

Walkthrough Menu
- General Tips
- Chapter 1: Rouen
- Chapter 2: Stratville
- Chapter 3: Library
- Chapter 4: Witch's Realm
- Chapter 5: Village
- Chapter 6: Ritual Hall
General Tips
- This is the official guide for Spirit Legends: The Forest Wraith.
- This guide won't tell you when to zoom into a location; the screenshots show each zoom scene.
- Hidden-object puzzles are referred to as HOPs. Only the locations of the HOPs will be shown.
- Use the Map to fast travel to a location.
Chapter 1: Rouen
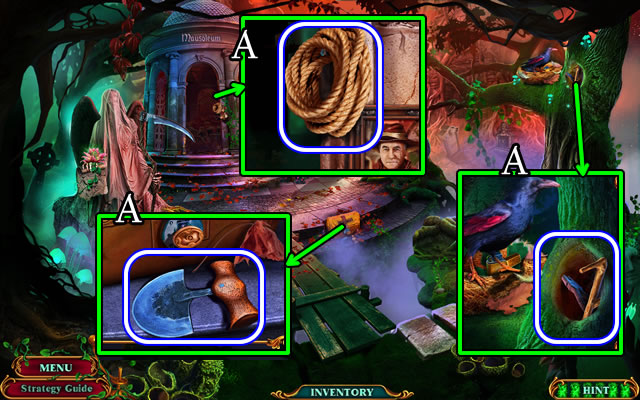
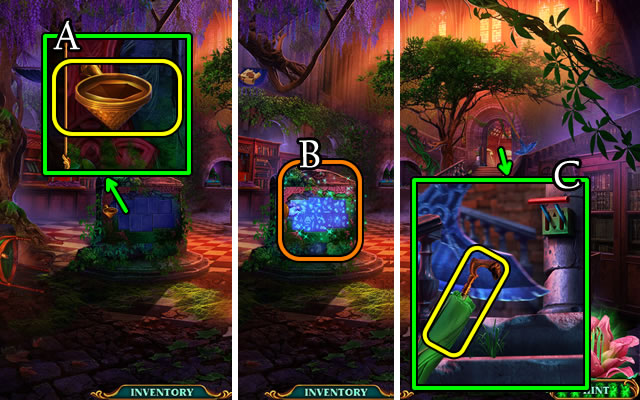
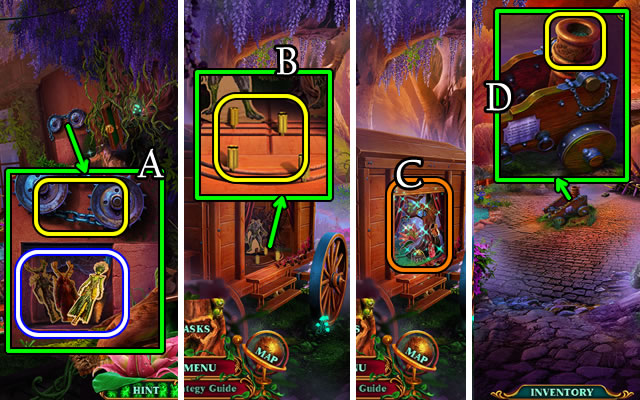
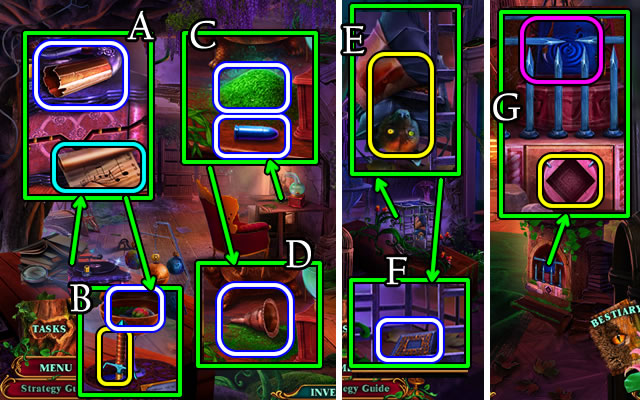
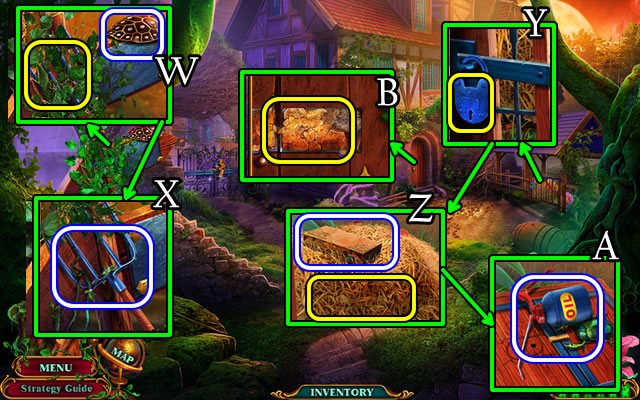
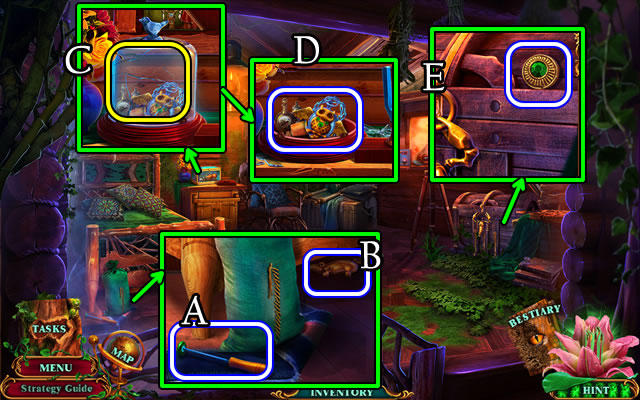
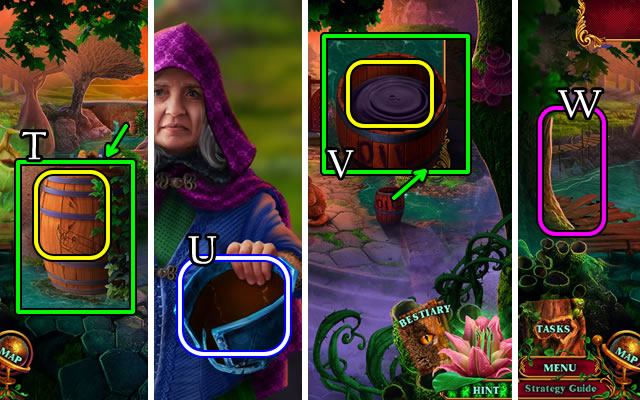
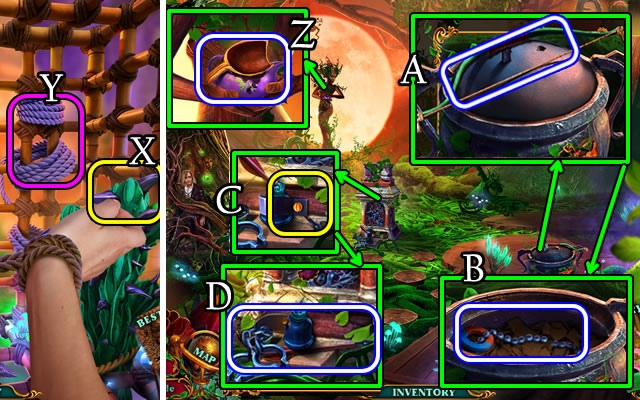
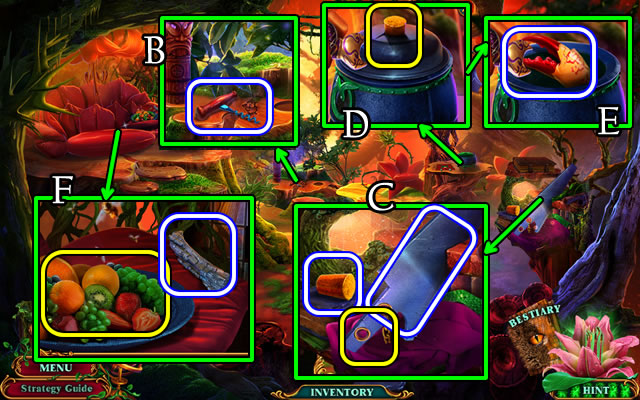
- Take CHOPPER; ROPE; HOOKED BRANCH, NIPPERS (A).
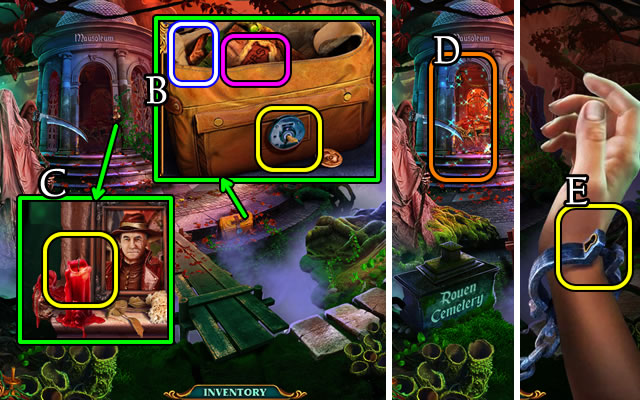
- Uncover, use NIPPERS; take Tasks, FLINT AND STEEL (B).
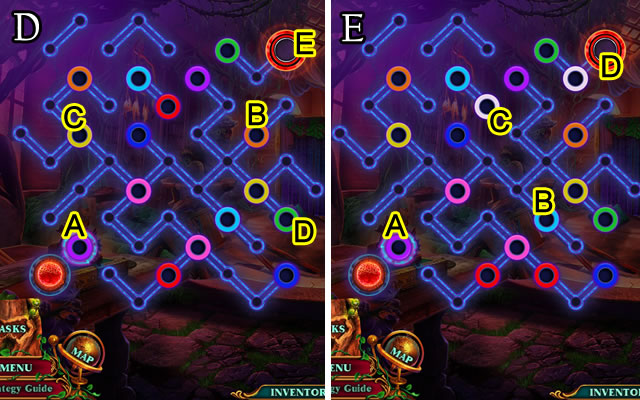
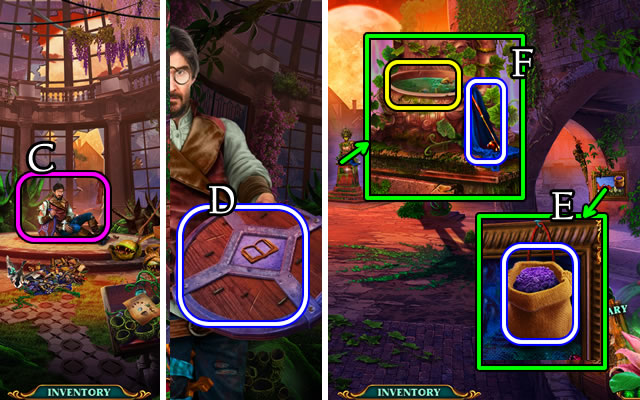
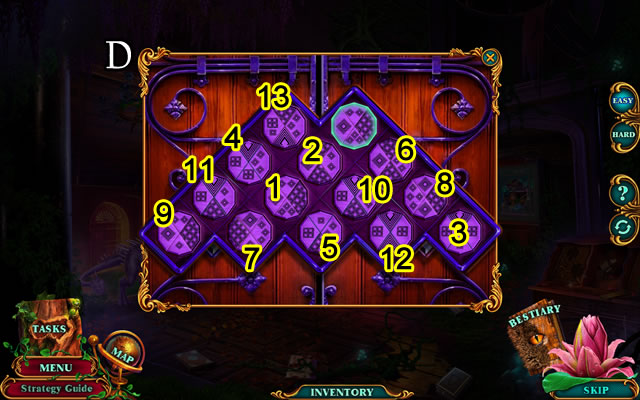
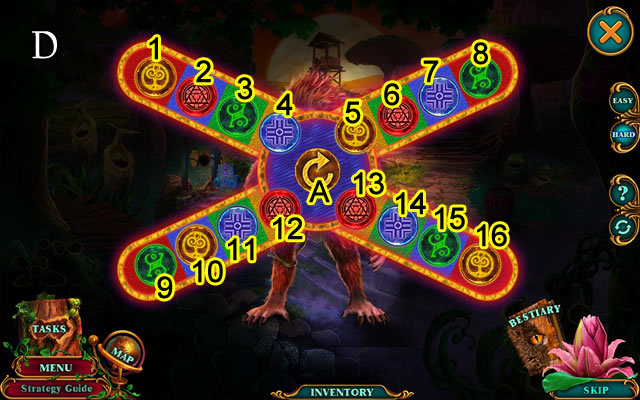
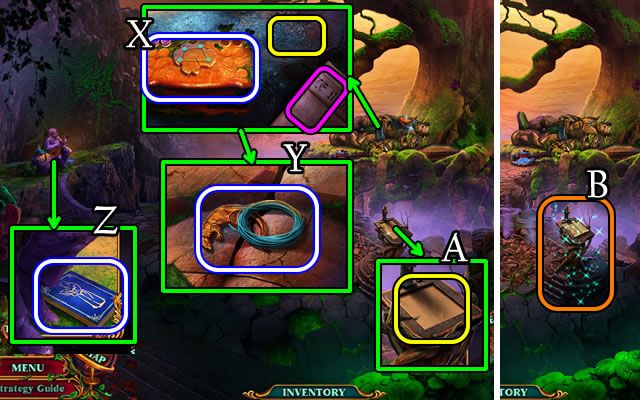
- Use FLINT AND STEEL (C) for HOP (D); receive HAIRPIN.
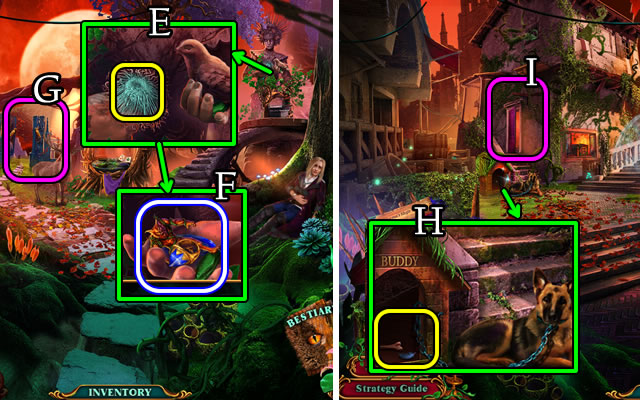
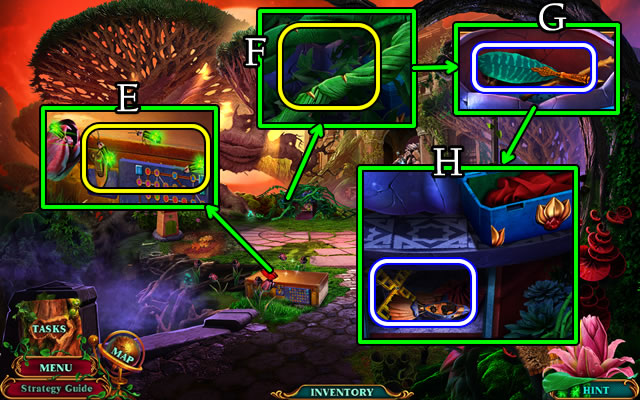
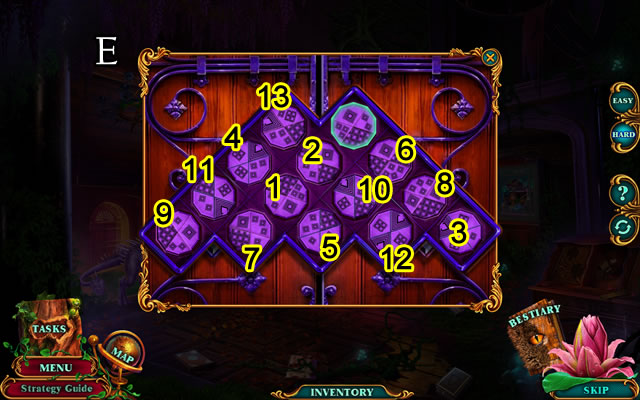
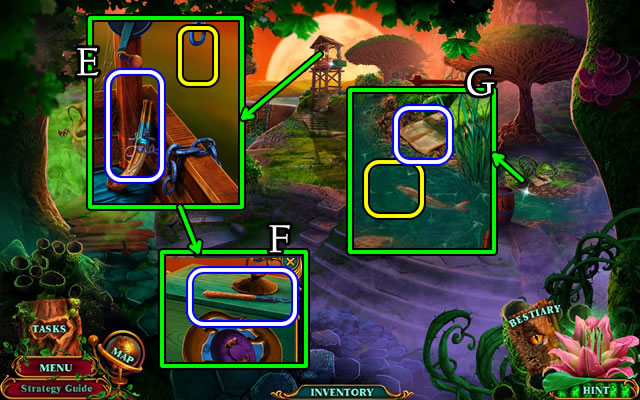
- Use HAIRPIN (E).
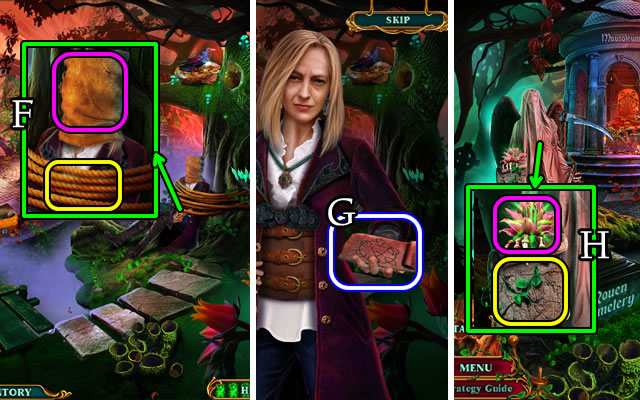
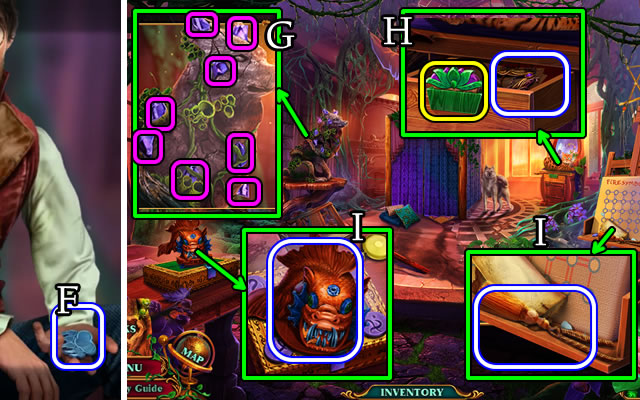
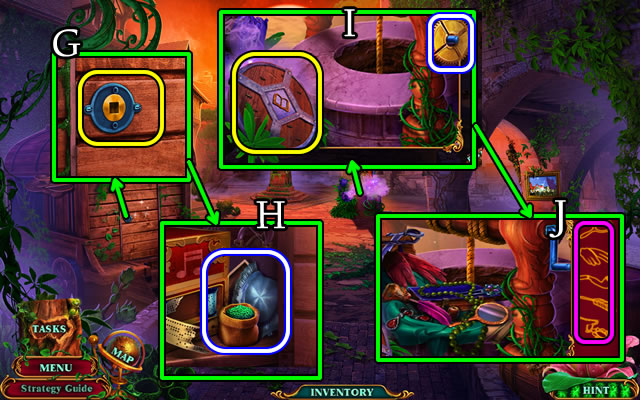
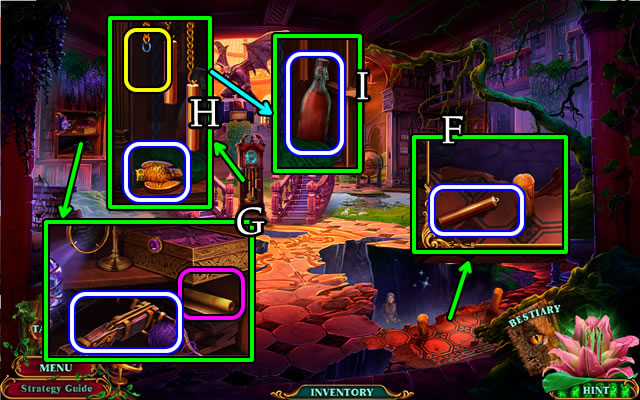
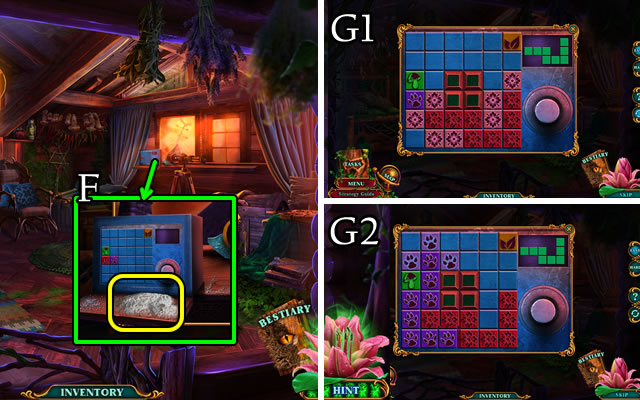
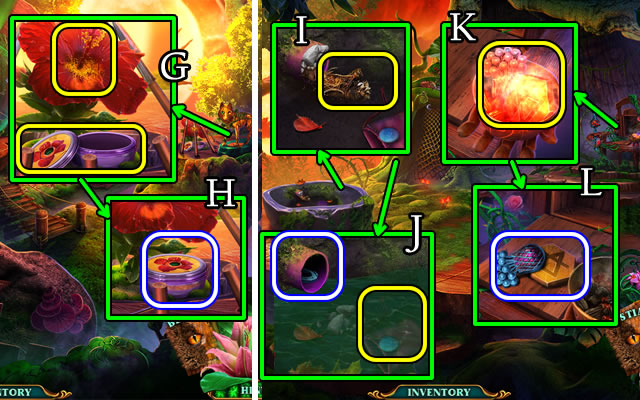
- Remove bag; speak to character; use CHOPPER (F); speak to character; take SCROLL WITH SYMBOLS (G).
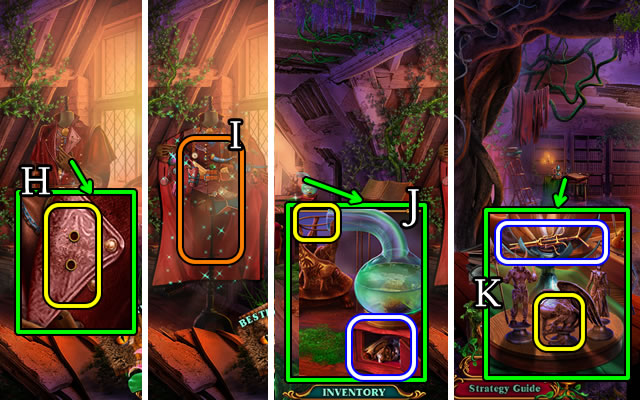
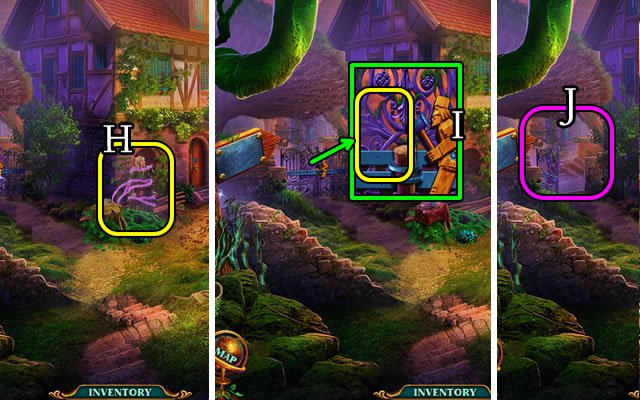
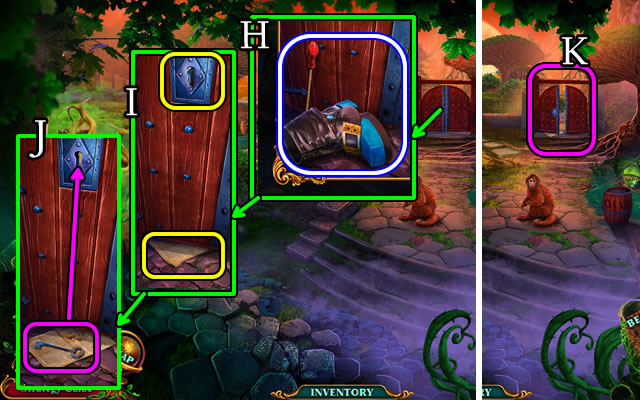
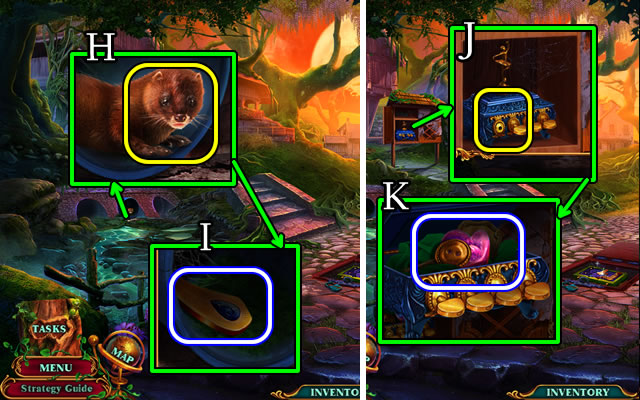
- Take Flower; replace SCROLL WITH SYMBOLS (H).
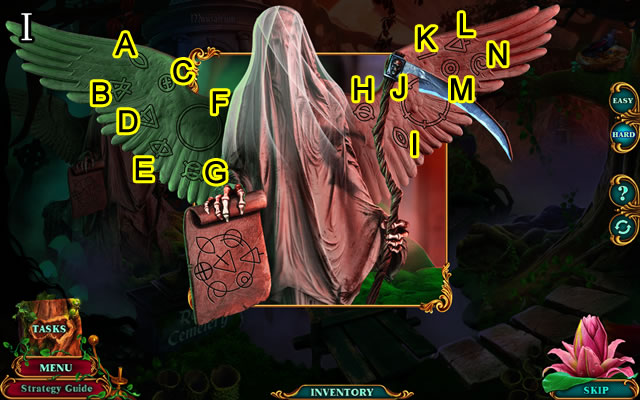
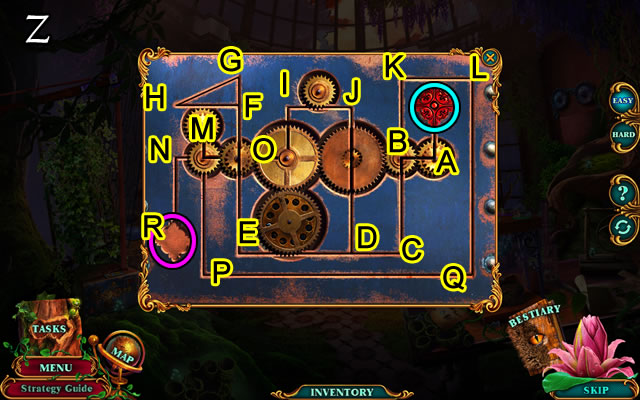
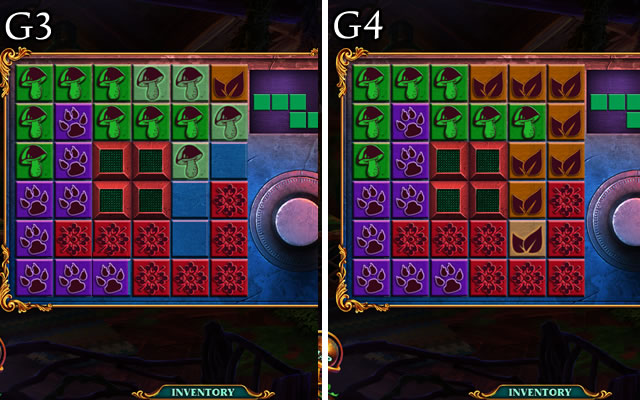
- Easy solution (I). A-H-L-M-N-C-D-F.
- Hard solution (I). A-L-M-N-C-D-I-K-B-N-F.
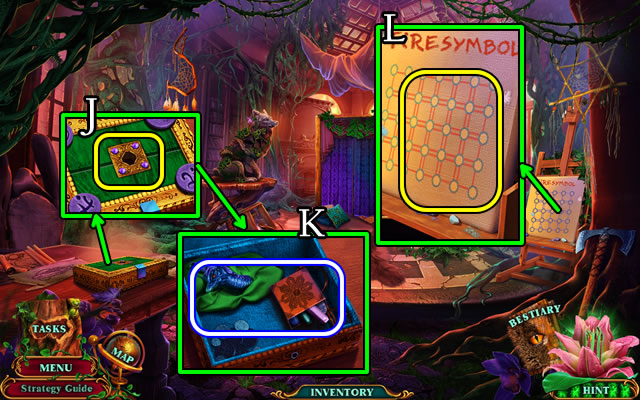
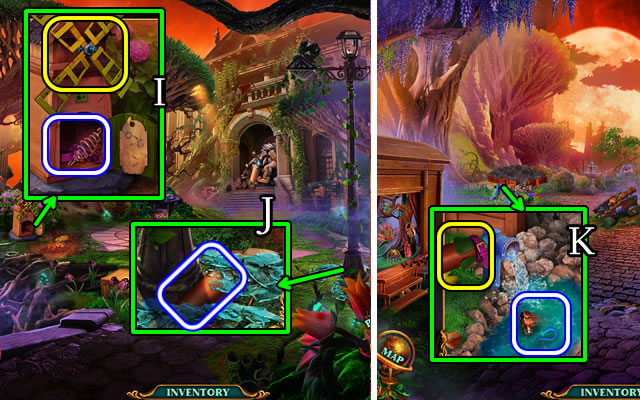
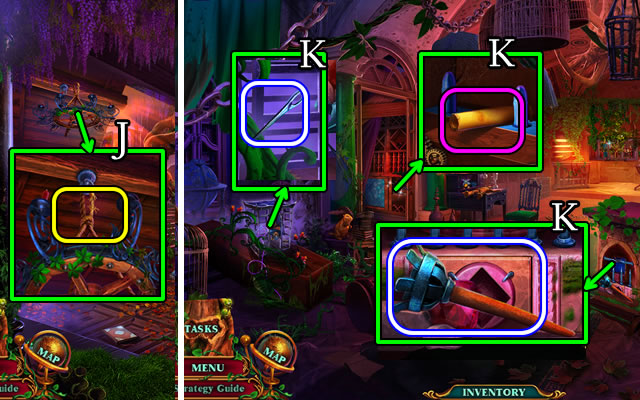
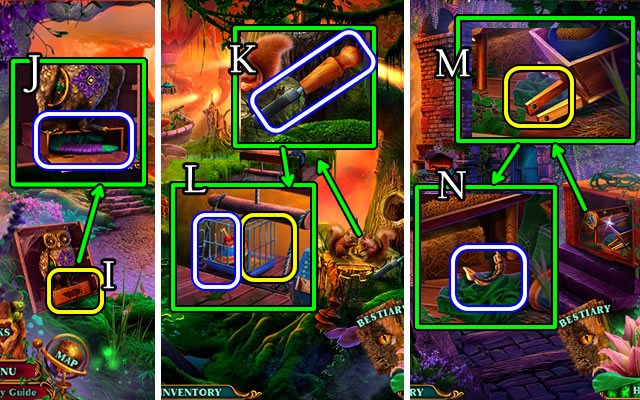
- Take SCYTHE.
- Use SCYTHE (J).
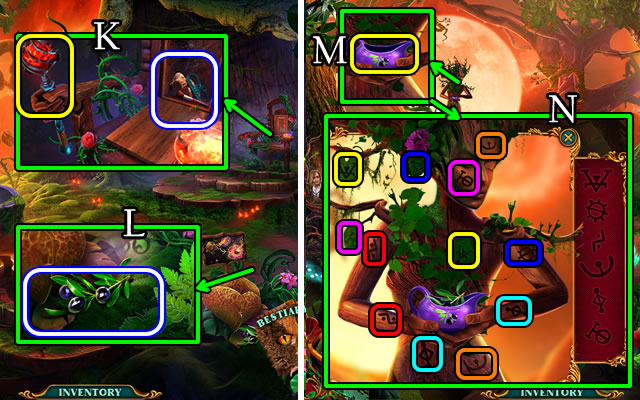
- Go (K).
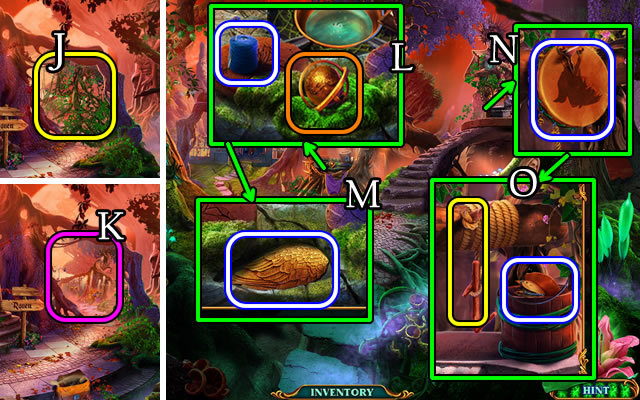
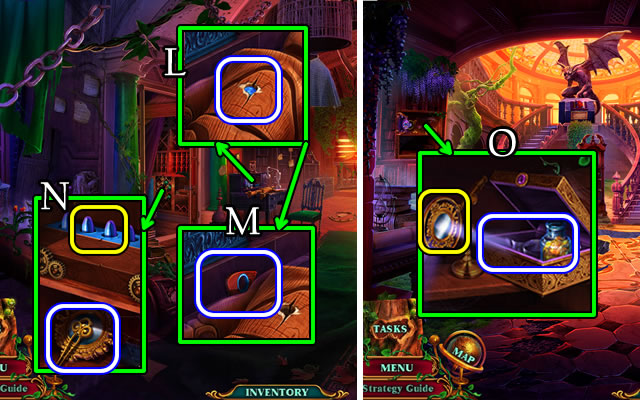
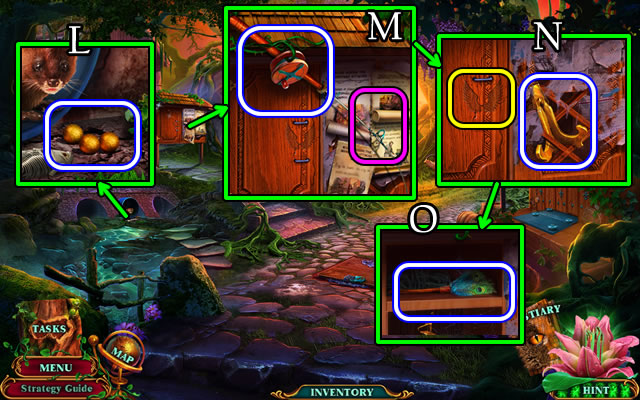
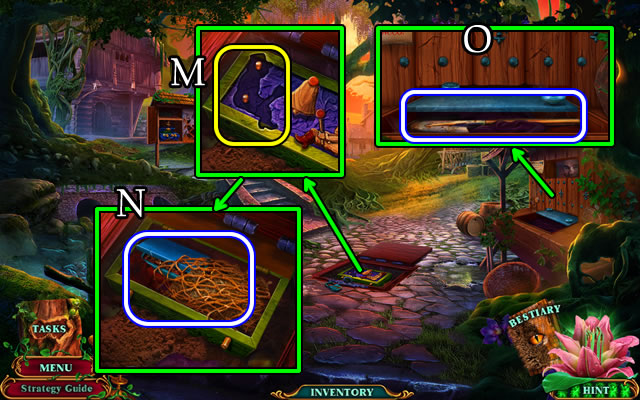
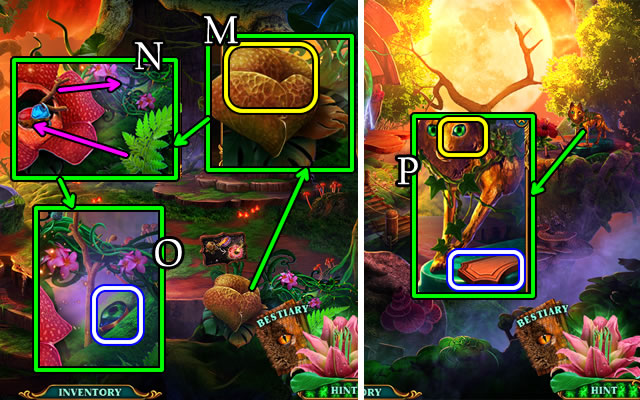
- Speak to character; take Map, NEEDLE AND THREAD (L); use CHOPPER take 1/2 EAGLE'S WINGS (M).
- Select cat; take BROKEN TAMBOURINE (N).
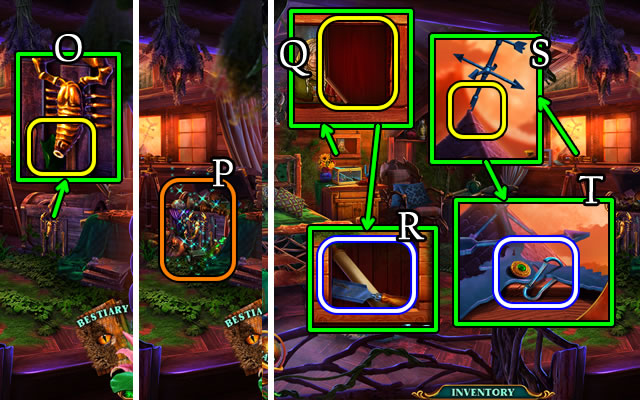
- Replace ROPE; attach HOOKED BRANCH; take FISHHOOK and LEATHER SCRAP (O).
- Go down.
- NEEDLE AND THREAD, LEATHER SCRAP on BROKEN TAMBOURINE for TAMBOURINE.

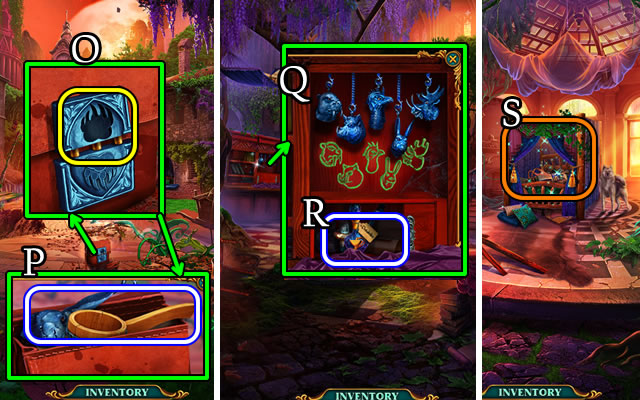
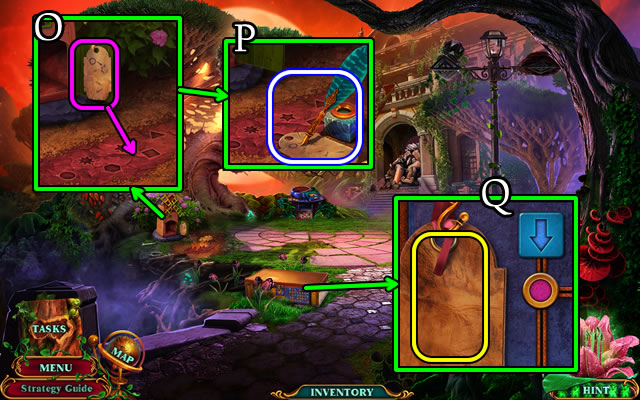
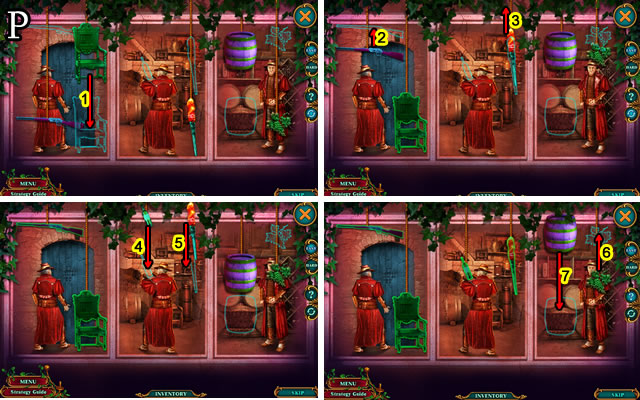
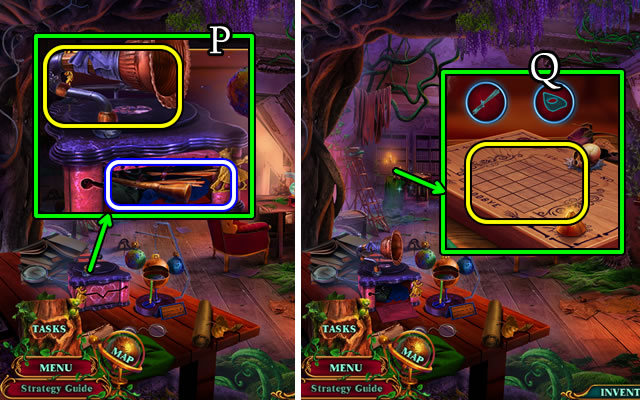
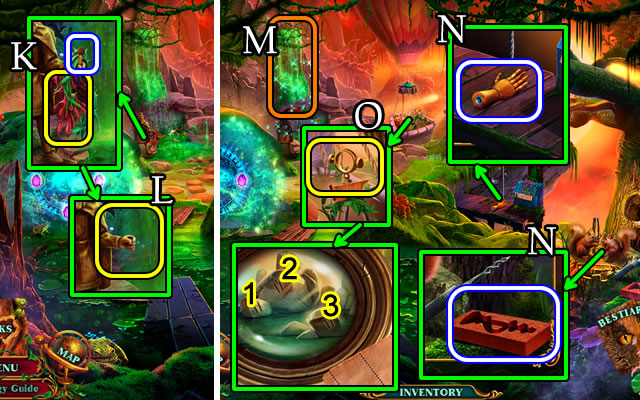
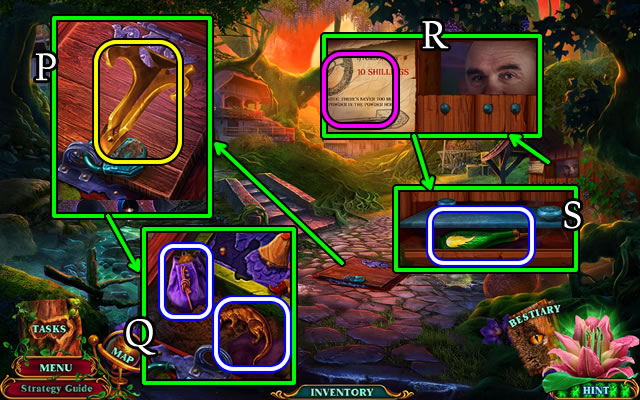
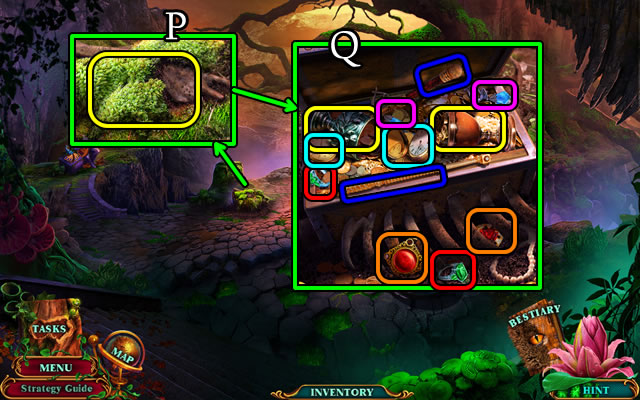
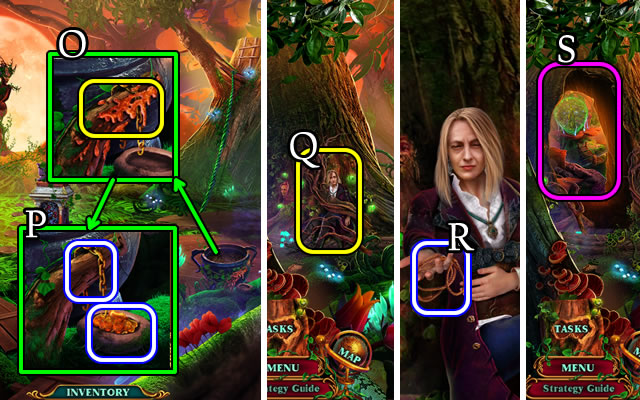
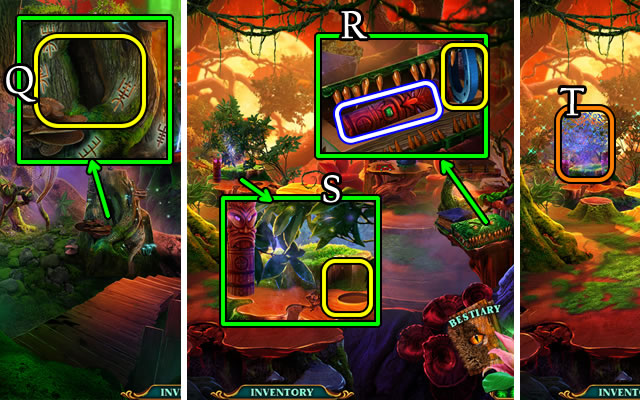
- Use TAMBOURINE (P); take LIGHTER, BAG EMBLEM (Q).
- Go forward.
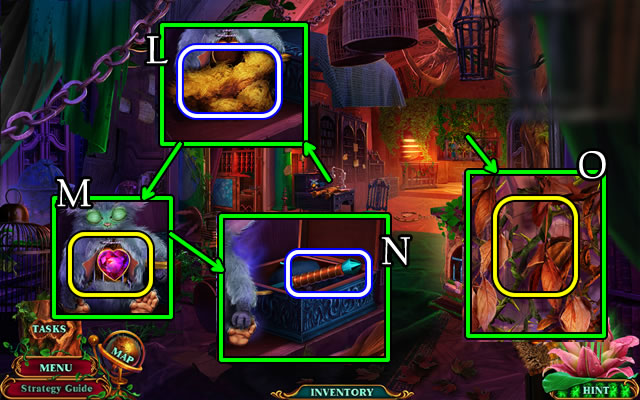
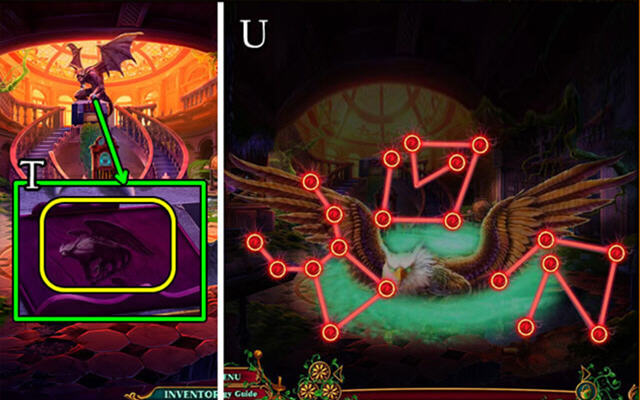
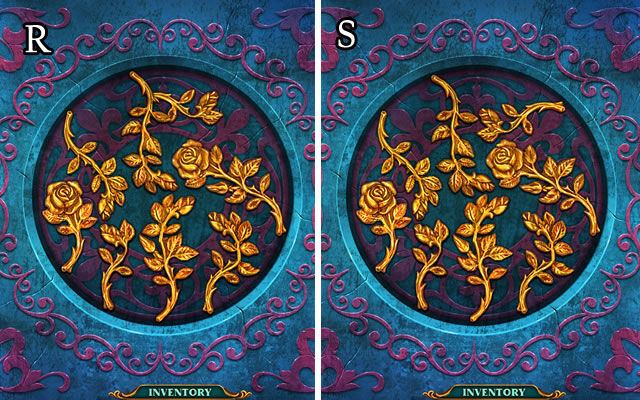
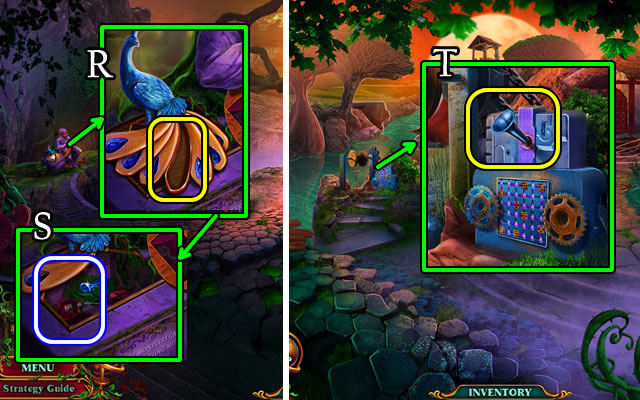
- Use BAG EMBLEM; take drawing, TEA STRAINER, SCISSORS and Bestiary (R).
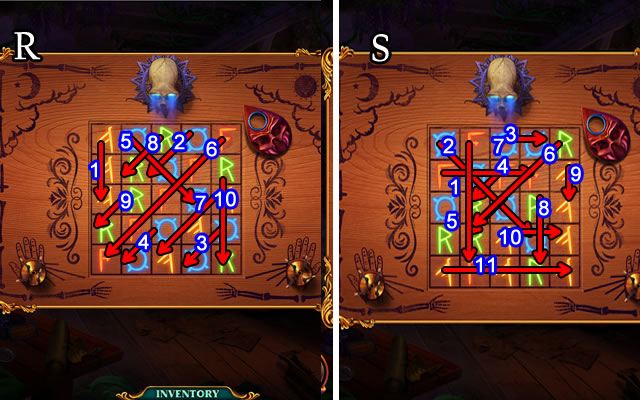
- Use Bestiary (S).
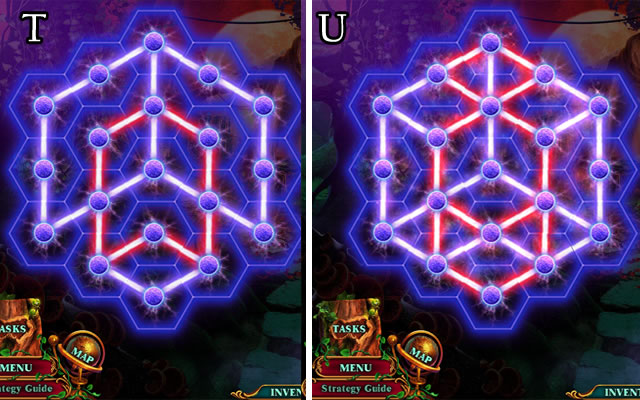
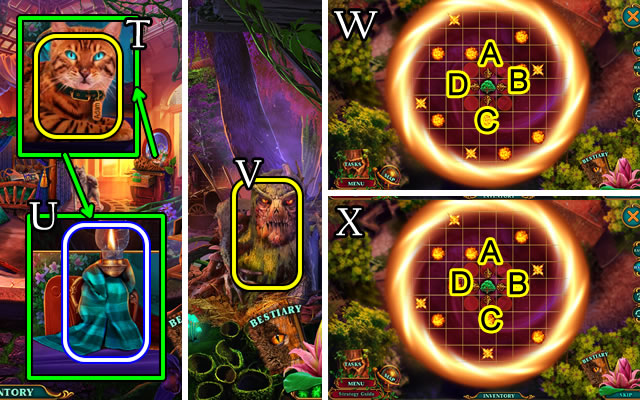
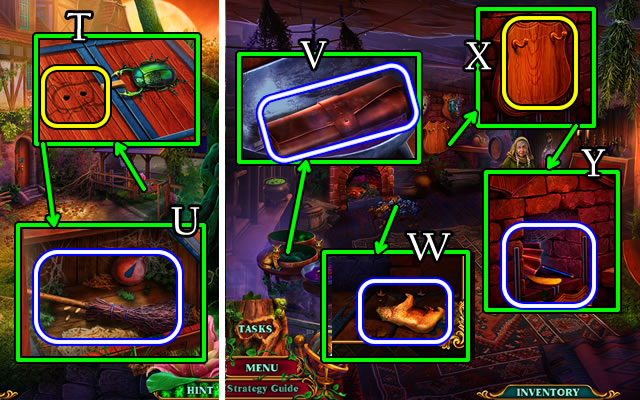
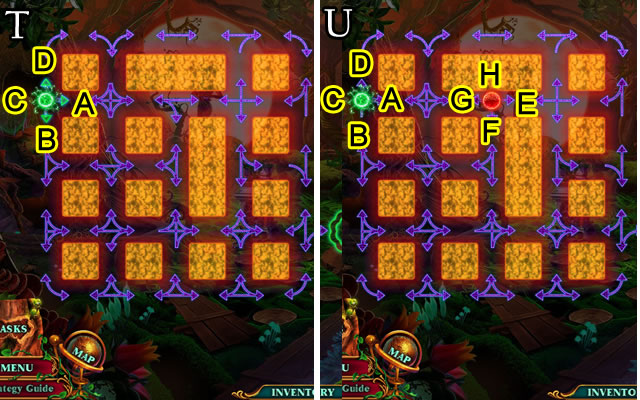
- Easy solution (T).
- Hard solution (U).
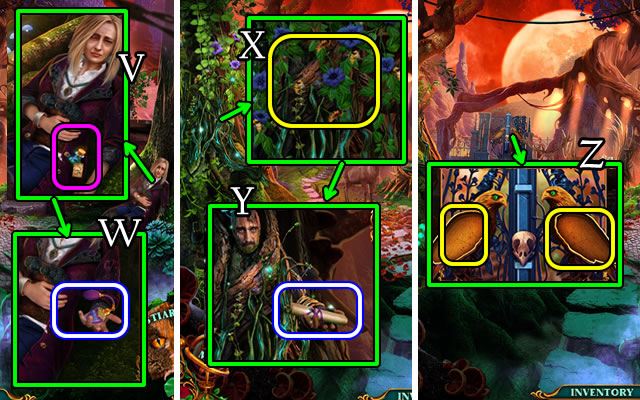
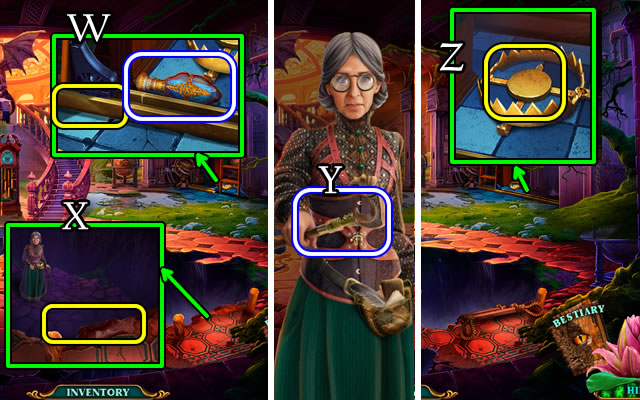
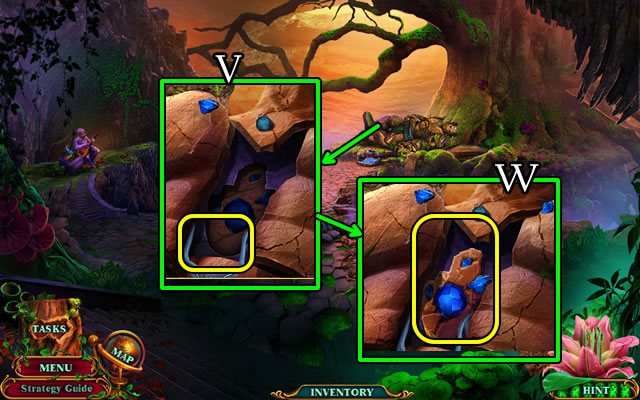
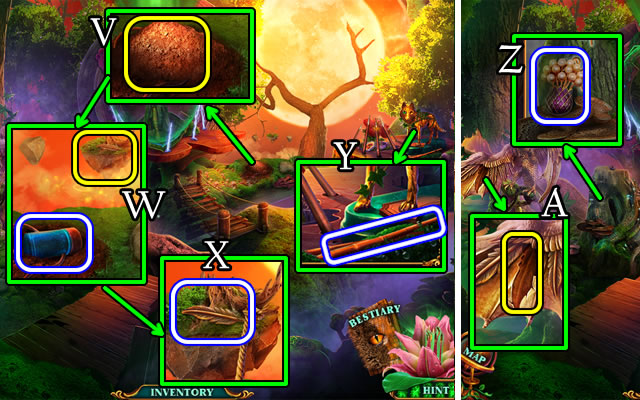
- Select character; use potion (V); speak to character; take REPELLANT (W).
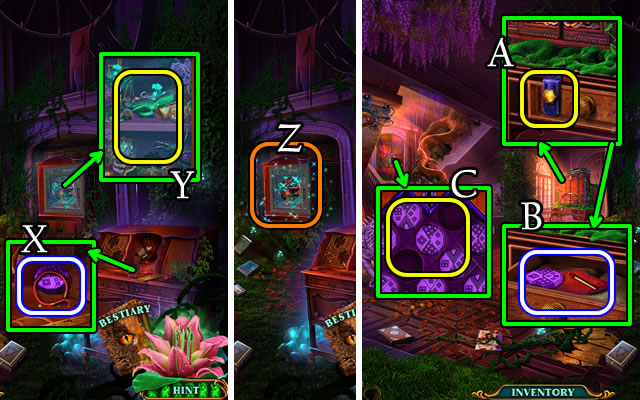
- Use REPELLANT (X); uncover, speak to character; take SCROLL WITH BROKEN TALISMAN (Y).
- SCROLL WITH BROKEN TALISMAN for 2/2 EAGLE'S WINGS.
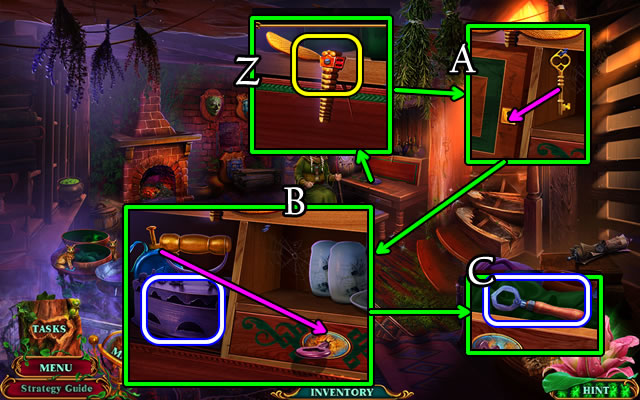
- Place 2/2 EAGLE'S WINGS (Z).
- Go forward.
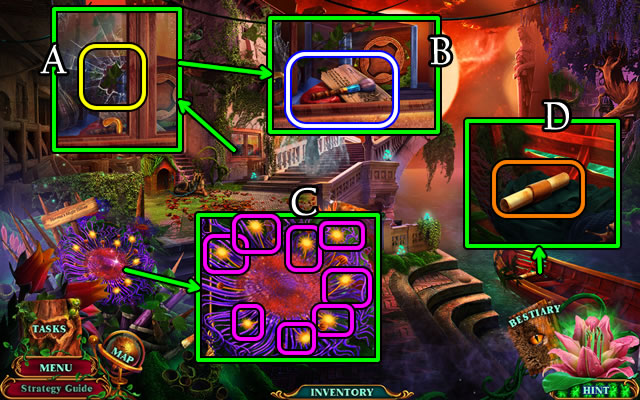
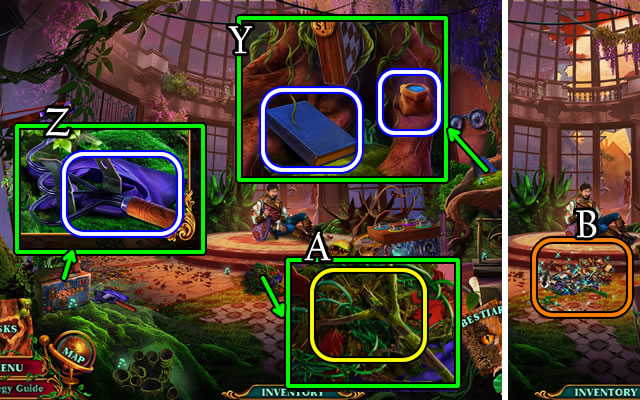
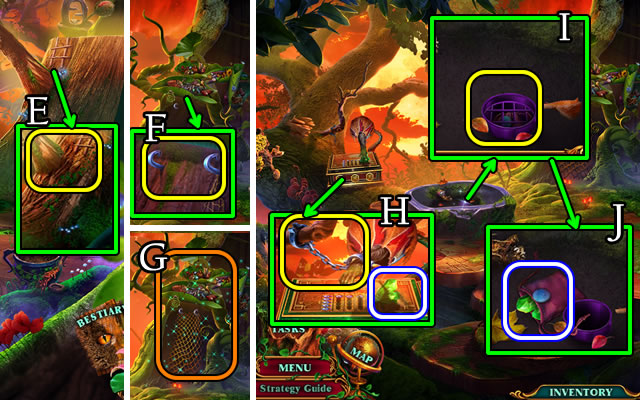
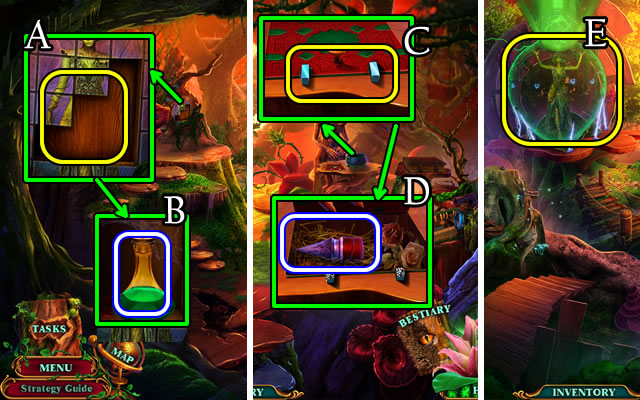
- Use FISHHOOK (A); take BRUSH, note and MEAT (B).
- Use BRUSH (C); receive FLOWER POLLEN.
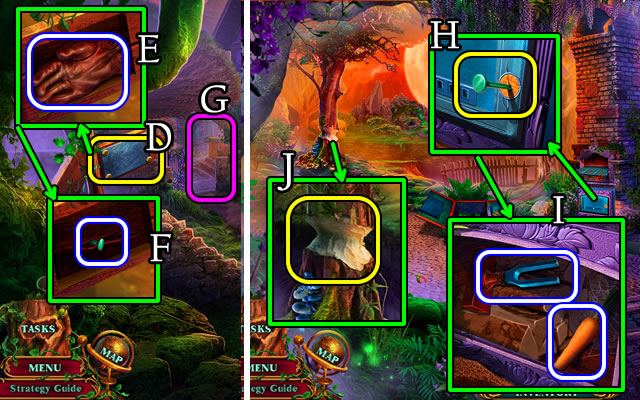
- Take map (D).
- Go down.
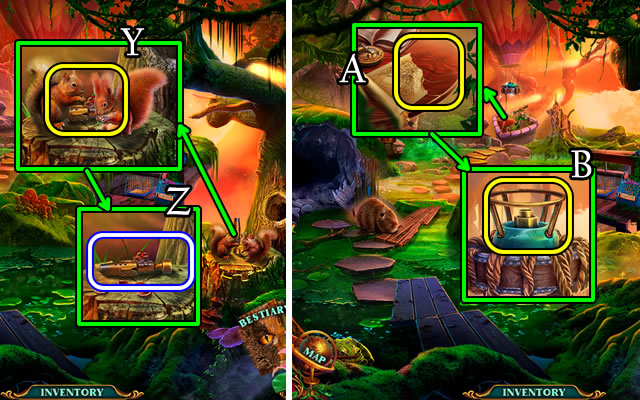
- Use FLOWER POLLEN (E); take FOREST MONSTER FIGURINE, DIAMOND RING and CRYSTAL (F).
- Go (G).
- Use MEAT (H).
- Go (I).
- Use Bestiary.
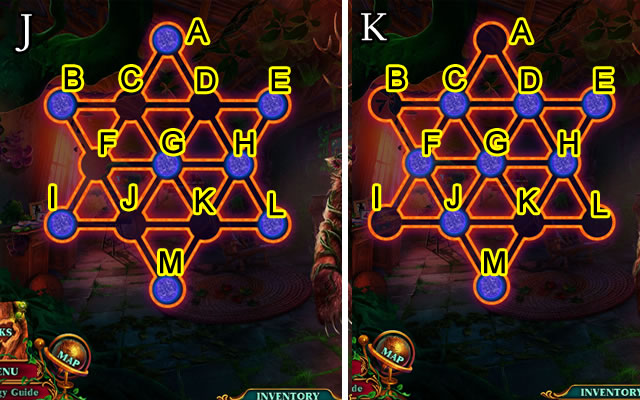
- Easy solution (J). (L-D)-(E-C)-(A-F)-(B-J)-(M-F)-(I-C)-(C-K).
- Hard solution (K). (C-I)-(I-K)-(K-C)-(E-K)-(C-E)-(M-H)-(E-K).

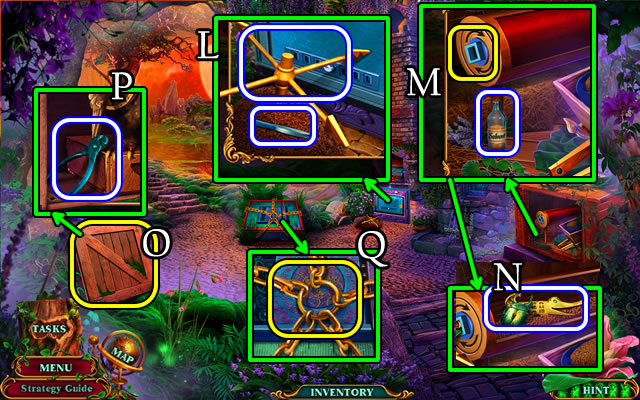
- Use LIGHTER; select button; take CHARCOAL, NAIL FILE and INLAY PART (L).
- Take DAMAGED INLAY (M).
- Take scroll; use SCISSORS (N); take TALISMAN PART (O).
- Use TEA STRAINER for TALISMAN ELEMENT (P).
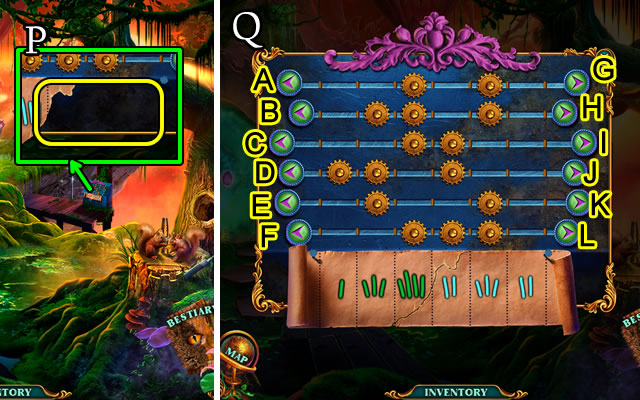
- Return to Florena's Meadow.
- CRYSTAL, TALISMAN ELEMENT and TALISMAN PART on SCROLL WITH BROKEN TALISMAN for DISENCHANTING TALISMAN.
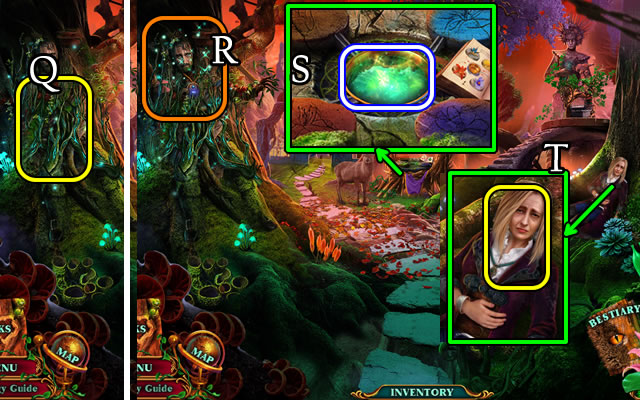
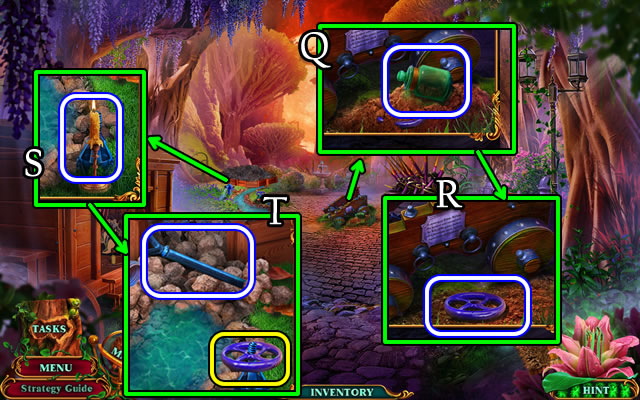
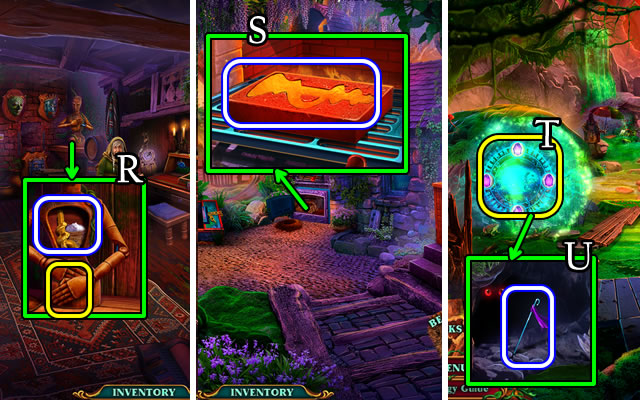
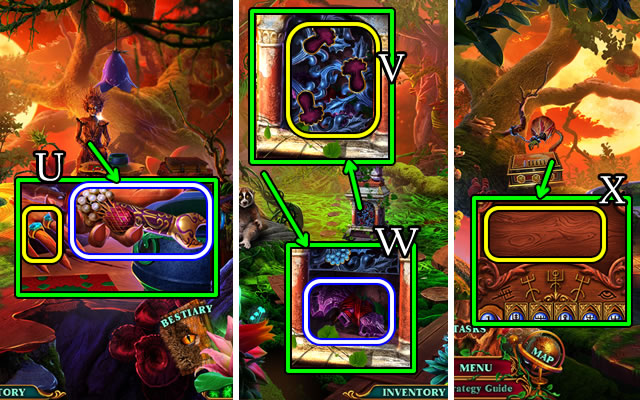
- Use DISENCHANTING TALISMAN (Q) for HOP (R); receive MEDICINAL INGREDIENTS.
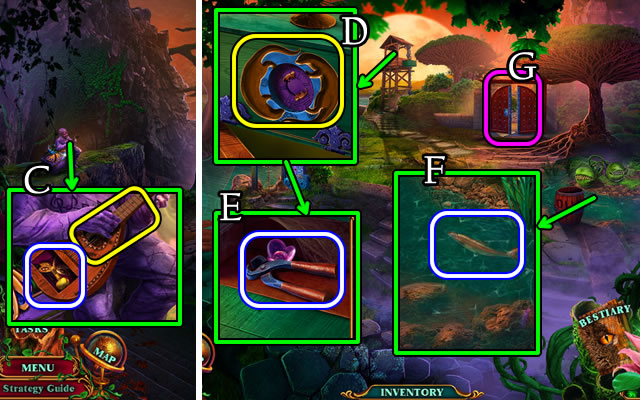
- Place MEDICINAL INGREDIENTS; take FIRST AID POTION (S).
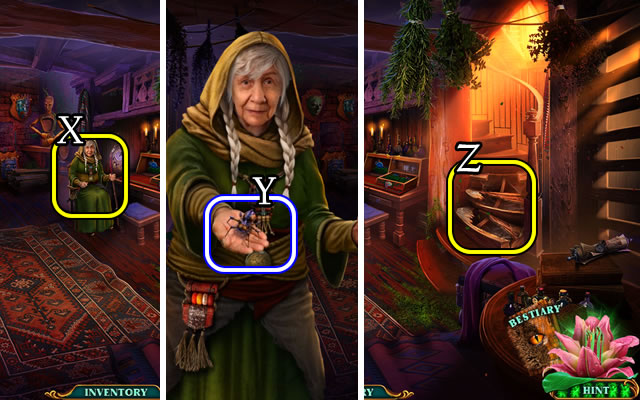
- Use FIRST AID POTION (T); speak to character.
- Go forward.
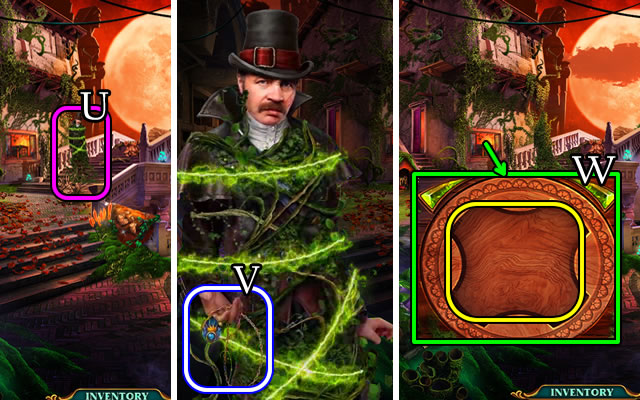
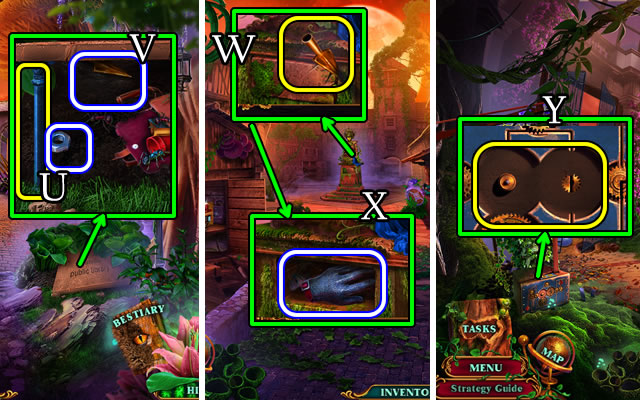
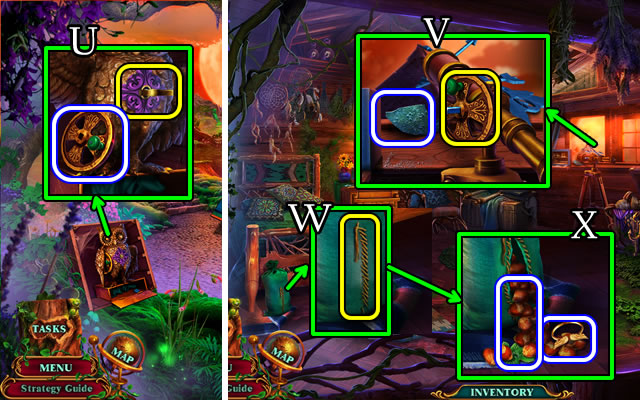
- Speak to character (U); take LOCKED MEDALLION (V).
- NAIL FILE on LOCKED MEDALLION; take INLAY CONNECTOR.
- INLAY PART and INLAY CONNECTOR on DAMAGED INLAY for INLAY WITH SPHERES.
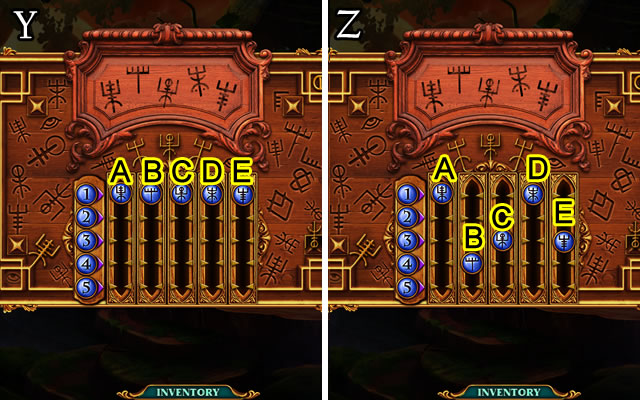
- Place INLAY WITH SPHERES (W).
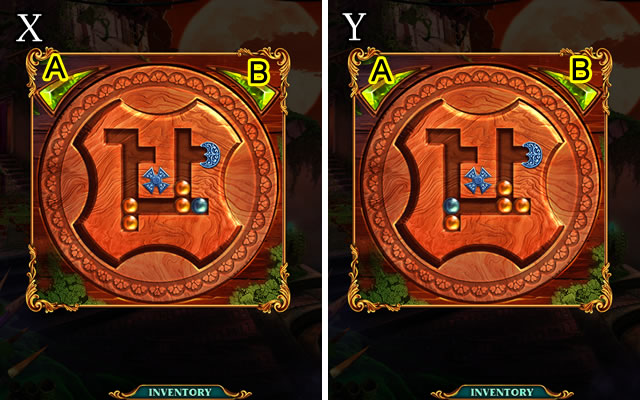
- Easy solution (X). Ax6-B.
- Hard solution (Y). A-Bx3-A-Bx7-A-B-Ax2-B-A-B.
- Take TRACING PAPER, SOLID TAR and CHISEL.
- Go forward.
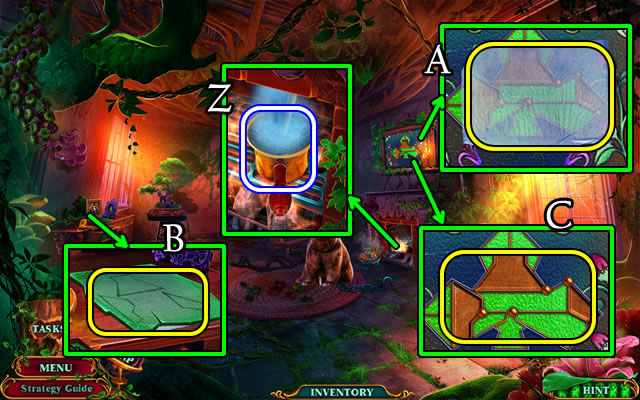
- Place SOLID TAR (Z); receive MELTED TAR.
- Place TRACING PAPER and CHARCOAL (A); receive PAPER PATTERN.
- Place PAPER PATTERN; use DIAMOND RING; take 3/3 STAINED GLASS SHARDS (B).
- Place 3/3 STAINED GLASS SHARDS (C).

- Easy solution (D). Ax4-B-C-Dx3-E-F-G-Hx5-Jx3-Ix4-Kx5.
- Hard solution (E). Bx2-Ax4-Cx5-Dx5-E-F-G-Hx5-Kx3-Jx5-Ix5.
- Take FORK, WIRE and FOREST MONSTER FIGURINE.

- Place 2 FOREST MONSTER FIGURINES (F).
- Easy solution (G). Ax2-Bx2-C-D-E.
- Hard solution (G). D-A-Bx2-E.
- Take MAGNET and COMB.
- Go down.
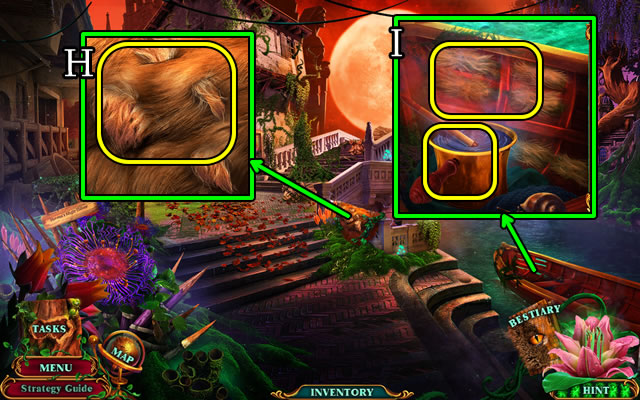
- Use COMB; take ROPE FIBERS (H).
- Place MELTED TAR, ROPE FIBERS; use CHISEL (I).
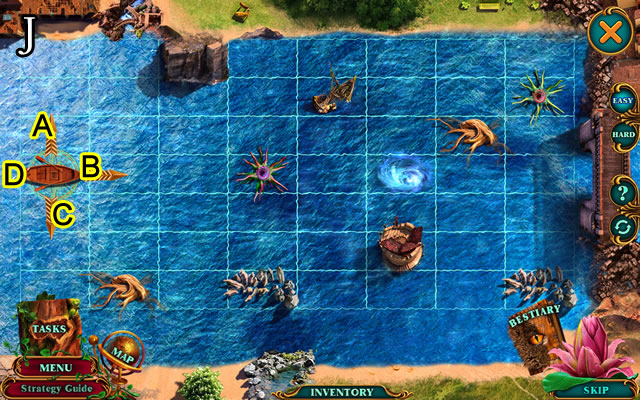
- Easy solution (J): A-B-C-B-C-B-A-B; C-B-C-B-A-B-C-B-A-B-A.
- Hard solution (J): A-B-C-B-C-B-A-B; C-B-A-B-A-D-C-B-A-B; C-B-C-B-A-B-C-B-A-B-A.
Chapter 2: Stratville
- Speak to character.
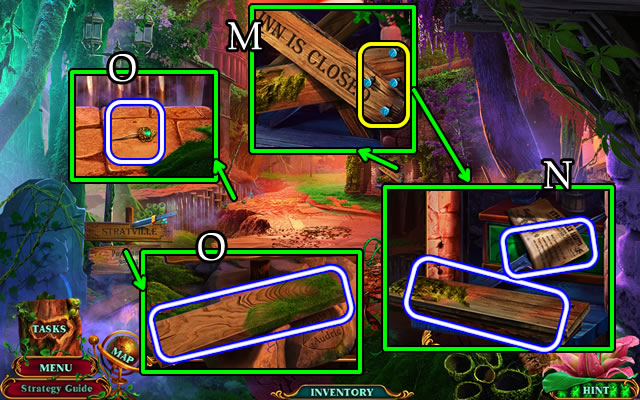
- Use FORK (M); take newspaper, PICKAXE HEAD, 2/4 BOARDS (N).
- Take 3/4 BOARDS; HAIRPIN (O).
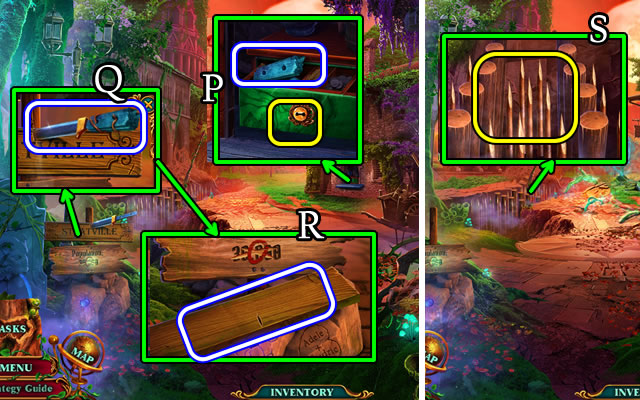
- Use HAIRPIN; take KNIFE HANDLE (P).
- Use KNIFE HANDLE, WIRE; take DAGGER (Q) and 4/4 BOARDS (R).
- Place 4/4 BOARDS (S).
- Go forward.
- Speak to character.
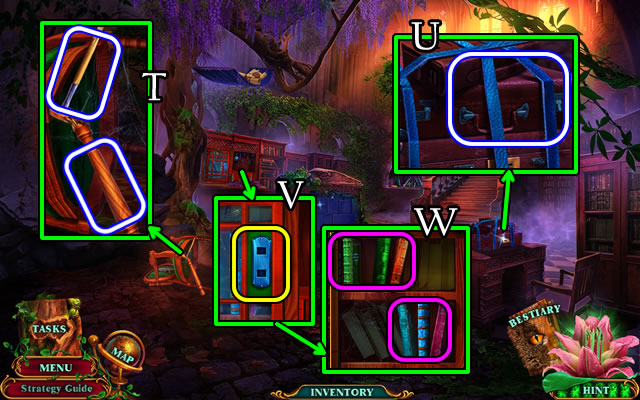
- Take SPEARHEAD and CHAIR LEG (T).
- Use DAGGER; take LEATHER BELT (U).
- Remove handle; use MAGNET (V); select, take HEAVY BOOKS (W).
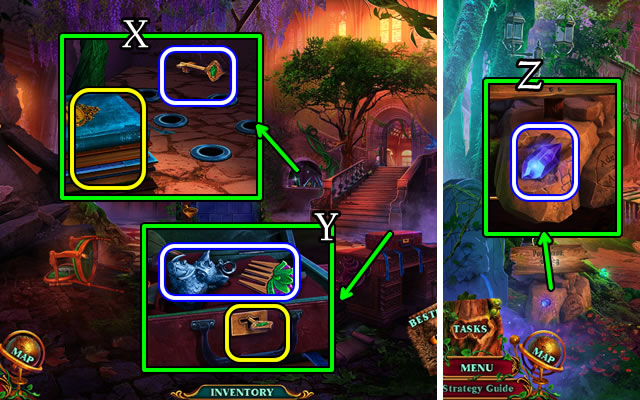
- Use HEAVY BOOKS; take SUITCASE KEY (X).
- Uncover; use SUITCASE KEY; take 1/4 MONSTER FIGURINES and COMB (Y).
- Go down.
- LEATHER BELT and CHAIR LEG on PICKAXE HEAD for MAKESHIFT PICKAXE.
- Use MAKESHIFT PICKAXE; take GLOWING CRYSTAL (Z).
- Go forward.
- Place GLOWING CRYSTAL (A); play HOP (B); receive UMBRELLA.
- Use UMBRELLA (C).
- Go forward.
- Use Bestiary.
- Easy solution (D). A-B-C-D-E.
- Hard solution (E). A-B-C-D.
- Speak to character; take BAG INLAY (F); speak to character.
- Use SPEARHEAD (G); receive CRYSTAL.
- Use COMB; take note, INCOMPLETE PENDANT (H).
- Take note, 1/2 CURTAIN TIEBACKS; INCOMPLETE ANGLER FISH (I).
- CRYSTAL on INCOMPLETE PENDANT for BOX PENDANT.
- Use BOX PENDANT (J); take CRAYONS and 2/4 MONSTER FIGURINES (K).
- Use CRAYONS (L).
- Easy solution (M).
- Hard solution (N).
- Take NIPPERS; 3/4 MONSTER FIGURINES.
- Return to Stratville.
- Place BAG INLAY (O); take WOODEN LADLE; 4/4 MONSTER FIGURINES (P).
- Go forward.
- Place 4/4 MONSTER FIGURINES; solution (Q); take PAINKILLER; ANGLER FISH LIGHT (R).
- Go forward.
- ANGLER FISH LIGHT on INCOMPLETE ANGLER FISH; take SCREWDRIVER, 2/2 CURTAIN TIEBACKS.
- Use 2/2 CURTAIN TIEBACKS for HOP (S); receive CALMING VALERIAN.
- Use CALMING VALERIAN (T); take SCARF and PETROLEUM LAMP (U).
- Return to Stratville.
- Use PETROLEUM LAMP (V).
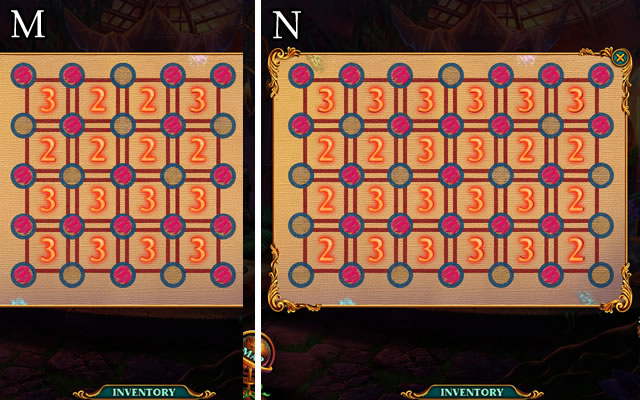
- Easy solution (W). D-A-D-Bx3-A-C-B-Cx3-D-C-Ax2-Dx3-B-C-Ax2-D-Ax2-Bx2-Cx2.
- Hard solution (X). D-A-Cx2-D-Ax3-Bx2-Cx3-A-B-D-Ax2.
- B-D-C-B-C-B-Cx2-A-Dx2-C-Ax2.
- Speak to character.
- Take FIRST AID BOOK, 1/4 FERTILIZERS (Y).
- Use NIPPERS; take RAKE and SHAWL (Z).
- Use RAKE (A) for HOP (B); receive WOODEN SWORD.
- SCARF, SHAWL and WOODEN SWORD on FIRST AID BOOK for SPLINT.
- Give PAINKILLER; use SPLINT (C); speak to character; take SHIELD (D).
- Go forward.
- Take 2/4 FERTILIZERS (E).
- Take CANDLE SNUFFER; use WOODEN LADLE for HANDLE (F).
- Use HANDLE, SCREWDRIVER (G); take 3/4 FERTILIZERS, SAUCER and picture (H).
- Use SHIELD; take 1/2 GEARS (I); select handle; find the objects (J); receive STAMP WITH INITIALS.
- Go down.

- Use STAMP WITH INITIALS (K); take 4/4 FERTILIZERS and HEAVY HILT (L).
- Use 4/4 FERTILIZERS; take MANDRAKE (M).
- Use MANDRAKE (N).
- Enter Library Gardens.
Chapter 3: Library

- Use Bestiary.
- Easy solution (O). A-D-C-B-A-B-C-B-C-D-A-D-C-D.
- Hard solution (P). C-D-A-B-C-B-C-D-A-B-C.
- Take GLASS FLASK (Q); use SAUCER for VALVE HANDLE (R).
- Take LIT CANDLE (S); use VALVE HANDLE; take RIFLE STAND (T).
- Use RIFLE STAND; take NUT (U); use CANDLE SNUFFER take SPEARHEAD (V).
- Return to Outside the Greenhouse.
- Use SPEARHEAD, HEAVY HILT (W); take CHAIN MAIL GLOVE and 2/2 GEARS (X).
- Go down.
- Use 2/2 GEARS (Y).
- Easy solution (Z). A-B-C-E-G-H-F-E-D-J-I-O-B-K-L-Q-P-M-N-R.
- Hard solution (Z). A-B-C-E-G-H-F-G-H-F-E-D-J-I-O-B-K-L-Q-P-M-N-R.
- Take FLEXIBLE SAW and CHAIN.
- Use CHAIN; take 3/3 CARDBOARD CUT-OUTS, CANNON RAMROD (A).
- Return to Library Gardens.
- Place 3/3 CARDBOARD CUT-OUTS (B) for HOP (C); receive CANNONBALL.
- Use CANNON RAMROD, CANNONBALL and LIT CANDLE (D).
- Go forward.
- Use GLASS FLASK for FIREFLIES (E).
- Use FLEXIBLE SAW (F); take 1/2 QUILL AND INKWELL (G); use stick for decoration; decoration on box; tile on slot; take BROKEN MECHANICAL BIRD and WINDMILL WHEEL (H).
- Place WINDMILL WHEEL and NUT; take SPRING and BELT (I).
- Use CHAINMAIL GLOVE; take QUIVER, GUNPOWDER (J).
- Go down.
- Use BELT and QUIVER; take SMALL MOTOR and S-HOOK (K).
- Return to Outside the Greenhouse.

- Use FIREFLIES (L); take MUSIC ROLL (M).
- Use MUSIC ROLL; take SALTPETER, 2/2 QUILL AND INKWELL (N).
- Return to Library Entrance.
- Remove leaves; place tag (O); use 2/2 QUILL AND INKWELL; take SUITCASE CODE (P).
- Place SUITCASE CODE (Q).
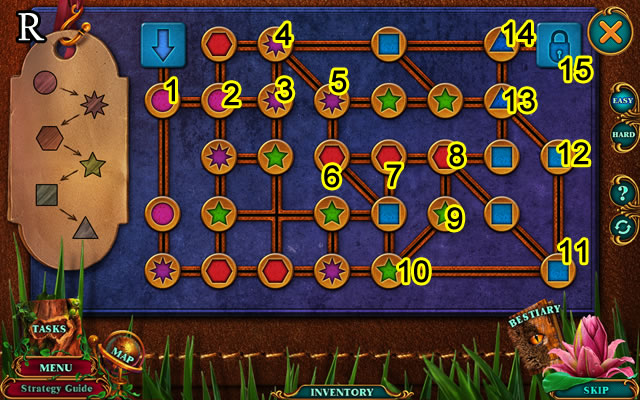
- Easy solution (R). 1-15.
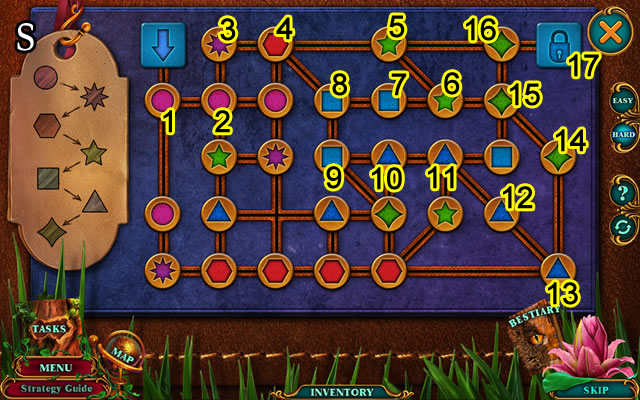
- Hard solution (S). 1-17.
- Take MYSTERIOUS EGG and LIGHTER.
- Go down.
- MYSTERIOUS EGG for LIZARD.

- Use LIZARD; take EMPTY DYNAMITE STICK; book for WING; GLASS CUTTER (T).
- Go forward.
- SPRING, SMALL MOTOR and WING on BROKEN MECHANICAL BIRD for MECHANICAL BIRD.
- Use MECHANICAL BIRD (U); take BAMBOO STICK, SHARP QUILL TIP and WICK (V).
- SALTPETER, GUNPOWDER and WICK on EMPTY DYNAMITE STICK for DYNAMITE.
- Use DYNAMITE and LIGHTER (W).
- Go forward.
- Take HAIR TIE, 1/2 PAINTED CHIPS (X).
- Use GLASS CUTTER (Y) for HOP (Z); receive WRENCH.
- Use WRENCH (A); take 2/2 PAINTED CHIPS, MATCH AND STRIKER (B).
- Place 2/2 PAINTED CHIPS (C).
- Easy solution (D). 1-13.
- Hard solution (E). 1-13.
- Go forward.
- Speak to character; take CLOCK WEIGHT (F).
- Take note, 1/2 NEEDLE AND THREAD, BROKEN CROSSBOW (G).
- Take 1/2 OWL EMBLEMS; place S-HOOK and CLOCK WEIGHT (H) take BOTTLE OF WHISKY (I).
- Go down.
- BAMBOO STICK, SHARP QUILL TIP and HAIR TIE on BROKEN CROSSBOW for CROSSBOW.
- Use CROSSBOW (J).
- Enter Secret Room.
- Take 2/2 NEEDLE AND THREAD; TORCH BASE and HEART; scroll (K).
- Take COTTON WADDING; (L) place HEART; use 2/2 NEEDLE AND THREAD (M); take SAI (N).
- COTTON WADDING, BOTTLE OF WHISKY and MATCH AND STRIKER on TORCH BASE for BURNING TORCH.
- Use BURNING TORCH (O).
- Easy and hard solutions (P).
- Take POUCH and NUMBER PLATE.

- Place NUMBER PLATE; select (Q); take HEALING WATER RECIPE; 2/2 OWL EMBLEMS (R).
- Go down.
- Place 2/2 OWL EMBLEMS (S); take RAIL and RAM FIGURINE (T).
- Place RAM FIGURINE (U); take ROPE LADDER (V).
- Return to Reading Hall.
- Use RAIL; take SPRING WATER (W).
- Use ROPE LADDER (X); speak to character; take CANE (Y).
- Use CANE (Z).
- Go forward.
- Take note, BROKEN PHONOGRAPH HORN (A); use SAI; take STYPTIC FRUIT (B).
- Take 1/2 BULLETS; use POUCH to take MAGIC MOSS DUST (C); take FUNNEL (D).
- Return to Secret Room.
- SPRING WATER, STYPTIC FRUIT and MAGIC MOSS DUST on HEALING WATER RECIPE for HEALING WATER.
- Use HEALING WATER (E); take DIAMOND SHAPE (F).
- Place DIAMOND SHAPE; take book for ADAM'S PIN (G).
- Return to Library Attic.
- Place ADAM'S PIN (H) for HOP (I); receive GLOBE.
- Place GLOBE; take WINDROW STATUETTE and PHONOGRAPH PIECE (J).
- Place WINDROW STATUETTE; take BULLET EXTRACTOR (K).
- Return to Secret Room.
- Use BULLET EXTRACTOR for 2/2 BULLETS (L); take SPIRIT BOARD PLANCHETTE (M).
- Place 2/2 BULLETS; take HAIRPIN and MIRROR (N).
- Return to Reading Hall.
- Place MIRROR; take JAR OF RESIN and RIBBON (O).
- Go forward.
- BROKEN PHONOGRAPH HORN, PHONOGRAPH PIECE and RIBBON on FUNNEL for PHONOGRAPH HORN.
- Place PHONOGRAPH HORN; take LONG FLUTE, BRUSH and INCENSE (P).
- Place SPIRIT BOARD PLANCHETTE and INCENSE (Q).
- Easy solution (R). 1-10.
- Hard solution (S). 1-11.
- Take CONJUROR SCROLL.
- Go down.
- Place CONJUROR SCROLL (T).
- Use Bestiary.
- Easy and hard solutions (U).
- Receive THROWING WEAPON.
- Enter portal
Chapter 4: Witch's Realm
- Speak to character; take TURTLE SHELL; use THROWING WEAPON (W); take RAKE (X).
- Use HAIRPIN (Y); take LOCKED BOX, use RAKE (Z); take OIL CAN (A).
- Use OIL CAN and BRUSH (B); open.
- Go forward.

- Take FOX HEAD (C).
- Take 1/3 DRAGONFLY WINGS; use JAR OF RESIN; place FOX HEAD (D); take FAN (E).
- Use FAN (F); take WOODEN WEDGE; use LONG FLUTE for UNICORN FIGURINE (G).
- UNICORN FIGURINE on LOCKED BOX; take HEALING HERBS and 2/3 DRAGONFLY WINGS.
- Go down.
- Give HEALING HERBS (H); find hidden symbols; receive WOODCUTTER FIGURINE.
- Place WOODCUTTER FIGURINE (I).
- Go (J).
- Take TWEEZERS, use TURTLE SHELL to unearth WEATHER VANE (L).
- Take SOLVENT; use WEATHER VANE and WOODEN WEDGE (M); take METAL BEETLE and CROCODILE FIGURINE (N).
- Use CROCODILE FIGURINE (O); take CUTTERS (P).
- Use CUTTERS (Q).
- Easy solution (R).
- Hard solution (S).
- Take MONSTER MASK; CAGED BEAVER.
- Go down.
- Place METAL BEETLE (T); take FLASK OF WATER and BROOM (U).
- Return to Witch's Hut.
- Use SOLVENT; take INSTRUMENT SET (V).
- Use BROOM; take TIN FIGURINE (W).
- Place MONSTER MASK (X); take 3/3 DRAGONFLY WINGS and UMBRELLA (Y).
- Place 3/3 DRAGONFLY WINGS (Z); use key (A); take IRON; use oil can (B); take BOTTLE OPENER (C).
- Go down.
- Use BOTTLE OPENER (D); take LEATHER GLOVE (E); use TWEEZERS for NAIL (F).
- Go (G).
- Use NAIL and IRON (H); take 1/2 TUNING FORK AND STICK, CARROT (I).
- INSTRUMENT SET and CARROT on CAGED BEAVER for BEAVER.
- Use BEAVER (J).
- Go forward.
- Use LEATHER GLOVE; take BRUSH (K); place UMBRELLA (L) for HOP (M); receive SPYGLASS.
- Take SCEPTER MOLD; MANNEQUIN HAND (N).
- Place SPYGLASS (O); select 1-3; take CODE.
- Place CODE (P).
- Easy solution (Q). G-I-J-K-Fx2.
- Hard solution (Q). Fx2-K-G-H-I.
- Take ENCHANTED CRYSTAL.
- Return to Witch's Hut.
- Place MANNEQUIN HAND; take SCEPTER PART, POWDERED SUGAR (R).
- Return to Yard.
- Place SCEPTER MOLD, TIN FIGURINE and SCEPTER PART; use FLASK OF WATER for UNACTIVATED SCEPTER (S).
- Go forward.
- ENCHANTED CRYSTAL on UNACTIVATED SCEPTER for SEAL-BREAKING SCEPTER.
- Use SEAL-BREAKING SCEPTER (T); take HOOKED ROD (U).
- Use Bestiary.

- Easy solution (V).
- Hard solution (W).
- Take ELEONORE'S SCROLLS (@).
- Return to Witch's Hut.
- Give ELEONORE'S SCROLLS (X); speak to character; take IRON WEB SPIDER (Y).
- Use IRON WEB SPIDER (Z).
- Go forward.
- Take 2/2 TUNING FORK AND STICK (A); use HOOKED ROD to take MOUSE INLAY (B).
- Use 2/2 TUNING FORK AND STICK (C); take BROKEN POCKET WATCH and HANDLE (D).
- Take 1/2 OWL'S EYES (E).
- Use POWDERED SUGAR and BRUSH (F).
- Easy solution (G1-G4).

- Hard solution (H1-H4).
- Take EMPTY HORN.
- Return to Yard.
- Place MOUSE INLAY (I); take BOOMERANG (J).
- Go forward.
- Use HANDLE; take FILE (K).
- Use FILE; take SPINNING TOP (L).
- Go down.
- Use SPINNING TOP (M); take SCORPION'S STINGER (N).
- Return to Second Floor.
- Place SCORPION'S STINGER (O) for HOP (P); receive PORTRAIT PART.
- Place PORTRAIT PART (Q); take CHISEL and VILLAGE MAP (R).
- Use BOOMERANG (S); take CARABINER and 2/2 OWL'S EYES (T).
- 2/2 OWL'S EYES on BROKEN POCKET WATCH; take WINDING KEY and PAPER SHIP.
- Return to Yard.
- Use WINDING KEY; take CRANK WHEEL (U).
- Return to Second Floor.
- Use CRANK WHEEL; take SHARP SQUARE (V).
- Use SHARP SQUARE (W); take WINGED RING; use EMPTY HORN for HORN WITH HAZELNUTS (X).
- Return to Swamplands.
- Use HORN WITH HAZELNUTS (Y); take BURNER (Z).
- Place VILLAGE MAP (A); BURNER (B).
- Go forward.
Chapter 5: Village
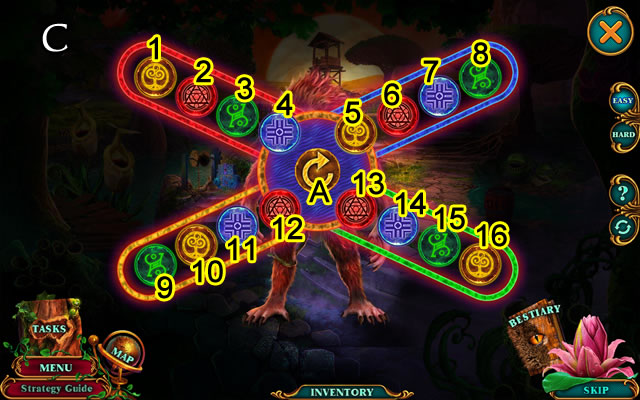
- Use Bestiary.
- Easy solution (C). (11-12)-(14-13)-(7-8)-(A)-(5-6)-(6-7)-(A)-( 5-6)-(A)-( 2-1)-(14-13)-(A)-(4-3)-(3-2).
- (A)- (4-3)-(A)-(11-12)-(16-15)-(15-14)-(14-13)-(A)-(9-10)-(10-11)-(A)-(11-12)-Ax3.
- Hard solution (D). (4-3)-(1-2)-(2-3)-(4-3)-(6-7)-(7-8)-(6-7)-(11-10)-(10- 9)-(12-11).
- (11-10)-(9-10)-(13-14)-(14-15)-(15-16)-(13-14)-(14-15)-(13-14).
- Take UNLOADED PISTOL; use CARABINER (E); select chain; take QUILL PEN (F).
- Use PAPER SHIP; take PAPER (G).
- Take SHOE; RAMROD (H); place PAPER; use QUILL PEN (I); select paper; use key (J).
- Go (K).
- Take BUCKSHOT (L).
- Take INCOMPLETE FISHING ROD; select notices (M); use CHISEL; take BOOKSTAND; use WINGED RING (N); take FEATHER DUSTER (O).
- Use BOOKSTAND, SHOE (P); take 1/2 OTTER FIGURINES, POUCH OF COINS (Q).
- Select door; speak to character; select price list (R); give POUCH OF COINS; take GUNPOWDER (S).
- Go down.
- BUCKSHOT, GUNPOWDER and RAMROD on UNLOADED PISTOL for LOADED PISTOL.
- Use LOADED PISTOL (T).
- Speak to character; take HELMET (U).
- Use HELMET for FUEL OIL (V).
- Go (W).
- Take newspaper, AKHAS'S CASKET; use FEATHER DUSTER (X); take 2/2 OTTER FIGURINES and FISHING LINE (Y).
- Take PRAYER BOOK (Z).
- Place PRAYER BOOK (A) for HOP (B); receive MANDOLIN.
- Replace MANDOLIN; take DRAGONFLY BAIT, GOLDEN TUNING PEG (C).
- Go down.
- Place 2/2 OTTER FIGURINES (D); take PLIERS, 1/2 FLORAL SIGNETS (E).
- FISHING LINE, DRAGONFLY BAIT on INCOMPLETE FISHING ROD for FISHING ROD.
- Use FISHING ROD for FISH (F).
- Go (G).
- Give FISH (H); take PEACOCK FEATHER (I).
- Use GOLDEN TUNING PEG (J); take BUTTON, 2/2 FLORAL SIGNETS (K).
- 2/2 FLORAL SIGNETS on AKHAS'S CASKET.

- Easy and hard solutions (L1-L3).
- Take VINE ROPE, BELLMAN INLAY.
- Place BELLMAN INLAY (M); take FISHING NET, TOBACCO (N).
- Give TOBACCO; take SHOVEL (O).
- Return to Akhas's Sanctuary.
- Use SHOVEL (P); uncover; solution (Q); take EXPANDER.
- Place PEACOCK FEATHER (R); take SMALL FUNNEL (S).
- Go down.
- Place SMALL FUNNEL; use FUEL OIL (T).
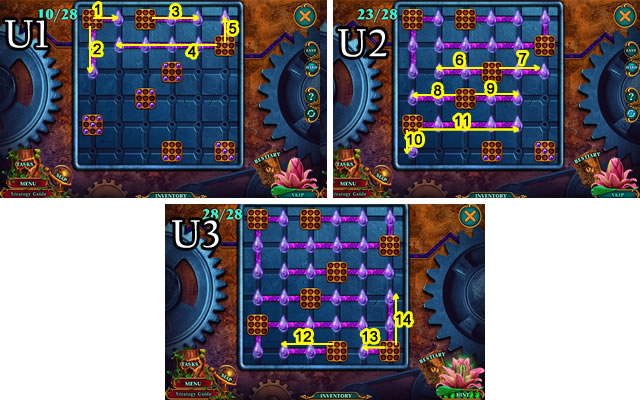
- Easy and hard solutions (U1-U3). 1-14.
- Take AKHAS'S HEART.
- Return to Akhas's Sanctuary.
- Use EXPANDER (V); place AKHAS'S HEART (W).
Chapter 6: Ritual Hall
- Select (X); use sword (Y); speak to character.
- Take SEED POD (Z).
- Take BOW (A); use PLIERS on lid; take BEADS WITH MAGNET (B).
- Use BUTTON (C); take EMPTY KEROSENE LAMP, SHACKLES, ARROW (D).
- ARROW, VINE ROPE on BOW for BOW WITH ARROW.
- Use BOW WITH ARROW (E).
- Go forward.
- Use FISHING NET (F) for HOP (G); receive FLORENA'S SCEPTER.
- Use SHACKLES; take FREEING CRYSTAL HALF (H).
- Use BEADS WITH MAGNET (I) for FREEING CRYSTAL HALF (J).
- Place FLORENA'S SCEPTER; take FLINT AND STEEL, BRUSH (K).
- Take OLIVES (L).
- Go down.
- Place OLIVES (M).
- Solution (N).
- Take OLIVE OIL.
- FLINT AND STEEL, OLIVE OIL on EMPTY KEROSENE LAMP for KEROSENE LAMP.
- Use KEROSENE LAMP (O); take RESIN, METAL CHAIN (P).
- FREEING CRYSTAL HALF and RESIN on FREEING CRYSTAL HALF for FREEING CRYSTAL.
- Use FREEING CRYSTAL (Q); speak to character; take LASSO (R).
- Go (S).
- Use Bestiary.
- Easy solution (T). A-B-Cx2-Bx2-Ax4.
- Hard solution (U). F-Gx2-F-Ex4-E-A-B-Cx2-Bx2-Ax4.
- Enter Ritual Hall.
- Use SEED POD (V); take EMPTY WATERING CAN; use LASSO (W); take HARPY FEATHER (X).
- Take WOODEN STICKS (Y).
- Take 1/3 BUD INLAYS (Z).
- Place HARPY FEATHER (A).
- Go forward.
- Take CORKSCREW (B).
- Take CORK; use METAL CHAIN; take SAW (C).
- Use CORK, CORKSCREW; receive LID (D); take CRAB'S CLAW (E).
- Use LID; take 1/2 PLATE AND COAL (F).
- Go down.
- Use SAW and BRUSH (G); take BOWL OF POLLEN (H).
- Return to On the Tree.
- Use CRAB'S CLAW (I); take HORSESHOE; place EMPTY WATERING CAN (J); receive FULL WATERING CAN.
- Use FULL WATERING CAN and WOODEN STICKS (K) for 2/3 BUD INLAYS and RUNE OF EARTH (L).
- Use BOWL OF POLLEN (M); give leaf; use stick (N); take WOLF'S EYE (O).
- Return to Ritual Hall.
- Use WOLF'S EYE; take 2/2 PLATE AND COAL (P).
- Use 2/2 PLATE AND COAL for RUNIC COMBINATION (Q).
- Go forward.
- Uncover; use HORSESHOE; take TOTEM (R).
- Place TOTEM (S) play HOP (T); receive FLORENA'S RING.
- Place FLORENA'S RING; take 3/3 BUD INLAYS, AXE HANDLE (U).
- Return to Near Florena's Heart.
- Place 3/3 BUD INLAYS (V); take AXE BLADE (W).
- Return to On the Tree.
- Place RUNIC COMBINATION (X).
- Easy solution (Y). Ax3-B-Cx4-Dx2-E.
- Hard solution (Z). Cx2-A-Bx3-Dx4-Ex3.
- Take MOSAIC PART.
- Return to Florena's Chamber.
- Place MOSAIC PART (A); take ACID (B).
- Use ACID (C); take AXE DETAIL (D).
- Go down.
- RUNE OF EARTH, AXE BLADE, AXE DETAIL on AXE HANDLE for AKHAS'S AXE.
- Use AKHAS'S AXE (E).
- Easy and hard solutions vary.
- Congratulations, you've completed Spirit Legends: The Forest Wraith!
Created at: 2018-12-16