
Walkthrough Menu
- General Tips
- Chapter 1: Castle Gardens
- Chapter 2: First Floor
- Chapter 3: Second Floor
- Chapter 4: Vault
- Chapter 5: Neglected Garden
- Chapter 6: Old Tower
General Tips
- This is the official guide for Spirit of Revenge: Cursed Castle!
- This guide will not mention each time you have to zoom into a location; the screenshots will show each zoom scene.
- Hidden-object puzzles are referred to as HOPS. This guide will not show screenshots of the HOPS, however, it will mention when an HOP is available and the inventory item you'll collect from it.
- This guide will give step-by-step Solutions for all puzzles which are not random. Please read the instructions in the game for each puzzle.
Chapter 1: Castle Gardens
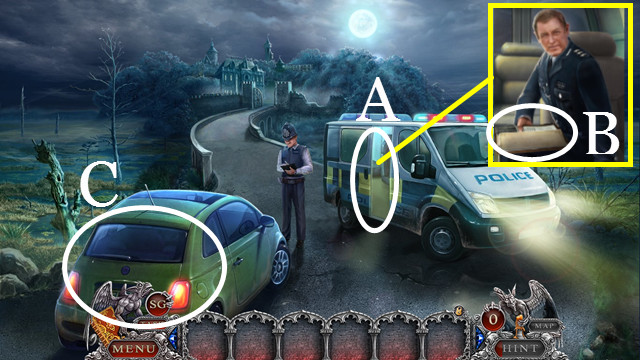
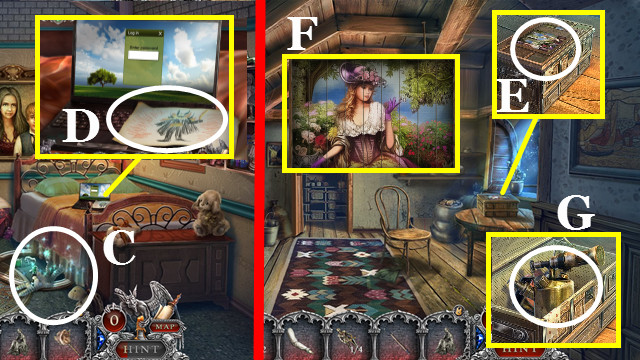
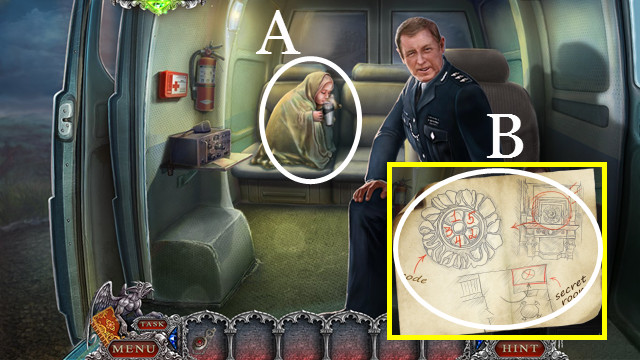
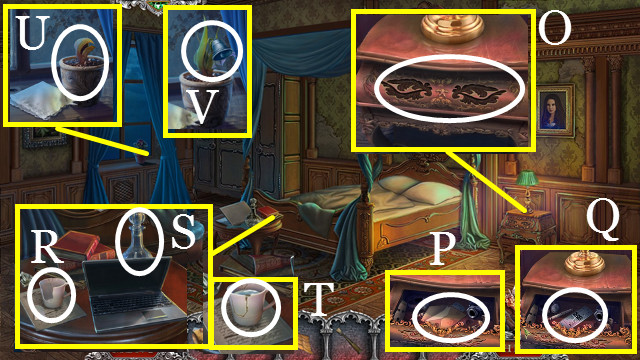
- Enter (A).
- Take the MAP and CASE REPORT (B).
- Exit the van.
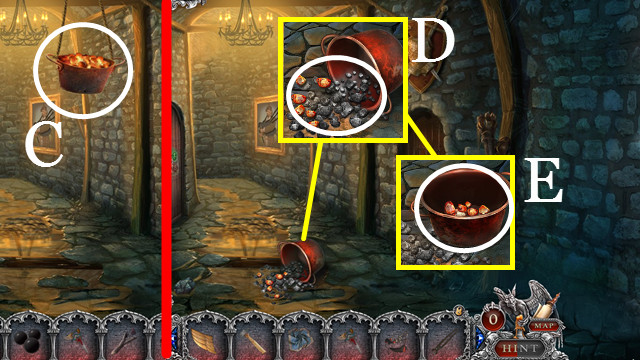
- Open the trunk (C) to trigger a HOP. Play it to receive COCOA POWDER.
- Enter (A).
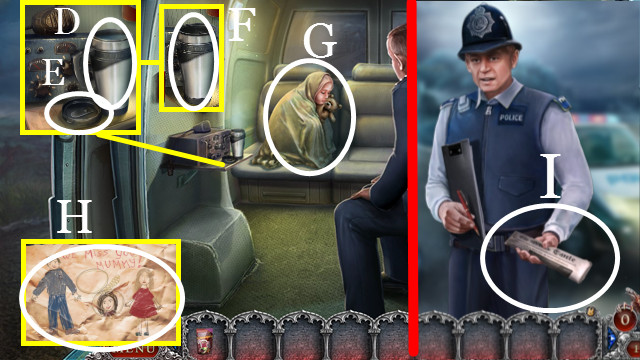
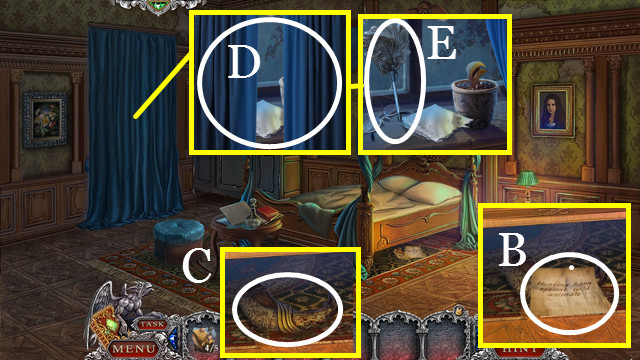
- Use the COCOA POWDER (D).
- Touch the lid (E); take the MUG OF COCOA (F).
- Give the MUG OF COCOA (G).
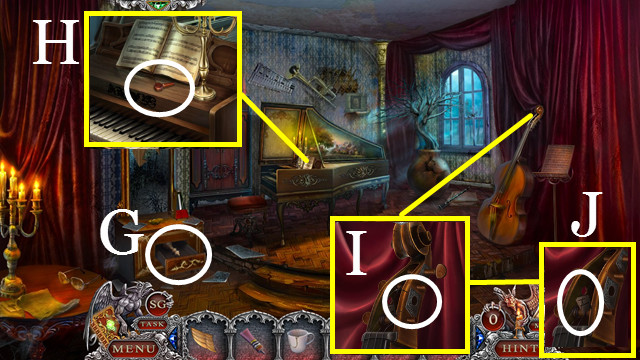
- Take JESSIE'S DRAWING 1/5 (H).
- Exit.
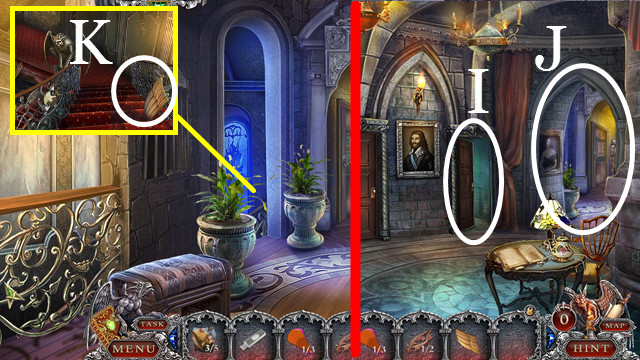
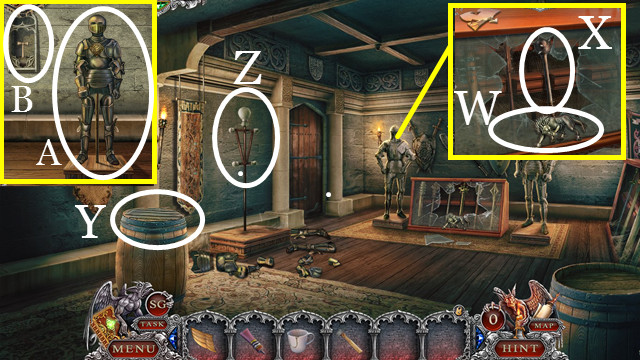
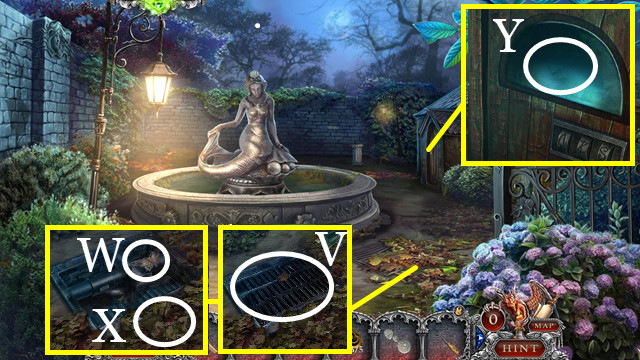
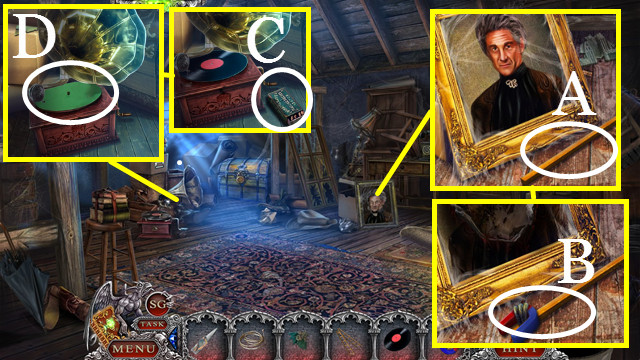
- Touch then take the newspaper (I); receive the FLASHLIGHT.
- Walk forward.
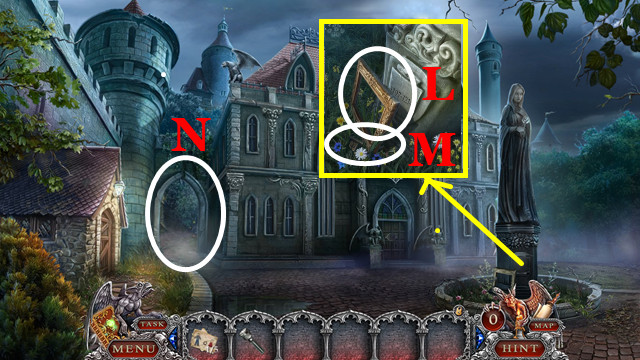
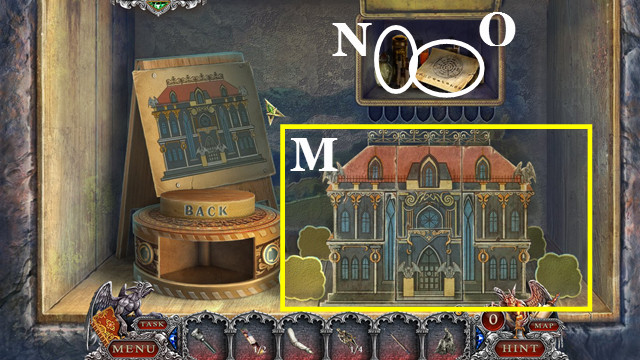
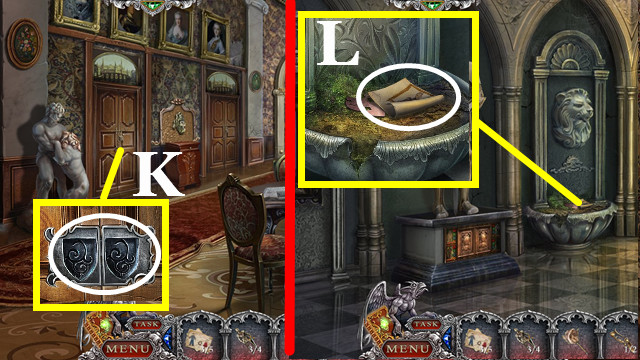
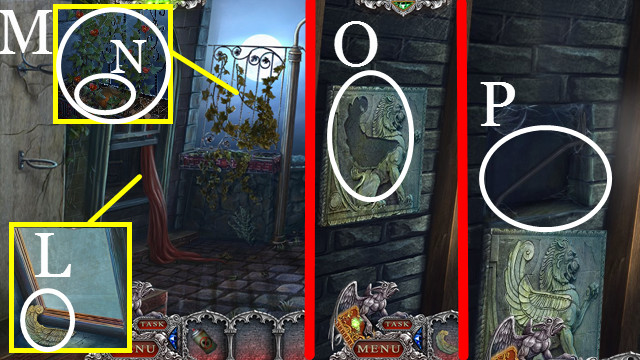
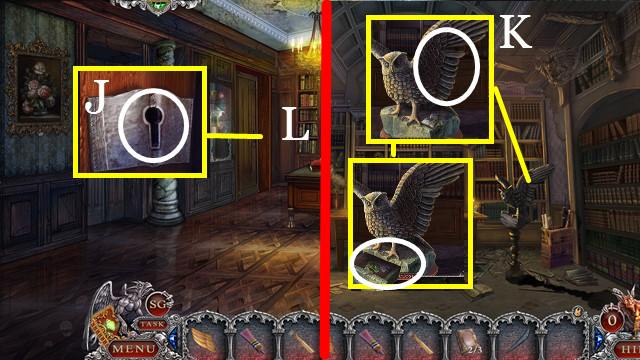
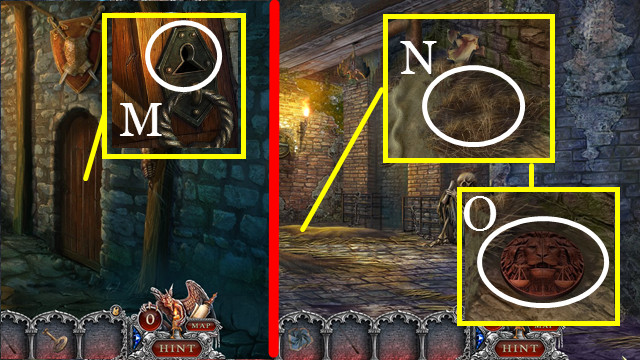
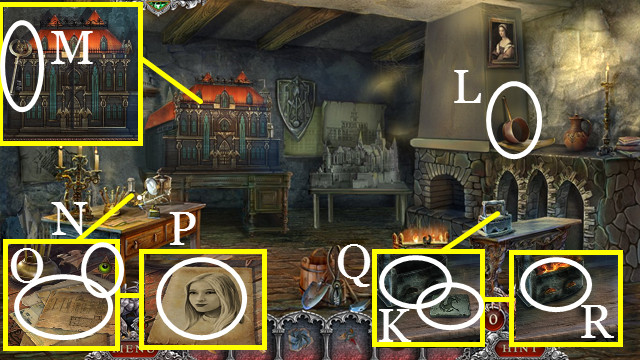
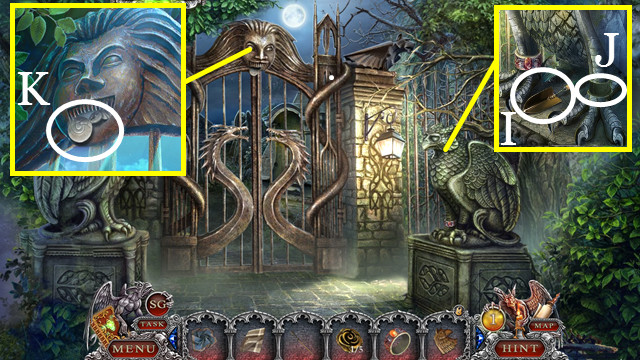
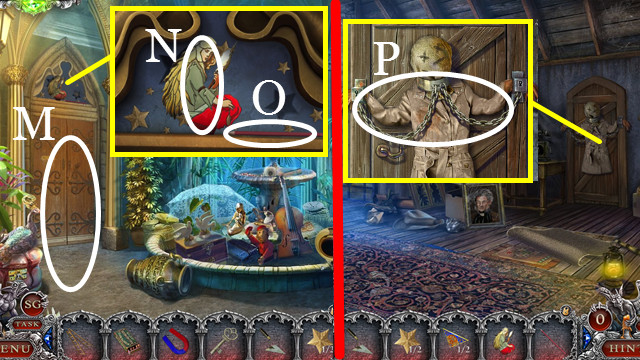
- Take the frame (L) and STOREROOM KEY (M).
- Walk through (N).
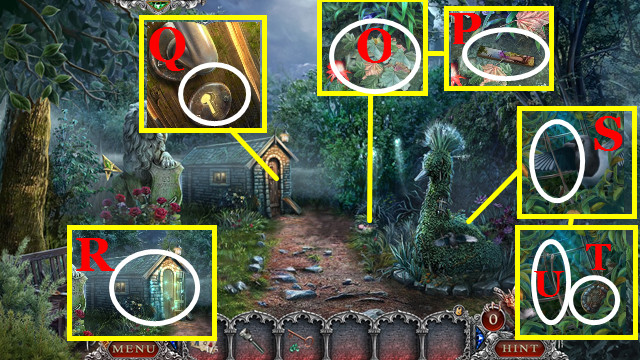
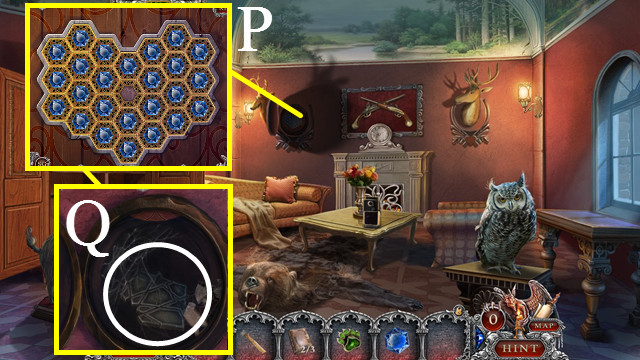
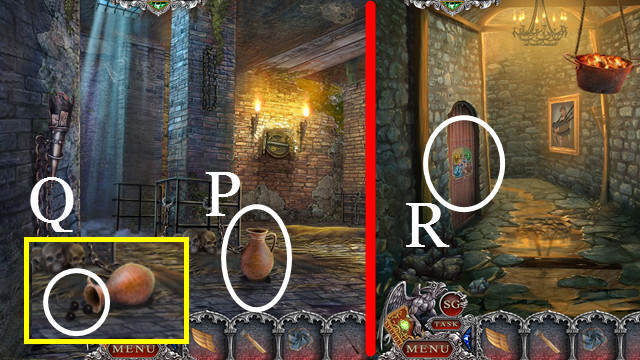
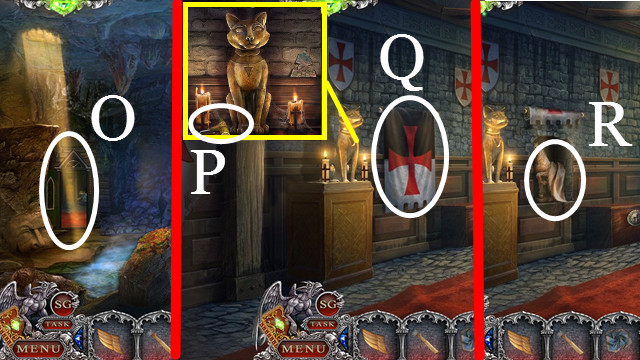
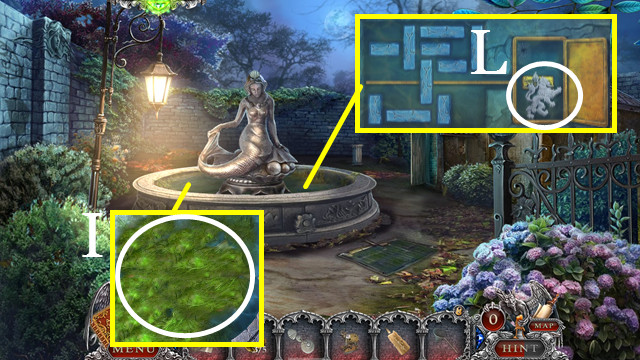
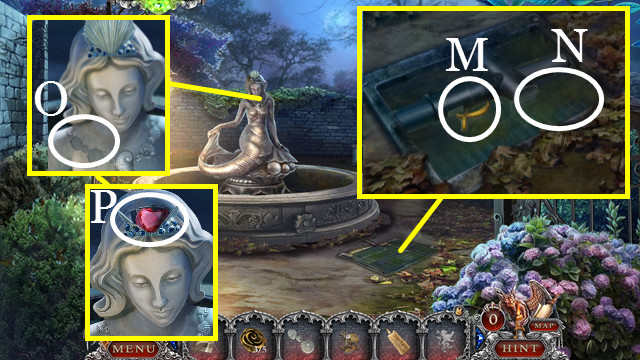
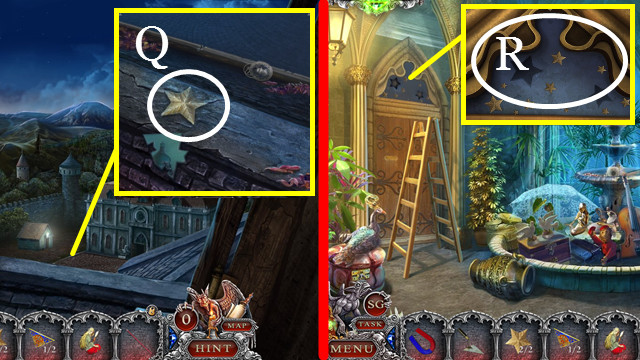
- Move the leaves (O); take the COLORED TILE 1/2 (P).
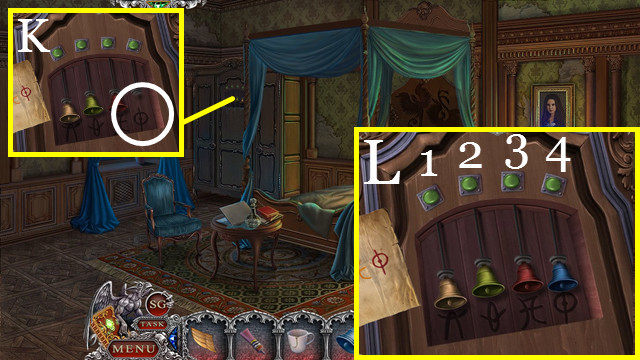
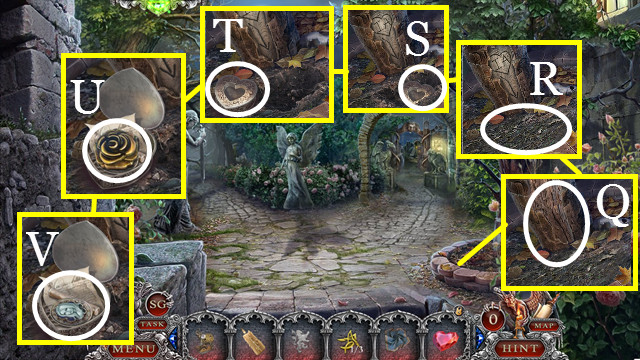
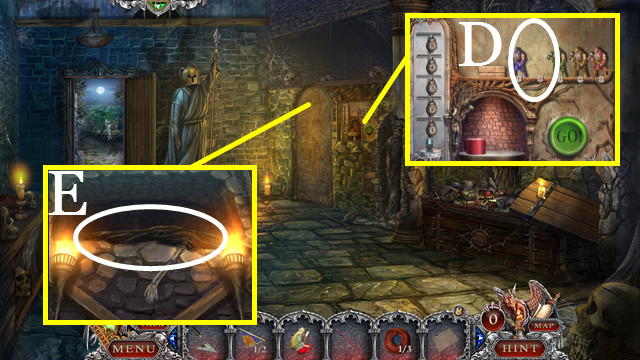
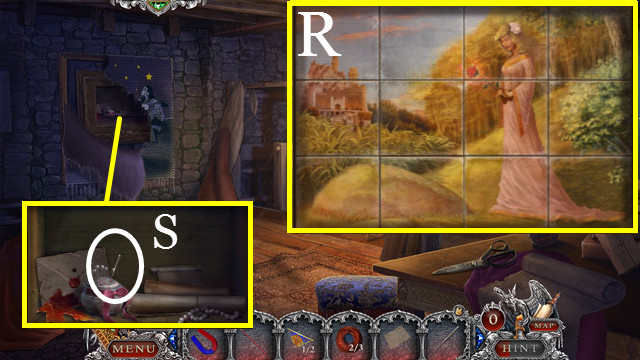
- Use the STOREROOM KEY (Q) to trigger a HOP (R). Play the HOP; receive the PLIERS.
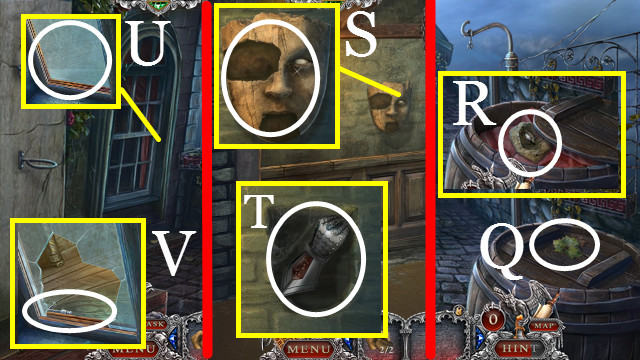
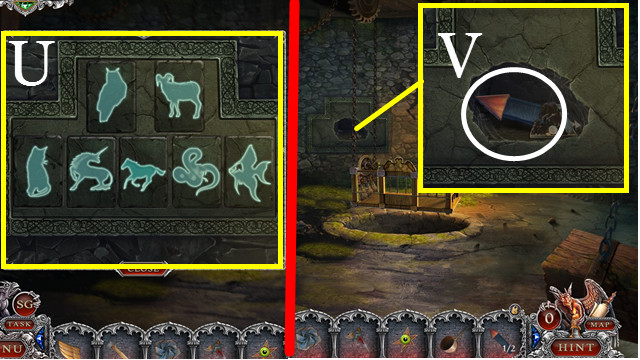
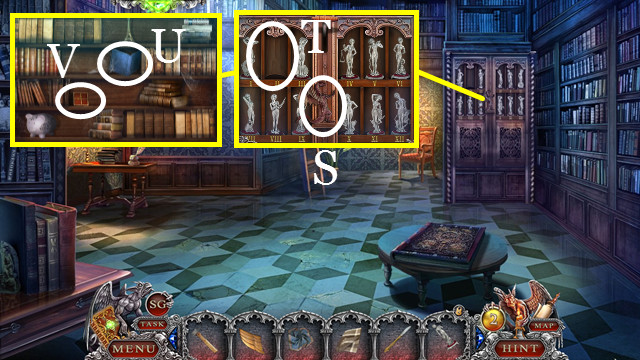
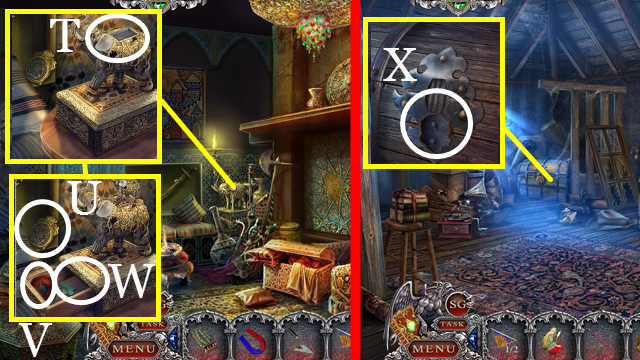
- Use the PLIERS (S); take the STONE FLOWER (T) and WIRE (U).
- Walk down.
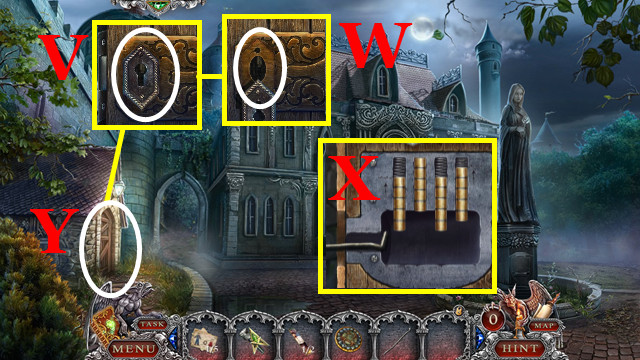
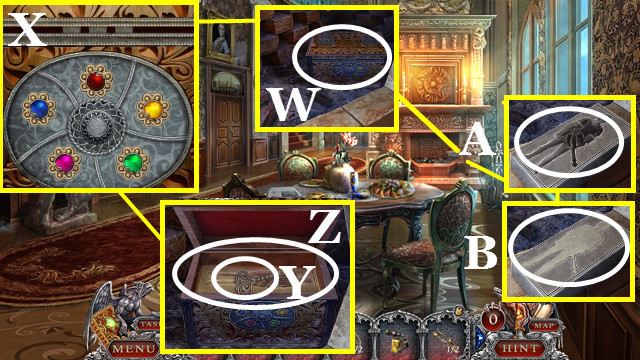
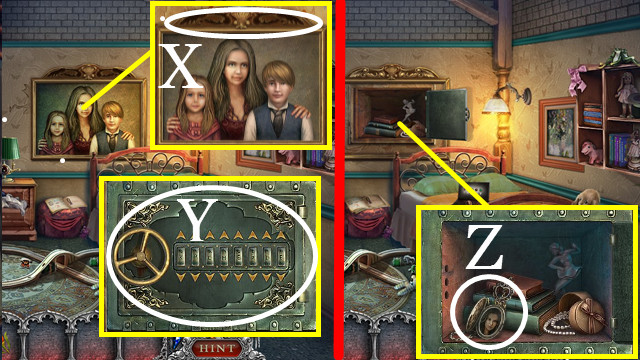
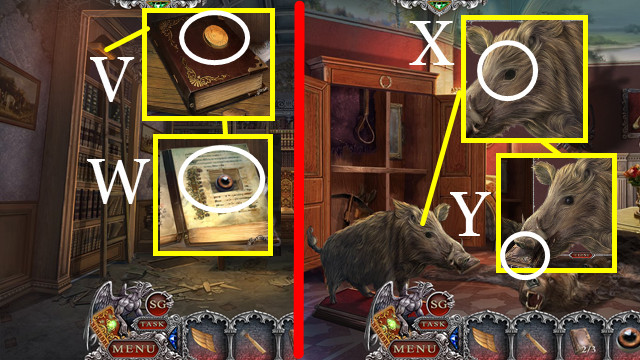
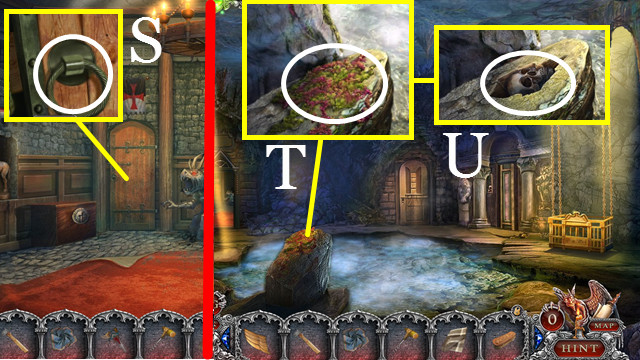
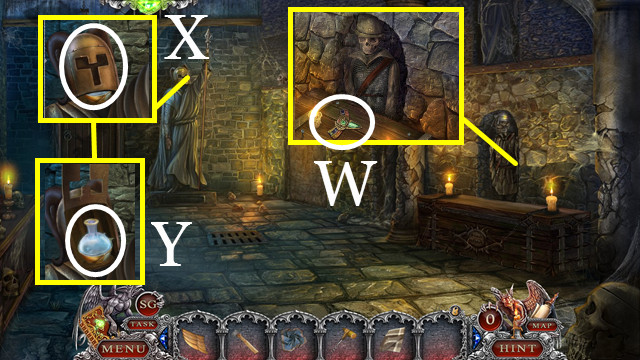
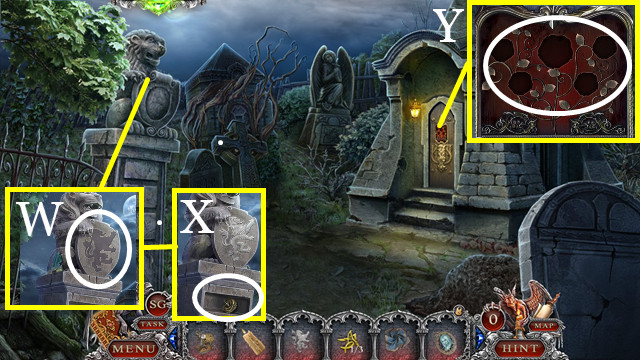
- Touch the keyhole (V).
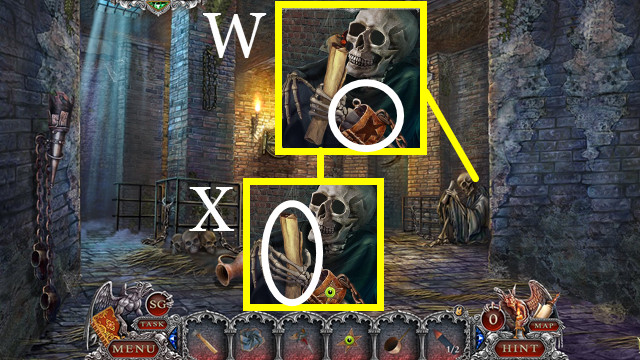
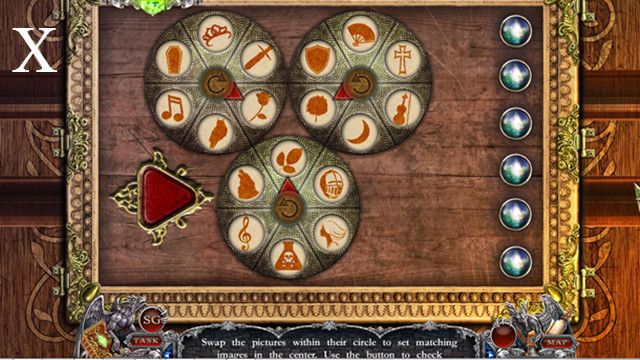
- Use the wire (W) to trigger a mini-game.
- Solution: (X).
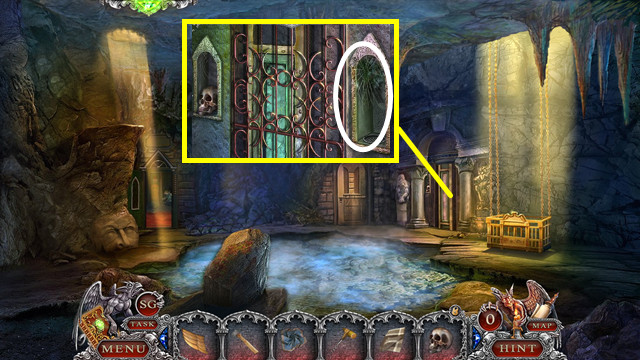
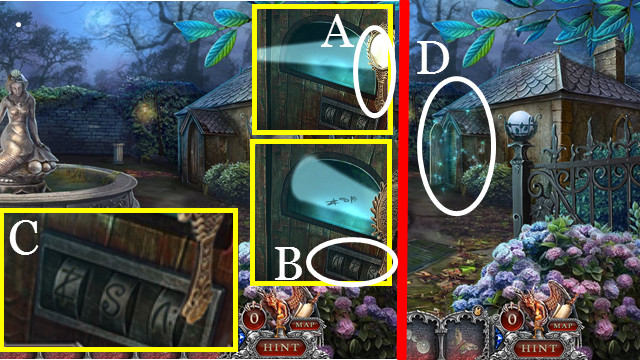
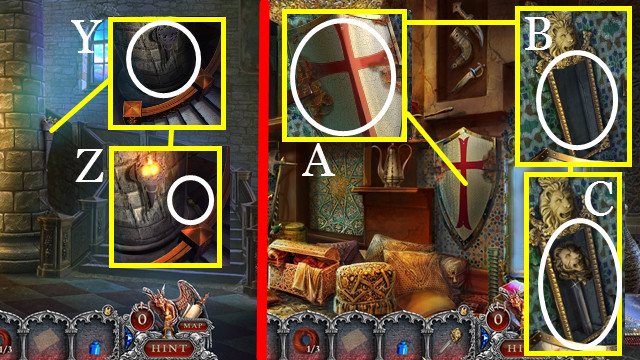
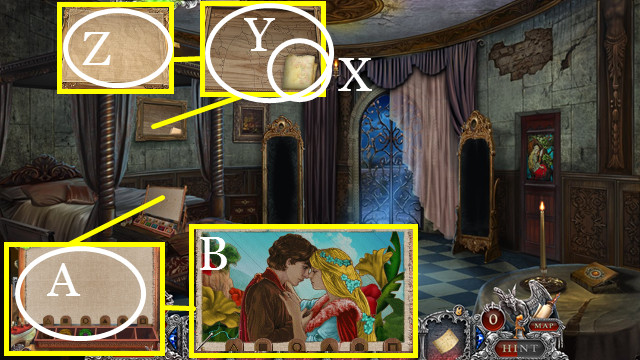
- Enter (Y).
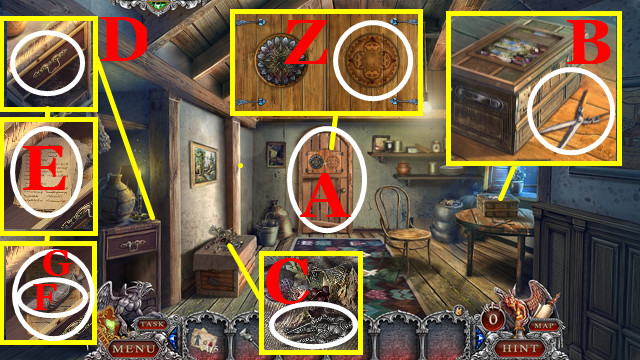
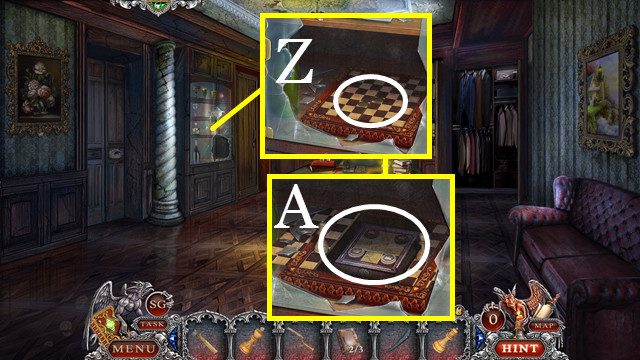
- Place the STONE FLOWER (Z) to trigger a HOP (A).
- Play the HOP; receive the SUN TOKEN.
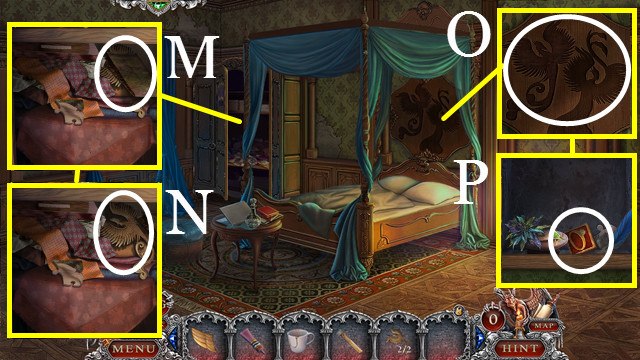
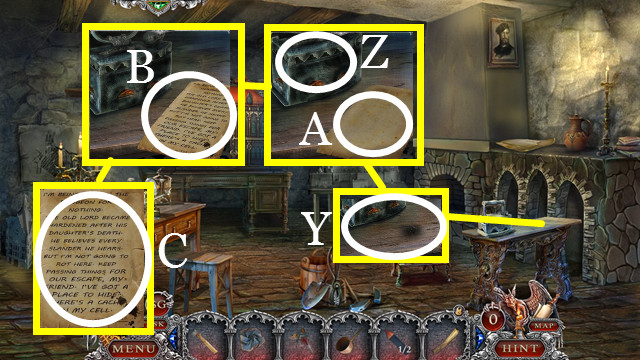
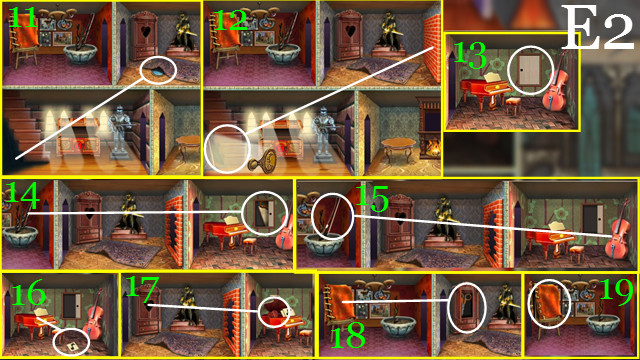
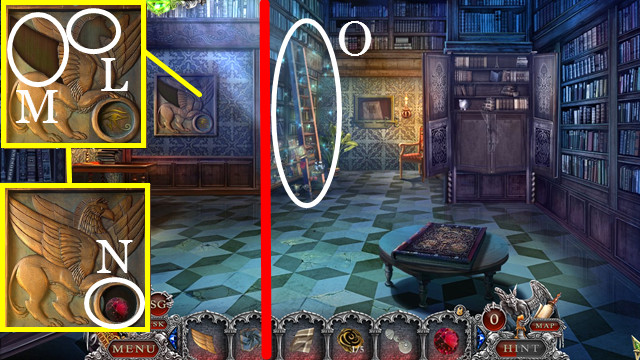
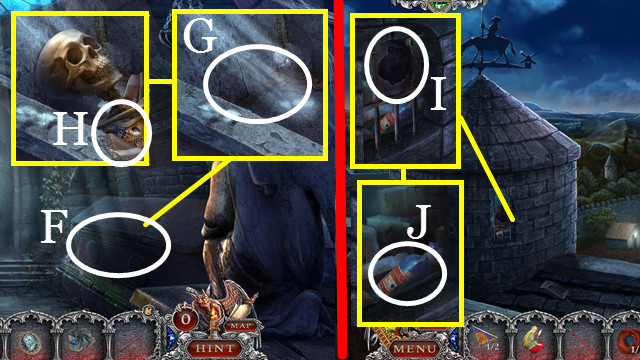
- Take the GARDEN SHEARS (B) and KNIGHT 1/4 (C).
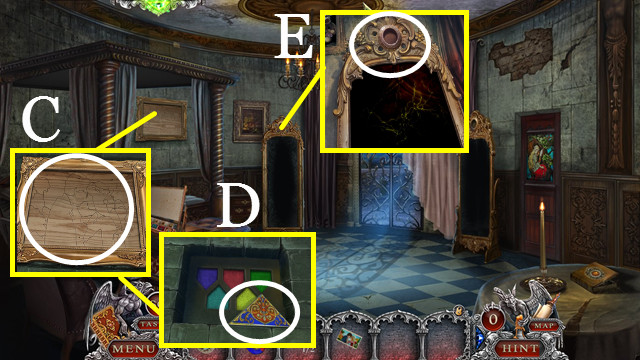
- Open the drawers (D); touch the papers (E); take the PUPPET'S ARM (F) and journal page (G).
- Return to the Garden.
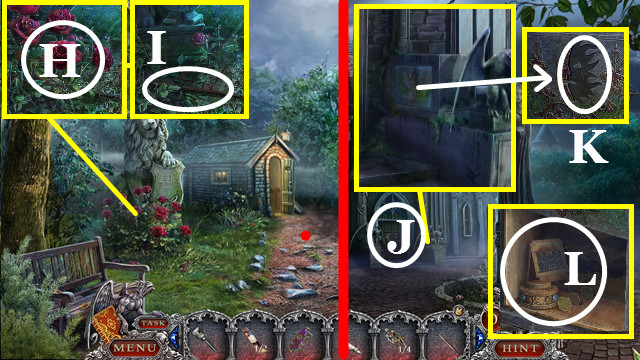
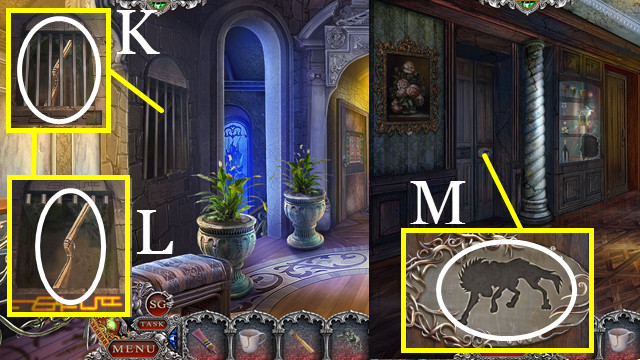
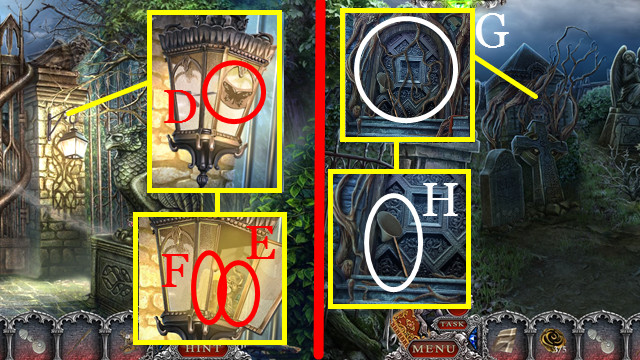
- Use the GARDEN SHEARS (H); take the HOOKED POLE (I).
- Walk down.
- Approach (J); place the SUN TOKEN (K).
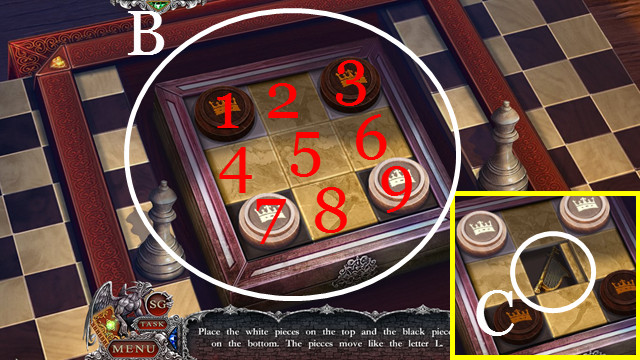
- Touch (L) to trigger a mini-game.
- Solution: (M).
- Take the TIN FIGURINE (N) and journal page (O).
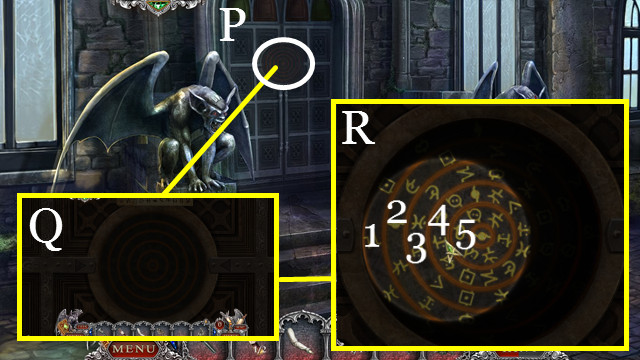
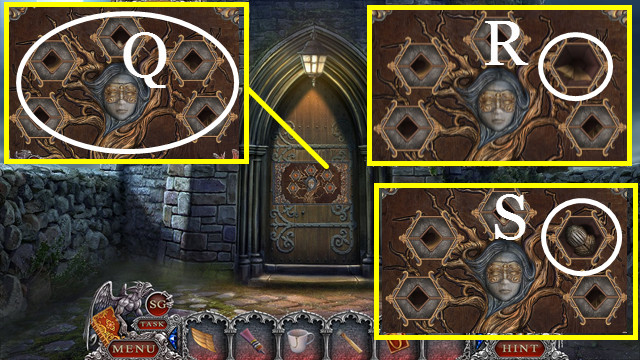
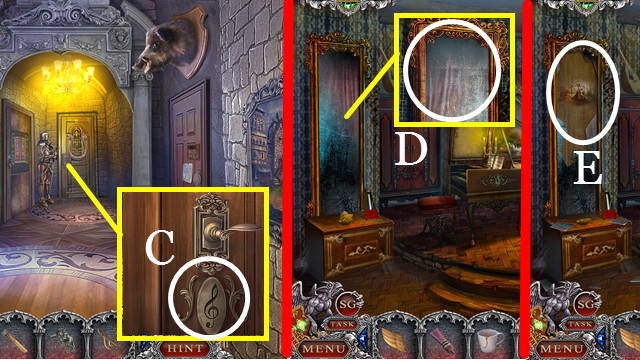
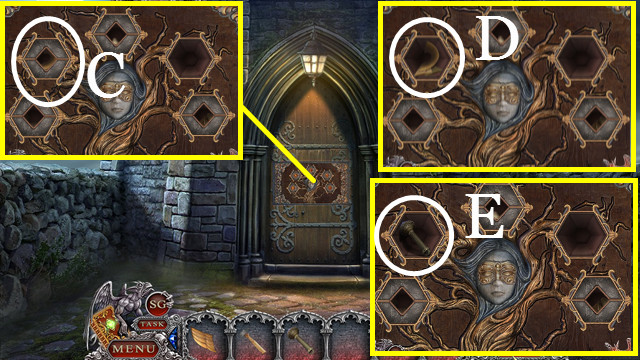
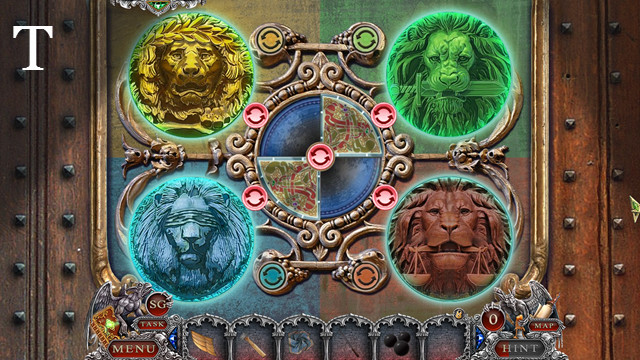
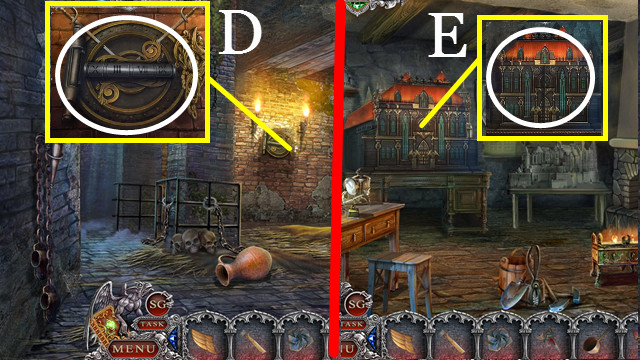
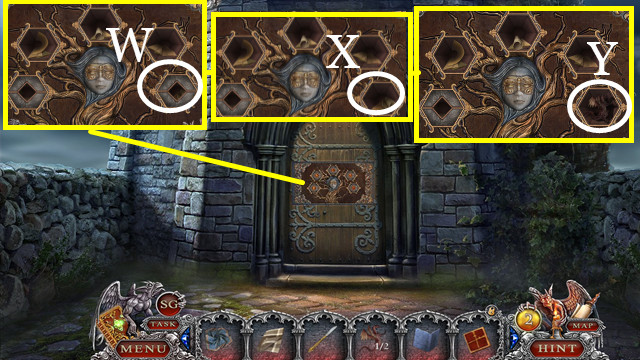
- Examine the door (P); use the FLASHLIGHT (Q) to trigger a mini-game.
- Solution (R): Rotate 1 clockwise x2. Rotate 2 counterclockwise x3. Rotate 3 counterclockwise x5. Rotate 4 counterclockwise x4. Rotate 5 counterclockwise x2.
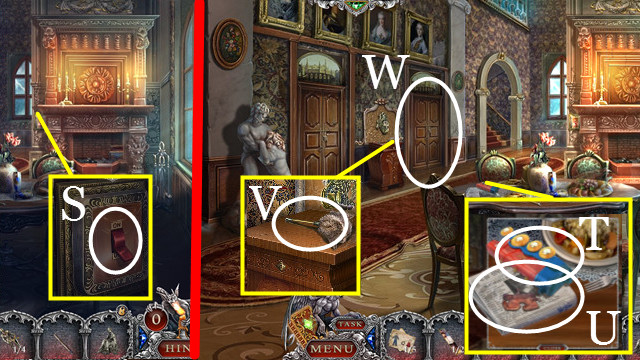
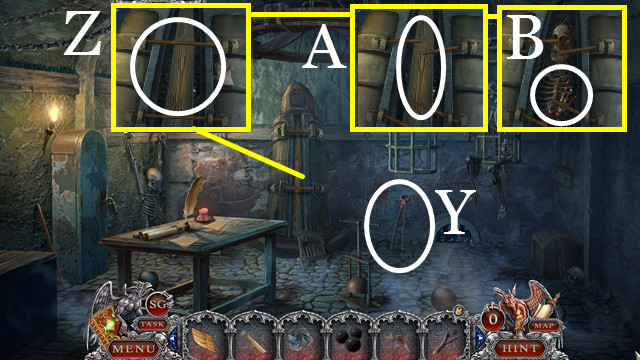
- Flip the switch (S).
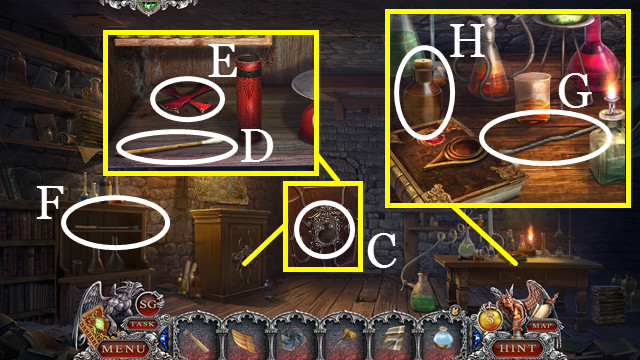
- Take the LOCOMOTIVE (T), newspaper (U), and FEATHER DUSTER (V).
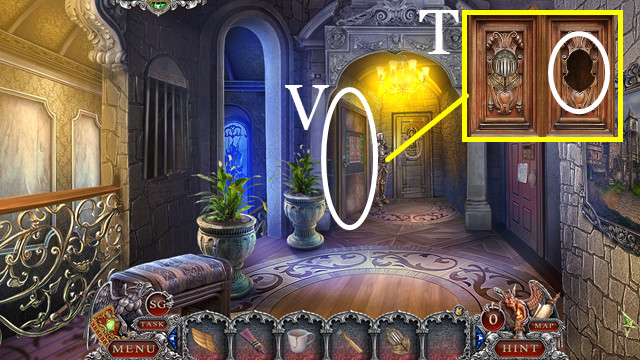
- Enter (W).
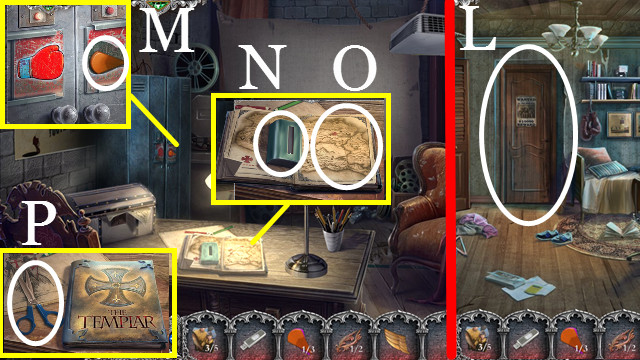
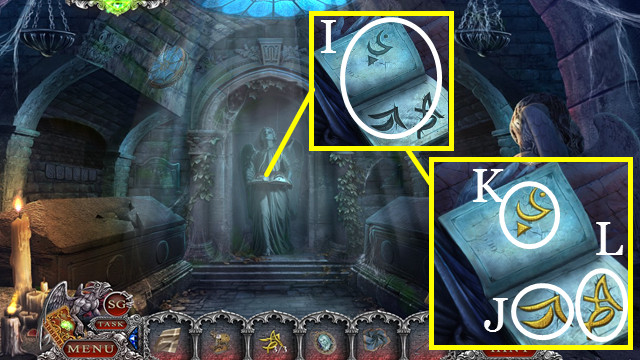
- Play the HOP (X) to receive the LEVER.
- Read the book (X1).
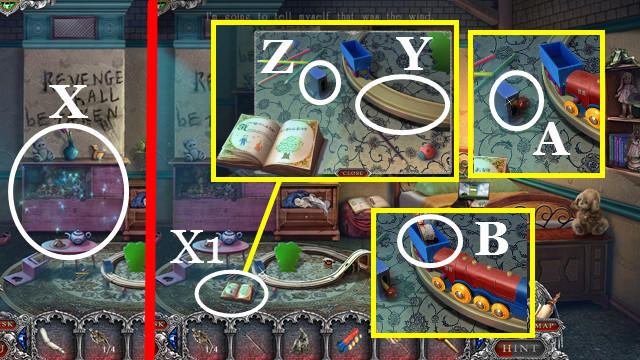
- Place the LOCOMOTIVE (Y) and LEVER (Z).
- Touch the lever (A).
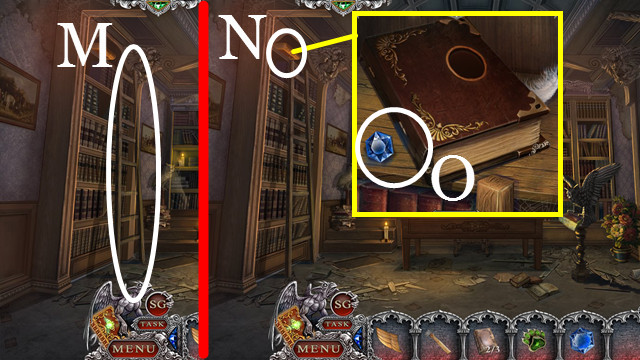
- Take the COLORED TILE 2/2 (B).
- Play the HOP (C) to receive the COAT OF ARMS TOKEN.
- Take JESSIE'S DRAWING 2/5 (D).
- Return to the Gardener's House.
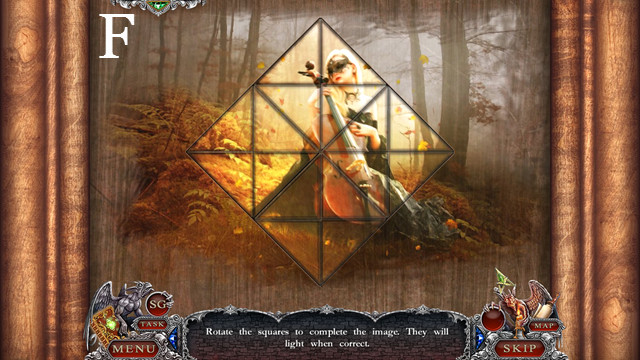
- Place the COLORED TILE (E) to trigger a mini-game.
- Solution: (F).
- Take the BLOWTORCH (G).
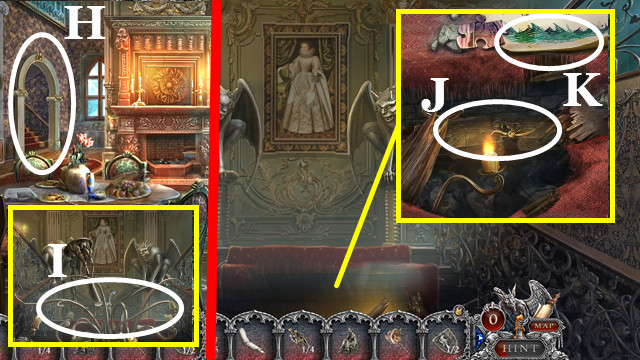
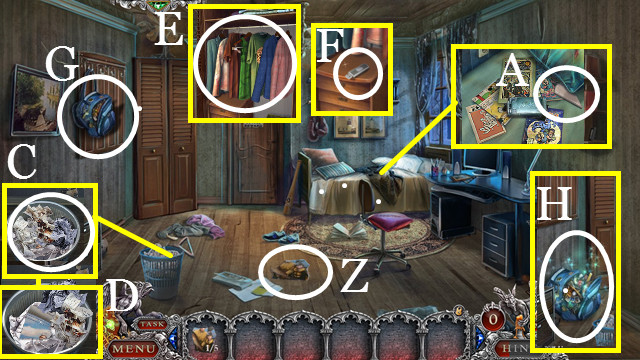
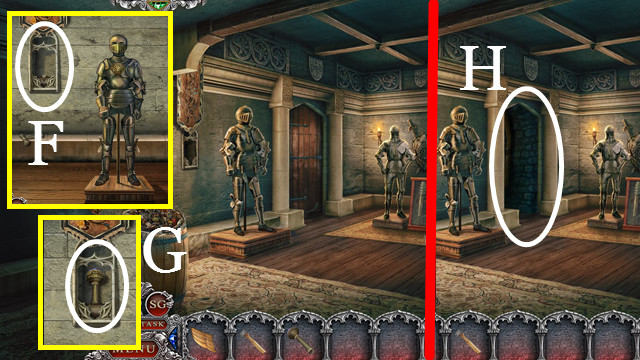
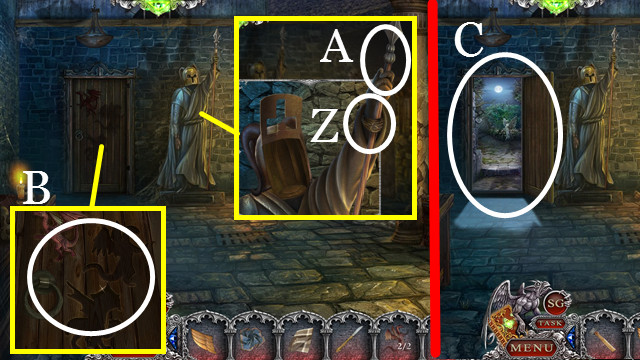
- Return to the Living Room; walk upstairs (H).
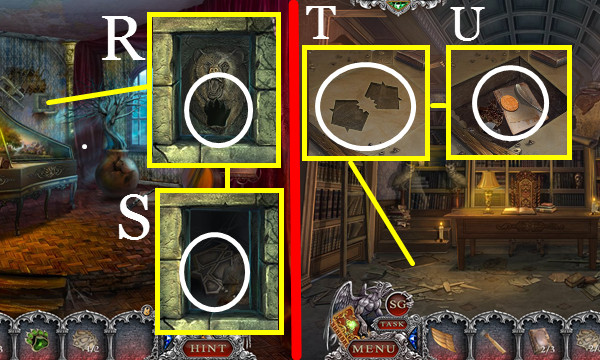
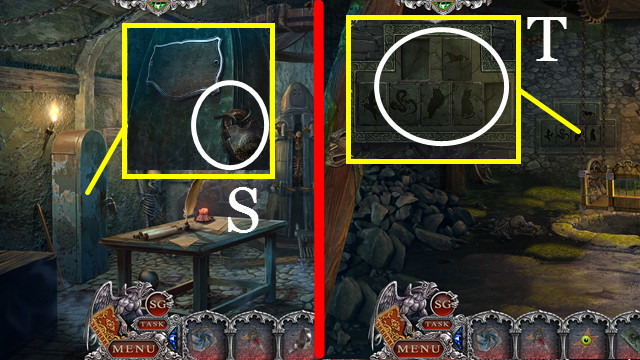
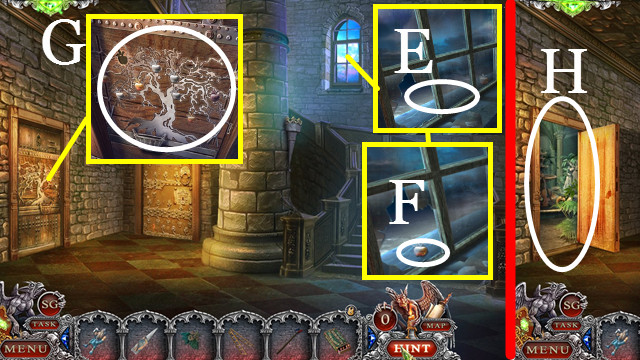
- Touch the debris (I).
- Use the HOOKED POLE (J); receive the FRAME PIECES 1/2.
- Take JESSIE'S DRAWING 1/3 (K).
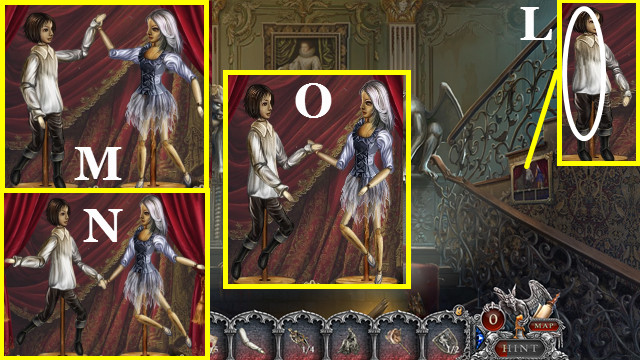
- Use the PUPPET'S ARM (L) to trigger a mini-game.
- Solution: M-N-O.
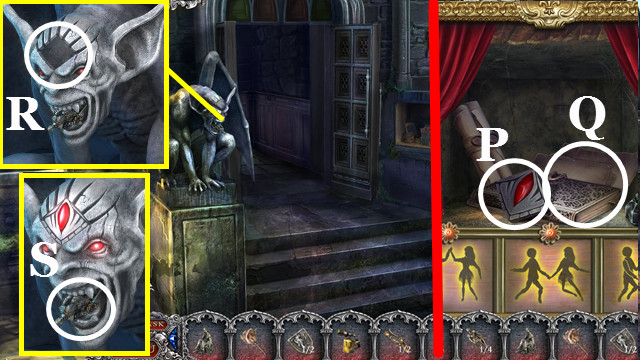
- Take the GARGOYLE'S RUBY (P) and journal entry (Q).
- Return to the Castle Entrance.
- Place the GARGOYLE'S RUBY (R); take the KNIGHT 2/4 (S).
- Return to Jessie's Room.

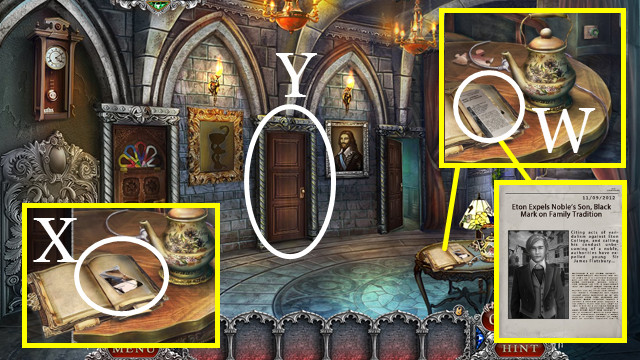
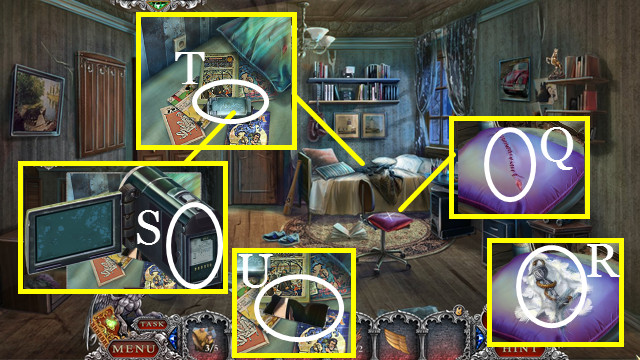
- Touch the laptop (T).
- Touch the keyboard; type the password (U): 1-1-6-0-9-enter.
- Touch the screen (V).
- Return to the Living Room.
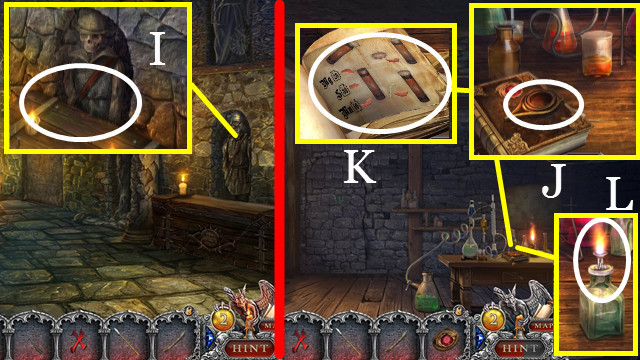
- Touch the box (W) to trigger a mini-game (X).
- Solution: pink-yellow-blue-red-green.
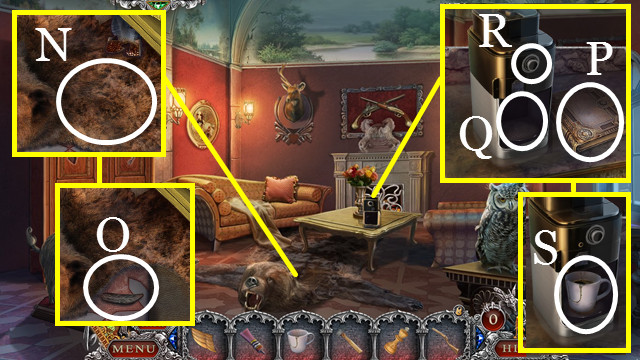
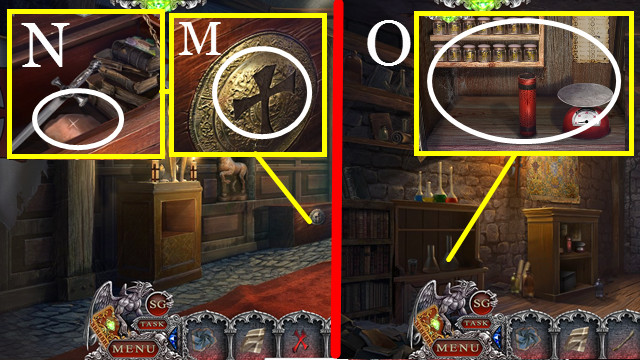
- Take the CABINET KEY (Y); touch the mold (Z).
- Use the TIN FIGURINE and BLOW TORCH (A).
- Take the KNIGHT 3/4 (B).

- Use the CABINET KEY (C).
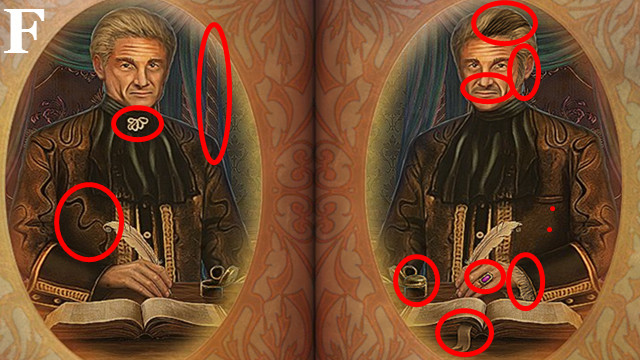
- Touch the book (D) to trigger a mini-game.
- Solution: Top Row: Agnes. Second Row: Francis, Catherine. Third Row: Jane, Charles, Thomas. Bottom Row: Matthew, Anne.
- Turn the page (E) to trigger a mini-game.
- Solution (F).
- Turn the page (G) to trigger a mini-game.
- Solution: (H); turn the page (I).
- Take the COAT OF ARMS TOKEN 2/2 (J).
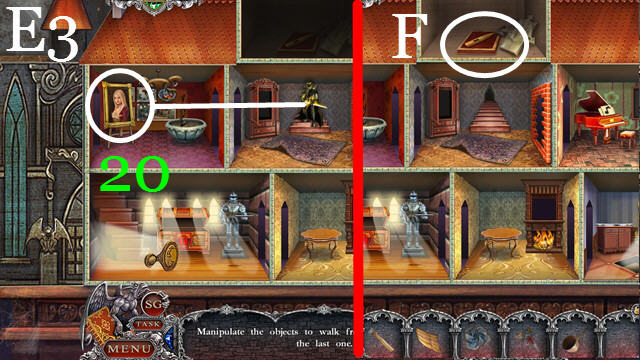
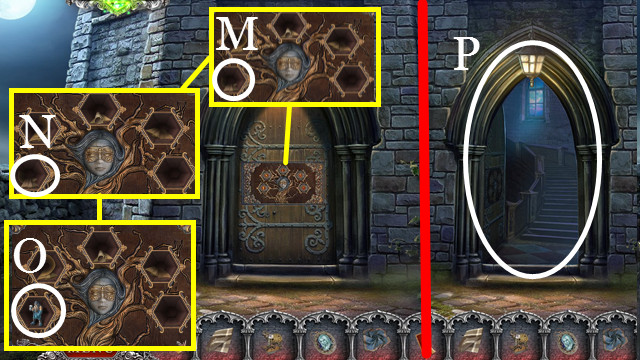
- Place the COAT OF ARMS TOKEN (K); go through the door.
- Take JESSIE'S DRAWING (L).

- Use the FEATHER DUSTER (M); take the KNIGHT 4/4 (N) and FRAME PIECES 2/2 (O).
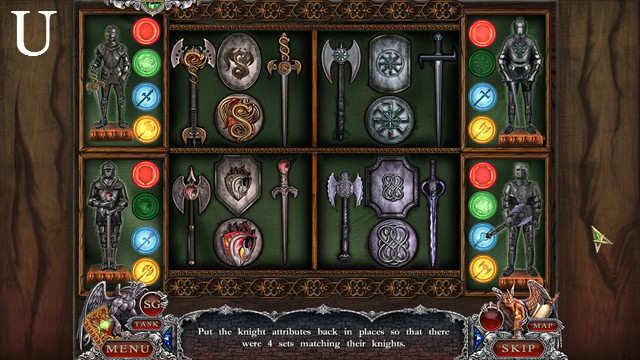
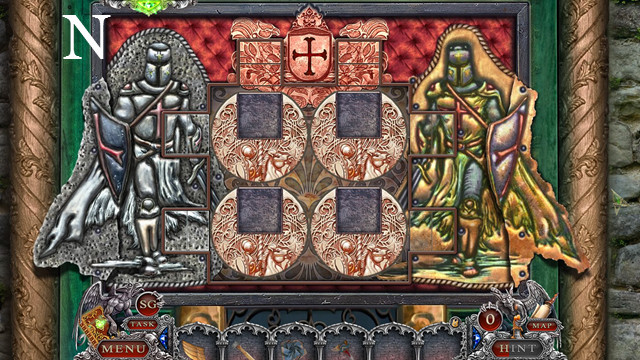
- Touch (P); place the KNIGHTS (Q); take the FLOWER KEY (R).
- Return to Jessie's Room.
- Use the FLOWER KEY (S); touch (T).
- Touch the picture (U), take JESSIE'S DRAWING 5/5 (V).
- Place JESSIE'S DRAWINGS (W); touch the pages.
- Use the FRAME PIECES (X).
- Touch (Y) to trigger a mini-game.
- Solution: M-I-C-H-E-L-L-E.
- Take the MOTHER'S LOCKET (Z).
- Return to the Police Van.
- Give the MOTHER'S LOCKET (A).
- Take the journal page (B).
- Return to the Living Room.
Chapter 2: First Floor
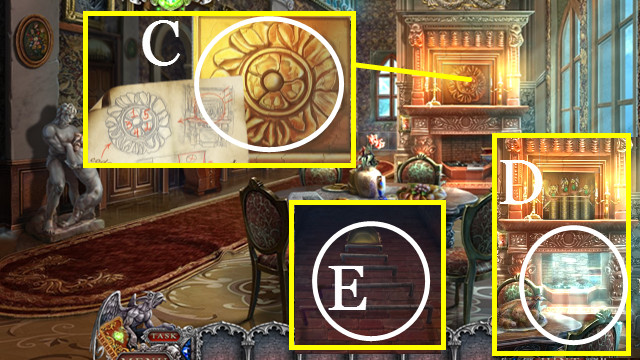
- Press the petals (C).
- Touch (D) to trigger a mini-game.
- Lower Column 1, 3, and 4 by one slot each. Raise column 2 by three slots. Lower column 1 by three slots.
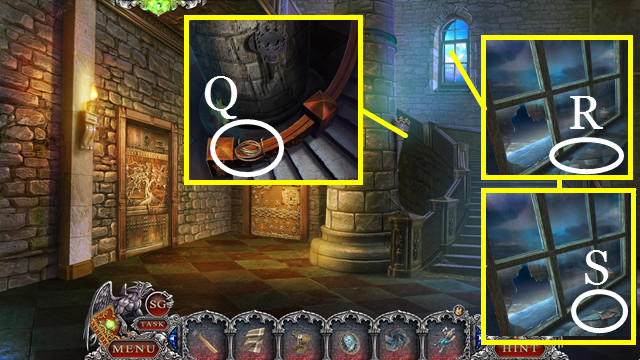
- Walk forward (E); climb the ladder (F).
- Talk (G).
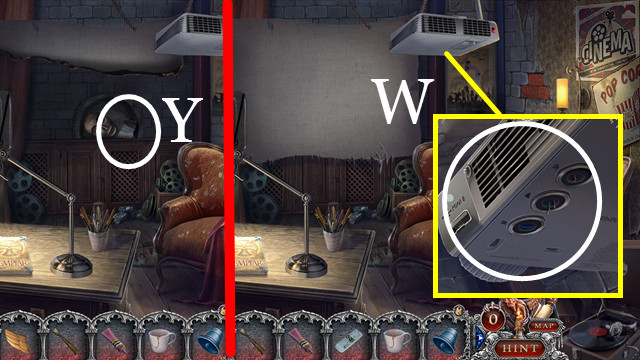
- Walk right; move the debris (H); take the INSECT REPELLENT (I).
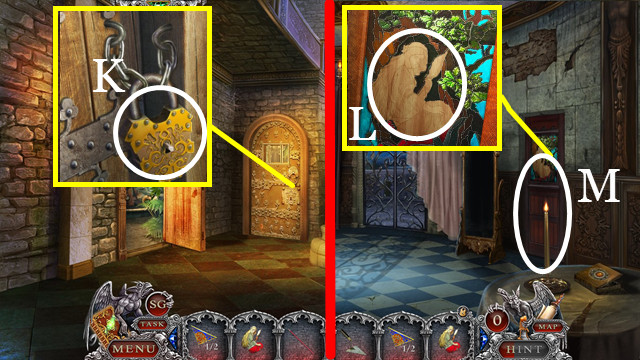
- Walk down; take the KEY (J); use the KEY (K).
- Climb the stairs.
- Take the WING (L).
- Use the INSECT REPELLENT (M); take the MASK'S PART 1/2 (N).
- Walk down then right.
- Use the WING (O); take the CROWBAR (P).
- Return to the Tower Bridge.
- Use the CROWBAR (Q); take the MASK'S PART 2/2 (R).
- Walk down.
- Use the MASK'S PART (S); take the GAUNTLET (T).
- Walk up.
- Use the GAUNTLET (U); open the window (V).
- Go through the window.
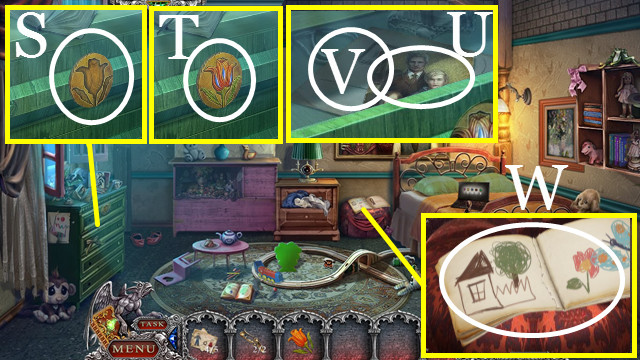
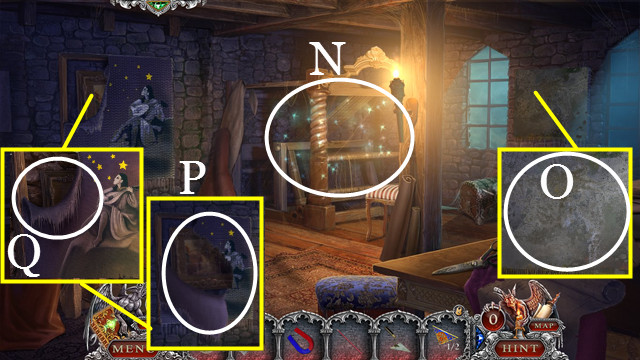
- Take the article (W) and PHOTO'S PART 1/5 (X).
- Enter (Y).
- Take the PHOTO'S PART 2/5 (Z) and COLORED TILE 1/3 (A).
- Move the papers x5 (C).
- Take the PHOTO'S PART 3/5 (D).
- Move the shirts 4x (E).
- Take the MEMORY STICK (F).
- Touch (G) to trigger a HOP (H).
- Play the HOP; receive the WOODWORK ELEMENT 1/2.
- Walk down.
- Touch the door (I).
- Walk (J).
- Take the GRIFFIN'S WING (K).
- Return to James's Room.
- Enter (L).
- Take the COLORED TILES 2/3 (M).
- Take the STORAGE BATTERY (N); close the book (O); take the SCISSORS (P).
- Walk down.
- Use the SCISSORS (Q); take the BOWL OF HYGIEIA (R).
- Use the STORAGE BATTERY (S).
- Move the camera (T); take the PHOTO'S PART 4/5 (U).
- Walk down.
- Place the BOWL OF HYGIEIA (V) to activate a HOP (W).
- Play the HOP; receive the COLORED TILE 3/3.
- Place the COLORED TILE (X) to trigger a mini-game.
- Solution: (Y).
- Touch the pane (Y); take the BEDROOM KEY (Z); unlock the door (A) and walk through.
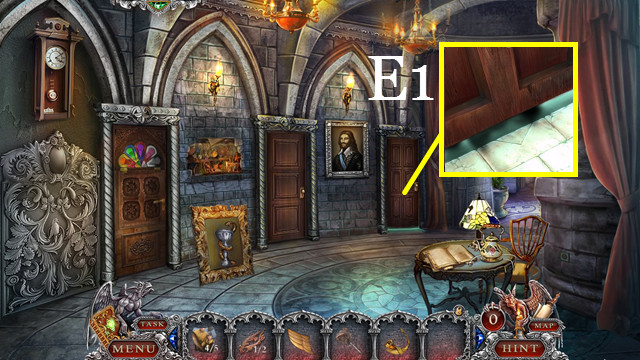
- Take the journal page (B) and HUNTING HORN (C).
- Move the curtains (D); take the FEATHER DUSTER TOKEN (E).
- Exit.
- Use the HUNTING HORN (E1); go through the door.
- Take the GLUE (F).
- Move the blanket (G); take the BOXING GLOVE TOKEN (H).
- Use the FEATHER DUSTER TOKEN (I); take the CHISEL (J).
- Return to James's Movie Room.
- Use the BOXING GLOVE TOKEN (K) to trigger a HOP.
- Play the HOP; receive the BALLET DANCER.
- Return to the Room for Servants.
- Place the BALLET DANCER (L) to trigger a mini-game.
- Solution: (M).
- Take the WOODWORK ELEMENT 2/2 (N).
- Return to the Lord's Room.
- Place the WOODWORK ELEMENTS (O); read the letter (P); take the REMOTE CONTROL (Q).
- Use the GLUE (R); touch the pitcher (S); take the CUP OF WATER (T).
- Use the CUP OF WATER (U); take the BLUE BELL (V).
- Return to James's Movie Room.
- Use the MEMORY STICK and REMOTE CONTROL (W).
- Take the PHOTO PART 5/5 (Y).
- Walk down.

- Use the PHOTO PART (Z) to activate a mini-game.
- Solution: (A).
- Touch (B).
- Return to the Room for Servants.
- Enter the code J-O-E (C) to activate a HOP; play it to receive the HAMMER.
- Return to Second Floor Corridor 2.
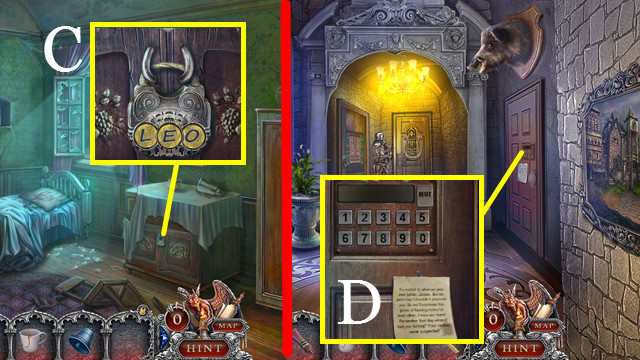
- Enter the code 0-1-0-4-0-9 (D); walk through the door.
- Use the HAMMER (E); touch the code twice (F).
- Return to James's Movie Room.
- Touch the poster (G) twice.
- Use the CHISEL (H) and HAMMER (I); take the PHOENIX 1/2 (J).
- Return to the Lord's Room.
- Place the BLUE BELL (K) to trigger a mini-game.
- Solution (L): Swap 1-2, 2-4, 3-4.
- Move the clothing (M); take the PHOENIX 2/2 (N).
- Use the PHOENIX (O); take the RING EMBLEM (P).
- Return to the Tower Bridge; walk forward.
- Use the RING EMBLEM (Q).
- Touch the paper (R); take the HELMET (S).
- Return to Second Floor Corridor 2.
Chapter 3: Second Floor
- Use the HELMET (T) to activate a mini-game.
- Solution: (U).
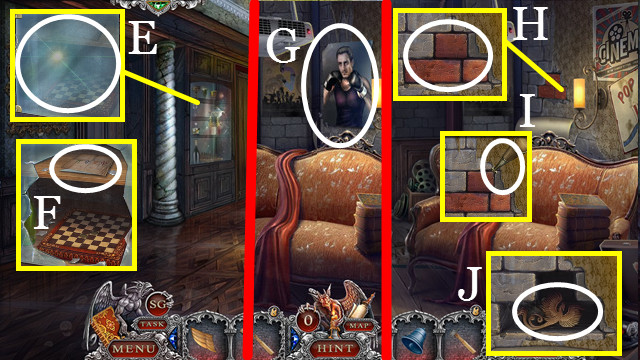
- Enter (V).
- Take the WOLF FIGURINE (W) and MACE (X).
- Use the MACE (Y) to activate a HOP. Play the HOP; receive the TREBLE CLEF.
- Touch (Z) to activate a mini-game.
- Solution: (A).
- Touch the lever (B).
- Return to the Second Floor Corridor 2.
- Place the TREBLE CLEF (C); enter.
- Touch (D).
- Touch (E) to trigger a mini-game.
- Solution: (F).
- Take the KING CHESS PIECE (G) and TUNING PEG (H).
- Use the TUNING PEG (I); take the STONE TILE (J).
- Return to the Second Floor Corridor 2.
- Use the STONE TILE (K); take the RIFLE TOKEN (L).
- Return to the Lord's Study.
- Place the WOLF FIGURINE (M); enter the door.
- Touch (N); Take the STONE FEATHER (O).
- Take the ANCIENT BOOK 1/3 (P).
- Place the EMPTY CUP (Q); press (R); take the CUP OF COFFEE (S).
- Return to the Lord's Study.
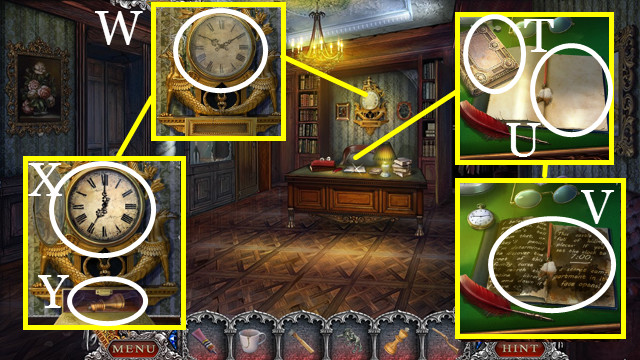
- Take the ANCIENT BOOK 2/3 (T); use the CUP OF COFFEE (U); touch the page twice (V).
- Open the clock (W).
- Set the clock to 7:00 (X); take the QUEEN CHESS PIECE (Y).
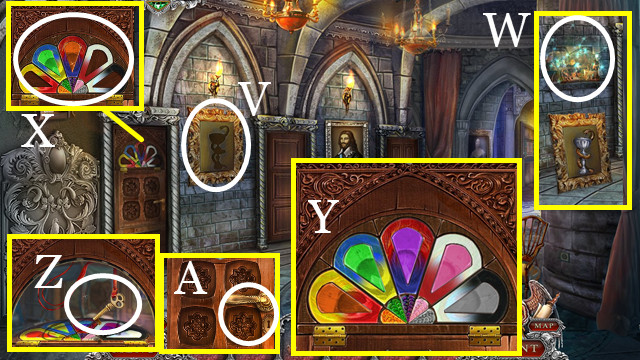
- Place the KING CHESS PIECE and QUEEN CHESS PIECE (Z); touch (A) to activate a mini-game.
- Solution: (B): 9-2, 7-6, 3-4, 4-9, 1-8, 6-1, 8-3, 2-7, 3-4, 9-2, 4-9, 7-6, 2-7, 1-8, 6-1, 8-3.
- Take the MUSIC CABINET KEY (C).
- Return to Music Room.
- Use the MUSIC CABINET KEY (D) to activate a HOP. Play the HOP; receive the ANTLER.
- Return to the Hunting Room.
- Use the RIFLE TOKEN (E).
- Move (F).
- Pull down (G); take the LIBRARY KEY (H).
- Use the ANTLER (I).
- Return to the Lord's Study.
- Use the LIBRARY KEY (J); enter.
- Use the GLUE and STONE FEATHER (K); take the BEAR PAW (L).
- Touch (M).
- Touch (N).
- Take the GLOWING GEM (O).
- Return to the Hunting Room.
- Place the GLOWING GEM (P) to activate a mini-game. The solution is random.
- Take the STONE TILE 1/2 (Q).
- Return to the Music Room.
- Use the BEAR PAW (R); take the STONE TILE 2/2 (S).
- Return to the Library.
- Place the STONE TILES (T); get the BRASS STAMP (U).
- Place the BRASS STAMP (V); press it (W); take the GLASS EYE (X).
- Return to the Hunting Room.
- Use the GLASS EYE (Y); take the ANCIENT BOOK 3/3 (Z).
- Return to the Library.

- Place the ANCIENT BOOKS (A) to trigger a mini-game.
- Solution: I-VII, II-III, III-IX, IV-VI, V-VIII, VI-VII, VIII-IX.
- Take the DOG EMBLEM (B).
- Return to the Tower Bridge; walk forward.
- Place the DOG EMBLEM (C); touch the page (D); take the LEVER (E).
- Return to the Armory.
- Place the LEVER (F); use it (G).
- Enter (H).
Chapter 4: Vault
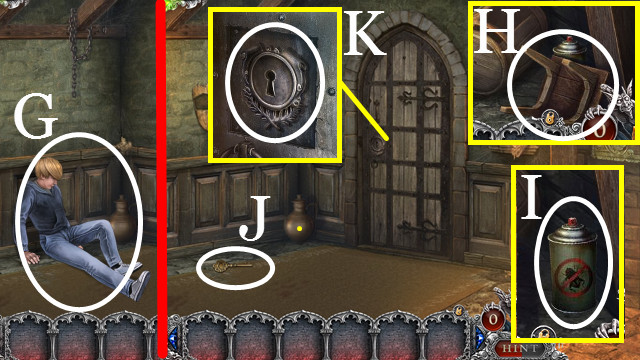
- Take the HANDKERCHIEF (I) and FILE (J).
- Walk forward.
- Clear the rocks 3x (K); take the DUNGEON KEY (L).
- Walk down.
- Use the DUNGEON KEY (M); enter.
- Move the hay three times (N); take the JUSTICE TOKEN (O).
- Touch (P); take the SLINGSHOT BALLS (Q).
- Walk down.
- Use the JUSTICE TOKEN (R) to trigger a mini-game.
- Solution: (T).

- Enter (U).
- Use the FILE (V) to trigger a HOP. Play the HOP; receive the SAW.
- Move the papers four times (W); take the SLINGSHOT (X).
- Take the TONGS (Y).
- Use the SAW (Z); move the board (A); take the BAGPIPES (B).
- Walk down.
- Use the SLINGSHOT (C).
- Use the TONGS (D); put six pieces of coal into the pot.
- Take the CAULDRON WITH COAL (E).

- Place the BAGPIPES (F); take the DICE (G).
- Walk forward.
- Touch (H); place the DICE (I) to trigger a mini-game.
- Solutions are random.
- Enter (J).
- Take the UNICORN TILE (K), DIPPER (L), CABINET KEY (M), and PRISONER'S TOKEN (N).
- Move the papers 4x (O); touch the portrait (P).
- Use the CAULDRON WITH COAL (Q); touch (R).
- Return to the Torture Room.
- Use the CABINET KEY (S) to activate a HOP. Play the HOP; receive the ARIES TILE.
- Return to the Underground Well.
- Use the UNICORN TILE and ARIES TILE (T) to trigger a mini-game.
- Solution: (U).
- Take the TOWER MODEL 1/2 (V).
- Return to the Dungeon.
- Use the PRISONER'S TOKEN (W); take the PARCHMENT (X).
- Return to Isaac's Workshop.
- Lay the PARCHMENT (Y); press the iron (Z) onto the parchment (A); touch the parchment twice (B-C).
- Return to the Dungeon.
- Enter the code X-III-VII-IX (D) to activate a HOP. Play the HOP; receive the TOWER MODEL 2/2.
- Return to Isaac's Workshop.
- Use the TOWER MODELS (E) to activate a mini-game.
- Solution: E1-E2-E3 (1-20).
- Take the TOWER EMBLEM (F).
- Return to the Tower Bridge; step forward.
- Place the TOWER EMBLEM (G); take the note (H) and GEAR WHEEL (I).
- Return to the Underground Well.
- Use the GEAR WHEEL (J); go down (K).
- Use the DIPPER (L); receive the ROUND TOKEN.
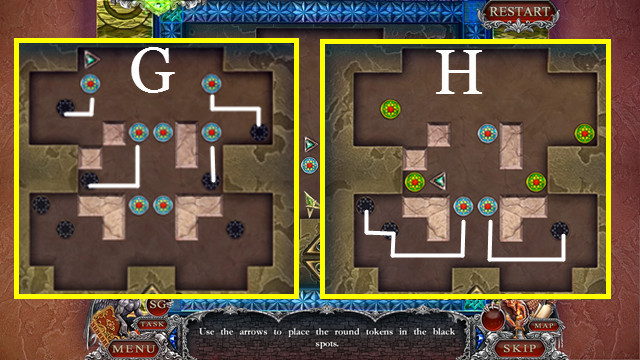
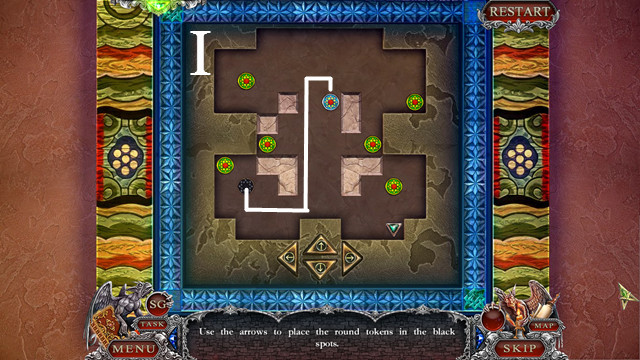
- Use the ROUND TOKEN (M) to activate a mini-game.
- Solution: (N).
- Enter (O).
- Take the CORKSCREW (P).
- Move the flag (Q); take the RUG (R).
- Use the SAW (S) to activate a HOP. Play the hop; receive the BRUSH.
- Return to the Underground Lake.
- Use the BRUSH (T); take the METAL SKULL (U).
- Apply the METAL SKULL (V); go through the door.
- Take the CAT COLLAR (W).
- Touch the mask (X); take the FLASK KEY (Y).
- Return to the Room of Templars.

- Use the CAT COLLAR (Z); take the SUN WITH STAR (A).
- Return to the Underground Lake.
- Use the SUN WITH STAR (B).
- Walk through the door.
- Use the FLASK KEY (C).
- Take the COTTON BUD (D), CROSS SYMBOL (E), NAIL PULLER (F), and FUSE (G).
- Use the CORKSCREW and COTTON BUD (H); receive the COTTON BUD WITH ALCOHOL.
- Return to the Crypt.
- Use the NAIL PULLER (I) to activate a HOP. Play the HOP; receive the SEAL OF DARKNESS.
- Return to the Alchemy Laboratory.
- Use the SEAL OF DARKNESS (J); take the DYNAMITE RECIPE (K).
- Use the COTTON BUD WITH ALCOHOL (L); receive the BURNING COTTON BUD.
- Return to the Room of Templars.
- Use the CROSS SYMBOL (M); take the MODELING CLAY (N).
- Return to the Alchemy Laboratory.
- Use the FUSE, MODELING CLAY and DYNAMITE RECIPE (O) to trigger a mini-game.
- Solution: (P).
- Use Q-R, S-T, U-Vx3, W-Y, Z-Ax2, B-C, D-E, F-E.
- Take the DYNAMITE (G).
- Use the DYNAMITE (H) and BURNING COTTON BUD (I).
- Enter (J).
- Take the KNIFE (K).
- Return to the Alchemy Laboratory.
- Play the HOP (L); take the BLUE TOKEN (M).
- Return to the Secret Library.

- Use the BLUE TOKEN (N).
- Touch the paper twice (O); take the CHIMERA'S HORN (P).
- Return to the Room of Templars.
- Use the CHIMERA'S HORN (Q); take the ZODIAC FIGURINE (R).
- Return to the Secret Library.
- Take the DRAGONS 1/2 (S).
- Place the ZODIAC FIGURINE (T) to activate a mini-game.
- Solution: X-IX, IX-I, XII-II, VIII-XI, XI-III, VII-IV, XII-V, XI-VI, VIII-XI, XII-IX, XI-VI, VI-X, XI-VI.
- Get the STONE BOOK (U) and SWORDS EMBLEM (V).
- Return to the Tower Bridge; walk forward.
- Use the SWORDS EMBLEM (W); read the paper (X); take the DRAGONS 2/2 (Y).
- Return to the Crypt.
- Use the KNIFE (Z); take the SPEAR (A).
- Use the DRAGONS (B).
- Enter (C).
Chapter 5: Neglected Garden
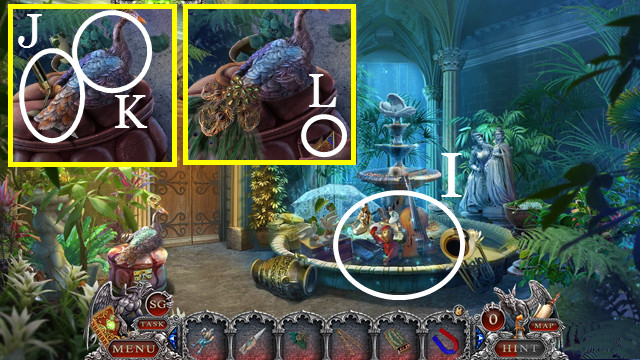
- Take the GOLDEN ROSE (D), GRIFFIN'S BRACELET (E), and GRIFFIN'S HEAD (F).
- Place the STONE BOOK (G).
- Walk (H).
- Take the TROWEL (I).
- Place the GRIFFIN BRACELET (J).
- Use the SPEAR (K); receive the NECKLACE PIECE.
- Return to the Secret Library.
- Use the GRIFFIN'S HEAD (L) and GRIFFIN'S WING (M).
- Take the GRIFFIN'S EYE (N) to trigger a HOP (O).
- Play the HOP; receive the GOLDEN ROSE 2/5.
- Return to the Cemetery Entrance.
- Use the GRIFFIN'S EYE (P).
- Take the GOLDEN ROSE 3/5 (Q).
- Walk forward (R).
- Play the HOP (S); take the STONE SWORD.
- Take the SCREWDRIVER (T).
- Return to the Backyard.
- Place the STONE SWORD (U).
- Take the left path.
- Use the SCREWDRIVER; touch the grate (V).
- Take the BUTTERFLY TOKEN (W).
- Move the leaves twice (X); take the MIRROR (Y).
- Use the MIRROR (Z).
- Touch the mirror (A).
- Rotate the buttons (B) in the correct order (C) to trigger a HOP.
- Play the HOP; receive the MACHETE.
- Return to the Cemetery Entrance.
- Use the BUTTERFLY TOKEN (D); take the ELEPHANT FIGURINE (E) and CANDLE (F).
- Return to the Cemetery.
- Use the MACHETE (G); take the BUTTERFLY NET (H).
- Return to the House near Fountain.
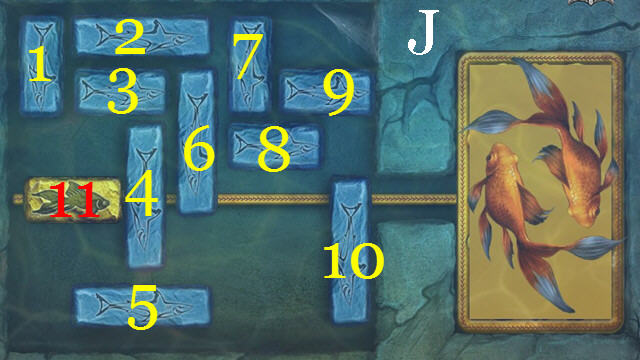
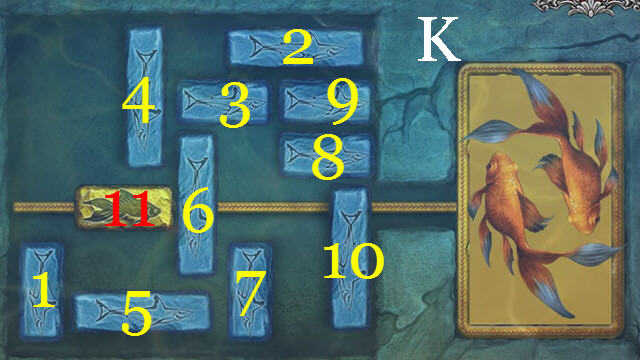
- Use the BUTTERFLY NET (I) to trigger a mini-game.
- Solution (J-K): 8-right, 7-down, 2-right, 6-down, 3-right, 4-up, 11-right, 1-down.
- 11-left, 4-down, 3-left, 4-up, 6-up, 11-right, 6-down, 2-left, 9-left, 8-left, 10-up, 11-right.
- Take the LION TOKEN (L).
- Take the GOLDEN SYMBOL 1/3 (M).
- Use the HANDKERCHIEF (N); receive WET HANDKERCHIEF.
- Place the NECKLACE PIECE (O); take the HEART CRYSTAL (P).
- Return to the Backyard.
- Remove the bark (Q).
- Use the TROWEL (R).
- Remove the jewel box (S).
- Place the HEART CRYSTAL (T).
- Take the GOLDEN ROSE 4/5 (U) and AGNES' LOCKET (V).
- Return to the Cemetery.
- Place the LION TOKEN (W); take the GOLDEN ROSE 5/5 (X).
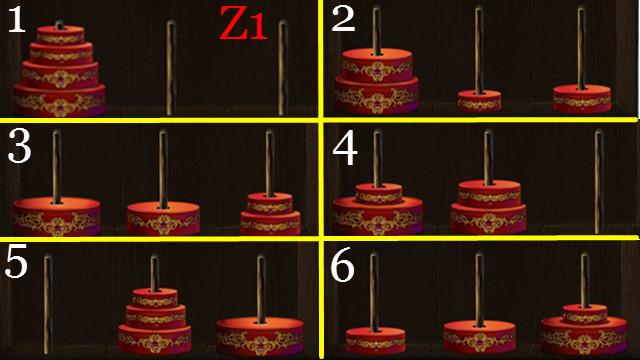
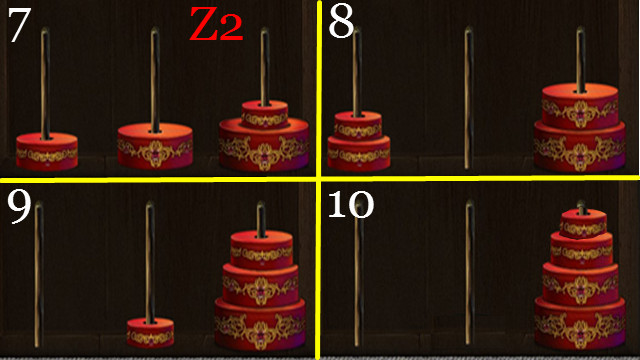
- Place the GOLDEN ROSE (Y) to trigger a mini-game.
- Solutions: Z1 and Z2.

- Enter (A).
- Use the WET HANDKERCHIEF (B); take the GOLDEN SYMBOL 2/3 (C).
- Place the CANDLE (D) to trigger a mini-game.
- Solution: 3-2-5-1; 6-1-4-5-2; 3-6-5-1-4-2.
- Take the SQUARE STONE (E).
- Return to the Cemetery.
- Place the SQUARE STONE (F).
- Take the CROWBAR (G) and GOLDEN SYMBOL 3/3 (H).
- Place the GOLDEN SYMBOL (I).
- Touch the symbols in order (J-K-L) to trigger a HOP.
- Play the HOP; receive the TOMB EMBLEM.
- Return to the Tower Bridge; walk forward.
- Place the TOMB EMBLEM (M); take the paper (N) and GIANT (O).
- Enter (P).
Chapter 6: Old Tower
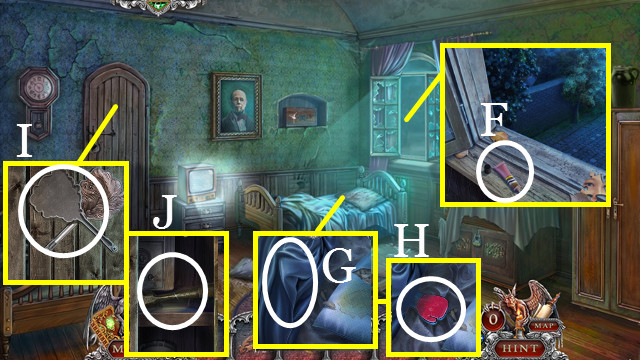
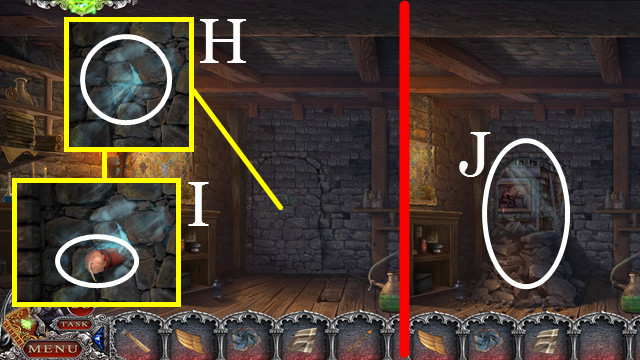
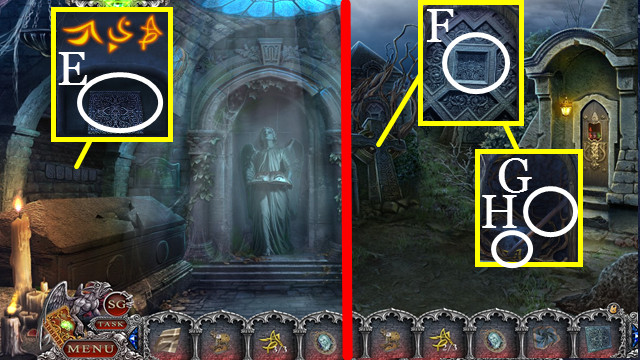
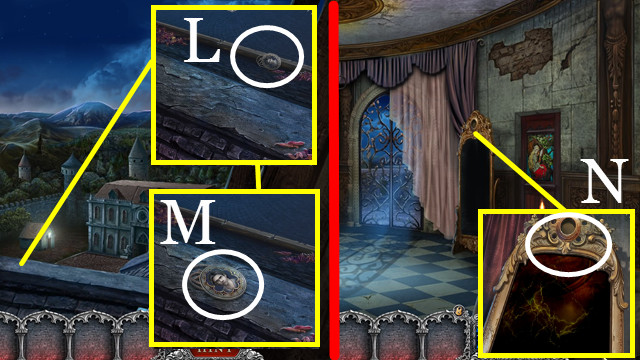
- Use the HANDKERCHIEF (R); take the GLASS SHARD (S).
- Take the TWINE (Q).
- Climb the stairs.
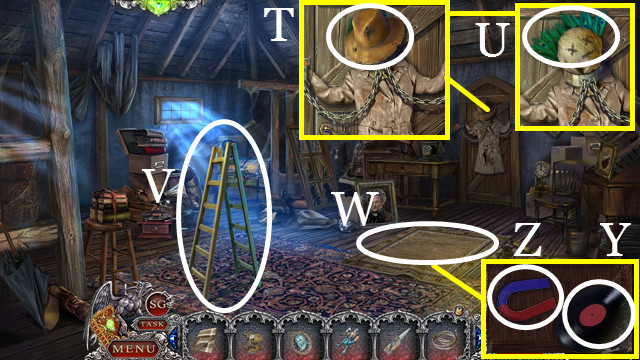
- Touch the hat (T); take the PEACOCK TAIL (U).
- Take the STEPLADDER (V).
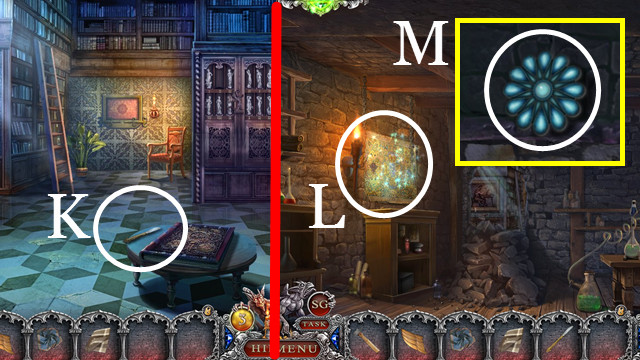
- Touch the rug twice (W) to trigger a mini-game.
- Solution: (X).
- Take the RECORD (Y) and MAGNET (Z).
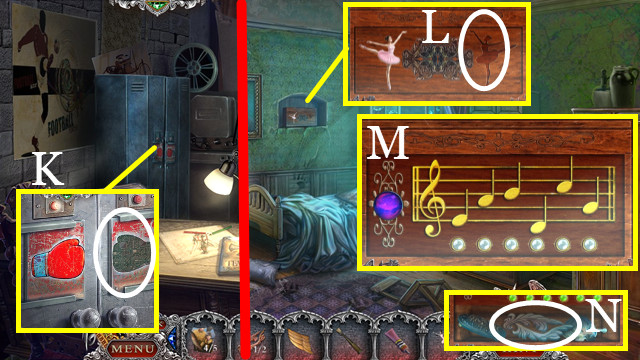
- Use the MAGNET and TWINE (A); take the MAGNET ON STICK (B).
- Use the RECORD (C); take the MATCHES (D).
- Walk down.
- Use the MAGNET ON STICK (E); take the APPLE (F).
- Place the APPLE (G); touch the door to trigger a mini-game.
- Enter (H).
- Play the HOP (I); take the SHACKLES KEY.
- Take the PALETTE KNIFE (J); use the PEACOCK TAIL (K).
- Take the GOLDEN STAR and MOSAIC TILE (L).
- Use the STEPLADDER (M); take the WEAVING MAID (N) and PENCIL (O).
- Return to the Attic.
- Use the SHACKLES KEY (P); walk through the door.
- Take the GOLDEN STAR 2/2 (Q).
- Return to the Winter Garden.
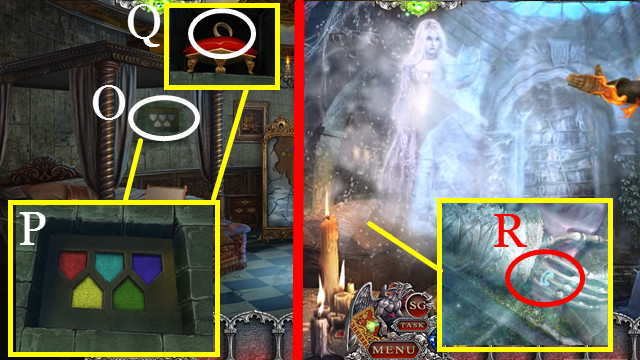
- Place the GOLDEN STAR (R); walk through the door.
- Place the ELEPHANT FIGURINE (T). Take the GOLDEN SEAL (U), THREAD SET 1/3 (V) and TRACING PAPER (W).
- Return to the Attic.
- Place the GOLDEN SEAL (X) to trigger a HOP. Play the HOP; receive the OILCAN.
- Walk down.
- Use the OILCAN and MATCHES (Y); take the LEVER (Z).
- Return to the Secret Treasure Room.
- Use the OILCAN (A); touch the shield; place the LEVER (B); use the lever (C).
- Return to the Crypt.
- Place the GIANT (D) to trigger a mini-game.
- Solution: purple-green-turquoise-red-yellow.
- Use the RUG (E); receive ISAAC'S REMAINS.
- Return to the Tomb of Agnes.
- Use the CROWBAR (F).
- Place ISAAC'S REMAINS (G).
- Take the CELESTIAL TOKEN (H).
- Return to the Roof.
- Use the CELESTIAL TOKEN (I); take the NITROGEN CYLINDER (J).
- Return to the Spiral Stairs.
- Use the NITROGEN CYLINDER and HAMMER (K); go through the door.
- Place the WEAVING MAID (L); enter (M).
- Play the HOP (N); receive the THREAD SET 2/3.
- Use the PALETTE KNIFE (O).
- Use the GLASS SHARD (P); touch (Q) to trigger a mini-game.
- Solution: (R).
- Take the EMBROIDERY NEEDLE (S).

- Move the paper (T); touch (U); take the NEEDLEWORK PATTERN (V).
- Take the THREAD SET 3/3 (W).
- Return to the Room of Agnes.
- Take the note (X); place the TRACING PAPER (Y).
- Use the PENCIL (Z); take the TRACING PAPER WITH PATERN.
- Use the THREAD SET, NEEDLEWORK PATTERN, TRACING PAPER WITH PATTERN, and EMBROIDERY NEEDLE (A) to trigger a mini-game.
- Solution: (B); take the EMBROIDERY.
- Place the EMBROIDERY (C).
- Take the MOSAIC TILE 2/2 (D).
- Place AGNES' LOCKET (E).
- Return to the Secret Treasure Room.
- Place the MOSAIC TILE (F) to trigger a mini-game.
- Solutions: G-H-I.
- Use the MAGNET (J); take the MAGNET ON STRING (K).
- Return to the Roof.
- Use the MAGNET ON STRING (L); take ISAAC'S LOCKET (M).
- Return to the Room of Agnes.
- Place the ISAAC'S LOCKET (N).
- Touch to trigger a mini-game (O).
- Solution: (P).
- Take the RING OF INSEPARABILITY (Q).
- Return to the Tomb of Agnes.
- Use the RING OF INSEPARABILITY (R).
- Congratulations, you've completed Spirit of Revenge: Cursed Castle.
Created at: 2014-09-07