

Walkthrough Menu
- General Tips
- Chapter 1: Nickfield
- Chapter 2: Sullivan
- Chapter 3: Rebecca
- Chapter 4: The School
- Chapter 5: Alex
- Chapter 6: Linda
- Chapter 7: Cameron
General Tips
- This is the official guide for Spirit of Revenge: Gem Fury.
- This guide will not show when you have to zoom into a location; the screenshots will show each zoom scene.
- Hidden-object puzzles are referred to as HOPs. This guide will not show screenshots of the HOPs, however, it will mention when an HOP is available and the inventory item you'll collect from it.
- Use the Map to fast travel to a location.
Chapter 1: Nickfield

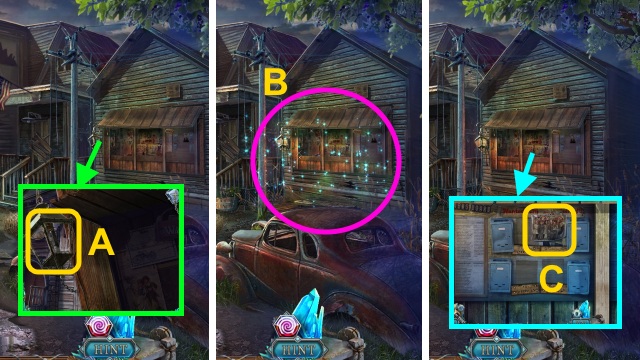
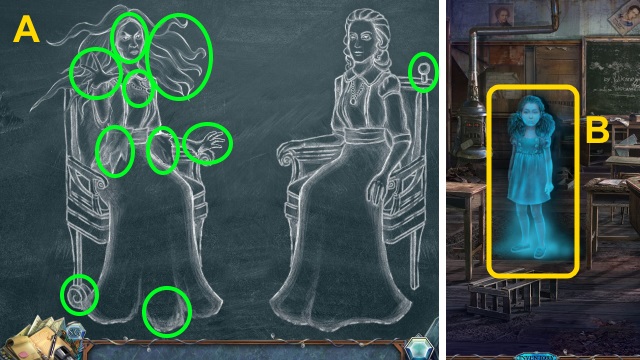
- Take the NOTEBOOK PAGE (1/2) (A).
- Talk to the woman; take the NOTEBOOK KEY (B).
- Take the NOTEBOOK PAGE (2/2) (C).
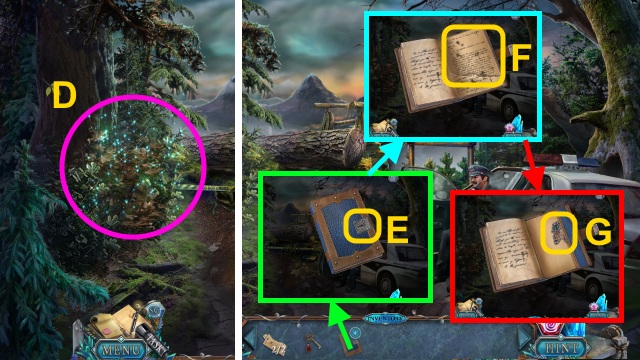
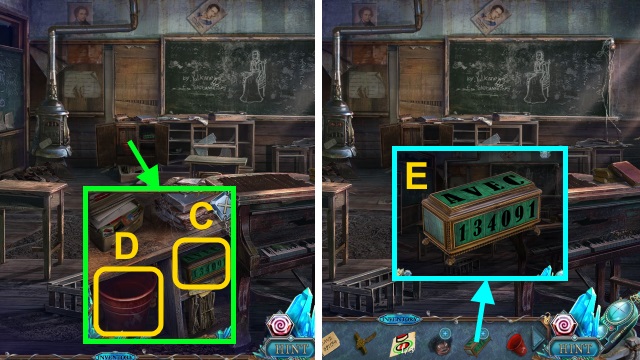
- Examine the bush; play the HOP to receive MOLLY'S NOTEBOOK (D).
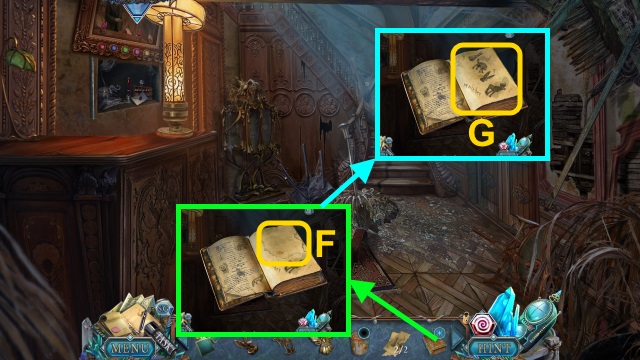
- Use the NOTEBOOK KEY on MOLLY'S NOTEBOOK (E).
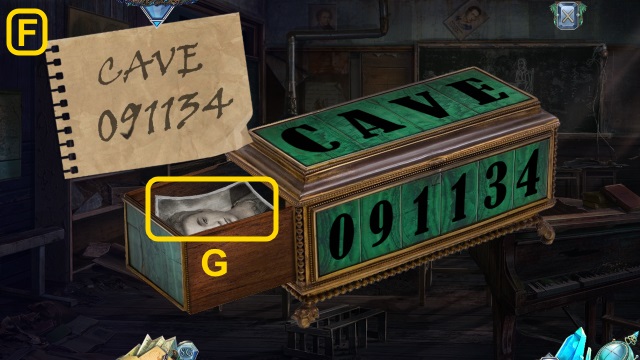
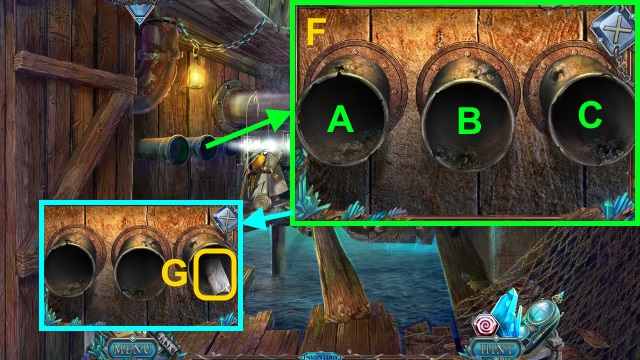
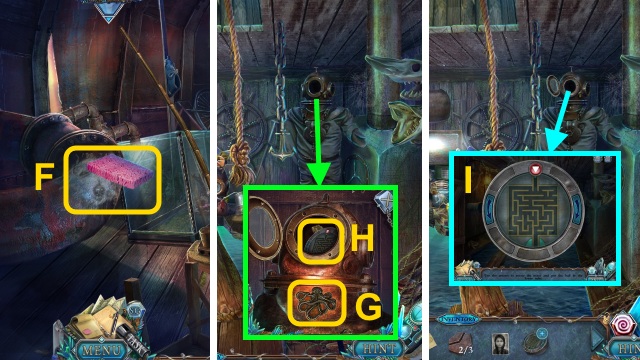
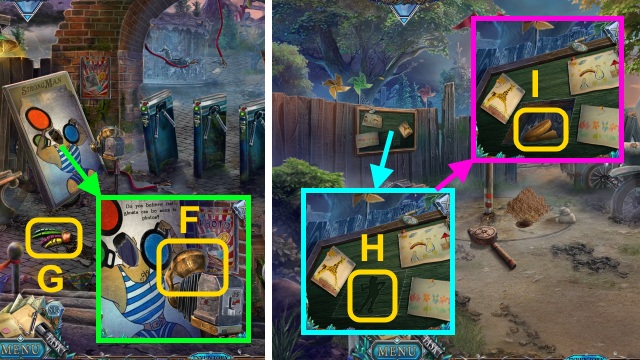
- Place the NOTEBOOK PAGE (2/2) (F).
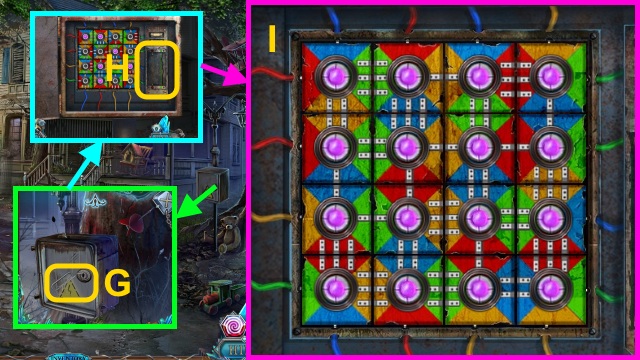
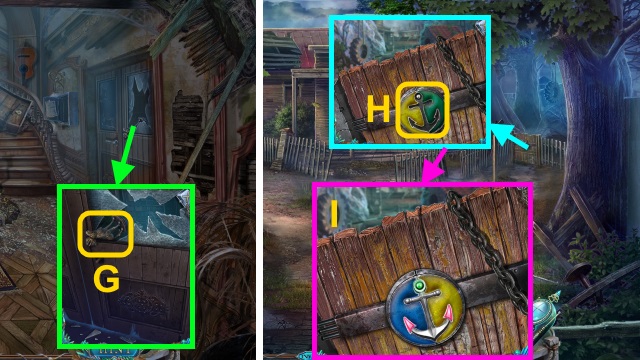
- Take the HAIRPIN (G).
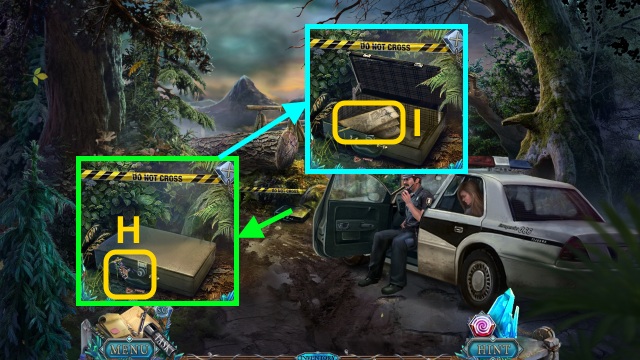
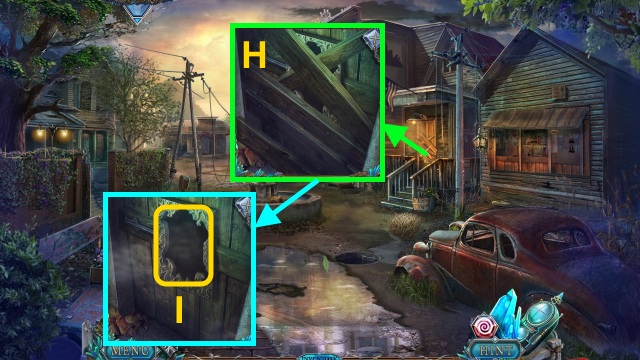
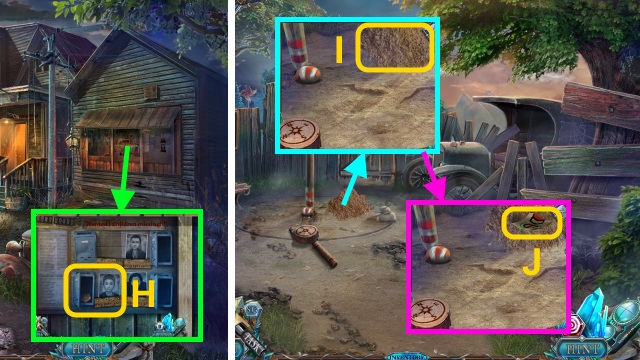
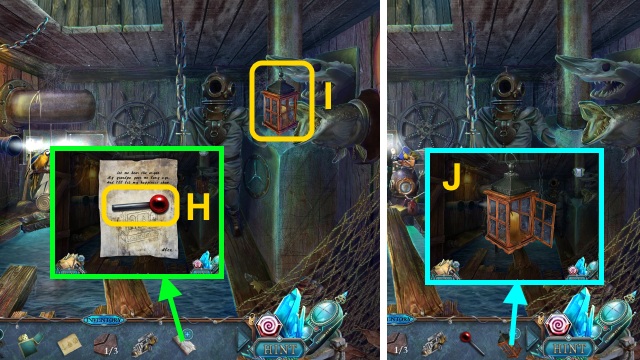
- Examine the key; use the HAIRPIN (H).
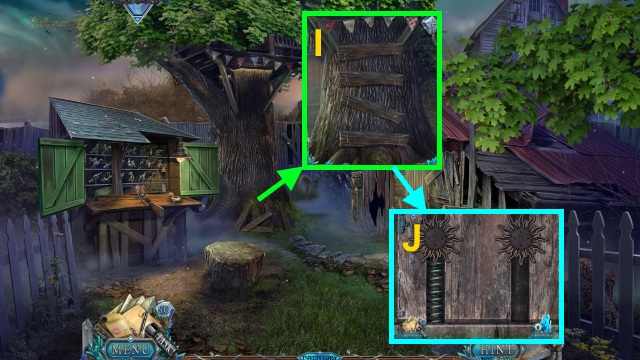
- Open the suitcase; take the Map (I).
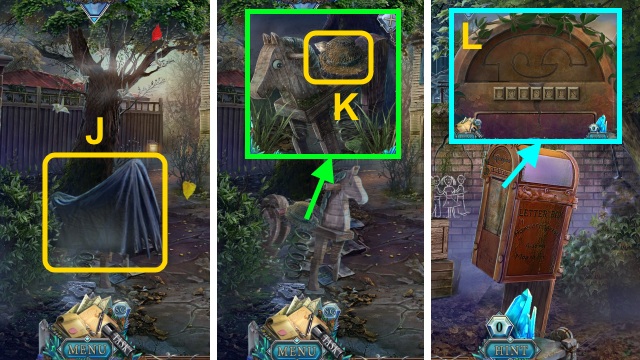
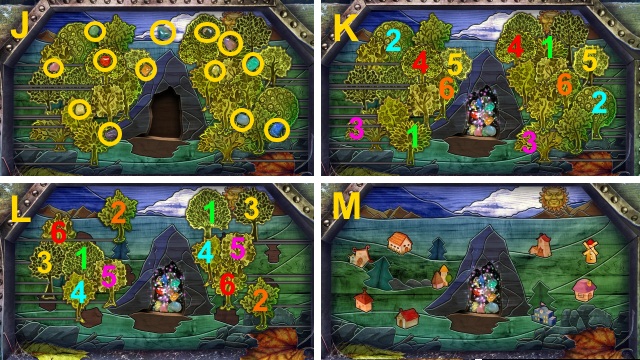
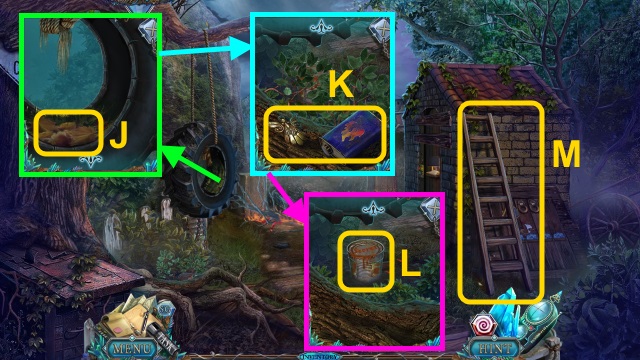
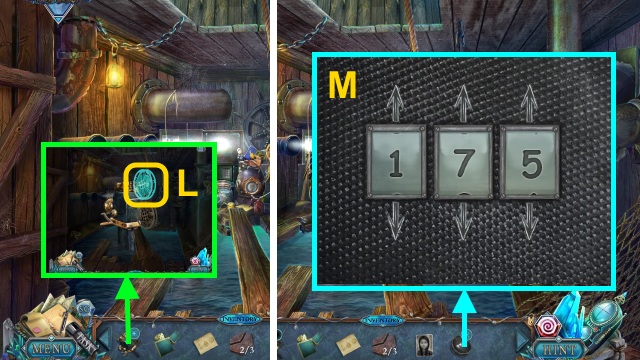
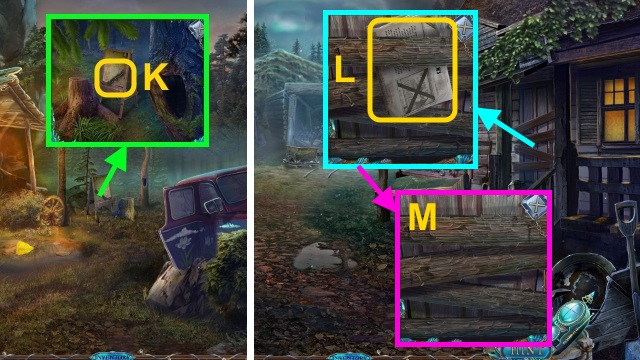
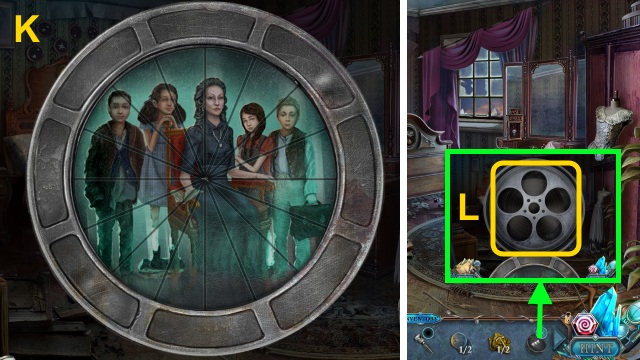
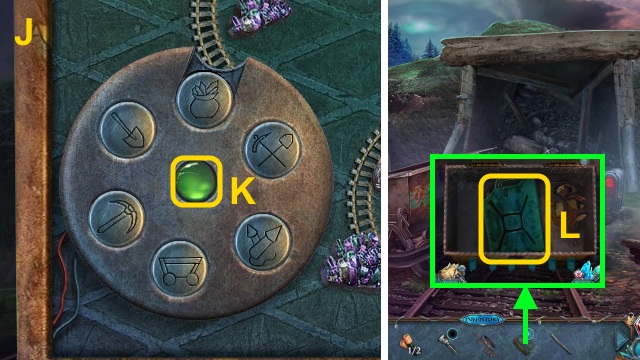
- Walk forward for a mini-game.
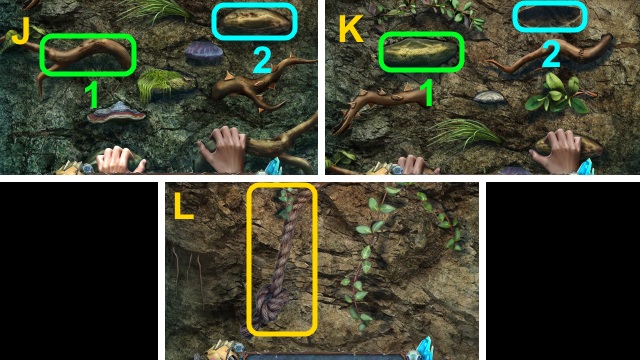
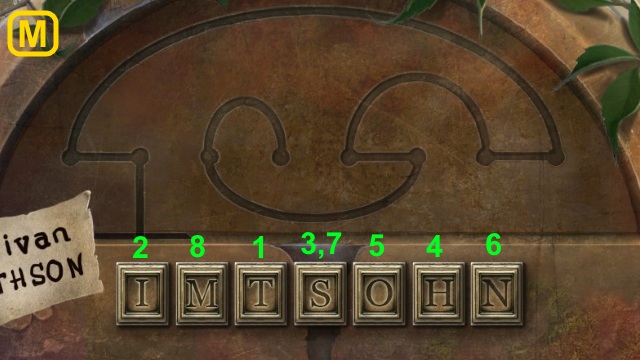
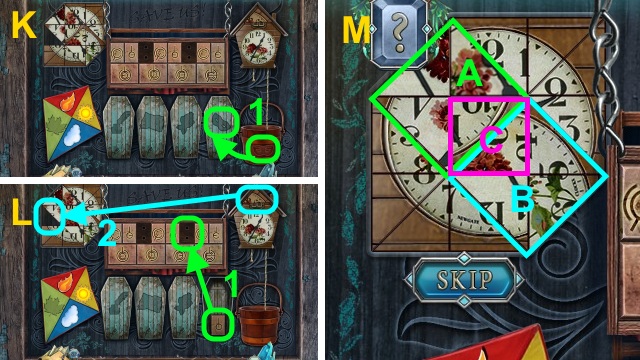
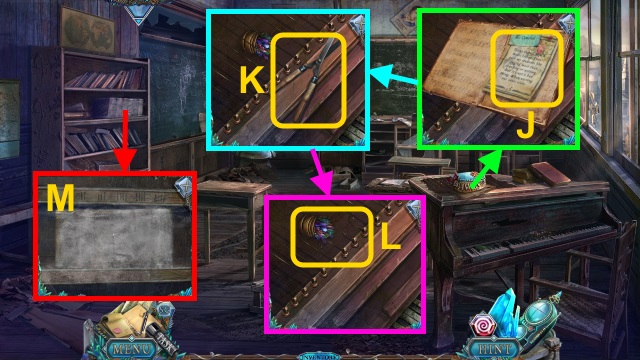
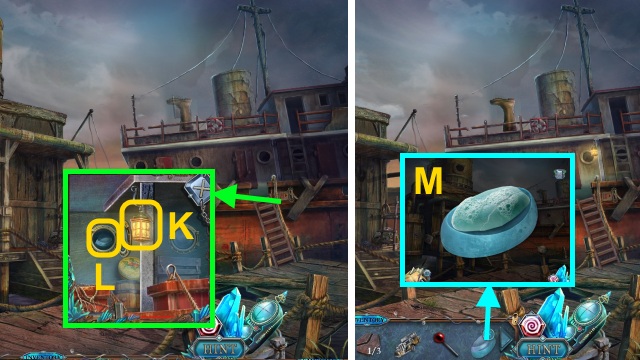
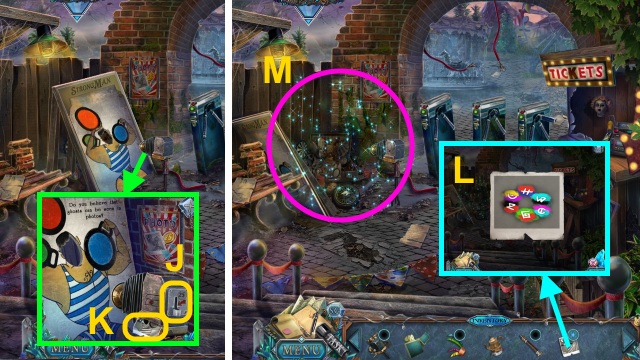
- Solution (J-L).
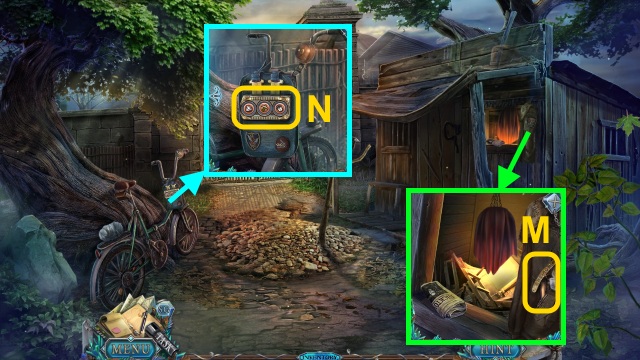
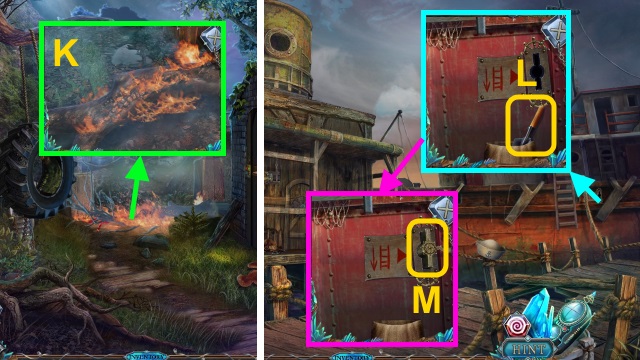
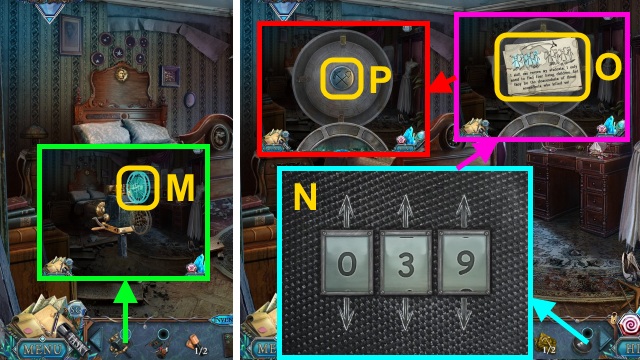
- Move the sleeve; take the RAZOR and BIKE CODE (M).
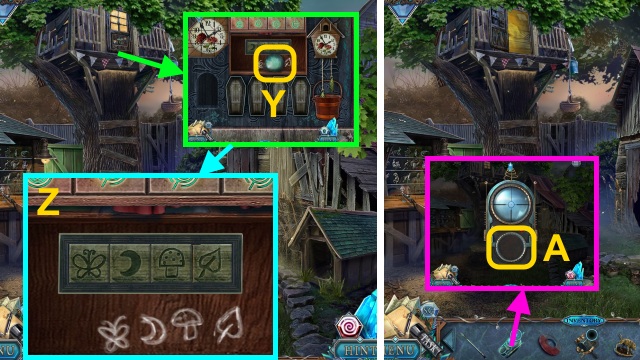
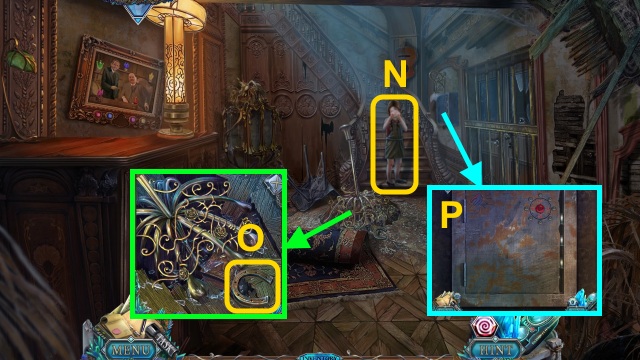
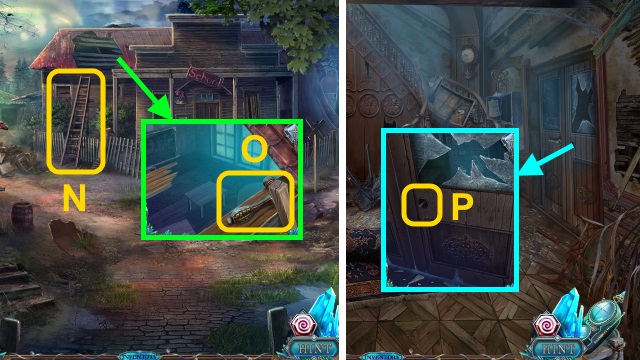
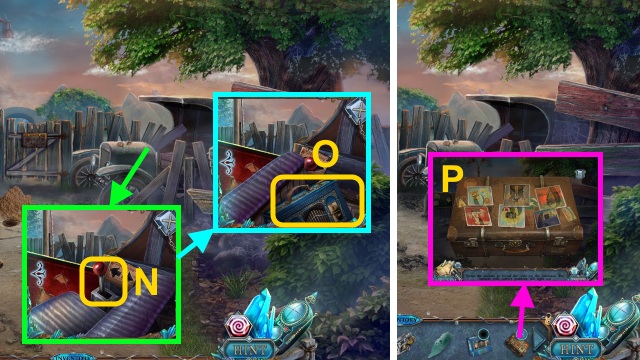
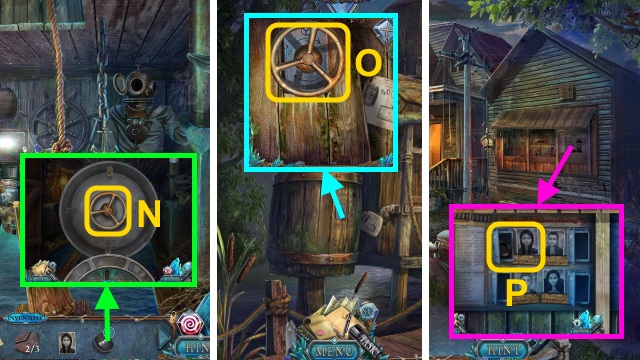
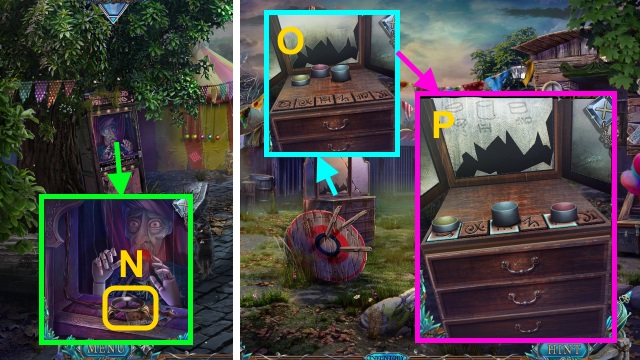
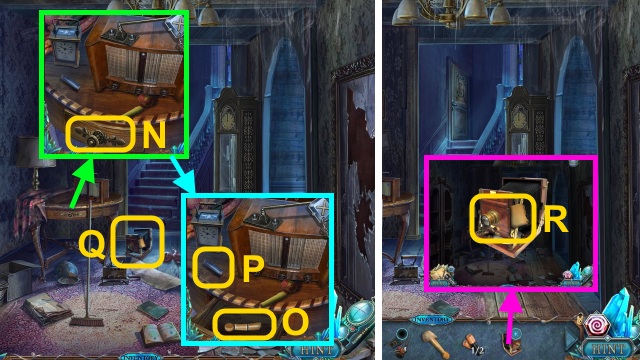
- Place the BIKE CODE for a mini-game (N).
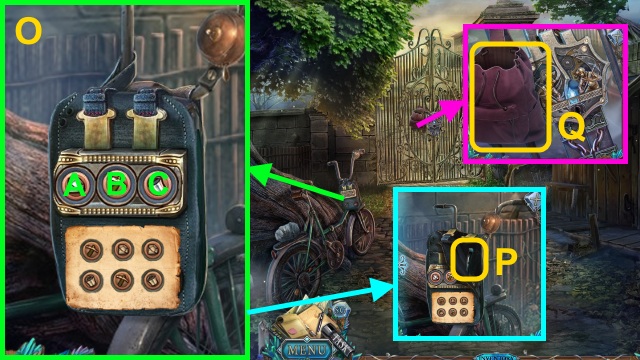
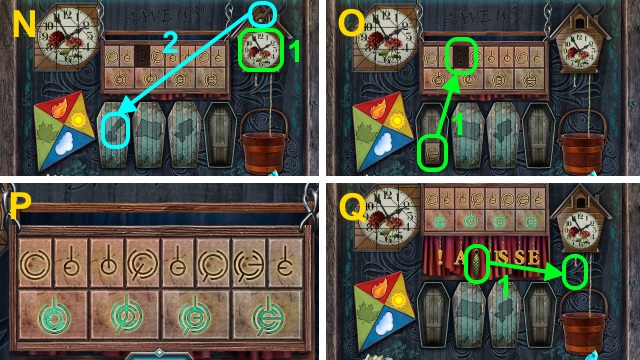
- Solution (O): B-Ax2-C-B-C.
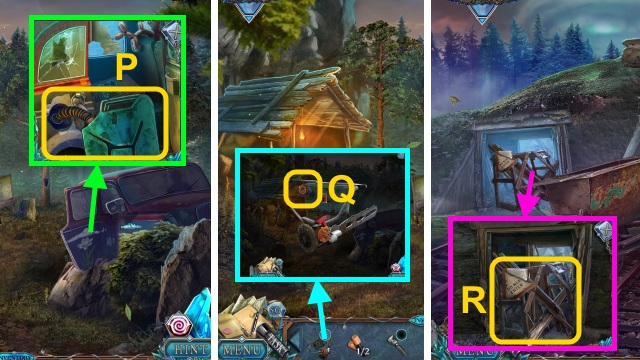
- Take the CROWBAR (P).
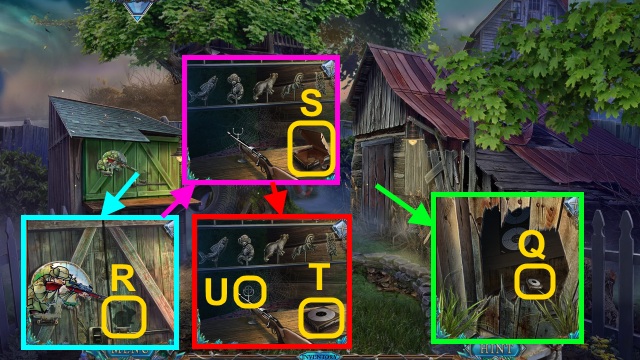
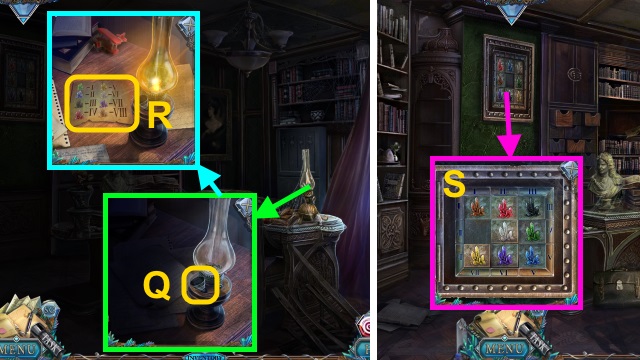
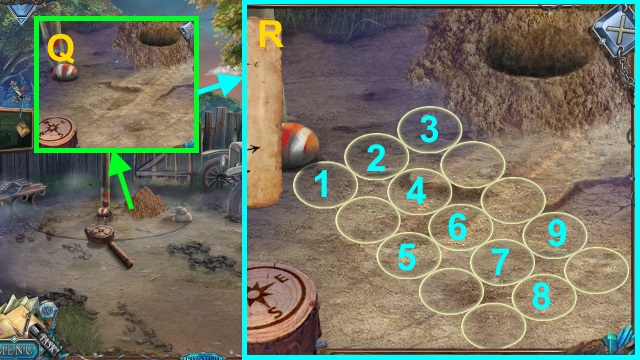
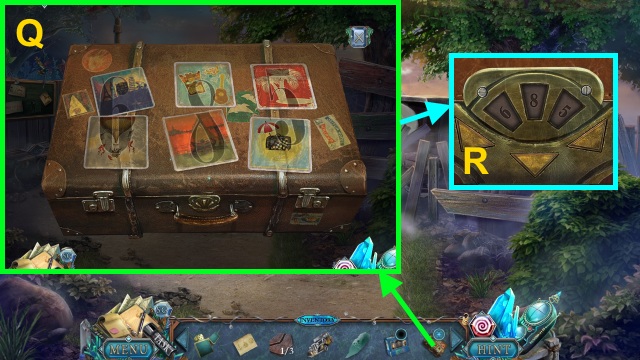
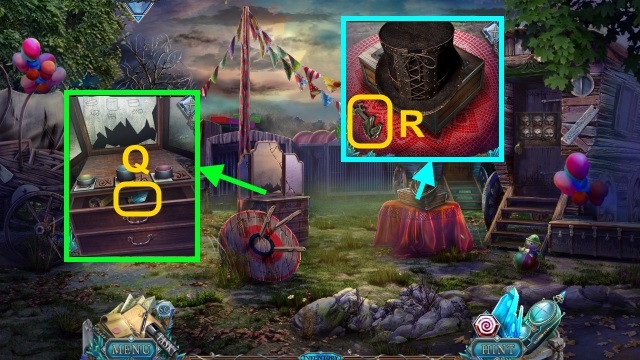
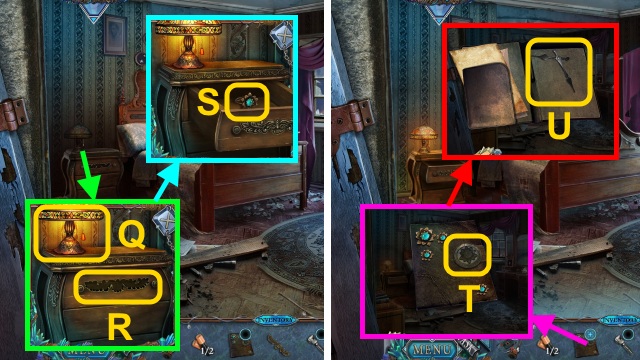
- Take the EMPTY SACK (Q).
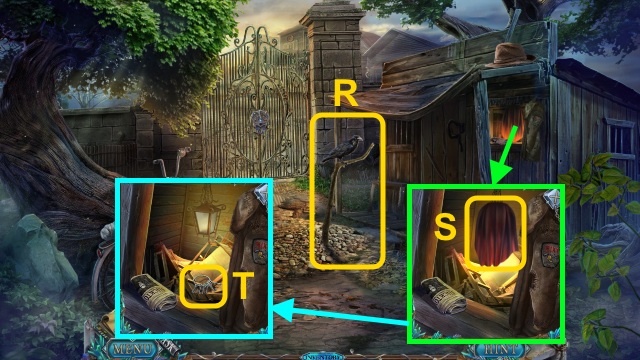
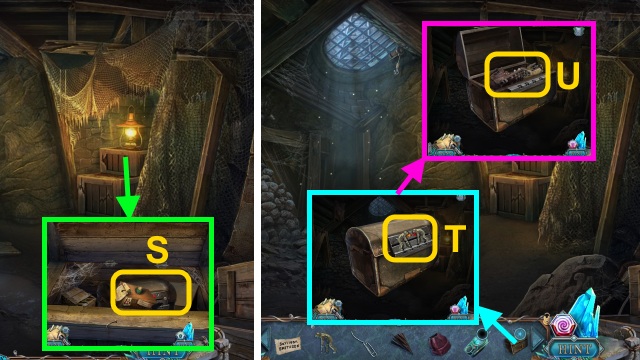
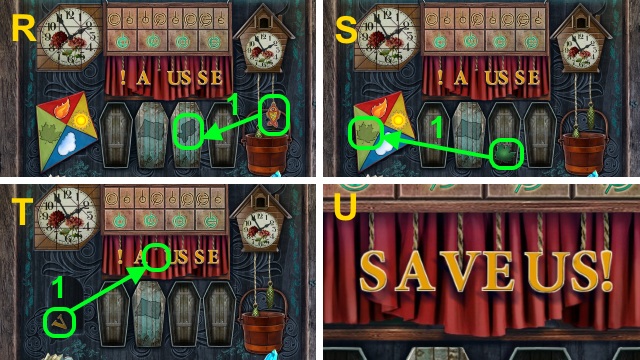
- Examine the crow; take the LONG STICK (R).
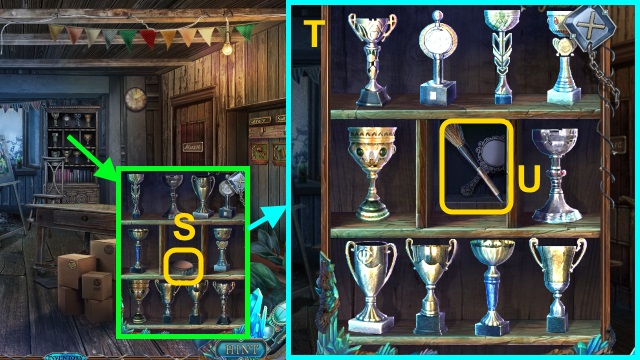
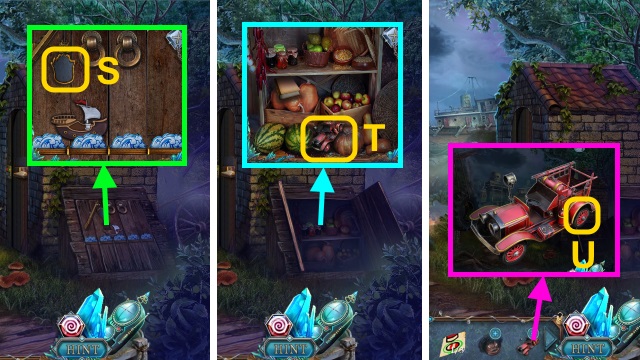
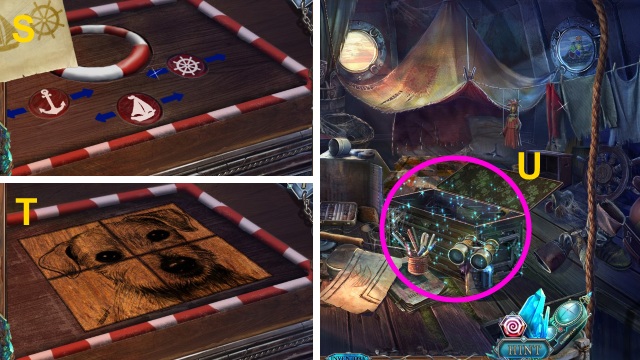
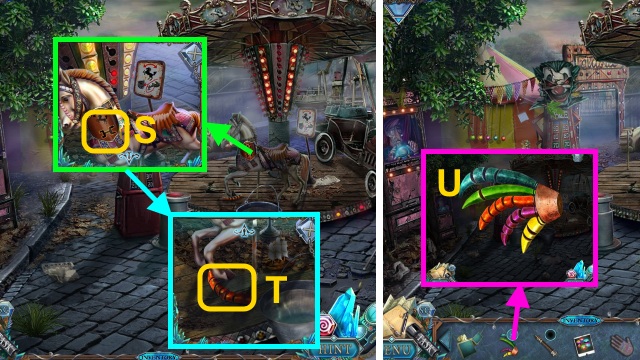
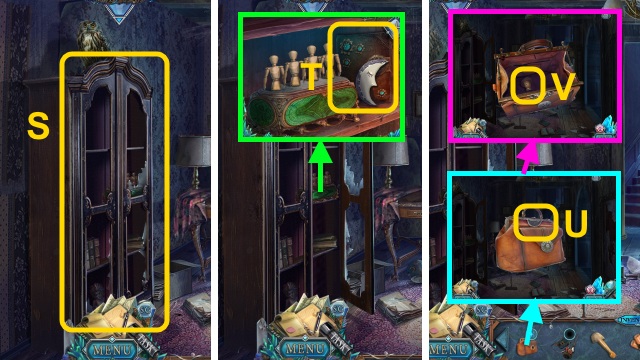
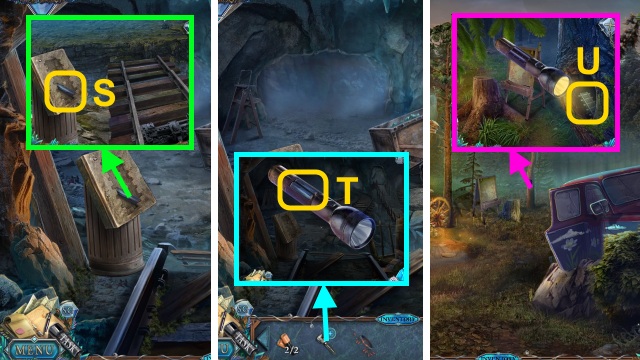
- Use the LONG STICK (S).
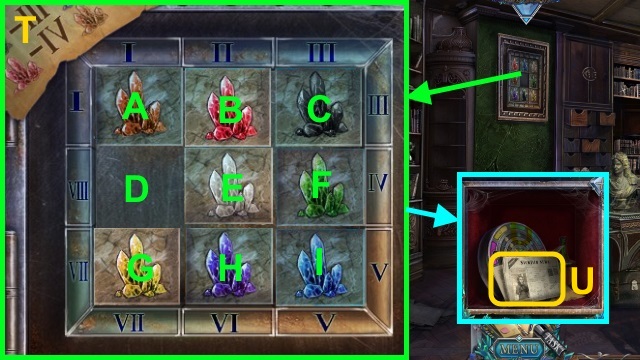
- Take the BUNCH OF KEYS (T).
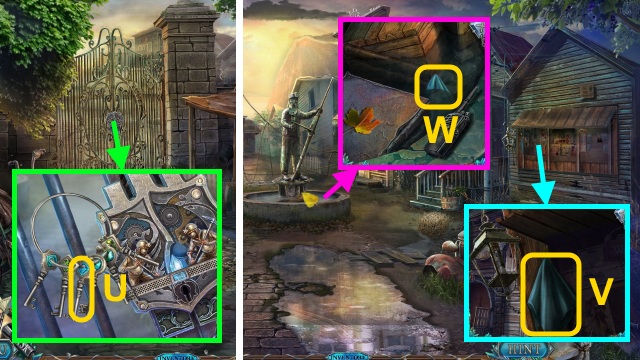
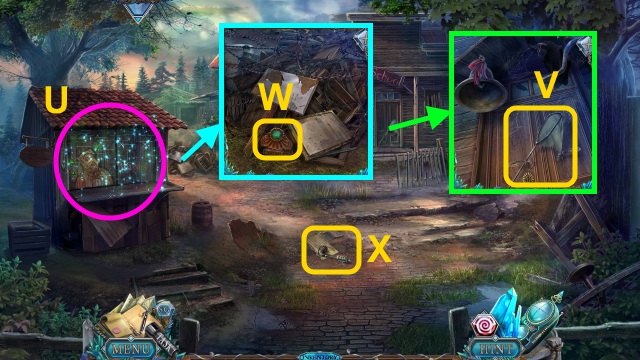
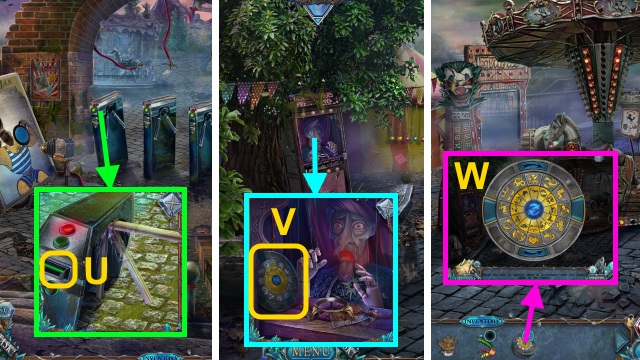
- Use the BUNCH OF KEYS; select the key (U).
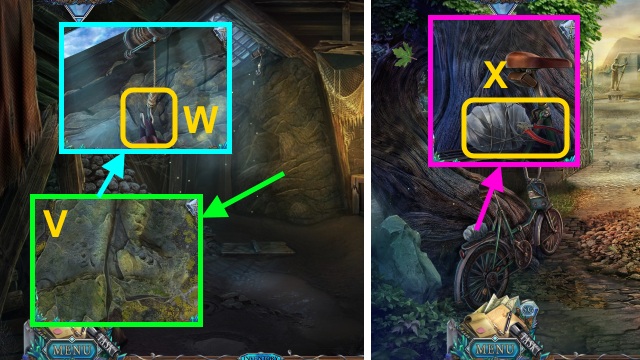
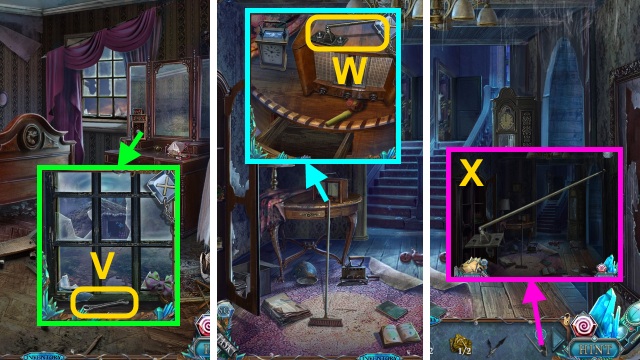
- Walk forward.
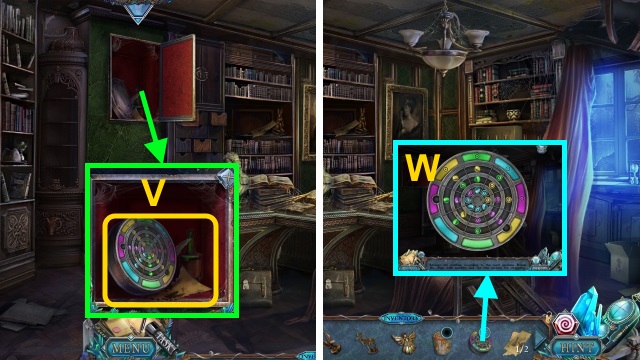
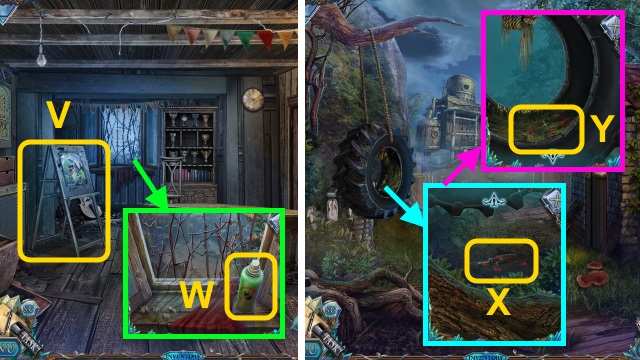
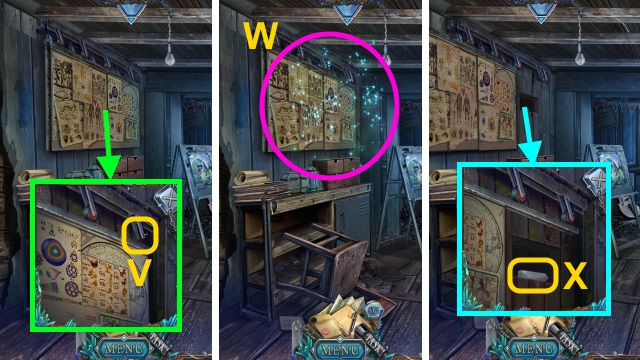
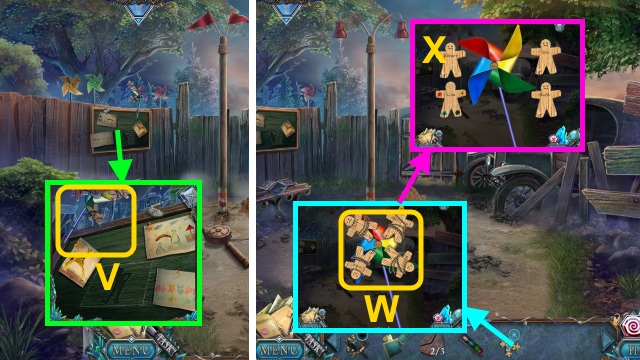
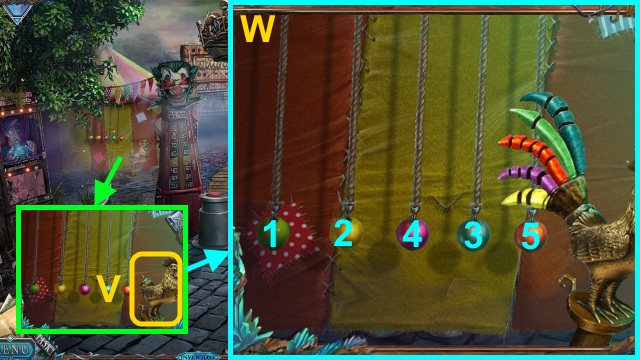
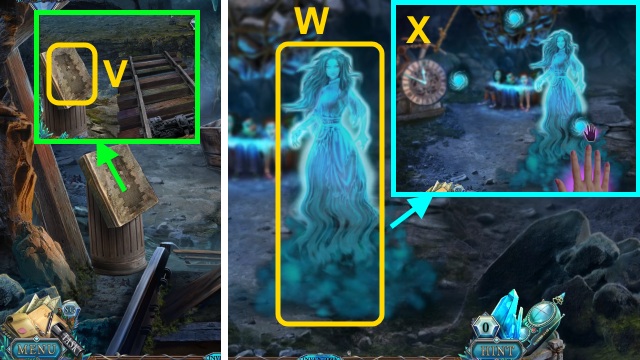
- Take the CLOTH (V).
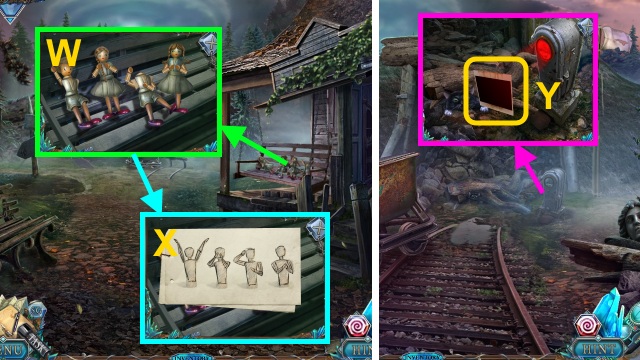
- Use the CLOTH (W); receive the SOAKED CLOTH.
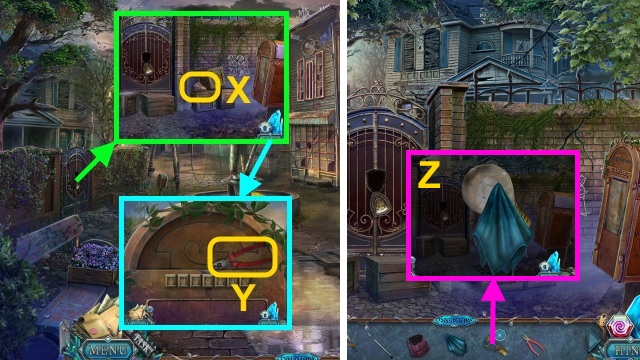
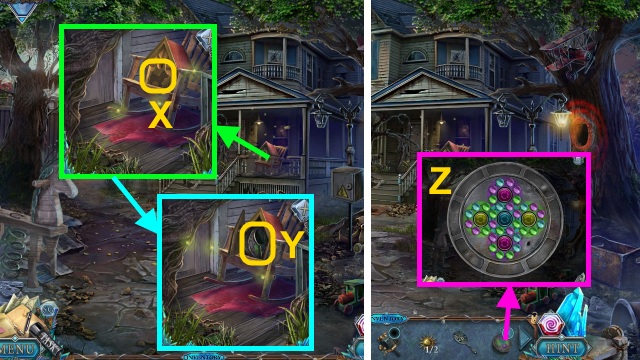
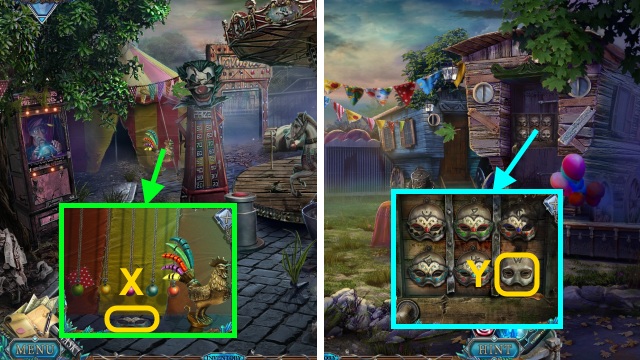
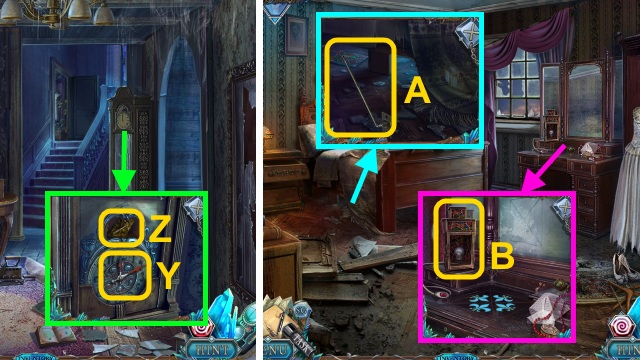
- Take the DIRTY LIGHT BULB (X).
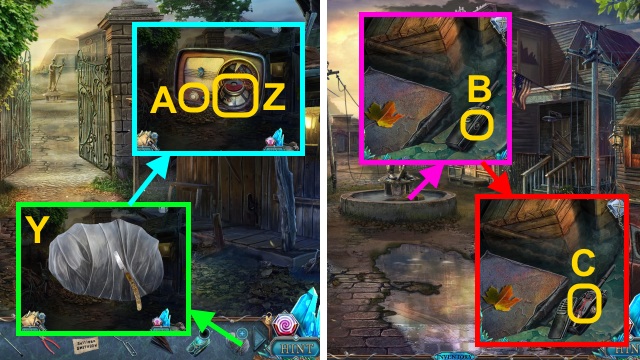
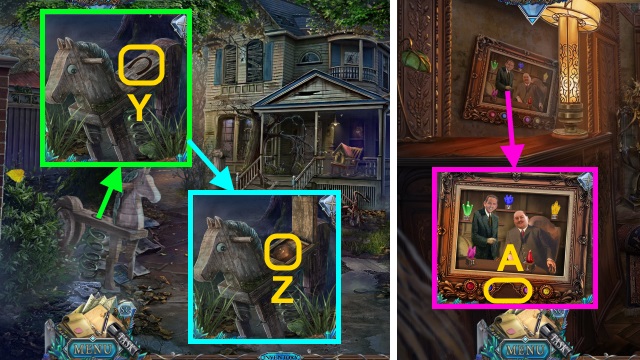
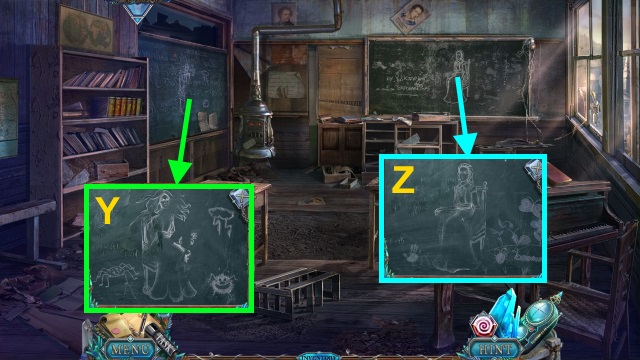
- Take the PLIERS (Y).
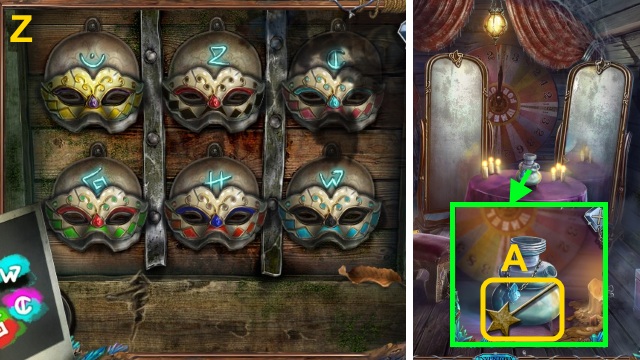
- Combine the DIRTY LIGHT BULB and SOAKED CLOTH (Z); receive the LIGHT BULB.
- Walk down.
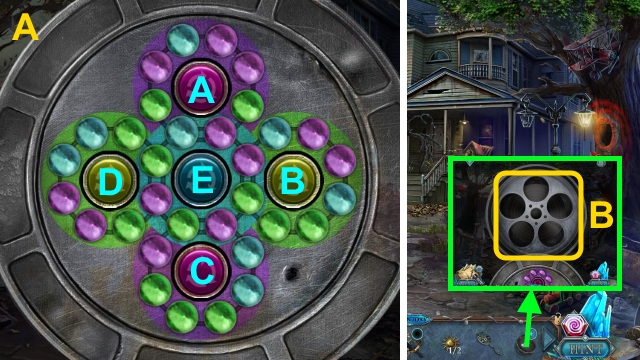
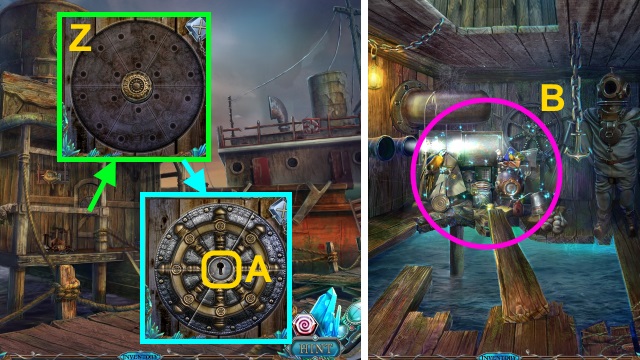
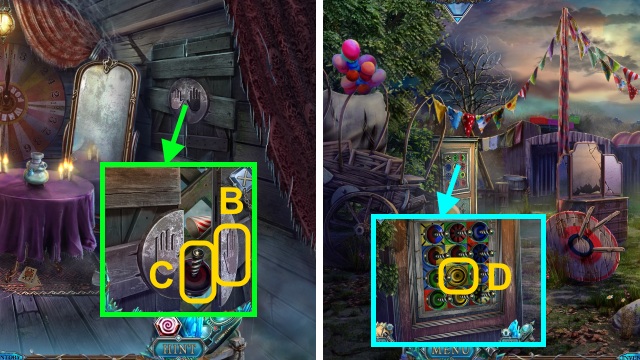
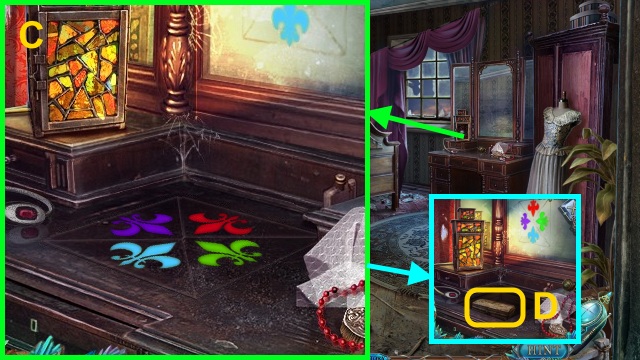
- Place the LIGHT BULB (A).
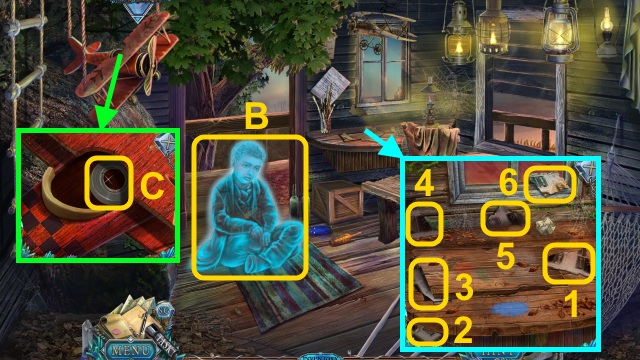
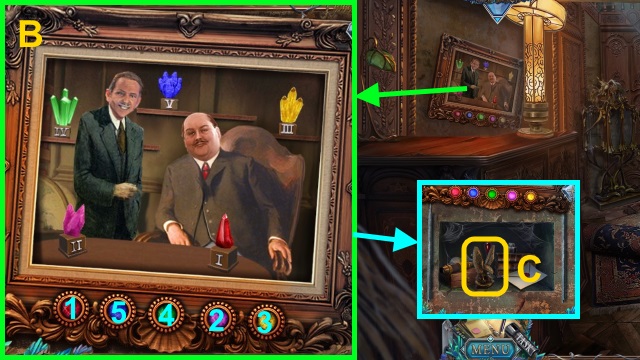
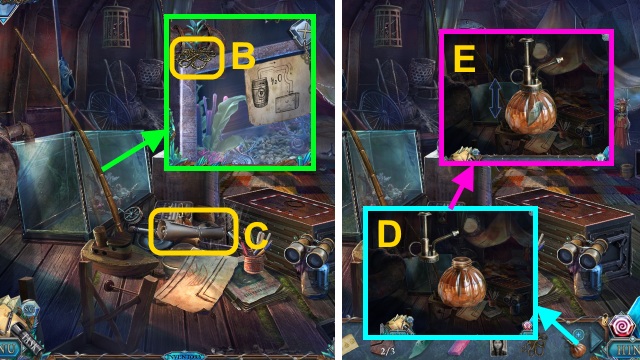
- Play the HOP (B).
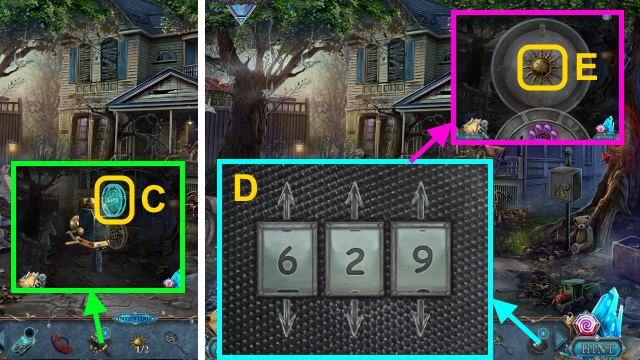
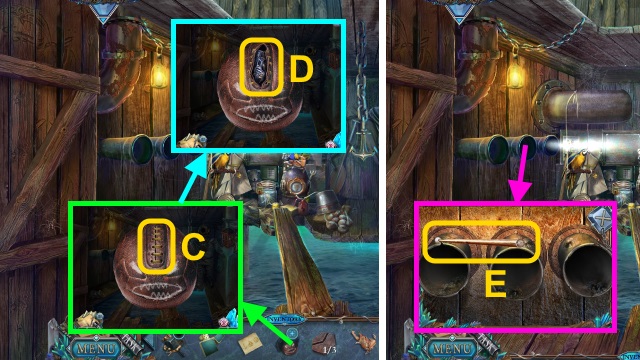
- Take the photo and note (C); receive the BOY'S NAME.

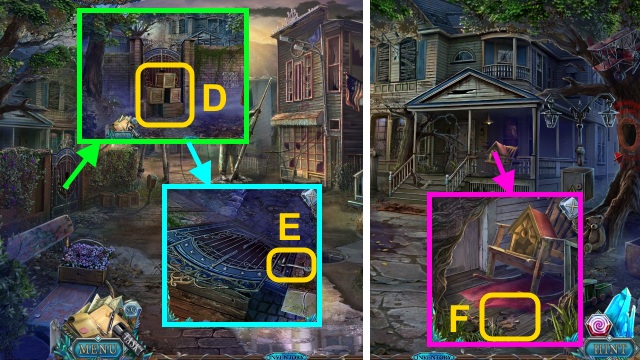
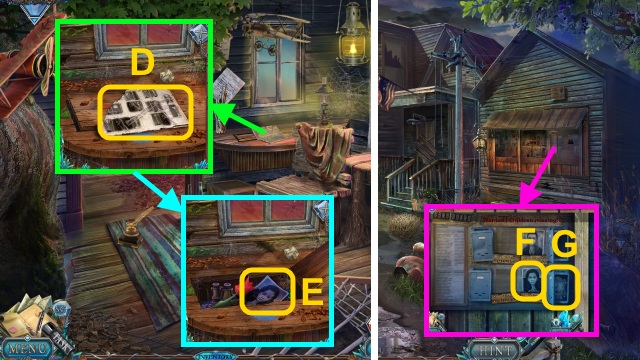
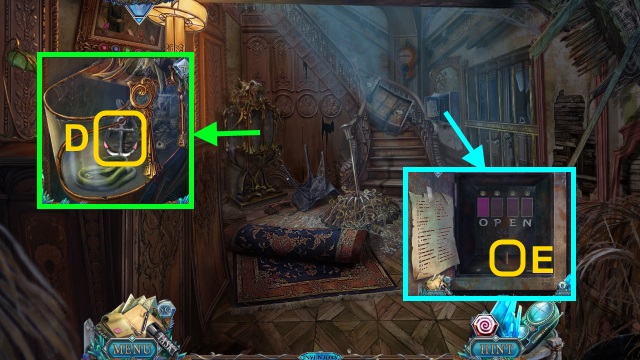
- Take the MINER FIGURINE (D).
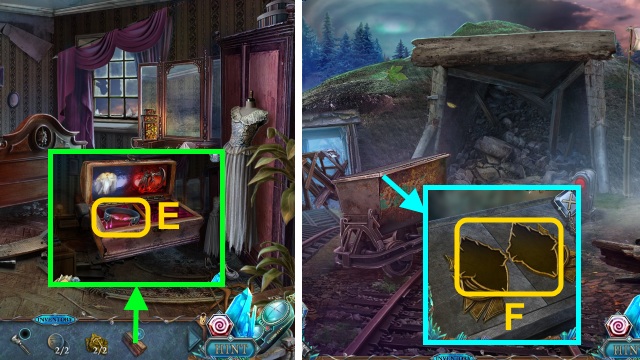
- Take the BLUEPRINT (E).
- Examine the BLUEPRINT (F); take the PAPER CLIP.
- Read the notes (@).
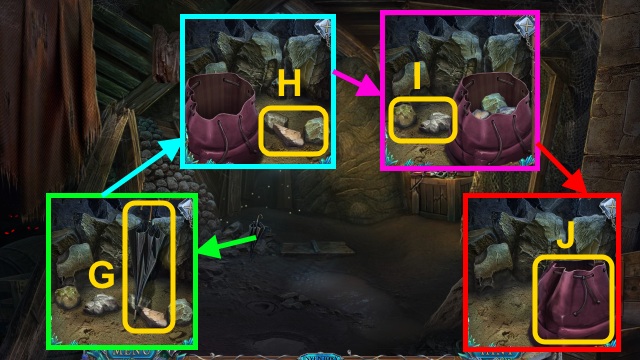
- Take the UMBRELLA (G).
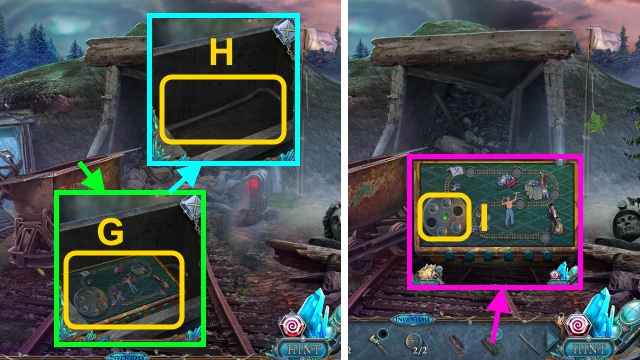
- Place the EMPTY SACK; gather the stones (H-I).
- Close the backpack; take the HEAVY SACK (J).
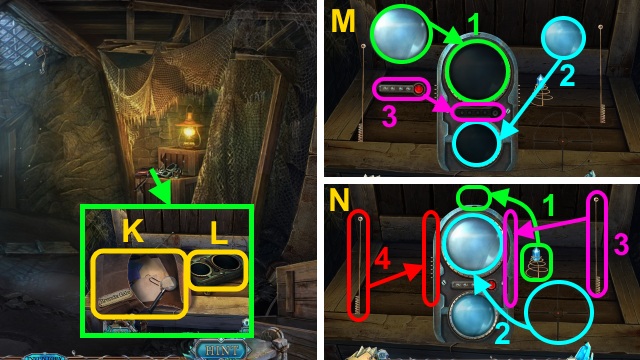
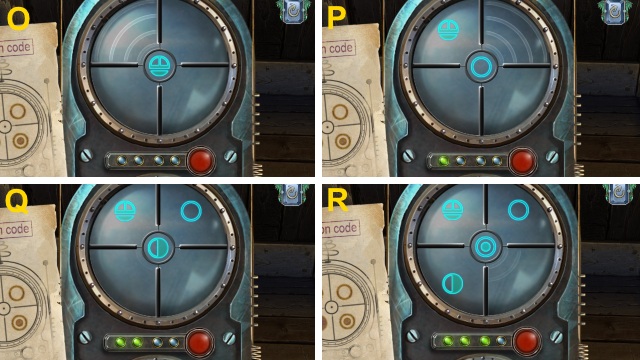
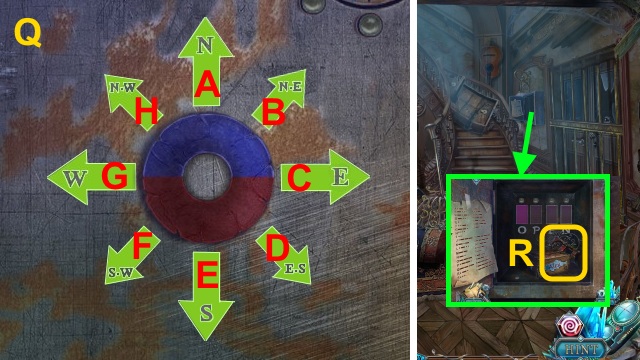
- Take the bag (K); examine the device for a mini-game (L).
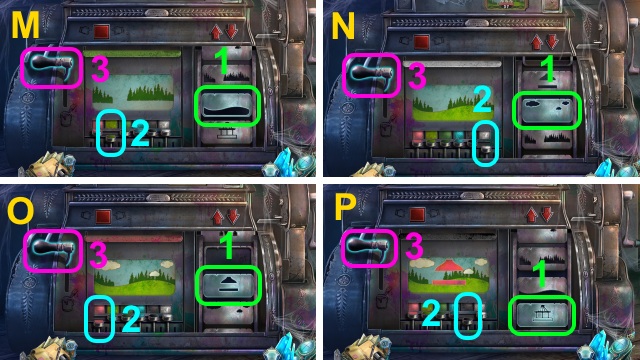
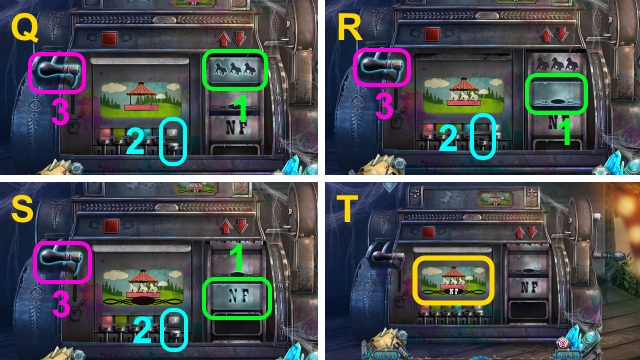
- Solution (M-R).
- Receive the GHOST CATCHER.
Chapter 2: Sullivan
- Open the crate; take the TRUNK (S).
- Combine the TRUNK and MINER FIGURINE (T).
- Take the CLIMBING BOOTS and CLIMBING GLOVES (U).
- Use the CLIMBING BOOTS and CLIMBING GLOVES (V); place the HEAVY SACK (W).
- Go up, then down.
- Use the PLIERS (X); take the PACKAGE.
- Use the RAZOR on the PACKAGE (Y); open it.
- Use the PLIERS (Z); take the MAGNET and KNOB (A).
- Walk forward.
- Place the KNOB (B).
- Take the WIRE (C).
- Stack the boxes (D); use the UMBRELLA (E).
- Walk forward.
- Move the rug; take the RABBIT (F).
- Scroll down; use the PAPER CLIP (G).
- Place the WIRE for a mini-game (H).
- Solution (I).
- Remove the cloth (J).
- Move the hat (K); take the AXE.
- Walk down.
- Place the BOY'S NAME for a mini-game (L).
- Solution (M).

- Take the FILM PROJECTOR (N).
- Walk forward.
- Take the GUN SIGHT (O).
- Walk forward.
- Take the DOG TOKEN (P).
- Use the AXE; take the PELLET BOX (Q).
- Place the RABBIT (R).
- Move the box (S); place the PELLET BOX (T) and GUN SIGHT (U).

- Play the HOP (V).
- HOP solution (W).
- Receive the SUN TOKEN (1/2).
- Walk down.
- Place the DOG TOKEN (X); take the MIRROR and FILM REEL (Y).
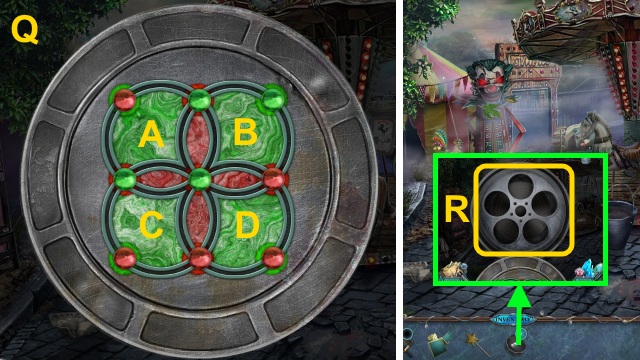
- Examine the FILM REEL for a mini-game (Z).
- Solution (A): Bx4-E-Cx3-Ex5-C-Bx2-E-B-Ex2-Dx3-Ax7-Cx2-Ex6.
- Dx2-Ax2-Ex2-Ax4-E-A-E-A-Ex6-Ax6-Ex4-D-Ex2-D-Ex6-Dx6.
- Take the FILM (B).
- Combine the FILM and FILM PROJECTOR (C).
- Examine the FILM REEL; enter the code (D).
- Take the SUN TOKEN (2/2) (E).
- Walk forward.
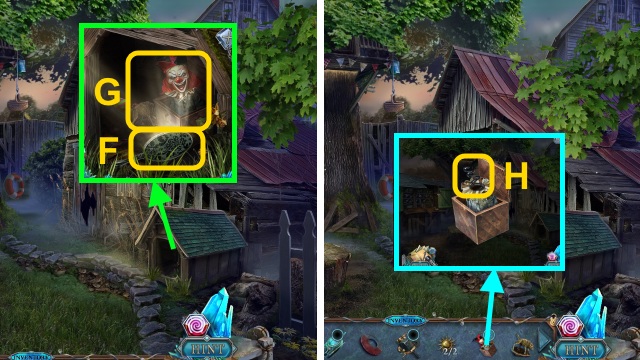
- Use the MIRROR (F); take the JACK-IN-THE-BOX and WOLF (G).
- Examine the JACK-IN-THE-BOX; use the PLIERS (H).
- Receive the SPRING.
- Place the boards (I).
- Place the SUN TOKEN (2/2) and SPRING for a mini-game (J).
- Solution (K-L).
- Solution (M): A-C-A-B-C-Bx3-C-A-C-B-Ax3-C.
- Solution (N-Q).

- Solution (R-W).
- Solution (X): Shoot the witch 5x.
- Take the LENS (Y); arrange the tiles (Z).
- Combine the GHOST CATCHER and LENS (A); receive the Ghost Catcher.
- Walk forward.
- Use the Ghost Catcher (B).
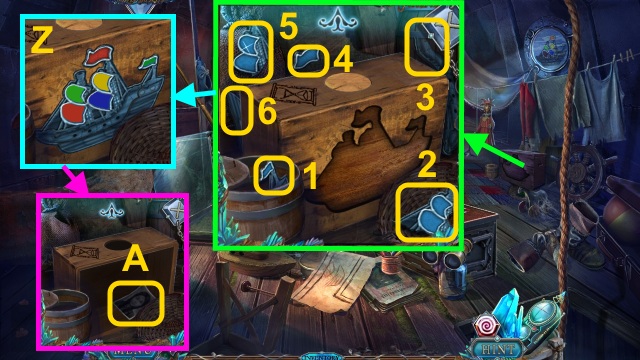
- Take the TAPE (C).
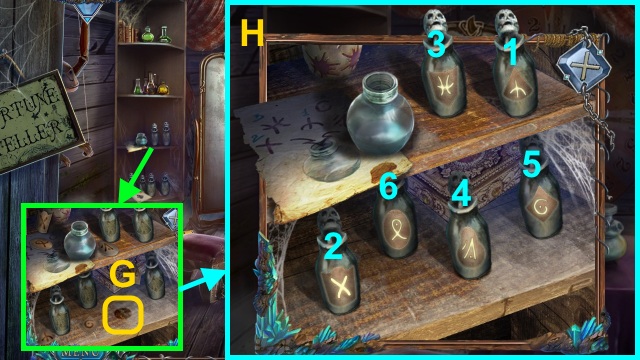
- Gather the pieces (1-6).
- Use the TAPE (D); take the NOTE.
- Open the cover; take REBECCA'S PHOTO (E).
- Go to the Town Square.
- Place REBECCA'S PHOTO (F); take the TOWN SEAL (G).
- Use the CROWBAR (H).
- Place the TOWN SEAL for a mini-game (I).
- Solution (J-M).
- Walk right.
Chapter 3: Rebecca
- Talk to the girl (N).
- Take the HORSESHOE TOKEN (O).
- Use the MAGNET for a mini-game (P).
- Solution (Q): (A-C-F)-(B-F-E-A)-(E-B-A-D-B).
- Take the LETTER T (R).
- Walk down, then forward.
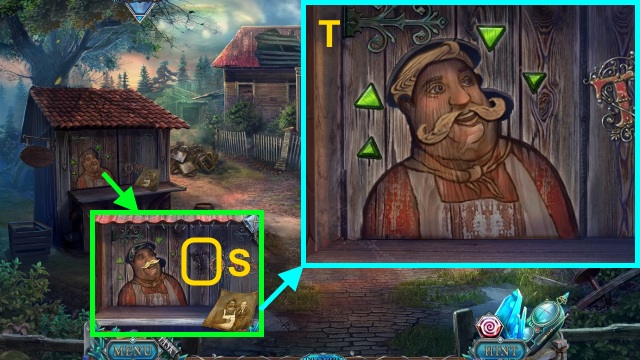
- Place the LETTER T for a mini-game (S).
- Solution (T).
- Play the HOP to receive the LIGHTER (U).
- Take the BUTTERFLY NET (V).
- Take the FRAME PIECE (W).
- Examine the handle (X); take the letter.
- Go to Sullivan's House.
- Place the HORSESHOE TOKEN (Y).
- Take the BIKE BELL (Z).
- Walk down, then right.
- Place the FRAME PIECE for a mini-game (A).
- Solution (B).
- Take the EAGLE (C).
- Use the BUTTERFLY NET (D); receive the ANCHOR.
- Place the BIKE BELL for a mini-game (E).
- Solution (F): (Bx3)-(A-Bx2-A)-(A)-(B-A).
- Take the STAG (G).
- Walk down, then forward.
- Place the ANCHOR (H).
- Match the colors (I).
- Walk right.
- Examine the leaves (J).
- Scroll down; take the ANGEL FIGURINE and LIGHTER FLUID (K).
- Move the branches; take the CAN (L).
- Take the LADDER (M).
- Walk down.
- Place the LADDER (N).
- Take the DOOR HANDLE (O).
- Walk down, then right.
- Place the DOOR HANDLE (P).
- Walk right.
- Pour the LIGHTER FLUID (Q); use the LIGHTER.
- Move the papers; take the SAFE COMBINATION (R).
- Place the SAFE COMBINATION for a mini-game (S).
- Solution (T): G-H-E-D-G-H-E-F-C-B.
- E-F-I-H-G-D-A-B-E-F-C-B-E.
- Take the newspaper (U).
- Take the FILM REEL and PAGE PIECE (1/2) (V).
- Examine the FILM REEL for a mini-game (W).
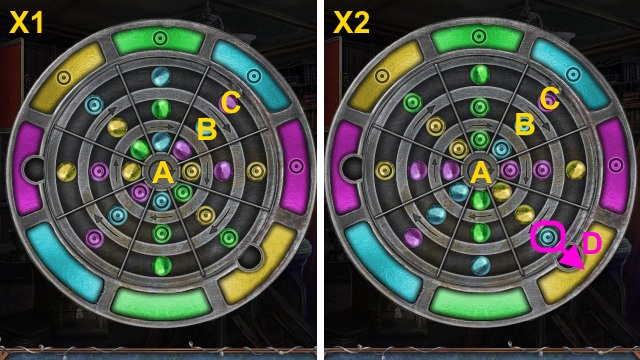
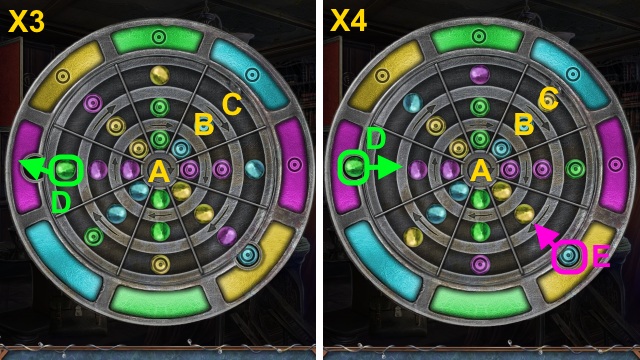
- Solution (X1): Ax5-Bx4-Cx4.
- Solution (X2): D-Cx6.
- Solution (X3): D-Cx5.
- Solution (X4): D-E-Cx6.
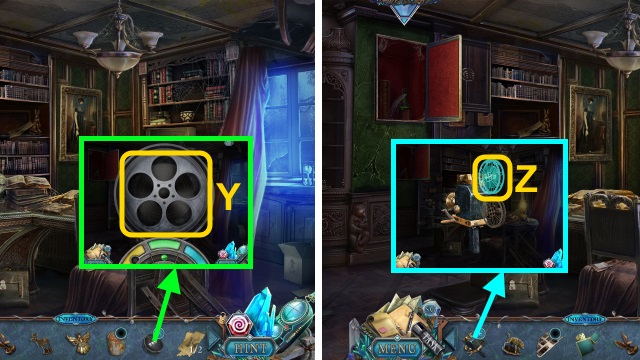
- Take the FILM (Y).
- Combine the FILM PROJECTOR and FILM (Z).
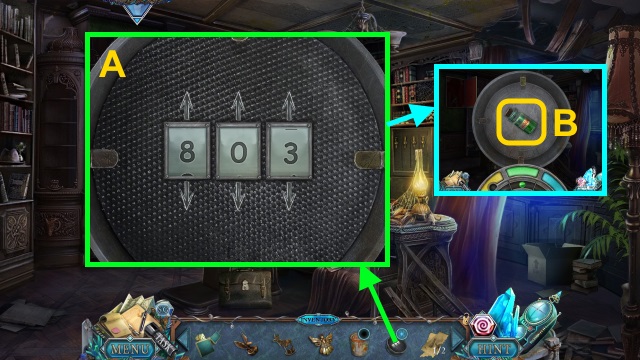
- Examine the FILM REEL; enter the code (A).
- Take the ACID (B).
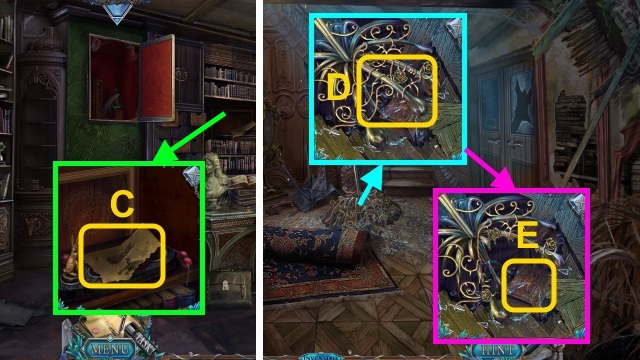
- Take the PAGE PIECE (2/2) (C).
- Walk down.
- Pour the ACID (D); take the BOOK (E).
- Read the BOOK; place the PAGE PIECE (2/2) (F).
- Take the PAGE WITH ANIMALS (G).
- Walk right.
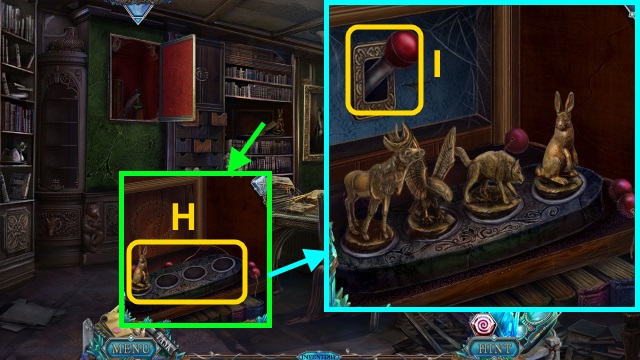
- Place the STAG, EAGLE, WOLF, and PAGE WITH ANIMALS (H).
- Arrange the animals; pull the lever (I).
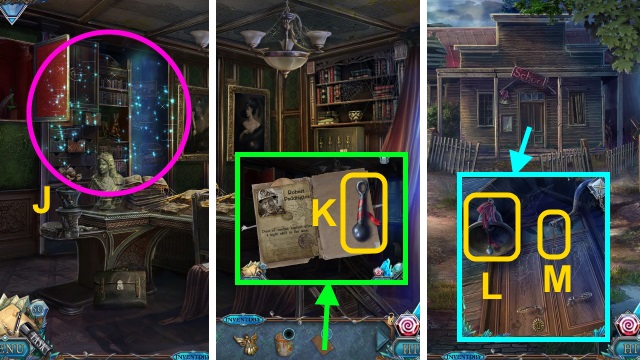
- Play the HOP to receive the FOLDER (J).
- Read the FOLDER; take the BELL CLAPPER.
- Walk down twice, then forward.
- Place the BELL CLAPPER; ring the bell (L).
- Use the key (M).
- Walk forward.
Chapter 4: The School
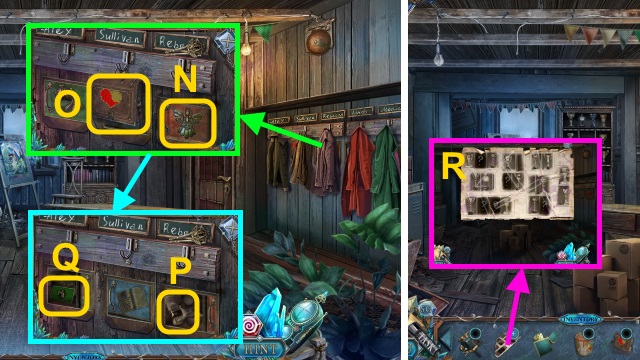
- Move the coats; place the ANGEL FIGURINE (N).
- Take SULLIVAN'S SCHOOLBAG (O); open the cubbies.
- Take the PAPER SCRAP (P) and ID CARD (Q).
- Combine the NOTE and PAPER SCRAP (R); receive the NOTE WITH HINT.
- Take the BRUSH (S); use the NOTE WITH HINT for a mini-game.
- Solution (T).
- Take the PAINTBRUSH (U).
- Move the easel (V).
- Take the INSECT REPELLANT (W).
- Walk down, then right.
- Use the INSECT REPELLANT (X); take the TUNING KEY.
- Scroll up; use the BRUSH (Y).
- Receive the CODE FROM ALEX.

- Read the note; use the ID CARD (Z).
- Play the HOP to receive the CAN OPENER (A).

- Combine the CAN and CAN OPENER; take the BRIEFCASE DETAIL (B).
- Combine the BRIEFCASE DETAIL and SULLIVAN'S SCHOOLBAG for a mini-game (C).
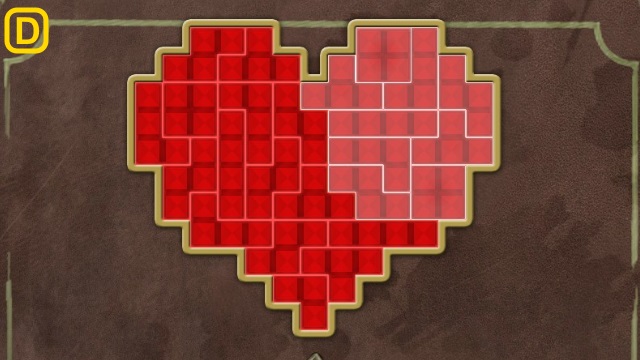
- Solution (D).

- Take SULLIVAN'S NOTEBOOK (E).
- Read SULLIVAN'S NOTEBOOK; take the POEM FOR REBECCA (F).
- Walk down, then forward.
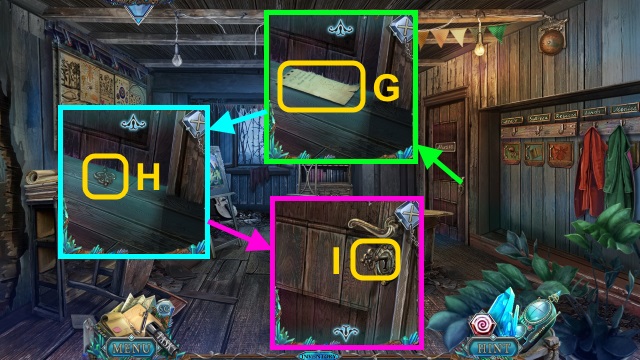
- Scroll down; read the note (G).
- Place the POEM FOR REBECCA; take the CLASSROOM KEY (H).
- Scroll up; use the CLASSROOM KEY (I).
- Walk right.
- Open the notebook; read the note (J).
- Move the notebook; take the GARDEN SHEARS (K).
- Use the TUNING KEY; take the WEIGHT TOKEN (L).
- Use the PAINTBRUSH for a mini-game (M).

- Solution (N).
- Take the PASSWORD (O).
- Walk down.

- Use the GARDEN SHEARS (P).
- Walk forward.
- Scroll right; take the GANGWAY LEVER and MAP PART (1/3) (Q).
- Take the MAKESHIFT HEAD (R).
- Walk down twice, then right.
- Place the WEIGHT TOKEN (S).
- Take the TOY CAR (T).
- Examine the TOY CAR; take the LITTLE WHEEL (U).
- Walk down, then forward.
- Place the LITTLE WHEEL (V).
- Play the HOP (W).
- Take the CHALK (X).
- Walk right.
- Use the CHALK 2x for a mini-game (Y-Z).
- Solution (A).
- Talk to Rebecca (B); use the Ghost Catcher.
- Open the cupboard; take the BOX (C) and EMPTY BUCKET (D).
- Combine the PASSWORD and BOX for a mini-game (E).
- Solution (F).
- Take ALEX'S PHOTO (G).
- Walk down three times.
Chapter 5: Alex
- Place ALEX'S PHOTO; take the CIRCUIT TOKEN (1/3) (H).
- Go to the Schoolyard.
- Use the EMPTY BUCKET (I); receive the BUCKET WITH SAND.
- Take the MAP PART (2/3) (J).
- Walk down twice, then right.
- Use the BUCKET WITH SAND (K).
- Walk forward.
- Take the TROWEL (L).
- Place the GANGWAY LEVER (M); pull it.

- Take the MAP PART (3/3) (N).
- Go to the Schoolyard.
- Read the note (O); place the MAP PART (3/3).
- Arrange the PARTS (P); take the TREASURE MAP.
- Use the TREASURE MAP for a mini-game (Q).
- Solution (R).

- Use the TROWEL; take the DOCK HOUSE KEY (S).
- Go to the Dock.
- Move the rug; take the LOCK DETAIL (1/6)-(2/6) (T-U).
- Scroll left.
- Move the fish; take the LOCK DETAIL (3/6)-(4/6) (V-W).
- Scroll right twice.
- Take the LOCK DETAIL (5/6)-(6/6)(X-Y).
- Place the LOCK DETAIL (6/6) (Z).
- Examine the lock; use the DOCK HOUSE KEY (A).
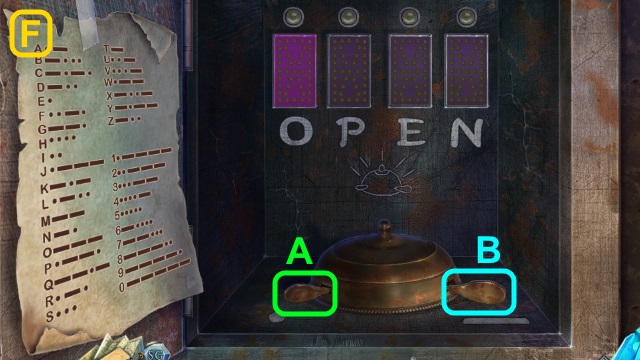
- Walk forward.
- Play the HOP; receive the CRAB (B).
- Examine the MAKESHIFT HEAD; use the CRAB (C).
- Take the CAR TOKEN (D).
- Take the drumstick (E); use it for a mini-game.
- Solution (F): (A-B-C)-(A-B-A-B)-(B-Cx2-A-B).
- Take ALEX'S PACKAGE (G).
- Open ALEX'S PACKAGE; take the LEVER (H) and note.
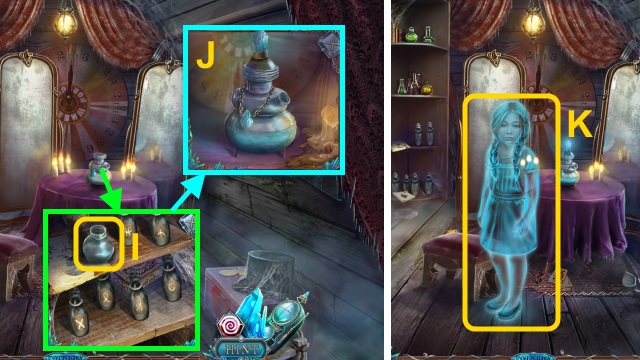
- Take the UNLIT LAMP (I).
- Open the UNLIT LAMP (J); use the LIGHTER.
- Take the LAMP.
- Walk down.
- Scroll up; place the LAMP (K).
- Open the porthole; take the SOAP DISH (L).
- Open the SOAP DISH (M); take the SOAP PIECE.
- Go to the Schoolyard.
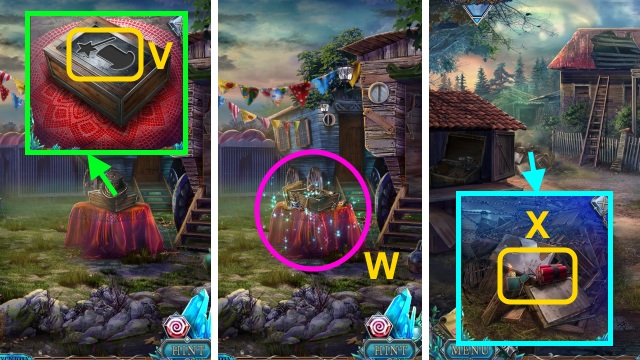
- Place the LEVER (N); pull it.
- Take the BROKEN BARREL ORGAN and SUITCASE (O).
- Examine the SUITCASE for a mini-game (P).
- Solution (Q).
- Enter the code (R); play the HOP to receive the TREBLE CLEF.

- Place the TREBLE CLEF on the BROKEN BARREL ORGAN (S); place the handle (T).
- Receive the BARREL ORGAN.
- Scroll left; place the CAR TOKEN (U).
- Open the case; take the CIRCUIT TOKEN (2/3) (V).
- Go to the Dock House.

- Use the BARREL ORGAN (W).
- Go up.
- Use the Ghost Catcher (X).
- Take the SPONGE (Y); scroll down.
- Move the board, lid, and cloth; gather the pieces (1-6).
- Color the tiles (Z).
- Take LINDA'S PHOTO (A).
- Take the OCTOPUS (B).
- Move the scroll (C); take the SPRAYER WITH WATER.
- Open the SPRAYER WITH WATER (D); place the SOAP PIECE for a mini-game.
- Shake the bottle (E); take the SOAP SOLUTION.
- Use the SOAP SOLUTION and SPONGE (F).
- Walk down.
- Place the OCTOPUS (G).
- Take the FILM REEL (H).
- Examine the FILM REEL for a mini-game (I).

- Solution (J): C-A-Bx2-A-B-A-B-A-Bx2-Ax3-B-A-B.
- Take the FILM (K).
- Combine the FILM PROJECTOR and FILM (L).
- Examine the FILM REEL; enter the code (M).
- Take the VALVE HANDLE (N).
- Walk down.
- Place the VALVE HANDLE (O).
- Go to the Town Square.
- Place LINDA'S PICTURE; take the LIFE PRESERVER (P).
- Go to the Attic.
Chapter 6: Linda

- Play the HOP; receive the NAIL PULLER (Q).
- Place the LIFE PRESERVER and CODE FROM ALEX for a mini-game (R).
- Solution (S-T).
- Play the HOP (U); receive the INK CARTRIDGE.
- Go to the Schoolyard.
- Use the NAIL PULLER (V); receive the PINWHEEL.
- Examine the PINWHEEL; remove the paper dolls (W).
- Flip them for a mini-game (X).
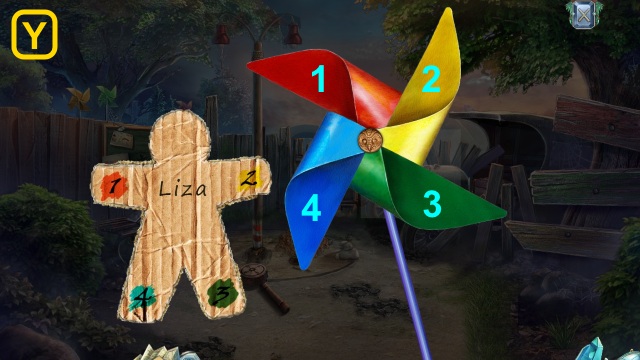
- Solution (Y).
- Take the CIRCUIT TOKEN (3/3) (Z).
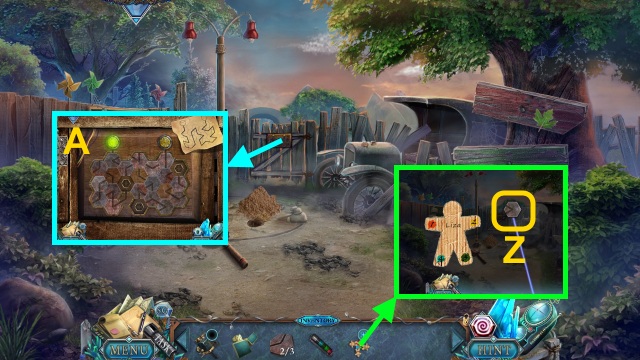
- Place the CIRCUIT TOKEN (3/3) for a mini-game (A).
- Solution (B).
- Walk forward.
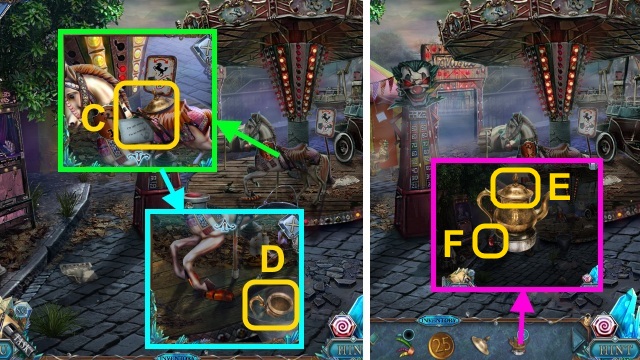
- Take the CLOWN'S BODY (C).
- Take the CLOWN'S HEAD (D).
- Combine the CLOWN'S BODY and CLOWN'S HEAD (E); take the CLOWN FIGURINE.
- Take the TEAPOT (F).
- Take the BROKEN ROOSTER TAIL (G).
- Walk down.
- Place the CLOWN FIGURINE (H).
- Take the TICKET ROLL (I).
- Walk forward.

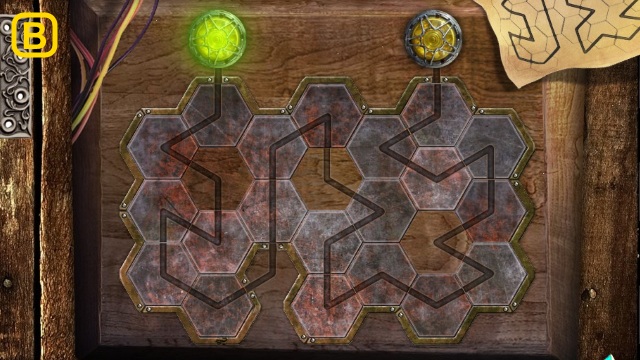
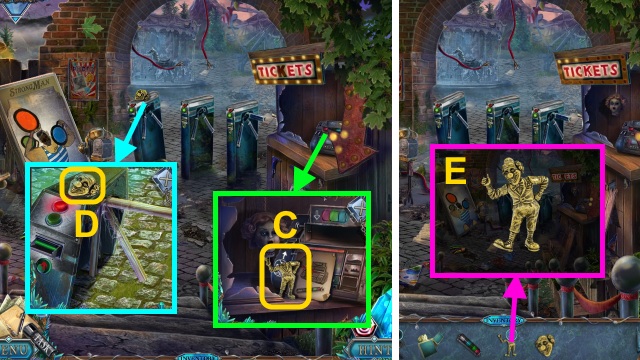
- Place the TICKET ROLL and INK CARTRIDGE (J); examine the machine for a mini-game.
- Solution (K-P).
- Solution (Q-S).
- Take the TICKET (T).
- Use the TICKET (U).
- Walk forward.
- Take the FILM REEL (V).
- Examine the FILM REEL for a mini-game (W).
- Solution (X): E-Ax3-F-Ax3-G -Cx2-F-Ax6-D-A-E-Cx6-G-Cx3-F-A.
- G-Ax5-F-D-Cx4-E-Cx2-D-Cx4-G-A-F-Cx4-E-Cx6-G-C-F-C-G-Cx5-D-C.
- Take the FILM (Y).
- Combine the FILM PROJECTOR and FILM (Z).
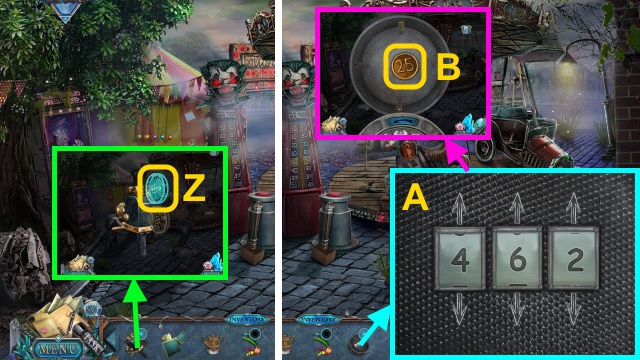
- Examine the FILM REEL; enter the code (A).
- Take the 25 CENT (B).
- Take the LID and note; scroll down (C).
- Use the TEAPOT (D); receive the TEAPOT WITH WATER.
- Combine the TEAPOT WITH WATER and LID (E); press the button (F).
- Receive the STEAM.
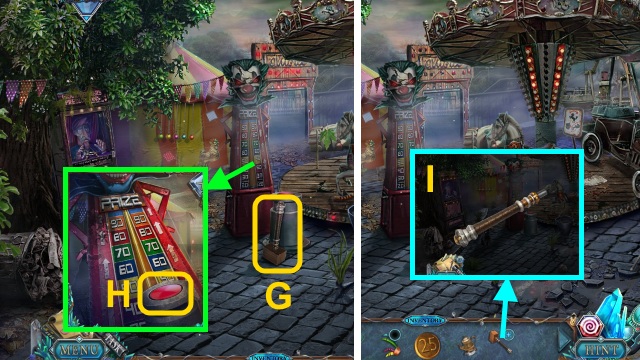
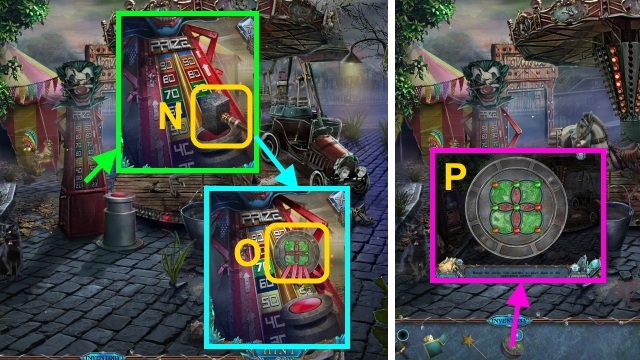
- Take the HAMMER (G).
- Use the HAMMER 2x (H).
- Examine the LIGHT HAMMER; remove the wood (I).
- Take the HANDLE.
- Walk down.
- Use the 25 CENT (J); take the STRONGMAN PHOTO (K).
- Examine the STRONGMAN PHOTO (L); take the PHOTO CLUE.
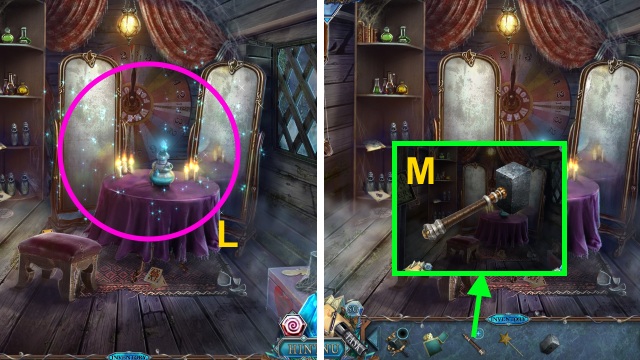
- Play the HOP (M); receive the CRYSTAL BALL.
- Walk forward.
- Place the CRYSTAL BALL (N); play the HOP to receive the PALM TOKEN.
- Walk forward.
- Use the STEAM (O).
- Place the weights (P).
- Open the drawers; take the VESSEL TOP (Q).
- Take the HORSE KEY (R).
- Walk down.
- Scroll up; use the HORSE KEY (S).
- Take the ROOSTER FEATHERS (T).
- Combine the BROKEN ROOSTER TAIL and ROOSTER FEATHERS (U); take the ROOSTER'S TAIL.
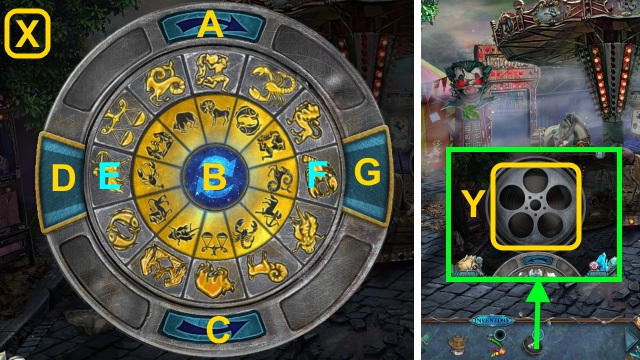
- Place the ROOSTER'S TAIL for a mini-game (V).
- Solution (W).
- Take the MASK (X).
- Walk forward.
- Place the PHOTO CLUE and MASK for a mini-game (Y).
- Solution (Z).
- Walk right.
- Take the WAND TOKEN (A).
- Place the PALM TOKEN (B); take the SWORD (C).
- Walk down.
- Place the SWORD for a mini-game (D).

- Solution (E): (L-B)-(B-A)-(J-L)-(L-B)-(E-J)-(C-J)-(D-J)-(K-H).
- (G-F)-(I-F)-(L-H)-(E-J)-(J-L)-(F-L)-(J-L)(J-E)-(K-H)-(L-H).
- Take the BOTTLE WITH POWDER (F).
- Walk right.
- Place the BOTTLE WITH POWDER for a mini-game (G).
- Solution (H).
- Take the SOLUTION FOR ILLUSIONS (I).
- Place the SOLUTION FOR ILLUSIONS and VESSEL TOP (J).
- Use the Ghost Catcher (K).
- Play the HOP (L); receive the LEAD HAMMER HEAD.
- Combine the HANDLE and LEAD HAMMER HEAD (M); take the SLEDGEHAMMER.
- Walk down twice.
- Use the SLEDGEHAMMER (N).
- Take the FILM REEL (O).
- Examine the FILM REEL for a mini-game (P).
- Solution (Q): Dx2-Cx3-Ax3.
- Take the FILM (R).
- Combine the FILM PROJECTOR and FILM (S).
- Examine the FILM REEL; enter the code (T).
- Take the HAT TOKEN (U).
- Walk forward.
- Move the hat; place the WAND TOKEN and HAT TOKEN (V).
- Play the HOP to receive the DYNAMITE (W).
- Go to the School Crossroads.
- Place the DYNAMITE; use the LIGHTER (X).
- Walk left.
Chapter 7: Cameron

- Take the DUCT TAPE (Y).
- Take the DRAWER HANDLE (Z).
- Take the TRAVEL BAG (A).
- Walk forward.
- Take the CHAINSAW (B).
- Take the PADLOCK KEY (C).
- Walk down, then left.

- Use the DUCT TAPE (D).
- Play the HOP to receive the SUN (E).
- Combine the TRAVEL BAG and SUN (F); take the GLOVES (G).
- Use the PADLOCK KEY (H).
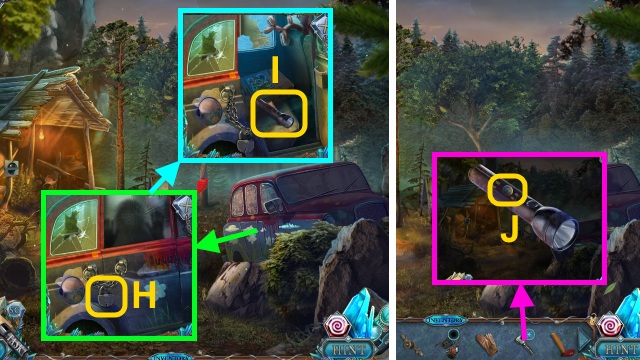
- Take the FLASHLIGHT WITHOUT BATTERIES and DOLL'S LEG (I).
- Open the FLASHLIGHT WITHOUT BATTERIES; take the MINER'S BUTTONS (1/2) (J).
- Take the DECORATION (K).
- Walk down.
- Read the newspaper (L).
- Use the GLOVES (M).
- Walk right.
- Place the DRAWER HANDLE (N); open the drawer.
- Take the DOLL'S ARM (O) and BATTERIES (1/2) (P).
- Take the OLD CAMERA (Q).
- Read the note; open the camera.
- Receive the FILM SLIDE (R).
- Open the cupboard (S).
- Take the MOON and CAMERON'S DIARY (T).
- Place the MOON on the TRAVEL BAG (U); take the DOLL'S HEAD (V).
- Walk down.
- Place the DOLL'S LEG, DOLL'S ARM, and DOLL'S HEAD (W).
- Take the DOLLS' POSITIONS (X).
- Walk forward.
- Place the FILM SLIDE (Y); take the SLIDE WITH CONSTELLATION.
- Walk down, then right.
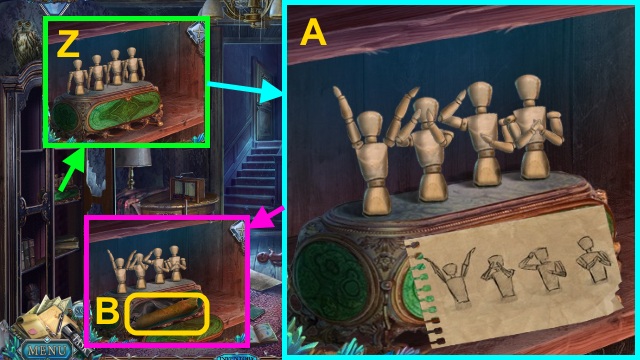
- Place the DOLLS' POSITIONS for a mini-game (Z).
- Solution (A).
- Take the CANVAS (B).
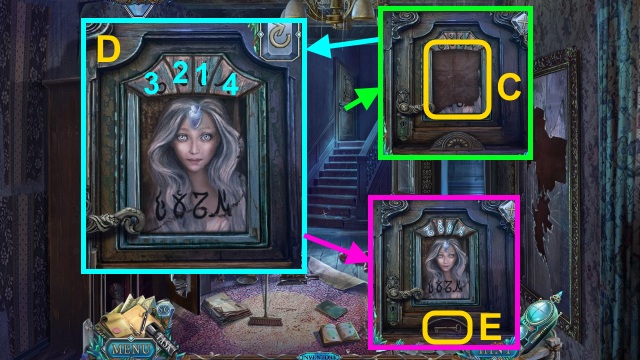
- Place the CANVAS (C); select the symbols (D).
- Use the key (E).
- Walk forward.
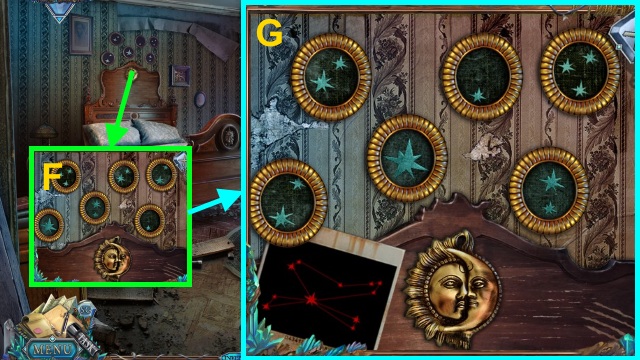
- Place the SLIDE WITH CONSTELLATION for a mini-game (F).
- Solution (G).
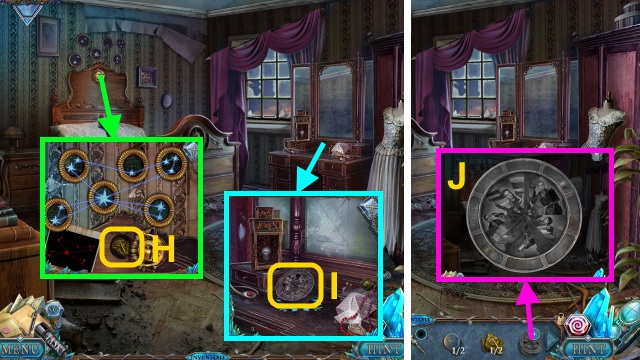
- Take the MINER EMBLEM (1/2) (H).
- Take the FILM REEL (I).
- Examine the FILM REEL for a mini-game (J).
- Solution (K).
- Take the FILM (L).
- Combine the FILM PROJECTOR and FILM (M).
- Examine the FILM REEL; enter the code (O).
- Take the note (O) and MINER'S BUTTONS (2/2) (P).
- Examine the lamp (Q); place the DECORATION (R).
- Take the RING (S).
- Examine CAMERON'S DIARY; use the RING (T).
- Read the diary; take the CLOCK HANDS (U).
- Take the WRENCH (V).
- Walk down.
- Use the WRENCH (W); take the SHORT ANTENNA.
- Examine the SHORT ANTENNA; take the EXTENDED ANTENNA (X).
- Place the CLOCK HANDS (Y); take the MINER EMBLEM (2/2) (Z).
- Walk forward.
- Use the EXTENDED ANTENNA (A); take the LAMP PANEL.
- Place the LAMP PANEL for a mini-game (B).
- Solution (C).
- Take the ANTIQUE JEWEL BOX (D).
- Open the ANTIQUE JEWEL BOX; take CAMERON'S BRACELET (E).
- Walk down twice, then forward.
- Place the MINER EMBLEM (2/2) (F).
- Take the MINER'S BOX (G) and BIG CROWBAR (H).
- Place the MINER'S BUTTONS on the MINER'S BOX for a mini-game (I).
- Solution (J).
- Press the button (K).
- Take the FUEL CAN (L).

- Use the BIG CROWBAR (M); take the CAT.
- Walk down, then right.
- Use the CAT (N).
- Play the HOP to receive the HOSE (O).
- Walk down, then left.
- Open the cover; use the HOSE and FUEL CAN (P).
- Take the FULL FUEL CAN.
- Combine the CHAINSAW and FULL FUEL CAN (Q); receive the FUELLED CHAINSAW.
- Walk down, then forward.
- Read the sign (R); use the FUELLED CHAINSAW.
- Walk left.
- Take the BATTERIES (2/2) (S).
- Combine the FLASHLIGHT WITHOUT BATTERIES and BATTERIES (2/2) (T); take the FLASHLIGHT.
- Walk down twice, then left.
- Use the FLASHLIGHT; take the TRACK SHAPE (U).
- Go to the Mine.
- Place the TRACK SHAPE (V).
- Walk forward.
- Use CAMERON'S BRACELET for a mini-game (W).
- Solution (X): catch the orbs.
- Congratulations! You have completed Spirit of Revenge: Gem Fury.
Created at: 2016-01-10