
Walkthrough Menu
- General Tips
- Chapter 1: The Shield Shrine
- Chapter 2: The Metal Kingdom
- Chapter 3: Mortis
- Chapter 4: Theresa
- Chapter 5: The Metal Tower
General Tips
- This is the official guide for Spirits of Mystery: Illusions.
- This guide will not show when you have to zoom into a location; the screenshots will show each zoom scene.
- Hidden-object puzzles are referred to as HOPs. This guide will not show screenshots of the HOPs, however, it will mention when an HOP is available and the inventory item you'll collect from it.
- Use the Map to fast travel to a location.
Chapter 1: The Shield Shrine
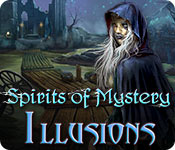
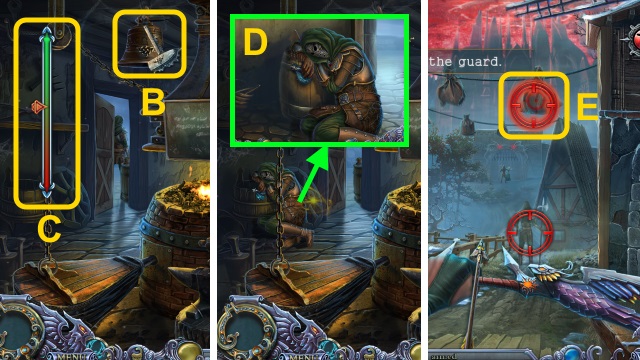
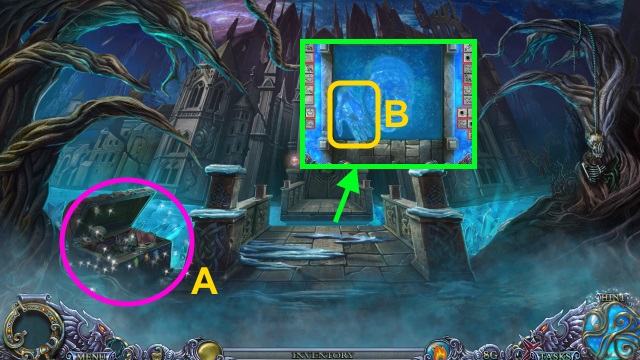
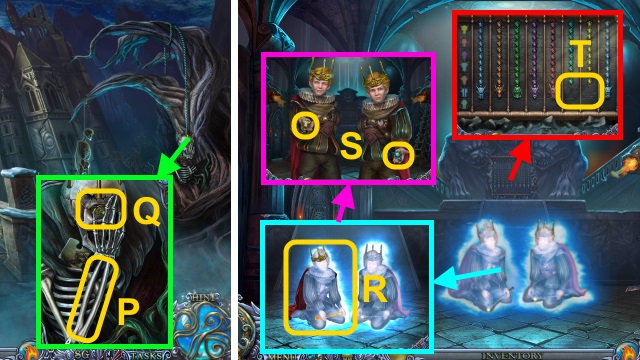
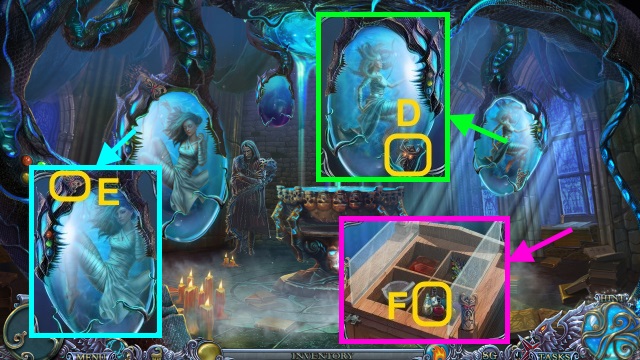
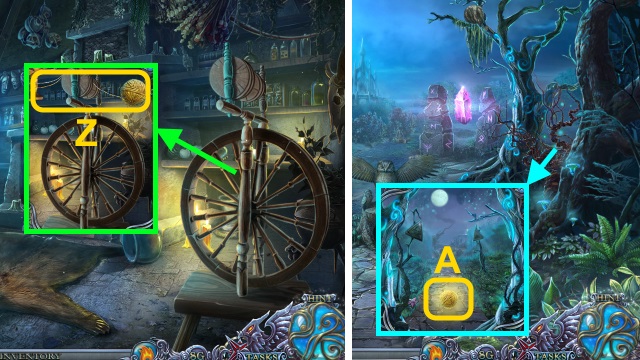
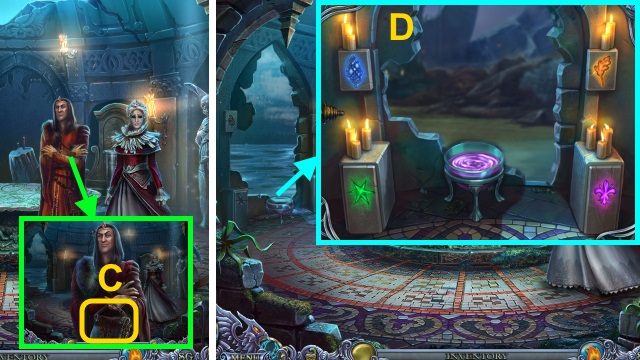
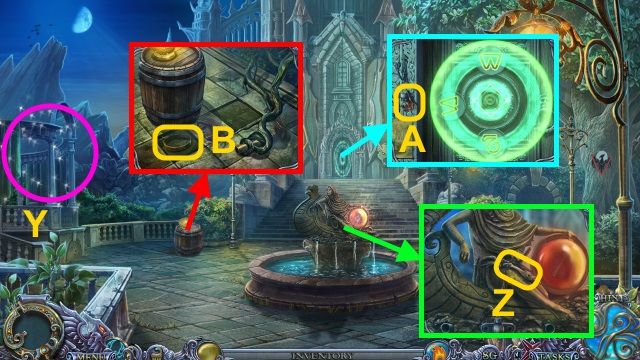
- Talk to Nanny; examine the case (A).
- Open the case; take the letter, BOW, and ARROWS (B).
- Combine the BOW and ARROWS.
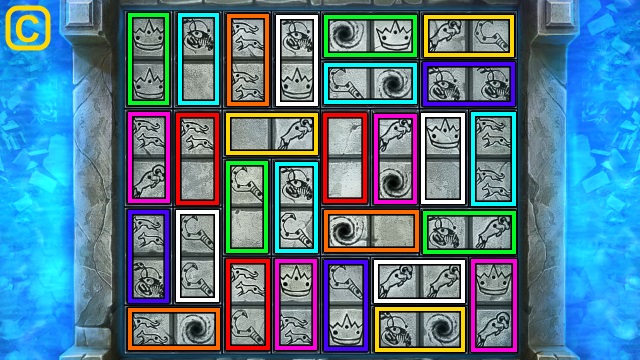
- Shoot each target (C).
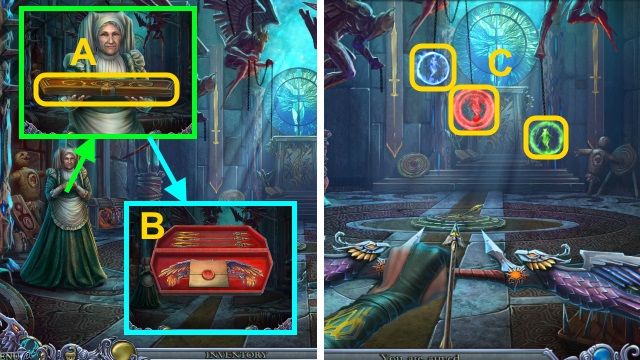
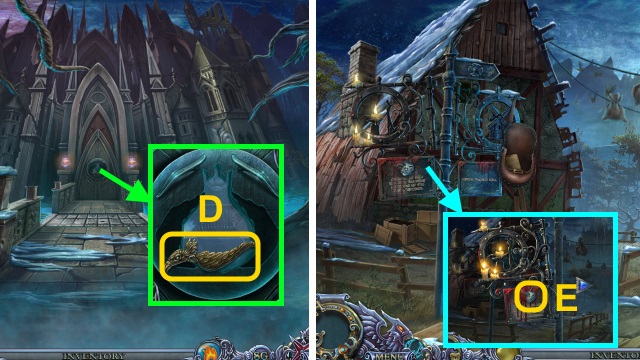
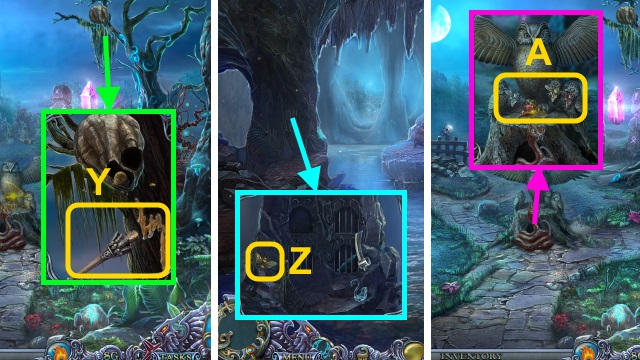
- Talk to Nanny. Take the relic (D); examine it.
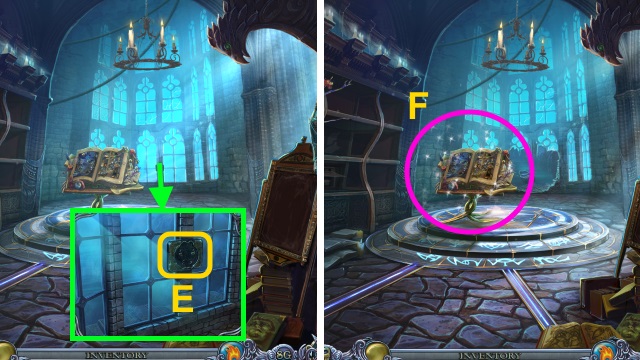
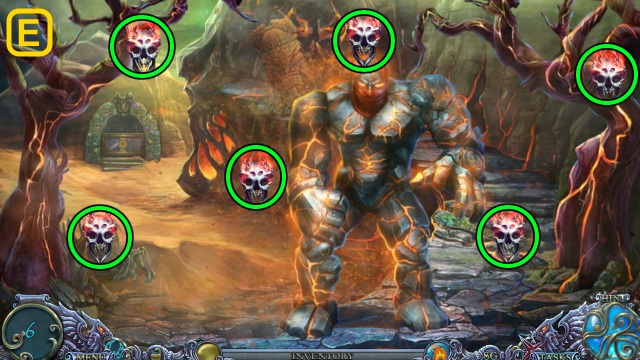
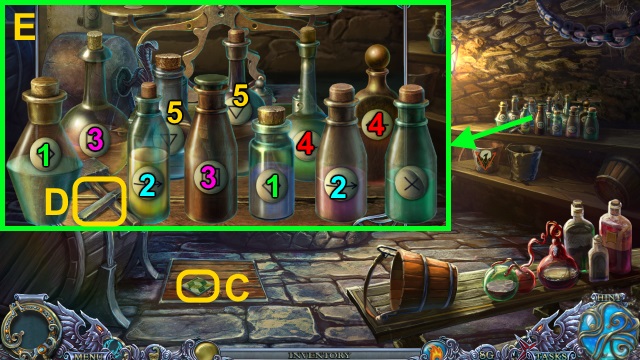
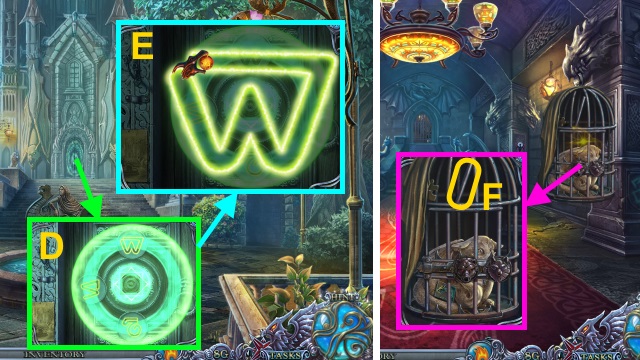
- Play the HOP (E).
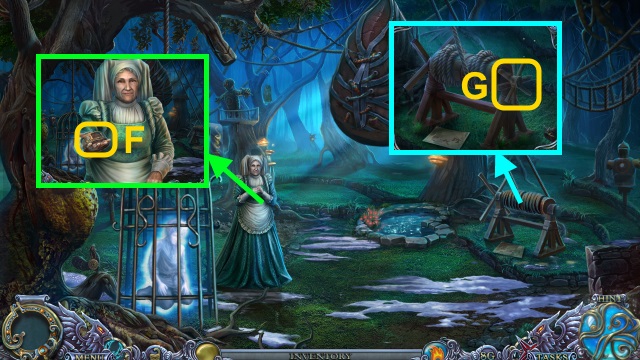
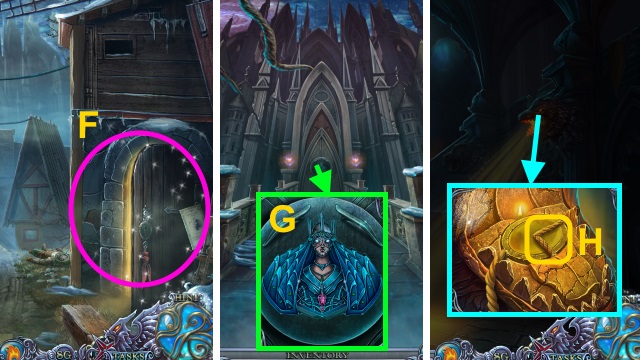
- Take the RIBBON (F).
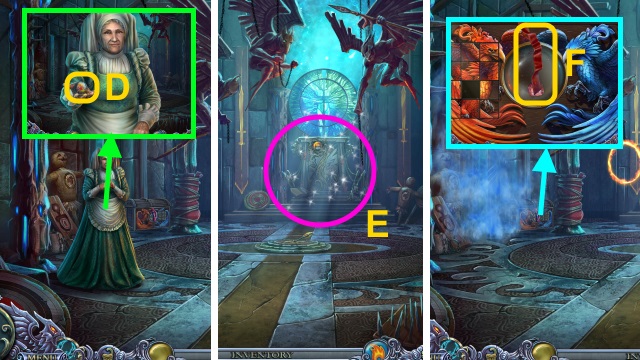
- Take the BROKEN ARROW (G).
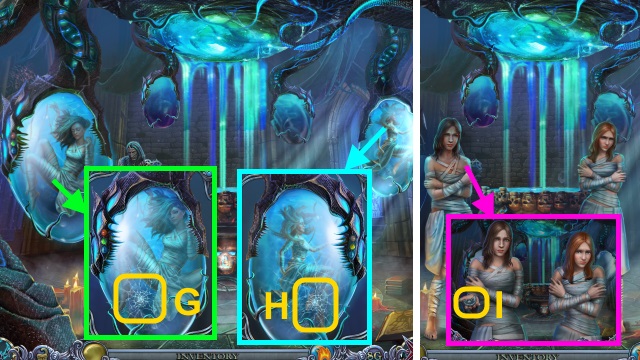
- Combine the BROKEN ARROW and RIBBON; take the ARROW.
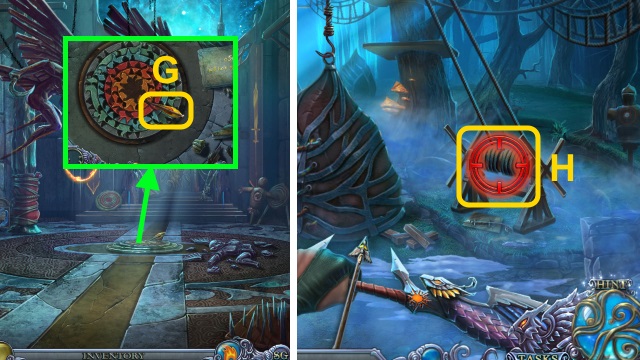
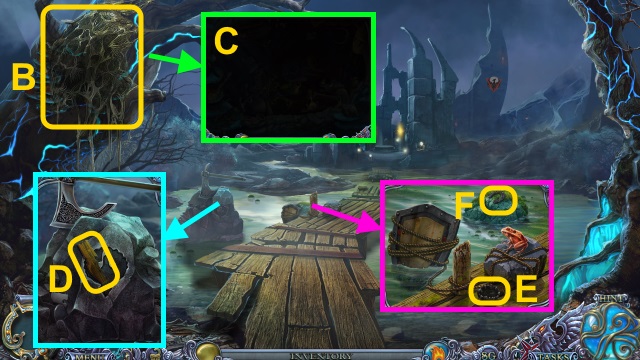
- Walk left.
- Combine the BOW and ARROW.
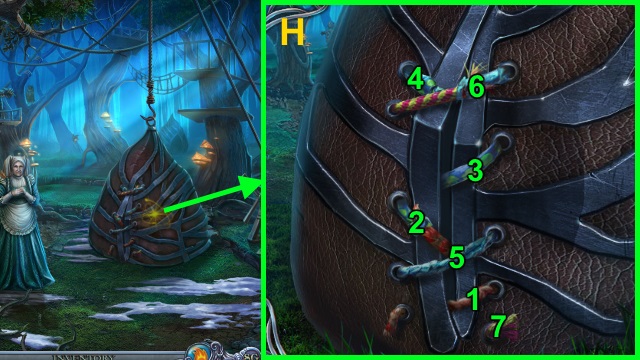
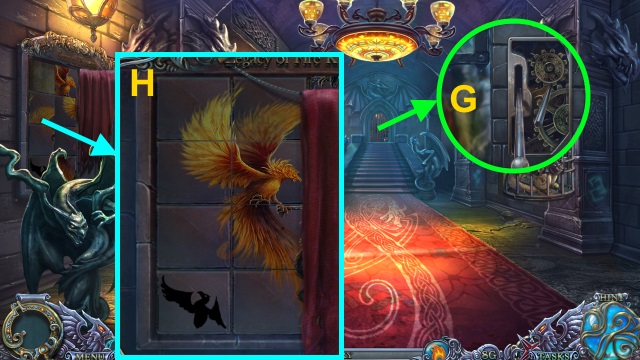
- Shoot the rope (H).
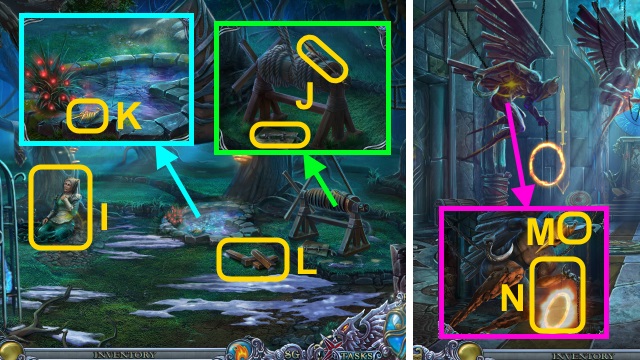
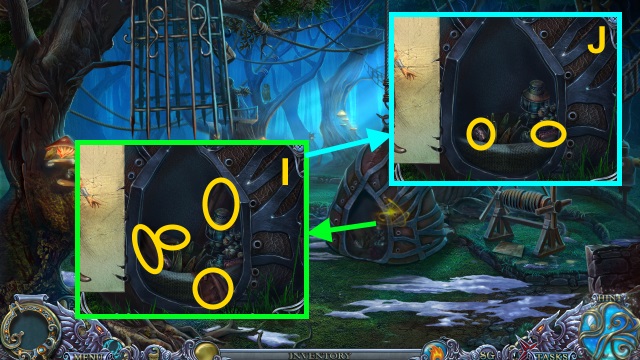
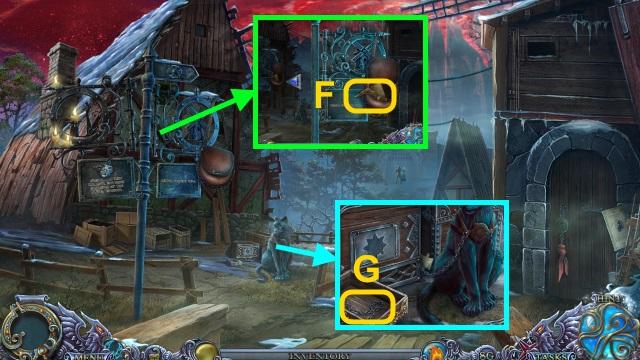
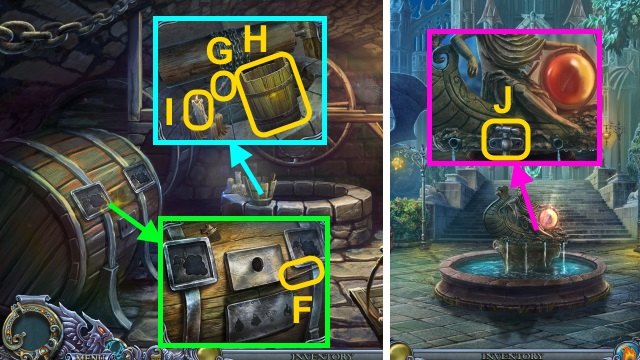
- Talk to Nanny (I).
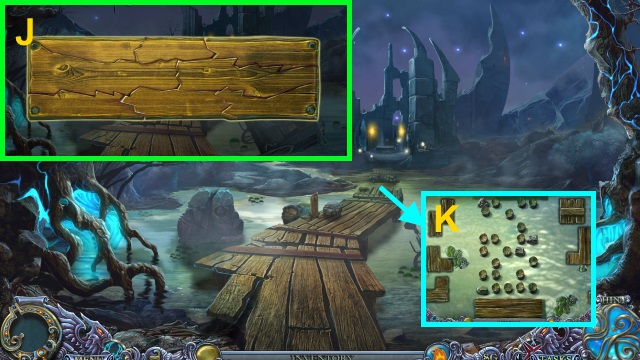
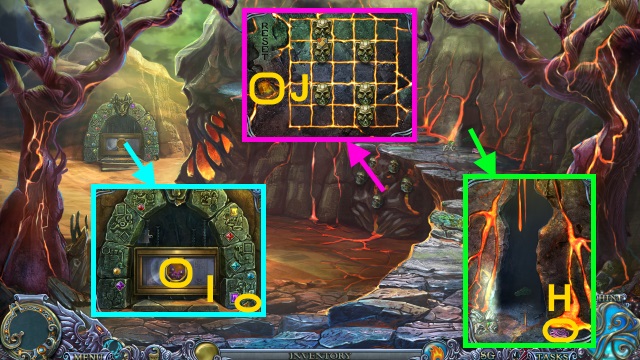
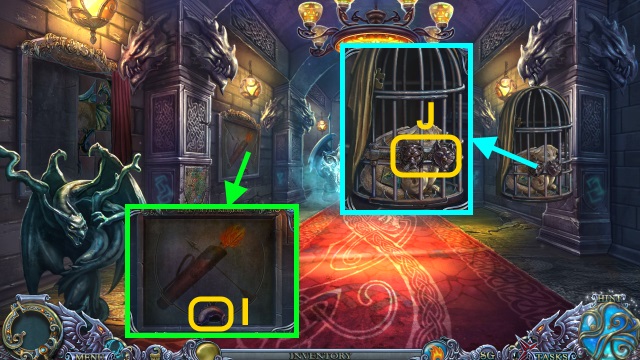
- Take the BROKEN ARROW and LIZARD WRENCH (J).
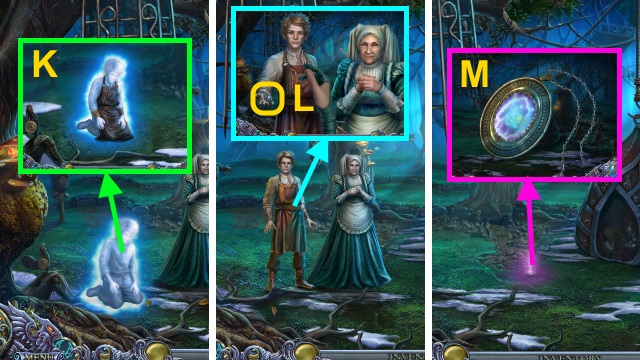
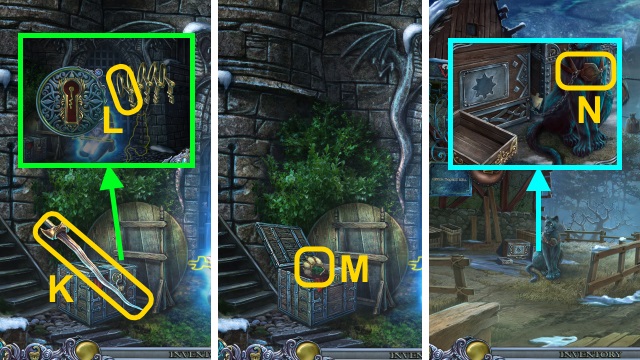
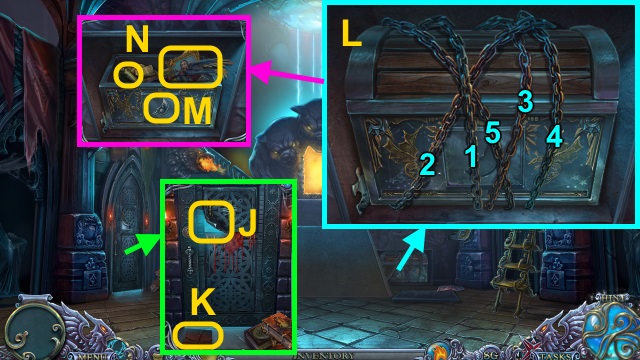
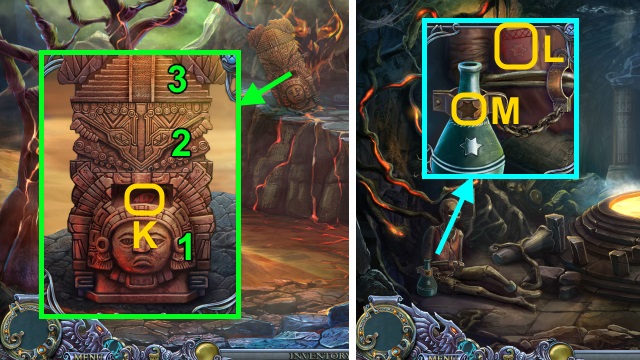
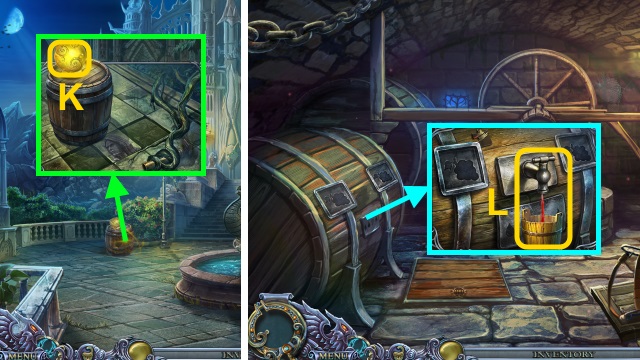
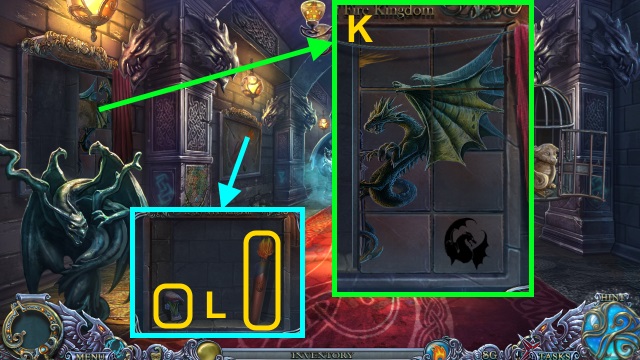
- Take the HORN (K).
- Take the PLANKS (L).
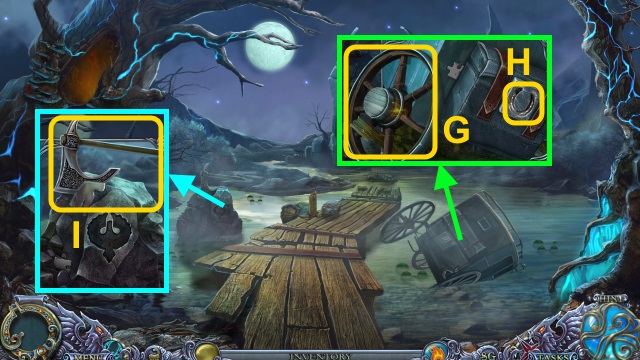
- Walk down.
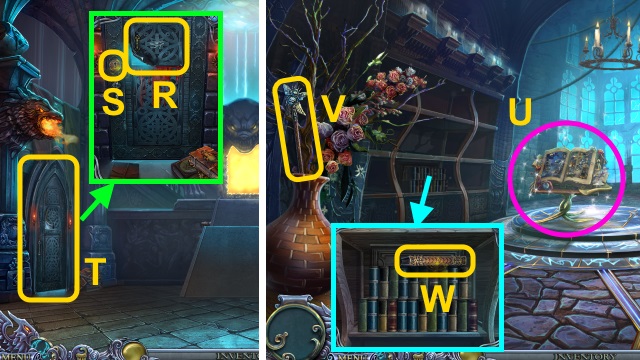
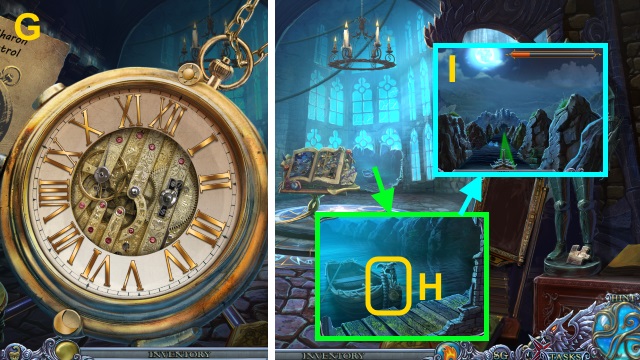
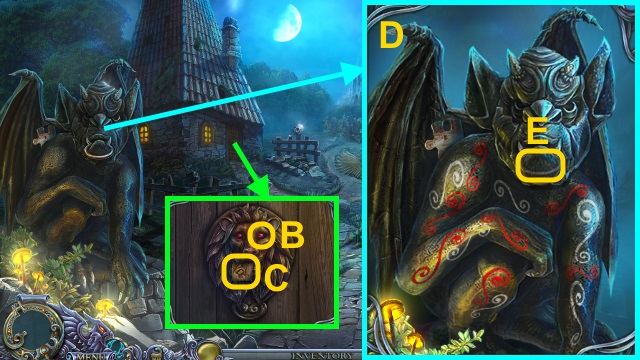
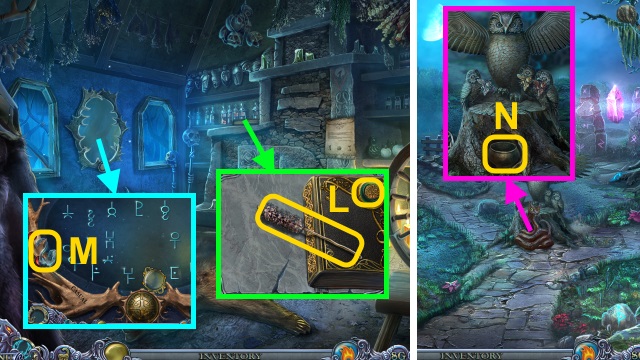
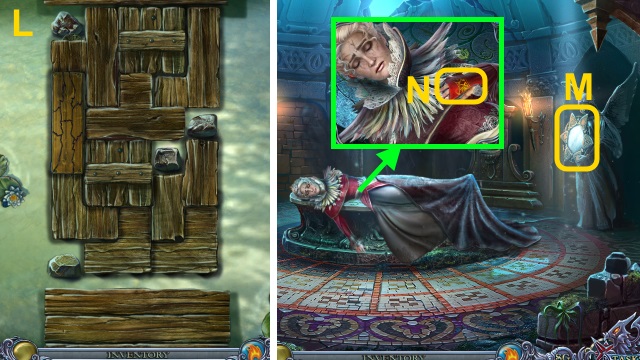
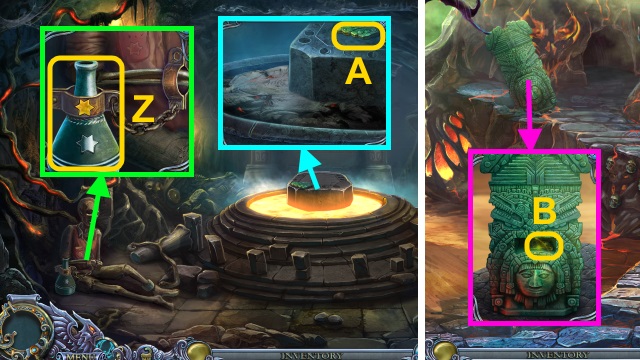
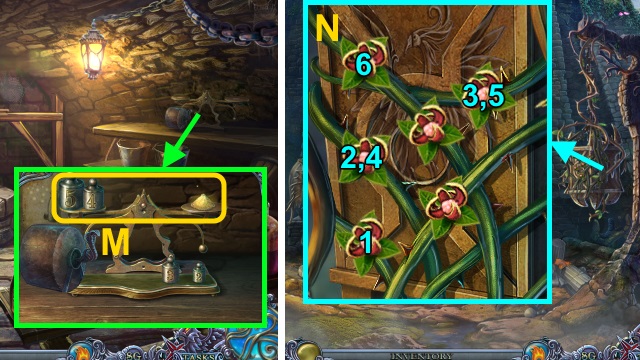
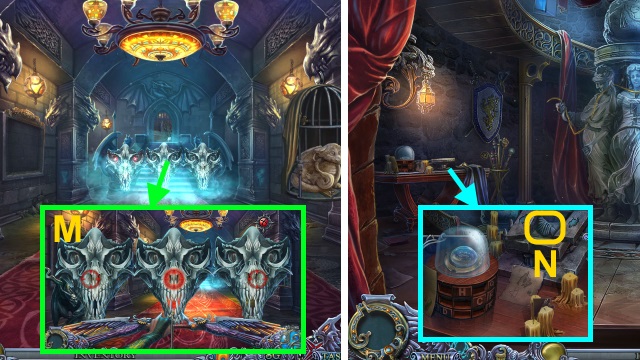
- Place the HORN (M); take the FIRE LASSO (N).
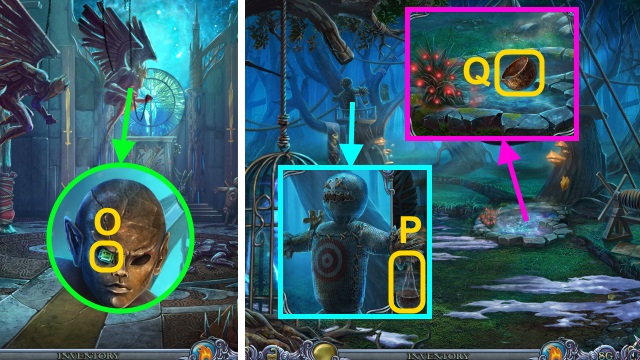
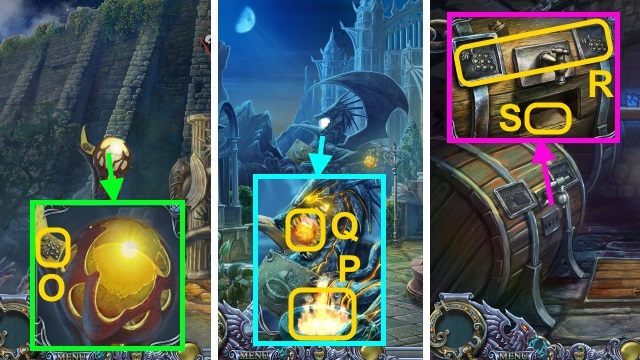
- Use the LIZARD WRENCH; take the GEMSTONE (1/2) (O).
- Walk left.
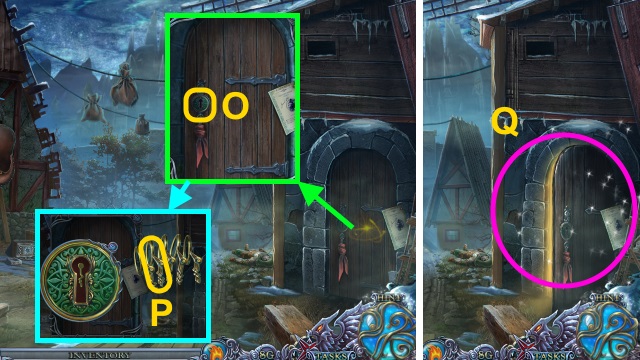
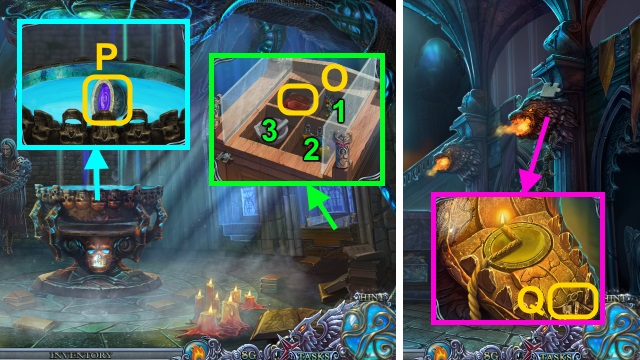
- Take the CUP (P).
- Use the FIRE LASSO; use the CUP (Q). Receive the CUP WITH WATER.
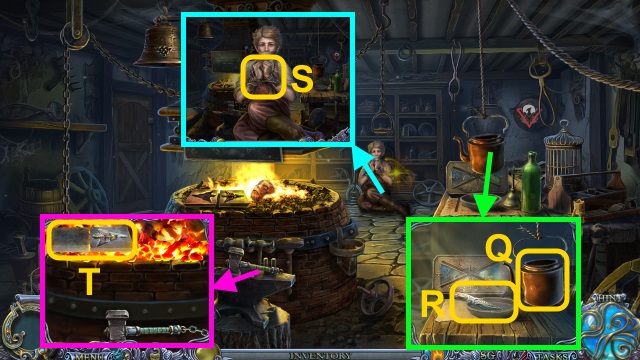
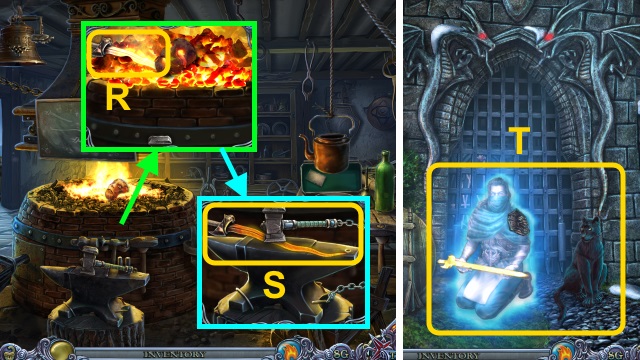
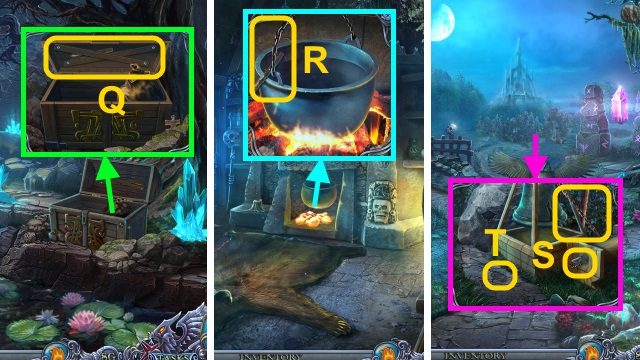
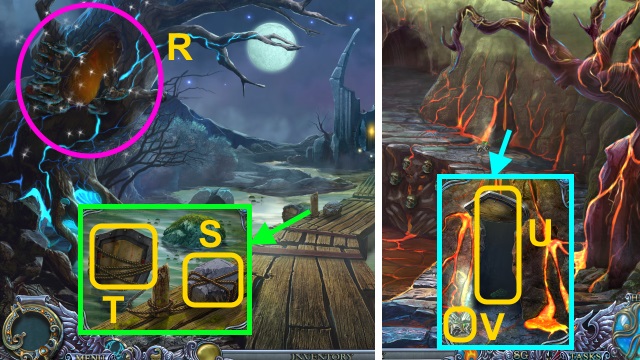
- Give the CUP WITH WATER (R); take the BOX (S).
- Open the BOX; read the note. take the SUNLIGHT and SOLUTION.
- Walk down.
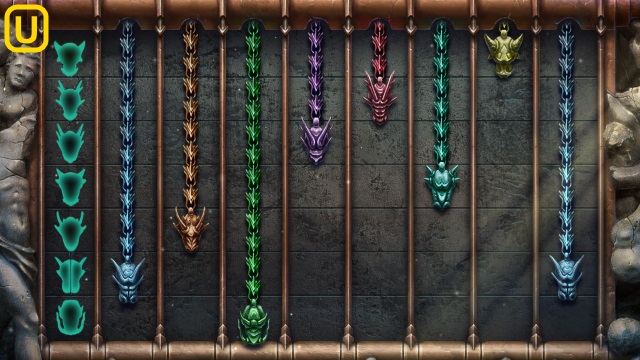
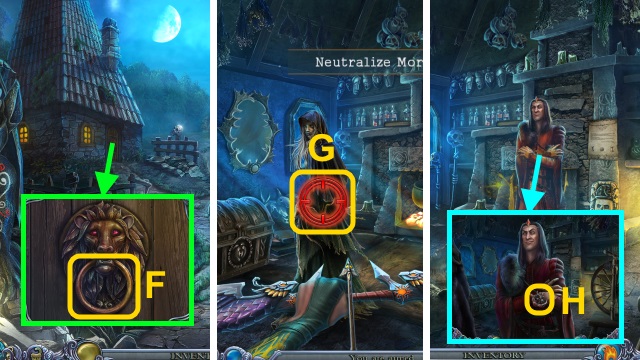
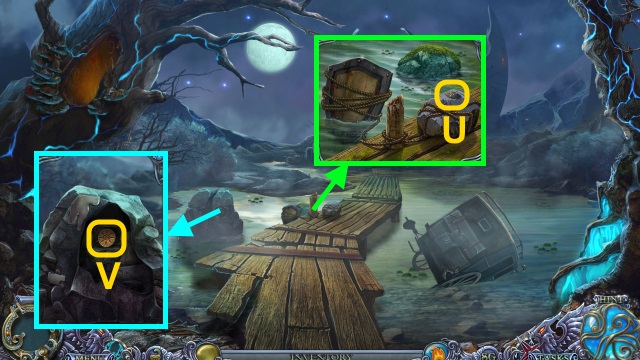
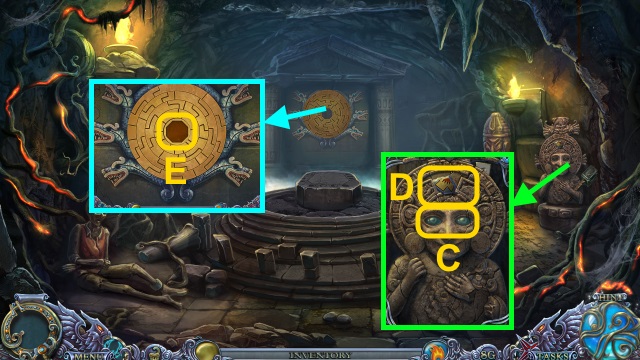
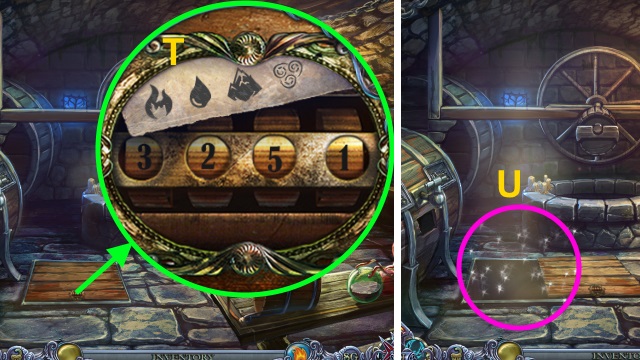
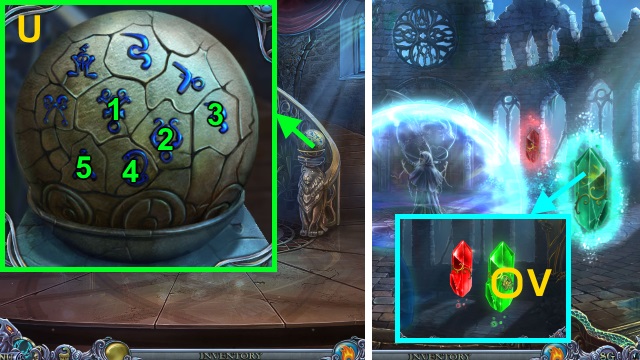
- Place the SUNLIGHT for a mini-game (T).
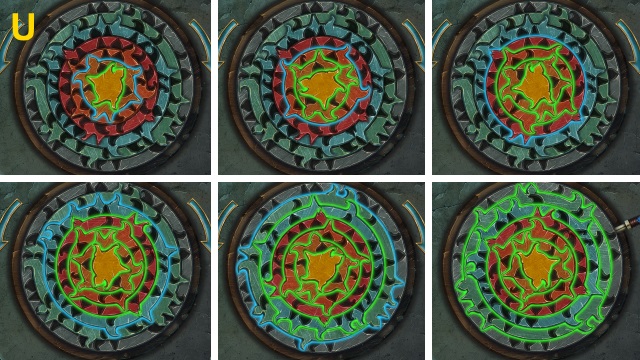
- Solution (U).
- Pull the lever.
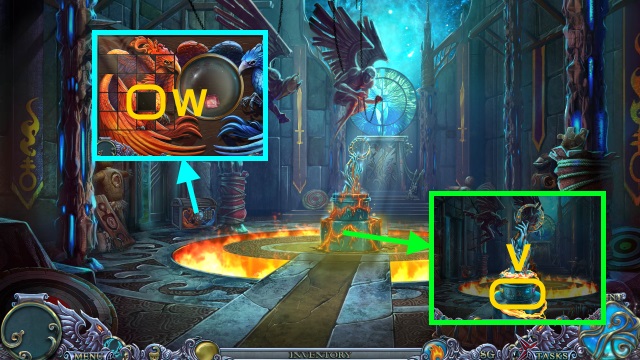
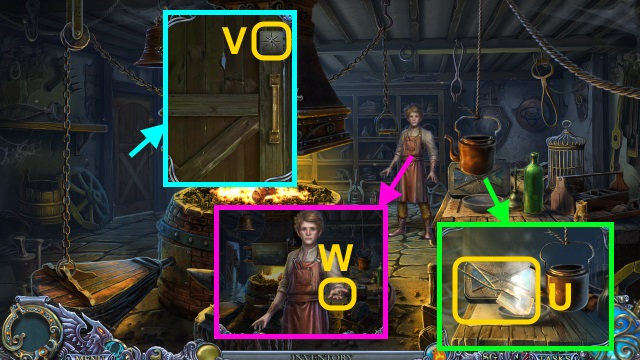
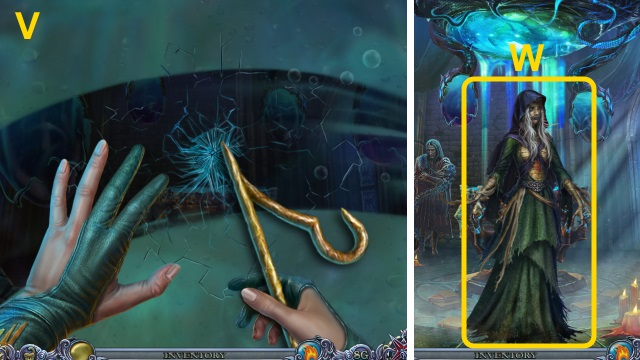
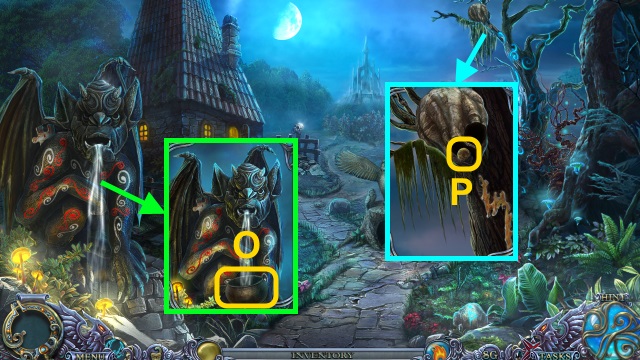
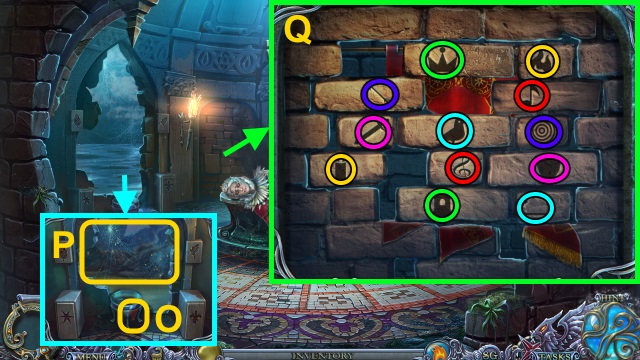
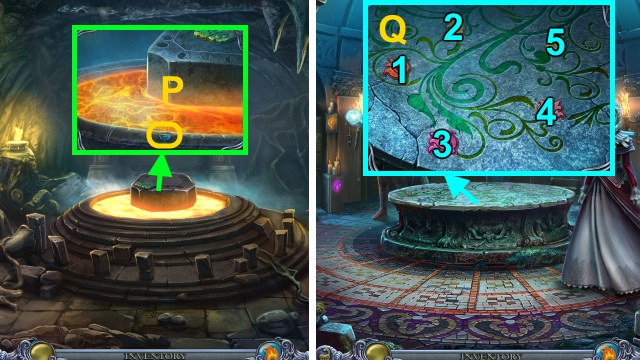
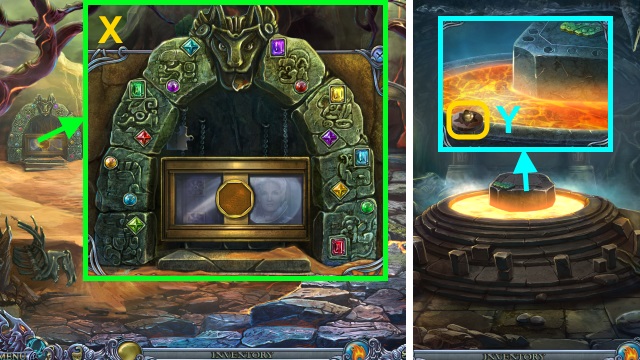
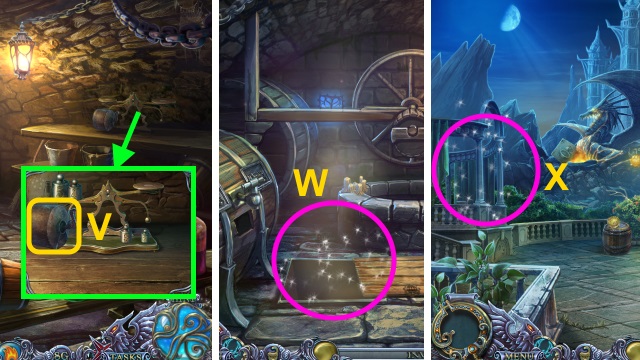
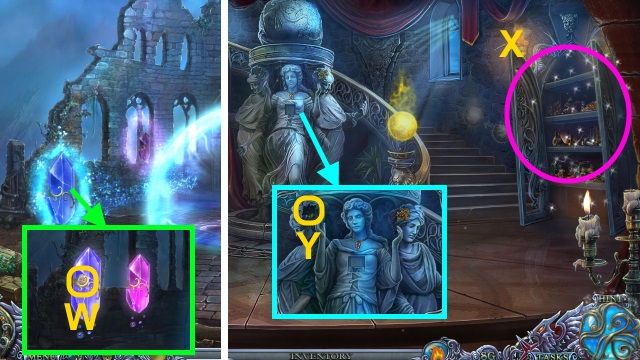
- Examine the statue (V); take the CHIP.
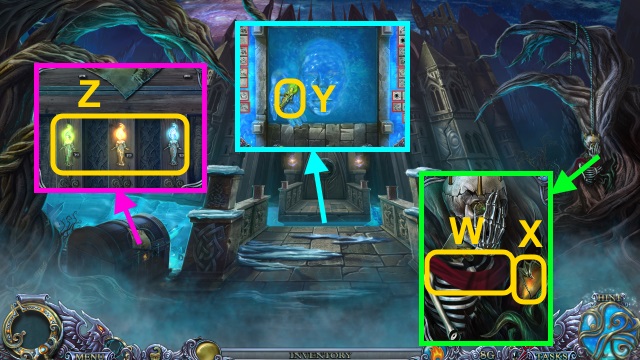
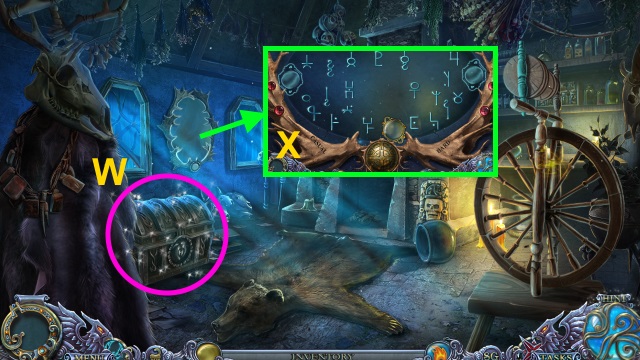
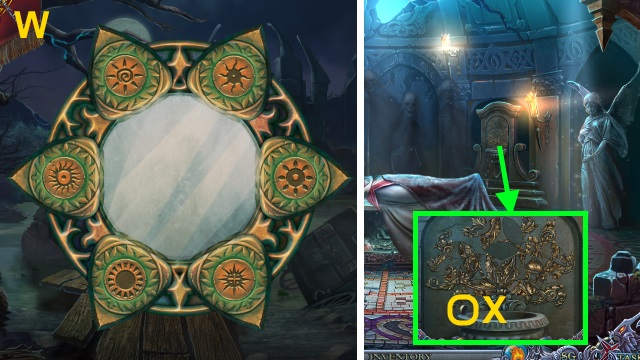
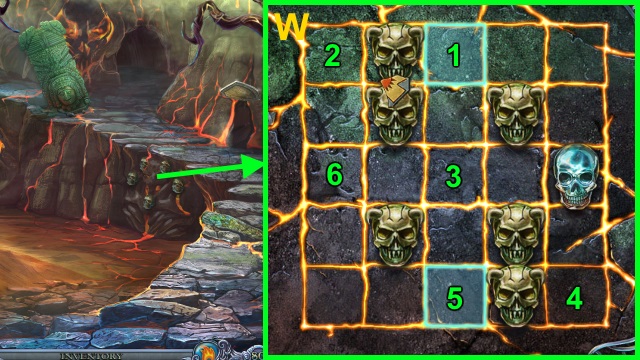
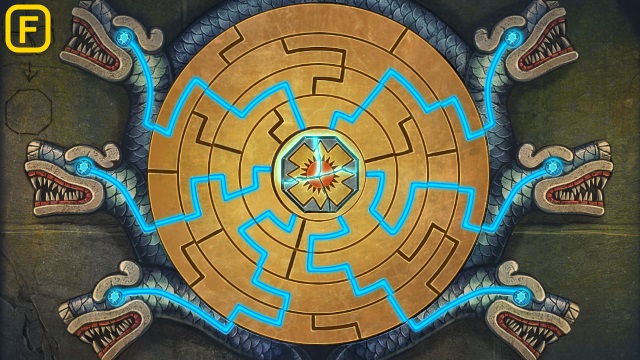
- Place the CHIP for a mini-game (W).
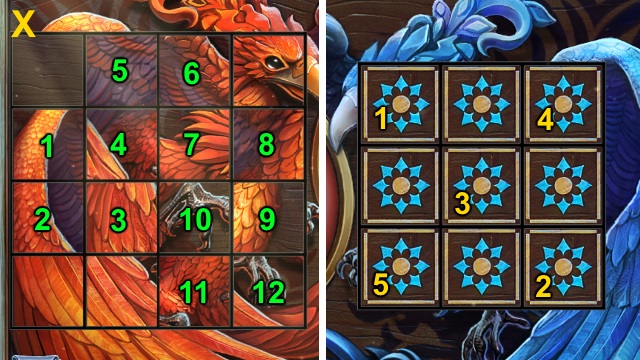
- Solution (X).
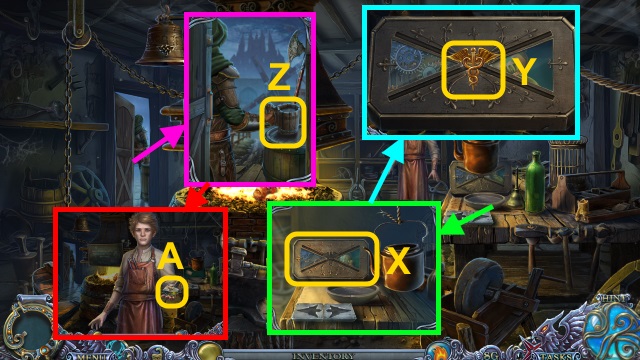
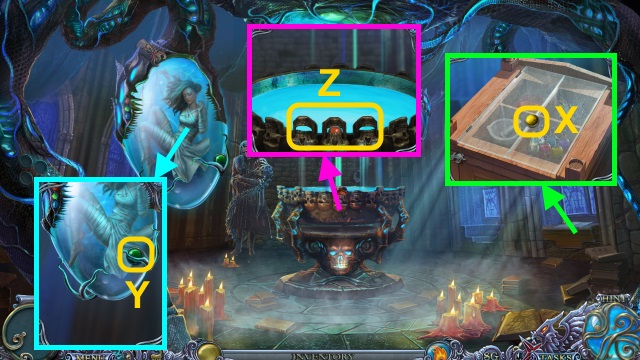
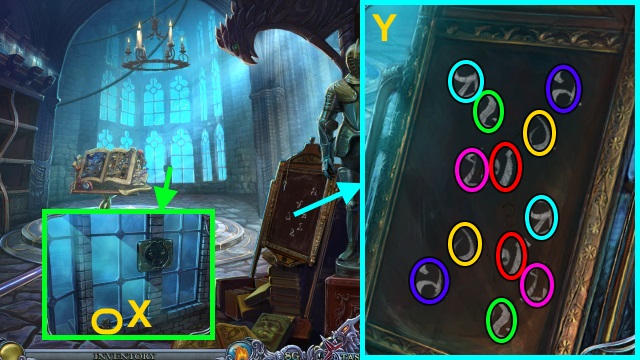
- Take the GEMSTONE.
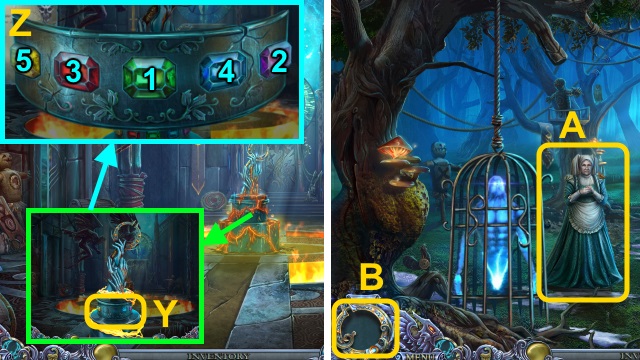
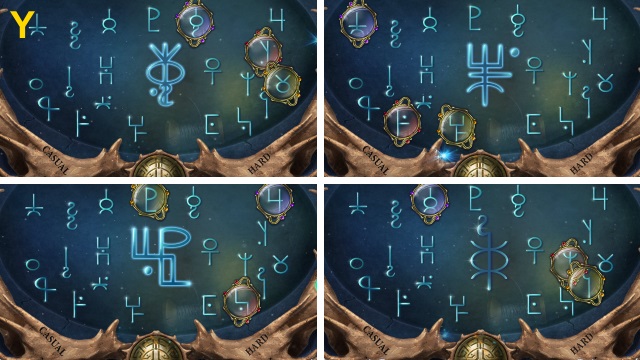
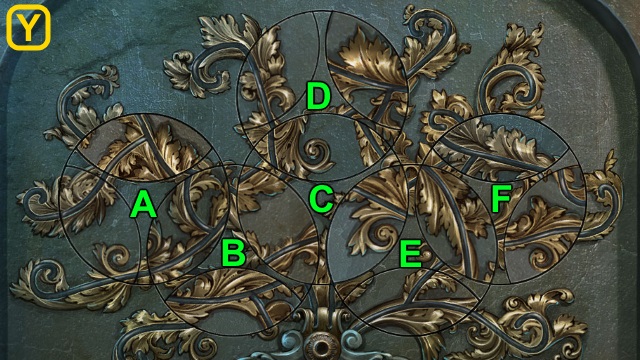
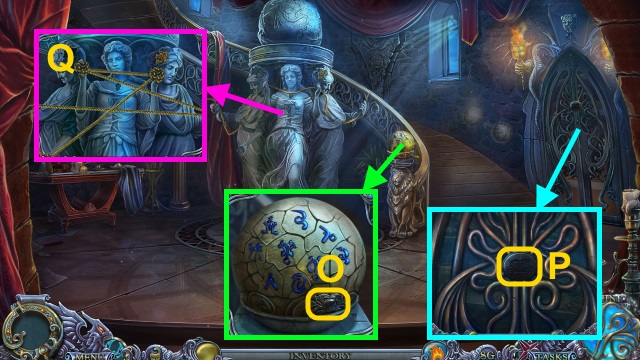
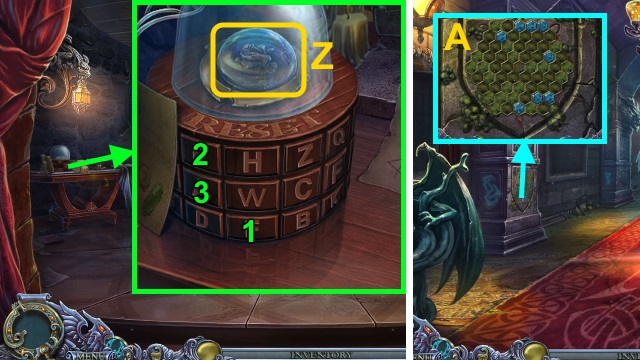
- Examine the statue; place the GEMSTONE and SOLUTION for a mini-game (Y); solution (Z).
- Take the Mirror.
- Walk left.
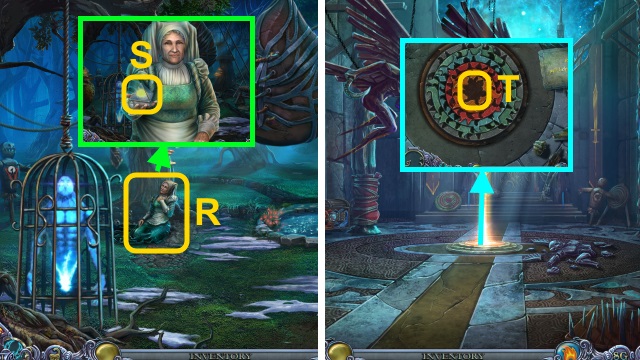
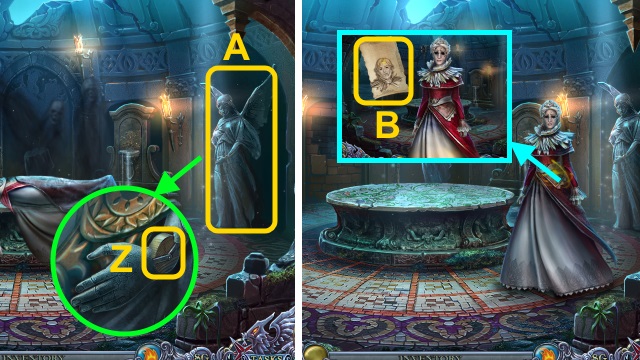
- Talk to Nanny (A).
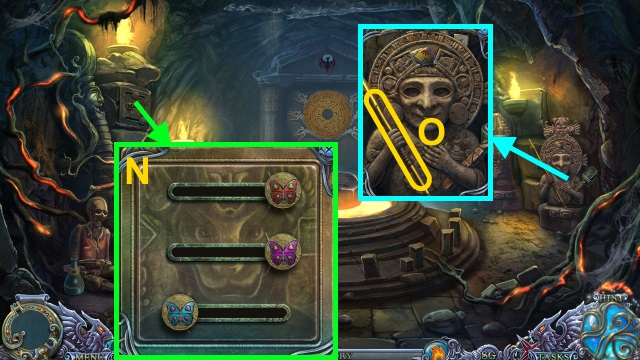
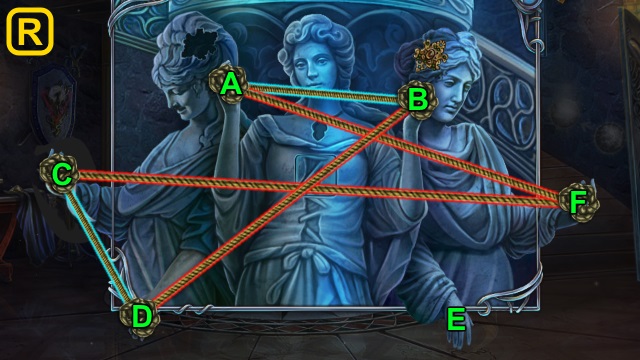
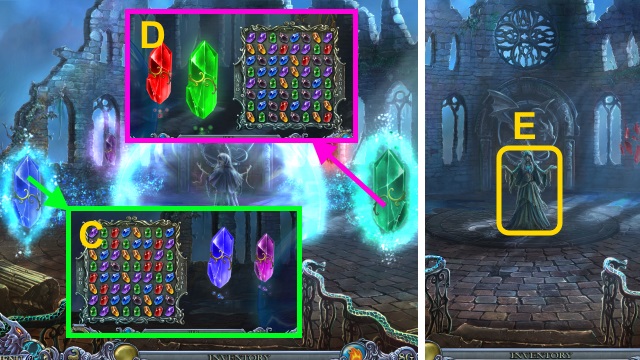
- Use the Mirror for a mini-game (B).
- Solution (C).
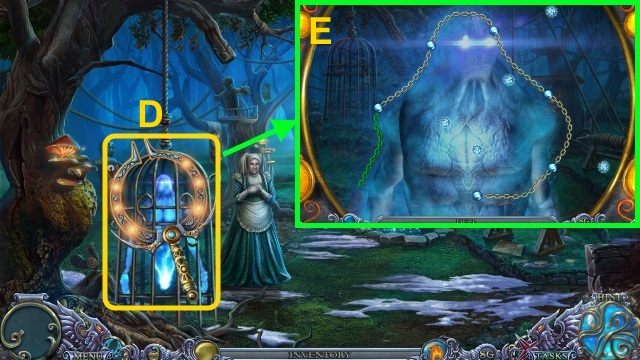
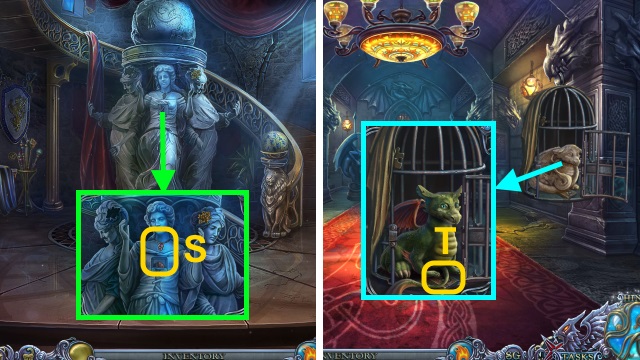
- Use the mirror for a mini-game (D). Solution (E): trace the chains.
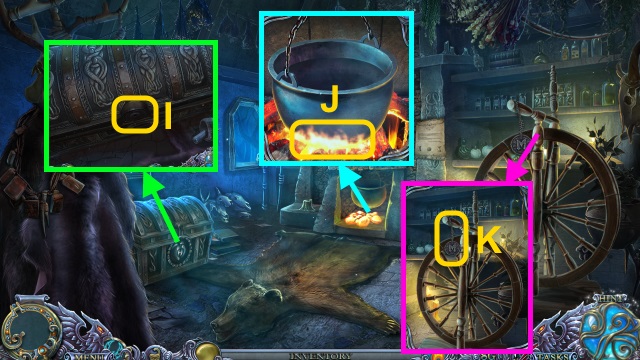
- Talk to Nanny; take the METAL BASE (F).
- Combine the METAL BASE and PLANKS; take the METAL BASE WITH WOOD.
- Place the METAL BASE WITH WOOD (G).
- Examine the bag for a mini-game; solution (H).
- Examine the paper; gather the pieces (I-J). Receive the BOY'S CLOTHES.
- Give the BOY'S CLOTHES; place the clothes (K).
- Talk to the boy; examine the pendant (L).
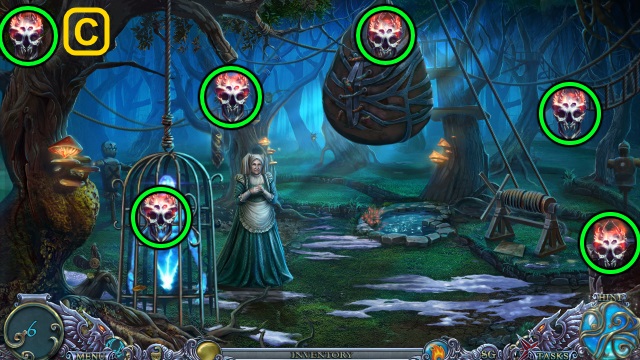
- Examine the pendant; play the HOP (M).
Chapter 2: The Metal Kingdom

- Take the CORKSCREW and TONGS (N).
- Take the FIGURINE (1/2) (O); scroll up.
- Use the TONGS (P); receive the HOT DAGGER.
- Pour the kettle (Q); use the HOT DAGGER (R). Receive the DAGGER.
- Use the DAGGER (S); receive the ROPE. Take the DOOR KEY.
- Use the TONGS (T); receive the ARROW SHAPE.
- Place the ARROW SHAPE (U); open the mold. Take the ARROWHEAD.
- Combine the BROKEN ARROW and ARROWHEAD; take the ARROW.
- Place the DOOR KEY (V).
- Talk to the boy; take the CADUCEUS PART (W).
- Examine the box (X); place the CADUCEUS PART.
- Place the parts (Y). Move the items; take the SLEEPING POTION.
- Combine the SLEEPING POTION and CORKSCREW.
- Use the SLEEPING POTION (Z).
- Take the BELL HAMMER (A).
- Use the BELL HAMMER for a mini-game (B). Solution (C): strike the bell until the meter is full.
- Use the ROPE (D); receive the CASTLE KEY.
- Walk left.
- Combine the BOW and ARROW; shoot the sandbag (E).
- Scroll right. Open the bag; take the NIPPERS (F).
- Examine the links; take the CHAIN (1/2) (G).
- Walk forward.
- Examine the scene; use the Mirror for a mini-game.
- Solution (H).
- Use the Mirror for a mini-game (I).
- Solution (J): trace the chains.
- Take the BENT SWORD (K).
- Use the key (L); receive the KEYS.
- Take the PAW (M).
- Walk down.
- Examine the harness (N); place the PAW. Take the GUARD'S PET.
- Examine the lock (O).
- Use the KEYS; use the key (P).
- Play the HOP; receive the ARMOR (Q).
- Walk down.
- Scroll up. Use the BENT SWORD and TONGS (R); receive the HOT SWORD.
- Scroll down; place the HOT SWORD (S). Use the hammer; take the SHARP SWORD.
- Walk left, then forward.
- Give the GUARD'S PET, ARMOR, and SHARP SWORD (T).

- Talk to the guard; take the KEY SOLUTION (U).
- Examine the gate for a mini-game. Solution (V): (E-B)-(C-E)-(H-C)-(F-H)-(G-F)-(E-G).
- Walk forward.
- Take the ROBE (W). Examine the plant; take the AMBER (X).
- Examine the AMBER; take the KEY PART.
- Examine the water; take the FIGURINE (Y).
- Place the FIGURINE (Z); open the chest.
- Play the HOP; receive the HAND (A).
- Examine the HAND; take the RING.
- Give the RING for a mini-game (B).
- Solution (C).
- Examine the door; take the NIPPERS PART (D).
- Combine the NIPPERS and NIPPERS PART; take the NIPPERS.
- Walk down.
- Use the NIPPERS (E); receive the KEY PART.
- Play the HOP; receive the GEMS (F).
- Combine the CASTLE KEY, KEY SOLUTION, 2 KEY PARTS, and GEMS; take the CASTLE KEY.
- Walk forward.
- Place the CASTLE KEY (G).
- Walk forward.
- Examine the rope 2x (H).
- Use the Mirror for a mini-game.
- Solution (I).
- Use the Mirror for a mini-game (J).
- Solution (K): Trace the chains.
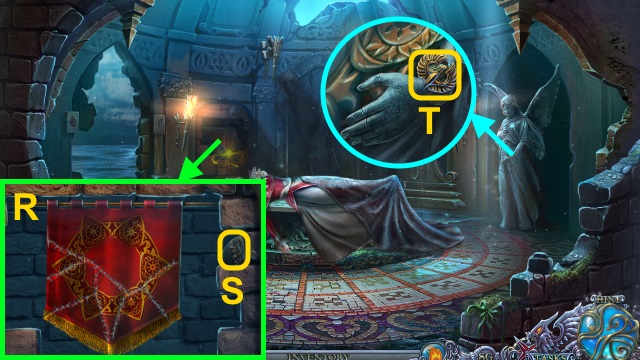
- Examine the books; take the METAL BAR (L).
- Examine the flag; take the FLAGPOLE (M). Place the METAL BAR for a mini-game (N).
- Solution (O).
- Take the SCEPTER and BONE.
- Walk down.
- Place the BONE (P); examine the skeleton. Take the CROWN (Q).
- Walk forward.
- Place the CROWN, SCEPTER, and ROBE (R).
- Take the MEDALLION WEIGHTS (S).
- Place the MEDALLION WEIGHTS for a mini-game (T).
- Solution (U): Multiple solutions are possible; final image is shown.
- Examine the scene; use the Mirror.
Chapter 3: Mortis
- Examine the scene.
- Use the FLAGPOLE 4x (V).
- Talk to Mortis (W).
- Take the BUTTON (1/3) (X).
- Take the BUTTON (2/3) (Y).
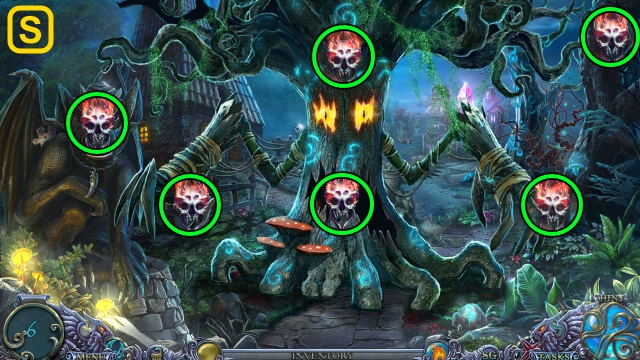
- Examine the skulls; select each skull (Z). Take the BUTTON.

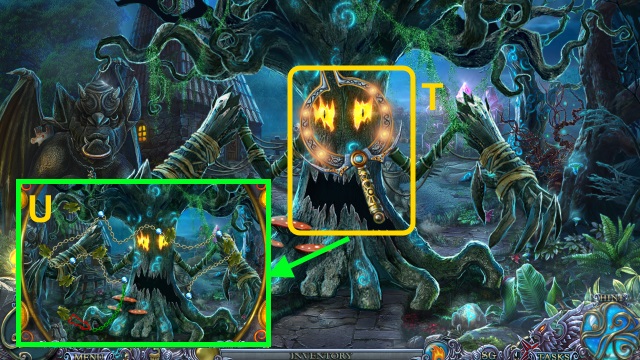
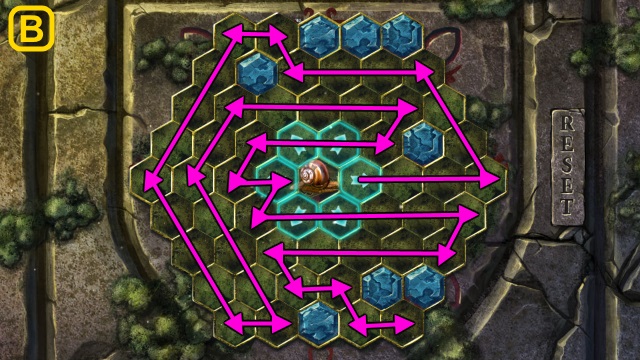
- Take the TOTEM (1/3) (A); place the BUTTON for a mini-game (B).
- Solution (C).
- Take the TOTEM (2/3) (D).
- Take the TOTEM (E).
- Place the TOTEM; take the SUN GRASS and DIAMOND (F).
- Use the DIAMOND; examine the pod (G). Receive the SHARP GLASS.
- Use the DIAMOND; examine the pod (H).
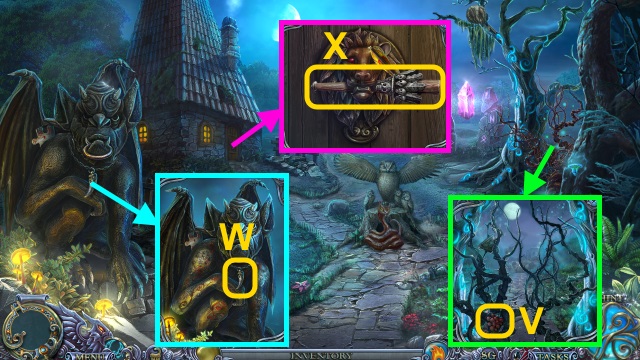
- Talk to the princesses; take the LUNAR KEY (I).
- Walk down.
- Examine the door (J). Examine the notebook (K). Use the SHARP GLASS; open the book. Take the BLANK PAPER and METAL POINTER.
- Examine the chest for a mini-game; solution (L).
- Place the LUNAR KEY (M). Take the BOW and CRYPTEX; examine the painting (N). Take the BOOK SEAL.
- Walk forward.
- Examine the book (O); place the BOOK SEAL.
- Place the herbs and potion; use the mortar and pestle (1-3). Take the POTION OF TRUE SIGHT.
- Pour the POTION OF TRUE SIGHT (P).
- Walk down.
- Use the METAL POINTER (Q); receive the STONE TOOTH. Take the LIBRARY KEY.
- Examine the door (R); use the LIBRARY KEY (S).
- Open the door (T).
- Walk left.
- Examine the book. Play the HOP; receive the DRAGON FIGURINE (U).
- Take the SILVER BUG and SHAFT (V).
- Take the ANCIENT BOOK (W); move the books. Take the CUTTER.
- Take the COAL (X).
- Take the CHALK for a mini-game; solution (Y).
- Use the BLANK PAPER and COAL; take the WRITTEN CODE.
- Combine the CRYPTEX and WRITTEN CODE; enter the code (Z). Open the CRYPTEX; take the AMULET PART.
- Walk down, then forward.
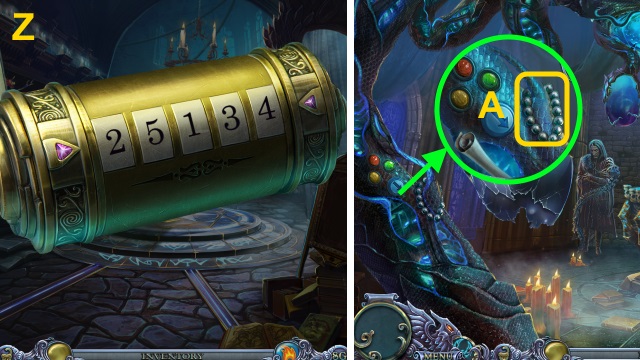
- Use the CUTTER; take the BEADS (A).
- Walk down, then left.
- Place the BEADS; open the door. Examine the scroll (B); take the FEATHER.
- Combine the FEATHER, SHAFT, and STONE TOOTH; take the ARROW.
- Walk down, then forward.
- Combine the BOW and ARROW; shoot the snake (C).
- Take the Mirror and MEDALLION (D).
- Combine the MEDALLION and DRAGON FIGURINE; open the medallion. Take the PART OF CHARON'S AMULET.
- Walk down, then left.
- Place the AMULET PART and PART OF CHARON'S AMULET (E). Take CHARON'S CLOCK.
- Play the HOP; receive the CLOCK HANDS (F).
- Examine CHARON'S CLOCK; place the numbers (G). Place the CLOCK HANDS; take CHARON'S CLOCK.
- Place CHARON'S CLOCK (H); go forward for a mini-game.
- Solution is random (I).
- Examine the scene.
- Take the LAMP and CHEST PUZZLE (1/2) (J).
- Open the bag; take the CHEST PUZZLE and BANNER PART (1/3) (K).
- Take the HANDLE (L).

- Place the CHEST PUZZLE (M); arrange the pieces.
- Move the items; place the HANDLE (N). Take the PICK.
- Use the PICK 3x; receive the DEBRIS. Take the GLOWING CRYSTALS (O).
- Open the LAMP; place the GLOWING CRYSTALS and SUN GRASS. Take the LAMP.
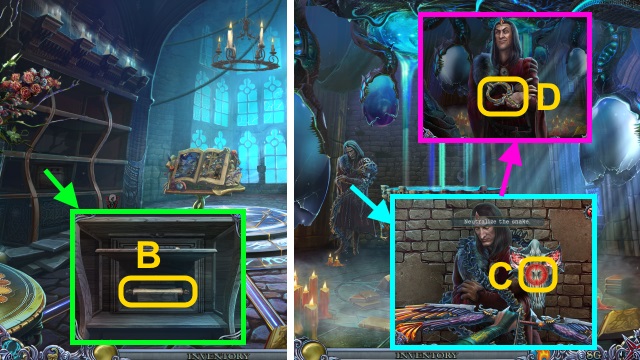
- Use the LAMP (P); examine the stone for a mini-game.
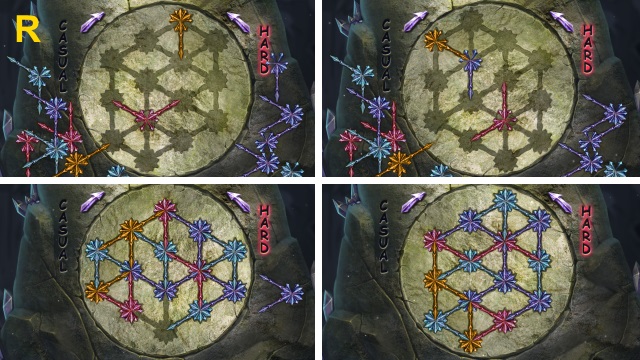
- Casual solution (Q).
- Hard solution (R): rotate counterclockwise between each step.
- Go left.
- Examine the scene; use the Mirror for a mini-game.
- Solution (S).
- Use the Mirror on the tree for a mini-game (T).
- Solution (U): Trace the chains.
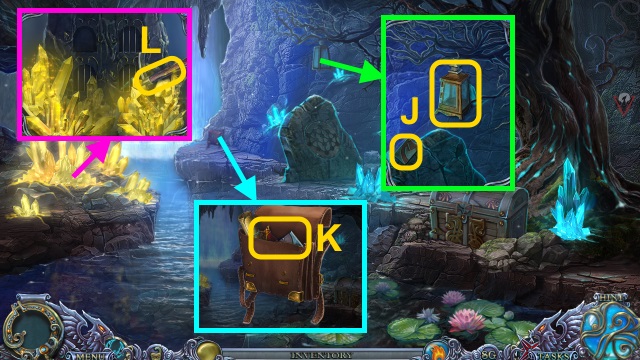
- Take the RED BERRIES (V).
- Take the TALON (W).
- Take the TORCH and STONE ARROW (X).
- Use the TORCH (Y); receive the TORCH WITH RESIN.
- Walk down.
- Use the TALON; take the COPPER BUG (Z).
- Walk left.
- Place the bug; place the SILVER BUG and COPPER BUG (A). Take the LION'S EYE.
- Place the LION'S EYE (B); take the GARGOYLE PICTURE (C).
- Place the GARGOYLE PICTURE, CHALK, and RED BERRIES; color the symbols (D). Take the KNOCKER (E).
- Use the KNOCKER (F).
- Walk left.
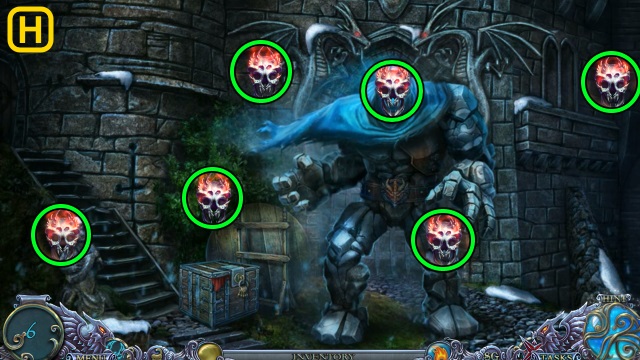
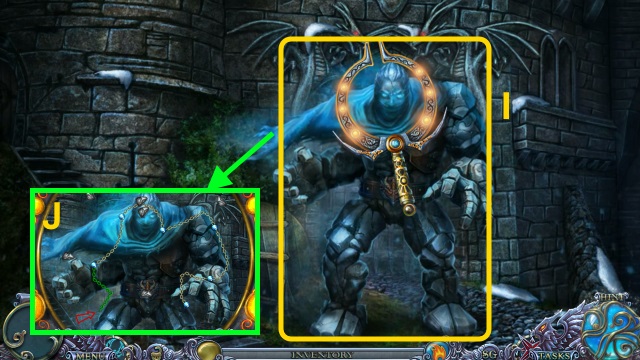
- Combine the BOW and STONE ARROW; shoot Mortis (G).
- Talk to Isa; take the CHEST KEY (H).
- Use the CHEST KEY (I). Play the HOP; receive the GOLDEN CALF'S WOOL.
- Use the TORCH WITH RESIN (J); receive the BURNING TORCH.
- Take MORTIS'S MEDALLION (K).
- Combine the ANCIENT BOOK and MORTIS'S MEDALLION; read the book. Take the TRACTATE.
- Take the BRUSH and COIN (L). Read the book; take the WASP SPRAY.
- Take the SWAN (M).
- Walk down.
- Use the BURNING TORCH; take the CAULDRON (N).
- Use the CAULDRON; receive the WATER (O).
- Use the WASP SPRAY; take the HELIX (P).
- Walk down.
- Use the COIN (Q); receive the SCREW. Use the COIN 3x; receive the FILE.
- Walk left twice.
- Use the FILE (R); receive the CHAIN. Pour the WATER; take the SWAN.
- Walk down.
- Place the CHAIN; turn the handle (S). Take the MAGIC LENS (1/2) (T).
- Walk down.

- Place the swan and 2 SWANS; take the EMERALD SPINDLE (U).
- Walk left twice.
- Place the EMERALD SPINDLE, HELIX, and GOLDEN CALF'S WOOL for a mini-game. Solution (V): turn the handle to fill the meter.
- Receive the GOLDEN CALF'S THREAD.
- Play the HOP; receive the MAGIC LENS (W).
- Place the MAGIC LENS for a mini-game (X).
- Solution (Y).
- Take the UNICORN'S MANE THREAD.
- Place the GOLDEN CALF'S THREAD and UNICORN'S MANE THREAD; take ADRIANNE'S THREAD (Z).
- Walk down.
- Use ADRIANNE'S THREAD (A).
- Go down the path.
Chapter 4: Theresa
- Examine the moss (B).
- Use the DEBRIS (C). Play the HOP; receive the JEWELRY HOOK.
- Take the WOODEN FLINDERS (1/8) (D).
- Take the TAR (E). Use the JEWELRY HOOK (F); take the HORSESHOE and CLAY.
- Take the WOODEN FLINDERS (2/8) (G). Use the BRUSH; place the HORSESHOE (H). Take the OILER and FLINT.
- Use the OILER; take the AXE (I).
- Use the AXE (G); take the FLINDERS (3/8)-(8/8).
- Examine the WOODEN FLINDERS; arrange the pieces (J). Use the TAR; take the PLANK.
- Place the PLANK for a mini-game (K).
- Solution (L).
- Walk forward.
- Take the SUN MIRROR (M).
- Take the BANNER PART (2/3) (N). Move the hand; take the SUN SYMBOL.
- Take the BANNER PART (O). Move the webs (P); receive the FLY.
- Examine the WALL for a mini-game; solution (Q).
- Place the BANNER PART; arrange the parts (R). Take the BANNER WITH SUN, SUN SYMBOL (2/3), and PART OF MOSAIC (1/2) (S).
- Take the PHOENIX FIGURINE (T).
- Walk down.
- Use the FLY; take the PART OF MOSAIC (2/2) (U).
- Place the PHOENIX FIGURINE; take the SUN SYMBOL (V).
- Combine the SUN MIRROR, BANNER WITH SUN, and SUN SYMBOL. Arrange the symbols (W); take the SUN MIRROR.
- Walk forward.
- Examine the object (X); place the PART OF MOSAIC for a mini-game.
- Casual Solution (Y): A-Fx2-Ex2-C-Bx2-Ax2-Bx2.
- Cx2-F-E-Fx2-D-Cx2-Dx2-E-B-Cx2-Bx2-C.
- Hard Solution is random. One possible solution (Y): Ex2-Fx2-Bx2-Ax2-Dx2-Cx2.
- Take the WOODEN JOINT.
- Examine the mechanism; place the WOODEN JOINT (Z).
- Place the SUN MIRROR (A); examine it.
- Talk to Theresa. Use the TRACTATE (B); examine it.
- Talk to Isa; take ISA'S BAG (C).
- Use ISA'S BAG; receive the PAPER WITH CHALKS. Pour the potion; set the colors. Light the candles (D).
- Go through the portal.
- Examine the scene; use the Mirror for a mini-game.
- Solution (E).

- Use the Mirror for a mini-game (F). Solution (G): Trace the chains.
- Take the FLEUR-DE-LIS (H).
- Take the BUTTERFLY and TALISMAN PARTS (1/4) (I).
- Take the GEMS (1/5) (J).
- Take the STATUE'S EYE (1/2) (K). Examine the statue parts in order (1-3); take the GEMS (2/5).
- Walk forward.
- Examine the pocket; read the note (L). Take the GOLD NUGGET. Use the CLAY (M); receive the KEY TEMPLATE.
- Place the BUTTERFLY; arrange the levers (N). Remove the cover; take the GEMS (3/5). Use the PAPER WITH CHALKS; receive the GEM SCHEME.
- Take the GOLDEN SPEAR (O).
- Take the GEMS (4/5) (P).
- Walk down twice.
- Place the FLEUR-DE-LIS for a mini-game; solution (Q).
- Take the SKULL.
- Walk down.
- Play the HOP; receive the JEWELRY TWEEZERS (R).
- Use the GOLDEN SPEAR (S); take the SHIELD (T).
- Walk forward, then left.
- Place the SHIELD; take the PIECE OF MALACHITE STATUE (1/2) (U). Use the JEWELRY TWEEZERS; take the GEMS (5/5) (V).
- Place the SKULL for a mini-game; solution (W).
- Take the TALISMAN PARTS (2/4).
- Place the GEM SCHEME and GEMS; arrange the gems (X). Take the TALISMAN PARTS (3/4).
- Walk forward.
- Place the KEY TEMPLATE, GOLD NUGGET (Y); use the JEWELRY TWEEZERS. Take the SHACKLE KEY.
- Use the SHACKLE KEY; take the FLASK OF FROST (Z).
- Pour the FLASK OF FROST; take the PIECE OF MALACHITE STATUE (A).
- Walk down.
- Place the PIECE OF MALACHITE STATUE; take the STATUE'S EYE (B).
- Walk forward.
- Place the STATUE'S EYE; change the colors to blue (C). Receive the HAMMER. Move the pieces; take the TALISMAN PARTS (D).
- Place the TALISMAN PARTS for a mini-game (E).
- Solution (F).
- Take the RECOVERED TALISMAN.
- Walk down.

- Place the RECOVERED TALISMAN (G); take THERESA'S SOUL.
- Walk down.
- Give THERESA'S SOUL (H); take the KEY TO THE METAL TOWER (I).
- Walk down twice.
- Place the KEY TO THE METAL TOWER (J).
- Walk forward.
Chapter 5: The Metal Tower
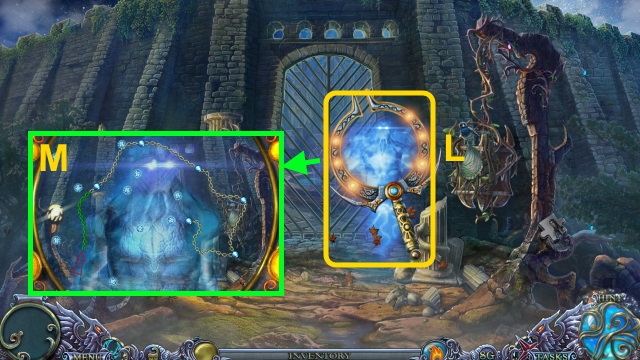
- Use the Mirror for a mini-game.
- Solution (K).
- Use the Mirror for a mini-game (L). Solution (M): Trace the chains.
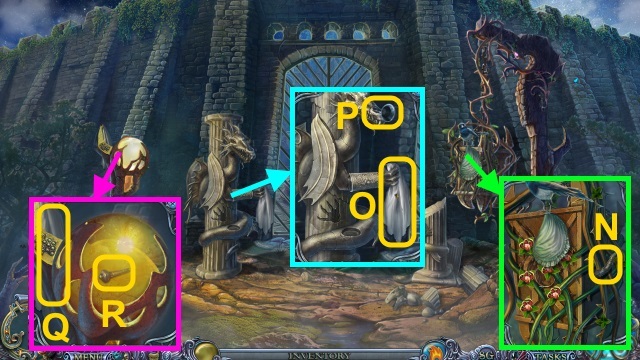
- Take the DRAGON'S HORN (N).
- Take the STAR PIN (O). Take the BELL (P); place the DRAGON'S HORN; take NANNY'S CLOTHES (1/3) (O).
- Take NANNY'S CLOTHES (2/3) (Q). Use the HAMMER (R); move the pieces. Take the BELL-CLAPPER.
- Combine the BELL and BELL-CLAPPER; take the BELL.

- Use the BELL; take NANNY'S CLOTHES (S).
- Give NANNY'S CLOTHES (T).
- Talk to Nanny; take the FIRE BROOCH (U).
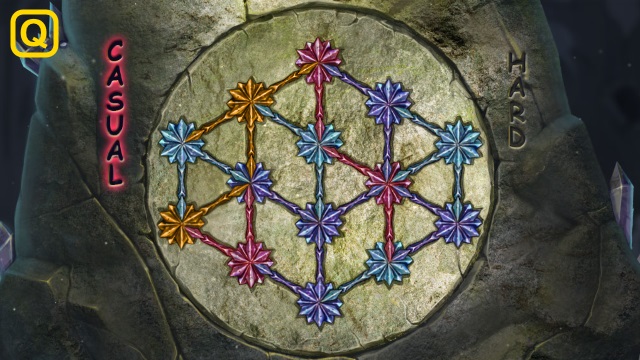
- Examine the wall for a mini-game (V).
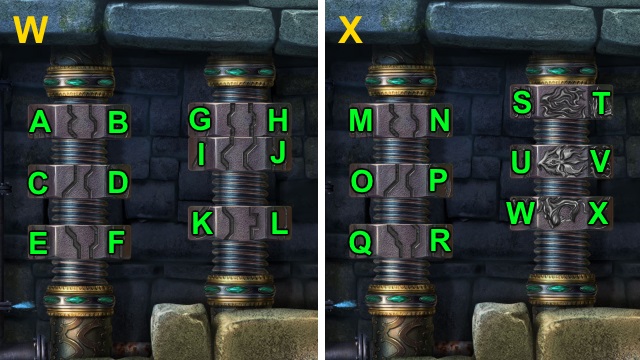
- Casual solution (W): C-Ax2-Bx3-Fx5-Ex7.
- Jx2-Lx7-Kx6-Gx5-Hx4.
- Hard solution (X): O-Mx2-Nx3-Rx5-Qx7.
- V-W-Sx2-Tx4.
- Walk forward.
- Move the curtain. Play the HOP; receive the GRAPES (1/2) (Y).
- Take the PRUNER PART (Z).
- Take the DRAGON'S SCEPTER (A).
- Examine the barrel; take the HOOP (B).
- Walk right.
- Take the PLATE (1/2) (C).
- Take the CARVING INSTRUMENTS (D); match the bottles (E). Remove the label; take the FLOWER ESSENCE.
- Take the INCENSE (F).
- Take the VALVE (G). Place the HOOP (H); take the BUCKET. Use the FLINT (I); take the CANDLE.
- Walk down.
- Place the VALVE; turn it (J). Use the STAR PIN; receive the SPIGOT.
- Use the FLOWER ESSENCE (K); receive the FIREFLY.
- Walk right.
- Place the SPIGOT and BUCKET (L); receive the WINE.
- Place the FIREFLY and weights (M); receive the 9 MEASURES OF FIREFLY'S DUST.
- Walk down twice.
- Use the INCENSE for a mini-game; solution (N).
- Open the case; take the PHOENIX FEATHER (1/7)-(7/7).
- Use the CARVING INSTRUMENTS; take the GRAPES (O).
- Walk forward.
- Place the 9 MEASURES OF FIREFLY'S DUST, WINE, and PHOENIX FEATHER (P); take the FIRE SPHERE (Q).
- Walk right.
- Place the GRAPES (R); take the STRANGE CODE (S).
- Examine the STRANGE CODE; use the CANDLE. Take the MATH CODE.
- Place the MATH CODE; enter the code (T).
- Play the HOP; receive the PRUNER PART (U).
- Combine the 2 PRUNER PARTS and SCREW; take the DULL PRUNER.
- Use the DULL PRUNER (V); receive the PRUNER.
- Play the HOP; receive the PLATE (W).
- Walk down.
- Play the HOP; receive the LEG (X).

- Use the PRUNER (Y); take the PART OF SCEPTER. Place the PLATE; take the BRACELET (1/2) (Z).
- Walk down.
- Place the LEG; take the BRACELET (A).
- Walk forward.
- Place the BRACELET (B); take the PART OF SCEPTER (C).
- Combine the DRAGON'S SCEPTER, FIRE SPHERE, 2 PARTS OF SCEPTER, take the SCEPTER.
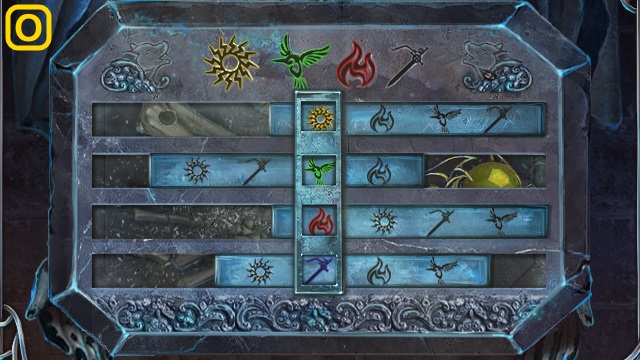
- Use the SCEPTER; select the symbols for a mini-game (D).
- Solution (E): trace the symbols.
- Walk forward.
- Take the ROD (F).
- Take the PHOENIX PART. Pull the lever; place the rod in the gears when the gate raises (G).
- Place the PHOENIX PART; arrange the tiles (H). Take the LATCH.
- Take the LATCH (I).
- Place the 2 LATCHES (J); take the DRAGON PART and ARROW FIGURINE.
- Place the DRAGON PART; arrange the tiles (K). Take the BOW FIGURINE.
- Place the FIRE BROOCH, ARROW FIGURINE, and BOW FIGURINE; take the BOX and QUIVER (L).
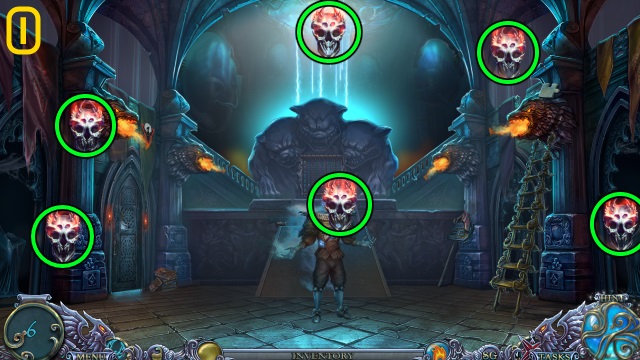
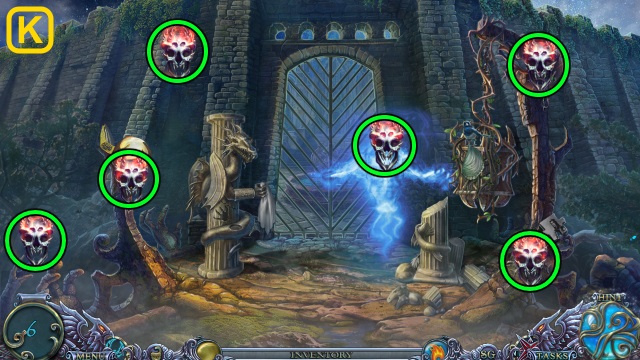
- Combine the BOW and QUIVER; shoot the skulls (M).
- Walk forward.
- Open the box; take the STATUE HAND (N).
- Take the CRAB (O).
- Place the CRAB (P). Play the HOP; receive the RUBEDO.
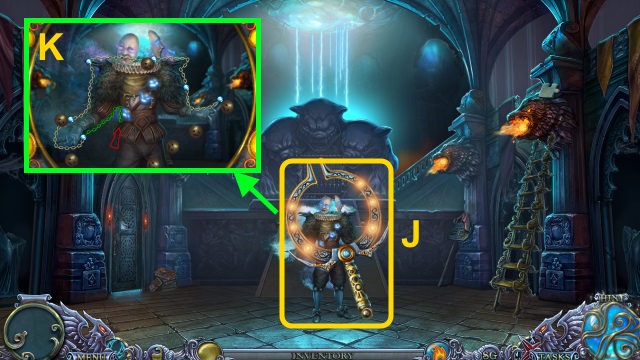
- Place the STATUE HAND for a mini-game (Q).
- Solution (R): (A-E)-(F-A)-(B-F)-(E-B).
- Take the HEAD.
- Combine the BOX and HEAD; take the MEDALLION.
- Place the MEDALLION; take the BEZOAR (S).
- Walk down.
- Use the BEZOAR and RUBEDO; take the CODE (T).
- Walk forward.
- Use the CODE (U); select the runes in order.
- Walk right.
- Take the HAIR TIE (V).
- Take the PELORUS (W).
- Walk down.
- Play the HOP; receive the SNAIL (X).
- Place the HAIR TIE (Y); take the LETTERS.
- Place the LETTERS; press them in order (1-3). Take the BLUE ROSE (Z).
- Walk down.
- Place the SNAIL for a mini-game (A).
- Solution (B).
- Take the INDICATOR.
- Combine the PELORUS and INDICATOR.
- Walk forward, then right.
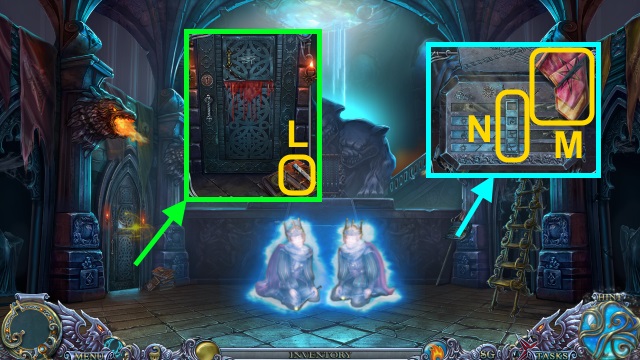
- Use the BLUE ROSE for a mini-game; solution is random (C).
- Use the PELORUS for a mini-game; solution is random (D).
- Talk to Mortis (E); use the Mirror.
Created at: 2017-07-14