

Walkthrough Menu
- General Tips
- Chapter 1: The Lost Spire
- Chapter 2: The Elder
- Chapter 3: The Earth Room
- Chapter 4: The Fire Cell
- Chapter 5: The Metal King
General Tips
- This is the official guide for Spirits of Mystery: The Fifth Kingdom.
- This guide will not show when you have to zoom into a location; the screenshots will show each zoom scene.
- Hidden-object puzzles are referred to as HOPs. This guide will not show screenshots of the HOPs, however, it will mention when an HOP is available and the inventory item you'll collect from it.
- Use the Map to fast travel to a location.
Chapter 1: The Lost Spire
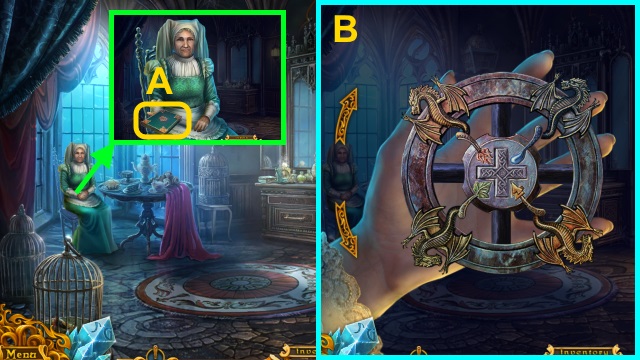
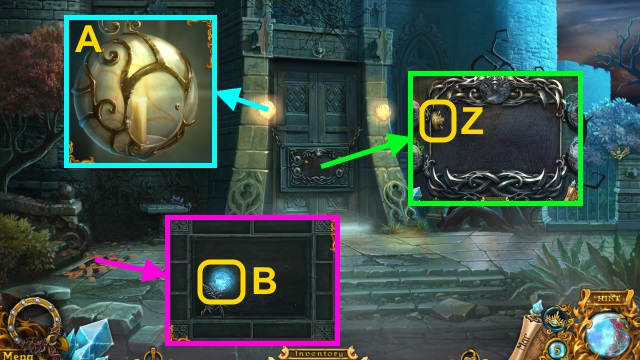
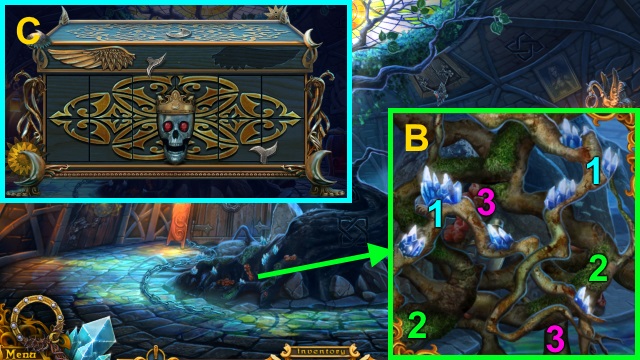
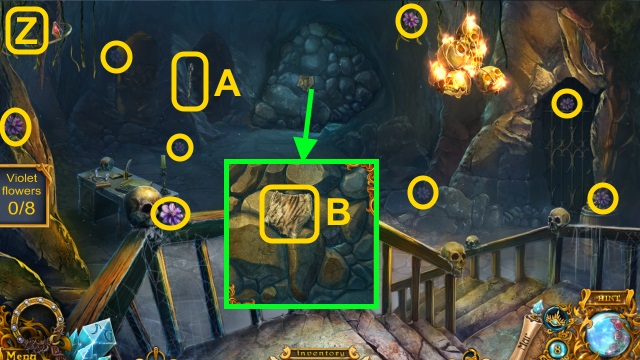
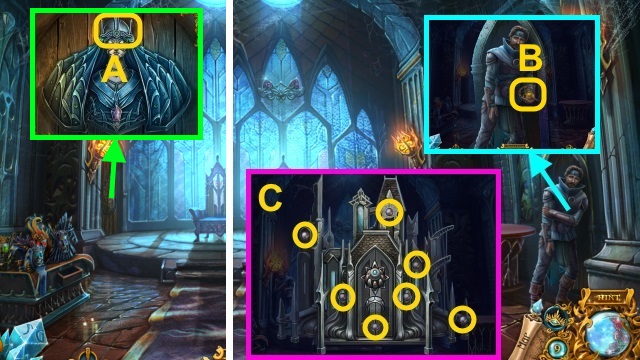
- Talk to Nanny; examine the book (A). Play the HOP; receive the EARTH ELEMENT. Take the medallion for a mini-game.
- Solution (B).
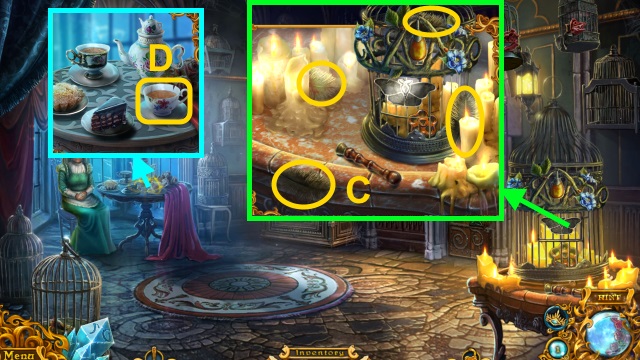
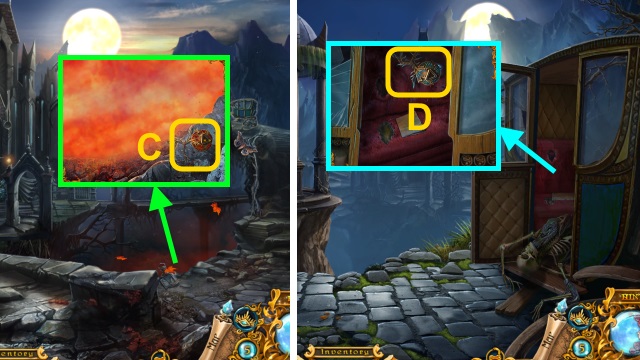
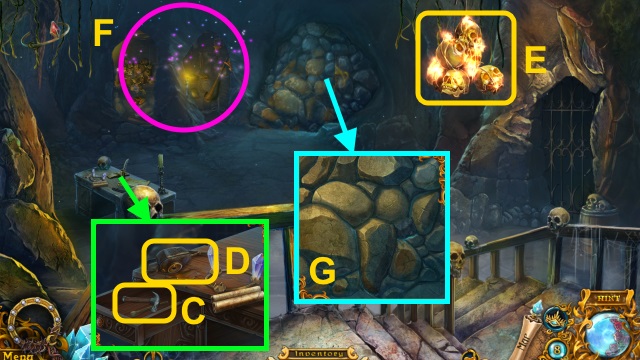
- Gather the feathers (C); take the DUSTER.
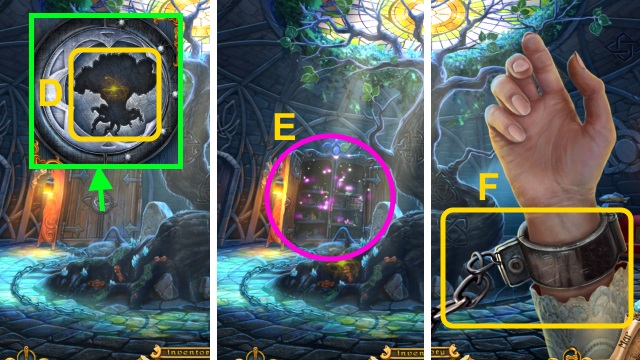
- Drink the tea; take the OLD CUP (D).
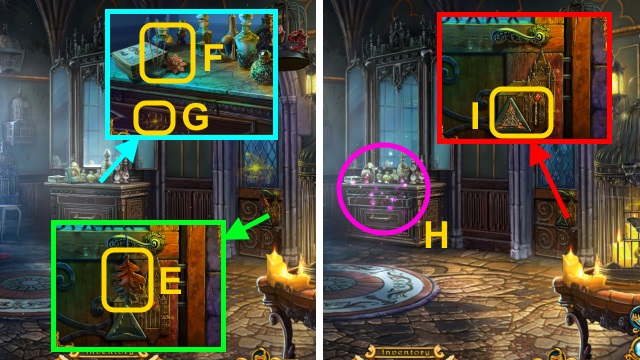
- Examine the door; scroll down. Take the WOODEN LEAF (E).
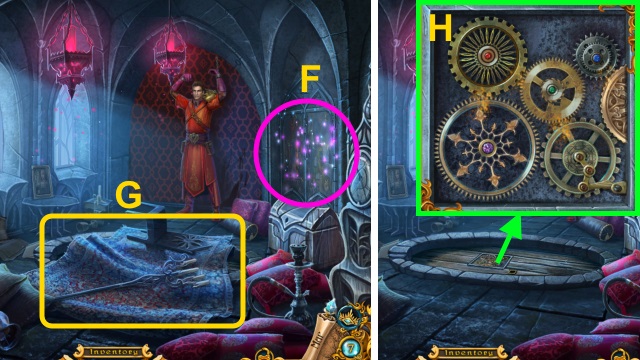
- Examine the picture. Take the INCENSE; examine the flower (F).
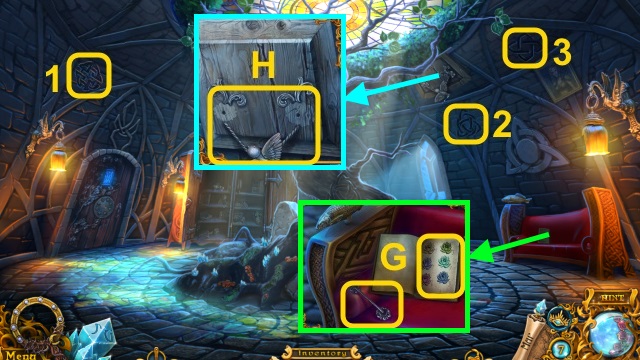
- Place the WOODEN LEAF (G).
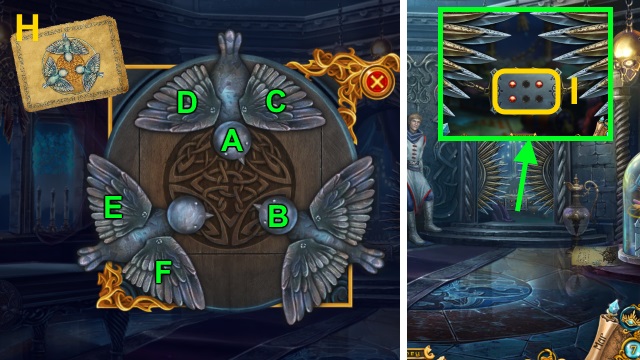
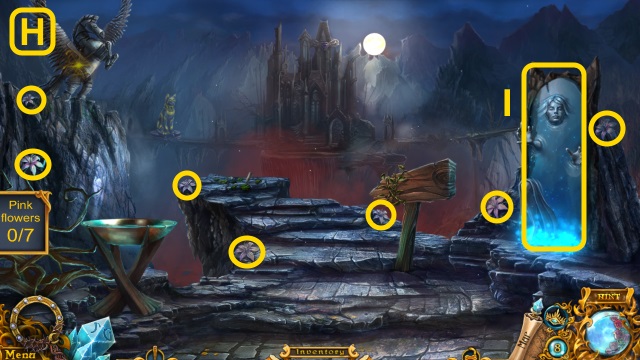
- Play the HOP; receive the KEY (H).
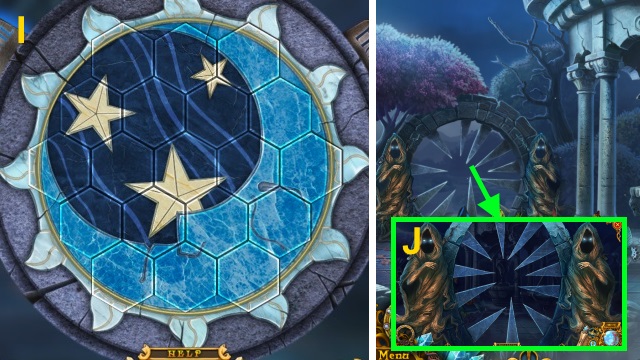
- Scroll down. Place the EARTH ELEMENT; use the KEY (I). Open the door.
- Walk right.
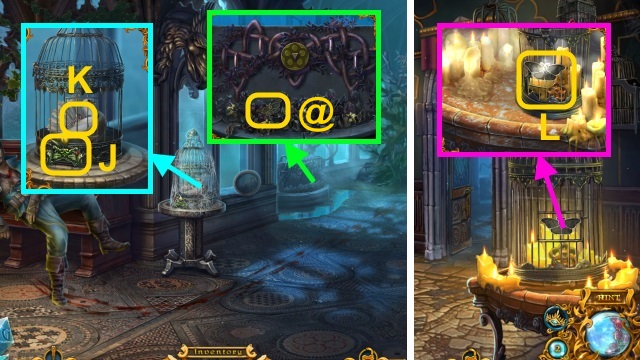
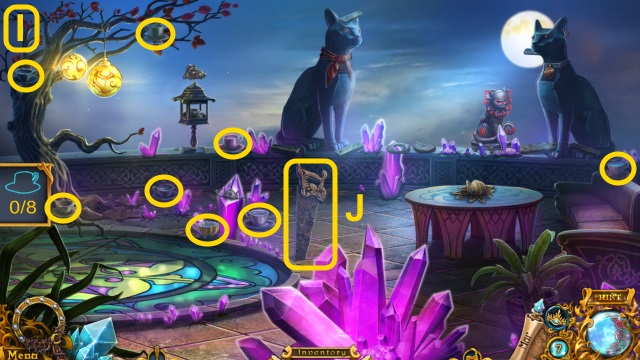
- Take the METAL MOTH (@).
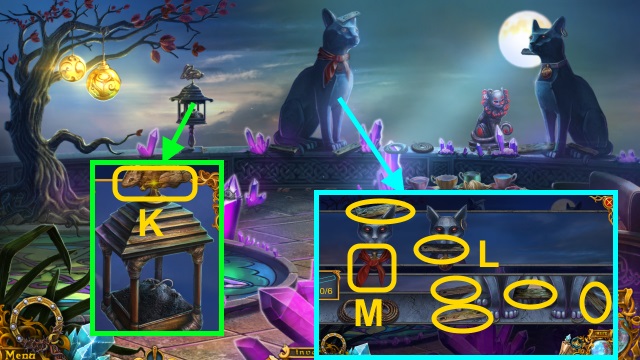
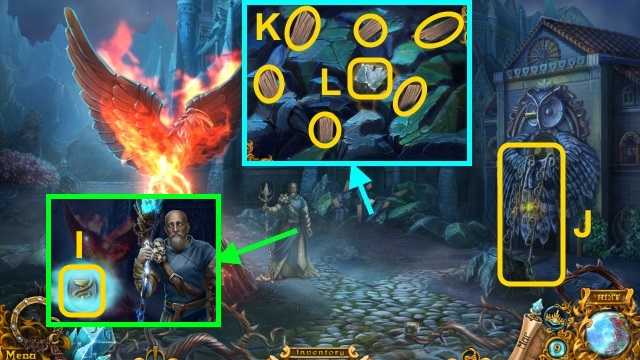
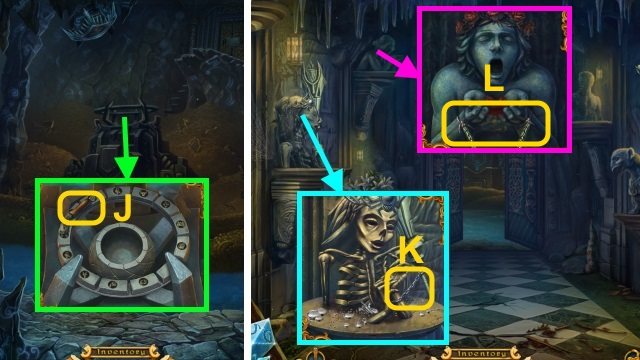
- Use the DUSTER; take the EARTH SYMBOL (J). Open the cage; take the SILVER CADUCEUS (K).
- Walk down.
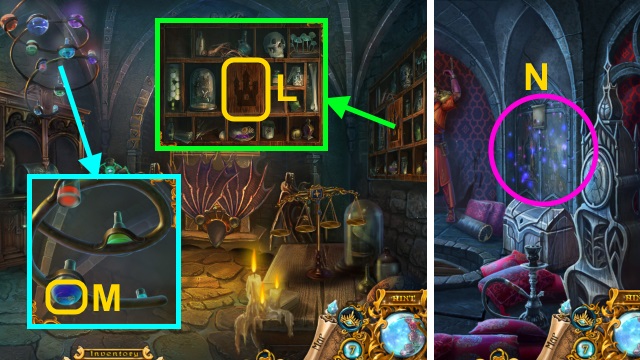
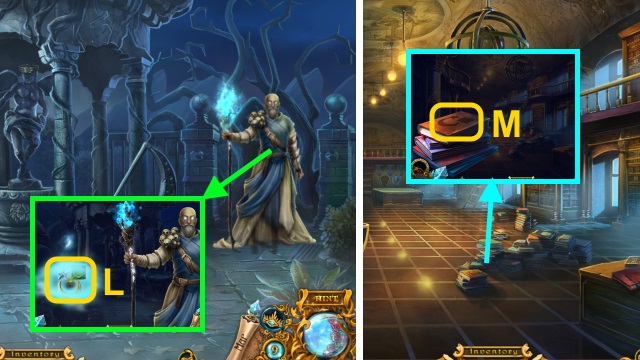
- Place the METAL MOTH; open the cage. Take the VALVE (L).
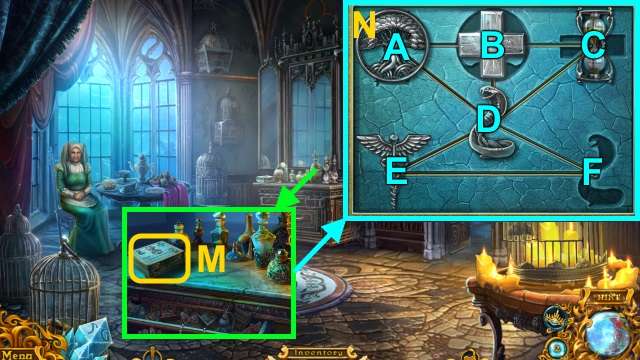
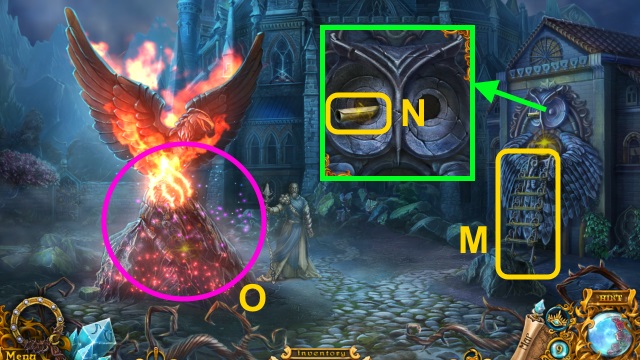
- Examine the box (M); place the SILVER CADUCEUS for a mini-game.
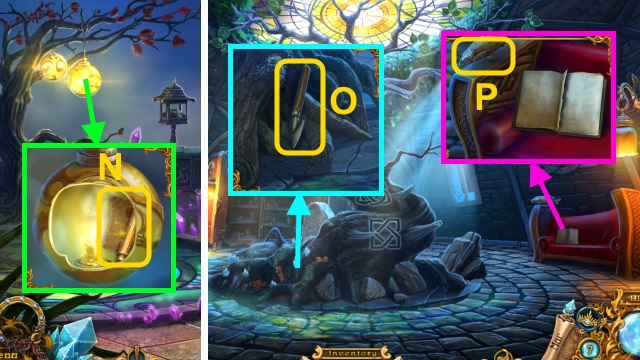
- Solution (N): D-C-B-A-D.
- Take the BANDAGE.
- Walk right.
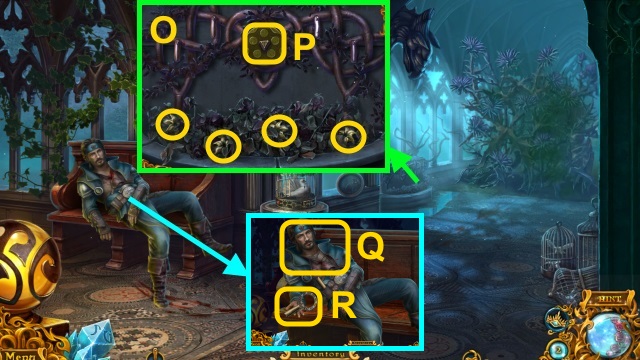
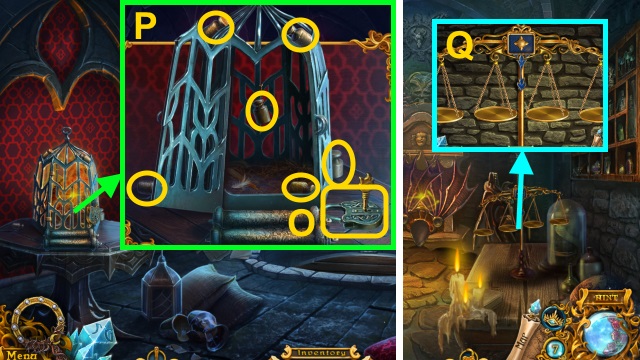
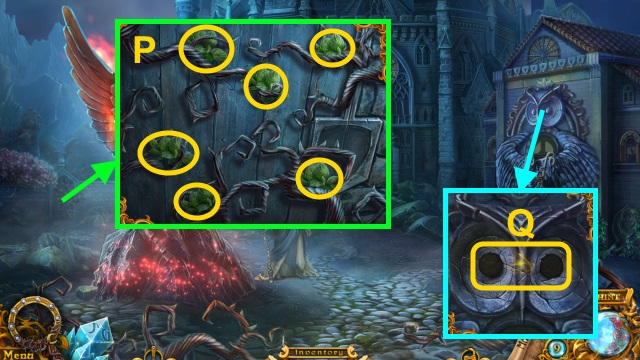
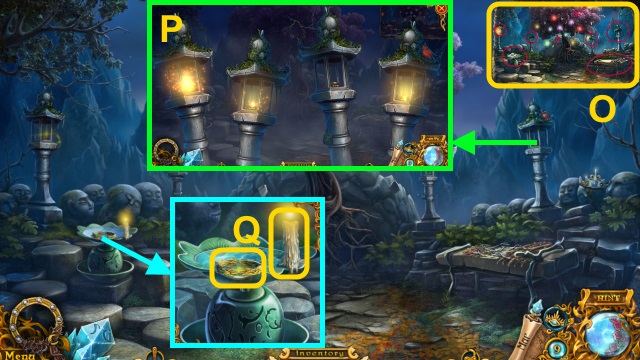
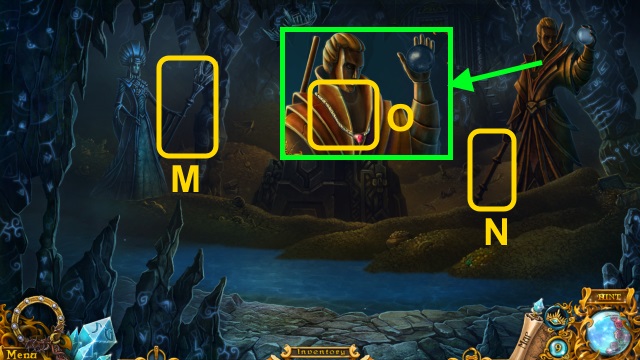
- Collect the flowers (O). Place the VALVE (P); turn it. Use the OLD CUP; receive the CUP OF WATER.
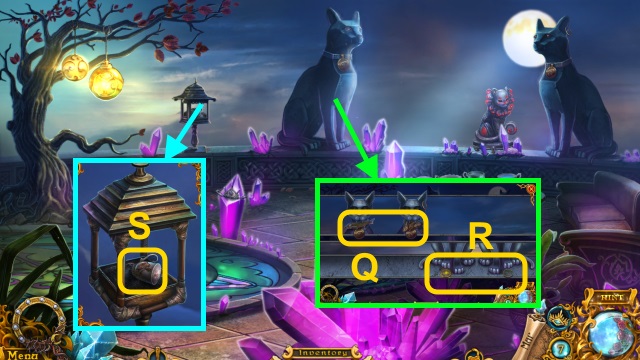
- Talk to the guard; use the BANDAGE (Q).
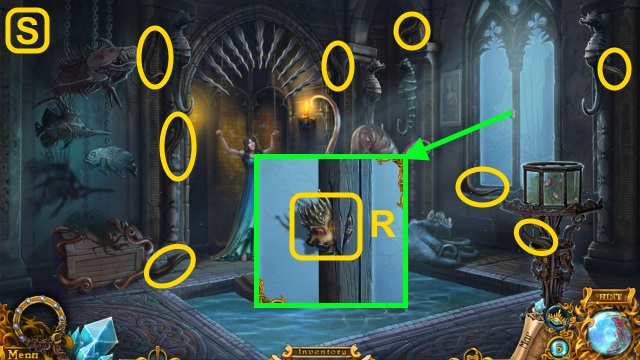
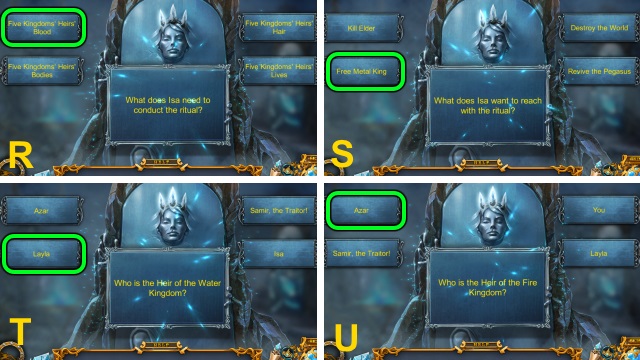
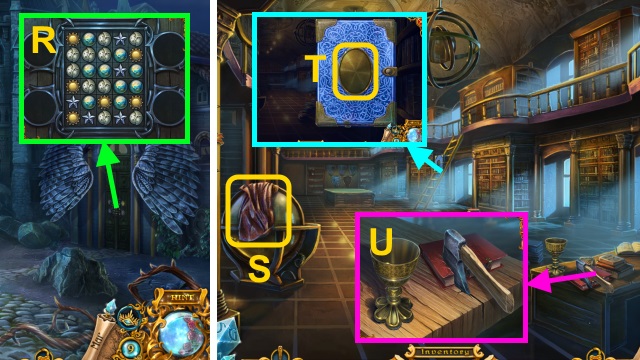
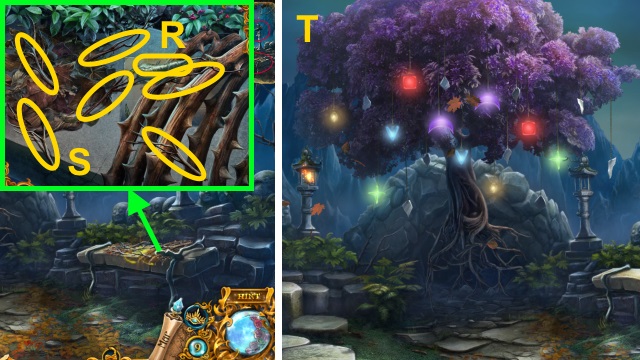
- Give the CUP OF WATER; read the note (R). Take the Moon Mirror and note.
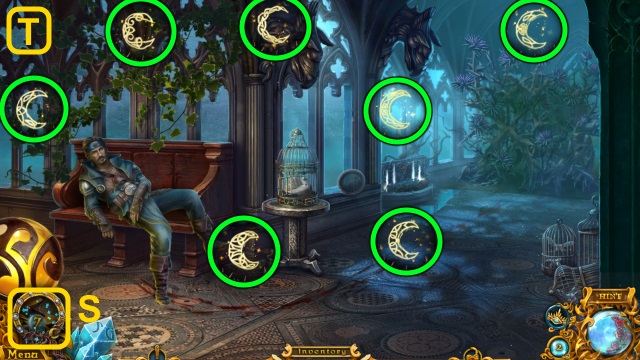
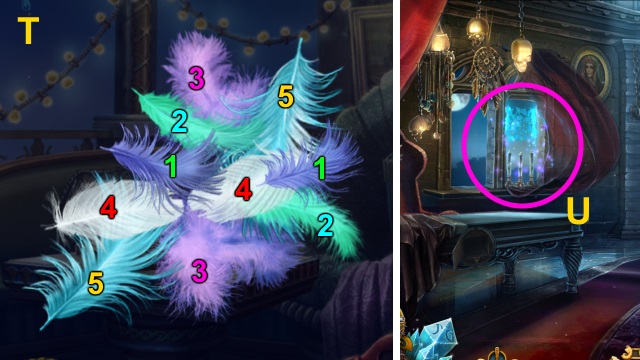
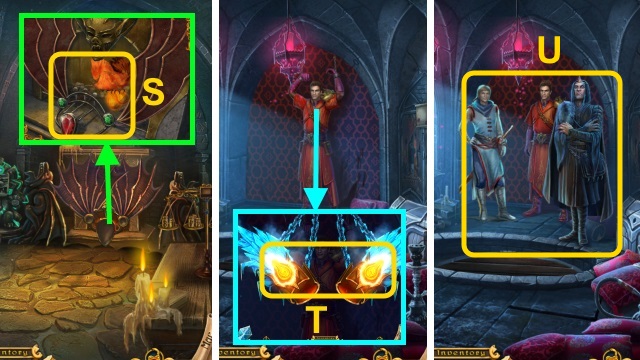
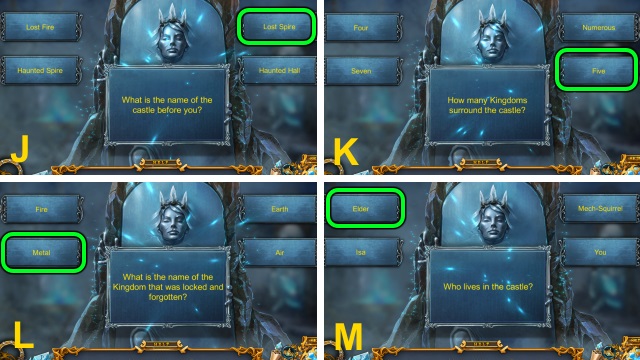
- Use the Moon Mirror for a mini-game (S).
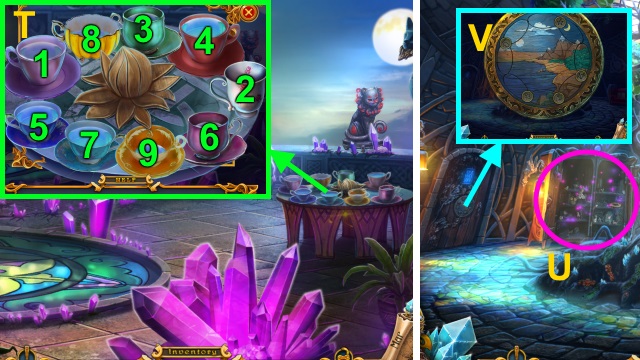
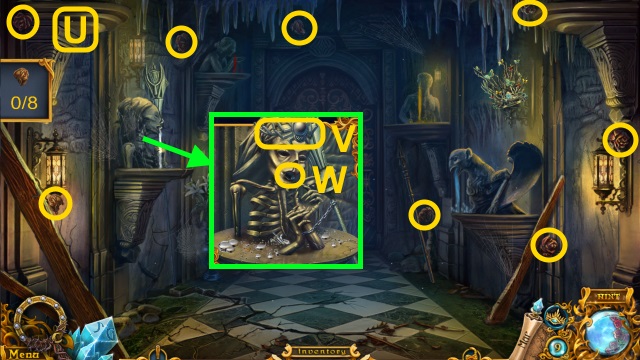
- Solution (T).
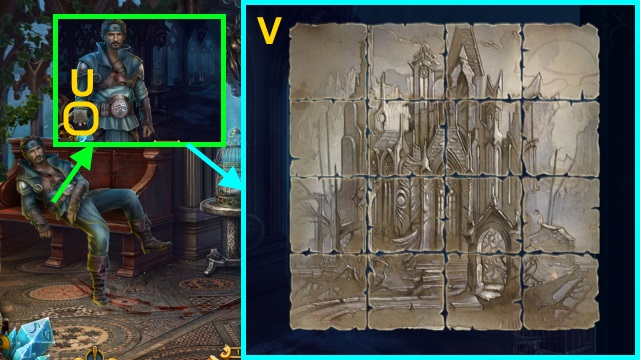
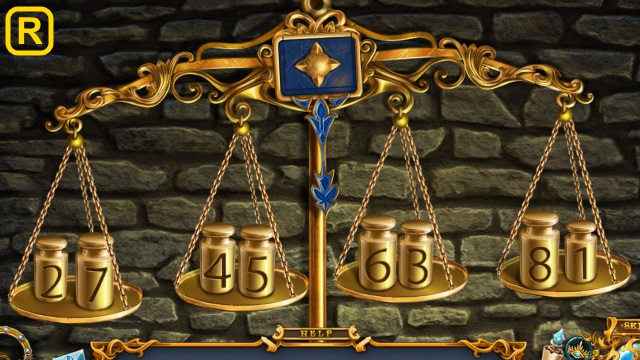
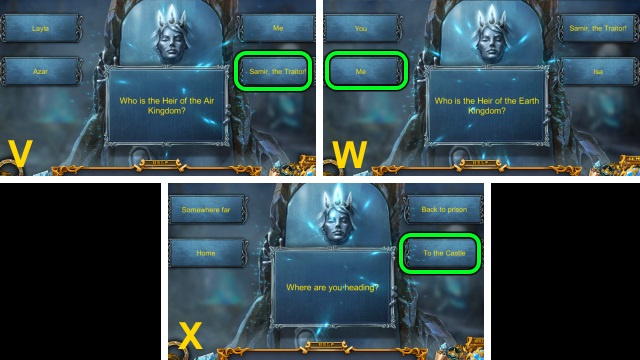
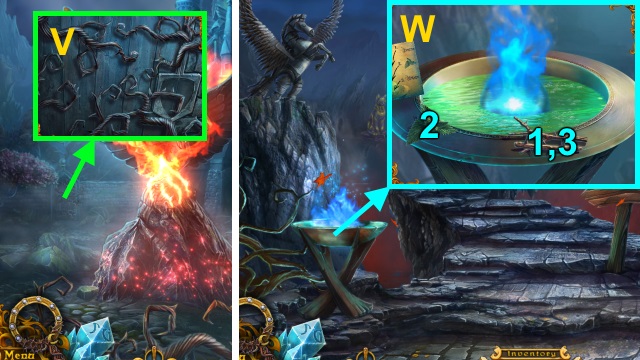
- Talk to the guard; examine the paper for a mini-game (U).
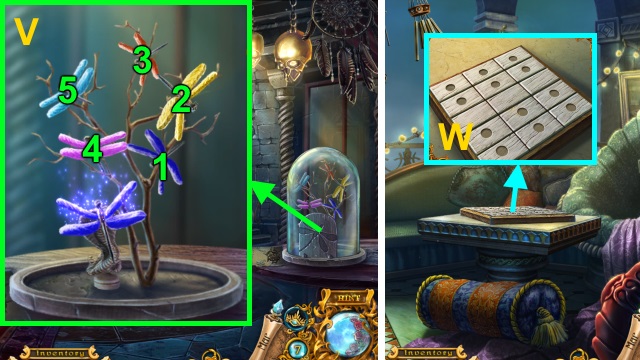
- Solution (V).
- Take the Map.
- Go right.
- Try to walk forward.
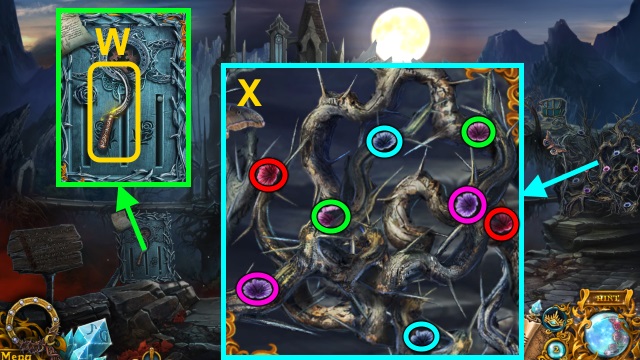
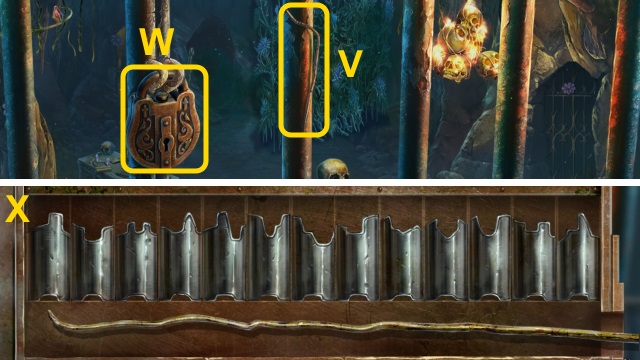
- Take the SICKLE (W).
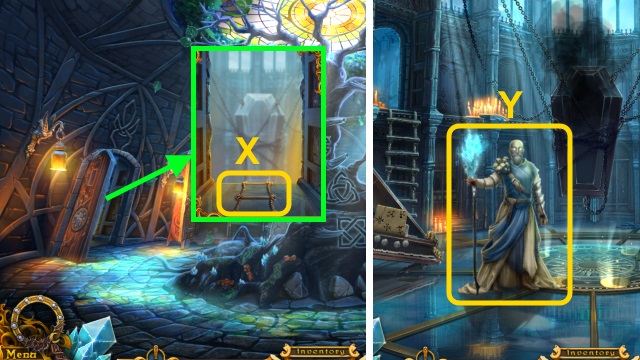
- Use the SICKLE for a mini-game; solution (X).
- Walk right.
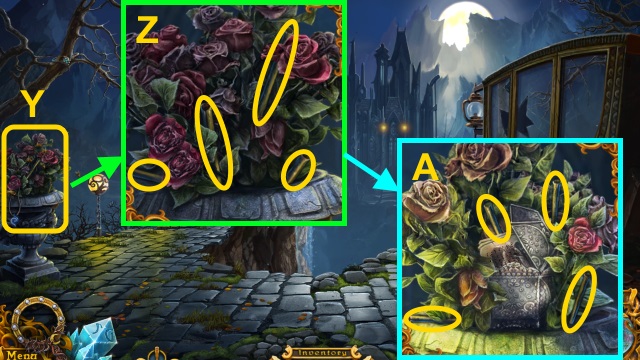
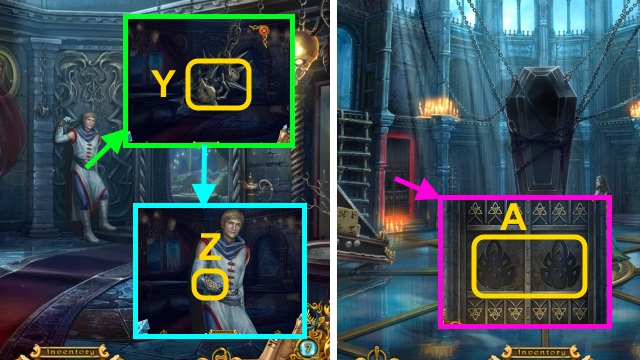
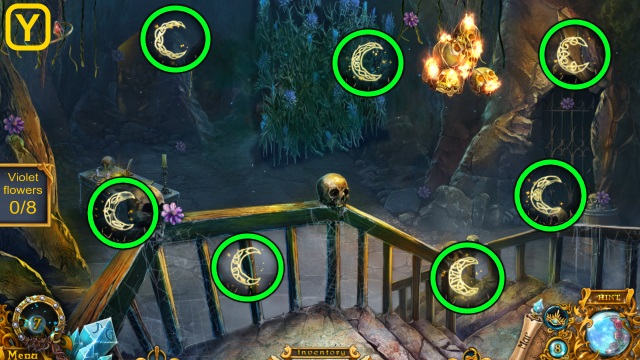
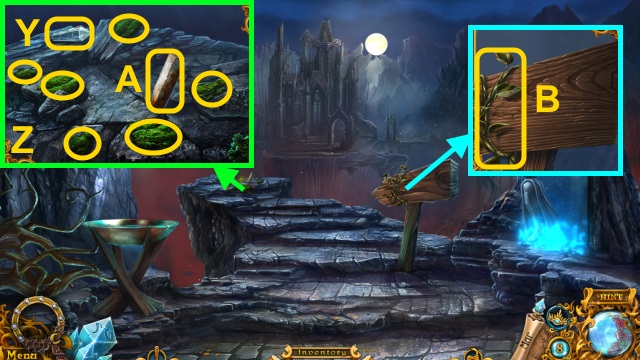
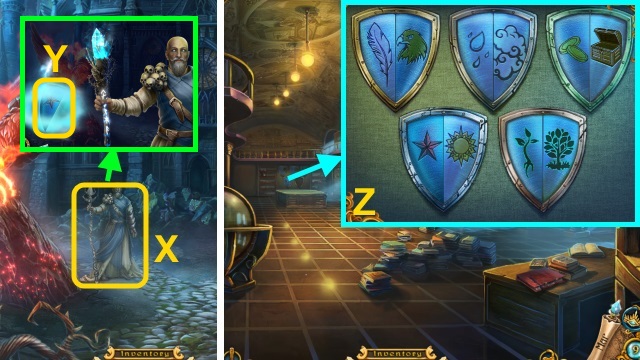
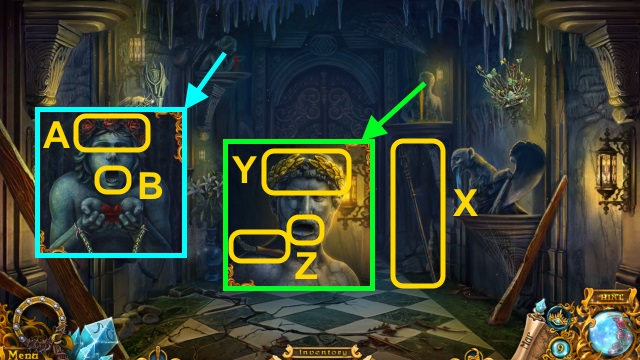
- Use the INCENSE (Y).
- Take the WAVE CRESTS (1/3). Move the leaves; gather the parts (Z).
- Scroll left; move the leaves. Gather the parts (A); receive the FISHING ROD PARTS.
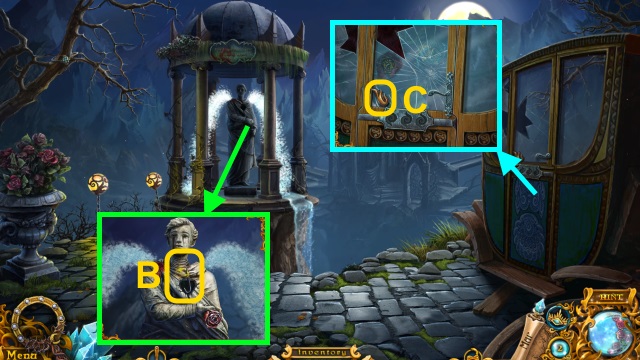
- Take the HOOK AND LINE (B).
- Examine the FISHING ROD PARTS; arrange the parts. Place the HOOK AND LINE; take the FISHING ROD.
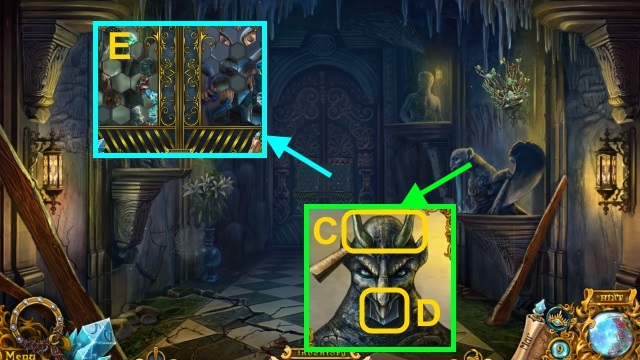
- Take the FLAME SMYBOL (C).
- Walk down.
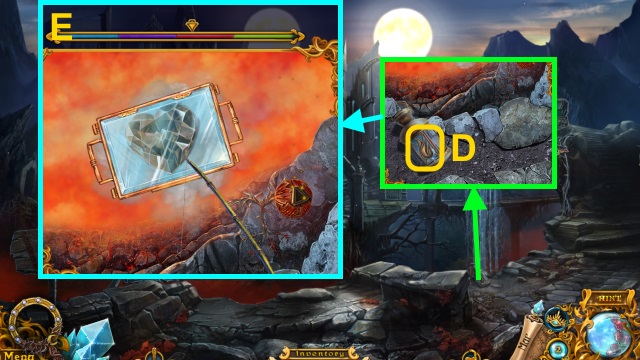
- Place the FLAME SYMBOL (D); take the WAVE CRESTS (2/3).
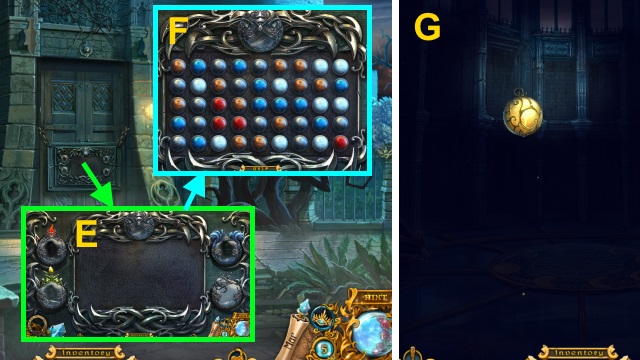
- Scroll up; use the FISHING ROD for a mini-game.
- Solution (E): stop the arrow in the red section of the bar.
- Receive the HUMAN HEART.
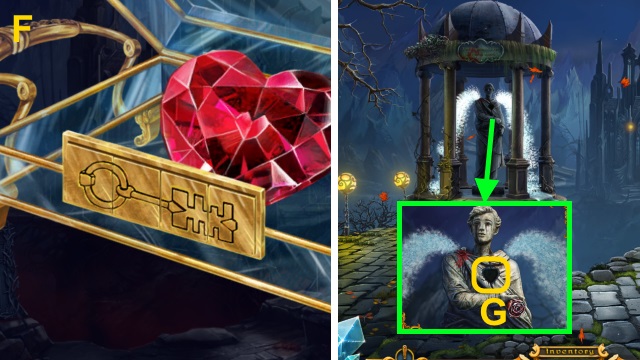
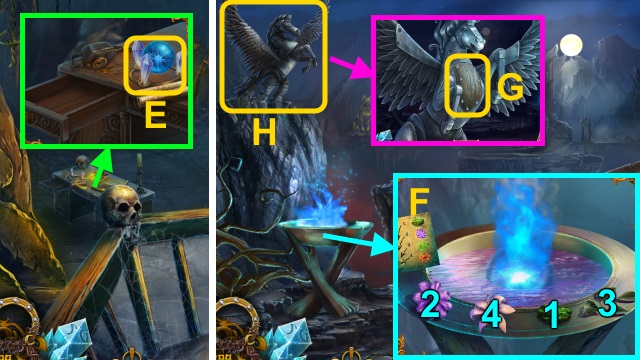
- Examine the HUMAN HEART for a mini-game; solution (F).
- Take the HUMAN HEART.
- Walk right.
- Place the HUMAN HEART (G); receive the ROSE LEVERS (1/2).
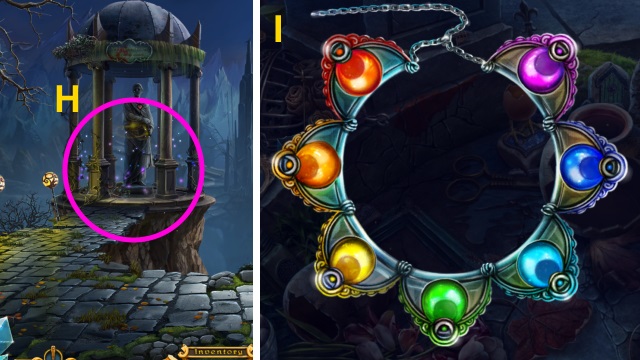
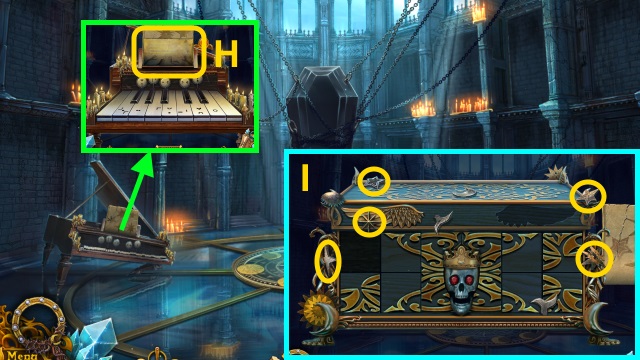
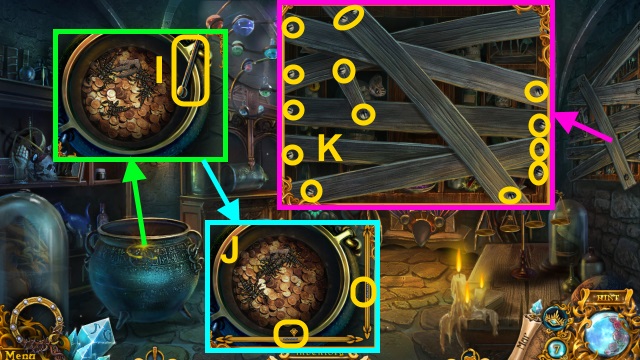
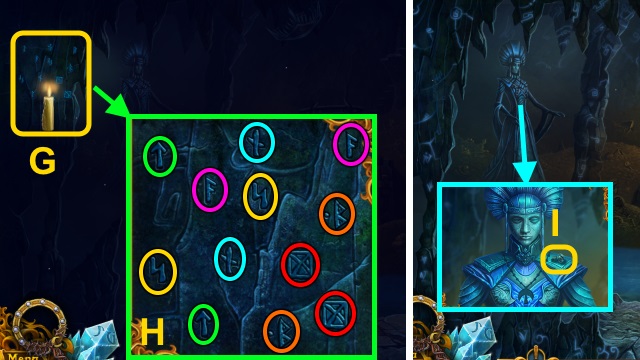
- Play the HOP; receive the WAVE CRESTS (3/3) (H).
- HOP mini-game solution (I).
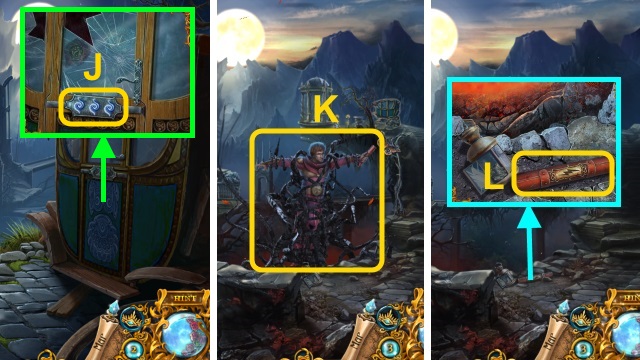
- Place the WAVE CRESTS (3/3) (J); open the door. Move the skeleton; take the ROSE LEVERS (2/2).
- Walk down.
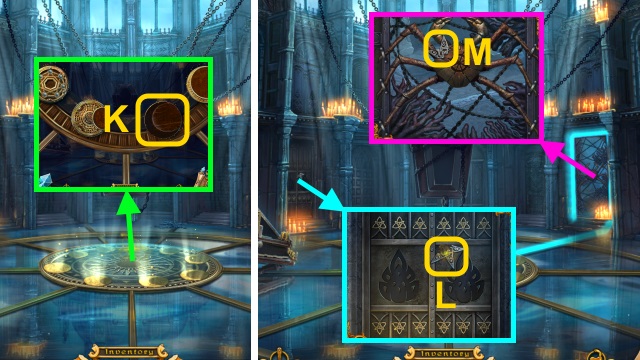
- Talk to the man (K).
- Take the CYLINDER (L).
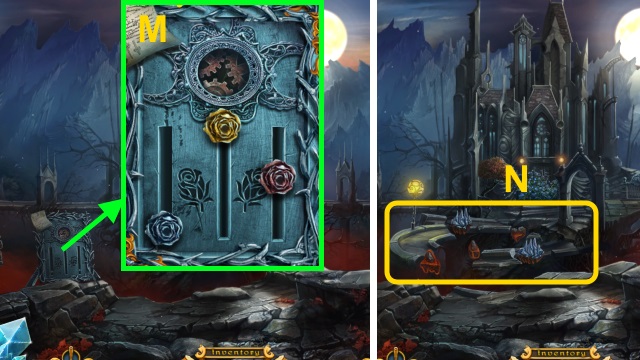
- Place the ROSE LEVERS (2/2); arrange the levers (M).
- Examine the bridge for a mini-game (N).
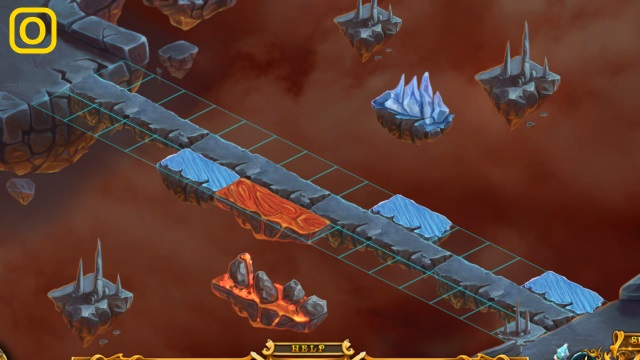
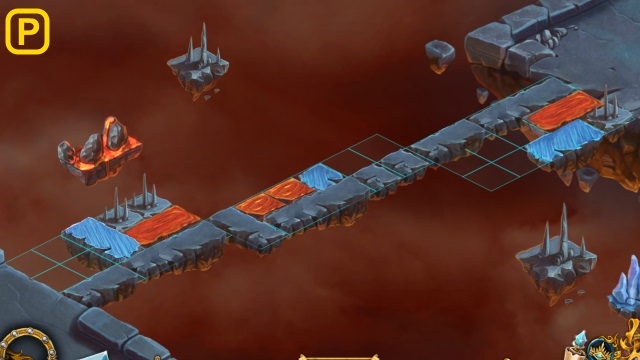
- Solution (O-P).
- Walk forward.
Chapter 2: The Elder
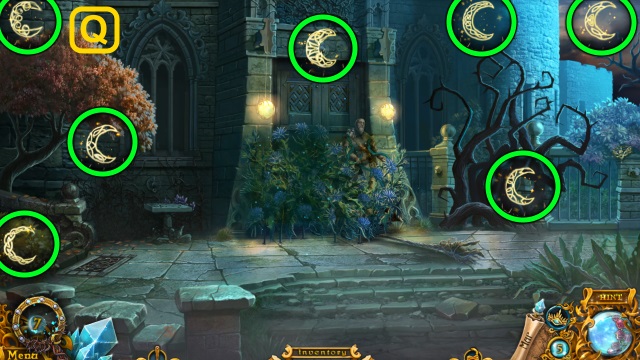
- Use the Moon Mirror for a mini-game.
- Solution (Q).
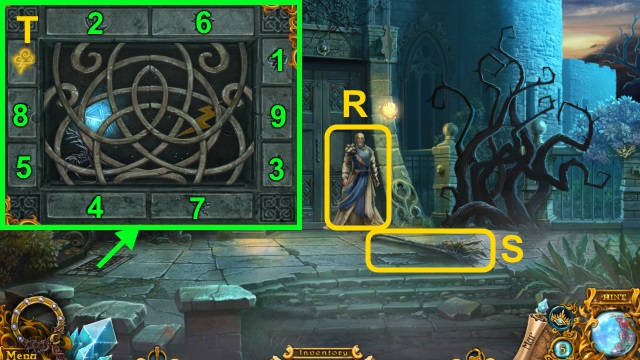
- Talk to the Elder (R).
- Take the BROKEN STAFF (S).
- Examine the grate for a mini-game; solution (T).
- Take the GOLD LIGHTNING.
- Combine the CYLINDER and GOLD LIGHTNING; take the OILER. Read the letter; take the RUBY EYE.

- Take the CRESCENT MOON (U); gather the BLUE CRYSTALS (V).
- Combine the BROKEN STAFF and BLUE CRYSTALS; take the STAFF.
- Give the STAFF; take the CASKET OF ETERNITY (W).
- Open the doors (X).
- Walk forward.
- Examine the scene.
- Examine the doors (Y).
- Take the SMALL CROWN (Z).
- Examine the CASKET OF ETERNITY; place the SMALL CROWN and RUBY EYE. Take the TRIANGLE KEY.
- Take the LAMP (A).
- Use the TRIANGLE KEY (B); take the AIR SYMBOL.
- Walk down.
- Scroll up; use the TRIANGLE KEY (C). Take the FIRE SYMBOL.
- Walk right.
- Use the TRIANGLE KEY (D); take the WATER SYMBOL.
- Walk down, then forward.
- Place the EARTH SYMBOL, AIR SYMBOL, FIRE SYMBOL, and WATER SYMBOL for a mini-game (E).
- Solution is random (F).
- Open the doors; walk forward.
- Use the LAMP (G).
- Examine the scene.
- Read the note; take the STAR CODE (H).
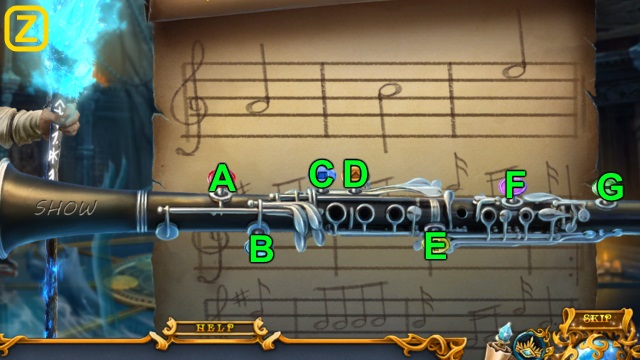
- Combine the CASKET OF ETERNITY and STAR CODE. Find the stars (I); receive the MELODY PART.
- Place the MELODY PART for a mini-game (H).
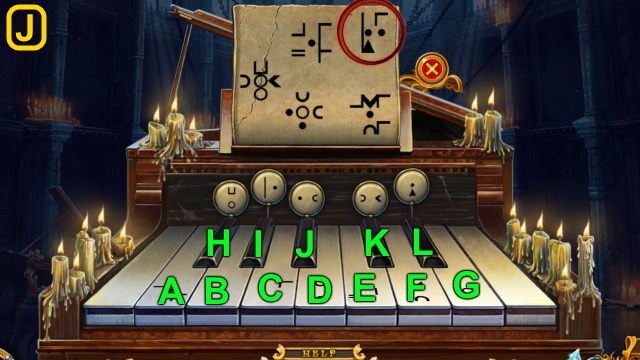
- Solution (J): (C-I-L)-(A-C-E)-(G-H-K)-(D-G-J)-(A-C-F).
- Read the note.
- Place the CRESCENT MOON (K).
- Take the STAR HALF (L).
- Examine the door; take the BROKEN STAR (M).
- Combine the BROKEN STAR and STAR HALF; take the STAR.
- Walk down.
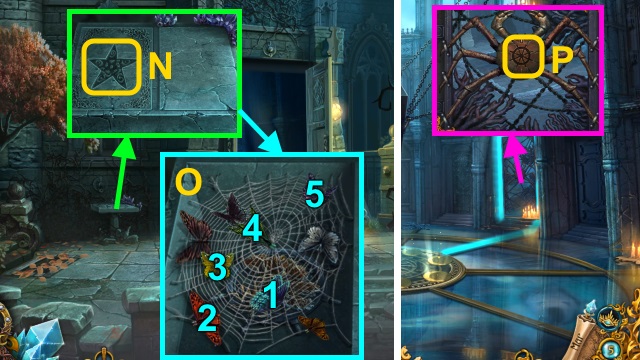
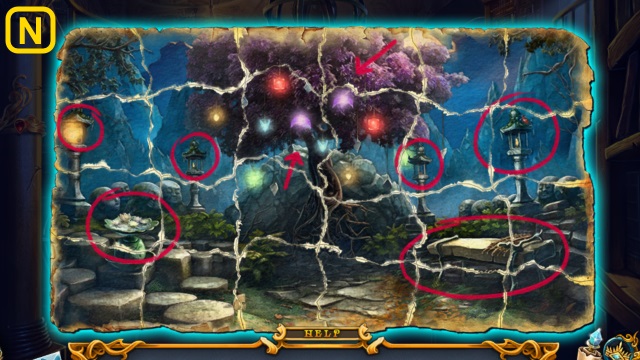
- Place the STAR for a mini-game (N).
- Solution (O).
- Use the DUSTER; take the TREE SYMBOL and WHEEL CREST.
- Walk forward.
- Scroll down; place the WHEEL CREST (P). Examine the door.
- Walk right.
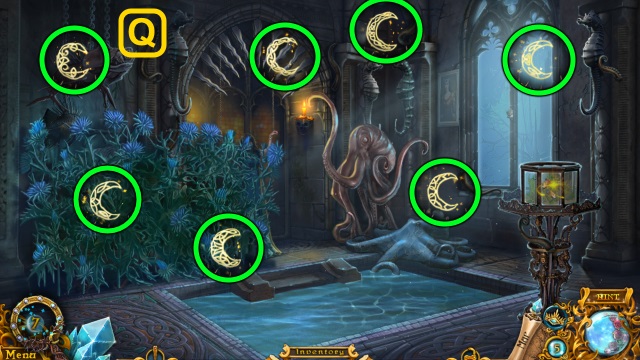
- Use the Moon Mirror for a mini-game.
- Solution (Q).
- Take the BROKEN OCTOPUS (R).
- Gather the OCTOPUS LEGS (S).
- Combine the BROKEN OCTOPUS and OCTOPUS LEGS; take the COPPER OCTOPUS.
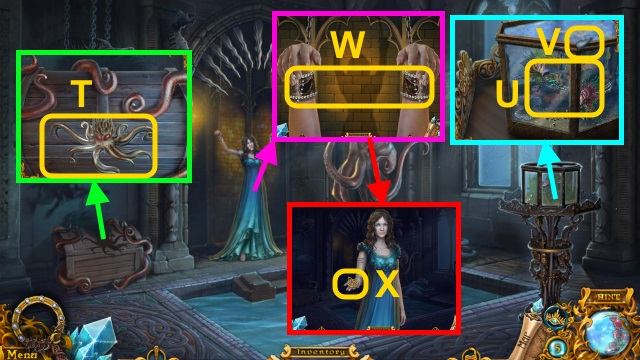
- Place the COPPER OCTOPUS; open the chest (T). Open the shell; take the PEARL (1/2) and FISH FOOD.
- Give the FISH FOOD (U); take the PEARL (2/2) (V).
- Talk to Layla; examine the shackles. Place the PEARL (2/2) (W).
- Take the FIRE EMBLEM (X).
- Walk down.
- Examine the scene.
Chapter 3: The Earth Room
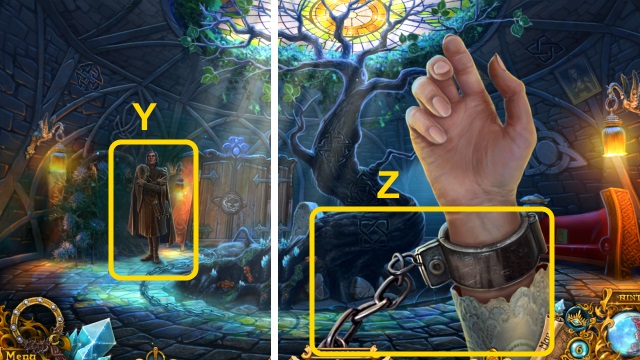
- Talk to Isa (Y).
- Examine the shackles (Z).
- Use the Moon Mirror for a mini-game.
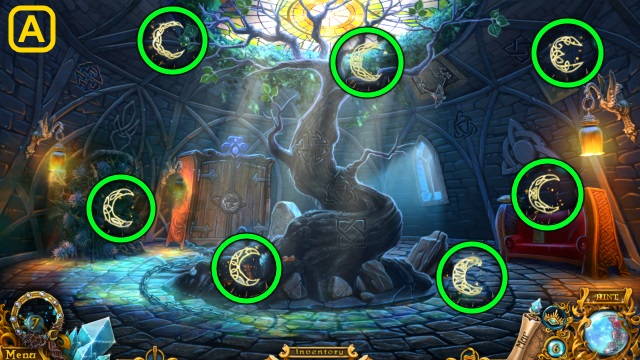
- Solution (A).
- Match the roots (B); take the PATTERN PART.
- Combine the CASKET OF ETERNITY and PATTERN PART for a mini-game.
- Solution (C); take the TREE HEART.
- Combine the TREE SYMBOL and TREE HEART; take the TREE HEART.
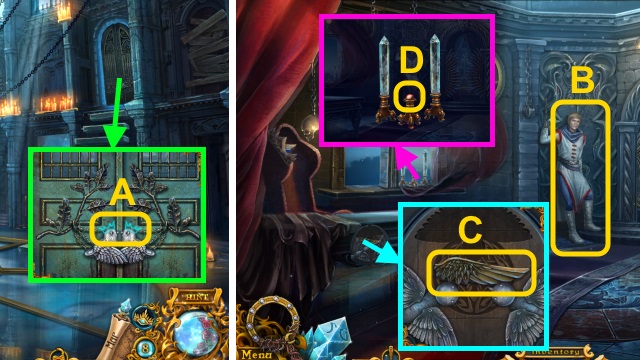
- Place the TREE HEART (D).
- Play the HOP; receive the BROKEN MECH-SQUIRREL (E).
- Examine the BROKEN MECH-SQUIRREL; assemble it. Take the MECH-SQUIRREL.
- Use the MECH-SQUIRREL (F).
- Find the Symbols (1-3).
- Open the book; take the PICTURE PART and HANDLE (G).
- Take the BIRD; place the HANDLE (H).
- Go up.
- Find the cups (I).
- Take the RUSTY SAW (J).
- Combine the RUSTY SAW and OILER; receive the EMPTY OILER. Take the SAW.
- Use the SAW; receive the WOODEN RABBIT (K).
- Gather the pieces (L); take the ROPE LADDER and HANDKERCHIEF (M).
- Open the lantern; take the PICTURE PART (N).
- Examine the PICTURE PART; take the SCOOP HANDLE. Place the PICTURE PART; take the PICTURE.
- Walk down.
- Place the SCOOP HANDLE; take the SCOOP (O).
- Use the SAW; receive the WOODEN FISH (P).
- Go up.
- Give the WOODEN RABBIT and WOODEN FISH (Q); take the CHIP (1/3)-(2/3) (R).
- Use the SCOOP; take the DIRTY CUP (S).
- Combine the DIRTY CUP and HANDKERCHIEF; take the TINY CROWN (1/2) and CUP.
- Place the PICTURE and CUP for a mini-game.
- Solution (T).
- Take the CHIP (3/3).
- Walk down.
- Play the HOP; receive the TINY CROWN (2/2) (U).
- Place the CHIP (3/3) for a mini-game (V).

- Solution (W).
- Use the ROPE LADDER (X).
- Go down the ladder.
- Talk to the Elder (Y); examine him for a mini-game.
- Solution (Z): (A-G-B)-(E-A-C-G-A).
- (G-A-G-D-F-E-G)-(F-G-D-A-E-G-D-F-A).
- Scroll down; place the TINY CROWN (2/2) (A).
- Walk right.
- Talk to Samir (B).
- Take the WING CREST (C).
- Combine the CASKET OF ETERNITY and WING CREST; take the CRYSTAL and CASTLE.
- Take the LAMP (1/3) (D); place the CRYSTAL.
- Play the HOP; receive the PICTURE WITH BIRDS (E).
- Take the NET and LAMP (2/3) (F).
- Place the BIRD and PICTURE WITH BIRDS for a mini-game (G).
- Solution (H): Ax2-B-Cx2-D-Fx3-Ex2.
- Take the LAMP (3/3).
- Place the LAMP (3/3) for a mini-game (I).
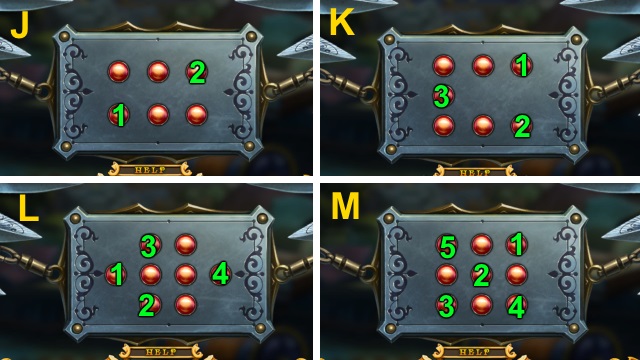
- Solution (J-M).
- Walk forward.
- Take the BROKEN NET (N).
- Combine the BROKEN NET and NET; take the NET.
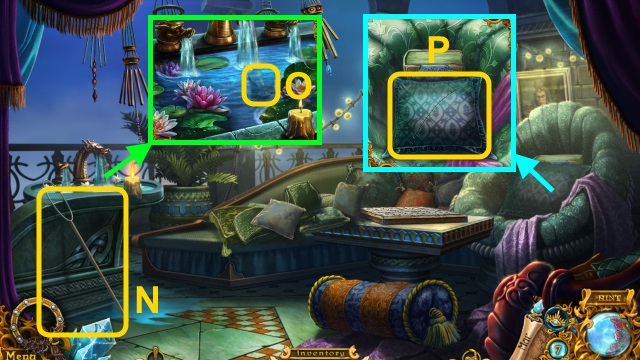
- Use the NET; take the CHESS PIECE (1/12) (O).
- Take the PILLOW and METAL DRAGONFLY (P).
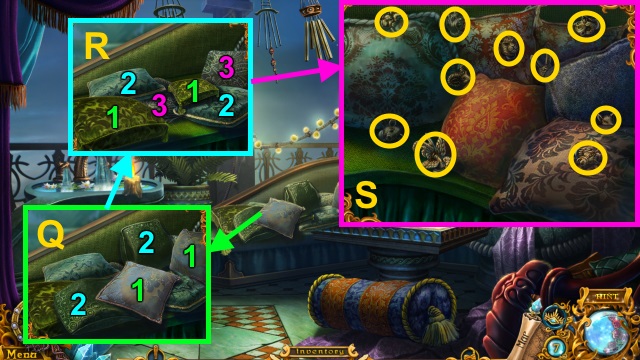
- Match the PILLOWS (Q-R); take the GEAR (1/3) and GLASS SHARD.
- Use the GLASS SHARD; gather the CHESS PIECE (2/12)-(11/12) (S).
- Combine the PILLOW and GLASS SHARD for a mini-game.
- Solution (T); take the AIR KEY (1/2).
- Walk down.
- Play the HOP; receive the CHESSBOARD SOLUTION (U).
- Place the METAL DRAGONFLY for a mini-game; solution (V).
- Take the CHESS PIECE (12/12).
- Walk forward.
- Place the CHESS PIECE (12/12) and CHESSBOARD SOLUTION for a mini-game (W).
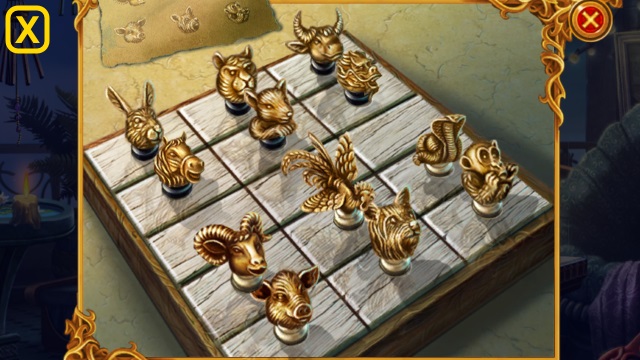
- Solution (X).
- Take the AIR KEY (2/2).
- Walk down.
- Use the AIR KEY (2/2) (Y).
- Take the FIRE EMBLEM (Z).
- Walk down.
- Place the 2 FIRE EMBLEMS (A).
- Walk left.
Chapter 4: The Fire Cell

- Talk to Azar (B).
- Take the HAMMER (C).
- Take the GEAR (2/3) (D).
- Use the GLASS SHARD (E).
- Play the HOP; receive the GEAR (3/3) (F).
- Move the chair and rug (G).
- Take the EMERALD (1/2). Place the GEAR (3/3); arrange the gears (H).
- Go forward.
- Take the TONGS (I); use the NET for a mini-game.
- Solution (J): stop the arrows inside the silver part of the bars.
- Receive the CASTLE CREST.
- Use the HAMMER; collect the nails (K). Play the HOP; receive the EMERALD (2/2).
- Place the CASTLE CREST (L); take the CRESCENT CREST.
- Combine the CASTLE and CRESCENT CREST; take the RUBY.
- Use the TONGS (M); receive the CAGE KEY.
- Walk down.
- Play the HOP; receive the FIRE MAGIC GEM (1/2) (N).
- Use the CAGE KEY (O); take the PHOENIX. Gather the WEIGHTS (P).
- Go forward.
- Place the WEIGHTS for a mini-game (Q).
- Solution (R).
- Take the FIRE MAGIC GEM (2/2).
- Place the EMERALD (2/2), RUBY, PHOENIX, and FIRE GEM (2/2); take the ACTIVATED FIRE GEM (1/2)-(2/2) (S).
- Walk down.
- Place the ACTIVATED FIRE GEM (2/2) (T).
- Talk to Isa (U).
- Take the PIN (V).
- Examine the PIN 3x; receive the PIN.
- Use the PIN for a mini-game (W).
- Solution (X).
- Use the Moon Mirror for a mini-game.
- Solution (Y).
- Collect the VIOLETS (Z).
- Take the TORCH (A).
- Take the RAG (B).
- Examine the TORCH; use the RAG. Receive the TORCH WITH RAG.
- Open the drawer; take the HAMMER and TONGS (C).
- Use the EMPTY OILER (D); receive the OIL. Use the TORCH WITH RAG; receive the UNLIT TORCH.
- Use the UNLIT TORCH (E); receive the LIT TORCH.
- Use the LIT TORCH (F). Play the HOP; receive the PICKAXE.
- Use the PICKAXE 5x (G).
- Walk forward.
- Gather the PINK FLOWERS (H).
- Examine the mirror for a mini-game (I).

- Solution varies; answers are shown (J-Q).
- Solution varies; answers are shown (R-X).
- Read the note; take the KNIFE HANDLE and RECIPE.
- Take the CRYSTAL (Y); gather the MOSS (Z).
- Use the TONGS (A); receive the KNIFE BLADE.
- Combine the KNIFE HANDLE, KNIFE BLADE, and OIL; receive the KNIFE.
- Use the KNIFE; take the LEAVES (B).
- Walk down.

- Play the HOP; receive the VIAL (C).
- HOP mini-game solution (D).
- Place the CRYSTAL; take the MAGIC FIRE ORB (E).
- Walk forward.
- Place the VIOLETS, PINK FLOWERS, MOSS, LEAVES, RECIPE, and MAGIC FIRE ORB. Place the ingredients in the bowl in order (F); use the VIAL. Take the LIFE ESSENCE.
- Use the HAMMER (G); receive the NAILS. Remove the cover; use the LIFE ESSENCE.
- Examine the statue (H).
Chapter 5: The Metal King
- Talk to the elder; take the CREST (I).
- Take the BROKEN STEPLADDER (J).
- Collect the PLANKS (K). Use the PICKAXE (L); take the HORN (1/2) and OWL EYE (1/2).
- Combine the BROKEN STEPLADDER, PLANKS, NAILS, and HAMMER; hammer the nails. Take the STEPLADDER.
- Place the STEPLADDER (M).
- Read the note; take the LIST (N).
- Use the PICKAXE; use the LIST. Play the HOP; receive the OWL EYE (2/2) (O).
- Gather the SPEARMINT (P).
- Place the OWL EYE (2/2) (Q).
- Examine the door for a mini-game; solution is random (R).
- Walk right.
- Take the RAG (S).
- Place the CREST (T); open the book. Take the TORN SCHEME and RECIPE.
- Take the AXE and GOBLET (U).
- Walk down.
- Use the AXE; receive the VINE (V).
- Walk down.
- Place the VINE, SPEARMINT, and RECIPE. Place the ingredients in order (W); use the GOBLET. Take the MEDICINE.
- Walk forward.
- Give the MEDICINE (X); take the SHIELD HALF (Y).
- Walk right.
- Place the SHIELD HALF for a mini-game; solution (Z).
- Take the SHIELD.
- Walk down.
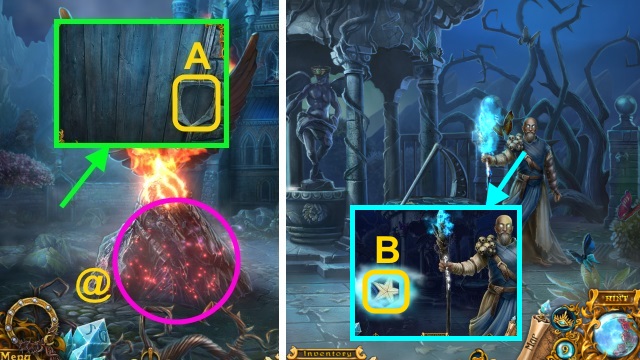
- Play the HOP; receive the STAR LANTERN (@).
- Place the SHIELD (A).
- Walk left.
- Talk to the elder; take the HEXAGON (B).

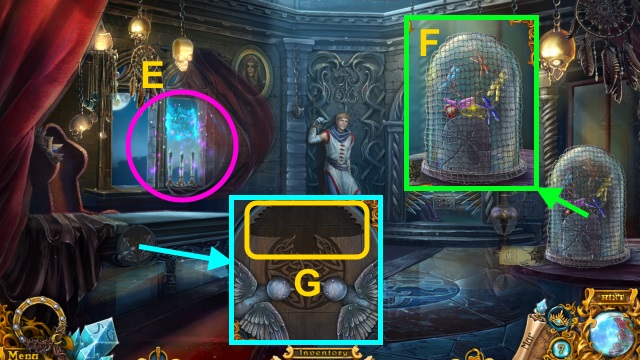
- Gather the butterflies (C).
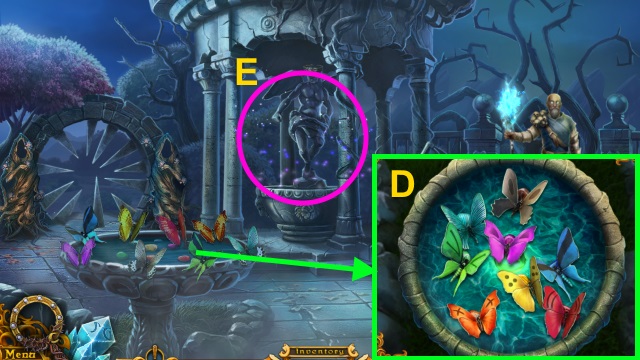
- Take the WREATH; arrange the butterflies (D). Take the STARLIGHT.
- Use the RAG. Play the HOP; receive the MOON LANTERN (E).

- Take the SPIDER DIADEM (F). Gather the flowers; receive the LOTUS (G).
- Place the HEXAGON for a mini-game (H).
- Solution (I).
- Take the MOONLIGHT.
- Combine the MOON LANTERN, STAR LANTERN, MOONLIGHT, and STARLIGHT; take the LANTERNS.
- Place the LANTERNS (J).
- Talk to the elder; take the BOOK KEYS (L).
- Walk down, then right.
- Place the BOOK KEYS (M). Examine the books; collect the PAPER (2/10)-(10/10).
- Combine the TORN SCHEME and PAPER (10/10) for a mini-game.
- Solution (N).
- Take the SCHEME.
- Walk down, then left twice.
- Use the SCHEME (O).
- Examine the lanterns for a mini-game; solution (P).
- Take the LAUREL and LIGHT (Q); place the LOTUS.
- Take the HORN (2/2) (R); gather the twigs (S). Take the BROOM; use the BROOM.
- Arrange the lights (T).
- Walk forward.
- Collect the ROSES (U).
- Combine the WREATH and ROSES; take the WREATH.
- Place the SPIDER DIADEM (V); Take the HEXAGON (1/4) (W).
- Take the SPEAR (X).
- Place the LAUREL (Y); take the BROKEN BLADE and HEXAGON (2/4) (Z).
- Place the WREATH (A); take the HEXAGON (3/4) (B).
- Place the HORN (2/2) (C); take the HEXAGON (4/4) (D).
- Place the HEXAGON (4/4) (E).
- Solution (F).
- Walk forward.
- Use the LIGHT (G); examine the wall for a mini-game.
- Solution (H).
- Take the SCREW (I).
- Take the BROKEN NIPPERS (J).
- Combine the BROKEN NIPPERS, BROKEN BLADE, and SCREW; take the WIRE CUTTER.
- Walk down.
- Use the WIRE CUTTER (K); receive the STAFF.
- Use the WIRE CUTTER (L); receive the MEDALLION.
- Walk forward.
- Give the STAFF (M).
- Give the SPEAR (N).
- Place the MEDALLION (O); receive the SPHERE.
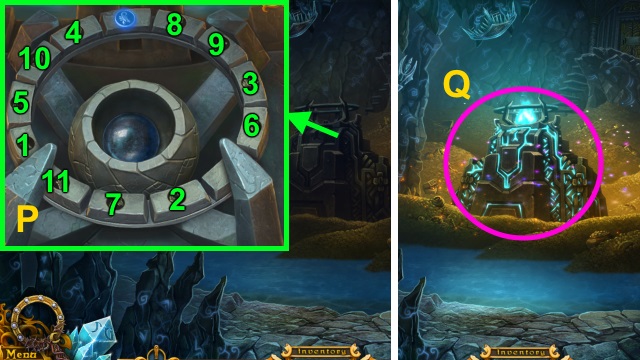
- Place the SPHERE for a mini-game; solution (P).
- Play the HOP; receive the COINS (Q).
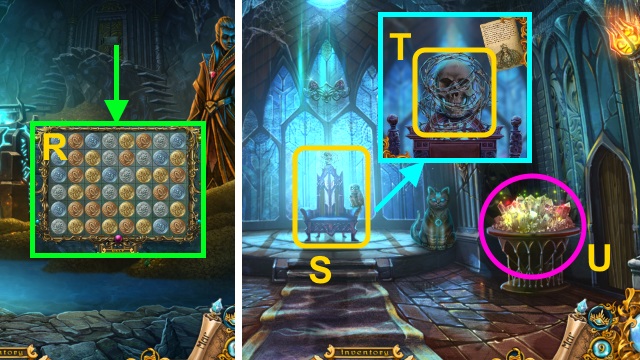
- Place the COINS for a mini-game; solution is random (R).
- Walk forward.
- Examine the throne (S).
- Use the WIRE CUTTER (T); take the SKULL (1/2).
- Play the HOP; take the NECKLACE (U).
- Walk down.
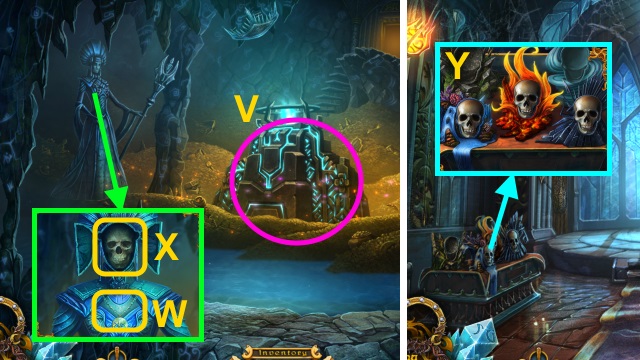
- Play the HOP; receive the CROWNS (V).
- Place the NECKLACE (W); take the SKULL (2/2) (X).
- Walk forward.
- Place the SKULL (2/2) and CROWNS for a mini-game (Y).
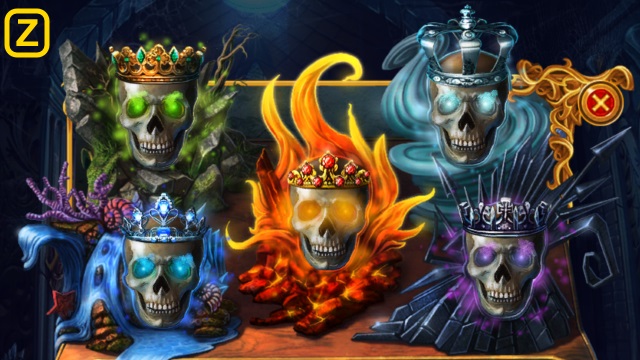
- Solution (Z).
- Take the METAL CROWN.
- Use the BROOM and OIL; place the METAL CROWN (A).
- Select 'Serve my people.'
- Talk to the guard; take the SUN MIRROR (B).
- Examine the Sun Mirror; take the AWL.
- Combine the CASTLE and AWL; gather the GEMS (C).
- Combine the SUN MIRROR and GEMS; take the SUN MIRROR.
- Walk left.
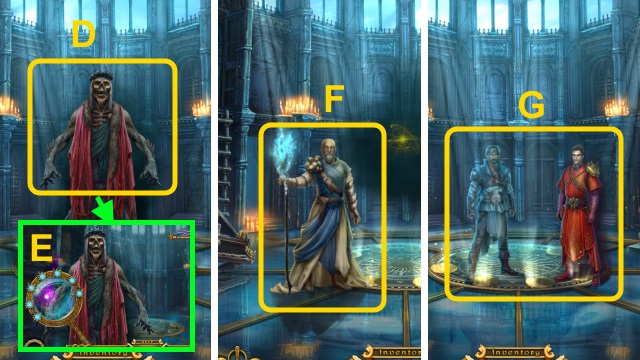
- Use the SUN MIRROR for a mini-game (D).
- Solution is random (E).
- Talk to the Elder (F).
- Talk to the guard and Azar (G); select either option.
- Congratulations! You have completed Spirits of Mystery: The Fifth Kingdom.
Created at: 2017-02-10