

Walkthrough Menu
- General Tips
- Chapter 1: My Room
- Chapter 2: Cell
- Chapter 3: Prehall
- Chapter 4: Black Isle
- Chapter 5: Forest
General Tips
- This is the official guide for Spirits of Mystery: The Lost Queen.
- This guide will not mention each time you have to zoom into a location; the screenshots will show each zoom scene.
- Hidden-object puzzles are referred to as HOPs. This guide will not show HOP solutions. It will identify the location of the HOP and the inventory item acquired.
- This guide will show solutions for non-random puzzles. Please read the in-game instructions for each puzzle.
- In this game, you will sometimes have to select the new scene to trigger dialog, cut-scenes, or tasks prior to interacting with the scene.
Chapter 1: My Room

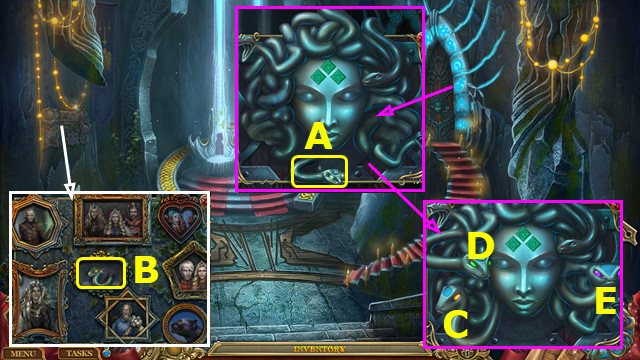
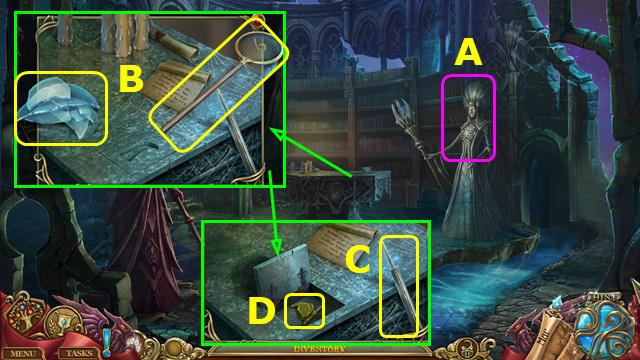
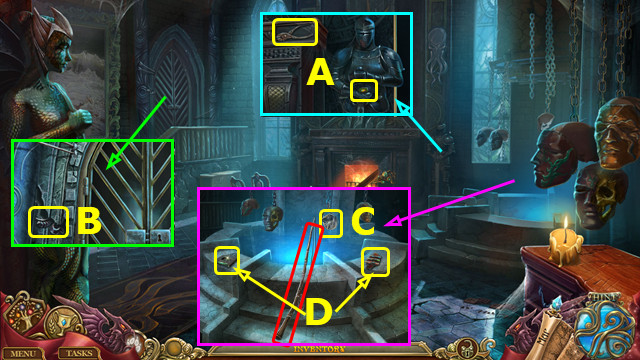
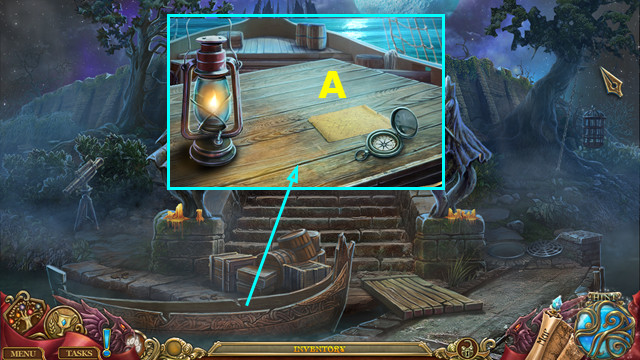
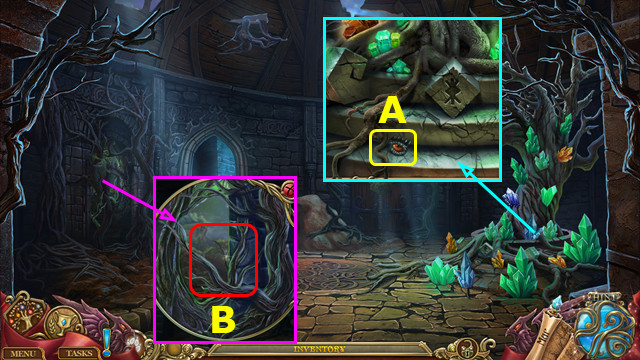
- Take PIN, 1/3 WOODEN RING, and PENDANT (A).
- Select 2x (B).
- Select 1-5; take MIRROR.
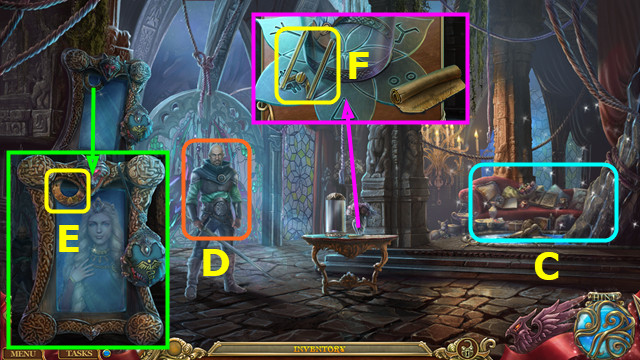
- Play HOP; earn CASKET (C).
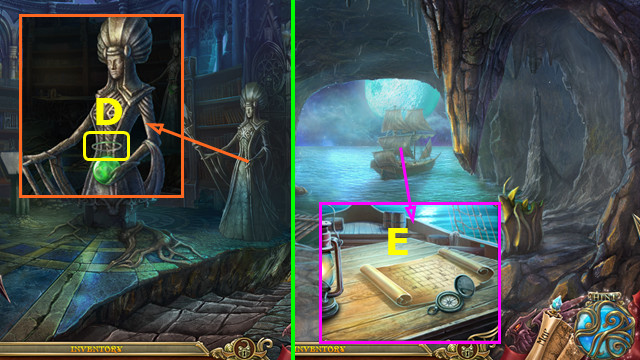
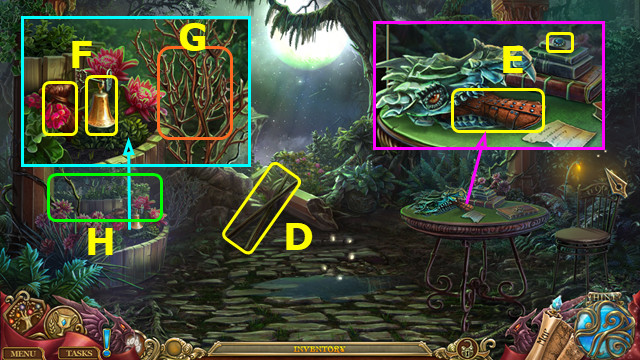
- Talk (D).
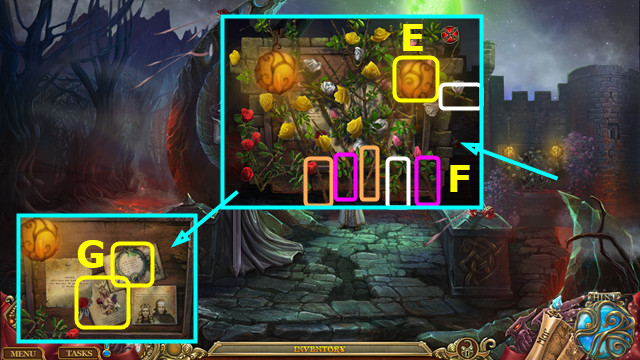
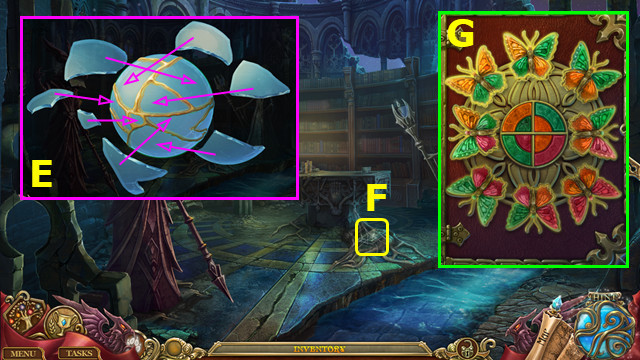
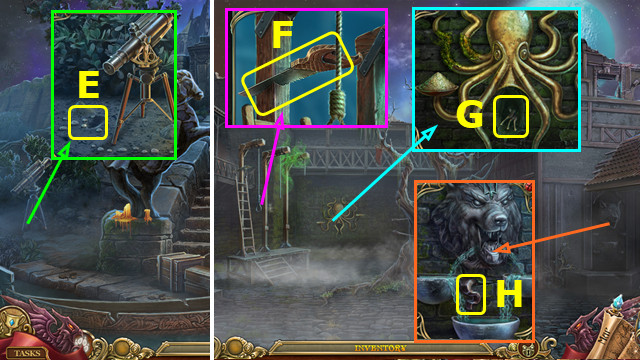
- Take 2/3 WOODEN RING (E).
- Take 1/4 DOOR KNOCKERS; read note (F).
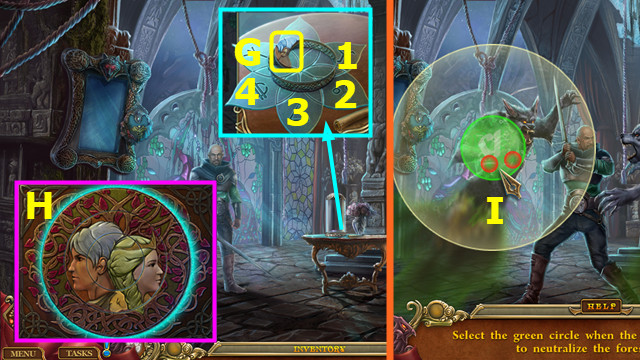
- Select (1-4); take 3/3 WOODEN RING (G).
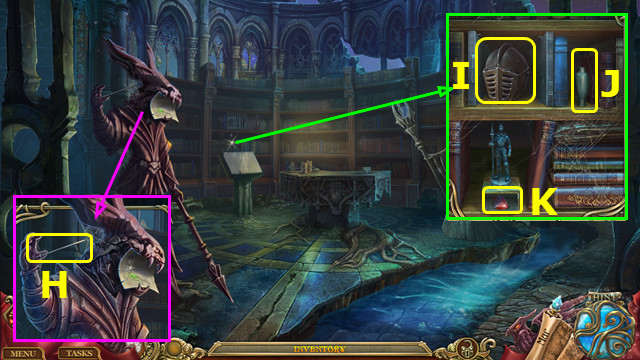
- WOODEN RING on CASKET; solution (H).
- Open CASKET; take RING.
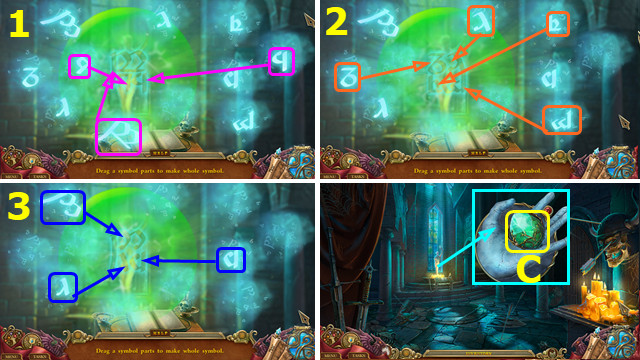
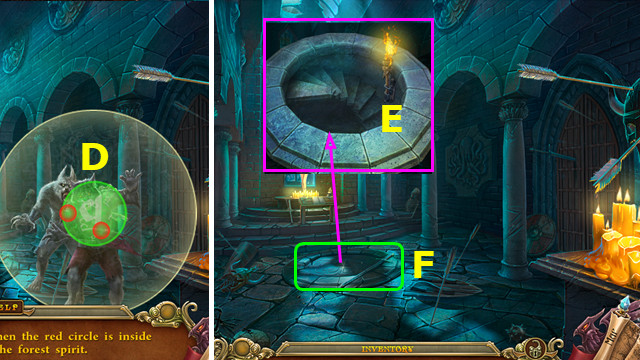
- Use RING; select when red circles are inside green 2x (I).

- Talk (J).
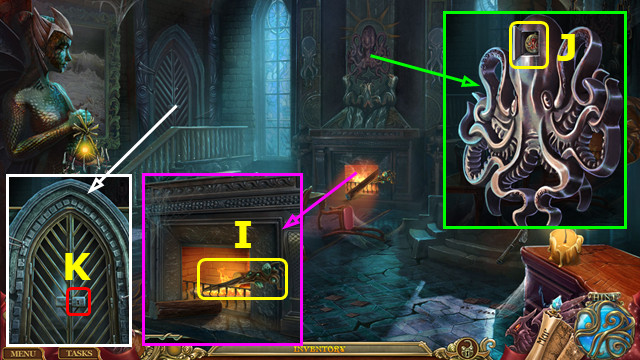
- Take BROKEN SWORD (K).
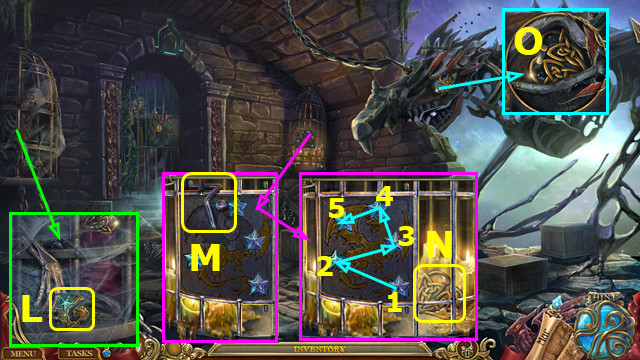
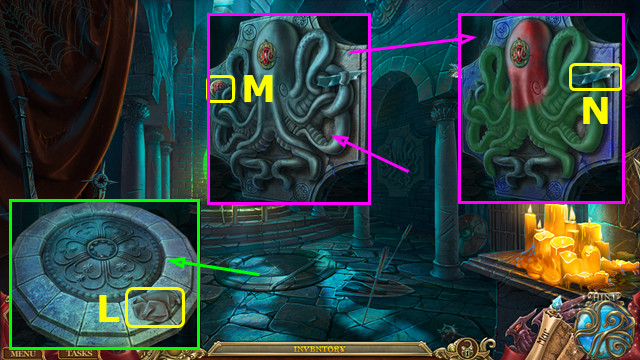
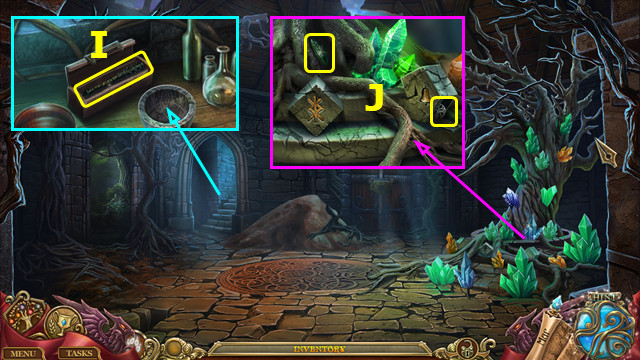
- Use BROKEN SWORD; take SMELLING SALTS (L).
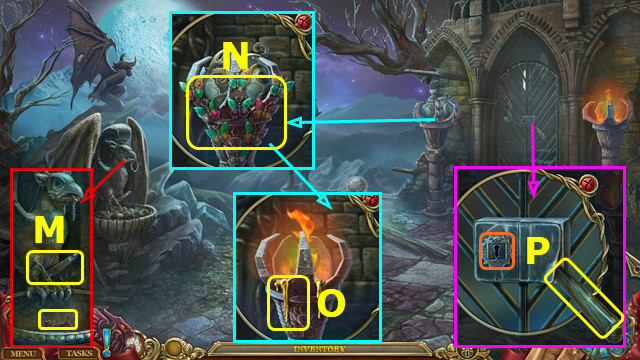
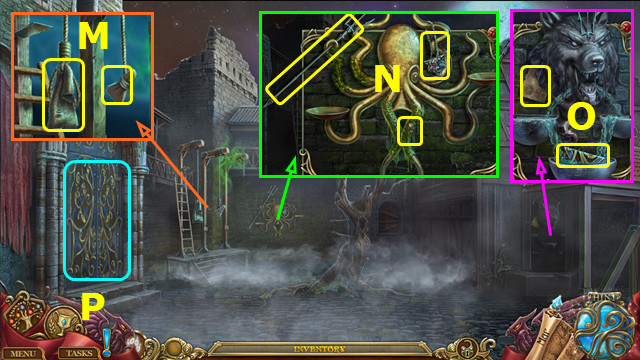
- Use SMELLING SALTS (M).
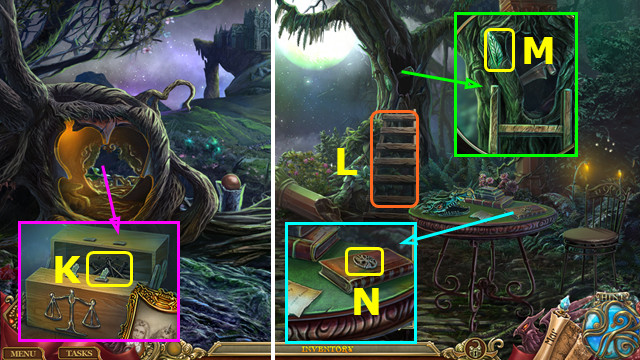
- Play HOP; earn ROPE.
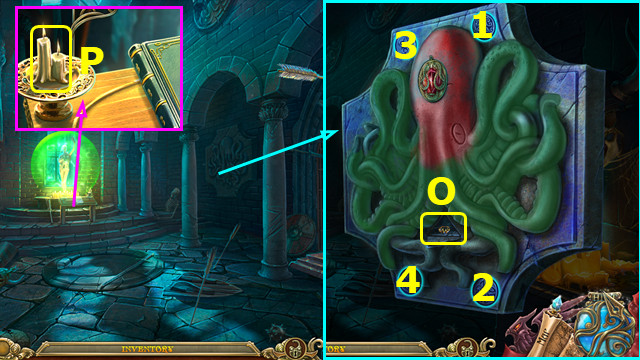
- Use ROPE; take CRYPTEX (N).
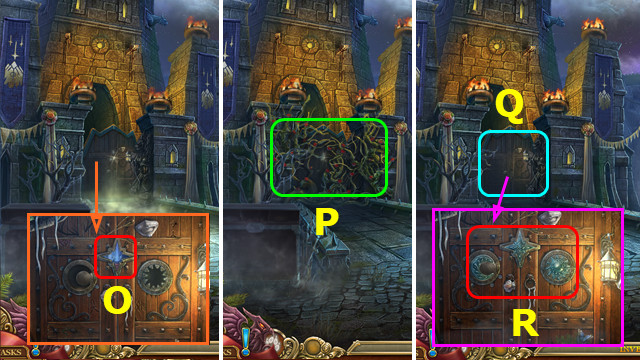
- Enter code on CRYPTEX (O); open and take map.
- Go left.
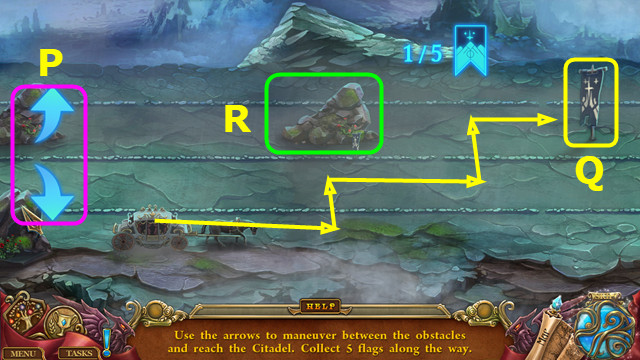
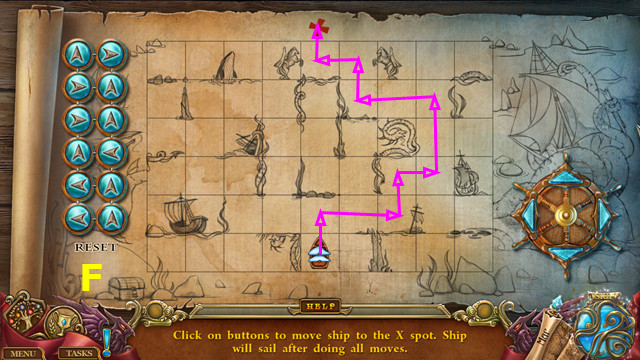
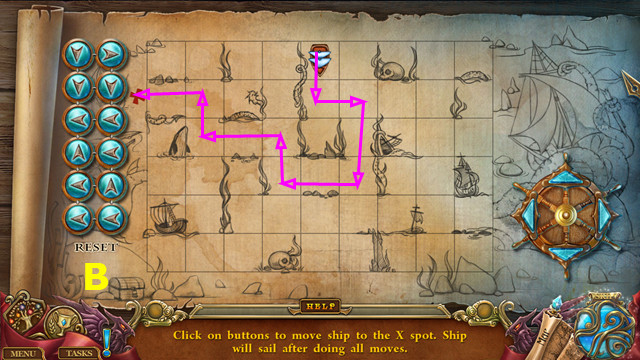
- Select Start.
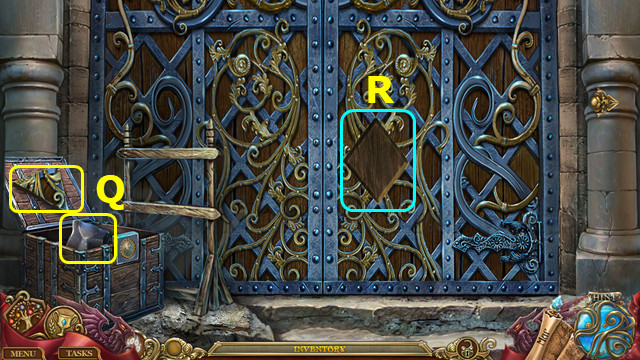
- Use arrows (P) to move carriage to collect 5 flags (Q).
- Avoid obstacles (R).
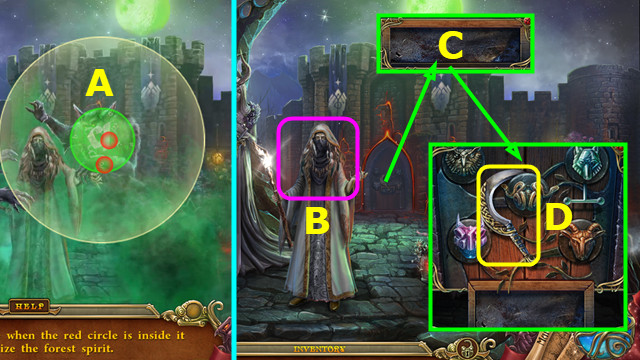
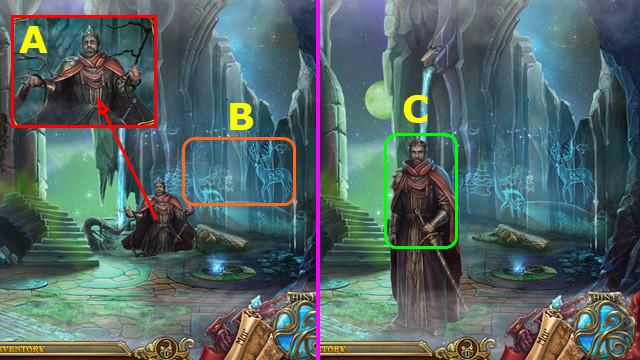
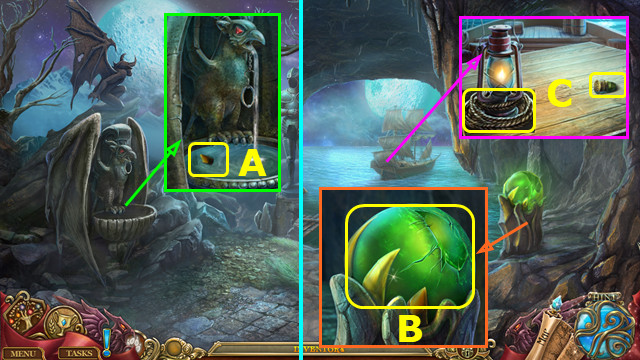
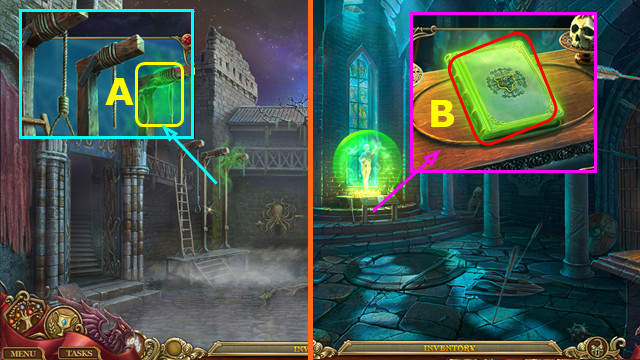
- Use RING; select when red circles are inside green 2x (A).
- Talk; take 2/4 DOOR KNOCKERS(B).
- Select (C).
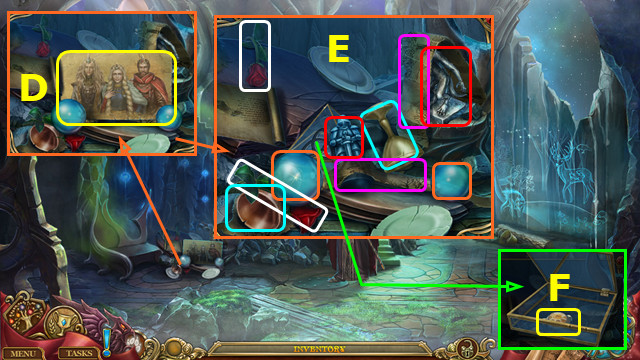
- Take SICKLE (D).
- Take LANTERN; use SICKLE (E).
- Select pairs (F).
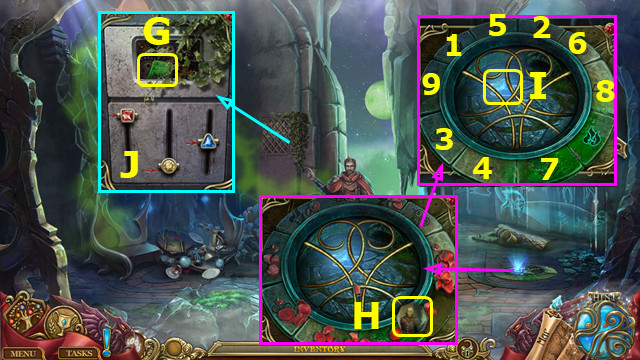
- Take 3/4 DOOR KNOCKERS and SOLUTION (G).

- Restore statue (H); take 4/4 DOOR KNOCKERS.
- Place WOODEN DOOR KNOCKERS; select 1-4 (I).
- Go forward.
- Exit mirror.
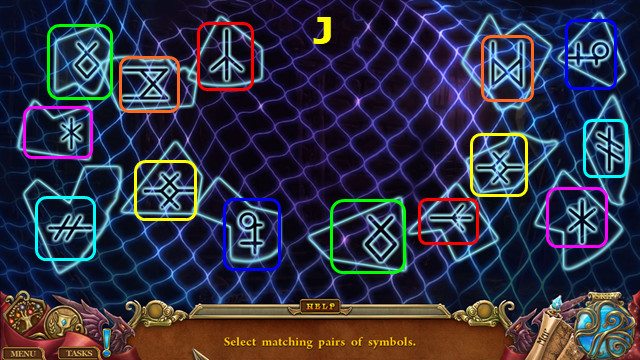
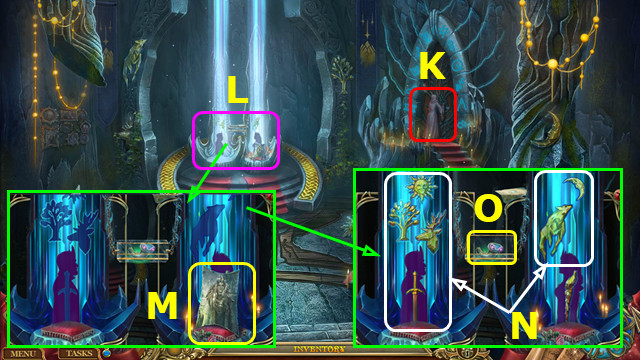
- Select pairs (J).
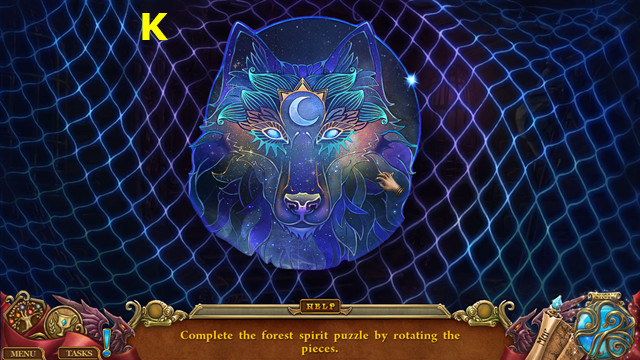
- Solution (K).
Chapter 2: Cell
- Exit mirror.
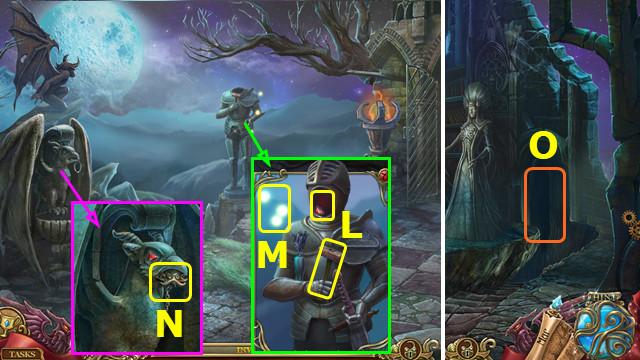
- Take WING (L).
- Take 1/2 PUZZLE PART; place WING (M).
- Select 1-5; take 1/3 LOCK PART (N).
- Look; exit (O).
- Play HOP.
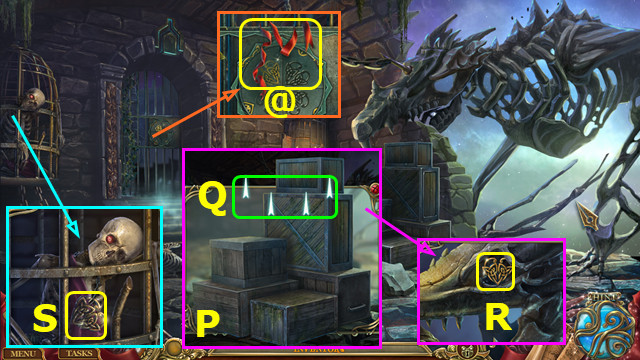
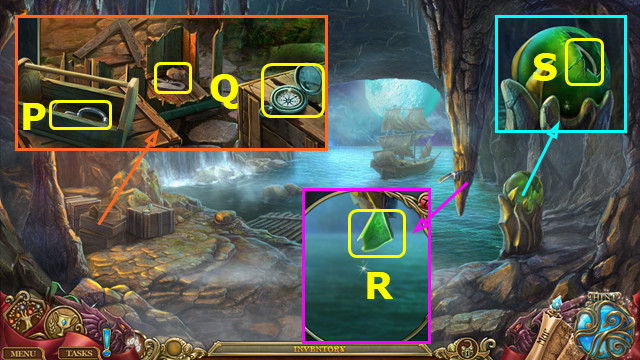
- Solution (P).
- Take RIBBON (@).
- Pan up (Q); play HOP; earn FEATHERS.
- RIBBON on FEATHERS; take FEATHER DUSTER.
- Take 2/3 LOCK PART (R).
- Use FEATHER DUSTER 3x; take 3/3 LOCK PART (S).
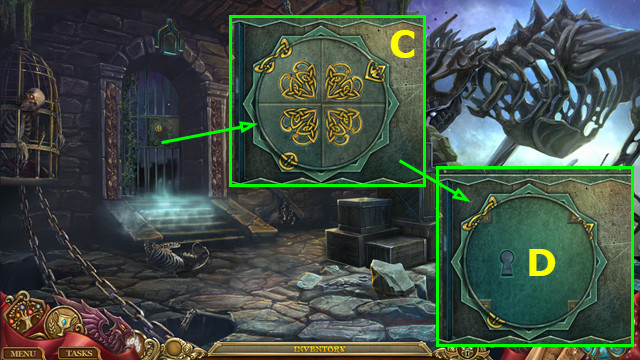
- Place LOCK PART; solution (C).
- Use PIN (D).
- Go forward.
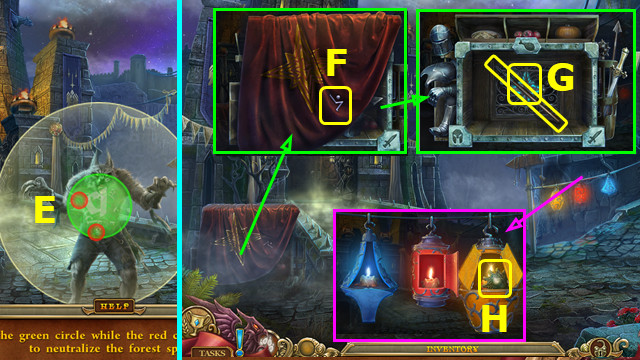
- Use RING; select when red circles are inside green 2x (E).
- Take 2/2 PUZZLE PART; remove cloth (F).
- Sort items as shown; take AXE; open doors; take STAR (G).
- Open 3 lanterns; take SUN (H).
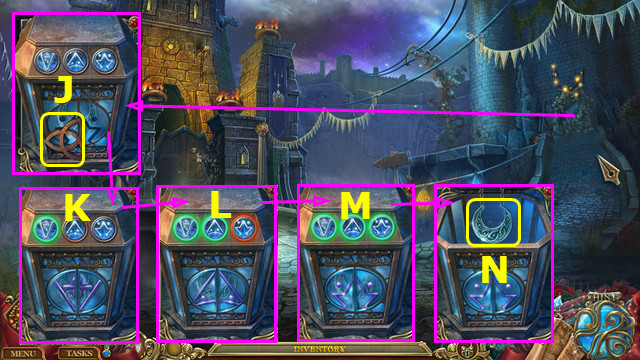
- Remove ivy 5x; take SYMBOL; place PUZZLE PART (J).
- Solution (K-L-M).
- Take MOON (N).
- Select (O).
- Use AXE (P).
- Play HOP (Q).
- Place MOON, STAR, and SUN (R).
- Go left.
- Use AXE (A).
- Play HOP (B).
- Exit mirror.
- Talk; take 1/3 LEVER (C).
- Take 1/3 PORTRAIT (D).
- Select pairs (E).
- Place SYMBOL; take 2/3 LEVER (F).
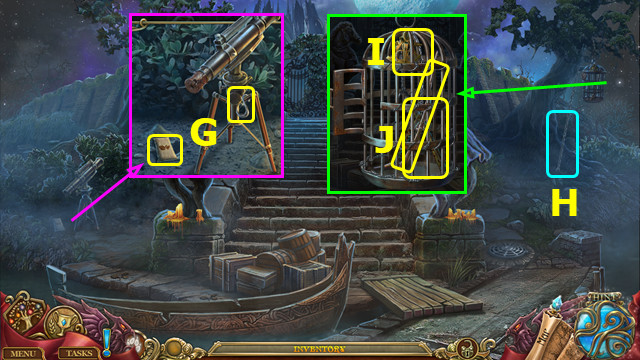
- Open grate; take FIRE SYMBOL (G).
- Take 2/3 PORTRAIT; remove debris 3x; place FIRE SYMBOL (H).
- Select 1-9; take 3/3 LEVER (I).
- Place LEVERS; solution (J).
- Go left.
- Talk (K).
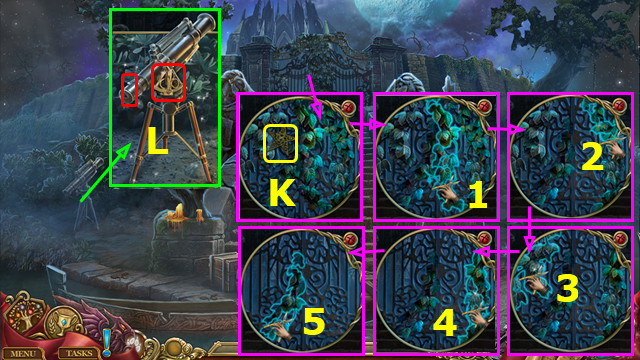
- Select (L); play HOP.
- Take 3/3 PORTRAIT (M).
- Restore items (N).
- Take 1/3 SNAKE PART (O).
- Talk; take 2/3 SNAKE PART (A).
- Place PORTRAITS; solution; take 3/3 SNAKE PART (B).
- Place SNAKE PART; select (D-E-C)-(C-E-D-C)-(E-D-E-C-D).
- Walk right.
Chapter 3: Prehall
- Talk; give RING (F).
- Talk; give PENDANT; take CLAW SIGN (G).
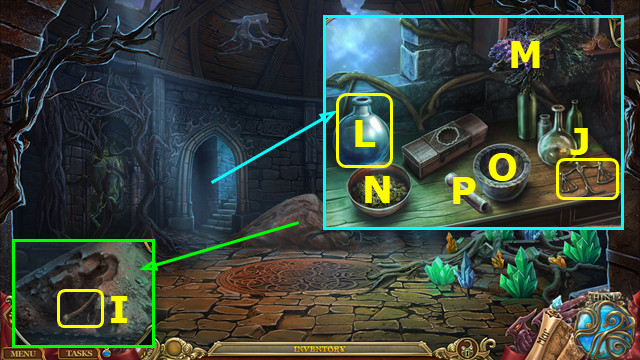
- Take KNIFE (H).
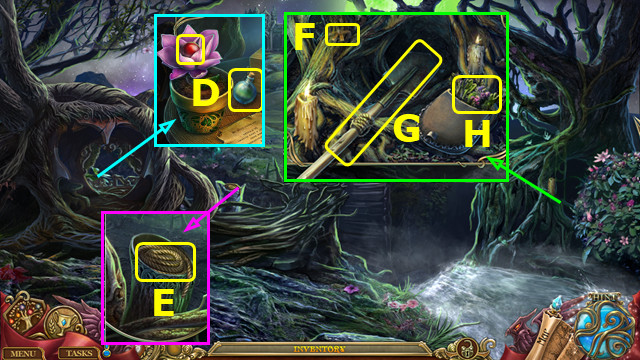
- Take BANDAGE; use KNIFE; earn MAGIC CRYSTALS (I).
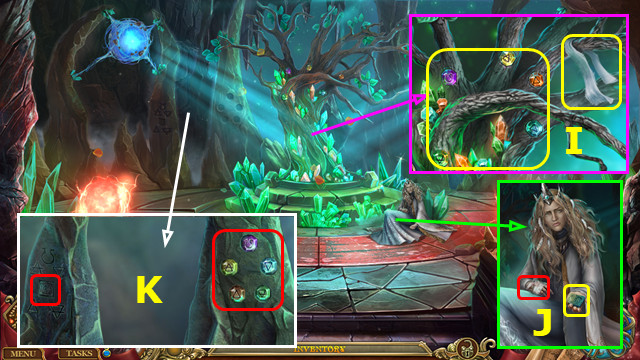
- Use BANDAGE; take RUNE (J).
- Place RUNE and MAGIC CRYSTALS, arrange as shown (K).
- Move leaves; take KEY and SWORD HANDLE (M).
- Take BUTTERFLIES; remove old light (N).
- Place LANTERN; use KNIFE; earn WAX (O).
- Take STICK; use KEY; select (P).
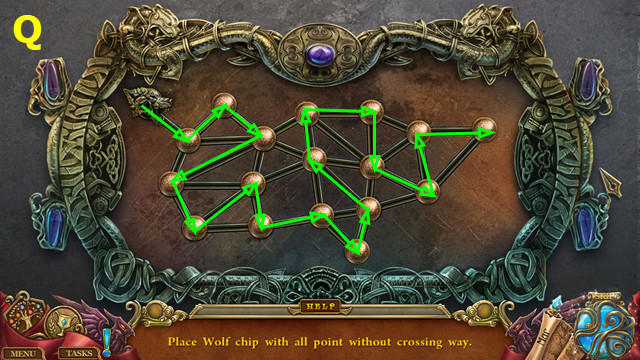
- Solution (Q).
- Walk right.
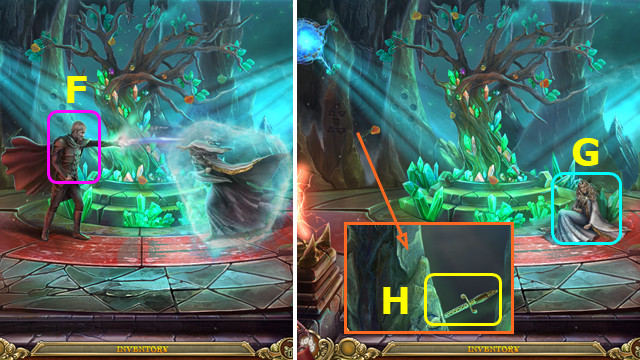
- Talk (A).
- Take MAGIC SPHERE and NET (B).
- Place SWORD HANDLE; earn SWORD (C).
- Place CLAW SIGN; take BIRD SIGN (D).
- Restore MAGIC SPHERE; add WAX (E).
- Take PRINCESS BOOK (F).
- BUTTERFLIES on PRINCESS BOOK; solution (G). Take FLOWER.
- Read note; take SMALL SPEAR; place MAGIC SPHERE (H).
- Place BIRD SIGN; take HELMET (I).
- Place FLOWERS; earn JAR WITH FLOWERS (J).
- Place SMALL SPEAR; take 1/2 RUBY EYE (K).
- Walk down.
- Place HELMET, SWORD, and JAR WITH FLOWERS. Open visor; take 2/2 RUBY EYE and HAMMER (L).
- Use NET; earn FIREFLY IN NET (M).
- Place RUBY EYES; take OCTOPUS MEDALLION (N).
- Go right.
- Use FIREFLY IN NET (O).
- Go right.
- Open toolbox; take FOUNTAIN HOOK (P).
- Use HAMMER; take FLINT and METAL COMPASS (Q).
- Place STICK; select; take MAGIC SHARD (R).
- Take HANDLE (S).
- Walk down 2x.
- Place FOUNTAIN HOOK; take PART OF FRAME (A).
- Go right 2x.
- Place MAGIC SHARD and PART OF FRAME; take MAGIC FULFILLMENT (B).
- Take ROPE; use FLINT; take ACID (C).
- Walk down.
- Place MAGIC FULFILLMENT; take MIRROR'S REFLECTION (D).
- OCTOPUS MEDALLION and MIRROR'S REFLECTION on MIRROR; select.
- Play HOP; earn MAP TO BLACK TRIDENT CASTLE.
- Go right.
- Place MAP TO BLACK TRIDENT CASTLE and COMPASS (E).
- Solution (F).
Chapter 4: Black Isle
- Use ROPE; earn GRAPPLING HOOK; take PLANT FERTILIZER (G).
- Select (H).
- Take SEXTANT (I).
- Use ACID and HANDLE; open and take 1/2 FISHING ROD and GARDEN SCISSORS (J).
- Take METAL STAR (K); use GARDEN SCISSORS 1-5.
- METAL STAR in CASKET; take LENS.
- Remove cork; place LENS and SEXTANT; select and play HOP; earn 1/2 STAR MAP (L).
- Go forward.
- Take POUCH; use GRAPPLING HOOK; earn SPATULA (M).
- Take TRIDENT and WOLF EMBLEM; use SPATULA; earn MOON TOKEN (N).
- Take OCTOPUS SOLUTION; place TRIDENT; take 1/2 GATE KEY STONE (O).
- Select (P).
- Place MOON TOKEN; take SHOULDER ARMOR and 2/2 GATE KEY STONE (Q).
- Place GATE KEY STONE (R).
- Walk left.
- Place SHOULDER ARMOR; take MATCHES and PLIERS (A).
- Use PLIERS; earn 1/2 OCTOPUS TENTACLE (B).
- Take 2/2 FISHING ROD (C).
- Place FISHING ROD; select 2x; take SAW HANDLE and PAINTS (D).
- Walk down 2x.
- Select; use POUCH; earn POUCH WITH SAND (E).
- Go forward.
- Use SAW HANDLE; take SAW (F).
- Place POUCH WITH SAND; take LOCK PICK (G).
- Use PLIERS; earn 2/2 OCTOPUS TENTACLE (H).
- Go left.
- Use SAW; take STAFF (I).
- Place OCTOPUS TENTACLE; take OCEAN MEDALLION (J).
- Use LOCK PICK (K).
- Go left.
- Take CLOTH (L).
- Place OCEAN MEDALLION; take ROSE SIGN (M).
- Use PAINTS; take VALGAR'S MEMORY SHARD (N).
- VALGAR'S MEMORY SHARD on MIRROR; select.
- Play HOP; earn TEMPLE COORDINATES.
- Place OCTOPUS SOLUTION; select 1-4; take RING RIM (O).
- Use MATCHES; take CANDLES (P).
- Walk down 2x.
- Use STAFF; earn MAGIC DUST (A).
- Go left 2x.
- Place WOLF EMBLEM and MAGIC DUST; open and select pages (B).
- Restore the symbols (1-3).
- Use RING RIM; take RING WITH SHARD (C).
- Select when red circles are inside green 2x (D).
- Earn STONE ROSE.
- Place STONE ROSE; remove lid; use CLOTH and CANDLES (E).
- Go (F).
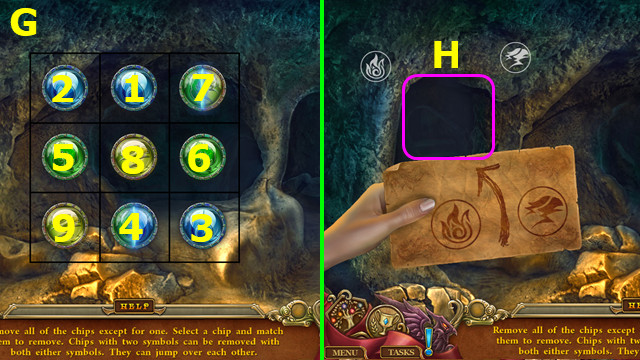
- Select 1-9 (G).
- Go (H).
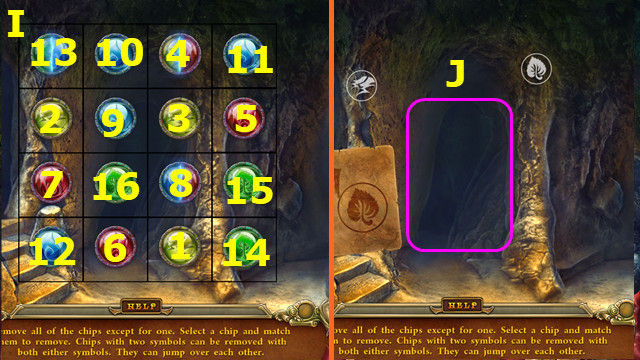
- Select 1-16 (I).
- Go (J).

- Select 1-28 (K).
- Go (L).
- Place STAR MAP; select (A).
- Solution (B).
Chapter 5: Forest
- Use PLANT FERTILIZER; take BRIDGE SPHERE and BOTTLE (D).
- Take ROPE; place BRIDGE SPHERE (E).
- Use CANDLES; take 1/2 RUNE (F).
- ROPE on shovel; take SHOVEL (G).
- Place ROSE SIGN; take HERBS (H).
- Go forward.
- Use SHOVEL 3x; take BELL TONGUE (I).
- Take LIBRA MEDAL (J).
- Place BOTTLE (L) and HERBS (M).
- Move (N-O)-(M-O)-(P-O).
- Move (O-L); take PLANT POTION.
- Take STONE EYE (A).
- Use PLANT POTION (B).
- Go left.
- Take LADDER (D).
- Place STONE EYE; take GLOVES and BROOCH (E).
- Place BELL TONGUE; earn BELL; take CRYSTAL SEEDS (F).
- Use GLOVES 3x (G).
- Play HOP; earn 2/2 RUNE (H).
- Walk down.
- Place BROOCH; take MACE (I).
- Place RUNE and BELL; take 1/2 LEAF SYMBOL and CRESCENT (J).
- Walk down.
- Place LIBRA MEDAL; take NAILS (K).
- Restore steps on LADDER; use NAILS and MACE.
- Go forward, left.
- Place LADDER (L).
- Take 2/2 LEAF SYMBOL (M).
- Place CRESCENT; take FULL MOON SIGNET (N).
- Walk down.

- Place FULL MOON SIGNET and LEAF SYMBOL (O).
- Go forward.
- Take STICK (P).
- Walk down, left.

- Use STICK; earn SCYTHE (A).
- Walk down, forward.
- Select and use CRYSTAL SEEDS (B).
- Move (D-E)-(F-E); place RING WITH SHARD; take STAFF.
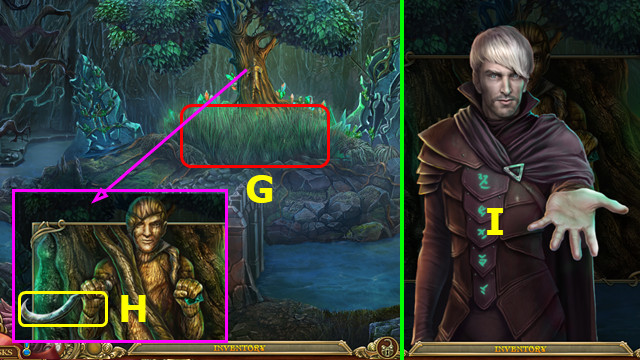
- Use SCYTHE (G).
- Talk; take SICKLE (H).
- Give STAFF (I).
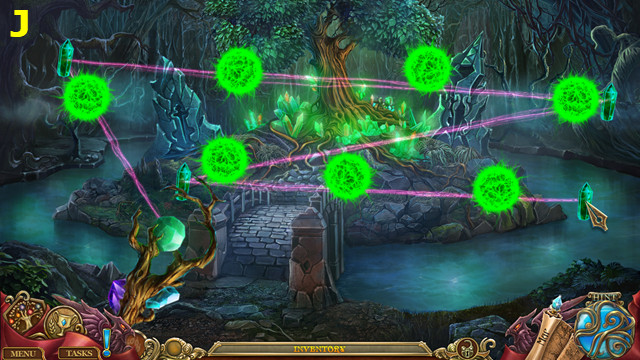
- Solution (J).
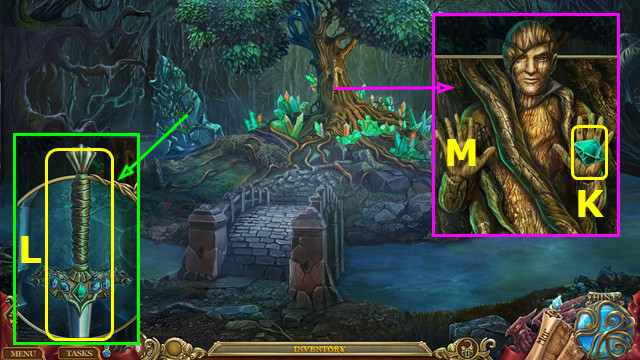
- Take SWORD CRYSTAL (K).
- Use SICKLE; place SWORD CRYSTAL; take MAGIC SWORD (L).
- Give MAGIC SWORD (M).
Created at: 2018-07-15