

Walkthrough Menu
- General Tips
- Chapter 1: Happy Birthday
- Chapter 2: Trading Places
- Chapter 3: Behind the Bookcase
- Chapter 4: At the Ravine
- Chapter 5: The Dungeon
General Tips
- This is the official guide for Spirits of Mystery: The Moon Crystal.
- This guide won't mention when to zoom into a location; screenshots will identify close-ups.
- Hidden-object puzzles are referred to as HOPs. Only locations of HOPs will be shown.
- Use the Map to fast travel to a location.
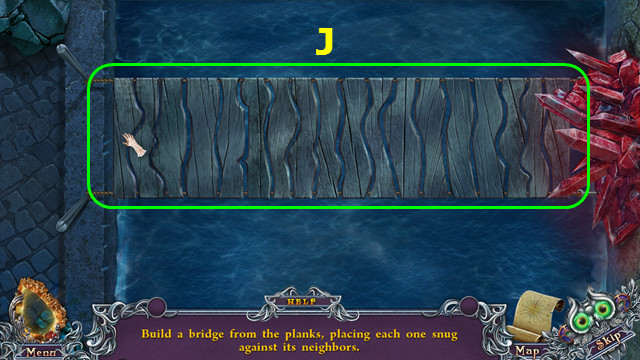
Chapter 1: Happy Birthday
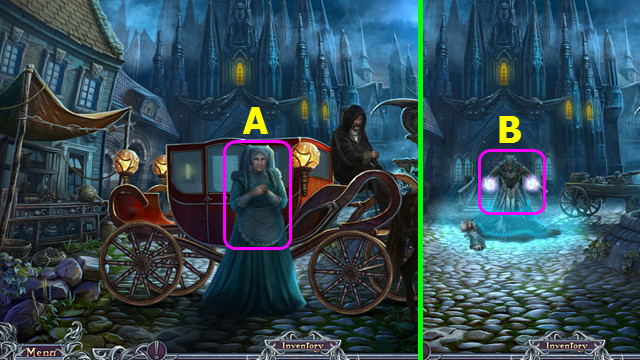
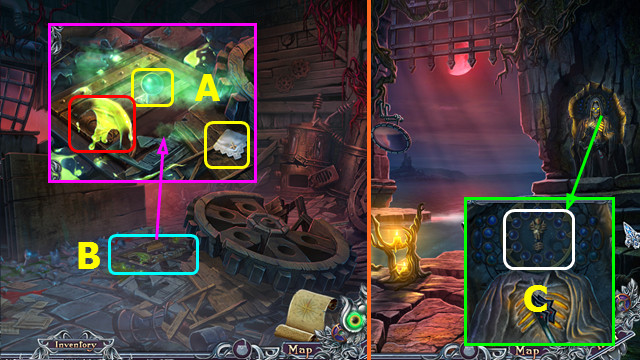
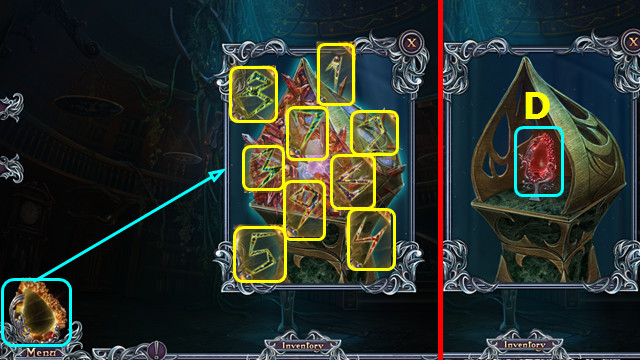
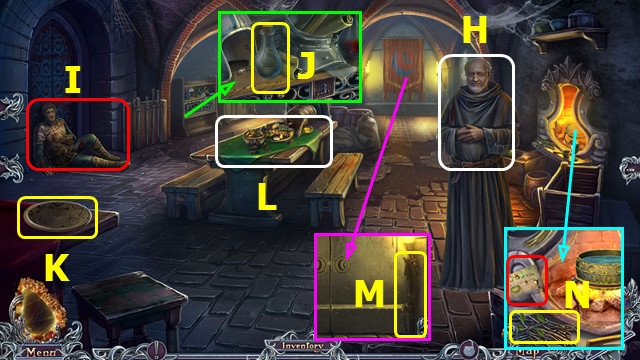
- Talk; take letter and AMULET (A).
- Select scene 3x.
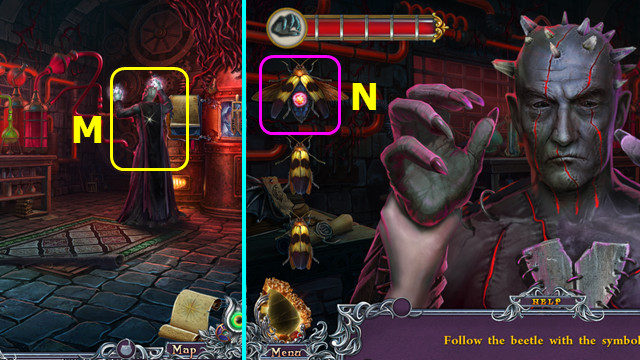
- Select (B).
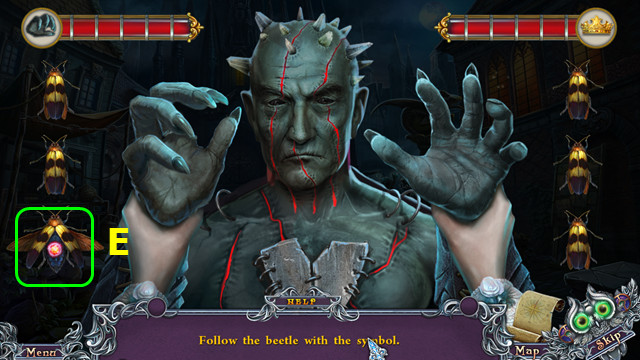
- Select (E) to start then follow and select the same beetle for each subsequent turn.
- This mini-game is randomly generated.
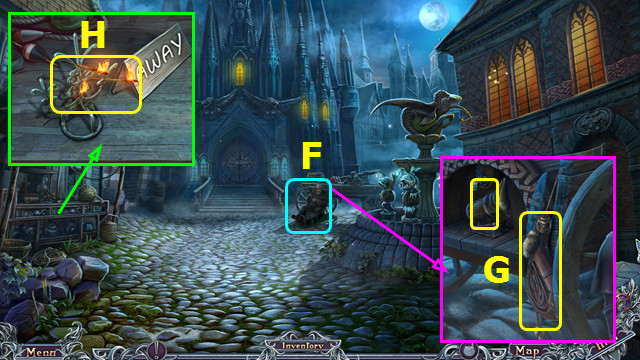
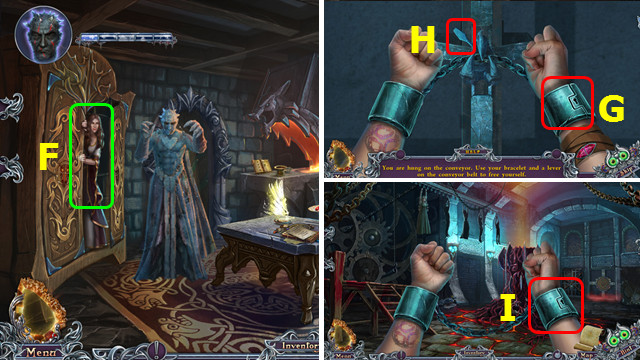
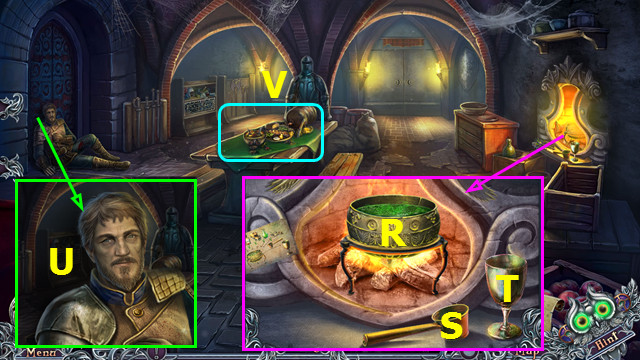
- Talk (F).
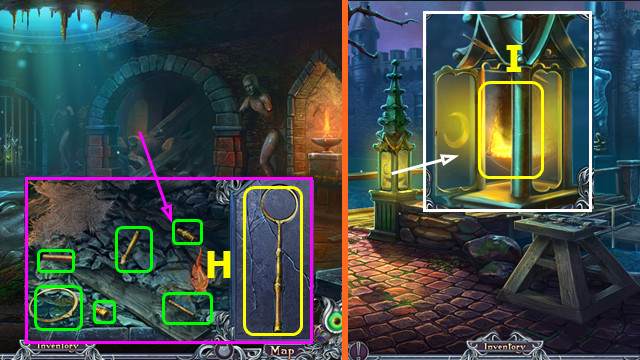
- Take SMOKER and WINESKIN (G).
- Take MATCHES (H).
- Read bulletins; take CORKSCREW (I).
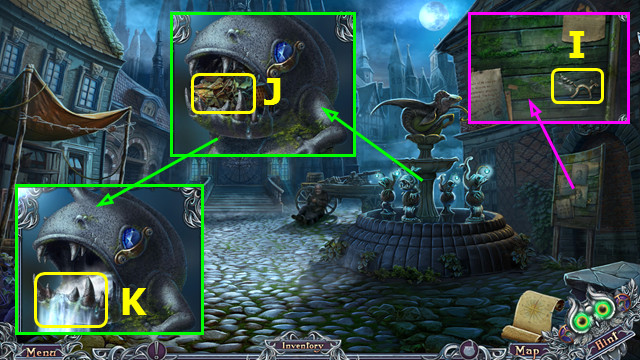
- CORKSCREW on WINESKIN; take EMPTY WINESKIN.
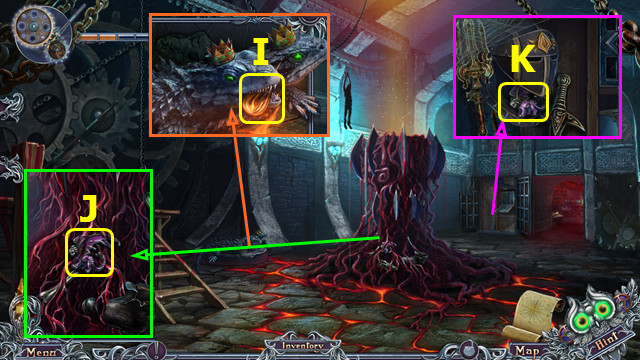
- Take LEAVES (J).
- LEAVES and MATCHES in SMOKER.
- Use SMOKER and EMPTY WINESKIN; earn WATER (K).
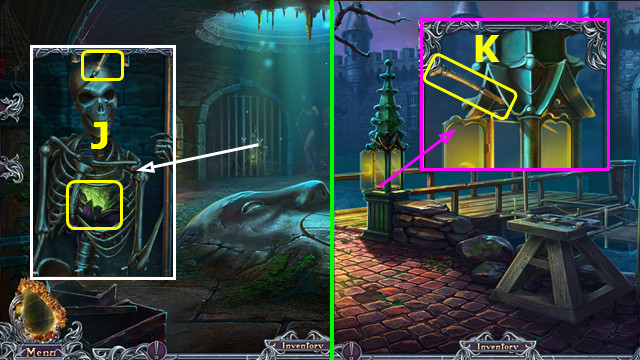
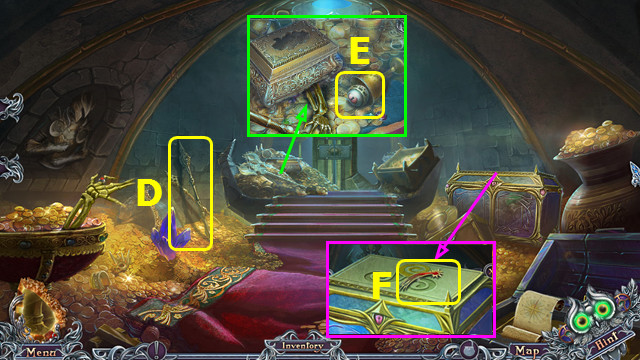
- Give WATER; take MEDALLION (L).
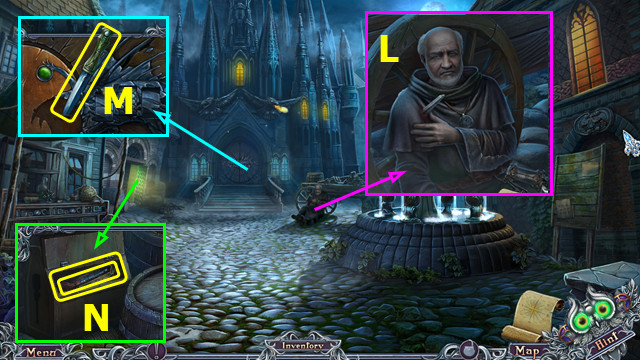
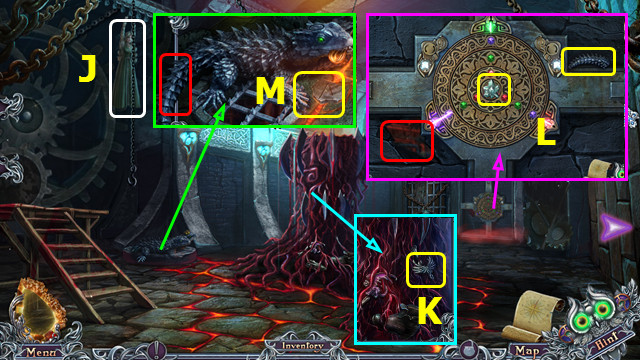
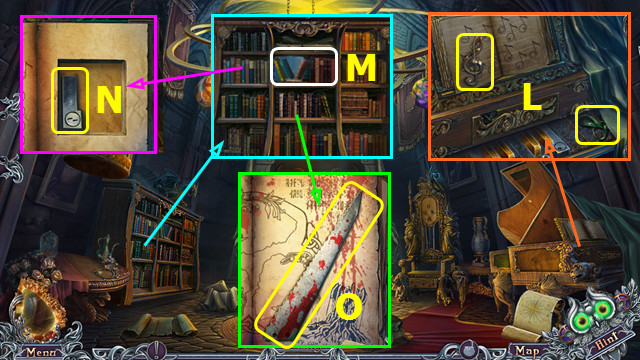
- Take DAGGER; place MEDALLION (M).
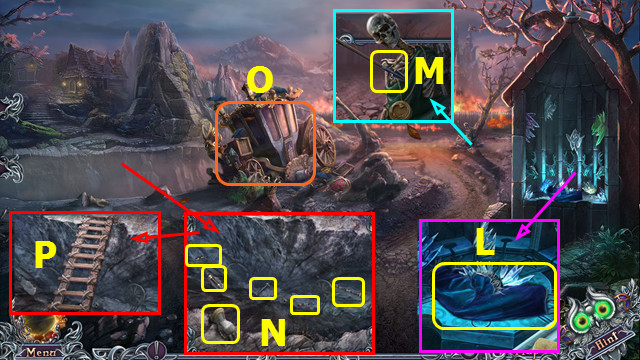
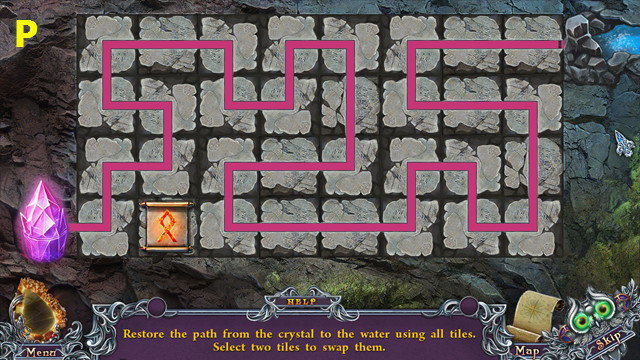
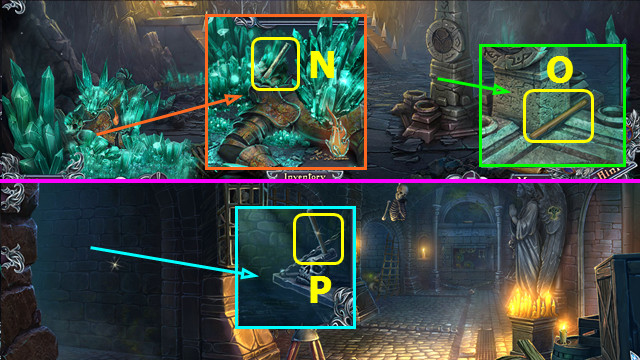
- Use DAGGER; open box, take SLING, and SCREWDRIVER (N).
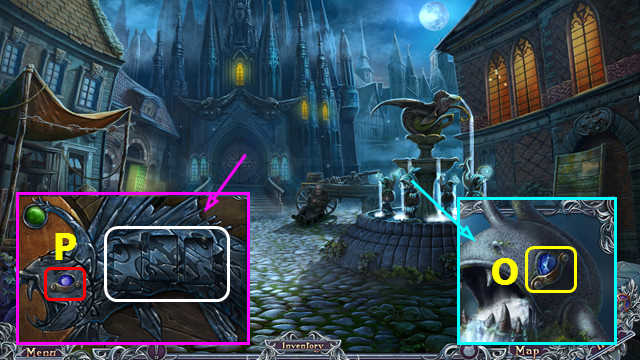
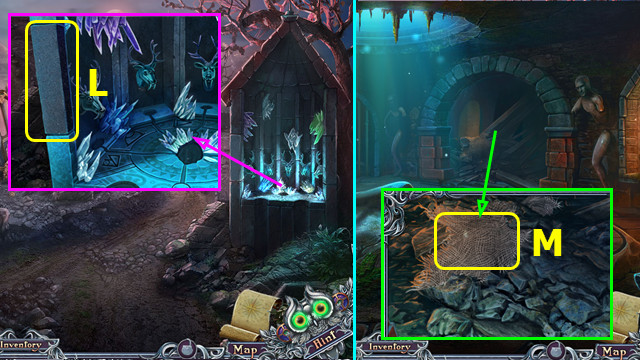
- Use SCREWDRIVER; take FISH'S EYE (O).
- Use FISH'S EYE and SCREWDRIVER; solution (P).
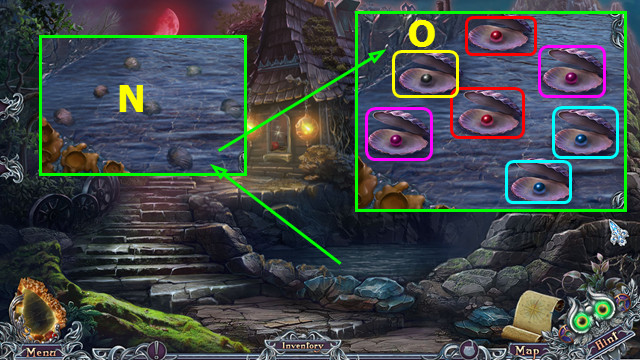
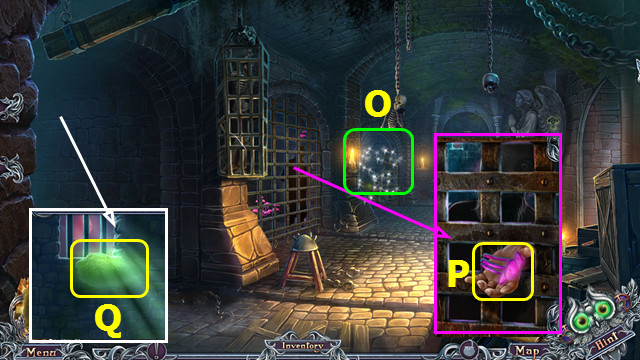
- Go forward.
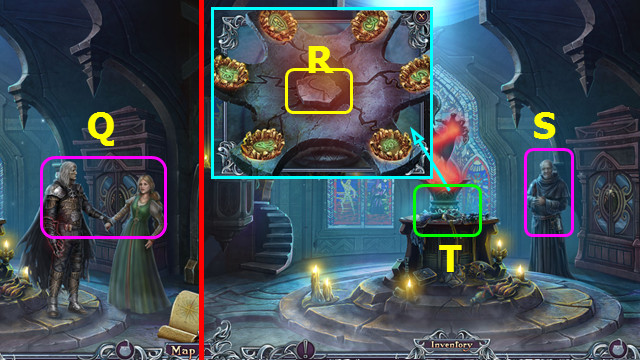
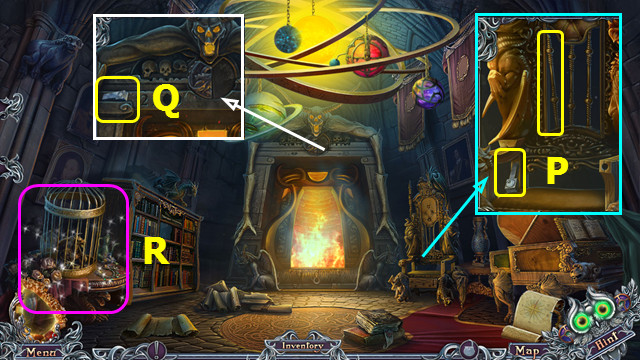
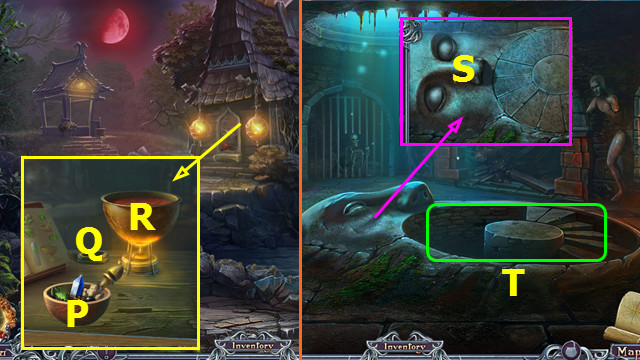
- Select (Q).
- Take 1/4 RUNESTONE; place AMULET (R).
- Talk; take TUBE (S).
- Take RUNE PARCHMENT from TUBE.
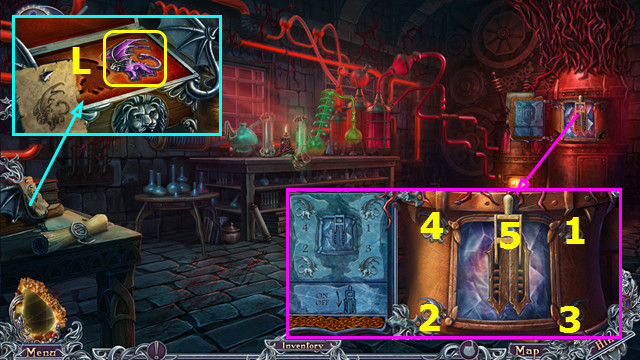
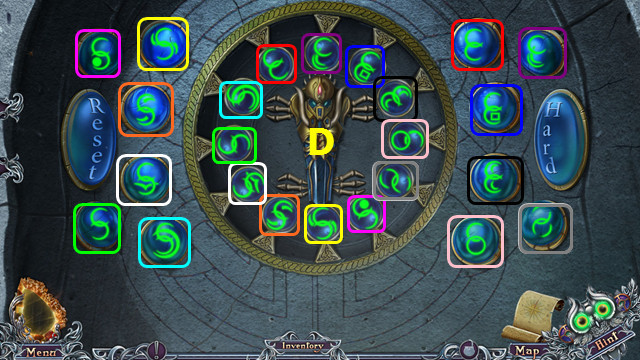
- Select (T).
- Place RUNE PARCHMENT.
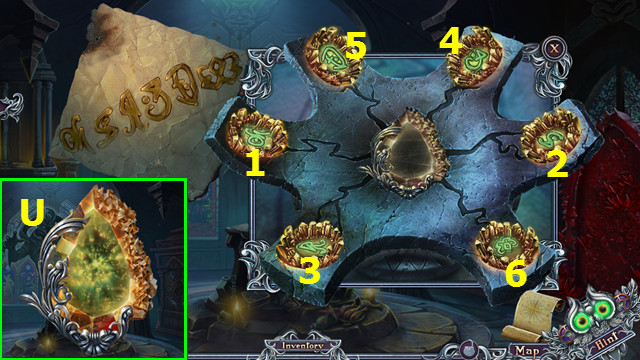
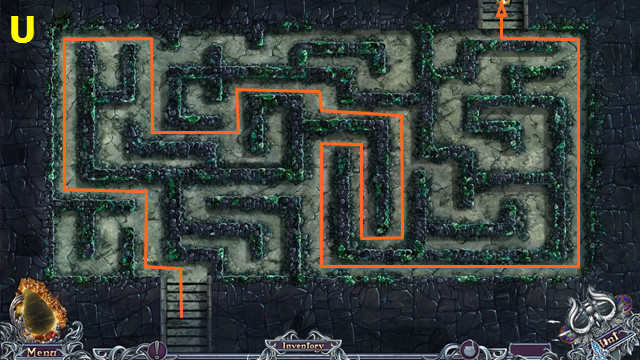
- Select (1-6).
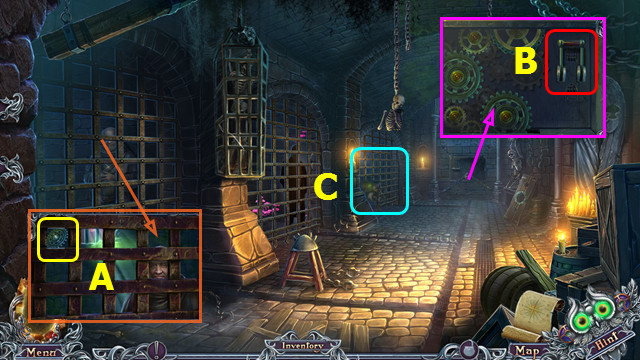
- Take AMULET (U).
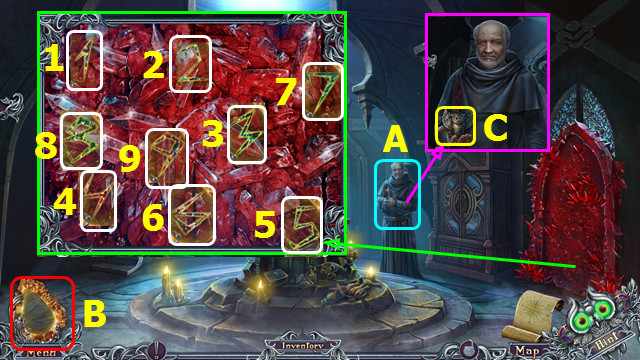
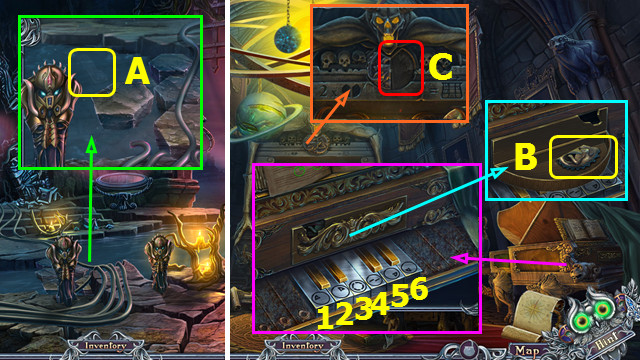
- Talk (A).
- Use (B) to select (1-9).
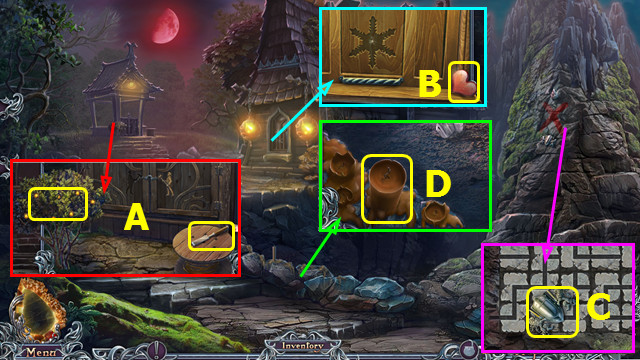
- Take CANDLESTICK (C).
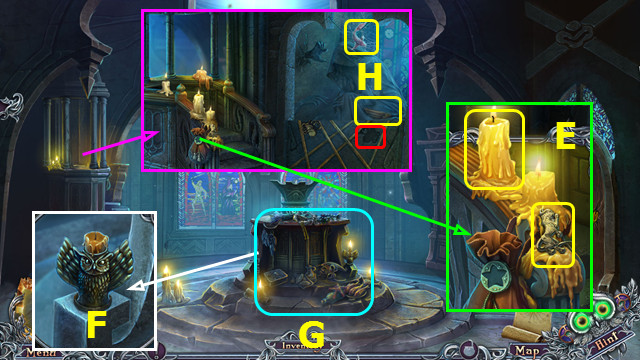
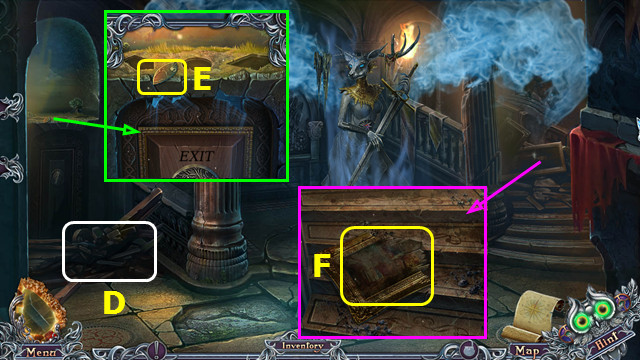
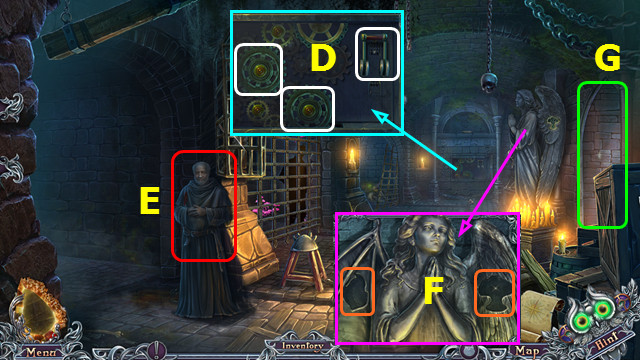
- Take LION KEY and CANDLE (E).
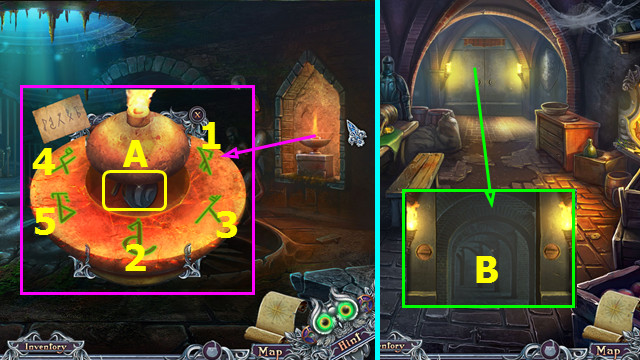
- Use CANDLESTICK, CANDLE, and MATCHES (F).
- Earn UNLIT MATCH.
- Play HOP; earn OCTOPUS (G).
- Place OCTOPUS; take 1st METAL FISH and OWL WING (H).
- Walk down.

- Talk (I).
- Place OWL WING; take CARVED DEER (J).
- Go forward.
- Place CARVED DEER; take DRAGONFLY STATUETTE (K).
- Walk down.
- Give DRAGONFLY STATUETTE (I).
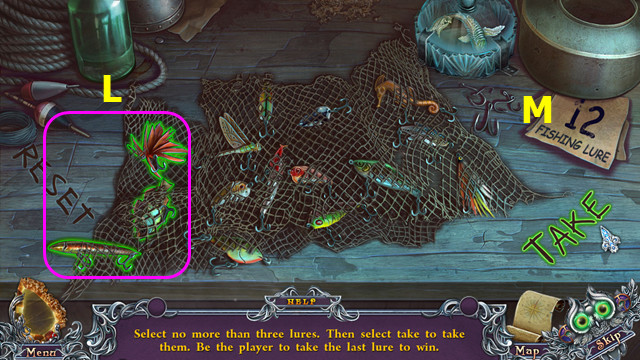
- This mini-game is randomly generated.
- Select 1-3 lures so total remaining is divisible by 4.
- Your first move is 3 lures (L), so remaining is 12 (M).
- Take 2nd METAL FISH.
- Go forward.

- Look (O).
- Place 2 METAL FISH (P).
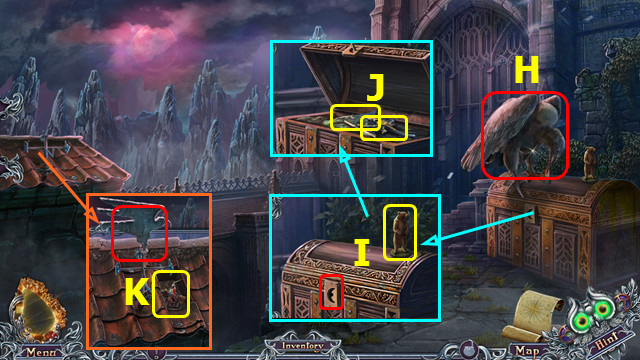
- Go right.
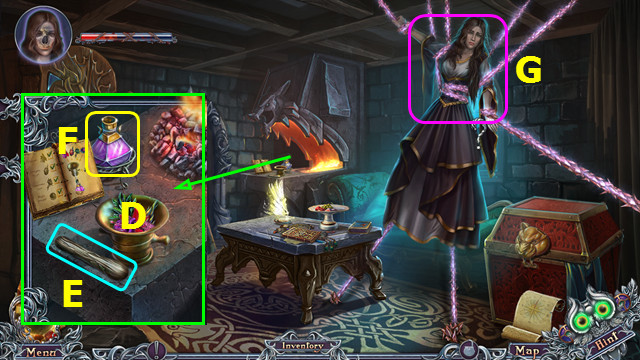
- Talk; take HANDBAG EMBLEM (Q).
- Walk down.
- Use HANDBAG EMBLEM; read instructions and take POTION BOTTLE (A).
- Go right.
- Use POTION BOTTLE (B).
- Select (C).
- Select (D).

- Select; take 4 GLASS STONES (E).
- Take SLINGSHOT FRAME (F).
- SLING, SLINGSHOT FRAME, and 4 GLASS STONES; take SLINGSHOT.
- Take CARVED BEAR (G).
- Select (H).
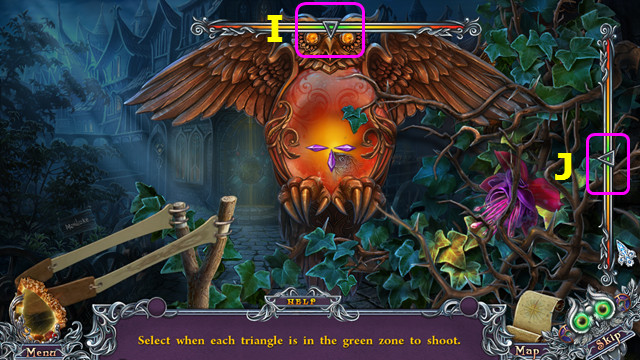
- Use SLINGSHOT.
- Select owl when (I-J) in green; repeat.
- Earn FISH.
- Walk down.
- Play HOP; earn TWEEZERS (L).
- Place CARVED BEAR; take BIRD (M).
- Go right.
- Use TWEEZERS; earn BUTTERFLY (N).
- Use FISH, BUTTERFLY, and BIRD (O).
- Go forward.
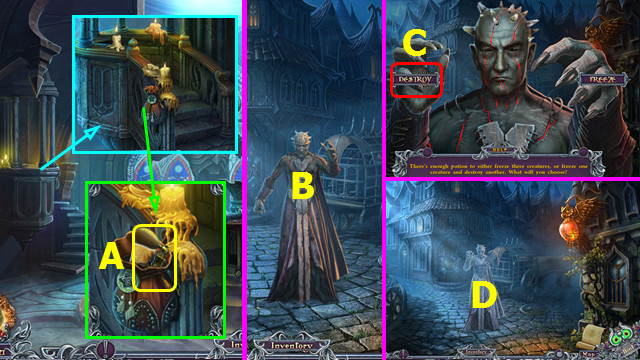
- Use POTION BOTTLE (P); select FREEZE.
- Talk; take RING (Q).
- Take DRAGON FRUIT (R).
- Take WIRE and LEATHER GLOVES (S).
- Take SHOVEL (T).
- Walk down.
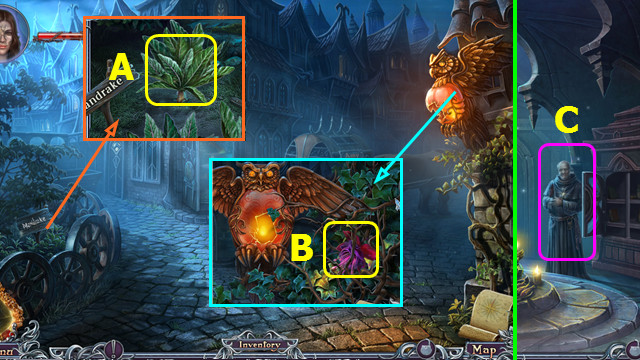
- Use SHOVEL; take MANDRAKE ROOT (A).
- Use LEATHER GLOVES; take FLOWER (B).
- Walk down.
- Give RING; take MAGIC POWDER (C).
- Go right, forward.
- Place FLOWER, DRAGON FRUIT, MANDRAKE ROOT, and MAGIC POWDER (D).
- Use (E-D); select (D).
- Take MAGIC POTION (F).
- Use MAGIC POTION (G).
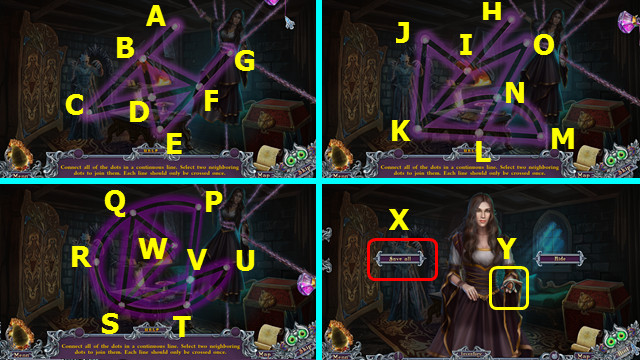
- Select (A-B-C-D-B-F-D-E-F-G).
- Select (H-I-J-K-I-O-N-K-L-M-N-L).
- Select (S-V-U-T-V-P-Q-W-S-Q-R-S-T).
- Select X; take PANTHER'S EAR (Y).
Chapter 2: Trading Places
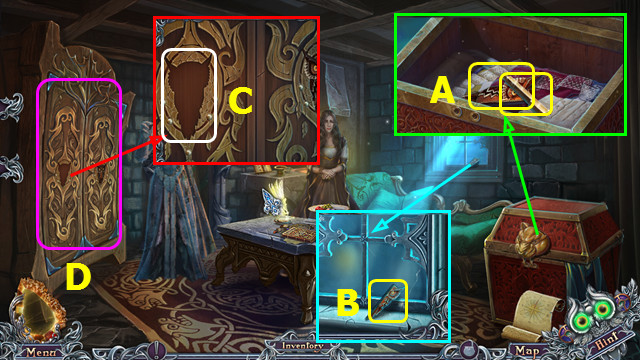
- Place PANTHER'S EAR, move items, take 1/5 PIANO KEY and 1st OWL PART (A).
- Take 2nd OWL PART (B).
- Place 2 OWL PARTS (C).
- Select (D).
- Solutions 1-4 (E).
- Talk (F).
- Select (G). Select Hx3 when crosshair is on it.
- Use WIRE (I).
- Talk (J).
- Take GLASS WINGS (K).
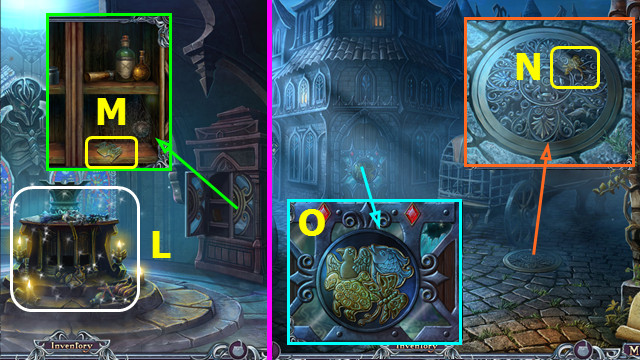
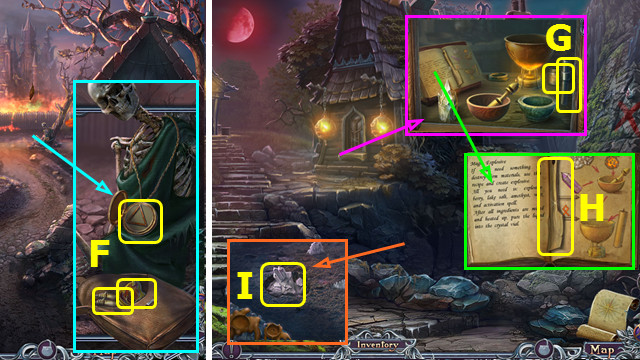
- Take TAIL and CRYSTAL; select opening (L).
- Place TAIL; take 2/4 RUNESTONE (M).
- Take KEY (N).
- Use KEY; take RUSTY HALBERD. Place GLASS WINGS; take 3/4 RUNESTONE (O).
- Use RUSTY HALBERD; take 4/4 RUNESTONE (P).
- Talk (Q).
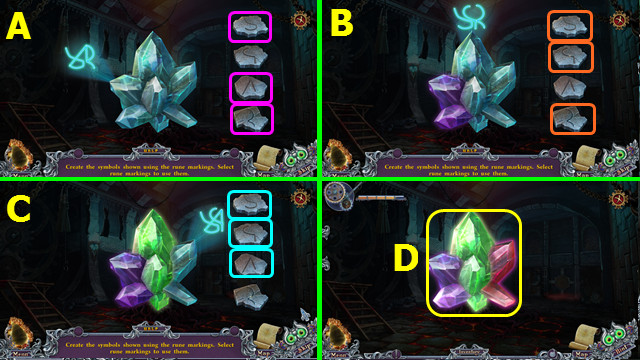
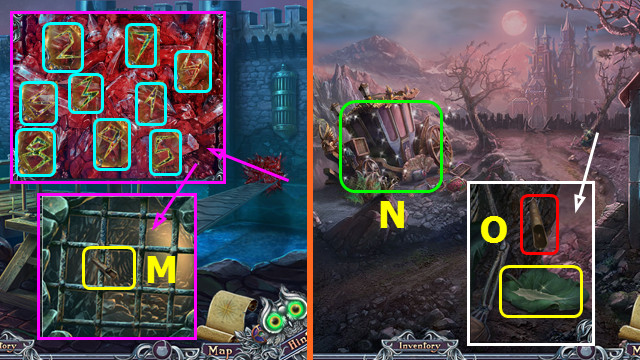
- 4 RUNESTONES on CRYSTAL.
- Select sets (A-C).
- Take MULTICOLORED CRYSTAL (D).
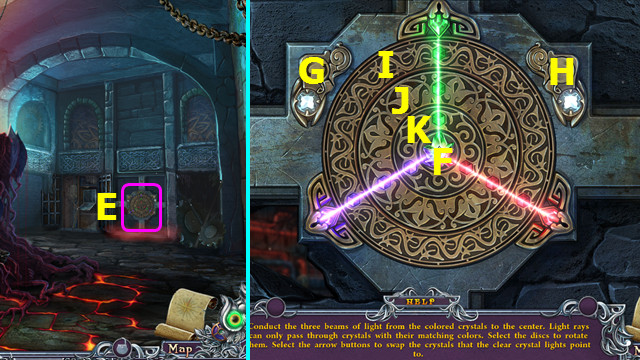
- Select (E).
- Place MULTICOLORED CRYSTAL (F).
- Select G-H-I-Kx2-G-I-Jx2-K-H-Jx2.
- Go forward.
- Select (M).
- Select (N) to start then follow and select the same beetle for each subsequent turn.
- This mini-game is randomly generated.
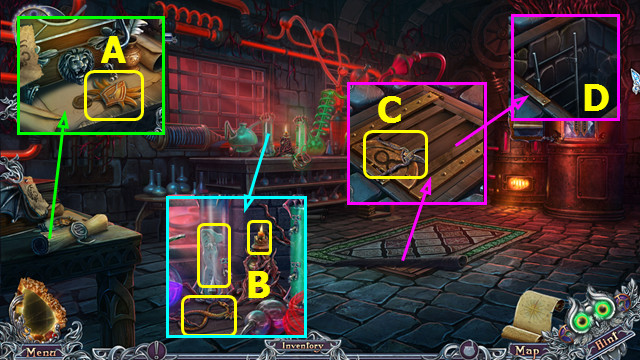
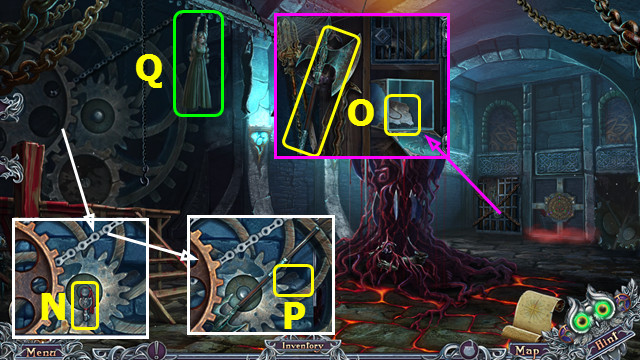
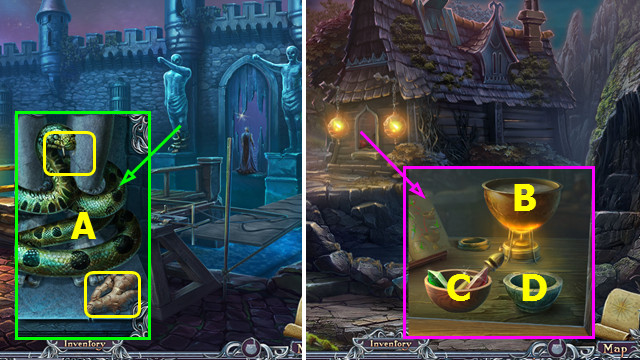
- Take COAT OF ARMS (A).
- Take INFINITY SYMBOL and 1/3 TABLET PART; use UNLIT MATCH to make MATCH (B).
- Move rug; take PRUNER and use INFINITY SYMBOL (C).
- Use MATCH (D).
- Select (E).
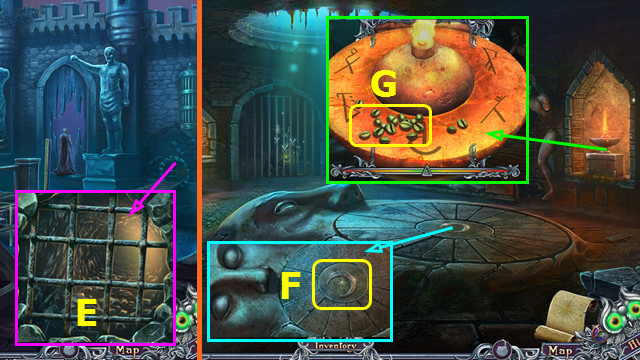
- Talk; take 2/3 TABLET PART (F).
- Play HOP; earn 3/3 TABLET PART (G).
- Take LIZARD CROWN; read note and place 3 TABLET PARTS (H).
- Walk down.
- Place LIZARD CROWN; take FIREBALL (I).
- Use PRUNER; take 1/3 MANTICORE STATUE (J).
- Place COAT OF ARMS; take 2/3 MANTICORE STATUE (K).
- Go forward.
- Place FIREBALL; take 3/3 MANTICORE STATUE (L).
- Place 3 MANTICORE STATUES; select 1-5.
- Remove boards (M).
- Talk (N).
- Go (O).
- Talk (P).
- Talk (Q).
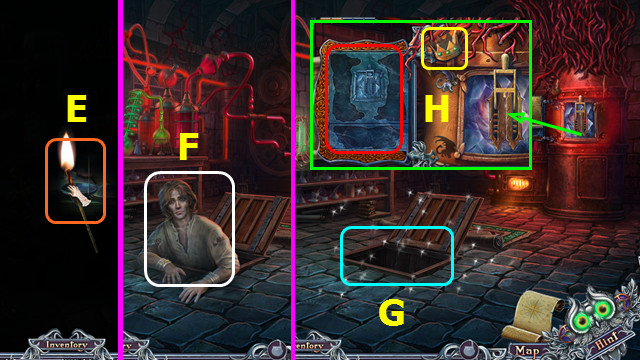
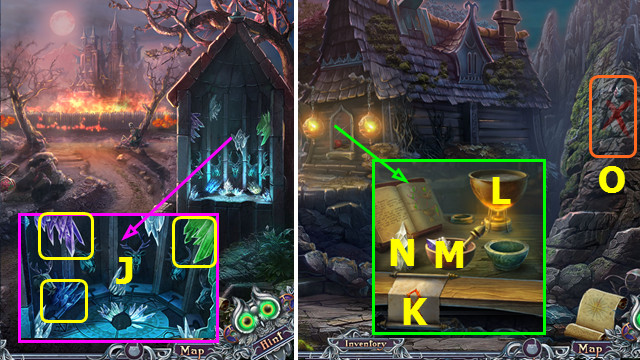
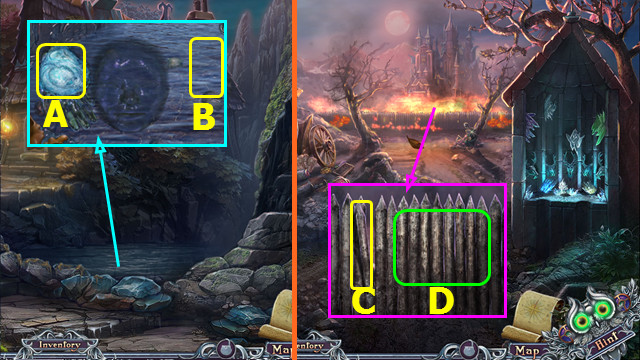
- Take 1/2 PRISM (R).
- Take HELMET (S).
- Use HELMET; take WATER (T).
- Walk down.
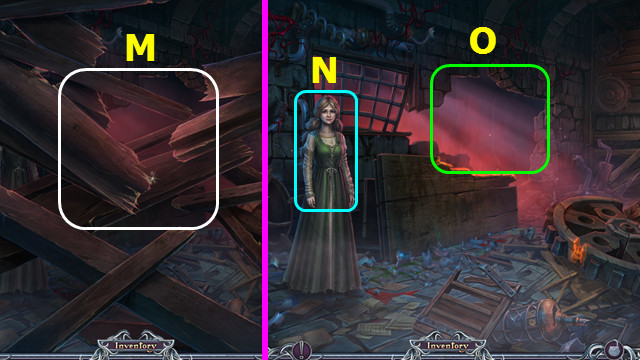
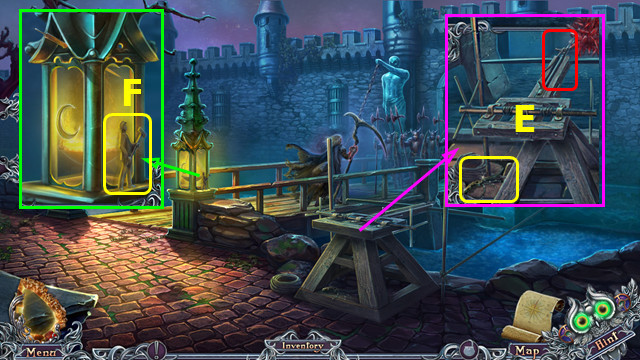
- Take CLOTH; move wood and take 2/2 PRISM. Use WATER; open hatch (A).
- Play HOP; earn 1/2 TOTEM (B).
- Go forward.
- Remove head; select (C).
- Place 2 PRISMS.
- Select each symbol from the inner ring first and then find its pair in the outer area.
- Start position is randomly generated.
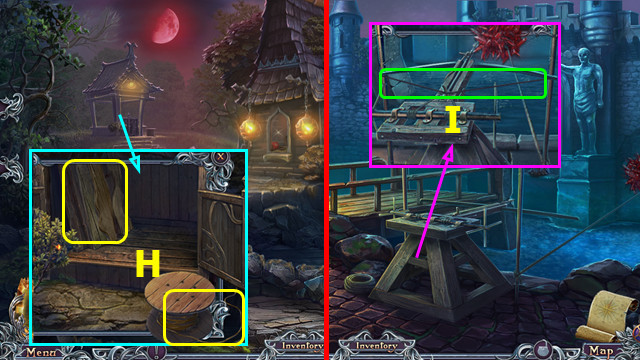
- Take 2nd TOTEM (D).
- Place 2 TOTEMS (E).
- Take HANDLE (F).
- Use CLOTH and HANDLE (G).
- Take DIAMOND KEY and 1/2 FINGER BONE (H).
- Walk down 2x.
- Use DIAMOND KEY; take 2/2 FINGER BONE (I).
- Go forward 2x.
- Place 2 FINGER BONES (J).
- Go (K).
- Select; take TREBLE CLEF and TAPE (L).
- Remove books; select (M).
- Place TREBLE CLEF; take 2/5 PIANO KEY (N).
- Turn page; take SAW BLADE (O).
- Use SAW BLADE; take STICK and 3/5 PIANO KEY (P).
- Take 4/5 PIANO KEY (Q).
- Play HOP; take MAGNET (R).
- MAGNET and TAPE on STICK; take STICK WITH MAGNET.
- Walk down.
- Use STICK WITH MAGNET; earn 5/5 PIANO KEY (A).
- Remove MAGNET from STICK.
- Walk left.
- Place 5 PIANO KEYS; select 4-2-1-3-6-5-1-2-4-5-6-3.
- Take TILE (B).
- Place TILE (C).
- Walk left.
Chapter 3: Behind the Bookcase
- Select 2x (D).
- Take 1/2 PLATE (E).
- Remove items; take PICTURE (F).
- Walk down.
- Play HOP; earn ARM LEVER (G).
- Place ARM LEVER (H).
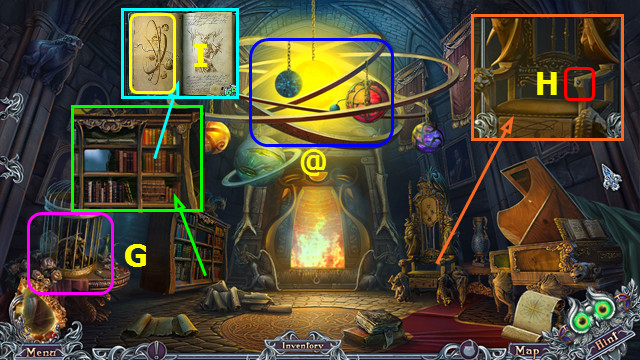
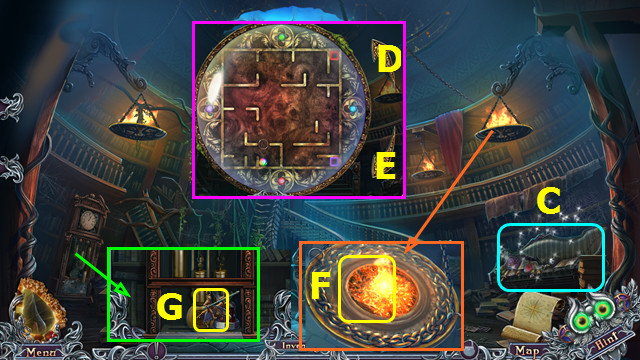
- Use LION KEY; place PICTURE and take SOLAR SYSTEM (I).
- Select (@).
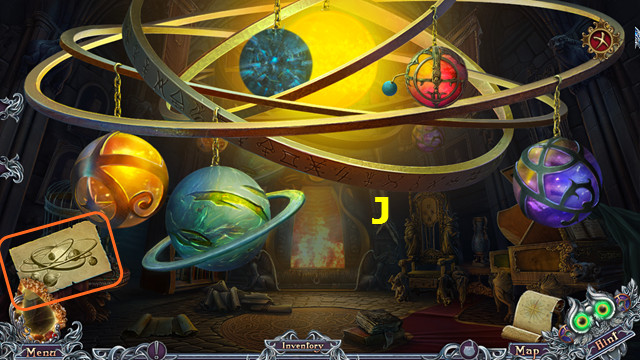
- Place SOLAR SYSTEM; solution (J).
- Go left.

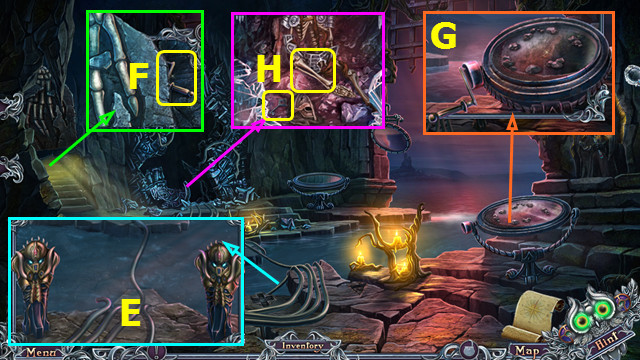
- Take MACE BLADE (K).
- Take FORCEPS (L).
- Walk down.
- Use FORCEPS; take 2/2 PLATE (M).
- Walk down.
- Place MACE BLADE; take MACE (N).
- Go left 2x.
- Select (O).

- Place 2 PLATES.
- Casual solution: R-Q-P-U-V-T-S.
- Hard level is randomly generated.
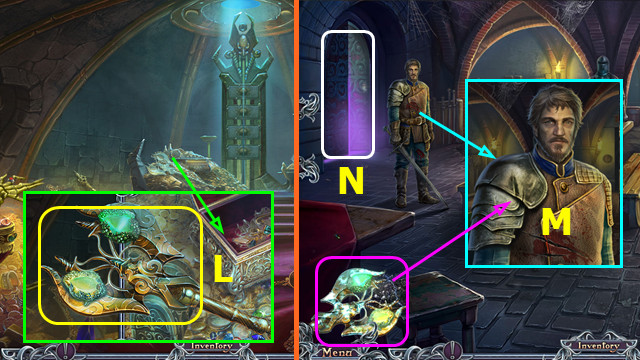
- Use MACE; take BRACELET. Place AMULET; take AMULET (W).
- Place BRACELET; take STAR (A).
- Place STAR; go (B).
- Select (C).
- Use AMULET; select 1-9.
- Select (D).
- Take COUNTERWEIGHT (E).
- Place COUNTERWEIGHT; take GLASS (F).
- Use GLASS; play HOP to earn SCROLL (G).
- Read SCROLL to earn LADDER SPELL.
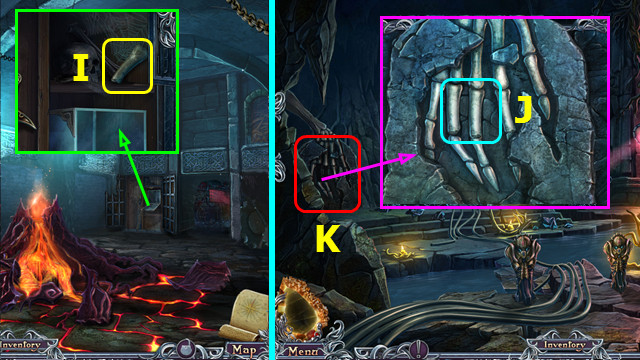
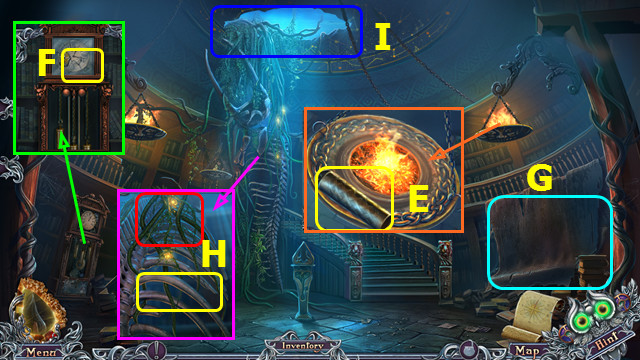
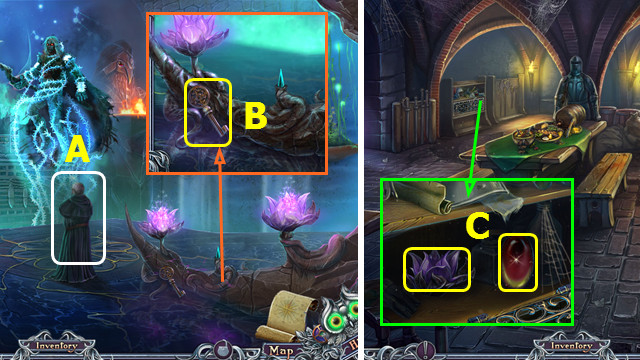
- Take RIB; use LADDER SPELL (H).
- Go (I).
- Take BOX and CLOCK FIGURE (A).
- Take MOON KEY, RAW COFFEE BEANS, and RAG (B).
- Walk down.
- Play HOP; earn CRYSTAL (C).
- CRYSTAL on BOX.
- Select (Dx4-Ex2-Dx2-Ex2)-(Dx3-E-Dx4-Ex5-Dx2-Ex2).
- -(Dx7-Ex3-Dx5-Ex2-Dx3-E-D-E-D)-(Ex3-Dx4-Ex3-Dx5-Ex2-Dx4-E-D(.
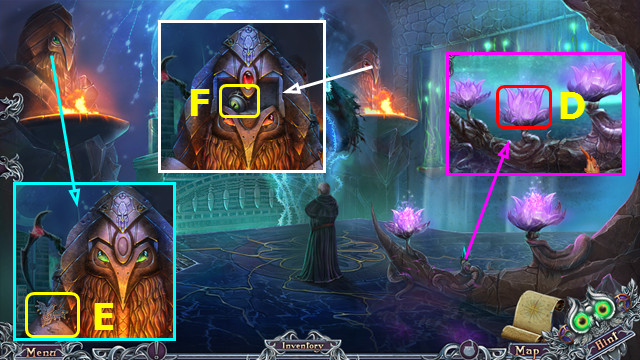
- Remove lid; take 1/2 RUNE and FUEL.
- RAG and FUEL on RIB; take TORCH.
- Use TORCH; earn BURNING TORCH (F).
- Place CLOCK FIGURE; take 1st KNIGHT (G).
- Go up.
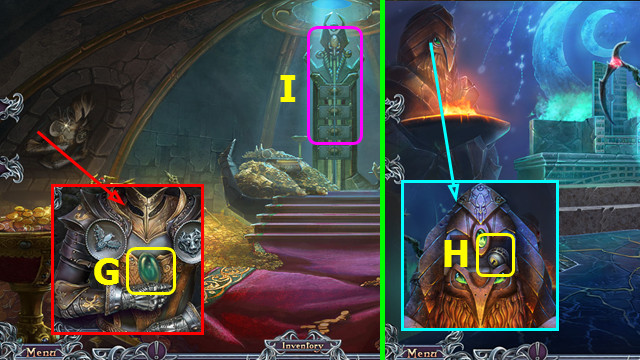
- Use BURNING TORCH; TORCH returns to inventory (H).
- Take BEAR; use MOON KEY (I).
- Open chest; take 1st NIPPERS PART and VANE (J).
- Place VANE; take 2nd KNIGHT (K).
- Go down 2x.
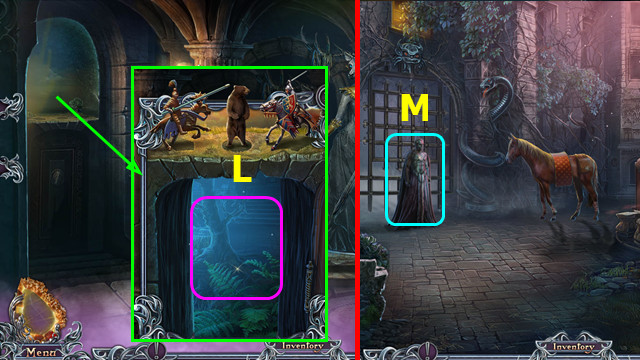
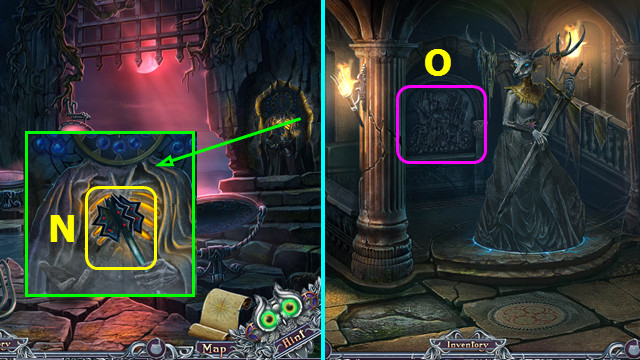
- Place 2 KNIGHTS and BEAR; go (L).
- Select (M).
- Select pair sand track beetle movements (N).
- Mini-game is randomly generated.
- Move saddle; take AXE BLADE (A).
- Take RAG (B).
- Select (C).
- Drag marble on path; earn HORSE CHARM (D).
- Use RAG; earn RAG WITH PITCH (E).
- RAG WITH PITCH on TORCH; take UNLIT TORCH.
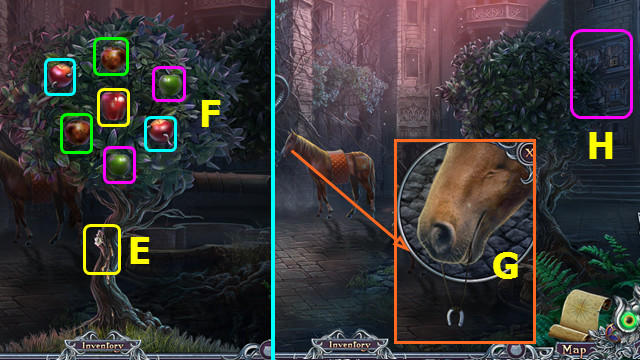
- Select pairs; take APPLE (F).
- Use APPLE; earn HORSESHOE (G).
- Select (H).
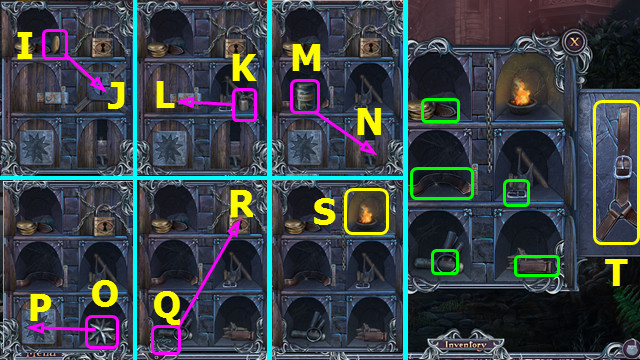
- Place HORSE CHARM; use (I) on (J).
- Use (K) on (L).
- Use (M) on (N).
- Use (O) on (P).
- Use (Q) on (R).
- Use UNLIT TORCH; earn LIT TORCH (S).
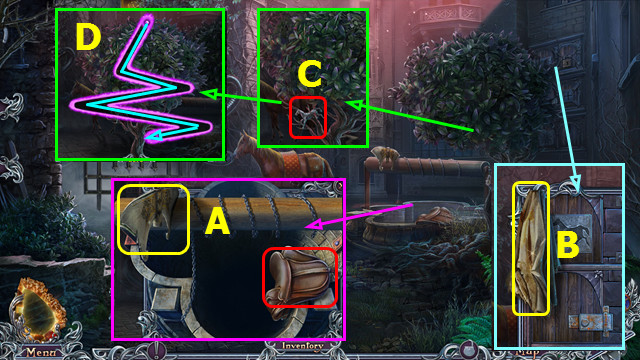
- Select 5 parts (green); take BRIDLE (T).
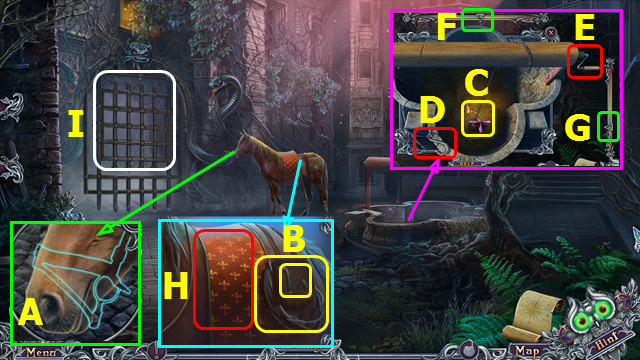
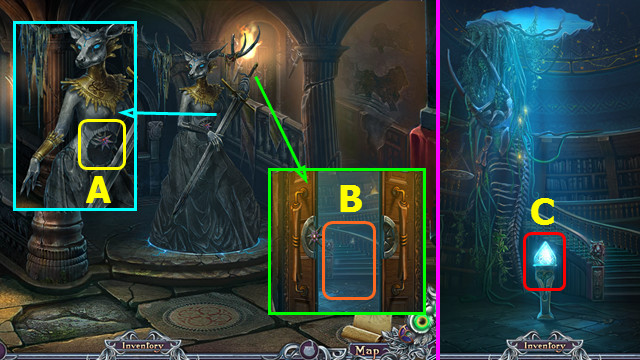
- Place BRIDLE (A).
- Take ROPE; place HORSESHOE, open bag, and take HOOK (B).
- ROPE on MAGNET; earn MAGNET ON ROPE.
- Use LIT TORCH (C); place HOOK (D).
- Select (E).
- Select Cx2, when (F-G) are in the green; earn SADDLE.
- Place SADDLE (H).
- Go (I).
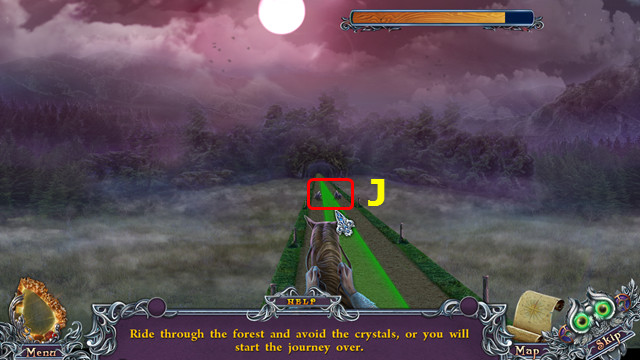
- Change lanes to avoid crystals (J).
- This mini-game is randomly generated.
Chapter 4: At the Ravine
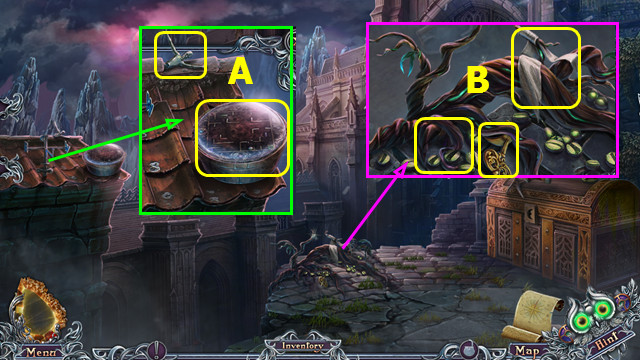
- Take UNFINISHED BAGPIPES (L).
- Take SPEARHEAD (M).
- Take GAUNTLET; use MAGNET ON ROPE to take PIPES (N).
- PIPES on UNFINISHED BAGPIPES; take BAGPIPES.
- Use BAGPIPES; play HOP to earn LADDER (O).
- Use LADDER; go (P).
- Use GAUNTLET; earn EXPLOSIVE BERRY. Take CHISEL (A).
- Take HEART CHARM (B).
- Take COAT OF ARMS (C).
- Take CANDLE (D).
- Walk down.
- Place HEART CHARM; take TRIANGLE KEY. Place COAT OF ARMS and open bag; take FIRE and SPELL (F).
- Open SPELL: take SNOWFLAKE CHARM and ACTIVATION SPELL.
- Go left.
- Place SNOWFLAKE CHARM; take EMPTY FLASK and JAR FOR VENOM (G).
- Place TRIANGLE KEY; take SCOOP (H).
- Use SCOOP; take LAKE SALT (I).
- Walk down.
- Use CHISEL 3x to take AMETHYST, EMERALD, and SAPPHIRE (J).
- Go left.
- Place ACTIVATION SPELL (K) and CANDLE (L).
- Place LAKE SALT, EXPLOSIVE BERRY, and AMETHYST; select (M).
- Use (N) on (L); earn MAGIC EXPLOSIVE.
- Select (O).
- Use MAGIC EXPLOSIVE.
- Solution (P).
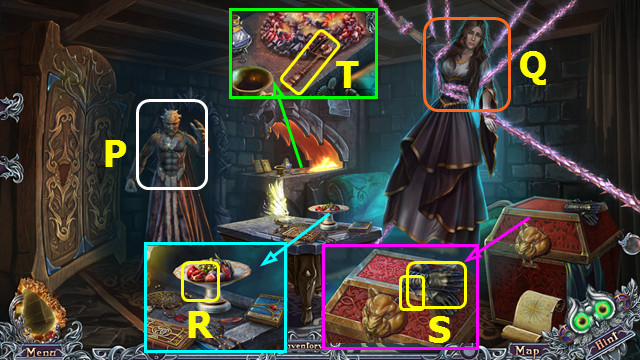
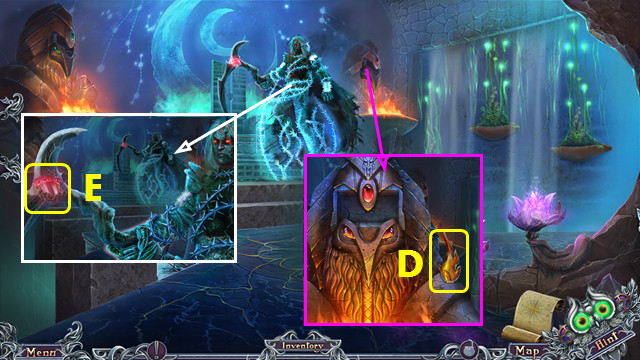
- Talk; take WATER SPHERE (A).
- Use EMPTY FLASK; earn LAKE WATER (B).
- Walk down.
- Use WATER SPHERE; take AXE HANDLE (C).
- AXE HANDLE on AXE BLADE; take AXE.
- Use AXE; go (D).
- Take 2nd NIPPERS PART; place SPEARHEAD (E).
- 1st NIPPERS PART on 2nd NIPPERS PART; take NIPPERS.
- Take CARPENTER FIGURINE (F).
- Walk down, left.
- Place CARPENTER FIGURINE; take BOARDS. Use NIPPERS; earn STRING (H).
- Go down, forward.
- Place and select STRING (I).
- Place BOARDS.
- Solution (J).

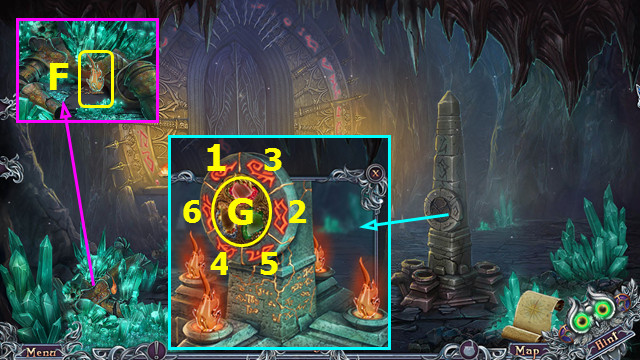
- Take 2/2 RUNE (K).
- Walk down.
- Place 2 RUNES and AMULET; take AMULET (L).
- Go forward.
- Use AMULET; select 1-9 to earn RUBY.
- Use NIPPERS; take SPILE (M).
- Walk down.
- Play HOP; earn REED PIPE (N).
- Place SPILE; take BIRCH SAP (O).
- Walk forward.
- Use REED PIPE and JAR FOR VENOM; earn SNAKE VENOM. Take GINGER (A).
- Walk down, left.
- Place LAKE WATER, SNAKE VENOM, and BIRCH SAP (B).
- Place EMERALD and RUBY; select (C).
- Use (D-B); earn MAGIC ACID.
- Walk down, forward.
- Use MAGIC ACID; go (E).
- Take MOON CHARM (F).
- Place RAW COFFEE BEANS; take ROASTED COFFEE BEANS when arrow is in green (G).
- Remove debris; select 6 net parts (green). Take INCOMPLETE HOOP NET (H).
- Walk down.
- Place MOON CHARM; take SMOKY LAMP (I).
- Go forward.
- Use SMOKY LAMP and MAGIC ACID; take KNIFE HANDLE and DEADLY FLOWER (J).
- Walk down.
- Use KNIFE HANDLE: take BLUNT KNIFE (K).
- Walk down.
- Use BLUNT KNIFE; earn SHARP KNIFE (L).
- Go forward 2x.
- Use SHARP KNIFE; take NET (M).
- NET on INCOMPLETE HOOP NET; earn HOOP NET.
- Walk down 2x; go left.
- Use HOOP NET (N).
- Select pairs; take BLACK PEARL (O).
- Place GINGER, SAPPHIRE, ROASTED COFFEE BEANS, DEADLY FLOWER, and BLACK PEARL; select (P).
- Use (Q-R); earn AWAKENING POWDER.
- Walk down; go forward 2x.
- Use AWAKENING POWDER (S).
- Go (T).
- Solution (U).
Chapter 5: The Dungeon
- Talk; take 1/2 GEAR (A).
- Use NIPPERS; open door and select (B).
- Play HOP; earn 2/2 GEAR (C).
- Remove old gears; place 2 GEARS and pull lever (D).
- Talk; take TREE (E).
- Place FIRE and TREE (F).
- Go (G).
- Talk; take POTION RECIPE (H).
- Talk (I).
- Take FLASK (J).
- Take TRENCHER (K).
- Use TRENCHER; play HOP to earn APRICOTS (L).
- Remove drape; use CHISEL to take RESIN (M).
- Take SANDALWOOD; place POTION RECIPE (N).
- Walk down.
- Play HOP; earn AMBERGRIS (O).
- Give APRICOTS; take MUSHROOMS (P).
- Use FLASK; earn MOSS (Q).
- Go right.
- Place SANDALWOOD, RESIN, MOSS, MUSHROOMS, and AMBERGRIS (R).
- Use (S-R); take POTION (T).
- Use POTION; take 1/2 TREASURY KEY (U).
- Play HOP; earn NOTE (V).
- Walk down 2x.
- Place NOTE; select 1-5 and take 2/2 TREASURY KEY (A).
- Take stairs, go right.
- Use 2 TREASURY KEYS; go (B).
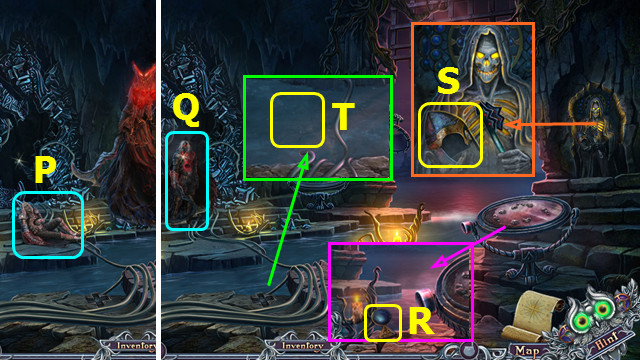
- Take SPEAR (D).
- Take 1/3 EYE (E).
- Take COMET (F).
- Walk down.
- Place COMET; take ROSE EMBLEM (G).
- Walk down.
- Use SPEAR; earn BEAR (H).
- Go right, forward.

- Place BEAR; take 1/2 TRISKELION PART (I).
- Place ROSE EMBLEM; take 2/2 TRISKELION PART (J).
- Place 2 TRISKELION PARTS; take AMULET OF LIFE (K).
- Place AMULET and AMULET OF LIFE: take STAFF (L).
- Walk down.
- Use STAFF (M).
- Go (N).
- Select (O).
- Talk; use STAFF (P).
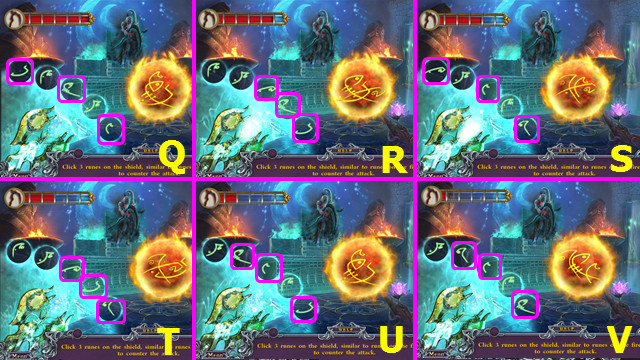
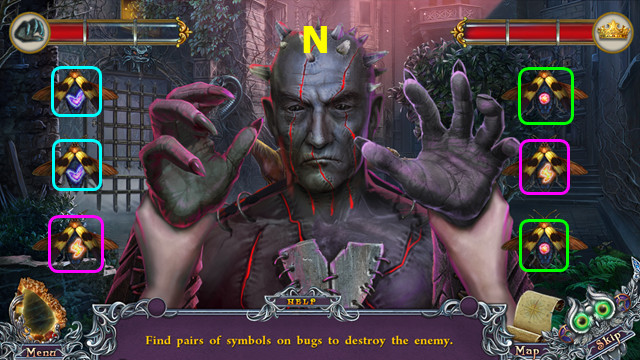
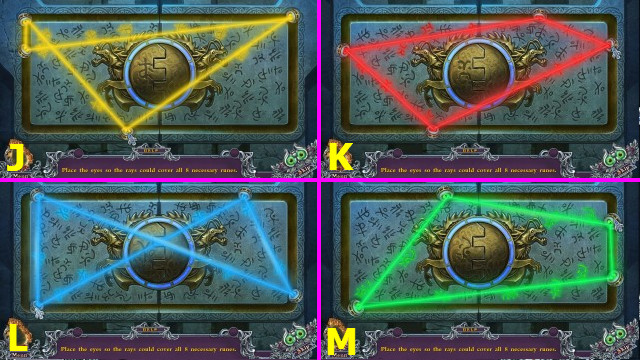
- Select 6 sets of randomly generated runes (Q-V).
- You earn AMULET OF LIFE and AMULET OF DEFENSE.
- Talk (A).
- Take KEY (B).
- Walk down.
- Use KEY; take RED CHAKRA and STONE FLOWER (C).
- Go left.
- Place STONE FLOWER (D).
- Take BIRD (E).
- Place RED CHAKRA; take 2/3 EYE (F).
- Walk down, forward.
- Place BIRD; take GREEN CHAKRA (G).
- Walk down, left.
- Place GREEN CHAKRA; take 3/3 EYE (H).
- Walk down. forward.
- Select (I).
- Place 3 EYES.
- Solution (J-M).
- Go forward.
- Take BIT (N).
- Take HANDLE (O).
- Walk down 3x.
- Place HANDLE; take HAMMER (P).
- Walk down.

- Use HAMMER; earn 1/4 FIERY STALAGMITE (A).
- Go (B).
- Go right, left.
- Use HAMMER; earn 2/4 FIERY STALAGMITE (C).
- Use HAMMER; earn 3/4 FIERY STALAGMITE (D).
- Use BIT and HAMMER; earn AMULET OF POWER (E).
- Walk down, forward 2x.
- Use HAMMER; earn 4/4 FIERY STALAGMITE (F).
- Place 4 FIERY STALAGMITES, AMULET OF LIFE, AMULET OF POWER, and AMULET OF DEFENSE. Select 1-6; take GOLDEN SHIELD (G).
- Walk down 2x; go left.
- Use GOLDEN SHIELD (I) on (J).
- Select 6 sets of randomly generated runes (K).
- Congratulations! You have completed Spirits of Mystery: The Moon Crystal!
Created at: 2017-09-17