

Walkthrough Menu
- General Tips
- Chapter 1: Mystery at Wolfgrin Mansion
- Chapter 2: Chloe
- Chapter 3: Ben
- Chapter 4: Humphrey
- Chapter 5: Abigail
- Chapter 6: The Resurrection Crown
General Tips
- This is the official guide for Stranded Dreamscapes: Deadly Moonlight.
- This guide will not mention when you have to zoom into a location; screenshots will show each zoom scene.
- The screenshots will show where to play Hidden-Object Puzzles (HOP).
- This guide will give step-by-step solutions for all puzzles that are not random. Read the instructions in the game for each puzzle.
- Inventory items marked with an orange + symbol need to be combined with other items or otherwise altered.
Chapter 1: Mystery at Wolfgrin Mansion

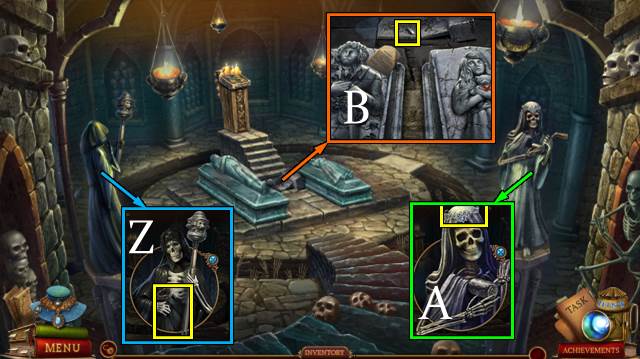
- Talk to the constable (A).
- Take the WOODEN HAMMER (B).
- Use the WOODEN HAMMER and open the compartment (C); take the CASE (D).
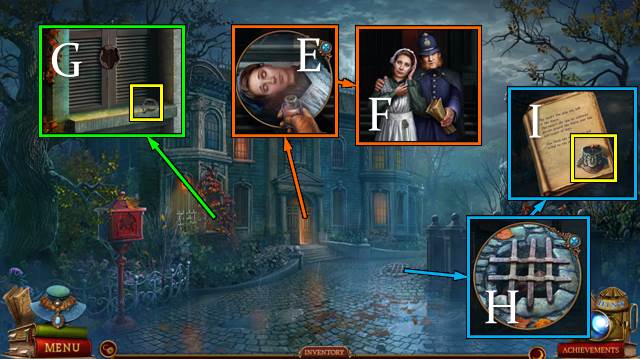
- Open the CASE; take the SCYTHE and SMELLING SALTS.
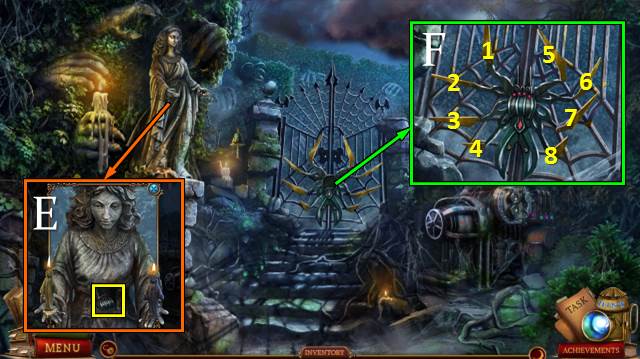
- Offer the SMELLING SALTS (E).
- Take the map (F).
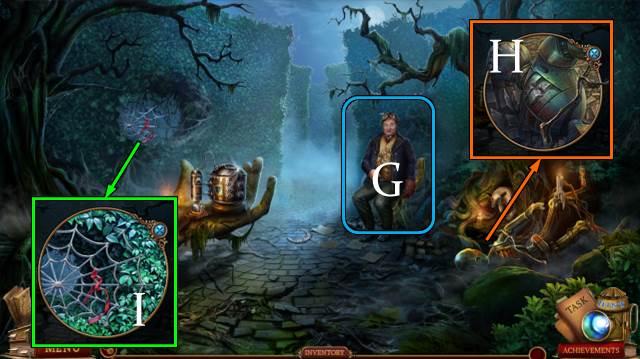
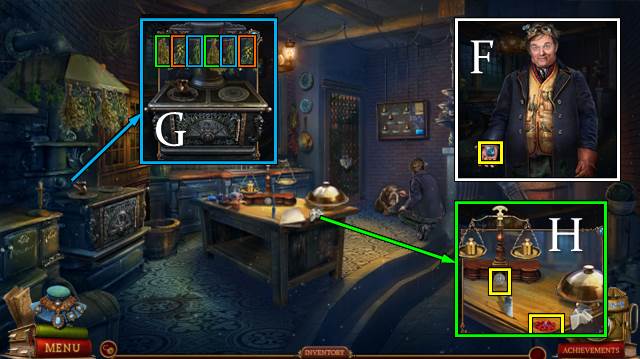
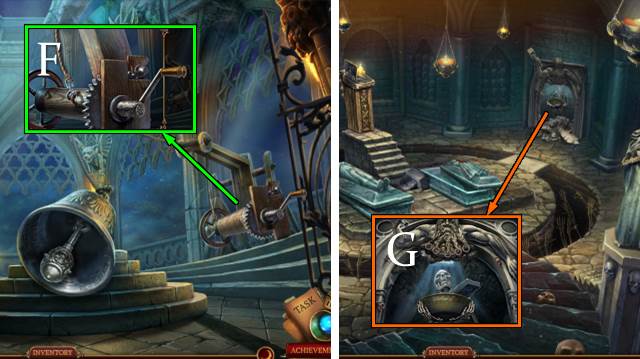
- Use the SCYTHE; take the OLD WIRE (G).
- Turn the OLD WIRE into a WIRE HOOK.
- Use the WIRE HOOK (H); open the folder, turn the pages and take the TOTEM HEAD (I).
- Go forward.
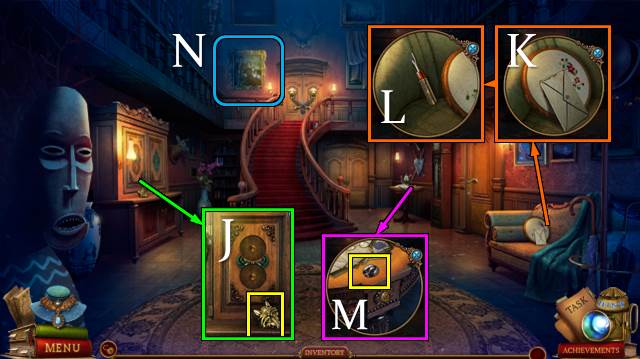
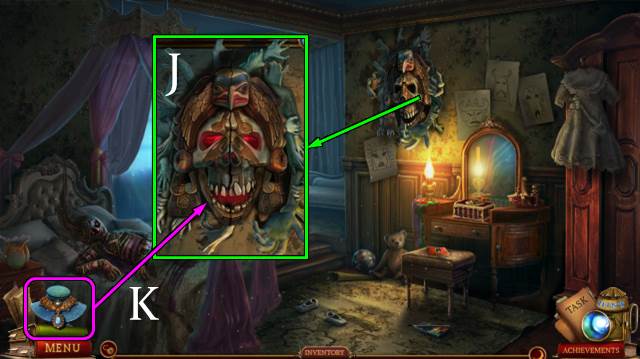
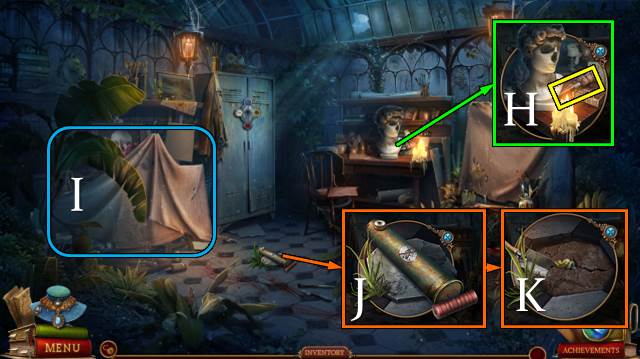
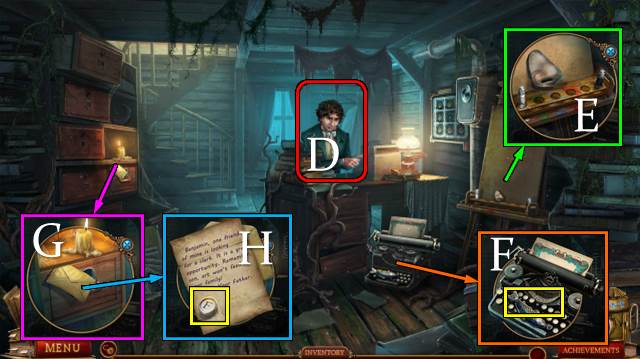
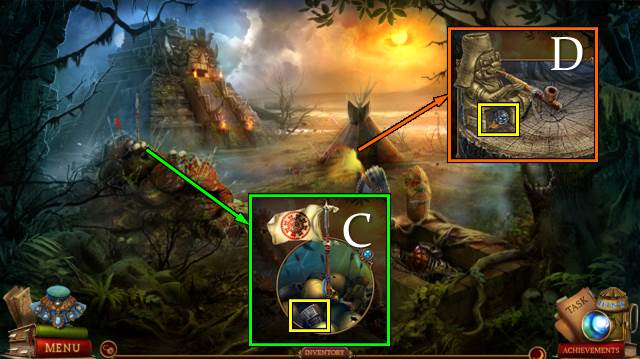
- Take the WOLF FIGURE (J).
- Take the note from the envelope (K). Move the embroidery and take the SEAM RIPPER (L).
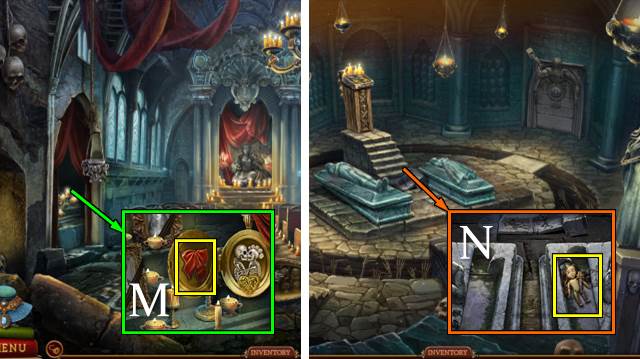
- Read the paper; take CHLOE'S PORTRAIT (M).
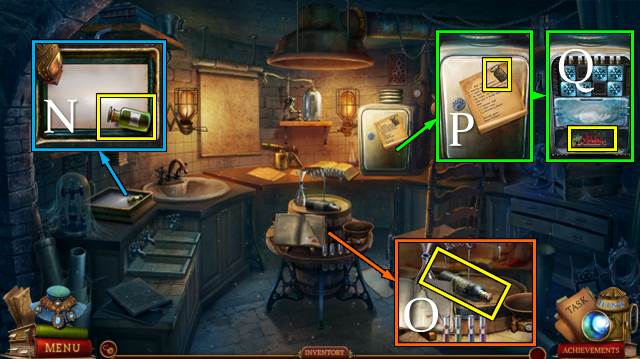
- Inspect the painting (N).
- Walk down.
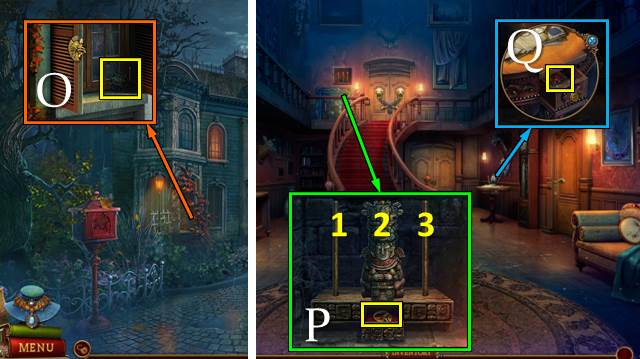
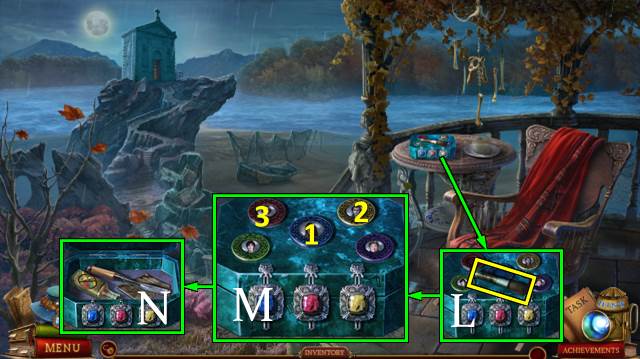
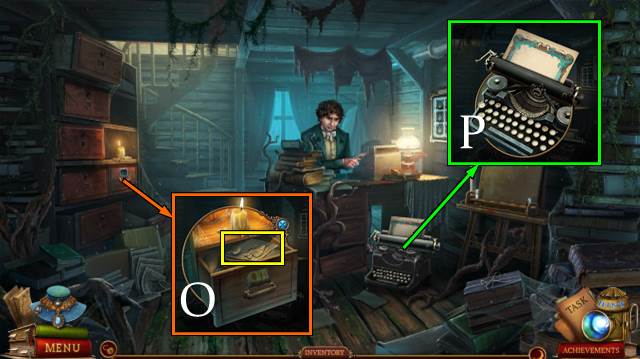
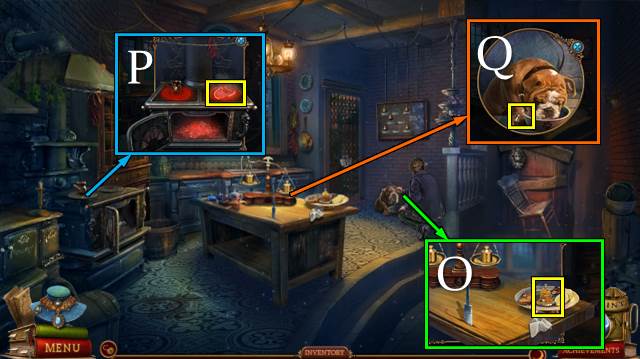
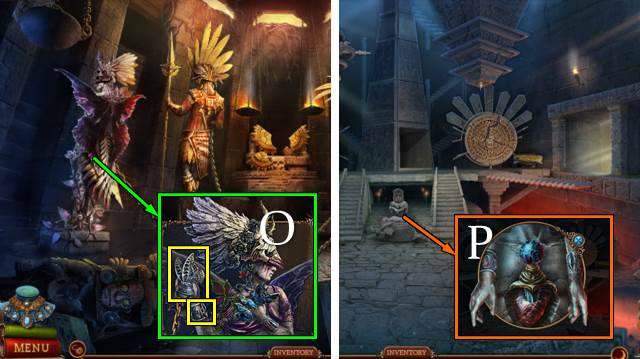
- Place the WOLF FIGURE; take the TOTEM HAT (O).
- Go forward.
- Place the TOTEM HEAD and TOTEM HAT for a mini-game (P).
- Solution: (3-1)-(2-1)-(3-2)-(1-2)-(1-3)-(2-3)-(1-2)-(3-1)-(3-2)-(1-2).
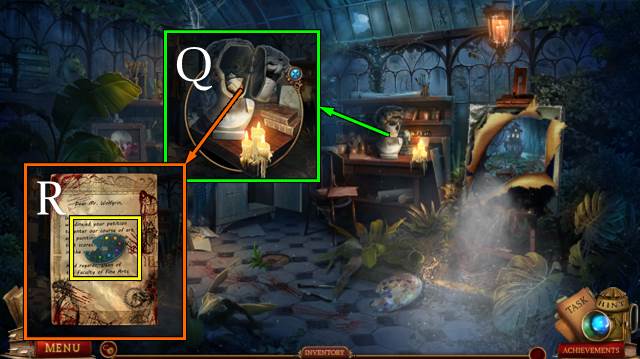
- Take the RING (P).
- Use the RING; take the HORSEMAN FIGURE (Q).
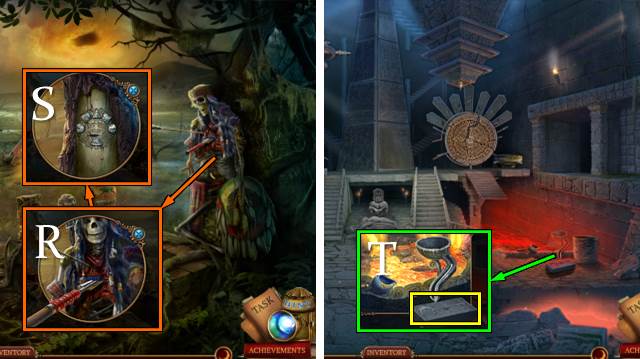
- Walk down.
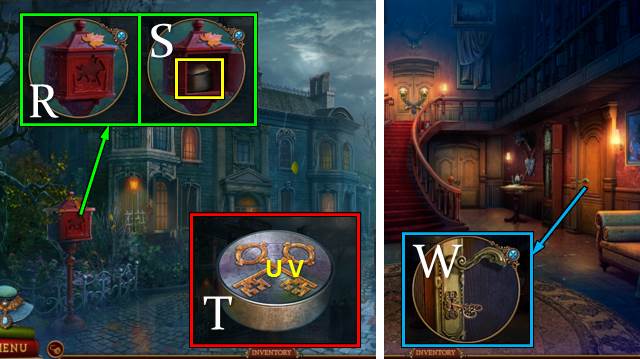
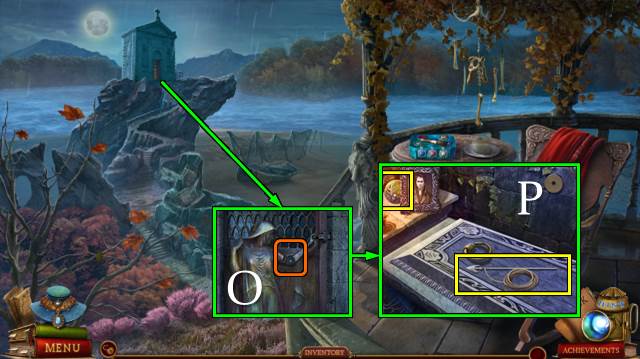
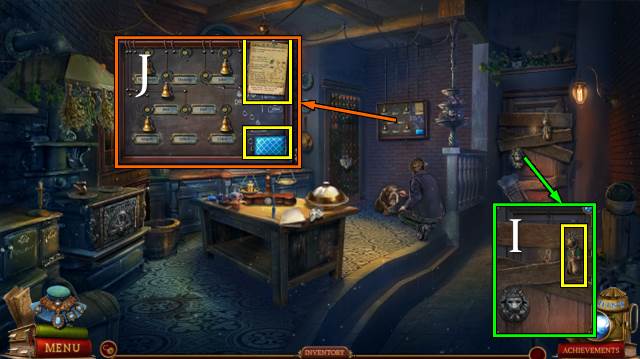
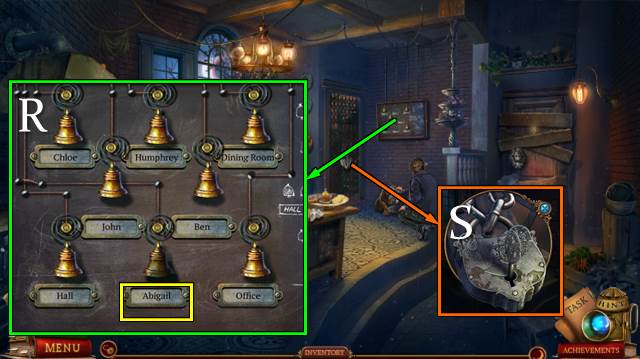
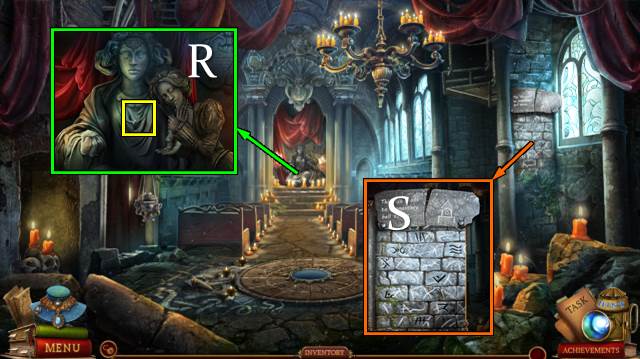
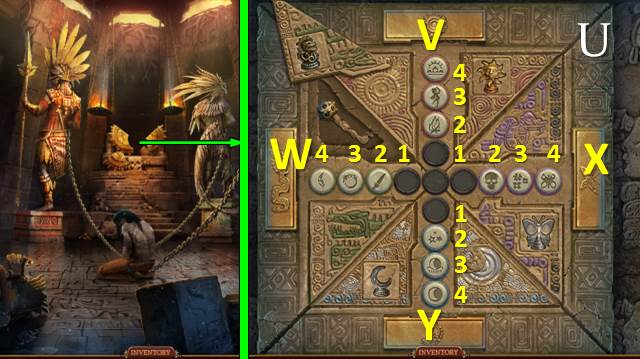
- Place the HORSEMAN FIGURE (R); take the label and PARCEL (S).
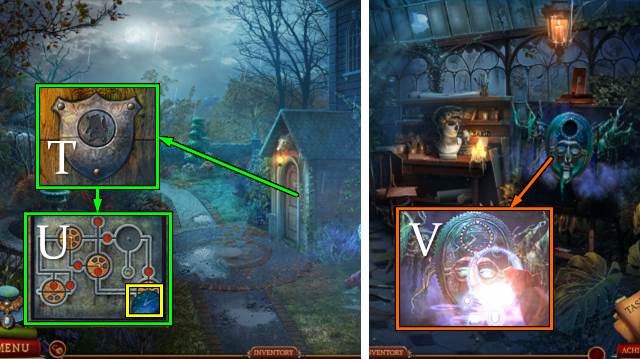
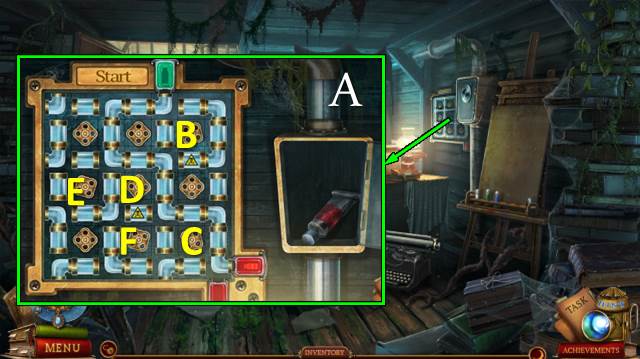
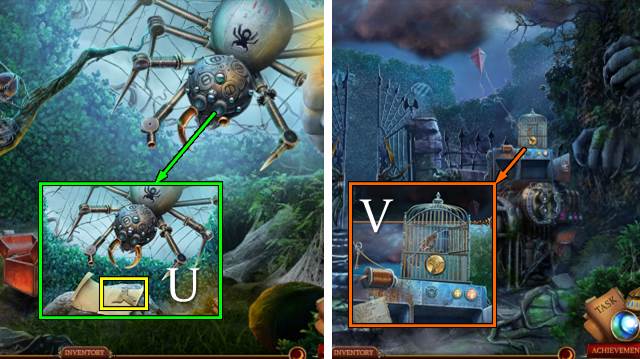
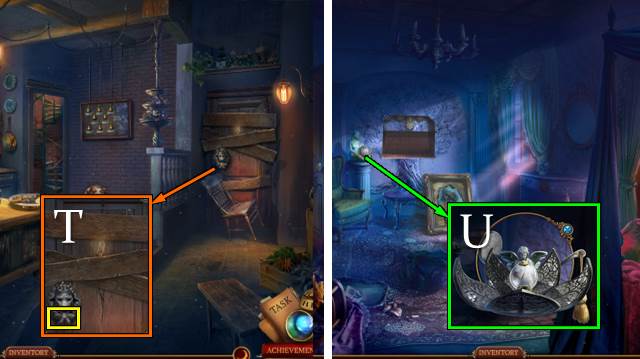
- Access the PARCEL for a mini-game (T).
- Solution: U6-V7.
- Take the OFFICE KEY.
- Go forward.
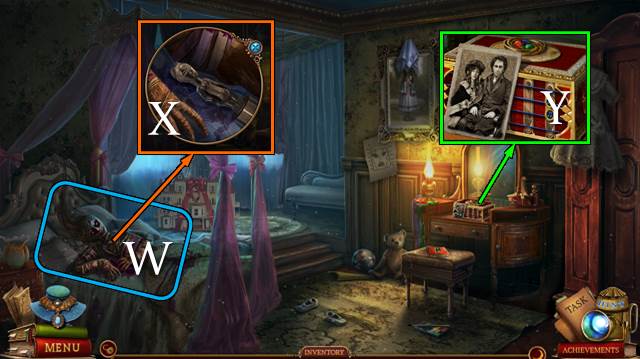
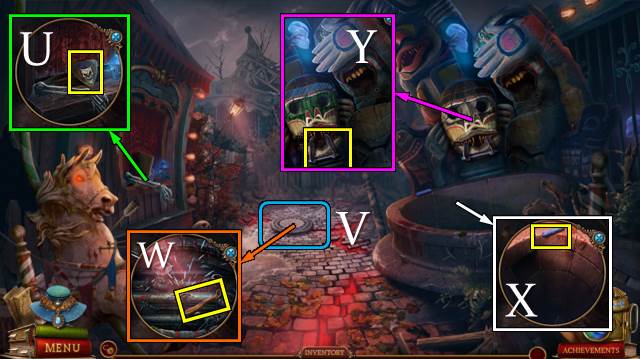
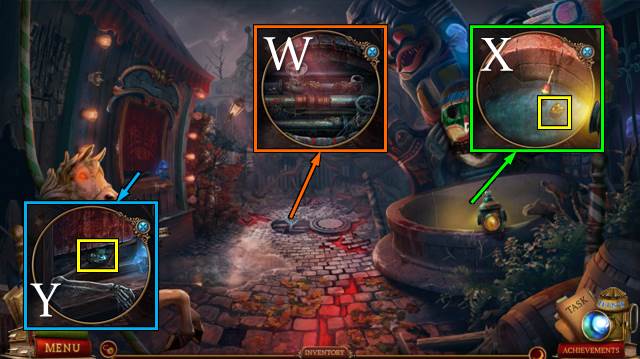
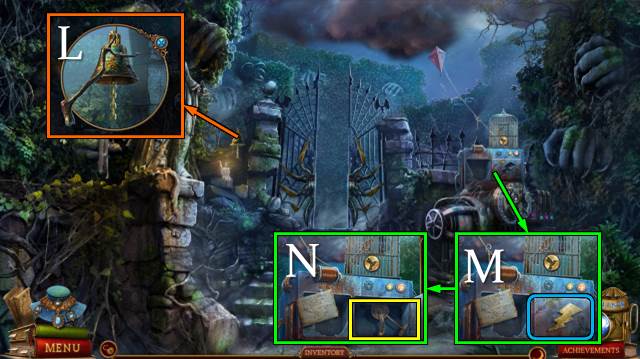
- Use the OFFICE KEY and open the door (W).
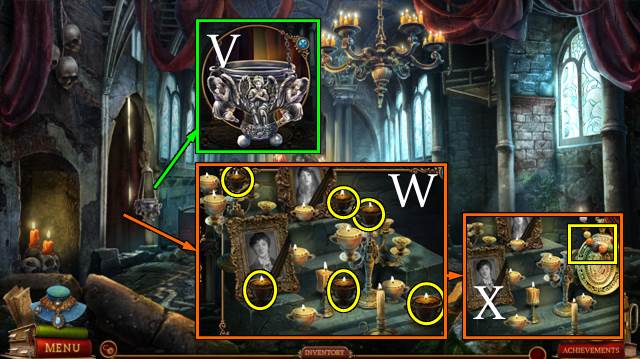
- Go right.
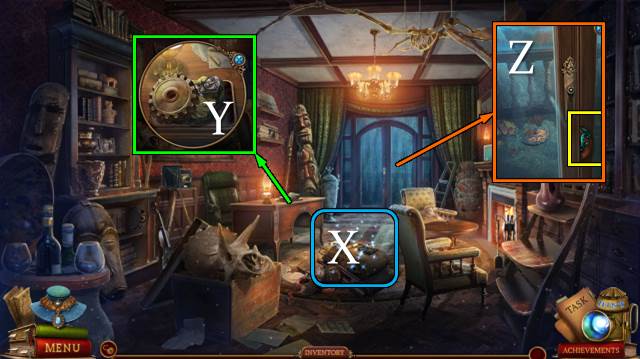
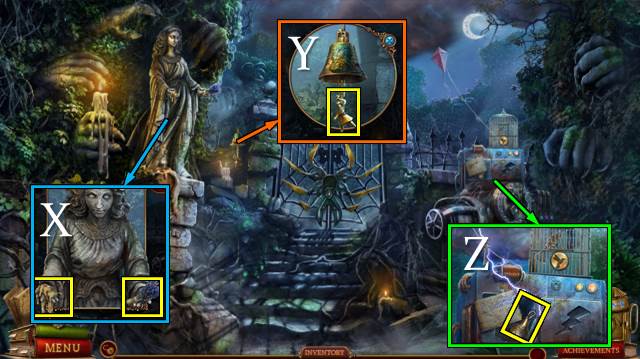
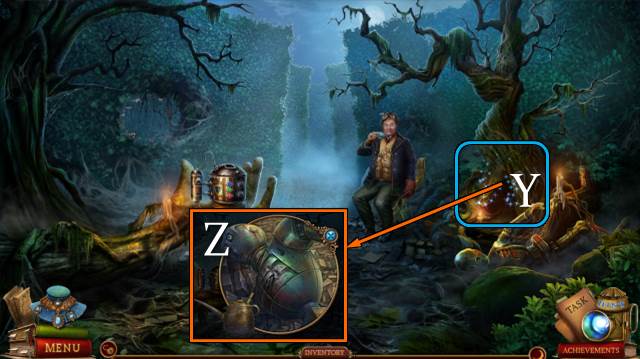
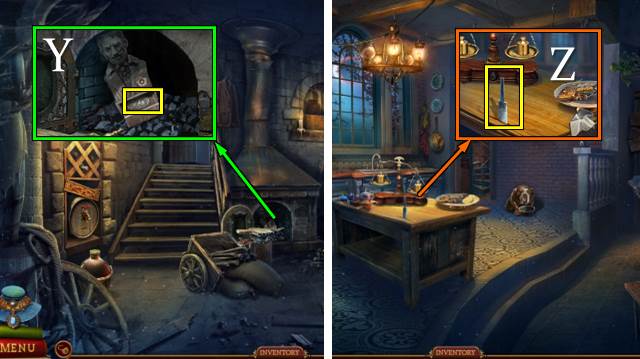
- Play the HOP (X); receive CABINET ORNAMENT 1/2.
- Take the COGWHEEL (Y).
- Take CABINET ORNAMENT 2/2 (Z).
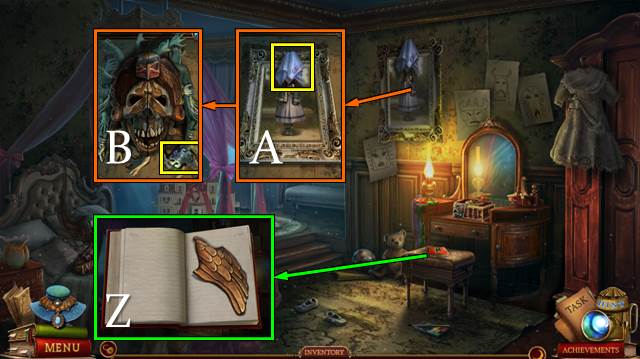
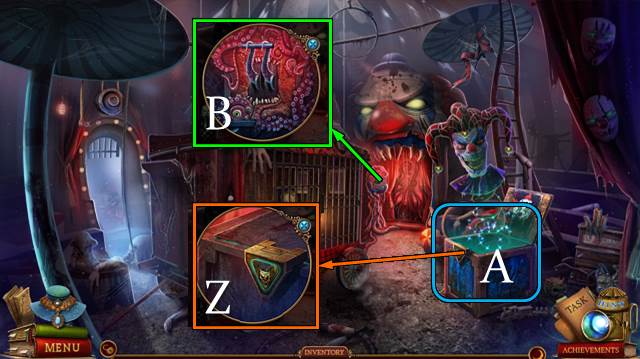
- Walk down.
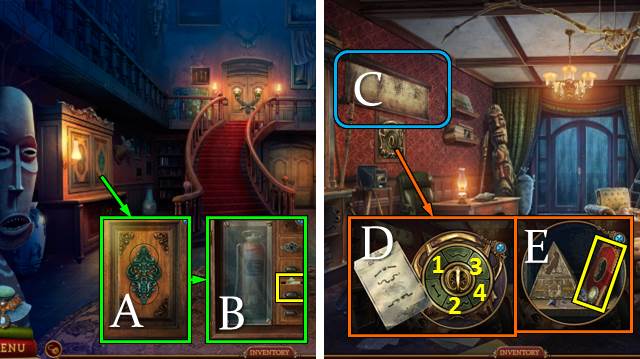
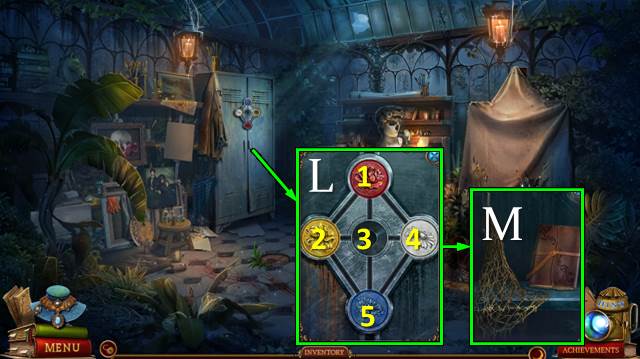
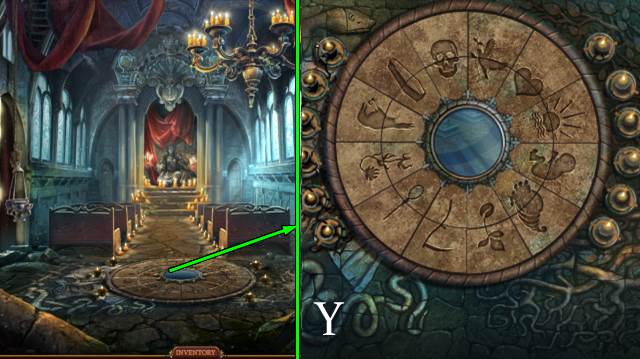
- Place the CABINET ORNAMENTS (A); open the drawer and take the SAFE CODE (B).
- Go right.
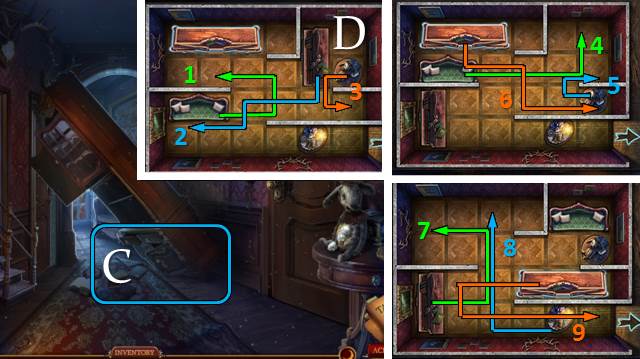
- Move the map (C).
- Place the SAFE CODE for a mini-game (D).
- Take the COIN and JOHN'S DIARY (E).
- Walk down.
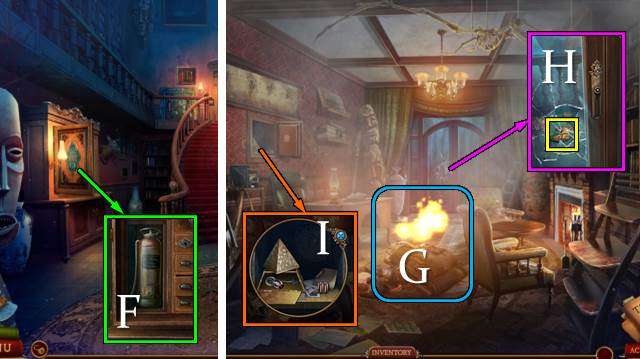
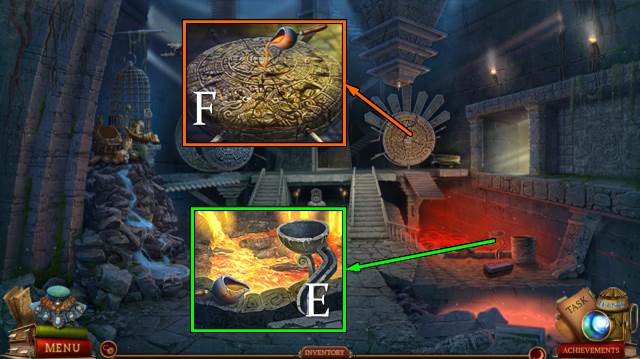
- Use the COIN; take the FIRE EXTINGUISHER (F).
- Go right.
- Use the FIRE EXTINGUISHER (G).
- Remove the glass; take the DIARY SYMBOL (H).
- Open JOHN'S DIARY with the DIARY SYMBOL for a HOP; receive the PYRAMID PART.
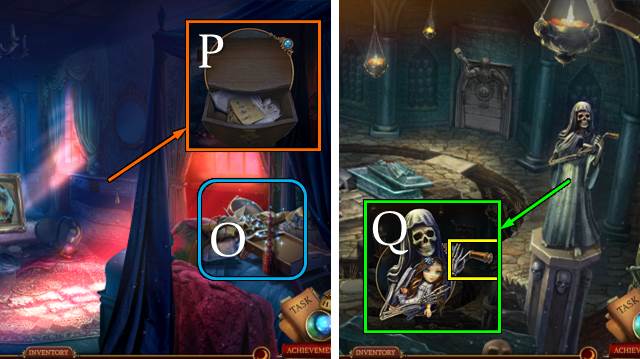
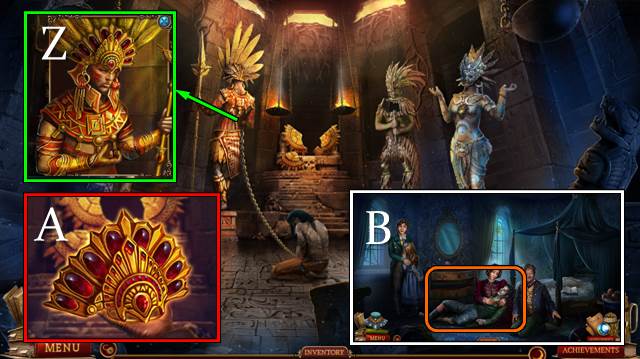
- Place the PYRAMID PART; take ABIGAIL'S PORTRAIT, the DRAWER KEY and BULLETS (I).
- Walk down.
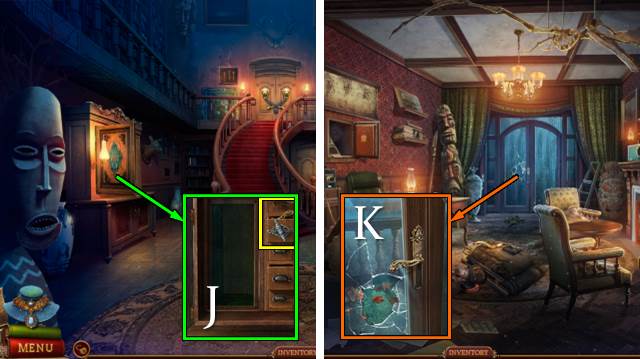
- Use the DRAWER KEY; take the DOOR HANDLE (J).
- Go right.
- Place the DOOR HANDLE and open the door (K).
- Go forward.
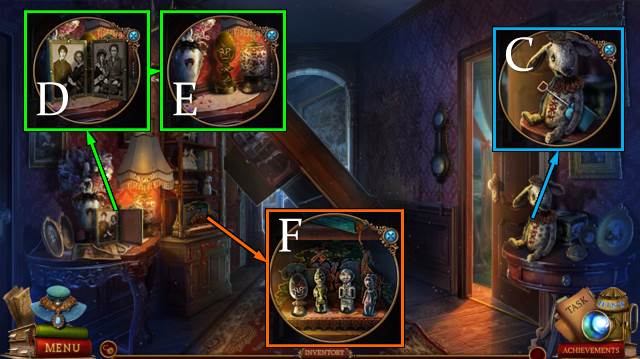
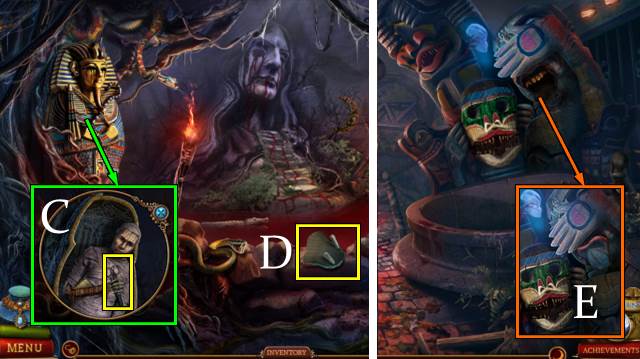
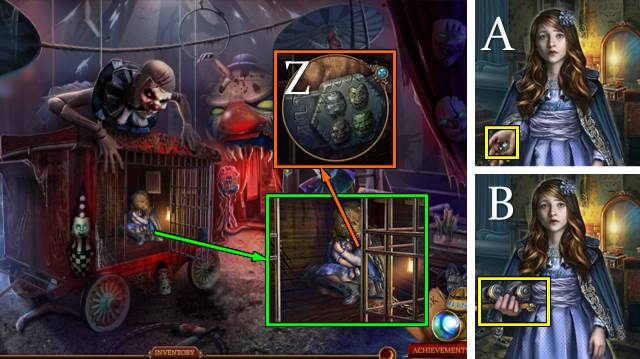
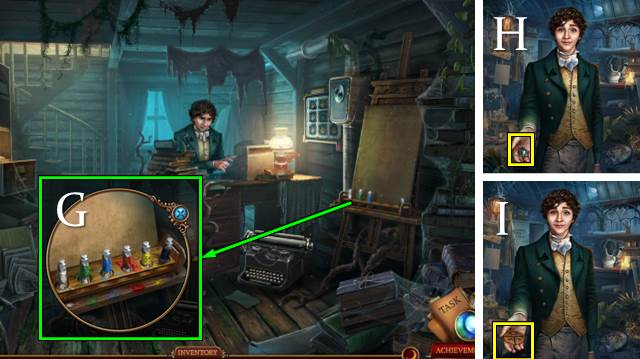
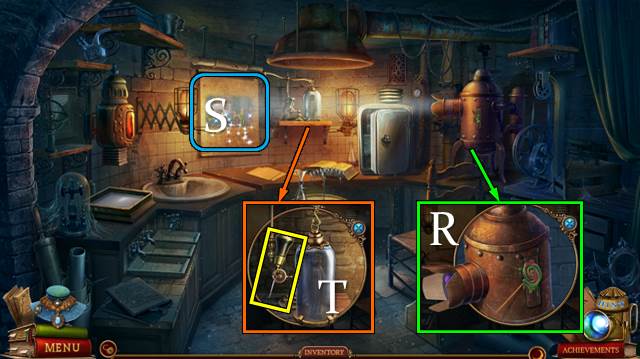
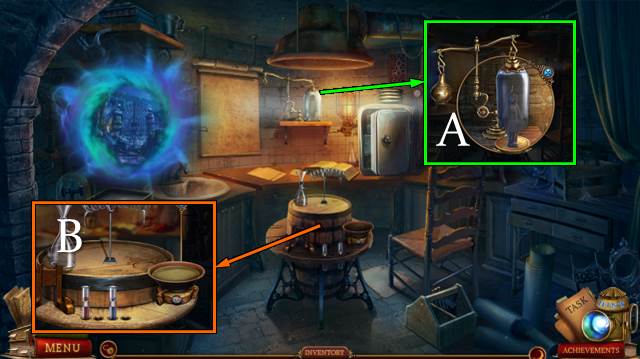
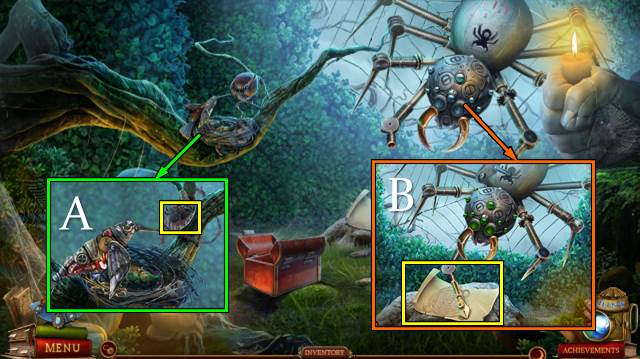
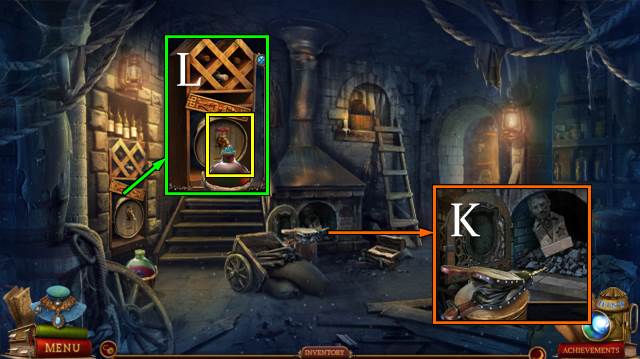
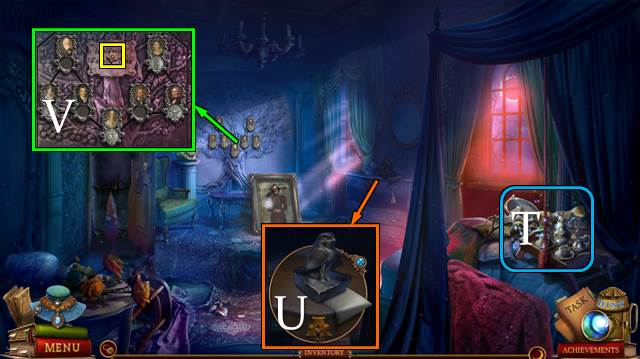
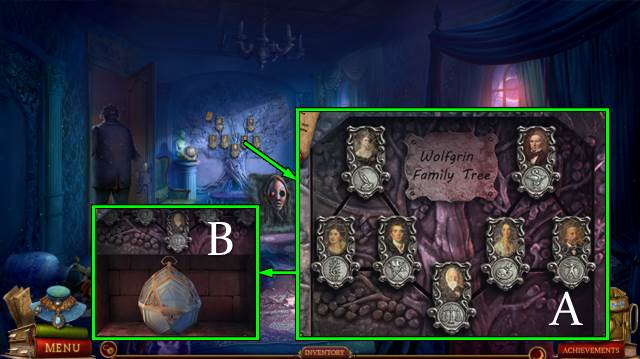
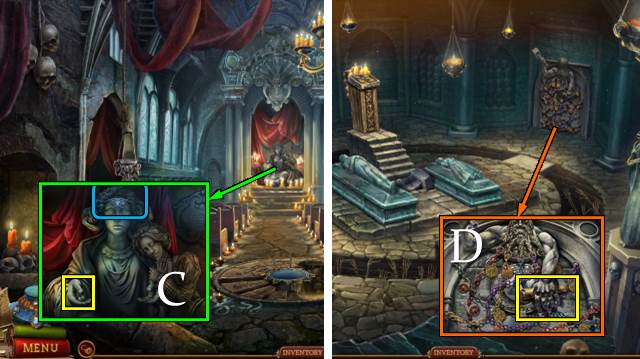
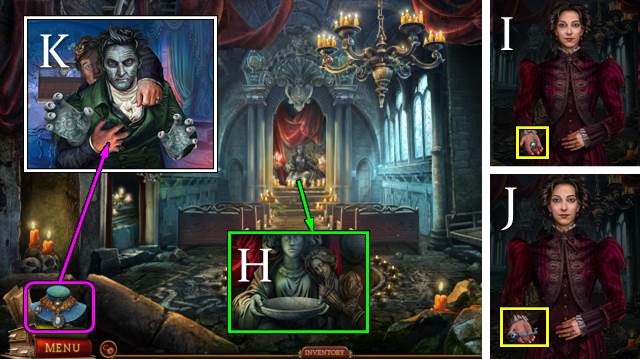
- Take the BRUSH (L); place ABIGAIL'S PORTRAIT and CHLOE'S PORTRAIT for a mini-game (M).
- Take the CHISEL and SOLVENT (N).
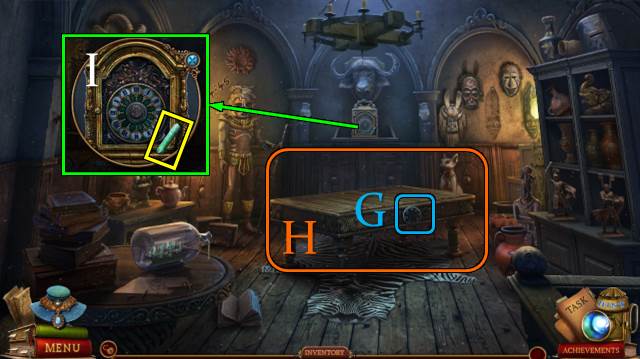
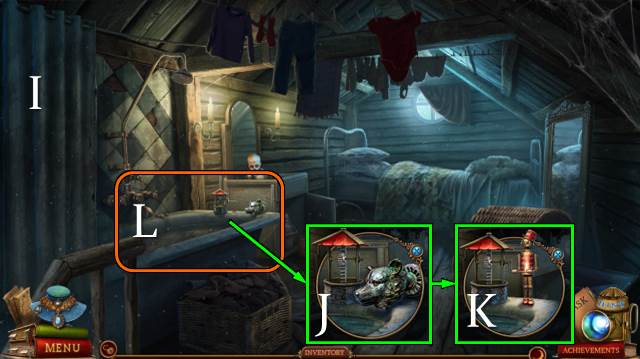
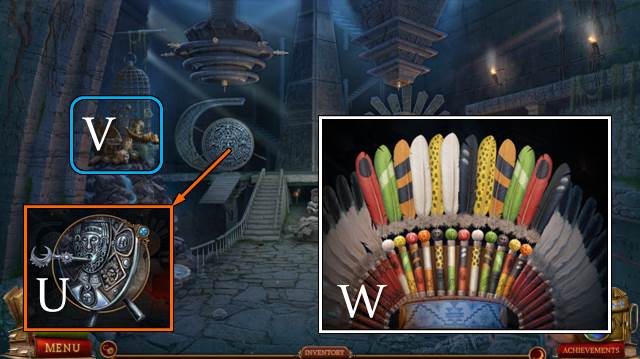
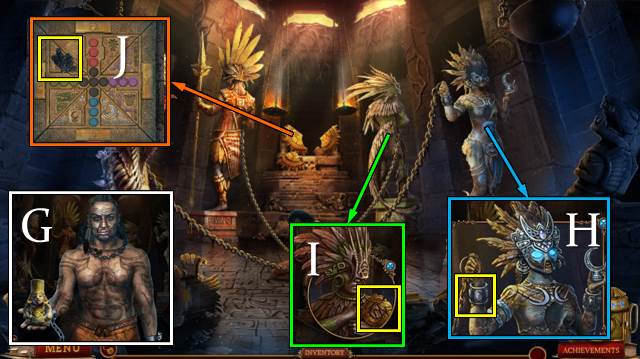
- Place the COGWHEEL (O); take the HARPOON AND ROPE, move the portrait and take the DEER SYMBOL (P).
- Walk down.

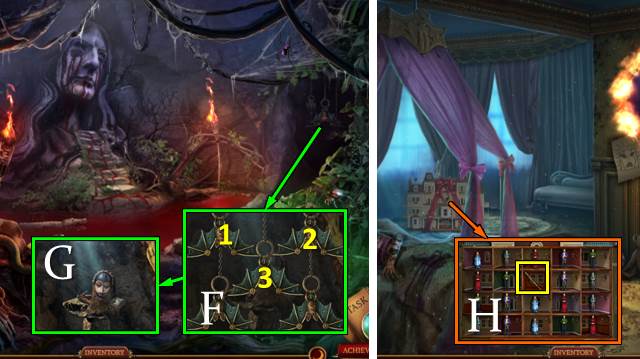
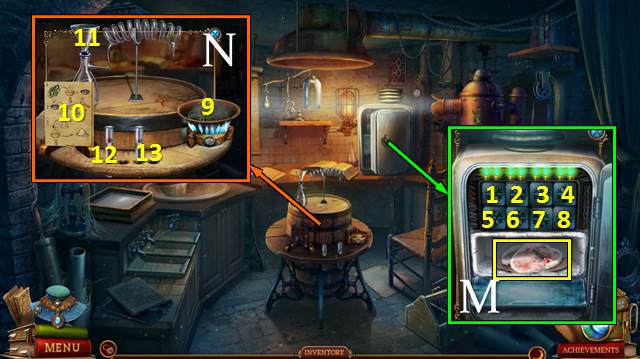
- Play the HOP (Q); receive a CHAIN.
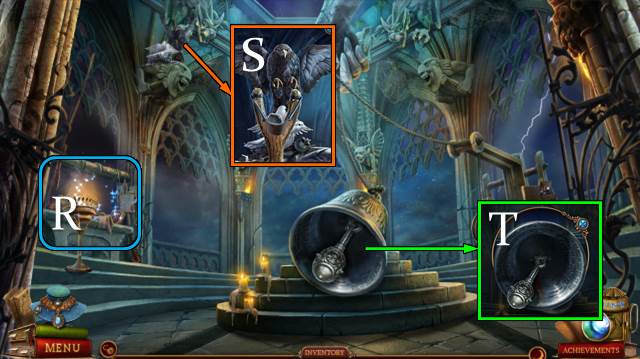
- Place the DEER SYMBOL, then the HARPOON AND ROPE; take the HARPOON (R).
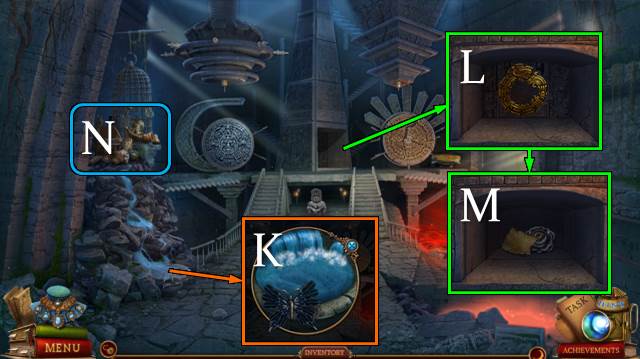
- Use the CHISEL and BRUSH; take STATUE 1/4 (S).
- Go forward.
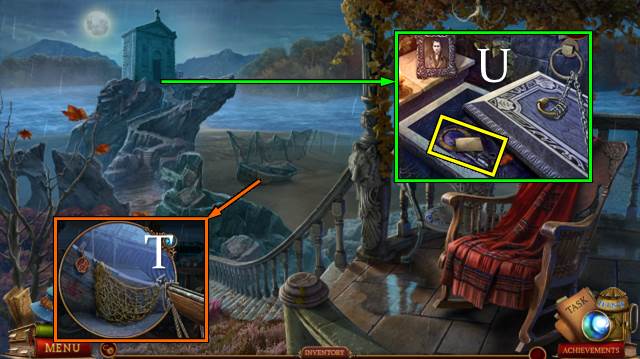
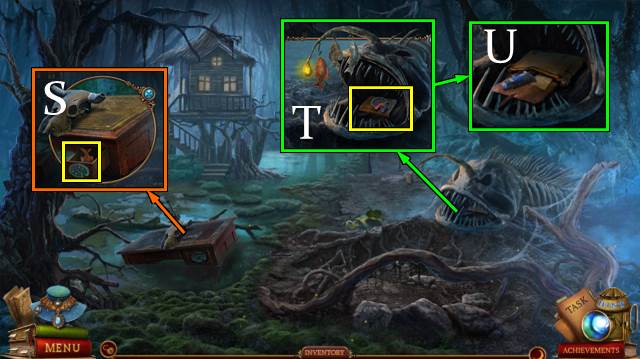
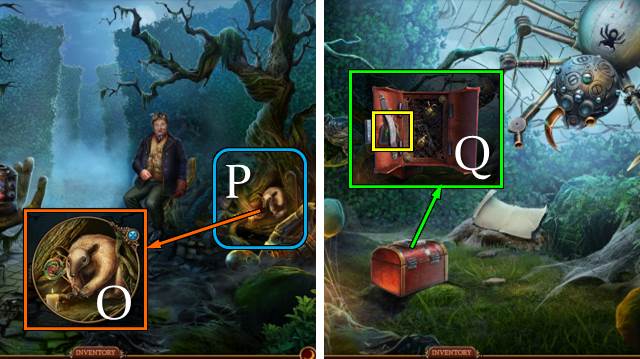
- Take the FISHING NET with the HARPOON (T).
- Use the SEAM RIPPER on the FISHING NET; take STATUE 2/4 and the RING.
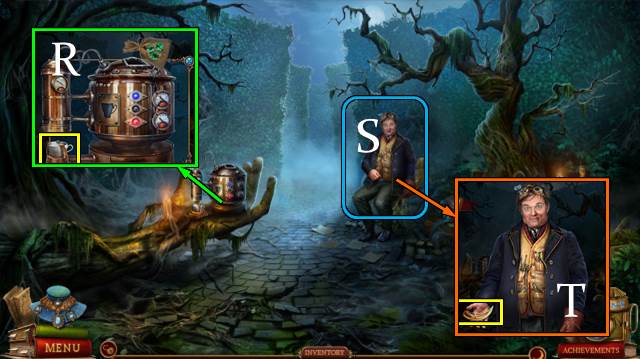
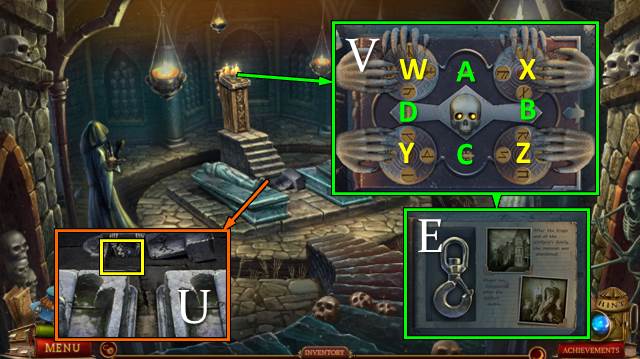
- Place the RING and CHAIN; take the note, necklace and PISTOL (U).
- Walk down twice.
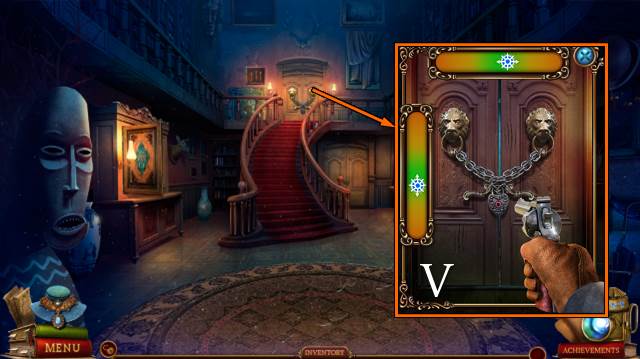
- Open the chamber of the PISTOL and place the BULLETS.
- Use the PISTOL for a mini-game (V).
- Go forward, then right.
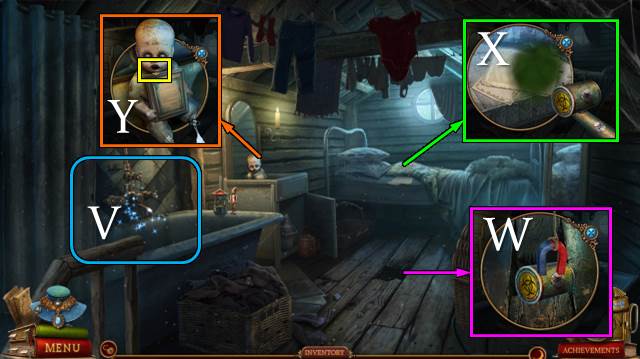
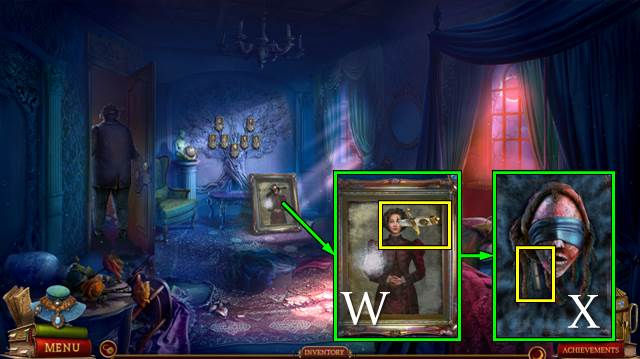
- Move the blanket (W).
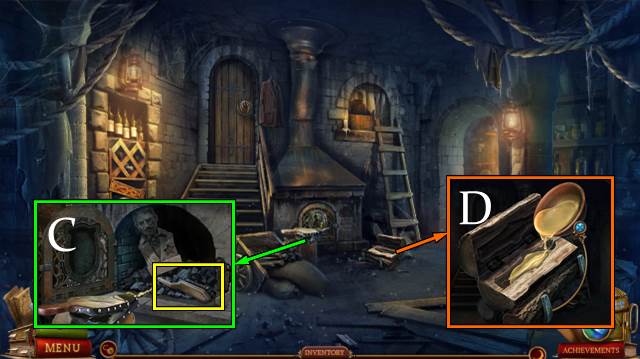
- Use the SOLVENT; move the hand and take STATUE 3/4 (X).
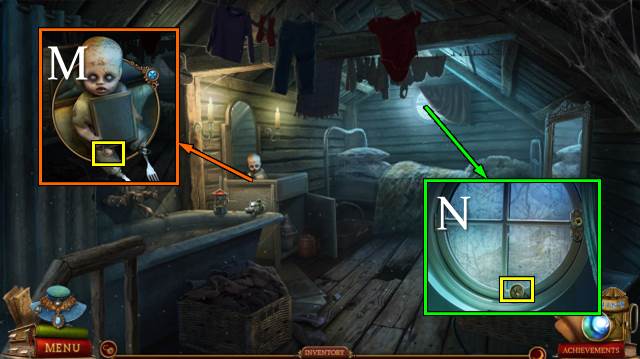
- Take the PHOTO (Y).
- Turn the page and take the RIGHT WING (Z).
- Take the HANDKERCHIEF (A).
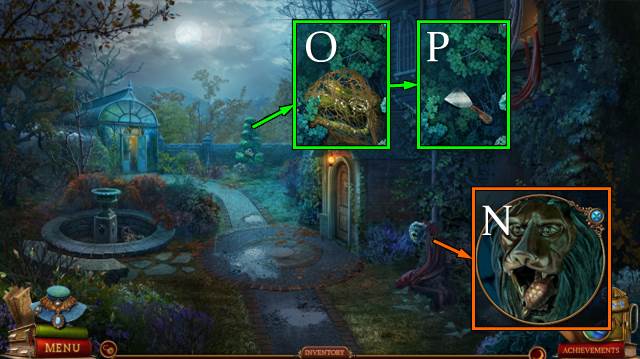
- Place the RIGHT WING; take the SUN FIGURE (B).
- Walk down.
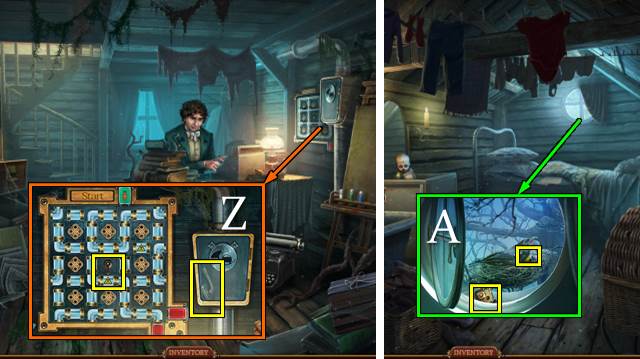
- Take the TOY SHOVEL (C).
- Place the PHOTO (D); take STATUE 4/4 (E).
- Place the STATUES (F).
- Go left.
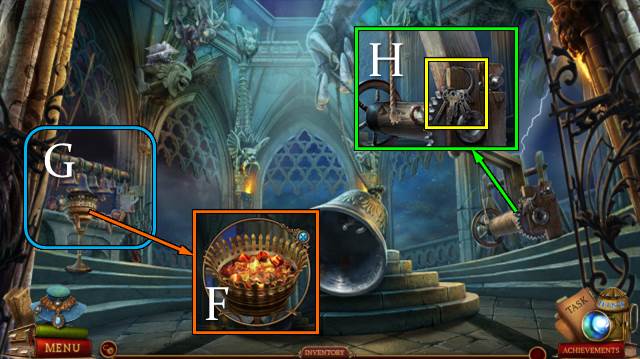
- Place the SUN FIGURE (G).
- Play the HOP (H); receive the LEFT WING.
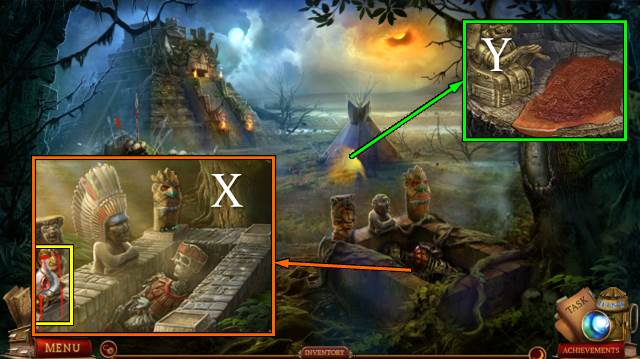
- Take COLORED CHALK 1/3 (I).
- Walk down and right.
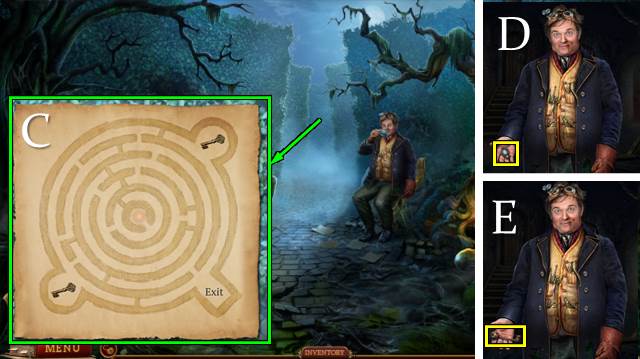
- Place the LEFT WING (J); use the necklace (K).
- Go right.
Chapter 2: Chloe
- Talk to Chloe. Open the note and take COLORED CHALK 2/3 (L).
- Read the note and take the CLOCK HANDS (M).
- Go to the Secret Room.
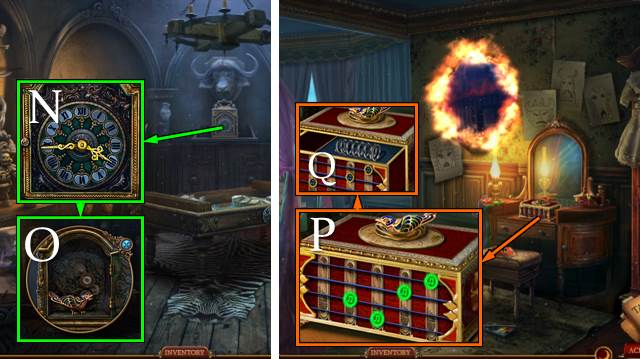
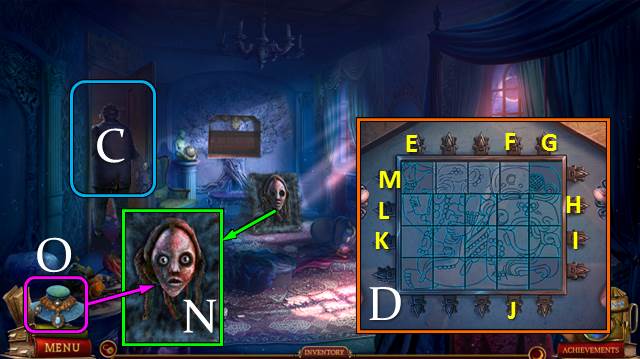
- Place the CLOCK HANDS and set them to 4:45 (N). Take the BIRD FIGURINE (O).
- Go down and right.
- Place the BIRD FIGURINE for a mini-game (P).
- Take the SPRING (Q).
- Walk down and left.
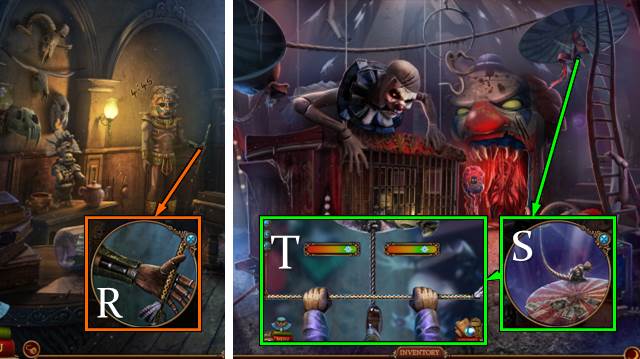
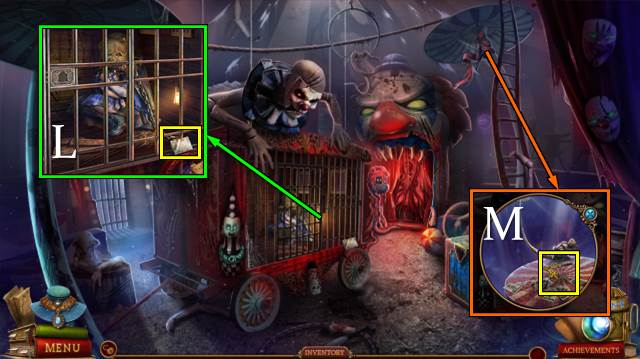
- Remove the broken spring and place the SPRING; take the POLE (R).
- Go to the Circus of Shadows.
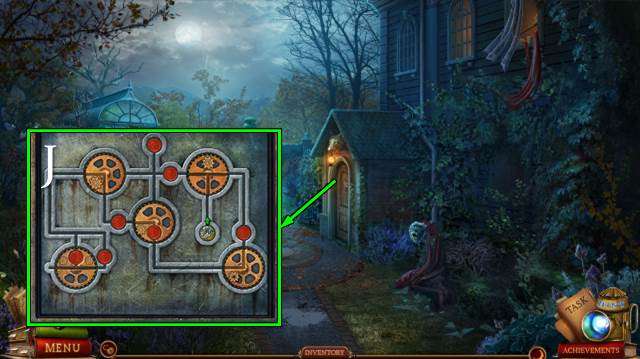
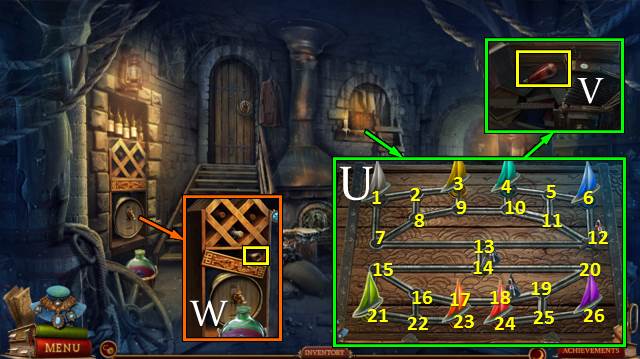
- Place the POLE (S) for a mini-game (T).
- Go left.
- Take the note and CLOWN TOKEN (U).
- Remove the manhole cover (V).
- Take ROLLER SKATE 1/2 (W).
- Take COLORED CHALK 3/3 (X).
- Use the COLORED CHALK; take the HANDLE (Y).
- Walk down.
- Place the CLOWN TOKEN (Z).
- Play the HOP (A); receive a LANTERN.
- Place and pull the HANDLE (B).
- Go right.
- Open the sarcophagus and take the SCISSORS and note (C).
- Take the JAW (D).
- Walk down and left.
- Place the JAW (E); receive the SLEEPING MECHANICAL BAT.
- Walk down and right.
- Open the LANTERN and take the MECHANICAL BAT.
- Place the SLEEPING MECHANICAL BAT and MECHANICAL BAT for a mini-game (F).
- Take the SHAMAN'S MASK and ANTLER (G).
- Walk down twice.
- Use the SCISSORS, open the dollhouse and take the TWEEZERS (H).
- Walk down.

- Place the ANTLER; take the DOLL FIGURE (I).
- Use the SCISSORS, open the doll and take the CANDLE (J).
- Go left.
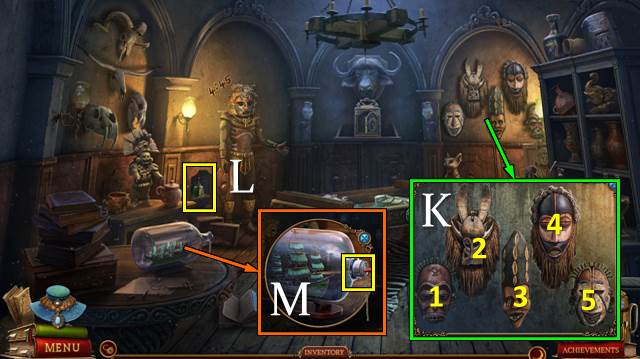
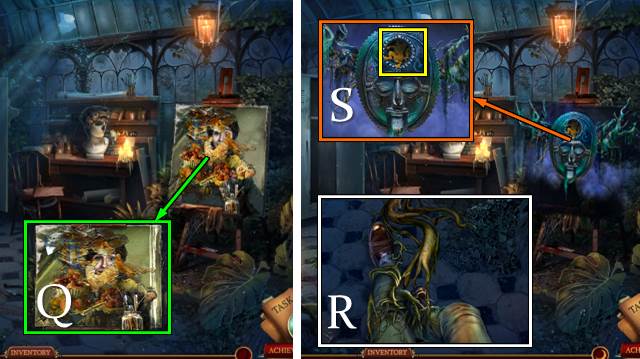
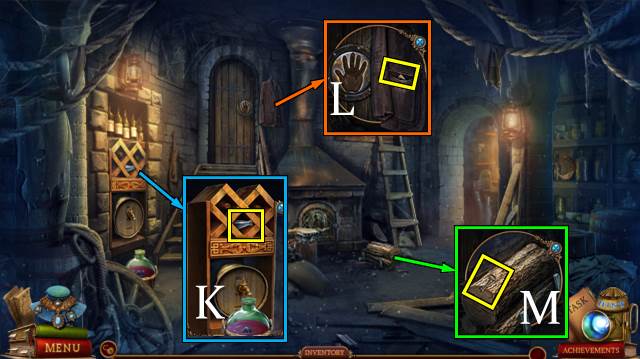
- Place the SHAMAN'S MASK for a mini-game (K).
- Solution: (1-2)-(1-5)-(1-3)-(1-4).
- Take the HERBICIDE (L).
- Pull the string. Use the TWEEZERS and take the MATCH (M).
- Walk down and right.
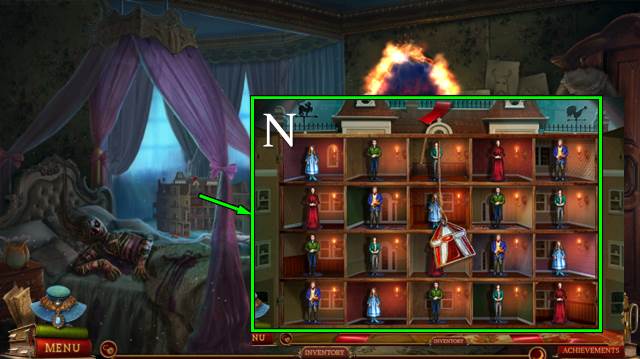
- Place the DOLL FIGURE for a mini-game (N).
- Take the CAGE KEY.
- Go forward.

- Play the HOP (O); receive SMALL MASK 1/4.
- Place the CAGE KEY. Take the PLANKS (P).
- Go left.
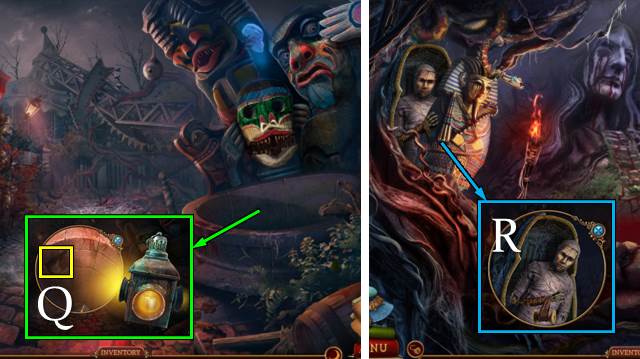
- Place the CANDLE in the LANTERN and use the MATCH; receive a LIT LANTERN.
- Place the LIT LANTERN; take the SPOOL (Q).
- Go down and right.
- Use the SPOOL to get some BANDAGE (R).
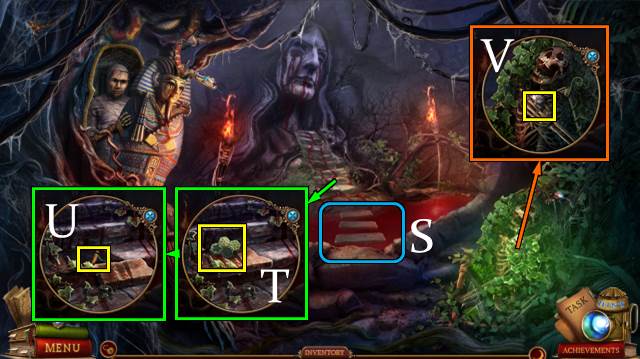
- Place the PLANKS (S).
- Take the WOODEN PLATE (T). Use the TOY SHOVEL and take the SLINGSHOT (U).
- Use the HERBICIDE; take SMALL MASK 2/4 (V).
- Walk down and left.
- Use the BANDAGE (W).
- Take SMALL MASK 3/4 (X).
- Place the SLINGSHOT; take SMALL MASK 4/4 (Y).
- Walk down.
- Place the SMALL MASKS (Z).
- Take the pendant (A); take ROLLER SKATE 2/2 (B).
Chapter 3: Ben
- Use the ROLLER SKATES (C) for a mini-game (D).
- Go forward.
- Play the HOP.
- Look in the pond; take the ROSE (E).
- Take the DIRTY CUP (F).
- Clean the DIRTY CUP with the HANDKERCHIEF; take the ACORN FIGURE and CUP.
- Place the WOODEN PLATE and ACORN FIGURE for a mini-game (G).
- Go left.
- Take the BRUSH (H).
- Remove the cloth and play the HOP (I); receive a TROWEL.
- Take the BROKEN FOGGER (J). Remove the tile, use the TROWEL and take the LILY (K).
- Place the ROSE and LILY for a mini-game (L).
- Solution: 5-2-3-4-1-2-3-5-4-3.
- Take the NET and NOTEBOOK (M).
- Open the NOTEBOOK, take the RULER and turn the pages.
- Walk down.
- Use the BRUSH; take the TURTLE (N).
- Remove the branches and use the NET (O); take the PUTTY KNIFE (P).
- Go left.
- Remove the canvas and use the PUTTY KNIFE (Q).
- Grab the vine, cut it and kick it away (R).
- Take the FAMILY ARMS (S).
- Walk down.
- Place the FAMILY ARMS (T); take the CLOCK FIGURE (U).
- Go left.
- Place the CLOCK FIGURE; use the necklace (V).
- Go right.
- Take the FISHING ROD (W).
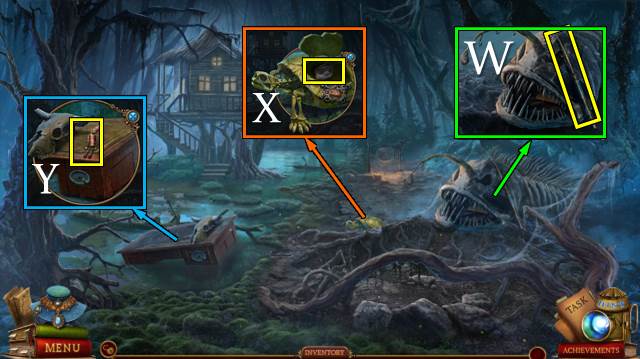
- Place the TURTLE; take the EYE (X).
- Move the skull; take the TOY MAN (Y).
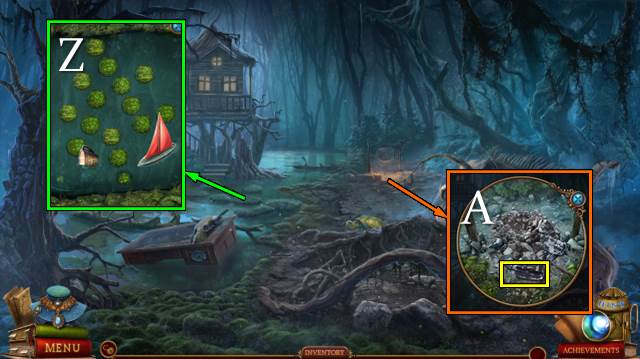
- Take the SHIP FIGURE and take some WATER with the CUP (Z).
- Pour the WATER and take the COAL (A).
- Walk down twice.
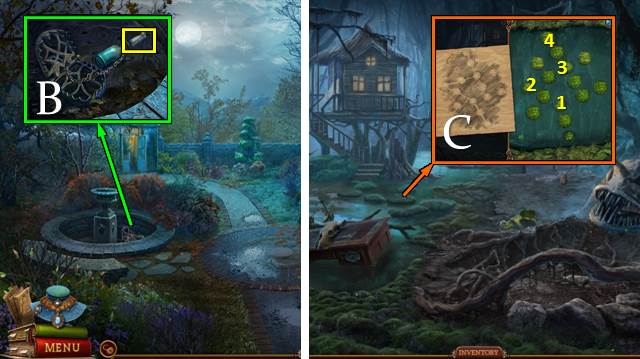
- Use the FISHING ROD; uncork the bottle and take the MAP PART (B).
- Put the MAP PART in the NOTEBOOK and use the COAL; take the PATH.
- Go left and right.
- Place the PATH for a mini-game (C).
- Talk to Ben (D).
- Take the NOSE (E).
- Take the METAL FISH (F).
- Take the envelope and open it with the RULER (G); read the note and take the 'F' BUTTON (H).
- Go forward.
- Move the shower curtain (I).
- Take the FREEZER HANDLE (J). Place the TOY MAN (K).
- Play the HOP (L); receive the BOOK FIGURE.
- Take the BUCKLE (M).
- Move the curtain and take the 'K' BUTTON (N).
- Walk down.
- Place the BOOK FIGURE; take the 'A' BUTTON and the STONE FISH (O).
- Place the 'F' BUTTON, 'K' BUTTON and 'A' BUTTON; take the PARENTAGE CERTIFICATE (P).
- Walk down twice.
- Place the NOSE and EYE (Q); open the paper and take the PALETTE FIGURE (R).
- Go right.
- Place the PALETTE FIGURE and take the WOODEN FISH (S).
- Place the WOODEN FISH, METAL FISH and STONE FISH. Take the MAGNET and place the BUCKLE (T). Take the note and BLUE PAINT (U).
- Go forward twice.
- Play the HOP (V); receive the GREEN PAINT.
- Use the MAGNET; take the INSECTICIDE (W).
- Attach the INSECTICIDE to the BROKEN FOGGER; take the FOGGER.
- Move the quilt; use the FOGGER (X). Inspect the papers for a HOP. Receive the LETTER FIGURE.
- Place the PARENTAGE CERTIFICATE; take the CHEESE (Y).
- Walk down.
- Place the LETTER FIGURE; take the HANDLE and ZIPPER PULL (Z).
- Go forward.
- Place the HANDLE. Take the TUBE KNOB, offer the CHEESE and take the YELLOW PAINT (A).
- Walk down.
- Place the TUBE KNOB for a mini-game (B).
- Solution: 2B-2C-3D-E-F. Push Start.
- Take the RED PAINT.
- Place the BLUE PAINT, GREEN PAINT, YELLOW PAINT and RED PAINT (G).
- Take the pendant (H); take the LOCK (I).
Chapter 4: Humphrey
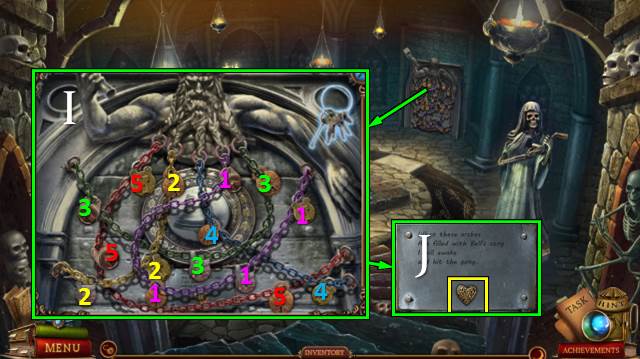
- Place the LOCK for a mini-game (J).
- Solution: up-down-up-left-up-down-right-down-up-right-down-up-down-left-up
- left-up-down-up-left-down-right-down-right-up.
- Go right.
- Take the LAB FLASK (K).
- Use the ZIPPER PULL and take the SLIDE (L).
- Take the METAL KEY and open the log (M).
- Go right.
- Take the ACID (N).
- Take the BOTTLE (O).
- Take the ANVIL, read the note and place the FREEZER HANDLE (P). Take the STRAWBERRIES (Q).
- Open the drawer, take the LOLLIPOP and place the SLIDE (R).
- Play the HOP (S); receive a PIRATE FLAG.
- Take the AWL (T).
- Walk down.
- Place the SHIP FIGURE and PIRATE FLAG for a mini-game (U).
- Solution: (5-11-12-13)-(22-21)-(13-14-15-16-17-18-24)-(21-15-16-17-18-19-20-14-13-7-8-9-10-4).
- (23-17-18-19-20-14-13-7-1)-(3-9-10-11-12-13-14-15-16-17-23)-(25-19-20-14-13-7-8-9-3).
- (6-5-11-12-13-14-15-21)-(26-20-14-13-7-8-9-10-11-12-6-5)-(2-8-9-10-11-12-13)-(5-6).
- (13-14-15-16-17-18-19-25-26).
- Take the RED BULB (V).
- Place the BOTTLE; take the RECIPE PART (W).
- Go right.
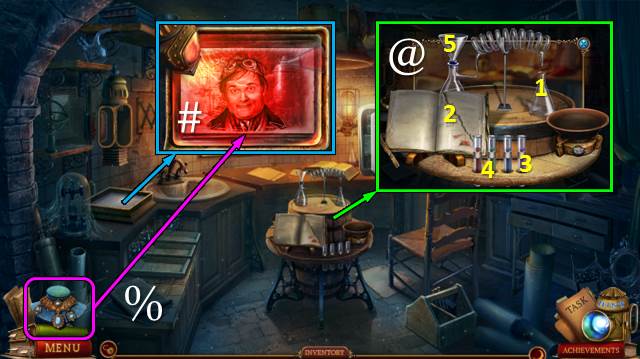
- Place the LAB FLASK (1) and RECIPE PART (2). Add purple (3) and green (4) to the funnel (5); take the PHOTO DEVELOPER (1) (@).
- Open the lamp and place the RED BULB and PHOTO DEVELOPER (#). Use the necklace (%).
- Go left.
- Take the LAVENDER. Take some WAX with the AWL (X).
- Take the SMITH (Y).
- Read the note and place the METAL KEY; take the WEIGHT (Z).
- Walk down.
- Place the WEIGHT; take the BLACK CANDLE (A).
- Switch on the burner and place the WAX; take the MELTED WAX (B).
- Walk down.
- Place the ANVIL and SMITH; take the METAL BRUSH (C).
- Pour the MELTED WAX; receive the EMPTY BOWL. Take the WHITE CANDLE (D).
- Go right and left.
- Place the BLACK CANDLE and WHITE CANDLE; take the SPIDER HEAD (E).
- Place the SPIDER HEAD for a mini-game (F).
- Solution: 1-2-3-7-2-5.
- Go forward.
- Talk to Humphrey (G).
- Take the STICK (H).
- Take the RIBBON; use the ACID (I).
- Go left.

- Place the LOLLIPOP; take the ANTS (J).
- Place the RIBBON; take the CORK (K).
- Walk down twice.
- Take the RUSTY BELL with the STICK (L).
- Clean the RUSTY BELL with the METAL BRUSH; take the LIGHTNING and BELL 1/3.
- Place the LIGHTNING (M); take the HAND DRILL (N).
- Go forward.
- Offer the ANTS (O).
- Play the HOP (P); receive the HEXAGONAL KEY.
- Go left.
- Use the HEXAGONAL KEY; take the CLOVER (Q).
- Walk down.
- Place the CORK, STRAWBERRIES, CLOVER and LAVENDER; take the REFRESHING TEA (R).
- Offer the REFRESHING TEA (S).
- Take the MANDIBLE (T).
- Go left.
- Place the MANDIBLE; take the CAGE KEY (U).
- Walk down twice.
- Place the CAGE KEY; take the HUMMINGBIRD (V).
- Go forward and left.

- Place the HUMMINGBIRD; take the WRENCH (W).
- Use the WRENCH; take the COMMON WEIGHT and EMPTY OILCAN (X).
- Walk down.
- Play the HOP (Y); receive the GIANT PEN.
- Use the HAND DRILL and use the EMPTY OILCAN; take the OIL (Z).
- Go left.
- Use the OIL; take the SPIDER KEY (A).
- Place the SPIDER KEY and GIANT PEN for a mini-game (B).
- Answers: sun, fear, moon, mask, death.
- Take the MAP.
- Walk down.
- Place the MAP for a mini-game (C).
- Take the pendant (D).
- Take HUMPHREY'S KEY (E).
- Go forward.
Chapter 5: Abigail
- Take FREEZER BUTTON 1/2 (F).
- Remove the herbs in pairs and take the SEAWEED (G).
- Read the note and take the VALVE. Place the COMMON WEIGHT and take the JUDICIAL EMBLEM (H).
- Take the DOLL CHARM (I).
- Take the SPONGE and SODA RECIPE (J).
- Walk down.
- Take the NEEDLE WITH THREAD from the DOLL CHARM.
- Use the NEEDLE WITH THREAD; take the BELLOWS (K).
- Place the VALVE; take FREEZER BUTTON 2/2 (L).
- Go right.
- Place the FREEZER BUTTONS for a mini-game (M).
- Solution: 5-2-7-4-8-3-6-1.
- Take the FROZEN MEAT.
- Place the EMPTY BOWL (9) and SODA RECIPE (10) and turn on the burner. Place the SEAWEED (9) and put in the flask (11). Add red (12) and blue liquid (13). Turn on the burner again and take the SODA ASH (N).
- Walk down and forward.
- Remove the cloche and use the SODA ASH and napkin. Take BELL 2/3 (O).
- Open the furnace, move the ashes twice and use the BELLOWS; place the FROZEN MEAT and take the MEAT (P).
- Offer the MEAT, open the collar and take BELL 3/3 (Q).
- Place the BELLS for a mini-game (R).
- Take the STAIRS KEY.
- Open the keyhole and use the STAIRS KEY (S).
- Go forward.
- Open the drapes.
- Play the HOP (T); receive the LEFT EYE.
- Take the HEAVY FIGURINE and note (U).
- Take the SCIENCE AWARD (V).
- Take the OFFICER'S HILT (W); take the FAMILY TREE and remove the blindfold (X).
- Walk down twice.
- Place the SCIENCE AWARD and take the SCIENCE EMBLEM (Y).
- Go forward.
- Take the BLADE with the HEAVY FIGURINE (Z).
- Go forward.
- Combine the BLADE with the OFFICER'S HILT; take the MILITARY EMBLEM.
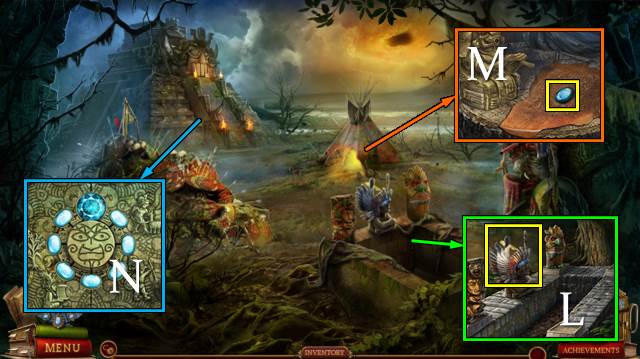
- Place the FAMILY TREE, JUDICIAL EMBLEM, SCIENCE EMBLEM and MILITARY EMBLEM for a mini-game (A).
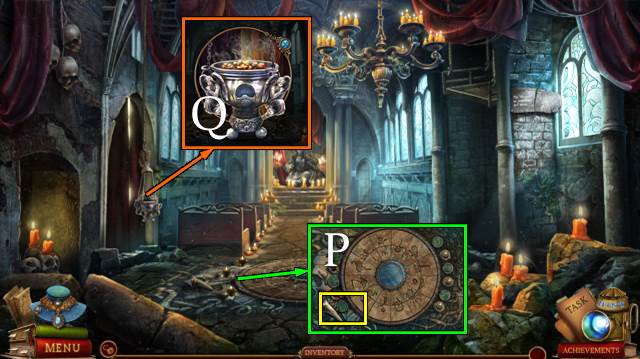
- Take the SUN CROWN SAFE (B).
- Offer the SUN CROWN SAFE (C).
- Play the mini-game (D).
- Solution: 2I-E-2K-M-J-H-I-G-L-K-F-2M.
- You receive the SUN CROWN SAFE.
- Open the SUN CROWN SAFE with HUMPREY'S KEY and take the RIGHT EYE.
- Place the LEFT EYE and RIGHT EYE (N). Use the necklace (O).
- Go forward.
- Take the MASSIVE HORN (P).
- Remove the cover and take the INCENSE (Q).
- Take the CROWN (R).
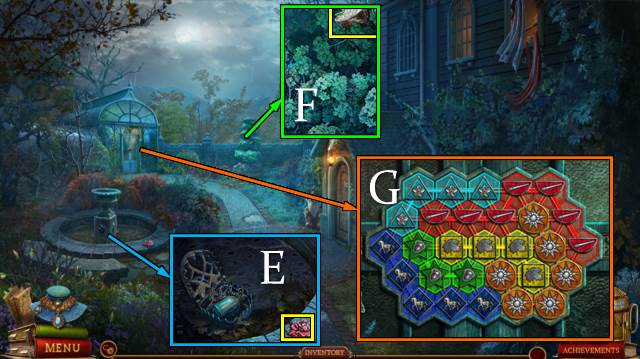
- Break the tile and receive a STONE. Use the SPONGE (S).
- Walk down twice.
- Place the CROWN; take the LILY FIGURE (T).
- Go forward.
- Place the LILY FIGURE; take the ANGEL (U).
- Go forward.
- Place the ANGEL (V).
- Find the 6 BLACK BOWLS (W). Open the curtain and take the BEADS (X).
- Place the BLACK BOWLS for a mini-game (Y).
- Go forward.
- Use the MASSIVE HORN; take the CLIPPERS (Z).
- Take the DIADEM (A).
- Take the note and CHALK and use the SPONGE (B).
- Walk down.
- Place the DIADEM; take the RING (C).
- Go forward.
- Place the RING; take the LIFT SOLUTION (D).
- Walk down.

- Place the CHALK and LIFT SOLUTION. Select the relevant symbols and push the brick (E).
- Go right.
- Place the INCENSE (F).
- Play the HOP (G); receive the BRUSHES.
- Take the KEYS and knot the rope (H).
- Walk down and forward.
- Place the KEYS for a mini-game (I).
- Take the TINY HEART (J).

- Place the BRUSHES; take the BLACK DOLL (K).
- Place the BLACK DOLL; take the MASSIVE SCEPTER (L).
- Walk down.
- Use the CLIPPERS on the DOLL CHARM; take the TINY SKELETON.
- Open the locket and place the TINY SKELETON and TINY HEART; take the RED BOW (M).
- Go forward.
- Place the RED BOW; take the BUREAU KEY and UNDRESSED DOLL (N).
- Walk down twice.
- Play the HOP (O); receive the SLINGSHOT.
- Use the BUREAU KEY; take the notes and TINY DRESS (P).
- Go to the Crypt.
- Put the TINY DRESS on the UNDRESSED DOLL; take the WHITE DOLL.
- Place the WHITE DOLL; take the HANDLE (Q).
- Go down and right.
- Play the HOP (R); receive the SLAB PIECE.
- Use the SLINGSHOT and STONE (S); receive the SKULL.
- Place the MASSIVE SCEPTER (T).
- Walk down and forward.
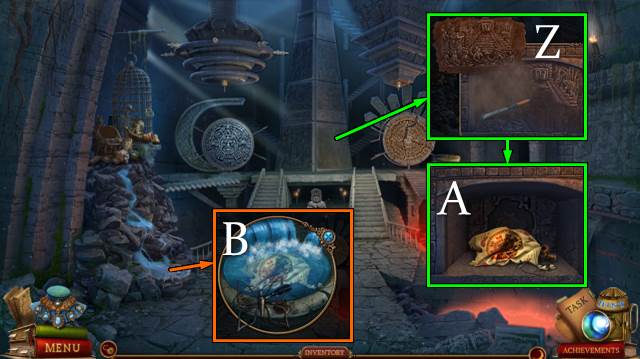
- Place the SLAB PIECE; take the MASSIVE GEAR (U).
- Place the SKULL for a mini-game (V).
- Solution: 2W-D-X-A-2W-2X-A-3W-3X-B-3X-Y-3Z.
- Take the CARABINER (E).
- Go down and right.
- Place and attach the CARABINER; place the HANDLE and MASSIVE GEAR and turn the handle (F).
- Walk down and forward.
- Take the SILVER KEY SHAPE and BOWL OF FATE (G).
- Walk down.
- Place the BOWL OF FATE (H).
- Take the pendant (I).
- Take ABIGAIL'S KEY (J).
- Use the necklace (K).
Chapter 6: The Resurrection Crown
- Open the SUN CROWN SAFE with ABIGAIL'S KEY and take the MOON PRISM.
- Take the BROKEN SHAMAN'S CROWN (L).
- Take the scroll and MOONSTONE (M).
- Place the MOONSTONE and MOON PRISM for a HOP (N). Take the MOON CROWN.
- Go forward.
- Take the SHAFT (O).
- Take the EMPTY PHIAL (P).
- Take the CHISEL. Remove the broken mold and place the SILVER KEY SHAPE (Q).
- Walk down.
- Place the SHAFT; take the SPEAR (R). Take the SILVER RELICS (S).
- Go forward.
- Place the SILVER RELICS; take the MOON KEY (T).
- Use the MOON KEY (U).
- Play the HOP (V); receive the FEATHERS.
- Place the BEADS and FEATHERS on the BROKEN SHAMAN'S CROWN for a mini-game (W).
- Receive the SHAMAN'S CROWN.
- Walk down.
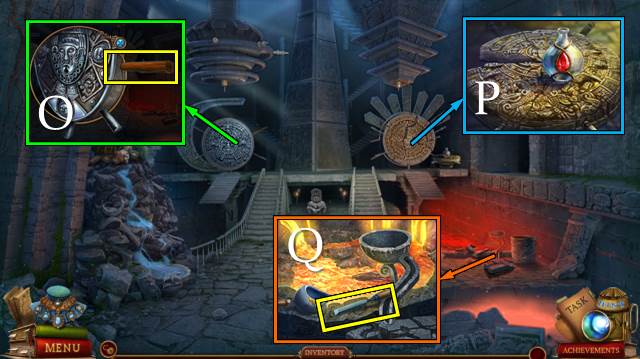
- Place the SHAMAN'S CROWN. Use the EMPTY PHIAL and take the SUN TRIBE BLOOD (X).
- Pour the SUN TRIBE BLOOD; take the SUN TRIBE HISTORY (Y).
- Go forward.
- Place the SUN TRIBE HISTORY and CHISEL (Z); take the DIRTY SUN FLAG and PIPE (A).
- Wash the DIRTY SUN FLAG; take the SUN FLAG (B).
- Walk down.
- Remove the flag and place the SPEAR and SUN FLAG. Take the SUN CALENDAR PART (C).
- Place the PIPE; take the OBSIDIAN FLOWER and GOLDEN COINS (D).
- Go forward.
- Place the GOLDEN COINS; take the GOLD (E).
- Place the SUN CALENDAR PART and GOLD (F).
- Go right.
- Take the SUN TOTEM (G).
- Place the MOON CROWN; take the MOON BRACELET (H).
- Take the OUROBOROS (I).
- Take the OBSIDIAN BLADES (J).
- Walk down.
- Place the OBSIDIAN BLADES; take the OBSIDIAN BUTTERFLY (K).
- Place the OUROBOROS (L); take the note and OBSIDIAN FLOWER (M).
- Play the HOP (N); receive the SUN TOTEM.
- Go right.
- Place the OBSIDIAN BUTTERFLY and 2 OBSIDIAN FLOWERS; take the OBSIDIAN BRACELET and BUTTERFLY FIGURINE (O).
- Walk down.
- Place the MOON BRACELET and OBSIDIAN BRACELET; take the RITUAL KNIFE and STONE HEART (P).
- Walk down.

- Place the 2 SUN TOTEMS; take the WARRIOR SOUL (Q).
- Go forward and right.

- Place the STONE HEART; take the MOON FIGURINE (R).
- Place the RITUAL KNIFE; take the SNAKE FIGURINE (S).
- Place the WARRIOR SOUL; take the SUN FIGURINE (T).
- Place the BUTTERFLY FIGURINE, MOON FIGURINE, SNAKE FIGURINE and SUN FIGURINE for a mini-game (U).
- Solution: (Y2-W1)-(Y3-V1)-(W1-Y3)-(W2-X1)-(W3-Y2)-(W4-Y1)-(X1-W4)-(X2-W3)-(X3-W2)
- (X4-W1)-(V1-X4)-(W1-X3)-(W2-X1)-(W3-V1)-(X1-W3)-(V1-W2)-(V2-W1)-(X3-V1)-(Y1-X3)-(V1-Y1)
- (V3-X2)-(V4-X1)-(W1-V4)-(Y1-V3)-(W2-V2)-(X1-W2).
- Take the SUN KEY.
- Open the SUN CROWN SAFE with the SUN KEY; take the SUN CROWN.
- Place the SUN CROWN (Z).
- Take the RESURRECTION CROWN (A).
- Use the RESURRECTION CROWN (B).
- Congratulations, you have completed Stranded Dreamscapes: Deadly Moonlight.
Created at: 2017-05-21