

Walkthrough Menu
- General Tips & Information
- Chapter 1: Tom's Apartment Building
- Chapter 2: Sarah's House
- Chapter 3: Tom's Last Trip
- Chapter 4: The Underground Lab
- Chapter 5: Ryde Corporation
- Chapter 6: The Talismans
General Tips & Information
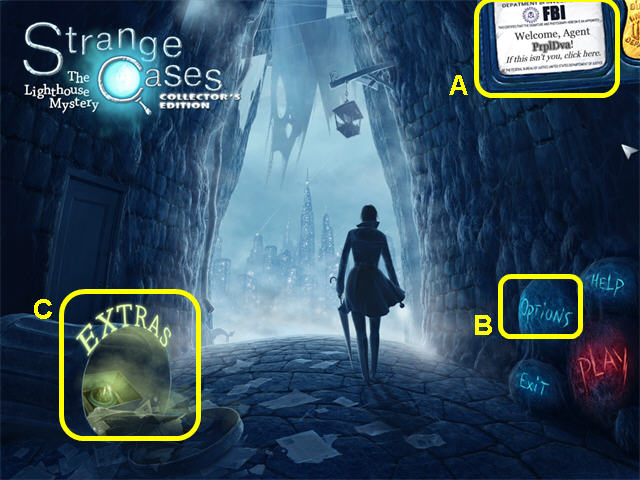
- From the main screen you may manage player profiles (A).
- The Options menu allows for the adjustment of music and sounds volumes (B).
- You may play this game in windowed or full screen mode.
- The custom cursor may be disabled.
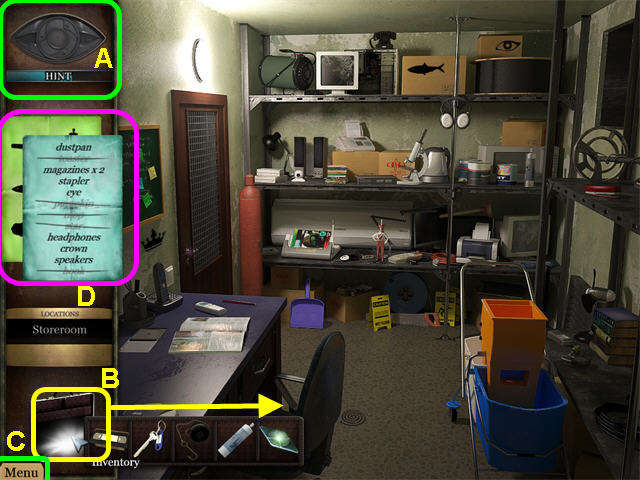
- Hints are unlimited, but you must wait for the meter to refill (A).
- Click on the Eye in the upper left corner for a hint on a hidden object.
- Select the briefcase in the lower left to access your inventory (B).
- To access the main menu, use the Menu button in the lower left corner (C).
- The Lighthouse cards will list items to be found; click to toggle between cards (D).
- The magnifying glass cursor indicates that a close-up view is available.
- Moving gears on the cursor means that you will need to solve a puzzle or use an inventory item.
- The talk bubble indicates that conversation is possible.
- For most scenes, you will have to find one or more Lighthouse cards.
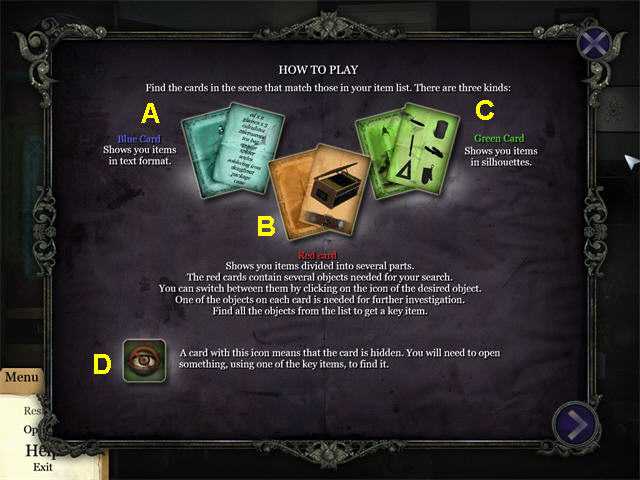
- Each card has a different type of hidden object list.
- The blue card has a standard text list of items to find (A).
- The red card has three fragmented items to find; click on the icons at the bottom to switch between items (B).
- The green card shows the silhouettes of items you need to find (C).
- The crossed-out eye indicates that the card is not yet visible (D).
- You may skip mini-games once the skip meter is full; click on the Skip button in the lower right corner.
- For instructions on a mini-game, select the “?” button in the lower left corner.
- Click on the “X” in the upper right corner to close a mini-game screen.
Chapter 1: Tom's Apartment Building
- Talk to the coroner and the FBI agent standing near the body.
- Click on the body to take a closer look.
- Open the large gift near the body.
- Enter the building and walk to the elevator.
- Push the UP button to call the elevator.
- Exit the elevator on the 9th floor and walk to the apartment with the police tape, on the left.
- Enter that apartment (904).
- Look at the broken window.
- Walk left and enter the bedroom.
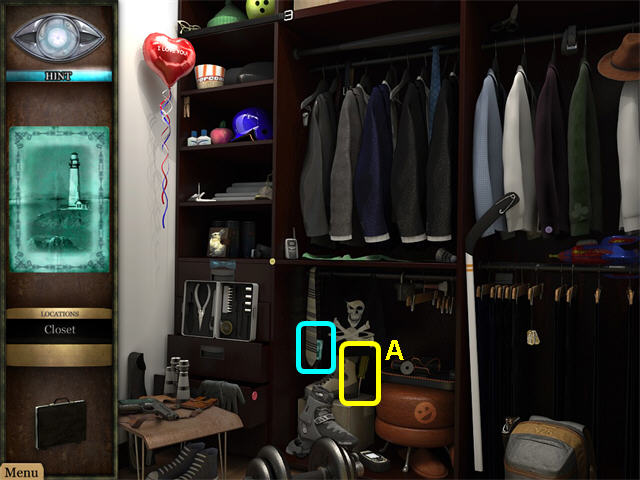
- Enter the closet via the first door on the left (1).
- Locate the blue card and the hidden objects.
- Take the SCREWDRIVER (A).
- Exit the closet.
- Locate the blue card and the hidden objects.
- Take the FAUCET HANDLE (B).
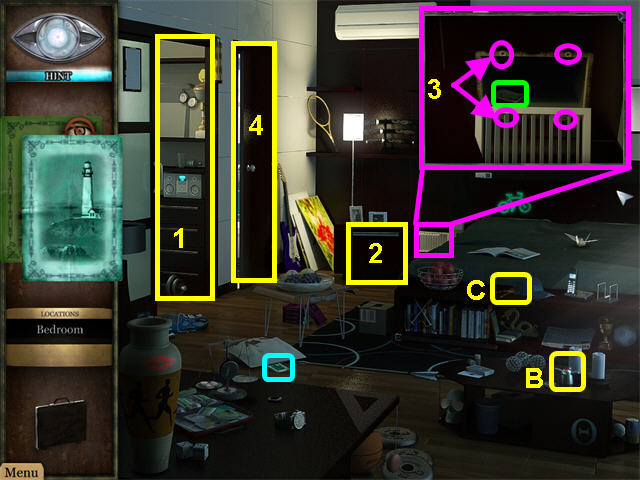
- Move the nightstand (2).
- Look at the close-up of the vent.
- Use the SCREWDRIVER to remove the screws (3).
- Take the green card and locate the hidden objects.
- Find the KEYS to APARTMENT 909 (C).
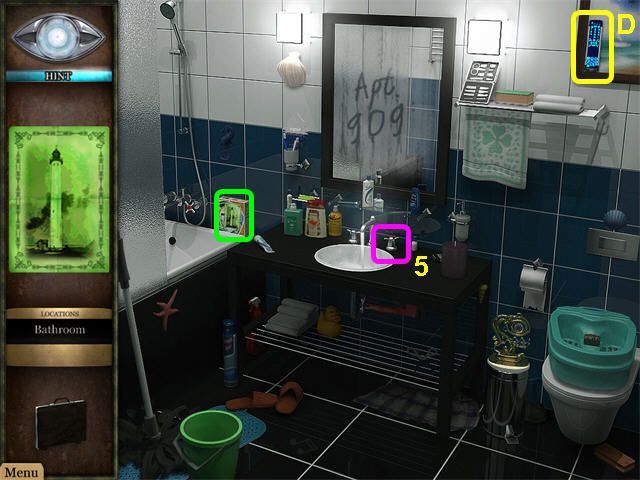
- Enter the bathroom (4).
- Replace the FAUCET HANDLE on the sink (5).
- Take the green card and locate the hidden objects.
- Take the REMOTE CONTROL (D).
- Exit to the hallway and walk to apartment 909.
- Use the KEYS to APARTMENT 909 and unlock the door.

- After the intruder leaves, look out the window to see the get-away car (1).
- Locate the blue card and the hidden objects.
- Take the LETTER to APARTMENT 901 (A).
- Open the refrigerator and remove the drink cartons (2).
- Make note of the safe.
- Exit to the hallway and walk to Apartment 901.
- Ring the doorbell.
- When the man answers the door, give him the LETTER for APARTMENT 901.
- The man will give you a DVD.
- Return to apartment 904.
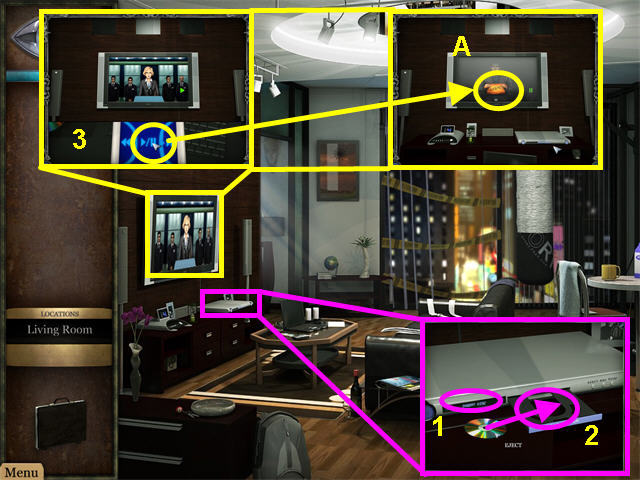
- Look at the close-up of the DVD player and push the eject button (1).
- Insert the DVD (2).
- Look at the close-up of the TV and use the REMOTE CONTROL on the TV (3).
- Push the pause button when you see Tom in the video and get the CODE (A).
- Exit and return to apartment 909.
- Look at the close-up of the safe and enter the code: 45890.
- Take the dossier from the safe, making sure to examine the photo of Tom and Sarah.
Chapter 2: Sarah's House
- Enter the garage by clicking on the brown garage door; then click under the door.
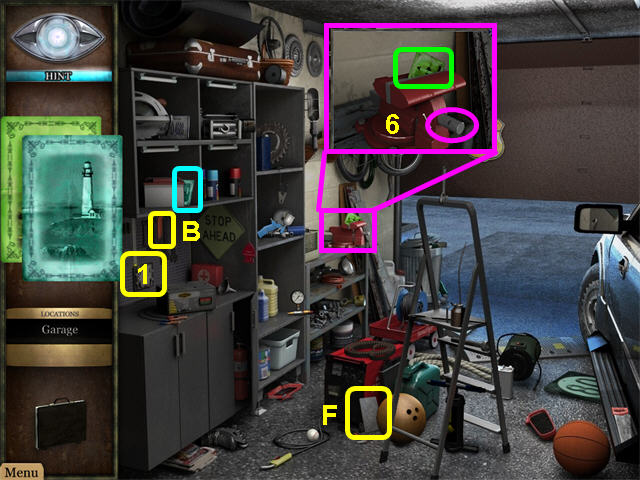
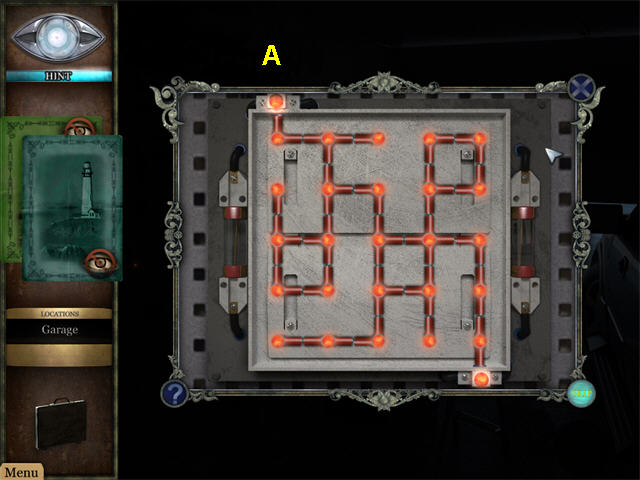
- Click on the blinking red light on the center left of the scene for a mini-game (1).
- Complete the circuits to turn on the lights (A).
- Locate the blue card and the hidden objects.
- Take the KNIFE (B).
- Exit the garage and enter the backyard.
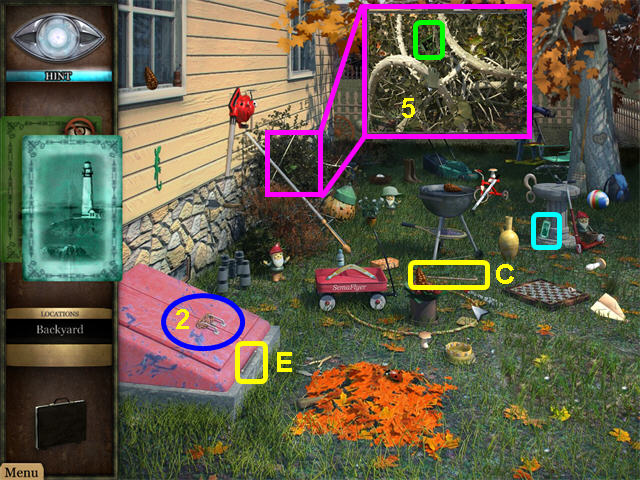
- Locate the blue card and the hidden objects.
- Take the CROWBAR (C).
- Use the CROWBAR to break the chain on the cellar doors (2).
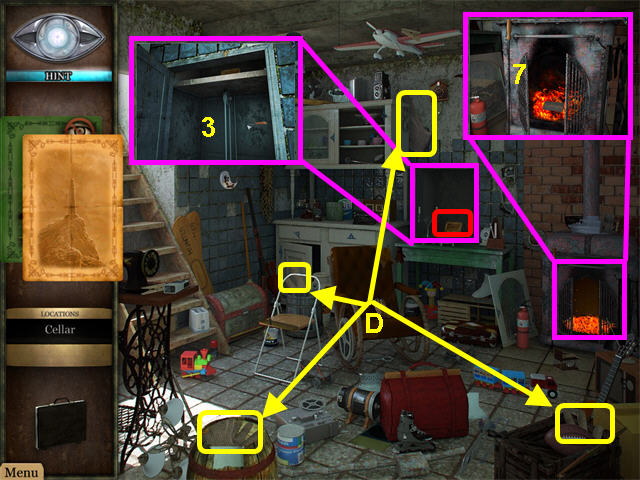
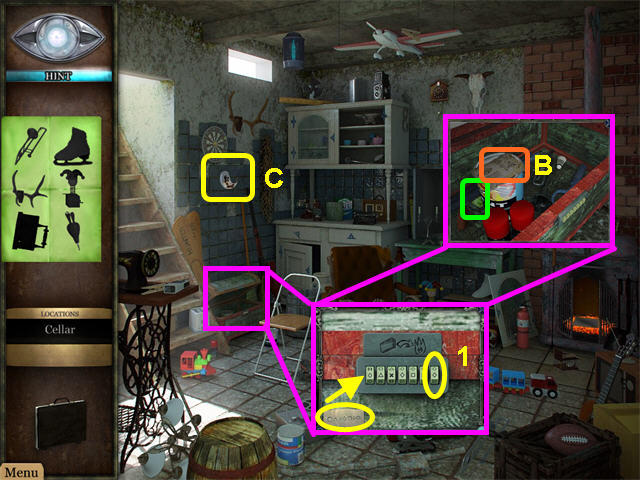
- Enter the cellar; look at the close-up of the dumb waiter (3).
- Use the KNIFE to cut the rope.
- Locate the red card and the fragmented objects.
- Take the GLOVES (D).
- Exit the cellar (4).
- Look at the close-up of the bush.
- Use the GLOVES to take the green card (5).
- Collect all the items and take the HANDLE (E).
- Return to the garage and use the HANDLE on the vise (6).
- Take the green card and collect all the items.
- Take the PLATE (F).
- Exit the garage and return to the cellar.
- Put the PLATE into the stove to reveal a CODE (7).
- Exit to the front of the house; enter the front door.
- Walk up the stairs.
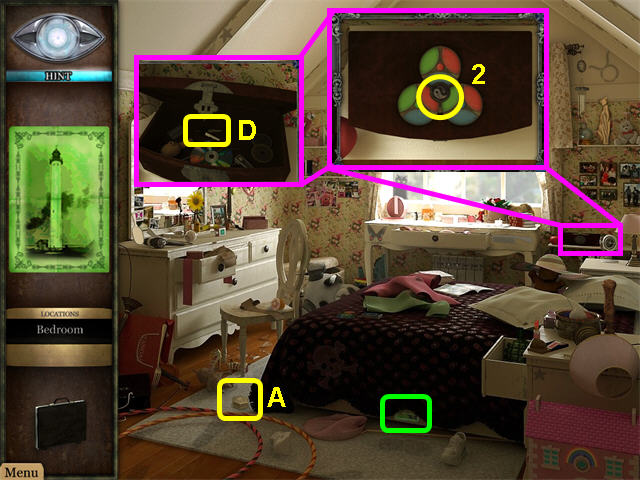
- Find the green card and collect all the items.
- Take the FACETED KEY (A).
- Exit the house and return to the cellar.
- Look at the chest to the right of the stairs.
- Place the FACETED KEY into the lock (1).
- Enter the CODE into the lock.
- Find the green card and collect all the items.
- Read the document about the legend of the King's Eye (B).
- Take the YANG LOCK PIECE (C).
- Return to the bedroom and look at the box to the right of the window.
- Place the YANG LOCK PIECE into the center niche (2).
- Solve the mini-game and take the CAR KEYS (D).
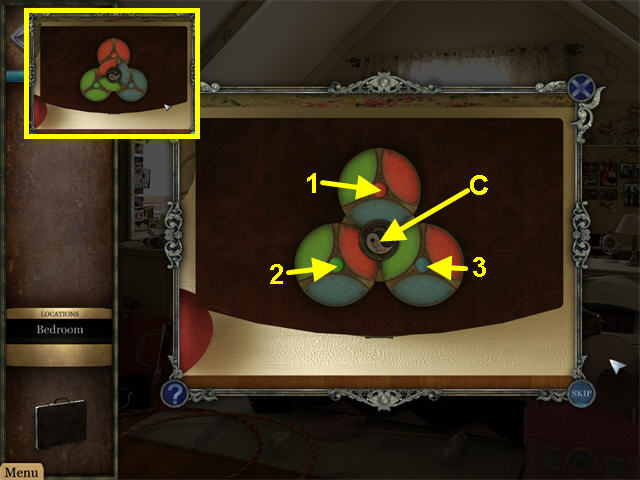
- The solution is: C-1-1-2-2-C-C-C-3-3-C.
- Exit the house and return to the garage.
- Use the CAR KEYS to open the car door.
- Look at the GPS inside the car.
Chapter 3: Tom's Last Trip
- Walk right, into the laboratory.
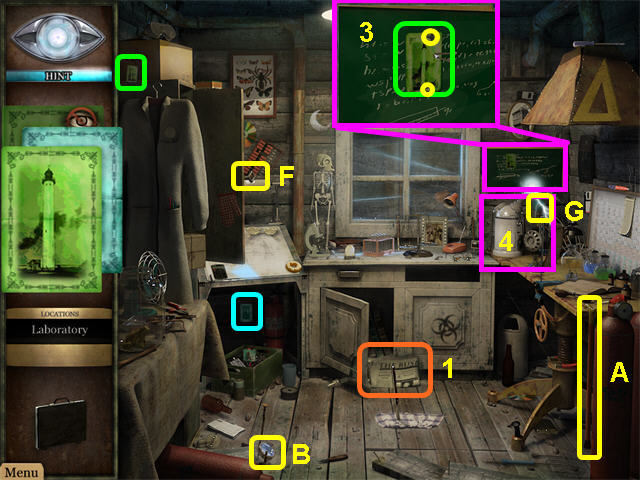
- Find the blue card and collect all the items.
- Take the CANE (A).
- Read the newspaper (1).
- Find the first green card and collect all the items.
- Take the LENS (B).
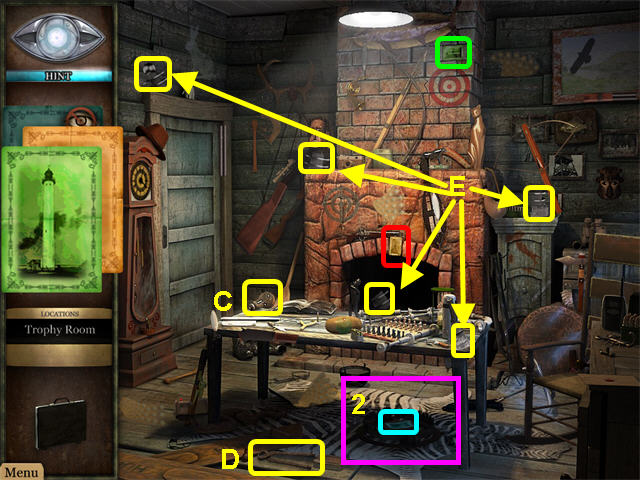
- Exit the laboratory and enter the center door to the trophy room.
- Use the CANE on the bear trap to get the blue card (2).
- Collect all the items and take the LIGHT BULB (C).
- Find the green card and collect all the items.
- Take the PINCERS (D).
- Find the red card and collect all the fragments.
- Take the TESLA COIL (E).
- Exit and return to the laboratory.
- Look at the close-up of the chalk board and use the PINCERS to remove the nails from the 2nd green card (3).
- Take the second green card and find all the items.
- Find the KEY (F).
- Use the TESLA COIL on the sparking electrical current.
- Take the BLUE CRYSTAL (G).
- Exit the laboratory and use the KEY on the left door to enter the reading room.
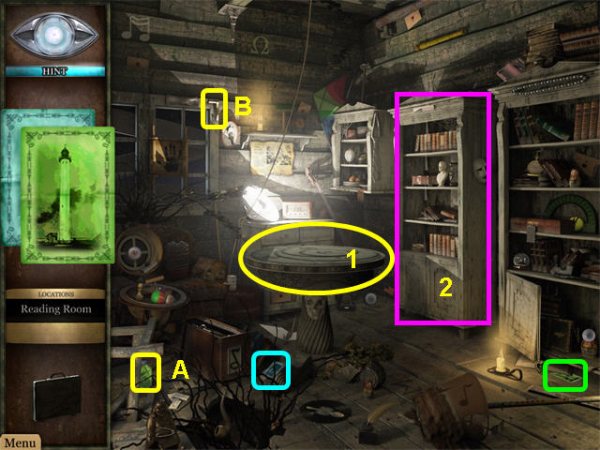
- Find the blue card and collect all the items.
- Take the GREEN CHEMICAL (A).
- Find the green card and collect all the items.
- Take the HANDLE (B).
- Make note of the Disc Table in the center of the room (1).
- Note the large bookcase on the right (2).
- Exit and return to the trophy room.
- Use the HANDLE to open the left door.
- Enter the door to go to the basement.
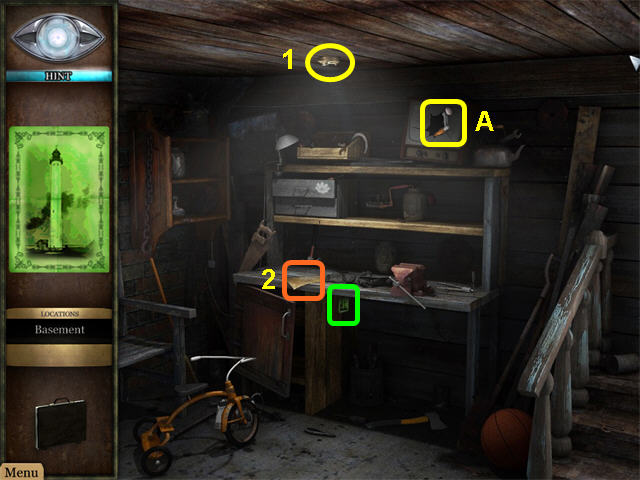
- Place the LENS into the hole in the ceiling to amplify the light (1).
- Find the green card and collect all the items.
- Take the WRENCH (A).
- Read the BLUE PRINTS (2).
- Exit the basement and the trophy room.
- While in the main hall, look at the wall above the TV set.
- Use the WRENCH to take the RED GEM.
- Walk right to the laboratory.
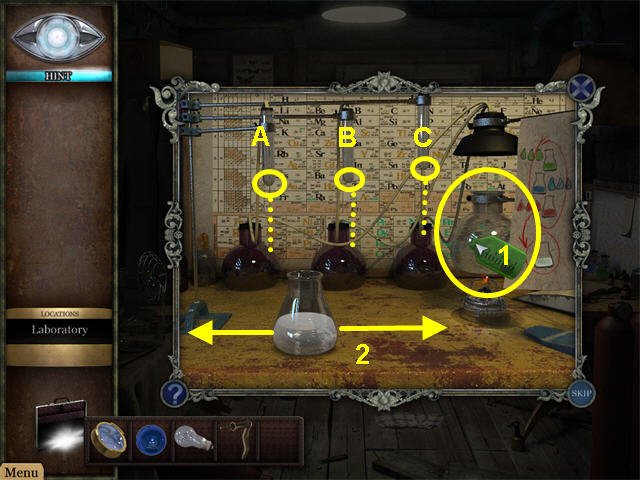
- Look at the close-up of the chemistry items on the right workbench.
- Pour the GREEN CHEMICAL into the beaker over the burner (1).
- Use the mouse to move the flask in front to capture 3 red drops, 3 green drops, and 3 blue drops, in that order (2).
- The drops will fall randomly from the 3 tubes (A, B, C).
- Should you make an error, start the sequence over.
- When correct, the SOLVENT will be added to your inventory.
- Return to the trophy room and look at the brick of pitch in the center of the table.
- Use the SOLVENT on the brick; then take the GREEN GEM.
- Walk to the reading room and look at the disc table in the center of the room.
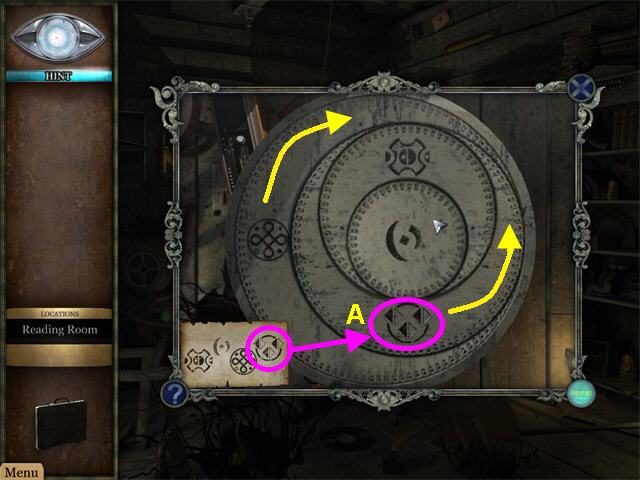
- Rotate the rings so that the symbols have the same orientation as the plans (1).
- Click and drag each ring into position.
- When correct, the bookcase on the right will open, revealing a hidden storage area.
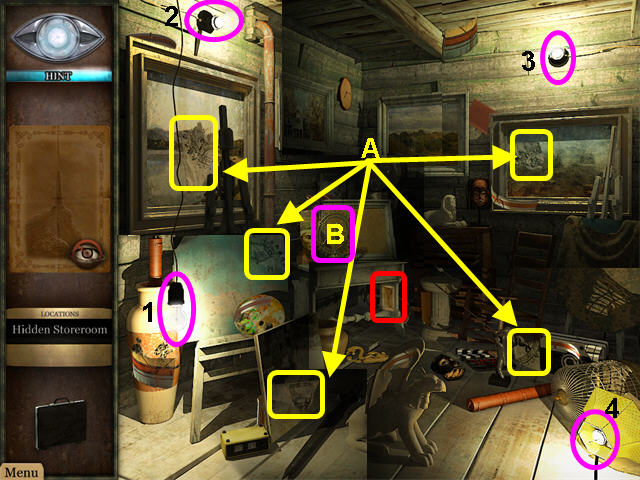
- There are 4 flashing red lights that indicate empty light sockets (1, 2, 3, 4).
- Place the LIGHT BULB into light socket 4 and find the red card.
- Move the LIGHT BULB from socket to socket and find the fragments of the items on the card.
- Take the SHIVA DRAWING (A).
- Place the LIGHT BULB into light socket 2 and click on the Shiva figurine for a mini-game (B).
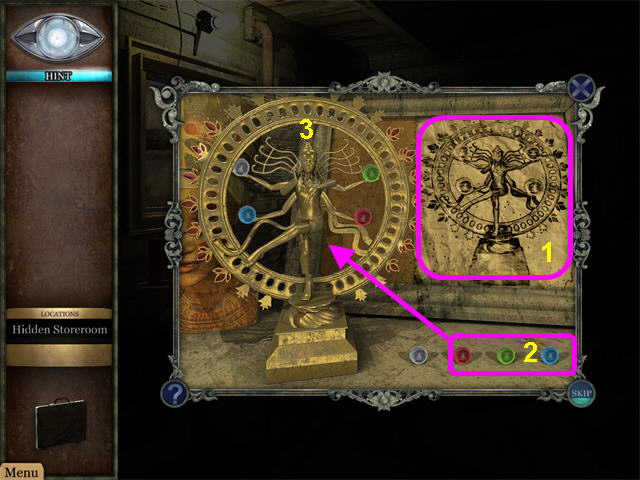
- Place the SHIVA DRAWING into the frame (1).
- Place the GREEN, RED, and BLUE GEMS next to the white gem (2).
- Place the 4 gems into the figurines hand so that the arms balance like in the drawing.
- The left arms should have the white over the blue gem and the green over the red gem on the right (3).
- Exit the hidden room and return to the laboratory.
- Enter the trap door in the floor to find the scientist.
Chapter 4: The Underground Lab
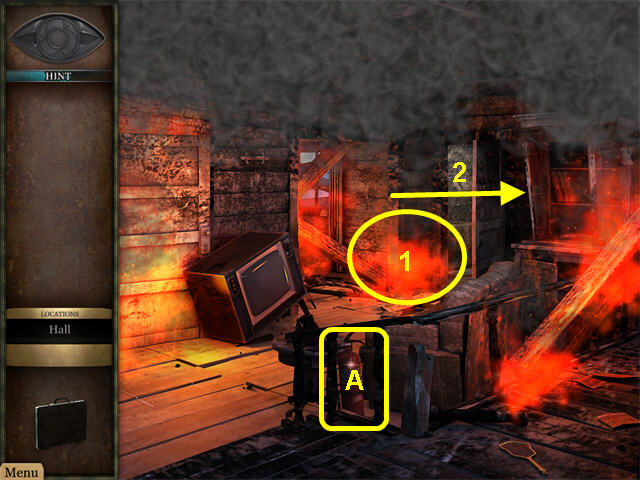
- Take the FIRE EXTINGUISHER (A).
- Use the FIRE EXTINGUISHER on the blaze blocking the laboratory door (1).
- Walk through the right door, into the laboratory (2).
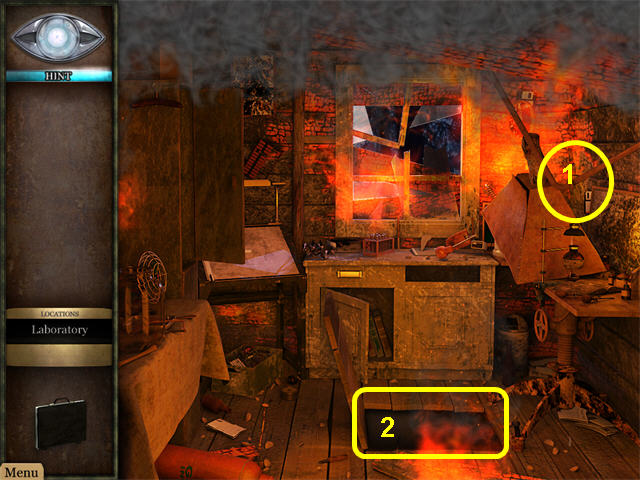
- Pull on the leaky pipe to douse the flames blocking the trapdoor (1).
- Once the flames are extinguished, enter the trap door (2).

- Find the green card and locate all the items on the list.
- Take the WHEEL (A).
- Use the WHEEL on the bunker door (1).
- Find the blue card and all the items on the list.
- Take the ANGLE GRINDER (A).
- Read the papers on the anti-hypnotic device (1).
- Use the ANGLE GRINDER to open the sealed door at the top of the steps (2).
- Walk through the steel door into the surveillance room.
- Push the eject button on the tape player to take the VIDEO TAPE of Ryde's murder confession.
- Look at the bottom center monitor for a mini-game.
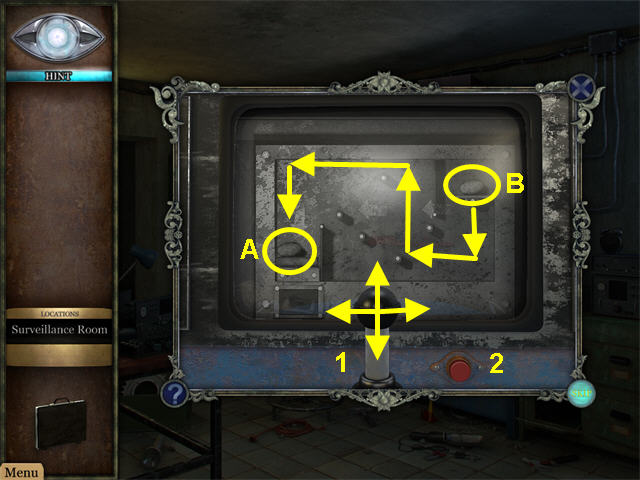
- Use the center lever to move the rock to the left bin (1, A).
- Push the red button when the rock is over the bin (2).
- Move the second rock to the left bin while avoiding the additional moving obstacles (B).
- Push the red button when the rock is over the bin to release the Lighthouse Card.
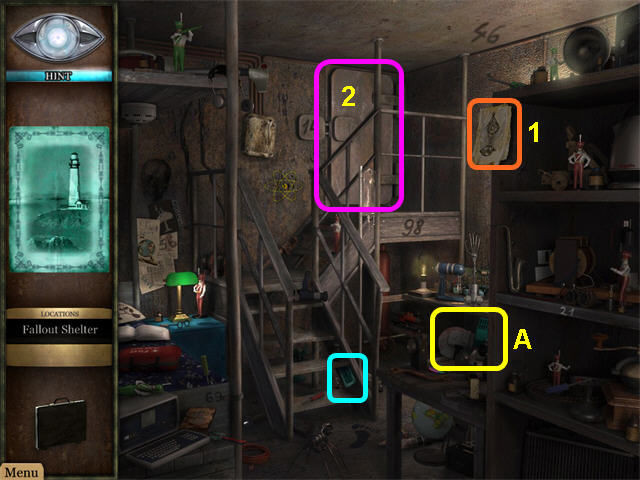
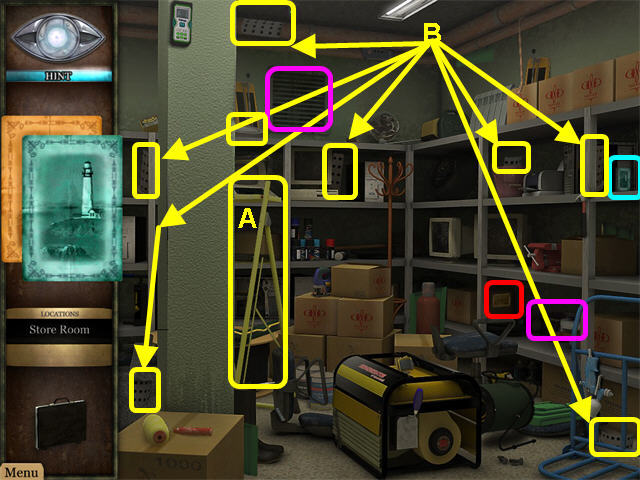
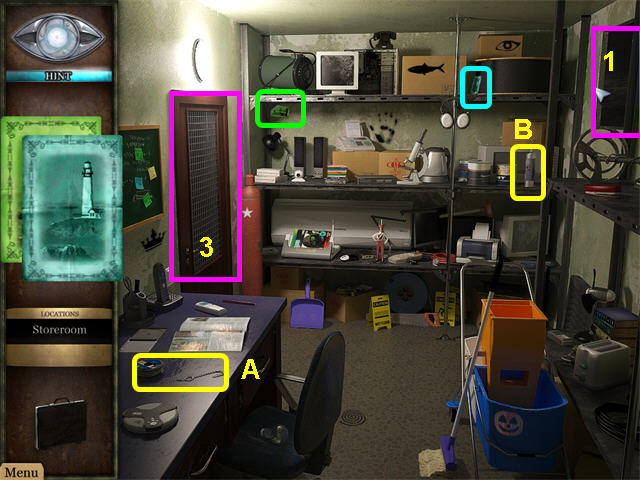
- Walk left to the storeroom.
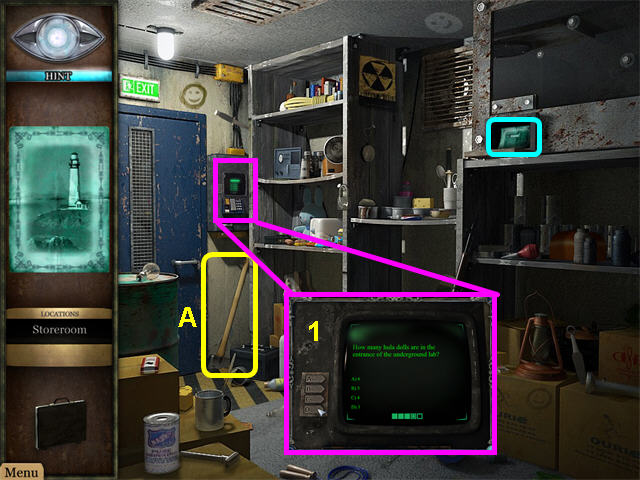
- Find the blue card and locate all the items.
- Take the SLEDGEHAMMER (A).
- Look at the security panel for a mini-game (1).
- Click anywhere to begin.
- You must correctly answer five questions based on items found in the area.
- Some of the possible answers are: 3 hula dolls, 4 smileys, blue chest, 5 red soldiers, 3 green soldiers, 3 monitors, 3 timekeeping devices, and number 34.
- Walk through the door to the generator room.
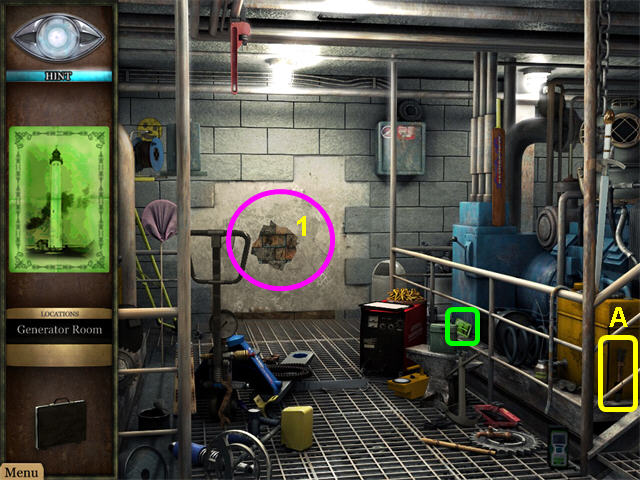
- Find the green card and locate all the items.
- Take the HANDLE (A).
- Use the SLEDGEHAMMER on the crumbling wall to make an escape hole (1).
- Use the HANDLE on the silver control box.
- Pull the handle to open the grate.
- Escape through the open grate.
Chapter 5: Ryde Corporation
- Look at the purse of the woman on the left.
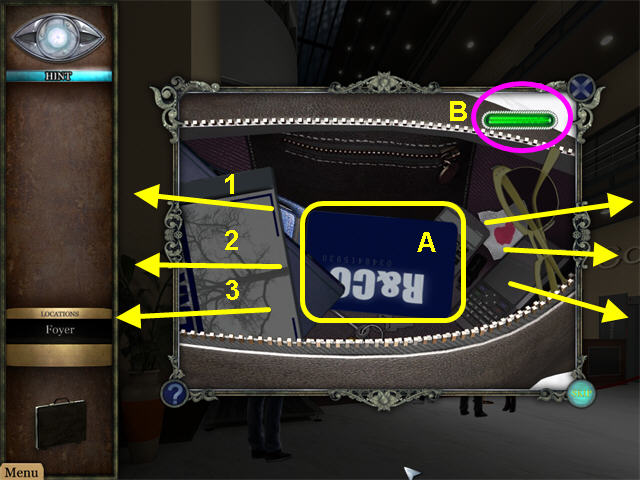
- Move items out of the way very slowly and carefully, so the woman doesn't know you are robbing her (1, 2, 3).
- Moving too quickly will trigger the motion detector and you will have to start over (B).
- Take the R & Co. ACCESS CARD (A).
- Walk down to the waiting room; use the ACCESS CARD to enter the offices.
- Enter Tom's office on the left.
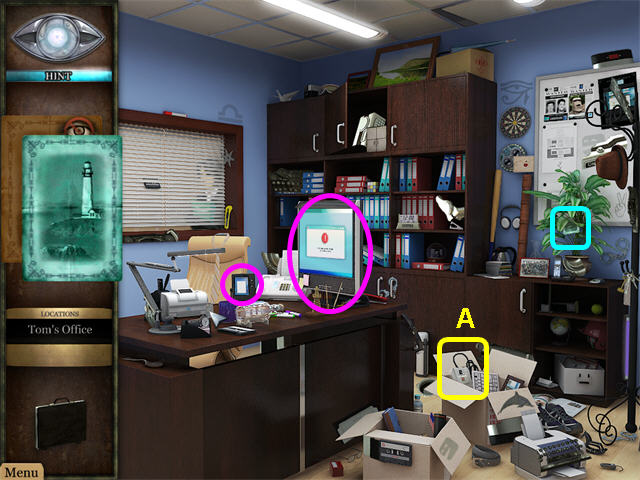
- Find the blue card and all the hidden items.
- Take the POWER STRIP (A).
- Note the sketch machine and the computer monitor missing a web-cam.
- Exit Tom's office and walk left down corridor D-10.
- Enter Cafe 777.
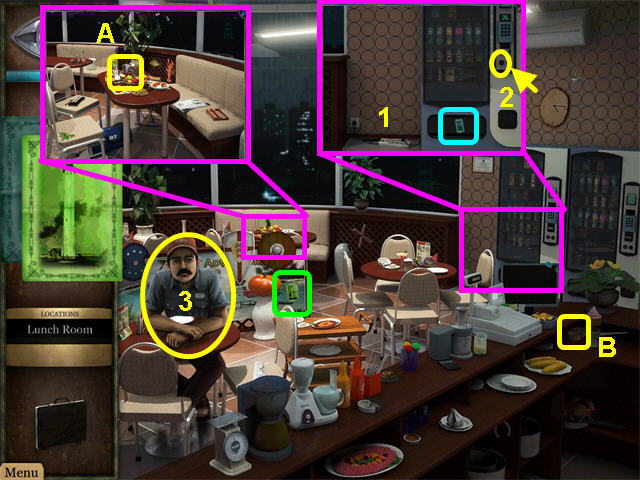
- Look at the close-up of the left vending machine.
- Plug in the POWER STRIP (1).
- Push the red button and take the blue card (2).
- Locate all the items and find the WEB CAM (A).
- Some items are in the close-up of the table.
- Take the green card and find all the items.
- Locate the SET OF CUPS (B).
- Talk to the man in the café; he was a friend of Tom.
- Give the set of cups to him to trigger a mini-game (3).
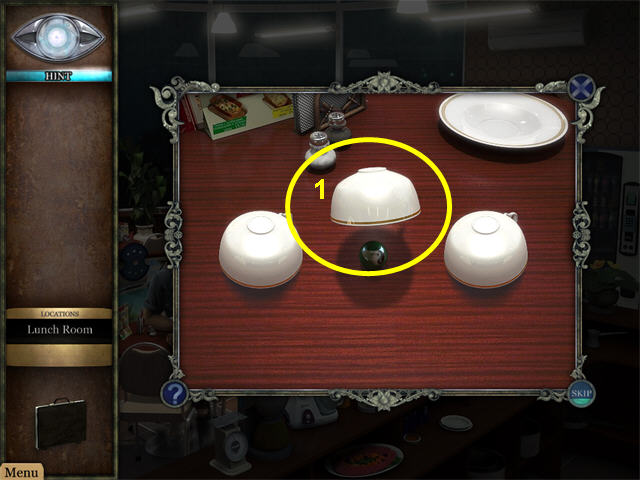
- Click on the cup to cover the ball and start the game (1).
- Watch carefully! Once the cups stop moving, select the cup with the ball.
- You must win three times.
- The Janitor gives you the KEY to the storage closet.
- Exit the cafe and look at the closet door on the right.
- Use the KEY to unlock the door and then enter.
- Take the blue card and find all the items.
- Locate the LADDER (A).
- Find the red card and locate all the fragments.
- Take the CYLINDER (B).
- Make note of the music box and the ventilation duct.
- Exit the closet and return to Tom's office.
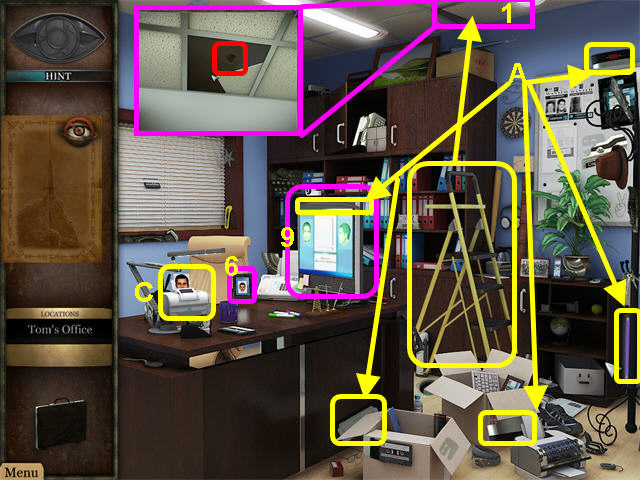
- Use the ladder on the loose ceiling tile (1).
- Take the red card and find all the fragmented items.
- Locate the UV LAMP (A).
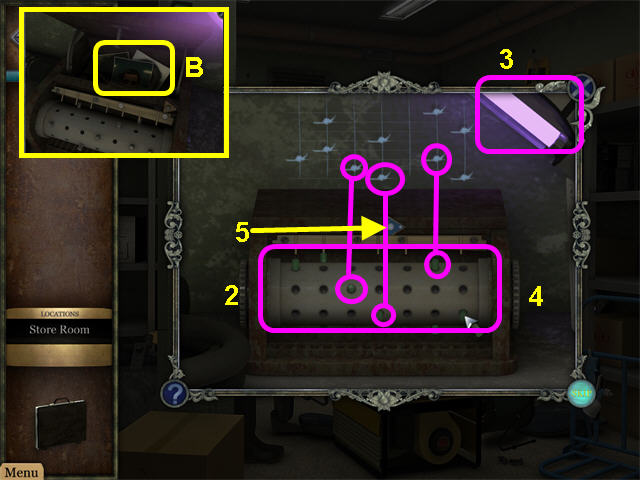
- Return to the storage room and look at the music box.
- Place the CYLINDER into the music box (2).
- Use the UV LAMP on the wall behind the music box (3).
- Place the pegs into the cylinder to duplicate the music (4).
- Press the blue triangle to play the music box (5).
- Take the PHOTOS that were hidden inside (B).
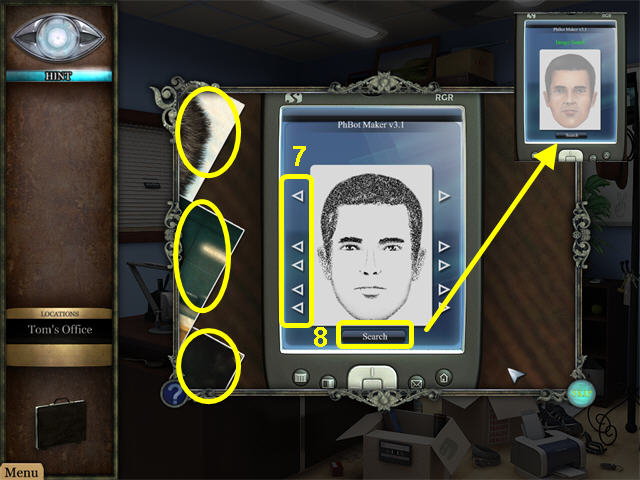
- Return to Tom's office.
- Use the photos on the sketch machine (6).
- Look at each photo; use the arrows to match the features (7).
- Press search; when you’ve chosen the correct features, a color photo will print (8).
- Take the PHOTO from the printer (C).
- Place the WEB CAM on the computer (9).
- Use the PHOTO on the computer.
- Select “My Computer” to see Tom's plans for stealing the device using the ventilation system.
- Return to the storage closet and enter the vent.
- Inside the ventilation system, go forward twice then left.
- Push out the grate and enter the storeroom.
- Take the blue card and find all the items.
- Locate the FISHING LINE (A).
- Take the green card and find all the items.
- Locate the SPRAY (B).
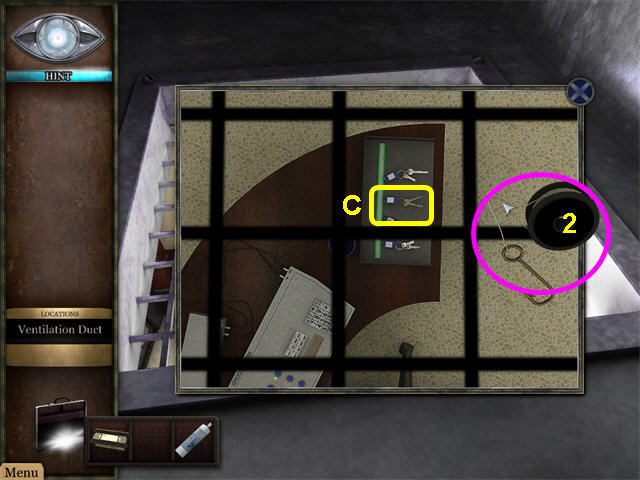
- Enter the vent and go back twice (1).
- Go left and look down vent 4.
- Use the FISHING LINE to take a SET of KEYS (2, C).
- Return to the storeroom and unlock the door with the key (3).
- Exit the storeroom; then walk left and then right.
- Click on the fuse box to turn off the fans.
- Back up once, then go forward and enter the restricted area.

- Use the SPRAY in a steady stream to find the laser locations (1).
- Walk forward through the gap in the lasers (2).
- Repeat this process for two more sets of lasers.
- Enter the metal doors.
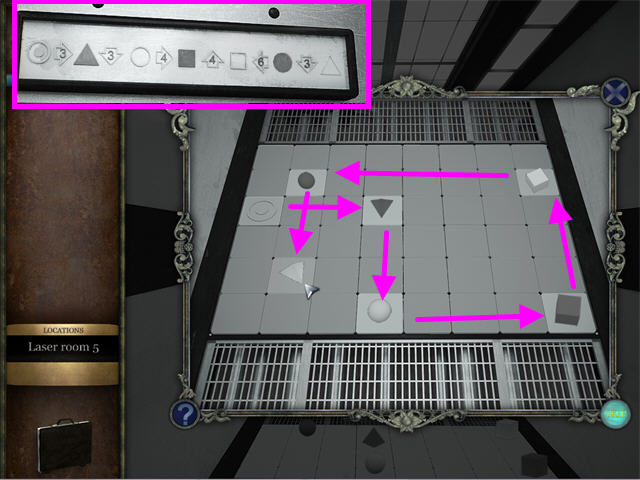
- Look at the symbols over the door for a clue to the mini-game.
- Look down at the grid of white tile and place the shapes as they appear in the symbols over the door.
- Enter the repository.
- Look at the center pedestal and take the ANTI-HYPNOTIC TALISMAN.
- Return to the storeroom and enter the vent.
- Move back and to the right, going through the fan.
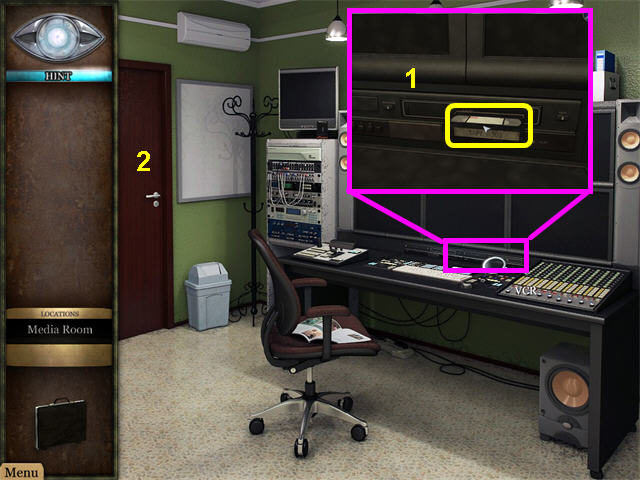
- Enter the Media Room and look at the close-up of the tape deck.
- Place the VIDEO TAPE into the machine (1).
- Exit through the left door to the conference room.
Chapter 6: The Talismans
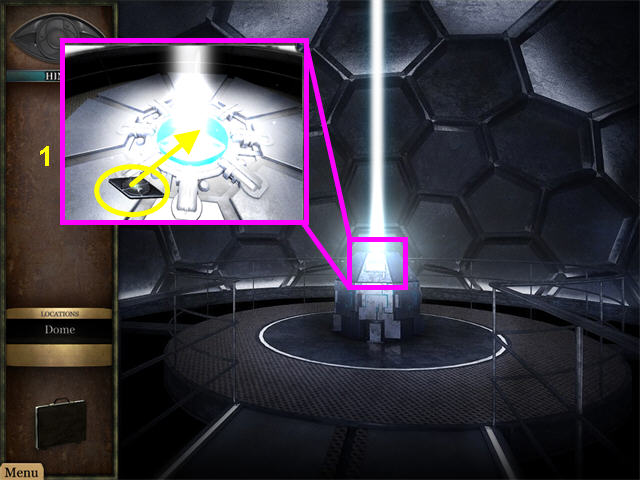
- Walk to the center of the dome.
- Place the anti-hypnotic talisman into the beam (1).
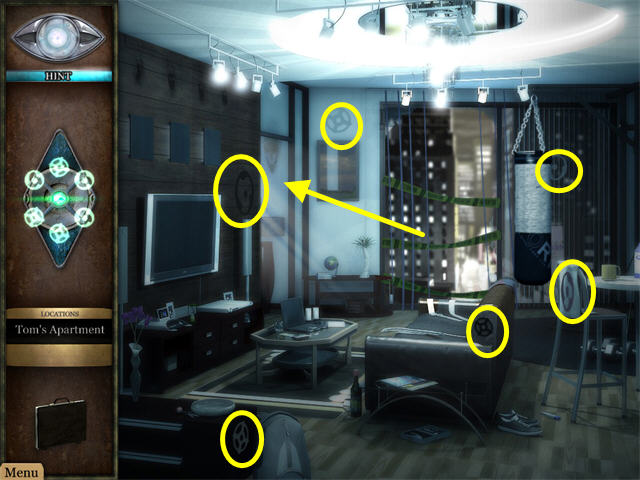
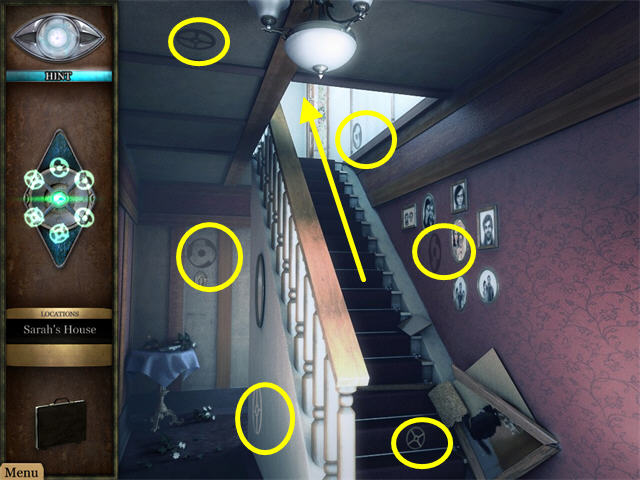
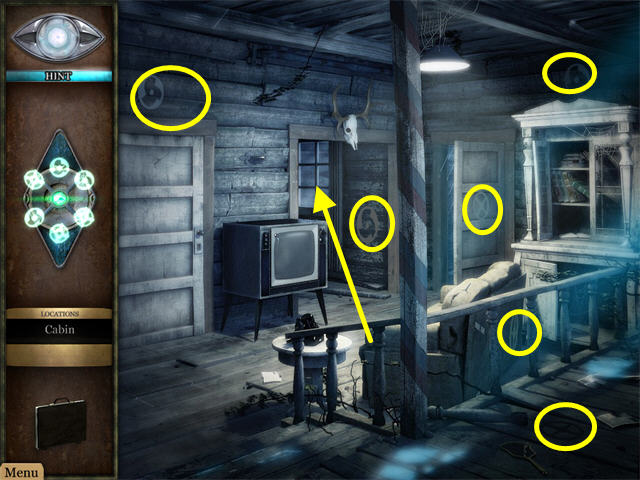
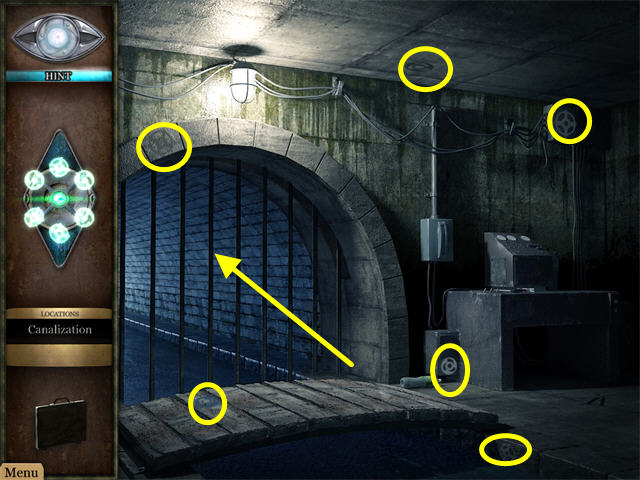

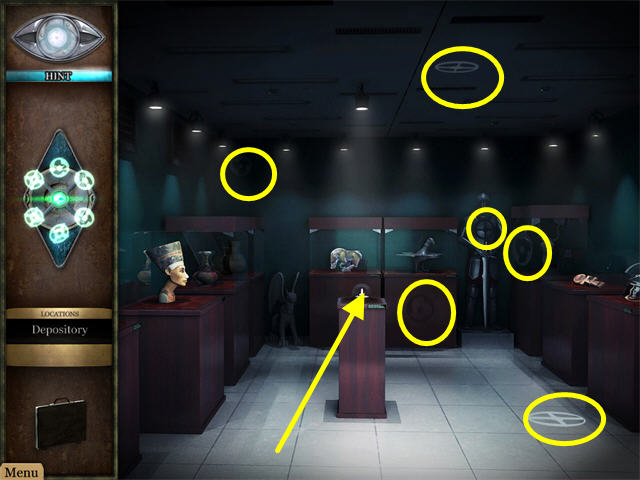

- Find the six symbols in each scene; follow the light to the next location.
- Hints do not work in this section!
- Once the TALISMAN is fully charged, you will return to the dome.
- Look at the close-up and place the charged TALISMAN into the beam to destroy the dome.
Created at: 2010-06-03