

Walkthrough Menu
- General Tips
- Chapter 1: The Sheriff's Letter
- Chapter 2: The Butcher's Daughter
- Chapter 3: The Undertaker
General Tips
- This is the official guide for Strange Cases: The Secrets of Grey Mist Lake Standard Edition.
- Many mini-games and hidden object scenes are randomized; your solution may vary.
- For this walkthrough, Hidden Object Scenes will be referred to as HOS.
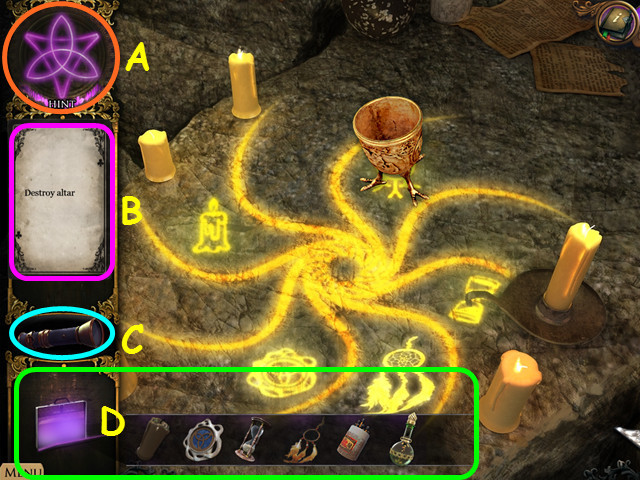
- Hints are unlimited, but you must wait for the Eye to refill (A).
- Click on the Eye for a hint in a Hidden Object Scene.
- You may skip mini-games once the meter fills.
- Your current task, Hidden Object list, or puzzle instructions will show on the card (B).
- You will have to find one CARD in the HOS which will provide you with the list of items to search for.
- Use the FLASHLIGHT in the creepy shadow areas to make RUNE STONES visible (C).
- Select the briefcase in the lower left to access your inventory (D).
- Right-click on an inventory item to drop it back into inventory.
- The magnifying glass cursor indicates that a close-up view is available.
- Puzzle pieces on the cursor means that you will need to solve a puzzle or use an inventory item.
- The talk bubble indicates that conversation is possible with a character.
Chapter 1: The Sheriff's Letter
- Click on the card Claire is holding.
- You will have the option of some interactive help.
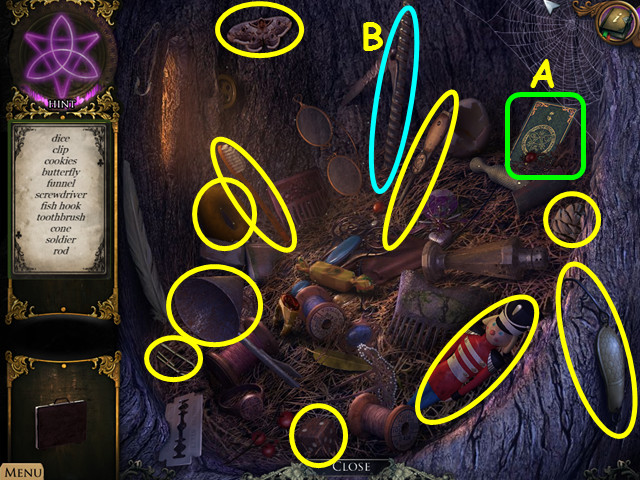
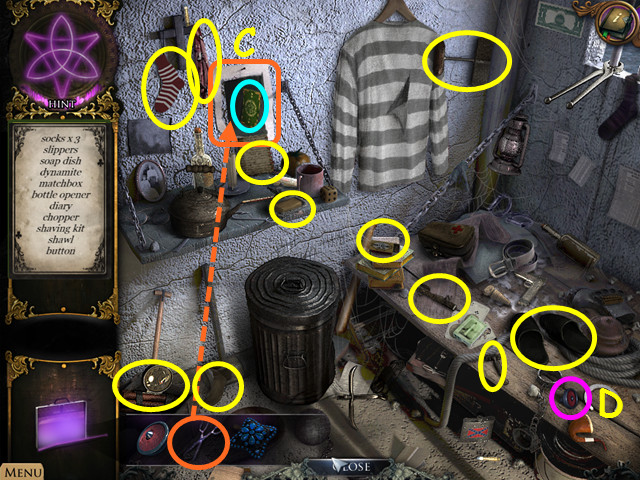
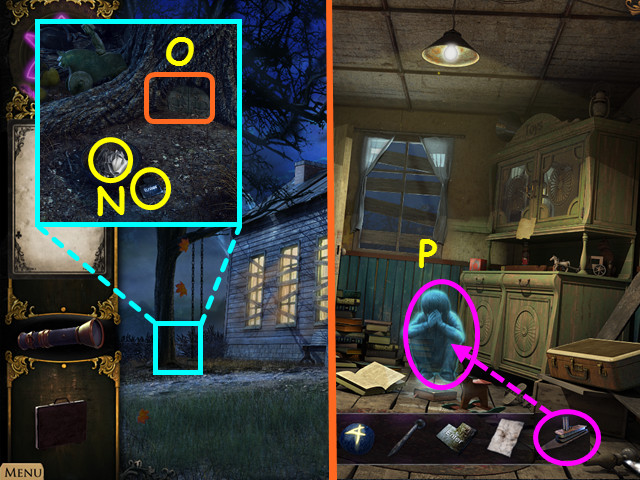
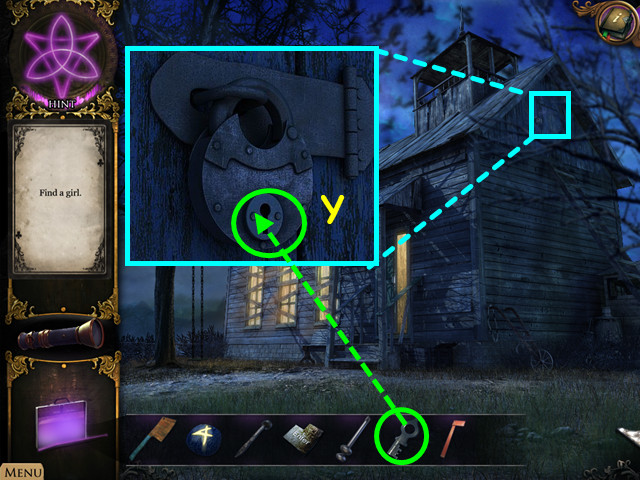
- Click on the hollow tree on the right to access a HOS.
- Click on the CARD in the upper right to acquire your list (A).
- Find all the items listed to acquire the ROD (B).
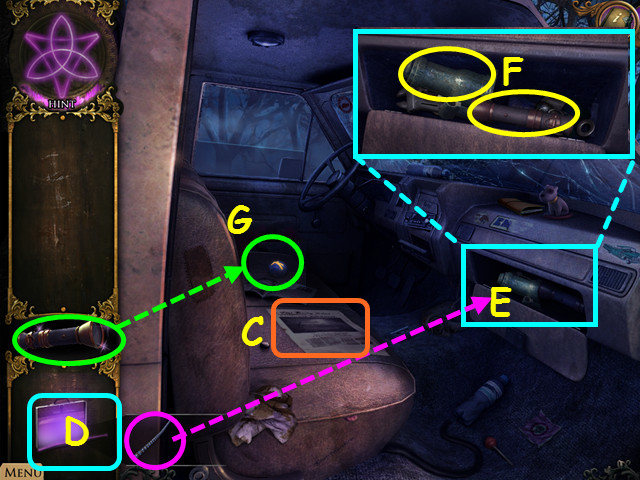
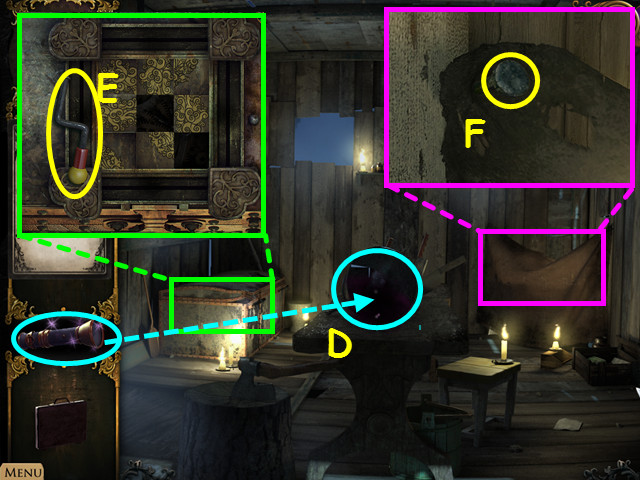
- Click on the door of the crashed car.
- Read the newspaper (C).
- Open the briefcase (D) to access your inventory items, then use the ROD on the glove compartment (E).
- Zoom into the glove compartment; take the FLASHLIGHT and the SCREW-JACK (F).
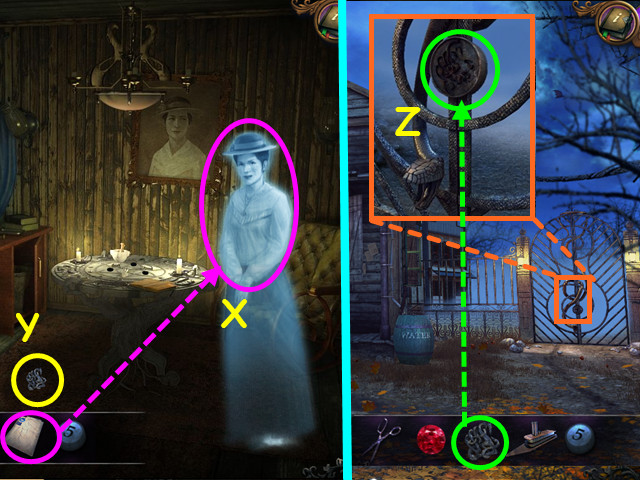
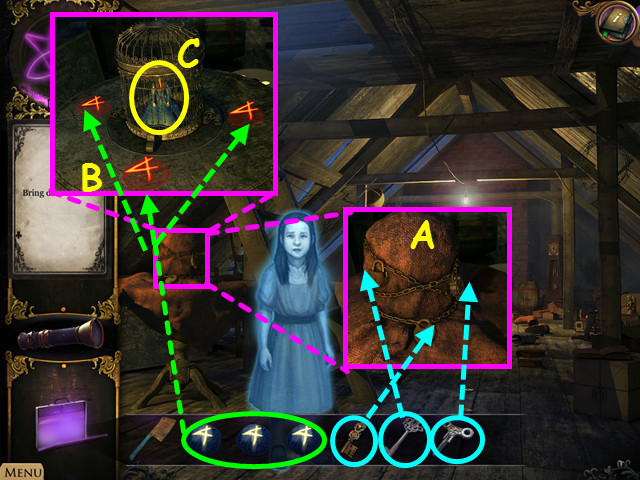
- Click on your FLASHLIGHT and aim it at the creepy shadow on the driver seat; take the RUNE STONE (G).
- Click down.
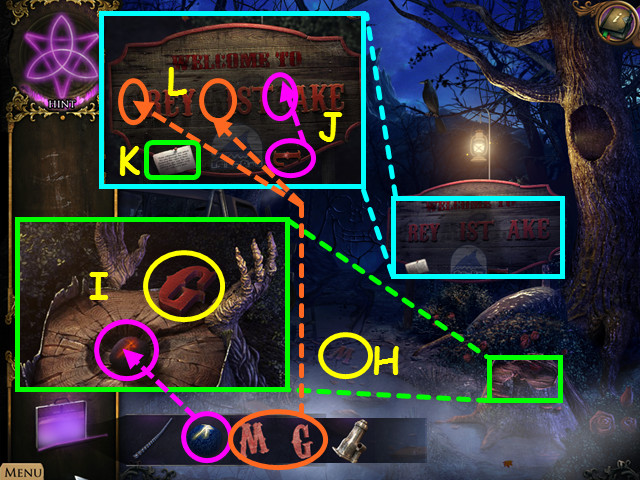
- Take the LETTER M (H).
- Zoom into the tree stump; use the RUNE STONE on it and take the LETTER G (I).
- The ghost will appear; talk to him.
- Examine the sign; take the LETTER L (J) and place it on the sign.
- Read the note on the sign for a clue (K).
- Put the LETTER G and the LETTER M on the sign (L).
- Go forward.
- There are 3 paths, you can take.
- Per the note on the sign, take the right path to town.
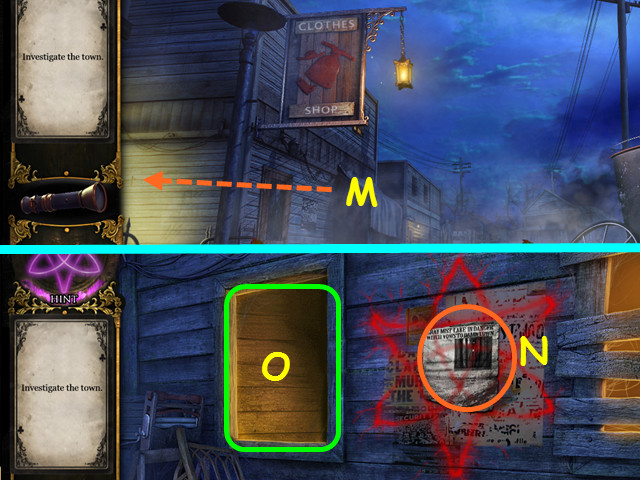
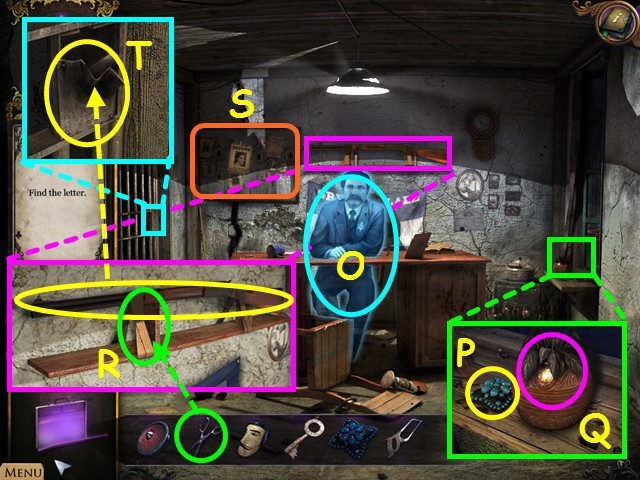
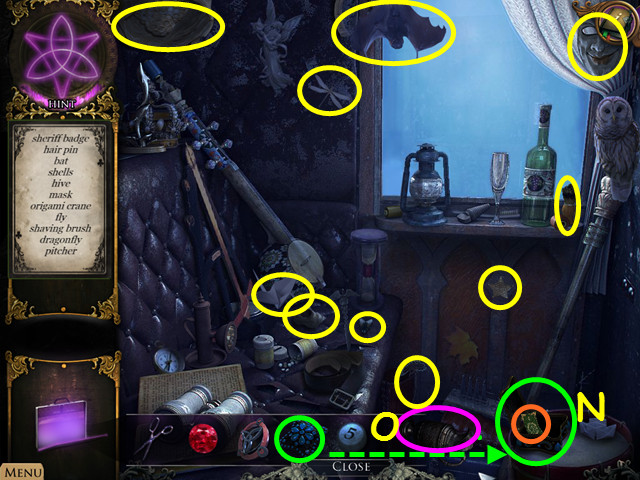
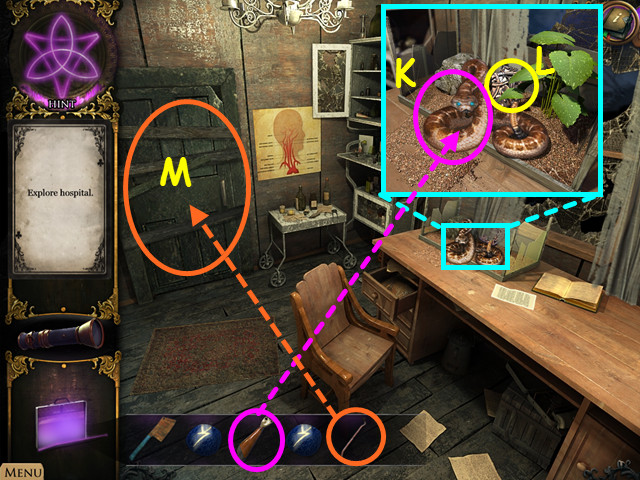
- Head left once you arrive at the clothes shop (M).
- Look at the newspaper (N).
- Enter the window (O).
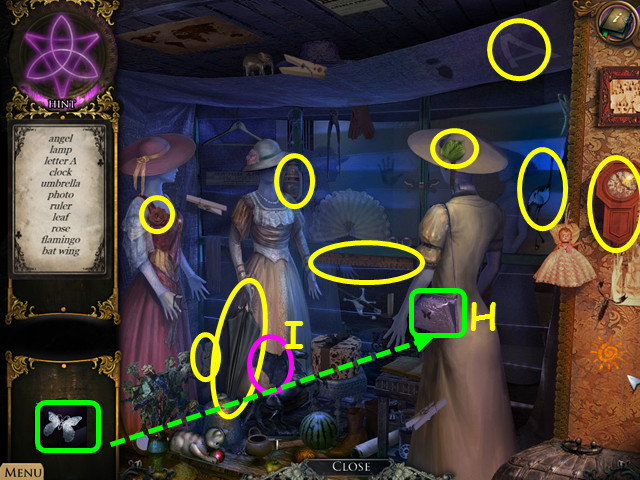
- Shine the FLASHLIGHT on the creepy shadow; take the RUNE STONE (P).
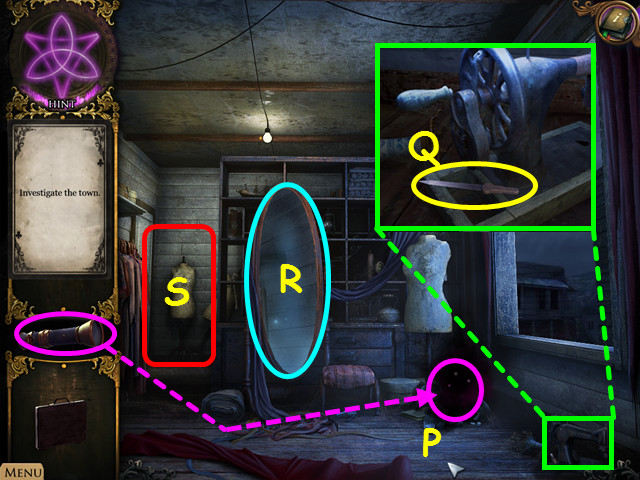
- Examine the sewing machine; take the FILE (Q).
- Look at the mirror (R).
- Walk forward (S).
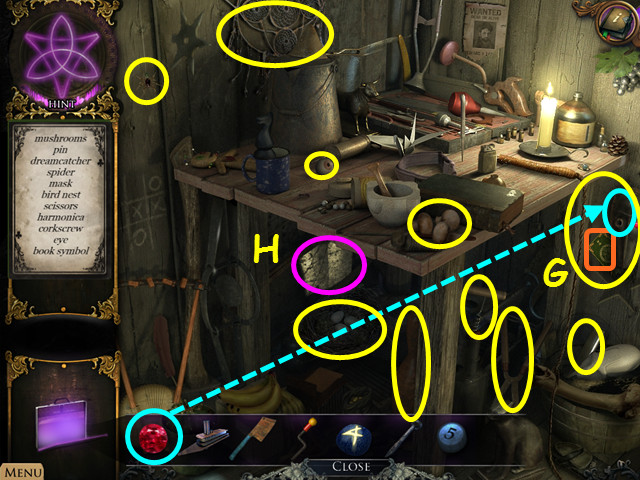
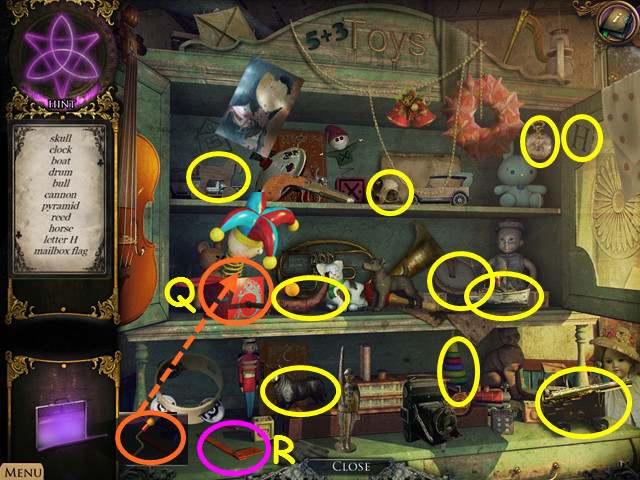
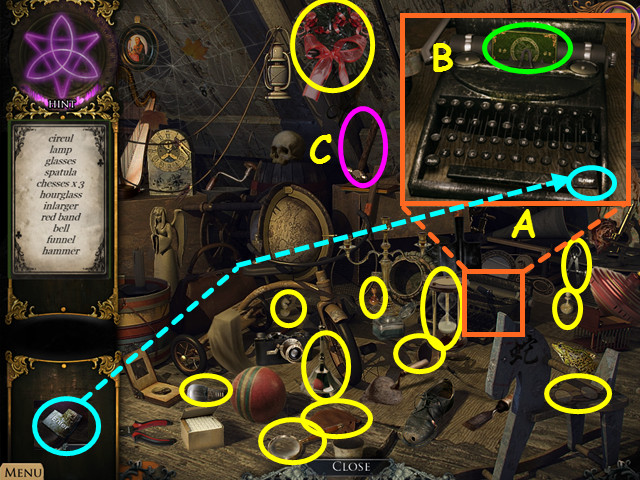
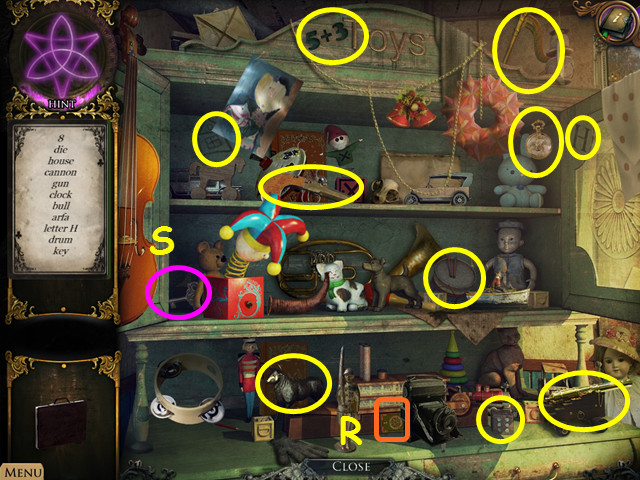
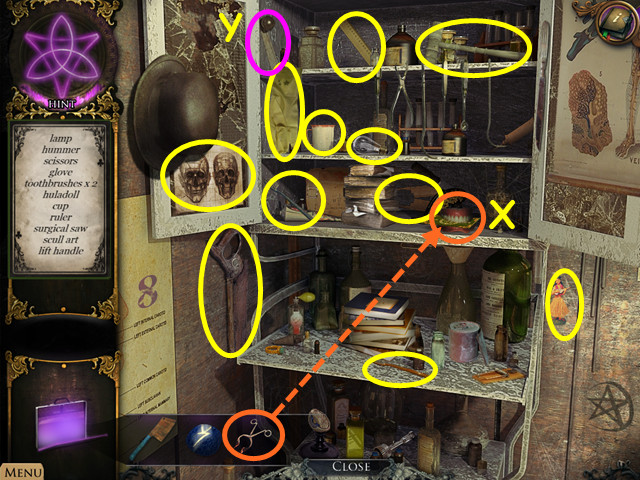
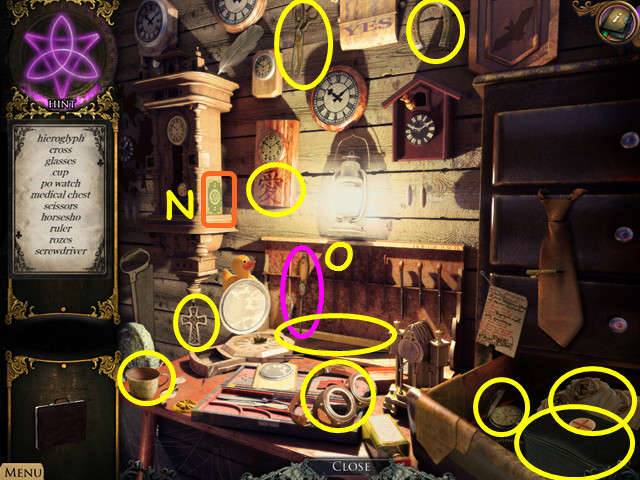
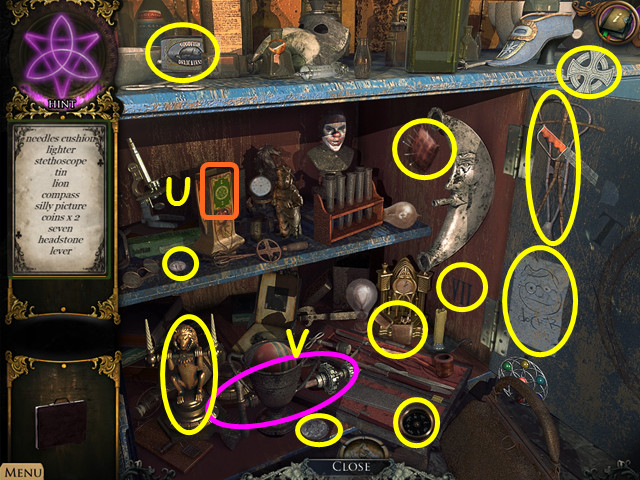
- Select the shelves on the right for a HOS.
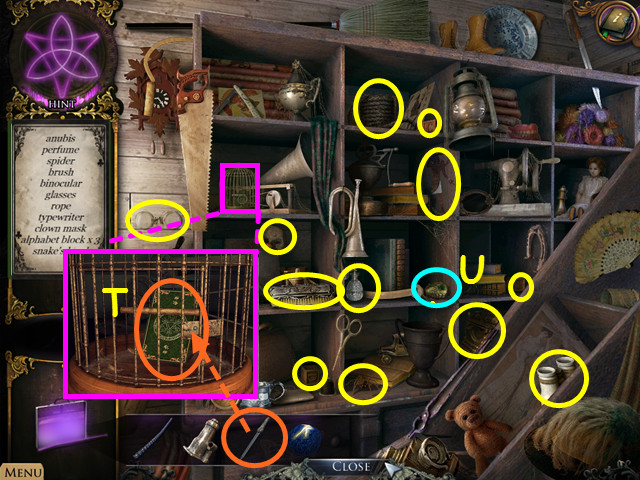
- Examine the birdcage; use the FILE on the lock and take the CARD (T).
- Find all the items listed to acquire the SNAKE'S HEAD (U).
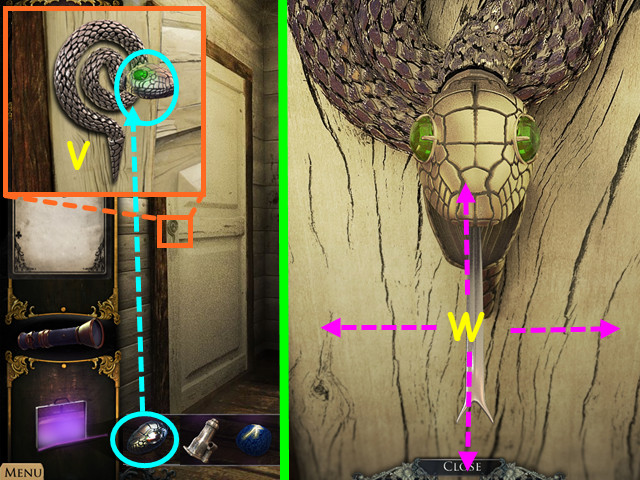
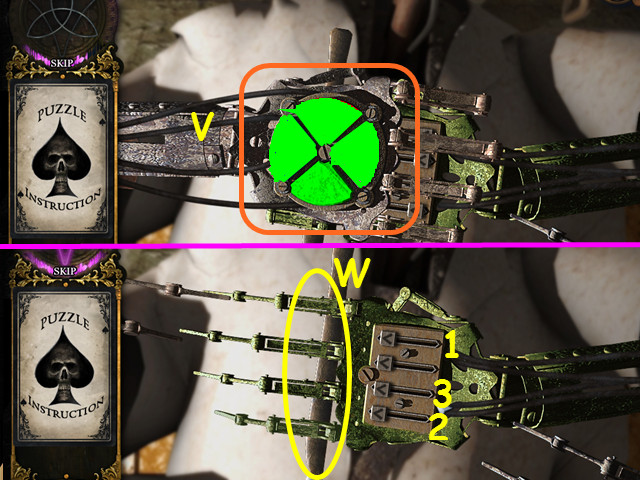
- Zoom into the left door; put the SNAKE'S HEAD on the lock (V).
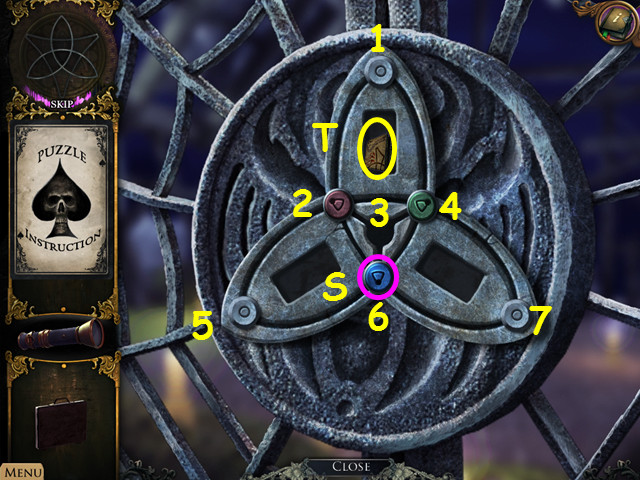
- Zoom into the door to activate a puzzle.
- You must pull the snake's tongue, up, down, left, or right (W).
- When you pull the tongue in the correct sequence, its eyes will light up. If you make the incorrect sequence, the puzzle will reset.
- To solve the puzzle, pull the tongue in this order: UP, UP, RIGHT, and LEFT.
- Go through the door.
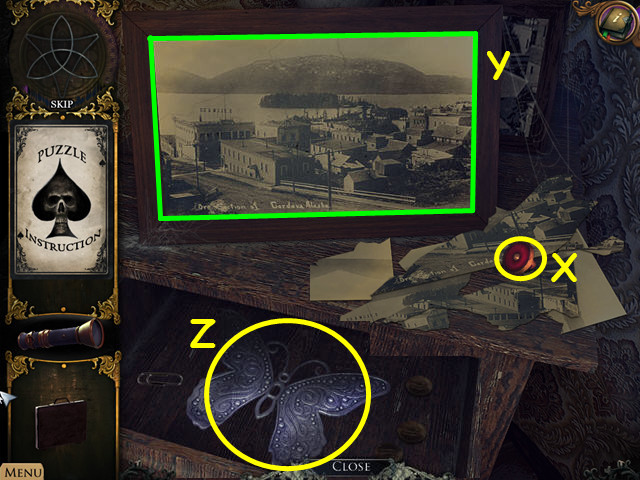
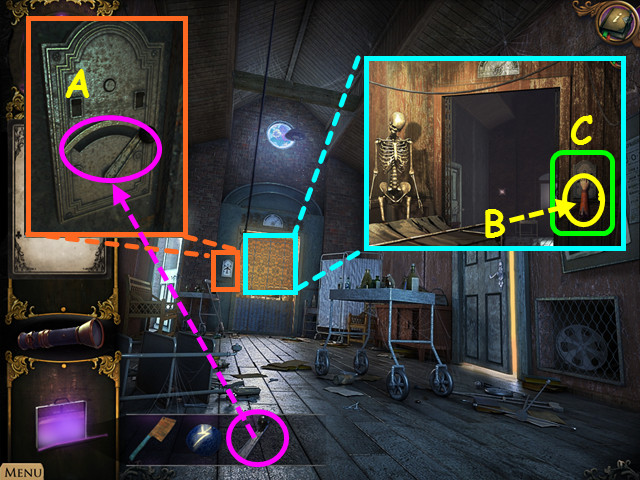
- Examine the cabinet on the right to activate a puzzle.
- Take the 1/2 BUTTON (X).
- Assemble the puzzle by dragging the photo pieces into the frame.
- Pieces placed correctly will lock in place.
- Please look at the screenshot for the solution (Y).
- Take the BUTTERFLY (Z).
- Go up the staircase.
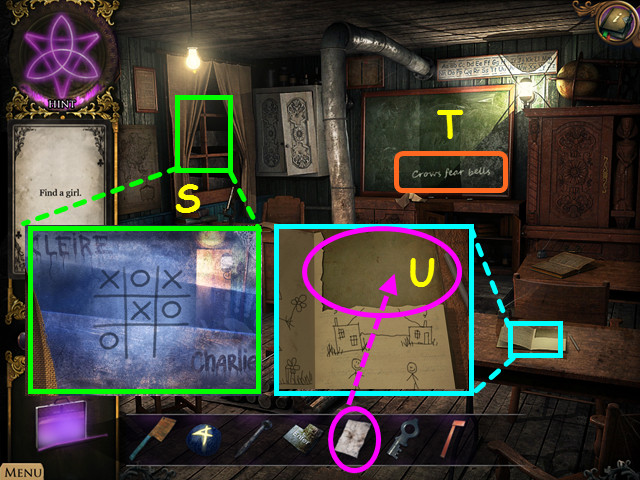
- Examine the table; read the newspaper.
- Go through the right door.
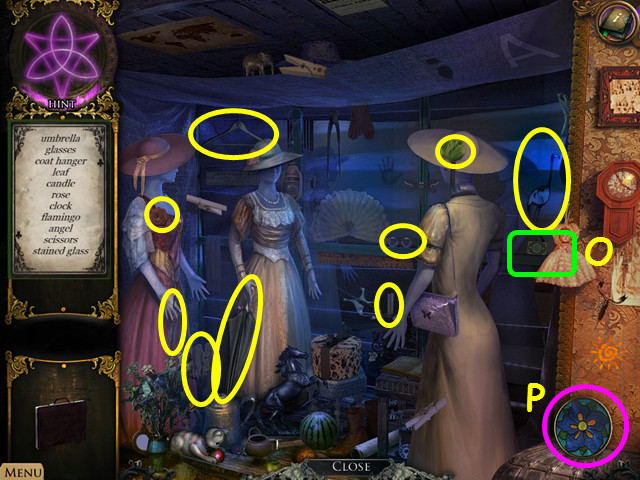
- Shine the FLASHLIGHT on the creepy shadow; take the RUNE STONE (A).
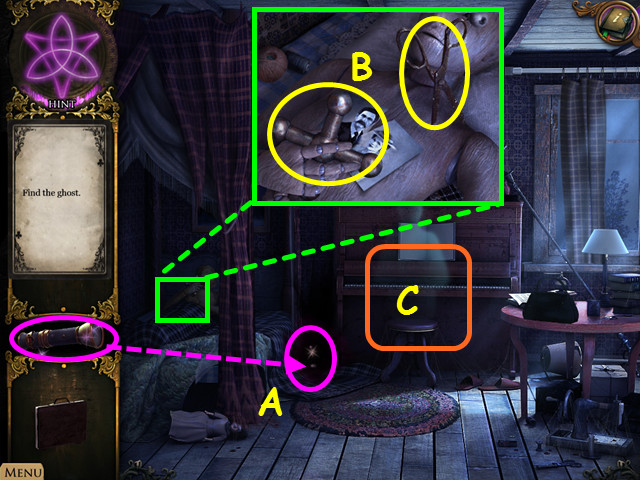
- Examine the bed; take the SCISSORS and the HANDLE (B).
- Click on the piano to access puzzle (C).
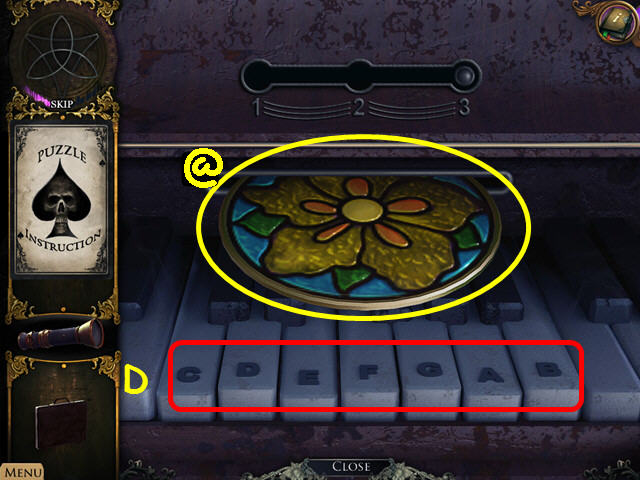
- Repeat the sequences shown on the piano (D).
- Sequence 1: B, G, and F.
- Sequence 2: B, G, F, A, and E.
- Sequence 3: B, G, F, A, E, D, and C.
- Take the 1/4 STAINED GLASS (@).
- Click on the window for a cut scene.
- Click down twice.
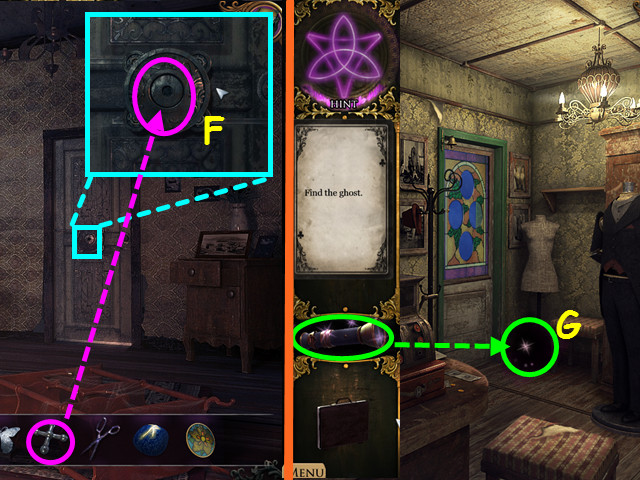
- Zoom into the door; put the HANDLE on it and go through the door (F).
- Shine the FLASHLIGHT on the creepy shadow; take the RUNE STONE (G).
- Click on the HOS on the left.
- Zoom into the purse; put the BUTTERFLY on it and take the CARD (H).
- Find the listed items to acquire the BAT WING (I).
- Click down; go up the staircase and head forward.
- Take the 2/4 STAINED GLASS on the chair.
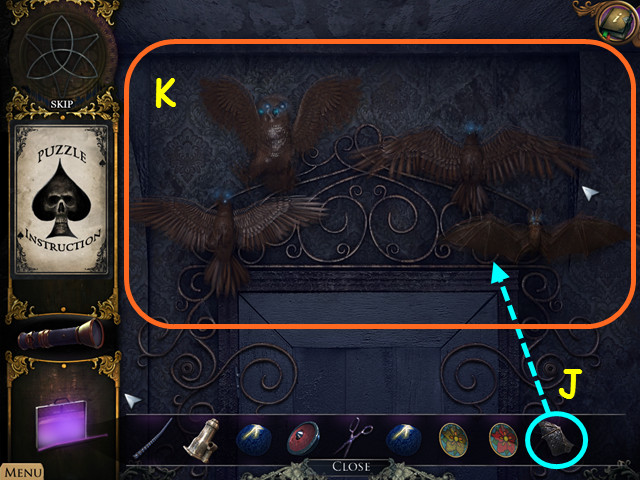
- Examine the bird statues above the door; put the BAT WING on the empty slot to activate the puzzle (J).
- Put the correct wings on each bird.
- Click on any two wings to swap their positions.
- Please look at the screenshot for the solution (K).
- Go through the door.
- Take the DUMMY'S HEAD (L).
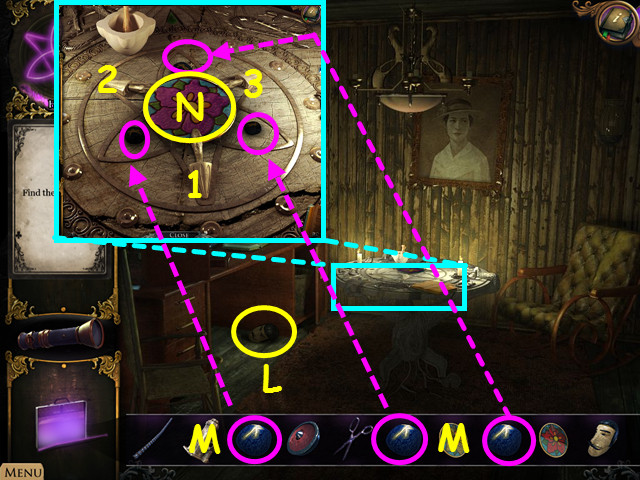
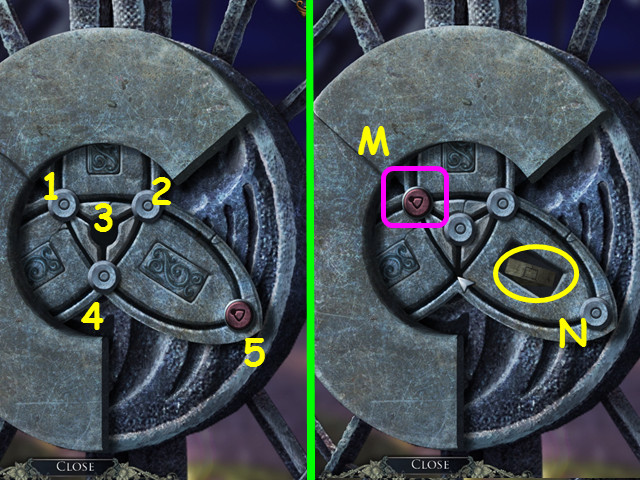
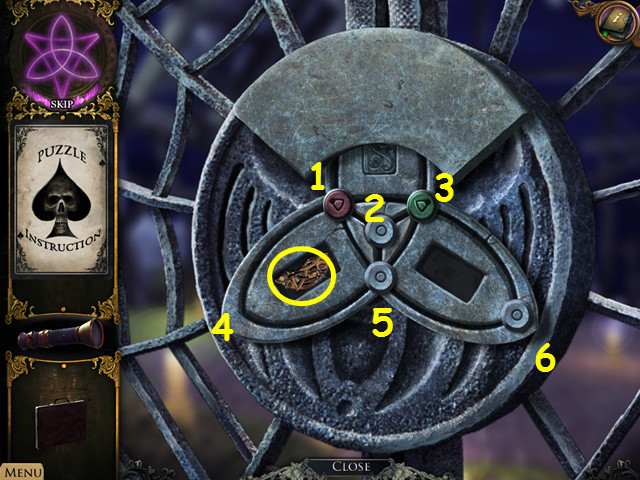
- Examine the table; put the 3 RUNE STONES on the circles to activate a puzzle (M).
- Click on the snakes in numerical order (1-3).
- Take the 3/4 STAINED GLASS (N).
- Click down 3 times and go through the door.
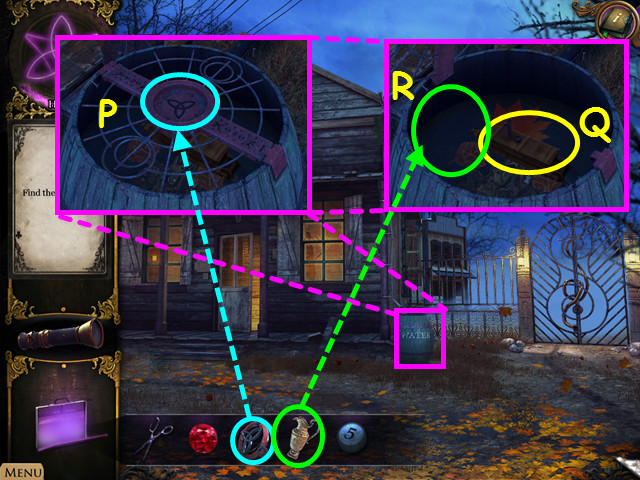
- Click on the HOS.
- Take the CARD on the right edge (O).
- Find the listed items to acquire the 4/4 STAINED GLASS (P).
- Examine the stained glass door; put the 4 STAINED GLASS pieces in their matching slots.
- Go through the door.
- Watch the cut scene then walk to the right.
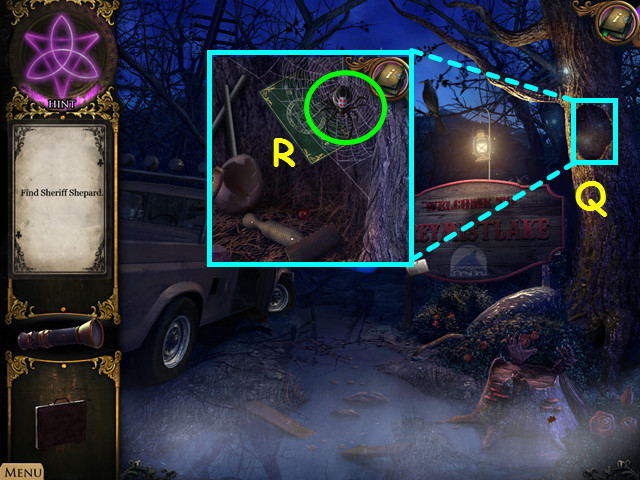
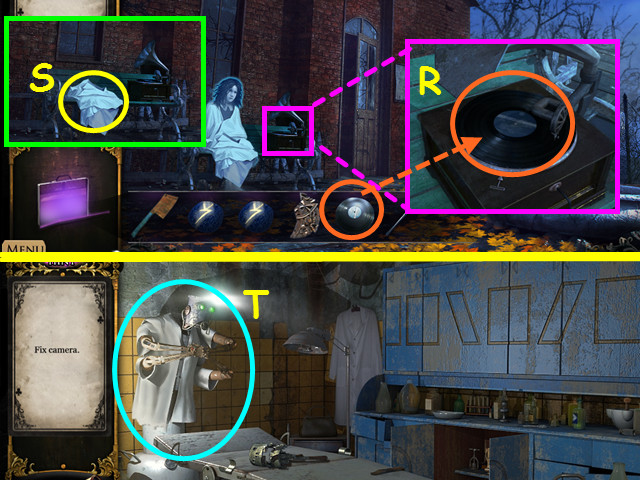
- Look inside the hollow tree (Q).
- Click on the spider guarding the card to learn you need to feed it (R).
- Close the scene.
- Go forward and click down 3 times.
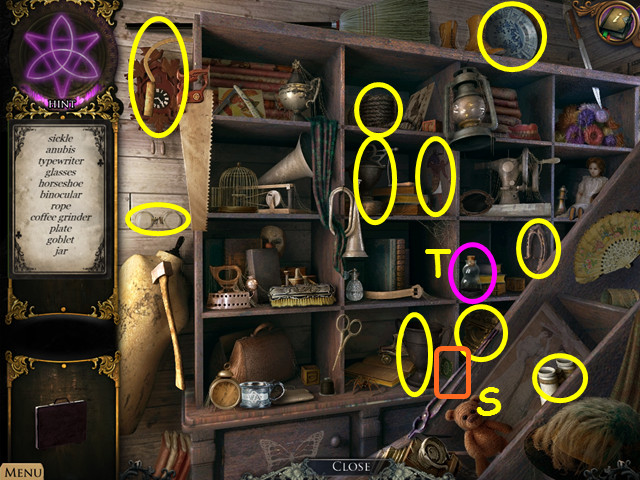
- Click on the HOS.
- Click on the CARD in the lower center, next to the goblet (S).
- Find the listed items to acquire the JAR (T).
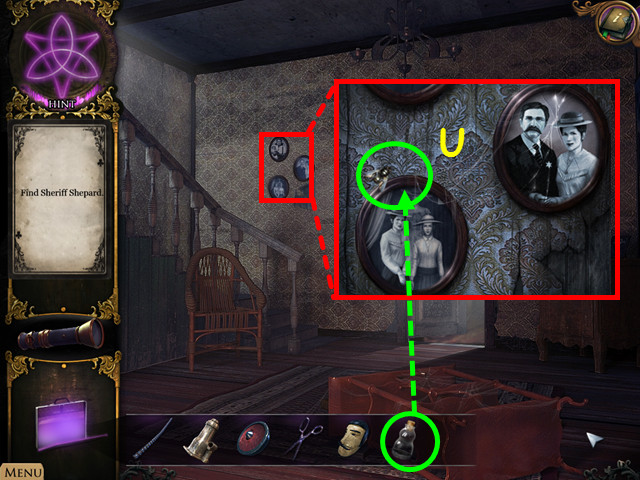
- Go through the left door.
- Zoom into the pictures; put the JAR over the FLY to create the JAR WITH FLY (U).
- Go back outside to the broken carriage area and head right.
- Zoom into the tree hollow for a HOS.
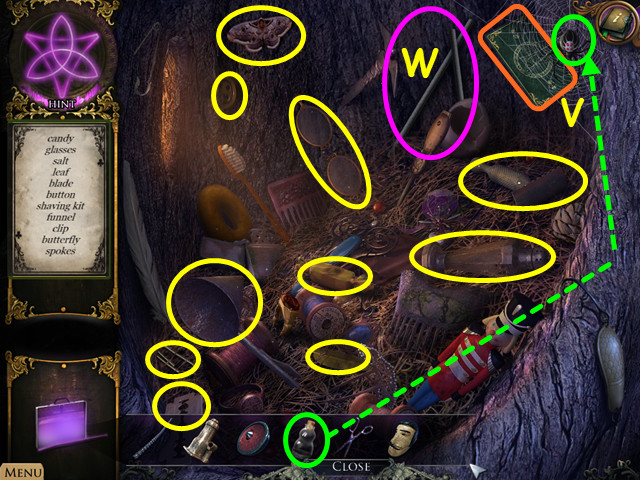
- Put the JAR WITH FLY on the spider and take the CARD (V).
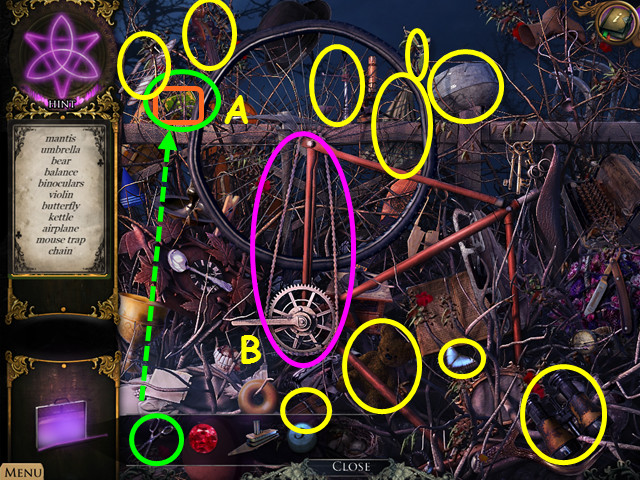
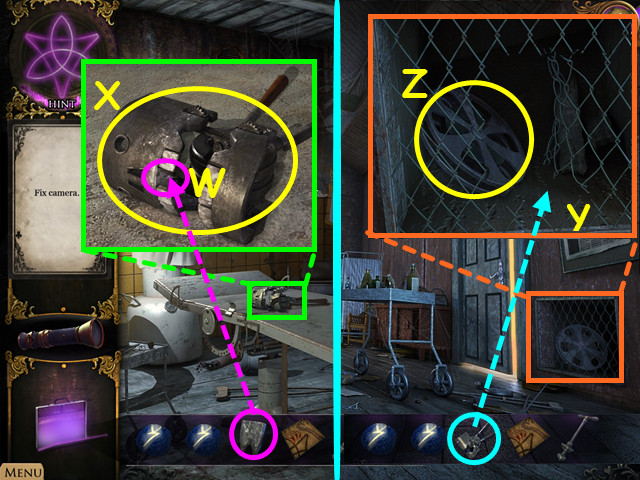
- Find the listed items to acquire the SPOKES (W).
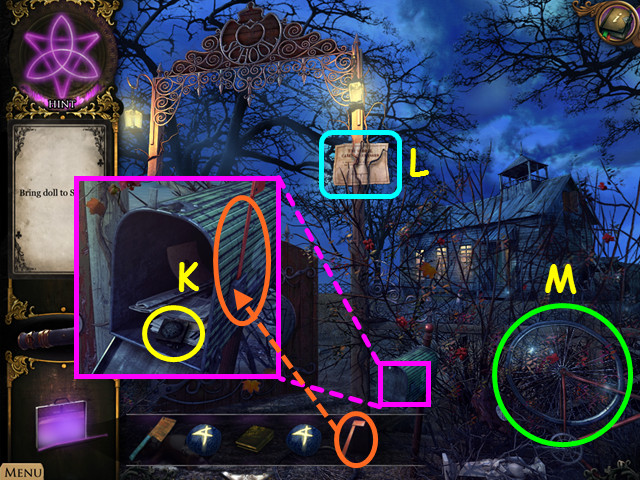
- Go forward.
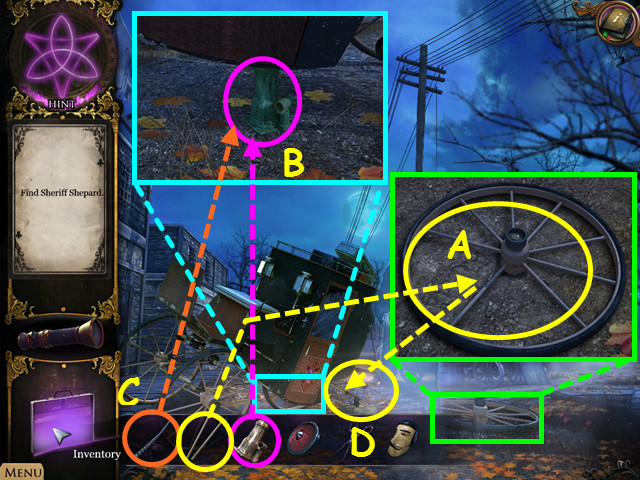
- Zoom into the wheel; put the SPOKES on it and take the WHEEL (A).
- Click on the carriage; place the SCREW-JACK on the ground (B).
- Put the ROD on the screw-jack (C).
- Put the WHEEL on the carriage (D).
- Click on the carriage to access a puzzle.
- To solve the puzzle click on the pieces in this order: E, E, F, F, F, G, G (H will turn with G).
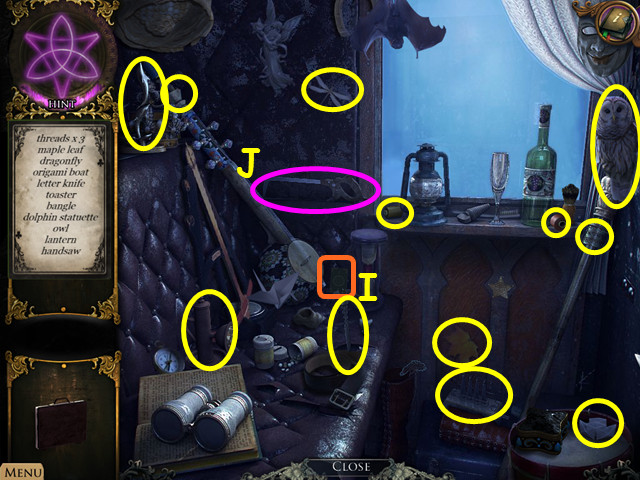
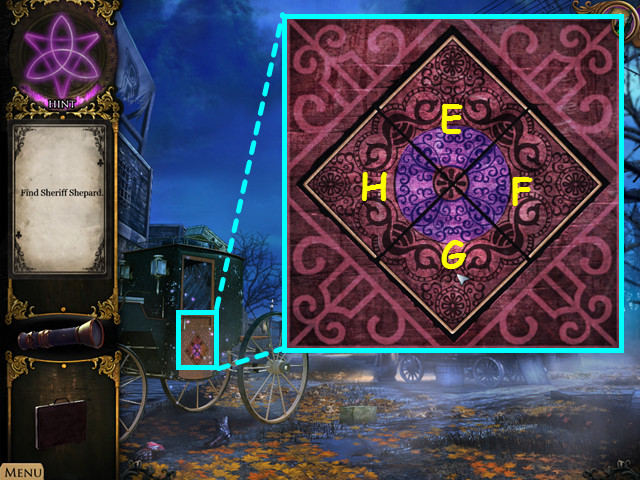
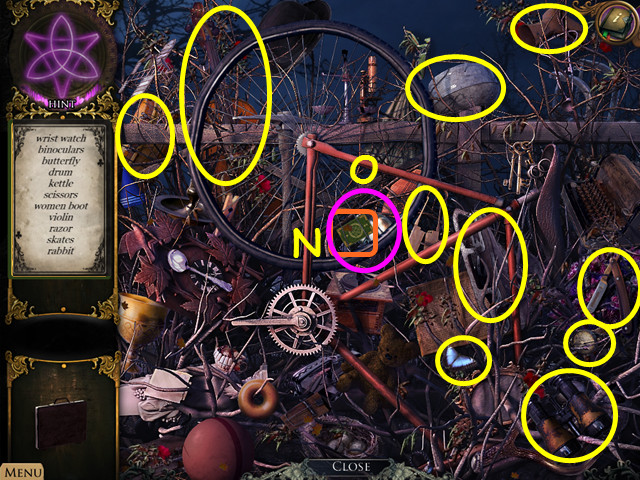
- Enter the carriage for a HOS.
- This mini-game is randomly generated, your solution may vary.
- E turns E and F, F turn F and G, while G turns G and H, and H turns only H.
- Our solution was to click on the pieces in this order: E, E, E, G, G, G, H, and H.
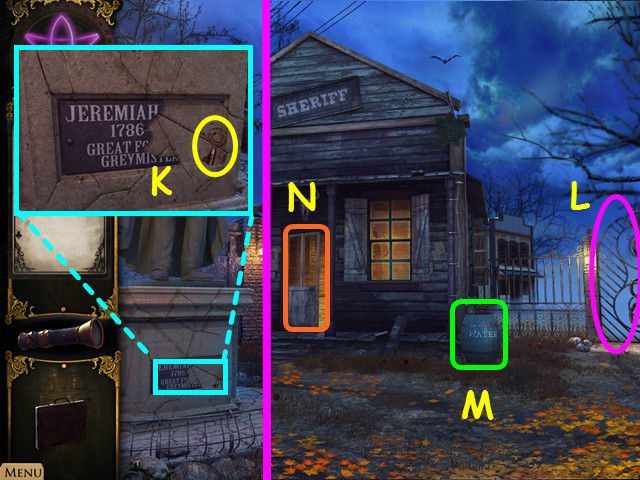
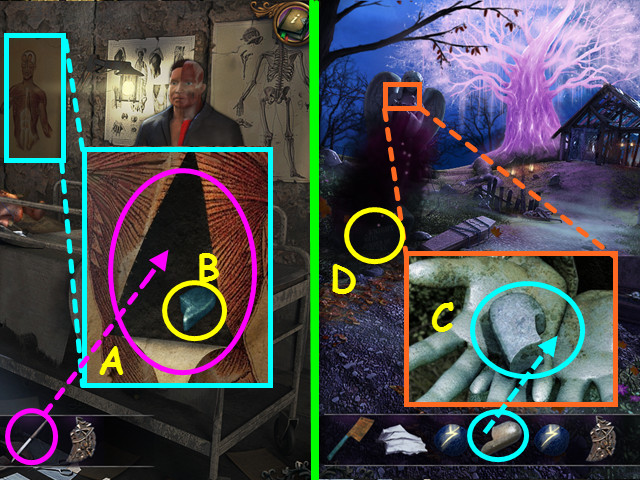
- Examine the base of the statue; take the CHEST KEY (K).
- Go towards the sheriff's department.
- Look closely the gate (L) and the barrel (M).
- Enter into the sheriff's department (N).
- Talk to the sheriff (O).
- Examine the window; take the JEWELRY BOX MEDALLION (P) and click on the flower vase (Q).
- Examine the rifle; cut the straps with the SCISSORS and take the RIFLE (R).
- Examine the board (S).
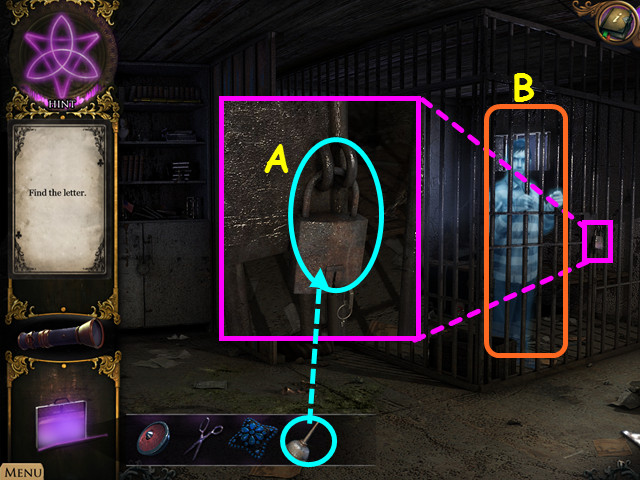
- Zoom into the cell door; use the RIFLE on the lock and go through the door (T).
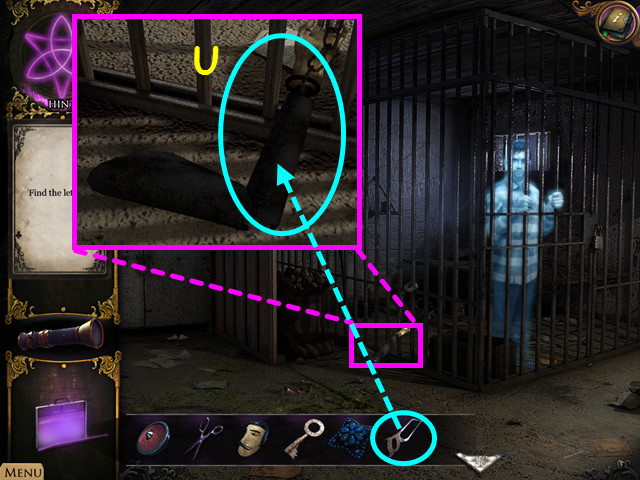
- Talk to the prisoner.
- Examine the dummy's arm; use the HANDSAW on it and take the DUMMY'S ARM (U).
- Click down 5 times.
- Put the DUMMY'S HEAD and the DUMMY'S ARM on the dummy (V).
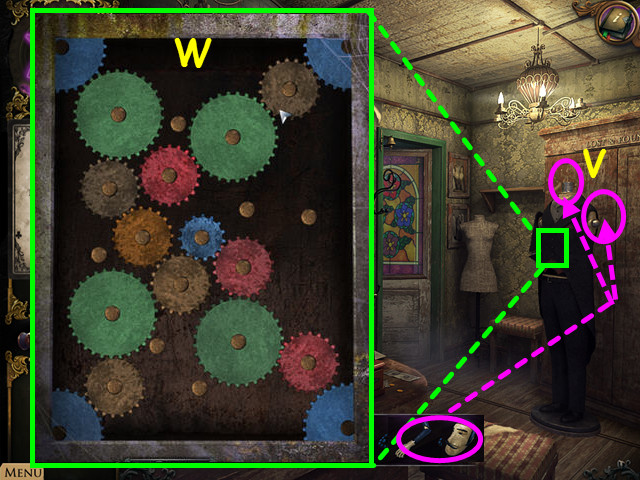
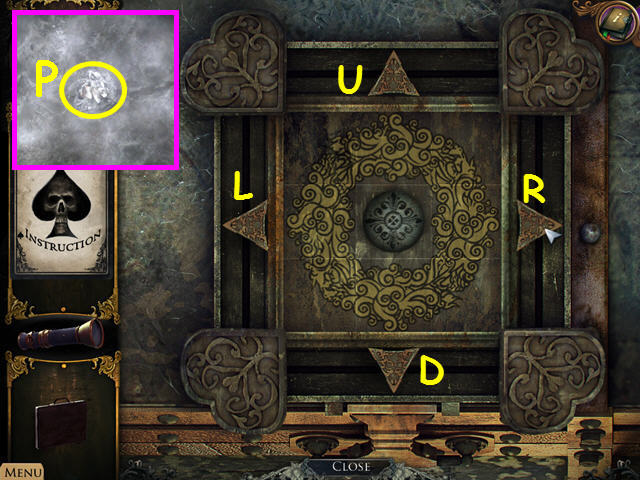
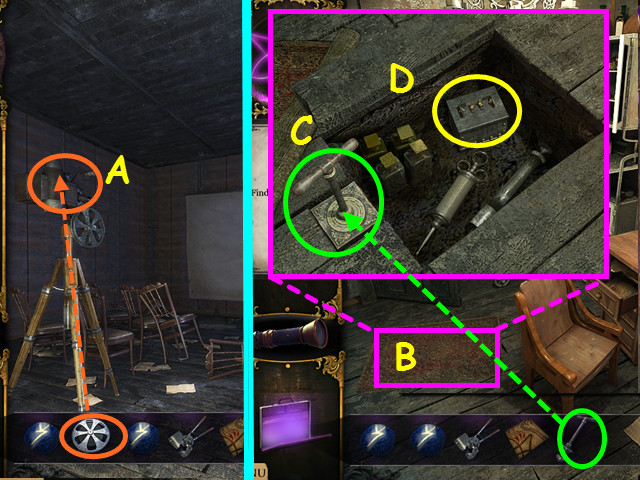
- Zoom into the dummy to activate a puzzle.
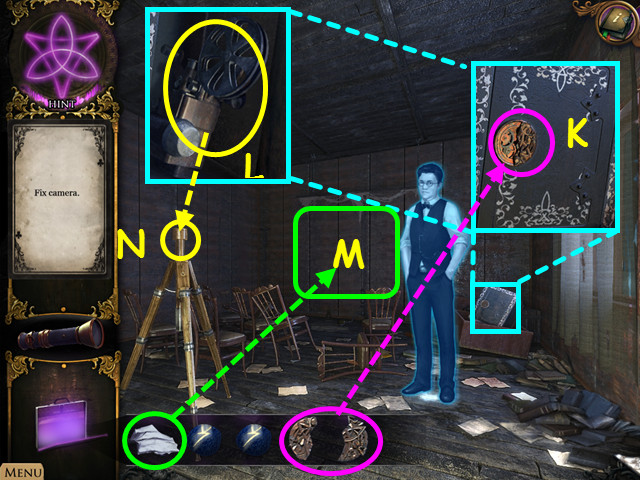
- Arrange the gears so they are all connected to the large blue pieces as shown in the screenshot (W).

- The dummy will open the closet once the puzzle has been solved; zoom into it.
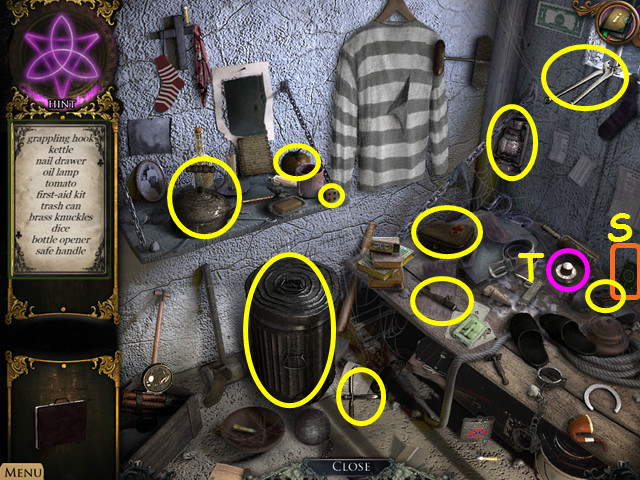
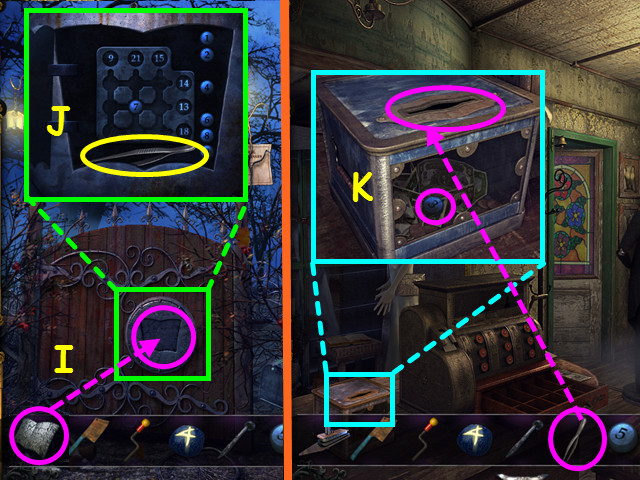
- Examine the box; use the CHEST KEY on the lock and take the CARD (X).
- Find the listed items to acquire the OIL CAN (Y).
- Return to the jail cell.
- Zoom into the lock; use the OIL CAN on it and click on the key to unlock the cell (A).
- Click on the holding cell for a HOS (B).
- Use the SCISSORS on the poster; take the CARD (C).
- Find the listed items to acquire the 2/2 BUTTON (D).
- Return to the dressmaker's shop.
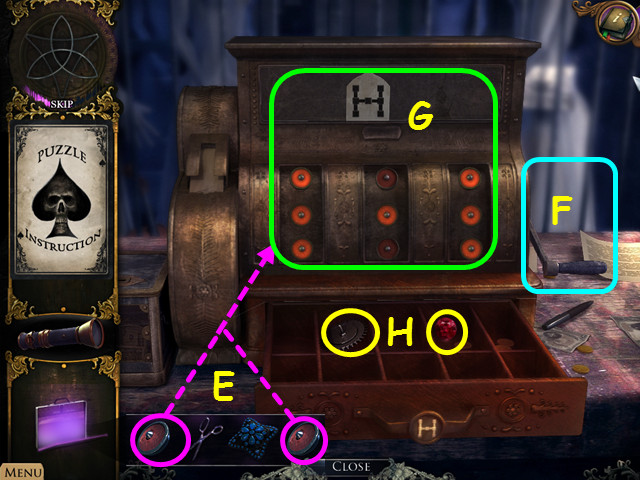
- Zoom into the cash register and put the 2 BUTTONS on it (E) to activate a puzzle.
- Click on the buttons to form an 'H' pattern on the card. Once you have the correct pattern, click on the handle (F) to open the cash register.
- Please look at the screenshot for the solution (G).
- Take the RUBY EYE and the GEAR (H).
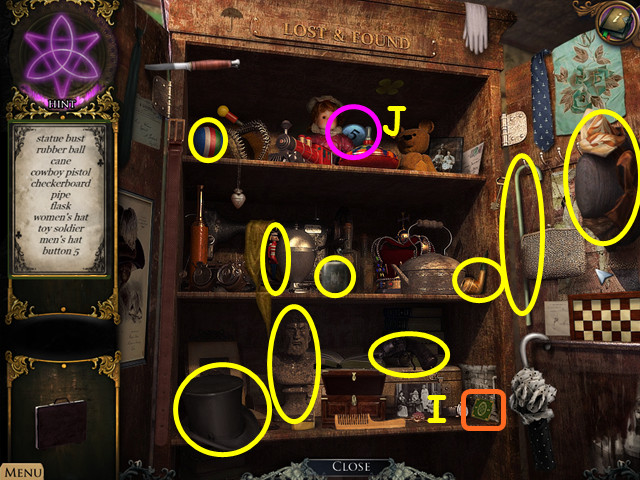
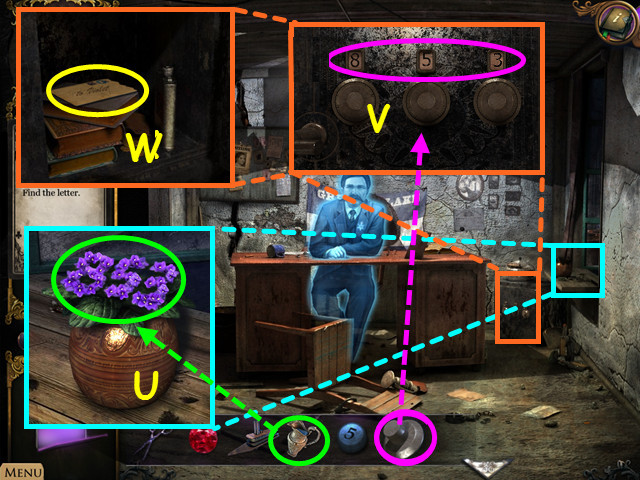
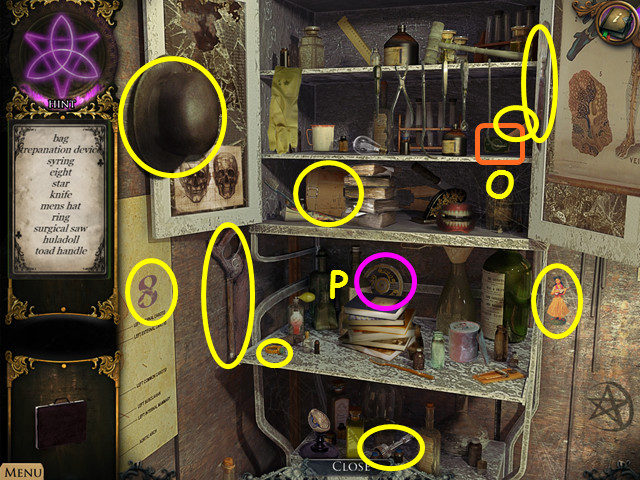
- Zoom into the cabinet for a HOS.
- Click on the CARD (I) in the lower right.
- Find the listed items to acquire the 1/2 PUZZLE PIECE (J).
- Click down; go up the steps, and forward twice.
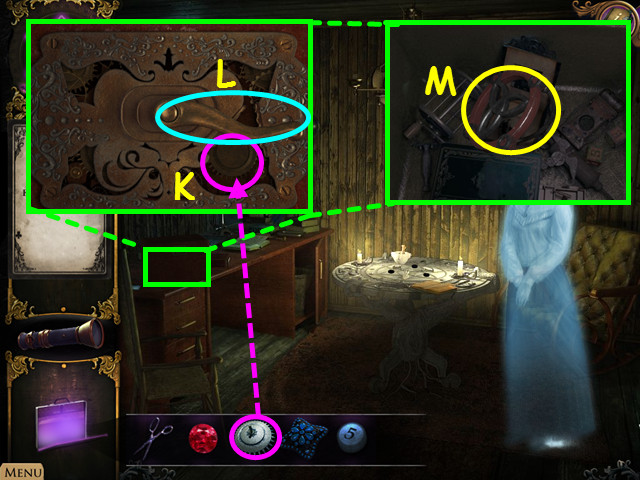
- Zoom into the box and put the GEAR on it (K).
- Click on the handle (L).
- Zoom into the box and take the STRANGE DEVICE (M).
- Return to the carriage; click on it to access a HOS.
- Place the JEWELRY BOX MEDALLION on the jeweled box then take the CARD (N).
- Find the listed items to acquire the PITCHER (O).
- Go forward and head towards the sheriff's dept.
- Examine the barrel; put the STRANGE DEVICE on the lock (P) and take the TOY BOAT (Q).
- Put the PITCHER in the water to create the PITCHER WITH WATER (R).
- Return to the holding cell for a HOS.
- Click on the CARD (S) on the bench.
- Find the listed items to acquire the SAFE HANDLE (T).
- Click down.
- Zoom into the window; water the plants with the PITCHER WITH WATER (U).
- The flowers form the number '853'.
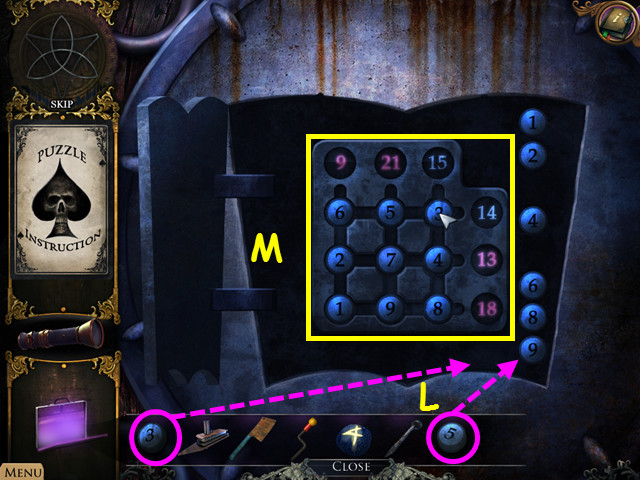
- Zoom into the safe; put the SAFE HANDLE on it (V).
- Change the numbers to 853.
- Examine the safe and take the SHERIFF'S LETTER (W).
- Click down 5 times; go up the steps and forward twice.
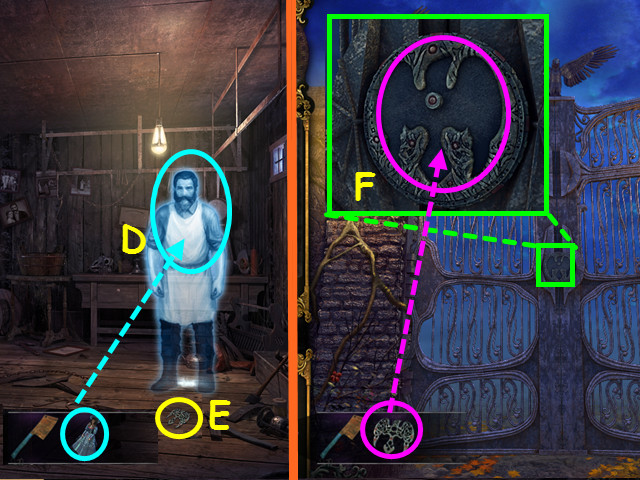
- Give the SHERIFF'S LETTER to the ghost (X).
- Take the SNAKE KEY on the ground (Y).
- Return to the outside of the sheriff's dept.
- Head towards the right gate; examine the lock and use the SNAKE KEY on it (Z).
- Go through the gate.
Chapter 2: The Butcher's Daughter
- Click on the man.
- Go forward.
- Click on the wheel to access a HOS.
- Cut the bushes in the upper left with the SCISSORS and click on the CARD (A).
- Find the listed items to acquire the CHAIN (B).
- Click down and go into the butcher's door.
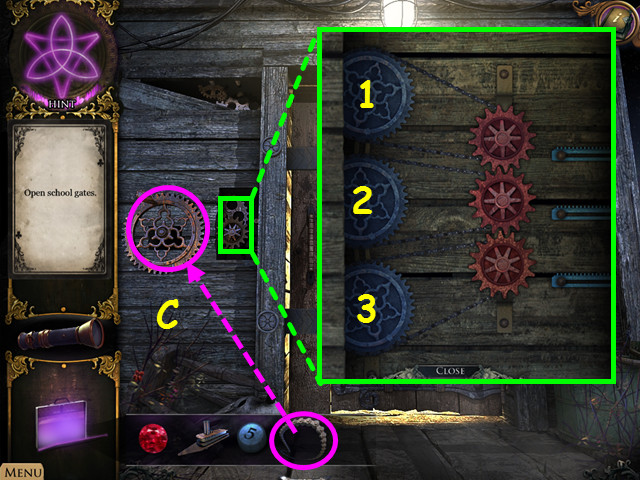
- Put the CHAIN on the mechanism on the left (C).
- Click on the mechanism to activate a puzzle.
- Click on the left gears in the correct order to unlock the door.
- To solve the puzzle, click on the gears in this order: 1, 2, 1, 3, and 2.
- Go through the door.
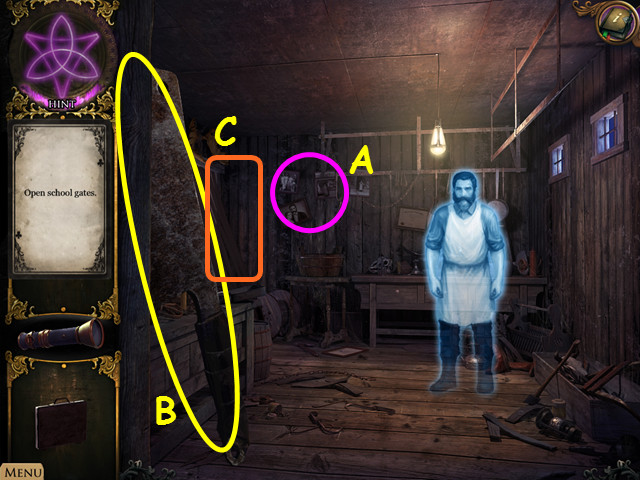
- Examine the photo (A).
- Take the CLEAVER (B).
- Head left into the finishing room (C).
- Shine the FLASHLIGHT on the creepy shadow; take the RUNE STONE (D).
- Examine the freezer; take the HANDLE (E).
- Zoom into the cloth and take the STAKE (F).
- Click on the butcher desktop HOS.
- Put the RUBY EYE on the mask to get the CARD (G).
- Find the listed items to acquire the STONE BOOK (H).
- Exit the butcher's house and go forward.
- Put the STONE BOOK on the gate (I).
- Examine the gate; take the PINCERS (J).
- Click down until you enter the shop.
- Zoom into the box; use the PINCERS to retrieve the 2/2 PUZZLE PIECE (K).
- Return to the school gate.
- Zoom into the gate and put the 2 PUZZLE PIECES on the board to activate a puzzle (L).
- Arrange the numbers so they match the amount on the edges.
- The number 7 is locked in; use that as your guide.
- Please look at the screenshot for the solution (M). First Row: 6, 5, 3 - Second Row: 2, 7, 4 - Third Row: 1, 9, 8.
- Go through the gates.
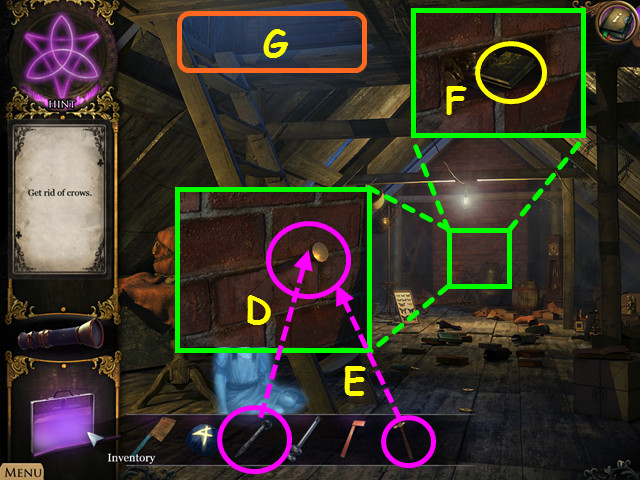
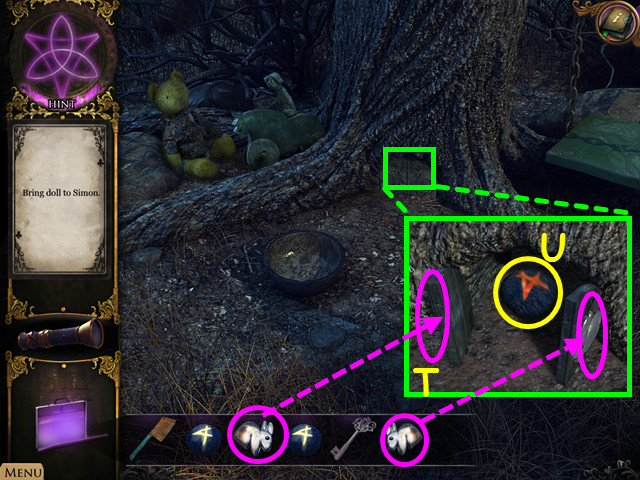
- Zoom into the big tree; take the PAPER and the ENTER BUTTON (N).
- Examine the bottom of the tree; 2 rabbits are needed (O).
- Click down and go inside the school.
- Give the TOY BOAT to the little boy (P).
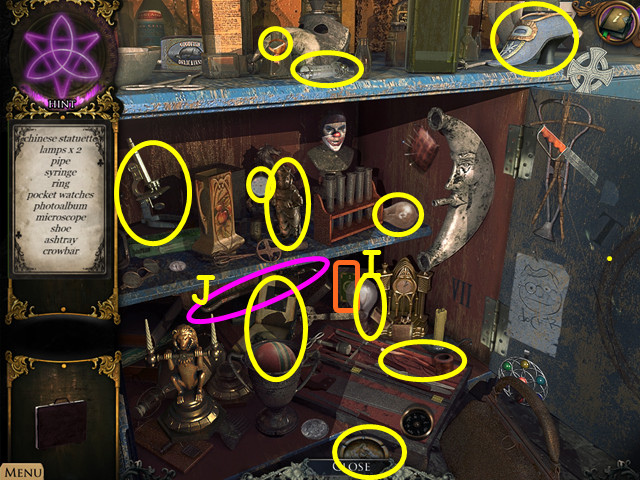
- Examine the shelf HOS.
- Put the HANDLE on the jack-in-the box and take the CARD (Q).
- Find the items listed to acquire the MAILBOX FLAG (R).
- Click down.
- Head left into the classroom.
- Click on the window to activate a tic-tac-toe game (S).
- Click on an empty spot to enter the 'X'.
- Win 3 rounds to complete the game.
- You will earn the GARRET KEY.
- The message: 'crows fear bells' appears on the blackboard (T).
- Examine the copybook; put the PAPER on it (U).
- The word 'CAT' appears in the paper.
- Exit the schoolroom.
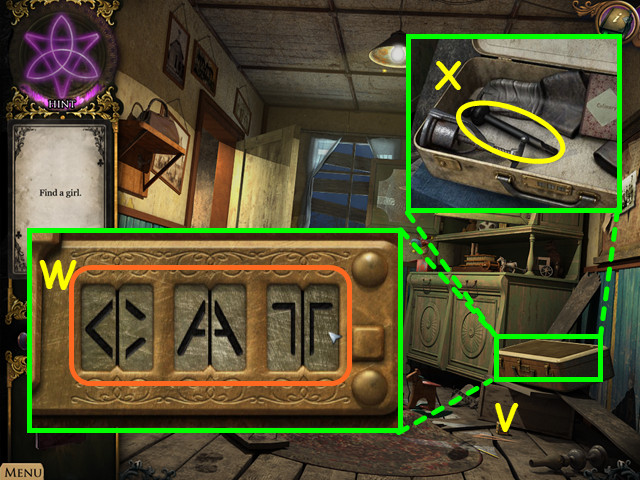
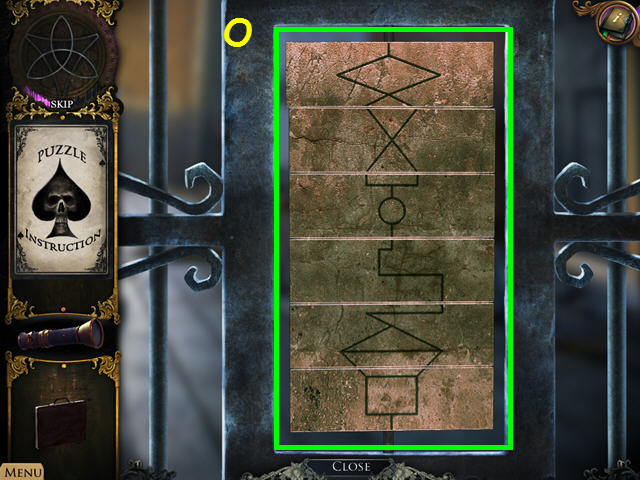
- Zoom into the suitcase to activate a puzzle (V).
- Using the clue in the copy book, spell out the word CAT with the symbols.
- Please look at the screenshot for the solution (W).
- Zoom into the opened suitcase; take the BELL CLAPPER (X).
- Exit the school.
- Examine the garret in the upper right; use the GARRET KEY in the lock (Y).
- Go through the window.
- Click on the ghost.
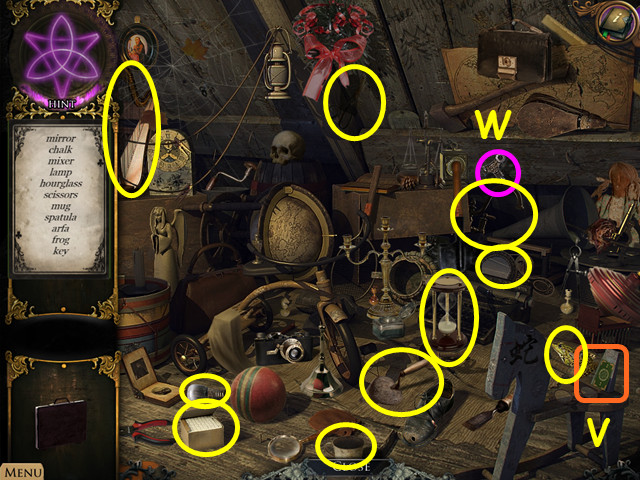
- Examine the mess HOS on the right.
- Zoom into the typewriter; put the ENTER BUTTON on the keyboard (A).
- Click on the button and take the CARD (B).
- Find the listed items to acquire the HAMMER (C).
- Zoom into the brick wall; put the STAKE on the wall (D).
- Use the HAMMER on the stake (E) and take FREEZER PIECE 2 (F).
- Go up to the bell (G).
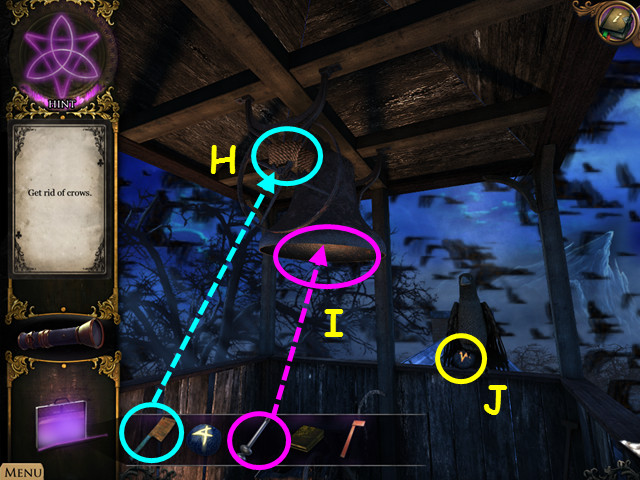
- Cut the ROPE with the CLEAVER (H).
- Put the BELL CLAPPER in the bell (I).
- Click on the bell to scare away the crow; take the RUNE STONE (J).
- Click down and talk to the ghost.
- Click down twice.
- Zoom into the mailbox; put the MAILBOX FLAG on it and take the FREEZER PIECE 1 (K).
- Read the notice (L).
- Select the bicycle for a HOS (M).
- Take the CARD (N) in the center.
- Find the listed items to acquire the 1/2 RABBIT (O).
- Go into the Butcher's finishing room.
- Examine the freezer on the left; put the 2 FREEZER BUTTONS on it to activate a puzzle.
- Assemble the puzzle by clicking on the arrows.
- This mini-game is randomly generated, your solution may vary.
- Our solution was: U, R, D, D, L, U, R, D, L, L, U, R, R, D, D, L, D, D, R, U, L, L, D, R, D, L, D, D, R, and U.
- Open the chest and take the FROZEN RABBIT (P).
- Return the classroom.
- Zoom into the stove and put the FROZEN RABBIT on it to acquire the 2/2 RABBIT (Q).
- Click down.
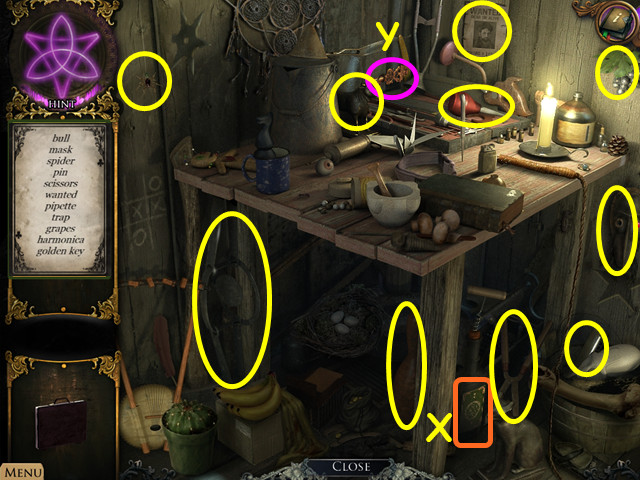
- Play the shelf HOS.
- Click on the CARD (R) in the lower center.
- Find the listed items to acquire the KEY (S).
- Click down and zoom into the big tree.
- Zoom into the rabbit home; put the 2 RABBITS in the slots on the doors (T).
- Take the RUNE STONE (U).
- Return to the garret.
- Play the mess HOS.
- Click on the CARD (V) in the lower right.
- Find the listed items to acquire the 2nd KEY (W).
- Return to the Butcher's finishing room.
- Play the butcher desktop HOS.
- Click on the CARD (X) in the lower center.
- Find the listed items to acquire the GOLDEN KEY (Y).
- Return to the garret.
- Zoom into the cage; use the GOLDEN KEY and the 2 KEYS on the 3 locks (A).
- Put the 3 RUNE STONES on the circles (B) and take the DOLL (C).
- Go back to the butcher's house.
- Give the DOLL to the ghost (D).
- Take the RAVEN KEY on the ground (E).
- Click down 3 times and head towards the gate on the left.
- Examine the gate and put the RAVEN KEY in the keyhole (F).
- Go through the gates.
Chapter 3: The Undertaker
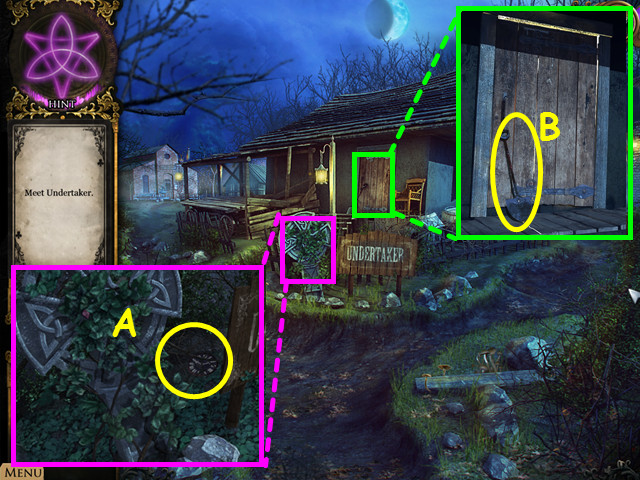
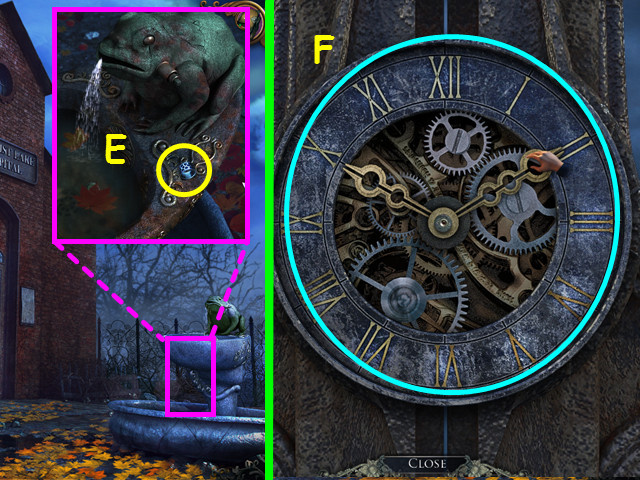
- Zoom into the tombstone; take the DIAL (A).
- Examine the door; take the SHOVEL (B).
- Go through the door.
- Notice all the clocks are set to 10:10.
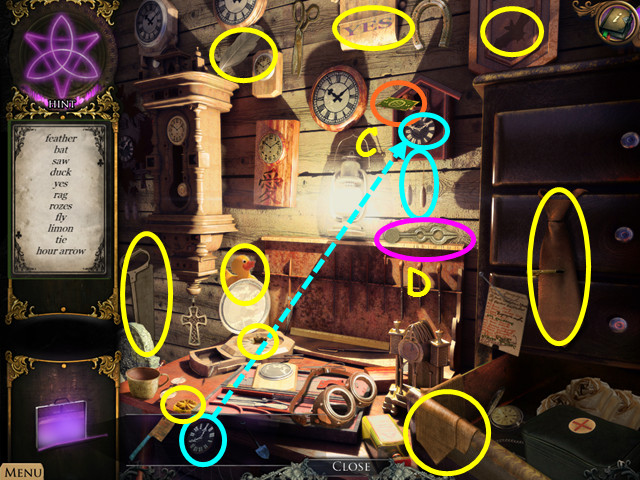
- Click on the desk HOS.
- Put the DIAL on the clock; pull the chain and take the CARD (C).
- Find the listed items to acquire the CLOCK HANDS (D).
- Click down and head left.
- Examine the fountain; take the RING (E).
- Click down twice.
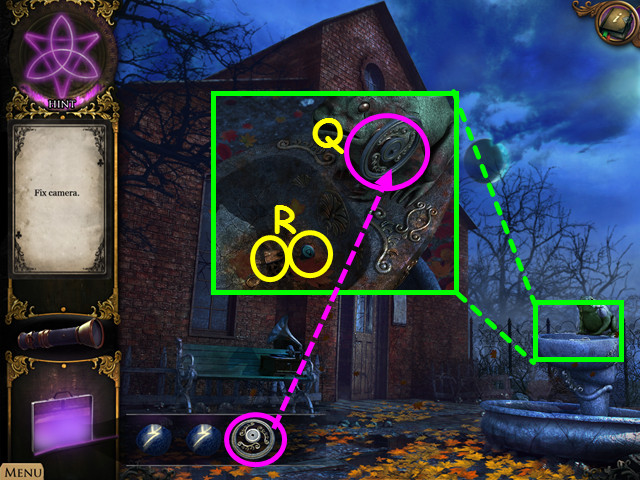
- Examine the gate and put the CLOCK HANDS on the clock face to activate a puzzle.
- Change the time to the same time all the clocks are set inside the house which is 10:10 (F).
- Go through the gates to access the cemetery.
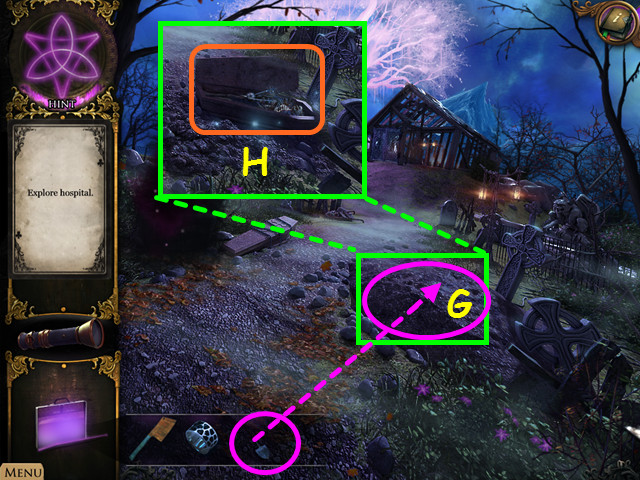
- Use the SHOVEL on the mound of dirt (G); open the casket to trigger a HOS (H).
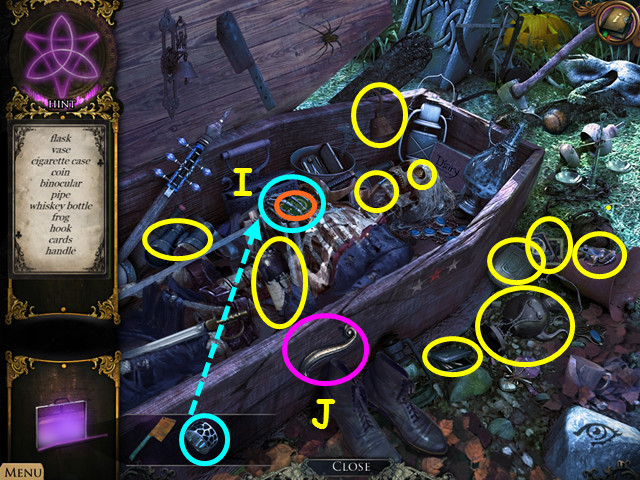
- Put the RING on the skeleton's hand and take the CARD (I).
- Find the listed items to acquire the HANDLE (J).
- Click down and head left.
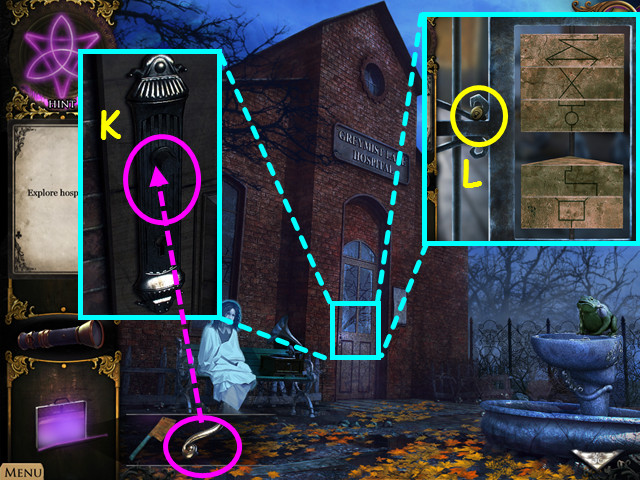
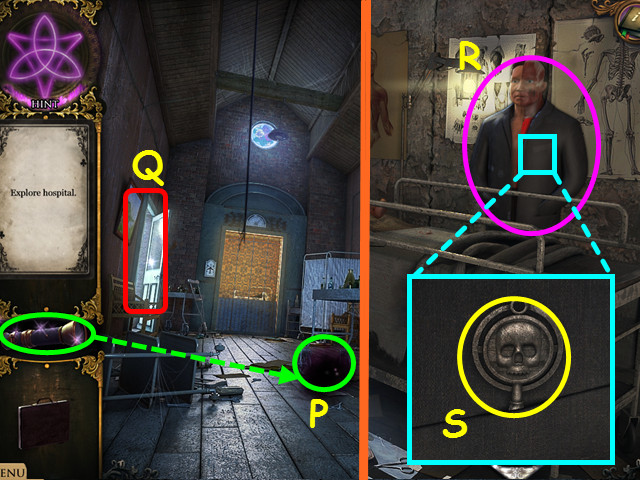
- Zoom into the hospital door; put the HANDLE on the door (K).
- Look at the door again and take the YELLOW PUZZLE PIECE (L).
- Click down, go right and head towards the building.
- Zoom into the lock; click on it to activate a puzzle.
- Put the YELLOW PUZZLE PIECE on the lock.
- Put the chips with symbols on them in the center in opposite ends of the lock (M).
- Click on the numbered locations in this order: 4-5-2-1-4.
- Take the PUZZLE PIECE (N).
- Return to the hospital area.
- Zoom into the door; put the PUZZLE PIECE on the door to activate the puzzle.
- Click on the pieces to rotate the images.
- Please look at the screenshot for the solution (O).
- Enter the hospital.
- Shine the FLASHLIGHT on the creepy shadow; take the RUNE STONE (P).
- Go through the left door to access the operating room (Q).
- Click on the dummy (R).
- Click on him again and take the DOCTOR'S ROOM KEY (S).
- Click down and zoom into the right door.
- Use the DOCTOR'S ROOM KEY in the lock (T).
- Click on the handle and go through the door (U).
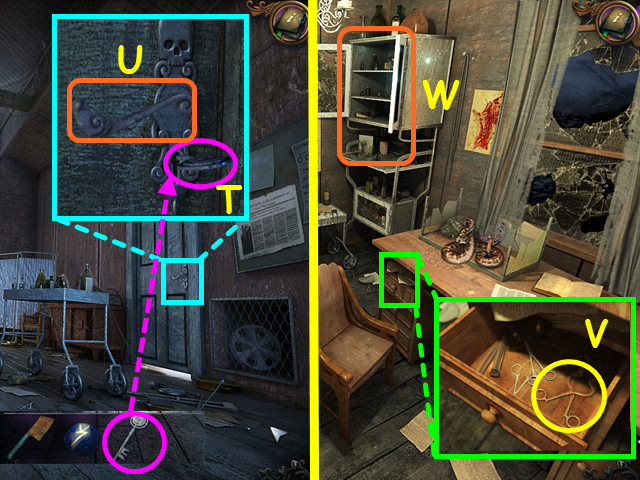
- Zoom into the drawer; open it, zoom into it and take the DENTAL FORCEPS (V).
- Click on the shelf HOS (W).
- Put the DENTAL FORCEPS on the dentures; take the CARD (X).
- Find the listed items to acquire the LIFT HANDLE (Y).
- Click down and click on the elevator.
- Put the LIFT HANDLE on the door (A).
- Click on the handle and enter the elevator.
- Take the HAND (B).
- Click on the handle and exit the elevator once it stops (C).
- Shine the FLASHLIGHT on the creepy shadow; take the RUNE STONE (D).
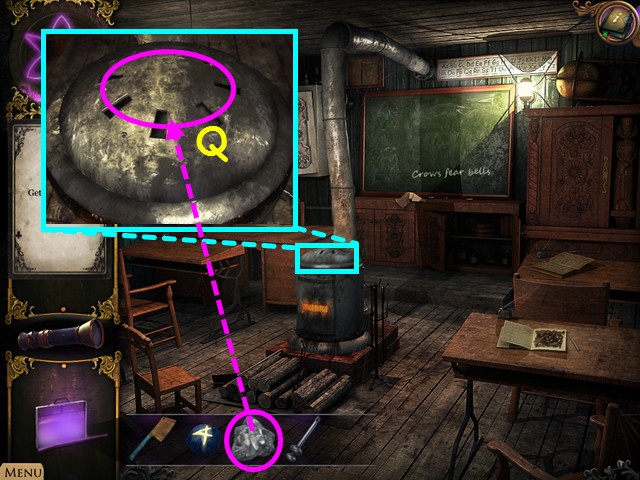
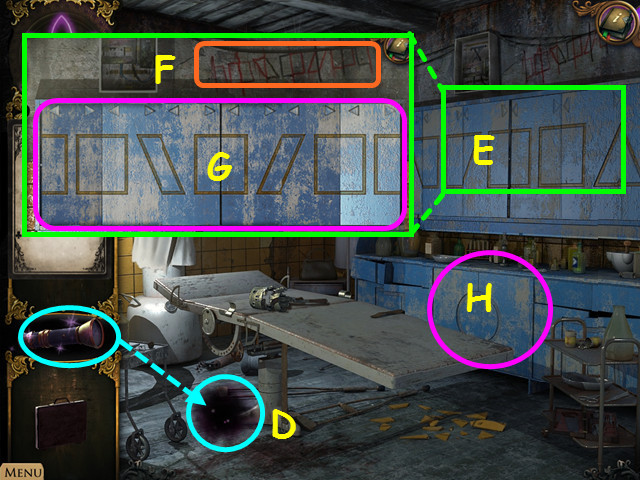
- Zoom into the cupboards in the back to activate a puzzle (E).
- Click on the arrows to move the panels.
- Place the panels in the correct order noted on the wall (F).
- Please look at the screenshot for the solution (G).
- Play the instrument shelf HOS (H).
- Click on the CARD (I) in the lower center (behind the light bulb).
- Find the listed items to obtain the CROWBAR (J).
- Go back into the elevator and click on the handle.
- Exit the elevator and go into the right door.
- Examine the snake on the table; put the HAND on the snake (K).
- Take KEY 1 (L).
- Use the CROWBAR on the door; go into the second doctor's room (M).
- Talk to the doctor.
- Return to the undertaker's house.
- Play the HOS on the desk.
- Click on the CARD (N) on the side of the large clock.
- Find the listed items to acquire the SCREWDRIVER (O).

- Return to the cemetery.
- Play the HOS in the coffin.
- Click on the CARD (P) in the lower center.
- Find the listed items to acquire the RECORD (Q).
- Return to the outside of the hospital.
- Zoom into the gramophone; put the RECORD on it (R).
- Take the CLOTH after the ghost leaves (S).
- Enter the hospital and take the elevator back downstairs.
- Zoom into the mechanical skeleton (T).
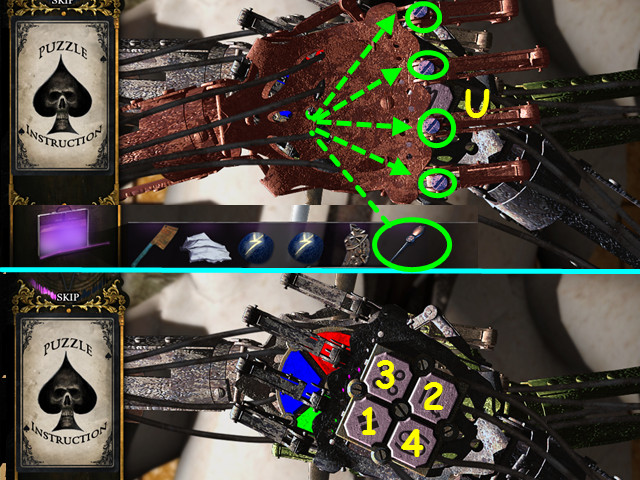
- Use the SCREWDRIVER to remove the 4 screws (U).
- Press the buttons in the correct order as shown in the screenshot (1-4).
- Next, click on the sections until they are all green (V).
- Lastly, click on the arrows until they all end up on the left side.
- To solve the puzzle, click on the arrows in numerical order (1 through 3).
- Take the SCALPEL (W).
- Go back to the operating room upstairs.
- Zoom into the poster and cut it with the SCALPEL (A).
- Take the HALF A HEART (B).
- Return to the cemetery.
- Zoom into the statue; put the HALF A HEART in her hand (C).
- Take the PLATE (D) at the bottom of the statue.
- Click down twice.
- Zoom into the statue base; put the PLATE on (E).
- Zoom into the statue's hand and take the GEM (F).
- Go through the gate.
- Zoom into the tombstone.
- Use the CLEAVER on the bushes (G); put the GEM in the hole (H).
- Take the GREEN PUZZLE PIECE (I).
- Go right and head towards the building.
- Put the GREEN PUZZLE PIECE on the lock.
- Slide the green piece to the position shown in the screenshot.
- Click on the numbered locations: 4-1-2-5-3-2-1-4.
- Take the KEY 2 (J).
- Return to the second doctor room in the hospital.
- Examine the safe; put KEY 1 and KEY 2 on the lock (K).
- Take the PROJECTOR (L).
- Put the CLOTH on the back wall (M).
- Put the PROJECTOR on the tripod (N).
- Click down.
- Play the shelf HOS.
- Take the CARD (O) on the second shelf.
- Find the listed items to obtain the FAUCET HANDLE (P).
- Go outside.
- Zoom into the fountain; put the FAUCET HANDLE on the faucet (Q).
- Take the BLUE PUZZLE PIECE and the TOOTH (R).
- Return to the building in the cemetery; zoom into it.
- Put the BLUE PUZZLE PIECE on the gate.
- Position the blue piece as shown in the screenshot (S).
- Click on the numbered locations in this order: 2-3-4-1-2-5-6-4-3.
- Take the CLOCK PART (T).
- Take the elevator in the hospital back downstairs.
- Play the HOS.
- Click on the CARD (U) on the device.
- Find the listed items to acquire the LEVER (V).
- Examine the head on the table; put the TOOTH in its mouth (W).
- Take the CLIPPERS (X).
- Take the elevator back up.
- Zoom into the grate in the lower right; cut the wires with the CLIPPERS (Y).
- Take the FILM REEL (Z).
- Go through the right door and then go through the back one.
- Put the FILM REEL in the projector (A).
- Click down.
- Pull back the carpet and zoom into it (B).
- Put the LEVER in the slot (C).
- Click on the lever and take the ACCUMULATOR (D).
- Go back to the operating room.
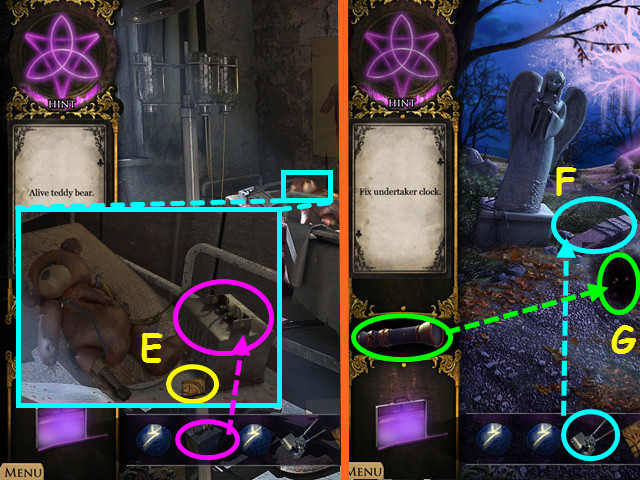
- Zoom into the teddy bear; put the ACCUMULATOR on it and take the CLOCK DETAIL 2 (E).
- Go back to the cemetery.
- Break the chains on the coffin with the CLIPPER to make the last rune stone fall out (F).
- Shine the FLASHLIGHT on the creepy shadow; take the RUNE STONE (G).
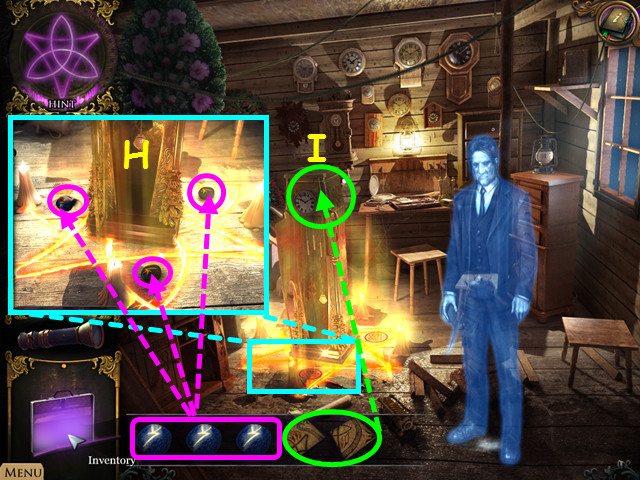
- Go back to the Undertaker's house.
- Zoom into the bottom of the clock; place the 3 RUNE STONES in the slots (H).
- Examine the top part of the clock; insert the CLOCK DETAIL 2 and the CLOCK PART into it to activate the puzzle (I).
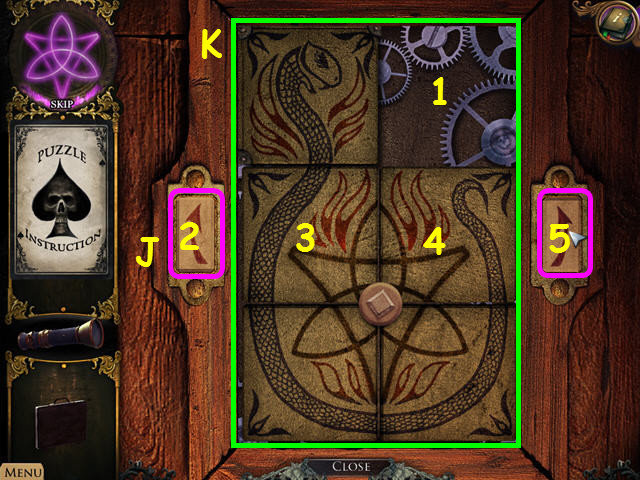
- The snake head cannot be moved.
- Use the arrows to rotate the puzzle (J).
- Click on the tiles to move them to an empty space.
- Click on the following locations to solve the puzzle: 5-4-3-2-1-5-4-3-2-1-5-4-3-2-1-5.
- Please look at the screenshot for the solution (K).
- Take the SPIDER KEY (L).
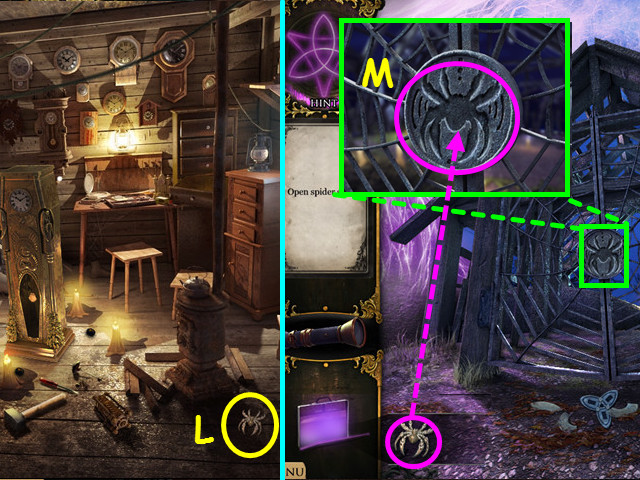
- Return to the building in the cemetery.
- Zoom into the gate and put the SPIDER KEY in the lock (M).
- Go forward.
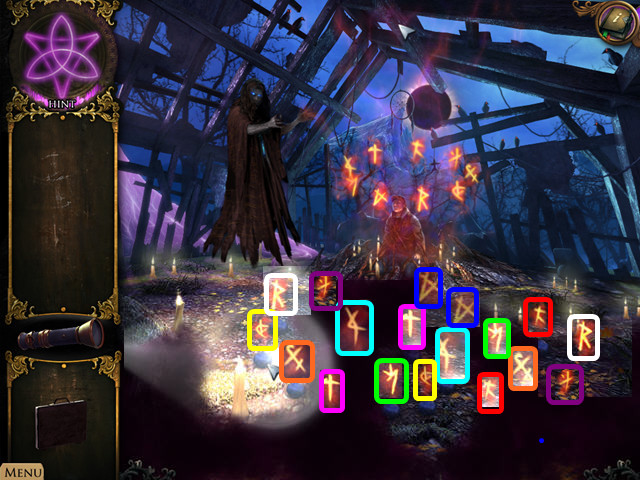
- Use the flashlight to see through the creepy shadow; click on ay two runes to reveal their symbols.
- Click on two matching symbols to eliminate them.
- Highlight a stone and then click on the hint to view its pair.
- Match all symbols to defeat the witch.
- Congratulations! You have completed Strange Cases: The Secrets of Grey Mist Lake Standard Edition!
Created at: 2012-01-17