
Walkthrough Menu
- General Tips
- Chapter 1: My Birthday
- Chapter 2: The Orphanage
- Chapter 3: Tea Party Lane
- Chapter 4: The Event Hall
- Chapter 5: The Amusement Park
General Tips
- This is the official guide for Surface: Alone in the Mist.
- This guide will not mention each time you have to zoom into a location; the screenshots will show each zoom scene.
- Hidden-object puzzles are referred to as HOPs. This guide will not show HOP solutions. It will identify the location of the HOP and the inventory item acquired.
- This guide will show solutions for non-random puzzles. Please read the in-game instructions for each puzzle.
Chapter 1: My Birthday
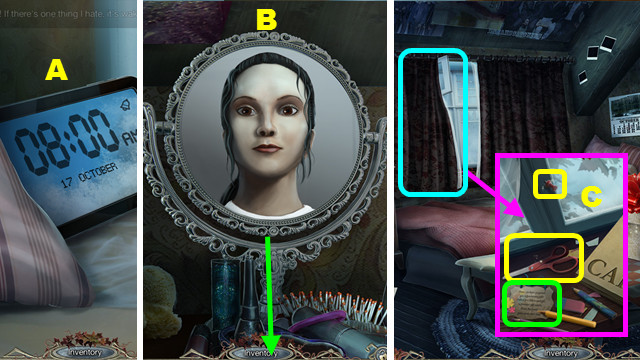
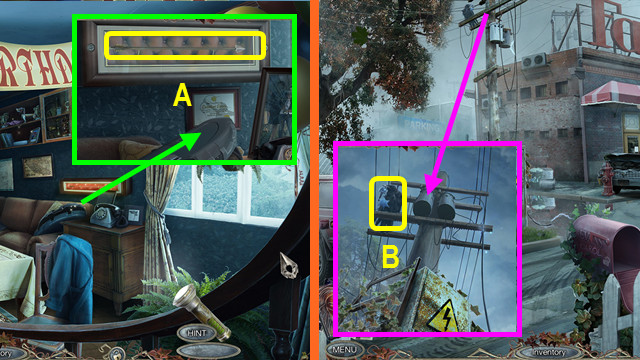
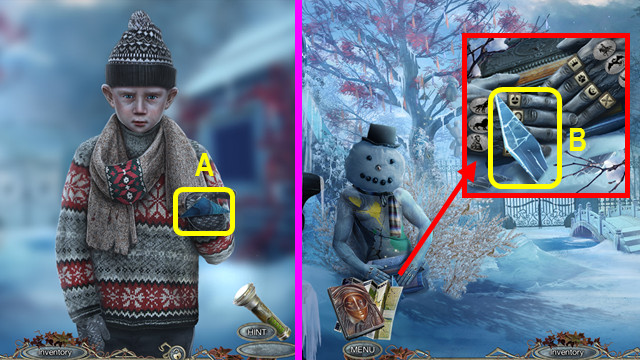
- Select the clock (A).
- Exit the mirror (B).
- Open the drapes and read the note; take the PUSH PIN and SCISSORS (C).
- Read the card; use the SCISSORS on the ribbon (D).
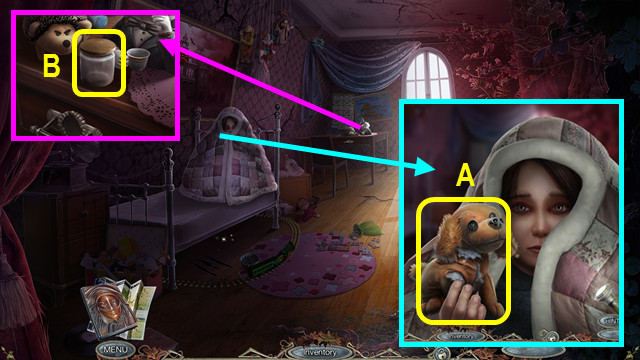
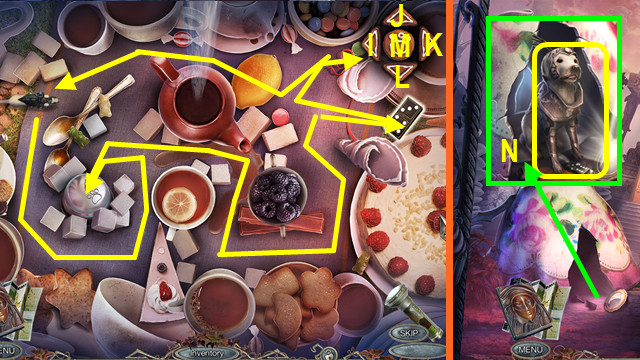
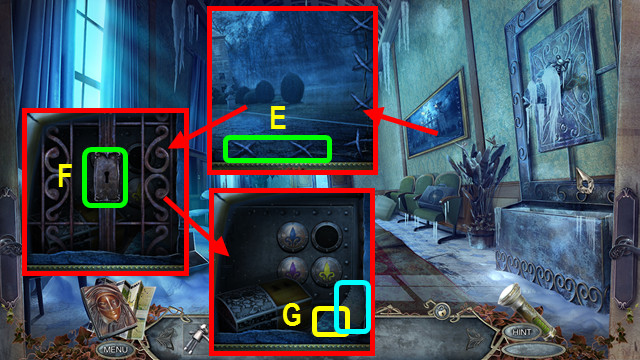
- Play the HOP; earn the TRUNK (E).
- Take the CLIP from the TRUNK (inventory).
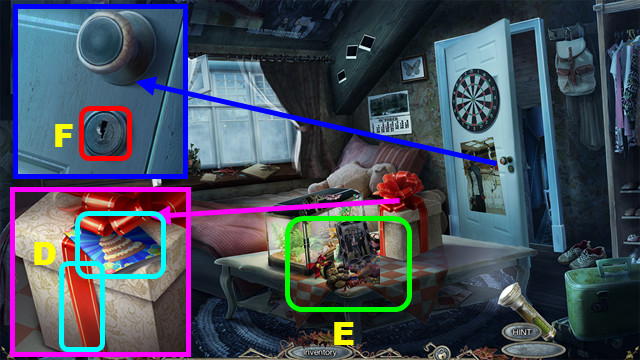
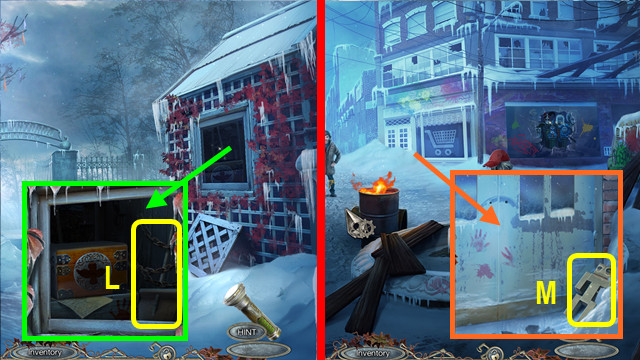
- Use the CLIP (F); walk forward.
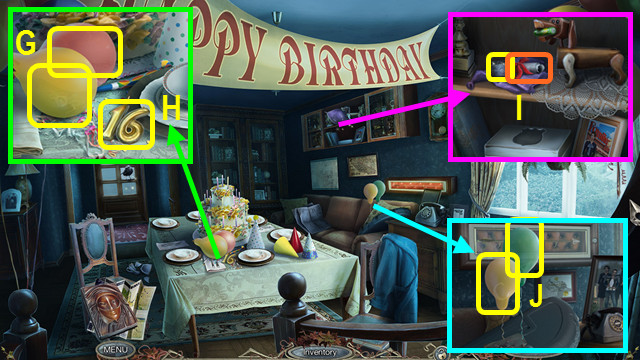
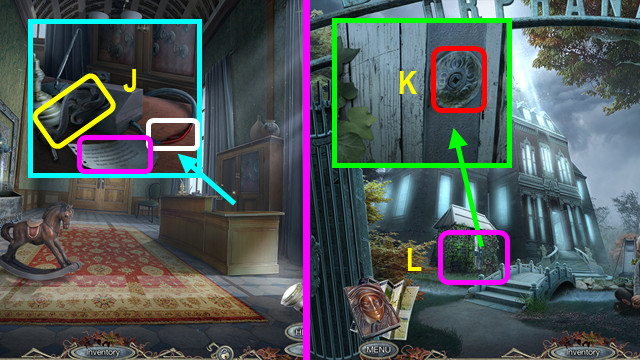
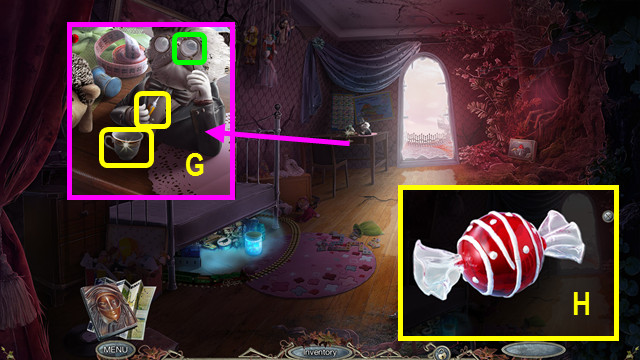
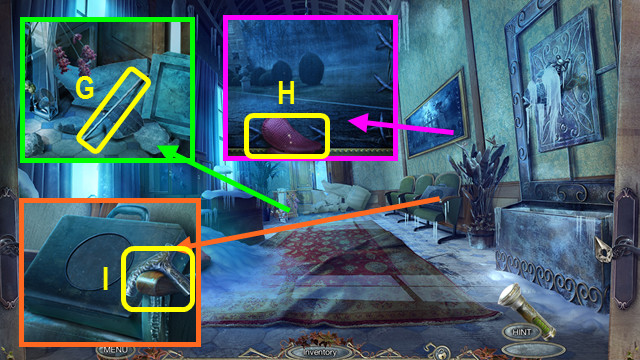
- Use the PUSH PIN 2x; earn the 1/5 and 2/5 LETTERS (G).
- Take the NUMBER 16 (H).
- Combine the TRUNK and NUMBER 16; take the CAMERA (inventory).
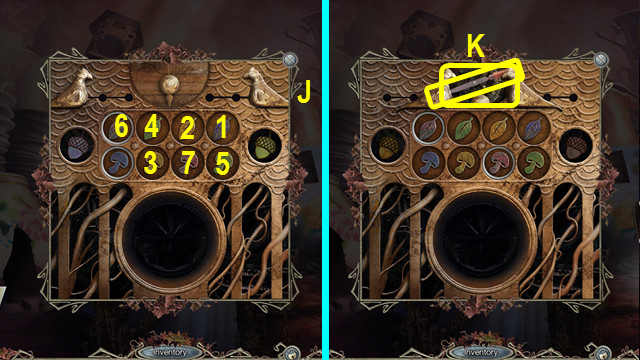
- Use the PUSH PIN; read the note and take the CODE REEL (I).
- Use the PUSH PIN 2x; earn the 3/5 and 4/5 LETTERS (J).
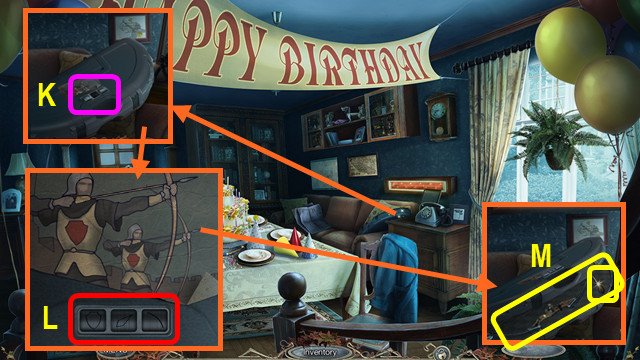
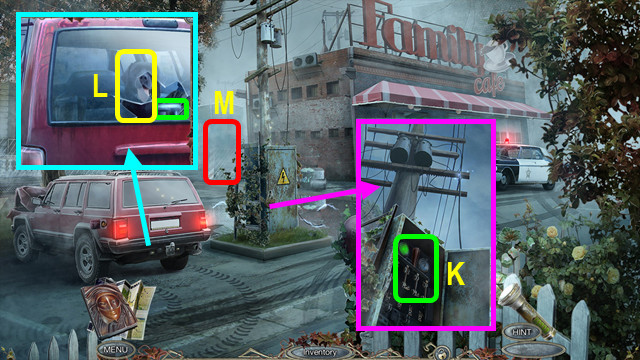
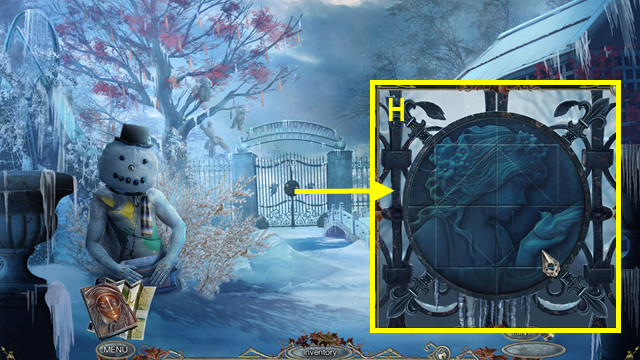
- Place the CODE REEL (K).
- Solution (L).
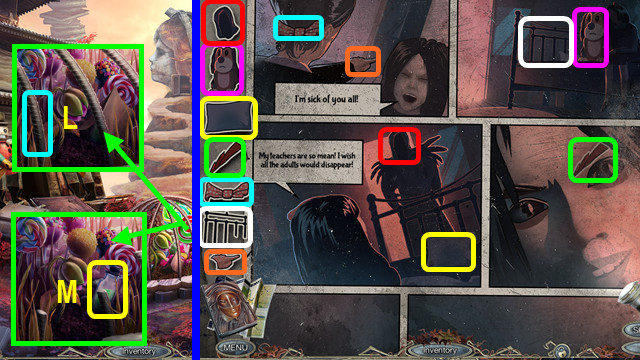
- Take the BOW and DOG TAIL (M).
- Talk to Mary.
- Walk forward.
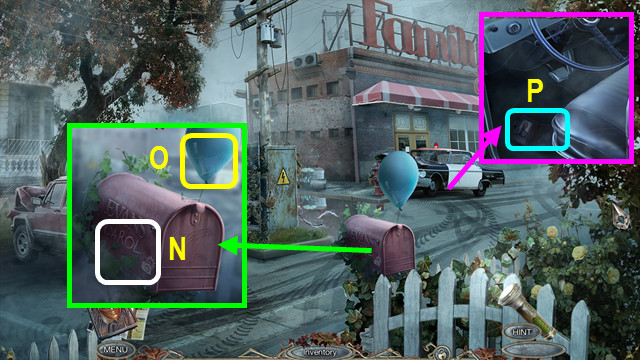
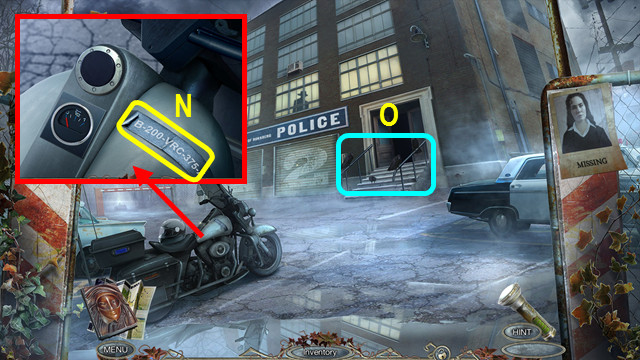
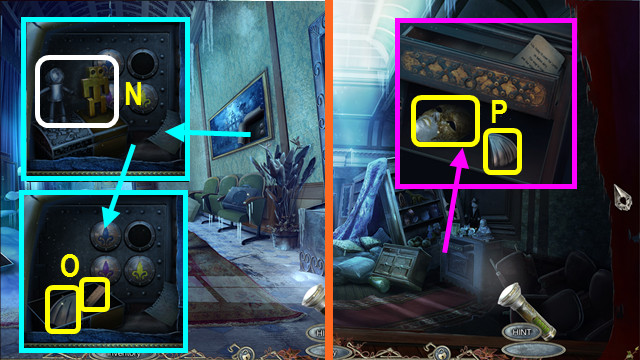
- Use the CAMERA (N); take the PHOTO.
- Use the PUSH PIN; earn the 5/5 LETTERS (O).
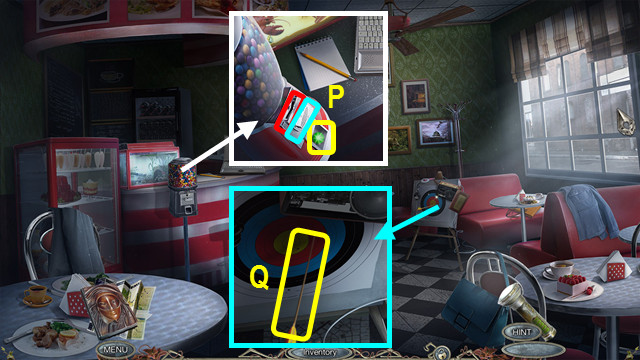
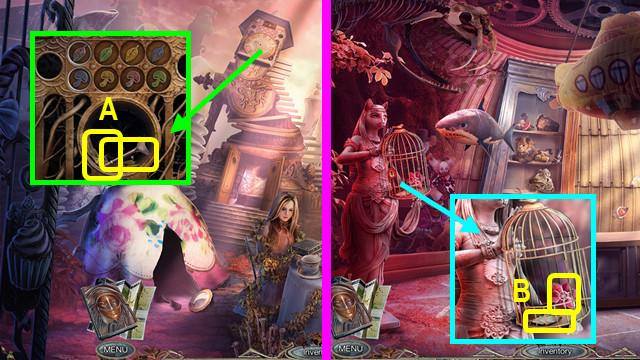
- Open the door; look at the wallet (P).
- Walk down 2x.
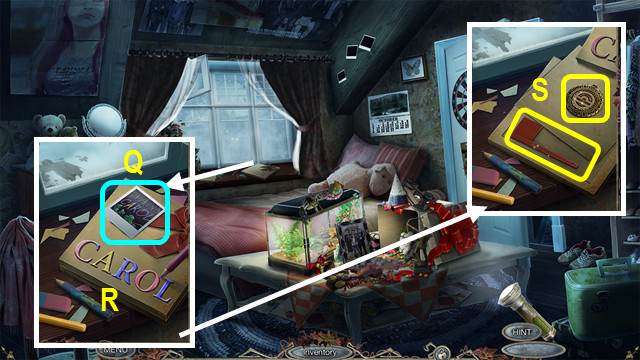
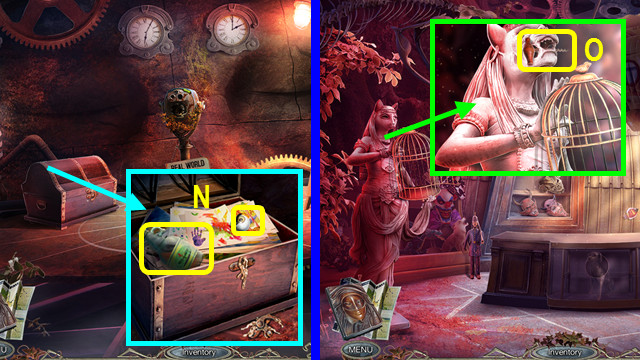
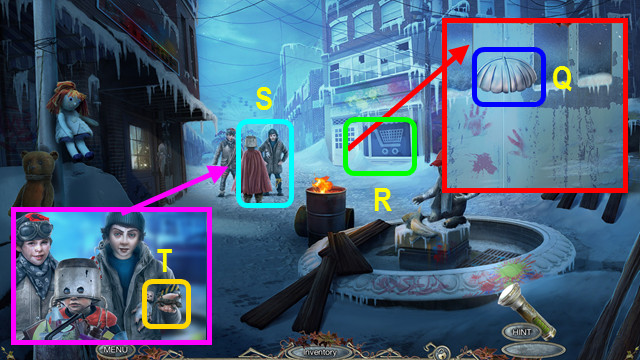
- Place the 5 LETTERS and PHOTO (Q).
- Solution (R).
- Take the GOLDEN PENDANT and FLAG (S).
- Walk forward.
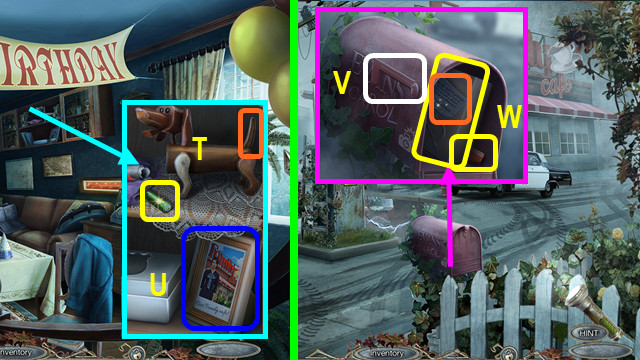
- Place the DOG TAIL; take the 1/2 BATTERY (T).
- Look at the photo (U).
- Walk forward.
- Place the FLAG; lower the flag (V).
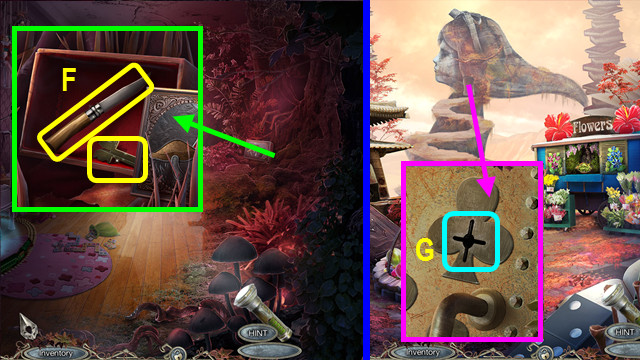
- Read the note; take the PARCEL and SCREWDRIVER (W).
- Combine the PARCEL and SCISSORS; take the WALL PICTURE (inventory).
- Walk down.
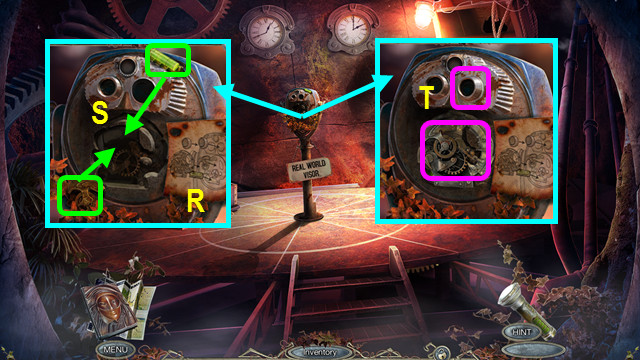
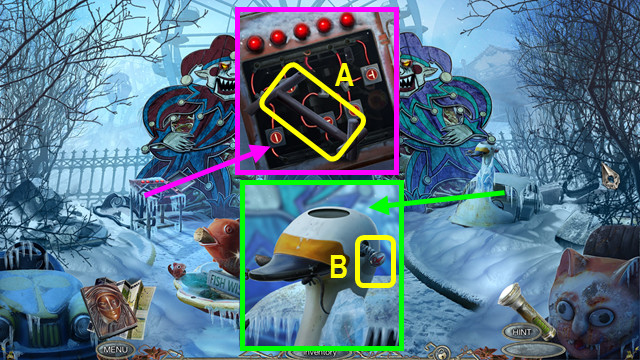
- Use the screwdriver; earn the ARROW (A).
- Combine the BOW and ARROW to make the BOWSTRING (inventory).
- Walk forward.
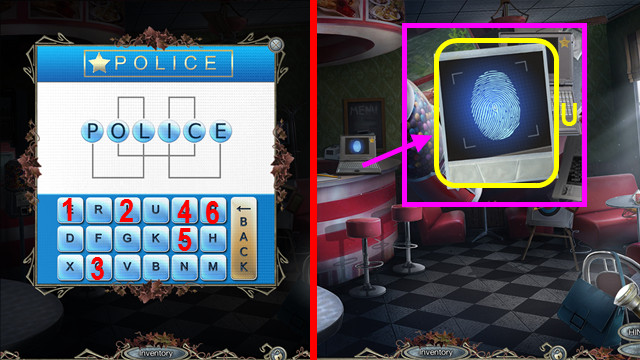
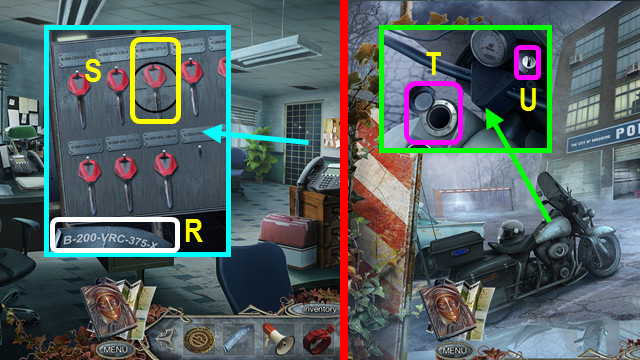
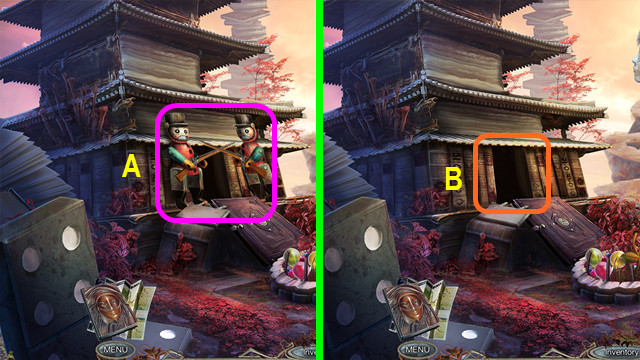
- Use the BOWSTRING; earn the POLICE KEYS (B).
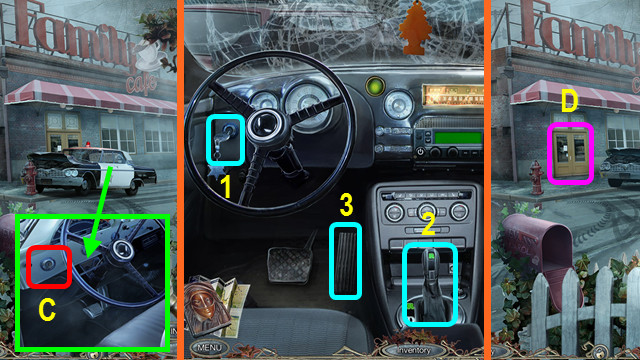
- Use the POLICE KEYS (C).
- Select 1-3.
- Open the doors; enter the Café (D).
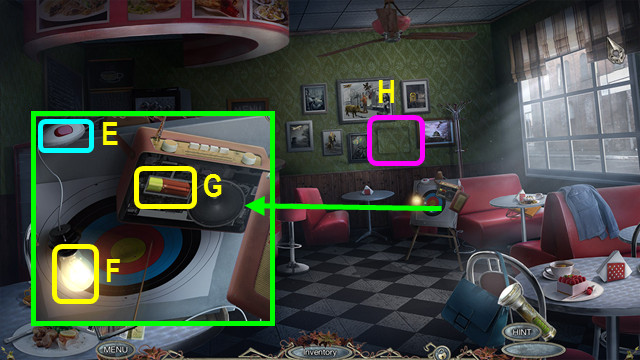
- Select (E); take the BULB (F).
- Use the SCREWDRIVER; take the 2/2 BATTERY (G).
- Place the WALL PICTURE (H).
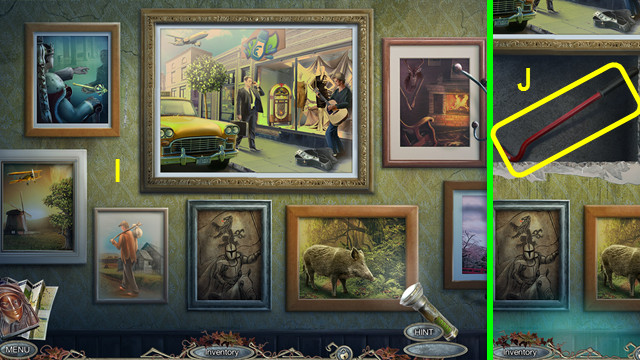
- Solution (I).
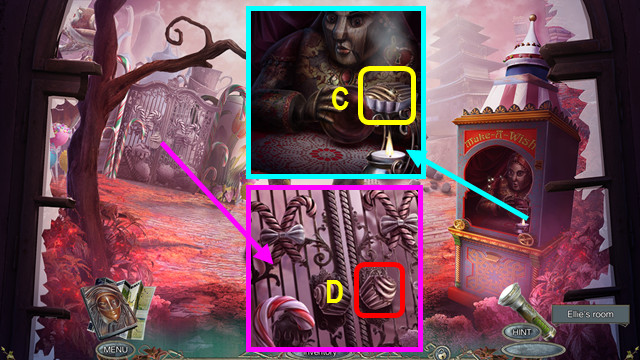
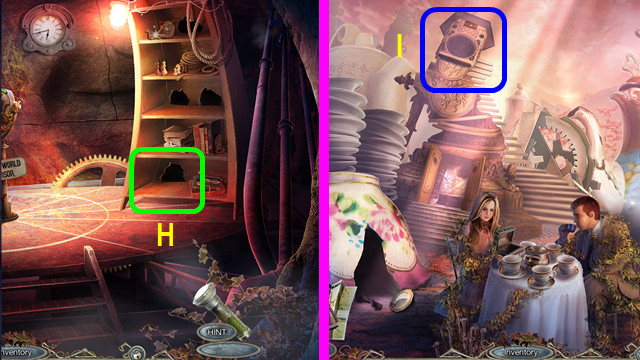
- Take the CROWBAR (J).
- Walk down.
- Use the CROWBAR, open the door, and pull the switch (K).
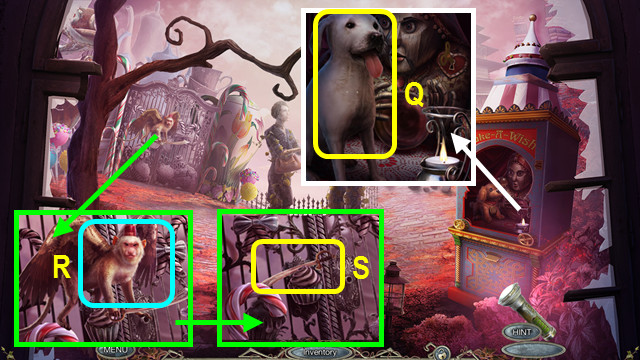
- Use the CROWBAR and open the door; earn the DOG (L).
- Walk forward (M).
- Take the STICKER (N).
- Use the DOG (O).
- Walk forward.
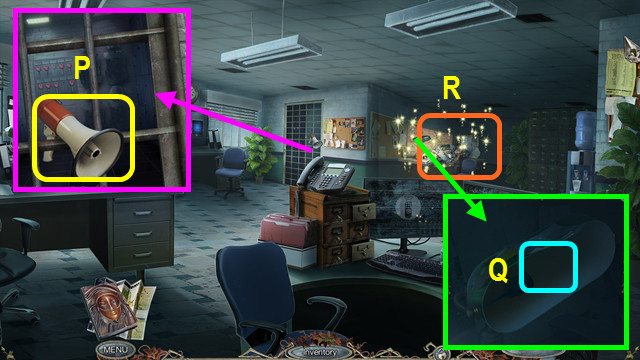
- Take the SPEAKER (P).
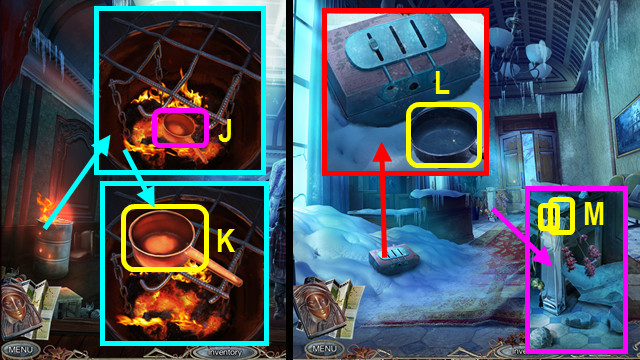
- Place the BULB (Q).
- Select the tape recorder and play the HOP; earn the POLICE BADGE (R).
- Walk down 3x.
- Place the POLICE BADGE; take the CD (S).
- Go to the Café.
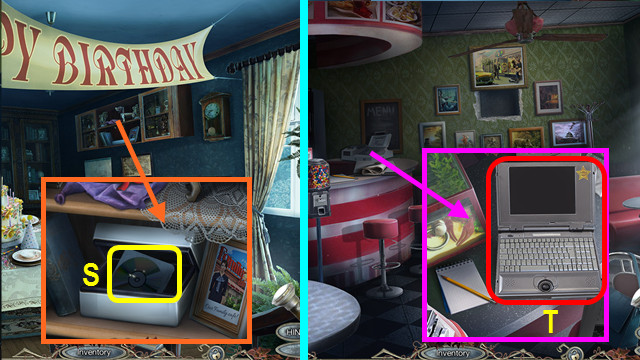
- Read the paper; open and turn on the laptop, and then enter the CD (T).
- Select 1-6.
- Use the CAMERA; take the SAFE CODE (U).
- Go to the Police Station.
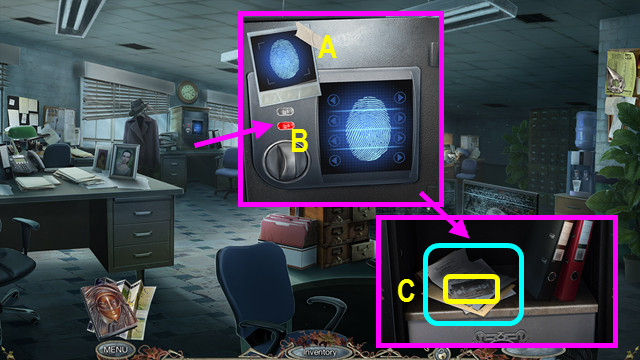
- Place the SAFE CODE (A).
- Solution (B).
- Take the BLADE; read the note (C).
- Walk down 2x.

- Use the BLADE; take the FISHING LINE and NET (D).
- Enter the Café.
- Use the NET to take the DRAWER PULL (E).
- Go to the Police Station.
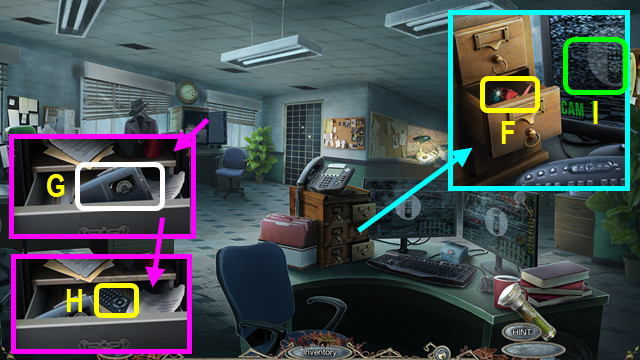
- Place the DRAWER PULL; take the TANGLE (F).
- Open the TANGLE to find the INSULATING TAPE, GREEN BUTTON, and COIN (inventory).
- Place the GREEN BUTTON; play the recorder (G).
- Read the address and take the REMOTE WITHOUT BATTERIES (H).
- Combine the REMOTE WITHOUT BATTERIES and the 2 BATTERIES to make the REMOTE CONTROL (inventory).
- Use the REMOTE CONTROL (I).

- Find the differences (J-K).
- Take the MAGNETIC KEY (L).
- Walk down.
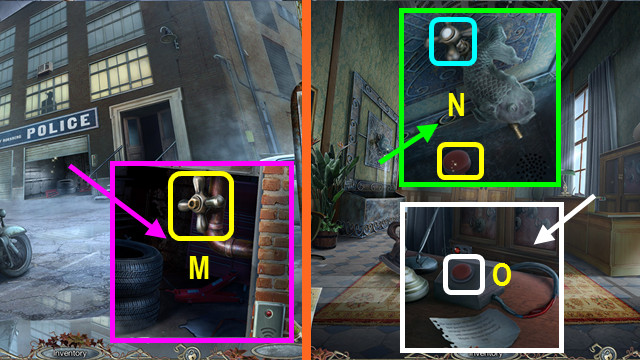
- Use the MAGNETIC KEY (M).
- Take the PLIERS and EMPTY CANISTER (N).
- Walk down.
- Open the cover and use the EMPTY CANISTER to get the GAS CANISTER (O).
- Enter the Café.
- Use the COIN, turn the knob, and take the BUBBLE GUM (P).
- Use the PLIERS to take the ARROW (Q).
- Combine the ARROW, BUBBLE GUM, and FISHING LINE to make the ARROW WITH FASTENER (inventory).
- Combine the BOW and ARROW WITH FASTENER to make the BOWSTRING (inventory).
- Return to the Police Station.
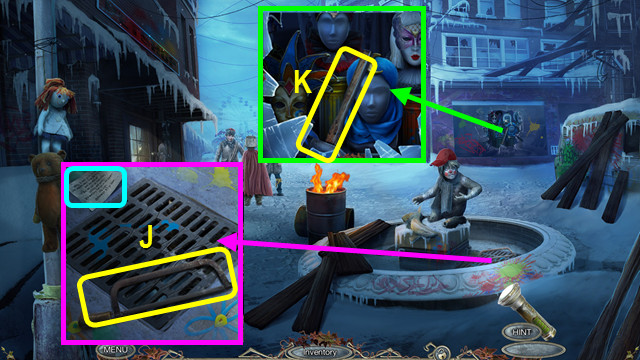
- Place the STICKER (R).
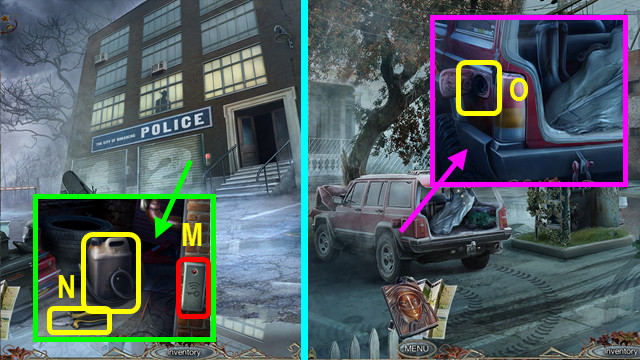
- Use the BOWSTRING to take the MOTORBIKE KEY (S).
- Walk down.
- Open the cap and use the GAS CANISTER (T).
- Use the MOTORBIKE KEY (U).
Chapter 2: The Orphanage
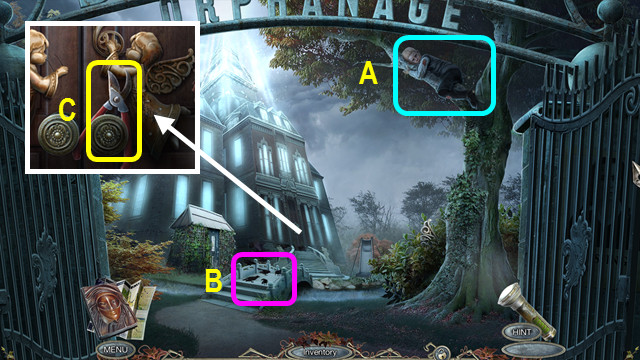
- Look at the Boy (A).
- Use the SPEAKER (B).
- Take the PRUNER (C).
- Walk down 2x.

- Use the PRUNER; take the LADDER (D).
- Go to the Orphanage's Park.
- Place the LADDER (E).
- Talk to the Boy; take the HORN (F).
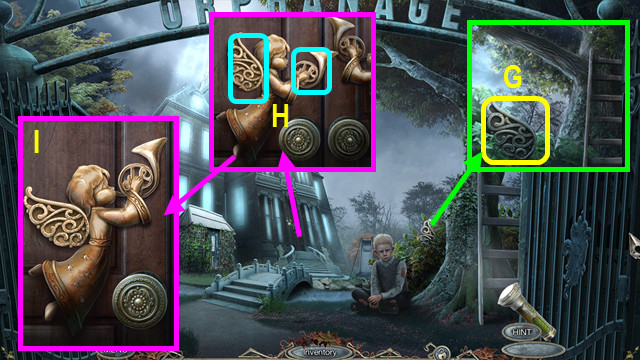
- Use the PRUNER; take the WINGS (G).
- Place the HORN and WINGS (H).
- Solution (I).
- Walk forward.
- Take the DOOR HANDLE, read the note, and use the INSULATING TAPE (J).
- Walk down.
- Use the DOOR HANDLE (K).
- Play the HOP; earn the WRENCH (L).
- Walk down.
- Use the WRENCH; take the VALVE (M).
- Go to the Foyer.
- Place and turn the VALVE; take the RED BUTTON (N).
- Place and push the RED BUTTON (O).
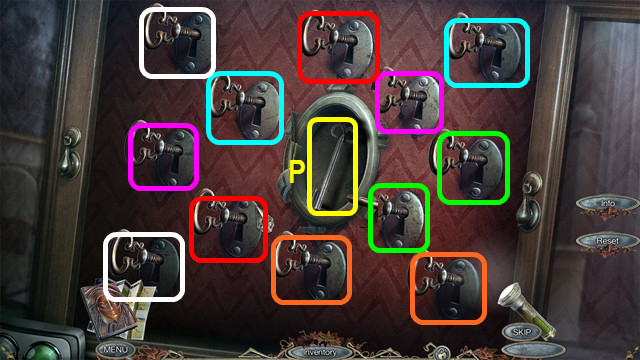
- Solution (color-coded).
- Take the IRON KEY (P).
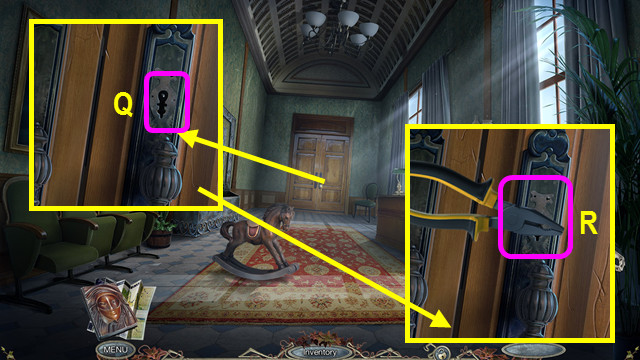
- Use the IRON KEY (Q).
- Use the PLIERS (R).
- Walk forward.
- Talk to Allie; take the TORN DOG (A).
- Take the JAR (B).
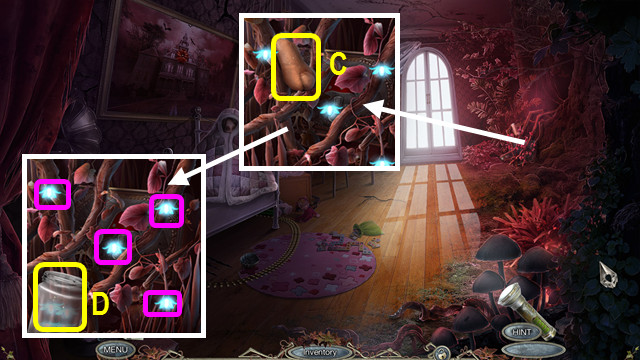
- Take the PLUSH PAW (C).
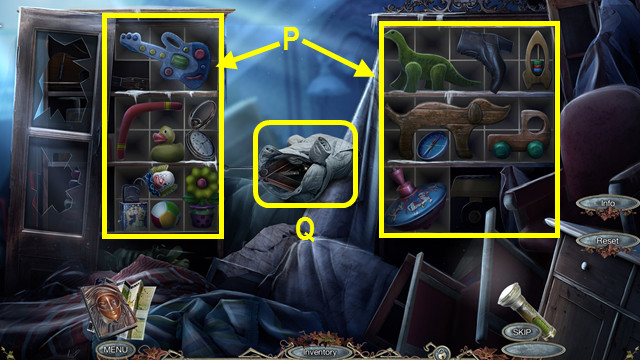
- Place the JAR, herd the fireflies (pink) into the jar, and take the GLOWING JAR (D).

- Take the IRON MOLD; place the GLOWING JAR (F).
- Play the HOP; earn the TOY HORSE (G).
- Open the TOY HORSE; take the SPOOL OF THREAD and TOY APPLE (inventory).
- Place the TOY APPLE; take the NEEDLE (H).
- Combine the TORN DOG, PLUSH PAW, SPOOL OF THREAD, and NEEDLE to make ALLIE'S DOG (inventory).
- Give ALLIE'S DOG to Allie (I).
- Walk forward.
- Take the 1st ALLIE'S MEDALLION HALF (J).
- Take the PICKAXE (K).
- Use the PICKAXE; take the 2nd ALLIE'S MEDALLION HALF and 1/3 DOMINOES (L).
- Walk down.
- Place the 2 ALLIE'S MEDALLION HALVES (M).
- Restore the items (color-coded).
- Take the WIND-UP KEY (N).
- Walk forward.

- Use the WIND-UP KEY (O).
- Place ALLIE'S DOG and the GOLD MEDALLION (P).
- Select the sets of symbols (1-3).
- Take the REVIVED DOG (Q).
- Use the REVIVED DOG (R).
- Take the SABER (S).
- Walk down.
- Use the SABER: take the 1/3 GEARS and BAG CLASP (A).
- Walk forward.
- Use the BAG CLASP; take the COPPER BELL (B).
- Place the IRON MOLD and COPPER BELL; take the CAKE (C).
- Place the CAKE; walk left (D).
Chapter 3: Tea Party Lane
- Use the CAMERA; take the LENS (E).
- Take the SPLIT CANDY (F).
- Walk down 2x.
- Place the LENS; take the CUP FROM SET and GLUE (G).
- Combine the SPLIT CANDY and GLUE (inventory).
- Restore the pieces; take the GLASS CANDY (H).
- Return to Tea Party Lane.
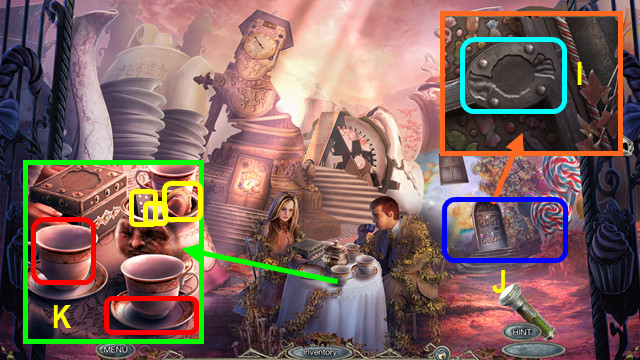
- Place the GLASS CANDY (I).
- Play the HOP; earn the PLATE FROM SET (J).
- Place the CUP FROM SET and the PLATE FROM SET; take the 2/3 DOMINOES, SUGAR, and MIRROR (K).
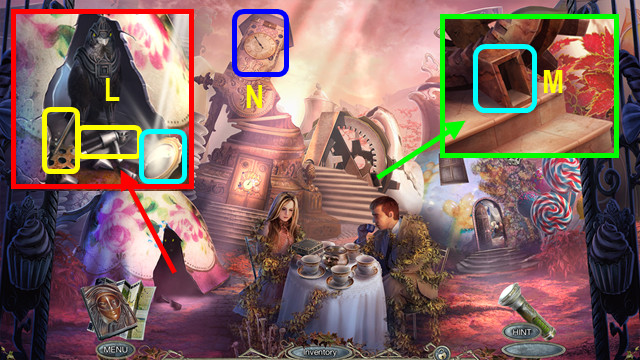
- Place the MIRROR; take the LEVER and 1st DOLL (L).
- Place the LEVER (M).
- Select (N).
- Take the CLOCK HAND (O).
- Place the CLOCK HAND (P).
- Walk forward.

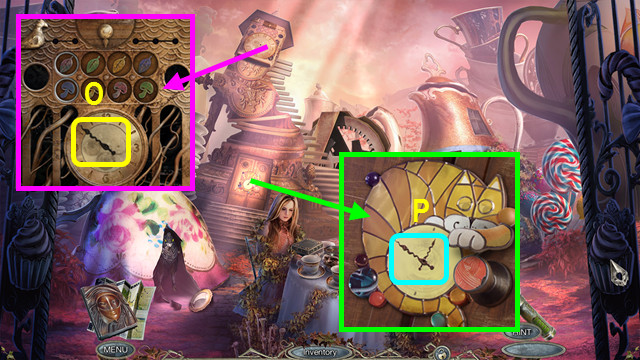
- Take the BROKEN KEY (Q).
- Use the SUGAR (R).
- Restore the items (color-coded).
- Take the HOOKED ARROW (S).
- Combine the BOW and HOOKED ARROW to make the LOADED BOW (inventory).
- Walk down 2x.
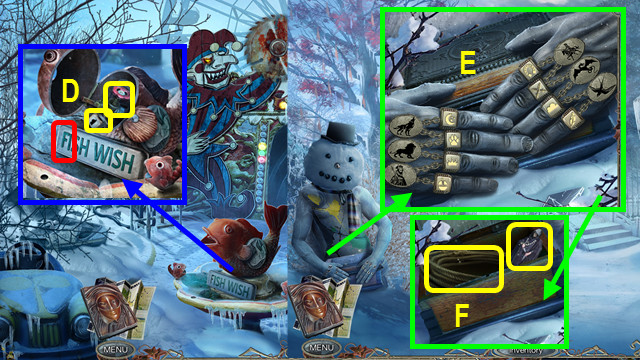
- Use the LOADED BOW (A).
- Take the 1st FLOWER and TOY CROWN (B).
- Go forward 2x.
- Place the TOY CROWN; take the MYSTERIOUS AMULET (C).
- Walk down 2x.
- Place the MYSTERIOUS AMULET; take the DIAMOND RING (D).
- Go forward 2x.
- Use the DIAMOND RING and place the REVIVED DOG (F).
- Move the 4 armor pieces to the dog; take the ARMORED DOG (G).
- Walk down.
- Use the ARMORED DOG (H).
- Solution: L-K-J-I-M-K-K-L-K-J-K-M-I-J-M-L-I-I.
- Take the ARMORED DOG and 3/3 DOMINOES (N).
- Walk down.

- Place the 3 DOMINOES (O).
- Walk right (P).

- Take the 2/3 GEAR (Q).
- Take the 3/3 GEAR (R).
- Go to Tea Party Lane.
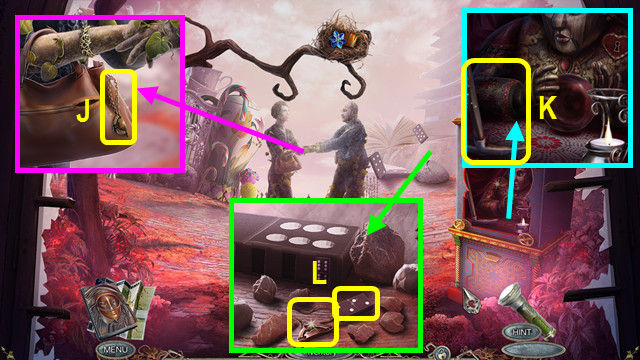
- Place the 3 GEARS; take the CAGE KEY and OILED CLOTH (A).
- Go forward.
- Use the CAGE KEY; take the FEATHERS and 2nd FLOWER (B).
- Return to Knowledge Street.

- Place the 2 FLOWERS (C).
- Play the HOP; earn the BOUQUET (D).
- Open the BOUQUET; take the FLOWER PIN and 1st KEY PART (inventory).
- Return to Tea Party Lane.
- Place the FLOWER PIN; take the MUSHROOM FIGURINE and LIGHTER (E).
- Walk down 2x.
- Place the MUSHROOM FIGURINE; take the KNIFE and 2nd KEY PART (F).
- Combine the BROKEN KEY and 2 KEY PARTS to make the CLOVER KEY (inventory).
- Go to Knowledge Street.
- Use the CLOVER KEY; walk forward (G).
- Use the ARMORED DOG; earn the BINOCULARS SCHEME and CUCKOO FIGURINE (H).
- Go to Tea Party Lane.
- Select (I).
- Place the CUCKOO FIGURINE (J).
- Move the circle frames 1-7.
- Take the FILE and BINOCULARS PART (K).
- Go to Knowledge Street.
- Use the FILE (L).
- Restore the items (color-coded).
- Take the ACID (M).
- Walk forward.
- Use the ACID; take the BOTTLED FERTILIZER and DUMMY'S EYE (N).
- Go to the Souvenir Shop.
- Place the DUMMY'S EYE; take the CORKSCREW (O).
- Combine the BOTTLED FERTILIZER and CORKSCREW to make the FERTILIZER (inventory).
- Go to Knowledge Street.

- Use the FERTILIZER (P).
- Use the KNIFE; take the 2nd BINOCULARS PART (Q).
- Walk forward.
- Place the BINOCULARS SCHEME (R).
- Move the 2 pieces (S).
- Place the 2 BINOCULARS PARTS (T).
- Play the HOP; take the ARROW.
- Combine the ARROW, FEATHERS, OILED CLOTH, and LIGHTER to make the BURNING ARROW (inventory).
- Combine the BOW and BURNING ARROW to make the FIRE BOW (inventory).
- Walk down.
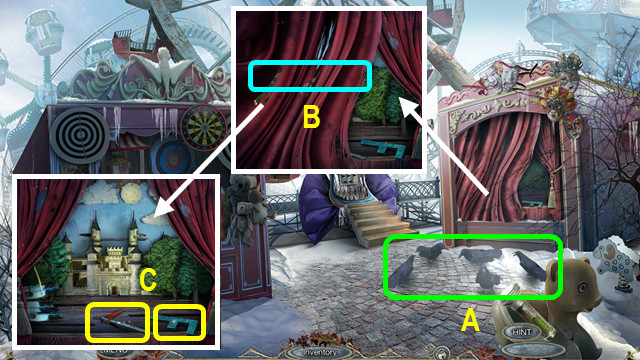
- Use the FIRE BOW (A).
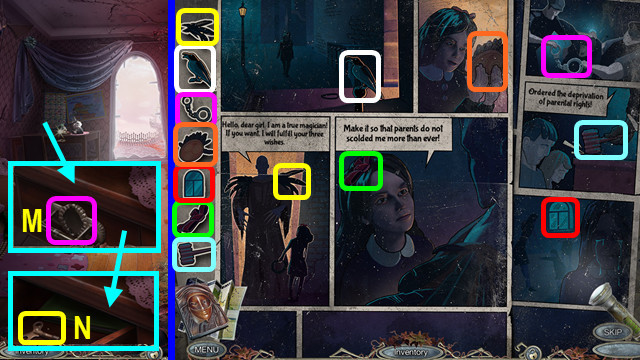
- Enter the Library (B).
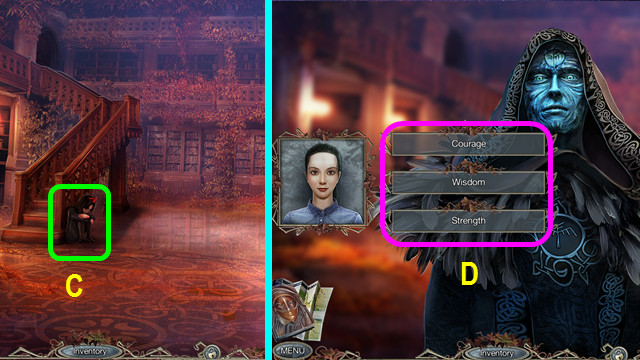
- Talk to Allie (C).
- Choose a quality (D).
Chapter 4: The Event Hall
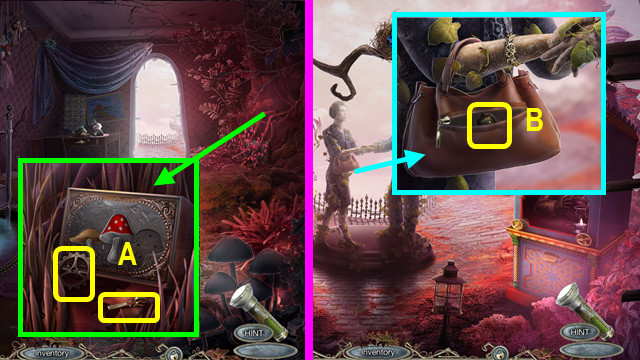
- Talk to Ann; take the COIN (A).
- Take the ADHESIVE TAPE (B).
- Use the COIN; take the BRUSH and read the note (C).
- Use the BRUSH (D).
- Play the HOP; earn the HOLSTER (E).
- Open the HOLSTER; take the gun and load the bullet to make the GUN (inventory).
- Use the GUN (F).
- Walk forward.
- Take the IRON DOWEL (G).
- Take the MITTEN (H).
- Take the CANE PART (I).
- Combine the IRON DOWEL, CANE PART, and ADHESIVE TAPE to make the STICK WITH HOOK (inventory).
- Walk down.
- Use the STICK WITH HOOK (J).
- Use the MITTEN to take the FIERY LADLE (K).
- Walk forward.
- Use the FIERY LADLE; take the LADLE WITH WATER (L).
- Use the LADLE WITH WATER; take the 1st SLIDER and the BRACELET (M).
- Walk down.

- Give the BRACELET (N).
- Select (O).
- Solution (P).
- Take the coat and RUSTY JACK (Q).
- Remove the 2nd SLIDER from the RUSTY JACK (inventory).
- Walk forward.
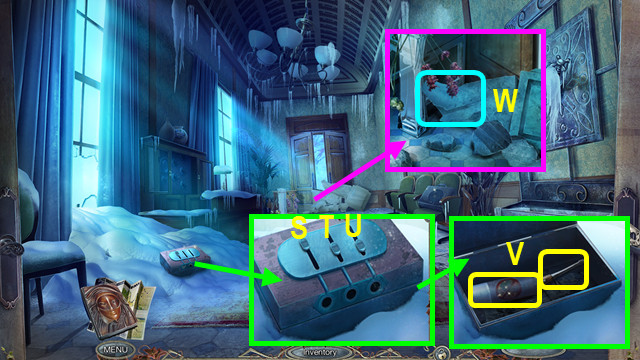
- Place the 2 SLIDERS; select Sx2-Ux4-Tx3.
- Take the RUST REMOVER and SCREWDRIVER (V).
- Combine the RUSTY JACK and RUST REMOVER to make the JACK (inventory).
- Use the JACK; walk forward (W).
- Talk to Simon; take the 1/3 TRIANGULAR PARTS (A).
- Use the MITTEN to take the SHARP SHARD (B).

- Use the SCREWDRIVER; take the ARROW WITH BLUNT POINT and read the note (C).
- Combine the BOW and ARROW WITH BLUNT POINT to make the LOADED BOW (inventory).
- Use the LOADED BOW to take the STASH KEY and 2/3 TRIANGULAR PARTS (D).
- Walk down.
- Use the SHARP SHARD (E).
- Use the STASH KEY (F).
- Take the 3/3 TRIANGULAR PARTS and read the note (G).
- Walk forward.
- Place the 3 TRIANGULAR PARTS; solution (H).
- Walk forward.
- Read the note; take the HACKSAW (J).
- Take the HAMMER (K).
- Walk down.
- Use the HACKSAW; take the BROKEN SHOVEL (L).
- Combine the BROKEN SHOVEL and HAMMER to make the SHOVEL (inventory).
- Walk forward.
- Use the SHOVEL; take the 2nd DOLL (M).
- Walk down 2x.
- Place the 2 DOLLS (N).
- Take the 1st SHELL HANDLE and RULER (O).
- Walk down.
- Use the RULER; take the 1st MASK and 2nd SHELL HANDLE (P).
- Walk forward 3x.
- Place the 2 SHELL HANDLES (Q).
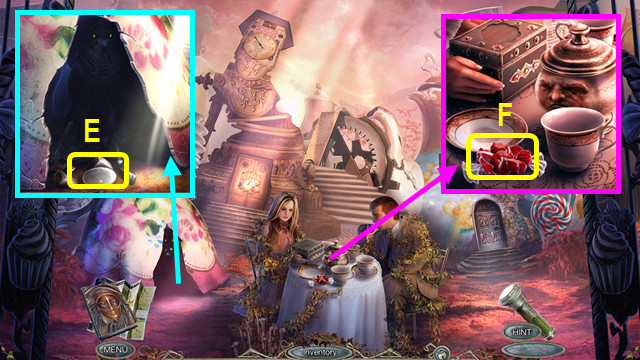
- Play the HOP; earn the BASKET WITH FOOD (R).
- Give the BASKET WITH FOOD (S).
- Take the 1st LIZARD (T).
- Walk forward.
Chapter 5: The Amusement Park
- Take the FOUNTAIN LEVER (A).
- Take the SAFE BUTTON (B).
- Walk down.
- Use the FOUNTAIN LEVER (C).
- Take the SHEET WITH CODE (D).
- Walk down 2x.

- Place the SAFE BUTTON and SHEET CODE; solution (E).
- Take the 2nd MASK (F).
- Walk forward 2x.
- Place the 2 MASKS (G).

- Solution (H).
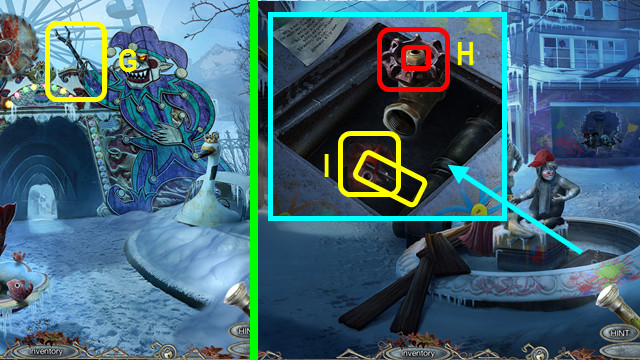
- Take the ICEBREAKER and SWAN CROWN (I).
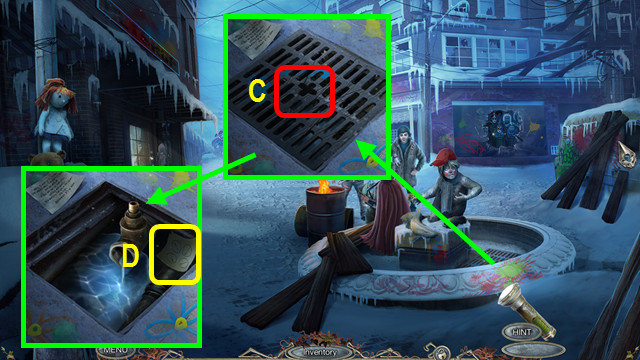
- Use the ICEBREAKER; take the 1/3 WIRE (J).
- Walk down.
- Use the ICEBREAKER; take the 2/3 WIRE and ARROW SHAFT (K).
- Walk forward 2x.
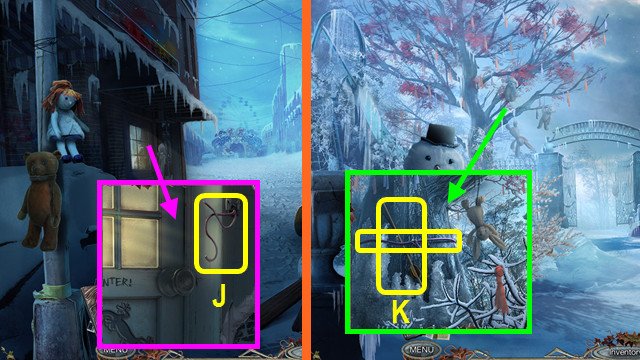
- Place the SWAN CROWN; take the 2nd LIZARD (L).
- Use the ICEBREAKER; take the 3/3 WIRE (M).
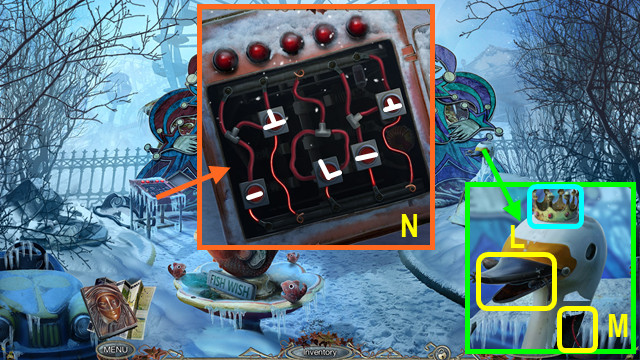
- Place the 3 WIRES; solution (N).
- Walk forward.
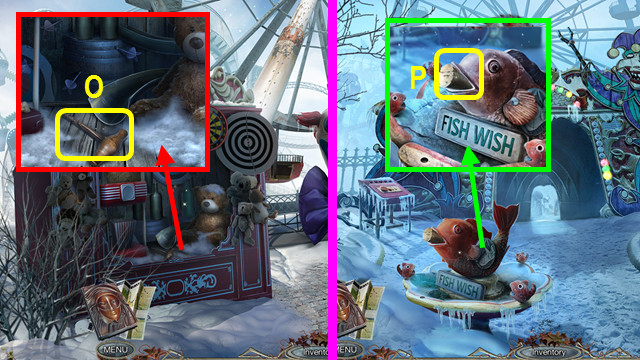
- Take the CORKSCREW (O).
- Walk down.
- Use the CORKSCREW to take the CORK (P).
- Combine the ARROW SHAFT and CORK to make the ARROW WITH CORK (inventory).
- Combine the BOW and ARROW WITH CORK to make the LOADED BOW (inventory).
- Walk forward.
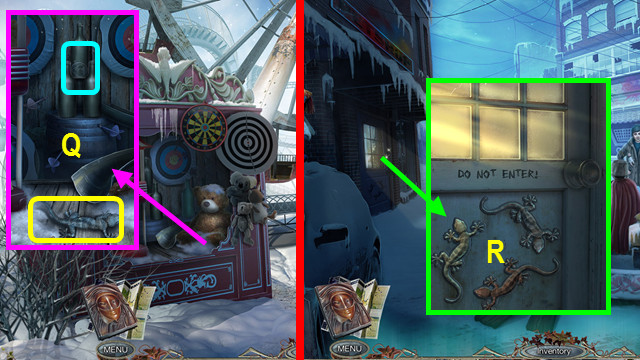
- Use the LOADED BOW; take the 3rd LIZARD (Q).
- Walk down 2x.
- Place the 3 LIZARDS (R).
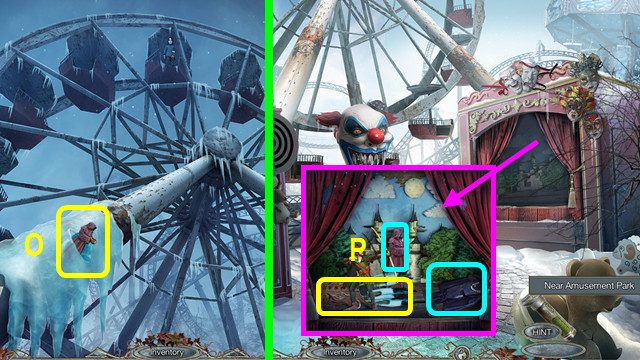
- Play the HOP; earn the LUNCHBOX.
- Open the LUNCHBOX and eat the burger; take the 1/5 FLAGS and OWL (inventory).
- Walk down.
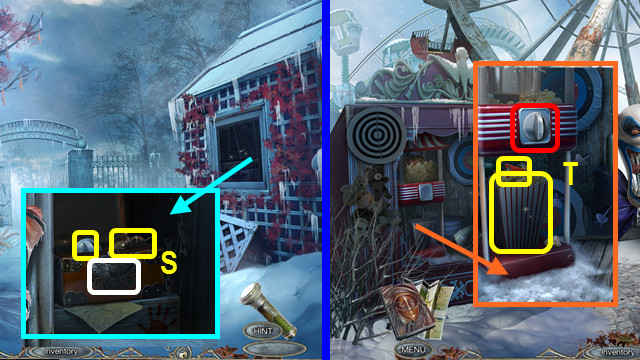
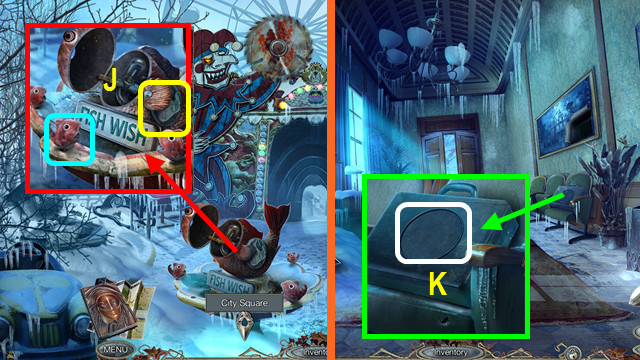
- Place the OWL; take the POPCORN MACHINE KEY and CURTAIN TIEBACK (S).
- Go forward 3x.
- Place and turn the POPCORN MACHINE KEY; take the 2/5 FLAGS and POPCORN (T).
- Use the POPCORN (A).
- Use the CURTAIN TIEBACK (B).
- Take the 3/5 FLAGS and LETTER F (C).
- Walk down.
- Place the LETTER F; take the STATUE RING and FAUCET (D).
- Walk down 2x.
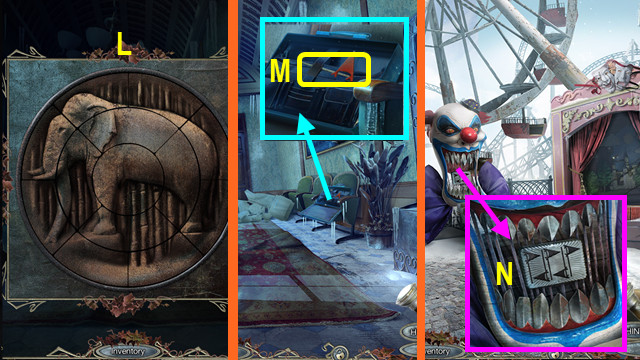
- Place the STATUE RING; solution (E).
- Take the SHERIFF FIGURINE and LASSO (F).
- Walk forward 2x.
- Use the LASSO to take the MECHANICAL ARM and NUT (G).
- Walk down.
- Place the FAUCET and NUT; turn off the water (H).
- Take the 4/5 FLAGS and FISH (I).
- Walk forward.
- Place the FISH; take the ROUND DISC (J).
- Walk down 3x.
- Place the ROUND DISC (K).
- Solution (L).
- Take the 5/5 FLAGS (M).
- Walk forward 4x.
- Place the MECHANICAL ARM and 5 FLAGS (N).
- Restore the items (color-coded).
- Go forward.
- Use the ICEBREAKER to take the MONK FIGURINE (O).
- Walk down.
- Place the MONK FIGURINE and SHERIFF FIGURINE; take the QUIVER (P).
- Combine the BOW and QUIVER to make the LOADED BOW (inventory).
- Go forward.
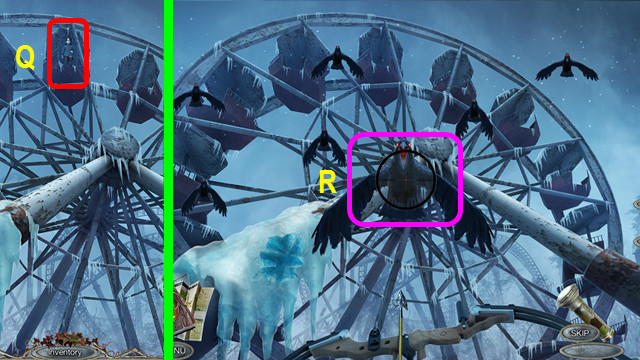
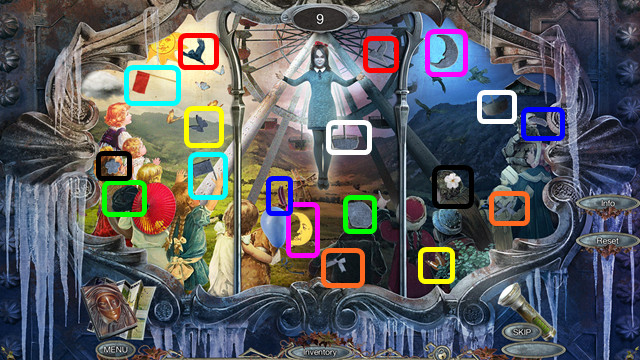
- Use the LOADED BOW (Q).
- Shoot the crows as they fly (R).
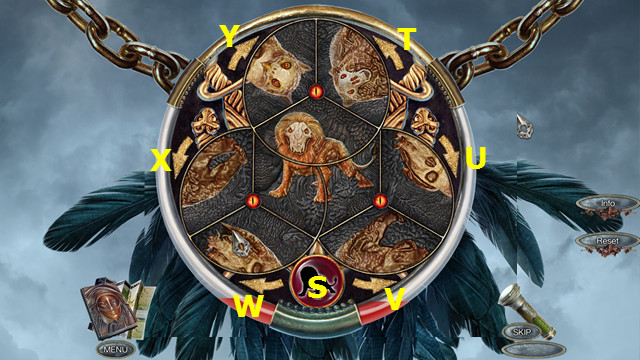
- Your solution depends on the animal shown (S).
- Select Wx2 for the manticore.
- Select T-U-X for the owl.
- Select V-X-Y for the bear.
- Congratulations! You have completed Surface: Alone in the Mist!
Created at: 2015-07-03