

Walkthrough Menu
- General Tips
- Chapter 1: The Entrance
- Chapter 2: The Screen
- Chapter 3: The Jungle
- Chapter 4: The Pier
- Chapter 5: The Deck
- Chapter 6: Back to City Center
- Chapter 7: The Imprisonment Place
General Tips
- This is the official guide for Surface: Reel Life.
- This guide will not mention each time you have to zoom into a location; the screenshots will show each zoom scene.
- We will use the acronym HOP for Hidden-object puzzles. Interactive items will be color-coded and some will be numbered; please follow the numbers in sequence.
- Use the map to travel to a location.
Chapter 1: The Entrance
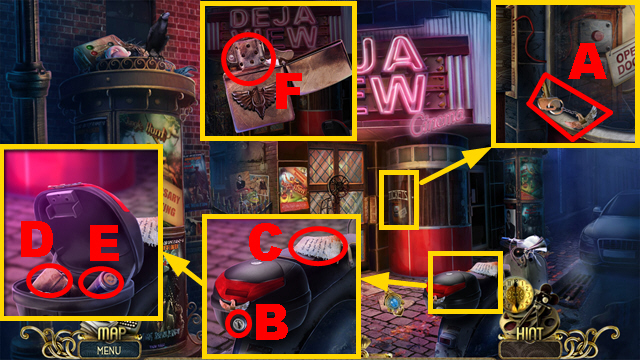
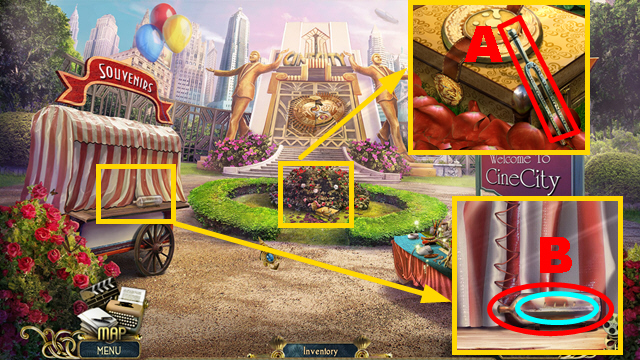
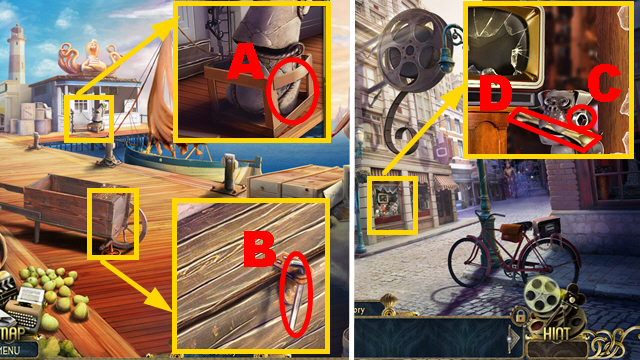
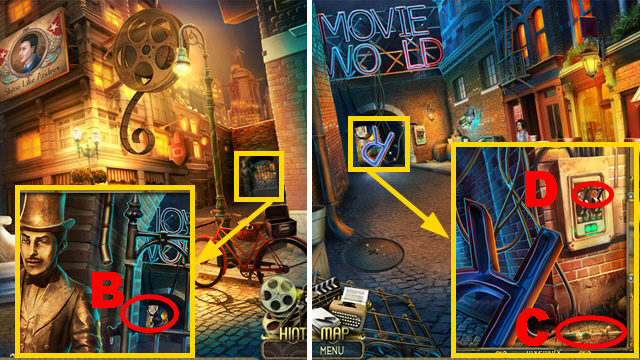
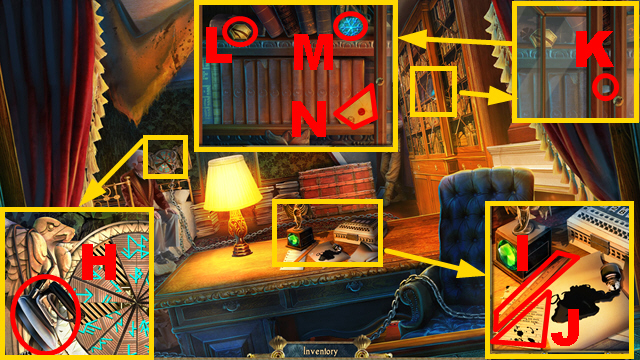
- Take the KEY (A).
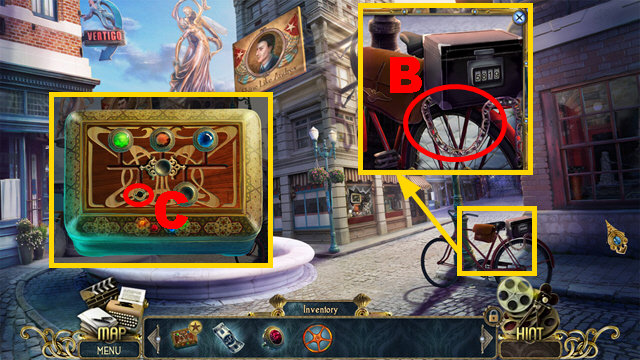
- Use the KEY (B); turn it.
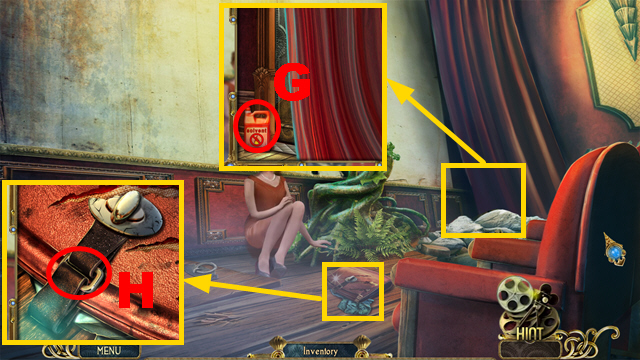
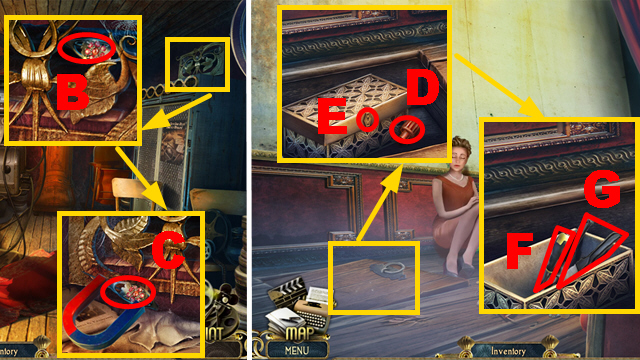
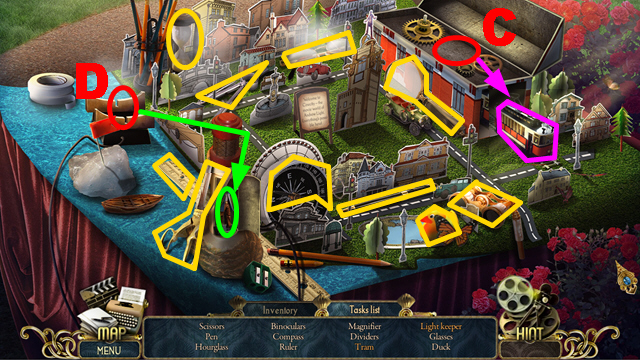
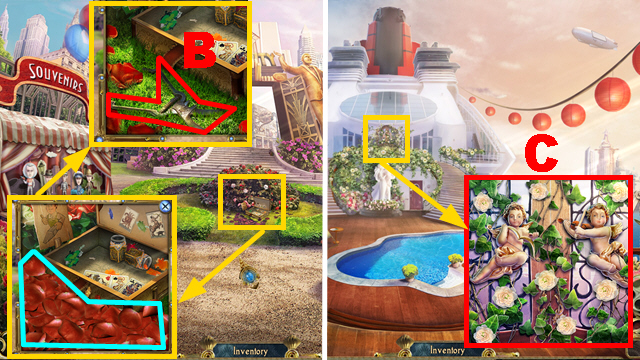
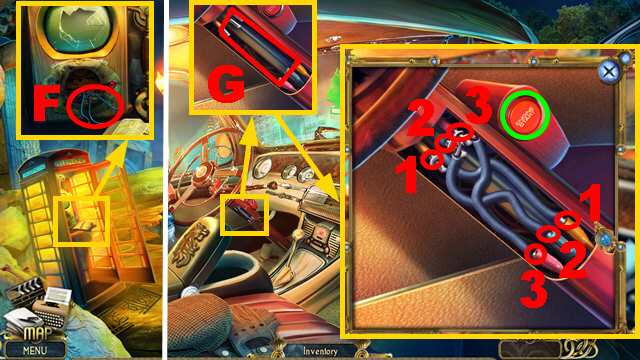
- Read the note (C); take the LIGHTER (D) and BATTERY (E).
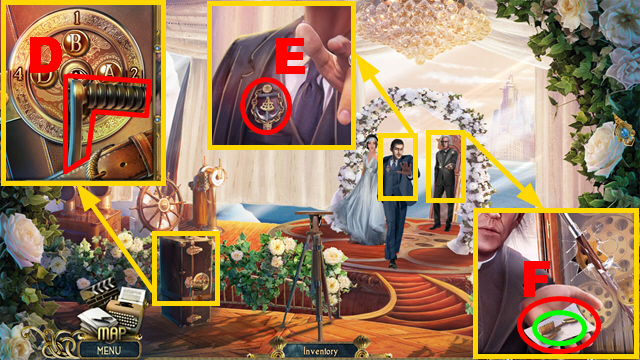
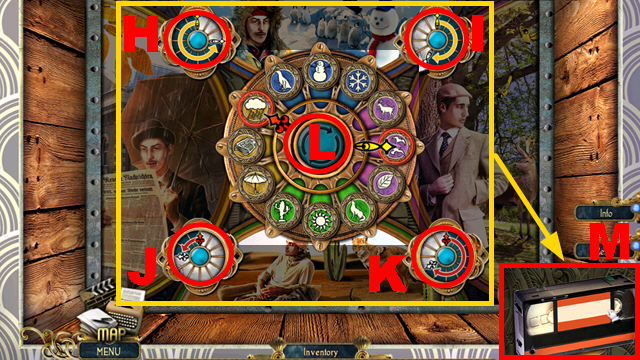
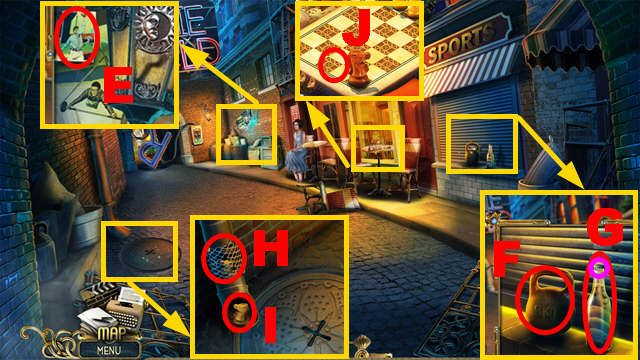
- Examine the LIGHTER; activate it (F).
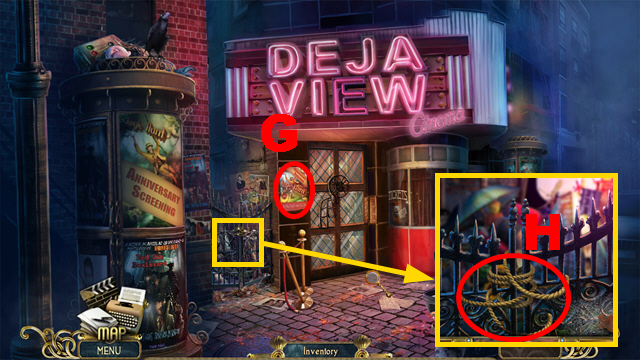
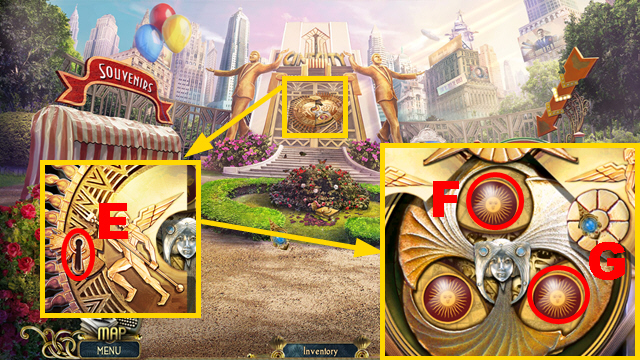
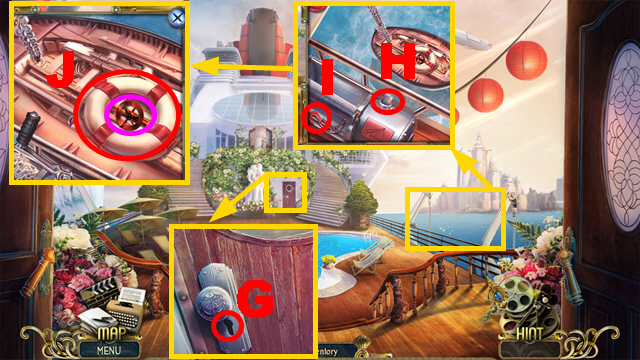
- Examine the poster (G).
- Use the LIGHTER (H).
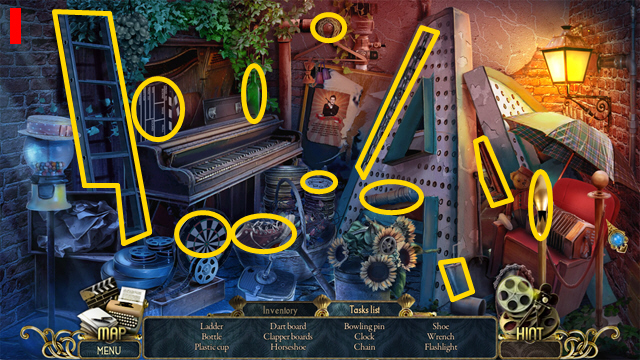
- Play the HOP.
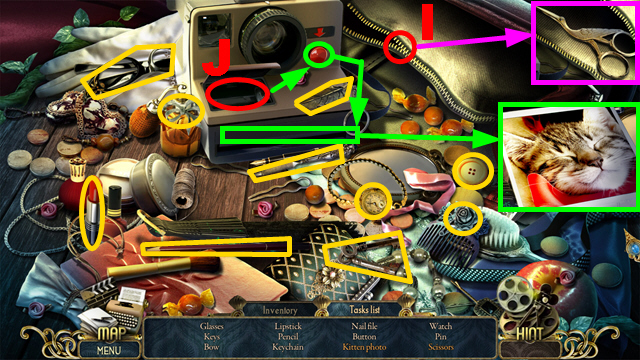
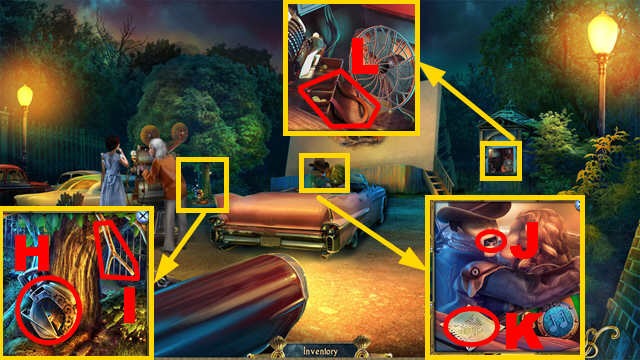
- You receive the LADDER (I).
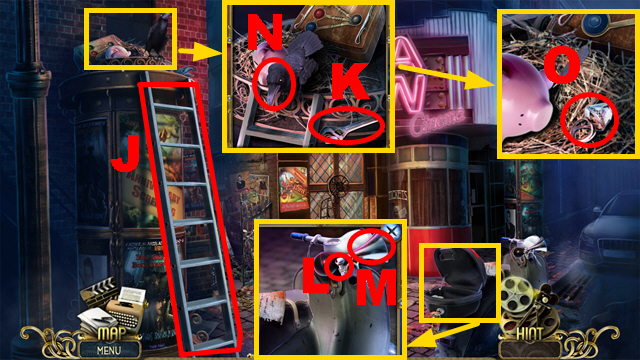
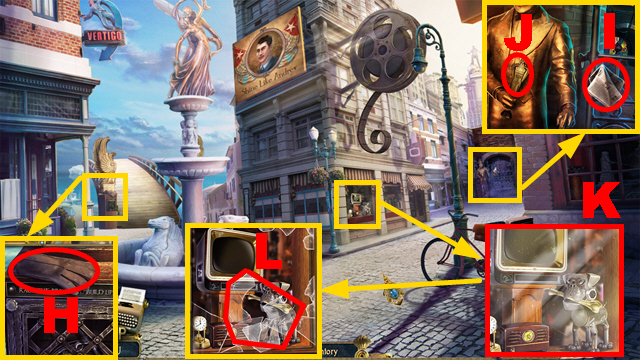
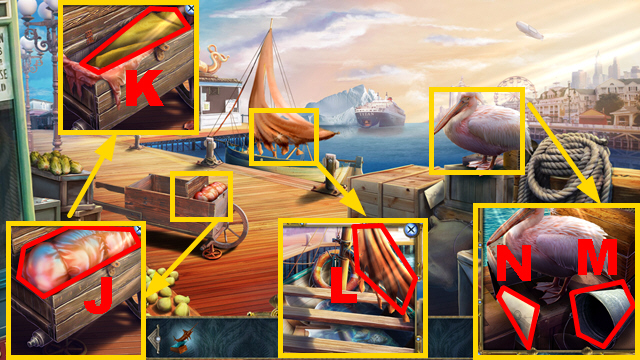
- Place the LADDER (J).
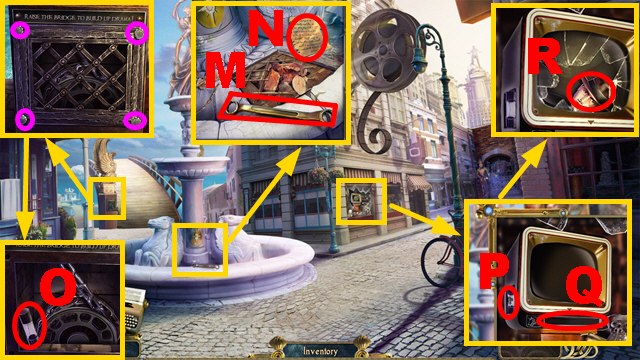
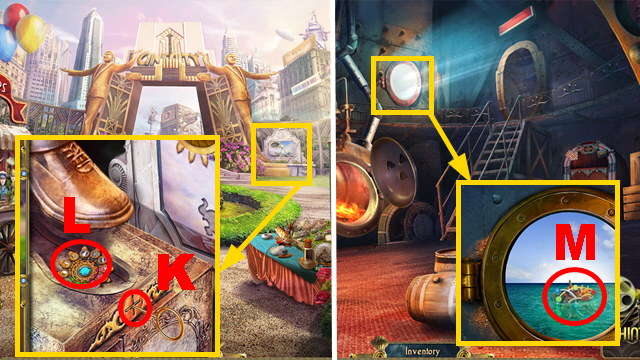
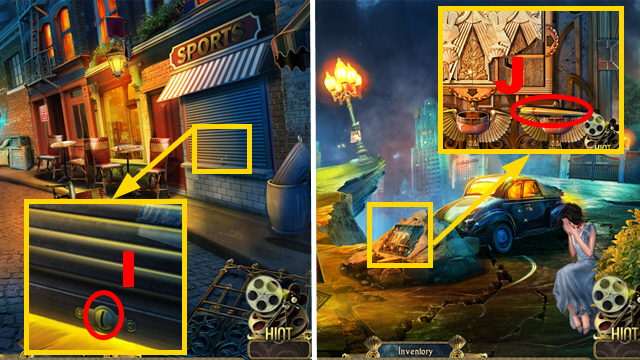
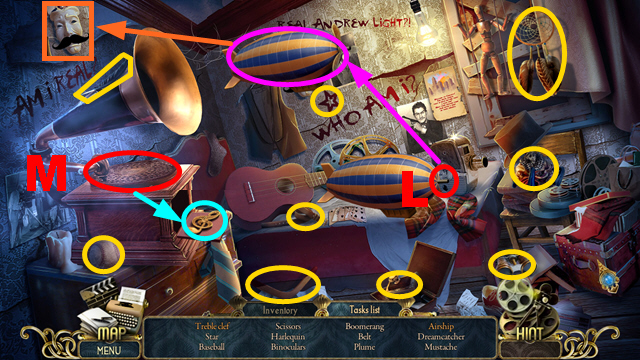
- Take the WRENCH (K).
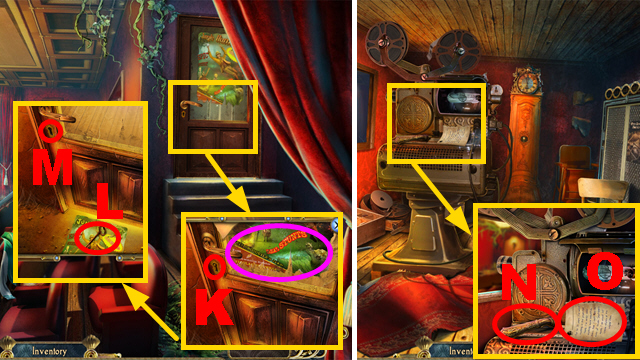
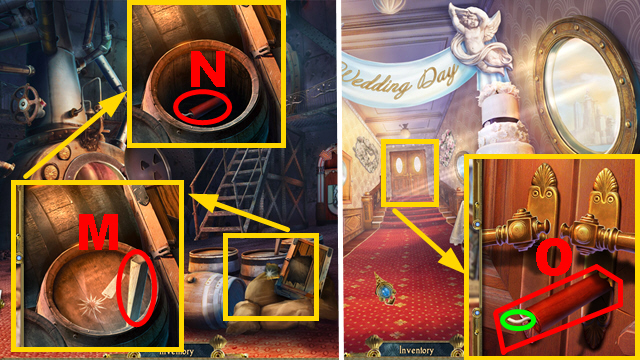
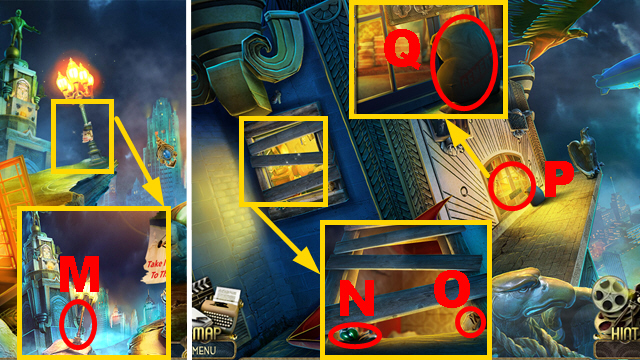
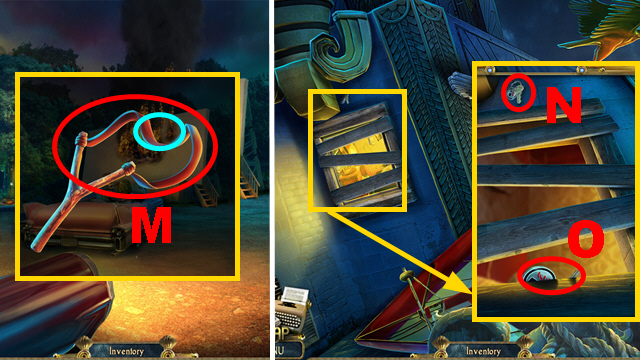
- Use the WRENCH (L); take the HORN (M).
- Use the HORN (N).
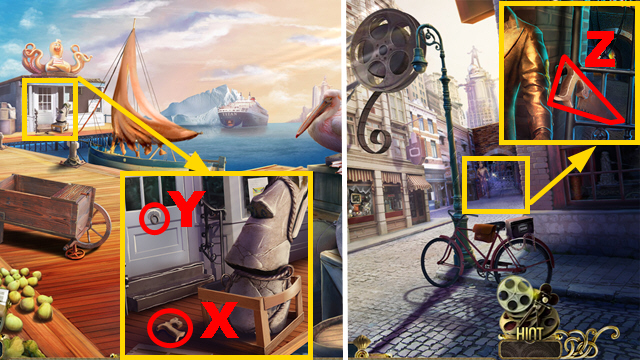
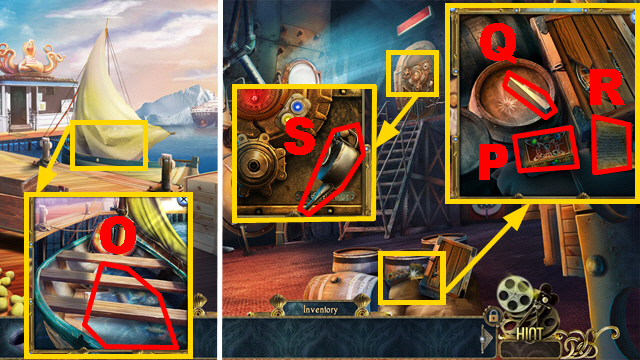
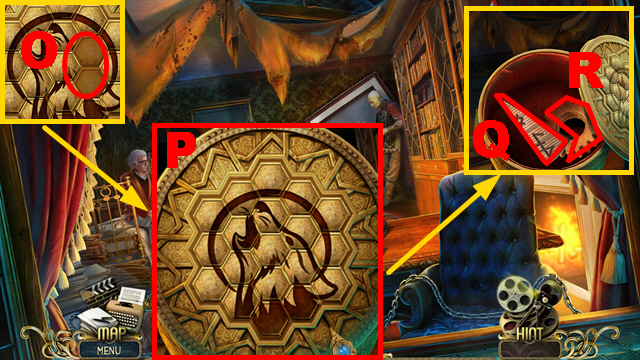
- Take the DIAMOND RING (O).
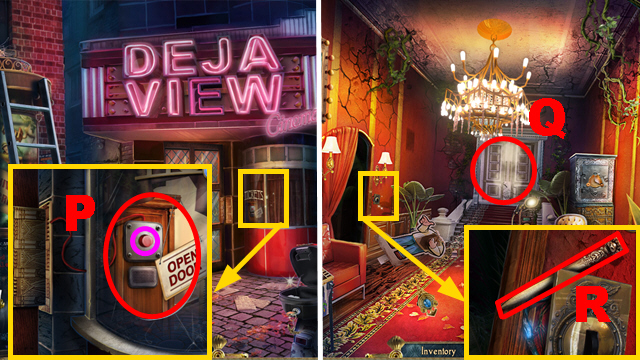
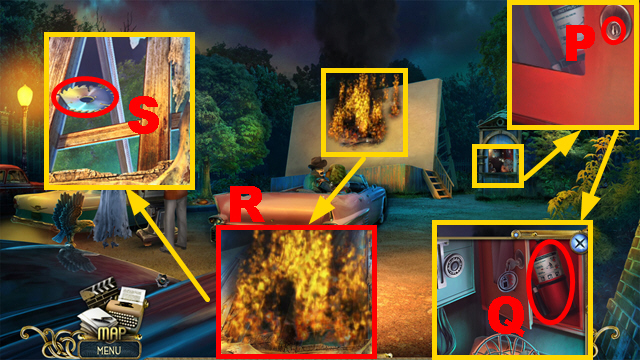
- Use the DIAMOND RING (P); push the button (purple).
- Move forward.
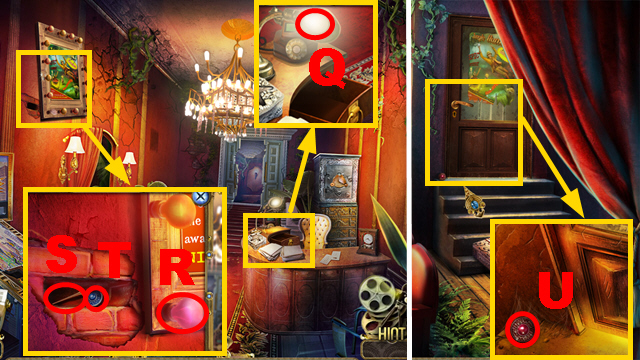
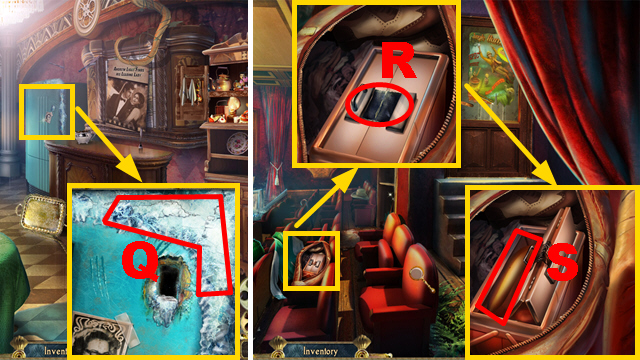
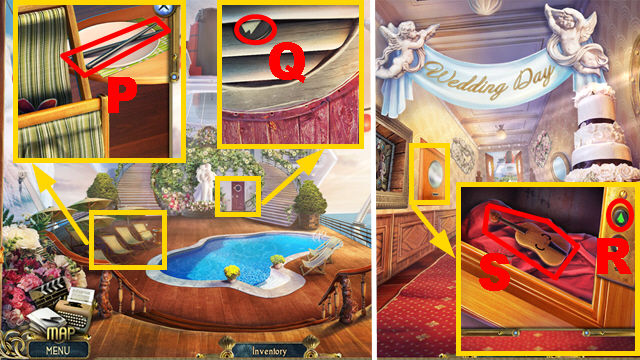
- Examine the door (Q).
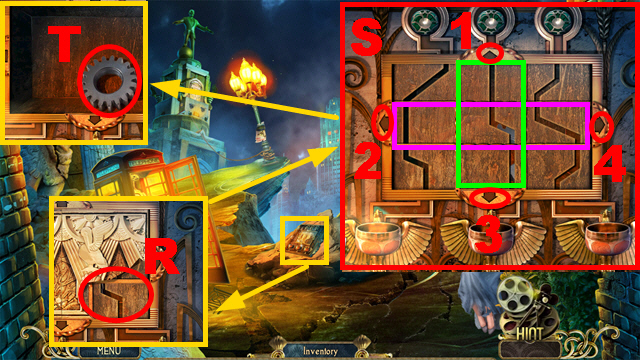
- Take the LETTER OPENER (R).
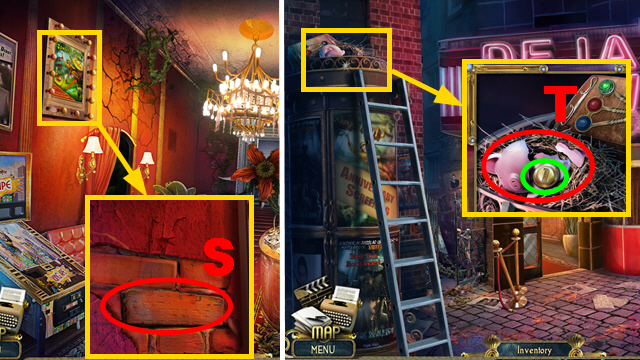
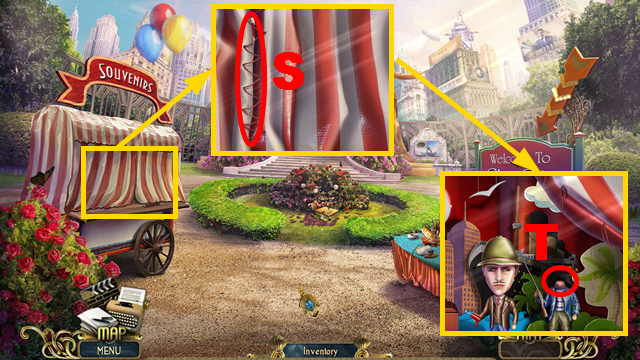
- Move the poster; use the LETTER OPENER (S).
- Take the BRICK.
- Walk down.
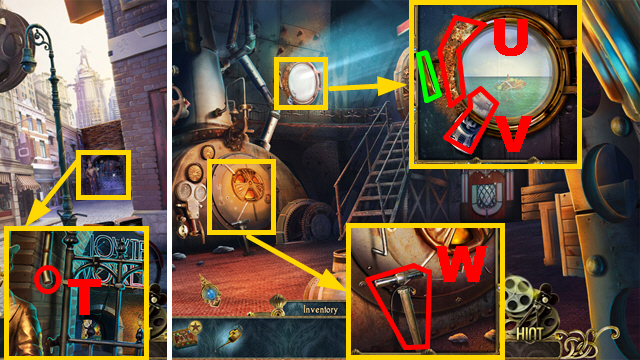
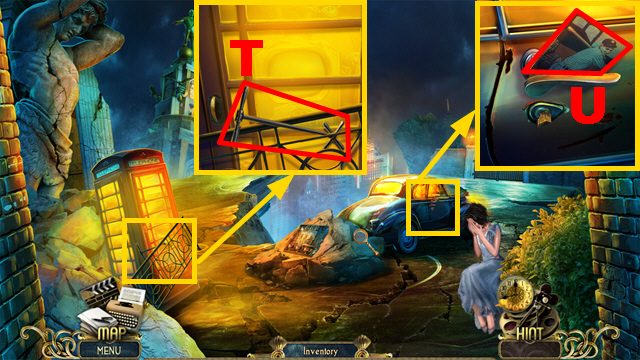
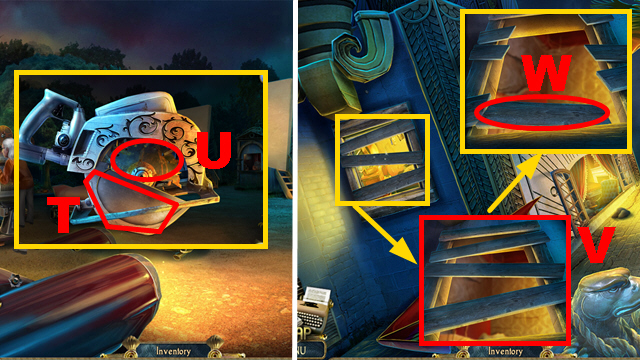
- Use the BRICK (T); take the COIN (green).
- Move forward.
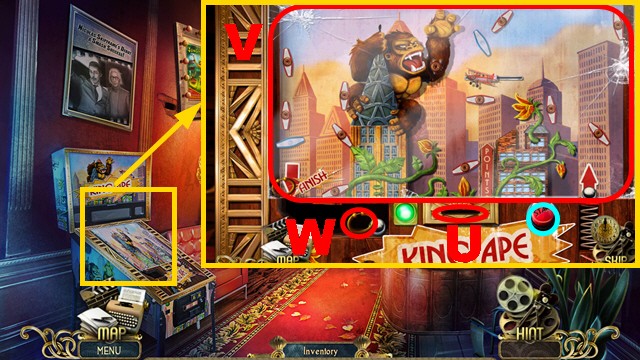
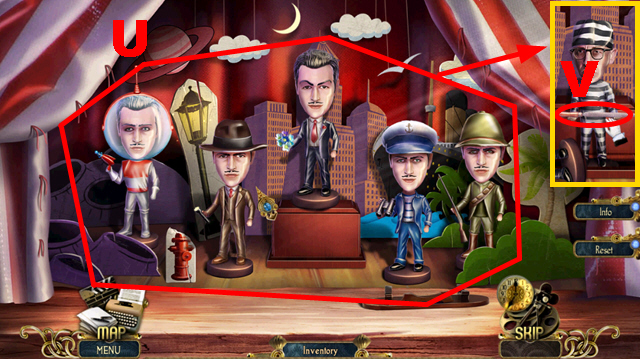
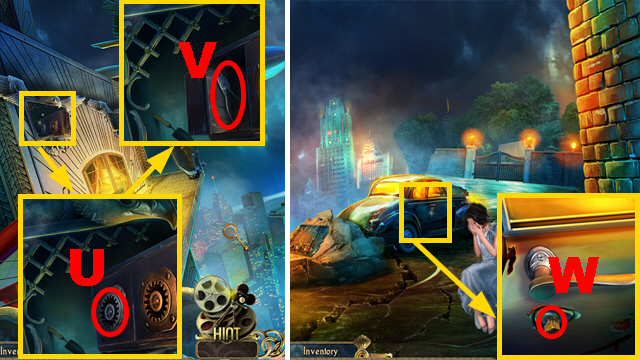
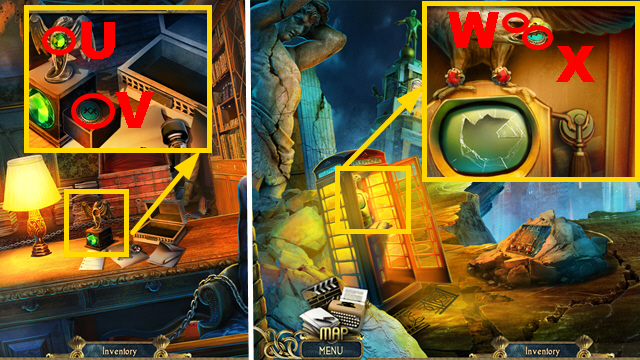
- Insert the COIN (U).
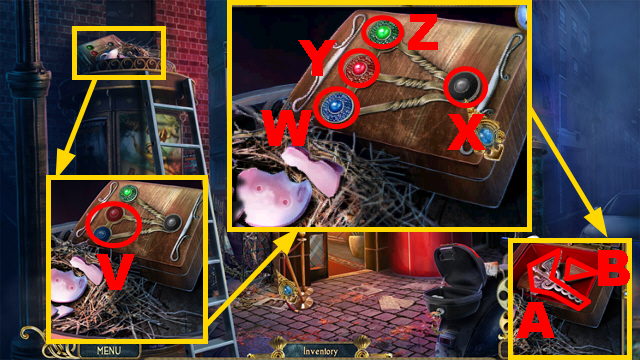
- Play the mini-game.
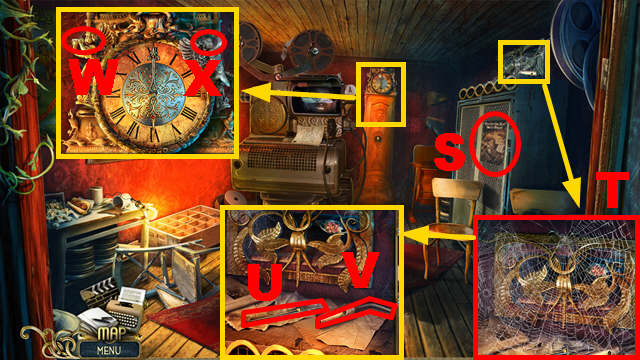
- Solution: (V).
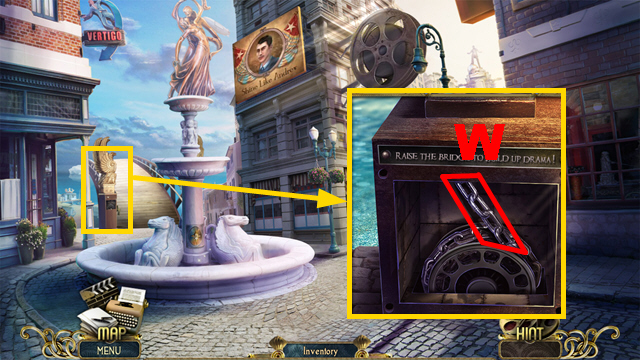
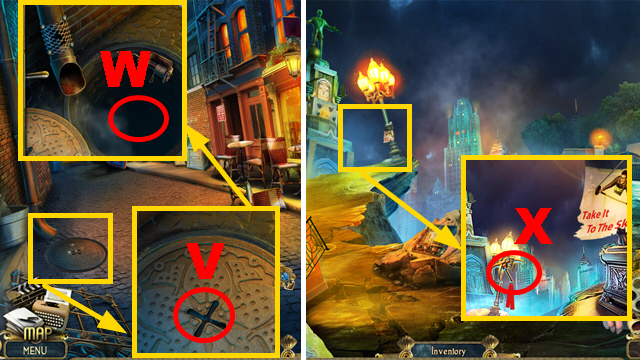
- Push the button (blue).
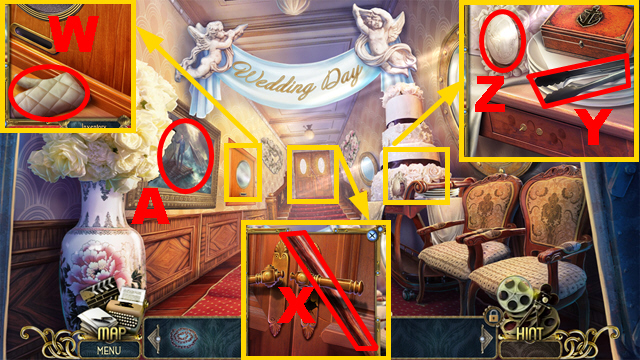
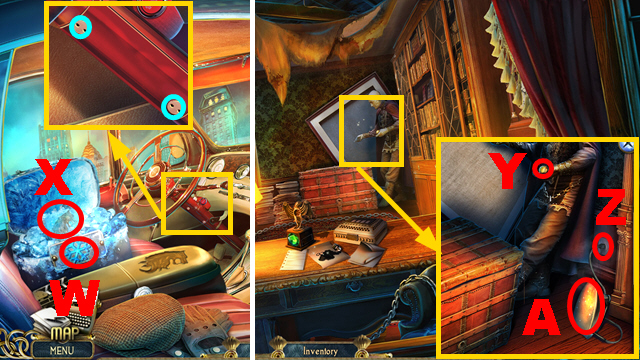
- Take the DRAWER PULL (W).
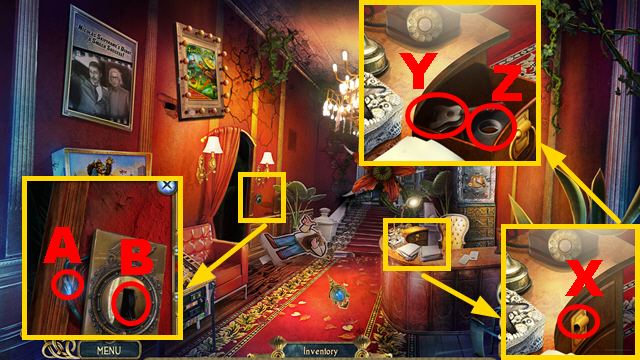
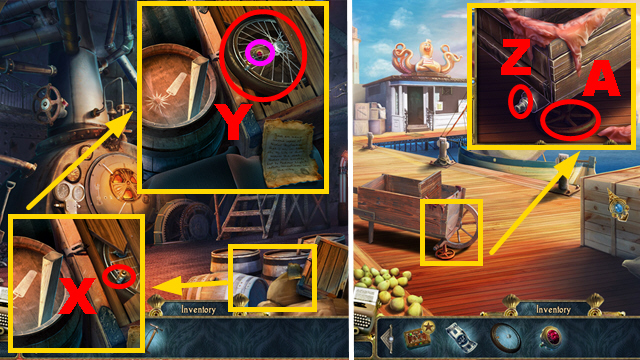
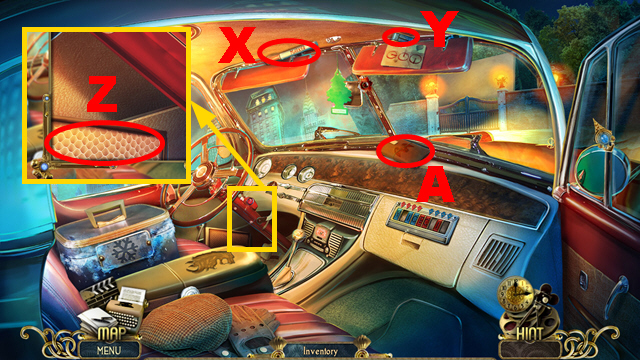
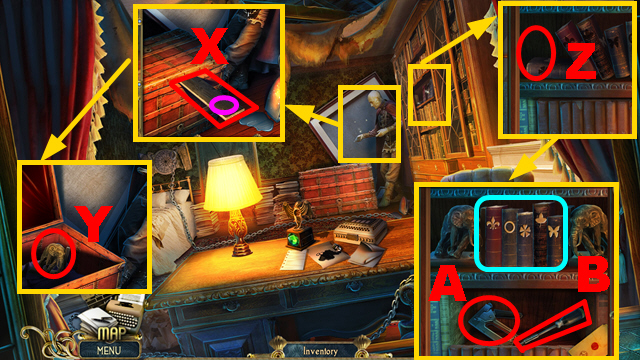
- Place the DRAWER PULL (X); open the drawer.
- Take the GUITAR (Y) and ELECTRICAL TAPE (Z).
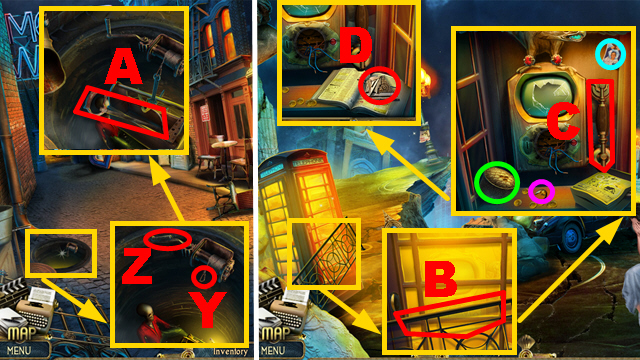
- Use the ELECTRICAL TAPE (A); turn the switch (B).
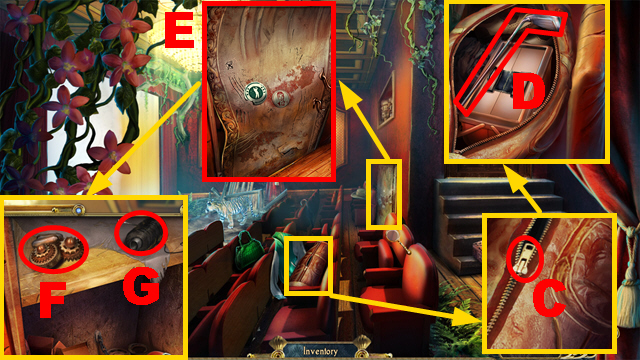
- Turn left.
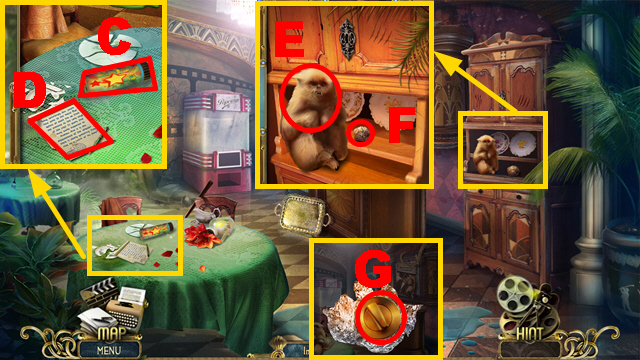
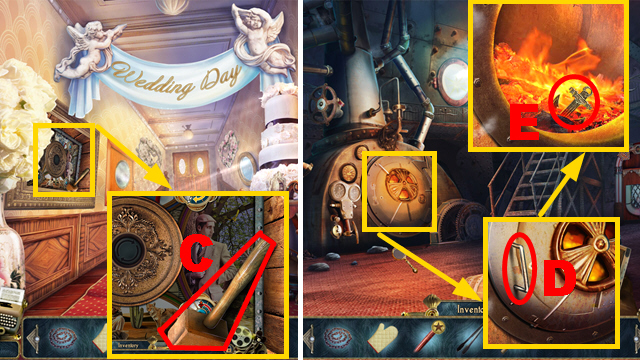
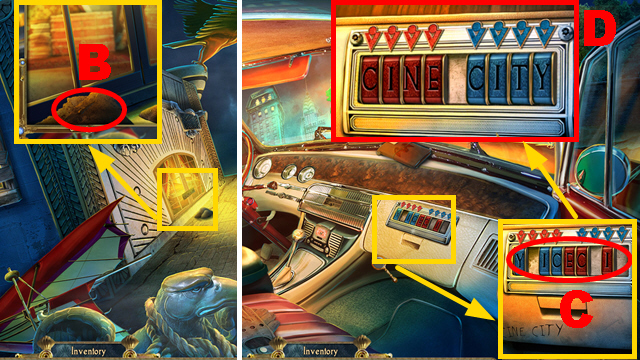
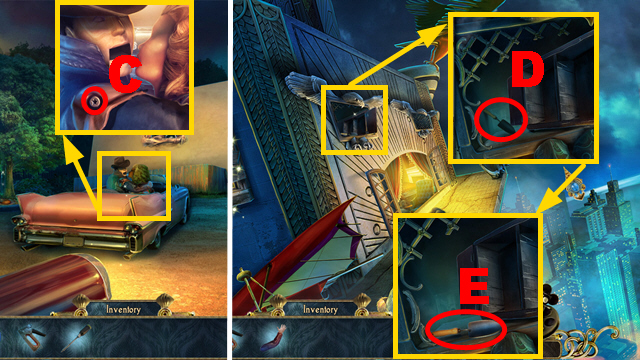
- Take the FIRECRACKER (C); examine the note (D).
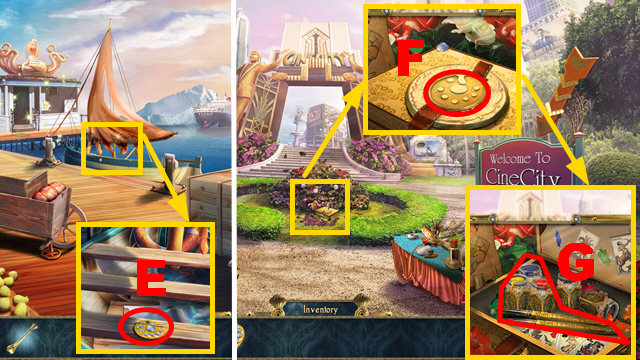
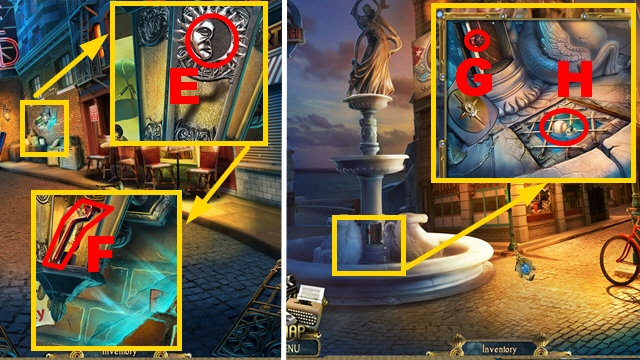
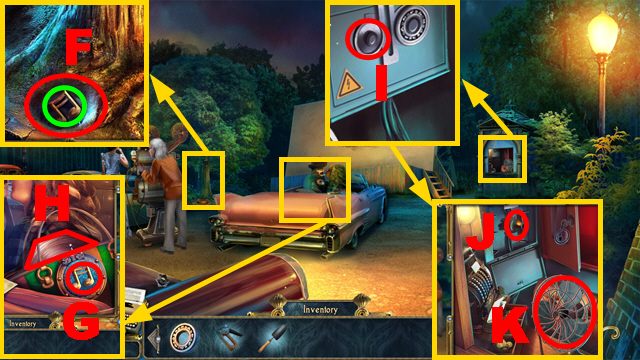
- Use the FIRECRACKER (E); take the FOIL PACK (F).
- Open the FOIL PACK; take the KNOB (G).
- Walk down.
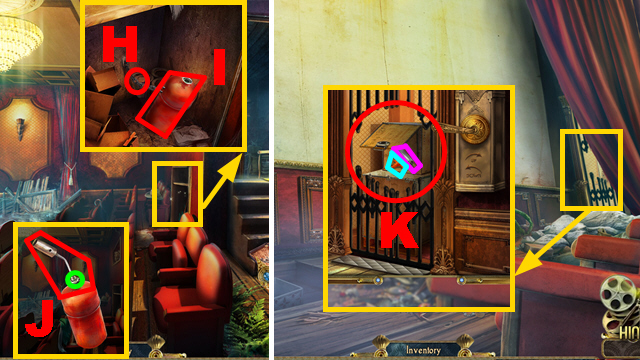
- Take the POPCORN BOX (H).
- Turn left.
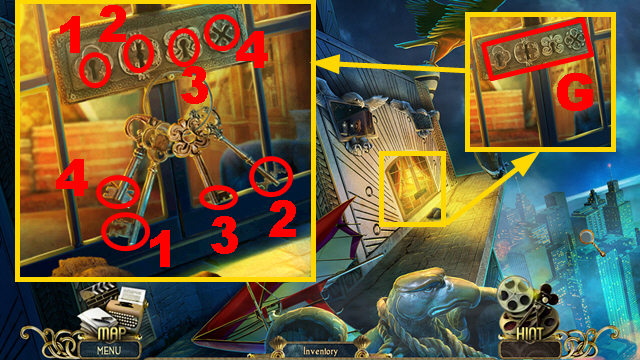
- Place the POPCORN BOX (I) and KNOB (J); turn the knob.
- Take the CUPBOARD KEY (K) and LOCK PART (L).
- Insert the CUPBOARD KEY (M); turn it.
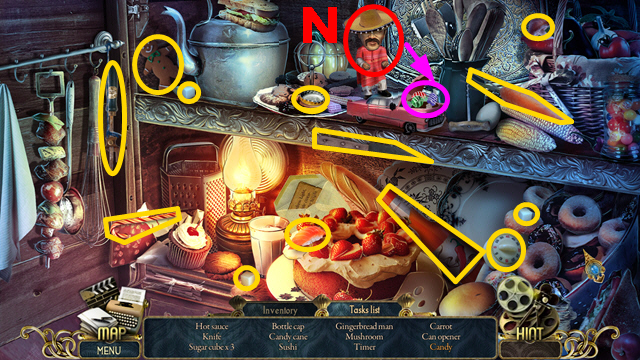
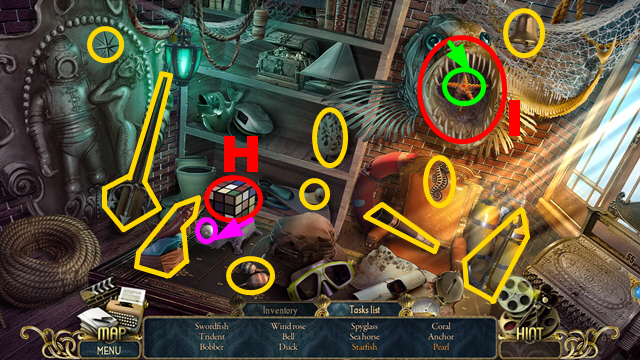
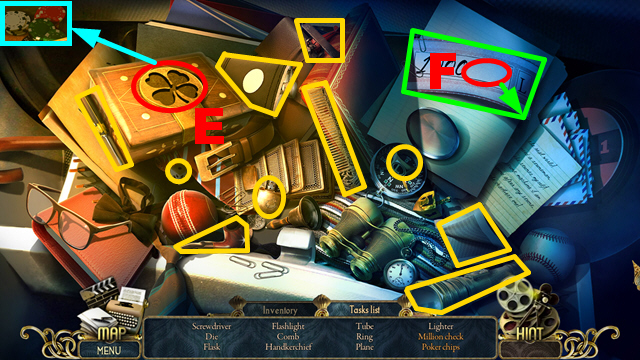
- Play the HOP.
- Place the GUITAR (N).
- You receive the HOT SAUCE.
- Walk down.
Chapter 2: The Screen
- Use the HOT SAUCE (O).
- Move forward, turn left.
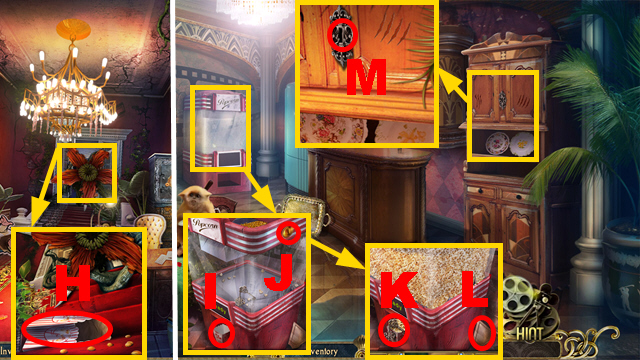
- Take the SCARF (P).
- Walk down twice.
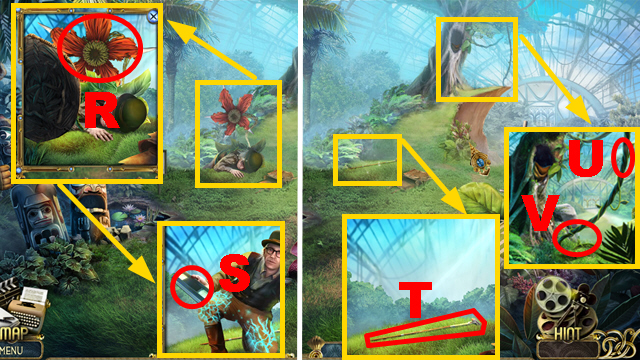
- Collect the LIGHTBULB with the SCARF (Q).
- Place the LIGHTBULB (R).
- Take the GOLDEN TRUMPET (S) and BLUE TOKEN (T).
- Move forward.
- Take the RED TOKEN (U).
- Walk down twice.
- Place the BLUE TOKEN and RED TOKEN (V).
- Play the mini-game.
- Solution: W, X, Y, Z, X.
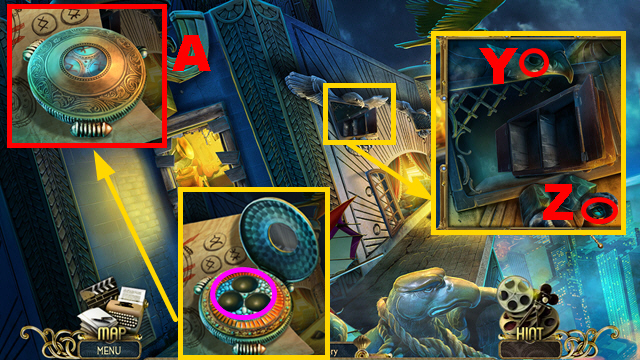
- Take the CADUCEUS (A) and LOCK PART (B).
- Move forward twice.
- Take the ZIPPER PULL (C) and GOLF CLUB (D).
- Use the GOLF CLUB (E); take the LOCK PART (F) and NEEDLE AND THREAD (G).
- Walk down.

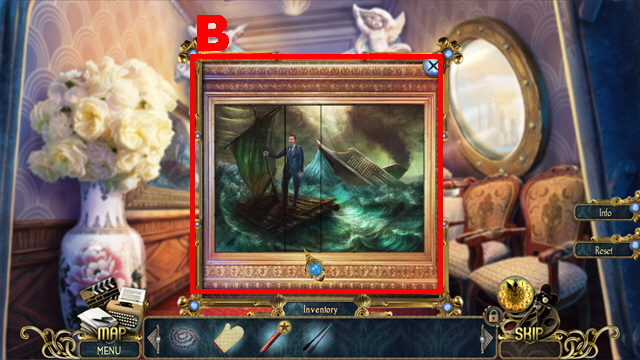
- Take the BROKEN LOCK (H).
- Examine the BROKEN LOCK.
- Place the LOCK PARTS (1-3).
- Take the LOCK MECHANISM.
- Place the LOCK MECHANISM (I).
- Activate the lock.
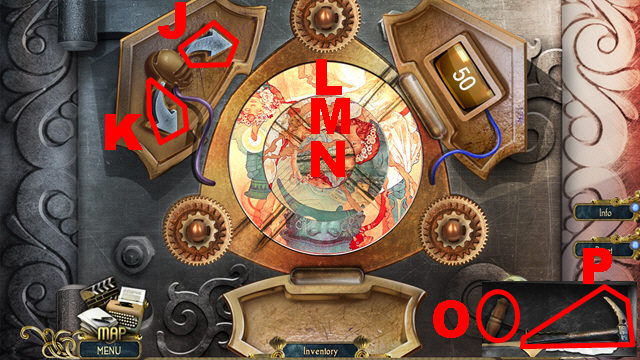
- Play the mini-game.
- Solution: M, Jx3, L, K, N, Kx2.
- Take the CORKSCREW (O) and ICE PICK (P).
- Turn left.
- Use the ICE PICK (Q).
- Walk down, move forward.
- Open the box; use the NEEDLE AND THREAD (R).
- Open the box; take the BANANA (S).
- Walk down, turn left.
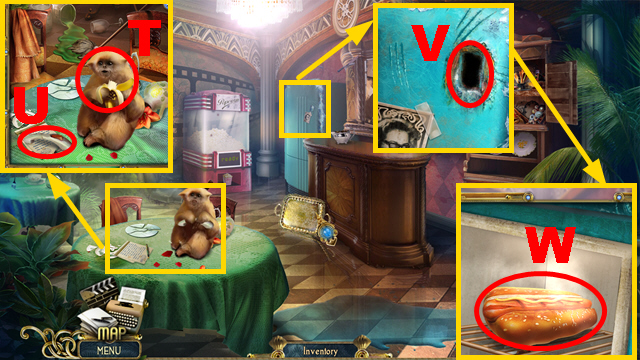
- Give the BANANA to the monkey (T); take the REFRIGERATOR HANDLE (U).
- Place the REFRIGERATOR HANDLE (V); pull it.
- Take the HOTDOG (W).
- Walk down, move forward.
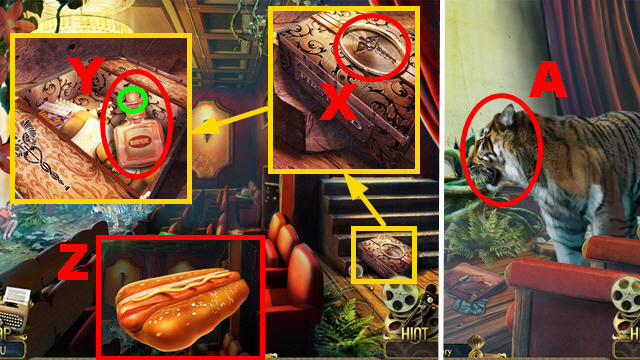
- Place the CADUCEUS (X).
- Use the CORKSCREW (green); take the MORPHINE (Y).
- Examine the HOTDOG.
- Pour the MORPHINE over the HOTDOG (Z); take the DRUGGED HOTDOG.
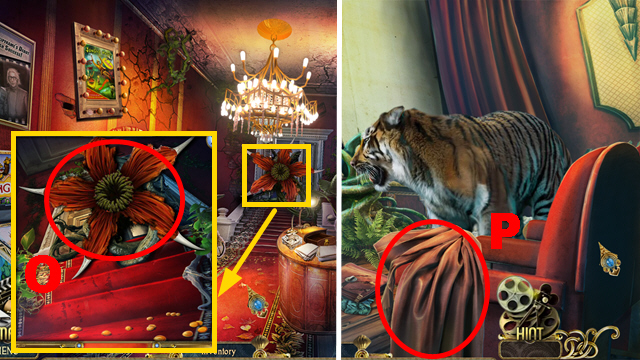
- Turn left.
- Give the DRUGGED HOTDOG to the tiger (A).
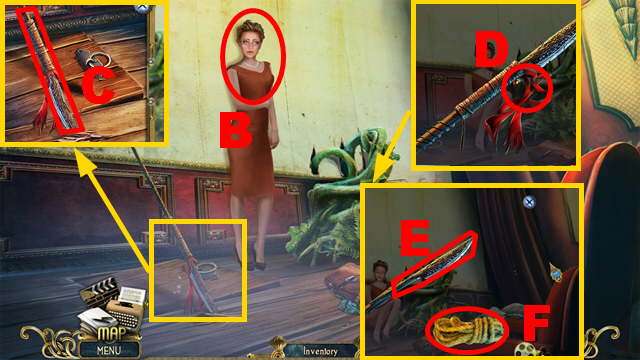
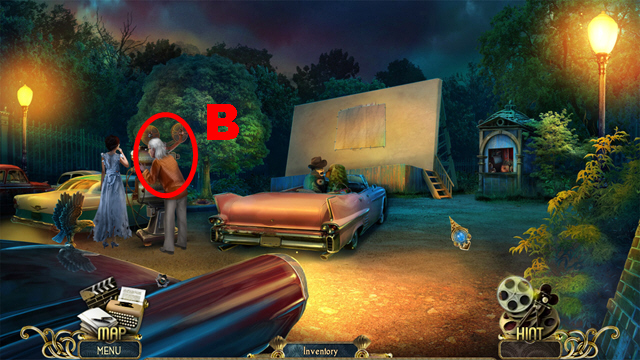
- Talk to the woman (B).
- Take the SPEAR (C).
- Examine the SPEAR; remove the ribbon (D).
- Take the SPEAR BLADE (E) and ROPE (F).
- Move aside the curtain; take the PAINT THINNER (G).
- Use the SPEAR BLADE (H).
- Play the HOP.
- Place the ZIPPER PULL (I) and BATTERY (J).
- You receive the PENCIL.
- Walk down.
- Take the poster (purple); use the PENCIL (K).
- Pull the poster; take the PROJECTION-ROOM KEY (L).
- Insert the PROJECTION-ROOM KEY (M); open the door.
- Turn right.
- Take the ELEVATOR LEVER (N); examine the note (O).
- Walk down, turn left.

- Place the ELEVATOR LEVER (P); pull it.
- Go to the Snack Bar.
- Use the PAINT THINNER (Q); take the MOP (R).
- Go to the Projection Room.
- Examine the poster (S).
- Use the MOP (T); take the SILVER TRUMPET (U) and TORCH TIP (V).
- Place the GOLDEN TRUMPET (W) and SILVER TRUMPET (X).

- Play the mini-game.
- Solution: Y, Zx3.
- Take the MAGNET (A).
- Use the MAGNET (B); take the PIN (C).
- Walk down, turn left.
- Remove the trapdoor; take the TORCH VALVE (D).
- Use the PIN (E); take the SCREWDRIVER (F) and NIPPERS (G).
- Walk down.
- Use the NIPPERS (H); take the GAS (I).
- Examine the GAS; place the TORCH TIP (J) and TORCH VALVE (green).
- Turn the valve; take the BLOWTORCH.
- Turn left.
- Use the BLOWTORCH (K).
- Open the box; take the PROJECTOR BULB (purple) and DESK-SET KEY (blue).
- Walk down, turn right.
- Place the PROJECTOR BULB (L).
- Use the SCREWDRIVER (orange); take the TORN FILM (green).
- Walk down twice.
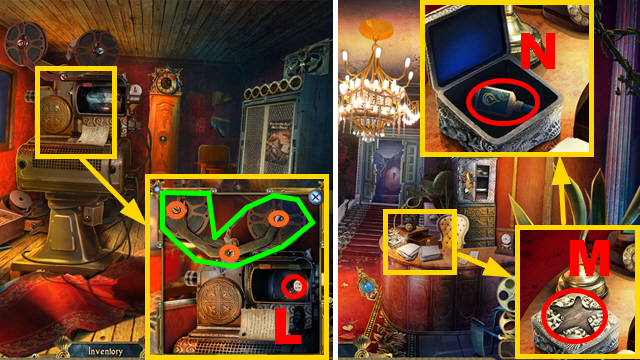
- Place the DESK-SET KEY (M); open the box. Take the GLUE (N).
- Move forward, turn right.
- Examine the TORN FILM.
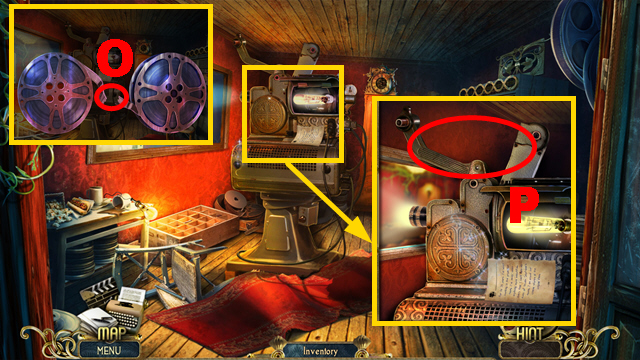
- Use the GLUE (O); take the FILM.
- Place the FILM (P).
- Walk down, turn left, and move forward.
Chapter 3: The Jungle
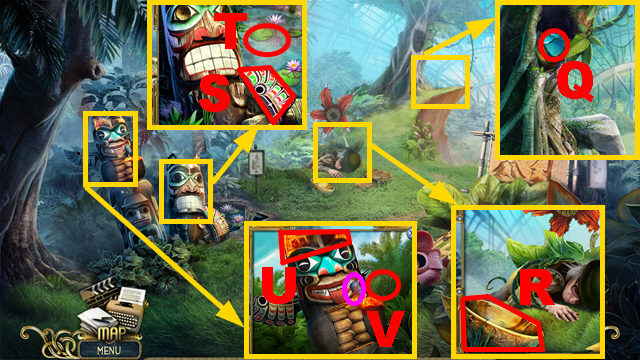
- Open the bag; take DIAMOND EYE 1/2 (Q). Take the BOWL (R) and WING (S).
- Place the BOWL (T) to acquire the BOWL OF WATER.
- Use the BOWL OF WATER (U); take the STATUE (purple).
- Place the WING (V).

- Play the mini-game.
- Solution: (W).
- Take the SHIELD (X).
- Place the STATUE (Y).
- Play the mini-game.
- Solution: Zx2, Cx4, Zx2, Cx5, Z, Ax6, Zx2, Bx4, Zx2, Cx4, Zx2, Cx5, Ax2, Bx3, Ax2, Cx3, Ax2.
- Take DIAMOND EYE 2/2 (green).

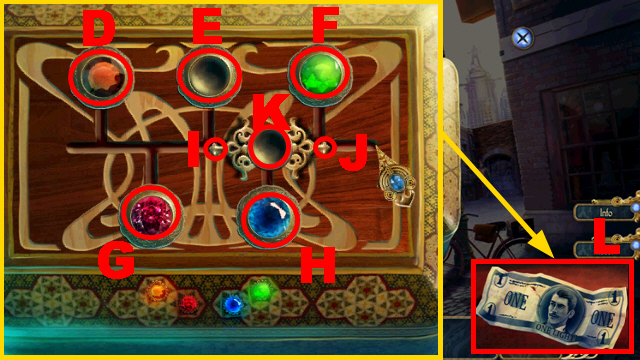
- Place 2 DIAMOND EYES (D).
- Play the mini-game.
- Solution: H, K, O, F, I, L, M, P, F, H, J, K, N, G, E, F, J, H, M, N, O, G, L, K, H, G, F, L, J, K, G, K.
- Take the MACHETE (Q).
- Use the SHIELD and MACHETE (R); take the VIDEOTAPE (S).
- Take the CANE (T).
- Use the CANE (U); grab the vine (V).
- Remove the tarp (W).
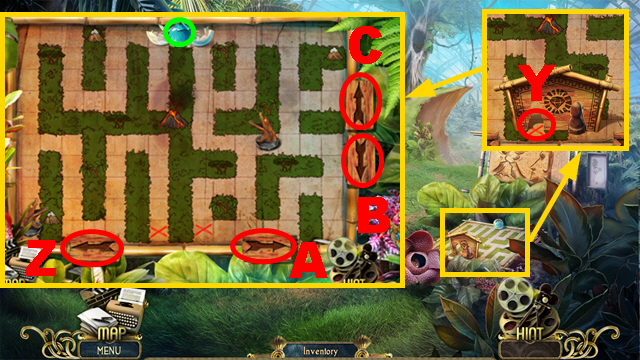
- Take the IRON KEY (X).
- Place the IRON KEY (Y); take the GEAR (Z).
- Take the TUNING FORK (A).
- Use the TUNING FORK (B); take the SHIP (blue).
- Play the HOP.
- Place the GEAR (C) and SHIP (D).
- You receive the GOLDEN KEY.
- Place the GOLDEN KEY (E).
- Play the mini-game.
- Solution: Fx2, Gx2.
- Move forward.
- Take the LEATHER GLOVE (H), newspaper (I), and MOVIE AWARD (J).
- Throw the MOVIE AWARD (K).
- Collect the SHARD OF GLASS with the LEATHER GLOVE (L).
- Take the SPANNER (M); examine the note (N).
- Use the SPANNER (purple); take the FUSE (O).
- Replace the broken fuse (P) with the FUSE; place the VIDEOTAPE (Q).
- Take the LIGHTHOUSE FIGURE (R).
- Walk down.
- Use the SHARD OF GLASS (S).
- Place the LIGHTHOUSE FIGURE (T).
- Play the mini-game.
- Solution: (U).
- Take the FILE (V).
- Move forward.
- Use the FILE (W).
- Turn left.
Chapter 4: The Pier
- Take the SAW HANDLE (X); place the ROPE (Y).
- Walk down.
- Place the SAW HANDLE; take the SAW (Z).
- Turn left.
- Use the SAW (A).
- Take the HEX KEY (B).
- Walk down.
- Use the HEX KEY (C); take the BONE (D).
- Turn left.
- Take the PALETTE (E).
- Walk down twice.
- Place the PALETTE (F); push it.
- Take the BRUSH AND PAINT (G).
- Go to the Pier.
- Play the HOP.
- Place the BRUSH AND PAINT (H) and BONE (I).
- You receive the SWORDFISH.
- Use the SWORDFISH (J); take the SAILCLOTH (K).
- Place the SAILCLOTH (L).
- Take the BUCKET (M) and LETTER (N).
- Use the BUCKET (O).
- Move forward.
- Take the BOX (P); place the wedge (Q).
- Examine the note (R).
- Take the EMPTY OILCAN (S).
- Walk down twice.
- Place the EMPTY OILCAN (T) to acquire the OILCAN.
- Go to the Hold.
- Use the OILCAN (U); pull the handle (green).
- Take the BILL (V).
- Take the PUMP (W).
- Place the PUMP (X); take the WHEEL (Y) and REEL (purple).
- Walk down.
- Place the WHEEL (Z); take the VALVE (A).
- Walk down.
- Take the CHAIN (B).
- Examine the BOX; place the REEL (C).
- Play the mini-game.
- Solution: Ix2, D, Jx3, K, I, E, Ix2, K, Jx4, F, Ix2, K, J, H, J, K, Ix2, E, J, K.
- Take the BILL (L).
- Go to the Hold.
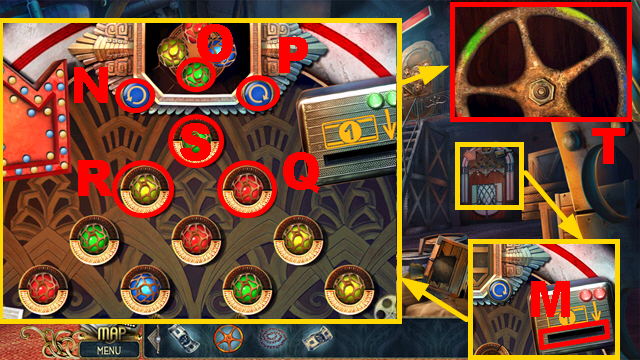
- Place 2 BILLS (M).
- Play the mini-game.
- Solution: Px2, O, P, O, Px2, O, Q, R, N, O, P, O, N, O, Q, S, Px2, O, Px2, O, P, O, P, O.
- Take the VALVE (T).
- Place 2 VALVES (U).
- Play the mini-game.
- Solution: (V).
- Move forward.
- Take the OVEN GLOVE (W), STICK (X), and TONGS (Y).
- Examine the medallion (Z) and portrait (A).
- Play the mini-game.
- Solution: (B).
- Take the MALLET (C).
- Walk down.
- Use the OVEN GLOVE (D); collect the ANCHOR with the TONGS (E).
- Move forward.
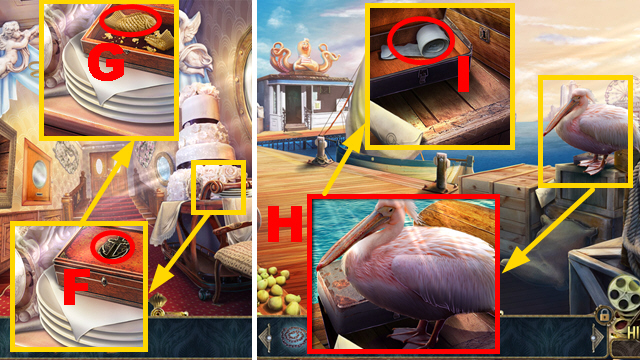
- Place the ANCHOR (F); take the LITTLE FISH (G).
- Walk down twice.
- Give the LITTLE FISH to the bird (H).
- Open the box; take the GAUZE (I).
- Walk down.

- Examine the STICK.
- Place the GAUZE (green); take the TORCH PIECE (J).
- Place the TORCH PIECE (K) to acquire the TORCH.
- Go to the Hold.
- Place the TORCH (L) to acquire the BURNING TORCH.
- Use the MALLET (M); take the DYNAMITE (N).
- Move forward.
- Place the DYNAMITE (O); use the BURNING TORCH (green).
- Move forward.
Chapter 5: The Deck
- Take the CHINESE STICKS (P).
- Collect the BUTTON (Q) with the CHINESE STICKS.
- Walk down.
- Place the BUTTON (R); push it.
- Open the blanket; take the VIOLIN (S).
- Move forward.
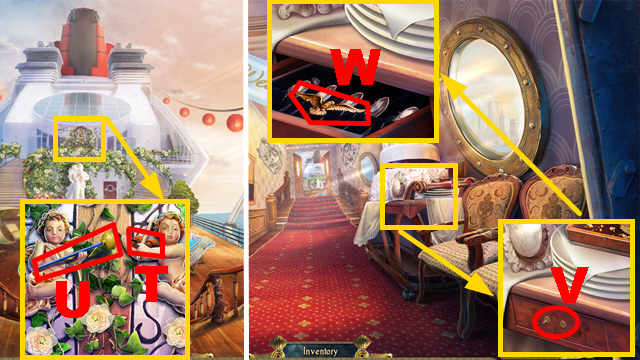
- Place the VIOLIN (T); take the SUCTION CUP ARROW (U).
- Walk down.
- Place the SUCTION CUP ARROW (V); take the EAGLE (W).
- Walk down three times.
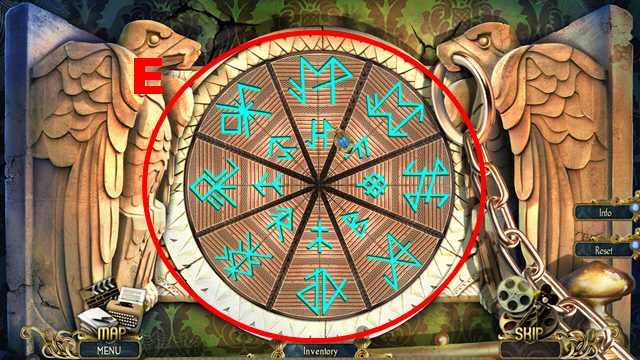
- Place the EAGLE (X).
- Play the mini-game.
- Clue: (Y).
- Solution: (Z).
- Take the VACUUM (A).
- Walk down.
- Use the VACUUM (blue); take the SECATEURS (B).
- Go to the Deck.
- Use the SECATEURS (C).
- Move forward.
- Take the LEVER (D), CAPTAIN'S KEY (E), and CROSS KEY (green).
- Examine the note (F).
- Walk down.
- Insert the CAPTAIN'S KEY into the lock (G); turn it.
- Place the LEVER (H) and CHAIN (I); turn the lever.
- Take the LIFE BUOY (J) and FISHING ROD (purple).
- Walk down five times.
- Use the CROSS KEY (K); take the HIDDEN CHAMBER LOCK PIECE (L).
- Go to the Hold.
- Collect the CATCH (M) with the FISHING ROD.
- Examine the CATCH.
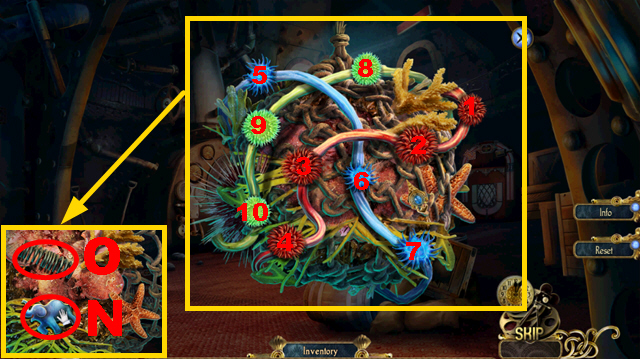
- Play the mini-game.
- Solution: 1-10.
- Take the ELEPHANT (N) and SPRING (O).
- Walk down three times.

- Place the ELEPHANT (P); take the PRISM (Q).
- Go to the Deck.
- Replace the broken spring with the SPRING (R).
- Take the GROOM HARE (S).
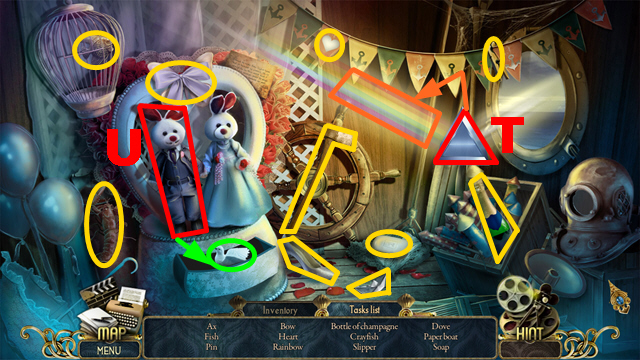
- Play the HOP.
- Place the PRISM (T) and GROOM HARE (U).
- You receive the SOAP.
- Move forward.
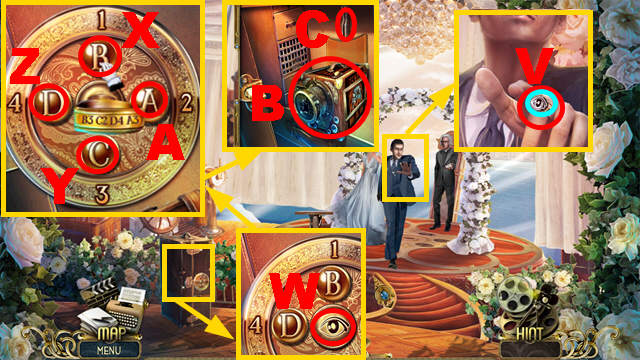
- Use the SOAP (V); take the SIGNET RING (blue).
- Place the SIGNET RING (W).
- Play the mini-game.
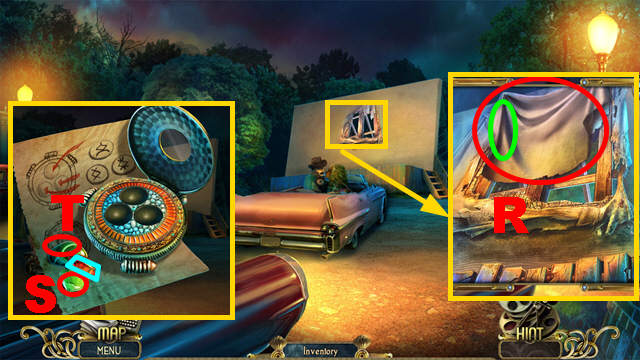
- Solution: X to 3, Y to 2, Z to 4, A to 3.
- Take the CAMERA (B) and TWEEZERS (C).
- Walk down five times.
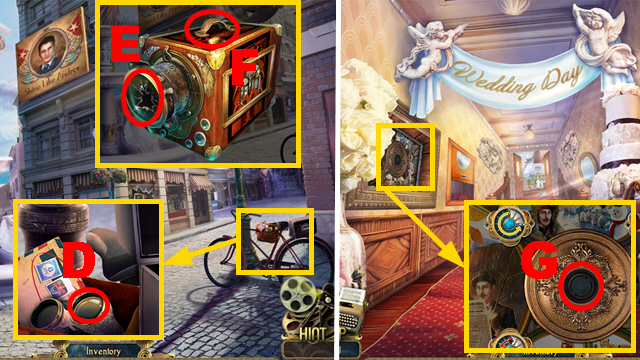
- Collect the LENS (D) with the TWEEZERS.
- Examine the CAMERA.
- Replace the broken lens (E) with the LENS; open the CAMERA (F).
- Go to the Corridor.
- Place the HIDDEN CHAMBER LOCK PIECE (G).
- Play the mini-game.
- Solution: L, K, J, K, I, Hx2, Ix2, L, K, J, K, Jx3, I, Hx2, I, Hx2, Ix2, H, Ix3, Hx2, Ix3, H, Ix2, H, Ix2, Hx2, I, L, Jx2, Kx2, Jx2, Kx2, J, L.
- Take the VIDEOTAPE (M).
- Move forward twice.

- Examine the CAMERA; place the VIDEOTAPE (N).
- Take the CAMERA WITH PHOTO.
- Place the CAMERA WITH PHOTO (O).
- Remove the cane (P).
- Give the LIFE BUOY to the woman (Q).
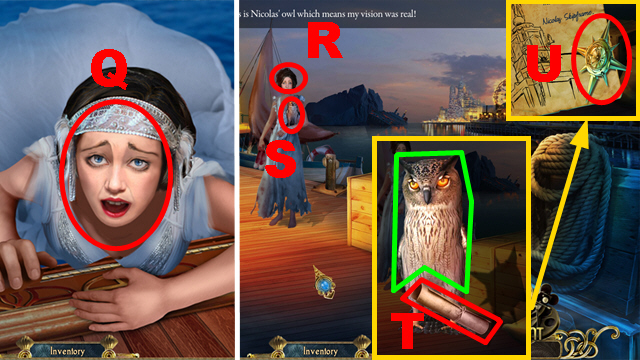
- Talk to the woman (R); take the OWL MAIL (S).
- Examine the OWL MAIL.
- Open the note (T); take the WIND CHART (U) and OWL (green).
- Walk down.
Chapter 6: Back to City Center
- Place the WIND CHART (V); open the compartment.
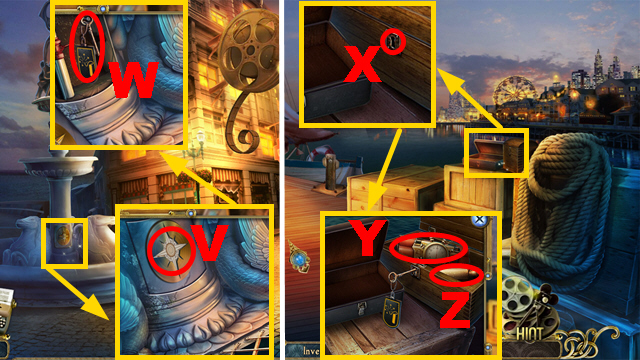
- Take the CHEST KEY (W).
- Turn left.
- Use the CHEST KEY (X); take the DYNAMITE (Y) and GLOWING STICK (Z).
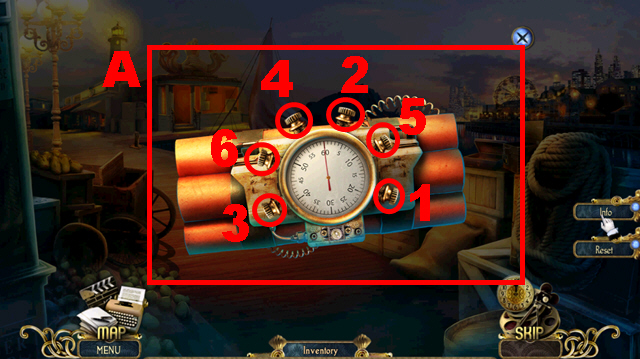
- Examine the DYNAMITE.
- Play the mini-game.
- Solution: 1-6.
- Take the CHARGED BOMB (A).
- Walk down.
- Place the CHARGED BOMB (B).
- Turn right.
- Take the BOTTLE OPENER (C); remove the broken lever (D).
- Take COLLECTIBLE CARD 1/3 (E) and the WEIGHT (F).
- Use the BOTTLE OPENER (purple); take the WATER BOTTLE (G).
- Use the WATER BOTTLE (H); take the CHESS PIECE (I).
- Place the CHESS PIECE (J).
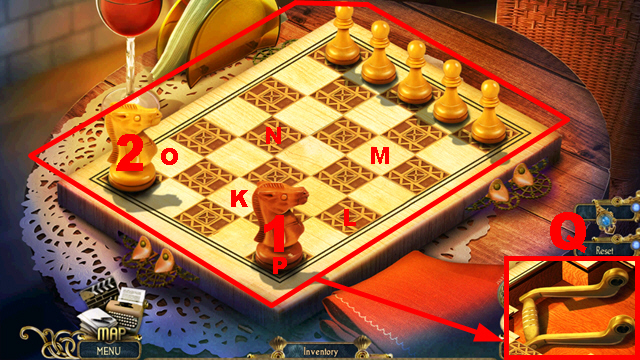
- Play the mini-game.
- Solution: 1-K, 1-L, 1-M, 1-N, 2-K, 1-O, 2-P, 2-K.
- Take the LEVER (Q).
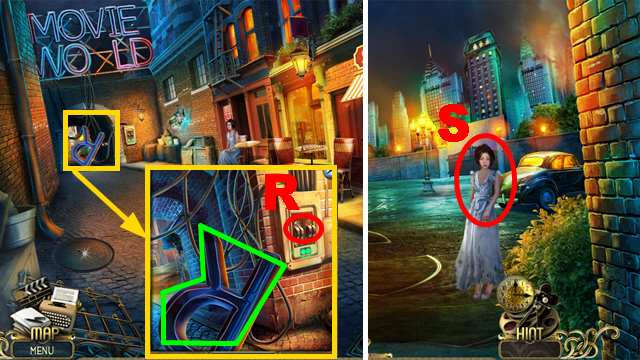
- Place the LEVER (R); pull it.
- Remove the letter (green).
- Move forward.
- Talk to the woman (S).
- Take the MANHOLE OPENER (T) and COLLECTIBLE CARD 2/3 (U).
- Walk down.
- Use the MANHOLE OPENER (V); throw the GLOWING STICK (W).
- Move forward.
- Use the OWL to collect the HOOK (X).
- Walk down.
- Place the HOOK (Y); turn the handle (Z).
- Take the HACKSAW (A).
- Move forward.
- Use the HACKSAW (B); answer the phone (C).
- Take the CLOSED BOX (green), MOON AMULET (purple), and COLLECTIBLE CARD 3/3 (blue).
- Open the book; take the ENGRAVING PIECE (D).
- Walk down.
- Place the MOON AMULET (E); take the LEVER (F).
- Walk down.
- Place the LEVER (G); turn it.
- Take the SPORTS SHOP KEY (H).
- Turn right.
- Insert the SPORTS SHOP KEY into the lock (I).
- Move forward.
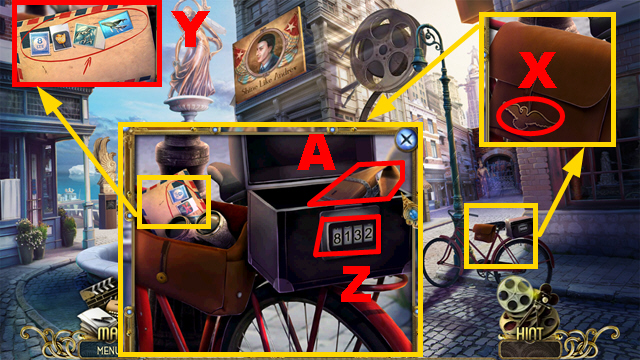
- Take the TOY BAT (J).
- Walk down.

- Play the HOP.
- Place the TOY BAT (K) and 3 COLLECTIBLE CARDS (L).
- You receive the HANG-GLIDER.
- Move forward.
- Use the HANG-GLIDER (M).
- Take the FOUR-LEAF CLOVER (N) and BOX TILE (O).
- Examine the window (P); you receive the ENGRAVING PIECE.
- Open the sack (Q).
- Walk down.
- Place 2 ENGRAVING PIECES (R).
- Play the mini-game.
- Solution (S): Green-left, purple-up, 1, green-right x2, 3, purple-down, 2, 2, 3, 3, purple-down, 2, 2, 4, 3, 3, 2, 1.
- Take the SILVER GEAR (T).
- Turn left.
- Place the SILVER GEAR (U); take the PLIERS (V).
- Walk down.
- Use the PLIERS (W).
- Turn right.
- Take the FELT PEN (X), BLUE LETTER (Y), and FILTER (Z).
- Examine the wallet (A).
- Walk down, turn left.
- Use the FILTER (B) to acquire the RED LETTER.
- Go to the Car.
- Place the BLUE LETTER and RED LETTER (C).
- Play the mini-game.
- Solution: (D).
- Play the HOP.
- Use the FOUR-LEAF CLOVER (E) and FELT PEN (F).
- You receive the BUNCH OF KEYS.
- Walk down, turn left.
- Place the BUNCH OF KEYS (G).
- Play the mini-game.
- Solution: 1-4.
- Move forward.
Chapter 7: The Imprisonment Place
- Take the IRON (H) and RULER (I).
- Examine the note (J).
- Use the RULER (K); take the BOX TILE (L) and SNOWFLAKE AMULET (M).
- Examine the letter (N).
- Examine the CLOSED BOX.
- Place 2 BOX TILES (O).
- Play the mini-game.
- Solution: (P).
- Take the RUNE PIECE (Q) and GOLDEN GEAR (R).
- Walk down.

- Place the GOLDEN GEAR (S); take the HAMMER (T) and FORK (U).
- Walk down twice.
- Use the HAMMER (V); take the RUNE PIECE (purple).
- Go to the Car.
- Place the SNOWFLAKE AMULET (W); take the FROZEN BADGE (X).
- Use the FORK (blue).
- Go to the Imprisonment Place.
- Take the IRON BALL (Y); place the IRON (Z).
- Hold the FROZEN BADGE next to the iron (A) to receive the EAGLE BADGE.
- Go to the Car.

- Place the EAGLE BADGE (B); take the RUNE PIECE (C).
- Go to the Imprisonment Place.
- Place 3 RUNE PIECES (D).
- Play the mini-game.
- Solution: (E).
- You receive the NIPPERS.
- Walk down twice.
- Use the NIPPERS to collect the WIRE SPOOL (F).
- Turn right.
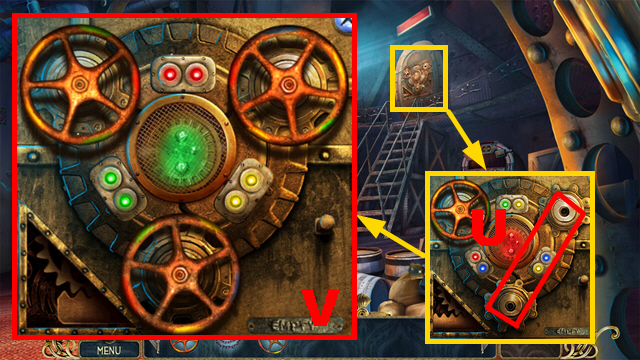
- Place the WIRE SPOOL (G).
- Play the mini-game.
- Solution: 1-3.
- Push the button (green).
- Take the BROKEN SAW (H) and SLINGSHOT FRAME (I).
- Remove the hat; take the BEARING (J).
- Examine the note (K).
- Take the ERASER (L).
- Examine the SLINGSHOT FRAME.
- Place the ERASER (M) and IRON BALL (blue); take the SLINGSHOT.
- Walk down, turn left.
- Use the SLINGSHOT (N); take the FIRE PANEL KEY (O).
- Walk down, turn right.
- Use the FIRE PANEL KEY (P); take the FIRE EXTINGUISHER (Q).
- Use the FIRE EXTINGUISHER (R); take the SAW BLADE (S).
- Examine the BROKEN SAW.
- Move the plunger (T); replace the broken blade with the SAW BLADE (U).
- Take the CIRCULAR SAW.
- Walk down, turn left.
- Use the CIRCULAR SAW (V); take the BOARD (W).
- Move forward.
- Place the BOARD (X); use the WEIGHT (purple).
- Open the chest; take the BOOKEND (Y).
- Place the BOOKEND (Z).
- Play the mini-game.
- Solution: (blue).
- Take the STAPLER (A) and STAR SCREWDRIVER (B).
- Walk down twice, turn right.
- Use the STAR SCREWDRIVER (C) to acquire the DUMMY HAND.
- Walk down, turn left.
- Use the DUMMY HAND (D); take the SHOVEL (E).
- Walk down, turn right.
- Use the SHOVEL (F); take the MUSIC AMULET (green).
- Place the MUSIC AMULET (G); take the RECORD (H).
- Place the BEARING (I); turn the switch (J).
- Open the fan; take the PROPELLER (K).
- Walk down, turn left.
- Play the HOP.
- Place the PROPELLER (L) and RECORD (M).
- You receive the ROCKER BLOTTER.
- Move forward.
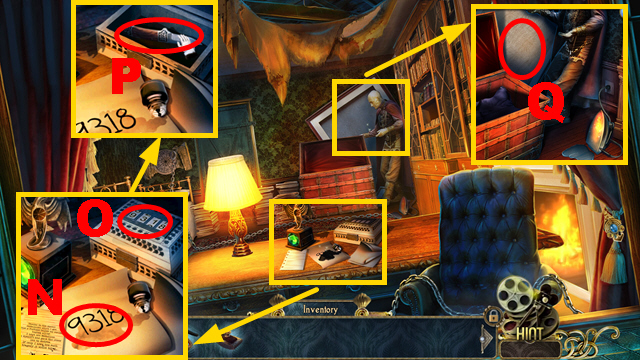
- Use the ROCKER BLOTTER (N); enter the correct code '9318' (O).
- Take the KNIFE (P).
- Use the KNIFE; take the CLOTH PIECE (Q).
- Go to the Drive-in Theater.
- Place the CLOTH PIECE (R); use the STAPLER (green).
- You receive the SCHEME AMULET.
- Examine the SCHEME AMULET; open it.
- Take the EMERALD (S), RUBY (blue), and MALACHITE (T).
- Go to the Imprisonment Place.
- Place the EMERALD (U); take the RUNE AMULET (V).
- Walk down twice.
- Place the RUBY (W); take the RUNE AMULET (X).
- Turn left.
- Place the MALACHITE (Y); take the RUNE AMULET (Z).
- Inspect the SCHEME AMULET.
- Place 3 RUNE AMULETS (purple).
- Take the PROJECTOR PART (A).
- Walk down, turn right.
- Give the PROJECTOR PART to the man (B).
- Congratulations, you have completed Surface: Reel Life.
Created at: 2014-05-04