

Walkthrough Menu
- General Tips
- Chapter 1: Home
- Chapter 2: The Pier
- Chapter 3: The Prison Cell
- Chapter 4: The Library
- Chapter 5: The Street of Rustling Wings
- Chapter 6: The Life Source
General Tips
- This is the official guide for Surface: Return to Another World.
- This guide will not mention each time you have to zoom into a location; the screenshots will show each zoom scene.
- Hidden-object puzzles are referred to as HOPs. This guide will not show HOP solutions. It will identify the location of the HOP and the inventory item acquired.
- This guide will show solutions for non-random puzzles. Please read the in-game instructions for each puzzle.
- In this game, you will sometimes have to select the new scene to trigger dialog, cut-scenes, or tasks prior to interacting with the scene.
Chapter 1: Home
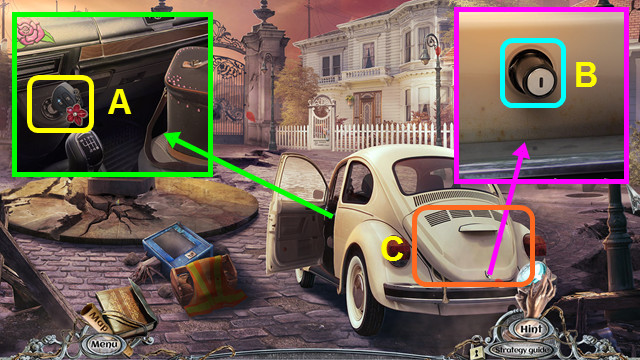
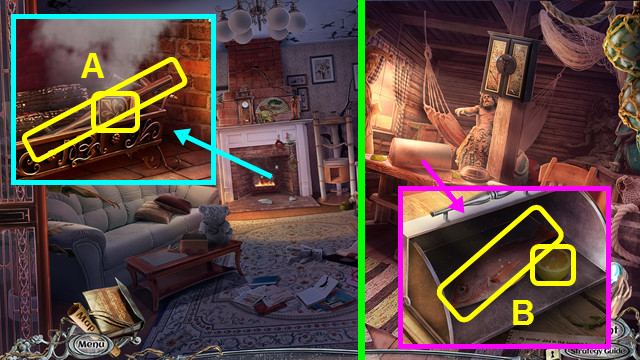
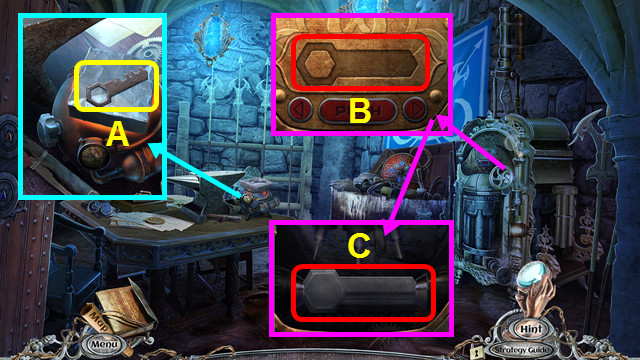
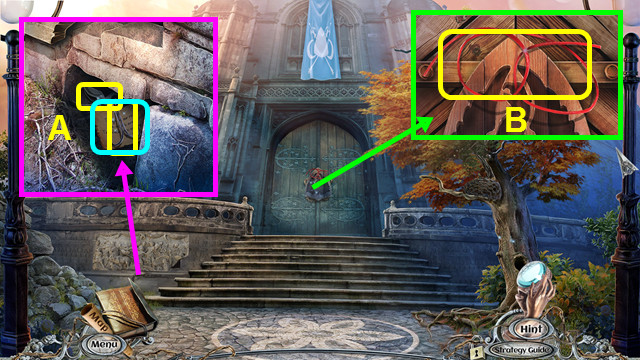
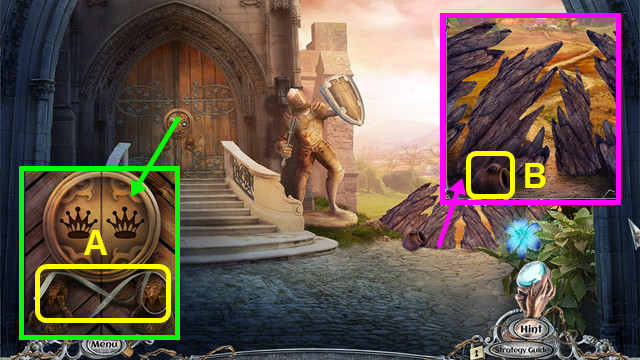
- Take the CAR KEYS (A).
- Use the CAR KEYS (B).
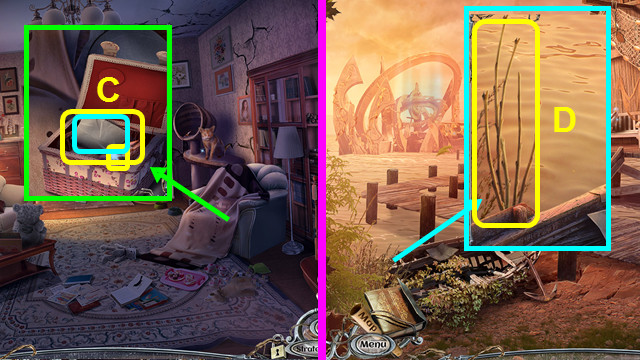
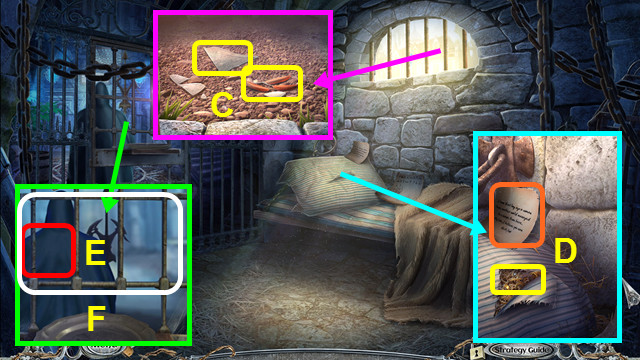
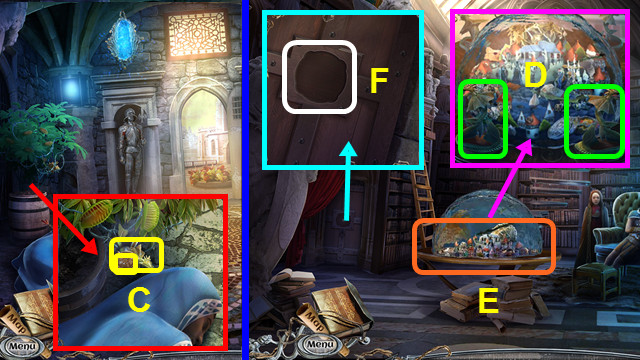
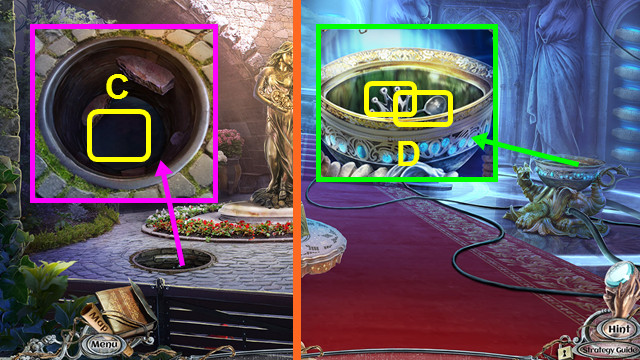
- Play the HOP; earn the HACKSAW (C).
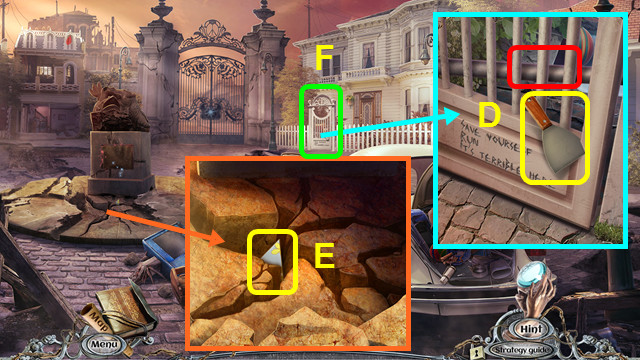
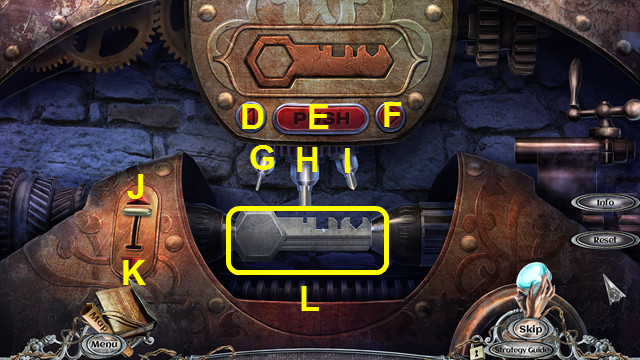
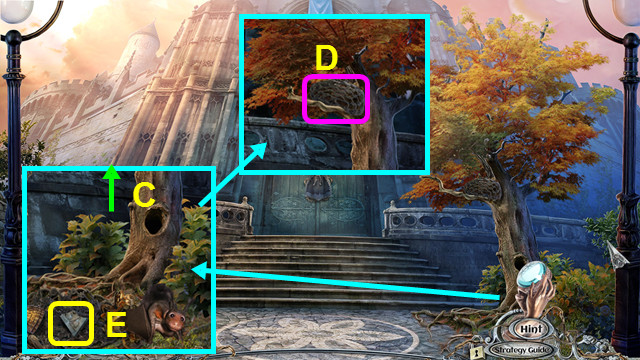
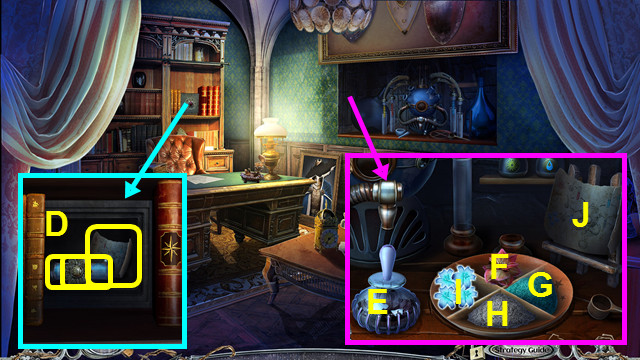
- Take the PAINT SCRAPER; use the HACKSAW (D).
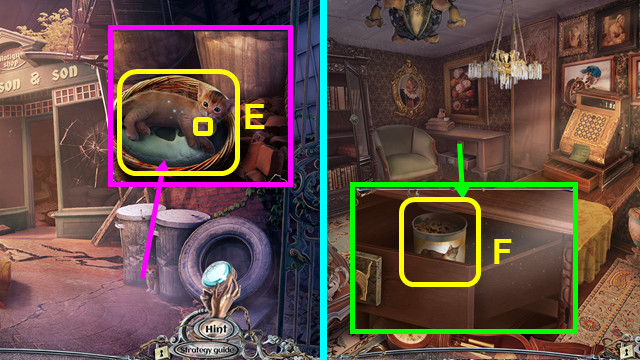
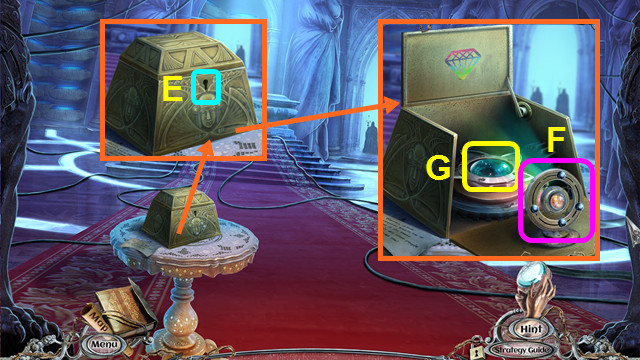
- Use the PAINT SCRAPER; take the MOSAIC PIECE (E).
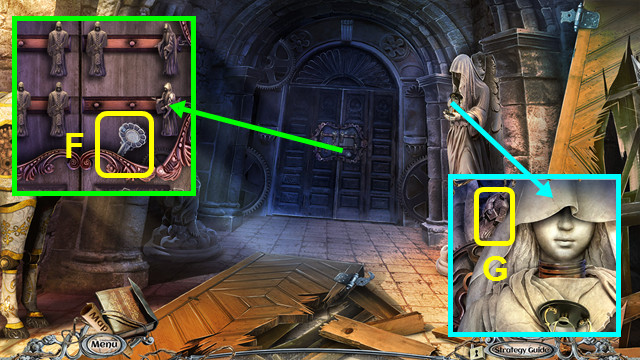
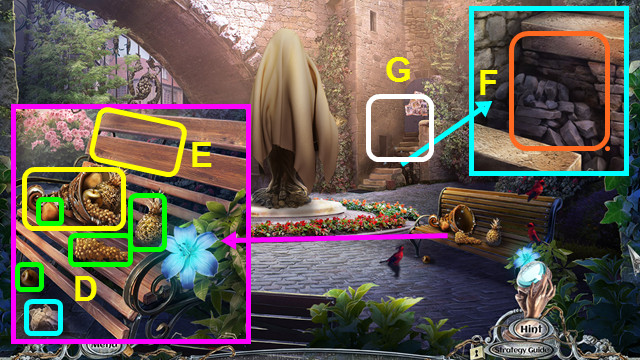
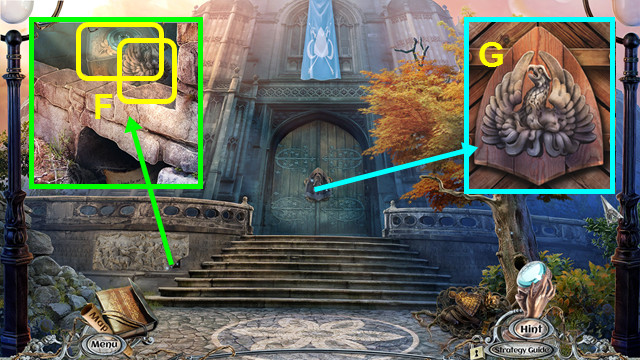
- Enter the Courtyard (F).
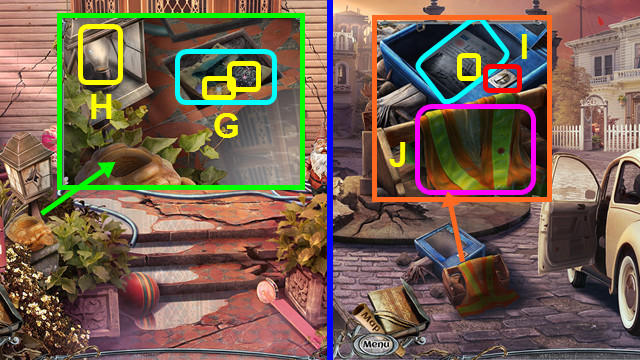
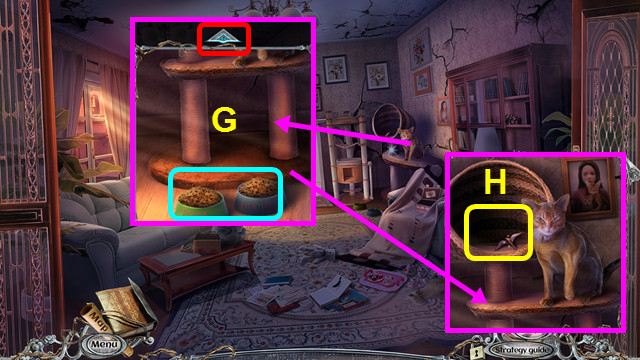
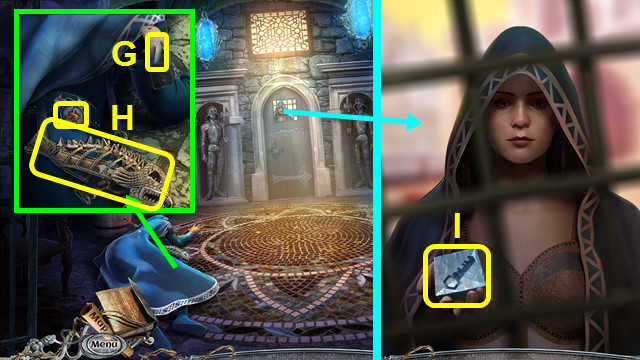
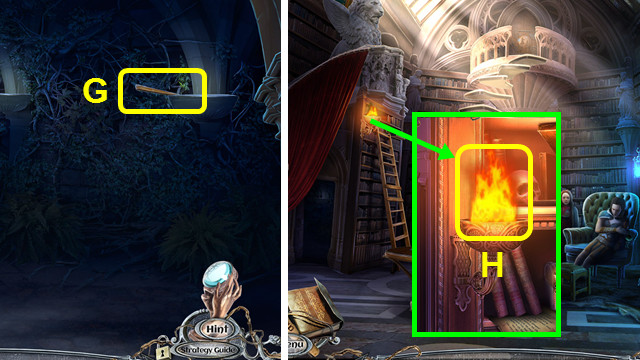
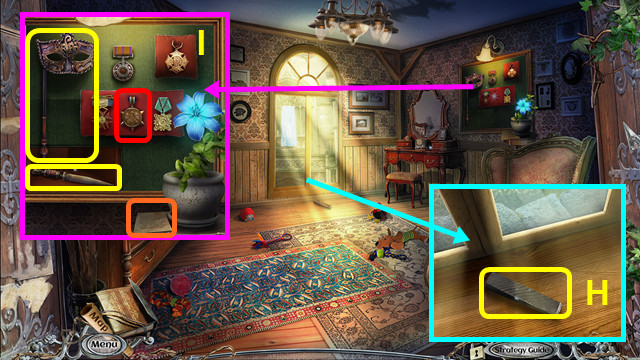
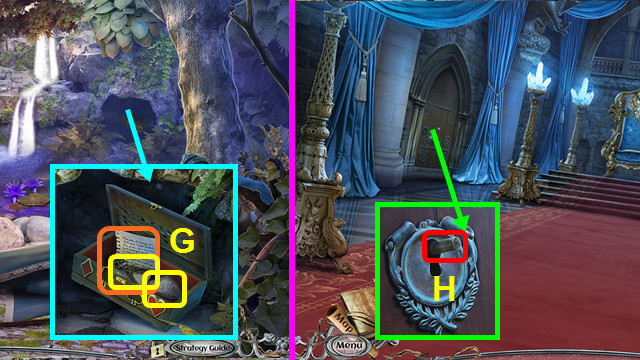
- Use the PAINT SCRAPER; take the HEART MEDALLION, COINS, and read the note (G).
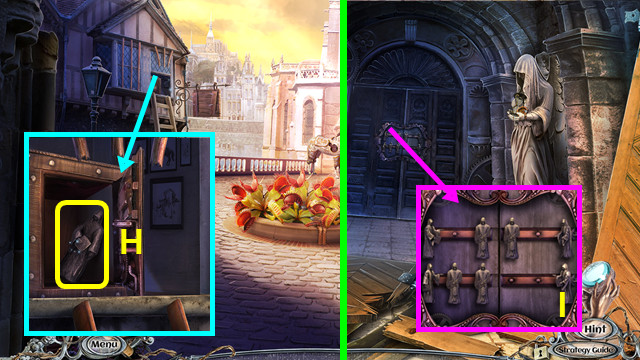
- Open the lamp; take the LIGHT BULB (H).
- Walk down.
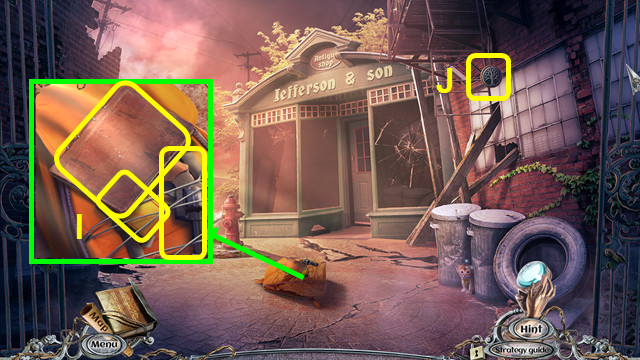
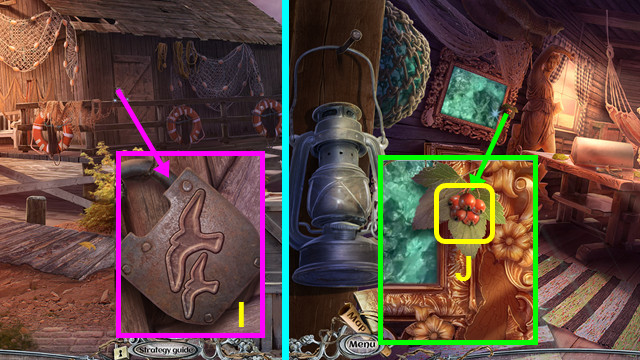
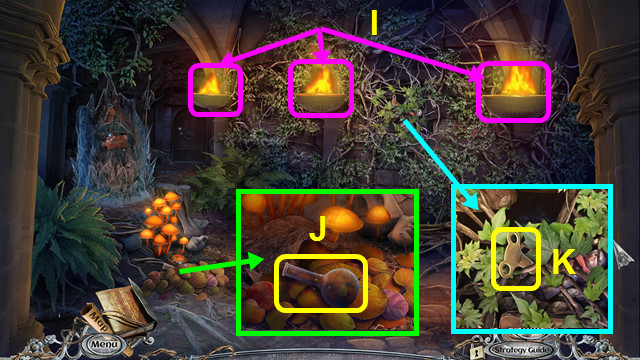
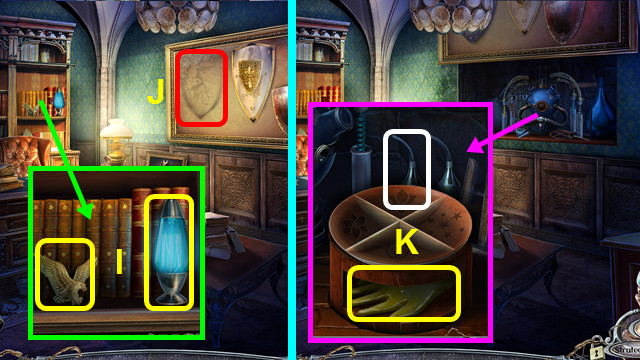
- Use the COINS; take the PAPER CLIP and read the paper (I).
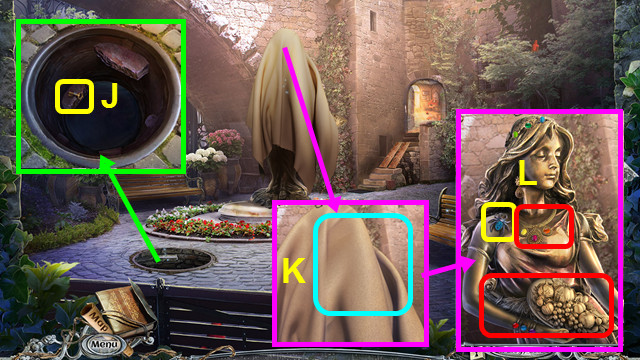
- Remove the safety vest (J).
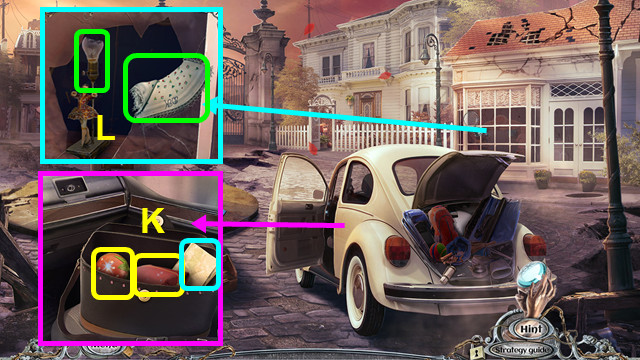
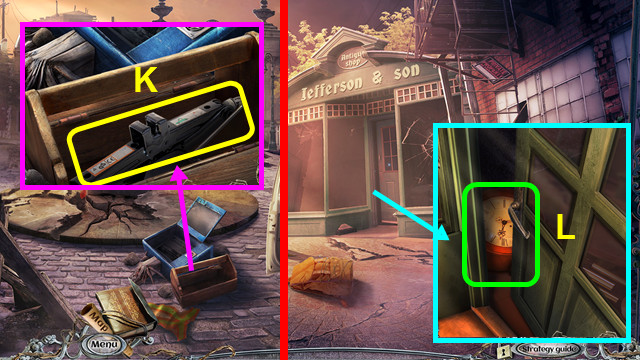
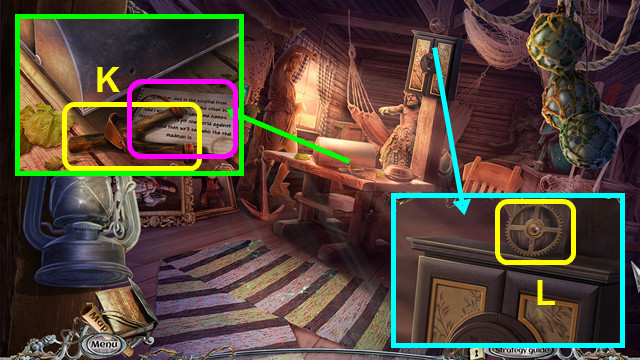
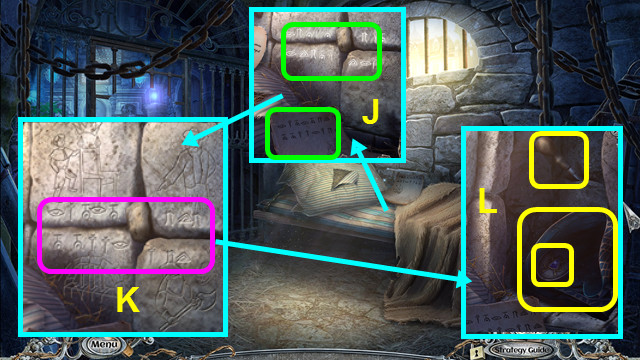
- Place and press the HEART MEDALLION; take the MAKEUP BAG, STRAWBERRY, and read the note (K).
- Combine the MAKEUP BAG and PAPER CLIP; take the HANDKERCHIEF (inventory).
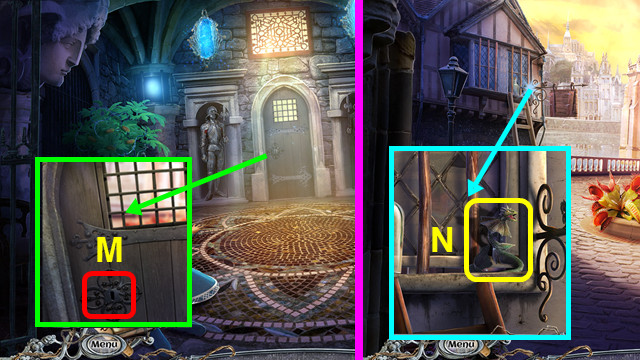
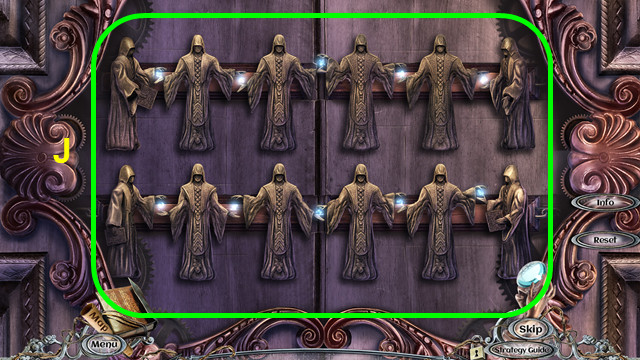
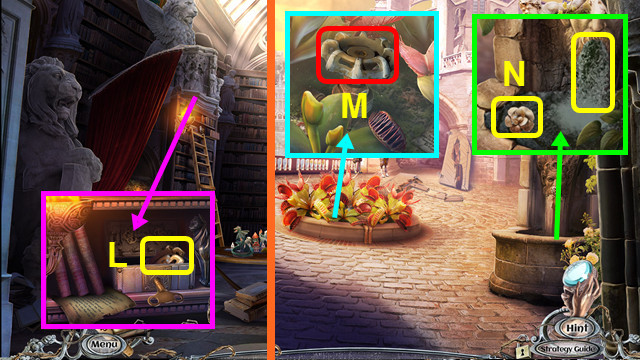
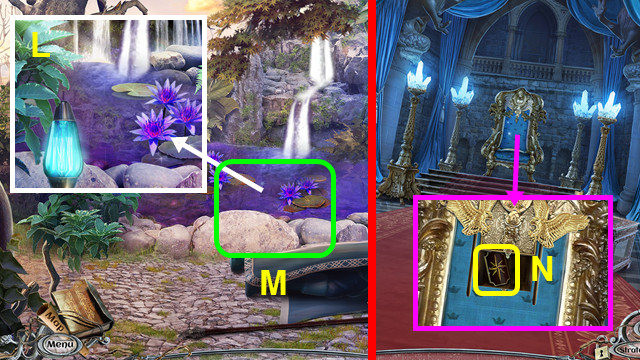
- Use the HANDKERCHIEF; replace the LIGHT BULB (L).
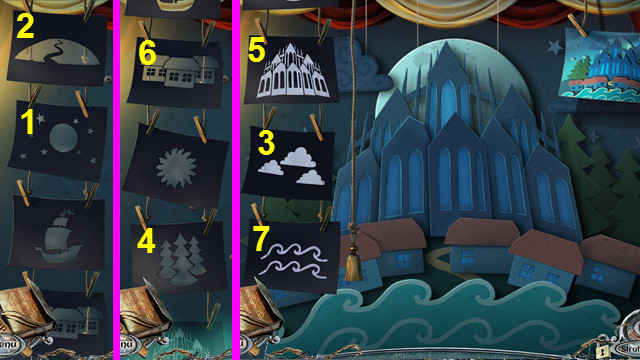
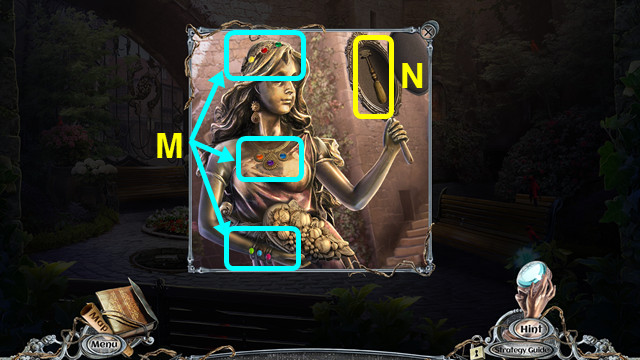
- Select the pieces 1-7.
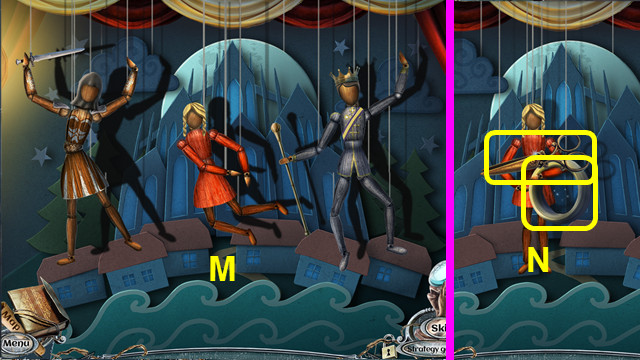
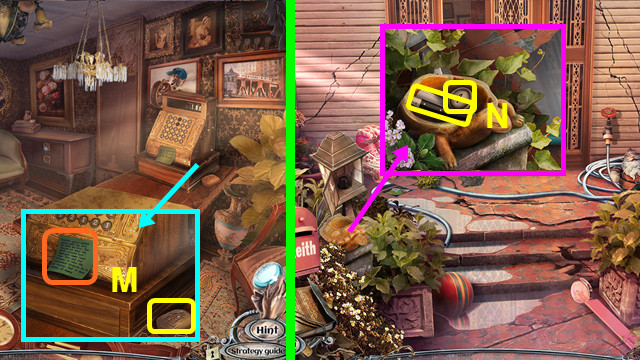
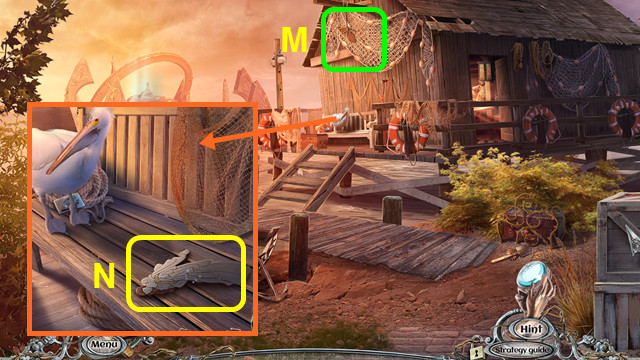
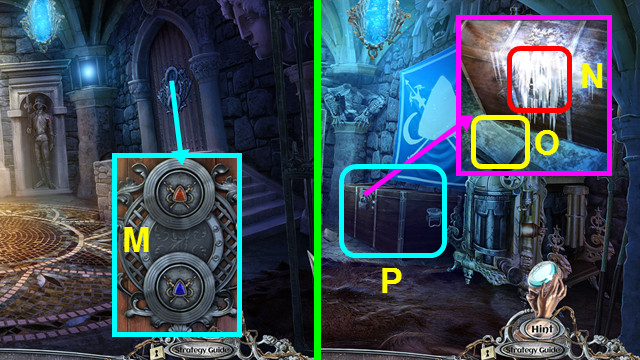
- Arrange the puppets (M).
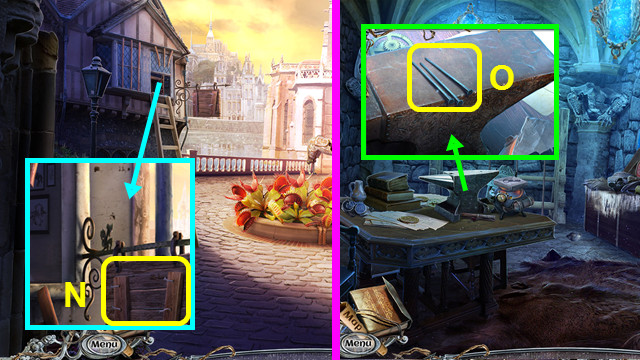
- Take the SCISSORS and FISHING LINE (N).
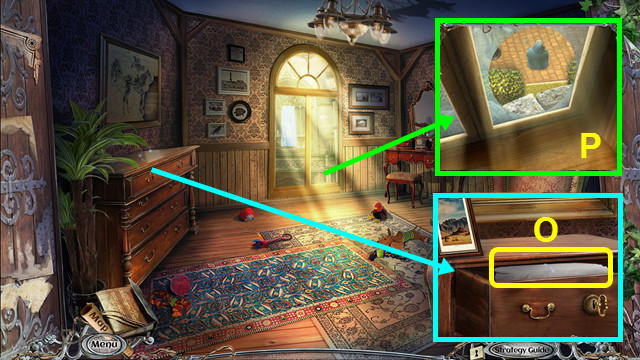
- Enter the Courtyard.
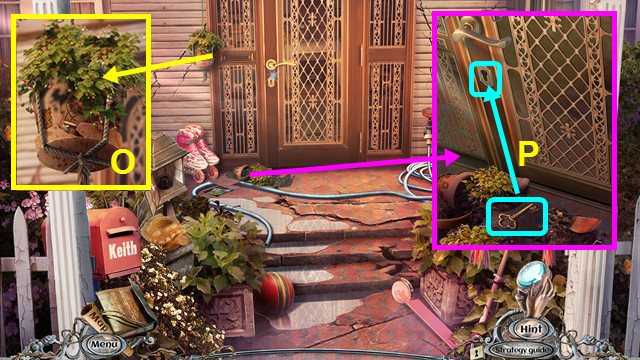
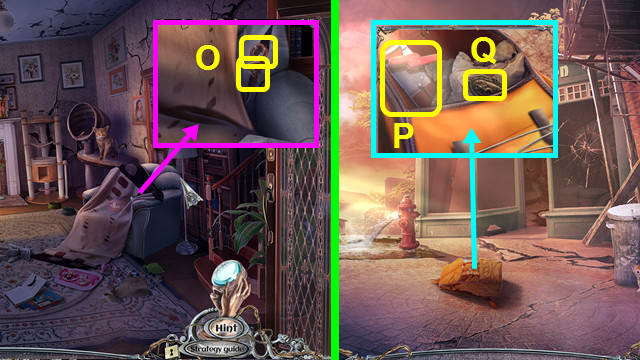
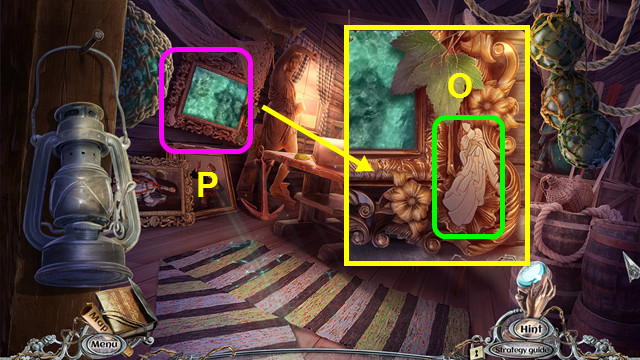
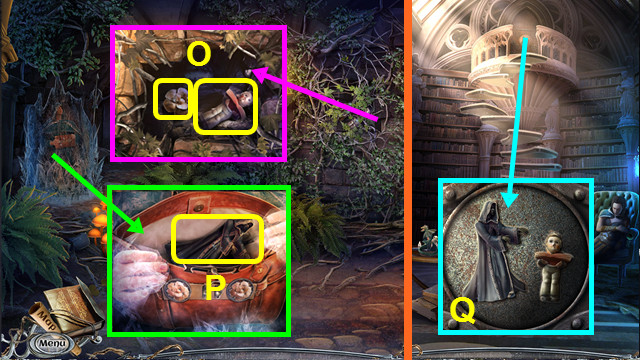
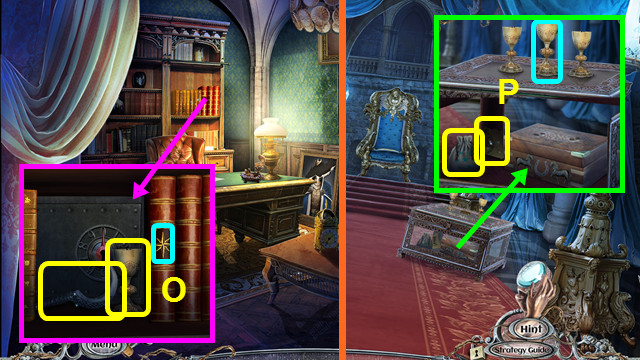
- Use the SCISSORS (O).
- Move the pieces, take the key, and use it in the lock (P).
- Walk forward.
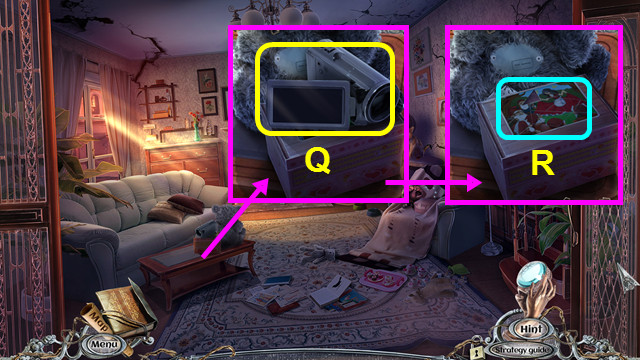
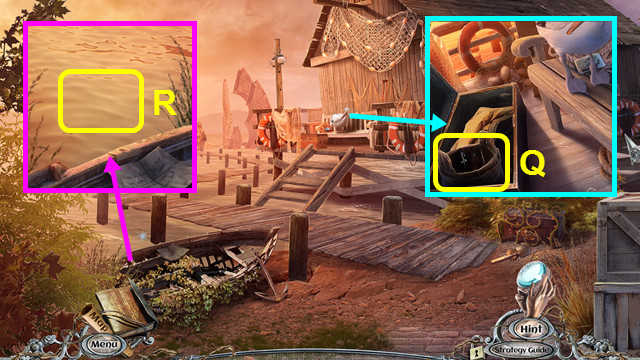
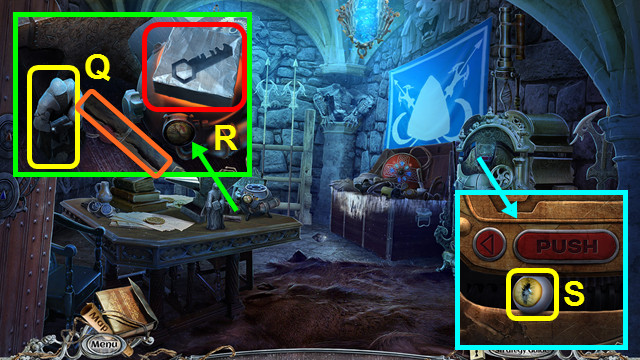
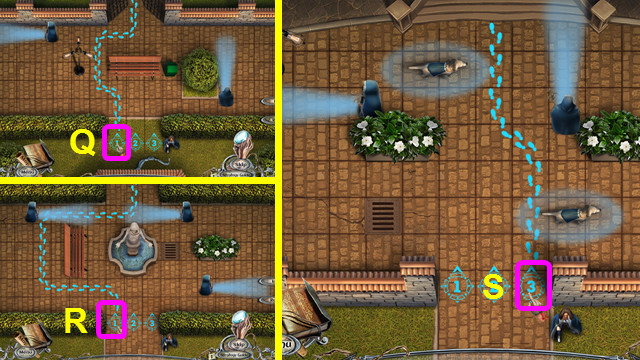
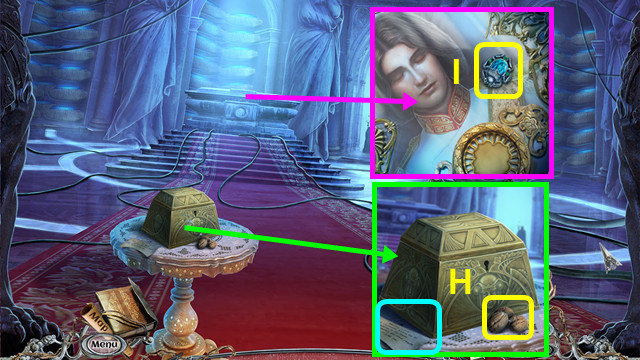
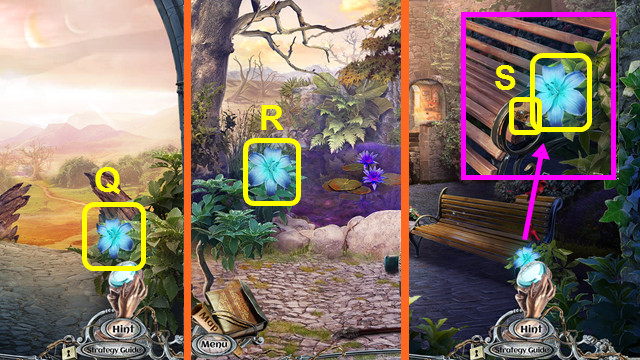
- Select (Q); take the VIDEO CAMERA.
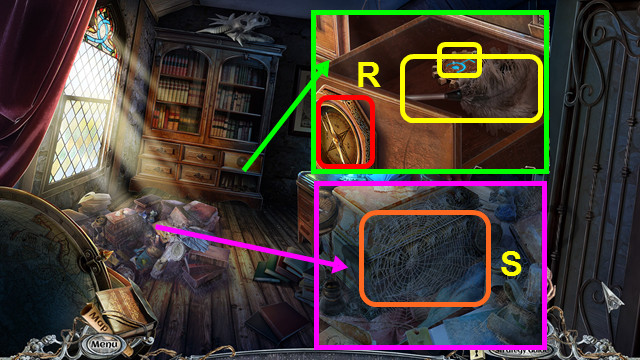
- Place the MOSAIC PIECE (R).
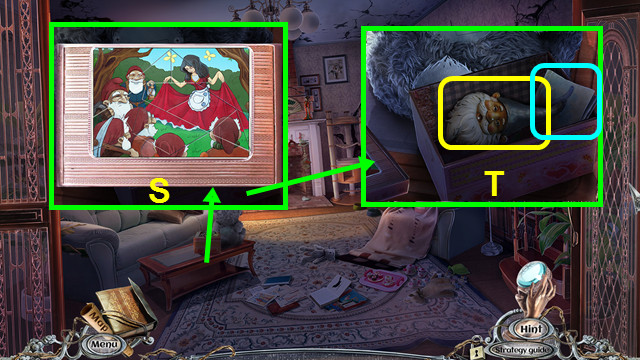
- Restore the mosaic (S).
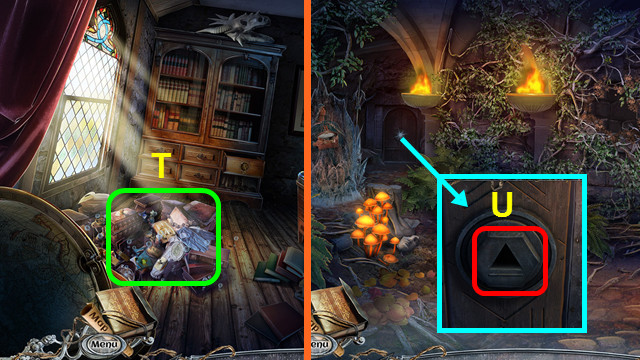
- Take the GNOME'S HEAD and read the note (T).
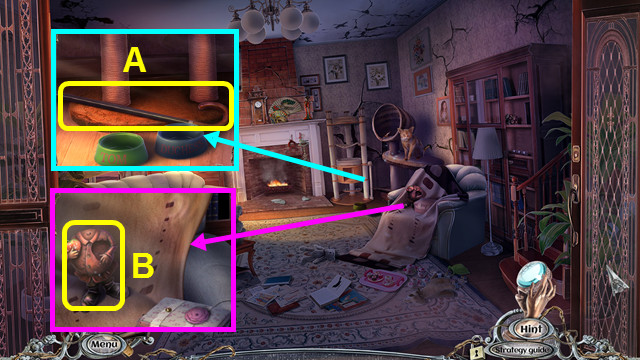
- Take the CANE (A).
- Take the BROKEN GNOME (B).
- Combine the BROKEN GNOME, GNOME'S HEAD, and STRAWBERRY to make the GARDEN GNOME (inventory).
- Walk down.
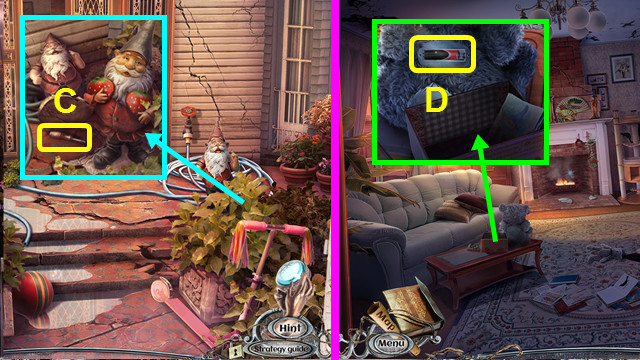
- Place the GARDEN GNOME; take the SCREWDRIVER (C).
- Go forward.
- Use the SCREWDRIVER; take the BATTERY (D).
- Combine the VIDEO CAMERA and BATTERY; take the WIRE (inventory).
- Walk down 2x.
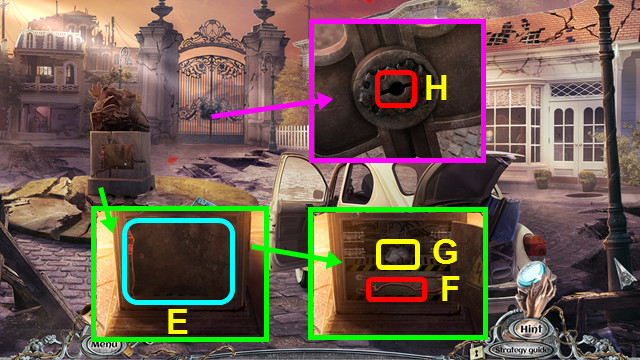
- Pan up; remove the cover (E).
- Place the WIRE (F).
- Open the note; take the GATE KEY and the 1st REGISTER BUTTON (G).
- Use the GATE KEY (H).
- Walk forward.
- Take the JOURNAL, MATCHES, and GUN (I).
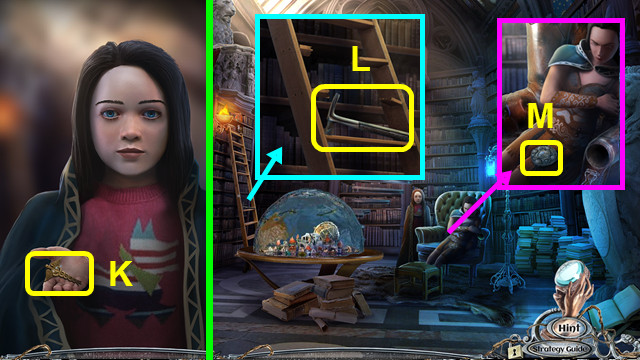
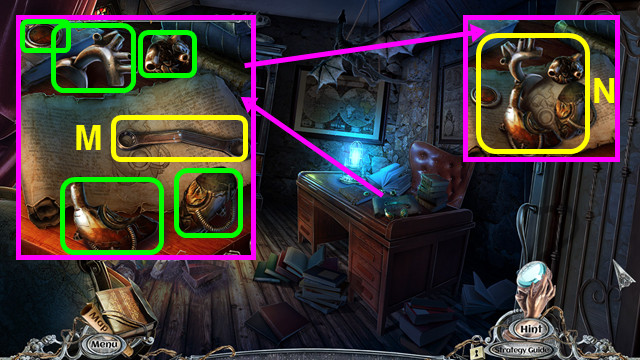
- Select the JOURNAL; play the HOP and take the HOUSE PENDANT (inventory).
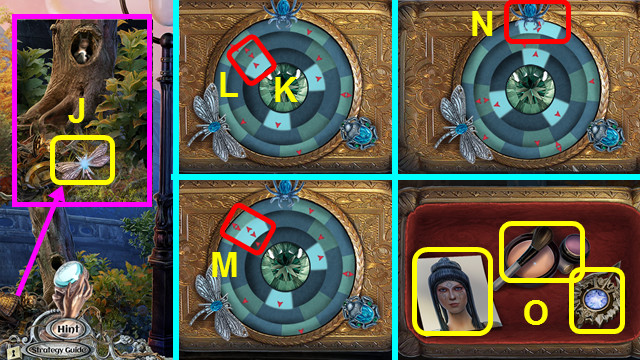
- Use the CANE to take the TREE PENDANT (J).
- Walk down.
- Place the TREE PENDANT and HOUSE PENDANT; take the JACK (K).
- Walk forward.
- Use the JACK (L).
- Walk forward.
- Read the note; take the TURTLE CARAPACE (M).
- Go to the Courtyard.
- Place the TURTLE CARAPACE; take the 2nd REGISTER BUTTON and RAZOR (N).
- Walk forward.
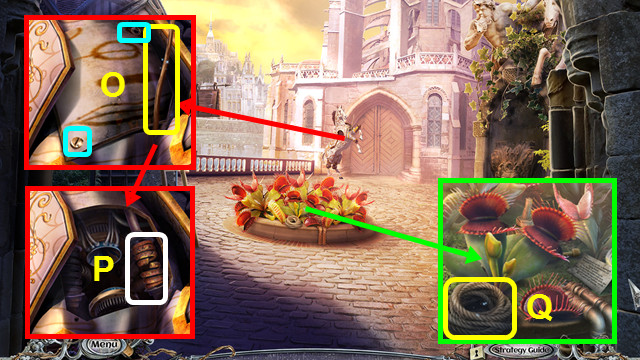
- Move the blanket and use the RAZOR; take the SPRING and 1st LOCK PART (O).
- Walk down 2x; go forward.
- Use the RAZOR; take the CAN OPENER (P).
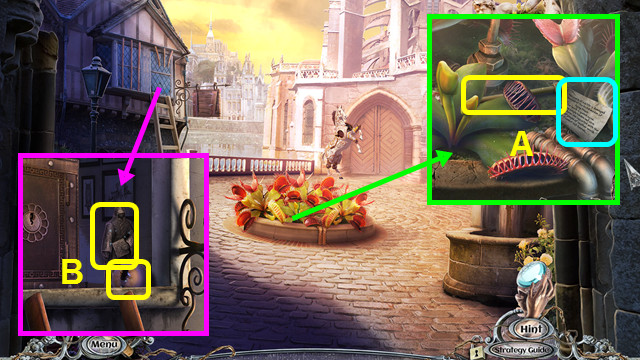
- Unfold the note 2x; select and read the note then take the BRASS EMBLEM (Q).
- Go forward.
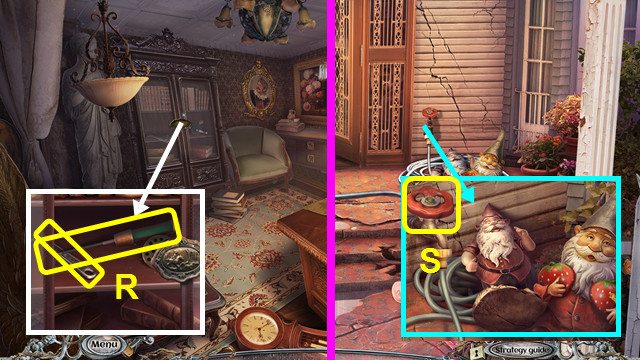
- Place and press the BRASS EMBLEM; take the BROKEN FISHING ROD and WRENCH (R).
- Return to the Courtyard.
- Use the WRENCH to take the VALVE (S).
- Walk down and forward.
Chapter 2: The Pier
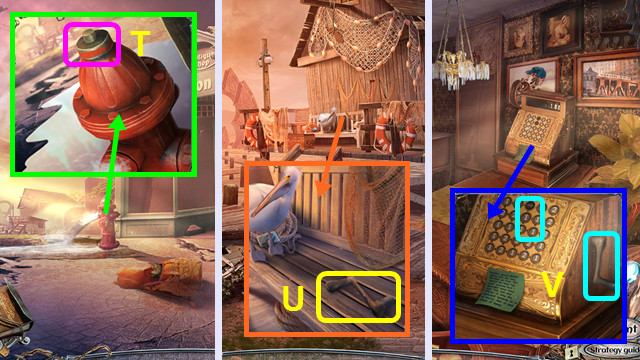
- Use the VALVE (T).
- Walk left.
- Pan right; take the CASH REGISTER HANDLE (U).
- Walk down and forward.
- Place the 2 REGISTER BUTTONS and CASH REGISTER HANDLE (V).
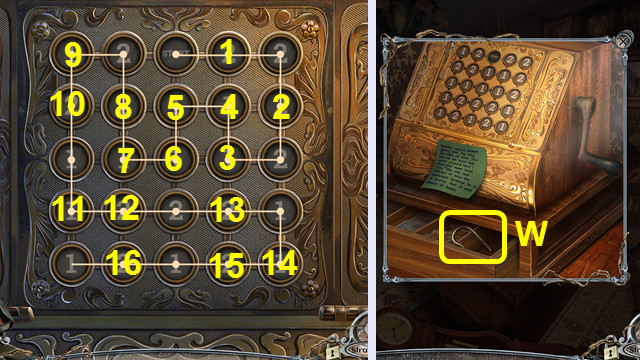
- Select the buttons 1-16.
- Take the FISHING HOOK (W).
- Combine the BROKEN FISHING ROD, FISHING LINE, and FISHING HOOK to make the FISHING ROD (inventory).
- Walk down and left.
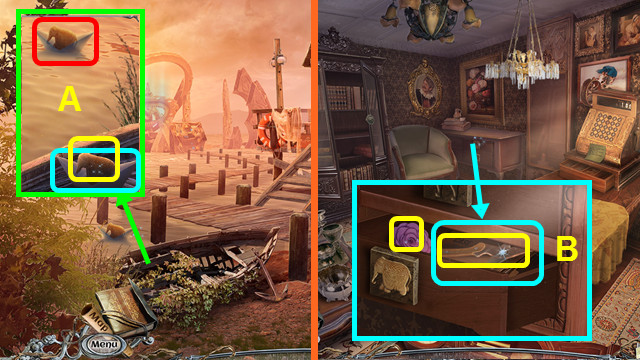
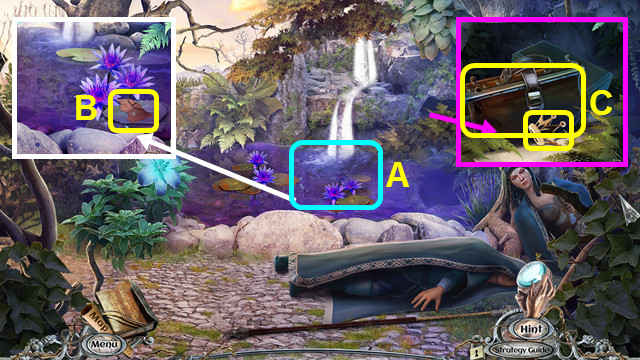
- Use the FISHING ROD; take the WOODEN ELEPHANT and read the note (A).
- Walk down and forward.
- Place the WOODEN ELEPHANT; take the FLOWER HANDLE, PRUNERS, and read the case file (B).
- Go to the Parent's House.
- Place the FLOWER HANDLE and read the note; take the UNFINISHED BASKET and 1/2 COPPER SEAGULLS (C).
- Go to the Pier.
- Use the PRUNERS; take the REEDS (D).
- Combine the UNFINISHED BASKET and REEDS to make TOM'S BASKET (inventory).
- Walk down.
- Place TOM'S BASKET; take the WOODEN CAT and KITTEN (E).
- Walk forward.
- Place the WOODEN CAT and use the CAN OPENER; take the CAT FOOD (F).
- Go to the Parent's House.
- Place the CAT FOOD; pan up (G).
- Place the KITTEN; receive the 2/2 COPPER SEAGULL (H).
- Go to the Pier.
- Place and press the 2 COPPER SEAGULLS (I).
- Walk forward.
- Take the BERRIES (J).
- Take the SLINGSHOT; read the note (K).
- Combine the SLINGSHOT and BERRIES; make the LOADED SLINGSHOT (inventory).
- Take the 1/4 GEARS (L).
- Walk down.
- Use the LOADED SLINGSHOT (M).
- Take the WOODEN FIGURINE (N).
- Go forward.
- Place the WOODEN FIGURINE (O).
- Play the HOP; earn the ANCHOR (P).
- Walk down.
- Pan left. Place and press the ANCHOR; take the BUCKET (Q).
- Use the BUCKET to take the BUCKET OF WATER (R).
- Go to the Parent's House.
- Use the BUCKET OF WATER; take the 2nd LOCK PART and HANDLE (A).
- Return to the Fisherman's Cabin.
- Use the HANDLE; take the FISH and LEMON (B).
- Walk down.
- Use the FISH; take the GLOVE COMPARTMENT BUTTON (C).
- Use the PRUNERS and place the 2 LOCK PARTS; take the 2/4 GEARS and MYSTERIOUS PAPER (D).
- Combine the MYSTERIOUS PAPER and LEMON to make the PAPER WITH CODE (inventory).
- Walk down 2x.
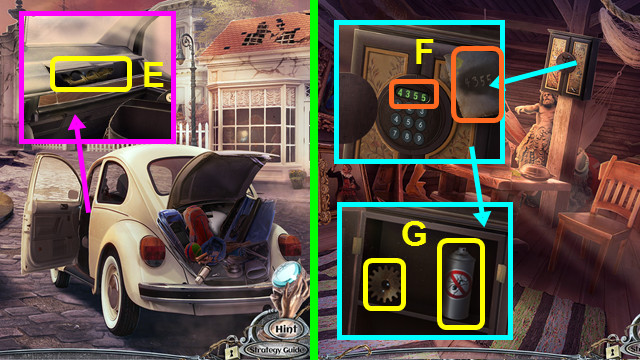
- Place and press the GLOVE COMPARTMENT BUTTON; take the CADUCEUS (E).
- Go to the Fisherman's Cabin.
- Place the CADUCEUS; place the PAPER WITH CODE and enter 4-3-5-5 (F).
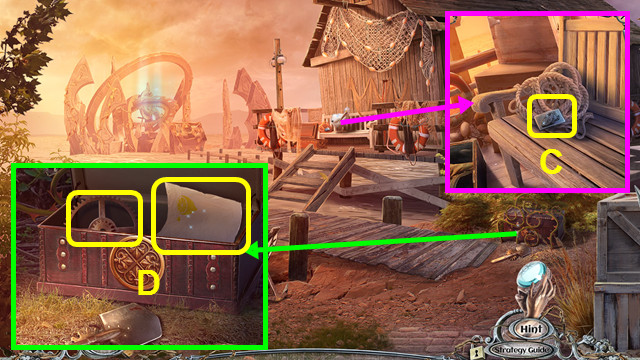
- Take the 3/4 GEARS and BUG SPRAY (G).
- Walk down.
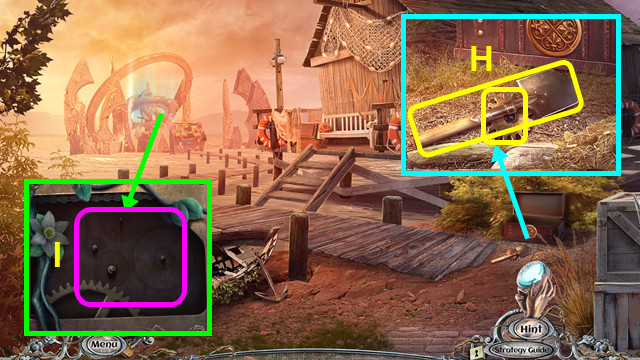
- Use the BUG SPRAY; take the SHOVEL and 4/4 GEARS (H).
- Place the 4 GEARS (I).
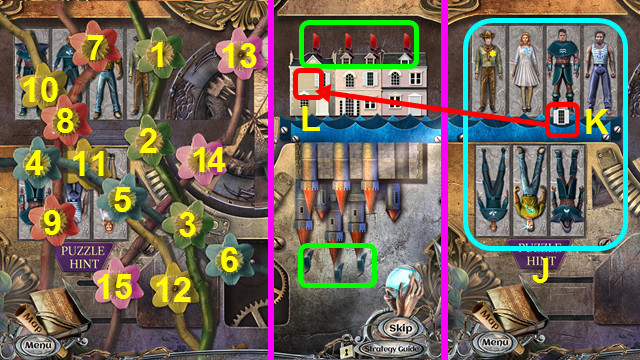
- Select the flowers 1-14.
- Select the 7 flags (green).
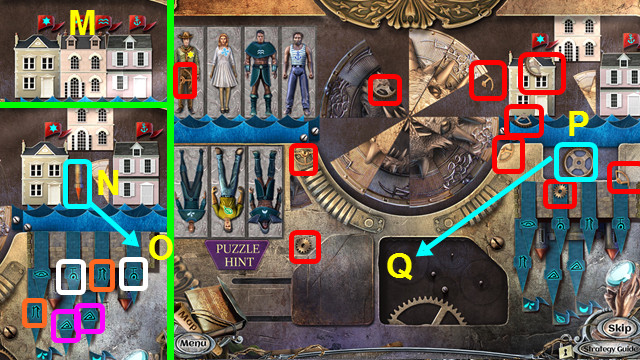
- Arrange the people (J).
- Move the window (K) to the house (L).
- Swap the windows (M).
- Place the spire (N) on the castle (O).
- Select pairs of symbols (color-coded).
- Take the gear (P) and place it (Q).
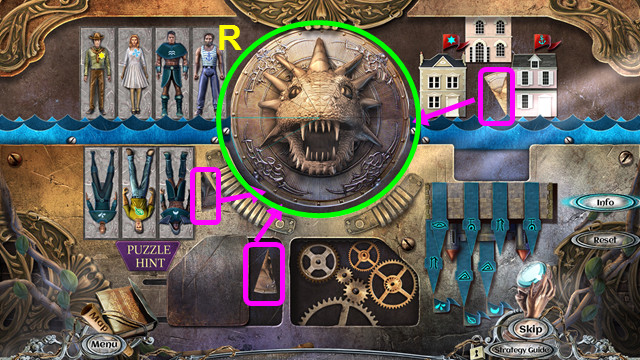
- Select the 10 gear parts (red).
- Take the 3 wedges (pink) and place them; restore the image (R).
Chapter 3: The Prison Cell
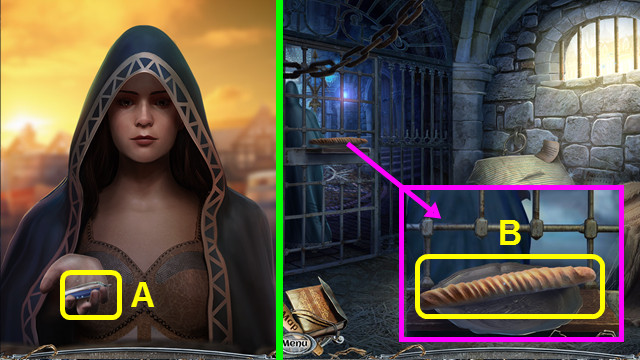
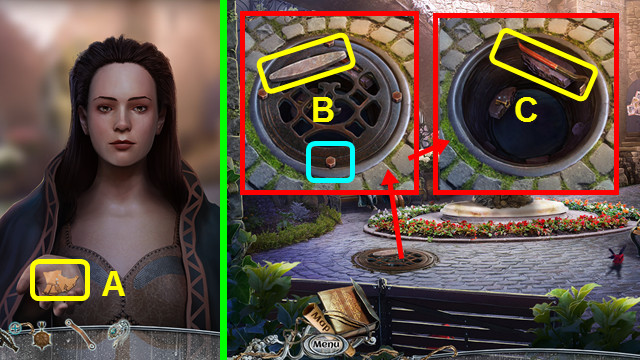
- Talk to the Stranger; take the SLEEPING-POTION CAPSULE (A).
- Take the LOAF OF BREAD (B).
- Open the LOAF OF BREAD; take the BREAD and FILE (inventory).
- Use the BREAD; take the GLASS SHARD and FEATHERS (C).
- Use the GLASS SHARD; take the DART BODY and read the note (D).
- Combine the DART BODY, SLEEPING-POTION CAPSULE, and feathers to make the SOPORIFIC DART (inventory).
- Use the SOPORIFIC DART (E); use the FILE (F).
- Walk left.
- Open the case; take the CHALK (G).
- Take the 1st GUARD INSIGNIA and FISH GUN (H).
- Talk to the Stranger; take the KEY MOLD (I).
- Walk down.
- Look at the hint; use the CHALK (J).
- Restore the runes (K).
- Take the 2nd GUARD INSIGNIA, cloak, and SCREWDRIVER (L).
- Walk left.
- Place and press the 2 GUARD INSIGNIAS (M).
- Walk right.
- Use the FISH GUN (N).
- You now have an UNLOADED FISH GUN.
- Use the stone on the lock (O).
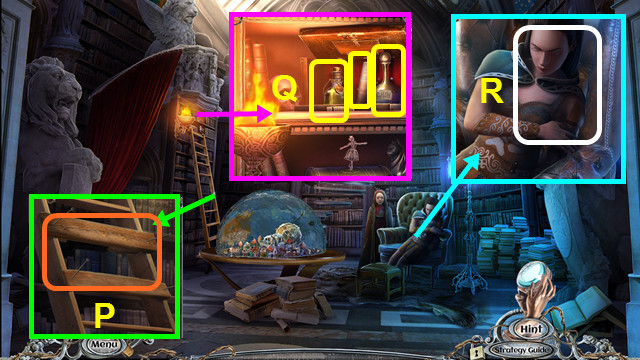
- Play the HOP; earn the BELONGINGS (P).
- Open the BELONGINGS; take the MATCHES, SHOVEL, and SPRING (inventory).
- Take the 1/4 LIBRARIAN FIGURINES and read the scroll (Q).
- Use the MATCHES and place the KEY MOLD (R).
- Take the 1st GARGOYLE EYE (S).
- Walk down.
- Pan up (T).
- Use the SHOVEL; take the IRON PIECE and CLAY (U).
- Walk right.
- Place the CLAY; take the CLAY KEY (A).
- Place the CLAY KEY (B).
- Place the IRON PIECE (C).
- Select G-K-E-F-I-J-E-F-G-E-K-G-E-F-J-E.
- Take the DUNGEON KEY (L).
- Walk down.
- Use the DUNGEON KEY (M).
- Go forward.
- Take the 1/2 DRAGONS (N).
- Take the STICK; use the SCREWDRIVER (O).
- Replace the SPRING (P).
- Take the ROPE (Q).

- Use the ROPE and STICK; take the BOTTLE (R).
- Walk down and right.
- Place the BOTTLE and push the bugs into the bottle; take the BOTTLE WITH BUGS (S).
- Walk down and forward.
- Use the BOTTLE WITH BUGS; take the KNITTING NEEDLE and read the note (A).
- Use the KNITTING NEEDLE; take the 2/4 LIBRARIAN FIGURINES and 2nd GARGOYLE EYE (B).
- Walk down and right.
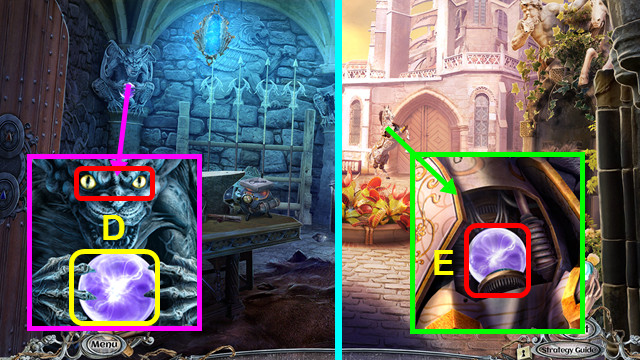
- Place the 2 GARGOYLE EYES; take the ENERGY BALL (D).
- Walk down and forward.
- Place the ENERGY BALL (E).
- Walk forward.
- Take the SUN KEY (F).
- Take the 3/4 LIBRARIAN FIGURINE (G).
- Walk down.
- Use the SUN KEY; take the 4/4 LIBRARIAN FIGURINE (H).
- Walk forward.
- Place the 4 LIBRARIAN FIGURINES (I).
- Solution (J).
- Walk forward.
Chapter 4: The Library
- Talk to Lila; take the CADUCEUS (K).
- Take the HAMMER (L).
- Take the AGONY EMBLEM (M).
- Walk down 2x.
- Pan right; use the HAMMER to take the CROOKED NAILS and PLANKS (N).
- Walk down and right.
- Use the CROOKED NAILS and HAMMER; take the STRAIGHT NAILS (O).
- Walk down and go forward 3x.
- Use the PLANKS, STRAIGHT NAILS, and HAMMER (P).
- Place and press the CADUCEUS; take the ANTIBIOTIC, BANDAGES, and REGENERATION ELIXIR (Q).
- Use the ANTIBIOTIC, BANDAGES, and REGENERATION ELIXIR (R).
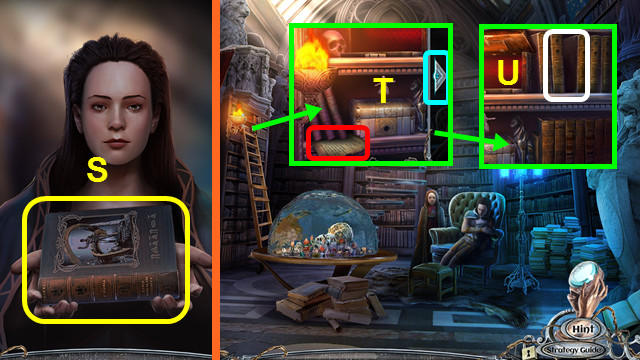
- Talk to Ruby; take the ANCIENT BOOK (S).
- Read the note and pan right (T).
- Place the ANCIENT BOOK (U).
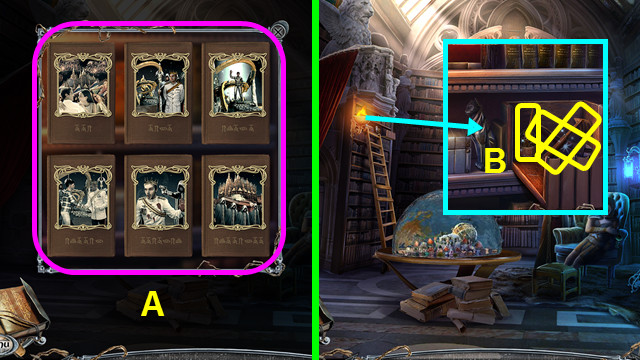
- Solution (A).
- Take the RAKE, NIPPERS, and MAGIC GLUE (B).
- Walk down 3x.
- Use the NIPPERS; take the MEDAL OF VALOR and 2/2 DRAGONS (C).
- Walk forward 3x.
- Place the 2 DRAGONS (D).
- Play the HOP; earn the CRESCENT (E).
- Add the CRESCENT to the AGONY EMBLEM (inventory).
- Place the AGONY EMBLEM (F).
- Walk left.
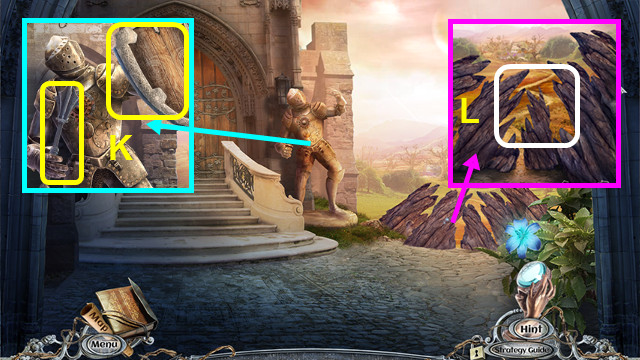
- Take the STICK (G).
- Walk down.
- Pan left; use the STICK to make the IMPROVISED TORCH (H).
- Walk left.
- Use the IMPROVISED TORCH 3x (I).
- Use the RAKE; take the FLASK (J).
- Take the WINDING KEY (K).
- Walk down.
- Use the WINDING KEY; take the FOUNTAIN VALVE (L).
- Walk down 2x.
- Place and turn the FOUNTAIN VALVE (M).
- Take the 1st FLOWER BUTTON; use the FLASK to make the FLASK WITH DARK WATER (N).
- Walk forward 2x; go left.
- Use the FLASK WITH DARK WATER; take the 2nd FLOWER BUTTON and BOY FIGURINE (O).
- Place and press the 2 FLOWER BUTTONS; take the AGONY-RESIDENT FIGURINE (P).
- Walk down.
- Place the AGONY-RESIDENT FIGURINE and the BOY FIGURINE (Q).
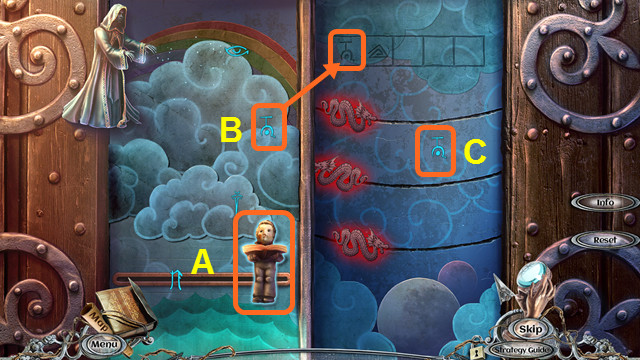
- Slide the boy (A) to catch first symbol (B).
- Slide dragons to allow matching symbol to float up (C).
- There is a set of 2, 3, 4, and 5 symbols.
- Walk forward.
- Take the WRENCH (M).
- Select the 5 heart pieces (green).
- Use the MAGIC GLUE; select and take the MECHANICAL HEART (N).
- Walk down 2x.
- Place the MECHANICAL HEART; take the HOURGLASS and BROKEN COMPASS (O).
- Walk forward.
- Place the HOURGLASS; take the 1/2 RUNES and COMPASS NEEDLE (P).
- Combine the BROKEN COMPASS, MAGIC GLUE, and COMPASS NEEDLE to make the COMPASS (inventory).
- Walk forward.
- Place the COMPASS; take the DUST BRUSH and 2/2 RUNES (R).
- Use the DUST BRUSH (S).
- Play the HOP; earn the BOOK WITH SECRET (T).
- Combine the BOOK WITH SECRET and 2 RUNES; take the TRIANGULAR KEY and FANCY NECKLACE (inventory).
- Walk down and left.
- Use the TRIANGULAR KEY (U).
Chapter 5: The Street of Rustling Wings
- Talk to Ruby; take the 1/4 PICTURE FRAGMENTS (A).
- Take the GRINDING STONE and use the WRENCH (B).
- Take the CROWBAR (C).
- Read the note, select the 4 fruit (green), and take the CORNUCOPIA (D).
- Use the CROWBAR to take the BOARDS (E).
- Place the BOARDS (F).
- Play the HOP (G).
- Walk forward.
- Take the WEDGE (H).
- Take the MASK and read the note; place the MEDAL OF VALOR and take the BLUNT KNIFE (I).
- Combine the BLUNT KNIFE and GRINDING STONE to make the SHARP KNIFE (inventory).
- Combine the MASK and SHARP KNIFE to take the DIAMOND; take the STICK (inventory).
- Walk down.
- Use the STICK to take the DRAWER KEY (J).
- Use the SHARP KNIFE (K).
- Take the 1st ORNATE AMULET; place the CORNUCOPIA and FANCY NECKLACE (L).
- Solution (M).
- Take the OLD GLASS CUTTER (N).
- Combine the OLD GLASS CUTTER and DIAMOND to make the GLASS CUTTER (inventory).
- Go forward.
- Use the DRAWER KEY; take the BEDSHEET (O).
- Tie the BEDSHEET together to make the TIED BEDSHEET (inventory).
- Use the GLASS CUTTER and TIED BEDSHEET; receive the HEAVY STONE (P).
- Select (Q) when the guards are in the position shown.
- Select (R) when the guards are in the position shown.
- Select (S) when the guards are in the position shown.
- Use the WEDGE and HEAVY STONE; take the HOOK, NIPPERS, and read the note (A).
- Take the WIRE (B).
- Combine the STICK, WIRE, and HOOK to make the STICK WITH HOOK (inventory).
- Pan up (C).
- Use the STICK WITH HOOK (D).
- Use the NIPPERS and move the items; take the BAS-RELIEF FRAGMENT (E).
- Place the BAS-RELIEF FRAGMENT; take the PHOENIX FIGURINE and ORNATE CHEST (F).
- Place the PHOENIX FIGURINE (G).
- Walk forward.
- Read the note and take the NUTS (H).
- Use the NIPPERS; take the 2nd ORNATE AMULET (I).
- Walk down.
- Give the NUTS; take the 3rd ORNATE AMULET (J).
- Combine the ORNATE CHEST and 3 ORNATE AMULETS (inventory).
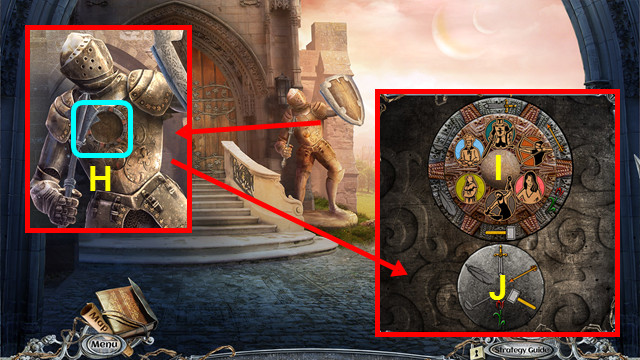
- Press the center gem (K). Press the lighted arrow when it is adjacent to 2-way arrow (L).
- Press the 2-way arrow on the 2nd ring when it is adjacent to a 2-way arrow on the outer ring (M).
- Press the 2-way arrow on the outer ring when it is adjacent to an amulet (N).
- Repeat this process for the other 2 amulets.
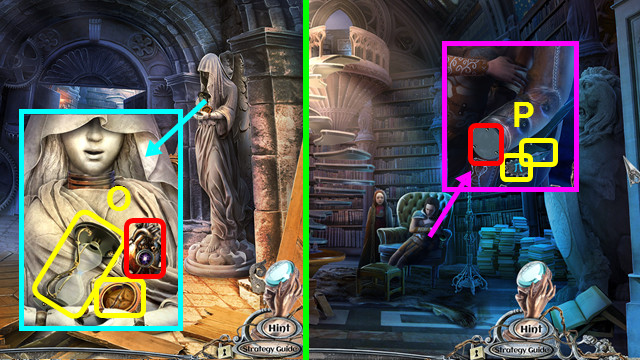
- Take the PHOTO OF CARETAKER, MAKEUP, and CARETAKER'S BADGE (O).
- Walk down.
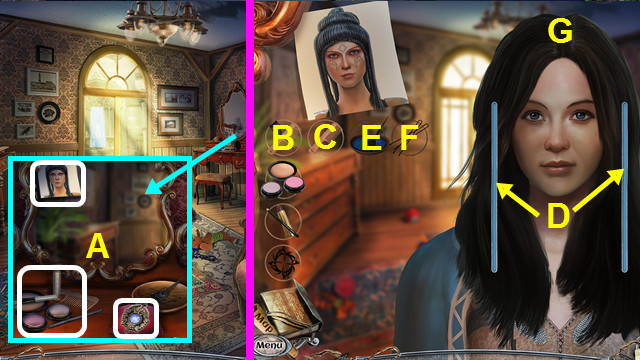
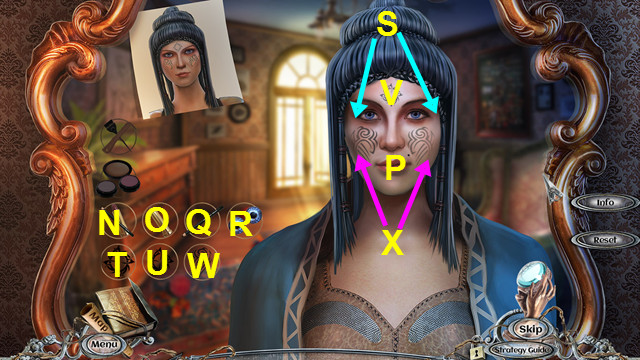
- Place the PHOTO OF CARETAKER, MAKEUP, and CARETAKER'S BADGE (A).
- Select B-C; drag the comb down the 2 blue lines (D).
- Select E; drag the dye brush down the 2 blue lines.
- Use (F) on (G).
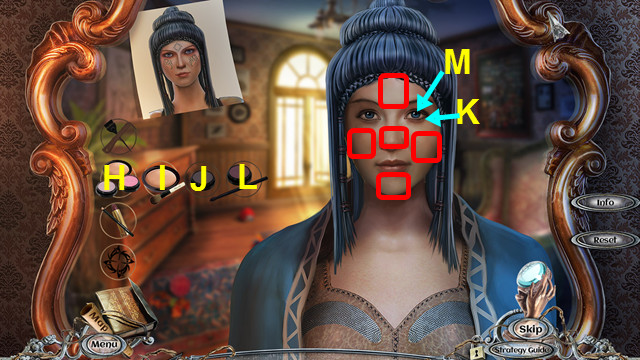
- Select H-I; use the brush on the 5 spots (red).
- Use (J) on (K).
- Use (L) on (M).
- Select N-O; use the lipstick on (P).
- Use (Q) on (P).
- Use (R) on (S).
- Select T-U; select (V).
- Use (W) on (X).
- Go forward 3x.
- Take the TAPE (A).
- Take the JUG (B).
- Combine the JUG and TAPE to make the JUG WITH TAPE (inventory).
- Walk down 4x.
- Use the JUG WITH TAPE to take the JUG WITH WATER and ITEM IN MUD (C).
- Go forward 3x.
- Use the JUG WITH WATER; take the SILVER SPOON and 1st CROWN AMULET (D).
- Combine the ITEM IN MUD and SILVER SPOON to find the SUN DISC and HAIRPIN (inventory).
- Use the HAIRPIN (E).
- Move the sliders to the position shown (F).
- Take the LENS (G).
- Walk forward.
- Place the SUN DISC (H).
- Select Jx4-I-Jx2-Ix2-Jx3-I-Jx4-I-Jx3-I.
- Take the MACE and SHIELD (K).
- Use the MACE (L).
- Walk right.
Chapter 6: The Life Source
- Play the HOP to earn the BROKEN GLASSES.
- Combine the BROKEN GLASSES and LENS to make the MYSTERY GLASSES (inventory).
- Use the MYSTERY GLASSES (A).
- Take the 2/4 PICTURE FRAGMENTS (B).
- Move the plants; take the BAG WITH CHEMICALS and 2nd CROWN AMULET (C).
- Walk down.
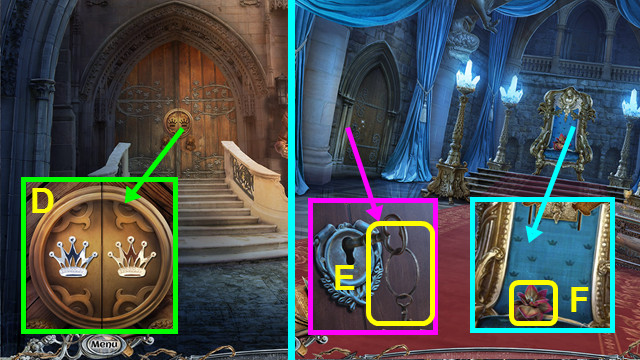
- Place and press the 2 CROWN AMULETS (D).
- Walk forward.
- Take the BUNCH OF KEYS (E).
- Combine the BAG WITH CHEMICALS and BUNCH OF KEYS; take the POTION INGREDIENT and CLUBS AMULET (inventory).
- Take the MOURNING FLOWER (F).
- Walk down and right.
- Place the CLUBS AMULET; take the PLIERS, SILVER POLLEN, and read the note (G).
- Walk down and forward.
- Use the PLIERS (H).
- Walk left.
- Take the 1st GOLDEN EAGLE and NEON LAMP (I).
- Place the SHIELD (J).
- Place the POTION INGREDIENT; take the RUBBER GLOVES (K).
- Walk down 2x; go right.
- Use the NEON LAMP and RUBBER GLOVES (L).
- Play the HOP; earn the SHARDS (M).
- Sort the SHARDS: take the 2nd GOLDEN EAGLE and MAGIC VIAL (inventory).
- Walk down and forward.
- Place the 2 GOLDEN EAGLES; take the STAR BADGE (N).
- Walk left.
- Place the STAR BADGE; take the KING'S CUP and MOON SICKLE (O).
- Walk down.
- Place the KING'S CUP; take the 3/4 PICTURE FRAGMENT and STARDUST (P).
- Walk down.
- Use the MOON SICKLE to take the 1/4 MOONFLOWERS (Q).
- Walk right.
- Use the MOON SICKLE to take the 2/4 MOONFLOWERS (R).
- Walk down 5x.
- Use the MOON SICKLE to take the 3/4 MOONFLOWERS; take the 4/4 PICTURE FRAGMENTS (S).
- Walk forward.
- Use the MOON SICKLE to take the 4/4 MOONFLOWERS (T).
- Place the 4 PICTURE FRAGMENTS; read the note and take the MECHANICAL HORSE (U).
- Go forward 4x.

- Talk to Thorvald; take the CODE (A).
- Place the MECHANICAL HORSE; read the note and take THORVALD'S SAFE KEY (B).
- Walk left.
- Place the CODE and THORVALD'S SAFE KEY; take the POTION RECIPE, PRINCE'S AMULET, and FISH GUN CHARGE (D).
- Combine the UNLOADED FISH GUN and FISH GUN CHARGE to make the CHARGED FISH GUN (inventory).
- Place the MAGIC VIAL (E), MOURNING FLOWER (F), STARDUST (G), SILVER POLLEN (H), 4 MOON FLOWERS (I), and POTION RECIPE (J).

- Move A to B; use C on B, and move B to D.
- Move E to B 4x; use C on B, and move B to F.
- Use G on H and I.
- Use G on J and K.
- Use L on D and F.
- Use M on I and K.
- Take the PURIFYING POTION (N).
- Walk down 2x; go right.
- Use the PURIFYING POTION (O).
- You earn the LIVING WATER.
- Walk down 2x.
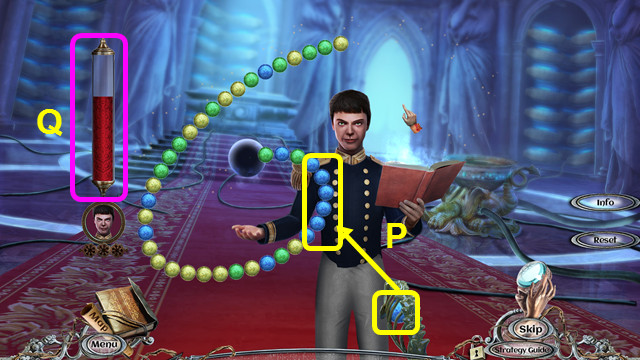
- Shoot spheres to make sets of three or more (P).
- Continue until the meter is empty (Q).
- This mini-game is randomly generated.
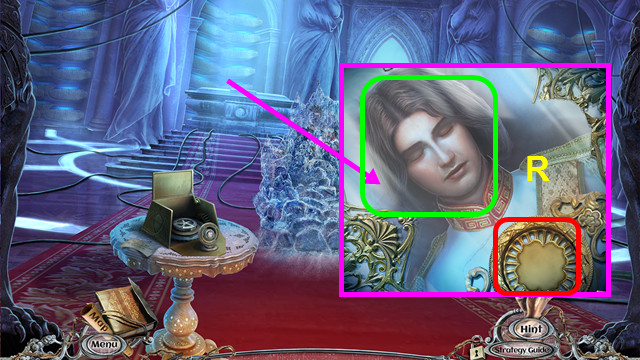
- Place the PRINCE'S AMULET; use the LIVING WATER (R).
- Congratulations! You have completed Surface: Return to Another World!
Created at: 2015-12-20