

Walkthrough Menu
- General Tips
- Chapter 1: At Home
- Chapter 2: The Chapel
- Chapter 3: The Cargo Bay
- Chapter 4: The Bridge
- Chapter 5: The Agency Lobby
- Chapter 6: The Street
General Tips
- This is the official guide for Surface: Virtual Detective.
- Hidden-object puzzles are referred to as HOPs. This guide will not show screenshots of the HOPs, however, it will mention when an HOP is available and the inventory item you'll collect from it.
- This guide will not mention each time you have to zoom into a location; the screenshots will show each zoom scene.
Chapter 1: At Home
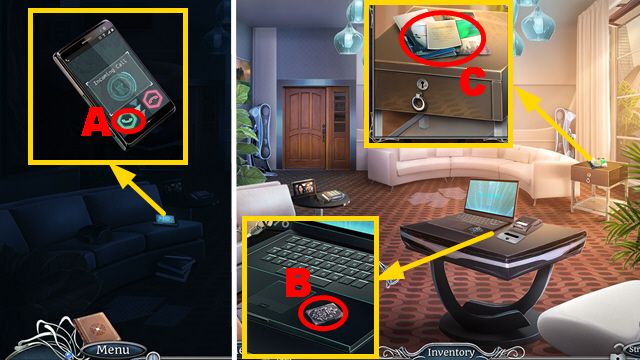
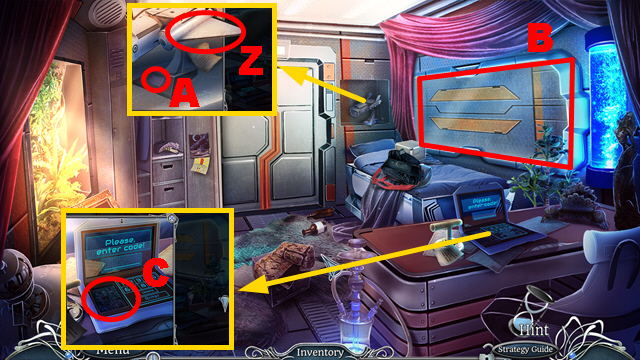
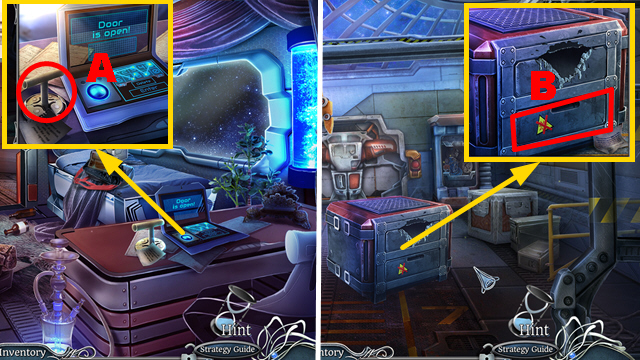
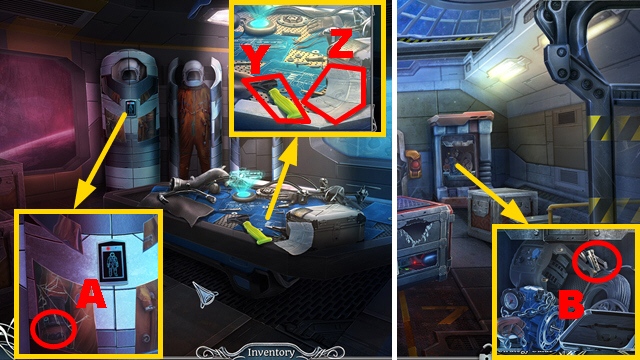
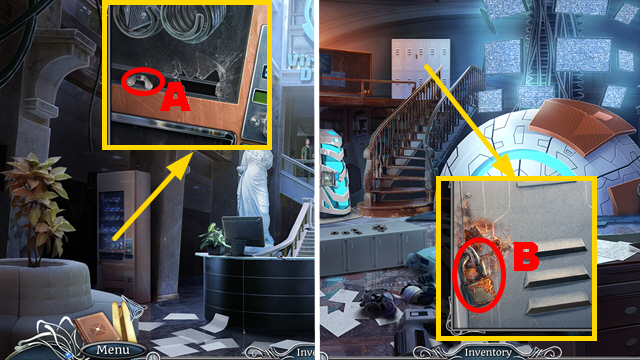
- Push the button (A).
- Take TILE 1/3 (B).
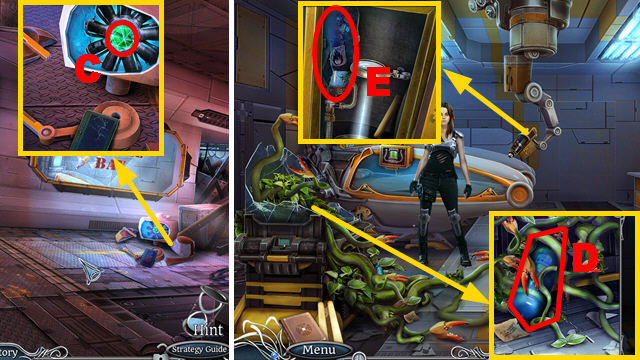
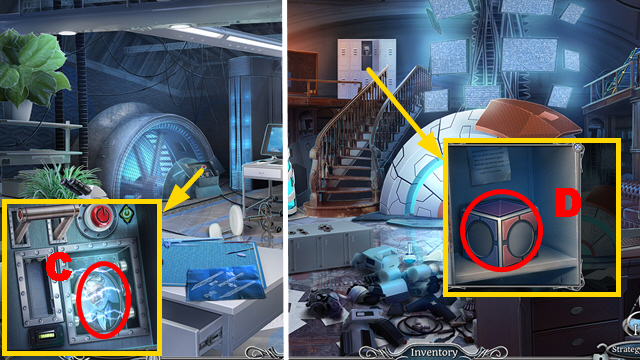
- Read the note, letter, and take TILE 2/3 (C).
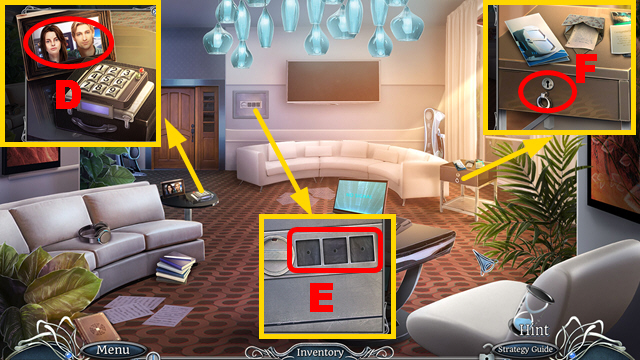
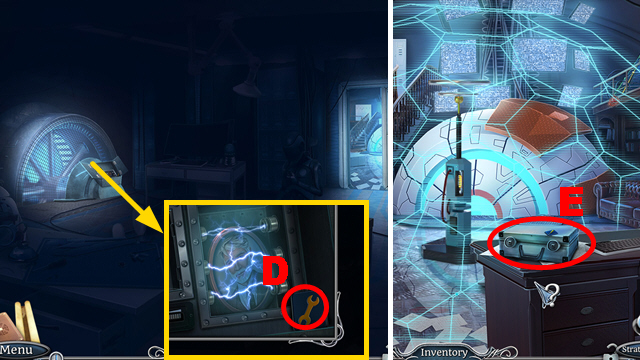
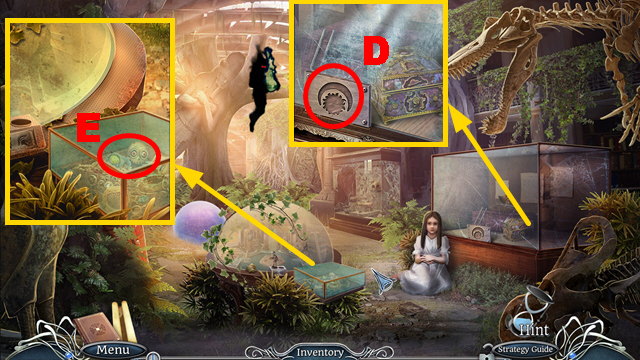
- Examine the photo and take TILE 3/3 (D).
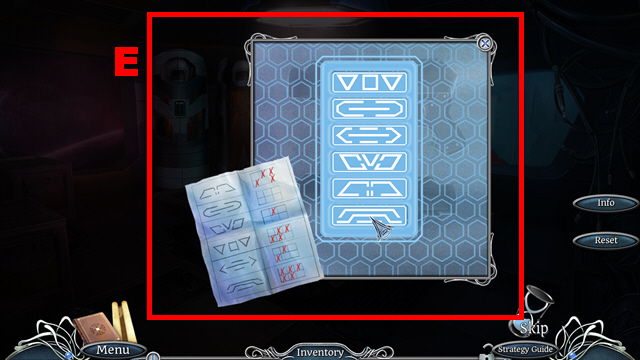
- Place 3 TILES (E) and play the HOP; receive the STAND KEY.
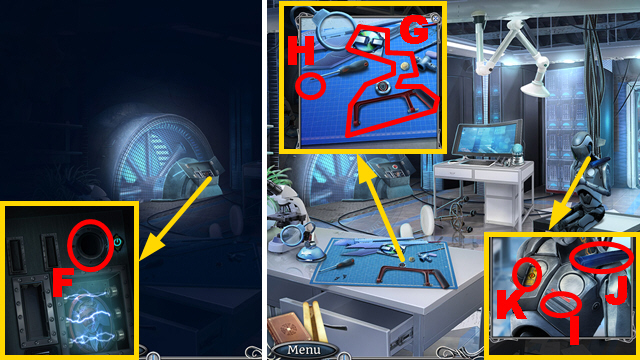
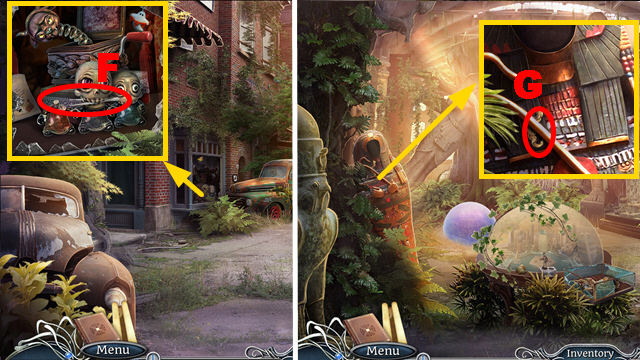
- Insert the STAND KEY and take the ROUTER (F).
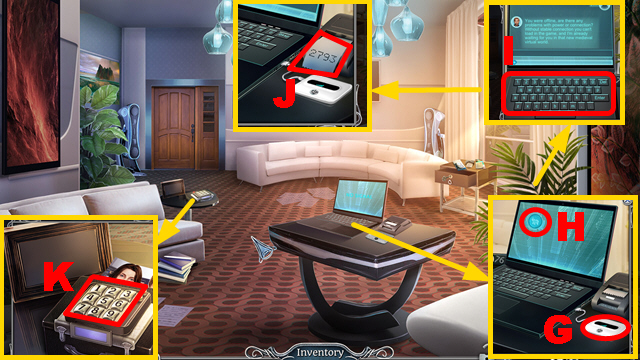
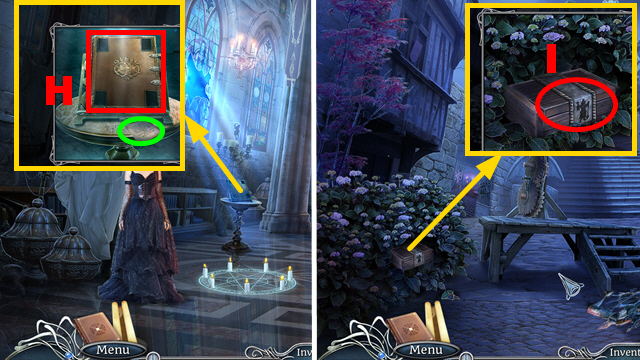
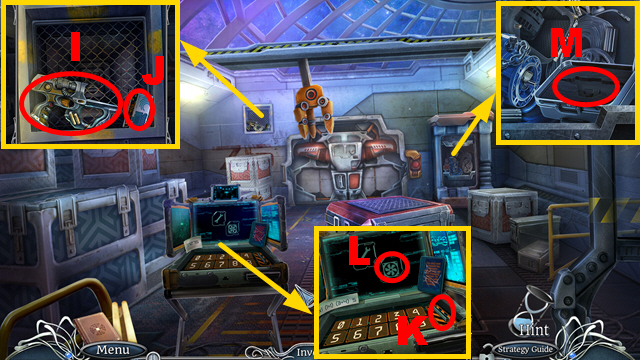
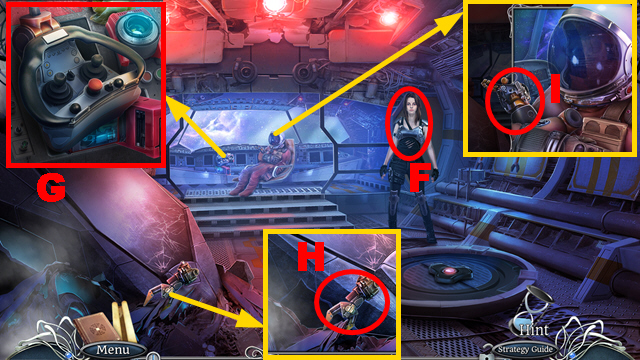
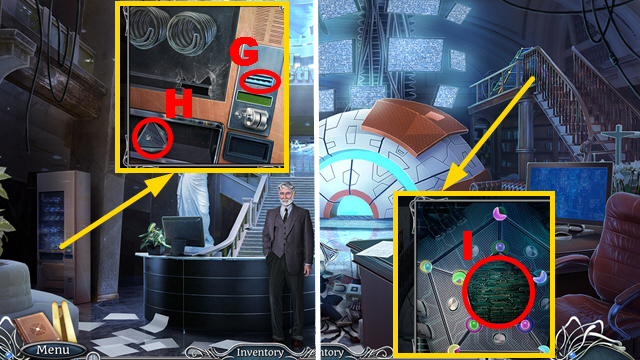
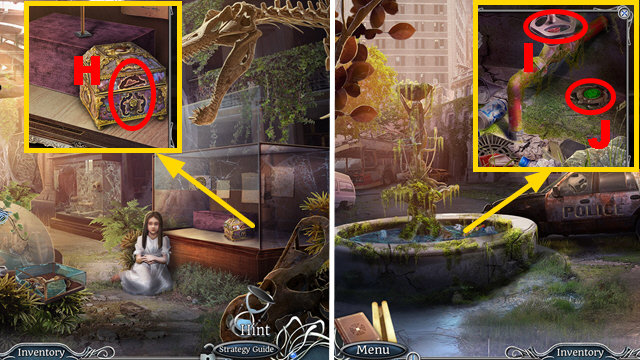
- Place the ROUTER (G) and push the button (H).
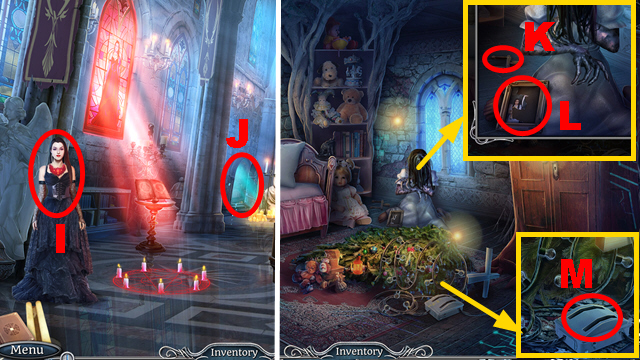
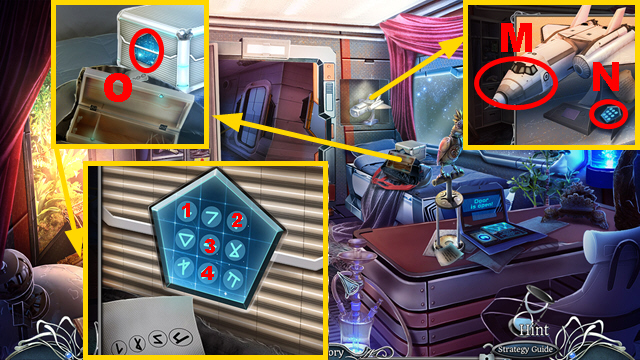
- Play the mini-game.
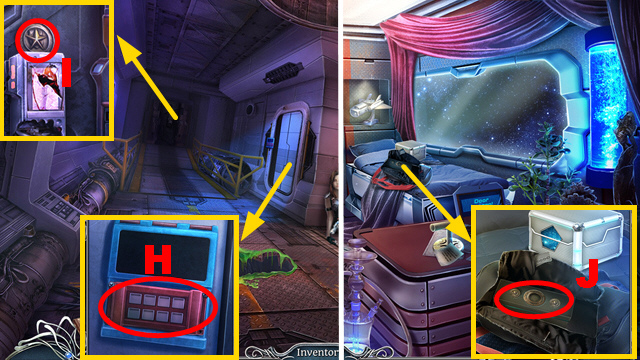
- Solution: Type in any reply 4 times (I).
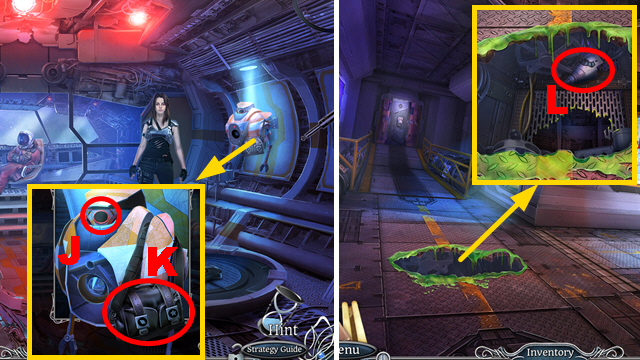
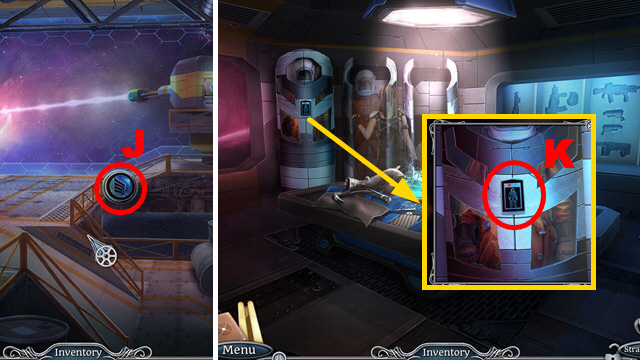
- Take the SAFE CODE (J).
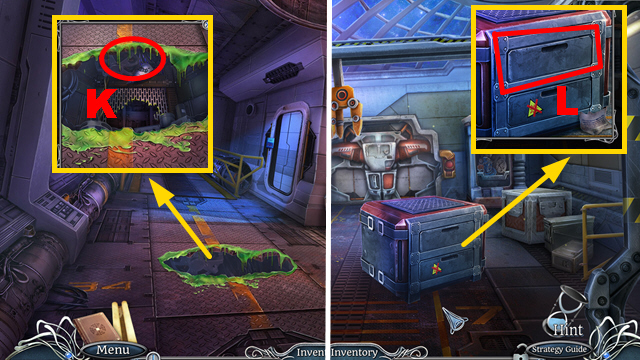
- Place the SAFE CODE, enter '2793', and take the DOCUMENTATION (K).
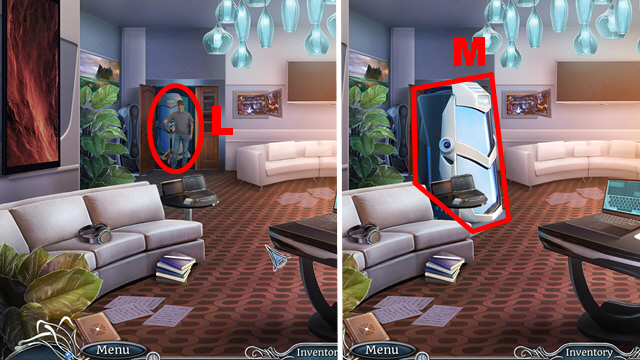
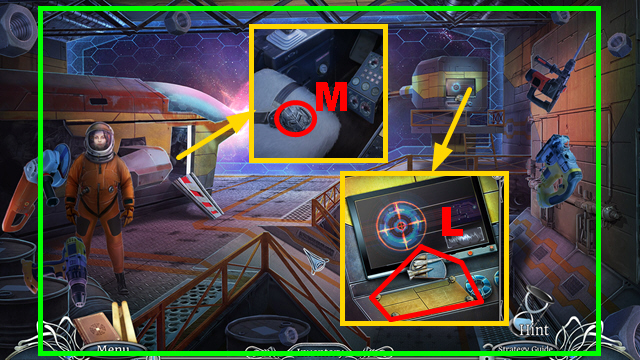
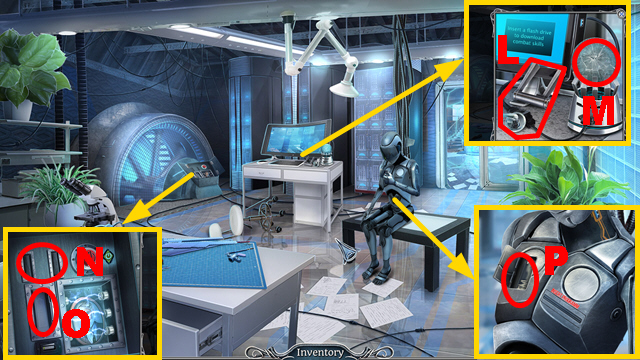
- Open the door and give the DOCUMENTATION (L).
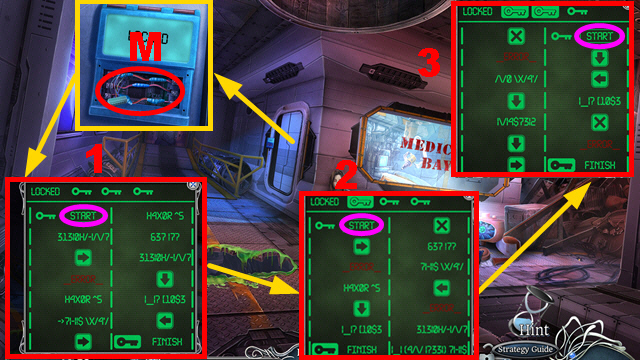
- Inspect the machine (M).
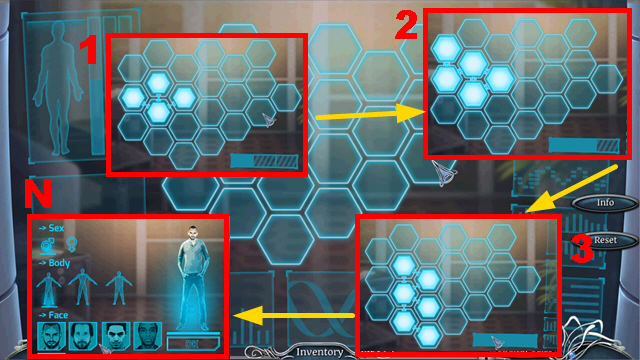
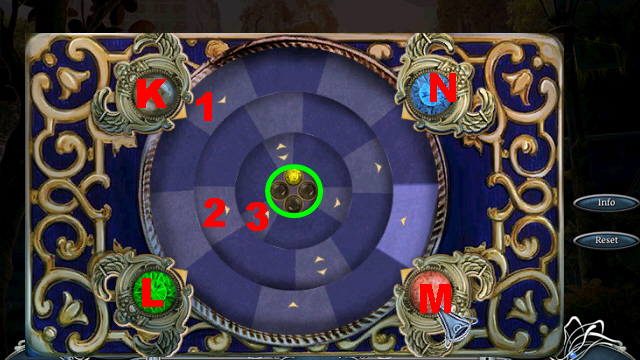
- Play the mini-game.
- Solution: 1-3.
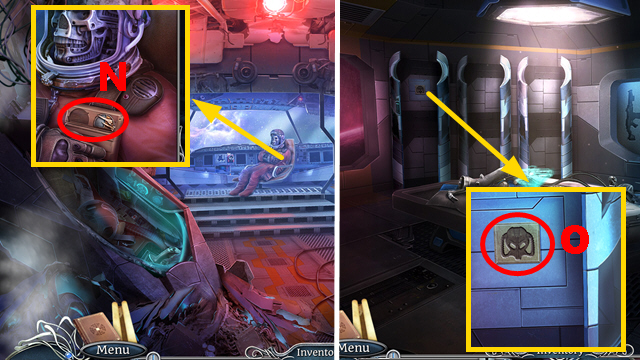
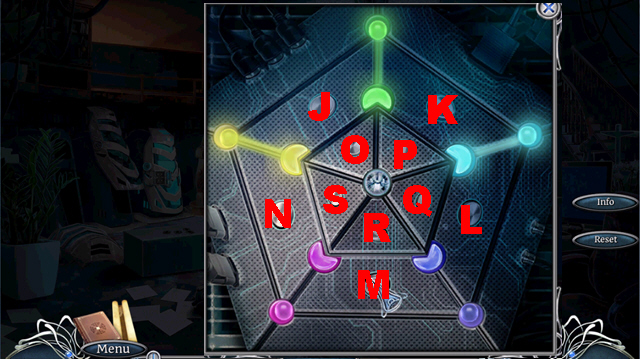
- Make 3 choices (N).
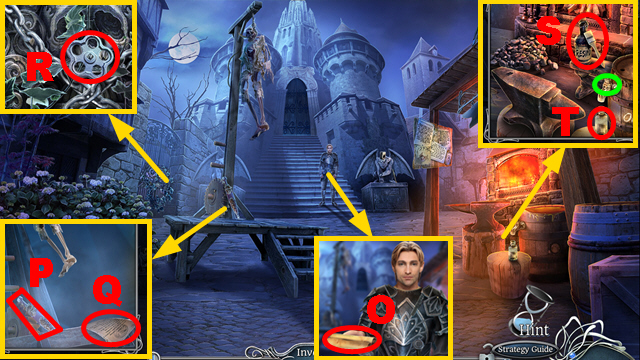
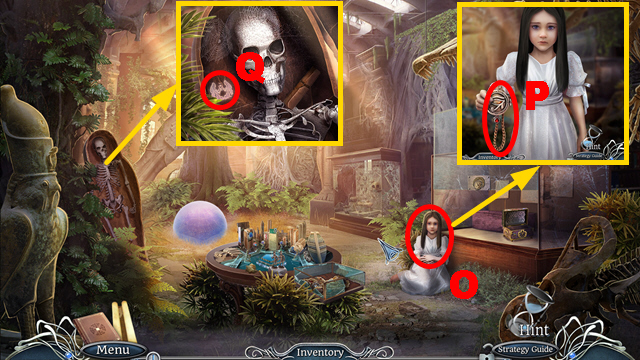
- Take the map (O).
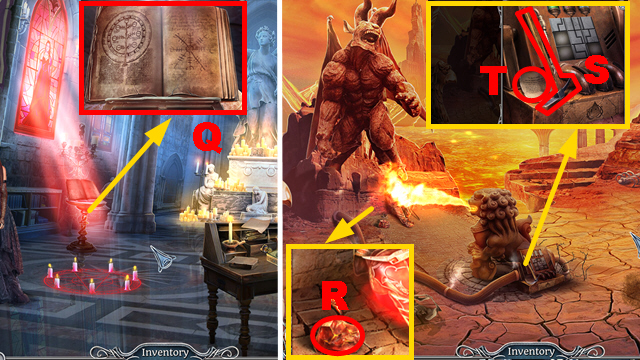
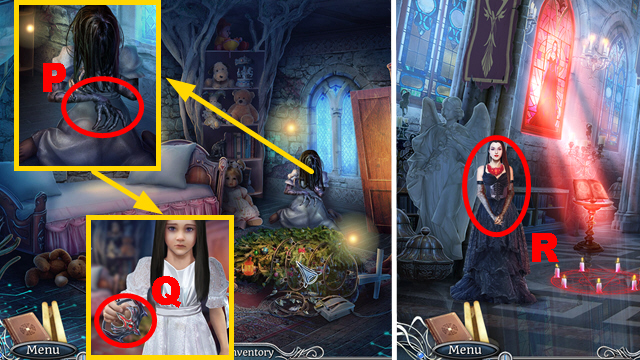
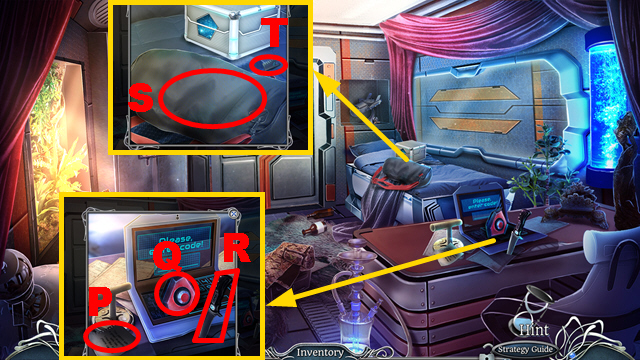
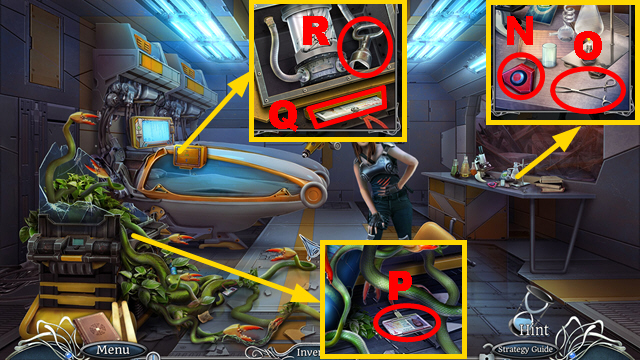
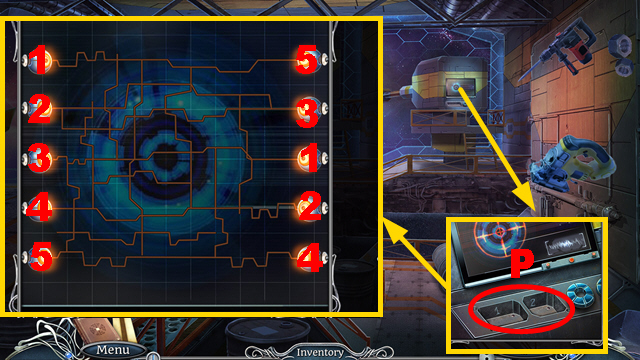
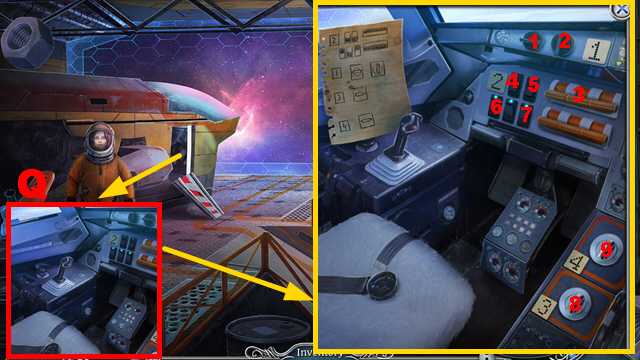
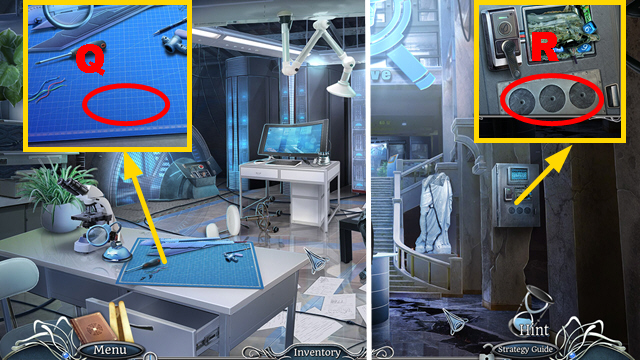
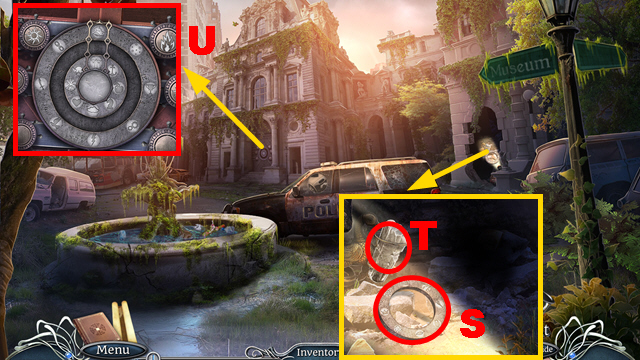
- Take the DAGGER (P) and read the note (Q).
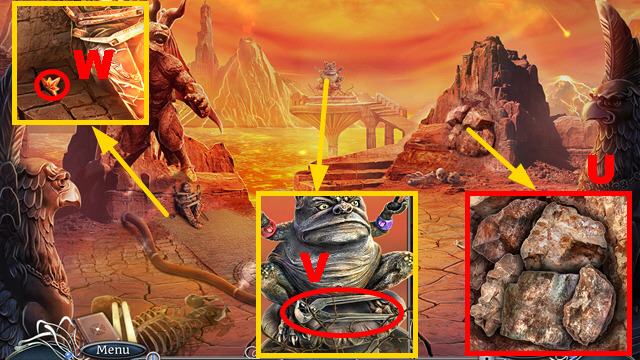
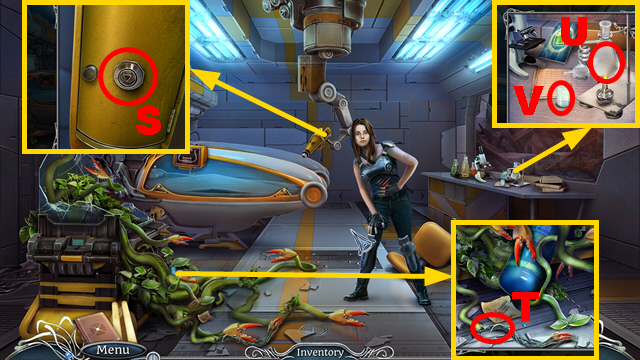
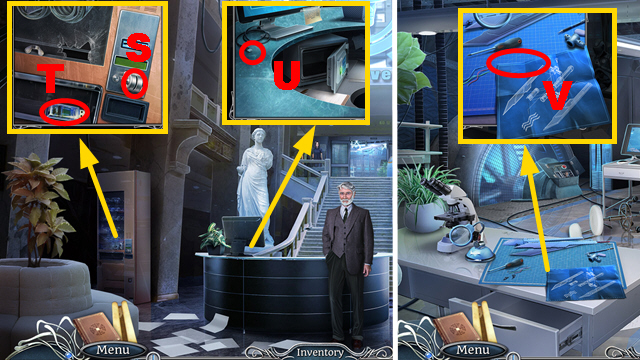
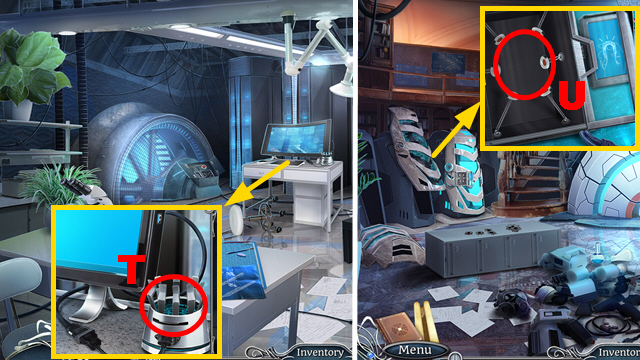
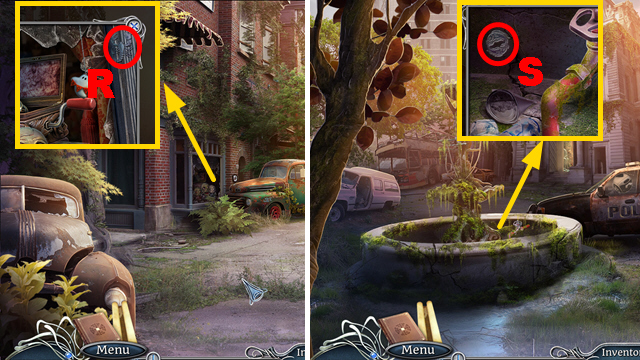
- Take the VALVE (R) and BOTTLE OF RESIN (S); place the VALVE (green) and take the OIL (T).
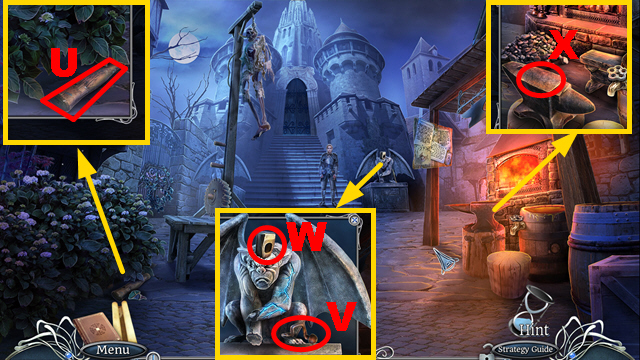
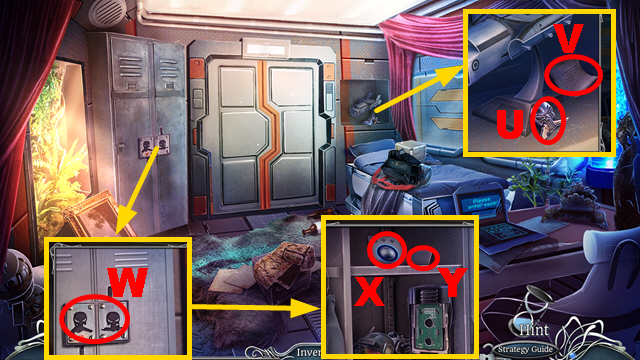
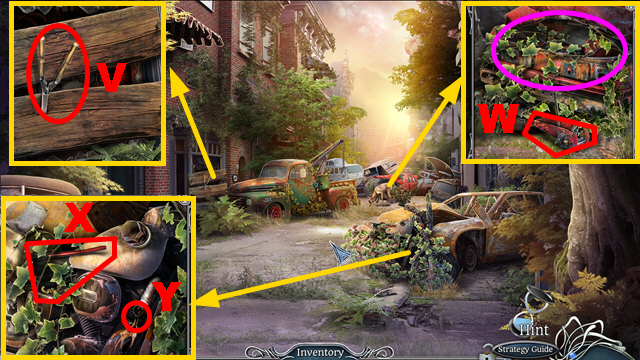
- Take the HANDLE (U) and BENT CRANK (V); place the HANDLE (W) to receive the HAMMER.
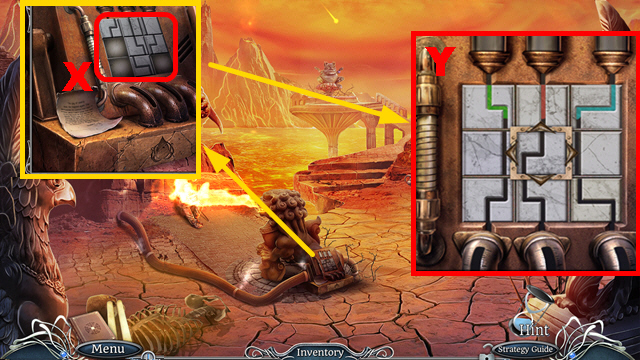
- Place the BENT CRANK, use the HAMMER, and take the CRANK (X).
- Pour the OIL over the DAGGER; take the SHARP DAGGER.
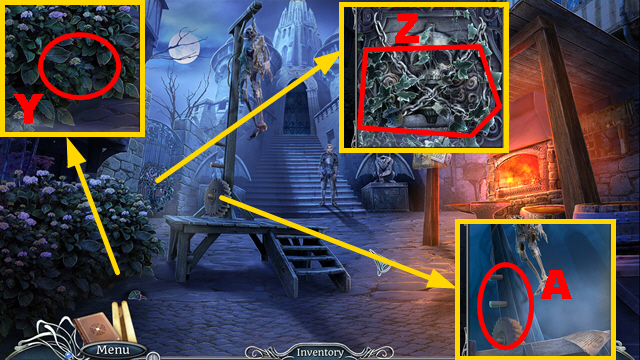
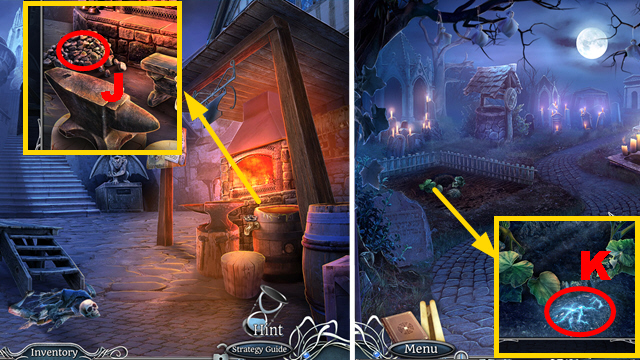
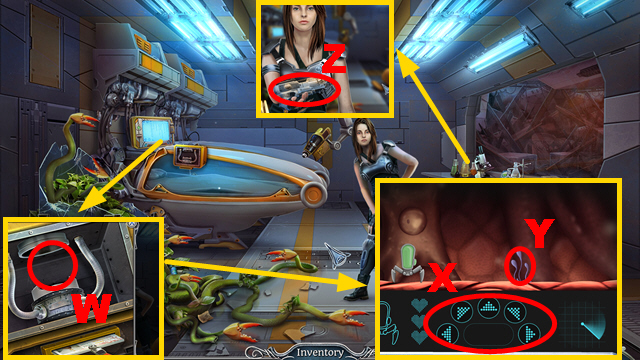
- Use the SHARP DAGGER and take the FILE and BIG GEAR (Y).
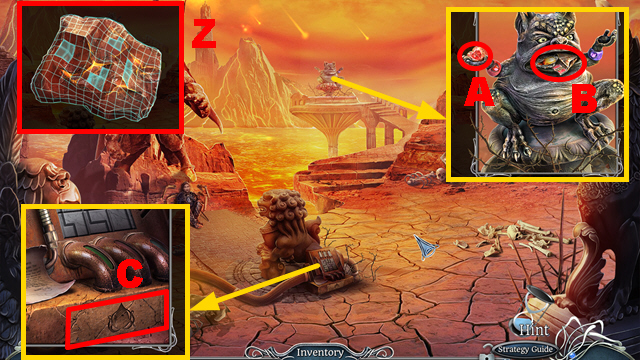
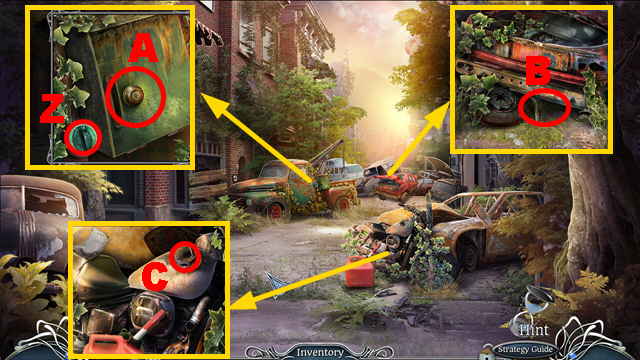
- Use the SHARP DAGGER, take the SMALL GEAR, and use the FILE (Z); receive the CHAIN.
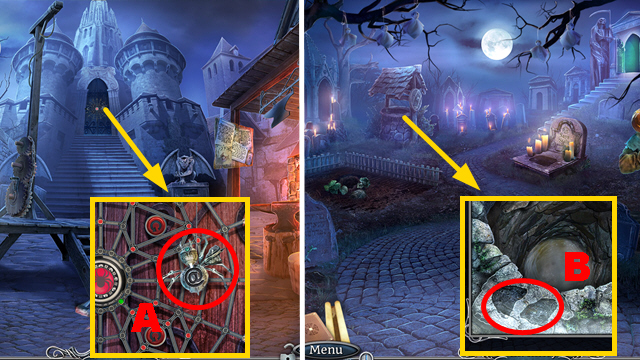
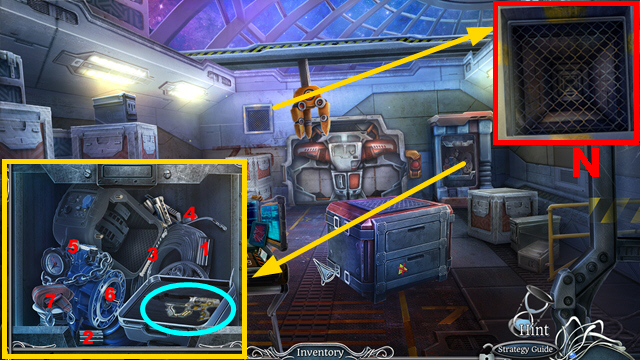
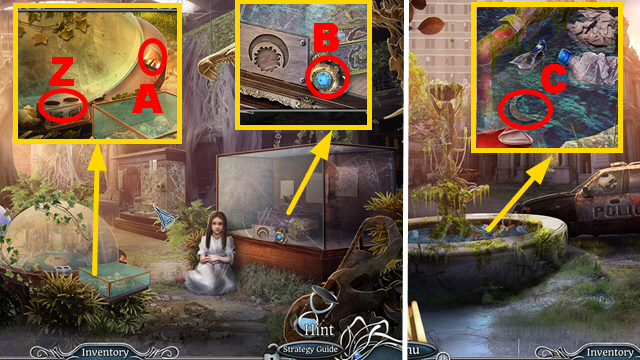
- Place the CRANK, BIG GEAR, SMALL GEAR, and CHAIN (A).
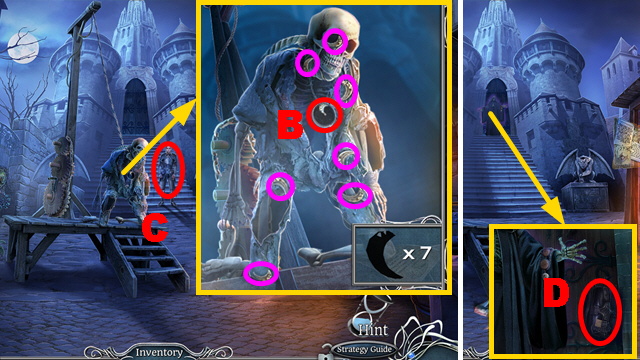
- Collect 7 parts (purple); take the AMULET (B).
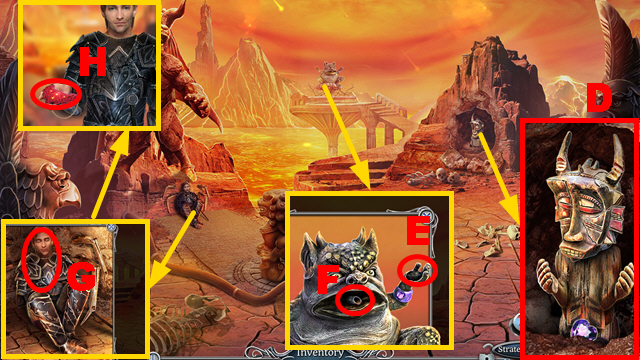
- Give the AMULET (C).
- Take STEPHEN'S BAG (D).
- Take the REAPER FIGURE from STEPHEN'S BAG.
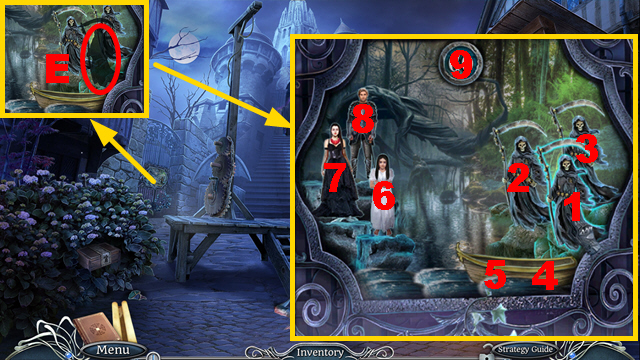
- Place the REAPER FIGURE (E).
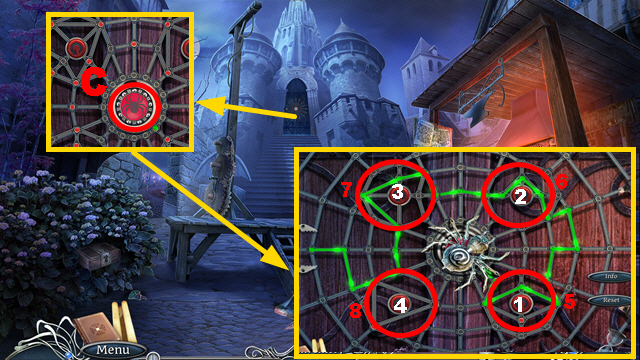
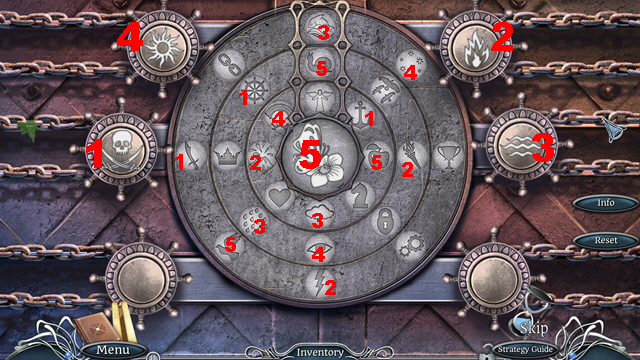
- Play the mini-game.
- Solution: 1-9-6-4-8-9-4-2-9-4-7-9-4-3-5-9-4.
- Enter the Cemetery.

- Take the PUPPET (F).
- Take the HOOK, LEG, and use the SHARP DAGGER (G); receive the ROPE.
- Use the HOOK to collect the PIG CORKSCREW (H); place the ROPE (I).
- Take GARGOYLE PART 1/3 from the PUPPET.
- Use the PIG CORKSCREW on the BOTTLE OF RESIN; take the RESIN.

- Take the STONE RUNE (J); use the RESIN and take the BUCKET (K) and LEG (L).
- Place the BUCKET (M); take GARGOYLE PART 2/3 and the BUCKET WITH WATER (N).
- Take the PUPPET ARM (O), GARGOYLE PART 3/3, and LENS (P).
- Walk down.
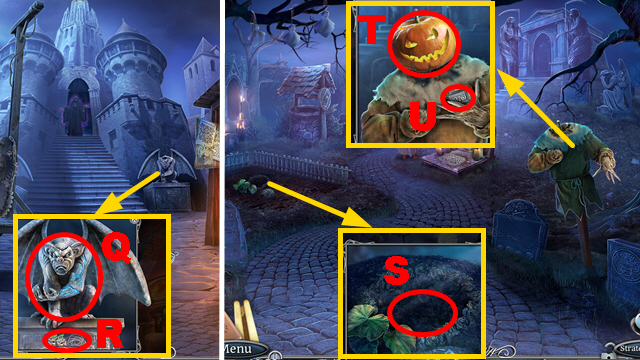
- Place 3 GARGOYLE PARTS (Q); take the SKULL SEEDS and THREAD (R).
- Turn left.
- Use the SKULL SEEDS, BUCKET WITH WATER, and take the PUMPKIN (S).
- Place the PUMPKIN (T); take the DATE OF DEATH (U).
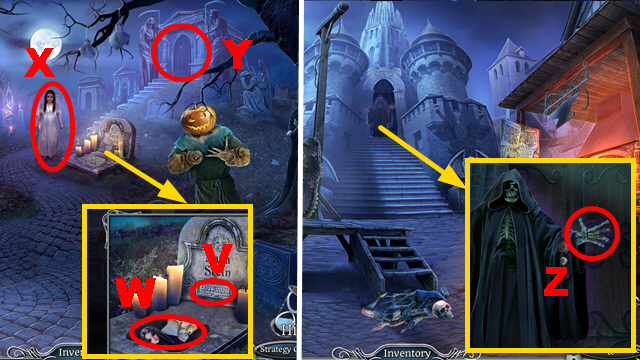
- Place the DATE OF DEATH (V); take the PUPPET HEAD and PHOTO PART (W).
- Place the THREAD, PUPPET ARM, and PUPPET HEAD on the PUPPET; take the FIXED PUPPET.
- Give the FIXED PUPPET (X).
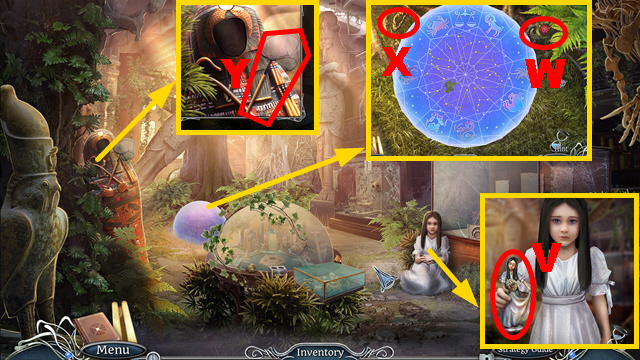
- Play the HOP (Y); receive the SCYTHE.
- Walk down.
- Place the SCYTHE (Z).
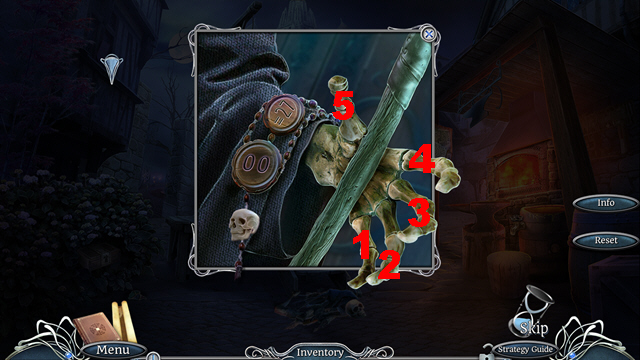
- Play the mini-game.
- Solution: 1-3-4-5-2.
- Take the BROKEN SPIDER (A).
- Take the STONE RUNE from the BROKEN SPIDER.
- Turn left.
- Place the 2 STONE RUNES and take the AT SIGN (B).
- Place 2 LEGS and the AT SIGN on the BROKEN SPIDER; take the MECHANICAL SPIDER.
- Walk down.
- Place the MECHANICAL SPIDER (C).
- Play the mini-game.
- Solution: 1-(8-6)-2-2-3-3-3.
- Go forward.
Chapter 2: The Chapel
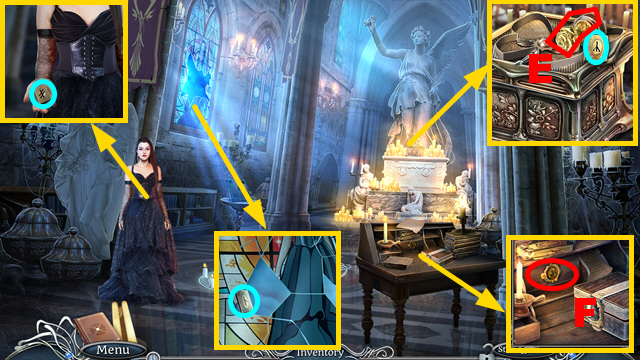
- Take 3 BOOK AMULETS (blue) and the SEAL (E).
- Place the SEAL and take BOOK AMULET 4/4 (F).
- Read the note (green); place 4 BOOK AMULETS and take the GRAVEDIGGER FIGURINE and GLASS SHARD 1/3 (H).
- Walk down.
- Place the GRAVEDIGGER FIGURINE and take GLASS SHARD 2/3 and SHOVEL (I).
- Use the SHOVEL (J); receive the HOT COALS.
- Turn left.
- Use the SHOVEL and take the MAGIC WISP (K).
- Walk down.

- Place the MAGIC WISP and take the TIN (L).
- Go forward.
- Use the TIN, HOT COALS, take the OWL TOKEN, and FEATHER (M).
- Place the OWL TOKEN, take the COMET EMBLEM, INK, and GLASS SHARD 3/3 (N).
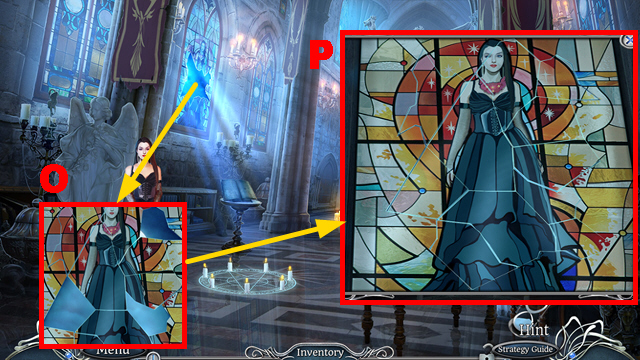
- Place 3 GLASS SHARDS (O).
- Play the mini-game.
- Solution: (P).
- Use the INK and FEATHER (Q).
- Take the CRACKED STONE (R) and PICKAXE (S); read the note (T).
- Use the PICKAXE and take STONE TILE 1/3 (U).
- Take the PLIERS and STONE TILE 2/3 (V).
- Use the PLIERS to collect the STAR EMBLEM (W).
- Take STONE TILE 3/3 from the CRACKED STONE.
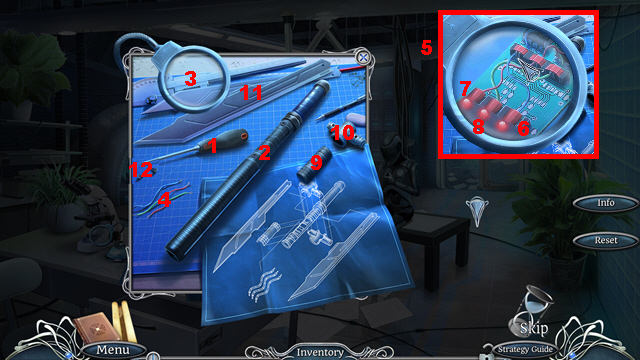
- Place the STAR EMBLEM on STEPHEN'S BAG; take the SHIP PART, PIPE, and MAGNIFIER.
- Place 3 STONE TILES (X).
- Play the mini-game.
- Solution: (Y).
- Use the MAGNIFIER on the CRACKED STONE to discover 4 spots (Z); hit it with the PIPE and take the RUBY HEART.
- Place the RUBY HEART (A); take the FLAME INLAY and STATUE PART 1/2 (B).
- Place the FLAME INLAY and take the GOBLET and STATUE PART 2/2 (C).
- Place 2 STATUE PARTS and take the AMETHYST HEART (D).
- Place the AMETHYST HEART (E) and GOBLET (F); receive the HEALING WATER.
- Give the HEALING WATER (G); take the FIRE NECKLACE (H).
- Give the FIRE NECKLACE (I).
- Play the HOP (J).
- Take the SWITCH (K) and RIPPED PHOTO (L).
- Place the SWITCH (M).
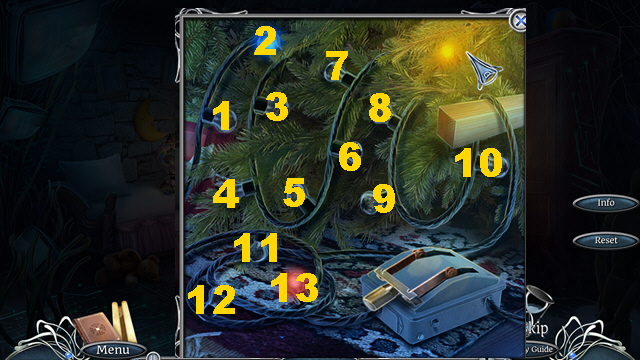
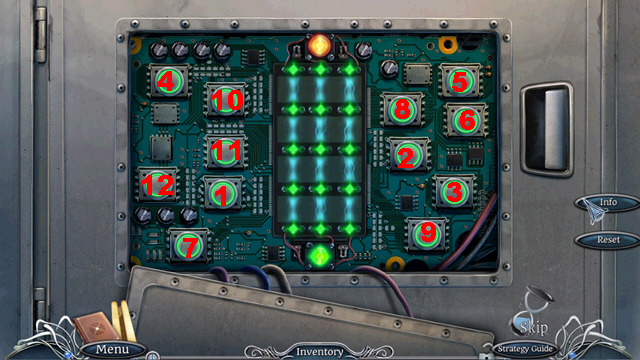
- Play the mini-game.
- Solution: 1-3-6-9-11-12.
- Take the BULB and PHOTO PART.
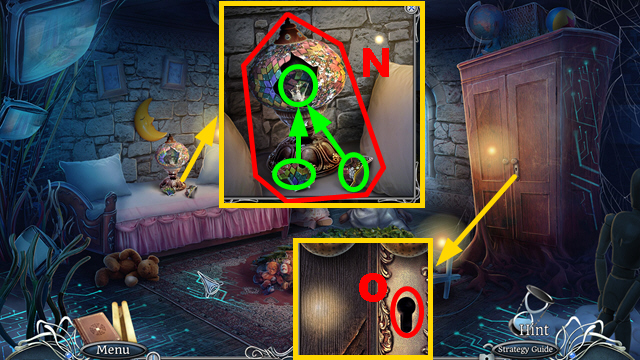
- Place the BULB and two lamp pieces (green); take the LAMP, KEY, and PHOTO PART (N).
- Insert the KEY and use the LAMP (O).
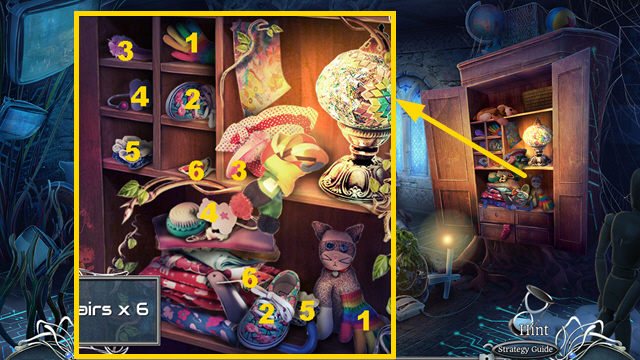
- Find pairs 1-6; take the PHOTO PART.
- Place 4 PHOTO PARTS on the RIPPED PHOTO; take the PHOTO.
- Give the PHOTO (P); take the CROWN OF DARKNESS (Q).
- Walk down.
- Give the CROWN OF DARKNESS (R).
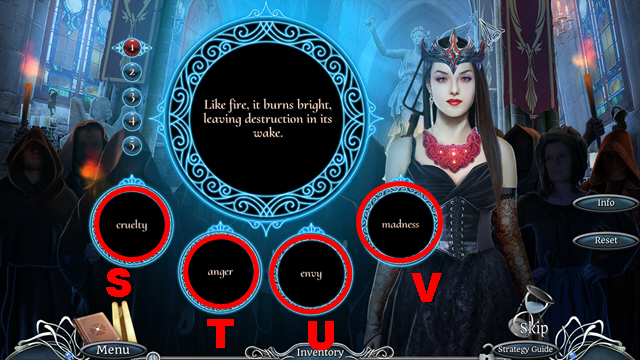
- Play the mini-game.
- Solution: T-U-S-U-V.
Chapter 3: The Cargo Bay
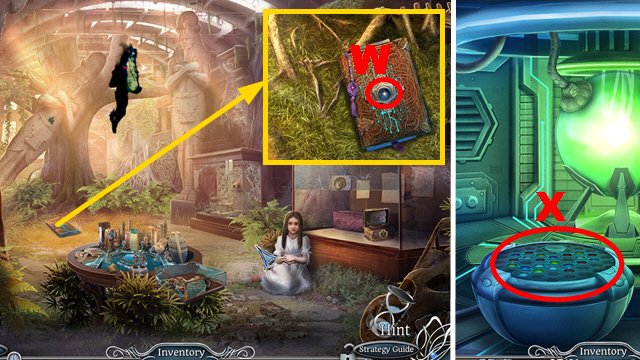
- Examine anywhere.
- Take the TABLET (W), WRENCH (X), and read the note (Y).
- Take the CONTROL PANEL CODE from the TABLET.
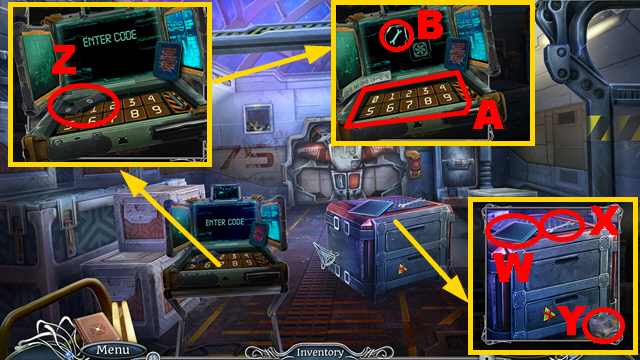
- Take the TABLET BUTTONS and place the CONTROL PANEL CODE (Z).
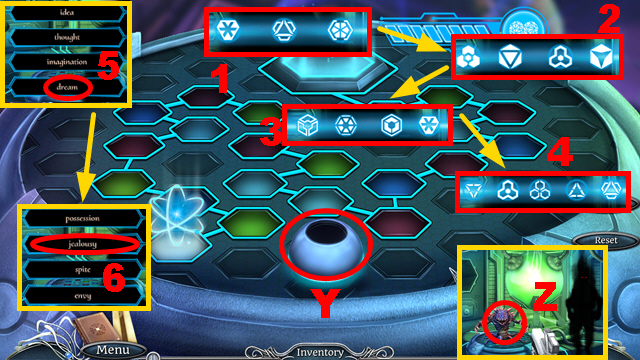
- Play the mini-game.
- Solution: Enter the code '31275' (A).
- Push the button (B).
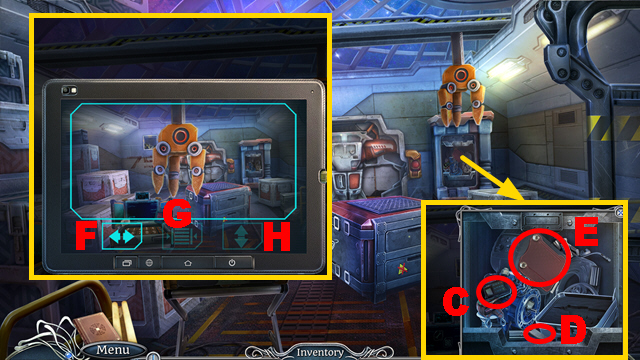
- Take the HACKING DEVICE (C) and PANEL KEY (D); use the WRENCH and take the TABLET ANTENNA (E).
- Place the TABLET ANTENNA and TABLET BUTTONS on the TABLET.
- Play the mini-game.
- Solution: Fx3-H-G-H-F-H-G-H-F-H-G-H-F-H-G-H-F-H-G-H-F-H-G.
- Take the PLASMA CUTTER BASE (I) and ACCESS CARD (J).
- Insert the ACCESS CARD (K) and push the button (L); receive the VENTILATION MAP.
- Place the PLASMA CUTTER BASE (M).
- Collect parts 1-7; take the PLASMA CUTTER (blue).
- Use the PLASMA CUTTER and VENTILATION MAP (N).

- Play the mini-game.
- Solution: (O); turn right-left-right-left-left-forward-right-(second right turn)-left.
- Read the note (P); take BOMB PART 1/3 (Q) and the KNIFE (R).
- Use the KNIFE and take the BROKEN MECHANICAL PARROT and LOCKER KEY (S); take HACKING DEVICE PART 1/3 (T).
- Take the LOCKER KEY (U); read the note (V).
- Place 2 LOCKER KEYS (W); take the COMMUNICATION MODULE (X) and BUTTON (Y).
- Place the SHIP PART (Z) and BUTTON (A).
- Play the HOP (B); receive the COORDINATES.
- Place the COMMUNICATION MODULE and COORDINATES (C).
- Go forward.
- Take the SCREWDRIVER (D) and HACKING DEVICE PART 2/3 (E); use the SCREWDRIVER and take the WIRES (F).
- Take the ADHESIVE TAPE (G).
- Use the SCREWDRIVER, WIRES, and ADHESIVE TAPE (H).
- Take the CAPTAIN'S INSIGNIA (I).
- Walk down.
- Place the CAPTAIN'S INSIGNIA and take the EMPTY TEST TUBE (J).
- Go forward.
- Use the EMPTY TEST TUBE (K) to acquire the ACID.
- Walk down twice.
- Use the ACID and take HACKING DEVICE PART 3/3 (L).
- Place 3 HACKING DEVICE PARTS on the HACKING DEVICE; take the HACKING DEVICE.
- Go forward twice.
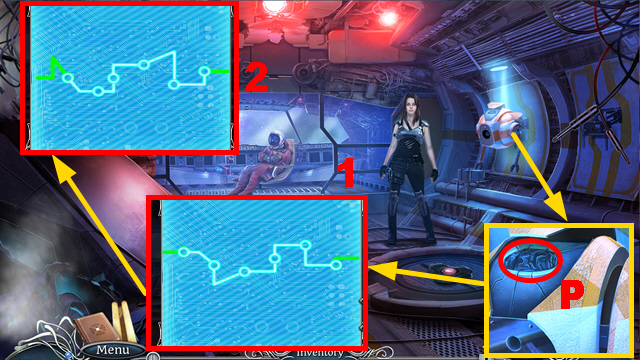
- Use the HACKING DEVICE (M).
- Play the mini-game.
- Solution: 1-3.
- Push the button (purple) to activate each solution part.
- Enter the Medical Bay.
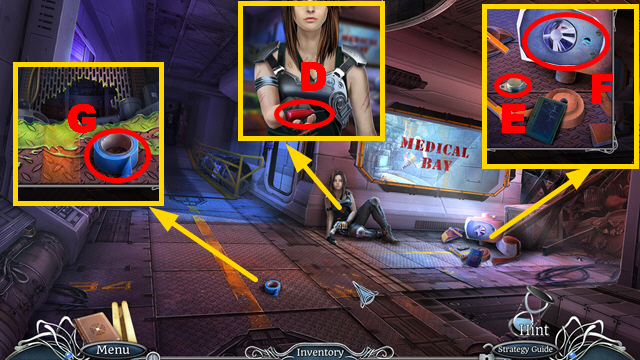
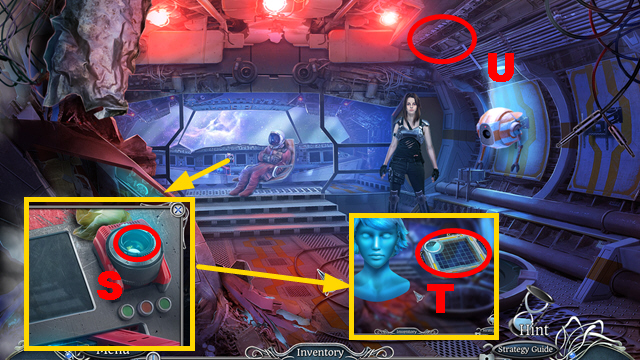
- Take BOMB PART 2/3 (N) and the FORCEPS (O).
- Use the FORCEPS to collect the ID BADGE (P).
- Place the ID BADGE (Q); take the TRIANGULAR KEY (R).
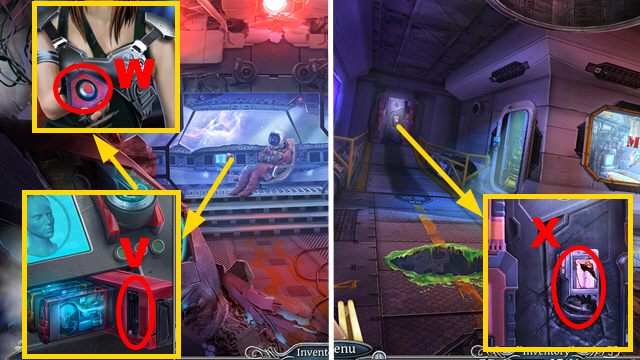
- Use the TRIANGULAR KEY, take the SCALPEL, and place the LENS (S).
- Use the SCALPEL to collect the PLANT PART (T).
- Place the PLANT PART (U); take the PENICILLIN (V).
- Place the PENICILLIN (W).
- Play the mini-game.
- Solution: Use the arrows (X) to avoid obstacles (Y).
- Take the GUN (Z).
- Take the FOB and DISCHARGED BATTERY from the GUN.
- Place the FOB on the BROKEN MECHANICAL PARROT; take the PARROT.
- Walk down twice.
- Place the PARROT and take the LASER TOOL (A).
- Walk down.
- Use the LASER TOOL, DISCHARGED BATTERY, and take the CHARGED BATTERY (B).
- Go forward twice.
- Use the LASER TOOL and take the CRYSTAL (C).
- Place the CRYSTAL and CHARGED BATTERY on the GUN; take the BLASTER.
- Go forward.
- Use the BLASTER and take the GAS (D).
- Place the GAS (E).
- Go forward.
Chapter 4: The Bridge
- Talk to Jean (F).
- Take the MANIPULATOR BASE (G), MANIPULATOR CLAW (H), and MANIPULATOR MODULE (I).
- Take the BOMB (J) and BAG (K).
- Place the MANIPULATOR MODULE and MANIPULATOR CLAW on the MANIPULATOR BASE; take the MANIPULATOR.
- Walk down twice.
- Use the MANIPULATOR to collect the SHIP PART (L).
- Walk down.
- Place the SHIP PART (M); take the CODE MODULE (N).
- Insert the CODE MODULE (O); enter the code 1-4 and take the CONTROLLER MODULE.
- Go to the Bridge.
- Place the CONTROLLER MODULE (P).
- Play the mini-game.
- Solution: 1-2.
- Take the ROBOT.

- Use the ROBOT (Q) and play the HOP (blue); receive the DISPLAY.
- Walk down three times.
- Place the DISPLAY and take the BOARD ACCESS KEY (R).
- Go to the Bridge.
- Place the BOARD ACCESS KEY (S); take the device (T).
- Examine the area (U); receive the MEMORY MODULE.
- Insert the MEMORY MODULE (V); take BOMB PART 3/3 (W).
- Place 3 BOMB PARTS on the BOMB; take the ARMED BOMB.
- Walk down twice.
- Place the ARMED BOMB (X).
- Enter the Armory.
- Take the HAMMER (Y) and LIST (Z).
- Use the HAMMER and take the BRACELET (A).
- Walk down three times.
- Place the LIST and take the WEAPON PARTS (B).
- Go to the Bridge.

- Place the BRACELET and take the WEAPON ACCESS CODES (C).
- Go to the Armory.
- Place the WEAPON ACCESS CODES (D).
- Play the mini-game.
- Solution: (E).
- Take the WEAPON BASE.

- Place the WEAPON BASE and WEAPON PARTS (F) and play the HOP (orange); receive the WEAPONS.
- Go to the Bridge.
- Give the WEAPONS (G); choose a weapon (H).
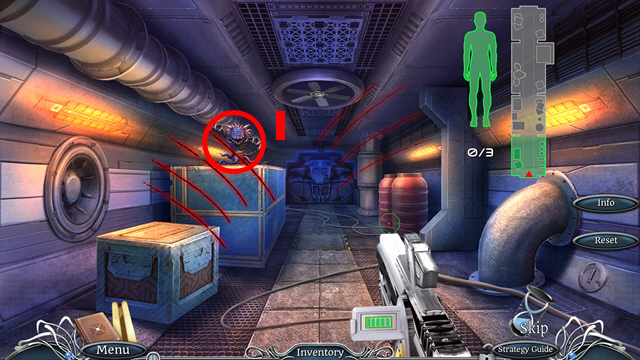
- Play the mini-game.
- Solution: Shoot 19 monsters (I) in five rooms.
- Take the COMET EMBLEM (J).
- Place 2 COMET EMBLEMS on the bag; take the TURRET MODULE, SHIP AMULET, and ARMORY CABINET KEY.
- Go to the Armory.
- Insert the ARMORY CABINET KEY and take the SPACE SUIT (K).
- Go to the Hangar.
- Use the SPACE SUIT (green).
- Take the SHIP AMULET and use the PANEL KEY (L).
- Take the ALIEN SHAPE (M).
- Walk down.
- Place 2 SHIP AMULETS and take the SHIP ACCESS CODE (N).
- Go to the Armory.
- Place the ALIEN SHAPE and take the TURRET MODULE (O).
- Go to the Hangar.
- Place 2 TURRET MODULES (P).
- Play the mini-game.
- Solution: 1-5.
- Place the SHIP ACCESS CODE (Q).
- Play the mini-game.
- Solution: 1-9.
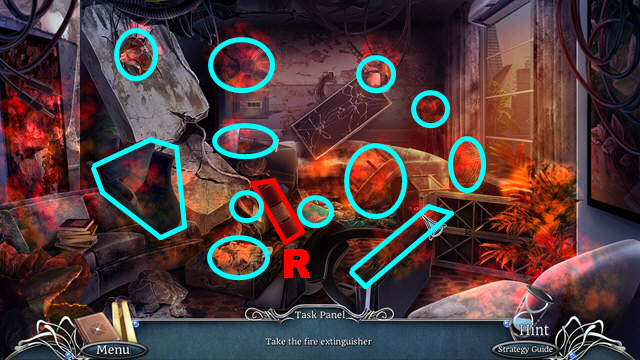
- Take the fire extinguisher (R).
- Extinguish 12 burning items (blue).
Chapter 5: The Agency Lobby
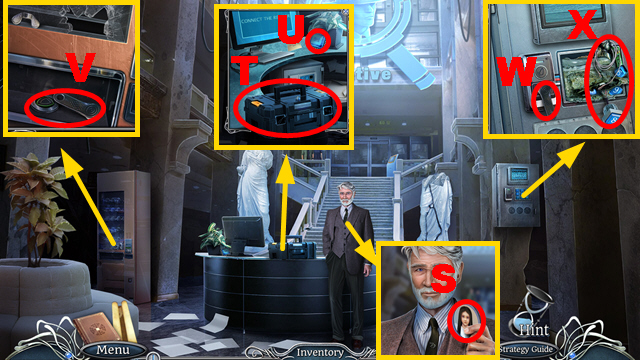
- Take NAYA'S PICTURE (S), the TOOLBOX (T), CHIP (U), SECURITY DISC 1/3, and MAGNET KEY (V).
- Place the MAGNET KEY (W); take the WIRES and BUTTON 1/3 (X).
- Take COIN 1/3 and BUTTON 2/3 (Y); place the CHIP (Z).
- Take BUTTON 3/3 from the TOOLBOX.
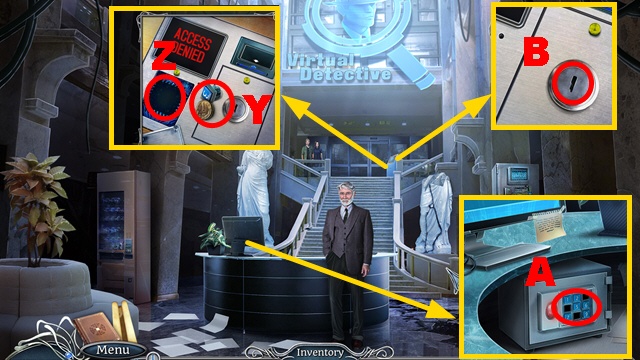
- Place 3 BUTTONS and take the MASTER KEY (A).
- Insert the MASTER KEY (B).
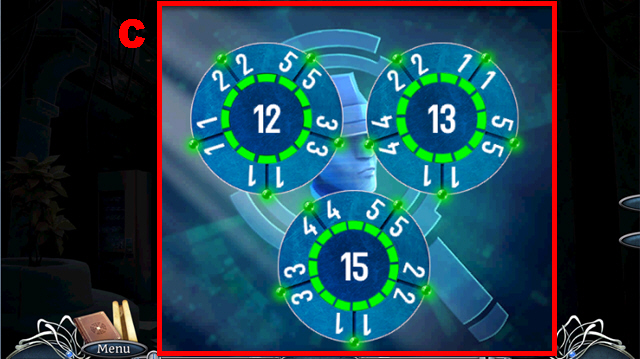
- Play the mini-game.
- Solution: (C).
- Go forward.
- Take the TOOLBOX TILE (D).
- Go forward.
- Take the CASE (E).
- Take the TOOLBOX TILE from the CASE.
- Place 2 TOOLBOX TILES on the TOOLBOX; take the LOCKED ACTIVATOR and GENERATOR BUTTON.
- Walk down.
- Place the GENERATOR BUTTON (F); push it.
- Take the HACKSAW BASE, SECURITY DISC 2/3, COIN 2/3, and PROGRAM (G); place the WIRES (H).
- Place the PROGRAM (I); take the DESIGN (J) and DEAD BATTERY (K).
- Take the LATCH and MASTER SWITCH (L); remove the crystal (M).
- Place the MASTER SWITCH (N) and DEAD BATTERY (O); take the CHARGED BATTERY.
- Place the CHARGED BATTERY and take SECURITY DISC 3/3 (P).
- Place the DESIGN (Q).
- Walk down.
- Place 3 SECURITY DISCS (R).
- Play the mini-game.
- Solution: 1-12.
- Take the SAW BLADE, BATON, and COIN 3/3.
- Insert 3 COINS (S); take the FLASH DRIVE (T).
- Place the LOCKED ACTIVATOR (U).
- Go forward.
- Place the BATON (V).
- Play the mini-game.
- Solution: (1-2)-2-2-3-(4-5)-(6-7)-(7-8)-9-(10-2)-(11-2)-(12-2)-(1-2).
- Take the WEAPON.
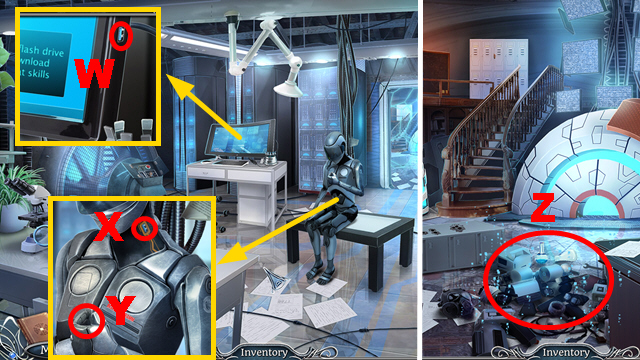
- Place the FLASH DRIVE (W); take the FLASH DRIVE WITH SKILLS.
- Place the FLASH DRIVE WITH SKILLS (X) and WEAPON (Y).
- Play the HOP (Z); receive the MAGNET.
- Walk down twice.
- Use the MAGNET to collect the WINGNUT (A).
- Place the SAW BLADE and WINGNUT on the HACKSAW BASE; take the HACKSAW.
- Go forward twice.
- Use the HACKSAW and take the LATCH (B).
- Place 2 LATCHES on the CASE; take the GLOVES.
- Walk down.
- Use the GLOVES (C); receive VICTOR'S PICTURE.
- Go forward.
- Place NAYA'S PICTURE and VICTOR'S PICTURE and take the CD and READER (D).
- Walk down twice.

- Place the READER and take the CAPSULE ACTIVATOR (E).
- Go forward twice.
- Use the CAPSULE ACTIVATOR, take the DOLLAR, and remove the crystal (F).
- Walk down twice.
- Insert the DOLLAR (G); take the PYRAMID TOP (H).
- Go forward twice.
- Place the PYRAMID TOP (I).
- Play the mini-game.
- Solution: J-S-J-O-J-Nx3-Ox2-M-L-Q-L-Q-L-Qx2-Lx3-Mx2-R-M-R-Mx2-S-Nx2-S-N-S-R-M-R-M-R-M-Rx2-M.
- Take the NUCLEUS.
- Walk down.
- Place the NUCLEUS and CD (T); take AION'S WORLD.
- Go forward.
- Place AION'S WORLD (U).
Chapter 6: The Street
- Take the PRUNERS (V) and BROKEN JACK (W).
- Use the PRUNERS and take the EMPTY CAN (purple).
- Use the PRUNERS and take the JACK PART and DECORATION (X); place the EMPTY CAN (Y).
- Take the CAR KEY from the BROKEN JACK.
- Remove the cover (Z); insert the CAR KEY and take the WRENCH and JACK PART (A).
- Place 2 JACK PARTS on the BROKEN JACK; take the JACK.
- Use the JACK and take the CROWBAR (B).
- Use the WRENCH (C).
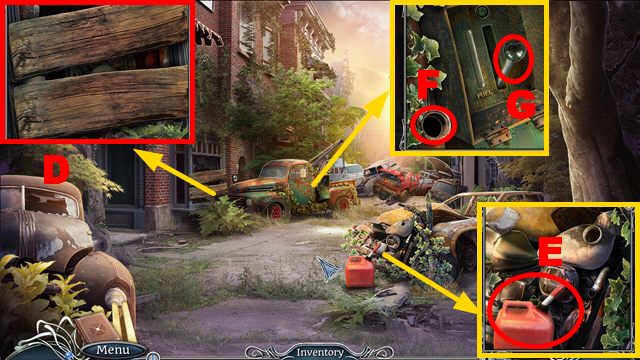
- Use the CROWBAR, take the WARRIOR STATUETTE, PANDORA'S BOX, and HOSE (D).
- Place the HOSE and take the GASOLINE (E).
- Use the GASOLINE (F); push the lever (G).
- Move the hook (H).
- Go forward.
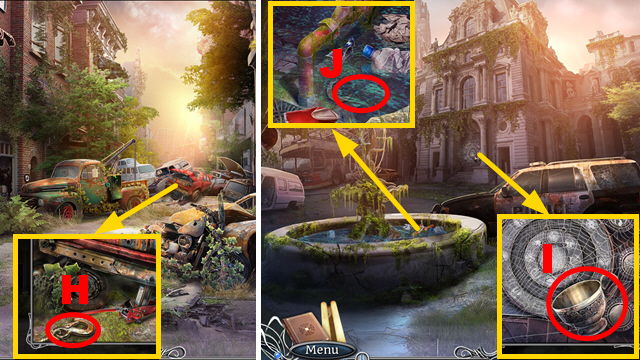
- Take the BOWL (I).
- Use the BOWL (J); receive the BOWL OF WATER.
- Use the BOWL OF WATER and take the DIAMOND (K).
- Use the DIAMOND and take the MASK and BAG (L).
- Take the CRANK from the BAG.
- Walk down.
- Place the CRANK and take the SPIDER (M).
- Go forward.
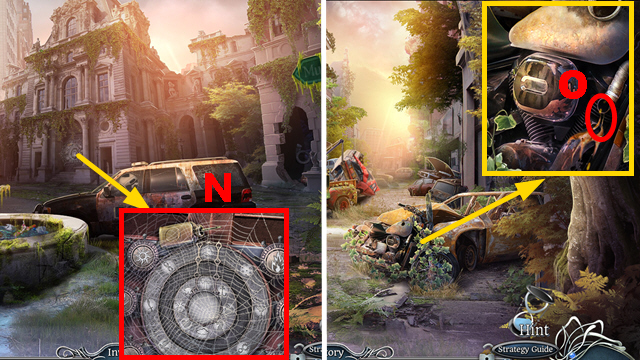
- Place the SPIDER and take the EMPTY OIL CAN (N).
- Walk down.
- Place the EMPTY OIL CAN (O); receive the OIL.
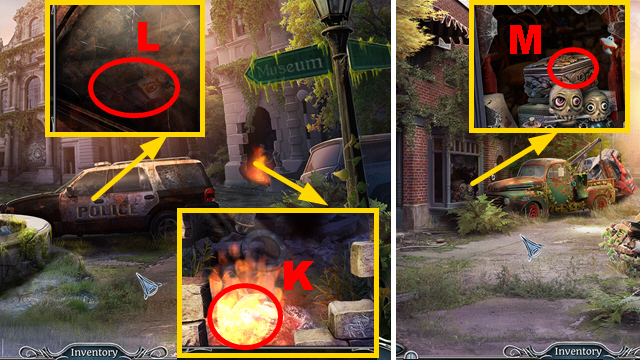
- Apply the OIL to the BAG; take the FLASHLIGHT and POLICE BADGE.
- Go forward.
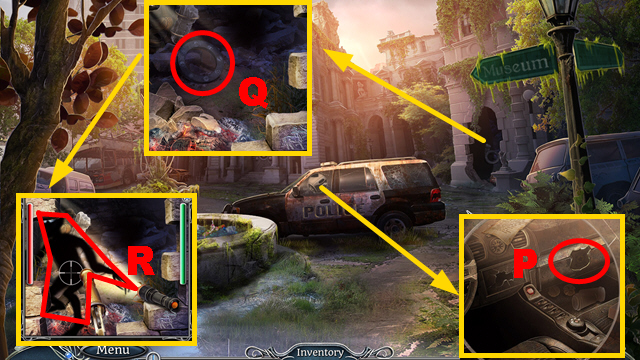
- Place the POLICE BADGE and take the GUN (P).
- Use the FLASHLIGHT and GUN (Q).
- Play the mini-game.
- Solution: Shoot the shadow (R) until its health is down.
- Take the MUSEUM RING (S); remove the stone (T).
- Place the MUSEUM RING (U).
- Play the mini-game.
- Solution: 1-5.
- Go forward.
- Take NAYA'S FIGURINE (V).
- Take the SUN EMBLEM from NAYA'S FIGURINE.
- Take BOX PART 1/4 (W) and the DECORATION (X).
- Take the NET (Y).
- Place the WARRIOR STATUETTE (Z); take the MASK (A).
- Take BOX PART 2/4 (B).
- Walk down.
- Use the NET to collect the MOON EMBLEM (C).
- Go forward.
- Place the MOON EMBLEM and SUN EMBLEM and take the TUNING FORK and MASK (D).
- Use the TUNING FORK and take BOX PART 3/4 and the SKULL (E).
- Walk down twice.
- Place the SKULL and take the TWEEZERS (F).
- Go forward twice.
- Use the TWEEZERS to collect the DECORATION (G).
- Place 3 DECORATIONS and take the VALVE (H).
- Walk down.
- Place the VALVE (I); take BOX PART 4/4 (J).
- Place 4 BOX PARTS on PANDORA'S BOX.
- Play the mini-game.
- Solution: Guide gems K-N into the middle (green) by activating the path elements 1-3 in the correct moment.
- Take the STONE OF LIGHT.

- Place the STONE OF LIGHT (K); take the MASK (L).
- Go forward.
- Place 4 MASKS and take the WARRIOR STATUETTE and HEART (M).
- Place the WARRIOR STATUETTE (N) and play the HOP (blue); receive the FANG.
- Give the HEART (O); take the HORUS EYE (P).
- Use the HORUS EYE (Q); receive the ZODIAC SIGN 1/4.
- Walk down twice.
- Use the HORUS EYE (R); receive ZODIAC SIGN 2/4.
- Go forward.
- Use the HORUS EYE (S); receive ZODIAC SIGN 3/4.
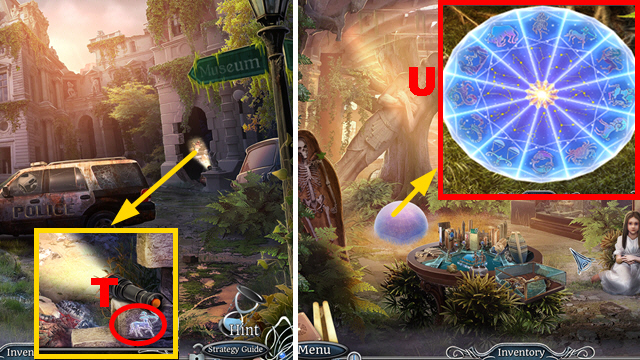
- Use the HORUS EYE (T); receive ZODIAC SIGN 4/4.
- Go forward.
- Place 4 ZODIAC SIGNS (U).
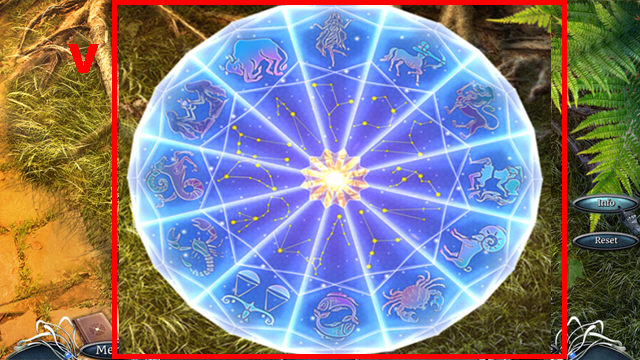
- Play the mini-game.
- Solution: (V).
- Use the FANG (W).
- Go forward.
- Inspect the area (X).
- Play the mini-game.
- Solution: Use the magic dice (Y) to move the figurine.
- On green fields, recreate the correct sequence 1-4.
- On dark blue fields, give the correct answer 5-6.
- On red fields, shoot monsters and crows (Z).
- Make a choice.
- Congratulations! You have completed Surface: Virtual Detective.
Created at: 2016-12-30