

Walkthrough Menu
General Tips
 • When the game first starts press ‘New Game’ to play. • This
game only allows you to play one user at a time. If you select
‘New Game’, you will erase your current game. • In the options
menu you change the volume of various categories. • There is a
gallery of images from the game that you can view from the
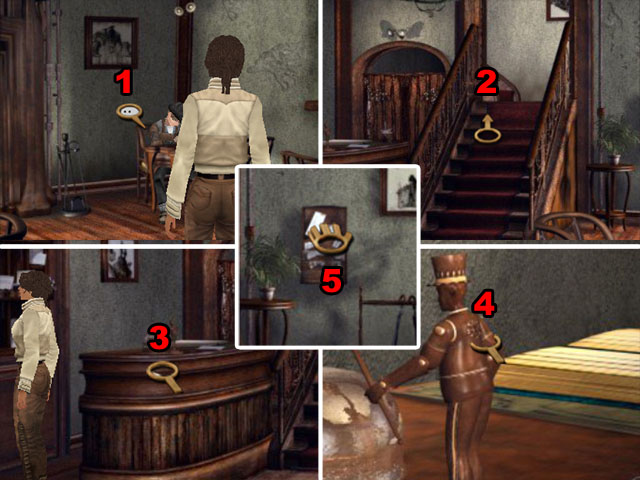
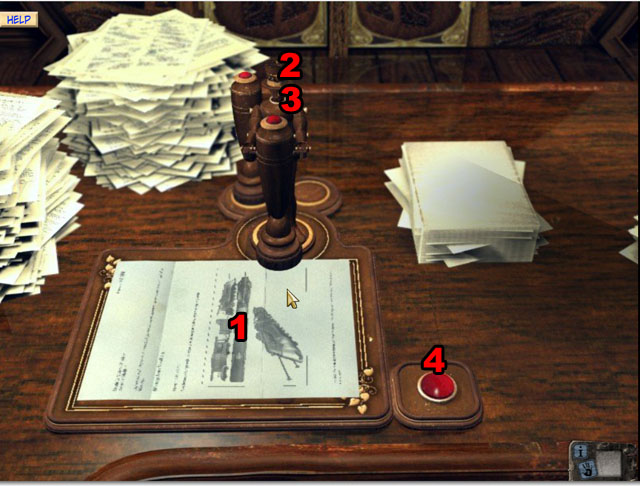
main menu. • There are 4 types of cursors in the game: the
speech cursor (1) for interacting with people. The movement
cursor (2) for changing the scene. The inspect cursor (3) for
viewing a scene more closely, and the use cursor (4) for
interacting with objects and using inventory items. • To open
the inventory box press on the hand at the bottom of the
screen. • Select an object and then the hand button to equip
it. When you use something it will use this object to interact
with. • When you have an object equipped it will show in the
box in the right bottom corner. • Select an object and then
the eye button to inspect the item. This is how you can read
information like a newspaper more than once. • There is a
phone at the top of the inventory that you can use to call the
contacts. Select the name you want to call and press the send
button. You cannot type in any numbers. • There is a simple
tutorial and help available if you select it when creating a
new game.
• When the game first starts press ‘New Game’ to play. • This
game only allows you to play one user at a time. If you select
‘New Game’, you will erase your current game. • In the options
menu you change the volume of various categories. • There is a
gallery of images from the game that you can view from the
main menu. • There are 4 types of cursors in the game: the
speech cursor (1) for interacting with people. The movement
cursor (2) for changing the scene. The inspect cursor (3) for
viewing a scene more closely, and the use cursor (4) for
interacting with objects and using inventory items. • To open
the inventory box press on the hand at the bottom of the
screen. • Select an object and then the hand button to equip
it. When you use something it will use this object to interact
with. • When you have an object equipped it will show in the
box in the right bottom corner. • Select an object and then
the eye button to inspect the item. This is how you can read
information like a newspaper more than once. • There is a
phone at the top of the inventory that you can use to call the
contacts. Select the name you want to call and press the send
button. You cannot type in any numbers. • There is a simple
tutorial and help available if you select it when creating a
new game.
Part 1 – Valadilene
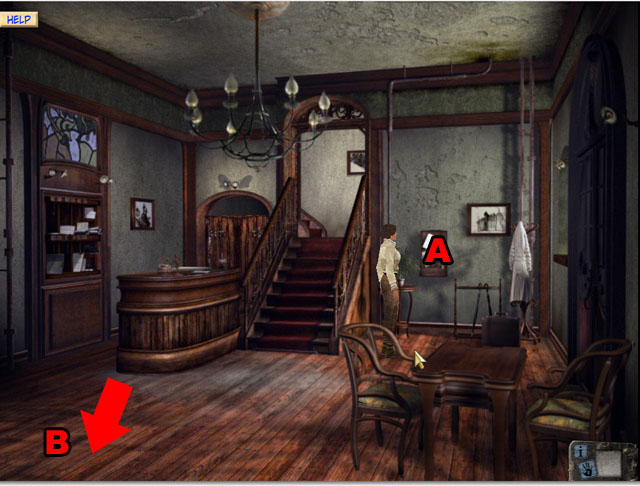 • Pick up the ADVERTISTING BROCHURE (A). • Move to the next
room to the left (B).
• Pick up the ADVERTISTING BROCHURE (A). • Move to the next
room to the left (B).
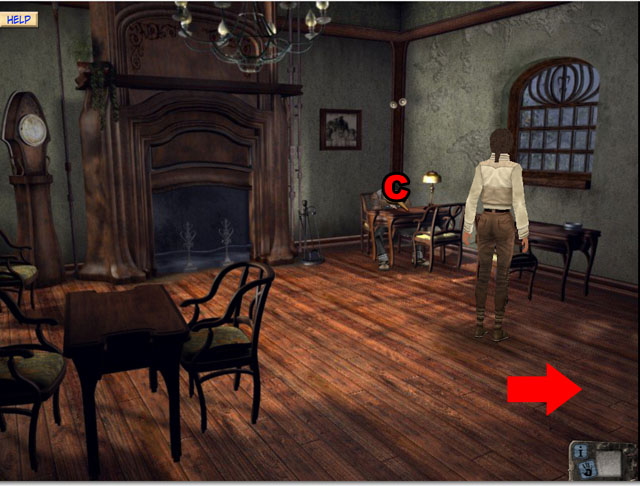 • Talk to the child drawing in the corner and select all of
the conversation topics (C).
• Talk to the child drawing in the corner and select all of
the conversation topics (C).
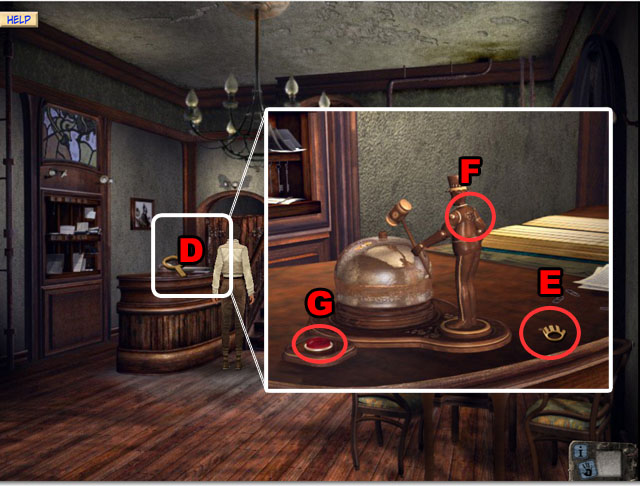 • Return to the previous scene and inspect the counter (D). •
Pick up the RECEPTION BELL KEY (E). • Use the KEY on the small
man’s back (F). • Press the red button (G).
• Return to the previous scene and inspect the counter (D). •
Pick up the RECEPTION BELL KEY (E). • Use the KEY on the small
man’s back (F). • Press the red button (G).
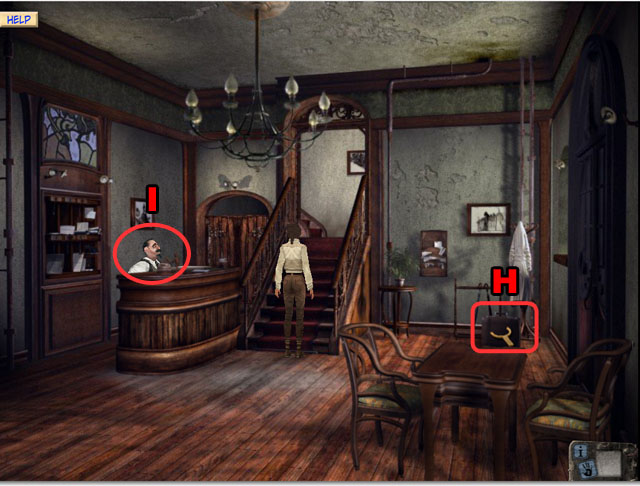 • Select the luggage near the door (H). • Talk to the owner
(I) and select all of the conversation options.
• Select the luggage near the door (H). • Talk to the owner
(I) and select all of the conversation options.
 • Walk to the end table behind the bed (J). • Press on the FAX
(K).
• Walk to the end table behind the bed (J). • Press on the FAX
(K).
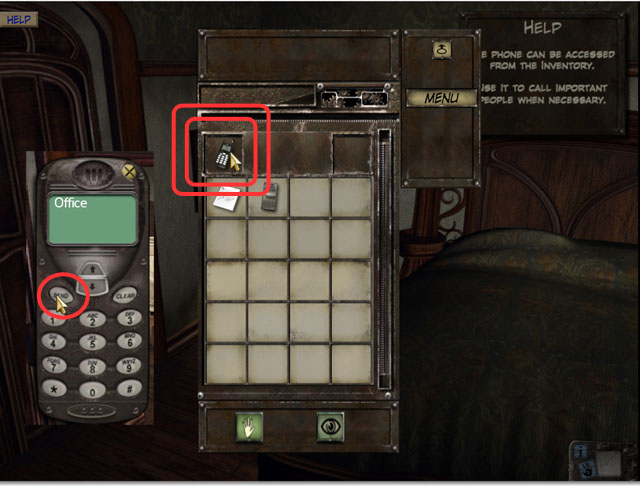 • Use the phone from your inventory and dial the Office.
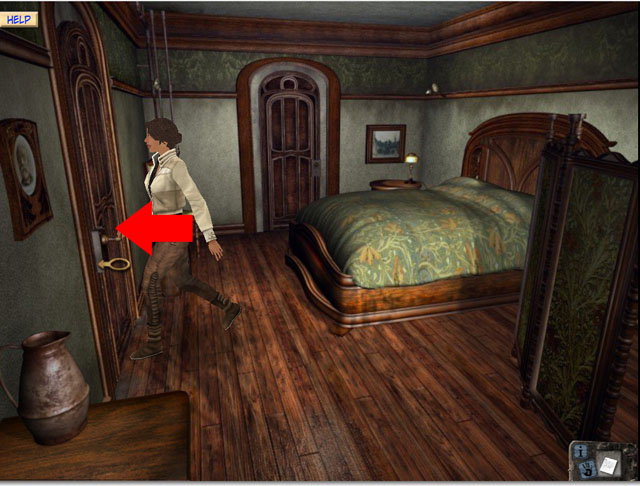 • Exit the room to the left.
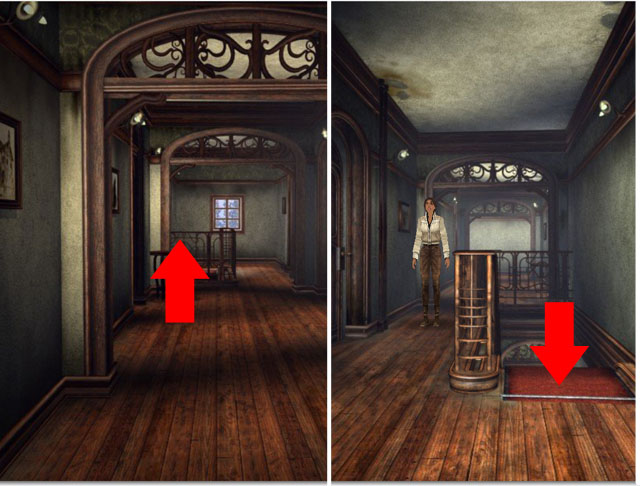 • Walk to the end of the hall and then go down the stairs.
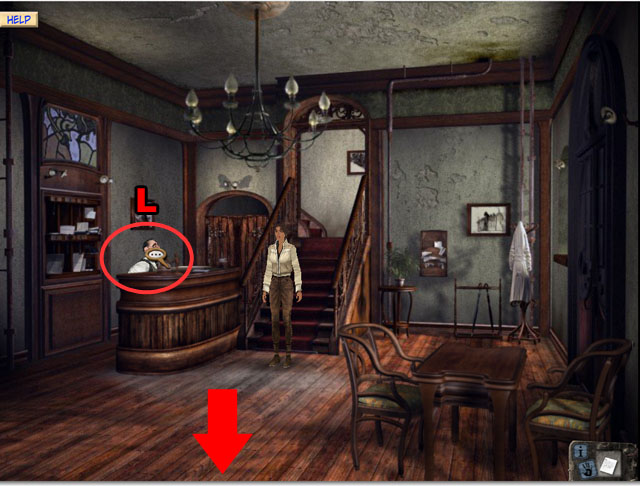 • Talk to the man (L) behind the desk again and press on
“Mission” to get the next fax. • Talk again and press on all
of the topics one by one. • Move to the other half of the
room.
• Talk to the man (L) behind the desk again and press on
“Mission” to get the next fax. • Talk again and press on all
of the topics one by one. • Move to the other half of the
room.
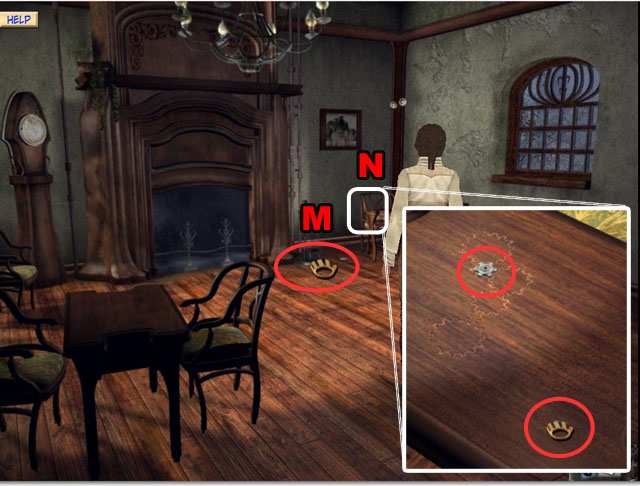 • Pick up the SMALL AND LARGE COGWHEELS on the ground (M). •
Inspect the desk (N). • Pick up the TINY AND MEDIUM COGWHEELS
on the desk.
• Pick up the SMALL AND LARGE COGWHEELS on the ground (M). •
Inspect the desk (N). • Pick up the TINY AND MEDIUM COGWHEELS
on the desk.
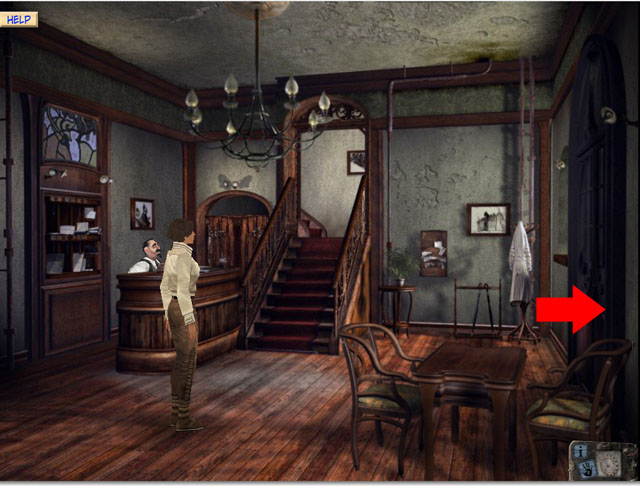 • Exit the hotel to the left.
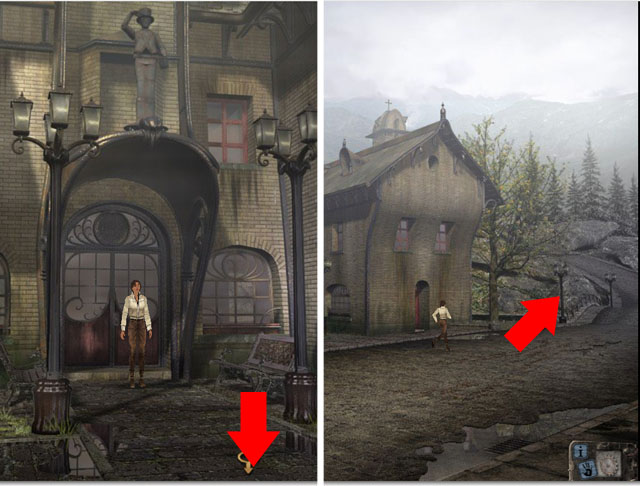 • Follow the path down to the main street.
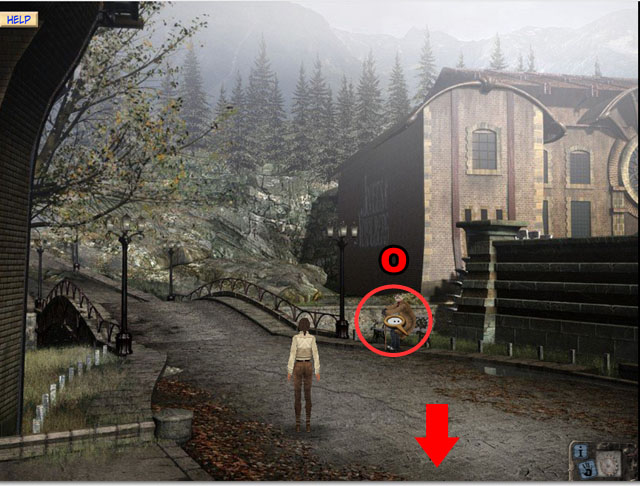 • Go to the right from the main street and talk to the man on
the bench (O).
• Go to the right from the main street and talk to the man on
the bench (O).
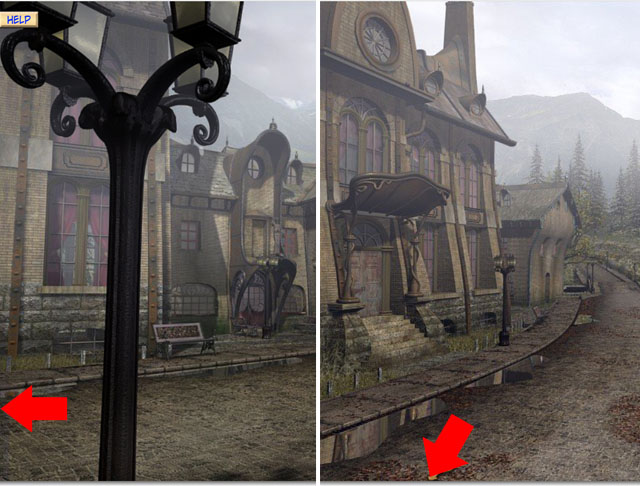 • Return to the left and go to the left two more times.
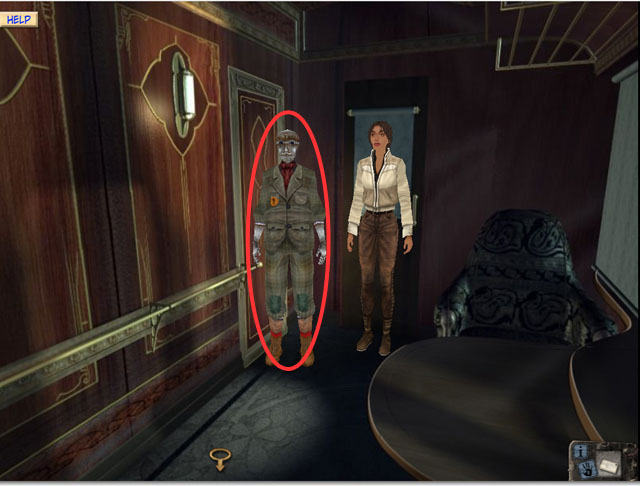
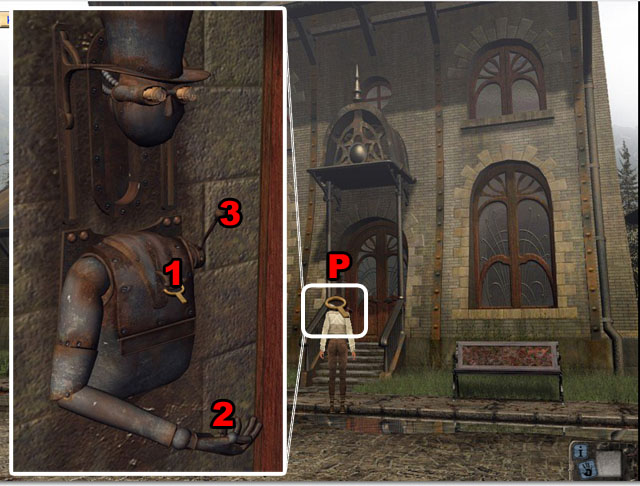 • Inspect the automaton to the left of the door (P). • Pull
the lever on the middle of his chest (1). • Place the 2nd FAX
from your inventory in his hand (2). • Pull the lever to the
right (3). • Enter the door.
• Inspect the automaton to the left of the door (P). • Pull
the lever on the middle of his chest (1). • Place the 2nd FAX
from your inventory in his hand (2). • Pull the lever to the
right (3). • Enter the door.
 • Move to the other side of the room.
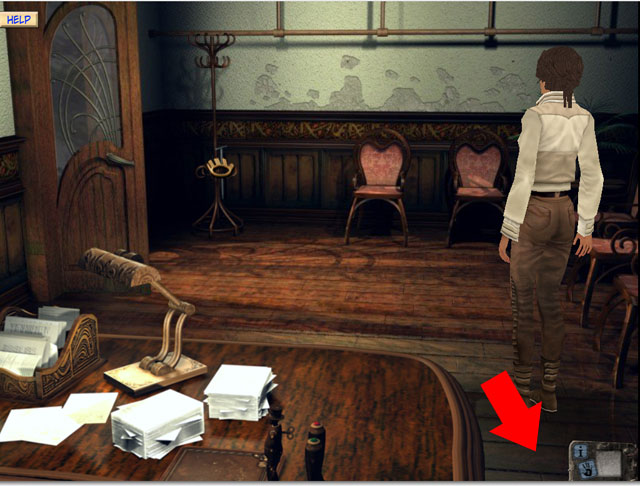
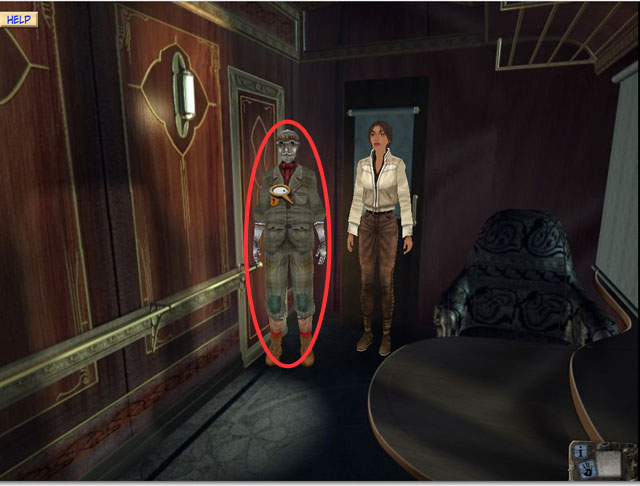
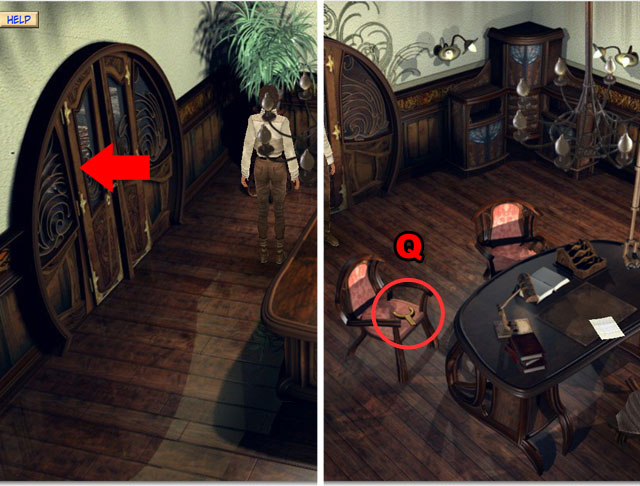 • Enter the door on the left and then sit in the right seat
(Q) to hear more story information. • Press outside the letter
to dismiss it.
• Enter the door on the left and then sit in the right seat
(Q) to hear more story information. • Press outside the letter
to dismiss it.
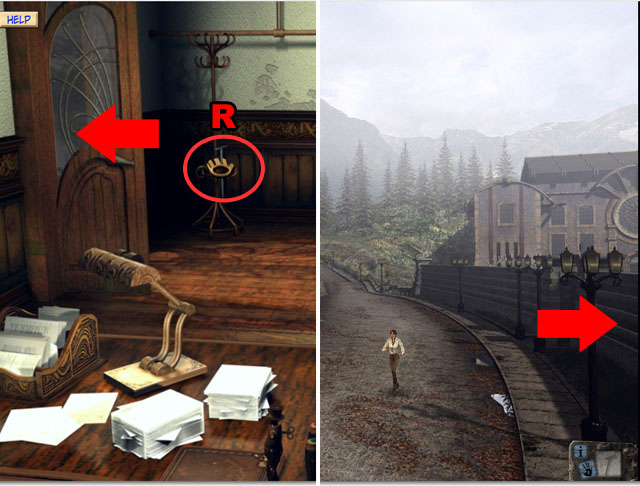 • Collect the TELESCOPIC KEY from the coat rack (R). • Exit
the room and then the house. • Walk to the right and then
inspect the door on the right. • You may get a phone call
during the walk. Stop walking to answer the phone.
• Collect the TELESCOPIC KEY from the coat rack (R). • Exit
the room and then the house. • Walk to the right and then
inspect the door on the right. • You may get a phone call
during the walk. Stop walking to answer the phone.
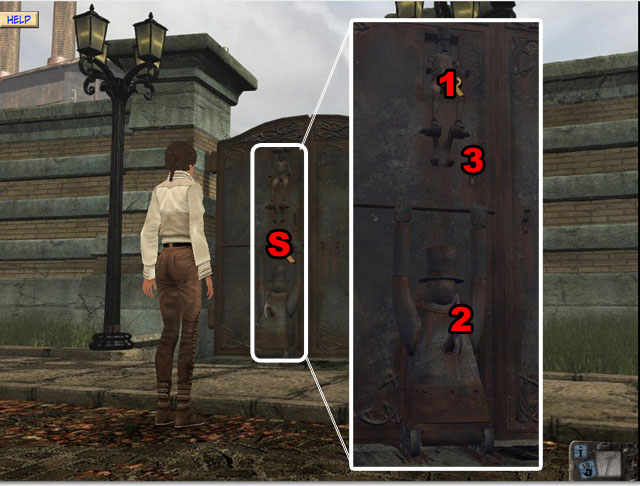 • Inspect the door (S). • Use the TELESCOPIC KEY on the
automaton at the top of the door (1). • Turn the key at the
bottom of the door (2) and then pull the lever in the middle
to open it (3).
• Inspect the door (S). • Use the TELESCOPIC KEY on the
automaton at the top of the door (1). • Turn the key at the
bottom of the door (2) and then pull the lever in the middle
to open it (3).
Part 2 – Secret Path
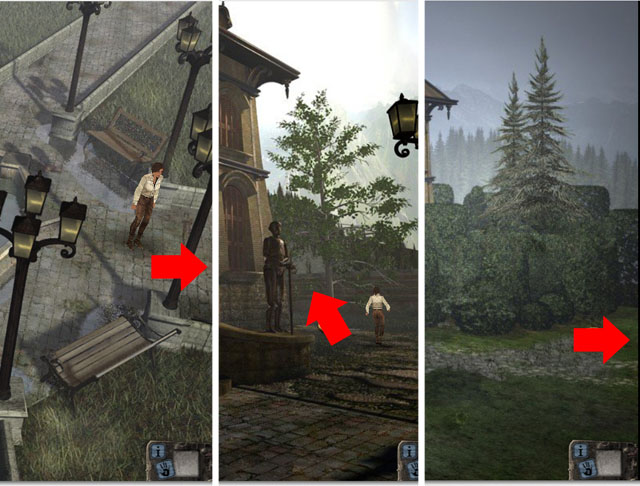 • Go through the door to the next junction. • Walk to the
right of the fountain then approach the house. • Go to the
right of the house and then go right two more times to get to
the hedge maze.
• Go through the door to the next junction. • Walk to the
right of the fountain then approach the house. • Go to the
right of the house and then go right two more times to get to
the hedge maze.
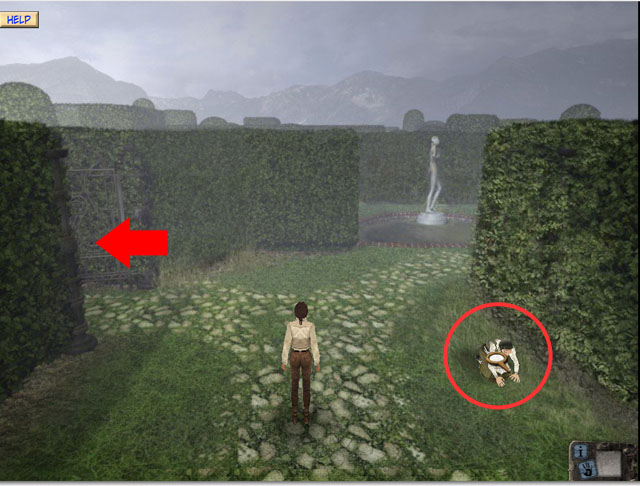 • Talk to the gardener once and then go to the left.
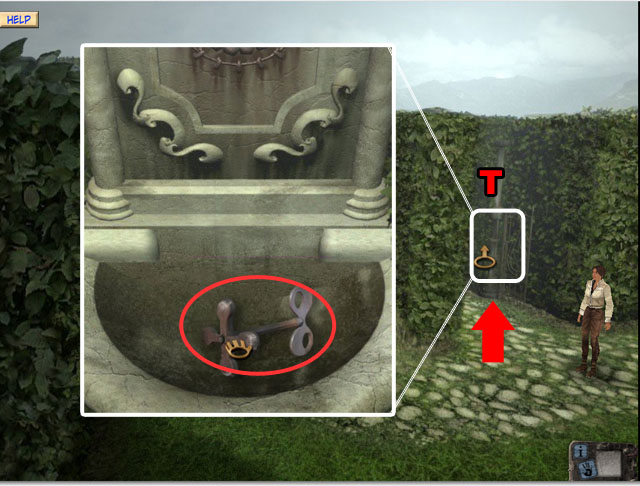 • Walk down the path and then take the first gate on the right
(T). • Inspect the fountain and take the VORALBERG KEY. •
Trace back your path until you are outside the maze again.
• Walk down the path and then take the first gate on the right
(T). • Inspect the fountain and take the VORALBERG KEY. •
Trace back your path until you are outside the maze again.
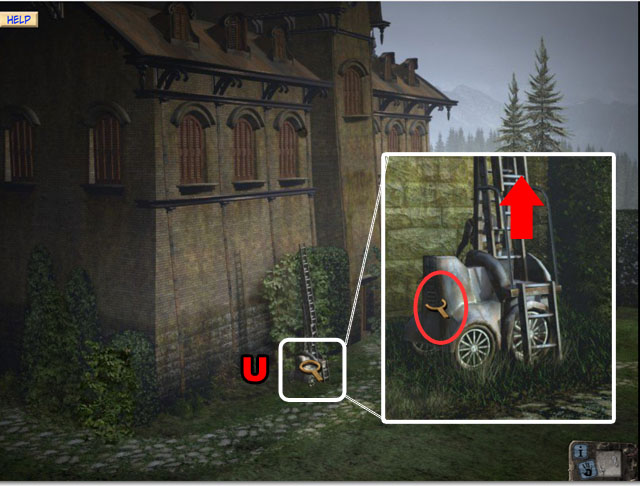 • Inspect the ladder (U) on the side of the house and use the
VORALBERG KEY on it. • Inspect it again after the animation is
finished and use the ladder to climb to the top of the
mansion.
• Inspect the ladder (U) on the side of the house and use the
VORALBERG KEY on it. • Inspect it again after the animation is
finished and use the ladder to climb to the top of the
mansion.
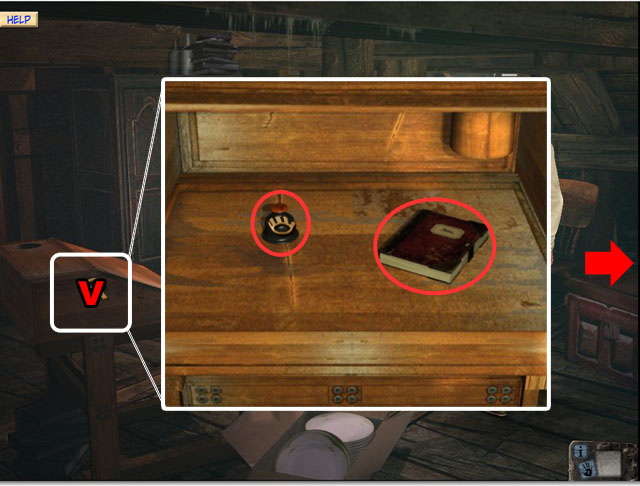 • Walk to the left and inspect the desk (V). • Take the INK
and the DIARY once you are finished reading it. • Walk to the
right three times.
• Walk to the left and inspect the desk (V). • Take the INK
and the DIARY once you are finished reading it. • Walk to the
right three times.
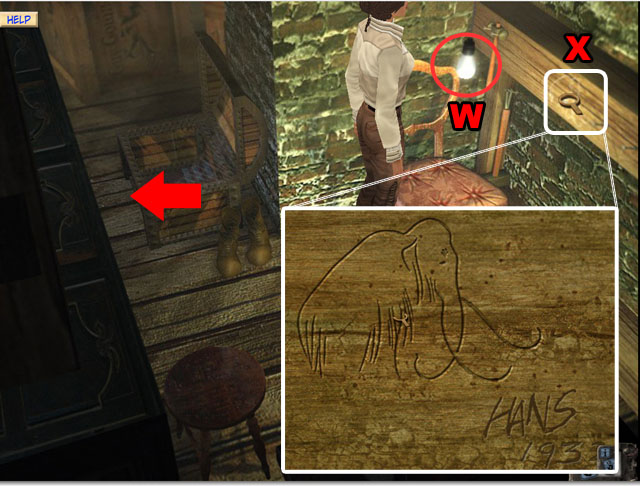 • Turn on the light bulb (W) • There is a mammoth drawing that
you can inspect (X). • Return to the room that you first
entered and meet Momo again. • Talk to Momo and receive the
PAPER AND PENCIL. • Return to the mammoth drawing and use the
PAPER AND PENCIL on it. • Give the copied mammoth drawing to
Momo. • A cut scene will show you where Momo’s secret place is
- to the west of the hotel. Climb down the ladder and go
there.
• Turn on the light bulb (W) • There is a mammoth drawing that
you can inspect (X). • Return to the room that you first
entered and meet Momo again. • Talk to Momo and receive the
PAPER AND PENCIL. • Return to the mammoth drawing and use the
PAPER AND PENCIL on it. • Give the copied mammoth drawing to
Momo. • A cut scene will show you where Momo’s secret place is
- to the west of the hotel. Climb down the ladder and go
there.
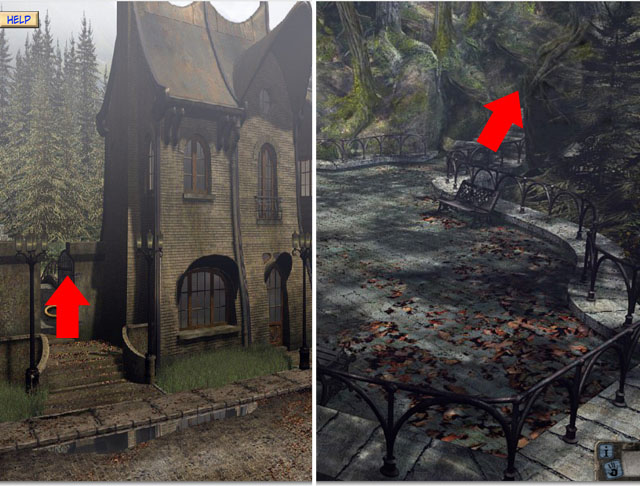 • Enter the gate and follow the path up the stairs to find
Momo.
• Enter the gate and follow the path up the stairs to find
Momo.
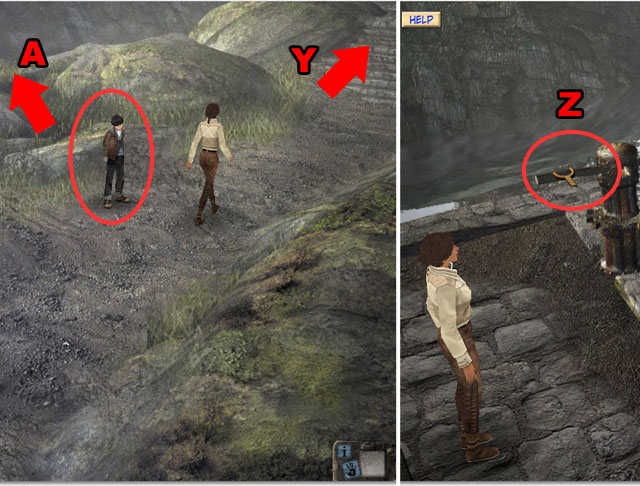 • Talk to Momo and ask him all of the topics on the list. • Go
up the stairs twice (Y) and then try to pull the handle to the
dam (Z). • Return to Momo and ask him about “Help”. • Momo
will push the lever for you and drain out the water. • Return
to Momo and go north (A). • Follow the path into the cave and
go to the end of the cave path.
• Talk to Momo and ask him all of the topics on the list. • Go
up the stairs twice (Y) and then try to pull the handle to the
dam (Z). • Return to Momo and ask him about “Help”. • Momo
will push the lever for you and drain out the water. • Return
to Momo and go north (A). • Follow the path into the cave and
go to the end of the cave path.
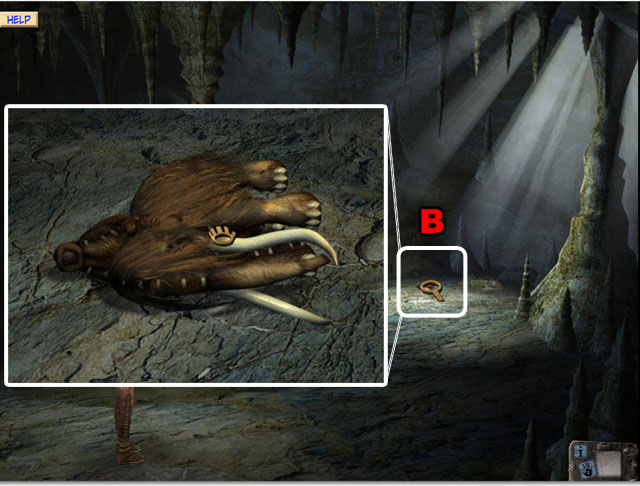 • Pick up the MAMMOTH DOLL on the ground (B). • Exit this area
and return to the fountain junction. • You will receive a
phone call in the scene where Momo was; stop to listen to the
cut scene.
• Pick up the MAMMOTH DOLL on the ground (B). • Exit this area
and return to the fountain junction. • You will receive a
phone call in the scene where Momo was; stop to listen to the
cut scene.
Part 3 – Factory
 • When you reach the fountain, go northwest. Travel down the
path.
• When you reach the fountain, go northwest. Travel down the
path.
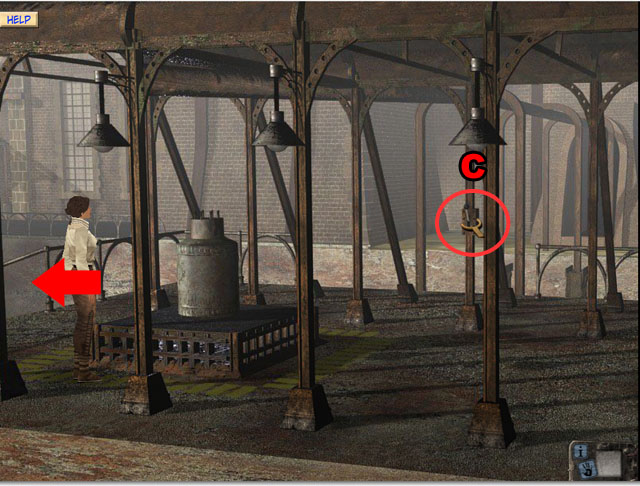 • Pull the lever in the next area and send the barrel inside
(C).
• Pull the lever in the next area and send the barrel inside
(C).
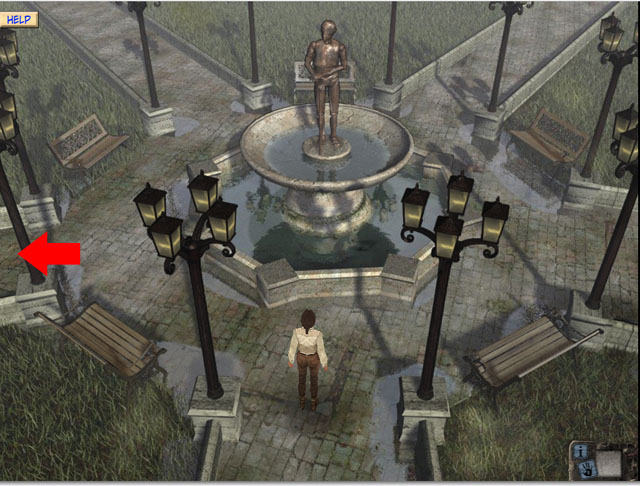 • Return to the fountain and go left.
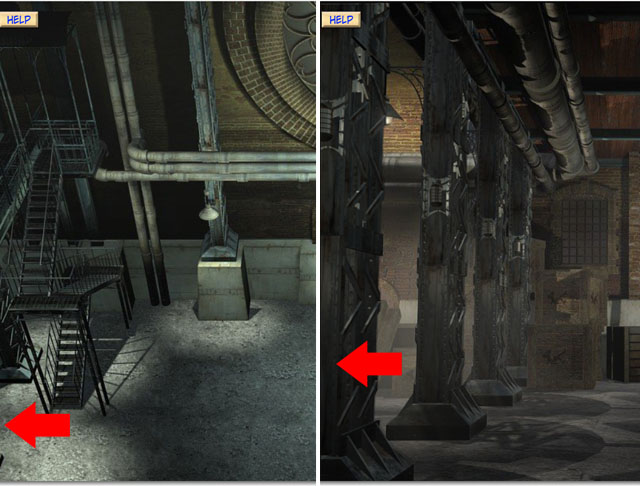 • Move forward two times and enter the factory. • Walk to the
left two screens and you will receive another phone call, this
time from your mother.
• Move forward two times and enter the factory. • Walk to the
left two screens and you will receive another phone call, this
time from your mother.
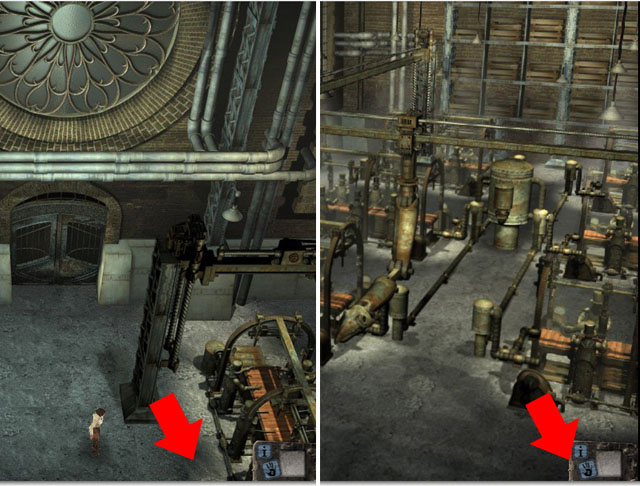
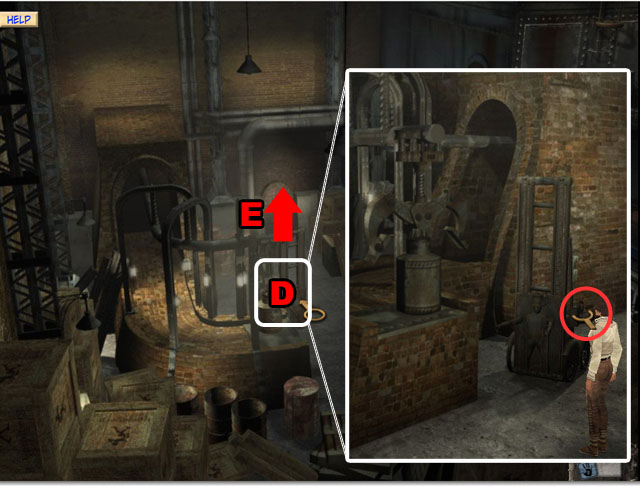 • Zoom in on the machine in the center (D) and pull the lever
to move the barrel. • Enter the office (E).
• Zoom in on the machine in the center (D) and pull the lever
to move the barrel. • Enter the office (E).
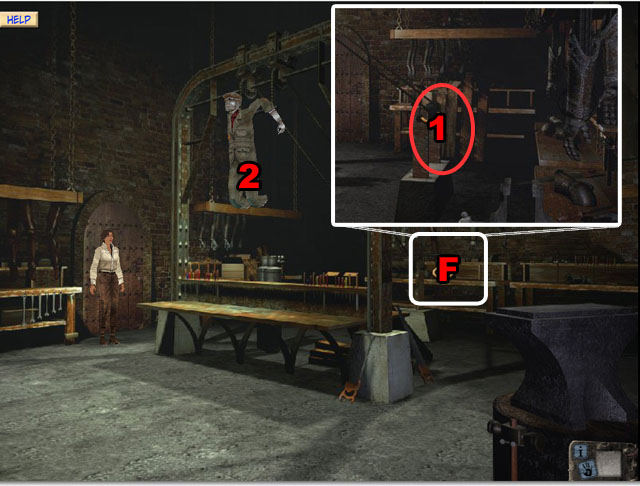 • Walk to the back of the office (F) and pull the lever to
lower Oscar down (1). • Talk to Oscar (2) about all the
subjects on his list. He will give you the PUNCH CARD when you
ask about production.
• Walk to the back of the office (F) and pull the lever to
lower Oscar down (1). • Talk to Oscar (2) about all the
subjects on his list. He will give you the PUNCH CARD when you
ask about production.
 • Exit the room and go all the way back to the entrance. Then
go to the right towards the machines.
• Exit the room and go all the way back to the entrance. Then
go to the right towards the machines.
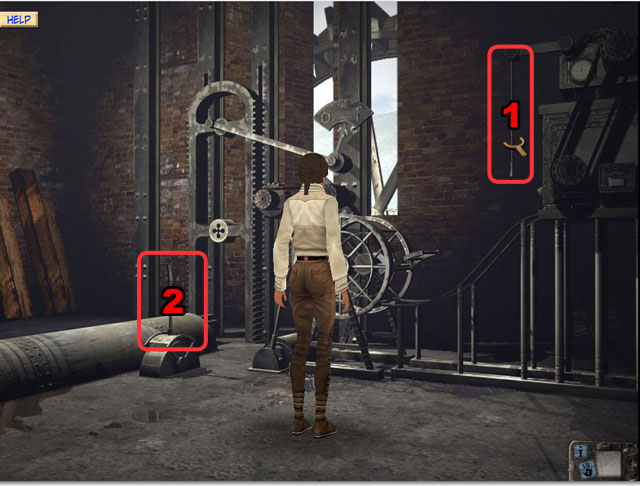 • Walk again to the right and then go inside the door. • Go to
the other side of the room; pull the Chain (1) and then pull
the lever (2).
• Walk again to the right and then go inside the door. • Go to
the other side of the room; pull the Chain (1) and then pull
the lever (2).
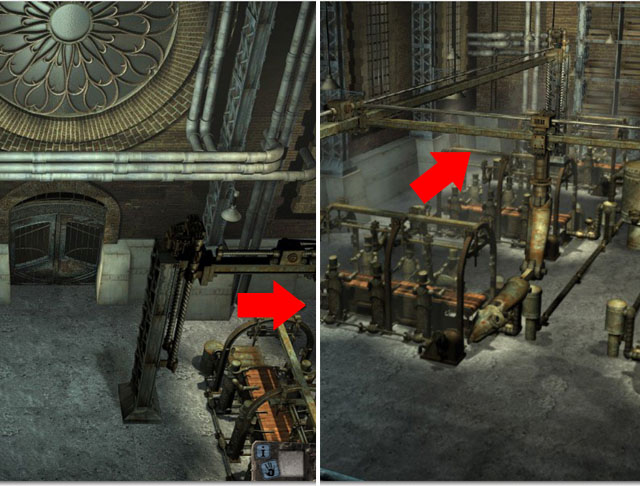
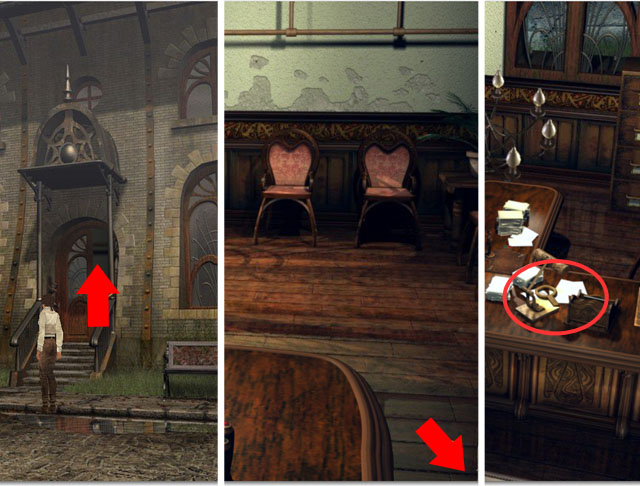
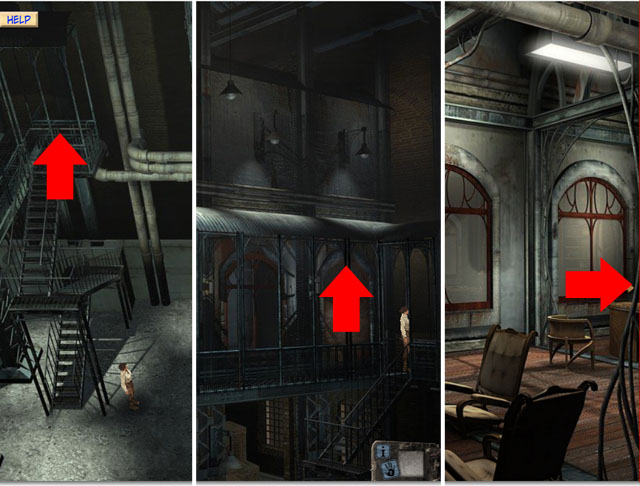 • Exit the room and go back to the entrance again. Go up the
stairs. • Go through the door and towards the right.
• Exit the room and go back to the entrance again. Go up the
stairs. • Go through the door and towards the right.
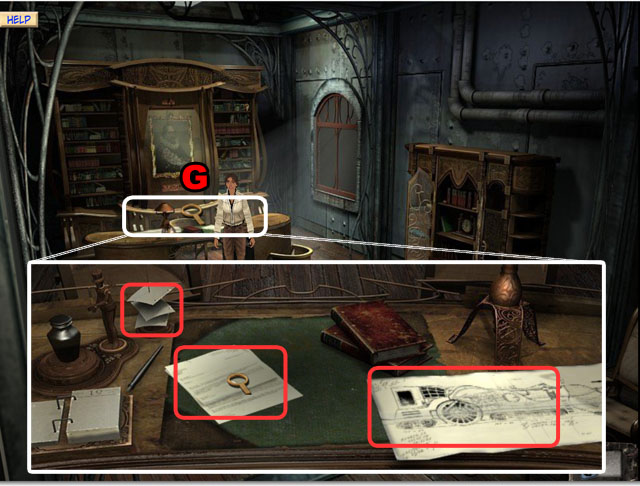 • Inspect the desk and look at all of the papers on the desk
(G).
• Inspect the desk and look at all of the papers on the desk
(G).
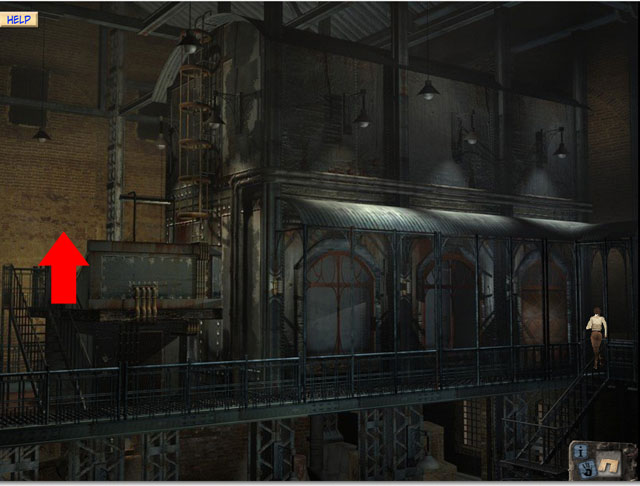 • Walk up the stairs again.
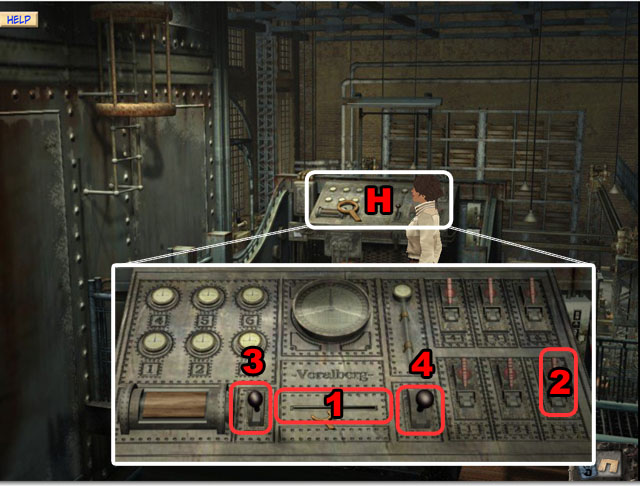 • Inspect the control panel (H). • Put the PUNCH CARD in the
control panel (1) and then pull the lever to the right under
the number three (2). • Pull the lever on the left 3 times (3)
and then the lever to the right of the punch card 1 time (4).
• Inspect the control panel (H). • Put the PUNCH CARD in the
control panel (1) and then pull the lever to the right under
the number three (2). • Pull the lever on the left 3 times (3)
and then the lever to the right of the punch card 1 time (4).
 • Walk down the stairs and go to the right.
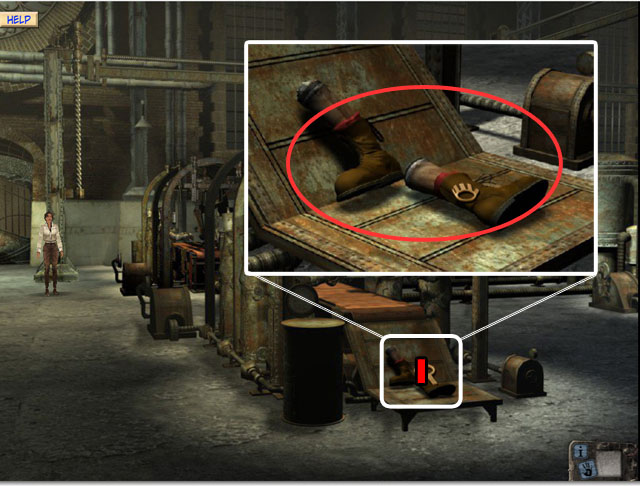 • Go down to inspect the machines, and take the LEGS (I).
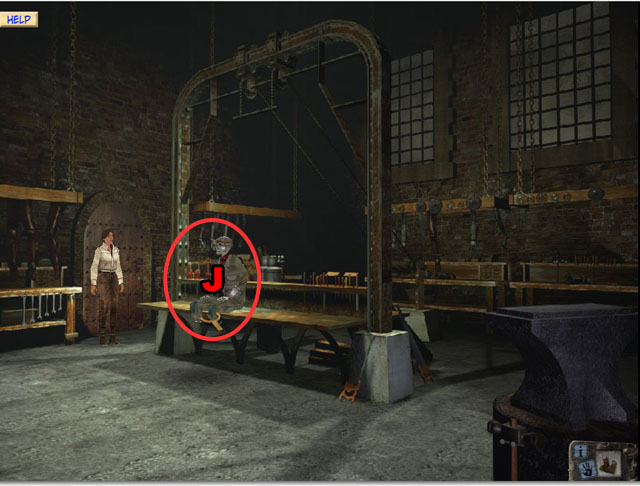 • Use the LEGS on Oscar (J) in the workshop and he will leave.
Part 4 – Train Station
 • Return to the fountain and go to the northeast. • Go north
three times and then walk to the train.
• Return to the fountain and go to the northeast. • Go north
three times and then walk to the train.
 • Enter the door on the train and talk to Oscar about the
“Mission”.
• Enter the door on the train and talk to Oscar about the
“Mission”.
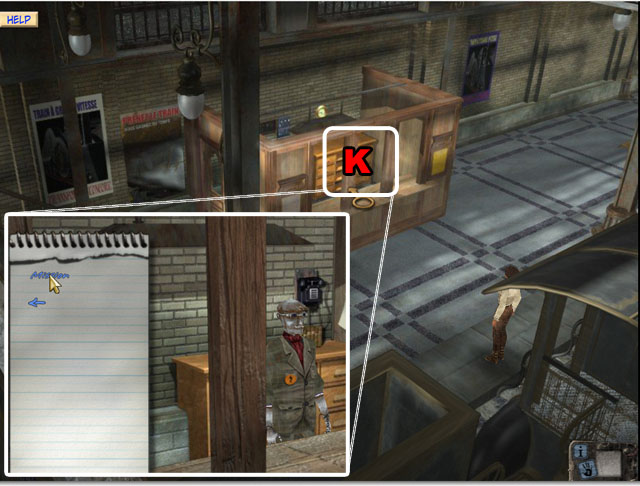 • Exit the train and talk to Oscar at the ticket booth (K).
Talk again about your “Mission”. • You will receive a TICKET
and a TRAIN RELEASE FORM.
• Exit the train and talk to Oscar at the ticket booth (K).
Talk again about your “Mission”. • You will receive a TICKET
and a TRAIN RELEASE FORM.
 • Return to town and the notary’s office. • Go to the desk in
the back of the office.
• Return to town and the notary’s office. • Go to the desk in
the back of the office.
 • Use the TRAIN RELEASE PERMIT on the table (1). • Press the
hat on the stamping automaton to open it (2). • Use the INK in
the automaton below the hat (3). • Press the button at the
bottom (4) and take the STAMPED RELEASE FORM.
• Use the TRAIN RELEASE PERMIT on the table (1). • Press the
hat on the stamping automaton to open it (2). • Use the INK in
the automaton below the hat (3). • Press the button at the
bottom (4) and take the STAMPED RELEASE FORM.
 • Try to give the STAMPED RELEASE FORM and the TICKET to Oscar
inside the train.
• Try to give the STAMPED RELEASE FORM and the TICKET to Oscar
inside the train.
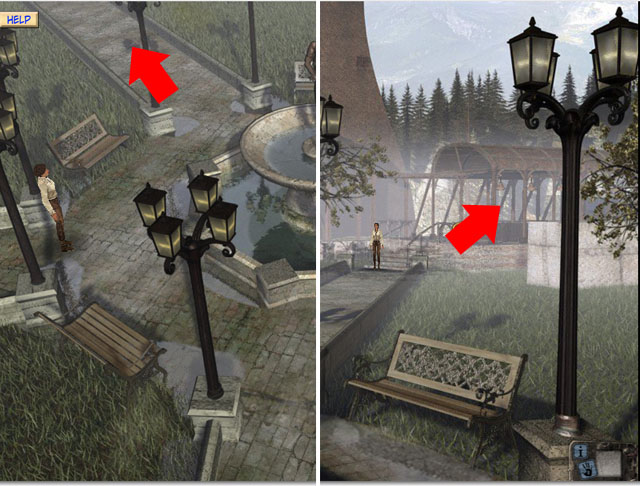
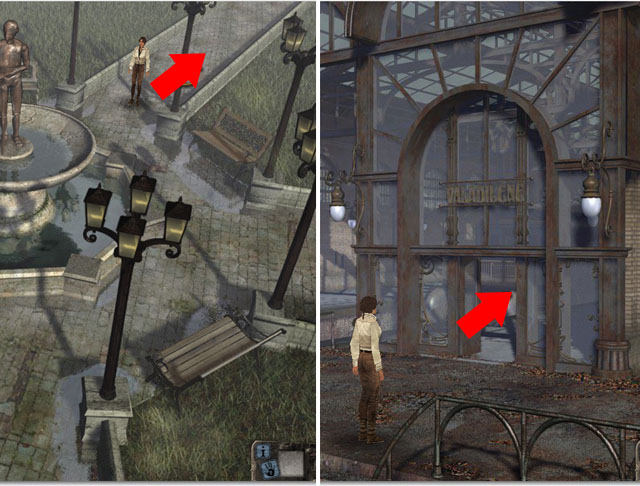
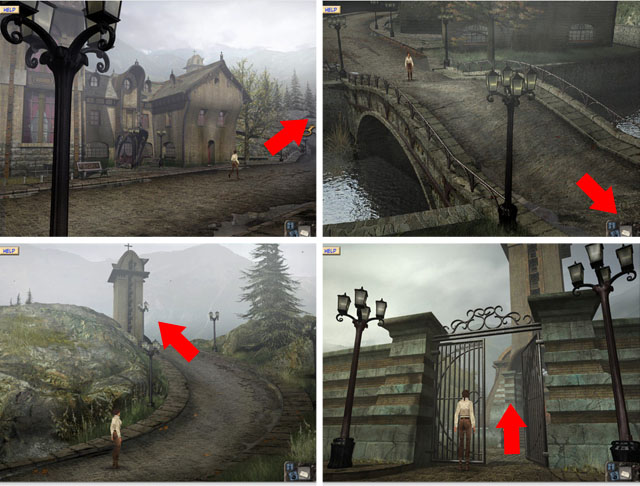 • Return to the town and follow this path until you are over
the bridge, outside town at the church.
• Return to the town and follow this path until you are over
the bridge, outside town at the church.
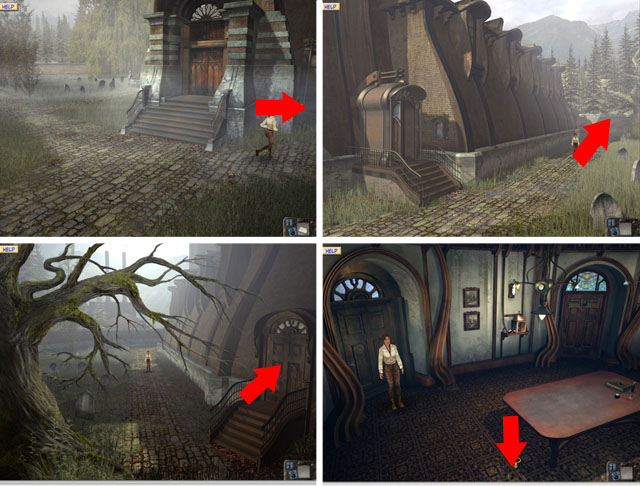 • Enter the church grounds and go to the right where you will
receive a call from work. • Follow the path and go inside the
church from the rear.
• Enter the church grounds and go to the right where you will
receive a call from work. • Follow the path and go inside the
church from the rear.
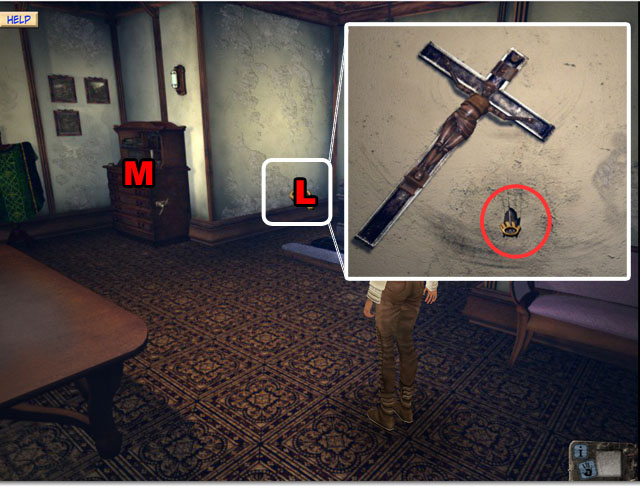 • Move to the other side of the room and inspect the altar
(L). • Move the crucifix and take the KEY behind it. • Inspect
the drawers on the others side of the room (M).
• Move to the other side of the room and inspect the altar
(L). • Move the crucifix and take the KEY behind it. • Inspect
the drawers on the others side of the room (M).
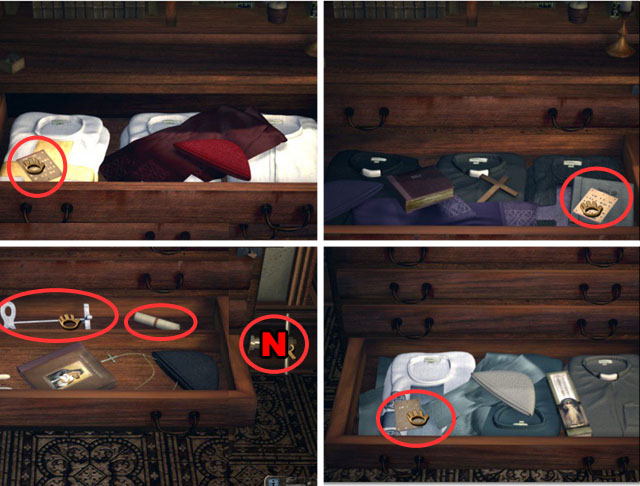 • Use the KEY on the lock in the drawers and take the 3 CARDS
from inside the top two and bottom drawers. • Open the 3rd
drawer and pull the lever to the right (N). Collect the
VORALBERG KEY and the priest’s NOTE.
• Use the KEY on the lock in the drawers and take the 3 CARDS
from inside the top two and bottom drawers. • Open the 3rd
drawer and pull the lever to the right (N). Collect the
VORALBERG KEY and the priest’s NOTE.
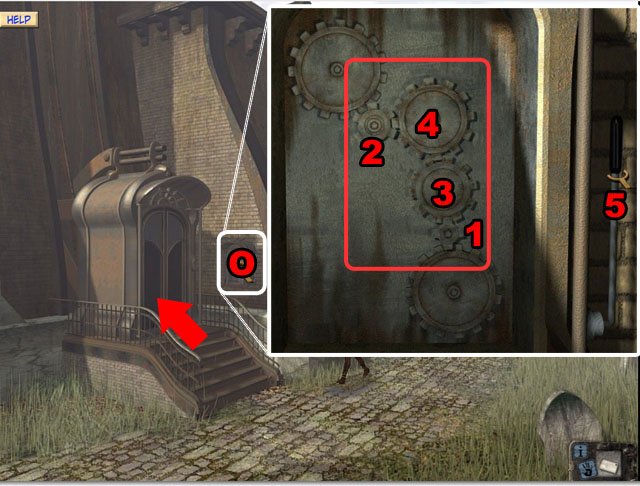 • Exit the church and go back one scene. • Inspect the control
panel near the elevator (O). • Use the TINY COG (1), SMALL COG
(2), MEDIUM COG (3) and LARGE COG (4) on the pegs and then
pull the lever (5). • Enter the elevator.
• Exit the church and go back one scene. • Inspect the control
panel near the elevator (O). • Use the TINY COG (1), SMALL COG
(2), MEDIUM COG (3) and LARGE COG (4) on the pegs and then
pull the lever (5). • Enter the elevator.
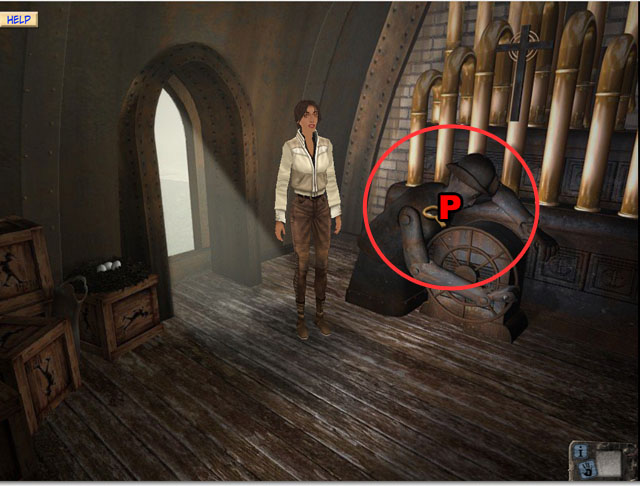 • Move to the other side of the room and inspect the automaton
(P). • Use the PURPLE CARD on the automaton to unlock the lock
in the cemetery.
• Move to the other side of the room and inspect the automaton
(P). • Use the PURPLE CARD on the automaton to unlock the lock
in the cemetery.
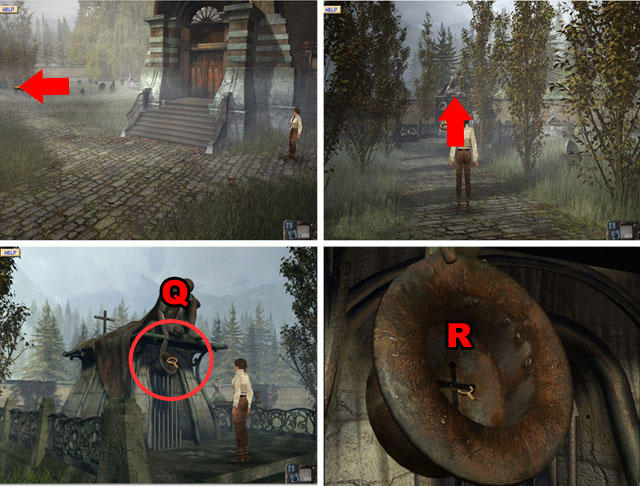 • Return to the front of the church and go to the left,
following the path to the crypt. • Inspect the hat (Q) and use
the VORALBERG KEY on the hat (R).
• Return to the front of the church and go to the left,
following the path to the crypt. • Inspect the hat (Q) and use
the VORALBERG KEY on the hat (R).
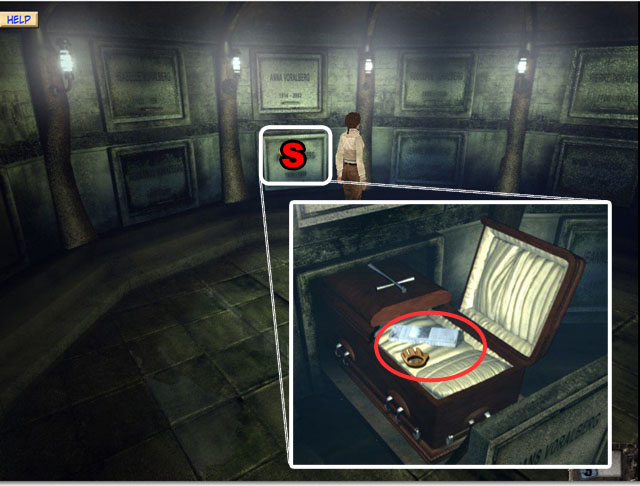 • Go inside the crypt and follow the path to the end. •
Inspect the coffin of Hans (S) and take the VOICE CYLINDER and
the GAZETTE.
• Go inside the crypt and follow the path to the end. •
Inspect the coffin of Hans (S) and take the VOICE CYLINDER and
the GAZETTE.
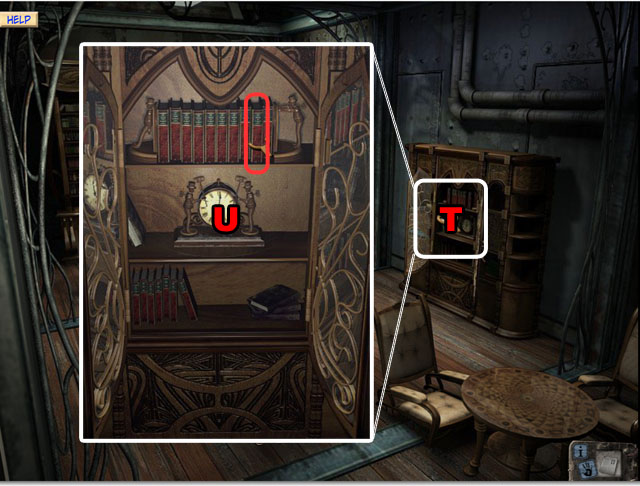 • Return to Anna’s office upstairs in the factory. • Inspect
the bookshelf. Pull the second book from the right to reveal a
secret compartment (T). • Take the MUSIC CYLINDER and then use
the VOICE CYLINDER on the machine (U). • After the cut scene,
take the TOY and the CYLINDER (U). • Return to the train.
• Return to Anna’s office upstairs in the factory. • Inspect
the bookshelf. Pull the second book from the right to reveal a
secret compartment (T). • Take the MUSIC CYLINDER and then use
the VOICE CYLINDER on the machine (U). • After the cut scene,
take the TOY and the CYLINDER (U). • Return to the train.
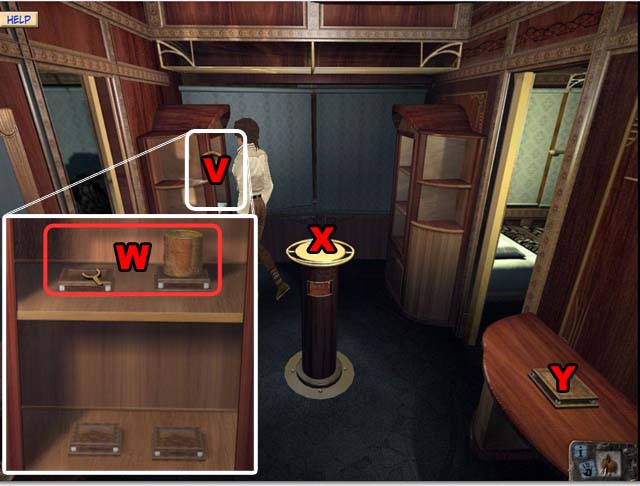 • Enter the train and walk past Oscar and down the hall. •
Inspect the cabinet to the left (V) and place the two
CYLINDERS on the pedestals (W). • Place the TOY on the center
pedestal of the room (X). • Place the MAMMOTH on the box to
the right (Y).
• Enter the train and walk past Oscar and down the hall. •
Inspect the cabinet to the left (V) and place the two
CYLINDERS on the pedestals (W). • Place the TOY on the center
pedestal of the room (X). • Place the MAMMOTH on the box to
the right (Y).
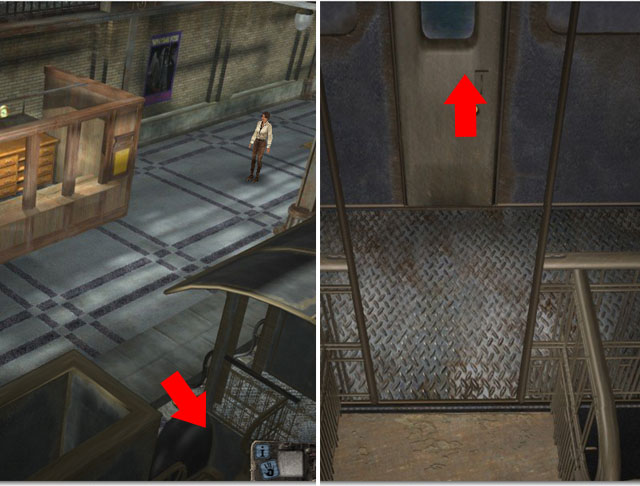
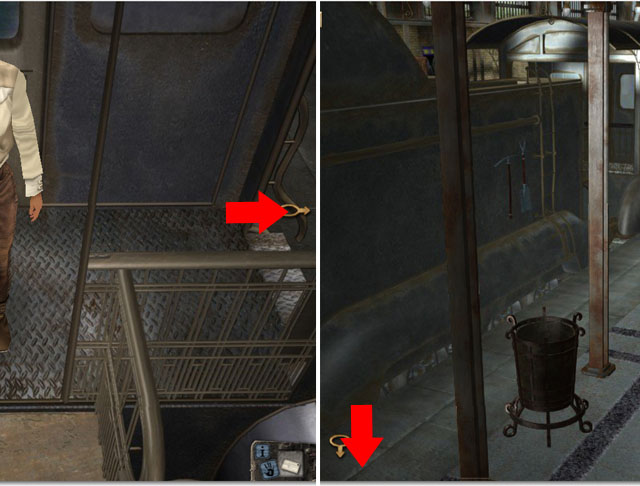 • Exit the room and give your TICKET to Oscar again; he will
refuse to take it again. • Exit the train and go to the
platform on the right. • Walk to the bottom of the screen.
• Exit the room and give your TICKET to Oscar again; he will
refuse to take it again. • Exit the train and go to the
platform on the right. • Walk to the bottom of the screen.
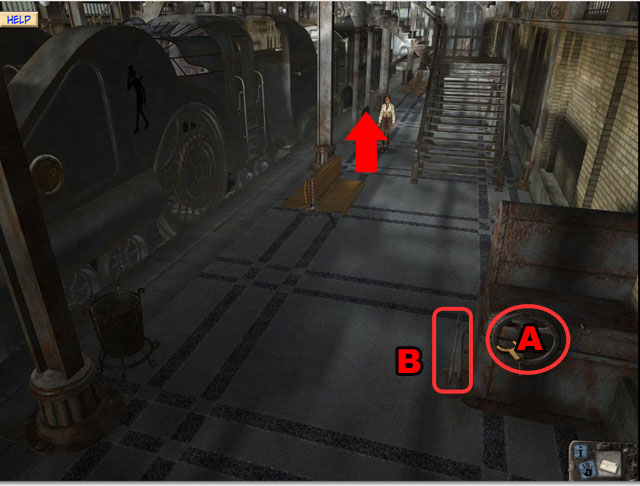 • Turn the wheel at the bottom of the screen (A) and then pull
the lever (B). • Once you have finished, turn the wheel again
(A). • Go back to the train and give your TICKET to Oscar for
the last time. • Congratulations! You finished the Syberia:
Part I!
• Turn the wheel at the bottom of the screen (A) and then pull
the lever (B). • Once you have finished, turn the wheel again
(A). • Go back to the train and give your TICKET to Oscar for
the last time. • Congratulations! You finished the Syberia:
Part I!
Created at: 2012-02-28