

Walkthrough Menu
- General Tips
- Chapter 1: The Artem Estate
- Chapter 2: Gary
- Chapter 3: The Archive
- Chapter 4: The Garde
- Chapter 5: Adam
General Tips
- This is the official guide for Tales of Terror: Art of Horror.
- This guide will not show when you have to zoom into a location; the screenshots will show each zoom scene.
- Hidden-object puzzles are referred to as HOPs. This guide will not show screenshots of the HOPs, however, it will mention when an HOP is available and the inventory item you'll collect from it.
- Use the Map to fast travel to a location.
Chapter 1: The Artem Estate
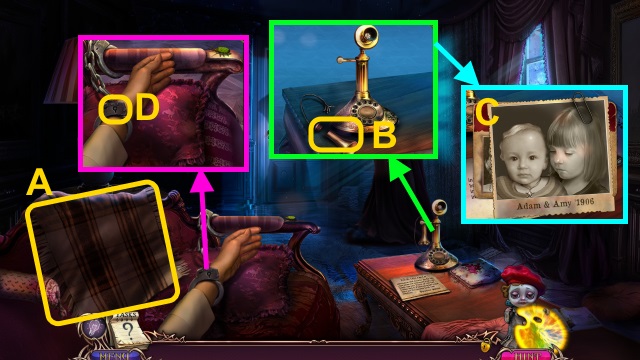
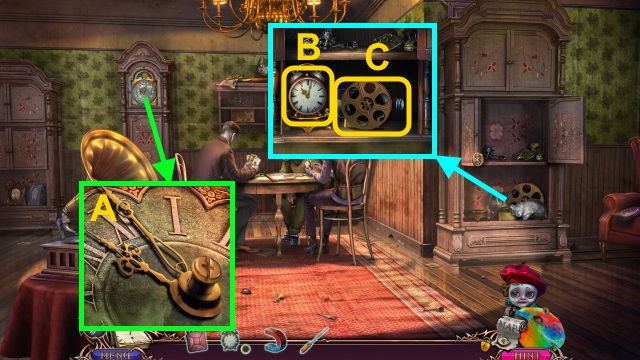
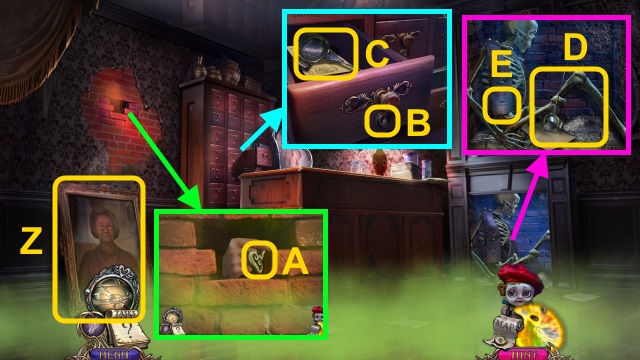
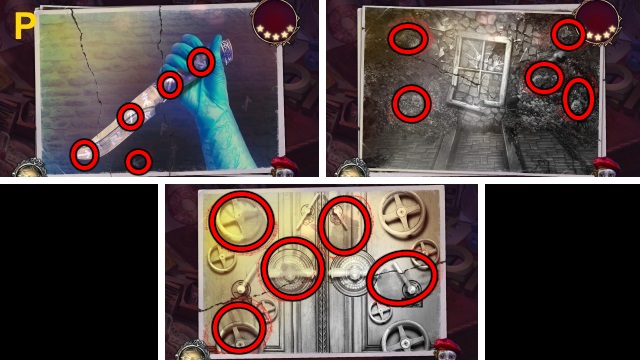
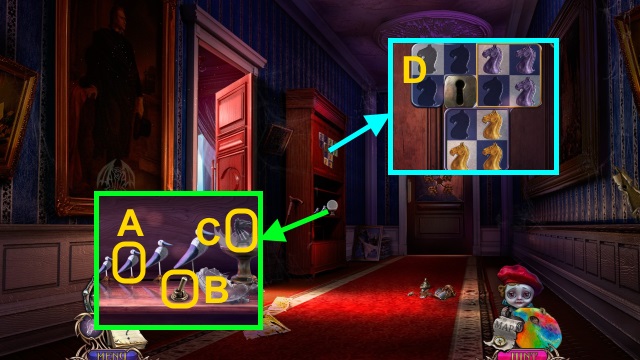
- Take the CASTER (A).
- Examine the phone; take the HORN (B).
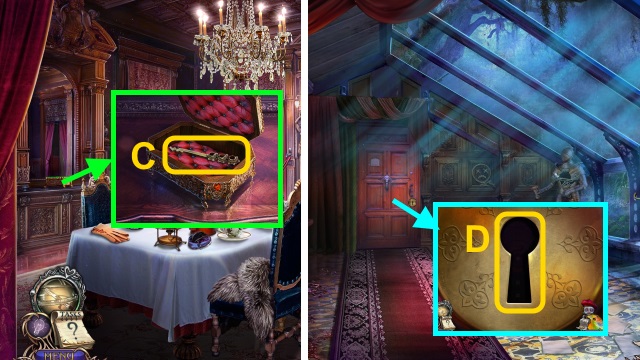
- Open the purse; examine the photos (C). Take the PAPERCLIP; examine the photos and ID. Take the Trinket.
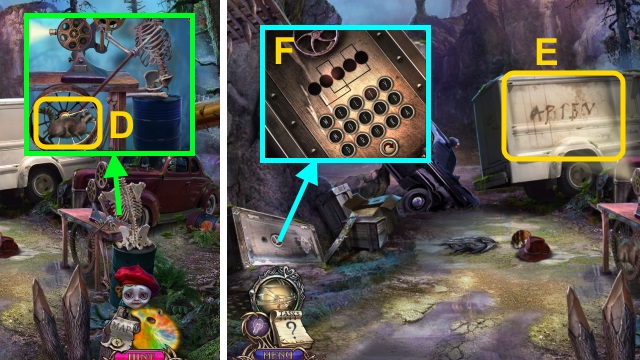
- Use the PAPERCLIP (D).
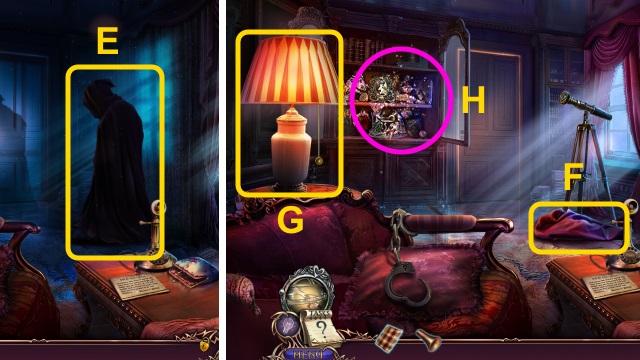
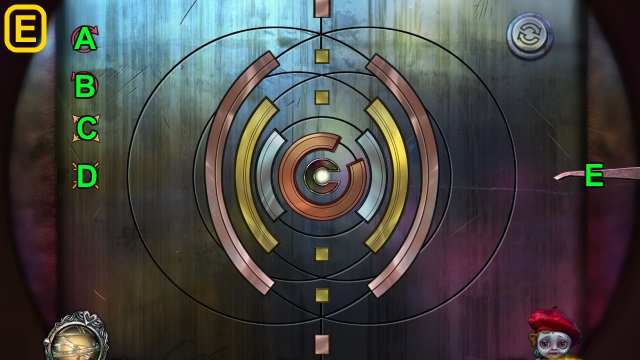
- Examine the figure (E); examine the telescope.
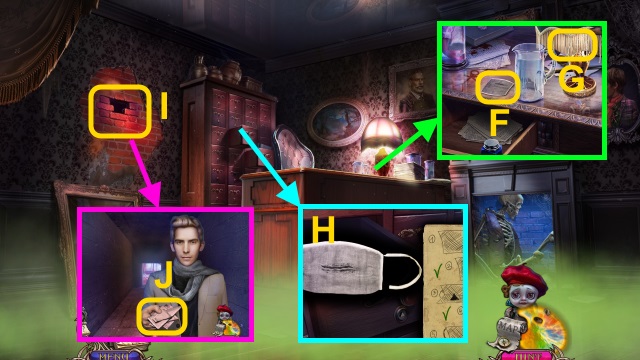
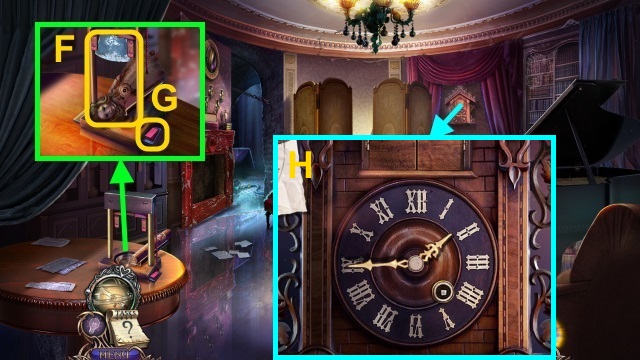
- Take the CLOTH (F).
- Examine the CLOTH; use the CASTER; take the IMPROVISED ROPE.
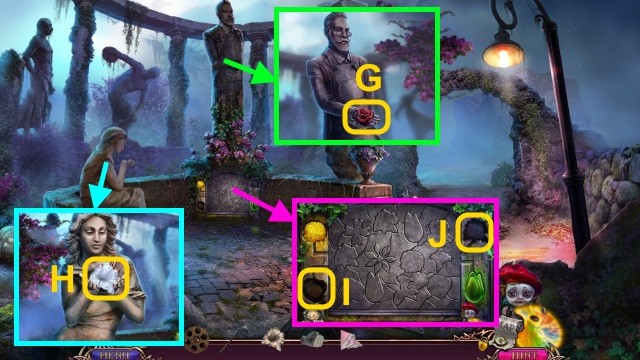
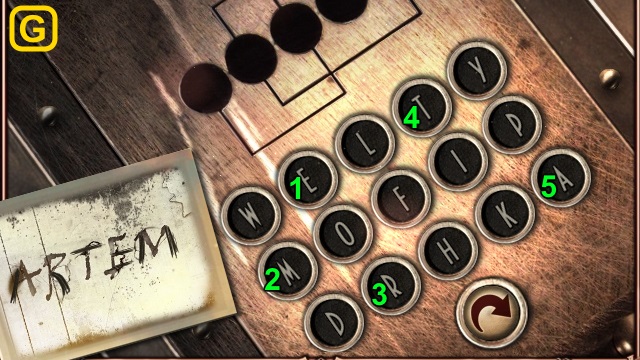
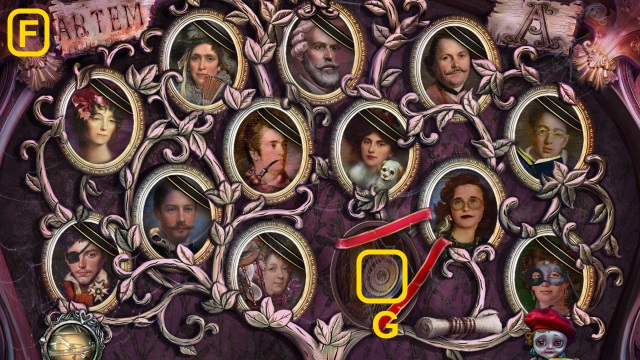
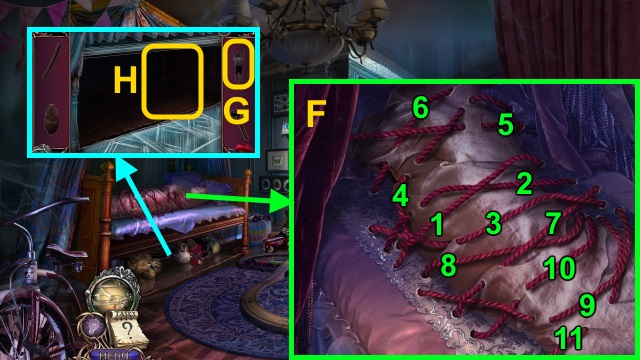
- Examine the lamp (G).
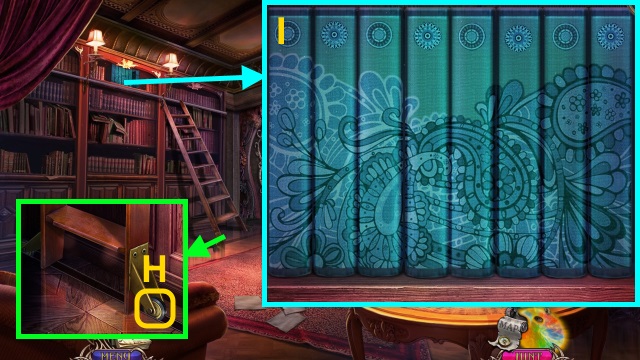
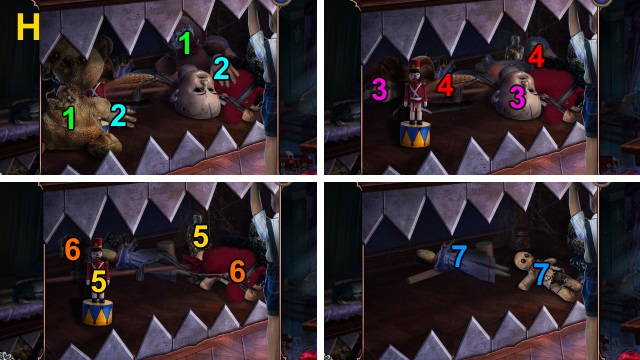
- Open the cupboard. Play the HOP; receive the TEASPOON (H).
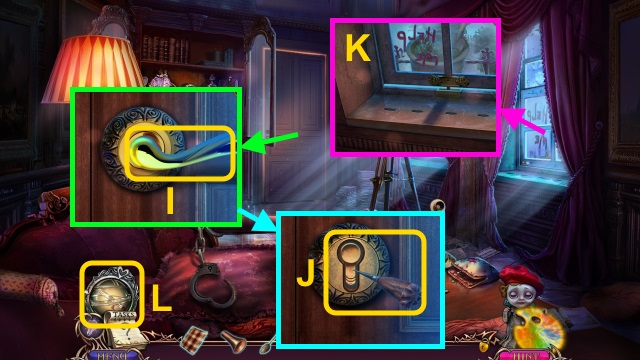
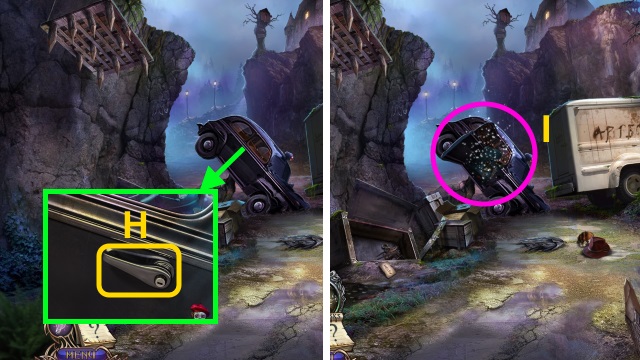
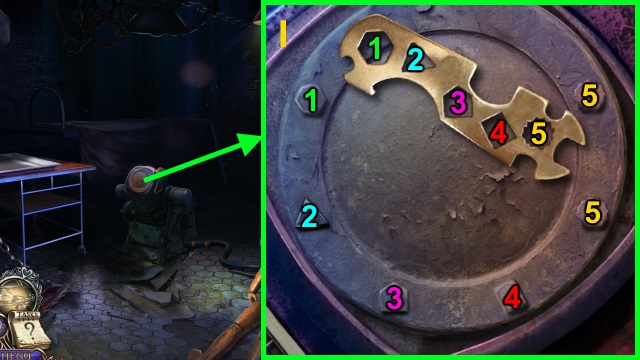
- Examine the handle (I); scroll down.
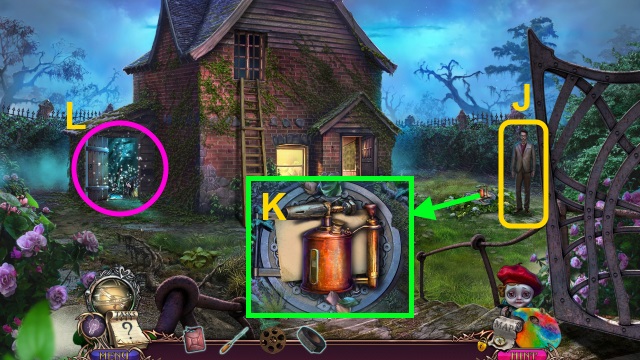
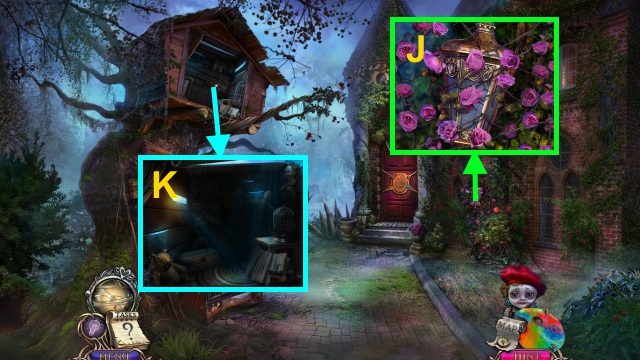
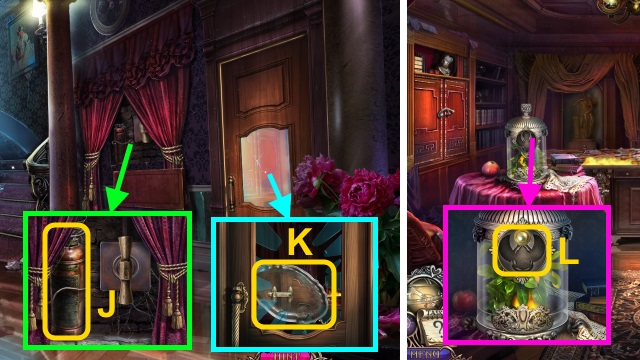
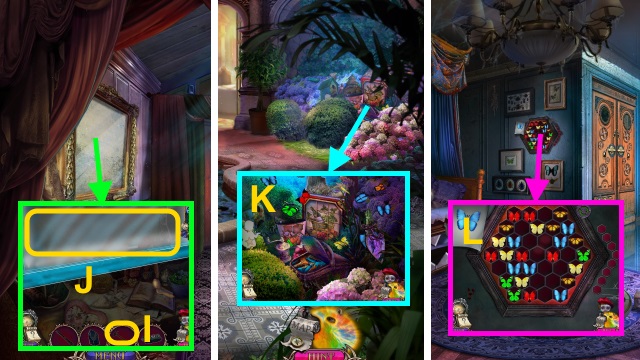
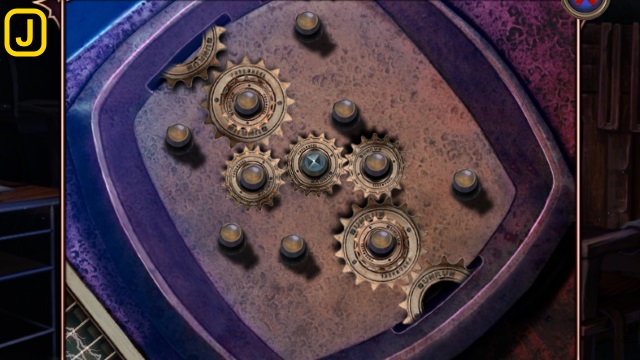
- Use the awl (J); receive the AWL.
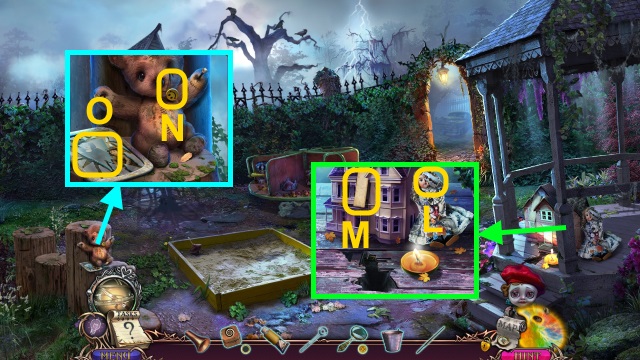
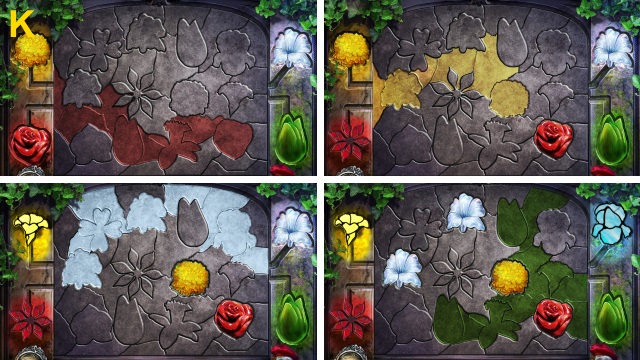
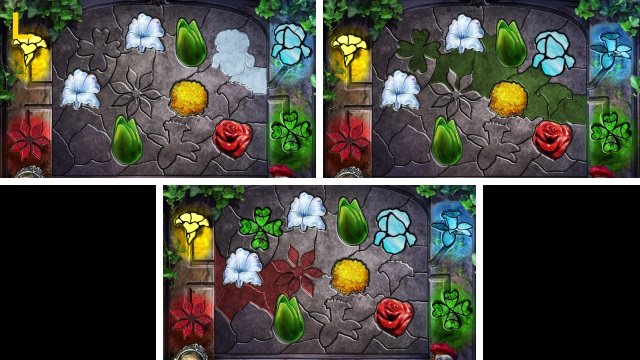
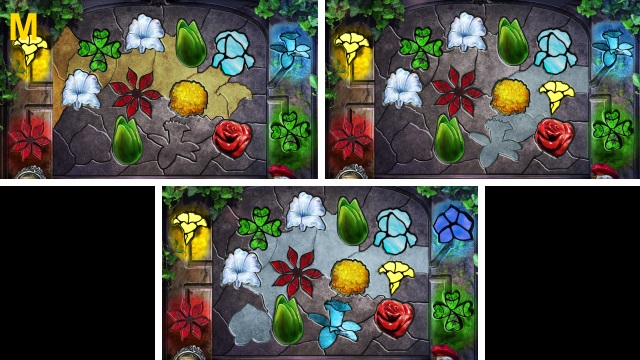
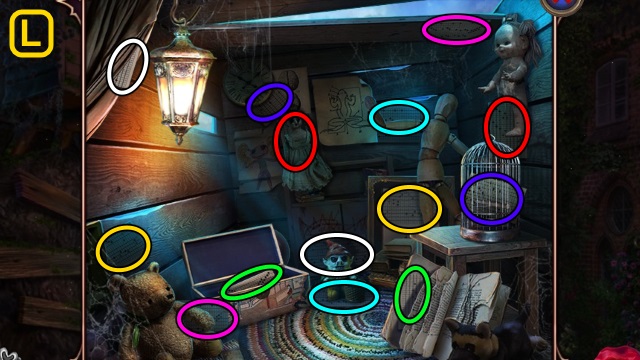
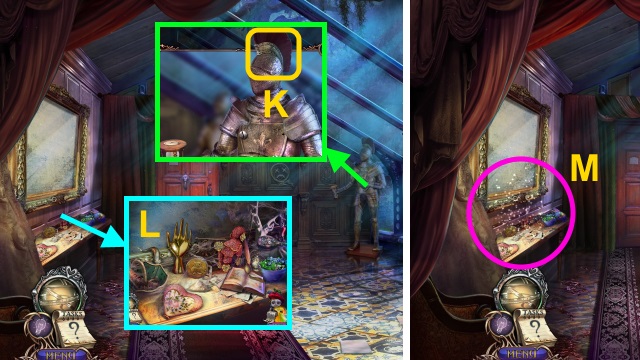
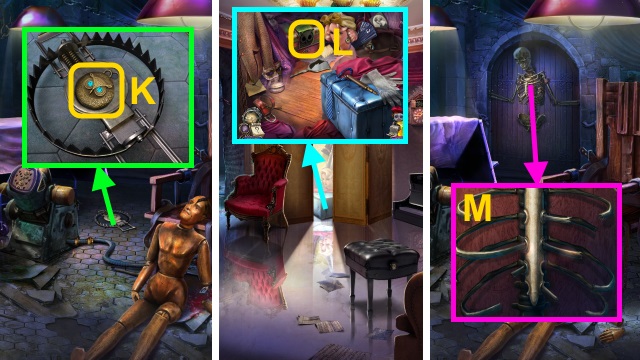
- Examine the window (K); use the Trinket (L).
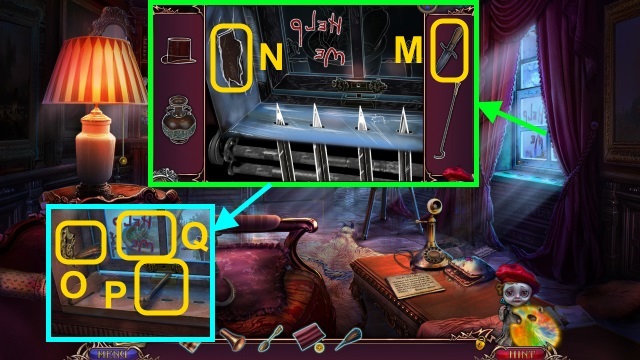
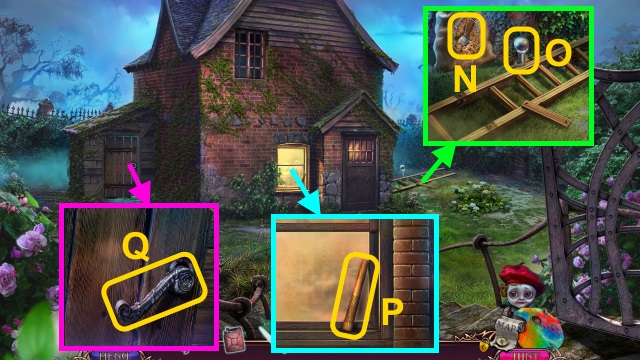
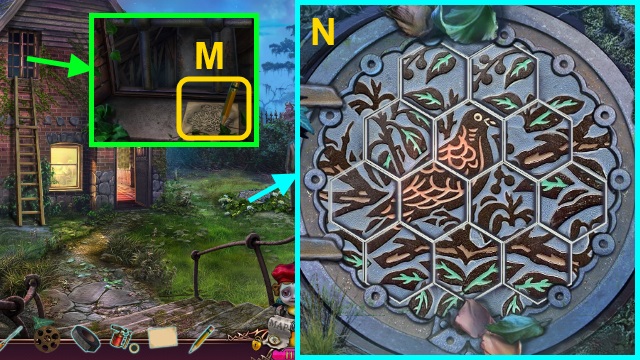
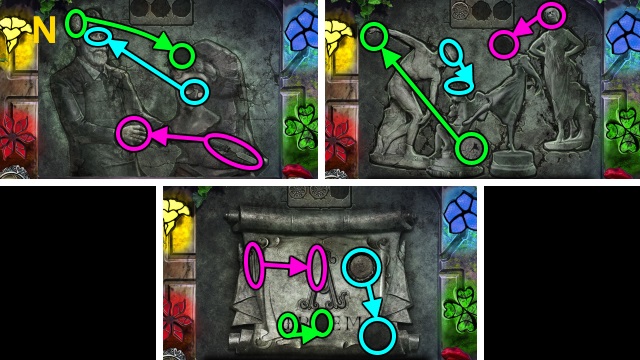
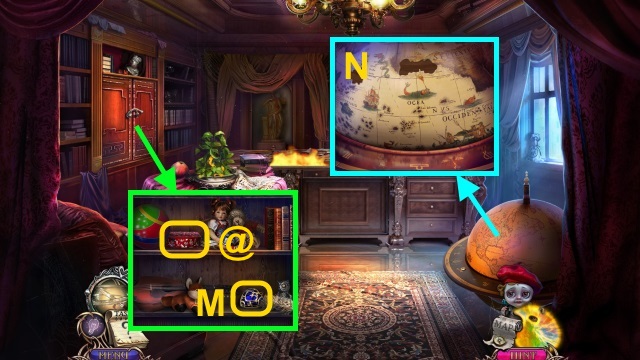
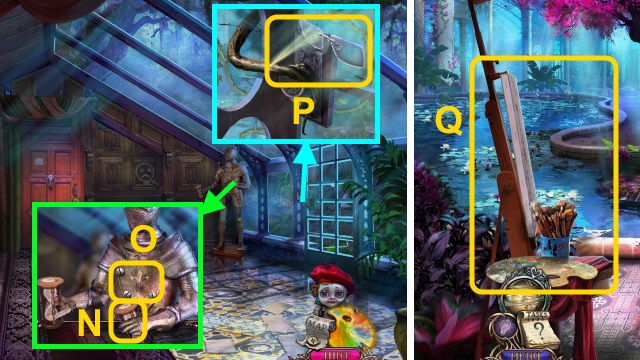
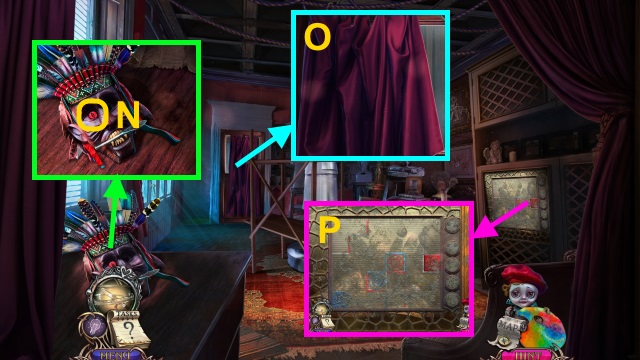
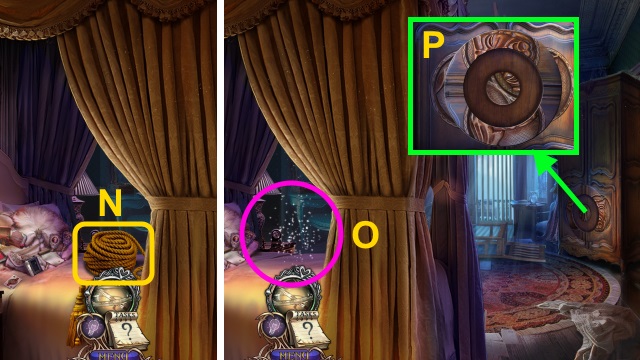
- Use the knife (M) on the wood (N).
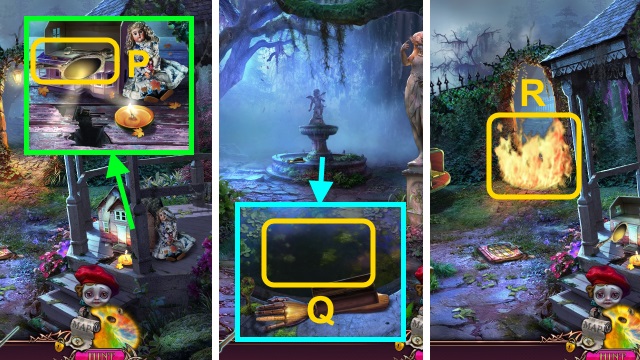
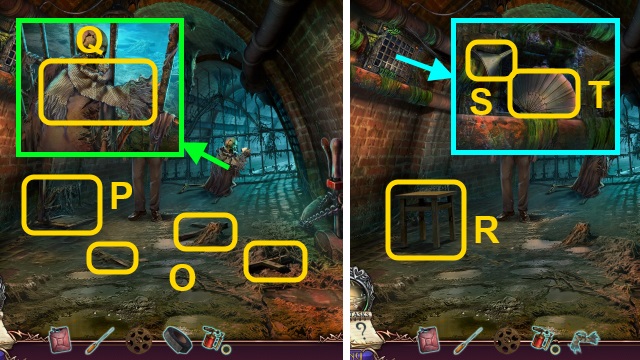
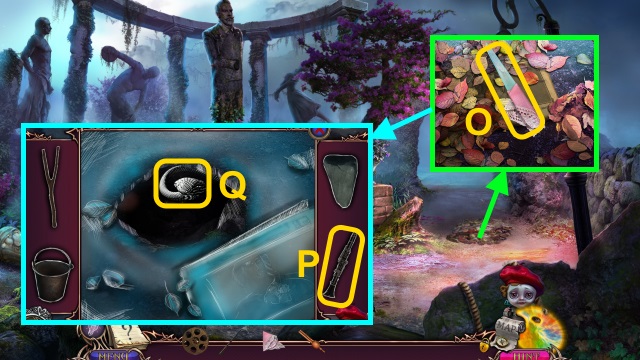
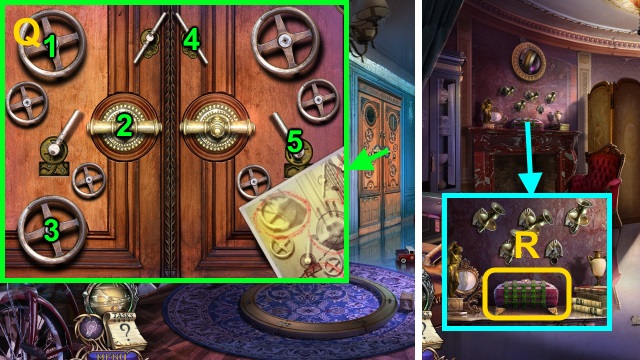
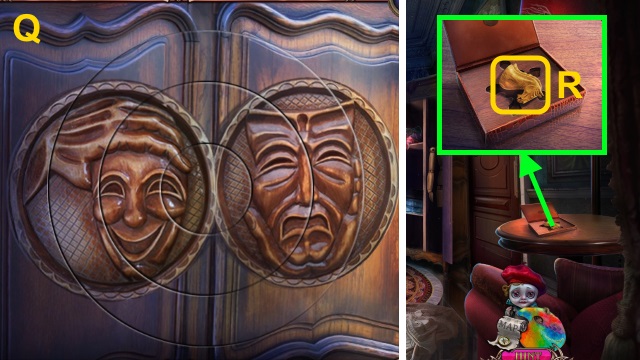
- Use the AWL (O); use the TEASPOON (P). Take the SHOVEL; move the plant (Q). Take the Map; use the IMPROVISED ROPE.
- Go right.
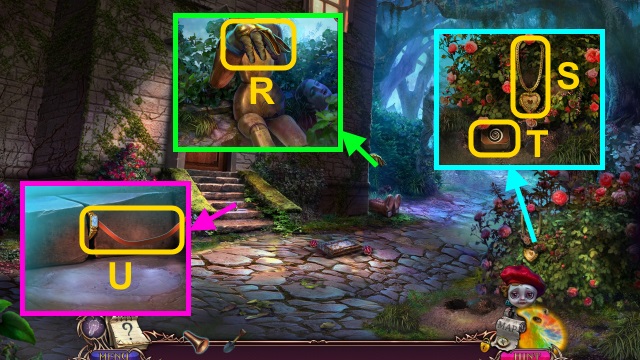
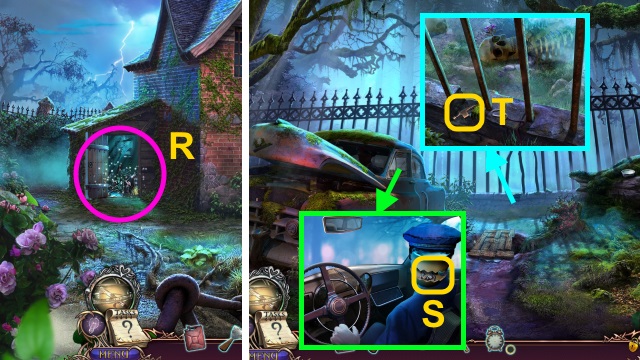
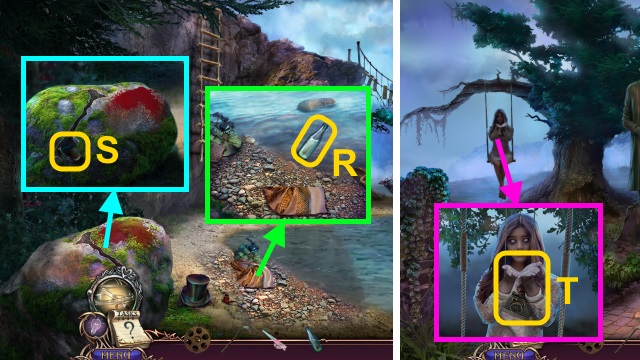
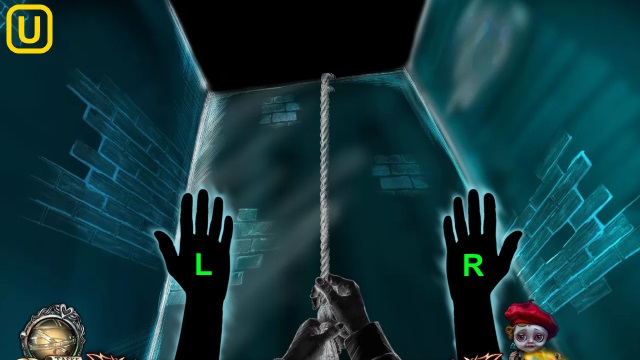
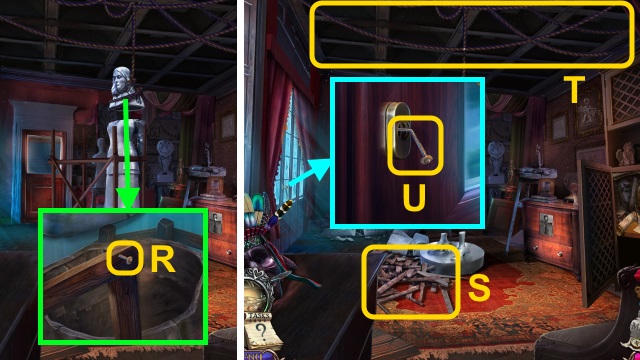
- Take the GLOVE (R).
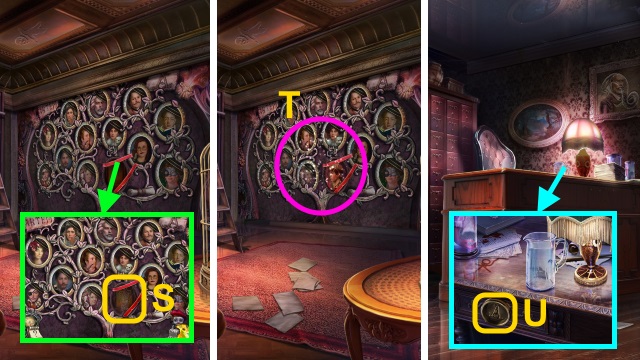
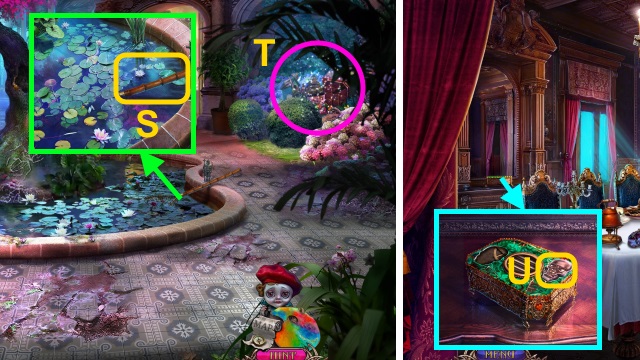
- Use the GLOVE; take the LOCKET (S). Use the SHOVEL; take the BOX (T).
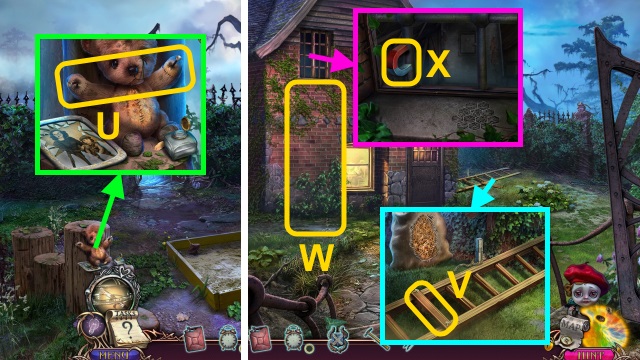
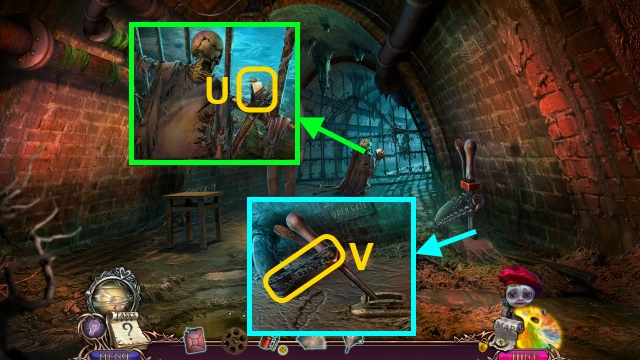
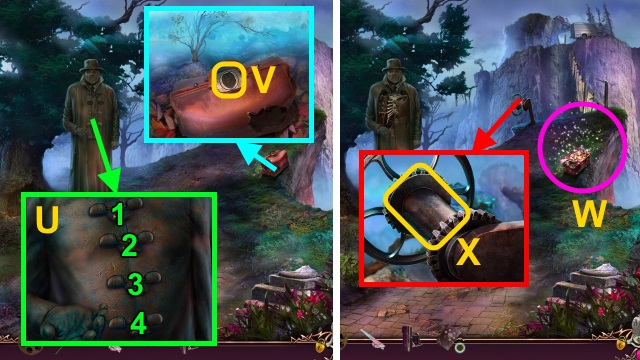
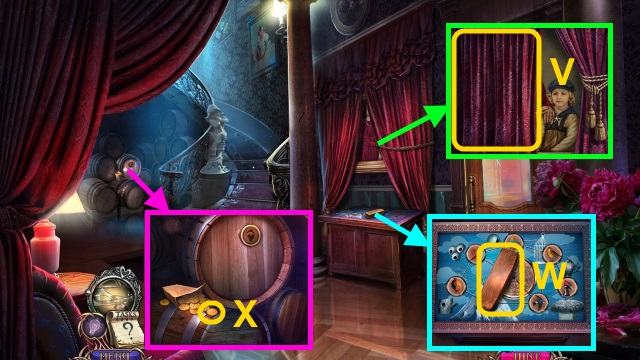
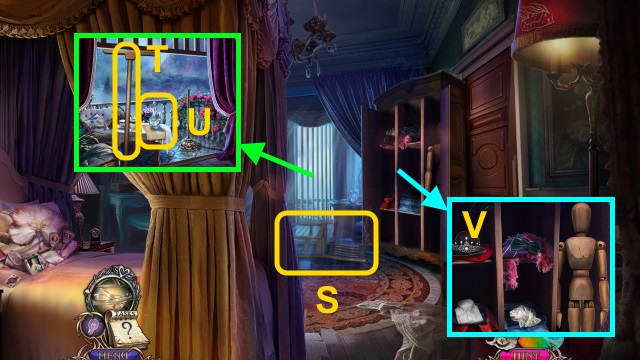
- Examine the ribbon (U).
- Walk right.
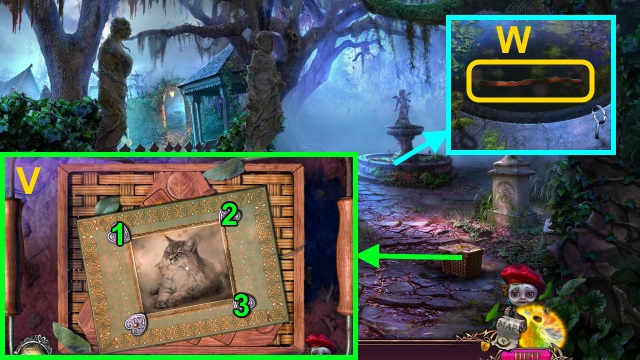
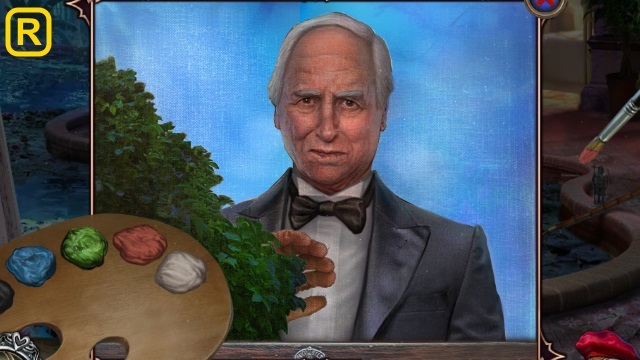
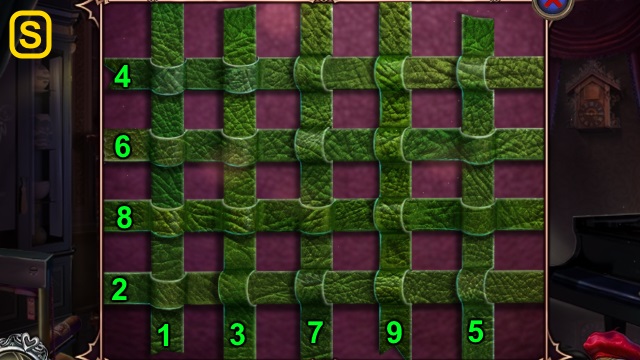
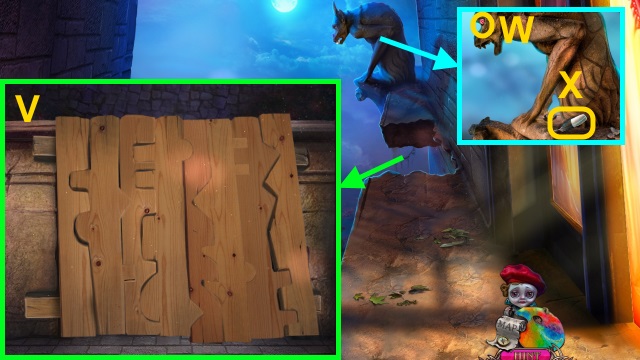
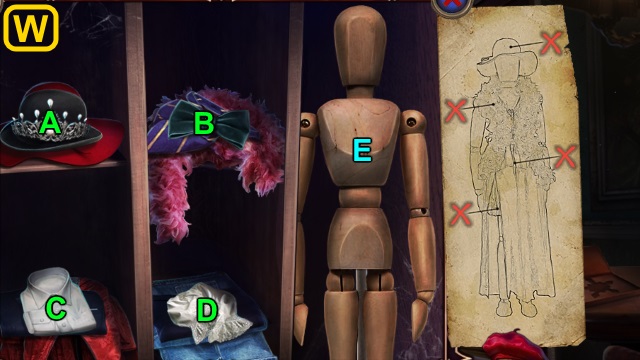
- Take the GLUE; examine the papers for a mini-game. Solution (V).
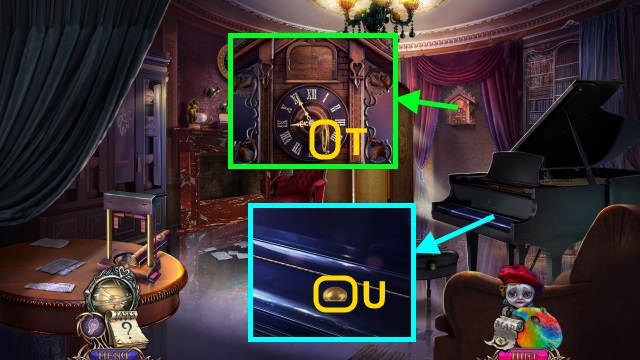
- Take the CAT PHOTO.
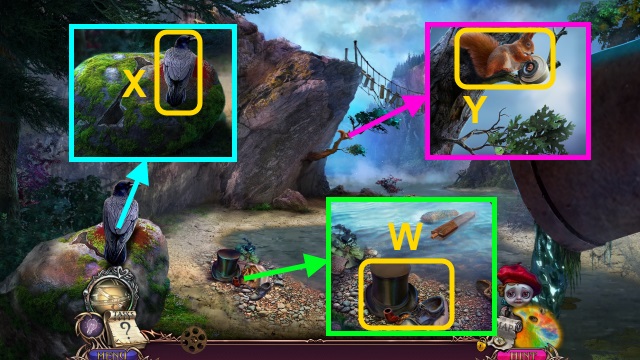
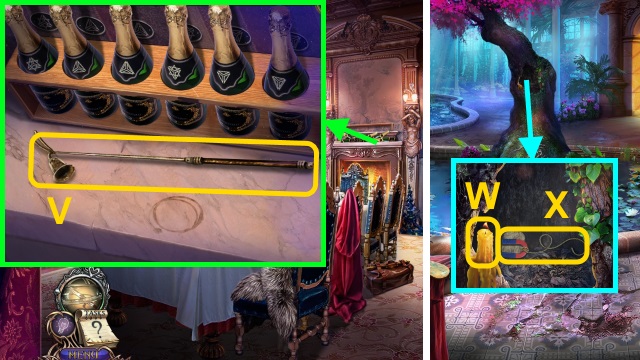
- Take the RIBBON (W); examine the arm.
- Walk down.
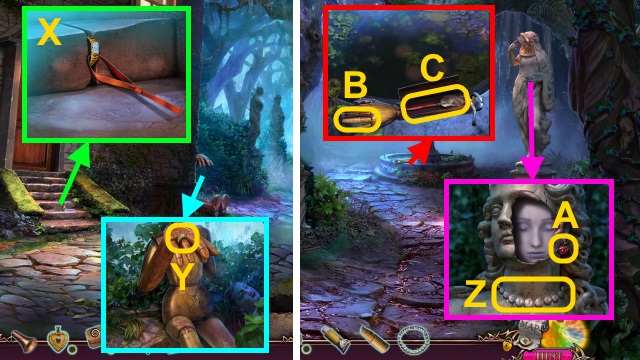
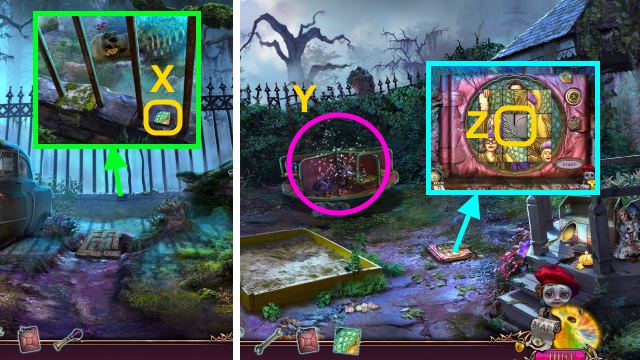
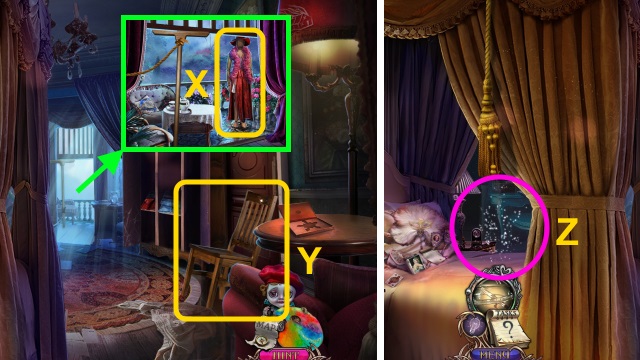
- Use the RIBBON; take the GOLDEN RING (X). Use the CAT PHOTO; take the WOODEN FINGER.
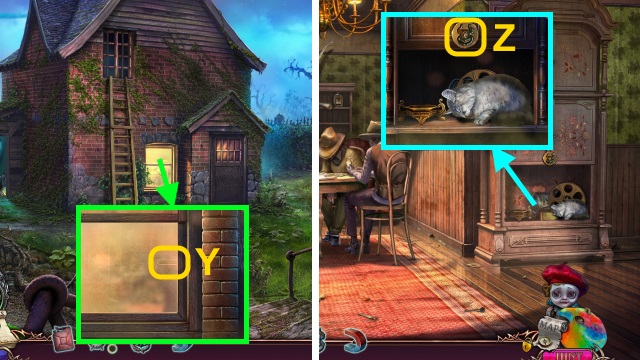
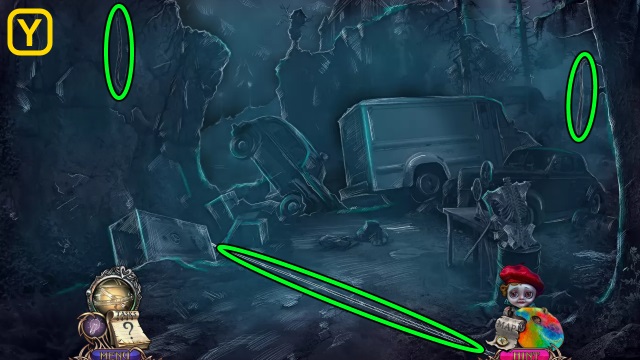
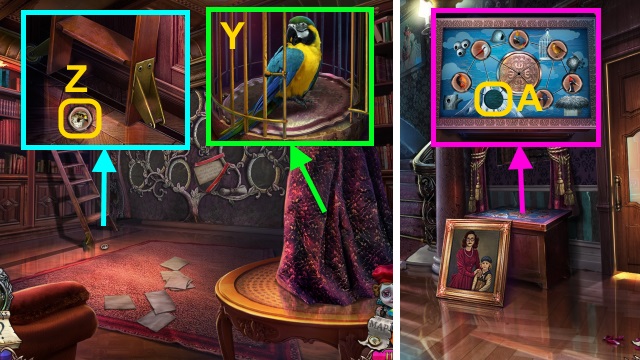
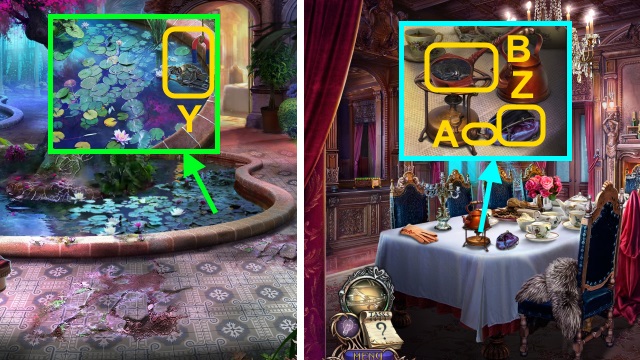
- Place the GOLDEN RING (Y); take the NECKLACE.
- Walk right.
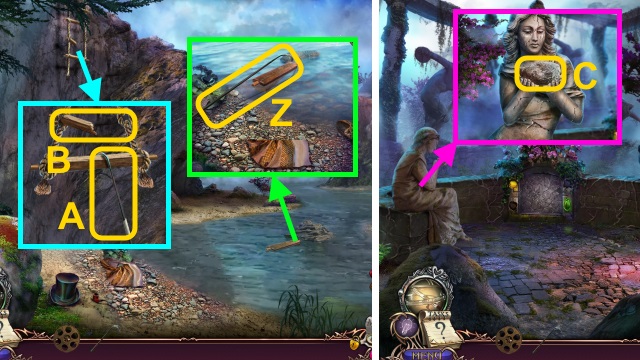
- Examine the snake; place the NECKLACE (Z). Take the HEART (A).
- Combine the LOCKET and HEART; examine it. Take the METAL SPIRAL.
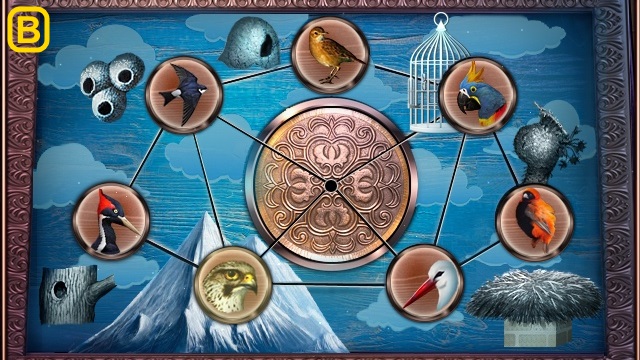
- Place the WOODEN FINGER (B); take the DUSTER (C).
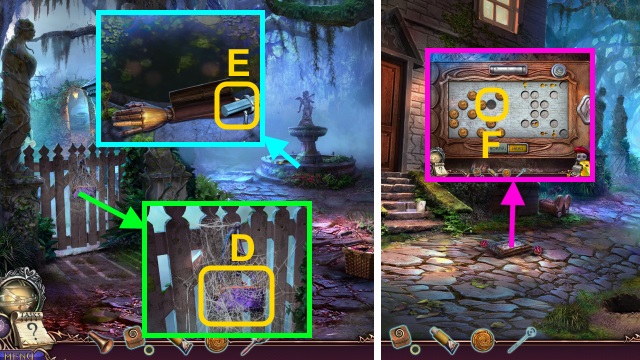
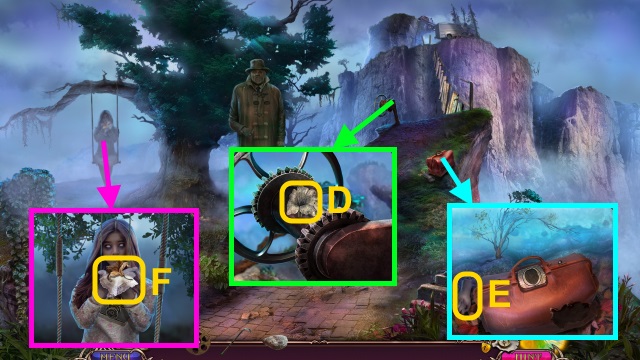
- Use the DUSTER (D); take the CLUTCH.
- Open the CLUTCH; take the note and LIPSTICK.
- Use the LIPSTICK (E); receive the SCREW EYE.
- Walk down.
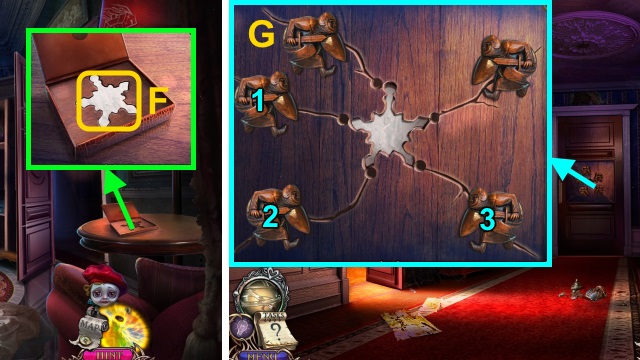
- Place the METAL SPIRAL for a mini-game (F).
- Solution (G).
- Read the note and letter. Play the HOP; receive the PLAYGROUND KEY.
- Walk right.
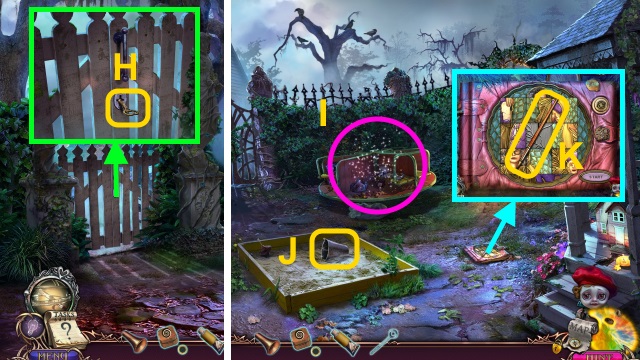
- Use the PLAYGROUND KEY (H); open the door.
- Walk left.
- Examine the dress. Play the HOP; receive the CRACKED MIRROR (I).
- Take the BUCKET (J).
- Take the BRUSH (K).
- Take the RAZOR (L); examine the paper (M).
- Use the RAZOR; take the SMILEY BUTTON (N).
- Combine the BOX and SMILEY BUTTON; take the SILVER PAINT.
- Examine the glass (O); use the SILVER PAINT and BRUSH. Take the MIRROR SHARD.
- Combine the CRACKED MIRROR, GLUE, and MIRROR SHARD; take the MIRROR.
- Use the MIRROR; examine the dollhouse. Take the WRENCH (P).
- Walk down.
- Use the BUCKET (Q); receive the WATER.
- Walk left; try to walk right.
- Pour the WATER (R).
- Walk right.
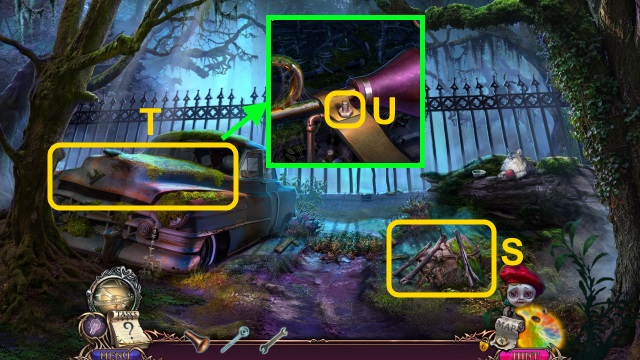
- Move the sticks; take the GAS (S).
- Open the hood (T).
- Use the WRENCH (U); take the CAR HORN.
- Examine the CAR HORN; place the HORN. Take the LOUD HORN.
- Try to walk forward.
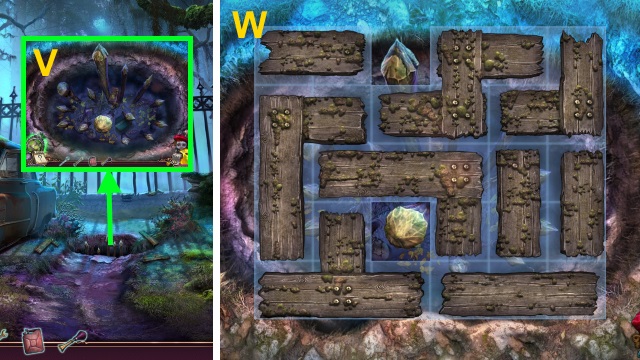
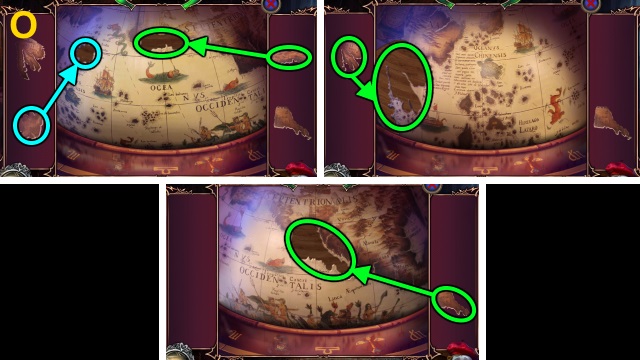
- Use the Trinket for a mini-game (V).
- Solution (W).
- Move the leaf; take the PICTURE PIECE (X).
- Walk down.
- Use the LOUD HORN. Play the HOP; receive the CHOPSTICKS (Y).
- Place the PICTURE PIECE for a mini-game (Z).
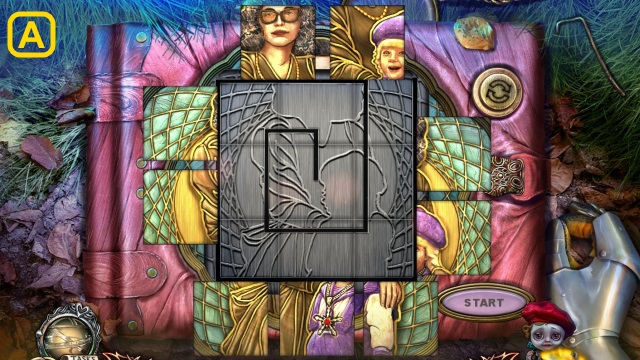
- Solution (A).

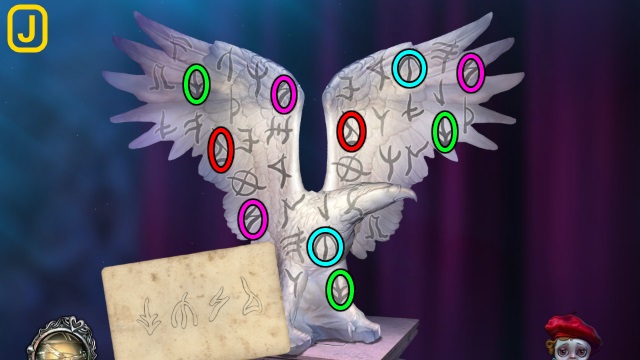
- Use the Trinket; use the items in order (B). Read the book; take the INK DEVELOPER.
- Turn the mirror; use the CHOPSTICKS (C). Take the CODE NOTE.
- Combine the CODE NOTE and INK DEVELOPER; take the CODE NOTE.
- Walk down.
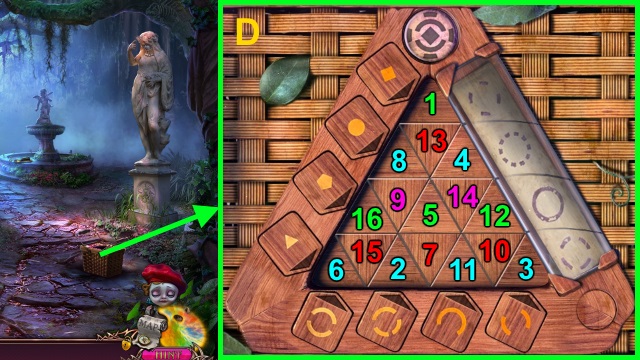
- Place the CODE NOTE for a mini-game.
- Solution (D).
- Take the MILK.
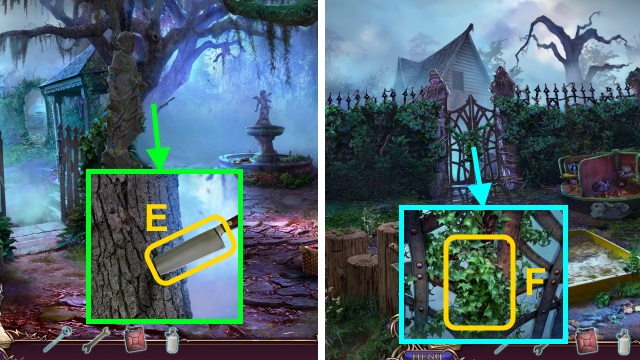
- Take the SHARP KNIFE (E).
- Walk left.
- Use the SHARP KNIFE (F); examine the handle. Take the HANDLE.
- Walk right.
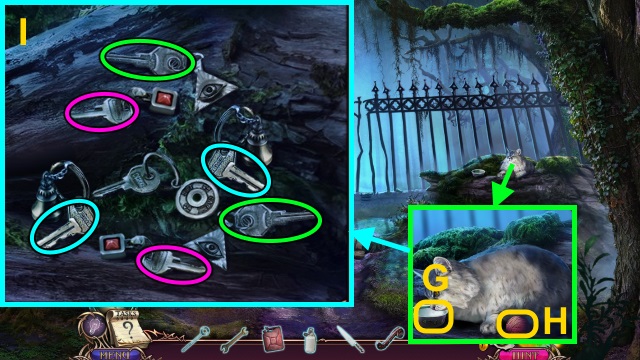
- Pour the MILK (G); take the YARN (H).
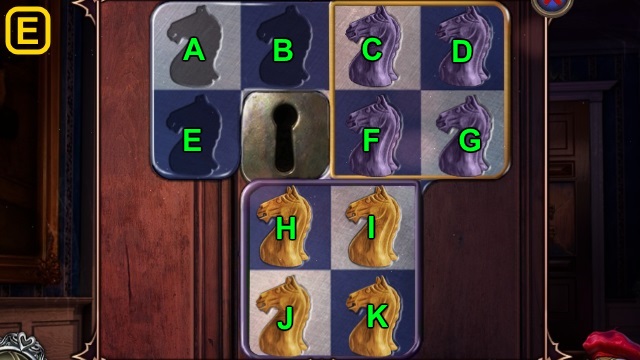
- Match the keys (I); take the CAR KEYS.
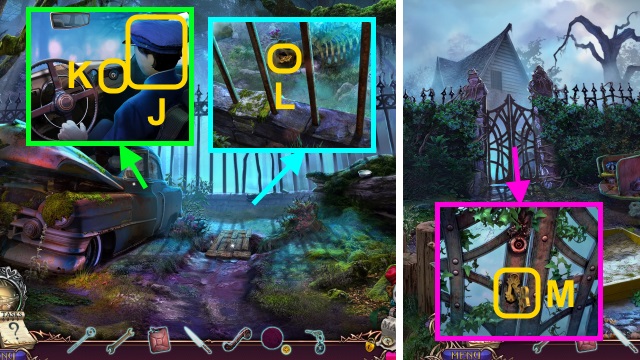
- Examine the mannequin (J). Use the CAR KEYS (K); take the PLIERS.
- Combine the YARN, SCREW EYE, and PLIERS; take the HOOK.
- Use the HOOK; take the GOLDEN KEY (L).
- Walk down.
- Use the GOLDEN KEY (M).
- Walk left.
Chapter 2: Gary
- Use the SHARP KNIFE; take the SCRAPER (N). Use the WRENCH (O); take the METAL BALL.
- Take the HAMMER HANDLE (P).
- Use the HANDLE (Q).
- Play the HOP; receive the BROKEN CLOCK (R).
- Walk down, then right.
- Place the METAL BALL; take the COAT OF ARMS (S).
- Use the SCRAPER; move the rock. Take the HAMMER HEAD (T).
- Combine the HAMMER HEAD and HAMMER HANDLE; take the CLAW HAMMER.
- Walk down.
- Use the CLAW HAMMER; take the NAILS (U).
- Walk left.
- Move the board; use the NAILS and CLAW HAMMER (V). Take the LADDER.
- Place the LADDER (W).
- Take the MAGNET (X).
- Use the MAGNET (Y); open the window.
- Walk forward.
- Use the COAT OF ARMS (Z); take the SCREWDRIVER.
- Use the SCREWDRIVER (A); take the CLOCK HANDS.
- Combine the BROKEN CLOCK and CLOCK HANDS; take the ALARM CLOCK.
- Place the ALARM CLOCK (B); take the FILM and DATE PLAQUE (C). Use the MAGNET; take the LEVER.
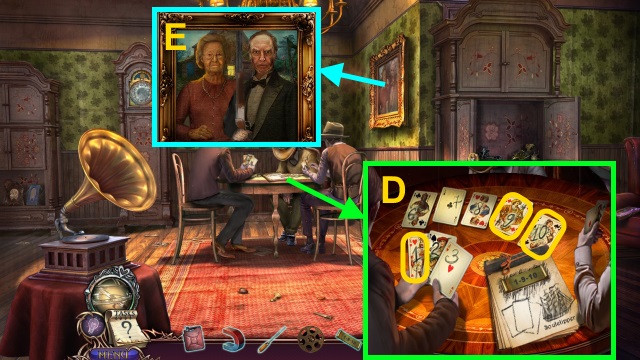
- Use the DATE PLAQUE; collect the cards (D). Take the SAFE CODE.
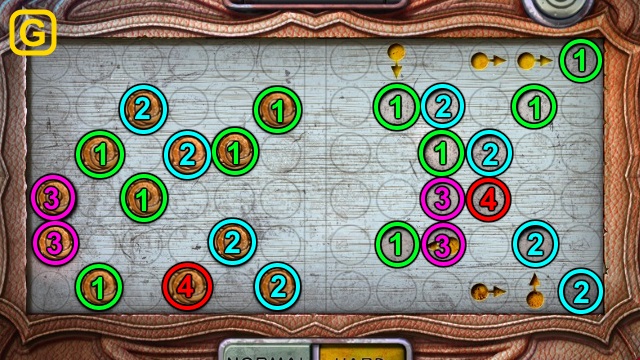
- Move the painting (E); use the SAFE CODE for a mini-game.
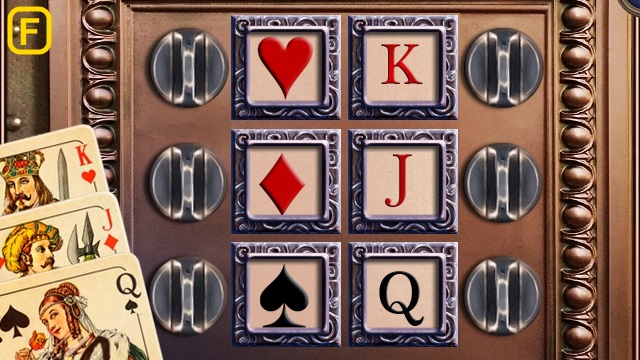
- Solution (F).
- Take the GARY TOKEN. Place the LEVER; pull it.

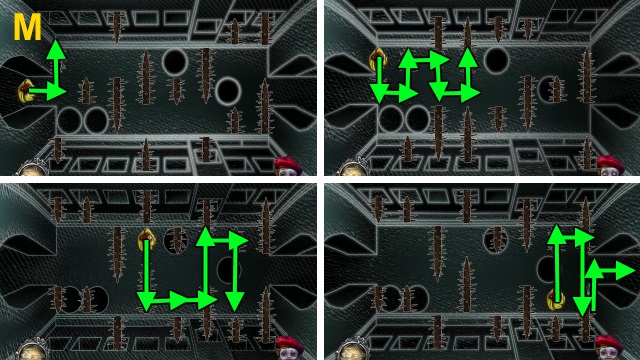
- Use the TRINKET for a mini-game. Solution (G): move Amy past the blades.
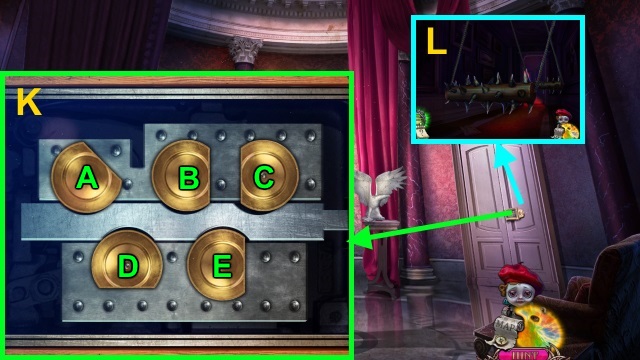
- Take the DUCT TAPE (H); place the GARY TOKEN for a mini-game.
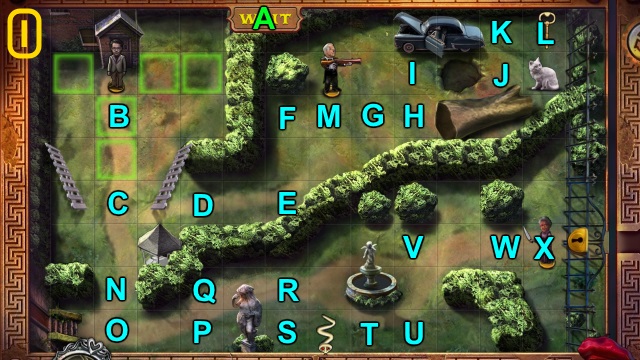
- Solution (I): B-A-C-D-E-F-A.
- G-H-A-I-J-K-L-K-J-Ax2-I-H.
- M-F-E-D-C-N-O-P-Q-R-S.
- T-A-U-V-W-X.
- Talk to Gary (J).
- Take the EMPTY BLOWTORCH and PAPER (K).
- Play the HOP; receive the PENCIL (L).
- Use the PAPER and PENCIL (M); take the PATTERN CODE.
- Place the PATTERN CODE for a mini-game; solution (N).
- Go right.
- Take the PLANKS (1/3)-(3/3) (O).
- Take the BROKEN STOOL (P).
- Combine the BROKEN STOOL and PLANKS (3/3); place the planks. Use the DUCT TAPE; take the STOOL.
- Take the SCARF (Q).
- Place the STOOL (R).
- Use the SCREWDRIVER. Use the SCARF (S); take the FUNNEL and FAN (T).
- Use the FAN (U); take the LIGHTER.
- Combine the EMPTY BLOWTORCH, FUNNEL, GAS, and LIGHTER; take the BLOWTORCH.
- Use the BLOWTORCH (V); pull the lever.
- Take the SHOE (W); move the hat. Take the BROKEN CANE.
- Use the SHOE; take the BERRY (X).
- Give the BERRY (Y); take the ADHESIVE TAPE.
- Combine the BROKEN CANE and ADHESIVE TAPE; take the CANE.
- Use the CANE (Z); take the RUNG.
- Use the CANE (A). Replace the RUNG (B).
- Go left.
- Take the STONE (C).
- Walk right.
- Use the STONE; take the STONE LILY (D).
- Take the STONE FIST (E).
- Examine the flower; take the HANDKERCHIEF (F).
- Walk down.
- Place the STONE FIST (G); take the RUBY ROSE.
- Place the STONE LILY; take the OPAL LILY (H).
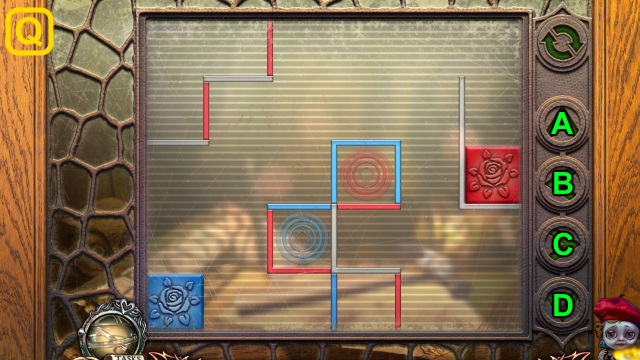
- Place the RUBY ROSE (I) and OPAL LILY (J) for a mini-game.
- Solution (K).
- Solution (L).
- Solution (M).
- Solution (N).
- Move the web and items; take the SNAKE CHARMER'S FLUTE.
- Move the leaves. Use the HANDKERCHIEF; take the GLASS (O). Move the leaves and newspaper; examine the hole.
- Use the Trinket; use the instrument (P) on the snake (Q). Use the SNAKE CHARMER'S FLUTE; take the EMPTY BOTTLE.
- Walk down.
- Use the EMPTY BOTTLE (R); receive the WATER BOTTLE.
- Use the WATER BOTTLE; take the BRONZE CLASP (S).
- Go left, then right.
- Use the GLASS; take the CAMERA (T).
- Place the BRONZE CLASP; open the clasps in order (U). Use the CANE; take the DETECTIVE'S DIARY and BADGE HOLDER.
- Examine the BADGE HOLDER; read the note. Take the DETECTIVE BADGE.
- Place the DETECTIVE BADGE (V).
- Play the HOP; receive the CHAIN (W).
- Place the CHAIN (X).
- Walk right.
Chapter 3: The Archive
- Examine the scene.
- Use the Trinket for a mini-game; Solution (Y).

- Play the HOP; receive the APPLE (Z).
- Place the FILM (A); take the SKELETON HAND and PENCIL (B).
- Use the SKELETON HAND. Give the APPLE (C); take the RACCOON.
- Place the RACCOON (D).
- Use the CAMERA (E).
- Examine the CAMERA; examine the picture. Use the PENCIL; take the SAFE CODE.
- Use the SAFE CODE for a mini-game (F).
- Solution (G).
- Turn the handle; read the diary. Take the LIGHTER; move the items. Take the CAR KEY.
- Use the CAR KEY (H).
- Play the HOP; receive the BOOK (I).
- Walk forward.
- Use the GLASS (J); play the HOP. Open the door; use the LIGHTER. Close the door; take the LANTERN.
- Use the LANTERN for a mini-game (K).
- Solution (L).
- Take the PUNCH TAPE.
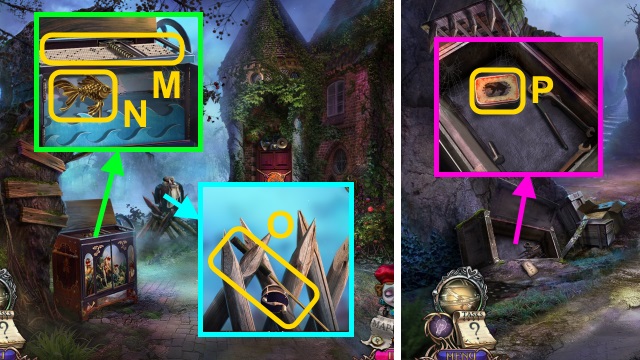
- Take the SCARAB; place the PUNCH TAPE (M). Take the GOLDFISH (N). Examine the background; take the STRING.
- Move the clothes; take the BROKEN FISHING ROD (O).
- Walk down.
- Place the GOLDFISH (P); take the LURE.
- Combine the BROKEN FISHING RODE, STRING, and LURE; take the FISHING ROD.
- Walk down.
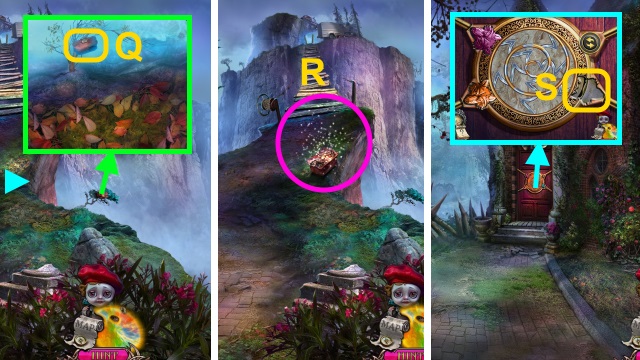
- Use the FISHING ROD (Q).
- Play the HOP; receive the WOLF HEAD (R).
- Walk right, then forward.
- Place the WOLF HEAD for a mini-game (S).
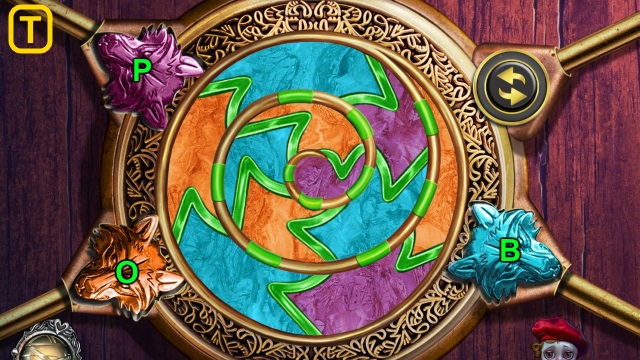
- Solution (T): P-O-B-O-B-P-B-O-B-P-O.
- Try to walk left.
- Use the Trinket for a mini-game.
- Solution (U): (L-Rx2-L-R)-(R-L-R-L-Rx2)-(L-R-L-Rx2-L-R).
- Receive the CORD.
- Examine the curtain; use the CORD (V). Move the painting; turn the handle.
- Take the BRUSH (W).
- Examine the bag; take the CRACKER (X).
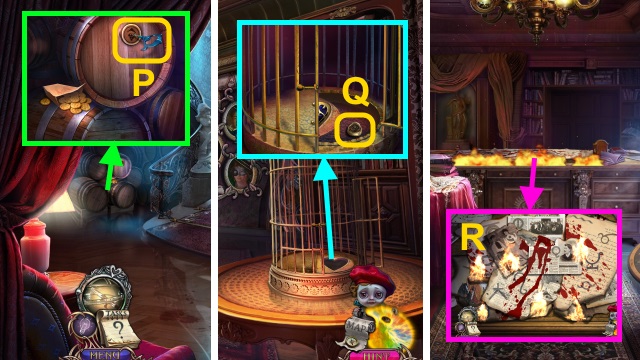
- Walk left.
- Move the cloth; open the cage (Y). Give the CRACKER; take the SILVER TRAY.
- Combine the SILVER TRAY and BRUSH; take the POLISHED TRAY.
- Take the HAWK (Z).
- Walk down.
- Place the HAWK for a mini-game (A).
- Solution (B).

- Move the clothes; take the MOON (C).
- Combine the DETECTIVE'S DIARY and MOON; select the moons in order (D).
- Read the diary; take the ARTEM FAMILY NOTES.
- Walk left.
- Use the ARTEM FAMILY NOTES for a mini-game (E).
- Solution (F).
- Take the WHEEL (G).
- Place the WHEEL (H).
- Place the BOOK for a mini-game; solution (I).
- Take the NIPPERS.
- Walk down.
- Use the NIPPERS (J); take the LONG HOOK and EMPTY EXTINGUISHER.
- Examine the door.
- Use the EMPTY EXTINGUISHER; use the POLISHED TRAY and LONG HOOK (K).
- Walk right.
- Use the SCARAB (L). Use the NIPPERS; receive the LEMON.
- Use the LEMON; open the cupboard. Move the toys; take the CANDY BOX (@). Move the toys and book; take the HEART AMULET (M).
- Open the CANDY BOX; move the items. Take the COUNTRIES.
- Use the COUNTRIES for a mini-game (N).
- Solution (O).
- Take the CORKSCREW.
- Walk down.
- Use the CORKSCREW and EMPTY EXTINGUISHER (P); receive the FULL EXTINGUISHER.
- Walk left.
- Place the HEART AMULET; take the SIGNET RING (Q).
- Walk down, then right.
- Use the FULL EXTINGUISHER (R); move the hose over the flames. Play the HOP; receive ADAM'S PORTRAIT.
- Walk down, then left.
- Place ADAM'S PORTRAIT (S).
- Play the HOP; receive the EMPTY HOURGLASS (T).
- Walk forward.
- Use the SIGNET RING (U). Move the items, take the COIN and FLASHLIGHT.
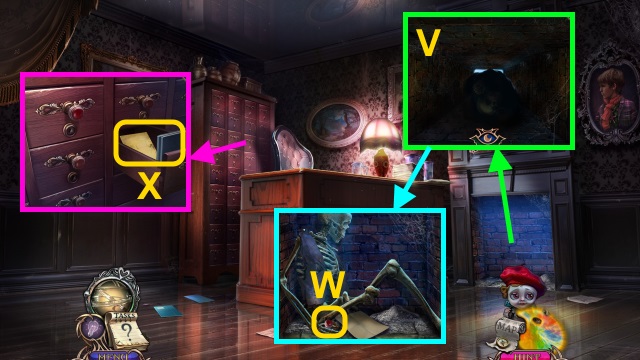
- Scroll up; use the FLASHLIGHT (V).
- Take the DRAWER KNOB (W).
- Place the DRAWER KNOB; examine the files and paper for a mini-game (X).
- Solution (Y).
- Move the portrait (Z).
- Take the TRIANGULAR KEY (A).
- Use the TRIANGULAR KEY (B); take the SILVER LADLE (C).
- Use the SILVER LADLE; take the COAL (D). Use the knife on the vest (E); receive the PAPER KNIFE. Take the GAUZE.
- Place the GAUZE; take the WET GAUZE (F). Use the PAPER KNIFE; take the STRINGS (G).
- Examine the note; use the WET GAUZE and COAL. Examine the gauze; use the STRINGS (H).
- Examine the wall (I).
- Take the TORN PHOTOS (J).
Chapter 4: The Garden
- Receive the DUSTER.
- Take the KNIGHT'S PLUME (K).
- Use the DUSTER 2x (L).
- Play the HOP; receive the SAND (M).
- Open the EMPTY HOURGLASS; use the SAND. Take the HOURGLASS.
- Give the HOURGLASS (N); examine the screw. Use the COIN (O); examine the armor. Take the GLASSES.
- Use the GLASSES (P).
- Walk right.
- Examine the easel for a mini-game (Q).
- Solution (R).
- Move the picture; take the CANVAS.
- Take the BROKEN NET (S).
- Play the HOP; receive the WINE BOTTLE (T).
- Walk forward.
- Take the SKULL (U).
- Place the WINE BOTTLE. Arrange the bottles; take the CANDLE (V).
- Walk down.
- Use the CANDLE and GLASSES (W); use the KNIGHT'S PLUME. Move the toys; take the MAGNET and WET CLAY (X). Take the BURNING CANDLE.
- Use the MAGNET (Y); take the TIN SOLDIER.
- Walk forward.
- Move the kettle. Open the purse (Z); move the coin. Place the knob (A); press it. Use the BURNING CANDLE, SILVER LADLE, and TIN SOLDIER (B). Use the CANVAS; receive the MOLTEN TIN.
- Combine the SKULL and WET CLAY; examine the clay. Use the MOLTEN TIN; take the SKULL.
- Place the SKULL; open the box. Take the LOCKPICK (C).
- Walk down twice.
- Use the LOCKPICK for a mini-game (D).
- Solution (E): Bx16-D-Ax20-E.
- Walk left.
- Examine the bed for a mini-game; solution (F).
- Open the blanket; take the DOLL.
- Examine the toys; use the Trinket. Place the doll (G) under the bed (H); examine the toys for a mini-game.
- Solution (H).
- Take the MALLET.
- Walk down.
- Examine the mirror; use the Trinket. Use the hammer (I) on the mirror (J). Use the MALLET on the mirror. Play the HOP; receive the NET.
- Examine the BROKEN NET 2x; use the NET. Take the BUTTERFLY NET.
- Walk right.
- Use the BUTTERFLY NET (K). Play the HOP; receive the BUTTERFLIES.
- Walk down, then left.
- Place the BUTTERFLIES for a mini-game (L).
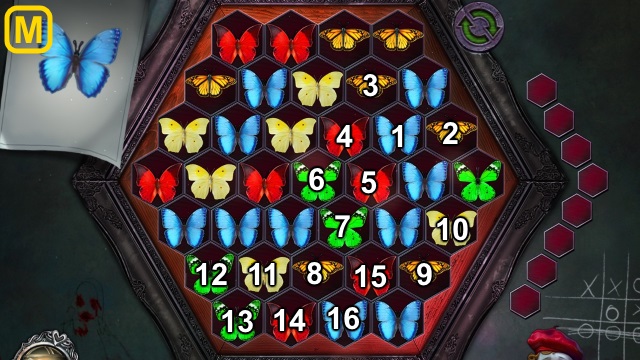
- Solution (M).
- Take the GLUE.
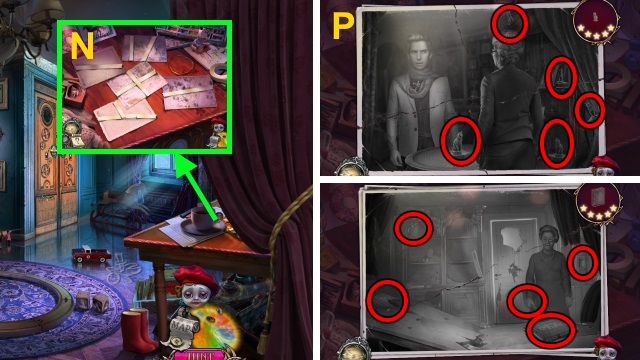
- Place the TORN PHOTOS; examine them. Place the GLUE; use the GLUE and tape on the photos. Examine the photos for a mini-game (N).
- Solution (O-P).
- Take the PHOTO.
- Place the PHOTO for a mini-game; solution (Q).
- Walk forward.
- Examine the box for a mini-game (R).
- Solution (S).
- Open the box; take the MELODY.
- Take the WINDING KEY (T).
- Take the PUZZLE PIECE (U). Open the piano; place the MELODY for a mini-game.
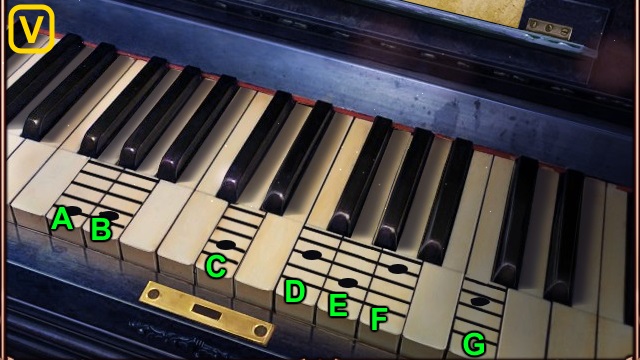
- Solution (V): E-B-F-B-G-D-A-C.
- Examine the key; take the SPRING.
- Examine the SPRING 3x; receive the HOOK.
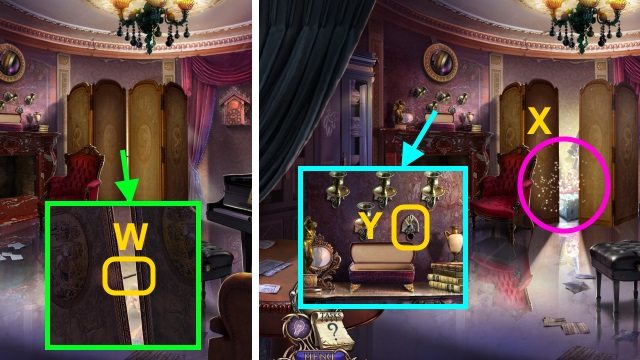
- Use the HOOK (W).
- Play the HOP; receive the CANDLESTICK (X).
- Place the CANDLESTICK for a mini-game (Y).
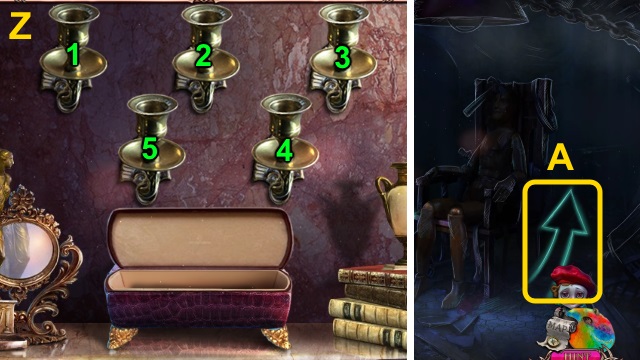
- Solution (Z).
- Walk left.
- Use the Trinket; select the arrow on the right (A).
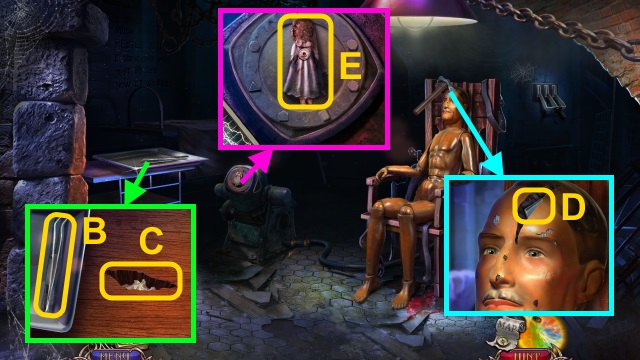
- Move the tray; use the KNIGHTS PLUME and tweezers (B) on the crack (C). Receive the TWEEZERS; take the HOURS DIAGRAM.
- Examine the axe 2x; use the TWEEZERS (D). Take the BLADE.
- Take the MECHANICAL DOLL (E).
- Combine the MECHANICAL DOLL and WINDING KEY; take the BROKEN DOLL.
- Walk down.
- Use the BLADE and BROKEN DOLL (F); press the button (G). Take the GEAR.
- Place the HOURS DIAGRAM for a mini-game; solution (H).
- Take the BIRD and MULTI-WRENCH.
- Walk left.
- Use the MULTI-WRENCH for a mini-game; solution (I).
- Place the GEAR for a mini-game.
- Solution (J).
- Use the HOOK; receive the OWL (K).
- Walk down.
- Place the OWL (L). Play the HOP; receive the BONES.
- Walk left.
- Place the BONES (M); examine them.
- Walk forward.
Chapter 5: Adam
- Take the EYE (N).
- Take the CURTAIN (O).
- Use the CURTAIN for a mini-game (P).
- Solution (Q): (A-B-D-C-D-B-A-C-A-B-A-D).
- (A-B-D-B-D-C-D-A-C-D-C-D-B-A-C-D-C).
- (A-C-D-C-A-B-A-B-D-B-A-C-D-C-A-B).
- Take the CLAW HAMMER.
- Use the CLAW HAMMER (R); receive the NAIL.
- Take the BOARDS (S). Take the NET (T).
- Examine the handle; use the NAIL and CLAW HAMMER (U). Open the door.
- Walk left.
- Place the BOARDS for a mini-game; solution (V).
- Place the EYE (W).
- Scroll down.
- Take the FEATHER (X).
- Walk down.
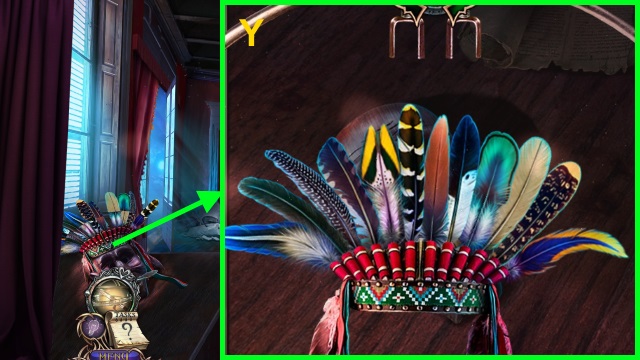
- Examine the headdress; place the FEATHER for a mini-game; solution (Y).
- Take the CHISEL.
- Walk left.
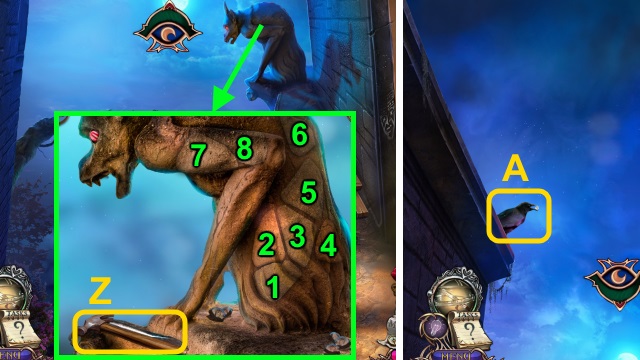
- Place the CLAW HAMMER and CHISEL (Z); use them on the stones (1-8). Take the STONES.
- Examine the NET 2x; place the STONES. Take the IMPROVISED NET.
- Scroll up.
- Use the IMPROVISED NET (A).
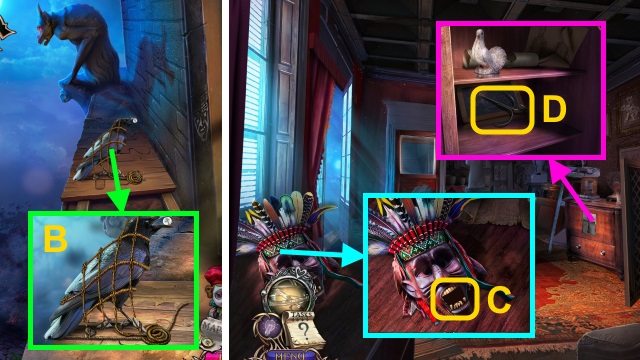
- Take the CRYSTAL BALL; remove the net (B). Take the ROPE.
- Walk down.
- Place the CRYSTAL BALL (C); take the ANKH AMULET.
- Place the ANKH AMULET; move the items. Take the GRAPPLING ANCHOR (D).
- Combine the GRAPPLING ANCHOR and ROPE; take the GRAPPLING HOOK.
- Walk left; scroll up.
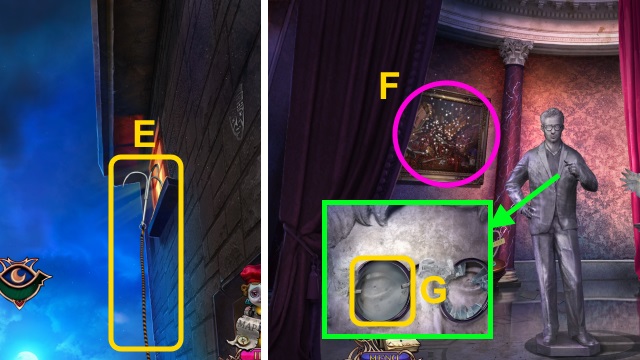
- Use the GRAPPLING HOOK (E).
- Go up.
- Play the HOP; receive the PLIERS (F).
- Use the PLIERS; take the LENS (G).

- Place the LENS (H); examine the symbols (1-3). Take the SYMBOLS CODE.
- Use the SYMBOLS CODE for a mini-game (I).
- Solution (J).
- Take the PUZZLE PIECE.
- Place the 2 PUZZLE PIECES for a mini-game; solution (K): Ax2-E-B-Dx2.
- Use the Trinket for a mini-game (L).
- Solution (M).
- Take the TWINE (N).
- Play the HOP; receive the WOODEN CIRCLE (O).
- Place the WOODEN CIRCLE for a mini-game (P).
- Solution (Q).
- Take the SQUEEGEE.
- Take the WHITE KNIGHT (R).
- Move the chair (S).
- Move the bars. Place the SQUEEGEE (T); use the TWINE. Take the DECANTER OF WATER and DRESS REFERENCE (U).
- Place the DRESS REFERENCE for a mini-game (V).
- Solution (W): (D-E)-(C-D)-(C-E)x2-(B-C)-(B-E)x2-(A-B)-(A-E)x2.
- Take the MANNEQUIN.
- Place the MANNEQUIN (X).
- Examine the chair (Y).
- Play the HOP; receive the EMPTY GLASS (Z).
- Walk right.
- Place the BIRD (A); flip the switch (B). Take the BLACK KNIGHT (C).
- Place the WHITE KNIGHT and BLACK KNIGHT for a mini-game (D).
- Solution (E): (I-B)-(D-I)-(I-E)-(B-I)-(I-D)-(G-B).
- (K-G)-(F-A)-(J-F)-(E-J)-(C-E)-(H-C)-(G-H).
- (B-G)-(G-K)-(H-G)-(E-I)-(A-H).
- Take the PLASTER SACK.
- Combine the DECANTER OF WATER and EMPTY GLASS; pour the PLASTER SACK. Take the PLASTER.
- Walk left.
- Pour the PLASTER; take the PLASTER AMULET (F).
- Walk right.
- Place the PLASTER AMULET for a mini-game; solution (G).
- Walk right.
- Congratulations! You have completed Tales of Terror: Art of Horror.
Created at: 2017-04-28