

Walkthrough Menu
General Tips

- From the main menu you can make a new profile, adjust options like sound, music, custom cursor and fullscreen mode, and see the game help.
- To the left of your UI is your magic menu. You will collect magical stones throughout the game that use can use from here.
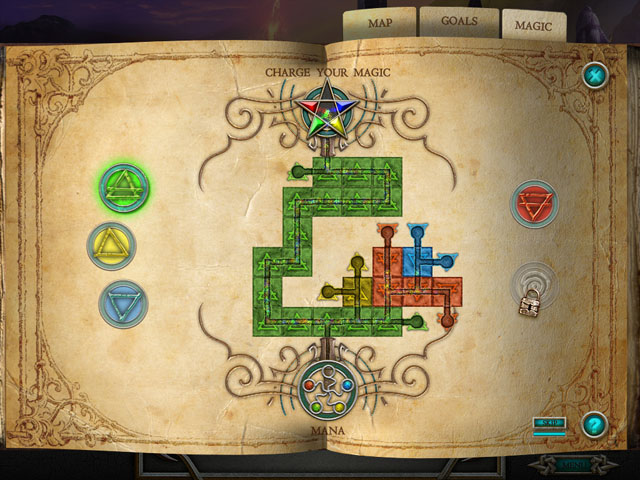
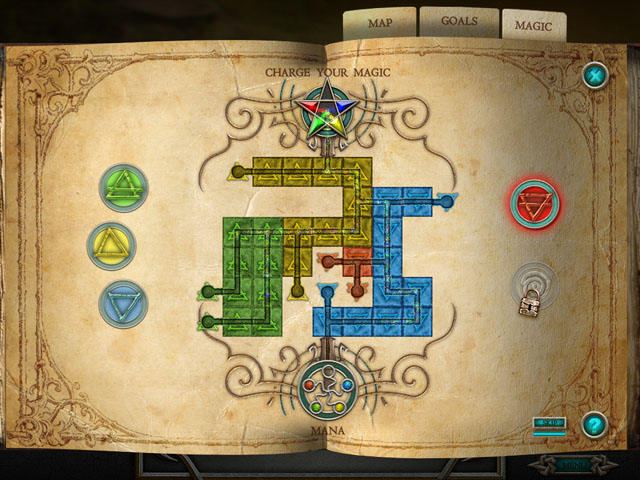
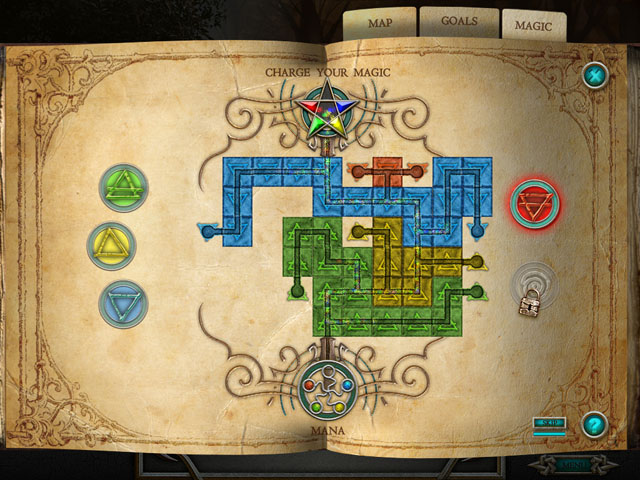
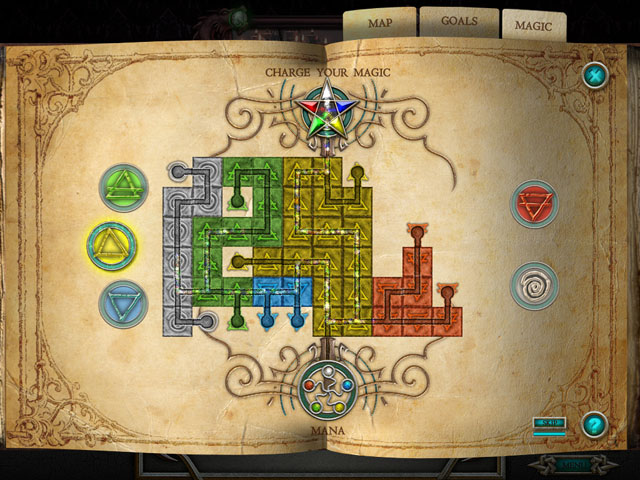
- Before using your magic each chapter you will need to click on the magic menu in order to recharge your MANA (A).
- The game will always turn the magic menu so that the magic stone you need to use next is at the top.
- In the middle of the UI is your inventory. This will show you what items you are looking for – with a silhouette – and the items that are in your inventory.
- Click on items in your inventory to use them on places in the world.
- In the game you will need to find hidden objects to fill your inventory. This will open up more hidden objects to find, and so on.
- Sometimes you will be looking for small pieces of the objects.
- To the left of the book there is a gem that when clicked will show you one of the things you are searching for in the world. It will actually take you to the correct scene and point out the object (B).
- In the book to the right of the UI it will show your current goals and a map of where you have been (C).
Chapter 1
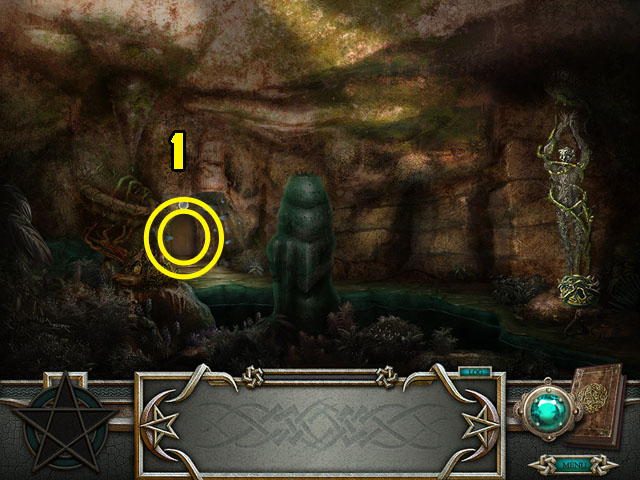
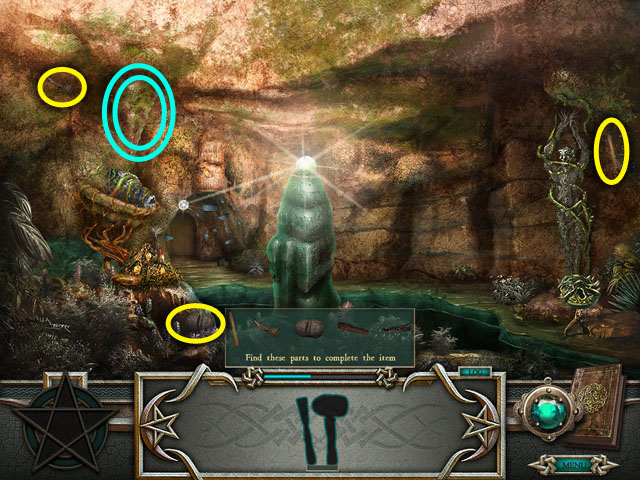
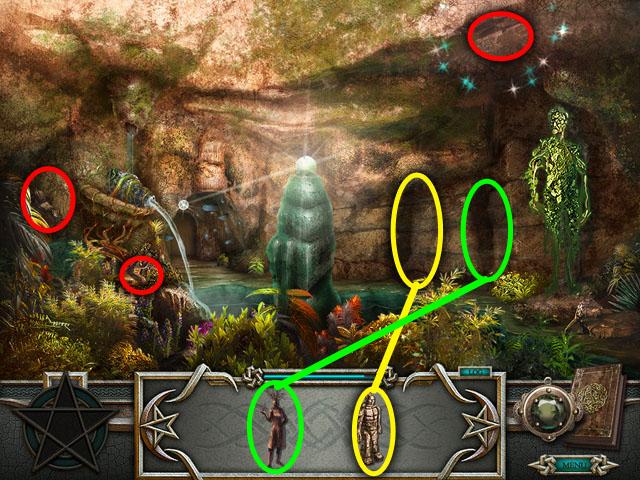
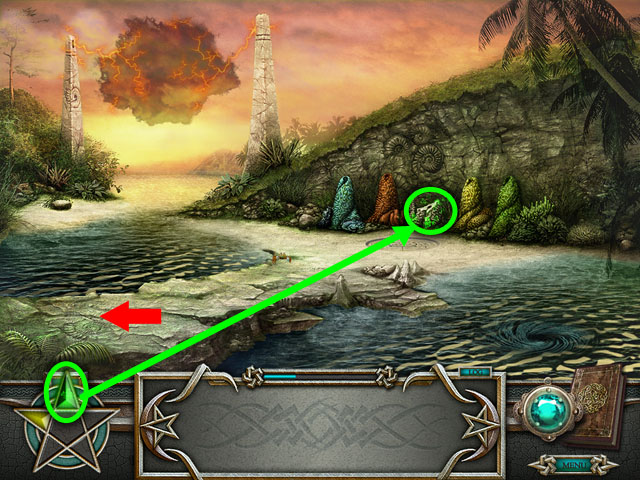
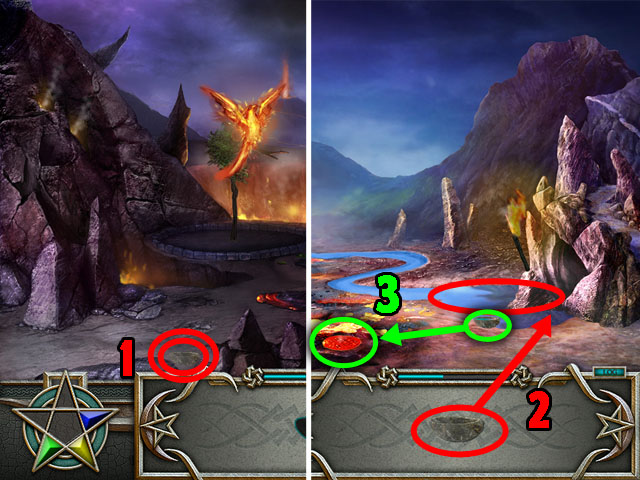
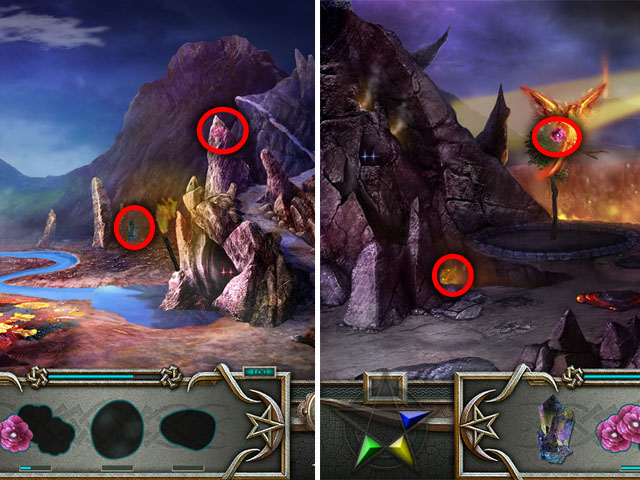
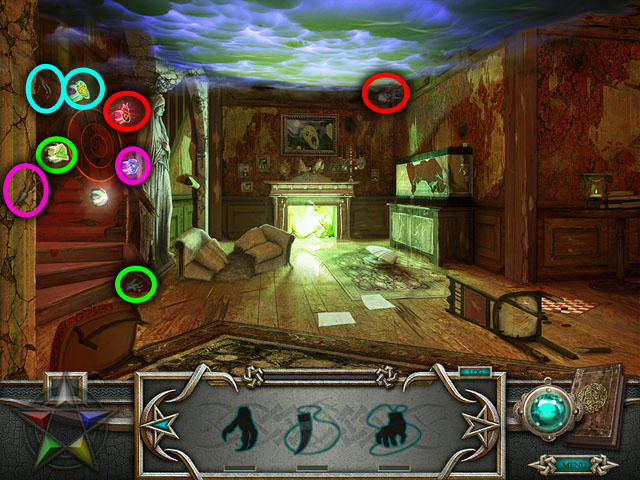
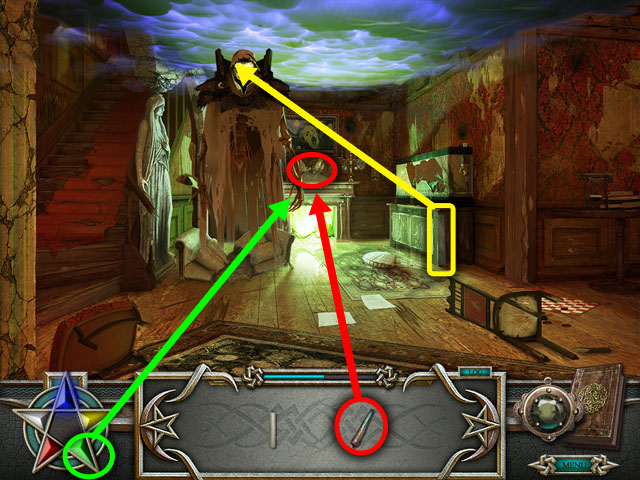
- Click on the entrance of the cave highlighted in yellow on the left side of the screen (1).
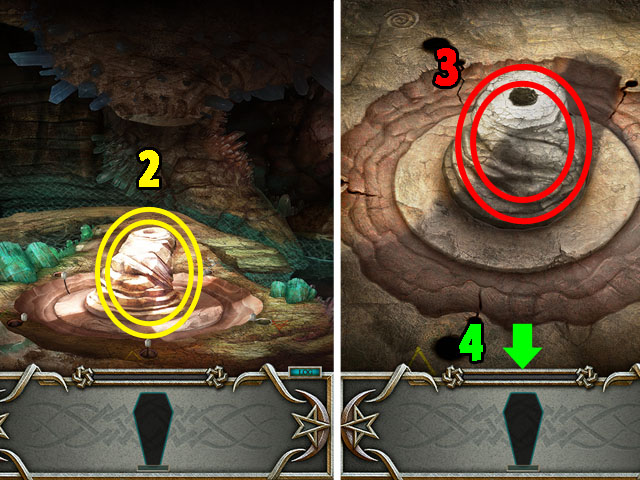
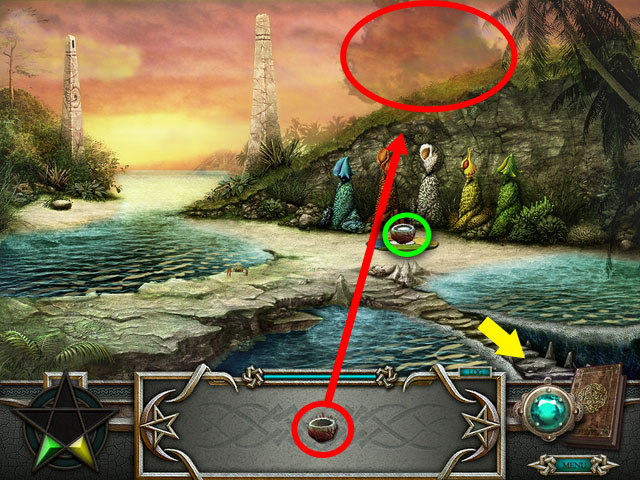
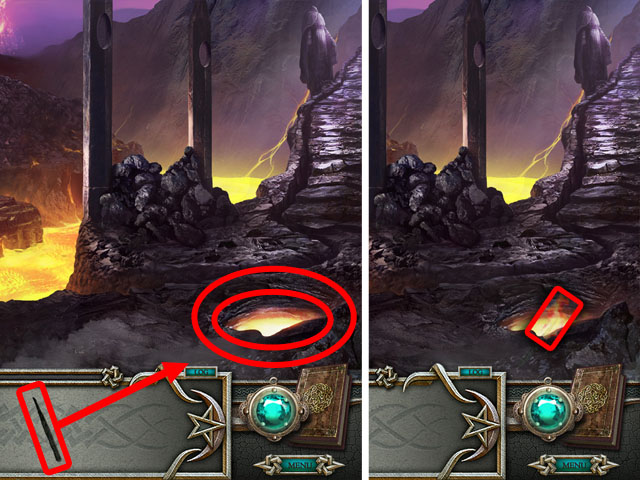
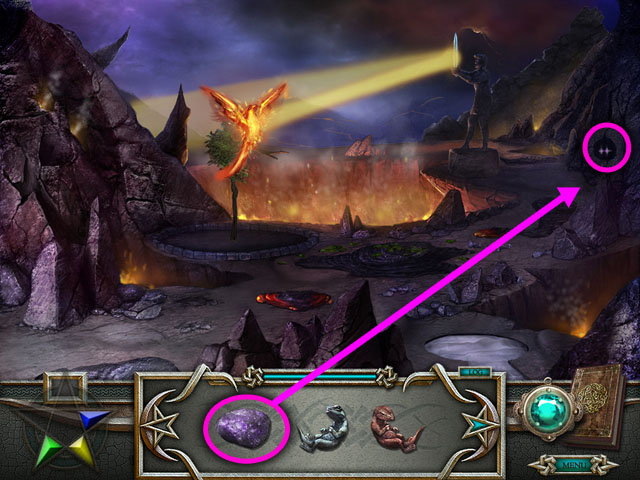
- Click on the stone in the middle of the scene to zoom in (2).
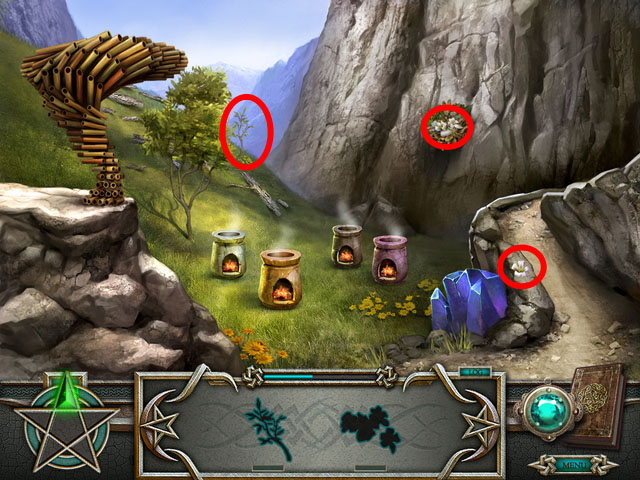
- Click on the stone in the middle again and you will receive a new goal (3), to find the AMBER CRYSTAL.
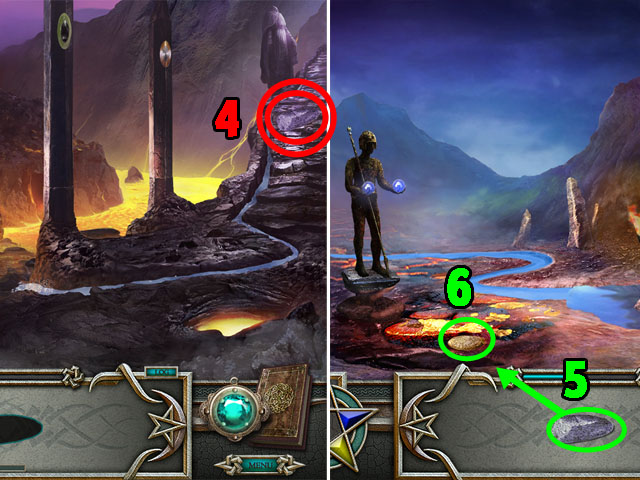
- Click towards the bottom to back out of the screen (4).
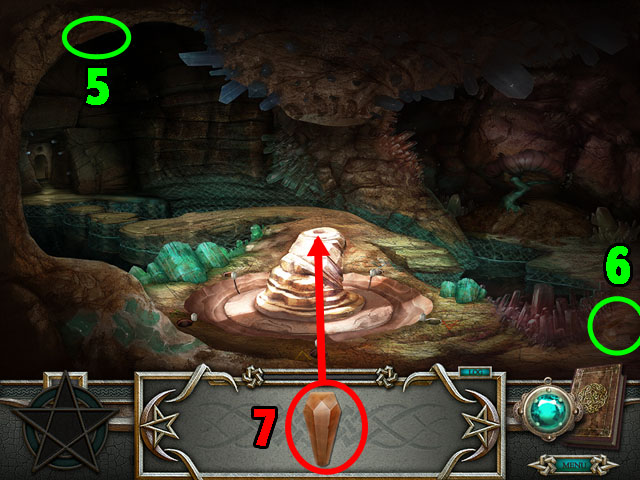
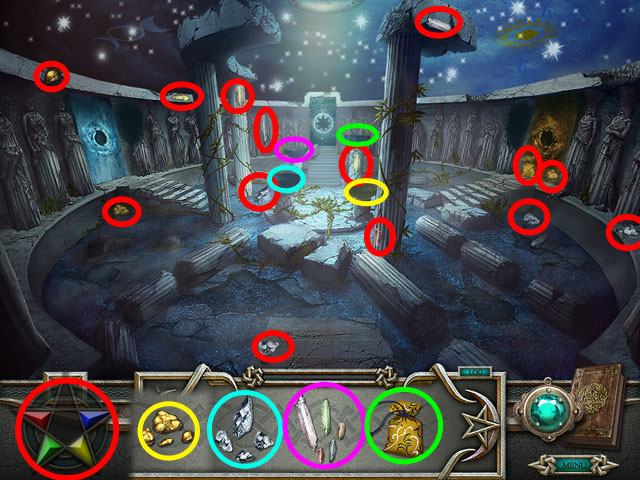
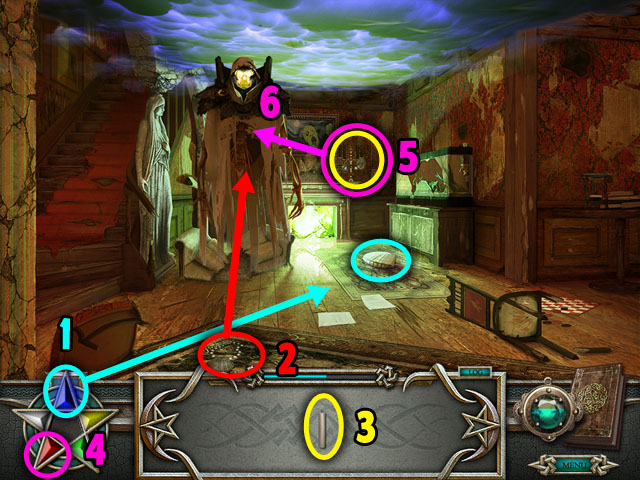
- Find the pieces of the AMBER CRYSTAL circled in green at the top and bottom of the screen (5, 6).
- You may have to click on the silhouette in the quest panel first, so that the game can show you where the first one is.
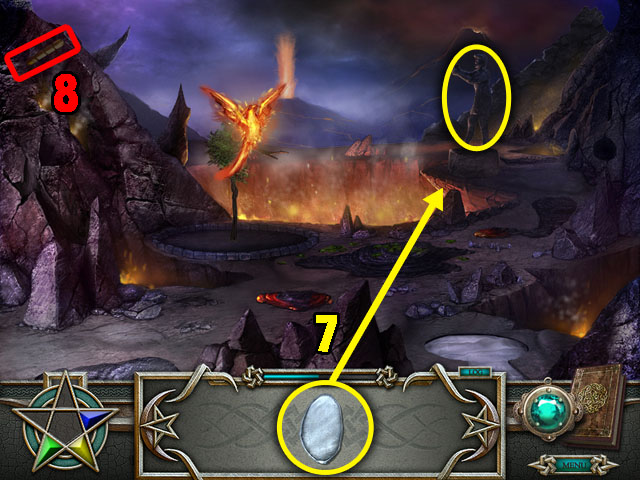
- Next take the AMBER CRYSTAL and use it on the mound (7).
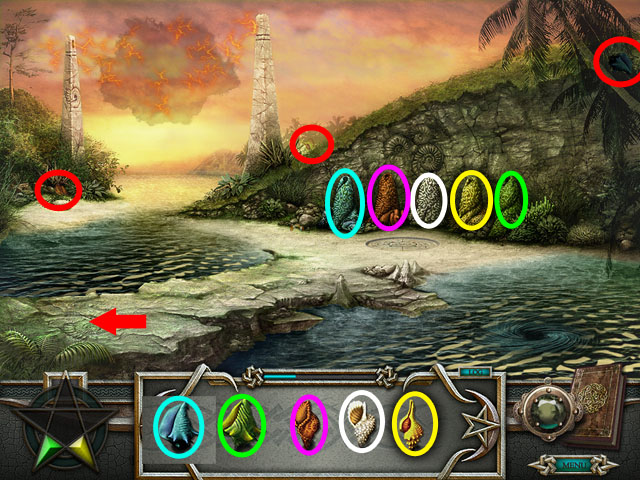
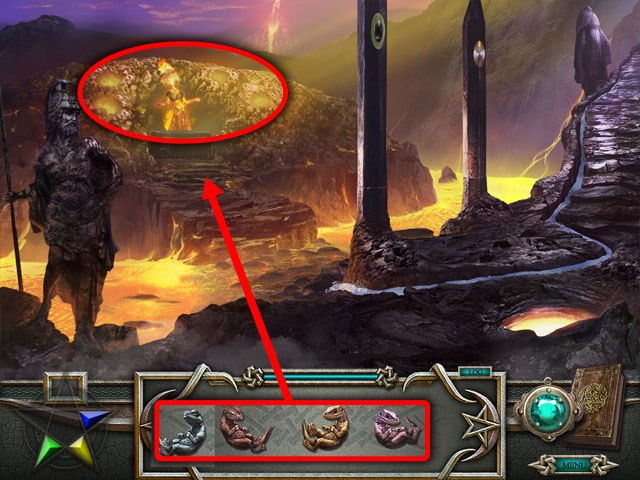
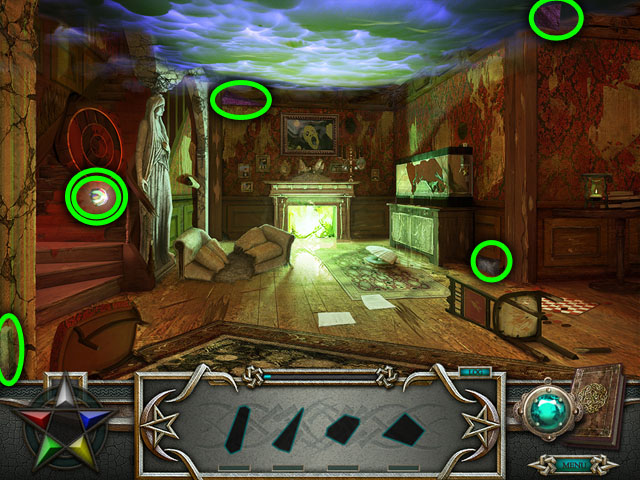
- You will now need to search for 5 more STONES.

- Find the 5 STONES in your quest panel circled in green in the image.
- After collecting them, return to the mound.
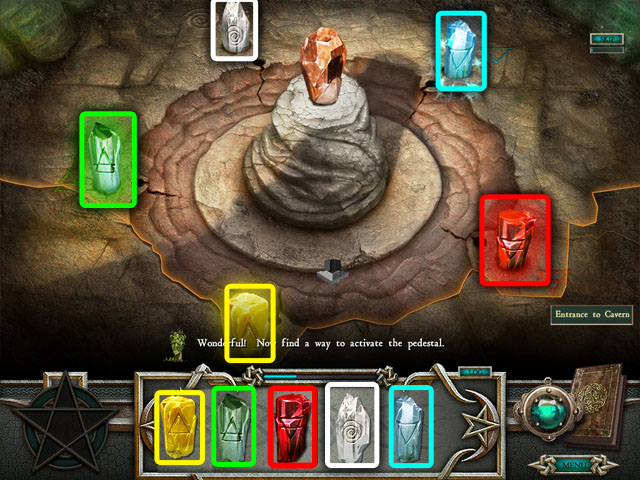
- Place the STONES to into the hole in the correct spots as shown in the screenshot.
- Each stone will have a drawing on it that matches the drawing next to the slot on the ground.
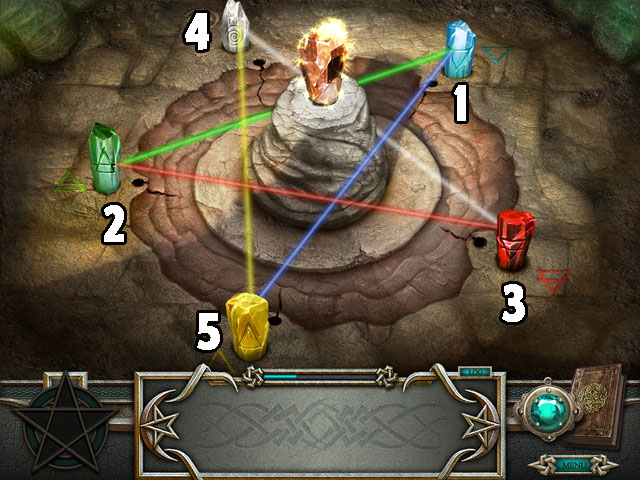
- Repeat the order of the light on stones. You may have to click on one of them if you did not see the first one light up.
- The order of stones is randomized, but you can follow the lines after the first step.
- Each time one more stone will light up, until all of them are lit.
- Final image is showed in the screenshot. The lines make a star.
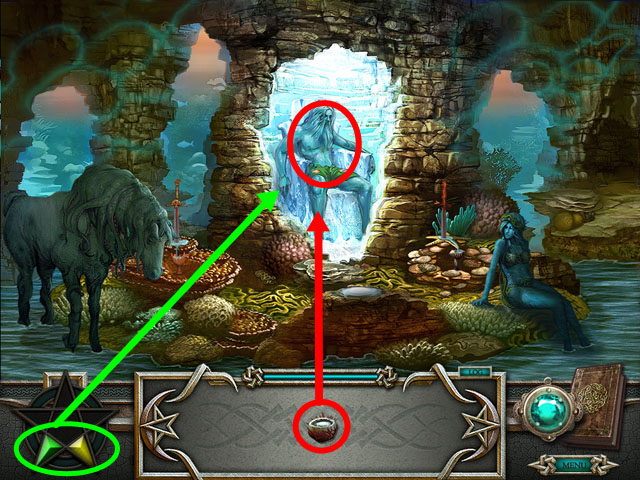
- Click on the entrance to Grotto on the left side of the screen.
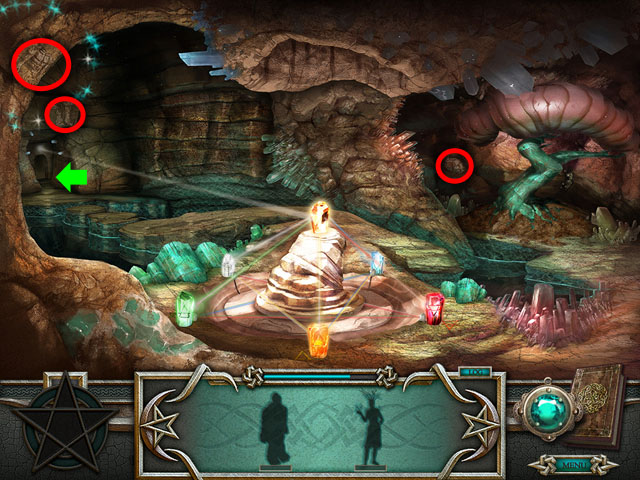
- Collect the two halves of the REFLECTING CRYSTAL circled in red in the screenshot.
- Use the CRYSTAL on the top of the stone in the middle of the room.
- Collect the stone in the bottom left corner.
- Place the STONE on the stone vase covered in vines on the left side.
- Return to the cavern.
- Find two pieces of the chisel.
- Return to the Grotto.
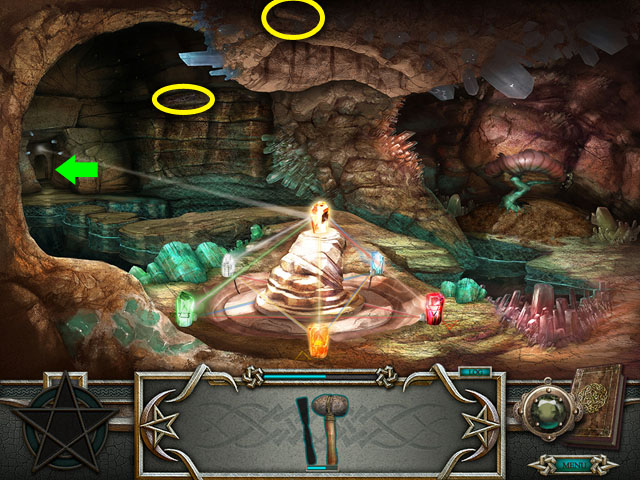
- Collect the parts of the stone hammer and the chisel highlighted in yellow.
- Break the stalactite highlighted in light blue with the STONE HAMMER and CHISEL.
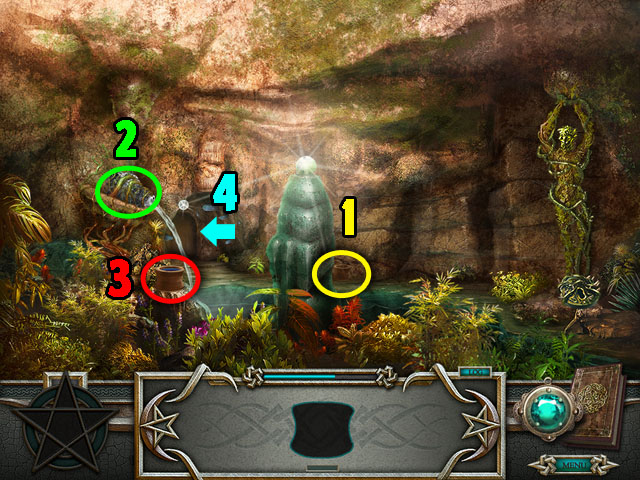
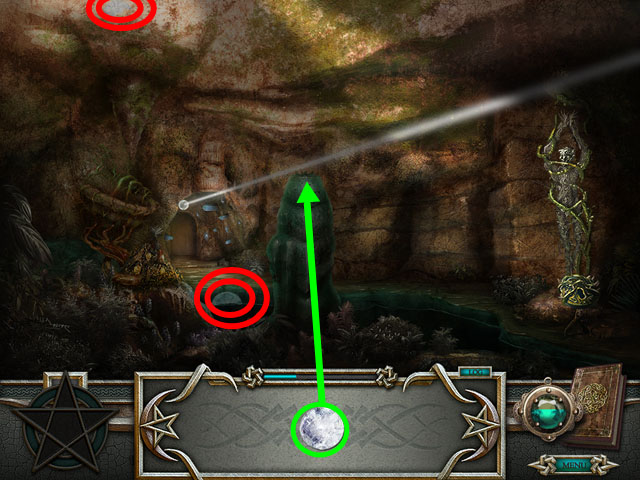
- Collect the WATER JAR highlighted in yellow (1).
- Place the JAR onto the water fountain highlighted in green (2).
- Collect the JAR WITH WATER once it appears under the water fountain (3).
- Return to the Cavern (4).

- Drag the WATER JAR onto the crystal tree (5).
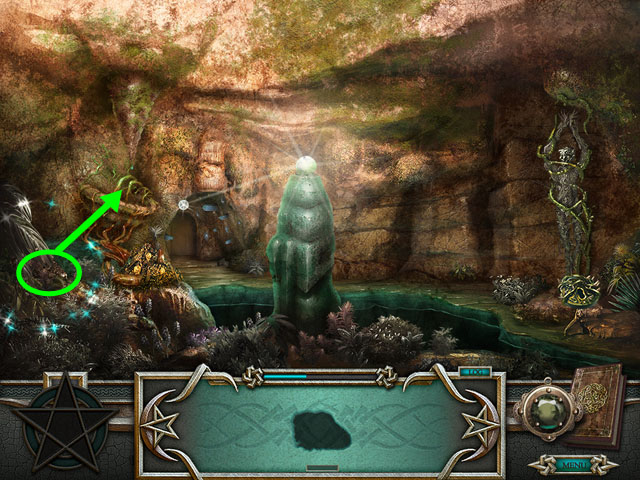
- Find the GREEN KEY highlighted in red (6).
- Return to the Grotto.
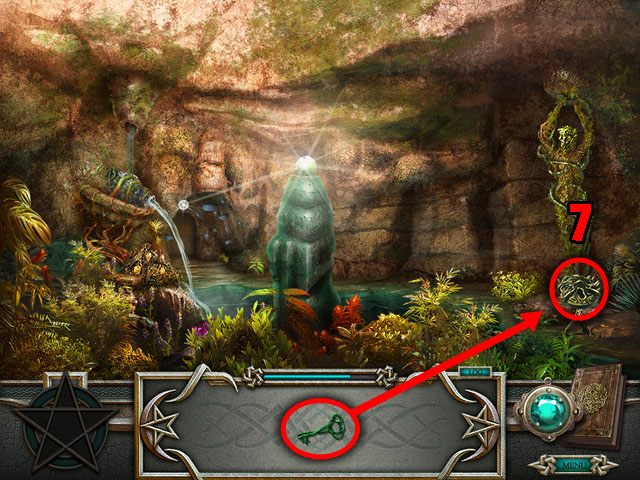
- Open the lock on the green man on the right side with the GREEN KEY (7).
- Return to the Cavern.
- Find three parts of stone Gnome.
- Return to the Grotto.
- Find three parts of the tree gnome.
- Place the TREE GNOME on the right hole highlighted in green.
- Place the STONE GNOME in the left hole highlighted in yellow.
- You will receive the green magical stone.
- The green magical stone goes into the bottom left corner of your inventory.
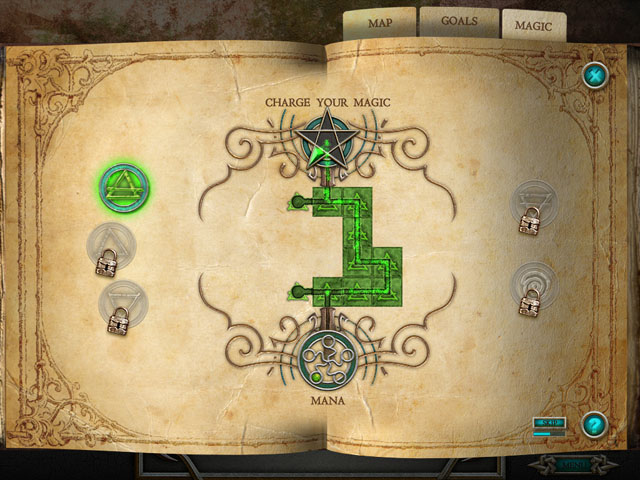
- Next you will be taken to the first mini-game.
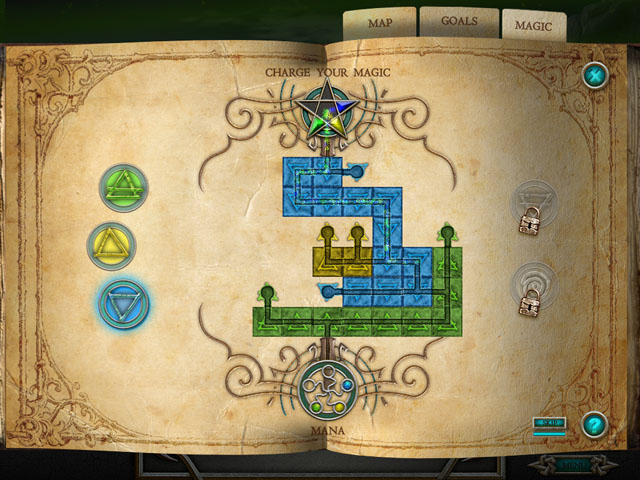
- Rotate all of the tiles to connect mana to the magical stone in the upper side.
- There can be no open ends: all of the mana paths must connect to something on the board.
- There are also some dead ends that must be connected to as well.
- Start from the bottom and rotate each piece until it matches all of the possible paths around it. Continue up until you have finished the puzzle.
- See the screenshot for the final image. The position of the dead ends is somewhat randomized.
Chapter 2
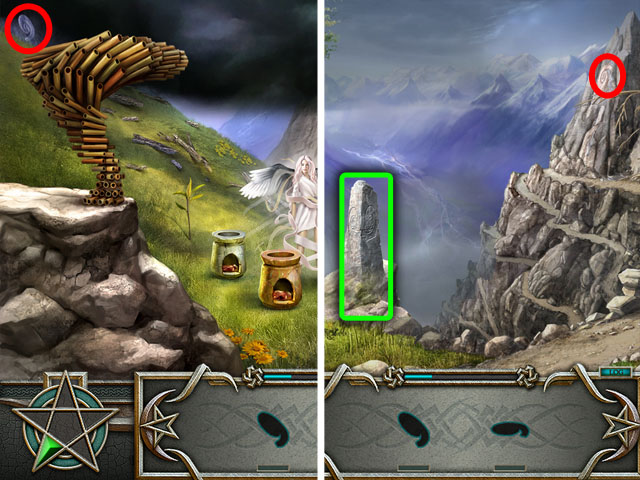
- Click on the “Remote Mountain Top, Himalayas, Tibet” in the book to move to next scene, or just click the “Continue” button.
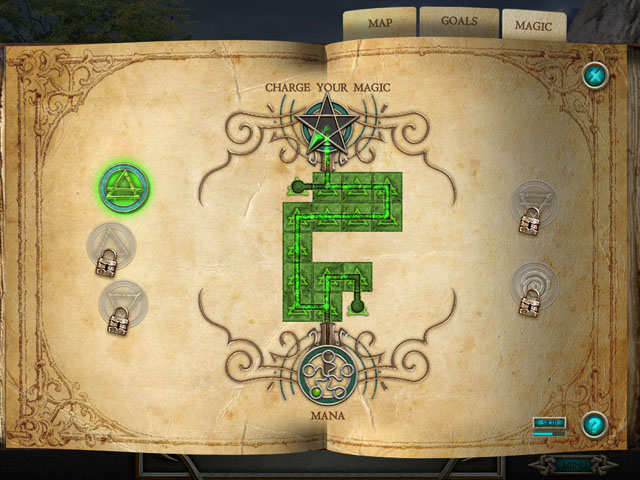
- Click on the star in the bottom left corner in the screen. It will say “Needs Charging” to indicate that you do not have enough mana.
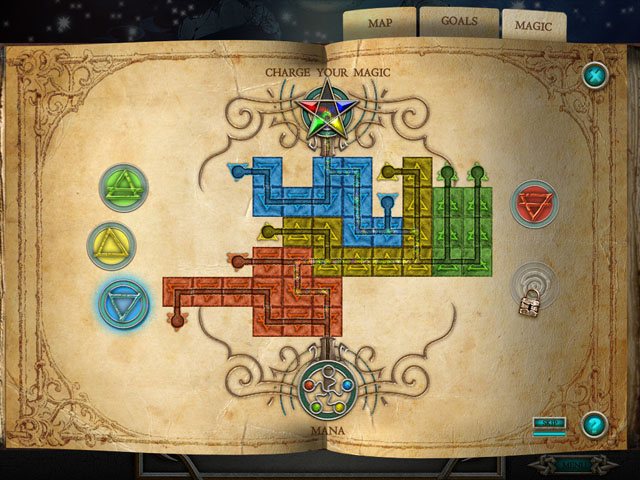
- Rotate all of the tiles to connect mana to the magical stone in the upper side.
- There are also some dead ends that must be connected to as well.
- Start from the bottom and rotate each piece until it matches all of the possible paths around it. Continue up until you have finished the puzzle.
- See the screenshot for the final image.

- Click on the green magical stone and drag to the broken path highlighted in red.
- This will use the earth magic to fix the area so that you can pass.
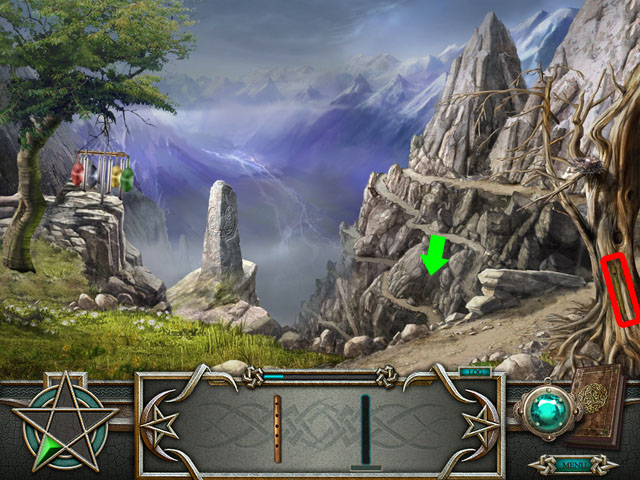
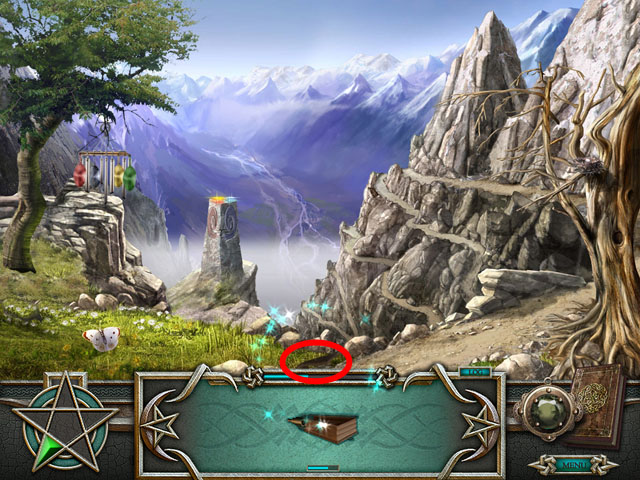
- Click on the road to the Valley of Clouds in the middle.
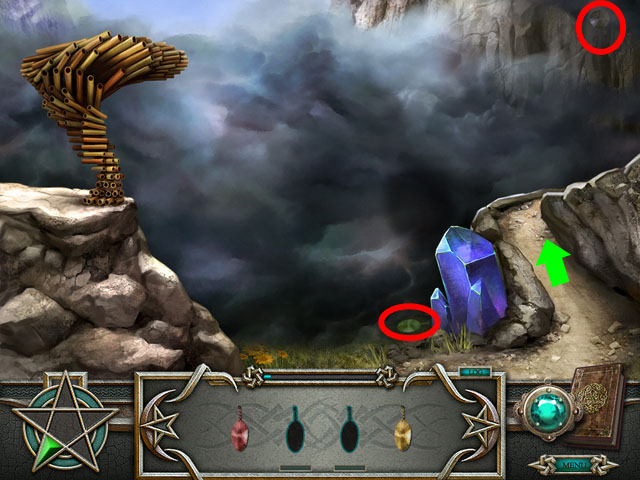
- Find the green charm and the blue charm highlighted in red.
- Return to the Rocky Outcropping from the road on the right side of the screen.
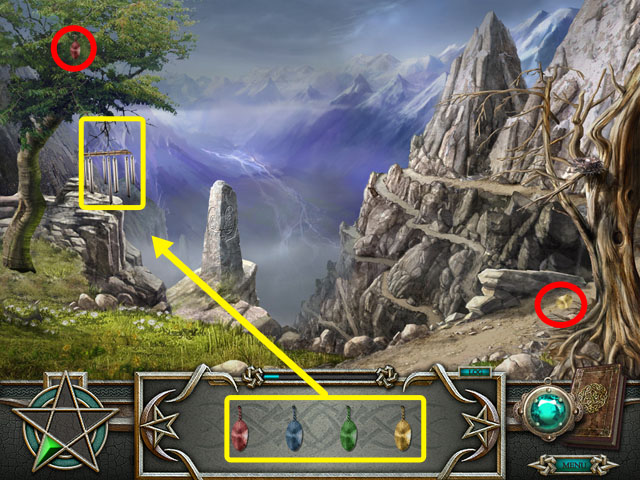
- Find the red charm and the yellow charm highlighted in red.
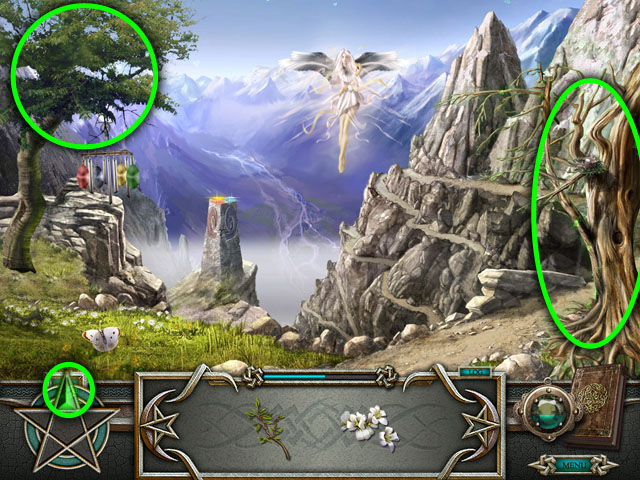
- Place all 4 CHARMS on the hanging chimes highlighted in yellow on the left side.
- Find the magical Bamboo Reed in the bottom right corner hidden on the tree.
- Return to the Valley of Clouds.
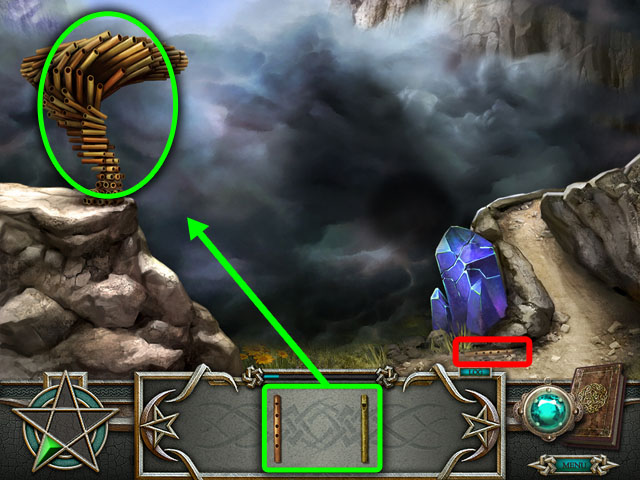
- Find the Magical Willow Reed in the bottom right corner.
- Drag the 2 REEDS to the Magical Woodwinds on the left side of the screen.
- Return to the Rocky Outcropping.
- Find the Air Magic Crystal highlighted in red.
- Return to the Valley of Clouds.
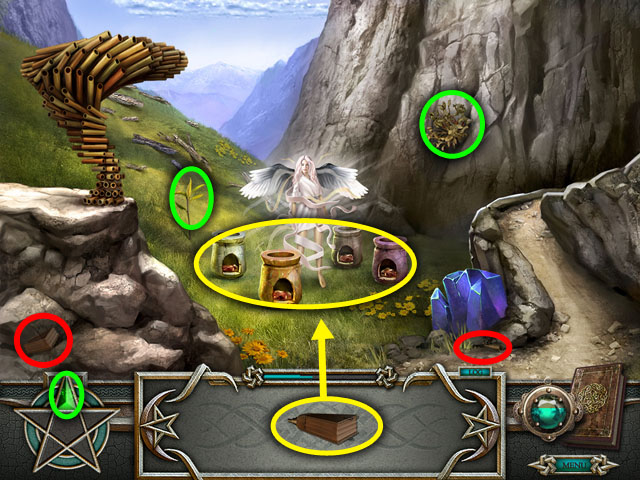
- Drag the AIR MAGIC CRYSTAL to the White lady passed out in the middle of the screen.
- Find the Blue Wind Symbol in the upper left corner.
- Return to the Rocky Outcropping.
- Find the Red Wind Symbol in the upper right corner.
- Drag the 2 SYMBOLS on the Wind Pillar highlighted in green.
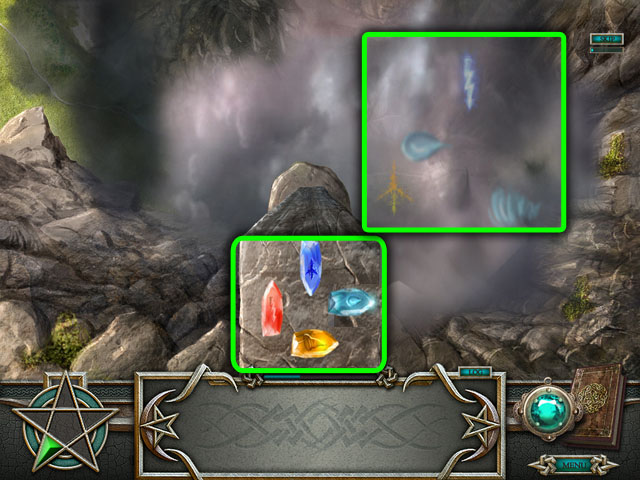
- Look at the symbols in the clouds to the right.
- Rotate the stones to match with the position of the symbols in cloud.
- The symbols on the stones and the symbols on the clouds must be rotated to exactly the same position.
- The color of the symbols and the color of the stones are different, follow just the images.
- You must match the symbols 5 times.
- See the screenshot for an example of one correct answer.
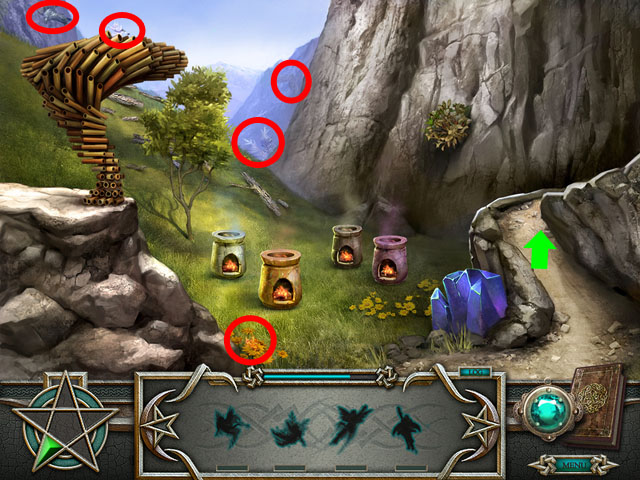
- Find a part of the Bellows highlighted in red.
- Return to the Valley of Clouds.
- Find two more pieces of the Bellows highlighted in red.
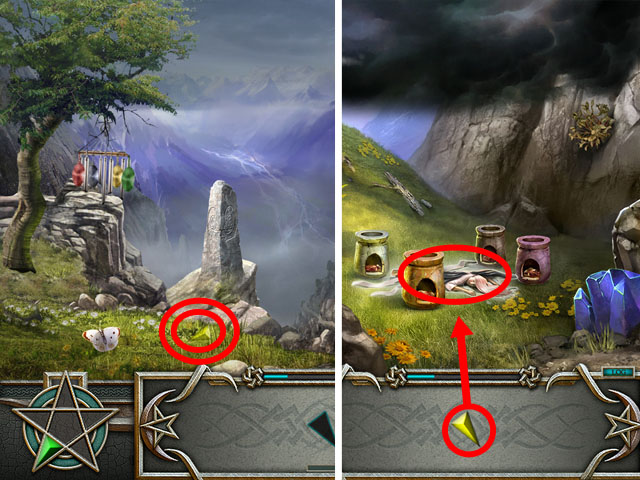
- Drag the BELLOWS on the burners in the middle.
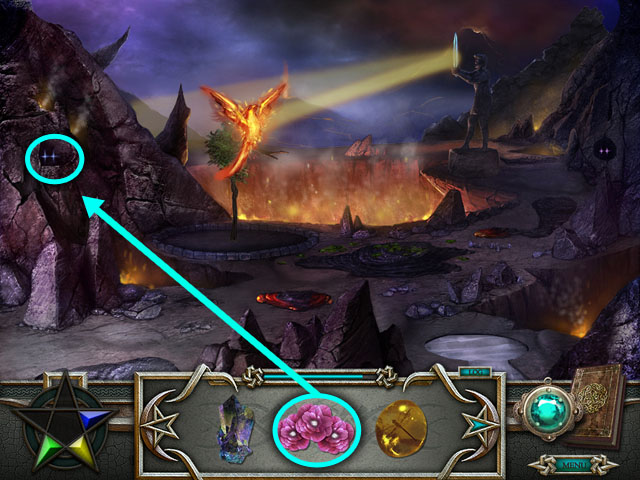
- Drag the green Magical stone from the left side of your inventory on the Wilted Jasmine Bush and the Sandalwood highlighted in green.
- Find the SANDALWOOD BRANCH and the JASMINE BLOOM highlighted in red.
- Return to the Rocky Outcropping.
- Drag the green Magical stone on the two trees in the both sides.
- You will have to wait for the pentagram on the left side to spin and animate before using it again.

- Find the WHITE AND PINK CHERRY BLOSSOMS and the AMBER RESIN highlighted in red.
- Return to the Valley of Clouds.

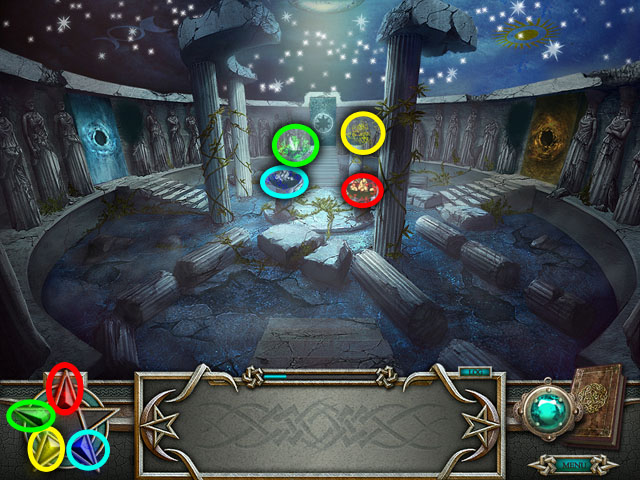
- Drag on the inventory items on the correct burner.
- The color of the inventory items and the burner are very similar.
- In the screenshots the correct pairs are circled in the same colors.
- Find five parts of the SYLPHS.
- Return to the Rocky Outcropping.
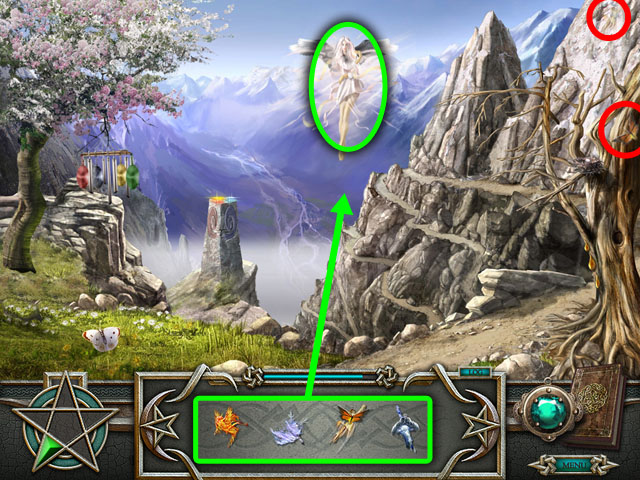
- Find two more parts of the SYLPHS highlighted in red.
- Drag the 4 SYLPHS to the White Lady in the middle.
- Rotate all of the tiles to connect MANA to the magic stone.
- In this puzzle, like the first puzzle you have to connect all of the pipes to eachother with no open ends.
- But now you have two different colors to choose from that you can select with the two buttons to the left.
- When you are in a certain color, any tile you click will turn into that color.
- The object is to connect the two dead-ends of the same color with blocks of that color.
- First click the green button and fill out the entire grid with the green tiles.
- Next click the yellow button and start from the bottom yellow dead end and make every tile between it and the other dead end yellow.
- See the screenshot for one possible solution. The tiles may be farther from each other than this in your play through.
Chapter 3

- Click on the “Deserted Island, South Pacific Ocean” in the book, or the “Continue” button.
- Click on the magical stone in the bottom left corner. It should be pulsing and say “Needs Charging”.
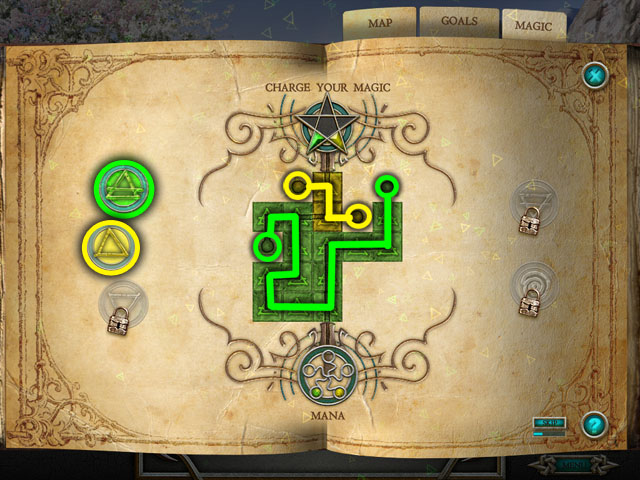
- Rotate all of the tiles to connect mana to the magical stone in the upper side.
- When you are in a certain color, any tile you click will turn into that color.
- The object is to connect the two dead-ends of the same color with blocks of that color.
- First click the green button and fill out the entire grid with the green tiles.
- Next click the yellow button and start from the bottom yellow dead end and make every tile between it and the other dead end yellow.
- See the screenshot for one possible solution. The tiles may be farther from each other than this in your play through.
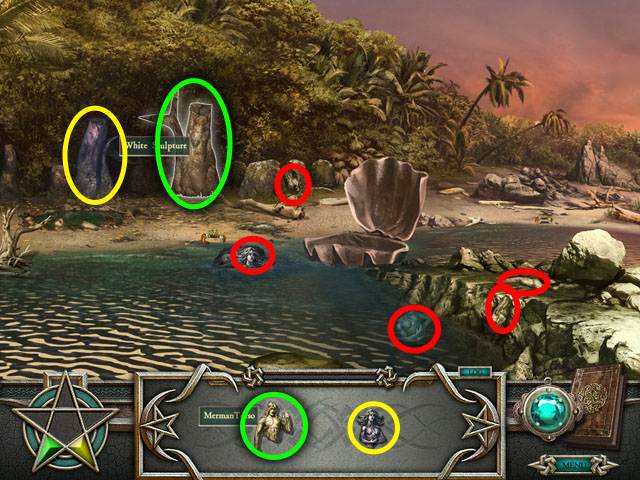
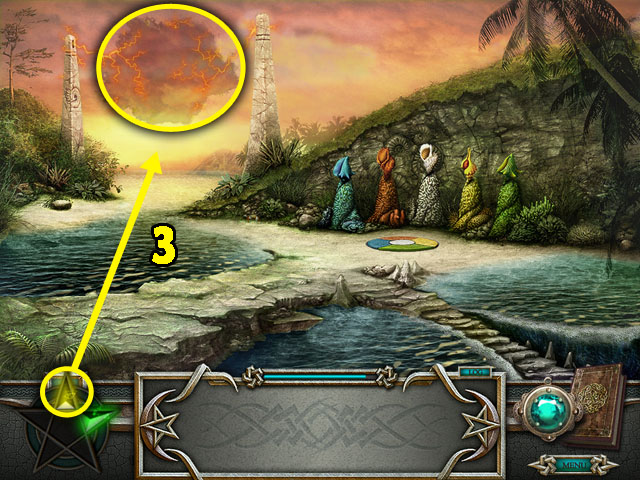
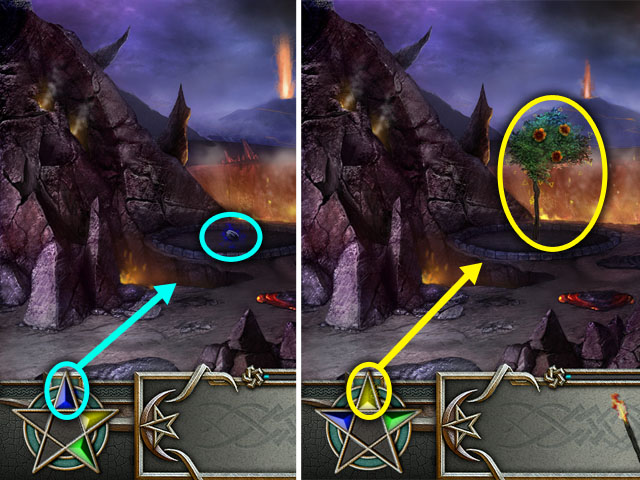
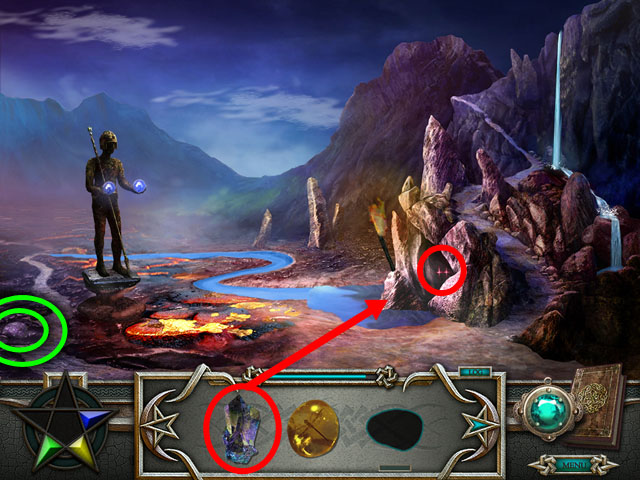
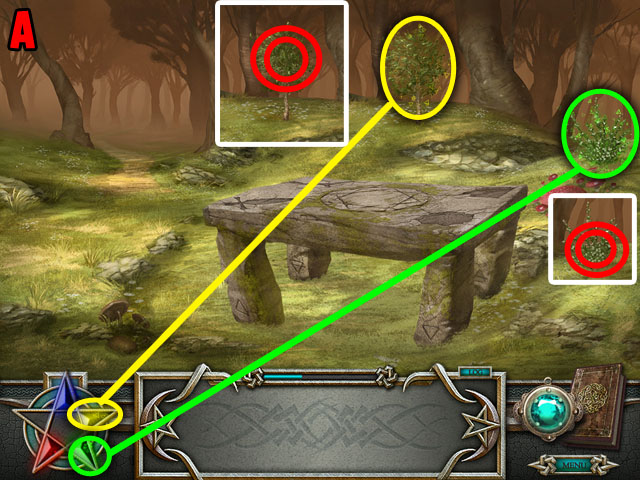
- First use your green magic on the stone circled in green, then use your yellow magic on the leaves circled in yellow.
- Find pieces of the Merman Torso and the Mermaid Torso highlighted in red.
- Place the MERMAN TORSO on the White Sculpture on the right.
- Place the MERMAID TORSO on the Blue Sculpture on the left.
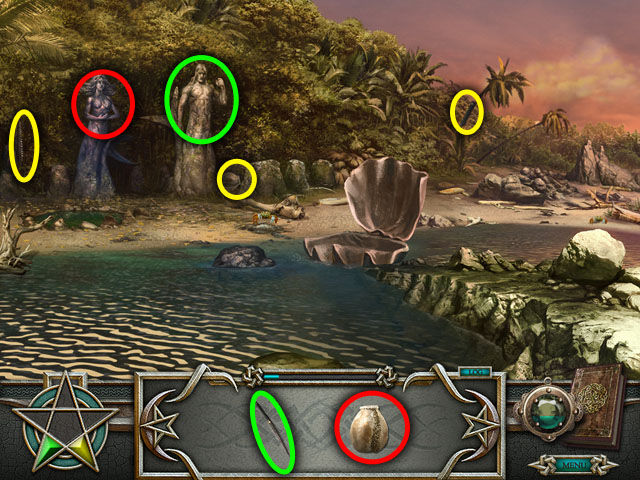
- Find pieces of the Harpoon and the Gourd highlighted in yellow.
- Place the HARPOON on the Merman highlighted in green.
- Place the GOURD on the Mermaid highlighted in red.
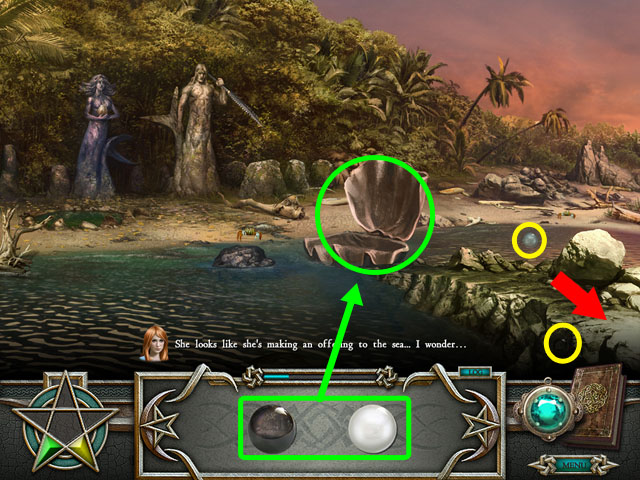
- Find the BLACK PEARL and the WHITE PEARL highlighted in yellow.
- Place them on the Giant Clam.
- Click on the Entrance to the Pool in the bottom right corner.
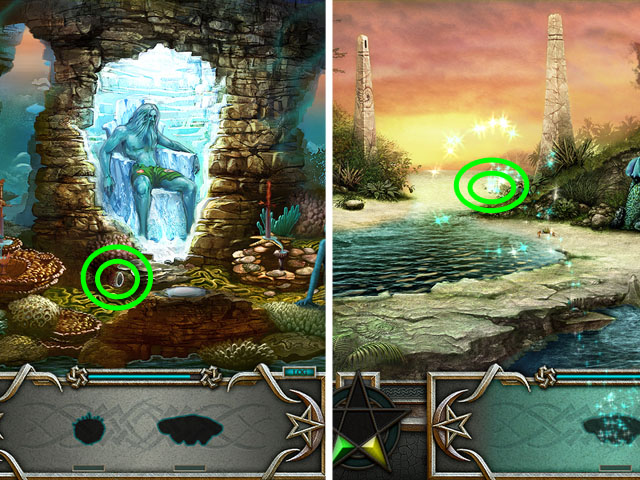
- Use the green magical stone to fix the broken Coral Pedestal highlighted in green.
- Click on the Entrance to the Beach in the bottom left corner.
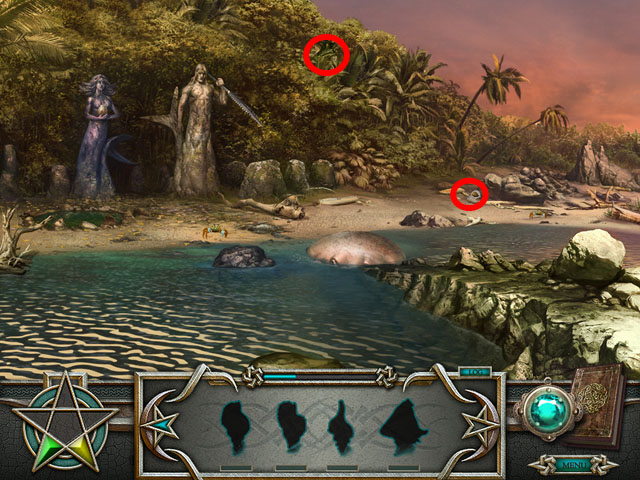
- Find the two musical Shells highlighted in red.
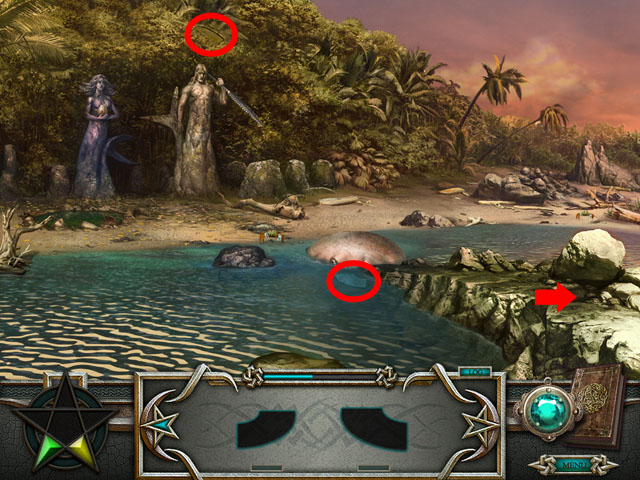
- Return to the Pool.
- Find 3 Musical Shells highlighted in red.
- Place 5 MUSICAL SHELLS on the Coral Pedestals. The color of shells and Coral Pedestals match up in the game. Also they have been circled with the same color in the screenshot.
- Return to the Beach.
- Find the Blue Stone and the Green Stone highlighted in red.
- Return to the Pool.
- Click on the Coral Pedestals to zoom in.
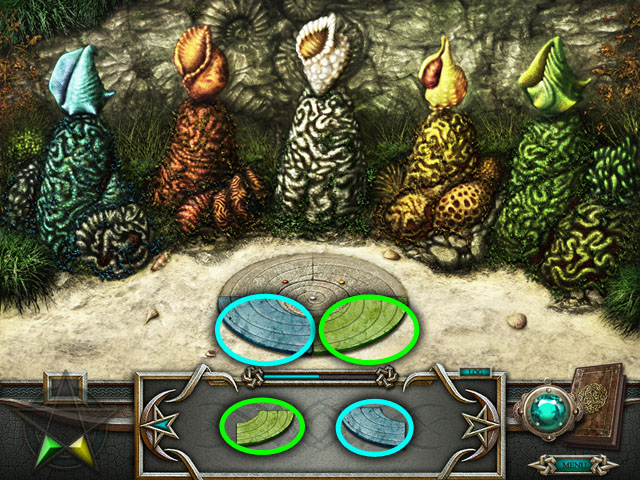
- Place the BLUE STONE in the bottom left highlighted in light blue.
- Place the GREEN STONE in the bottom right highlighted in green.
- Return to the Pool by clicking on the bottom side.
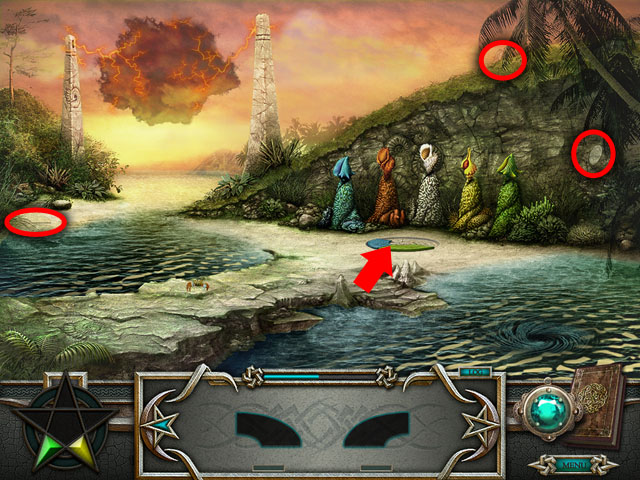
- Find the stones highlighted in red.
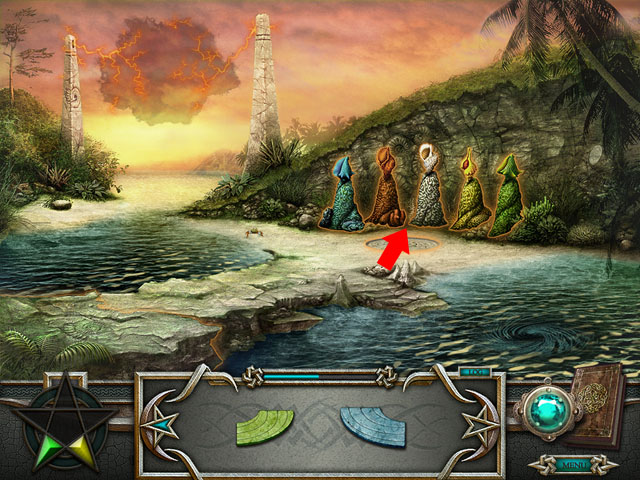
- Return to the Five Horns.
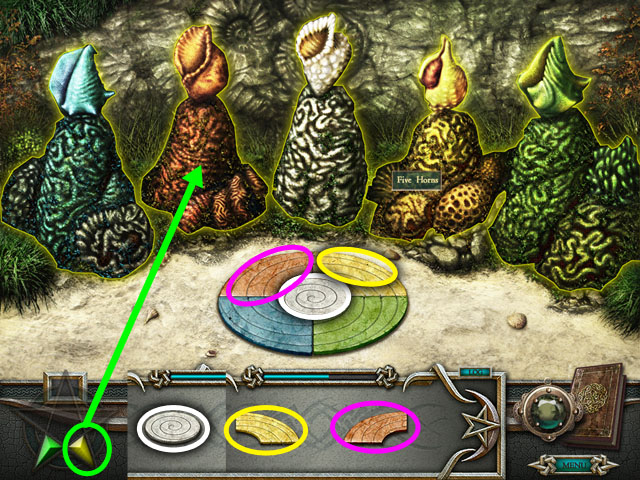
- Place the RED STONE in the upper left.
- Place the YELLOW STONE in the upper right.
- Place the WHITE STONE in the middle.
- Use the Magical Yellow Stone on the 5 shell horns.
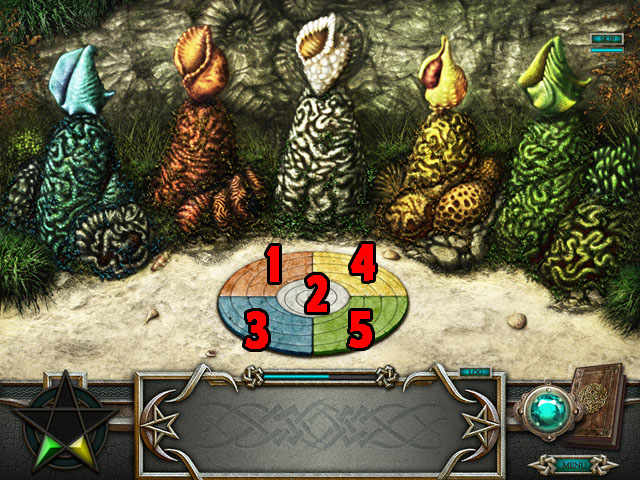
- The Musical Horns will lights up in a specific order.
- Click on the colored stone that matches the color of the musical horns.
- Each correct answer you will get one more horn to play. After you have gotten the correct order of all 5 horns, you will have won the mini-game.
- See the screenshot for an example solution.
- Enter the Grotto from the entrance in the bottom right corner of the previous scene.
- There will be an arrow pointing to where you need to click.
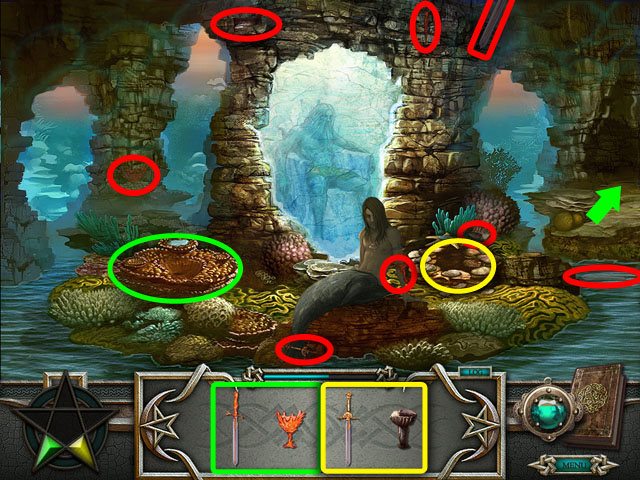
- Find pieces of the Coral Sword, Coral Chalice, Shell Swords and Shell Chalice highlighted in red.
- Place the CORAL SWORD and the CORAL CHALICE on the Coral Altar highlighted in green.
- Place the SHELL SWORD and the SHELL CHALICE on the Shell Altar highlighted in yellow.
- Return to the Pool from the entrance on the right side.
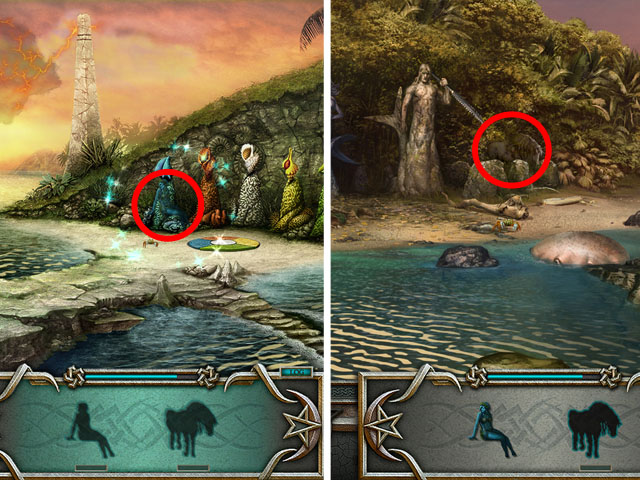
- Find the Nereid highlighted in red.
- Return to the Beach.
- Find the Kelpie highlighted in red.
- Return to the Grotto.
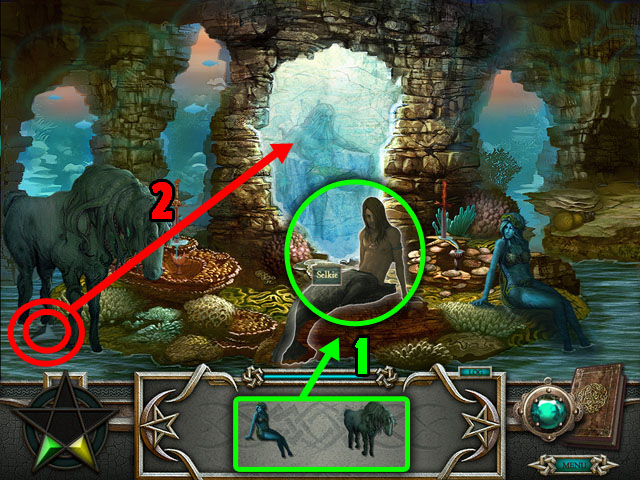
- Place the NEREID and the KELPIE on the Selkie in the middle highlighted in green (1).
- Find the Magical blue stone and place it on the frozen Throne in the middle (2).
- Return to the Pool.
- Use the Magical Yellow Stone on the cloud (3) to start a rain storm.
- Return to the Beach.

- Use the Magical Green Stone on the water hole (4).
- Return to the Grotto.
- Find the CORAL CAULDRON highlighted in green.
- Return to the Pool.
- Find the SHELL BASIN highlighted in green.
- Return to the Beach.
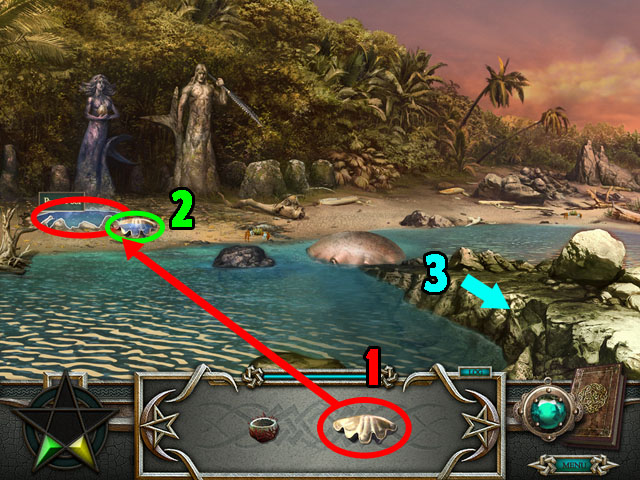
- Place the SHELL BASIN on the Pure Pool (1).
- Collect the FILLED BASIN (2) which will appear afterwards.
- Return to the Grotto (3).
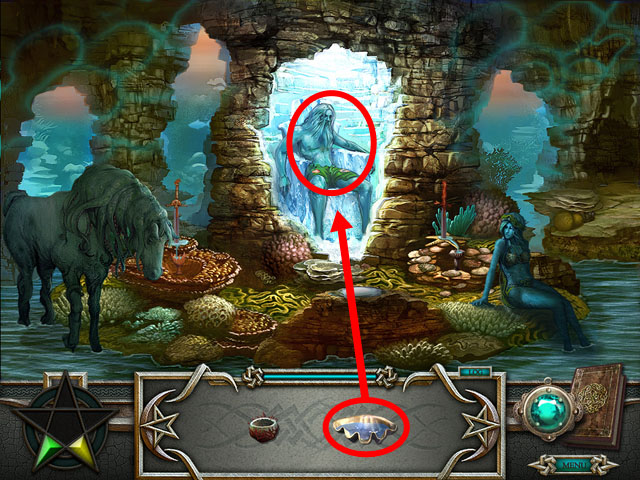
- Place the FILLED BASIN on the Parched Lord in the middle.
- Return to the Pool.
- Place the CORAL CAULDRON on the Raincloud highlighted in red.
- Collect the FILLED CAULDRON highlighted in green after it appears.
- Return to the Grotto.
- Place the FILLED CAULDRON on the Parched Lord highlighted in red in the middle.
- Use the Magical Yellow Stone and then the Magical Green Stone on the Parched Lord.
- It does not matter what order you use the magic spells.

- Rotate all of the tiles to connect mana to the magical stone in the upper side.
- In this puzzle, like the first puzzle you have to connect all of the pipes to each other with no open ends.
- But now you have three different colors to choose from that you can select with the three buttons to the left.
- When you are in a certain color, any tile that you click will turn into that color.
- The object is to connect the two dead-ends of the same color with blocks of that color.
- First find the shortest and easiest path and use the correct color to turn all of the pipes in the right direction. Repeat this with the next two longer paths until you have finished the board like in the previous puzzles.
- If you make a mistake you can always go back and use another color to erase it.
- The pipes can only be rotated one way correctly, so rotate them all in the correct position first without worrying about color if you are having trouble.
- See the screenshot for one possible solution. The tiles may be farther from each other than this in your play through.
Chapter 4
- Click on the “Heart of the Volcano, Ring of Fire, North Pacific” in the book, or click “Continue”.
- Click on the star in the bottom left corner.
- Rotate all of the tiles to connect mana to the magical stone in the upper side.
- In this puzzle, like the first puzzle you have to connect all of the pipes to each other with no open ends.
- But now you have three different colors to choose from that you can select with the three buttons to the left.
- When you are in a certain color, any tile that you click will turn into that color.
- The object is to connect the two dead-ends of the same color with blocks of that color.
- First find the shortest and easiest path and use the correct color to turn all of the pipes in the right direction. Repeat this with the next two longer paths until you have finished the board like in the previous puzzles.
- If you make a mistake you can always go back and use another color to erase it.
- The pipes can only be rotated one way correctly, so rotate them all in the correct position first without worrying about color if you are having trouble.
- See the screenshot for one possible solution. The tiles may be farther from each other than this in your play through.

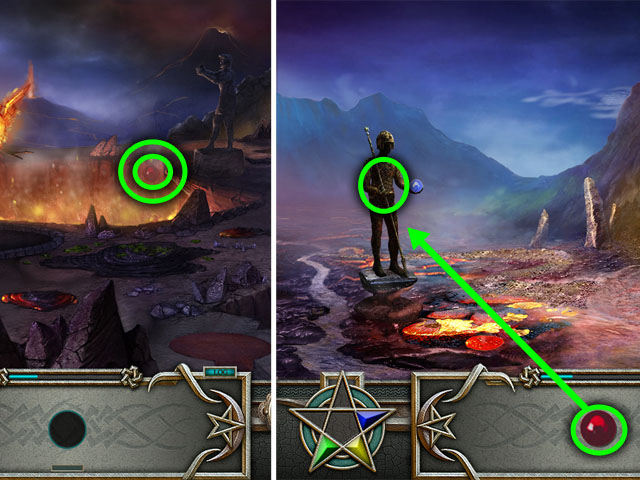
- Drag the Magical Yellow Stone to the Sulfur Cloud highlighted in yellow.
- This will clear the screen of the green clouds.
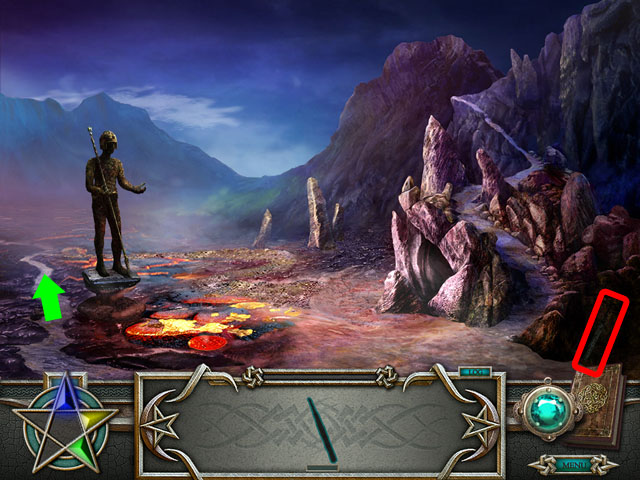
- Find the BRANCH highlighted in red in the bottom right corner.
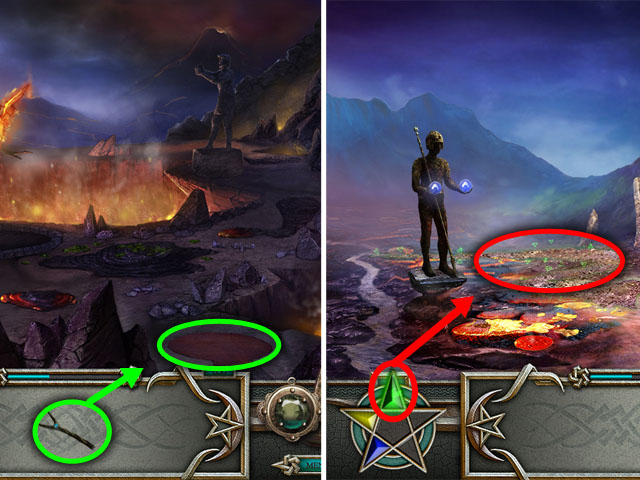
- Move to the Lava Lake by the path in the bottom left corner.
- Drag the BRANCH on the Firepit.
- Collect the TORCH.
- Return to the Pumice Plains by clicking the bottom side of the screen.
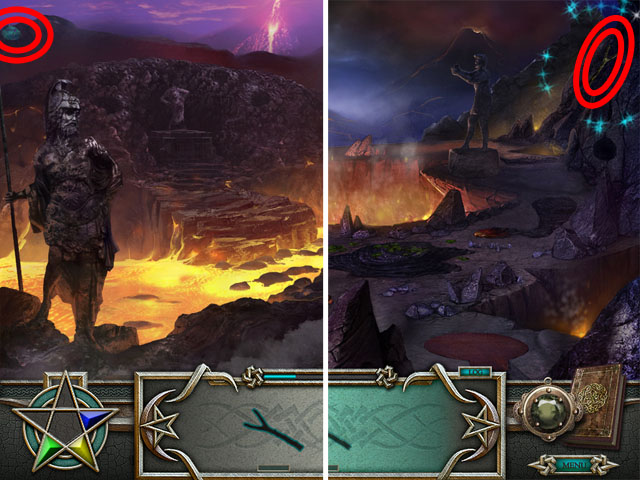
- Move to the Brimstone Ridge by the path on the right side.
- Use the Magical Blue Stone in the bottom left corner on the Obsidian Seed highlighted in light blue to fill the basin with water and grow the tree.
- Use the Magical Yellow Stone in the bottom left corner on the Blazing Blossoms highlighted in yellow to bring out the bird.
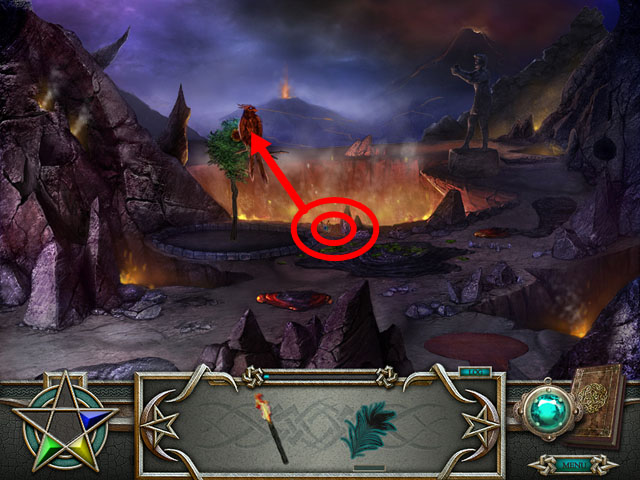
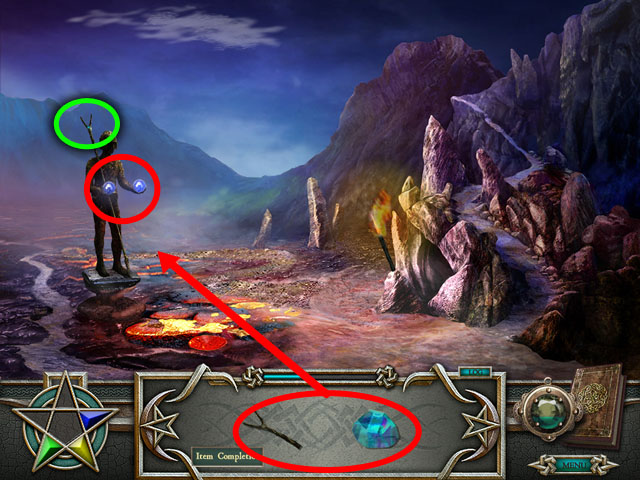
- Collect the FIERY PLUME highlighted in red.
- Drag the FIERY PLUME onto the Firebird.
- Return to the Pumice Plains by clicking the bottom side of the screen.
- Find the GOLDEN CIRCLE highlighted in red.
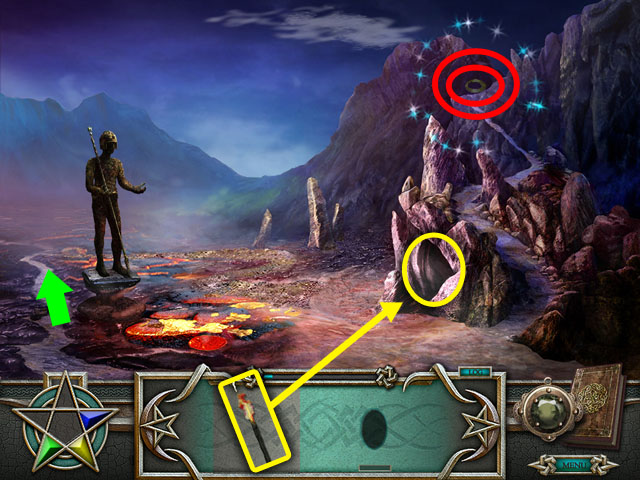
- Drag the TORCH on the cave highlighted in yellow.
- Return to the Lave Lake by clicking the path on the left side.
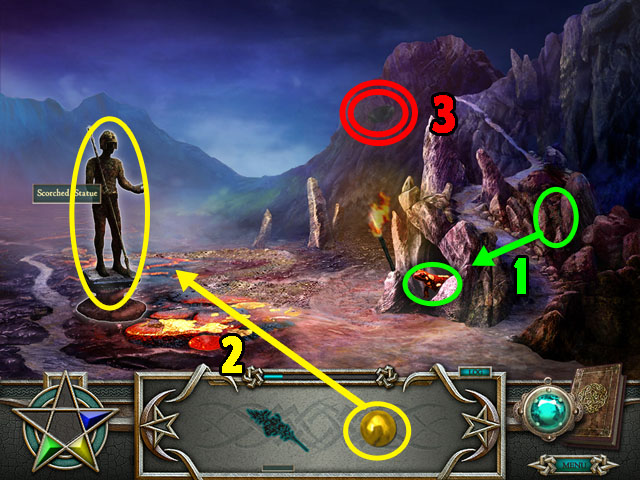
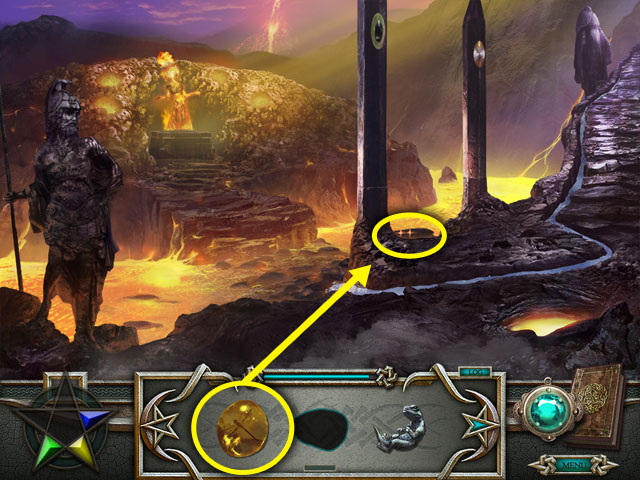
- Find the SILVER CIRCLE (1).
- Place the GOLDEN AND SILVER CIRCLE on the Metallic Pillar (2).
- Find the GOLDEN SPHERE (3).
- Return to the Pumice Plains (4).
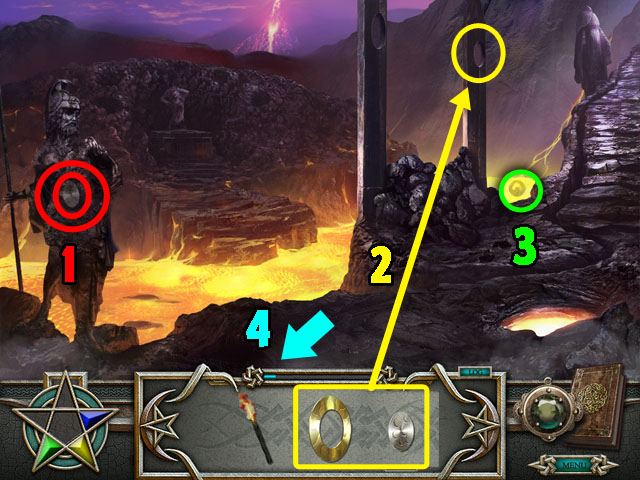
- Find the SWEET BERRIES and drag it on the Salamander (1).
- Place the GOLDEN SPHERE on the Scorched Statue (2).
- Collect the OBSIDIAN CIRCLE (3).
- Return to the Brimstone Ridge.
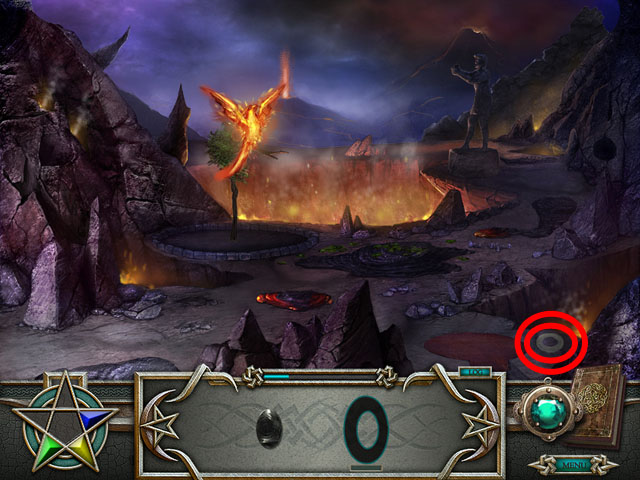
- Find the MOONSTONE CIRCLE highlighted in red.
- Return to the Lave Lake.
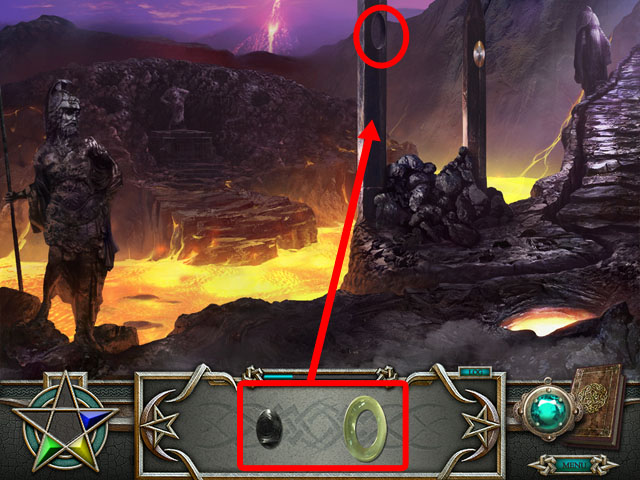
- Place the OBSIDIAN CIRCLE and the MOONSTONE CIRCLE on the Obsidian Pillar.
- Return to the Brimstone Ridge.
- Find the CRIMSON SPHERE highlighted in green.
- Return to the Pumice Plains.
- Place the CRIMSON SPHERE on the Scorched Statue.
- Return to the Lava Lake.
- Find the DOWSING CRYSTAL circled in red about the statue.
- Return to the Brimstone Ridge.
- Find the DOWSING ROD at the top right side of the screen.
- Return to the Pumice Plains.
- Place the DOWSING CRYSTAL and the DOWSING ROD on the Scorched Statue.
- Collect the CRYSTAL ROD highlighted in green.
- Return to the Brimstone Ridge.
- Place the CRYSTAL ROD on the Dark Soil highlighted in green to find water.
- Return to the Pumice Plains.
- Use the Magical Green Stone to the river highlighted in red to turn it into water.
- Return to the Brimstone Ridge.
- Collect the OBSIDIAN BOWL (1).
- Fill the BOWL with water (2) in the previous scene.
- Collect the FILLED OBSIDIAN BOWL and place it on the Molten Metal (3).
- Return to the Lave Lake.
- Collect the PUMICE STONE (4).
- Return to the Pumice Plains.
- Place the PUMICE STONE on the Metal Disk (5) to shine it up.
- Collect the MIRROR (6).
- Return to the Brimstone Ridge.
- Place the MIRROR on the Guardian Statue (7).
- Collect the WAND (8).
- Return to the Pumice Plains.
- Collect another WAND (9).
- Return to the Lava Lake.
- Collect the last Wand (10).
- Enter the Altar from the path in the middle.
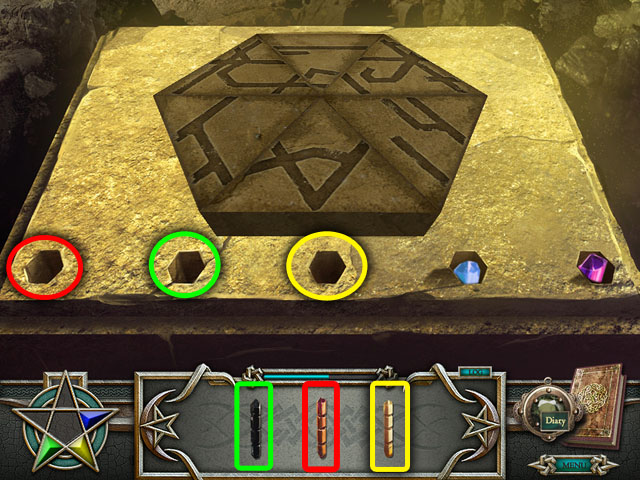
- Place the 3 WANDS into the hole.
- The wands in the screenshot are circled with the same color as the hole that they go into.
- After placing all of the wands you can start the next puzzle.
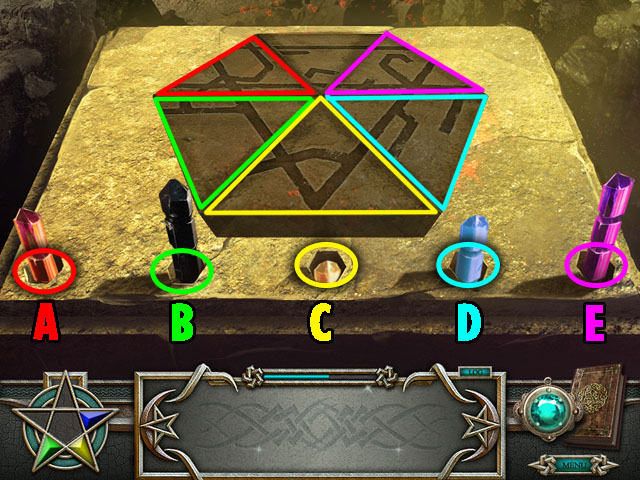
- The goal of this puzzle is the line up all of the lines on the triangles that make up the hexagon.
- Each of the wands when clicked moves a different hexagon, rotating it clockwise.
- The wands and the hexagons they move are circled in the same color.
- From the starting position, with all wands all the way down, this is the correct sequence.
- Click A two times to turn the red triangle twice.
- Click B three times.
- You don’t need click on wand C.
- Click D two times.
- Click E three times.
- The lines on tiles in the upper side will then all connect together and show an upside down letter A.
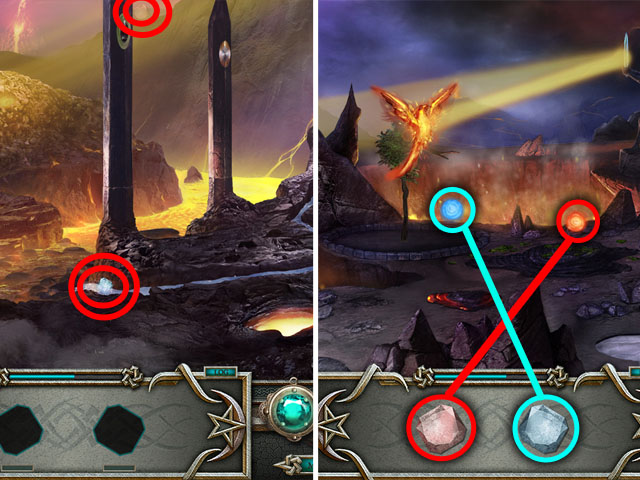
- Find the PEARL STONE and the HOLLOW STONE highlighted in red.
- Return to the Brimstone Ridge.
- Drag the 2 STONES on the floating balls of the same color.
- Collect the 2 STONES from the ground.
- Return to the Lava Lake.
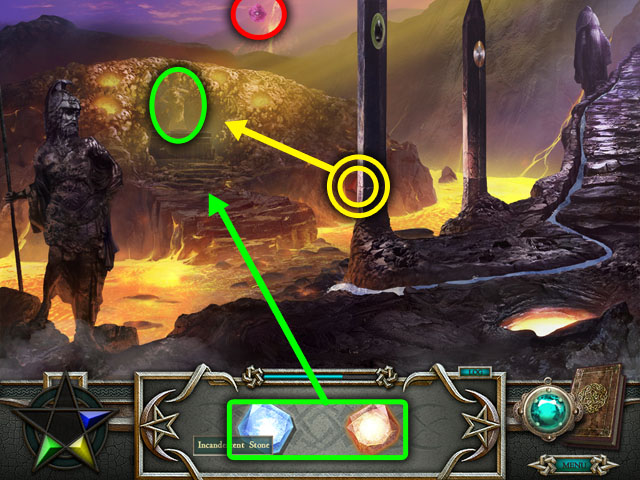
- Place the INCANDESCENT STONE and the LUMINOUS STONE on the Dark Lady highlighted in green.
- Find the RED FIRE STONE highlighted in yellow.
- Place the RED FIRE STONE on the Dark Lady.
- Find one FRAGRANT BLOOM highlighted in red.
- Return to the Pumice Plains.
- Find the PRETTY ROCK and the FRAGRANT BLOOM highlighted in red.
- Return to the Brimstone Ridge.
- Find the FRAGRANT BLOOM and the AMBER DRAGONFLY highlighted in red.
- Place the FRAGRANT BLOOMS on the blue eyes.
- Collect the BLUE DRAGONLING from the hole.
- Return to the Lava Lake.
- Place the AMBER DRAGONFLY on the Orange Eyes.
- Collect the ORANGE DRAGONLING from the hole.
- Return to the Pumice Plains.
- Place the PRETTY ROCK on the Red Eyes.
- Collect the RED DRAGONLING from the hole.
- Collect the STAR STONE highlighted in green.
- Return to the Brimstone Ridge.
- Place the STAR STONE on the Purple Eyes.
- Collect the PURPLE DRAGONLING from the hole.
- Return to the Lava Lake.
- Place all of the DRAGONLINGS in the Fiery Nest highlighted in red.
- Rotate all of the tiles to connect mana to the magical stone in the upper side.
- In this puzzle, like the first puzzle you have to connect all of the pipes to each other with no open ends.
- But now you have four different colors to choose from that you can select with the four buttons on the left and right.
- When you are in a certain color, any tile that you click will turn into that color.
- The object is to connect the two dead-ends of the same color with blocks of that color.
- First find the shortest and easiest path and use the correct color to turn all of the pipes in the right direction. Repeat this with the next three longer paths until you have finished the board like in the previous puzzles.
- If you make a mistake you can always go back and use another color to erase it.
- The pipes can only be rotated one way correctly, so rotate them all in the correct position first without worrying about color if you are having trouble.
- See the screenshot for one possible solution. The tiles may be farther from each other than this in your play through.
Chapter 5

- Click on the “Hidden Grove, Black Forest, Germany” in the book.
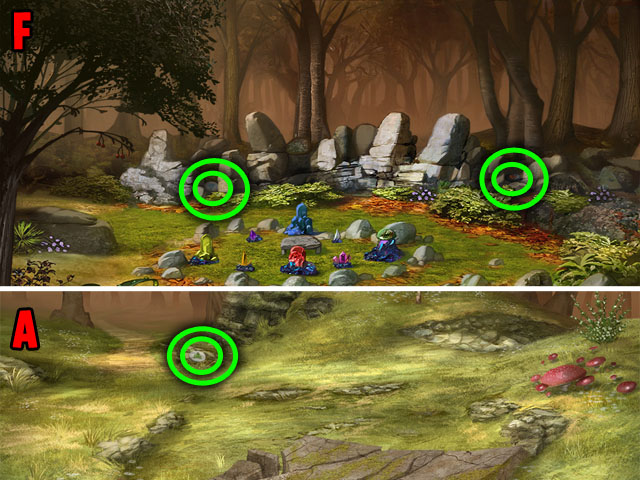
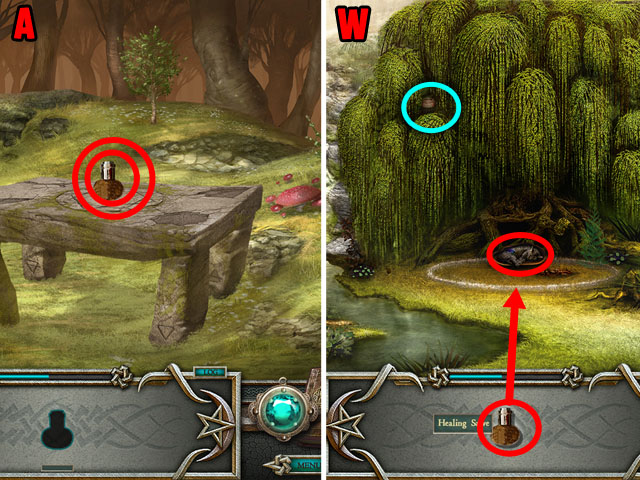
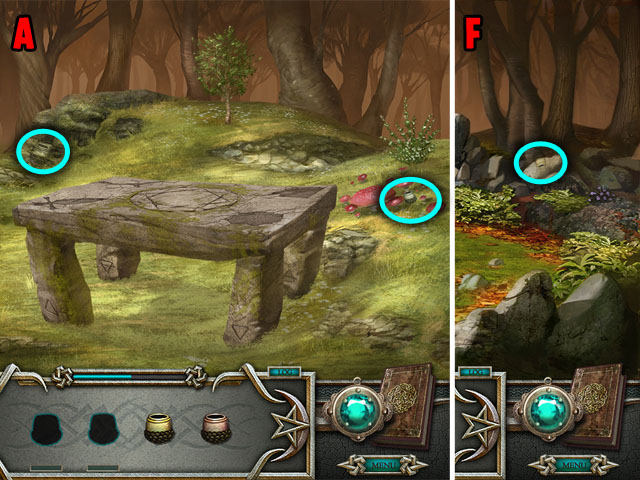
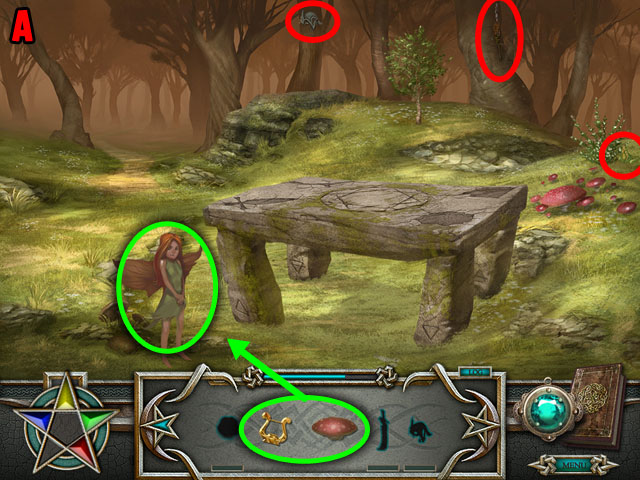
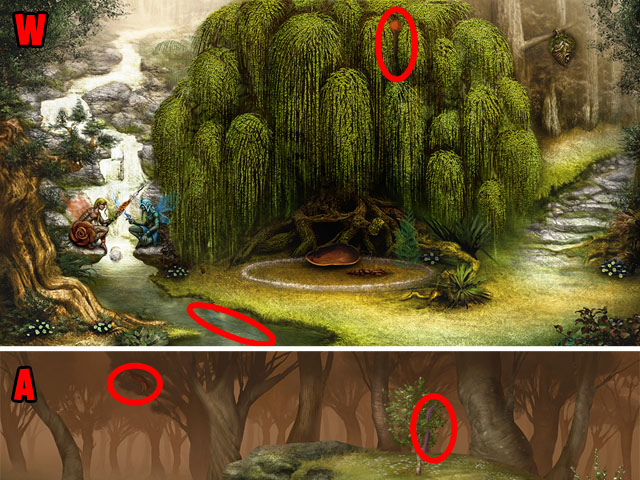
- Find the ROCK SALT and the CEDAR BRANCH highlighted in red at the Fallen Altar (A).
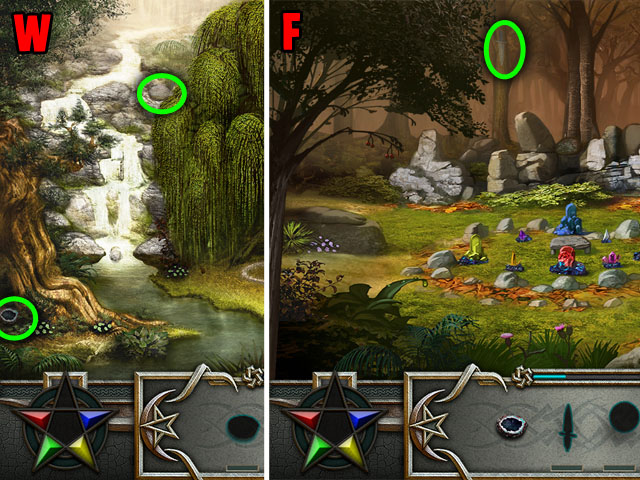
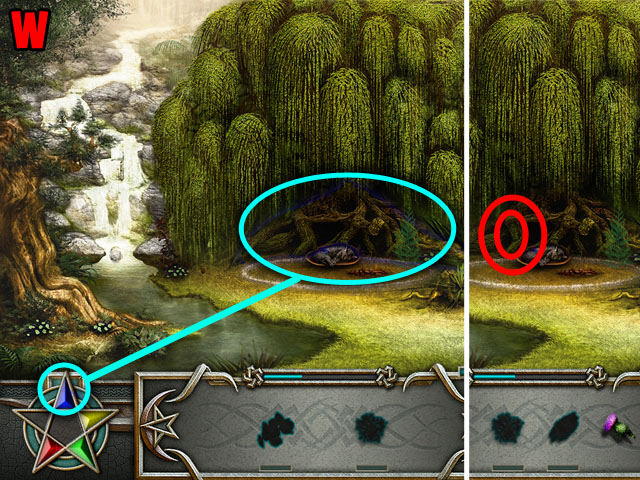
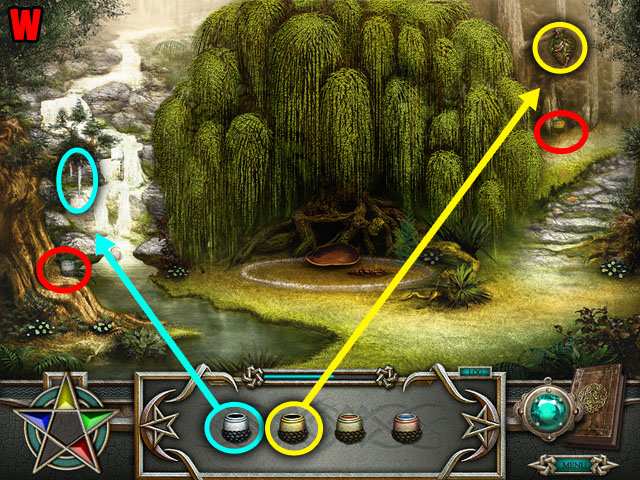
- Find the HAWK FEATHER highlighted in red at the Waterfall (W).
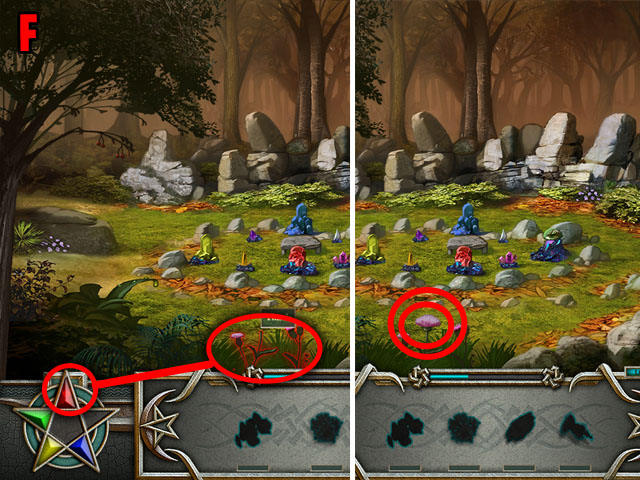
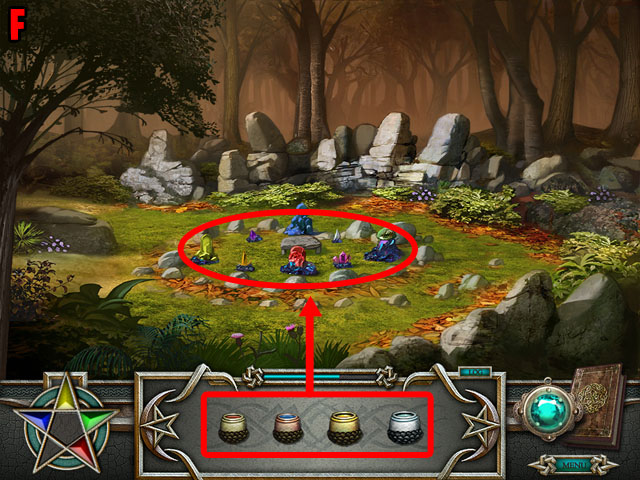
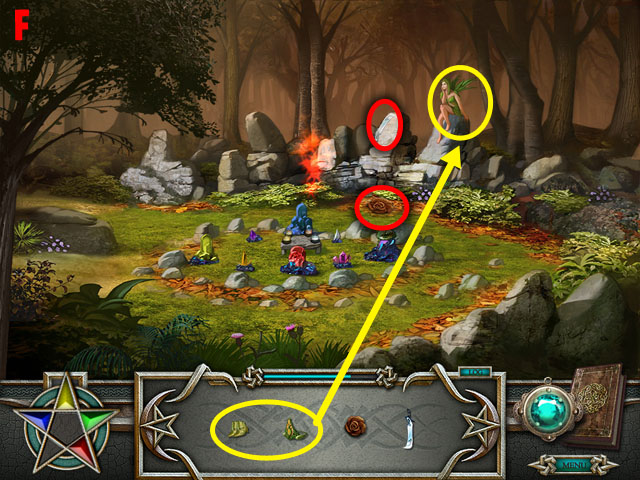
- Find the RIVER SHELL highlighted in red at the Fairy Circle (F).
- Return to the Waterfall.

- Place all of the inventory items on the Shady Spot in the middle.
- Collect the FLOWER highlighted in green.
- Return to the Fallen Altar.
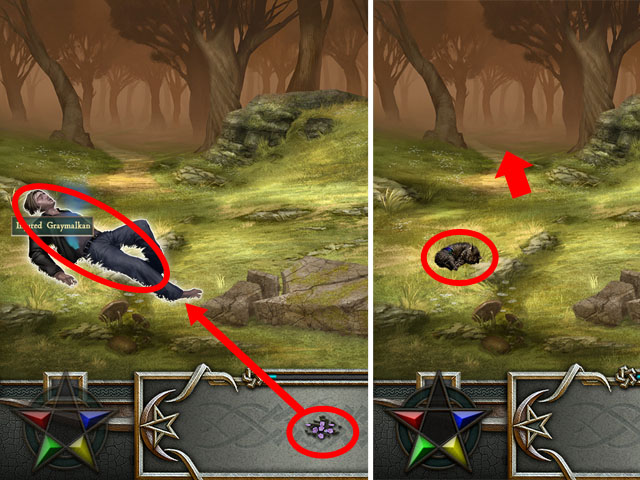
- Place the FLOWER on the Injured Graymalkan.
- Collect the GRAYMALKAN.
- Return to the Waterfall.

- Place the GRAYMALKAN on the Safe Spot.
- Collect the GRAY STONE highlighted in green.
- Return to the Fairy Circle.
- Collect two STONES highlighted in green.
- Return to the Fallen Altar.
- Collect the WHITE STONE highlighted in green.
- Place all of the STONES on the Riverstone in the middle of the scene.
- Collect the ASHWOOD STICK highlighted in green.
- Return to the Waterfall.
- Collect the HOLLOW GEODE and the ROUND STONE highlighted in green.
- Return to the Fairy Circle.
- Collect the OLD BLADE highlighted in green.
- Return to the Fallen Altar.
- Enter the Ritual Altar (R).
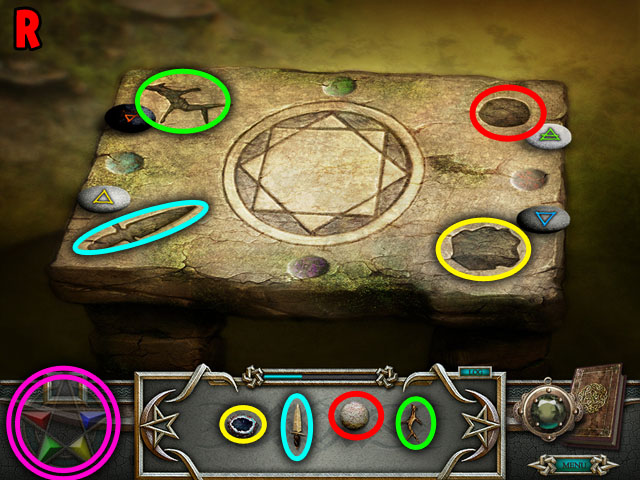
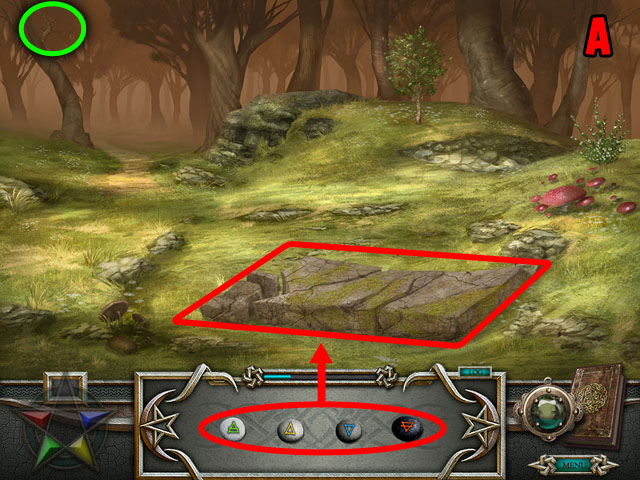
- Place all of the inventory items on the table in the outline that fits their shape.
- The color that circles the items in the inventory and spots that they go in are matched.
- Click on the star highlighted in purple in the bottom left corner to regenerate your mana.
- Rotate all of the tiles to connect mana to the magical stone in the upper side.
- In this puzzle, like the first puzzle you have to connect all of the pipes to each other with no open ends.
- But now you have four different colors to choose from that you can select with the four buttons on the left and right.
- When you are in a certain color, any tile that you click will turn into that color.
- The object is to connect the two dead-ends of the same color with blocks of that color.
- First find the shortest and easiest path and use the correct color to turn all of the pipes in the right direction. Repeat this with the next three longer paths until you have finished the board like in the previous puzzles.
- If you make a mistake you can always go back and use another color to erase it.
- The pipes can only be rotated one way correctly, so rotate them all in the correct position first without worrying about color if you are having trouble.
- See the screenshot for one possible solution. The tiles may be farther from each other than this in your play through.
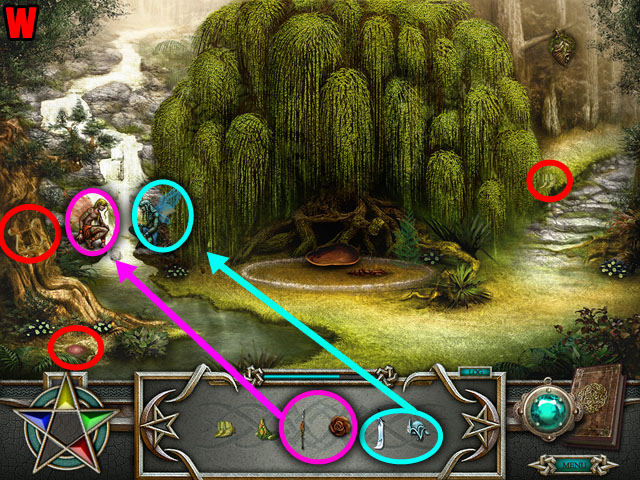
- Drag the Magical Yellow stone and then the Magical Green Stone on the two trees that are sparkling yellow and green.
- Collect the HOREHOUND BLOSSOMS and the EUCALYPTUS LEAVES highlighted in red.
- Return to the Waterfall.
- Drag the Magical Blue Stone on the White Willow in the middle.
- Collect the WHITE WILLOW BARK highlighted in red.
- Return to the Fairy Circle.
- Drag the Magical Red Stone on the Thistle.
- Collect the THISTLE.
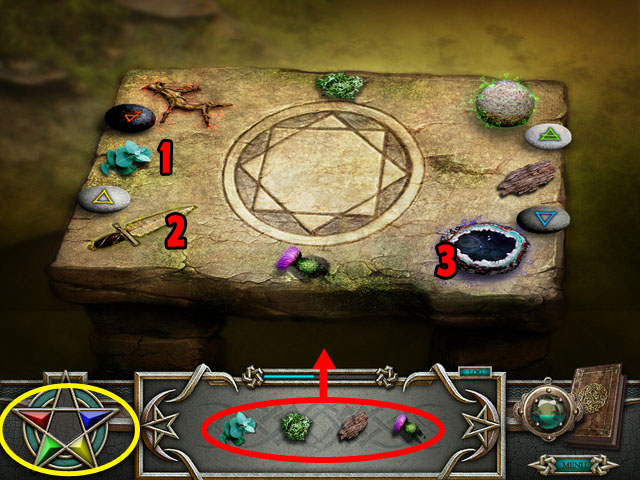
- Place all of the inventory items that you just collected on the table.
- They will all automatically go to the correct spot.
- Click on the magic star highlighted in yellow.
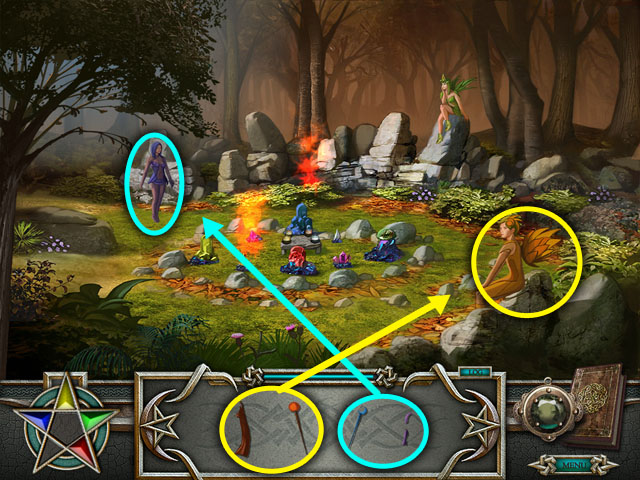
- Drag the Magical Yellow Stone on the Air Blade in the bottom left.
- Drag the Magical Blue Stone on the Chalice in the bottom right.
- Drag the Magical Red Stone on the Fire Wand in the upper left.
- Drag the Magical Green Stone on the Mortar in the upper right.
- You will then need to match the pattern that plays on the star in the middle.
- Each point of the star is pointing at a different object on the table.
- Click the objects on the table that the star points to in the same order.
- The first solution will be 3 items long.
- The number in the screenshot is sample solution, your play through will be randomized.
- The next solution is 3 items long and the last two solutions are 4 items long.
- Collect the HEALING SALVE on the table.
- Return to the Waterfall.
- Drag the SALVE on the Injured Graymalkan.
- Collect the ACORN highlighted in light blue.
- Return to the Fallen Altar.
- Collect two ACORNS highlighted in light blue.
- Return to the Fairy Circle.
- Collect the ACORN highlighted in light blue.
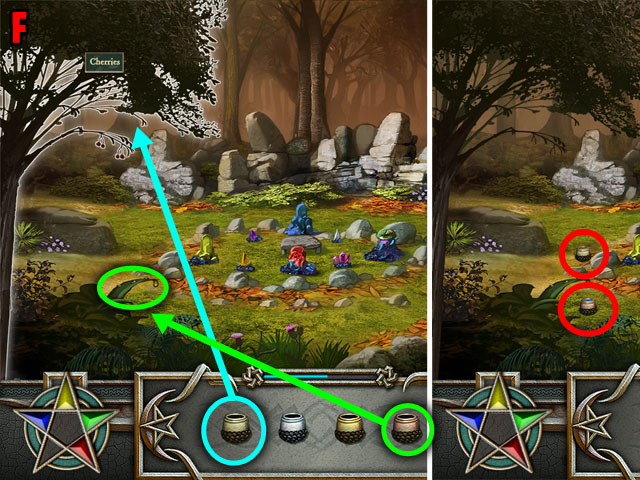
- Place the PALE ACORN on the Cherry tree highlighted in light blue.
- Place the COPPER ACORN on the Dewdrops highlighted in green.
- Collect the PALE ACORN CHERRY and the COPPER ACORN DEWDROPS highlighted in red.
- Return to the Waterfall.
- Place the SILVER ACORN on the First Frost highlighted in light blue.
- Place the GOLDEN ACORN on the Dripping Honey highlighted in yellow.
- Collect the GOLDEN ACORN HONEY and the SILVER ACORN FROST highlighted in red.
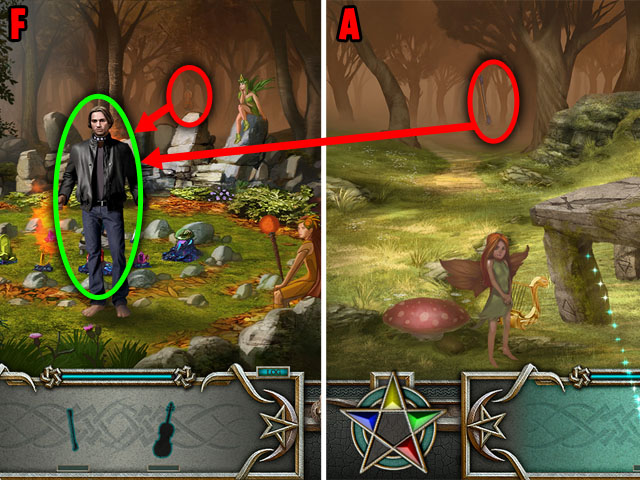
- Place all of the ACORNS in the Fairy Circle.
- Collect the three items highlighted in red.
- You can place the TOADSTOOL and the FAIRY HARP on the Fairy later.
- Return to the Waterfall.
- Collect the three items highlighted in red.
- You can place the ROSE SHIELD and the THORNY SPEAR on the left fairy Rosethorn after collecting them.
- You can place the FROSTY HELMET and the ICY SWORD on the right fairy Coldsnap highlighted in light blue after collecting them.
- Return to the Fairy Circle.
- Collect two items highlighted in red.
- Place the FLOWERING CROWN and the FAIRY SHOES on the Fairy highlighted in yellow.
- Return to the Waterfall.
- Collect two items highlighted in red.
- Return to the Fallen Altar.
- Collect two items highlighted in red.
- Return to the Fairy Circle.
- Place the COBWEB CLOAK and the IVORY STAFF on the fairy Moonglow highlighted in light blue.
- Place the SUNWING CLOAK and the SUN STAFF on the right fairy highlighted in yellow.
- Find the FIDDLE highlighted in red.
- Return to the Fallen Altar.
- Collect the BOW highlighted in red.
- Return to the Fairy Circle.
- Place the Fiddle and the Bow on Graymalkan in the middle.
- Rotate all of the tiles to connect mana to the magical stone in the upper side.
- In this puzzle, like the first puzzle you have to connect all of the pipes to each other with no open ends.
- But now you have four different colors to choose from that you can select with the four buttons on the left and right.
- When you are in a certain color, any tile that you click will turn into that color.
- The object is to connect the two dead-ends of the same color with blocks of that color.
- First find the shortest and easiest path and use the correct color to turn all of the pipes in the right direction. Repeat this with the next three longer paths until you have finished the board like in the previous puzzles.
- If you make a mistake you can always go back and use another color to erase it.
- The pipes can only be rotated one way correctly, so rotate them all in the correct position first without worrying about color if you are having trouble.
- See the screenshot for one possible solution. The tiles may be farther from each other than this in your play through.
Chapter 6
- Click on “The Last Temple” in the book.
- Find all the pieces of items highlighted in red.
- Place the GOLDEN SHARDS in the Golden Vessel highlighted in yellow.
- Place the SILVER FROST in the Silver Vessel highlighted in light blue.
- Place the CRYSTAL FRAGMENTS in the Crystal Vessel highlighted in purple.
- Place the INCENSE SATCHEL in the Glass Vessel highlighted in green.
- Click on the star in the bottom left corner to charge your mana.
- Rotate all of the tiles to connect mana to the magical stone in the upper side.
- In this puzzle, like the first puzzle you have to connect all of the pipes to each other with no open ends.
- But now you have four different colors to choose from that you can select with the four buttons on the left and right.
- When you are in a certain color, any tile that you click will turn into that color.
- The object is to connect the two dead-ends of the same color with blocks of that color.
- First find the shortest and easiest path and use the correct color to turn all of the pipes in the right direction. Repeat this with the next three longer paths until you have finished the board like in the previous puzzles.
- If you make a mistake you can always go back and use another color to erase it.
- The pipes can only be rotated one way correctly, so rotate them all in the correct position first without worrying about color if you are having trouble.
- See the screenshot for one possible solution. The tiles may be farther from each other than this in your play through.
- Use the Magical Stones on the Vessels.
- The colors of stones and the Vessels are matched in the screenshot.
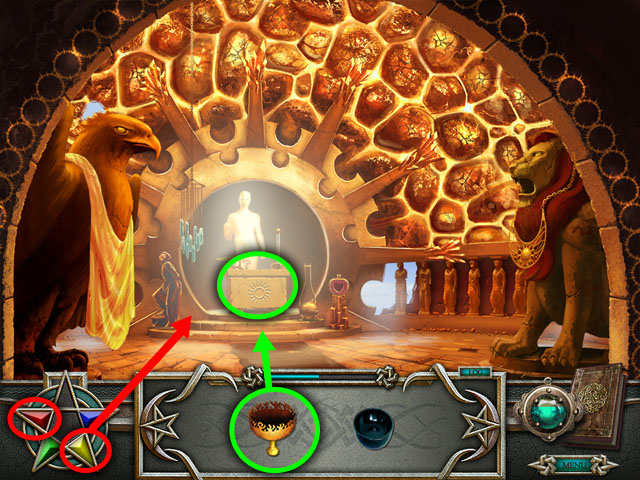
- Collect pieces of items highlighted in red.
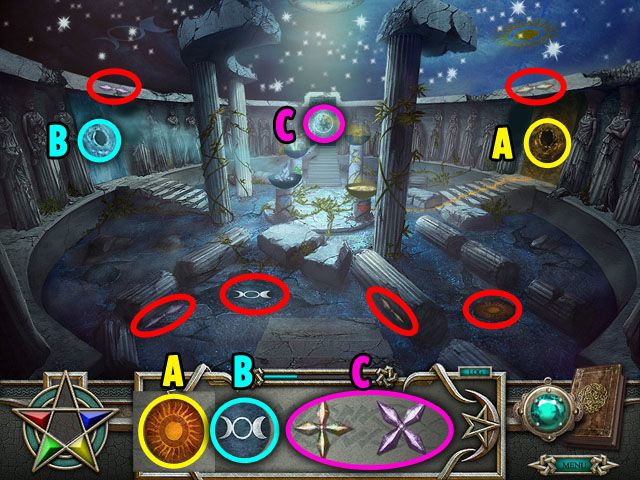
- Place the SUN sign on the Sun Portal (A).
- Place the MOON sign on the Moon Portal (B).
- Place the MISTY STAR and the CRYSTAL STAR on the Star Portal (C).
- Enter the Sun Portal (A).
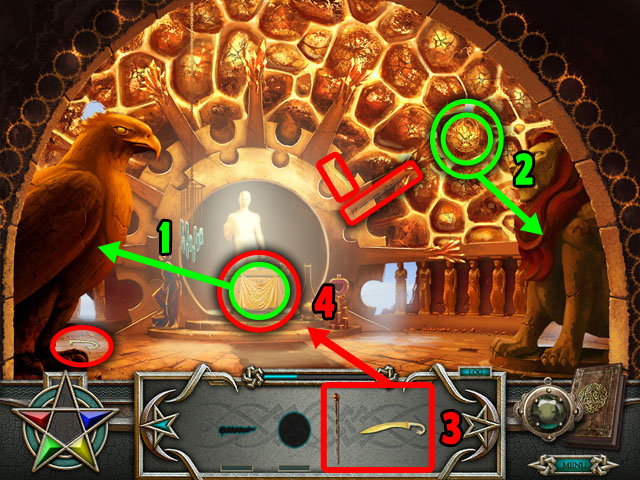
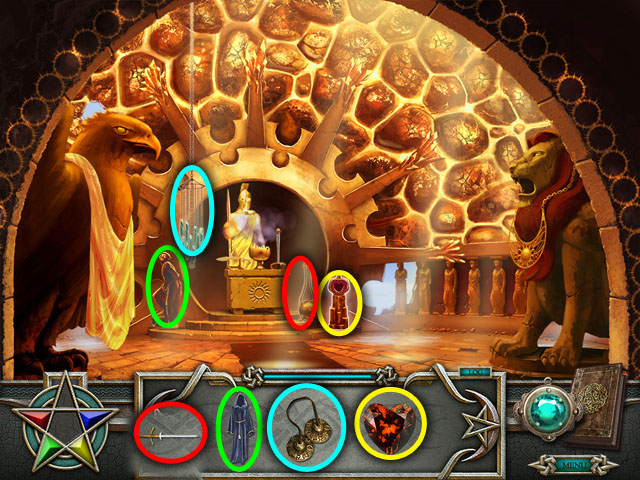
- Collect two items highlighted in green.
- Place the STAR WINDS on the Eagle Guardian (1).
- Place the SUN BLAZE on the Lion Guardian (2).
- Collect pieces of items highlighted in red (3).
- Place them on the Sun Altar in the middle (4).
- Exit the room.
- Enter the Star Portal.
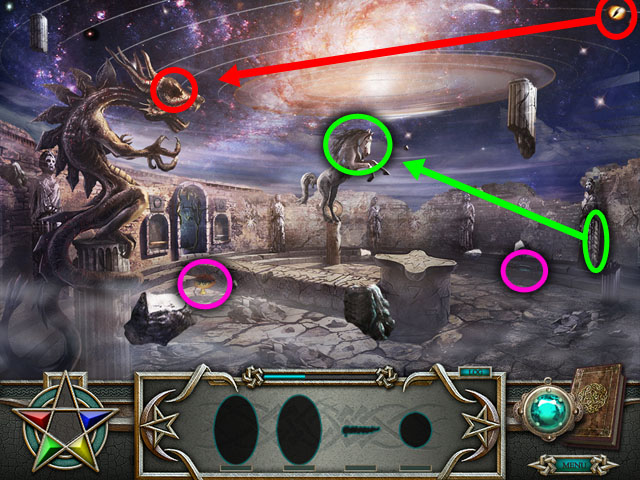
- Find and place the CRYSTAL HORN on the Unicorn Guardian highlighted in red.
- Find and place the STARRY EYES on the Dragon Guardian highlighted in green.
- Find other pieces of items circled in purple.
- Exit the room.
- Enter the Moon Portal.
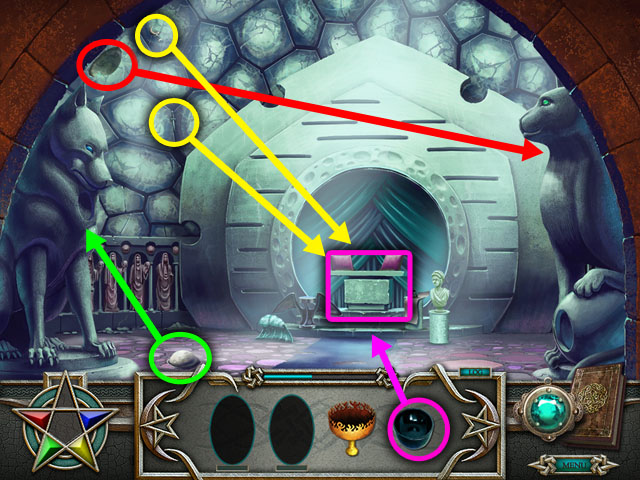
- Find the FULL MOON highlighted in green and place it on the Wolf Guardian in the left.
- Find the NEW MOON highlighted in red and place it on the Cat Guardian on the right.
- Find two items highlighted in yellow.
- Place the SCRYING BOWL on the Moon Altar highlighted in purple.
- Enter the Sun Portal.
- Place the BURNER on the Sun Altar highlighted in green.
- Use the Magical Yellow and Red Stone highlighted in red on the Burner.
- Enter the Moon Portal.
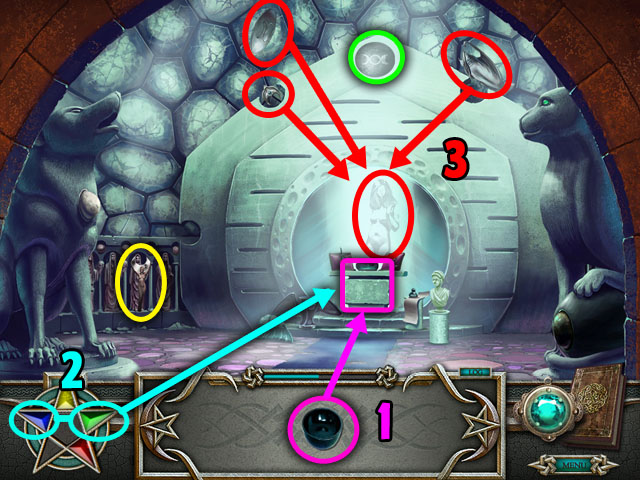
- Place the SCURRYING BOWL on the Moon Altar highlighted in purple (1).
- Use the Magical Green Stone and Magical Blue Stone on the Scurrying Bowl (2).
- Find three items highlighted in red (3).
- Place them on the Silver Lady in the middle.
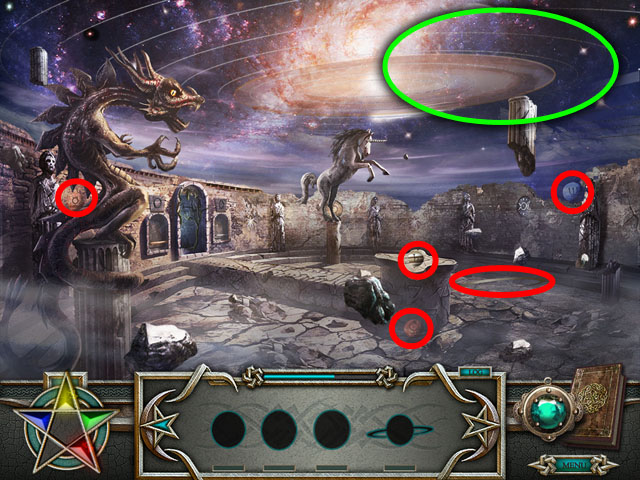
- Find the GLOWING MOON highlighted in green.
- Find the BLESSING OF THE MOON highlighted in yellow.
- Return to the Sky Dome.
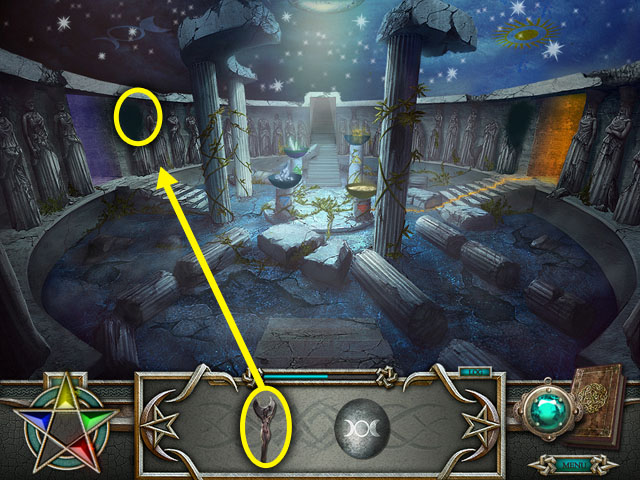
- Place the BLESSING OF THE MOON on the Shadowed Moon.
- Enter the Moon Portal.
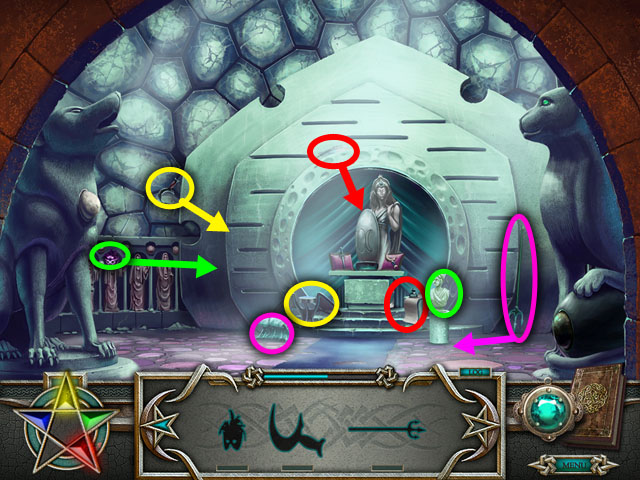
- Find four items and place them on the correct spots in the scene.
- Place the AMETHYST MASK on the Ivory Figure highlighted in green.
- Place the BLACK SICKLE on the Shadowy Wings highlighted in yellow.
- Place the SEA GREEN TRIDENT on the Water Stand highlighted in purple.
- Place the SILVER QUILL on the Quicksilver Ink highlighted in red.
- Enter the Star Portal.
- Find the four items highlighted in red.
- Place all of them on the Heavens highlighted in green.
- Exit the room.
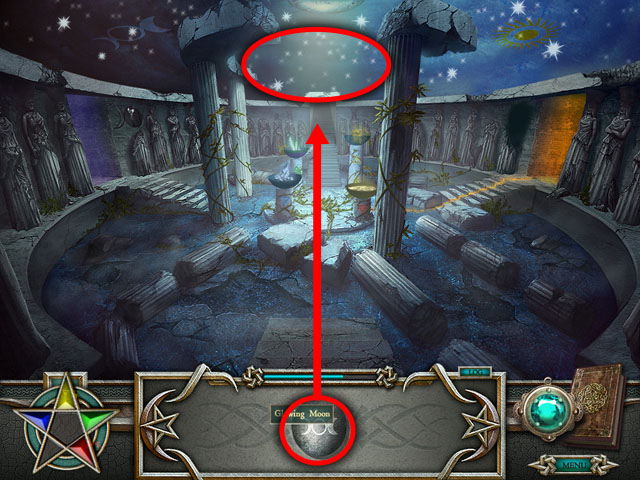
- Place the GLOWING MOON on the Sky Dome.
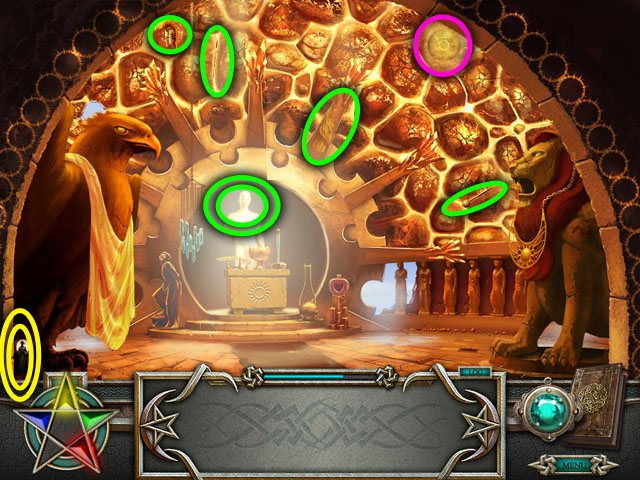
- Enter the Sun Portal.
- Find four items highlighted in green.
- Place all of them on the Golden Lord in the middle.
- Find the GLOWING SUN highlighted in purple.
- Find the BLESSING OF THE SUN highlighted in yellow.
- Exit the room.
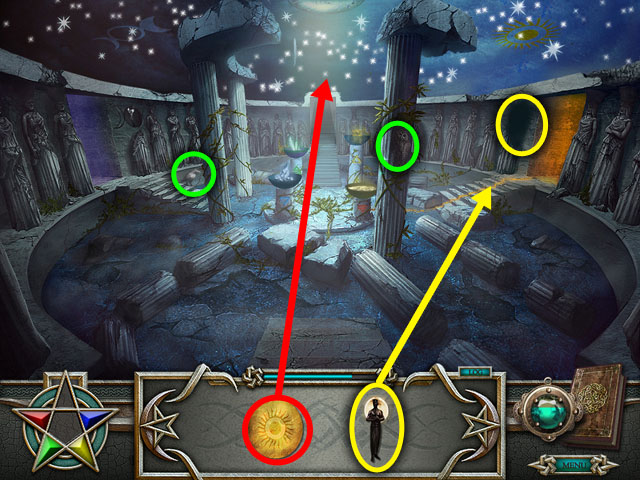
- Place the BLESSING OF THE SUN on the darkened spot highlighted in yellow.
- Place the GLOWING SUN highlighted in red on the Sky Dome.
- Find two birds highlighted in green.
- Enter the Sun Portal.
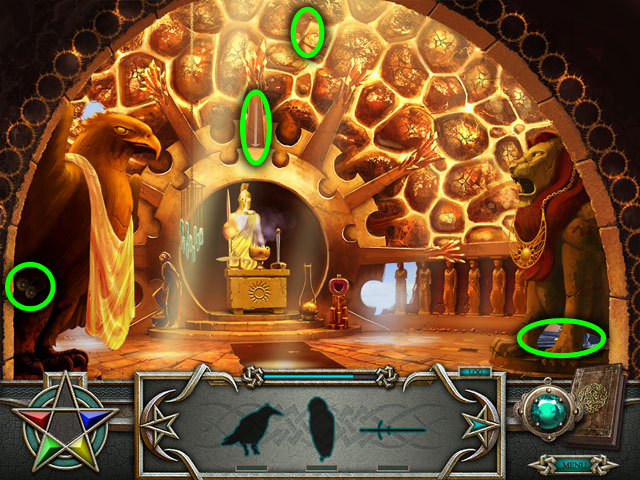
- Find four items circled in green.
- Enter the Star Portal.
- Place the OWL on the Moonlight Nook on the right.
- Place the CROW on the Sunny Nook in the left.
- Find the SUN highlighted in yellow.
- Find the GARNET HEART highlighted in green.
- Exit the room.
- Find the MOON highlighted in yellow.
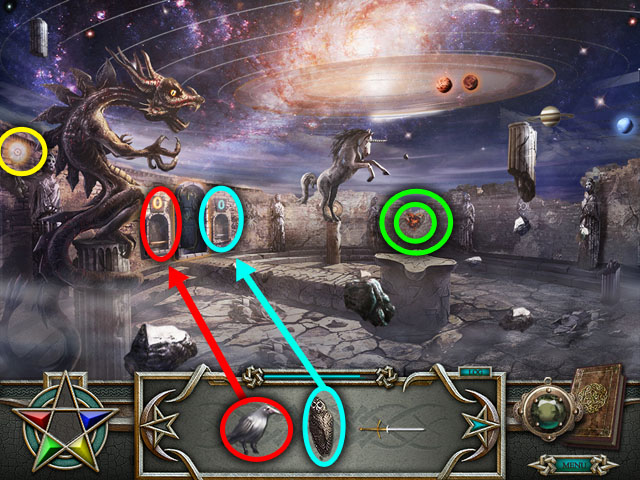
- Enter the Star Portal.
- Place the SUN and the MOON on the empty sky highlighted in red.
- Exit the room.
- Find the EARTH.
- Enter the Star Portal.
- Place the EARTH on the empty sky.
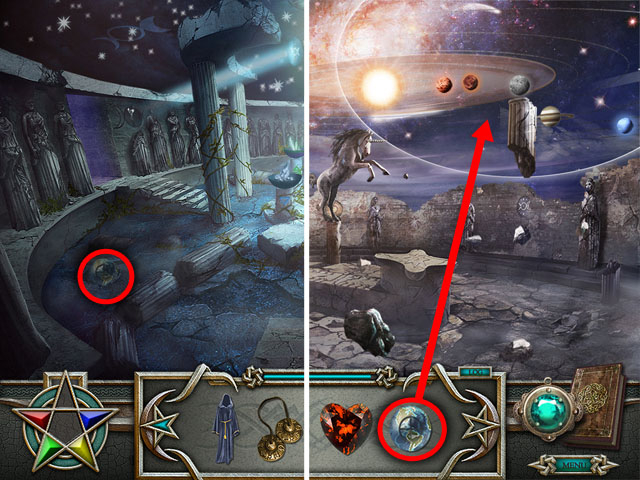
- Exit the scene and enter the Sun Portal.
- Place the GARNET HEART on the Golden Pomegranate highlighted in yellow.
- Place the BRONZE BELLS on the Swaying Crystals highlighted in light blue.
- Place the GREAT SWORD on the Sword Stand highlighted in red.
- Place the RITUAL ROBE on the Stormy Figure highlighted in green.
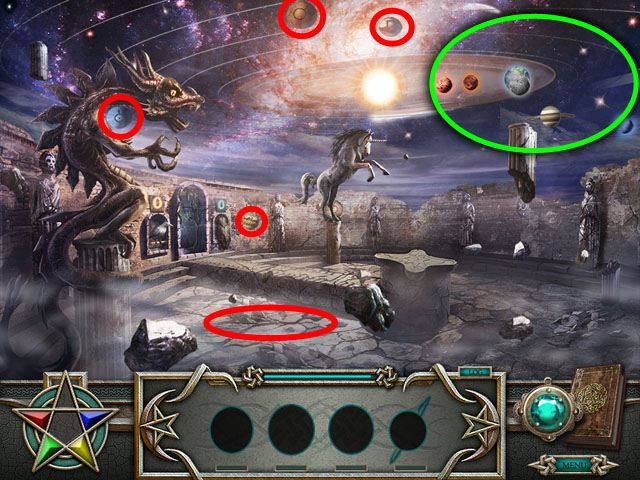
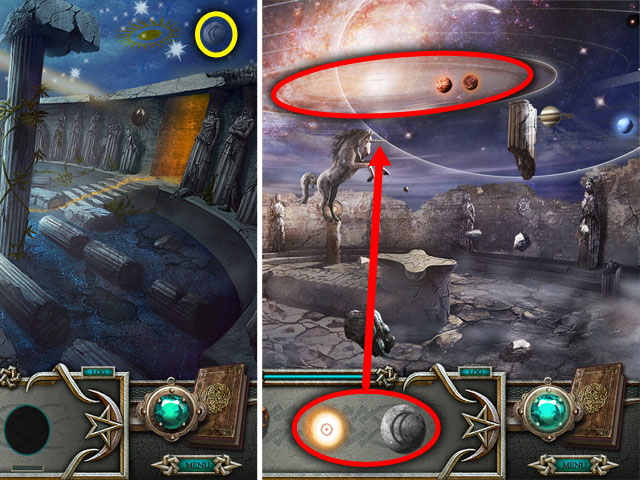
- Return to the Star Portal.
- Find five items highlighted in red.
- Place the 4 PLANETS on the Heavens highlighted in green.
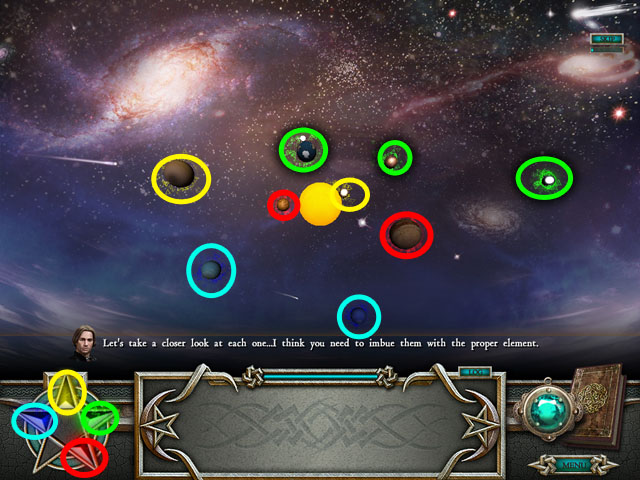
- Each of the planets will be highlighted in a color.
- Use the Magical Stone of the same color on each planet, until none of the planets are highlighted.
- You will receive another magical stone.
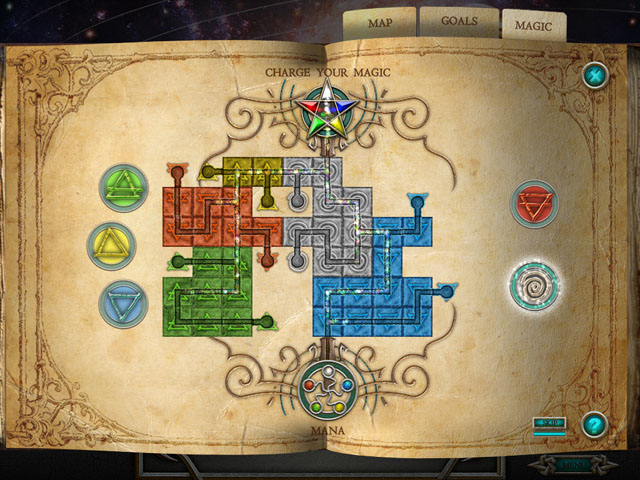
- Rotate all of the tiles to connect mana to the magical stone in the upper side.
- In this puzzle, like the first puzzle you have to connect all of the pipes to each other with no open ends.
- But now you have five different colors to choose from that you can select with the five buttons on the left and right.
- When you are in a certain color, any tile that you click will turn into that color.
- The object is to connect the two dead-ends of the same color with blocks of that color.
- First find the shortest and easiest path and use the correct color to turn all of the pipes in the right direction. Repeat this with the next four longer paths until you have finished the board like in the previous puzzles.
- If you make a mistake you can always go back and use another color to erase it.
- The pipes can only be rotated one way correctly, so rotate them all in the correct position first without worrying about color if you are having trouble.
- See the screenshot for one possible solution. The tiles may be farther from each other than this in your play through.
Chapter 7
- Find four items and place them in the correct stones, highlighted in the same colors in the screenshot.
- Place the STONE AMULET on the stone highlighted in green.
- Place the OBSIDIAN AMULET on the stone highlighted in red.
- Place the SEALED CHARM on the stone highlighted in purple.
- Place the CLAW TALISMAN on the stone highlighted in light blue.
- Find four items highlighted in green.
- Place all of them on the stone on the left side.
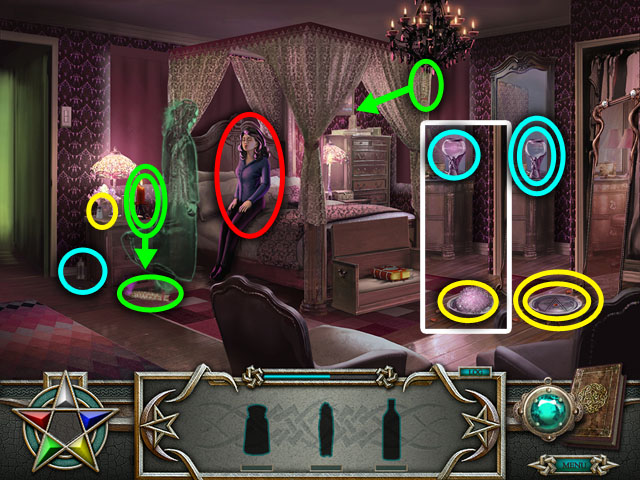
- Enter your Mother’s Room from the stairs in the left.
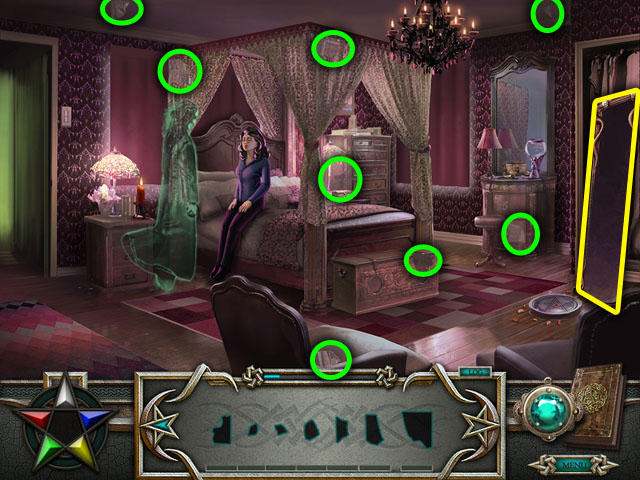
- Find 8 items highlighted in green.
- Click on the Mirror highlighted in yellow to look at it closer.

- Drag all of the pieces of mirror on the mirror frame.
- It doesn’t matter where you drag the pieces to, they will snap in the correct place.
- Click on the star in the bottom left corner.
- Rotate all of the tiles to connect mana to the magical stone in the upper side.
- In this puzzle, like the first puzzle you have to connect all of the pipes to each other with no open ends.
- But now you have five different colors to choose from that you can select with the five buttons on the left and right.
- When you are in a certain color, any tile that you click will turn into that color.
- The object is to connect the two dead-ends of the same color with blocks of that color.
- First find the shortest and easiest path and use the correct color to turn all of the pipes in the right direction. Repeat this with the next four longer paths until you have finished the board like in the previous puzzles.
- If you make a mistake you can always go back and use another color to erase it.
- The pipes can only be rotated one way correctly, so rotate them all in the correct position first without worrying about color if you are having trouble.
- See the screenshot for one possible solution. The tiles may be farther from each other than this in your play through.
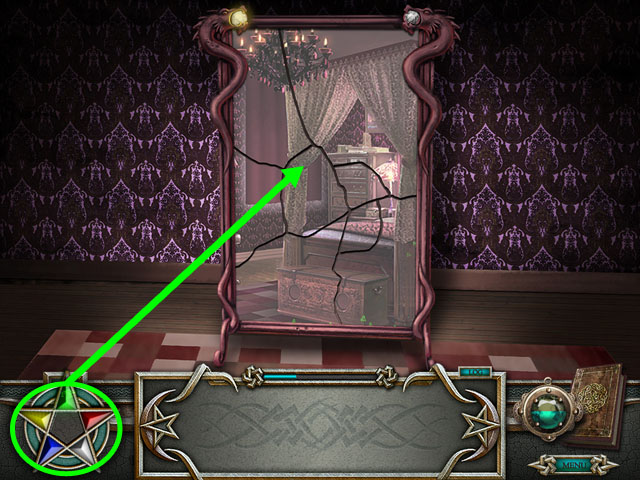
- Use all of the stones in order on the mirror.
- You will know which stone to use next because it will be rotated to the top of the star.
- Enter the Mirror.
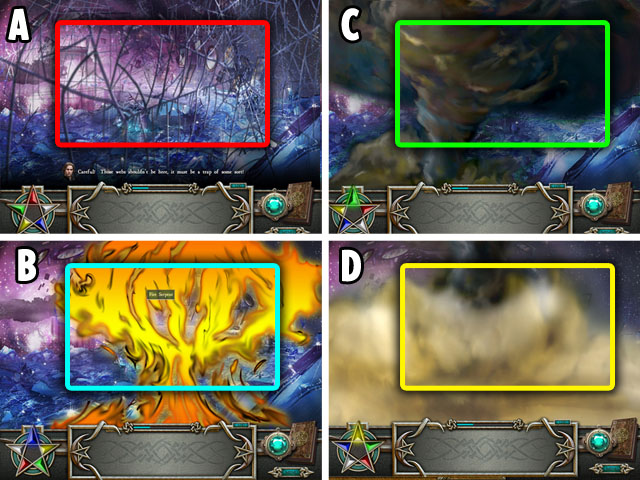
- Use the Red Stone (A) to destroy the spider webs.
- Use the Blue Stone (B) to distinguish the fire.
- Use the Green Stone (C) to destroy the tornado.
- Use the Yellow Stone (D) to blow away the mist.
- Find the SILVER DAGGER and use it on the Tainted Beast highlighted in green.
- Find the OBSIDIAN WAND and use it on the Twisted Idol highlighted in red.
- Enter the Witch’s Web through the door in the upper left side.
- Find the two items and place them on the chest.
- Return to your Mother’s Room.
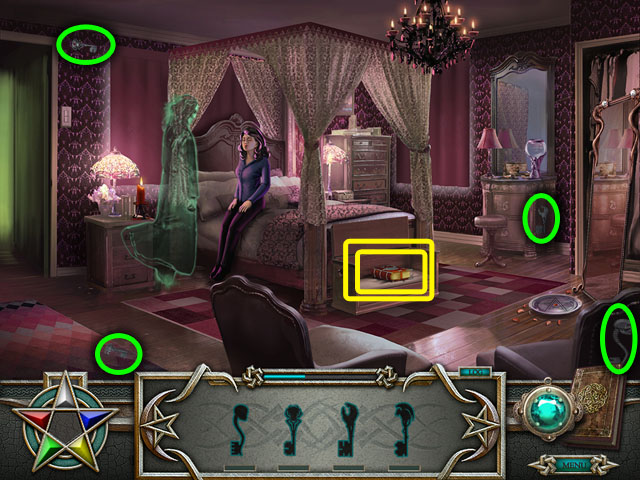
- Find four KEYS highlighted in green.
- Click on the book highlighted in yellow.
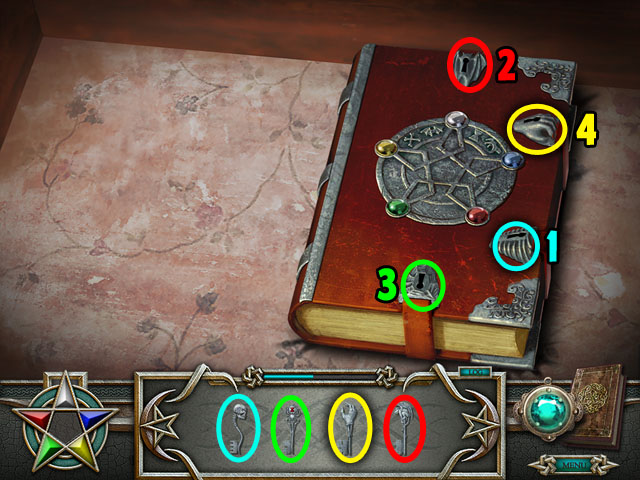
- Place all of KEYS in the correct locks.
- The colors circling the correct keys and keyholes match.
- Click on the keys in the correct order as shown in the screenshot.
- Return to the Front Room.
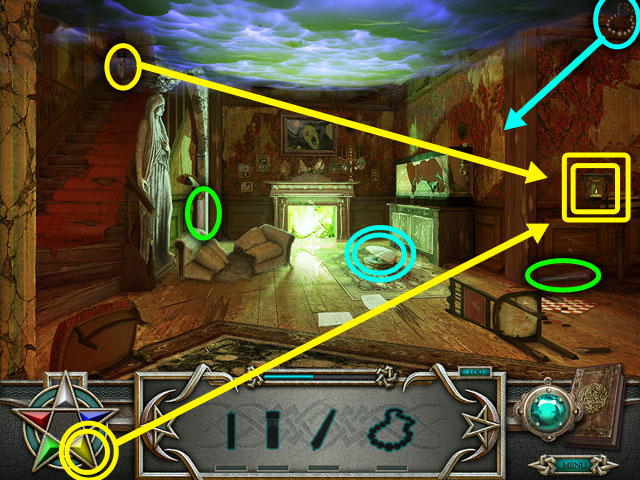
- Find two items circled in green.
- Find and place the ROSE OIL on the Oil Burner highlighted in yellow.
- Use the yellow stone on the Oil Burner.
- Find and place the STRING OF PEARLS on the Shell highlighted in light blue.
- Find the CIRCLE OF INCENSE.
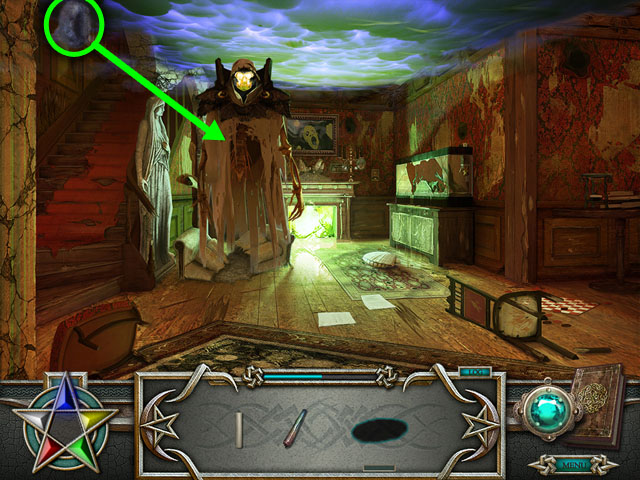
- Place it on the Dark Specter.
- Place the RAINBOW QUARTZ on the Quartz Cluster highlighted in red.
- Find the QUARTZ WAND highlighted in yellow and place it on the Dark Specter.
- Use the Magical Green Stone on the Quartz Cluster.
- Use the Magical Blue Stone on the Shell (1).
- Find the SEA AMULET and place it on the Dar Specter (2).
- Place the WHITE CANDLE on the Candelabra (3).
- Click on the Magical Red Stone (4).
- Place it on the Candelabra (5).
- Place the CANDELABRA on the Dark Specter (6).
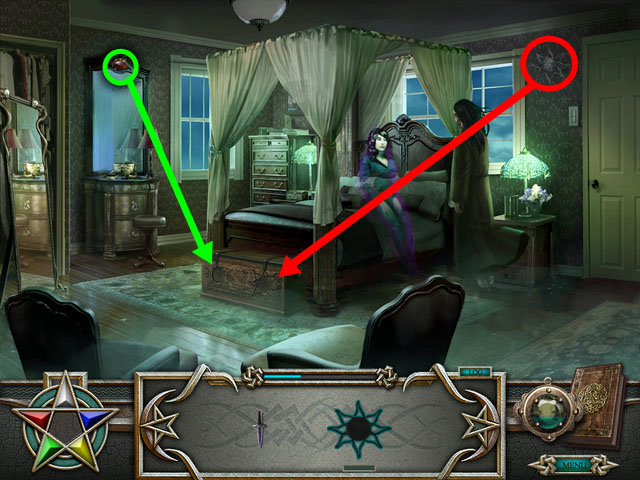
- Return to your Mother’s room.
- Find the SALT highlighted in yellow.
- Place it on the Pentacle.
- Collect the SACRED SALT.
- Find the SMUDGE STICK highlighted in green.
- Place it on the Red Candle.
- Collect the SMUDGE STICK FLAME.
- Find the PURE WATER highlighted in light blue.
- Place it on the Chalice.
- Collect the BLESSED WATER.
- Place all of the items your mother in the middle.
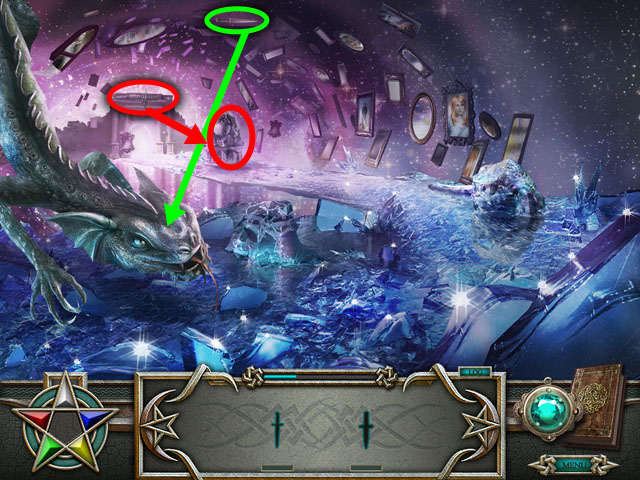
- Enter the Mirror.
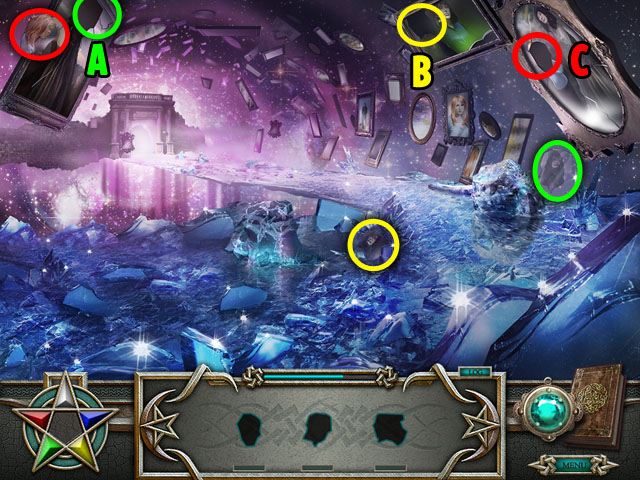
- Collect three pieces of picture.
- Place the piece of picture highlighted in green on the missing spot (A).
- Place the piece of picture highlighted in yellow on the missing spot (B).
- Place the piece of picture highlighted in red on the missing spot (C).

- Place PICTURE highlighted in green on the Sleeping Damon.
- Place PICTURE highlighted in red on the Looming Damon.
- Place PICTURE highlighted in yellow on the Raging Damon.
- Find three SPHERES and place on the correct color of the Spheres highlighted in light blue.
- Find four items.
- Place them on the correct spot.
- Place the CRIMSON FLAMES on the Crimson Webs highlighted in red.
- Place the ONYX FEATHER on the Onyx Smoke highlighted in light blue.
- Place the FLOWER on the Emerald Thorns highlighted in green.
- Place the AMETHYST SERPENT on the Amethyst Flows.
- Use the 4 Magic stones – red, green, yellow and blue – on the 4 items that you just placed.
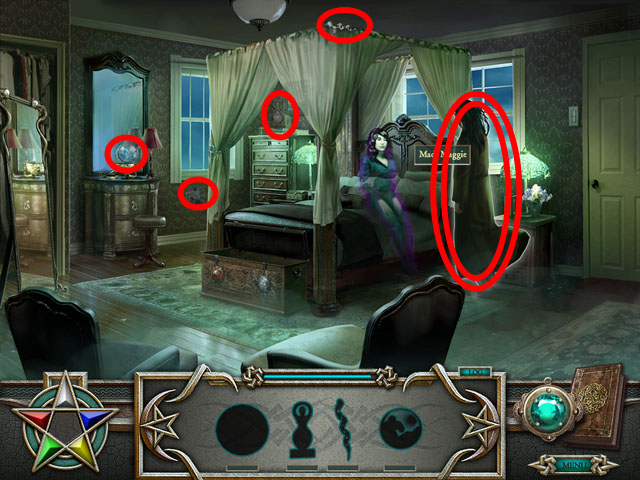
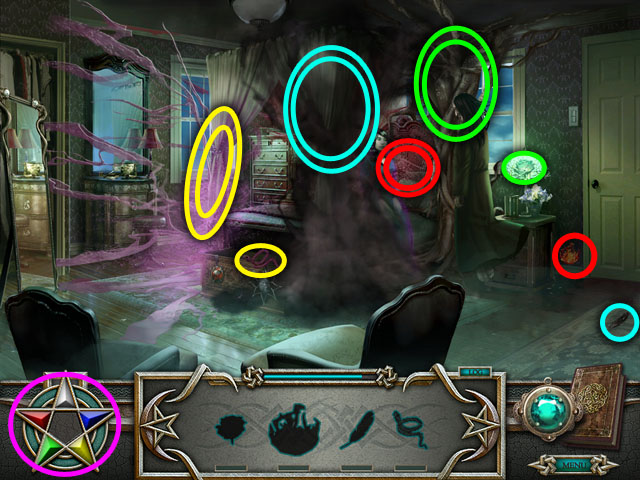
- Find four items highlighted in red.
- Place all of them on the Mad Maggie on the right side.

- Use the Yellow Stone on the symbol (A).
- Use the Red Stone on the symbol (B).
- Use the Green Stone on the symbol (C).
- Use the Blue Stone on the symbol (D).
- Use the White Stone on the symbol (E).
- Congratulations! You have completed Tamara the 13th!
Created at: 2010-12-28