

Walkthrough Menu
General Tips
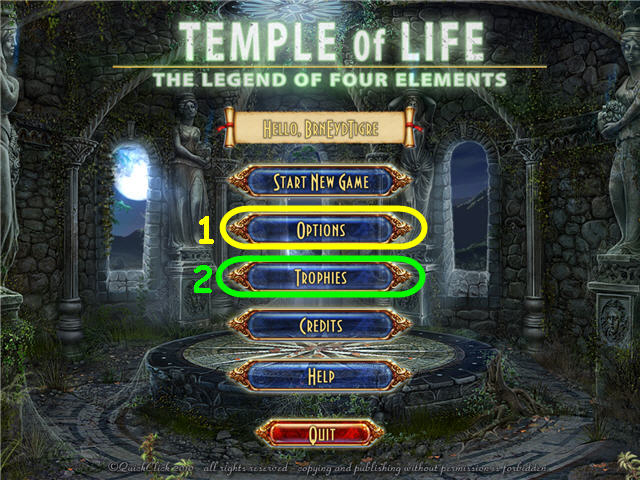
- Click on Options (1) to adjust the Music, Volume, Full Screen, Wide Screen, Game Cursors and High Quality.
- You may set your difficulty level and choose between Casual or Expert Mode.
- You can earn Trophies throughout the game. To see the various awards, click on Trophies (2) and hover your cursor over the locks.
- Shoot the monsters that appear to get extra hints and trophies.
- A magnifying glass cursor indicates you can examine the area.
- A grabbing hand icon indicates you can take the item.
- A gear icon indicates you need to use an inventory item there. Clicking on a gear icon will bring up a picture of the item needed.
- The Treasures of the Pharaoh items will be marked with a '#' in the screenshots.
- Examine the Journal in the lower left to access puzzle clues and story updates.
- Throughout the guide, we will use the acronym 'HOS' for Hidden Object Scenes.
- There are no penalties for random clicking in HOS.
- Items in the find list that are in blue require an extra step in order to find; these steps will be marked in the same color on the screenshots.
- You will need to activate HOS by your actions throughout the game. If one is not available in the same spot as the guide, please check to see what you may have missed.
Chapter 1 – Cairo
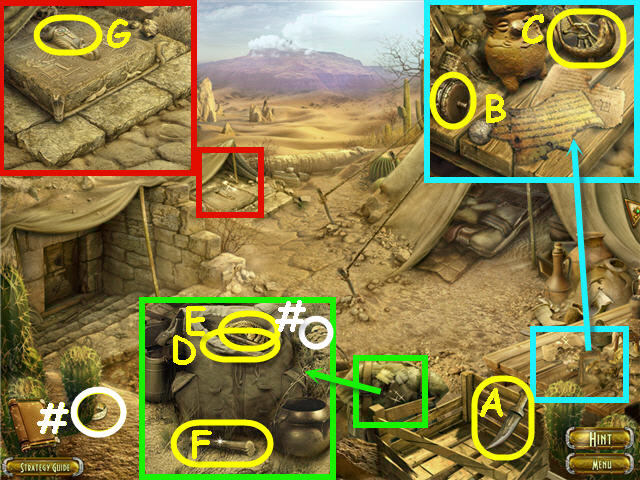
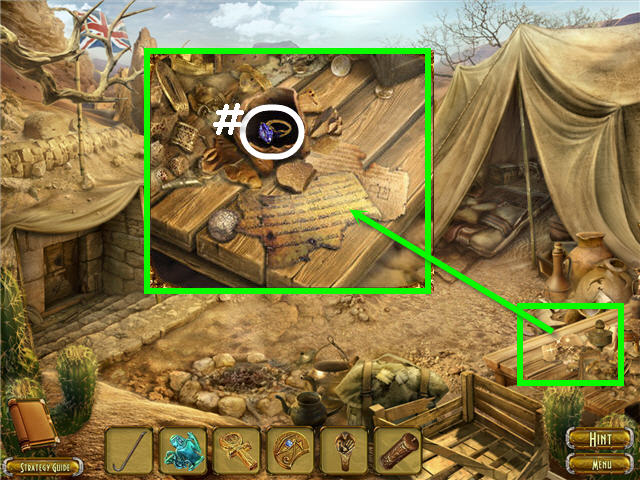
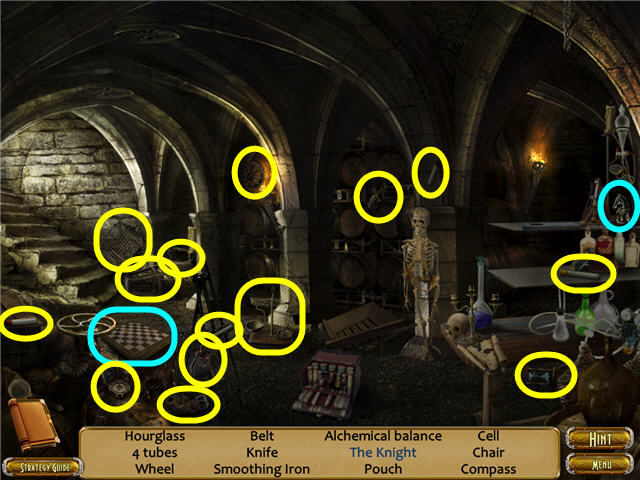
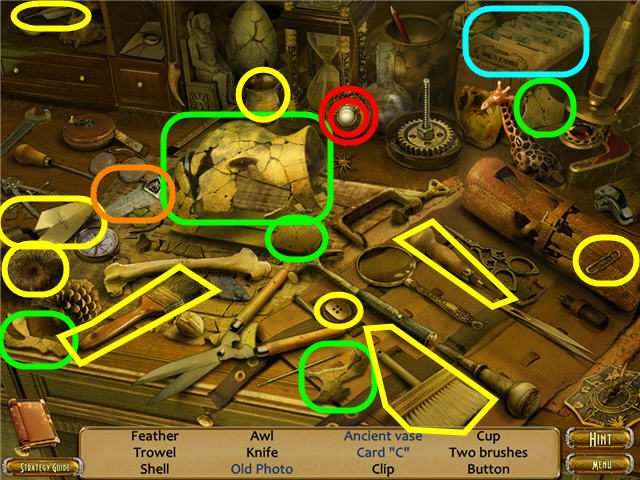
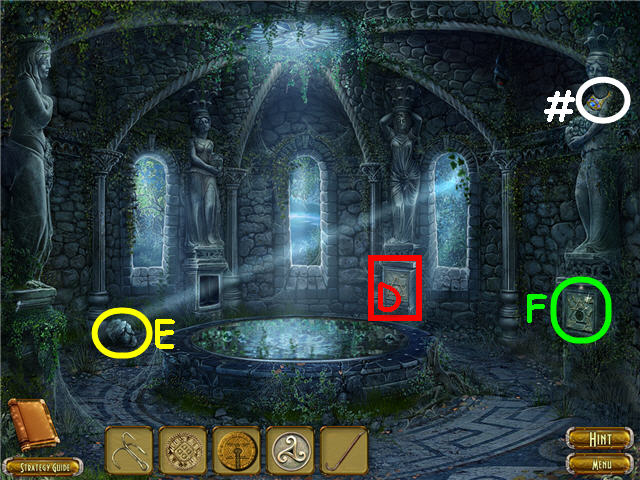
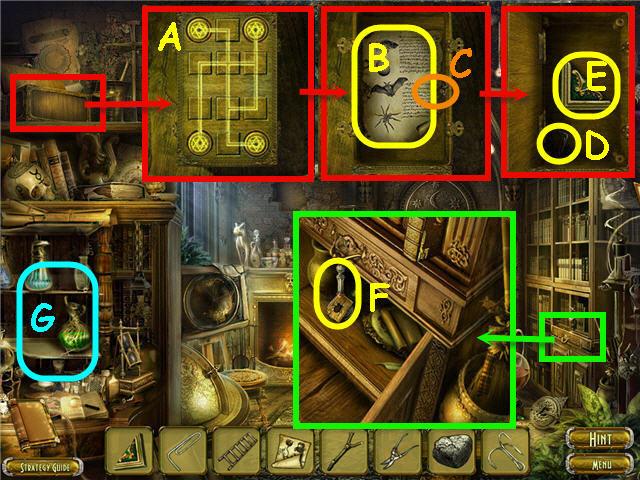
- Take the PHARAOH'S RING 1/5 (#) and the KNIFE (A).
- Examine the table; take the BRONZE DRUM (B) and METAL SNAKE (C).
- Examine and open the backpack; take the BRUSH (D), ROPE (E) and PHARAOH'S RING 2/5 (#).
- Use the KNIFE on the peg; take the PEG (F).
- Examine the stone plate; use the KNIFE on the cross and take the GOLDEN CROSS (G).
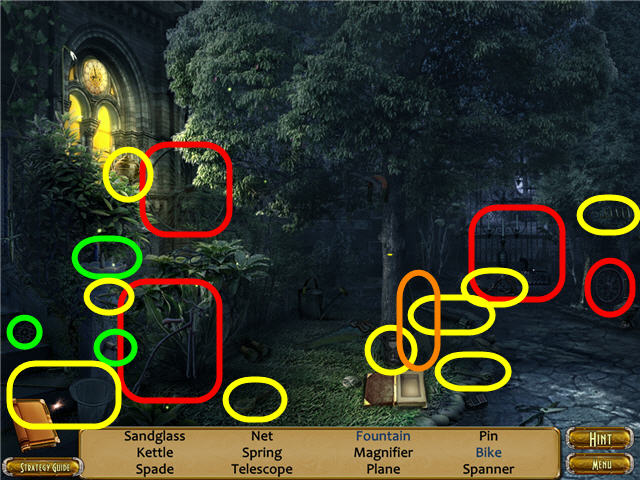
- Examine the doorway to access a HOS.
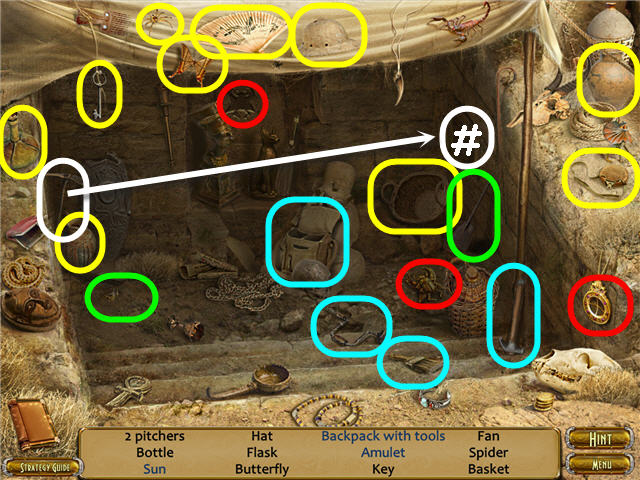
- Find the items listed.
- Move the awning to get the bottle.
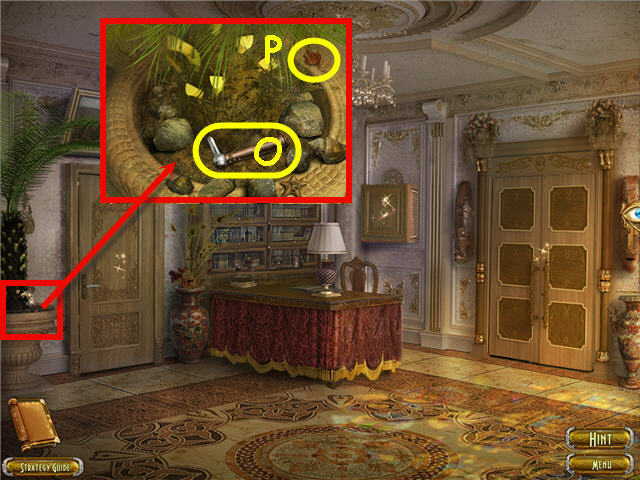
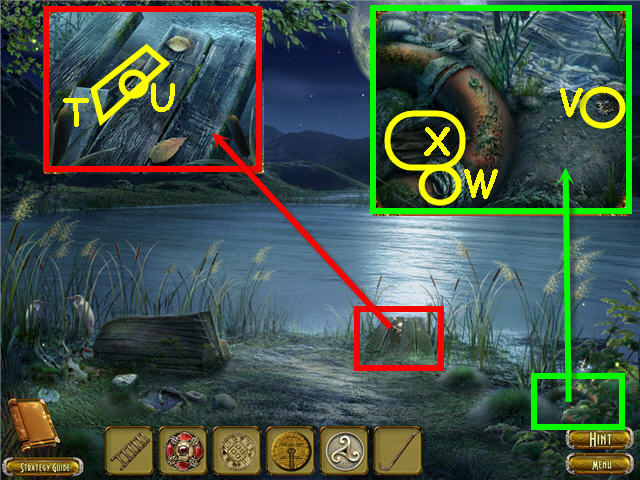
- Use the pick on the wall; take the PHARAOH'S BANGLE 1/5 (#).
- Use the shovel on the dirt to get the sun.
- Place the auger, hammer and brush in the backpack to get the backpack with tools.
- Place the scarab in the slot; take the gem and place in the medallion to get the amulet. You will earn the SUN.
- Place the PEG and ROPE on the opening and exit out.
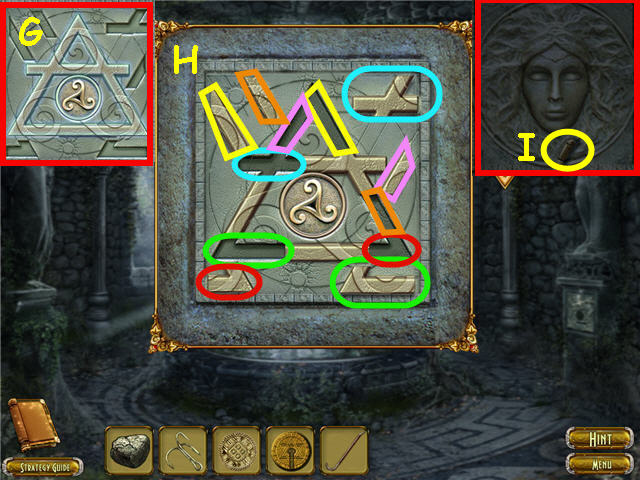
- Examine the stone plate/tomb entrance and head down.
- Examine and use the BRUSH on the stone plate.
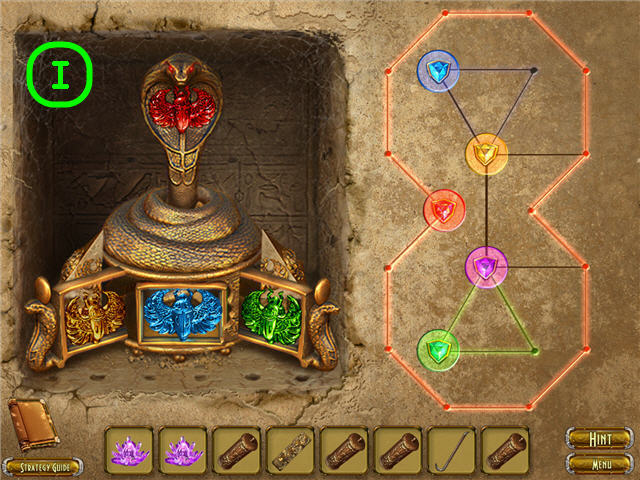
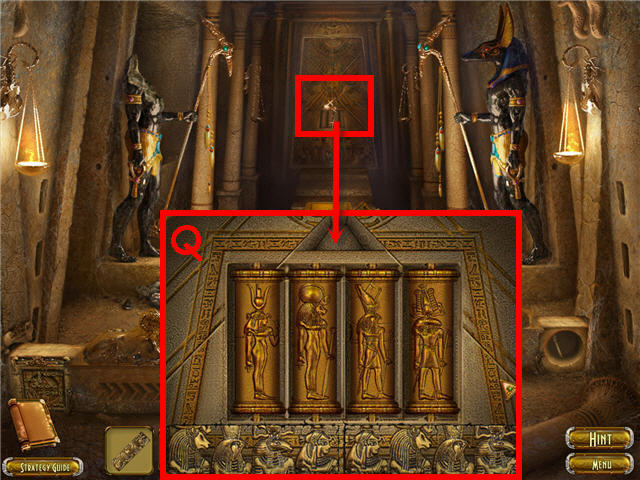
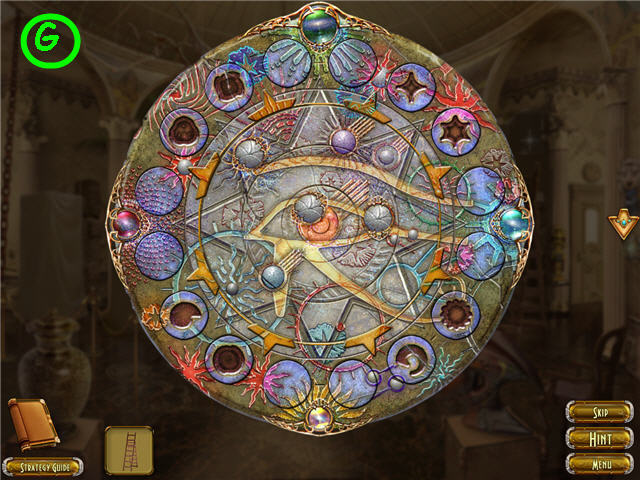
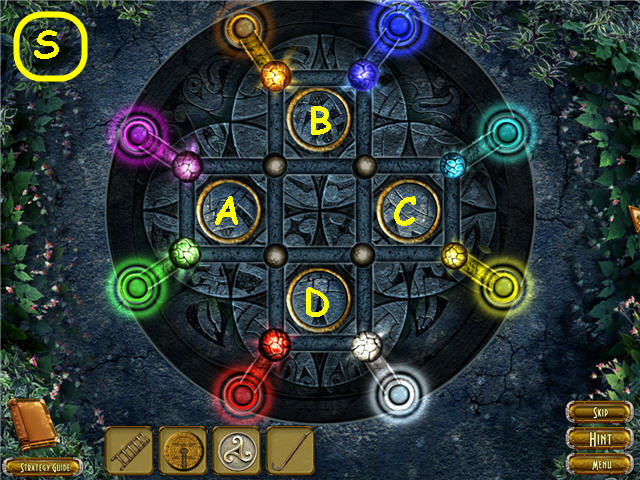
- Place the SUN in the center to trigger a puzzle.
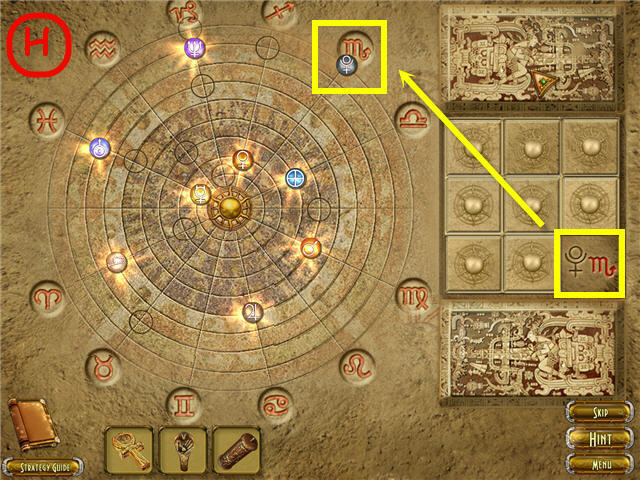
- Click on the center symbols to move them in line with their corresponding symbols represented under the right tiles.
- Click on a tile next to the exposed symbols to move the tile and get the next clue. See screenshot (H) for solution.
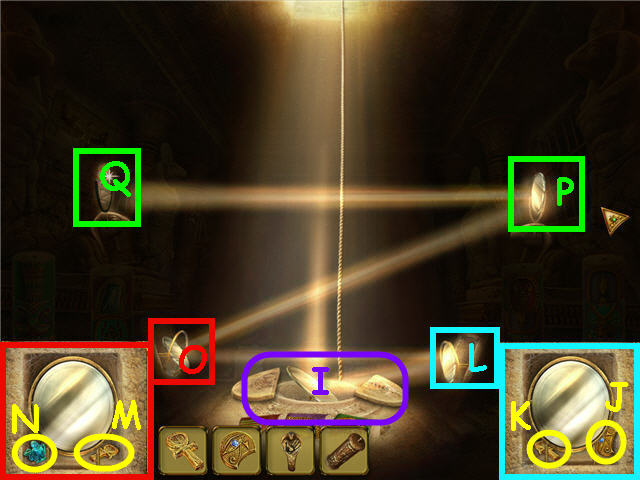
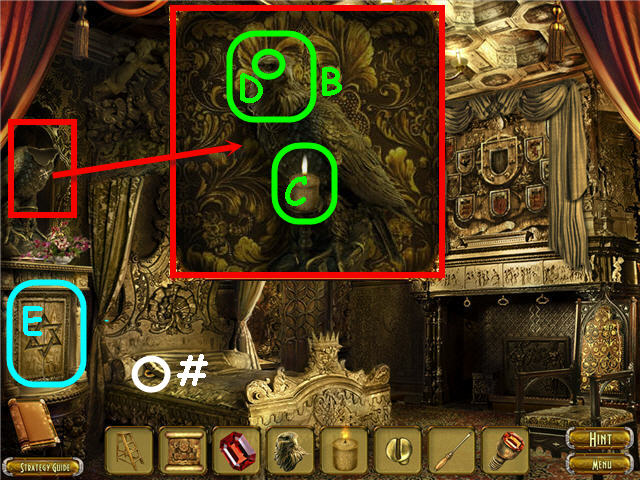
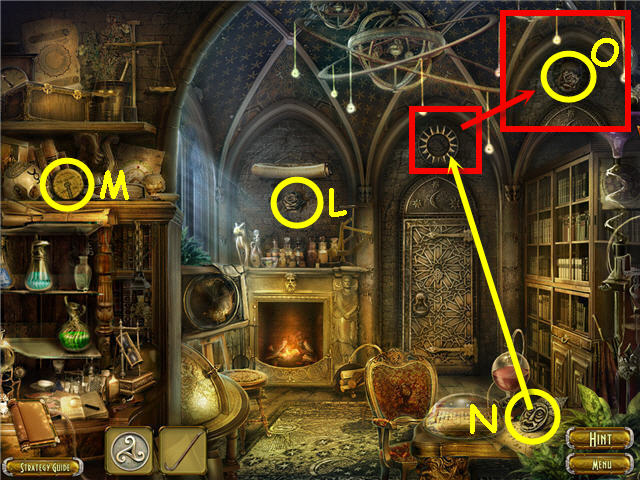
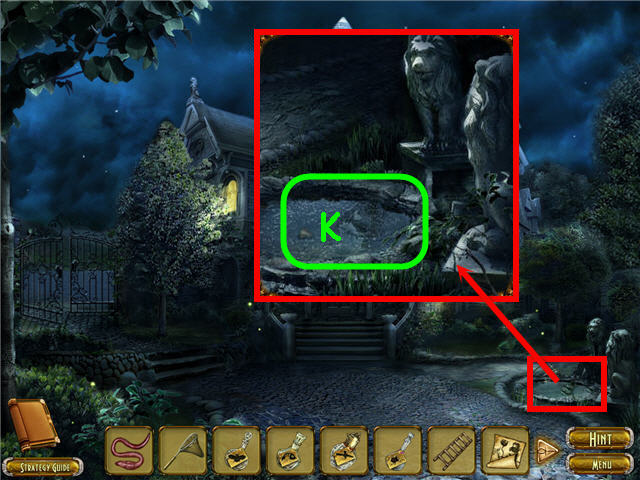
- Click on the mirror (I).
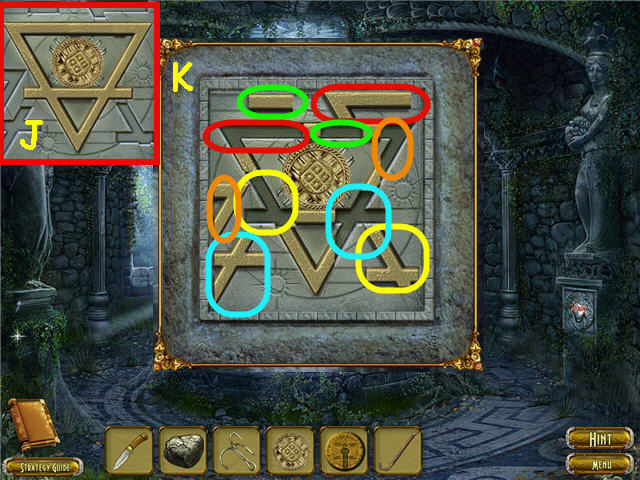
- Examine and place the GOLDEN CROSS on the stone pedestal.
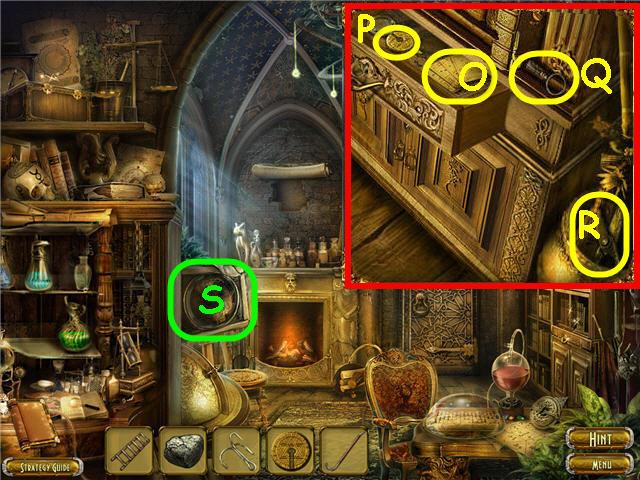
- Take the GOLD STATUETTE (J) and GOLDEN CROSS (K).
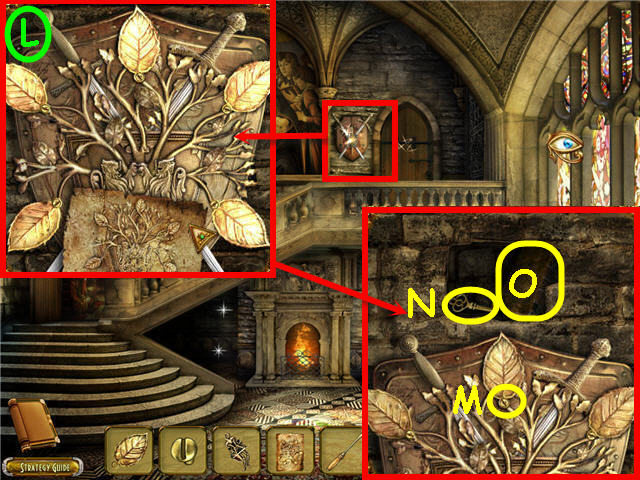
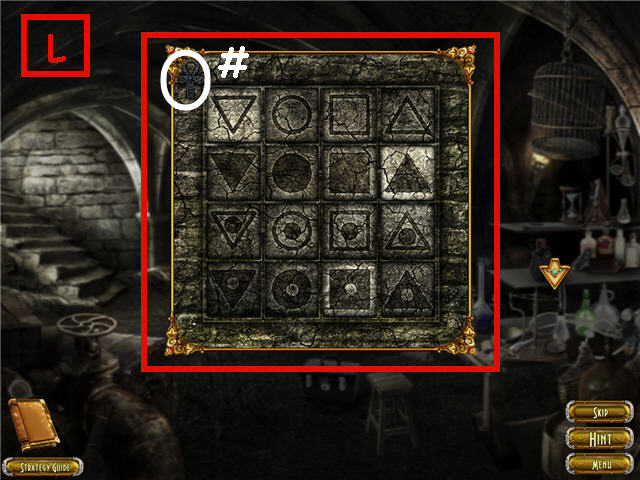
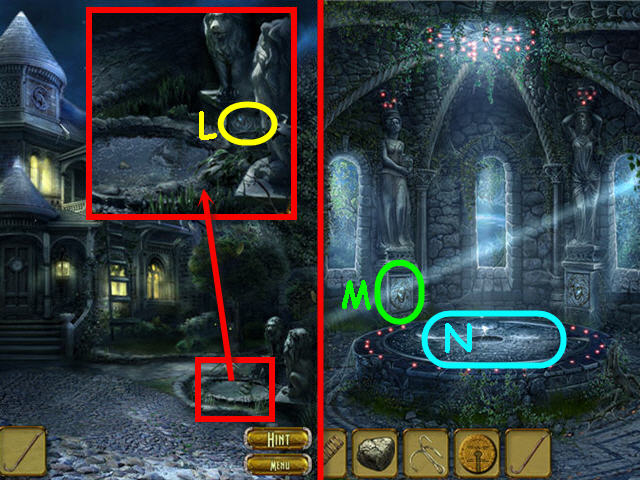
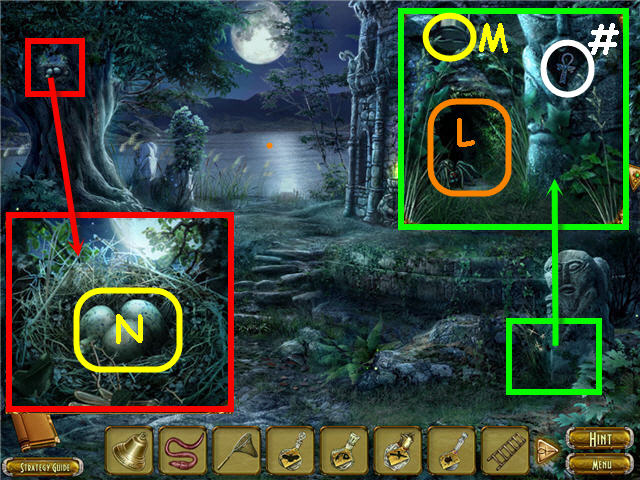
- Click the mirror (L).
- Examine and place the GOLDEN CROSS on the stone pedestal.
- Take the GOLDEN CROSS (M) and EMERALD FIGURE (N).
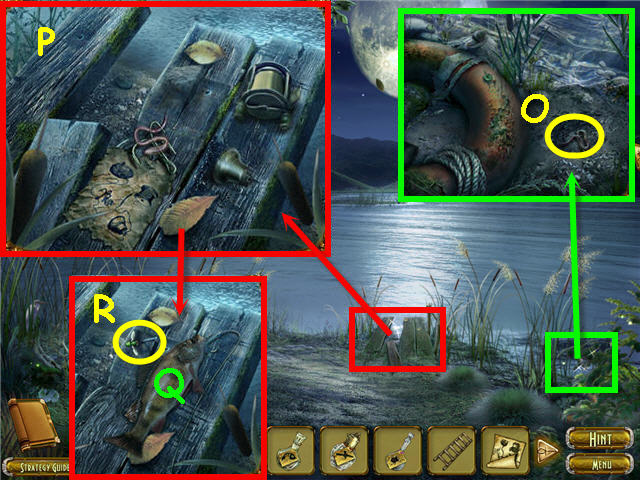
- Click the mirrors (O) and (P) the stone (Q).
- Head up.
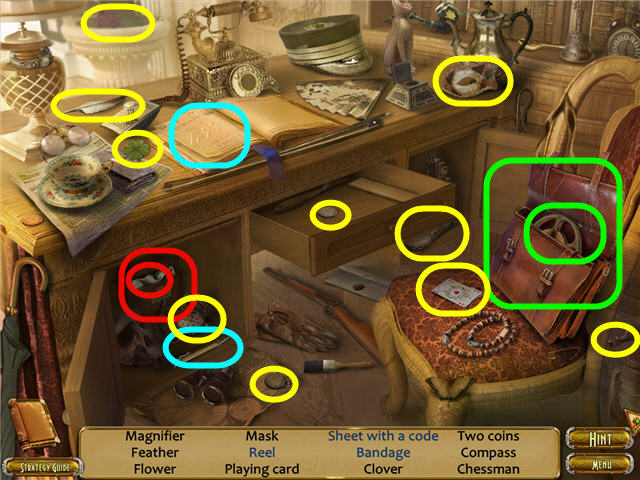
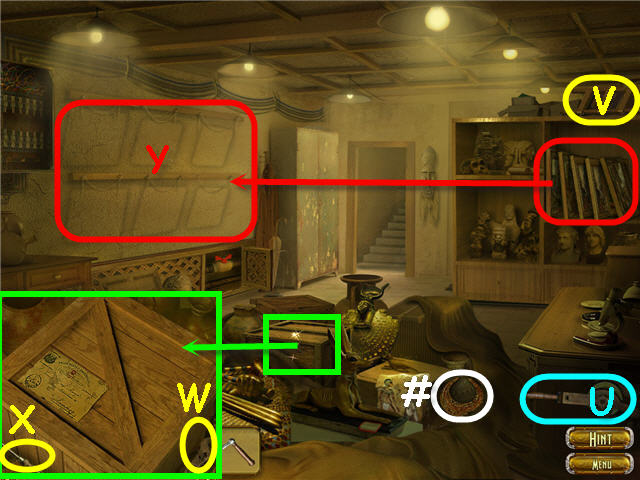
- Examine the tent to access a HOS.
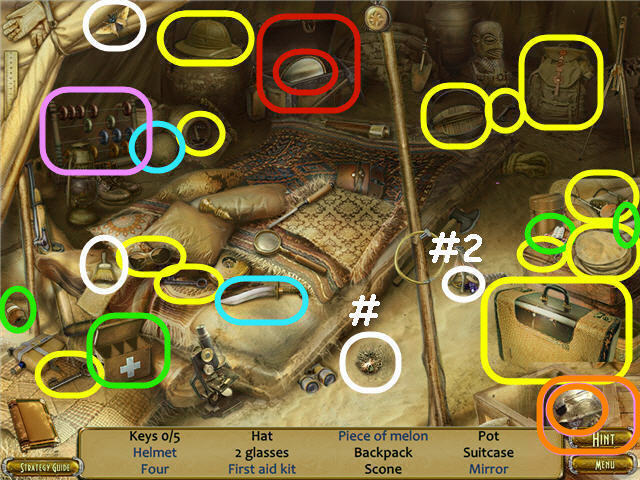
- Find the items listed.
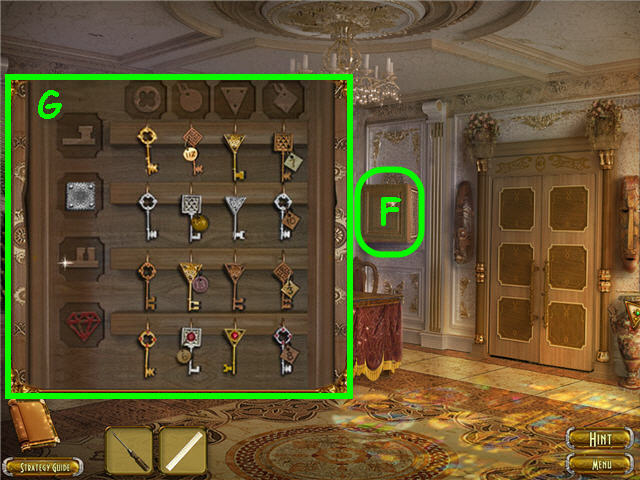
- Open the box by finding the 5 keys to get the mirror.
- Place the pills, medicine bottle and bandage in the kit to get the first aid kit.
- Use the knife on the melon to get a piece of melon.
- Click on the abacus 4 times to get four.
- Open the box to get the helmet.
- Click on the brush to get PHARAOH'S BROOCH 1/5 (#).
- Click on the moth to get a PHARAOH'S SIGNET 1/5 (#2).
- You will earn the MIRROR.
- Go down to the tomb.
- Place the MIRROR in the upper left frame and click on it to trigger a puzzle.
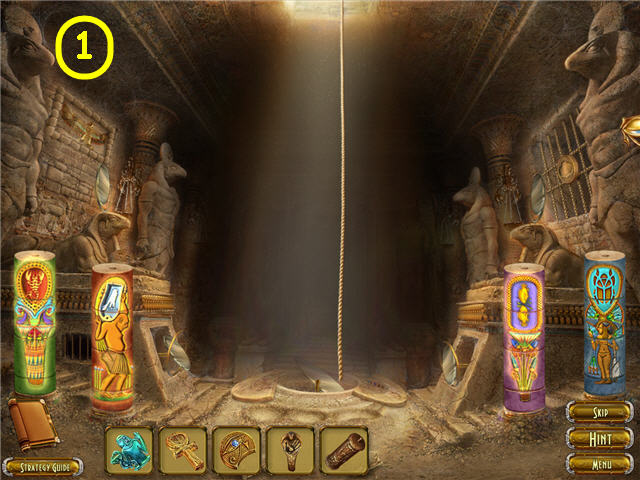
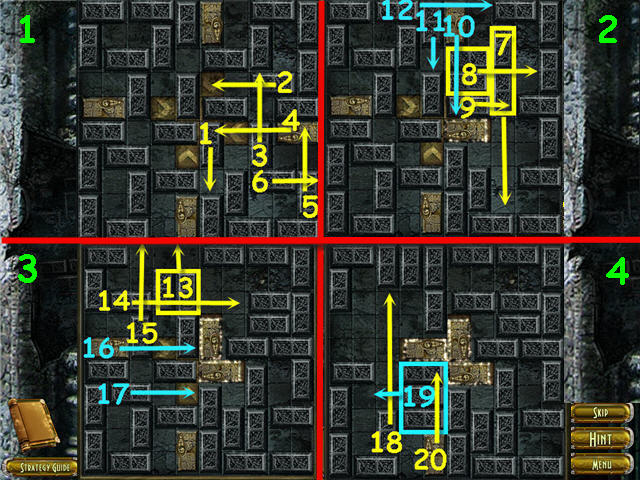
- Arrange the pillar pieces to complete the pillars.
- The starting layout is random. See screenshot (1) for solution.
- Head back to camp.
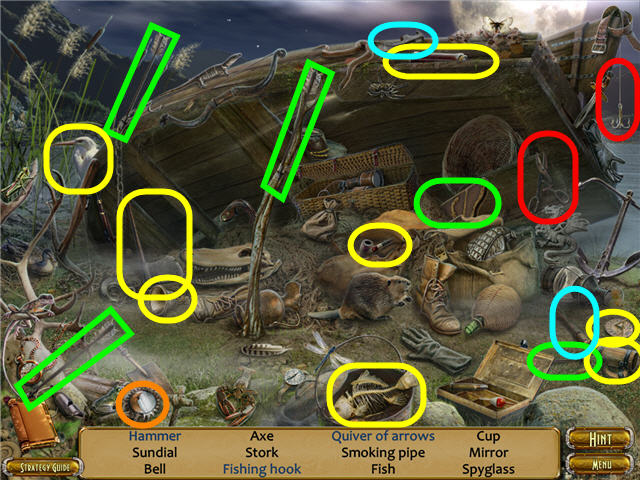
- Examine the doorway to access a HOS.
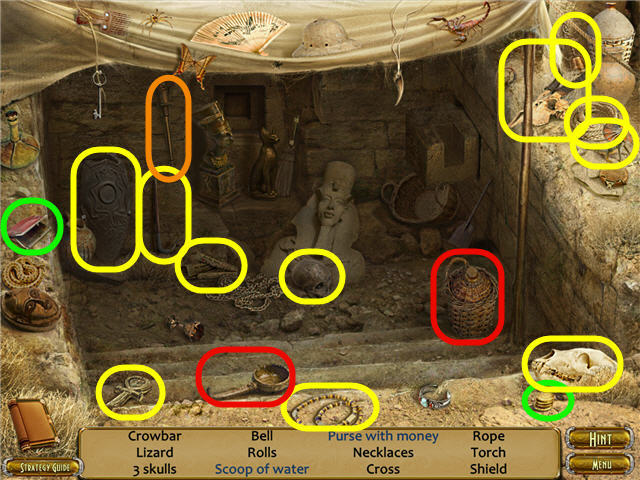
- Find the items listed.
- Place the coins in the purse to get a purse with money.
- Use the scoop on the jug to get a scoop of water.
- You will earn a CROWBAR.
- Examine the table.
- Use the CROWBAR on the statue; take the PHARAOH'S SIGNET 2/5 (#).
- Head down to the tomb.
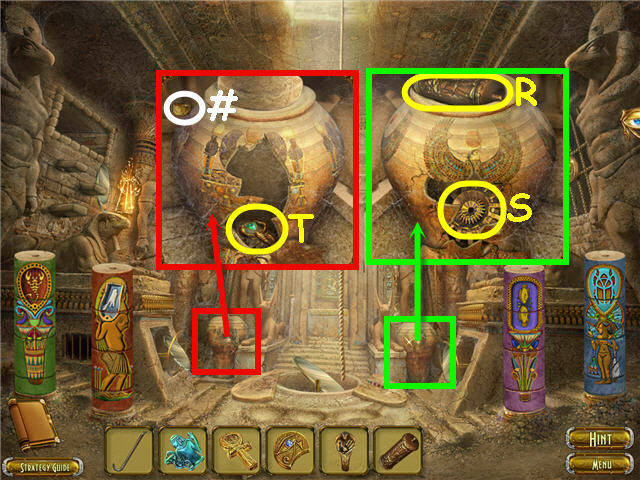
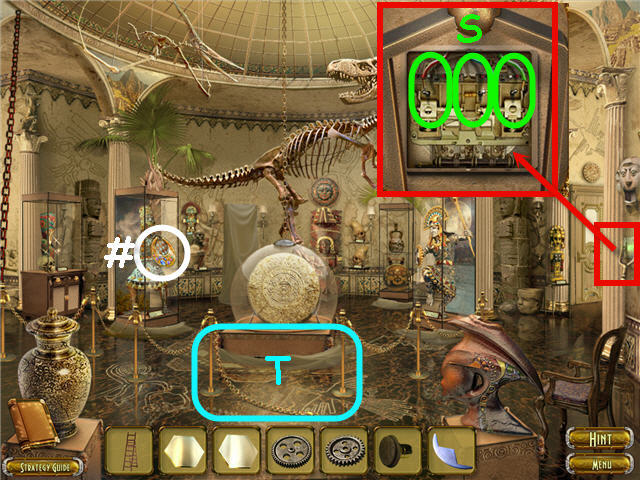
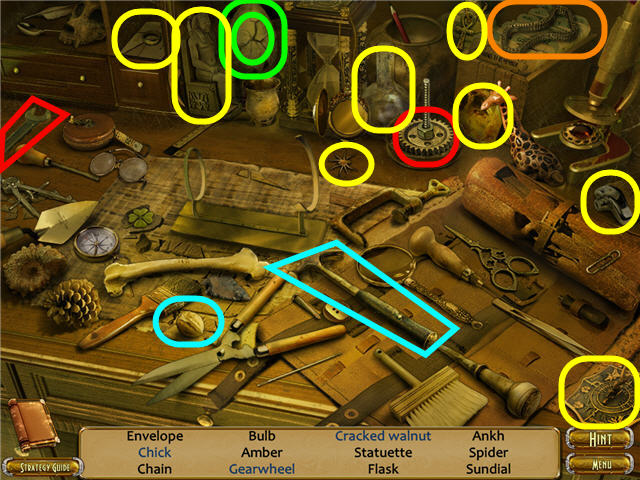
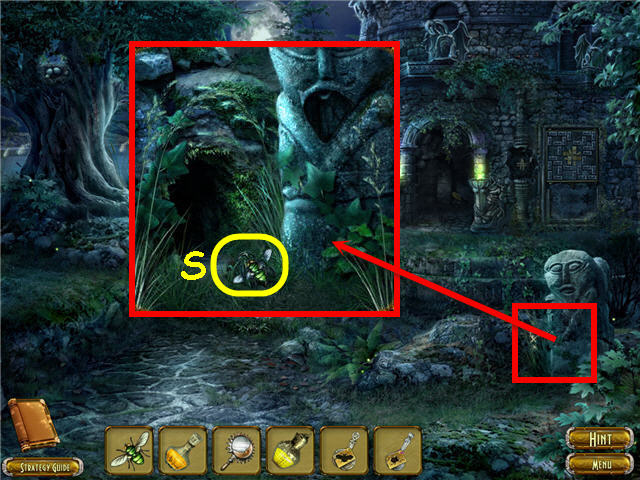
- Examine and use the CROWBAR 3 times on the pottery; take the 2nd BRONZE DRUM (R) and GEAR (S).
- Examine and use the CROWBAR 2 times on the pottery; take the PHARAOH'S BANGLE 2/5 (#) and GOLDEN SCORPION (T).
- Climb through the upper left niche.
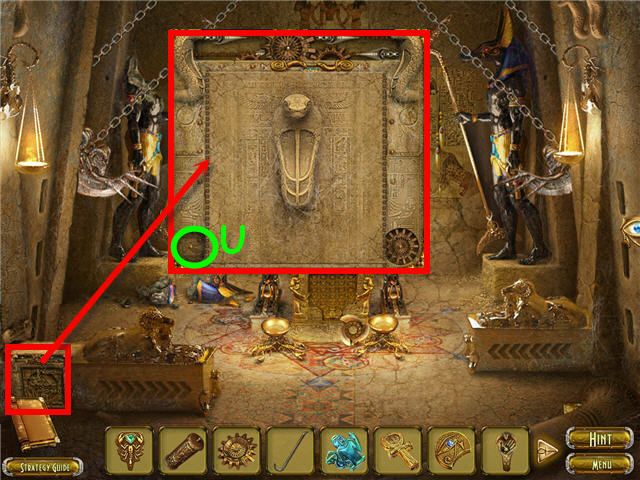
- Use the CROWBAR on the left ram statue.
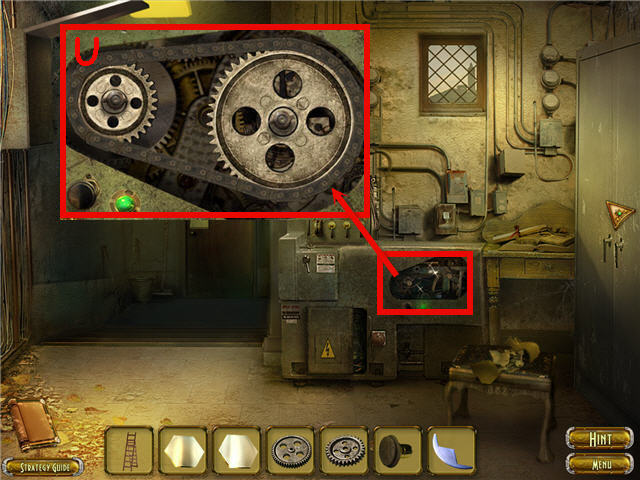
- Examine the secret mechanism; place the GEAR in the lower left (U) to trigger a puzzle.
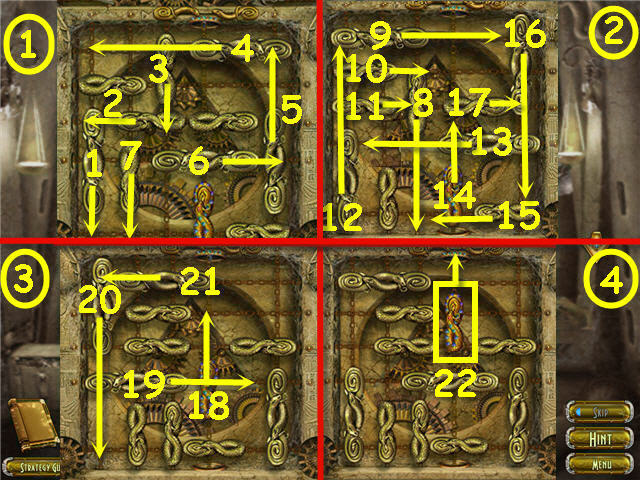
- Slide the gold bars so that you can free and move the colored bar up.
- See screenshot for solution.
- Use the CROWBAR on the right ram statue.
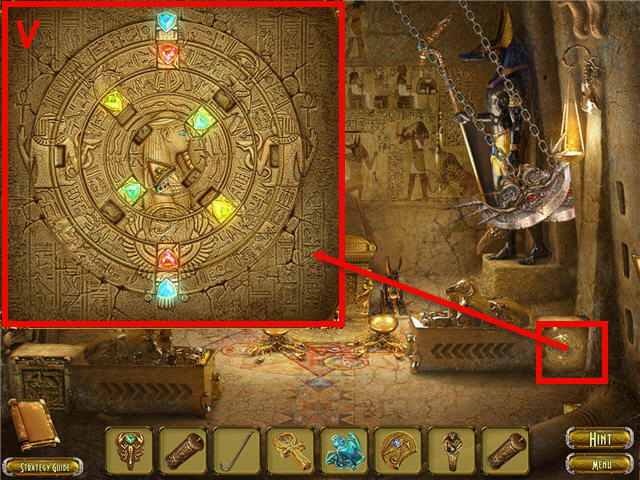
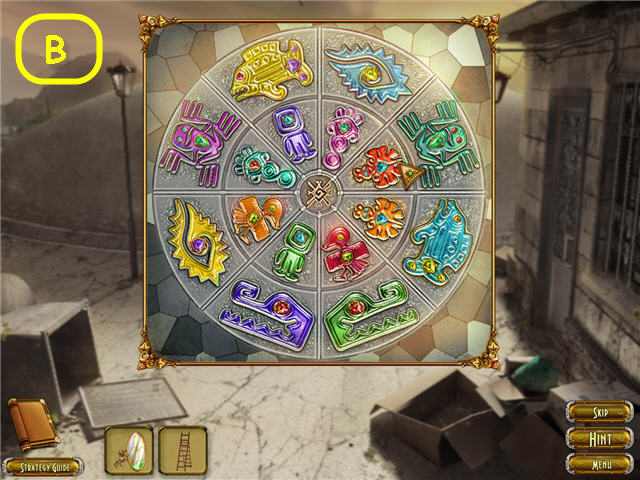
- Examine the secret mechanism; place the METAL SNAKE in the center to trigger a puzzle.
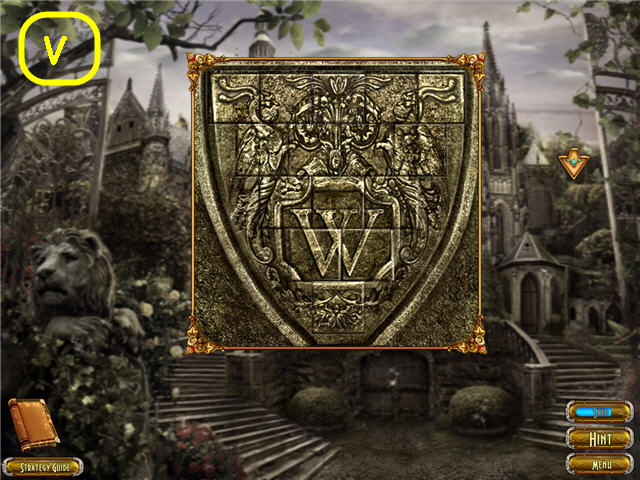
- Unlock the rings by sliding the gems.
- Rotate the rings to complete the picture. See screenshot (V) for solution.
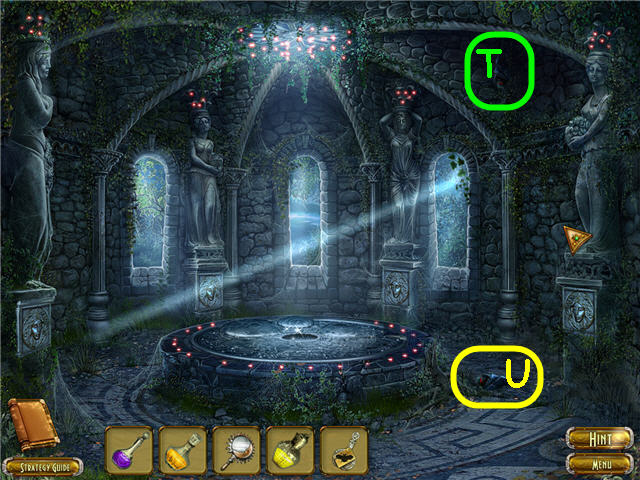
- Take the 3rd BRONZE DRUM and click the lever.

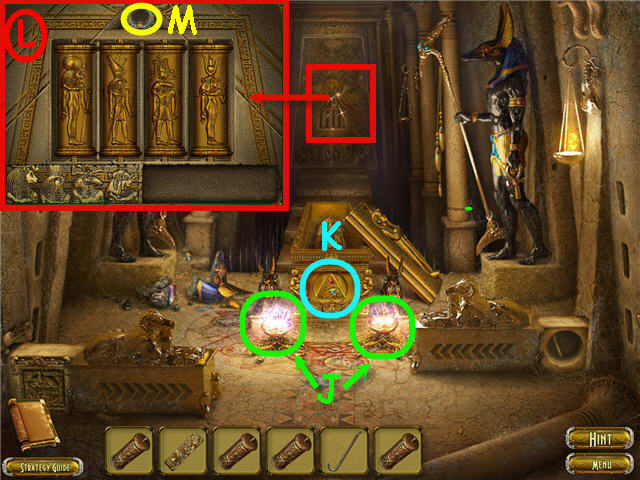
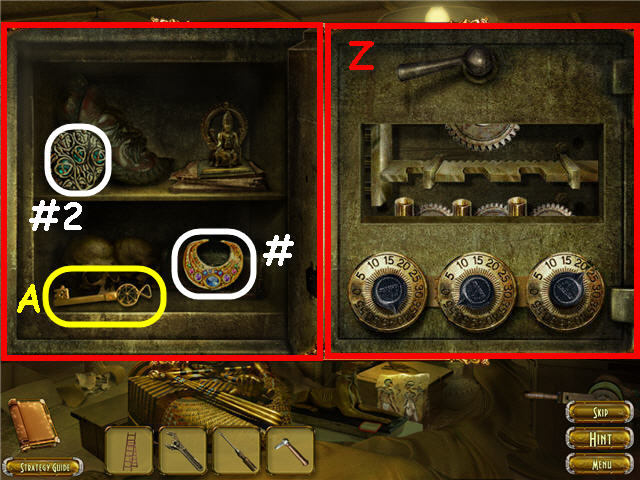
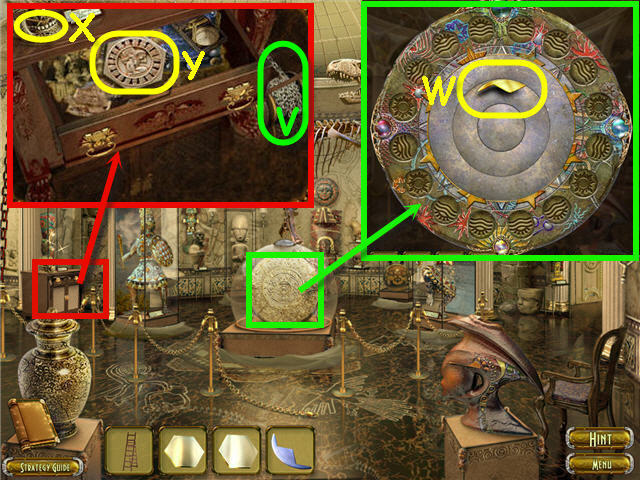
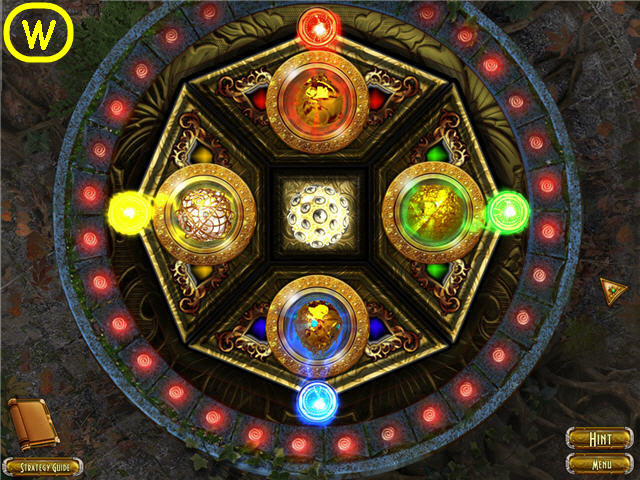
- Examine the sarcophagus.
- Place the GOLD STATUETTE, GOLDEN CROSS and EMERALD FIGURE in the matching slots (W).
- Take the parchment for your journal.
- Place the gems in the matching grooves and click to trigger a puzzle (X).
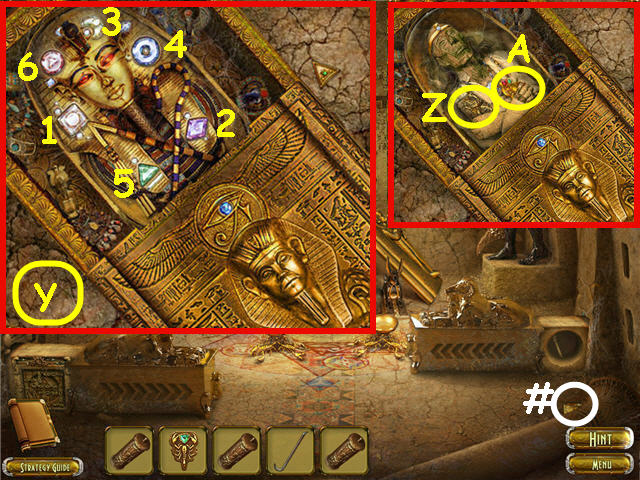
- Click on the gems in the correct order to open the sarcophagus. See screenshot (Y) for solution.
- Take the TABLET WITH SYMBOLS (Z) and GOLDEN SCARAB PART (A).
- Take the PHARAOH'S BANGLE 3/5 (#).
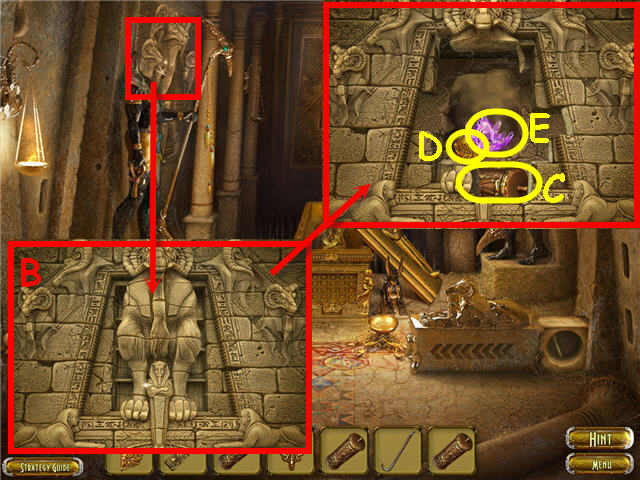
- Examine the stone bas-relief.
- Use the CROWBAR on all the outer and inner pieces of the relief (B).
- Take the 4th BRONZE DRUM (C), 2nd GOLDEN SCARAB PART (D) and CRYSTAL (E).
- Return to the tomb entrance.
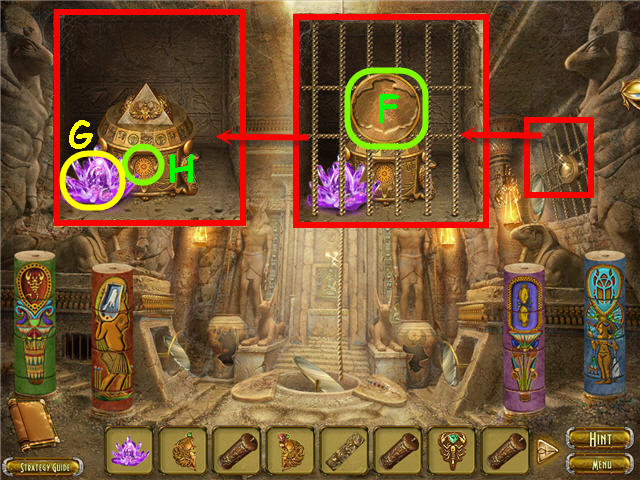
- Examine the niche.
- Place the 2 GOLDEN SCARAB PARTS in the lock (F).
- Take the 2nd CRYSTAL (G).
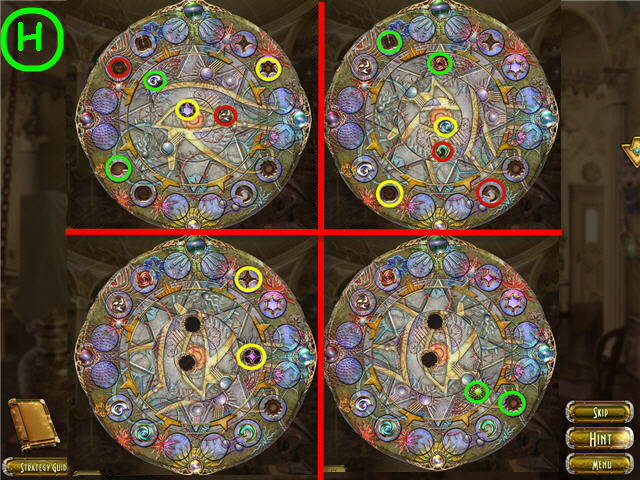
- Place the GOLDEN SCORPION in the slot (H) to trigger a puzzle.
- Move the gems to their corresponding colored circle.
- Place your cursor on the scarab color that matches the path you wish to move and right or left-click to move the gem along that path.
- Red Gem; cursor on red scarab - click the right or left mouse 7 times.
- Yellow Gem; cursor on yellow scarab - right click twice.
- Green Gem; red scarab – right click, yellow scarab – left click, green scarab – left click, yellow scarab – right click, red scarab – left click.
- Blue and Purple Gem; blue scarab – left click, yellow scarab – left click three times, green scarab – left click, yellow scarab – right click, blue scarab – right click, green scarab – right click.
- See screenshot (I) for solution.
- Take the GOLD STATUETTE.
- Climb into the left niche.
- Place a CRYSTAL in each plate (J).
- Place the GOLD STATUETTE in the panel (K).
- Examine the door.
- Place the 4 BRONZE DRUMS and the TABLET WITH SYMBOLS in the slots.
- Turn the BRONZE DRUMS so that the figures match the TABLET WITH SYMBOLS.
- See screenshot for solution (L).
- Take the MAGIC LENS (M) and exit out.
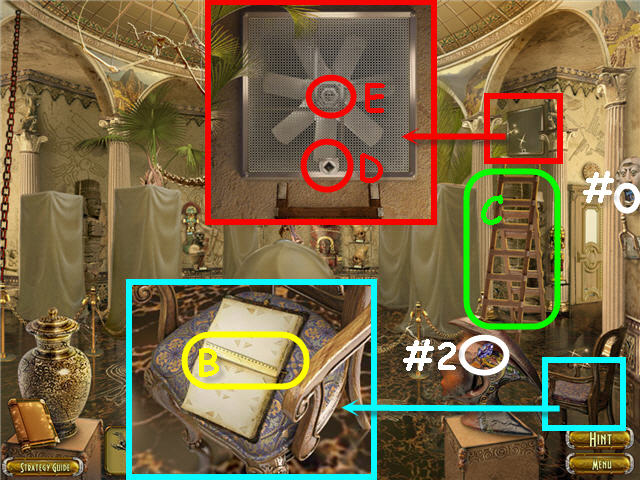
- Back out.
- Examine the stone throne to trigger a puzzle.
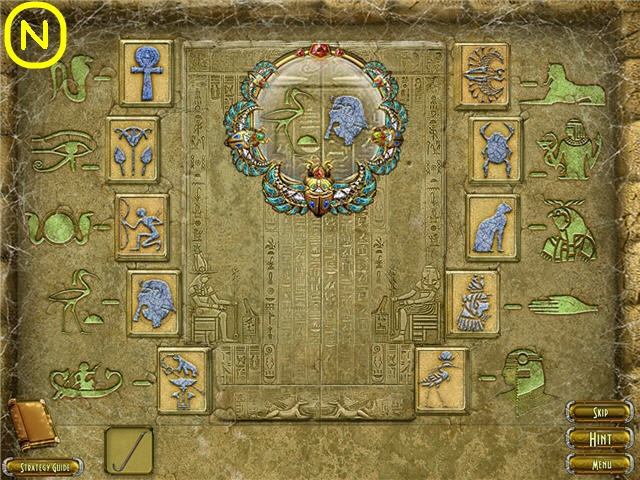
- Move the MAGIC LENS to see the correct matching pair of glyphs.
- Switch the blue glyph tiles next to the correct green glyph. See screenshot for solution (N).
- Place the MAGIC LENS in the center to trigger a puzzle.
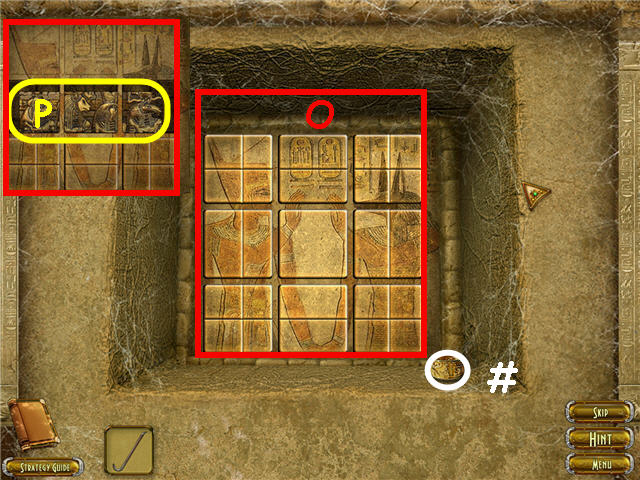
- Rearrange the tiles to complete the picture. See screenshot (O) for solution.
- Take the TABLET WITH SYMBOLS (P).
- Take the PHARAOH'S BANGLE 4/5 (#).
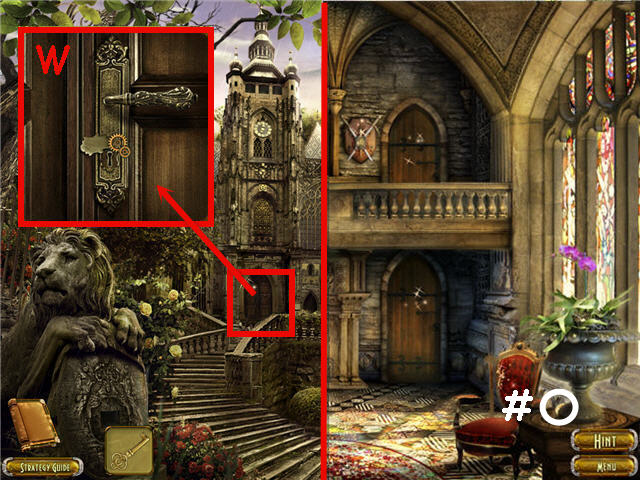
- Head left through the niche.
- Examine the door.
- Place the TABLET WITH SYMBOLS on the lower right.
- Arrange the bronze drums to match the lower right symbols (Q).
- Take THE SPHERE OF THE WATER ELEMENT.
Chapter 2 – Castle
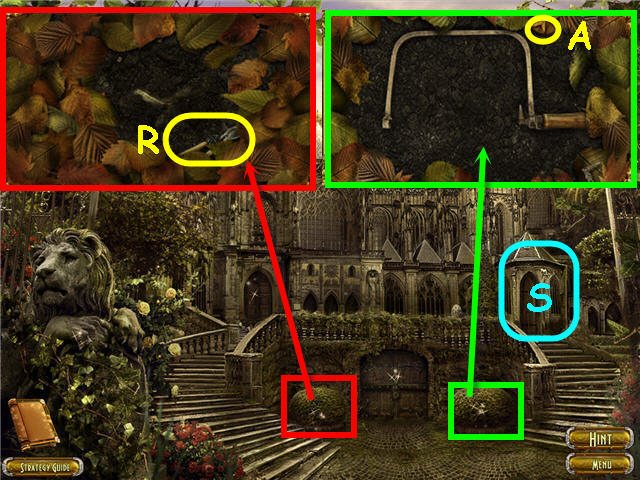
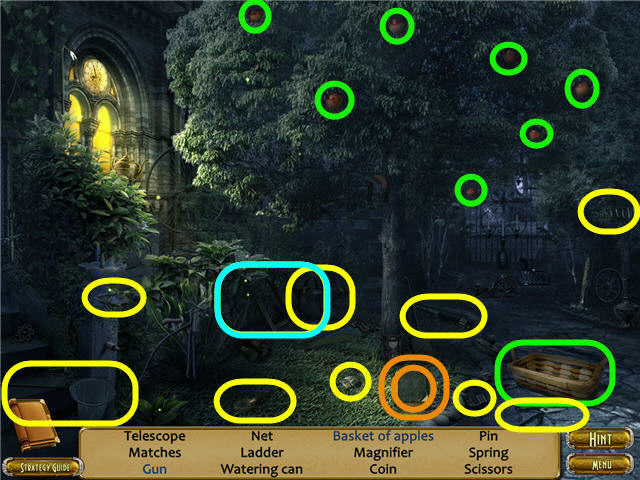
- Examine the left flowerbed; move the leaves and take the GARDEN PRUNER (R).
- Examine the right flowerbed; take the WOODEN DISK (A).
- Examine the annex to access a HOS (S).
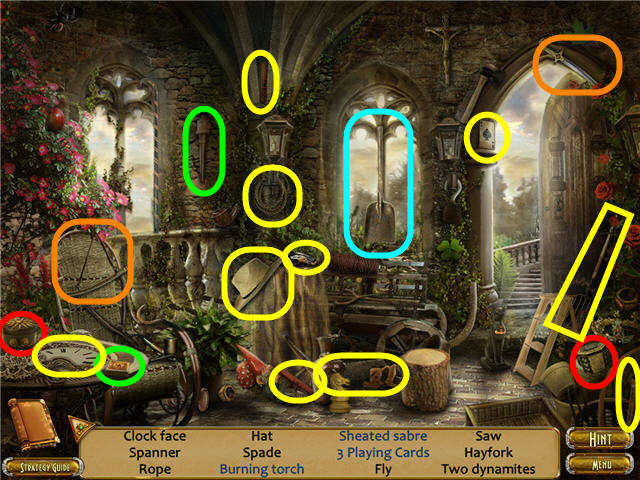
- Find the items listed.
- Open the matchbox, strike the match, take the lit match and light the torch to get a burning torch.
- Open the 2 containers to get the playing cards.
- Place the sabre in the sheath to get a sheathed sabre.
- You will earn a SPADE.
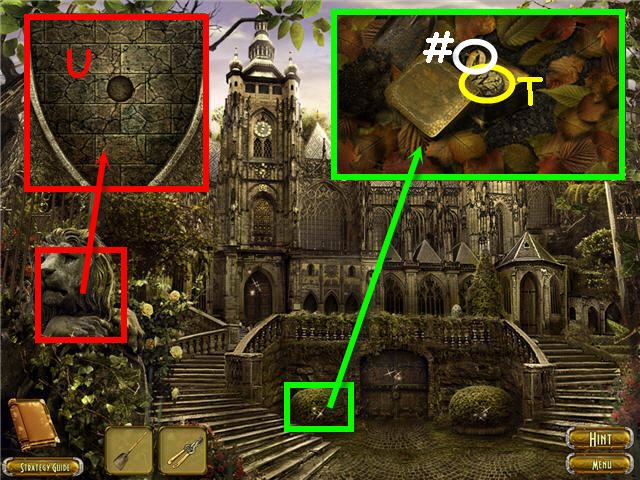
- Examine and use the SPADE on the left flowerbed.
- Open the tin; take the STONE DISC (T) and PHARAOH'S RING 3/5 (#).
- Examine and use the GARDEN PRUNER on the lion statue a few times.
- Place the STONE DISC in the center (U) to trigger a puzzle.
- Swap the tiles to complete the bas relief. See screenshot for solution (V).
- Take the KEY.
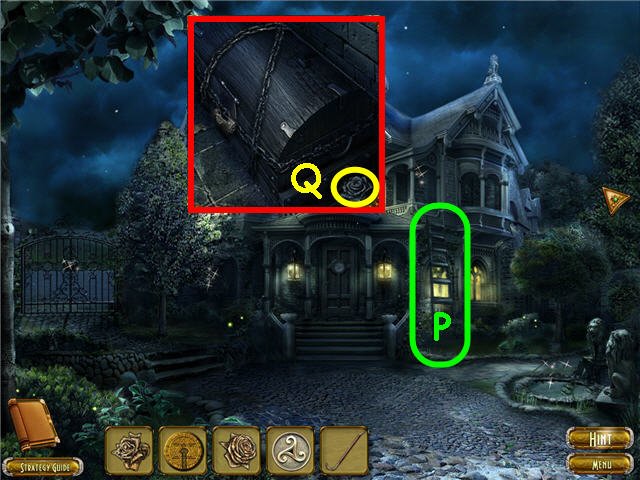
- Examine the front door.
- Use the KEY on the lock (W) and turn the key.
- Enter the castle.
- Take the PHARAOH'S RING 4/5 (#).
- Head into the dining room.
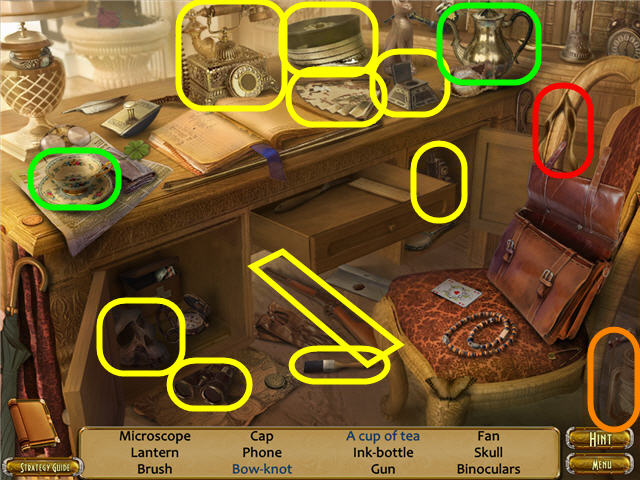
- Examine the china cabinet to access a HOS.
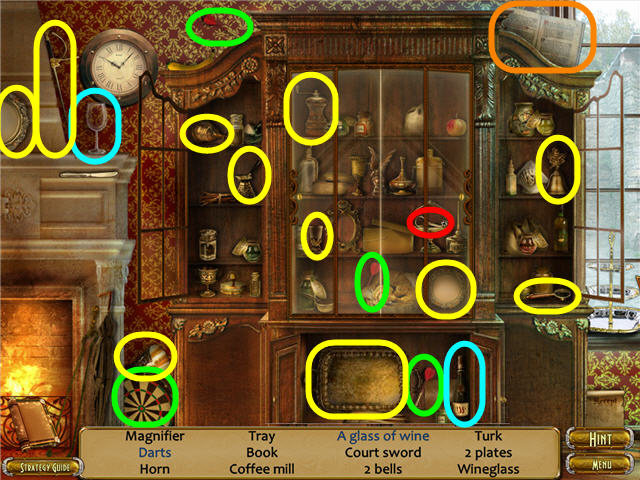
- Find the items listed.
- Slide the glass doors to get the items in the cabinet.
- Use the key circled in red on the bottom cabinet.
- Place the darts on the dartboard to get the darts.
- Use the wine bottle on the glass to get a glass of wine.
- You will earn a BOOK.
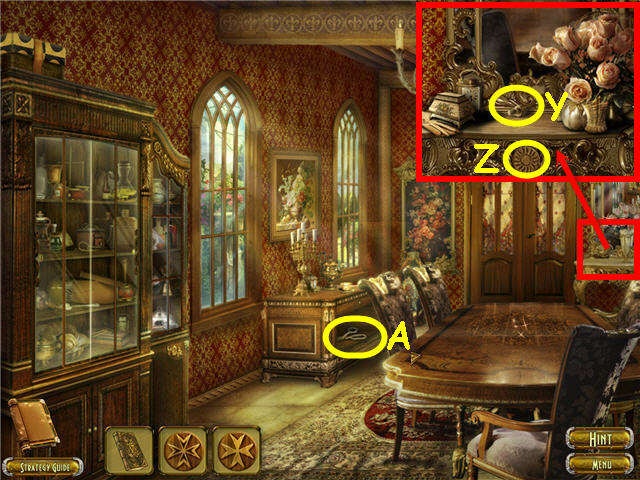
- Examine the dressing table.
- Move the items; take the BRONZE HANDLE (Y) and 2nd WOODEN DISK (Z).
- Open the cabinet; take the SCISSORS (A).
- Head straight.
- Examine the fire place to access a HOS.
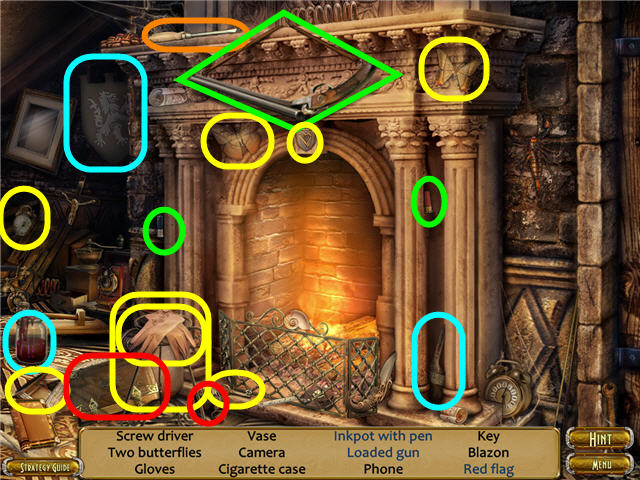
- Find the items listed.
- Place the shotgun shells in the shotgun to get a loaded gun.
- Dip the brush in the paint jar and use the dipped brush on the flag to get a red flag.
- Open the book, take the quill and place in the inkpot to get an inkpot with pen.
- You will earn a SCREWDRIVER.

- Examine the chair; use the SCREWDRIVER on the arm (B).
- Take the PHARAOH'S BROOCH 2/5 (#) the PARCHMENT (C) the WOODEN COAT (D) and the 3rd WOODEN DISK (1).
- Back out.
- Examine the annex to access a HOS.
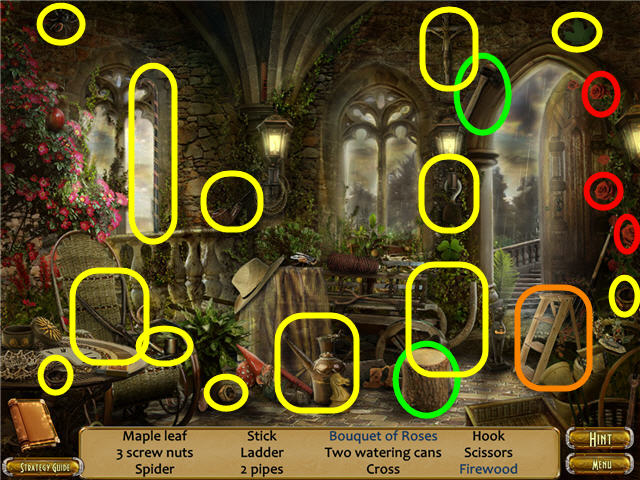
- Find the items listed.
- Use the axe on the stump to get firewood.
- Collect the three roses to get a bouquet of roses.
- You will earn a LADDER.
- Head straight twice to the dining room.
- Place the LADDER by the cabinet (E).
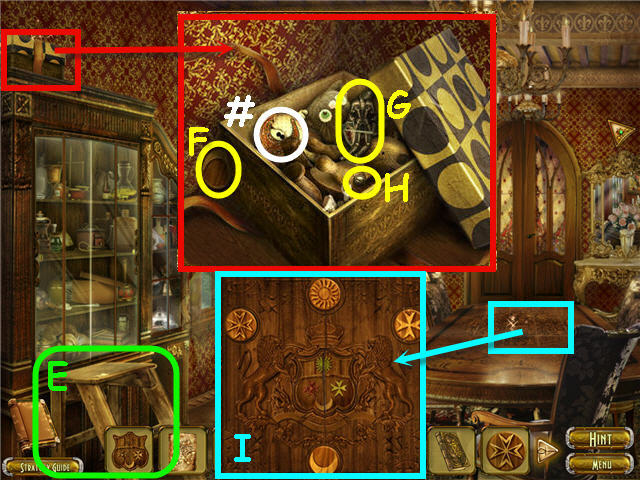
- Examine the box; use the SCISSORS on the bow and open the lid.
- Take the 4th WOODEN DISC (F), KNIGHT FIGURE (G) and PHARAOH'S NECKLACE 1/5 (#).
- Use the SCREWDRIVER to get the SCREW (H).
- Examine the table.
- Place the WOODEN COAT in the center.
- Place the 4 WOODEN DISCS in the slots (I) in the position found on the WOODEN COAT to trigger a puzzle.
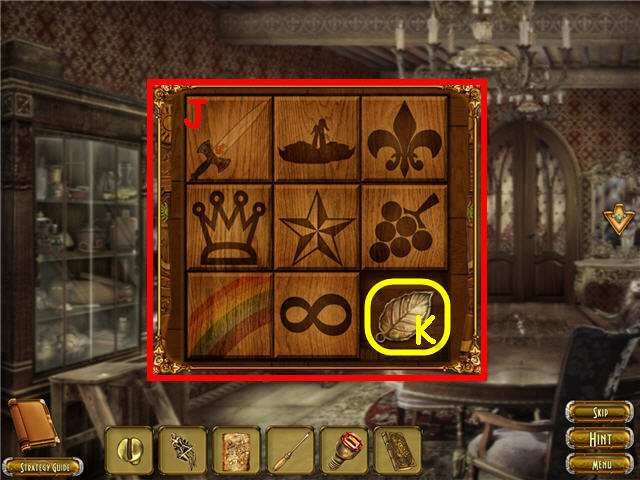
- Slide the tiles to place them in the correct order.
- The starting layout is random.
- Clue: Look at the points, lines and other details on the tiles and place them in numerical order. See screenshot (J) for solution.
- Take the GOLD LEAF (K).
- Head straight.
- Examine the shield.
- Place the GOLD LEAF and SCREW on the top of the shield.
- Use the SCREWDRIVER on the SCREW to trigger a puzzle.
- Rotate the leaves to match the PARCHMENT which is automatically displayed. See screenshot (L) for solution.
- Use the SCREWDRIVER to get the SCREW (M).
- Take the KEY (N) and 2nd BOOK (O).
- Examine and use the KEY on the 1st floor door and enter.
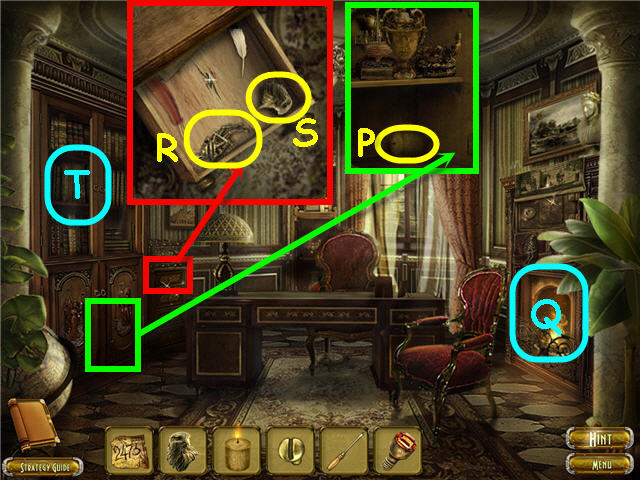
- Open and examine the cabinet.
- Move the items to the top shelf; take the EXTINGUISHED CANDLE (P).
- Use the EXTINGUISHED CANDLE in the fireplace (Q) to get a BURNING CANDLE.
- Examine and open the drawer.
- Move the items to expose the hole; take the 2nd KNIGHT FIGURE (R) and BRONZE EAGLE HEAD (S).
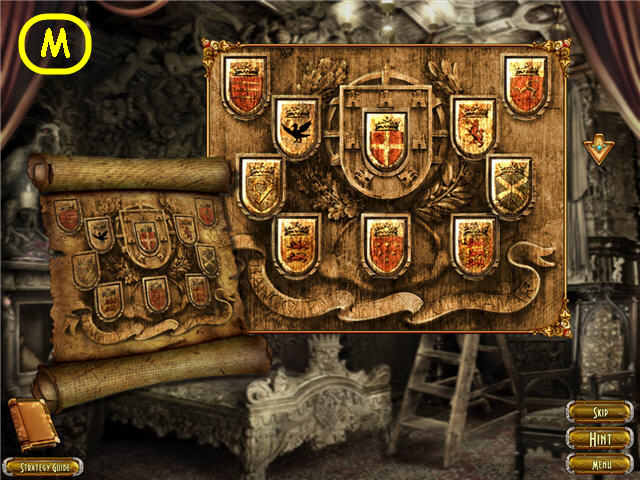
- Examine and place the 2 BOOKS on the shelves (T) to trigger a puzzle.
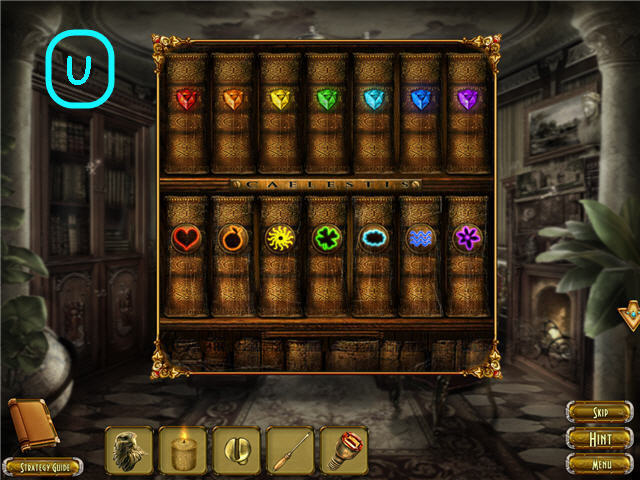
- Arrange the two rows of books in a rainbow colored order.
- See screenshot (U) for solution.
- You will earn a FRAGMENT WITH THE FIGURES.
- Examine the fireplace panel.
- Place the red headed KNIGHT FIGURE in the left slot and the KNIGHT FIGURE with the red shield on the right to trigger a puzzle.
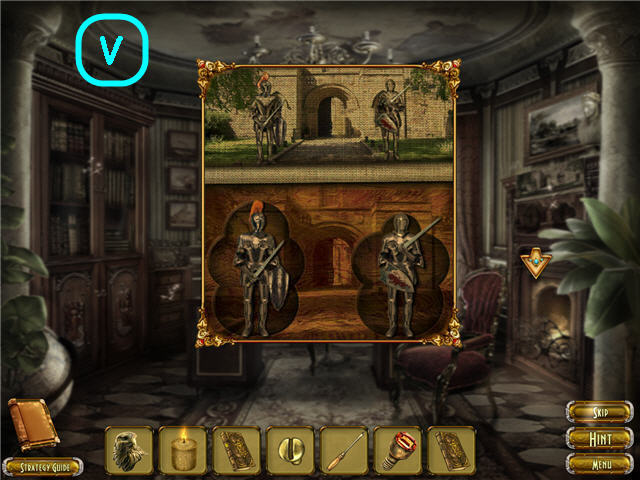
- Position the limbs and heads to match the knights above.
- See screenshot (V) for solution.
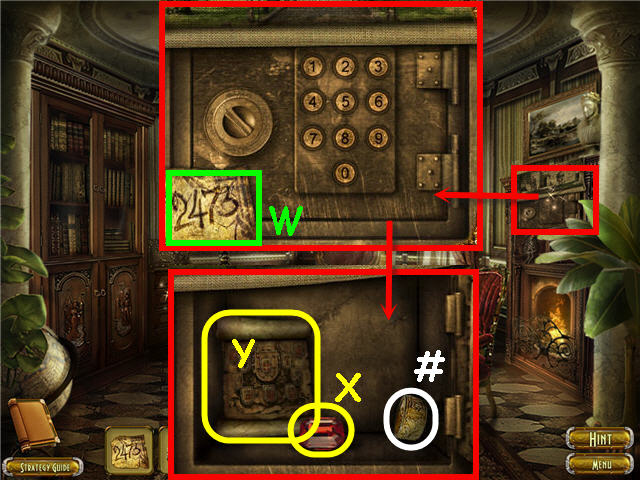
- Examine the safe and automatically use the FRAGMENT WITH THE FIGURES (W).
- Enter the code 2473 to solve it.
- Take the PHARAOH'S BANGLE 5/5 (#), RUBY (X), and SCROLL (Y).
- Back out.
- Examine the fireplace to access a HOS.
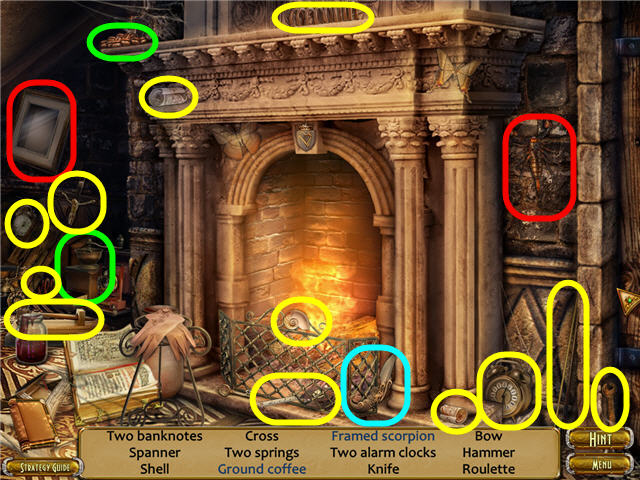
- Find the items listed.
- Place the coffee beans in the grinder to get ground coffee.
- Place the scorpion in the frame to get a framed scorpion.
- You will earn a KNIFE.
- Head into the 1st floor right door.
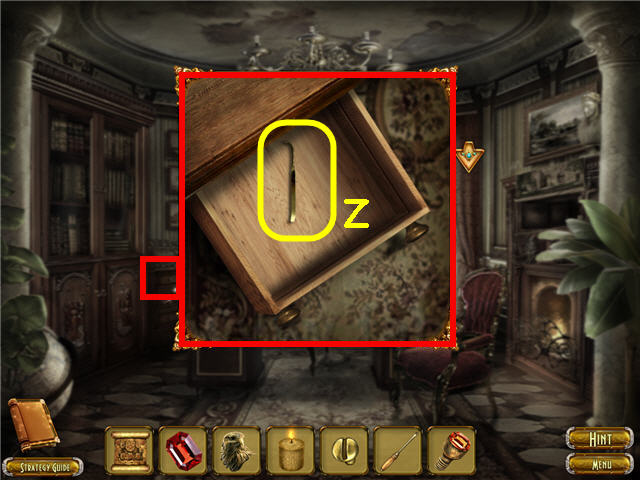
- Examine and use the KNIFE on the drawer; take the SKELETON KEY (Z).
- Back out.
- Examine and use the SKELETON KEY on the bedroom door to trigger a puzzle.
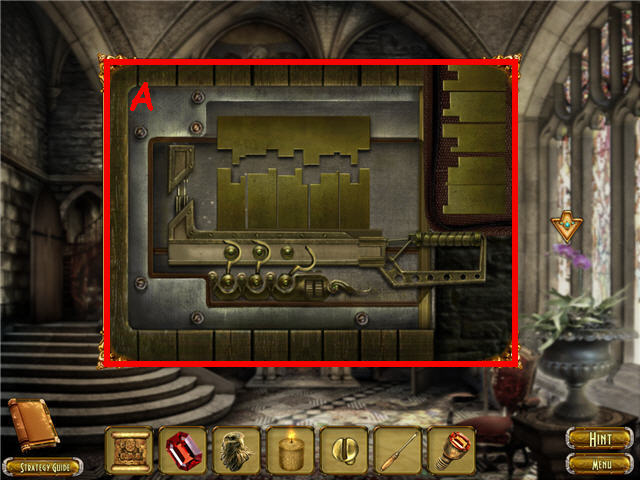
- Arrange the metal plates on the bottom lock row so that the teeth fit together.
- There are extra plates to the right. See screenshot (A) for solution.
- Head into the bedroom.
- Take the PHARAOH'S RING 5/5 (#).
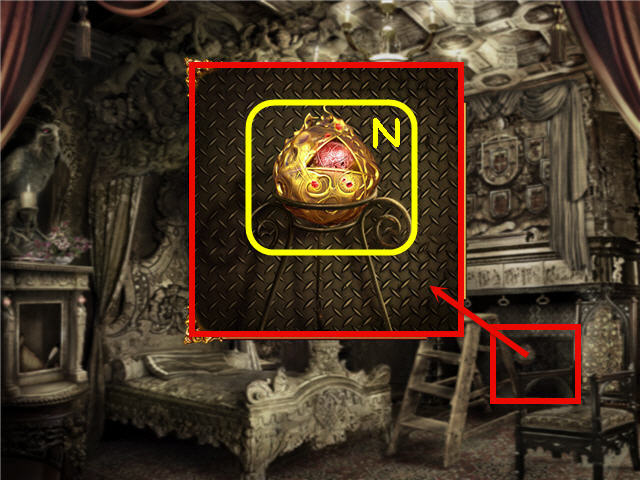
- Examine and place the BRONZE EAGLE HEAD (B), BURNING CANDLE (C) and RUBY (D) on the statuette.
- Examine the pedestal (E); place the BRONZE HANDLE on the colored bar to trigger a puzzle.

- Move the colored bar across the plate by moving the gold bars out of the way.
- See screenshot for solution.
- Take the HACKSAW BLADE and PHARAOH'S SIGNET 3/5.
- Exit the castle.

- Examine the flowerbed.
- Connect the BLADE HOLDER (1) and HACKSAW BLADE to the saw; place the SCREW and use the SCREWDRIVER on the SCREW to get a HACKSAW (F).
- Examine and use the HACKSAW on the basement door lock (G).
- Enter the basement.
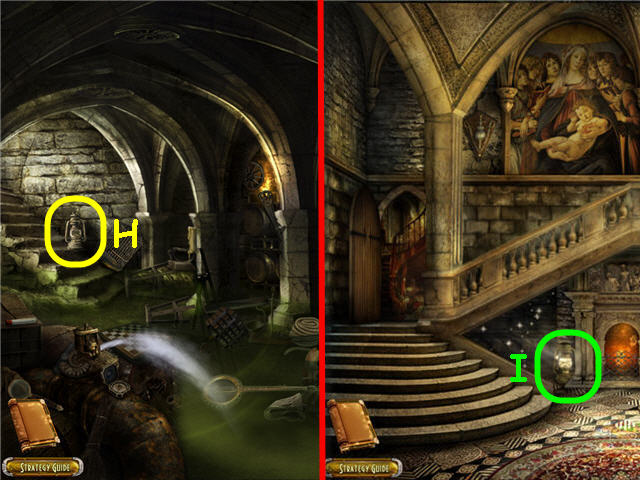
- Take the KEROSENE LAMP (H).
- Exit left and into the castle.
- Place the KEROSENE LAMP under the stairs (I).
- Examine under the stairs to access a HOS.
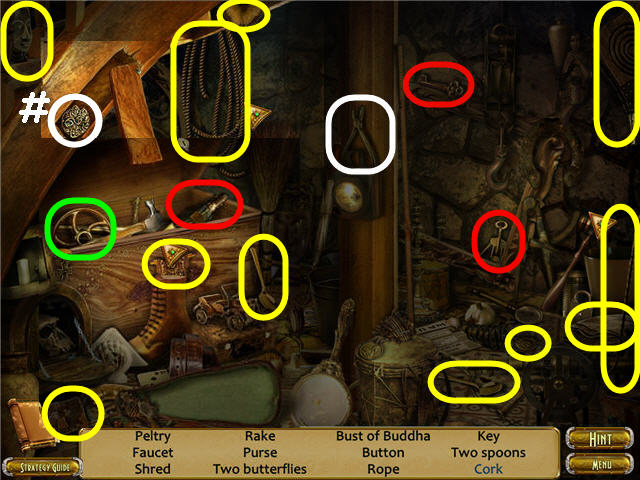
- Find the items listed.
- Use the pliers on the nail; take the PHARAOH'S BROOCH 3/5 (#).
- Use the key on the trunk; use the corkscrew on the bottle to get a cork.
- You will earn a FAUCET.
- Back out and head into the basement.
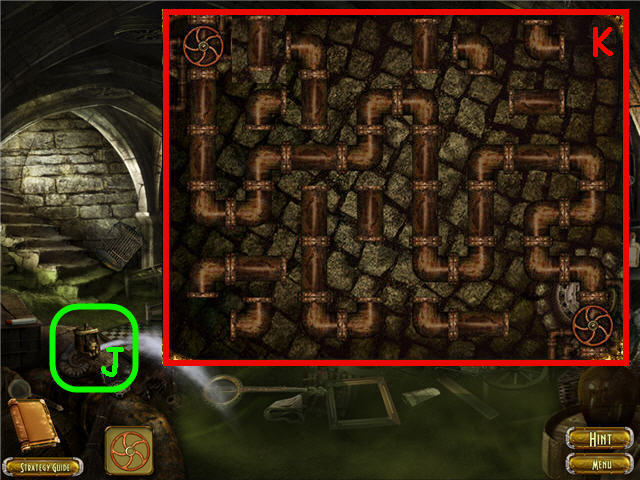
- Place the FAUCET on the tap (J) to trigger a puzzle.
- Arrange the pipes to complete the flow from one tap to the other. See screenshot for solution (K).
- Automatically trigger a HOS.
- Find the items listed.
- Place the knight on the chess board and move him to get the knight.
- You will uncover the stash in the center of the room.
- Examine the stash to trigger a puzzle.
- Arrange the tiles in the correct order to open the stash.
- See screenshot (L) for solution.
- Take the WOODEN BLAZON (2) and the PHARAOH'S STAFF 1/5 (#).
- Exit and head into the castle bedroom.
- Open the curtain; exit the room and head into the dining room.
- Take the LADDER by the china cabinet and head back to the bedroom.
- Place the LADDER by the fireplace.
- Examine and place the WOODEN BLAZON on the bas-relief to trigger the puzzle.
- Arrange the blazons in the same order as the SCROLL which was automatically used.
- See screenshot (M) for solution.
- Examine the fireplace.
- Take THE SPHERE OF THE FIRE ELEMENT (N).
Chapter 3 – Museum
- Examine the planter; move the rocks and shells and take the FAUCET (O) and TETRAHEDRON KEY (P).
- Examine the left door and exit the close-up to trigger a HOS.
- Examine the desk to access a HOS.
- Find the items listed.
- Open the left panel to get the pen; use the pen on the ledger to get a sheet with a code.
- Open the first aid kit to get the bandage.
- Open the briefcase to get the reel.
- Open the drawer and right panel to find more objects.
- You will earn a NOTE for your journal.
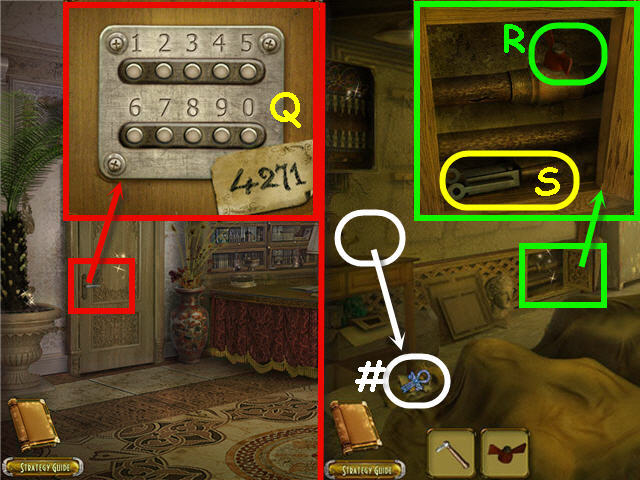
- Examine the left door; use the code to unlock; 4271 (Q).
- Head left.
- Open and examine the panel; place the FAUCET on the valve (R) and turn it.
- Take the LEVER (S).
- Knock over the vase; take the PHARAOH'S STAFF 2/5 (#).
- Open and examine the electrical box to trigger a puzzle.
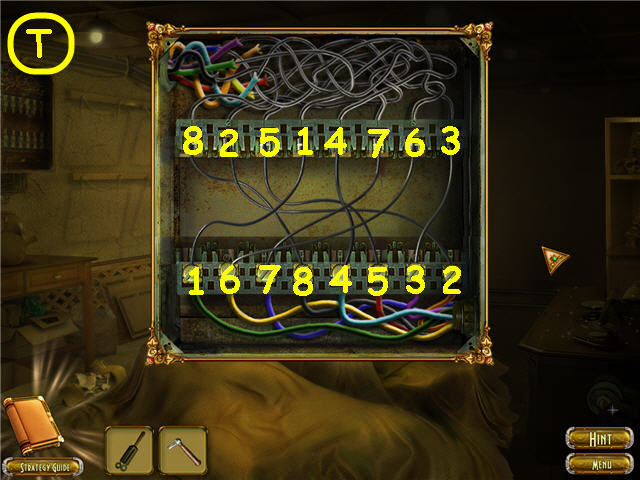
- Connect the wires from the top to the correct connector on the bottom.
- See screenshot (T) for solution.
- Examine the desk to access a HOS.
- Find the items listed.
- Place the vase pieces on the vase to get an ancient vase.
- Open the locket to get an old photo.
- Click on the file box three times to get a card 'C'.
- You will earn a KNIFE.
- Remove the covers off the artifacts.
- Use the LEVER on the mechanism (U) and click it.
- Take the PHARAOH'S NECKLACE 2/5 (#).
- Take the LADDER (V).
- Examine the crate; use the KNIFE on the rope.
- Take the SPANNER (W) and SCREWDRIVER (X).
- Hang the pictures on the wall (Y).
- Examine the safe; use the SCREWDRIVER to remove the screws and trigger a puzzle.
- Click the dials in the correct order to pull down all the bars.
- Use the handle on the top to reset the puzzle.
- Solution: Right, left 2x, middle, right, middle. See screenshot (Z) for solution.
- Take the PHARAOH'S NECKLACE 3/5 (#), PHARAOH'S BROOCH 4/5 (#2), THE KEY OF THE HALL (A).
- Head straight.
- Examine and use THE KEY OF THE HALL on the right door.
- Enter to the exhibition hall.
- Open the mouth on the head; take the PHARAOH'S STAFF 3/5 (#).
- Take the PHARAOH'S SIGNET 4/5 (#2).
- Examine the chair; open the book; take the RULER (B).
- Place the LADDER by the ventilation duct (C).
- Click on the grate; use the TETRAHEDRON KEY on the lock (D) and turn.
- Use the SCREWDRIVER and SPANNER on the fan screw (E).
- Exit the room.
- Examine and use the RULER on the case (F) to trigger a puzzle.
- Rearrange the keys in the correct order based on the criteria above and to the left.
- See screenshot for solution (G).
- Examine the desk to access a HOS.
- Find the items listed.
- Use the teapot on the cup to get a cup of tea.
- Click on the ribbon a few times to get a bow-knot.
- You will earn a LAMP.
- Head to the exhibition hall and up the ladder.
- Use the LAMP in the duct and head straight.
- Take the PHARAOH'S SIGNET 5/5 (#).
- Move the cardboard; examine the box.
- Take the BUTTON (H).
- Move the box; take the PART OF THE MIRROR (I).
- Click on the lamp (1).
- Head right.
- Examine the cabinet to access a HOS.
- Find the items listed.
- Open the suitcase and pouch to find more objects.
- Place the cannonball in the cannon; strike the match on the matchbook; use the lit match on the cannon to get the hit target.
- Open the wallet to get the U.S. dollar.
- You will earn a GEAR.
- Knock over the vase; take the PHARAOH'S STAFF 4/5 (#).
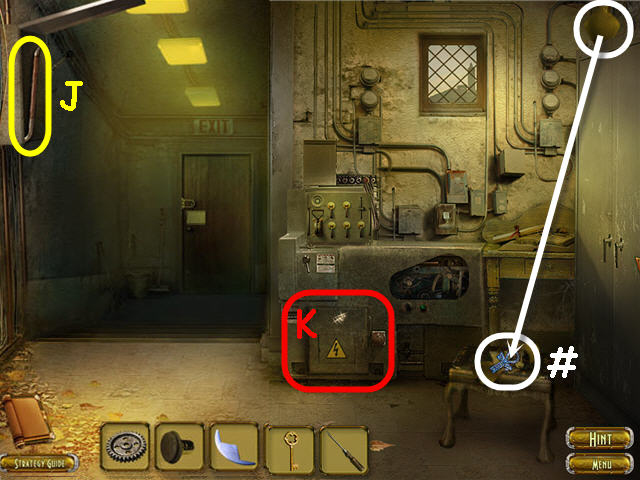
- Open the cabinet; take the CROWBAR (J).
- Examine and use the KEY on the panel (K) to trigger a puzzle.
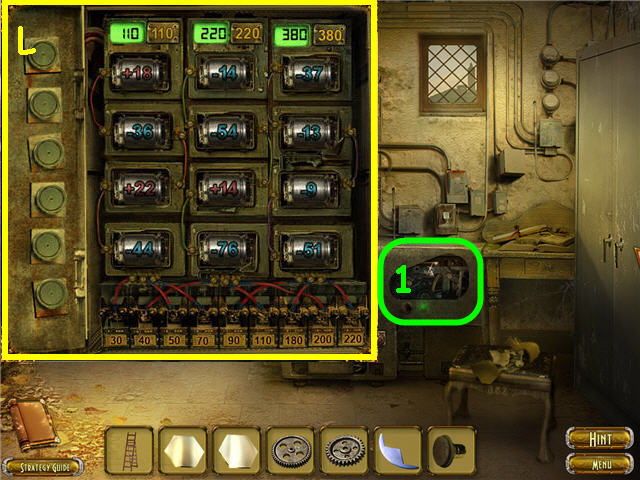
- The goal is to change the fuses so that the numbers on the fuses add up to 110, 220 and 380.
- See screenshot (L) for solution.
- Examine the mechanism (1) to trigger a later HOS.
- Head straight.
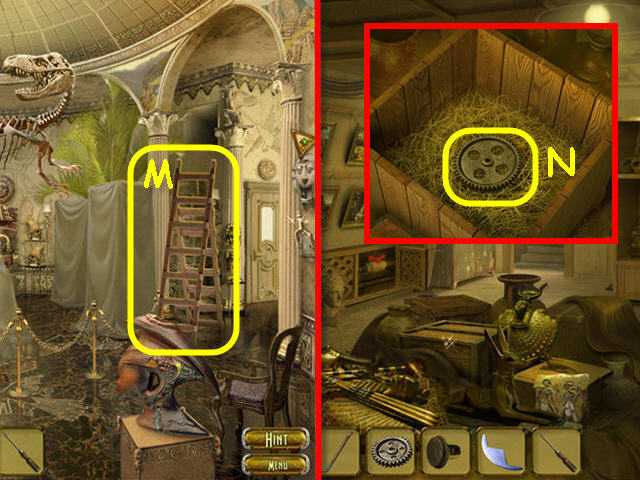
- Take the LADDER (M).
- Back out and head left.
- Examine and use the CROWBAR on the crate; take the 2nd GEAR (N).
- Head straight, right, through the control room door on the right and back out.
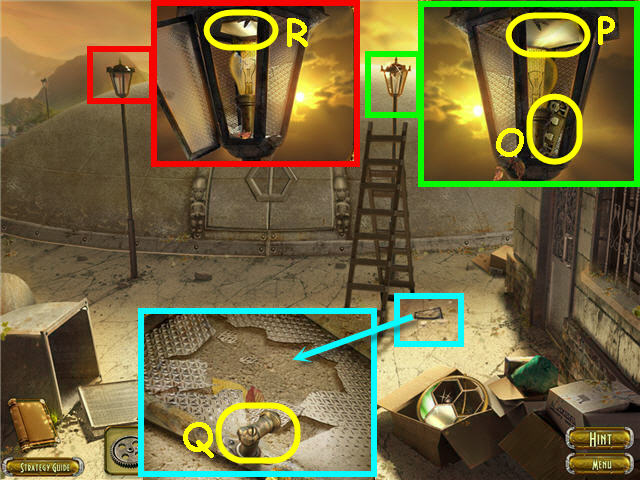
- Place the LADDER by the right lamp.
- Examine and open the lamp; take the FITTING PIECE (O) and the 2nd PART OF THE MIRROR (P).
- Examine the broken lamp door; use the SCREWDRIVER to get the PEN (Q).
- Place the LADDER by the left lamp.
- Examine and use the PEN on the lamp and open the lamp door.
- Take the 3rd PART OF THE MIRROR (R).
- Head right and straight.
- Examine the chopper switch.
- Open the panel; place the FITTING PIECE inside.
- Click on each wire to connect them (S).
- Remove the chain (T).
- Take the covers off the display cases.
- Take the PHARAOH'S NECKLACE 4/5 (#).
- Back out and head left.
- Examine the desk to access a HOS.
- Find the items listed.
- Remove the egg shell to get the chick.
- Use the wrench on the nut to get the gearwheel.
- Use the hammer on the nut to get a cracked walnut.
- You will earn a CHAIN.
- Head straight, right and into the control room.
- Examine the mechanism; place the BUTTON on the lower left.
- Place the larger gear on the right, the smaller gear on the left.
- Place the CHAIN on the gears (U); push the button.
- Head straight.
- Examine the left display; pull the lever (V).
- Use the KEY (X) on the drawer; take the STONE INSERTION (Y).
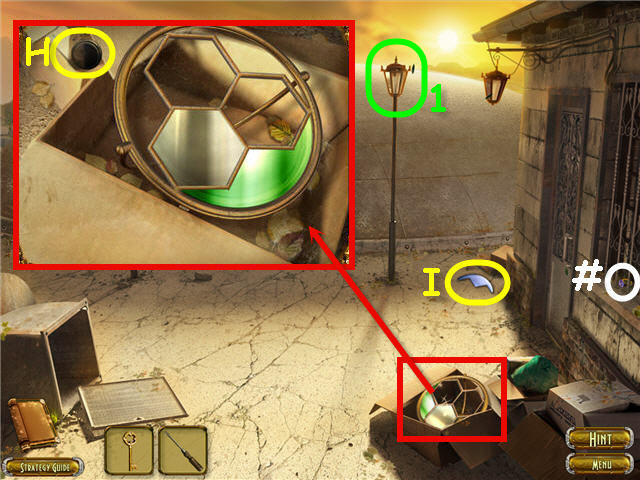
- Examine the Aztec Altar; take the 4th PART OF THE MIRROR (W).
- Head to the control room and back out to the roof.

- Examine the box.
- Place the 4 PARTS OF THE MIRROR on the frame; take the FRAME WITH THE MIRRORS (Z).
- Place the STONE INSERTION on the dome door (A).
- Examine the dome door to trigger a puzzle.
- Find the matching shaped pairs.
- See screenshot (B) for solution.
- Automatically trigger another puzzle.
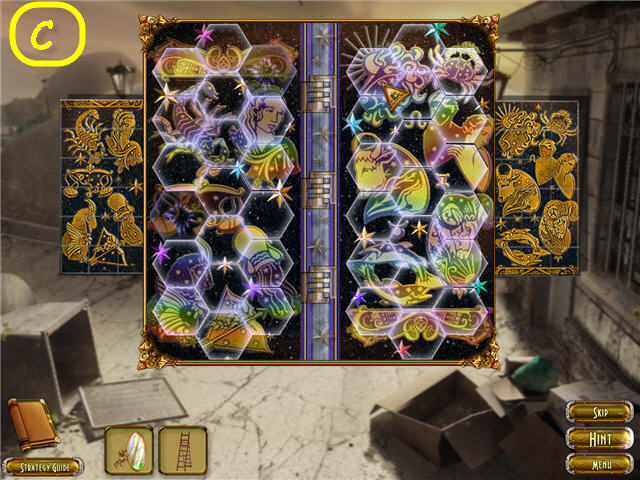
- Restore the picture by placing the hexagons in the correct spot.
- See screenshot (C) for solution.
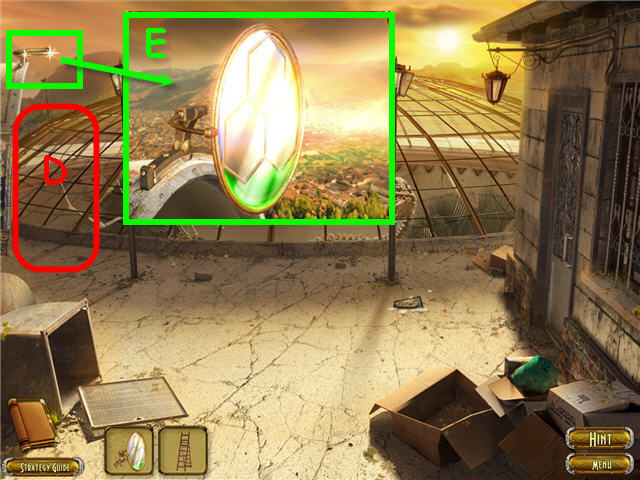
- Place the LADDER on the left (D).
- Place the FRAME WITH THE MIRRORS on the upper left (E) and click on the mirror.
- Head right and straight.
- Examine the Aztec Altar to trigger a puzzle.
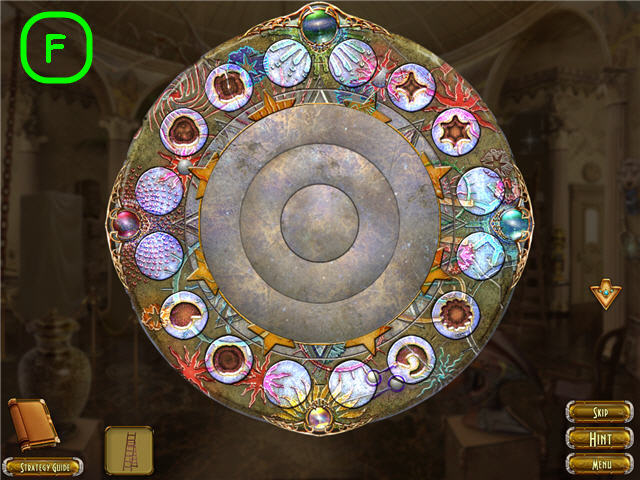
- Arrange the circles in the outer ring to complete the border.
- Click on any two to switch.
- See screenshot (F) for solution.
- Rotate the inner rings to complete the picture.
- See screenshot (G) for solution.
- Place the symbols in the matching slots on the outer ring.
- Rotate the rings to get the second set; do the same with the outer ring for the next two.
- See screenshot (H) for solution.
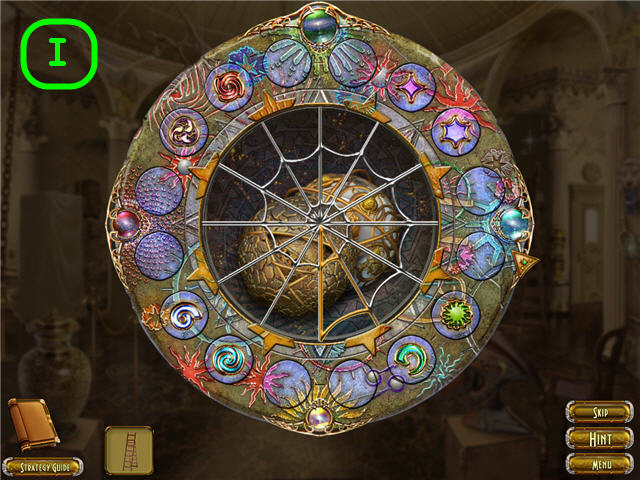
- Arrange the inner triangle to complete the web.
- See screenshot (I) for solution.
- Take THE SPHERE OF THE EARTH ELEMENT and THE SPHERE OF THE AIR ELEMENT.
Chapter 4 – Temple
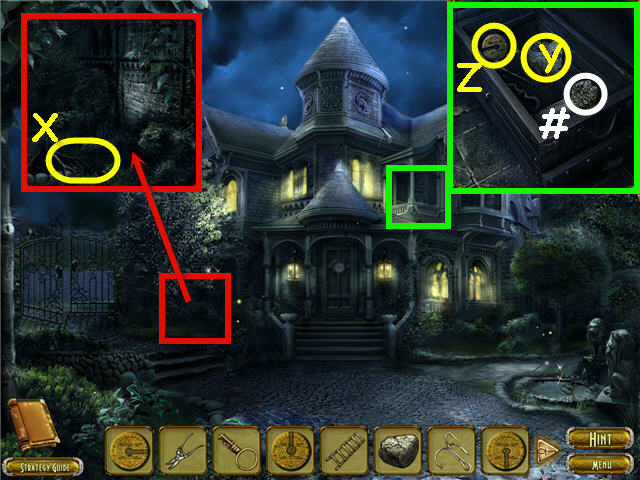
- Examine the palisade; take the CROWBAR (J).
- Examine the fountain; take the BRONZE DISC (K).
- Enter the house.
- Roll up the scroll; take the 1st BRONZE ROSE (L).
- Move the skull; take the ROUND INSET (M).
- Drag the ROUND INSET (N) to the slot above the door; take the 2nd BRONZE ROSE (O).
- Exit the house.
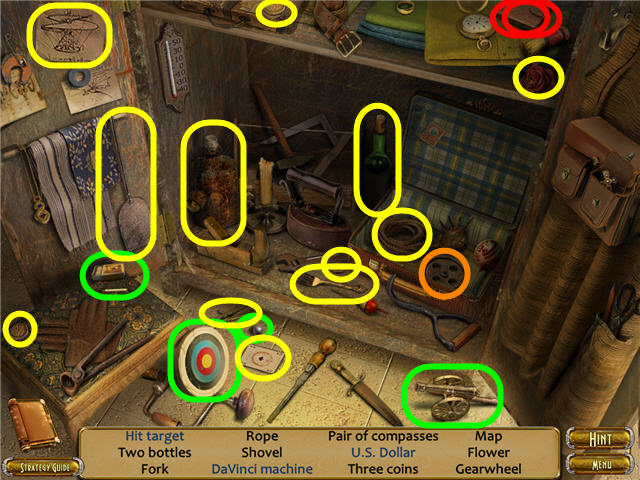
- Examine the right of the yard to access a HOS.
- Find the items listed.
- Pick the apples to get the basket of apples.
- Open the book to get the gun.
- You will earn a LADDER.
- Place the LADDER under the balcony (P).
- Examine the balcony; take the 3rd BRONZE ROSE (Q).
- Take the LADDER.
- Examine the gate.
- Place the 3 BRONZE ROSES on the lock to trigger a puzzle.
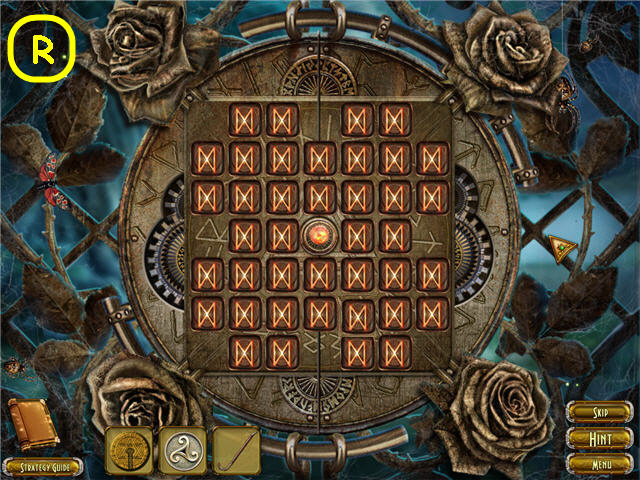
- Click on the correct order of buttons to light up all the buttons.
- The starting layout is random. See screenshot (R) for solution.
- Head through the gates.
- Examine the stone plateau to trigger a puzzle.
- Rotate the gold circles to place the colored balls in the corresponding slots.
- Solution: These are all left clicks; A – 3x, D - 2x, C – 1x – D - 3x, A – 3x, B – 1x, D – 3x, C – 1x, B – 1x.
- C – 1x, D – 1x, B – 2x, A – 1x, B – 3x, A – 1x, B – 3x, A – 1x, B – 3x, A – 3x.
- See screenshot (S) for solution.
- Head straight.
- Examine the pier.
- Use the CROWBAR on the hole in the board; take the OAR (T) and JEWEL (U).
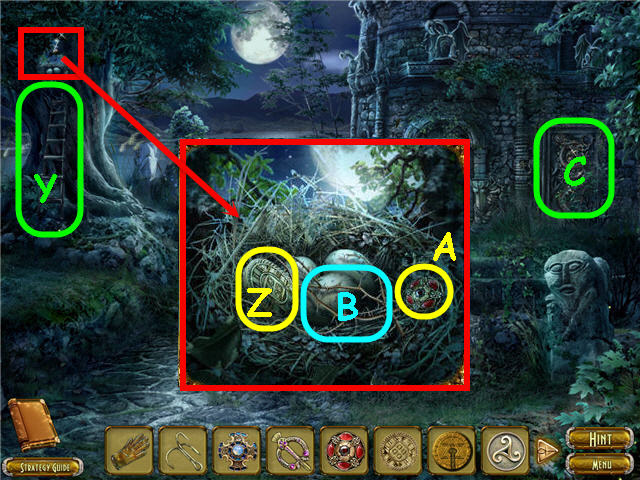
- Examine the bed of rushes; move the plants and rag out of the way.
- Take the 2nd JEWEL (V), HOOK (W) and GLOVE (X).
- Back out.
- Place the LADDER against the tree (Y).
- Examine the nest; move the branches and feather; take the GOLD DISC (Z) and 3rd JEWEL (A).
- Use the GLOVES to move the thorns (B) and expose the eggs.
- Exit out of the close-up; take the LADDER.
- Examine the bas-relief (C).
- Place the 3 JEWELS in the slots to trigger a puzzle.
- Use the CROWBAR on the broken left stone.
- Slide the grey bars to free the gold bars and move them to the center as depicted on the left. See screenshot for solution.
- Head into the temple.
- Click on the panel (D).
- Take the PHARAOH's NECKLACE 5/5 (#).
- Take the STONE (E).
- Examine and place the BRONZE DISC in the right pedestal (F) to trigger a puzzle.
- Place the border around the triangle (G).
- See screenshot for steps (H).
- Take the KNIFE (I).
- Use the KNIFE on the left pedestal a few times.
- Examine and place the GOLD DISC in the left pedestal to trigger a puzzle.
- Place the border around the triangle (J).
- See screenshot for steps (K).
- Back out twice.
- Examine the fountain; use the KNIFE on the pedestal; take the STONE TABLET (L).
- Head back into the temple.
- Place the STONE TABLET on the second from left pedestal (M).
- Examine the altar (N) to trigger the next task.
- Back out three times and into the house.
- Examine the cabinet.
- Open the top drawer; take the ASTRONOMICAL MAPS (O) and 2nd ROUND INSET (P).
- Pull the book; take the KEY (Q).
- Pull the curtains; take the GARDEN PRUNERS (R).
- Place the ASTRONOMICAL MAPS on the globe (S) to trigger a puzzle.
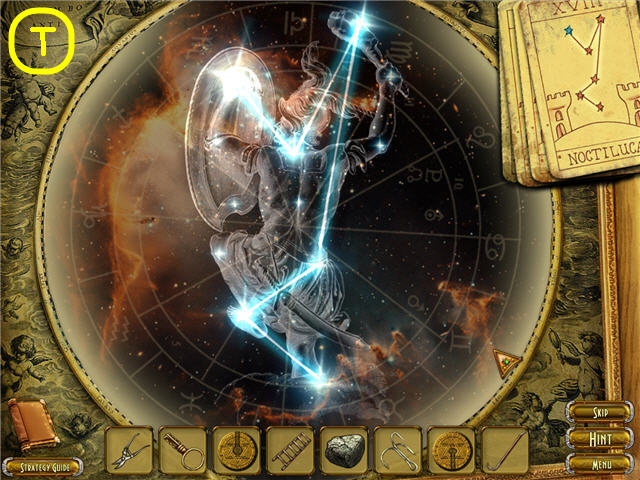
- Starting with the blue star on the map card click on the stars to complete the picture.
- See screenshot (T) for 1st map and next screenshot for 2nd.
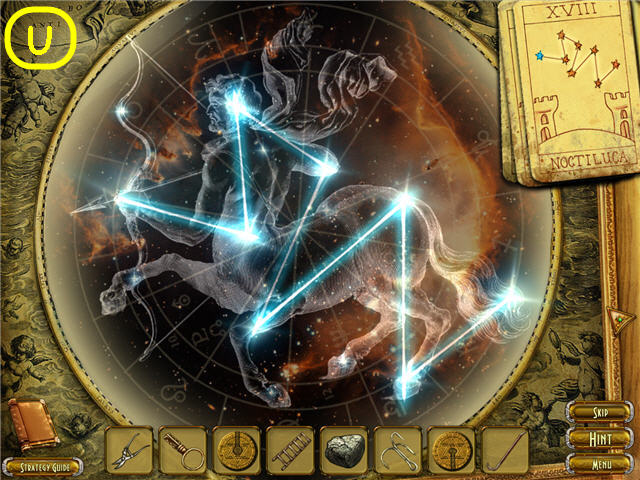
- See screenshot (U) for 2nd map.
- See next screenshot for 3rd.
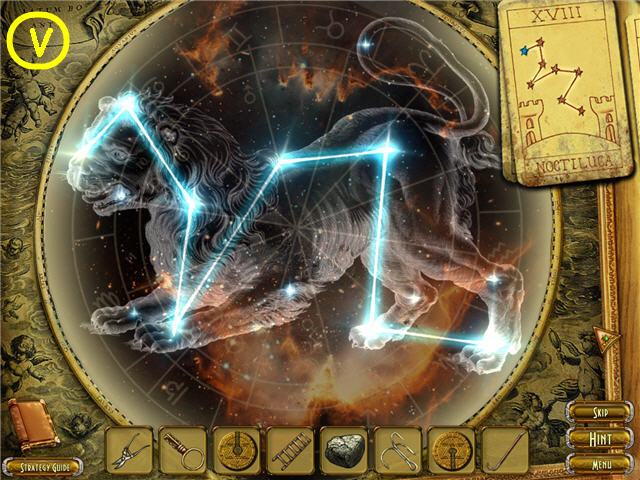
- See screenshot (V) for 3rd map.
- See next screenshot for 4th.
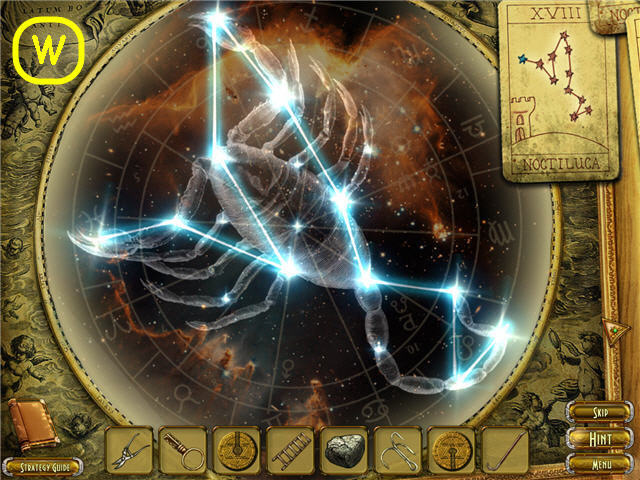
- See screenshot (W) for 4th map.
- Take the 3rd ROUND INSET.
- Exit the house.
- Examine the palisade.
- Use the GARDEN PRUNER on the sapling a few times; take the STAG (X).
- Place the LADDER under the balcony.
- Examine the balcony; use the KEY on the chest lock.
- Use the CROWBAR on the board in the chest twice.
- Take THE FISHING GEAR SCHEME (Y), the PHARAOH'S BROOCH 5/5 (#), and the 4th ROUND INSET (Z).
- Automatically get the LADDER.
- Head back into the house.
- Examine the casket; place the 4 ROUND INSETS in the corners to complete the pattern (A).
- Take MOONSTONE RECIPE for your journal (B).
- Open the secret compartment (C); take the CLIP (D) and TRIANGULAR INSERT (E).
- Examine and use the TRIANGULAR KEY on the cabinet.
- Take the FLASK FOR POISON (F).
- Examine the alchemists table (G).
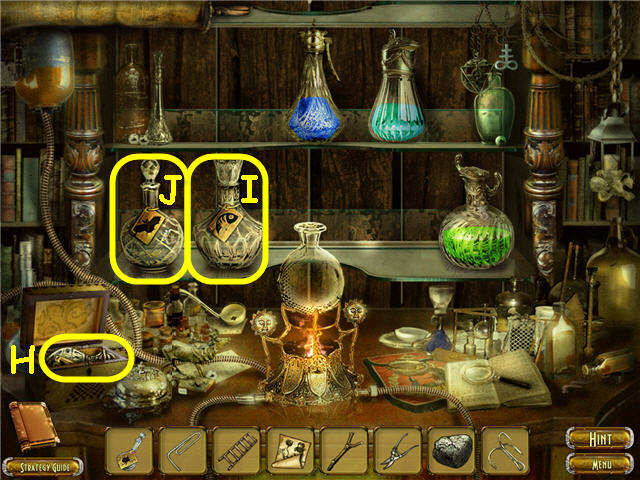
- Use the CLIP on the box; take the FLASK FOR YOLK (H).
- Take the FLASK FOR FISH BILE (I), and FLASK FOR BLOOD (J).
- Exit the house.
- Examine the right side of the yard to access a HOS.
- Find the items listed.
- Assemble the two tires and bike frame to get a bike.
- Place the valve on the tap to get a fountain.
- You will earn a SPADE.
- Head to the lake.
- Use the OAR and STAG on the boat.
- Examine the boat to access a HOS.

- Find the items listed.
- Open the pouches, pot, and tackle boxes to find items.
- Place the shot gun shell in the shotgun to get the loaded gun.
- Click on the turtle three times to get a turtle.
- Use the paper on the skull; click on the skull to get teeth imprints.
- You will earn a LANDING NET.
- Back out twice.
- Examine and use the LANDING NET on the fountain (K).
- Automatically get a BELL.
- Head through the gate.
- Examine the statue.
- Use the GARDEN PRUNER on the leaves (L).
- Open the statue mouth; take the PHARAOH'S STAFF 5/5 (#).
- Take the SEA LINE REEL (M).
- Use the LADDER on the tree; examine the nest.
- Use the FLASK FOR YOLK on the eggs (N); get the VULTURES EGG YOLK.
- Head straight.
- Examine the boat to access a HOS.
- Find the items listed.
- Put the 4 arrows in the quiver to get the quiver of arrows.
- Use the scissors on the fishing line to get the fishing hook.
- Use the hammer head on the handle to get a hammer.
- You will earn a MIRROR.
- Examine and use the SPADE on the rushes; take the WORM (O).
- Examine the dock.
- Place THE FISHING GEAR SCHEME, BELL, SEA LINE REEL, HOOK, WORM and ROCK on the dock (P).
- Use the FLASK FOR FISH BILE on the fish (Q) to get the BILE OF LAKE PERCH.
- Use the LANDING NET to get the FLY (R).
- Back out.
- Examine the statue; use the FLY on the spider.
- Use the FLASK FOR POISON on the spider (S) to get the SPIDER'S POISON.
- Head into the temple.
- Use the MIRROR on the bat (T).
- Use the FLASK FOR BLOOD on the bat (U) to get the VAMPIRE'S BLOOD.
- Back out twice and into the house.
- Examine the alchemists table to trigger a puzzle.
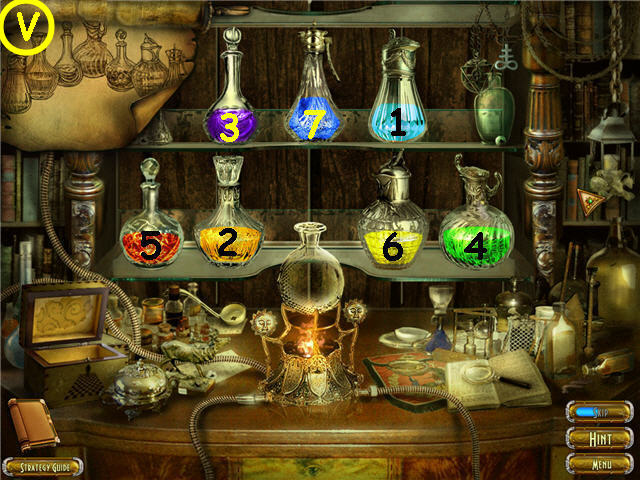
- Place the ingredients in the order of the moonstone recipe in the journal.
- Solution: Light blue (1), orange (2), purple (3), green (4), red (5), yellow (6) and dark blue (7).
- See screenshot for solution (V).
- You will earn the MOONSTONE.
- Head to the temple.
- Examine the altar.
- Place the MOONSTONE in the center to trigger a puzzle.
- The goal is to place each gem in its matching colored slot.
- Use the colored buttons on either side of the slots to rotate a path.
- Solution - Click the colored buttons in the following order: Red fireball - upper yellow, left blue; place the fire element in the slot.
- Blue fireball – left red, bottom yellow, right blue; place the water element in the slot.
- Green fireball – left red, bottom green two times; place the earth element in the slot.
- Yellow fireball – left red, bottom yellow two times; place the air element in the slot.
- Align all elements: left red two times, blue left, upper green, blue right, bottom green two times.
- See screenshot for solution (W).
- Congratulations! You have successfully completed the Temple of Life: The Legend of Four Elements Standard Edition.
Created at: 2012-01-17