Welcome to the The Andersen Accounts: A Voice of Reason Walkthrough Can you stop a dangerous band of criminals from destroying the city? Whether you use this document as a reference when things get difficult or as a road map to get you from beginning to end, we're pretty sure you'll find what you're looking for here. This document contains a complete The Andersen Accounts: A Voice of Reason game walkthrough featuring annotated screenshots from actual gameplay! We hope you find this information useful as you play your way through the game. Use the walkthrough menu below to quickly jump to whatever stage of the game you need help with. This walkthrough was created by Margie B, and is protected under US Copyright laws. Any unauthorized use, including re-publication in whole or in part, without permission, is strictly prohibited.Walkthrough Menu
General Tips
- This is the official guide for The Andersen Accounts: A Voice of Reason.
- This guide won't tell you when to zoom into a location; the screenshots show each zoom scene.
- Hidden-object puzzles are referred to as HOPs. Only the locations of the HOPs will be shown.
- Use the Map to fast travel to a location.
Chapter 1: Rachel's Apartment
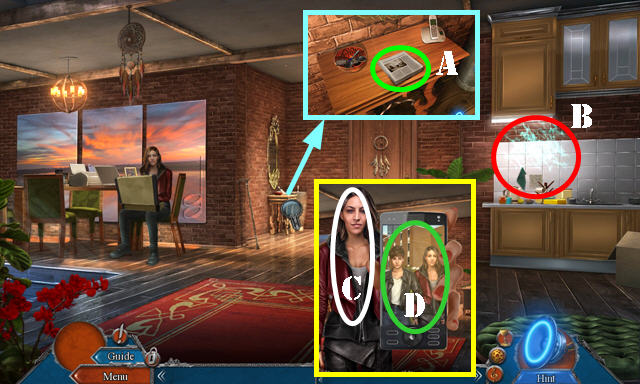
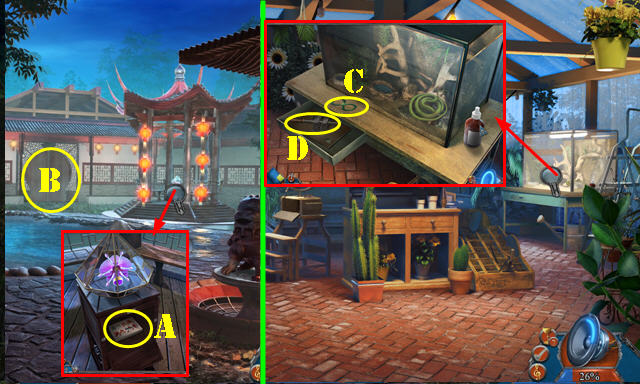
- Select scene twice.
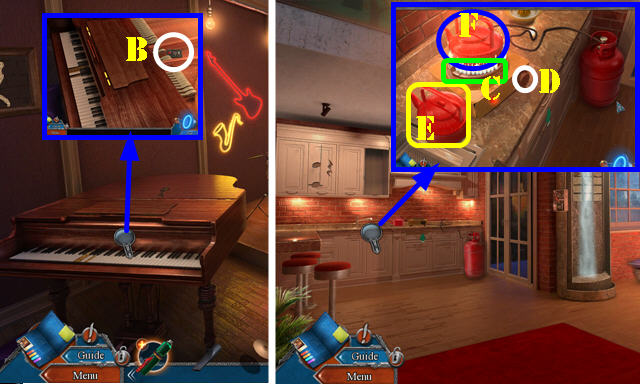
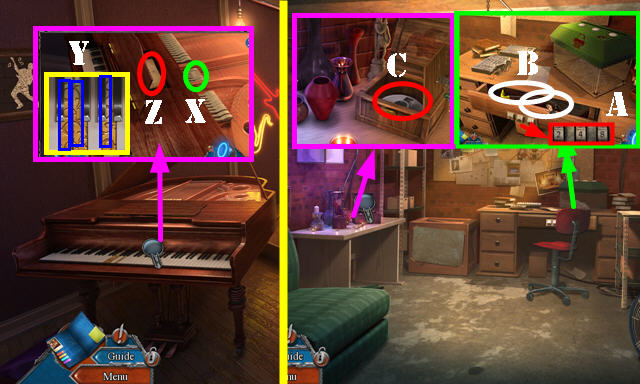
- Select newspapers 2x (A).
- Play HOP (B); receive TEA BOTTLE.
- Give TEA BOTTLE (C).
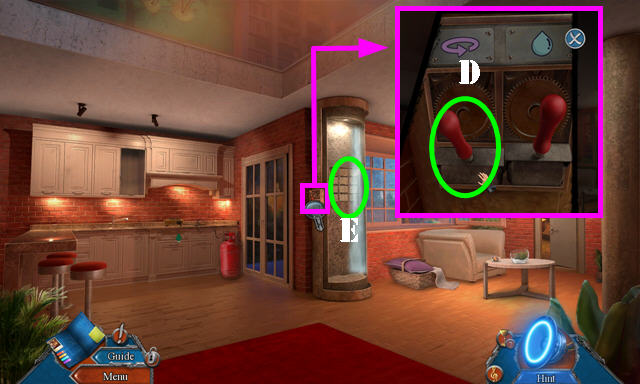
- Select phone (D).
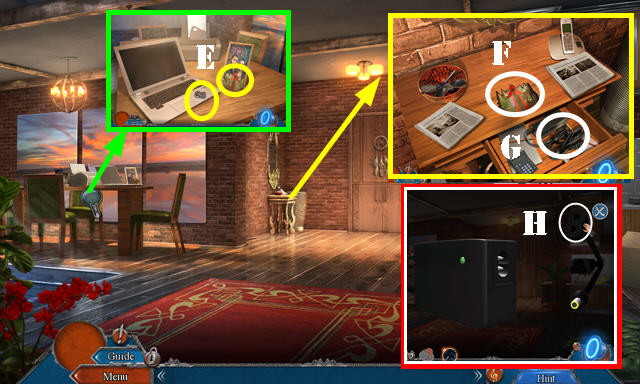
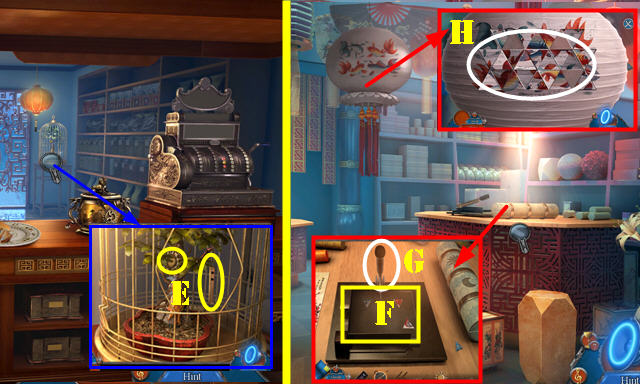
- Take RIDING HOOD SEAL and COINS (E).
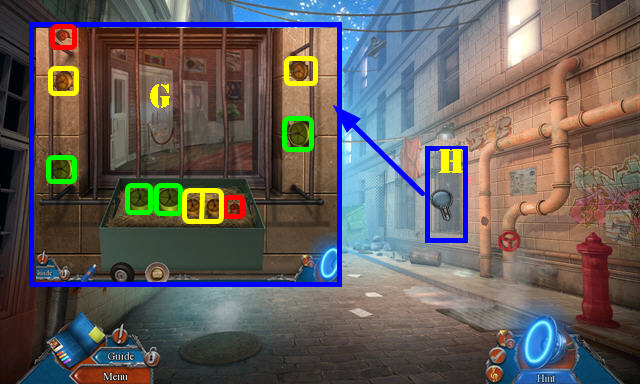
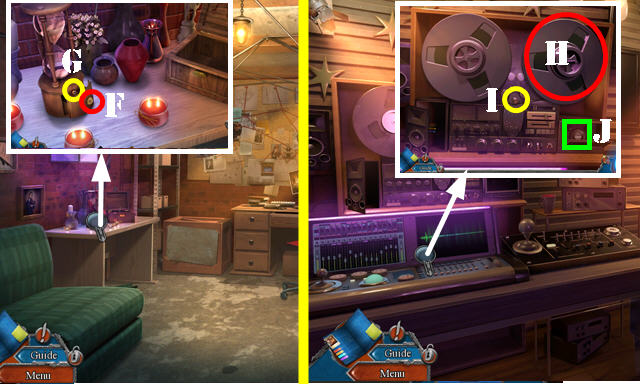
- Place RIDING HOOD SEAL (F); take DISCONNECTED CHARGER (G).
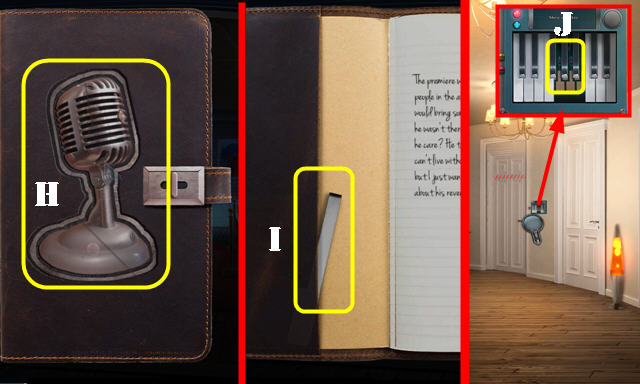
- Select top plug of DISCONNECTED CHARGER (H); take CHARGER.
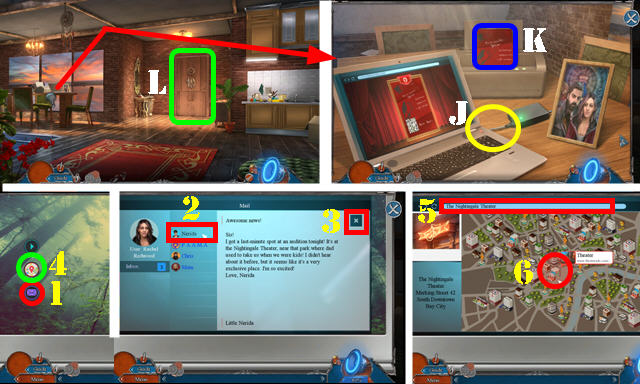
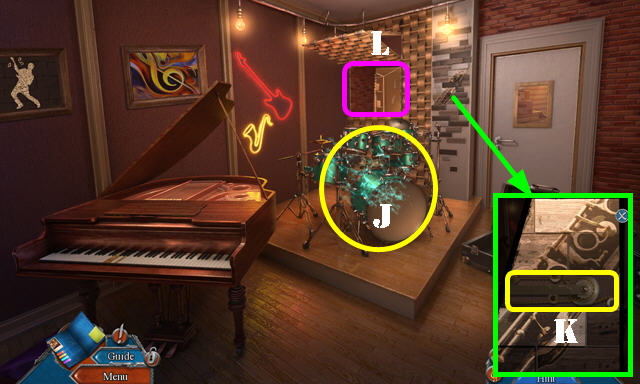
- Use CHARGER (J).
- Select 1-6.
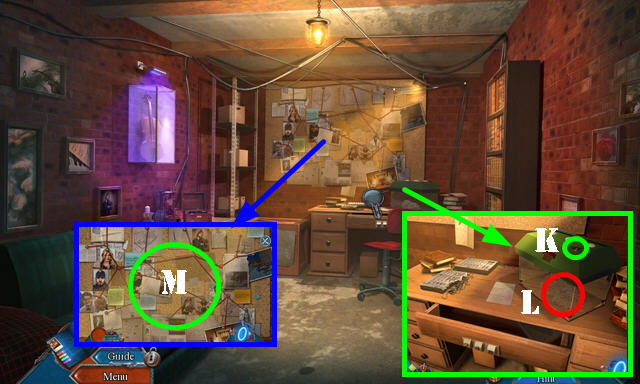
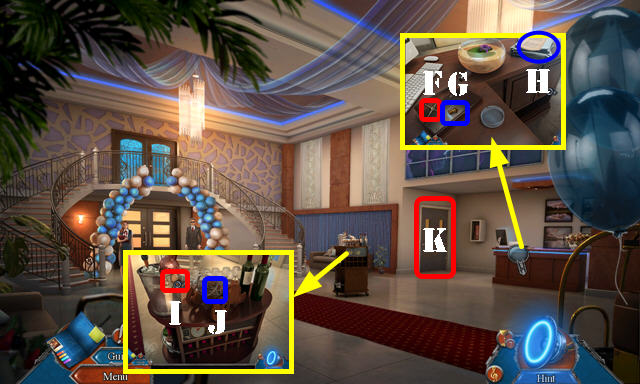
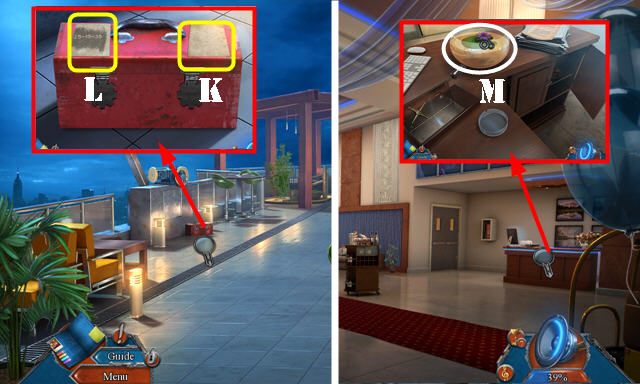
- Take AUDITION CALL (K).
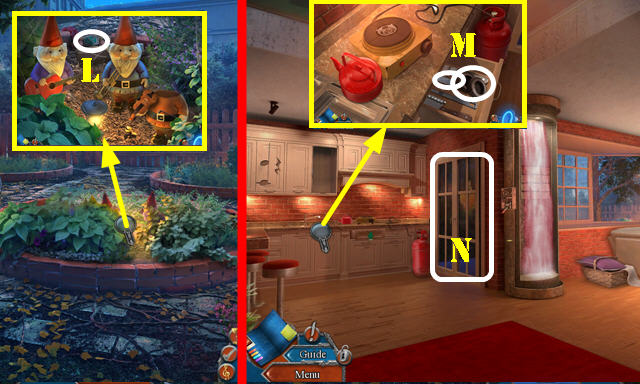
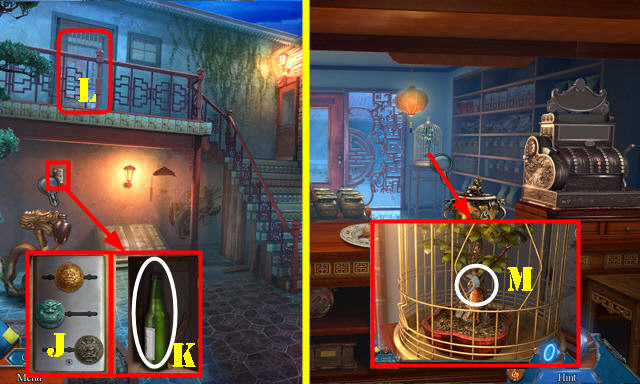
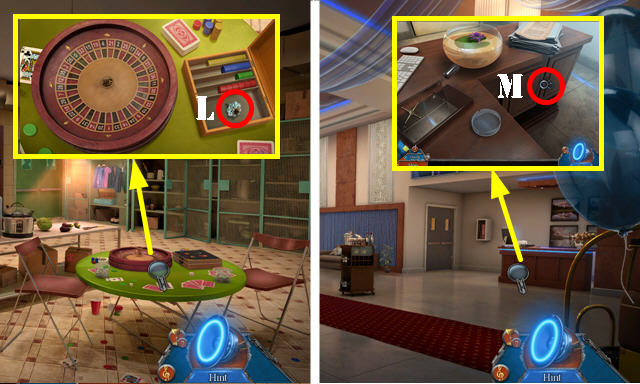
- Go (L).
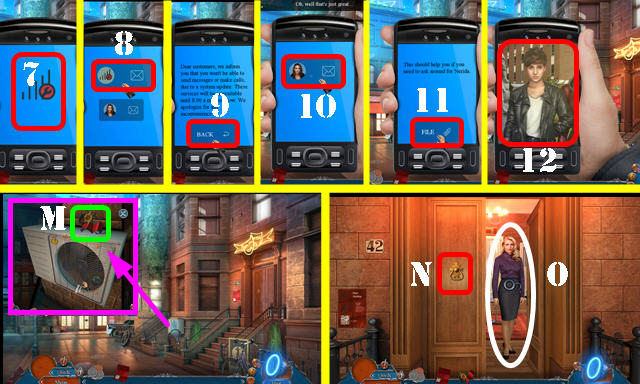
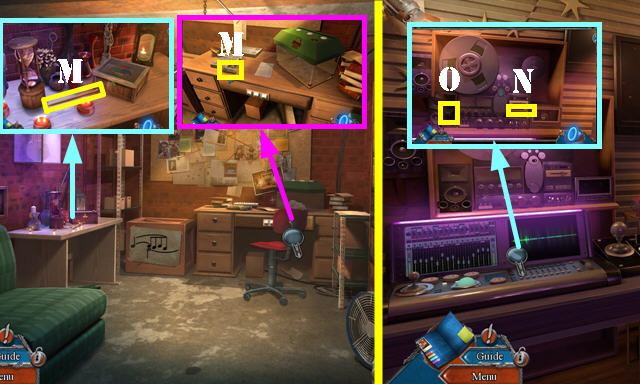
- Select 7-12.
- Take BENT EMBLEM (M).
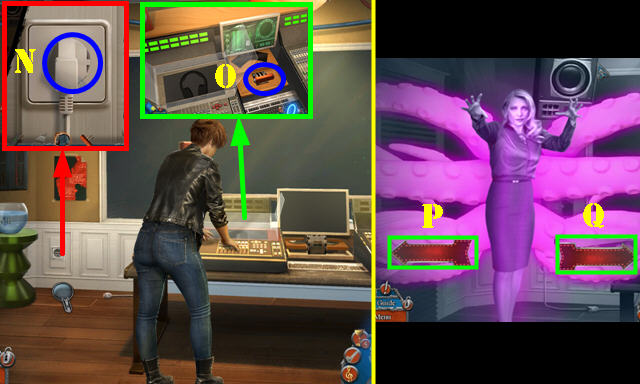
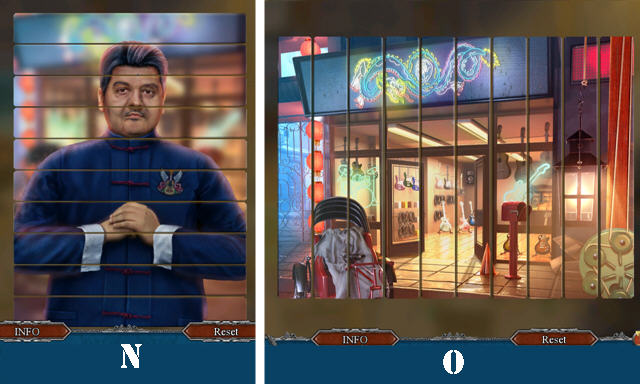
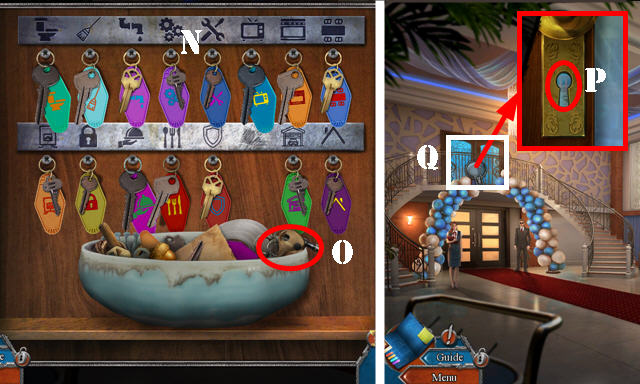
- Knock on door (N). Give AUDITION CALL (O).
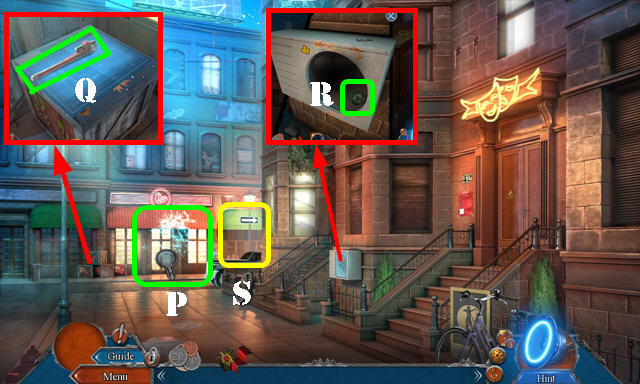
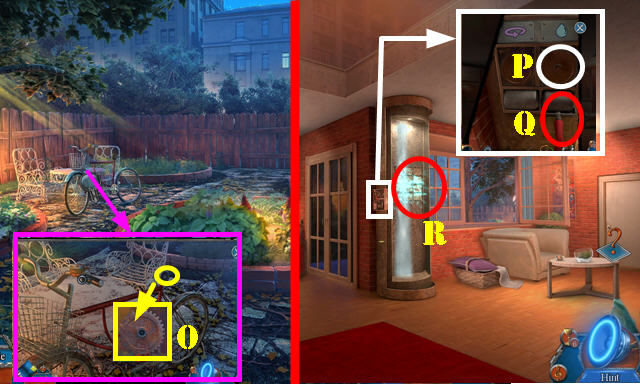
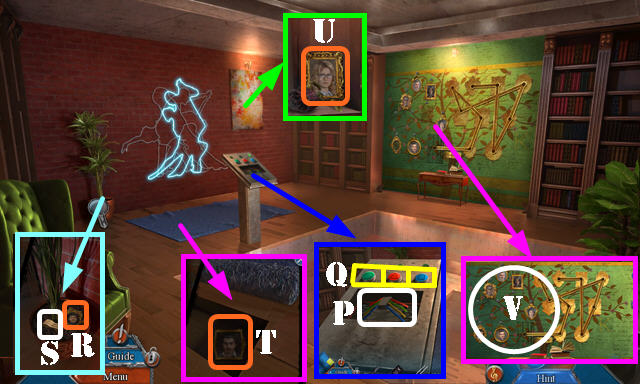
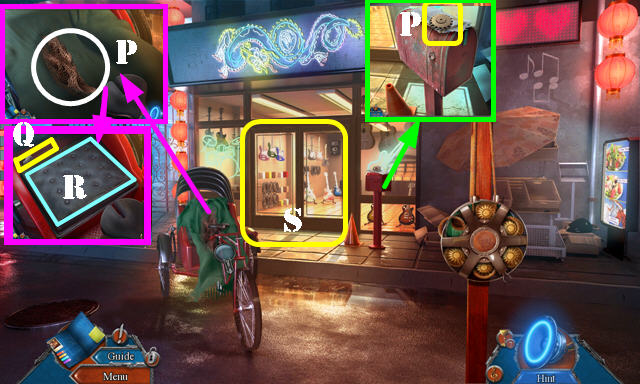
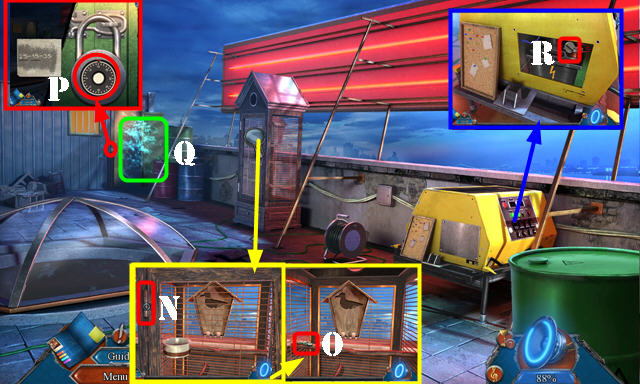
- Play HOP (P); receive LIGHTER.
- Take WRENCH (Q) and remove blueprint.
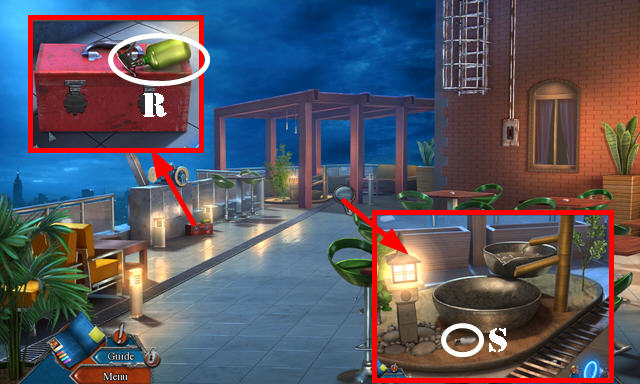
- Remove grid and use WRENCH; take RECYCLING SIGN (R).
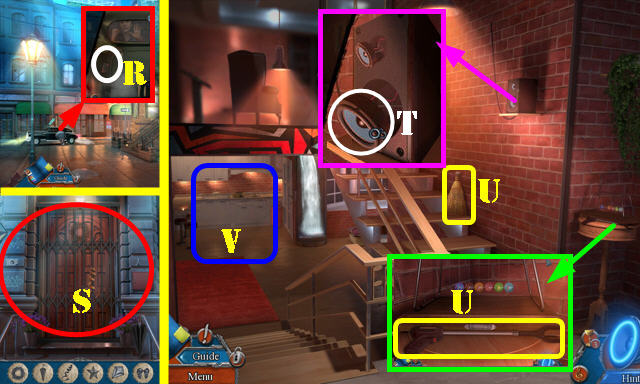
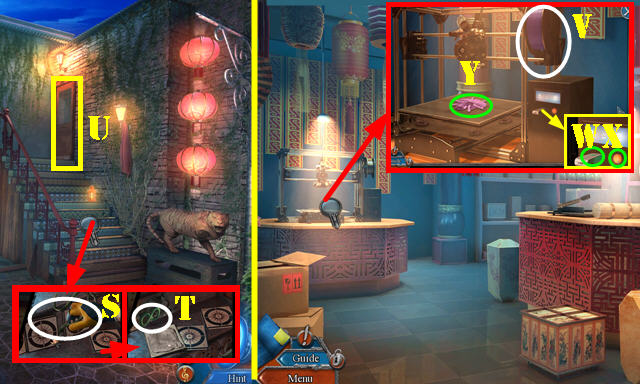
- Go (S).
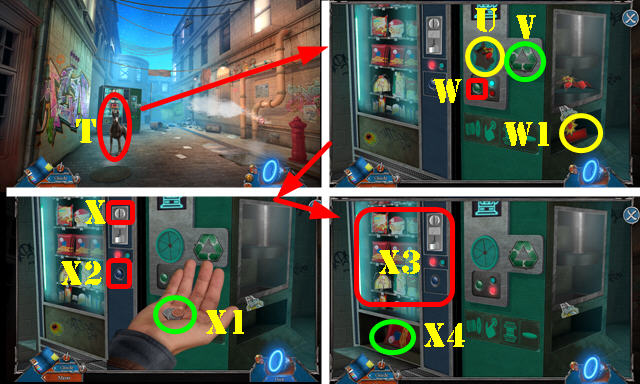
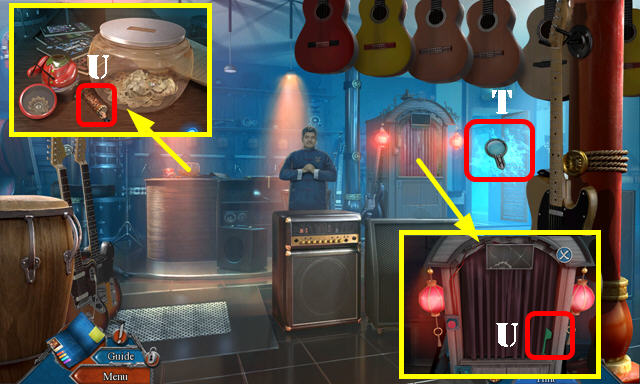
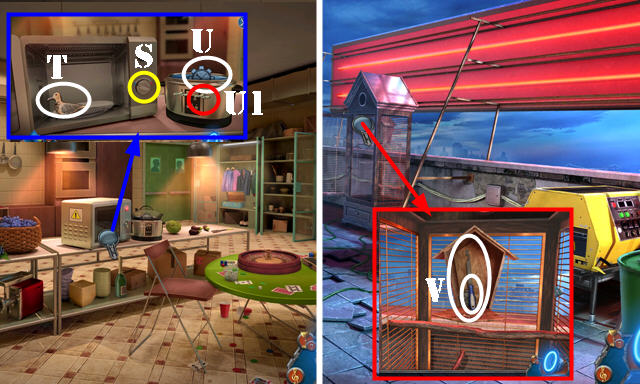
- Select LIGHTER; receive LIGHTER and SMALL BALL.
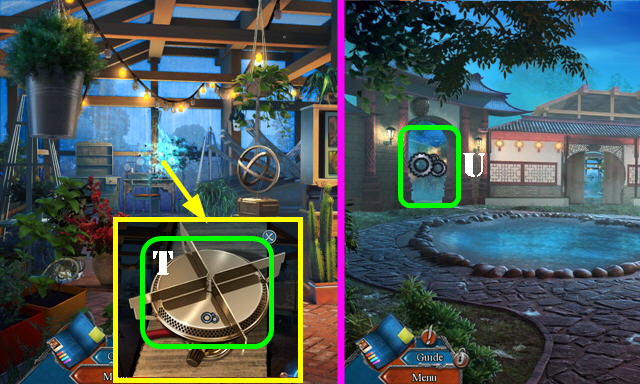
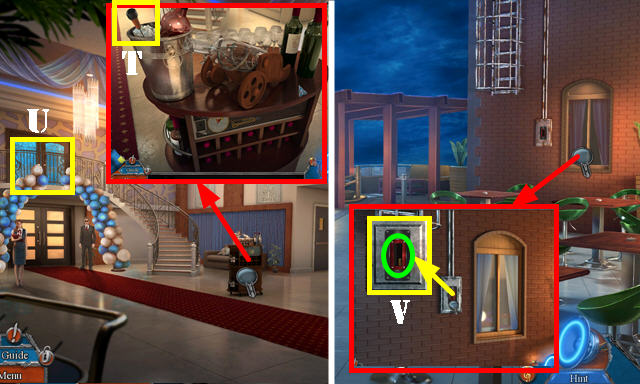
- Throw SMALL BALL (T).
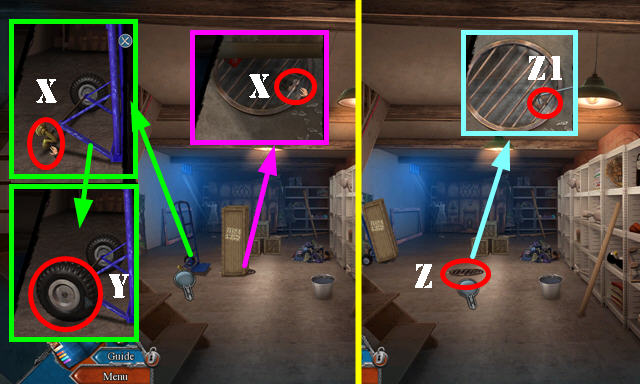
- Take SMALL WHEEL (U).
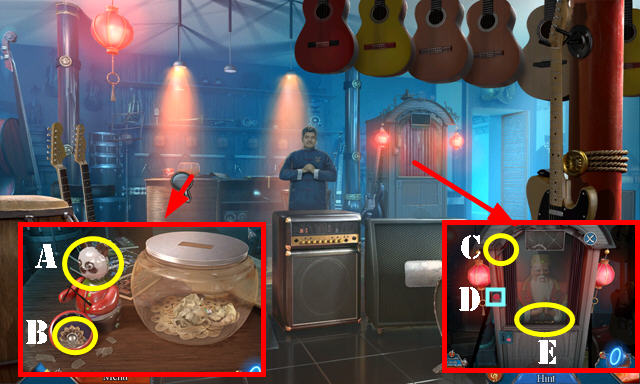
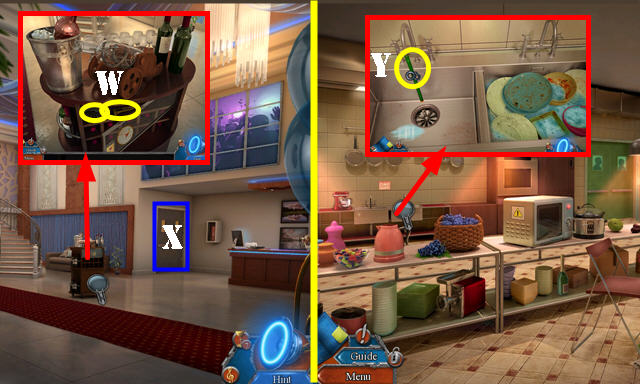
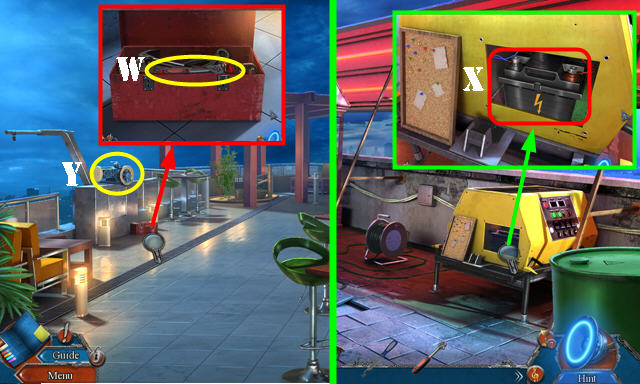
- Place RECYCLING SIGN (V) and BENT EMBLEM (U). Push green button (W); take DYNAMITE EMBLEM (W1).
- Place COINS (X).
- Select coins 3x (X1); receive SUBWAY TOKEN. Push blue button (X2). Kick machine (X3); take JUMPY CHIPS (X4).
- Open JUMPY CHIPS; select twice; take BUBBLEGUM.
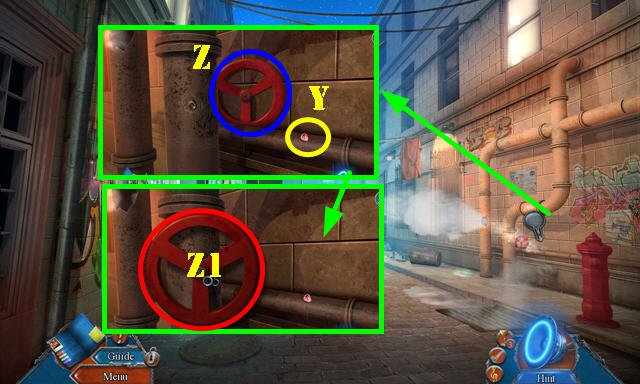
- Use BUBBLEGUM (Y). Select valve (Z) and use WRENCH (Z1).
- Walk down.
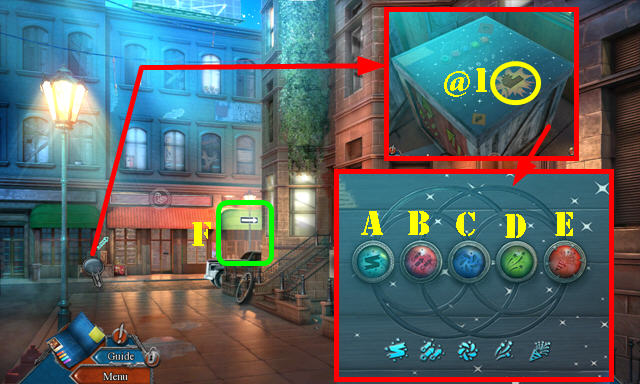
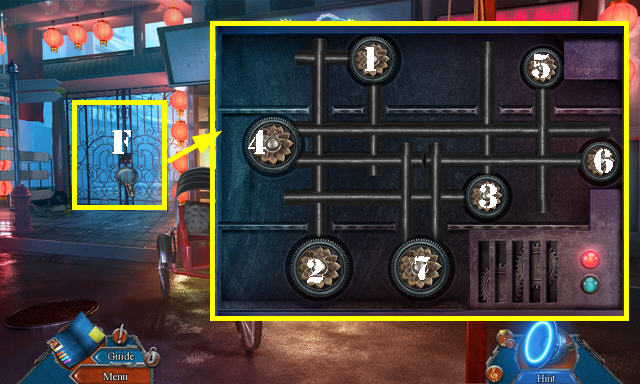
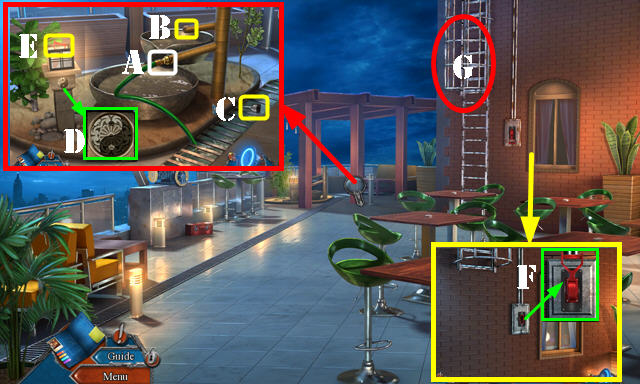
- Place DYNAMITE EMBLEM @1). Solution (B-E)-(E-C)-(C-A)-(A-D)-(C-E)-(E-B)-(A-C)-(C-E).
- Take FIREWORKS.
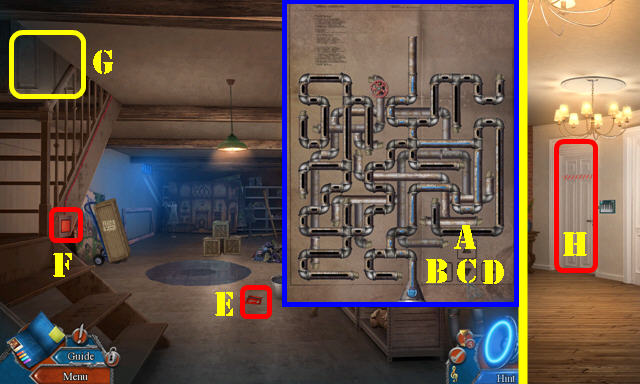
- Go (F).
- Place FIREWORK and then place all pieces as shown (G); use LIGHTER on the sticks you just placed.
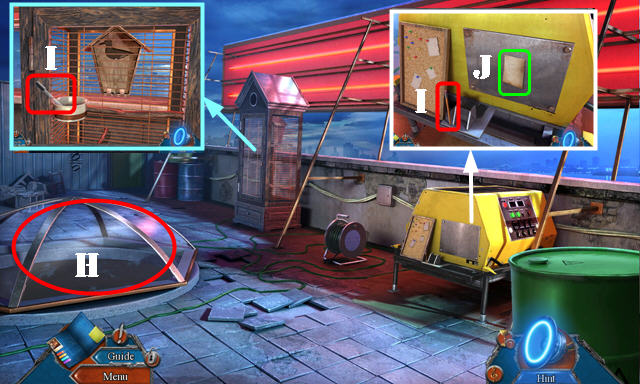
- Enter (H).
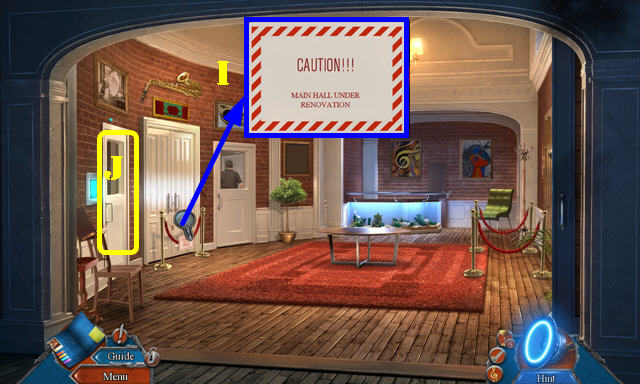
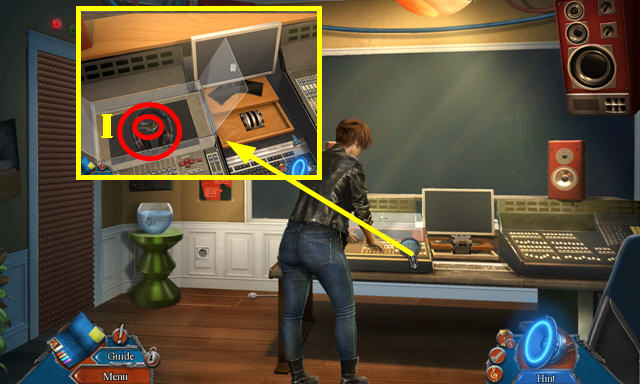
- Look at sign (I).
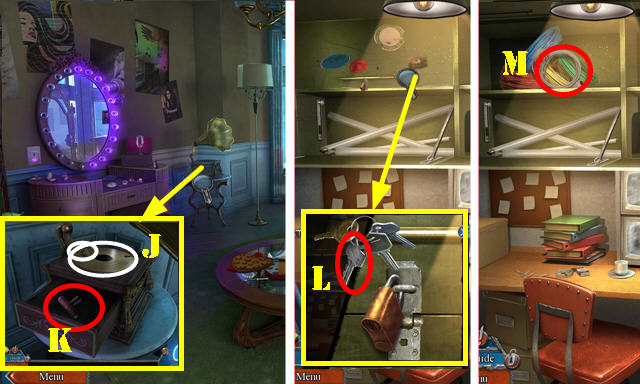
- Go (J).
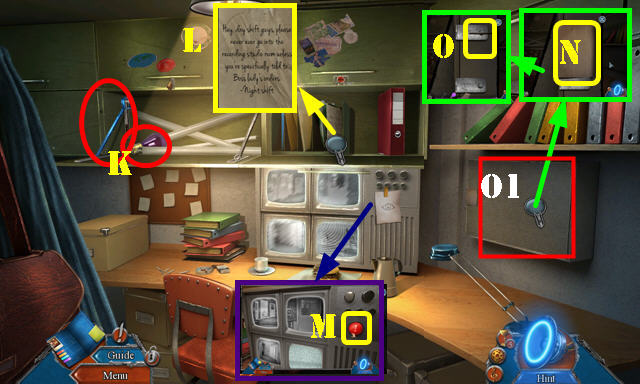
- Open cabinet; take MANHOLE HOOK and LIGHT BULBS 1/2 (K).
- Open cabinet; look at note (L).
- Remove note; push button (M).
- Take PLUMBING BLUEPRINT (N).
- Use SUBWAY TOKEN (O). Play HOP (O1); receive COPPER WIRE.
- Walk down.
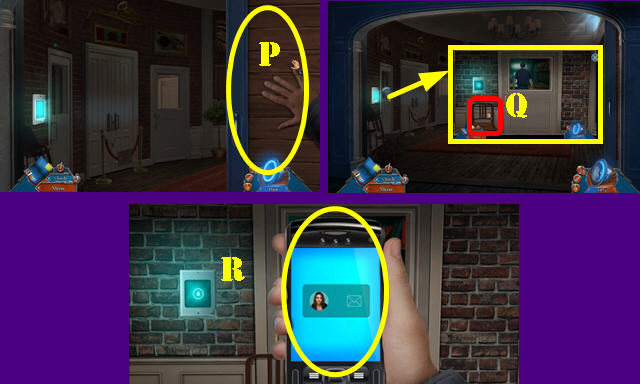
- Select scene and open door (P).
- Select chair (Q).
- Select phone 3x (R).
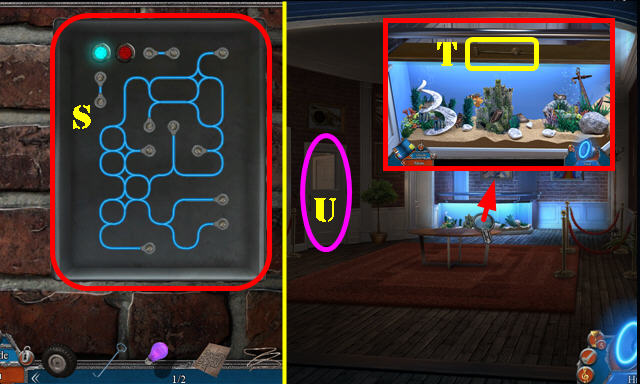
- Solution (S).
- Take GLASS CUTTER (T).
- Go (U).
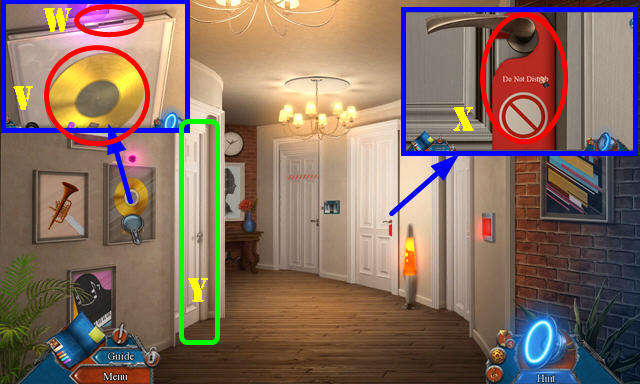
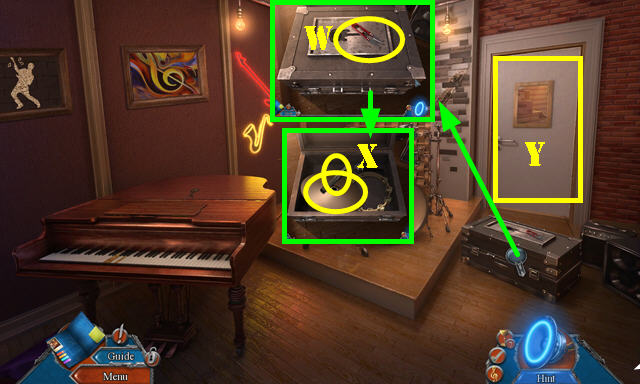
- Use GLASS CUTTER; take RECORD (V).
- Take PIANO KEYS 1/3 (W).
- Move sign (X).
- Go (Y).
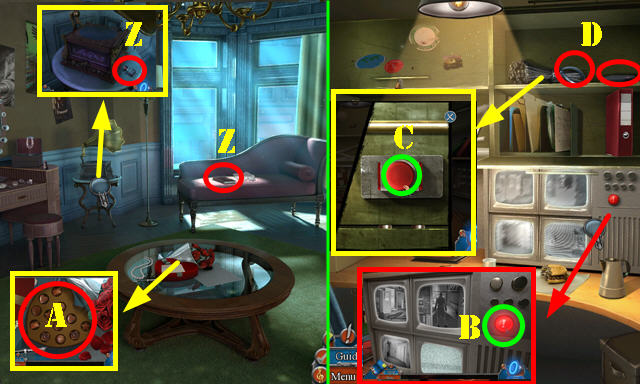
- Take DIARY and THREE-PIN BUTTON (Z).
- Look at note and open box (A). Play HOP; receive PIANO KEYS 2/3.
- Walk down 2x, and then left.
- Push button (B).
- Place THREE-PIN BUTTON and select (C). Take TRACKING DEVICE and ZIP TIE (D).
- Walk down.
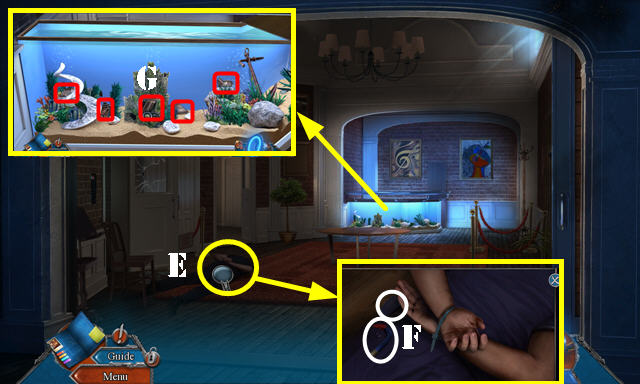
- Use ZIP TIE (E).
- Take ELECTROSHOCK WEAPON and MAGNET (F).
- COPPER WIRE on MAGNET; take HANGING MAGNET.
- Open aquarium and use HANGING MAGNET over each marked spot (G); receive MICROPHONE SYMBOL.
- MICROPHONE SYMBOL on DIARY; solution (H). Select diary 4x; take PIANO KEYS 3/3 (I).
- Go to Hallway.
- Place PIANO KEYS 3/3 (J).
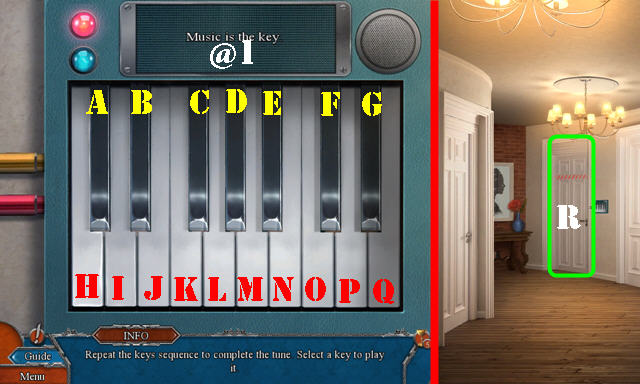
- Solution (@1): (H-J-L)-(O-E-D-K)-(I-L-E-M-L).
- Enter (R).
- Take CLOTH (S).
- Walk down.
- Use CLOTH (T); receive LIGHT BULBS 2/2.
- Go (U).
- Place LIGHT BULBS 2/2 (V). Play HOP; receive TWEEZERS.
- Walk down.
- Use TWEEZERS (W); receive CRUMPLED PAPER.
- Select phone on scene.
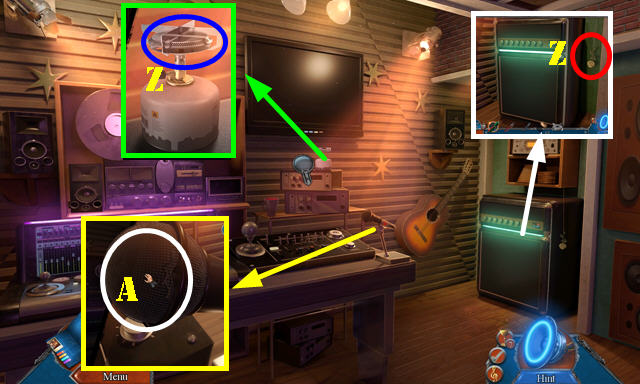
- Take GLASS SHARD and PLAYBACK NEEDLE (X).
- Place SMALL WHEEL (Y).
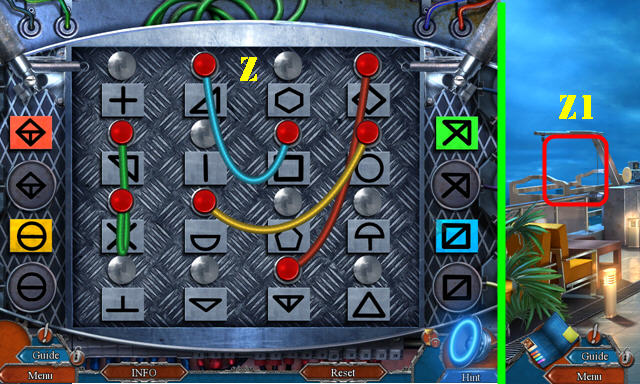
- Use MANHOLE HOOK (Z1); place PLUMBING BLUEPRINT (Z).
- Solution: (C-B-C-D-C-D-C-B-A-B-C-B-C-D-C).
- Take KEY CARD (E).
- Use KEY CARD (F).
- Go (G-H).
- Select phone on scene.
- Open CRUMPLED PAPER; take PAPER CLIP.
- Use PAPER CLIP; take HEADPHONES and KEY RING (I).
- Go to Caroline's Room.
- Place RECORD and PLAYBACK NEEDLE (J); take LEVER (K).
- Go to Maintenance Room.
- Use KEY RING on lock; select second key (L). Take EXTENSION CORD (M).
- Go to Recording Studio.
- Plug in EXTENSION CORD (N).
- Place LEVER and pull it (O).
- Select (P-Q-P).
- Walk down.
Chapter 2: House
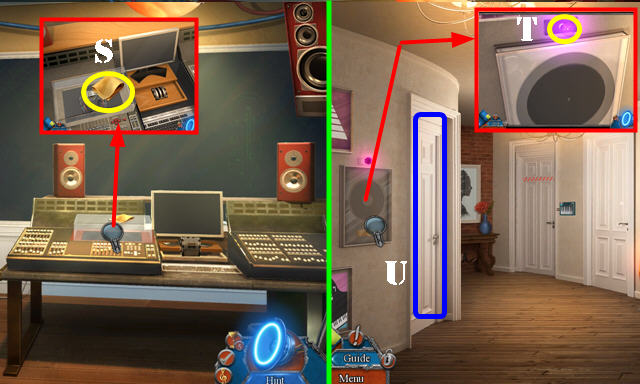
- Place TRACKING DEVICE (R).
- Play automatic HOP (S).
- Select speaker and use GLASS SHARD (T); receive SPEAKER.
- Take HAND BROOM and REACHER (U).
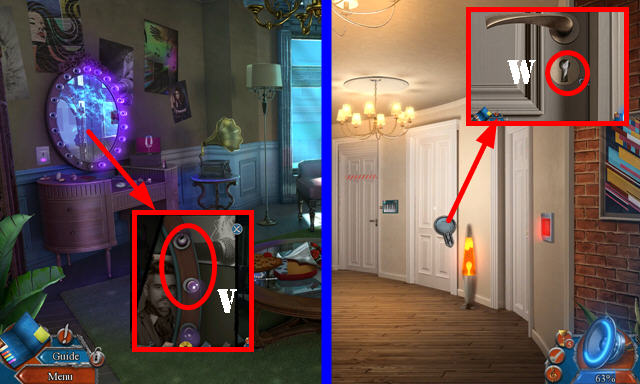
- Go (V).
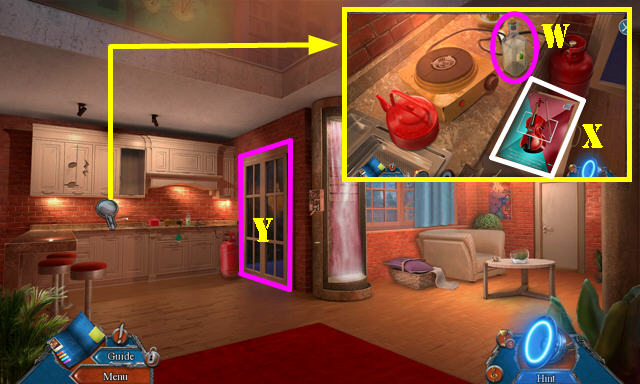
- Take VINEGAR (W).
- Open drawer; select flyer twice (X).
- Go (Y).
- Use HAND BROOM; take KNOB (Z).
- Remove seat (A).
- Walk down.
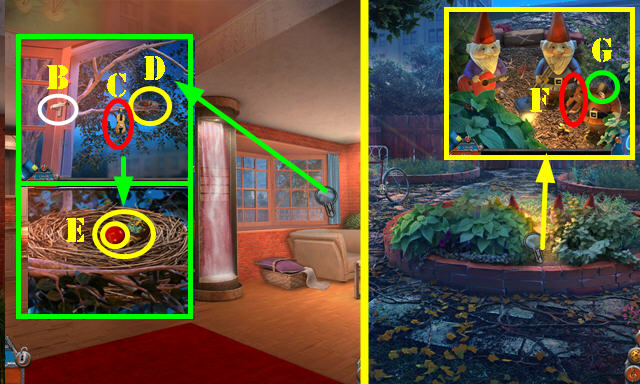
- Move curtain; place KNOB (B); take CLAY VIOLIN (C).
- Use REACHER (D); take GOLDEN DRAGONS 1/2 and SPHERE (E).
- Go to Backyard.
- Place CLAY VIOLIN (F); take KEYNOTES SEQUENCE (G).
- Walk down twice.
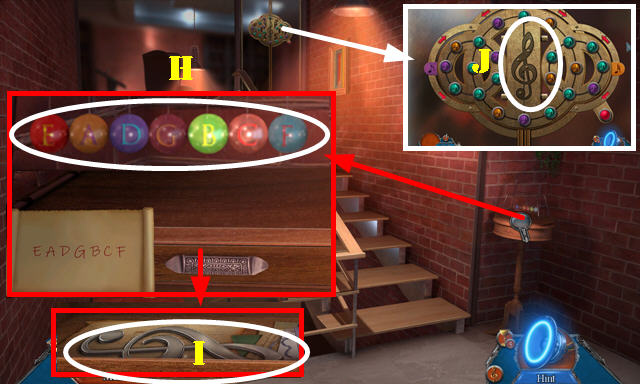
- Place KEYNOTES SEQUENCE and SPHERE. Solution (H).
- Take CLEF KEY (I).
- Place CLEF KEY (J).
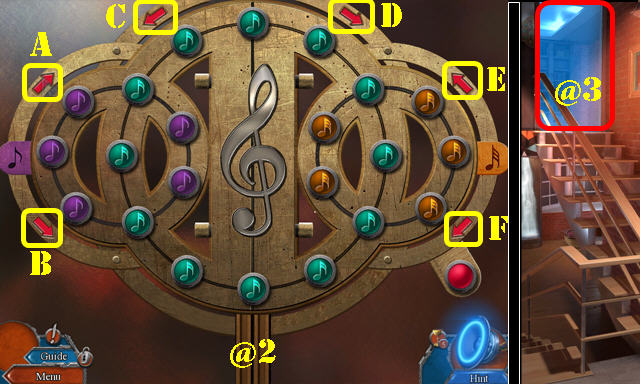
- Solution (@2): C-A-Cx2-Fx3-Dx2-F-Dx4-F-A.
- C-B-Cx3-Ax2-Dx2-A-Dx4-A.
- Go to Library (@3).
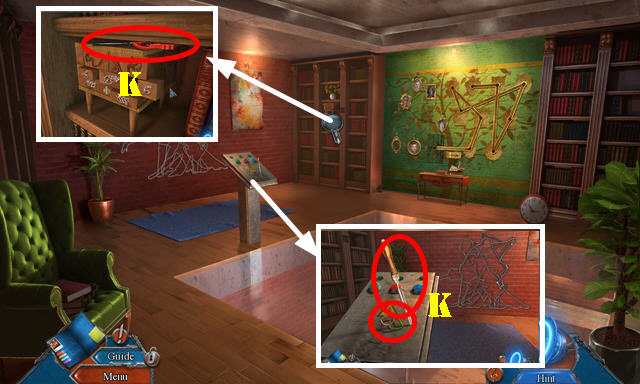
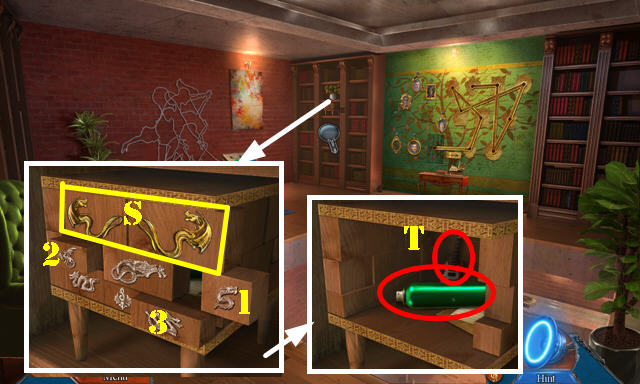
- Take GAS LIGHTER, LETTER OPENER, and RUBBER BANDS (K).
- Go to Backyard.
- Use LETTER OPENER; take CUTLERY BADGE (L).
- Walk down.
- Place CUTLERY BADGE; take HEADPHONE EARPADS and LOCK-RING TOOL (M).
- Go (N).
- Use LOCK-RING TOOL; take GEAR (O).
- Walk down.
- Pace GEAR (P) and select lever (Q).
- Play HOP (R); receive GOLDEN DRAGONS 2/2.
- Go to Library.
- Place GOLDEN DRAGONS 2/2 (S); select 1-3.
- Take HAIR SPRAY and MINIATURE GUITAR (T).
- Go to Living Room.
- SPEAKER and HEADPHONE EARPADS on HEADPHONES; take NOISE-CANCELING HEADPHONES.
- GAS LIGHTER and RUBBER BANDS on HAIR SPRAY; take IMPROVISED FLAMETHROWER.
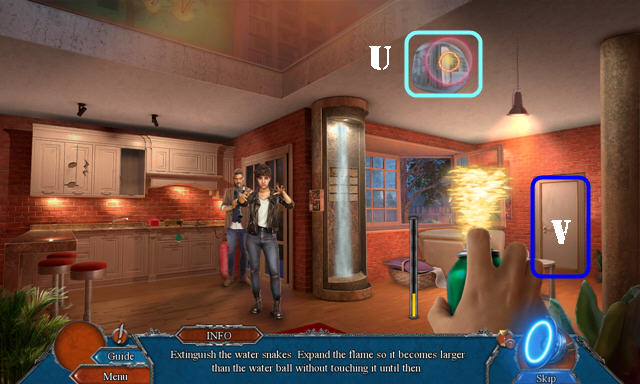
- Place NOISE-CANCELING HEADPHONES on the scene and use IMPROVISED FLAMETHROWER.
- Solution is random (U).
- Receive EMPTY SPRAY.
- Go (V).
- Take THREAD CUTTER (W).
- Place MINIATURE GUITAR; take VACUUM ATTACHMENT and CYMBALS 1/2 (X).
- Go (Y).
- Take STOVE PLATE and GOLDEN ROSE (Z).
- Use THREAD CUTTER; take MICROPHONE MESH (A).
- Walk down.
- Place GOLDEN ROSE; take TUNER (B).
- Walk down.
- Select EMPTY SPRAY; receive GAS LIGHTER.
- Place STOVE PLATE (C); push button (D).
- Select kettle (E) and use GAS LIGHTER (C). Take BOILING WATER (F).
- Go to Backyard.
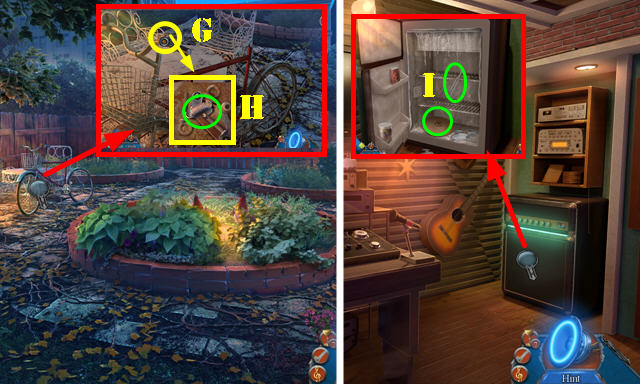
- Select MICROPHONE MESH 3x; receive CLEANING BALL.
- Use VINEGAR and CLEANING BALL (G); take SPRING (H).
- Go to Recording Studio.
- Open fridge and use BOILING WATER; take TUNING FORK and CYMBALS 2/2 (I).
- Walk down.
- Place CYMBALS 2/2; play HOP (J); receive DECORATIVE TILE.
- Place DECORATIVE TILE (K).
- Go (L).
- Take CONSOLE FADER and KNITTING NEEDLE (M).
- Go to Recording Studio.
- Place CONSOLE FADER (N). Take PIN CONNECTOR (O).
- Go to Library.
- Remove cover and place PIN CONNECTOR (P).
- Select green, red, and blue buttons (Q).
- Move stones 3x; take PORTRAIT FRAMES 1/3 (R); select soil and take PIANO HAMMERS (S).
- Use TUNING FORK and remove board; take PORTRAIT FRAMES 2/3 (T).
- Remove painting and use KNITTING NEEDLE; take PORTRAIT FRAMES 3/3 (U).
- Place PORTRAIT FRAMES 3/3 (V).

- Solution (1-9).
- Take TOY MUSICIAN (W).
- Go to Music Room.
- Place PIANO HAMMERS (X). Select three patterned keys (Y); take LOCK CODE (Z).
- Go to Shrine Room.
- Place LOCK CODE and enter 2-4-8 (A); take PRY TOOL and WATERFALL LEVER (B).
- Open box; place SPRING and TOY MUSICIAN; take TAPE REELS (C).
- Go to Living Room.
- Place WATERFALL LEVER and select (D).
- Play HOP (E); receive BRASS WINDER.
- Go to Shrine Room.
- Place BRASS WINDER (F); take RECORDER PART (G).
- Go to Recording Studio.
- Place TAPE REELS (H) and RECORDER PART (I).
- Take SHREDDER BUTTON (J).
- Go to Shrine Room.
- Place SHREDDER BUTTON and select (K); take SHREDDED PHOTOS (L).
- Place SHREDDED PHOTOS (M).
- Solution (N-O).
Chapter 3: Chinatown
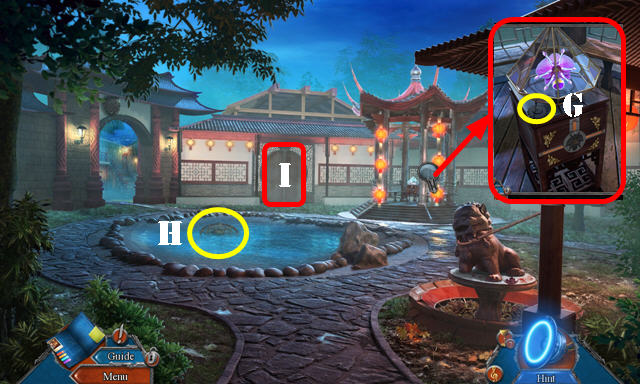
- Take BRONZE COGS 1/2 and NET (P).
- Remove cover and use PRY TOOL; take SPRAY NOZZLE (Q).
- Remove seat (R).
- Go (S).
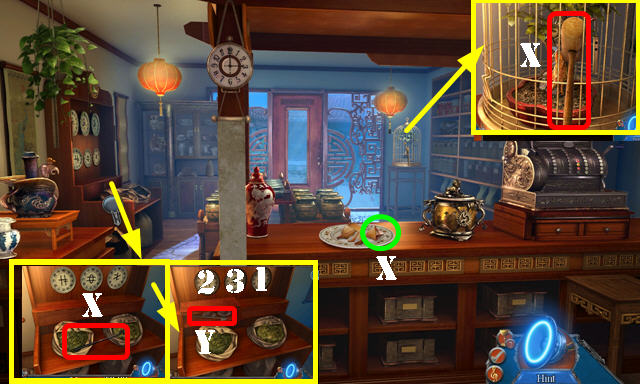
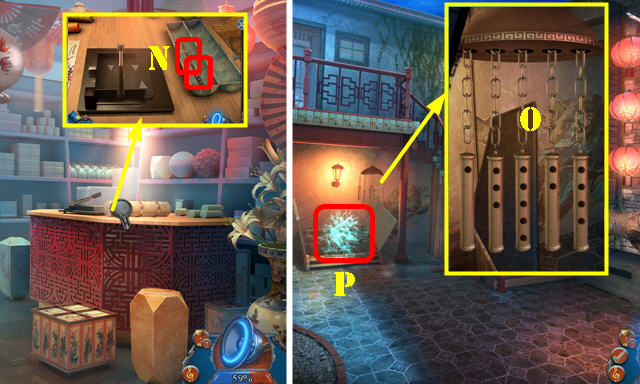
- Play HOP (T); receive PIPA BASE.
- Take MAILBOX FLAG and CYLINDER (U).
- Walk down.

- Place MAILBOX FLAG and select (V); take INSULATING TAPE (W).
- Place CYLINDER (X); take TOY HEAD (Y).
- Go (Z).
- Place TOY HEAD (A); take IRON LOTUS (B).
- Use INSULATING TAPE (C); press button (D). Take DECORATED PEGS 1/4 (E).
- Walk down.
- Place IRON LOTUS. Solution: (1-7).
- Go (F).
- Take BRONZE COGS 2/2 (G).
- Use NET (H); receive WOODEN WHEEL.
- Go (I).
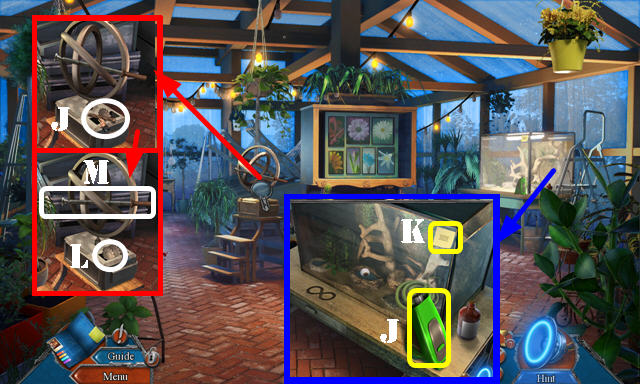
- Take DECORATED PEGS 2/4 and VACUUM BASE (J).
- Look at note (K).
- Place BRONZE COGS 2/2 (L); take TOMMY BAR (M).
- Walk down.
- VACUUM ATTACHMENT on VACUUM BASE; take HAND VACUUM.
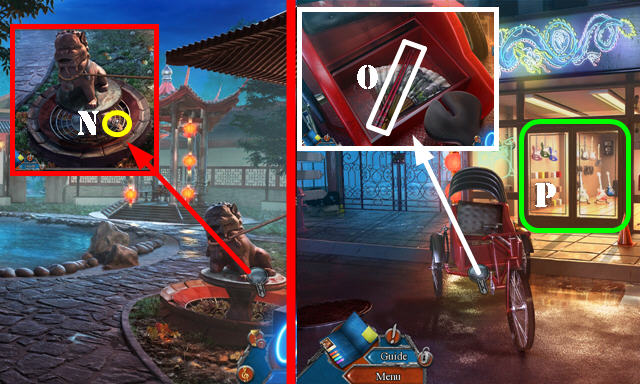
- Use HAND VACUUM; take GAME TOKEN (N).
- Walk down.
- Place WOODEN WHEEL; take CHOPSTICKS (O).
- Go (P).
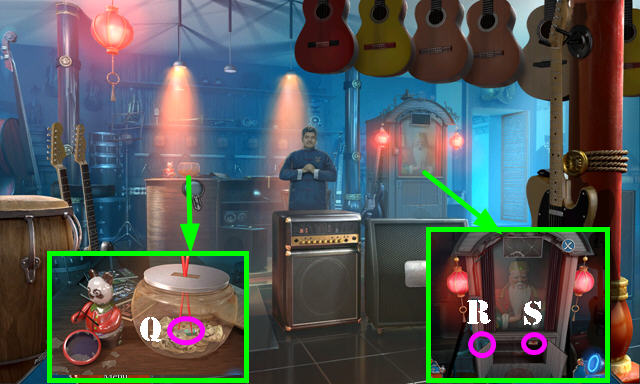
- Use CHOPSTICKS (Q); receive MEMORY STICK.
- Insert GAME TOKEN (R); take MATCHES (S).
- Go to Greenhouse.
- Use MATCHES (T). Play HOP; receive FLOWER SCENT.
- Walk down.
- Use FLOWER SCENT and go (U).
- Take DECORATED PEGS 3/4 (V).
- Go (W).
- Take HOOK POLE, FORTUNE MESSAGE, and WOODEN MALLET (X).
- Place FORTUNE MESSAGE on plates; select 1-2-3; take SUNDIAL ARROW (Y).
- Go to Greenhouse.

- Select (A).
- Place SPRAY NOZZLE and select (B).
- Use HOOK POLE (C); receive GLASS EYE.
- Place SUNDIAL ARROW (D); take TORN CODE (E).
- Go to Steps.
- Place GLASS EYE (F); take CHIME CHAINS 1/3 (G).
- Place TORN CODE (H).
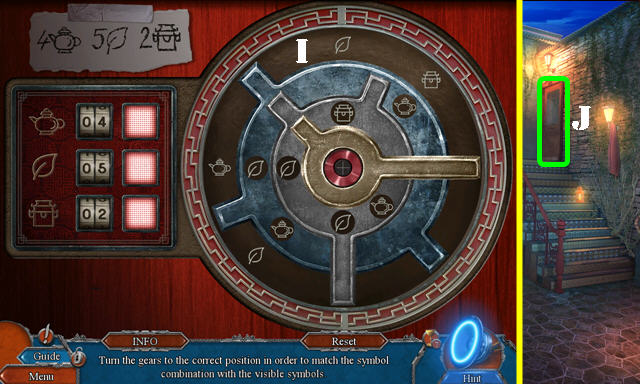
- Solution (I).
- Enter (J).
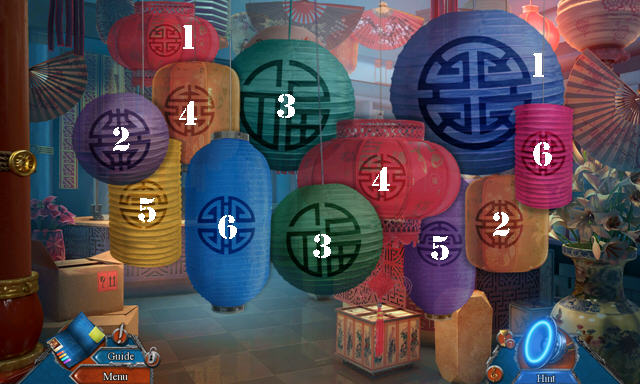
- Select matching symbols (1-6).
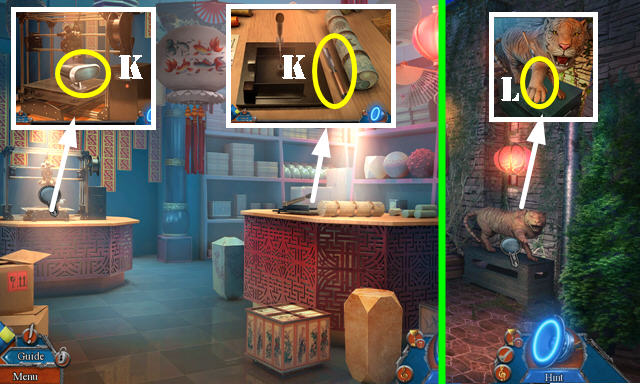
- Take CARDLESS SCANNER and SHAFT GOUGE (K).
- Walk down.
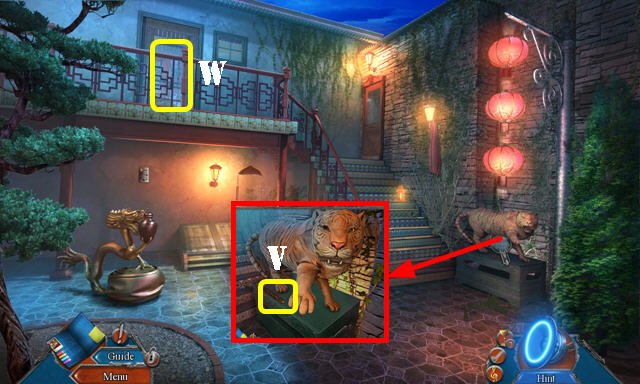
- Use SHAFT GOUGE (L); receive TIGER PAW.
- Walk down.
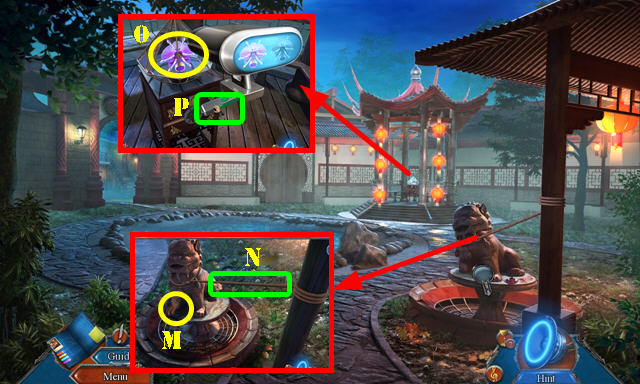
- Place TIGER PAW and use WOODEN MALLET (M).
- Take BUNGEE CORD (N).
- MEMORY STICK on CARDLESS SCANNER; take 3-D SCANNER.
- Use 3-D SCANNER (O). Take FLOWER DESIGN (P).
- Go to Tea Shop.
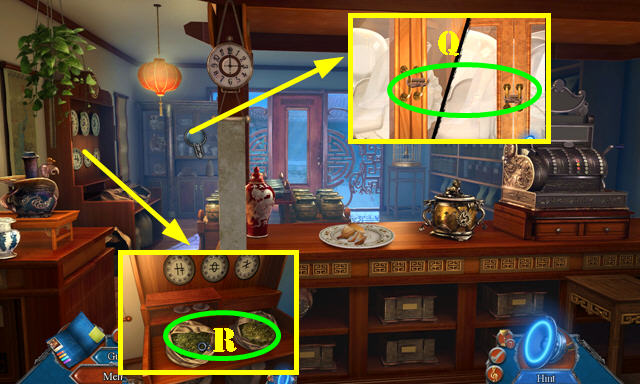
- Use BUNGEE CORD (Q). Play HOP; receive COARSE SIEVE.
- Use COARSE SIEVE (R); receive GARDEN GLOVE and PRINTING MATERIAL.
- Walk down.
- Use GARDEN GLOVE and select 2x (S); take SNAKE BADGE (T).
- Go (U).
- Place PRINTING MATERIAL (V) and FLOWER DESIGN (W). Push button (X); take FLOWER TOKEN (Y).
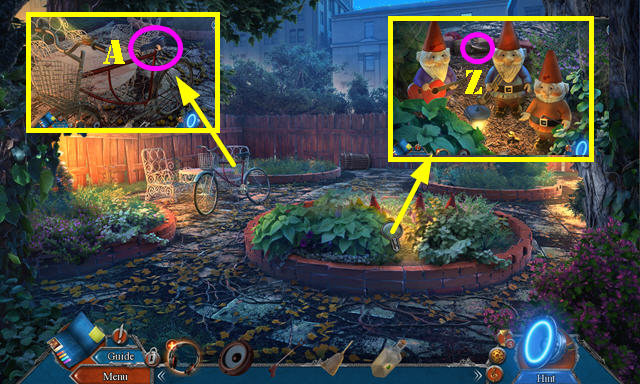
- Go to Garden.
- Place FLOWER TOKEN; take DECORATIONS MATRIX (A).
- Go (B).
- Place SNAKE BADGE (C); take HAND VICE BASE and PRESS BLADE (D).
- Go to Tea Shop.
- TOMMY BAR on HAND VICE BASE; take HAND VICE.
- Use HAND VICE; take CHIME CHAINS 2/3 and SUN EMBLEM (E).
- Go to Lantern Shop.
- Place PRESS BLADE and DECORATIONS MATRIX (F). Select handle (G); take LANTERN DECORATIONS (F).
- Place LANTERN DECORATIONS (H).

- Solution (I).
- Take TOKEN SLIDER.
- Walk down.
- Place TOKEN SLIDER; position tokens as shown (J); take DECORATED PEGS 4/4 and SAKE BOTTLE (K).
- Go (L).
- Use SAKE BOTTLE; take MOON EMBLEM (M).
- Go to Lantern Shop.
- Place SUN EMBLEM and MOON EMBLEM; take ALLEN KEY and CHIME CHAINS 3/3 (N).
- Walk down.
- Place CHIME CHAINS 3/3; solution (O).
- Play HOP (P); receive GOLDEN STRINGS.
- Go to Music Shop.

- DECORATED PEGS 4/4 and GOLDEN STRINGS on PIPA BASE; take UNTUNED PIPA.
- Give UNTUNED PIPA (Q).
- Place TUNER (R).
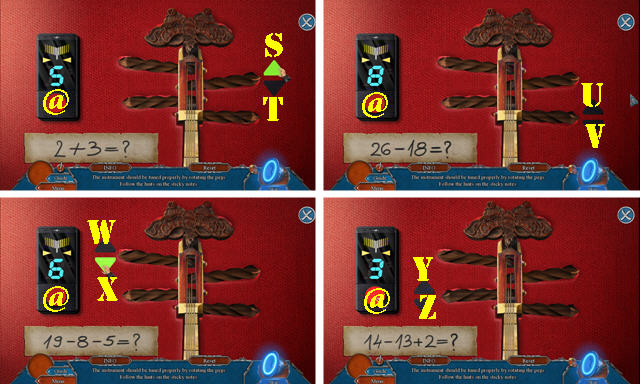
- Press: (Sx6-@)- (Ux3-@)- (Xx2-@)- (Zx3-@).
- Take PIPA.
- Select note on scene.
Chapter 4: Kitchen
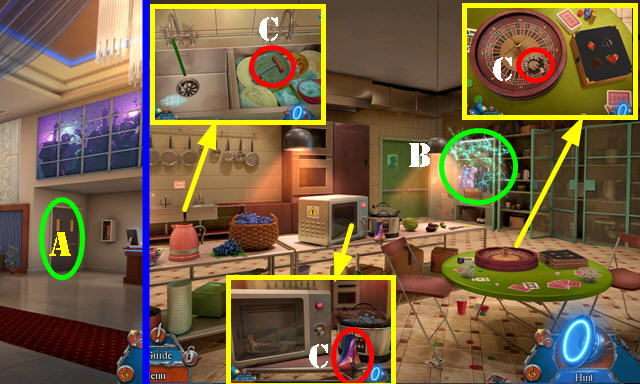
- Go (A).
- Play HOP (B); receive WAITER UNIFORM.
- Take KITCHEN TOWEL, STONE ORNAMENTS 1/2, and CORKSCREW (C).
- Use ALLEN KEY; take ROULETTE GRIP (D).
- Take COAT HANGER from WAITER UNIFORM.
- Use COAT HANGER (E); receive KITCHEN TWEEZERS.
- Walk down.
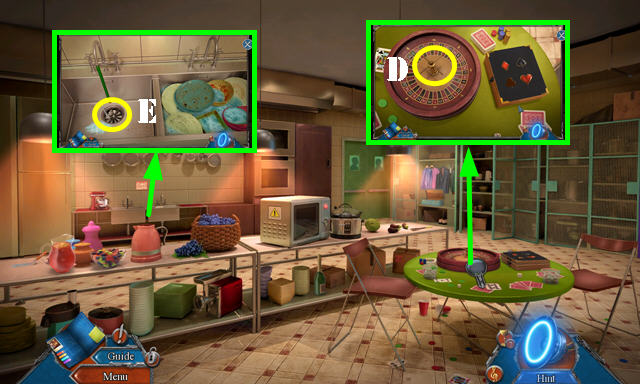
- Place ROULETTE GRIP (F); take TUBE FITTING (G). Look at paper (H).
- Use CORKSCREW (I); receive CORK STOPPER.
- Use KITCHEN TWEEZERS (J); receive CLUB SUIT.
- Go (K).
- Place CLUB SUIT; take BRASS HANDLE (L).
- Walk down.
- Place BRASS HANDLE (M).
- Solution (N).
- Take WROUGHT KEY (O).
- Use WROUGHT KEY (P).
- Go (Q).
- Take CLEANING SPRAY and look at note (R).
- Take SALT SHAKER (S).
- Walk down.
- Use SALT SHAKER; take ICE PICK (T).
- Go (U).
- Use ICE PICK (V); receive COCKTAIL BUTTON.
- Walk down.
- Place COCKTAIL BUTTON; take STONE ORNAMENTS 2/2 and BOX CUTTER (W).
- Go (X).
- Use BOX CUTTER (Y); receive RUBBER TUBE.
- Go to Terrace.
- Use TUBE FITTING and RUBBER TUBE (A).
- Place CORK STOPPER (B). Take SCREW BIT (C).
- Place STONE ORNAMENTS 2/2 (D). Open lantern; take OLD LEVER (E).
- Place OLD LEVER (F).
- Go (G).
- Examine (H).
- Take PENCIL and PIPETTE (I).
- Look at note (J).
- Walk down.
- Use PENCIL (K); take COMBINATION NOTE (L).
- Walk down.
- Use PIPETTE (M); receive SCENTED OIL.
- Go to Roof.
- Use SCENTED OIL (N); take PRESSURE SLIDER (O).
- Place COMBINATION NOTE on lock; stop at 25-15-35 (P).
- Play HOP (Q); receive CORDLESS DRILL.
- SCREW BIT on CORDLESS DRILL; take ELECTRIC SCREWDRIVER.
- Use ELECTRIC SCREWDRIVER; take ROTARY CONTROLLER (R).
- Go to Kitchen.
- Place ROTARY CONTROLLER (S); take BIRD BADGE (T).
- Place PRESSURE SLIDER (U1). Remove top; take TOOLS TOKEN 1/2 (U).
- Go to Roof.
- Place BIRD BADGE; take SLIM JIM and TOOLS TOKEN 2/2 (V).
- Walk down.
- Place TOOLS TOKEN 2/2; take RATCHET WRENCH (W).
- Go to Roof.
- Use RATCHET WRENCH; take POWER BATTERY (X).
- Walk down.
- Place POWER BATTERY (Y) and select.
- Solution (Z).
- Go (Z1).
- Use SLIM JIM (A).
- Give PIPA (B).
- Take WALKIE TALKIE (C).
- Move coffee cup; use CLEANING SPRAY and KITCHEN TOWEL; press button (D).

- Pull door handle (E). Play HOP: receive MALFUNCTIONING MEGAPHONE.
- Select WALKIE TALKIE twice; take BATTERIES.
- Select MALFUNCTIONING MEGAPHONE and place BATTERIES; take MEGAPHONE.
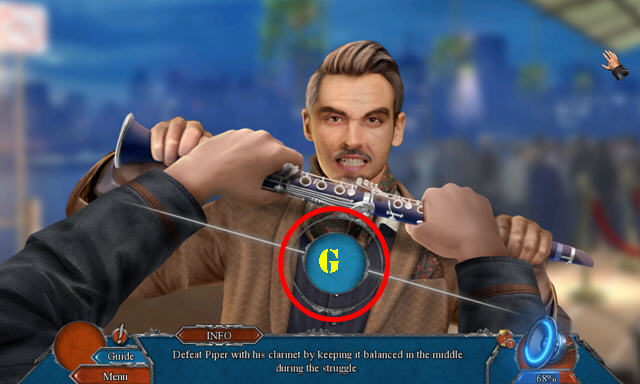
- Use MEGAPHONE on scene (F).
- Solution is random (G); select the blue ball once it's in the middle of the target.
- Congratulations, you've completed The Andersen Accounts: A Voice of Reason.
Created at: 2019-08-04