

Walkthrough Menu
- General Tips
- Chapter 1: Red Cape Bar
- Chapter 2: Atrium
- Chapter 3: Lille's Room
- Chapter 4: Subway Cart
- Chapter 5: Cecil's Room
General Tips
- This is the official guide for The Andersen Accounts: Chapter One.
- This guide won't tell you when to zoom into a location; the screenshots show each zoom scene.
- Hidden-object puzzles are referred to as HOPs. Only the locations of the HOPs will be shown.
- Use the Map to fast travel to a location.
Chapter 1: Red Cape Bar
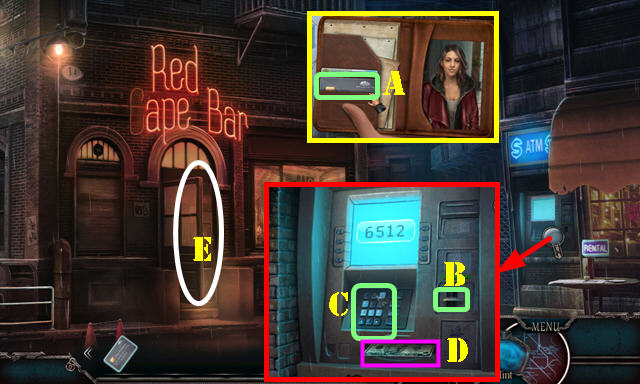
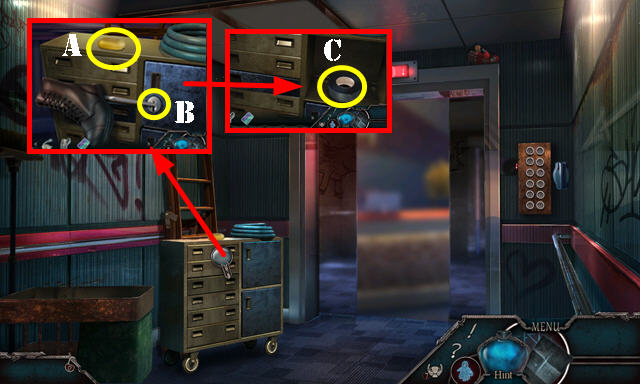
- Select 4x; take CREDIT CARD (A).
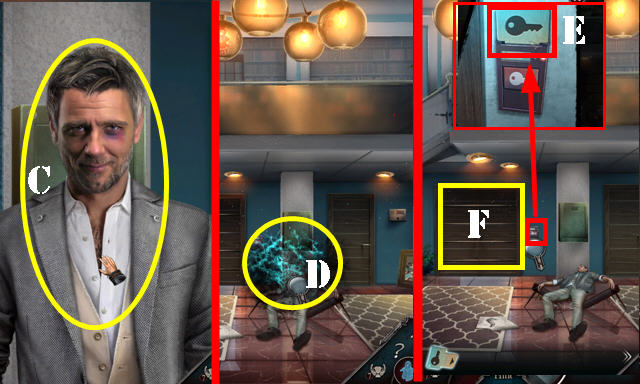
- Use CREDIT CARD (B); select 6512 (C); take 10 BUCKS (D).
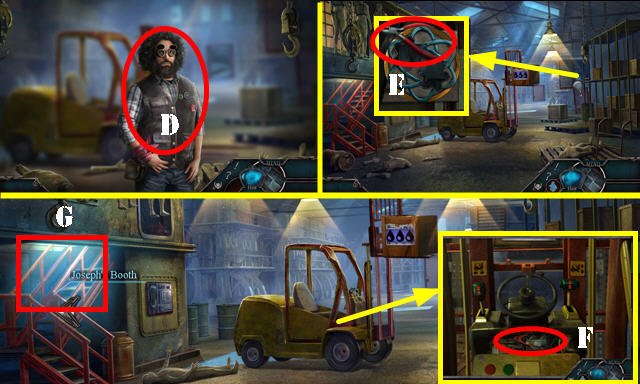
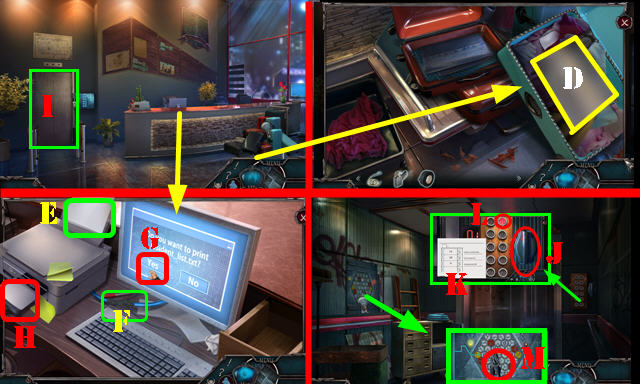
- Enter (E).
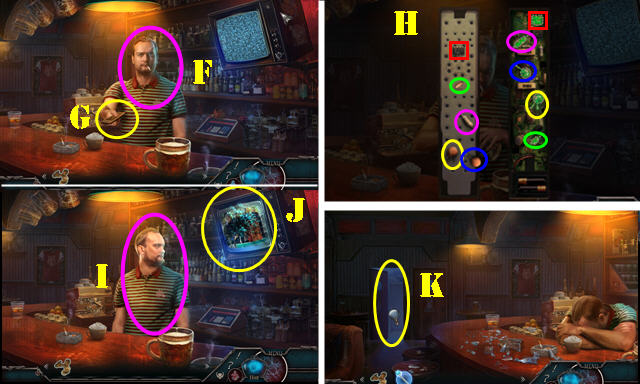
- Talk; give 10 BUCKS (F); receive CHANGE.
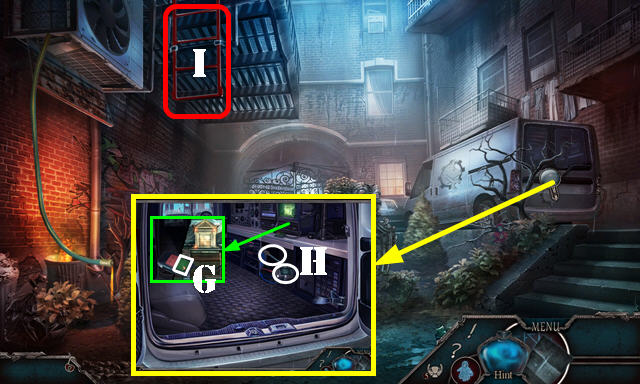
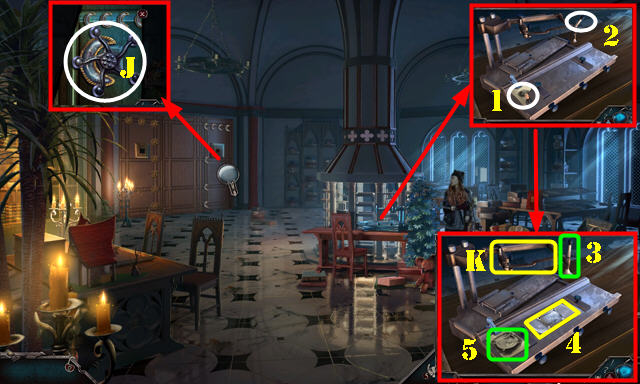
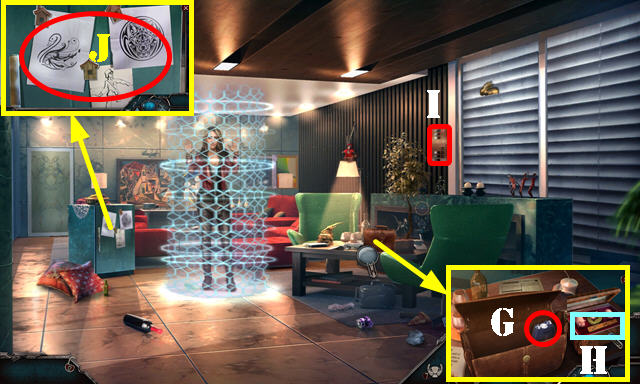
- Take BROKEN REMOTE (G).
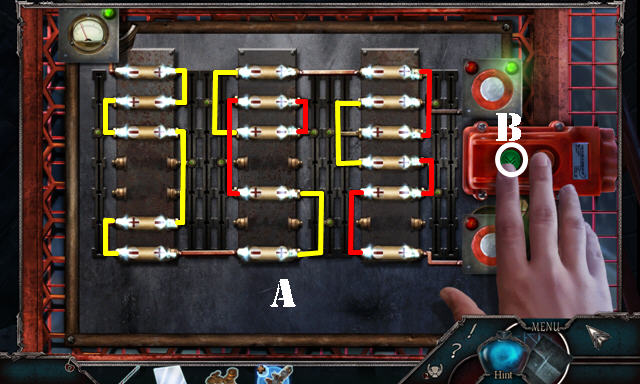
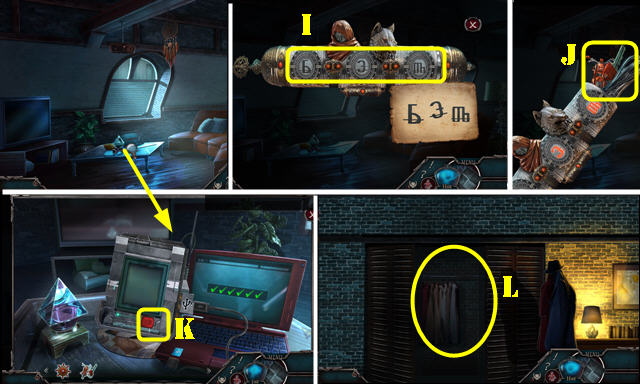
- Open BROKEN REMOTE (H); place pieces (color coded); receive REMOTE.
- Give REMOTE (I).
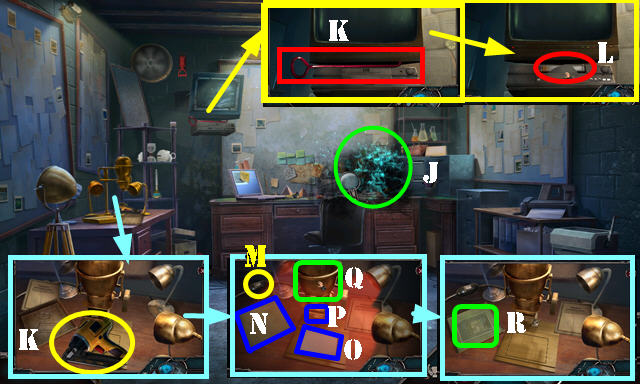
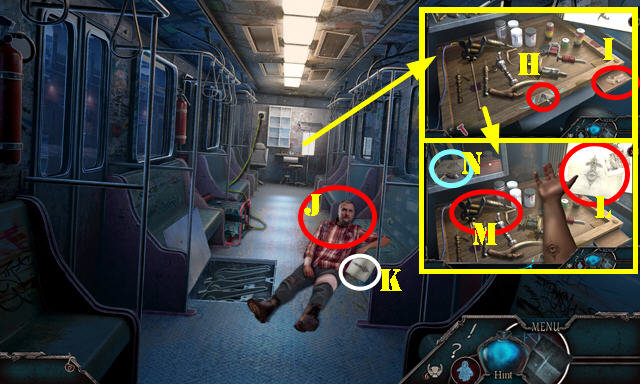
- Play HOP (J); receive FOLDED ANTENNA.
- Look (K).
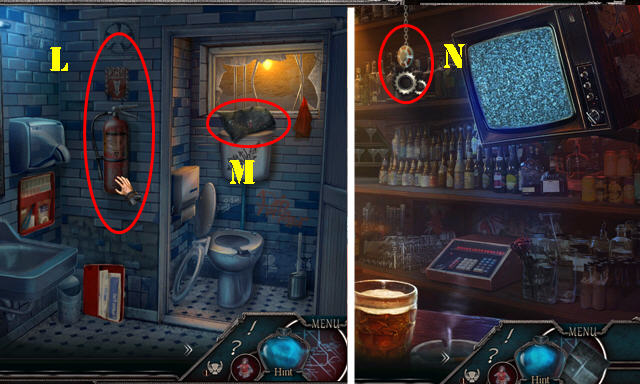
- Select FIRE EXTINGUISHER (L).
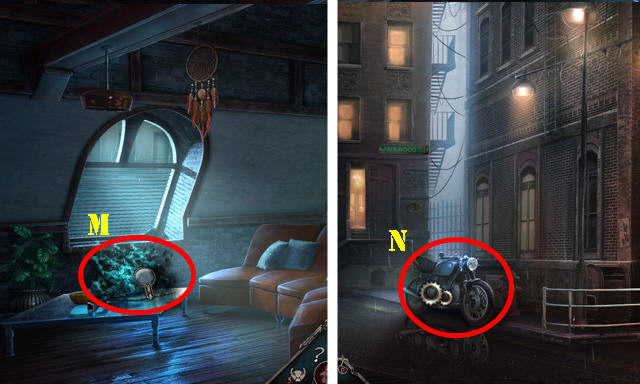
- Take Map and select it (M).
- Walk down.
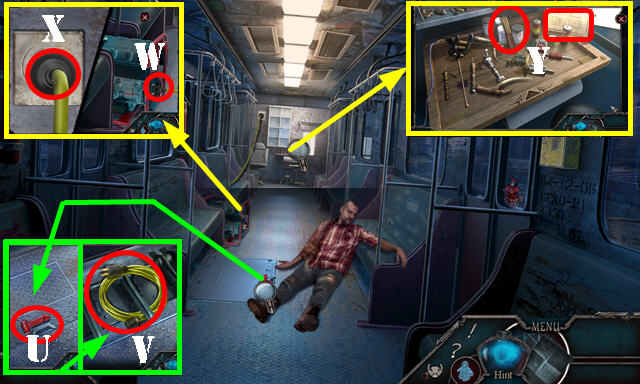
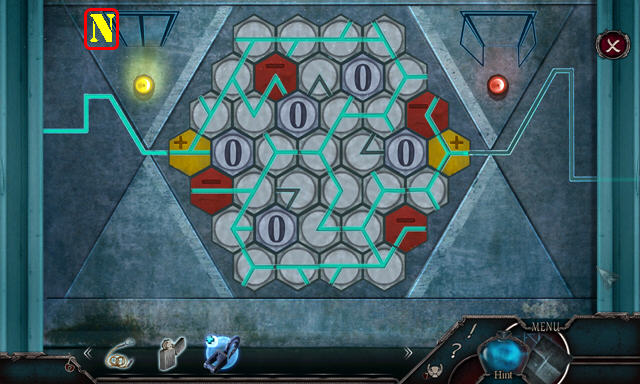
- Select FOLDED ANTENNA; receive ANTENNA.
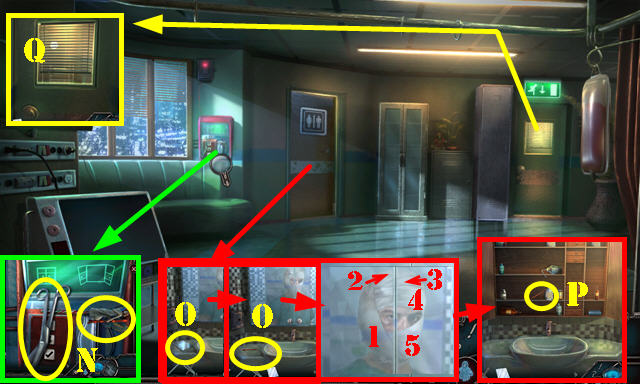
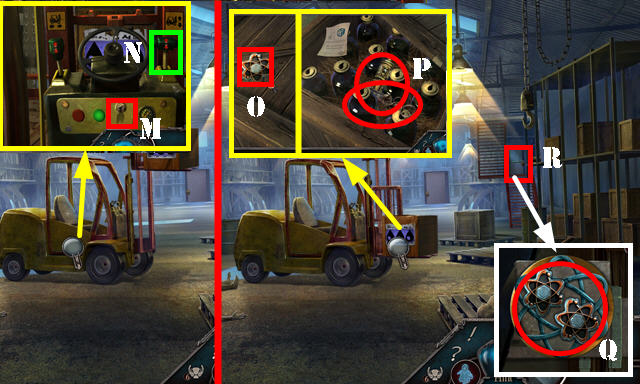
- Use ANTENNA (N); receive ALLEY TOKEN.
- Walk down.
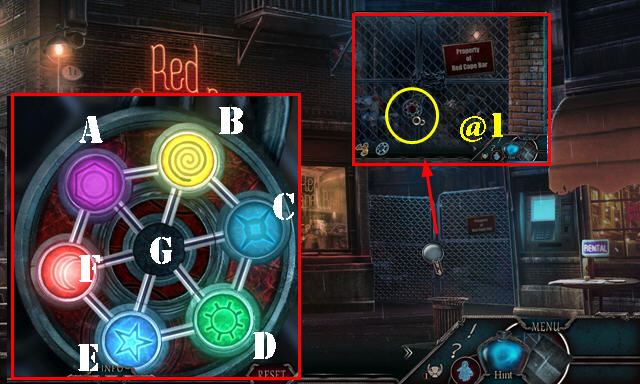
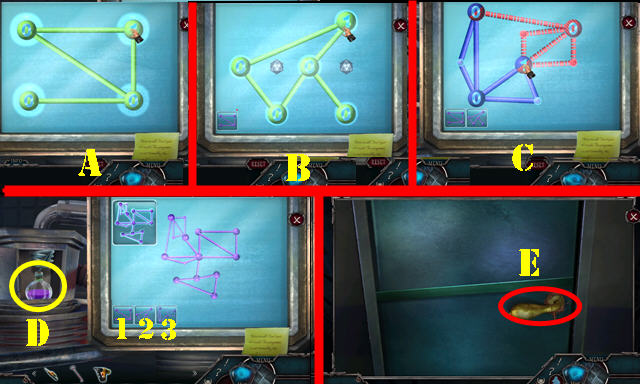
- Place ALLEY TOKEN (@1).
- Solution: A-F-E-D-C-G-E-F-A-B-G-E-F-A-B-G.
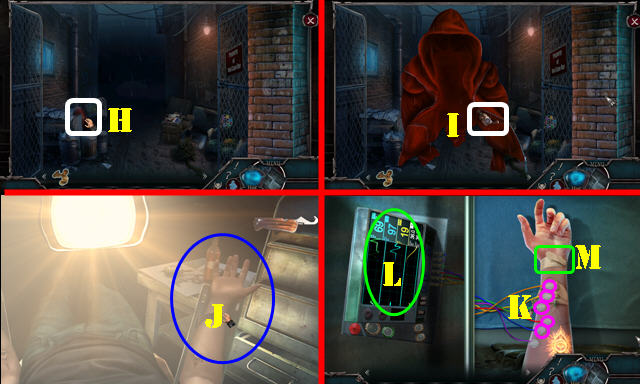
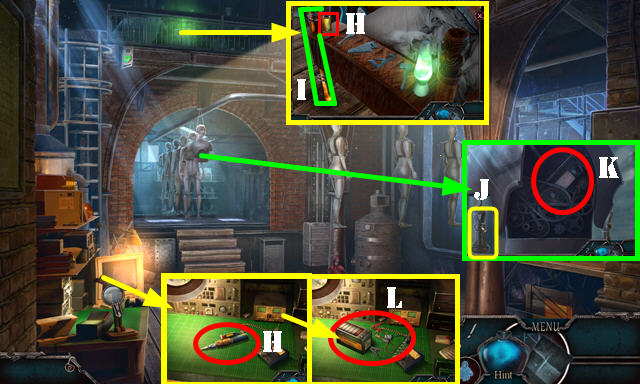
- Select jacket and open (H); take RACHEL'S ITEM (I).
- Select arm 3x (J).
- Remove each wire (K). Select monitor (L). Look at bracelet (M).
- Take BANDAGE SCISSORS and DECORATION STICK (N).
- Select DECORATION STICK twice; receive DECORATIVE STICK and BOBBY PINS 1/3.
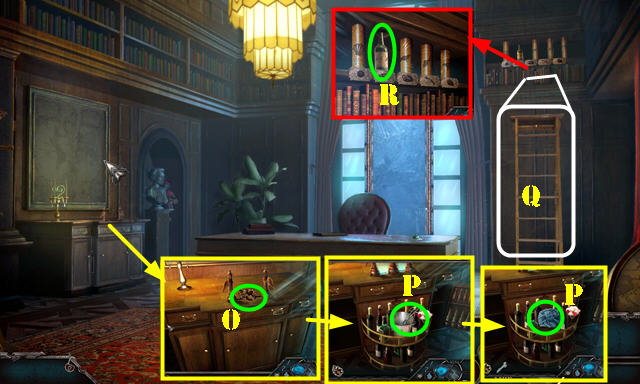
- Take MIRROR and BOBBY PINS 2 /3 (O).
- Use BANDAGE SCISSORS; select 1-5.
- Open cabinet; take BOBBY PINS 3/3 (P).
- Select door (Q).
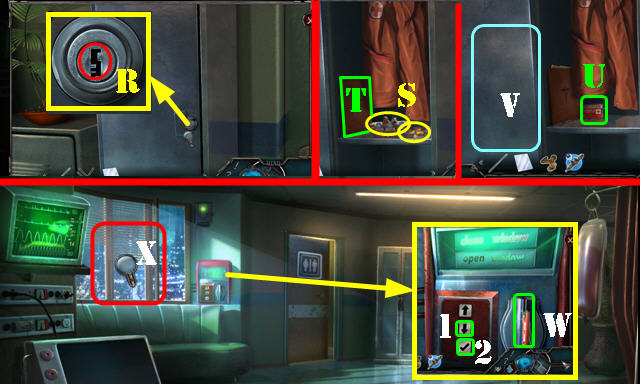
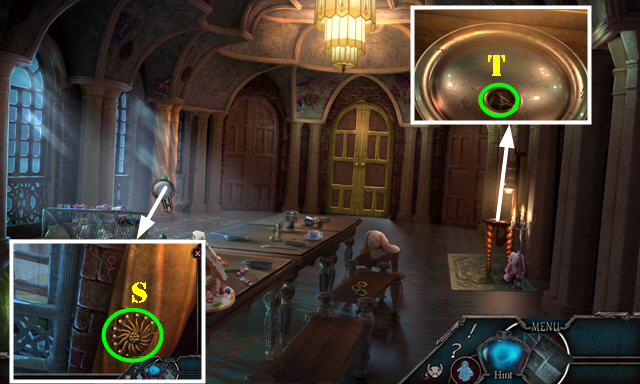
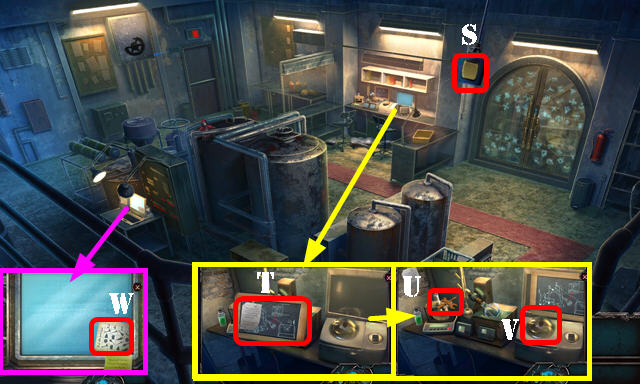
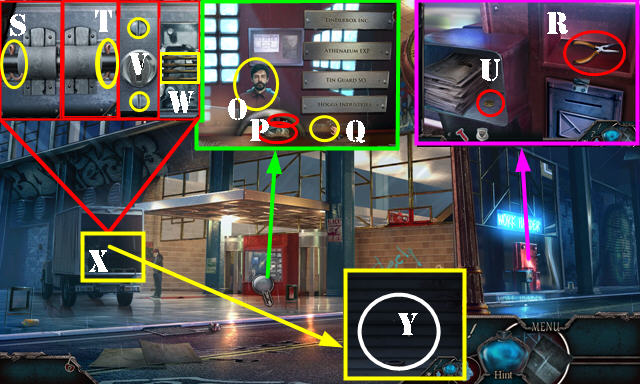
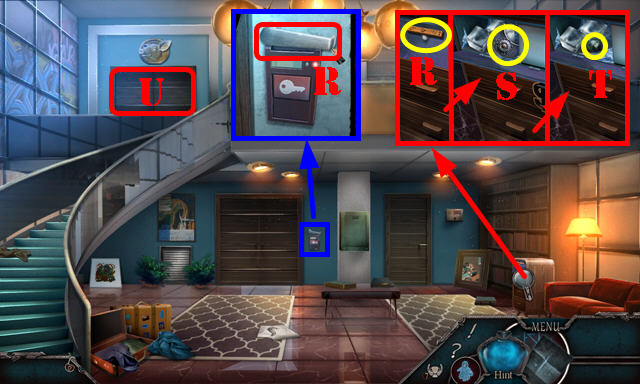
- Use BOBBY PINS 3/3 (R); take CHANGE and RACHEL'S ITEM (S).
- Select folder 3x (T); take HOSPITAL ID (U).
- Close door (V).
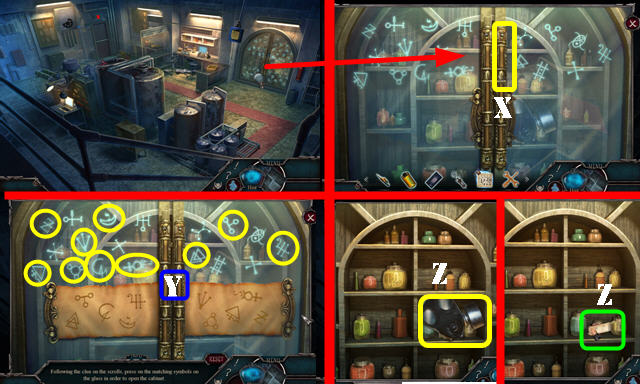
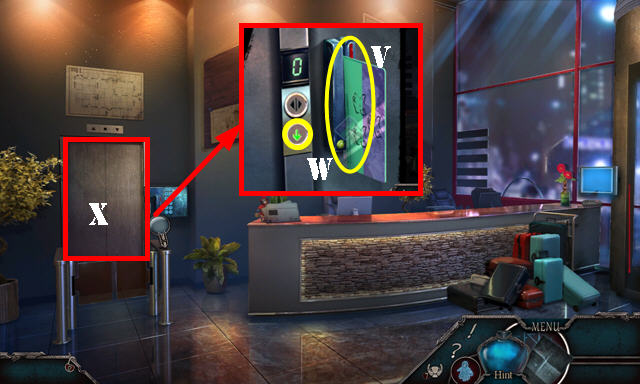
- Use HOSPITAL ID (W). Press 1-2.
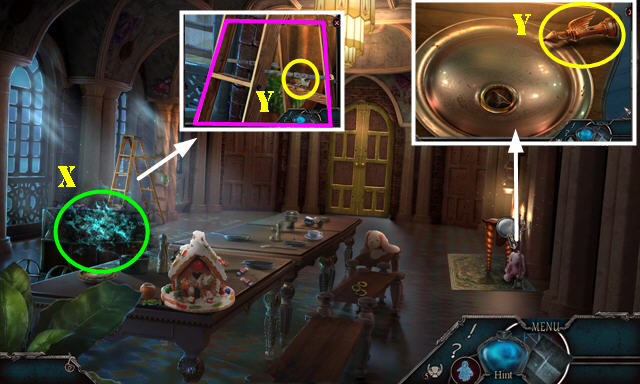
- Play puzzle (X).
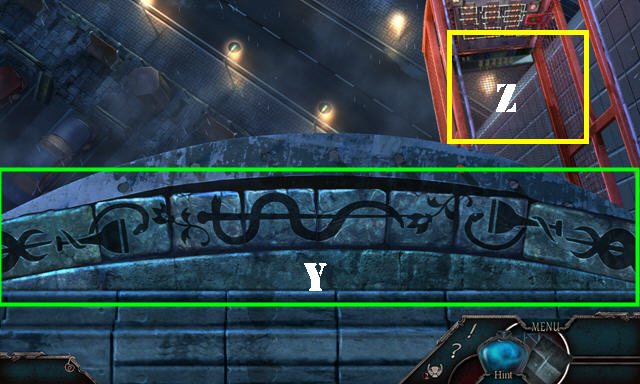
- Solution (Y).
- Go (Z).
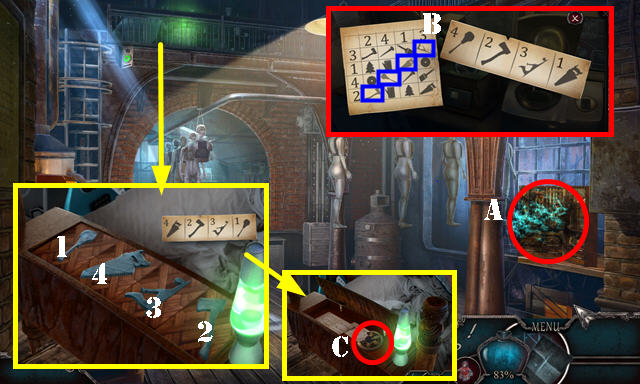
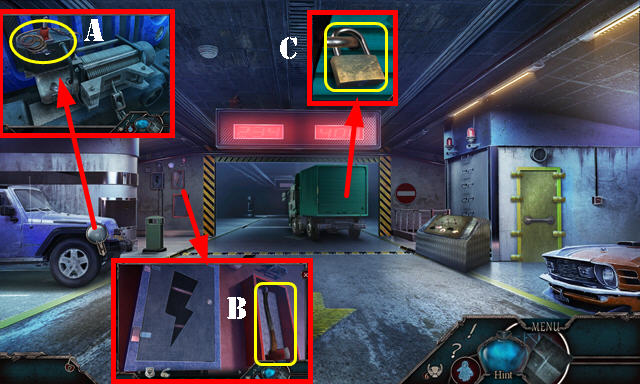
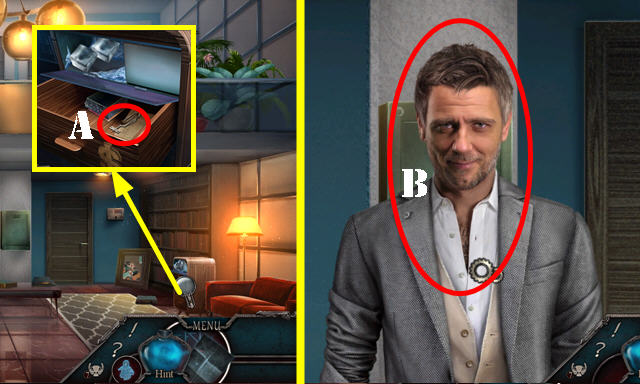
- Solution (A).
- Press button (B).
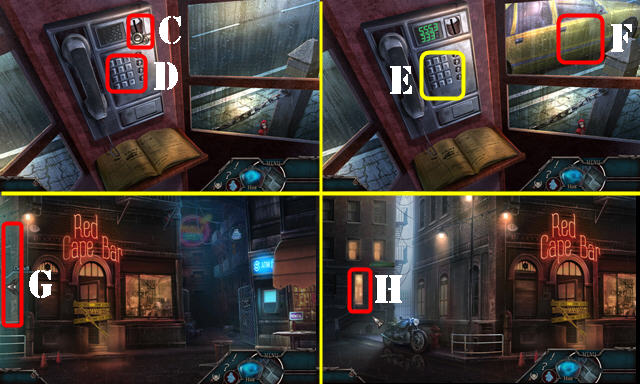
- Insert CHANGE (C). Dial 911 (D); play HOP.
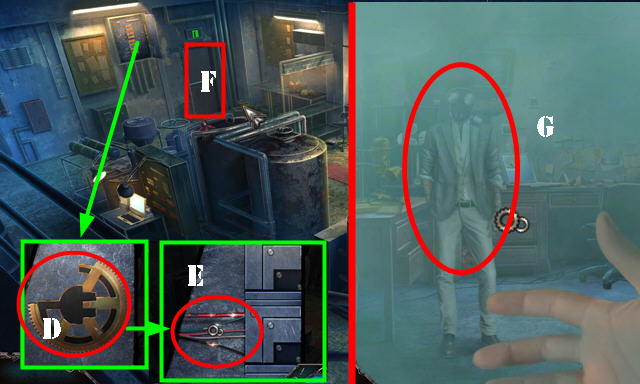
- Dial 5553333 (E).
- Go (F-G-H).
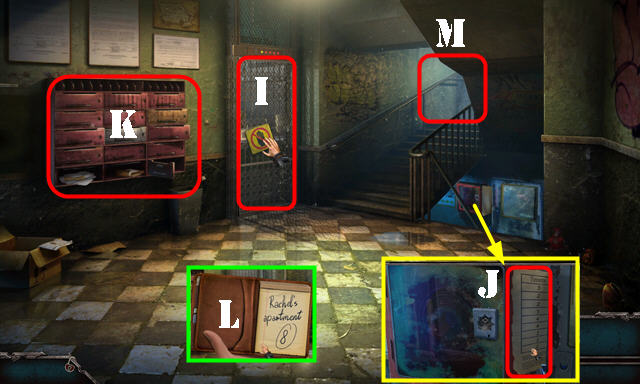
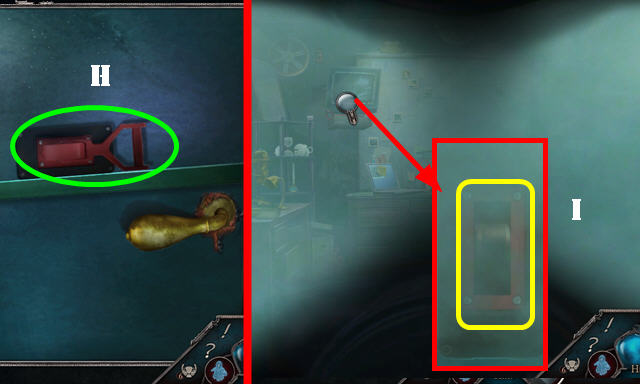
- Open door (I).
- Select and take TENANT LIST (J).
- Place TENANT LIST (K). Play HOP.
- Select notepad (L).
- Go (M).
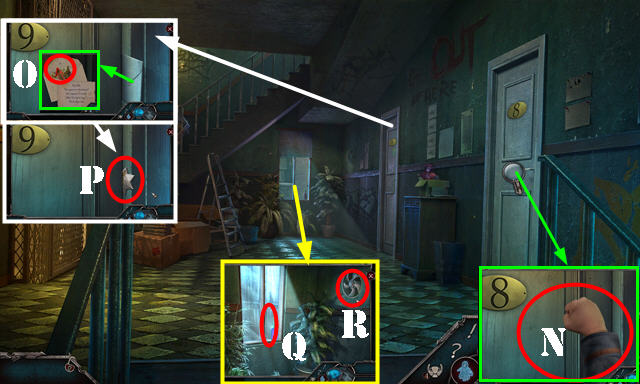
- Knock (N).
- Knock on door; open letter and take CAPE LOGO (O). Take FIREFIGHTER BADGE (P).
- Take BOTTLE (Q).
- Remove grid; take PENTAGONAL FAN CONNECTOR (R).
- Walk down twice.
- Place CAPE LOGO; take ALLEN WRENCH SET (S).
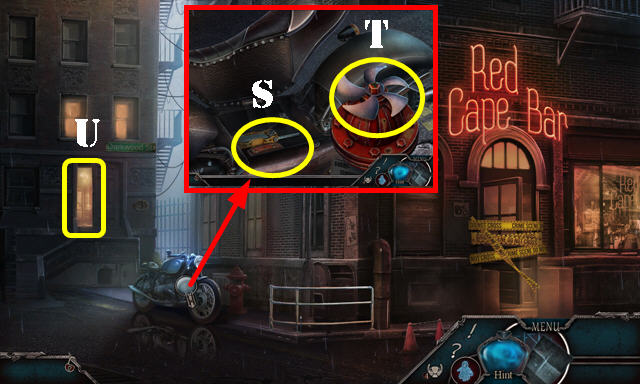
- Place PENTAGONAL FAN CONNECTOR and select (T); receive HOSE CAP.
- Go (U).
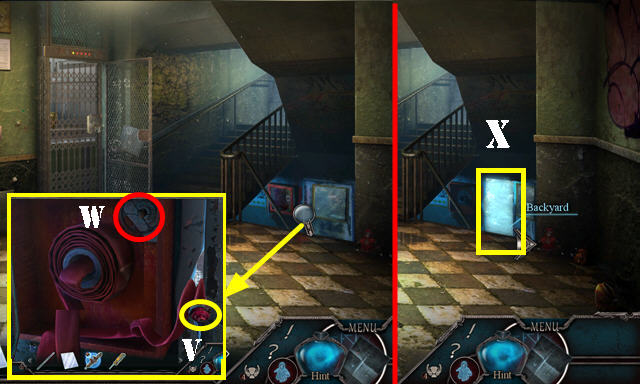
- Use FIREFIGHTER BADGE; select hose and place HOSE CAP (V). Turn valve (W).
- Go (X).
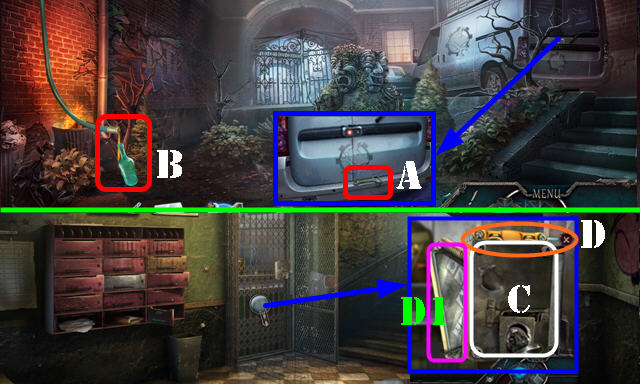
- Take BOTTLE OPENER (A).
- BOTTLE OPENER on BOTTLE; receive EMPTY BOTTLE.
- Use EMPTY BOTTLE (B); receive OIL.
- Walk down.
- Use ALLEN WRENCH SET and OIL (C). Select wrench (D) and use MIRROR on scene (D1).
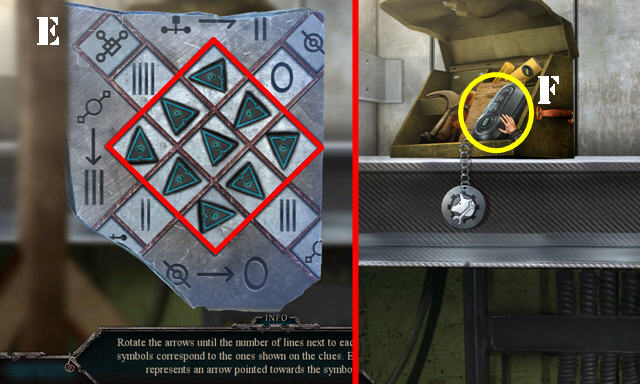
- Solution (E).
- Take VAN KEY and look at note (F).
- Go to Backyard.
- Use VAN KEY and press button (G); take PASSWORD CRACKER and GRABBER (H).
- Use GRABBER; play puzzle (I).
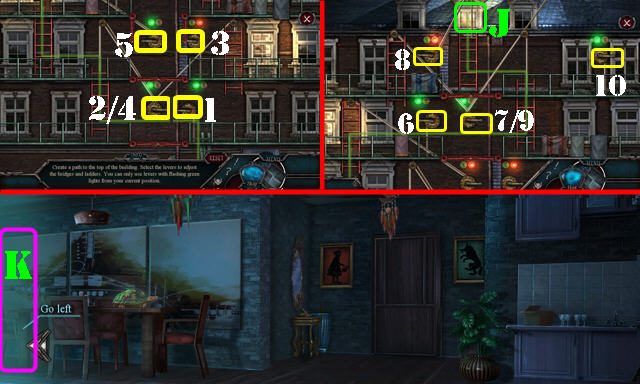
- Solution (1-10).
- Go (J-K).
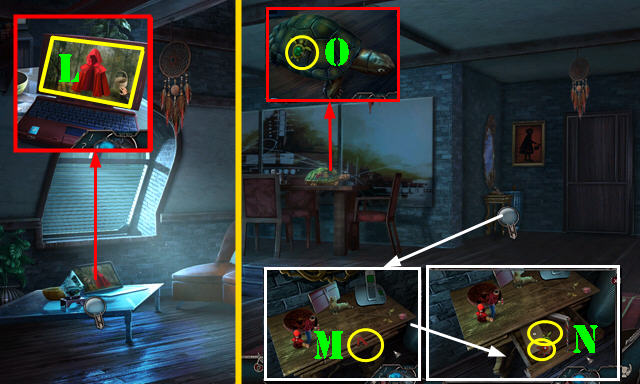
- Select screen (L).
- Go right.
- Remove stick (M); use DECORATIVE STICK. Take BOOK DIAL and TURTLE TRINKET (N).
- Place TURTLE TRINKET (O).
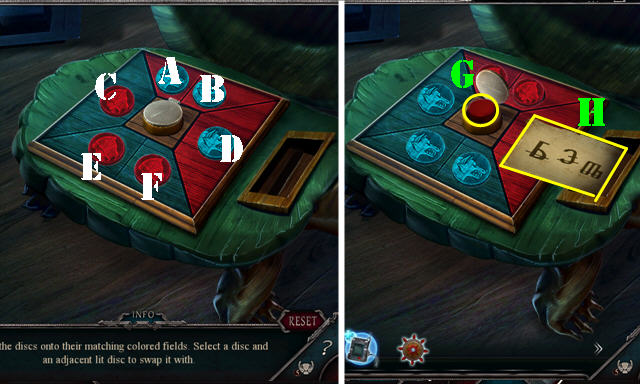
- Solution: (A-C)-(B-A)-(D-F)-(E-C)-(C-A).
- Press button (G); take SCROLL CODE (H).
- Go left.
- SCROLL CODE on RACHEL'S ITEM; select symbols (I). Take USB CABLE and BIKE KEYS (J).
- Select PASSWORD CRACKER and place USB CABLE.
- Place PASSWORD CRACKER and press button (K).
- Hide (L).
Chapter 2: Atrium
- Exit closet.
- Play HOP (M); receive PHOTO.
- Go to Outside the Bar.
- Use BIKE KEYS (N).
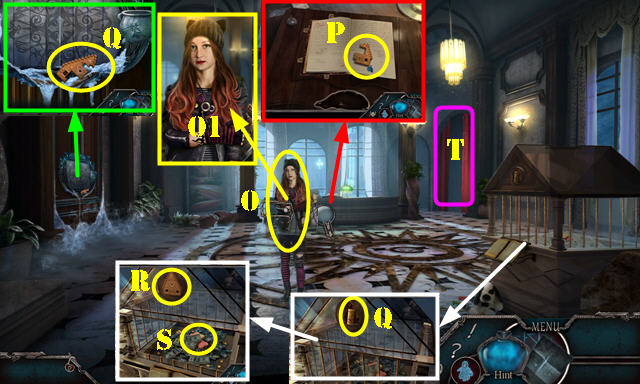
- Talk (O); give PHOTO (O1).
- Place BOOK DIAL; select page twice; take CAKE HOUSE 1/2 (P).
- Take CORK and CAKE HOUSE 2/2 (Q).
- Place CAKE HOUSE 2/2 (R); take SPRINKLES TREAT (S).
- Go (T).
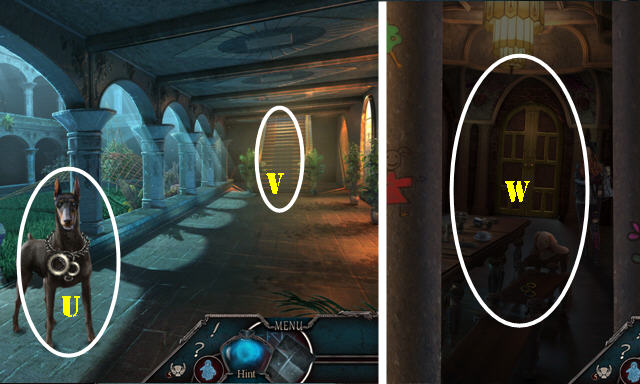
- Throw SPRINKLES TREAT (U).
- Go (V-W).
- Select scene.
- Play HOP (X); receive MACHINE HEAD.
- Take LADDER, FAIRY TOWER, and WORKSHOP TOKENS 1/3 (Y).
- Walk down.
- Take WORKSHOP TOKENS 2/3 (A).
- Open paper 4x; take WORKSHOP TOKENS 3/3 (B).
- Place WORKSHOP TOKENS 3/3 (C).
- Enter Workshop (D).
- Take PEN EMBLEM and STRING (E).
- STRING on CORK; receive CORK ON A STRING.
- Use CORK ON A STRING; take DEVELOPING AGENT and CHARCOAL (F).
- Walk down twice.
- Place PEN EMBLEM (G); take BLANK PAPER and MOON WINDER (H).
- Place BLANK PAPER and use CHARCOAL; take BROOCH SKETCH (I).
- Go to Workshop.
- Place MOON WINDER (J). Play HOP; receive TIN SCRAP.
- Select 1-2; place MACHINE HEAD (3), TIN SCRAP (4), and BROOCH SKETCH (5). Press down (K); take WITCH'S BROOCH.
- Go to Reception Hall.
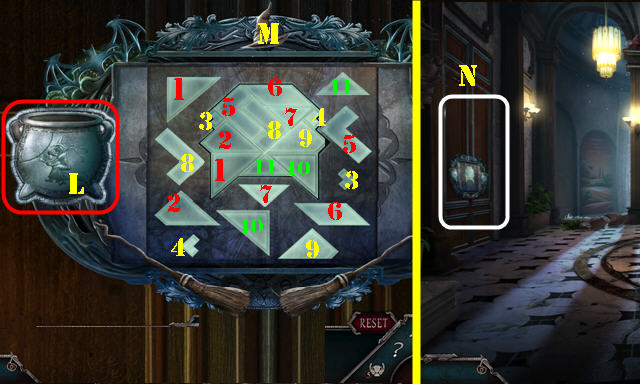
- Place WITCH'S BROOCH (L).
- Solution (M).
- Go (N).
- Take MUSIC BOX KEY and place FAIRY TOWER (O); take TONGS and RAG (P).
- Place LADDER (Q); take ALCOHOL (R).
- Go to Second Floor.
- Use ALCOHOL and RAG; take SUN WINDER (S).
- Use TONGS (T); receive BIRD CYLINDER.
- Return to Workshop.
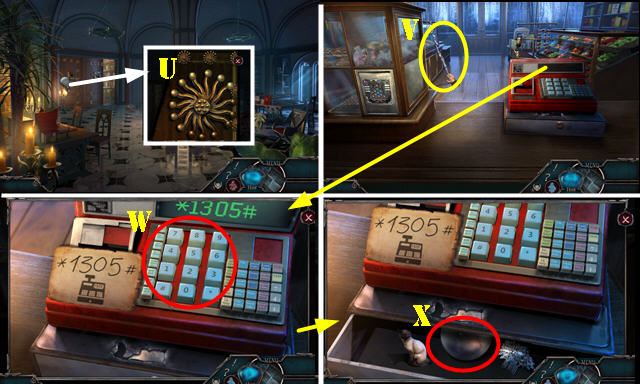
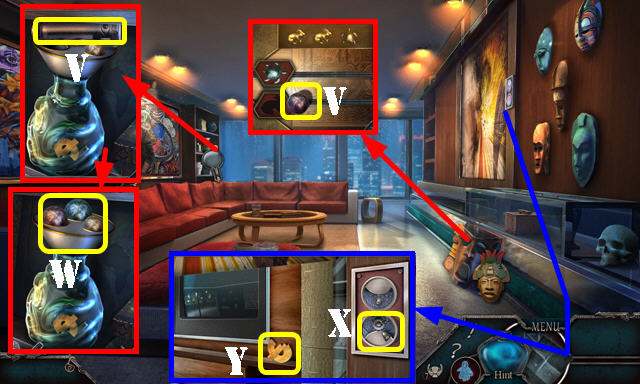
- Use SUN WINDER (U). Play HOP; go forward and receive REGISTER CODE.
- Take VINE BRANCH (V).
- Place REGISTER CODE; enter (*1305#)(W). Take CRYSTAL BALL (X).
- Walk down.

- Give VINE BRANCH and CRYSTAL BALL (Y); receive FIERY STAFF.
- Go to Warden's Office.
- Use FIERY STAFF (Z).
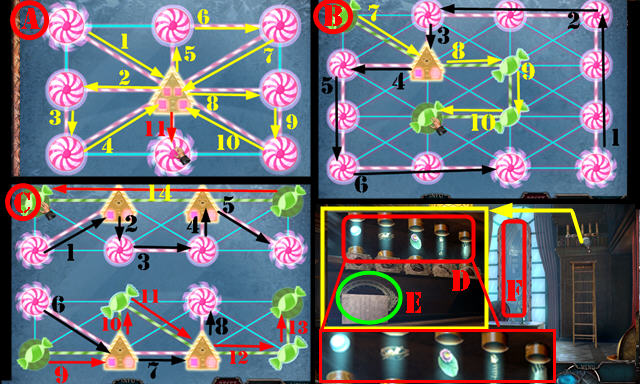
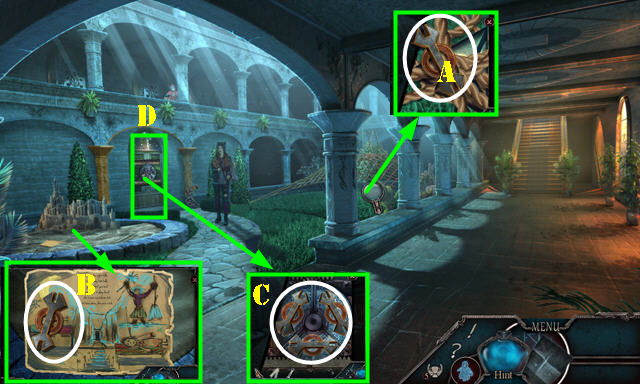
- Solution (A-C).
- Place BIRD CYLINDER. Solution (D).
- Look at note; take FRAME (E).
- Go (F).
- Take WEIGHT and TOY UMBRELLA (G).
- Use TOY UMBRELLA (H).
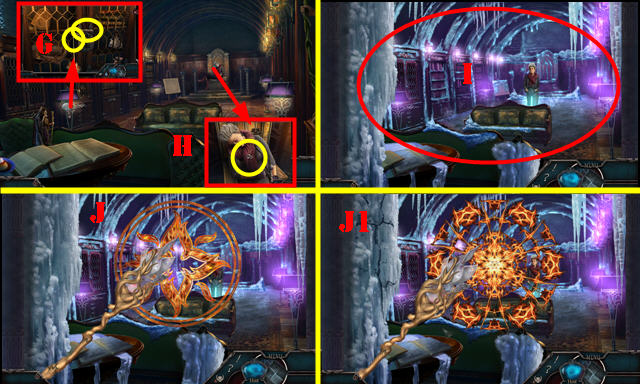
- Use FIERY STAFF on scene (I).
- Manipulate image (J) and then select scene.
- Manipulate image (J1).
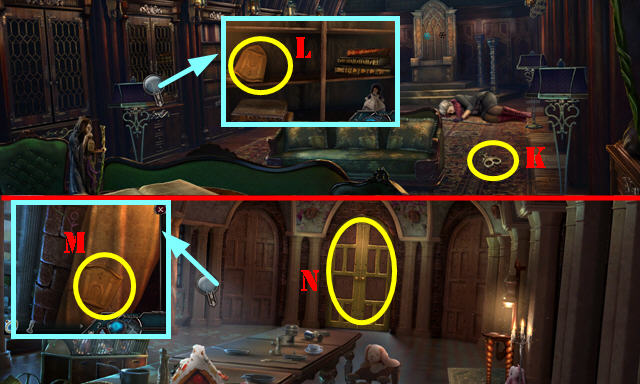
- Take CABINET KEY (K).
- Use CABINET KEY and select; take PILLAR EMBLEM (L).
- Go to Second Floor.
- Place PILLAR EMBLEM (M).
- Go (N).
Chapter 3: Lille's Room
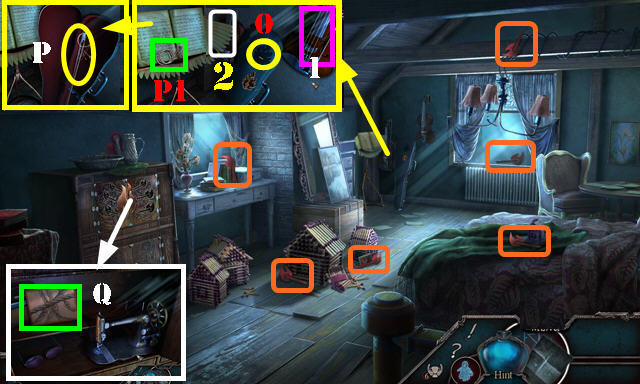
- Take LILLE'S MATCHES 1/6-6/6 (orange).
- Select strings (1-2). Place MUSIC BOX KEY and select (O); select strings (P); take VIOLIN STRINGS (P1).
- Place LILLE'S MATCHES 6/6; take KNOT MANUAL (Q).
- Go to Atrium.
- Place KNOT MANUAL. Select 1-4. Take SAFE PARTS 1/2 (S).
- VIOLIN STRINGS on FRAME; take IMPROVISED SIEVE.
- Use IMPROVISED SIEVE; take SAFE PARTS 2/2 (T).
- Go to Counter.
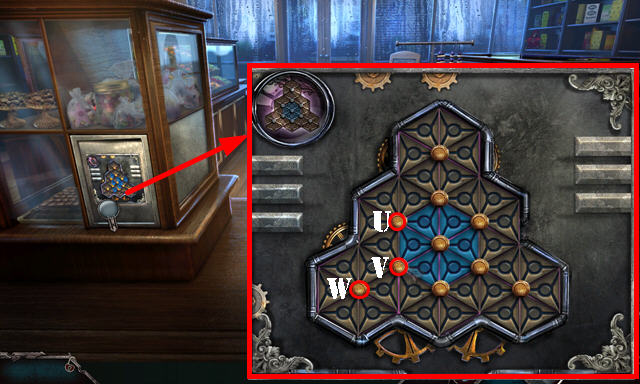
- Place SAFE PARTS 2/2. Solution U-V-Wx4-Vx5-W-Vx2.
- Take SNOWFLAKE TOKEN.
- Go to Witch's Lair.
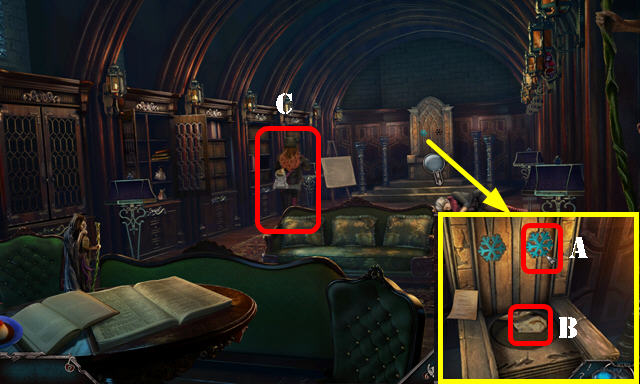
- Place SNOWFLAKE TOKEN (A); look at note; take JOZEF'S CALLING CARD (B).
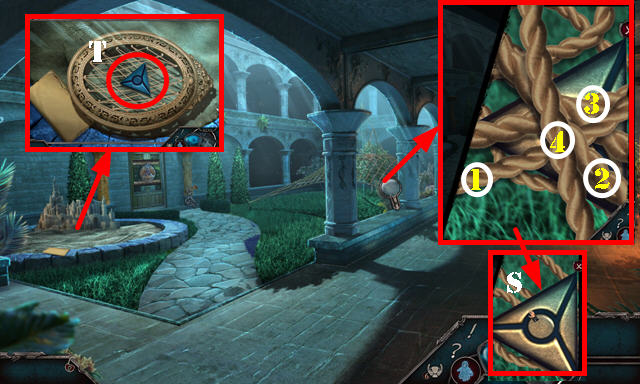
- Use JOZEF'S CALLING CARD (C).
- Use JOZEF'S CALLING CARD (D).
- Take NIPPERS (E).
- Select panel twice; take CLAMPS and EMPTY BATTERY (F).
- Go (G).
- Take SOLDERING IRON and FILM (H).
- Use NIPPERS (I); receive PRY BAR.
- Place WEIGHT (J); take VHS TAPE and ATOM EMBLEMS 1/2 (K).
- Place EMPTY BATTERY and CLAMPS; select clamps; take BATTERY (L).
- Walk down.
- Place BATTERY; select knob (M). Pull (N).
- Take ATOM EMBLEMS 2/2 (O).
- Use PRY BAR; look at note; take SYRINGE and HOLDER TOP (P).
- Place ATOM EMBLEMS 2/2 (Q).
- Go (R).
- Flip switch (S).
- Look at note and select board (T); take TOOLBOX ITEM (U).
- Select (V).
- Look at note; take DECIPHERING TABLE (W).
- Place HOLDER TOP (X).
- Solution (Y).
- Take GAS MASK and CODED MESSAGE (Z).
- Go to Joseph's Booth.
- Place TOOLBOX ITEM; play HOP (A); receive ELECTRICIAN'S GLOVES.
- CODED MESSAGE on DECIPHERING TABLE; select symbols (B); receive CODE.
- Place CODE; select 1-4; take MECHANICAL EMBLEM (C).
- Go to Production Room.
- Place MECHANICAL EMBLEM (D); use ELECTRICIAN'S GLOVES (E).
- Go (F).
- Use GAS MASK on scene (G).
- Walk down.
- Try to walk down; take VENTILATOR SWITCH (H).
- Go to Production Office.
- Place VENTILATOR SWITCH and select (I).
- Play HOP (J); receive ALUM.
- Take MANHOLE OPENER and NAIL GUN (K).
- Use VHS TAPE; take PHOTO PAPER (L).
- Look at note; press switch (M). Use DEVELOPING AGENT (N). Place PHOTO PAPER (O) and FILM (P).
- Select (Q-O); take MIXTURE PHOTO (R).
- Walk down.

- Use SYRINGE (S); select test tube (T).
- Place ALUM (U); close cover. Select alum; take MIXTURE PART (V).
- Place MIXTURE PHOTO (W); solution (X).
- Use MIXTURE PART (Y).
- Solution (A-B-C).
- Select: 1-2-3.
- Take CORROSIVE ACID (D).
- Try to walk down. Use CORROSIVE ACID (E).
- Walk down.
- Select scene.
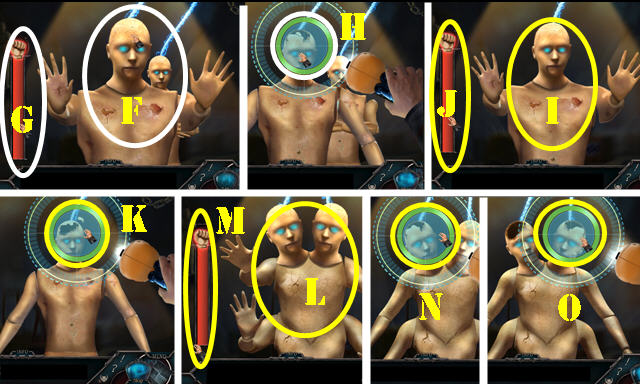
- Use NAIL GUN on mannequin. Punch body (F) until meter (G) fills up.
- Aim at head (H).
- Punch body (I) until meter (J) fills up.
- Aim at head (K).
- Punch body (L) until meter (M) fills up.
- Aim at heads (N-O).
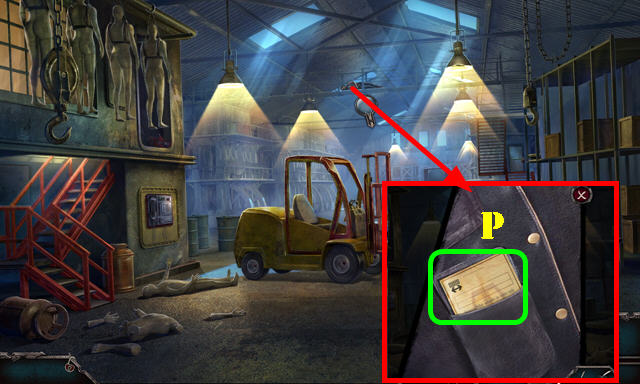
- Open pocket; receive SHIPMENT INFORMATION (P).
- Select scene. SHIPMENT INFORMATION is automatically used.
- Open bag (Q); take EMPTY ZIP DRIVE.
- Look at two notes (R).
- Use SOLDERING IRON; take ZIP DISC and GARAGE TOKENS 1/2 (S).
- Use MANHOLE OPENER; take DIAL SETS 1/3 (T); play HOP; receive LOCKER KEY.
- Go (U).
- Take DIAL SETS 2/3 (V).
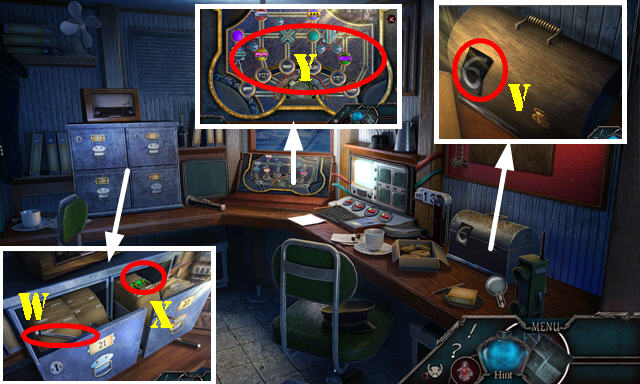
- Open drawer; take WRENCH ADAPTER (W).
- Use LOCKER KEY; take GARAGE TOKENS 2/2 (X).
- Place GARAGE TOKENS 2/2 (Y).
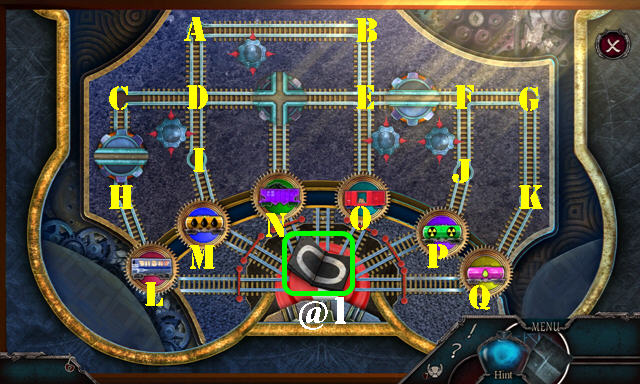
- Solution: (I-M)-(C-I)-(A-L)-(B-A)-(E-B)-(J-G)-(I-P)-(B-O)-(G-N)-(M-Q)-(A-M).
- Take DIAL SETS 3/3 and push button (@1).
- Walk down.
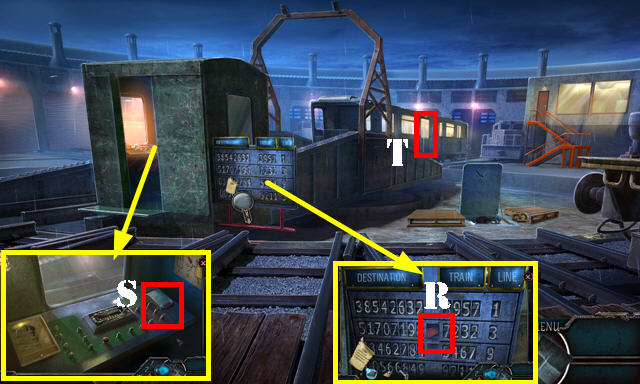
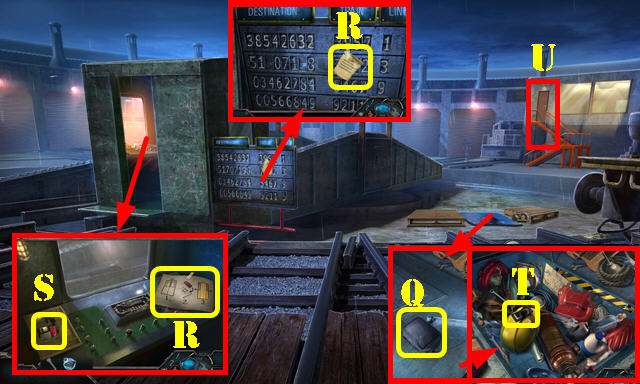
- Place DIAL SETS 3/3; take TRAIN PUNCH CARD (R).
- Use TRAIN PUNCH CARD (S).
- Enter (T).
Chapter 4: Subway Cart
- Take GLASS BREAKER (U).
- Use WRENCH ADAPTER; take EXTENSION CORD (V).
- Use EXTENSION CORD (W-X).
- Take TATTOO NEEDLES and CONSOLE SCHEMATICS (Y).
- Go to Control Room.

- Use TATTOO NEEDLES; take SCOTCH (A).
- ZIP DISC on EMPTY ZIP DRIVE; take ZIP DRIVE.
- Use ZIP DRIVE (B).
- Use CONSOLE SCHEMATICS. Solution: Cx2-D-Ex3-F.
- Play HOP (G); receive TRIANGLE EMBLEM.
- Go to Subway Cart.
- Place TRIANGLE EMBLEM (H); take BANDAGES (I).
- Use SCOTCH and BANDAGES (J); take CHRIS'S TATTOO DESIGN (K).
- Place CHRIS'S TATTOO DESIGN (L). Select gun (M). Take VISITOR CARD (N).
- Talk (O). Place VISITOR CARD (P). Select (Q); take SECURITY BADGE and DEPOSITORY KEY (P).
- Use DEPOSITORY KEY; take NEEDLE PLIERS (R).
- Use NEEDLE PLIERS twice (S-T); receive IRON ROD.
- Use IRON ROD; take COIN (U).
- Use COIN (V); select four pins (W).
- Go (X). Select door (Y).
- Take ROPE (A).
- Use GLASS BREAKER; take FIRE AXE (B).
- Use FIRE AXE (C). Play HOP; receive ALLIGATOR CLIPS.
- Place ALLIGATOR CLIPS (D). Flip switch (E).
- Select door (F) and car (G).
- Go (H).
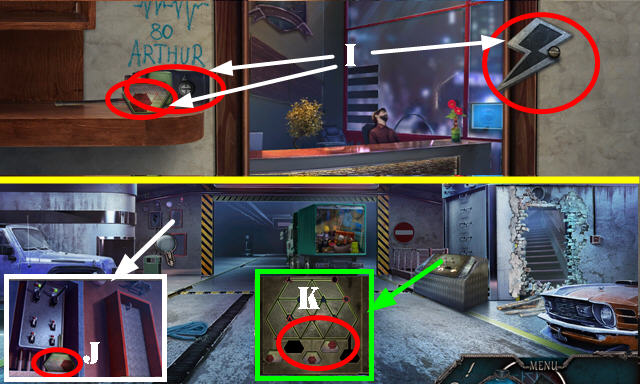
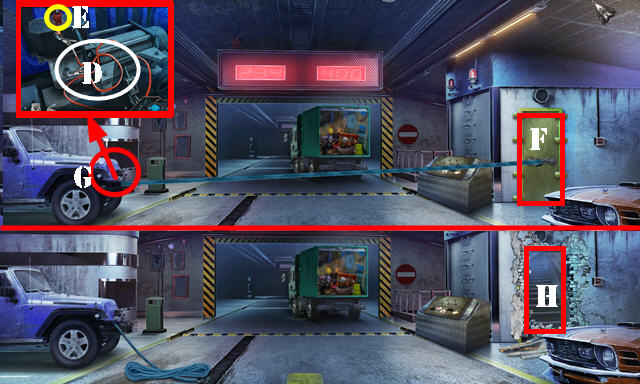
- Take LIGHTNING SYMBOL, TOOLBOX EMBLEM 1/2, and WALKIE-TALKIE (I).
- Walk down.
- Place LIGHTNING SYMBOL; take TOOLBOX EMBLEM 2/2 (J).
- Place TOOLBOX EMBLEM 2/2 (K).
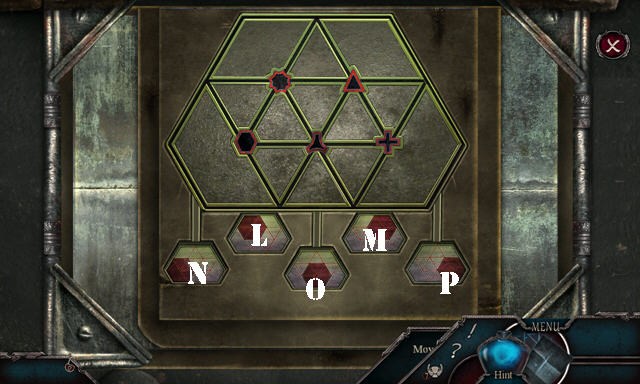
- Solution: Mx3-Lx3-Nx3-Mx2-Lx4-Mx2-P-Nx3.
- Take BATTERIES.
- Go to Reception.
- BATTERIES in WALKIE-TALKIE; take WALKIE-TALKIE.
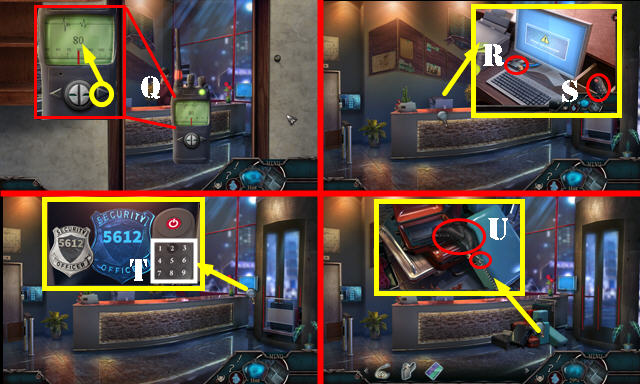
- Use WALKIE-TALKIE; move dial to right, stop at 80 (Q).
- Take LIGHTER (R). Open drawer; take SCANNER CONTROLLER (S).
- Use SECURITY BADGE and SCANNER CONTROLLER; enter (5612) (T). Play HOP; receive COMPANY CARD.
- Take HEAVY BOOT and CUTICLE PUSHER (U).
- Go left.
- Use COMPANY CARD (V). Press down button (W).
- Enter Elevator (X).
- Take SOAP (A).
- Use CUTICLE PUSHER and HEAVY BOOT (B); take ISOLATION TAPE (C).
- Go forward.
- Use SOAP on zipper and select; take PAPER (D).
- Place PAPER (E); use ISOLATION TAPE (F). Select yes (G); take BUILDING MAP (H).
- Enter Elevator (I).
- Use COMPANY CARD (J). Use BUILDING MAP (K); select 11 (L).
- Take GRAPPLING HOOK and play puzzle (M).
- Solution (N).
- ROPE on GRAPPLING HOOK; take ROPE HOOK.
- Use ROPE HOOK (O).
- Press button (P).
- Go (Q).
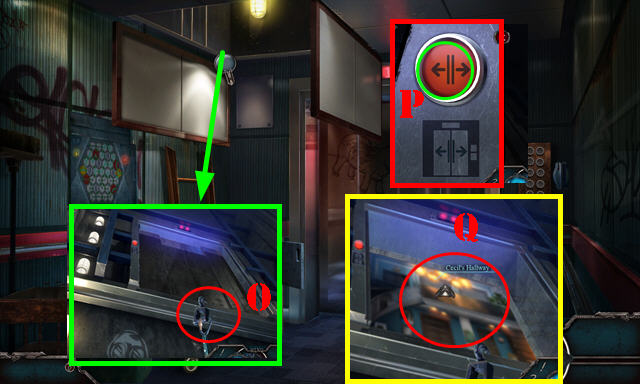
Chapter 5: Cecil's Hallway
- Take SYMBOL WAND 1/2 and LID HANDLE (R).
- Place LID HANDLE; take CRESCENT MOON TOKEN (S).
- Use LIGHTER; take MARBLES 1/2 (T).
- Go (U).
- Take MARBLES 2/2 and MACE (V).
- Place MARBLES 2/2 (W); select twice; receive DOLLAR TOKEN 1/2.
- Place CRESCENT MOON TOKEN (X); take DOLLAR TOKEN 2/2 (Y).
- Walk down.
- Place DOLLAR TOKEN 2/2; take MUSIC BOX KEY (A).
- Use MACE (B).
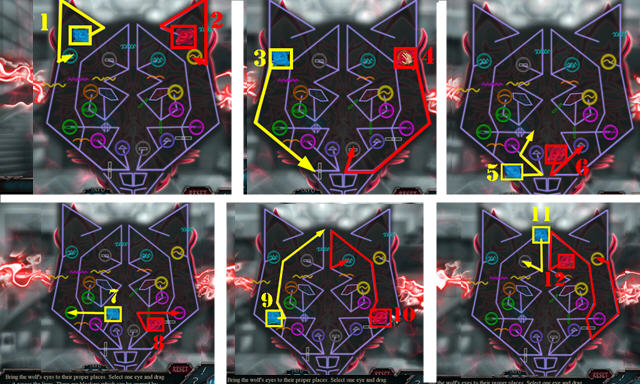
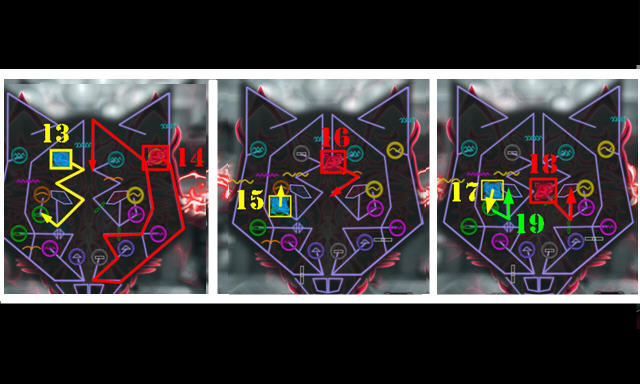
- Solution (1-19).
- Punch (C).
- Play HOP (D); receive FARKASH'S KEYCARD.
- Use FARKASH'S KEYCARD (E).
- Enter (F).
- Open bag; take TASER (G).
- Use MUSIC BOX KEY; take SYMBOL WAND 2/2 (H).
- Use TASER (I); receive RABBIT TOKEN.
- Open door (J).
- Go to Living Room.

- Place RABBIT TOKEN; select Lx2-K. Take HOGGS EMBLEM.
- Place SYMBOL WAND 2/2 (M); arrange symbols (N); take MURAL PIECE.
- Place MURAL PIECE (O). Play HOP; receive TRIBAL FORK.
- Go to Cecil's Room.
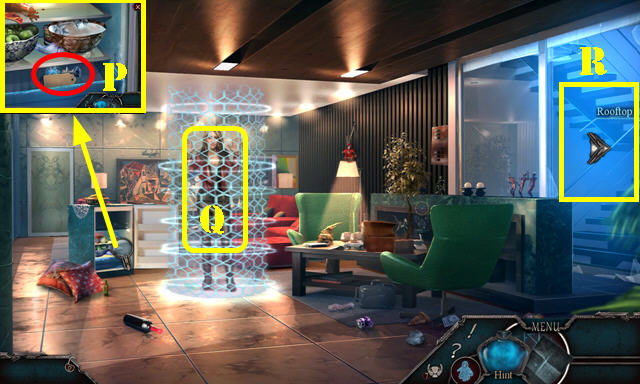
- Use TRIBAL FORK and open drawer; take CLARITY POTION (P).
- Use CLARITY POTION (Q); receive DEVIL'S BREATH.
- Go (R).
- Place HOGGS EMBLEM (T).
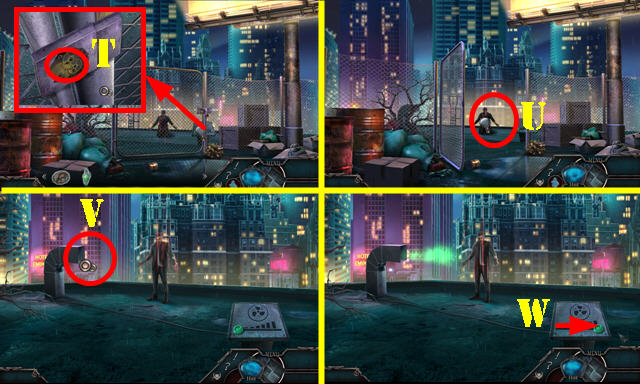
- Talk (U).
- Use DEVIL'S BREATH (V).
- Select scene.
- Slide button (W).
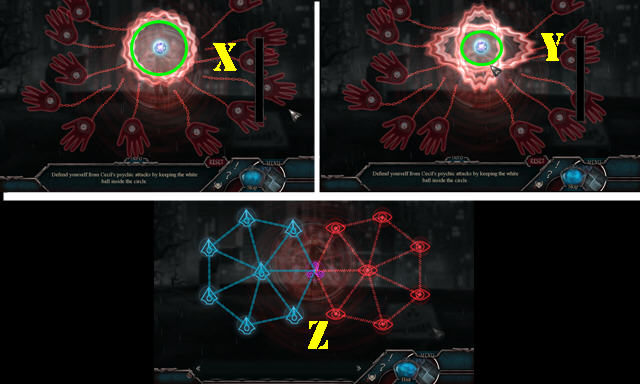
- Keep ball in center (X-Y).
- Untangle (Z).
- Congratulations, you've completed The Andersen Accounts: Chapter One!
Created at: 2018-05-06