

Walkthrough Menu
General Tips
• Select "Play" (A) to begin your adventure. After you select "Play", you will have to choose between "New Game", "Continue" or "Cancel". If you select "New Game" all your previous progress for that profile will be lost. • Choose 'Options' (B) to adjust screen size, volume, and cursor. • Select 'Quit' (C) to exit the game. • Select 'If this is not you, click here' (D) to manage your player profiles. • Inventory items will stay in inventory until no longer needed. • Some inventory items will be automatically used once you enter a puzzle. • In this guide we will refer to Hidden Object Scenes as 'HOS'. • The Hints are available in the Main Quests and in the HOS. • All puzzles can be skipped once the skip button has become available.Chapter 1
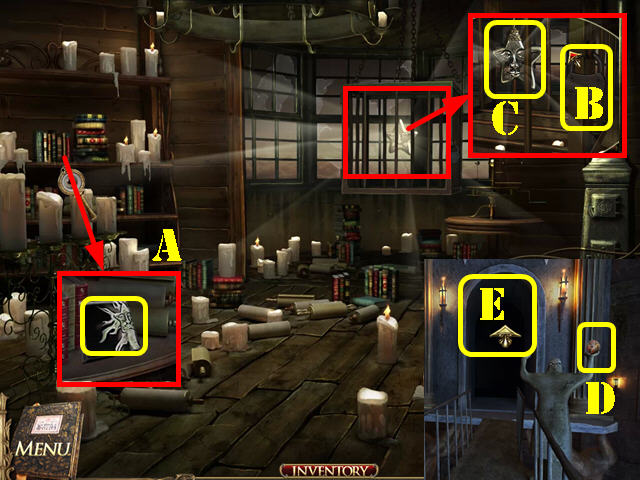
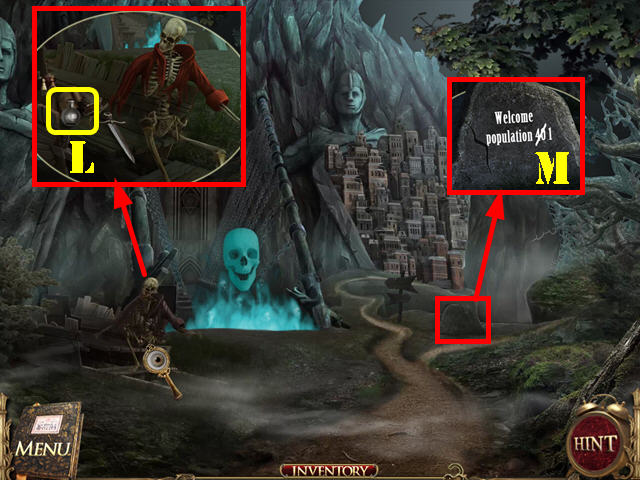
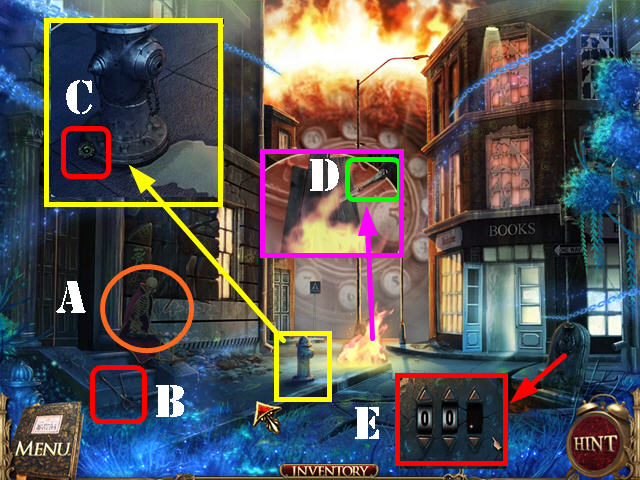 • Talk to the skeleton (A); it will ask you for a crown. •
Take the FORCEPS (B). • Examine the fire hydrant; take the 1/5
NUMBER (C). • Zoom into the fire; retrieve the KNIFE with the
FORCEPS (D). • Note the gravestone; a cylinder is missing (E).
• Go into the bookstore.
• Talk to the skeleton (A); it will ask you for a crown. •
Take the FORCEPS (B). • Examine the fire hydrant; take the 1/5
NUMBER (C). • Zoom into the fire; retrieve the KNIFE with the
FORCEPS (D). • Note the gravestone; a cylinder is missing (E).
• Go into the bookstore.
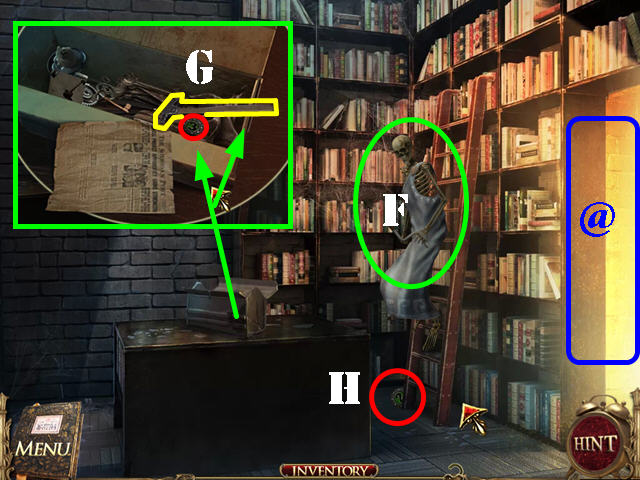 • Talk to the skeleton (F); it will ask you for glasses. •
Zoom into the toolbox; push the paper aside; take the 2/5
NUMBER and the HAMMER (G). • Take the 3/5 NUMBER by the bottom
of the ladder (H). • Go through the entryway (@).
• Talk to the skeleton (F); it will ask you for glasses. •
Zoom into the toolbox; push the paper aside; take the 2/5
NUMBER and the HAMMER (G). • Take the 3/5 NUMBER by the bottom
of the ladder (H). • Go through the entryway (@).
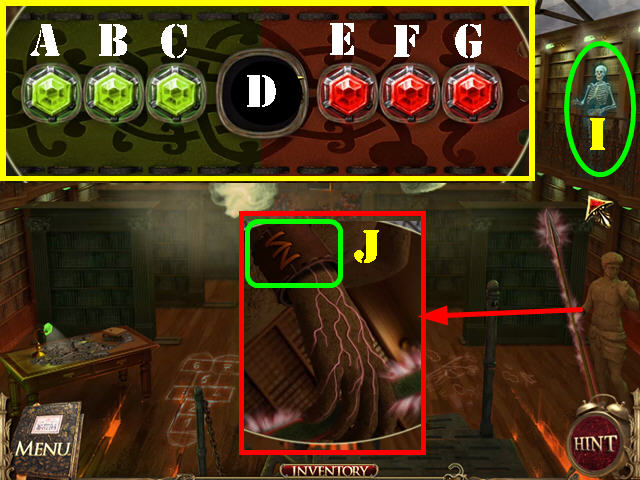 • Talk to the skeleton (I); it wants a way to bring light to
the people. • Zoom into the statue; cut the bracelet with the
KNIFE to activate a puzzle (J). • You must move the green gems
to the left and the red ones to the right. You cannot skip
over a gem of the same color. • To solve the puzzle, press on
the gems in this order: C, E, F, D, B, A, C, E, G, F, D, B, C,
E, and D. • You will earn the SPEAR.
• Talk to the skeleton (I); it wants a way to bring light to
the people. • Zoom into the statue; cut the bracelet with the
KNIFE to activate a puzzle (J). • You must move the green gems
to the left and the red ones to the right. You cannot skip
over a gem of the same color. • To solve the puzzle, press on
the gems in this order: C, E, F, D, B, A, C, E, G, F, D, B, C,
E, and D. • You will earn the SPEAR.
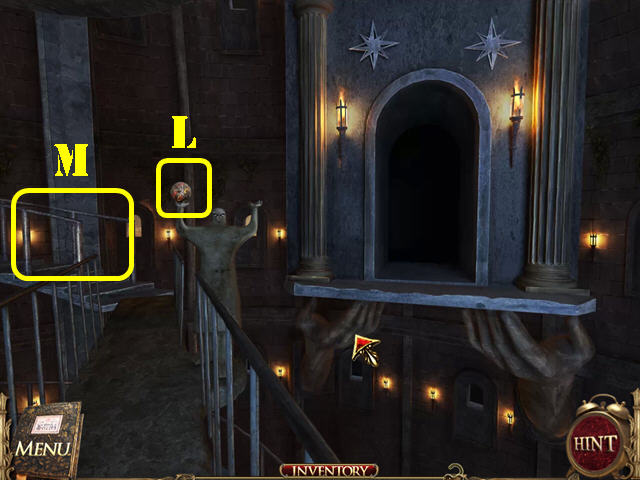
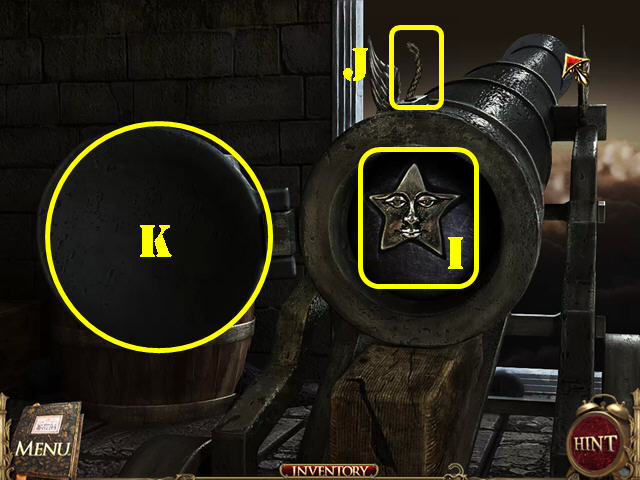
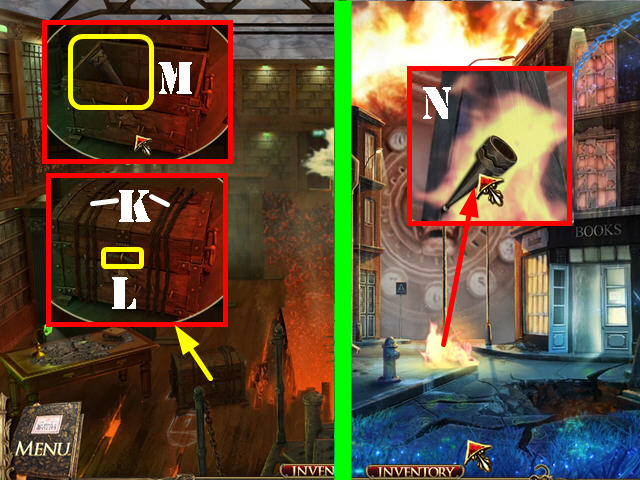 • Use the SPEAR on the chest to bring it closer. Zoom into the
chest and cut the 6 ropes with the KNIFE (K). • Remove the
piece blocking the latch with the HAMMER (L). • Take the TORCH
(M). • Go outside. • Zoom into the fire; light the TORCH (N).
• Go back to the library.
• Use the SPEAR on the chest to bring it closer. Zoom into the
chest and cut the 6 ropes with the KNIFE (K). • Remove the
piece blocking the latch with the HAMMER (L). • Take the TORCH
(M). • Go outside. • Zoom into the fire; light the TORCH (N).
• Go back to the library.
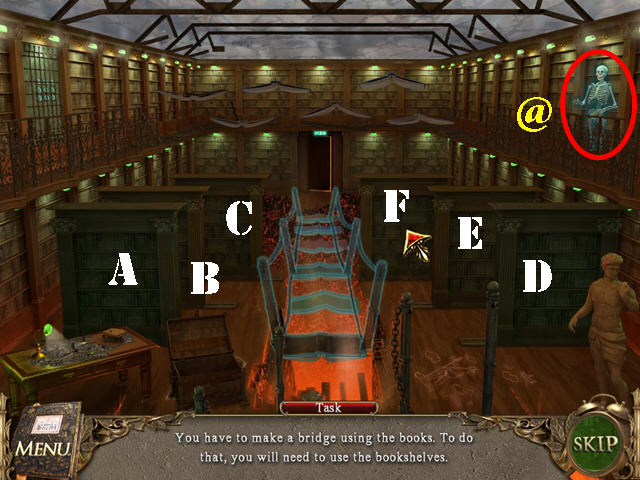 • Give the torch to the skeleton to activate a puzzle (@). •
You must press on the bookcases to make the books fall on the
ground; each bookcase controls a different set of books: • To
solve the puzzle, select the bookcases in this order: A, D,
and F. Please watch the video solution below.
• Go forward.
• Give the torch to the skeleton to activate a puzzle (@). •
You must press on the bookcases to make the books fall on the
ground; each bookcase controls a different set of books: • To
solve the puzzle, select the bookcases in this order: A, D,
and F. Please watch the video solution below.
• Go forward.
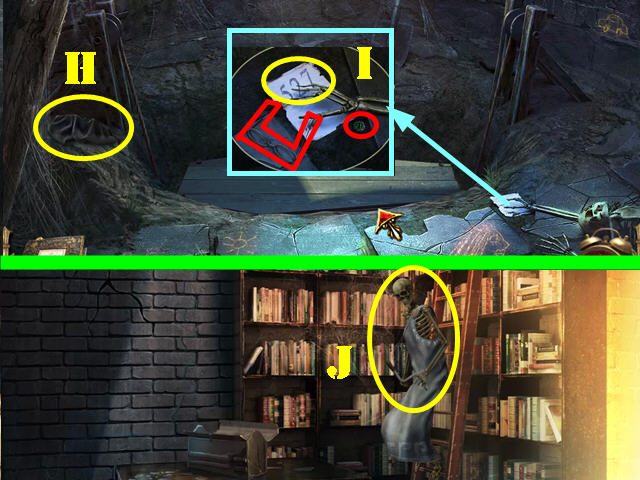 • Take the RAG (H). • Look at the ground; take the 4/5 NUMBER,
the GLASSES, and look at the code: 527 (I). • Walk down twice.
• Give the GLASSES to the skeleton to receive the HANDLE (J).
• Walk down.
• Take the RAG (H). • Look at the ground; take the 4/5 NUMBER,
the GLASSES, and look at the code: 527 (I). • Walk down twice.
• Give the GLASSES to the skeleton to receive the HANDLE (J).
• Walk down.
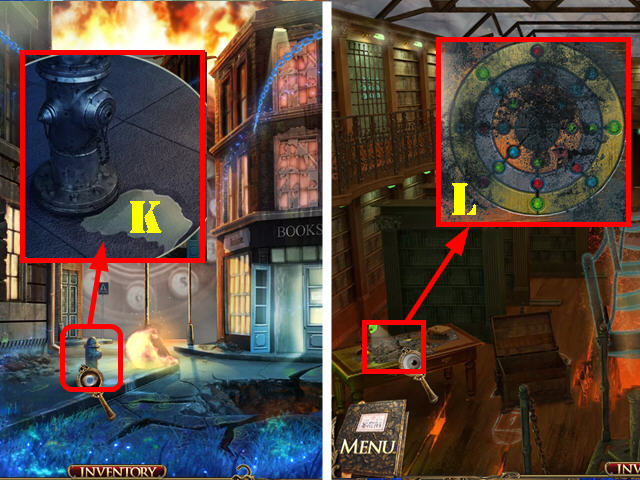 • Examine the fire hydrant; soak up the water with the RAG to
create the WET RAG (K). • Go back to the library. • Zoom into
the table; clean off the dirt with the WET RAG (L) to activate
a puzzle.
• Examine the fire hydrant; soak up the water with the RAG to
create the WET RAG (K). • Go back to the library. • Zoom into
the table; clean off the dirt with the WET RAG (L) to activate
a puzzle.
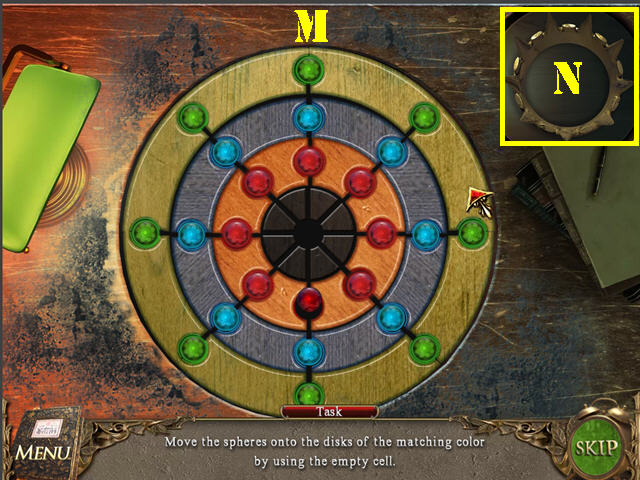 • Your goal is to put all the marbles into their matching
holes. • Press on the disks to rotate them; press on the
marbles to move them to an empty space (M). Please watch the
video for a step-by-step solution.
• Take the CROWN (N). • Go forward.
• Your goal is to put all the marbles into their matching
holes. • Press on the disks to rotate them; press on the
marbles to move them to an empty space (M). Please watch the
video for a step-by-step solution.
• Take the CROWN (N). • Go forward.
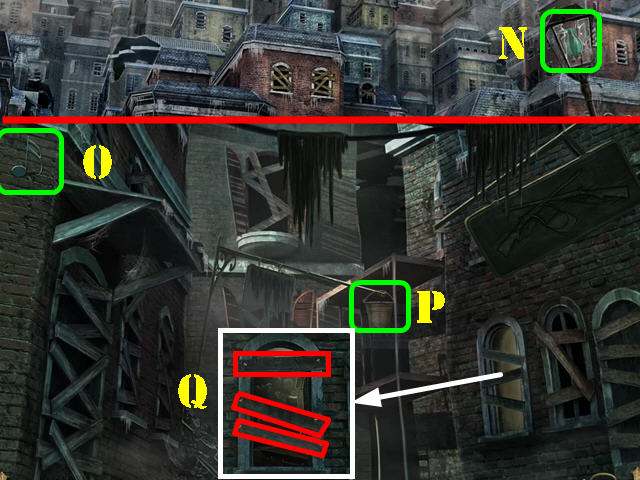
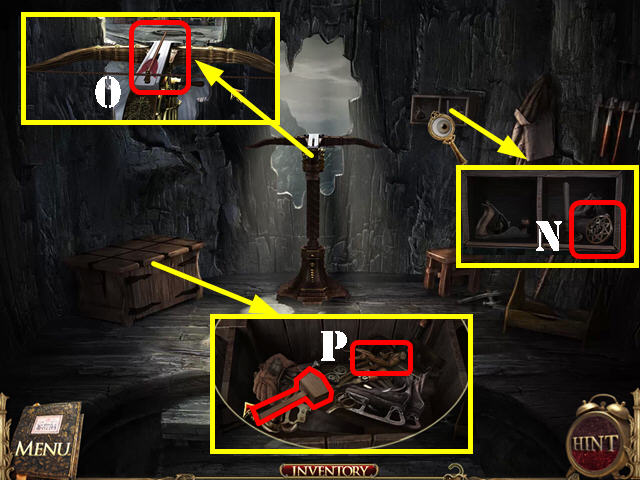
 • Zoom into the winch; put the HANDLE on it (O). • Zoom into
the raised casket; pull the 4 nails out with the HAMMER (P). •
Take the BOOK and the 5/5 NUMBER (Q) from inside the coffin. •
Go back outside. • Put the CROWN on the skeleton's head (R) to
receive the HANDLE. • Go back to the casket. • Put the HANDLE
on the pick head to get the PICKAXE (S). • Walk down twice.
• Zoom into the winch; put the HANDLE on it (O). • Zoom into
the raised casket; pull the 4 nails out with the HAMMER (P). •
Take the BOOK and the 5/5 NUMBER (Q) from inside the coffin. •
Go back outside. • Put the CROWN on the skeleton's head (R) to
receive the HANDLE. • Go back to the casket. • Put the HANDLE
on the pick head to get the PICKAXE (S). • Walk down twice.
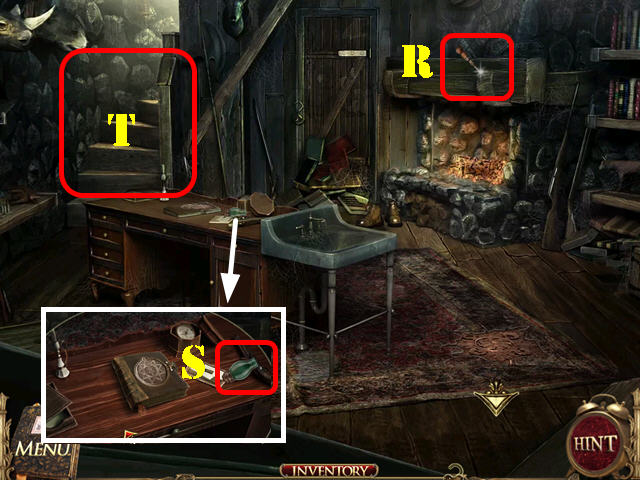
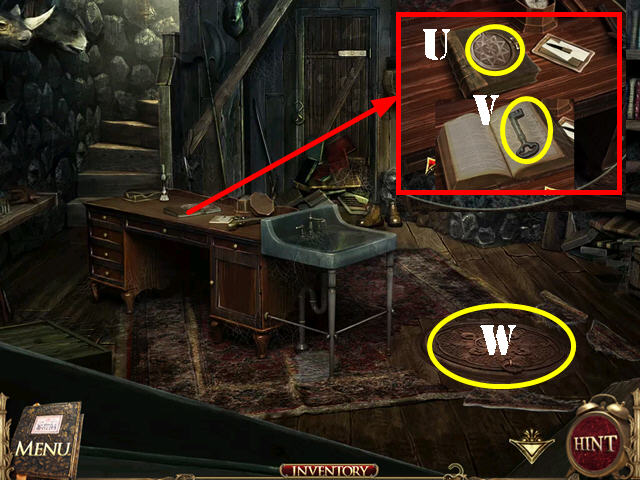
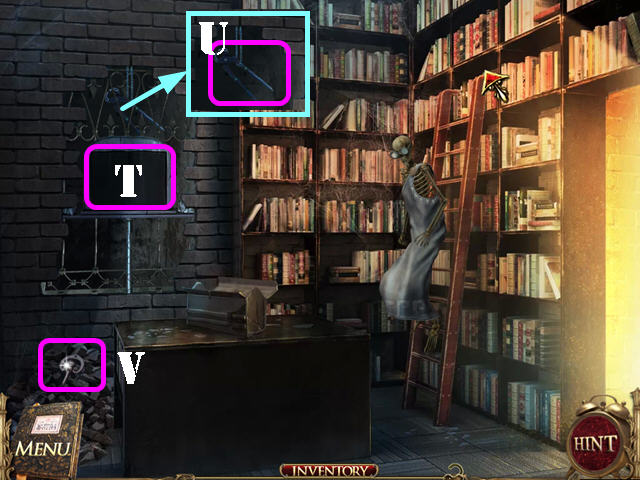 • Use the PICKAXE on the wall 3 times. Put the BOOK in the
book stand (T). • Take the WIRE CUTTERS (U) and the RED KEY
(V). • Go back into the library.
• Use the PICKAXE on the wall 3 times. Put the BOOK in the
book stand (T). • Take the WIRE CUTTERS (U) and the RED KEY
(V). • Go back into the library.
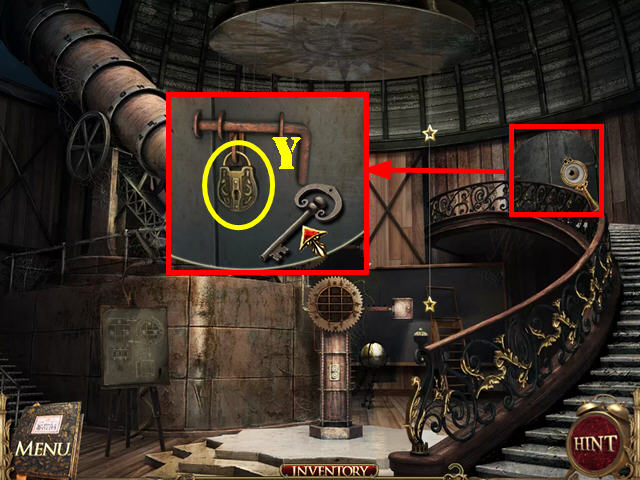
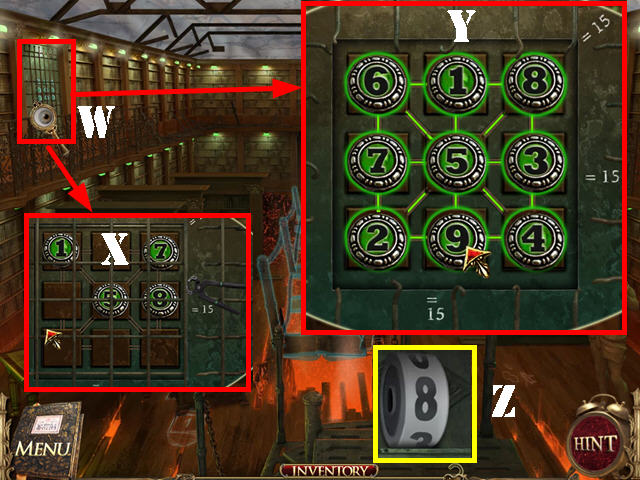 • Zoom into the bars in the upper left (W). • Cut the wire
with the WIRE CUTTERS (X). • Put the 5 NUMBERS on the board to
activate a puzzle. • Select two numbers to swap them. You can
only swap numbers which are connected to the same bars. •
Arrange the numbers so that the vertical, diagonal and
horizontal lines all add up to 15. • The bars in between the
numbers will light up once they are in the right spots. •
Please look at the screenshot for the solution (Y). • Take the
CYLINDER (Z). • Walk down twice.
• Zoom into the bars in the upper left (W). • Cut the wire
with the WIRE CUTTERS (X). • Put the 5 NUMBERS on the board to
activate a puzzle. • Select two numbers to swap them. You can
only swap numbers which are connected to the same bars. •
Arrange the numbers so that the vertical, diagonal and
horizontal lines all add up to 15. • The bars in between the
numbers will light up once they are in the right spots. •
Please look at the screenshot for the solution (Y). • Take the
CYLINDER (Z). • Walk down twice.
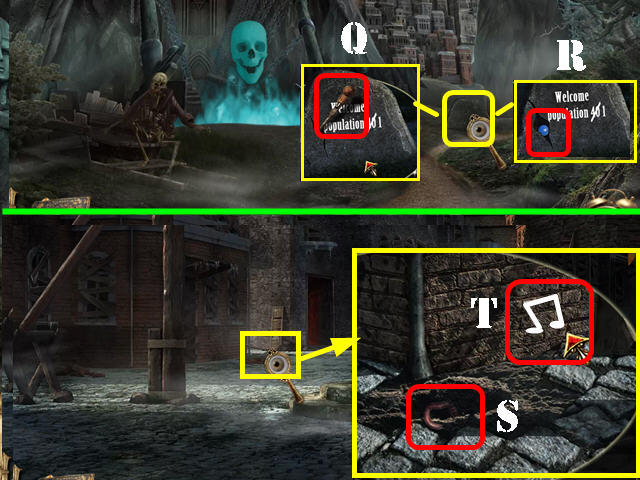
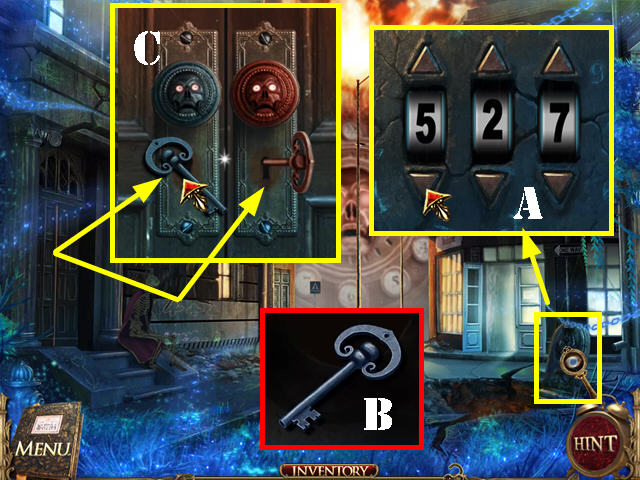 • Zoom into the gravestone; add the CYLINDER to activate a
puzzle. • Change the code to 527 (A). • Take the BLUE KEY (B).
• Zoom into the left door; put the BLUE KEY and the RED KEY
into their matching keyholes (C).
• Zoom into the gravestone; add the CYLINDER to activate a
puzzle. • Change the code to 527 (A). • Take the BLUE KEY (B).
• Zoom into the left door; put the BLUE KEY and the RED KEY
into their matching keyholes (C).
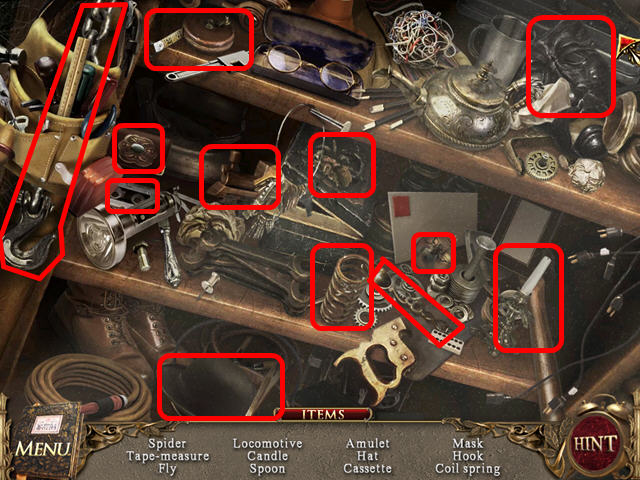
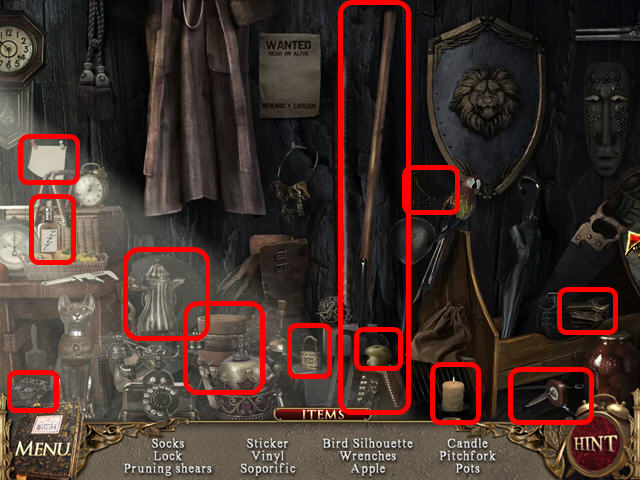
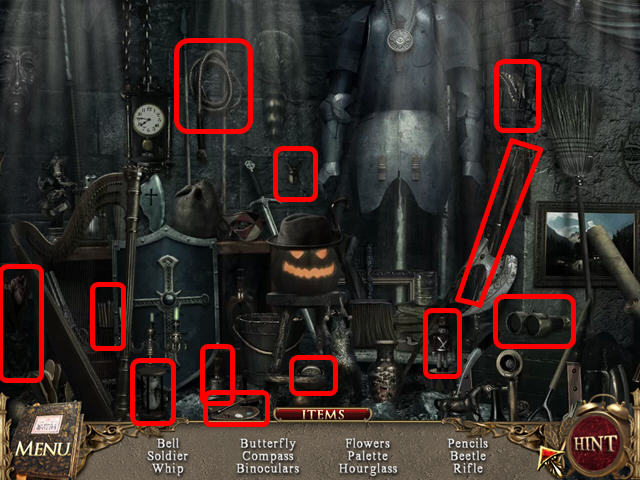
 • Try to go into the bookstore to activate a HOS. • Find all
the listed items to obtain the LEVER.
• Try to go into the bookstore to activate a HOS. • Find all
the listed items to obtain the LEVER.
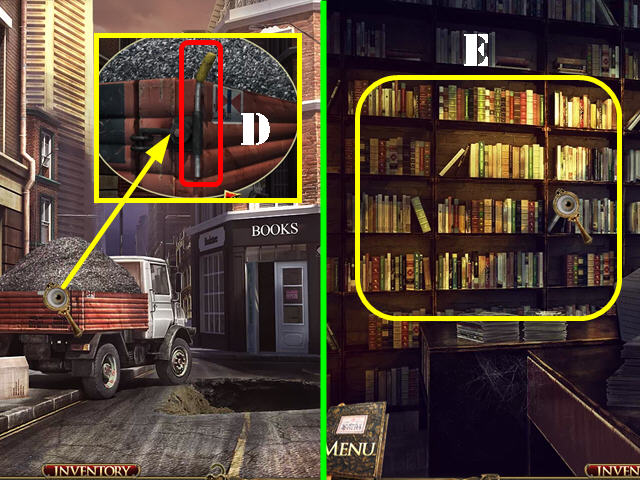 • Zoom into the back of the truck; put the LEVER on the latch
(D) and press on the lever to make the gravel fall on the
ground. • Go into the bookstore. • Examine the bookcase to
activate a puzzle (E).
• Zoom into the back of the truck; put the LEVER on the latch
(D) and press on the lever to make the gravel fall on the
ground. • Go into the bookstore. • Examine the bookcase to
activate a puzzle (E).
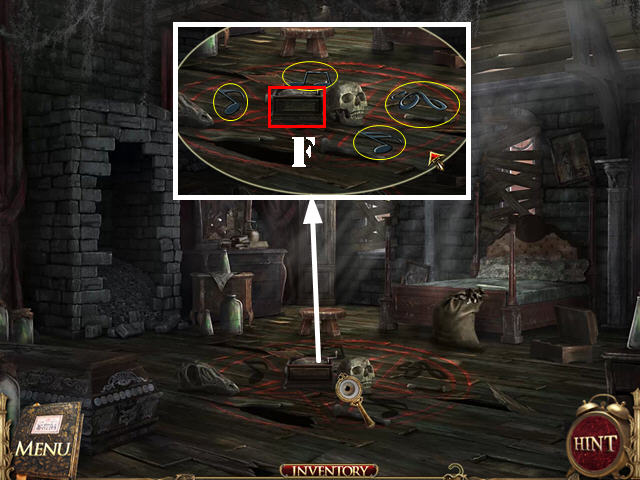
 • Arrange the books in the correct order. Solve the
mathematical equations etched on the bookcase and put the
missing book below it. • For example, place the book with the
'10' on the spine below the 3 + 7 equation. • Please look at
the screenshot for the solution (F). • You will earn the BOOK
and will be automatically transported outside.
• Arrange the books in the correct order. Solve the
mathematical equations etched on the bookcase and put the
missing book below it. • For example, place the book with the
'10' on the spine below the 3 + 7 equation. • Please look at
the screenshot for the solution (F). • You will earn the BOOK
and will be automatically transported outside.
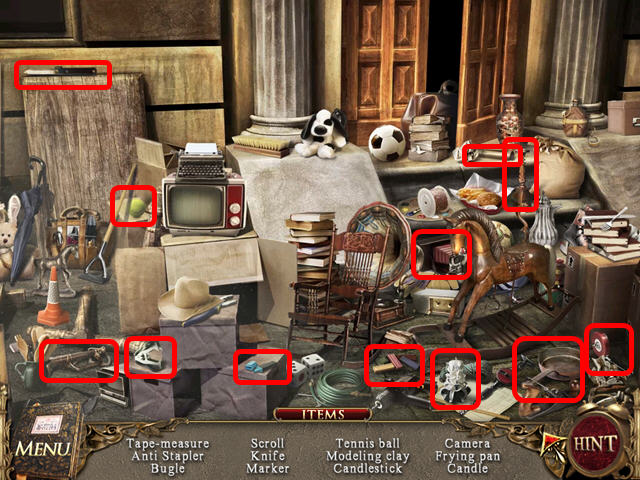
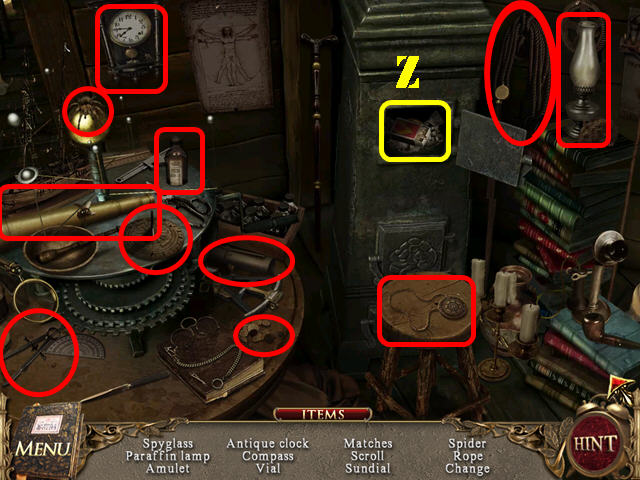
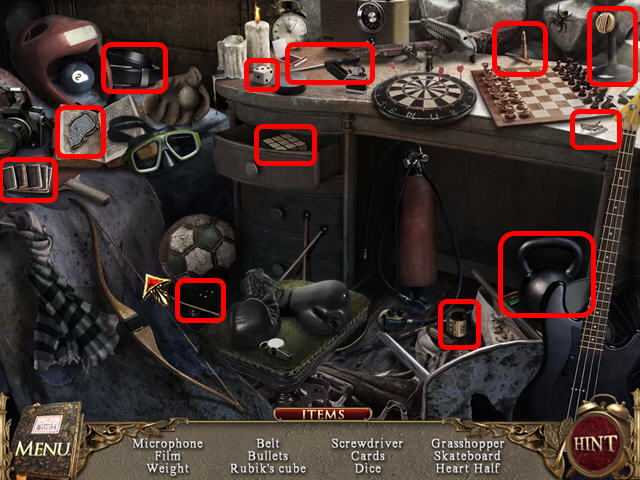
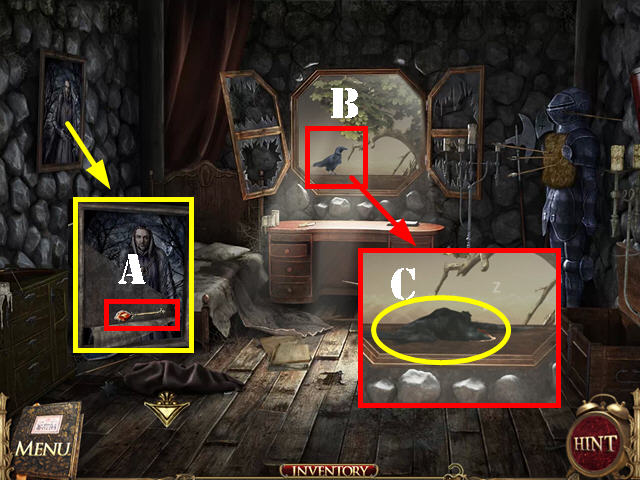
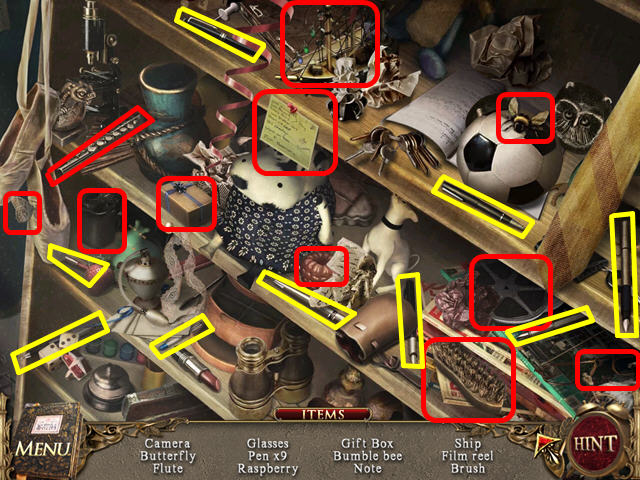 • Go through the left door to access the bedroom. • Examine
the desk; put the BOOK down and press on the book to activate
a HOS. • Play the HOS and find all the listed items. • The 9
pens are marked in yellow. • You will earn the PEN.
• Go through the left door to access the bedroom. • Examine
the desk; put the BOOK down and press on the book to activate
a HOS. • Play the HOS and find all the listed items. • The 9
pens are marked in yellow. • You will earn the PEN.
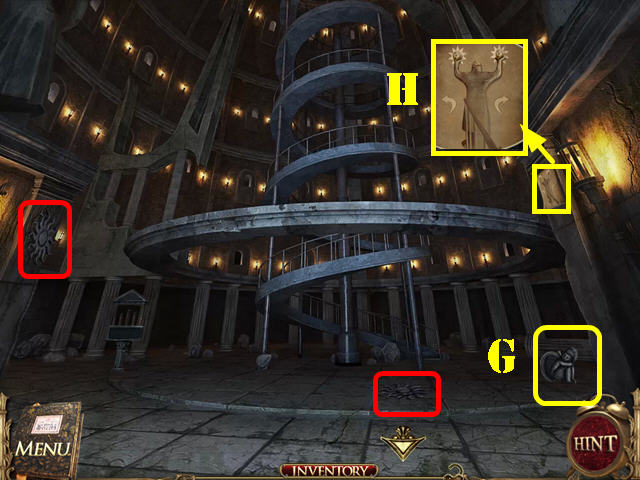
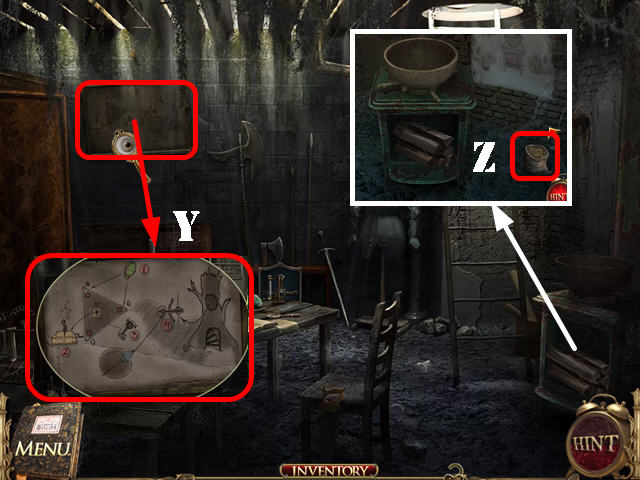
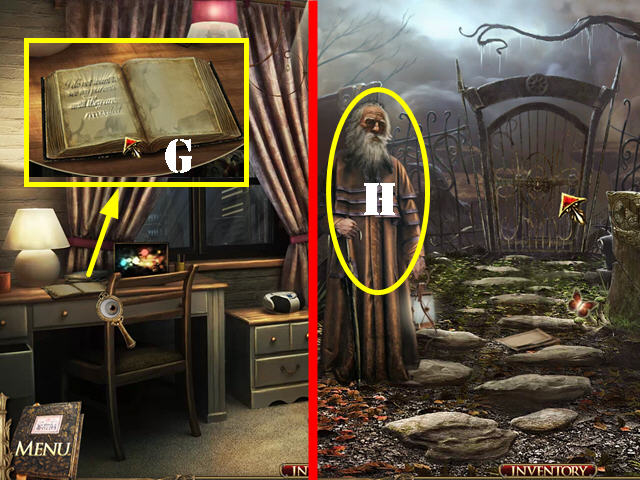 • Zoom into the book on the desk; add the PEN to it to be
transported to another scene (G). • Talk to the man to receive
the MAGIC WAND (H) and activate a HOS.
• Zoom into the book on the desk; add the PEN to it to be
transported to another scene (G). • Talk to the man to receive
the MAGIC WAND (H) and activate a HOS.
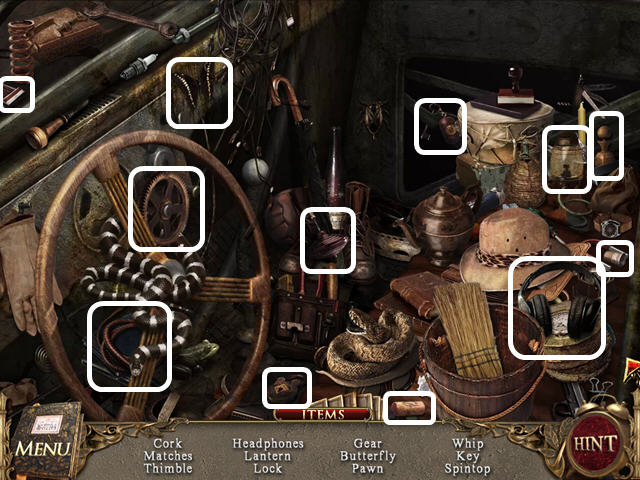 • Play the HOS. • Find all the items on the list. • You will
receive the PIECE OF STONE PLATE.
• Play the HOS. • Find all the items on the list. • You will
receive the PIECE OF STONE PLATE.
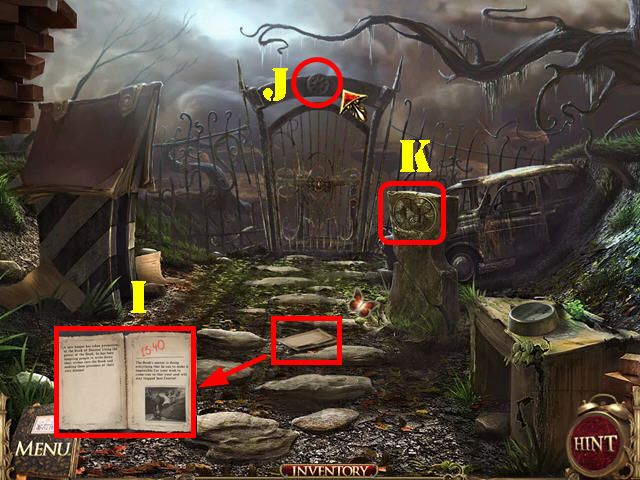 • Zoom into and take the RED NOTE (I). • Take the 1/5 GEAR
(J). • Examine the stone; put the PIECE OF STONE PLATE on it
to activate a puzzle (K).
• Zoom into and take the RED NOTE (I). • Take the 1/5 GEAR
(J). • Examine the stone; put the PIECE OF STONE PLATE on it
to activate a puzzle (K).
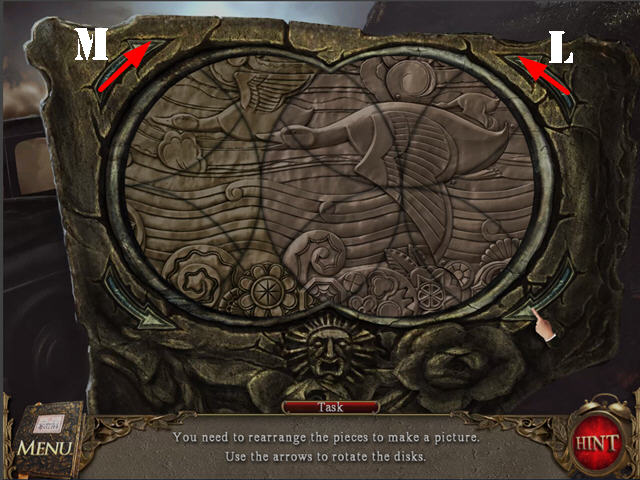 • Press on the arrows to rotate the images. • To solve the
puzzle, press on the arrows in this order: L x 2 and M x 1. •
You will earn the TICKET.
• Press on the arrows to rotate the images. • To solve the
puzzle, press on the arrows in this order: L x 2 and M x 1. •
You will earn the TICKET.
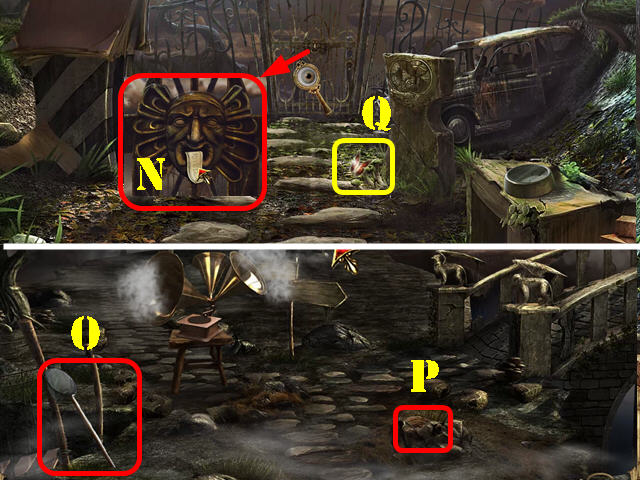 • Zoom into the back gate; put the TICKET on the gate (N). •
Go through the gate. • Take the BUTTERFLY NET (O). • Take the
first PENDULUM PART (P). • Walk down. • Take the GLOWING
BUTTERFLY with the BUTTERFLY NET (Q). • Go forward and then go
right.
• Zoom into the back gate; put the TICKET on the gate (N). •
Go through the gate. • Take the BUTTERFLY NET (O). • Take the
first PENDULUM PART (P). • Walk down. • Take the GLOWING
BUTTERFLY with the BUTTERFLY NET (Q). • Go forward and then go
right.
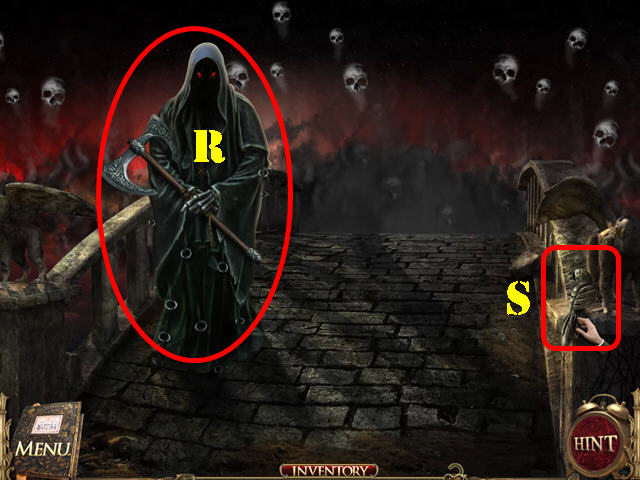 • Try to go forward and the Grim Reaper will not let you do so
until you light up all the stars (R). • Take the BIRD (S). •
Walk down and go towards the lower left.
• Try to go forward and the Grim Reaper will not let you do so
until you light up all the stars (R). • Take the BIRD (S). •
Walk down and go towards the lower left.
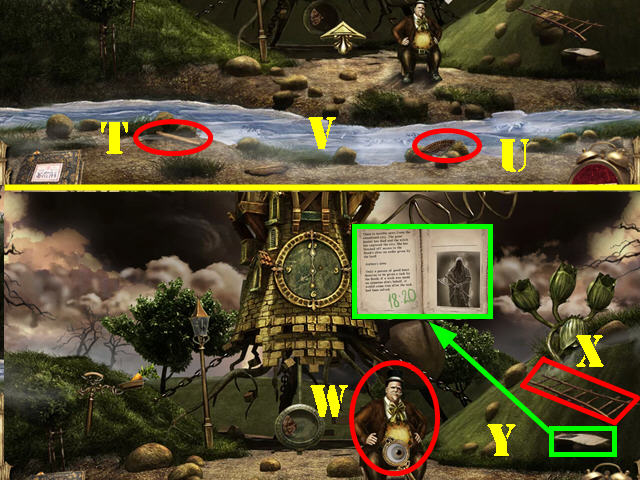 • Take the HAMMER (T). • Take the second PENDULUM PART (U). •
Use the MAGIC WAND on the river to freeze the water; go
forward (V). • Talk to the magician (W). • Grab the LADDER
(X). • Look at and take the GREEN NOTE (Y) in the lower right.
• Walk down 3 times.
• Take the HAMMER (T). • Take the second PENDULUM PART (U). •
Use the MAGIC WAND on the river to freeze the water; go
forward (V). • Talk to the magician (W). • Grab the LADDER
(X). • Look at and take the GREEN NOTE (Y) in the lower right.
• Walk down 3 times.
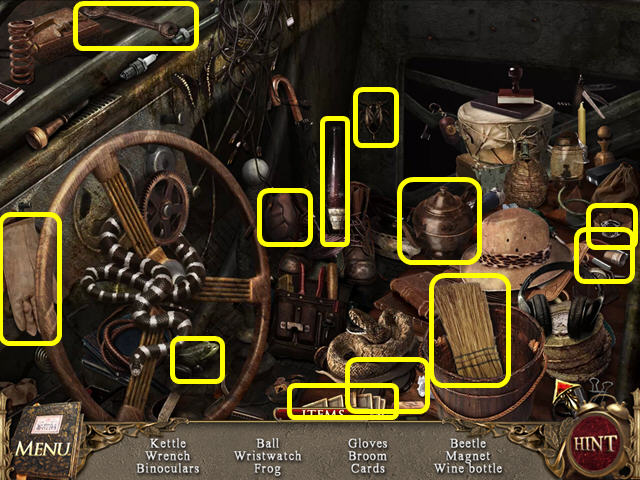 • Play the HOS. • Find the items on the list. • You will
receive the WRENCH.
• Play the HOS. • Find the items on the list. • You will
receive the WRENCH.
 • Zoom into the clock; break the glass with the HAMMER and
take the CLOCK HANDS (Z). • Go forward; head towards the lower
left and then forward.
• Zoom into the clock; break the glass with the HAMMER and
take the CLOCK HANDS (Z). • Go forward; head towards the lower
left and then forward.
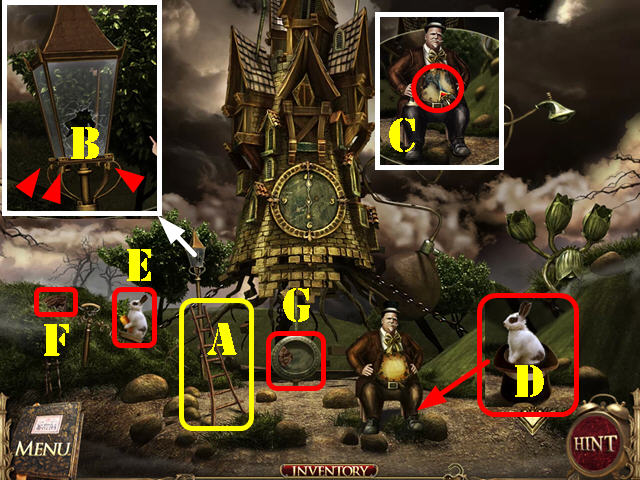 • Zoom into the lamppost and put the LADDER on it (A). •
Examine the lamp. Remove the three bolts (red arrows) with the
WRENCH to receive the STREET LIGHT (B). • Zoom into the
magician and put the CLOCK HANDS on his clock (C). • Zoom into
the RABBIT and take it (D). • Put the RABBIT on the swing (E)
and take the third PENDULUM PART (F). • Put the 3 PENDULUM
PARTS on the pendulum (G). • Go up the steps.
• Zoom into the lamppost and put the LADDER on it (A). •
Examine the lamp. Remove the three bolts (red arrows) with the
WRENCH to receive the STREET LIGHT (B). • Zoom into the
magician and put the CLOCK HANDS on his clock (C). • Zoom into
the RABBIT and take it (D). • Put the RABBIT on the swing (E)
and take the third PENDULUM PART (F). • Put the 3 PENDULUM
PARTS on the pendulum (G). • Go up the steps.
Chapter 2
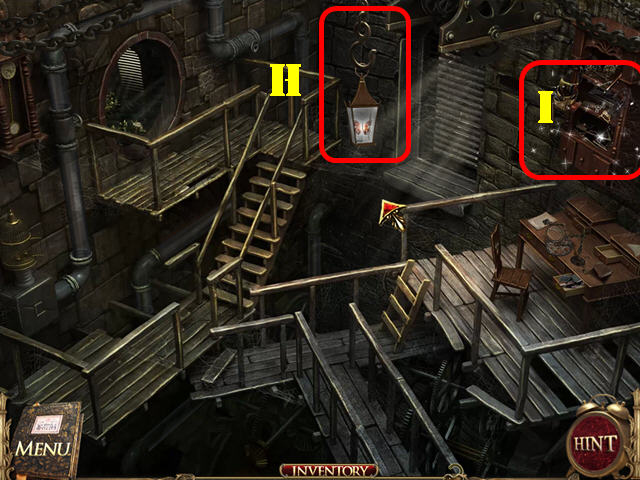 • Put the STREET LIGHT on the hook and then put the GLOWING
BUTTERFLY in the lamp (H). • Play the HOS (I).
• Put the STREET LIGHT on the hook and then put the GLOWING
BUTTERFLY in the lamp (H). • Play the HOS (I).
 • Find all the items on the list. • You will receive the
LOCOMOTIVE.
• Find all the items on the list. • You will receive the
LOCOMOTIVE.
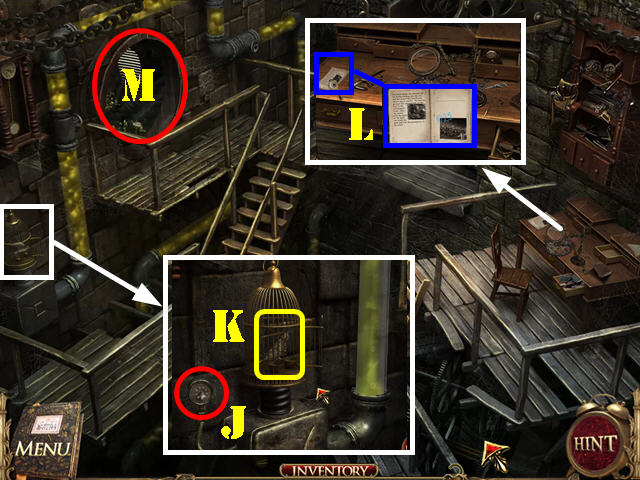 • Examine the birdcage; take the 2/5 GEAR (J). • Put the BIRD
in the cage (K). • Zoom into the desk; look at and take the
BLUE NOTE (L). • Exit the desk and go through the tunnel (M).
• Examine the birdcage; take the 2/5 GEAR (J). • Put the BIRD
in the cage (K). • Zoom into the desk; look at and take the
BLUE NOTE (L). • Exit the desk and go through the tunnel (M).
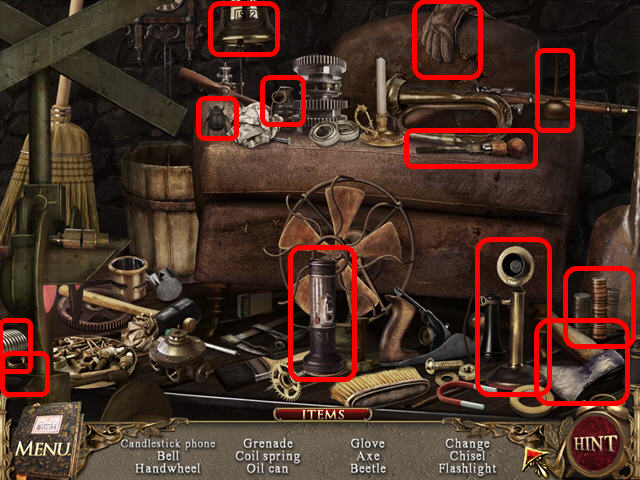 • Play the HOS. • Find the listed items to receive the HAND
WHEEL.
• Play the HOS. • Find the listed items to receive the HAND
WHEEL.
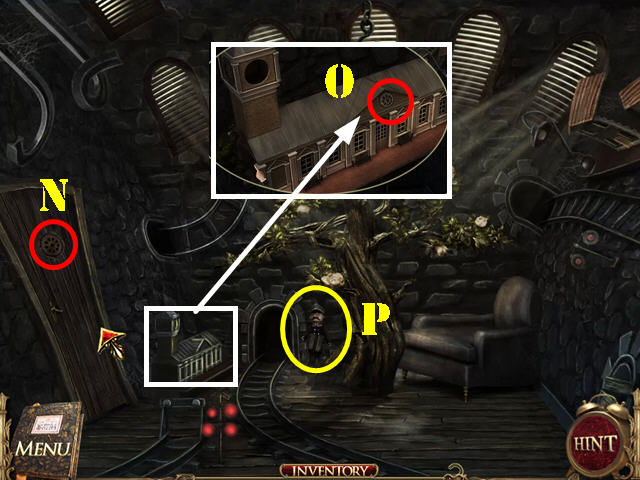 • Take the 3/5 GEAR on the door (N). • Examine the train
station; take the 4/5 GEAR (O). • Talk to the train conductor
(P). • Walk down twice.
• Take the 3/5 GEAR on the door (N). • Examine the train
station; take the 4/5 GEAR (O). • Talk to the train conductor
(P). • Walk down twice.
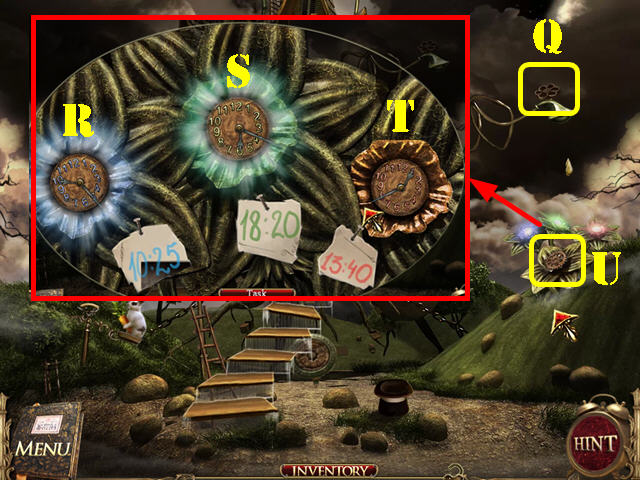 • Put the HAND WHEEL on the faucet; turn the wheel to moisten
the flowers (Q). • Examine the flowers to activate a puzzle;
you must have the RED NOTE, BLUE NOTE, and GREEN NOTE in
inventory to activate this puzzle. The notes will be
automatically added to the puzzle. • Change the blue clock to
10:25 (R), the green clock to 6:20 (S), and the red clock to
1:40 (T). • Take the 5/5 GEAR (U). • Go back into the tower.
• Put the HAND WHEEL on the faucet; turn the wheel to moisten
the flowers (Q). • Examine the flowers to activate a puzzle;
you must have the RED NOTE, BLUE NOTE, and GREEN NOTE in
inventory to activate this puzzle. The notes will be
automatically added to the puzzle. • Change the blue clock to
10:25 (R), the green clock to 6:20 (S), and the red clock to
1:40 (T). • Take the 5/5 GEAR (U). • Go back into the tower.
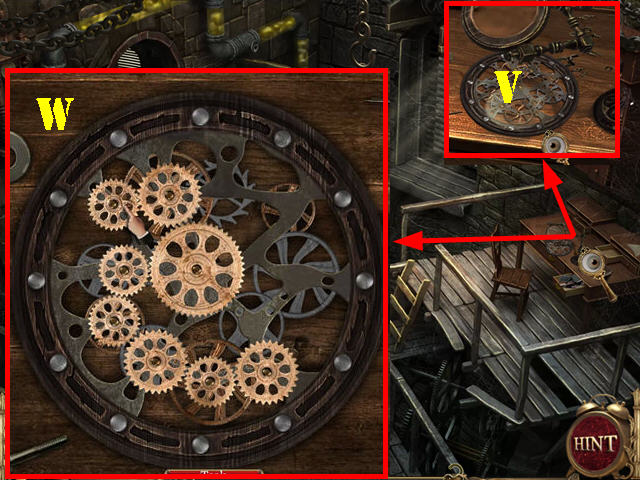 • Zoom into the desk; put the 5 GEARS on the mechanism to
activate a puzzle (V). • Arrange the gears correctly so they
can all rotate; start by placing the gear in the lower center
first. • Please look at the screenshot for the solution (W). •
You will earn the MECHANISM. • Go back into the tunnel.
• Zoom into the desk; put the 5 GEARS on the mechanism to
activate a puzzle (V). • Arrange the gears correctly so they
can all rotate; start by placing the gear in the lower center
first. • Please look at the screenshot for the solution (W). •
You will earn the MECHANISM. • Go back into the tunnel.
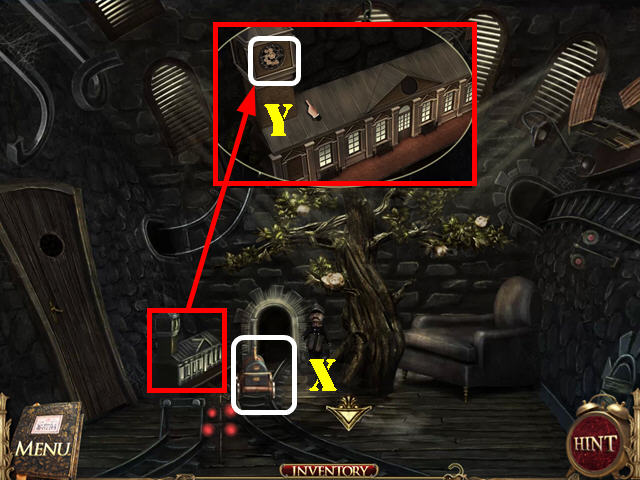 • Put the LOCOMOTIVE on the train tracks (X). • Zoom into the
train station; put the MECHANISM on the tower (Y). • Push the
locomotive to activate a puzzle.
• Put the LOCOMOTIVE on the train tracks (X). • Zoom into the
train station; put the MECHANISM on the tower (Y). • Push the
locomotive to activate a puzzle.
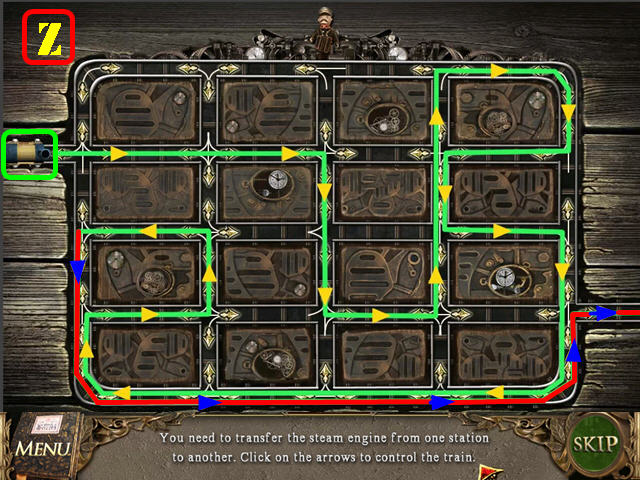 • Select the arrow that is facing the direction you want the
locomotive to go in. Lead the train to the exit in the lower
right. • Please look at the screenshot for the solution (Z) or
play the video below.
• Select the arrow that is facing the direction you want the
locomotive to go in. Lead the train to the exit in the lower
right. • Please look at the screenshot for the solution (Z) or
play the video below.
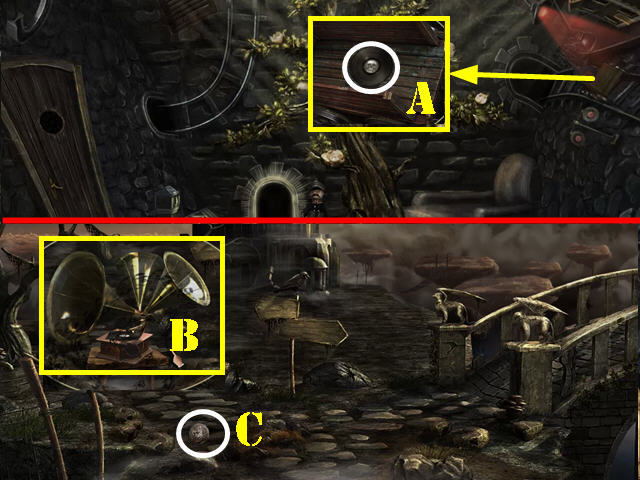 • Examine the caboose on the right; take the VINYL (A). • Walk
down 4 times. • Zoom into the phonograph; put the VINYL on the
turntable (B). • Take the SPHERE that falls on the ground (C).
• Go forward.
• Examine the caboose on the right; take the VINYL (A). • Walk
down 4 times. • Zoom into the phonograph; put the VINYL on the
turntable (B). • Take the SPHERE that falls on the ground (C).
• Go forward.
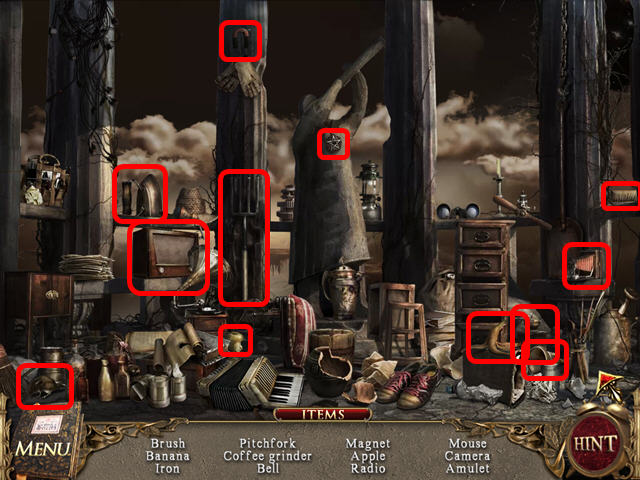 • Play the HOS. • Find the listed items to get ARIES.
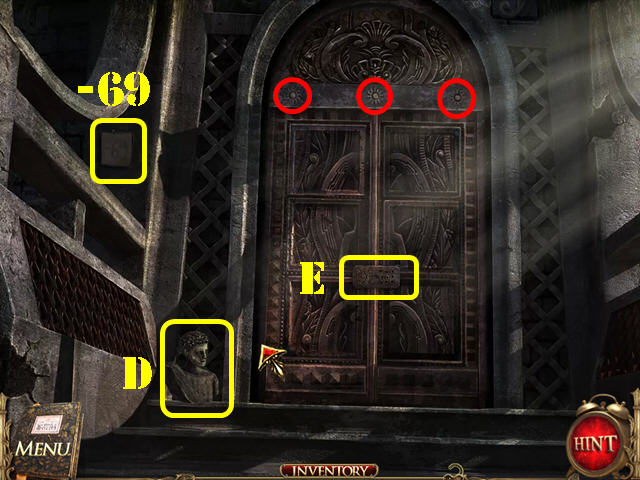 • Take a closer look at the door; take the first STONE (D). •
Take the first COORDINATE (-69). • Take the 3 STARS (red). •
Examine the plaque on the door (E); put ARIES on the board to
activate the puzzle.
• Take a closer look at the door; take the first STONE (D). •
Take the first COORDINATE (-69). • Take the 3 STARS (red). •
Examine the plaque on the door (E); put ARIES on the board to
activate the puzzle.
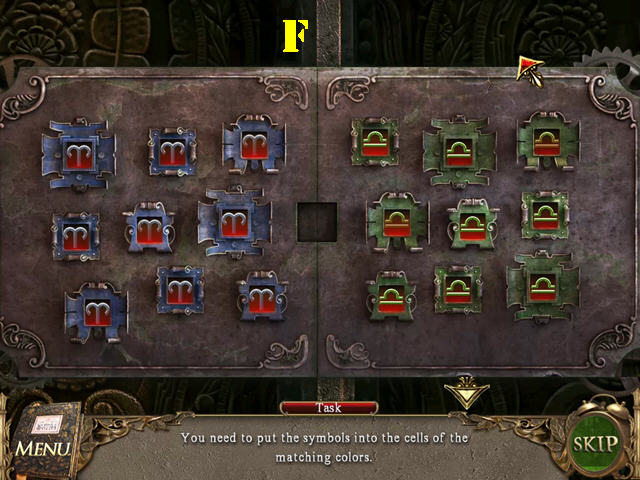 • Put the symbols into the cells of the same color. Press on a
symbol to move it to an empty spot. The blue symbols belong on
the left and the green ones on the right. • Please see the
screenshot for the final solution (F) and the video for a
step-by-step solution.
• Go through the door.
• Put the symbols into the cells of the same color. Press on a
symbol to move it to an empty spot. The blue symbols belong on
the left and the green ones on the right. • Please see the
screenshot for the final solution (F) and the video for a
step-by-step solution.
• Go through the door.
 • Talk to the old man. • Take the 2 STARS (red). • Grab the
second STONE (G). • Look at the sketch (H). • Go up the
stairs.
• Talk to the old man. • Take the 2 STARS (red). • Grab the
second STONE (G). • Look at the sketch (H). • Go up the
stairs.
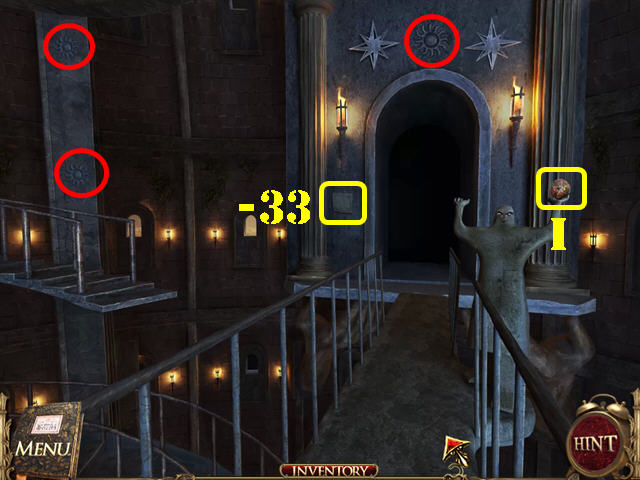 • Take the COORDINATE (-33). • Take the 3 STARS (red). • You
can put the SPHERE in either the left or right hand to access
the doors. Put the SPHERE in the right hand for now (I). • Go
forward.
• Take the COORDINATE (-33). • Take the 3 STARS (red). • You
can put the SPHERE in either the left or right hand to access
the doors. Put the SPHERE in the right hand for now (I). • Go
forward.
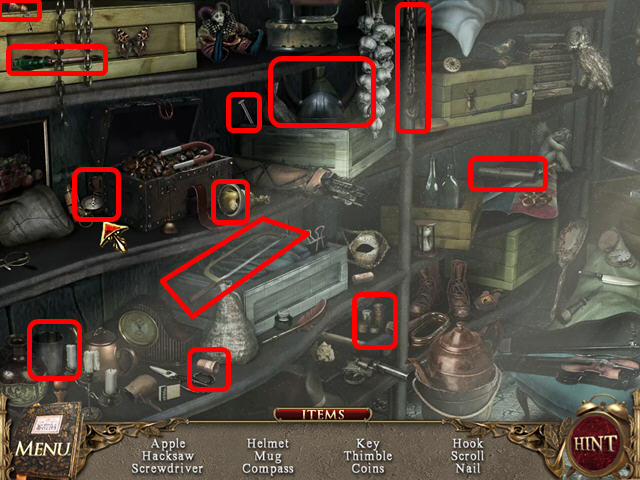 • Play the HOS. • Find the listed items to get the HACKSAW.
 • Take the 2 STARS (red) in the scene. • Examine the chest and
take the 2 STARS (red). • Examine the cannon (J); take the
STAR (red), the STONE (K), and the COORDINATE (+73). • Exit
the cannon and walk down.
• Take the 2 STARS (red) in the scene. • Examine the chest and
take the 2 STARS (red). • Examine the cannon (J); take the
STAR (red), the STONE (K), and the COORDINATE (+73). • Exit
the cannon and walk down.
 • Put the SPHERE on the statue's left hand (L). • Go left (M).
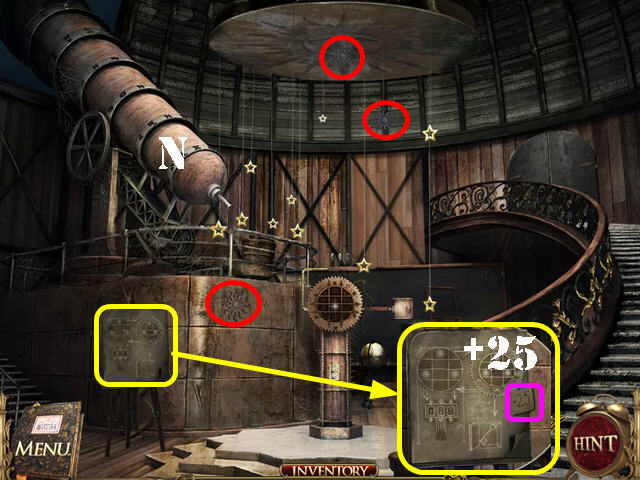 • Take the 3 STARS (red). • Examine the board; take the
COORDINATE (+25). • Zoom into the telescope; the 4 COORDINATES
in your inventory will automatically be used (N).
• Take the 3 STARS (red). • Examine the board; take the
COORDINATE (+25). • Zoom into the telescope; the 4 COORDINATES
in your inventory will automatically be used (N).
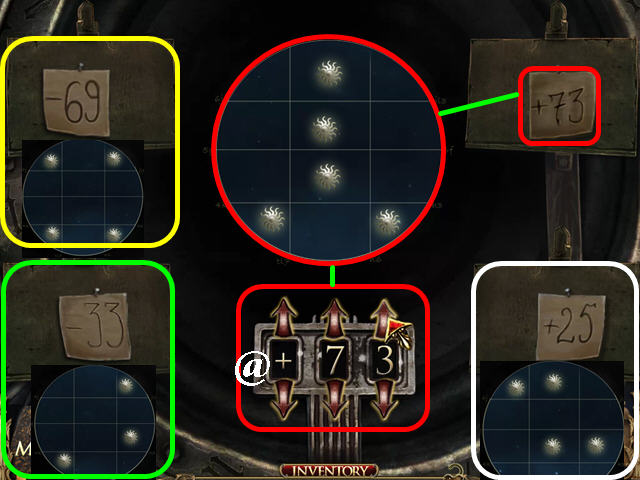 • Use the arrows (@) to change the coordinates in the
telescope using the four coordinates as clues; note the
arrangement of the stars with each coordinate (+73). • Repeat
the same process for the rest of the coordinates (-69, -33,
+25). • Walk down 3 times.
• Use the arrows (@) to change the coordinates in the
telescope using the four coordinates as clues; note the
arrangement of the stars with each coordinate (+73). • Repeat
the same process for the rest of the coordinates (-69, -33,
+25). • Walk down 3 times.
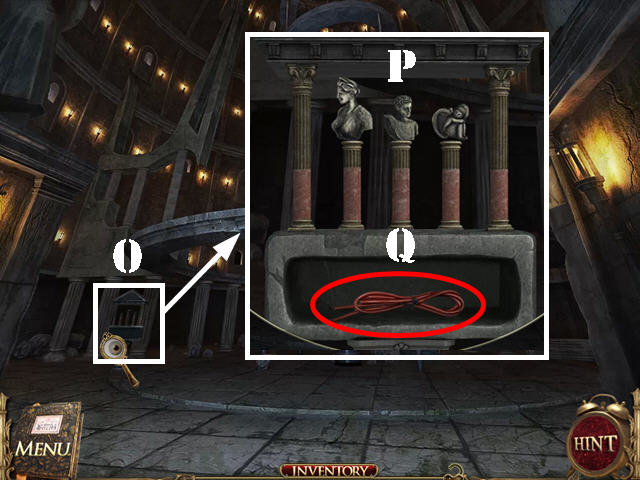 • Zoom into the pedestal; add the 3 STONES to it to activate a
puzzle (O). • Place the stones in such an order that all the
columns are at the same level. • Please look at the screenshot
for the solution (P) and take the WIRE (Q). • Go back into the
observatory.
• Zoom into the pedestal; add the 3 STONES to it to activate a
puzzle (O). • Place the stones in such an order that all the
columns are at the same level. • Please look at the screenshot
for the solution (P) and take the WIRE (Q). • Go back into the
observatory.
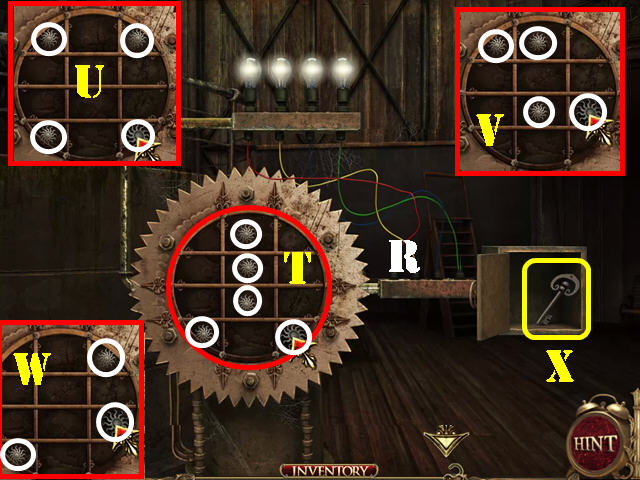 • Examine the device in the back; add the WIRE to it (R). •
Arrange the 16 STARS on the device according to the patterns
of the stars once the coordinates were entered. • Take the
stars from inventory and add them to the device one by one
into one of the cells. Click on a star to remove it if you put
it in the wrong spot. • Please look at the screenshot for the
solution (T, U, V, and W). • Take the KEY (X).
• Examine the device in the back; add the WIRE to it (R). •
Arrange the 16 STARS on the device according to the patterns
of the stars once the coordinates were entered. • Take the
stars from inventory and add them to the device one by one
into one of the cells. Click on a star to remove it if you put
it in the wrong spot. • Please look at the screenshot for the
solution (T, U, V, and W). • Take the KEY (X).
 • Zoom into the upper right door (Y). • Use the KEY in the
lock and go through the door.
• Zoom into the upper right door (Y). • Use the KEY in the
lock and go through the door.
 • Play the HOS. • Open the cover; take the matches (Z). • You
will receive the MATCHES.
• Play the HOS. • Open the cover; take the matches (Z). • You
will receive the MATCHES.
 • Examine the bookcase; take the PUZZLE PIECE (A). • Examine
the cage; cut the lock off with the HACKSAW (B) and take the
STAR (C). • Walk down twice. • Put the SPHERE on the statue's
right hand (D) and go through the door (E).
• Examine the bookcase; take the PUZZLE PIECE (A). • Examine
the cage; cut the lock off with the HACKSAW (B) and take the
STAR (C). • Walk down twice. • Put the SPHERE on the statue's
right hand (D) and go through the door (E).
 • Examine the chest; put the PUZZLE PIECE on it to activate a
puzzle. • Select any two tiles to swap their positions. •
Please look at the screenshot for the solution (F). • Take the
WICK (G).
• Examine the chest; put the PUZZLE PIECE on it to activate a
puzzle. • Select any two tiles to swap their positions. •
Please look at the screenshot for the solution (F). • Take the
WICK (G).
 • Examine the cannon; put the STAR on the cannonball (I). •
Add the WICK (J) to the cannon and close the cover (K). •
Light the wick with the MATCHES. • Walk down 5 times and go
right; the Grim Reaper is gone, you can now cross the bridge.
• Examine the cannon; put the STAR on the cannonball (I). •
Add the WICK (J) to the cannon and close the cover (K). •
Light the wick with the MATCHES. • Walk down 5 times and go
right; the Grim Reaper is gone, you can now cross the bridge.
 • Zoom into the skeleton and try to take the sword. • Take the
CHEMISTRY FLASK (L). • Look at the stone (M). • Go forward.
• Zoom into the skeleton and try to take the sword. • Take the
CHEMISTRY FLASK (L). • Look at the stone (M). • Go forward.
 • Play the HOS. • Find the listed items to obtain the CROWBAR.
 • Take the first BULB (N). • Go through the right side of the
main building. • Take the first NOTE (O) in the upper left and
then take the BUCKET (P). • Examine the boarded window; remove
the 3 boards with the CROWBAR (Q). • Go through the window.
• Take the first BULB (N). • Go through the right side of the
main building. • Take the first NOTE (O) in the upper left and
then take the BUCKET (P). • Examine the boarded window; remove
the 3 boards with the CROWBAR (Q). • Go through the window.
 • Touch anywhere in the scene for a character to appear. •
Take the CHISEL (R). • Zoom into the desk; take the second
BULB (S). • Exit the desk and go up the left steps (T).
• Touch anywhere in the scene for a character to appear. •
Take the CHISEL (R). • Zoom into the desk; take the second
BULB (S). • Exit the desk and go up the left steps (T).
 • Play the HOS. • Find the listed items to obtain the HEART
HALF. • Walk down 3 times and go through to the left side of
the building.
• Play the HOS. • Find the listed items to obtain the HEART
HALF. • Walk down 3 times and go through to the left side of
the building.
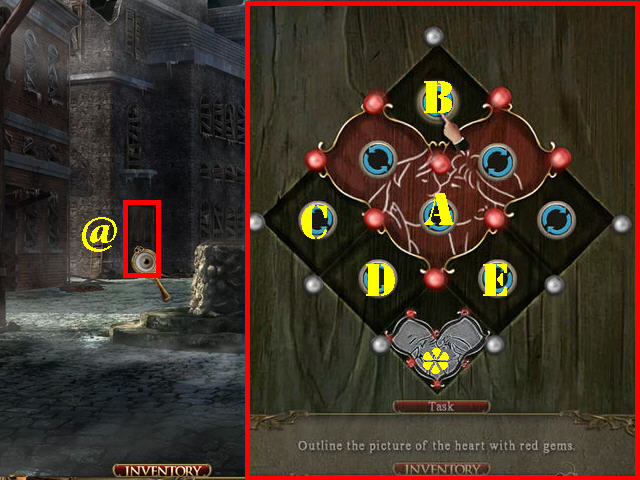 • Examine the door (@); put the HEART HALF on the lock to
activate a puzzle (*). • Press on the buttons with arrows to
move the pearls around; place the red pearls around the
outline of the heart. • To solve the puzzle, press on the
buttons in this order: A x 2, B x 2, C x 2, D x 2, E x 2, and
B x 2. You can also watch the video solution below.
• Go through the door.
• Examine the door (@); put the HEART HALF on the lock to
activate a puzzle (*). • Press on the buttons with arrows to
move the pearls around; place the red pearls around the
outline of the heart. • To solve the puzzle, press on the
buttons in this order: A x 2, B x 2, C x 2, D x 2, E x 2, and
B x 2. You can also watch the video solution below.
• Go through the door.
Chapter 3
 • Play the HOS. • Find all the listed items to obtain the
DRAGON'S BLOOD.
• Play the HOS. • Find all the listed items to obtain the
DRAGON'S BLOOD.
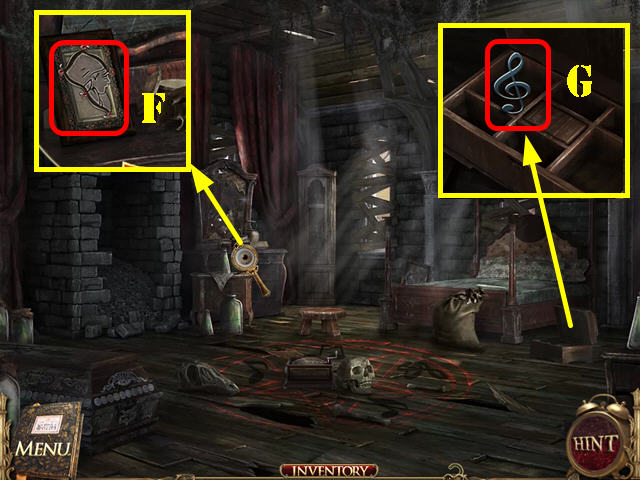 • Look at the vanity; take the HEART HALF (F). • Look at the
box; take the TREBLE CLEF (G). • Walk down twice and go
through the right side of the center building. Go through the
right window and go up the left steps.
• Look at the vanity; take the HEART HALF (F). • Look at the
box; take the TREBLE CLEF (G). • Walk down twice and go
through the right side of the center building. Go through the
right window and go up the left steps.
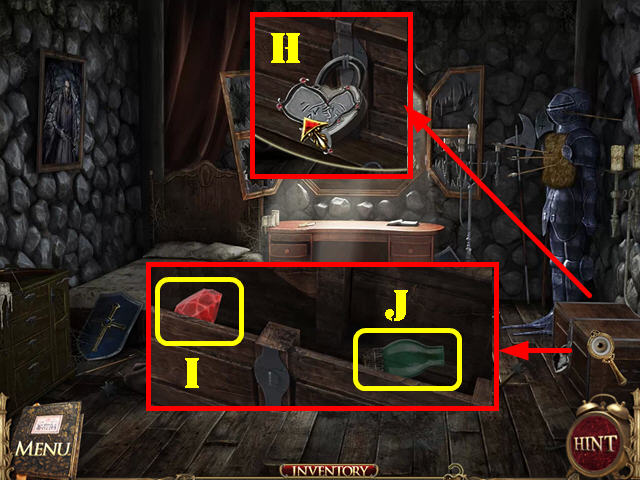 • Zoom into the chest; put the HEART HALF on the lock (H). •
Take the RUBY (I) and the third BULB (J). • Walk down 4 times.
• Zoom into the chest; put the HEART HALF on the lock (H). •
Take the RUBY (I) and the third BULB (J). • Walk down 4 times.
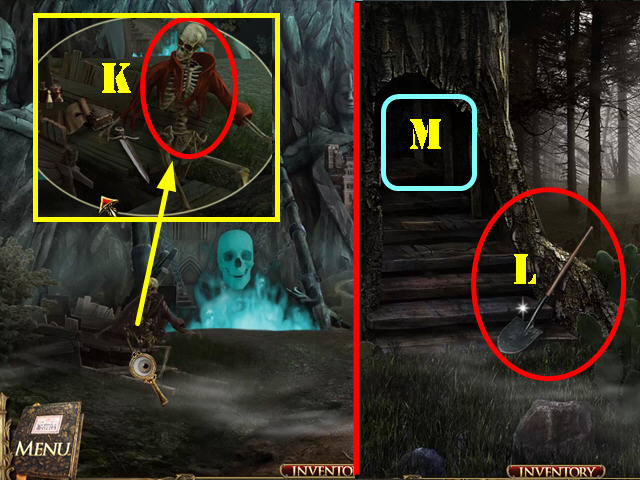 • Zoom into the skeleton; give the RUBY to the skeleton to
receive the SWORD (K). • Go towards the lower right. • Cut the
cacti with the SWORD; take the SHOVEL (L). • Go into the tree
house (M).
• Zoom into the skeleton; give the RUBY to the skeleton to
receive the SWORD (K). • Go towards the lower right. • Cut the
cacti with the SWORD; take the SHOVEL (L). • Go into the tree
house (M).
 • Play the HOS. • Find the listed items to get the SOPORIFIC.
 • Examine the shelf; take the AMULET (N). • Examine the
crossbow; take the ARROW (O). • Open the chest; take the
HAMMER and the ROOT (P). • Walk down twice.
• Examine the shelf; take the AMULET (N). • Examine the
crossbow; take the ARROW (O). • Open the chest; take the
HAMMER and the ROOT (P). • Walk down twice.
 • Zoom into the stone; use the CHISEL on the crack (Q). • Use
the HAMMER on the chisel and take the SPHERE (R). • Go forward
and then go through the left side of the main building. • Zoom
into the ground; use the SHOVEL in the dirt and take the WORM
(S). • Take the second NOTE (T) on the wall. • Walk down; go
through the right side of the main building and go into the
window.
• Zoom into the stone; use the CHISEL on the crack (Q). • Use
the HAMMER on the chisel and take the SPHERE (R). • Go forward
and then go through the left side of the main building. • Zoom
into the ground; use the SHOVEL in the dirt and take the WORM
(S). • Take the second NOTE (T) on the wall. • Walk down; go
through the right side of the main building and go into the
window.
 • Zoom into the desk; put the AMULET (U) on the book and take
the KEY (V). • Cut the carpet with the SWORD. Zoom into the
hatch to activate a puzzle (W).
• Zoom into the desk; put the AMULET (U) on the book and take
the KEY (V). • Cut the carpet with the SWORD. Zoom into the
hatch to activate a puzzle (W).
 • Press on the rings to form the right image. Please look at
the screenshot for the solution (X). • Go down into the hatch.
• Press on the rings to form the right image. Please look at
the screenshot for the solution (X). • Go down into the hatch.
 • Play the HOS. • Find the listed items to obtain the third
NOTE.
• Play the HOS. • Find the listed items to obtain the third
NOTE.
 • Look at the diagram (Y). • Examine the stove area; take the
GRAIN (Z). • Go up the ladder and then take the left steps.
• Look at the diagram (Y). • Examine the stove area; take the
GRAIN (Z). • Go up the ladder and then take the left steps.
 • Look at the picture on the wall; cut the canvas with the
SWORD and take the FIRE WAND (A). • Zoom into the window; put
the GRAIN down in front of the crow (B). • Put the SOPORIFIC
on the grain. Take the FEATHER from the crow after it falls
asleep (C). • Walk down 3 times and go left.
• Look at the picture on the wall; cut the canvas with the
SWORD and take the FIRE WAND (A). • Zoom into the window; put
the GRAIN down in front of the crow (B). • Put the SOPORIFIC
on the grain. Take the FEATHER from the crow after it falls
asleep (C). • Walk down 3 times and go left.
 • Hang the BUCKET from the rope (D). • Zoom into the well; use
the KEY in the lock (E). • Touch the bucket so it can get
water from the well; take the FULL BUCKET. • Go into the
building.
• Hang the BUCKET from the rope (D). • Zoom into the well; use
the KEY in the lock (E). • Touch the bucket so it can get
water from the well; take the FULL BUCKET. • Go into the
building.
 • Zoom into the ground; put the TREBLE CLEF and the 3 NOTES
into the slots (yellow). • Take the MUSIC BOX (F). • Walk down
twice.
• Zoom into the ground; put the TREBLE CLEF and the 3 NOTES
into the slots (yellow). • Take the MUSIC BOX (F). • Walk down
twice.
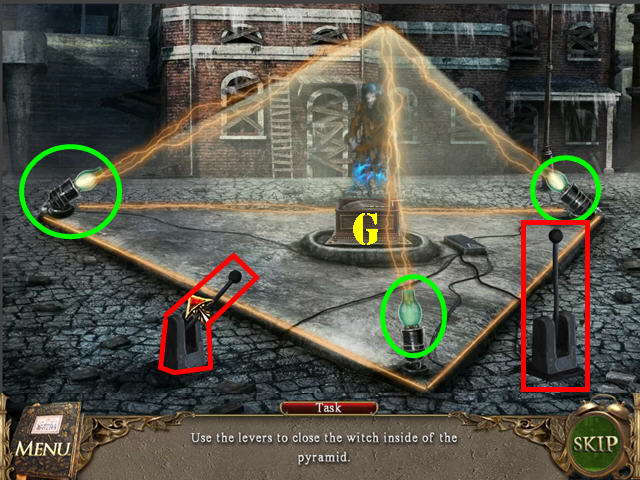 • Zoom into the plaza. • Put the 3 BULBS in the 3 devices
(green). • Put the MUSIC BOX into the main (G). • Position the
levers in the right positions to close the witch inside the
pyramid. • Position the levers in the order shown in the
screenshot (red).
• Zoom into the plaza. • Put the 3 BULBS in the 3 devices
(green). • Put the MUSIC BOX into the main (G). • Position the
levers in the right positions to close the witch inside the
pyramid. • Position the levers in the order shown in the
screenshot (red).
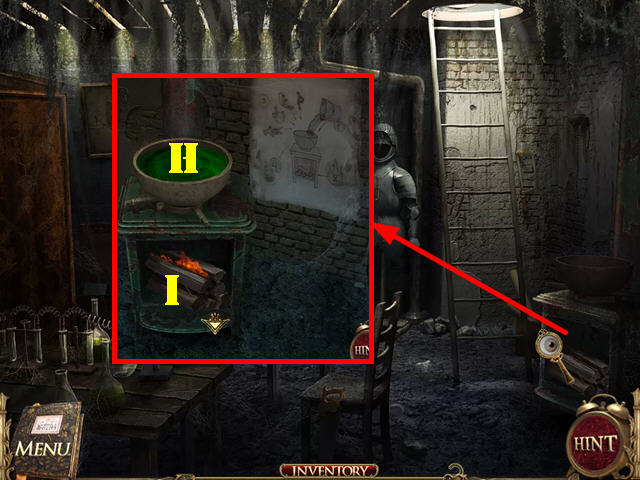 • Go through the right side of the main building; through the
right window and then go back down into the hatch. • Zoom into
the stove area; add the FULL BUCKET in the pot (H). • Add the
FIRE WAND to the logs (I). • Put the ROOT, WORM, FEATHER,
DRAGON'S BLOOD, and then the CHEMISTRY FLASK to obtain the
POISON.
• Go through the right side of the main building; through the
right window and then go back down into the hatch. • Zoom into
the stove area; add the FULL BUCKET in the pot (H). • Add the
FIRE WAND to the logs (I). • Put the ROOT, WORM, FEATHER,
DRAGON'S BLOOD, and then the CHEMISTRY FLASK to obtain the
POISON.
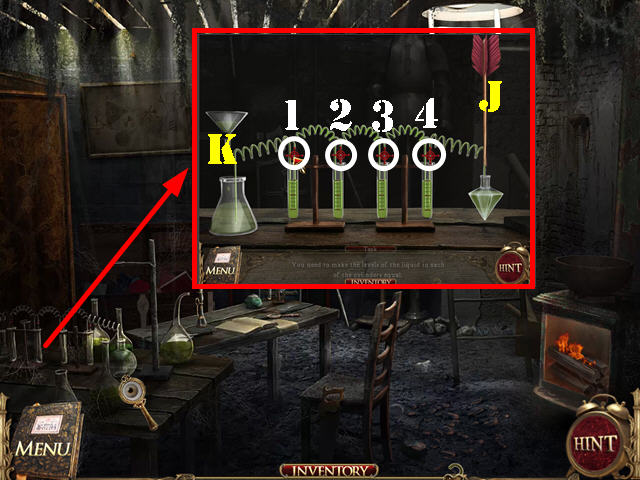 • Zoom into the table; put the ARROW on the tube (J). • Pour
the POISON down the funnel to activate a puzzle. (K). • Make
the liquid level in each cylinder equal. Each valve controls
the liquid in two other tubes. • Please look at the screenshot
for the solution and press on valves in this order: 3, 4, and
1 • You will receive the POISONED ARROW.
• Zoom into the table; put the ARROW on the tube (J). • Pour
the POISON down the funnel to activate a puzzle. (K). • Make
the liquid level in each cylinder equal. Each valve controls
the liquid in two other tubes. • Please look at the screenshot
for the solution and press on valves in this order: 3, 4, and
1 • You will receive the POISONED ARROW.
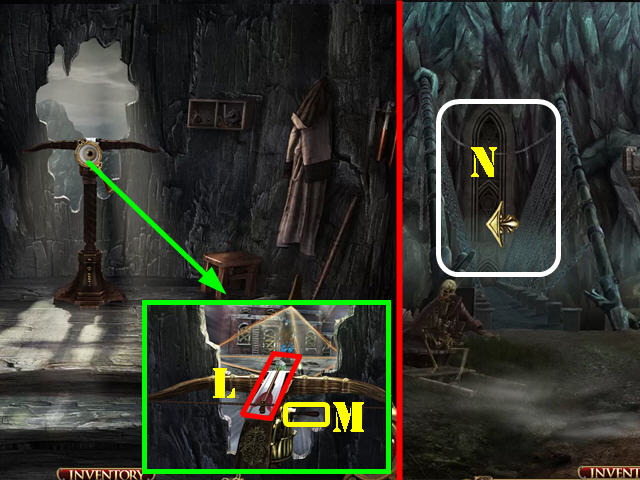 • Exit this building; walk down twice and go in the lower
right. Enter the tree house. • Examine the crossbow; put the
POISONED ARROW on the crossbow (L) and then pull on the lever
(M). • Walk down twice and go towards the door behind the
skeleton (N). • Talk to the man to bring up a puzzle.
• Exit this building; walk down twice and go in the lower
right. Enter the tree house. • Examine the crossbow; put the
POISONED ARROW on the crossbow (L) and then pull on the lever
(M). • Walk down twice and go towards the door behind the
skeleton (N). • Talk to the man to bring up a puzzle.
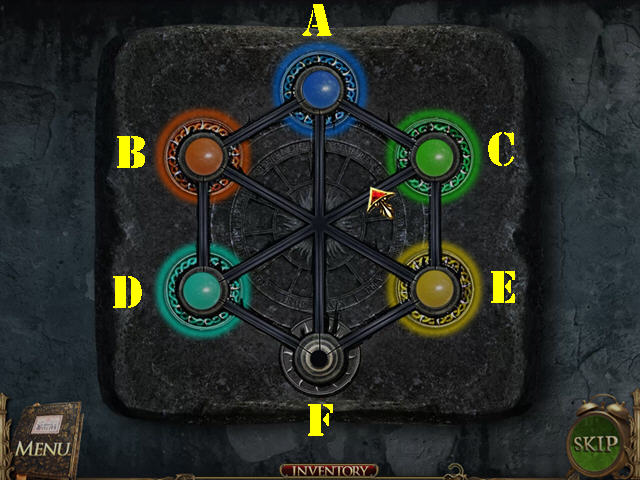 • Put the SPHERE on the puzzle to activate it. • To solve the
puzzle, select the spheres in this order: E, C, A, F, D, B, E,
C, D, B, E, and F. Please watch the video solution below.
• You will receive the PUZZLE PIECE.
• Put the SPHERE on the puzzle to activate it. • To solve the
puzzle, select the spheres in this order: E, C, A, F, D, B, E,
C, D, B, E, and F. Please watch the video solution below.
• You will receive the PUZZLE PIECE.
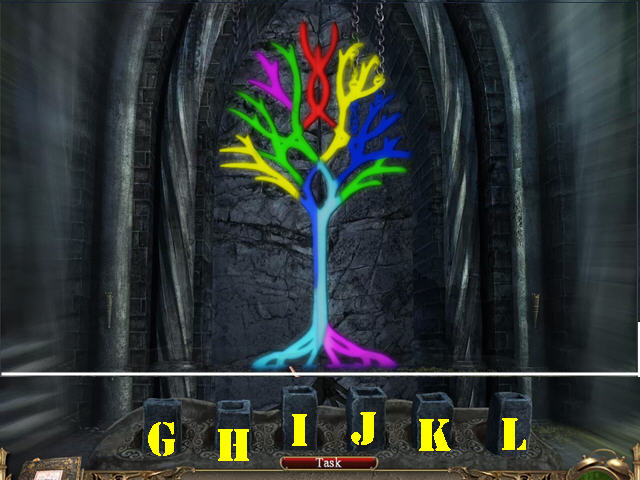 • Zoom into the stones in the lower left. • Put the PUZZLE
PIECE in the empty slot to activate a puzzle. • Paint the
picture by pressing on the right stones. • To solve the
puzzle, press on the stones in this order: I, H, G, L, J, I,
H, and I. • Go through the doorway after the puzzle has been
solved. Chapter: Find the Pieces of Your Souls
• Zoom into the stones in the lower left. • Put the PUZZLE
PIECE in the empty slot to activate a puzzle. • Paint the
picture by pressing on the right stones. • To solve the
puzzle, press on the stones in this order: I, H, G, L, J, I,
H, and I. • Go through the doorway after the puzzle has been
solved. Chapter: Find the Pieces of Your Souls
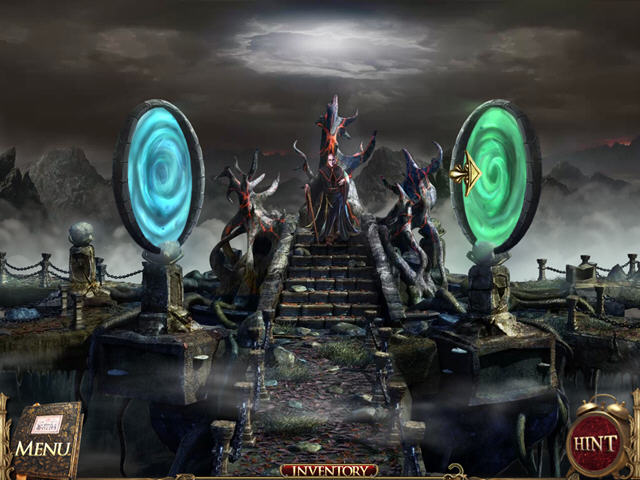 • Select any of the two portals (I selected the one on the
right the first time). • Talk to the man which appears in the
next scene; he wants you to find all the pieces of your soul.
• Go forward twice.
• Select any of the two portals (I selected the one on the
right the first time). • Talk to the man which appears in the
next scene; he wants you to find all the pieces of your soul.
• Go forward twice.
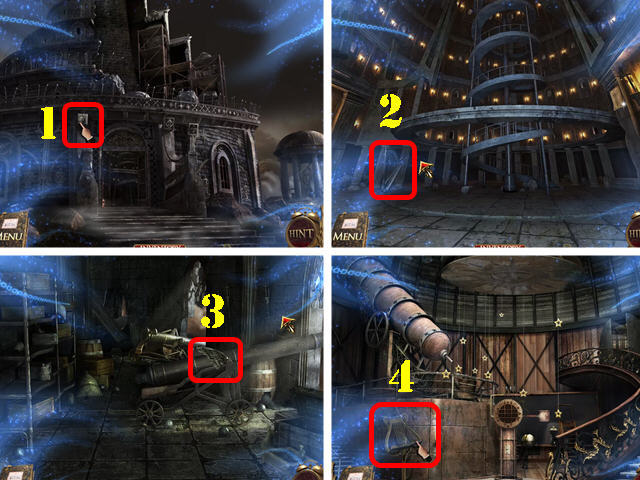 • Take the 1/15 SOUL FRAGMENT (1). • Go through the doors. •
Take the 2/15 SOUL FRAGMENT (2). • Go up the stairs and then
forward. • Take the 3/15 SOUL FRAGMENT (3). • Walk down; put
the SPHERE on the statue's left hand. • Go through the left
door. • Take the 4/15 SOUL FRAGMENT (4). • Go into the upper
right door.
• Take the 1/15 SOUL FRAGMENT (1). • Go through the doors. •
Take the 2/15 SOUL FRAGMENT (2). • Go up the stairs and then
forward. • Take the 3/15 SOUL FRAGMENT (3). • Walk down; put
the SPHERE on the statue's left hand. • Go through the left
door. • Take the 4/15 SOUL FRAGMENT (4). • Go into the upper
right door.
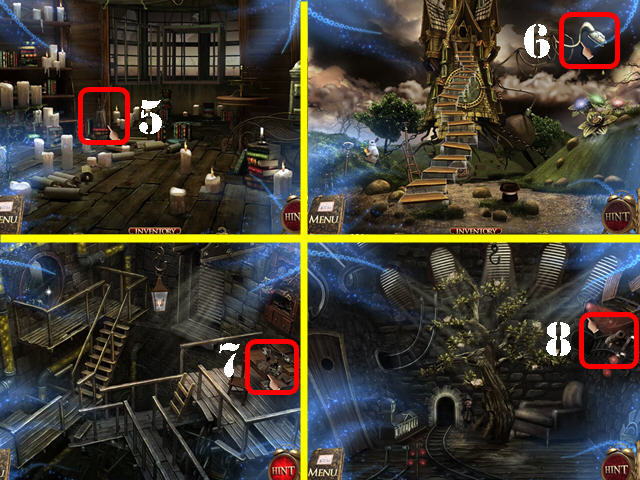 • Take the 5/15 SOUL FRAGMENT (5). • Walk down 6 times; go in
the lower left and forward. • Take the 6/15 SOUL FRAGMENT (6).
• Go up the steps. • Take the 7/15 SOUL FRAGMENT (7). • Go
into the tunnel on the left. • Take the 8/15 SOUL FRAGMENT
(8). • Walk down 4 times; go right and then forward twice.
• Take the 5/15 SOUL FRAGMENT (5). • Walk down 6 times; go in
the lower left and forward. • Take the 6/15 SOUL FRAGMENT (6).
• Go up the steps. • Take the 7/15 SOUL FRAGMENT (7). • Go
into the tunnel on the left. • Take the 8/15 SOUL FRAGMENT
(8). • Walk down 4 times; go right and then forward twice.
 • Take the 9/15 SOUL FRAGMENT (9). • Go through the left side
of the building. • Take the 10/15 SOUL FRAGMENT (10). • Go
through the door. • Take the 11/15 SOUL FRAGMENT (11). • Walk
down twice; go through the right side of the building and then
through the window. • Take the 12/15 SOUL FRAGMENT (12). • Go
up the left steps.
• Take the 9/15 SOUL FRAGMENT (9). • Go through the left side
of the building. • Take the 10/15 SOUL FRAGMENT (10). • Go
through the door. • Take the 11/15 SOUL FRAGMENT (11). • Walk
down twice; go through the right side of the building and then
through the window. • Take the 12/15 SOUL FRAGMENT (12). • Go
up the left steps.
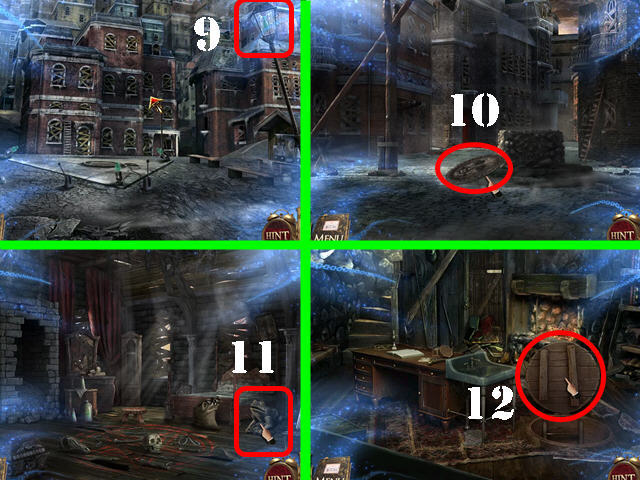
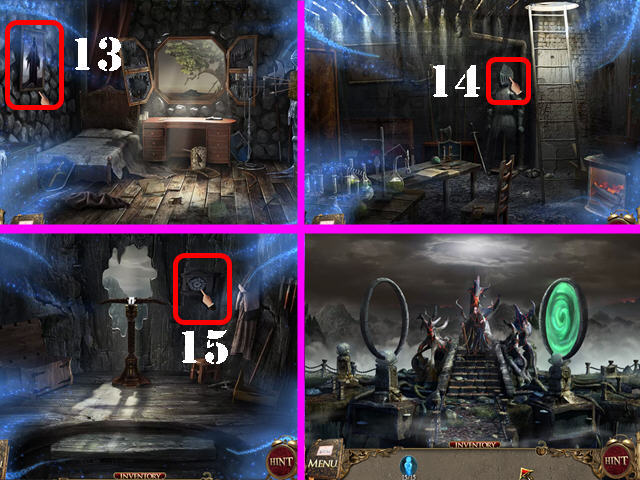 • Take the 13/15 SOUL FRAGMENT (13). • Walk down and go into
the hatch. • Take the 14/15 SOUL FRAGMENT (14). • Go up the
ladder; walk down 3 times and go right. Enter the tree house.
• Take the 15/15 SOUL FRAGMENT (15). • Walk down twice and go
towards the front door (the arrow will point to the left. • Go
through the right portal (or the one you did not choose the
first time around). And then go forward.
• Take the 13/15 SOUL FRAGMENT (13). • Walk down and go into
the hatch. • Take the 14/15 SOUL FRAGMENT (14). • Go up the
ladder; walk down 3 times and go right. Enter the tree house.
• Take the 15/15 SOUL FRAGMENT (15). • Walk down twice and go
towards the front door (the arrow will point to the left. • Go
through the right portal (or the one you did not choose the
first time around). And then go forward.
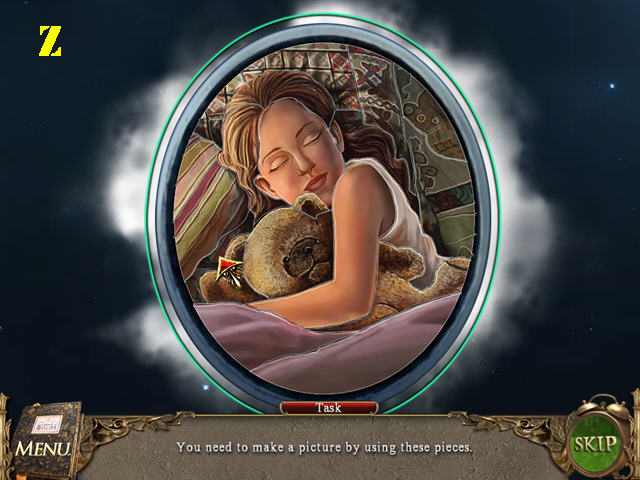 • Drag the puzzle pieces into place as shown in the screenshot
(Z). • Congratulations, you have completed The Book of
Desires!
• Drag the puzzle pieces into place as shown in the screenshot
(Z). • Congratulations, you have completed The Book of
Desires!
Created at: 2012-04-17