

Walkthrough Menu
- General Tips
- Act 1 – Two Houses
- Act 2 – In Love with the Enemy
- Act 3 – Blood for Blood
- Act 4 – A Fatal Plan
- Act 5 – The End of the Feud
General Tips
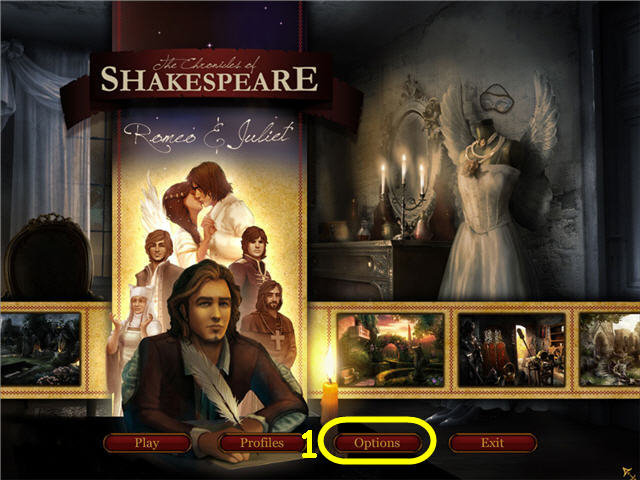
- Click on Options (1) to adjust the Effects, Music Volume, Fullscreen or Windowed Mode.
- An eye icon signifies you can left click to receive a new task.
- A magnifying cursor indicates you can investigate closer.
- Click on Anne in the lower right to get a hint.
- The hints will be in the form of a vision above Anne’s head, written word on the top or a sparkling area surrounding an item.
- The items on the top are the list of items to find.
- Before you can pick up an item, you must first find where it goes and have it added to the list above.
- Examine the journal in the lower left to check your task list and story updates.
- If you click on Anne during a puzzle you will be asked if you want Anne to solve it for you.
- Click on menu in the bottom left to exit the game.
Act 1 – Two Houses
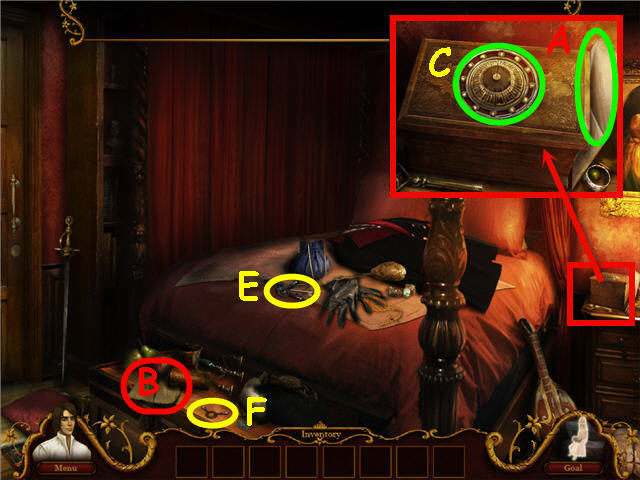
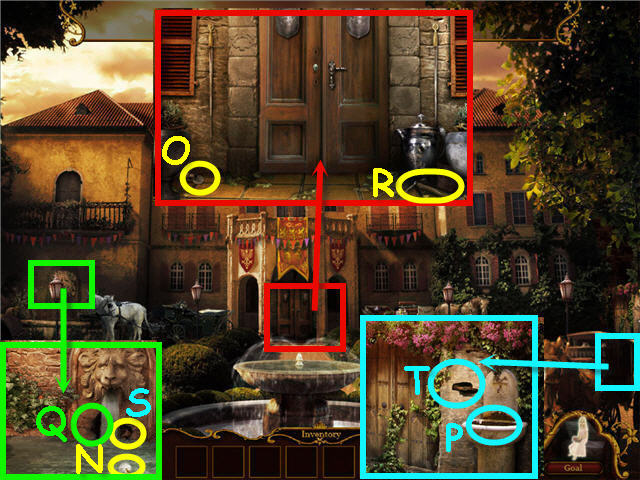
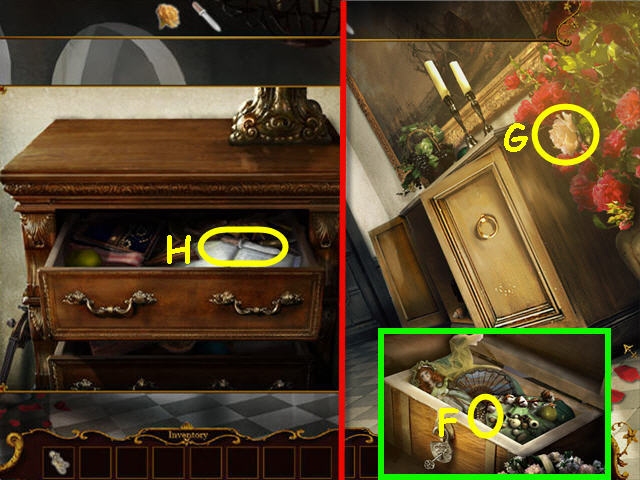
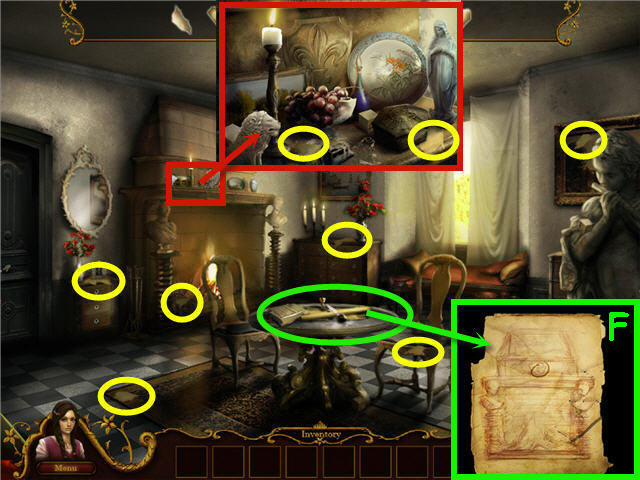
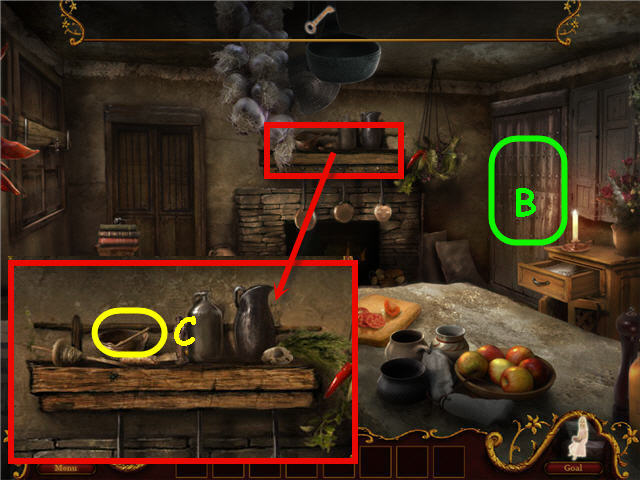
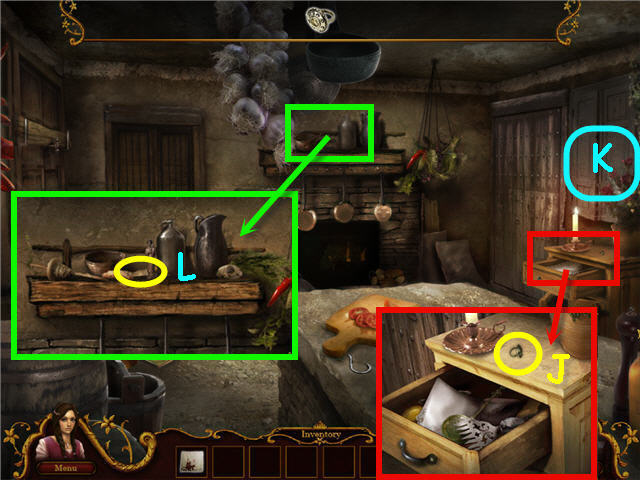
- Examine the nightstand; click on the envelope (A).
- Take the letter (B).
- Examine the nightstand; click the top of the box (D).
- Take the 2 POINTER PAIRS (E-F).
- Exit the room.
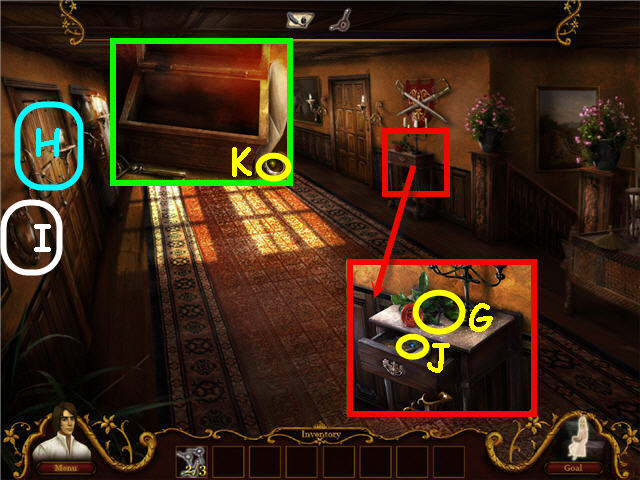
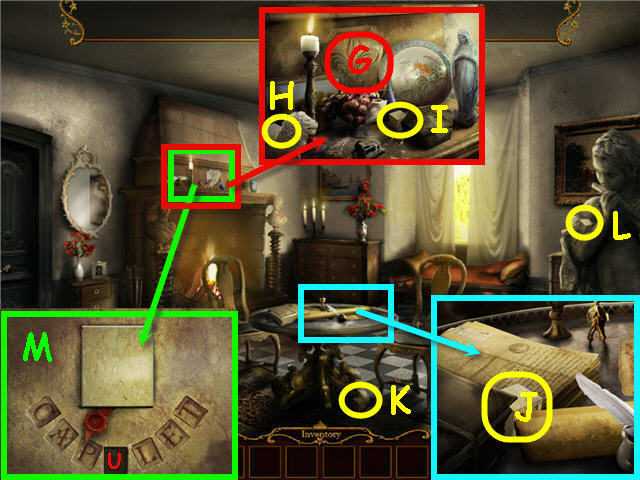
- Examine the hall table; take the POINTER PAIR (G).
- Head into Romeo’s room on the right.
- Examine the nightstand; place the POINTER PAIRS on the top of the box.
- Exit the room.
- Click on the door (H).
- Examine the plaque (I); click on the center.
- Examine the hall table; open the drawer and take the BLUE MARBLE (J).
- Head into Romeo’s bedroom.
- Examine the nightstand; take the YELLOW MARBLE (K).
- Exit the room.
- Examine the plaque (I); place the BLUE MARBLE in the top slot to trigger a puzzle.
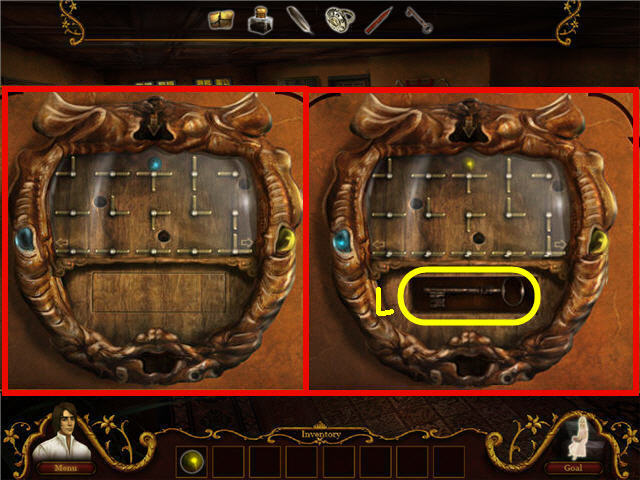
- The goal is to move the marble to its matching colored slot without falling into the holes.
- Click on the arrows to tilt the board left or right to move the ball. When you finish the blue marble, place the YELLOW MARBLE into the top slot to begin the second round.
- Solution: Left =L, Right = R; blue marble – L, R, Lx5; yellow marble – R, L, Rx5, L, R.
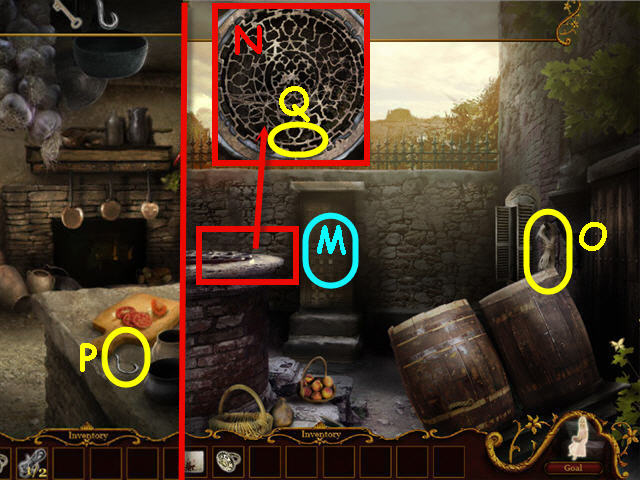
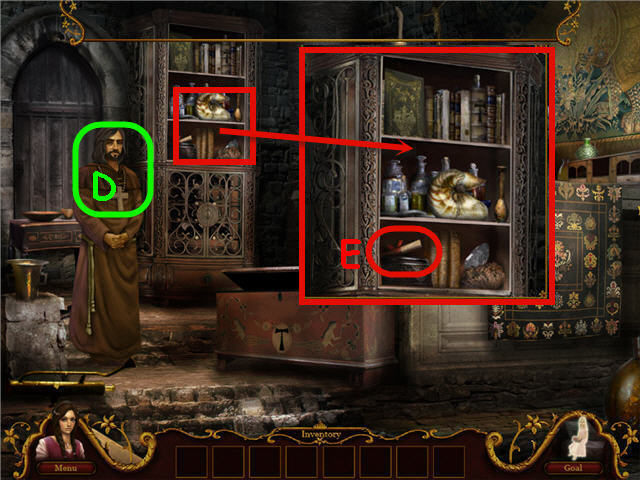
- Take the KEY TO FATHER’S WORKROOM (L).
- Use the KEY TO FATHER’S WORKROOM on the left door and enter.
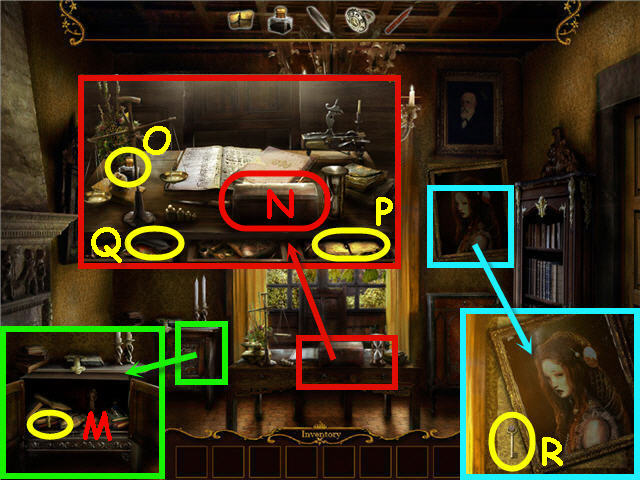
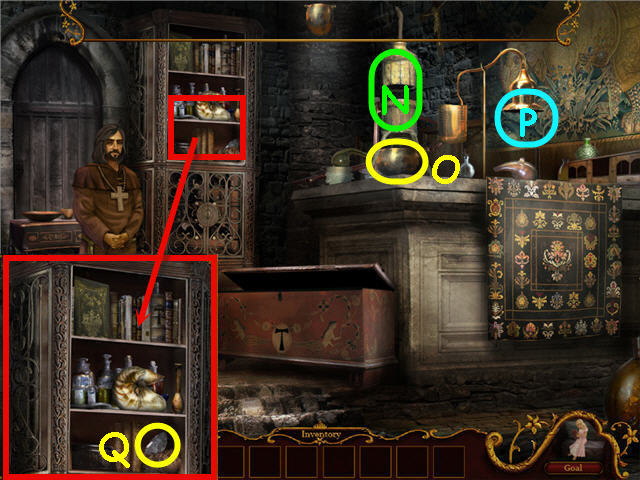
- Examine the cabinet; open the doors.
- Take the SEALING WAX (M).
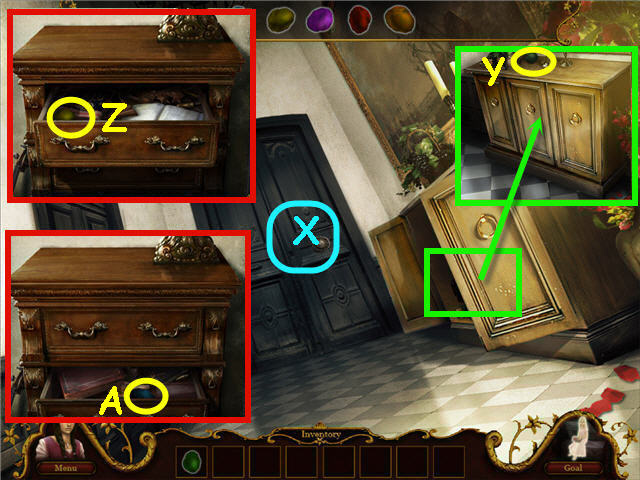
- Examine the desk; open the drawers.
- Click on the box (N).
- Take the INK POT (O), PARCHMENT PAPER (P), and QUILL (Q).
- Examine and click on the painting; take the KEY FOR FATHER’S CASKET (R).
- Examine the desk; use the KEY FOR FATHER’S CASKET on the box and take the SIGNET RING to get the LETTER.
- Exit and go downstairs.
- Click on the left door and the right cupboard.
- Back out.
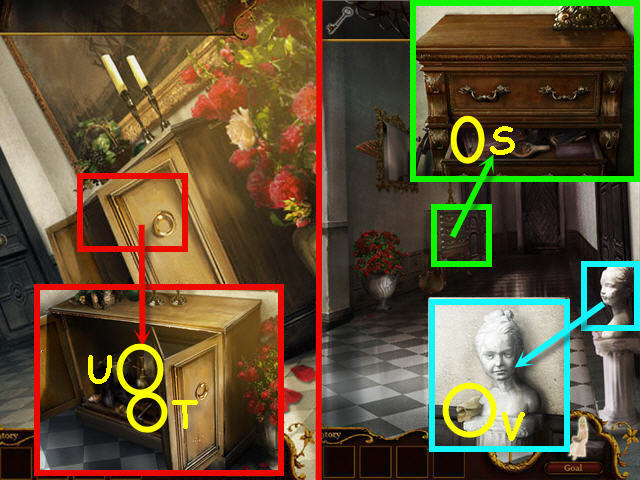
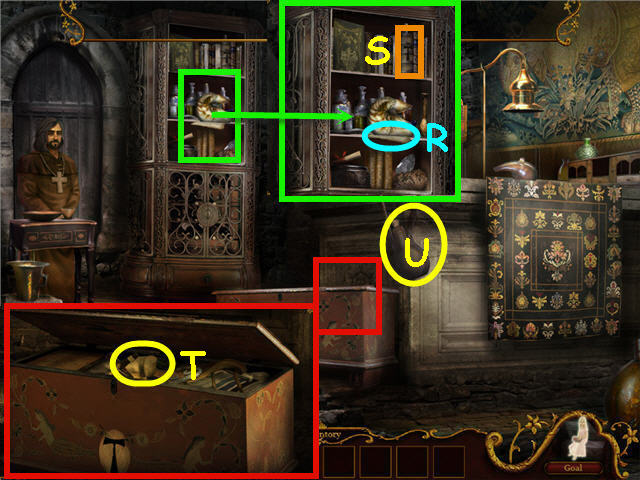
- Examine the chest of drawers.
- Open the bottom drawer; take the KEY FOR THE HALLWAY CUPBOARD (S).
- Back out.
- Use the KEY FOR THE HALLWAY CUPBOARD on the cupboard.
- Take the DOOR HANDLE (T).
- Examine and place the DOOR HANDLE on the left door.
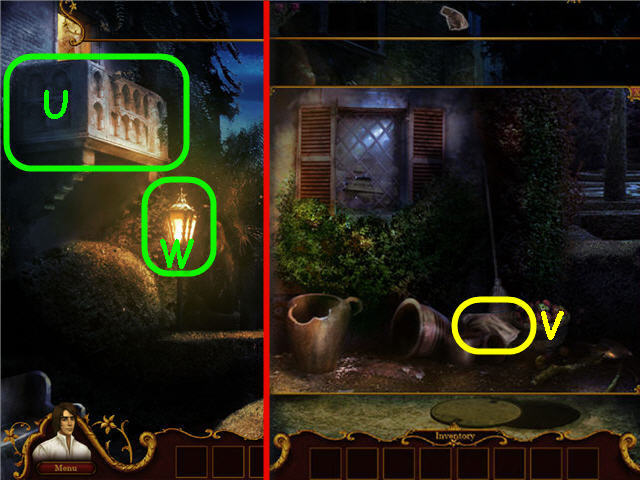
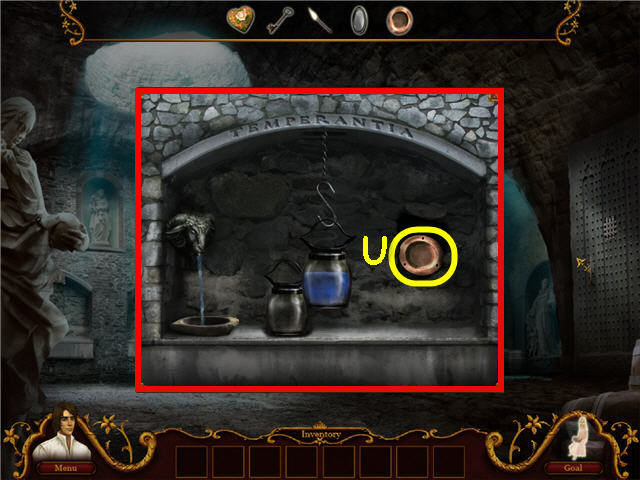
- Examine the cupboard; take the OILCAN (U).
- Back out.
- Examine the bust; take the CLOTH (V).
- Back out.
- Examine the left door; use the OILCAN and the CLOTH on the handle.
- Enter the left room.
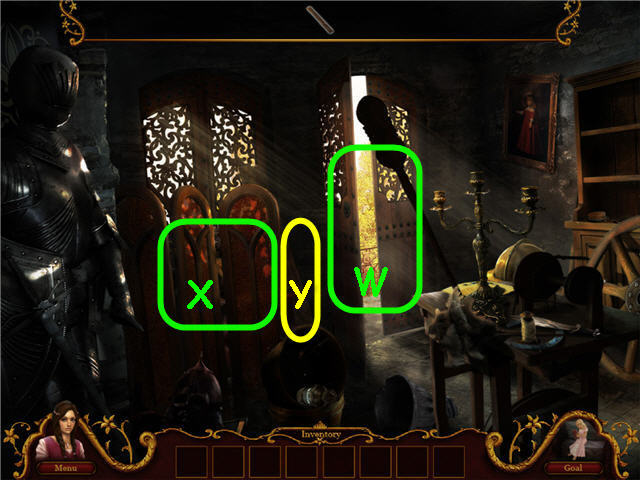
- Click on the door (W) and the privacy screen (X).
- Take the BOARD (Y).
- Use the BOARD on the door.
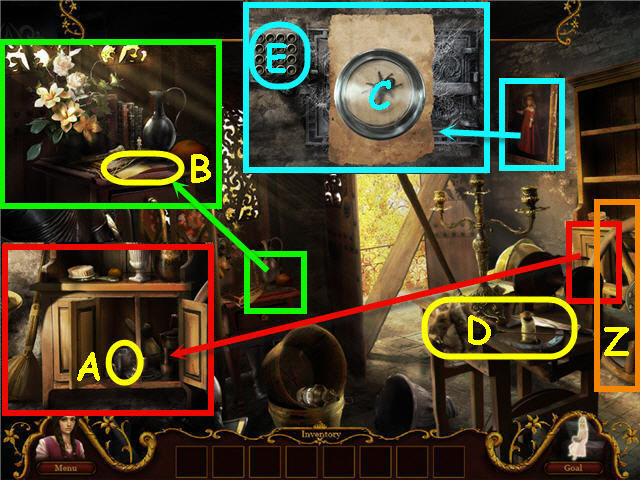
- Examine the painting and click on the spider web.
- Move the wheel (Z) and examine and open the cupboard.
- Take the GLASS (A).
- Examine the small table; take the PAPER (B).
- Examine and use the GLASS and PAPER on the spider; click to remove (C).
- Take the FEATHER DUSTER (D); use on the spider web.
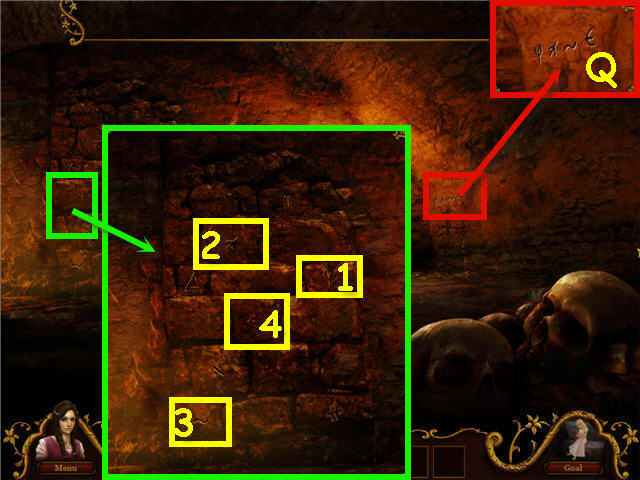
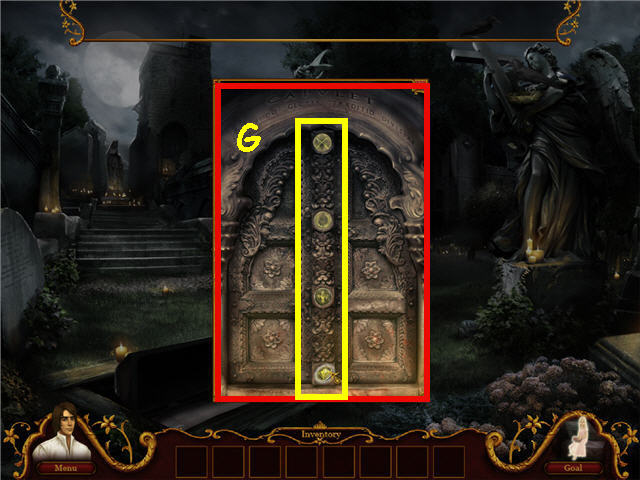
- Examine the lock (E) to trigger a puzzle.
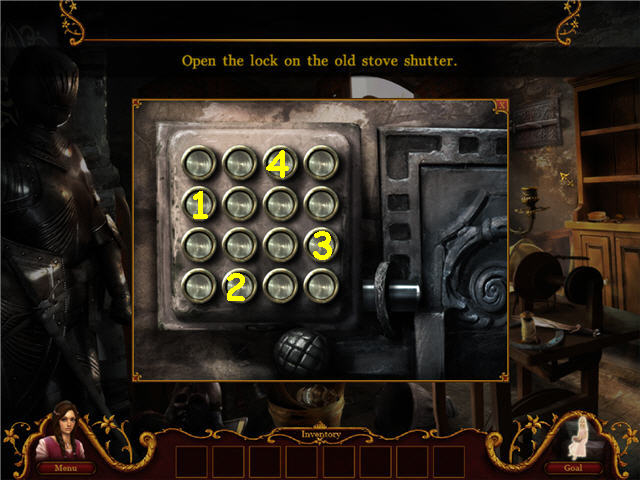
- Open the lock by having all buttons pushed in at the same time.
- See screenshot for solution.
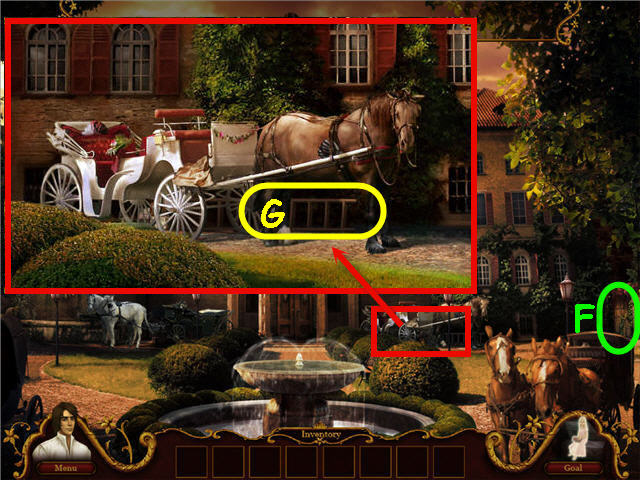
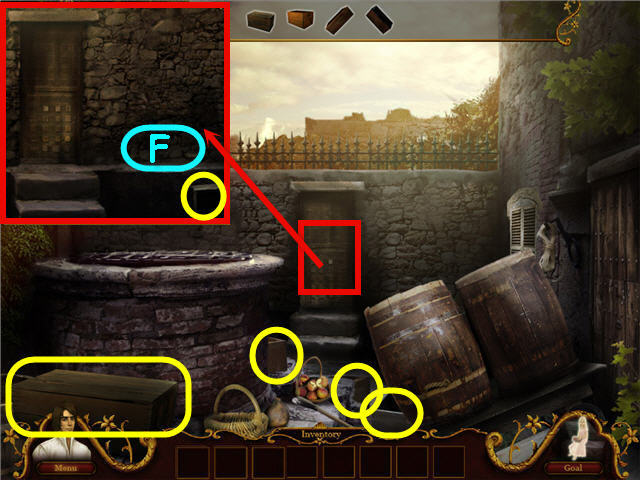
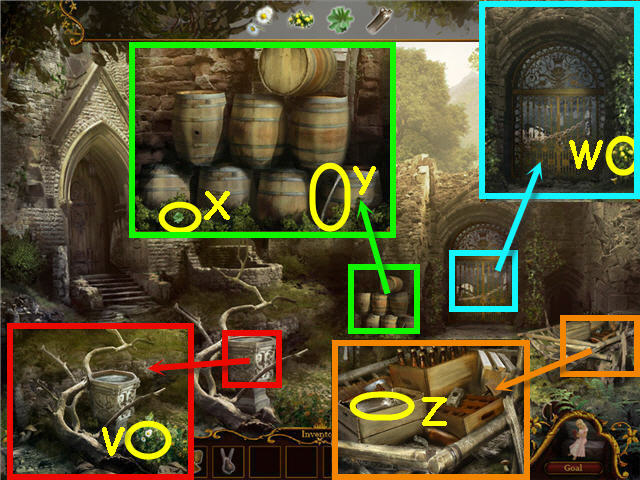
- Examine and click on the right gate (F).
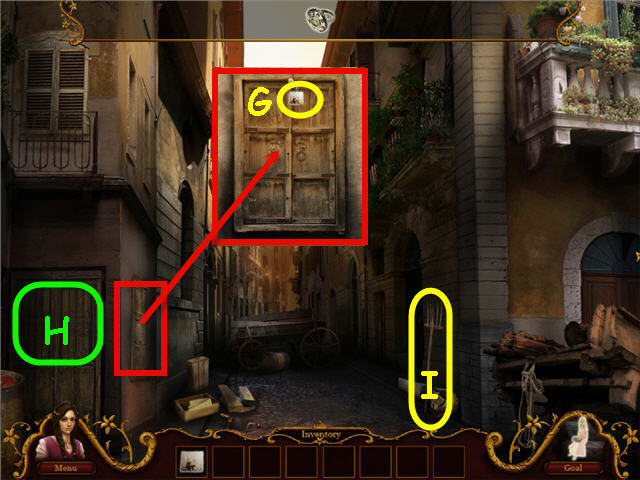
- Examine the horse and carriage; take the LADDER (G).
- Examine and use the LADDER on the gate and head over.
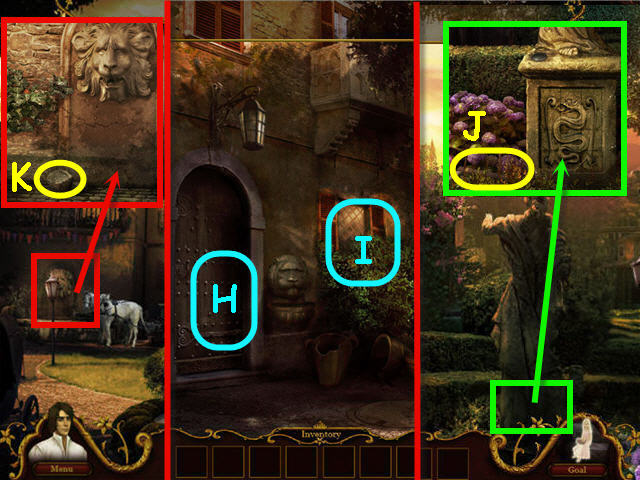
- Click on the door (H).
- Examine and click on the window (I).
- Head up the right path.
- Examine the right statue; take the SICKLE (J).
- Back out.
- Examine the window; use the SICKLE on the upper bush.
- Examine the window while in close up.
- Back out.
- Examine the fountain; take the STONE (K).
- Head back over the ladder.
- Examine and use the STONE on the window; click on the top of the box.
- Head up the right path.
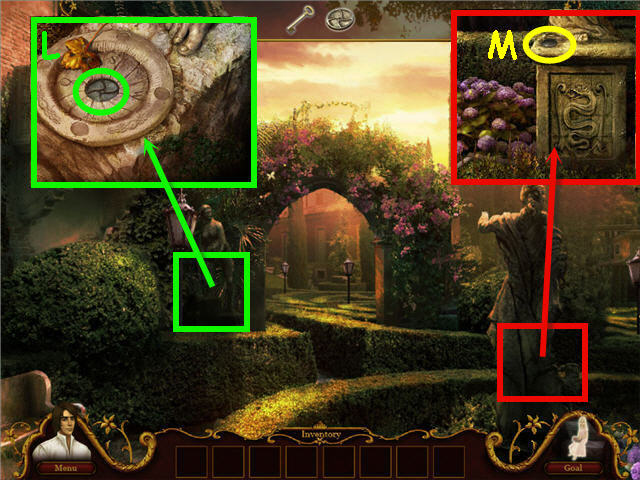
- Examine the left statue; click on the center (L).
- Examine the right statue; take the COIN (M).
- Back out twice.
- Examine the fountain.
- Click on the lion mouth; take the COIN (N).
- Examine the door; take the COIN (O).
- Examine the gate.
- Examine the basin (P); click on the coin.
- Examine the fountain; click on the crack (Q).
- Examine the door; take the HAMMER (R).
- Examine the fountain; use the HAMMER on the crack.
- Take the VALVE (S).
- Examine the gate; place the VALVE on the stem (T).
- Examine the basin; take the COIN.
- Head right twice.
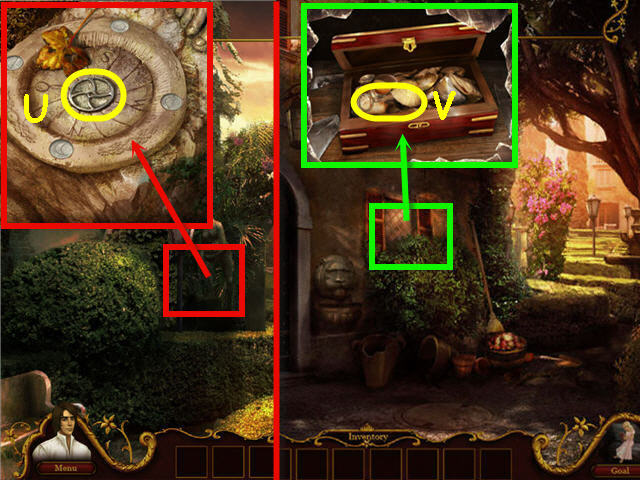
- Examine the left statue; place the 4 COINS in the correct slots. See screenshot for solution.
- Take the STONE DISK (U).
- Back out.
- Examine the window twice; place the STONE DISC on the box.
- Take the KEY TO BACKDOOR (V).
- Use the KEY on the DOOR.
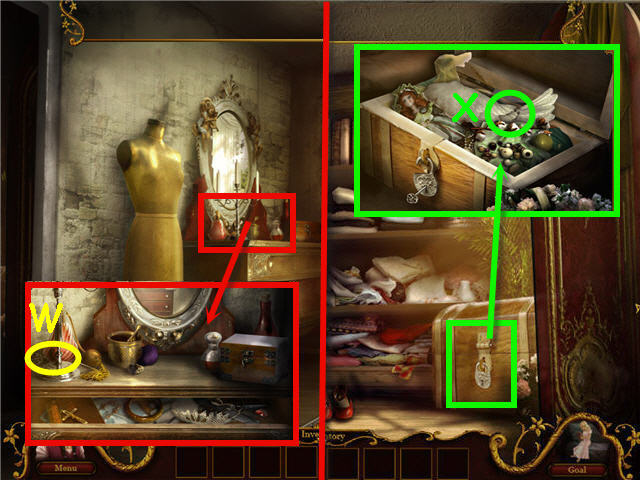
- Head left.
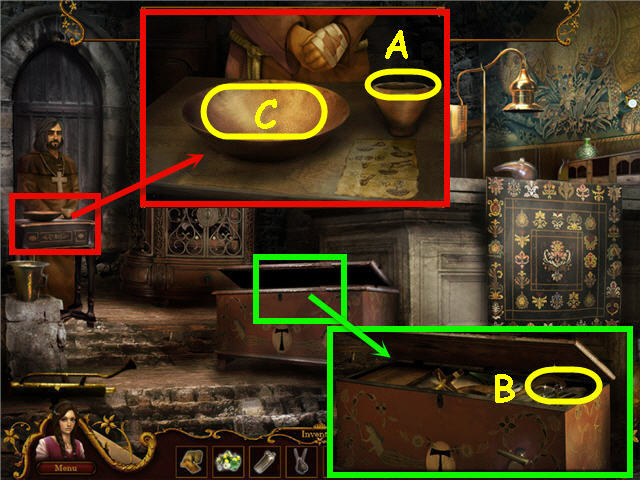
- Examine the trunk; click on the lock.
- Back out.
- Examine the dresser; take the KEY FOR THE CLOTHES STORAGE (W).
- Head left.
- Examine and use the KEY FOR THE CLOTHES STORAGE on the trunk.
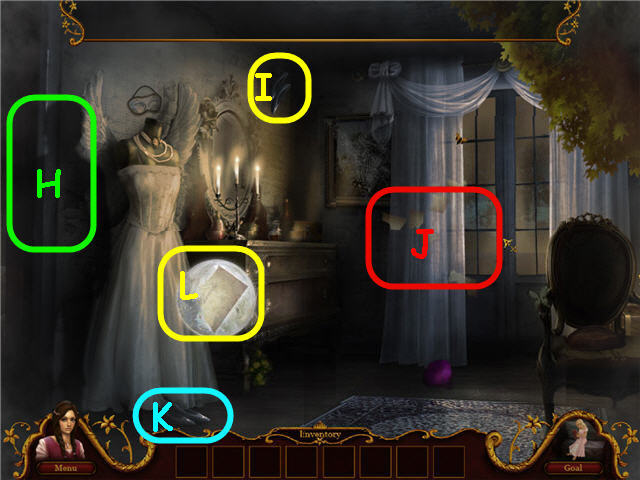
- Click on the broken wing (X).
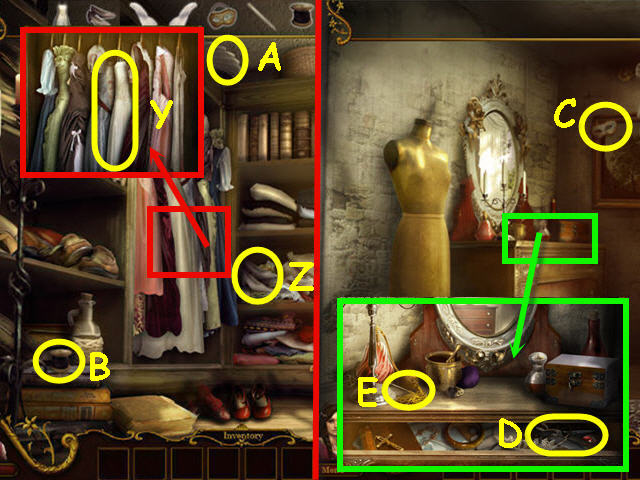
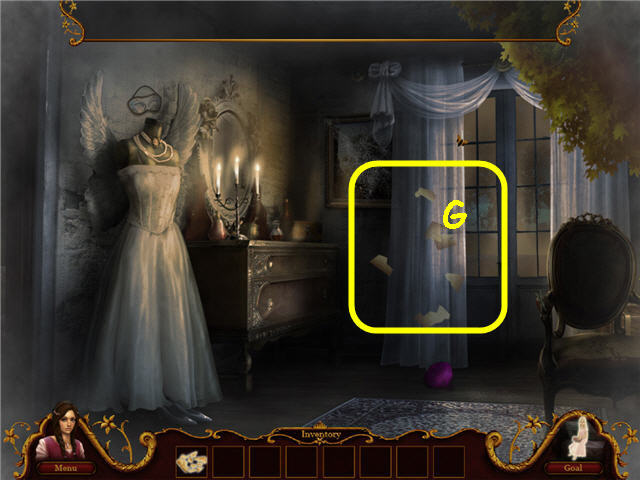
- Examine the dresses; take the WHITE BALL DRESS (Y).
- Take the SHOES (Z), ANGEL’S WING (A) and THREAD (B).
- Back out.
- Take the MASK (C).
- Examine the dresser.
- Open the drawer; take the SCISSORS (D) and NEEDLE (E) to get the SEWING UTENSILS.
- Head left.
- Examine the trunk.
- Use the SEWING UTENSILS on the wing to get the ANGEL’S WING.
- Back out.
- Place the WHITE BALL DRESS, 2 ANGEL’S WINGS, MASK and SHOES on the mannequin.
- Head left.
- Examine the trunk; take the NECKLACE (F).
- Back out three times.
- Click on the rose (G).
- Back out.
- Examine the chest of drawers on the left.
- Open the top drawer; take the KNIFE (H).
- Back out.
- Use the KNIFE to get the WHITE ROSE.
- Back out and head into the right door.
- Place the WHITE ROSE and NECKLACE on the mannequin.
Act 2 – In Love with the Enemy
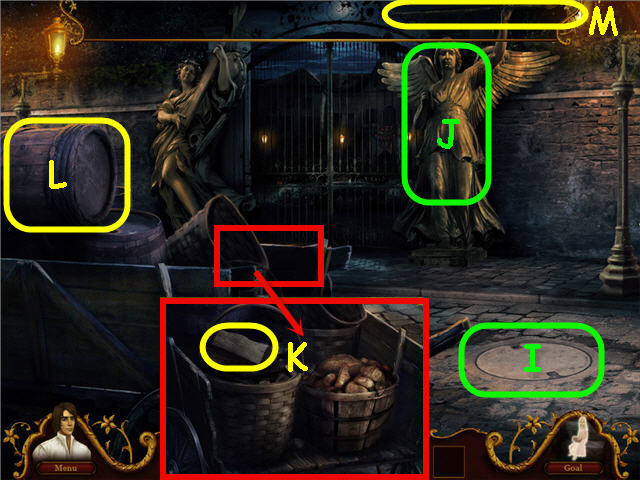
- Examine and click on the manhole cover (I).
- Examine the statue (J); click on the spear.
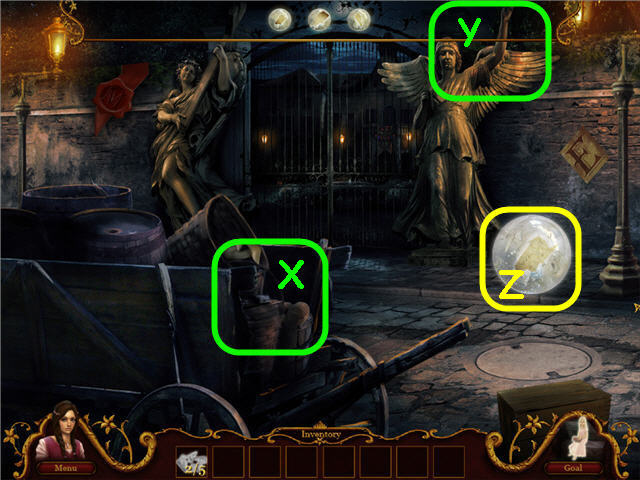
- Examine the cart; take the WOODEN BLOCK (K).
- Take the BARREL (L).
- Examine and use the BARREL on the base of the statue; take the SPEAR (M).
- Examine and use the WOODEN BLOCK and SPEAR on the manhole cover.
- Head down.
- Click on the opposite side of the water.
- Examine and then click on the board.
- Head up.
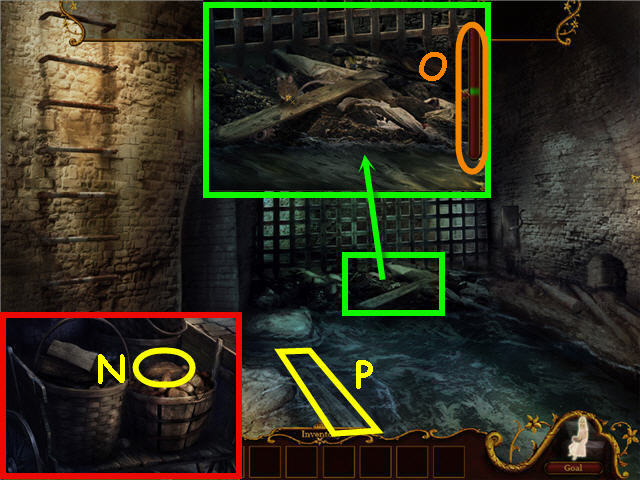
- Examine the cart; take the BREAD (N).
- Head down.
- Examine the board; use the BREAD on the board to trigger a puzzle.
- The goal is to get the mouse over the board to tip it.
- When the bar on the right (O) hits the green, click on the board. Continue until the board falls.
- Take the BOARD (P).
- Place the BOARD across the water in front of the archway.
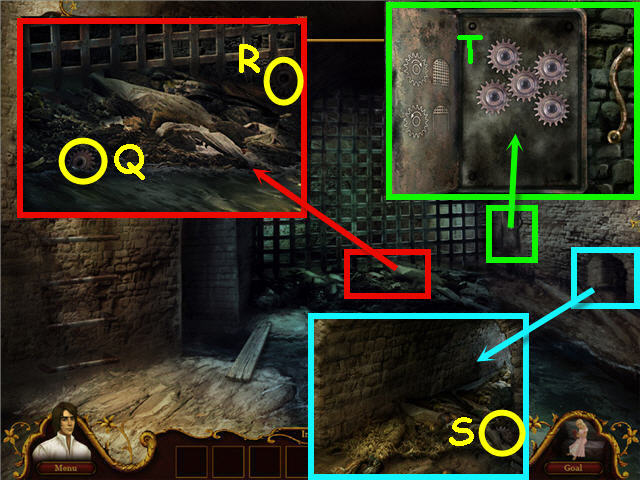
- Examine and click on the gearbox.
- Examine the ground; take the 2 COGWHEELS (Q-R).
- Examine the niche; take the COGWHEEL (S).
- Examine and place the 3 COGWHEELS in the gearbox (T); click the lever.
- Head up the right ladder and head right.
- Examine and click on the balcony (U).
- Back out via the bottom left.
- Examine the window area; take the CLOTH (V).
- Head up the right.
- Place the CLOTH over the lamp (W).
- Examine and click on the balcony.
- Examine the door (X).
- Examine the cabinet; take the STONE KEY (Y).
- Back out.
- Examine the chest of drawers.
- Open the top drawer; take the STONE KEY (Z).
- Open the bottom drawer; take the STONE KEY (A).
- Head into the room on the right.
- Examine the dresser; take the STONE KEY (B).
- Back out twice and head into the left door.
- Examine the cupboard; take the STONE KEY (C).
- Examine the small table; take the STONE KEY (D).
- Back out; click on the door straight ahead.
- Place the stones in the slots in rainbow colored order. See screenshot (E) for solution.
- Head straight.
- Examine the table.
- Collect the 8 SCRAPS OF PARCHMENT. Marked in yellow on screenshot.
- Examine the table.
- Place the 8 SCRAPS OF PARCHMENT on the torn paper.
- Click on the scraps to trigger a puzzle.
- Arrange the pieces to complete the picture. See screenshot (F) for solution.
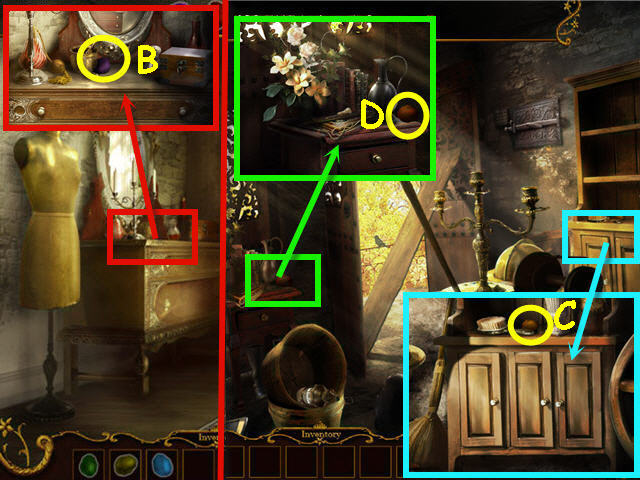
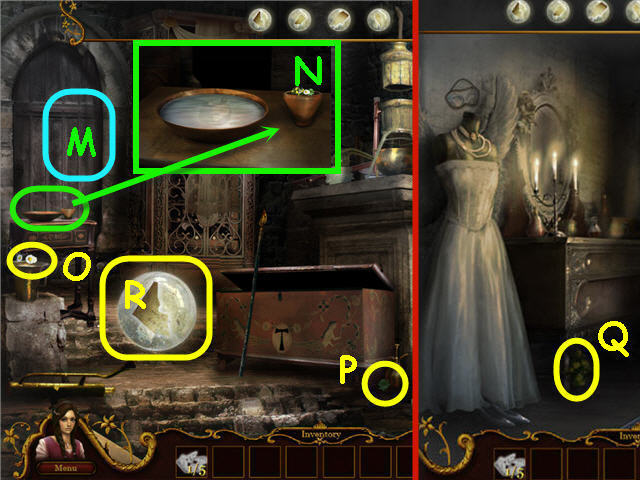
- Examine the mantle.
- Click on the crest (G) twice.
- Take the CUBE U (H) and CUBE P (I).
- Examine the table; take the CUBE T (J).
- Take the CUBE C (K) and CUBE L (L).
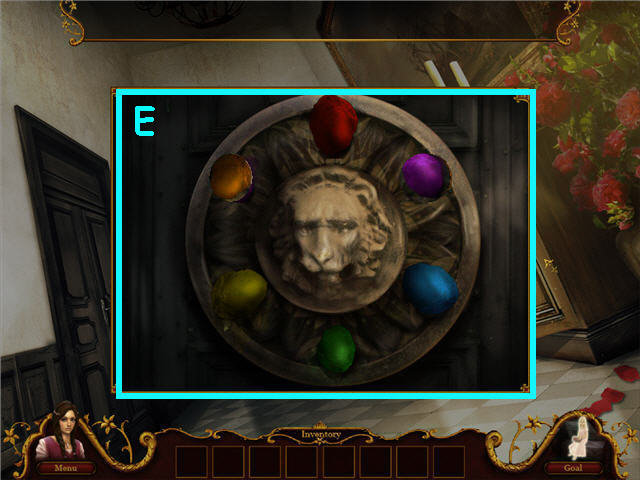
- Examine the mantle and the crest.
- Place the CUBE U, CUBE P, CUBE T, CUBE C and CUBE L in the correct slots.
- Solution: Spell out CAPULET (M).
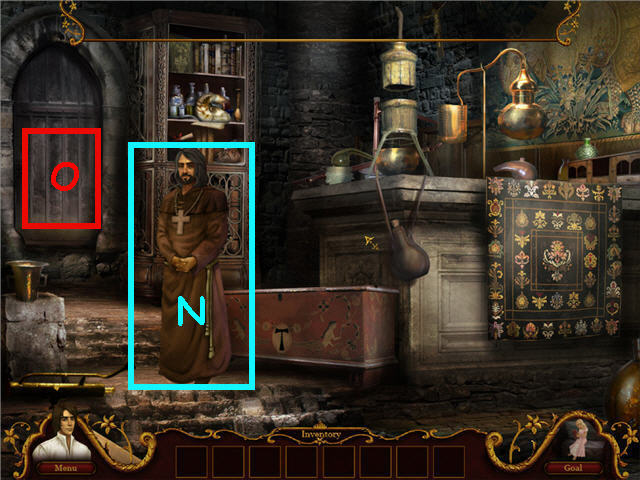
- Click on Father Lorenzo (N).
- Click on the left doorway (O) twice to head through.
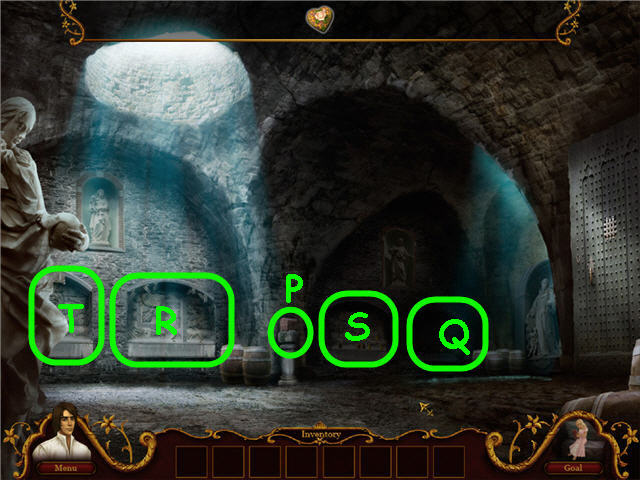
- Examine and click on the center chest (P).
- Examine and click on the far right alcove (Q).
- Examine and click on the 2nd from left alcove (R).
- Examine and click on the 2nd from right alcove (S).
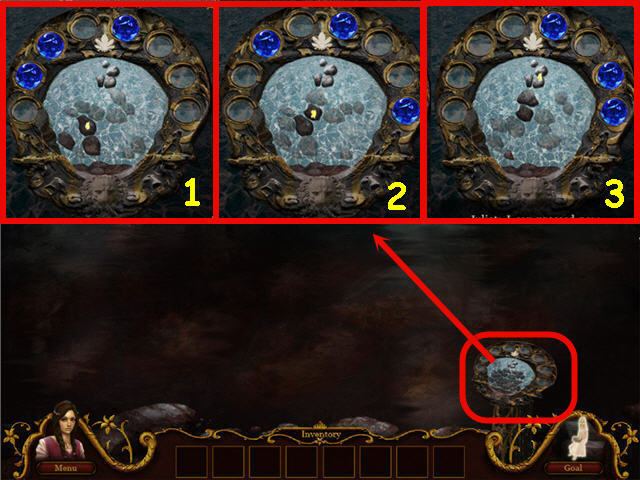
- Examine the left alcove (T).
- The goal is to find the correct amount of water to hang in order to get the pan.
- If you fill the large jug up and hang it on the hook you will note that the pan is in the 4th slot. Empty the jug by clicking on the bottom of the fountain.
- Solution: Jugs – Fill the small jug, dump it in the large jug, fill small jug, place in the large jug and you will now have 1 in the small jug. Empty the large jug, place the 1 from the small jug in the large jug, fill the small jug and place in the large jug. You now have 4 in the large jug,
- Hang on the hook; take the SCALE PAN (U).
- Examine the 2nd from right alcove.
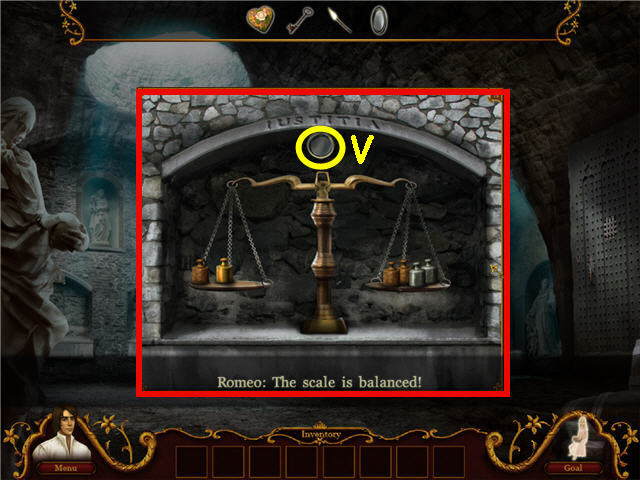
- Hang the SCALE PAN on the left chains.
- The goal is to balance the scales by moving the correct weights from the right pan to the left.
- Solution: Move the leftmost and rightmost weights on the right pan to the left pan.
- Take the LENS (V).
- Examine the 2nd from left alcove.
- Place the LENS in the hands of the center statue.
- Click on the lenses to direct the light from the center to the torch on the right.
- See screenshot for solution.
- Take the TORCH (W).
- Examine the right alcove.
- Use the TORCH on the dark alcove.
- Open the box; take the KEY FOR CHEST (X).
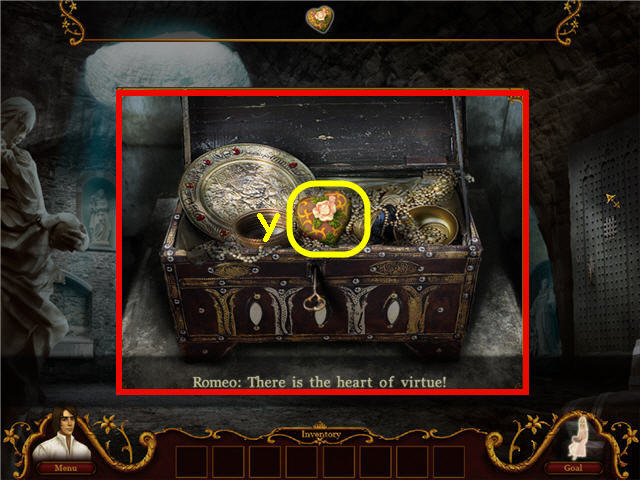
- Examine and use the KEY FOR CHEST on the chest.
- Take the HEART OF VIRTUE (Y).
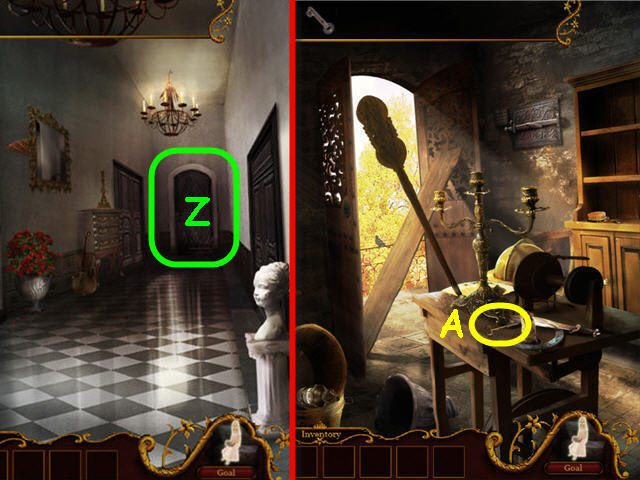
- Click on the door (Z) at the end of the hall.
- Back out and head through the left door.
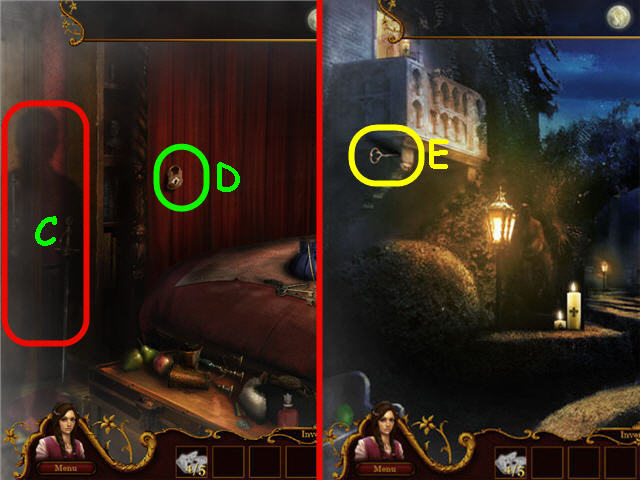
- Take the KEY (A).
- Back out two times.
- Use the KEY on the door and head straight.
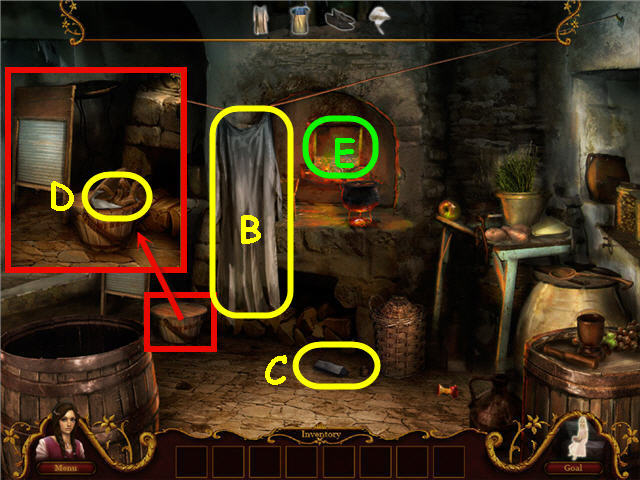
- Click on the petticoat (B).
- Take the WOOD (C).
- Examine the wooden bin.
- Open the lid; take the FUSE (D).
- Place the WOOD and FUSE in the oven (E).
- Take the PETTICOAT.
- Back out.
- Take the DRESS (F) and SHOES (G).
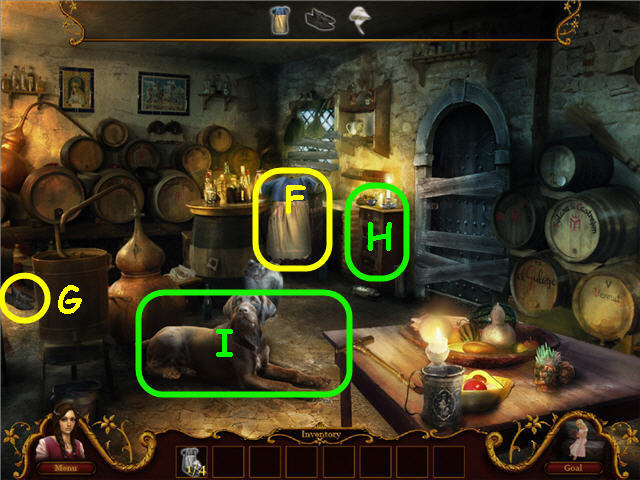
- Examine the cupboard (H).
- Examine the dog (I).
- Back out.
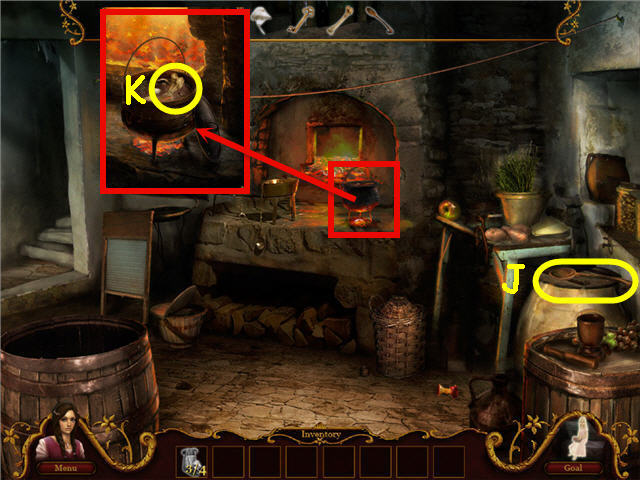
- Examine the pot.
- Remove the lid; click on the bone.
- Take the SPOON (J).
- Examine the pot.
- Use the SPOON to get the BONE (K).
- Back out.
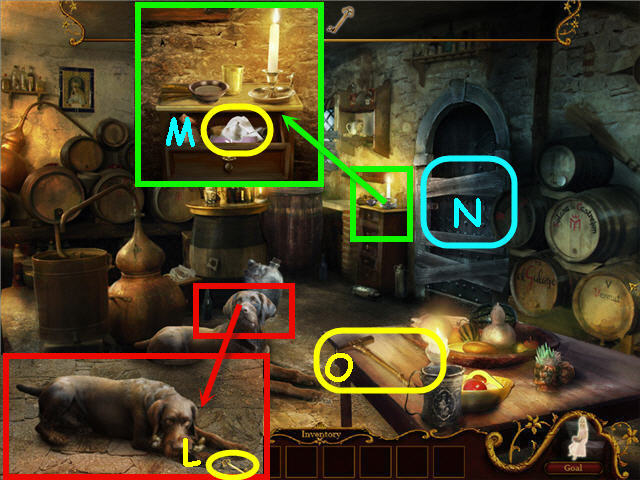
- Examine the dog.
- Give the dog the BONE; take the KEY FOR CUPBOARD (L).
- Examine the cupboard.
- Use the KEY FOR CUPBOARD on the drawer; take the HEADDRESS (M).
- Click on the door (N).
- Take the HAMMER (O).
- Examine and use the HAMMER on the boards on the door.
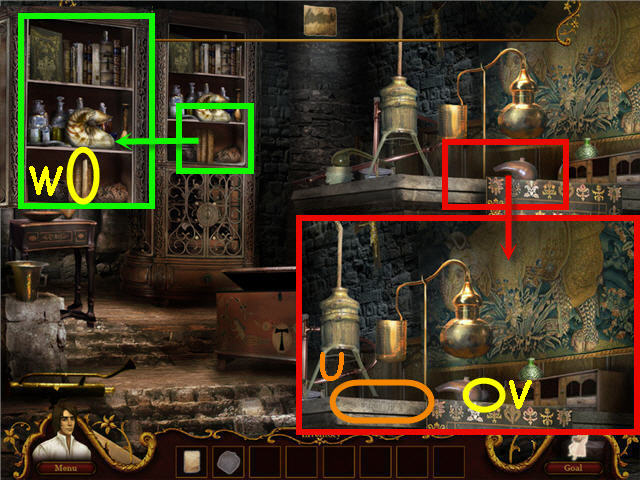
Act 3 – Blood for Blood
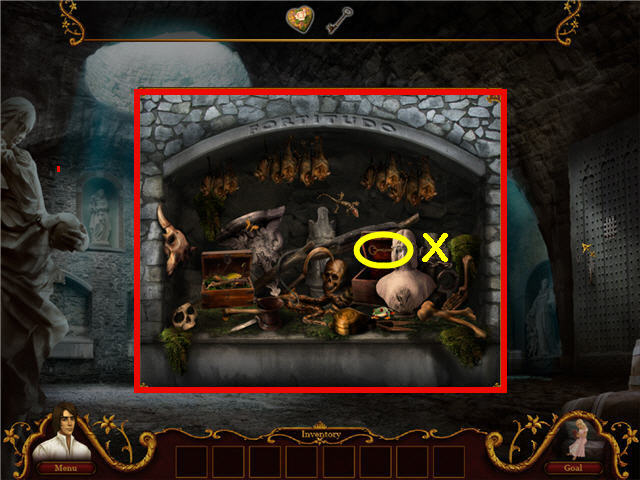
- Examine and click on the shutter (P) and chest (Q).
- Examine the rope and click on the key (R).
- Examine the tray; take the SCISSORS (S).
- Examine the rope.
- Use the SCISSORS on the rope by the key; take the KEY FOR CHEST (R).
- Examine and use the KEY FOR CHEST on the chest; take the HAMMER (S) and CHISEL (T).
- Examine the shutter; use the CHISEL on the top and the HAMMER on the CHISEL.
- Enter through the opened window.
- Click on the left window (U).
- Move the pedestal (V).
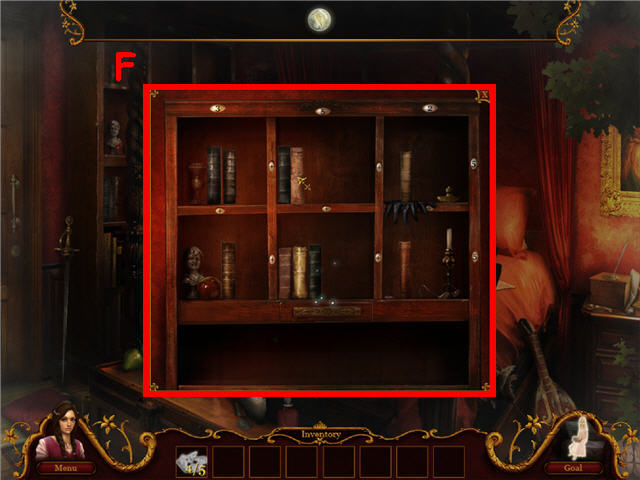
- Take the BOOK (W).
- Examine the cupboard; click on the drawer.
- Examine the pots; take the BOOK (X) and HANDLE (Y).
- Examine the cupboard; place the HANDLE on the drawer.
- Open the drawer; take the BOOK (Z).
- Place the BOOKS on the pedestal.
- Take the BAR (A).
- Place the BAR on the window (U).
- Click on the door (B).
- Examine the mantle.
- Take the KEY FOR THE BACKDOOR (C).
- Use the KEY FOR THE BACKDOOR on the backdoor.

- Examine and click on the barrels (D).
- Take the 2 TIRES (E-F).
- Examine and use the 2 TIRES on the axles of the cart.
- Take the WAGON (D).
- Use the WAGON on the right door (E).
- Click on the door straight ahead.
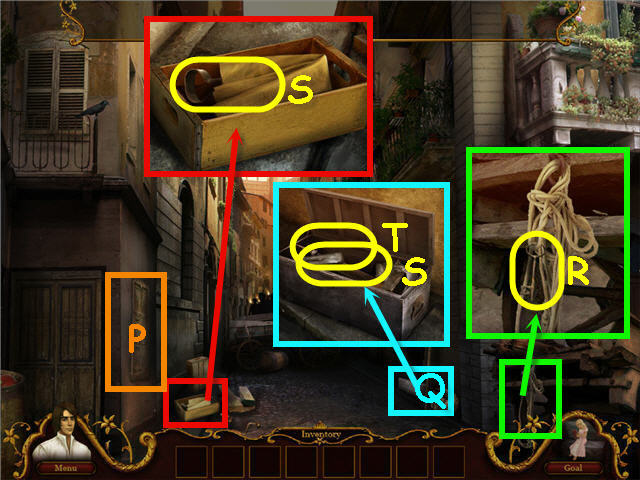
- Find the 5 BOXES (in yellow).
- Examine the door; place the BOXES on the landing (F).
- Examine the shutter; take the SHRED OF SHIRT (G).
- Click on the door (H).
- Take the HAY FORK (I).
- Use the HAY FORK on the door and enter.
- Examine the cupboard; take the SEAL RING (J).
- Examine the shutter (K); click on the latch.
- Examine the mantle; take the KNIFE (L).
- Examine the shutter; use the KNIFE on the latch.
- Exit through the window.
- Click on the door (M).
- Examine the grate and click on it (N).
- Take the ROPE (O).
- Go through the far right window.
- Take the HOOK (P) to get a FISHING ROD.
- Exit out the window.
- Examine the grate; use the FISHING ROD to get the KEY (Q).
- Use the KEY on the door (M).
- Click on Father Lorenzo.
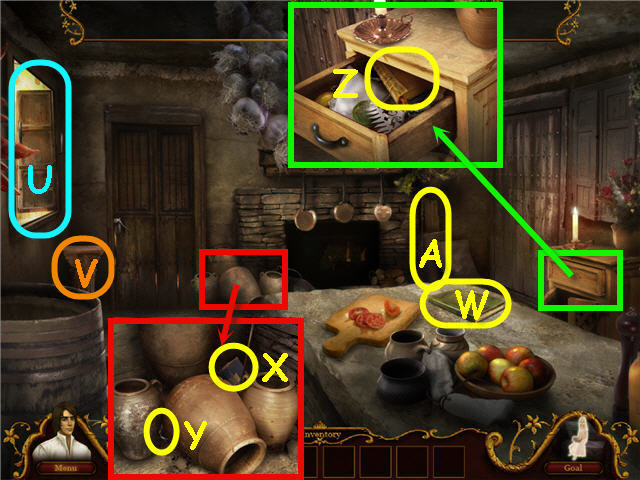
- Examine the cabinet; click on the paper under the shell to find the recipe (R).
- Examine the chest; click on the lock.
- Examine the cabinet.
- Examine the book with the T on the binder (S); take the KEY FOR THE CHEST.
- Examine and use the KEY FOR THE CHEST on the chest.
- Take the BANDAGE (T).
- Take the BOTTLE OF WATER (U).
- Back out.
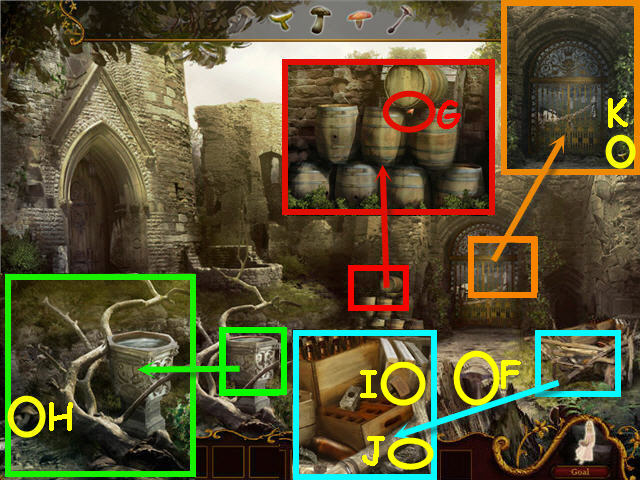
- Examine the urn; take the HERB (V).
- Examine the cart; click on the box lid.
- Examine the gate; take the HERB (W).
- Examine the barrels; take the HERB (X) and CROWBAR (Y).
- Examine the cart.
- Use the CROWBAR on the box top; take the BRANDY (Z).
- Head into the monastery.
- Examine the table.
- Place the HERBS in the mortar (A).
- Examine the chest; take the PESTLE (B).
- Examine the table; use the PESTLE on the mortar.
- Take the GROUND HERBS (A).
- Place the place the BOTTLE OF WATER in the bowl GROUND HERBS, BRANDY and BANDAGES in the bowl (C).
- Take the HERBAL BANDAGE.
Act 4 – A Fatal Plan
- Click on Father Lorenzo (D).
- Examine the cabinet; click on the scroll (E).
- Back out.
- Take the MUSHROOM (F).
- Examine the barrels; click on the mushroom (G).
- Examine the urn; take the MUSHROOM (H).
- Examine the cart; take the HAMMER (I) and MUSHROOM (J).
- Examine the gate; take the MUSHROOM (K).
- Head inside the monastery.
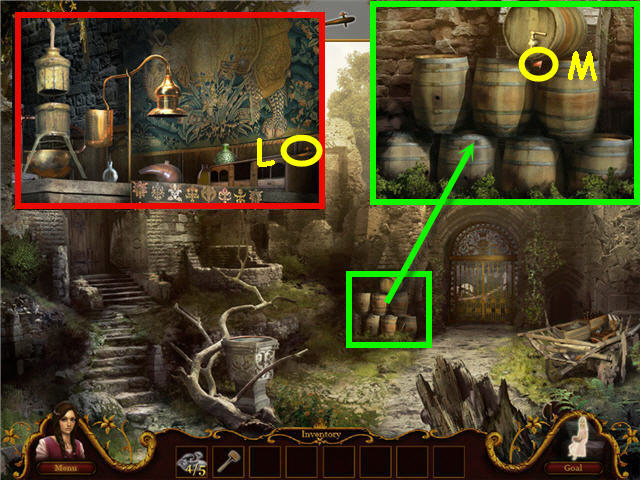
- Examine the distiller; take the TAP (L).
- Back out.
- Examine the barrels; use the TAP and HAMMER on the top barrel.
- Click on the top barrel; take the MUSHROOM (M).
- Enter the monastery.
- Examine the distiller.
- Place the MUSHROOM in the still (N); click on the top to lower.
- Take the MUSHROOM HEAD (O).
- Place the MUSHROOM HEAD on the distiller (P).
- Examine the cabinet; take the FLINT (Q).
- Use the FLINT on the distiller (P); take the SLEEPING DRAUGHT.
- Examine the right wall and note the symbols (Q).
- Examine the left wall; press the matching bricks from the code on the right wall.
- See screenshot for solution.
- Head straight twice.
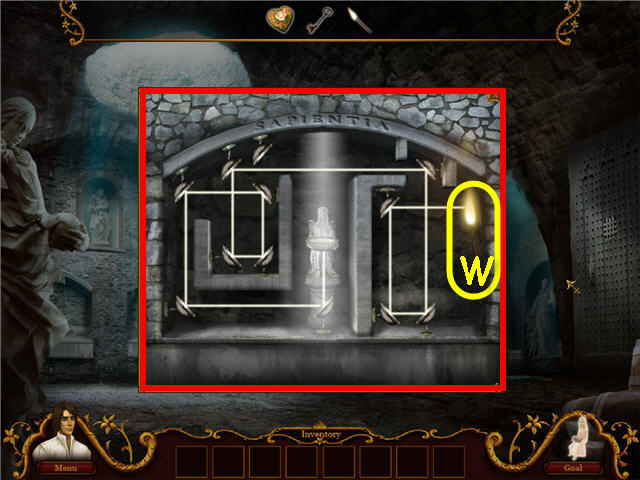
- Examine the panel and note the will o’wisp on the bottom.
- The goal is to move the will o-wisp up the stone path by placing the blue gems in the correct spaces. See screenshot for solution.
- Head forward.
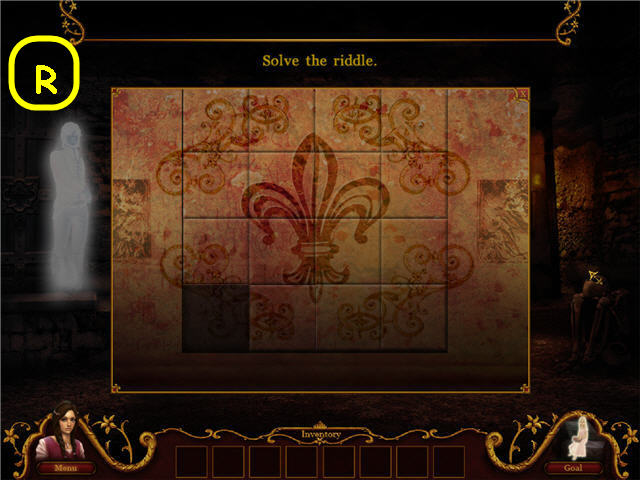
- Examine the altar; click away all the dusty areas.
- Rearrange the squares by sliding the squares on the top of their matching bottoms. See screenshot for solution (R).
Act 5 – The End of the Feud
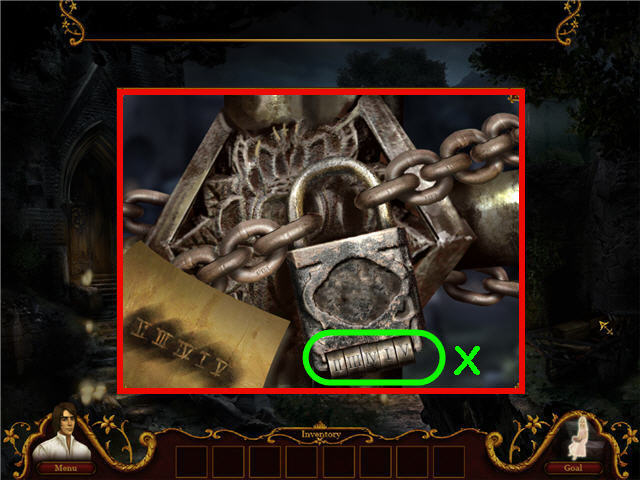
- Examine the gate; click on the lock.
- Enter the monastery.
- Examine the chest; take the NUMBER MODULE (S).
- Back out.
- Examine the gate; examine the lock.
- Place the NUMBER MODULE on the lock (T).
- Enter the monastery.
- Examine the distiller; click on the code (U) and take the CARBON (V).
- Examine the cabinet; take the PAPER (W).
- Examine the distiller; use the PAPER and the CARBON on the code.
- Click on the paper code.
- Back out.
- Examine the gate; examine the lock.
- Click the tumblers to match the code from the distiller.
- Solution: II – III – IV – I - V. See screenshot (X) for solution.
- Head straight.
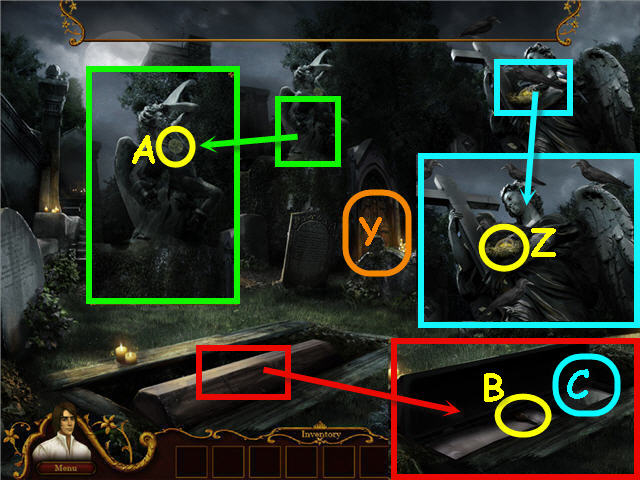
- Examine the door (Y).
- Examine the right statue; take the COIN (Z).
- Examine the left statue; click on the coin (A).
- Examine and open the grave.
- Take the CHISEL (B); click on the upper area inside the coffin (C).
- Examine the left statue; use the CHISEL to get the COIN.
- Examine the altar; take the KNIFE (D) and COIN (E).
- Examine the coffin.
- Use the KNIFE on the upper area inside the coffin; take the COIN (F).
- Examine the door; place the 4 COINS in their correct slots.
- See screenshot (G) for solution.
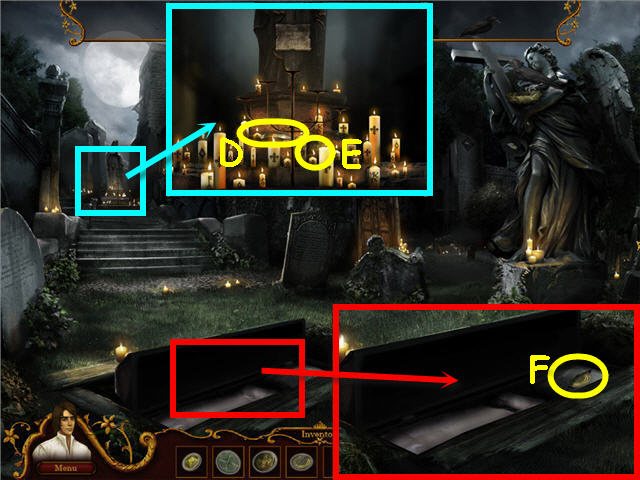
- Click on the shadow (H).
- Click on the sparkles.
- Take the SHOES (I).
- Click on the letter pieces (J).
- Place the SHOES on the floor in front of the dress (K).
- Take the LETTER SHREDS (L).
- Head left.
- Click on the shadow (M).
- Examine the table; click on the mortar (N).
- Take the 2 HERBS (O-P).
- Back out.
- Take the HERB (Q).
- Head left.
- Examine the table; place the HERBS in the mortar.
- Take the LETTER SHREDS (R).
- Head straight through the newly opened door.

- Click on the shadow (S).
- Examine the cart; click on the right bushel (T).
- Examine the right statue; click on the right hand (U).
- Back out two times.
- Take the BREAD (V).
- Head left.
- Take the SPEAR (W).
- Head straight through the door.
- Examine the cart; place the BREAD in the right bushel (X).
- Examine the right statue; place the SPEAR in its hand (Y).
- Take the LETTER SHREDS (Z).
- Head down.

- Click on the shadow (A).
- Examine the statue; take the LETTER SHREDS (B).
- Head forward.
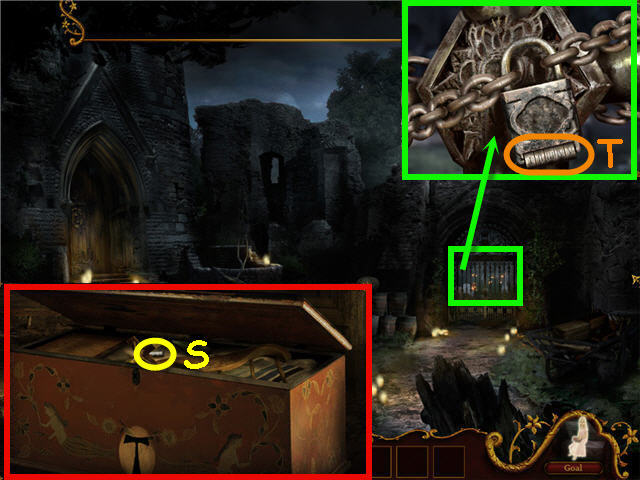
- Click on the shadow (C).
- Click on the lock (D) on the curtain.
- Back out.
- Take the KEY (E).
- Head forward.
- Use the KEY on the lock.
- Examine the shelves to trigger a puzzle.
- Arrange the books on the shelves so that they add up to the numbers above and on the right.
- See screenshot (F) for solution.
- Take the LETTER SHREDS.
- Back out 4 times.
- Place the LETTER SHREDS on the letter pieces (G).
- Congratulations! You have successfully completed The Chronicles of Shakespeare: Romeo and Juliet.
Created at: 2011-10-05