

Walkthrough Menu
- General Tips
- Prologue: The Mine
- Chapter 1: London, England
- Chapter 2: Ballyscath, Ireland
- Chapter 3: Underground
- Chapter 4: The Hidden World
- Chapter 5: Total Eclipse
General Tips

- From the main menu you can look at cut scenes, the credits, adjust options like full screen and sound, and manage your profiles.
- The hidden objects in the game are somewhat randomized. You may see different objects when you play the game.
- The INVENTORY OBJECTS that you find are not randomized however.
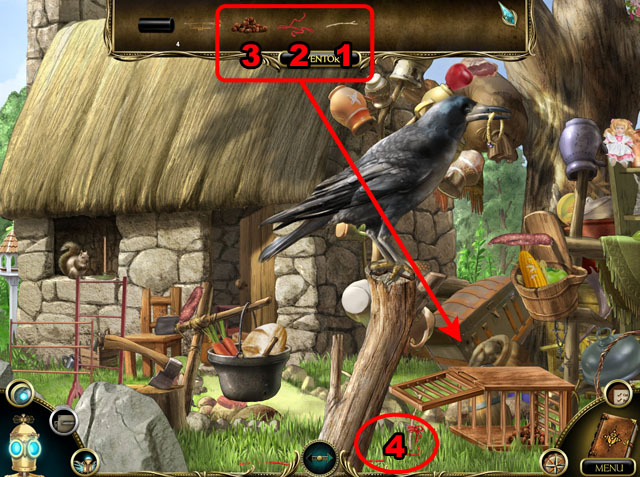
- There are three different types of cursor icons.
- The hand icon (1) shows that you can pick up something.
- The gears icon (2) shows that something can be interacted with. Sometimes you will need to do other steps first before you can interact with this object.
- The magnifying glass icon (3) shows that you can investigate this area further. It usually brings up a new scene.
- Some scenes in the game are zoomable or scrollable.
- You can click and drag to zoom or scroll the screen. Also you arrows at the bottom of the screen to move around (4).
- Hidden objects may be spread out between multiple scenes in a zooming scene and in a scrolling scene they may be hidden behind objects in the foreground.
- There is a map in the bottom right corner that you use for movement.
- Beside the map is your journal. Most of the puzzles can be finished by looking in this book for clues.
- Also inside the journal you will see outlines in red of the objects that you need to interact with next.
- Above the journal is the list of tasks that you are currently working on.
- The inventory in this game is at the top of the screen.
- There are hint buttons on the left side near the robot’s head.
- The top button is used during hidden object scenes and finds one object for you.
- The second button is also used during hidden object scenes and shows you the shape of an object.
- The third button is used for hints during the rest of the game and the mini-games.
Prologue: The Mine
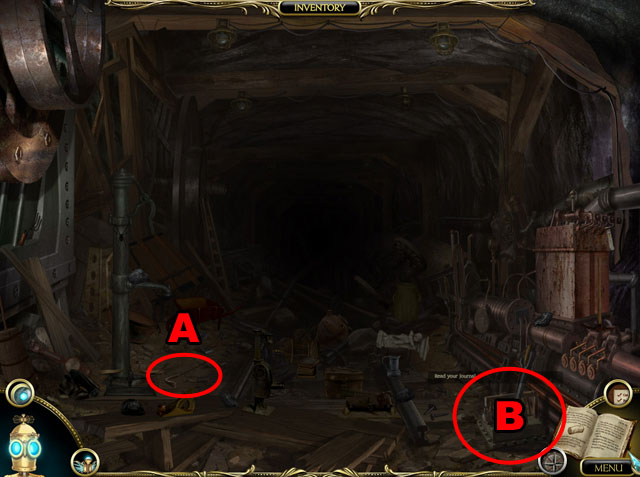
- Click on the journal in the bottom right corner to get a hint at what you need to do next.
- Pick up the CROWBAR (A).
- Use the CROWBAR on the area circled (B).
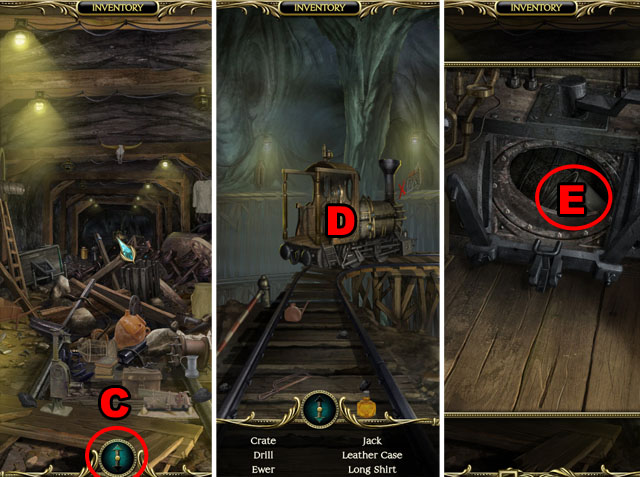
- This scene is zoomable.
- Zoom in by clicking in the middle of the screen or the button at the bottom (C).
- Click on the train (D).
- Click on the empty coal bin and take the PAIL to get your next task (E).
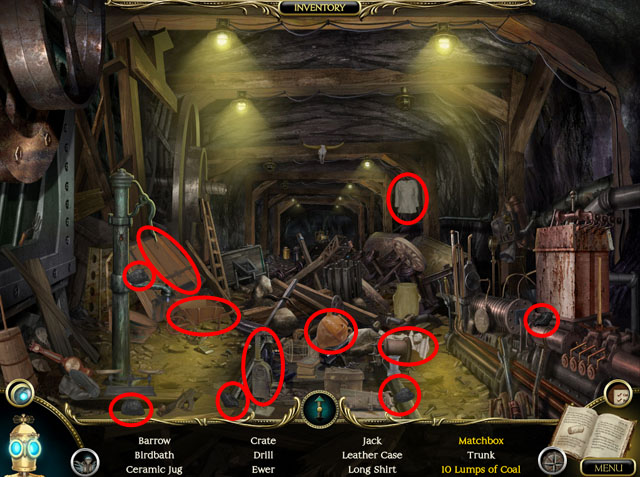
- Return to the first scene and find all of the hidden objects.
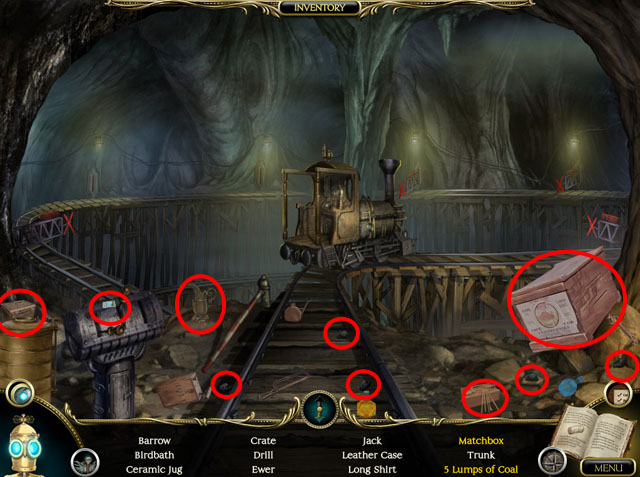
- There will be some objects in the middle scene as well.
- The objects may be randomized in your playthrough.
- You will receive a MATCHBOOK and some COAL. These will not be randomized.
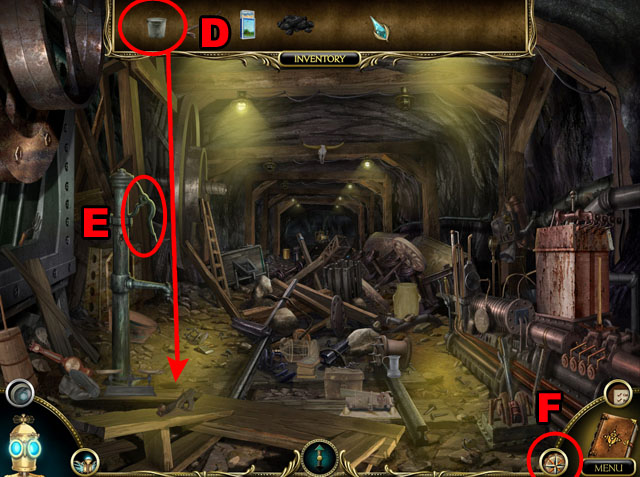
- Use the PAIL under the pump (D).
- Pump the pump to fill the pail and the handle will fall off (E).
- Take the PAIL again.
- Go to the next scene with the map to the left of the journal (F).
- Click on the Village Stream.


- This scene is scrollable to the left and right.
- Find the hidden objects in the scene.
- You will receive an IRON BAR and a LANTERN.
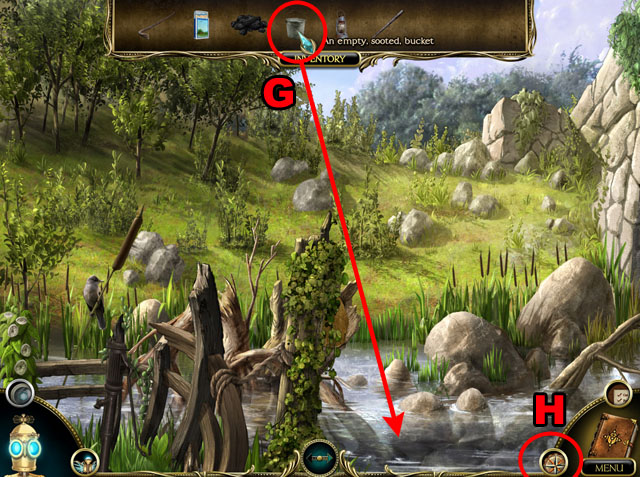
- Use the PAIL on the water in the middle of the scene (H) to get the PAIL WITH WATER.
- Return to the mines.

- Zoom in on the scene and use the METAL BAR on the control panel (I).
- Pull the levers and the bar until they look like the screenshot. This will unblock the train’s path.
- Enter the train (J).
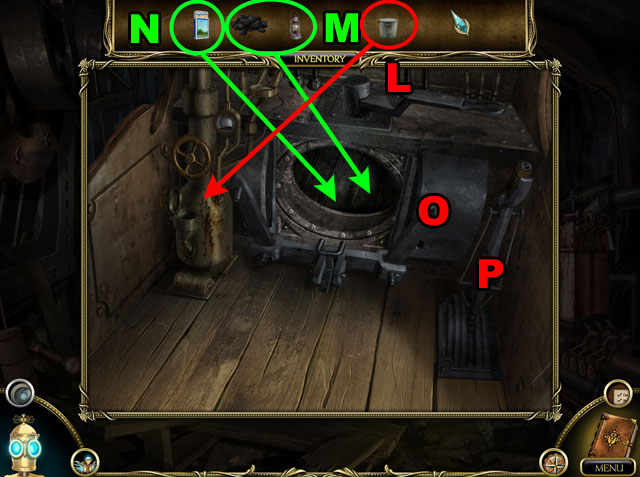
- Use the PAIL OF WATER on the water tank to the left (L).
- Use the COAL and then the LANTERN on the inside of the coal burner (M).
- Use the MATCHES to light the furnace (N).
- Close the doors (O).
- Pull the brake lever to take off (P).
Chapter 1: London, England
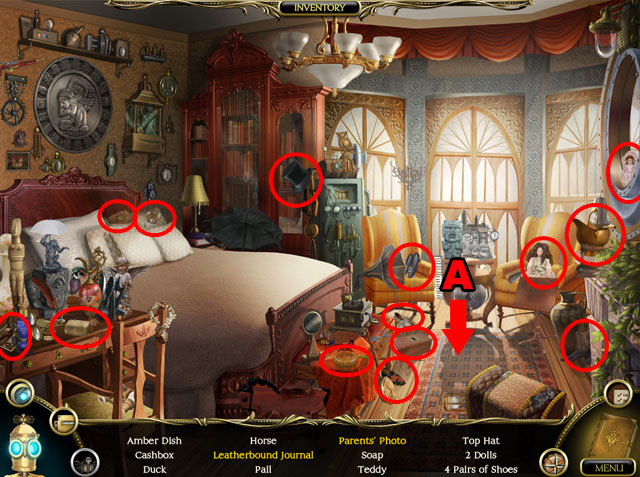
- Enter your Parents’ House on the map.
- Find all of the hidden objects.
- You will receive a journal and a photo in your journal.
- Click on the rug to see some loose floor boards.
- Use the map and go to your Parents’ Attic.
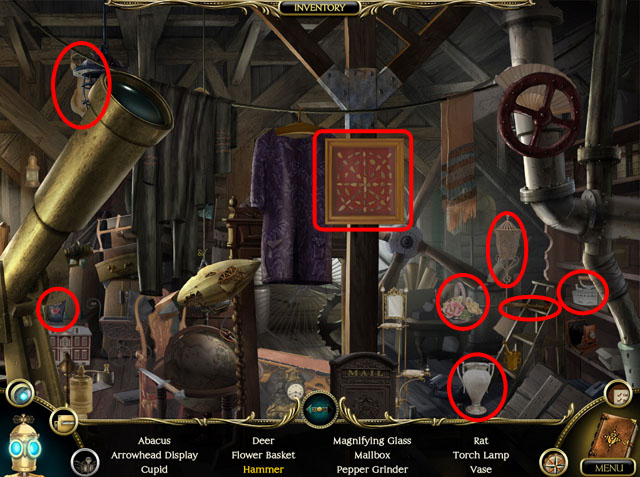
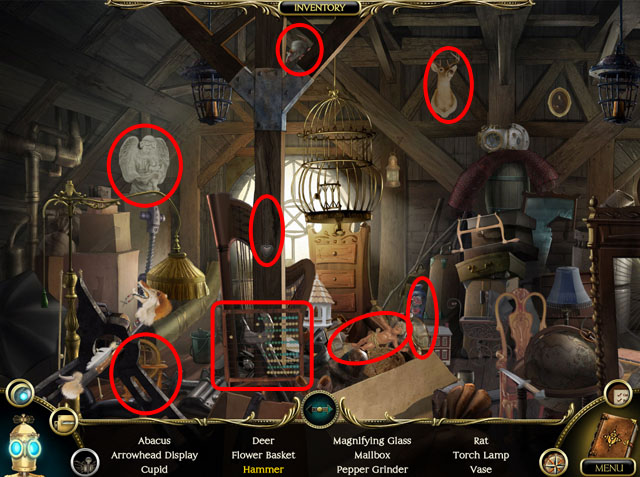
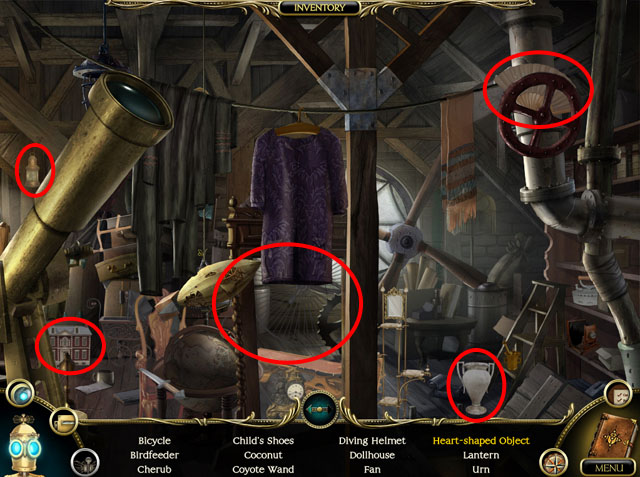
- This is a scrollable scene.
- Find all of the hidden objects.
- You will receive a HAMMER.
- Go back to your Parents’ House with the map and use the HAMMER on the boards under the rug.
- Click the treasure chest.
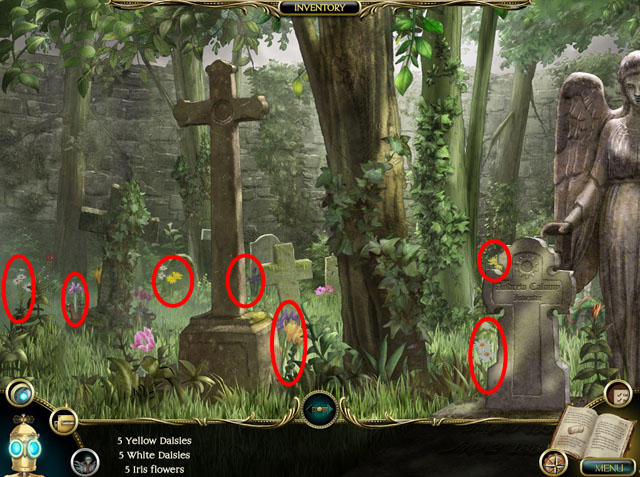
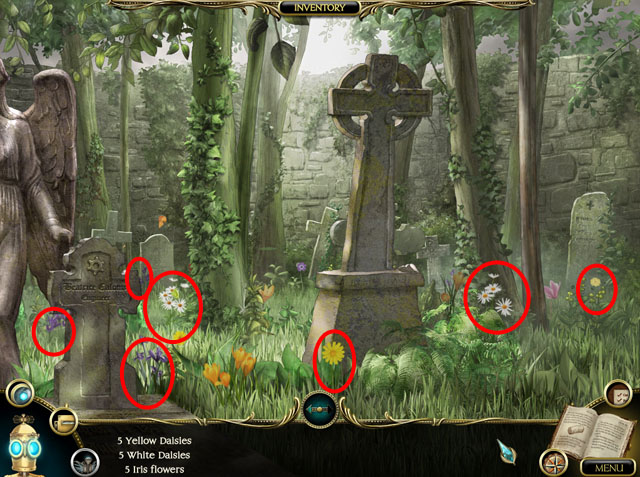
- Use the map to go to the Cemetery.
- This is a scrollable scene.
- Find all the hidden objects.
- You will receive a bunch of FLOWERS.

- Put the FLOWERS between the graves (B).
- Click on the left grave (C) then click on the 9 in the date on the grave (D).
- Solve the puzzle by clicking the buttons in the correct order so that all of them stay down (E).
- Then click the 9 to spin it so that it says 6 instead.
- Return to your Parents’ Attic with the map.
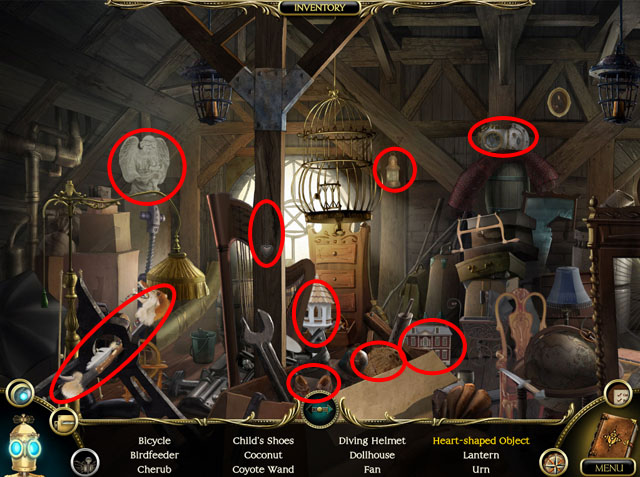
- Find the hidden objects.
- You will receive a HEART SHAPED OBJECT.
- Return to the Cemetery.
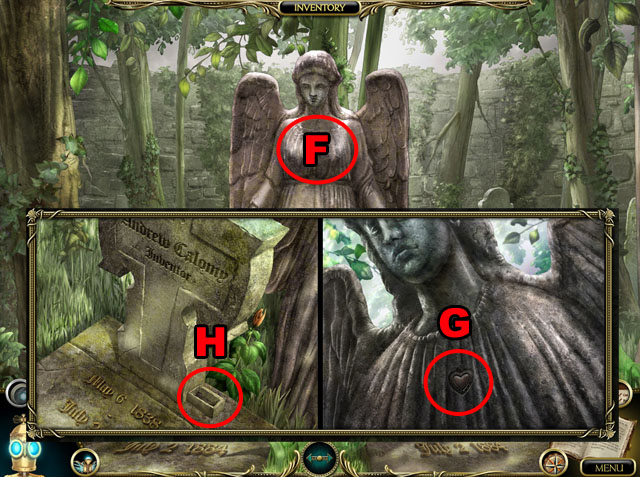
- Click on the statue in the middle (F).
- Use the HEART SHAPED OBJECT on the hole in its chest (G).
- Take the KEY from the other grave (H) when it pops out.
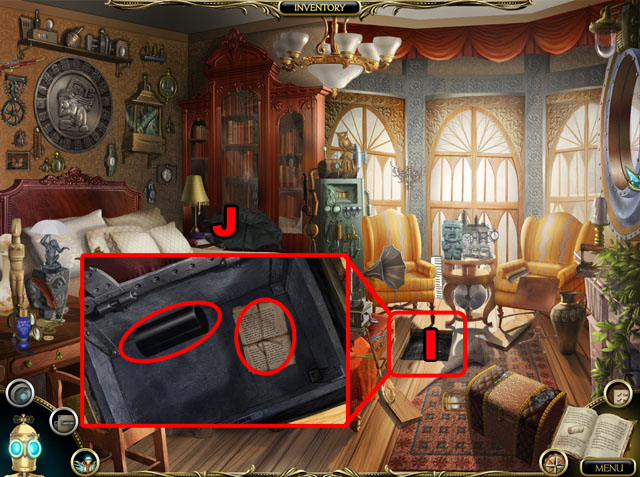
- Return to your Parents’ Bedroom.
- Use the KEY on the chest in the floor (I).
- Take the CYLINDER and the NOTES (J).
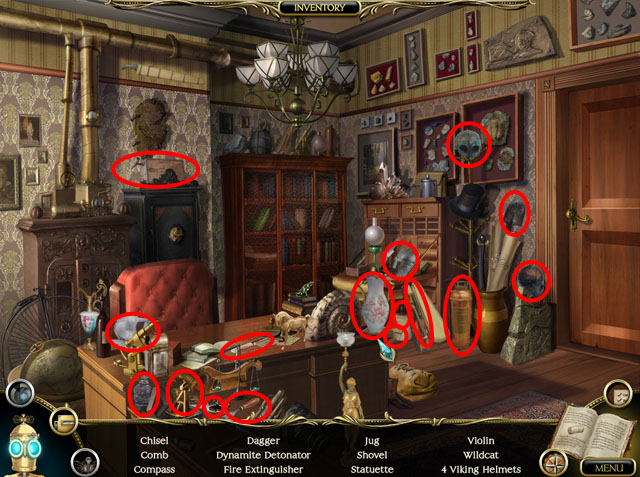
- Use the map to go to the Professor’s Office.
- Find all the hidden objects.
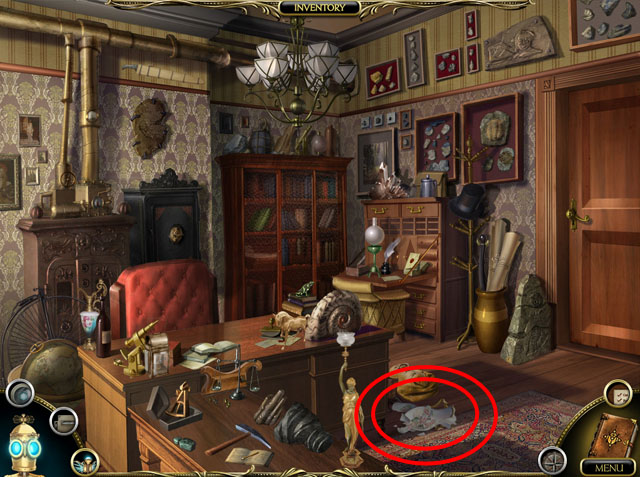
- Investigate the pieces of paper on the floor.
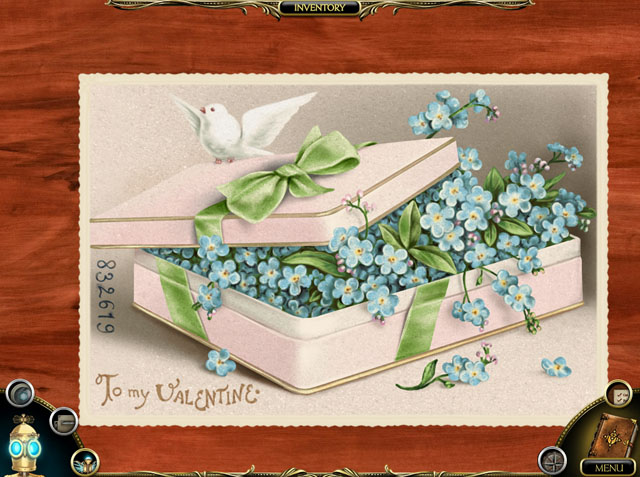
- Arrange the puzzle pieces to create a postcard.
- Click and drag a piece to move it around.
- Drop it near other matching pieces to stick them together.
- Use the edges of the puzzle at first to help you put it together.
- See the screenshot for the complete puzzle.
- You will receive the postcard once you put it back together.
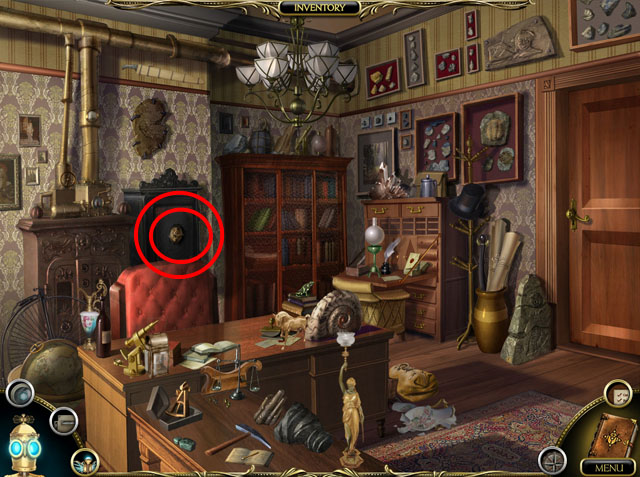
- Click on the safe in the background.
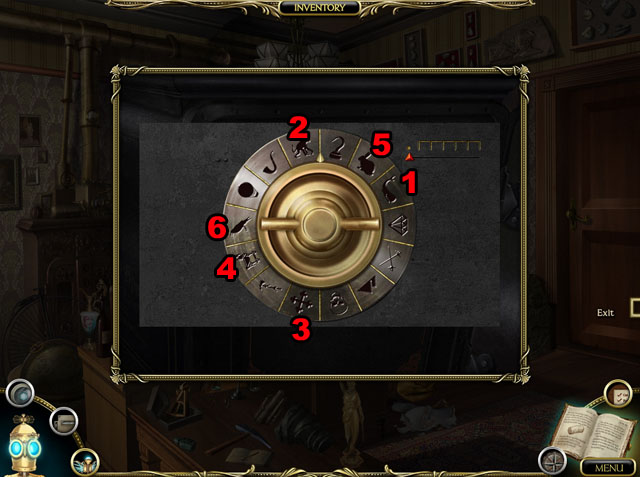
- The postcard in your journal should have all of the clues you need to finish this puzzle.
- There is a list of books and a number on the card.
- Use the numbers with the list of books to find out what symbols need to be turned to in the correct order to open the safe.
- The correct order is Whale, Monkey, Cross, Trojan horse, Rabbit and then Raven.
- Take the 3 OBSIDIAN SCROLLS and the letter.
Chapter 2: Ballyscath, Ireland
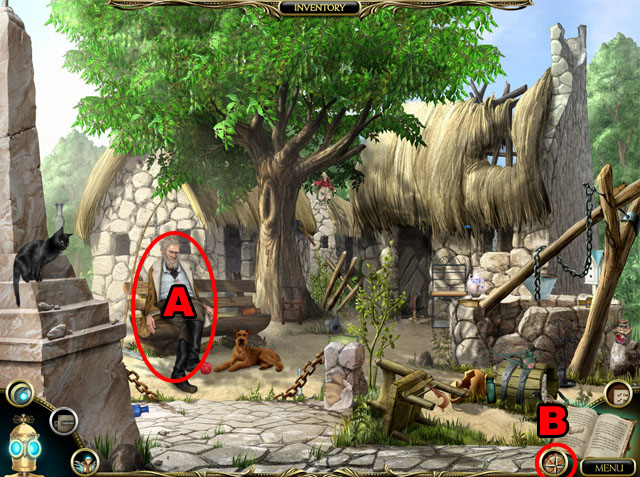
- Enter the Village Square.
- Click on the man sitting (A).
- Use the map (B) to go to Farmhouse.

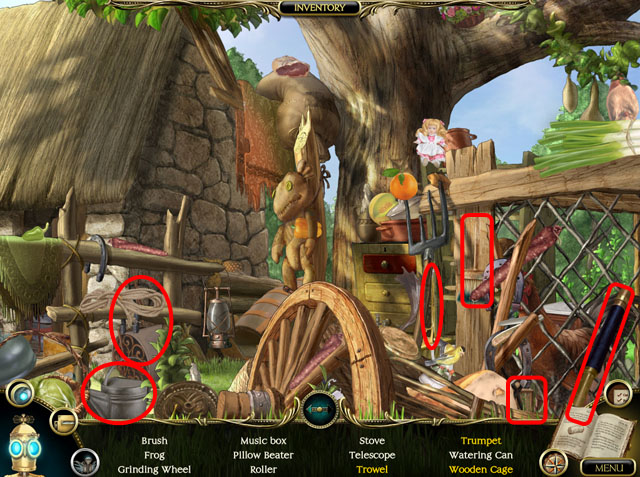
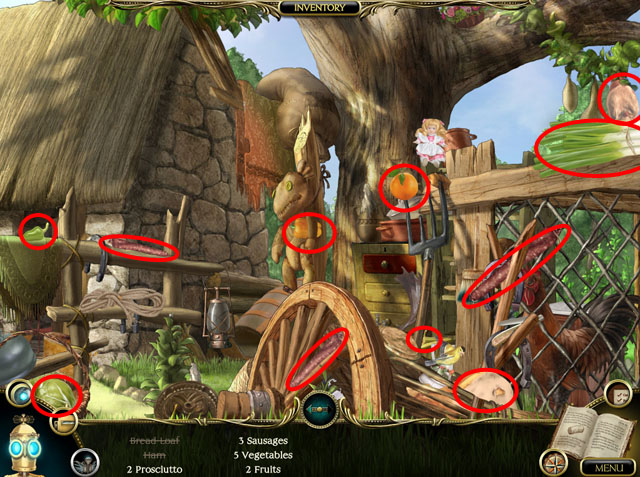
- This is a scrolling scene.
- Find all of the hidden objects.
- You will receive a WOODEN CAGE, a TROWEL and a TRUMPET.
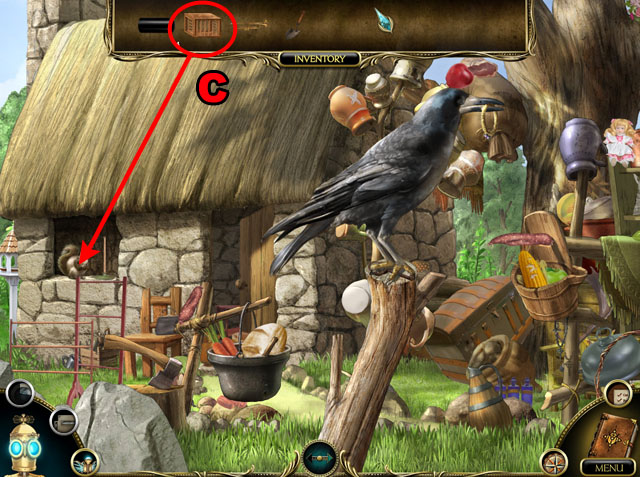
- Use the WOODEN CAGE on the squirrel (C). It will be placed in the scene.
- Travel to the Village Stream.
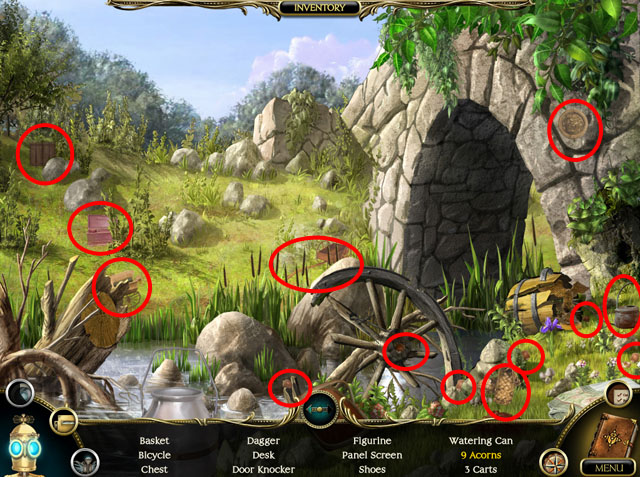
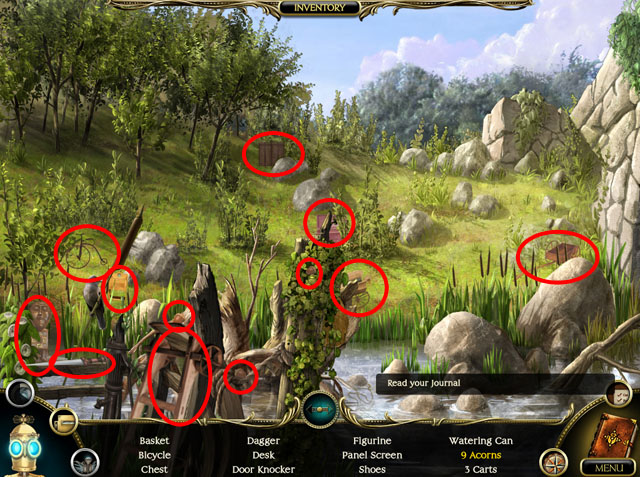
- This is a scrolling scene.
- Find all of the hidden objects.
- You will receive a PILE OF ACORNS.
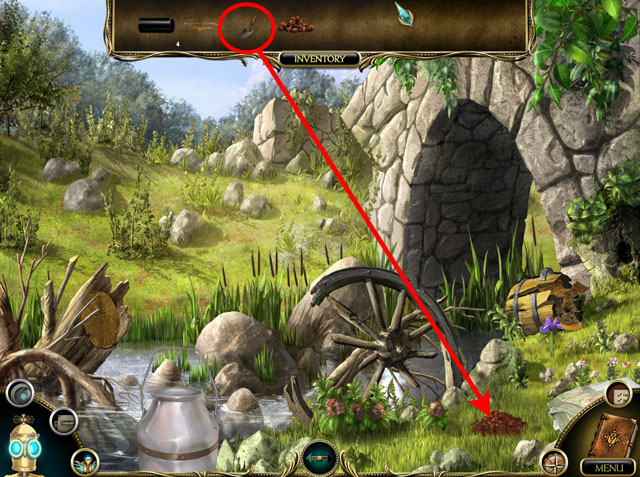
- Use the TROWEL on the dirt pile to the right.
- Collect the ANIMAL BONE.
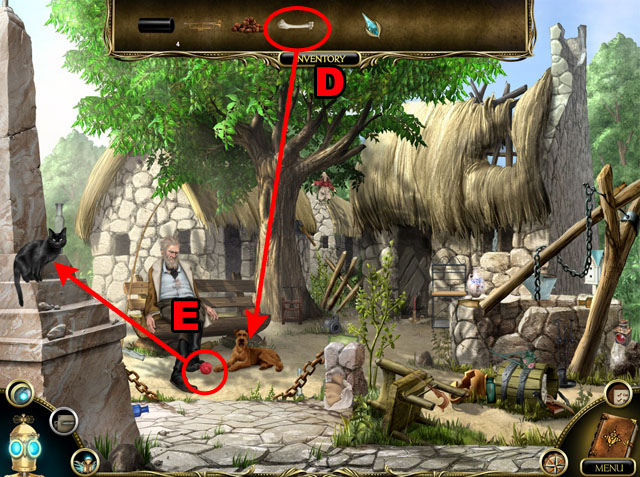
- Return to the Village Square.
- Use the ANIMAL BONE on the dog (D).
- Take the BALL OF YARN.
- Use the BALL OF YARN on the cat and receive the STRING (E).
- Take the WOODEN STICK from where the cat was.
- Go back to the Farmhouse.
- Use the STICK on the cage (1).
- Then use the STRING on the cage (2).
- Then use the ACORNS on the cage (3).
- Lastly, once the squirrel is inside the cage, pull the string to catch it (4).
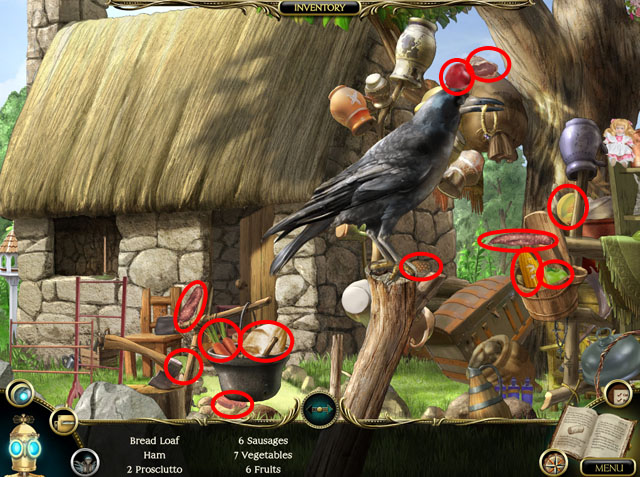
- Find all of the hidden objects.
- You will receive a CUP OF TEA.
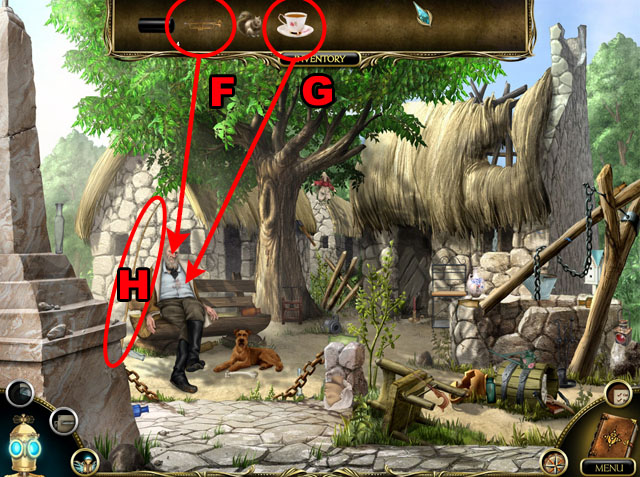
- Return to the Town Square.
- Use the TRUMPET on the sleeping man (F).
- Use the TEA on the man once he has awakened (G).
- Click on the fishing pole to start the next hidden object scene.

- Find all of the hidden objects.
- You will receive the FISHING POLE.
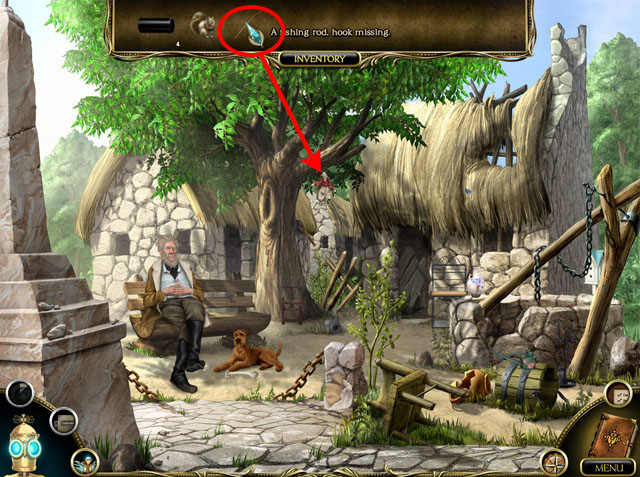
- Use the FISHING POLE on the tiny scarecrow in the tree.
- Take the TINY SCARECROW and go to the farmhouse.
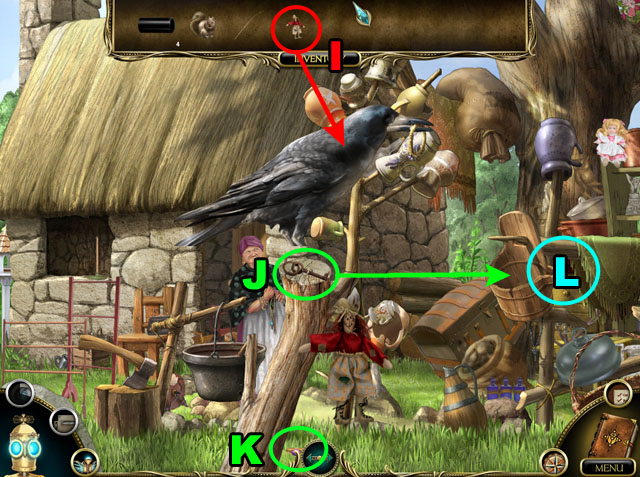
- Use the SCARECROW on the CROW (I).
- Take the RUSTED KEY from its roost (J).
- Take the RING that falls from its mouth off the ground (K).
- Use the RUSTED KEY on the drawer to the very right of the screen (L).
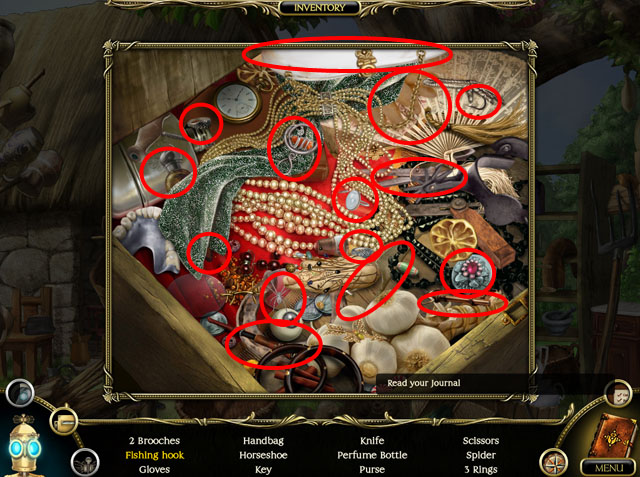
- Find all of the hidden objects inside the drawer.
- You will receive a FISH HOOK.
- Go to the stream scene again.
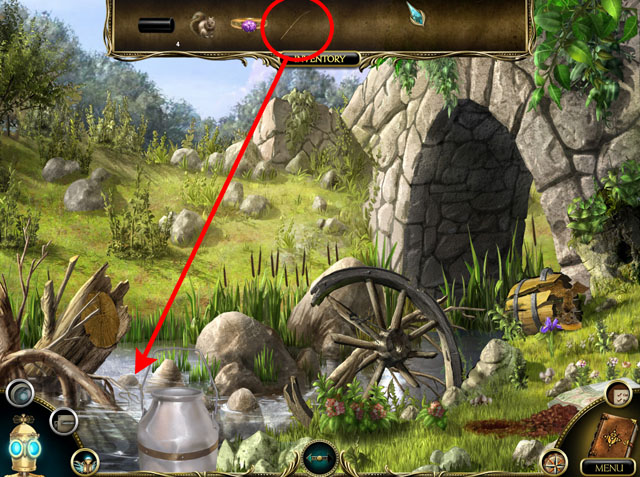
- Use the FISH HOOK on the FISHING POLE in your inventory.
- Use the FISHING POLE on the stream to get another OBSIDIAN CYLINDER.
- Go to the Town Square.
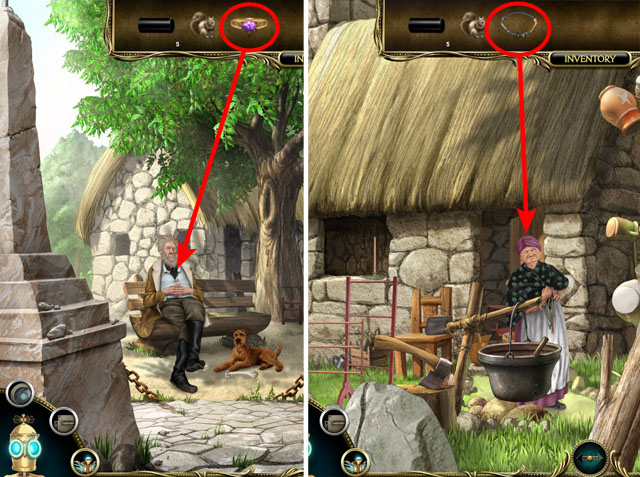
- Give the RING to the man sitting on the bench.
- You will receive MARTHA’S CHARM.
- Return to the Farmhouse.
- Give Martha her CHARM.
Chapter 3: Underground
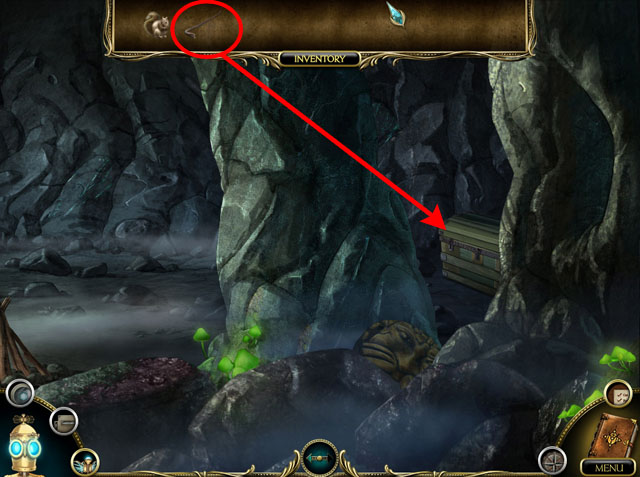
- This is a scrolling scene.
- Scroll all the way to the right and use the CROWBAR to open the chest.
- Look inside the chest.
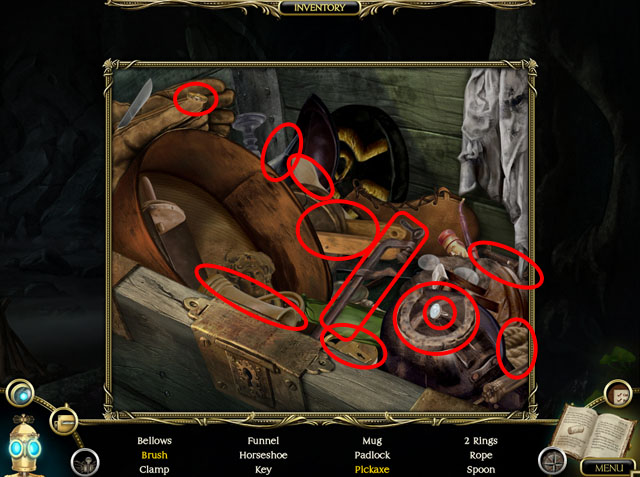
- Find all of the hidden objects.
- You will receive a BRUSH and a PICKAXE.
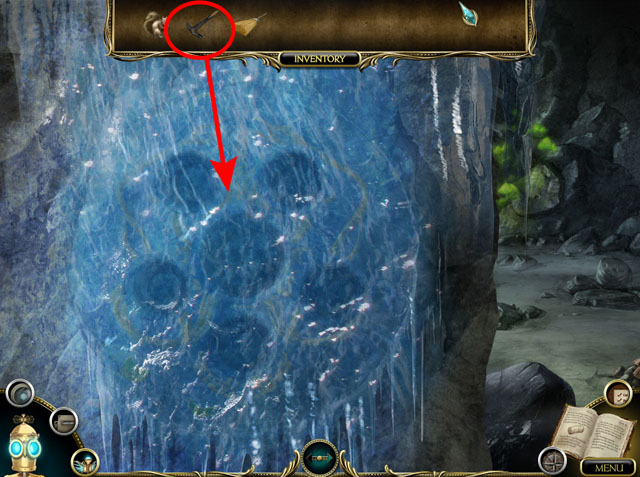
- Scroll all the way to the left.
- Use the PICKAXE on the ice multiple times to free the relief.
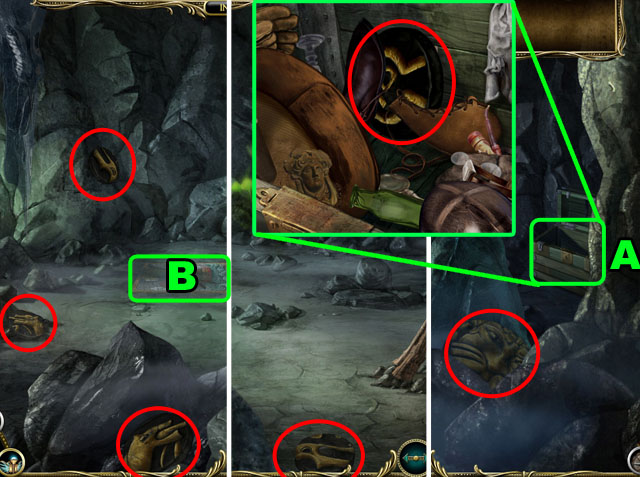
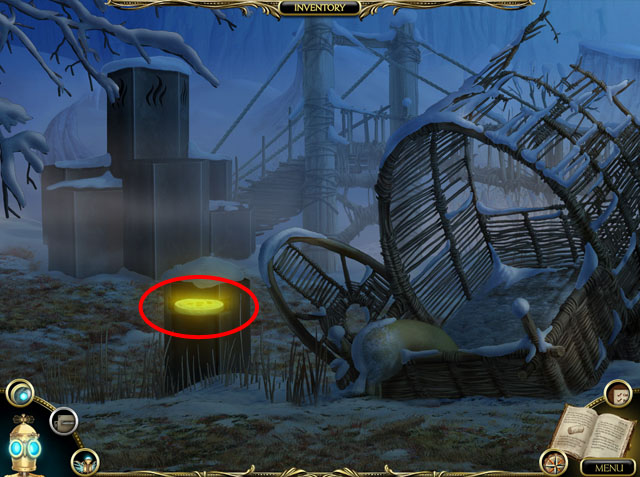
- Find all of the STONE DISKS circled in red in the scene.
- There is one STONE DISK in the chest as well (A). Read the note behind the disk.
- Look at the mosaic (B).
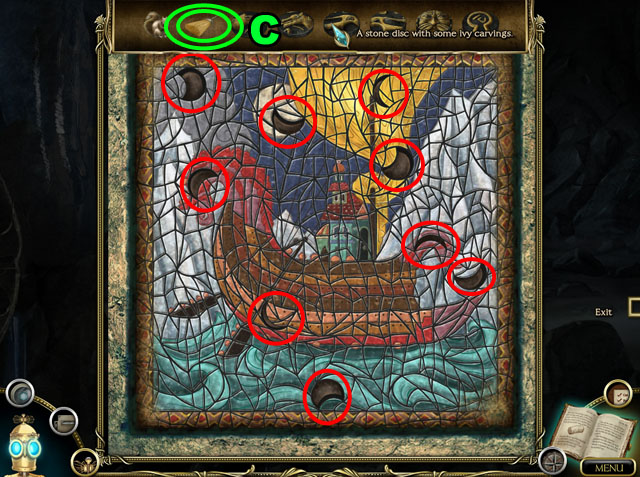
- Use the BRUSH multiple times to dust off the mosaic.
- Find all of the MOON SHAPES in the mosaic.
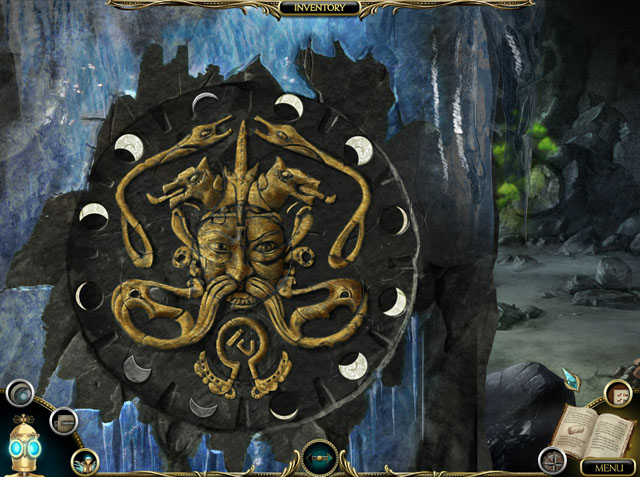
- Return to the relief on the left.
- Arrange the MOON SHAPES in the correct pattern around the edge of the puzzle.
- The correct order is small, medium, and then large in a repeating pattern.
- Start at the dark grey shapes, because they cannot be moved.
- After placing the moons you can place the large DISKS.
- Place them in the correct position and the click on the edge of the disk to rotate it.
- Clicking on the middle will pick it up again.
- See the screenshot for the correct solutions.
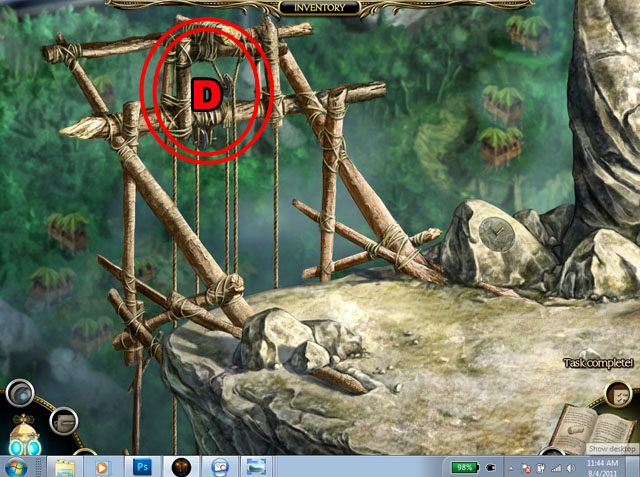
- Click on the winch to end the chapter (D).
Chapter 4: The Lost World
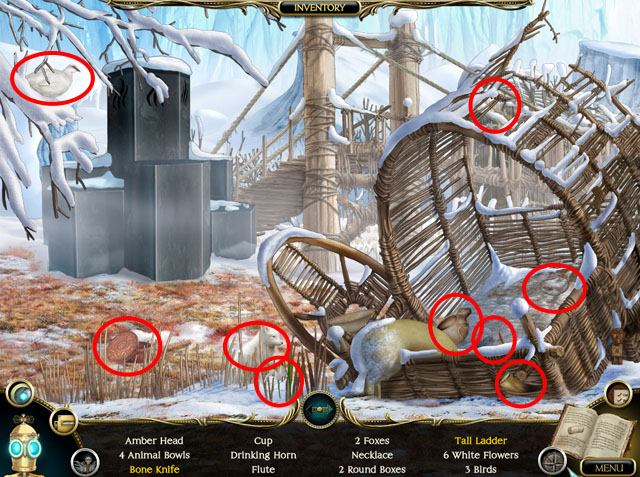
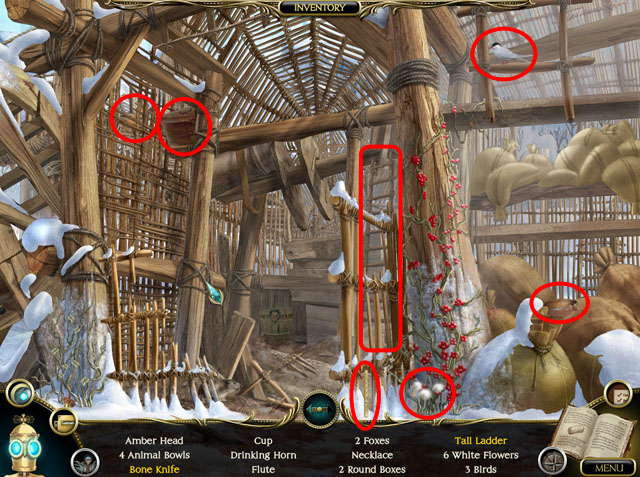
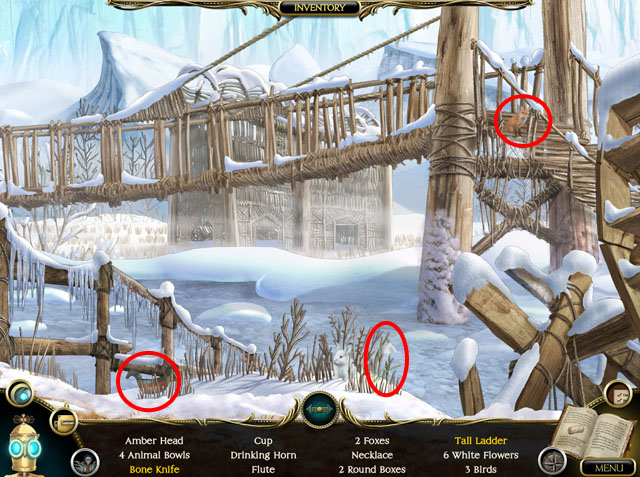
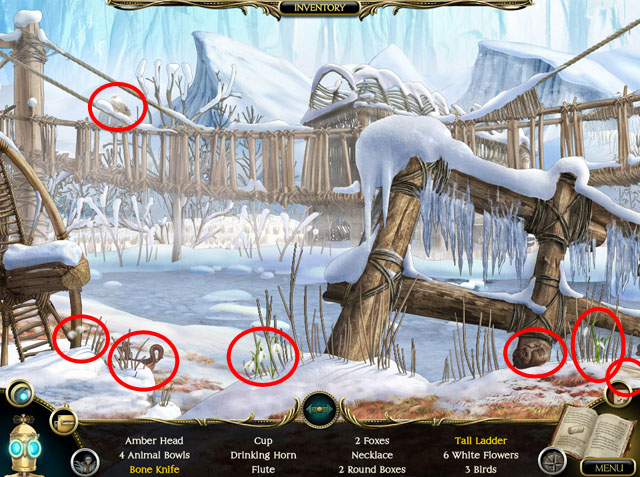
- This is a scrolling scene.
- Find all of the hidden objects.
- You will find a BONE KNIFE and a LADDER.
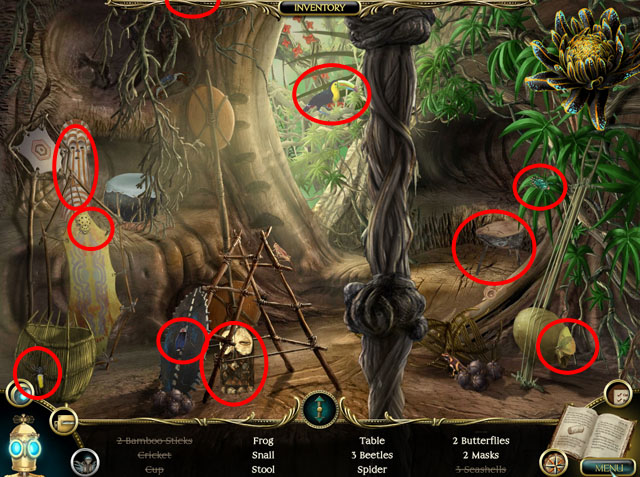
- Go to the Forest area.
- This is a zoomable scene.
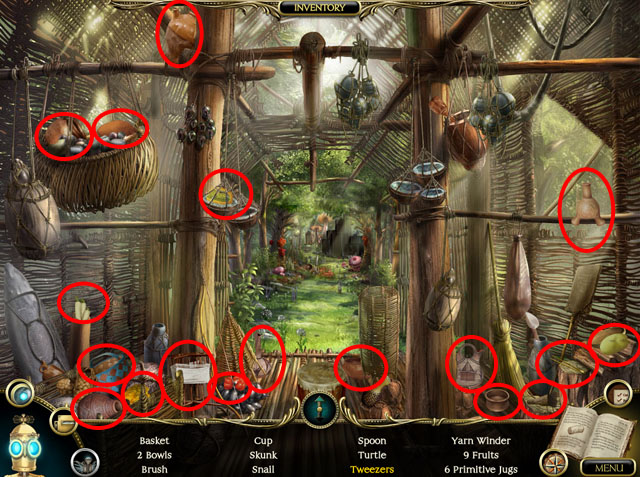
- Find all of the hidden objects.
- You will receive WOODEN TWEEZERS.
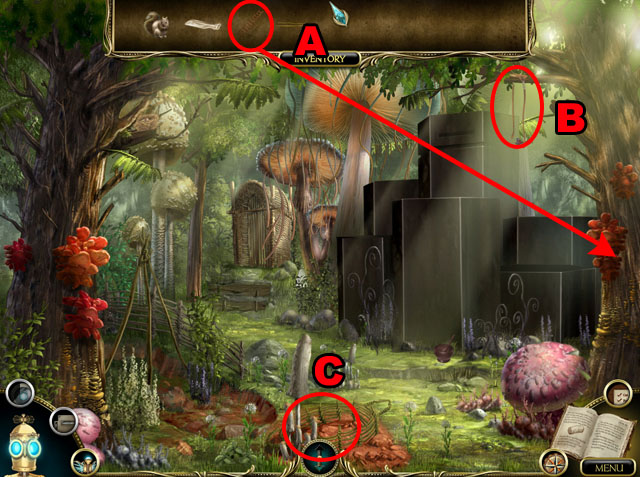
- Zoom in and use the LADDER on the tree to the right (A).
- Take the SLINGSHOT from the top of the tree (B).
- Take the MUD from the ground (C).
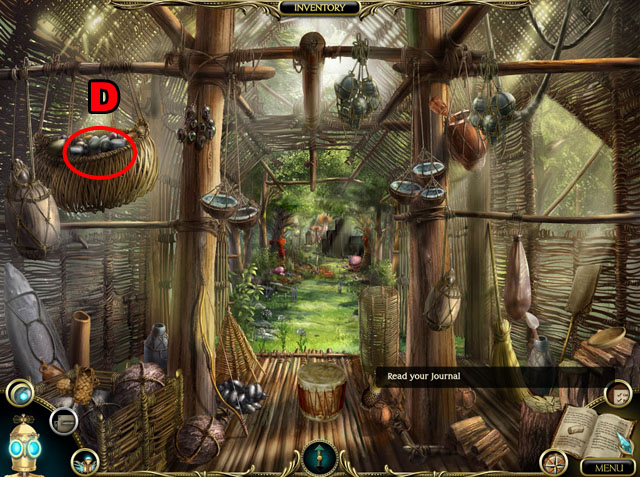
- Zoom out and take the STONES from the basket (D).
- Go to the desert area using the map.
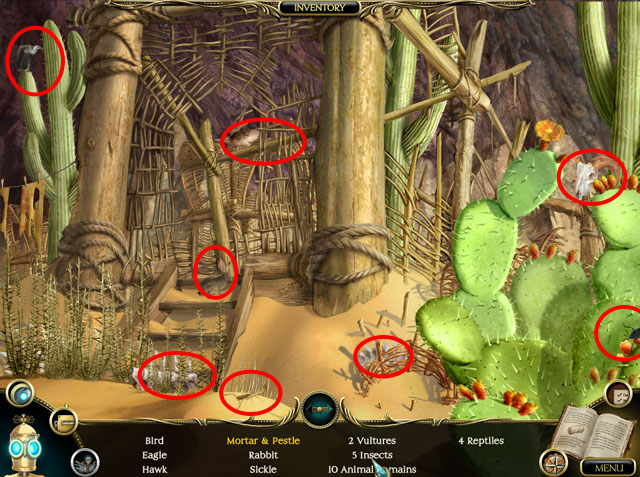
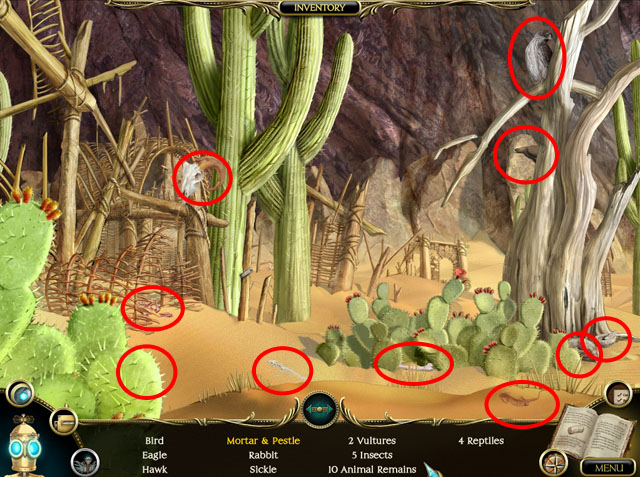
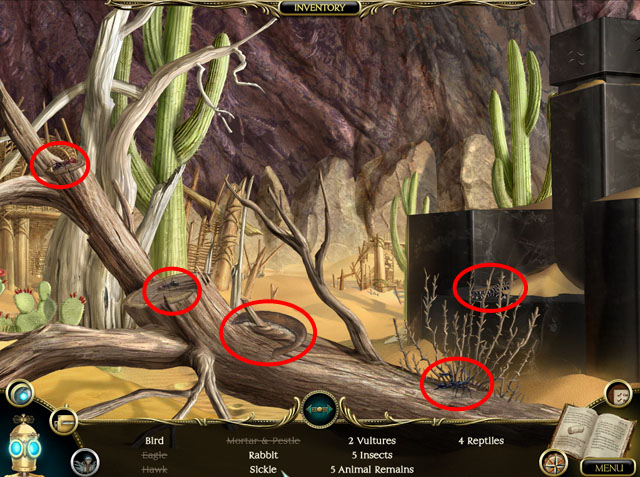
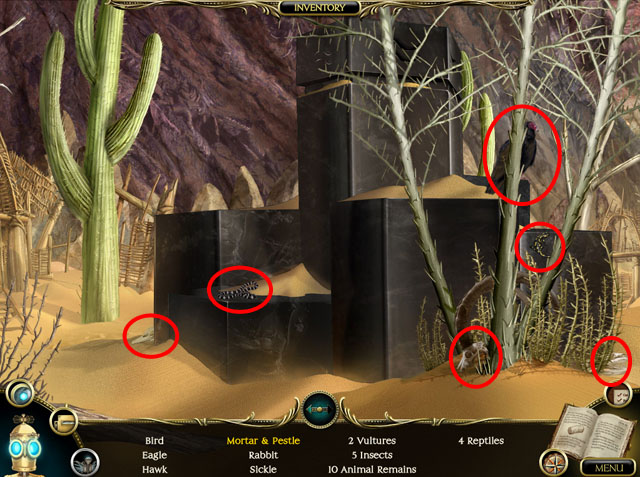
- This is a scrolling scene.
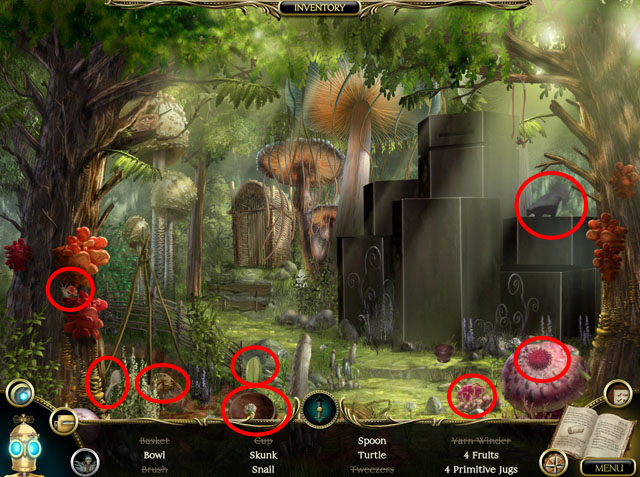
- Find all of the hidden objects.
- You will receive a MORTAR and PESTAL.
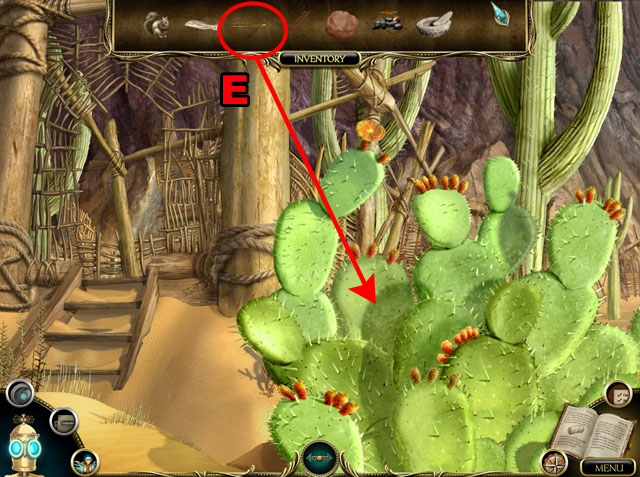
- Use the TWEEZERS on the cactus to collect its NEEDLES (E).
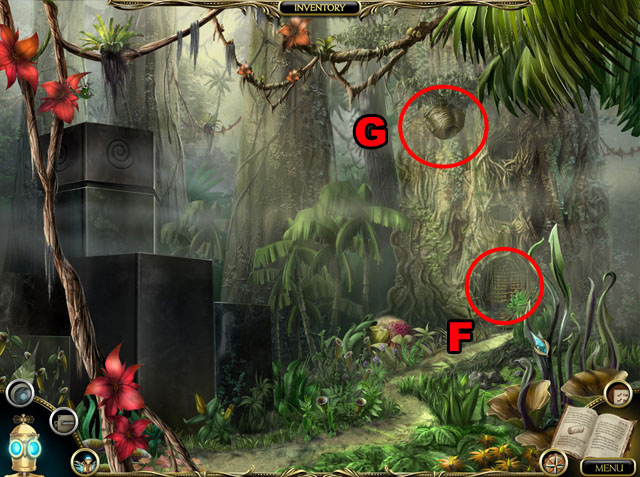
- Travel to the Rainforest area.
- Click on the door (F).
- Use the SLINGSHOT on the beehive (G).
- Enter the door.
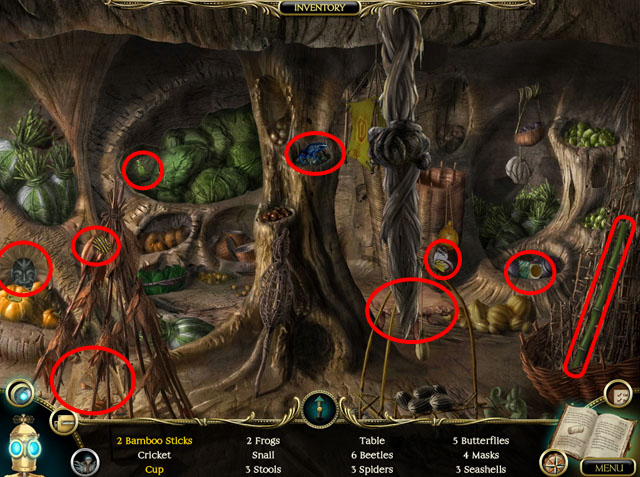
- This is a scrollable scene only vertical instead of horizontal.
- Find all of the hidden objects.
- You will receive BAMBOO POLES and a DRINKING CUP.

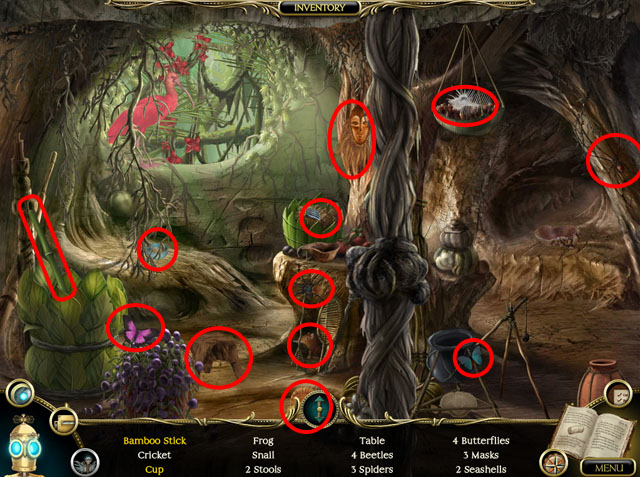
- Scroll to the very top of the screen.
- Use the BONE KNIFE (H) on the STRANGE PLANT to collect it (I).
- Use the STRANGE PLANT on the MORTAR AND PESTAL to get the poison (J).
- Cut the BAMBOO POLES (K) with the KNIFE.
- Use the MUD (L) on the NEEDLES (M).
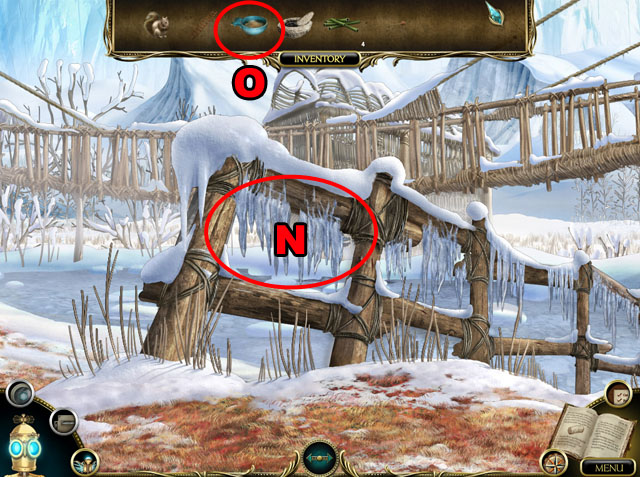
- Return to the Tundra.
- Use the CUP (O) on the ICICLES (N) to collect them.
- Go to the Desert.
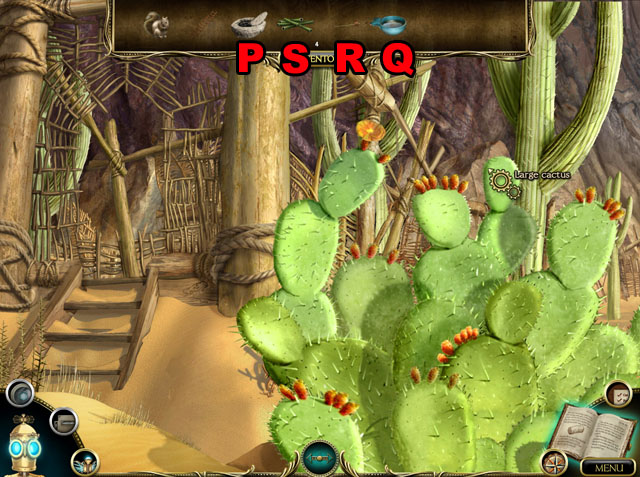
- When you enter the Desert the ICICLES will turn into WATER.
- Use the WATER CUP (Q) on the MORTAR AND PESTLE (P).
- Use the DARTS (R) on the MOTAR AND PESTLE.
- Use the DARTS on the BLOWGUNS (S) made from bamboo.
- Go back to the tundra.
Chapter 5: Total Eclipse
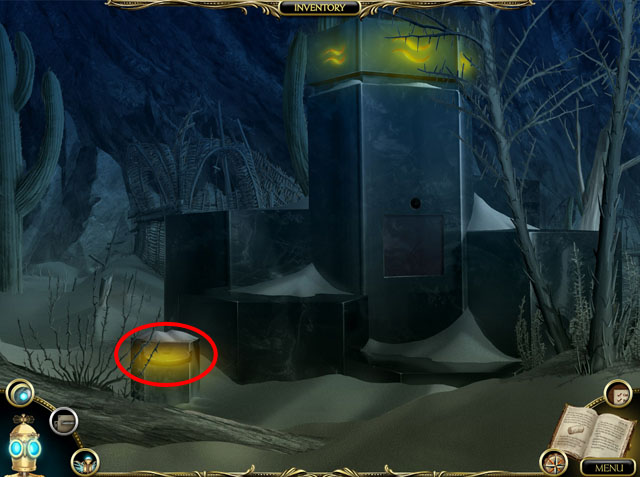
- Travel to the Desert.
- Take the DISK.
- Travel to the Tundra.
- Take the DISK.
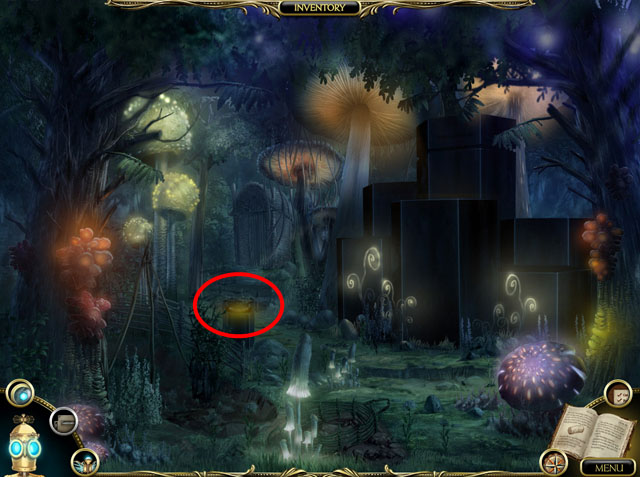
- Travel to the Woodland.
- Take the DISK.
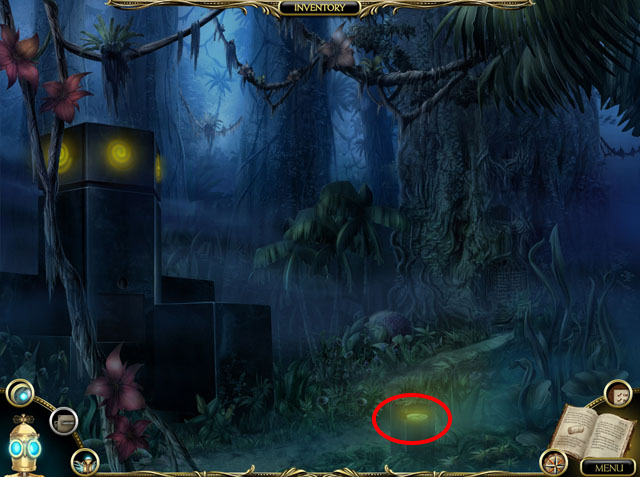
- Travel to the Jungle.
- Take the DISK.
- Travel to the Overlook.
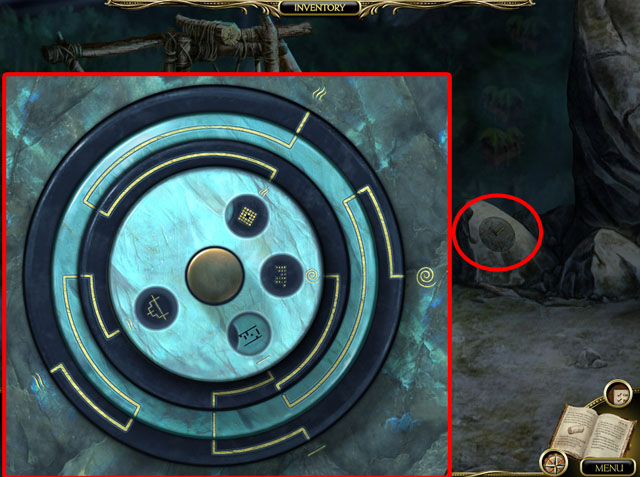
- Click on the stone outcropping.
- Use the 4 DISKS on the puzzle.
- To solve this puzzle you must connect the symbols from the outside ring to those on the inside ring with lines.
- All the symbols must connect and there cannot be any dead ends.
- Start from the outside and line up the lines with the symbols. There should only be one way this lines up correctly.
- Then work in from there to the rings on the inside. There is only one answer.
- See the screenshot for the correct positions.
- Travel to the Jungle.
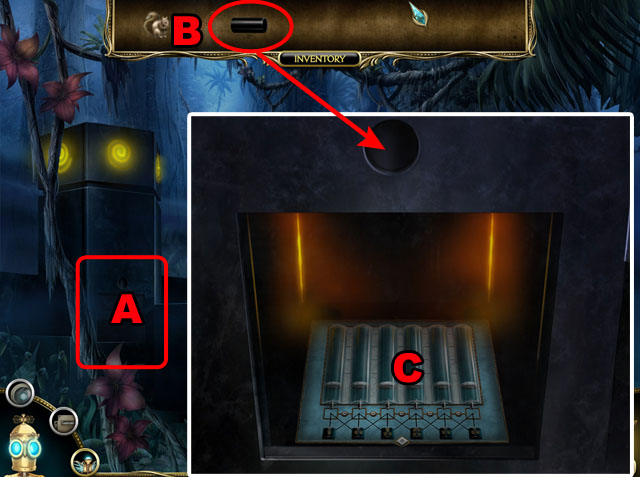
- Inspect the panel (A).
- Use the CYLINDER on the top of the panel to open it (B).
- Click on the panel (C).
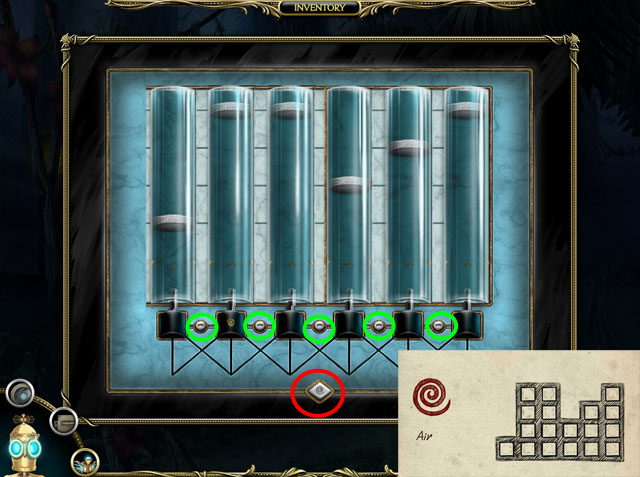
- Click on the air sign circled in red to start the air blowing.
- In your parent’s notebook there is the solution to this puzzle, by the air glyph.
- Click on the areas circled in green to switch the height of the two columns on either side.
- Match the columns with the heights in the drawing.
- See the screenshot for the final solution.
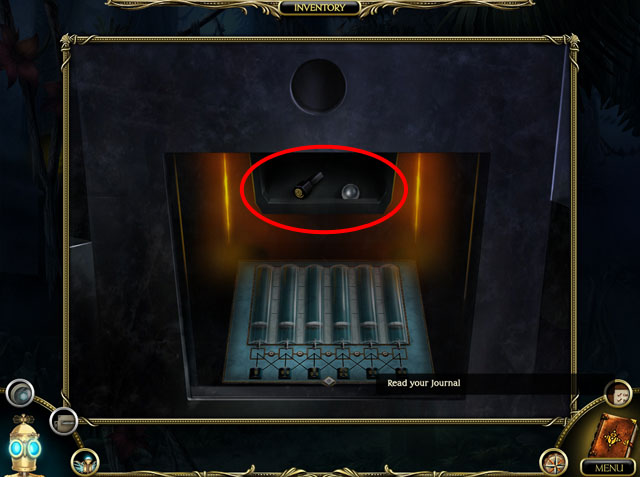
- Take the AIR SYMBOL and the METAL SPHERE.
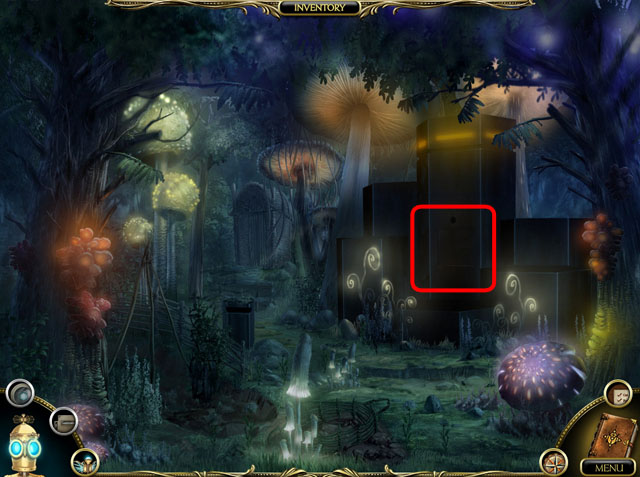
- Travel to the Woodland.
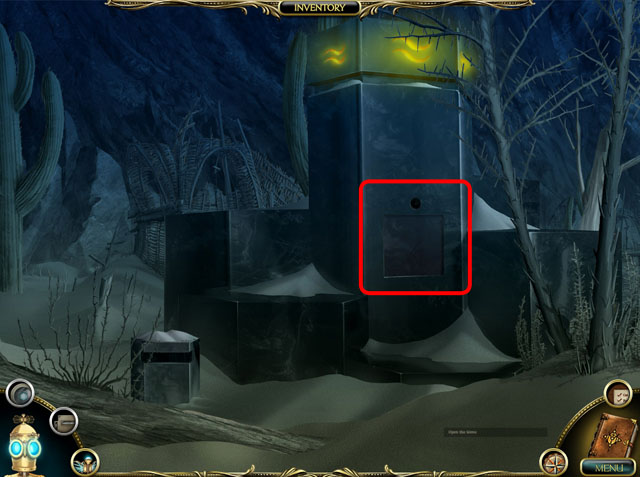
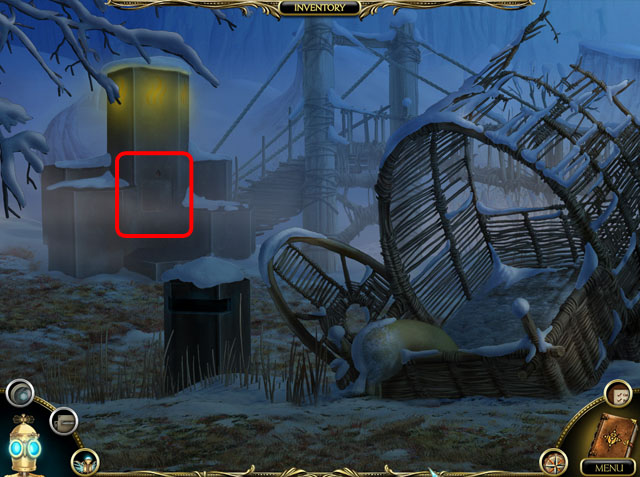
- Inspect the panel.
- Use the CYLINDER on the hole above the panel then click on the panel.
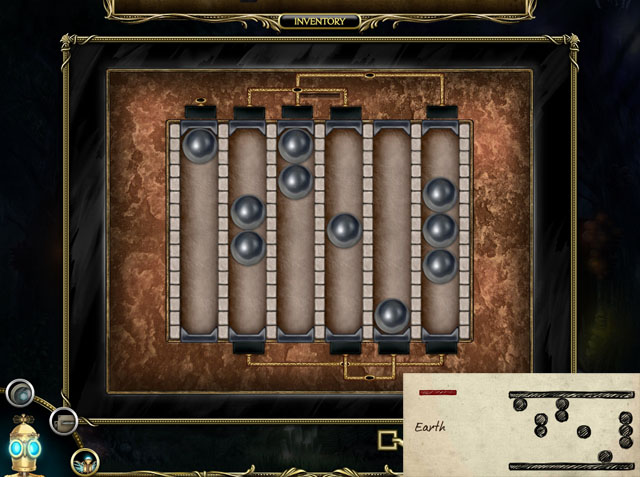
- This is the earth contraption. Use the notes from your parent’s book to solve it.
- Use the METAL SPHERE on the contraption to add one more sphere.
- Click the spheres to pick them up and place them so that the number of spheres in each column matches the notes from your parents.
- Next use magnets to change the location of the spheres in the column.
- A magnet on the bottom top will make the spheres travel to the top.
- A magnet on both sides will make them stop in the middle.
- A magnet on the bottom or no magnet will make them stay on the bottom.
- Arrange the magnets so that the spheres match the positions on the note.
- See the screenshot for the correct solution.
- Take the EARTH SYMBOL from the panel once finished.
- Travel to the Desert.
- Inspect the panel.
- Use the CYLINDER on the hole above the panel then click on the panel.
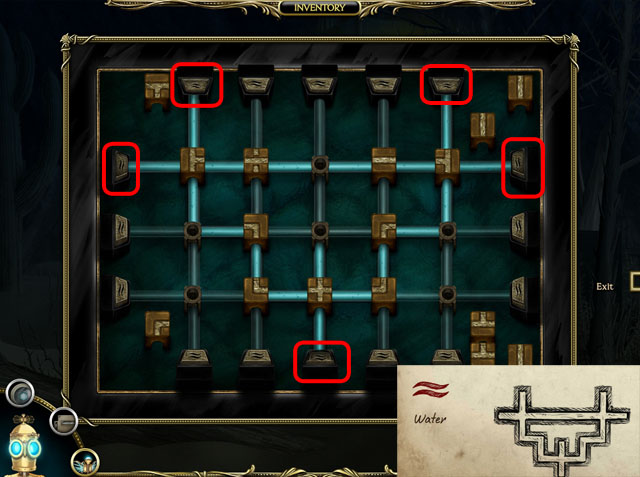
- This is the water contraption. Use the notes from your parent’s book to solve it.
- Click on the buttons with the water symbols on them to send water into the middle.
- If there is no tile in the junctions, the water will stop there.
- If there is a tile with an opening where the water is coming from the water will travel through the tile.
- Line up the tiles in a way that it will draw the pattern in your parent’s notes.
- Use the tiles like in the screenshot and click the button circled in red to finish the puzzle.
- Take the GLASS PIECE and the WATER SYMBOL.
- Travel to the Tundra.
- Inspect the panel.
- Use the CYLINDER on the hole above the panel then click on the panel.
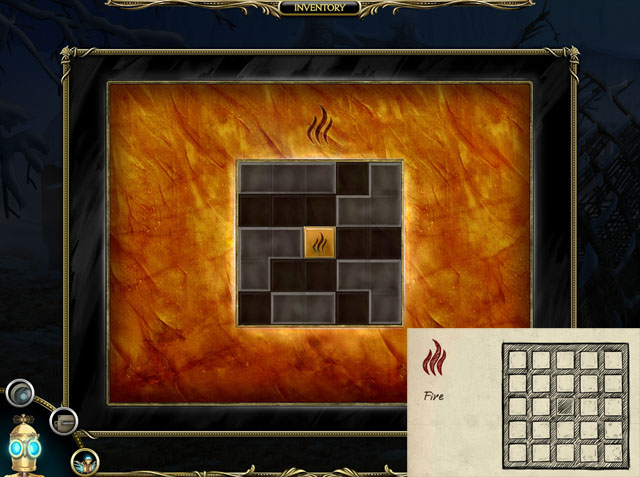
- This is the fire contraption. Use the notes from your parent’s book to solve it.
- Use the GLASS PIECE on the puzzle to start.
- When a glass piece is placed on the board it will glow brightly and the squares touching it will glow faintly.
- If two pieces are next to a space it will glow brightly.
- Make all of the squares except for the middle one glow brightly to finish the puzzle.
- See the screenshot for the answer.
- Take the FIRE SYMBOL once finished.
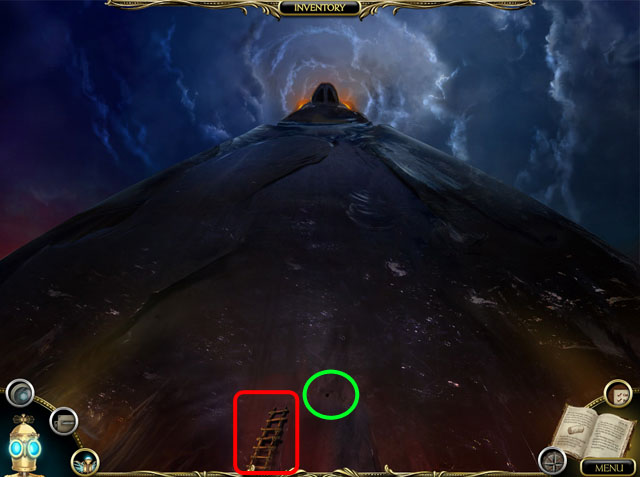
- After the cut scene use the LADDER under the small hole.
- Click the hole to inspect it.
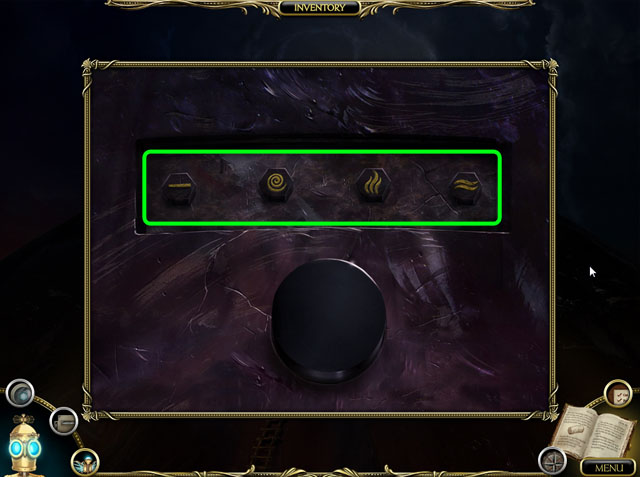
- Place the SYMBOLS from your inventory in the correct order to finish the last puzzle.
- The order is hinted at in the text of the large note you found much earlier.
- The correct order is EARTH, AIR, FIRE then WATER.
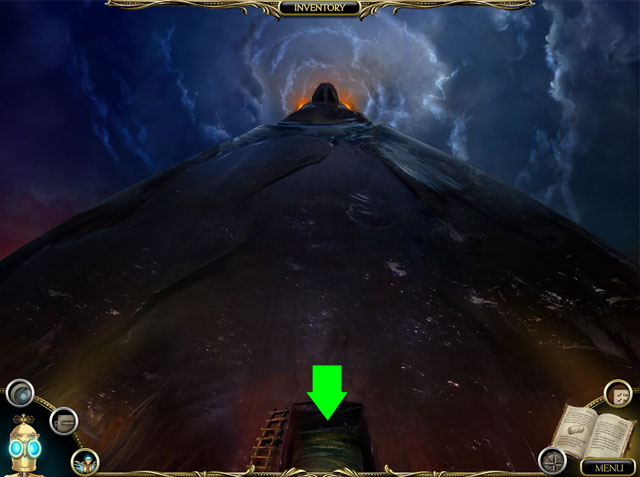
- Enter the building and then click on the stairs on the inside.
- Congratulations you have finished The Clockwork Man – The Hidden World!
Created at: 2011-08-17