

Walkthrough Menu
- General Tips
- Chapter 1: The House of Dr. Magnus
- Chapter 2: Nothing Town
- Chapter 3: The Graveyard
- Chapter 4: The Summer House
- Chapter 5: The Castle
- Golden Eye of Horus Locations
General Tips
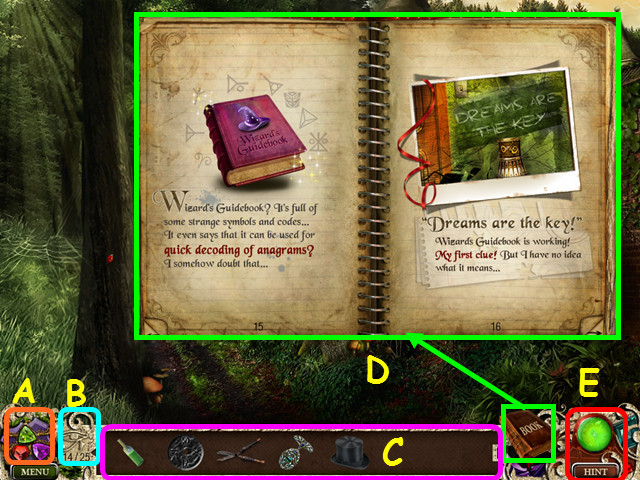 • Select the Jewels to see your achievements (A). • The count
shows the number of Golden Eye of Horus you have located (B).
• Your inventory (C) is located in the lower panel – select an
item to use it. • Read your Book for important clues that you
have found (D). • Hints are unlimited, but you must wait for
the meter to refill (E). • Hidden Object Scenes and mini-games
are often randomized - your solution may vary. • Hidden Object
Scenes will be referred to as HOS in this walkthrough.
• Select the Jewels to see your achievements (A). • The count
shows the number of Golden Eye of Horus you have located (B).
• Your inventory (C) is located in the lower panel – select an
item to use it. • Read your Book for important clues that you
have found (D). • Hints are unlimited, but you must wait for
the meter to refill (E). • Hidden Object Scenes and mini-games
are often randomized - your solution may vary. • Hidden Object
Scenes will be referred to as HOS in this walkthrough.
Chapter 1: The House of Dr. Magnus
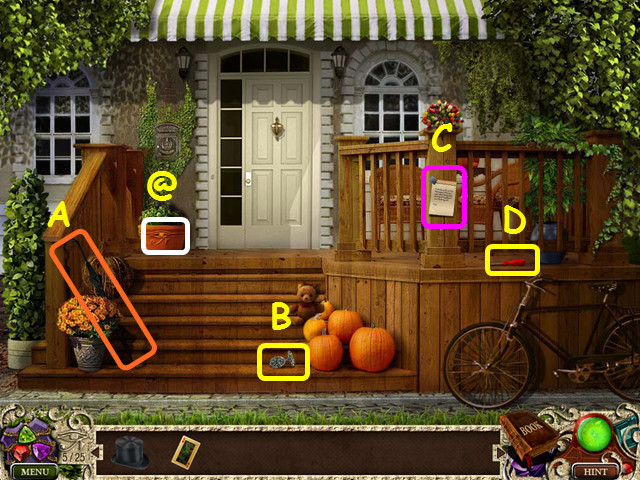
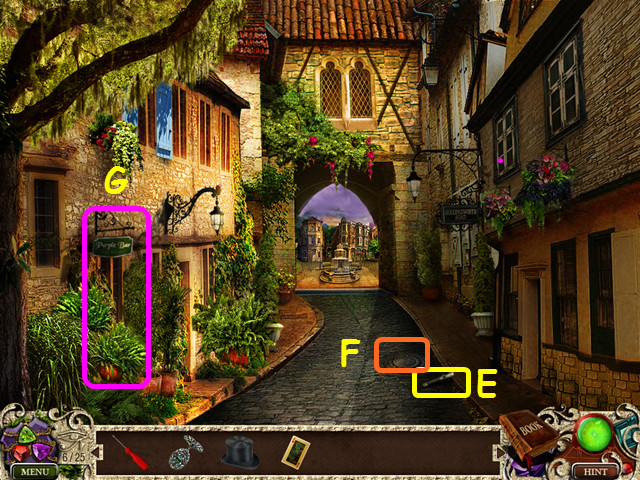
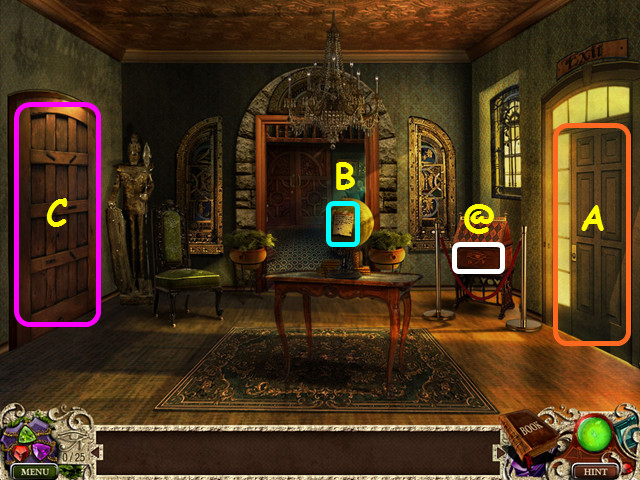 • You will have the option of a brief tutorial. • Note the
exit (A). • Read the note (B). • Take the 1/25 Golden Eye of
Horus (@). • Walk left to the kitchen (C).
• You will have the option of a brief tutorial. • Note the
exit (A). • Read the note (B). • Take the 1/25 Golden Eye of
Horus (@). • Walk left to the kitchen (C).
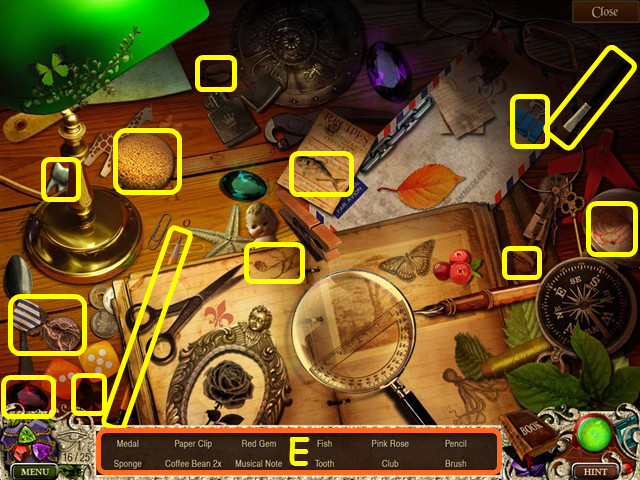
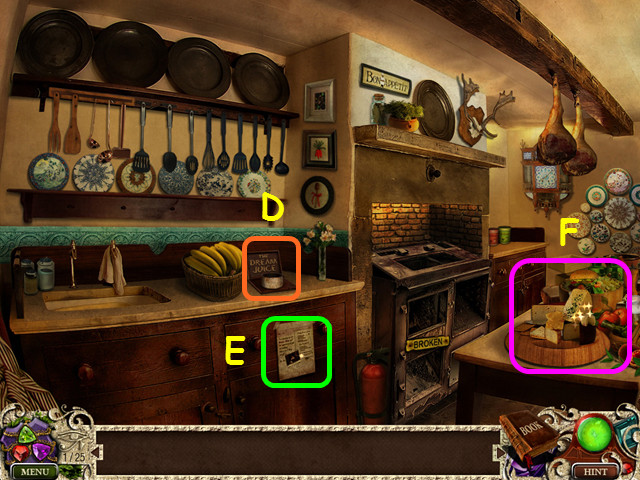 • Look at the Dream Juice stand (D). • Read the potion recipe
(E). • Select the table for a HOS (F).
• Look at the Dream Juice stand (D). • Read the potion recipe
(E). • Select the table for a HOS (F).
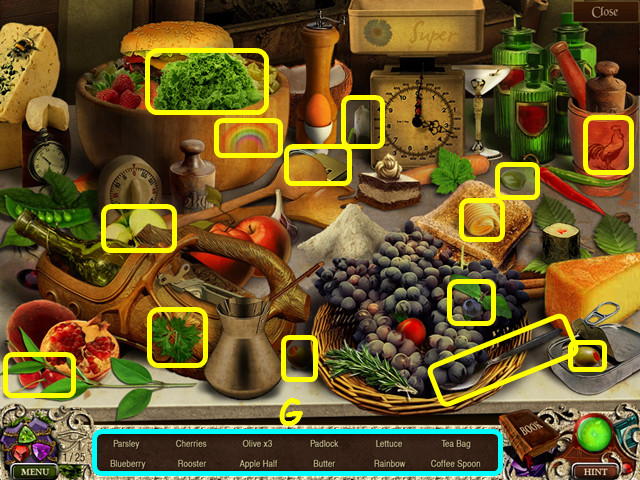 • Locate all the items on the list (G). • You will earn the
DRAWER KEY. • Walk to the right, then go forward.
• Locate all the items on the list (G). • You will earn the
DRAWER KEY. • Walk to the right, then go forward.
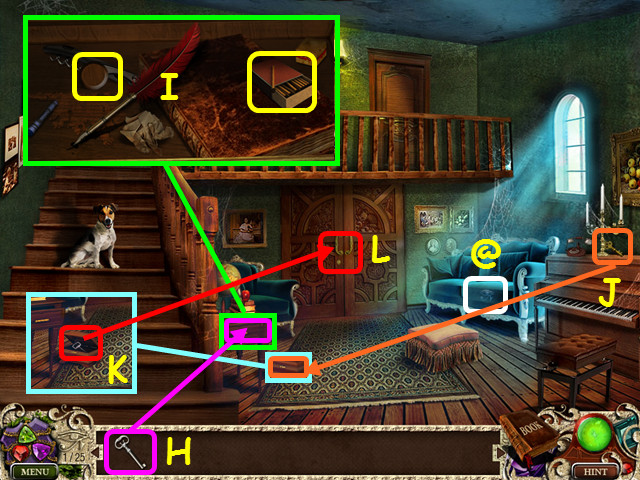 • Take the 2/25 Golden Eye of Horus (@). • Use the DRAWER KEY
on the drawer, then look inside (H). • Take the BUTTON and the
MATCHES (I). • Take the SMALL KEY (J). • Use the SMALL KEY on
the small chest then take the LIBRARY KEY (K). • Use the
LIBRARY KEY on the double doors, then walk forward (L).
• Take the 2/25 Golden Eye of Horus (@). • Use the DRAWER KEY
on the drawer, then look inside (H). • Take the BUTTON and the
MATCHES (I). • Take the SMALL KEY (J). • Use the SMALL KEY on
the small chest then take the LIBRARY KEY (K). • Use the
LIBRARY KEY on the double doors, then walk forward (L).
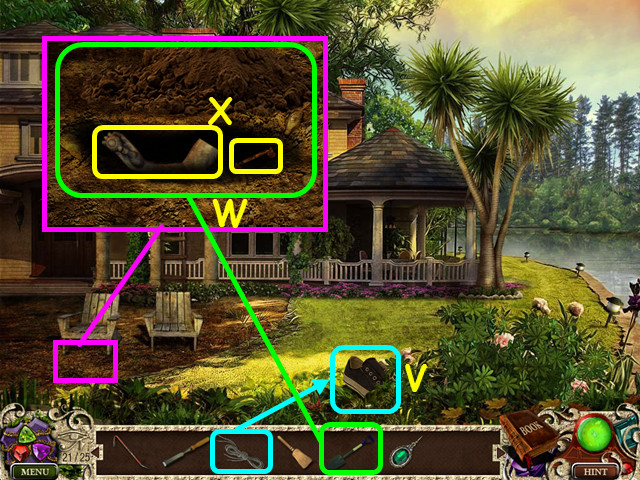
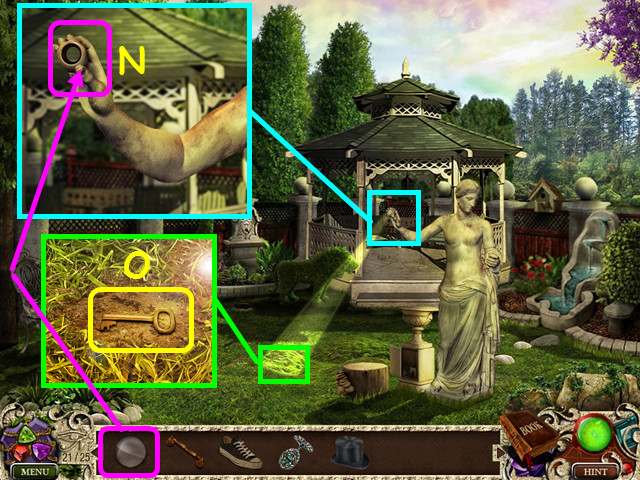
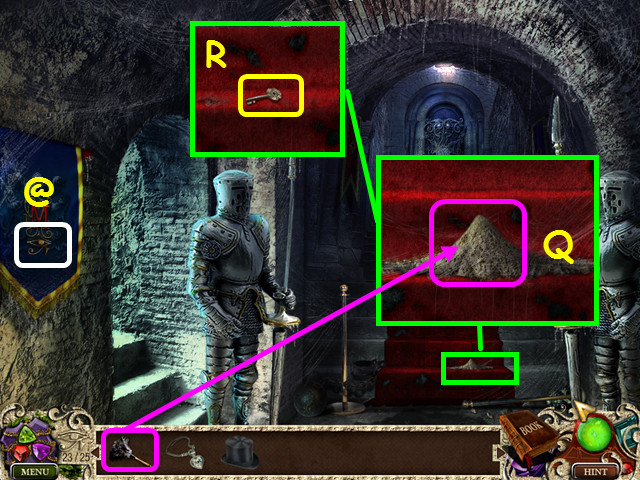
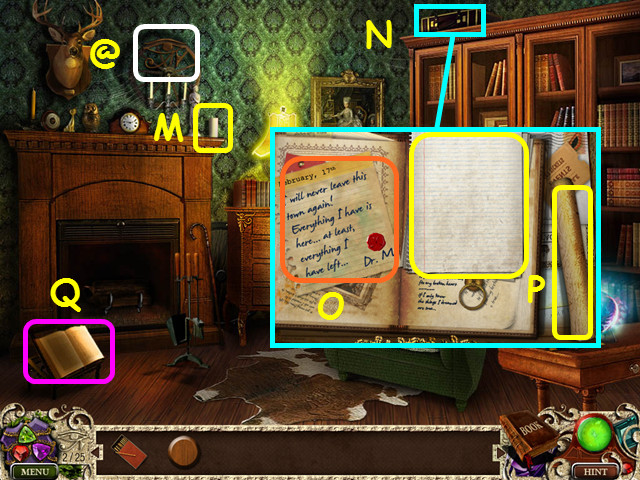 • Take the 3/25 Golden Eye of Horus (@). • Take the CANDLE
(M). • Look at the briefcase and open the clasp (N). • Read
the note (O ). • Take the PAPER and the HAMMER HANDLE (P). •
Read the spell book (Q).
• Take the 3/25 Golden Eye of Horus (@). • Take the CANDLE
(M). • Look at the briefcase and open the clasp (N). • Read
the note (O ). • Take the PAPER and the HAMMER HANDLE (P). •
Read the spell book (Q).
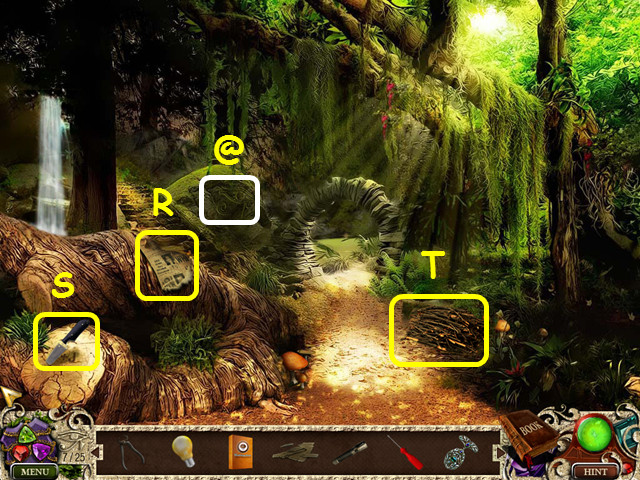
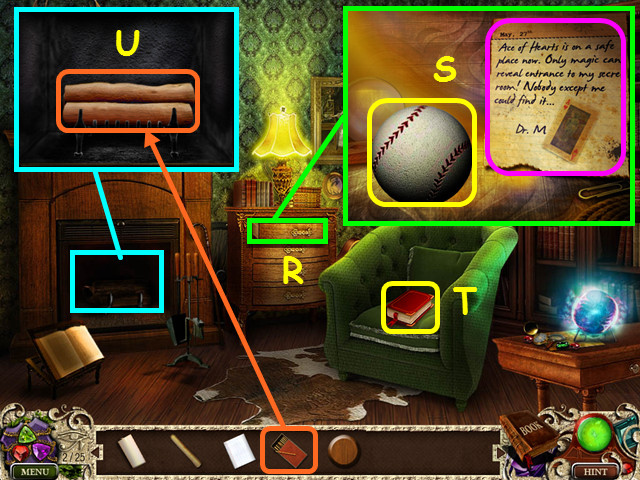 • Open the drawer and look inside (R). • Read the note and
take the BALL (S). • Take the RED BOOK (T). • Look at the
fireplace; use the MATCHES to light the logs (U). • Walk down
once.
• Open the drawer and look inside (R). • Read the note and
take the BALL (S). • Take the RED BOOK (T). • Look at the
fireplace; use the MATCHES to light the logs (U). • Walk down
once.
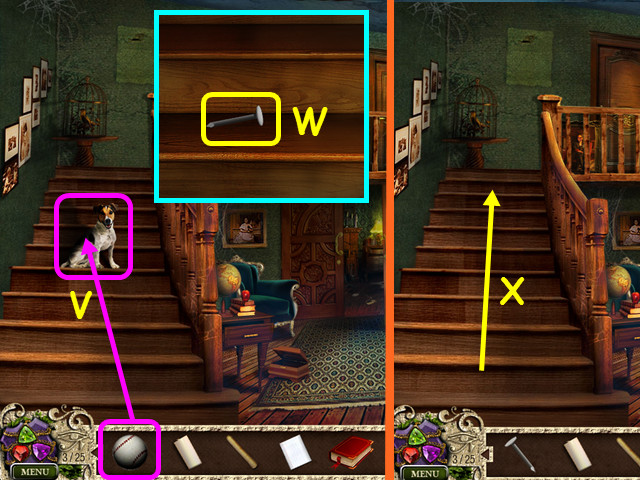 • Give the BALL to the dog (V). • Take the NAIL (W). • Walk up
the stairs (X).
• Give the BALL to the dog (V). • Take the NAIL (W). • Walk up
the stairs (X).
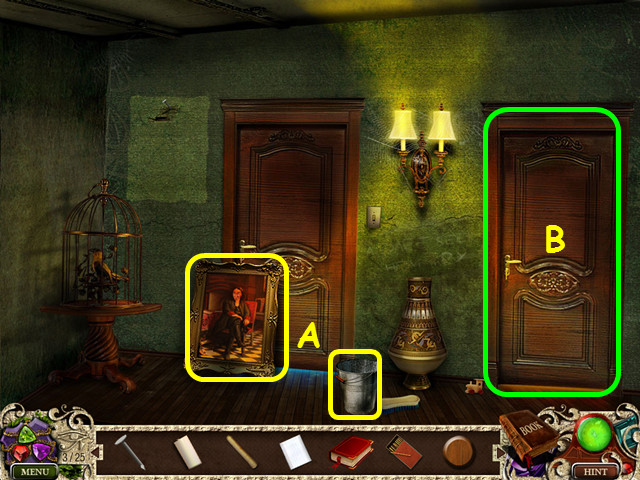 • Take the PAINTING and the BUCKET (A). • Enter the right door
(B).
• Take the PAINTING and the BUCKET (A). • Enter the right door
(B).
 • Read the newspaper (C). • Look at the portrait (D). • Look
at the coat (E). • Take the BROWN BOOK (F). • Select the chest
for a HOS (G).
• Read the newspaper (C). • Look at the portrait (D). • Look
at the coat (E). • Take the BROWN BOOK (F). • Select the chest
for a HOS (G).
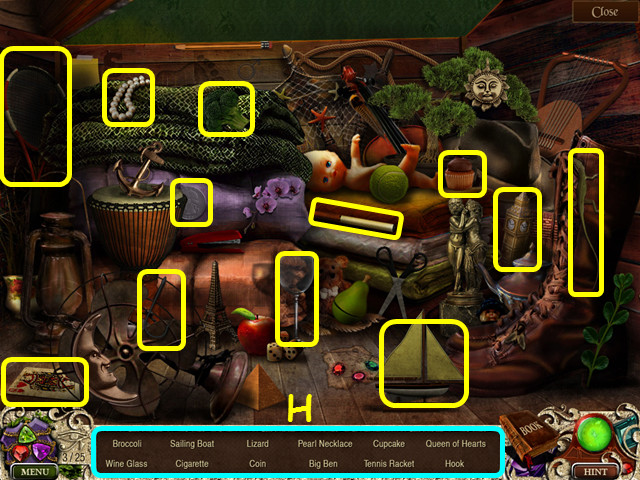 • Locate all the items on the list (H). • You will earn the
HAMMER. • Walk down.
• Locate all the items on the list (H). • You will earn the
HAMMER. • Walk down.
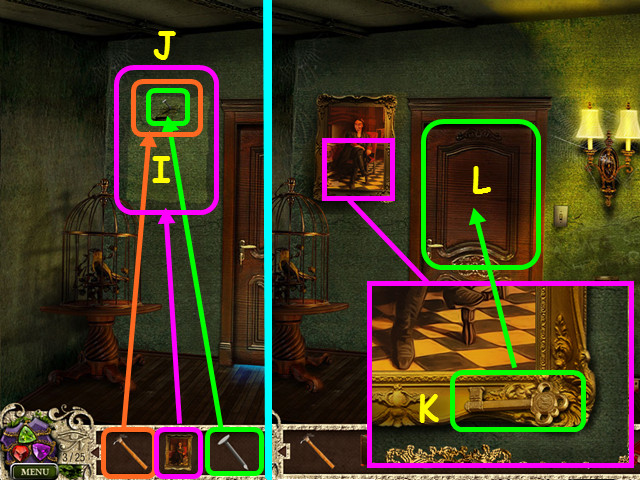 • Place the NAIL in the wall, then use the HAMMER on the nail
3 times (I). • Hang the PAINTING on the nail (J). • Look at
the painting and take the DOOR KEY (K). • Use the DOOR KEY on
the left door, then walk inside (L).
• Place the NAIL in the wall, then use the HAMMER on the nail
3 times (I). • Hang the PAINTING on the nail (J). • Look at
the painting and take the DOOR KEY (K). • Use the DOOR KEY on
the left door, then walk inside (L).
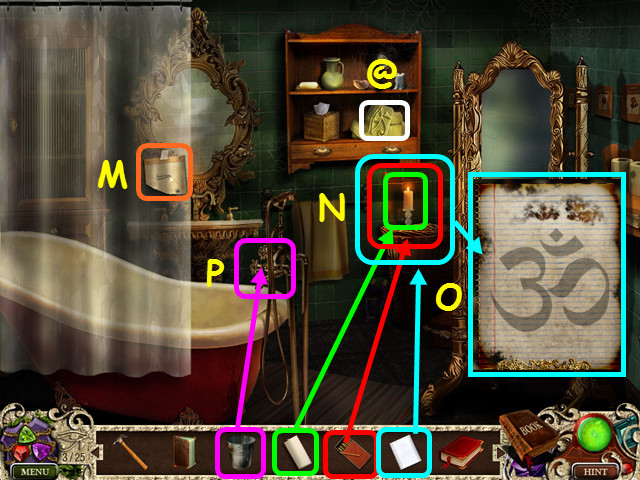 • Take the 4/25 Golden Eye of Horus (@). • Read the note (M).
• Place the CANDLE in the holder, then use the MATCHES to
light the candle (N). • Hold the PAPER over the lit candle to
see the symbol (O). • Use the BUCKET on the faucet to get the
FULL BUCKET (P). • Walk down, then enter the room on the
right.
• Take the 4/25 Golden Eye of Horus (@). • Read the note (M).
• Place the CANDLE in the holder, then use the MATCHES to
light the candle (N). • Hold the PAPER over the lit candle to
see the symbol (O). • Use the BUCKET on the faucet to get the
FULL BUCKET (P). • Walk down, then enter the room on the
right.
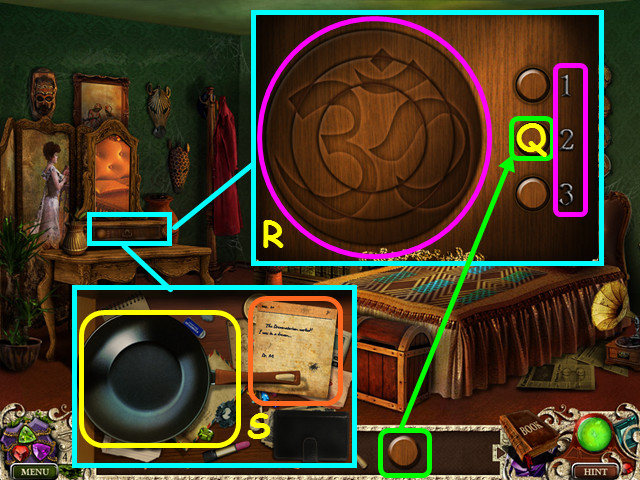 • Look at the vanity and place the BUTTON in the number 2
position (Q). • Press the buttons to reform the symbol (R). •
You can refer to your book if necessary for the symbol on the
paper you held over the candle. • Press the buttons in this
sequence: 1-1-3-2-2-2. • Take the COOKING PAN and read the
note (S). • Walk down twice, then go forward to the library.
• Look at the vanity and place the BUTTON in the number 2
position (Q). • Press the buttons to reform the symbol (R). •
You can refer to your book if necessary for the symbol on the
paper you held over the candle. • Press the buttons in this
sequence: 1-1-3-2-2-2. • Take the COOKING PAN and read the
note (S). • Walk down twice, then go forward to the library.
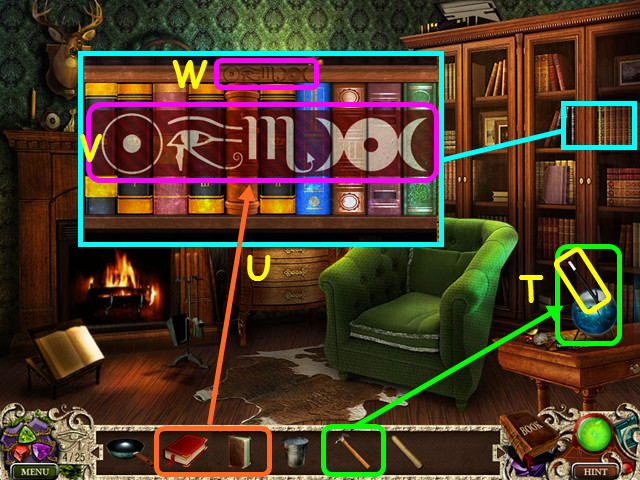 • Use the HAMMER to break the orb, then take the MAGIC WAND
(T). • Look at the bookcase; place the BROWN BOOK and the RED
BOOK on the shelf for a mini-game (U). • Select 2 books to
swap positions to match the symbols (V) etched into the shelf
(W). • You will earn the SPONGE. • Walk down, go up the
stairs, then enter the bathroom on the left.
• Use the HAMMER to break the orb, then take the MAGIC WAND
(T). • Look at the bookcase; place the BROWN BOOK and the RED
BOOK on the shelf for a mini-game (U). • Select 2 books to
swap positions to match the symbols (V) etched into the shelf
(W). • You will earn the SPONGE. • Walk down, go up the
stairs, then enter the bathroom on the left.
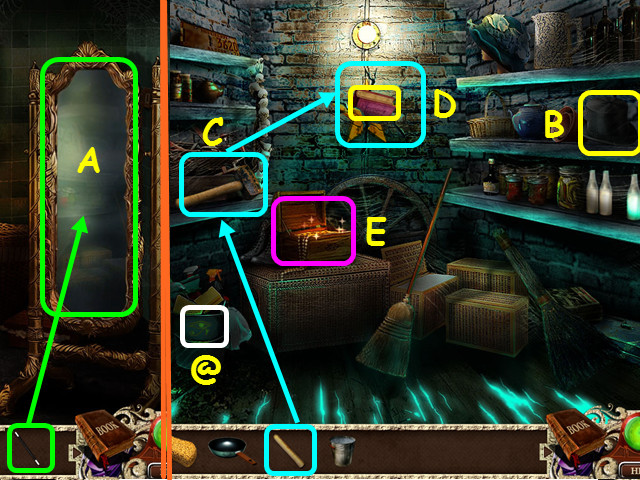 • Use the MAGIC WAND on the large standing mirror, then enter
the mirror (A). • Take the 5/25 Golden Eye of Horus (@). •
Take the TOP HAT (B). • Use the HAMMER HANDLE on the head;
take the SLEDGEHAMMER (C). • Use the SLEDGE HAMMER on the star
3 times; take the WIZARD'S GUIDEBOOK (D). • Look at the
jewelry box for a HOS (E).
• Use the MAGIC WAND on the large standing mirror, then enter
the mirror (A). • Take the 5/25 Golden Eye of Horus (@). •
Take the TOP HAT (B). • Use the HAMMER HANDLE on the head;
take the SLEDGEHAMMER (C). • Use the SLEDGE HAMMER on the star
3 times; take the WIZARD'S GUIDEBOOK (D). • Look at the
jewelry box for a HOS (E).
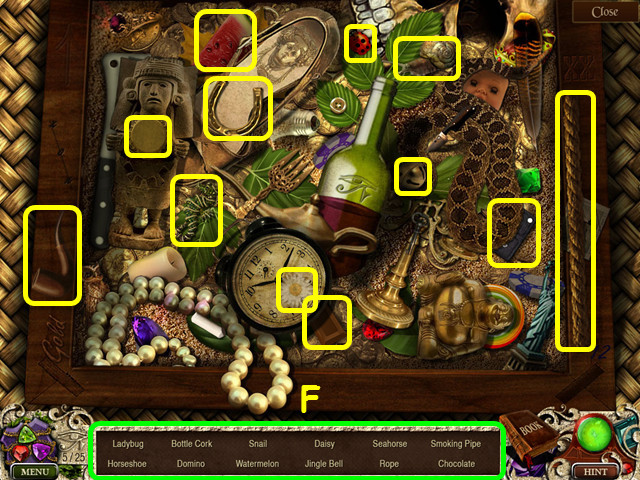 • Locate all the items on the list (F). • You will earn the
CRANBERRY JUICE. • Walk down twice.
• Locate all the items on the list (F). • You will earn the
CRANBERRY JUICE. • Walk down twice.
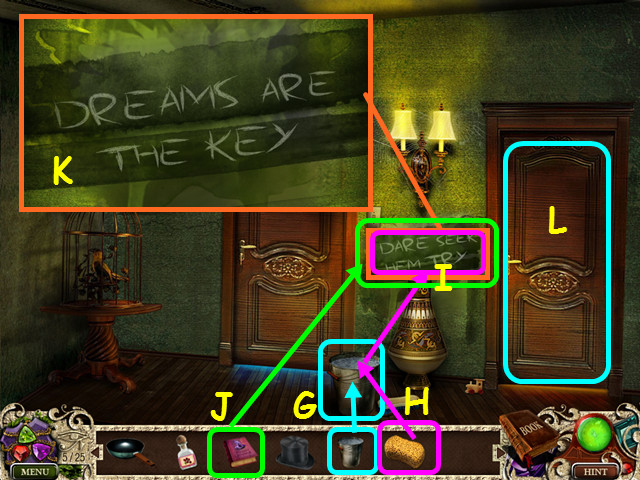 • Place the FULL BUCKET on the floor (G). • Use the SPONGE on
the bucket to get the WET SPONGE (H). • Use the WET SPONGE on
the wall 3 times (I). • You will see a close-up of the
writing, “A DARE SEEK HEM TRY.” • Exit the close-up. • Use the
WIZARD'S GUIDEBOOK on the writing (J). • The wall will now
say, “DREAMS ARE THE KEY” (K). • Enter the bedroom on the
right (L).
• Place the FULL BUCKET on the floor (G). • Use the SPONGE on
the bucket to get the WET SPONGE (H). • Use the WET SPONGE on
the wall 3 times (I). • You will see a close-up of the
writing, “A DARE SEEK HEM TRY.” • Exit the close-up. • Use the
WIZARD'S GUIDEBOOK on the writing (J). • The wall will now
say, “DREAMS ARE THE KEY” (K). • Enter the bedroom on the
right (L).
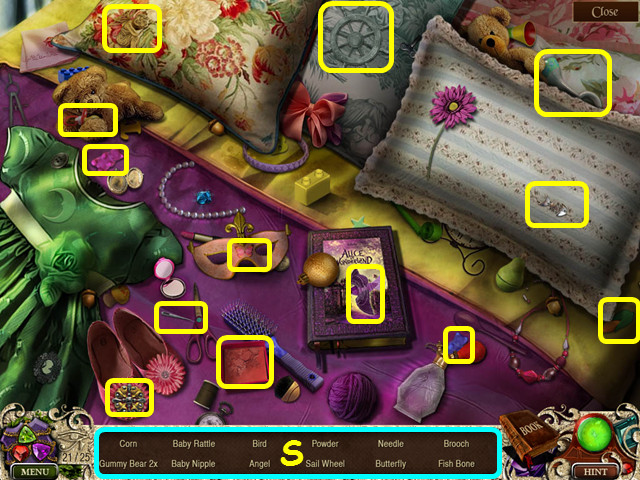
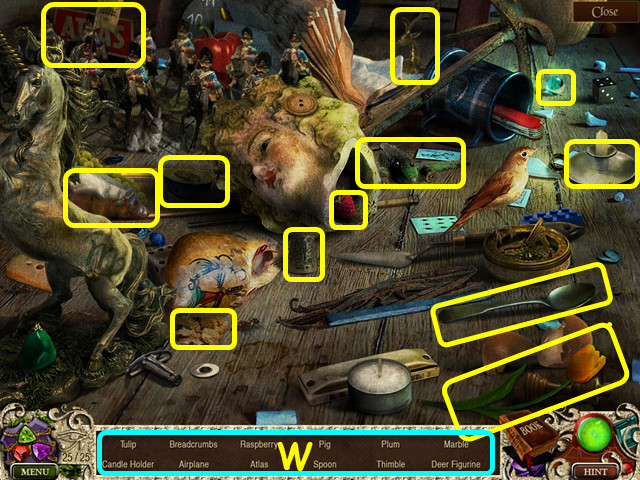
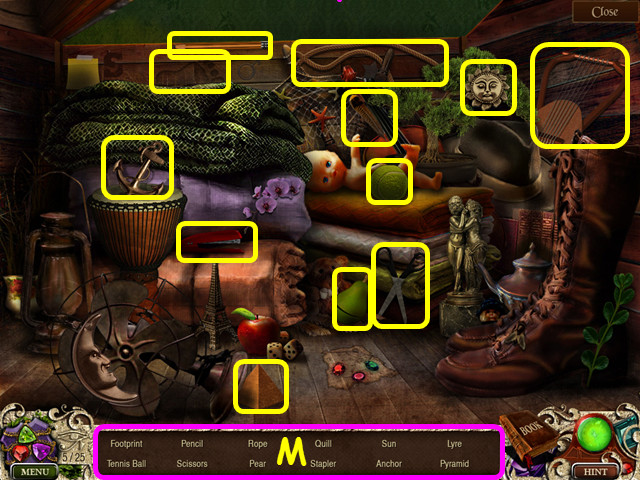 • Select the chest at the end of the bed for a HOS. • Locate
all the items on the list (M). • You will earn the
GOOSEBERRIES. • Walk down, enter the bathroom, then enter the
mirror.
• Select the chest at the end of the bed for a HOS. • Locate
all the items on the list (M). • You will earn the
GOOSEBERRIES. • Walk down, enter the bathroom, then enter the
mirror.
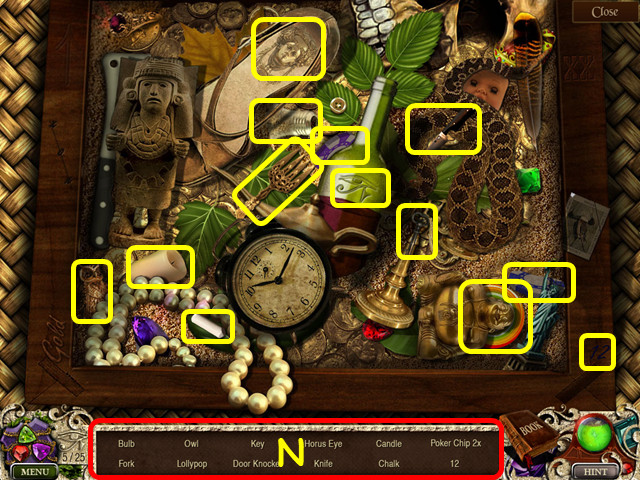 • Select the jewelry chest for a HOS. • Locate all the items
on the list. (N). • You will earn the GLOVE. • Walk down 3
times, then enter the library.
• Select the jewelry chest for a HOS. • Locate all the items
on the list. (N). • You will earn the GLOVE. • Walk down 3
times, then enter the library.
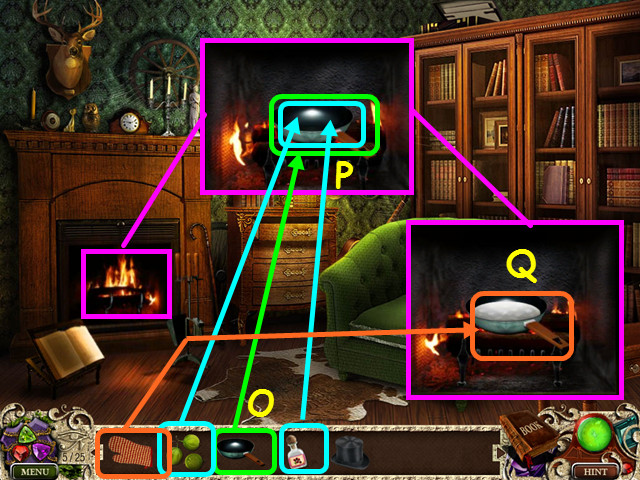 • Look at the fireplace and place the COOKING PAN on the
flames (O). • Note- if you did not use the matches to light
the logs earlier, do so prior to placing the pan on the
flames. • Place the CRANBERRY JUICE and the GOOSEBERRIES into
the pan (P). • Use the GLOVE to take the COOKING PAN (Q). •
Walk down twice, then enter the kitchen on the left.
• Look at the fireplace and place the COOKING PAN on the
flames (O). • Note- if you did not use the matches to light
the logs earlier, do so prior to placing the pan on the
flames. • Place the CRANBERRY JUICE and the GOOSEBERRIES into
the pan (P). • Use the GLOVE to take the COOKING PAN (Q). •
Walk down twice, then enter the kitchen on the left.
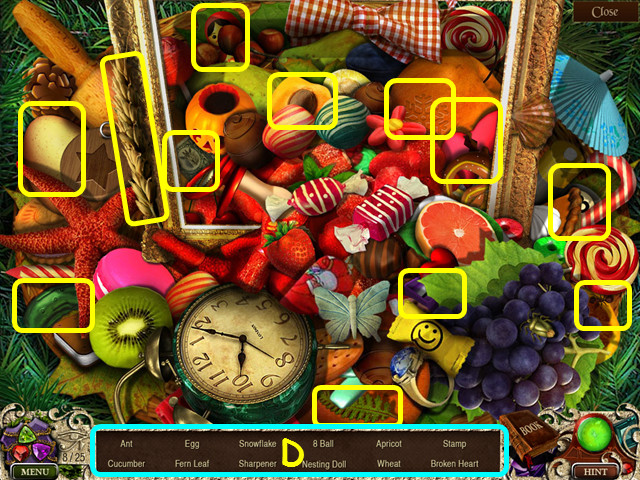
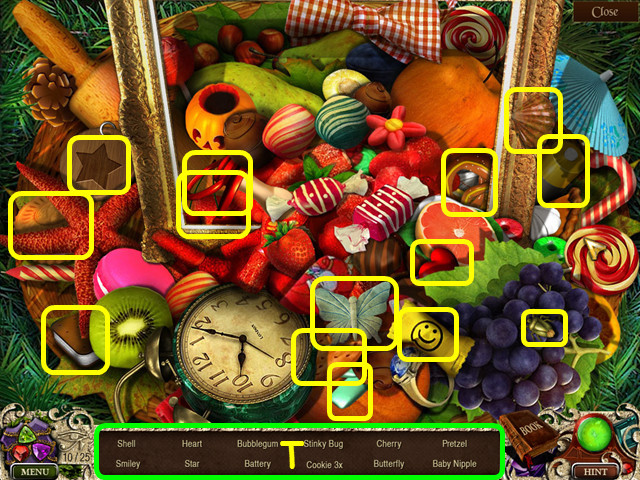
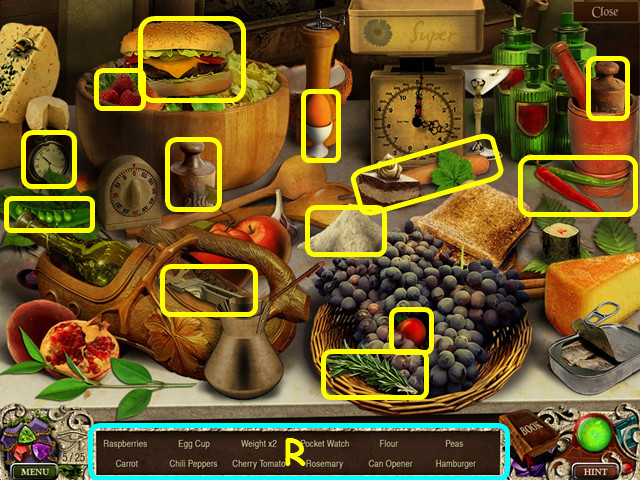 • Select the table on the right for a HOS. • Locate all the
items on the list (R). • You will earn the EMPTY BOTTLE.
• Select the table on the right for a HOS. • Locate all the
items on the list (R). • You will earn the EMPTY BOTTLE.
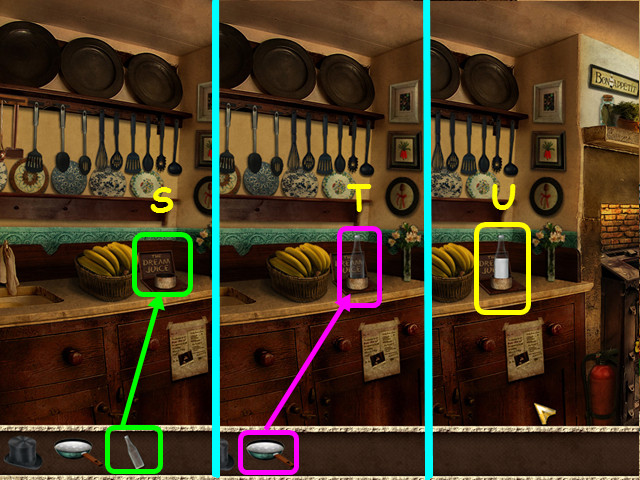 • Place the EMPTY BOTTLE into the holder on the counter (S). •
Pour the COOKING PAN into the bottle (T). • Take the DREAM
JUICE (U). • Walk right, go forward, then go up the stairs.
Enter the bathroom on the left, then go through the mirror.
• Place the EMPTY BOTTLE into the holder on the counter (S). •
Pour the COOKING PAN into the bottle (T). • Take the DREAM
JUICE (U). • Walk right, go forward, then go up the stairs.
Enter the bathroom on the left, then go through the mirror.
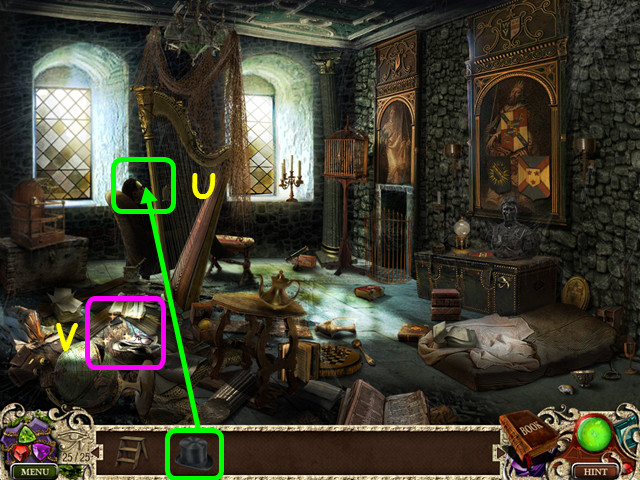
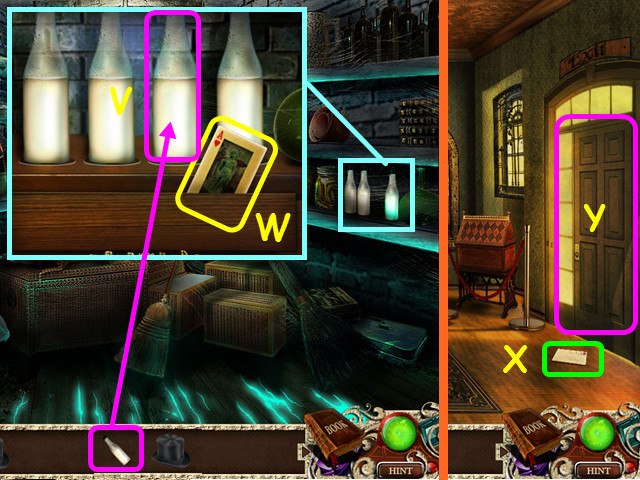 • Look at the bottles on the shelf and place the DREAM JUICE
on the shelf (V). • Take the PLAYING CARD (W). • Walk down 4
times. • Read the note (X). • Exit through the door on the
right (Y).
• Look at the bottles on the shelf and place the DREAM JUICE
on the shelf (V). • Take the PLAYING CARD (W). • Walk down 4
times. • Read the note (X). • Exit through the door on the
right (Y).
Chapter 2: Nothing Town
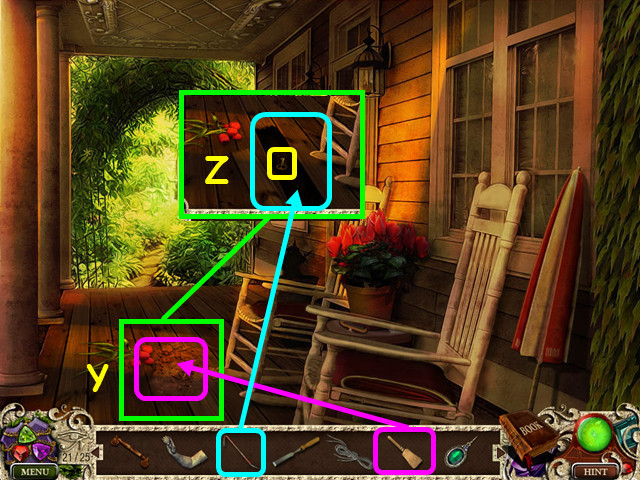
 • Look at the umbrella (A). • Take the 6/25 Golden Eye of
Horus (@). • Take the BROOCH (B). • Read the note (C). • Take
the SCREWDRIVER (D). • Walk to the right.
• Look at the umbrella (A). • Take the 6/25 Golden Eye of
Horus (@). • Take the BROOCH (B). • Read the note (C). • Take
the SCREWDRIVER (D). • Walk to the right.
 • Take the FLASHLIGHT (E). • Note the manhole (F). • Walk left
to enter the Purple Bar (G).
• Take the FLASHLIGHT (E). • Note the manhole (F). • Walk left
to enter the Purple Bar (G).
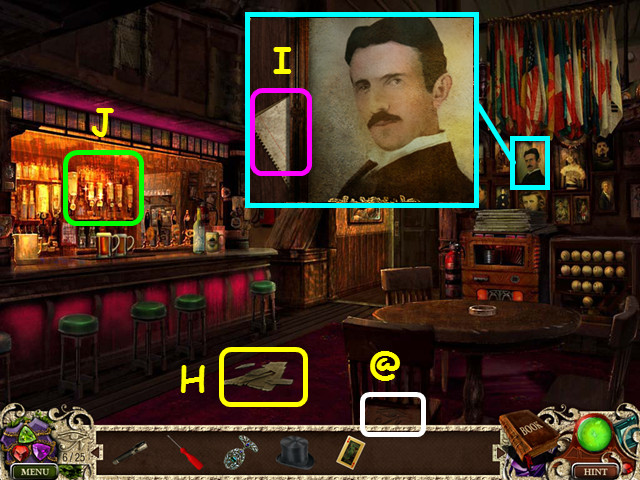 • Take the 7/25 Golden Eye of Horus (@). • Take the RIPPED
NEWSPAPER (H). • Look at the portrait and read the note (I). •
Select the bar taps for a HOS (J).
• Take the 7/25 Golden Eye of Horus (@). • Take the RIPPED
NEWSPAPER (H). • Look at the portrait and read the note (I). •
Select the bar taps for a HOS (J).
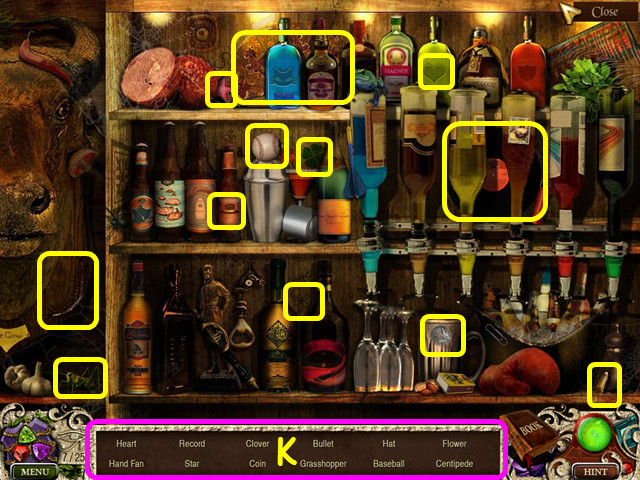 • Locate all the items on the list (K). • You will earn the
BAKING SODA. • Walk down, then go forward.
• Locate all the items on the list (K). • You will earn the
BAKING SODA. • Walk down, then go forward.
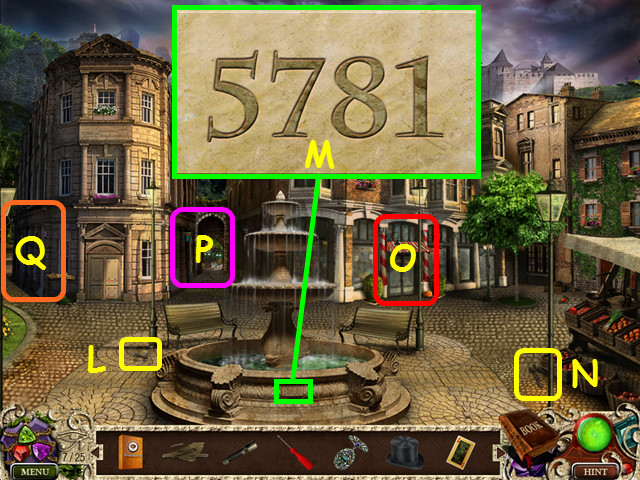 • Take the LIGHT BULB (L). • Look at the fountain base to see
the numbers 5781 (M). • Take the PINCERS (N). • Note the
entrance to the candy store (O). • Note the entrance to the
alley (P). • Walk left to the forest (Q).
• Take the LIGHT BULB (L). • Look at the fountain base to see
the numbers 5781 (M). • Take the PINCERS (N). • Note the
entrance to the candy store (O). • Note the entrance to the
alley (P). • Walk left to the forest (Q).
 • Take the 8/25 Golden Eye of Horus (@). • Take the NEWSPAPER
PART 1 (R). • Take the KNIFE (S). • Take the DRY BRANCHES (T).
• Walk down, then enter the candy store on the right.
• Take the 8/25 Golden Eye of Horus (@). • Take the NEWSPAPER
PART 1 (R). • Take the KNIFE (S). • Take the DRY BRANCHES (T).
• Walk down, then enter the candy store on the right.
 • Look at the diploma and use the KNIFE to cut it from the
frame (U). • Enter the numbers from the fountain 5781 on the
keypad, then press enter (V). • Take the METAL CIRCLE and look
at the book (W). • Read the note and press the arrow (X). •
Take the BOX KEY (Y).
• Look at the diploma and use the KNIFE to cut it from the
frame (U). • Enter the numbers from the fountain 5781 on the
keypad, then press enter (V). • Take the METAL CIRCLE and look
at the book (W). • Read the note and press the arrow (X). •
Take the BOX KEY (Y).
 • Note the door to the basement (A). • Take the LEMON (B). •
Select the window display for a HOS (C).
• Note the door to the basement (A). • Take the LEMON (B). •
Select the window display for a HOS (C).
 • Locate all the items on the list (D). • You will earn the
COIN. • Walk down, then enter the alley in the center.
• Locate all the items on the list (D). • You will earn the
COIN. • Walk down, then enter the alley in the center.
 • Take the 9/25 Golden Eye of Horus (@). • Look in the
dumpster; read the note and take the RATCHET WRENCH (E). •
Take the HEDGE TRIMMERS (F). • Use the BOX KEY on the small
box (G). • Look inside the box for a mini-game.
• Take the 9/25 Golden Eye of Horus (@). • Look in the
dumpster; read the note and take the RATCHET WRENCH (E). •
Take the HEDGE TRIMMERS (F). • Use the BOX KEY on the small
box (G). • Look inside the box for a mini-game.
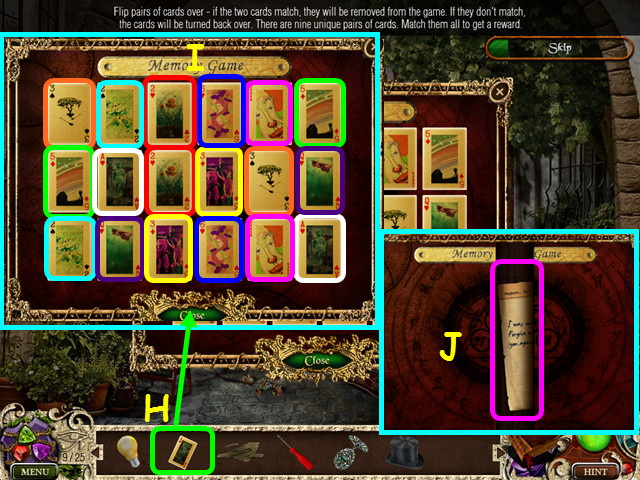 • Place the PLAYING CARD on the board to trigger the mini-game
(H). • Flip 2 cards over at a time to find matching pairs (I).
• Matching pairs will be removed from the board. • Once all 9
pairs of cards are found, read the note (J). • Walk down
twice, then enter the Purple bar on the left.
• Place the PLAYING CARD on the board to trigger the mini-game
(H). • Flip 2 cards over at a time to find matching pairs (I).
• Matching pairs will be removed from the board. • Once all 9
pairs of cards are found, read the note (J). • Walk down
twice, then enter the Purple bar on the left.
 • Note the flat area on the bar (K). • Take the EMPTY BOTTLE
(L). • Look at the door and use the COIN in the slot (M). •
Walk forward to enter the restroom.
• Note the flat area on the bar (K). • Take the EMPTY BOTTLE
(L). • Look at the door and use the COIN in the slot (M). •
Walk forward to enter the restroom.
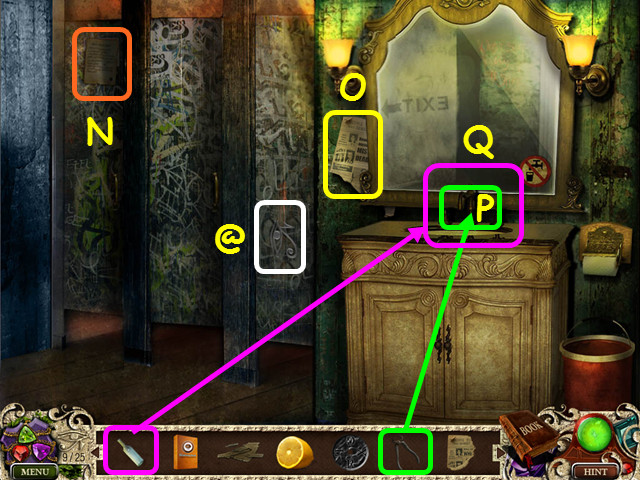 • Read the acid instructions (N). • Take the 10/25 Golden Eye
of Horus (@). • Take the NEWSPAPER, PART 2 (O). • Use the
PINCERS to open the water tap (P). • Use the EMPTY BOTTLE on
the water to get the WATER (Q). • Walk down and look at the
flat area on the bar.
• Read the acid instructions (N). • Take the 10/25 Golden Eye
of Horus (@). • Take the NEWSPAPER, PART 2 (O). • Use the
PINCERS to open the water tap (P). • Use the EMPTY BOTTLE on
the water to get the WATER (Q). • Walk down and look at the
flat area on the bar.
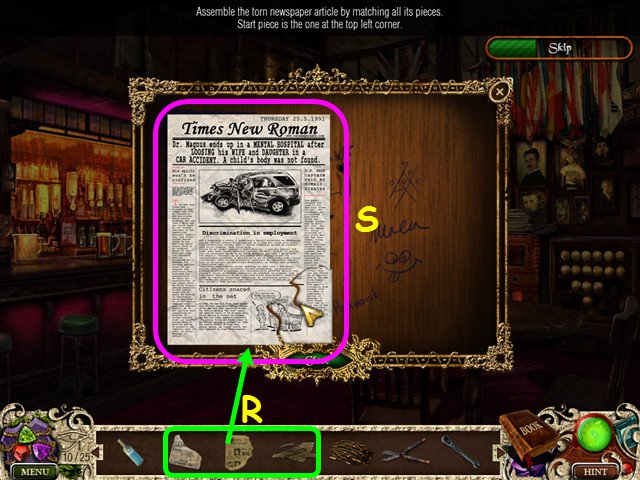 • Place the RIPPED NEWSPAPER, NEWSPAPER, PART 1, and
NEWSPAPER, PART 2 on the surface for a mini-game (R). •
Restore the newspaper by dragging the pieces into position
(S). • The mini-game begins with the upper left piece locked
into position. • Exit the close-up, then walk down to exit the
bar. Walk forward, then enter the candy store. • Select the
window display on the left for a HOS.
• Place the RIPPED NEWSPAPER, NEWSPAPER, PART 1, and
NEWSPAPER, PART 2 on the surface for a mini-game (R). •
Restore the newspaper by dragging the pieces into position
(S). • The mini-game begins with the upper left piece locked
into position. • Exit the close-up, then walk down to exit the
bar. Walk forward, then enter the candy store. • Select the
window display on the left for a HOS.
 • Locate all the items on the list (T). • You will earn the
LIGHTER. • Walk down twice and enter the Purple Bar on the
left. • Select the bar taps for a HOS.
• Locate all the items on the list (T). • You will earn the
LIGHTER. • Walk down twice and enter the Purple Bar on the
left. • Select the bar taps for a HOS.
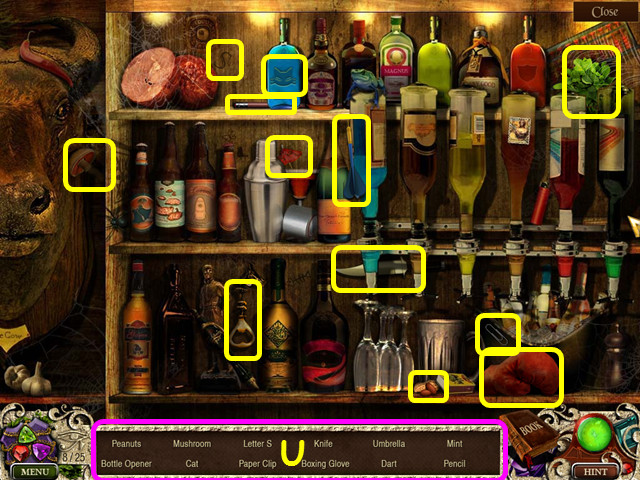 • Locate all the items on the list (U). • You will earn the
BOLT. • Walk down, forward, enter the candy store, then enter
the door on the right to the basement.
• Locate all the items on the list (U). • You will earn the
BOLT. • Walk down, forward, enter the candy store, then enter
the door on the right to the basement.
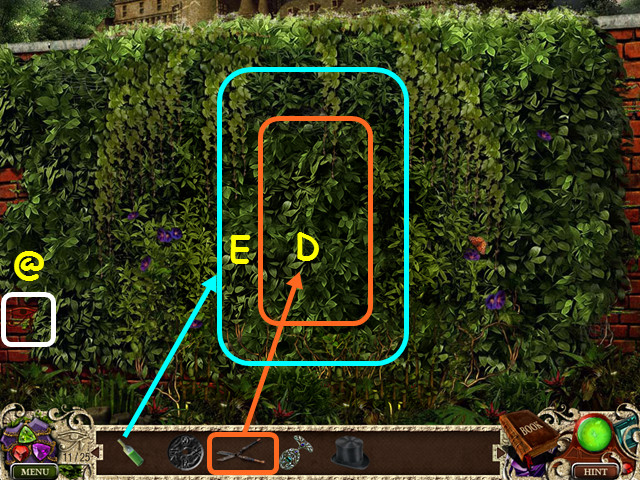
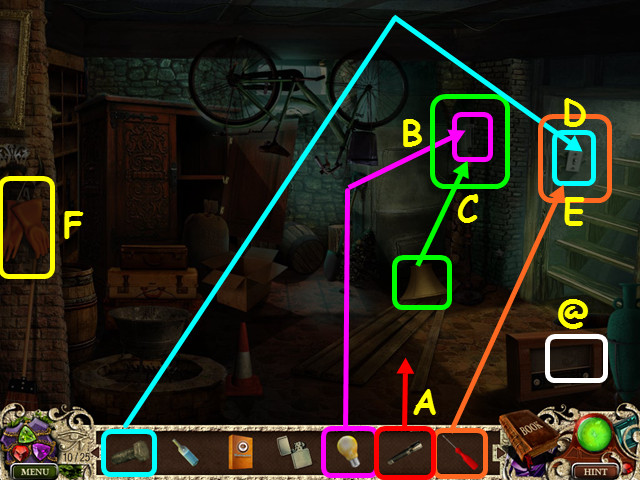 • Use the FLASHLIGHT anywhere in the darkness (A). • Place the
LIGHT BULB into the lamp (B). • Take the LAMPSHADE and place
it on the lamp (C). • Place the BOLT on the switch (D). • Use
the SCREWDRIVER on the switch, then flip the switch to turn on
the light (E). • Take the 11/25 Golden Eye of Horus (@). •
Take the RUBBER GLOVES (F). • Walk up the stairs on the right,
walk down to exit the candy store, then enter the forest to
the left.
• Use the FLASHLIGHT anywhere in the darkness (A). • Place the
LIGHT BULB into the lamp (B). • Take the LAMPSHADE and place
it on the lamp (C). • Place the BOLT on the switch (D). • Use
the SCREWDRIVER on the switch, then flip the switch to turn on
the light (E). • Take the 11/25 Golden Eye of Horus (@). •
Take the RUBBER GLOVES (F). • Walk up the stairs on the right,
walk down to exit the candy store, then enter the forest to
the left.
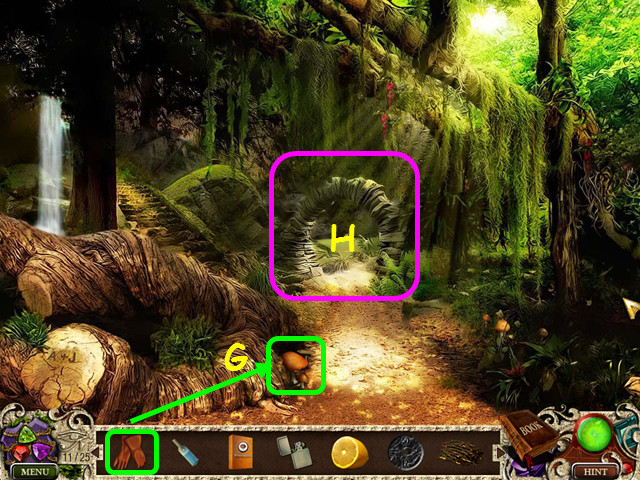 • Use the RUBBER GLOVES to take the MUSHROOM (G). • Note the
archway (H). • Walk down, enter the candy store, then enter
the basement door.
• Use the RUBBER GLOVES to take the MUSHROOM (G). • Note the
archway (H). • Walk down, enter the candy store, then enter
the basement door.
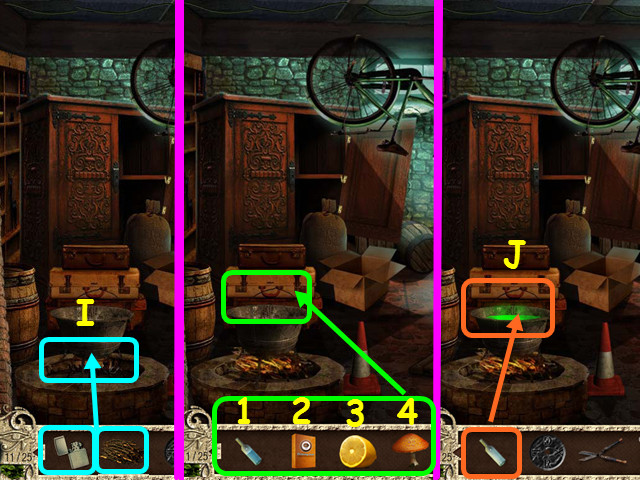 • Place the DRY BRANCHES under the cauldron, then use the
LIGHTER on the branches (I). • Place the WATER (1), BAKING
SODA (2), LEMON (3), and MUSHROOM (4) in that order into the
cauldron. • The EMPTY BOTTLE will return to your inventory;
use it on the cauldron to get the BOTTLE WITH ACID (J). • Exit
the basement, then walk down twice.
• Place the DRY BRANCHES under the cauldron, then use the
LIGHTER on the branches (I). • Place the WATER (1), BAKING
SODA (2), LEMON (3), and MUSHROOM (4) in that order into the
cauldron. • The EMPTY BOTTLE will return to your inventory;
use it on the cauldron to get the BOTTLE WITH ACID (J). • Exit
the basement, then walk down twice.
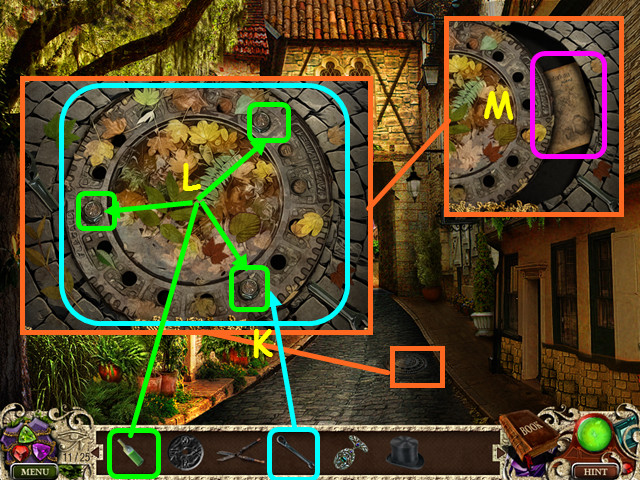 • Look at the manhole and use the RATCHET WRENCH on the bolts
(K). • Use the BOTTLE WITH ACID on the 3 bolts (L). • Read the
Dreamatorium plans (M). • Walk forward, enter the forest on
the left, then go under the arch.
• Look at the manhole and use the RATCHET WRENCH on the bolts
(K). • Use the BOTTLE WITH ACID on the 3 bolts (L). • Read the
Dreamatorium plans (M). • Walk forward, enter the forest on
the left, then go under the arch.
Chapter 3: The Graveyard
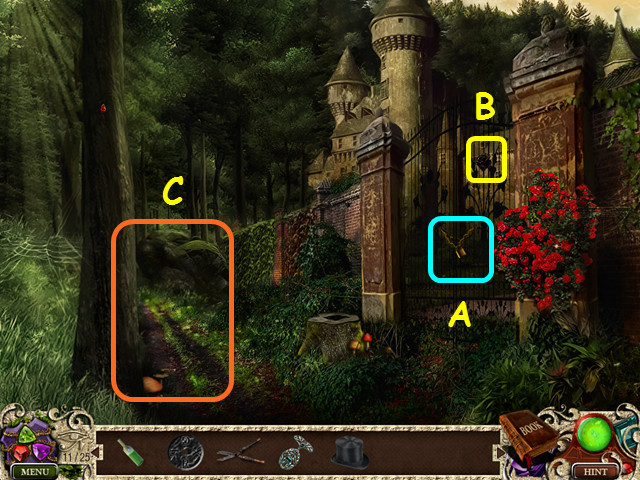 • Look at the front gate to realize you have been here before
(A). • Take the BLACK ROSE (B). • Walk forward on the path
(C).
• Look at the front gate to realize you have been here before
(A). • Take the BLACK ROSE (B). • Walk forward on the path
(C).
 • Try the hedge trimmers on the vines 3 times (D). • Use the
BOTTLE OF ACID on the vines (E). • Take the 12/25 Golden Eye
of Horus (@).
• Try the hedge trimmers on the vines 3 times (D). • Use the
BOTTLE OF ACID on the vines (E). • Take the 12/25 Golden Eye
of Horus (@).
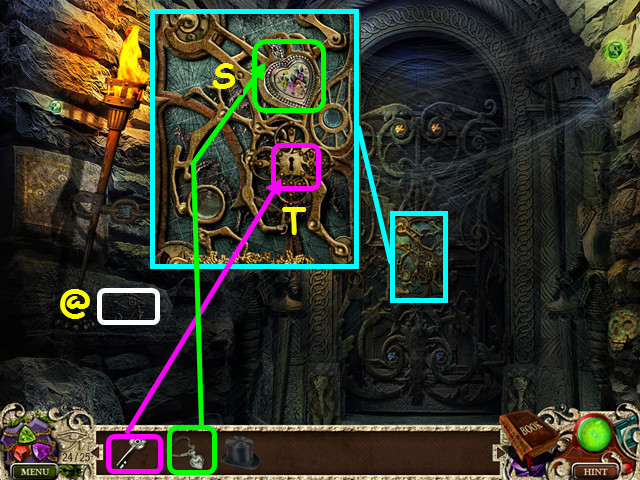
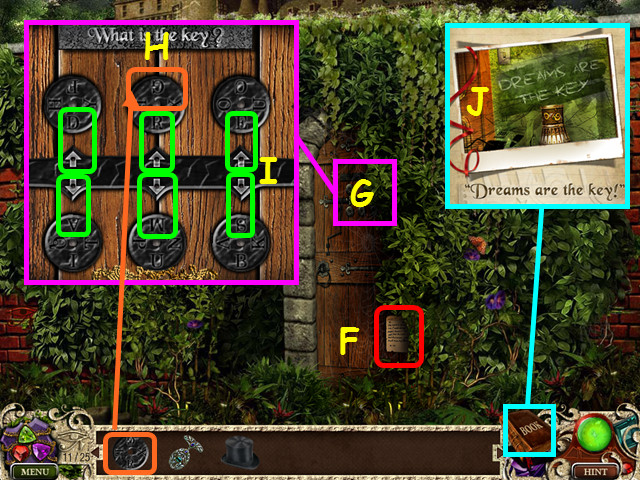 • Read the note (F). • Look at the door for a mini-game (G). •
Place the METAL CIRCLE into the hole to trigger the mini-game
(H). • Turn the circles so that the letters D-R-E-A-M-S are at
the arrows (I). • Refer to your book for the clue from Chapter
1, if necessary (J). • Walk forward.
• Read the note (F). • Look at the door for a mini-game (G). •
Place the METAL CIRCLE into the hole to trigger the mini-game
(H). • Turn the circles so that the letters D-R-E-A-M-S are at
the arrows (I). • Refer to your book for the clue from Chapter
1, if necessary (J). • Walk forward.
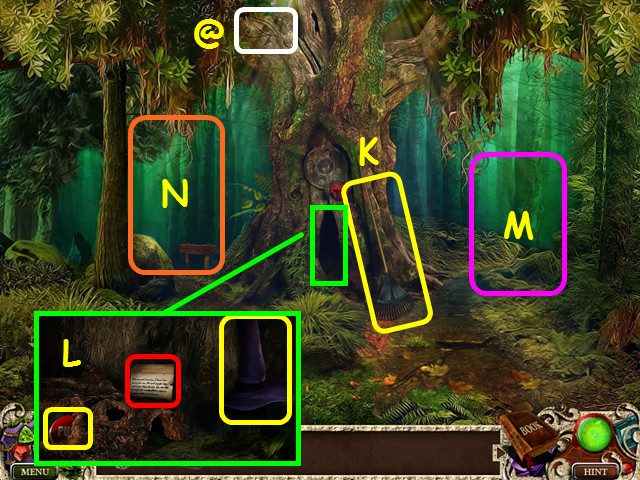 • Take the 13/25 Golden Eye of Horus (@). • Take the RAKE (K).
• Look in the tree hollow: take the PUSH BUTTON, OLD HAT, and
read the note (L). • Note the path to the right (M). • Take
the left path to the lake (N).
• Take the 13/25 Golden Eye of Horus (@). • Take the RAKE (K).
• Look in the tree hollow: take the PUSH BUTTON, OLD HAT, and
read the note (L). • Note the path to the right (M). • Take
the left path to the lake (N).
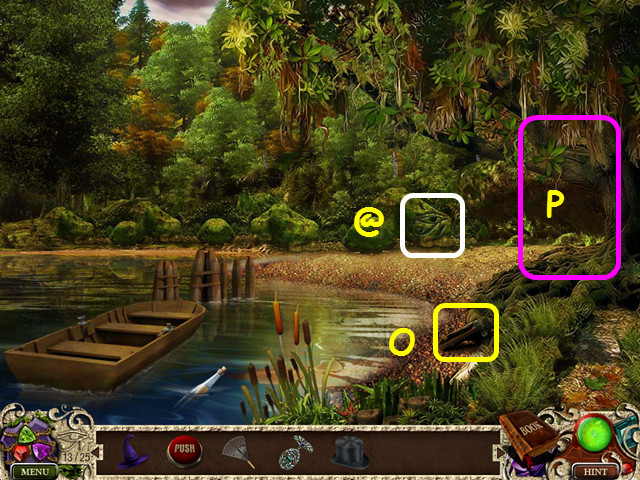 • Take the 14/25 Golden Eye of Horus (@). • Take the HAMMER
(O). • Walk right (P), then take the right path.
• Take the 14/25 Golden Eye of Horus (@). • Take the HAMMER
(O). • Walk right (P), then take the right path.
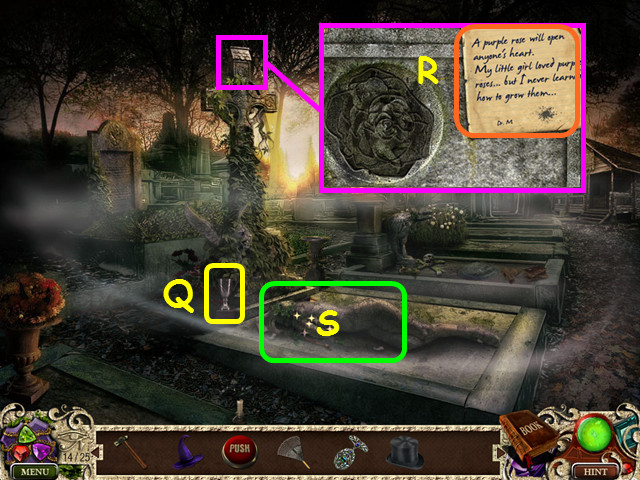 • Take the SILVER TROPHY (Q). • Look at the cross and read the
note to learn you will need a purple rose (R). • Select the
sarcophagus lid for a HOS (S).
• Take the SILVER TROPHY (Q). • Look at the cross and read the
note to learn you will need a purple rose (R). • Select the
sarcophagus lid for a HOS (S).
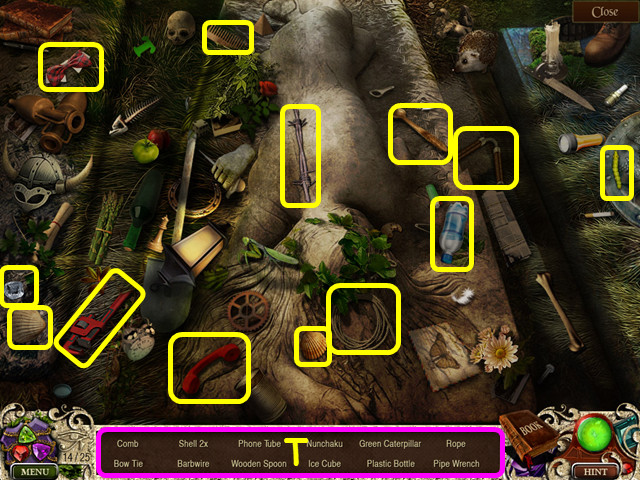 • Locate all the items on the list (T). • You will earn the
EMPTY WATERING BUCKET. • Walk forward.
• Locate all the items on the list (T). • You will earn the
EMPTY WATERING BUCKET. • Walk forward.
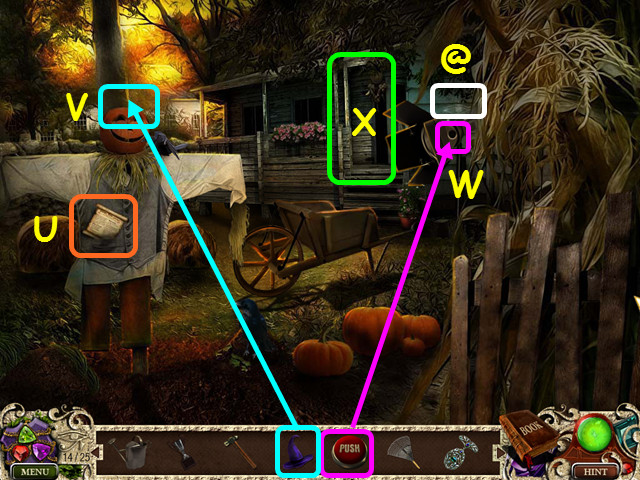 • Take the 15/25 Golden Eye of Horus (@). • Read the
instructions (U). • Place the OLD hat on the scarecrow (V). •
Place the PUSH BUTTON on the floodlight (W). • Walk forward
into the shack (X).
• Take the 15/25 Golden Eye of Horus (@). • Read the
instructions (U). • Place the OLD hat on the scarecrow (V). •
Place the PUSH BUTTON on the floodlight (W). • Walk forward
into the shack (X).
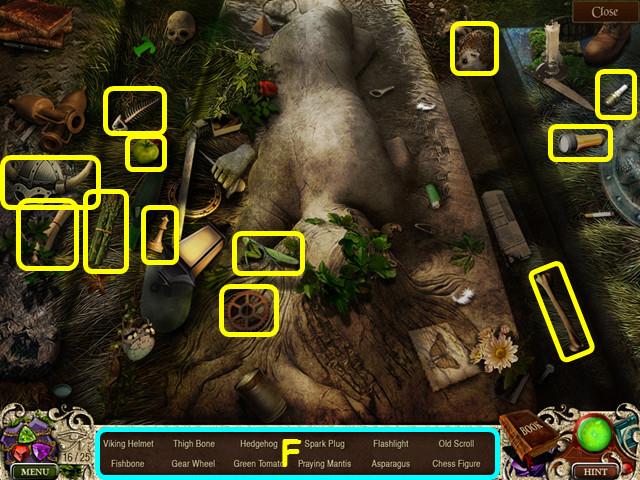
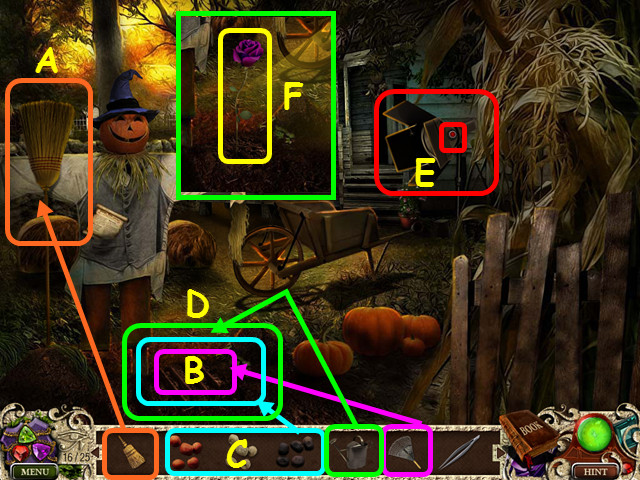
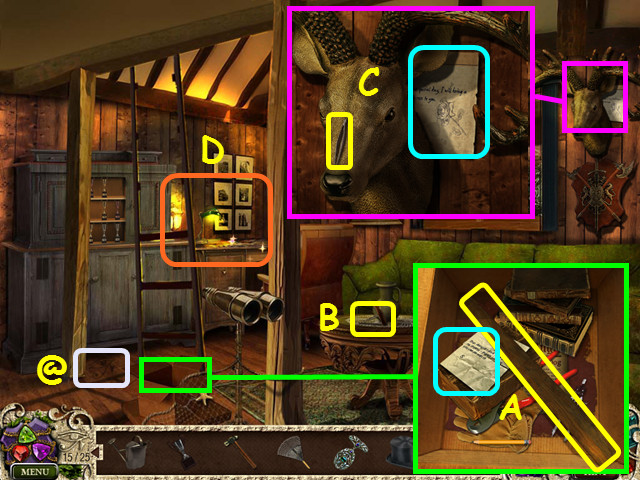 • Take the 16/25 Golden Eye of Horus (@). • Look in the box;
take the 1st PLANK and read the note (A). • Take the CORKSCREW
(B). • Look at the trophy head; take the TWEEZERS and read the
note (C). • Select the desk for a HOS (D).
• Take the 16/25 Golden Eye of Horus (@). • Look in the box;
take the 1st PLANK and read the note (A). • Take the CORKSCREW
(B). • Look at the trophy head; take the TWEEZERS and read the
note (C). • Select the desk for a HOS (D).
 • Locate all the items on the list (E). • You will earn the
GREEN EMERALD. • Walk down twice.
• Locate all the items on the list (E). • You will earn the
GREEN EMERALD. • Walk down twice.
 • Select the sarcophagus lid for a HOS. • Locate all the items
on the list (F). • You will earn the FLORAL SNIPS. • Walk
down, then go left to the lake.
• Select the sarcophagus lid for a HOS. • Locate all the items
on the list (F). • You will earn the FLORAL SNIPS. • Walk
down, then go left to the lake.
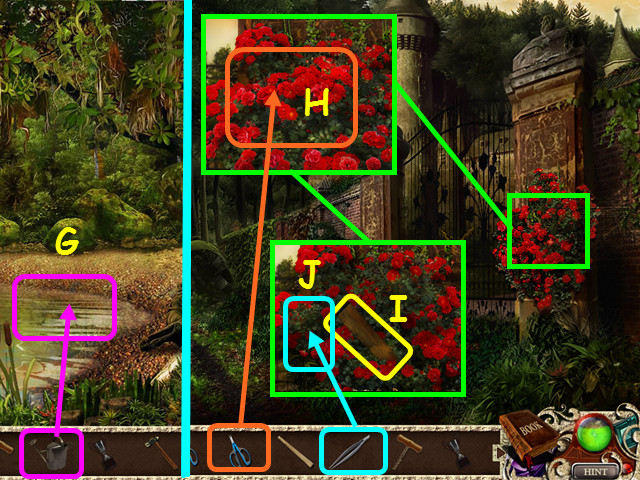 • Use the EMPTY WATERING BUCKET on the water to get the FULL
WATERING BUCKET (G). • Go right, then walk down twice. • Look
at the roses and use the FLORAL SNIPS twice on the roses (H).
• Take the 2nd PLANK (I). • Use the TWEEZERS on the roses to
get the RED ROSE SEEDS (J). • Walk forward twice, then take
the right path.
• Use the EMPTY WATERING BUCKET on the water to get the FULL
WATERING BUCKET (G). • Go right, then walk down twice. • Look
at the roses and use the FLORAL SNIPS twice on the roses (H).
• Take the 2nd PLANK (I). • Use the TWEEZERS on the roses to
get the RED ROSE SEEDS (J). • Walk forward twice, then take
the right path.
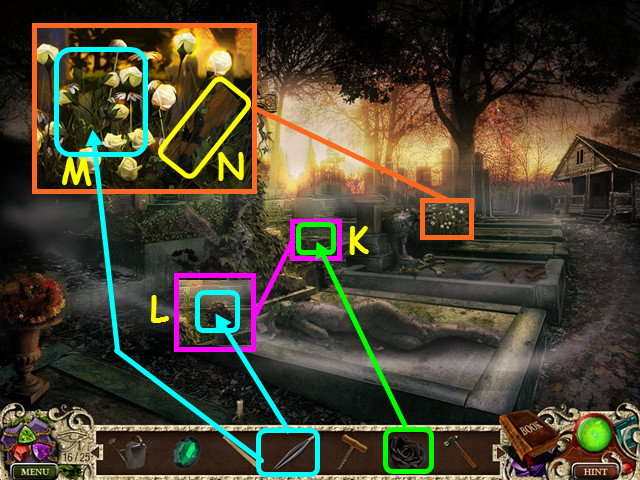 • Place the BLACK ROSE in the urn (K). • Use the TWEEZERS on
the black roses to get the BLACK ROSE SEEDS (L). • Look at the
white roses and use the TWEEZERS to get the WHITE ROSE SEEDS
(M). • Take the 3rd PLANK (N). • Walk forward twice.
• Place the BLACK ROSE in the urn (K). • Use the TWEEZERS on
the black roses to get the BLACK ROSE SEEDS (L). • Look at the
white roses and use the TWEEZERS to get the WHITE ROSE SEEDS
(M). • Take the 3rd PLANK (N). • Walk forward twice.
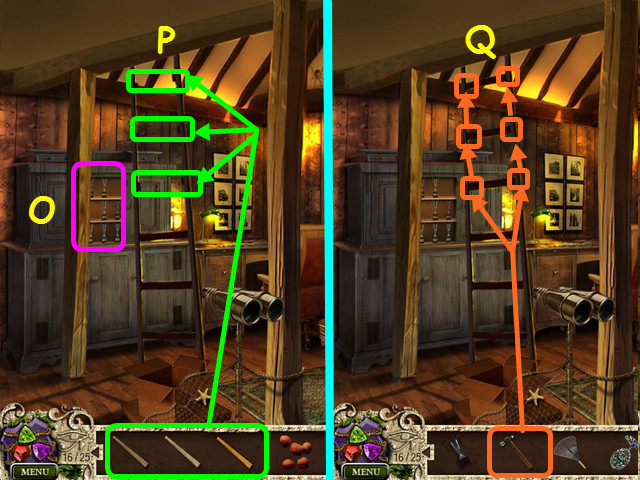 • Note the trophy case (O). • Place the 3 PLANKS on the ladder
(P). • Use the HAMMER on each end of the 3 planks (Q). • Go up
the ladder.
• Note the trophy case (O). • Place the 3 PLANKS on the ladder
(P). • Use the HAMMER on each end of the 3 planks (Q). • Go up
the ladder.
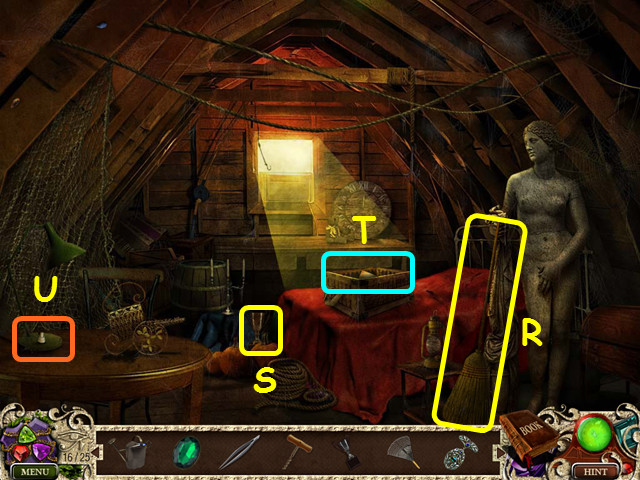 • Take the BROOM (R). • Take the BRONZE TROPHY (S). • Look in
the box and read the note (T). • Turn on the lamp (U). • Walk
down and select the desk for a HOS.
• Take the BROOM (R). • Take the BRONZE TROPHY (S). • Look in
the box and read the note (T). • Turn on the lamp (U). • Walk
down and select the desk for a HOS.
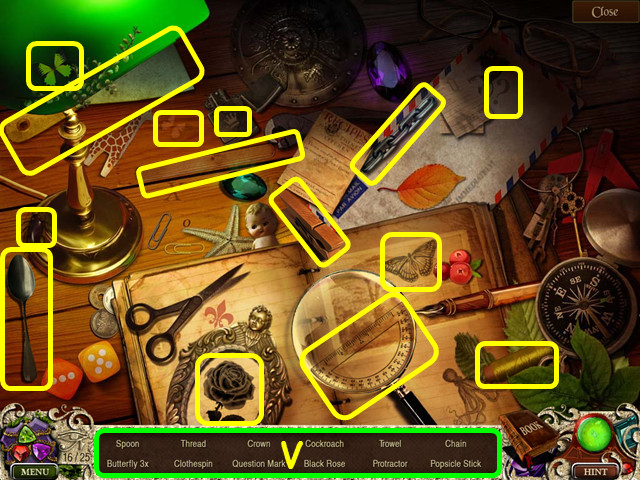 • Locate all the items on the list (V). • You will earn the
NET. • Look at the trophy case for a mini-game.
• Locate all the items on the list (V). • You will earn the
NET. • Look at the trophy case for a mini-game.
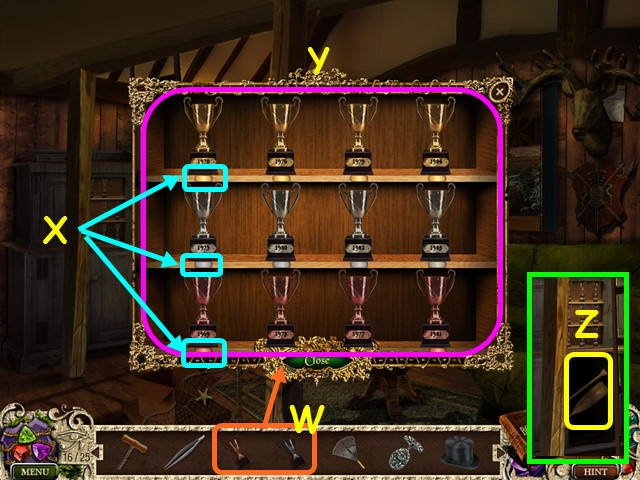 • Place the BRONZE TROPHY and the SILVER TROPHY on the shelves
to trigger the mini-game (W). • Sort the trophies by the color
from the shelves (X), then sort them by year from oldest to
most recent (Y). • Select 2 trophies to swap positions. • The
top shelf years are: 1970, 1976, 1979, 1984. • The center
shelf years are: 1975, 1980, 1982, 1983. • The bottom shelf
years are: 1969, 1973, 1977, 1981. • Take the OARS from the
cabinet under the trophy case (Z). • Walk down.
• Place the BRONZE TROPHY and the SILVER TROPHY on the shelves
to trigger the mini-game (W). • Sort the trophies by the color
from the shelves (X), then sort them by year from oldest to
most recent (Y). • Select 2 trophies to swap positions. • The
top shelf years are: 1970, 1976, 1979, 1984. • The center
shelf years are: 1975, 1980, 1982, 1983. • The bottom shelf
years are: 1969, 1973, 1977, 1981. • Take the OARS from the
cabinet under the trophy case (Z). • Walk down.
 • Place the BROOM on the scarecrow (A). • Use the RAKE 3 times
on the dirt once the crow leaves (B). • Place the BLACK ROSE
SEEDS, the RED ROSE SEEDS, and the WHITE ROSE SEEDS into the
dirt (C). • Use the FULL WATERING BUCKET on the dirt (D). •
Aim the spot light down, then press the red button (E). • Take
the PURPLE ROSE (F). • Walk down once.
• Place the BROOM on the scarecrow (A). • Use the RAKE 3 times
on the dirt once the crow leaves (B). • Place the BLACK ROSE
SEEDS, the RED ROSE SEEDS, and the WHITE ROSE SEEDS into the
dirt (C). • Use the FULL WATERING BUCKET on the dirt (D). •
Aim the spot light down, then press the red button (E). • Take
the PURPLE ROSE (F). • Walk down once.
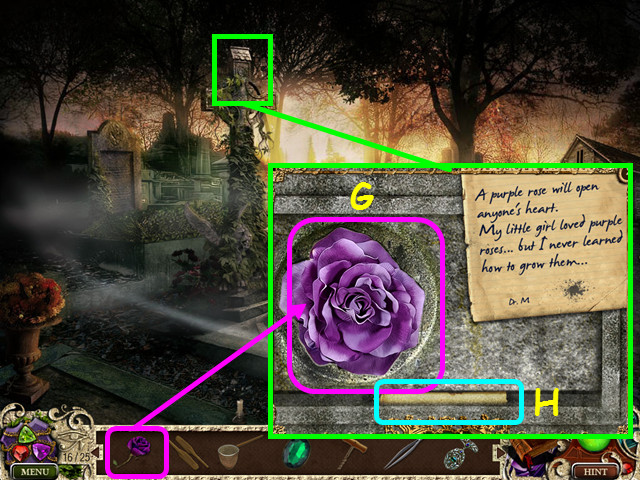 • Look at the cross and place the PURPLE ROSE into the carving
(G). • Read the hidden note (H). • Walk down, then go left to
the lake.
• Look at the cross and place the PURPLE ROSE into the carving
(G). • Read the hidden note (H). • Walk down, then go left to
the lake.
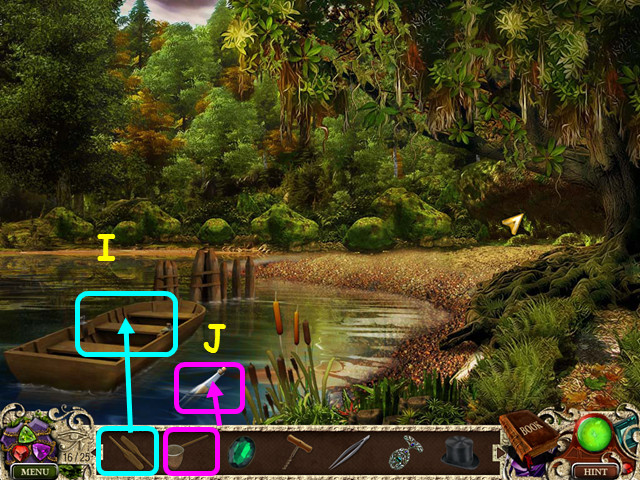 • Place the OARS into the boat (I). • Use the NET to capture
the MESSAGE IN THE BOTTLE (J). • Walk right twice, go forward
twice, then climb the ladder.
• Place the OARS into the boat (I). • Use the NET to capture
the MESSAGE IN THE BOTTLE (J). • Walk right twice, go forward
twice, then climb the ladder.
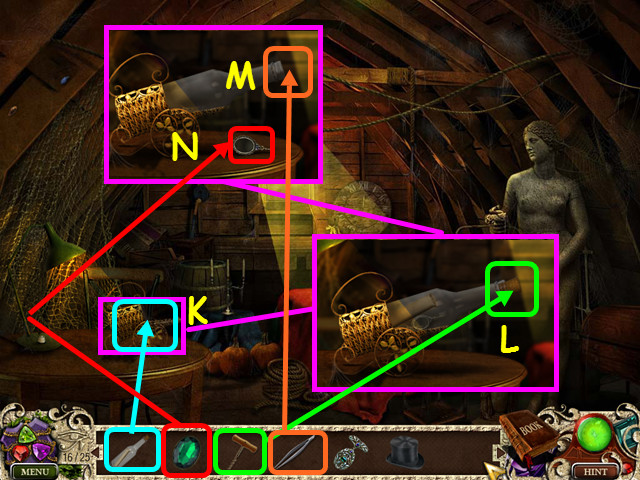 • Look at the table and place the MESSAGE IN THE BOTTLE into
the holder (K). • Use the CORKSCREW to remove the cork (L). •
Use the TWEEZERS to get the note; use the TWEEZERS again to
pill out the earring (M). • Place the GREEN EMERALD into the
earring then take the emerald earring (N). • Walk down 4
times, go left to the lake, then go left on the boat.
• Look at the table and place the MESSAGE IN THE BOTTLE into
the holder (K). • Use the CORKSCREW to remove the cork (L). •
Use the TWEEZERS to get the note; use the TWEEZERS again to
pill out the earring (M). • Place the GREEN EMERALD into the
earring then take the emerald earring (N). • Walk down 4
times, go left to the lake, then go left on the boat.
Chapter 4: The Summer House
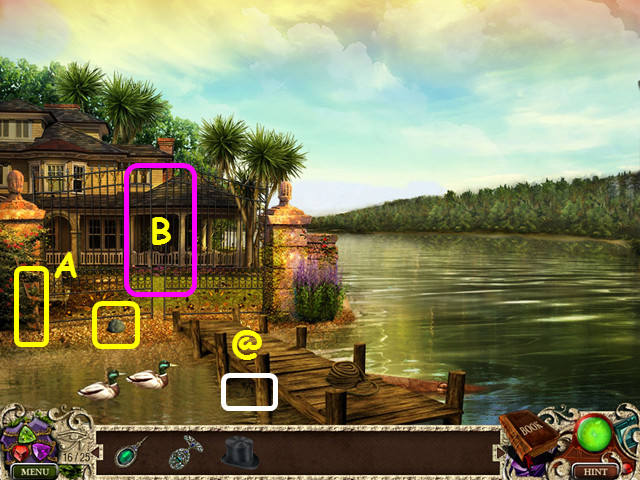 • Take the 17/25 Golden Eye of Horus (@). • Take the BROOM
HANDLE and the ROCK (A). • Walk forward through the gate (B).
• Take the 17/25 Golden Eye of Horus (@). • Take the BROOM
HANDLE and the ROCK (A). • Walk forward through the gate (B).
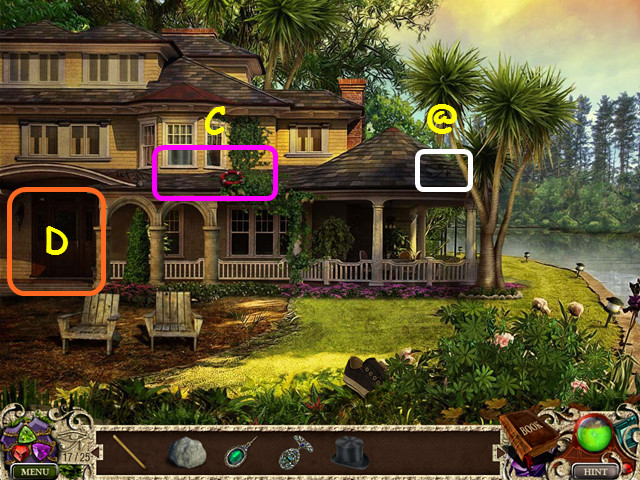 • Take the 18/25 Golden Eye of Horus (@). • Note the roof area
(C). • Walk to the porch (D).
• Take the 18/25 Golden Eye of Horus (@). • Note the roof area
(C). • Walk to the porch (D).
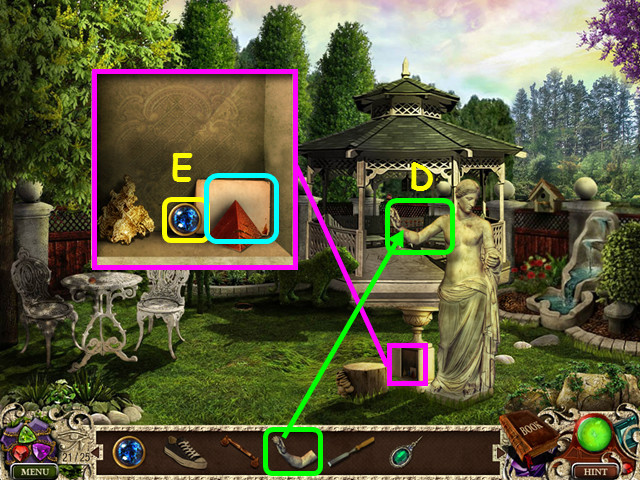
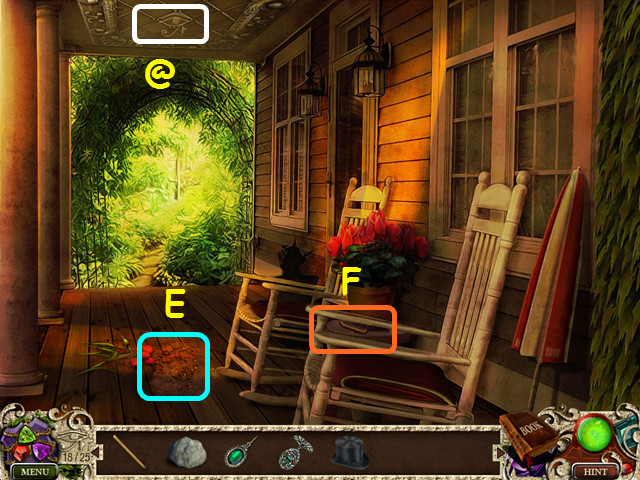 • Take the 19/25 Golden Eye of Horus (@). • Note the dirt on
the floor (E). • Note the eyeglass case (F). • Walk forward.
• Take the 19/25 Golden Eye of Horus (@). • Note the dirt on
the floor (E). • Note the eyeglass case (F). • Walk forward.
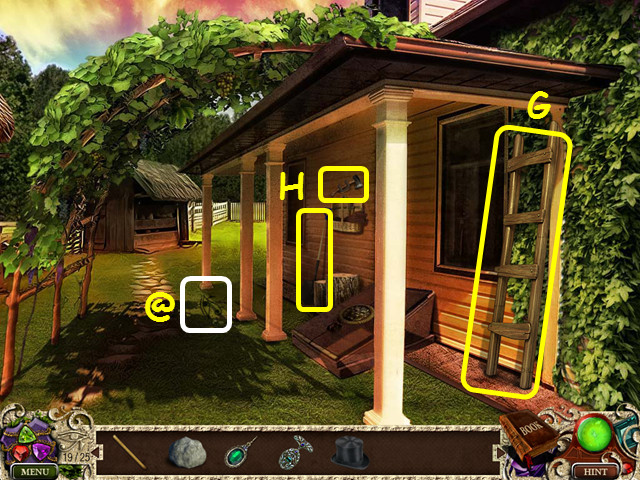 • Take the 20/25 Golden Eye of Horus (@). • Take the LADDER
(G). • Take the AXE and the SHOVEL (H). • Walk forward.
• Take the 20/25 Golden Eye of Horus (@). • Take the LADDER
(G). • Take the AXE and the SHOVEL (H). • Walk forward.
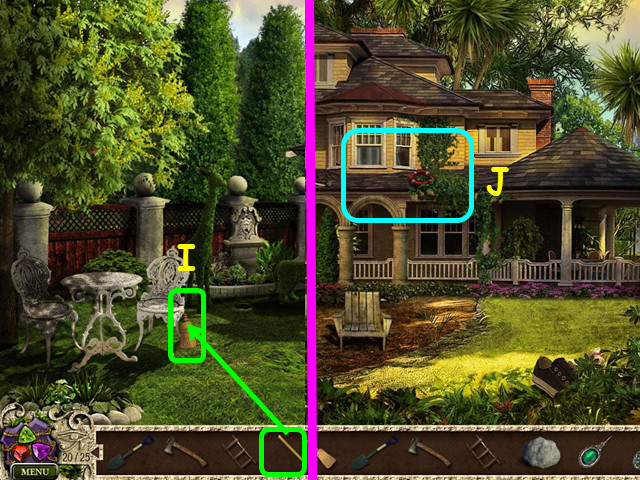 • Use the BROOM HANDLE on the broom head, then take the BROOM
(I). • Walk down 3 times. • Zoom into the roof (J).
• Use the BROOM HANDLE on the broom head, then take the BROOM
(I). • Walk down 3 times. • Zoom into the roof (J).
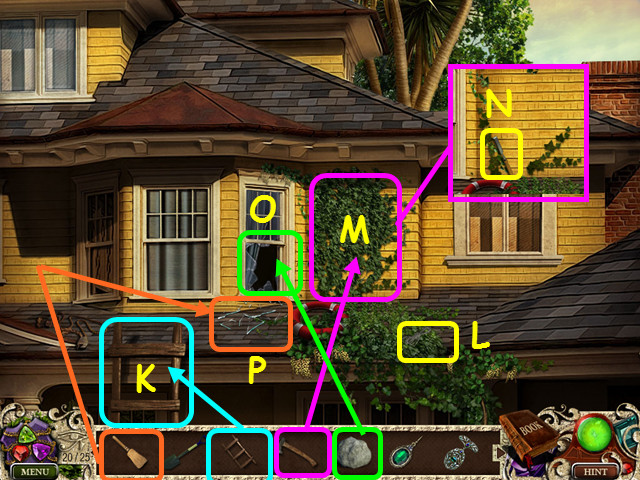 • Place the LADDER against the roof (K). • Take the SHOESTRING
(L). • Use the AXE to chop down the ivy (M). • Take the CHISEL
(N). • Use the ROCK to break the window (O). • Use the BROOM 3
times on the broken glass (P). • Enter the bedroom.
• Place the LADDER against the roof (K). • Take the SHOESTRING
(L). • Use the AXE to chop down the ivy (M). • Take the CHISEL
(N). • Use the ROCK to break the window (O). • Use the BROOM 3
times on the broken glass (P). • Enter the bedroom.
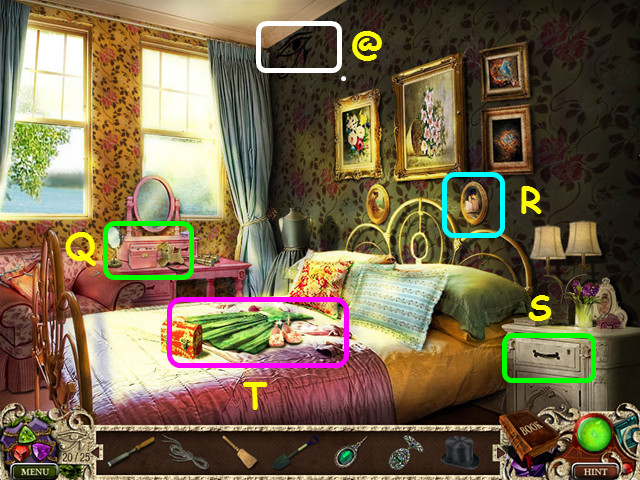 • Take the 21/25 Golden Eye of Horus (@). • Note the locked
case (Q). • Look at the portrait (R). • Note the locked drawer
(S). • Select the clothing on the bed for a HOS (T).
• Take the 21/25 Golden Eye of Horus (@). • Note the locked
case (Q). • Look at the portrait (R). • Note the locked drawer
(S). • Select the clothing on the bed for a HOS (T).
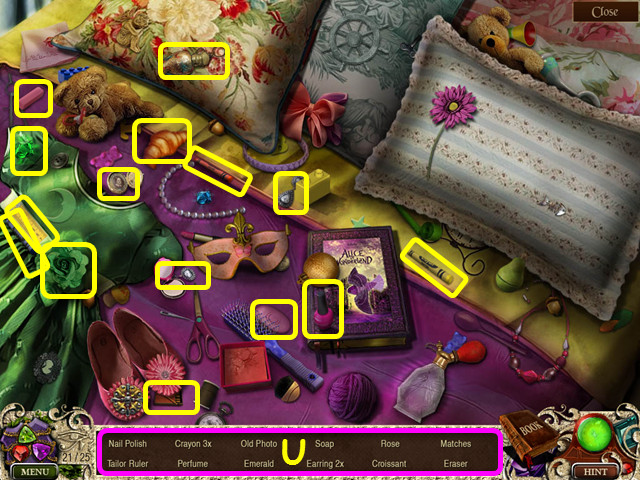 • Locate all the items on the list (U). • You will earn the
CROWBAR. • Go out the window and down the ladder.
• Locate all the items on the list (U). • You will earn the
CROWBAR. • Go out the window and down the ladder.
 • Use the SHOESTRING on the shoe, then take the SNEAKER (V). •
Look at the ground and use the SHOVEL 3 times on the dirt (W).
• Take the STATUE HAND and the PULL HANDLE (X). • Walk left to
the porch.
• Use the SHOESTRING on the shoe, then take the SNEAKER (V). •
Look at the ground and use the SHOVEL 3 times on the dirt (W).
• Take the STATUE HAND and the PULL HANDLE (X). • Walk left to
the porch.
 • Use the BROOM on the dirt 3 times (Y). • Use the CROWBAR to
remove the boards, then take the JEWELRY BOX KEY (Z). • Walk
down, go up on the roof, then enter the window.
• Use the BROOM on the dirt 3 times (Y). • Use the CROWBAR to
remove the boards, then take the JEWELRY BOX KEY (Z). • Walk
down, go up on the roof, then enter the window.
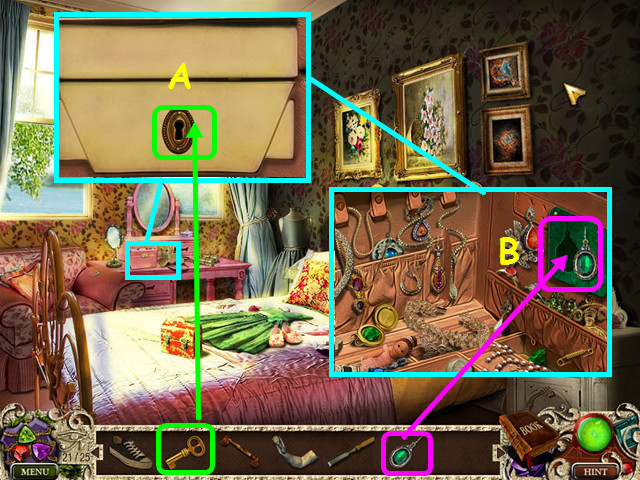 • Look at the jewelry box and use the JEWELRY BOX KEY on the
lock (A). • Place the EMERALD EARRING with its mate (B).
• Look at the jewelry box and use the JEWELRY BOX KEY on the
lock (A). • Place the EMERALD EARRING with its mate (B).
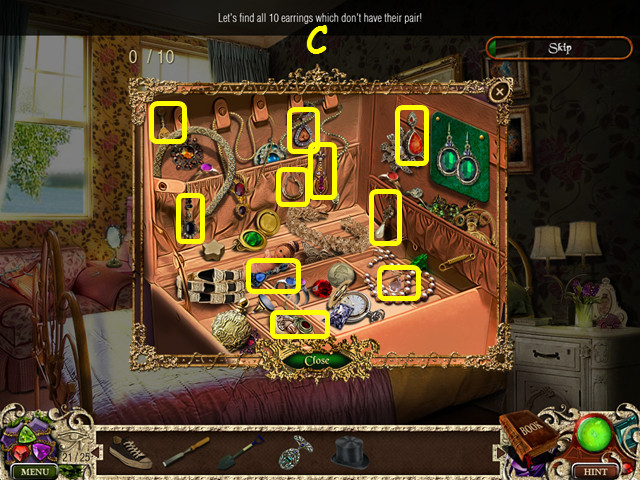 • Locate the 10 earrings that do not have a match (C). • You
will earn the 1st LION'S EYE. • Go out the window, down the
ladder, go left to the porch, then go forward twice.
• Locate the 10 earrings that do not have a match (C). • You
will earn the 1st LION'S EYE. • Go out the window, down the
ladder, go left to the porch, then go forward twice.
 • Place the STATUE HAND on the statue (D). • Look in the base
of the urn; take the 2nd LION'S EYE and read the note (E). •
Walk down.
• Place the STATUE HAND on the statue (D). • Look in the base
of the urn; take the 2nd LION'S EYE and read the note (E). •
Walk down.
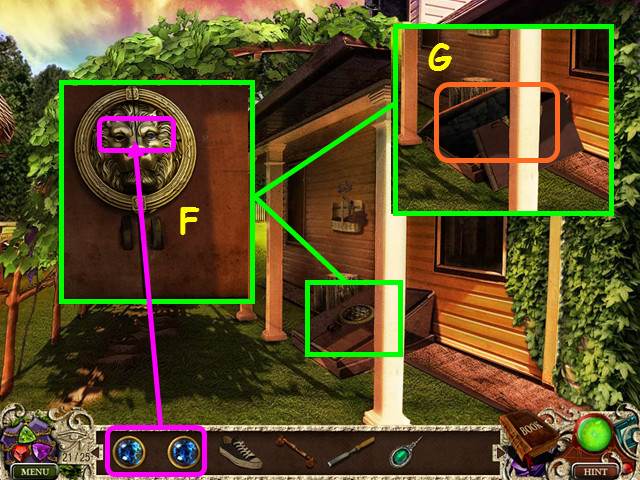 • Look at the cellar door and place the 2 LION'S EYES into the
lion head (F). • Enter the cellar (G).
• Look at the cellar door and place the 2 LION'S EYES into the
lion head (F). • Enter the cellar (G).
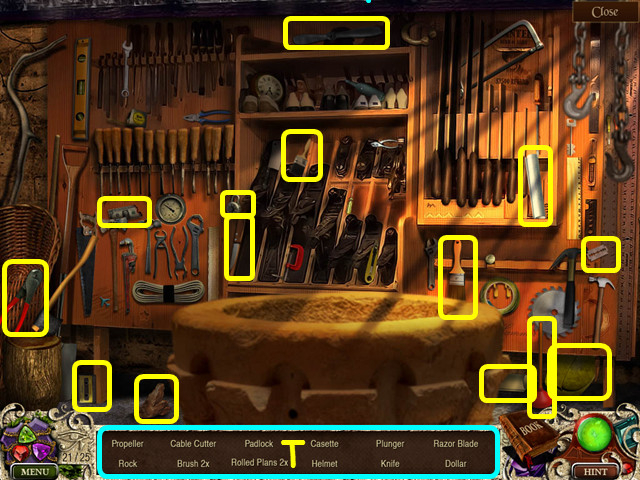
 • Look at the diagram and note the numbering (H). • Open the
dryer (I). • Select the tools for a HOS (J).
• Look at the diagram and note the numbering (H). • Open the
dryer (I). • Select the tools for a HOS (J).
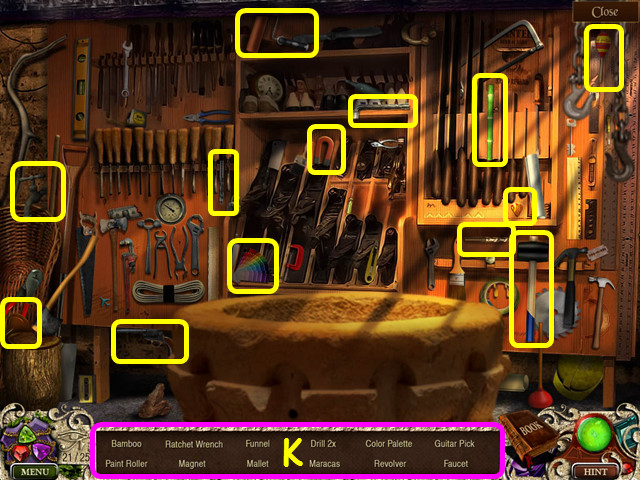 • Locate all the items on the list (K). • You will earn the
GLASSES. • Walk down twice.
• Locate all the items on the list (K). • You will earn the
GLASSES. • Walk down twice.
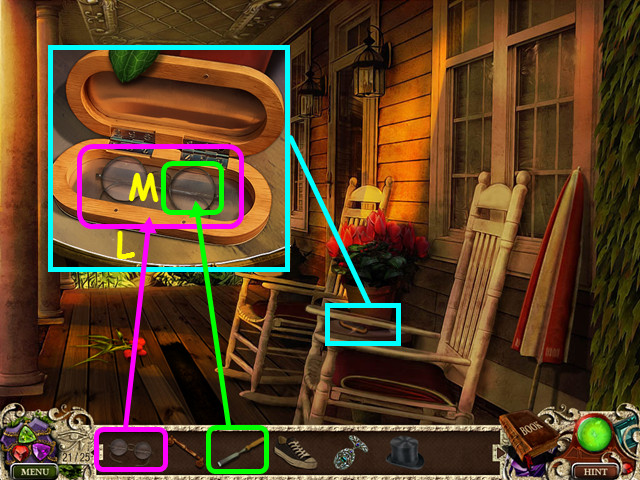 • Look at the table and place the GLASSES into the case (L). •
Use the CHISEL on the glasses to get the ROUND GLASS (M). •
Walk forward twice.
• Look at the table and place the GLASSES into the case (L). •
Use the CHISEL on the glasses to get the ROUND GLASS (M). •
Walk forward twice.
 • Look at the statue arm and place the ROUND GLASS into the
hole (N). • Look where the light shines and take the DRAWER
KEY (O). • Walk down 3 times, go up the ladder to the roof and
enter the window.
• Look at the statue arm and place the ROUND GLASS into the
hole (N). • Look where the light shines and take the DRAWER
KEY (O). • Walk down 3 times, go up the ladder to the roof and
enter the window.
 • Look at the nightstand and use the DRAWER KEY on the lock
(P). • Place the handle on the box and remove the lid (Q). •
Place the BROOCH into the indentation and read the note (R). •
Select the bed for a HOS.
• Look at the nightstand and use the DRAWER KEY on the lock
(P). • Place the handle on the box and remove the lid (Q). •
Place the BROOCH into the indentation and read the note (R). •
Select the bed for a HOS.
 • Locate all the items on the list (S). • You will earn the
OIL CAN. • Go out through the window and down the ladder. Walk
left to the porch, go forward, then enter the cellar. • Select
the tools for a HOS.
• Locate all the items on the list (S). • You will earn the
OIL CAN. • Go out through the window and down the ladder. Walk
left to the porch, go forward, then enter the cellar. • Select
the tools for a HOS.
 • Locate all the items on the list (T). • You will earn the
GEAR. • Walk down, then go forward.
• Locate all the items on the list (T). • You will earn the
GEAR. • Walk down, then go forward.
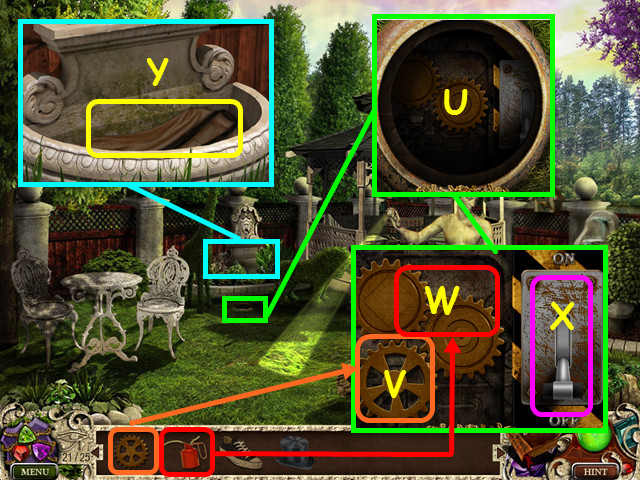 • Look at the fountain control and open the cover (U). • Place
the GEAR (V) into the mechanism and use the OIL CAN on the
gears (W). • Pull the lever (X). • Look in the fountain and
take the WET JACKET (Y). • Walk down and enter the cellar.
• Look at the fountain control and open the cover (U). • Place
the GEAR (V) into the mechanism and use the OIL CAN on the
gears (W). • Pull the lever (X). • Look in the fountain and
take the WET JACKET (Y). • Walk down and enter the cellar.
 • Place the WET JACKET into the dryer (A). • Close the dryer
door (B), then press the controls (C). • Open the dryer and
take the DRY JACKET. • Place the DRY JACKET on the mannequin
(D).
• Place the WET JACKET into the dryer (A). • Close the dryer
door (B), then press the controls (C). • Open the dryer and
take the DRY JACKET. • Place the DRY JACKET on the mannequin
(D).
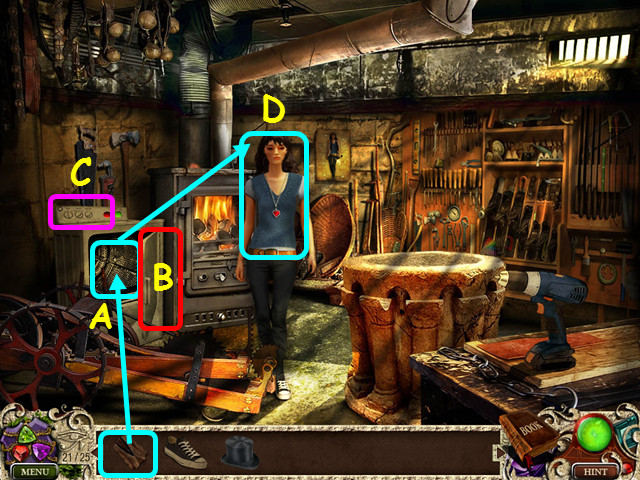
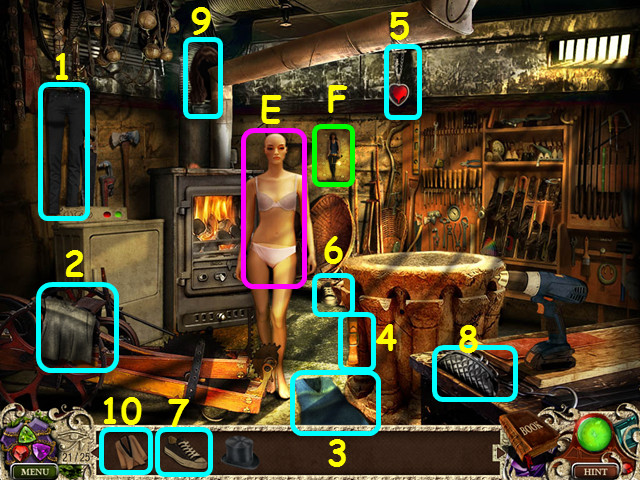 • Place the items on the mannequin (E) in numerical order
(1-10). • Refer to the diagram if necessary (F). • Look at the
mannequin for a mini-game.
• Place the items on the mannequin (E) in numerical order
(1-10). • Refer to the diagram if necessary (F). • Look at the
mannequin for a mini-game.
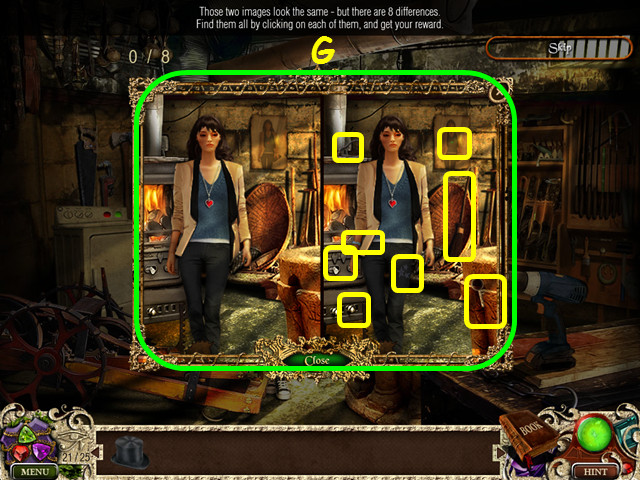 • Find the 8 differences between the 2 photos (G). • You will
earn the CASTLE GATE KEY. • Walk down 5 times, go right, then
walk down twice. • Use the CASTLE GATE KEY on the gate lock,
then enter the gate.
• Find the 8 differences between the 2 photos (G). • You will
earn the CASTLE GATE KEY. • Walk down 5 times, go right, then
walk down twice. • Use the CASTLE GATE KEY on the gate lock,
then enter the gate.
Chapter 5: The Castle
 • Walk forward into the labyrinth for a mini-game. • Use the
direction arrows (A) to guide the red ball from start (B) to
finish (C). • Walk forward again.
• Walk forward into the labyrinth for a mini-game. • Use the
direction arrows (A) to guide the red ball from start (B) to
finish (C). • Walk forward again.
 • Select the pool on the right for a HOS. • Locate all the
items on the list (D). • You will earn the CHEST KEY.
• Select the pool on the right for a HOS. • Locate all the
items on the list (D). • You will earn the CHEST KEY.
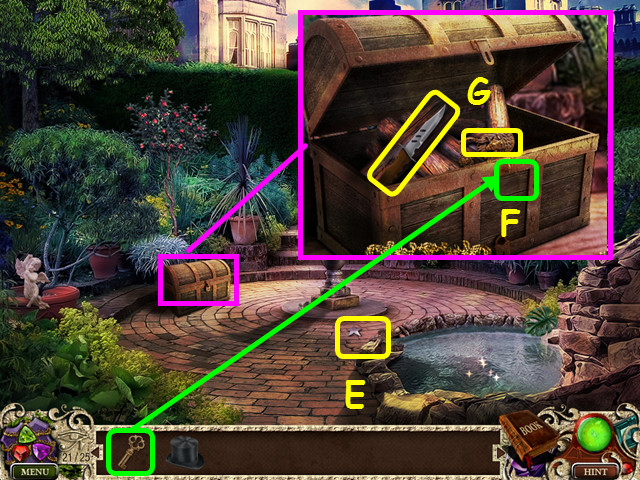 • Take the STAR 1 (E). • Look at the chest and use the CHEST
KEY on the lock (F). • Take the KNIFE and the DOOR KNOCKER 1
(G). • Walk forward.
• Take the STAR 1 (E). • Look at the chest and use the CHEST
KEY on the lock (F). • Take the KNIFE and the DOOR KNOCKER 1
(G). • Walk forward.
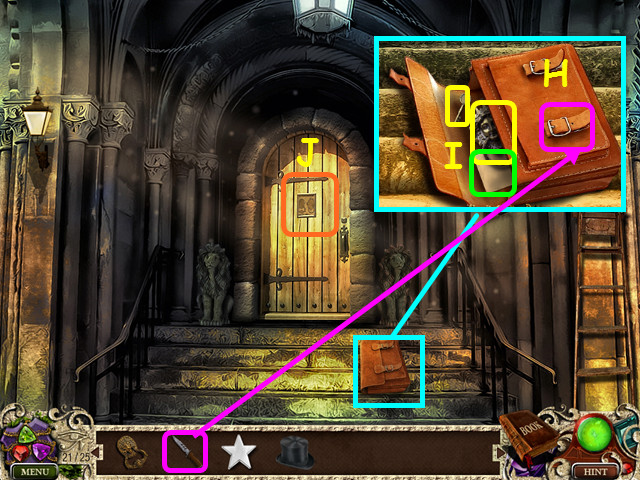 • Look at the briefcase and use the KNIFE on the straps (H). •
Take the DOOR KNOCKER 2, BOX KEY, and read the note (I). •
Look at the door for a mini-game (J).
• Look at the briefcase and use the KNIFE on the straps (H). •
Take the DOOR KNOCKER 2, BOX KEY, and read the note (I). •
Look at the door for a mini-game (J).
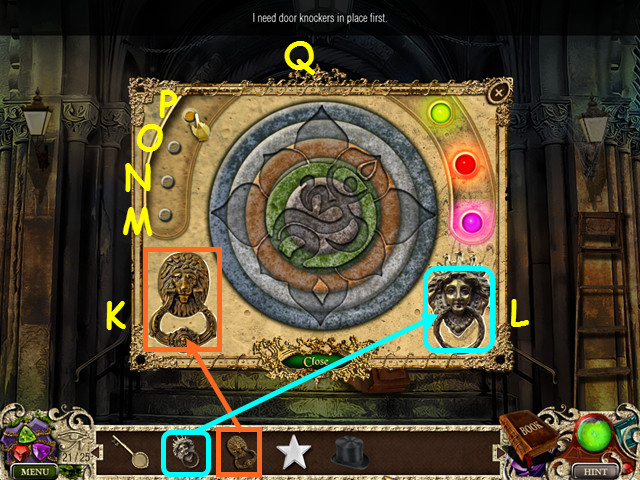 • Place DOOR KNOCKER 1 in the left niche (K). • Place DOOR
KNOCKER 2 into the right niche (L). • Rotate the rings by
pressing the buttons (M-P) to complete the symbol (Q). • Press
the buttons in this order: Mx1, Nx10, Ox3, and Px5. • You will
earn the LOCKET CHAIN. • Walk forward.
• Place DOOR KNOCKER 1 in the left niche (K). • Place DOOR
KNOCKER 2 into the right niche (L). • Rotate the rings by
pressing the buttons (M-P) to complete the symbol (Q). • Press
the buttons in this order: Mx1, Nx10, Ox3, and Px5. • You will
earn the LOCKET CHAIN. • Walk forward.
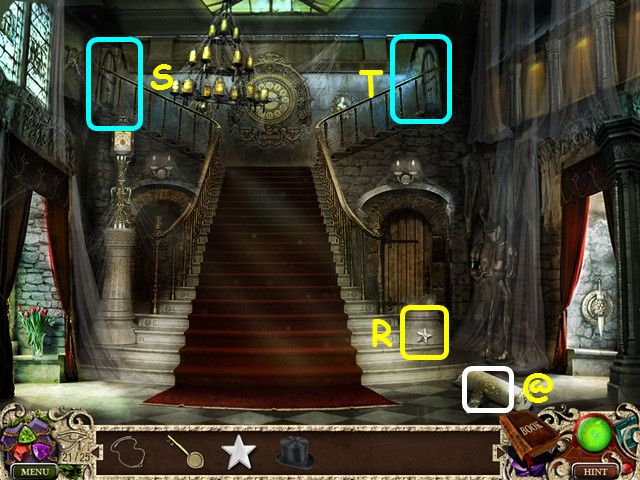 • Take the 22/25 Golden Eye of Horus (@). • Take the STAR 2
(R). • Note the upper left door (S). • Enter the upper right
door (T).
• Take the 22/25 Golden Eye of Horus (@). • Take the STAR 2
(R). • Note the upper left door (S). • Enter the upper right
door (T).
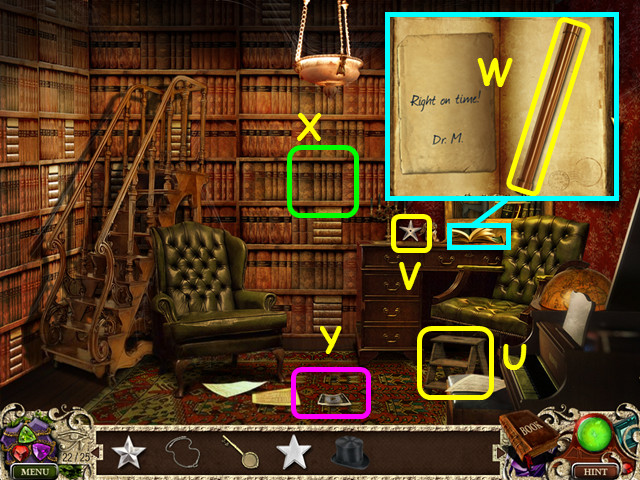 • Take the STOOL (U). • Take the STAR 3 (V). • Look at the
book and take the metal bar (W). • Note the hidden area on the
book case (X). • Look at the photo showing the time of 7:15
(Y). • Walk down and enter the upper left office.
• Take the STOOL (U). • Take the STAR 3 (V). • Look at the
book and take the metal bar (W). • Note the hidden area on the
book case (X). • Look at the photo showing the time of 7:15
(Y). • Walk down and enter the upper left office.
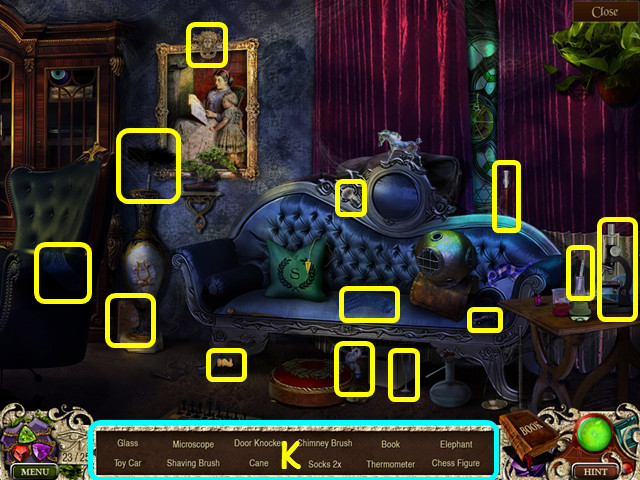
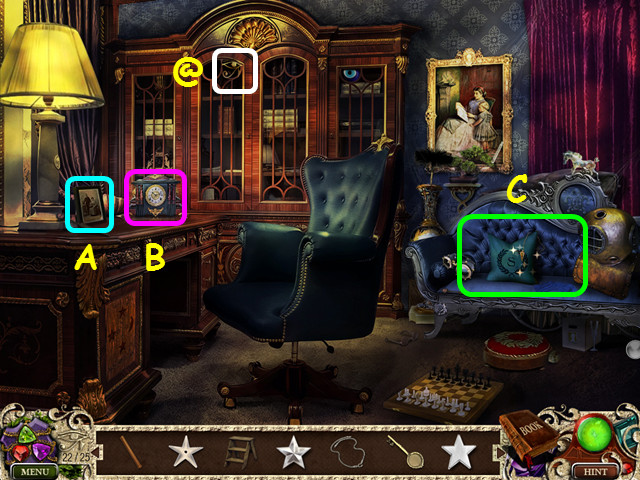 • Take the 23/25 Golden Eye of Horus (@). • Look at the
photograph (A). • Look at the clock and note the time is 7:15
(B). • Select the couch for a HOS (C).
• Take the 23/25 Golden Eye of Horus (@). • Look at the
photograph (A). • Look at the clock and note the time is 7:15
(B). • Select the couch for a HOS (C).
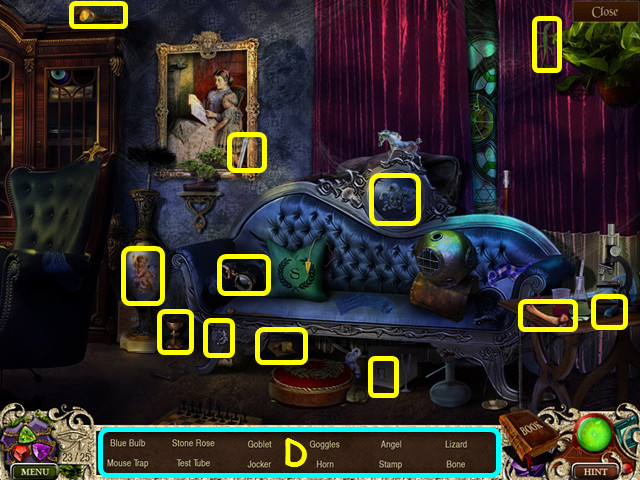 • Locate all the items on the list (D). • You will earn the
MOON.
• Locate all the items on the list (D). • You will earn the
MOON.
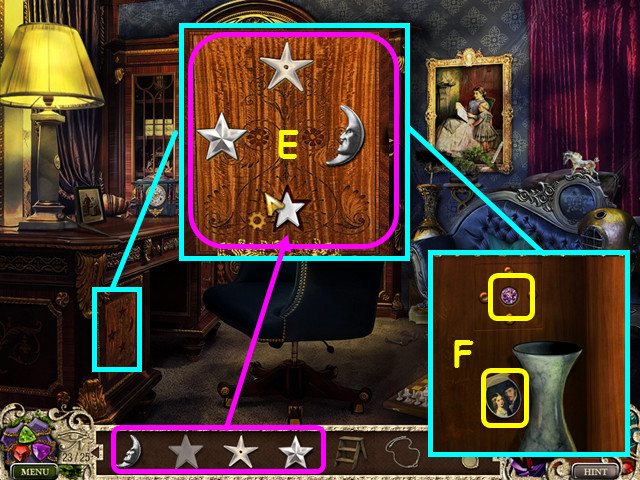 • Look at the desk door; place the MOON, STAR 1, STAR 2, and
STAR 3 into the indentations (E). • Take the LOCKET PHOTO and
the PURPLE GEM (F). • Walk down 3 times.
• Look at the desk door; place the MOON, STAR 1, STAR 2, and
STAR 3 into the indentations (E). • Take the LOCKET PHOTO and
the PURPLE GEM (F). • Walk down 3 times.
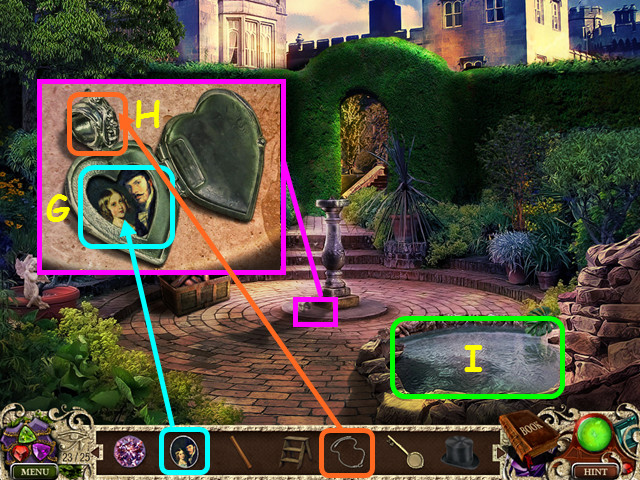 • Look at the locket and place the LOCKET PHOTO inside (G). •
Place the LOCKET CHAIN on the top to get the LOCKET (H). •
Select the pool for a HOS (I).
• Look at the locket and place the LOCKET PHOTO inside (G). •
Place the LOCKET CHAIN on the top to get the LOCKET (H). •
Select the pool for a HOS (I).
 • Locate all the items on the list (J). • You will earn the
BLUE GEM. • Walk forward twice and enter the left office.
• Locate all the items on the list (J). • You will earn the
BLUE GEM. • Walk forward twice and enter the left office.
 • Select the couch for a HOS. • Locate all the items on the
list (K). • You will earn the DUSTER. • Walk down twice.
• Select the couch for a HOS. • Locate all the items on the
list (K). • You will earn the DUSTER. • Walk down twice.
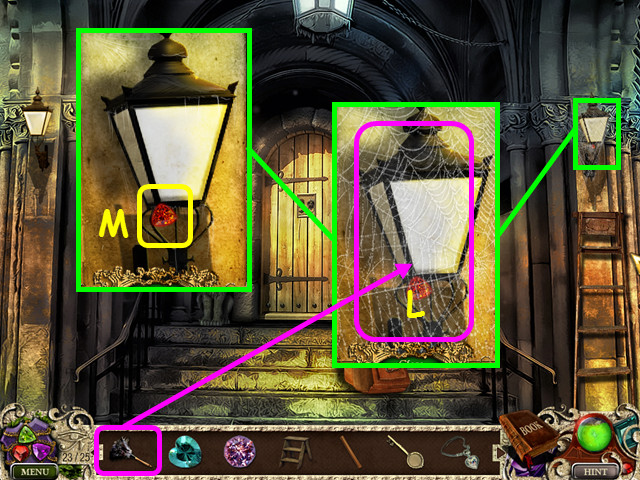 • Look at the right carriage light an use the DUSTER twice on
the cobwebs (L). • Take the RED GEM (M). • Walk forward, then
enter the right office.
• Look at the right carriage light an use the DUSTER twice on
the cobwebs (L). • Take the RED GEM (M). • Walk forward, then
enter the right office.
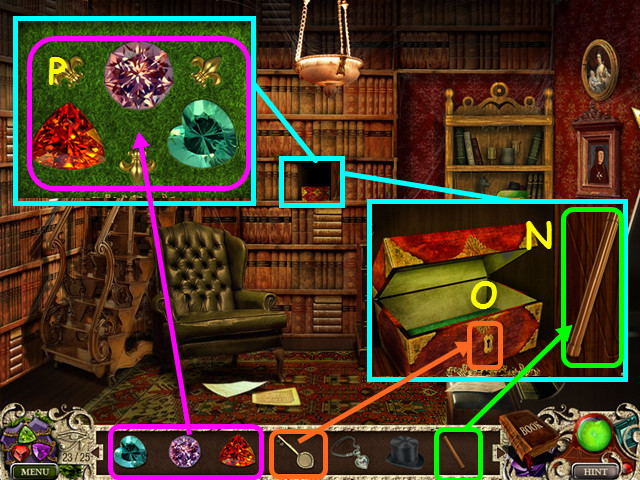 • Look at the secret area on the bookcase and place the METAL
BAR on the door (N). • Make sure the top of the bar is canted
to the right; select the bar to change its position. • Use the
BOX KEY in the lock (O). • Look inside the box; place the RED
GEM, BLUE GEM, and the PURPLE GEM into the indentations (P). •
Walk forward.
• Look at the secret area on the bookcase and place the METAL
BAR on the door (N). • Make sure the top of the bar is canted
to the right; select the bar to change its position. • Use the
BOX KEY in the lock (O). • Look inside the box; place the RED
GEM, BLUE GEM, and the PURPLE GEM into the indentations (P). •
Walk forward.
 • Take the 24/25 Golden Eye of Horus (@). • Look at the stairs
and use the DUSTER 3 times on the dust pile (Q). • Take the
SILVER KEY (R). • Walk forward.
• Take the 24/25 Golden Eye of Horus (@). • Look at the stairs
and use the DUSTER 3 times on the dust pile (Q). • Take the
SILVER KEY (R). • Walk forward.
 • Take the 25/25 Golden Eye of Horus (@). • Look at the door
and place the LOCKET into the opening (S). • Use the SILVER
KEY on the lock (T). • Walk forward.
• Take the 25/25 Golden Eye of Horus (@). • Look at the door
and place the LOCKET into the opening (S). • Use the SILVER
KEY on the lock (T). • Walk forward.
 • Place the TOP HAT on Dr. Magnus (U). • Select the debris for
a HOS (V).
• Place the TOP HAT on Dr. Magnus (U). • Select the debris for
a HOS (V).
 • Locate all the items on the list (W). • You will earn the
CLOCK HAND. • Walk down twice, go left, then walk down once
more.
• Locate all the items on the list (W). • You will earn the
CLOCK HAND. • Walk down twice, go left, then walk down once
more.
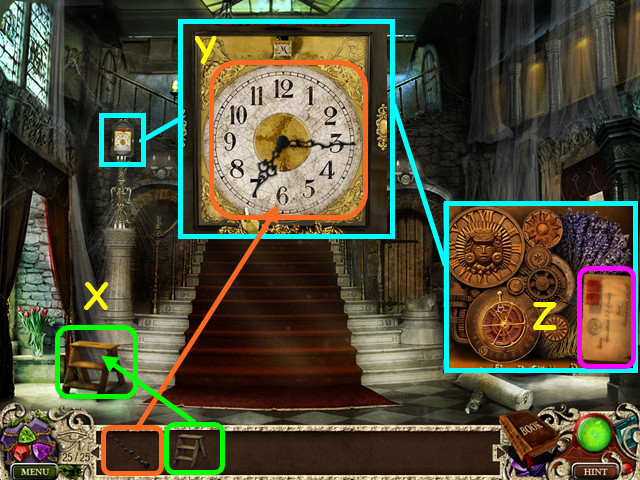 • Place the STOOL on the floor below the clock (X). • Look at
the clock; place the CLOCK HAND on the face then set the time
to 7:15 (Y). • Read the letter (Z). • Enter the right office,
then walk forward 3 times. • Congratulations! You have
completed the Dreamatorium of Dr. Magnus!
• Place the STOOL on the floor below the clock (X). • Look at
the clock; place the CLOCK HAND on the face then set the time
to 7:15 (Y). • Read the letter (Z). • Enter the right office,
then walk forward 3 times. • Congratulations! You have
completed the Dreamatorium of Dr. Magnus!
Golden Eye of Horus Locations
• This section lists all the locations of the Golden Eye of Horus scattered through the game separated by chapter. You can find screenshots of each location throughout the guide, they are all marked with the ‘@’ symbol. • Chapter 1, Entryway: on the inlaid box behind the velvet rope. • Chapter 1, Parlor: on the blue sofa. • Chapter 1, Library: wall decoration to the right of the deer head. • Chapter 1, Bathroom: on the yellow towels on the shelf. • Chapter 1, Secret Room: on the bucket. • Chapter 2, Porch: on the clay pot. • Chapter 2, Purple Bar: on the seat of the chair, bottom center. • Chapter 2, Forest: carved into the mossy rock between the stairs and arch. • Chapter 2, Alley: on the left building, above the 1st floor window. • Chapter 2, Restroom: on the right stall door. • Chapter 2, Basement: on the radio in the lower right. • Chapter 3, Vine-covered Wall: on the brick, lower left. • Chapter 3, Forest Paths: on the left branch of the center tree. • Chapter 3, Lake: on the large moss-covered rock. • Chapter 3, Scarecrow Garden: just above the floodlight. • Chapter 3, Shack: on the floor in front of the trophy case. • Chapter 4, Dock: in the water under the center of the dock. • Chapter 4, Front Yard: on the right end of the roof. • Chapter 4, Porch: on the ceiling. • Chapter 4, Side of House: on the ground between the 3rd and 4th column. • Chapter 4, Bedroom: on the wall, near the ceiling. • Chapter 5, Grand Stairway: on the fallen column. • Chapter 5, Left Office: on the left center door of the large cabinet. • Chapter 5, Secret Hall: on the banner on the left wall. • Chapter 5, Secret Hall Door: under the torch on the rock wall.Created at: 2012-09-09