

Walkthrough Menu
General Tips
- “The Fall Trilogy Chapter 2: Reconstruction” is a Puzzle Adventure Game!
- Click on the menu button to adjust the Voice, Music, and Sound effects levels.
- There are the choices of Screen Resolution, Full Screen, Custom Cursor, or 360 Degree Free View in the menu options. 360 Degree Free View is the default display in Adventure Mode.
- There is a skip button for the puzzles after a couple minutes.
- You have a choice between Casual and Adventure Mode.
- In Casual Mode the puzzles are set to Easy (but they can be changed to Normal, individually). The Hint and skip buttons recharge faster and some scenes have added sparkles.
- In Adventure Mode the puzzles are set to Normal (again, they can be changed to Easy, individually). There is an additional puzzle and fewer sparkles to guide you.
- Hints can be obtained by clicking on the eye in the bottom right.
- Mini-game instructions can be repeated by clicking the “i” in the lower right.
- You can reset and change the difficulty on the mini-games by clicking on the circular arrow in the bottom right.
- Tasks to be completed can be viewed anytime by clicking on the Task button in the bottom left.
- Click on “Menu,” in the bottom right of the task bar, to exit the game.
Part 1: The 13th Floor
- Answer the phone.
- Head left into the elevator.
- Click on the 13 on the elevator pad.
- Head out of the elevator.
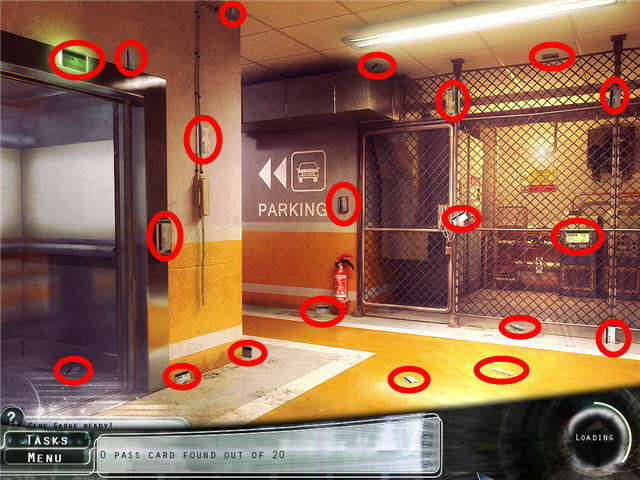
- Find the 20 PASS CARDS.
- Head into the elevator.
- Place the ELEVATOR PASS CARD in the slot.
- Click on 13 on the elevator pad.
- Click on 20 on the elevator pad.
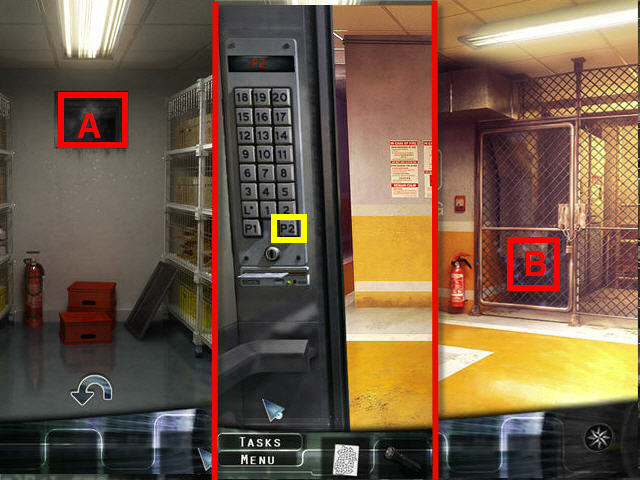
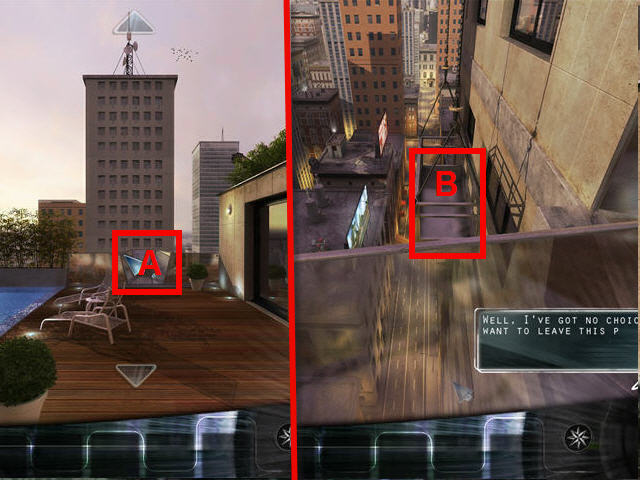
- Exit the elevator and look right, towards the elevator.
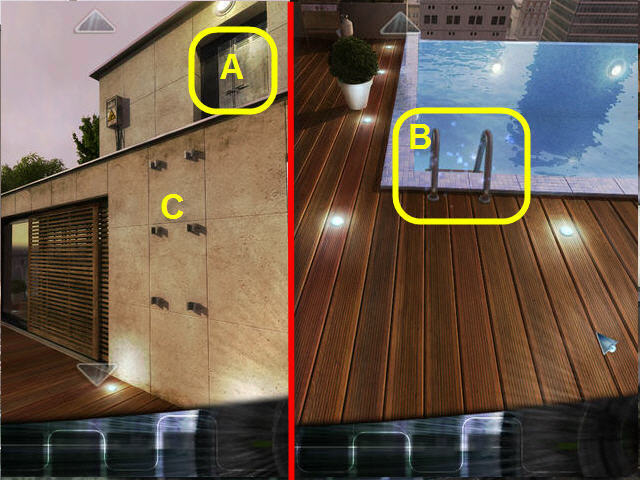
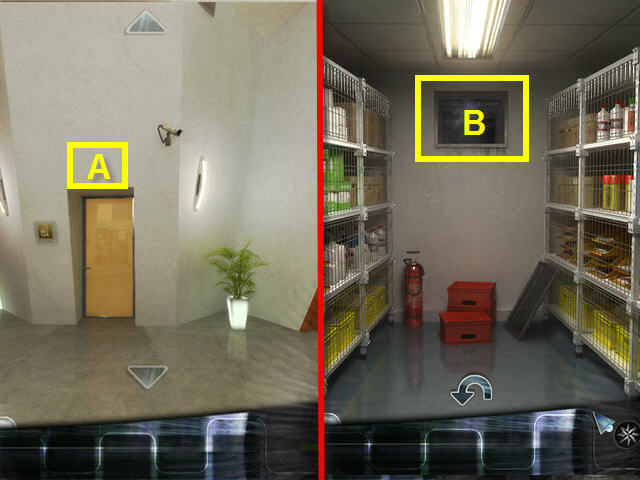
- Click on the elevator machine room (A).
- Head to your left.
- Look down.
- Face the pool and take the LADDER (B).
- Place the LADDER on the hooks on the wall (C).
- Climb up the LADDER.
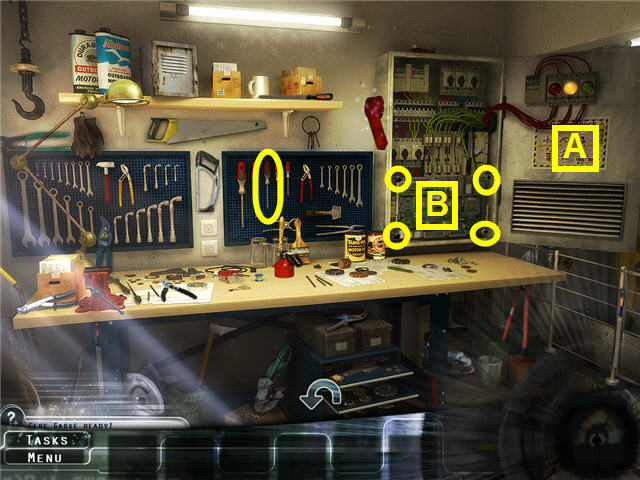
- Click on the mechanism cabinet door (A) to open it.
- Click on the motherboard (B).
- Take the middle SCREWDRIVER from the pegboard.
- Use the SCREWDRIVER on the corners of the motherboard to remove all the screws.
- Click on the fallen motherboard.
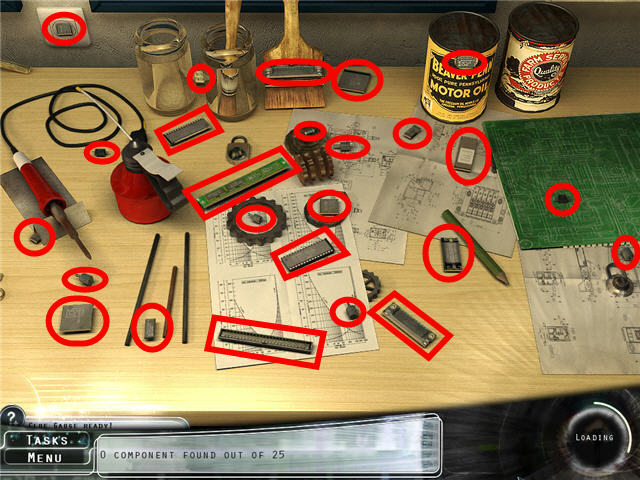
- Find the 25 COMPONENTS.
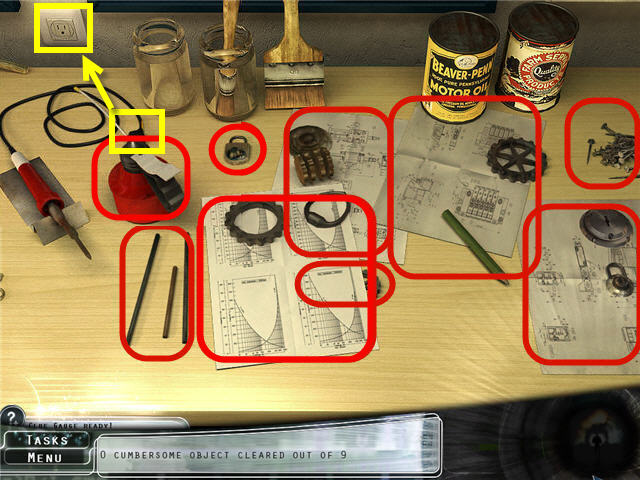
- Clear the workspace of the nine cumbersome objects.
- Click on the plug of the soldering iron and plug it in the wall outlet.
- Place the MOTHERBOARD on the cleared workspace.
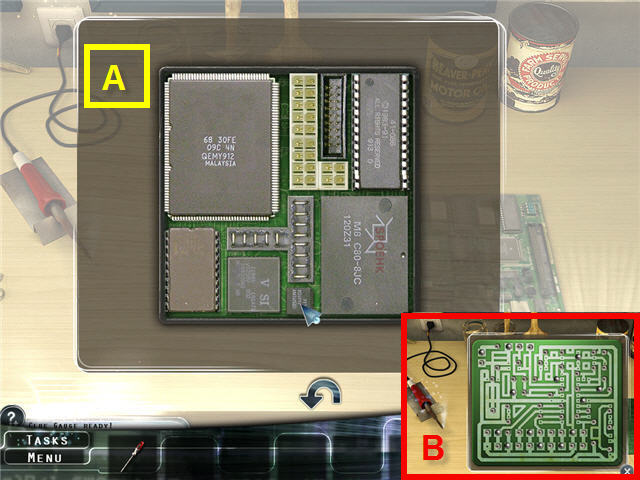
- Click and drag the pieces onto the MOTHERBOARD so that they all fit without overlapping.
- The solutions for Normal and Easy Modes are the same; the difference is how many pieces are in place when you start. See screenshot (A) for the solution.
- Pick up the soldering iron to begin the next mini-game (B). The sequence is random.
- In Easy Mode you will get three sequences of three lights in a row to solder.
- In Normal Mode you will get three sequences of lights to solder, starting with three lights, then four, and then five.
- You can start over anytime by setting down the soldering iron.
- Back away from the workbench and place the MOTHERBOARD back into the cabinet.
- Use the SCREWDRIVER on the each corner to screw the MOTHERBOARD back in.
- Click on the cabinet door to close it.
- Pull down the red lever attached to the cabinet to turn it on.
- Back out of the area two times.
- Walk to the glass balcony on your left and look right to the window washer cradle.
- Head back to the elevator and push the 13th floor.
- In Casual Mode, the door will be unlocked, so you can enter the office and skip this section.
- In Adventure Mode, you will need to click on the biometric door lock and crack the code!
- The solutions for Normal and Easy Modes are the same.
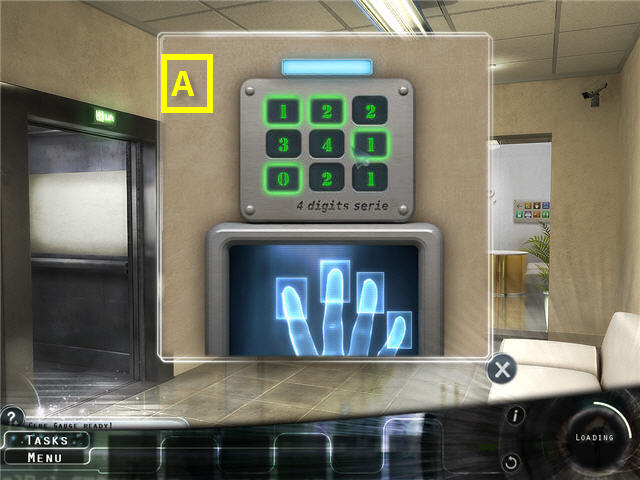
- Light up all the numbers on the panel.
- The numbers signify how many adjoining buttons have been pressed.
- When a key lights up, that is the number of surrounding keys that must remain pressed. See screenshot (A) for the solution.
- Enter the office and click on the phone.
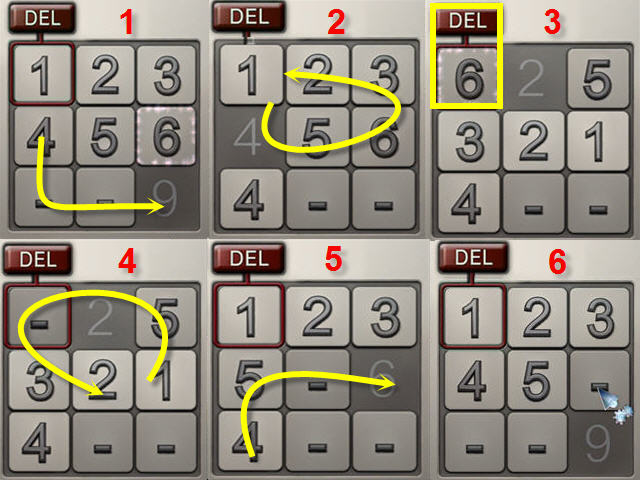
- In Easy Mode you’ll need to slide the numbers so that the 6 is in the first square, so you can delete the 6, and then return all the pieces to their original positions. See the screenshot for the solution.
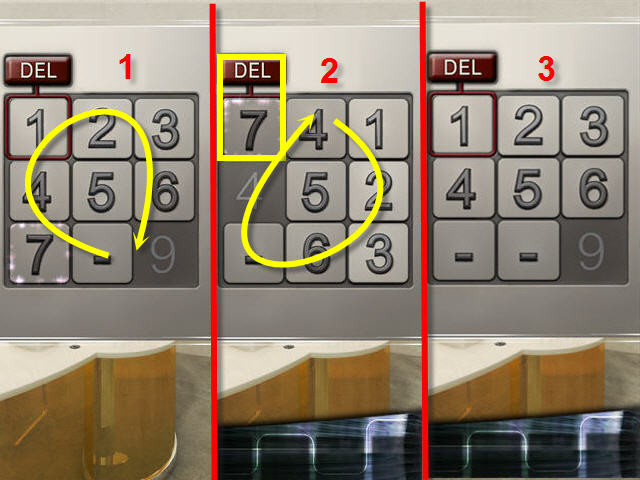
- In Normal Mode you’ll need to slide the numbers so that the 7 is in the first square, so you can delete the 7, and then return all the pieces to their original positions. See the screenshot for the solution.
- Go right three times.
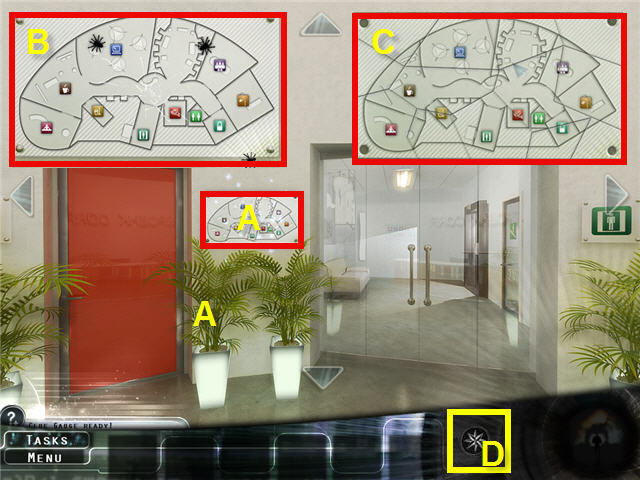
- Click on the map (A) on the wall next to the surveillance room.
- Click on the spiders to get rid of them (B).
- Reassemble the map. See the screenshot (C) for the solution.
- In Easy Mode you’ll left-click and drag the pieces into position.
- In Normal Mode you’ll right-click to hold and rotate the pieces and then left-click and drag them into position to connect.
- When complete, you will get a map (D) that is now available for checking where the rooms are and what cameras are active.
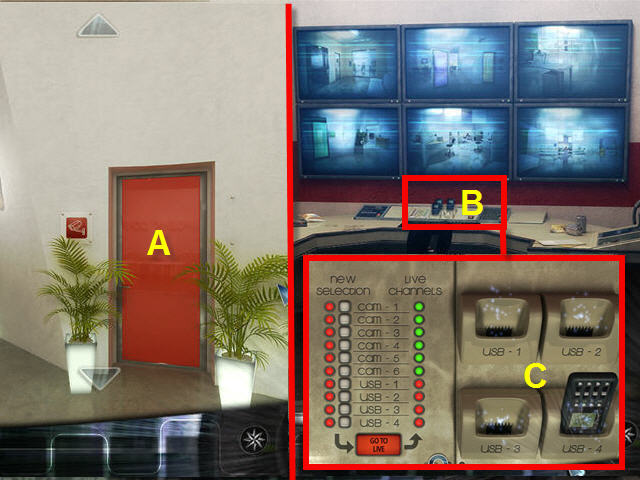
- Head into the video surveillance room (A).
- Click on the console (B).
- Click on the right side, by the recorder slots (C).
- Find the 20 RECORDERS.
- Place the three RECORDERS in the three open USB slots on the right.
- Click on the broken recorder in USB-4.
- Look at your map and determine which cameras to shut off.
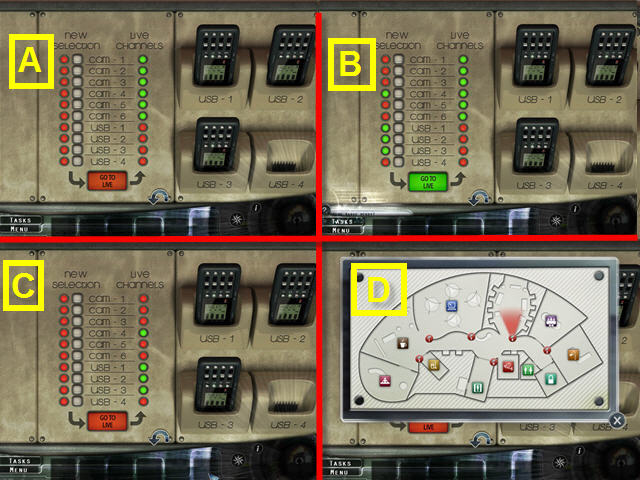
- Click on the buttons next to cam 4, USB-1, USB-2, and USB-3.
- Click on the green “Go to Live” button. See screenshots (B) and (C) for before and after shots.
- Check your map (D) to be sure all cameras are off except the waiting room cam 4.
- Leave the room and head directly down the hall to the left, to the laboratory entrance.
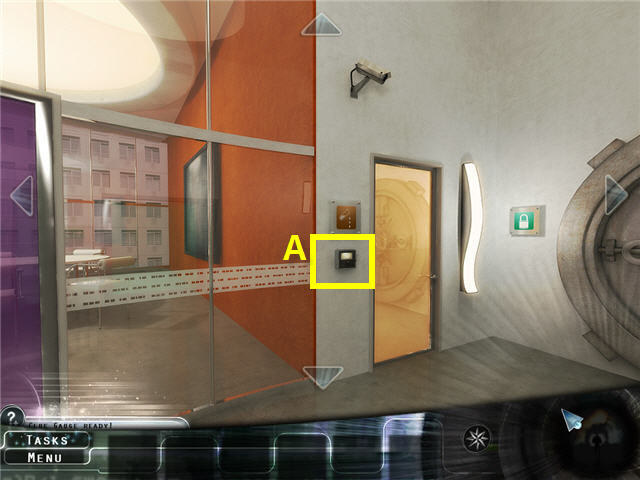
- Click on the signature lock on the left of the laboratory door (A) to get a new task.
- Head down the hall to the other end and enter the top management office.
Part 2: The Secured Room
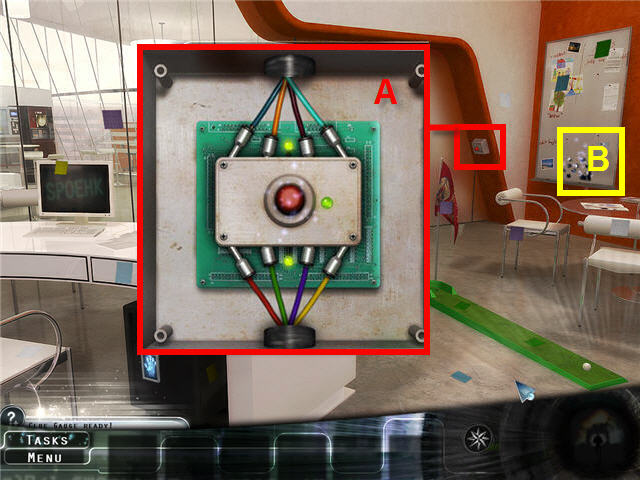
- Click on the red button to the right of the glass panels.
- Connect the wires so that both the green lights light up.
- The solutions for both Easy and Normal are the same. See screenshot (A) for the solution.
- Click on the red button once the wires are connected correctly.
- Click on the puzzle (B) on the bulletin board.
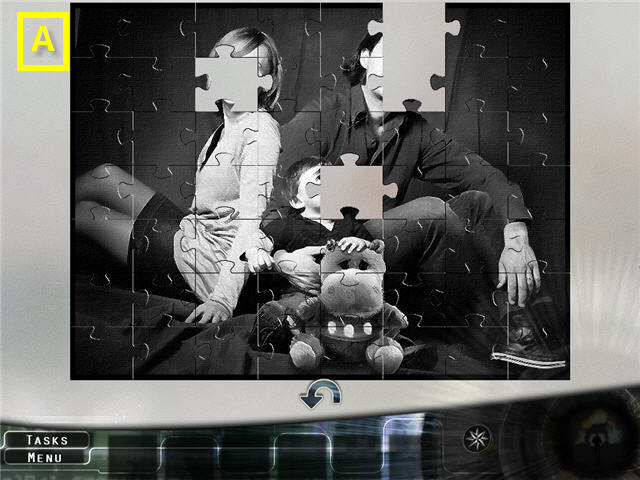
- Assemble the jigsaw puzzle by clicking and dragging the pieces together. See the screenshot for the solution.
- Click on the safe under the desk.
- Click on various numbers on the panel a few times and you will be taken back to the room.
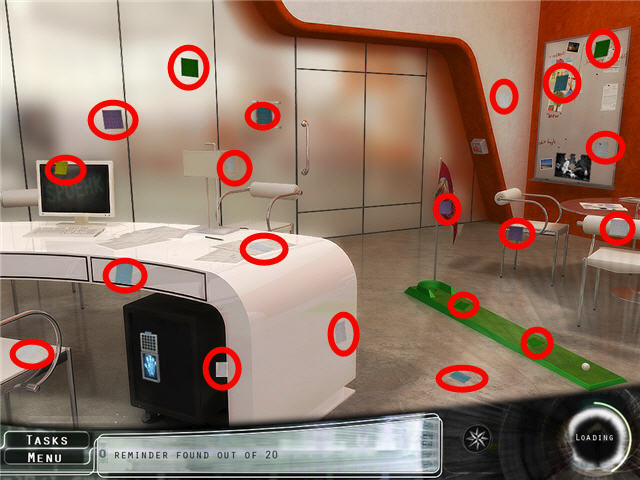
- Find the 20 REMINDERS.

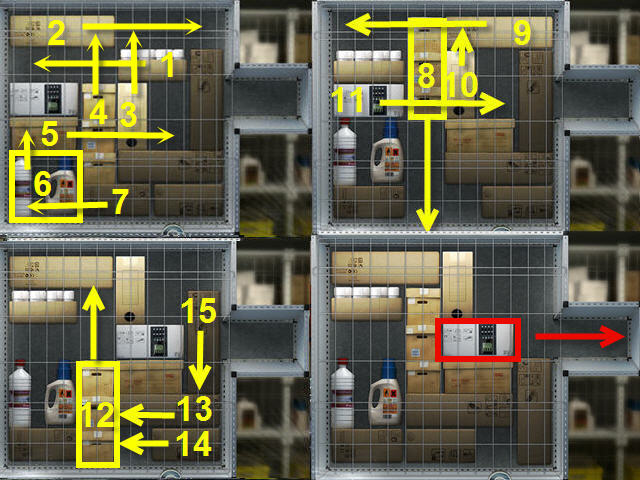
- Click on the correct 12 keys to make the panel match the reminder (A).
- The numbers signify how many surrounding buttons are pushed. See the screenshot for the solution.
- In Normal Mode you will need to find all 12 correct buttons.
- In Easy Mode 5 of the 12 buttons will already be pushed for you. The solution is the same for both.
- Click on the safe and a check book will be placed on the desk.
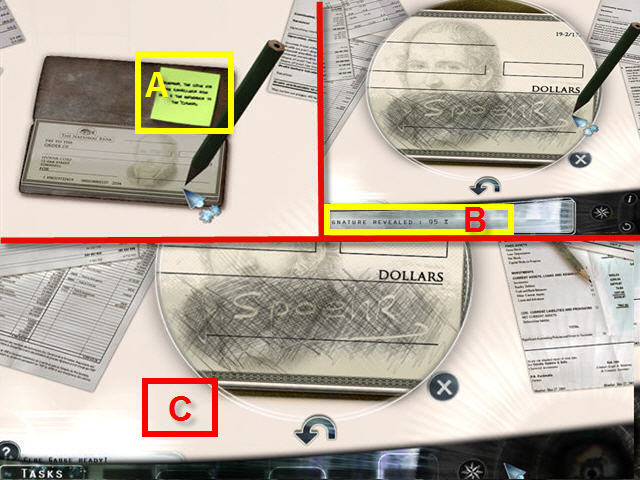
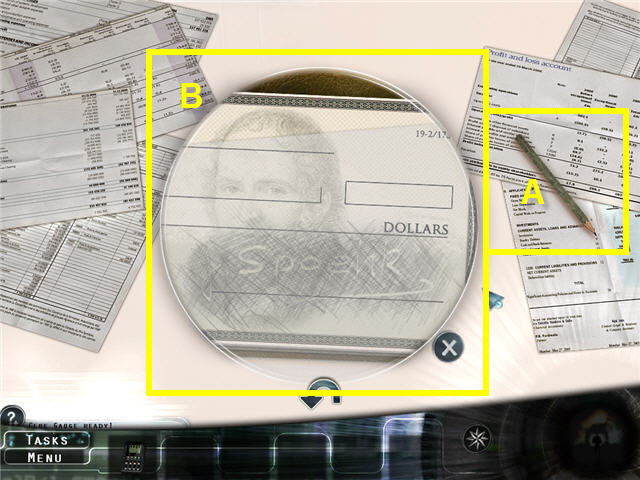
- Click on the desk and click on the sticky note on the checkbook (A).
- Pick up the pencil and draw over the signature line until the bar on the bottom (B) says 100%. See the screenshot (C) for the solution.
- Head out the door and go right twice.
- Enter the storeroom.
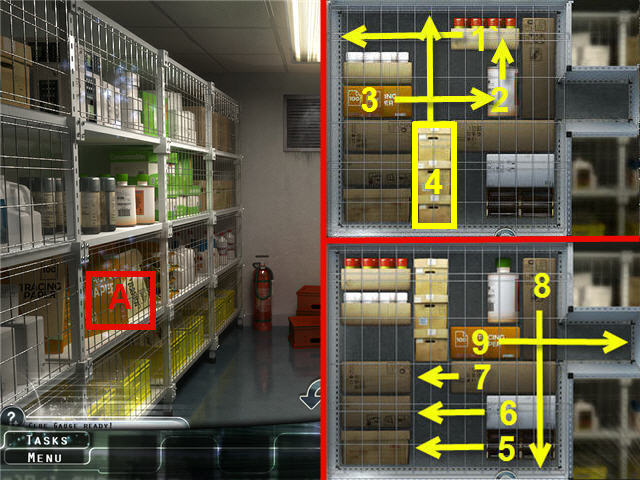
- In Easy Mode you’ll need to click on the second shelf from the bottom, on the left (A).
- Get the TRACING PAPER out of the cage by sliding the contents around. See the screenshot for the solution.
- In Normal Mode you’ll click on the second shelf from the bottom, on the left (A).
- Again, you’ll need to get the TRACING PAPER out of the cage by sliding contents around. See Screenshot for solution.
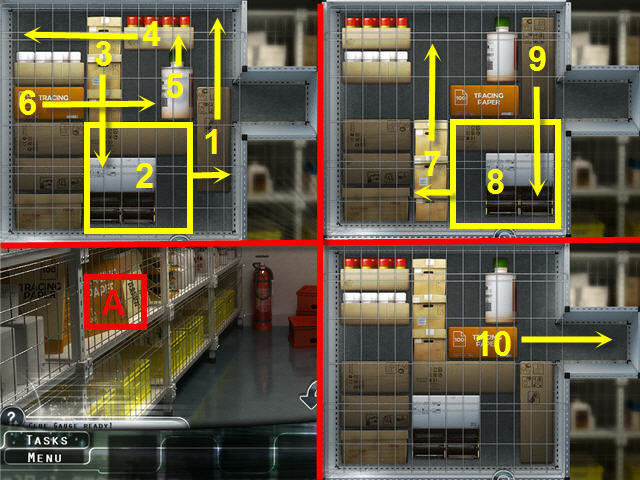
- In Easy Mode you’ll click on the second shelf from the top, on the left (A).
- Get the DIGITAL RECORDER out of the cage by sliding the contents around. See the screenshot for the solution.
- In Normal Mode you’ll click on the second shelf from the bottom, on the left (A).
- Get the DIGITAL RECORDER out of the cage by sliding the contents around. See the screenshot for the solution.
- Exit the storeroom and go right into the top management office.
- Click on the desk and click the TRACING PAPER on the checkbook two times.
- Pick up the pencil (A) and use it on the TRACING PAPER covered checkbook (B) to get IMPORTANT SIGNATURE ON TRACING PAPER in inventory.
- Head out of the office and go right down the hall to the laboratory.
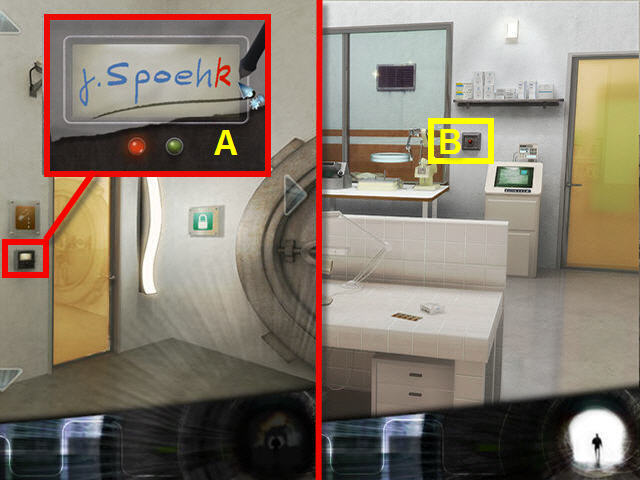
- Click on the signature pad, on the left of the door, and place the IMPORTANT SIGNATURE ON TRACING PAPER (A) on it.
- Use the stylus to copy the letters in red. The letter will turn blue when correct and the next letter will turn red.
- In Normal Mode, the signature will require more precise tracing than in Easy Mode.
- Enter the laboratory.
- Click on the red button on the wall (B).
- Exit the room and go down the hall to the storeroom.
- Exit the room and go left down the hall to the storeroom (A).
- Click on the grill covering the ventilation duct.
- Click on the opened duct to get another task (B).
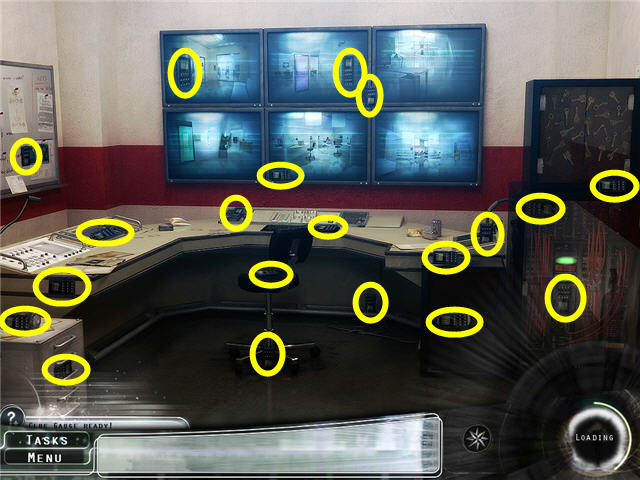
- Leave the storeroom and go down the hall to the video surveillance room.
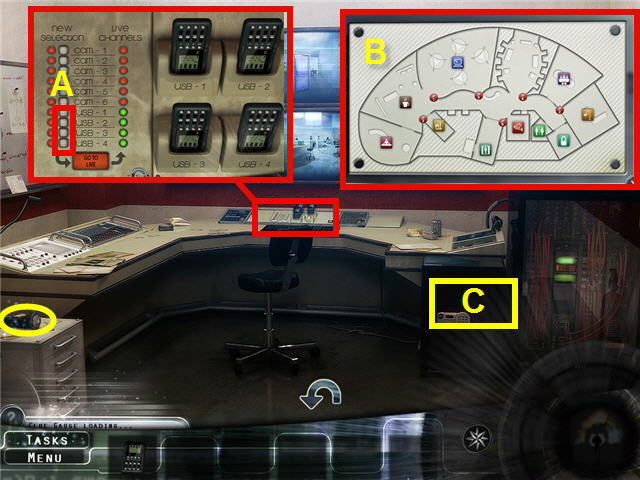
- Take the FLASHLIGHT on the file cabinet to the left.
- Click on the console and place the DIGITAL RECORDER into the USB-4 slot.
- Click on the buttons to the left of USB-1 through USB-4 (A) and then click on the “Go to Live” button. See the screenshot for the solution.
- All surveillance cameras should now be deactivated. Check your map (B) to be sure!
- Click on the safe (C) and see the reference to the checkbook note.
- Exit the room and go across the hall to the waiting area.

- Click on all the artwork and statues around the room.
- Note the numbers on the plaques underneath.
- Remember the sticky note on the checkbook (A).
- Take special note of the numbers under the Diamond Sutra (B).
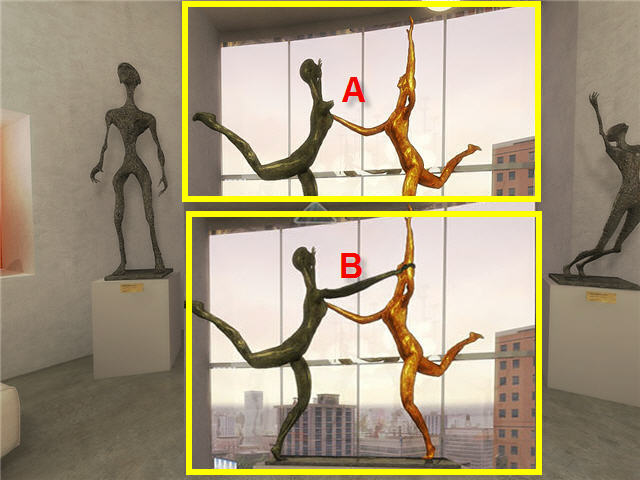
- Click on the dislocated arm of the statue (A) by the window so that it fits in place (B).
- Leave the waiting room and head over to the video surveillance room.
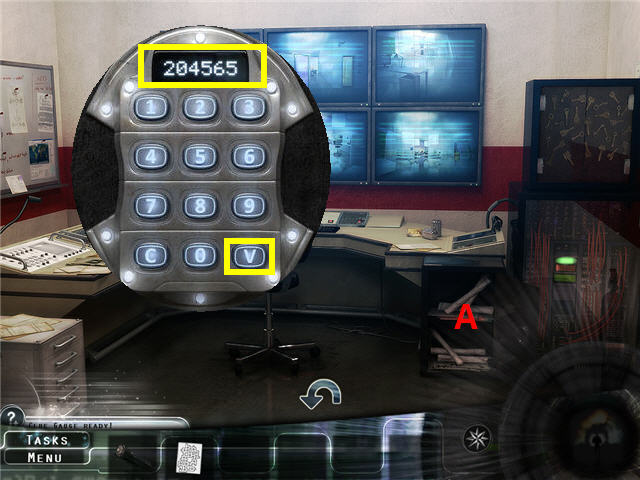
- Click on the safe and enter the code 2-0-4-5-6-5 that you took from the plaque under the Diamond Sutra.
- Push the V button on the code pad after you have completed entering the number.
- Click on the opened safe (A) and get the AIR CONDITIONING MAP in inventory.
- Head to the storeroom and click on the vent (A).
- Leave the storeroom and go over to the elevators, through the glass doors opposite the reception desk.
- Press the P2 button and ride down to the control unit.
- Click on the locked chain link door (B).
- Head into the elevator and push the 20.
- Exit the elevator and climb up the ladder to the elevator machinery room.
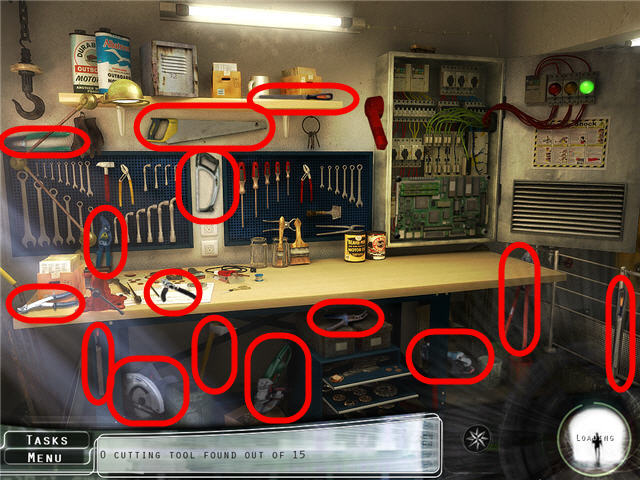
- Find the 15 cutting tools and you will receive CUTTING PLIERS in your inventory.
- Leave the room and enter the elevator.
- Push P2 on the elevator pad and exit to the parking garage.
- Use the CUTTING PLIERS on the chain link gate.
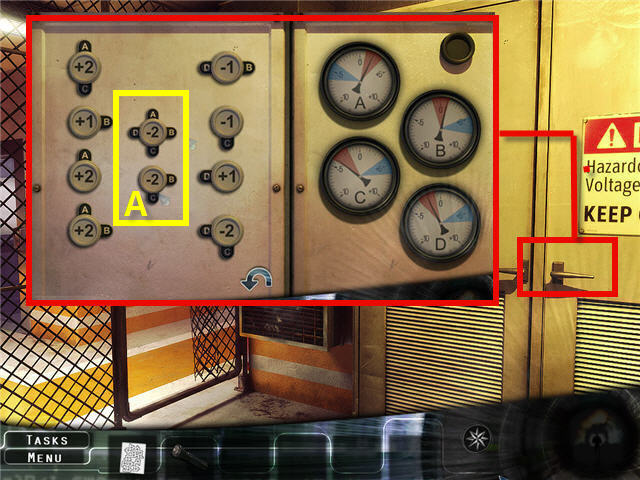
- Enter the temperature control unit room and click on the control cabinet.
- The object is to move all the arrows so they point to the red zone on the dials by rearranging the buttons on the left, adding or subtracting whichever way the dial goes.
- In Easy Mode, there are eight buttons.
- In Normal Mode there are 10 buttons.
- See the screenshot for the solution. The insert (A) applies only to Normal Mode.
- Leave the area and head back to the 13th floor.
- Go into the storeroom.
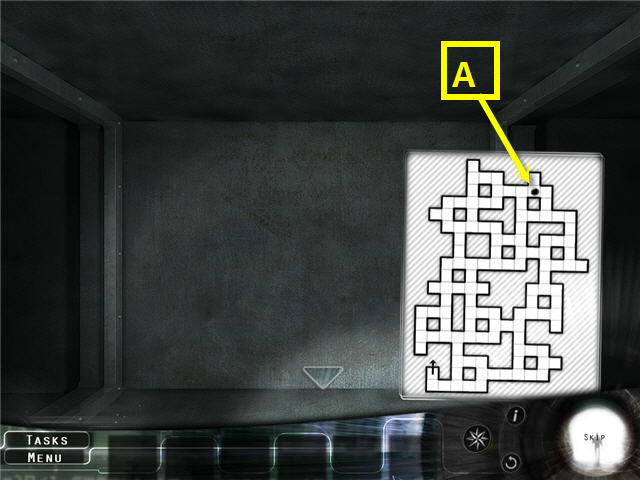
- Climb into the ventilation ducts.
- In Easy and Normal Modes the path through the labyrinth is: Forward, Right, Left , Forward 5x, Right, Forward 3x, Left, Forward 5x, Right, Left, Forward 3x, Right, Forward, Right.
- The difference between the Easy and Normal Modes is a dot on the map in Easy Mode (A) that shows you where you are.
- Push the grill in front of you and enter the secured room.
Part 3: Final Preparations
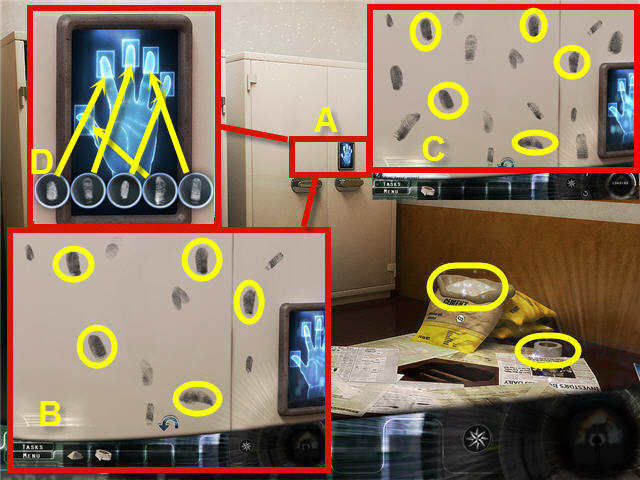
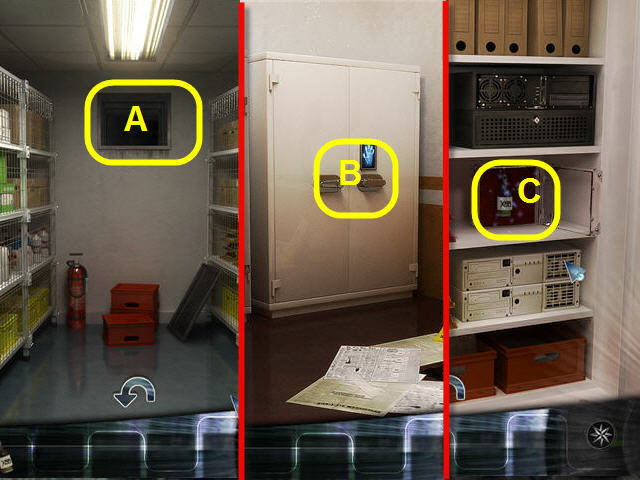
- Click on the cabinet (A) and then click on the greasy fingerprints.
- Back out of the close-up.
- Pick up the STICKY TAPE and the CEMENT POWDER.
- Click on the cabinet.
- Use the CEMENT POWDER on the fingerprints.
- Use the STICKY TAPE on five of the prints that came from the same hand to get PRINT SET.
- Look at the size of the prints to match them.
- See screenshot (B) for Easy Mode and screenshot (C) for Normal Mode.
- Take the PRINT SET and place it on the circles below the biometric hand (D).
- Place the PRINT SET on the matching fingers. See the Screenshot for the solution.
- Click on the cabinet.
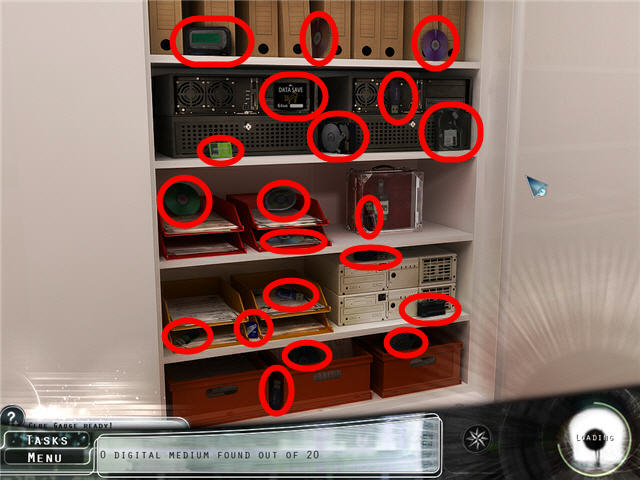
- Find the 20 DIGITAL MEDIUMS.
- Click on the ventilation duct to get back to the storeroom.
- Exit the storeroom and go across the hall to the computer room.
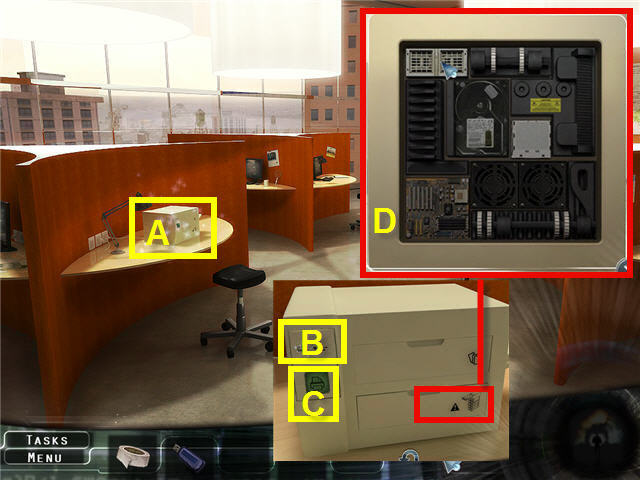
- Click on the printer (A).
- Place the DIGITAL MEDIUM in the slot on the upper left of the printer (B).
- Press the green button (C).
- Press the bottom tray of the printer.
- Click, hold, and drag the pieces to the panel.
- Assemble the parts so that they all fit together, leaving no spaces or overlapping.
- The solutions for both the Normal and Easy Modes are the same (D).
- The Easy Mode has a couple parts already in place at the beginning of the puzzle.
- Click on the green print button.
- Click on the top paper tray.
- Leave the computer room and go across the hall into the storeroom.
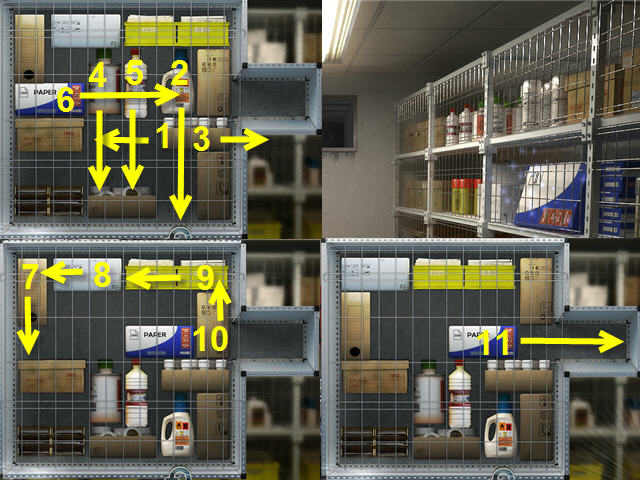
- In Easy Mode you’ll click on the second shelf from the top on the right (A).
- Get the REAM OF PAPER out of the cage by sliding the contents around. See the screenshot for the solution.
- In Normal Mode you’ll click on the second shelf from the bottom on the right (A).
- Get the REAM OF PAPER out of the cage by sliding the contents around. See the screenshot for the solution.
- Exit the storeroom and go back to the computer room.
- Click on the printer.
- Click on the paper tray.
- Place the REAM OF PAPER in the paper tray of the printer and click it closed.
- Push the green button.
- Take the printed paper from the tray on the right.
- Use the scissors on the paper (A).
- The object of the puzzle is to put together the pieces to get a completed document.
- Some of the pieces of paper may need to be turned over, by right-clicking them, in order to put the page together.
- The difference between Easy and Normal Modes is the number of pieces that the document is cut into. See the screenshot for the solution (B).
- Use the STICKY TAPE on the sheet and get the FORMULA’S DOCUMENT.
- Exit the room and go to the laboratory.
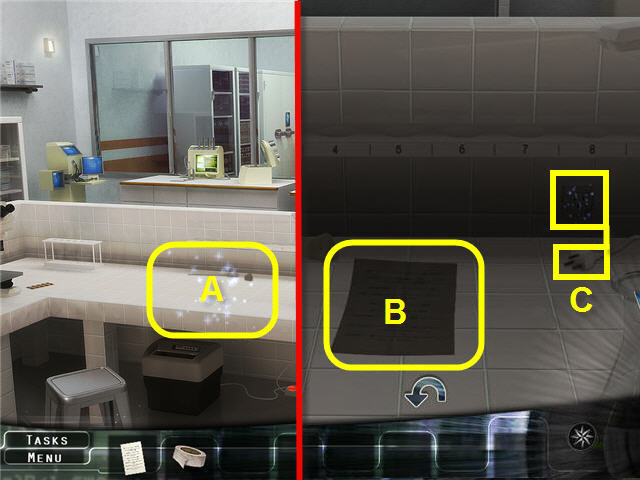
- Click on the counter in the lab (A).
- Place the FORMULA’S DOCUMENT on the counter.
- Plug the plug on the counter into the socket.
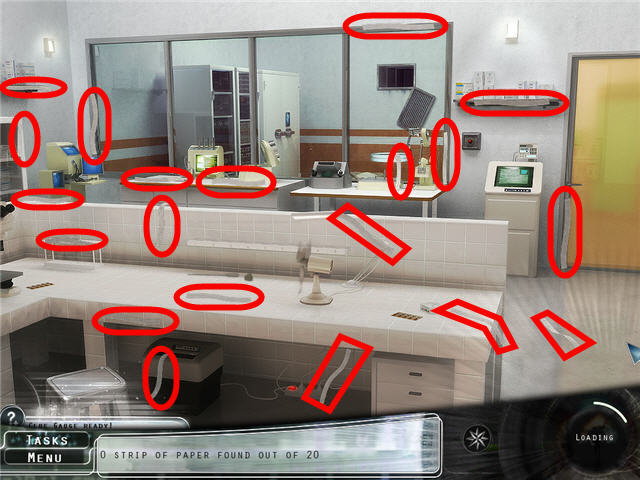
- Find the 20 STRIPS OF PAPER.
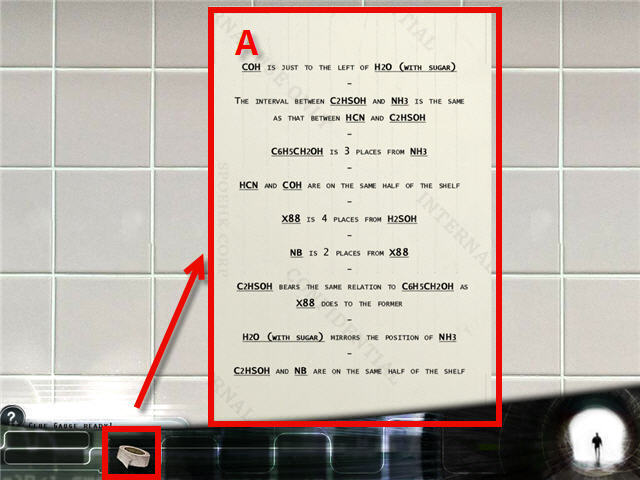
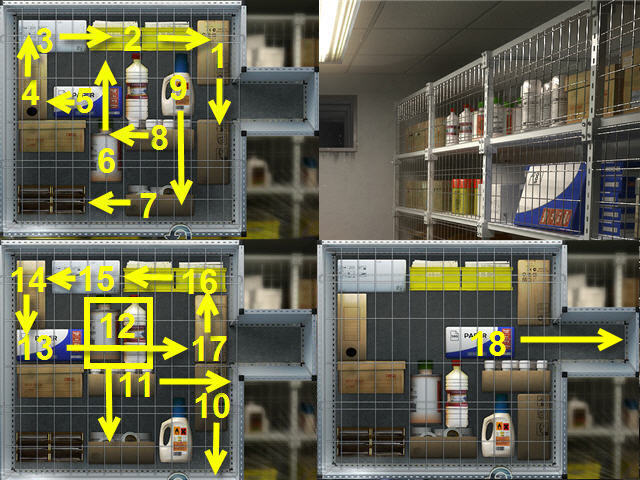
- Arrange the STRIPS OF PAPER in the correct order to complete the document. See the screenshot (A) for the solution.
- In Easy Mode left-click and drag the strips to arrange them in order.
- In Normal Mode right-click and drag to rotate the strips into the correct vertical positions. Left-click to drag them into the correct order to complete the document.
- Use the STICKY TAPE on the completed document.
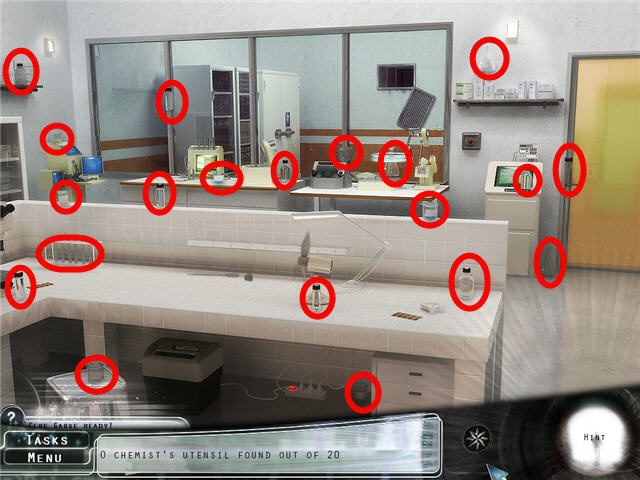
- Find the 20 CHEMIST’S UTENSILS to have the CHEMIST’S LAB EQUIPMENT added to your inventory.
- Place the CHEMIST’S LAB EQUIPMENT on the counter.
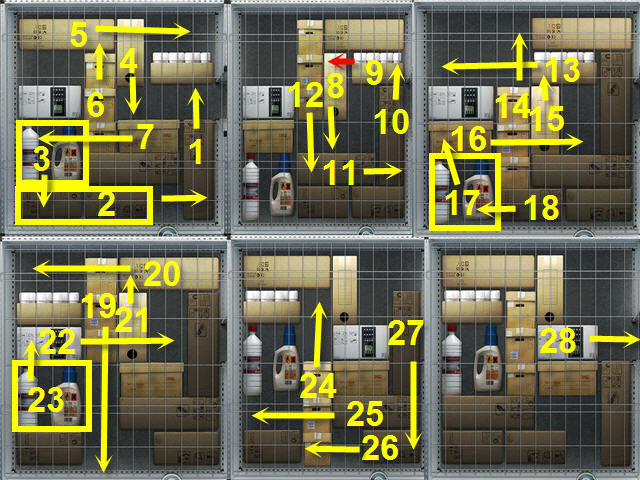
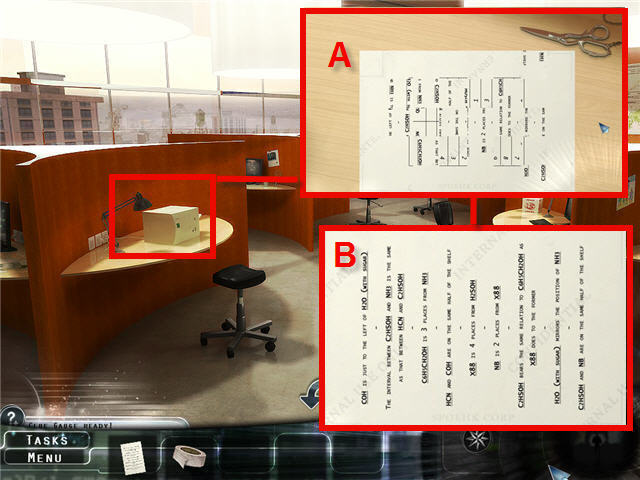
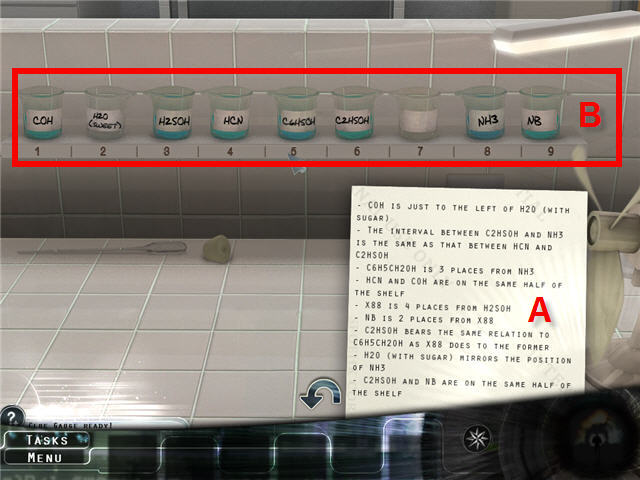
- Place the containers on the shelf in the correct order, following the clues on the sheet (A) that is hidden in the bottom right.
- The difference between Easy and Normal Modes is that two of the containers are locked in place in Easy Mode. See screenshot (B) for the solution.
- Exit the laboratory and go down the hall to the lounge.
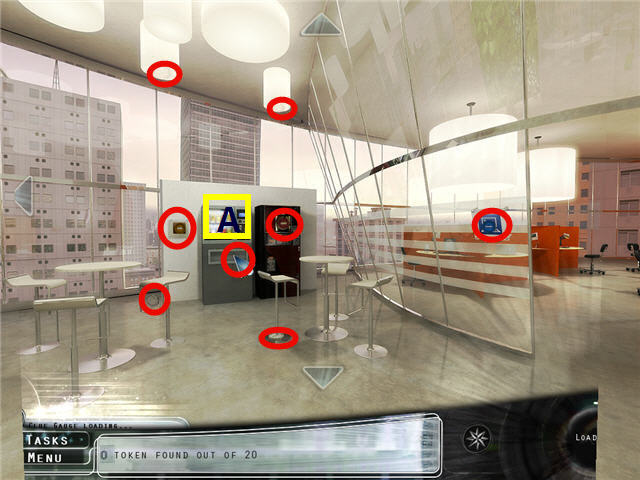
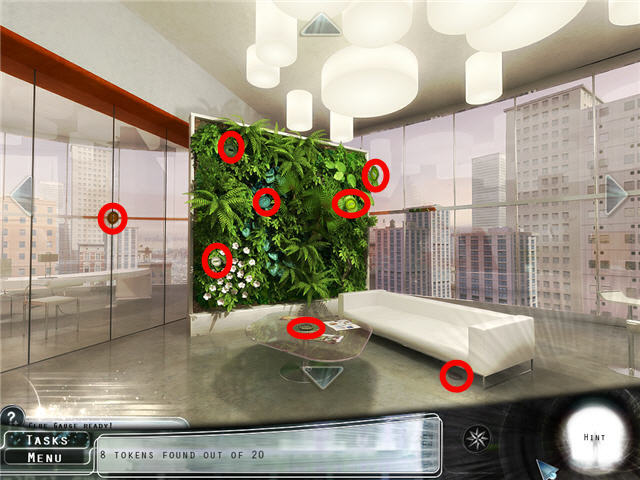
- Click on the beverage dispenser (A).
- Click on the coin slot and back away from the close-up.
- Find eight of the 20 TOKENS.
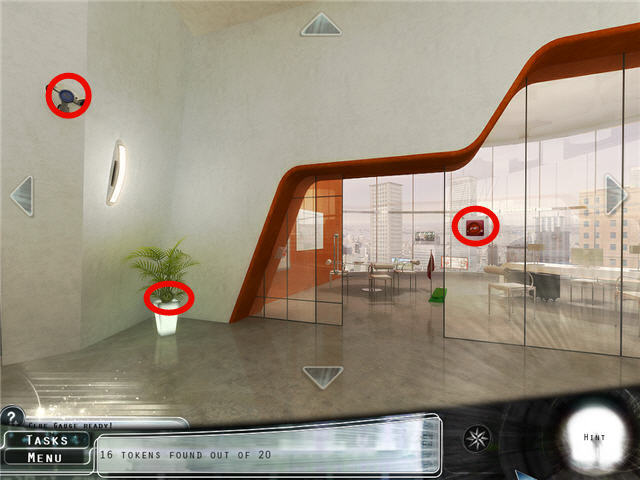
- Pan left two times.
- Find eight more of the 20 TOKENS.
- Pan left two times.
- Find three more of the 20 TOKENS.
- Pan left one time.
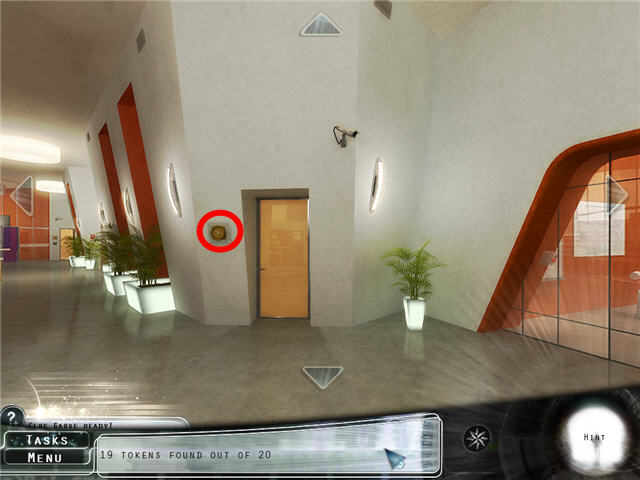
- Find the last of the 20 TOKENS.
- Head back to the beverage dispenser.
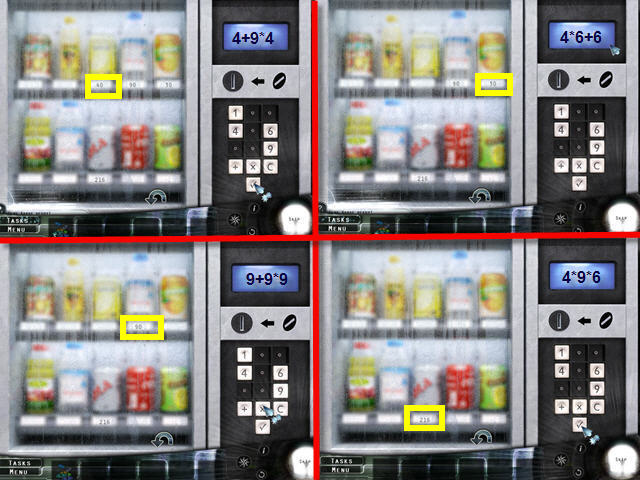
- In Easy Mode you’ll click on the beverage dispenser.
- Place a TOKEN in the slot, punch in the calculation and click on the check mark.
- You need to find all four calculations to get the item needed.
- Place a TOKEN before each drink. See the screenshot for the solution.
- You will get a SWEET DRINK in inventory.
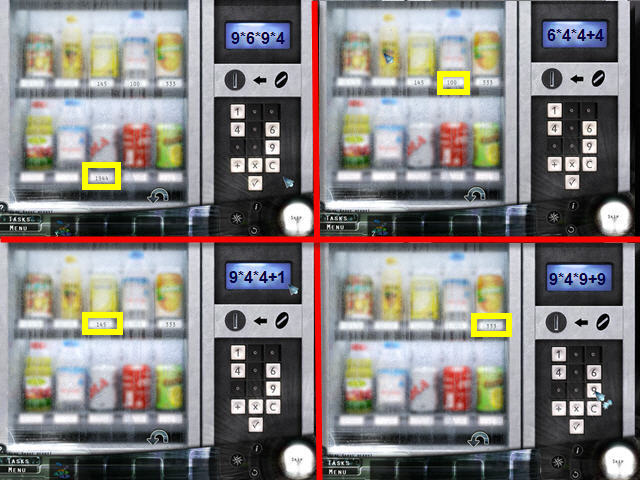
- You’ll do the same in Normal Mode, but the calculations will be slightly more difficult.
- See the screenshot for the solution.
- You will get a SWEET DRINK in inventory.
- Leave the lounge and head into the storeroom.
- Climb into the ventilation system (A).
- Click on the cabinet (B).
- Take the X88 COMPONENT (C) from the cabinet.
- Head back through the ventilation system to the storeroom.
- Leave the storeroom and head down the hall to the laboratory.
- Click on the counter to get a close-up.
- Place the SWEET DRINK in the H20 Sweet container.
- Place the X88 COMPONENT in the unlabeled container.
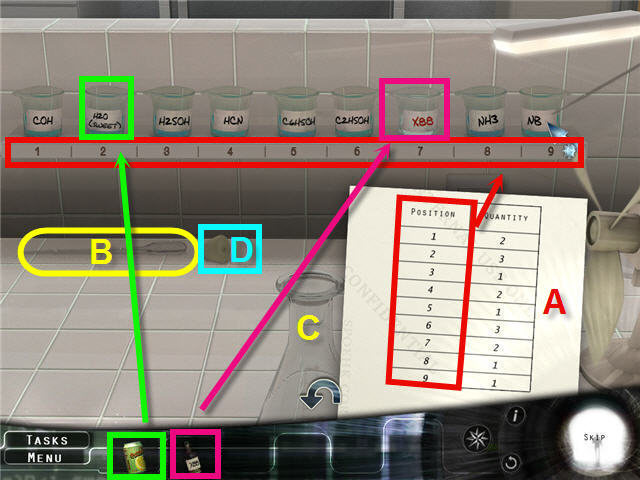
- Click on the quantities list (A) hidden in the bottom right, to bring it up.
- Using the dropper (B), place the correct number of drops from each bottle into the beaker (C).
- The “Position” column on the sheet is the number under the containers on the shelf.
- The “Quantity” column is the number of times you will need to use the dropper on that container and place it in the beaker.
- You must go back to the same container three separate times if it requires three drops; you cannot squeeze the dropper three times after one filling.
- Place the stopper (D) on the beaker (C) and have the ERLENMEYER (FINAL FORMULA) added to your inventory.
- Leave the laboratory and head into the elevator.
- Click on the pass card slot on the button panel.
- Exit the elevator and head into the video surveillance room.
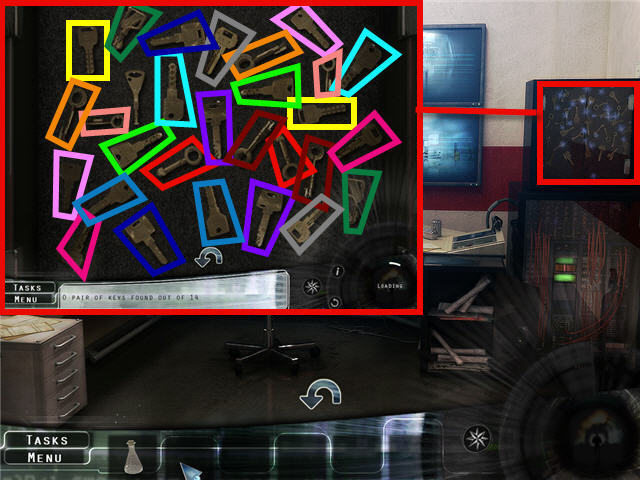
- Click on the key cabinet.
- Find the matching pairs; take the remaining key and have the ELEVATOR MASTER KEY added to your inventory.
- Leave the video surveillance room and head to the elevator.
- Use the ELEVATOR MASTER KEY on the key hole under the floor numbers in the elevator.
- Click on 20.
- Exit onto the 20th floor and head to the right, to the glass balcony (A).
- Look to the right and click on the cradle (B).
- Congratulations! You have completed The Fall Trilogy Chapter 2: Reconstruction.
Created at: 2010-09-29