

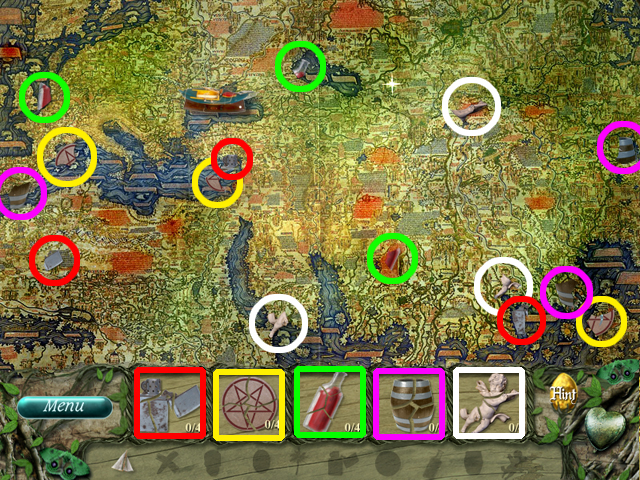
Walkthrough Menu
- General Tips
- Chapter One
- Chapter Two
- Chapter Three
- Chapter Four
- Chapter Five
- Chapter Six
- Chapter Seven
- Chapter Eight
- Chapter Nine
- Chapter Ten
- Chapter Eleven
- Chapter Twelve
- Chapter Thirteen
- Chapter Fourteen
- Chapter Fifteen
- Chapter Sixteen
- Chapter Seventeen
- Chapter Eighteen
- Chapter Nineteen
- Chapter Twenty
General Tips
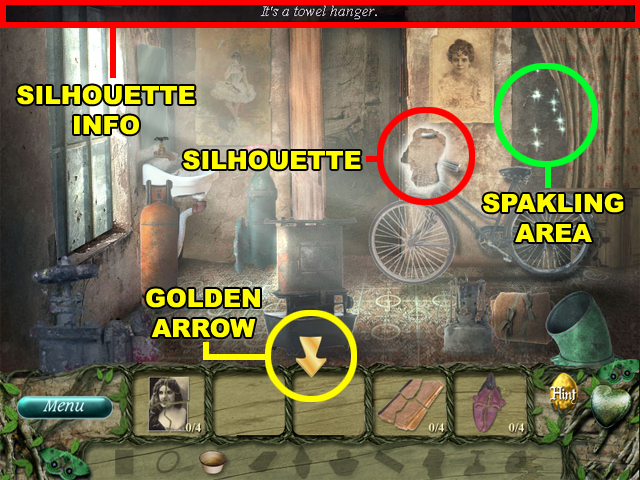
- Look for areas that sparkle once every few seconds. These areas contain silhouettes and helpful information about the item that belongs there.
- Areas that sparkle rapidly should be either examined or explored. When your cursor becomes a golden arrow, it means that the area can be explored.
- Sometimes there is an exit area at the bottom of the scene that will allow you to switch between rooms. These areas are invisible, but your cursor will still become a golden arrow as a signal.
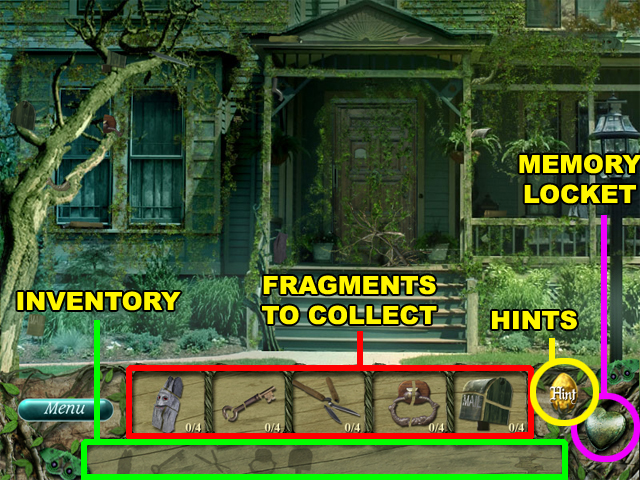
- The hints are unlimited, but you must wait until the HINT gauge recharges to use them again. The HINT button’s only ability is to highlight hidden fragments.
- The fragments that you need to collect are displayed above your INVENTORY. An item will be stored in your INVENTORY after you find its missing fragments.
- After picking up an item from your INVENTORY, you can put it back by right-clicking.
- The MEMORY LOCKET will allow you to view a memory from a completed chapter.
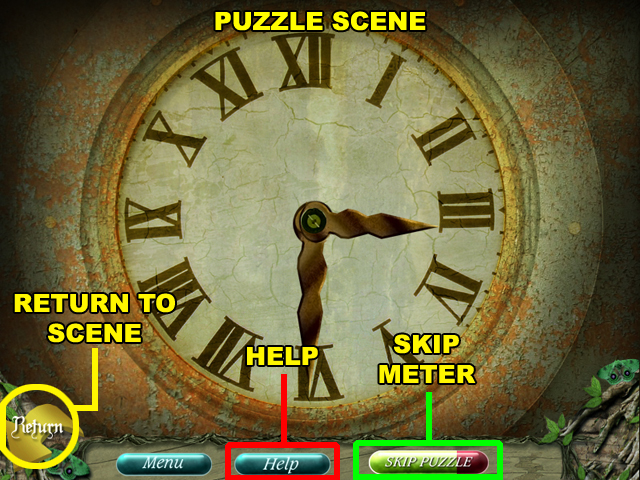
- All of the puzzles can be skipped, except the very last one. You can only use the SKIP PUZZLE button once its meter is full.
- The HELP button will give you guidance on how to complete the puzzle.
- The RETURN button will allow you to exit the puzzle. You can return to the puzzle again afterwards.
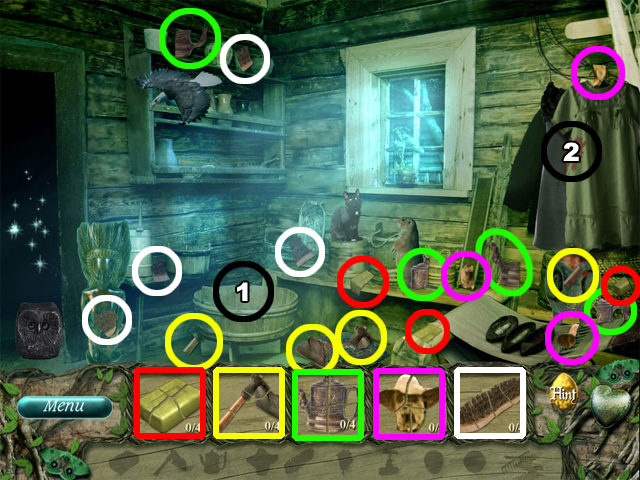
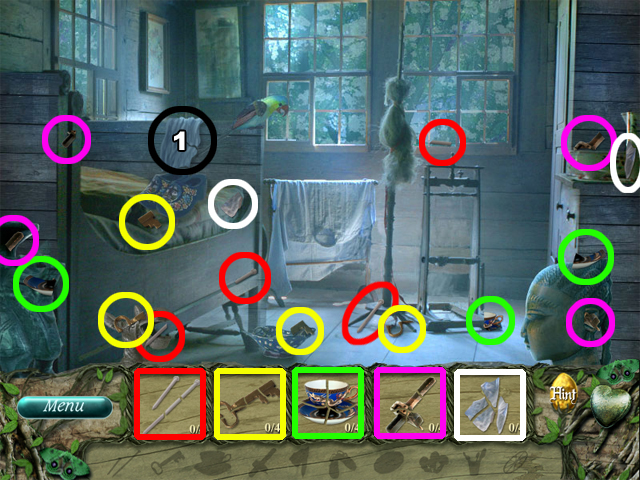
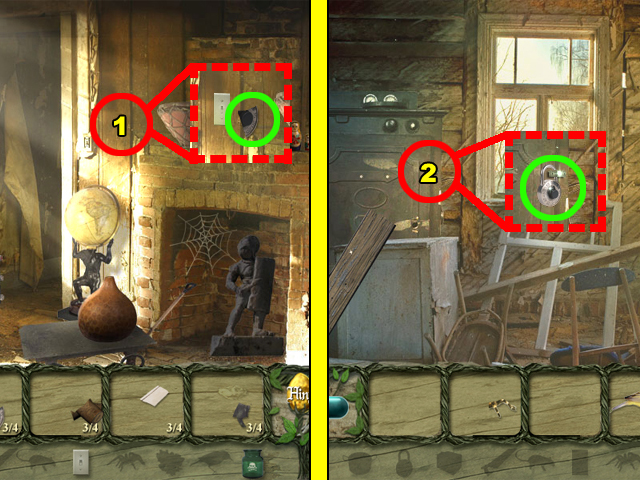
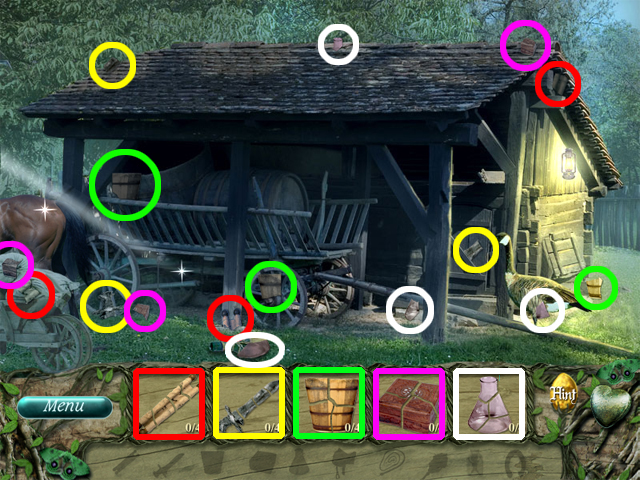
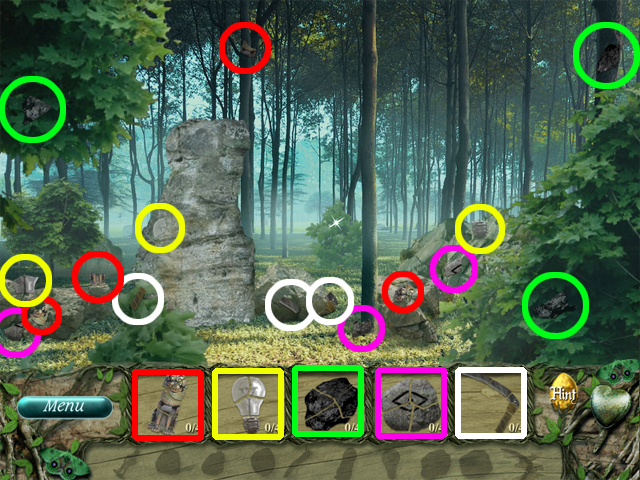
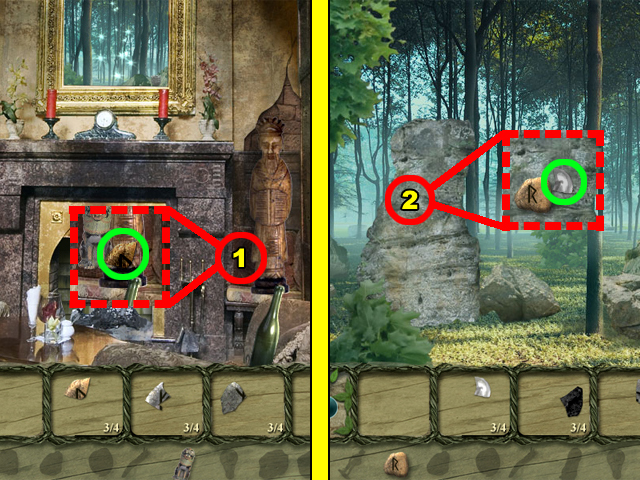
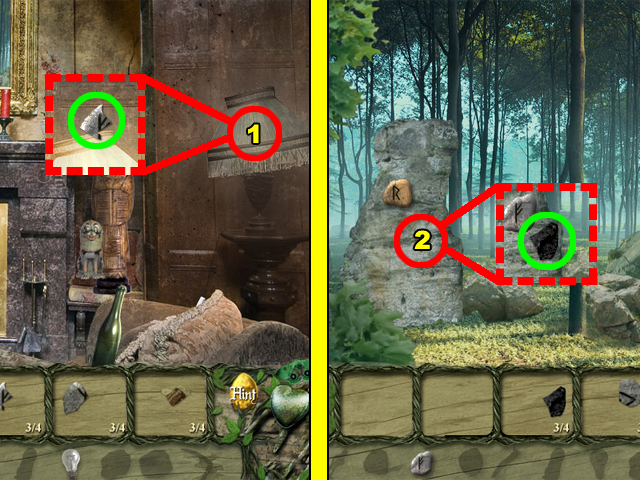
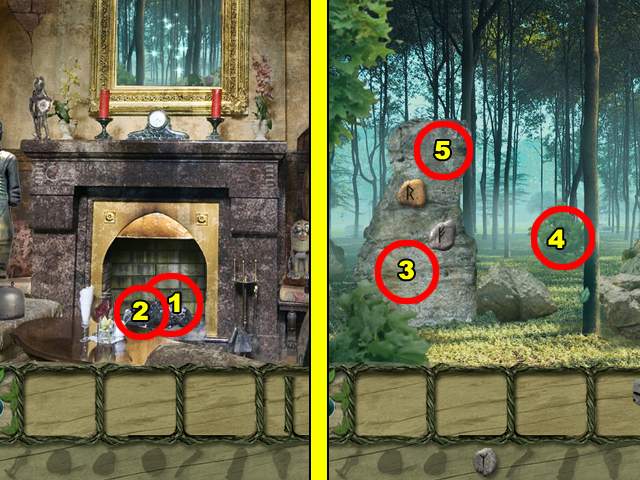
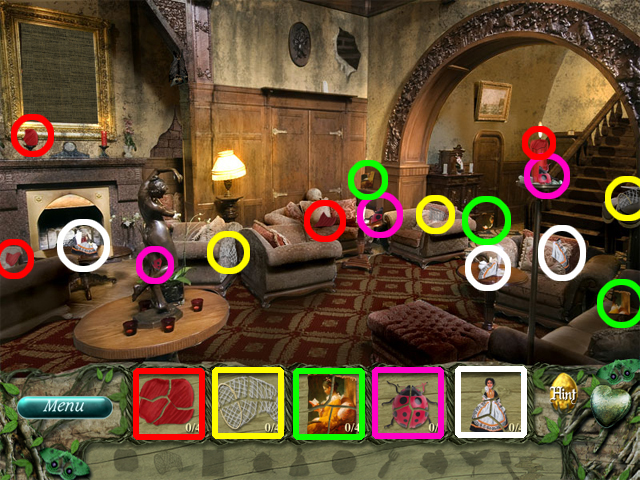
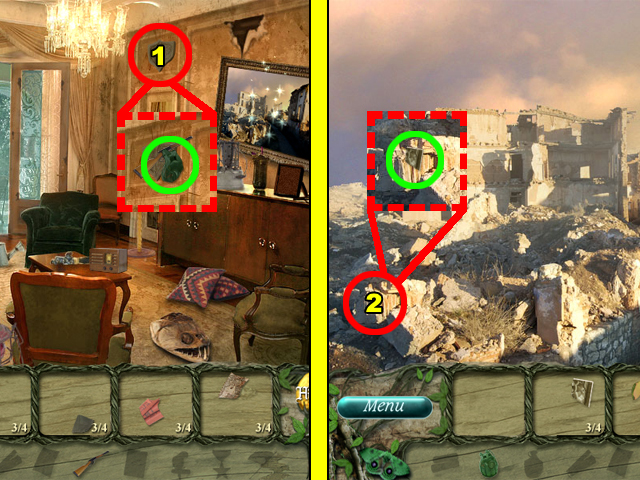
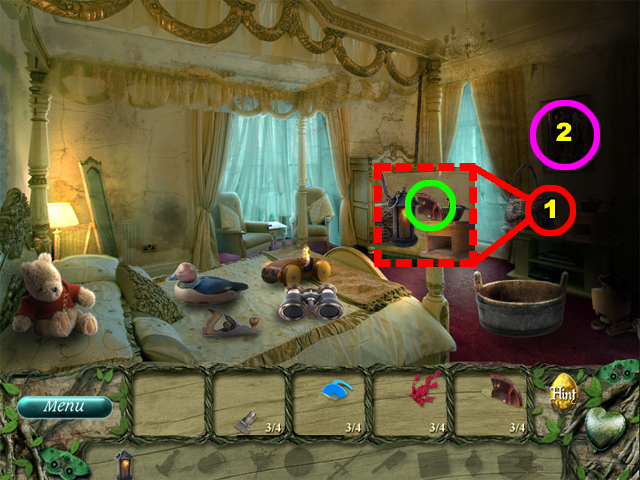
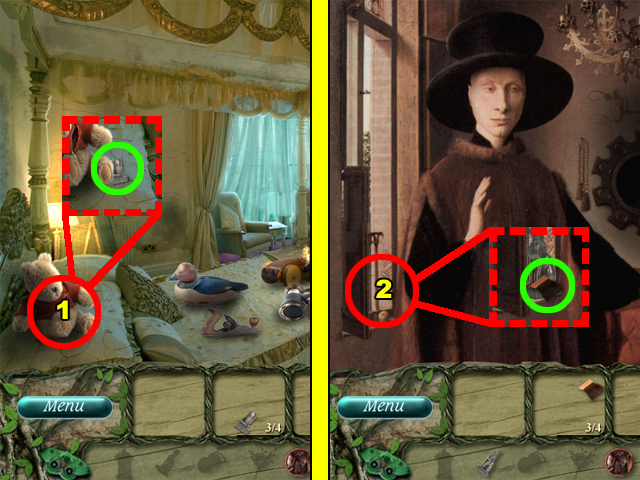
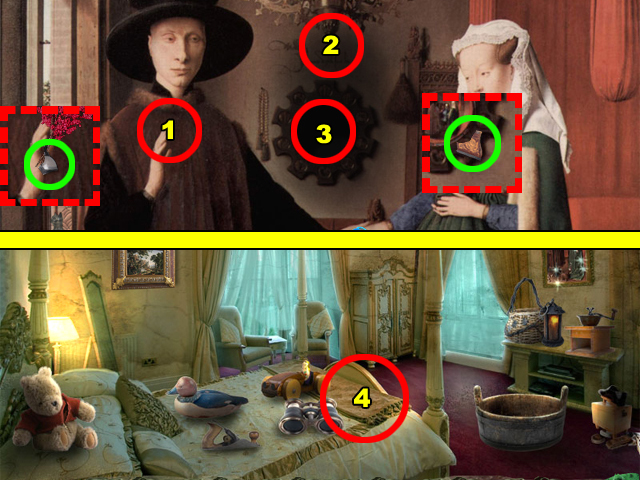
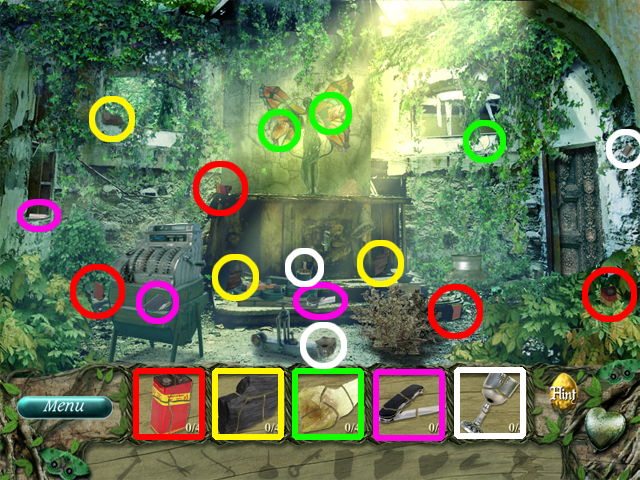
Chapter One
Scene 1
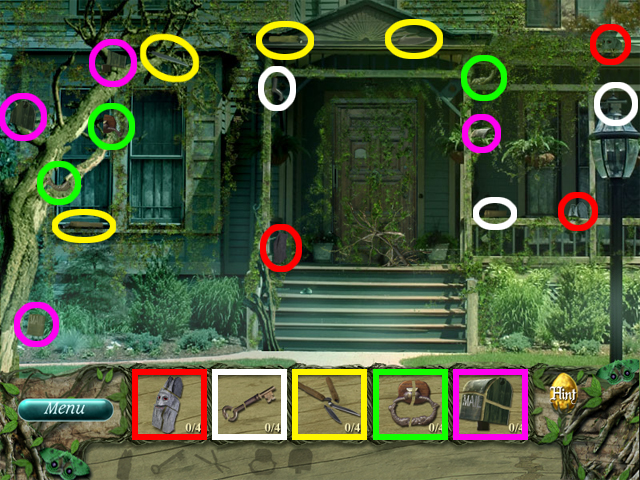
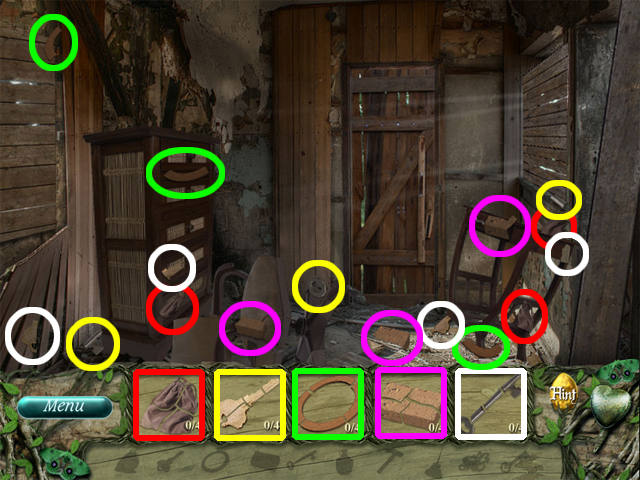
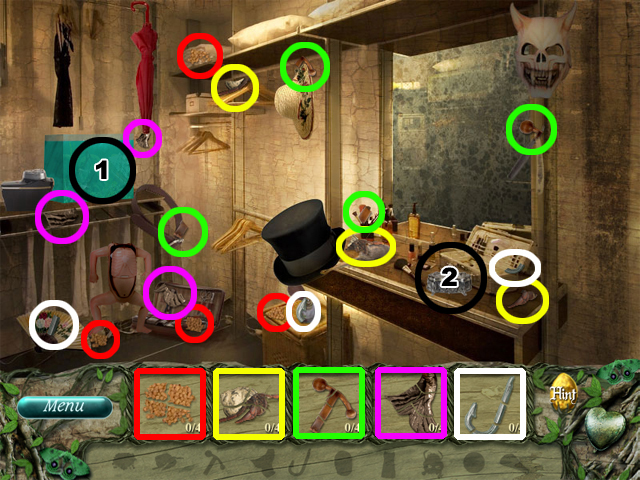
- The 5 items in your inventory have been highlighted with a color that matches their hidden fragments. For example: the GARGOYLE fragments are all highlighted in red, and the KEY fragments are all highlighted in white.
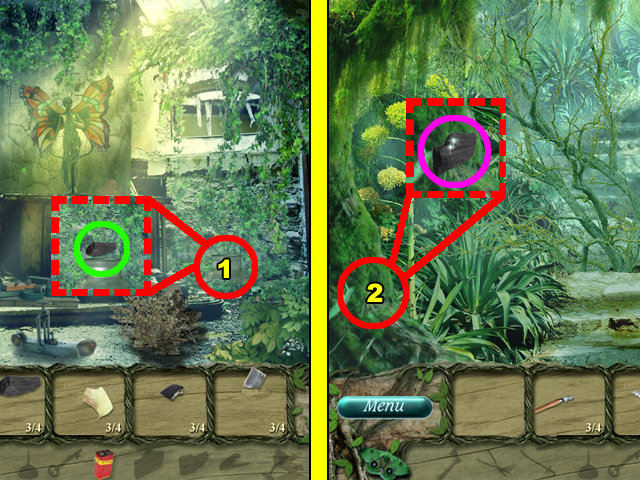
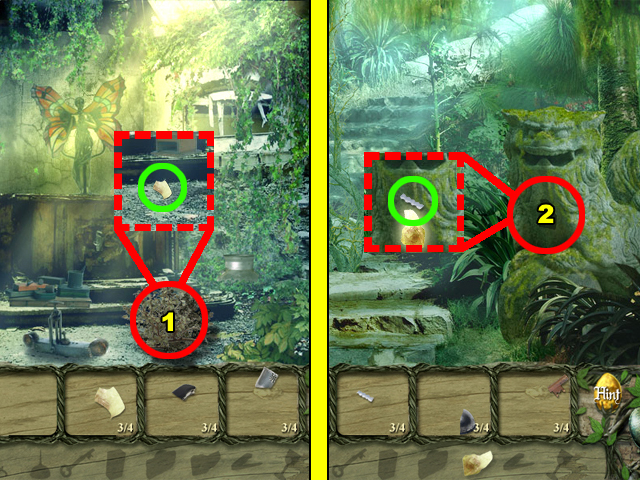
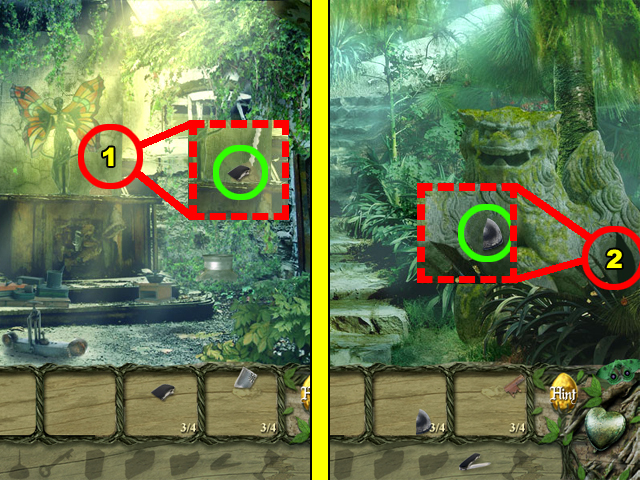
- Collect the highlighted fragments.
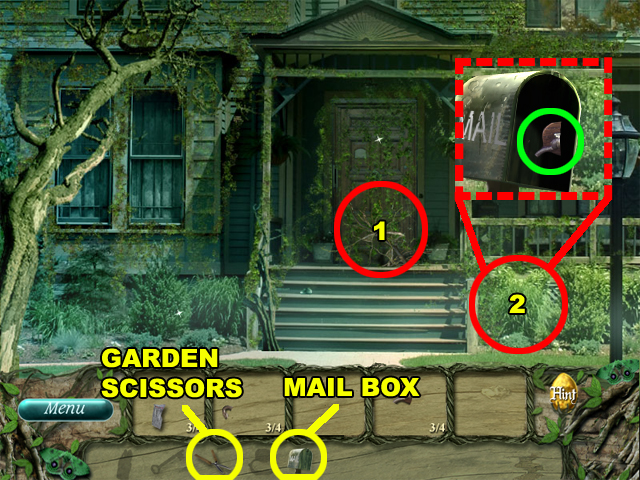
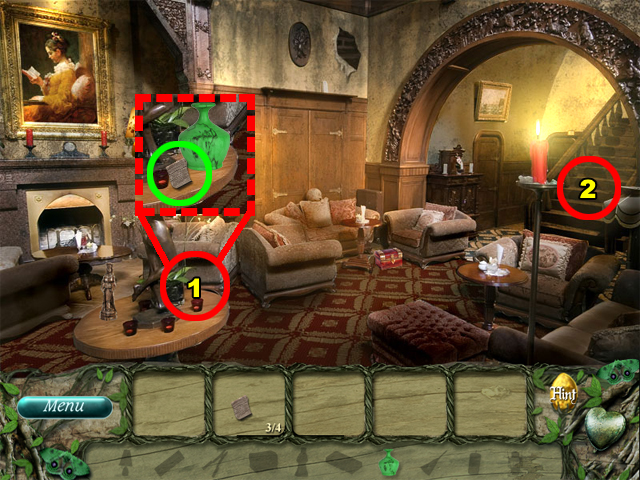
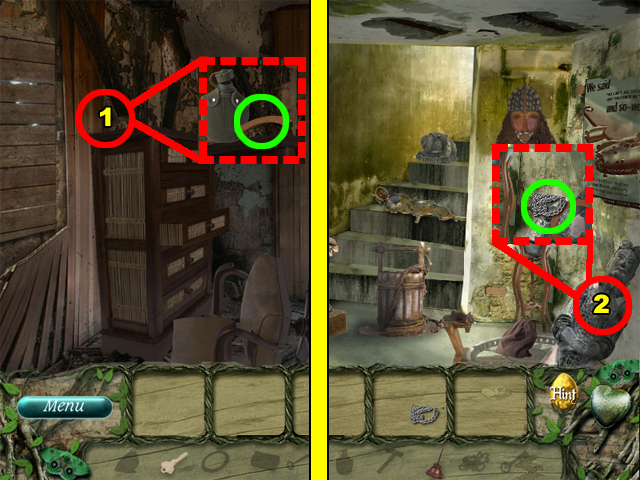
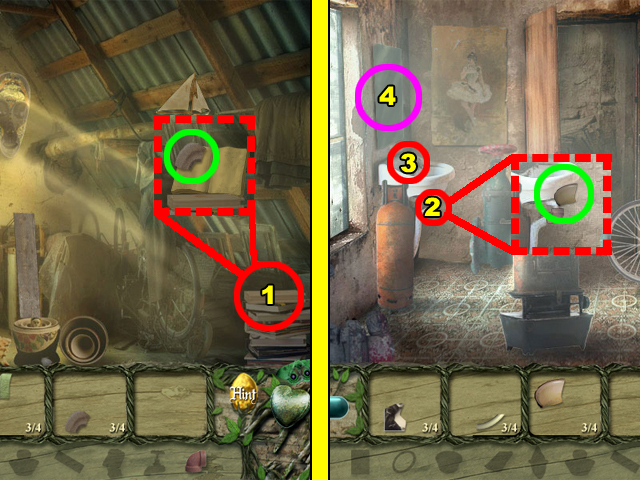
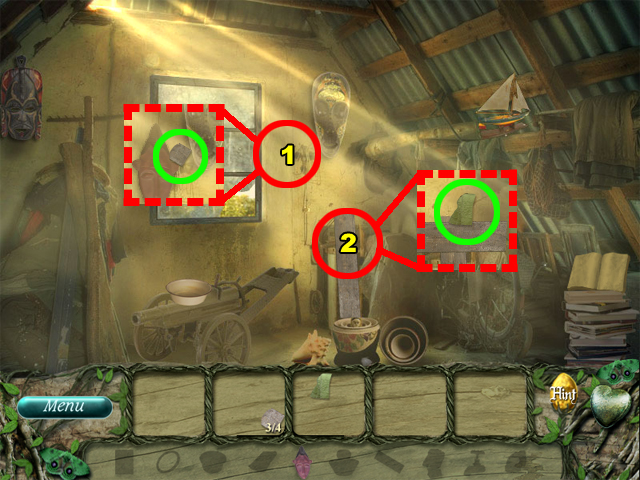
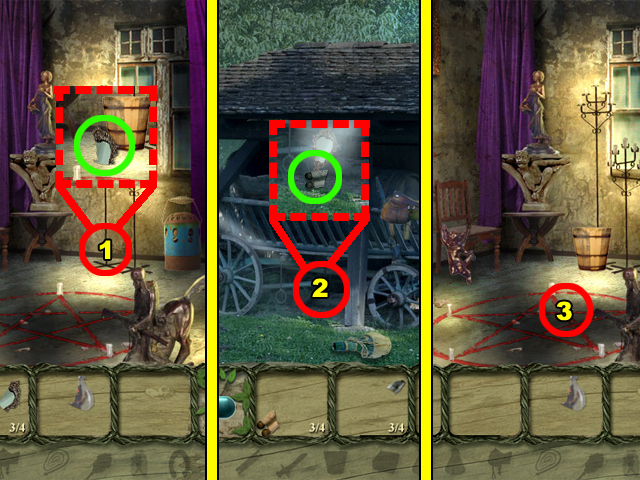
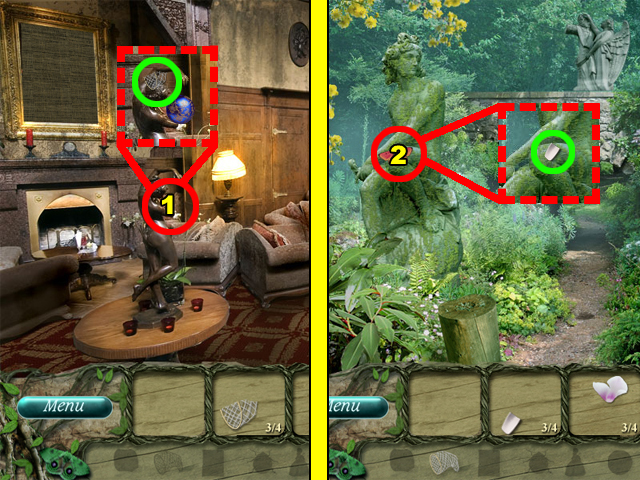
- Use the GARDEN SCISSOR to cut the twigs at position 1.
- Place the MAIL BOX at position 2.
- Collect the DOOR KNOB fragment in the MAIL BOX.
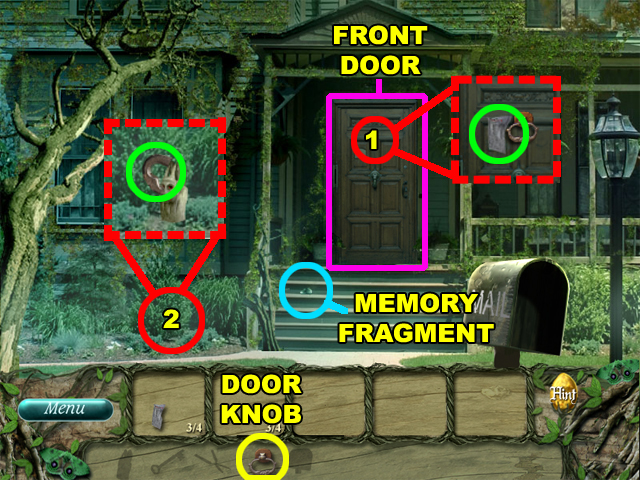
- Place the DOOR KNOB on the door at position 1.
- Collect the GARGOYLE fragment beside the DOOR KNOB.
- Place the GARGOYLE at position 2.
- Collect KEY fragment beside the GARGOYLE.
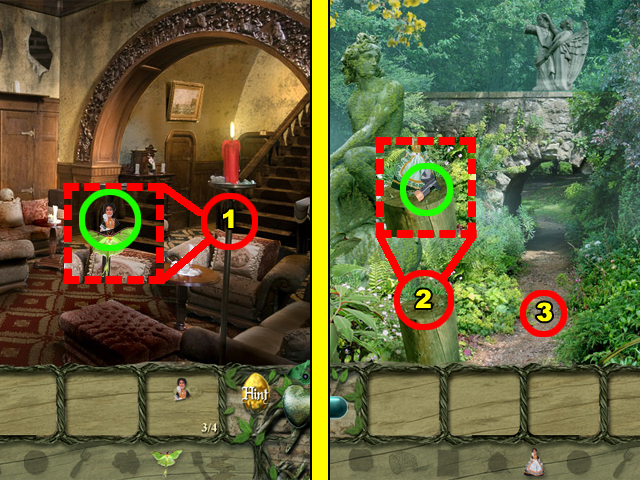
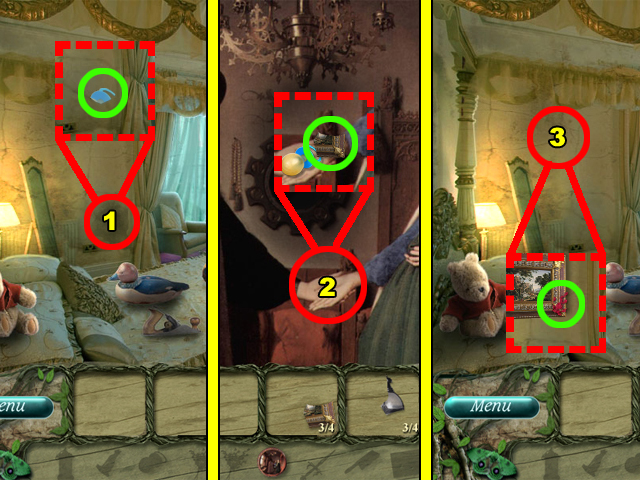
- Collect the MEMORY LOCKET -highlighted in blue- on the stair way.
- Use the KEY on the front door to complete this chapter.
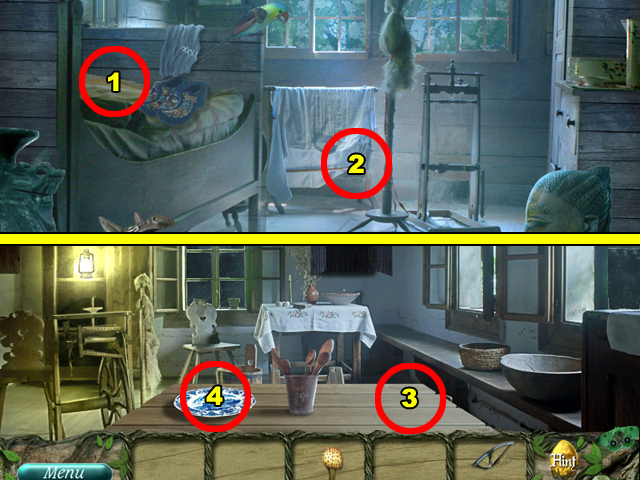
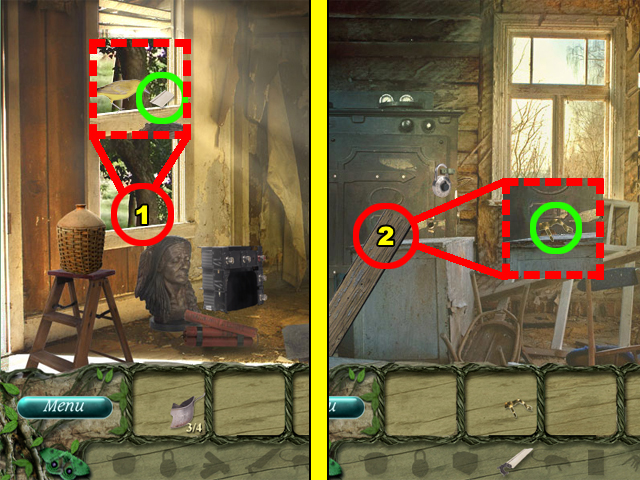
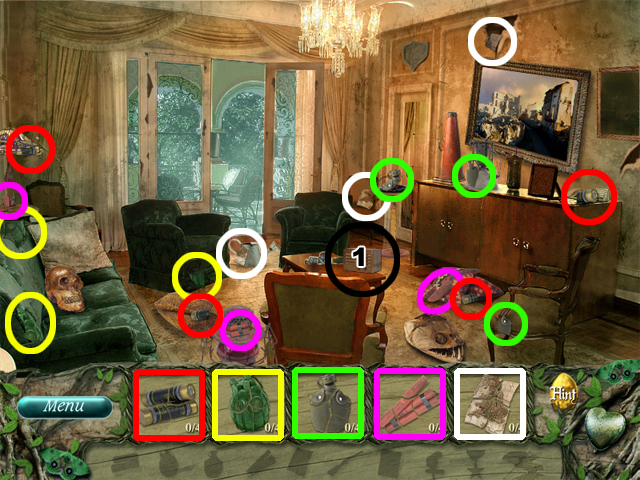
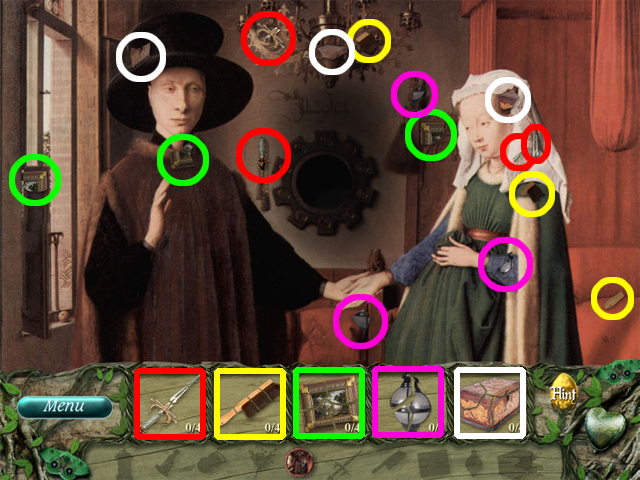
Chapter Two
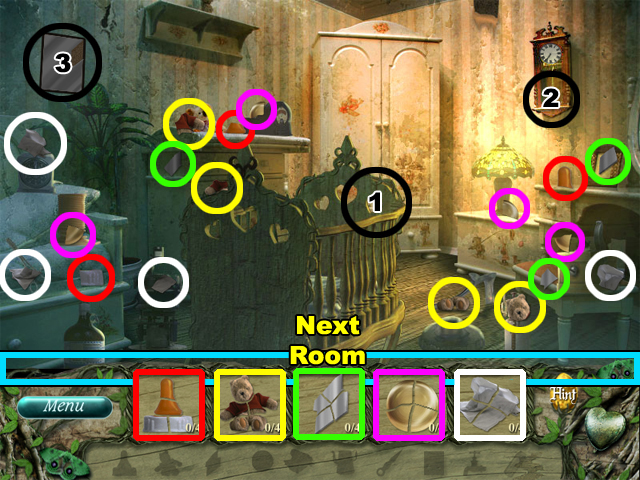
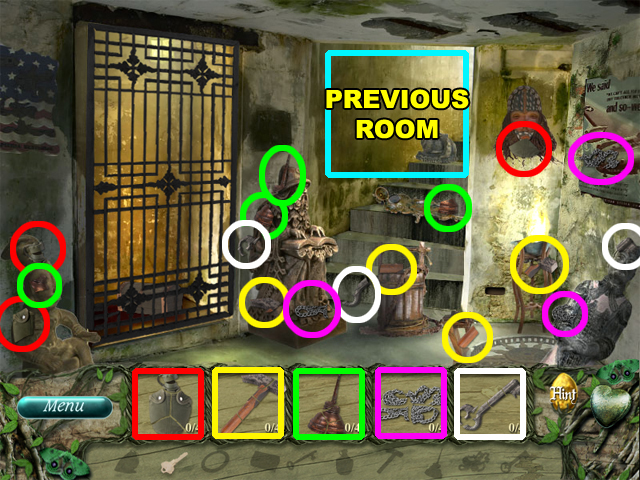
Scene 1
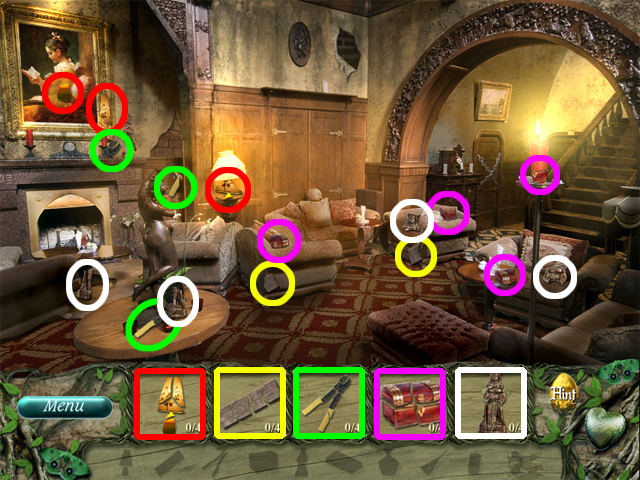
- Collect the available hidden fragments.
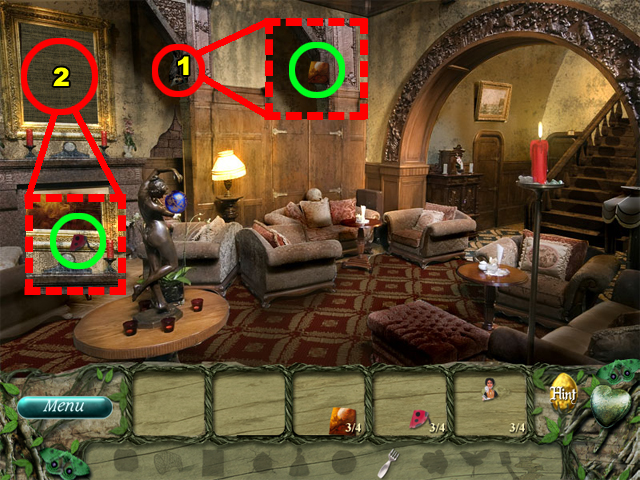
- Place the MAIDEN on the table at position 1.
- Collect the STAIR STEP fragment beside the MAIDEN.
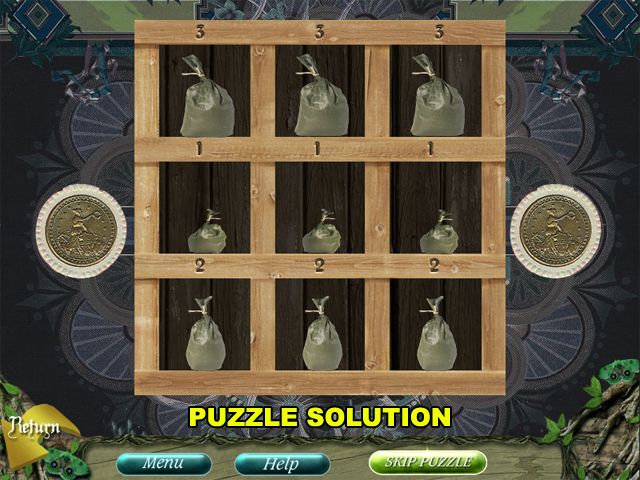
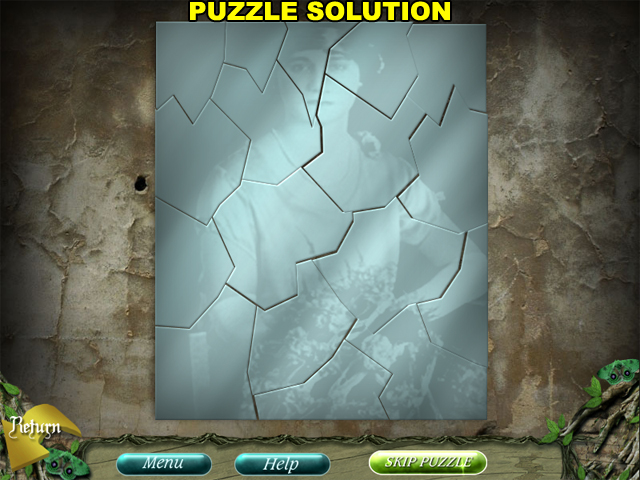
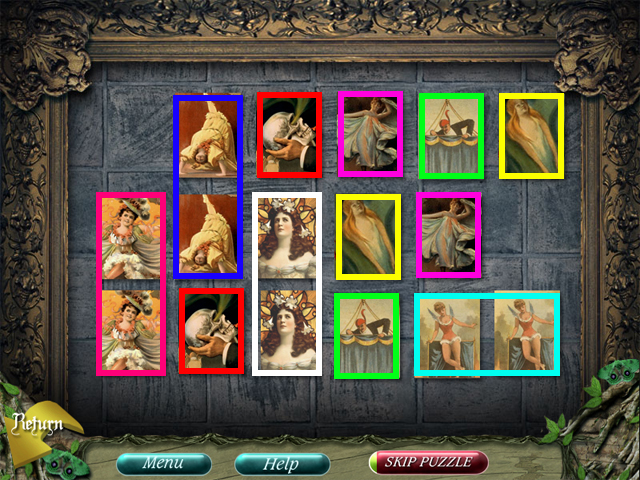
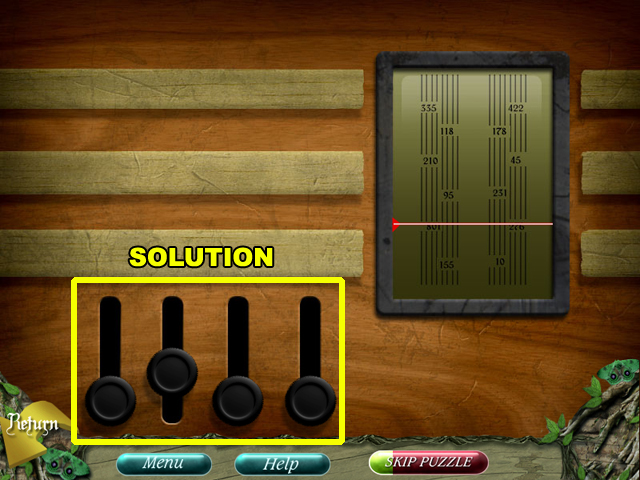
- Place the BOX at position 2, and then click on it to start the puzzle.
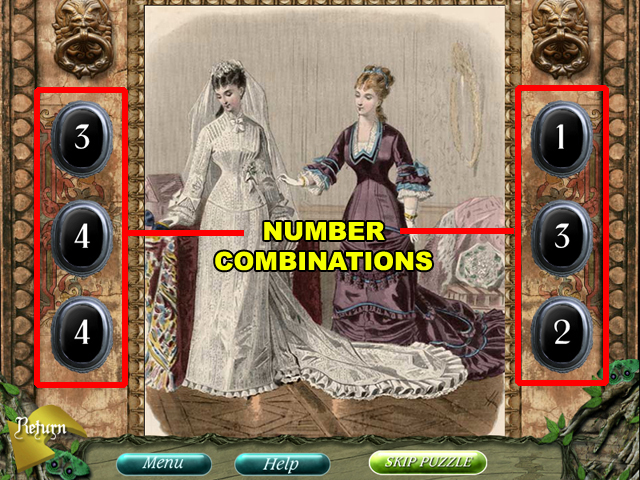
- Find the correct combination of numbers to complete the picture. Click on the numbers to change their value by 1.
- Each time you change a number, a section of the puzzle will rotate by 90 degrees.
- The correct combinations are 3-4-4 for the left side is, and 1-3-2 for the right side.
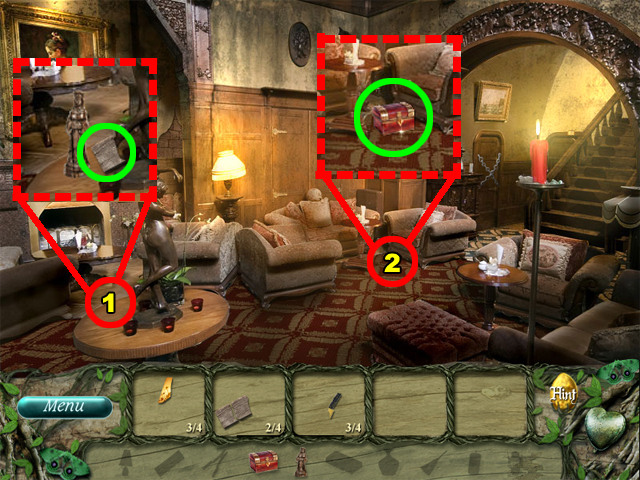
- After this puzzle you will receive a LAMP fragment.
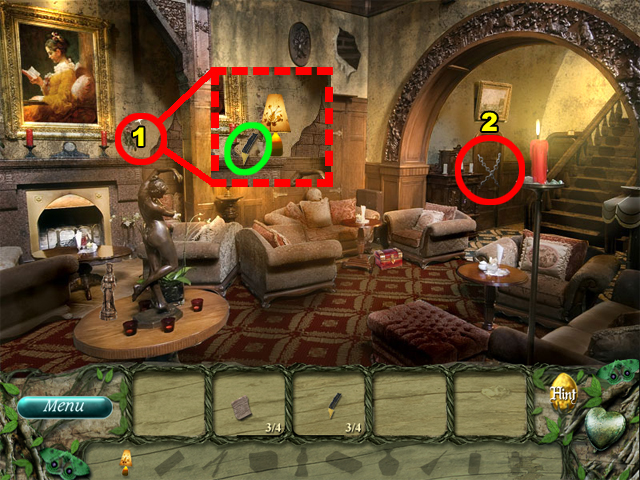
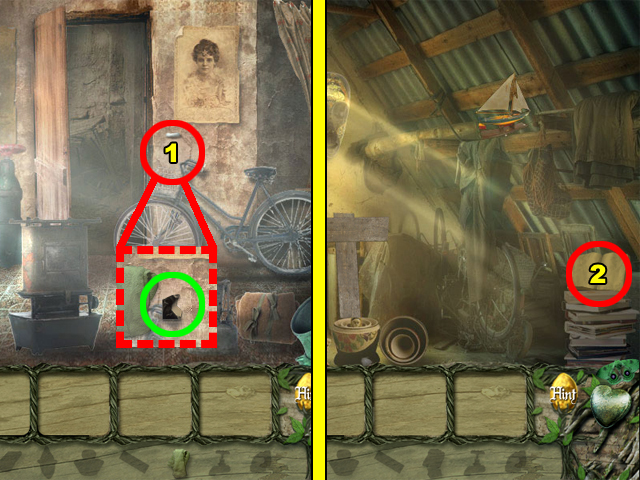
- Place the LAMP above the fireplace at position 1.
- Collect the PLIERS fragment beside the LAMP.
- Use the PLIERS to cut the chains covering the door at position 2.
- Enter the door after the chain has been removed.
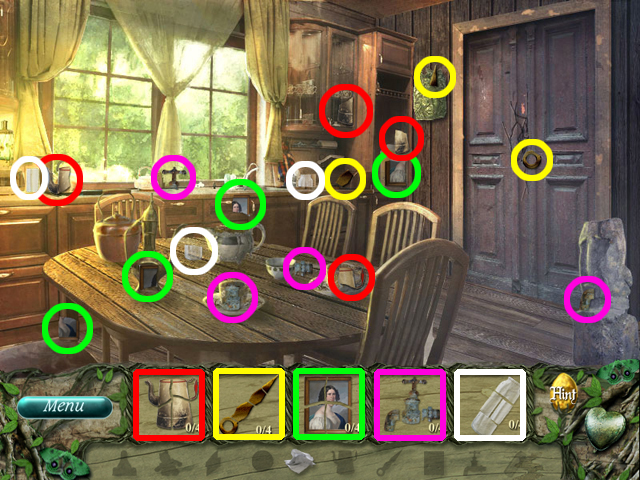
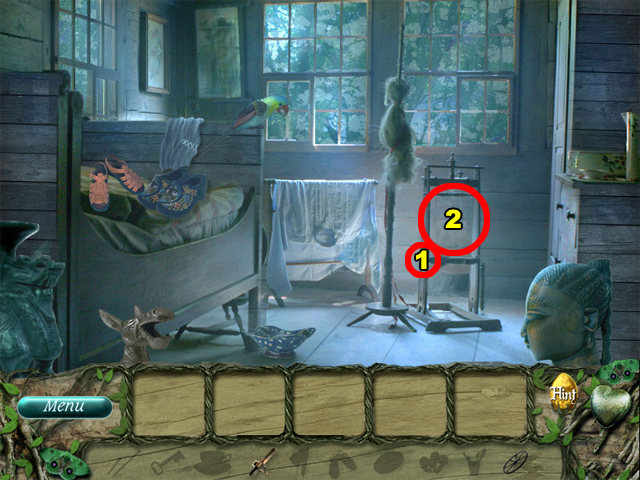
Scene 2
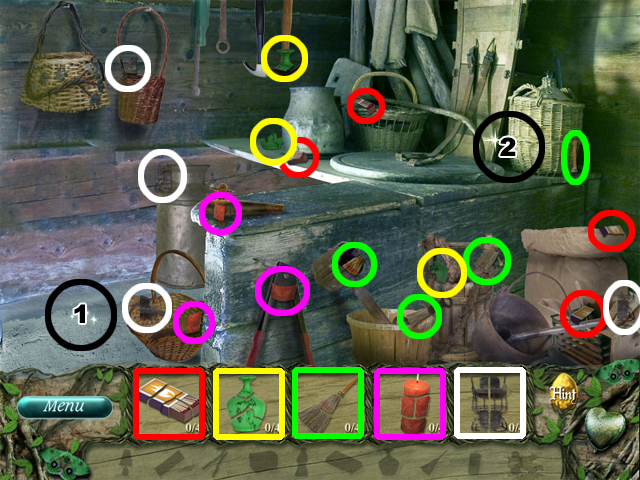
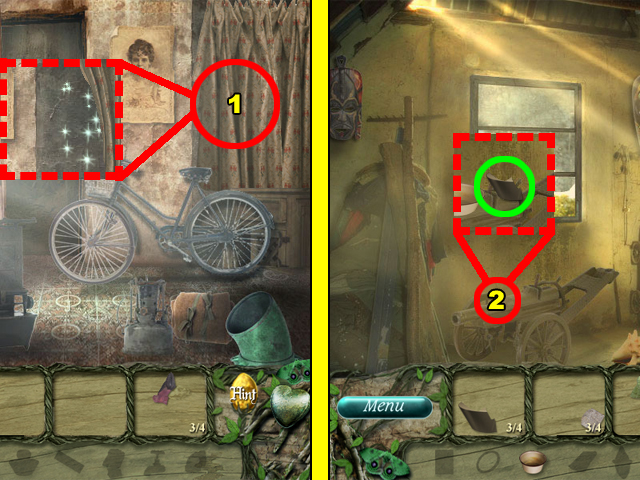
- Collect the hidden fragments of the items.
- Use the BROOM to sweep the dirt at position 1.
- Place the UNLIT LANTERN at beside the basket at position 2.
- Use the MATCHES to light the UNLIT LANTERN.
- Collect the RED CANDLE fragment beside the LANTERN.
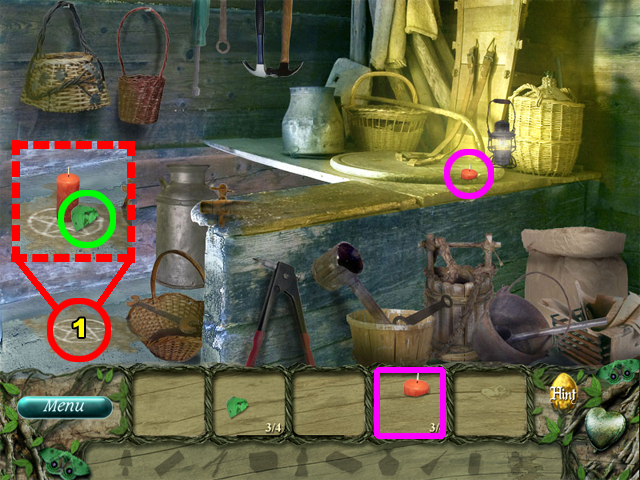
- Place the RED CANDLE on the symbol at position 1.
- Collect the final VASE fragment by the CANDLE.
- Afterwards you will automatically be transferred to the previous room.
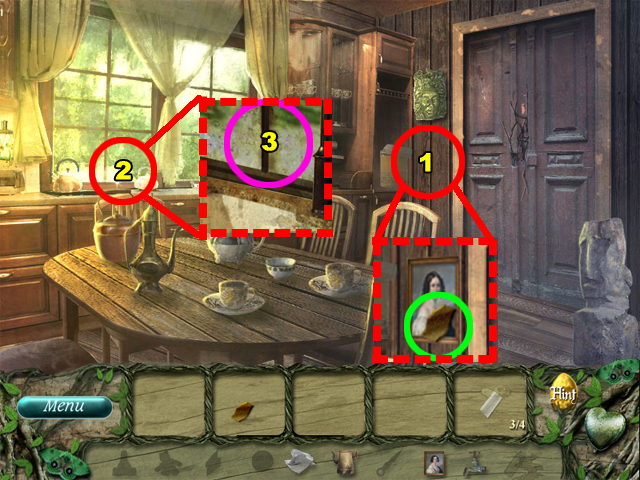
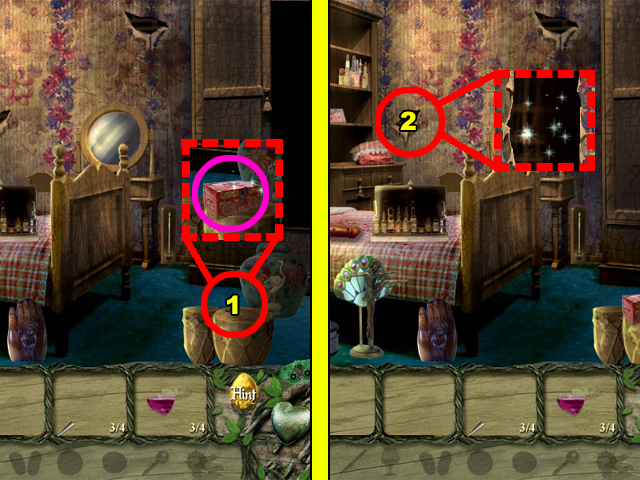
- Place the VASE beside the MAIDEN at position 1.
- Collect the STAIR STEP fragment by the VASE.
- Use the STAIR STEP on the stairs at position 2 to complete this chapter.
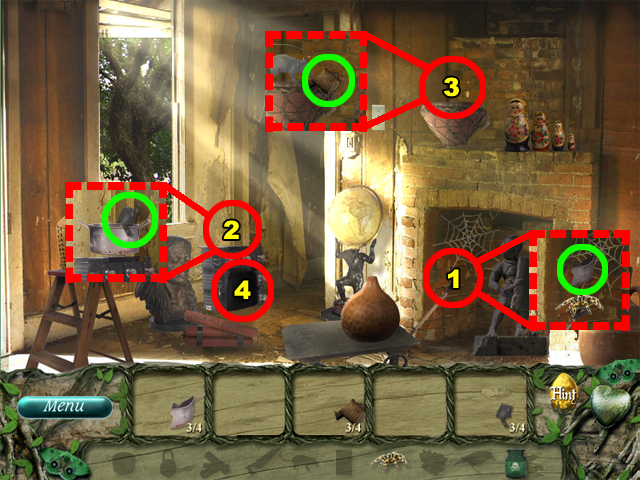
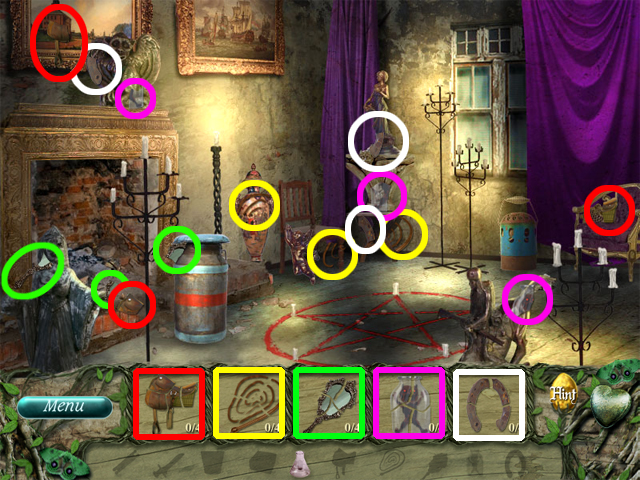
Chapter Three
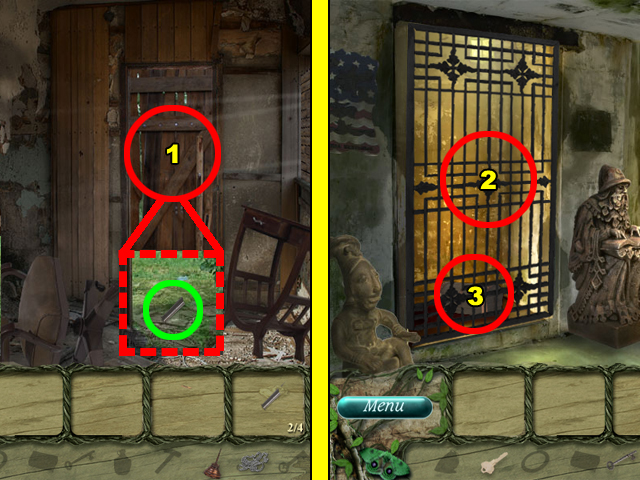
Scene 1
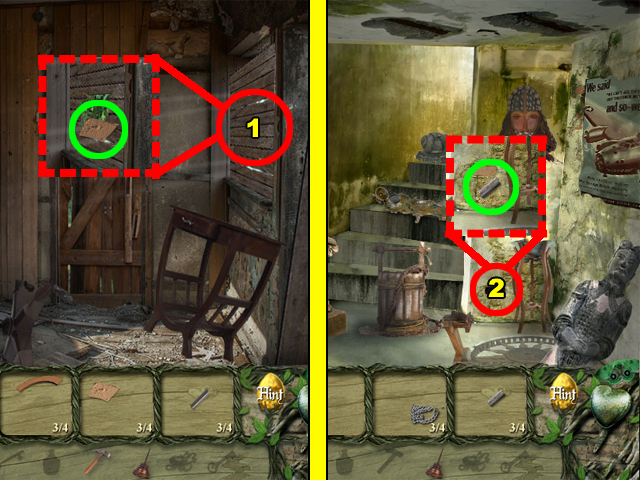
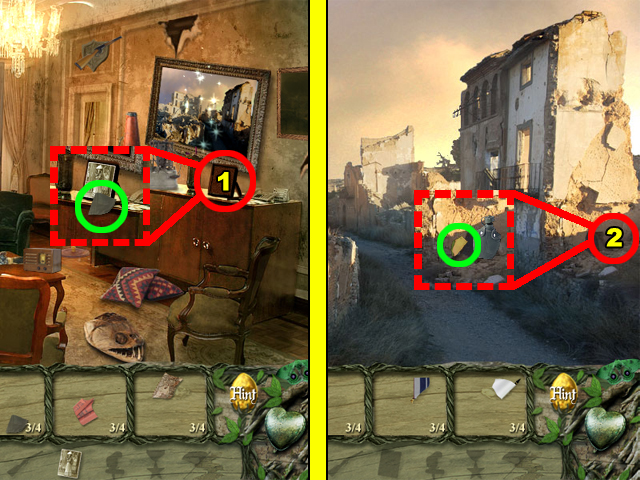
- Collect the item fragments.
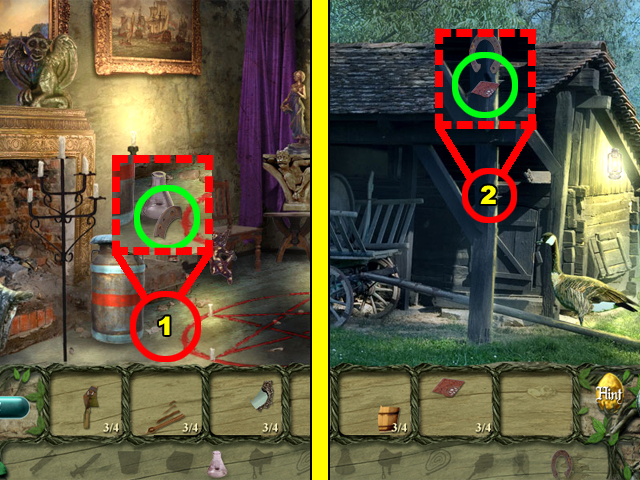
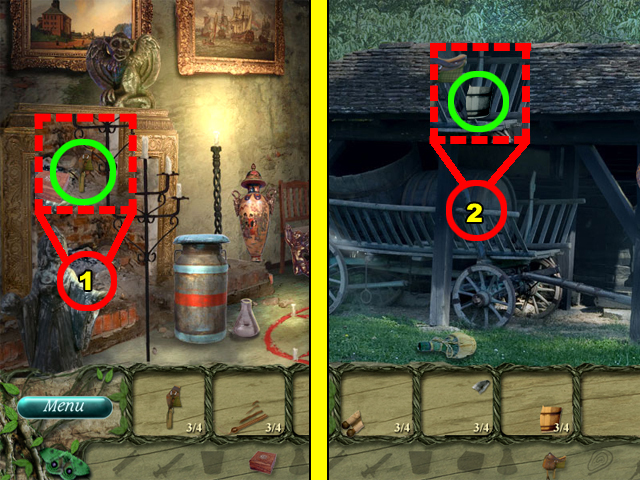
- Place the BEAR on the crib at position 1.
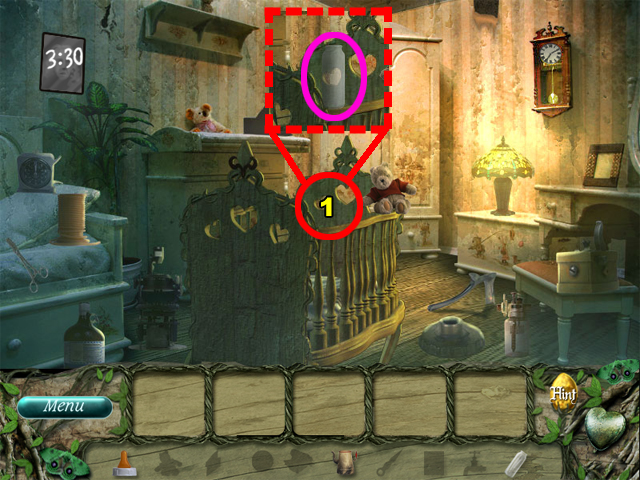
- Collect the MIRROR PIECE fragment beside the BEAR.
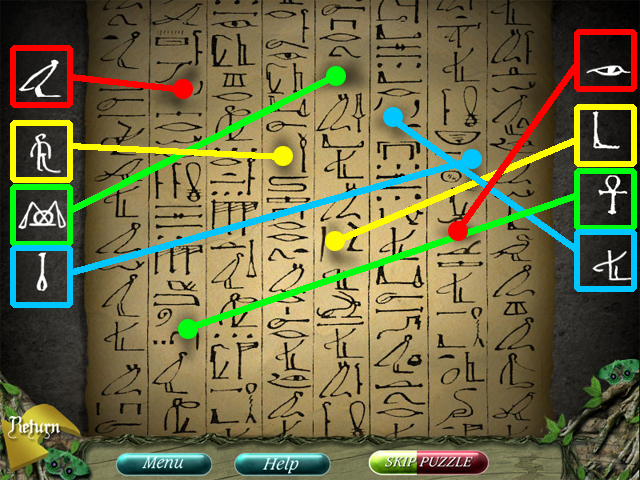
- Use the CLOCK PENDULUM on the clock at position 2.
- Use the MIRROR PIECE on the broken mirror at position 3. Afterwards the mirror will have “3:30” written on it.
- Click in the blue highlighted area to enter the next room. The area highlighted in blue will be referred to as the “exit area” from now on.
Scene 2
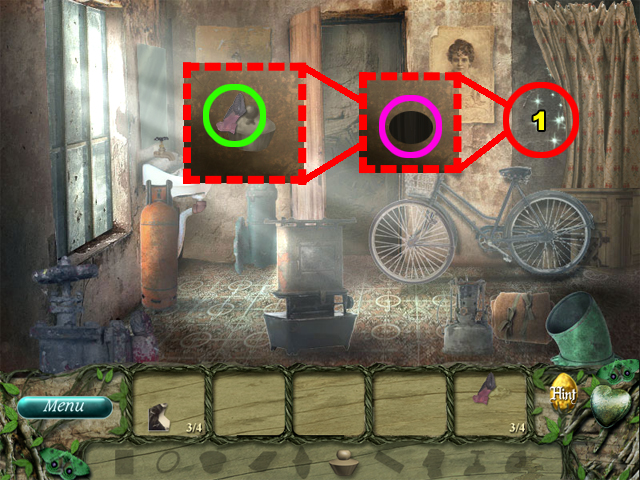
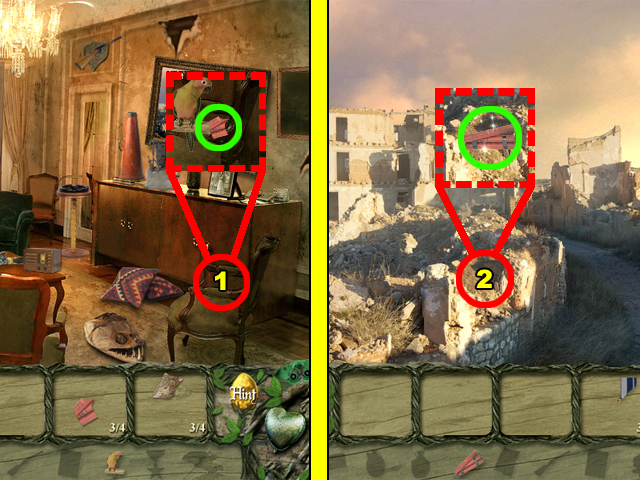
- Collect the fragments around the room.
- Place the PICTURE on the wall at position 1.
- Collect the CLOCK POINTER fragment on the PICTURE.
- Examine (zoom into) the sparkling sink area at position 2.
- Attach the SPIGOT to the sink at position 3.
- Use the CLOTH PIECE on the SPIGOT afterwards to zoom out.

- After zooming out, collect the BABY BOTTLE fragment above the sink.
- Afterwards you will be taken to the previous room.
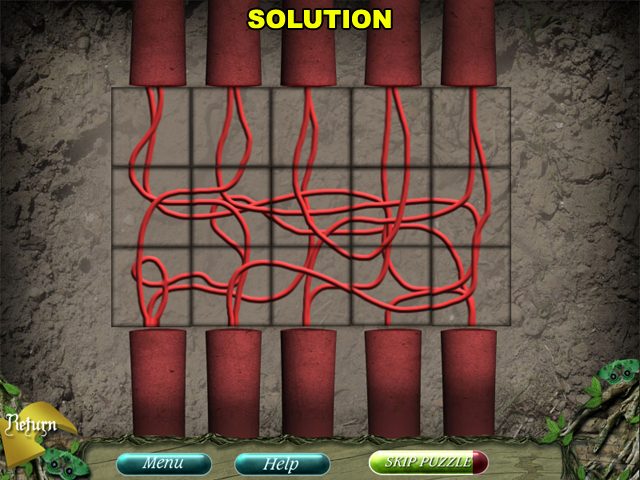
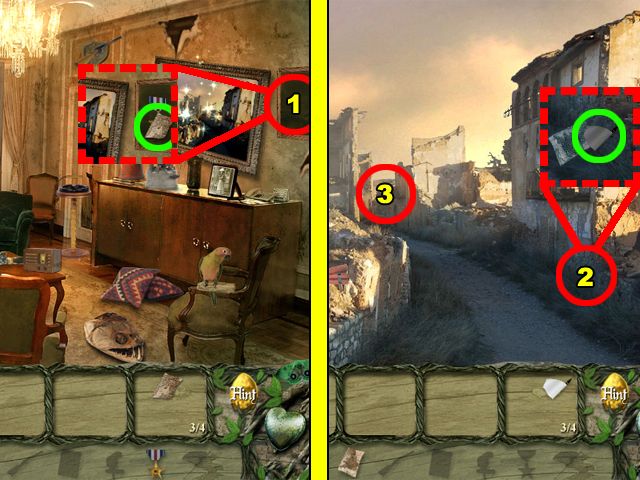
- Use the CLOCK POINTER on the clock at position 1, and then click on the clock to start the puzzle.
- Rotate the CLOCK POINTERS until the time is set to 3:30. Click on the pointers of the clock to rotate them clockwise.
- The long pointer should be pointed downwards, and the short pointer should be pointed to the right.
- Afterwards you will receive a fragment of the BABY BOTTLE TEAT.
- Place the BABY BOTTLE on the crib at position 1.
- Use the MILK KETTLE and BABY BOTTLE TEAT on the BABY BOTTLE afterwards. Be sure to use the MILK KETTLE first, and the BABY BOTTLE TEAT second.
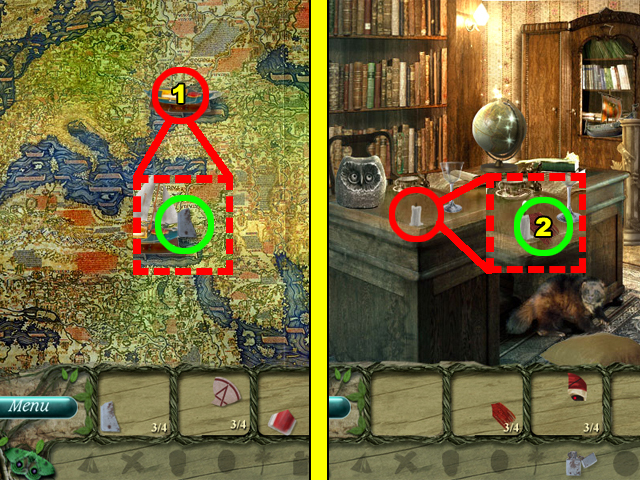
Chapter Four
Scene 1

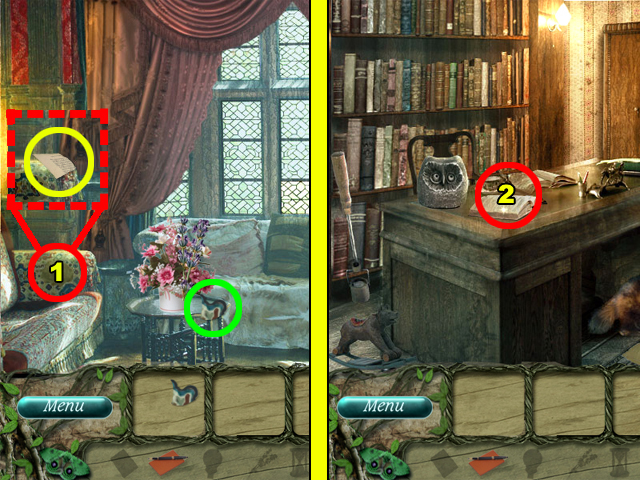
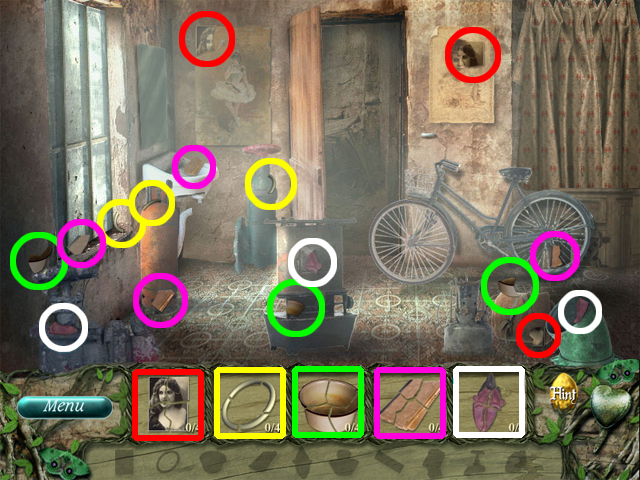
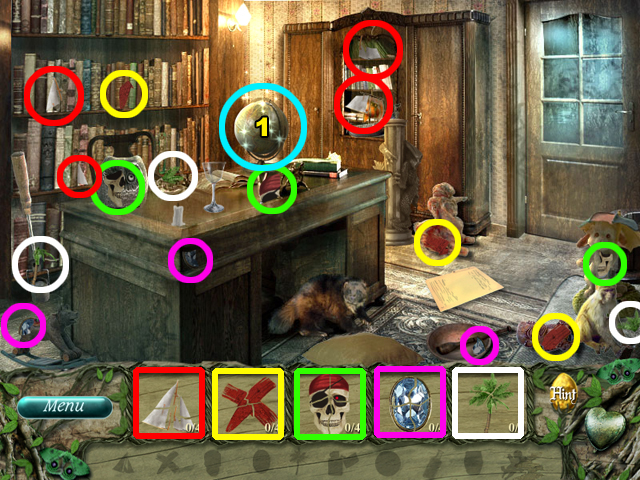
- Collect the hidden fragments around the room.

- Place the BOOK by the corner of the desk at position 1.
- Place the COMPASS into the compass holder at position 2.
- Place the HOURGLASS by the corner of the desk at position 3.
- Collect the PEN fragment beside the HOURGLASS.
- Click on the COMPASS to initiate the next puzzle.
- (For puzzle only)The 4 panels will glow in a specific sequence; copy the sequence to win.
- Click on the colored panels in this order: SOUTH, NORTH, EAST, WEST, and NORTH. Afterwards you will receive a LAVENDER fragment.
- Enter through the sparkling door to the right after the puzzle.
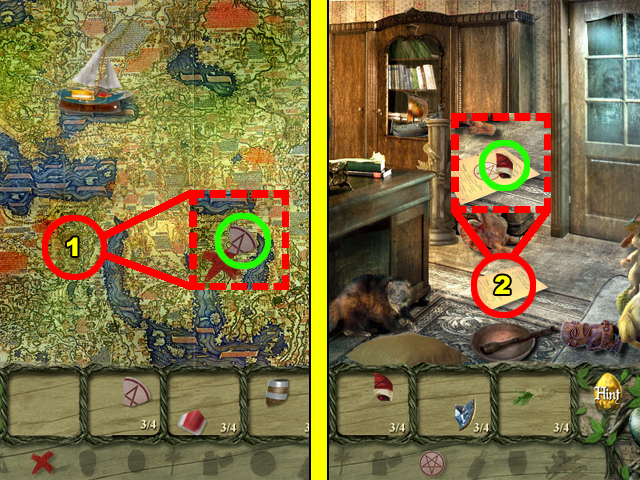
Scene 2
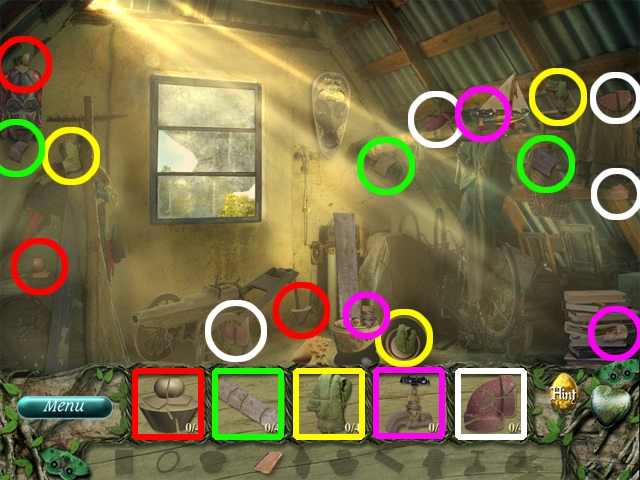
- Collect the missing fragments first.
- Place the ELK’S HEAD above the lamp at position 1.
- Collect the WINDOW PIECE fragment beside the ELK’S HEAD.
- Use the WINDOW PIECE to repair the window at position 2.
- Collect the VASE WITH FLOWER fragment by the WINDOW PIECE afterwards.
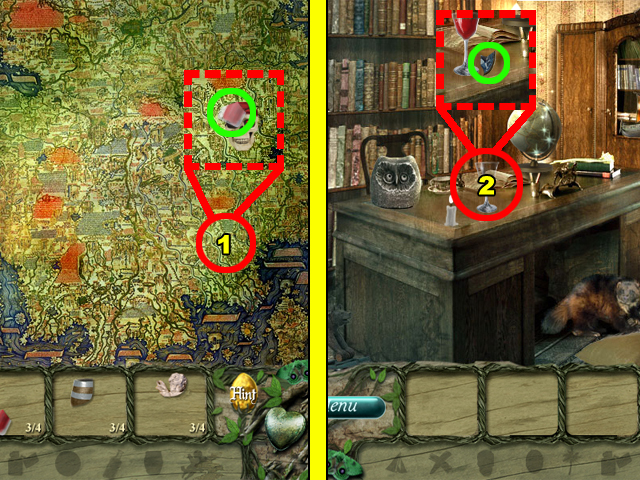
- Place the VASE WITH FLOWER on the table at position 3.
- Use the LAVENDER on the VASE WITH FLOWER to reveal an item.
- Collect the SOFA PATTERN fragment beside the VASE WITH FLOWER.
- Use the SOFA PATTERN on the sofa at position 1.
- Collect the PAGE fragment by the SOFA PATTERN to clear this room.
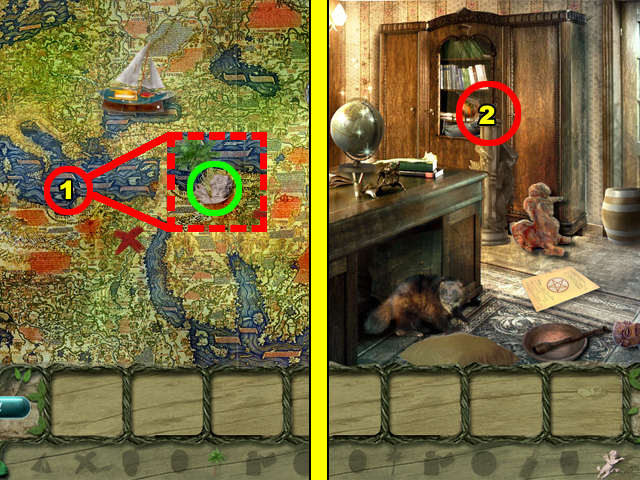
- Place both the PAGE and PEN onto the sparkling book at position 2. Use the PAGE first and the PEN second to conclude this chapter.
Chapter Five
Scene 1
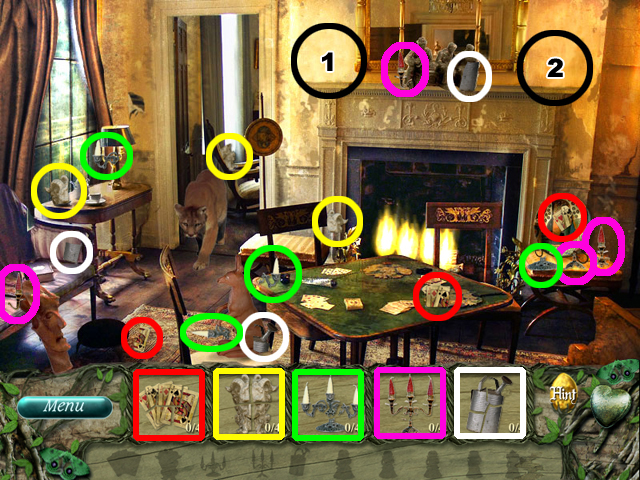
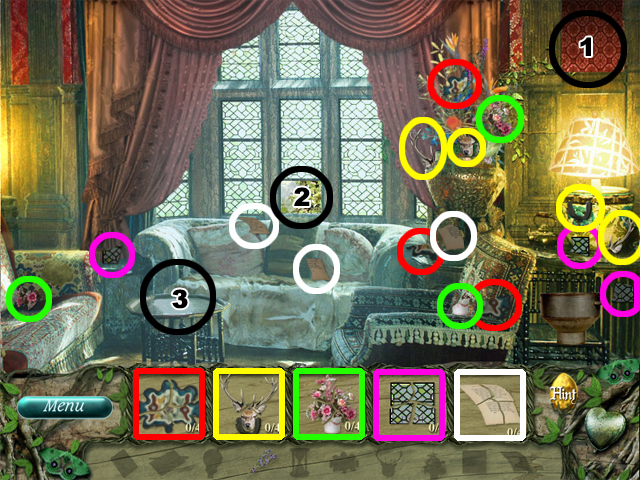
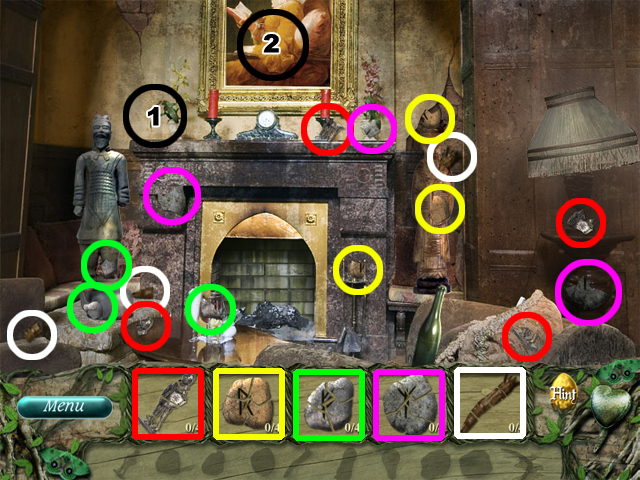
- Collect the hidden fragments.
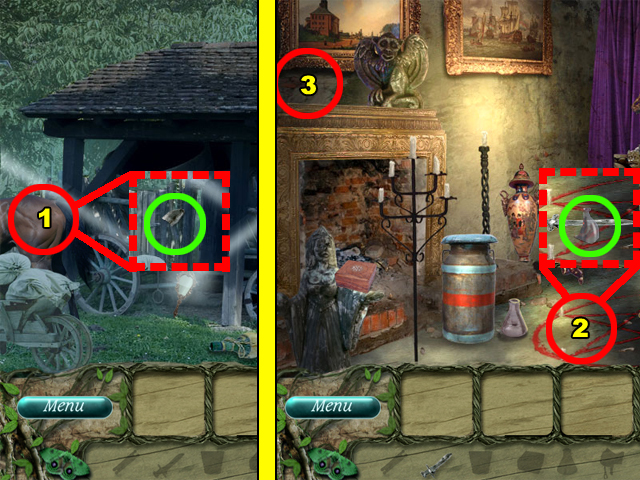
- Place the white CANDLE HOLDER above the fireplace at position 1.
- Place the red CANDLE HOLDER above the fireplace at position 2.
- Click on the red or white CANDLE HOLDER to initiate the puzzle.
- (For puzzle only)You must light all of the candles to clear the puzzle. Click on the fuse of a candle to light the candles adjacent to it. If you try to light a lit candle, it will become unlit again.
- Light the candles in this order to win: 1st, 3rd, 5th, 2nd, 3rd, and 6th. Afterwards you will receive a WATERING CAN fragment.

- Use the WATERING CAN to extinguish the fire at position 1.
- Collect the PLAYING CARDS where you extinguished the fire.
- Place the PLAYING CARDS on the table at position 2, and then click on them to begin the next puzzle.
- Place all of the cards into their matching numbered slots to win.
- Click on a card to move it to a connected slot. A card cannot move unless it is connected to an empty slot.
- Each of the slots is connected to another slot by a think white line. Follow those lines to figure out where each slot connects to.
- Click on the slots in this order to solve this puzzle: 2-5-6-1-2-5-3-2-1. You will receive a SATYR HEAD fragment afterwards.
- Place the SATYR HEAD above the fireplace at position 1.
- Enter the fireplace to advance to the next room.
Scene 2
- Collect the doll fragments around this scene.
- Place the 5 dolls into the 5 silhouettes above the fire place. Each doll belongs in a specific silhouette.
- The order is: DOLL WITH AXE, DOLL WITH GOAT, DOLL WITH BABY, OLD DOLL, and WITCH DOLL. Afterwards the dolls will reenact a ritual which will end this chapter.
Chapter Six
Scene 1
- Collect the hidden fragments.
- Place the RED BOX on the drums at position 1. Click on the RED BOX afterwards to initiate the puzzle.
- (For puzzle only)Your goal is to get the race horse to stop where the blue flag is. To move the race horse click one of the 4 pink buttons.
- Press the buttons in this order to win: FOURTH, FIRST, and SECOND. You will receive a SCISSORS fragment afterwards.
- Use the SCISSORS to cut a doorway in the wall at position 2. Enter the doorway to continue.
Scene 2
- Collect the fragments, and then return to the previous room. Click in the area highlighted in blue to exit.
- From now on the area highlighted in blue will be referred to as the “exit area”.
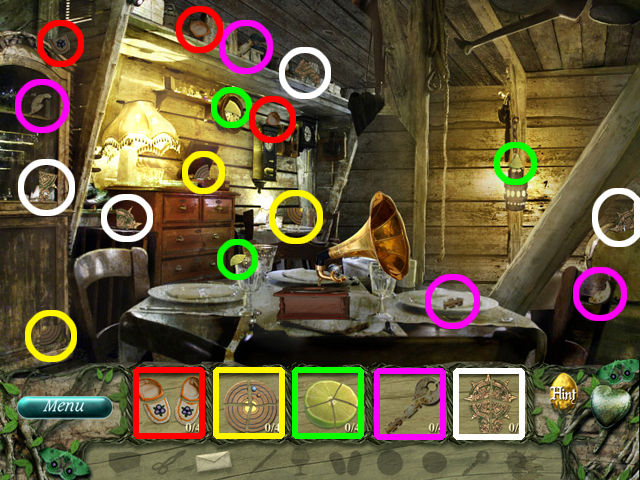
- Use the KEY to open the drawer at position 1.
- Collect the WINE GLASS fragment above position 1.
- Place the ARTIFACT on the vase at position 2.
- Collect the NEEDLE fragment above the ARTIFACT.
- Revisit the other room.
- Place the WINE GLASS on the table at position 3.
- Collect the LIME fragment beside the WINE GLASS.
- Use the NEEDLE on the gramophone at position 4.
- Collect the SOLAR SYSTEM fragment on the gramophone.
- Place the SOLAR SYSTEM on the wall at position 5, and then click on it to start a puzzle.
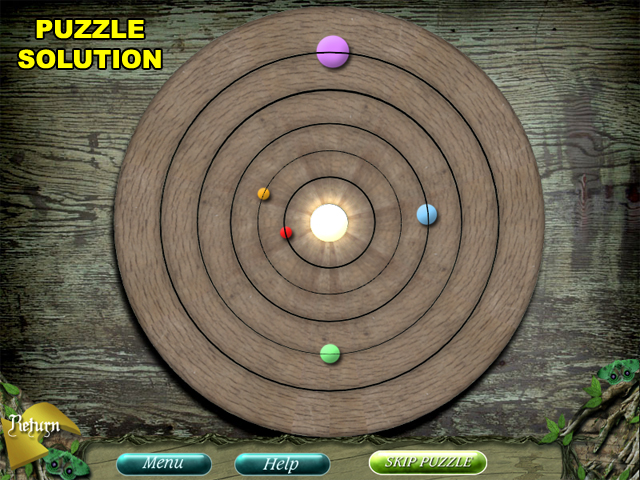
- Align the rings of the puzzle until the picture of the solar system is complete.
- Click on the outer rings of the puzzle to rotate them clock-wise; the central piece is not rotatable. You will receive a BABY SHOES fragment once you are finished.
- Clearing this puzzle will complete this scene.

- Place the BABY SHOES on the pillow at position 1.
- Place the LETTER beside the BABY SHOES at position 2.
- Use the LIME on the LETTER afterwards to complete this chapter.
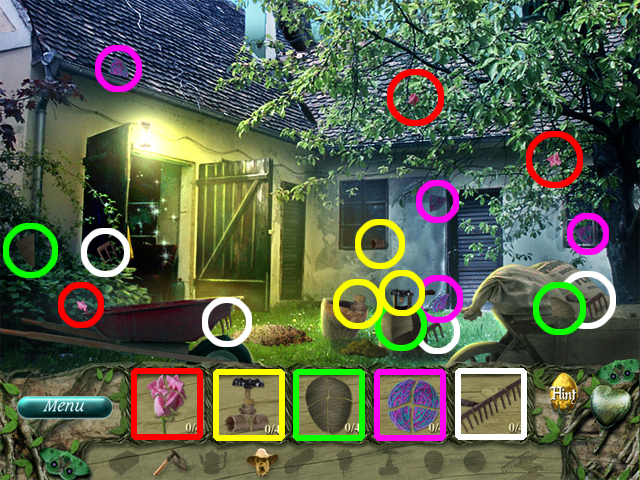
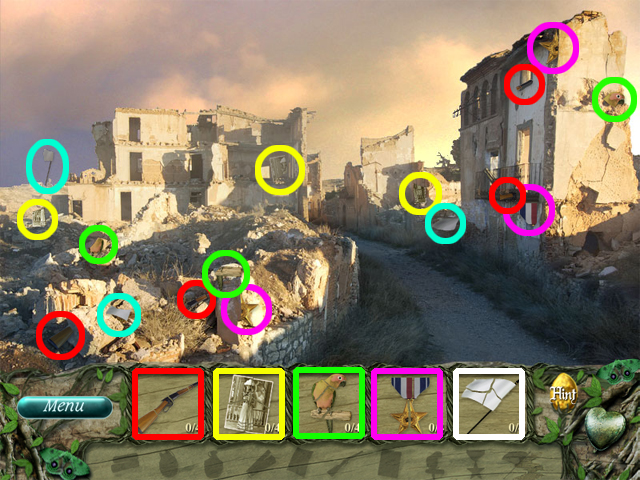
Chapter Seven
Scene 1
- Collect the hidden fragments.
- Use the KETTLE WITH WATER on wood basin at position 1.
- Use the SCRUB BRUSH to clean the stain at position 2.
- Collect the SCARECROW fragment where the stain was.
- Enter the sparkling door way to the left of this room.
Scene 2
- Collect the item fragments around this scene.
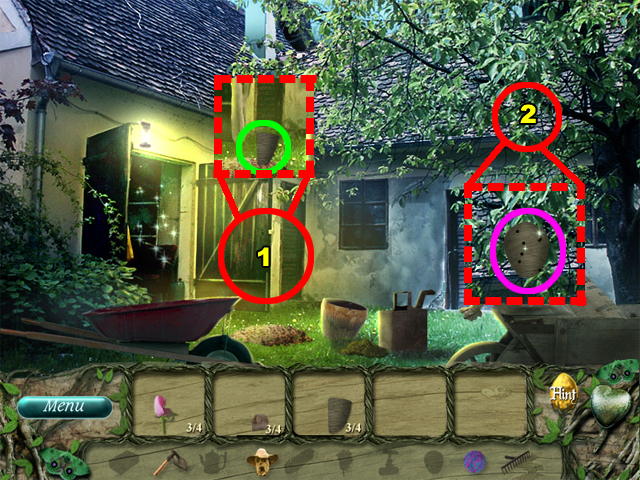
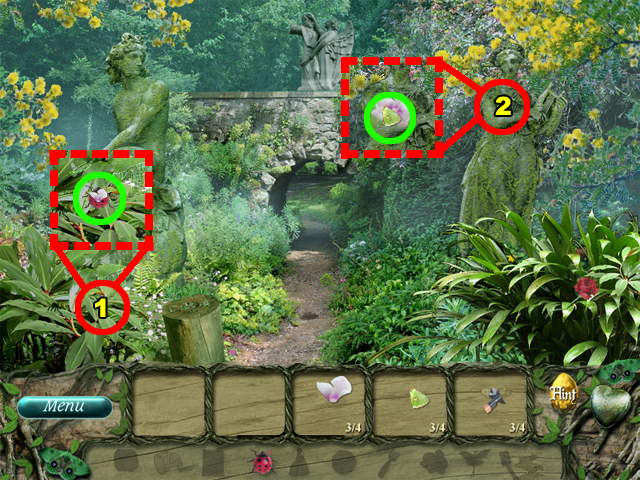
- Place the SCARECROW above the leaf pile at position 1.
- Collect the BEEHIVE fragment beside the SCARECROW.
- Place the BEEHIVE in the tree at position 2, and then click on it to initiate the puzzle.
- (For puzzle only)Click on the bees that pop up out of the BEEHIVE until the puzzle is complete. Click on 10 of the bees to advance. You will receive a SPIGOT fragment afterwards.
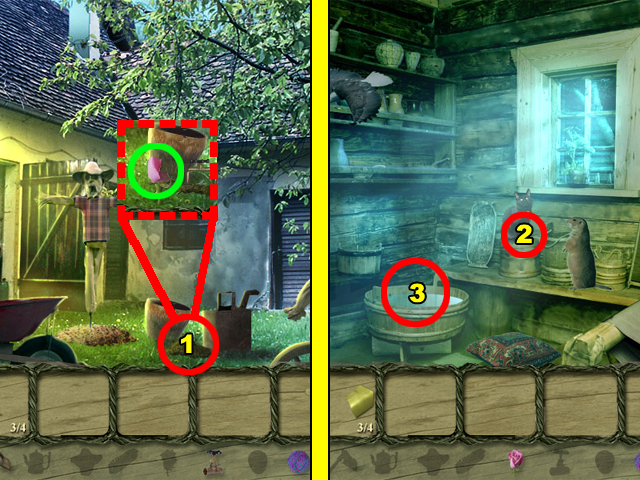
- Use the HOE TOOL and SPIGOT on the dirt patch at position 1. Use the HOE TOOL before using the SPIGOT.
- Collect the ROSE fragment beside the SPIGOT to complete this scene.
- Give the BALL OF YARN to the cat at position 2.
- Collect the BAR SOAP fragment nearby the BALL OF YARN.
- Use the BAR SOAP and ROSE in the wood basin at position 1.
Chapter Eight
Scene 1
- Collect the item fragments hidden around the room.
- Use the CROCHET NEEDLES to repair the cloth at position 1.
- Collect the CLOTH PIECE that appears beside position 1.
- Exit this scene to enter the next room. The exit area is at the bottom of this scene.
Scene 2
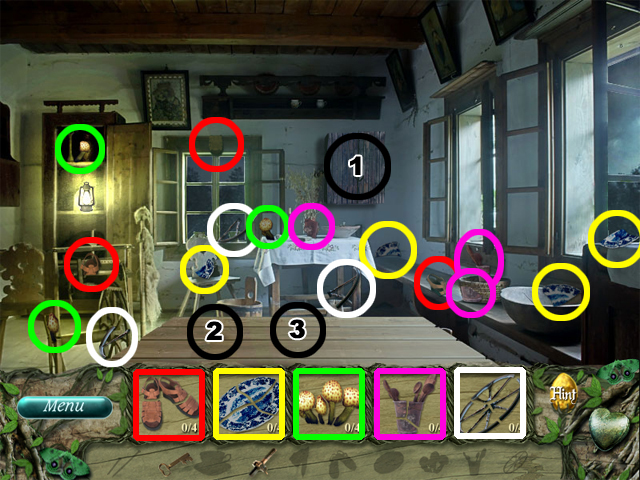
- Collect the hidden fragments.
- Use the KEY to open the cabinet at position 1.
- Collect the SANDALS and SET OF SPOONS fragments inside the cabinet.
- Place the PLATE on the table at position 2.
- Place the SET OF SPOONS on the table at position 3.
- Revisit the previous scene. The exit area is at the bottom of this scene.
- Place the SANDALS beside the shoes at position 1.
- Collect the CLOTH PIECE fragment nearby the SANDALS.
- Use the CLOTH PIECE on the cloth at position 2.
- Collect the TEA CUP fragment where you used the CLOTH PIECE.
- Visit the other room again.
- Place the TEA CUP on the table at position 3.
- Collect the MUSHROOMS fragment beside the TEA CUP.
- Place the MUSHROOMS on the PLATE at position 2, and then click on them to start the puzzle.

- Find the 12 differences between the 2 images. Click on a difference to erase it from one of the pictures.
- You will receive a DISTAFF WHEEL fragment afterwards.
- You will be taken to the previous room now that this room is complete.
- Place the DISTAFF PIECE into the distaff at position 1.
- Place the DISTAFF WHEEL into the distaff at position 2.
Chapter Nine
Scene 1
- Collect the hidden item fragments.
- Exit this room to enter the next scene. The exit area is at the bottom of this room.
Scene 2
- Collect the item fragments.
- Enter the area at the top of the stair case to return to the previous scene.
- Use the HAMMER to break the boarded window at position 1.
- Collect the BRICK fragment where the HAMMER was used.
- Return to the other room.
- Place the BRICK into the slot in the wall at position 2.
- Collect the KEY fragment that appears under the BRICK.
- Exit this room.

- Use the KEY to open the drawer at position 1.
- Collect the BAG fragment inside of the drawer.
- Return to the lower room.
- Place the BAG at position 2, and then click on it to start the puzzle.
- Arrange the bags according to their sizes to complete this puzzle. There are 3 sizes: large, medium, and small.
- Select any 2 bags to swap their positions. Each of the slots is labeled with a number to show where each bag belongs; (3) means large, (2) means medium, and (1) means small.
- After arranging the bags you will receive a FLASH fragment.
- Return to the room upstairs to use the FLASH.
- Place the FLASH on the dresser at position 1.
- Collect the WOODEN WHEEL fragment beside the FLASH.
- Go back down stairs.
- Place the WOODEN WHEEL on the statue at position 2.
- Collect the CHAINS fragment beside the WOODEN WHEEL.
- Return to the room upstairs.
- Use the CHAINS on the door at position 1.
- Use the OIL on the CHAINS, and then click on them to open the door.
- Collect the BIG KEY fragment beyond the door to complete this scene.
- Use the BIG KEY on the gate at position 2.
- Use the SMALL KEY on the chest at position 3 to complete this chapter.
Chapter Ten
Scene 1
- Collect the fragments hidden around this scene.
- Use the exit area at the bottom of this room to enter the next room.
Scene 2
- Collect the item fragments in this room.
- Place the OLD DIARY on the stack of books at position 1.
- Collect the SPIGOT fragment on the OLD DIARY.
- Return to the previous room using the exit area at the bottom of this scene.
- Place the PIPE below the sink at position 2.
- Collect the POT fragment beside the PIPE.
- Place the SPIGOT on the sink at position 3.
- Click on the mirror at position 4 to start the puzzle.
- Place all of the puzzle pieces into their matching silhouettes to complete this picture. Left-click to pick up a puzzle piece and right-click to drop it.
- You will receive a CURTAIN RING fragment afterwards.
- Use the CURTAIN RING to open the curtain at position 1 for a later use.
- Leave this room for now.
- Place the POT on the cannon at position 2.
- Collect the BATHTUB PLUG fragment beside the POT.
- Return to the previous room again.
- Examine the sparkling area behind the curtain at position 1.
- Use the BATHTUB PLUG to plug the hole in the bathtub.
- Collect the MASK fragment beside the BATHTUB PLUG.
- Enter the other room again afterwards.
- Hang the MASK on the wall at position 1.
- Collect the WOOD BOARD fragment beside the MASK.
- Place the WOOD BOARD on the wooden board at position 2.
- Collect the TOWEL fragment above the WOOD BOARD.
- Exit this room.
- Hang the TOWEL on the towel hanger at position 1.
- Collect the PHOTO fragment beside the TOWEL.
- Now that this room is complete, you will be taken to the other room.
- Place the PHOTO on the OLD DIARY at position 2 to complete this chapter.
Chapter Eleven
Scene 1
- Collect the hidden fragments around this room.
- Enter the other room by using the exit area at the bottom of this scene.
Scene 2
- Find the hidden item fragments.
- Place the BIRD FOOD on the windowsill at position 1.
- Collect the POISON fragment nearby the BIRD FOOD.
- Return to the previous room; the exit area is at the bottom of this scene.
- Place the LIGHT SWITCH on the wall at position 1.
- Collect the PADLOCK fragment beside the LIGHT SWITCH.
- Go to other room.
- Use the PADLOCK on the latch at position 2.
- Click on the PADLOCK to initiate the puzzle.
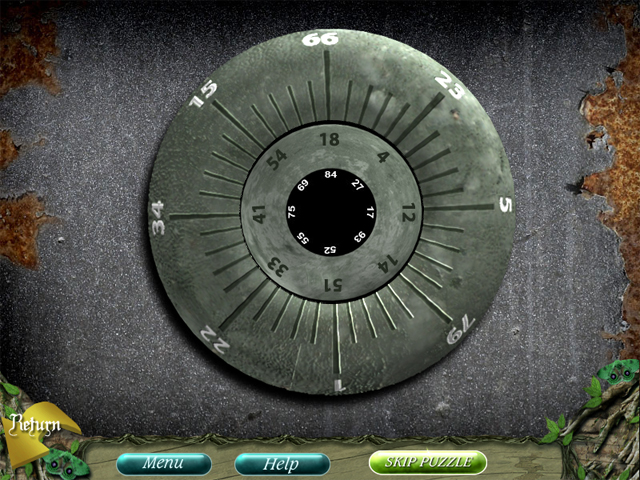
- Rotate the dials of the PADLOCK until the outer dials sum up to the numbers of the innermost dial. The central dial cannot be rotated; rotate the other dials by clicking on them.
- Rotate the large dial until the number 66 is pointed upwards. And then, rotate the second largest dial until its number 18 is pointed upwards to complete this puzzle.
- You will receive a BIRD fragment afterwards.
- Revisit the previous scene.
- Place the BIRD on the windowsill at position 1.
- Collect the HANDSAW fragment beside the bird.
- Leave the room afterwards.
- Use the HANDSAW to cut the board at position 2.
- Collect the SPIDER fragment at position 2 afterwards to complete this scene.
- Place the SPIDER below the spider web at position 1.
- Collect the POT fragment above the SPIDER.
- Place the POT on the stove at position 2.
- Collect the RAT fragment above the POT.
- Place the RAT above the fireplace at position 3.
- Collect the WOOD SCRAPS fragment beside the RAT.
- Place the WOOD SCRAPS into the stove at position 4.
- Pour the POISON into the POT at position 2 to complete this chapter.
Chapter Twelve
Scene 1
- Collect the hidden fragments.
- Go to the next room. The exit area is at the bottom of this scene.
Scene 2
- Collect the fragments around this scene.
- Place the FLASK on the floor at position 1.
- Collect the HORSESHOE fragment nearby the FLASK.
- Go to the previous room. The exit area is at the bottom of this room.
- Place the HORSESHOE on the wooden beam at position 2.
- Collect the BOX fragment under the HORSESHOE.
- Return to the previous scene.
- Place the BOX on the small statue at position 1.
- Collect the SADDLE fragment beside the BOX.
- Go back to the previous room.
- Place the SADDLE on the wagon at position 2.
- Collect the BUCKET fragment beside the SADDLE.
- Go to the other room.
- Place the BUCKET above the pentagram at position 1.
- Collect the MIRROR fragment nearby the BUCKET.
- Go to the previous room.
- Place the MIRROR under the wagon at position 2.
- Collect the SCROLL fragment under the MIRROR.
- Go to the previous room.
- Place the SCROLL in the pentagram at position 3 to initiate a puzzle.
- Drag and drop the white symbols into their blurry silhouettes on the SCROLL to complete this puzzle. Use the lines connecting the symbols to the silhouettes to figure out where each symbol belongs.
- After completing this puzzle you will receive a WHIP fragment.
- Go to the scene outside afterwards.
- Use the WHIP to move the horse at position 1.
- Collect the SWORD fragment that was behind the horse at position 1.
- You will be taken to the previous room afterwards.
- Place the SWORD in the pentagram at position 2.
- Collect the DEVIL IN A JAR fragment nearby the SWORD.
- Place the DEVIL IN A JAR above the fireplace at position 3.
Chapter Thirteen
Scene 1
- Collect the hidden fragments.
- Place the KNIGHT above the fireplace at position 1 to activate the portrait.
- Enter the sparkling portrait at position 2.
Scene 2
- Collect the fragments in this scene.
- Go back to the previous scene. The exit area is at the bottom of this scene.
- Place the LION STATUE beside the statue at position 1.
- Collect the RUNE 1 fragment beside the LION STATUE.
- Revisit the other scene.
- Place RUNE 1 on the rock at position 2.
- Collect the LAMP fragment beside the RUNE.
- Go to the previous scene.
- Use the LAMP on the lampshade at position 1.
- Collect the RUNE 2 fragment beside the LAMP.
- Return to the other scene.
- Use RUNE 2 on below RUNE 1 at position 2.
- Collect the COAL fragment beside RUNE 2.
- Return to the previous scene.
- Place the COAL in the fireplace at position 1.
- Collect the TORCH fragment beside the COAL.
- Use the TORCH to light the fireplace at position 2.
- Collect the RUNE 3 fragment near position 2 to complete this scene.
- Place RUNE 3 below RUNE 2 at position 3.
- Collect the SCYTHE fragment beside RUNE 3.
- Use the SCYTHE to cut the bush at position 4.
- Collect the EYE RUNE fragment where the bush was.
- Use the EYE RUNE above RUNE 1 at position 5 to complete this chapter.
Chapter Fourteen
Scene 1
- Collect the hidden fragments.
- Go to the next room. The exit area is at the bottom of this scene.
Scene 2
- Collect the item fragments.
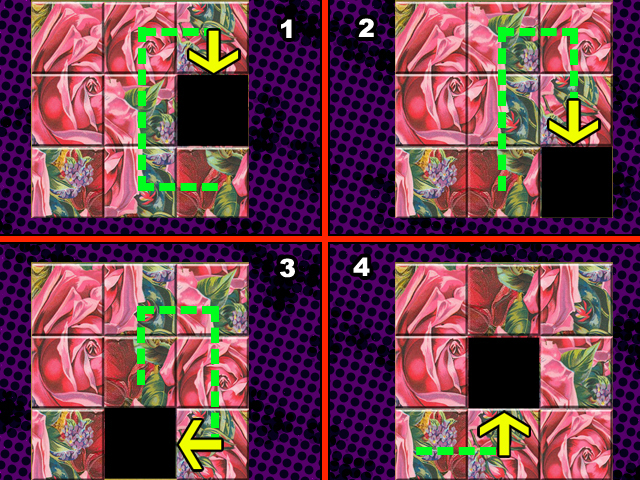
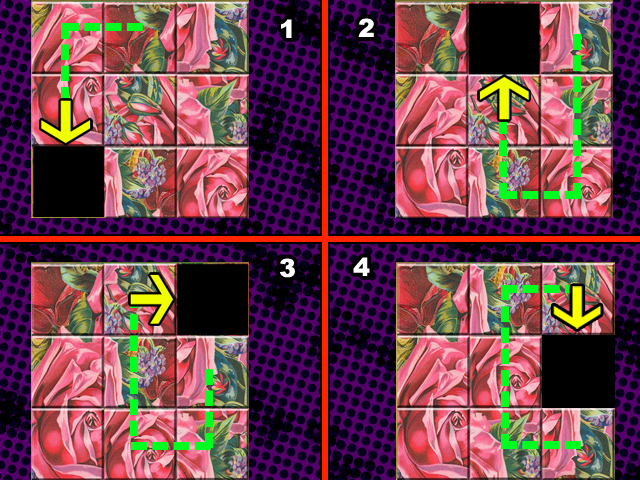
- Place the ROSE PEDAL on the rose at position 1. Click on the ROSE to start the puzzle.

- Slide the squares into their correct places to complete the picture. A square can slide in 4 directions, but can only slide into an empty slot.
- Slide the squares according to the direction of the arrow. The squares with the dotted line should follow the square with the arrow on it (like a snake’s body). The black square represents the empty space in this puzzle.
- Follow the directions numerically to solve this puzzle in 12 steps.
- Return to the previous scene afterwards.
- Place the ORNAMENT BALL on the statue at position 1.
- Collect the NET fragment above the ORNAMENT BALL.
- Go to the other scene.
- Use the NET to capture the butterfly at position 2.
- Collect the FORK fragment where the butterfly was.
- Go to the previous scene.
- Use the FORK to move the bat at position 1.
- Collect the PICTURE CANVAS fragment where the bat was.
- Place the PICTURE CANVAS in the picture frame at position 2.
- Collect the LADYBUG fragment under the PICTURE CANVAS.
- Go to the other scene.
- Place the LADYBUG on the plant at position 1.
- Collect the ORCHID fragment on the LADYBUG.
- Place the ORCHID on the statue at position 2.
- Collect the BUTTERFLY fragment on the ORCHID.
- Go to the previous scene.
- Place the BUTTERFLY below the candle at position 1.
- Collect the DOLL fragment above the BUTTERFLY to complete this scene.
- Place the DOLL on the chopped wood at position 2.
- Collect the SHOVEL fragment nearby the DOLL.
- Use the SHOVEL to unearth the dirt at position 3 and end this chapter.
Chapter Fifteen
Scene 1
- Collect the hidden fragments around this room.
- Use the FISH FOOD on the fish tank at position 1.
- Use the BOX CRANK on silver box at position 2. Click on the box to initiate its puzzle.
- Pair the identical cards together to win.
- Click on a face-down card to reveal its picture. You can only reveal 2 cards at a time. If you reveal 2 cards that do not match, they will both return to their face-down positions. When you find a matching pair, they will disappear from the board.
- Use this screenshot to find the locations of the identical cards. You will receive a MERMAID TAIL fragment upon afterwards.
- Examine the fish tank to enter the next scene.
Scene 2
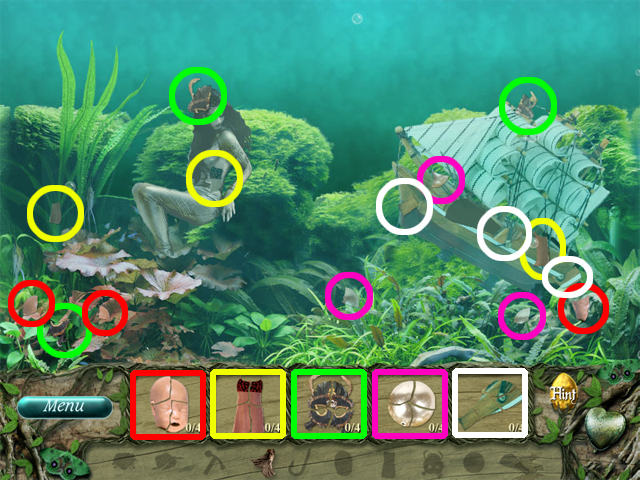
- Collect the scattered fragments.
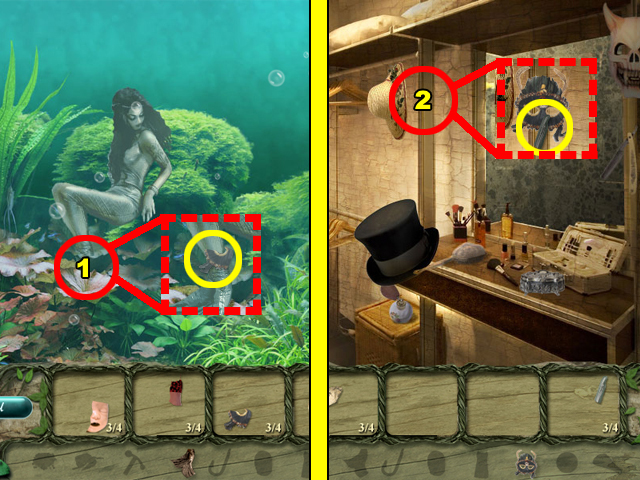
- Attach the MERMAID TAIL to the mermaid at position 1.
- Collect the MASK nearby the MERMAID TAIL.
- Exit the fish tank. The exit area is at the bottom of this scene.
- Place the MASK beside the hat at position 2.
- Collect the HOOK fragment by the MASK.
- Examine the fish tank again.
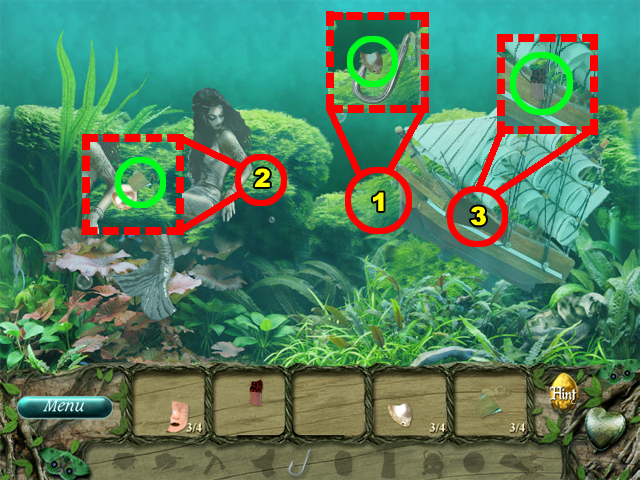
- Place the HOOK beside the ship at position 1.
- Collect the PEARL fragment on the HOOK.
- Place the PEARL beside the mermaid at position 2.
- Collect the SHIP FRAGMENT beside the PEARL.
- Use the SHIP FRAGMENT on the ship at position 3.
- Collect the DRESS fragment where you used the SHIP FRAGMENT.
- Exit the fish tank.

- Place the DRESS on the hanger at position 1.
- Collect the HERMIT CRAB fragment above the dress.
- Examine the fish tank again.
- Place the HERMIT CRAB by the seaweed at position 2.
- Collect the DOLL HEAD fragment near the HERMIT CRAB to complete this scene.
- Place the DOLL HEAD on the doll at position 1 to complete this chapter.
Chapter Sixteen
Scene 1
- Collect the missing fragments.
- Examine the globe at position 1.
Scene 2
- Collect the hidden fragments.
- Attach the SAIL to the boat at position 1.
- Collect the LIGHTER fragment beside the SAIL.
- Go back to the previous scene. The exit area is at the bottom of this scene.
- Use the LIGHTER to the light the candle at position 2.
- Collect the TREASURE MARK beside the candle.
- Examine the globe again.
- Place the TREASURE MARK at position 1.
- Collect the PENTAGRAM fragment beside the TREASURE MARK.
- Visit the previous scene.
- Place the PENTAGRAM onto the paper at position 2.
- Collect the PIRATE SKULL fragment beside the PENTAGRAM.
- Examine the globe.
- Place the PIRATE SKULL at position 1.
- Collect the RED LIQUID BOTTLE fragment beside the RED SKULL.
- Exit this scene again.
- Use the RED LIQUID BOTTLE to fill the glass at position 2.
- Collect the JEWEL fragment beside the glass.
- Examine the globe once again.

- Place the JEWEL at position 1.
- Collect the BARREL fragment beside the JEWEL.
- Revisit the previous scene.
- Place the BARREL by the door at position 2.
- Collect the PALM TREE fragment above the BARREL.
- Enter the other scene again.
- Place the PALM TREE below the ship at position 1.
- Collect the CHERUB fragment beside the PALM TREE to complete this scene.
- Place the CHERUB on the column statue at position 2 to end this chapter.
Chapter Seventeen
Scene 1
- Collect the hidden fragments.
- Use the BATTERY on the radio at position 1, and then click on the radio to start the puzzle.
- Tune the radio so that the red line stays on the white line.
- Click on the black knobs to change their positions. The positions of the knobs will determine where the red line goes.
- To complete this puzzle, your knobs should be in the same position as what is seen here. The first, third, and last knobs should be all the way down. And the second knob should be one click away from being all the way down.
- Afterwards the painting in the previous scene will begin to sparkle. Click on the painting to enter the next scene.
Scene 2
- Collect all of the missing fragments.
- Return to the previous scene. The exit area is at the bottom of this scene.
- Place the RIFLE on the wall mount at position 1.
- Collect the GRENADE fragment beside the RIFLE.
- Go back to the previous scene.
- Use the GRENADE on the ruble at position 2.
- Collect the PHOTO fragment where the GRENADE was used.
- Go back to the previous scene.
- Place the PHOTO in the picture frame at position 1.
- Collect the FLASK fragment beside the PHOTO.
- Go back to the other scene.
- Place the FLASK alongside the building at position 2.
- Collect the PARROT fragment beside the FLASK.
- Revisit the previous scene.
- Place the PARROT on the chair at position 1.
- Collect the DYNAMITE fragment beside the PARROT.
- Go back to the other scene.
- Place the DYNAMITE on the ruble at position 2.
- Click on the DYNAMITE to start the puzzle.
- Rotate the squares until the picture of wires is complete. This screenshot shows how the solution will look.
- Click on the squares to rotate them by 90 degrees. You will receive a MEDAL fragment upon completion.
- Afterwards revisit other scene again.
- Place the MEDAL in the frame at position 1.
- Collect the MAP fragment on the MEDAL to complete this scene.
- Place the MAP alongside the building at position 2.
- Collect the FLAG fragment beside the MAP.
- Place the FLAG near the horizon at position 3.
Chapter Eighteen
Scene 1

- Collect the fragments around this scene.
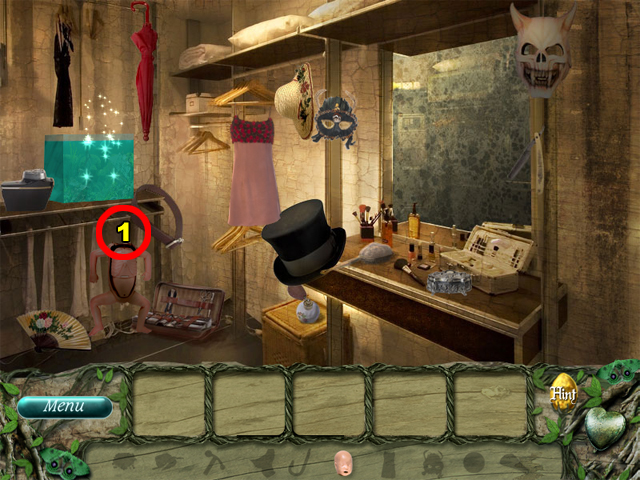
- Place the LANTERN on the bookshelf at position 1.
- Collect the MIRROR GLOBE fragment beside the LANTERN.
- Examine the portrait at position 2 to enter the next room.
Scene 2
- Collect the fragments in this room.
- Leave this room afterwards. The exit area is at the bottom of this scene.
- Use the DAGGER to cut the teddy bear at position 1.
- Collect the CAT STATUE fragment beside the bear.
- Return to the other room.
- Place the CAT STATUE on the windowsill at position 2.
- Collect the BRUSH fragment beside the CAT STATUE.
- Return to the other room.
- Use the BRUSH on the dirty section of the wall at position 1.
- Collect the PACIFIER fragment where the BRUSH was used.
- Return to the other room.
- Place the PACIFIER in the woman’s hand at position 2.
- Collect the PICTURE fragment beside the PACIFIER.
- Return to the previous room.
- Place the PICTURE on the wall at position 3.
- Collect the RED FLOWERS fragment beside the PICTURE.
- Return to the other room.
- Place the RED FLOWERS in the man’s hand at position 1.
- Collect the LANTERN fragment nearby the RED FLOWERS.
- Use the LANTERN to brighten the room at position 2.
- Place the MIRROR GLOBE into the slot at position 3.
- Collect the CAMERA OBSCURA fragment by the MIRROR GLOBE to complete this chapter.
- Place the CAMERA OBSCURA on the blanket at position 4.
Chapter Nineteen
Scene 1
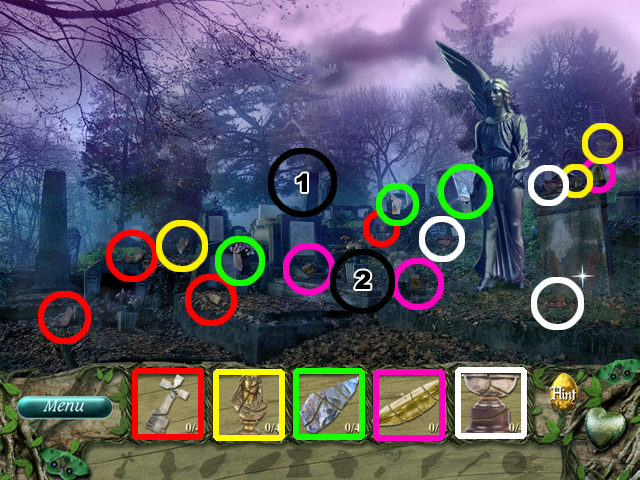
- Collect the scattered fragments.
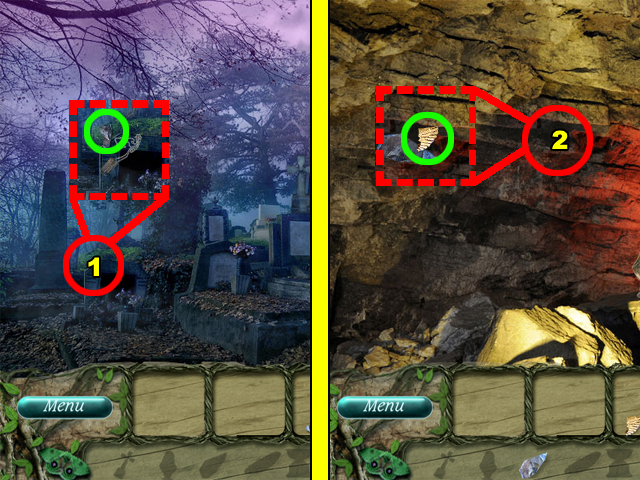
- Place the CROSS on the headstone at position 1.
- Click on the sparkling grave at position 2 to enter the next room.
Scene 2
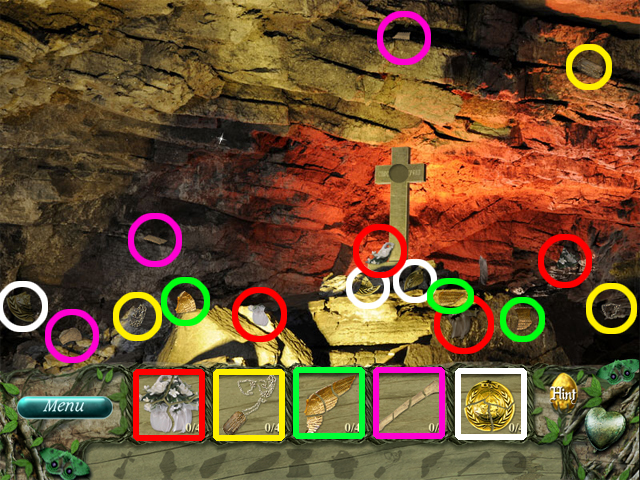
- Collect the fragments hidden around this room.
- Go back to the previous scene. The exit area is at the bottom of this scene.
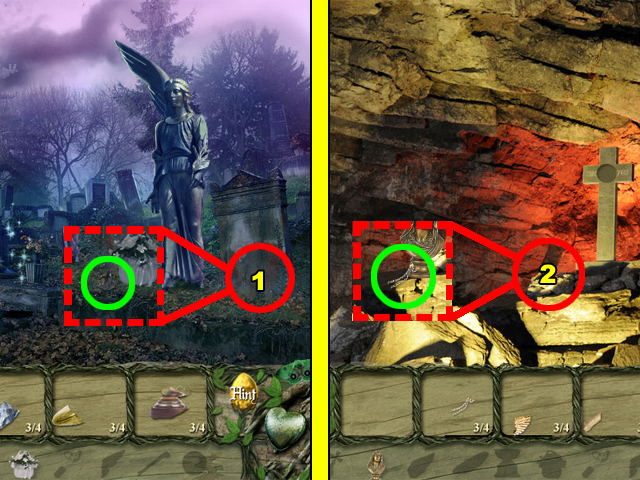
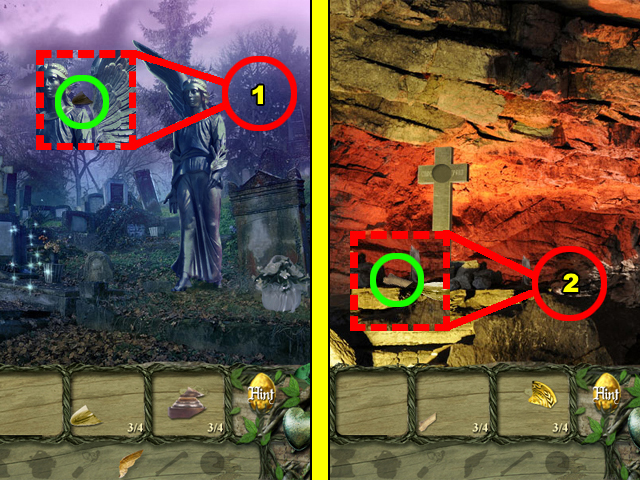
- Place the FLOWERS by the headstone at position 1.
- Collect the MADONA STATUE fragment beside the FLOWERS.
- Go to the other room.
- Place the MADONA STATUE beside the cross at position 2.
- Collect the SOLDIERS ID fragment beside the MADONA STATUE.
- Go to the previous room.
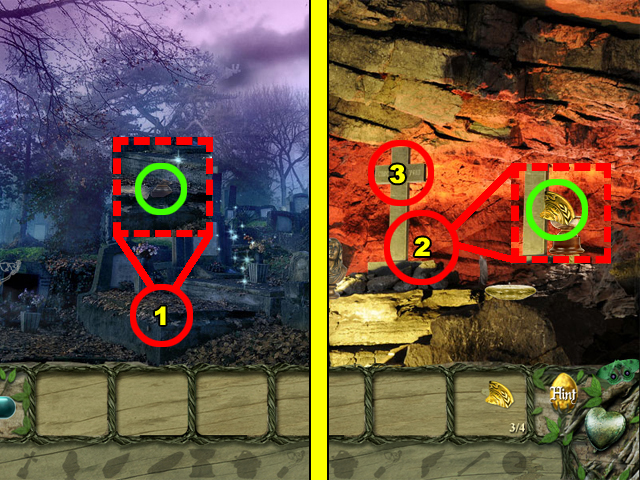
- Place the SOLDIERS ID on the headstone at position 1.
- Collect the CRYSTAL fragment beside the SOLDIERS ID.
- Go to the other room.
- Place the CRYSTAL on the cave wall at position 2.
- Collect the WINGS fragment beside the CRYSTAL.
- Go to the other room.
- Place the WINGS on the statue at position 1.
- Collect the CEREMONIAL CANDLE fragment nearby the WINGS.
- Go to the other room.
- Place the CEREMONIAL CANDLE on the rock at position 2.
- Collect the BONE fragment beside the CEREMONIAL CANDLE.
- Go to the previous room again.
- Place the BONE on the grave at position 1.
- Collect the CEREMONIAL URN fragment beside the BONE to complete this scene.
- Place the CEREMONIAL URN beside the cross at position 2.
- Collect the MEDAL fragment beside the CEREMONIAL URN.
- Place the MEDAL into the cross at position 3 to complete this chapter.
Chapter Twenty
Scene 1
- Collect the hidden fragments.
- Use the AXE to cut the tree at position 1.
- Enter the area at position 2 to proceed to the next room.
Scene 2
- Collect the hidden fragments in this room.
- Use the FLAMMABLE LIQUID on the container at position 1.
- Collect the COAL fragment where the FLAMMABLE LIQUID was used.
- Revisit the previous room. The exit area is at the bottom of this scene.
- Place the COAL on the tree at position 2. Click on the COAL afterwards to initiate the puzzle.
- (For puzzle only)You must kill all of the evil bugs to complete this puzzle. Simply click on an evil bug to kill it.
- After killing the 15 bugs you will receive a SCISSORS fragment.
- Return to the other room.
- Use the SCISSORS to cut the bush at position 1.
- Collect the QUARTZ fragment where the bush was earlier.
- Revisit the other room.
- Use the QUARTZ in the slot of the statue at position 2.
- Collect the SWORD fragment above the QUARTZ.
- Visit the other room again.
- Place the SWORD beside the statue at position 1.
- Collect the POCKET KNIFE fragment beside the SWORD.
- Return to the other room.
- Use the POCKET KNIFE to cut the leaf at position 2.
- Collect the OIL CAN that was behind the leaf at position 2.
- Go to the other room again.

- Use the OIL CAN on the register at position 1.
- Collect the GOBLET on the register.
- Go to the previous room.
- Place the GOBLET beside the statue at position 2.
- Collect the RUSTY KEY fragment above the GOBLET to complete the scene.
- Use the RUSTY KEY on the door at position 3 to begin the final puzzle.
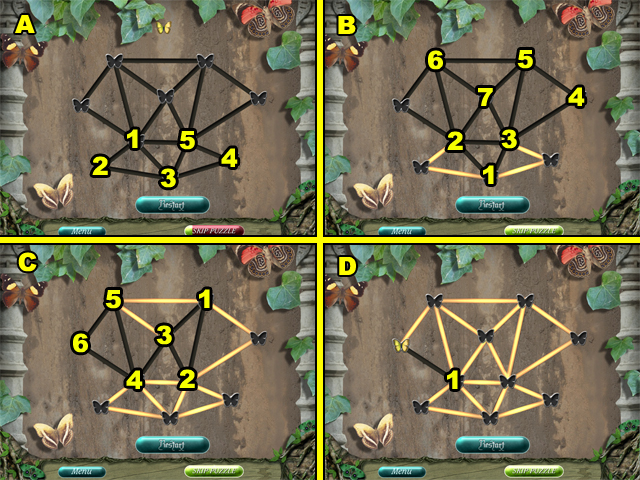
- Guide the butterfly across all of the available pathways without taking the same path twice.
- Move the butterfly by clicking an empty butterfly silhouette. The butterfly can only move to a silhouette if it is connected to it by path.
- Guide the butterfly to each of the silhouettes in numerical order. Follow the 4 sections of this solution alphabetically to win.
- Enjoy the stunning conclusion to this game.
Created at: 2010-05-22