

Walkthrough Menu
- General Tips
- Chapter 1: The Antique Shop
- Chapter 2: The Auditorium
- Chapter 3: The Floating Island
- Chapter 4: Bob's Office
- Chapter 5: The Garden
- Chapter 6: The Underground Shelter
General Tips
- This is the official guide for The Keeper of Antiques: The Imaginary World.
- This guide will not mention each time you have to zoom into a location; the screenshots will show each zoom scene.
- Hidden-object puzzles are referred to as HOPs. This guide will not show HOP solutions. It will identify the location of the HOP and the inventory item acquired.
- This guide will show solutions for non-random puzzles. Please read the in-game instructions for each puzzle.
- In this game, you will sometimes have to select the new scene to trigger dialog, cut-scenes, or tasks prior to interacting with the scene.
Chapter 1: The Antique Shop
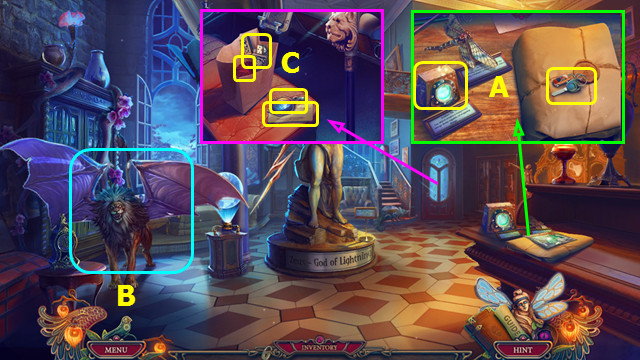
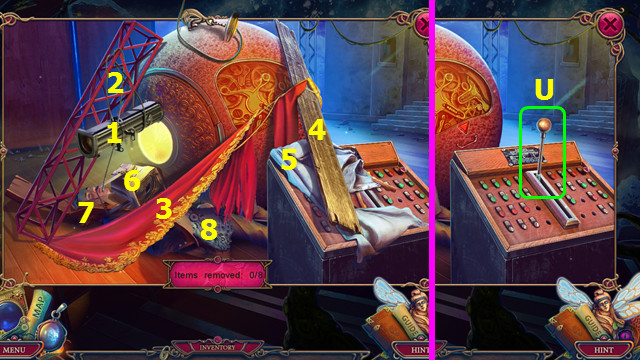
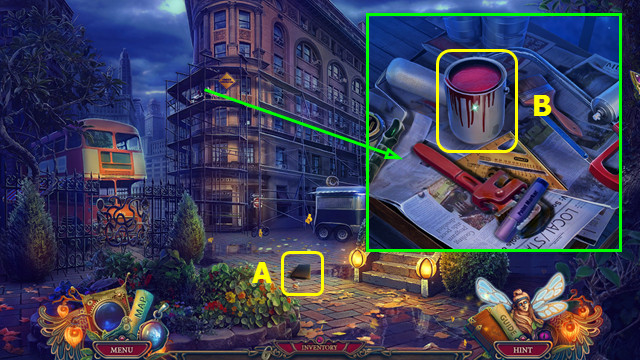
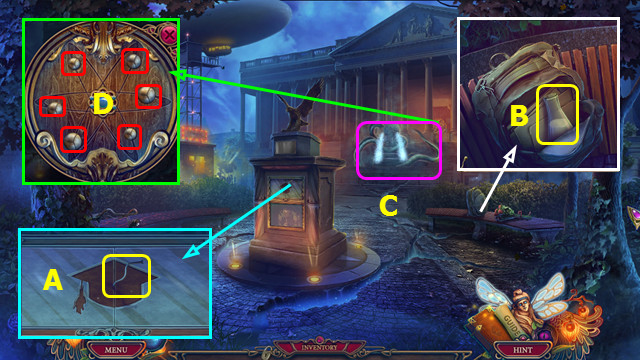
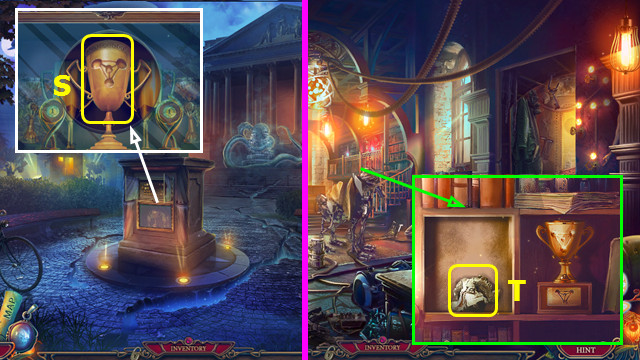
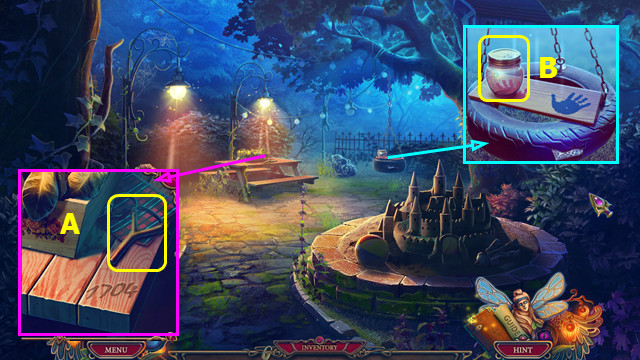
- Select the bullseye.
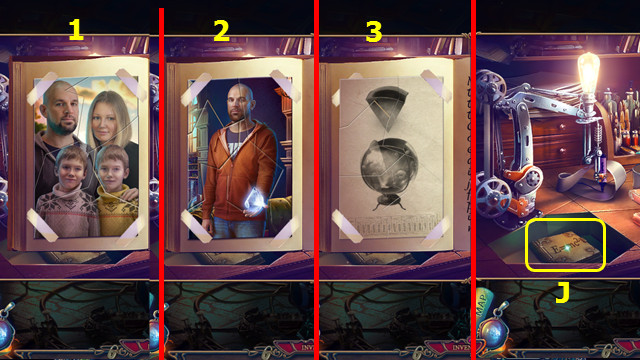
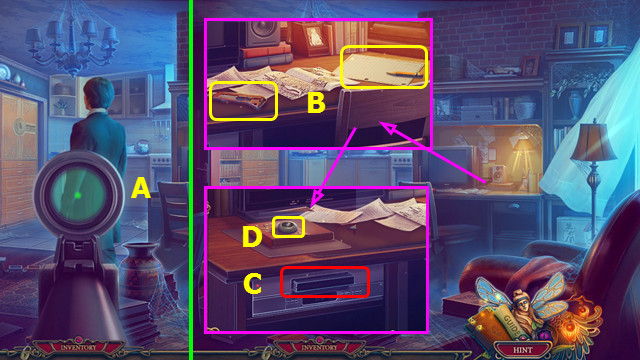
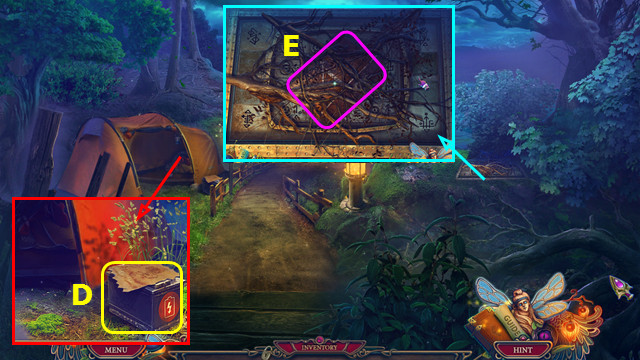
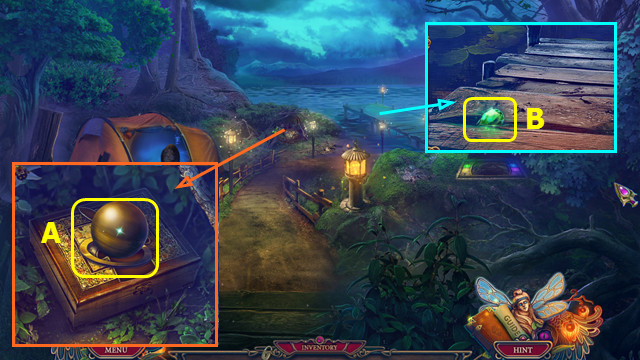
- Take the MONSTER TRAP: move the magazine and take the CAR KEYS (A).
- Use the MONSTER TRAP (B).
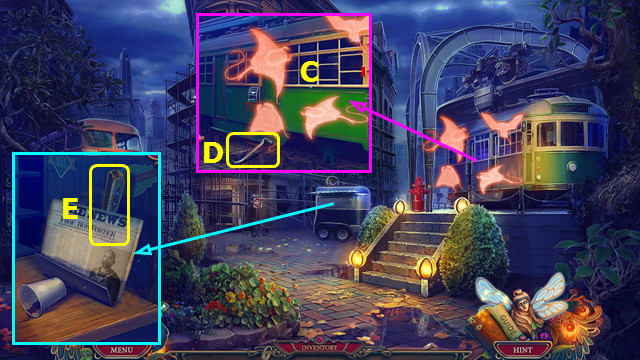
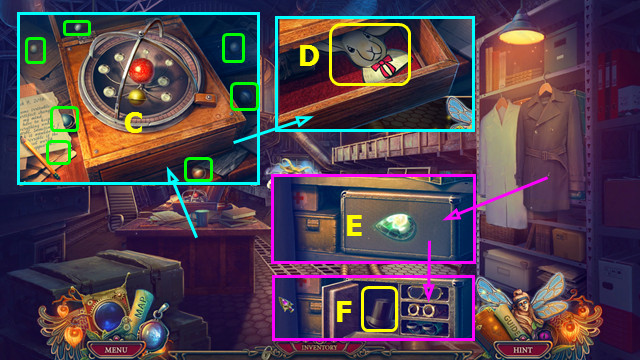
- Use the CAR KEYS; take the amulet and KEY CARD. Open the bag: take the LIGHTER and YARN (C).
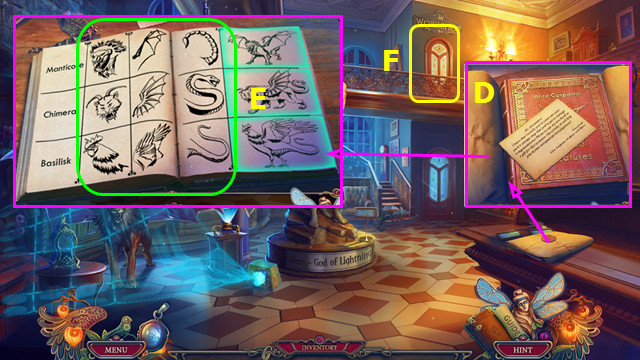
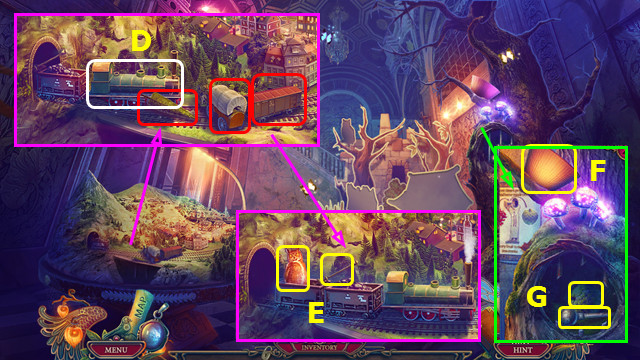
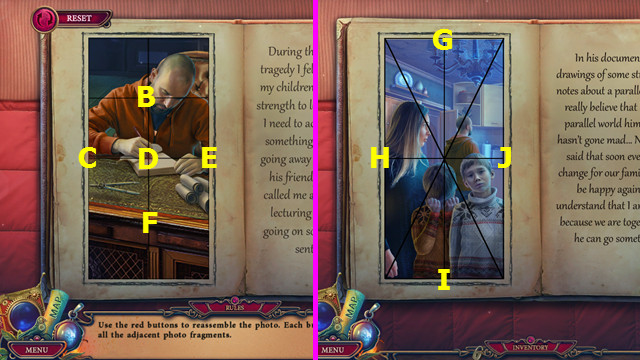
- Use the LIGHTER; read the card and open the book (D).
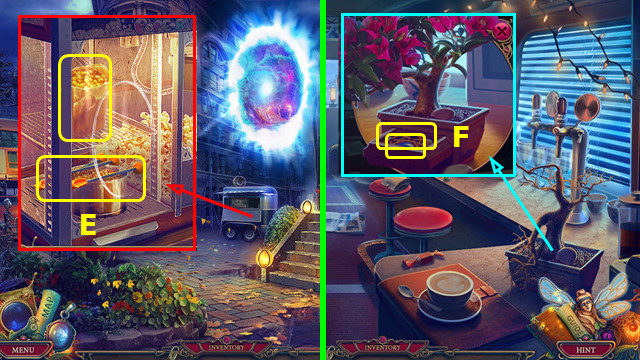
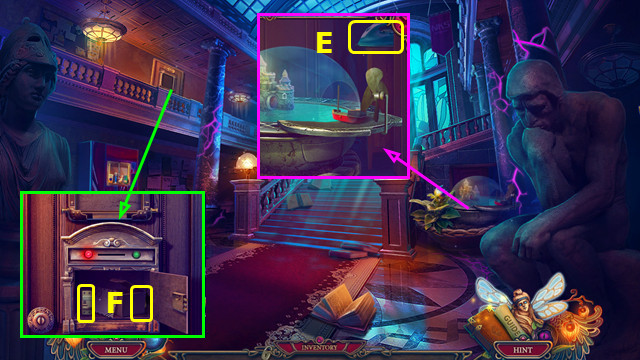
- Swap the images as shown (E).
- Take the FEATHERS.
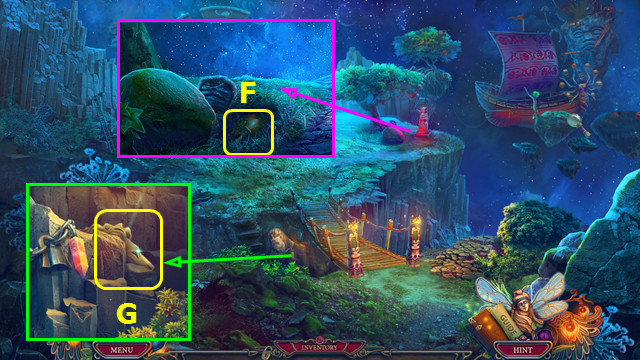
- Play the HOP; earn the KITE (F).
- Combine the KITE, YARN, and FEATHERS to make the LIGHTNING HUNTER.
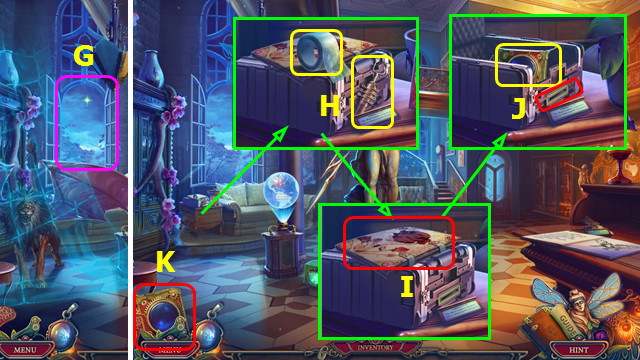
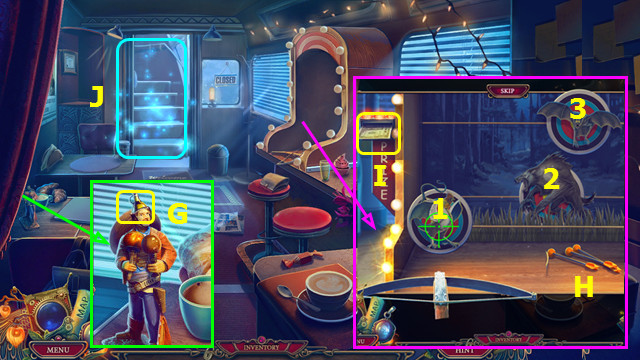
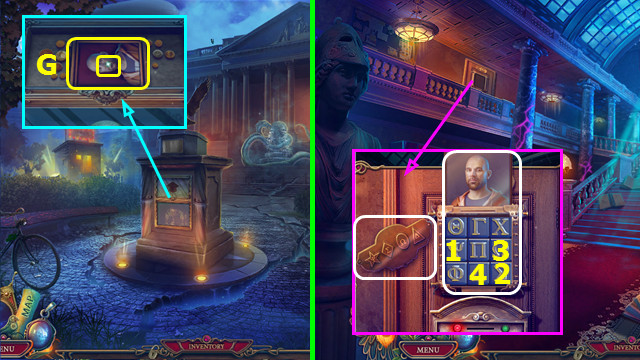
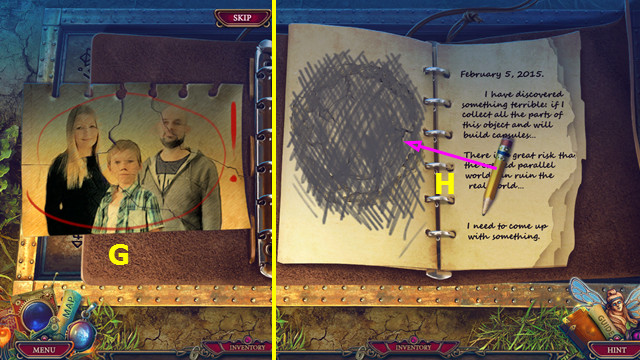
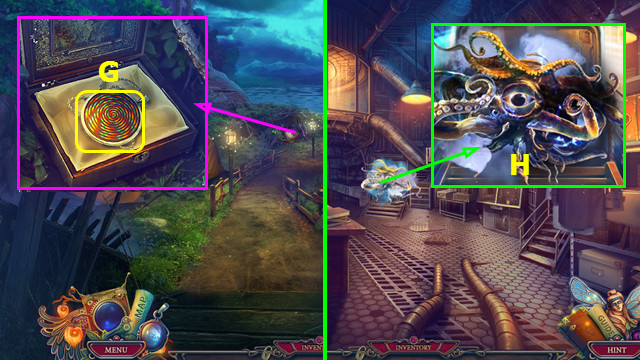
- Use the LIGHTNING HUNTER (G).
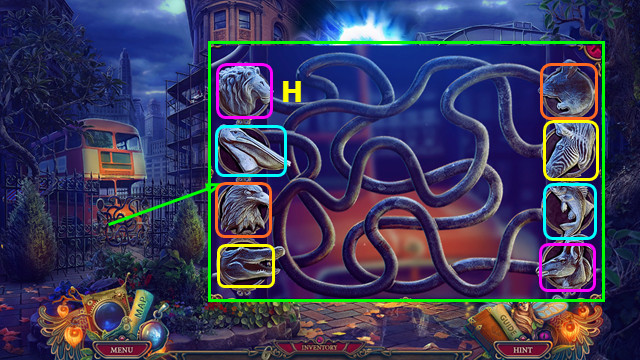
- Take the TAPE; select and take the TIME ACCELERATOR (H).
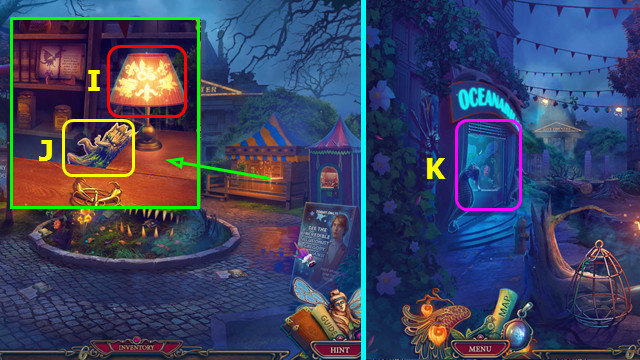
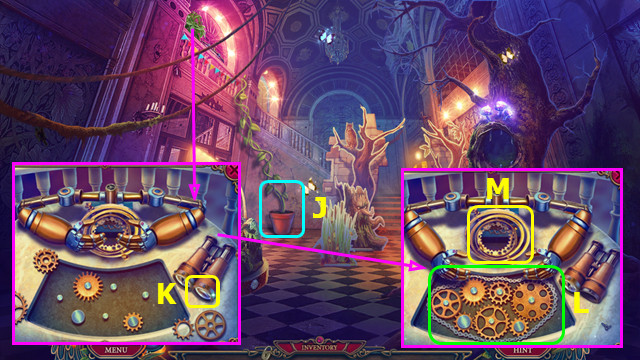
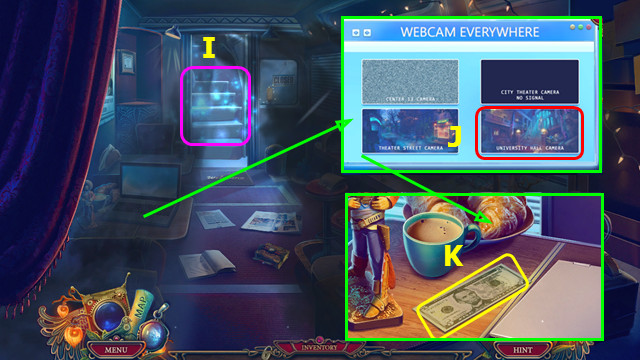
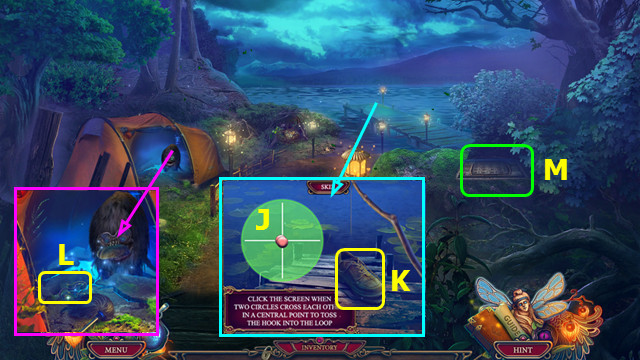
- Select and play the HOP (I).
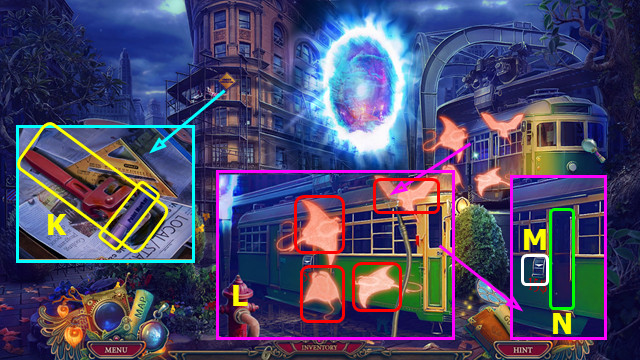
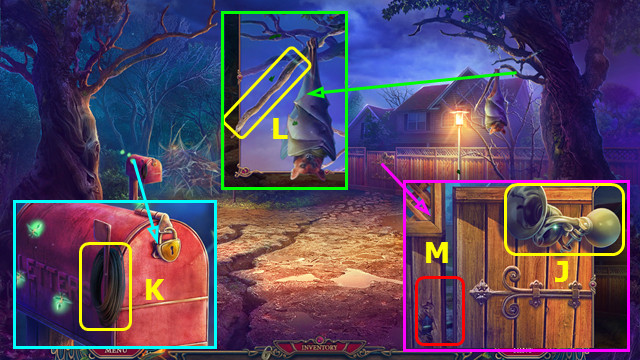
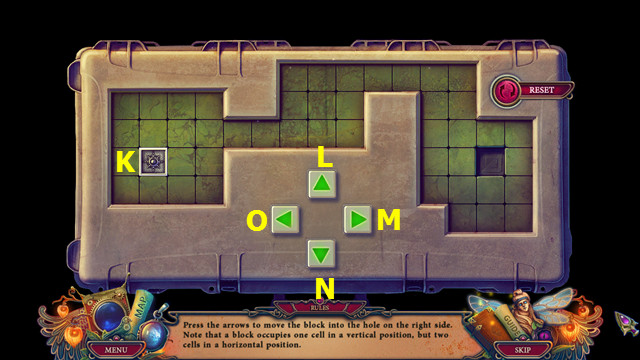
- Use the KEY CARD; select and read the instructions, and then take the KEEPER'S TOOL (J).
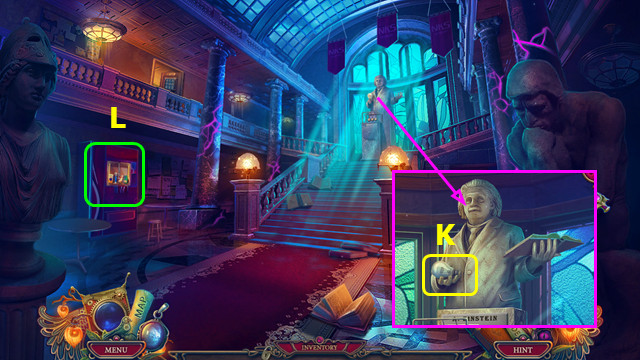
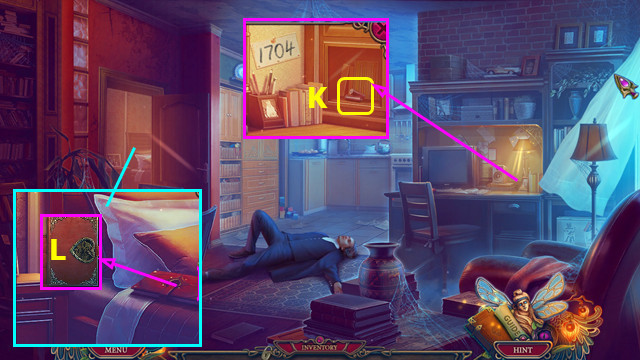
- The KEEPER'S TOOL now sits on the menu bar (K).
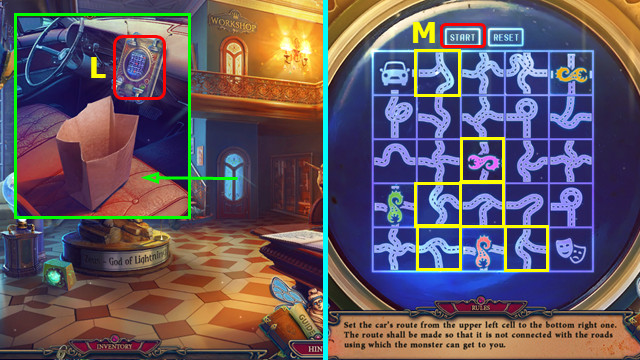
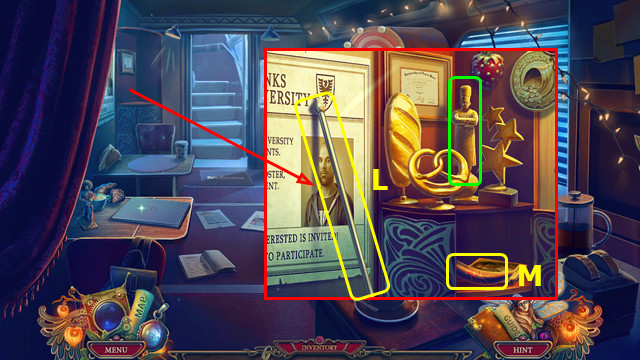
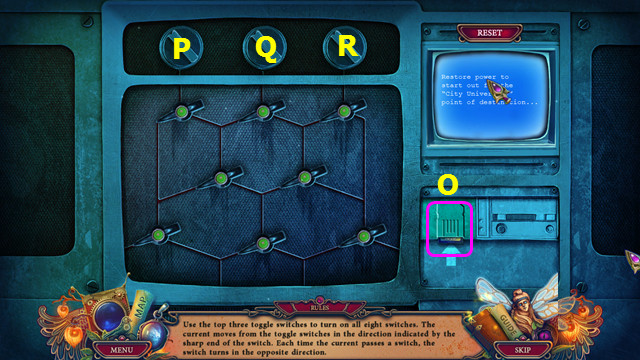
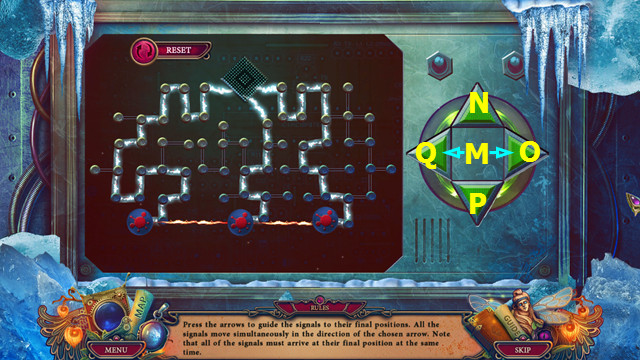
- Place and select the KEEPER'S TOOL (L).
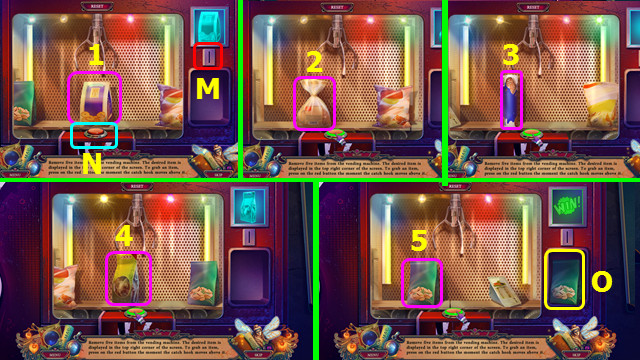
- Change the highlighted squares as shown; select (M).
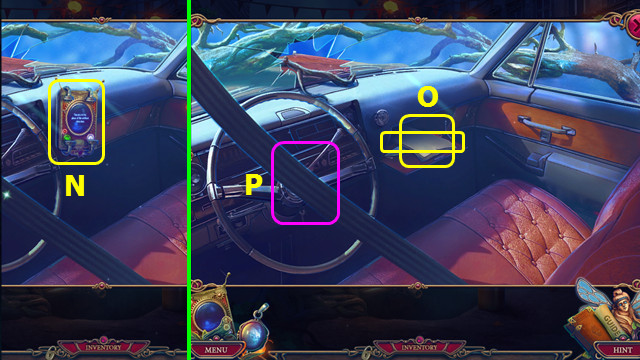
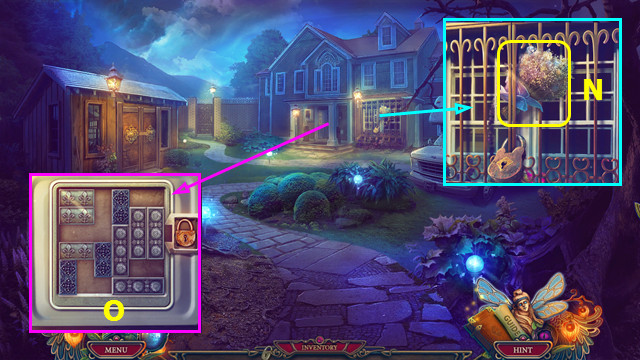
- Select and take the KEEPER'S TOOL (N).
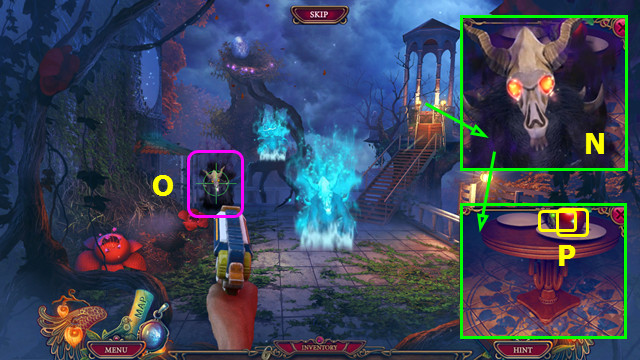
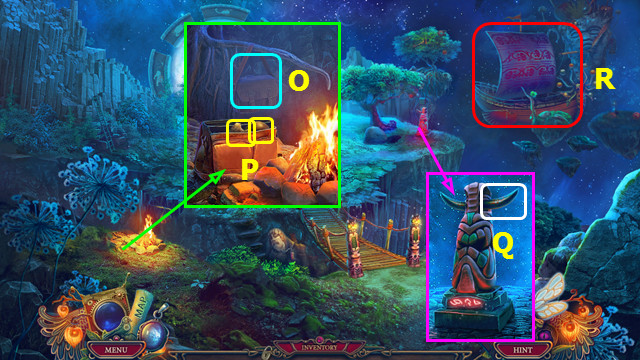
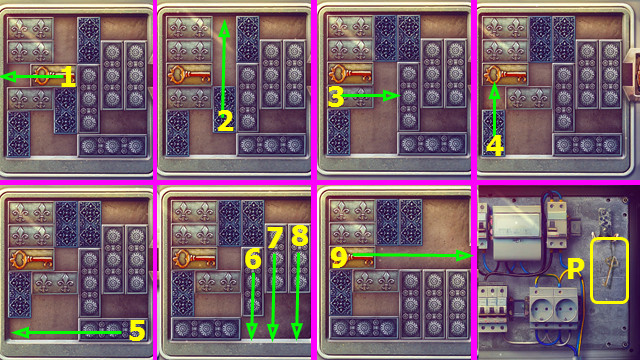
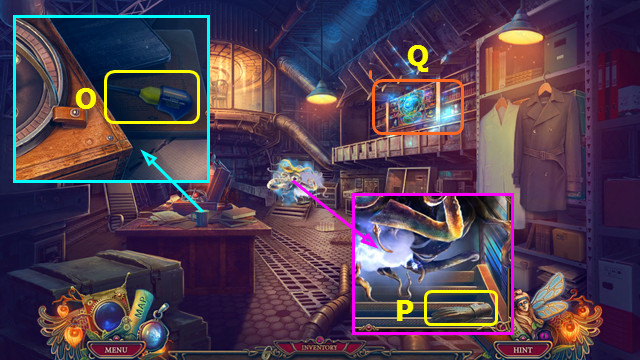
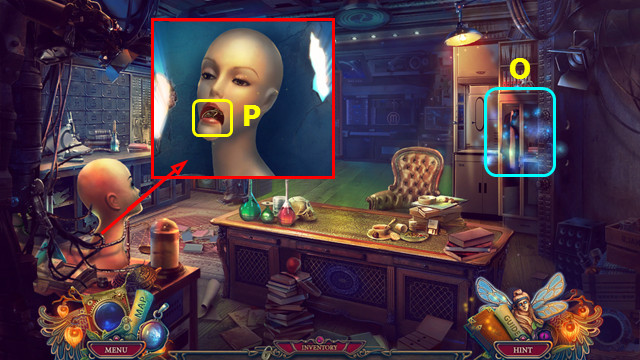
- Open the glovebox; take the map and KNIFE (O).
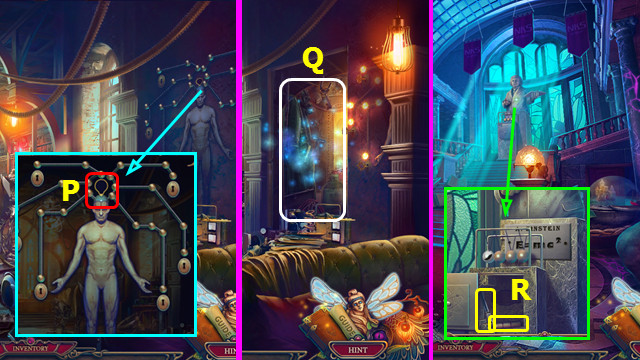
- Use the KNIFE (P).
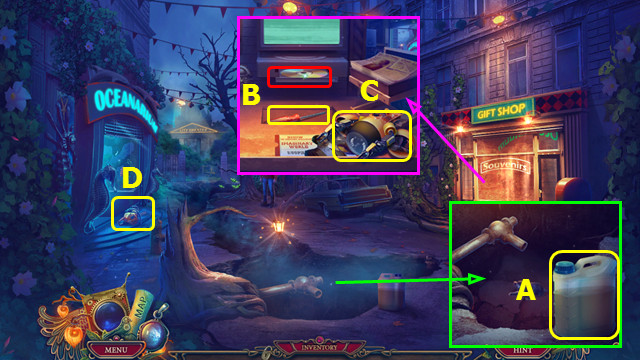
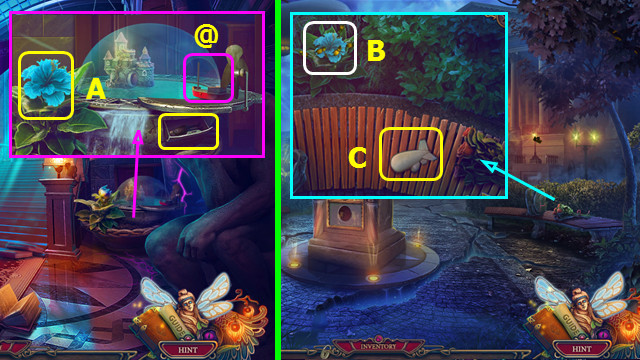
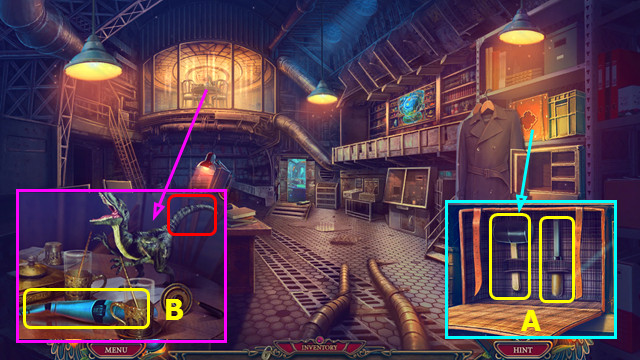
- Take the GASOLINE CANISTER (A).
- Select the DVD; take the SCREWDRIVER (B).
- Take the BROKEN SUBMARINE (C).
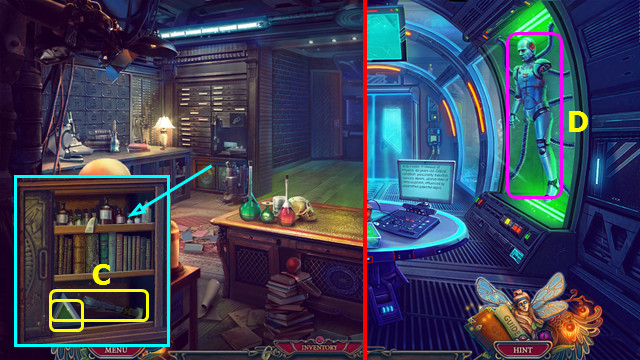
- Take the EMPTY CHAINSAW (D).
- Open the EMPTY CHAINSAW and use the GASOLINE CANISTER to make the FILLED CHAINSAW.
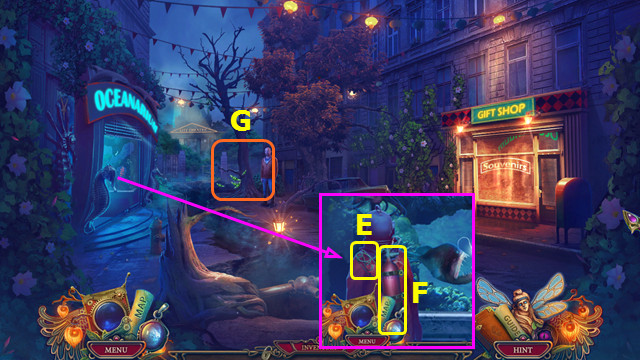
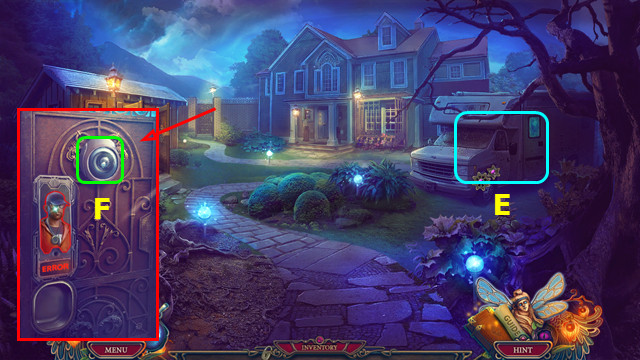
- Take the ROPE WITH CARABINER (E).
- Use the SCREWDRIVER; take the HELIUM TANK (F).
- Use the FILLED CHAINSAW (G).
- Go forward.
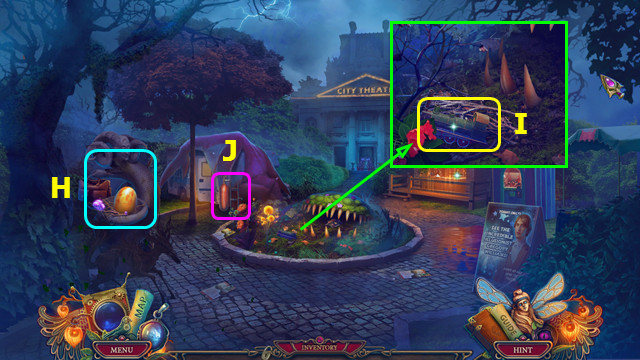
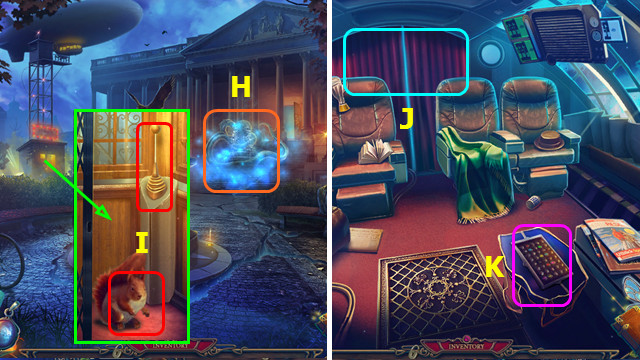
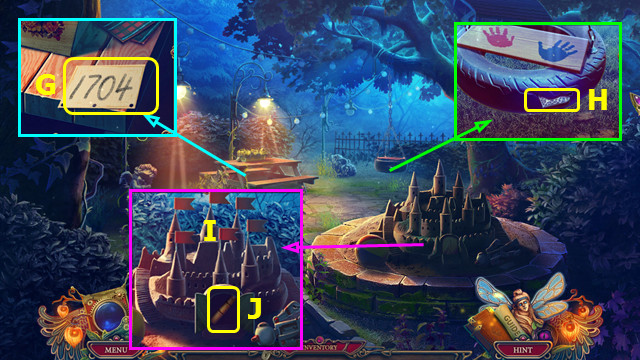
- Select (H).
- Take the TOY LOCOMOTIVE (I).
- Place the HELIUM TANK (J).
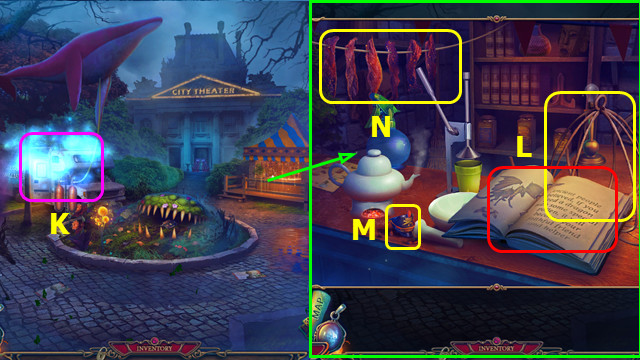
- Play the HOP; earn the ACID (K).
- Read the book; select and take the WICKER CAGE (L).
- Take the SOLDIERS HAT (M).
- Use the KNIFE to take the JERKY (N).
- Walk down.
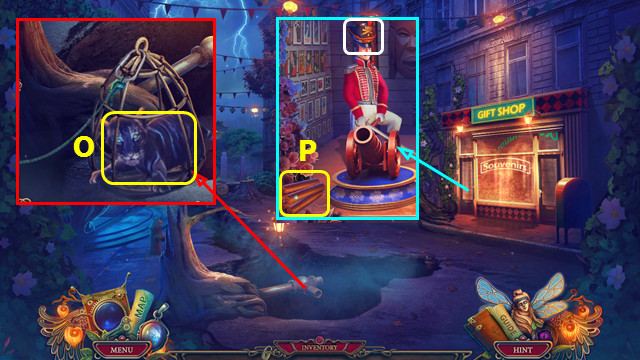
- Place the WICKER CAGE, JERKY, and ROPE WITH CARABINER; select the rope. Take the TIGER CUB (O).
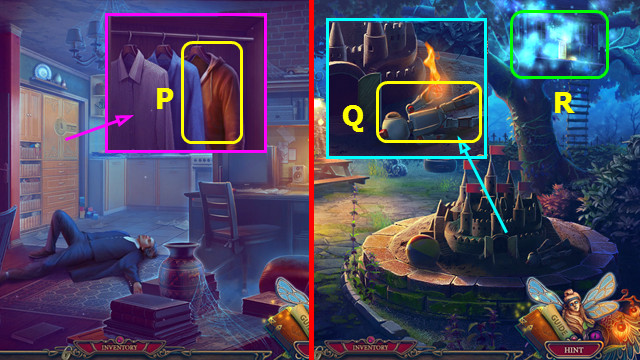
- Place the SOLDIER'S HAT; take the FIRECRACKERS (P).
- Use the TAPE on the FIRECRACKERS.
- Go forward.
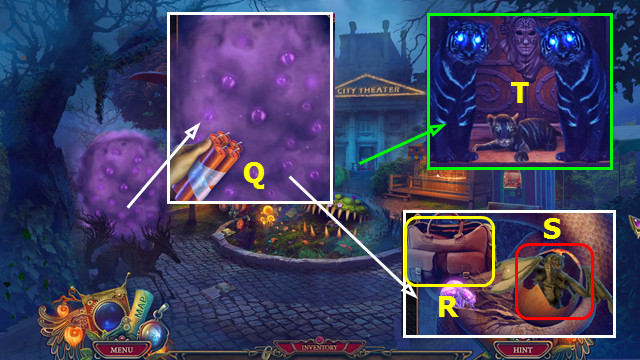
- Use the FIRECRACKERS and LIGHTER (Q).
- Take the SATCHEL (R).
- Select, and then use the TIME ACCELERATOR (S).
- Look at the SATCHEL; read the book and take the SHAKER.
- Place the TIGER CUB (T).
- Go forward.
- Use the KEEPER'S TOOL on the scene.
- Take the BROKEN VIDEO CAMERA (A).
- Remove the CAMERA FLASH from the BROKEN VIDEO CAMERA.
- Restore the sign (B).
- Take and open the wallet; take the 1/3 DOLLARS (C).
- Place the TOY LOCOMOTIVE (D) and remove the obstacles (red).
- Take the 1st SCENERY PIECE and ANTENNA (E).
- Combine the BROKEN SUBMARINE, ANTENNA, and CAMERA FLASH to make the REMOTE-CONTROLLED SUBMARINE.
- Take the SHADE and read the poster (F).
- Use the ACID; take the LEVER and WATERY FRUIT (G).
- Walk down.
- Place the SHADE (I).
- Play the HOP.
- Take the 2nd SCENERY PIECE (J).
- Walk down.
- Select (K).
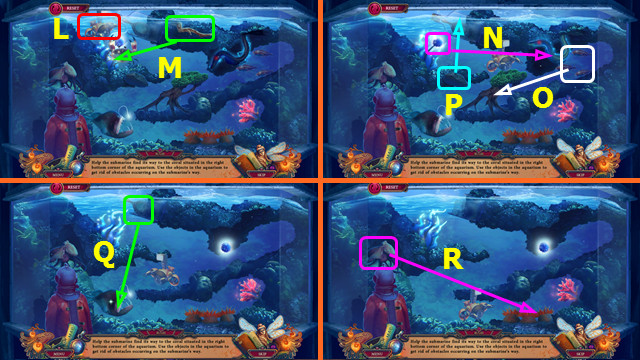
- Use the REMOTE-CONTROLLED SUBMARINE (L). Use the stick on the crab (M).
- Use the glowing ball on the eel (N). Use the fish on the branch (O). Use the rock on the jar (P).
- Use the mirror on the anglerfish (Q).
- Use the octopus on the anemones (R); you earn the CORAL.
- Go forward.
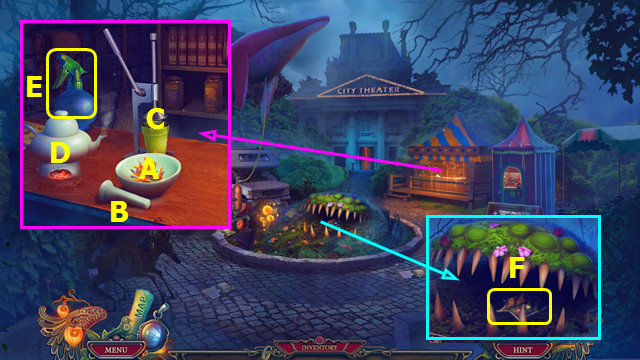
- Place the CORAL (A). Use B on A. Place the WATERY FRUIT (C).
- Use C on A; use D on A. Use A on E; take the SEDATIVE (E).
- Use the SEDATIVE; take the 3rd SCENERY PIECE (F).
- Go forward.

- Place the 3 SCENERY PIECES (red).
- Select the opening (G).
- Select Jx2-Kx3-H-I-H-Kx2-J-K-H.
Chapter 2: The Auditorium
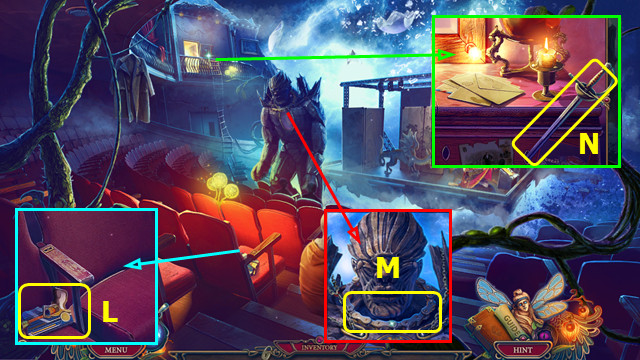
- Take the TOY PISTOL (L).
- Take the CHAIN (M).
- Read the letters and take the SWORD (N).
- Walk down and left.

- Select; use the SHAKER to make the SHAKER WITH POLLEN (O).
- Use the SWORD; take the FLYING DISC (P).
- Walk down and forward.
- Use the FLYING DISC (Q).
- Take the UNCHARGED SMARTPHONE (R).
- Walk down 2x.
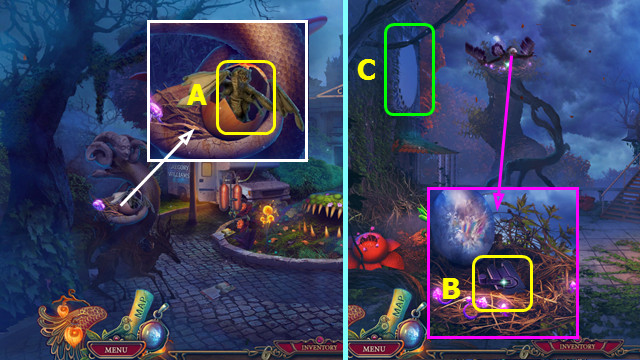
- Use the SHAKER WITH POLLEN to take the DRAGON (A).
- Go forward and left.
- Use the DRAGON; take the MECHANICAL CHARGER (B).
- Use the MECHANICAL CHARGER on the UNCHARGED SMARTPHONE to make the SMARTPHONE WITH PHOTO.
- Play the HOP to earn the GROWTH POTION (C).
- Walk down and forward.
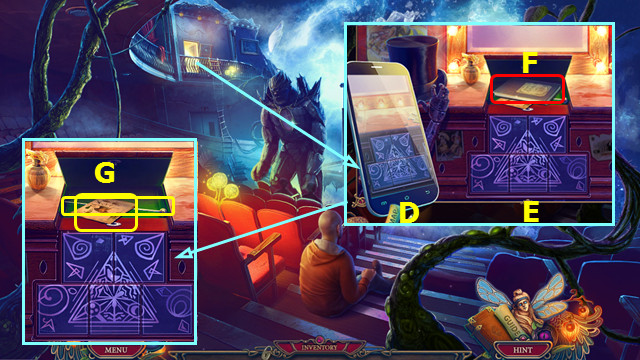
- Place the SMARTPHONE WITH PHOTO (D).
- Select the tiles to make them match the photo (E).
- Play the HOP (F).
- Take the BROTH RECIPE and NEEDLE (G).
- Walk down and left.
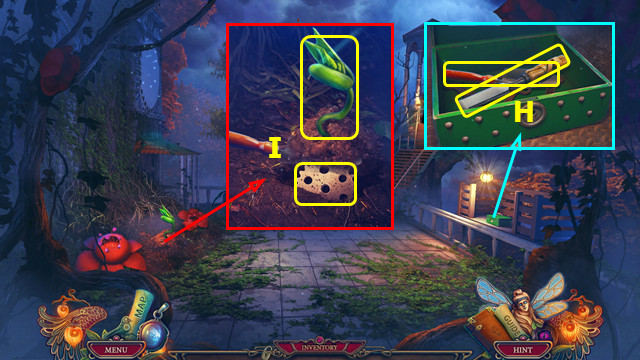
- Use the NEEDLE; take the CHISEL and TROWEL (H).
- Use the TROWEL to take the GIANT SPROUT; take the GEAR (I).
- Walk down.
- Use the GIANT SPROUT and GROWTH POTION (J).
- Remove the 2 screws and take the LENS (K).
- Place the GEAR; place the gears as shown and add the CHAIN (L).
- Take the FLYWHEEL (M).
- Combine the TOY PISTOL and LENS to make the LIGHT GUN.
- Walk left.
- Use the LIGHT GUN (N).
- Shoot the monster 4x (O).
- Take the APPLE and KEEPER'S TOOL (P).
- Walk down and forward.
- Use the KEEPER'S TOOL (Q).
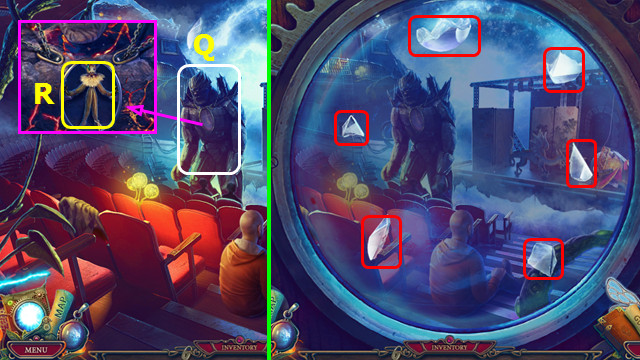
- Select the 6 pieces (red).
- Take the STRAW DOLL and place the FLYWHEEL (R).
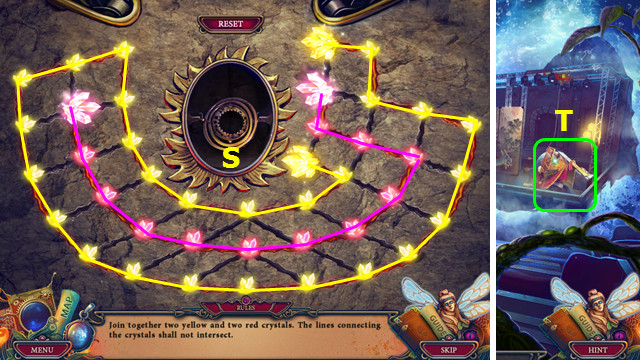
- Connect the crystals as shown (S).
- Select (T).
- Select 1-8.
- Take the NIPPERS; place and select the LEVER (U).
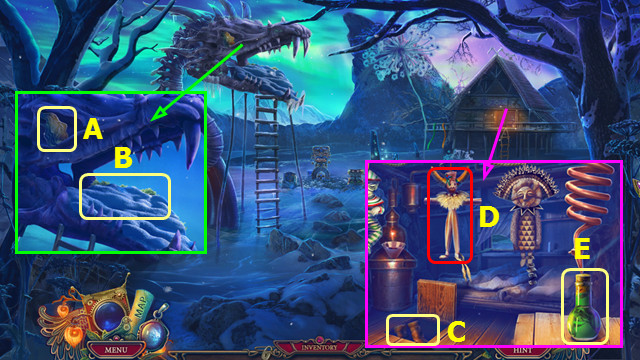
- Take the FIRE SYMBOL (A).
- Select 3x to take the REINDEER MOSS (B).
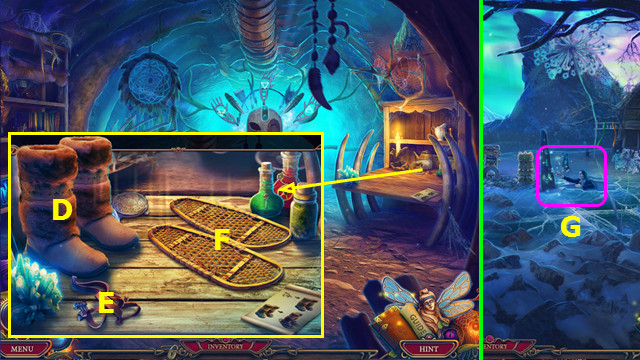
- Open the lid; take the FUR BOOTS (C).
- Place the STRAW DOLL (D); take the BASIS FOR BROTH (E).
- Walk left.
- Take the DRAGNET and read the note (F).
- Take the WOOD FOR TOTEM (G).
- Use the CHISEL on the WOOD FOR TOTEM to make the 1st TOTEM HEAD.
- Walk down.
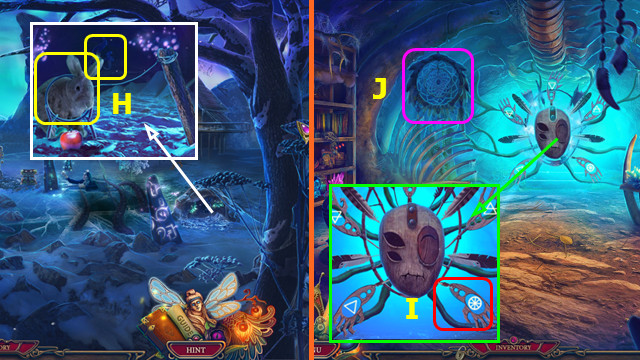
- Place the DRAGNET and APPLE; take the RABBIT and LEATHER STRAPS (H).
- Walk left.
- Place the RABBIT (I).
- Play the HOP; earn the WIND CHIME (J).
- Select the color-coded pairs.
- Take the 2nd TOTEM HEAD (@).
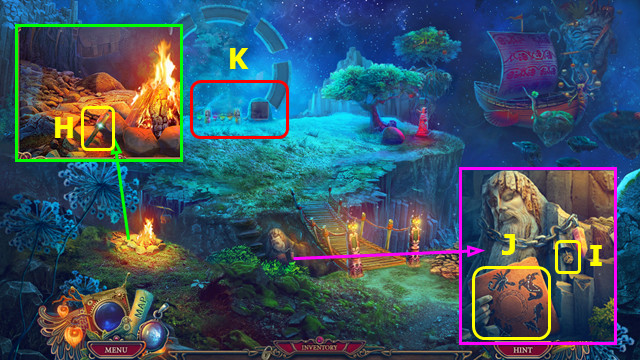
- Select (K).

- Place the FIRE SYMBOL (L).
- Play the HOP.
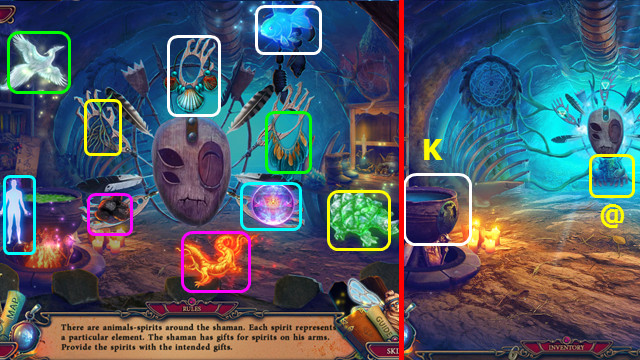
- Place the BROTH RECIPE (M).
- Place the REINDEER MOSS in (N).
- Use O-P-Q in N.
- Place the BASIS FOR BROTH and WIND CHIME in (N) to make the SPIRIT REFLECTOR.
- Walk down.
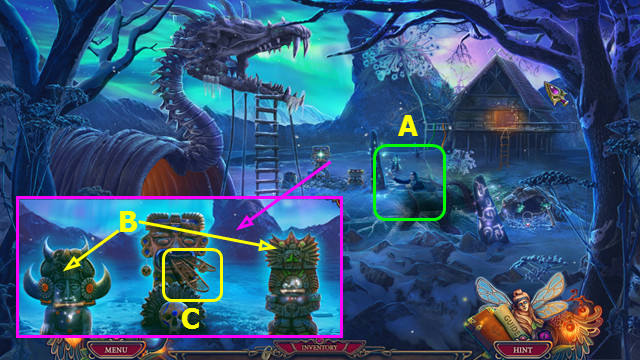
- Use the SPIRIT REFLECTOR (A).
- Place the 2 TOTEM HEADS (B).
- Take the WOODEN SIDES (C).
- Walk left.
- Place the FUR BOOTS (D), LEATHER STRAPS (E), and WOODEN SIDES (F).
- Use E on D and place D on F; take the ICE SHOES.
- Walk down.
- Use the ICE SHOES (G).
Chapter 3: The Floating Island
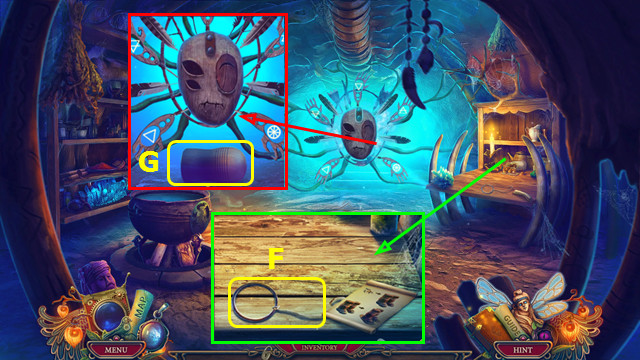
- Take the INCENSE STICK (H).
- Take the BROKEN KEY and read the note (I).
- Use the INCENSE STICK; take the CONSTELLATION PLATE (J).
- Select (K).
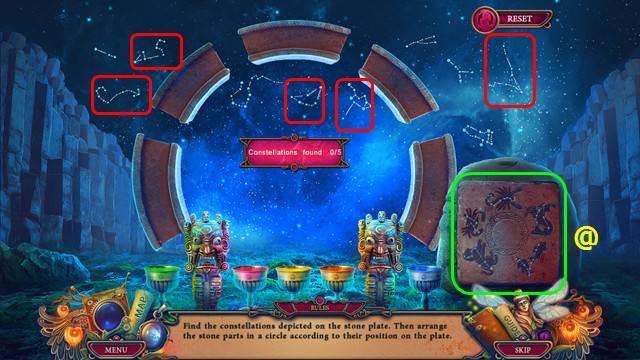
- Place the CONSTELLATION PLATE (@).
- Select the constellations (red).
- Swap the ring pieces as shown (L).
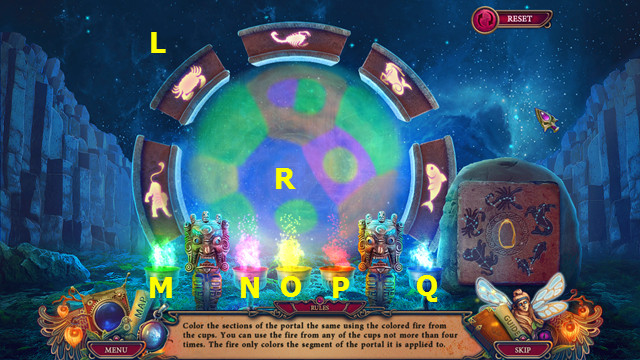
- Use P-M-N-O on R.
- Walk forward.
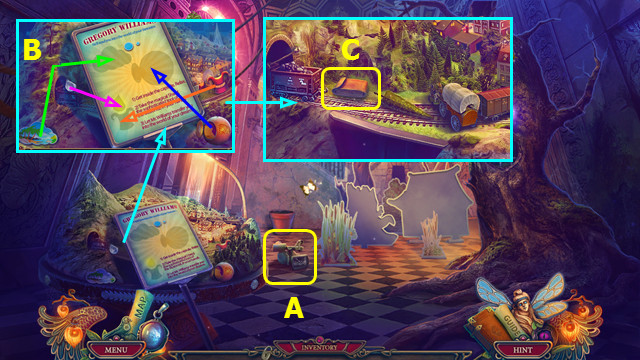
- Take the DOCUMENTS FOLDER (A).
- Open the documents folder and read the diagram; take the CERTIFICATE OF BOB and the CATALYST.
- Use the NIPPERS; take the TIN OF PAINT (B).
- Use the KEEPER'S TOOL (C).
- Take the CROWBAR (D).
- Use the CROWBAR; read the paper and take the CONFECTIONERY TONGS (E).
- Walk down.
- Use the CROWBAR; select 4x to take the PAINTED MARACA (F).
- Use the CONFECTIONERY TONGS to take the LION'S HEAD (G).
- Go forward.
- Place the LION'S HEAD (H).
- Select the color-coded pairs.
- Walk left.
- Play the HOP; earn the CULINARY AWARD (I).
- Select the laptop screen; select the view and click to copy coordinates (J). You earn the MEMORY CARD WITH COORDINATES.
- Take the 2/3 DOLLARS (K).
- Take the FLAGPOLE and place the CULINARY AWARD (L).
- Play the HOP.
- Look at the photo and take the STONE HORN (M).
- Walk down 2x.
- Use the FLAGPOLE (O).
- Open the bag; take the WATER OF LIFE and HOLLOW FRUIT (P).
- Place the STONE HORN (Q).
- Play the HOP; earn the KEY KEEPER'S CHEST (R).

- Open the KEY KEEPER'S CHEST; add the BROKEN KEY (A).
- Use A on C; use B on C to make the WHOLE KEY.
- Use the WHOLE KEY; take the SHARP CRYSTAL (D).
- Go forward.
- Use the SHARP CRYSTAL; take the SUCKER-TIPPED ARROWS and UNPOPPED POPCORN (E).
- Walk left.
- Use the WATER OF LIFE; take the ATOMIC MODEL and WOODEN HANDLE (F).
- Combine the HOLLOW FRUIT, UNPOPPED POPCORN, WOODEN HANDLE, and TIN OF PAINT to make the HOMEMADE MARACA.
- Place the PAINTED MARACA and the HOMEMADE MARACA; take the OIL (G).
- Place the SUCKER-TIPPED ARROWS (H); hit the 3 targets (1-3).
- Take the 3/3 DOLLARS (I).
- Play the HOP; earn the FIRE HOSE (J).
- Walk down.
- Use the OIL and earn the MARKER; take the ADJUSTABLE WRENCH (K).
- Use the ADJUSTABLE WRENCH and FIRE HOSE (L).
- Hover over each ray (red).
- Use the 3/3 DOLLARS (M).
- Select (N).
- Place the MEMORY CARD WITH COORDINATES (O).
- Select Q-P-Qx4-R.
- Use the KEEPER'S TOOL on the scene; play the HOP.
- Take the OLD NAIL (A).
- Open the backpack, read the note, and take the LIQUID NITROGEN (B).
- Add the CATALYST to the LIQUID NITROGEN.
- Use the LIQUID NITROGEN; select and play the HOP to earn the PASSWORD (C).
- Place the ATOMIC MODEL (D) and select each atom (red).
- Go forward.
- Use the KEEPER'S TOOL on the scene.
- Take the IRON (E).
- Use the CERTIFICATE OF BOB and read the letter; take the PANEL DETAIL. Move the box and take the MORTARBOARD FIGURE (F).
- Walk down.
- Place the MORTARBOARD FIGURE; take the PORTRAIT OF BOB and the COIN (G).
- Go forward.
- Place the PORTRAIT OF BOB and the PASSWORD; press 1-4.
- Walk left.
Chapter 4: Bob's Office

- Select the 6 parts (red).
- Place the MARKER (H).
- Select (I).
- Restore the 3 photos (1-3).
- Take the BRONZE BOOK (J).
- Walk down.
- Place the BRONZE BOOK; take the BULB (K).
- Select (L).
- Use the COIN (M).
- Press the button (N) to take the items (1-5).
- Take the NUTS (O).
- Walk left.
- Place the BULB (P). Play the HOP.
- Play the HOP; earn the METAL BALL (Q).
- Walk down.
- Place the METAL BALL; take the 1st MECHANICAL FINGER and GLASS CUTTER (R).
- Walk down.
- Use the GLASS CUTTER; take the CUP (S).
- Walk forward and left.
- Place the CUP; take the CRUMPLED NEWSPAPER (T).
- Use the IRON on the CRUMPLED NEWSPAPER to make the NEWSPAPER.
- Walk down.
- Place the NEWSPAPER (@); take the FRAGRANT FLOWER and BOB (A).
- Walk down.
- Place the FRAGRANT FLOWER (B). Move the roses; take the AEROSTAT (C).
- Go forward and left.
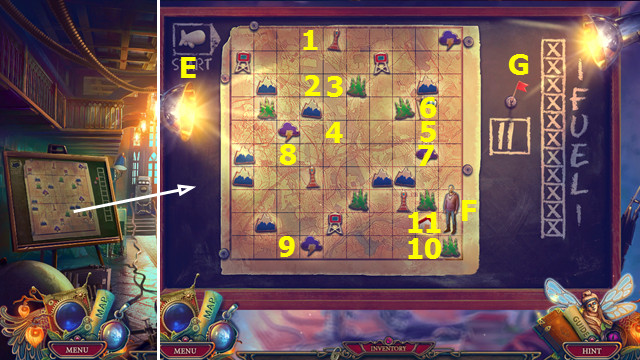
- Place the AEROSTAT (E) and BOB (F).
- Place the flags (G) at points 1-11.
- Earn the MAP and take the LIFT HANDLE.
- Walk down 2x.
- Play the HOP; earn the GREEN CHIP KEY (H).
- Use the NUTS and place the LIFT HANDLE (I).
- Walk left.
- Select (J).
- Select (K).
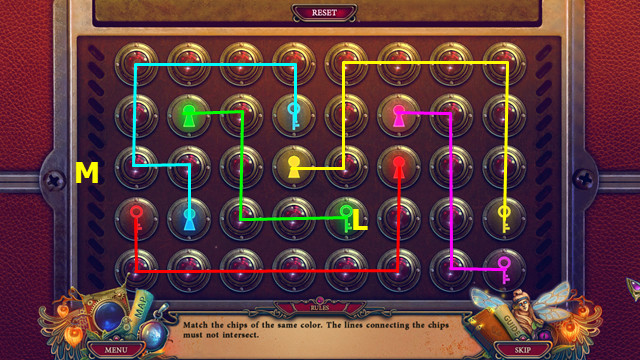
- Place the GREEN CHIP KEY (L).
- Connect the chips as shown (M).
- Read the note; take the WRENCH and FORMULA.
- Walk down.
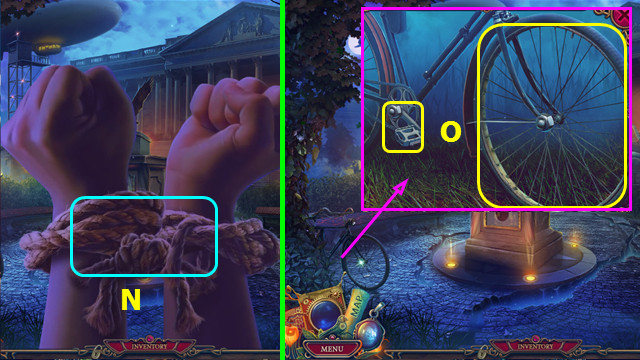
- Select 2x (N).
- Use the WRENCH; take the PEDAL. Select the wheel 3x to take the BICYCLE WHEEL (O).
- Go forward.
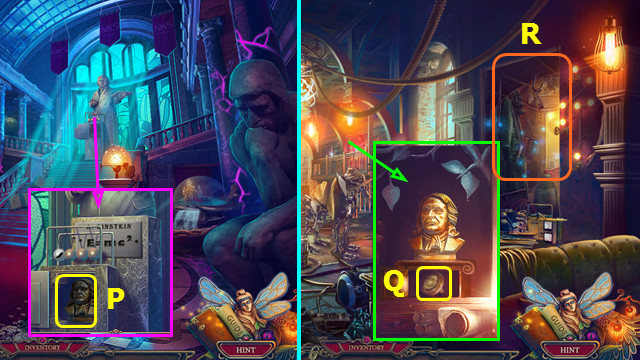
- Place the FORMULA; take the BUST OF NEWTON (P).
- Walk left.
- Place the BUST OF NEWTON; take the STEERING WHEEL MOUNT (Q).
- Play the HOP; earn the CHAIR LEGS (R).
- Return to the Airship.
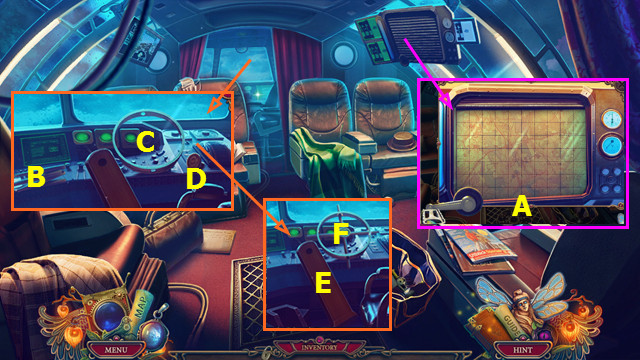
- Use the PEDAL and place the MAP (A).
- Place the CHAIR LEGS (B), BICYCLE WHEEL (C), and STEERING WHEEL MOUNT (D).
- Use B on C; use D on C.
- Select (E); select (F).

- Avoid the clouds (G).
- Select Hx2-I-H-Ix3-Hx2-I.
- Take the HORN (J).
- Take the FISHING LINE (K).
- Use the HORN; take the BRANCH (L).
- Combine the BRANCH, FISHING LINE, and OLD NAIL to make the FISHING ROD.
- Use the FISHING ROD (M).
- Go forward.
- Take the DRIED BOUQUET (N).
- Place the PANEL DETAIL (O).
- Move the pieces in order 1-9.
- Take the MAILBOX KEY (P).
- Walk down.
- Use the MAILBOX KEY and read the note; take the SCANNER BUTTON and SEDATIVES (R).
- Use the DRIED BOUQUET; go forward (S).
Chapter 5: The Garden
- Take the SLINGSHOT (A).
- Take the JAR WITH LID (B).
- Walk down.
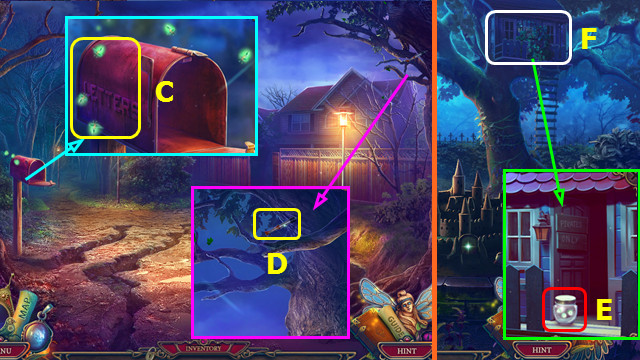
- Use the JAR WITH LID to make the FIREFLY LANTERN (C).
- Use the SLINGSHOT to take the TRANQUILIZER DART (D).
- Walk left.
- Select the ivy 4x and open the door; place the FIREFLY LANTERN (E).
- Play the HOP; earn the BEETLE FIGURE (F).
- Walk down and right.
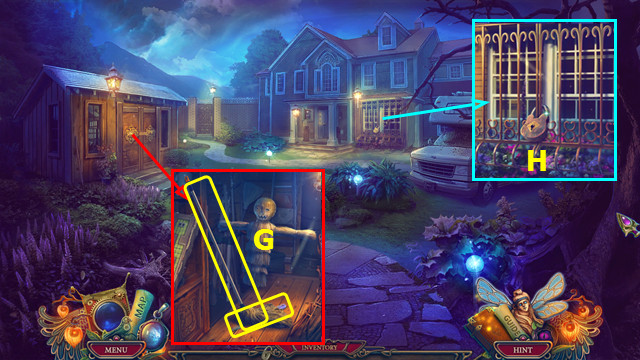
- Place the BEETLE FIGURE; take the MOP and FILE (G).
- Use the FILE and open the grate (H).
- Go forward.
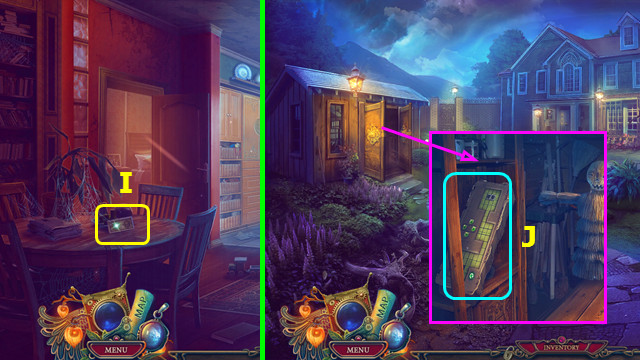
- Take the CHIP FROM SAFE (I).
- Walk down.
- Select (J).
- Place the CHIP FROM SAFE (K).
- Select M-L-Mx3-L-O-N-M-Lx2-Mx3-Nx3-M-L.
- Read the note and take the TRANQUILIZER GUN.
- Combine the TRANQUILIZER GUN, TRANQUILIZER DART, and SEDATIVES to make the LOADED DART GUN.
- Go forward.
- Use the LOADED DART GUN; select when the spot is green (A).
- You earn the VAN KEYS.
- Take the BOX OPENER and the PAPER AND PENCIL (B).
- Load the tape in the VCR (C).
- Take the DOOR ACTIVATOR (D).
- Walk down.
- Use the VAN KEYS; play the HOP to earn the HAT (E).
- Place the DOOR ACTIVATOR; earn the SMALL FLAG (F).
- Walk down and left.
- Use the PENCIL AND PAPER; take the LOCKER CODE (G).
- Use the BOX OPENER; take the HEART KEY (H).
- Place the SMALL FLAG (I). Play the HOP.
- Read the note and take the 2nd MECHANICAL FINGER (J).
- Walk down, right, and forward.
- Place the LOCKER CODE; open the safe and take the BATTERIES (K).
- Place the HEART KEY (L).
- Select D-B-Dx3-Bx2-Fx2-D-Fx3-Dx3. Turn the page.
- Select G-H-I-J.
- Turn the page and take the 3rd MECHANICAL FINGER.
- Place the 3 MECHANICAL FINGERS; take BOB'S JACKET (P).
- Walk down 2x; go left.
- Play the HOP; earn BOB'S GLASSES (R).
- Place the BATTERIES; take the FIRE ROBOT (Q).
- Walk down, right, and forward.
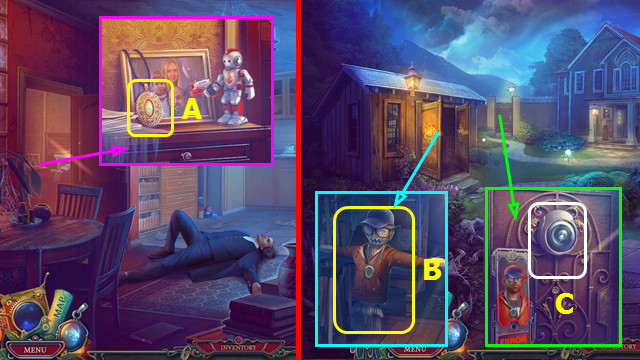
- Select the locket; use the FIRE ROBOT; Take BOB'S PENDANT (A).
- Walk down.
- Place the HAT, BOB'S JACKET, BOB'S PENDANT, and BOB'S GLASSES; take the FALSE BOB (B).
- Use FALSE BOB (C).
- Walk left.
- Use the KEEPER'S TOOL on the scene.
- Read the note and take the POWER SUPPLY (D).
- Select the branches 3x; select the journal (E).
- Restore the photo; turn the page (G).
- Use the pencil on the drawing (H).
- Exit the close-up.
- Use the FISHING ROD; click when the 2 dots meet (J).
- Take the SHOE (K).
- Take the STONES from the SHOE; add the MOP and SEDATIVE to make the MONSTER BAIT.
- Use the MONSTER BAIT; take the COLORED WIRES (L).
- Select (M).
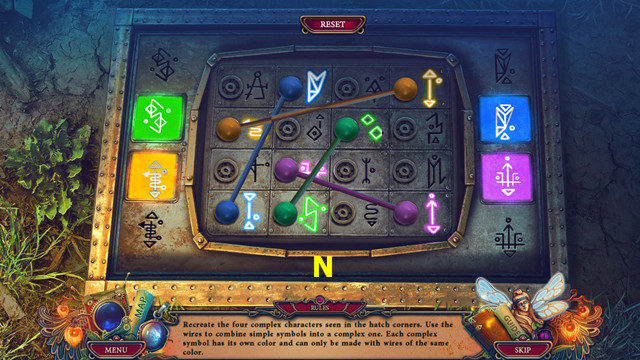
- Place the COLORED WIRES on the device.
- Arrange the wires as shown (N).
- Enter the hatch.
Chapter 6: The Underground Shelter
- Take the MODEL ADHESIVE (O).
- Take the GLOVE (P).
- Play the HOP; earn the TWEEZERS (Q).
- Walk down.
- Use the GLOVE; take the SATURN MODEL (A).
- Use the MODEL ADHESIVE on the SATURN MODEL to make the MODEL DETAIL.
- Use the TWEEZERS to take the EMERALD EYE (B).
- Enter the hatch.
- Place the MODEL DETAIL (C).
- Read the note and select the 7 planets (green).
- Read the note and take the RABBIT FIGURINE (D).
- Move the COATS and place the EMERALD EYE (E).
- Play the HOP; take the HAT (F).
- Walk down.
- Place the HAT and RABBIT FIGURINE; take the HYPNOSIS PENDANT (G).
- Enter the hatch.
- Use the HYPNOSIS PENDANT (H).
- Go forward.
- Use the STONES on the scene.
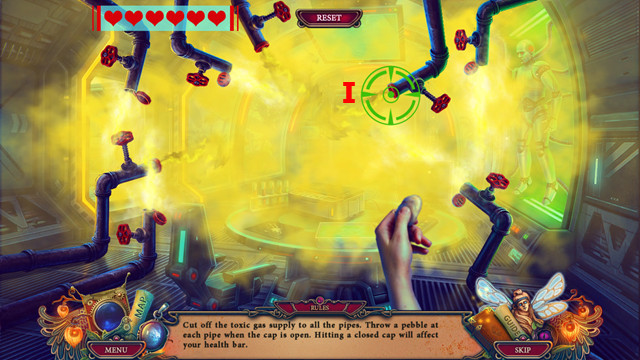
- Hit each of the 8 valves when the bullseye is green (I).

- Place the POWER SUPPLY and SCANNER BUTTON; read the note (J).
- Place K in L; move L to M and take the LASER LIGHT.
- Take the METAL RHOMBUS (N).
- Walk left.
- Play the HOP; earn the DINOSAUR'S TAIL (O).
- Use the LASER LIGHT; remove the player and take the CABINET HANDLE (P).
- Walk down 2x.
- Place the METAL RHOMBUS; take the MALLET and CHISEL (A).
- Place the DINOSAUR'S TAIL; take the DUMMY HAND (B).
- Go forward and left.
- Use the CHISEL and MALLET; take the ARROW BUTTON and DUMMY LEG (C).
- Walk down.
- Place the DUMMY ARM and DUMMY LEG; select (D).
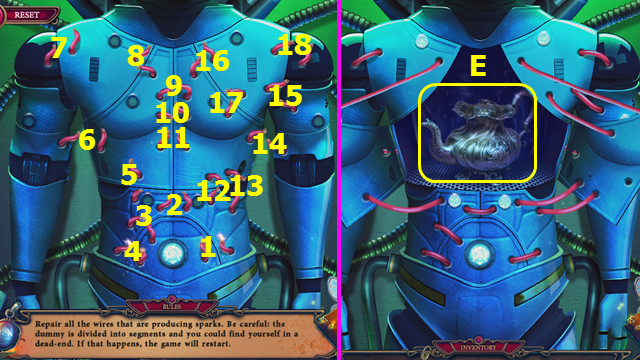
- Select 1-18.
- Take the ANTIQUE TEAPOT (E).
- Walk down.
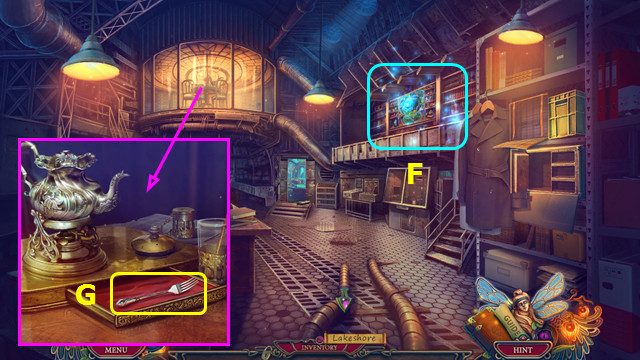
- Play the HOP; earn the SPHERE OF FIRE (F).
- Place the ANTIQUE TEAPOT: select and take the ALTERED FORK (G).
- Go forward and left.
- Use the SPHERE OF FIRE and the ALTERED FORK (H).
- Play the HOP.
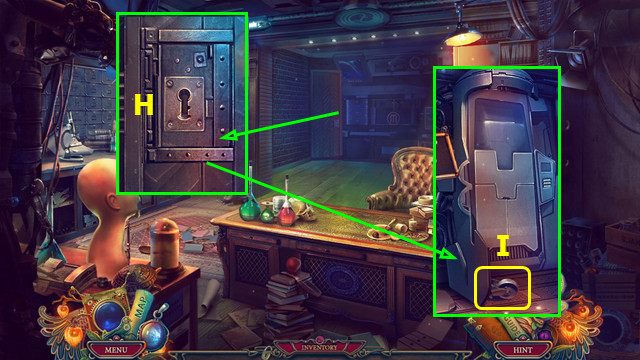
- Open the cover and read the note; take the DEVICE WHEEL (I).
- Move the books and place the DEVICE WHEEL (J).
- Place the CABINET HANDLE; take the 2nd ARROW BUTTON (K).
- Walk down.
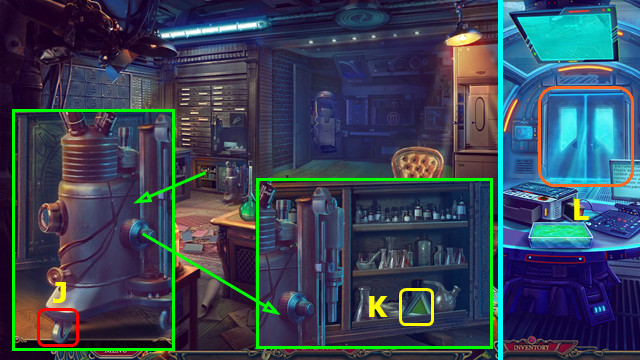
- Select (L).
- Place the 2 ARROW BUTTONS (M).
- Select P-Q-N-Q-P-Q-P-Q-Px2-O-N-Ox2-Px2-Q-P-O-P-O-P-Q.
- Go forward.
- Use the KEEPER'S TOOL on the scene.
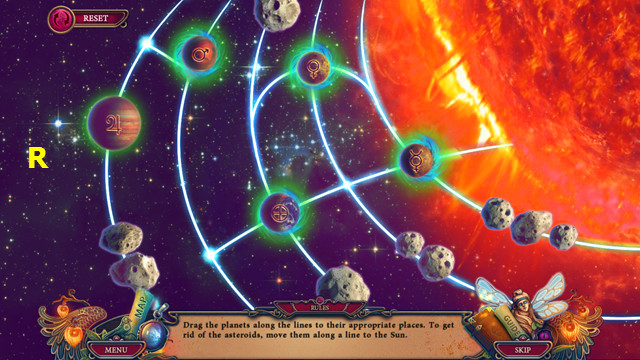
- Restore the planets to the correct locations (R).
- Congratulations! You have completed The Keeper of Antiques: The Imaginary World!
Created at: 2017-02-26