
Walkthrough Menu
- General Tips
- Chapter 1: The Antique Shop
- Chapter 2: Inside the Book
- Chapter 3: Uncle Paul's Nightmare
- Chapter 4: Rose's Nightmares
- Chapter 5: Arthur's House
- Chapter 6: The Evil Spirit
General Tips
- This is the official guide for The Keeper of Antiques: The Revived Book.
- This guide will not show when you have to zoom into a location; the screenshots will show each zoom scene.
- Hidden-object puzzles are referred to as HOPs. This guide will not show screenshots of the HOPs, however, it will mention when an HOP is available and the inventory item you'll collect from it.
- Use the Map to fast travel to a location.
Chapter 1: The Antique Shop
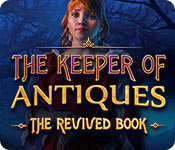
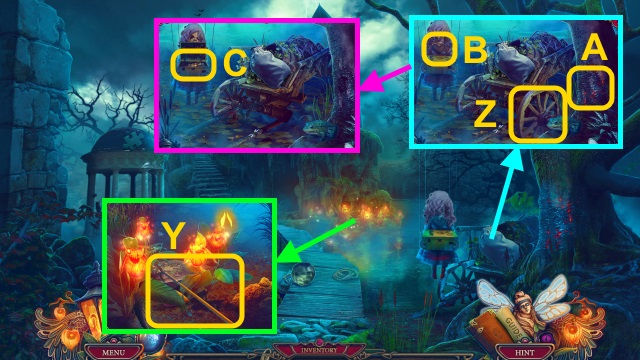
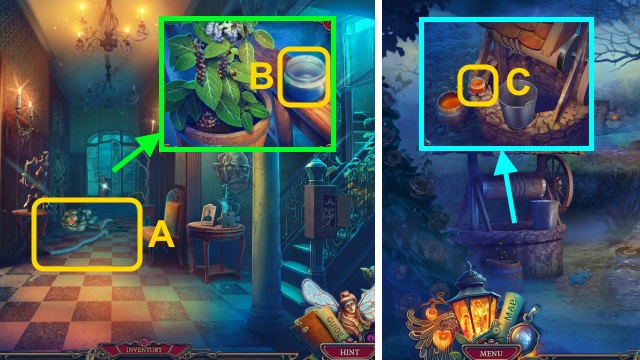
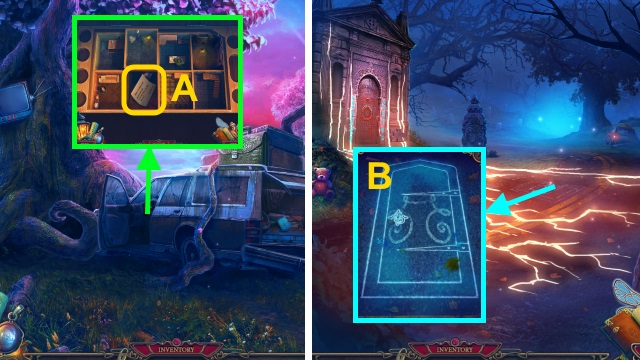
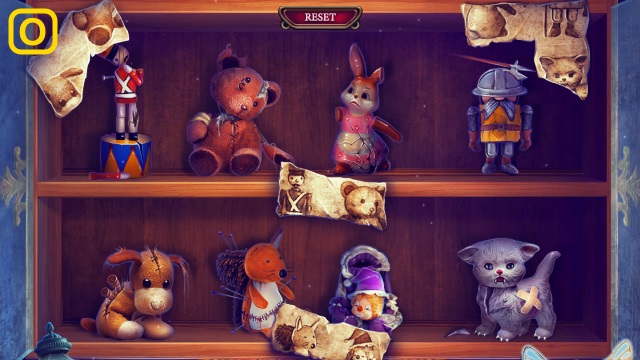
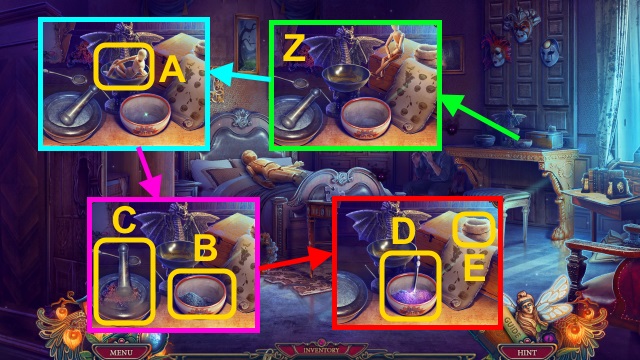
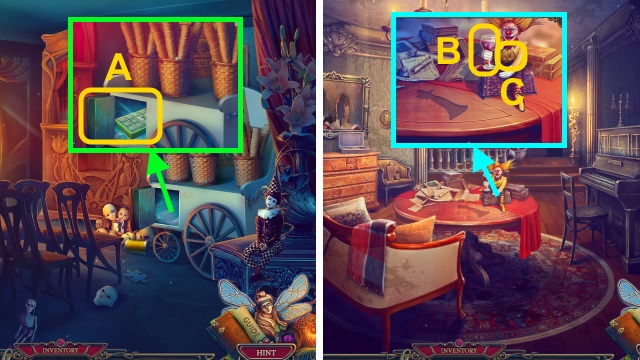
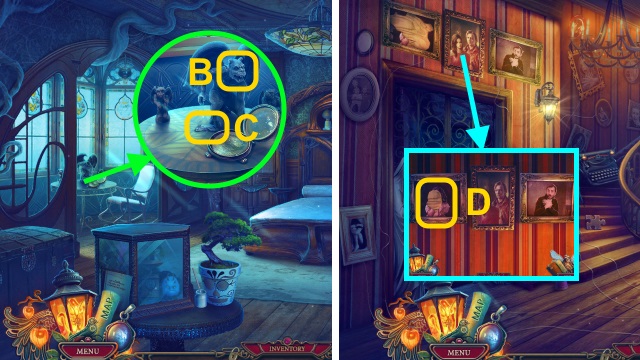
- Take the Amulet and GLOVE (A).
- Use the GLOVE; receive the ICICLES (B).
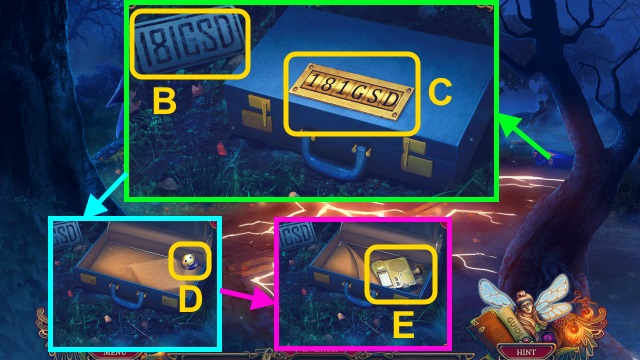
- Take the BAG (C).
- Open the BAG. Take the passport (D); examine the photos.
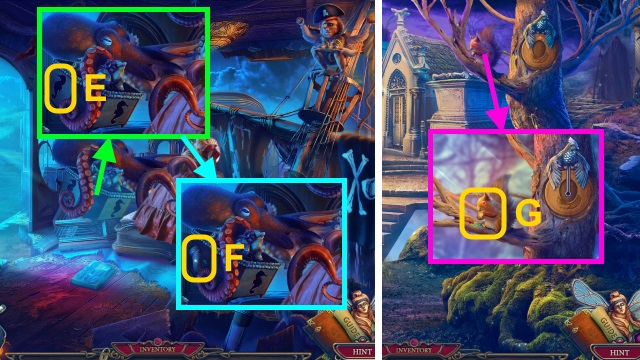
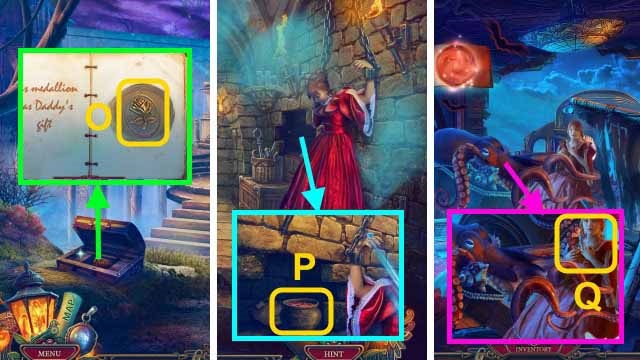
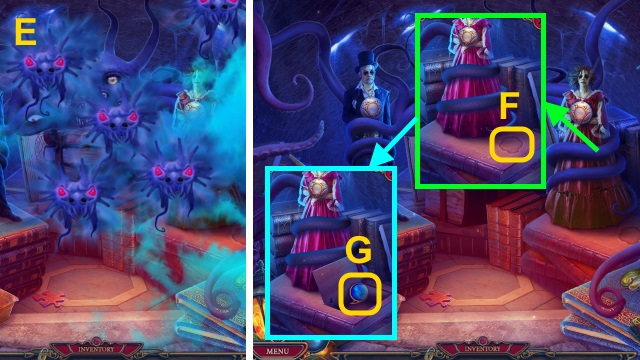
- Take the FAMILY MEDALLION and POWDER (E).
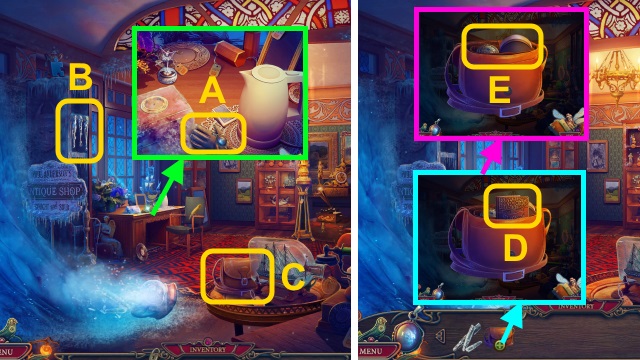
- Open the kettle; place the ICICLES (F).
- Pour the kettle (G); place the FAMILY MEDALLION (H).
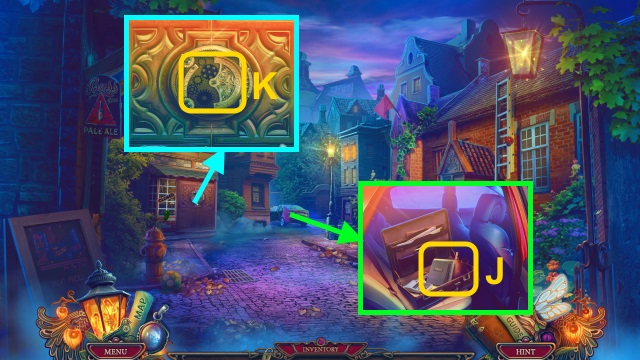
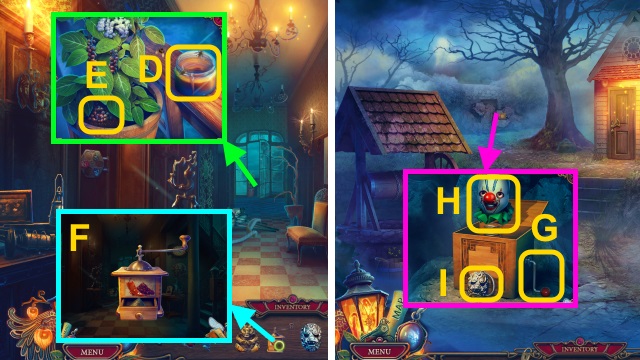
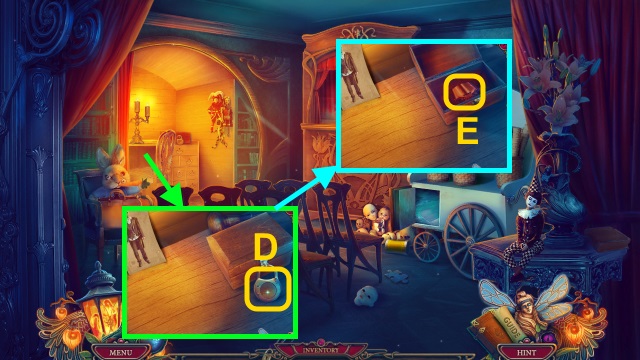
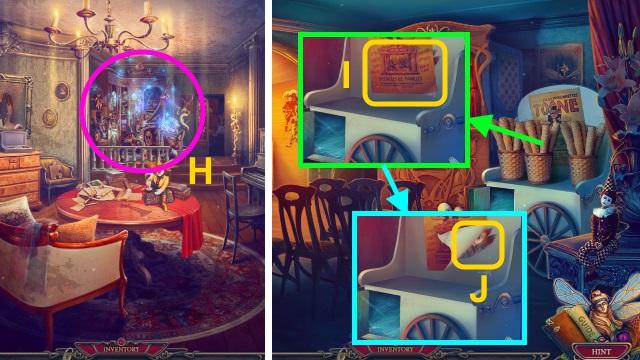
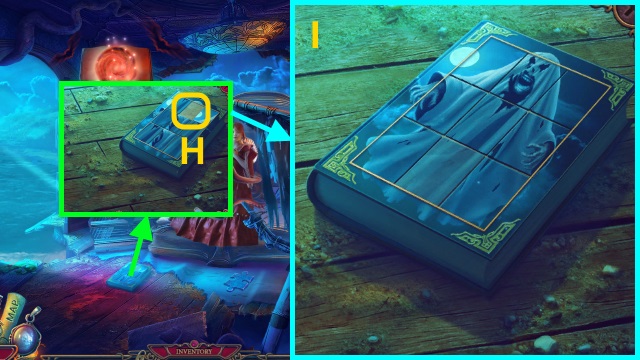
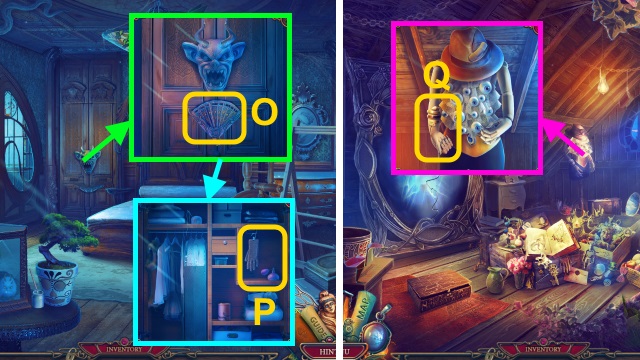
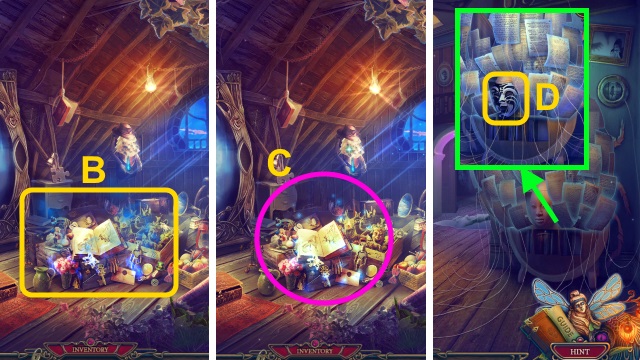
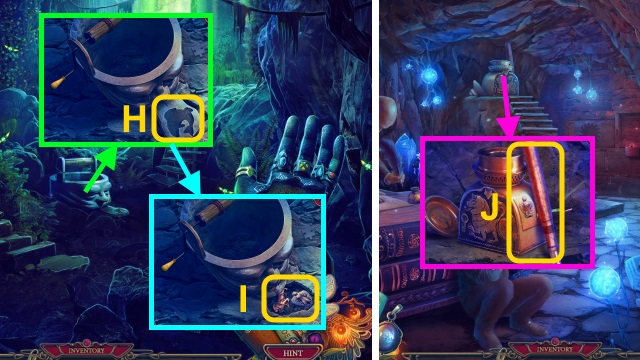
- Move the book; take the KEEPER MEDALLION and GLASS EYE (I).
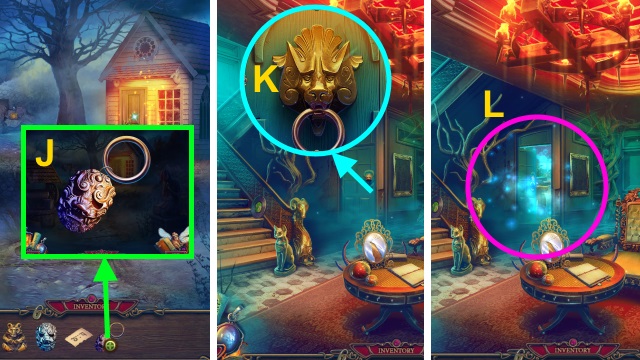
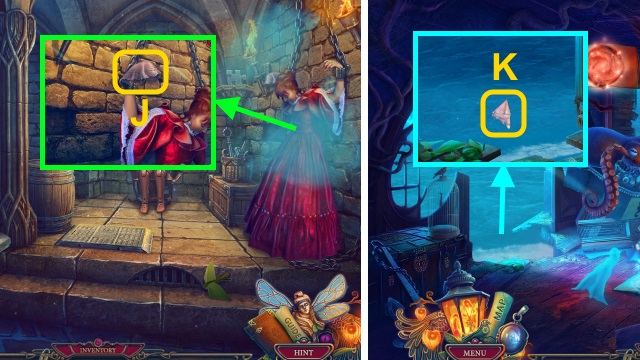
- Place the GLASS EYE (J).
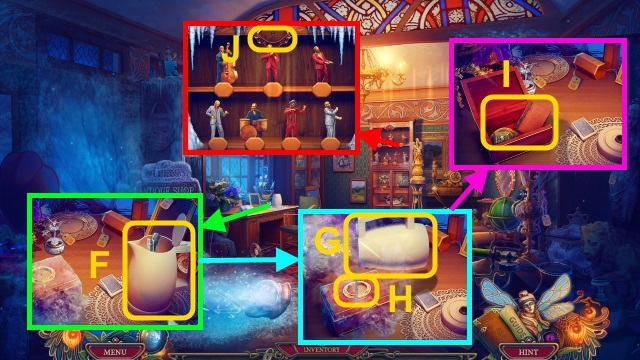
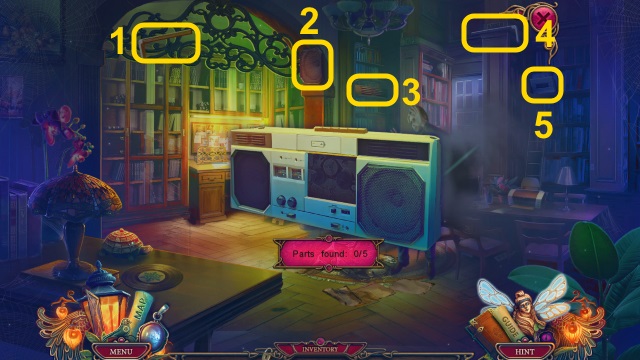
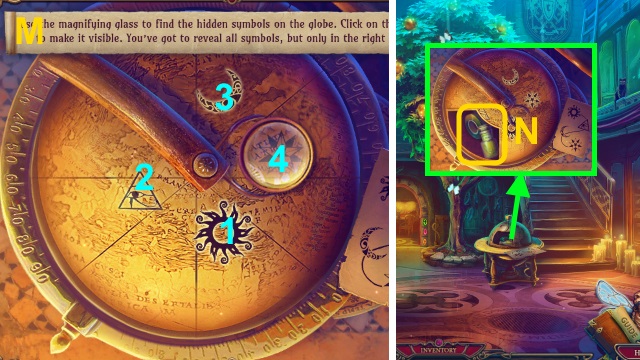
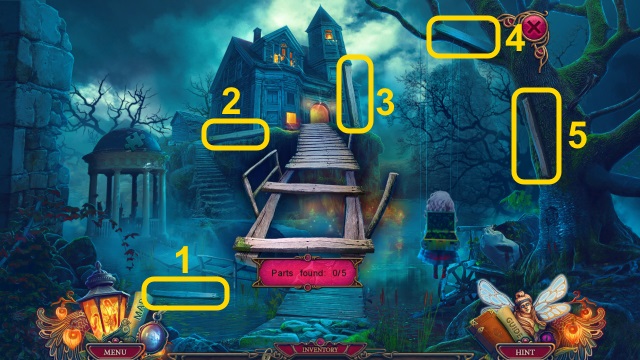
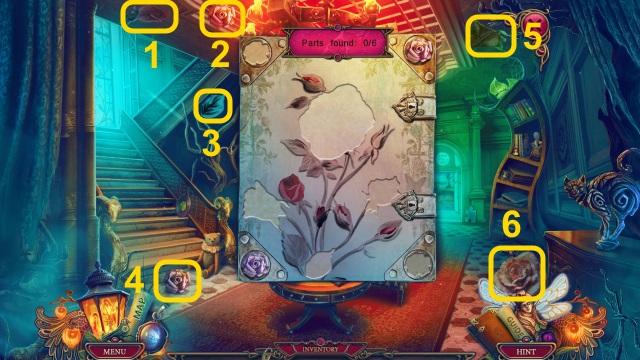
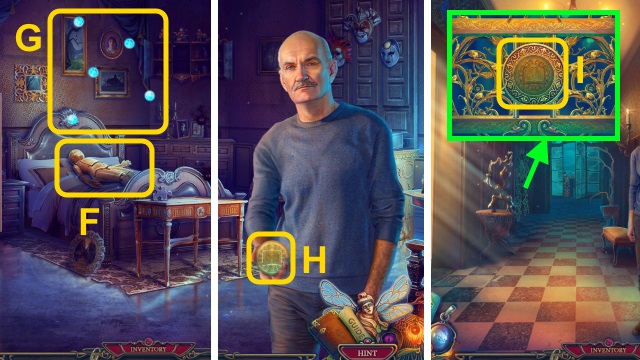
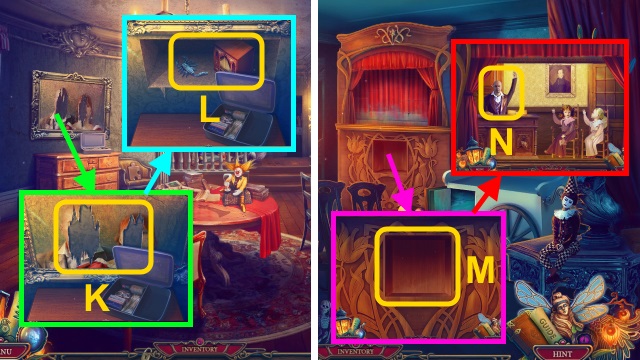
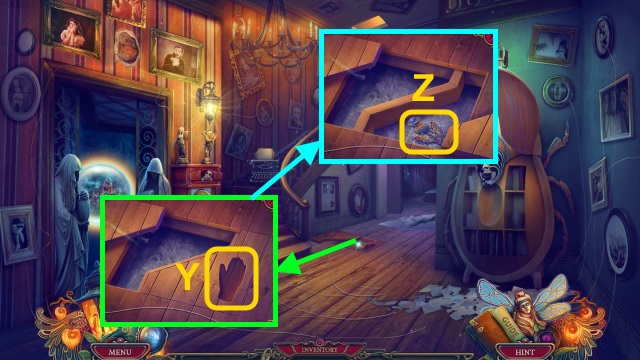
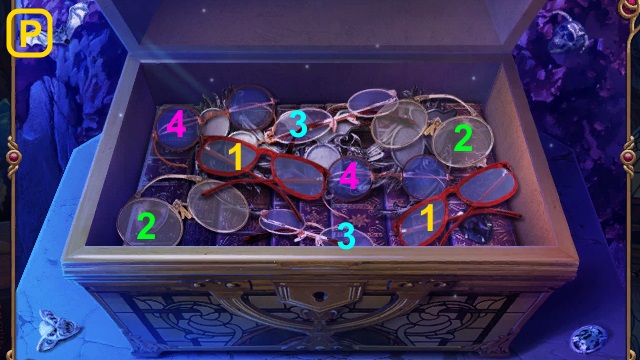
- Find the parts (1-5).

- Play the mini-game; solution (K).
- Walk forward.
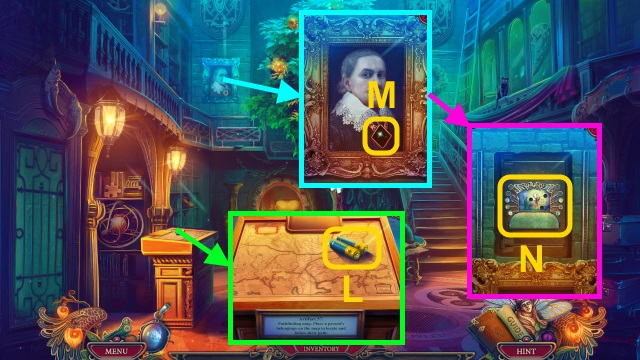
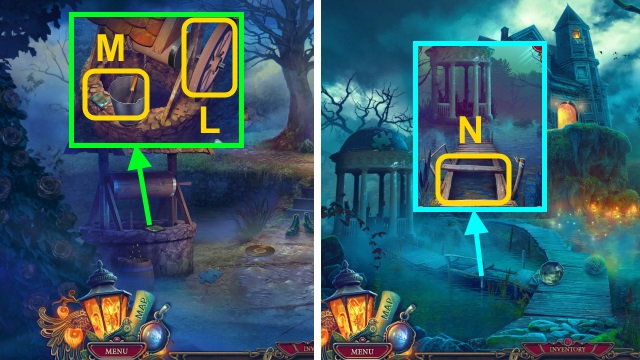
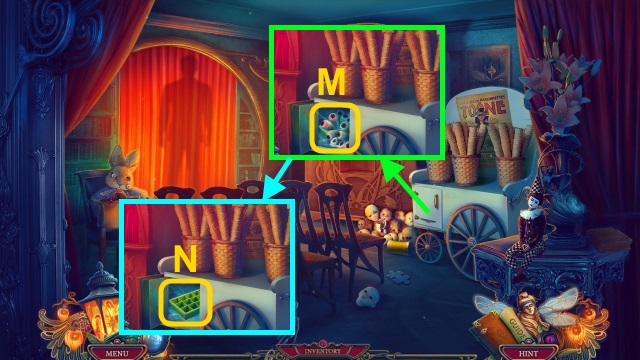
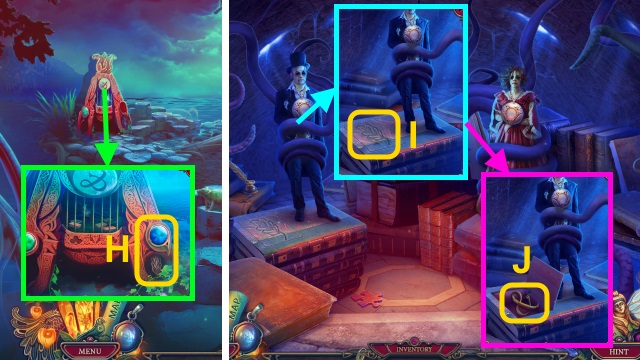
- Take the BATTERIES (L).
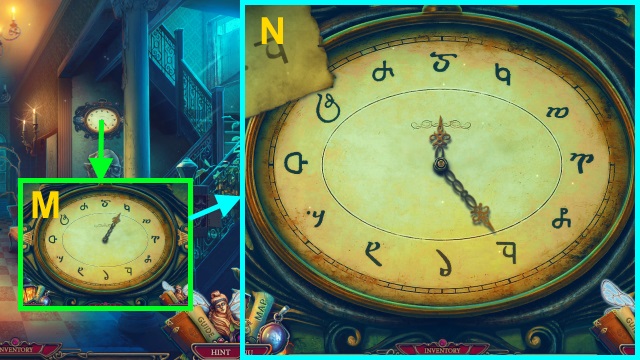
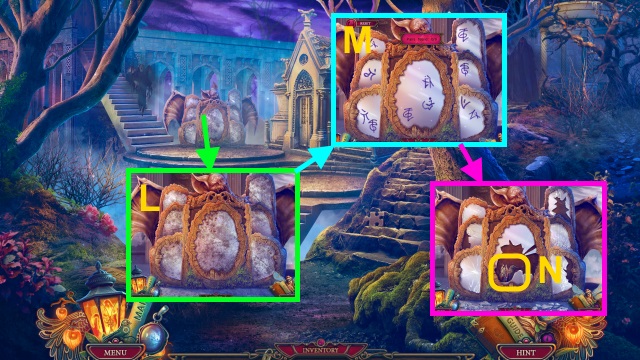
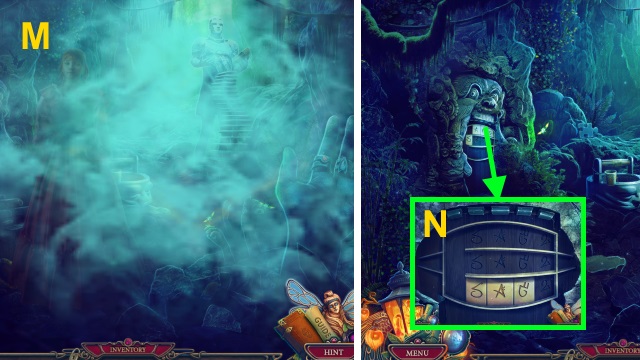
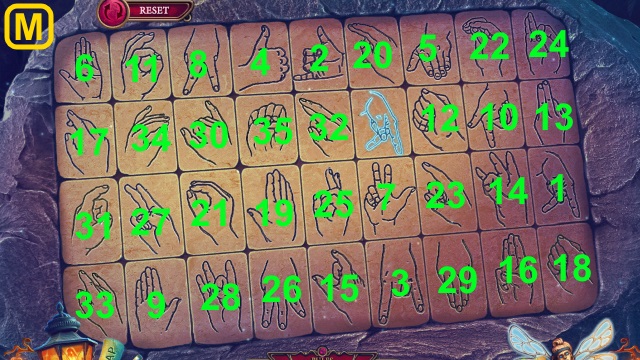
- Place the KEEPER MEDALLION (M).
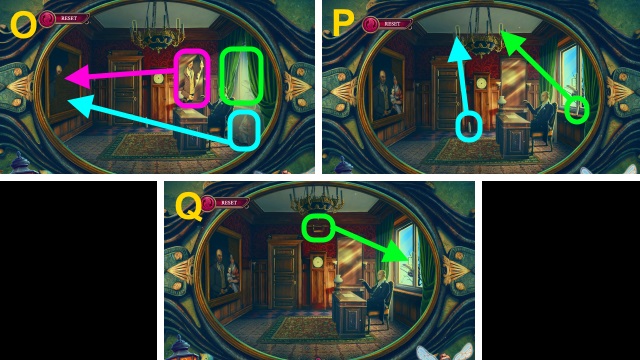
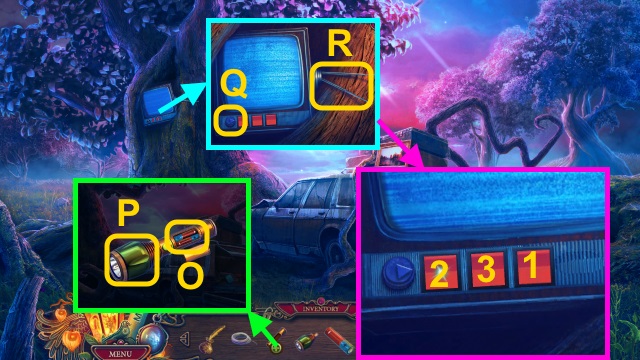
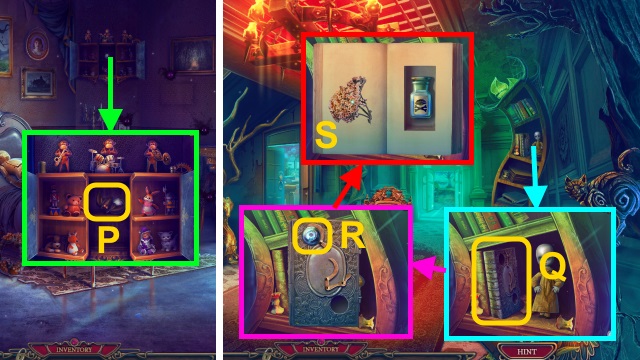
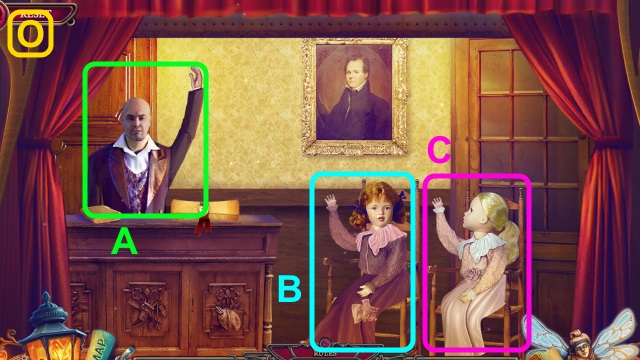
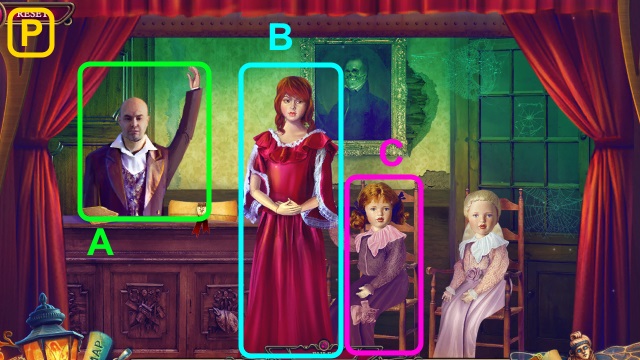
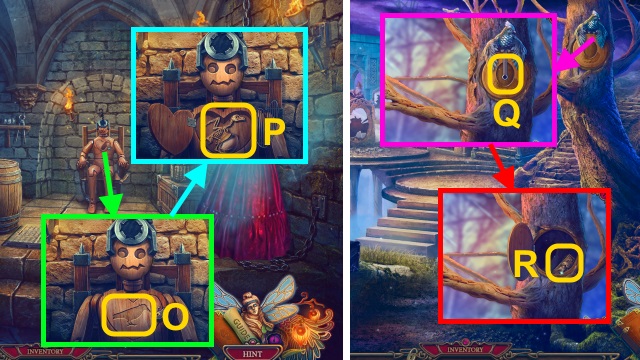
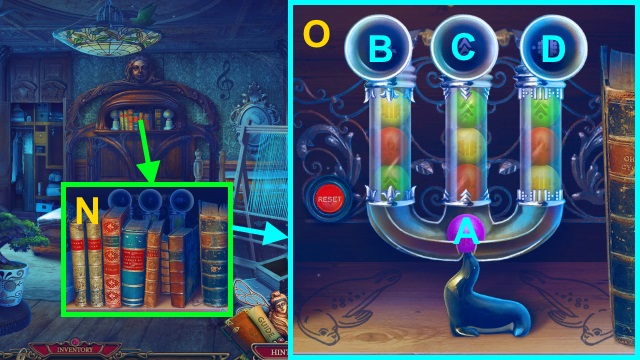
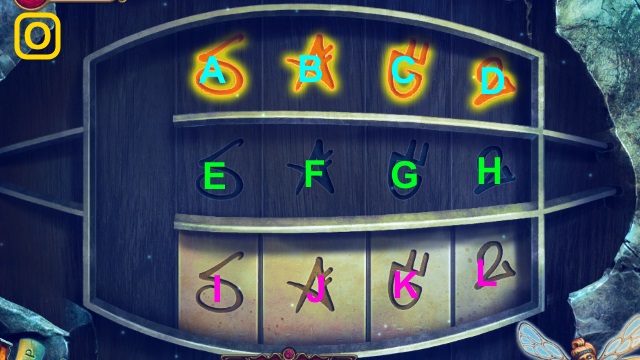
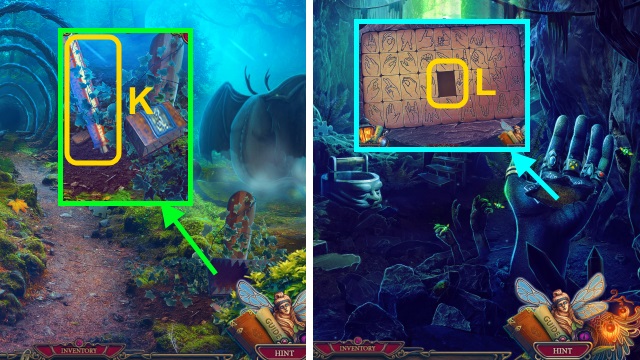
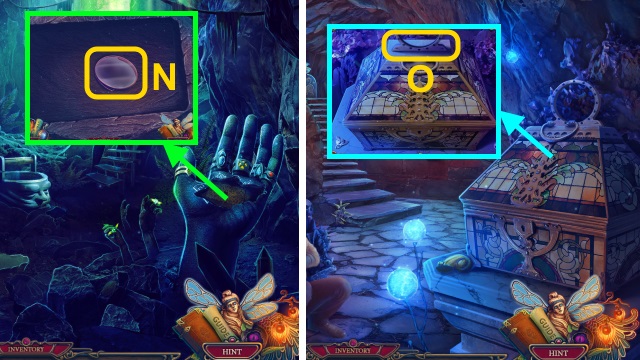
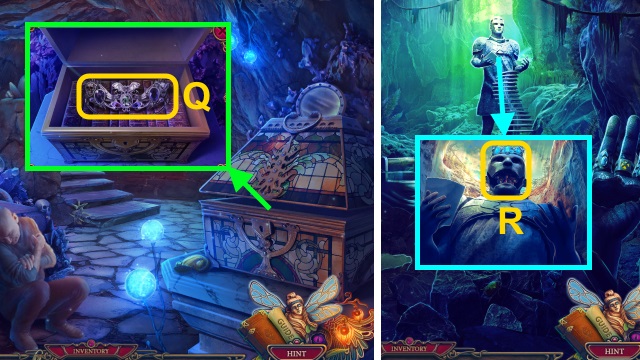
- Examine the wall for a mini-game (N).
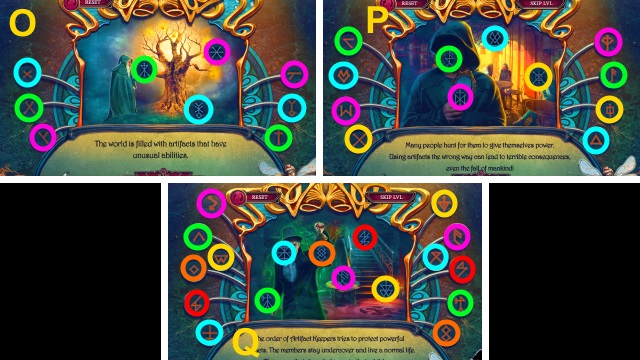
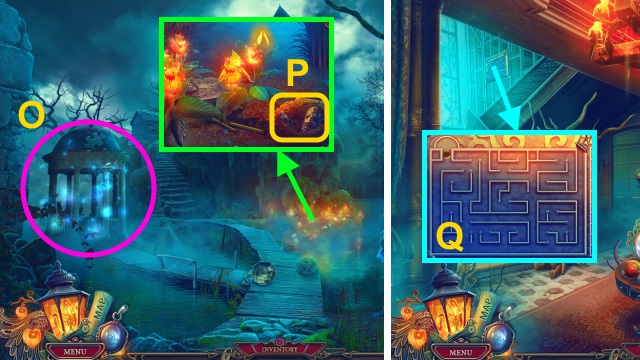
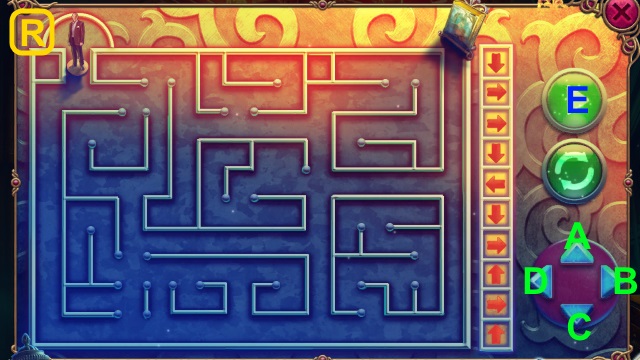
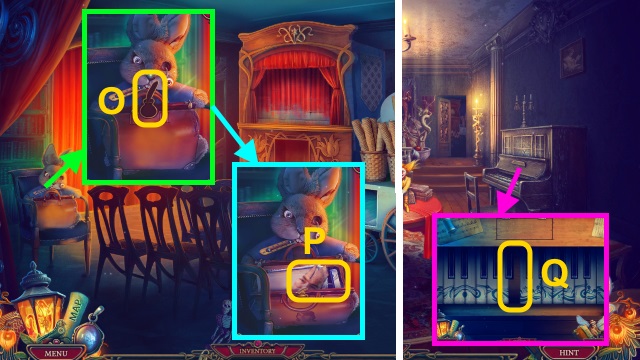
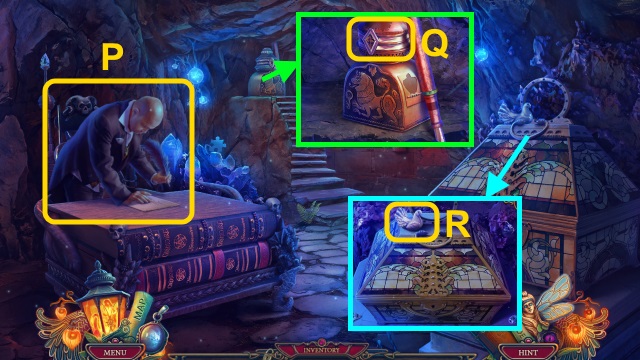
- Solution (O-Q).
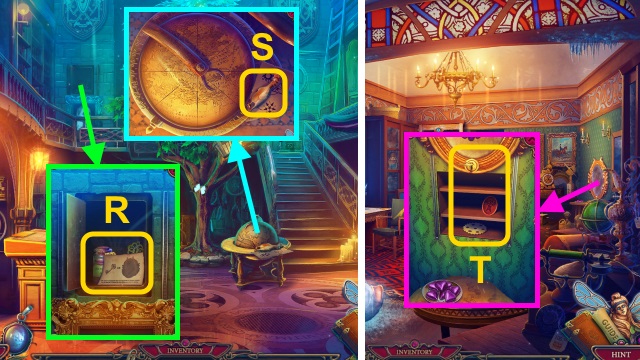
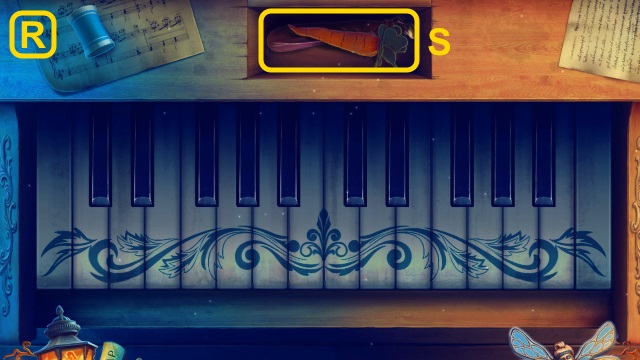
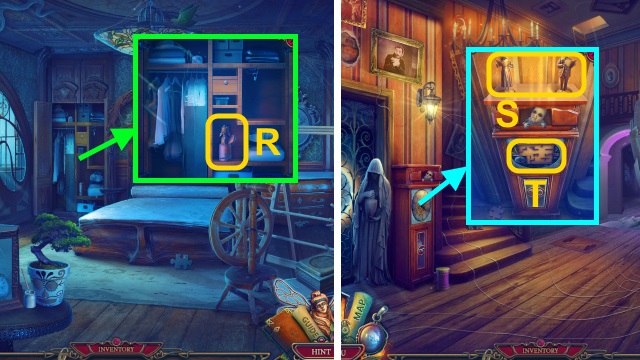
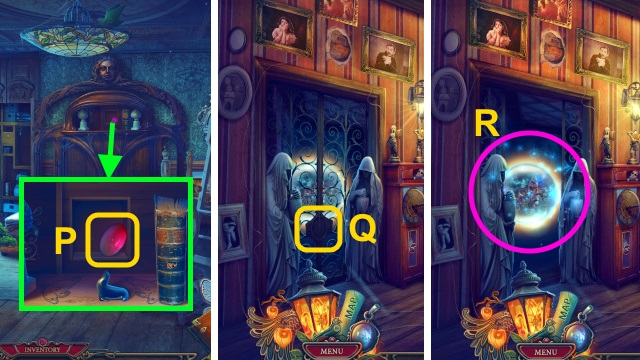
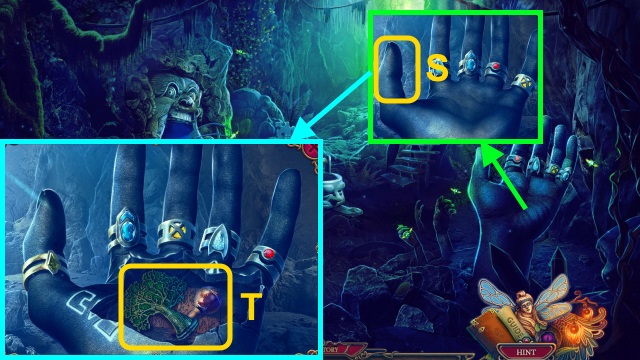
- Take the note, REVEALING POTION, and PORTRAIT KEY (R).
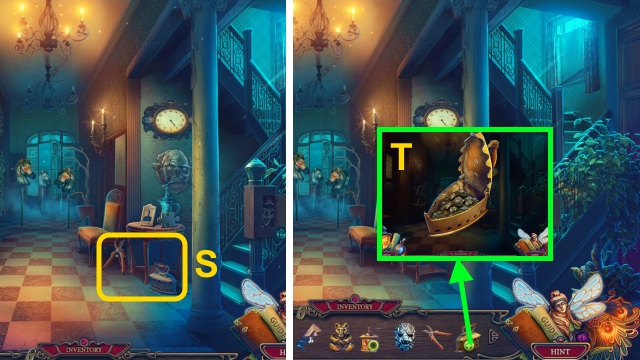
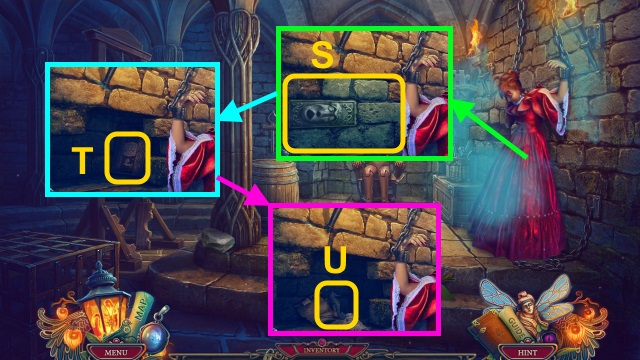
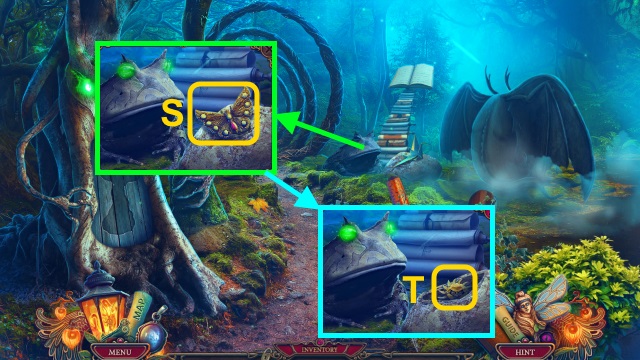
- Take the RUBBER CHICKEN (S).
- Walk down.
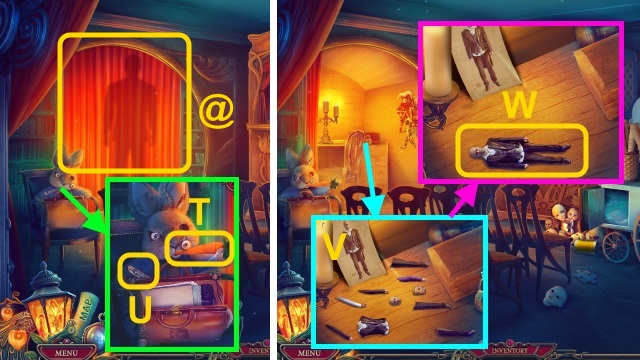
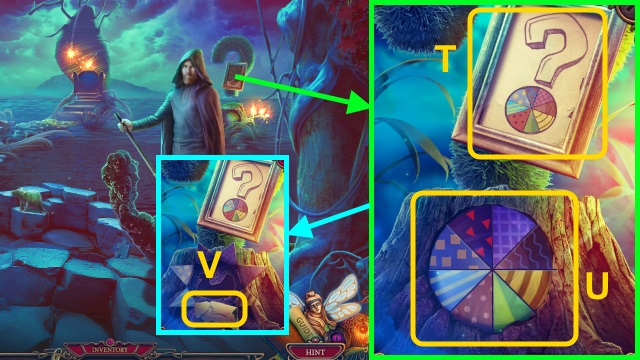
- Use the PORTRAIT KEY; take the GEAR and SIGNET BADGE (T).
- Walk forward.
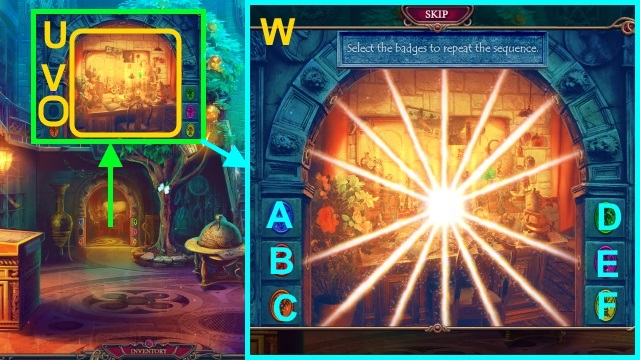
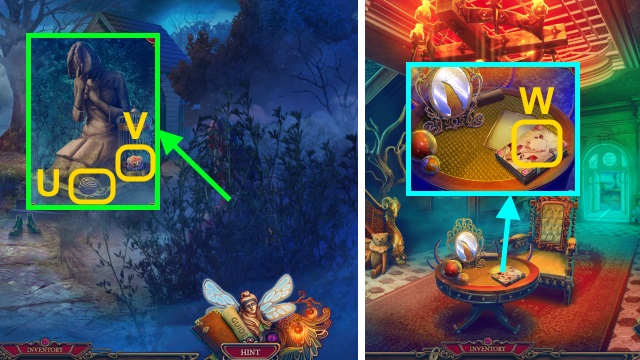
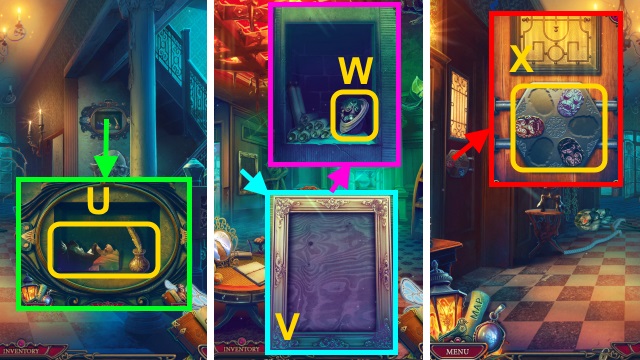
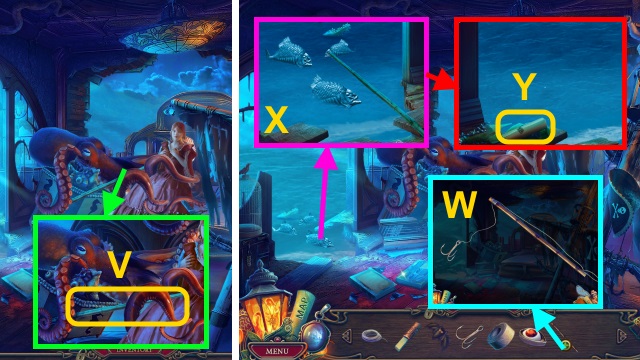
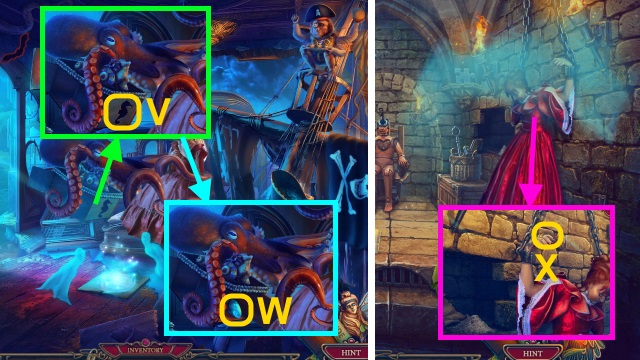
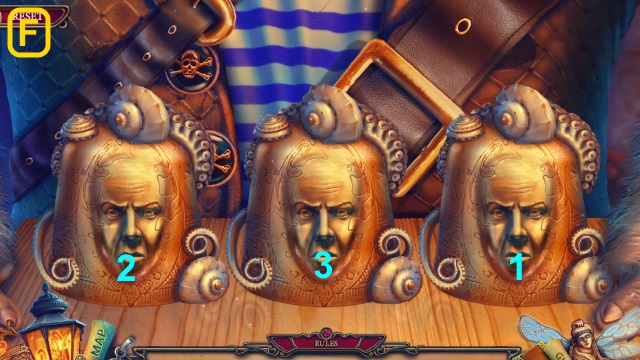
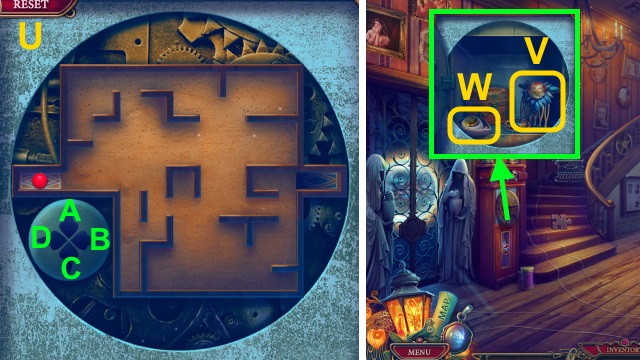
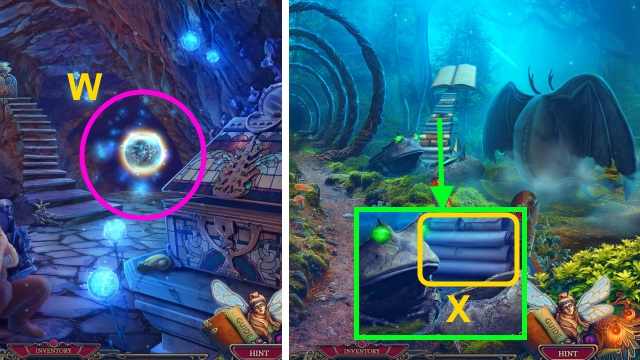
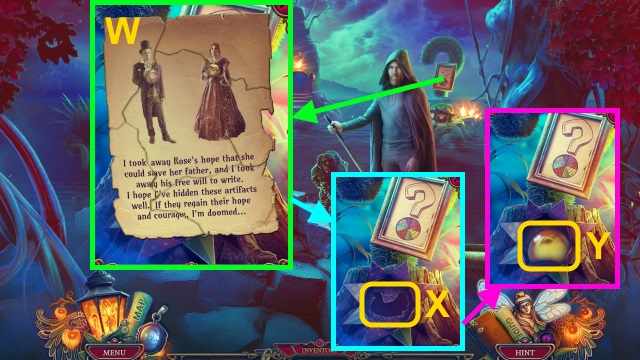
- Use the POWDER (U); place the SIGNET BADGE for a mini-game (V).
- Solution (W): (C-A-E)-(E-A-D-B).
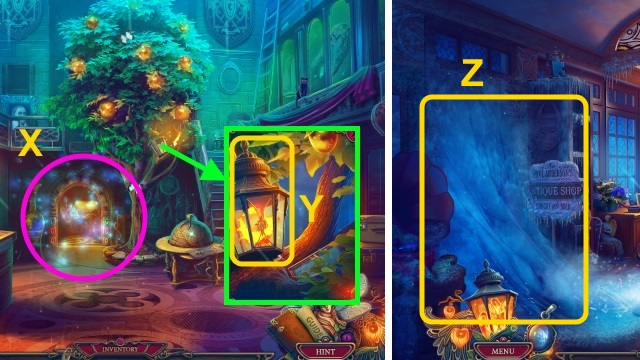
- Play the HOP; receive the SALAMANDER FOOD (X).
- Give the SALAMANDER FOOD; take Spark (Y).
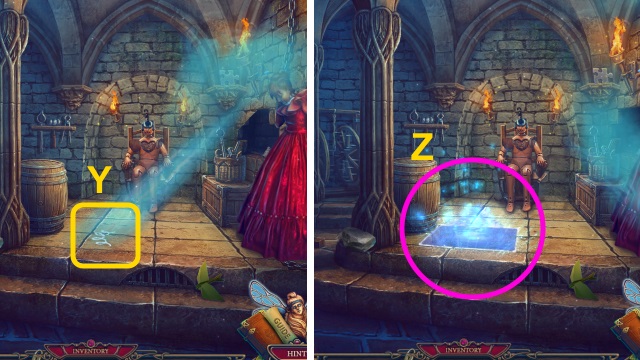
- Walk down.
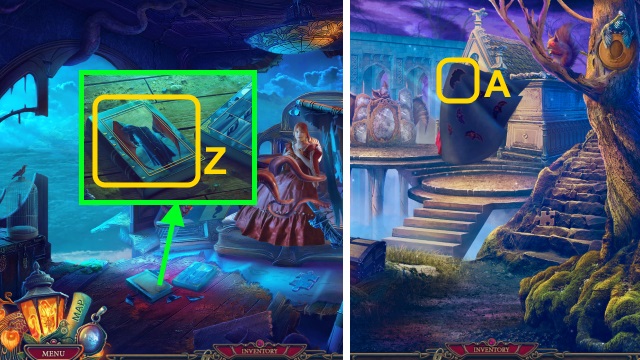
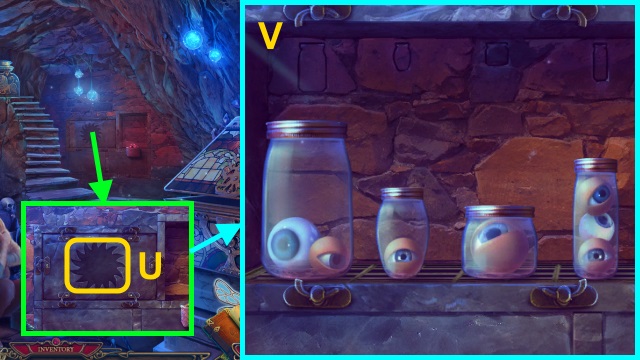
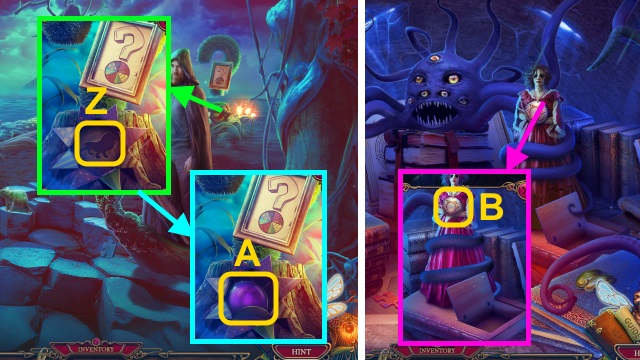
- Examine the ice (Z).
- Give the RUBBER CHICKEN (A); take the DAMAGED IDENTITY CARD (B).
- Walk forward.
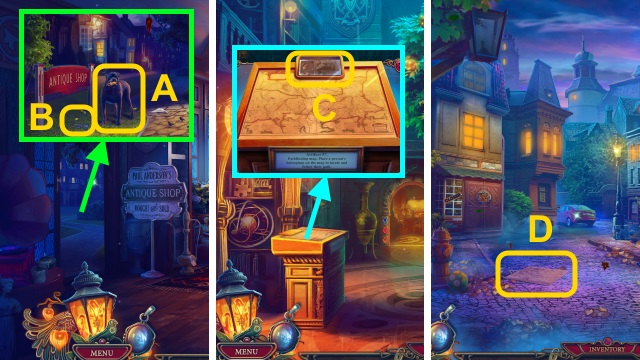
- Place the DAMAGED IDENTITY CARD; use the REVEALING POTION (C).
- Go left.
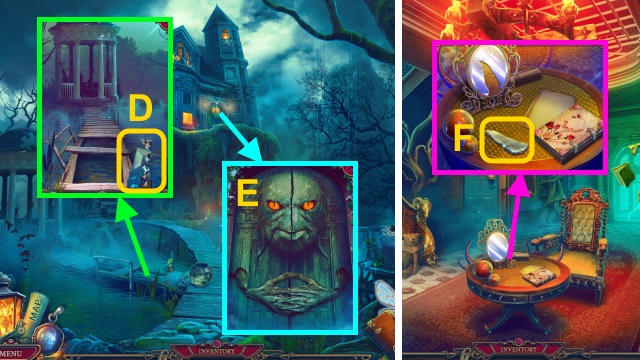
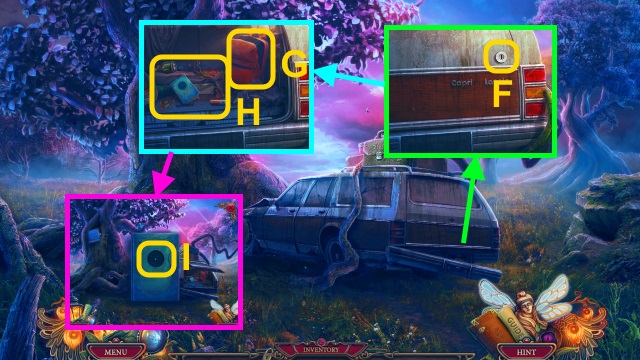
- Take the MAP (D).
- Take the ID CARD (E).
- Open the door; take the EXTINGUISHER NOZZLE (F).
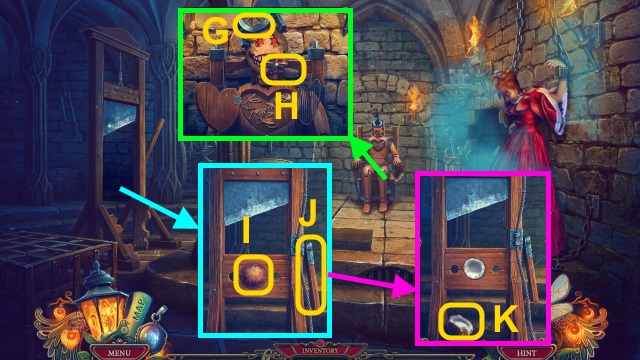
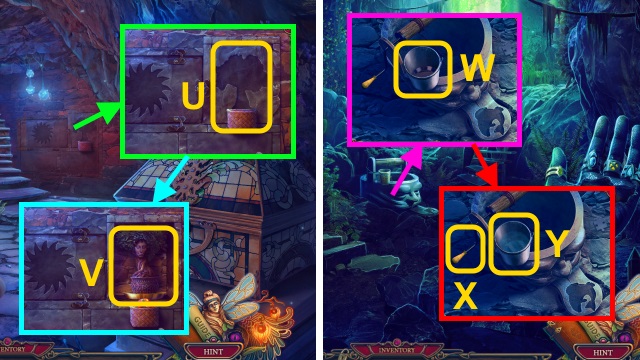
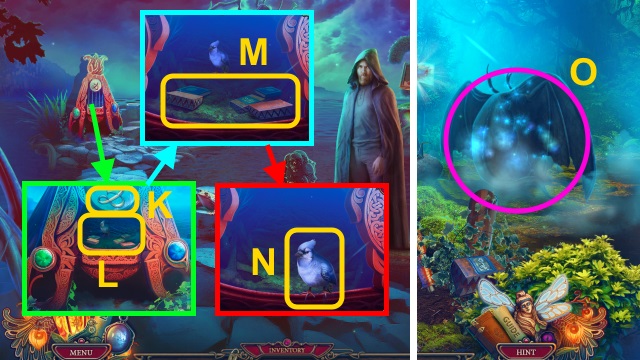
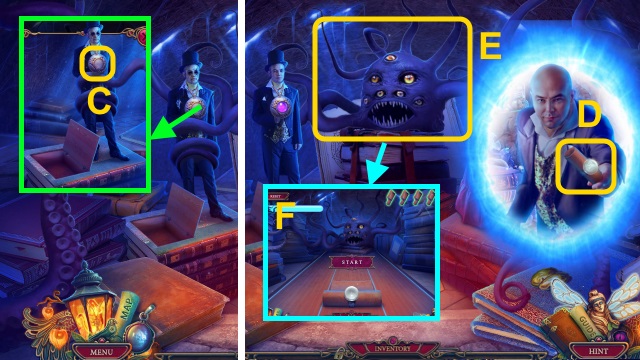
- Use the ID CARD; examine the case for a mini-game (G).

- Solution (H-I).
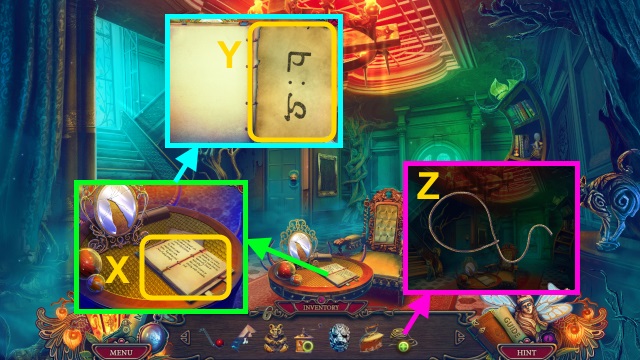
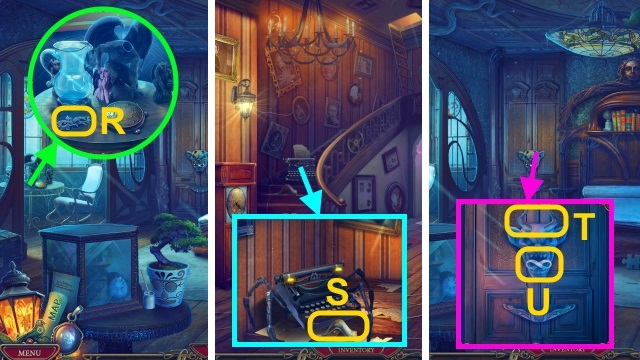
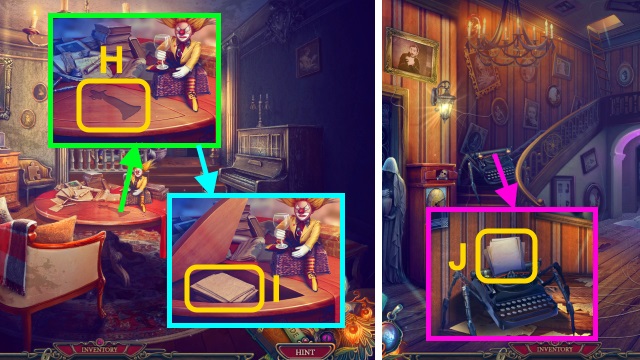
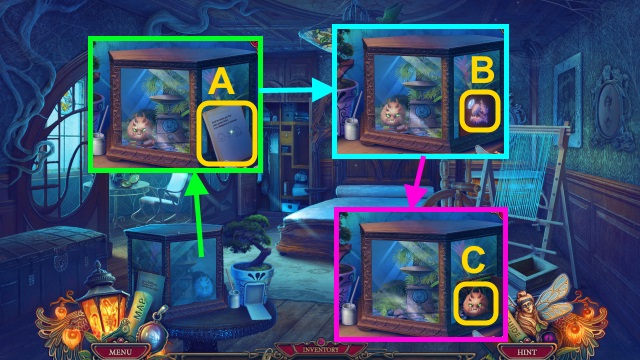
- Read the diary; take CLAIRE'S PHOTO and the OILER (J).
- Use the OILER; place the GEAR (K).
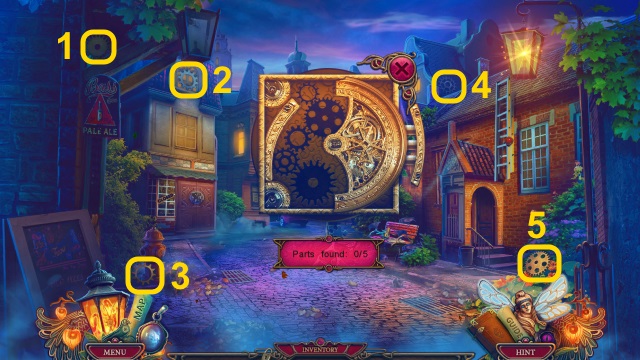
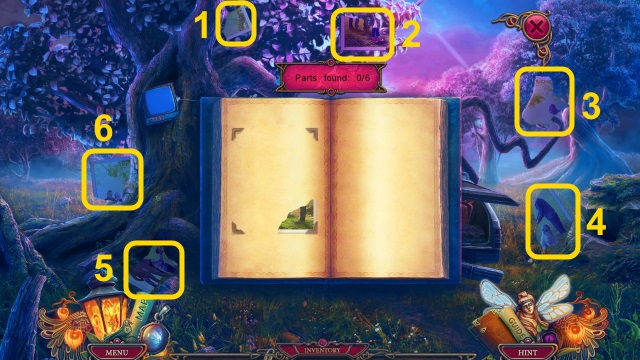
- Find the parts (1-5).

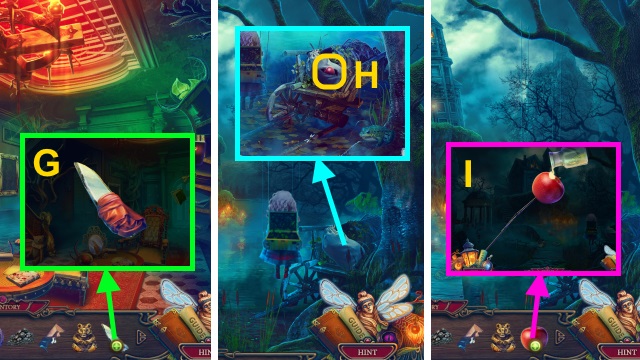
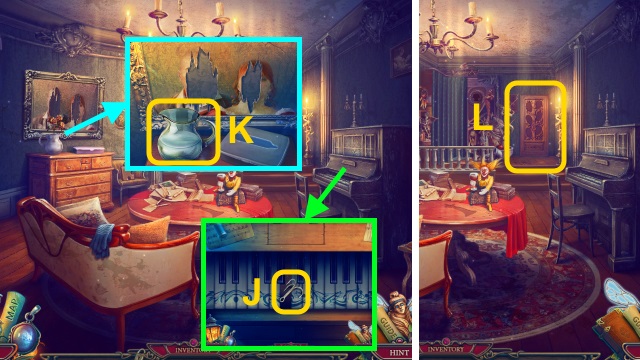
- Examine the room (L).
- Take the BOOMERANG and BROKEN FAN (M).
- Walk down twice.
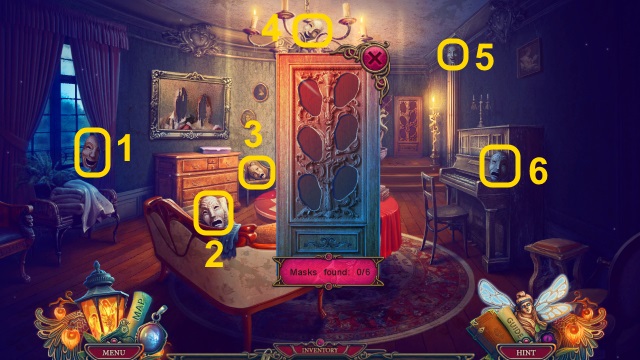
- Use the BOOMERANG for a mini-game; hit the umbrella (N).
- Take the BROKEN UMBRELLA (O).
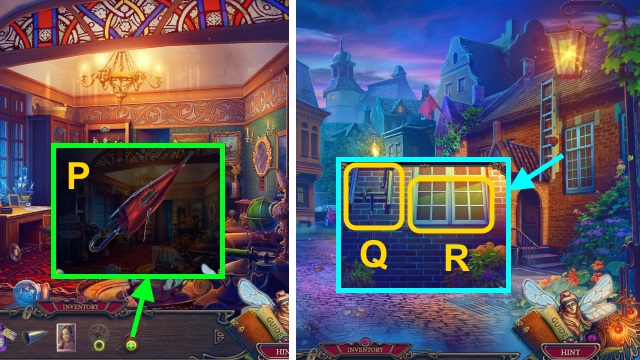
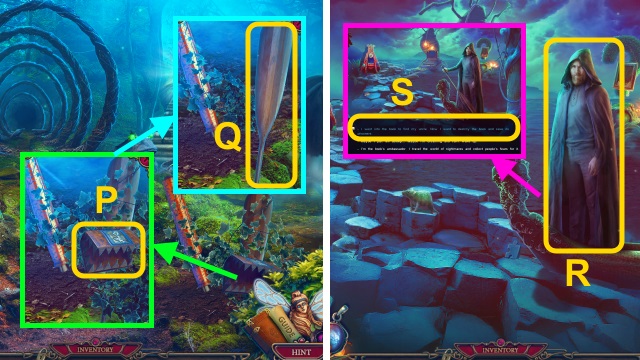
- Examine the BROKEN UMBRELLA 3x (P); receive the SPOKE and CANE.
- Walk forward, then left.
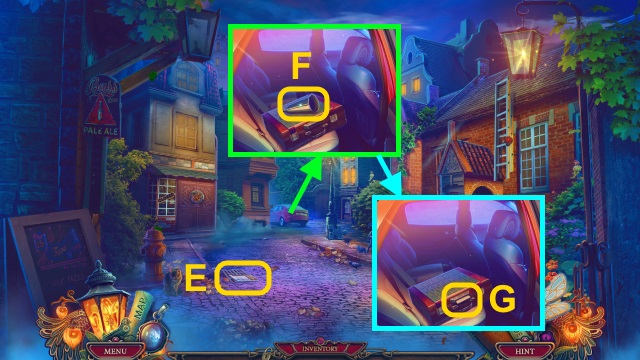
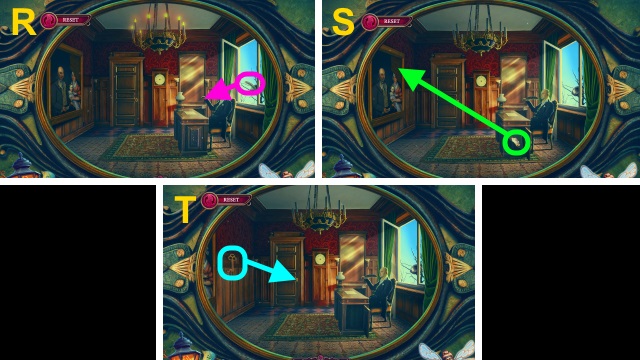
- Use the CANE; take the CRANK (Q).
- Open the window (R).
- Walk right.

- Take the BROKEN FIRE EXTINGUISHER (S).
- Combine the BROKEN FIRE EXTINGUISHER and EXTINGUISHER NOZZLE (T); receive the FIRE EXTINGUISHER.
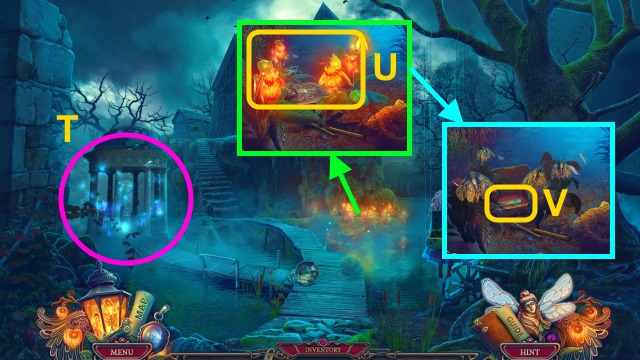
- Use the FIRE EXTINGUISHER (U).
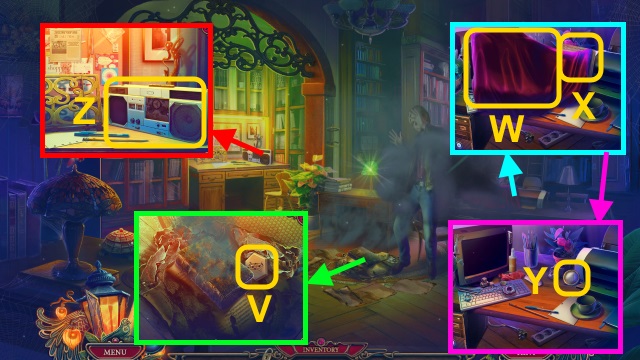
- Take the MELODIC CHIP (V).
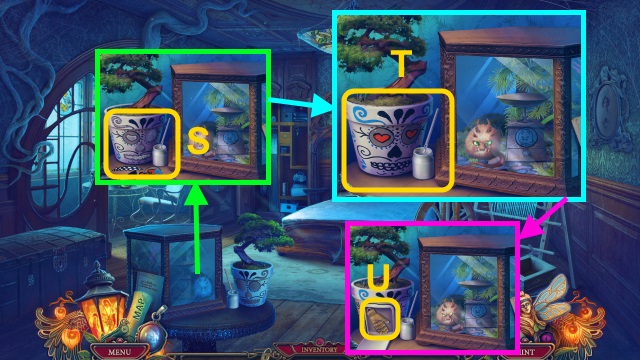
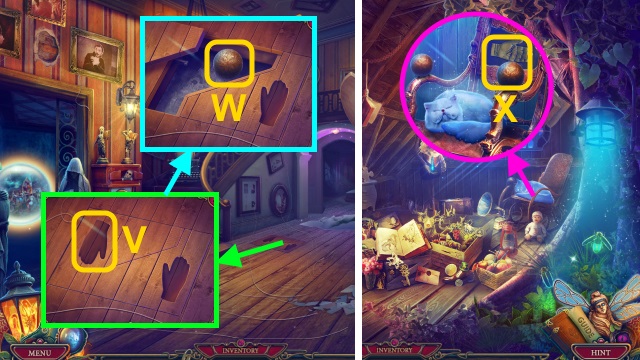
- Take the RAG (W); read the newspaper (X).
- Take the MAGNIFYING GLASS (Y).
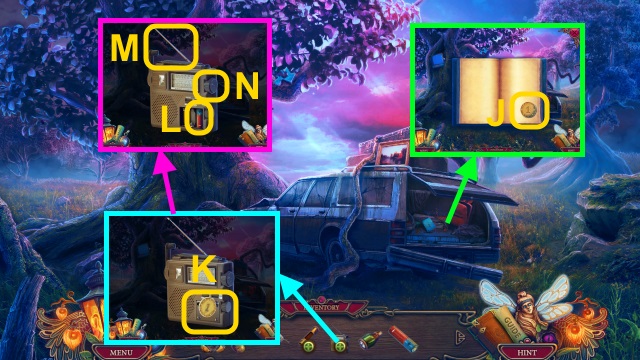
- Examine the cassette player (Z).
- Find the pieces (1-5).
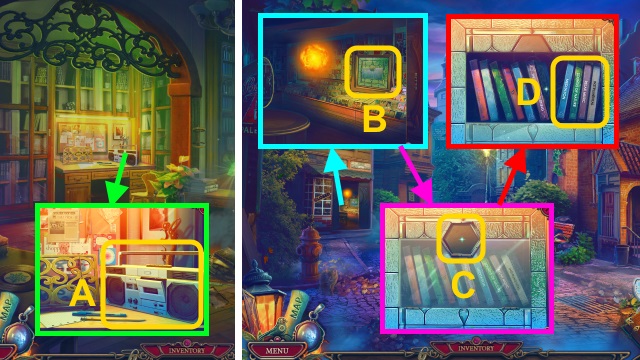
- Take the CASSETTE PLAYER (A).
- Walk down.
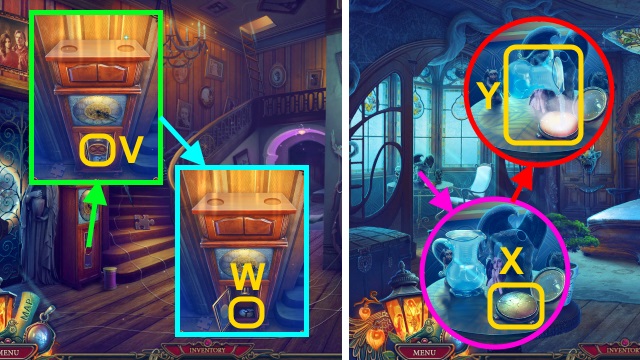
- Examine the window (B); place the MELODIC CHIP (C).
- Examine the tapes 5x (D); receive the CASSETTE TAPE.
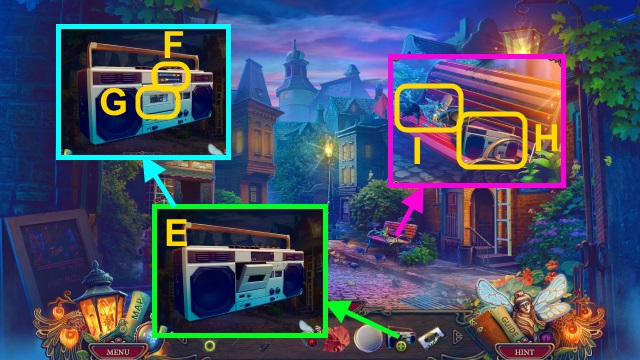
- Examine the CASSETTE PLAYER (E); open the cover.
- Place the BATTERIES (F) and CASSETTE TAPE (G); receive the CROW REPELLENT.
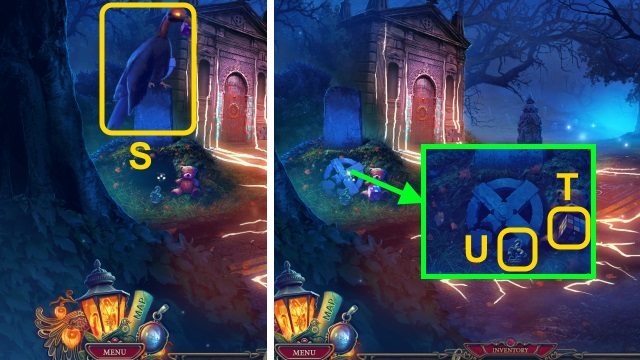
- Use the CROW REPELLENT (H).
- Take the TOY HELICOPTER and SHOE BRUSH (I).
- Examine the TOY HELICOPTER; take the PROPELLER (J).
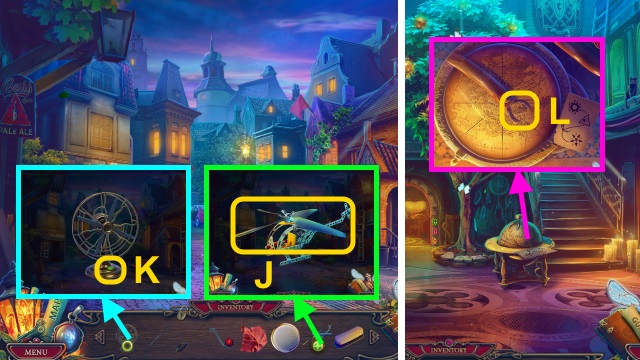
- Combine the BROKEN FAN and PROPELLER; press the button (K).
- Receive the FAN.
- Walk down.
- Place the MAGNIFYING GLASS for a mini-game (L).
- Solution (M).
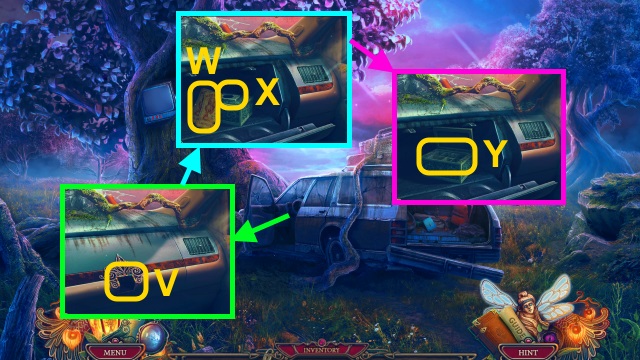
- Receive the MAGNIFYING GLASS; take the ADHESIVE and ELECTRICAL TAPE (N).
- Go left, then right.

- Place the FAN (O).
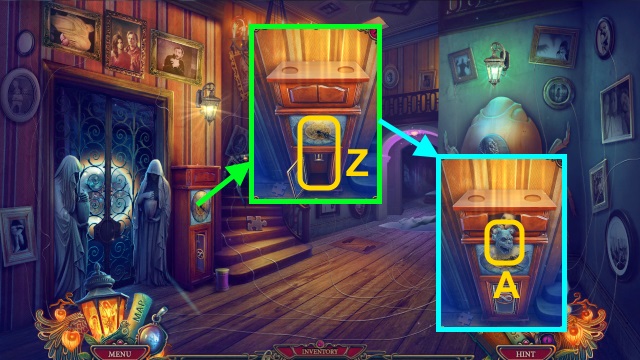
- Give the CLAIRE'S PHOTO; take the MEMORY CARD (P).
- Take the DAMAGED BOOK (Q).
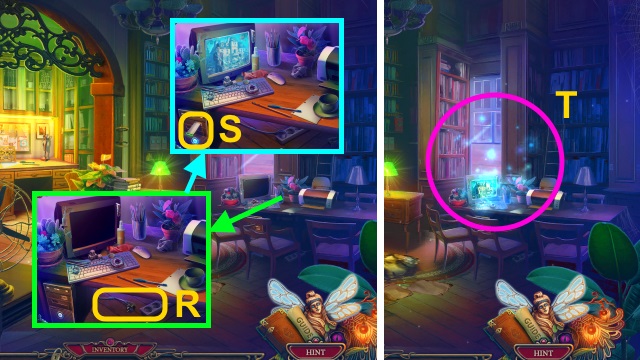
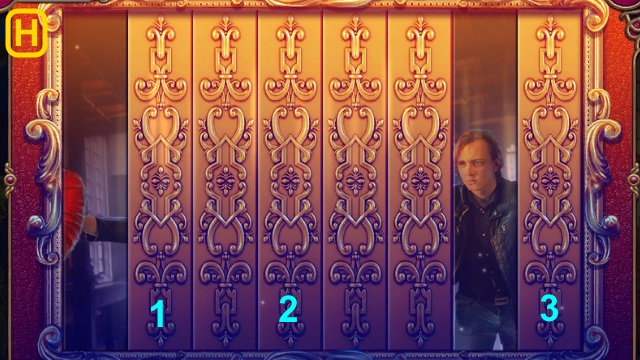
- Use the ELECTRICAL TAPE; place the plug (R).
- Press the button; use the MEMORY STICK (S).
- Play the HOP; receive the BOOK PICTURE (T).
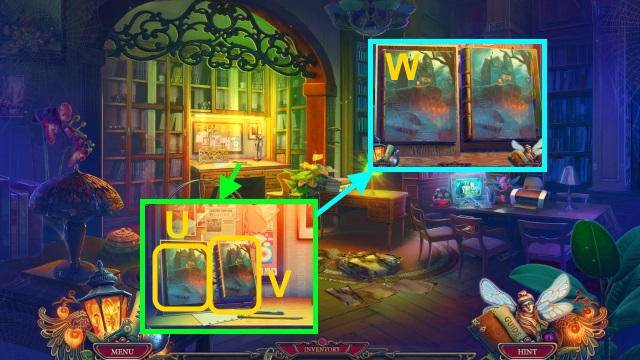
- Place the BOOK PICTURE (U) and DAMAGED BOOK (V); use the SHOE BRUSH and REVEALING POTION. Examine the picture.
- Use the MAGNIFYING GLASS for a mini-game (W).
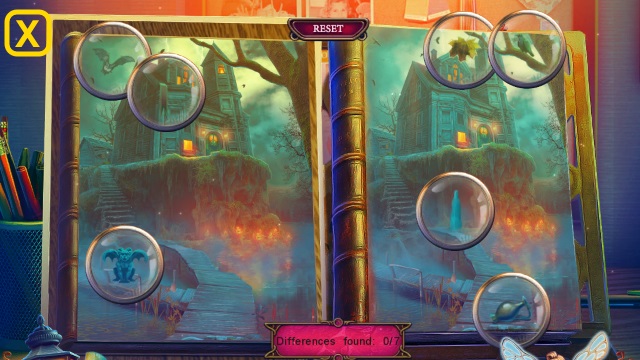
- Solution (X).
Chapter 2: Inside the Book
- Use the CANE; take the DOLL HEART (Y).
- Take the WOODEN WHEEL (Z) and EMBERS (A); place the DOLL HEART (B).
- Take the PENDULUM (C).
- Take the PORTRAIT SCRAP and BEAR EMBLEM (D).
- Use the PENDULUM (E).
- Walk forward.
- Take the MIRROR SHARD (F).
- Combine the MIRROR SHARD and RAG (G); take the IMPROVISED KNIFE.
- Walk down.
- Use the IMPROVISED KNIFE; take the APPLE (H).
- Combine the APPLE, SPOKE, and ADHESIVE (I); receive the APPLE BAIT.
- Walk forward.
- Use the APPLE BAIT (J).
- Walk forward.
- Take the BOARD (K).
- Use the WOODEN WHEEL (L); take the TROWEL and BOOK FIGURINE (M).
- Walk down twice.
- Place the BOARD (N).
- Find the parts (1-5).
- Play the HOP; receive the PEPPER MILL (O).
- Use the TROWEL; take the UNCLE FIGURINE and FACE KEY (P).
- Walk forward.
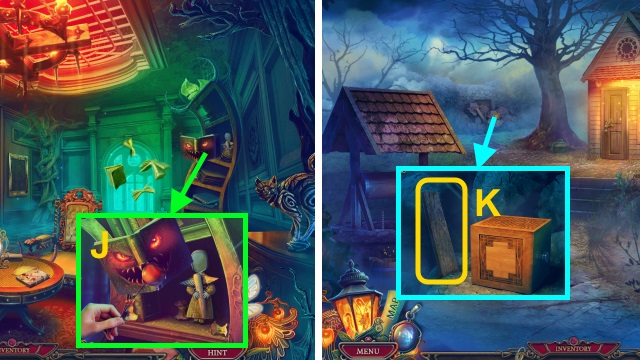
- Place the BOOK FIGURINE and UNCLE FIGURINE for a mini-game (Q).
- Solution (R): C-Bx2-C-D-C-B-A-B-A-E.
- Walk left.
- Take the PRUNERS and IRON (S).
- Open the IRON. Place the EMBERS (T); examine them. Receive the HEATED IRON.
- Walk down, then forward.
- Use the PRUNERS; take the ROPE (U) and FLOWER EMBLEM (V).
- Walk down.
- Place the FLOWER EMBLEM (W).
- Find the parts (1-6).
- Read the book (X).
- Use the HEATED IRON; take the NOTE WITH SYMBOLS (Y).
- Examine the ROPE 2x (Z); receive the LASSO.
- Walk left.
- Use the LASSO (A).
- Take the EMPTY JAR (B).
- Walk down, then forward.
- Place the EMPTY JAR; take the HONEY (C).
- Walk down, then left.
- Use the HONEY (D); take the PEPPERCORNS (E).
- Combine the PEPPER MILL and PEPPERCORNS (F); take the GROUND PEPPER.
- Walk down, then forward.
- Place the CRANK (G); use the GROUND PEPPER (H). Take the FACE KEY ON RING (I).
- Examine the FACE KEY ON RING (J); receive the FACE KEY and RING.
- Walk down.
- Place the RING (K).
- Play the HOP; receive the CLOCK HAND (L).
- Walk left.
- Place the NOTE WITH SYMBOLS and CLOCK HAND (M); arrange the hands for a mini-game (N).
- Solution (O-T).
- Take the INKWELL and PORTRAIT SCRAP (U).
- Walk down.
- Place the 2 PORTRAIT SCRAPS (V); take the FISHING LINE and FACE KEY (W).
- Walk left.
- Place the 3 FACE KEYS (X).
- Walk left.
- Take the BROKEN FLASHLIGHT (Y).
- Walk forward.
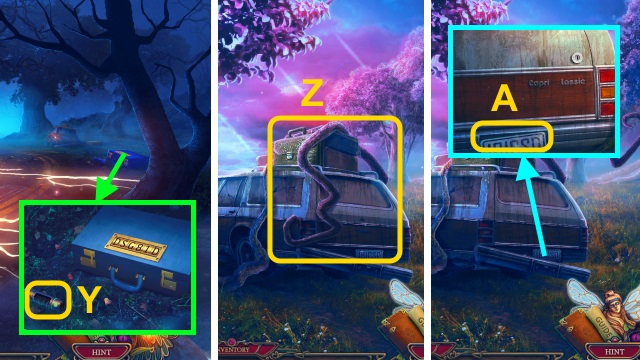
- Examine the roots (Z).
- Take the LICENSE PLATE (A).
- Walk down.
- Place the LICENSE PLATE (B); enter the code (C).
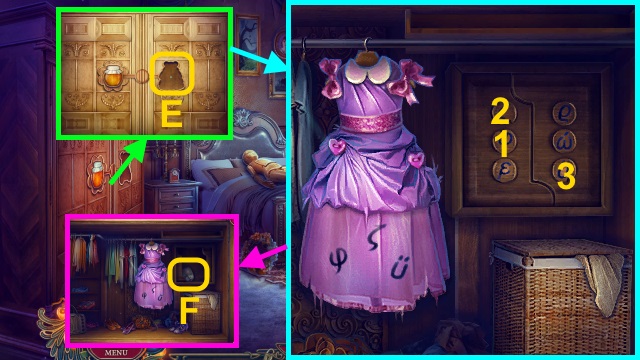
- Move the clothes; take the SMILEY EMBLEM (D).
- Take the OLD RADIO and TRUNK KEY (E).
- Walk forward.
- Use the TRUNK KEY (F).
- Dump the backpack (G). Take the BATTERY and LIGHTBULB; examine the book (H).
- Place the SMILEY EMBLEM (I).
- Find the parts (1-6).
- Turn the page; take the OLD COIN (J).
- Combine the OLD RADIO and OLD COIN (K); take the BATTERY (L), ANTENNA (M), and DIAL (N).
- Open the BROKEN FLASHLIGHT (O); place the 2 BATTERIES and LIGHTBULB (P). Receive the FLASHLIGHT.
- Place the DIAL (Q) and ANTENNA (R); examine the antenna 3x.
- Press the buttons (1-3).
- Walk down.
- Use the FLASHLIGHT (S).
- Take the PUZZLE-BOX KEY (T) and HORSE STATUETTE (U).
- Walk forward.
- Place the PUZZLE-BOX KEY (V).
- Examine the tickets (W); place the HORSE STATUETTE (X).
- Examine the box for a mini-game (Y).
- Solution (Z).
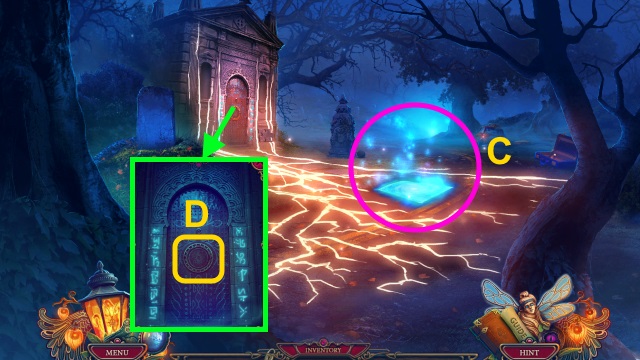
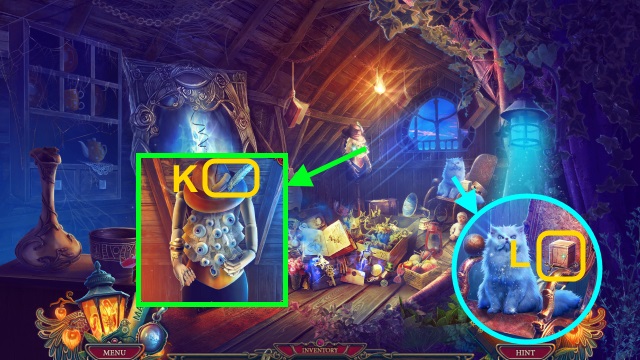
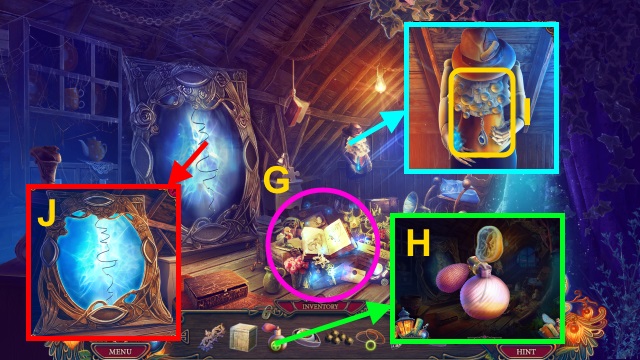
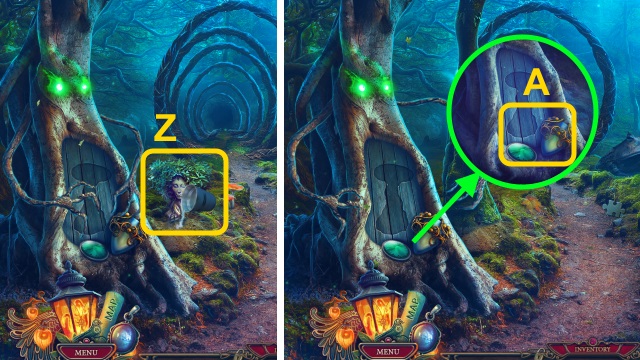
- Take the note and CHALK OF MEMORIES (A).
- Walk down.
- Use the CHALK OF MEMORIES (B).
- Play the HOP; receive the DREAMCATCHER (C).
- Examine the door; use the DREAMCATCHER (D).
- Walk forward.
Chapter 3: Uncle Paul's Nightmare
- Place the BEAR EMBLEM (E).
- Select the symbols (1-3).
- Take the TERRIBLE FACE (F).
- Walk down twice.

- Play the HOP; receive the SAUSAGE (G).
- Place the TERRIBLE FACE; take the paper and CADUCEUS (H).
- Walk forward.
- Place the CADUCEUS (I).
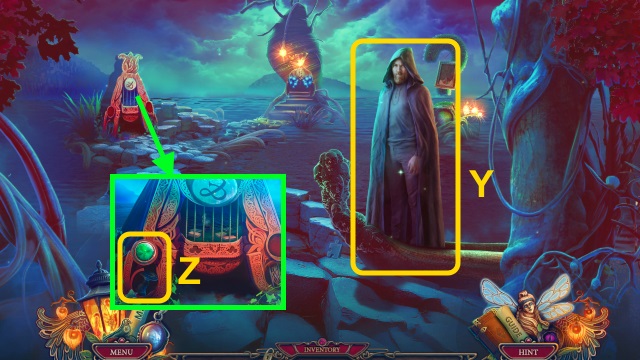
- Give the SAUSAGE (J); take the STONE MOUTH and SWEET DREAMS RECIPE (K).
- Walk down; then left.
- Place the STONE MOUTH (L); examine the statue 2x.
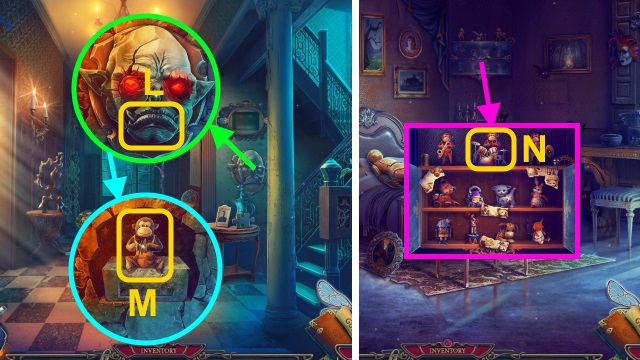
- Take the TOY MONKEY (M).
- Walk left.
- Place the TOY MONKEY (N); examine the shelf for a mini-game.
- Solution (O).
- Take the BAT and SPHERE OF FEAR (P).
- Walk down twice.
- Examine the book (Q); place the SPHERE OF FEAR (R).
- Take the POISON and VALERIAN (S).
- Walk down.
- Play the HOP; receive the PUPPET (T).
- Use the POISON (U).
- Open the box; take the CYLINDER (V).
- Walk forward, then left.
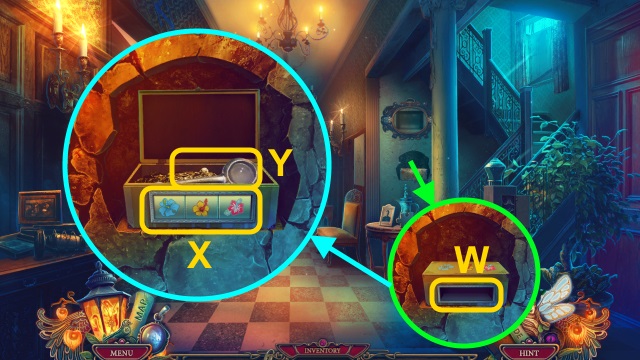
- Examine the box; place the CYLINDER (W).
- Enter the code (X); take the CRYSTAL SPOON (Y).
- Walk left.
- Place the SWEET DREAMS RECIPE, CRYSTAL SPOON, VALERIAN, and PUPPET (Z).
- Place the puppet; examine it (A).
- Pour the ashes (B). Place the valerian; use the pestle (C).
- Pour the powder; use the spoon (D).
- Pour the mixture (E). Receive the SWEET DREAM POWDER.
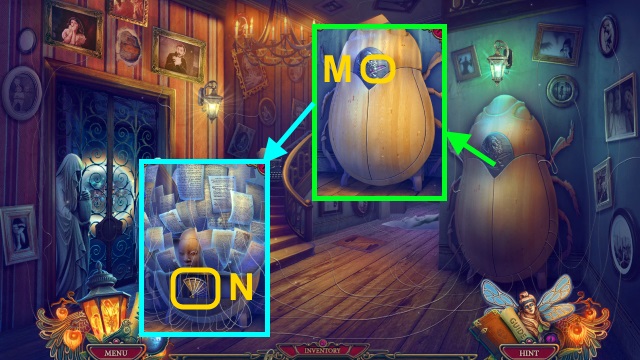
- Use the SWEET DREAM POWDER (F); examine the orbs (G).
- Take the COAT OF ARMS (H).
- Walk down.
- Place the COAT OF ARMS (I).
- Walk left to the Living Room.
- Take the HOOK (J).
- Move the flowers; take the PITCHER WITH WATER (K).
- Try to walk forward.
- Examine the door (L).
- Find the parts (1-6).
- Walk forward.
- Open the door; move the ice cream (M).
- Take the ICE TRAY (N).
- Place the INKWELL (O).
- Take the PORTRAIT SCRAP and GRAND PIANO KEY (P).
- Walk down.
- Place the GRAND PIANO KEY for a mini-game (Q).
- Solution (R).
- Move the pieces; take the FELT CARROT and DOLL LEG.
- Walk forward.
- Give the FELT CARROT (T); take the THERMOMETER (U).
- Open the curtain (@).
- Place the DOLL LEG (V); assemble the doll.
- Take the ARTHUR DOLL (W).
- Walk down.

- Place the THERMOMETER (X).
- Take the BANDAGE and SLEEPING POWDER (Y).
- Combine the ICE TRAY, PITCHER WITH WATER, and SLEEPING POWDER (Z); receive the FILLED ICE TRAY.
- Walk forward.
- Place the FILLED ICE TRAY; open the door. Take the SOPORIFIC ICE CUBES (A).
- Walk down.
- Place the SOPORIFIC ICE CUBES (B); take the STORYTELLER'S MEDAL (C).
- Walk forward.
- Place the STORYTELLER'S MEDAL (D).
- Take the BOOK EMBLEM (E).
- Walk down.
- Place the BOOK EMBLEM for a mini-game (F).
- Solution (G).
- Play the HOP; receive the SOLVENT (H).
- Walk forward.
- Move the baskets; use the SOLVENT (I).
- Take the PORTRAIT SCRAP (J).
- Walk down.
- Place the 2 PORTRAIT SCRAPS (K).
- Take the THEATER CRANK BOX and SCORPION (L).
- Walk forward.
- Place the THEATER CRANK BOX (M).
- Place the ARTHUR DOLL for a mini-game (N).
- Solution (O): A-B-C.
- Solution (P): Ax3-B-C.
- Take the GEAR and RUBY EYE (Q).
- Walk down twice.
- Give the GEAR (R).
- Walk right.
Chapter 4: Rose's Nightmares

- Take the SCORPION (S).
- Remove the cloth (T).
- Place the 2 SCORPIONS (U).
- Take the BAMBOO STICK (V).
- Combine the BAMBOO STICK, FISHING LINE, and HOOK (W); receive the FISHING ROD.
- Use the FISHING ROD 4x (X).
- Take the letter, CLOCK HAND, and COVER FRAGMENT (Y).
- Place the pieces; place the COVER FRAGMENT (Z).
- Go up.
- Place the BAT (A).
- Collect the items (1-6).
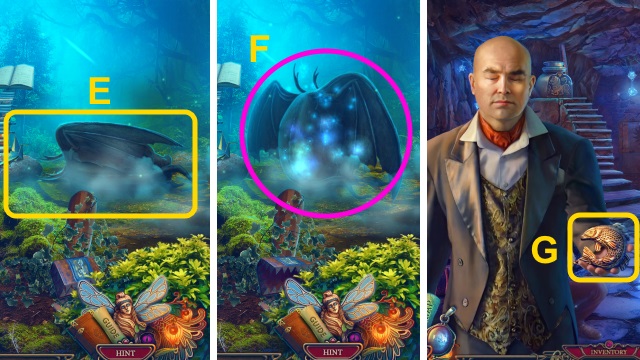
- Play the HOP; receive the GOLD SEA HORSE (B).
- Examine the shovel (C). Examine the clay 3x; take the CERAMIC BOWL (D).
- Walk down.
- Place the GOLDEN SEA HORSE (E); take the LEFT HORN and NUT (F).
- Go up.
- Give the NUT; take the COVER TILE (G).
- Walk down.
- Place the COVER TILE (H).
- Complete the image (I).
- Go forward.
- Take the HANDKERCHIEF (J).
- Walk down.
- Use the HANDKERCHIEF (K); receive the WET HANDKERCHIEF.
- Go up.
- Use the WET HANDKERCHIEF for a mini-game (L).
- Solution is random (M).
- Take the HILT DECORATION and WOODEN RAVEN (N).
- Walk down, then forward.
- Place the WOODEN RAVEN (O).
- Move the grate. Examine the bones; take the WOODEN EGG (P).
- Walk down, then up.
- Place the WOODEN EGG (Q).
- Take the HOWLING STONE (R).
- Walk down, then forward.
- Place the HOWLING STONE; examine the wall 3x (S).
- Read the book (T); examine the recipe.
- Take the SILVER SEA HORSE (U).
- Walk down.
- Place the SILVER SEA HORSE (V).
- Take the PRECIOUS GEMSTONE (W).
- Go forward.
- Place the PRECIOUS GEMSTONE (X).
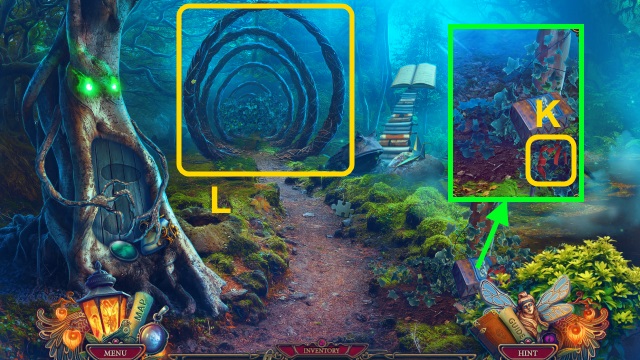
- Use the CHALK OF MEMORIES (Y).
- Play the HOP; receive the WIND ROSE (Z).
- Walk down, then up.

- Place the WIND ROSE (A).
- Move the items; take the BANANA (B).
- Walk down.
- Give the BANANA (C); take the COCONUT (D). Examine the cups for a mini-game (E).
- Solution (F).
- Receive the SKULL MEDAL.
- Go forward.
- Place the SKULL MEDAL (G); take ROSE'S BROOCH (H).
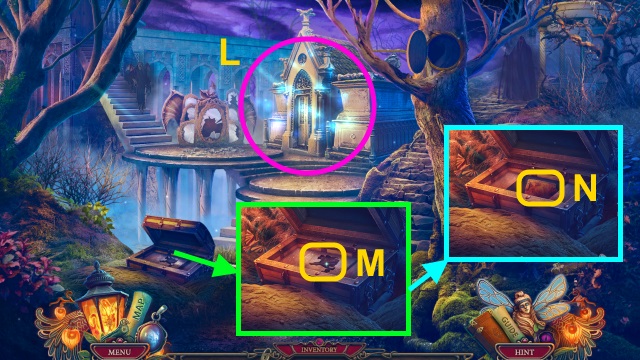
- Assemble the guillotine; place the COCONUT (I). Pull the lever (J).
- Take the COCONUT MILK (K).
- Walk down, then up.
- Play the HOP; receive the ROSE PETALS (L).
- Place ROSE'S BROOCH (M).
- Examine the book (N).
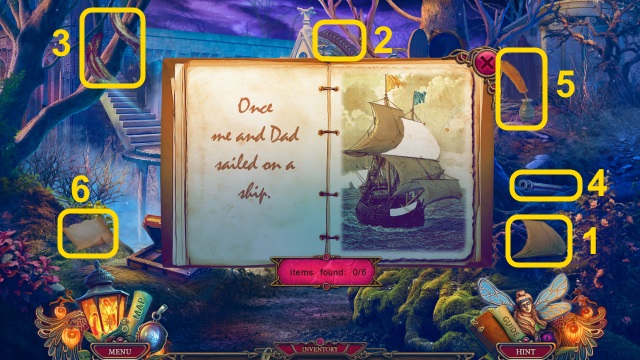
- Find the parts (1-6).
- Take ROSE'S MEDALLION (O).
- Walk down, then forward.
- Use the CERAMIC BOWL; use the COCONUT MILK and ROSE PETALS (P). Take the HARMONY ELIXIR.
- Walk down.
- Give ROSE'S MEDALLION; use the HARMONY ELIXIR (Q).
Chapter 5: Arthur's House
- Take the CARVED ORNAMENT (R).
- Walk down.
- Take the RIGHT HORN (S).
- Walk forward.
- Place the LEFT HORN and RIGHT HORN (T); take the INFINITY SYMBOL (U).
- Walk down.
- Place the INFINITY SYMBOL (V).
- Take the PENDULUM PIECES (W).
- Walk forward.
- Open the box. Place the PENDULUM PIECES; examine them (X).
- Pour the water; take the PENDULUM (Y).
- Walk down.
- Place the CLOCK HAND and PENDULUM (Z); take the DEMON HEAD (A).
- Walk forward.
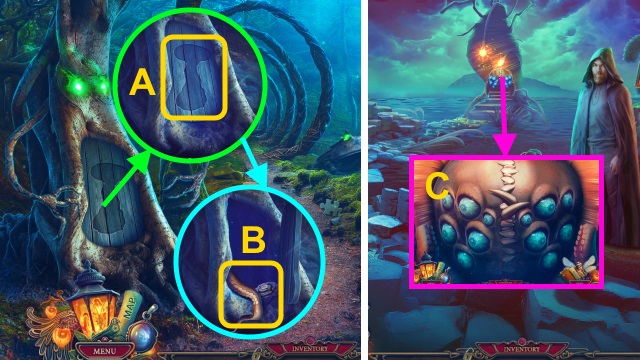
- Place the DEMON HEAD (B); take the PAINTING SCRAP (C).
- Walk down.
- Place the PAINTING SCRAP for a mini-game (D).

- Solution (E).

- Take the MUSE EMBLEM (F).
- Walk down, then left to the Living Room.
- Play the HOP; receive the SCHOLARLY FIGURINE (G).
- Place the MUSE EMBLEM (H); take the STACK OF PAPER (I).
- Walk down, then right.
- Use the STACK OF PAPER (J).
- Go up.
- Place the BANDAGE; take the SILVER FEATHER (K).
- Take the ENGRAVED STONE (L).
- Walk down.
- Place the SILVER FEATHER (M).
- Take the ANCIENT FAN (N).
- Walk forward.
- Place the ANCIENT FAN (O).
- Take the GLOVE and PERFUME BOTTLE (P).
- Go down, then up.
- Examine the hand; use the GLOVE (Q). Receive the ANTIQUE BRACELET.
- Walk down, then forward.
- Place the ANTIQUE BRACELET; take the SCHOLARLY FIGURINE (R).
- Walk down.
- Place the 2 SCHOLARLY FIGURINES (S); examine the clock for a mini-game (T).
- Solution (U): B-A-D-A-B-C-D-A-B-A-B.
- Take the COMB (V) and AMBER EYE (W).
- Go up.
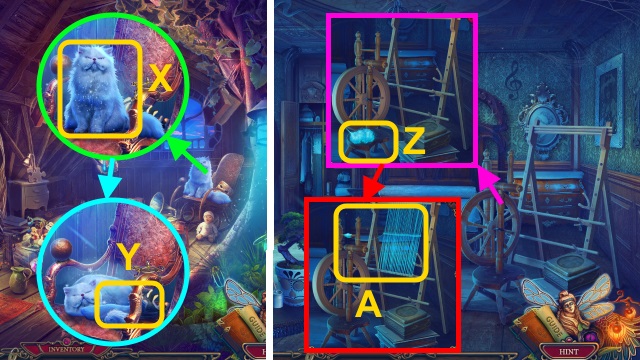
- Use the COMB (X); take the EVIL MASK and FROSTY WOOL (Y).
- Walk down, then forward.
- Place the FROSTY WOOL; press the pedal (Z).
- Place the spool (A); take the ICE CLOTH.
- Walk down, then up.
- Use the ICE CLOTH (B).
- Play the HOP; receive the KIND MASK (C).
- Walk down.
- Place the EVIL MASK and KIND MASK for a mini-game (D).
- Solution (E-G).
- Take the SLEIGH BELLS and SMALL PORTRAIT (H).
- Walk forward.
- Place the SMALL PORTRAIT (I).
- Take the TAMBOUR and KNIFE HANDLE (J).
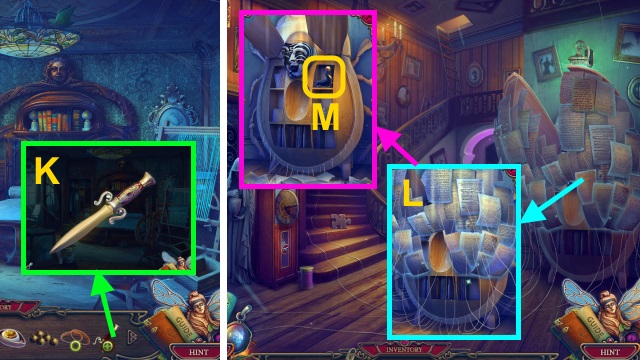
- Combine the KNIFE HANDLE and HILT DECORATION (K); receive the MYSTICAL DAGGER.
- Walk down.
- Use the MYSTICAL DAGGER (L); remove the papers.
- Take the SEAL FIGURINE (M).
- Walk forward.
- Move the books; place the SEAL FIGURINE for a mini-game (N).
- Solution (O): (A-Dx2)-(A-B)-(A-C)-(A-Bx2)-(A-D)-(A-C)-(A-D).
- Take the PRICELESS GEMSTONE (P).
- Walk down.
- Place the PRICELESS GEMSTONE (Q).
- Play the HOP; receive the COLORED DECORATIONS (R).
- Walk forward.
- Place the COLORED DECORATIONS; use the glue (S).
- Place the pieces (T).
- Take the LEFT HAND (U).
- Walk down.
- Place the LEFT HAND (V).
- Take the WOODEN ORNAMENT (W).
- Go up.
- Place the WOODEN ORNAMENT; take the RIGHT HAND (X).
- Walk down.
- Place the RIGHT HAND (Y).
- Take the EMBLEM OF THORNS (Z).
- Walk forward.
- Read the note (A); place the EMBLEM OF THORNS (B).
- Take the HUNGRY CREATURE (C).
- Walk down, then up.

- Place the HUNGRY CREATURE for a mini-game; use the creature to eat the thorns (D).
- Receive the FULL CREATURE; take the TENTACLE (E).
- Walk down, then forward.
- Place the FULL CREATURE; take the EMERALD EYE (F).
- Walk down, then up.
- Play the HOP; receive the LEMON (G).
- Examine the PERFUME BOTTLE; use the LEMON (H). Receive the LEMON JUICE.
- Use the LEMON JUICE; take the SAPPHIRE EYE (I).
- Place the RUBY EYE, AMBER EYE, EMERALD EYE, and SAPPHIRE EYE (J).
- Walk left.
Chapter 6: The Evil Spirit
- Take the RIBBONS (K).
- Examine the branches (L).
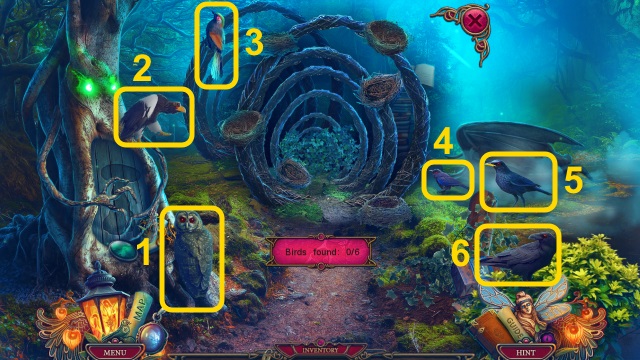
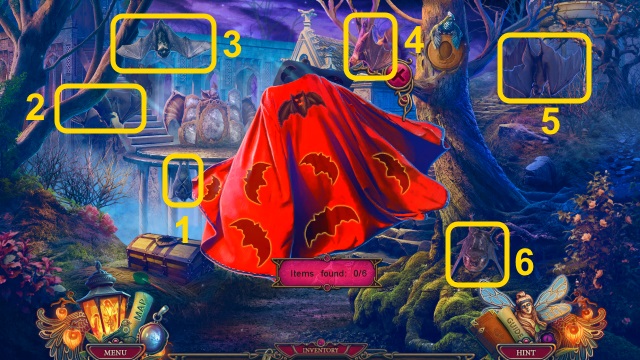
- Find the birds (1-6).
- Walk forward.
- Examine the scene 3x (M).
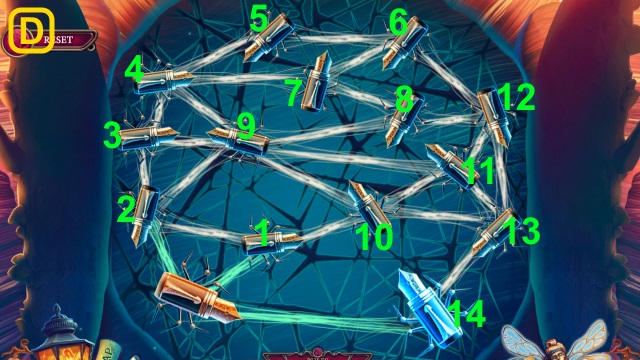
- Place the ENGRAVED STONE for a mini-game (N).
- Solution (O): (I-E)-(J-B)-(E-A)-(K-G)-(A-I)-(B-F)-(I-E).
- (L-D)-(E-A)-(F-J)-(A-I)-(G-C)-(I-E)-(J-B)-(E-A).
- Walk left.
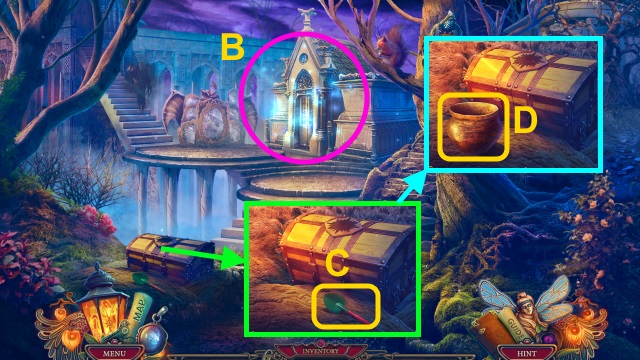
- Examine Arthur (P).
- Place the CARVED ORNAMENT; take the GIANT RING (Q).
- Take the DOVE FIGURINE (R).
- Walk down.
- Place the GIANT RING (S).
- Arrange the rings; take the TREE EMBLEM and MARACA (T).
- Walk left.
- Place the TREE EMBLEM (U).
- Take the SEEDLING GIRL and METALLIC SAUCER (V).
- Walk down.
- Place the METALLIC SAUCER; examine it (W).
- Turn the handle (X); take the FRESH WATER (Y).
- Walk down.
- Use the SEEDLING GIRL and FRESH WATER (Z).
- Take the AMULET OF WISDOM and PERIOD (A).
- Walk forward.

- Place the AMULET OF WISDOM (B).
- Read the paper (C); take the LEATHER FABRIC.
- Combine the TAMBOUR, LEATHER FABRIC, RIBBONS, SLEIGH BELLS, and MARACA; receive the TAMBOURINE WITH MARACA (D).
- Walk down.
- Use the TAMBOURINE WITH MARACA (E).
- Play the HOP; receive the DEMONIC INK (F).
- Walk forward, then left.
- Give the DEMONIC INK; take the STONE FISH (G).
- Walk down.
- Place the STONE FISH (H).
- Take the HARPY EMBLEM and LION FIGURINE (I).
- Walk left.
- Place the HARPY EMBLEM; take the GIANT PEN (J).
- Walk down twice.
- Use the GIANT PEN; take the HAND TILE (K).
- Walk forward.
- Place the HAND TILE for a mini-game (L).
- Solution (M).
- Take the MAGIC MONOCLE (N).
- Walk left.
- Place the MAGIC MONOCLE for a mini-game (O).
- Solution (P).
- Place the pieces; take the HORRIFIC DIADEM (Q).
- Walk down.
- Place the HORRIFIC DIADEM; take the BUTTERFLY (R).
- Walk down.
- Place the BUTTERFLY (S).
- Take the SUN EMBLEM (T).
- Walk forward, then left.
- Place the SUN EMBLEM (U).
- Arrange the jars (V).
- Play the HOP; receive the MAGICAL POWDER (W).
- Walk down twice.
- Pour the MAGICAL POWDER (X).
- Walk right.
- Talk to the boatman (Y).
- Place the PERIOD; take the WOODEN MUSHROOM (Z).
- Walk down.
- Place the WOODEN MUSHROOM (A).
- Take the TENTACLE and ROSE EMBLEM (B).
- Walk right.
- Place the 2 TENTACLES for a mini-game (C).
- Solution (D).
- Move the spirits (E).
- Place the ROSE EMBLEM (F).
- Take the COMMA (G).
- Walk down.
- Place the COMMA; take the QUILL EMBLEM (H).
- Walk forward.
- Place the QUILL EMBLEM (I).
- Take the AMPERSAND (J).
- Walk down.
- Place the AMPERSAND (K); examine the shelf (L).
- Move the books (M); take the MYSTERIOUS BIRD (N).
- Walk down.
- Play the HOP; receive the SCROLL PIECE (O).
- Use the MYSTERIOUS BIRD (P).
- Take the OAR (Q).
- Walk right.
- Give the OAR (R); select the first answer (S).
- Place the SCROLL PIECE (T); arrange the pieces (U).
- Examine the paper (V).
- Arrange the pieces (W); take the note.
- Place the DOVE FIGURINE (X).
- Take the FLAME OF HOPE (Y).
- Place the LION FIGURINE (Z).
- Take the FLAME OF COURAGE (A).
- Walk forward.
- Place the FLAME OF HOPE (B).
- Place the FLAME OF COURAGE (C).
- Use the scroll (D) on the spirit (E) for a mini-game.
- Dodge the spheres and use the scroll when it charges (F).
- Congratulations! You have completed The Keeper of Antiques: The Revived Book.
Created at: 2016-07-08