

Walkthrough Menu
- General Tips
- Chapter 1 – Rutland
- Chapter 2 – The Rose
- Chapter 3 – The Mansion
- Chapter 4 – The Church
General Tips

- Click on Options (1) to adjust the Music and Voice Volume. You can also choose Full Screen and Custom Cursor.
- You may choose between Casual, Advanced or Hardcore Modes.
- A magnifying glass cursor indicates you can examine the area.
- A grabbing hand icon indicates you can take the item.
- Throughout the guide, we will use the acronym 'HOS' for Hidden Object Scenes.
- Items in the find list that are in red require an extra step in order to find.
- Click on the skull in the lower right to get a hint.
- There is a short penalty for random clicking.
- Examine the Journal in the lower left to access story updates.
- You will need to activate HOS by your actions throughout the game. If you do not have one where we have them, please check to see what you may have missed.
- Puzzles in the game that require clues will not be able to be performed till you find the clue.
Chapter 1 – Rutland
- Talk to the boy.
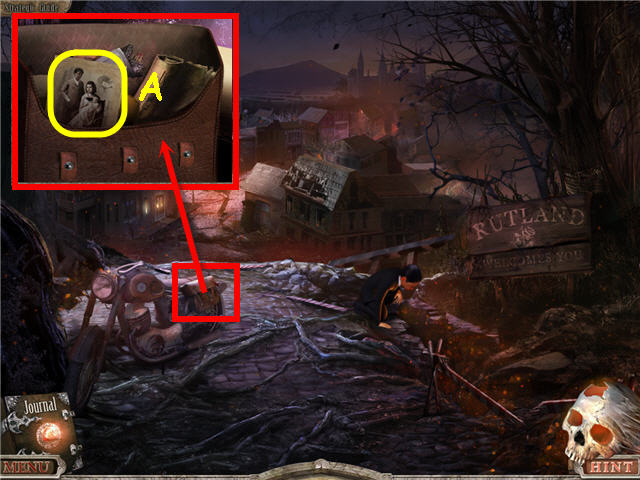
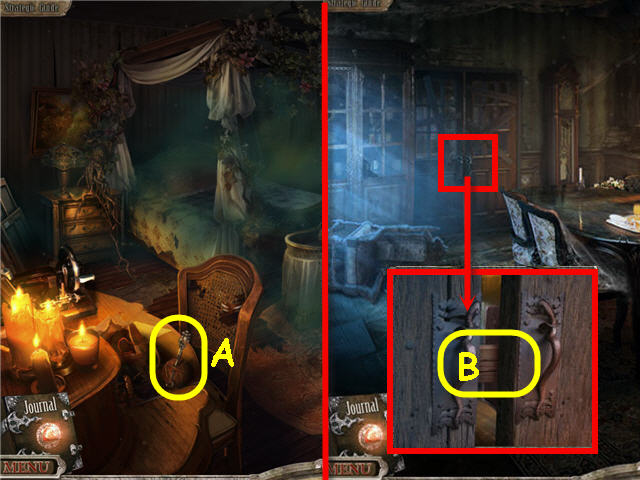
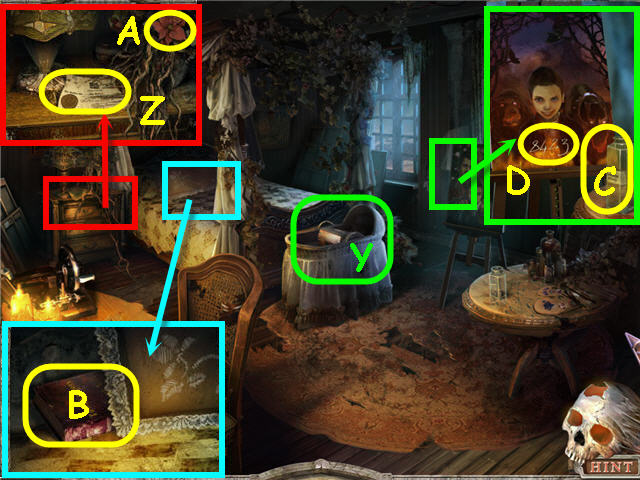
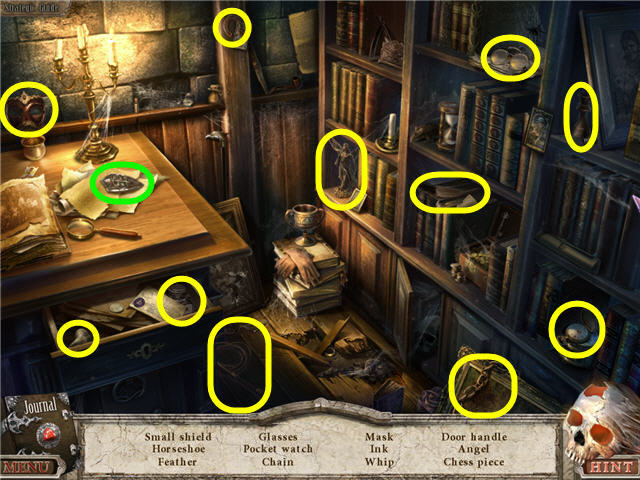
- Examine and open the motorcycle bag; take the FAMILY PHOTO (A).
- Head straight.
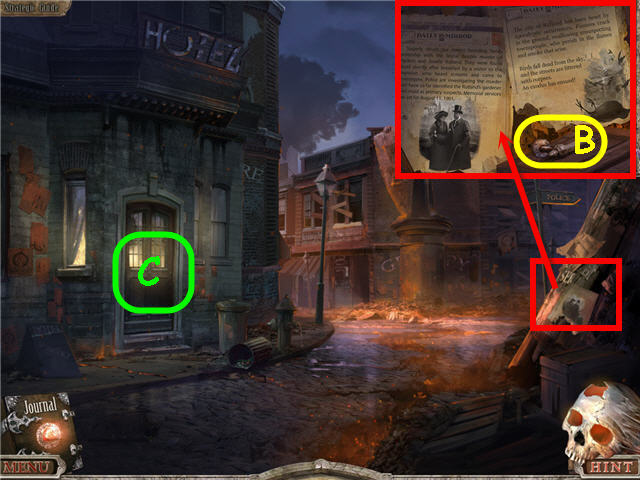
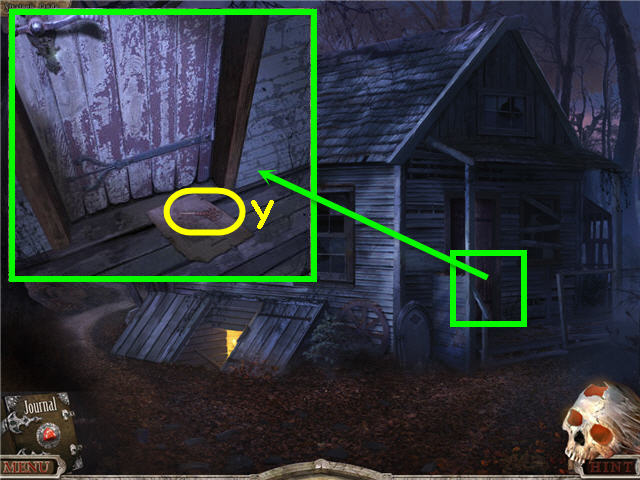
- Examine the signpost; take the DOOR HANDLE (B).
- Click on the news clipping to get a journal update.
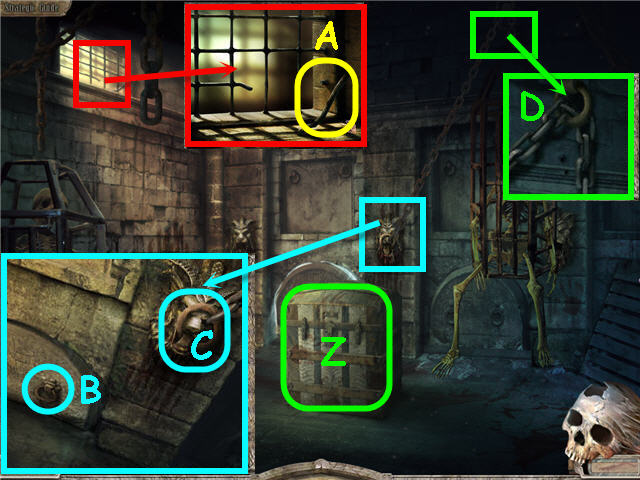
- Examine and use the DOOR HANDLE on the door (C).
- Turn the handle and enter.
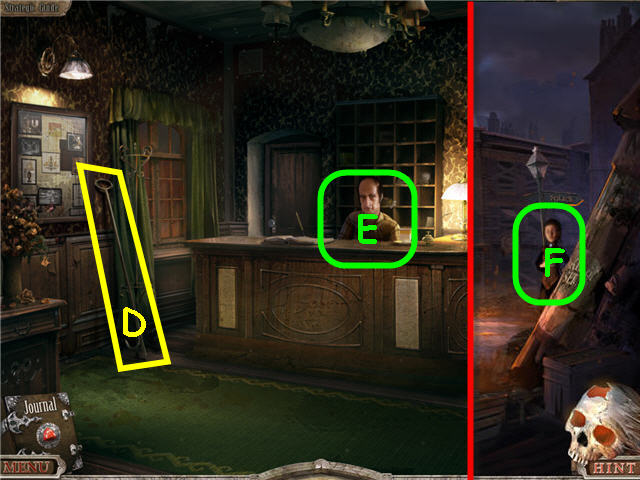
- Take the BOAT HOOK (D).
- Examine and click on the bulletin board to get a journal update.
- Talk to the clerk (E); show him the FAMILY PHOTO and take the CODE CIPHER.
- Back out.
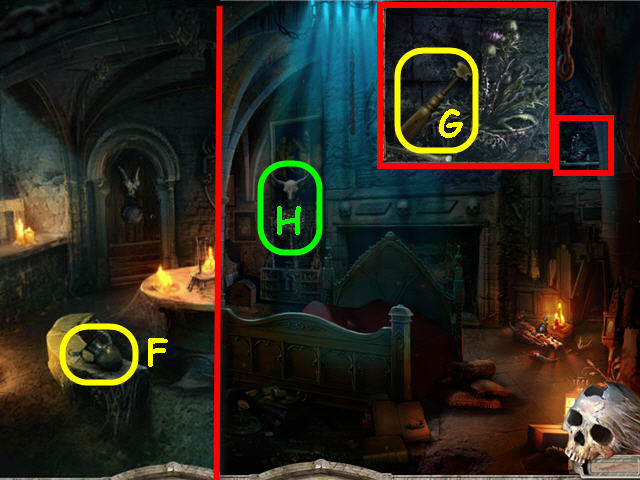
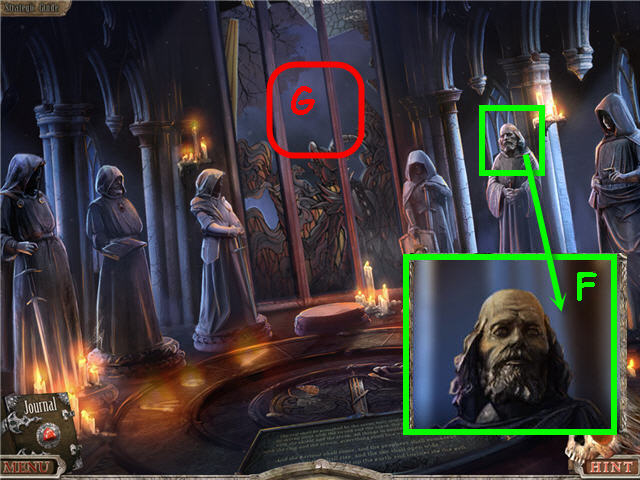
- Click on the girl (F).
- Head up the street to the left of the statue.

- Take the REFRIGERATOR HANDLE (G).
- Back out; head right and then straight.
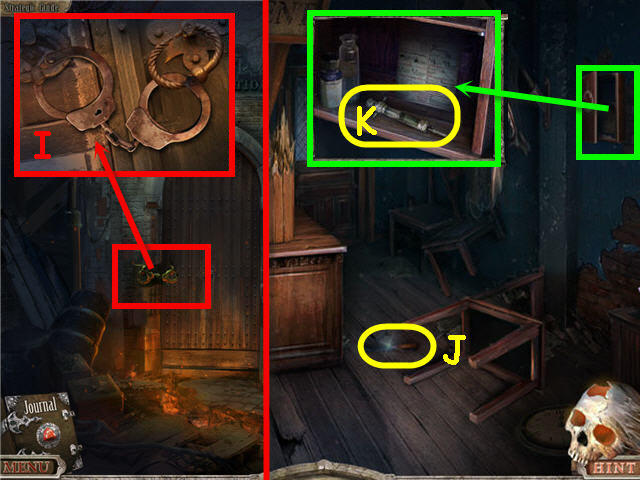
- Examine the skull; use the BOAT HOOK to get the HANDCUFF KEY (H).
- Back out.
- Examine the lock.
- Use the HANDCUFF KEY on the handcuffs (I); click a few times and enter.
- Take the SCREWDRIVER (J).
- Examine the first aid kit; take the SEDATIVE (K).
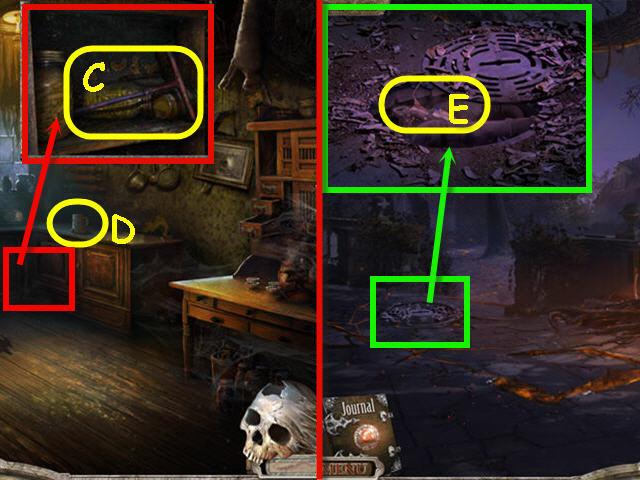
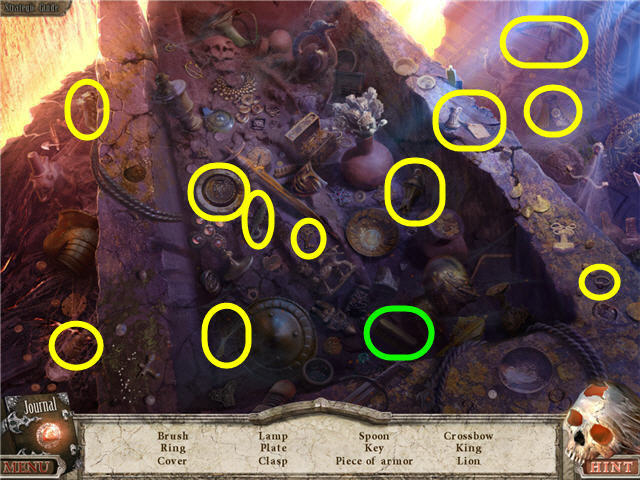
- Examine the file drawers to access a HOS.
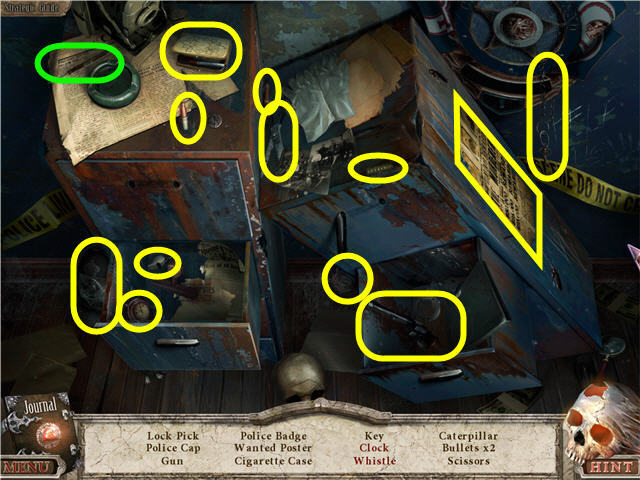
- Find the items listed.
- Open the file drawer to find the items in red.
- You will earn the LOCK PICK.
- Back out twice.
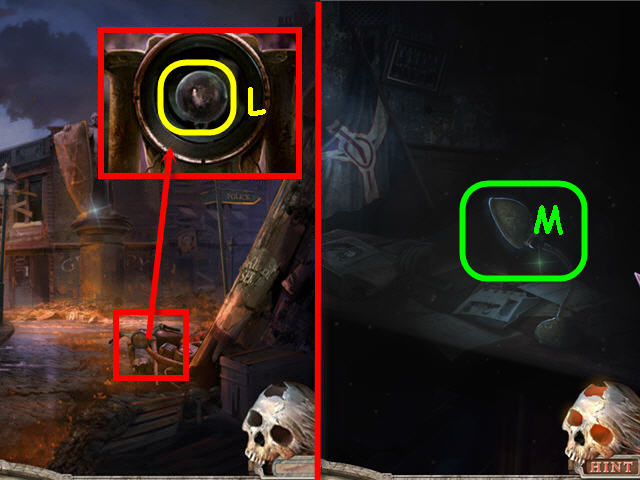
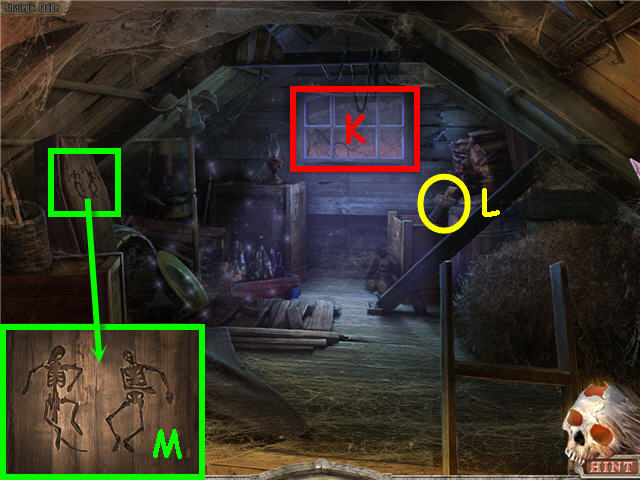
- Examine the motorcycle.
- Use the SCREWDRIVER on each of the 4 screws; take the LIGHT BULB (L).
- Head right to the police station; enter and head into the back room.
- Examine and use the LIGHT BULB on the lamp (M).

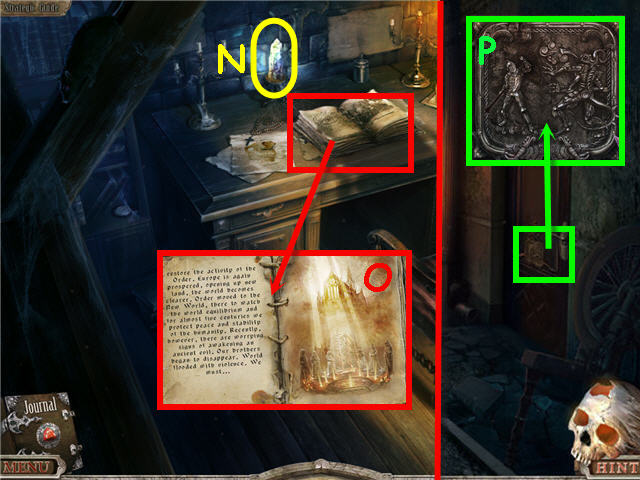
- Examine the notebook in the officer's pocket.
- Place the CODE CIPHER on the numbers (N).
- Examine the files; note the letters on the drawers and the notebook (O).
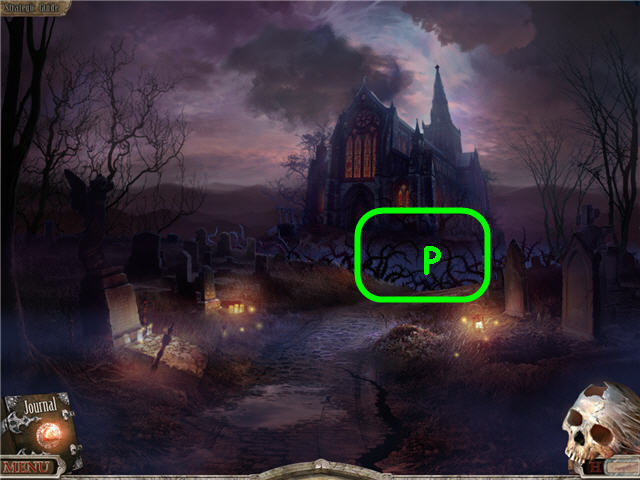
- Examine the safe (P) to trigger a puzzle.
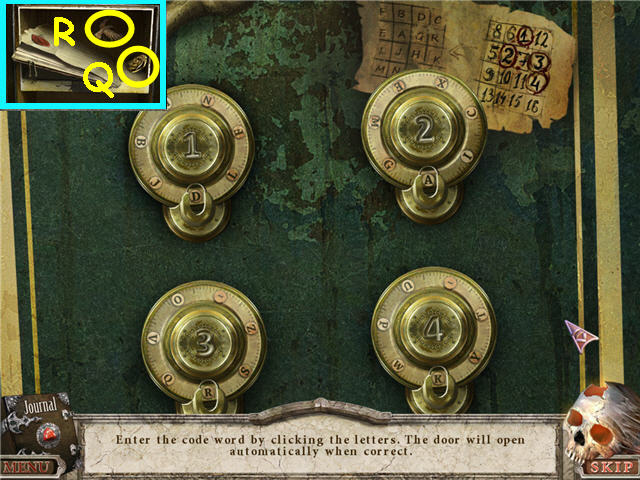
- Use the code from the notebook and the letters on the drawers to open the safe.
- Solution: 1 =D, 2=A, 3=R, 4=K. See screenshot for solution.
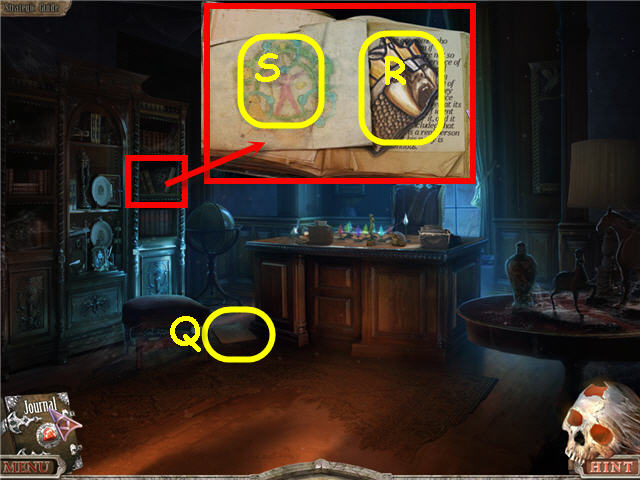
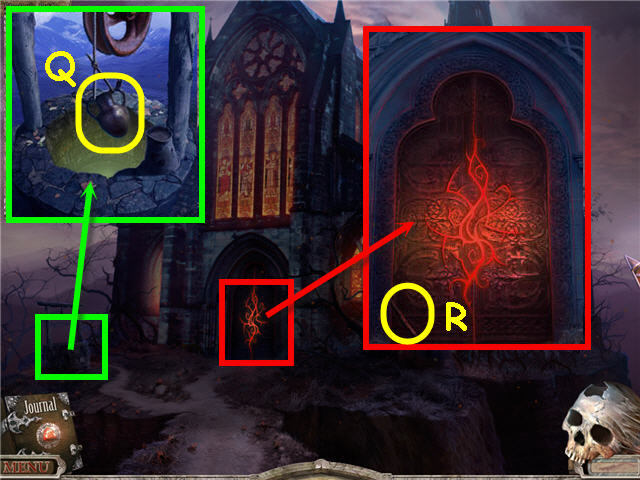
- Examine the safe; take the SMALL ROSE (Q), METAL BIRD (R) and read the note.
- Back out three times; head into the hotel.
- Examine the reception desk to access a HOS.
- Find the items listed.
- Get a RECORD.
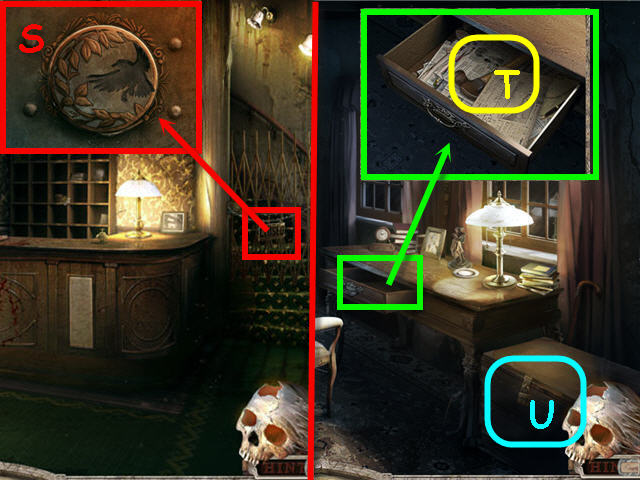
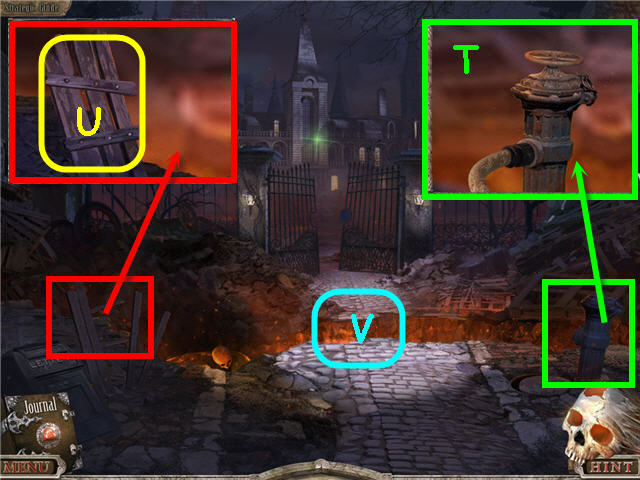
- Examine the gate; use the METAL BIRD on the lock (S).
- Head upstairs.
- Open the drawer and zoom in.
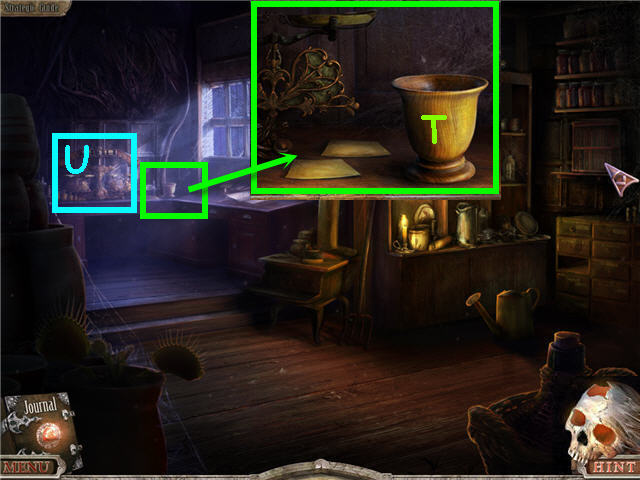
- Move the newspaper; take the HAMMER (T).
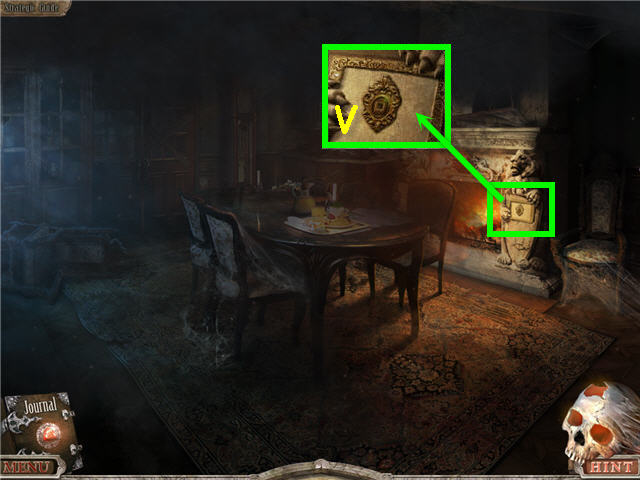
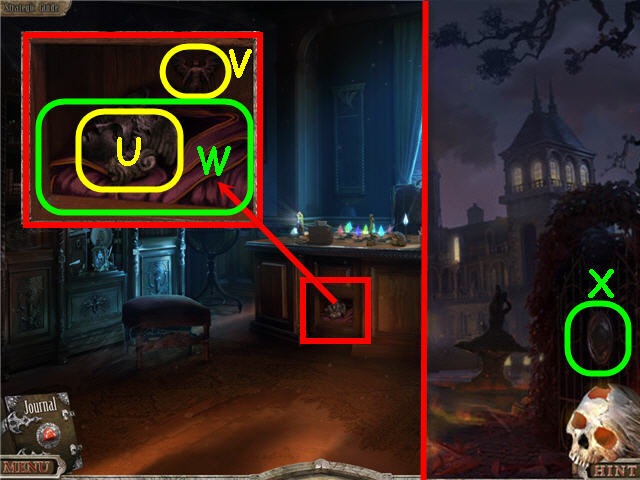
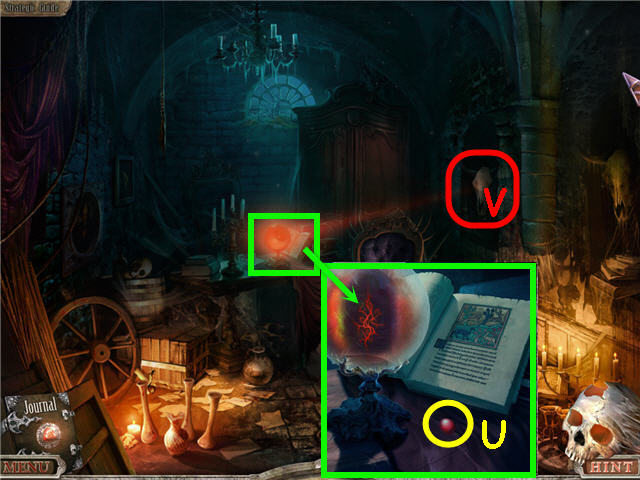
- Examine the trunk (U); use the LOCK PICK on the lock to trigger a puzzle.
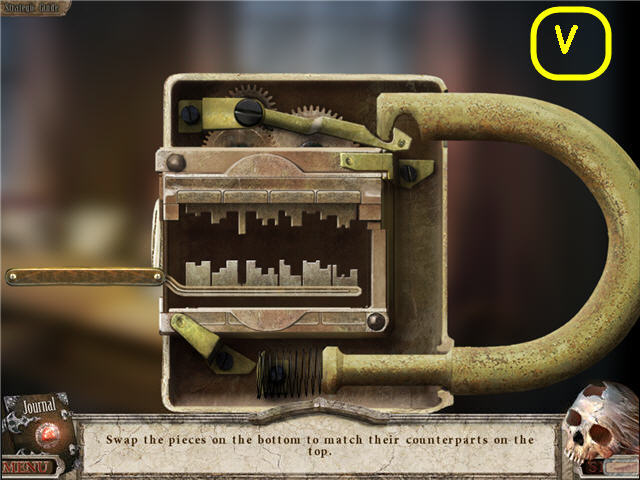
- Arrange the bottom row so that the teeth fit into the upper spaces.
- See screenshot (V) for solution.
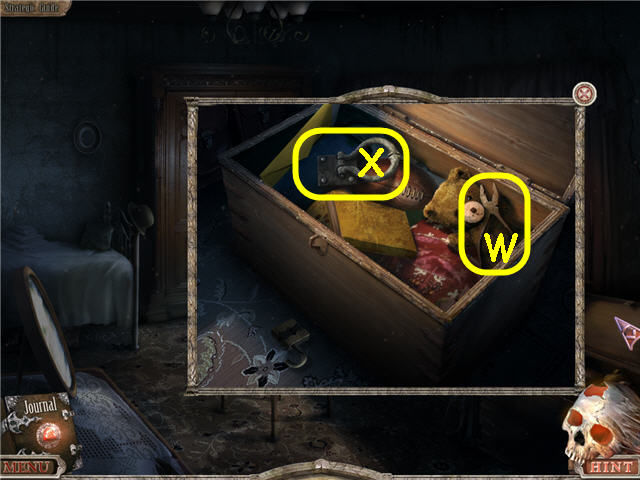
- Open the trunk.
- Take the PLIERS (W) and DOOR RING (X).
- Back out.
- Head into the left rear room.
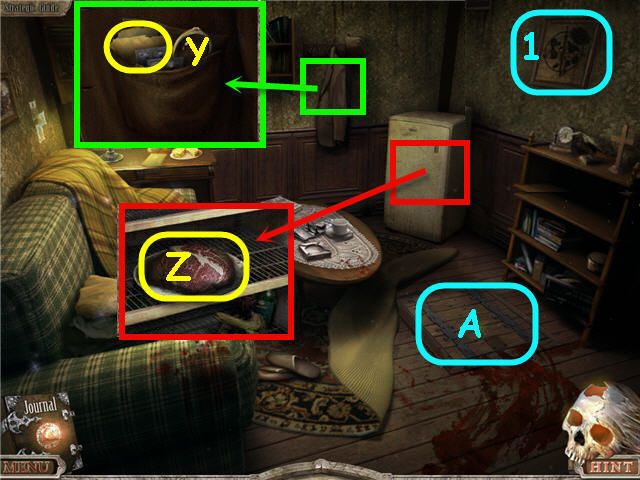
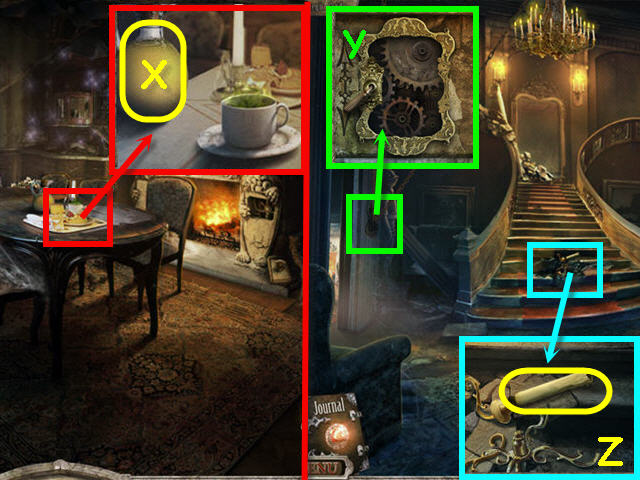
- Examine the jacket pocket; take the color code clue (Y) for your journal.
- Examine and place the REFRIGERATOR HANDLE on the refrigerator.
- Open and examine the refrigerator.
- Use the SEDATIVE on the meat; take the MEAT WITH SEDATIVE (Z).
- Move the carpet; examine the hatch (A).
- Place the DOOR RING on the hatch; click to open.
- Examine the picture (1) to get a clue in your journal.
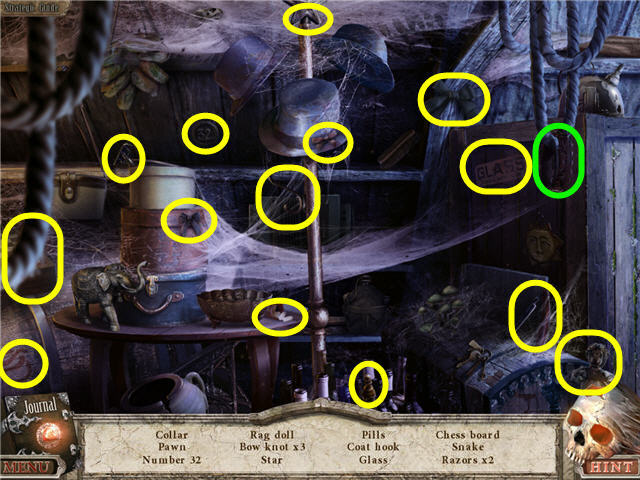
- Examine the couch to access a HOS.
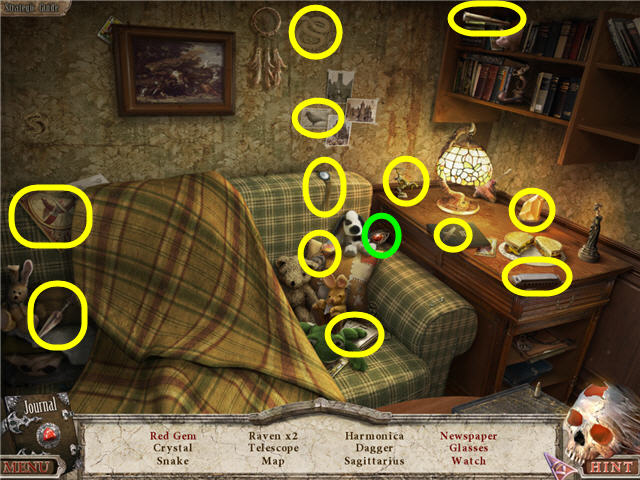
- Find the items listed.
- Move the blanket to find the items in red.
- You will earn the RED GEM.
- Head down the hatch.
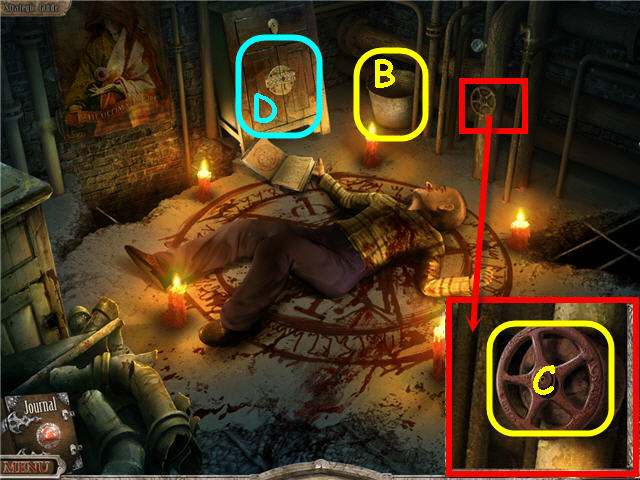
- Take the EMPTY BUCKET (B).
- Examine and use the PLIERS on the valve; take the VALVE (C).
- Examine the cupboard (D).
- Place the RED GEM in the slot to trigger a puzzle.
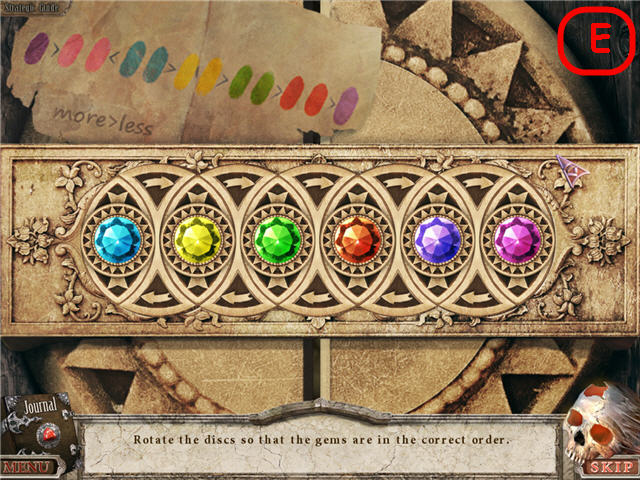
- Rotate the disks to place the gems in the order on the color code.
- Solution: From left; light blue, yellow, green, red, purple, pink.
- See screenshot (E) for solution.
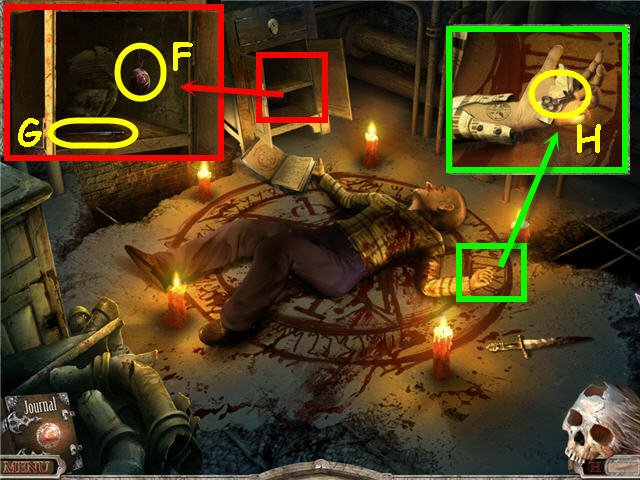
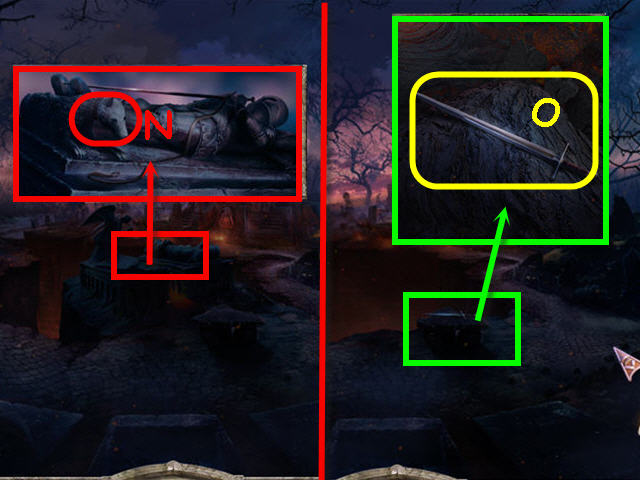
- Examine the cupboard; take the MEDALLION ARTIFACT (F), SMALL SWORD (G) and the note.
- Examine and open the concierge's hand; take the WARDROBE KEY (H) and the note.
- Back out twice and head upstairs.
- Examine and use the WARDROBE KEY on the wardrobe; turn a few times.
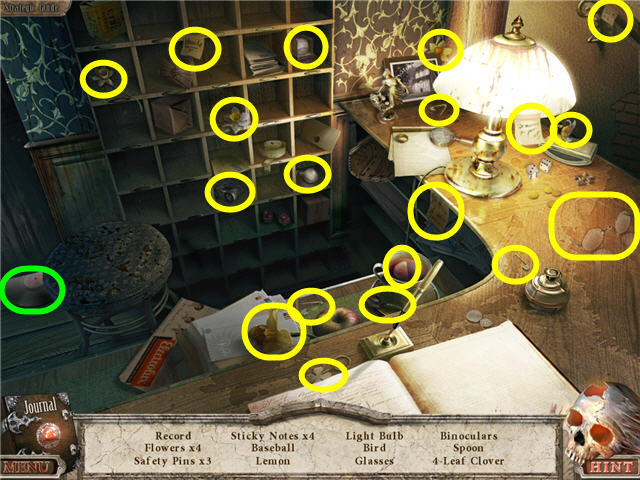
- Examine the wardrobe to access a HOS.
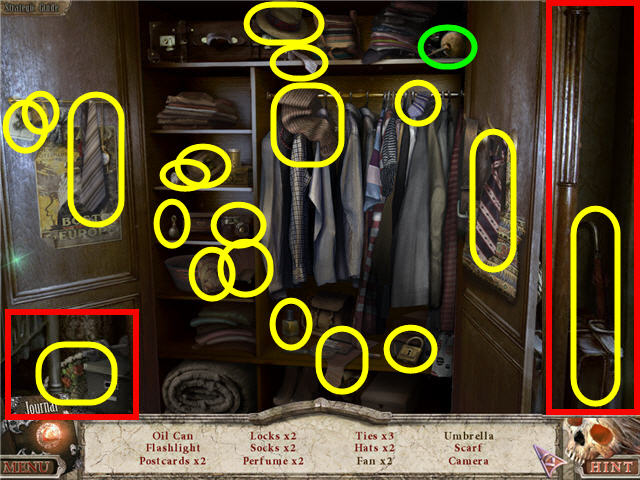
- Take the fan and umbrella (in the red boxes).
- Open the cupboard and find the remaining items.
- You will earn the OIL CAN.
- Back out twice.
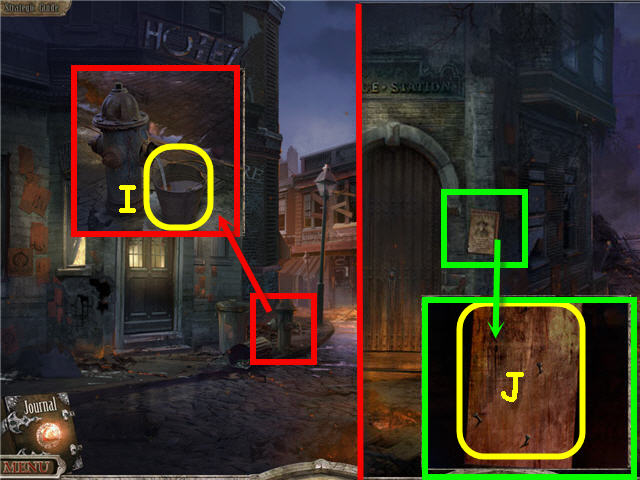
- Examine and use the EMPTY BUCKET on the fire hydrant.
- Take the BUCKET FULL OF WATER (I).
- Head right to the Police Station.
- Examine the sign; remove the poster.
- Use the HAMMER to get the NAILS (J).
- Back out and head up the left street.
Chapter 2 – The Rose
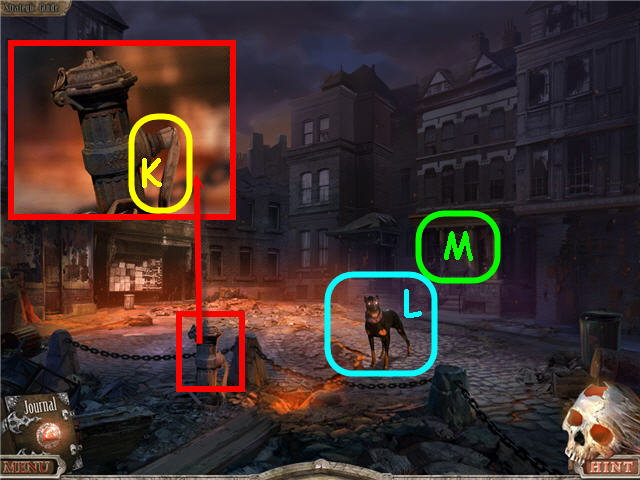
- Examine the hydrant; use the OIL CAN on the hose.
- Take the HOSE (K).
- Give the MEAT WITH SEDATIVE to the dog (L).
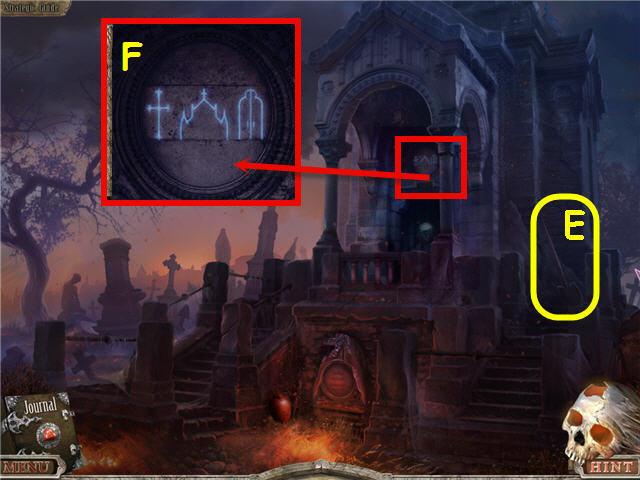
- Examine the doorway (M) twice.
- Place the SMALL ROSE on the top of the stem and the SMALL SWORD in the center of the lock to trigger a puzzle.
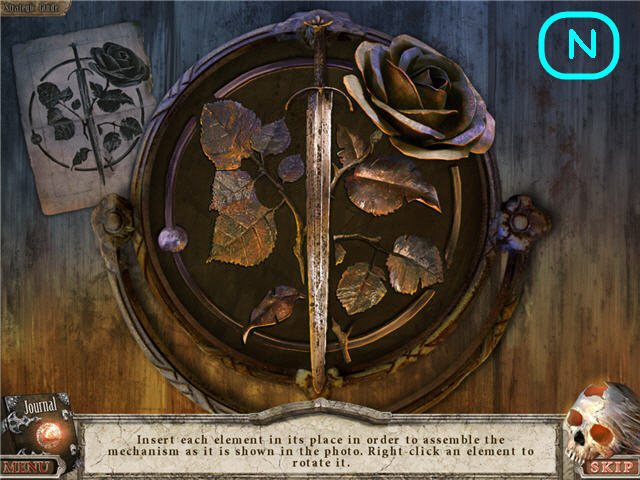
- Place the leaves and border in place to duplicate the photo from the concierge's room.
- See screenshot (N) for solution.
- Enter the house.
- Examine and use the BUCKET FULL OF WATER on the fireplace.
- Use the HAMMER on the brick and push the button (O).
- Head into the fireplace.
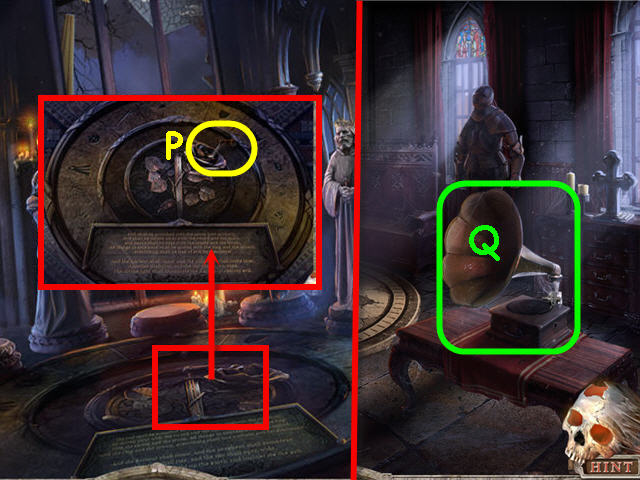
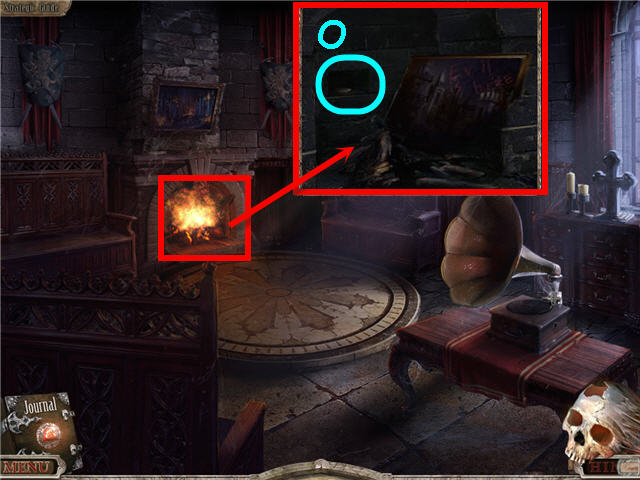
- Examine the center ring; take the GRAMOPHONE HANDLE (P).
- Back out.
- Examine the gramophone (Q).
- Place the RECORD on the turntable and the GRAMOPHONE HANDLE in the hole on the gramophone to trigger a puzzle.
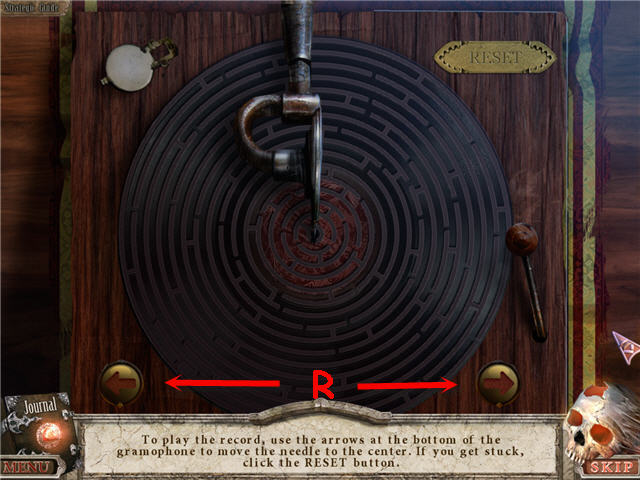
- Use the arrows (R) on the bottom to move the needle to the center.
- Click the arrows in this order to solve the puzzle: R, R, L, L, R, L, L, R, R, L, L, R, L, R, R.
- Examine the gramophone; take the NUMBER STONE.
- Back out twice.
- Examine the center statue.
- Place the NUMBER STONE on the grid to trigger a puzzle.
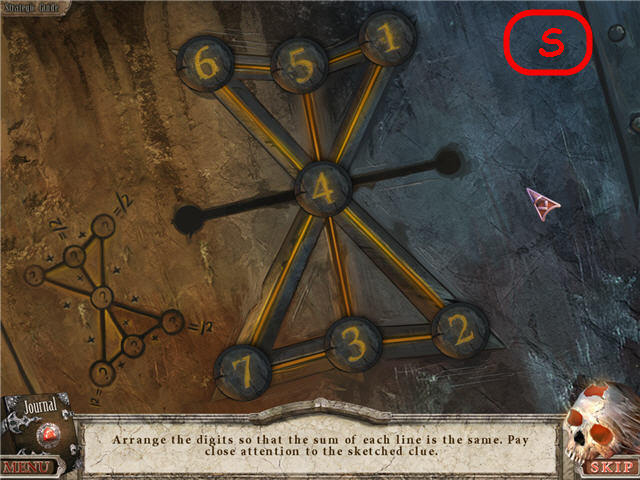
- Arrange the numbers so that all the angles add up to 12.
- See screenshot (S) for solution.
- Take the RUNE.
- Head up right twice.
- Examine and place the HOSE and VALVE on the hydrant (T).
- Turn the VALVE three times.
- Examine and use the NAILS on the planks.
- Use the HAMMER on each of the NAILS; take the BOARD BRIDGE (U).
- Place the BOARD BRIDGE across the chasm (V).
- Head straight twice.
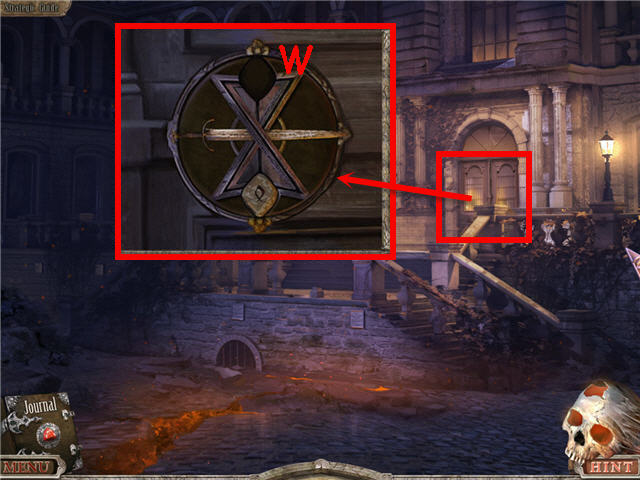
- Examine the door.
- Place the RUNE in the slot (W).
- Enter the mansion and head left.
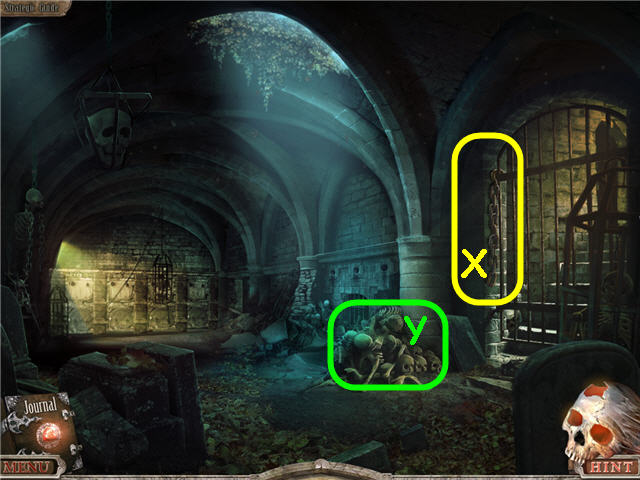
- Take the CHAIN (X).
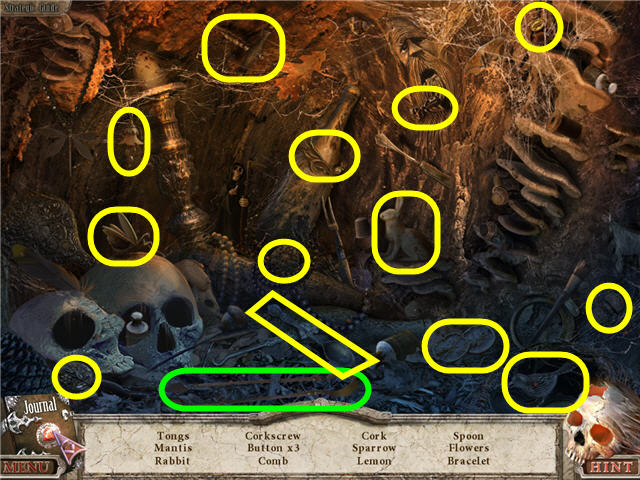
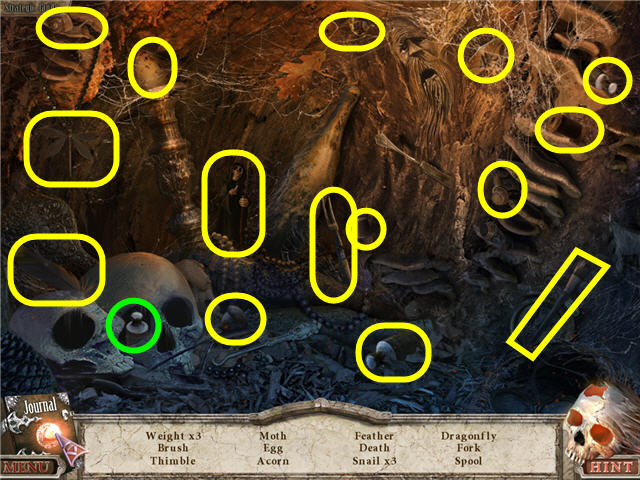
- Examine the skull pile (Y) to access a HOS.
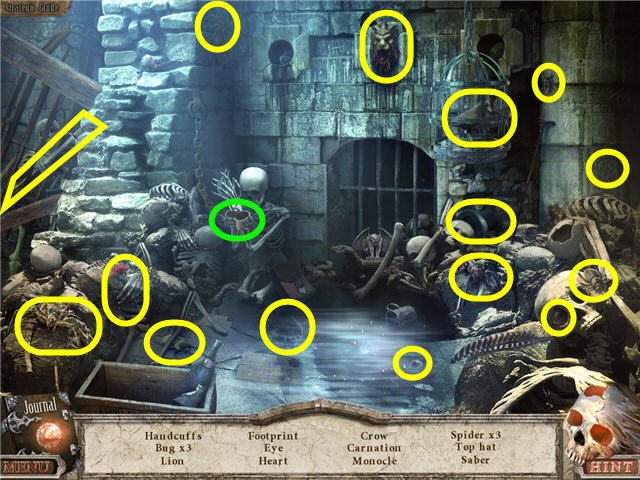
- Find the items listed and get HANDCUFFS.
- Head to the back of the room.
- Move the trunk (Z) to the left.
- Examine the window; take the METAL ROD (A).
- Examine the right lion head.
- Place the HANDCUFFS on the bottom ring (B).
- Place the CHAIN on the lion head ring (C).
- Move the trunk to the right.
- Examine the top of the cage; use the METAL ROD on the hook (D).
- Head through the hole and forward.
- Take the SPADE (E).
- Examine the area above the door; note the symbols (F) to get a clue in your journal.
- Back out and head right.
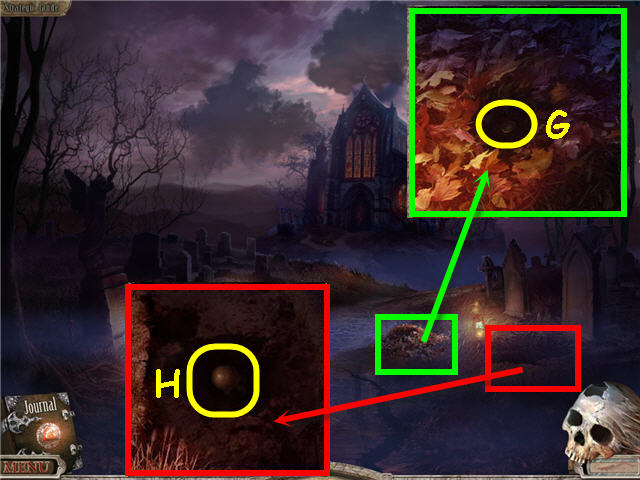
- Examine the pile of leaves; move the leaves and take the COIN (G).
- Examine and use the SPADE on the dirt; take the SMALL SKULL (H).
- Back out and head upper left.
- Examine the cellar door.
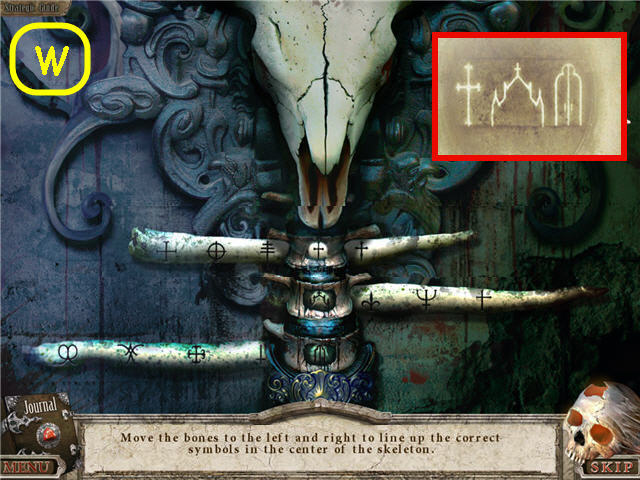
- Place the COIN in the eye socket to trigger a puzzle.
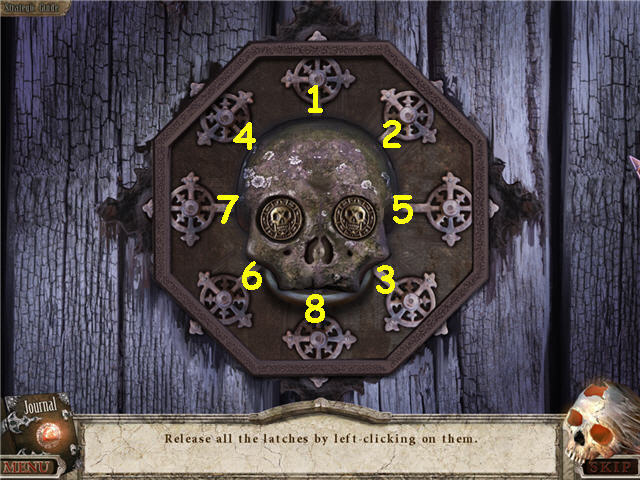
- Release all the latches in the correct order.
- See screenshot for order to click.
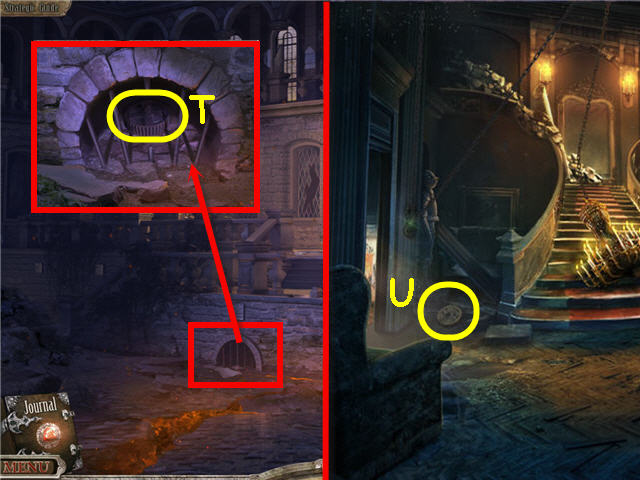
- Head down into the cellar.
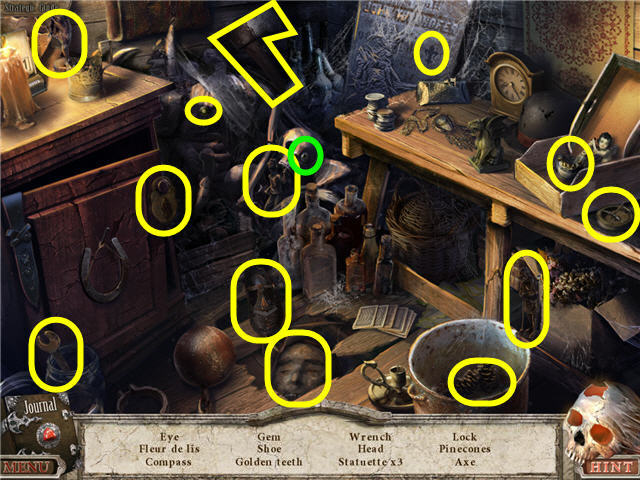
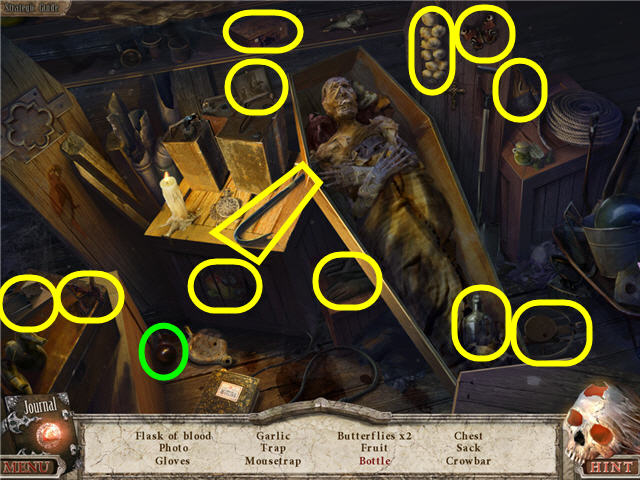
- Examine the coffin to access a HOS.
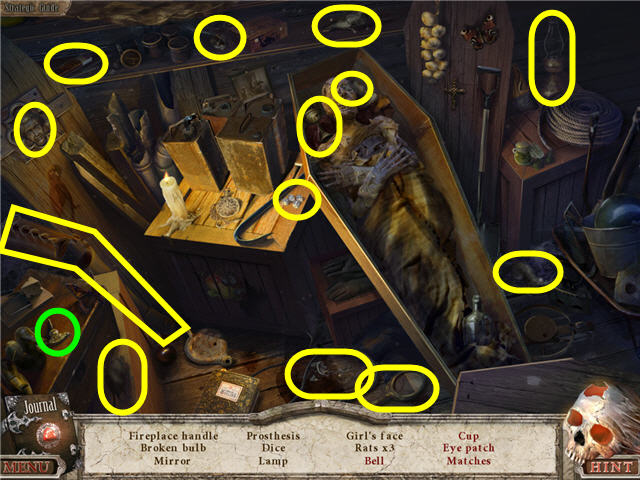
- Find the items listed.
- Move the coffin lid and rag on the top shelf to get the items in red.
- You will earn the FIREPLACE HANDLE.
- Examine the board game table on the left.
- Place a SMALL SKULL on the board to trigger a puzzle.
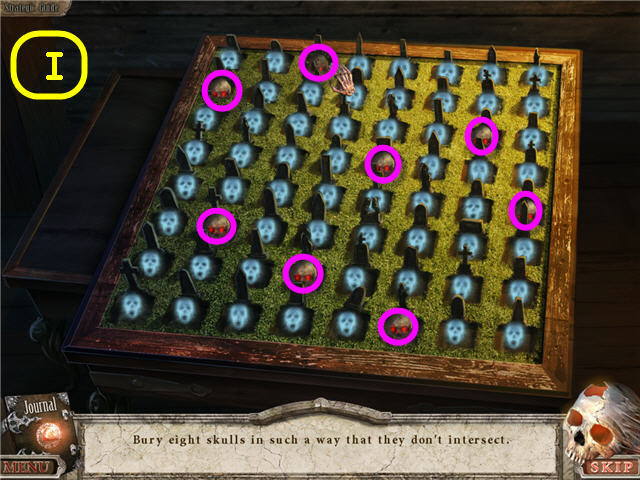
- Place the 8 skulls so they do not intersect horizontally, vertically or diagonally.
- See screenshot for solution (I).
- Take the clue for the labyrinth and METAL BALL.
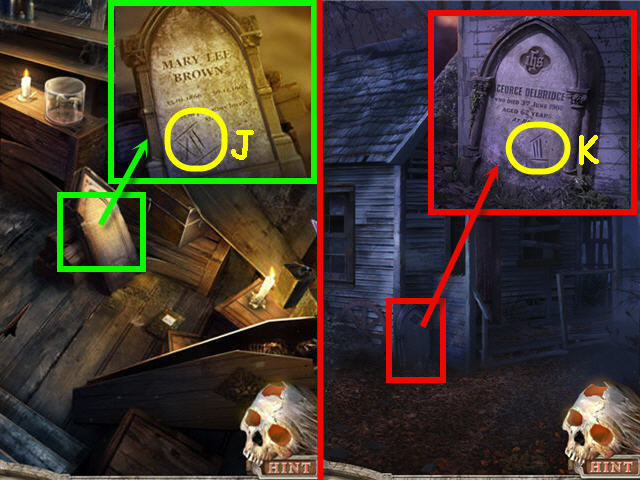
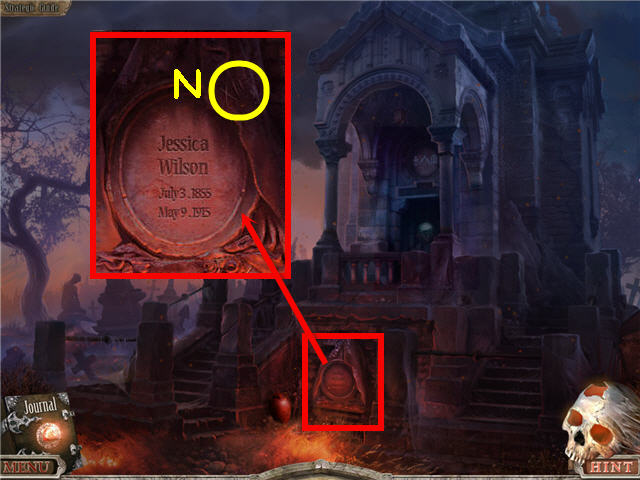
- Examine the gravestone; click the Roman Numerals (J).
- Back out.
- Examine the gravestone; click the Roman Numerals (K).
- Back out and head right.
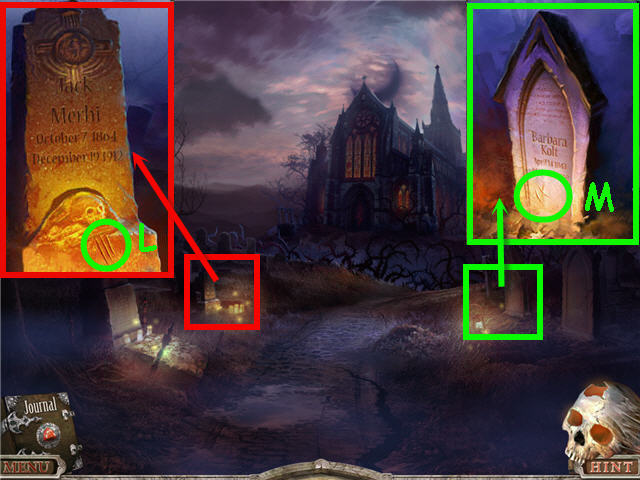
- Examine the gravestone on the left; click the Roman Numerals (L).
- Examine the gravestone on the right; click the Roman Numerals (M).
- Back out and head forward.
- Examine the gravestone; click the Roman Numerals (N).
- Back out and head to the upper left twice.

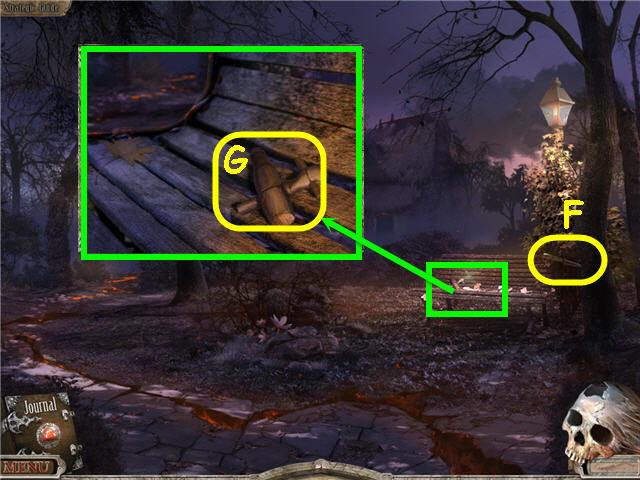
- Examine the bench; take the WIRE CUTTER (O).
- Examine and click on the clock (P).
- Examine the gate (Q).
- Place the METAL BALL on the labyrinth to trigger a puzzle.
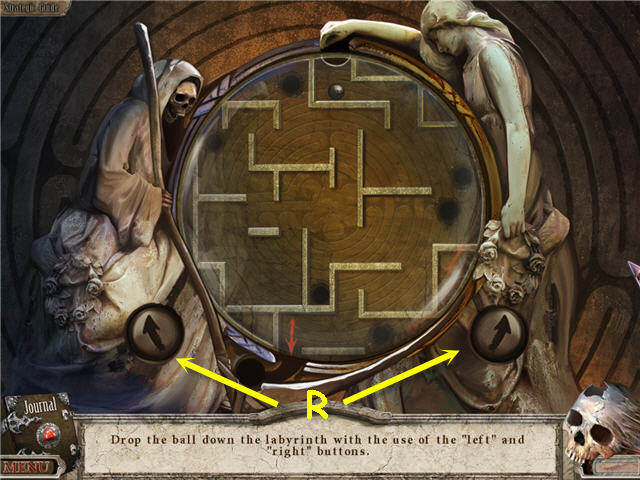
- Move the ball through the labyrinth without falling in a hole. Use the arrows (R) on the bottom to rotate the board.
- Click the arrows in the following order: L, R, R, R, L, L, R, R, L, L, L, R, L, R, L, R, R, R, L, L, R, L.
- Head straight.
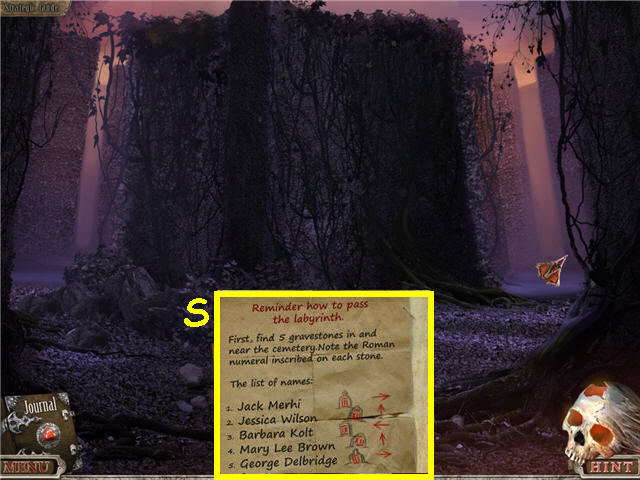
- Find your way using the clues from the gravestones and clock (S).
- Solution: Right, Straight, Left, Straight, and Right.
- Head straight.
Chapter 3 – The Mansion
- Examine and use the WIRE CUTTER on the grate.
- Take the GEAR (T).
- Head inside the mansion.
- Try to head up the stairs.
- Take the GEAR (U).
- Head left.
- Examine the right panel of the fireplace.
- Place the FIREPLACE HANDLE in the slot (V) and turn.
- Examine the opened compartment to trigger a puzzle.
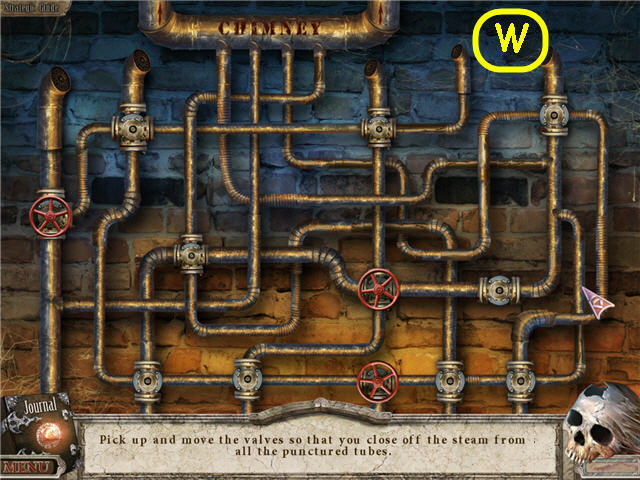
- Move the valves to the correct stems to shut off the steam.
- See screenshot for solution (W).
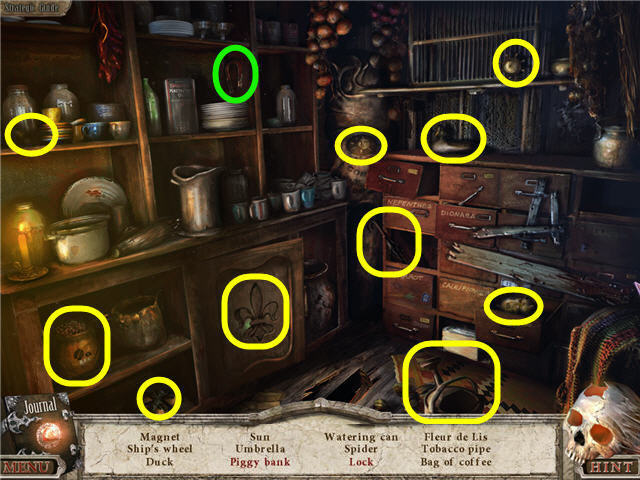
- Examine the corner hutch to access a HOS.
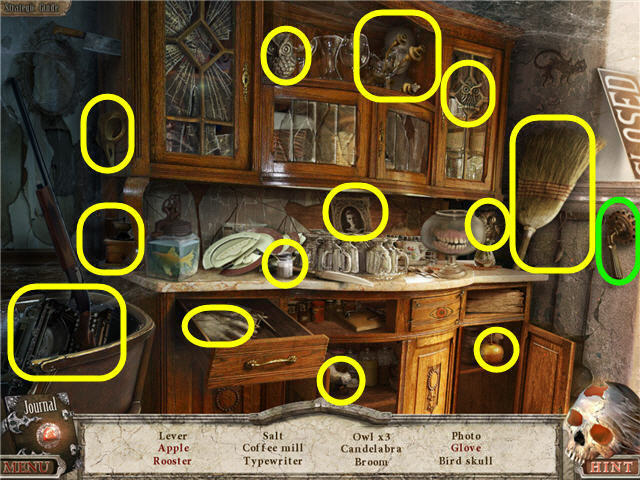
- Find the items listed.
- Open the left drawer, bottom middle and right cabinet doors to find the items in red.
- You will earn the LEVER.
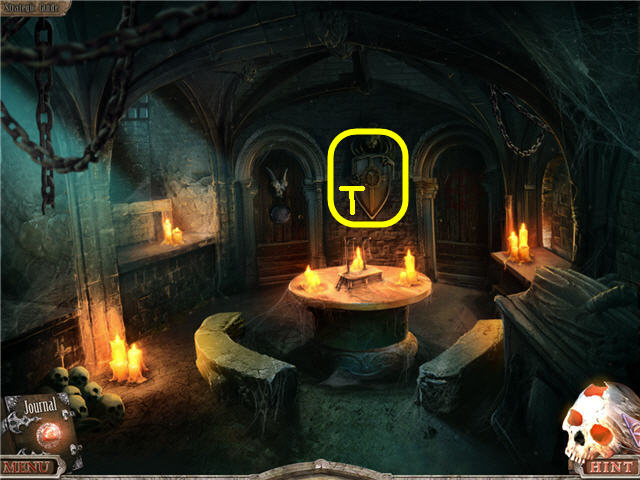
- Examine the place setting; click the teacup.
- Examine the place setting; take the OIL (X).
- Back out.
- Examine and place the 2 GEARS on the mechanism (Y) and the LEVER in the hole; click to activate.
- Examine the stairs; take the candle (Z).
- Head upstairs and then left.
- Take the CROCHET HOOK(A).
- Back out twice and head left.
- Examine and use the CROCHET HOOK on the door latch (B).
- Head through the double doors.
- Open and examine the cabinet; take the DRAIN KEY (C).
- Take the EMPTY CUP (D).
- Head through the double doors.
- Examine and use the DRAIN KEY on the drain; take the EMPTY SPRAYER (E).
- Examine the hole in the tree twice to access a HOS.
- Find the items listed and get TONGS.
- Head straight left.
- Take the KNIFE (F).
- Examine the bench; take the TAP (G).
- Head up the left path.
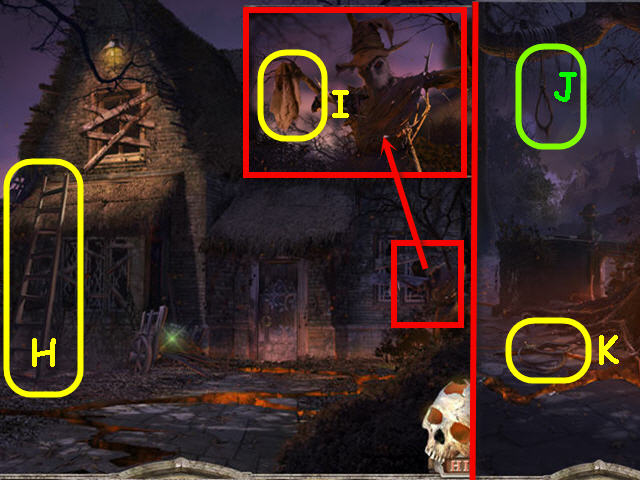
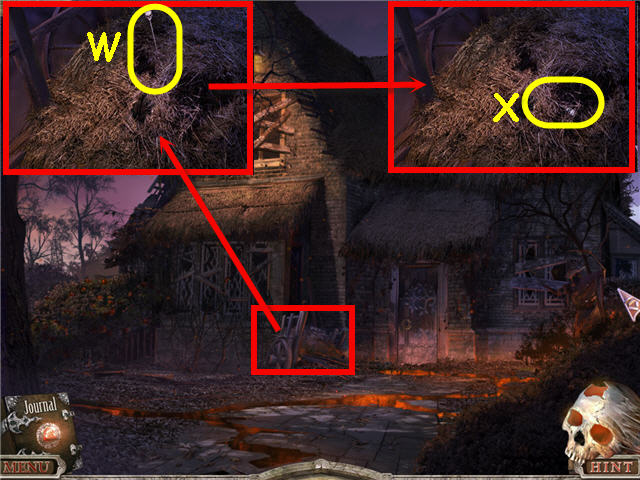
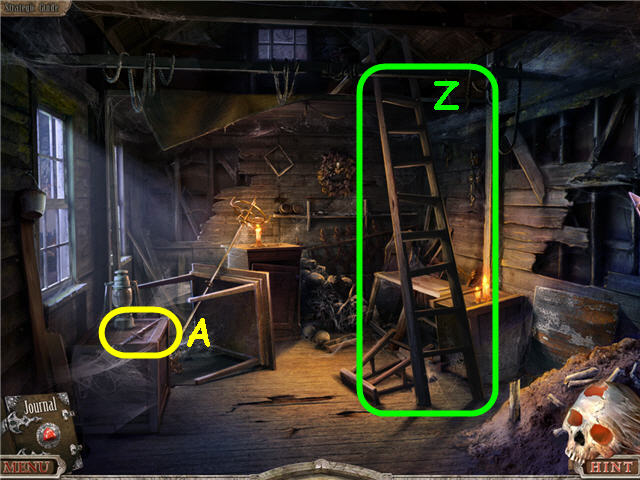
- Take the LADDER (H).
- Examine the scarecrow; take the RAG (I).
- Back out twice.
- Examine the noose; cut the rope (J) a few times with the KNIFE.
- Take the ROPE (K).
- Back out.
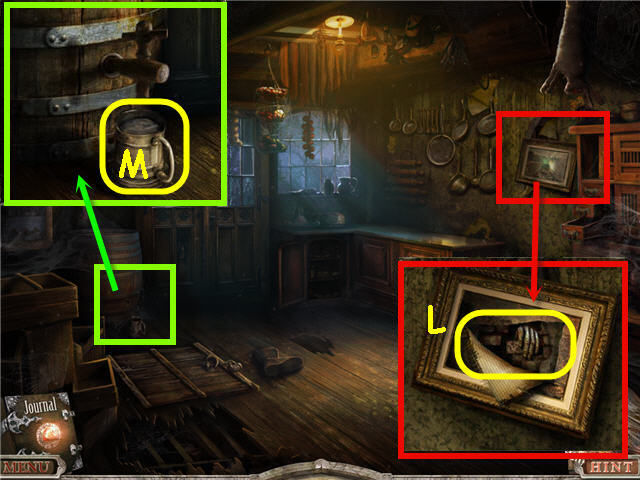
- Examine and use the KNIFE on the picture.
- Move away the paper; examine the hand (L) and click on the symbols to get a clue in your journal.
- Examine and use the EMPTY CUP and TAP on the barrel.
- Turn the TAP; take the FULL CUP (M).
- Back out.
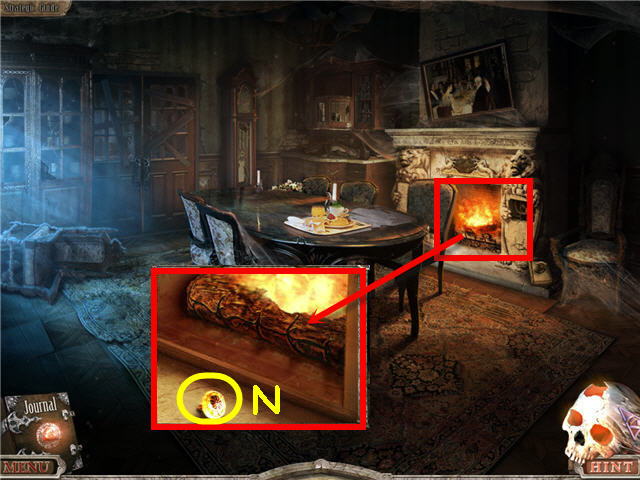
- Examine the fireplace.
- Use the TONGS on the button in the fire.
- Use the FULL CUP on the button; take the BUTTON WITH FLOWER (N).
- Examine the corner hutch to access a HOS.
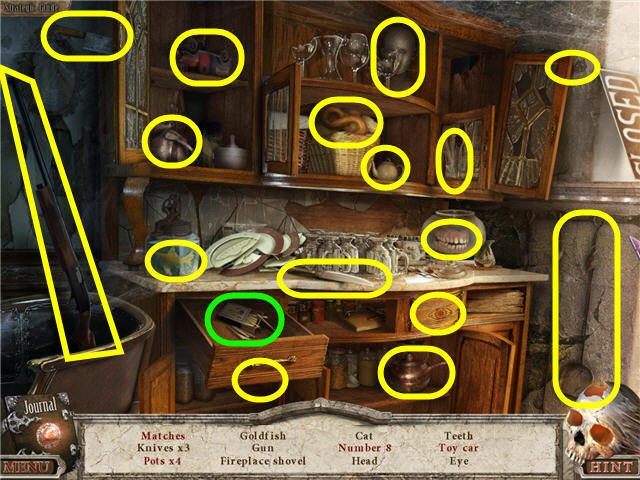
- Find the items listed.
- Open the cabinet drawers and doors to get the items in red.
- You will earn the MATCHES.
- Head left twice.
- Examine the hole in the tree to access a HOS.
- Find the items listed and get WEIGHTS.
- Head up the left path twice.
- Examine the door.
- Place the BUTTON WITH FLOWER in the empty slot to trigger a puzzle.
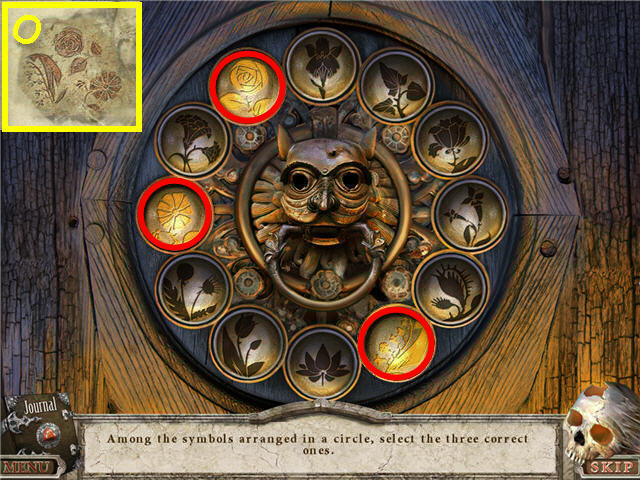
- Click the three symbols that match the symbols from the kitchen painting (O).
- See screenshot for solution.
- Head into the house.

- Examine the desk.
- Click on the first page, then flip through the pages of the book by clicking in the lower right; take the PESTLE (P).
- Click on the last page of the book that contained the PESTLE to get a clue in your journal.
- Examine the candle holder; use the CANDLE and MATCHES on the holder (Q).
- Examine the cupboard to access a HOS.
- Find the items listed.
- Open the bottom cupboard and onion drawer to get the items in red.
- You will earn the PRUNING SHEARS.
- Back out.
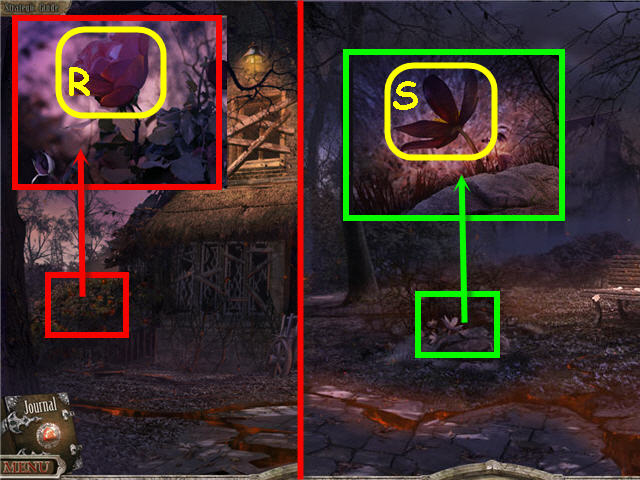
- Examine the bushes.
- Use the PRUNING SHEARS to get the ROSE (R).
- Back out.
- Examine the flower.
- Use the PRUNING SHEARS to get the FLOWER OF LIFE (S).
- Head left and into the house.
- Examine and place the FLOWER OF LIFE in the mortar (T); use the PESTLE.
- Place the ROSE in the mortar; use the PESTLE to get CRUSHED PETALS.
- Examine and place the WEIGHTS, CRUSHED PETALS and EMPTY SPRAYER by the scale (U) to trigger a puzzle.
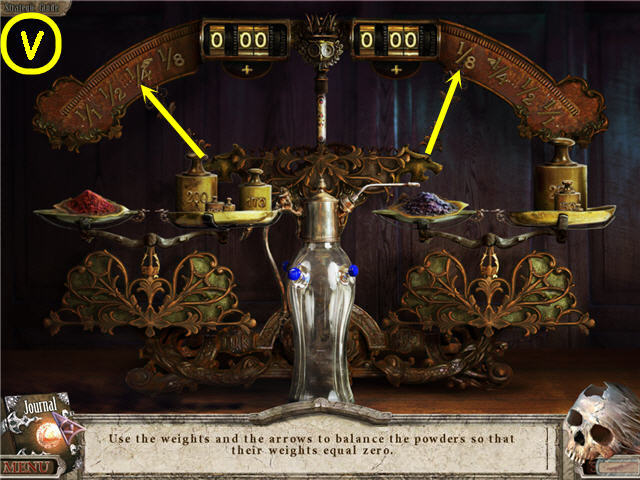
- Place the weights on the scale to balance them (V).
- Solution: Left Pan = weights 200, 170, 100, 70 and arrow to 1/4.
- Right Pan = weights 250, 150, 40 and click on 1/8 to point arrow that direction.
- Get a SPRAYER when complete.
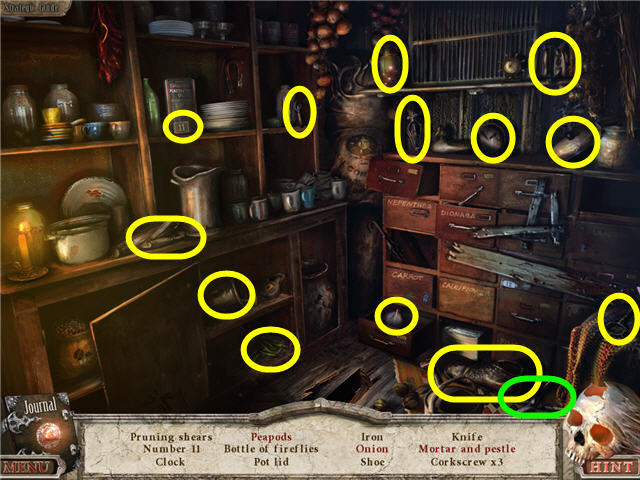
- Examine the cupboard to access a HOS.
- Find the items listed.
- Open the cupboard door to get the lock.
- Open the drawer to the right of the cauliflower to get the moneybox.
- You will earn the MAGNET.
- Back out.
- Examine the cart; try and take the skull needle (W).
- Use the MAGNET to get the NEEDLE (X).
- Back out five times; head upstairs and left.
- Use the SPRAYER on the bassinet (Y).
- Examine the nightstand; click on the birth certificate (Z) and flower (A).
- Examine the bed; move the pillow and take the BOOK (B).
- Examine the easel.
- Place the OIL in the solvent (C).
- Use the RAG on the solvent to get a RAG WITH SOLVENT.
- Use the RAG WITH SOLVENT on the painting twice; click on the numbers (D).
- Back out twice and head left twice.
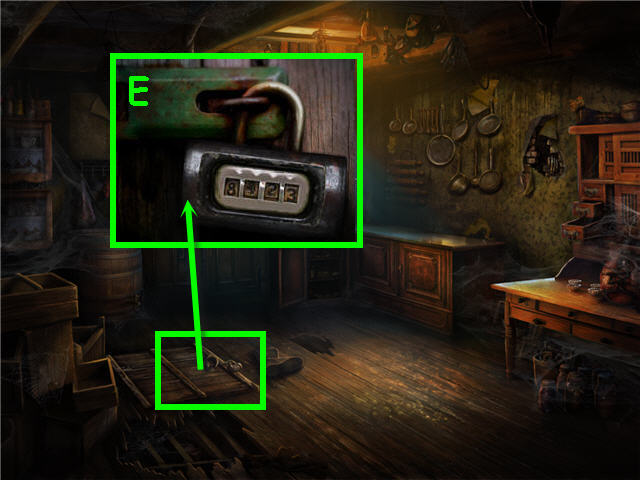
- Examine the hatch.
- Use the code from the painting in the bedroom to open the lock (E).
- Solution: 8423.
- Examine the hatch to access a HOS.
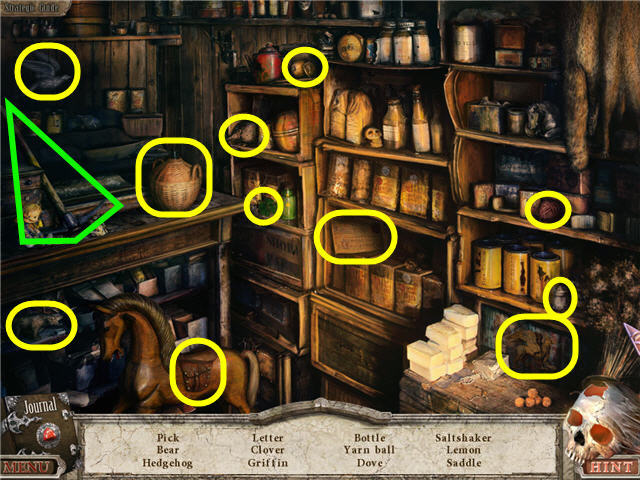
- Find the items listed.
- Get the PICK.
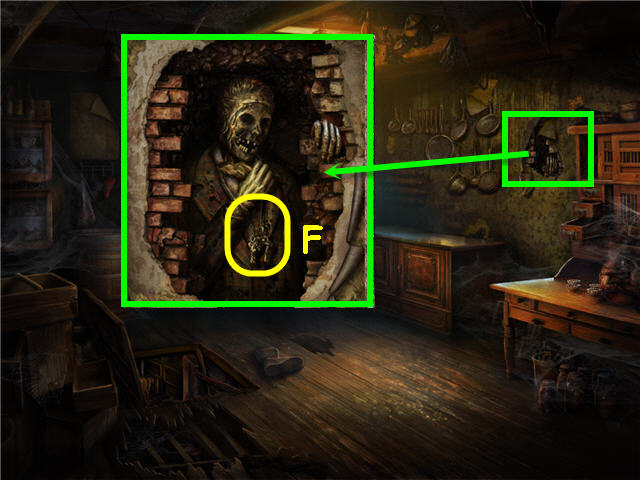
- Examine and use the PICK on the hole in the wall three times.
- Take the METAL GARGOYLE (F).
- Back out twice.
- Examine the lock on the right door.
- Place the METAL GARGOYLE on the lock to trigger a puzzle.
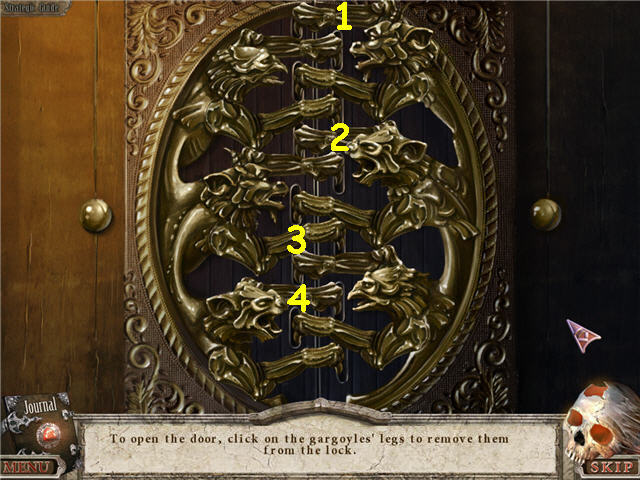
- Open the lock by clicking on the gargoyle's legs.
- Each leg controls 2 other legs.
- Solution: 1, 5, 8 and 10.
- Head right through the newly opened door.
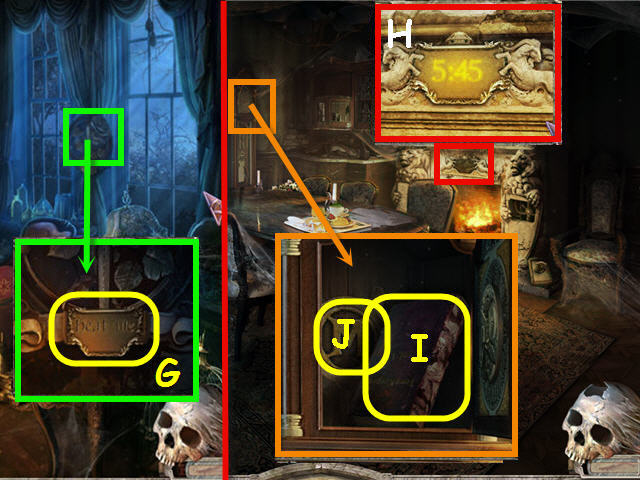
- Examine the rose plaque; take the METAL PLATE (G).
- Back out, head left.
- Examine the fireplace panel; place the METAL PLATE in the slot.
- Note the time: 5:45 (H).
- Examine the clock; set the time to the time from the fireplace (5:45).
- Take the BOOK (I) and MEDALLION (J).
- Back out; head upstairs and left.
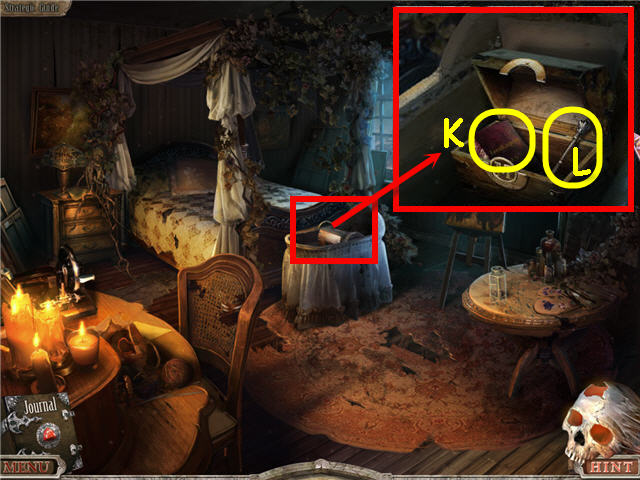
- Examine the bassinet.
- Place the MEDALLION on the chest; take the BOOK (K) and the MACE (L).
- Back out twice and head right.
- Examine and place the 3 BOOKS on the bookshelf to trigger a puzzle.
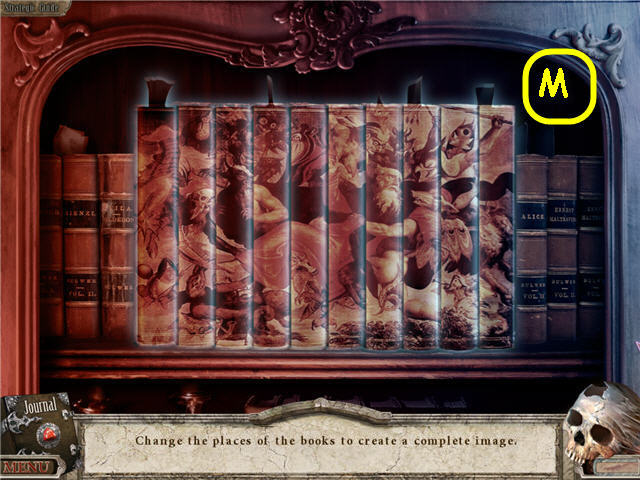
- Arrange the books to complete the picture.
- See screenshot for solution (M).
- Head straight.
- Examine the right bookshelf to access a HOS.
- Find the items listed.
- Get a SMALL SHIELD.
Chapter 4 – The Church
- Take the CRYSTAL (N).
- Examine the book; turn the page (O).
- Back out twice and head upstairs.
- Examine the right door.
- Place the SMALL SHIELD and MACE in the matching slots (P).
- Head right.
- Take the TESTAMENT (Q).
- Examine the bookshelf.
- Open the book; flip the page and take the STAINED-GLASS WINDOW (R).
- Click on the left page (S) to get a clue added to your journal.
- Examine the desk; place the CRYSTAL in the empty holder to trigger a puzzle.

- Arrange the crystals and turn the pyramids to match the picture on the left.
- Solution: Arrange the crystals so that a full pattern is projected onto the wall. Click the left rear pyramid 3x, middle left pyramid 2x, middle right pyramid 3x, and right pyramid 3x.
- See screenshot (T) for solution.
- Examine the desk panel; take the METAL HEAD (U), STATUETTE OF DEMON (V) and CLOAK (W).
- Back out four times.
- Place the METAL HEAD on the gate lock (X).
- Head through the gate and back out.
- Examine the door.
- Use the TESTAMENT on the bottom of the door.
- Examine the door handle; use the NEEDLE in the keyhole.
- Pull out the TESTAMENT; take the KEY (Y).
- Use the KEY in the lock; turn a few times.
- Enter the house.
- Examine the back wall to access a HOS.
- Find the items listed.
- Get an EYE.
- Place the LADDER on the right (Z).
- Take the RITUAL KNIFE (A).
- Head up the ladder.
- Take the SLEDGEHAMMER (B).
- Back out three times and head right.
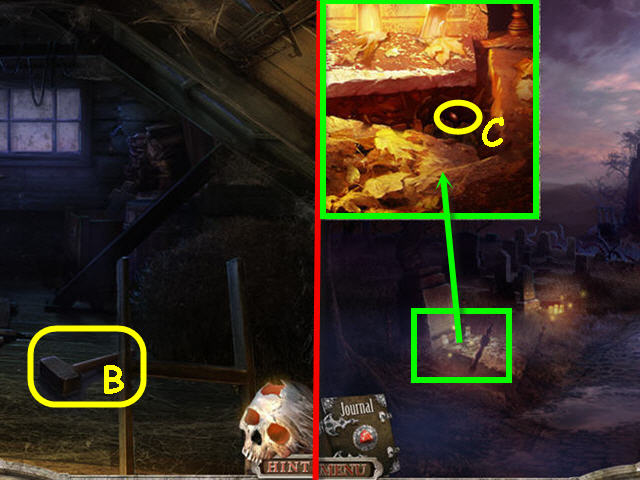
- Examine the gravestone; use the SLEDGEHAMMER on the pot.
- Take the GEM (C).
- Back out and head straight.
- Examine and use the SLEDGEHAMMER on the pot.
- Take the GEM (D).
- Examine the door (E).
- Place the STATUETTE OF DEMON on the bottom right to trigger a puzzle.
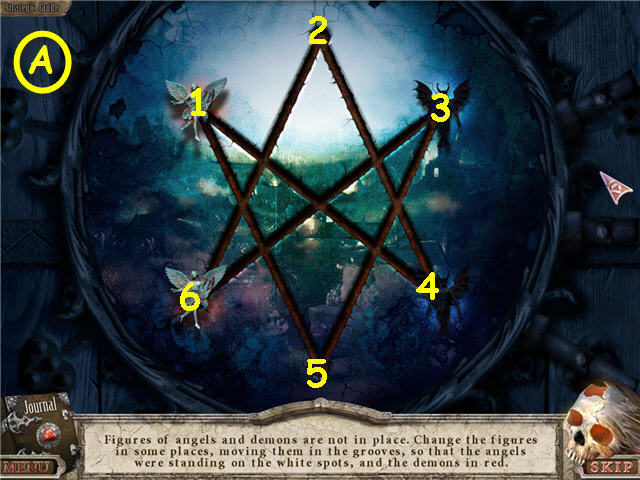
- Move the angels to the white spots and the demons to the red by sliding them along the lines.
- Solution: 4 to 2; 1 to 4; 3 to 5 to 1; 6 to 3; 2 to 6 (A).
- See next screenshot for part 2.
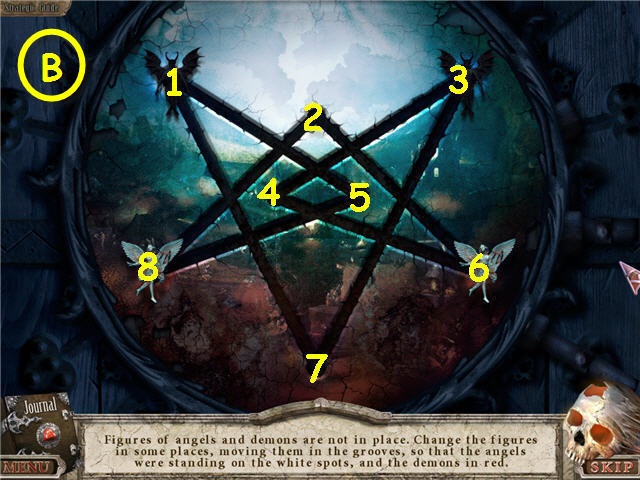
- Move the angels to the white spots and the demons to the red by sliding them along the lines.
- Solution: 8 to 2; 6 to 4; 3 to 7; 4 to 3; 1 to 5 to 8; 2 to 6; 7 to 1 to 5; 3 to 7 to 1; 6 to 4 to 3; 8 to 2 to 6; 5 to 8 (B).
- See next screenshot for part 3.
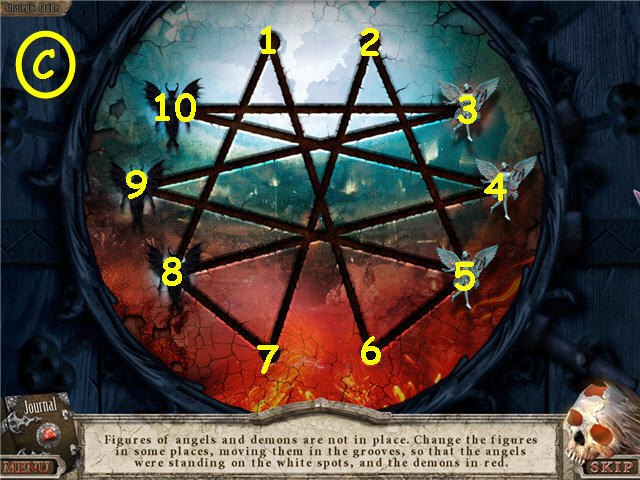
- Move the angels to the white spots and the demons to the red by sliding them along the lines.
- Solution: 5 to 6 to 1; 8 to 7 to 2; 9 to 5; 3 to 9, 2 to 7; 10 to 3; 4 to 10; 7 to 8 to 4; 1 to 8 (C).
- Head into the building.
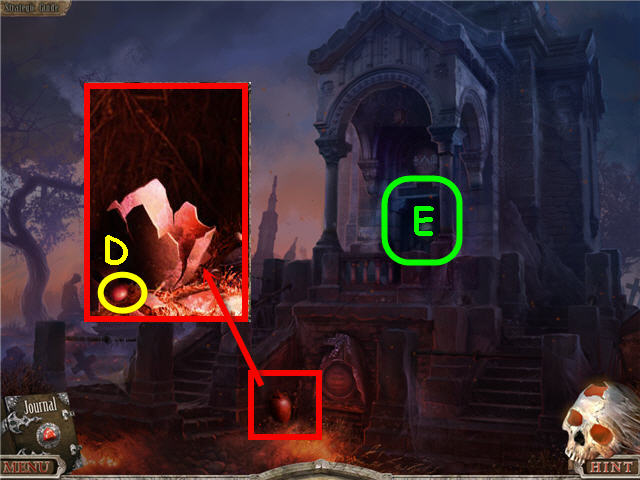
- Take the VASE (F).
- Head through the right rear door.
- Examine the shelf; take the GLASS CUTTER (G).
- Examine the wall left of the fireplace (H).
- Place the EYE in the socket to trigger a puzzle.
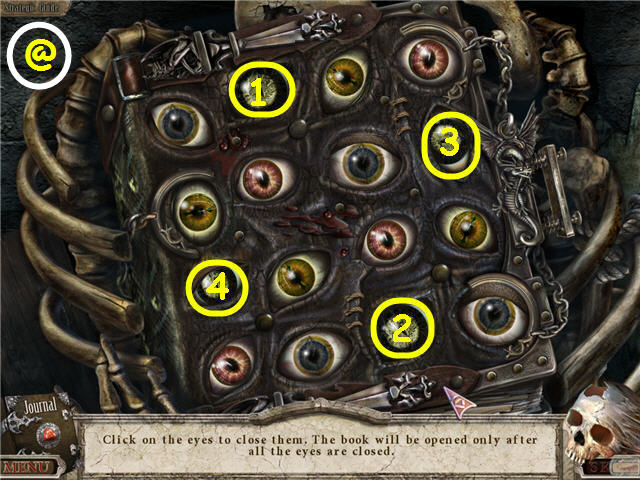
- Click on the correct eyes to close them all.
- See screenshot for solution (@).
- Click the note; take the MEDALLION ARTIFACT and RING ARTIFACT.
- Back out three times, head left and down into the cellar.
- Examine the coffin to access a HOS.
- Find the items listed.
- Open the coffin (if not open yet) for items in red.
- You will earn the FLASK OF BLOOD.
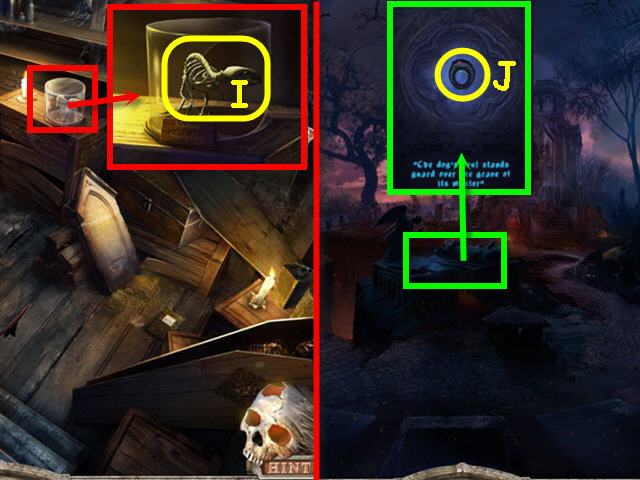
- Examine the glass display case.
- Use the GLASS CUTTER on the dome; take the MOUSE SKELETON (I).
- Back out twice.
- Examine the left coffin.
- Place the RING ARTIFACT in the center (J); back out of the close-up.
- Examine the left coffin to access a HOS.
- Find the items listed and get a BRUSH.
- Head left; into the house and up the ladder.
- Examine and use the BRUSH on the window (K).
- Take the CROSS (L).
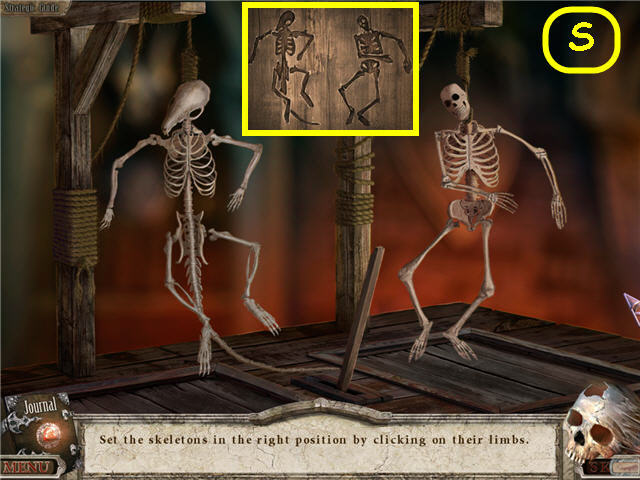
- Examine the coffin and click on the skeletons (M) to get a clue added to your journal.
- Examine the corner to access a HOS.
- Find the items listed and get a COLLAR.
- Back out three times.
- Examine the grave; place the COLLAR on the dog (N).
- Examine the stone; take the SWORD ARTIFACT (O).
- Head right.
- Try and head down the path; use the SWORD ARTIFACT on the brambles (P).
- Head straight.
- Examine and use the ROPE and the VASE on the well.
- Use the CROSS on the well; take the VASE WITH HOLY WATER (Q).
- Examine the doorway; take the BONE WITH RUNES (R).
- Back out twice and head straight twice.
- Examine the table.
- Place the MOUSE SKELETON on the left noose to trigger a puzzle.
- Arrange the skeleton limbs to match the etching on the coffin from the attic, now located in your journal.
- See screenshot for solution (S). The lever will move automatically when correct.
- Take the SHIELD ARTIFACT (T).
- Examine the left door.
- Place the FLASK OF BLOOD on the star to trigger a puzzle.

- Make a trail of blood using all the lines one time.
- Follow the arrows in the screenshot in the following color order: green, yellow, orange, red, pink, cyan and white.
- Head into the left rear door.
- Use the VASE WITH HOLY WATER in the room.
- Examine the crystal ball.
- Use the RITUAL KNIFE on the bulge in the cloth; take the GEM (U).
- Examine the skull (V).
- Place the BONE WITH RUNES on the bottom center slot to trigger a puzzle.
- Slide the bones with runes to match the symbols seen on the top of the doorway to the crypt.
- See screenshot for solution (W).
- Back out three times; head right, and forward into the church.
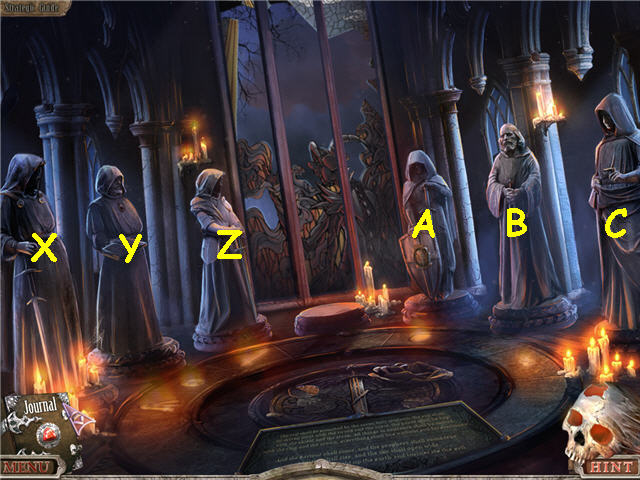
- Place the artifacts on the statues.
- Solution from left to right: CLOAK (X), MEDALLION ARTIFACT (Y), SWORD ARTIFACT (Z), and SHIELD ARTIFACT (A). Place the 3 GEMS in the crown - take the CROWN ARTIFACT from his head (B), RING ARTIFACT(C).
- Back out.
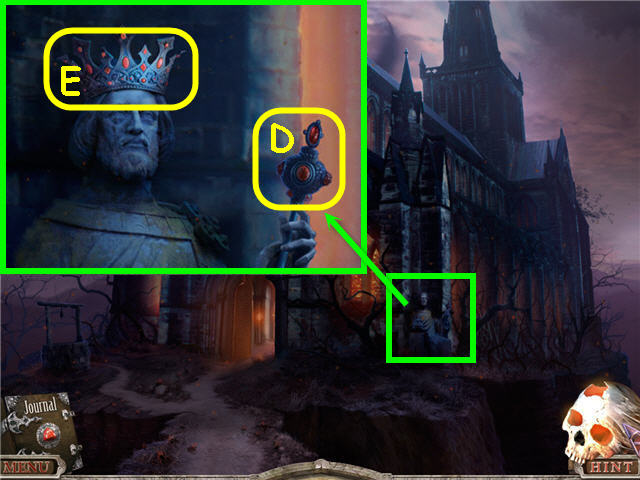
- Examine the statue.
- Place the CROWN ARTIFACT on its head; take the SCEPTER ARTIFACT (D) and the CROWN ARTIFACT (E).
- Head inside the church.
- Examine the 2nd statue from the right.
- Place the CROWN ARTIFACT on its head (F).
- Examine and place the STAINED GLASS on the stained glass window (G) to trigger a puzzle.
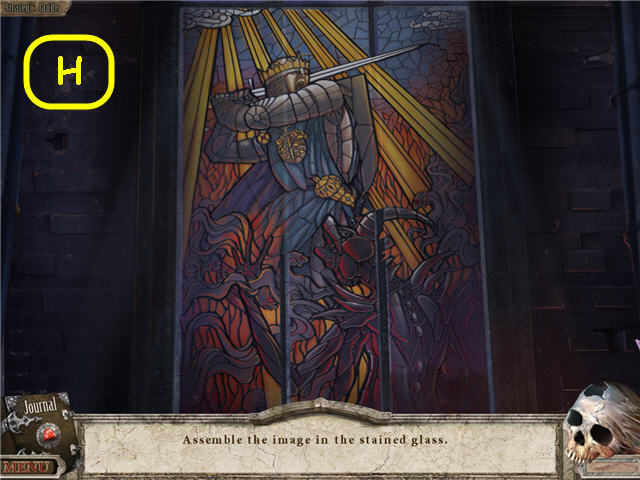
- Assemble the stained glass window by placing the pieces in the correct spots.
- The pieces will lock into place when correct.
- Right click to rotate the pieces. See screenshot for solution (H).
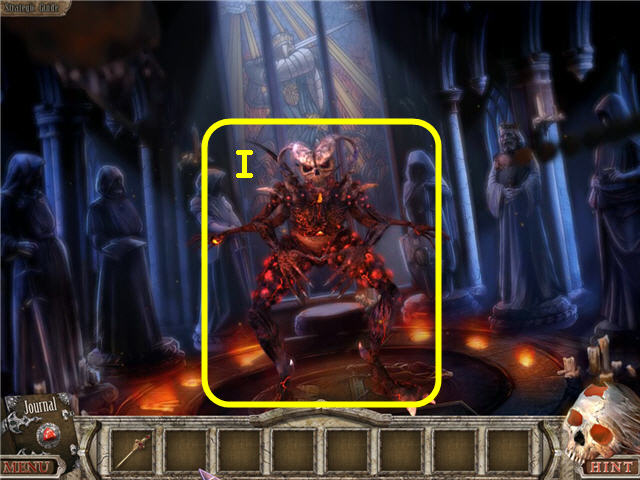
- Watch the cutscene.
- Use the SCEPTER ARTIFACT on the demon (I).
- Congratulations! You have successfully completed The Keepers: Lost Progeny Standard Edition.
Created at: 2011-12-14