

Walkthrough Menu
- General Tips
- Chapter 1: Leaving Toto Island
- Chapter 2: Welcome to Fog Island
- Chapter 3: The Lighthouse
- Chapter 4: Return to Toto Island
- Chapter 5: The Mansion
- Chapter 6: The Swamp
- Chapter 7: The Underwater Station
- Chapter 8: The Ice Station
- Chapter 9: The Finale
General Tips
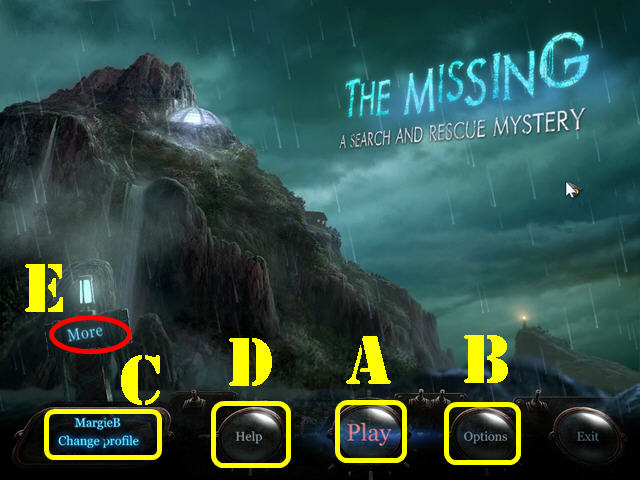
- Click on 'Play' (A) to access the main chapters in the game.
- The 'Options' (B) button allows you to adjust the screen, music, cursor, and sound.
- The 'Change Profile' button (C) can be used to add or delete a new player.
- Click on the 'Help' (D) button to view general tips for playing the game.
- The 'More' (E) button shows other titles by this developer.
- There are 56 CRYSTALS to collect in the game. They have all been marked with the (@) symbol in the screenshots.
- The Items in the Hidden Object Scenes are random; your lists may vary from ours.
- Some items you pick up during the course of the game will not be directly used in a scene but they need to be in your inventory to access certain parts of the game. SPOILER ALERT!!! For example, you need to have the COAT in inventory before you can enter the Ice Station.

- Look at your NOTES (N) in the lower left corner; in it you will find a Map, Notes, and Tasks.
- The Hint (H) Button is in the lower right corner of each scene.
- You have unlimited Hints in the Hidden Object Scenes and in Quest Scenes, but you must wait for them to recharge between uses.
- Pass your mouse at the bottom of the scene to bring up the Inventory tray (I). Use the arrows in your inventory tray to scroll through all the items you've collected.
- To use an inventory item, select it and drag it to the desired location; click it into the spot in which you want it used.
Chapter 1: Leaving Toto Island
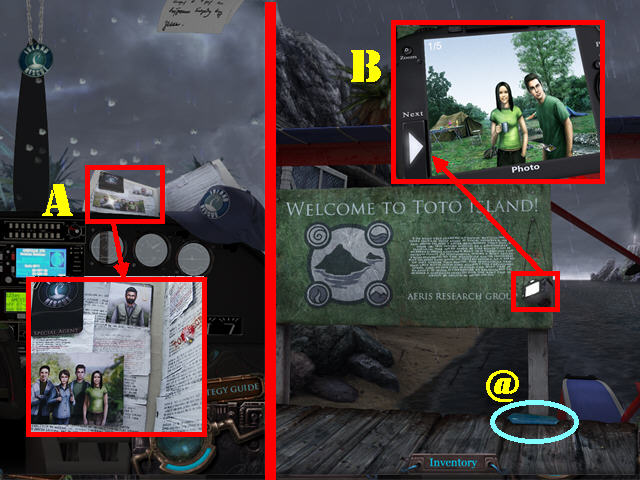
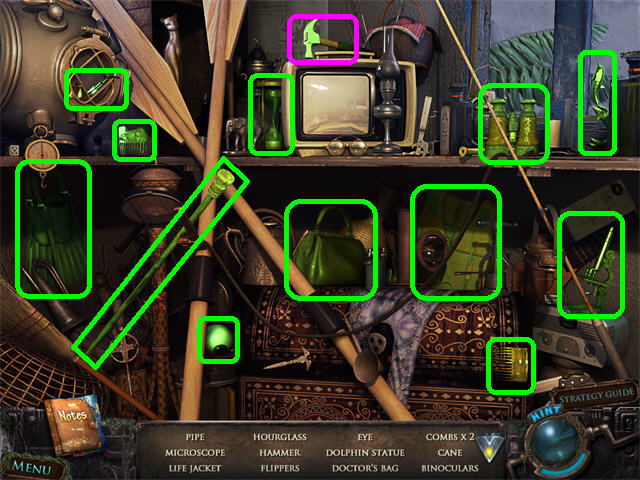
- Read the article on the dashboard (A).
- Head left.
- Examine the camera hanging on the side of the sign; click on the arrow to scroll through the pictures (B).
- Collect the CRYSTAL (@) marked in blue.
- Head left.
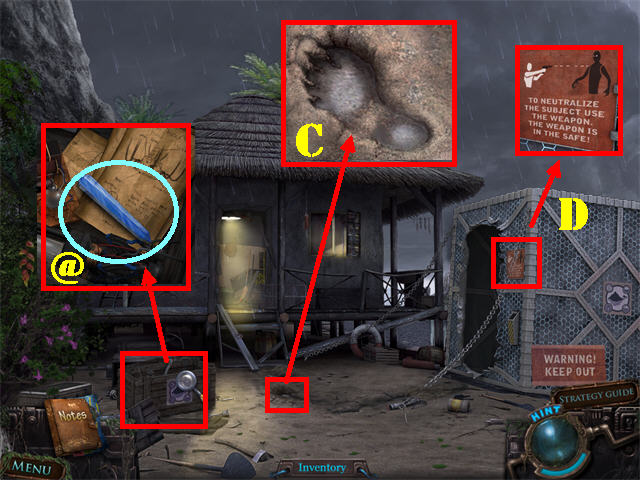
- Examine the crate on the ground; take the CRYSTAL (@) and exit out of the crate.
- Examine the footprint on the ground (C).
- Zoom into the cage.
- Zoom into the sign in the upper right; it shows you how to use the weapon (D).
- Click down and go into the hut.
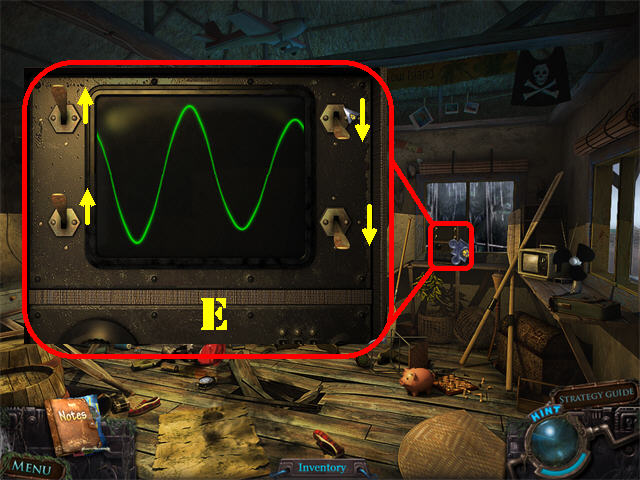
- Look at the shortwave radio.
- Adjust the frequency by flipping the buttons in the correct order as shown in the screenshot (E).
- Anne appears on the screen and tells you to get the weapon from the safe and that she is locked in the underground storage.
- Adjusting the frequency on the radio activates a Hidden Object Scene; play it.
- Find all the items on the list.
- The HAMMER will be added to inventory.
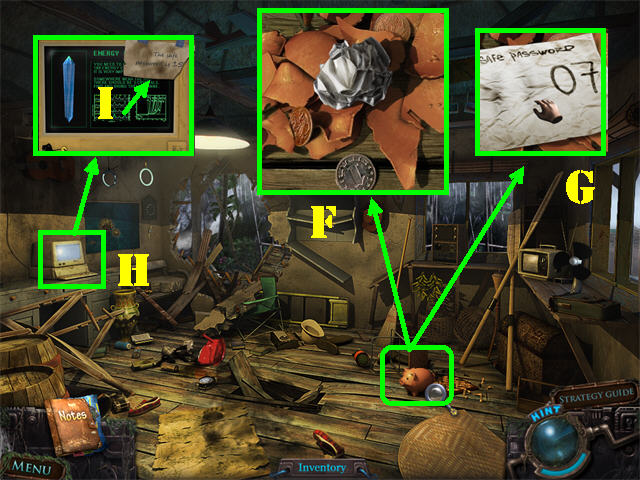
- Zoom into the piggy bank; break it open with the HAMMER (F).
- Click on the SAFE PASSWORD (G) to add it to the notes.
- Examine the monitor on left (H); click on the torn password to complete the safe password in the notes (I).
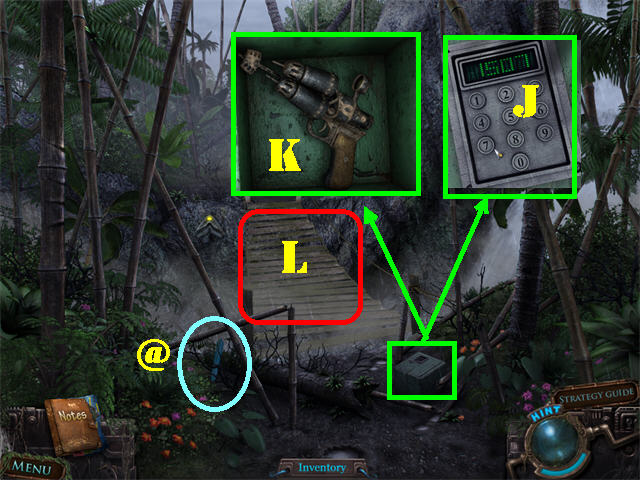
- Go through the hole in the back wall.
- Collect the CRYSTAL (@) on the ground.
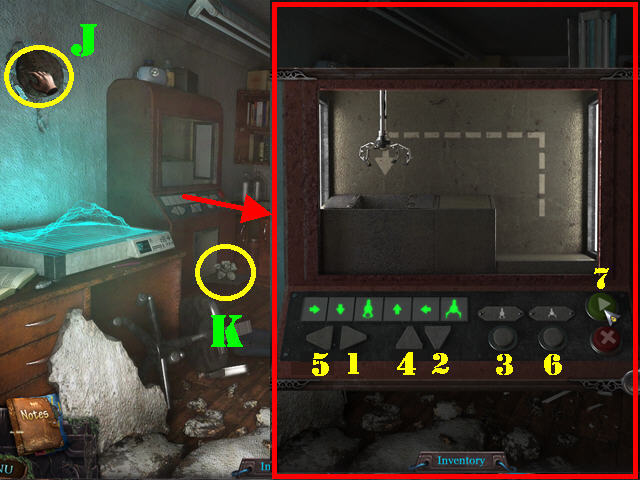
- Zoom into the safe on the ground; punch in the code ‘1507' on the keypad (J).
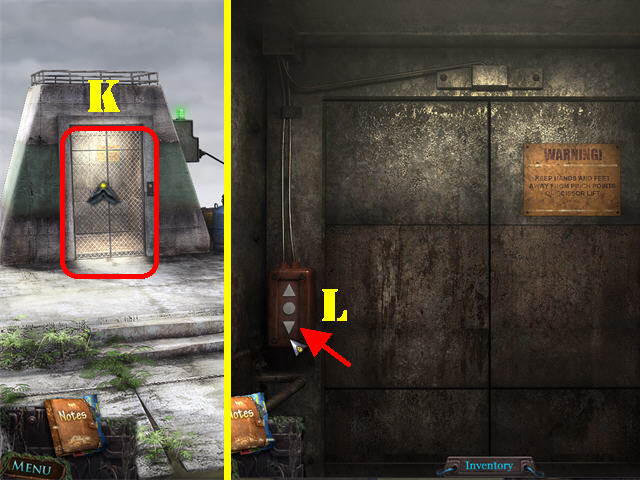
- Zoom into the safe again and take the WEAPON (K).
- Try to cross the bridge and it will fall apart (L).
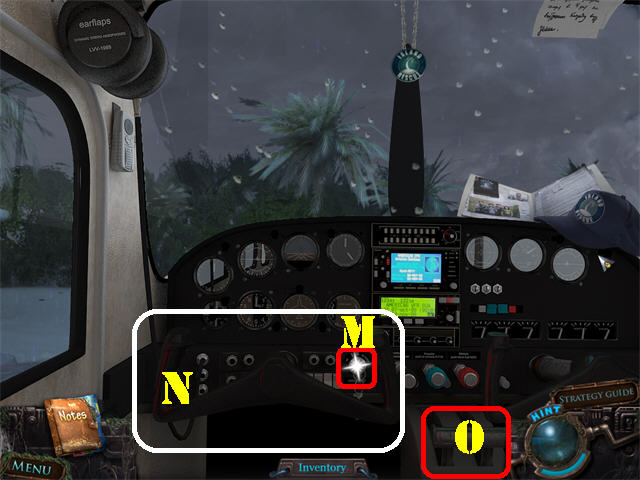
- Return to the plane.
- Click on the key to start the engine (M).
- Click on the steering wheel to move the plane (N).
- Click on the handle to fly the plane (O).
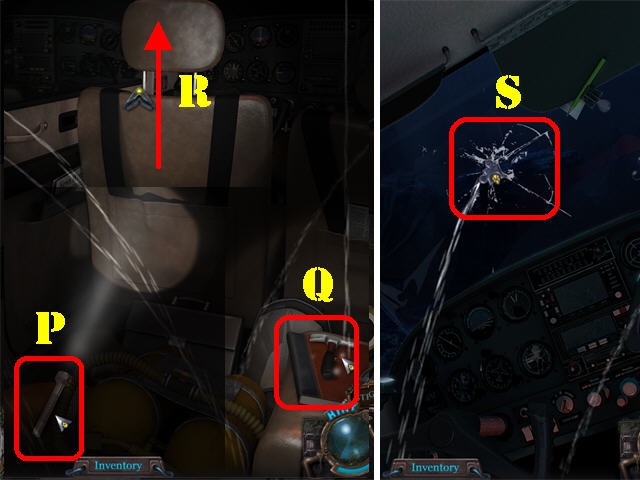
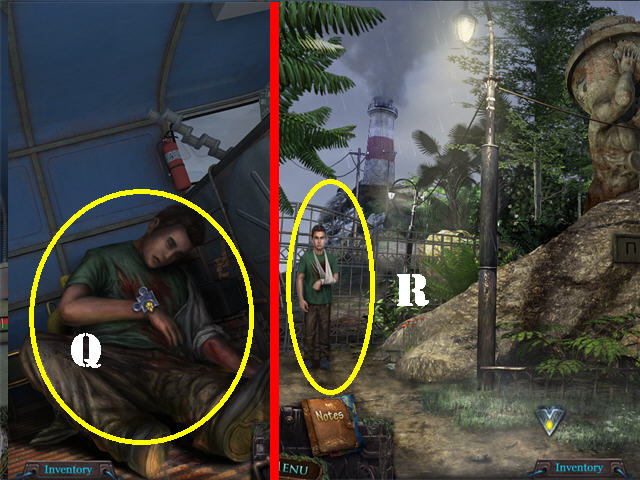
- Grab the FLASHLIGHT in the lower center to attach it your cursor (P).
- Take the HAMMER in the lower right (Q).
- Click in the upper center side of the screen (R).
- Break the glass on the windshield with the HAMMER (S).
Chapter 2: Welcome to Fog Island
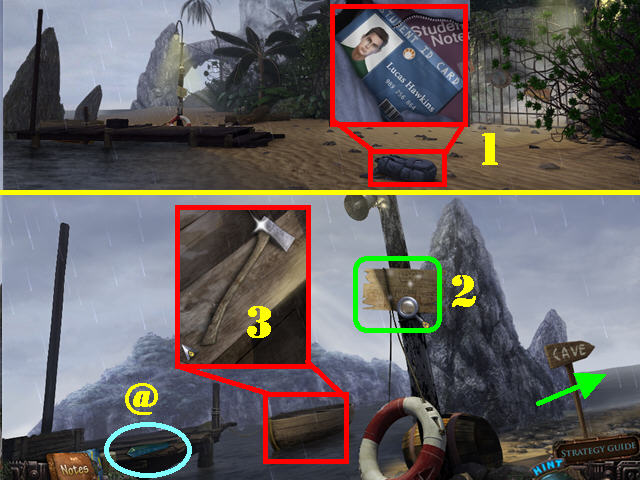
- Examine the backpack; it is a backpack that belongs to one of the students (1).
- Go left.
- Take the CRYSTAL (@) on the pier.
- Examine the signboard on the pole; it has celestial signs on it (2).
- Take a closer look at the boat; take the AXE (3).
- Exit the boat and head right towards the cave.
- Examine the tent; click on the creature drawing (4).
- Go towards the cave and go through the door.
- Examine the lit image on the left; take the AMULET (5).
- Click down and go forward.
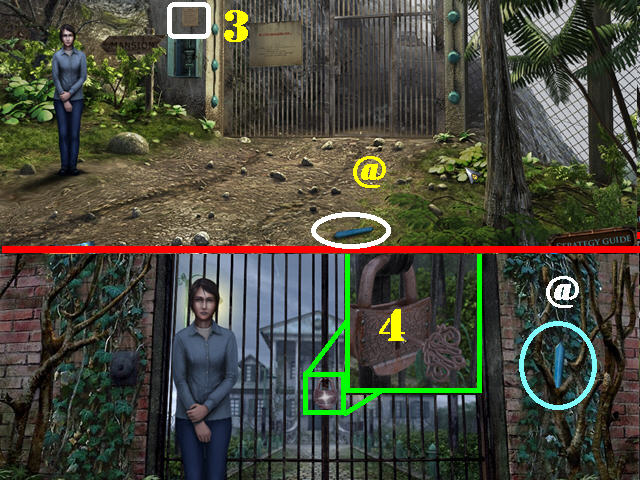
- Take the CRYSTAL (@) by the door.
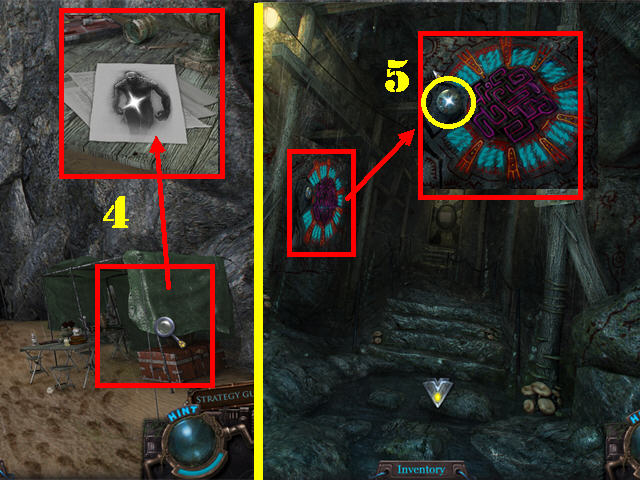
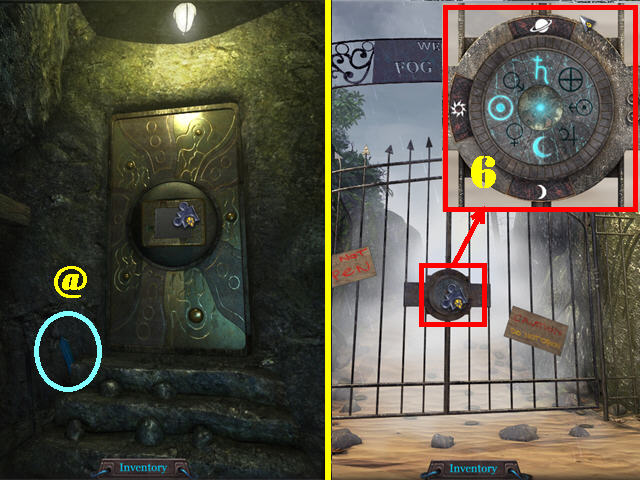
- Examine the door; you need some missing pieces.
- Click down 5 times and head towards the gate.
- Zoom into the gate; place the AMULET in the center of the lock to activate a puzzle.
- Place the levers next to each matching astrological symbol using the images you found on the signboard.
- Please look at the screenshot for a solution (6).
- Go through the gate.
- Collect the CRYSTAL (@) marked in blue.
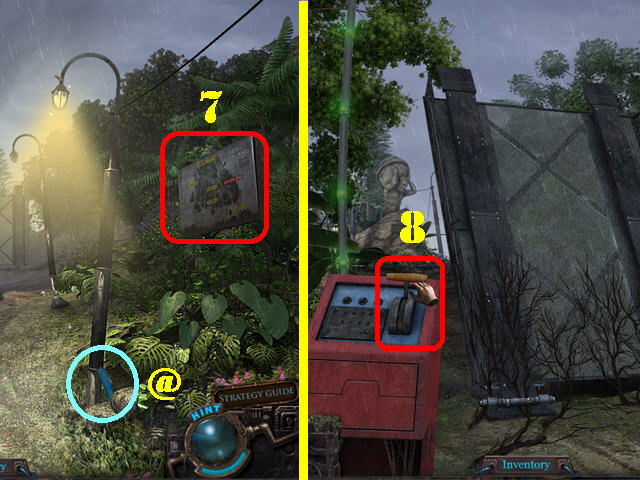
- Examine the fog Island map on the right (7).
- Go forward.
- Pull the lever; there's no power to the bridge switch (8).
- Click down and head left towards the garage.
- Go into the garage.
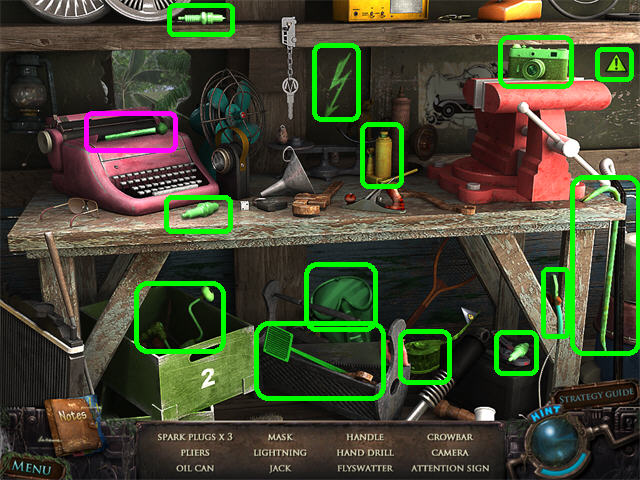
- Play the Hidden Object Scene.
- Find the listed items to obtain the HANDLE.
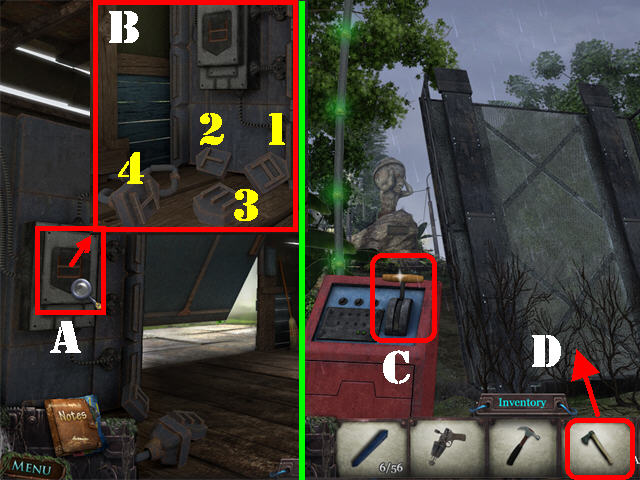
- Examine the switch on the left (A).
- Place the blocks in the correct sequence on the switch.
- Please look at the screenshot for the order (B). The electricity is now fixed; you can lower the bridge.
- Return to the bridge.
- Click on the handle to lower the bridge (C).
- Cut the roots at the bottom of the bridge with the AXE (D).
- Go forward.
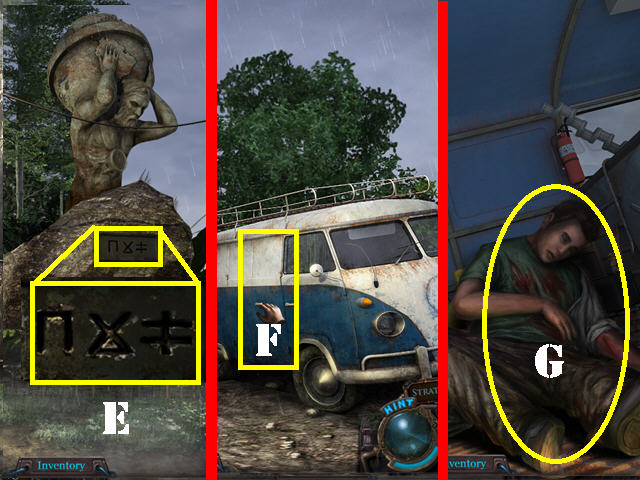
- Examine the plaque with the strange symbols below the large statue (E).
- Head right.
- Open the door to the van and go inside (F).
- One of the students is inside; he needs a first-aid kit (G).
- Click down and head left.
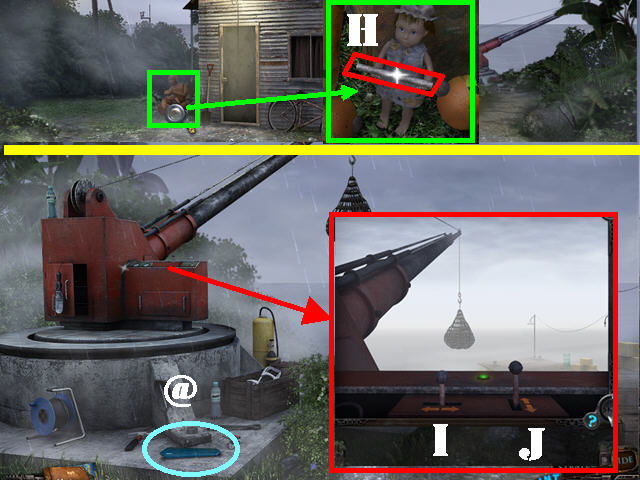
- Examine the mannequin next to the weather station; take the HANDLE from the doll (H).
- Head right.
- Grab the CRYSTAL (@) in the lower left.
- Examine the crane; place the 2 HANDLES in the empty slots to activate a puzzle.
- Move HANDLE J all the way to the right until it stops (I).
- Move HANDLE K all the way down until it stops (J).
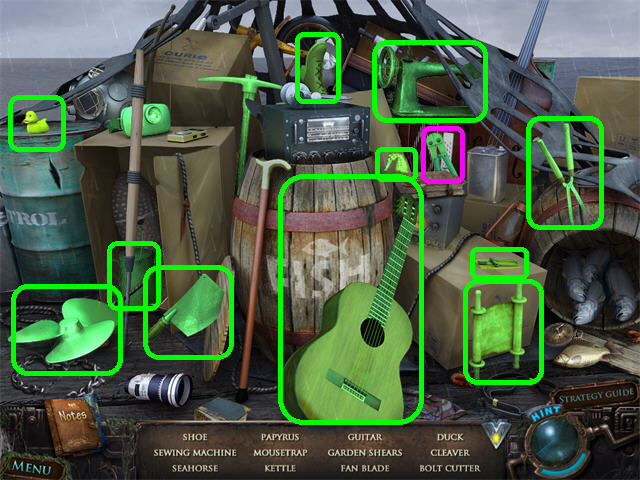
- Play the Hidden Object Scene by the dock on the right.
- Find the listed items to obtain the BOLT CUTTER.
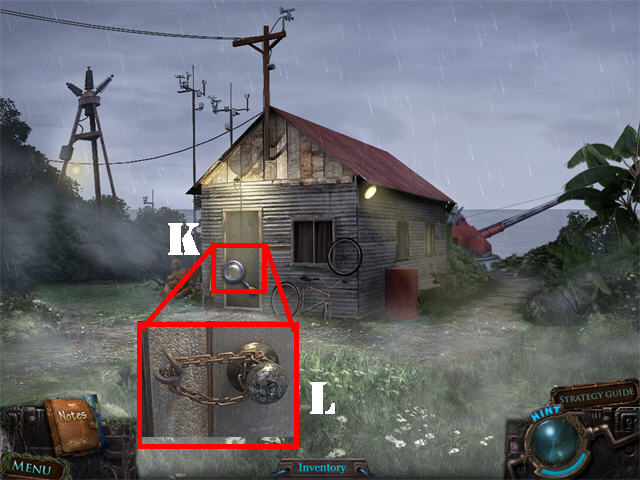
- Return to the weather station.
- Zoom into the door (K); cut the chain with the BOLT CUTTER (L).
- Enter the weather station.
- Grab the FIRST-AID KIT on the bed (M).
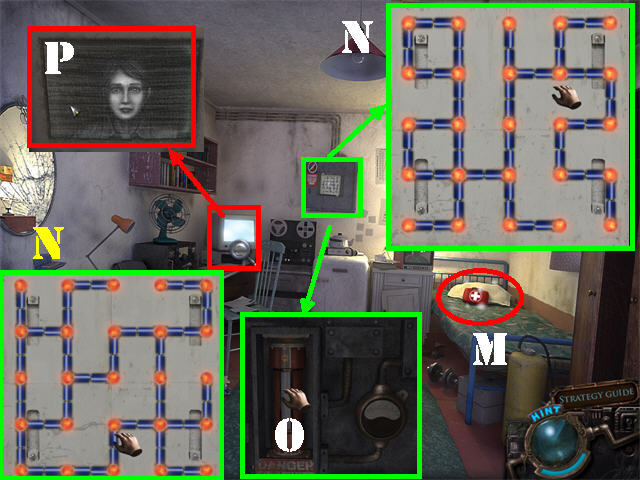
- Examine the panel on the back wall.
- Connect all the wires as shown in the screenshot. The screenshot shows 2 alternate solutions (N).
- Zoom into the panel again; take the BATTERY (O).
- Take a closer look at the monitor (P); it's Anna again.
- Return to the inside of the van.
- Give the FIRST-AID KIT to the injured student (Q).
- Click down.
- Give the BOLT CUTTER to the student so he can open the gate (R).
- Go through the gate.
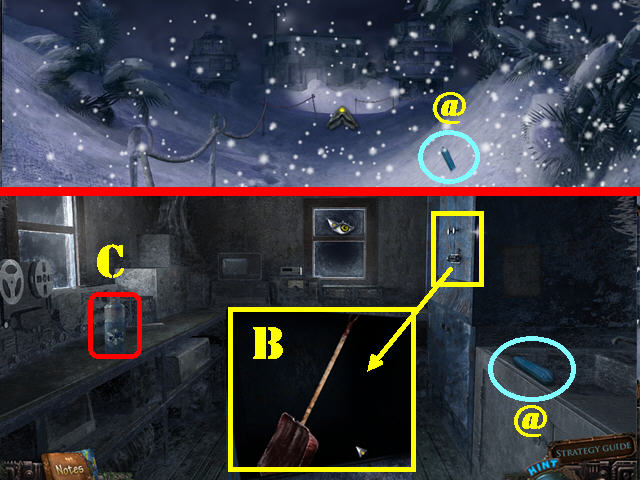
Chapter 3: The Lighthouse
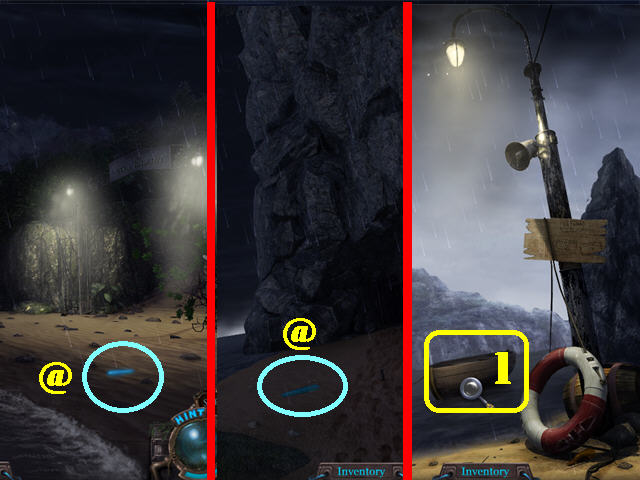
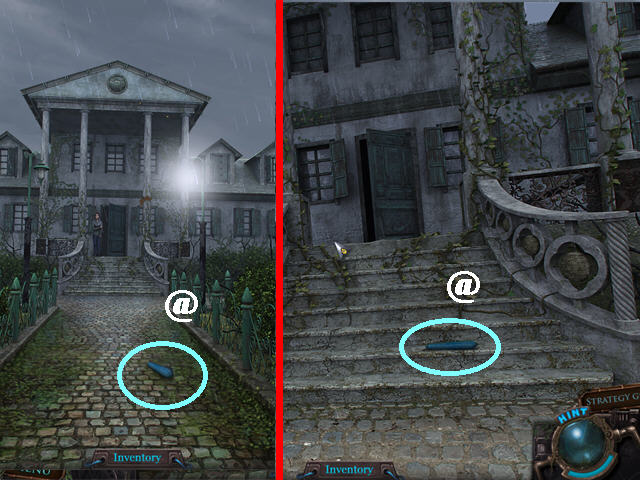
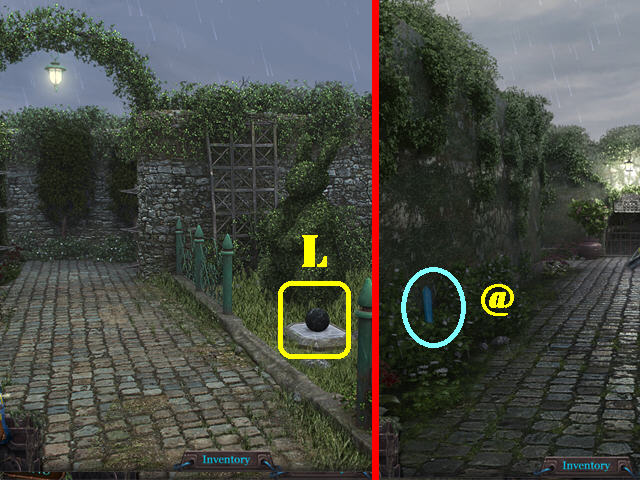
- Grab the CRYSTAL (@) on the ground.
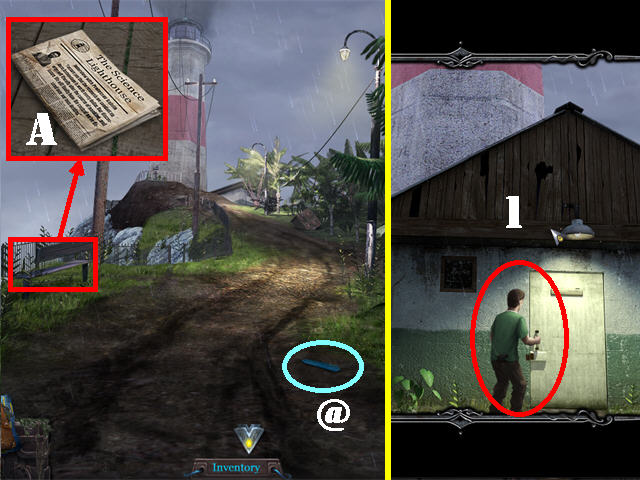
- Zoom into the bench; read the newspaper (A).
- Head forward.
- Click on the door to follow the student but he will lock you out (1).
- Head left.
- Grab the CRYSTAL (@) on the ground.
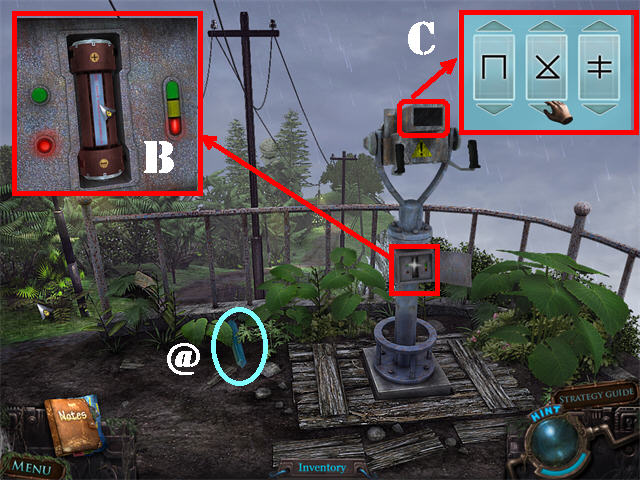
- Zoom into the compartment at the bottom; place the BATTERY in the slot (B).
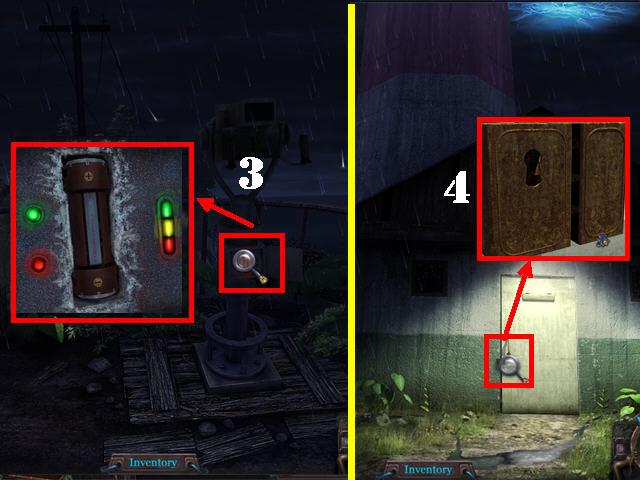
- Take a closer look at the top of the device; enter the code found at the statue as shown in the screenshot (C).
- Click down 3 times.
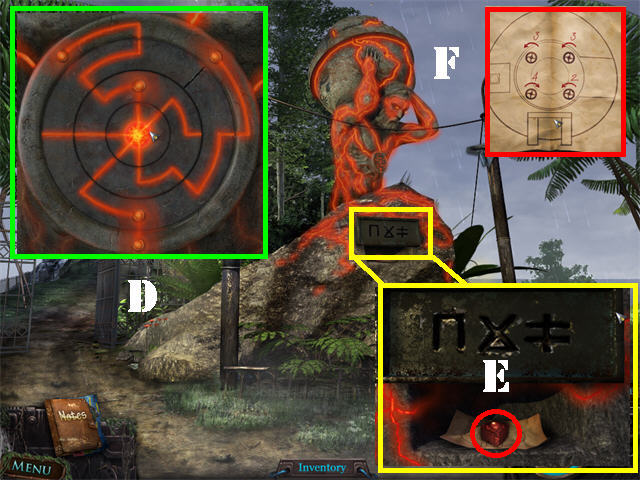
- Examine the statue to activate a puzzle.
- Rotate the rings until all the laser beams are connected as shown in the screenshot (D).
- Zoom into the niche at the base of the statue; take the RED GEM (E) and look at the DIAGRAM (F).
- Click down twice; head left towards the garage and then go to the left of the garage.
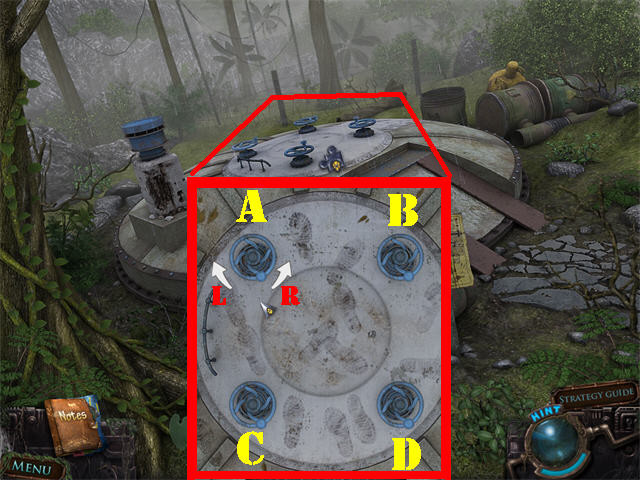
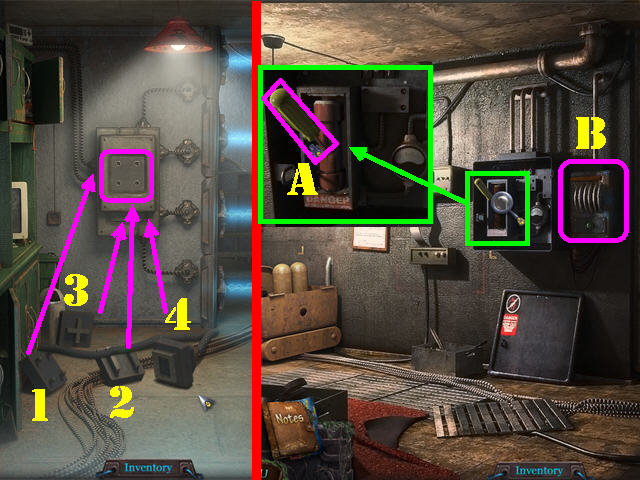
- Zoom into the valves above the device.
- Hover your mouse over each valve to bring up the arrows. Click on the direction of the arrows you want the valve to move.
- Looking at the screenshot ‘AR' means move the ‘RIGHT ARROW ‘on ‘VALVE A'. ‘AL' means move the LEFT ARROW on VALVE A. Use this key for the rest of the valves.To solve the puzzle click on the arrows in this order: AR x 3, BR x 3, CL x 4, and DR x 2.
- Grab the CRYSTAL (@) that just fell on the ground.
- Go into the hatch.
- Take the CRYSTAL (@) on the ground.
- Go forward.
- Play the Hidden Object Scene by the shelves.
- Find the silhouette items using the light on your cursor to obtain the OARS.
- Click down; go up the ladder and click down once more.
- Take the CRYSTAL (@) on the ground.
- Click down; go forward twice, head left past the large statue and forward.
- Grab the CRYSTAL (@) by the lighthouse.
- Click down 6 times to arrive at the beach.
- Grab the CRYSTAL (@) that just fell on the ground.
- Head left and then go right towards the cave.
- Take the CRYSTAL (@) on the ground.
- Click down.
- Click on the boat; place the OARS in the boat (1).
- Click on the boat and head forward twice.
Chapter 4: Return to Toto Island
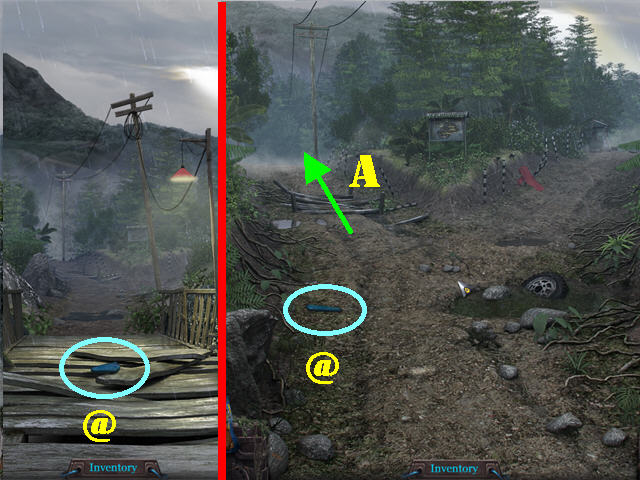
- Take the CRYSTAL (@) on the ground.
- Go forward.
- Take the CRYSTAL (@) on the ground.
- Click on the left side of the road (A) and the creature will appear at first and then Anna will appear.
- Head left.
- Take the CRYSTAL (@) on the ground.
- Head left and then forward twice.
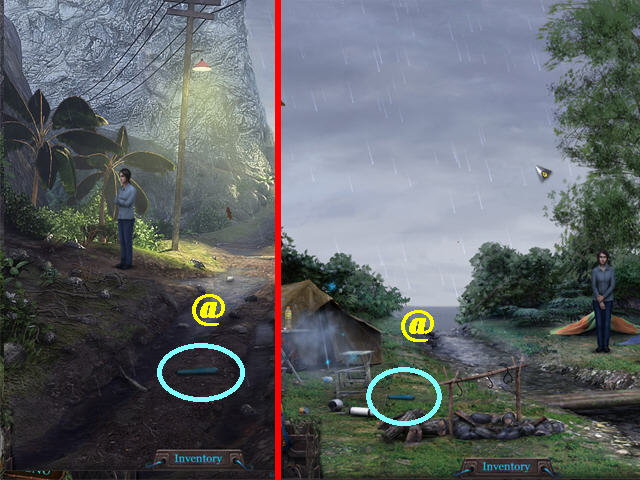
- Take the CRYSTAL (@) on the ground.
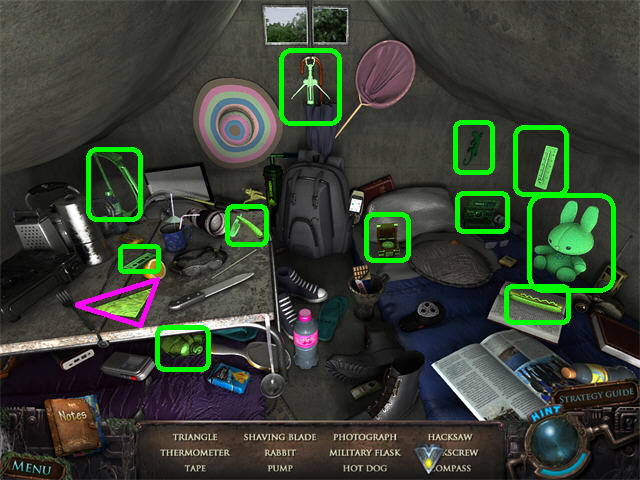
- Play the Hidden Object Scene by the left tent.
- Find the items listed to obtain the TRIANGLE.
- Head right towards Anna.
- Take the CRYSTAL (@) on the ground.
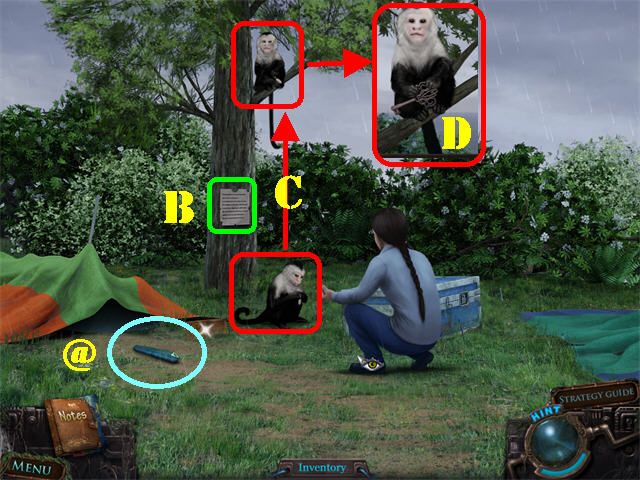
- Take the NOTE (B) attached to the tree.
- Click on the monkey and it will go up the tree (C).
- Zoom into the monkey and you will see it is holding a key; you must find a way to pry it away from it (D).
- Click down 5 times and head right at the fork in the road.
- Take the CRYSTAL (@) on the ground.
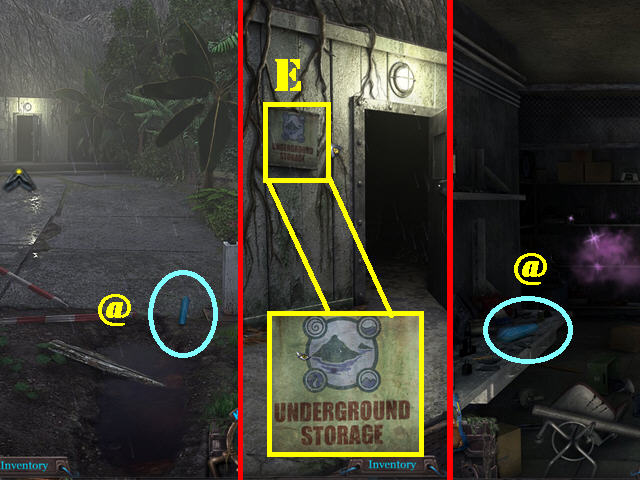
- Go forward; look at the sign (E).
- Enter the underground storage.
- Take the CRYSTAL (@) on the left.
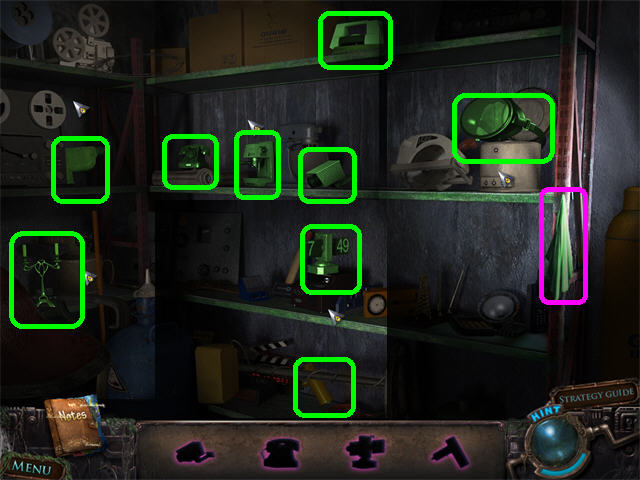
- Play the Hidden Object Scene.
- Find the silhouette items to obtain the RAG.
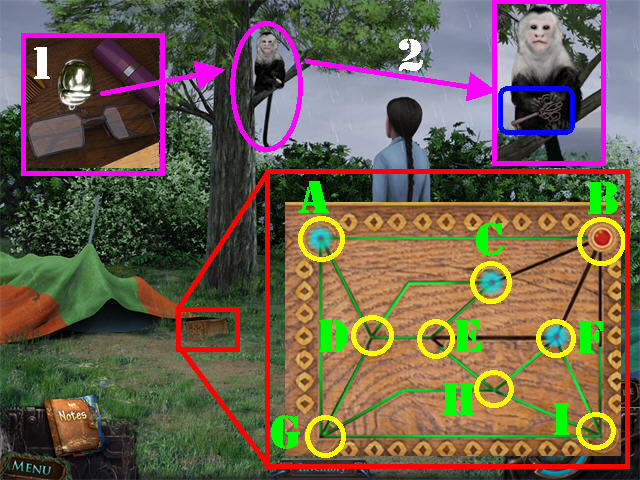
- Return to the tent area in which the monkey was located.
- Zoom into the box at the base of the tent; place the TRIANGLE on the box to activate a puzzle.
- Pass the slider through all the lines without going over any line twice.
- To solve the puzzle click on the circles in this order: D, E, C, D, G, A, B, I, G, H, I, F, H, E, F, B, and C.
- Use the RAG to clean the NECKLACE (1).
- Zoom into the monkey; give the NECKLACE to the monkey to automatically obtain the GATE KEY (2).
- Click down 4 times and go forward towards the gate.
- Grab the CRYSTAL (@) on the ground.
- Take the NOTE (3) next to the gate.
- Head left and go forward.
- Take the CRYSTAL (@) on the right.
- Zoom into the lock on the gate; open it with the GATE KEY (4).
- Go through the gate to access the Mansion.
Chapter 5: The Mansion
- Take the CRYSTAL (@) on the ground.
- Go forward.
- Take the CRYSTAL (@) on the steps.
- Enter the Mansion.
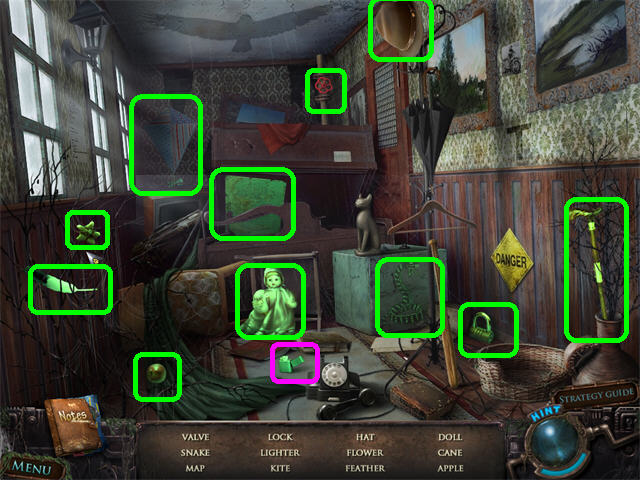
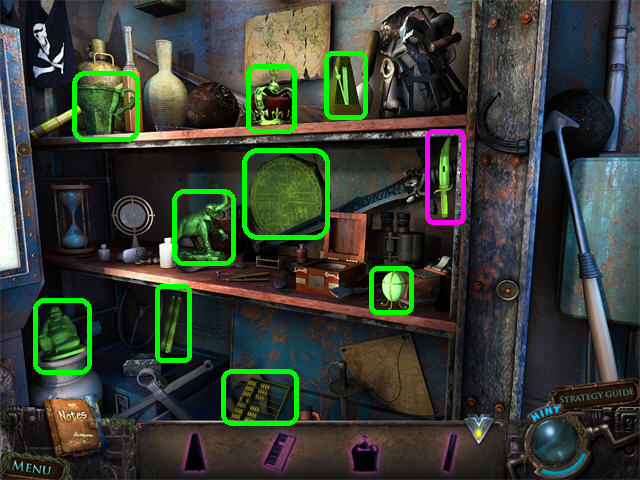
- Play the Hidden Object Scene on the left.
- Find the listed items to obtain the LIGHTER.
- Go through the right door.
- Grab the CRYSTAL (@) on the ground.
- Click on the SHIELD (A) to automatically give it to the statue on the right (B).
- Look at the NOTE (C) by the door.
- Click down and go up the steps.
- Take the CRYSTAL (@) on the banister.
- Go into the left door.
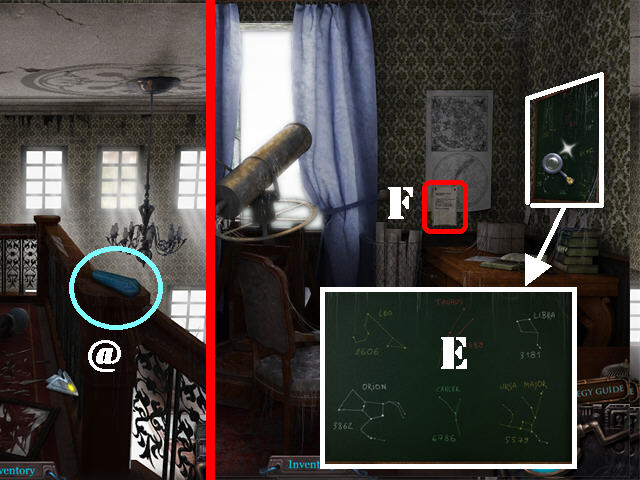
- Look at the chalkboard on right (E).
- Take the NOTE (F) on the back wall.
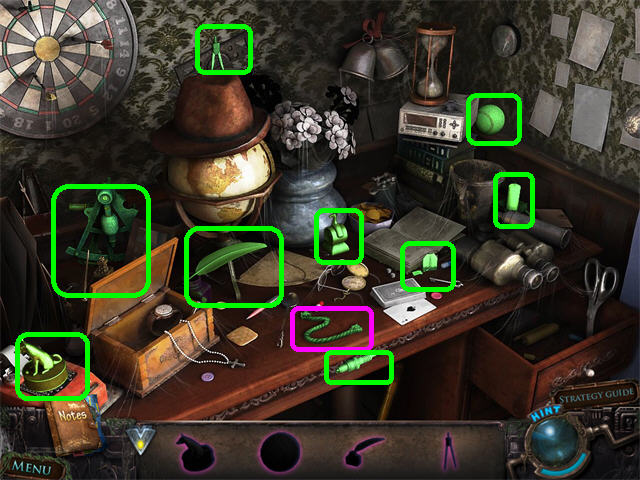
- Play the Hidden Object Scene on the desk.
- Find the silhouette items to obtain the WICK.
- Click down; go down the steps on the right, click down again and head right.
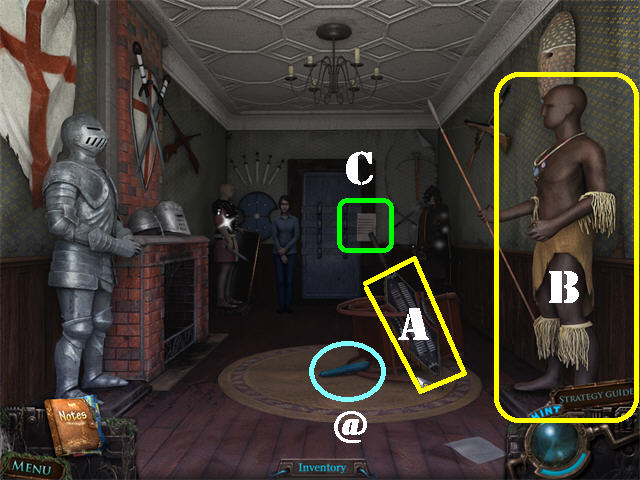
- Take the CRYSTAL (@) on the ground.
- Grab the KNIGHT'S SWORD on the right (G).
- Click down and head left.
- Take the CRYSTAL (@) on the ground.
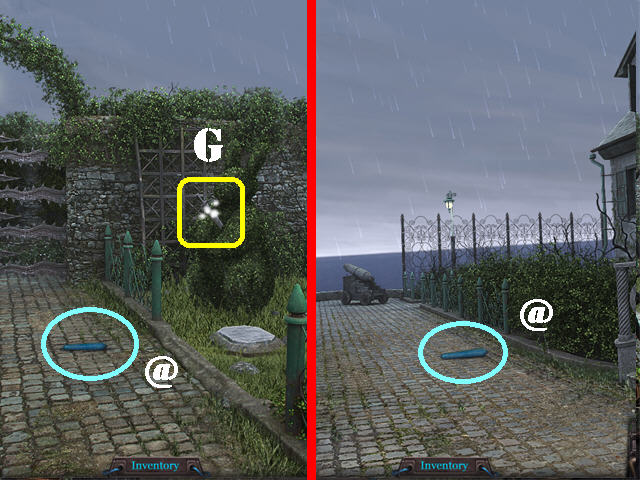
- Head forward towards the cannon.
- Take the CRYSTAL (@) on the ground.
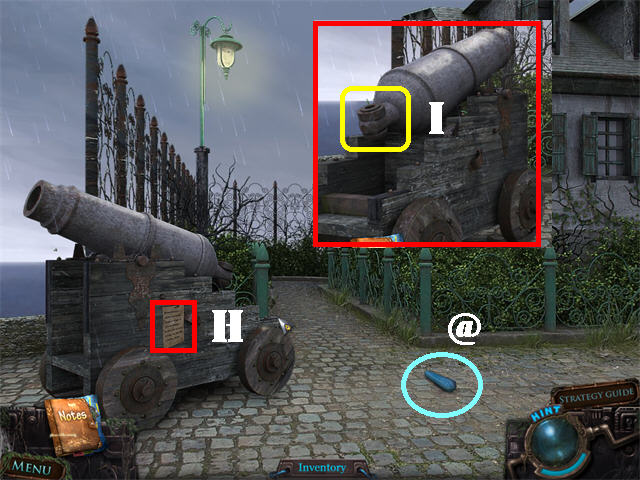
- Take the NOTE (H) on the side of the cannon.
- Click on the cannon to move its position.
- Place the WICK on the back of the cannon (I).
- Light the FUSE with the LIGHTER.
- The cannon will blow a hole through the side of the mansion; go towards it.
- Go through the hole in the wall.
- Take the CANNONBALL in the upper left (J).
- Examine the device on the left.
- Click on the correct sequence of buttons in order to move the mechanical arm so it can pick up and drop off the flower.
- Please click on the buttons in the order shown in the screenshot (K).
- Take the FLOWER at the bottom of the device.
- Click down twice; head right, click down and head right.
- Place the CANNONBALL on the stone piece on the ground to unlock the gate (L).
- Go through the gate.
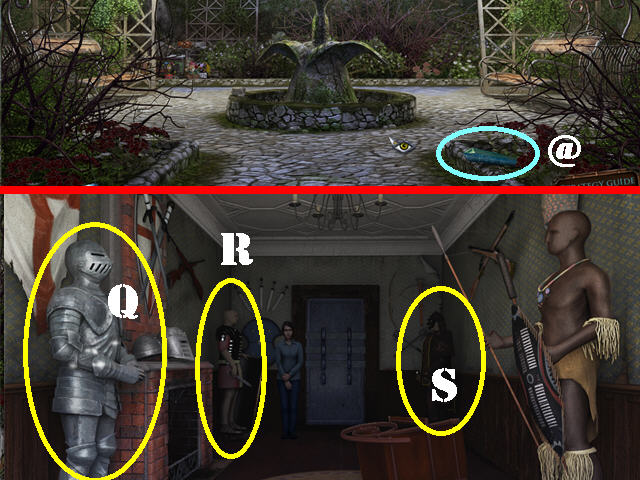
- Take the CRYSTAL (@) on the left.
- Go forward; head left and go towards the statue.
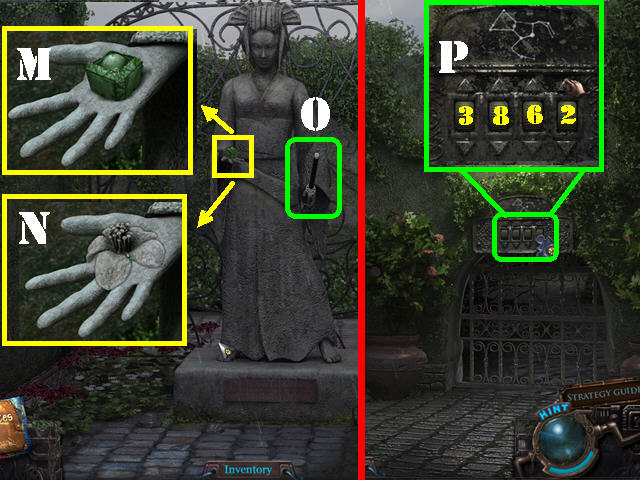
- Zoom into the left hand; take the GREEN GEM (M).
- Place the FLOWER on the left hand (N).
- Take the KATANA on the right hand (O).
- Click down twice.
- Zoom into the lock above the gate.
- Using the symbol above the gate as a clue choose the correct code according to the symbols found in the signboard by the boat.
- The solution is ‘3862' (P).

- Go through the gate.
- Play the Hidden Object Scene.
- Find the listed items to obtain the ROMAN HELMET.
- Tale the CRYSTAL (@) in the lower right.
- Return to the inside of the mansion and head into the right door.
- Give the KNIGHT'S SWORD to the knight on the left (Q).
- Zoom into the ROMAN LEGIONNAIRE and place the ROMAN HELMET on its head (R).
- Zoom into the samurai and place the KATANA in the holder (S).
- The back door is now unlocked; go through it.
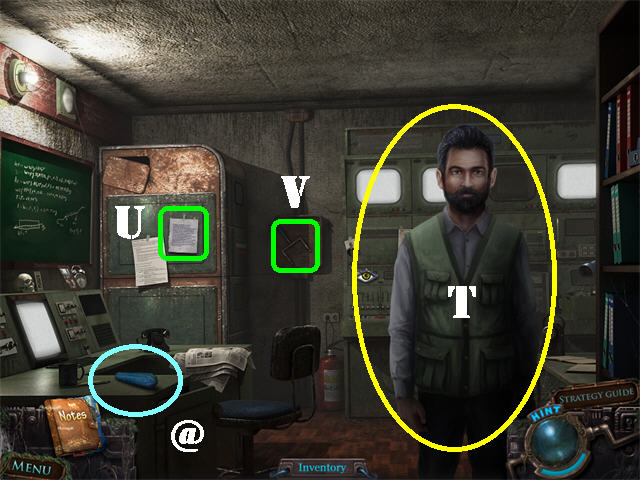
- Talk to Professor Kelvin (T).
- Grab the CRYSTAL (@) on the left.
- Take the NOTE (U) on the left.
- Grab the HANDLE (V) by the back wall.
- Click down until you reach the locked gate.
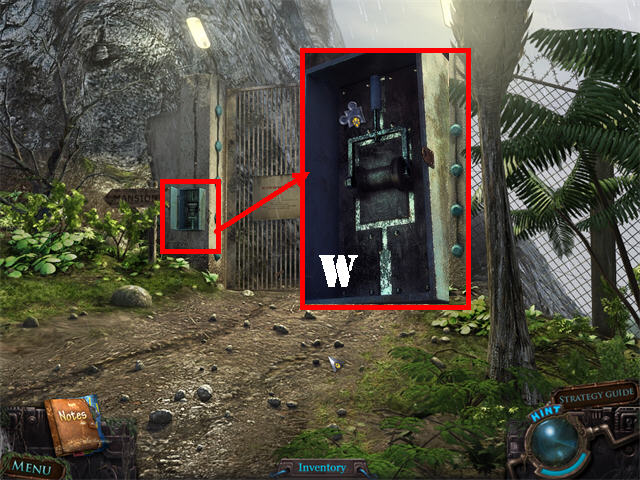
- Examine the box next to the gate; place the HANDLE on it (W).
- Pull the HANDLE.
- Go through the gate.
Chapter 6: The Swamp
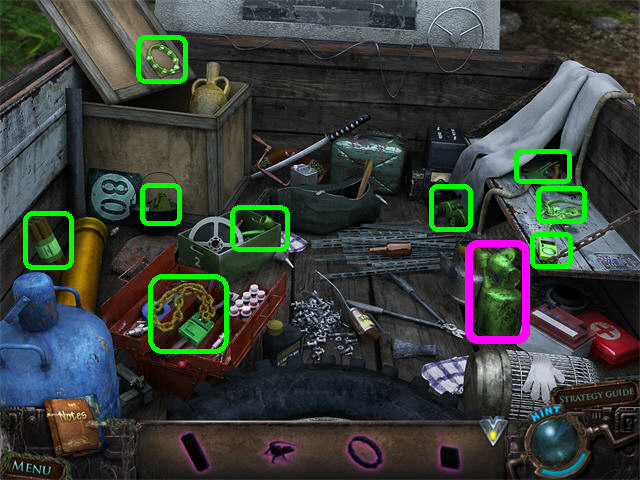
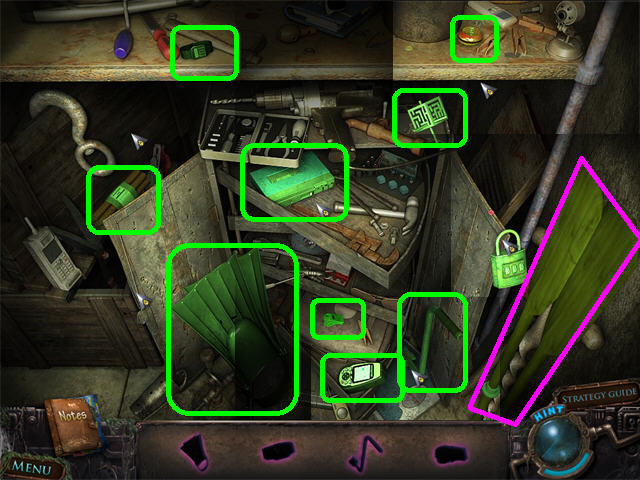
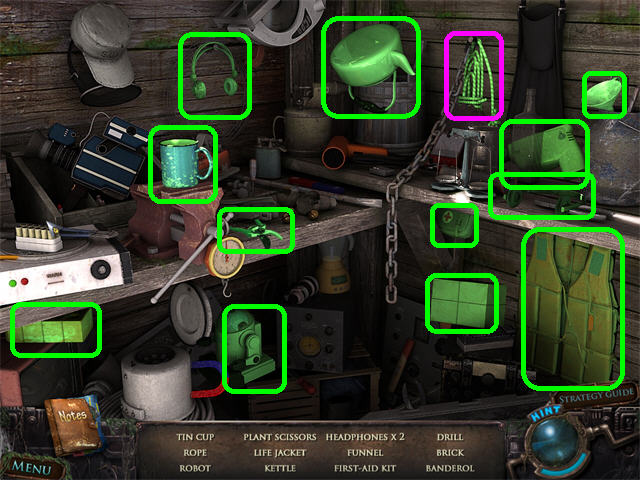
- Play the Hidden Object Scene in the back of the truck.
- Find the silhouette items to obtain the BLOWTORCH.
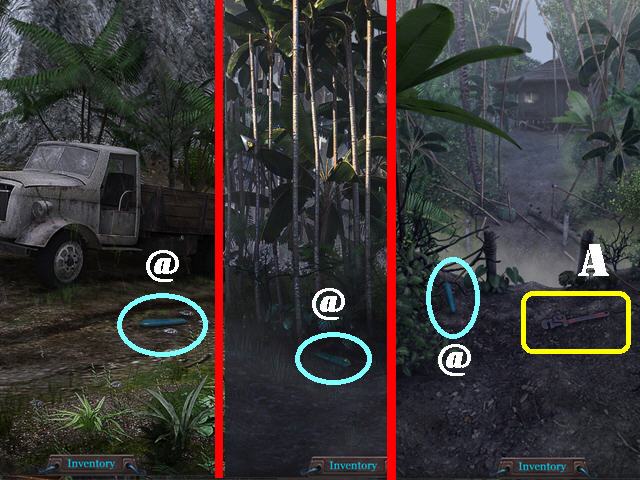
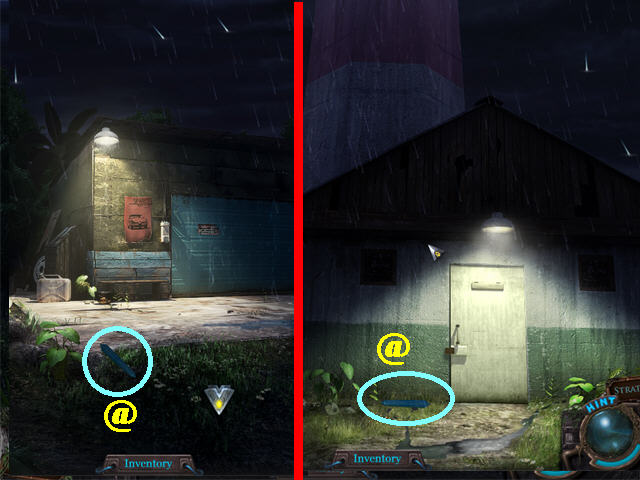
- Take the CRYSTAL (@) on the ground.
- Head right.
- Take the CRYSTAL (@) on the ground.
- Head left.
- Take the CRYSTAL (@) on the ground.
- Grab the WRENCH (A) on the ground.
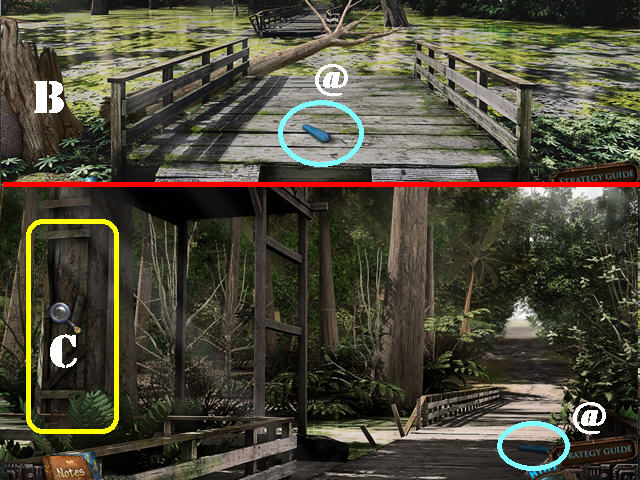
- Click down and head right.
- Take the CRYSTAL (@) on the ground.
- Chop down the tree on the left with the AXE (B).
- Cross the bridge.
- Take the CRYSTAL (@) on the ground.
- Zoom into the ladder on left; fix the ladder on the tree with the HAMMER (C).
- Go into the Treehouse.
- Play the Hidden Object Scene on the left to obtain the ROPE.
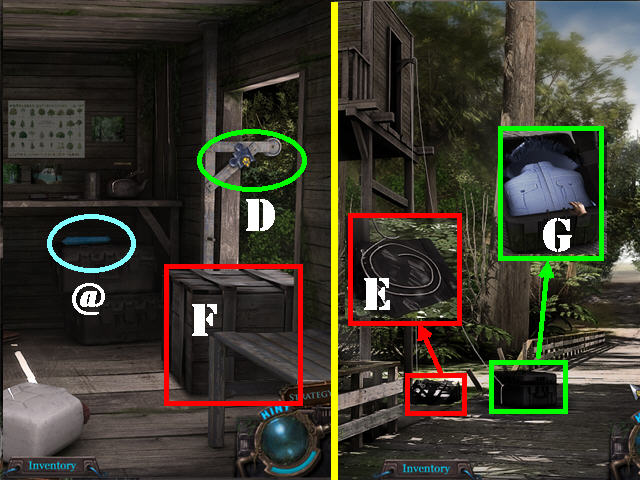
- Take the CRYSTAL (@) in the back.
- Place the ROPE on the pulley (D).
- Click down.
- Zoom into the box on the ground; click on the rope (E).
- Go back up to the Treehouse.
- Push the Crate out the window (F).
- Click down.
- Zoom into the case; open it and take the COAT (G).

- Go forward.
- Take the CRYSTAL (@) on the left.
- Go forward.
- Take the CRYSTAL (@) on the ground.
- Go towards the ladder on the right and then go down the ladder (H).
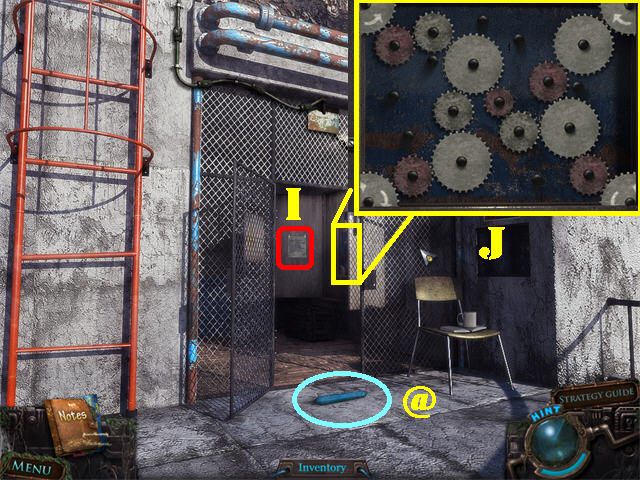
- Take the CRYSTAL (@) on the ground.
- Take the NOTE (I) in the back.
- Zoom into the gears in the back to activate a puzzle.
- Place the GEARS on the correct pegs as shown in the screenshot (J).
- Solving the gear puzzle activates the elevator.
- Go up the ladder; click down and enter the elevator (K).
- Click on the down button in the elevator (L).
- Go forward.
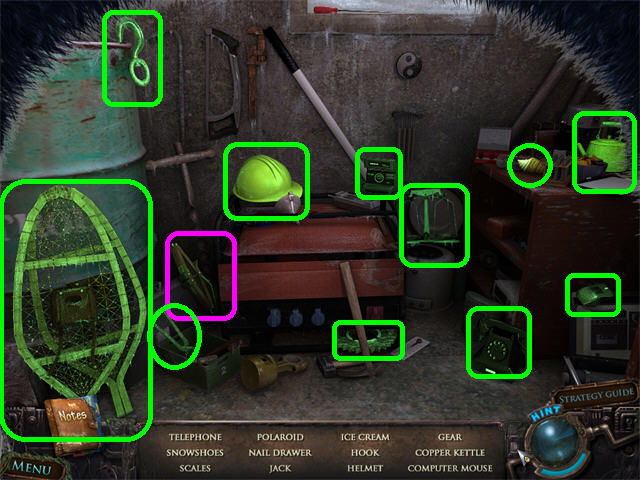
Chapter 7: The Underwater Station
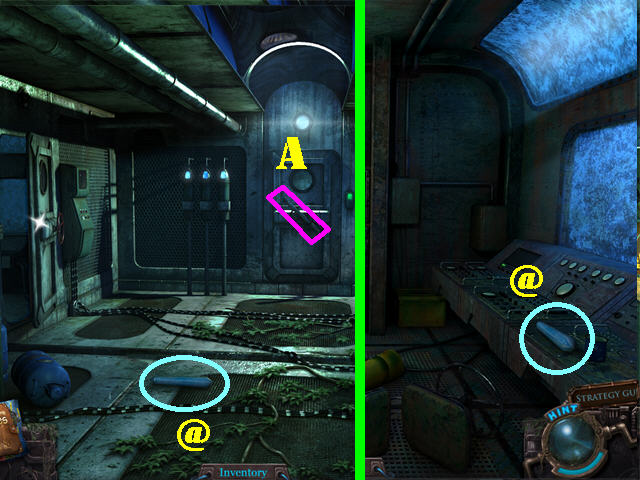
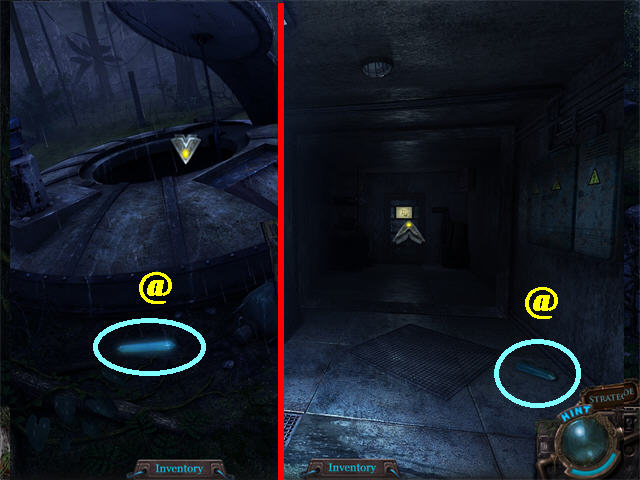
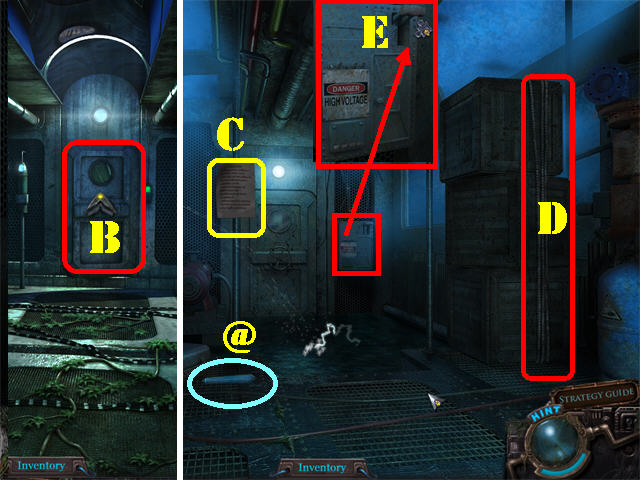
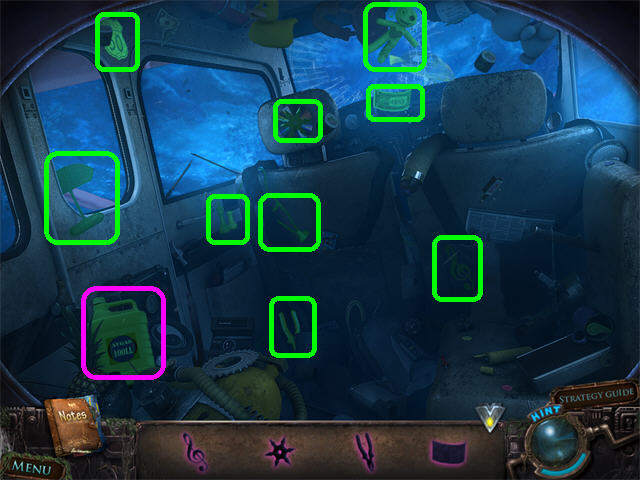
- Take the CRYSTAL (@) on the ground.
- Take the PIPE (A) on the back door.
- Go into the left door.
- Take the CRYSTAL (@) on the right.
- Play the Hidden Object Scene by the shelves.
- Find the silhouette items to obtain the DAGGER.
- Click down.
- Click on the back door and go through it (B).
- Take the CRYSTAL (@) on the ground.
- Take the NOTE (C) by the back door.
- Cut the ROPES on the right with the DAGGER (D).
- Zoom into the switch box and click on the handle (E).
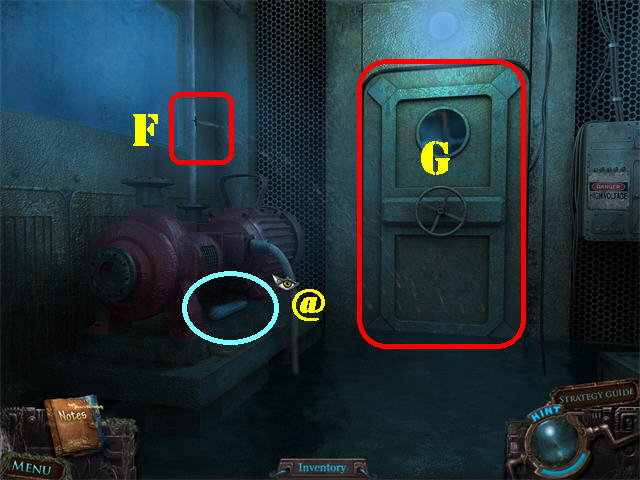
- Go through the back door.
- Take the CRYSTAL (@) by the water pump.
- Fix the broken pipe with the WRENCH (F).
- Use the PIPE on the fixed pipe.
- Go through the back door (G).
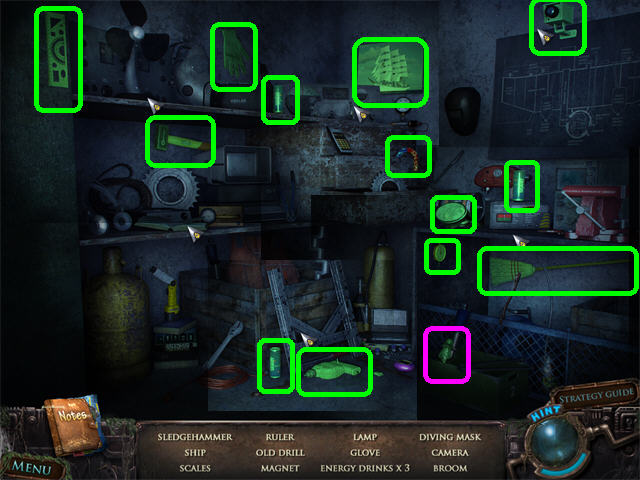
- Play the Hidden Object Scene in the back.
- Find the listed items to obtain the LAMP.
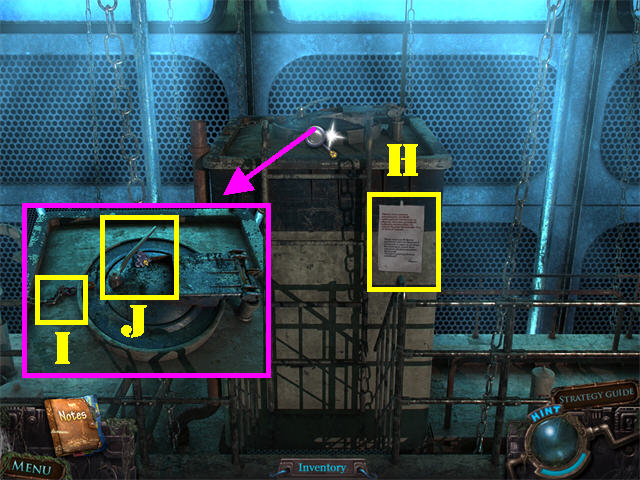
- Go up towards the bathyscaphe.
- Take the NOTE (H).
- Zoom into the hatch; cut the chain with the BLOWTORCH (I).
- Click on the handle and go into the hatch (J).
- Take the CRYSTAL (@) on the right.
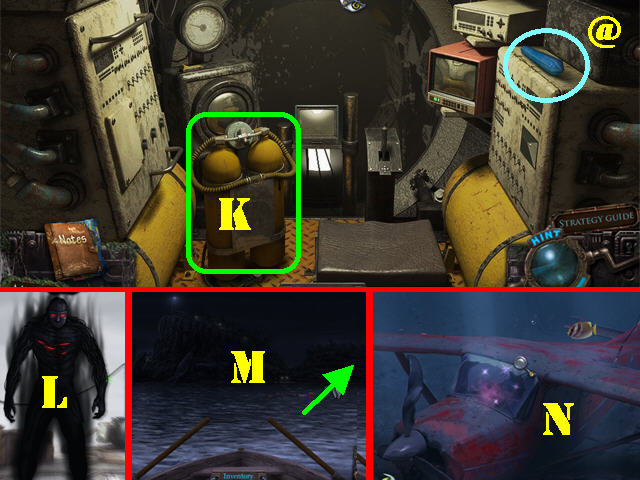
- Grab the AQUALUNG (K).
- Click down until you reach the outside of the elevator and the creature will appear again (L).
- Click down until you reach the boat; then head right (M).
- Go forward 3 times to reach the underwater plane (N).You have to have the AQUALUNG in your inventory before you can go underwater.
- Play the Hidden Object Scene by the plane.
- Find the silhouette items to obtain the AVIATION GAS.
- Click down 4 times to reach the boat. Click down; go forward and head left twice.
- Try to go forward and the creature will appear again; eventually blocking the road (N).
- Click down; go forward twice and left by the fork in the road.
- Take the CRYSTAL (@) on the ground.
- Go forward.
- Take the CRYSTAL (@) above the red barrel.
- Zoom into the generator in the lower right; use the AVIATION GAS in the funnel (O).
- Click on the handle on the generator to lift the container (P).
- Go forward twice.
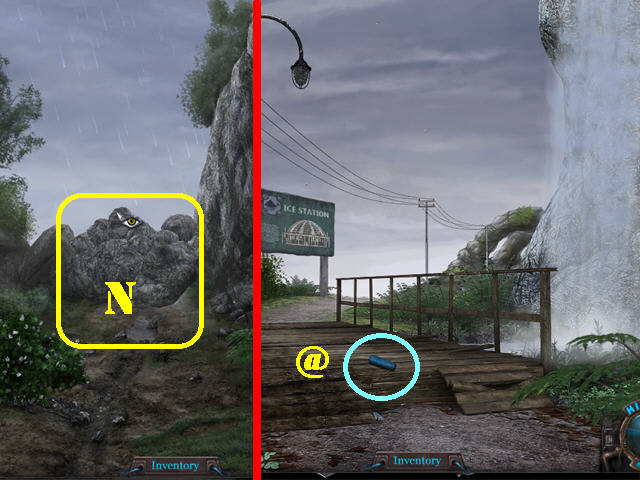
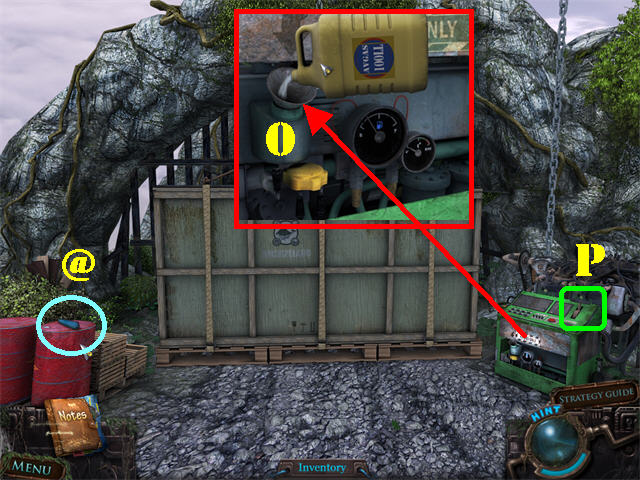
Chapter 8: The Ice Station
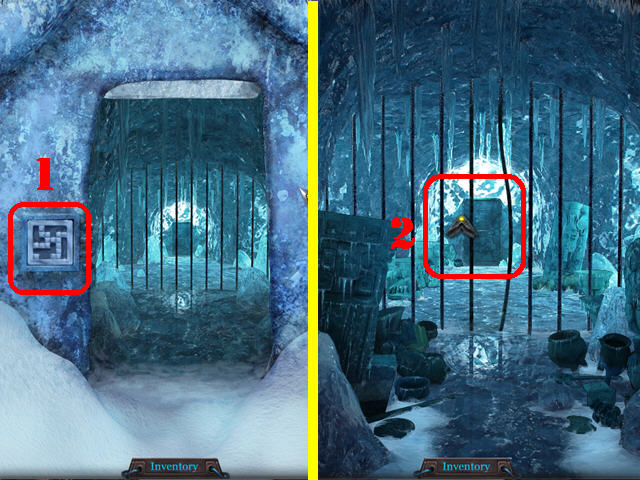
- Take the CRYSTAL (@) on the ground.
- Grab the NOTE (A) on the ground.
- Go forward.
- Take the CRYSTAL (@) on the ground.
- Go through the door. The COAT must be in your inventory to continue past this point.
- Take the CRYSTAL (@) on the ground.
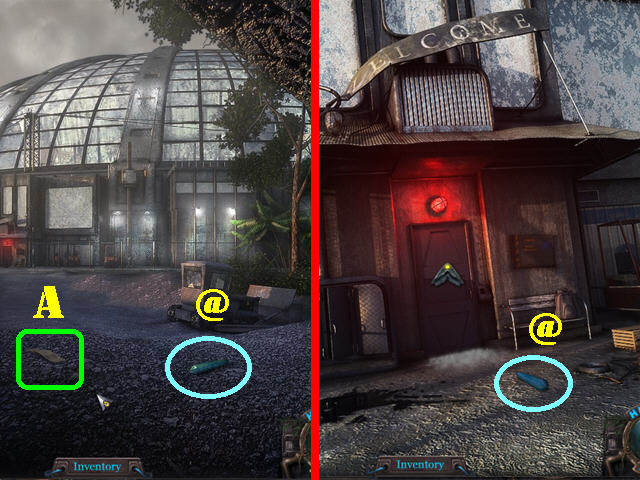
- Go forward; head right, forward and into the building.
- Take the CRYSTAL (@) on the right.
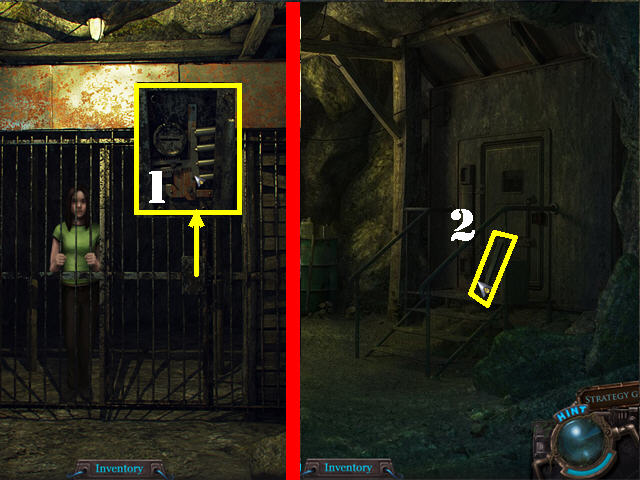
- Zoom into the locker on the right; open the latch and take the SHOVEL (B).
- Take the NITROGEN (C) on the left.

- Click down 3 times.
- Use the SHOVEL to remove the snowdrift (D).
- Go into the door to encounter another student inside the lab (E).
- Take the CRYSTAL (@) on the left.
- Play the Hidden Object Scene in the back.
- Find the listed items to obtain the JACK.
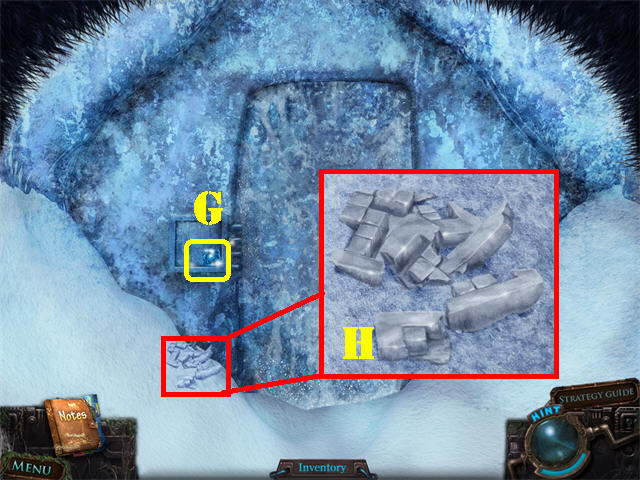
- Go out the right door; right, forward, right, and forward twice.
- Take the BLUE GEM (G).
- Zoom into the ice pieces on the left; take the ICE (H).
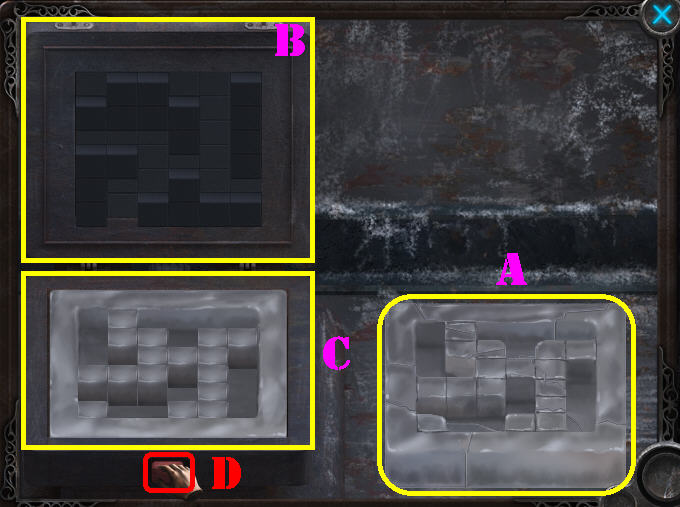
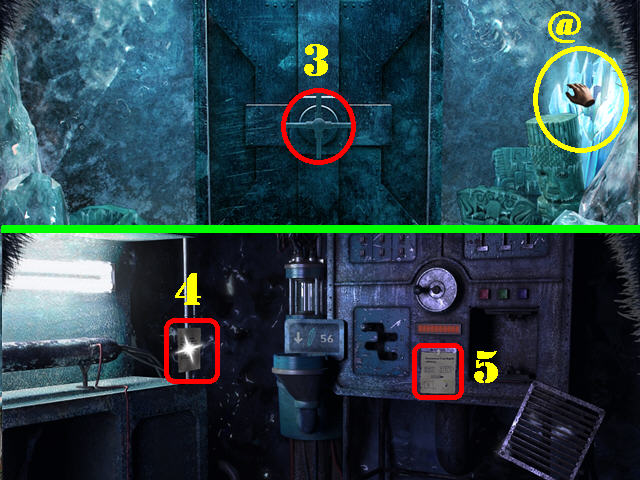
- Click down 5 times; go into the lab.
- Examine the device on the left; place the ICE in the lower right side of the puzzle to activate the puzzle (A).
- In order to make a copy of the key in the lower right (A), you must click on the correct squares in the form maker in the upper left (B).
- You must create the mirror image of the key in the lower right corner by clicking on the correct squares in the upper left.
- Please look at the screenshot for the solution (A). Click on the red button (C) at the bottom to confirm your selection.
- The ICE KEY will be added to inventory after the puzzle has been solved.
- Go right twice; head forward, right and forward twice.
- Place the ICE KEY on the lock next to the door (1).
- Go through the door; use the JACK on the bars (2).
- Go forward.
- Take the CRYSTAL (@) on the right.
- Click on the wheel and go through the door (3).
- Take the NOTE (4) on the left.
- Take the NOTE (5) on the machine.
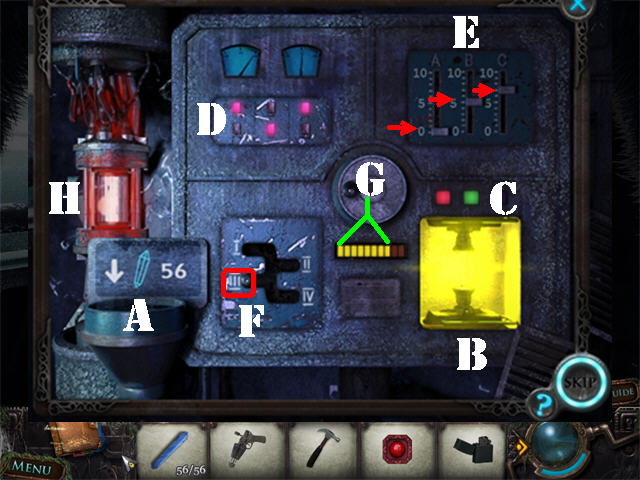
- Zoom into the machine.
- Place the 56 CRYSTALS in the lower left slot (A).
- Place the LAMP in the lower right slot (B).
- Use the diagram you just uncovered to solve the puzzle.
- Click on the green and red buttons to make the lamp turn yellow (C).
- Click on the switches in the upper left as shown in the screenshot (D).
- Slide the levers in the upper right as shown in the screenshot to reflect the numbers 0, 5, and 7 (E).
- Slide the lever to the ‘III' (F).
- Rotate the wheel until all yellow bars are lit except for the last two bars (G).
- Use the NITROGEN on the ENERGY CAPSULE to cool it down after it heats up (H).
- Take the ENERGY CAPSULE after it has cooled down.
- Click down until a cut scene appears.
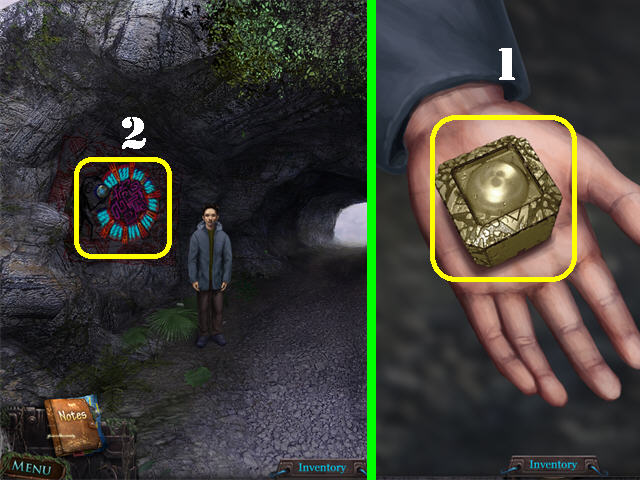
- Take the YELLOW GEM from the boy's hand (1).
- Click on the portal on the left; it will take you straight to Fog Island (2).
- Go forward.
- Zoom into the door.
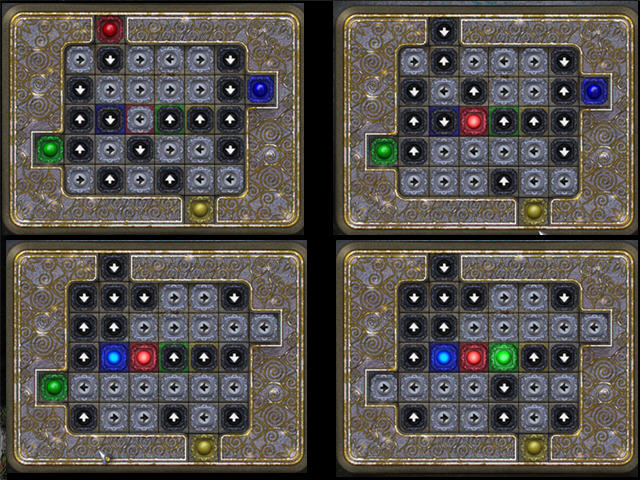
- Place the RED GEM, BLUE GEM, GREEN GEM, and YELLOW GEM on the board to activate a puzzle.
- Move the tiles to their matching color by placing the arrows in the correct spots.
- Click on an arrow and it will swap positions with the arrow it is pointing to.
- An arrow will reverse its position once it hits a dead end.
- Please look at the screenshot for the solution.
- Check out our video solution!
- Go through the door.
Chapter 9: The Finale
- Go through the left door and head right to see a student behind bars.
- Zoom into the lock on the bars; break it with the HAMMER (1).
- You will automatically receive the KEY after the student has been freed.
- Click down twice.
- Knock down the bar by the right door and go through the door (2).
- Click down and go up the ladder. Click down twice, head forward twice, make a left, go forward, and head left by the lighthouse.
- Zoom into the device; cool down the battery with the NITROGEN (3); take the BATTERY.
- Click down.
- Zoom into the lighthouse door; open the door with the KEY Samantha gave you (4).
- Enter the lighthouse.
- Place the plugs in the correct order into the switch as shown in the screenshot.
- Go forward.
- Examine the panel; take the SCREWDRIVER (A).
- Put the BATTERY in the slot.
- Click on the handle to open the gate and go through it (B).

- Talk to the student (C).
- Use the WEAPON on the creature that appears in the scene (D).
- Examine the rocket on the left; use the SCREWDRIVER on the panel (E).
- Use the HAMMER on the SCREWDRIVER.
- Put the ENERGY CAPSULE in the compartment.
- Use the LIGHTER on the rocket's fuse.
- Congratulations! You have completed The Missing: A Search and Rescue Mystery!
Created at: 2011-07-24