

Walkthrough Menu
- General Tips
- Chapter 1: Wisdom
- Chapter 2: Honesty
- Chapter 3: Justice
- Chapter 4: Prudence
- Chapter 5: Hope
- Chapter 6: Patience
- Chapter 7: Benevolence
- Chapter 8: Integrity
- Chapter 9: Loyalty
- Chapter 10: Love
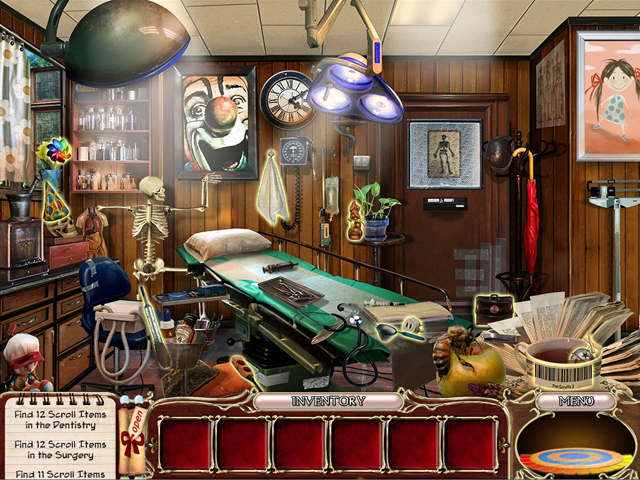
General Tips
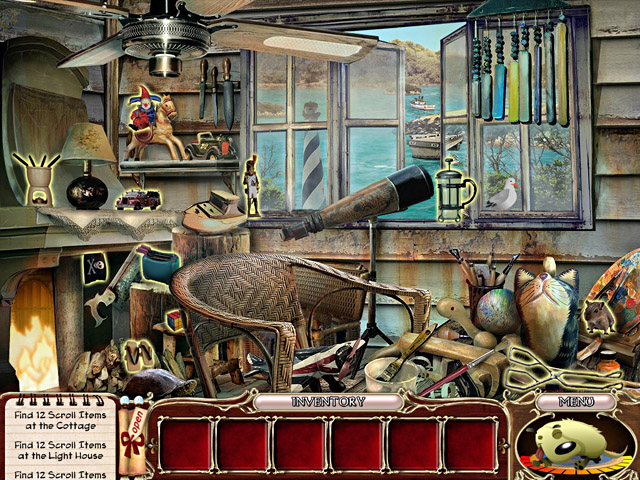
 ● To help the Scruffs reclaim the Throne of Scrufford, you
will need to find and interact with various objects and
Scrufford citizens. ● Look for sparkling areas of interest,
try using different objects to solve puzzles and never give
up! Call Scruffy any time you need his help on your quest of
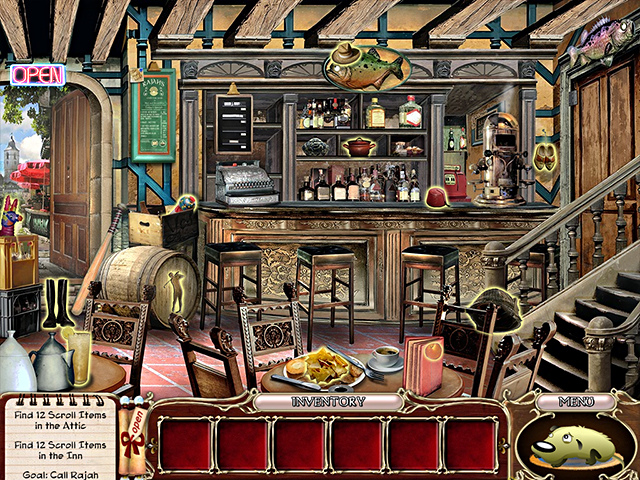
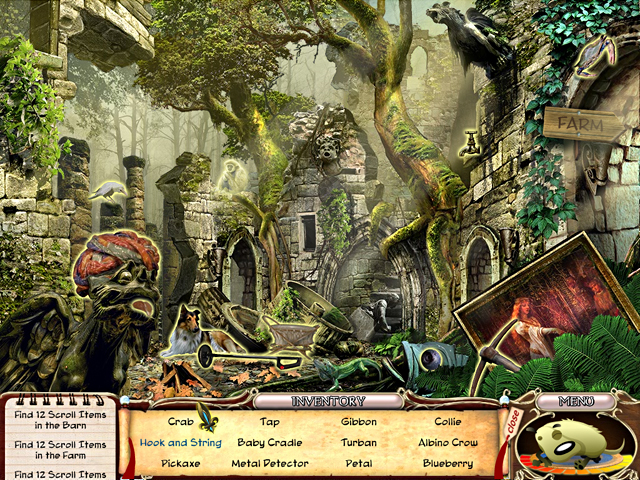
retrieving the long-lost Scrufford Regalia. ● The image on the
right shows all features of the game interface you can use: ●
The Notepad (A) shows the list of your current tasks. Complete
a task and it will get crossed off. Whenever a new task
appears, the bell will ring, and the Notepad will rise to show
you the newly added task. ● The Scroll (B) at the bottom of
the screen contains a list of items that you must find. You
can open or close the Scroll to view your inventory any time
you like by clicking on the scroll tab on the edge. As you
locate Scroll items on your list they will be crossed off. ●
Click on the Inventory tab (C) to access special items you’ve
collected that are parts of puzzles. Some inventory items will
be found in separate pieces - a number will indicate how many
more of the same type you need to pick up. Click on the Scroll
to reopen it. ● Click on Scruffy (E) to search for objects!
You can use Scruffy anytime - he’ll even tell you when there’s
nothing to look for in a particular area. But he needs to
recharge in between hints! ● Thought Bar (F) appearing at the
top of your screen, when you click on objects, can give you
hints. Keep an eye on it!
● To help the Scruffs reclaim the Throne of Scrufford, you
will need to find and interact with various objects and
Scrufford citizens. ● Look for sparkling areas of interest,
try using different objects to solve puzzles and never give
up! Call Scruffy any time you need his help on your quest of
retrieving the long-lost Scrufford Regalia. ● The image on the
right shows all features of the game interface you can use: ●
The Notepad (A) shows the list of your current tasks. Complete
a task and it will get crossed off. Whenever a new task
appears, the bell will ring, and the Notepad will rise to show
you the newly added task. ● The Scroll (B) at the bottom of
the screen contains a list of items that you must find. You
can open or close the Scroll to view your inventory any time
you like by clicking on the scroll tab on the edge. As you
locate Scroll items on your list they will be crossed off. ●
Click on the Inventory tab (C) to access special items you’ve
collected that are parts of puzzles. Some inventory items will
be found in separate pieces - a number will indicate how many
more of the same type you need to pick up. Click on the Scroll
to reopen it. ● Click on Scruffy (E) to search for objects!
You can use Scruffy anytime - he’ll even tell you when there’s
nothing to look for in a particular area. But he needs to
recharge in between hints! ● Thought Bar (F) appearing at the
top of your screen, when you click on objects, can give you
hints. Keep an eye on it!
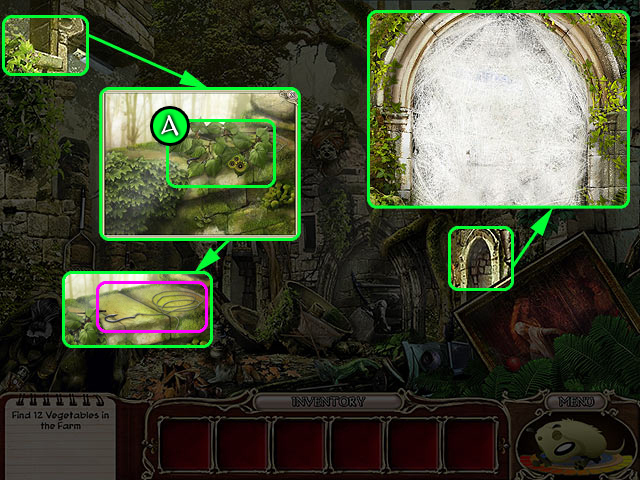
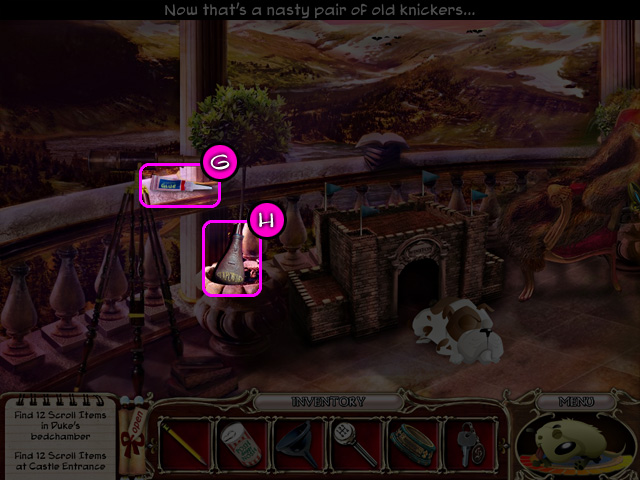
 ● The cursor will change as you move over various active
areas: ● If you see a Magnifying Glass (G) appear, this means
you can view this location close-up. Examine such areas
thoroughly! ● Areas of Interest (H) will sparkle. They contain
puzzles or vital clues needed to solve puzzles found
elsewhere. Click on an area of interest and it will reveal a
vignette (close-up) of that particular area. Some will have
hidden items within them so make sure you check these
vignettes thoroughly for items too. You can use Scruffy! Once
a particular puzzle has been solved, that area will stop
sparkling. ● There is a Help Button (I) In the top left corner
of each mini-game. Click on this for more detailed
instructions on how to play a particular mini-game. You can
also Skip a Puzzle (J) after the bar completely fills up. ● A
Rotating Gear (K) indicates that the object you are pointing
at is interactive. Click on it and see what happens.
● The cursor will change as you move over various active
areas: ● If you see a Magnifying Glass (G) appear, this means
you can view this location close-up. Examine such areas
thoroughly! ● Areas of Interest (H) will sparkle. They contain
puzzles or vital clues needed to solve puzzles found
elsewhere. Click on an area of interest and it will reveal a
vignette (close-up) of that particular area. Some will have
hidden items within them so make sure you check these
vignettes thoroughly for items too. You can use Scruffy! Once
a particular puzzle has been solved, that area will stop
sparkling. ● There is a Help Button (I) In the top left corner
of each mini-game. Click on this for more detailed
instructions on how to play a particular mini-game. You can
also Skip a Puzzle (J) after the bar completely fills up. ● A
Rotating Gear (K) indicates that the object you are pointing
at is interactive. Click on it and see what happens.
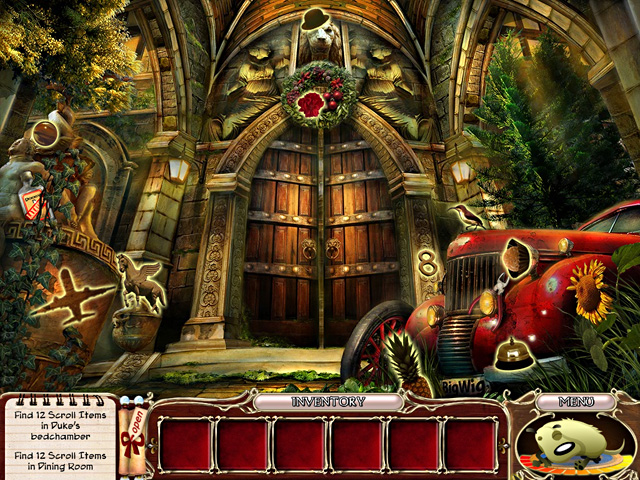
 ● Note the areas where your cursor turns into Walking Feet
(L). Click on that area to visit other locations. ● Each
Chapter is made up of three distinct parts: ● Collection items
search - At the beginning of each chapter the knight will ask
you to collect certain types of item and deliver them to him
(or her) in return for a scroll. ● Scroll items search - the
Knight will give you several lists of items to find in various
locations. Some of these objects will be used to solve
puzzles. ● Puzzles solving - in every chapter there are small
tasks to complete and one main puzzle to solve. Once solved,
you will be rewarded with a regalia item and you can then move
on to the next chapter.
● Note the areas where your cursor turns into Walking Feet
(L). Click on that area to visit other locations. ● Each
Chapter is made up of three distinct parts: ● Collection items
search - At the beginning of each chapter the knight will ask
you to collect certain types of item and deliver them to him
(or her) in return for a scroll. ● Scroll items search - the
Knight will give you several lists of items to find in various
locations. Some of these objects will be used to solve
puzzles. ● Puzzles solving - in every chapter there are small
tasks to complete and one main puzzle to solve. Once solved,
you will be rewarded with a regalia item and you can then move
on to the next chapter.
 ● If you get stuck, Scruffy can help you find items and spots
of interest. Click on Scruffy first, then move your cursor to
get a reaction. It is just like a "Hot and Cold" game - the
closer you are, the more excited Scruffy gets. When you are
close enough to the object, it will start shaking and Scruffy
will give you thumbs up!
● If you get stuck, Scruffy can help you find items and spots
of interest. Click on Scruffy first, then move your cursor to
get a reaction. It is just like a "Hot and Cold" game - the
closer you are, the more excited Scruffy gets. When you are
close enough to the object, it will start shaking and Scruffy
will give you thumbs up!
 ● You can also use Scruffy to help you with close-ups. If an
item that must be applied to a close-up will glow in your
inventory.
● You can also use Scruffy to help you with close-ups. If an
item that must be applied to a close-up will glow in your
inventory.
Chapter 1: Wisdom
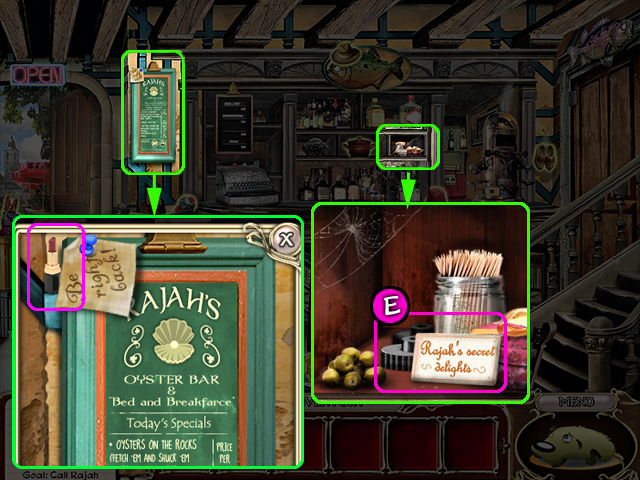
 ● The first knight, Rajah, will meet the Scruffs at the INN
ENTRANCE and ask them to help him find his Collection. He will
wait for his complete Collection in the ATTIC. ● Find Rajah's
Collection items at the INN ENTRANCE. ● Once all items are
found, click on the stairs on the right of the screen to go to
the ATTIC.
● The first knight, Rajah, will meet the Scruffs at the INN
ENTRANCE and ask them to help him find his Collection. He will
wait for his complete Collection in the ATTIC. ● Find Rajah's
Collection items at the INN ENTRANCE. ● Once all items are
found, click on the stairs on the right of the screen to go to
the ATTIC.
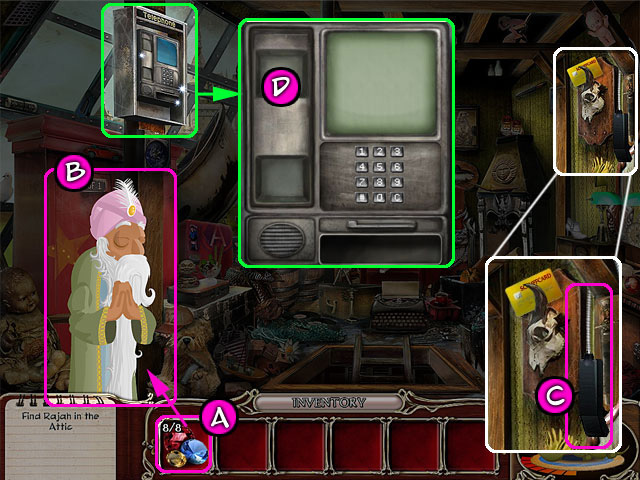 ● Click on the items collected in your Inventory (A) and give
them to Rajah (B). ● Rajah will then give you a Scroll
containing a list of items to find. You will need to find all
of these to move on to the next chapter.
● Click on the items collected in your Inventory (A) and give
them to Rajah (B). ● Rajah will then give you a Scroll
containing a list of items to find. You will need to find all
of these to move on to the next chapter.
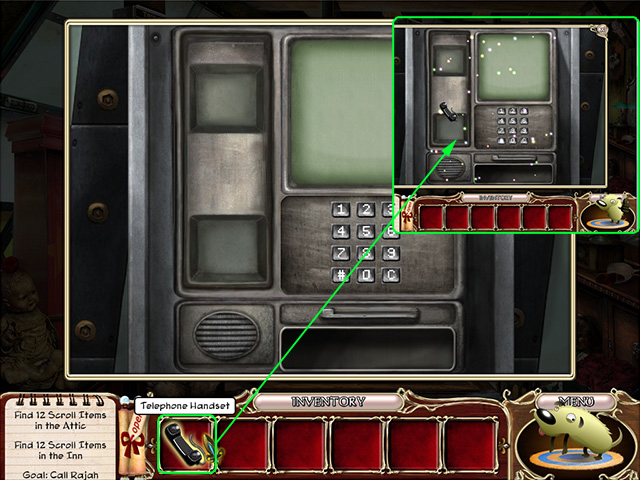
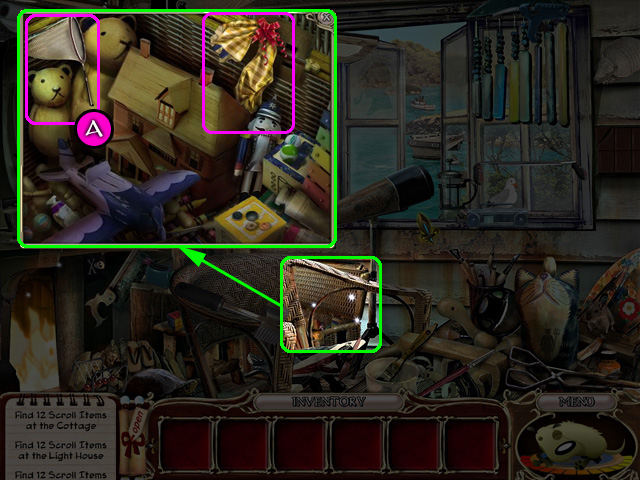
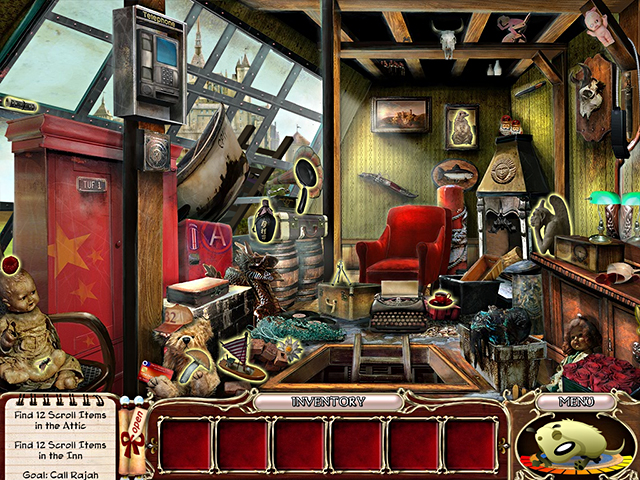 ● Find all Scroll items in the ATTIC. ● Examine the sparkling
areas in the ATTIC. Note that the Telephone is missing the
Handset and the Typewriter is missing its Knobs. ● Fix the
Telephone by finding the missing Handset (C) on the right wall
and placing it on the empty cradle (D) of the Telephone. ● Go
downstairs to the INN ENTRANCE
● Find all Scroll items in the ATTIC. ● Examine the sparkling
areas in the ATTIC. Note that the Telephone is missing the
Handset and the Typewriter is missing its Knobs. ● Fix the
Telephone by finding the missing Handset (C) on the right wall
and placing it on the empty cradle (D) of the Telephone. ● Go
downstairs to the INN ENTRANCE
 ● Find all Scroll items at the INN ENTRANCE. Note that the
object "Lipstick" is hidden within the Menu Board sparkling
location. Click the “Be right back” note to reveal it.
● Find all Scroll items at the INN ENTRANCE. Note that the
object "Lipstick" is hidden within the Menu Board sparkling
location. Click the “Be right back” note to reveal it.
 ● Retrieve the missing Knobs (E) from the Shelf and go back to
the ATTIC ● If all scroll objects have been found, the
Telephone will ring. Click on the handset to answer. You will
be prompted to insert a Credit Card.
● Retrieve the missing Knobs (E) from the Shelf and go back to
the ATTIC ● If all scroll objects have been found, the
Telephone will ring. Click on the handset to answer. You will
be prompted to insert a Credit Card.
 ● Pick up the Credit Card (H) and put it in the phone slot
(I). You now need to find out what the password is. ● Fix the
Typewriter (F) by applying the knobs to the Typewriter and
then turning them. ● Take a piece of paper with 4-digit Pin
Code (G) from the Typewriter. ● Enter the correct Pin Code
into the Telephone using the buttons. A mini-game will start.
● Play the Sudoku game. ● Once you complete this puzzle, you
will receive the first Regalia item - The Tapestry of "The
Order of the Knights of Scrufford"!
● Pick up the Credit Card (H) and put it in the phone slot
(I). You now need to find out what the password is. ● Fix the
Typewriter (F) by applying the knobs to the Typewriter and
then turning them. ● Take a piece of paper with 4-digit Pin
Code (G) from the Typewriter. ● Enter the correct Pin Code
into the Telephone using the buttons. A mini-game will start.
● Play the Sudoku game. ● Once you complete this puzzle, you
will receive the first Regalia item - The Tapestry of "The
Order of the Knights of Scrufford"!
Chapter 2: Honesty
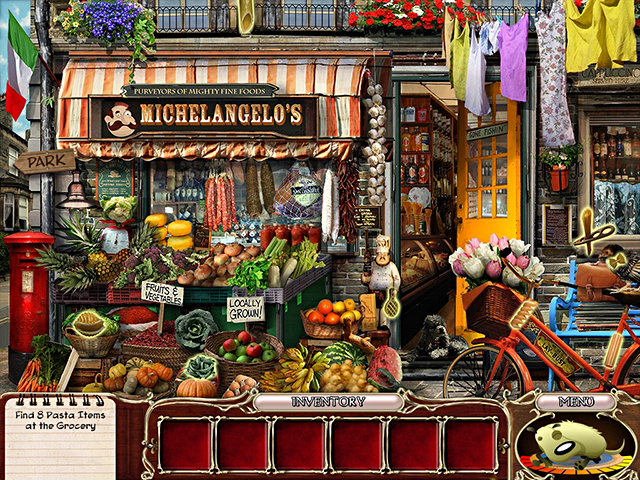 ● Find Michelangelo’s Collection items at the GROCERY. ● Once
you have found them all, click on the sign leading to the PARK
on the left of the screen. In the Park you can click on the
sign on the left which takes you to the TRAIN STATION. ● Give
Michelangelo his Collection and he will give you a scroll. He
will also tell you that the train schedule is messed up and
that you have to fix it to get what you are looking for.
● Find Michelangelo’s Collection items at the GROCERY. ● Once
you have found them all, click on the sign leading to the PARK
on the left of the screen. In the Park you can click on the
sign on the left which takes you to the TRAIN STATION. ● Give
Michelangelo his Collection and he will give you a scroll. He
will also tell you that the train schedule is messed up and
that you have to fix it to get what you are looking for.
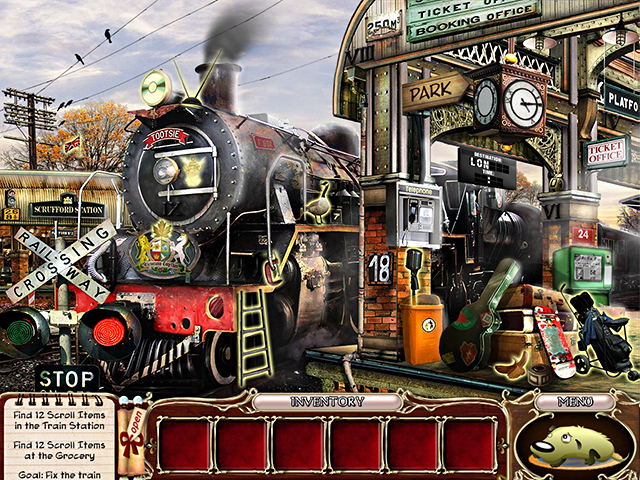 ● Find all Scroll items in the TRAIN STATION. One of the
Scroll objects - the Clamp - will be saved in your inventory.
● Examine the Newspaper Stand. It is operated with 2 coins,
and the newspaper inside contains the train schedule.
● Find all Scroll items in the TRAIN STATION. One of the
Scroll objects - the Clamp - will be saved in your inventory.
● Examine the Newspaper Stand. It is operated with 2 coins,
and the newspaper inside contains the train schedule.
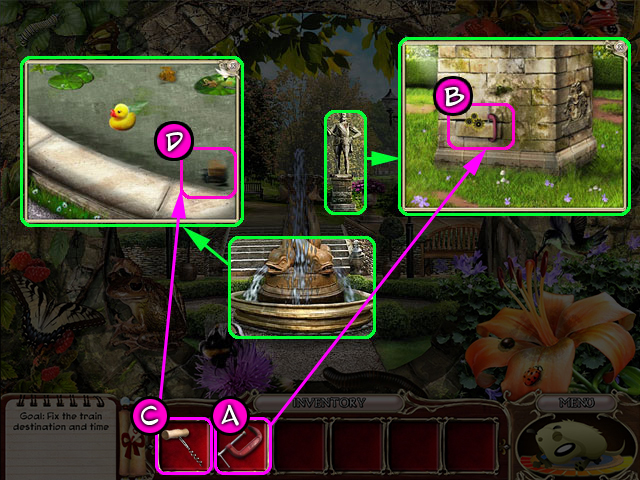 ● Go to the PARK and examine the Statue. In a close-up, you
will see that one of the bricks at the base of the statue is
loose. Use the Clamp (A) on the loose brick (B) to get the
first Coin. ● Examine the Fountain. There is a Coin on the
bottom, but you need to drain the water out by removing the
cork. ● Go to the GROCERY.
● Go to the PARK and examine the Statue. In a close-up, you
will see that one of the bricks at the base of the statue is
loose. Use the Clamp (A) on the loose brick (B) to get the
first Coin. ● Examine the Fountain. There is a Coin on the
bottom, but you need to drain the water out by removing the
cork. ● Go to the GROCERY.
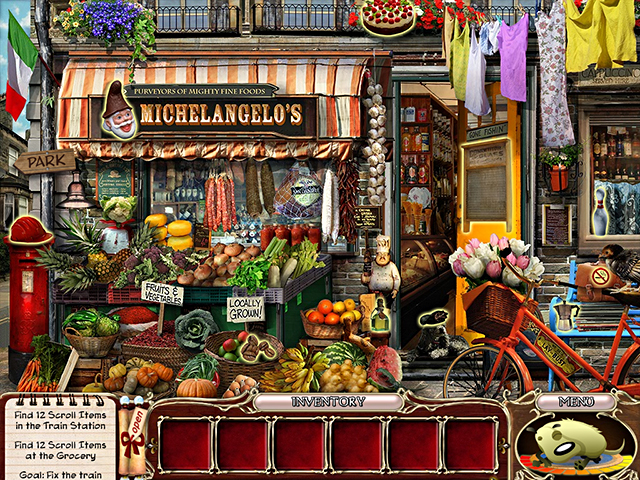 ● Find all Scroll items at the GROCERY. Two of the objects -
"Lime" and "Asparagus" are hidden in the Vegetable Stand
sparkling location. Click the weight to move it and reveal the
Lime.
● Find all Scroll items at the GROCERY. Two of the objects -
"Lime" and "Asparagus" are hidden in the Vegetable Stand
sparkling location. Click the weight to move it and reveal the
Lime.
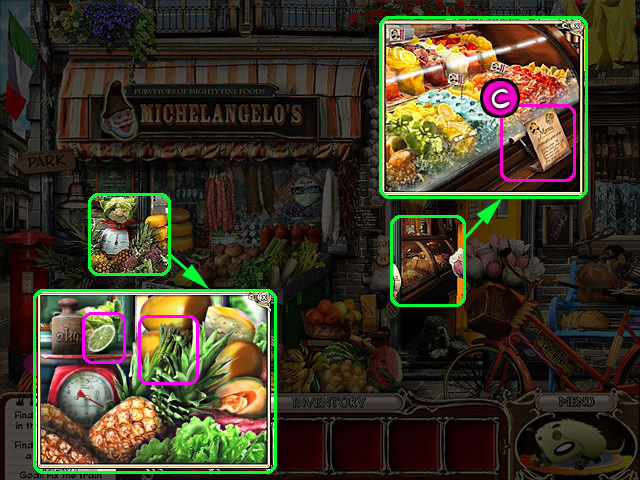 ● Examine the sparkling area inside the GROCERY. Click on the
Menu Card (C) to reveal the Corkscrew. Pick it up. ● Return to
the PARK. ● Use the Corkscrew (C) to remove the Cork (D) in
the Fountain to drain the water and pick up the second Coin. ●
Go to the TRAIN STATION.
● Examine the sparkling area inside the GROCERY. Click on the
Menu Card (C) to reveal the Corkscrew. Pick it up. ● Return to
the PARK. ● Use the Corkscrew (C) to remove the Cork (D) in
the Fountain to drain the water and pick up the second Coin. ●
Go to the TRAIN STATION.
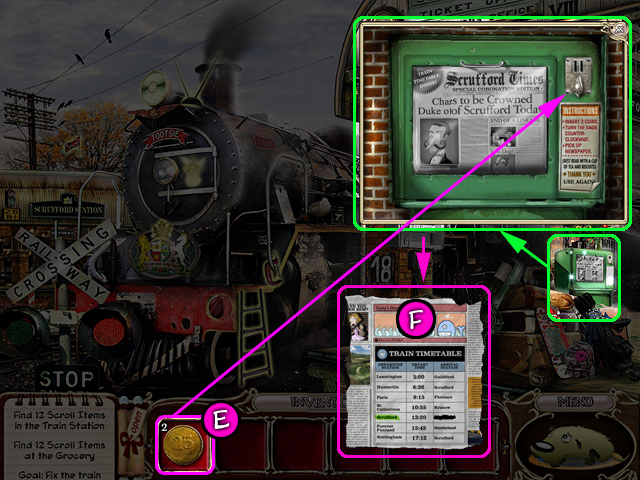 ● Place Coins (E) in the Newspaper Stand slot, turn the knob
and click on the newspaper to pick up the Train Timetable (F).
Click on the Timetable icon in your inventory to view it
close-up. ● Note the time next to the highlighted departure
station, Scrufford. It is 1:20 p.m. But the destination
station is obscured - you need to find this out.
● Place Coins (E) in the Newspaper Stand slot, turn the knob
and click on the newspaper to pick up the Train Timetable (F).
Click on the Timetable icon in your inventory to view it
close-up. ● Note the time next to the highlighted departure
station, Scrufford. It is 1:20 p.m. But the destination
station is obscured - you need to find this out.
 ● Enter the Ticket office. It opens after all Scroll items
have been found. The device (H) that controls the destination
display is missing three letter Rolls. These Rolls (I) are
located in the mini-game screen and around the TRAIN STATION.
Insert the Rolls into the device to activate the mini-game
(G).
● Enter the Ticket office. It opens after all Scroll items
have been found. The device (H) that controls the destination
display is missing three letter Rolls. These Rolls (I) are
located in the mini-game screen and around the TRAIN STATION.
Insert the Rolls into the device to activate the mini-game
(G).
 ● Play the Train Tracks game - align all the tracks to uncover
the train path from departure station to destination. Click on
a piece of track to rotate it. ● When the game is complete,
the device will start working and the Destination station will
be shown on the display.
● Play the Train Tracks game - align all the tracks to uncover
the train path from departure station to destination. Click on
a piece of track to rotate it. ● When the game is complete,
the device will start working and the Destination station will
be shown on the display.
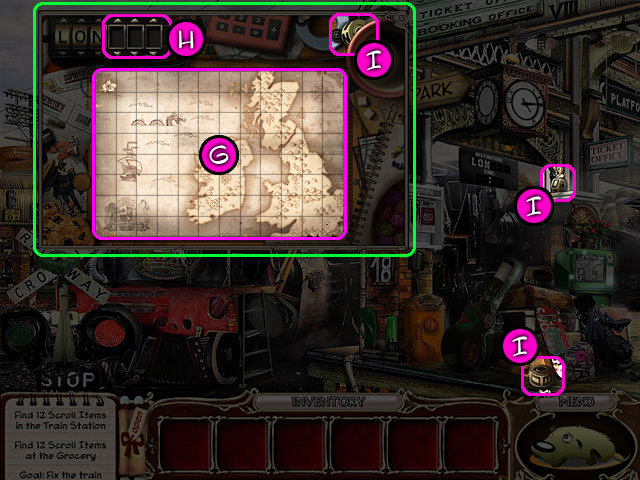
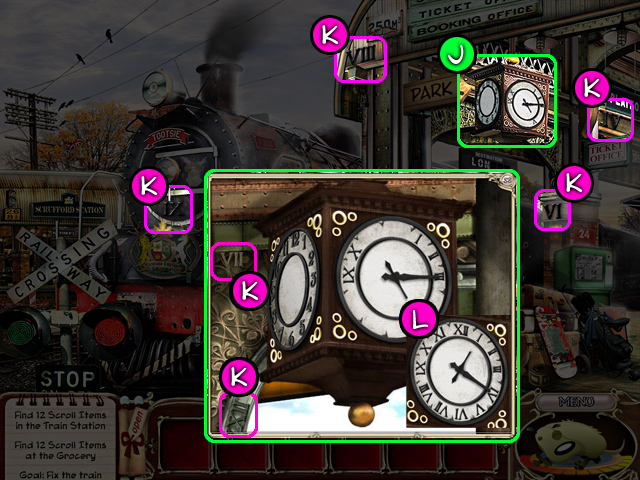 ● Examine the sparkling Clock (J) in the TRAIN STATION. The
Clock face seems to be missing Numbers. ● Pick up the two
Roman Numerals (K) next to the clock. ● Pick up four remaining
Numerals in the TRAIN STATION. ● Apply Numerals to their
correct positions on the clock face, then drag the clock hands
to show the time from the Train Schedule - 1:20 p.m. (L). ●
The clock will then open and reveal the second Regalia - >The
Royal Orb of Scrufford!
● Examine the sparkling Clock (J) in the TRAIN STATION. The
Clock face seems to be missing Numbers. ● Pick up the two
Roman Numerals (K) next to the clock. ● Pick up four remaining
Numerals in the TRAIN STATION. ● Apply Numerals to their
correct positions on the clock face, then drag the clock hands
to show the time from the Train Schedule - 1:20 p.m. (L). ●
The clock will then open and reveal the second Regalia - >The
Royal Orb of Scrufford!
Chapter 3: Justice
 ● Find Max’s collection items at the POLICE STATION. ● Click
the front door to go to the CASTLE ENTRANCE - from here you
can get to the TENNIS COURT. ● Give Max his collection. He'll
tell you about The Grolly and give you a clue about how to get
the Grolly to give you what you need.
● Find Max’s collection items at the POLICE STATION. ● Click
the front door to go to the CASTLE ENTRANCE - from here you
can get to the TENNIS COURT. ● Give Max his collection. He'll
tell you about The Grolly and give you a clue about how to get
the Grolly to give you what you need.
 ● Find all Scroll items in the TENNIS COURT. One of the
objects you find - a Hose - will be added to your inventory
for later use. ● View the Drinking Fountain close-up to find
the Pinecone. ● Go to the POLICE STATION.
● Find all Scroll items in the TENNIS COURT. One of the
objects you find - a Hose - will be added to your inventory
for later use. ● View the Drinking Fountain close-up to find
the Pinecone. ● Go to the POLICE STATION.
 ● Find all Scroll items in the POLICE STATION. ● Examine
sparkling locations.
● Find all Scroll items in the POLICE STATION. ● Examine
sparkling locations.
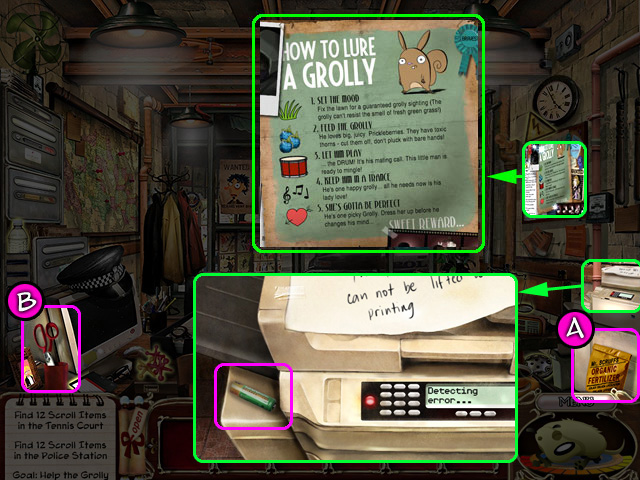 ● Read the Poster about the Grolly. He likes the smell of
grass, so you need to make sure the grass on the tennis court
is green and fresh! ● Examine the Photocopier to find the
Battery. ● Pick up the Organic Fertilizer (A). ● Go to the
CASTLE ENTRANCE.
● Read the Poster about the Grolly. He likes the smell of
grass, so you need to make sure the grass on the tennis court
is green and fresh! ● Examine the Photocopier to find the
Battery. ● Pick up the Organic Fertilizer (A). ● Go to the
CASTLE ENTRANCE.
 ● Pick up the Sprinkler (D). ● Go back to the TENNIS COURT.
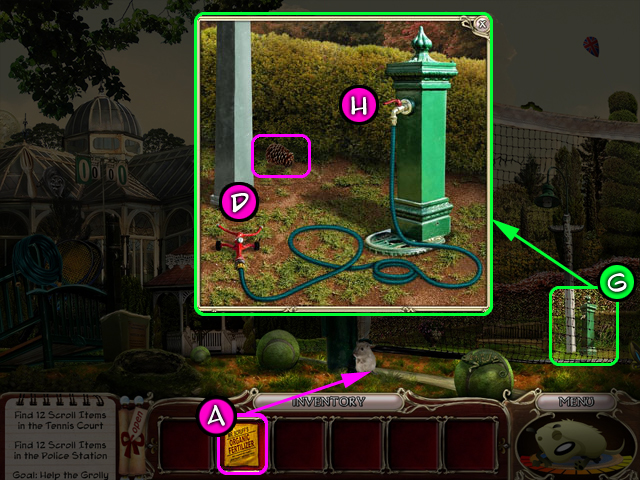 ● Apply the Fertilizer (A) to the Lawn. ● Click on a sparkling
Water Fountain (G) and examine it. Apply the Hose onto the
nozzle (H). Attach the Sprinkler (D) and turn on the water. ●
The Grolly will appear. He is hungry! ● Go back to the POLICE
STATION. ● Pick up the Scissors (B) and go to the CASTLE
ENTRANCE. ● Examine the Ivy Pot (C). Use Scissors (B) to cut 3
Berries (E). ● Return to the TENNIS COURT. The Grolly will be
waiting there, in anticipation of the treat!
● Apply the Fertilizer (A) to the Lawn. ● Click on a sparkling
Water Fountain (G) and examine it. Apply the Hose onto the
nozzle (H). Attach the Sprinkler (D) and turn on the water. ●
The Grolly will appear. He is hungry! ● Go back to the POLICE
STATION. ● Pick up the Scissors (B) and go to the CASTLE
ENTRANCE. ● Examine the Ivy Pot (C). Use Scissors (B) to cut 3
Berries (E). ● Return to the TENNIS COURT. The Grolly will be
waiting there, in anticipation of the treat!
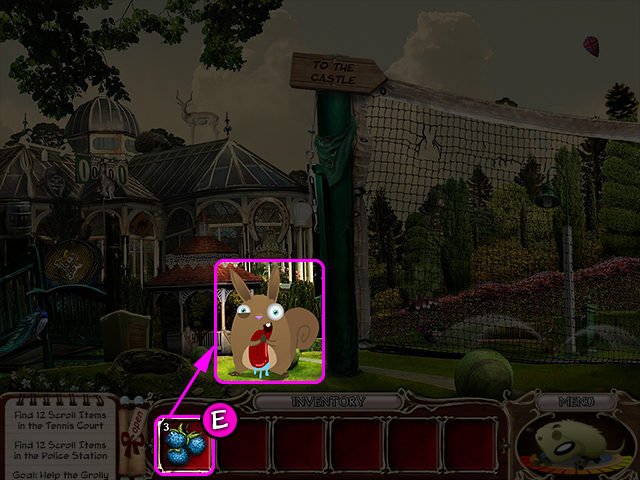 ● Give the Grolly the Berries (E). He will bring out a drum to
play, but he has no Drumsticks. ● Go to the CASTLE ENTRANCE.
● Give the Grolly the Berries (E). He will bring out a drum to
play, but he has no Drumsticks. ● Go to the CASTLE ENTRANCE.
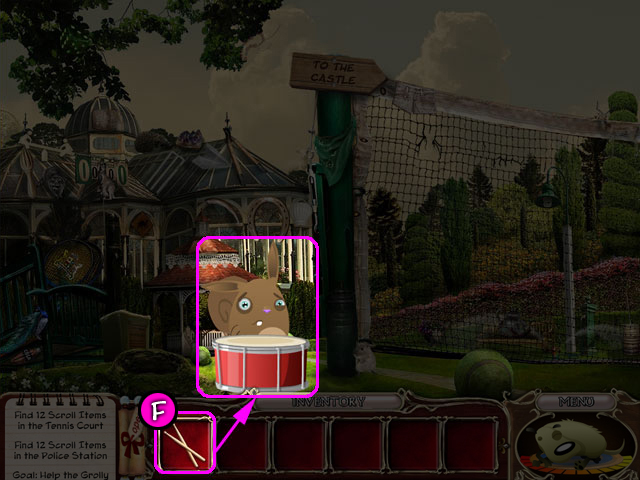 ● Pick up the DRUMSTICKS (F) and bring them to the Grolly. He
will start playing the drum to attract the mate.
● Pick up the DRUMSTICKS (F) and bring them to the Grolly. He
will start playing the drum to attract the mate.
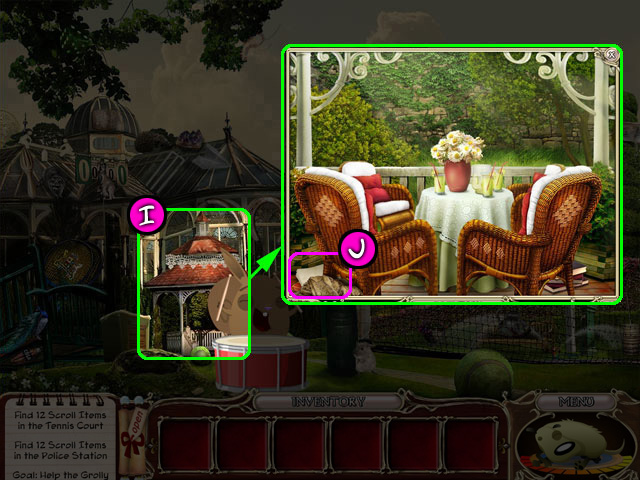 ● Check out the Gazebo (I). Click on the Scarf hanging on the
left chair backrest to reveal the Pile of Paper (J). Pick it
up. ● Go to the POLICE STATION.
● Check out the Gazebo (I). Click on the Scarf hanging on the
left chair backrest to reveal the Pile of Paper (J). Pick it
up. ● Go to the POLICE STATION.
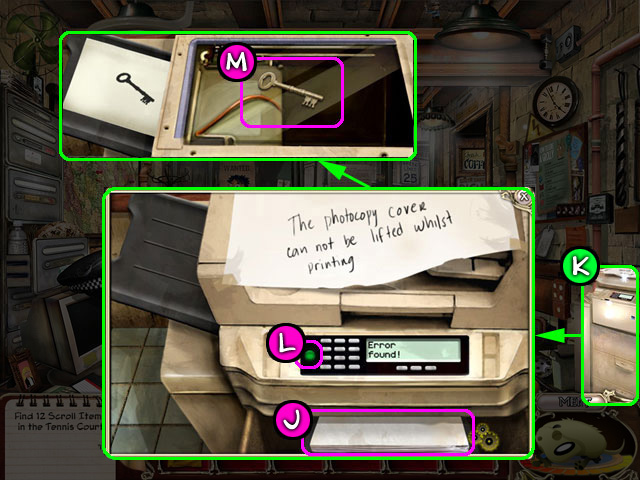 ● Examine the Photocopier (K). It has now detected the error
and needs the Paper to operate. Click on the bottom to open
the Paper Tray. Apply the Paper (J) onto the open Tray and
click to close it. ● Press the Green Button (L) on the Copier.
A photocopy of a Key will come out. Lift the cover and pick up
the Key (M). ● Go to the CASTLE ENTRANCE.
● Examine the Photocopier (K). It has now detected the error
and needs the Paper to operate. Click on the bottom to open
the Paper Tray. Apply the Paper (J) onto the open Tray and
click to close it. ● Press the Green Button (L) on the Copier.
A photocopy of a Key will come out. Lift the cover and pick up
the Key (M). ● Go to the CASTLE ENTRANCE.
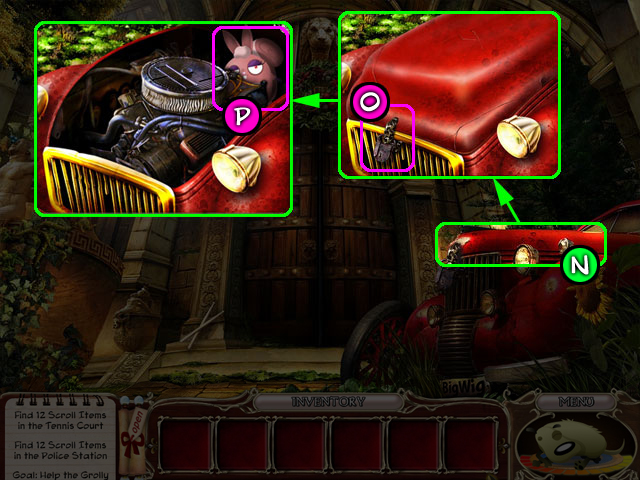 ● Click on the Car Bonnet (N) to zoom in. Use the Key (M) to
open the Padlock (O) and then click the Bonnet to open it.
Pick up the Grolly Doll (P). ● Proceed to the TENNIS COURT.
● Click on the Car Bonnet (N) to zoom in. Use the Key (M) to
open the Padlock (O) and then click the Bonnet to open it.
Pick up the Grolly Doll (P). ● Proceed to the TENNIS COURT.
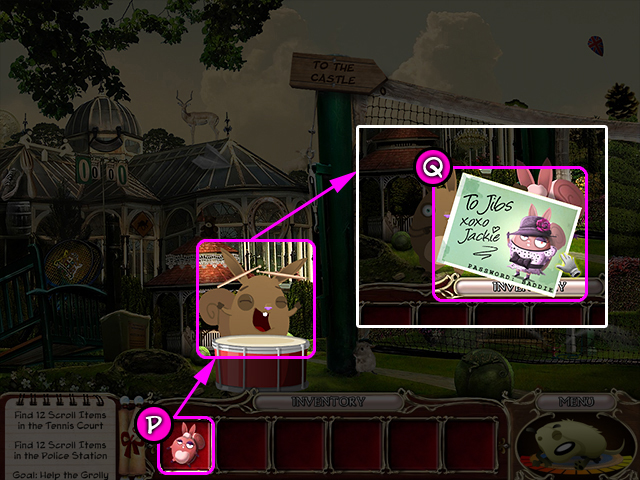 ● Give Grolly his Doll (P). He will give you the Postcard (Q)
showing you how The Doll must be dressed. Note the password,
"BADDIE" on the bottom of the card. ● Go to the POLICE
STATION.
● Give Grolly his Doll (P). He will give you the Postcard (Q)
showing you how The Doll must be dressed. Note the password,
"BADDIE" on the bottom of the card. ● Go to the POLICE
STATION.
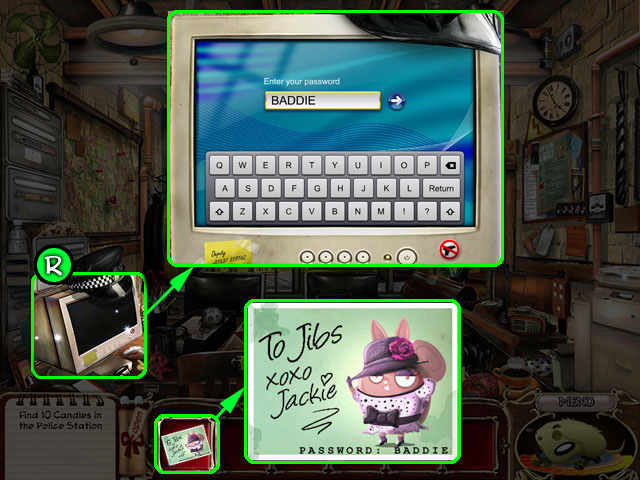 ● Click on the Computer (R) to zoom in. Type the password
(BADDIE) from the Postcard using your keyboard or on-screen
keyboard. Press Return. ● Once the Computer is unlocked, you
will receive an email from Basil with instructions on how to
play the mini-game. Click to proceed to the game.
● Click on the Computer (R) to zoom in. Type the password
(BADDIE) from the Postcard using your keyboard or on-screen
keyboard. Press Return. ● Once the Computer is unlocked, you
will receive an email from Basil with instructions on how to
play the mini-game. Click to proceed to the game.
 ● You will be given pairs of photos. Identify which person
from the left picture is not present on the snapshot on the
right. Click that person to move to the next photo. ● On
completion of this mini-game, you will receive an email from
Max Tilly. In the email, will be instructions to check out the
Gazebo. ● Go to the TENNIS COURT.
● You will be given pairs of photos. Identify which person
from the left picture is not present on the snapshot on the
right. Click that person to move to the next photo. ● On
completion of this mini-game, you will receive an email from
Max Tilly. In the email, will be instructions to check out the
Gazebo. ● Go to the TENNIS COURT.
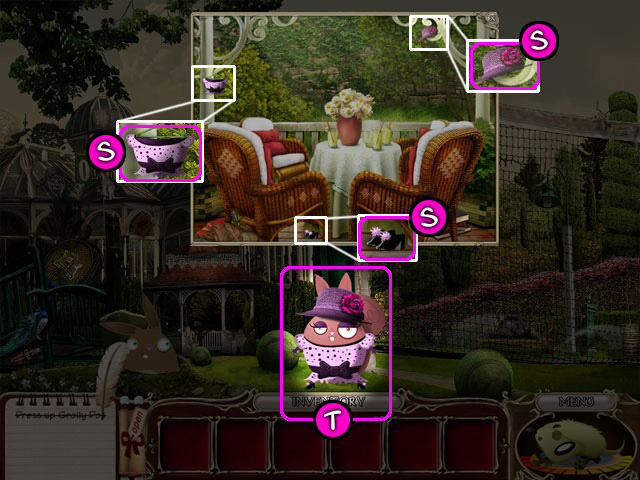 ● Examine the Gazebo to pick up three Grolly Doll Accessories
(S): Dress, Shoes and Hat. ● Dress up the female Grolly Doll
(T). ● Happy at last, Grolly will give you the third Regalia
item - >The Royal Mace of Scrufford.
● Examine the Gazebo to pick up three Grolly Doll Accessories
(S): Dress, Shoes and Hat. ● Dress up the female Grolly Doll
(T). ● Happy at last, Grolly will give you the third Regalia
item - >The Royal Mace of Scrufford.
Chapter 4: Prudence
 ● Find Pixie’s collection in the GRAND HALL. ● Click on the
stairs going up to the DUKE’S BEDCHAMBER and give Pixie her
collection. ● Pixie will give you the Scroll and a clue: send
out a smoke signal out of the castle.
● Find Pixie’s collection in the GRAND HALL. ● Click on the
stairs going up to the DUKE’S BEDCHAMBER and give Pixie her
collection. ● Pixie will give you the Scroll and a clue: send
out a smoke signal out of the castle.
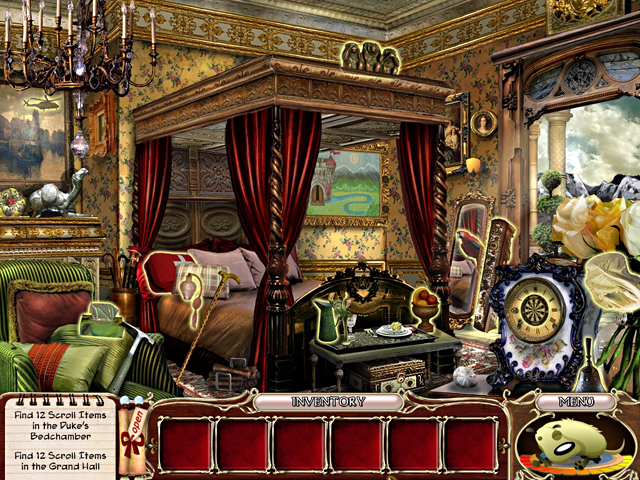 ● Find all Scroll items in the DUKE’S BEDCHAMBER.
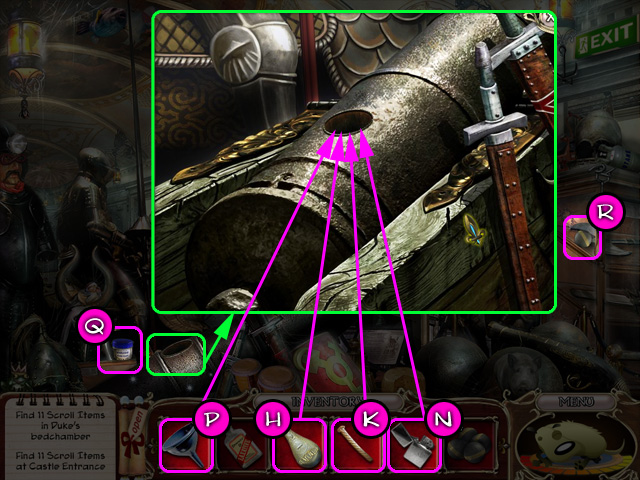
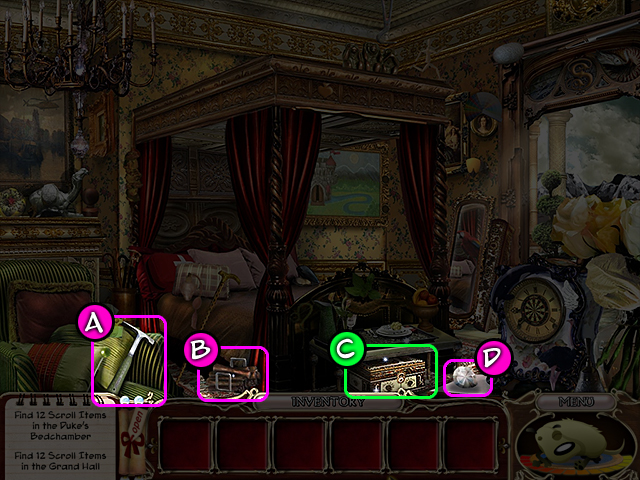 ● Pick up the Hammer Chisel (A), Firewood (B), Crystal Eye
(D). ● Examine the Chest under the Ottoman (C). You need to
find the combination to open the lock. ● Click on the open
area on the right to go to the BALCONY.
● Pick up the Hammer Chisel (A), Firewood (B), Crystal Eye
(D). ● Examine the Chest under the Ottoman (C). You need to
find the combination to open the lock. ● Click on the open
area on the right to go to the BALCONY.
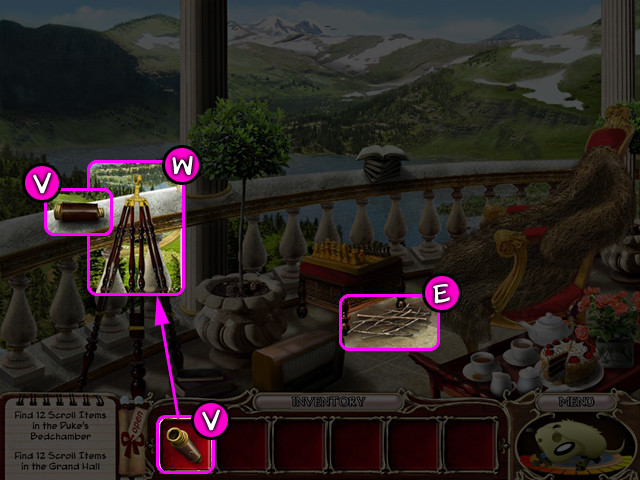 ● Pick up the Tinder (E) and Telescope Body (V). ● Place the
Telescope Body onto the Tripod (W). ● Click on the bottom of
the screen to go back to the DUKE'S BEDCHAMBER. ● Click on the
left of the room to return to the GRAND HALL.
● Pick up the Tinder (E) and Telescope Body (V). ● Place the
Telescope Body onto the Tripod (W). ● Click on the bottom of
the screen to go back to the DUKE'S BEDCHAMBER. ● Click on the
left of the room to return to the GRAND HALL.
 ● Find all Scroll items in the Grand Hall. One of the objects
you find, the Oil Can (H), will be saved in your inventory for
later use.
● Find all Scroll items in the Grand Hall. One of the objects
you find, the Oil Can (H), will be saved in your inventory for
later use.
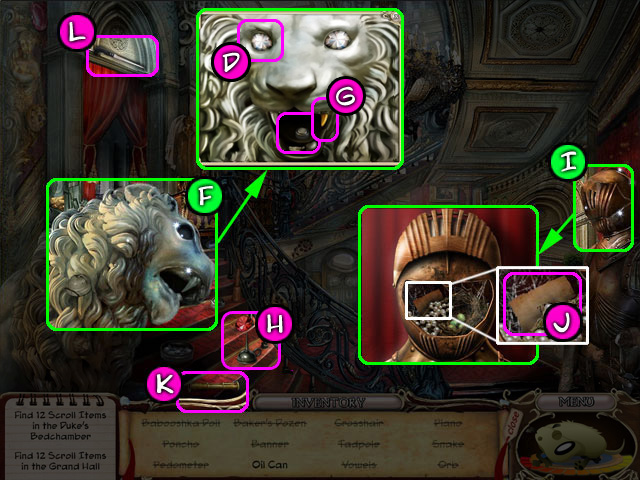 ● Pick up the telescope Eyepiece (K) and Carving Knife (L). ●
Examine the sparkling Lion Statue (F) and Rusty Armor (I).
Pick up the Watch Battery from the Lion's tongue. ● Place the
Crystal Eye (D) into the empty eye socket of the Lion Statue.
The golden Fang (G) will slide out. Use the Hammer Chisel (A)
to take the Fang (G) out. ● The Visor of the Armor is rusty,
apply the Oil Can (H) to it. Then click the visor to open it.
Pick up the Combination Note (J). ● Click on the arch at the
bottom right to go to the DINING ROOM.
● Pick up the telescope Eyepiece (K) and Carving Knife (L). ●
Examine the sparkling Lion Statue (F) and Rusty Armor (I).
Pick up the Watch Battery from the Lion's tongue. ● Place the
Crystal Eye (D) into the empty eye socket of the Lion Statue.
The golden Fang (G) will slide out. Use the Hammer Chisel (A)
to take the Fang (G) out. ● The Visor of the Armor is rusty,
apply the Oil Can (H) to it. Then click the visor to open it.
Pick up the Combination Note (J). ● Click on the arch at the
bottom right to go to the DINING ROOM.
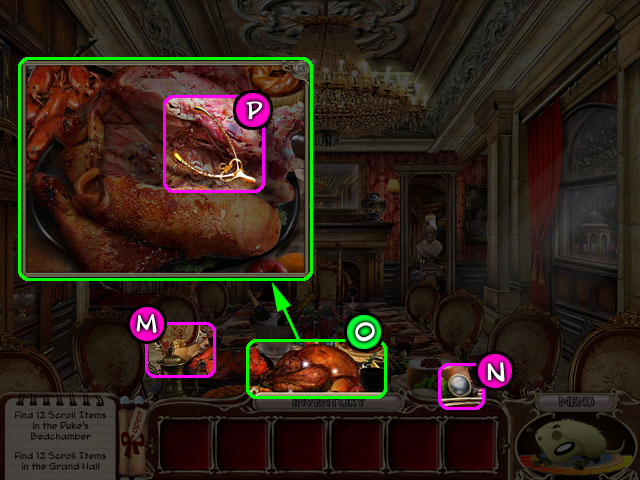 ● Pick up the Lighter (M) and the telescope Lens (N). ●
Examine the sparkling areas: Turkey on the table (O) and the
Fireplace (U). ● Carve the Turkey with the Carving Knife. Take
the Gold Wishbone (P).
● Pick up the Lighter (M) and the telescope Lens (N). ●
Examine the sparkling areas: Turkey on the table (O) and the
Fireplace (U). ● Carve the Turkey with the Carving Knife. Take
the Gold Wishbone (P).
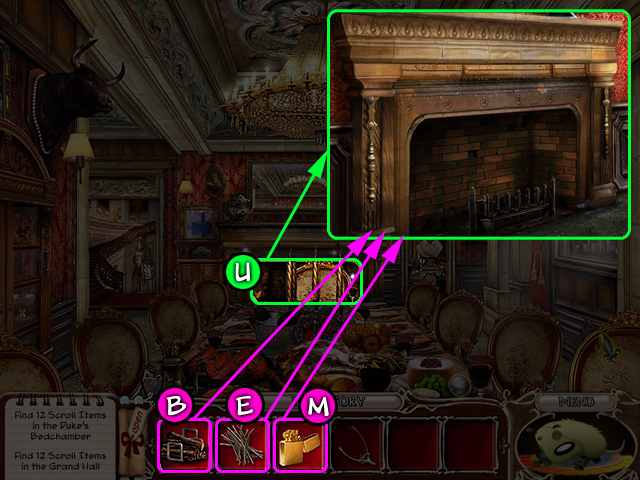 ● Light the fireplace by first putting down the Firewood (B),
add the Tinder (E) to it and then light the whole thing up
using the Lighter (M) from your inventory. This is the smoke
signal Pixie was talking about - it can be seen for miles
around! ● Go back to the DUKE'S BEDCHAMBER. ● Click on the
Chest in the DUKE'S BEDCHAMBER.
● Light the fireplace by first putting down the Firewood (B),
add the Tinder (E) to it and then light the whole thing up
using the Lighter (M) from your inventory. This is the smoke
signal Pixie was talking about - it can be seen for miles
around! ● Go back to the DUKE'S BEDCHAMBER. ● Click on the
Chest in the DUKE'S BEDCHAMBER.
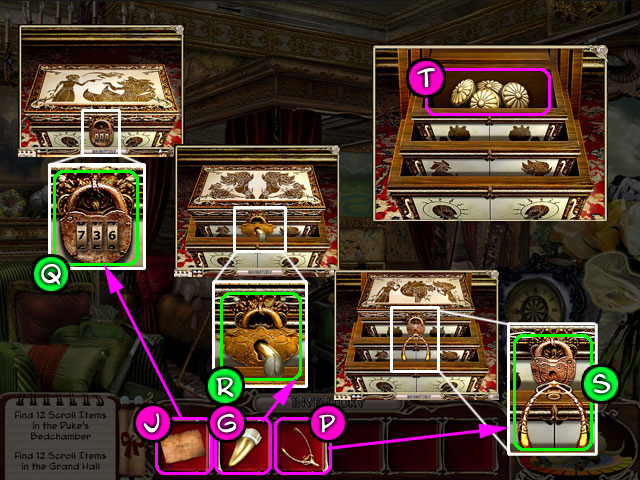 ● Open the Combination Lock (Q) with the number written on the
Combination Note (J) found in the Visor of the suit of Armor.
● Open the second Chest (R) with the Gold Fang (G) from the
Lion Statue. ● Open the third Chest (S) with the Gold Wishbone
(P). Pick up the Four Dials (T) from the Chest. ● Go to the
BALCONY.
● Open the Combination Lock (Q) with the number written on the
Combination Note (J) found in the Visor of the suit of Armor.
● Open the second Chest (R) with the Gold Fang (G) from the
Lion Statue. ● Open the third Chest (S) with the Gold Wishbone
(P). Pick up the Four Dials (T) from the Chest. ● Go to the
BALCONY.
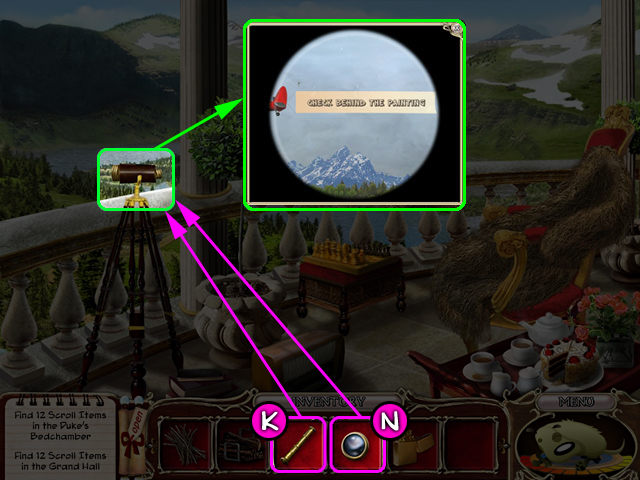 ● Fix the Telescope by applying the Lens (N) and the Eyepiece
(K) onto the Tripod with the Telescope Body. ● Click on the
assembled Telescope to look into it. You will see a flying
airplane in your telescope view - carrying a message for you
to 'check behind the painting'. ● Return to the DUKE'S
BEDCHAMBER.
● Fix the Telescope by applying the Lens (N) and the Eyepiece
(K) onto the Tripod with the Telescope Body. ● Click on the
assembled Telescope to look into it. You will see a flying
airplane in your telescope view - carrying a message for you
to 'check behind the painting'. ● Return to the DUKE'S
BEDCHAMBER.
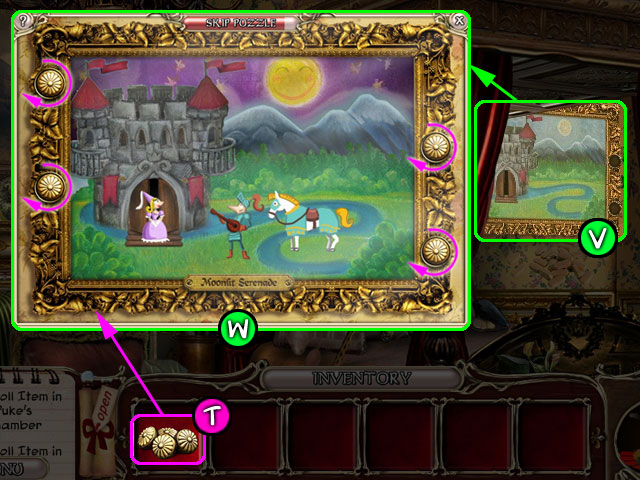 ● Click on the sparkling Painting area (V) to examine it.
Apply the dials onto the Round Slots on the Painting frame.
This will activate the mini-game (W). ● Turn the dials to
change the Painting details so that it represents the name of
the Painting - "Moonlit Serenade". ● Once the puzzle is
complete, the Painting will slide aside to reveal The Duke of
Scrufford’s Signet Ring!
● Click on the sparkling Painting area (V) to examine it.
Apply the dials onto the Round Slots on the Painting frame.
This will activate the mini-game (W). ● Turn the dials to
change the Painting details so that it represents the name of
the Painting - "Moonlit Serenade". ● Once the puzzle is
complete, the Painting will slide aside to reveal The Duke of
Scrufford’s Signet Ring!
Chapter 5: Hope
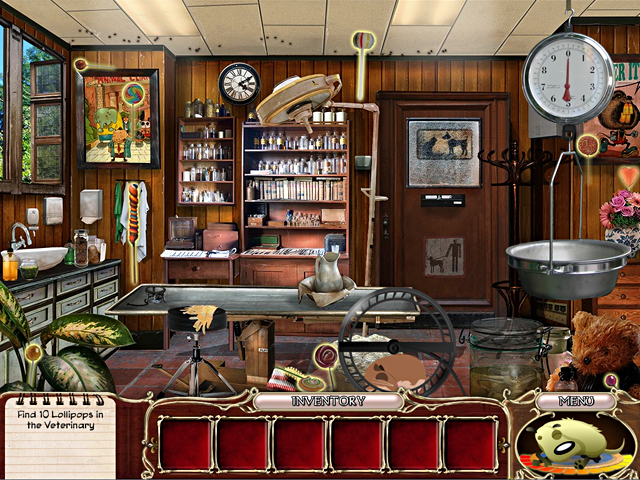 ● Find Bernard's collection in the VETERINARY, then exit
through the door to the clinic RECEPTION. ● Enter the door
with the tooth symbol to find Bernard in the DENTISTRY. ● Give
him his collection, and in return you will receive the Scroll
and a hint to get the hamster running to power up the X-Ray
machine.
● Find Bernard's collection in the VETERINARY, then exit
through the door to the clinic RECEPTION. ● Enter the door
with the tooth symbol to find Bernard in the DENTISTRY. ● Give
him his collection, and in return you will receive the Scroll
and a hint to get the hamster running to power up the X-Ray
machine.
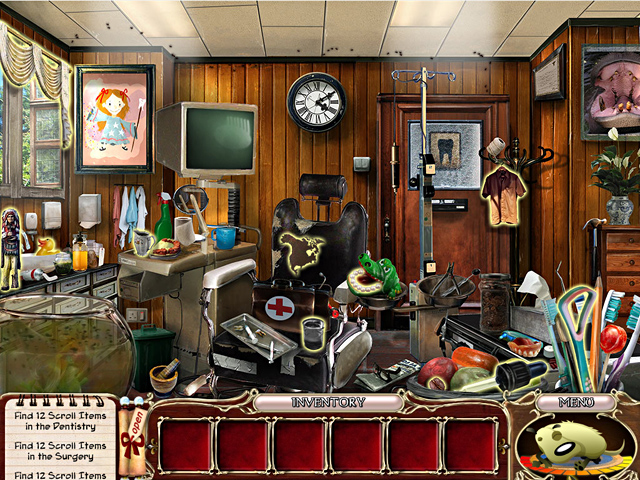 ● Find all Scroll items in the DENTISTRY. The Beaker and
Dropper will be saved for later use. One of the scroll items,
Peppermint candy, is hidden in the Plug Point location. Return
to the VETERINARY.
● Find all Scroll items in the DENTISTRY. The Beaker and
Dropper will be saved for later use. One of the scroll items,
Peppermint candy, is hidden in the Plug Point location. Return
to the VETERINARY.
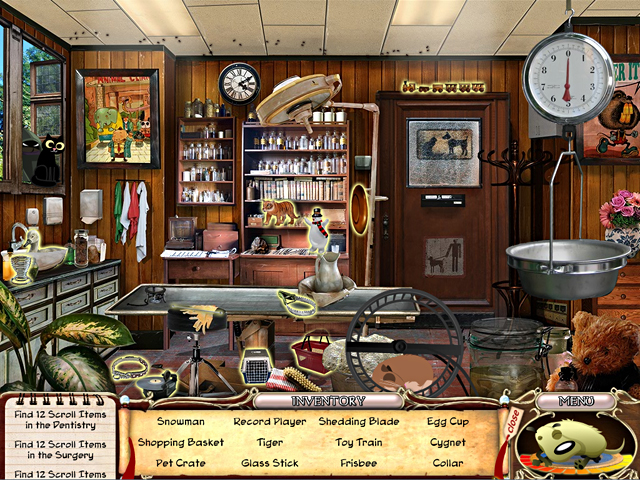 ● Find all Scroll items in the VETERINARY. The Glass Stick and
Frisbee will go to your Inventory.
● Find all Scroll items in the VETERINARY. The Glass Stick and
Frisbee will go to your Inventory.
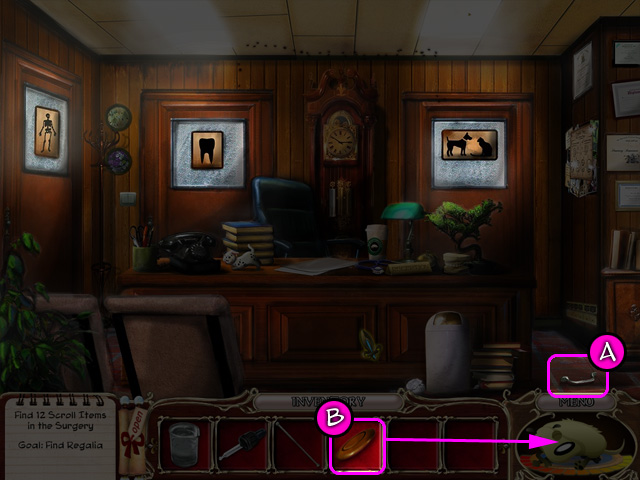 ● Return to the RECEPTION and pick up the Handle (A). ● Try
clicking the door with the Skeleton symbol. Dr. Baxter will
appear and suggest you distract Scruffy with the Frisbee,
otherwise he won't let you in. ● Throw Scruffy the Frisbee (B)
and, when he runs off, click the SURGERY door. ● Once in the
SURGERY, you can call Scruffy back by using the Whistle (C) on
his pad.
● Return to the RECEPTION and pick up the Handle (A). ● Try
clicking the door with the Skeleton symbol. Dr. Baxter will
appear and suggest you distract Scruffy with the Frisbee,
otherwise he won't let you in. ● Throw Scruffy the Frisbee (B)
and, when he runs off, click the SURGERY door. ● Once in the
SURGERY, you can call Scruffy back by using the Whistle (C) on
his pad.
 ● Find all Scroll items in the SURGERY. Kitchen lighter, Hand
Sieve and Adapter will go into your Inventory.
● Find all Scroll items in the SURGERY. Kitchen lighter, Hand
Sieve and Adapter will go into your Inventory.
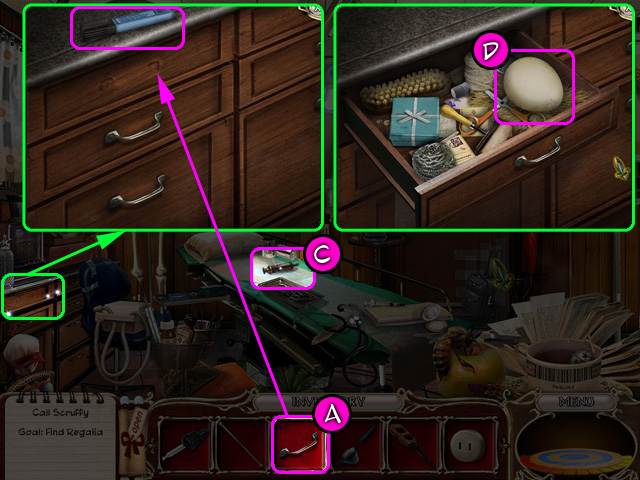 ● Examine the sparkling area on the left. Pick up the Marker.
The Drawer is missing its handle. Use Handle (A) on the
Drawer, then click to open it. Pick up the Ostrich Egg (D). ●
Go to the RECEPTION and, provided that you have found all
scroll items, you will notice two sparkling locations.
● Examine the sparkling area on the left. Pick up the Marker.
The Drawer is missing its handle. Use Handle (A) on the
Drawer, then click to open it. Pick up the Ostrich Egg (D). ●
Go to the RECEPTION and, provided that you have found all
scroll items, you will notice two sparkling locations.
 ● Examine the Grandfather Clock. Open the door and pick up the
Platinum Foil (E) hanging there as one of the weights. ●
Examine the Poster on the wall. To wake up the Hamster, you'll
need to make a special Serum. The recipe seems to be missing.
● Examine the Grandfather Clock. Open the door and pick up the
Platinum Foil (E) hanging there as one of the weights. ●
Examine the Poster on the wall. To wake up the Hamster, you'll
need to make a special Serum. The recipe seems to be missing.
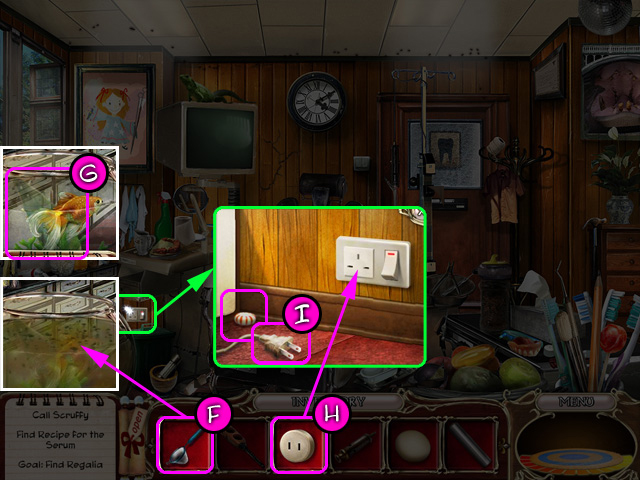 ● Go to the DENTISTRY and use the Hand Sieve (F) to clean up
the dirty fish tank. ● Now you can pick up the Aloe Vera Leaf
(G) from inside the tank. ● Examine the Socket. Insert the
Adaptor (H) into the socket. Click the Plug (I) to plug on the
X-Ray machine. The machine will not come on as there is still
no power. ● Exit the DENTISTRY and go to the VETERINARY.
● Go to the DENTISTRY and use the Hand Sieve (F) to clean up
the dirty fish tank. ● Now you can pick up the Aloe Vera Leaf
(G) from inside the tank. ● Examine the Socket. Insert the
Adaptor (H) into the socket. Click the Plug (I) to plug on the
X-Ray machine. The machine will not come on as there is still
no power. ● Exit the DENTISTRY and go to the VETERINARY.
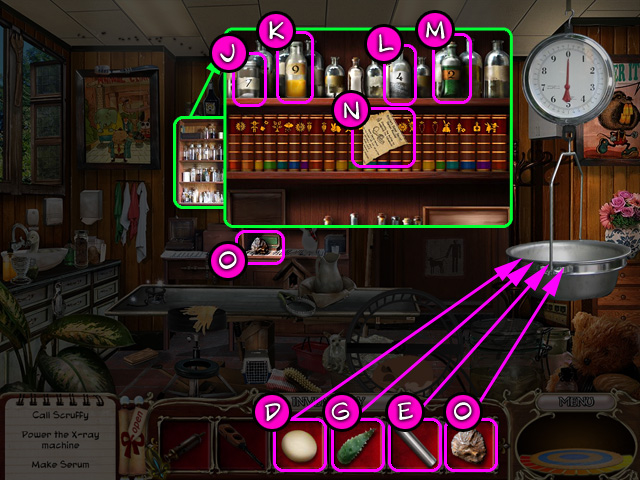 ● Examine the sparkling Bookshelf. Pick up four Bottles (J-M)
and play the books arranging game. ● Once all books are
correctly positioned, the Serum Recipe (N) will slide out.
Pick it up. ● Pick up the Meteor Rock (O) and place all
ingredients one by one on the weighing scale to find out what
each bottle contains.
● Examine the sparkling Bookshelf. Pick up four Bottles (J-M)
and play the books arranging game. ● Once all books are
correctly positioned, the Serum Recipe (N) will slide out.
Pick it up. ● Pick up the Meteor Rock (O) and place all
ingredients one by one on the weighing scale to find out what
each bottle contains.
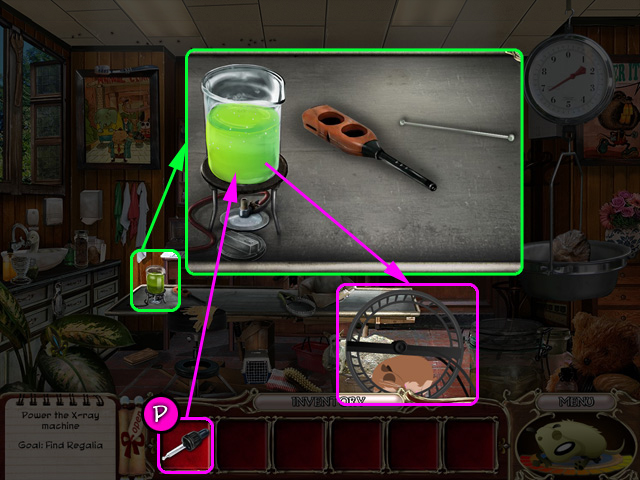
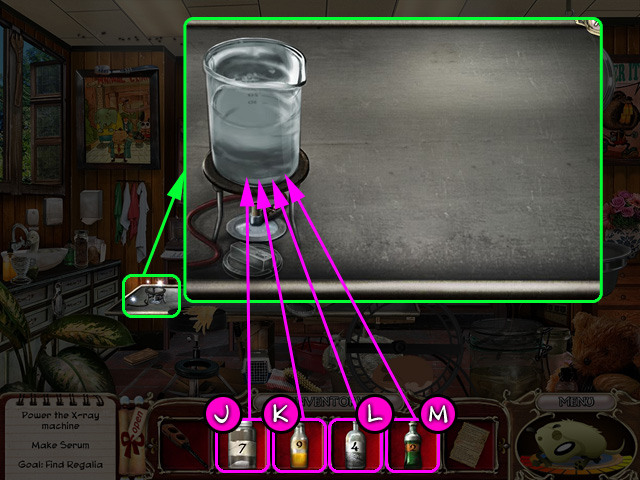 ● Make the Serum according to the instructions in the Serum
Recipe: ● First pour in the Ostrich Yolk (K), then add Aloe
Vera Juice (M), mix with the Glass Stick, then use the Kitchen
Lighter to light up the Bunsen burner. When the mixture starts
boiling, pour in the Meteor Rock Powder (J) and turn off the
burner. Lastly, add the Platinum Sprinkles (L) and mix with
the Glass Stick.
● Make the Serum according to the instructions in the Serum
Recipe: ● First pour in the Ostrich Yolk (K), then add Aloe
Vera Juice (M), mix with the Glass Stick, then use the Kitchen
Lighter to light up the Bunsen burner. When the mixture starts
boiling, pour in the Meteor Rock Powder (J) and turn off the
burner. Lastly, add the Platinum Sprinkles (L) and mix with
the Glass Stick.
 ● Use the Dropper (P) to pick up some Serum and give it to the
Hamster. ● Now the clinic is receiving power and you can go
check the X-Ray machine. ● Go to the DENTISTRY and click on
the X-ray screen.
● Use the Dropper (P) to pick up some Serum and give it to the
Hamster. ● Now the clinic is receiving power and you can go
check the X-Ray machine. ● Go to the DENTISTRY and click on
the X-ray screen.
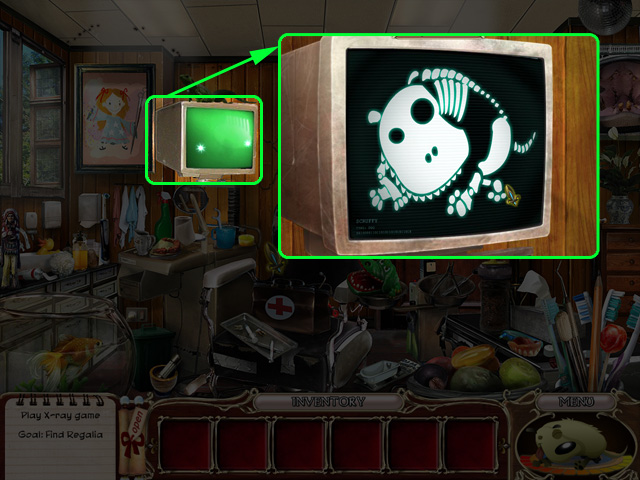 ● Play the memory game. Upon completion you will receive the
Regalia item - The Shield of Scrufford!
● Play the memory game. Upon completion you will receive the
Regalia item - The Shield of Scrufford!
Chapter 6: Patience
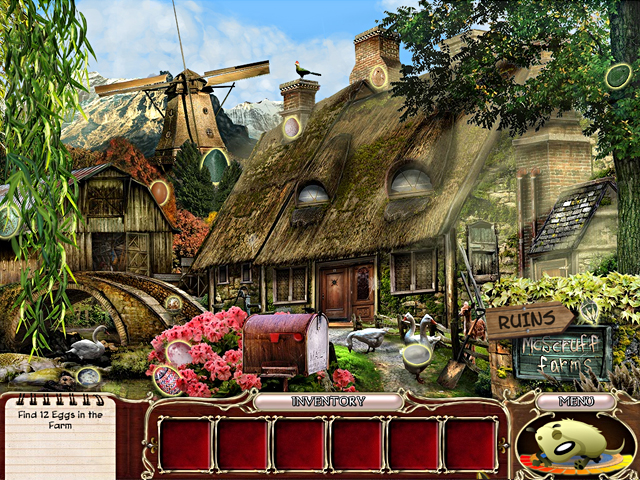 ● Search for Scott’s items on the FARM. ● Once you have found
them all, go to the RUINS. ● Give Scott his collection. ●
Scott will give you a clue to fix the Mural but won't say
where it is. You will also receive a Scroll from him.
● Search for Scott’s items on the FARM. ● Once you have found
them all, go to the RUINS. ● Give Scott his collection. ●
Scott will give you a clue to fix the Mural but won't say
where it is. You will also receive a Scroll from him.
 ● Find all Scroll items in the RUINS. A Metal Detector will be
saved in your inventory for later use. ● Examine the sparkling
areas in the RUINS.
● Find all Scroll items in the RUINS. A Metal Detector will be
saved in your inventory for later use. ● Examine the sparkling
areas in the RUINS.
 ● Click on the Branch (A) in the Mossy Wall to slide it away
and reveal a Fishing Hook and Line. ● The second sparkling
area will lead you to a SIDE DOOR covered with thick web. ● Go
back to the FARM.
● Click on the Branch (A) in the Mossy Wall to slide it away
and reveal a Fishing Hook and Line. ● The second sparkling
area will lead you to a SIDE DOOR covered with thick web. ● Go
back to the FARM.
 ● Find all Scroll items in this location. The Hay Fork will
come in handy later; it will be added to your Inventory. ●
Examine the area under the bridge to find the Knife. ● Click
on the door of the BARN to enter.
● Find all Scroll items in this location. The Hay Fork will
come in handy later; it will be added to your Inventory. ●
Examine the area under the bridge to find the Knife. ● Click
on the door of the BARN to enter.
 ● Find all scroll items in the BARN. ● Examine the sparkling
locations.
● Find all scroll items in the BARN. ● Examine the sparkling
locations.
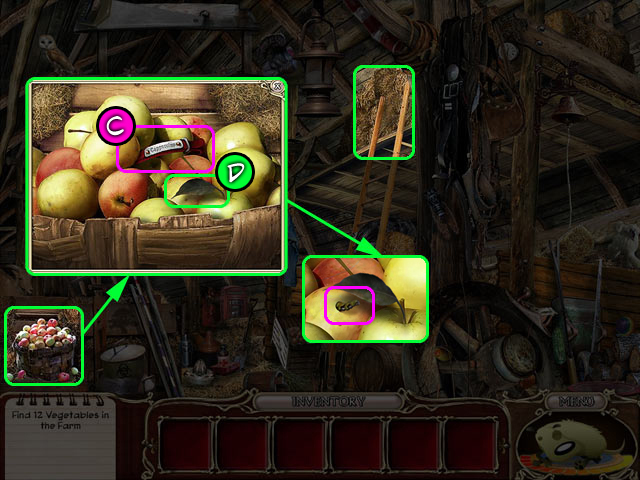 ● Examine the Apple Basket: pick up the Cat Collar (C), then
click the Apple Leaf (D) to reveal an Apple Worm. Pick it up.
● The second sparkling area is the Haystack, but to reach it,
you will have to fix the Ladder. ● Exit to the FARM, then go
to the WINDMILL.
● Examine the Apple Basket: pick up the Cat Collar (C), then
click the Apple Leaf (D) to reveal an Apple Worm. Pick it up.
● The second sparkling area is the Haystack, but to reach it,
you will have to fix the Ladder. ● Exit to the FARM, then go
to the WINDMILL.
 ● There are two sparkling areas in the WINDMILL: A Window on
the right and a Pigeon's Nest on the left. Pick up the Bamboo
Rungs (F) and Ribbon (G) from the Windowsill. You won't be
able to see what's in the Nest while the Mother Pigeon is
guarding it. ● Return to the FARM, then enter the FARM HOUSE.
● There are two sparkling areas in the WINDMILL: A Window on
the right and a Pigeon's Nest on the left. Pick up the Bamboo
Rungs (F) and Ribbon (G) from the Windowsill. You won't be
able to see what's in the Nest while the Mother Pigeon is
guarding it. ● Return to the FARM, then enter the FARM HOUSE.
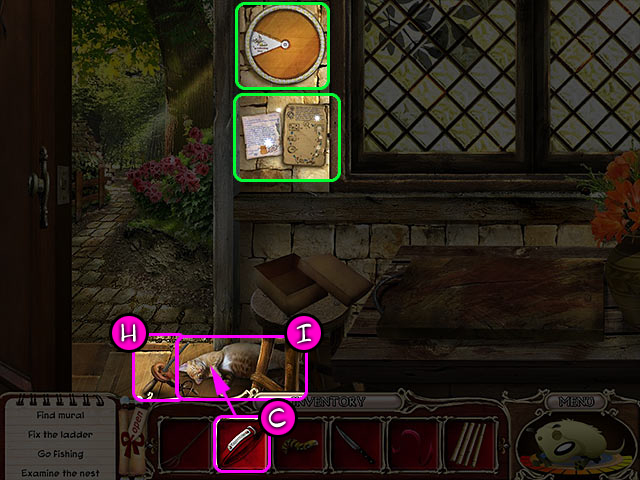 ● There are some Notes on the wall, and a strange-looking
Clock designed by Scott himself. A message on the wall
contains information on making Yarn. You have to find a spider
web to make this very special Yarn. ● Pick up the Hand Spindle
(H) and apply the Collar (C) to the Sleeping Cat (I). The cat
will run away. Where could he go? ● Exit the FARM HOUSE and go
to the RUINS. Enter the sparkling SIDE DOOR.
● There are some Notes on the wall, and a strange-looking
Clock designed by Scott himself. A message on the wall
contains information on making Yarn. You have to find a spider
web to make this very special Yarn. ● Pick up the Hand Spindle
(H) and apply the Collar (C) to the Sleeping Cat (I). The cat
will run away. Where could he go? ● Exit the FARM HOUSE and go
to the RUINS. Enter the sparkling SIDE DOOR.
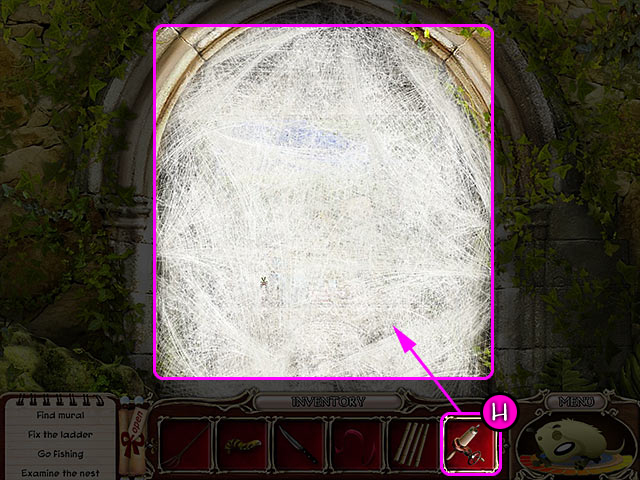 ● Use the Hand Spindle (H) on the spider webs 3 times. The
Ball of Yarn will go to your inventory. The thick spider web
is covering a special Mural. Upon close examination, you will
see that the Mural is missing 4 round pieces.
● Use the Hand Spindle (H) on the spider webs 3 times. The
Ball of Yarn will go to your inventory. The thick spider web
is covering a special Mural. Upon close examination, you will
see that the Mural is missing 4 round pieces.
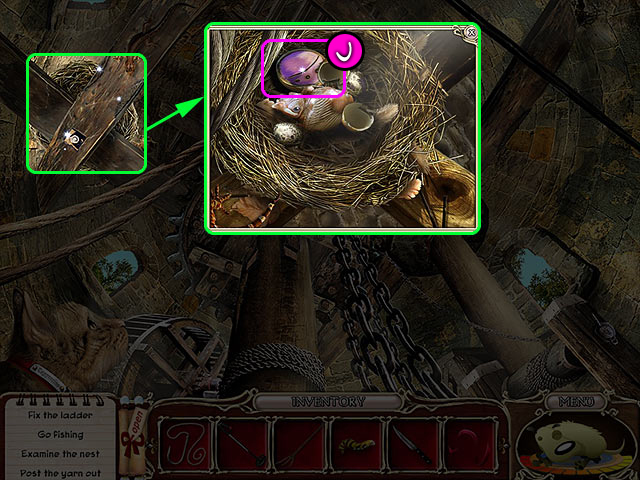 ● Go to the WINDMILL: This is where Cappuccino is - chasing
pigeons in the old windmill! He has frightened away the Mother
Pigeon so that you can access her nest. Click on the Nest area
and once there, pick up the round, purple Mural Piece (J). ●
Go to the BARN.
● Go to the WINDMILL: This is where Cappuccino is - chasing
pigeons in the old windmill! He has frightened away the Mother
Pigeon so that you can access her nest. Click on the Nest area
and once there, pick up the round, purple Mural Piece (J). ●
Go to the BARN.
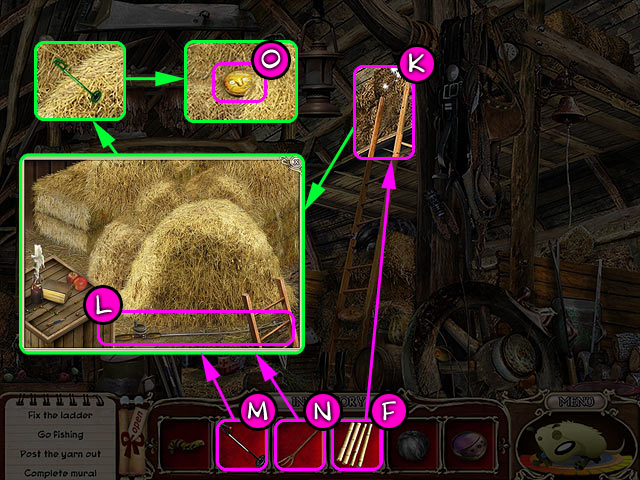 ● Use Bamboo Rungs (F) on the Ladder (K) to repair it. Click
the sparkling area to view a close-up of the Haystack. ● Pick
up the Fishing Rod (L). ● Click on the Metal Detector (M) in
your Inventory and move your mouse around the hay to see if
there's anything remarkable about this pile of hay. When the
Metal Detector starts glowing green and beeping fast, click on
the hay. There's definitely something hidden within! ● Use the
Hay Fork (N) twice on the Pile to shuffle it. This will reveal
the Yellow Mural Piece (O). Pick it up. ● Go to the FARM and
click the sparkling area Under the Bridge.
● Use Bamboo Rungs (F) on the Ladder (K) to repair it. Click
the sparkling area to view a close-up of the Haystack. ● Pick
up the Fishing Rod (L). ● Click on the Metal Detector (M) in
your Inventory and move your mouse around the hay to see if
there's anything remarkable about this pile of hay. When the
Metal Detector starts glowing green and beeping fast, click on
the hay. There's definitely something hidden within! ● Use the
Hay Fork (N) twice on the Pile to shuffle it. This will reveal
the Yellow Mural Piece (O). Pick it up. ● Go to the FARM and
click the sparkling area Under the Bridge.
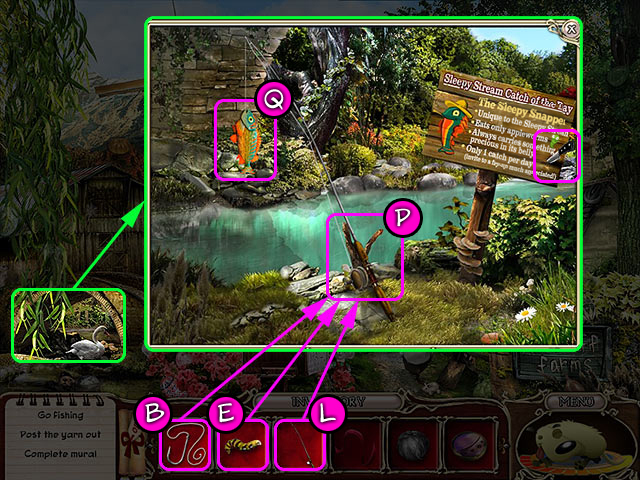 ● Put Fishing Rod (L) onto the Post (P). Then apply the Hook
(B) to it. Finally, use the Worm (E) as bait and start
fishing. Pick up the caught Fish (Q) and the Knife (R) on the
wooden board. Now proceed to the FARM HOUSE.
● Put Fishing Rod (L) onto the Post (P). Then apply the Hook
(B) to it. Finally, use the Worm (E) as bait and start
fishing. Pick up the caught Fish (Q) and the Knife (R) on the
wooden board. Now proceed to the FARM HOUSE.
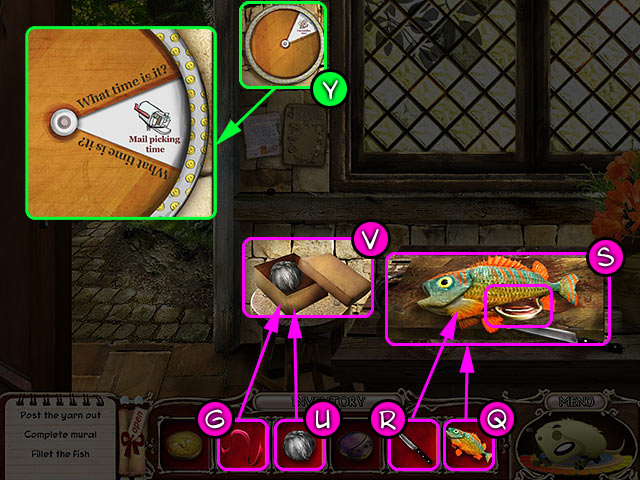 ● Place the Fish (Q) onto the Cutting Board (S). Use the Knife
(R) to cut the Fish open. The third Mural Piece (T) will slide
out of the fish's belly. Pick it up. ● Put the Yarn (U) into
the Box (V). Use the Ribbon (G) to tie it and pick up the
Package. It is now ready to be posted. ● Go to the FARM.
● Place the Fish (Q) onto the Cutting Board (S). Use the Knife
(R) to cut the Fish open. The third Mural Piece (T) will slide
out of the fish's belly. Pick it up. ● Put the Yarn (U) into
the Box (V). Use the Ribbon (G) to tie it and pick up the
Package. It is now ready to be posted. ● Go to the FARM.
 ● Click on the Mailbox (W) to open it, then put the Package
(X) in there and click again to close the Mailbox. ● Return to
the HOUSE. ● Click on the Clock (Y) to check if it’s Mail
Picking Up Time. If it isn’t, then that means you have not yet
found all Scroll items in this chapter. ● Go to the FARM and
open the Mailbox. You will find the last Mural Piece (Z). Now
you can fix the Mural! ● Go to the SIDE DOOR in the RUINS.
Click on the Mural.
● Click on the Mailbox (W) to open it, then put the Package
(X) in there and click again to close the Mailbox. ● Return to
the HOUSE. ● Click on the Clock (Y) to check if it’s Mail
Picking Up Time. If it isn’t, then that means you have not yet
found all Scroll items in this chapter. ● Go to the FARM and
open the Mailbox. You will find the last Mural Piece (Z). Now
you can fix the Mural! ● Go to the SIDE DOOR in the RUINS.
Click on the Mural.
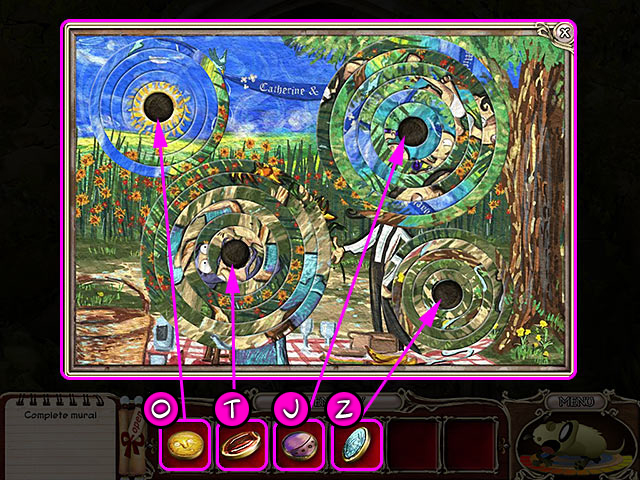 ● Apply the 4 Mural Pieces as shown. This will activate the
mini-game. ● Drag the rings to rotate them and restore the
painting. When all the rings are in their correct positions,
the mural will open up and reveal The Land Deed of Scrufford!
● Apply the 4 Mural Pieces as shown. This will activate the
mini-game. ● Drag the rings to rotate them and restore the
painting. When all the rings are in their correct positions,
the mural will open up and reveal The Land Deed of Scrufford!
Chapter 7: Benevolence
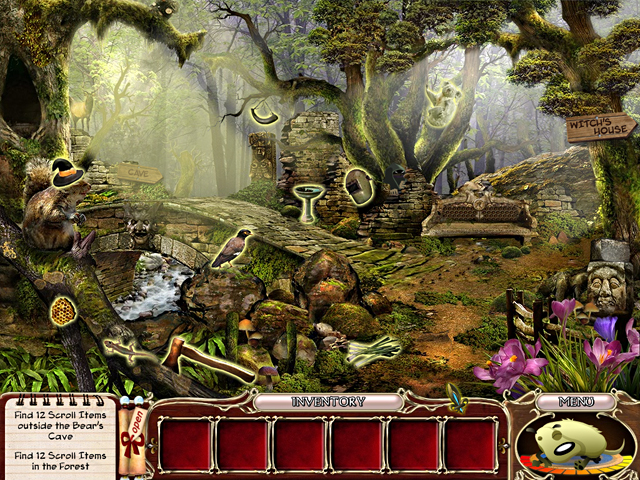
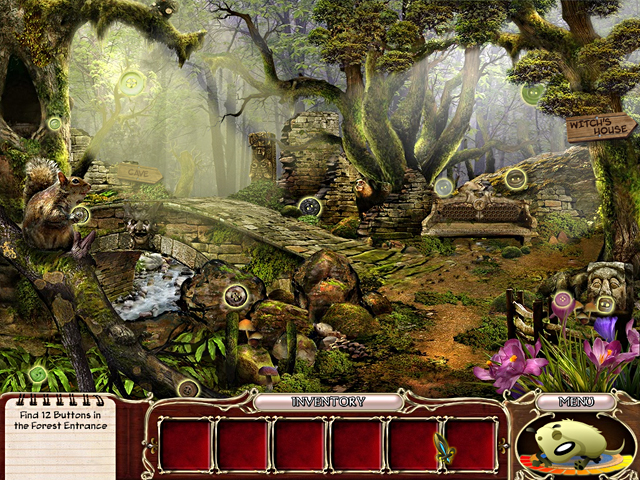 ● Search for Witch’s items in the FOREST ENTRANCE. ● Once you
have found them all, go over the bridge on the right to the
BEAR CAVE. ● Give the Witch her collection. ● Eleanor will
give you the scroll. She will also tell you that the thing you
are looking for is guarded by a bear.
● Search for Witch’s items in the FOREST ENTRANCE. ● Once you
have found them all, go over the bridge on the right to the
BEAR CAVE. ● Give the Witch her collection. ● Eleanor will
give you the scroll. She will also tell you that the thing you
are looking for is guarded by a bear.
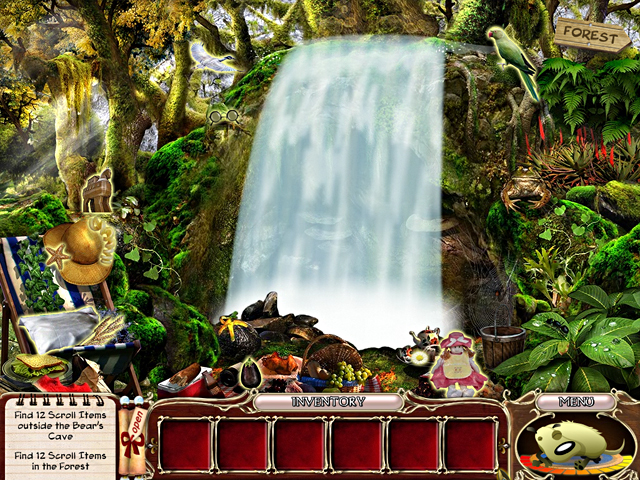 ● Find all Scroll items OUTSIDE the BEAR CAVE. Pick up the
Bucket (A) for later use. ● Examine sparkling areas OUTSIDE
the BEAR CAVE.
● Find all Scroll items OUTSIDE the BEAR CAVE. Pick up the
Bucket (A) for later use. ● Examine sparkling areas OUTSIDE
the BEAR CAVE.
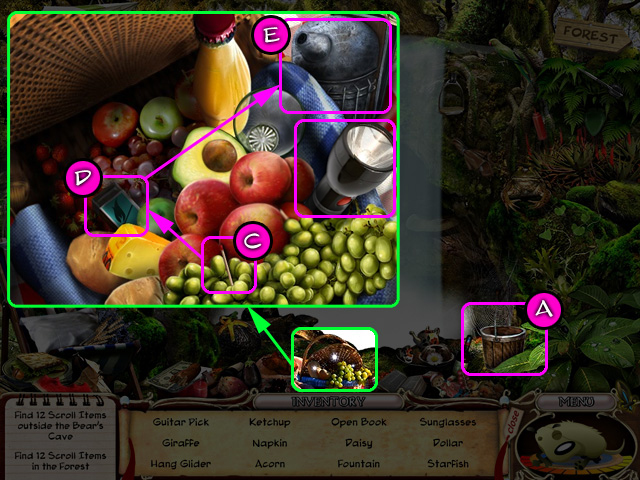 ● Pick up the Flashlight and a Match (C). Use the Match on the
Matchbox (D) and light up the Bee Smoker (E) with the lit
match. Pick up the Lit Bee Smoker. ● Go back to the FOREST
ENTRANCE.
● Pick up the Flashlight and a Match (C). Use the Match on the
Matchbox (D) and light up the Bee Smoker (E) with the lit
match. Pick up the Lit Bee Smoker. ● Go back to the FOREST
ENTRANCE.
 ● Find all Scroll items in this location. The Axe will be
added to your Inventory. ● Click the sign on the right to go
to the WITCH'S HOUSE.
● Find all Scroll items in this location. The Axe will be
added to your Inventory. ● Click the sign on the right to go
to the WITCH'S HOUSE.
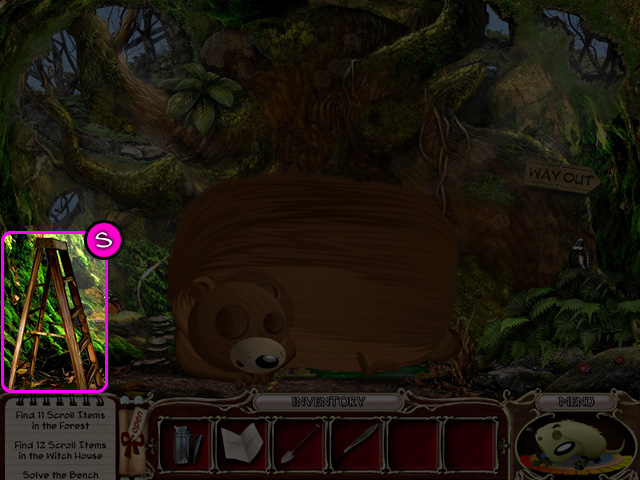
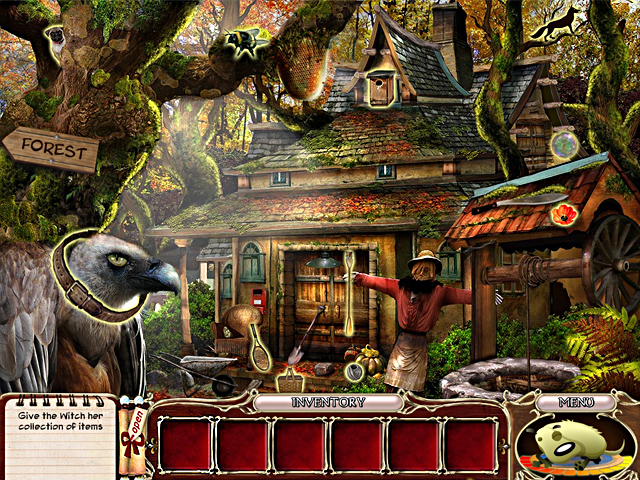 ● Find all Scroll items at the WITCH'S HOUSE location. Pick up
the Wheelbarrow (F) - you will need this to carry Concrete
Blocks. Pick up Shovel (G), Machete (H) and first Concrete
Block (I). ● Examine the sparkling areas.
● Find all Scroll items at the WITCH'S HOUSE location. Pick up
the Wheelbarrow (F) - you will need this to carry Concrete
Blocks. Pick up Shovel (G), Machete (H) and first Concrete
Block (I). ● Examine the sparkling areas.
 ● A Scroll item - Nut - is laying on the Well's stone rim. The
Well opening is blocked by a wooden cover. Use the Axe (J) to
break this cover, and the Flashlight (B) to light up depths of
the well. You will find a bag of Ready-mix Cement at the
bottom of the well. To bring it up, you will need to find a
Well Crank. Pick up the second Concrete Block (L).
● A Scroll item - Nut - is laying on the Well's stone rim. The
Well opening is blocked by a wooden cover. Use the Axe (J) to
break this cover, and the Flashlight (B) to light up depths of
the well. You will find a bag of Ready-mix Cement at the
bottom of the well. To bring it up, you will need to find a
Well Crank. Pick up the second Concrete Block (L).
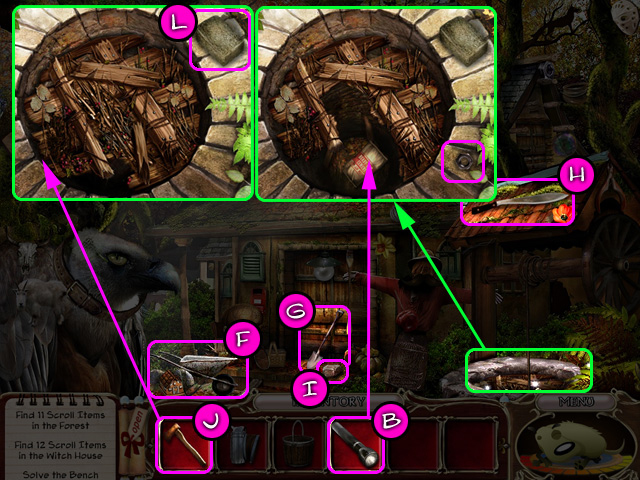
 ● Go back to the FOREST ENTRANCE. Pick up the third Concrete
Block (M) from the statue head on the right. Examine the
sparkling areas in the FOREST ENTRANCE. ● Pick up the Key and
the fourth Concrete Block (O) from the Bench. Note that the
intricate pattern on the bench's backrest is missing its
centrepiece. ● Pick up the last Concrete Block (P) from the
incomplete dam, then apply the Wheelbarrow (F) with bricks on
the incomplete dam. Use Bucket (A) with the Stream to pick up
some water. Pick up the Crank (Q) from the rocks on the left.
Return to the WITCH'S HOUSE and apply the crank on the Well.
Click the Crank to bring up the bag of Cement. ● Pour Cement
(K) into the Bucket with water, then apply this mixture onto
the incomplete dam. This will stop the Stream and the Bear's
Cave is now open. ● Examine the Tree hole: use the Key (N) to
open the Ornate Box. Pick up the folded paper (R). It contains
instructions on how to prod the Bear.
● Go back to the FOREST ENTRANCE. Pick up the third Concrete
Block (M) from the statue head on the right. Examine the
sparkling areas in the FOREST ENTRANCE. ● Pick up the Key and
the fourth Concrete Block (O) from the Bench. Note that the
intricate pattern on the bench's backrest is missing its
centrepiece. ● Pick up the last Concrete Block (P) from the
incomplete dam, then apply the Wheelbarrow (F) with bricks on
the incomplete dam. Use Bucket (A) with the Stream to pick up
some water. Pick up the Crank (Q) from the rocks on the left.
Return to the WITCH'S HOUSE and apply the crank on the Well.
Click the Crank to bring up the bag of Cement. ● Pour Cement
(K) into the Bucket with water, then apply this mixture onto
the incomplete dam. This will stop the Stream and the Bear's
Cave is now open. ● Examine the Tree hole: use the Key (N) to
open the Ornate Box. Pick up the folded paper (R). It contains
instructions on how to prod the Bear.
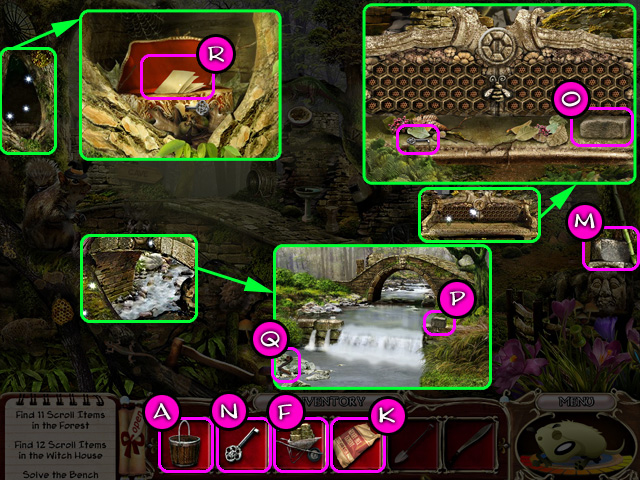
 ● Go to the BEAR'S CAVE. Pick up the Stepladder (S) next to
the Sleeping Bear. ● Go back to the WITCH'S HOUSE.
● Go to the BEAR'S CAVE. Pick up the Stepladder (S) next to
the Sleeping Bear. ● Go back to the WITCH'S HOUSE.
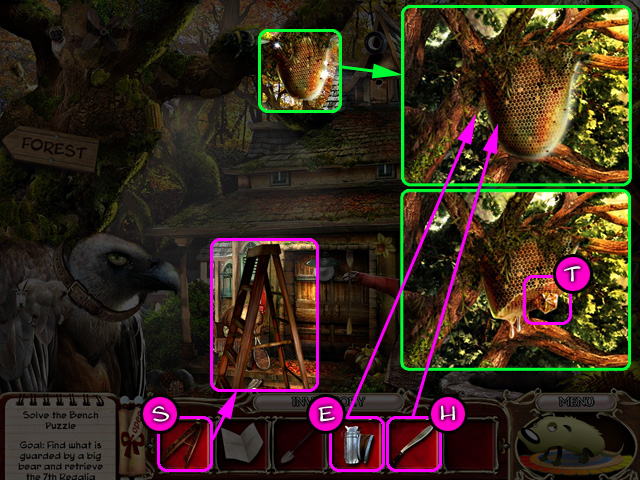 ● Apply the Stepladder (S) under the Beehive. This allows
examining this sparkling area. ● You now have access to the
beehive but the angry bees will not allow you to examine the
hive. You will need to smoke the bees out in order to examine
the hive more closely. Apply the Bee Smoker (E) on the hive -
the bees will leave. Use the Machete (H) to cut the hive open,
revealing the Amber Diamond (T). Pick it up. ● Go to the
FOREST ENTRANCE.
● Apply the Stepladder (S) under the Beehive. This allows
examining this sparkling area. ● You now have access to the
beehive but the angry bees will not allow you to examine the
hive. You will need to smoke the bees out in order to examine
the hive more closely. Apply the Bee Smoker (E) on the hive -
the bees will leave. Use the Machete (H) to cut the hive open,
revealing the Amber Diamond (T). Pick it up. ● Go to the
FOREST ENTRANCE.
 ● Click on the Bench. Fit the Amber Diamond (T) into the open
Socket (U) - this will activate the mini-game. Solve the
mini-game to make the Queen Bee move up, pushing the socket
up. If all the scroll items have been found, a ray of sunlight
will shine through the gem and reveal a spot on the ground -
'X' marks the spot! ● Apply the Shovel (G) on the X-mark on
the ground. Pick up the Bear Prod (V) and head to the BEAR'S
CAVE.
● Click on the Bench. Fit the Amber Diamond (T) into the open
Socket (U) - this will activate the mini-game. Solve the
mini-game to make the Queen Bee move up, pushing the socket
up. If all the scroll items have been found, a ray of sunlight
will shine through the gem and reveal a spot on the ground -
'X' marks the spot! ● Apply the Shovel (G) on the X-mark on
the ground. Pick up the Bear Prod (V) and head to the BEAR'S
CAVE.
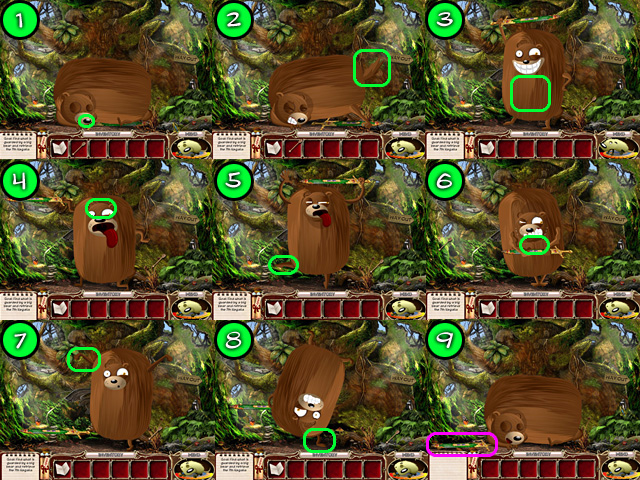 ● Use the Bear Prod in proper sequence to get the desired
reaction: Bear's Nose Tail Belly Head Leg Chest Arm Elbow ●
Pick up The Sword of Scrufford!
● Use the Bear Prod in proper sequence to get the desired
reaction: Bear's Nose Tail Belly Head Leg Chest Arm Elbow ●
Pick up The Sword of Scrufford!
Chapter 8: Integrity
 ● Look for Captain Wickham's collection at the PIER. ● When
you've found all the items, click on the ROW BOAT to go to the
other side of the Harbor. Once you're in the BOAT, Click on
the rock bay on the left to go to the BEACH. ● Go to the
COTTAGE on top on the cliff. Give the Captain his collection.
He will give you a scroll in return and a clue - "Find 4
pearls to open the Nautical Safe".
● Look for Captain Wickham's collection at the PIER. ● When
you've found all the items, click on the ROW BOAT to go to the
other side of the Harbor. Once you're in the BOAT, Click on
the rock bay on the left to go to the BEACH. ● Go to the
COTTAGE on top on the cliff. Give the Captain his collection.
He will give you a scroll in return and a clue - "Find 4
pearls to open the Nautical Safe".
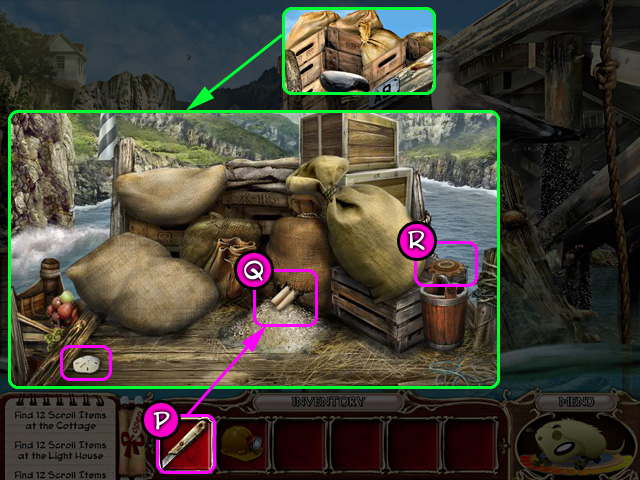
 ● Find all Scroll items in the COTTAGE. The Tongs will be
added to your inventory for later use. ● Examine the Sparkling
areas in the location.
● Find all Scroll items in the COTTAGE. The Tongs will be
added to your inventory for later use. ● Examine the Sparkling
areas in the location.
 ● Pick up the Fishing Net (A). The scroll item - Crowbar is
behind the gift wrapper. ● There is something behind the
fireplace, but you will have to extinguish the fire before you
can access that area. ● Return to BEACH - one of your oars has
disappeared, now you need to find the missing oar. ● Go to the
LIGHTHOUSE
● Pick up the Fishing Net (A). The scroll item - Crowbar is
behind the gift wrapper. ● There is something behind the
fireplace, but you will have to extinguish the fire before you
can access that area. ● Return to BEACH - one of your oars has
disappeared, now you need to find the missing oar. ● Go to the
LIGHTHOUSE
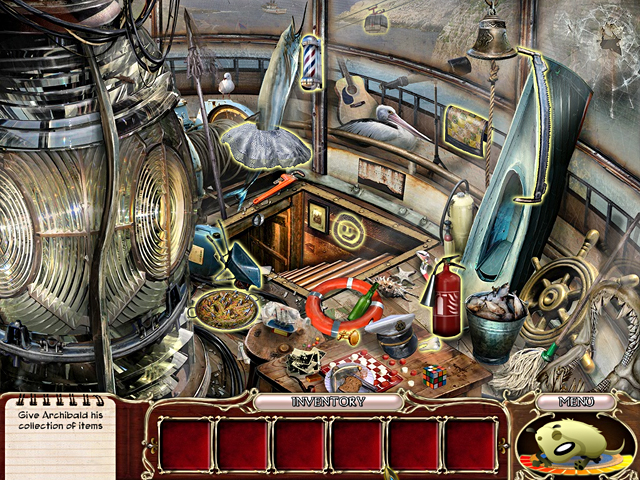 ● Find all Scroll items there. The Fire Extinguisher will be
added to your inventory. ● Examine sparkling areas in the
LIGHTHOUSE.
● Find all Scroll items there. The Fire Extinguisher will be
added to your inventory. ● Examine sparkling areas in the
LIGHTHOUSE.
 ● In the Pantry, click on the fishing nets to move them aside
and reveal the missing Oar (D). Pick up the scroll item -
Juicer.
● In the Pantry, click on the fishing nets to move them aside
and reveal the missing Oar (D). Pick up the scroll item -
Juicer.
 ● Back in the LIGHTHOUSE, examine the "Ship-in-a-bottle". Pick
up the first Cog (E). ● Click on the different colored beads
to pull the thread, making the sails of the ship go up. The
correct sequence is shown in the image on the right. ● When
the "Ship-in-a-bottle" puzzle is solved, the Blue Pearl (F)
will tumble out of the bottle opening. Collect it and head
back to the COTTAGE.
● Extinguish the fire in the fireplace using the Fire
Extinguisher (G). The area behind the fireplace is now open.
The Nautical Safe is found here. ● Place the Blue Pearl in any
of the slots on the Nautical Safe. ● Go back to the BEACH.
● Back in the LIGHTHOUSE, examine the "Ship-in-a-bottle". Pick
up the first Cog (E). ● Click on the different colored beads
to pull the thread, making the sails of the ship go up. The
correct sequence is shown in the image on the right. ● When
the "Ship-in-a-bottle" puzzle is solved, the Blue Pearl (F)
will tumble out of the bottle opening. Collect it and head
back to the COTTAGE.
● Extinguish the fire in the fireplace using the Fire
Extinguisher (G). The area behind the fireplace is now open.
The Nautical Safe is found here. ● Place the Blue Pearl in any
of the slots on the Nautical Safe. ● Go back to the BEACH.
 ● Examine sparkling areas. In the archway of the Sand Castle
there is a Bottle (H) with Special Sand for Oysters. Use Tongs
(I) on the Bottle to extract it. ● The Cave in the cliff looks
very dark and dangerous. You need proper equipment to explore
it. ● There is the second Cog (J) lying on the Crate. Pick it
up. ● Place the Oar (D) from the inventory onto the Rowlock.
Now you can move between sea and land locations again.
● Examine sparkling areas. In the archway of the Sand Castle
there is a Bottle (H) with Special Sand for Oysters. Use Tongs
(I) on the Bottle to extract it. ● The Cave in the cliff looks
very dark and dangerous. You need proper equipment to explore
it. ● There is the second Cog (J) lying on the Crate. Pick it
up. ● Place the Oar (D) from the inventory onto the Rowlock.
Now you can move between sea and land locations again.
 ● Once on the ROWBOAT, find all the scroll items here. Pick up
the third Cog (K)
● Once on the ROWBOAT, find all the scroll items here. Pick up
the third Cog (K)
 ● Click on the FISHING BOAT in the sea to go there. Pick up
the fourth Cog (L) and Snorkeling Gear (M). ● Examine the
sparkling area. The Pulley Gearbox mechanism is missing some
of the cogs. ● Return to the ROWBOAT, then go back to the
PIER.
● Click on the FISHING BOAT in the sea to go there. Pick up
the fourth Cog (L) and Snorkeling Gear (M). ● Examine the
sparkling area. The Pulley Gearbox mechanism is missing some
of the cogs. ● Return to the ROWBOAT, then go back to the
PIER.
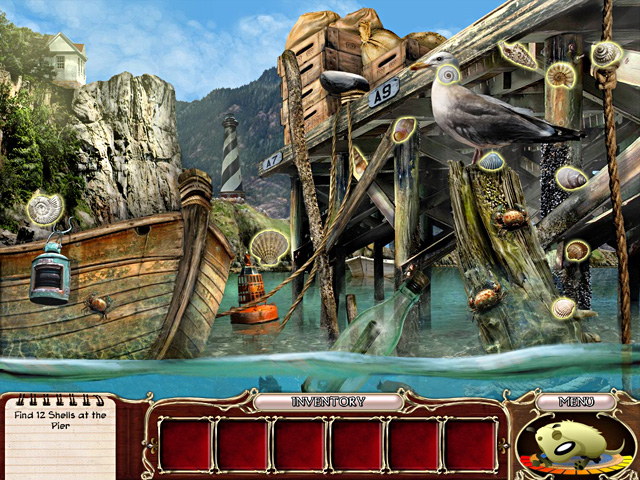
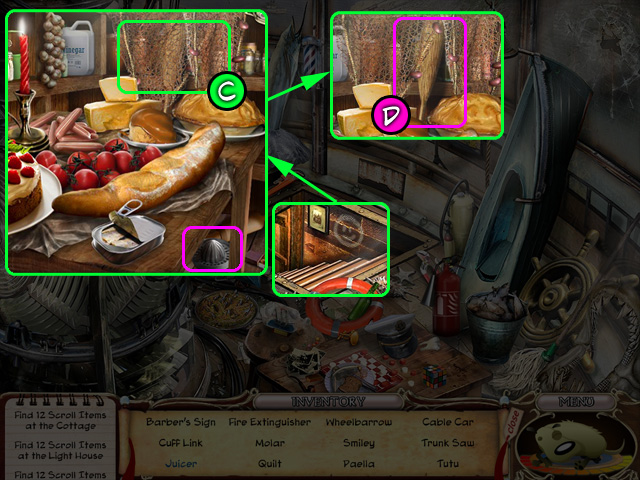
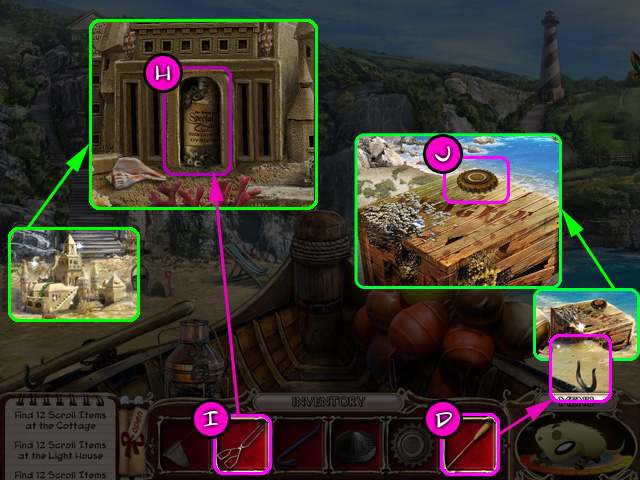
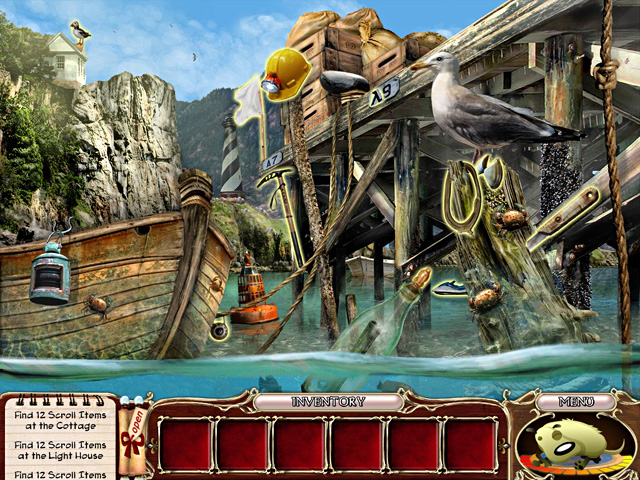 ● Find all the Scroll items at the PIER. ● One of the scroll
items, Sand Dollar, is hidden in the boardwalk location. ●
Miner's Hat and Stanley Knife will be saved in your Inventory.
● Click the water's edge at the PIER to dive into the sea.
● Find all the Scroll items at the PIER. ● One of the scroll
items, Sand Dollar, is hidden in the boardwalk location. ●
Miner's Hat and Stanley Knife will be saved in your Inventory.
● Click the water's edge at the PIER to dive into the sea.
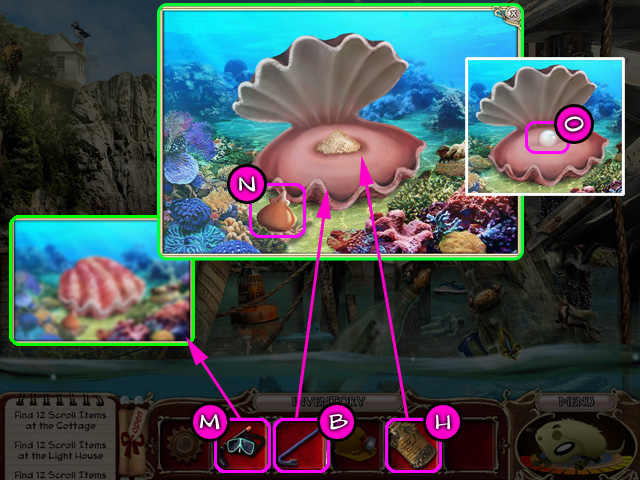 ● Apply the Snorkelling Gear (M) to the screen to see clearly.
● Pick up the Squid (N). ● Use the Crowbar (B) on the Oyster
to open it. Place the Special Sand in the shell to irritate
the Oyster. Click on the Oyster to close it. The Oyster will
now start making a pearl. ● Open Oyster and retrieve the White
Pearl (O). If the Oyster does not open - it is because not all
the scroll items have been found. Find all the Scroll Items
and return to the Underwater location to retrieve the pearl ●
Examine the remaining sparkling areas in the PIER - the
Boardwalk.
● Apply the Snorkelling Gear (M) to the screen to see clearly.
● Pick up the Squid (N). ● Use the Crowbar (B) on the Oyster
to open it. Place the Special Sand in the shell to irritate
the Oyster. Click on the Oyster to close it. The Oyster will
now start making a pearl. ● Open Oyster and retrieve the White
Pearl (O). If the Oyster does not open - it is because not all
the scroll items have been found. Find all the Scroll Items
and return to the Underwater location to retrieve the pearl ●
Examine the remaining sparkling areas in the PIER - the
Boardwalk.
 ● Use the Stanley Knife (P) to slash open the jute sacks. One
of them contains a map with a secret information. Pick up the
Map (Q). The information on the map has been done using candle
wax. You will need ink to reveal the drawing. ● Pick up the
fifth Cog (R) and go to the ROW BOAT. ● Click on the FISHING
BOAT and open the Pulley Gearbox.
● Use the Stanley Knife (P) to slash open the jute sacks. One
of them contains a map with a secret information. Pick up the
Map (Q). The information on the map has been done using candle
wax. You will need ink to reveal the drawing. ● Pick up the
fifth Cog (R) and go to the ROW BOAT. ● Click on the FISHING
BOAT and open the Pulley Gearbox.
 ● Open the glass cover; insert all 5 Cogs as shown .as shown
in the image. Close the cover and push the Green button to
activate the pulley. (If you have placed cogs incorrectly they
will flash red when you try to start the pulley). ● Take the
Yellow Pearl (S) from the cage that has been winched up. ●
Return to the ROW BOAT and go to the BEACH.
● Open the glass cover; insert all 5 Cogs as shown .as shown
in the image. Close the cover and push the Green button to
activate the pulley. (If you have placed cogs incorrectly they
will flash red when you try to start the pulley). ● Take the
Yellow Pearl (S) from the cage that has been winched up. ●
Return to the ROW BOAT and go to the BEACH.
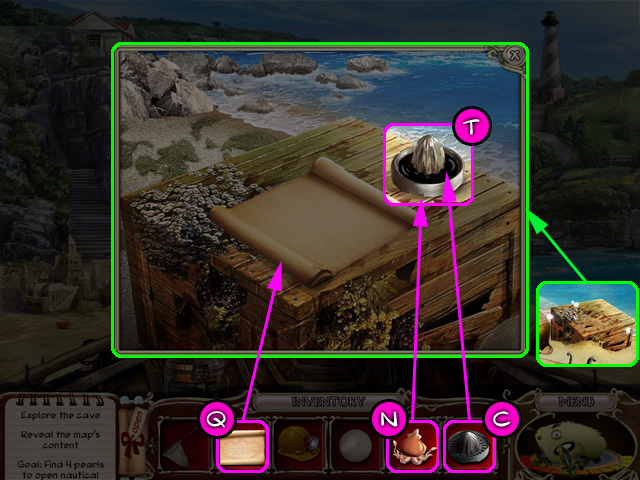 ● To reveal the secret writing on the Map you will first need
somewhere flat to place the map. The Crate will do just well.
Place the Map (Q) on it. ● Place Juicer (C) next to the Map
and then put Squid (M) on the Juicer to get some Ink. Pick up
the Juicer with Ink (T) and spill it over the Map - note
position of X on the map.
● To reveal the secret writing on the Map you will first need
somewhere flat to place the map. The Crate will do just well.
Place the Map (Q) on it. ● Place Juicer (C) next to the Map
and then put Squid (M) on the Juicer to get some Ink. Pick up
the Juicer with Ink (T) and spill it over the Map - note
position of X on the map.
 ● Go to the Cave on the beach. Use Miner's hat (U) to light up
the cave, then use the Fishing Net (A) to fish out the Red
Pearl from the pool marked X on the map. ● Go to the COTTAGE
and put all pearls into the slots of the Nautical safe, then
play the game to open it and reveal the Regalia item - >The
Golden Compass of Scrufford!
● Go to the Cave on the beach. Use Miner's hat (U) to light up
the cave, then use the Fishing Net (A) to fish out the Red
Pearl from the pool marked X on the map. ● Go to the COTTAGE
and put all pearls into the slots of the Nautical safe, then
play the game to open it and reveal the Regalia item - >The
Golden Compass of Scrufford!
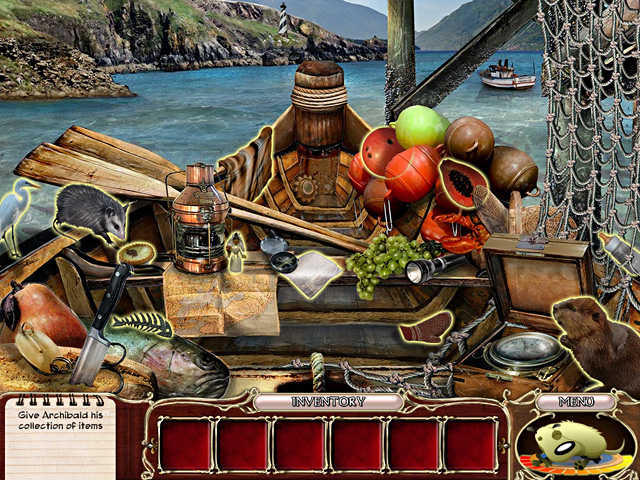
Chapter 9: Loyalty
 ● Find all of Fritz's missing items at the CASTLE ENTRANCE. ●
Click on the door to enter the Castle and go through the wide
archway on the right to the DINING ROOM. ● Give Fritz his
collection; receive the scroll and a hint: find 4 cannonballs
to reveal the Regalia item.
● Find all of Fritz's missing items at the CASTLE ENTRANCE. ●
Click on the door to enter the Castle and go through the wide
archway on the right to the DINING ROOM. ● Give Fritz his
collection; receive the scroll and a hint: find 4 cannonballs
to reveal the Regalia item.
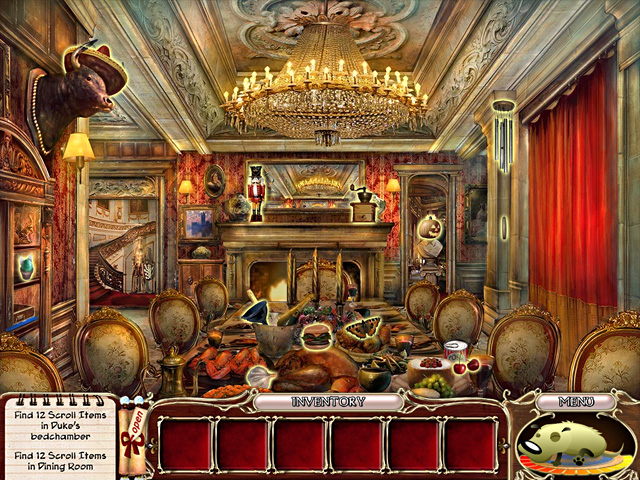 ● Find all Scroll Items in the Dining room. The Funnel will be
added to your inventory for later use. Pick up the Pencil in
the Cupboard on the left. ● Pick up a can of Doggy Food (A).
● Find all Scroll Items in the Dining room. The Funnel will be
added to your inventory for later use. Pick up the Pencil in
the Cupboard on the left. ● Pick up a can of Doggy Food (A).
 ● Examine sparkling area on the right. Pick up the Electrical
Tape (B) from the sideboard with broken China. Assemble the
shards of plates according to the white outlines. You now need
to glue the pieces together. ● Exit the DINING ROOM.
● Examine sparkling area on the right. Pick up the Electrical
Tape (B) from the sideboard with broken China. Assemble the
shards of plates according to the white outlines. You now need
to glue the pieces together. ● Exit the DINING ROOM.
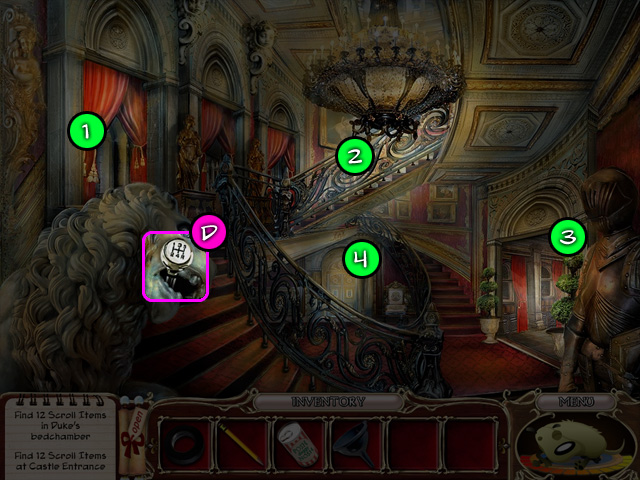 ● Pick up the GEAR STICK (D) from the lion statue’s mouth. ●
Note the navigation areas in this room: 1 - to the Armory 2 -
to the Duke's Bedchamber and Balcony 3 - to the Dining Room 4
- to the Castle Entrance ● Go to the DUKE’S BEDCHAMBER
● Pick up the GEAR STICK (D) from the lion statue’s mouth. ●
Note the navigation areas in this room: 1 - to the Armory 2 -
to the Duke's Bedchamber and Balcony 3 - to the Dining Room 4
- to the Castle Entrance ● Go to the DUKE’S BEDCHAMBER
 ● Find all scroll items in DUKE'S BEDCHAMBER. The Fountain Pen
is hidden under the Duke's Bed. ● The Lobster Fork will come
in handy later and will be saved in your inventory.
● Find all scroll items in DUKE'S BEDCHAMBER. The Fountain Pen
is hidden under the Duke's Bed. ● The Lobster Fork will come
in handy later and will be saved in your inventory.
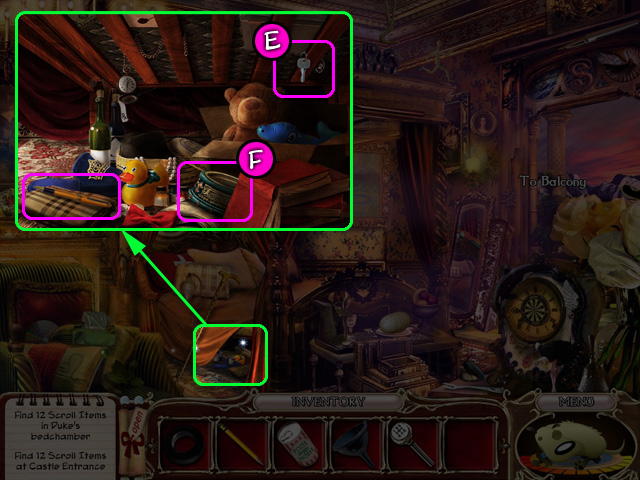 ● Examine the sparkling area under the Duke's Bed. Pick up the
Key (E) and Dog Bowl (F). ● Go to the BALCONY through the
archway on the right.
● Examine the sparkling area under the Duke's Bed. Pick up the
Key (E) and Dog Bowl (F). ● Go to the BALCONY through the
archway on the right.
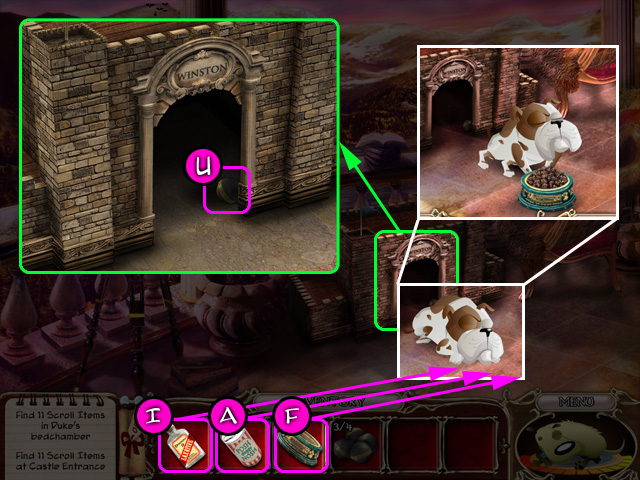
 ● Charles' dog Winston has occupied the Balcony, and it looks
like he's guarding something very precious, hidden inside his
Kennel. ● Winston won't let you examine the Kennel, so you
have to find a way to distract him. ● Pick up the Glue (G) and
Gunpowder (H). ● Return to the CASTLE ENTRANCE through the
GRAND HALL.
● Charles' dog Winston has occupied the Balcony, and it looks
like he's guarding something very precious, hidden inside his
Kennel. ● Winston won't let you examine the Kennel, so you
have to find a way to distract him. ● Pick up the Glue (G) and
Gunpowder (H). ● Return to the CASTLE ENTRANCE through the
GRAND HALL.
 ● Find all the scroll items in the CASTLE ENTRANCE. ● The Wire
Cutter will be added to your inventory for later use.
● Find all the scroll items in the CASTLE ENTRANCE. ● The Wire
Cutter will be added to your inventory for later use.
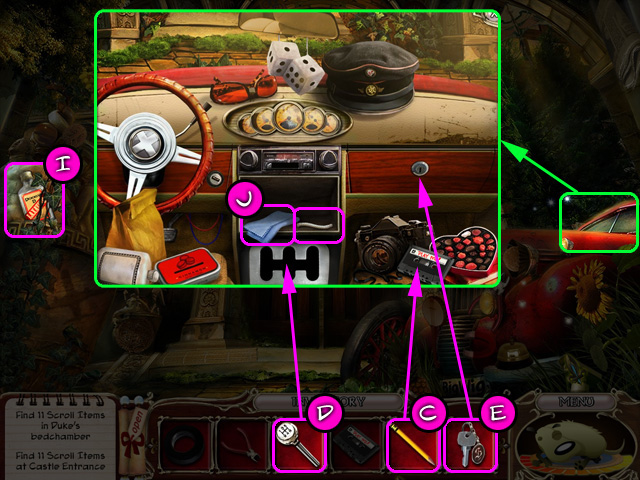 ● Pick up the Laxative (I) and examine the sparkling area -
the old Car on the right to find the Wick scroll item. ● Once
inside the Car, pick up the Polishing Cloth (J). ● Use the Key
(E) on the Glove Compartment to unlock it. Click on the cover
to open it and pick up the Lighter (N). ● Insert Gear Shift
(D) into the Gear Box. Use the Pencil (C) on the Scrambled
Cassette to fix it. Pick it up.
● Pick up the Laxative (I) and examine the sparkling area -
the old Car on the right to find the Wick scroll item. ● Once
inside the Car, pick up the Polishing Cloth (J). ● Use the Key
(E) on the Glove Compartment to unlock it. Click on the cover
to open it and pick up the Lighter (N). ● Insert Gear Shift
(D) into the Gear Box. Use the Pencil (C) on the Scrambled
Cassette to fix it. Pick it up.
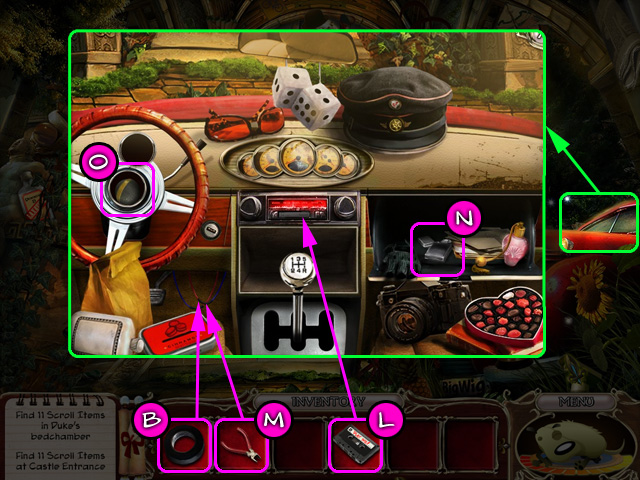 ● Insert the Cassette (L) into the Car Radio. ● There is a
broken key stuck in the ignition. To start the car, you will
have to hot-wire it. ● Use the Wire Cutter (M) to cut the
wires just below the stuck key, then apply the Tape (B) on the
cut-wires to connect them again. ● This will start the car
engine and the cassette will start to play. ● Follow the
recorded instructions by shifting gears. “Start” indicates the
beginning of the message. ● Once the instructions have been
followed correctly, the middle part of the steering wheel will
open and reveal the first Cannonball (O). Pick it up. ● Go to
the ARMORY
● Insert the Cassette (L) into the Car Radio. ● There is a
broken key stuck in the ignition. To start the car, you will
have to hot-wire it. ● Use the Wire Cutter (M) to cut the
wires just below the stuck key, then apply the Tape (B) on the
cut-wires to connect them again. ● This will start the car
engine and the cassette will start to play. ● Follow the
recorded instructions by shifting gears. “Start” indicates the
beginning of the message. ● Once the instructions have been
followed correctly, the middle part of the steering wheel will
open and reveal the first Cannonball (O). Pick it up. ● Go to
the ARMORY
 ● Find all Scroll Items in this location. Pick up the Silver
Polish (Q).
● Find all Scroll Items in this location. Pick up the Silver
Polish (Q).
 ● Examine the Cannon. Use Funnel (P), Gunpowder (H), Wick (K)
and Lighter (N) to fire it. After the cannon fires, pick up
the second Cannonball (R) from the broken glass display case
on the right. ● Go to the DINING ROOM.
● Examine the Cannon. Use Funnel (P), Gunpowder (H), Wick (K)
and Lighter (N) to fire it. After the cannon fires, pick up
the second Cannonball (R) from the broken glass display case
on the right. ● Go to the DINING ROOM.
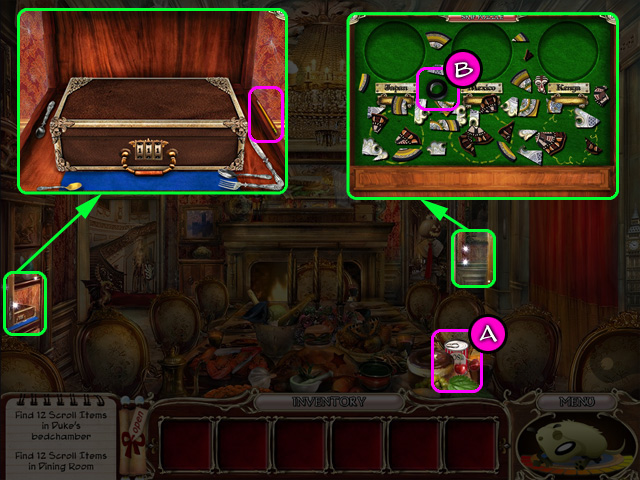
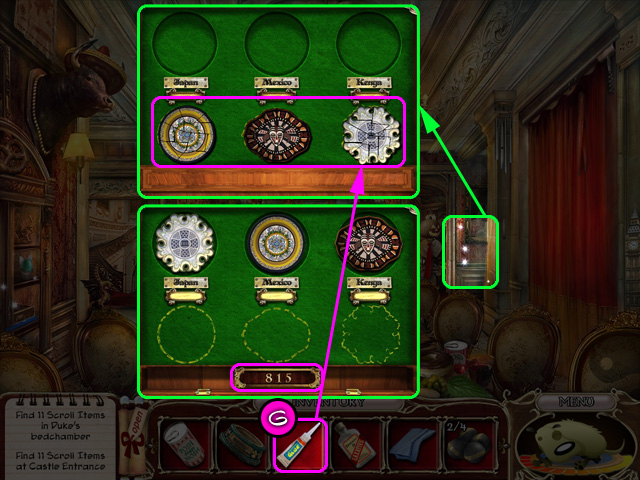 ● Use Glue (G) to fix the plates, then place them onto correct
indentations according to the country of origin. Refer to the
image for the plates positions. ● A number will be revealed
once all the plates are in their correct positions. Use this
number to open the Cutlery Case.
● Use Glue (G) to fix the plates, then place them onto correct
indentations according to the country of origin. Refer to the
image for the plates positions. ● A number will be revealed
once all the plates are in their correct positions. Use this
number to open the Cutlery Case.
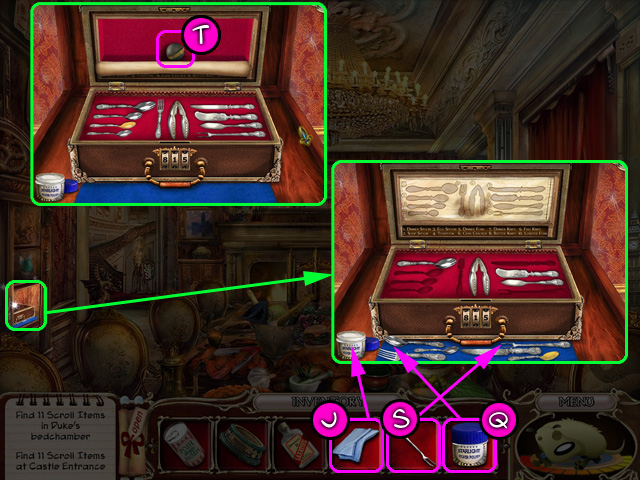 ● Place the Lobster Fork (S) on the blue Polishing Pad. ● You
will need to polish the silver before replacing them in their
correct positions in the Cutlery Case. First dip the Polishing
Cloth in the Silver Polish. Use the Cloth to wipe all the
silver on the Polishing Pad. Once all the silver has been
polished - pick up and drag each cutlery item to its
corresponding slot in the case. Once the entire silver cutlery
has been placed correctly, the third Cannonball (T) will be
revealed. Pick it up. ● Go to the BALCONY.
● Place the Lobster Fork (S) on the blue Polishing Pad. ● You
will need to polish the silver before replacing them in their
correct positions in the Cutlery Case. First dip the Polishing
Cloth in the Silver Polish. Use the Cloth to wipe all the
silver on the Polishing Pad. Once all the silver has been
polished - pick up and drag each cutlery item to its
corresponding slot in the case. Once the entire silver cutlery
has been placed correctly, the third Cannonball (T) will be
revealed. Pick it up. ● Go to the BALCONY.
 ● Place the Dog Bowl (F) in front of Winston. Put the Dog Food
(A) into the Bowl. Sprinkle Winston's food with the Laxative
(I). Winston will eat food without Laxative if you allow it to
stand in front of him for too long. Put a new portion for him
when he finishes the first one. ● If all scroll items have
been found, it won't take long for the Laxative to have
effect. When Winston runs away, examine his Kennel. Pick up
the last Cannonball (U).
● Place the Dog Bowl (F) in front of Winston. Put the Dog Food
(A) into the Bowl. Sprinkle Winston's food with the Laxative
(I). Winston will eat food without Laxative if you allow it to
stand in front of him for too long. Put a new portion for him
when he finishes the first one. ● If all scroll items have
been found, it won't take long for the Laxative to have
effect. When Winston runs away, examine his Kennel. Pick up
the last Cannonball (U).
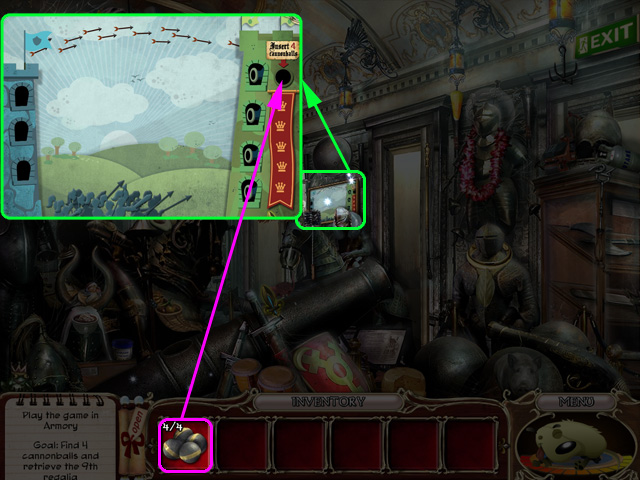 ● Go to the ARMORY and click on the Painting on the wall to
see the mini-game. Insert 4 Cannonballs to start the game. You
will need to hit the Knight from the blue tower with the
cannonballs 4 times to win this game. ● After the game is
complete, the painting will slide away to reveal >The Crown of
Scrufford!
● Go to the ARMORY and click on the Painting on the wall to
see the mini-game. Insert 4 Cannonballs to start the game. You
will need to hit the Knight from the blue tower with the
cannonballs 4 times to win this game. ● After the game is
complete, the painting will slide away to reveal >The Crown of
Scrufford!
Chapter 10: Love
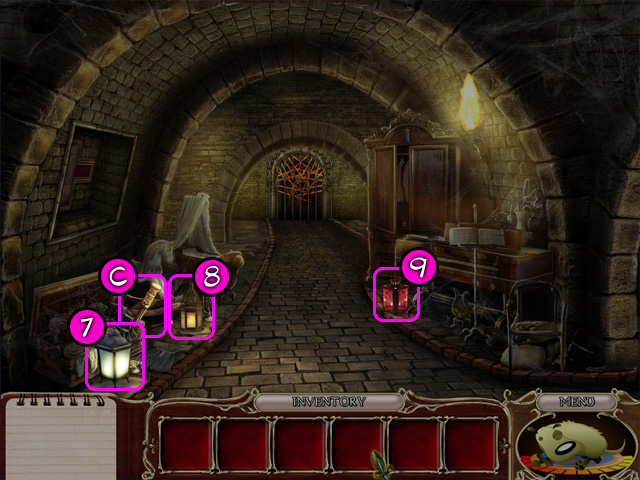
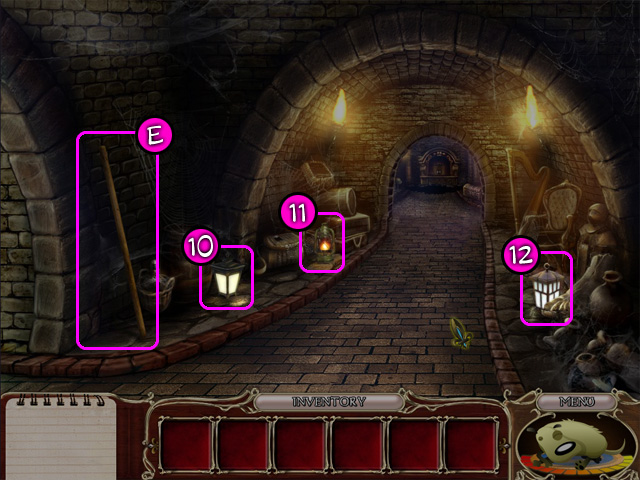
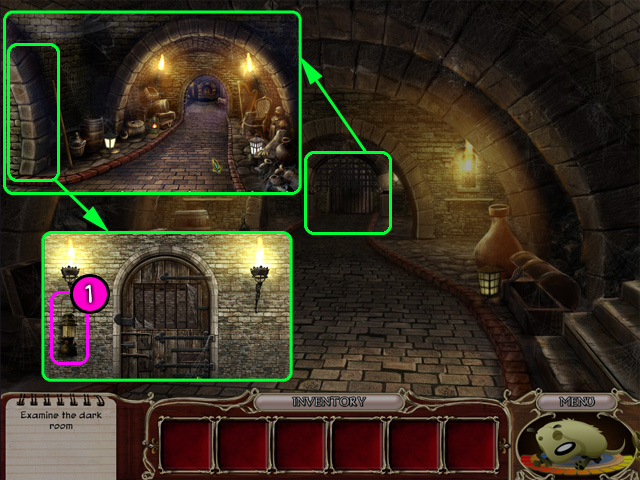 ● You start this chapter in the DUNGEON PASSAGE. Look around
and go through the archway ahead of you. ● In the next
location, DUNGEON CORRIDOR, choose the passage on the left and
enter the JAIL. ● Alfie will give you a quest to find him 12
lanterns. Pick up the first Lantern hanging on the wall (1). ●
Exit the JAIL and pick up Lanterns in DUNGEON PASSAGE, DUNGEON
CORRIDOR, CENTRAL HALL and GALLERY. Refer to the images. ●
Come back to Alfie and give him the Lanterns. In return, he
will give you a Bat Whistle.
● You start this chapter in the DUNGEON PASSAGE. Look around
and go through the archway ahead of you. ● In the next
location, DUNGEON CORRIDOR, choose the passage on the left and
enter the JAIL. ● Alfie will give you a quest to find him 12
lanterns. Pick up the first Lantern hanging on the wall (1). ●
Exit the JAIL and pick up Lanterns in DUNGEON PASSAGE, DUNGEON
CORRIDOR, CENTRAL HALL and GALLERY. Refer to the images. ●
Come back to Alfie and give him the Lanterns. In return, he
will give you a Bat Whistle.
 ● Return to the DUNGEON PASSAGE. Pick up the Battery (A).
 ● Go to the CENTRAL HALL and examine the sparkling area. Open
the upper compartment and put the Battery (A) inside. This
will activate the mini-game. Connect the bulbs with correct
number of wires to light them all up. Pick up the Night Vision
Goggles.
● Go to the CENTRAL HALL and examine the sparkling area. Open
the upper compartment and put the Battery (A) inside. This
will activate the mini-game. Connect the bulbs with correct
number of wires to light them all up. Pick up the Night Vision
Goggles.
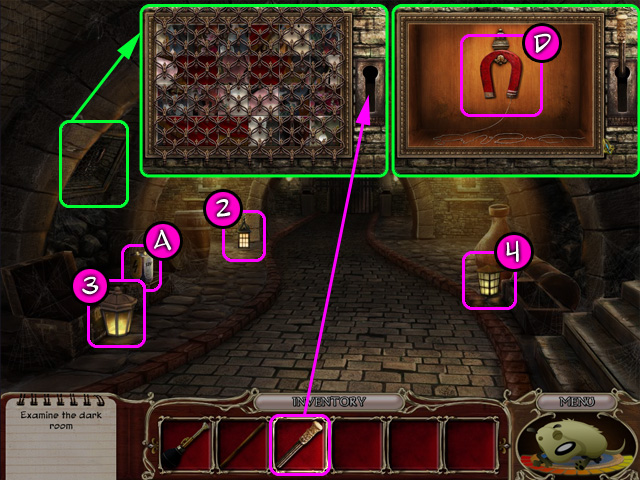
 ● Go to the GALLERY through the passage on the left, Pick up
the Lever (C). ● Back to the DUNGEON PASSAGE again. Use the
Lever (C) on the lever socket on the wall and pull it to lift
the grill. Play the game to assemble the portrait. It will
then slide up and reveal the Magnet on a string (D). ● Go to
the DUNGEON CORRIDOR.
● Go to the GALLERY through the passage on the left, Pick up
the Lever (C). ● Back to the DUNGEON PASSAGE again. Use the
Lever (C) on the lever socket on the wall and pull it to lift
the grill. Play the game to assemble the portrait. It will
then slide up and reveal the Magnet on a string (D). ● Go to
the DUNGEON CORRIDOR.
 ● Pick up the Stick (E). It will automatically combine with
the Magnet in your Inventory.
● Pick up the Stick (E). It will automatically combine with
the Magnet in your Inventory.
 ● Go to the CENTRAL HALL and use the Magnet-on-a-stick (F) on
the alcove where you can see a Medallion (G) hanging just out
of your reach. ● Use the right passage to go to the DARK ROOM.
● Go to the CENTRAL HALL and use the Magnet-on-a-stick (F) on
the alcove where you can see a Medallion (G) hanging just out
of your reach. ● Use the right passage to go to the DARK ROOM.
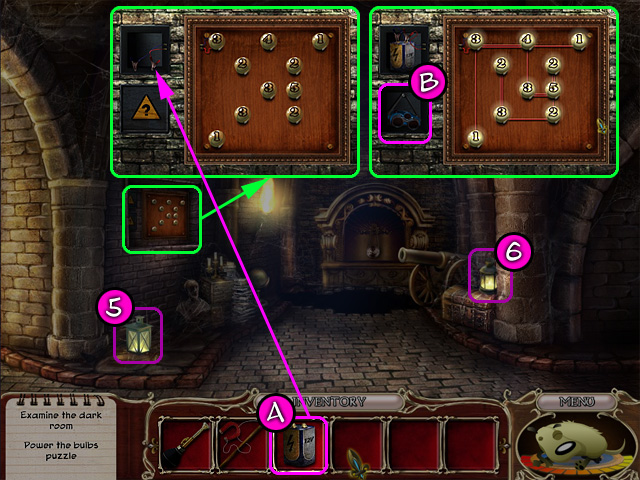
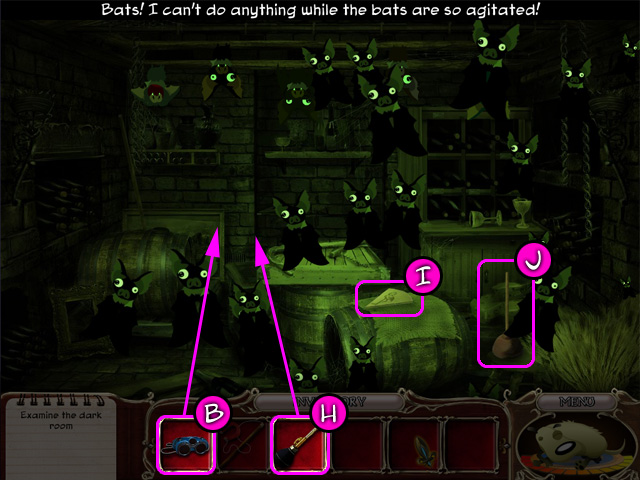 ● Use Night Vision Goggles (B) on the room to see that it is
full of agitated bats fluttering around. ● Use Bat whistle (H)
to calm down the bats. Now you can pick up the Brass wedge (I)
and Plunger (J). ● Go to the GALLERY and examine the sparkling
area on the wall.
● Use Night Vision Goggles (B) on the room to see that it is
full of agitated bats fluttering around. ● Use Bat whistle (H)
to calm down the bats. Now you can pick up the Brass wedge (I)
and Plunger (J). ● Go to the GALLERY and examine the sparkling
area on the wall.
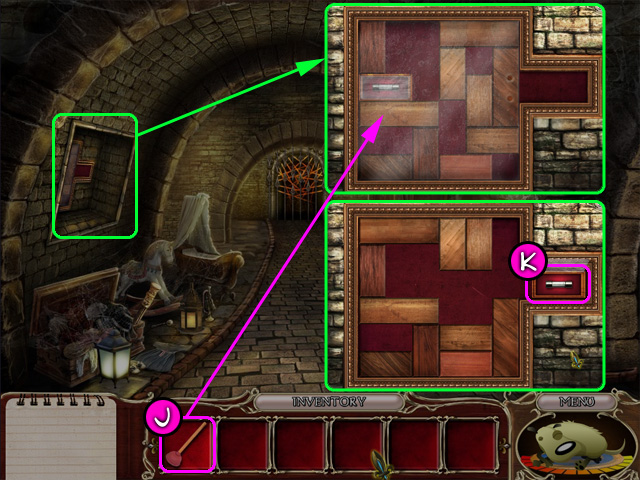 ● Use the Plunger (J) on the glass cover of the puzzle to lift
it. This will activate the game. ● Move the rectangular blocks
around to get the fuse out through the opening in the left.
Pick up the Fuse (K). ● Click on the archway ahead of you to
go to the DUNGEON DOOR.
● Use the Plunger (J) on the glass cover of the puzzle to lift
it. This will activate the game. ● Move the rectangular blocks
around to get the fuse out through the opening in the left.
Pick up the Fuse (K). ● Click on the archway ahead of you to
go to the DUNGEON DOOR.
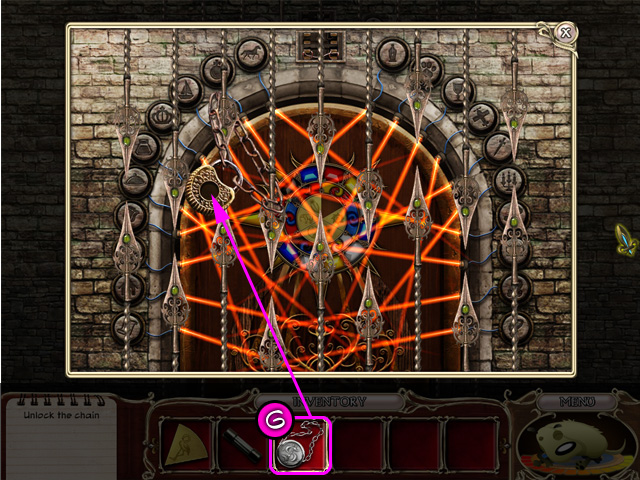 ● Examine the ornate lock securing the spears. Use the
Medallion (G) to unlock the chain and activate the game. ●
Click on the spears in correct order to open them all.
● Examine the ornate lock securing the spears. Use the
Medallion (G) to unlock the chain and activate the game. ●
Click on the spears in correct order to open them all.
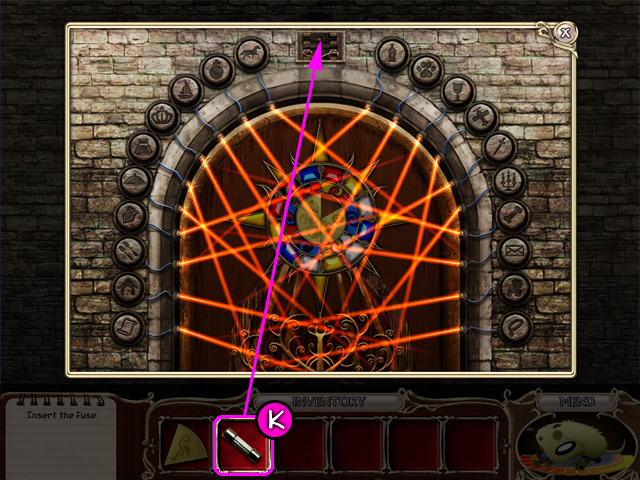 ● Use the Fuse (K) on the fuse box above the door. This will
activate the next game. ● Push buttons with related symbols to
turn off groups of symbols. Each group consists of 4 symbols.
● Use the Fuse (K) on the fuse box above the door. This will
activate the next game. ● Push buttons with related symbols to
turn off groups of symbols. Each group consists of 4 symbols.
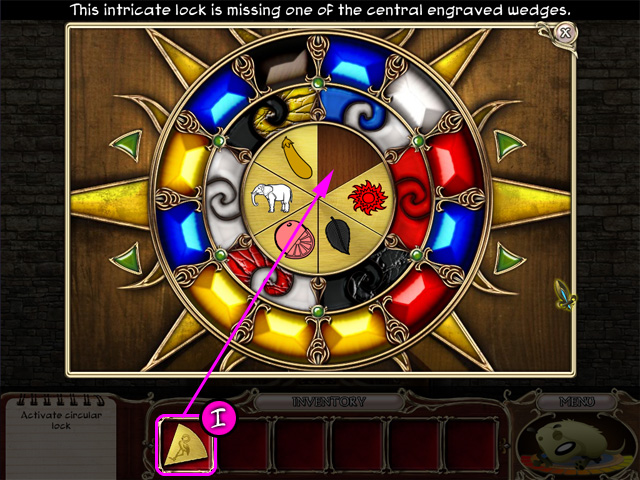 ● Once all lasers are turned off, you will be able to access
the last lock. Apply the Brass Wedge (I) to activate the last
mini-game. ● Click arrows to rotate the inner ring and click
the adjacent gems to swap their colors. Highlight all wedges
according to the symbols on them to solve this puzzle. Cracked
gems cannot be swapped. Flamingo (Pink) = Red + White Sun
(Yellow) = Yellow + Yellow Leaf (Green) = Blue +Yellow Orange
(Orange) = Yellow + Red Elephant (Gray) = White + Black
Aubergine (Purple) = Red + Blue ● When all the symbols are lit
with the correct color, the lock will open. Enjoy the final
cut scene and congratulations, you've won "The Scruffs: Return
of the Duke!"
● Once all lasers are turned off, you will be able to access
the last lock. Apply the Brass Wedge (I) to activate the last
mini-game. ● Click arrows to rotate the inner ring and click
the adjacent gems to swap their colors. Highlight all wedges
according to the symbols on them to solve this puzzle. Cracked
gems cannot be swapped. Flamingo (Pink) = Red + White Sun
(Yellow) = Yellow + Yellow Leaf (Green) = Blue +Yellow Orange
(Orange) = Yellow + Red Elephant (Gray) = White + Black
Aubergine (Purple) = Red + Blue ● When all the symbols are lit
with the correct color, the lock will open. Enjoy the final
cut scene and congratulations, you've won "The Scruffs: Return
of the Duke!"
Created at: 2012-02-20