
Walkthrough Menu
- General Tips
- Chapter 1: Help Mom
- Chapter 2: Flower of Life
- Chapter 3: Ruins
- Chapter 4: Mines
- Chapter 5: Quarantined
- Chapter 6: Escape
General Tips
- This is the official guide for The Secret Order: Bloodline.
- This guide won't tell you when to zoom into a location; the screenshots show each zoom scene.
- Hidden-object puzzles are referred to as HOPs. Only the locations of the HOPs will be shown.
- Use the Map to fast travel to a location.
Chapter 1: Help Mom
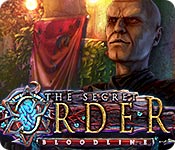
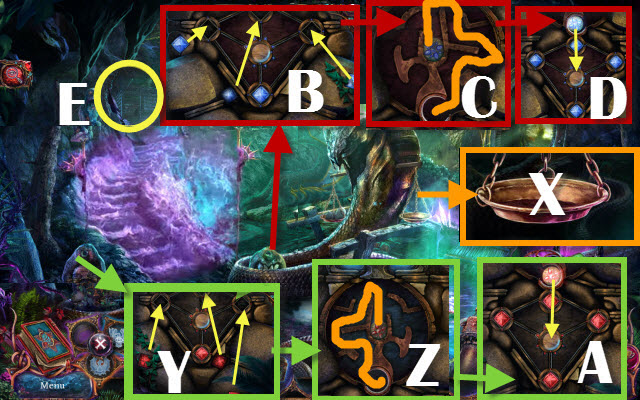
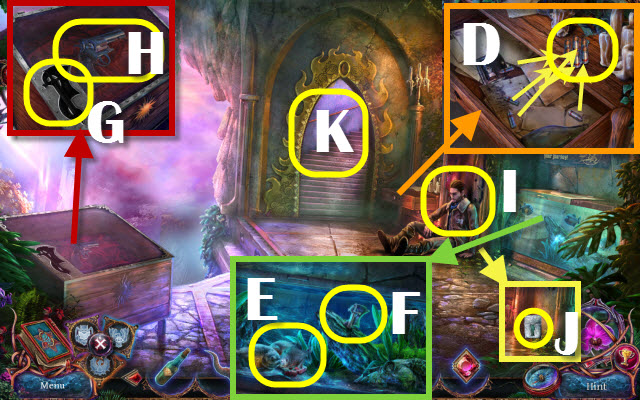
- Talk (A).
- Take UMBRELLA (B); read (C).
- Examine UMBRELLA; take UMBRELLA HOOK and FABRIC.
- Examine crate; solution (D).
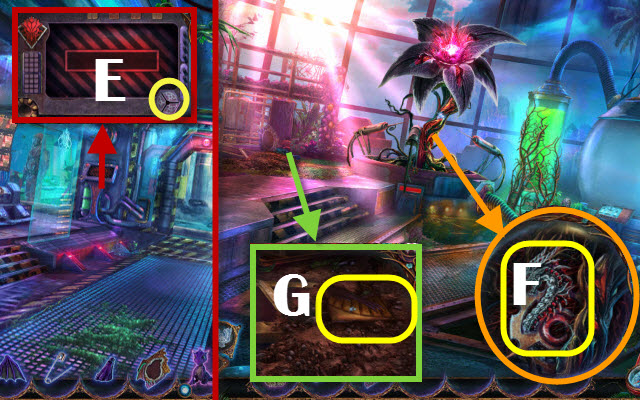
- Take BROKEN STRETCHER (E).
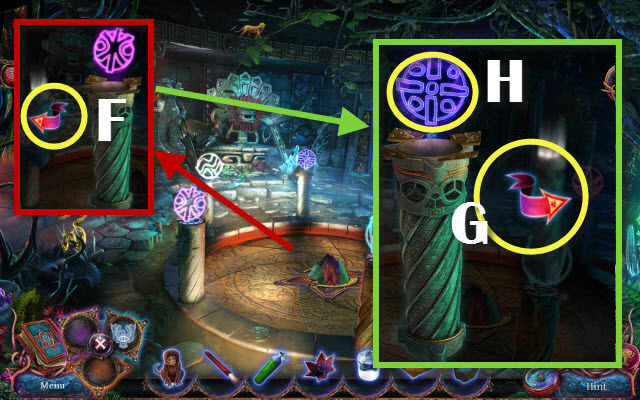
- Use UMBRELLA HOOK (F).
- Take NEEDLE AND THREAD (G).
- FABRIC and NEEDLE AND THREAD on BROKEN STRETCHER; create STRETCHER.
- USE STRETCHER; select (H).
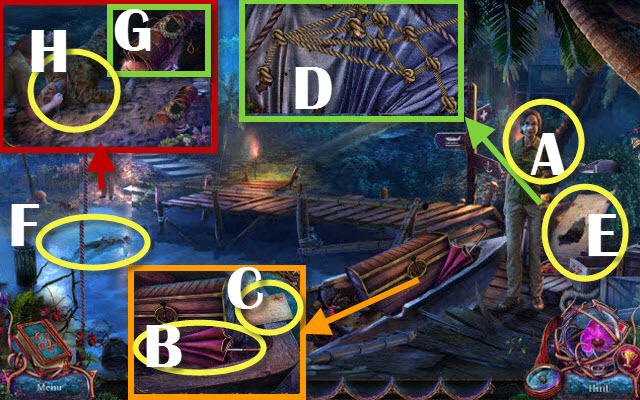
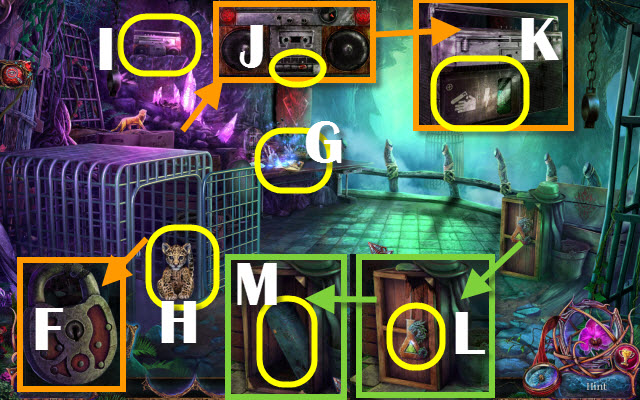
- Talk (I).
- Open (J); play HOP; receive FIRST AID KIT.
- Give FIRST AID KIT (I); receive BUNGALOW KEY.
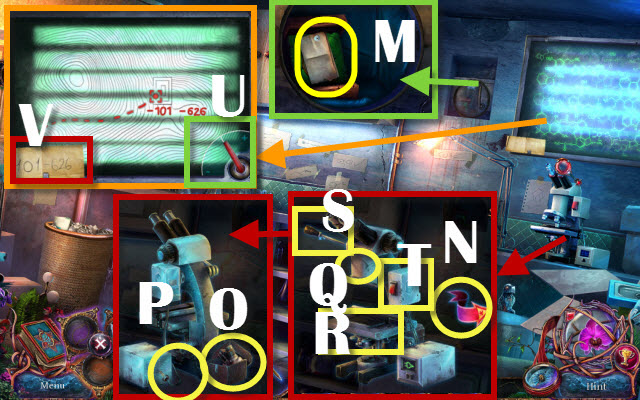
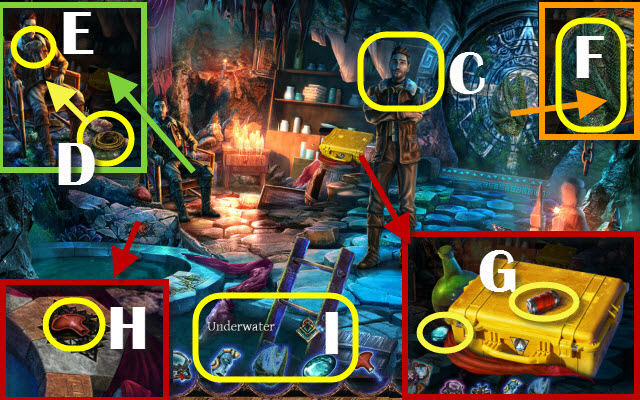
- Go (K-L).
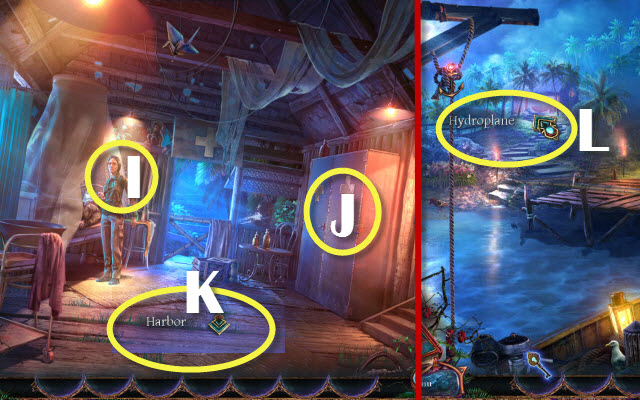
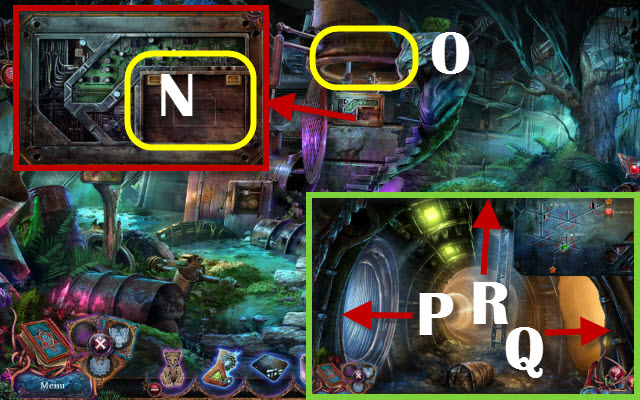
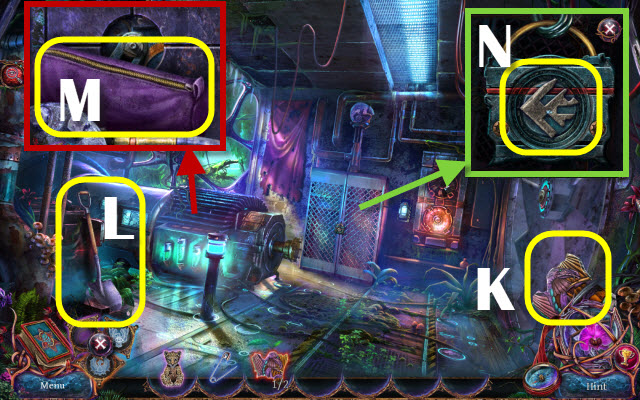
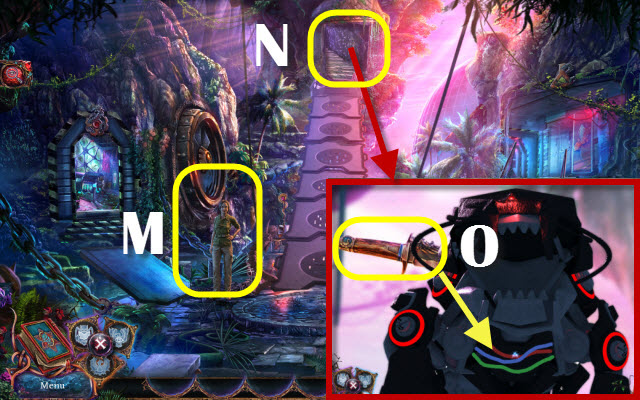
- Take DRILL WITH CABLE (M).
- Take STRAW, WIRE 1/4, COLORED SYMBOLS and DRILL KNOB (N).
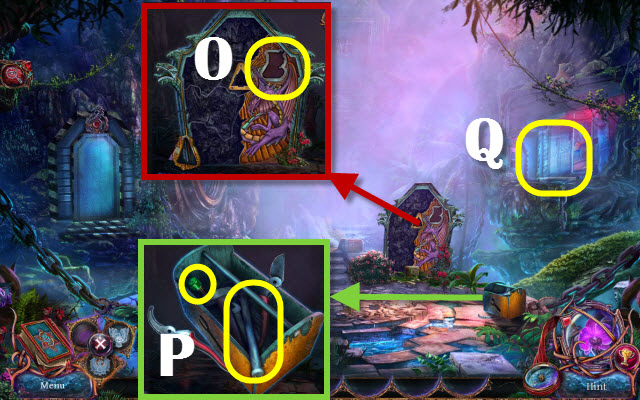
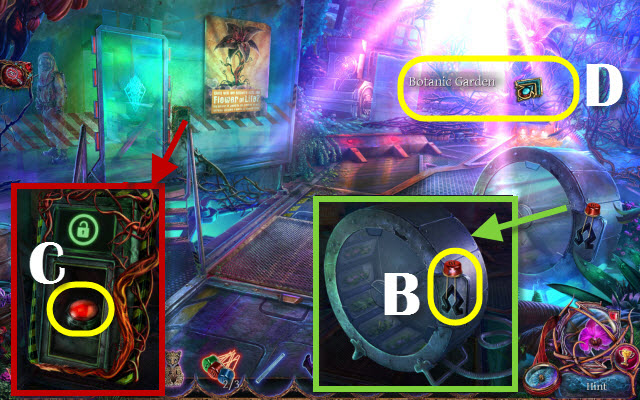
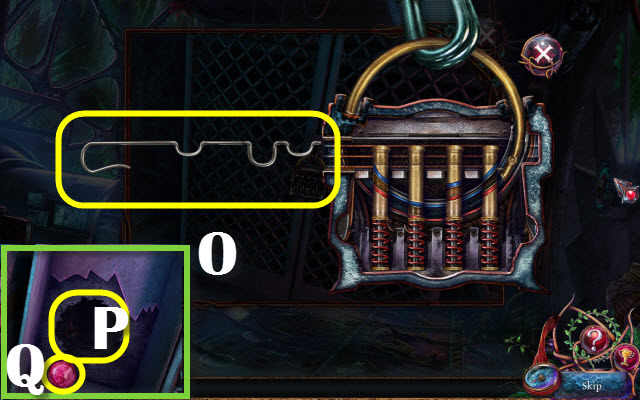
- Use BUNGALOW KEY (O); open.
- Play (P); take KEY CARD (Q) and ALLIGATOR (R).
- Open ALLIGATOR; create PENCIL SHARPENER.
- Examine DRILL WITH CABLE; take WIRE 2/4; add DRILL KNOB. Receive HAND DRILL.
- Go to Hospital.
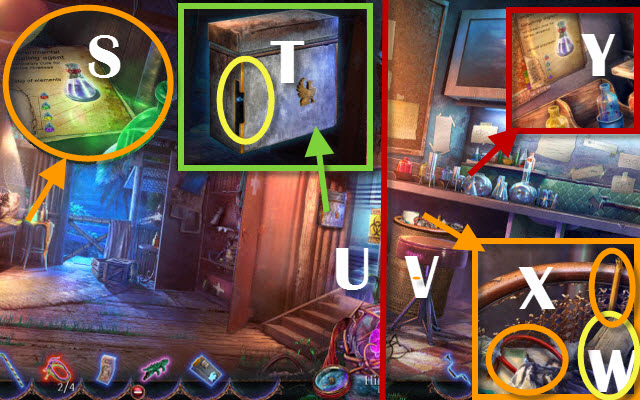
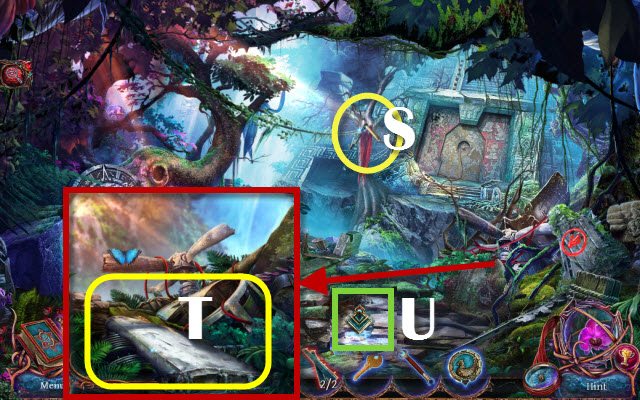
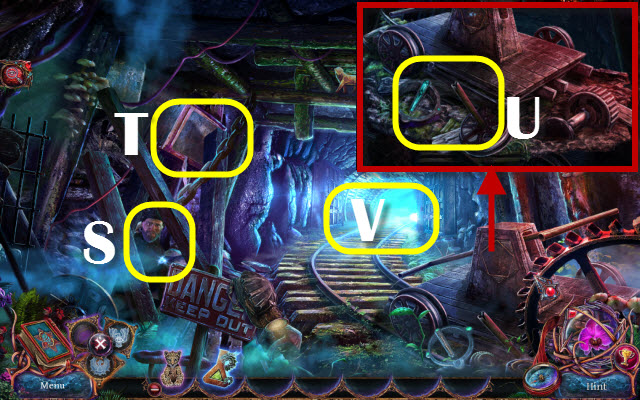
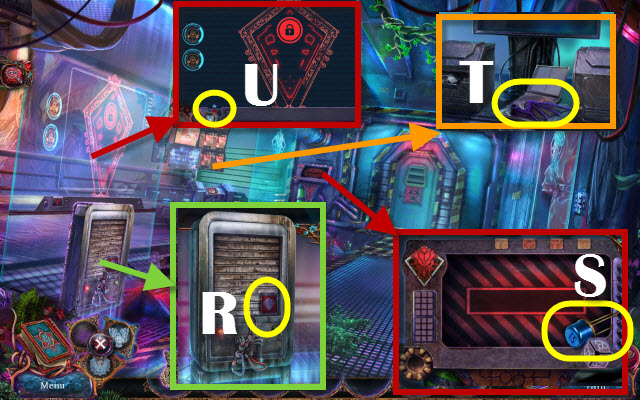
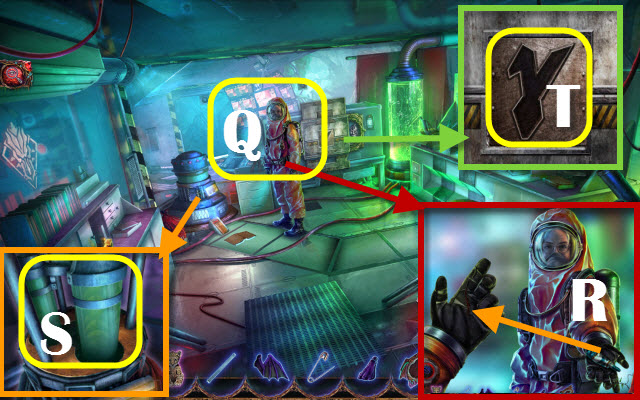
- Take INCOMPLETE RECIPE (S).
- Insert KEY CARD (T).
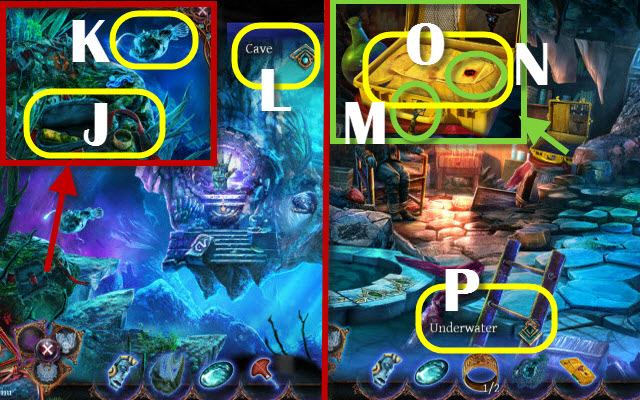
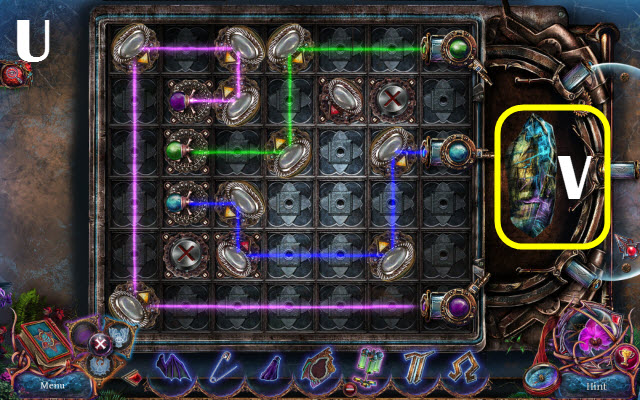
- Go (U).
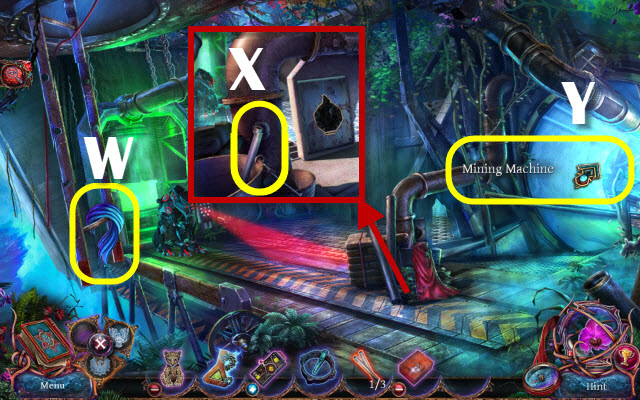
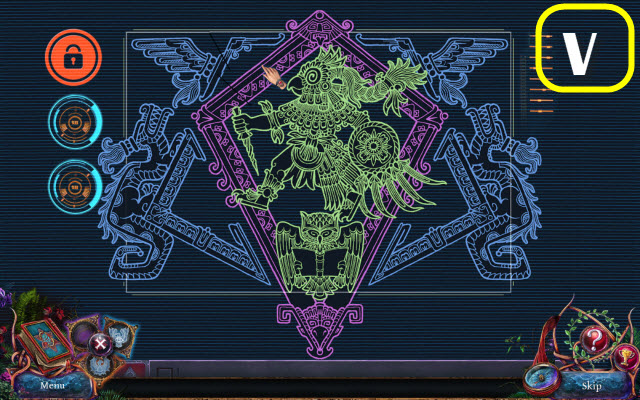
- Move (V).
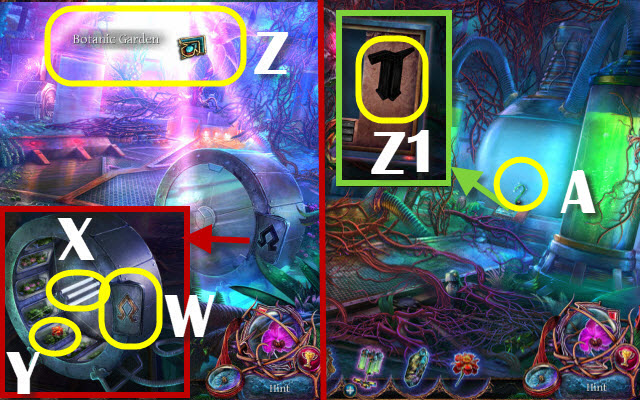
- Read (W); take WIRE 3/4 and BROKEN PENCIL (X).
- BROKEN PENCIL on PENCIL SHARPENER; create SHARP PENCIL.
- SHARP PENCIL on INCOMPLETE RECIPE; create RECIPE.
- Place RECIPE (Y).
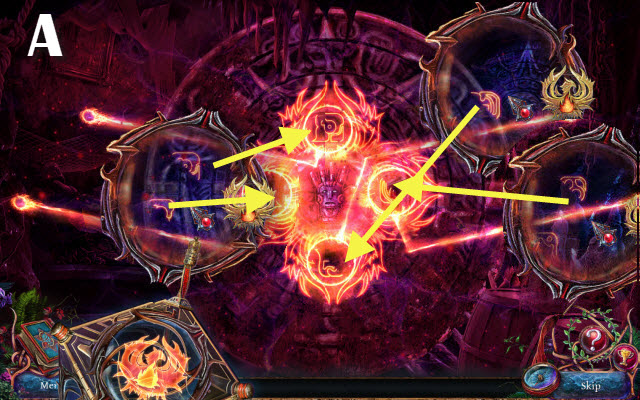
- Solution: (B-D)-(D-E)-(E-F)-(F-H)-(E-F)-(D-E)-(E-F)-(F-H)-(E-F) and (E-K).
- (B-D)-(C-D)-(D-E)-(E-F) and (E-J).
- (A-D)-(C-D)-(D-E)-(E-F) and (F-L).
- (A-D)-( D-E)-(E-F)-(F-H)-(E-F)-(D-E)-(E-F) and (E-I).
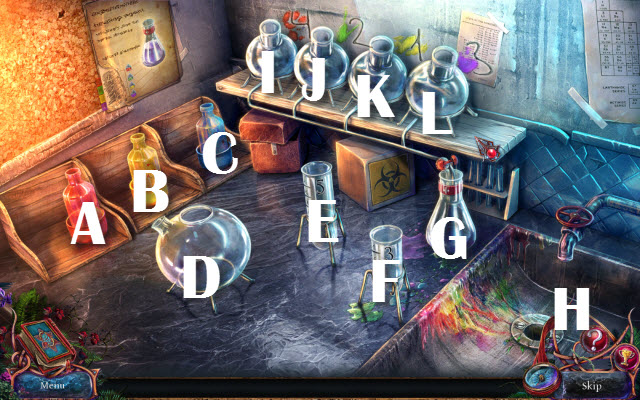
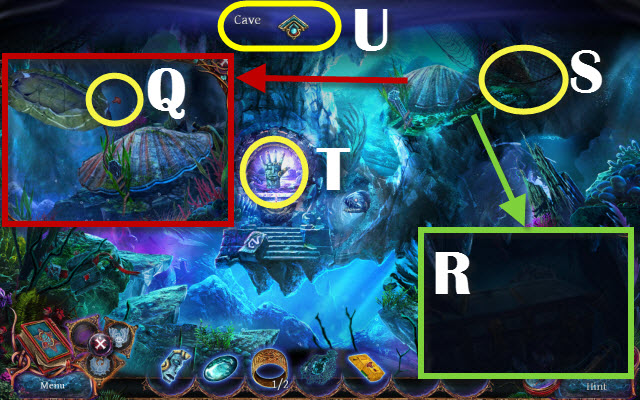
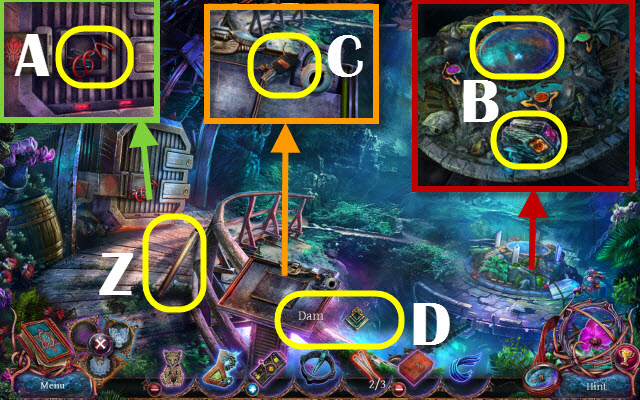
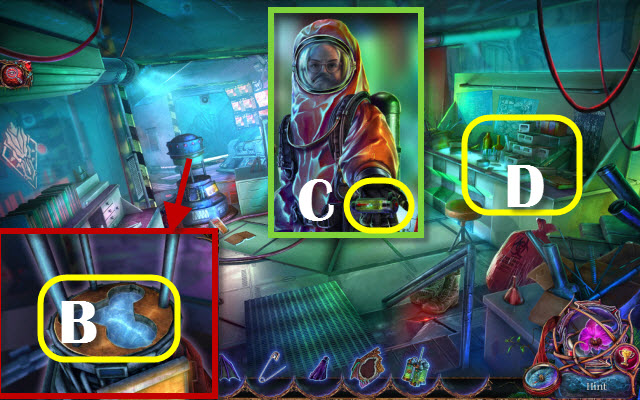
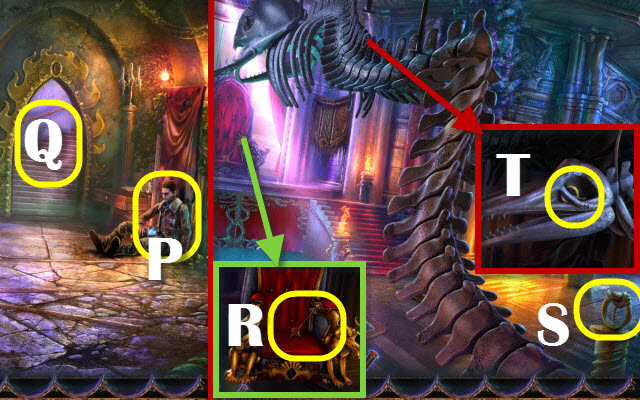
- Take HEALING AGENT (G).
- Walk down.
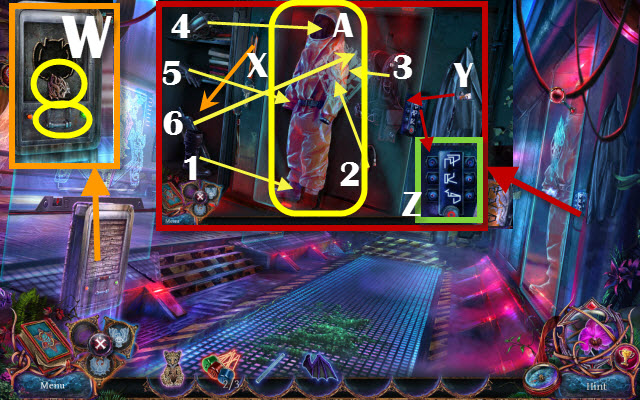
- Use HEALING AGENT (Z).
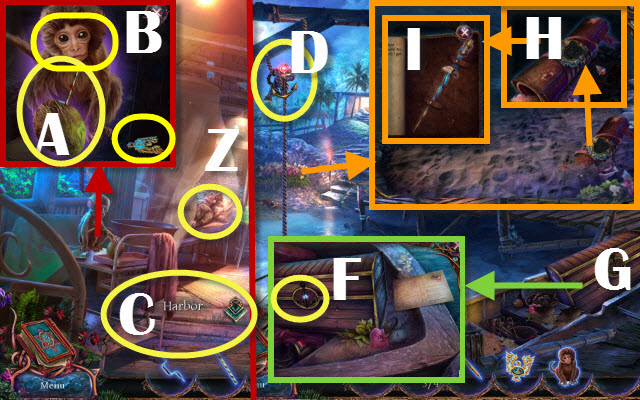
- Use HAND DRILL and STRAW (A); take EAGLE EMBLEM and MONKEY (B).
- Go (C).
- Use MONKEY (D); receive ANCHOR TOKEN.
- Place ANCHOR TOKEN (F); select.
- Play HOP (G); receive DUCT TAPE.
- Place EAGLE EMBLEM (H); take DAGGER (I).
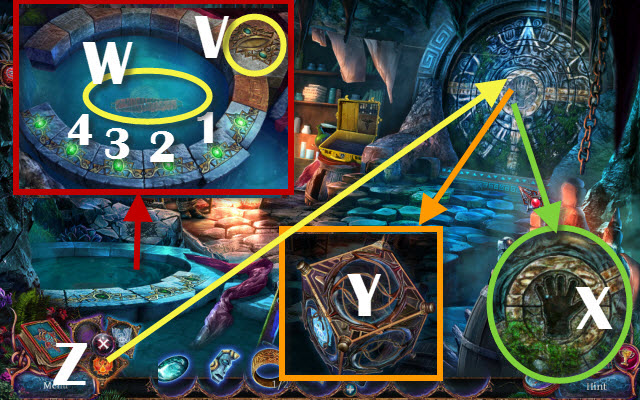
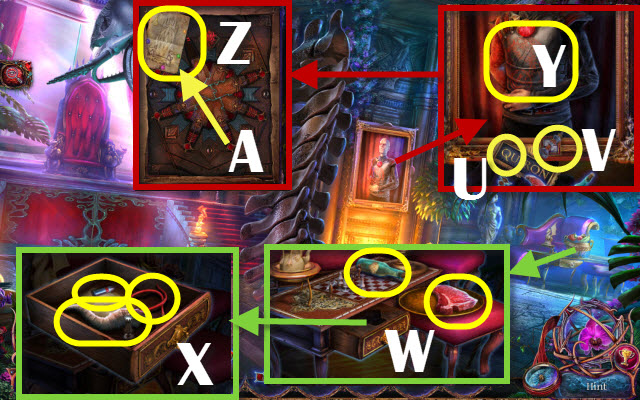
- Go to Laboratory.
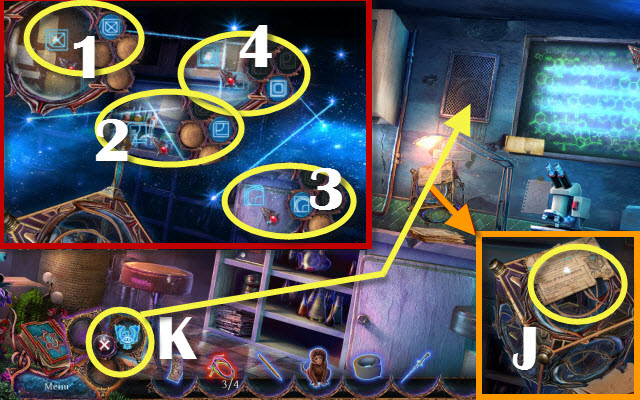
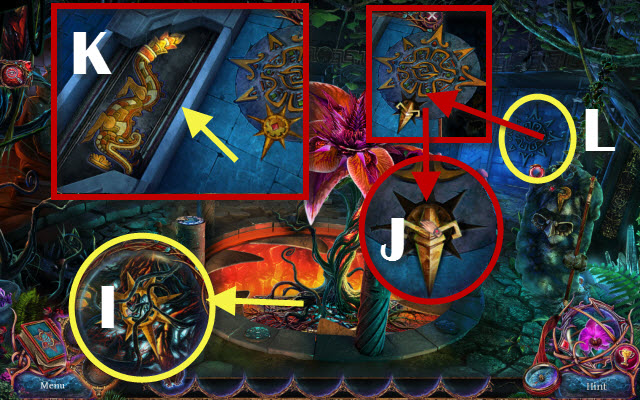
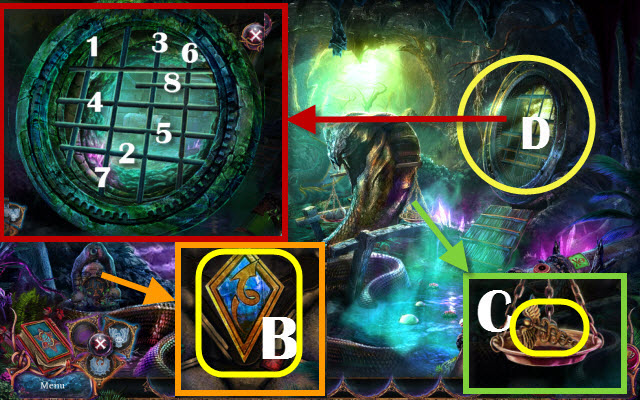
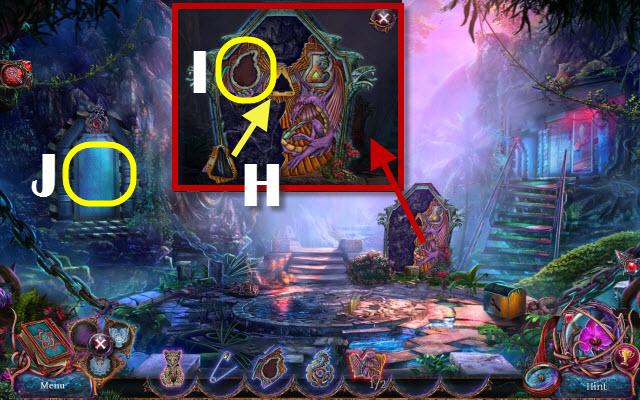
- Read; place DAGGER (J).
- Drag (K).
- Solution: 1-4.
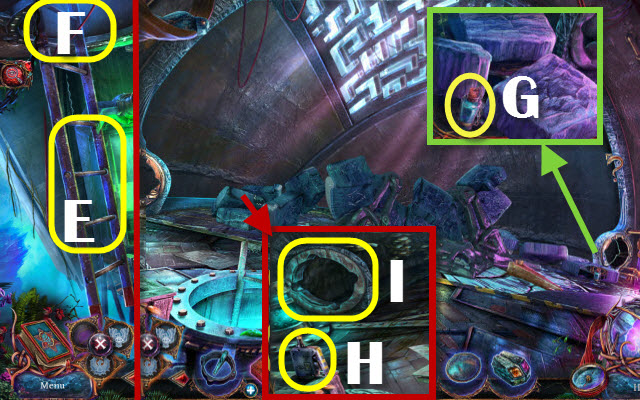
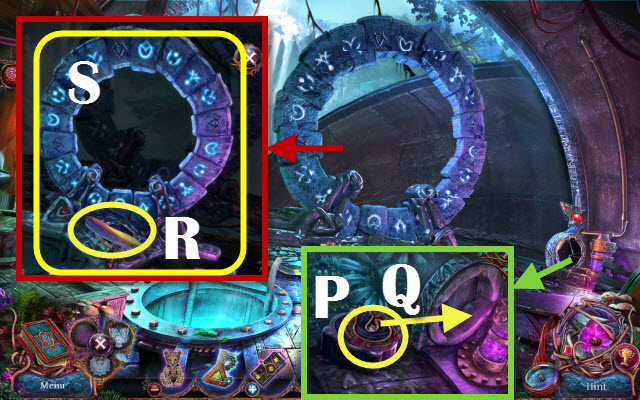
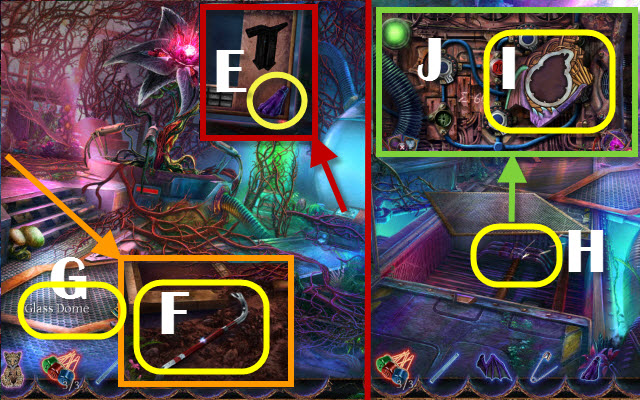
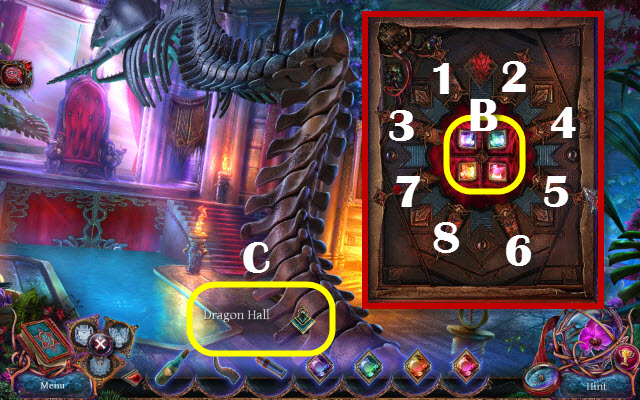
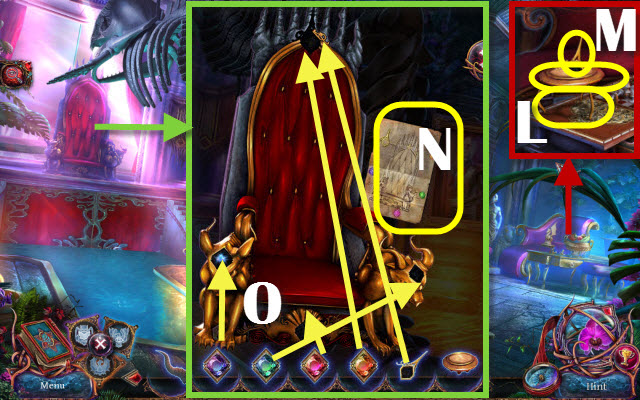
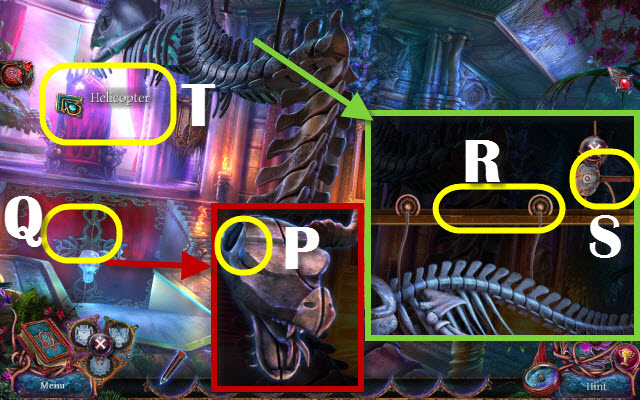
- Open; receive HANDLE; read, take STONE DISK 1/4 and MICROFILM (M).
- Turn (N); take COMPOUND LENS (O); select (P).
- Place COMPOUND LENS (Q) and MICROFILM (R); select (S-T).
- Set (U); use SHARP PENCIL and take COORDINATES (V).
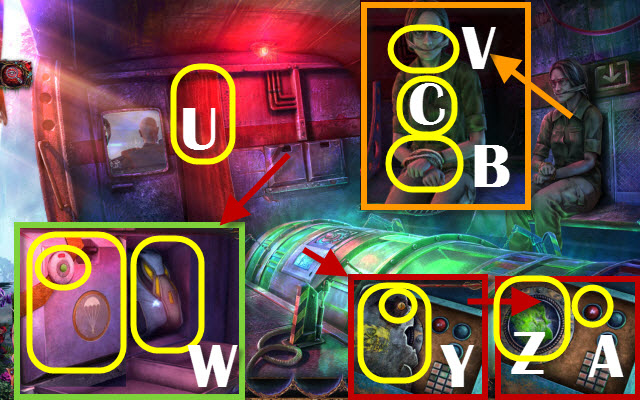
- Go to Hydroplane.
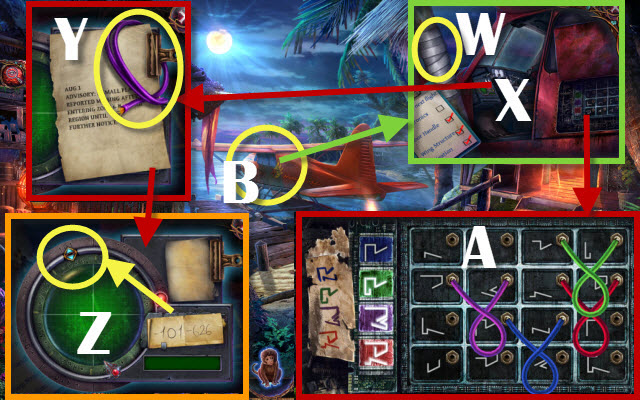
- Use DUCT TAPE (W).
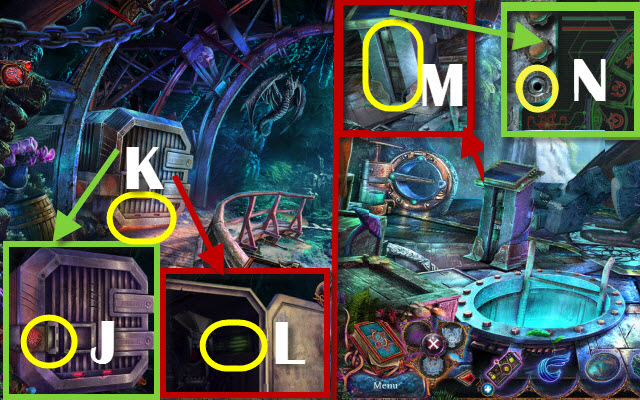
- Place HANDLE (X); open. Take WIRE 4/4 (Y); place COORDINATES and set code (Z).
- Open; place COLORED SYMBOLS and WIRE 4/4; solution (A).
- Go (B).
Chapter 2: Flower of Life

- Solution: (Cx2)-(C-D)-(D-E)-(D-F)-(D-G)-(D-H) and (I-J).
- Select (K).
- Take PARACHUTE BELT (L).
- Take WING PART 1/2 (M).
- Take BAG WITH MACHETE (N); examine; take MACHETE and BAG.
- Use MACHETE (O); enter.
- Take WING PART 2/2 (P).
- Take SMALL KEY (Q).
- Take WRENCH and GRIFFIN EMBLEM (R).
- GRIFFIN EMBLEM on BAG; take CHEMICAL SYMBOL and PUNCH CARDS.
- Walk down; go forward.
- Use MONKEY (S); receive CRANK.
- Take PANEL 1/3 and STONE DISC 2/4 (T).
- Go (U).
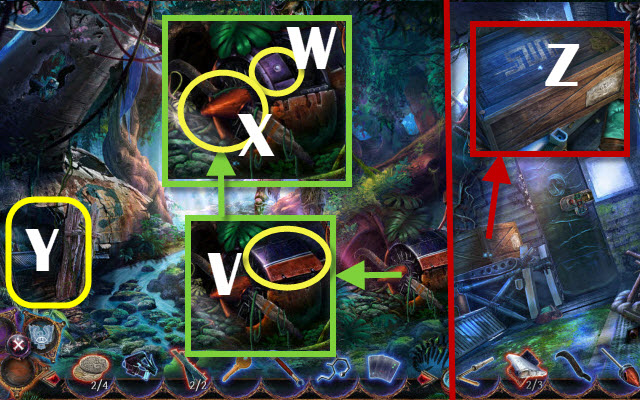
- Take PANELS 2/3 (V).
- Use WRENCH (W); take BROKEN PROPELLER WITH VINES (X).
- Examine BROKEN PROPELLER WITH VINES; take PROPELLER BLADE and NOSE CONE.
- Go (Y).
- Use PROPELLER BLADE (Z); open; take PANELS 3/3, STONE DISC 3/4 and WHEEL.
- Go to Ravine.
- Take LOCKED BOX (A), examine; use SMALL KEY and CHEMICAL SYMBOL. Take BRIDGE BLUEPRINT and PASSPORT BOX.
- Place BRIDGE BLUEPRINT (B); move (C).
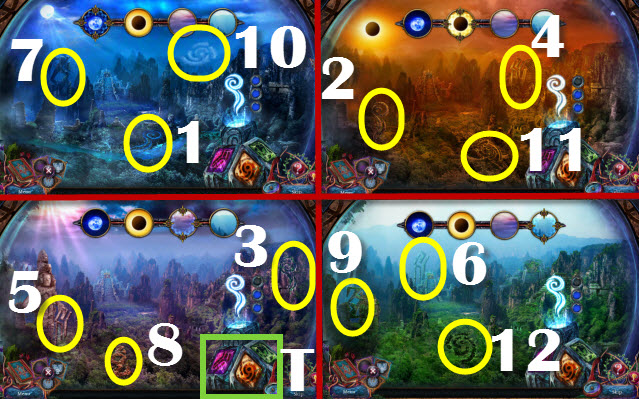
- Follow highlights; place WHEEL, NOSE CONE, PARACHUTE BELT, CRANK, WING PART 2/2, PANELS 3/3 (D). Move PANELS (E) and select.
- Take CLOSED WALLET (F); examine; take PASSPORT and NICKEL.
- PASSPORT and PUNCH CARDS on PASSPORT BOX,; receive CODE CARD.
- Go Inside Wreck.
- Use CODE CARD (G).
- Solution (H).
- Play HOP (I); receive STONE DISC 4/4.
- Use NICKEL (J); take UNLIT FLARE, NET and OXYGEN TANK (J1).
- Examine UNLIT FLARE; select; receive FLARE.
- Go to Ravine.
- Place STONE DISC 4/4 (K).
- Solution (L-M-N).
- Go forward.
- Play HOP (O); receive GOLDEN PLATE.
- Select (P).
- Take BUCKET (Q); select (R); take CARVED EMBLEM (S).
- Select twice (T); take BRANCH (U).
- NET on BRANCH; receive BUTTERFLY CATCHER.
- Go to Plane Crash.
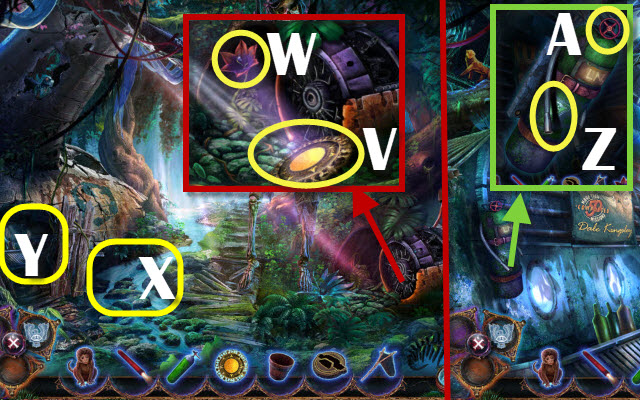
- Use GOLDEN PLATE (V); take FLOWER (W).
- Use BUCKET (X); receive BUCKET OF WATER.
- Go (Y).
- Select (Z); turn (A); add BUCKET OF WATER. Turn (A); take ICE.
- Go to Ravine.
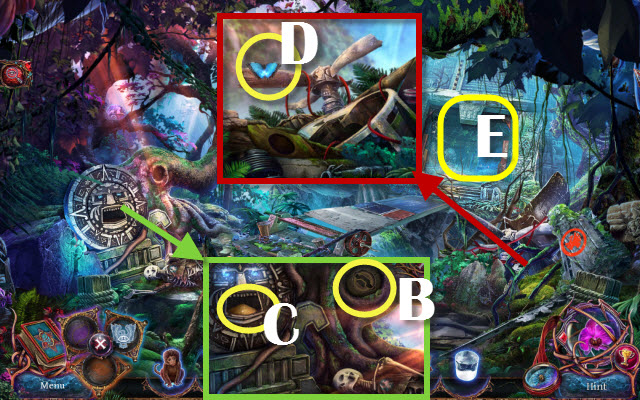
- Insert CARVED EMBLEM (B); take SAND (C).
- Use BUTTERFLY CATCHER (D); catch BUTTERFLY.
- Go (E).
- Go left (F).
- Select (G) after each; place FLOWER (H), OXYGEN TANK, BUTTERFLY, ICE, SAND and FLARE.
- Take DOOR PIECE (I).
- Take SPEAR HEAD; insert DOOR PIECE (J).
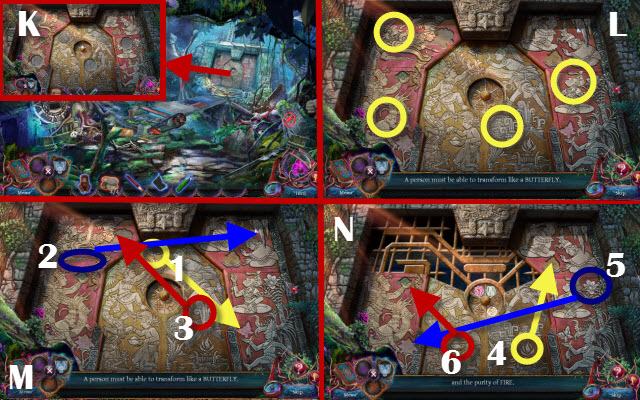
- Solution (K).
- Go (L).
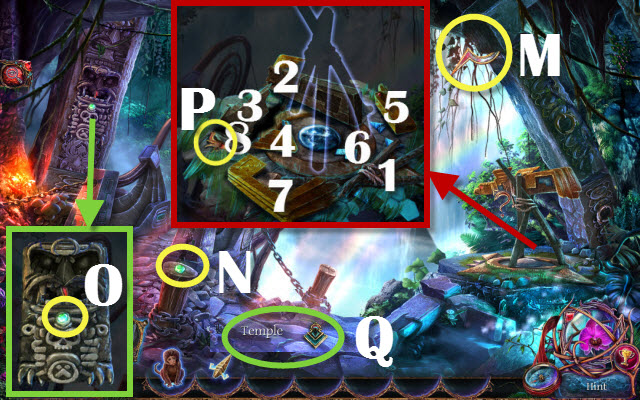
- Use MONKEY (M); get SYMBOL.
- Take OWL'S EYE 1/2 (N).
- Take OWL'S EYES 2/2 (O).
- Assemble (1-8); take PHOENIX SYMBOL (P).
- Go (Q).

- Place OWL'S EYES 2/2; take OWL MASK (R).
- Place SYMBOL (S); take UNCOMPLETE SPEAR (T).
- SPEAR HEAD on UNCOMPLETE SPEAR; receive SPEAR.
- Go (U).
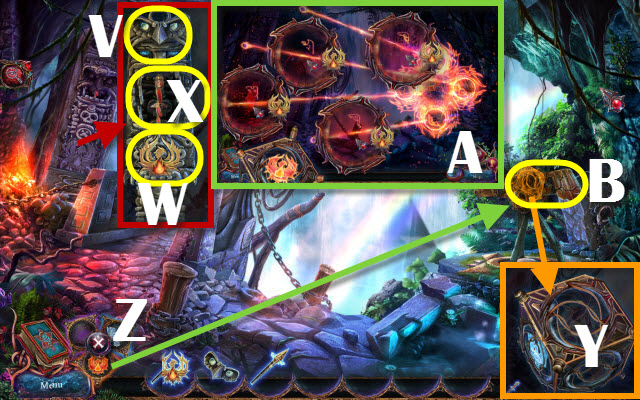
- Place OWL MASK (V) and PHOENIX SYMBOL (W); take CHARGED PHOENIX DAGGER (X).
- Insert CHARGED PHOENIX DAGGER (Y).
- Drag Phoenix (Z).
- Solution (A).
- Use SPEAR (B); select.
Chapter 3: Ruins
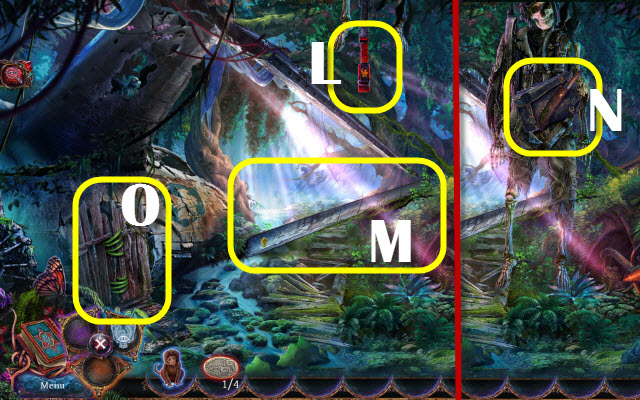
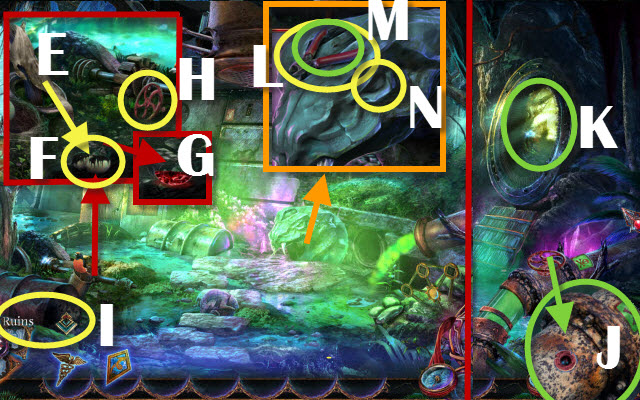
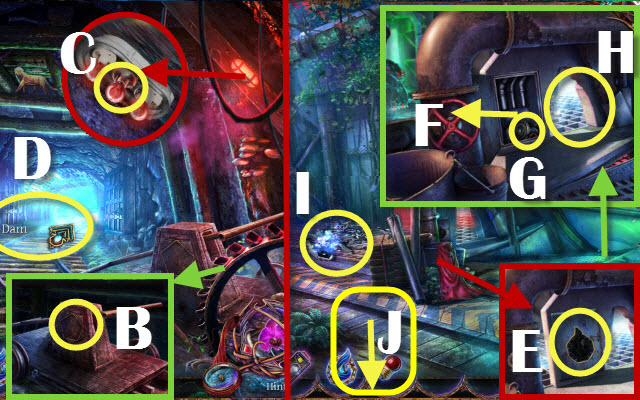
- Talk (C).
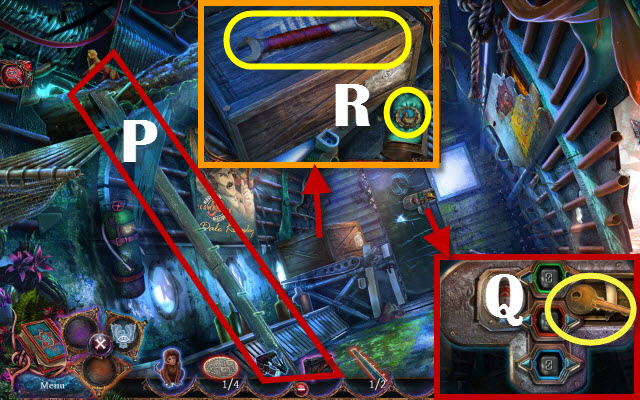
- Use (D); take DISASSEMBLED AQUA-LUNG (E).
- Take FILLED NET (F); examine; take AQUA-LUNG PART, GLOVE PATTERN and NET.
- Take GLOVE EYE and 2nd AQUA-LUNG PART (G).
- Both AQUA-LUNG PARTS on DISASSEMBLED AQUA-LUNG; receive AQUA-LUNG.
- Take RED HANDLE (H).
- Go (I).
- Take GLOVE RING 1/2 and KEY (J).
- Use NET; catch ILLUMINATING FISH (K).
- Go (L).
- Use KEY (M) and RED HANDLE (N); take INFLATABLE BOAT (O).
- Go (P).
- Use INFLATABLE BOAT; pull handle (Q).
- Place ILLUMINATING FISH (R).
- Play HOP (S); receive FISH SYMBOL.
- Take GLOVE PIECE (T).
- Go (U).
- Place FISH SYMBOL (V).
- Solution: 1-4.
- Take RED CRYSTAL and GLOVE RINGS 2/2 (W).
- GLOVE EYE, GLOVE PATTERN and GLOVE RINGS 2/2 on GLOVE PIECE; create COMPLETE GLOVE.
- Use COMPLETE GLOVE (X).
- Insert RED CRYSTAL (Y).
- Drag (Z).
- Solution (A).
- Go forward.
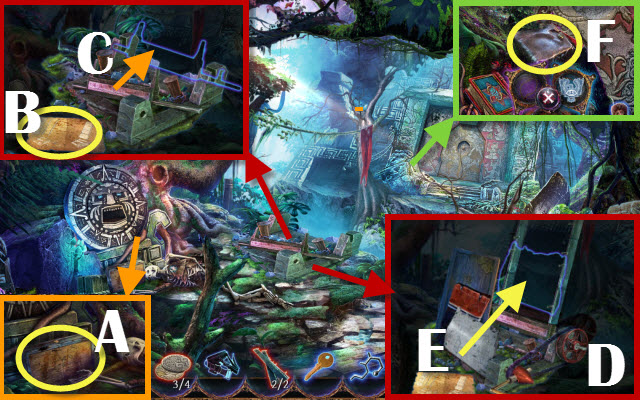
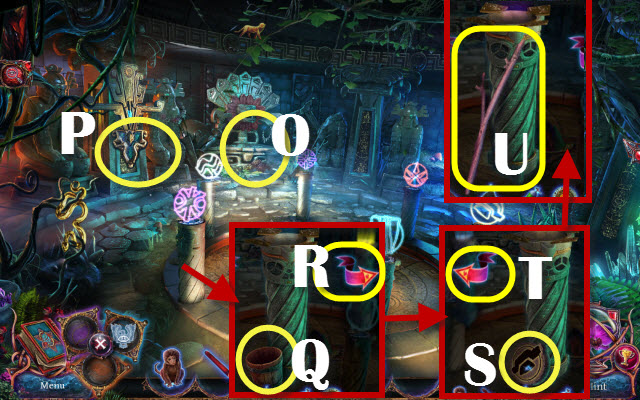
- Take DELTOID KEY (B).
- Take FIRST AID SYMBOL (C).
- Pull (1-8).
- Go (D).
- Use (E); select (F); take SERPENT EYE (G) and RED HANDLE (H).
- Go (I).
- Insert RED HANDLE (J); turn.
- Go (K).
- Take TONGS (L); insert DELTOID KEY (M) and SERPENT EYE (N).
- Go Underwater.
- Use TONGS; take COGWHEEL and WEIGHTS (O).
- Go (P).
- Take SPADE (Q).
- Insert FIRST AID SYMBOL; take TAPE (R).
- Go to Facility Basement.

- Use SPADE; take PIECE OF SHRINE (S).
- Open; use TAPE (T) and COGWHEEL (U).
- Take BROKEN BATTERY (V).
- Go (W).
- Place WEIGHTS (X).
- Place PIECE OF SHRINE and gems (Y).
- Slide gem (Z); place (A).
- Place gems (B); slide (C); insert (D).
- Go (E).
- Use BROKEN BATTERY (F).
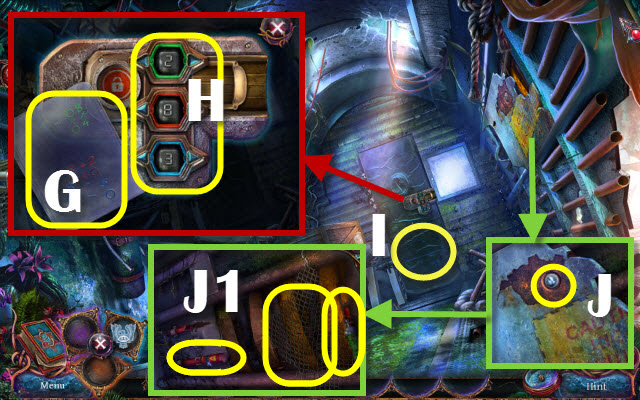
- Play HOP (G); receive SCREWDRIVER.
- Take JAGUAR CUB (H); use (I).
- Play (J); use SCREWDRIVER; take GOOD BATTERY (K).
- Take MOLECULE SYMBOL (L) and MAP (M).
- Go to Facility Basement.
- Place GOOD BATTERY and MAP (N).
- Go (O).
- Solution: P-R-Q-P and R.
Chapter 4: Mines
- Talk (S); receive DECOY FRAME.
- Play HOP (T); receive STASH.
- Take CYAN LEVER and STAIR 1/3 (U).
- Go (V).
- Take WATER SYMBOL WAVE (W).
- Take STAIRS 2/3 (X).
- Go (Y).
- Take STAIRS 3/3 (Z).
- Take CABLES (A).
- Take LENS TO THE PAST and STATUE GROUP (B).
- Take KEY (C).
- KEY on STASH; take EXPLOSIVE, TIMER and HANDLE.
- TIMER and CABLES on unwrapped EXPLOSIVE; create ARMED EXPLOSIVE.
- Go (D).
- Place STAIRS 3/3 (E).
- Go (F).
- Take ILLUMINATED INK WELL (G).
- Take DETONATOR (H); place CYAN LEVER (I).
- Go to Mining Machine.
- Place ARMED EXPLOSIVES (J).
- Use DETONATOR (K); take ENERGY CELL (L).
- Go to Observatory.
- Place ENERGY CELL (M).
- Place HANDLE (N).
- Random layout.
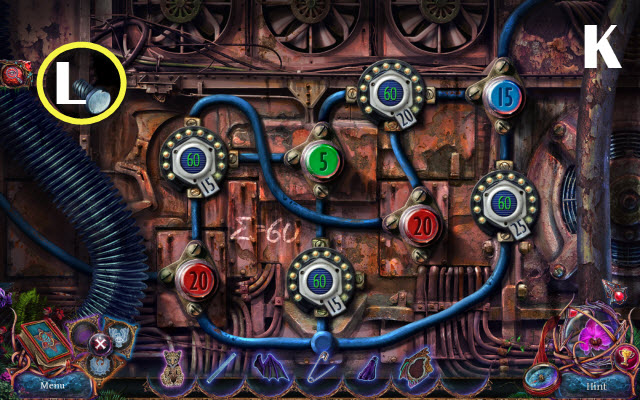
- Solution (O).
- Take WATER SYMBOL FRAME (P); move (Q).
- WATER SYMBOL WAVE on WATER SYMBOL FRAME ; create WATER SYMBOL.
- Take FEATHER (R).
- FEATHER on opened ILLUMINATED INK WELL; create ILLUMINATED INK WELL WITH FEATHER.
- Place STATUE GROUP (R), LENS TO THE PAST and ILLUMINATED INK WELL WITH FEATHERS (S); examine.
- Solution 1-12.
- Take CHARGED STATUES (T).
- Examine CHARGED STATUES; take ORANGE STATUE, BLUE STATUE, PURPLE STATUE and GREEN STATUE.
- Go to Mining Machine.

- Place ORANGE STATUE, BLUE STATUE, PURPLE STATUE and GREEN STATUE (U); take BLUE CRYSTAL (V).
- Insert BLUE CRYSTAL (W).
- Drag (X).

- Solution: 1-4.
- Push (Y).
- Solution: Shoot (Z).
- Take MINING SYMBOL (A).
- Go to Depleted Mine.
- Place MINING SYMBOL (B).
- Take RED LED (C).
- Go (D).
- Place WATER SYMBOL (E); move (F); take SPEAKER (G).
- SPEAKER, RED LED and battery on DECOY FRAME; create DECOY.
- DECOY on JAGUAR CUB; create JAGUAR CUB WITH DECOY; place (H) and turn (F).
- Play HOP (I); receive DISASSEMBLED PULSAR GENERATOR.
- Examine DISASSEMBLED PULSAR GENERATOR; take PAW. Assemble; create PULSAR GENERATOR.
- Go (J).

- Give PULSAR GENERATOR (K); talk; receive SPECIAL KEY.
- Go (L).
- Use SPECIAL KEY and PAW (M).
- Go (N).
Chapter 5: Quarantined
- Place MOLECULE SYMBOL (O).
- Take FUSE 1/3 and UV LIGHT BULB (P).
- Go (Q).
- Take SD CARD (R).
- Take FUSES 2/3 (S).
- Take DRAGON WING (T).
- Place SD CARD (U).
- Solution (V).
- Untie and flip; take DRAGON PIN BOARD (W). Examine; take SAFETY PIN.
- Use (X), place (Y); set (Z).
- Place (1-6); take (A).
- Go forward.
- Take FUSES 3/3 (B).
- Push (C).
- Go (D).
- Take DRAGON LEG (E).
- Take CROWBAR (F).
- Go (G).
- Use CROWBAR (H).
- Take SLOT OF THE ENGINEERING SYMBOL (I).
- Place the FUSES 3/3 (J).
- Solution (K).
- Take BOLT (L).
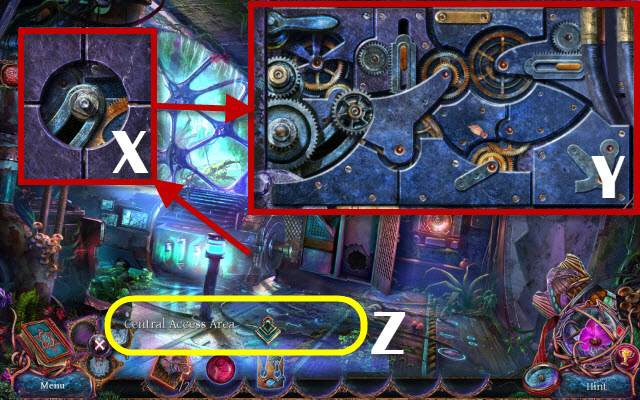
- Go to Central Access Area.
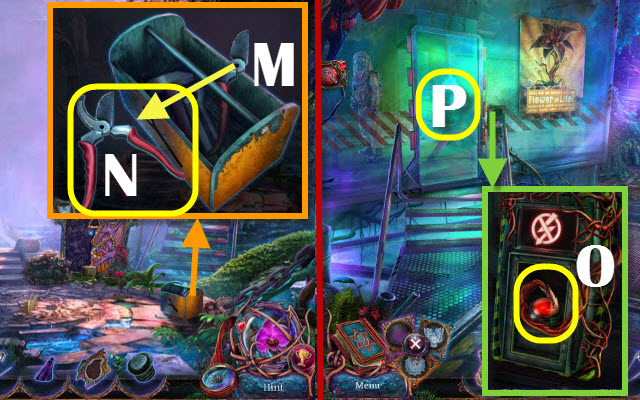
- Drag (M); place BOLT; take PRUNING SHEARS (N).
- Go to Glass Dome.
- Use PRUNING SHEARS; push (O).
- Go (P).
- Talk (Q); drag (R).
- Take REVOLVER CONTAINER (S); open; take the GAMMA SYMBOL, PI SYMBOL and OMEGA SYMBOL.
- Place GAMMA SYMBOL (T).
- Solution (U).
- Take RARE MINERAL (V).
- Walk down.
- Place OMEGA SYMBOL (W) and UV LIGHT BULB (X); take PLANT (Y).
- Go (Z).
- Place PI SYMBOL (Z1); take LIFE ESSENCE (A).
- RARE MINERAL, PLANT and LIFE ESSENCE on REVOLVER CONTAINER; create REVOLVER CONTAINER.
- Go to Quarantine.
- Place REVOLVER CONTAINER (B).
- Take (C).
- Play HOP (D); receive DRAGON FIGURINE.
- DRAGON LEG and DRAGON WING on DRAGON FIGURINE; take TRIANGLE KEY.
- Go to Control Room.
- Insert TRIANGLE KEY (E).
- Go to Botanic Garden.
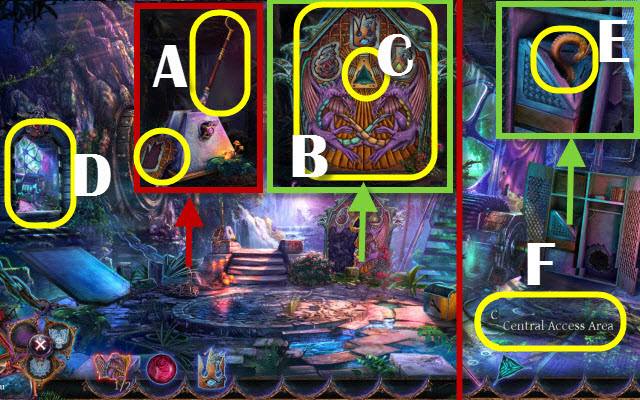
- Take ENGINEERING SYMBOL (F).
- Take RELIEF PIECE 1/2 (G).
- Go to Central Access Area.
- Drag (H); place SLOT OF THE ENGINEERING SYMBOL and ENGINEERING SYMBOL (I).
- Go (J).
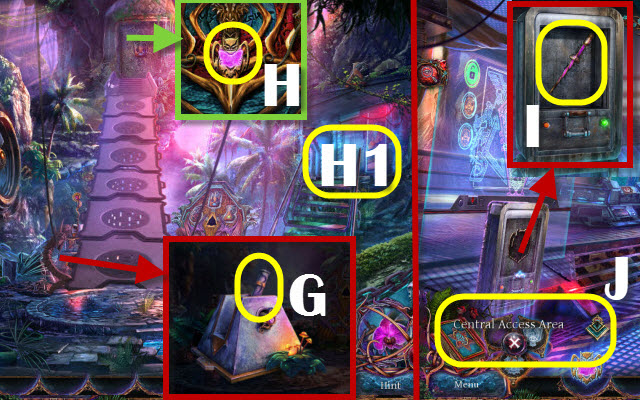
- Take RELIEF PIECES 2/2 (K) and SHOVEL (L).
- Take HANDBAG (M).
- SAFETY PIN to HANDBAG; take WIPE and PAPER CLIP. Straighten PAPER CLIP.
- Select (N); use PAPER CLIP.
- Solution (O).
- Use JAGUAR CUB (P); take RED RUBY ROSE (Q).
- Go to Control Room.

- Select; use WIPE (R). Close (S); select (T); take COGWHEEL (U).
- Go to Botanic Garden.
- Use SHOVEL (V); play HOP (W); receive CROWN SYMBOL.
- Go to Engineering.
- Place COGWHEEL (X).
- Solution (Y).
- Go (Z).
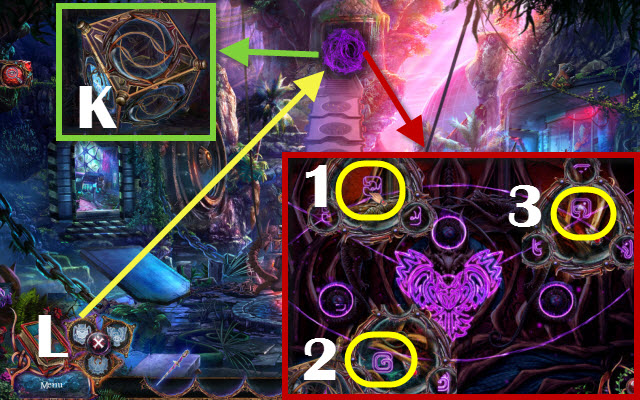
- Take LEVER and SLOT OF THE CROWN SYMBOL (A).
- Place RELIEF PIECES 2/2, SLOT OF THE CROWN SYMBOL and CROWN SYMBOL (B); take TRIANGLE SYMBOL (C).
- Go (D).
- Place TRIANGLE SYMBOL; take LEVER PART (E).
- LEVER PART and RED RUBY ROSE on LEVER; create LEVER.
- Go (F).
- Place LEVER (G).
- Take OWL SYMBOL (H).
- Go (H1).
- Place OWL SYMBOL; take OWL DAGGER (I).
- Go (J).
- Place OWL DAGGER (K); drag (L).
- Solution: 1-3.
- Talk (M).
- Go (N).
- Select; drag (O); receive GRIFFIN DAGGER.
Chapter 6: Escape
- Talk (P); receive VIAL.
- Go (Q).
- Take CONNECTOR (R).
- Select (S).
- Take LETTER Q (T).
- Place Q (U); take DRAWER OPENER (V).
- Take STEAK and ALCOHOL (W).
- Open; place DRAWER OPENER; take HORN, CARTRIDGE and CABLE (X).
- Use GRIFFIN DAGGER (Y); take SEQUENCE CODE (Z).
- Place CONNECTOR and CABLE (A).
- Solution: (1-8).
- Take ORANGE GEM, VIOLET GEM, PINK GEM and GREEN GEM (B).
- Go (C).
- Place CARTRIDGE and cartridges; take LOADED CARTRIDGE RING (D).
- Give STEAK (E); take CABINET OPENER (F).
- Insert CABINET OPENER (G); take EMPTY WEAPON (H).
- LOADED CARTRIDGE RING on opened EMPTY WEAPON; receive LOADED WEAPON.
- Give LOADED WEAPON; talk (I).
- Take EMPTY LIGHTER (J); open. Add ALCOHOL; create LIGHTER.
- Go (K).
- Use LIGHTER (L); take THRONE PIECE and BOWL OF MELTED WAX (M).
- Place SEQUENCE CODE (N), THRONE PIECE, PINK GEM, GREEN GEM, PURPLE GEM, and ORANGE GEM (O).
- Place HORN (P).
- Play HOP (Q); receive RATCHET HANDLE.
- Use BOWL OF MELTED WAX (R) and RATCHET HANDLE (S); pull.
- Go (T).
- Close (U).
- Take RAG (V); talk.
- Take SHIM, MOM'S PARACHUTE and PARACHUTE (W).
- Use SHIM; take PANEL (Y).
- Use RAG (Z); push (A).
- Use PANEL (B); receive MIXED LIQUID; give MOM'S PARACHUTE (C).
- VIAL on MIXED LIQUID; push top; create MIXED LIQUID.
- Place MIXED LIQUID (Z).
Created at: 2017-07-16