
Walkthrough Menu
- General Tips
- Chapter 1: Return to the Buried Kingdom
- Chapter 2: The Skull Cave
- Chapter 3: The Creature
- Chapter 4: The Marshes
- Chapter 5: Nezul's Tower
- Chapter 6: Nezul
General Tips
- This is the official guide for The Secret Order: Return to the Buried Kingdom.
- This guide won't tell you when to zoom into a location; the screenshots show each zoom scene.
- Hidden-object puzzles are referred to as HOPs. Only the locations of the HOPs will be shown.
- Use the map for fast travel to a location.
Chapter 1: Return to the Buried Kingdom
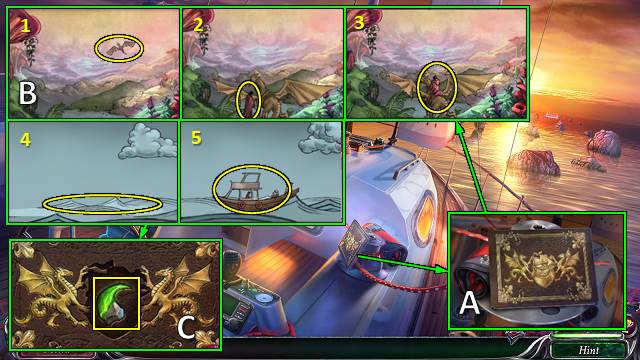
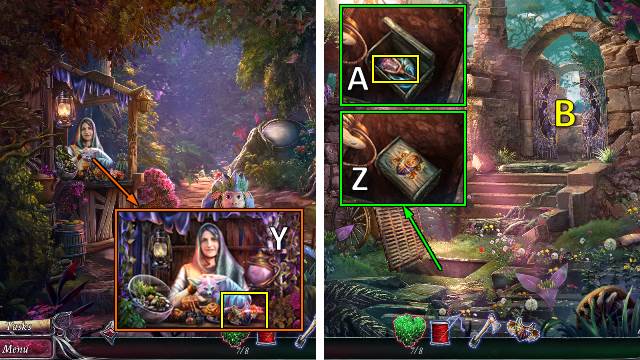
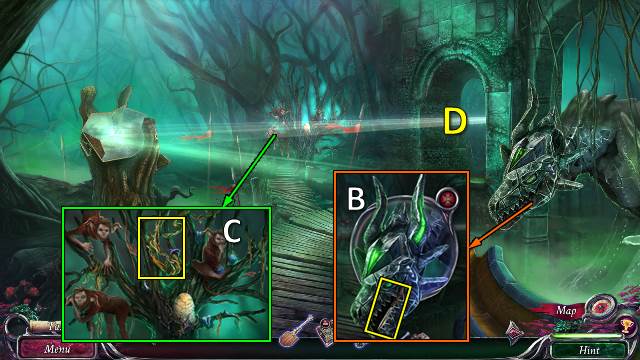
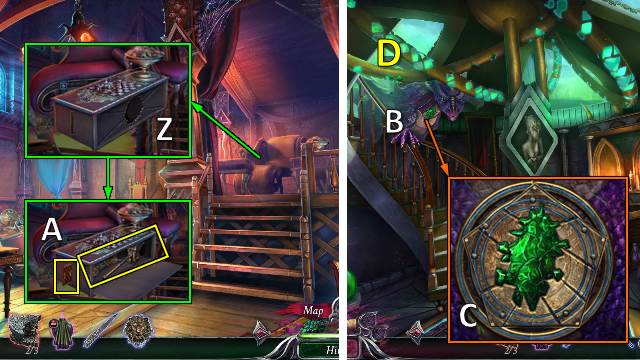
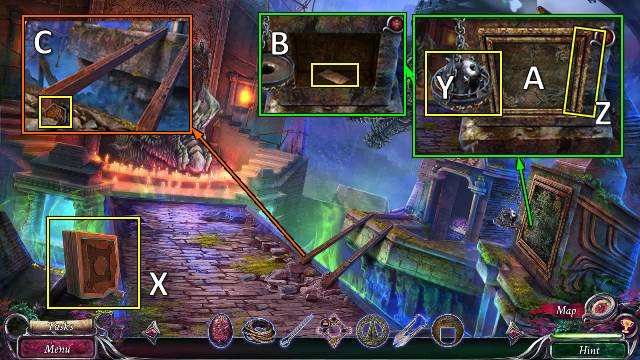
- Open book (A).
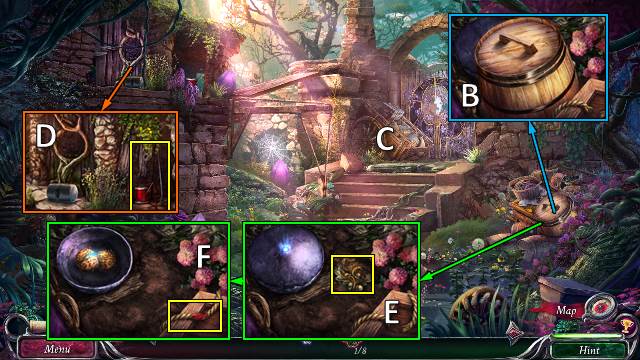
- Solution (B).
- Remove shield; take SCORPION TAIL (C).
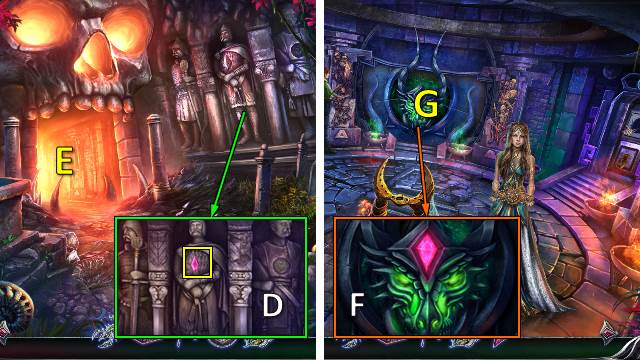
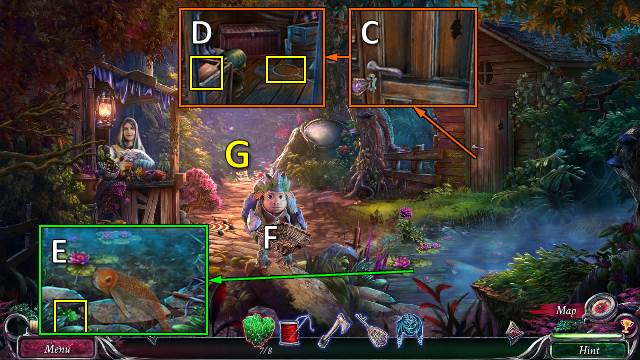
- Take SAILOR'S TOOLKIT (D).
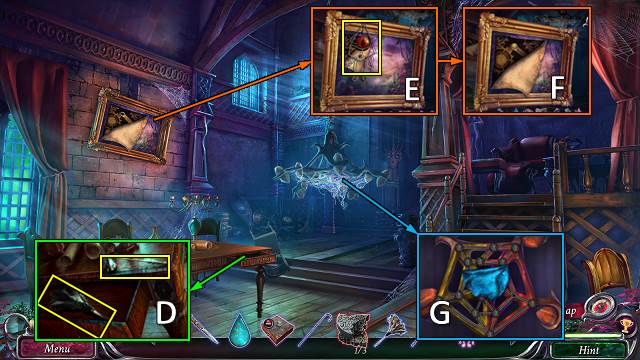
- Inspect pictures and open pocket in SAILOR'S TOOLKIT; take MARLIN SPIKE and PLIERS.
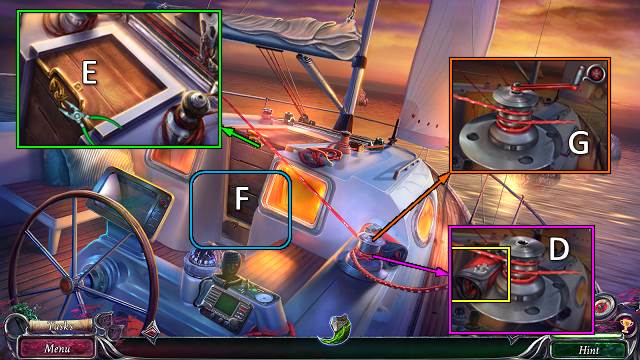
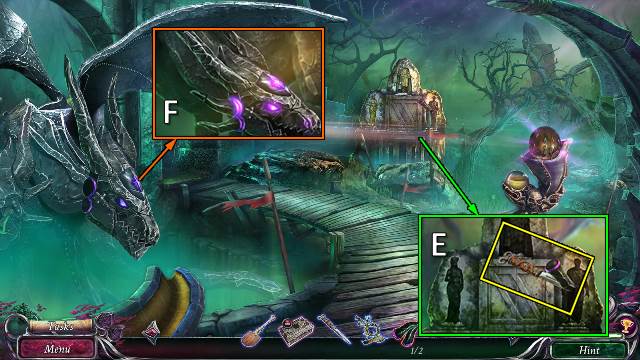
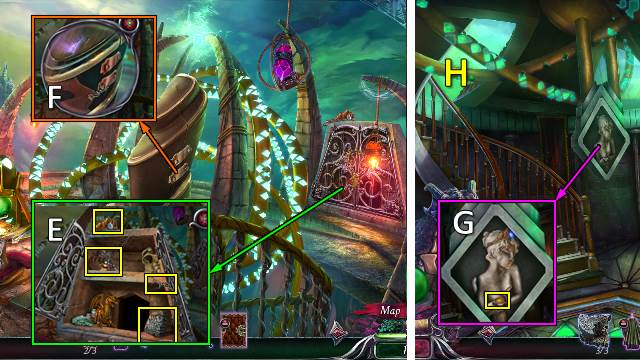
- Use PLIERS; open hatch (E).
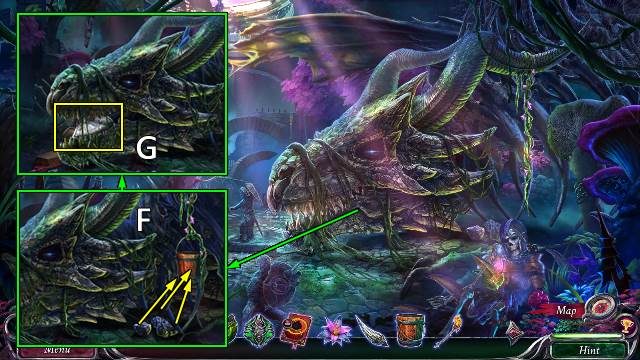
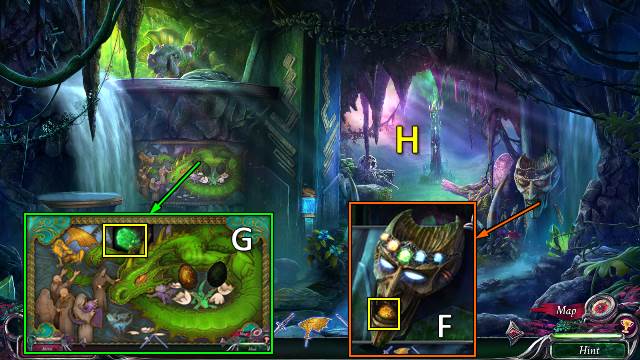
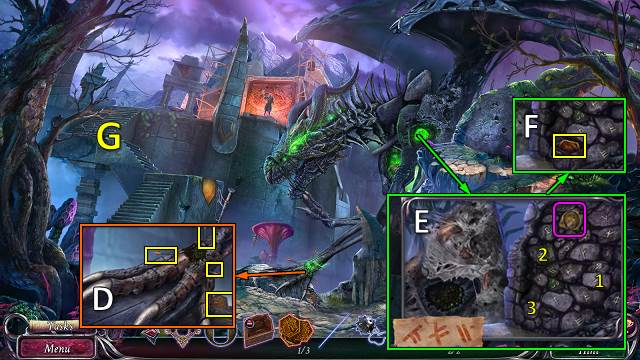
- Play HOP (F); receive WINCH HANDLE.
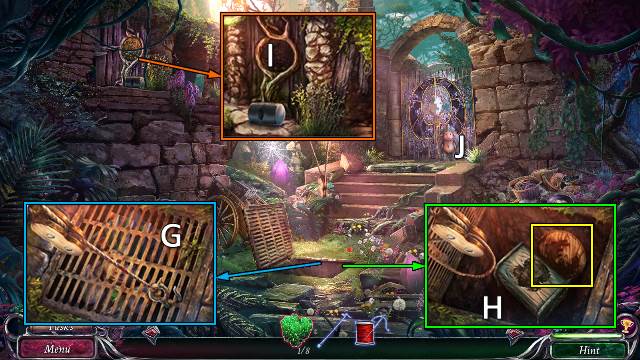
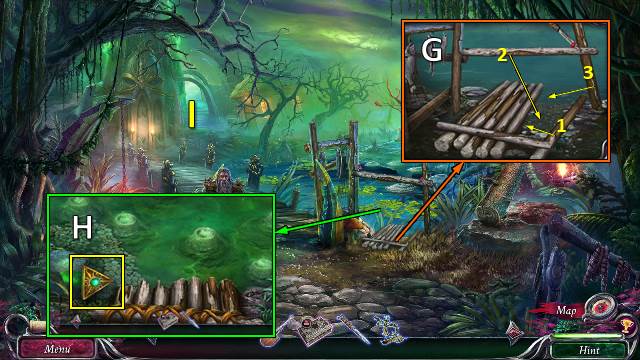
- Place WINCH HANDLE (G).
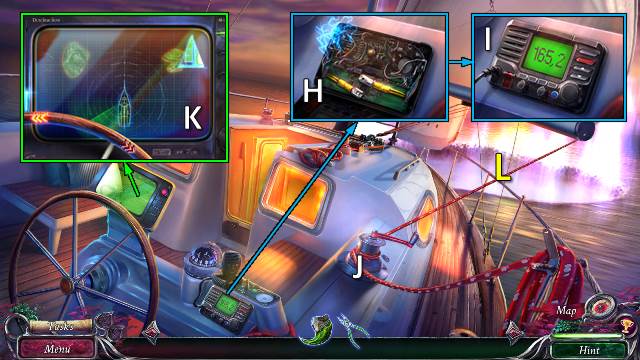
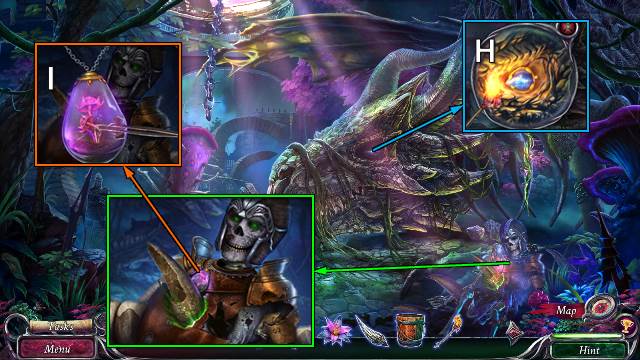
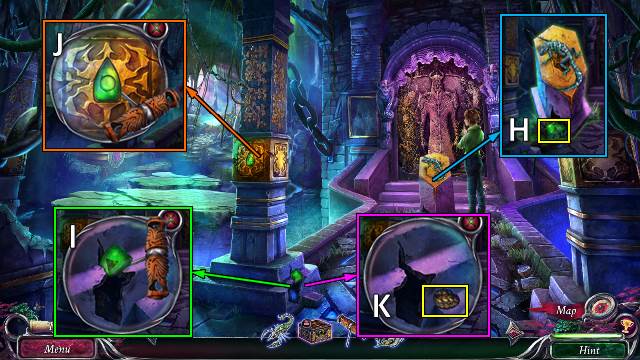
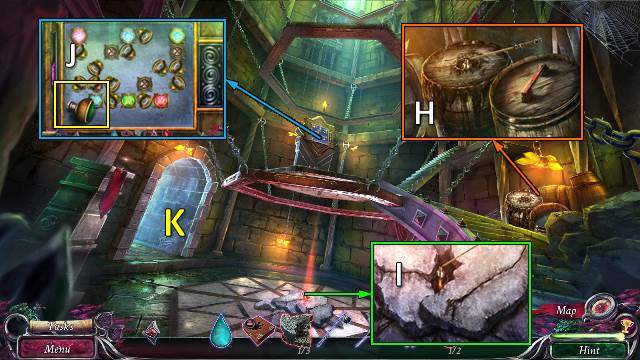
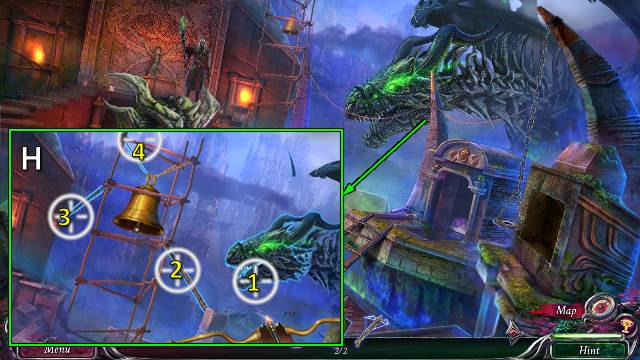
- Use MARLIN SPIKE; connect wires (H).
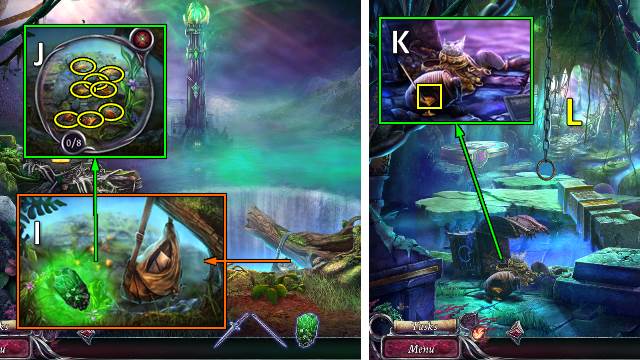
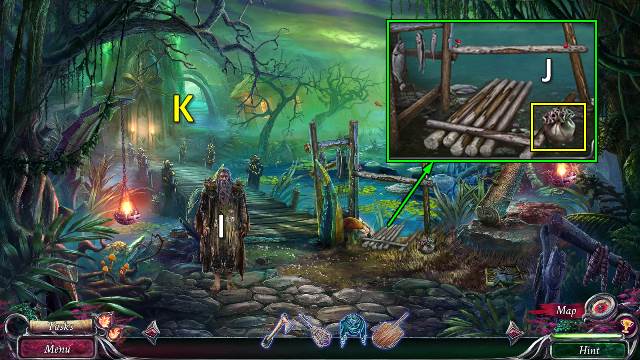
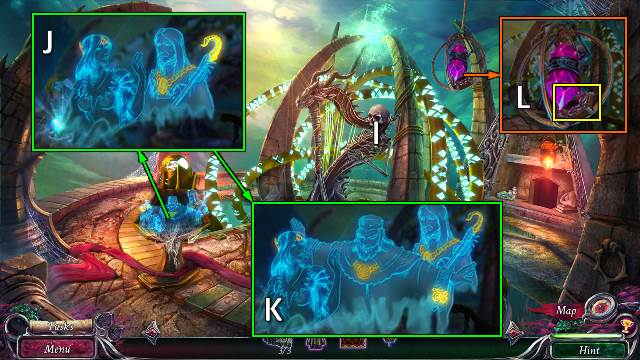
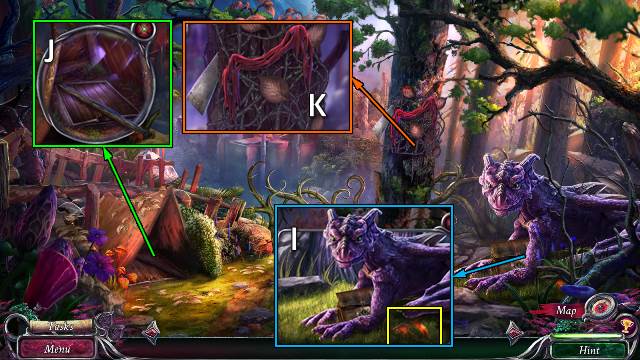
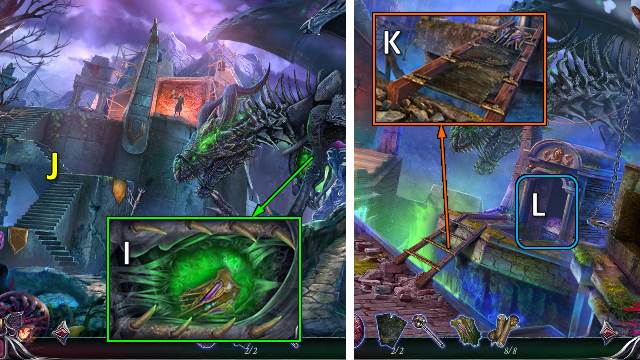
- Inspect (I).
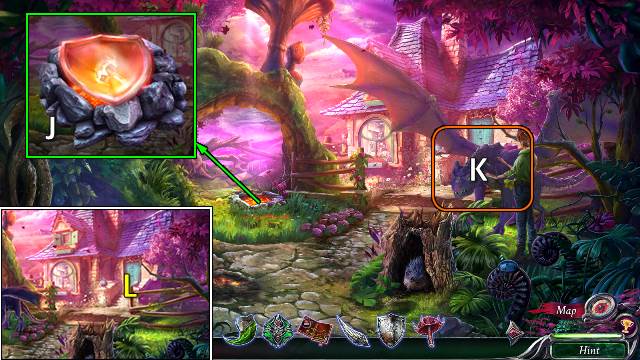
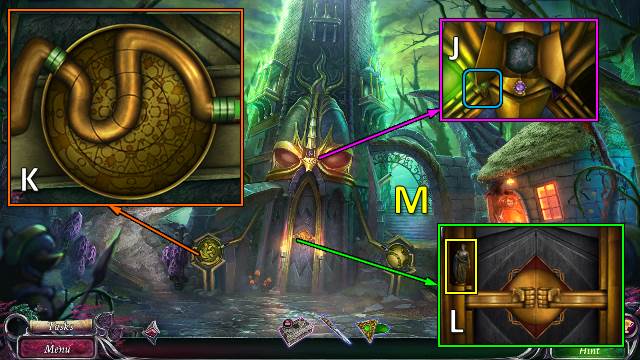
- Turn winch (J).
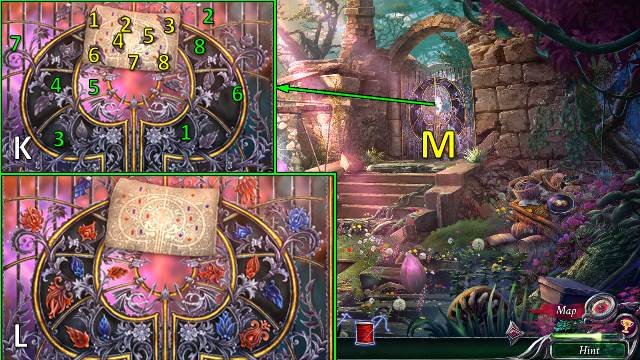
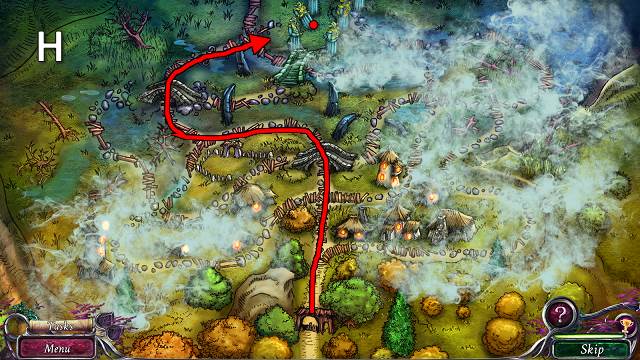
- Navigate obstacles (K).
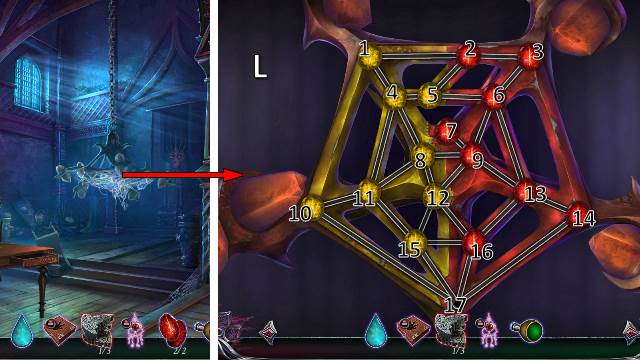
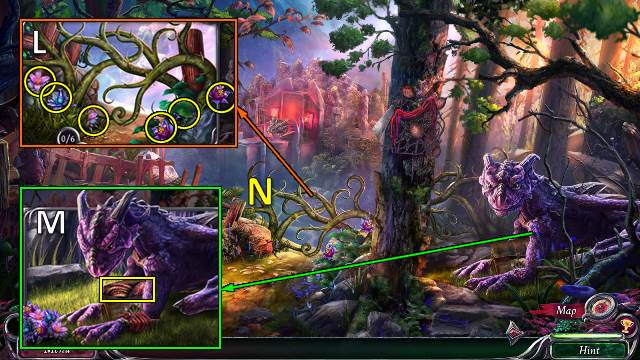
- Go (L).
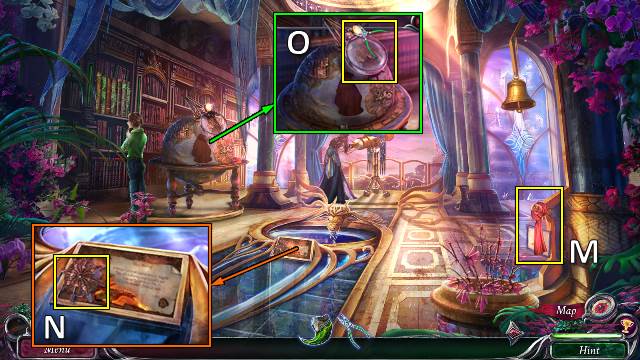
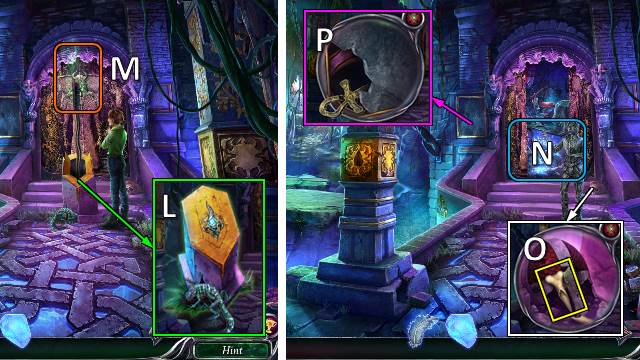
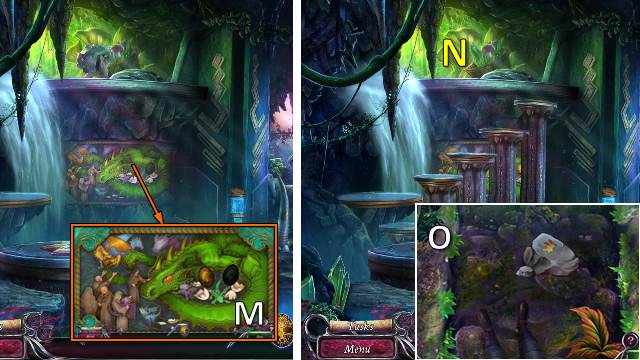
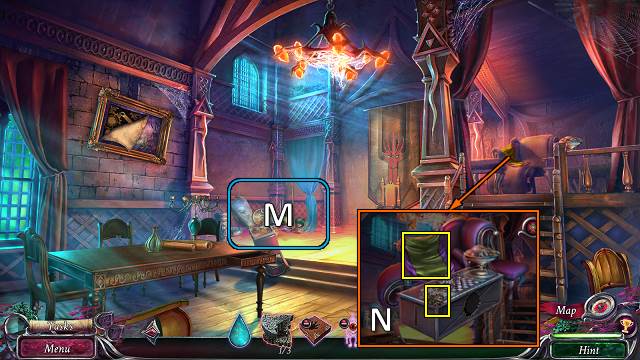
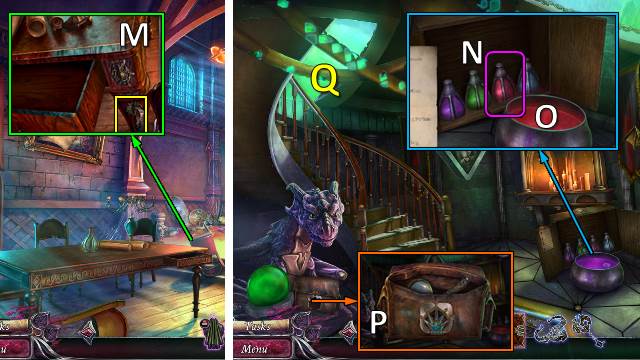
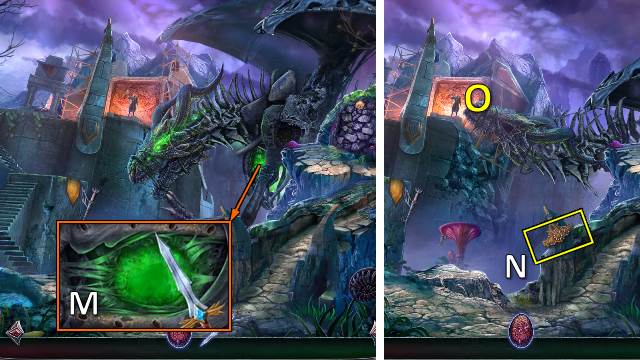
- Take SCARF (M).
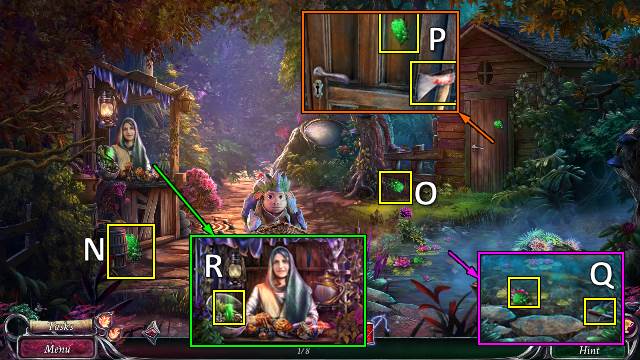
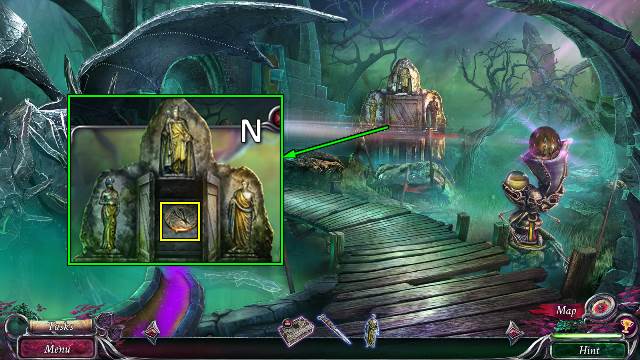
- Take GLOBE DECORATION (N).
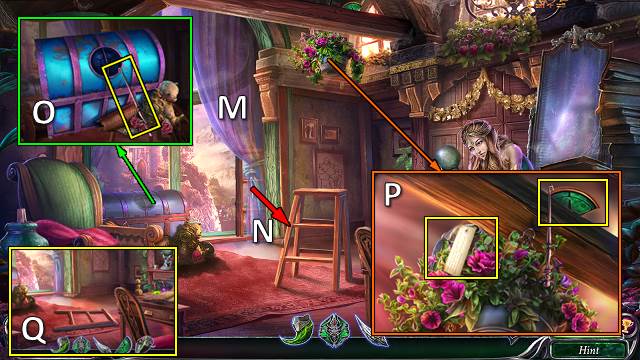
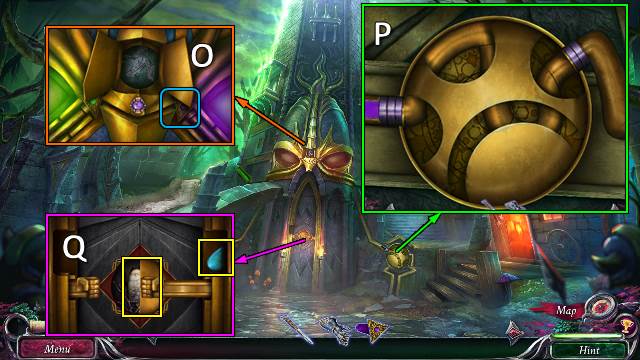
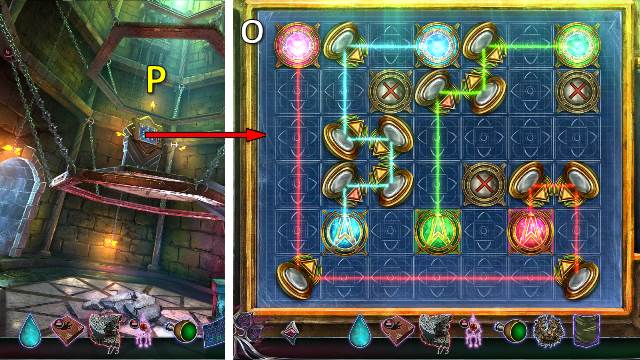
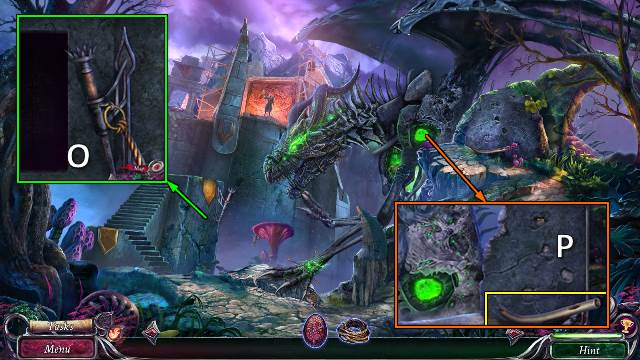
- Use SCARF and PLIERS; take LENS (O).
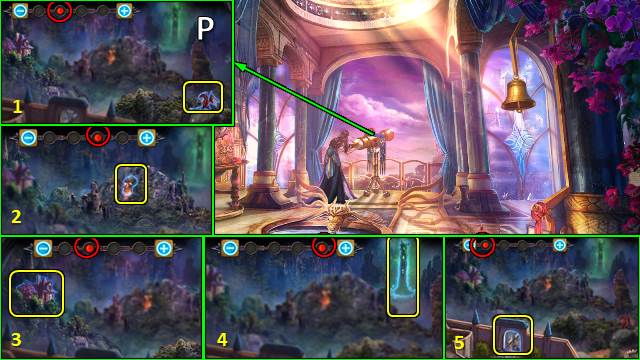
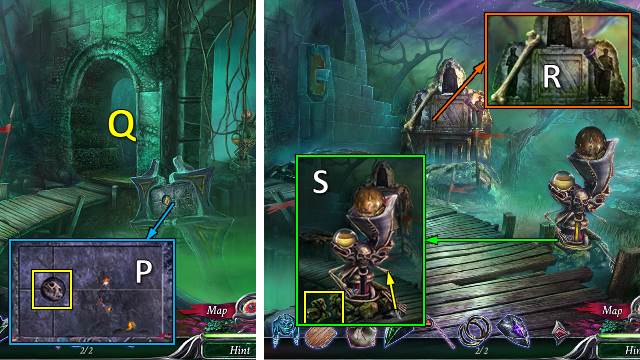
- Place LENS. Solution (P).
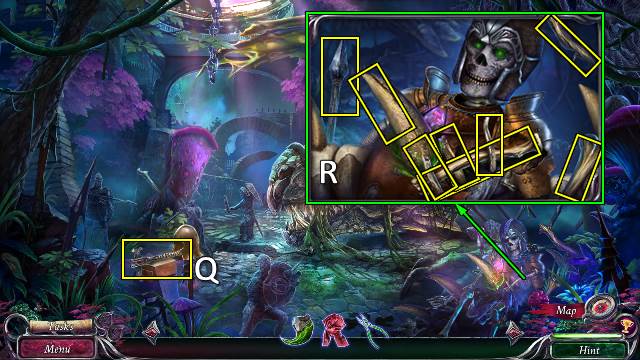
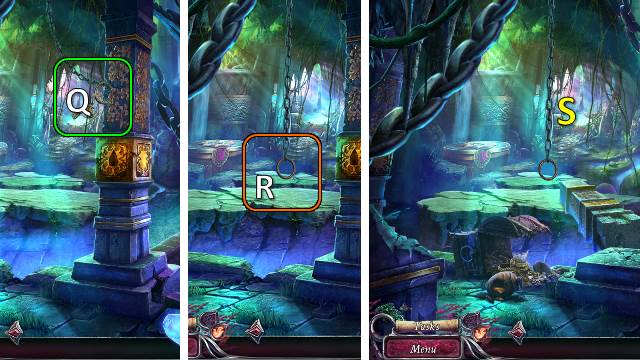
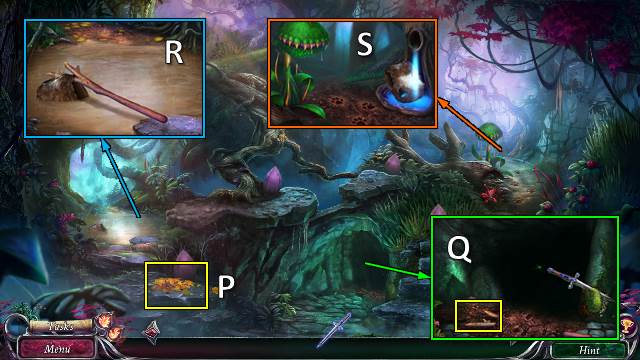
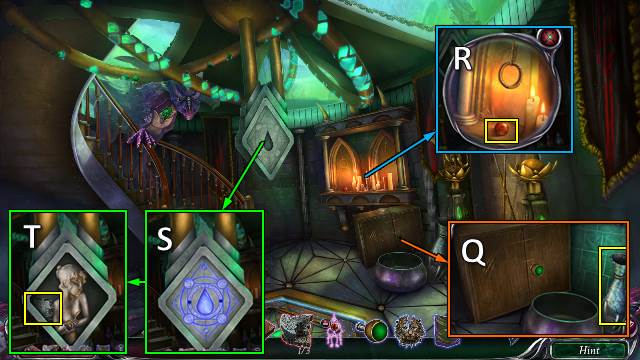
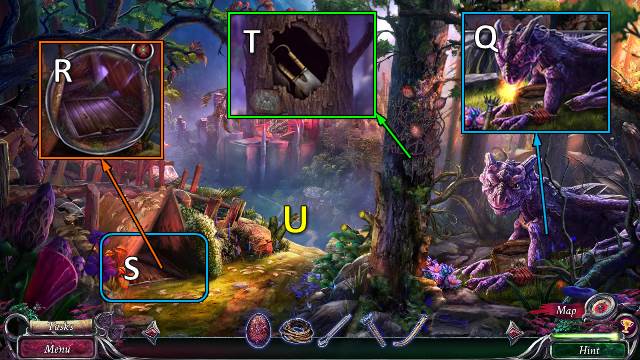
- Take BROKEN WEAPON (Q).
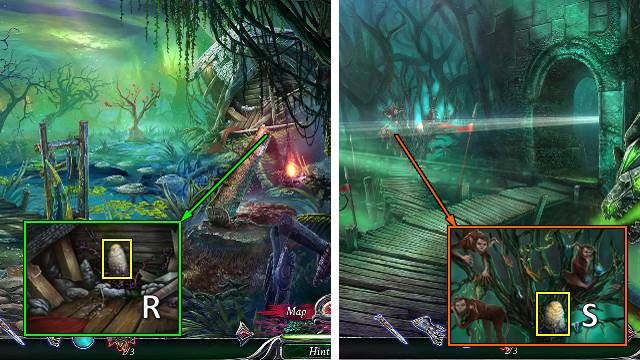
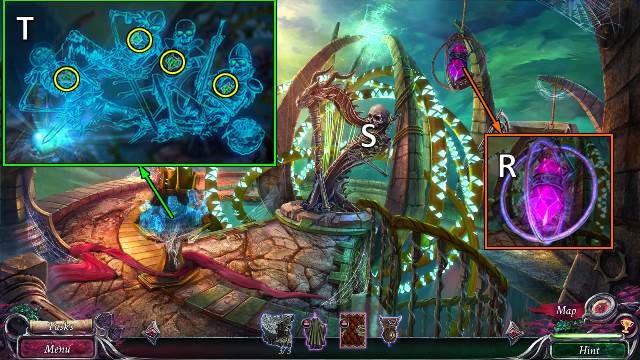
- Select 8x bones; receive PILE OF BONES (R).
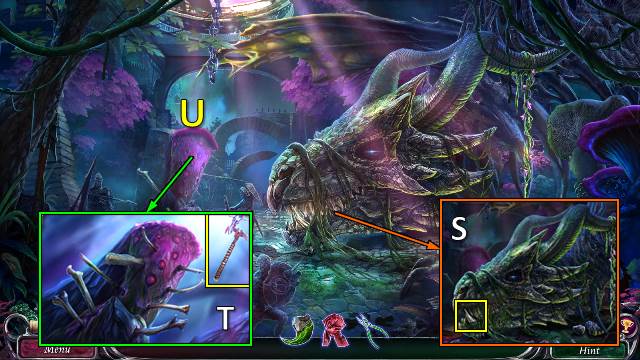
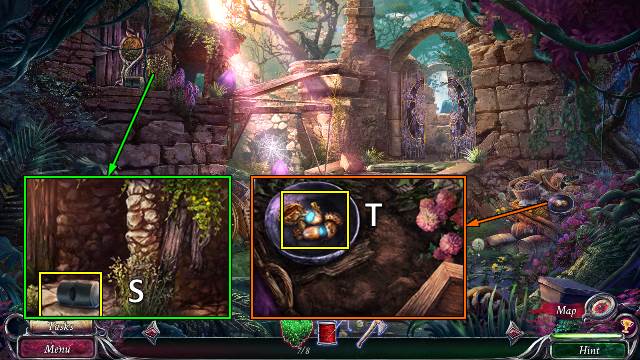
- Take SHARP TOOTH with PLIERS (S).
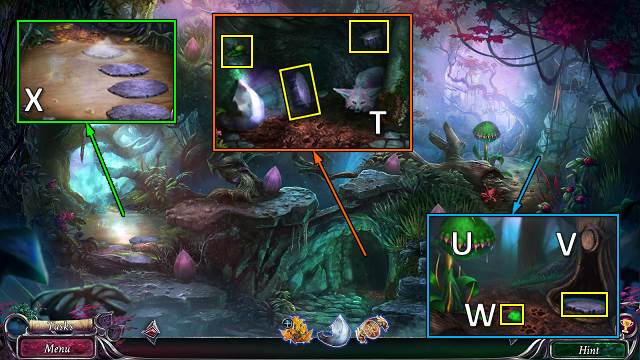
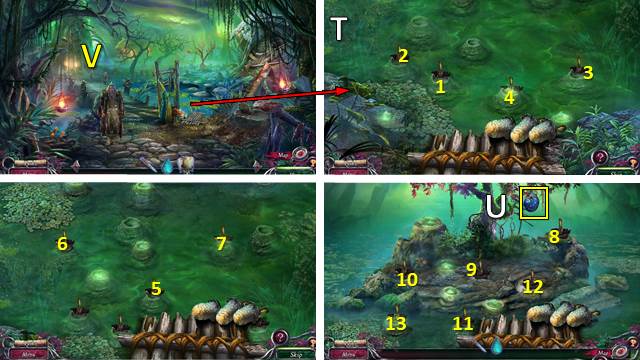
- Place PILE OF BONES. Take LEVER with BROKEN WEAPON (T).
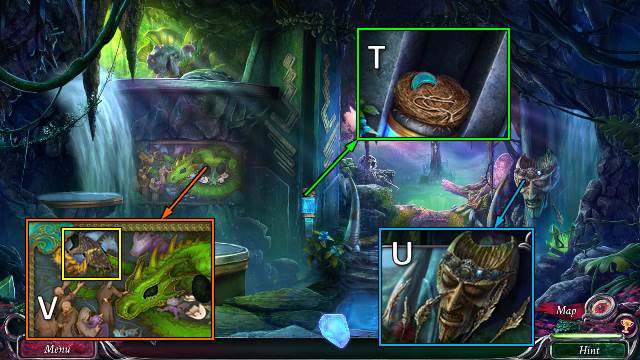
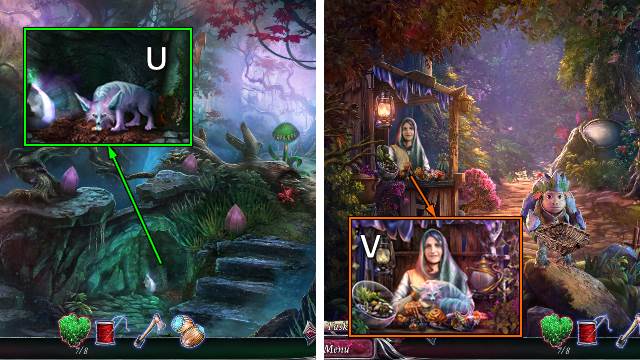
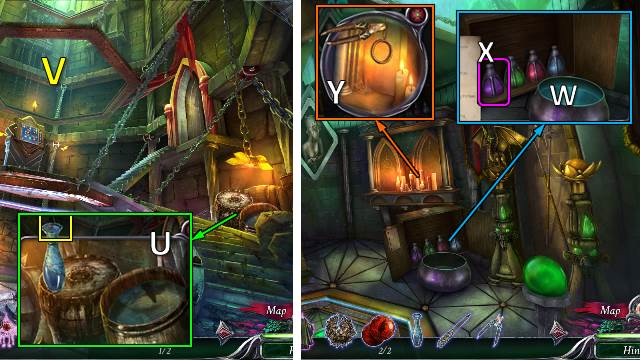
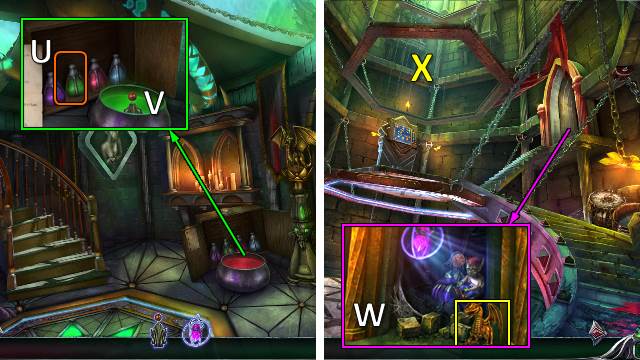
- Go (U).
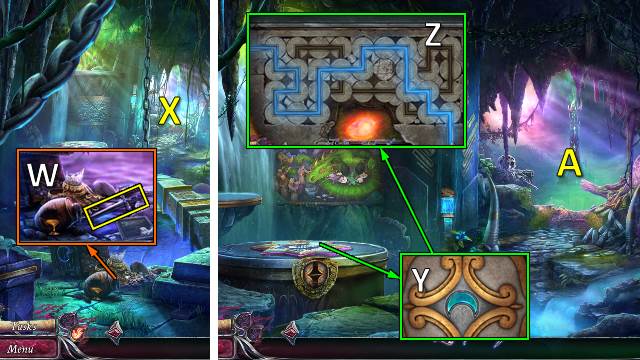
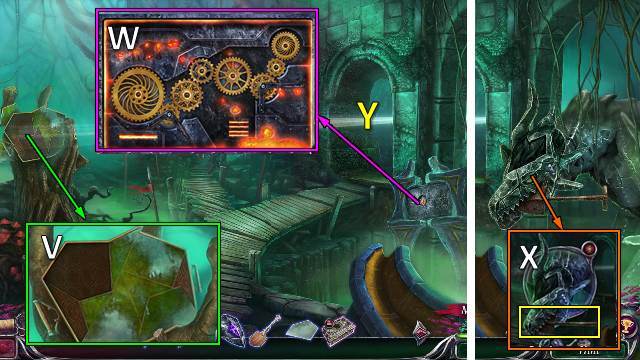
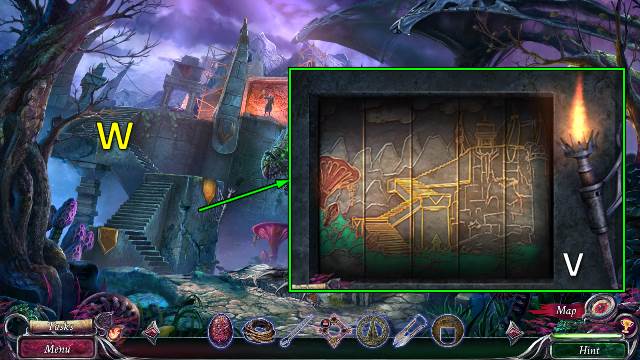
- Place and pull LEVER (V).
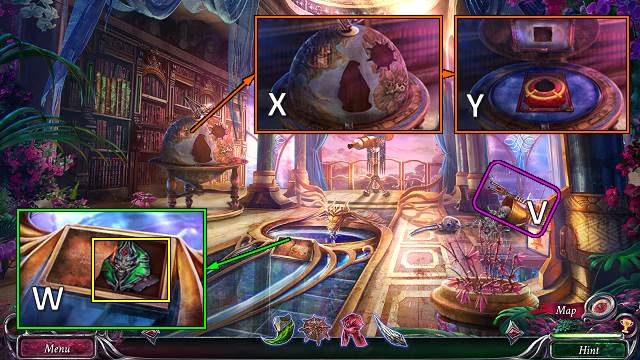
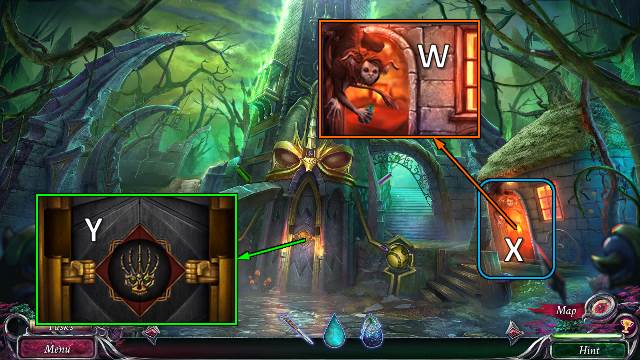
- Take SKELETON SEAL and GLOBE DECORATION (W).
- Place GLOBE DECORATION x2 (X).
- Take LOCKED BOOK and MAGIC MIRROR (Y).
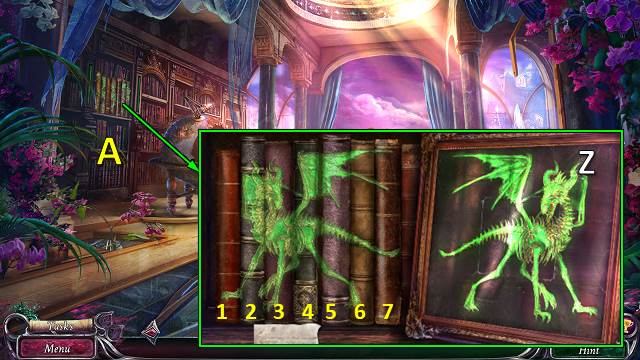
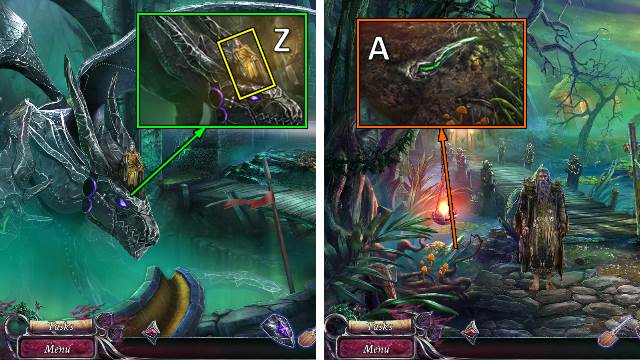
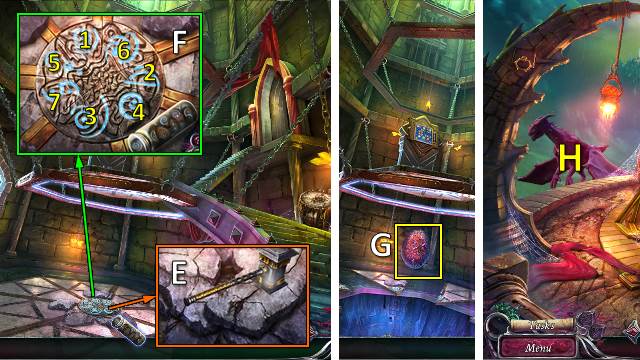
- Take note; place MAGIC MIRROR. Solution: 3-1-6-5-7-2-4-3 (Z).
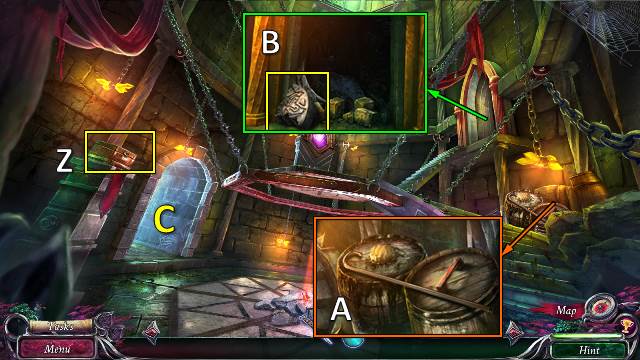
- Go (A).
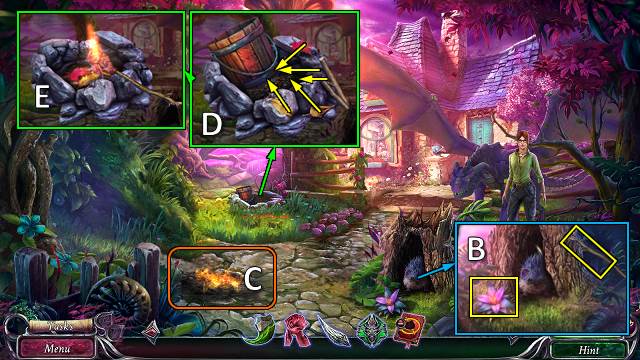
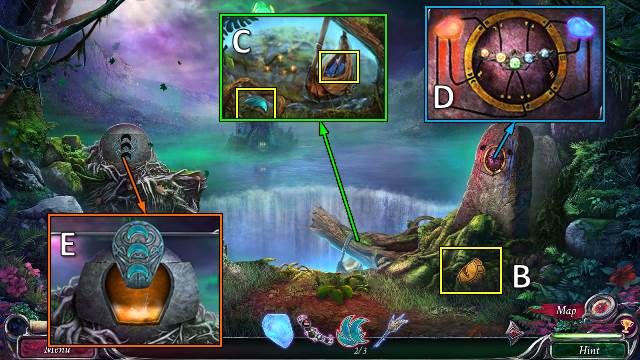
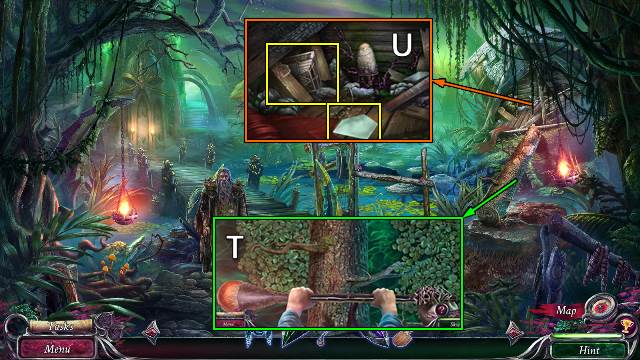
- Take LUNAR LILY. Take STURDY STICK with SHARP TOOTH (B).
- SCARF on STURDY STICK; receive STICK WITH CLOTH.
- Light STICK WITH CLOTH (C); receive TORCH.
- Take BUCKET; move branches and leaves (D).
- Use TORCH (E).
- Go to Enshrouded Battleground.
- Place BUCKET; move rocks (F).
- Take SHIELD (G).
- Use TORCH; take CRYSTAL KEY (H).
- CRYSTAL KEY on LOCKED BOOK. Take TWEEZERS. Receive POTION KIT.
- Take DREAMSHROOM with TWEEZERS (I).
- Go to Road to Julie's Home.
- Place SHIELD and DREAMSHROOM; take COOKED DREAMSHROOM (J).
- LUNAR LILY and COOKED DREAMSHROOM on POTION KIT. Move presses; take CALMING ESSENCE.
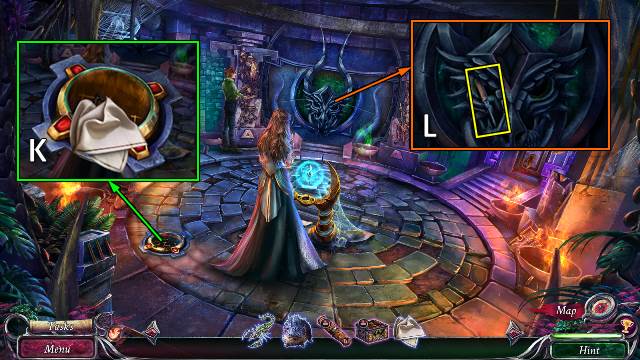
- Offer CALMING ESSENCE (K).
- Go (L).
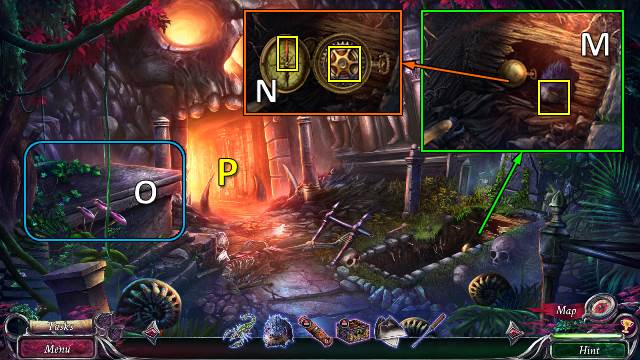
- Open (M).
- Move (N).
- Take CROCHET HOOK (O).
- Take SCORPION STAFF. Use CROCHET HOOK; take EMBLEM PART (P).
- Take STEPLADDER (Q).
- Walk down.
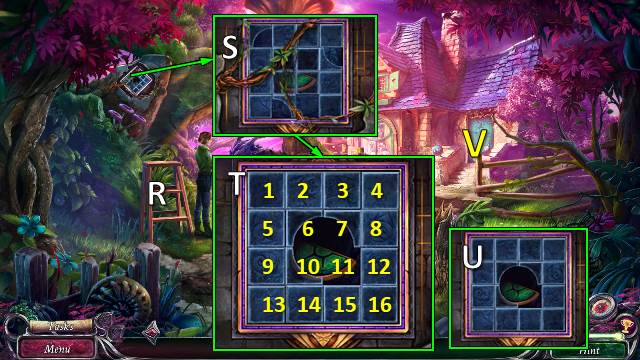
- Place STEPLADDER (R).
- Take VINES (S).
- Solution (T): 14-10-6-2-1-5-6-2-3-7-11-15-16-12-8-7-11-12-16-15-14-10-11.
- Take EMBLEM PART (U).
- Go (V).
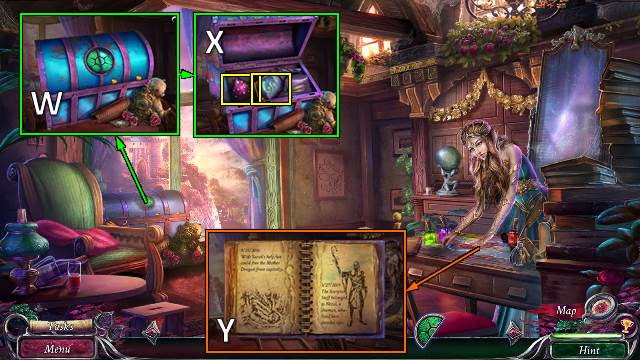
- Place EMBLEM PART x2 (W).
- Open compartment. Take note, SPLIT RING and HEDGEHOG FRUIT (X).
- Read book (Y).
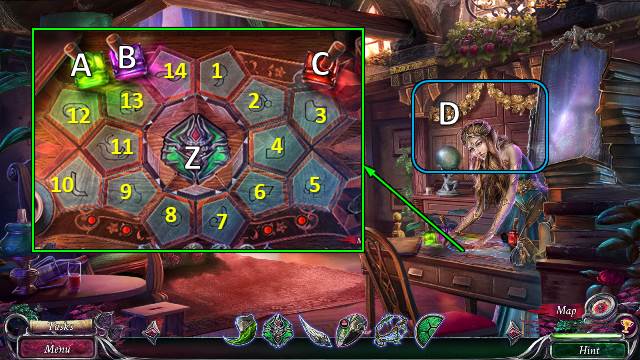
- Place SKELETON SEAL (Z).
- Solution: (B13-C5)-(A2-B11-C12)-(A3-B7-B14-C10)-(A8-B4-B6-C1-C9).
- Play HOP (D); receive SCORPION CRYSTALS.
- Walk down.
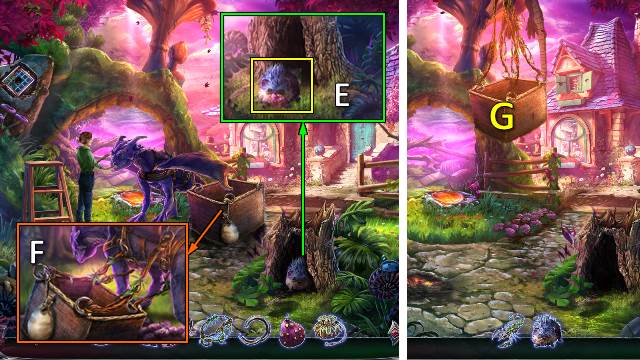
- Offer HEDGEHOG FRUIT. Take HEDGEHOG and SCORPION CLAW (E).
- SCORPION CLAW, SCORPION CRYSTALS and SCORPION TAIL on SCORPION STAFF.
- Place SPLIT RING and VINES; use SHARP TOOTH (F).
- Go (G).
Chapter 2: The Skull Cave
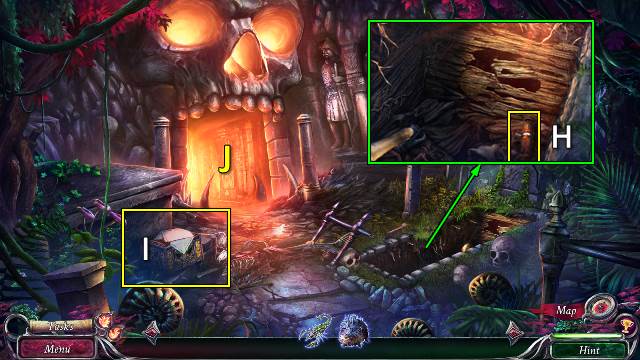
- Take CORKSCREW HANDLE (H).
- Take STRANGE BOX (I).
- Go (J).
- HANDKERCHIEF from STRANGE BOX.
- Use HANDKERCHIEF (K); receive OIL SOAKED RAG.
- Take SCREWDRIVER (L).
- Walk down.
- Use SCREWDRIVER; receive BROKEN SCREWDRIVER. Release HEDGEHOG; take SWORD DECORATION (M).
- BROKEN SCREWDRIVER on CORKSCREW HANDLE; receive TOOL.
- Use TOOL; take GEAR and MAGNETIC NEEDLE (N).
- Use OIL SOAKED RAG; open. Play HOP (O); receive MAGE WAND.
- Go (P).
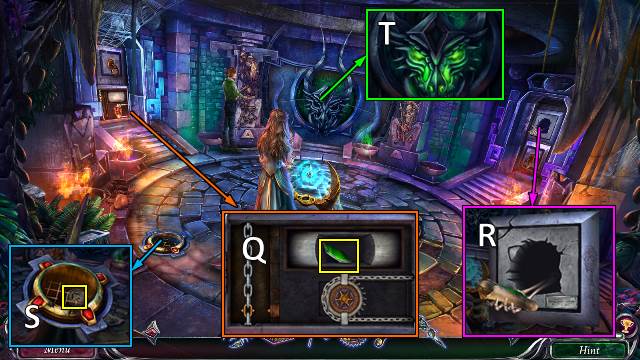
- Use OIL SOAKED RAG; place GEAR. Pull chain; take EYE 1/2 (Q).
- Place MAGE WAND; take note and EYE 2/2 (R).
- Use MAGNETIC NEEDLE; take ROYAL SEAL INLAY (S).
- Place EYE (T).
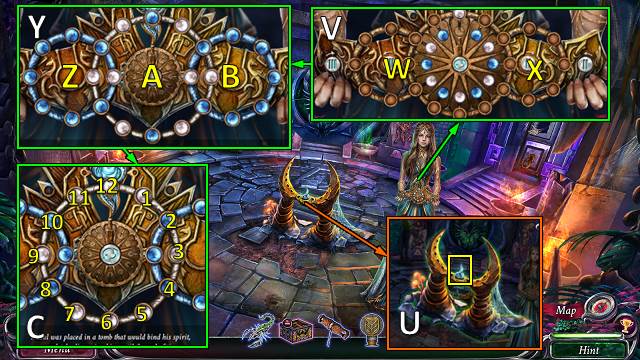
- Take JEWELRY FRAGMENT (U).
- Place JEWELRY FRAGMENT (V).
- Solution 1: Xx5-W-Xx5.
- Solution 2 (Y): A counter clockwise x1, Z counter clockwise x1, B counter clockwise x1, A clockwise x2.
- Solution 3 (C): 12-8-7-6-5-4.
- Receive CROWN PIECE.
- Walk down.
- Place SWORD DECORATION and ROYAL SEAL INLAY; take RUBY (D).
- Go (E).
- Place RUBY (F).
- Go (G).
- Take PERIDOT 1/3 (H).
- Take PERIDOT 2/3 with TOOL (I).
- Use TOOL; take PERIDOT 3/3 (J).
- PERIDOT on STRANGE BOX; take GLOWING GEM and FEATHER.
- Use GLOWING GEM; take LOST EGG (K).
- Place LOST EGG and CROWN PIECE (L).
- Place SCORPION STAFF (M).
- Play HOP (N); receive GREEDY CHEST.
- Take BONE SHARD (O).
- Use BONE SHARD; take DAMAGED ANKH (P).
- Turn DAMAGED ANKH into STURDY HOOK.
- Place STURDY HOOK (Q).
- FEATHER on GREEDY CHEST.
- Place and swing GREEDY CHEST (R).
- Go (S).
- Take CRESCENT SYMBOL 1/3 and PIECE OF STRING (T).
- Take CORRODED CIRCLET. Place PIECE OF STRING; receive WHISK BROOM (U).
- Take LOOSE WING (V).
- Walk down.
- Use WHISK BROOM; take JEWELED DAGGER (W).
- Go (X).
- Take CRESCENT SYMBOL 2/3; use JEWELED DAGGER (Y).
- Solution (Z).
- Receive RED GEM.
- Go (A).
- Take AMBER EYE (B).
- Use JEWELED DAGGER; take CRESCENT SYMBOL 3/3, CALLIGRAPHY BRUSH and POLISHING CLOTH. Read notes (C).
- POLISHING CLOTH on CORRODED CIRCLET; receive SHINY CIRCLET.
- Place GLOWING GEM, RED GEM and SHINY CIRCLET; take ENCHANTED CIRCLET (D).
- Place CRESCENT SYMBOL and LOOSE WING; receive GOLDEN WING (E).
- Walk down.
- Place ENCHANTED CIRCLET; take GOLDEN EGG (F).
- Place AMBER EYE, GOLDEN EGG and GOLDEN WING; take RESURRECTION GEM (G).
- Go (H).
- Use RESURRECTION GEM (I).
- Find SHATTERED EGG x8 (J).
- Walk down twice.
- Take HONEY with CALLIGRAPHY BRUSH (K).
- Go (L).
- HONEY on SHATTERED EGG; receive REPAIRED EGG.
- Place REPAIRED EGG (M).
- Go (N).
- Avoid obstacles (O).
Chapter 3: The Creature
- Take MUDDY LEAVES (P).
- Take FORKED STICK; take TOUGH MOSS with JEWELED DAGGER (Q).
- Take MUDDY LUMP with FORKED STICK (R).
- Place MUDDY LUMP (S); receive DULL CHESTPLATE.
- TOUGH MOSS and JEWELED DAGGER on DULL CHESTPLATE; receive SILVER PLATE and COAT OF ARMS TOKEN 1.
- Place SILVER PLATE; take HEAVY STONES 1-2/3 and SHINY BEETLE (T).
- Offer SHINY BEETLE (U). Move cork (V); take RESURRECTION GEM 1/8 and HEAVY STONES 3/3 (W).
- Place HEAVY STONES (X).
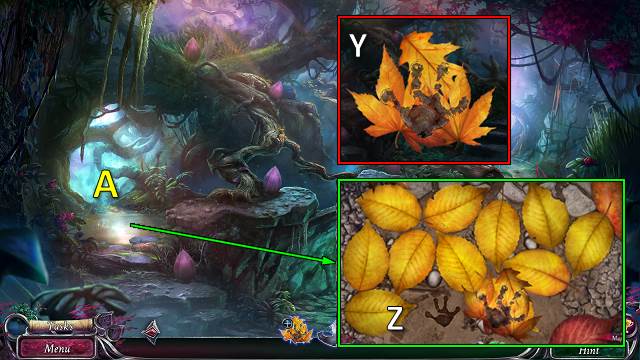
- Turn MUDDY LEAVES into FOOTPRINT (Y).
- Place FOOTPRINT; find match (Z).
- Go (A).
- Open (B).
- Move (C).
- Take METAL POKER and NEEDLE AND THREAD (D).
- Move rocks; take EMBLEM CENTER (E).
- Use METAL POKER and NEEDLE AND THREAD; take ROPE (F).
- Place ROPE (G).
- Take EMBLEM FRAME (H).
- EMBLEM CENTER on EMBLEM FRAME; receive EMBLEM.
- Place EMBLEM (I).
- Talk (J).
- Receive DOOR CLUE.
- Place DOOR CLUE; solution part 1 (K).
- Solution part 2 (L).
- Go (M).
- Take RESURRECTION GEM 2/8 (N).
- Take RESURRECTION GEM 3/8 (O).
- Take AXE and RESURRECTION GEM 4/8 (P).
- Use METAL POKER; take RESURRECTION GEM 5-6/8 (Q).
- Take RESURRECTION GEM 7/8. Talk (R).
- Walk down.
- Take UNIQUE TOOL with AXE (S).
- Use UNIQUE TOOL; take SHELLED NUTS (T).
- Walk down.
- Offer SHELLED NUTS. Receive LOST PET (U).
- Go forward twice.
- Offer LOST PET (V); receive SINGING VASE.
- Walk down.
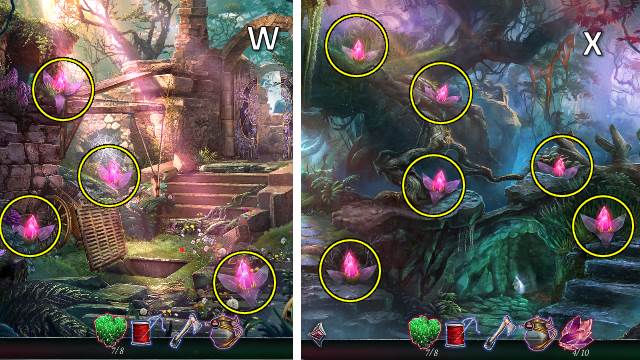
- Take CRYSTAL BLOSSOMS 1-4/10 (W).
- Walk down.
- Take CRYSTAL BLOSSOMS 5-10/10 (X).
- Go forward twice.
- CRYSTAL BLOSSOMS in SINGING VASE.
- Offer SINGING VASE; take COAT OF ARMS TOKEN 2 (Y).
- Walk down.
- Place COAT OF ARMS TOKEN 1 and COAT OF ARMS TOKEN 2 (Z); take SKELETON KEY and SILK SCARF (A).
- Go (B).
- Use SKELETON KEY (C).
- Move items and take BAKING PEEL and NET (D).
- NEEDLE AND THREAD on NET.
- Use NET; take RESURRECTION GEM 8/8 (E).
- Offer RESURRECTION GEM (F).
- Go (G).
- Solution (H).
Chapter 4: The Marshes
- Talk (I).
- Take OLD SACK (J).
- Go (K).

- Take GREEN SCALE and WALKING STICK (L).
- Take METAL RING 1-2/2 (M).
- Use SKELETON KEY; take PURPLE SCALE (N).
- Go (O).
- Take LITTLE JAWBONE (P).
- Go (Q).
- Take LONG BONE (R).
- LITTLE JAWBONE on OLD SACK; take WOMAN FIGURINE. Receive EMPTY SACK.
- Move arm. Take LOOSE STONES with EMPTY SACK (S).
- Walk down twice.
- LOOSE STONES on WALKING STICK; receive BALANCING STICK.
- Place BALANCING STICK; get across (T).
- Take MIRROR PIECE and TREASURE BOX (U).
- Go to West Marsh.
- Use UNIQUE TOOL; restore mirror. Place MIRROR PIECE and use SILK SCARF (V).
- Solution (W).
- Take OLD SHOVEL. Place GREEN SCALE (X).
- Go (Y).
- Take KING FIGURINE; place PURPLE SCALE (Z).
- Walk down twice.
- Use OLD SHOVEL; take CURVED HORN (A).
- Go to West Marsh.
- Place CURVED HORN; take SPLIT DAGGER (B).
- Take TOUGH VINES with SPLIT DAGGER; take LITTLE HORN 1/2 (C).
- Go (D).
- Take LITTLE HORN 2/2 with SPLIT DAGGER (E).
- Place LITTLE HORN (F).
- Walk down twice.
- BAKING PEEL and METAL RING on LONG BONE; receive OAR.
- Use SPLIT DAGGER; move post x3. Place TOUGH VINES and OAR (G).
- Take GREEN JEWEL (H).
- Go (I).
- Place GREEN JEWEL (J).
- Solution (K).
- Take MAN FIGURINE (L).
- Go (M).
- Place WOMAN FIGURINE, KING FIGURINE and MAN FIGURINE; take TREASURE TOKEN (N).
- Walk down.
- TREASURE TOKEN on TREASURE BOX; take GAUNTLET and PURPLE JEWEL.
- Place PURPLE JEWEL (O).
- Solution (P).
- Take TEARDROP CRYSTAL. Take MUSHROOM 1/3 with GAUNTLET (Q).
- Walk down.
- Take MUSHROOM 2/3 with GAUNTLET (R).
- Go to West Marsh.
- Take MUSHROOM 3/3 with GAUNTLET (S).
- Walk down twice.
- Place MUSHROOM (T).
- Solution (1-13).
- Take SPARKLING FRUIT (U).
- Go (V).
- Offer SPARKLING FRUIT (W).
- Play HOP (X); receive NEZUL'S SYMBOL.
- Place NEZUL'S SYMBOL (Y).
Chapter 5: Nezul's Tower
- Take OLD BOX (Z).
- Take CANE and WOODEN PLUG (A).
- Take ICON PIECES 1/3 (B).
- Go (C).
- Use SPLIT DAGGER; take DUSTER and CANDLE SNUFFER (D).
- Take HANGING CHARM and tear painting (E).
- Place WOODEN PLUG and move mechanism (F).
- Take CLOTH (G).
- Walk down.
- Use CANDLE SNUFFER (H); receive STICKY SNUFFER.
- Take FIRE OPAL 1/2 with STICKY SNUFFER (I).
- Use CANE and DUSTER; take KNOB (J).
- Go (K).
- CLOTH on OLD BOX; take FIRE OPAL 2/2 with SPLIT DAGGER.
- Place FIRE OPAL (L).
- Solution: 9-12-16-17-15-11-8-12-15-17-10-11-8-4-1-2-5-6-13-16-17-
- 14-13-9-12-15-17.
- Play HOP (M); receive ELEVATOR BLUEPRINT.
- Take BROKEN LION HEAD and ROYAL BANNER (N).
- Walk down.
- Place ELEVATOR BLUEPRINT. Solution (O).
- Go (P).
- Take VASE; use KNOB (Q).
- Take MARBLE 1/2 (R).
- Place TEARDROOP CRYSTAL (S); take ICON PIECES 2/3 (T).
- Walk down.
- Remove lid. Use VASE; take DRAGON PRINT INLAY and WATER (U).
- Go (V).
- Place WATER (W). Select (X). Place BROKEN LION HEAD (W); receive LION HEAD.
- DRAGON PRINT INLAY on OLD BOX; take FILE and CUTTERS.
- Use CUTTERS (Y); receive METAL RING.
- Go to Tower Hall.
- CUTTERS on HANGING CHARM; receive MARBLE 2/2. Place ROYAL BANNER.
- MARBLES and METAL RING on LION HEAD.
- Place LION HEAD (Z).
- Take WAR HAMMER, NET LAUNCHER and LOCKED JOURNAL (A).
- Go to Chamber of Sorcery.
- Use NET LAUNCHER (B).
- Solution (C).
- Go (D).
- Use FILE; take TIARA, INNER TABLE INLAY, and ICON PIECES 3/3. Take DECORATIVE SPIKE with FILE (E). Try to take dragon.
- Use DECORATIVE SPIKE and WAR HAMMER (F).
- Walk down.
- Place TIARA; take LOCKET (G).
- Go (H).
- Offer LOCKET (I).
- Solution (J-K).
- Take OUTER TABLE INLAY (L).
- Go to Tower Hall.
- Place INNER TABLE INLAY and OUTER TABLE INLAY; take FLINT AND STEEL and CORRODED KEY (M).
- Go to Chamber of Sorcery.
- Use (N); place CORRODED KEY (O). Receive KEY.
- KEY on LOCKED JOURNAL. Take ROYAL INSIGNIA.
- Place ROYAL INSIGNIA; take ROYAL COMPASS and LITTLE KNIFE (P).
- Go (Q).
- Use FLINT AND STEEL (R); receive FAERIE LANTERN.
- Offer ROYAL COMPASS (S).
- Solution (T).
- Receive WOODEN BALL.
- Walk down.
- LITTLE KNIFE and WOODEN BALL on HANGING CHARM; receive HANDMADE DOLL.
- Use (U). Place HANDMADE DOLL (V); receive LITTLE FRIEND.
- Walk down.
- Place FAERIE LANTERN and offer LITTLE FRIEND; take DRAGON STATUETTE (W).
- Go (X).

- Place DRAGON STATUETTE (Y).
- Play HOP (Z); receive MOTHER DRAGON'S SCALE.
- Go forward.
- Offer MOTHER DRAGON'S SCALE (A).
- Select egg pieces (B). Select C-D.
- Receive DECODED CLUE.
- Walk down twice.
- Use WAR HAMMER; move debris. Place ICON PIECES (E).
- Place DECODED CLUE (F). Solution: 1-7.
- Take EGG OF COMPASSION (G).
- Go to Tower Parapet.
- Go (H).
Chapter 6: Nezul
- Take SAW HANDLE (I).
- Take SPLINT (J).
- Take RAGGED STRAP and SAW BLADE (K).
- SAW BLADE on SAW HANDLE; receive SAW.
- Collect CALMING HERBS x6. Use SAW (L).
- Place CALMING HERBS, SPLINT and RAGGED STRAP. Open bag; take EGG OF COMPASSION and ROPE COIL (M).
- Go (N).
- Touch. Place ROPE COIL; receive COTTER PIN. Take UNLIT TORCH (O).
- Take BENT RAIL (P).
- Walk down.
- Use UNLIT TORCH (Q); receive TORCH.
- Use BENT RAIL (R).
- Play HOP (S); receive ORNATE FRAME.
- COTTER PIN on ORNATE FRAME; receive DISC.
- Use TORCH and DISC; take SHEARS and TEMPLE EMBLEM (T).
- Go (U).
- Place TORCH. Solution (V).
- Go (W).
- Take BOW CASE (X).
- Take WIRE with SHEARS. Take FLAIL with ROPE COIL (Y). Take BOARDS with DISC (Z). Take STONE SLABS 1-2/2 (A).
- Take SEQUENCE (B).
- Take DRAGON COINS 1/3 with COTTER PIN (C). Place BOARDS.
- Walk down.
- Use FLAIL; take ARROWS 1-3/3 and DRAGON COINS 2/3 (D).
- Use FLAIL. Place TEMPLE EMBLEM and SEQUENCE; select 1-2-3 (E).
- Take DRAGON COINS 3/3 (F).
- Go (G).
- DRAGON COINS on ORNATE FRAME; receive COMPLETED FRAME.
- COMPLETED FRAME, WIRE and ARROWS on BOW CASE; take BOW.
- Use BOW. Solution (H).
- Receive BELL CLAPPER.
- Walk down.
- Take SHIELD and BONE SPIKES 1-4/8 and 5-8/8 (I).
- Go (J).
- Place BONE SPIKES; use BELL CLAPPER. Place STONE SLABS and SHIELD (K).
- Play HOP (L); receive ENCHANTED SWORD.
- Walk down.
- Use ENCHANTED SWORD (M).
- Take ROYAL CROWN (N).
- Go (O).
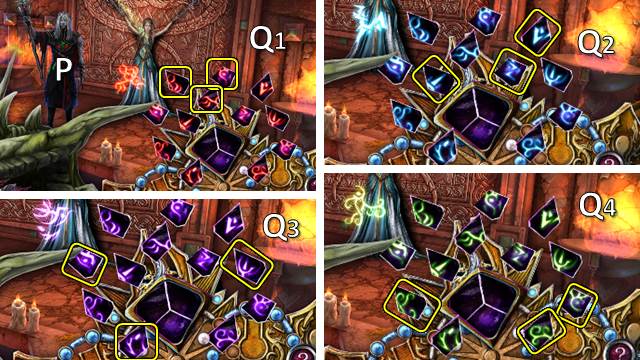
- Offer ROYAL CROWN (P).
- Solution (Q1-4).
- Congratulations, you have completed The Secret Order: Return to the Buried Kingdom.
Created at: 2019-06-09