

Walkthrough Menu
- General Tips
- Chapter 1: Facility
- Chapter 2: Druid's House
- Chapter 3: Mansion
- Chapter 4: Beacon
- Chapter 5: Reliquary
General Tips
- This is the official guide for The Secret Order: Shadow Breach.
- This guide won't tell you when to zoom into a location; the screenshots show each zoom scene.
- Hidden-object puzzles are referred to as HOPs. Only the locations of the HOPs will be shown.
- Use the Map to fast travel to a location.
Chapter 1: Facilty
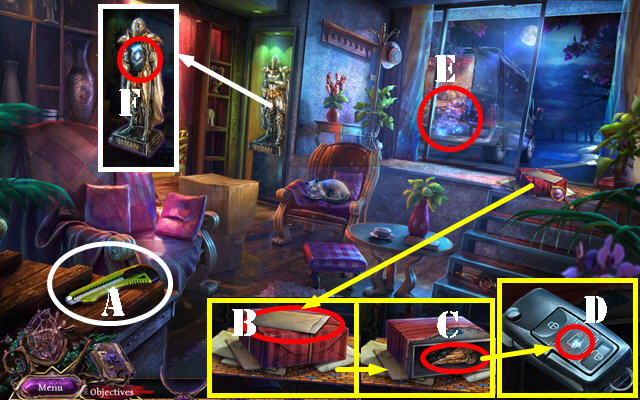
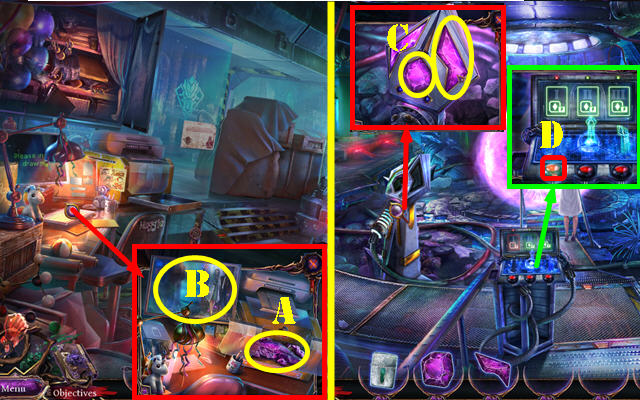
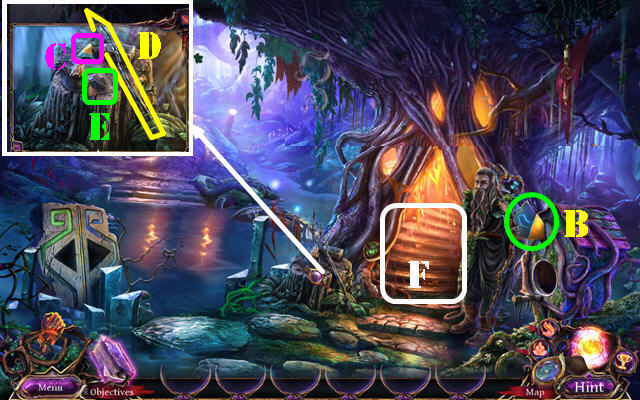
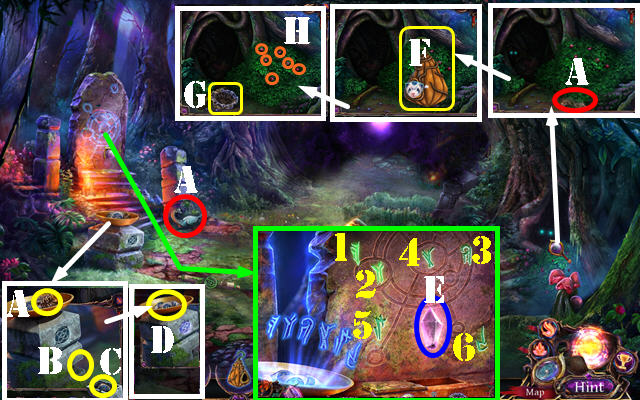
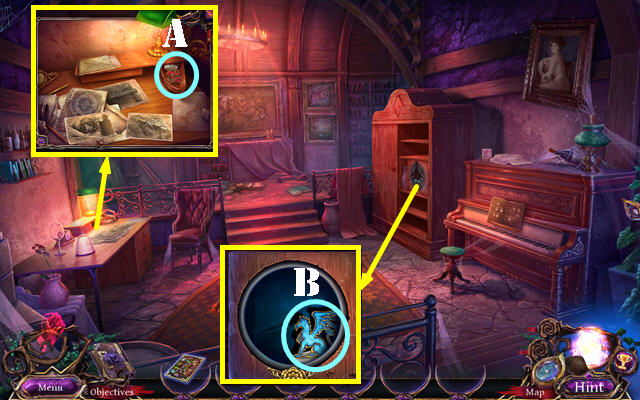
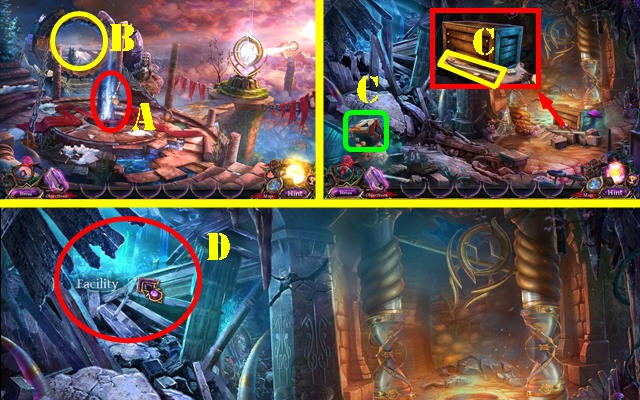
- Take BOX CUTTER (A).
- Read note (B).
- Use BOX CUTTER and select twice; take SHIELD (C) and press button (D).
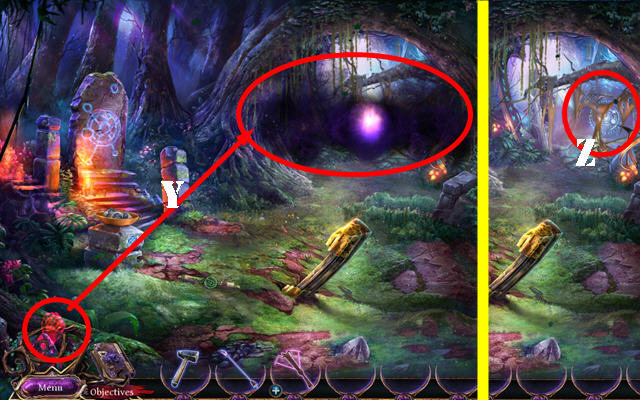
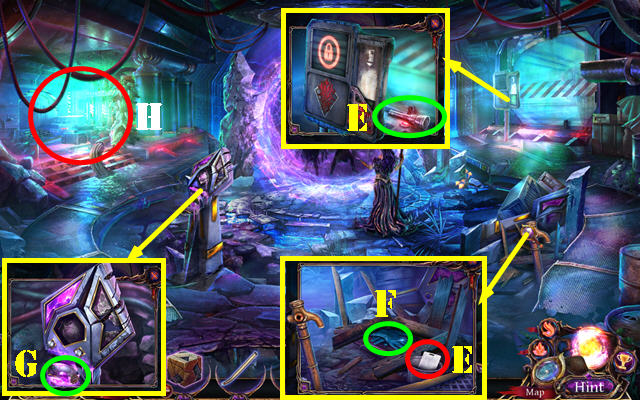
- Play HOP (E); receive SWORD.
- SWORD on SHIELD; receive SWORD AND SHIELD.
- Use SWORD AND SHIELD; select button (F).
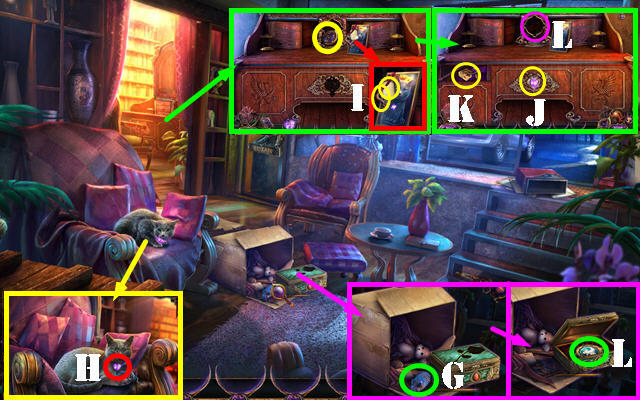
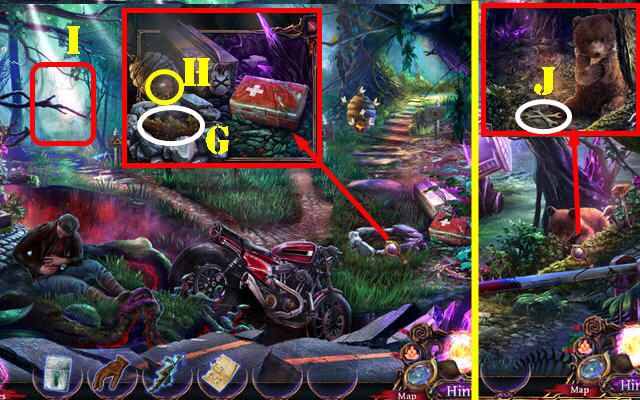
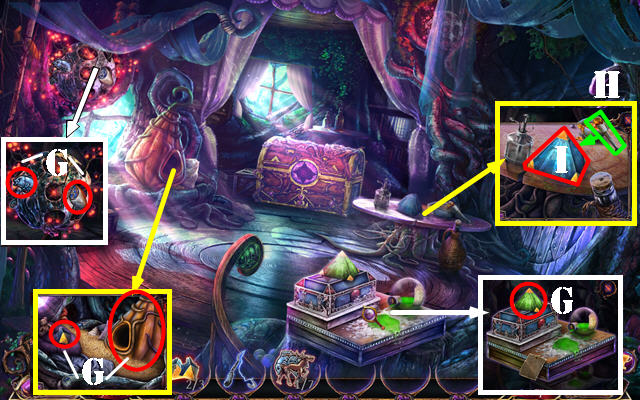
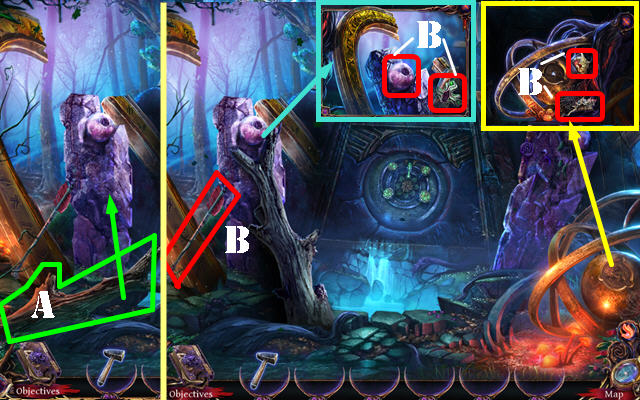
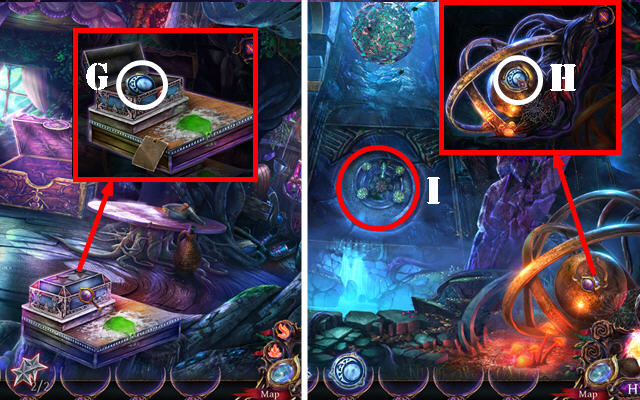
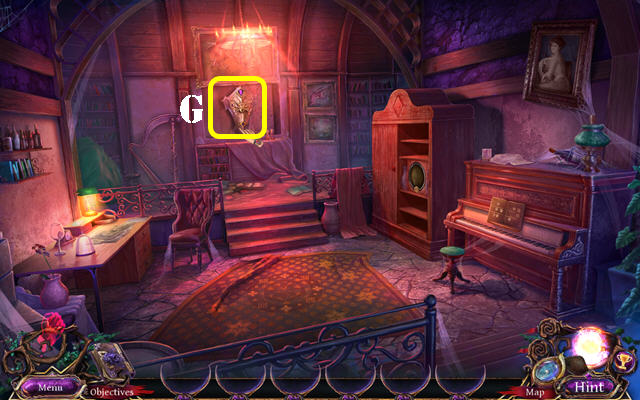
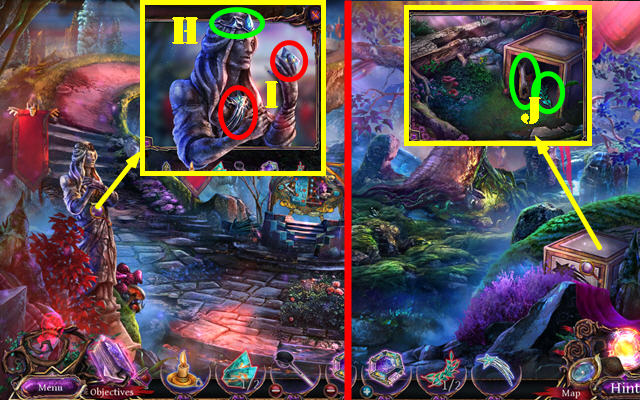
- Take MOUSE TOY (G).
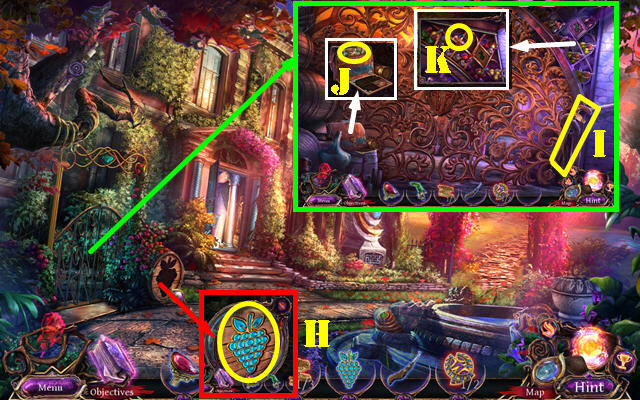
- Use MOUSE TOY; take AMETHYST HEART (H).
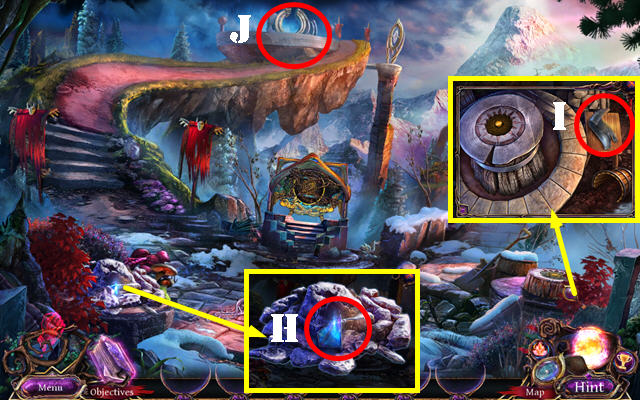
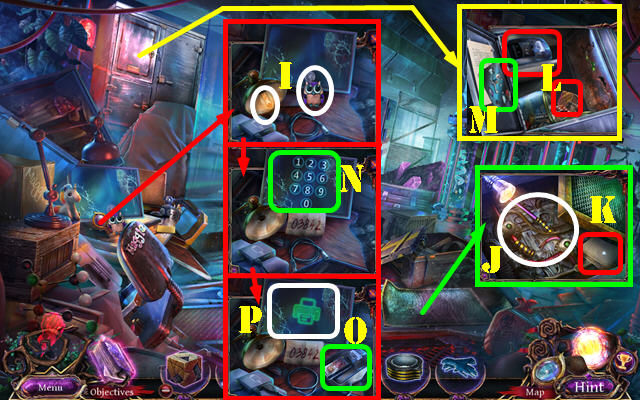
- Look at note; take HEART FRAME and compass (I).
- Select HEART FRAME; place AMETHYST HEART; receive HEART MEDALLION.
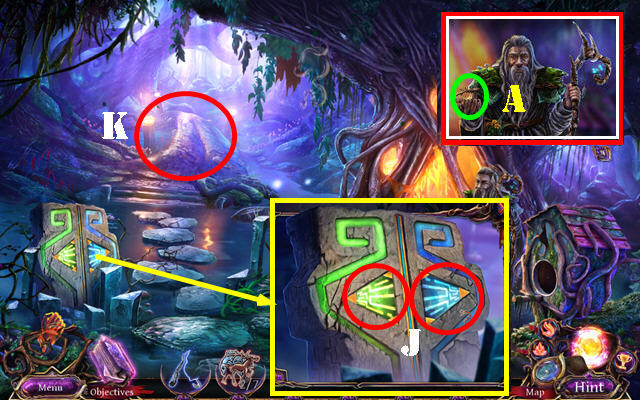
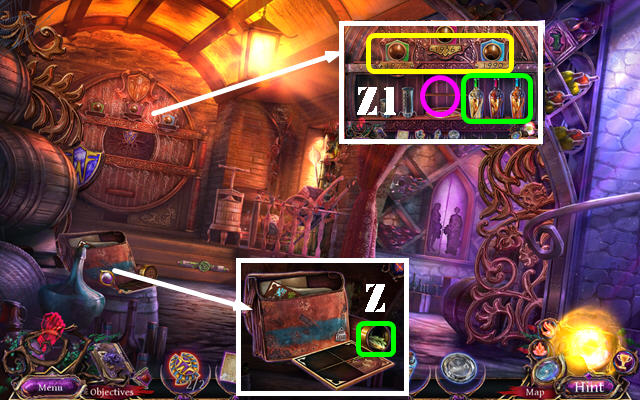
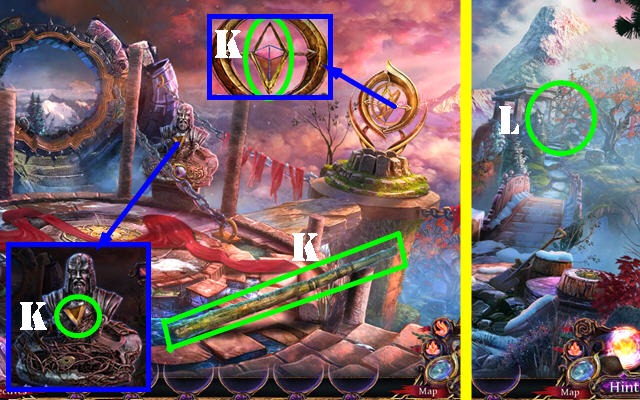
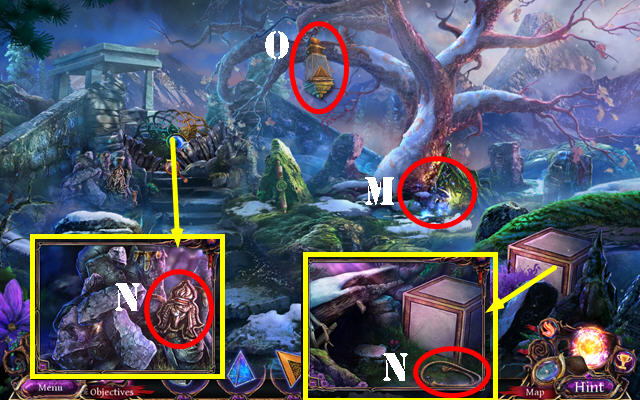
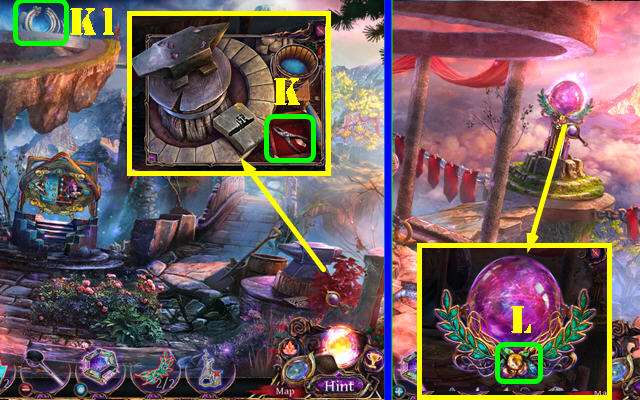
- Place HEART MEDALLION (J). Open drawer and look at note; take GOLDEN ROSE (K).
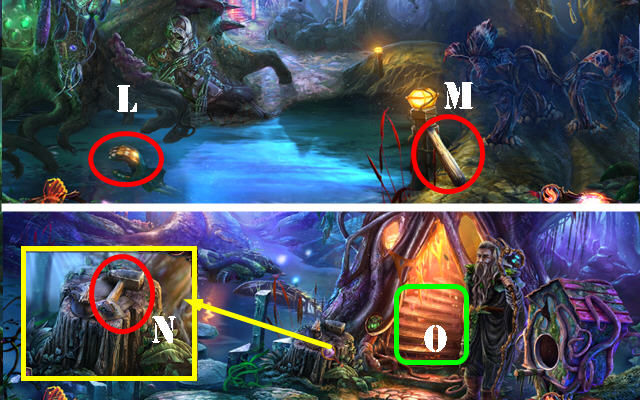
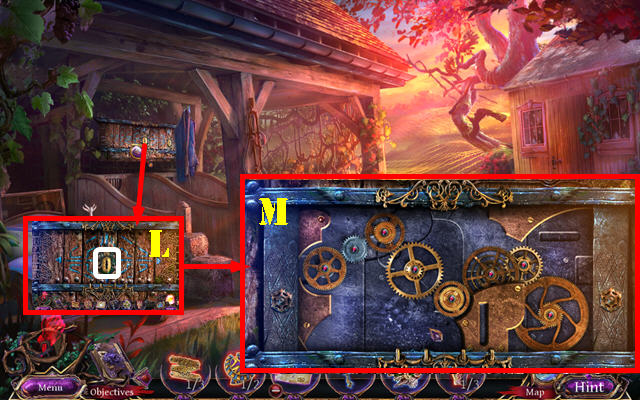
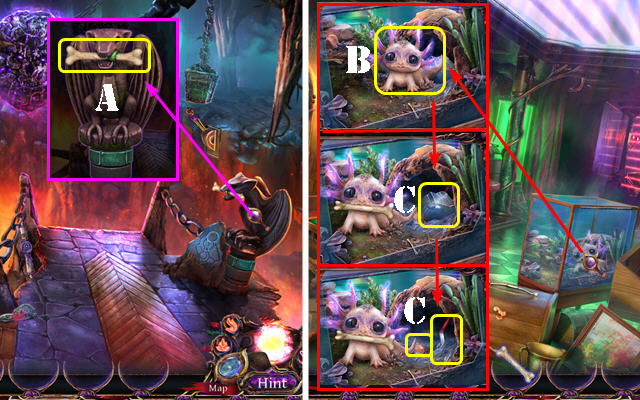
- Place GOLDEN ROSE; take GRIFFIN ORNAMENT (L).
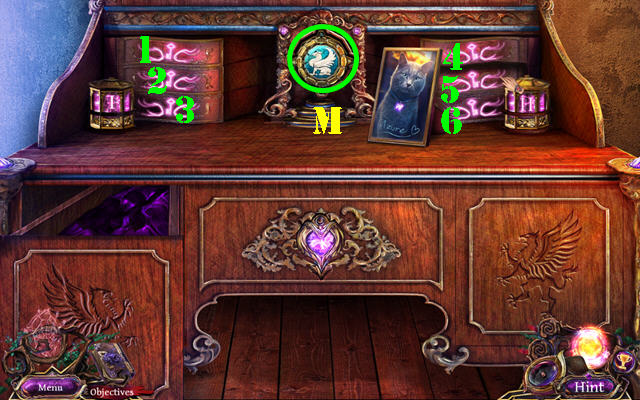
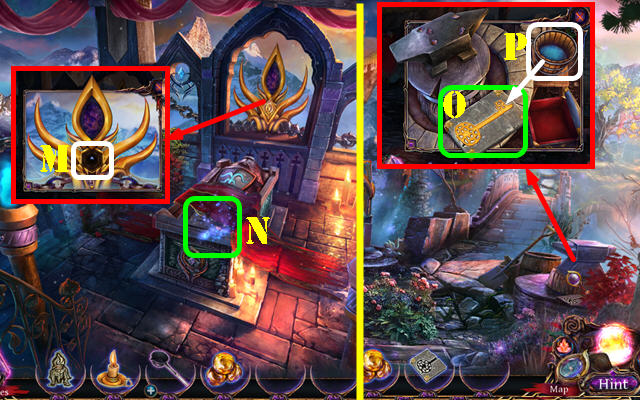
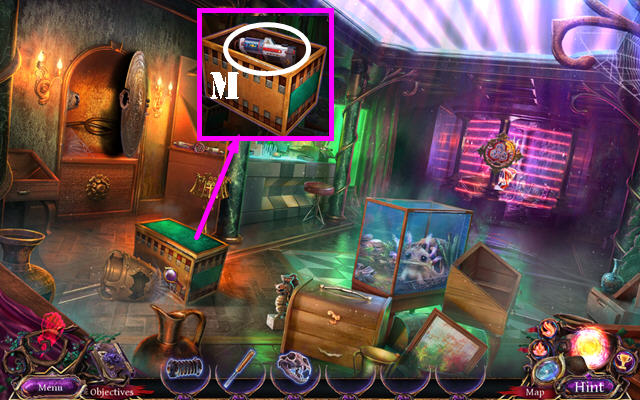
- Place GRIFFIN ORNAMENT (M).
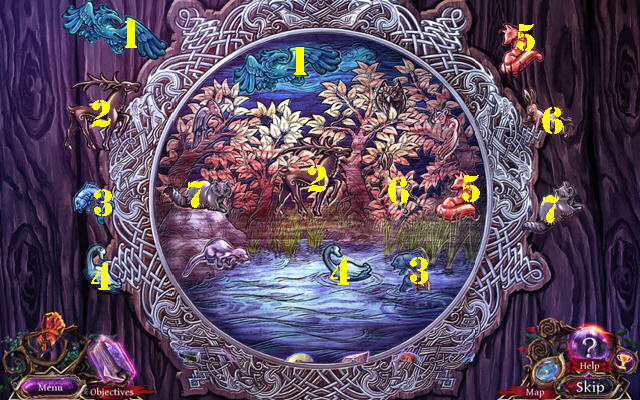
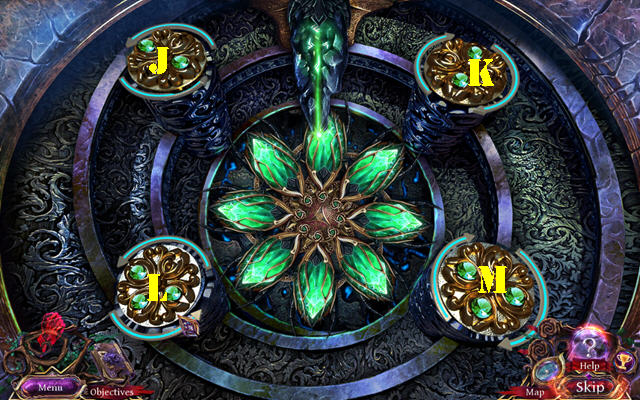
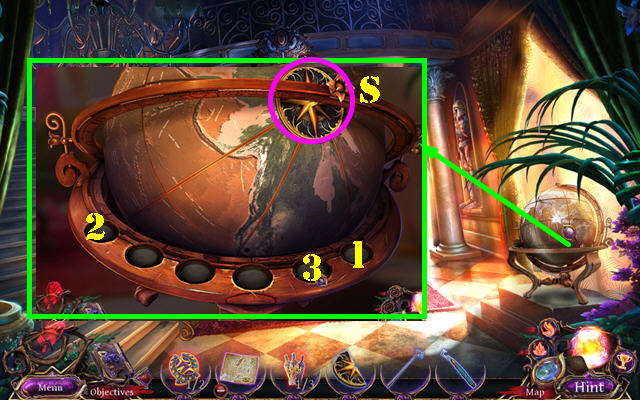
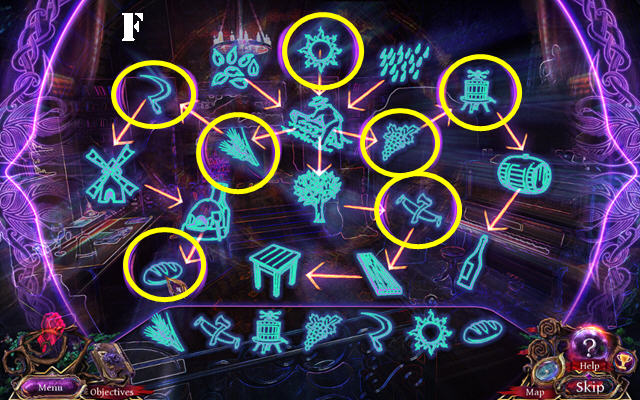
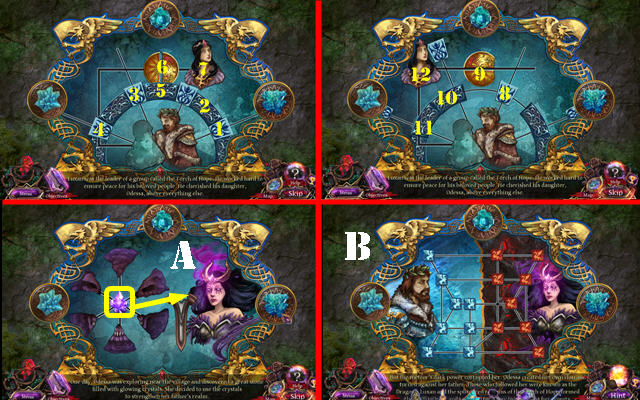
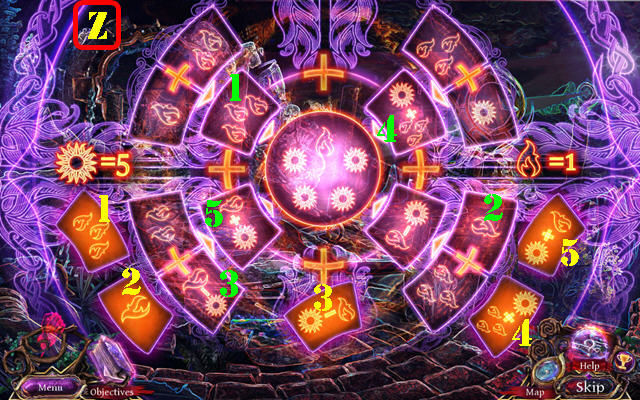
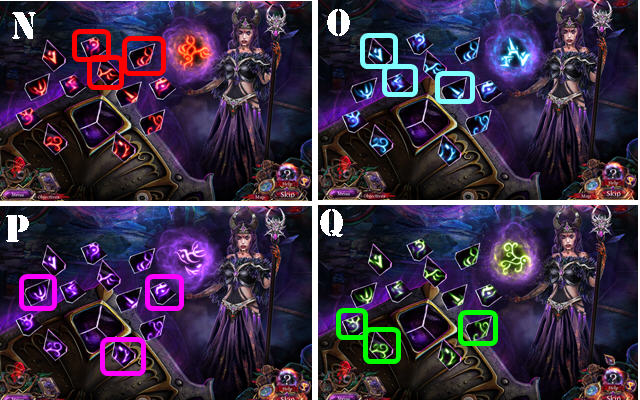
- Sequences: (1-2-5)-(3-4-6-2)-(3-6-4-1-2-5).
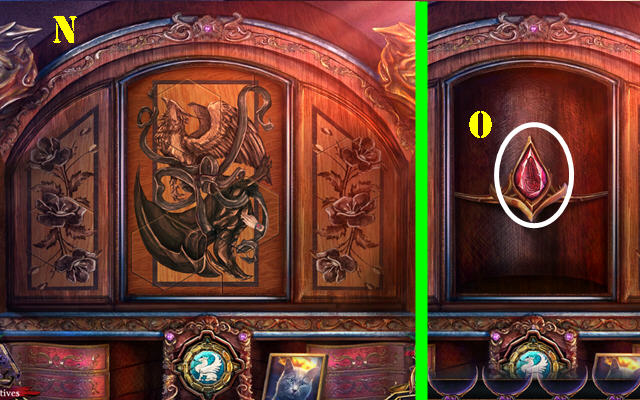
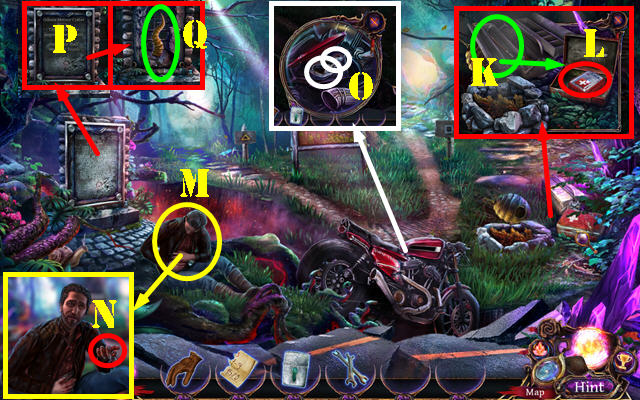
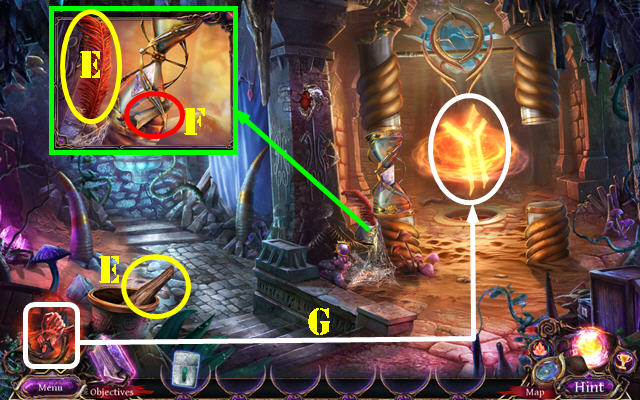
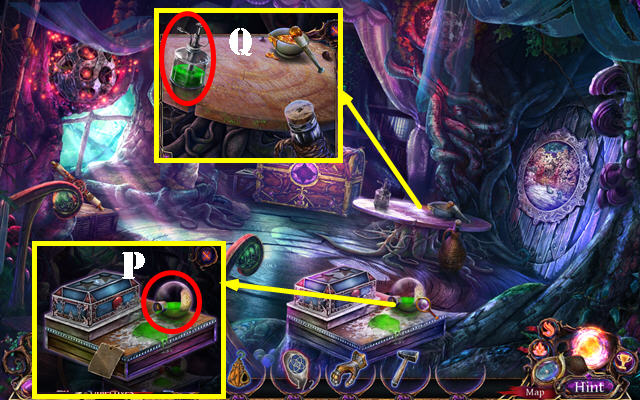
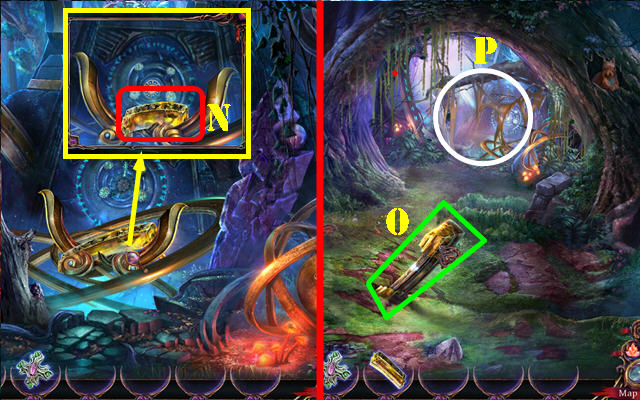
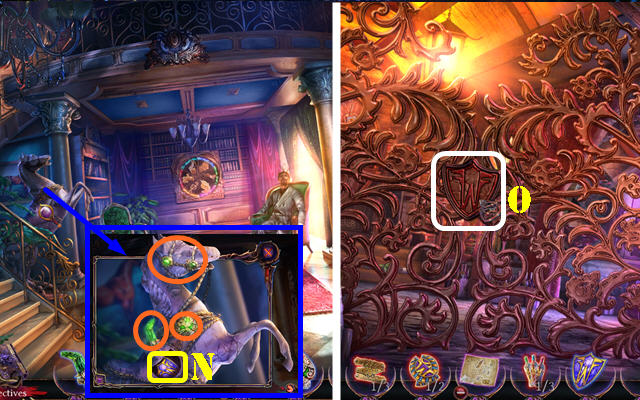
- Solution (N).
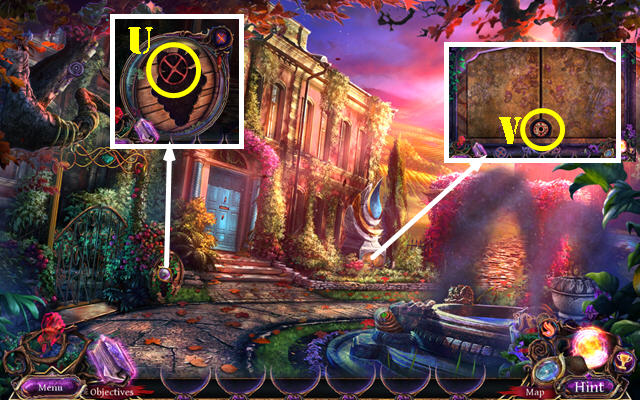
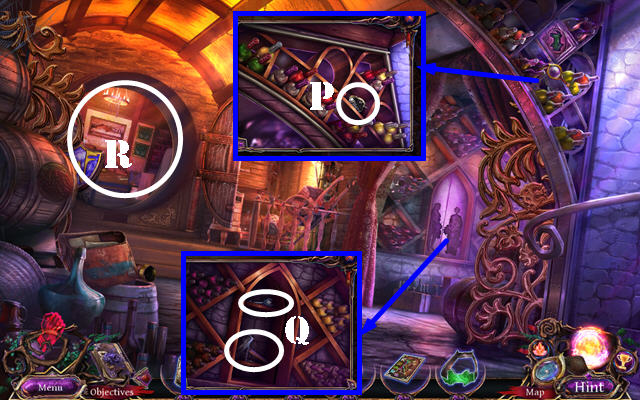
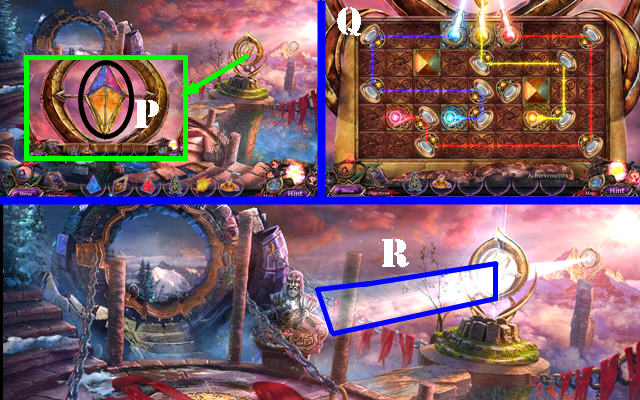
- Select ruby (O).
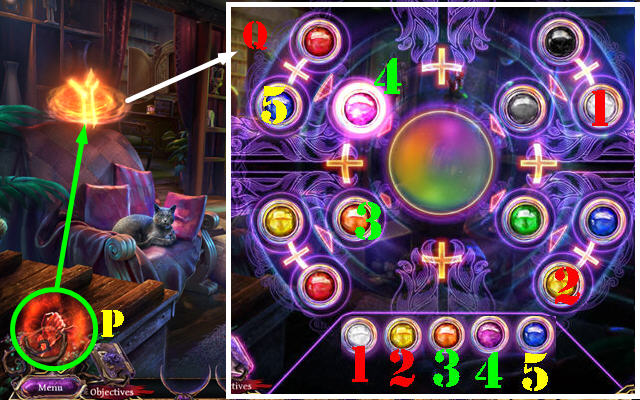
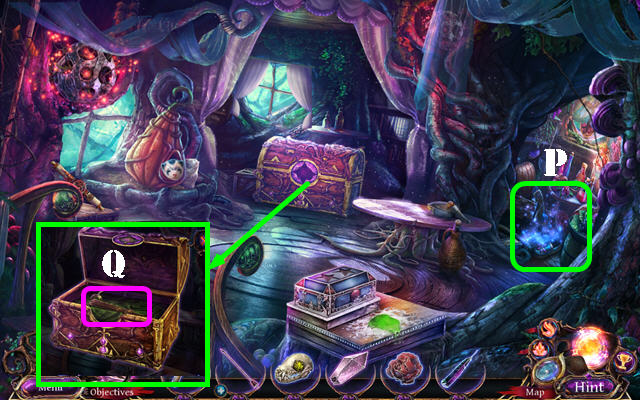
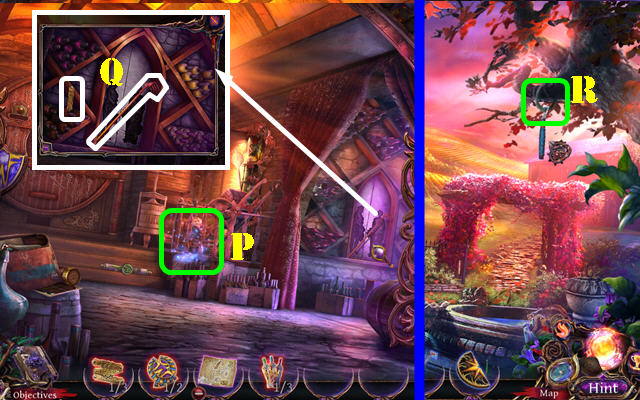
- Use Magic Bracelet (P).
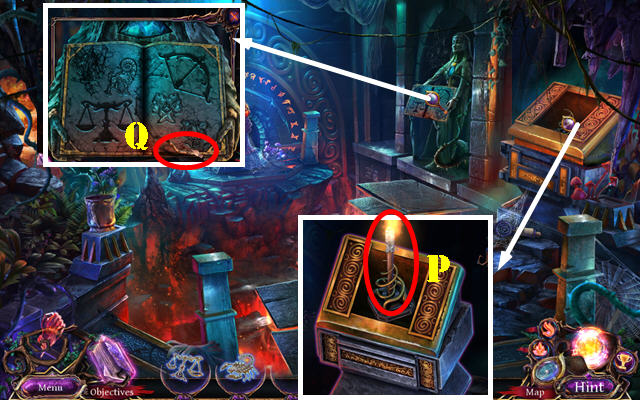
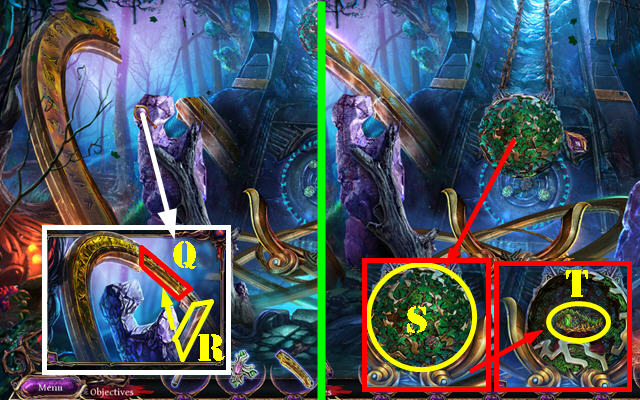
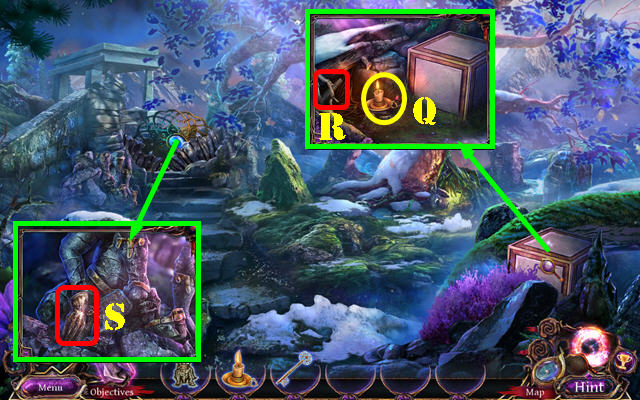
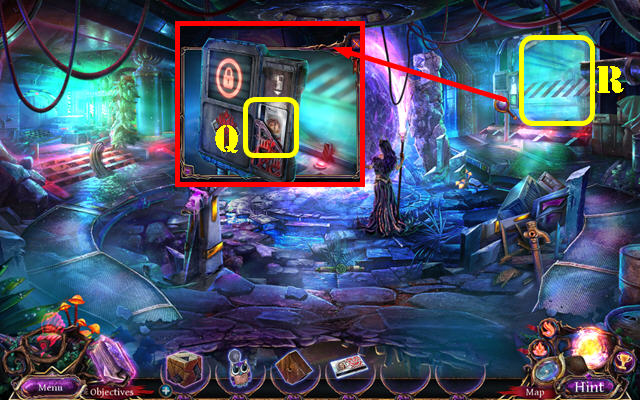
- Solution (Q).
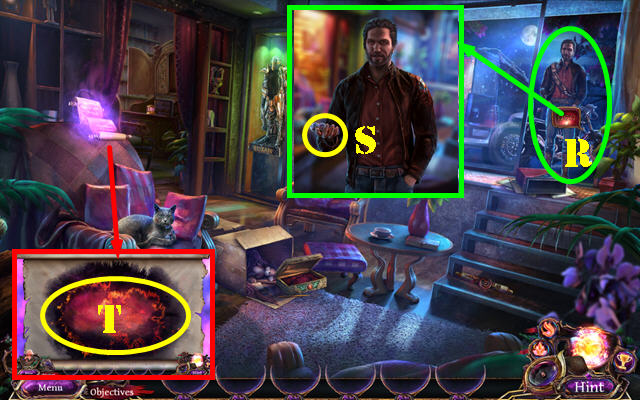
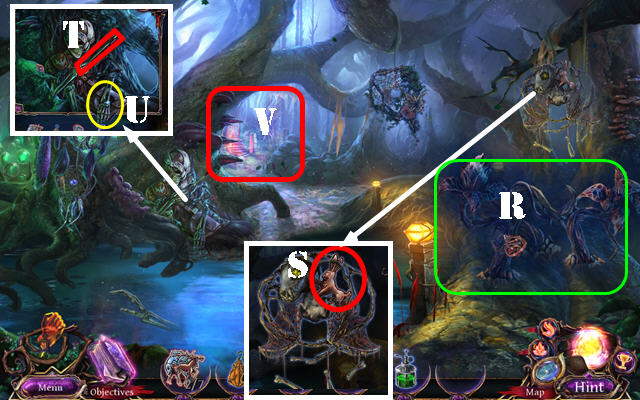
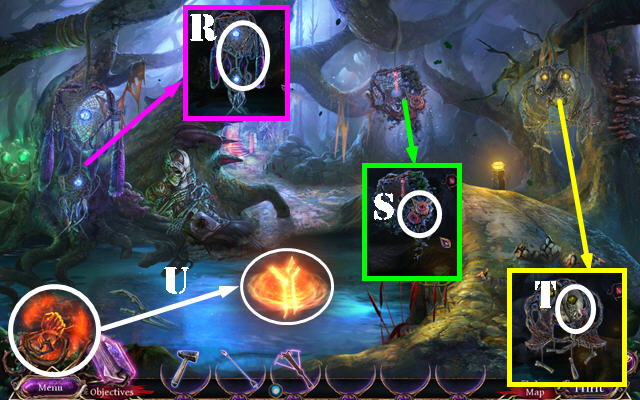
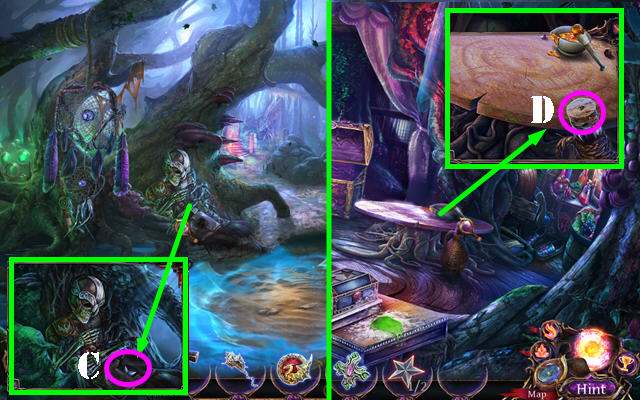
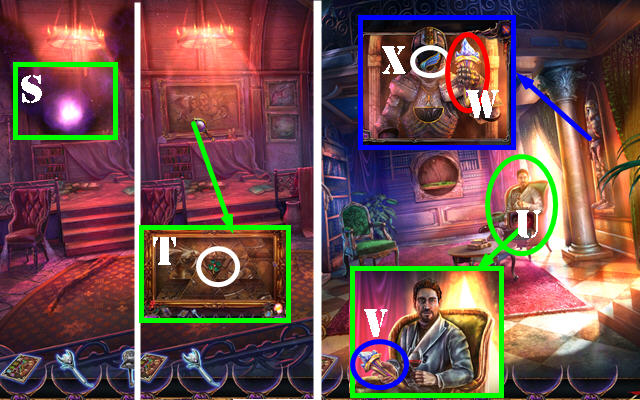
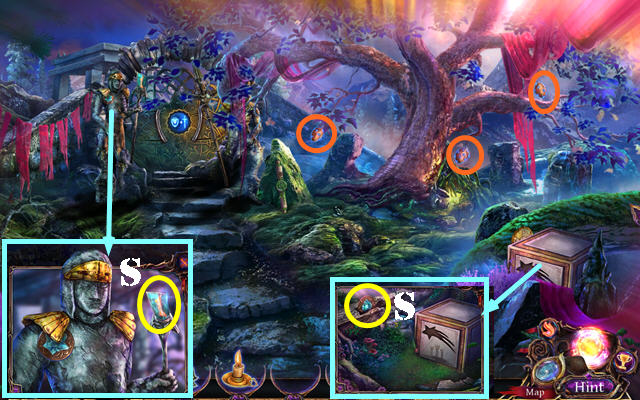
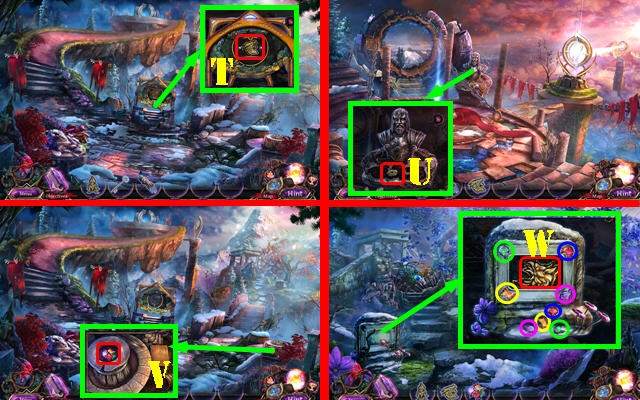
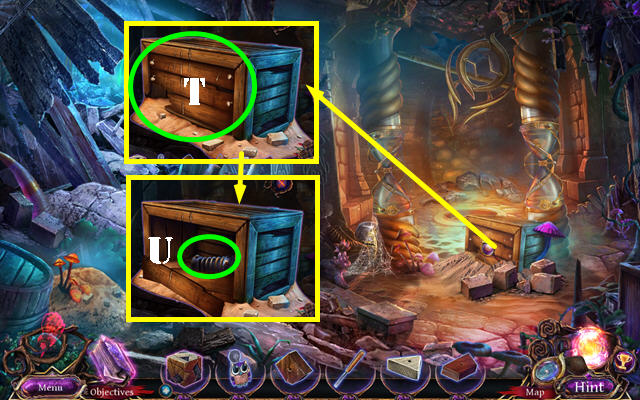
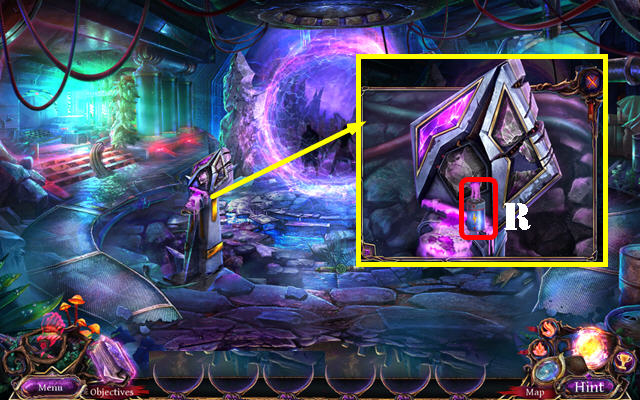
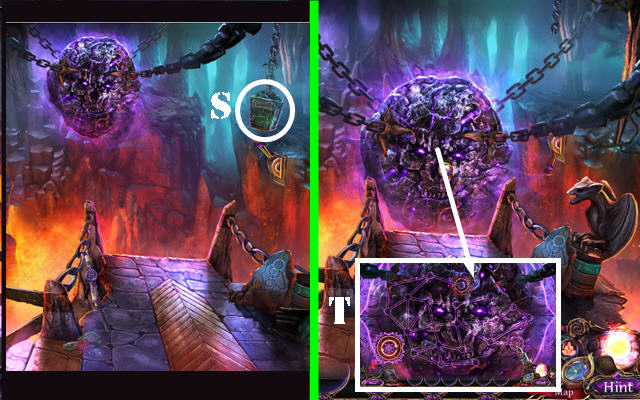
- Talk (R); take INK (S).
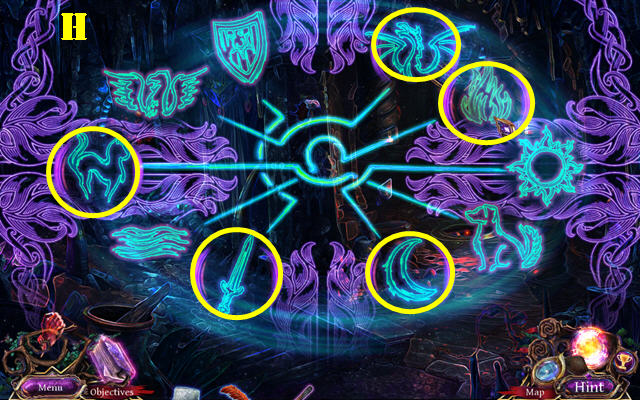
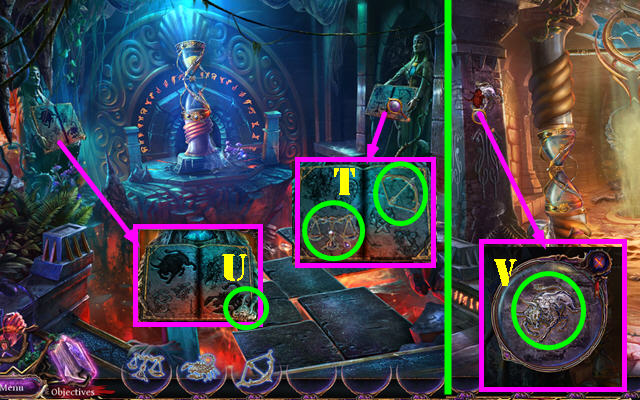
- Use INK (T).
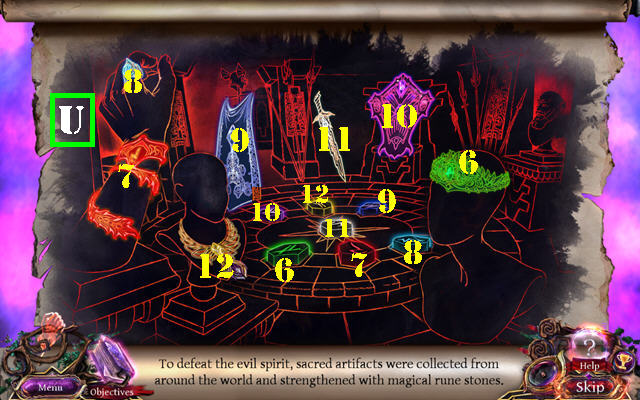
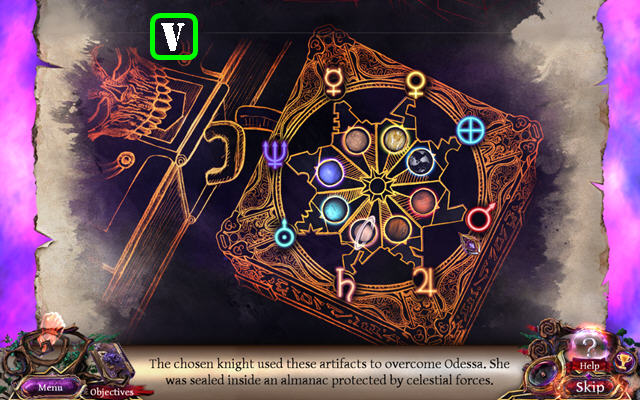
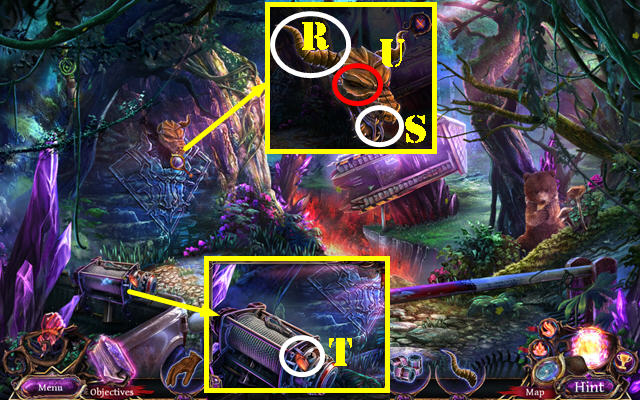
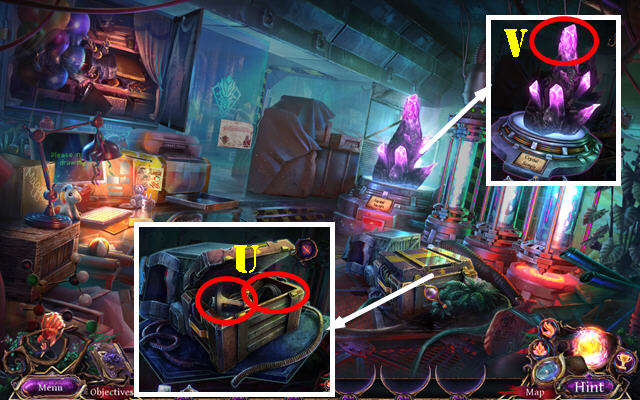
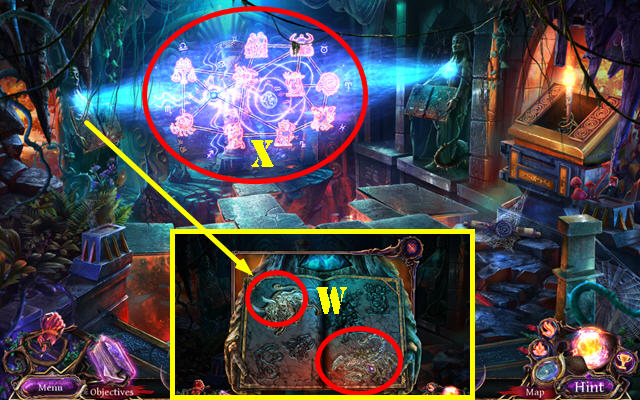
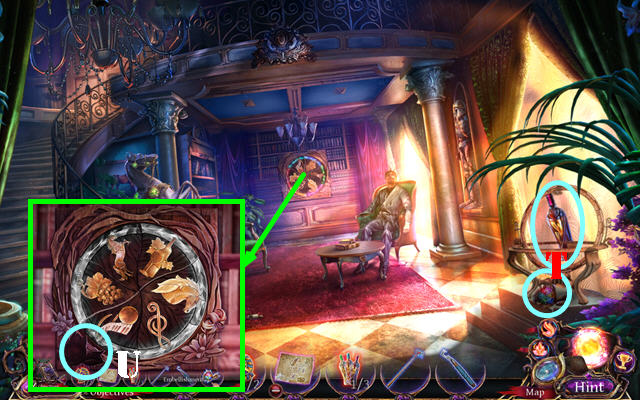
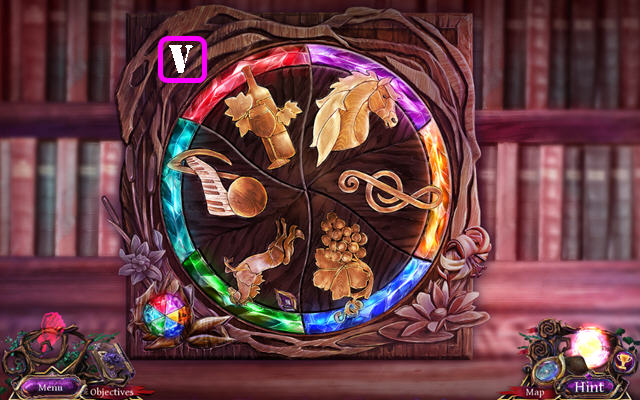
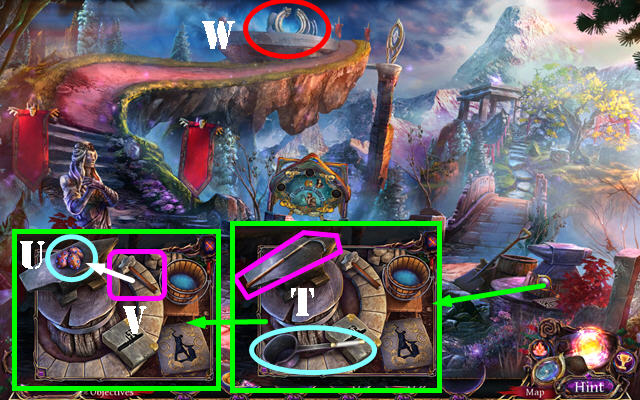
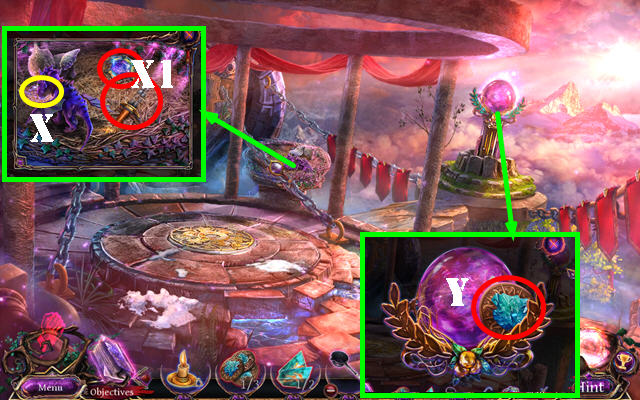
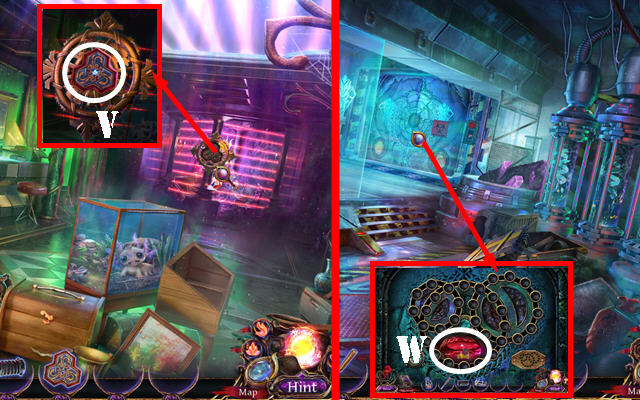
- Solution (U-V).
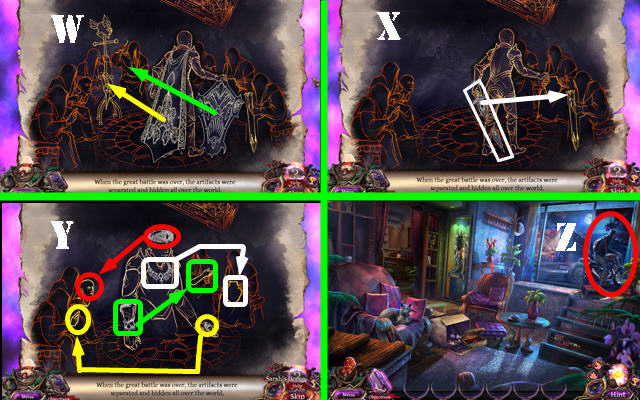
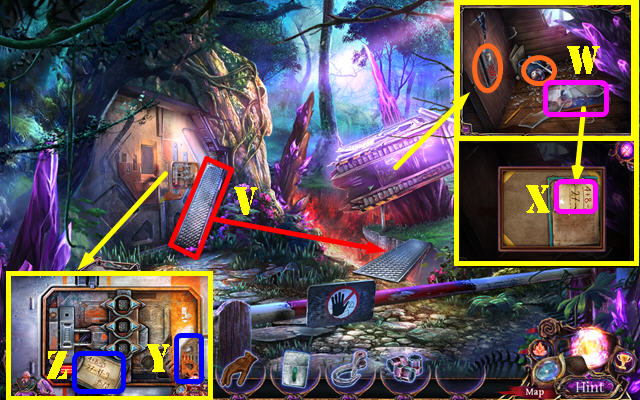
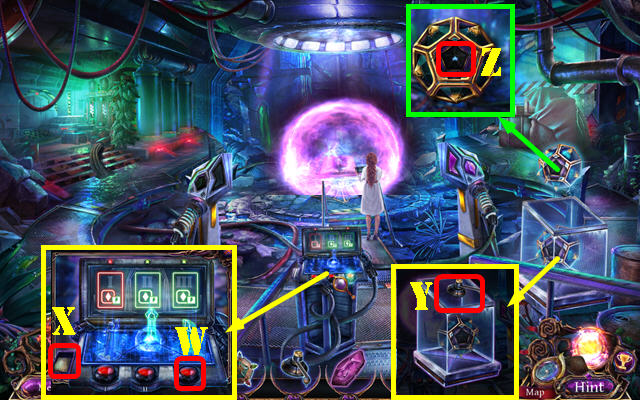
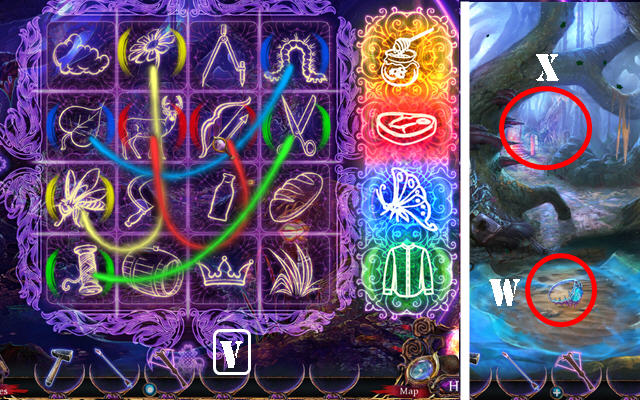
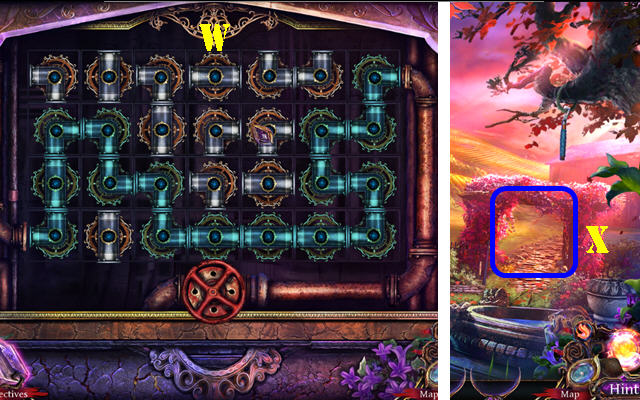
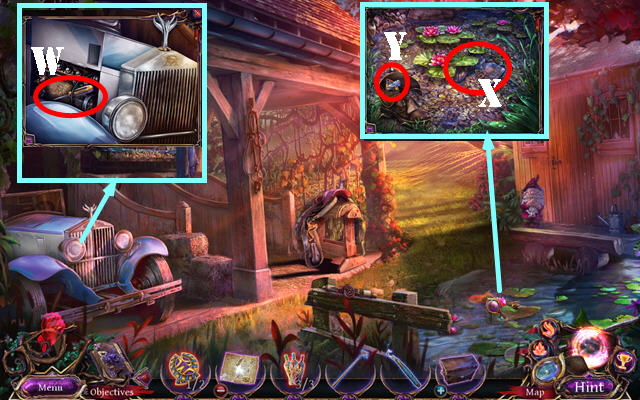
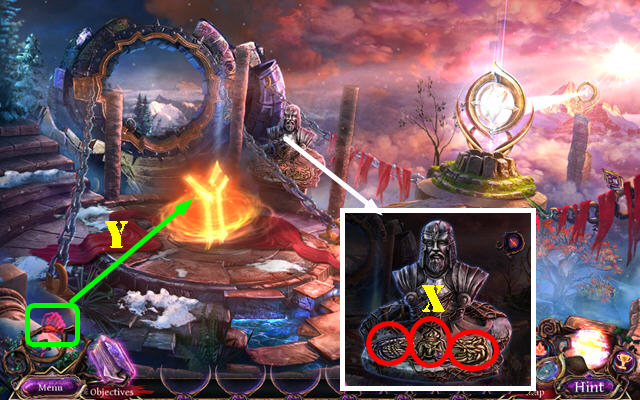
- Solution (W-X-Y).
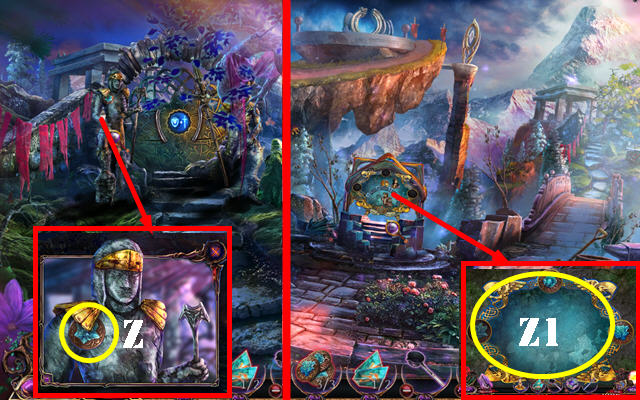
- Go (Z).
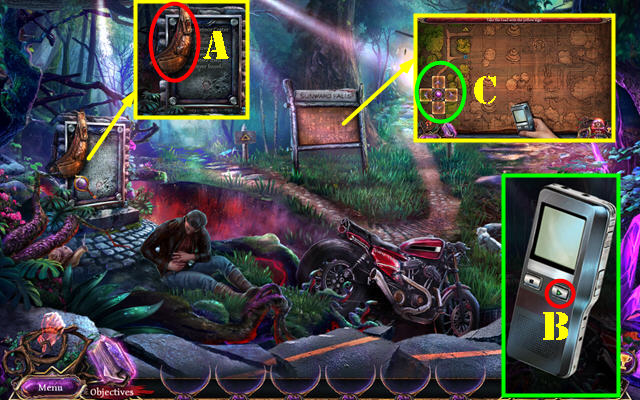
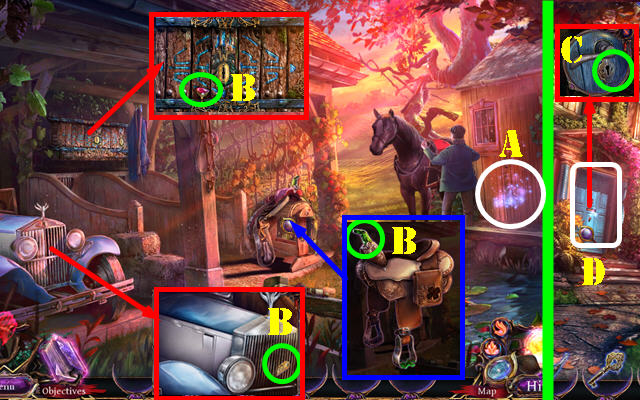
- Take SATCHEL (A).
- Select SATCHEL twice; take LIGHTER and VOICE RECORDER.
- Select play button (B) on VOICE RECORDER.
- Use VOICE RECORDER (C).
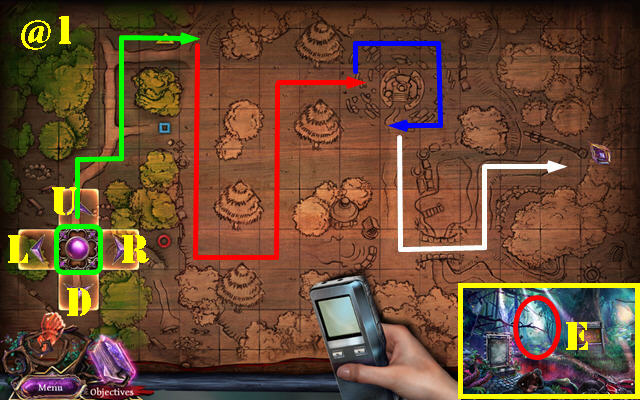
- Solution (@1): (Ux2-R-Ux3-Rx2 (green))-(Dx5-Rx2-Ux4-Rx2 (red))-(U-Rx2-Dx2-L (blue))-(Dx3-Rx2-Ux2-Rx2 (white)).
- Map is activated.
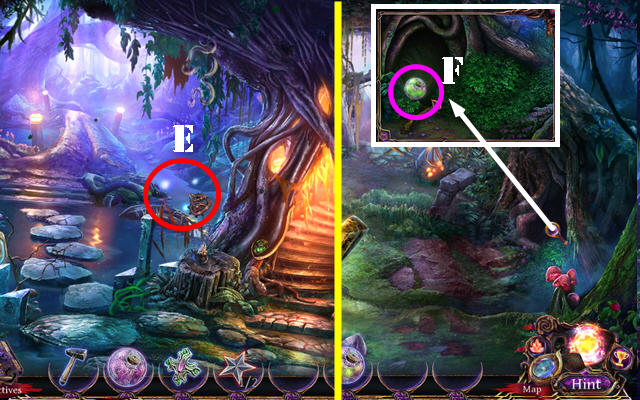
- Go (E).
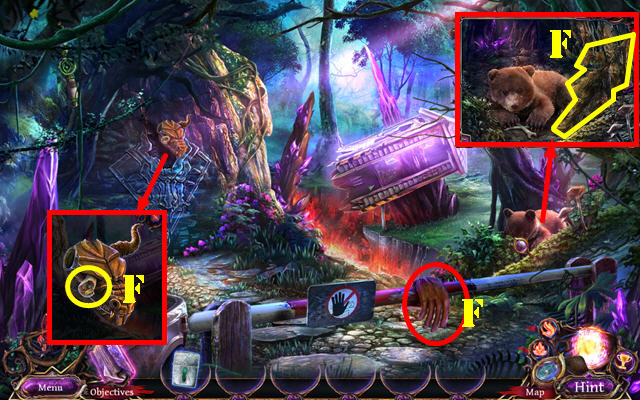
- Take LEATHER GLOVE, BRANCH, and CODE PART (F).
- Walk down.
- Use BRANCH and LIGHTER (G).
- Select; take HONEYCOMB (H).
- Go (I).
- Give HONEYCOMB; take TOOLBOX EMBLEM (J).
- Walk down.
- Use TOOLBOX EMBLEM; take crowbar and use it (K); take FIRST-AID-KIT (L).
- Use FIRST-AID KIT (M); take MOTORCYCLE KEY (N).
- Use MOTORCYCLE KEY and select; take HEX KEY and HOOK (O).
- Use HEX KEY (P); receive NUTS.
- Remove cover; take DRAGON HORN (Q).
- Go to Facility Entrance.
- Place DRAGON HORN (R): take DRAGON TONGUE (S).
- Use DRAGON TONGUE; take DRAGON EYE (T).
- Place DRAGON EYE (U).
- Place metal plank (V).
- Take ID CARD and WINDLASS HANDLE (orange). Use LEATHER GLOVE (W); select frame twice and take CODE PART (X).
- Place CODE PART on CODE PART; receive CODE.
- Use ID CARD (Y) and CODE (Z).
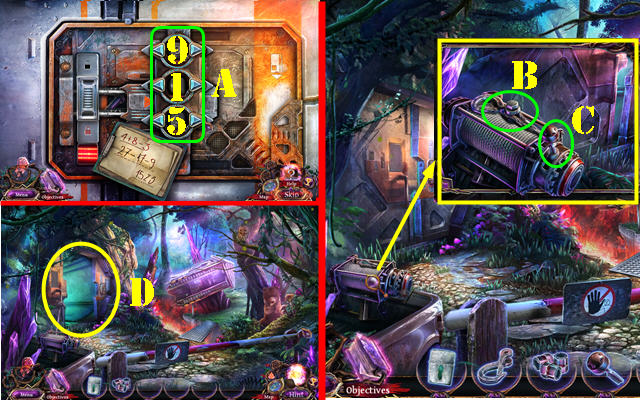
- Solution 915 (A). Receive BOLT.
- Use HOOK and BOLT and select (B).
- Place WINDLASS HANDLE and select (C).
- Go (D).
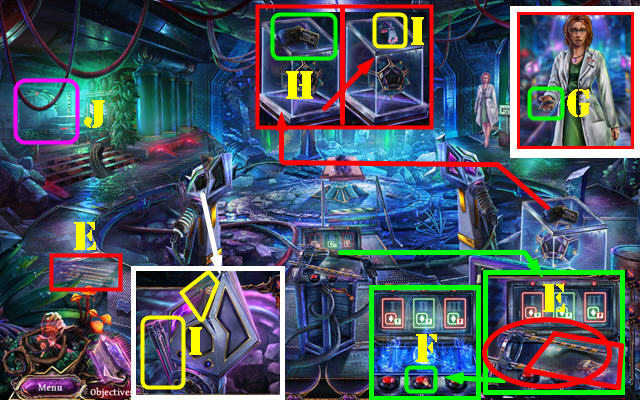
- Take TRANSPARENCY SHEET 1/3, TRANSPARENCY SHEETS 2/3, and MODULE 1/3 (E).
- Press button (F). Take FLASH DRIVE (G).
- Look at video camera and select (H).
- Take METAL HANDLE, MODULES 2/3, and TRANSPARENCY SHEETS 3/3 (I).
- Go (J).
- Take MODULES 3/3, GLASS TUBE, and IGNITION BUTTON (K).
- Play HOP (L); receive JEWELED AMULET.
- Insert FLASH DRIVE (M); select monitor 2x (N); take BLUEPRINT and KEY CARD (O).
- Open; take ENERGY CELL (P).
- TRANSPARENCY SHEETS 3/3 on BLUEPRINT; place as shown (Q-R-S).
- Place BLUEPRINT and MODULES 3/3. Place pieces 1-2-3.
- Place NUTS, ENERGY CELL, GLASS TUBE, IGNITION BUTTON, and HANDLE (T).
- Use KEY CARD; take GLASS CUTTER and PICKAXE (U).
- Use PICKAXE (V); receive CRYSTAL PIECE.
- Walk down.
- Select button (W); take CRYSTAL DRAWING (X).
- Use GLASS CUTTER (Y); select.
- Place JEWELED ORNAMENT (Z).
- Solution (1-4).
- Take CRYSTAL.
- Go to Generator.
- Place CRYSTAL DRAWING and CRYSTAL PIECE (A); select monitor (B); take SHAPED CRYSTAL (A).
- Walk down.
- Place CRYSTAL and SHAPED CRYSTAL (C).
- Press button (D).
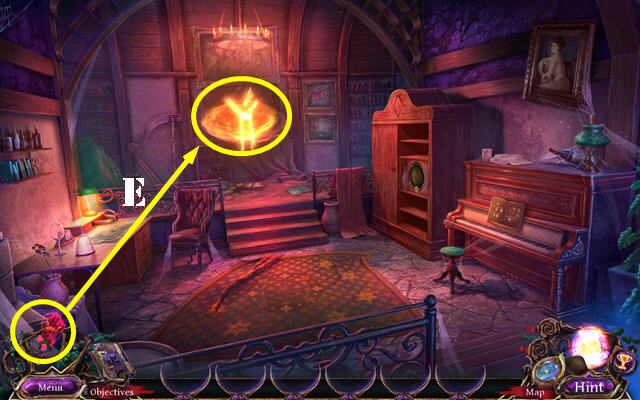
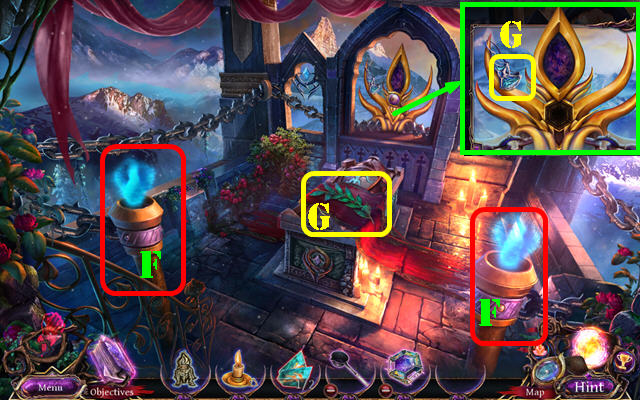
- Take FEATHER and TORCH BASE (E).
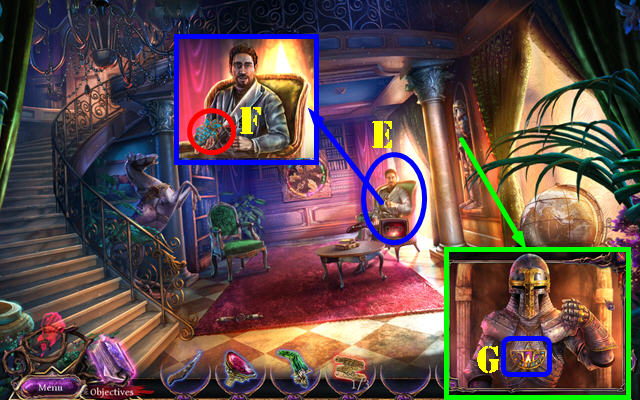
- Look at note (F).
- Use Magic Bracelet (G).
- Solution (H).

- Go (I).
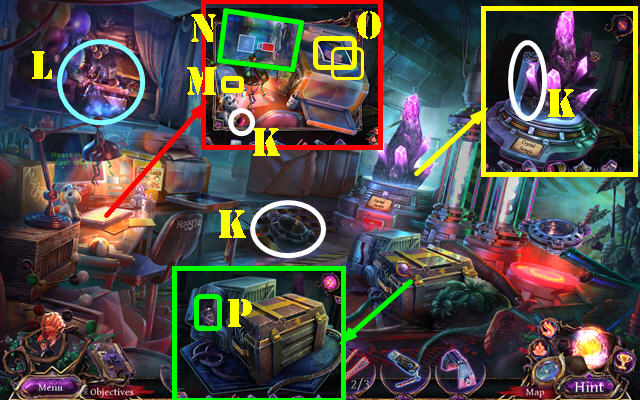
- Take LIBRA and BRASS HANDLE (J).
- Walk down.
- Place BRASS HANDLE (K); take DIAMOND (L).
- Go (M).

- Use FEATHER and place DIAMOND; take DAGGER and read note (N).
- Walk down.
- Use DAGGER (O); receive CLOTH. Play HOP; receive SCORPIO.
- Go to Zodiac Chamber.
- CLOTH on TORCH BASE; receive TORCH.
- Place TORCH and use LIGHTER (P).
- Take HOOKED METAL (Q).
- Walk down.

- Use HOOKED METAL; take SAGITTARIUS (R).
- Go (S).
- Place LIBRA and SAGITTARIUS (T).
- Take BULL HEAD (U).
- Walk down.
- Place BULL HEAD; take TAURUS (V).
- Go to Zodiac Chamber.
- Place TAURUS and SCORPIO (W).
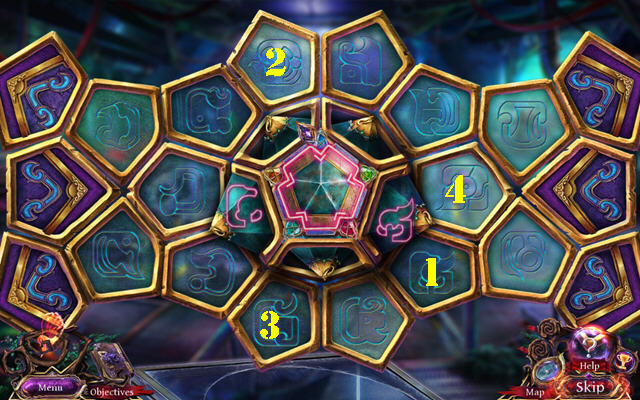
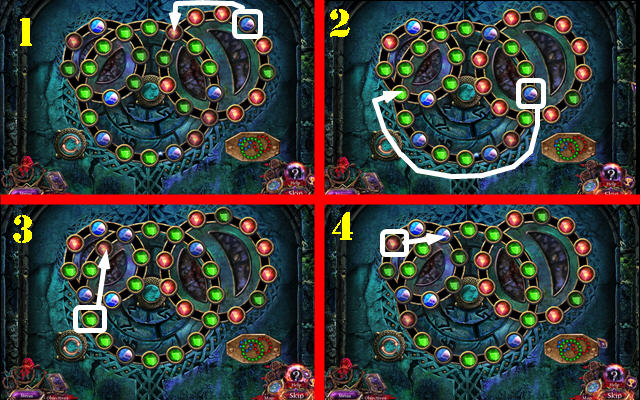
- Play puzzle (X).
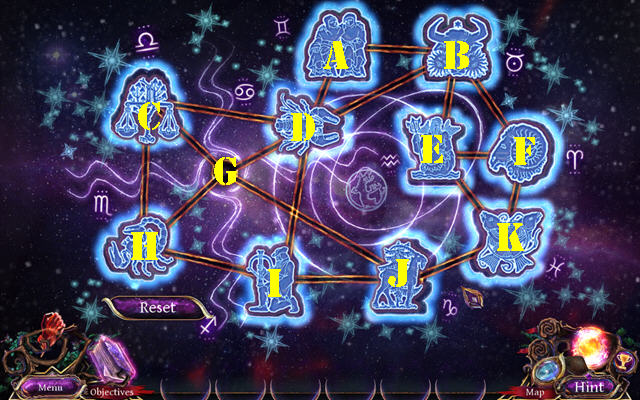
- Solution one: J-I-H-C-G-D-A-B-F-K-J-I.
- H-C-D-A-B-F-K-J-I-D-B-F.
- K-E-B-D-G-J-K-E-B-F-K-J-G-D-C-G.
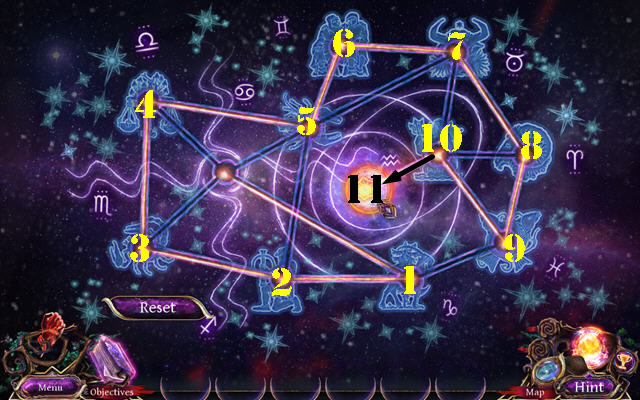
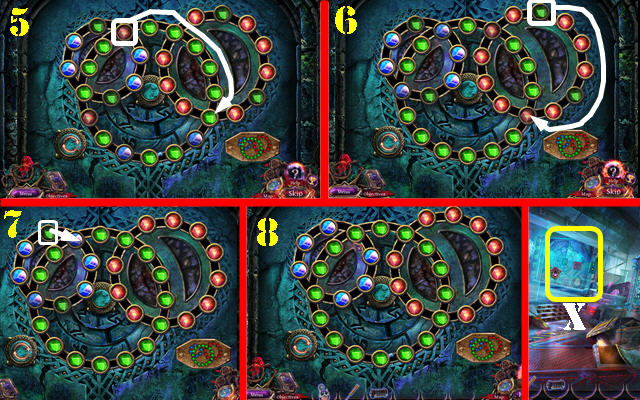
- Solution two (1-11).
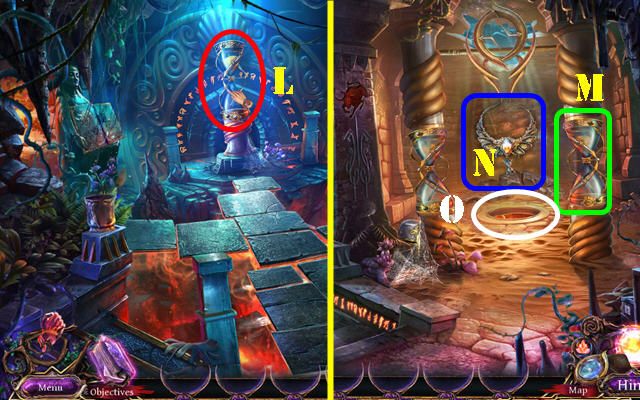
- Take HOURGLASS (L).
- Walk down.
- Place HOURGLASS (M).
- Take Relic (N).
- Go (O); walk forward.
Chapter 2: Druid's House
- Take PYRAMID PIECES 1/3 (B).
- Move candle; take PYRAMID PIECES 2/3 (C) and FISHING ROD (D). Look at note (E).
- Go (F).
- Take GREEN PYRAMID, WOODEN ANIMAL 1/7, RUNE STONE 1/2, PYRAMID PIECES 3/3, and PET HOUSE (G).
- Use pestle (H) on stone (I); place PYRAMID PIECES 3/3; take BLUE PYRAMID (I).
- Walk down.
- Take WOODEN ANIMALS 2/7 (A).
- Place GREEN PYRAMID and BLUE PYRAMID (J).
- Go (K).
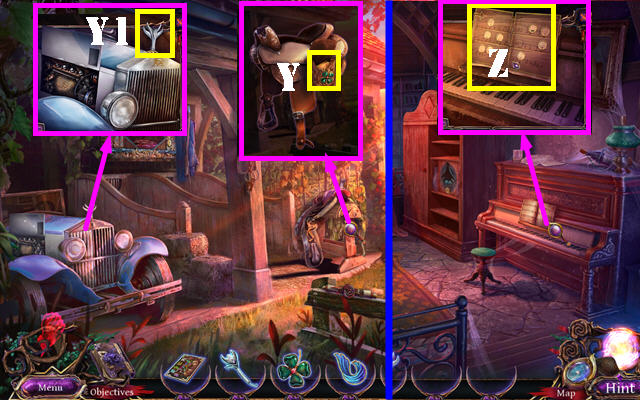
- Use FISHING ROD (L); receive METAL GAUNTLET.
- Take WOODEN HANDLE (M).
- Walk down.
- Place WOODEN HANDLE; take HAMMER (N).
- Go (O).
- Use METAL GAUNTLET (P); receive BASILISK VENOM.
- Use BASILISK VENOM; take PETRIFYING SPRAY (Q).
- Return to Swampy Bridge.
- Use PETRIFYING SPRAY and HAMMER (R).
- Take WOODEN ANIMALS 3/7 (S).
- Take ARROW SHAFT (T); select arm (U).
- Go (V).
- Take WOODEN ANIMALS 4/7, WOODEN ANIMALS 5/7, and POUCH (A).
- Use HAMMER (B); take RUNE STONES 2/2 (C).
- Place RUNE STONES 2/2 (D).
- Select 1-6; take SUNSTONE (E).
- Open POUCH; take BAT SKULL and WOODEN ANIMALS 6/7.
- Place PET HOUSE; take MIRUS (F).
- Place POUCH (G); select berries (H); take BERRIES (G).
- Walk down twice.
- Take FLOWER (I).
- Place BERRIES (J); take FEATHER (K).
- Go (L).
- Place MIRUS (M); take WOODEN ANIMALS 7/7 (N).
- Place WOODEN ANIMALS 7/7 (O).
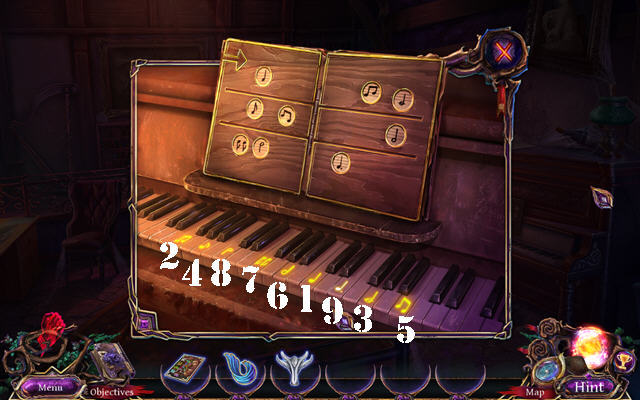
- Solution (1-7).
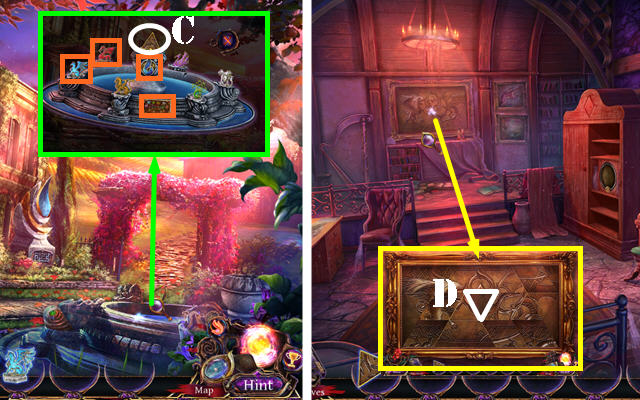
- Play HOP (P); receive FLOWER ORNAMENT.
- Place FLOWER ORNAMENT and select; take CROSSBOW (Q).
- Go to Swampy Bridge.
- Place FEATHER (R), FLOWER (S), and BAT SKULL (T).
- Use Magic Bracelet and play puzzle (U).
- Solution (V).
- Take Relic (W).
- Go (X).
- Remove arrowhead from ARROW SHAFT; place SUNSTONE; receive SUNSTONE ARROW.
- SUNSTONE ARROW on CROSSBOW.
- Use Magic Bracelet and CROSSBOW (Y).
- Go (Z).
- Take log and place it (A).
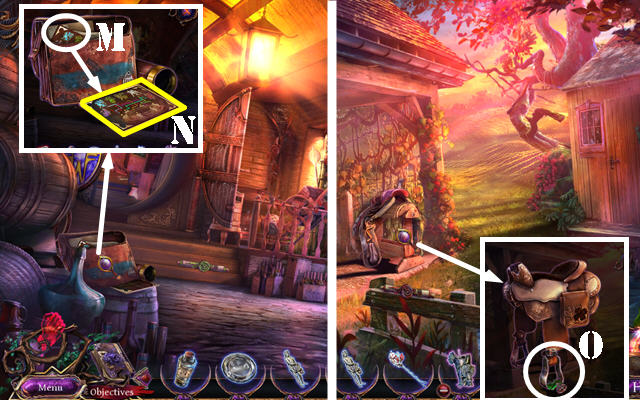
- Take SUNSTONE ARROW, AMETHYST JAR, ORNAMENT BASE, DRAGON INSIGNIA, and SNAIL SHELL (B).
- Walk down twice.
- Use DRAGON INSIGNIA; take SILVER STARS 1/2 (C).
- Go to Druid's House.
- Use SNAIL SHELL (D); receive CORK.
- Walk down.
- CORK on AMETHYST JAR.
- Use AMETHYST JAR (E); receive GLOWING SPHERE.
- Go to Druid Shrine.
- Use GLOWING SPHERE (F). Play HOP; receive SILVER STARS 2/2.
- Go to Druid's House.
- Place SILVER STARS 2/2 and select; take MOON STONE (G).
- Go to Relic Spheres.
- Place MOON STONE (H).
- Play puzzle (I).
- Solution (Mx2-Jx2-L).
- Take GOLD INLAY (N).
- Walk down.
- Use GOLD INLAY (O); take GOLD PART.
- Go (P).
- Place GOLD PART (Q) and piece (R).
- Take SUNSTONE from SUNSTONE ARROW.
- SUNSTONE on ORNAMENT BASE; receive SUNSTONE ORNAMENT.
- Use Magic Bracelet and HAMMER (S).
- Place SUNSTONE ORNAMENT; select and take Relic (T).
- Go forward.
Chapter 3: Mansion
- Select vines twice; take VALVE HANDLE (U).
- Place VALVE HANDLE (V).
- Solution (W).
- Go (X).
- Play HOP (A); receive HOOF KNIFE.
- Receive MANSION KEY.
- Take LABELS 1/3, SADDLE DECORATION, and RED JEWEL (B).
- Walk down.
- Use MANSION KEY (C) and select; enter Mansion (D).
- Talk (E); take GRAPE EMBLEM (F).
- Use HOOF KNIFE; take ROUND EMBLEM 1/2 (G).
- Walk down.
- Use GRAPE EMBLEM (H).
- Take CANE (I).
- RED JEWEL on CANE. Select head twice; take SECRET KEY. Select handle; take FORMULA.
- Use HOOF KNIFE and select; take SADDLE DECORATION (J). Take WINE BOTTLES 1/3 (K).
- Go to Stable.
- Use SECRET KEY (L).
- Solution (M).
- Take ORNATE BRIDLE.
- Go to Mansion.
- Place two SADDLE DECORATIONS and ORNATE BRIDLE (orange). Take FAMILY CREST (N).
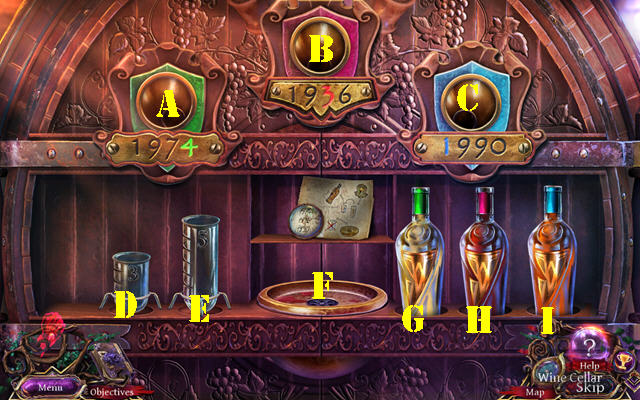
- Go to Wine Cellar.
- Place FAMILY CREST (O).
- Play HOP (P); receive COMPASS PART.
- Take RAKE and LABELS 2/3 (Q).
- Walk down.
- Use RAKE (R); receive LATCH HOOK.
- Go to Mansion.
- Place COMPASS PART (S).
- Select 1-2-3.
- Take WINE BOTTLES 2/3 and EMBELLISHMENT (T).
- Place EMBELLISHMENT (U).
- Solution (V).
- Take WINE BOTTLES 3/3 and CAMERA CASE.
- Go to Stable.
- Use LATCH HOOK; take SCREWDRIVER (W).
- Use RAKE (X). Select boot twice; take STATUE FRAGMENTS 1/3 and ROUND EMBLEM 2/2 (Y).
- Open CAMERA CASE; take REFLECTOR, FLASH POWDER, and CAMERA.
- Select CAMERA and use SCREWDRIVER; receive LENS.
- LENS on FORMULA; receive RECIPE.
- Go to Wine Cellar.
- Place ROUND EMBLEM 2/2; take STONE FRAGMENTS 2/3 and LABELS 3/3 (Z).
- Place LABELS 3/3, WINE BOTTLES 3/3, and RECIPE (Z1).
- Solution (I-E)-(E-D)-(D-F)-(E-D)-(I-E)-(E-D)-(D-F)-(E-D)-(E-C)-(D-F).
- (H-D)-(D-B).
- (G-E)-(E-D)-(D-F)-(E-D)-(G-E)-(E-D)-(E-A).
- Go forward.
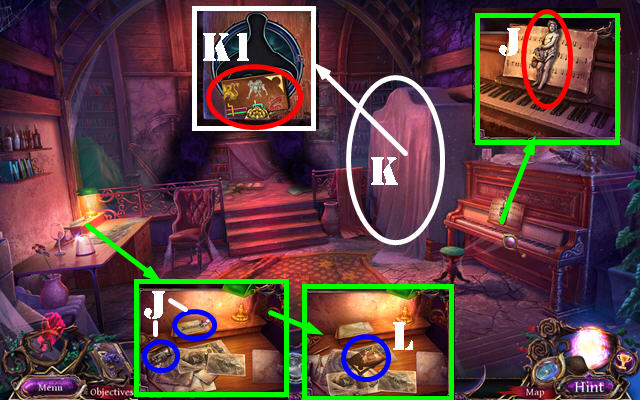
- Take BACCHUS STATUETTE, CERES STATUETTE, and BOBBY PIN (J).
- Remove cloth (K); take TILES 1/2 (K1).
- Look at two pictures; take TILES 2/2 (L).
- Walk down.
- Place tile (M). Place TILES 2/2; take FOUNTAIN PLAQUE (N).
- Go to Stable.
- Use BOBBY PIN; take GREEN INLAY (O).
- Go to Wine Cellar.
- Use GREEN INLAY; take STATUE FRAGMENTS 3/3 (P).
- STATUE FRAGMENTS 3/3 on CERES STATUETTE; select all three pieces.
- Place BACCHUS STATUETTE and CERES STATUETTE; take FLASH and WRENCH (Q).
- Go (R).
- REFLECTOR and FLASH POWDER on FLASH.
- Use FLASH (S); take CLOVER (T).
- Go to Mansion.
- Talk (U); take CRYSTAL TORCH (V).
- Place CRYSTAL TORCH (W); take WATER EMBLEM (X).
- Go to Stable.
- Place CLOVER and select; take MUSICAL CLUE (Y).
- Use WRENCH; take HOOD ORNAMENT (Y1).
- Go to Secret Room.
- Place MUSICAL CLUE (Z).
- Solution (1-9).
- Take DRAGON STATUE (A).
- Place HOOD ORNAMENT; take GRIFFIN STATUE (B).
- Walk down twice.
- Place FOUNTAIN PLAQUE, GRIFFIN STATUE, DRAGON STATUE, and WATER EMBLEM (orange); take TRIANGLE (C).
- Go to Secret Room.
- Place TRIANGLE (D).
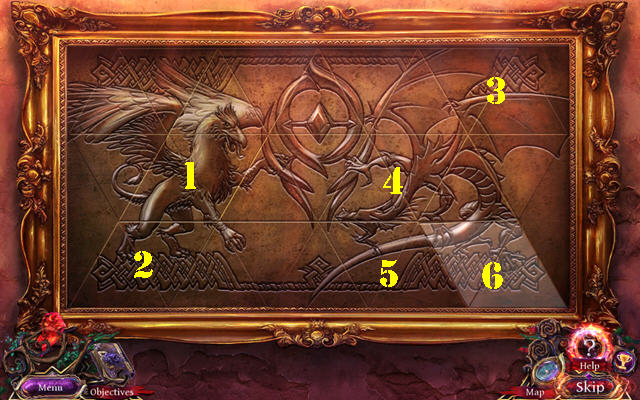
- Solution (1-6).
- Use Magic Bracelet and play puzzle (E).
- Solution (F).
- Take Relic (G).
- Walk down twice.
Chapter 4: Beacon
- Select stone twice; take BLUE PRISM (H).
- Take BENT METAL (I).
- Go (J).
- Take POLE, LANTERN EMBLEM, and BROKEN PRISM (K).
- Walk down; go (L).
- Play HOP (M); receive RED PRISM.
- Take ROPE and TORCH SEAL (N).
- BENT METAL and ROPE on POLE; receive HOOKED POLE.
- Use HOOKED POLE (O); receive LANTERN.
- Go to Beacon.
- LANTERN EMBLEM on LANTERN; take GLASS PANES and CANDLE.
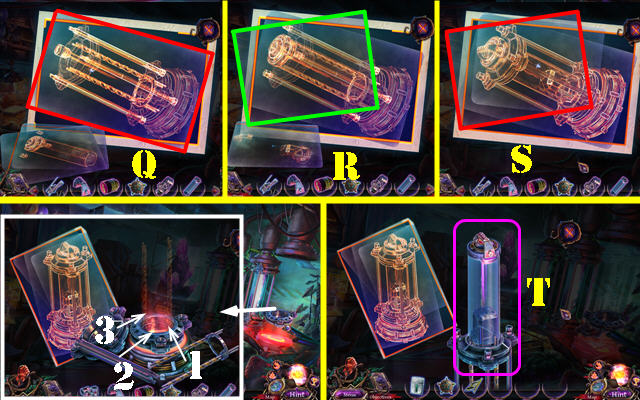
- GLASS PANES, RED PRISM, and BLUE PRISM on BROKEN PRISM; receive FIXED PRISM.
- Place FIXED PRISM (P).
- Solution (Q).
- Use CANDLE (R); receive LIT CANDLE.
- Go to Tree of Ancestors.
- Select tree and then select any of the nuts (orange); receive MAGIC NUTS.
- Take RUNIC TRAPEZOID 1/2 and DISCS 1/3 (S).
- Walk down.
- Take CRUCIBLE and METAL HOOK (T).
- Place MAGIC NUTS (U); use hammer on it (V); take CRUSHED NUTS (U).
- Go (W).
- Place CRUSHED NUTS (X); take HEXAGONAL FRAME and GRIFFIN SWORD (X1).
- Take DISCS 2/3 (Y).
- Go to Tree of Ancestors.
- Use METAL HOOK (Z); receive DISCS 3/3.
- Walk down.
- Place DISCS 3/3 (Z1).
- Solution one (1-12).
- Solution two; select meteor 6x; place gem (A).
- Solution three (B).
- Receive DRAGON SHIELD.
- Go to Tree of Ancestors.

- Place DRAGON SHIELD and GRIFFIN SWORD (C).
- Solution (D).
- Go (E).
- Select both pillars (F).
- Take DIADEM and JEWELED LAURELS 1/2 (G).
- Walk down twice.
- Place DIADEM (H); take RUNIC TRAPEZOID 2/2 and SHOOTING STAR (I).
- Go to Tree of Ancestors.
- Place SHOOTING STAR; take BLACKSMITH FIGURINE and JEWELED LAURELS 2/2 (J).
- Walk down.
- Place BLACKSMITH FIGURINE; take SMALL PLIERS (K).
- Go (K1).
- Place JEWELED LAURELS 2/2; take GOLD NUGGETS (L).
- Go to Luxan's Grave.
- RUNIC TRAPEZOID 2/2 and SMALL PLIERS on HEXAGONAL FRAME; receive LUXAN'S ORNAMENT.
- Place LUXAN'S ORNAMENT (M).
- Play HOP (N); receive KEY MOLD.
- Walk down twice.
- Place KEY MOLD (O).
- GOLD NUGGETS in CRUCIBLE.
- CRUCIBLE on key mold. Use bucket (P); take RELIC KEY (O).
- Use LIT CANDLE (Q); take FILE (R).
- Use FILE; take CLAWED GAUNTLET (S).
- Walk down.
- Use CLAWED GAUNTLET and RELIC KEY; take DRAGON SEAL (T).
- Go to Beacon.
- Use CLAWED GAUNTLET; take ANCIENT COIN (U).
- Walk down.
- Place ANCIENT COIN; take GEMS (V).
- Go to Tree of Ancestors.
- Place GEMS; arrange as shown (color-coded). Take GRIFFIN SEAL (W).
- Go to Beacon.
- Place GRIFFIN SEAL, DRAGON SEAL, and TORCH SEAL (X).
- Use Magic Bracelet (Y); play puzzle.
- Solution (Z).
- Take Relic (A).
- Go (B).
- Take PUZZLE CUBE and METAL POLE (C).
- Use METAL POLE; go (D).
- Take FLASHLIGHT and BLANK BADGE (E).
- Move boards; take RUBBER GLOVES (F).
- Use RUBBER GLOVES (G); receive ELECTRICAL TAPE.
- Go (H).
- Take HANGING DECORATION and LIGHTBULB (I).
- LIGHTBULB in FLASHLIGHT.
- Use METAL POLE, FLASHLIGHT, RUBBER GLOVES, and ELECTRICAL TAPE (J); take FOLDED PAPER (K).
- Select FOLDED PAPER; receive PASSCODE and PAPERCLIP.
- Use PAPERCLIP; take BADGE PRINTER and OAKWOOD BLOCK (L). Look at note (M).
- Use PASSCODE; enter 03842 (N).
- Place BADGE PRINTER (O), select cable, and use BLANK BADGE; select monitor (P). Take ACCESS BADGE.
- Walk down.
- Use ACCESS BADGE (Q).
- Go (R).
Chapter 5: Reliquary
- Take CHERRYWOOD BLOCK, BEECHWOOD BLOCK, and CHISEL (S).
- Walk down twice.
- Use CHISEL (T); receive NAILS 3/3.
- Take GUN BARREL (U).
- OAKWOOD BLOCK, CHERRYWOOD BLOCK, BEECHWOOD BLOCK, and NAILS 3/3 on PUZZLE CUBE; select cube and take DRAGON ORNAMENT.
- Go to Reliquary.
- Place DRAGON ORNAMENT (V). Play HOP; receive LUXAN'S CROWN.
- Go to Generator.
- Place LUXAN'S CROWN (W).
- Solution (1-7). Solved image (8).
- Go (X).
- Use CHISEL; take BONE (A).
- Go to Reliquary.
- Use HANGING DECORATION; give BONE (B).
- Take HEAVY STONE, VALVE HANDLE, and GEMSTONES 1/2 (C).
- Go to Generator.

- Use HEAVY STONE; take ACID and PLASTER POWDER (D).
- Walk down.
- Place VALVE HANDLE and use PLASTER POWDER (E); receive QUICK-SET PLASTER.
- Go to Reliquary.
- Use ACID (F); take BATTLE HORN (G).
- Go to Meteor Crater.

- Use BATTLE HORN (H).
- Move rock; take GEMSTONES 2/2 (I).
- Take BROKEN STATUE (J).
- QUICK-SET PLASTER on BROKEN STATUE; arrange as shown (1-5). Place GEMSTONES 2/2 in eye sockets. Receive FIERCE STATUE.
- Place FIERCE STATUE (K); take SHARP-TOOTHED SKULL (L).
- Go to Reliquary.
- Use SHARP-TOOTHED SKULL; take LASER GUN (M).
- Walk down for a puzzle.
- Solution (N-Q).
- GUN BARREL on LASER GUN; take DEAD BATTERY.
- Use CHISEL and place DEAD BATTERY (R); receive CHARGED BATTERY.
- CHARGED BATTERY on LASER GUN.
- Go to Meteor Crater.
- Use LASER GUN (S).
- Play puzzle (T).
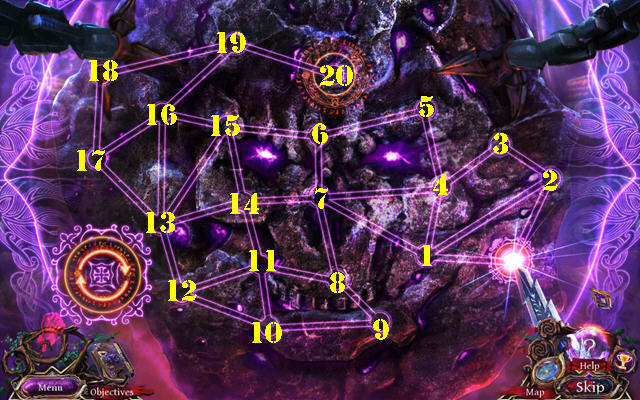
- Solution (1-20).
- Congratulations, you've completed The Secret Order: Shadow Breach!
Created at: 2018-06-24