

WALKTHROUGH MENU
- 1ST REALM
- 2ND REALM
- 3RD REALM
- 4TH REALM
- 5TH REALM
- 6TH REALM
- 7TH REALM
- 8TH REALM
- 9TH REALM
- 10TH REALM
- 11TH REALM
- 12TH REALM
- 13TH REALM
- 14TH REALM
- 15TH REALM
- 16TH REALM
- 17TH REALM
- 18TH REALM
- 19TH REALM
- 20TH REALM
GENERAL TIPS
- The game consists of 20 Realms (Chapters) and each Realm is divided into 3 Scenes.
- You can choose to play the game in Timed or Untimed Mode. Make your selection at the beginning of the game.
- When you click randomly on the scene your cursor will disappear for a few seconds. You will not be able to click on anything until the cursor returns.
- To use a Hint, click on the Genie Lamp in the lower right once it has been charged. A circle will form around the perimeter of a random object and a sparkle will appear over the item you need to pick up.
- Hints can only help you find fragmented items; they will not show you where to place inventory items.
- There are several mini-games in between each Realm, each game is different. You can skip a mini-game by clicking on the Skip Button in the lower right once the lamp is completely full.
- Click on the Map in the lower right when you want to switch between locations.
- When your cursor changes into an Eye Icon it means that area can be interacted with. Click on that area to obtain a clue of what to do next or to pick up an item.
INVENTORY ITEMS
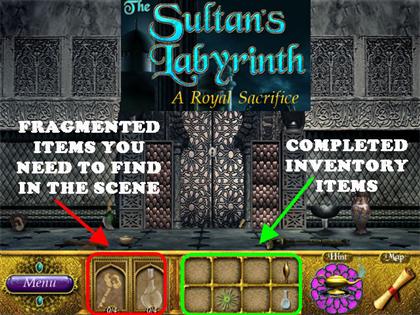
- Some items in the scene are broken up into several pieces. You can view the broken pieces in the lower left corner of the scene.
- Each time you find a fragmented piece it will become lighter in your inventory tray.
- Once the fragmented pieces have been assembled they will move to the tray in the middle.
- Inventory items will not always be used in the same spot they were found, use the Map to travel to other locations to find the right spots for them.
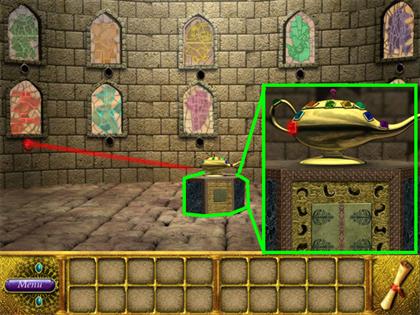
LAMP HALL
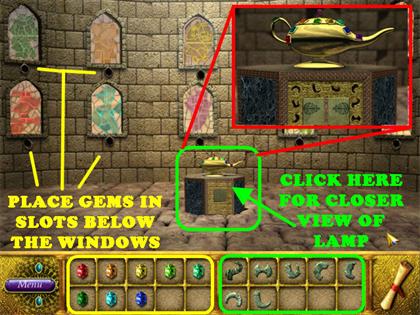
- The Lamp Hall is the area in which you can place the Jewels and the Pedestal Pieces.
- The Jewels and Pedestal Pieces will be given to you at the end of each Realm.
- Grab the Jewels from inventory and place them in the slots below the windows. Some of the colors are very similar so you have to test them after you place them.
- To test the Jewels, click on the Genie Lamp in the middle of the scene for a closer view. If the Jewels are in the right place, they will glow on the close-up view of the lamp.
- If the Jewels are in the wrong place, click on the “Return” button in the lower left to return to the previous view.
- In the close-up view of the Lamp you can also place the Pedestal Pieces into the right slots.
- You can place the Jewels and Pedestal Pieces as you receive them or you can wait to place them at the end of the game.
1ST REALM
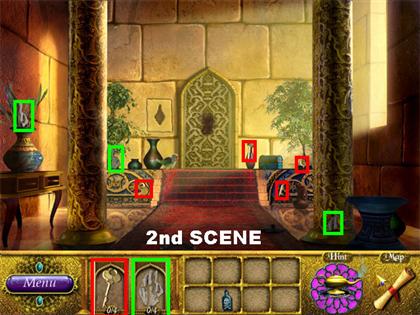
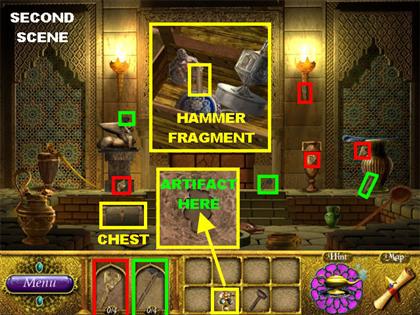
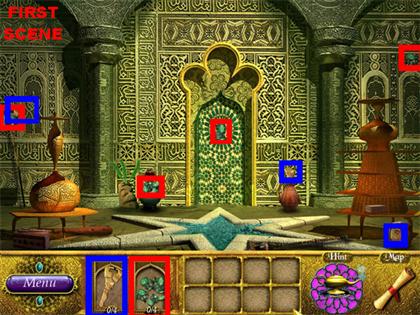
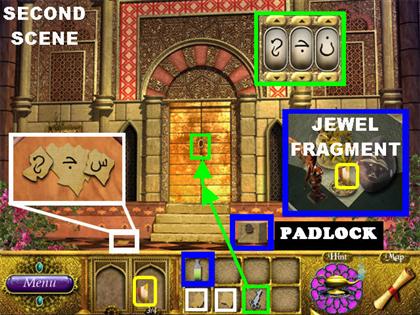
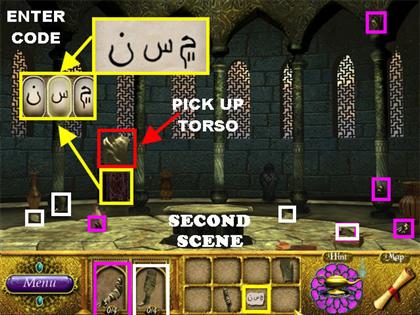
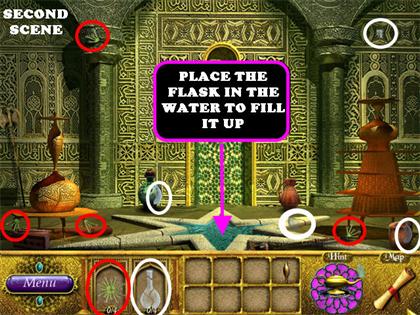
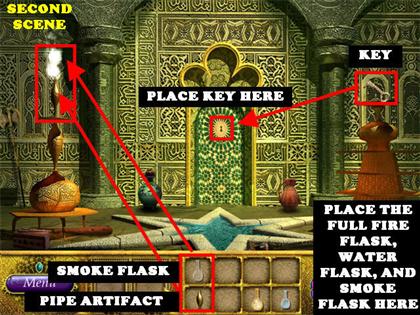
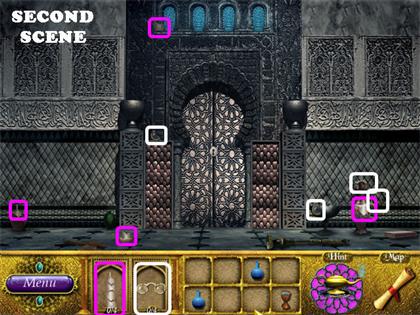
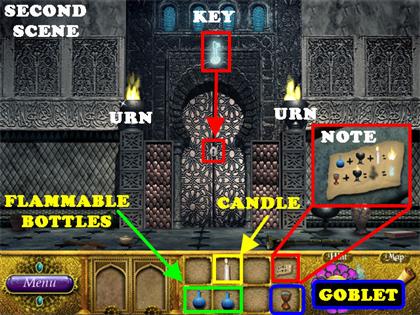
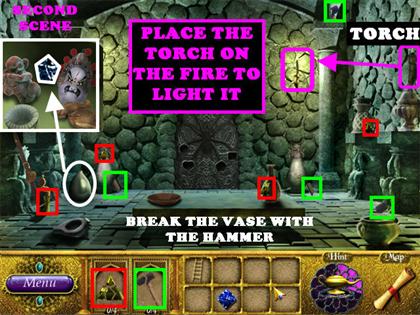
SECOND SCENE
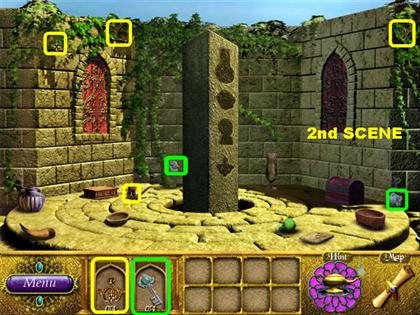
- The game will take you straight to Second Scene and will walk you through a brief tutorial in the game.
- Pick up the fragmented items as shown in the screenshot. The items have been color coded for easy viewing. You will not be able to collect all the pieces of the key right away.
- Once all the items have been picked up, click on the Map in the lower right to view all available scenes.
- Click on the First Scene on the Map.
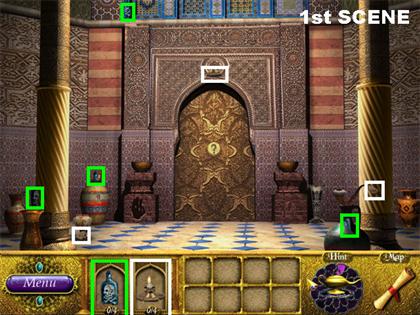
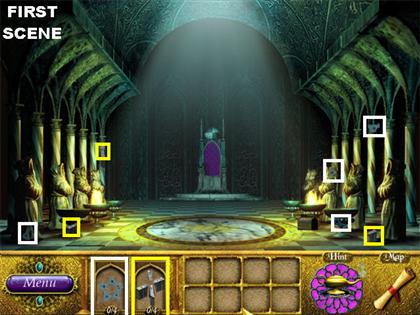
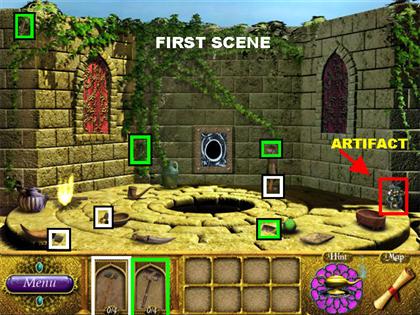
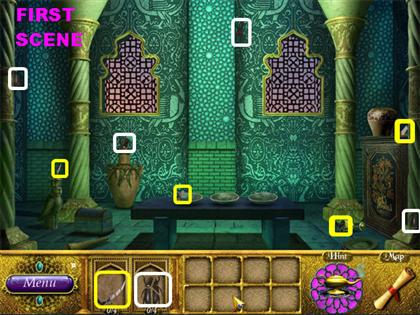
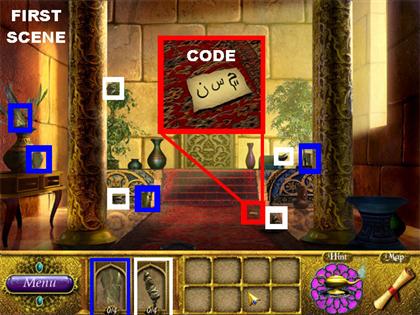
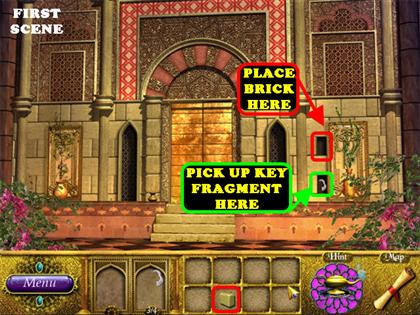
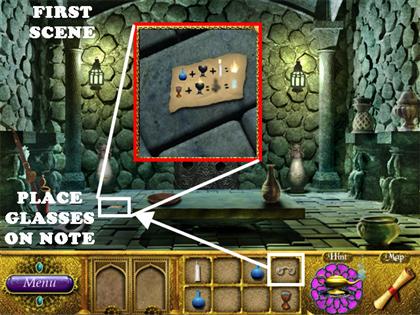
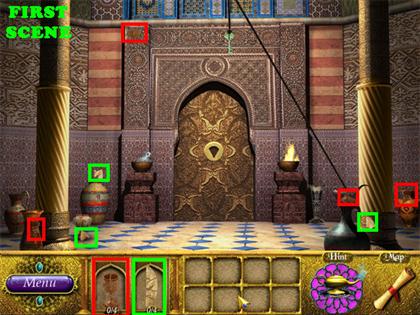
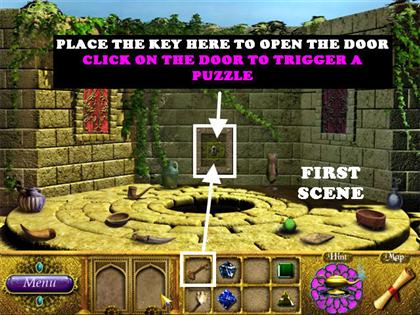
FIRST SCENE
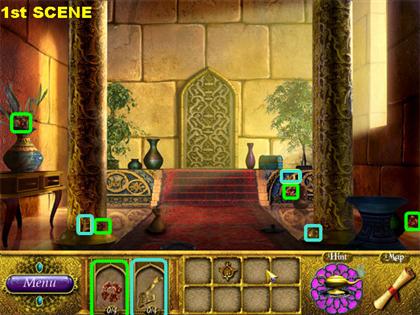
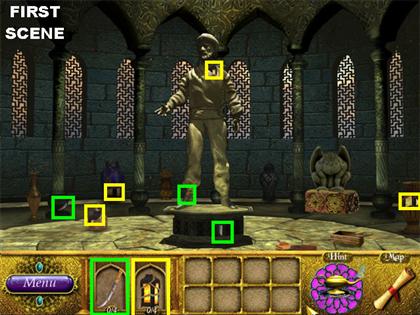
- Pick up the pieces according to the markings on the screenshot.
- Go to the Third Scene.
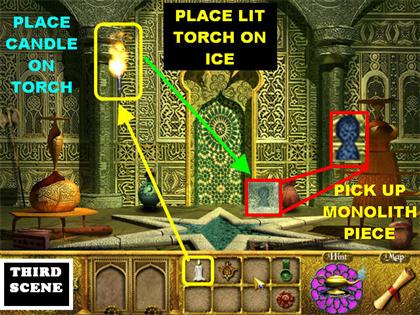
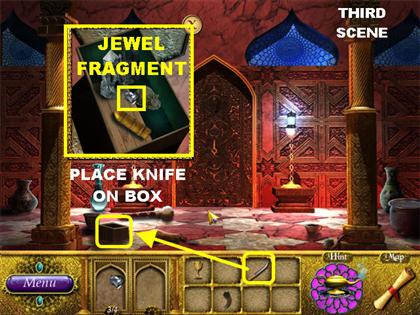
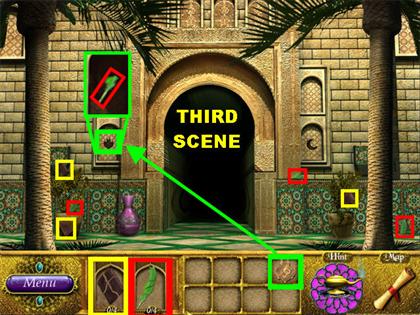
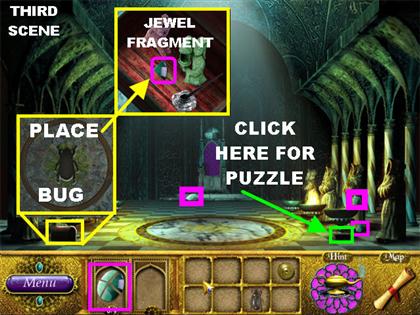
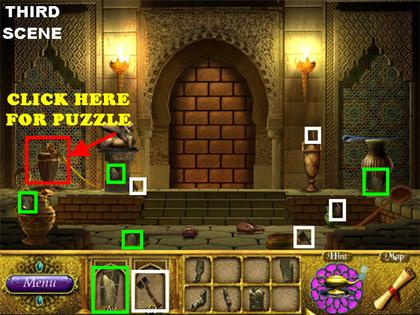
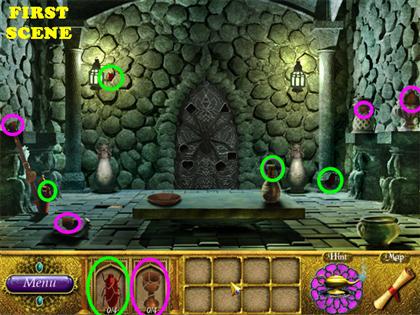
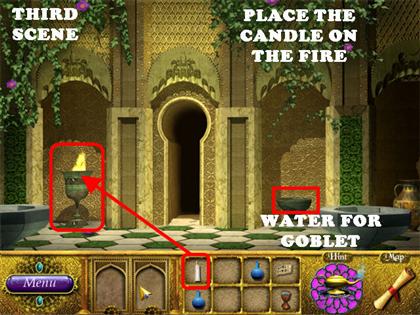
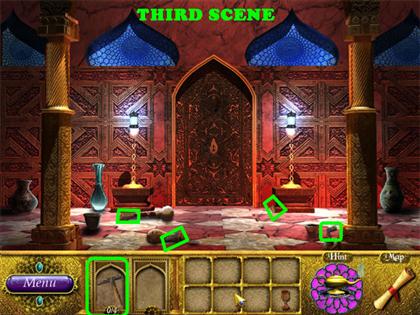
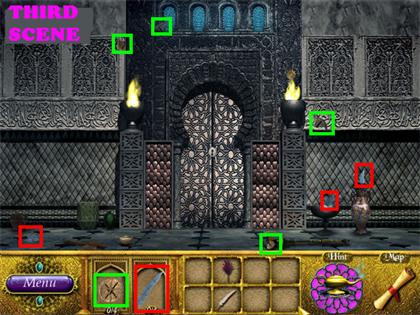
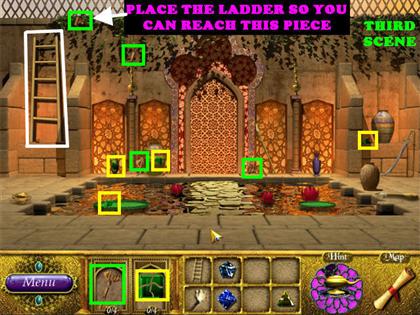
THIRD SCENE
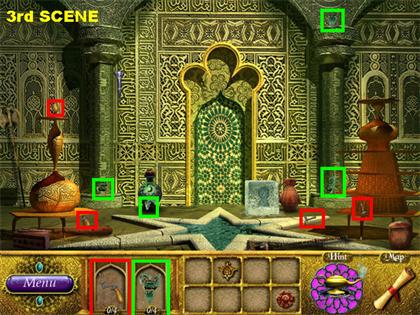
- Pick up the pieces according to the markings on the screenshot.
- Go back to the Second Scene.
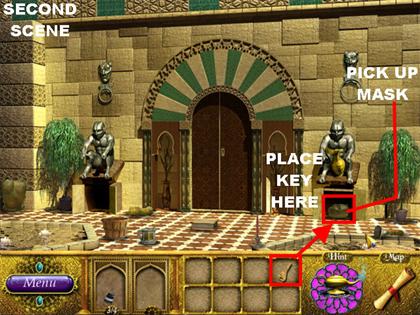
SECOND SCENE
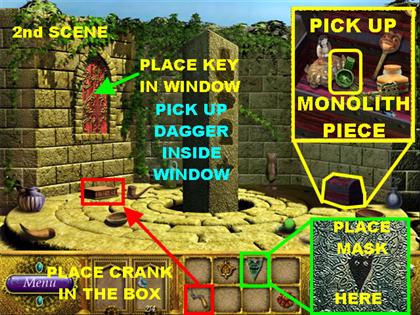
- Click on the chest in the lower right for a closer view.
- Place the Mask from inventory into the slot to open the chest.
- Pick up the Monolith piece that appears inside the chest.
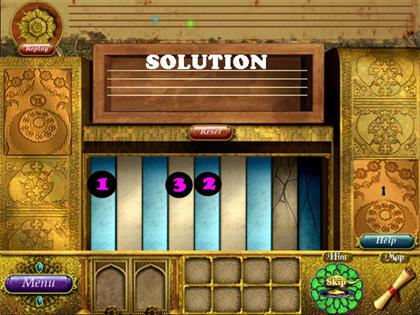
- Place the Crank on the box in the lower left to trigger a mini-game.
- Follow the musical sequence.
- Once the sequence has been completed, the Key Fragment will be added to your inventory. The key is now complete.
- Place the Key on the left window to open it.
- Pick up the Dagger inside the window.
- Go back to the First Scene.
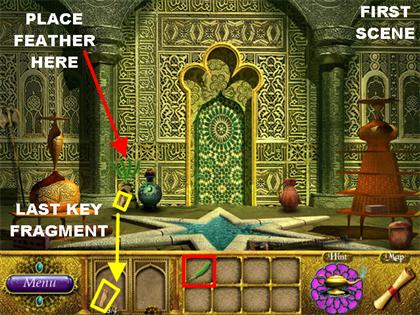
FIRST SCENE
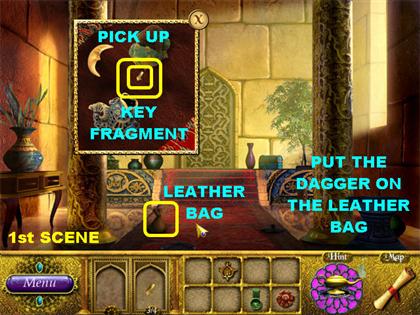
- Place the Dagger on the leather bag on the lower left side of the red carpet.
- Click on the cut bag for a closer view.
- Pick up the Key Fragment inside the bag.
- This Scene is complete, go back to the Second Scene.
SECOND AND THIRD SCENE
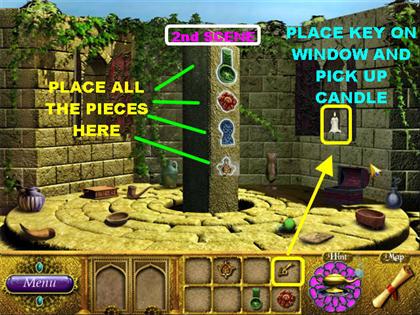
- Second Scene – Place the Key on the RIGHT Window to open it.
- Pick up the Lit Candle inside the window.
- Go back to the Third Scene.
- Third Scene – Place the Lit Candle on the Unlit Torch in the upper left to light it.
- Place the Lit Torch on the block of ice in the lower right to melt it.
- Pick up the last monolith piece that appears after the ice has melted.
- This scene has been completed. Go back to the Second Scene.
- Second Scene – Place all 4 Monolith Pieces on the Monolith in the center of the scene to end this Realm.
- You’ve collected your first Lamp Hall Gem. You will be taken to the Lamp Hall.
LAMP HALL
- Follow the game’s tutorial on placing the gems.
- Grab the Jewel from inventory and place it in the slot below the red window.
- To test the Jewels, click on the Genie Lamp in the middle of the scene for a closer view. If the Red Jewel is in the right place, it will glow on the close-up view of the lamp.
- If the Jewel is in the wrong place, click on the “Return” button in the lower left to return to the previous view.
- You can also place the Pedestal pieces in the close-up view of the Genie Lamp.
2ND REALM
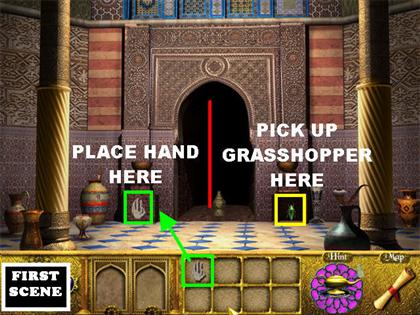
FIRST SCENE
- Look for the fragmented items marked in the screenshot.
- You will find all the pieces for the Acid Bottle but the last piece of the Candle will not be available until later.
- Go to the Second Scene.
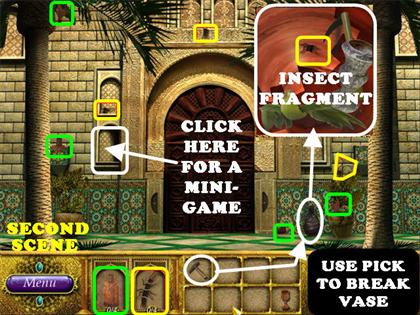
SECOND SCENE
- Look for all the fragmented pieces as indicated in the screenshot.
- You will find all the pieces of the Key. The last piece of the Hand will be found later.
- Go to the Third Scene.
THIRD SCENE
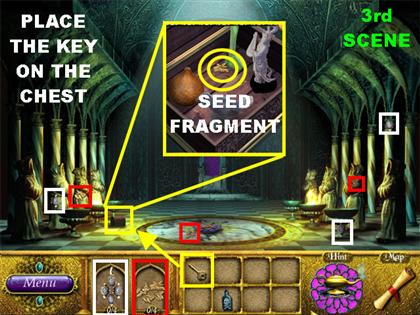
- Please pick up the pieces as shown in the screenshot.
- Use the Key to unlock the chest in the lower left.
- Pick up the last Seed Fragment inside the chest.
- Go back to the Second Scene.
SECOND SCENE

- Give the parrot above the steps the Seeds from your inventory.
- The parrot will show you some symbols. The symbols go into your inventory.
- Place the Acid Bottle on the door and you will find there is a grasshopper carved on it.
- Go back to the First Scene.
FIRST SCENE
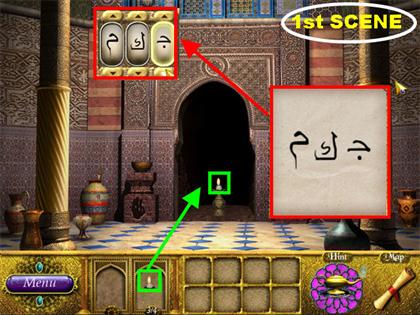
- Click on the door and symbols will appear.
- Click on the note in your inventory and you will see symbols appear on the lower right.
- Use the arrows in the upper left to change the symbols until they resemble the ones on the paper on the right.
- The door will open after the code has been entered correctly.
- Pick up the Candle Fragment inside the door.
- Go back to the Third Scene.
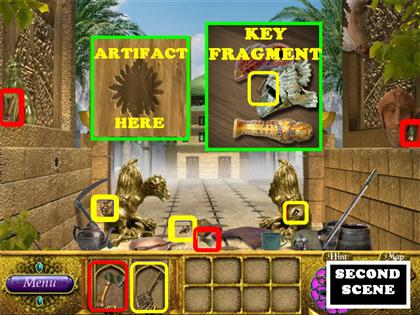
THIRD SCENE
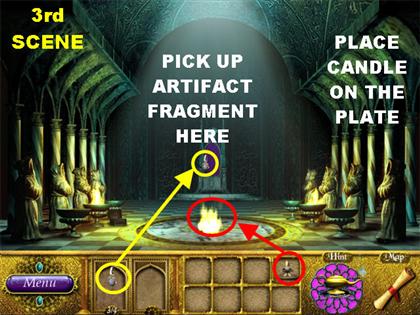
- Place the Candle on the plate in the center of the floor to light it.
- Pick up the last Artifact Fragment on the back wall.
- This scene is complete. Go back to the Second Scene.
SECOND AND FIRST SCENES
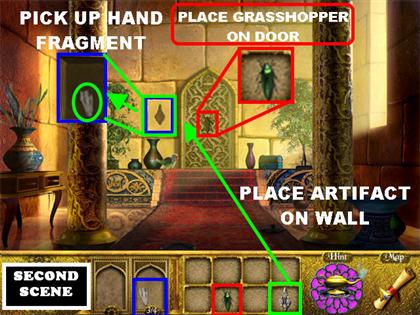
- Second Scene – Place the Artifact on the spot carved on the left side of the back wall.
- Pick up the Hand Fragment in the niche in the wall.
- Go back to the First Scene.
- First Scene - Place the Hand in the spot on the left side of the back wall.
- Pick up the Grasshopper that appears on the right side of the back wall.
- This scene has been completed. Go back to the Second Scene.
- Second Scene – Place the Grasshopper on the door.
- You will receive a Pedestal Artifact. You can place it in the Lamp Hall now or later.
3rd REALM
FIRST SCENE
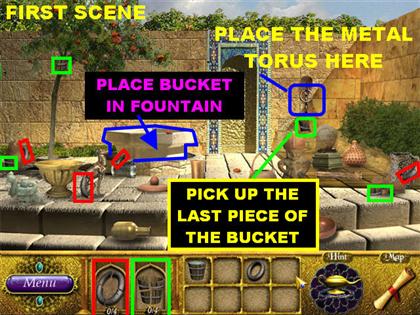
- Please look at the screenshot for the locations of all the fragmented pieces.
- The Metal Torus will go into your inventory.
- Place the Metal Torus in the hole on the right side of the back wall.
- Pick up the last piece of the Water Bucket that appears below the Torus.
- Place the Water Bucket in the fountain on the left to fill it with water.
- Go to the Third Scene.
THIRD SCENE
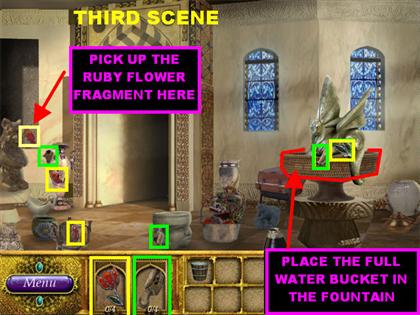
- Please look at the screenshot for the locations of all the fragmented pieces.
- Place the FULL Water Bucket in the Dry Fountain on the right. A secret niche opens up on the left edge of the scene.
- Pick up the last Ruby Flower Fragment that appears in the niche.
- Go to the Second Scene.
SECOND SCENE
- Please look at the screenshot for the locations of all the items. You will not be able to find 2 of the pieces.
- Place the Ruby Flower on the carving in the upper right side of the wall.
- Pick up the last Key Fragment that appears below the flower.
- Go to the First Scene.
FIRST SCENE
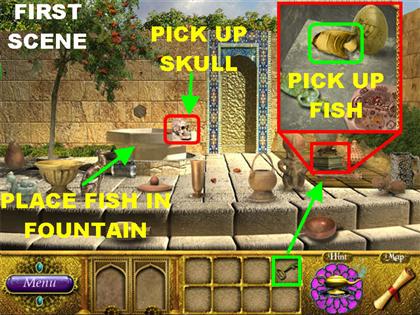
- Place the Key in the locked box in the lower right for a closer view.
- Pick up the Fish inside the box.
- Place the Fish in the fountain on the left.
- Pick up the Skull that appears on the side of the fountain.
- Go back to the Second Scene.
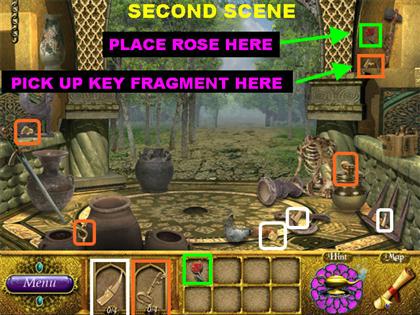
SECOND SCENE
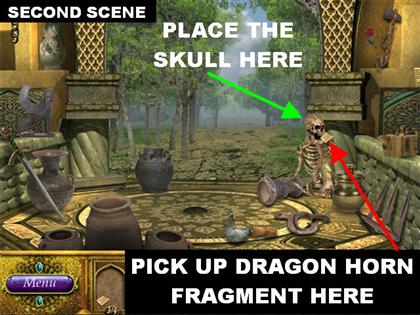
- Place the Skull on the skeleton on the far right.
- Pick up the last Dragon Horn Fragment from the skeleton’s jaw.
- Go back to the Third Scene.
THIRD SCENE
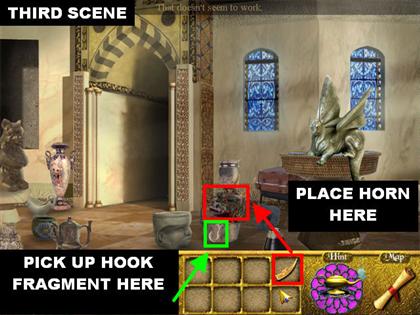
- Place the Horn on the mask in the lower center.
- Pick up the last Hook Fragment that appears below the mask.
- The Third Scene is now complete.
- Go back to the Second Scene.
FIRST AND SECOND SCENES
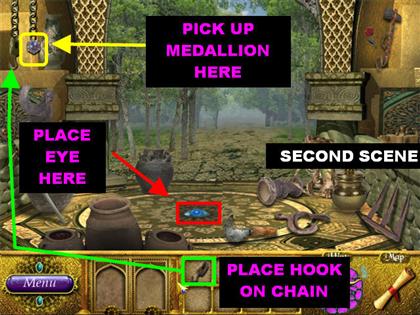
- Second Scene – Place the Hook on the chain in the upper left.
- Pick up the Medallion that appears on the chain on the upper left.
- Go back to the First Scene.
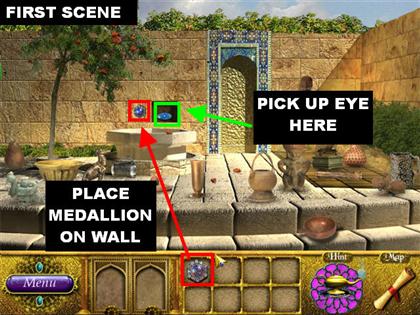
- First Scene – Place the Medallion on the left side of the back wall.
- Pick up the Blue Eye that appears inside the niche in the wall.
- This Scene is Complete. Go back to the Second Scene.
- Second Scene – Place the Eye on the hole in the ground to end this Realm.
- You receive a Gem once the level is completed, you can place it in the Hall later if you wish.
4th REALM
FIRST SCENE
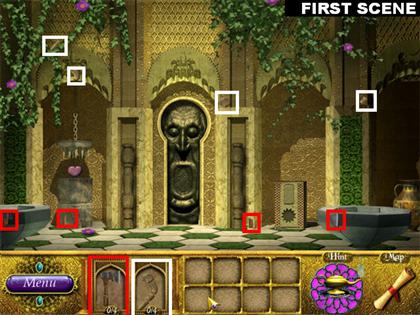
- Please look at the screenshot for the locations of all the Axe and Old Crank pieces.
- Go to the Second Scene.
SECOND SCENE
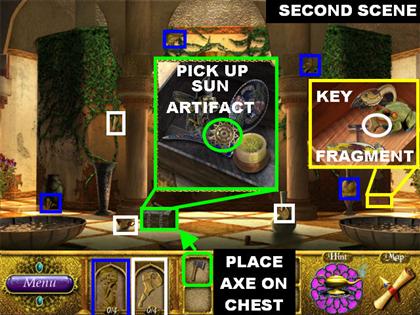
- Pick up the items according to the markings on the screenshot.
- Place the Axe on the box with chains in the lower left.
- Pick up the Sun Artifact inside the chest.
- Place the Old Crank on the box on the far right.
- Pick up the last Key Fragment inside the box. You can use the Key now or later, for the purposes of this guide, we will use it later.
- Go to the Third Scene.
THIRD SCENE
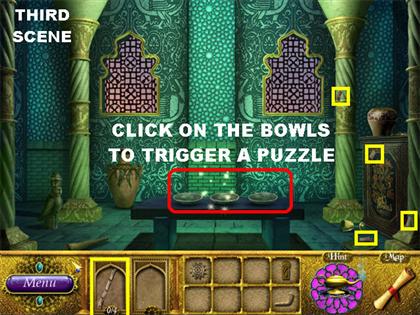
- Pick up the 4 Wooden Stick Fragments according to the screenshot.
- Click on the plates in the center to trigger a puzzle.
FRUIT PLATE PUZZLE
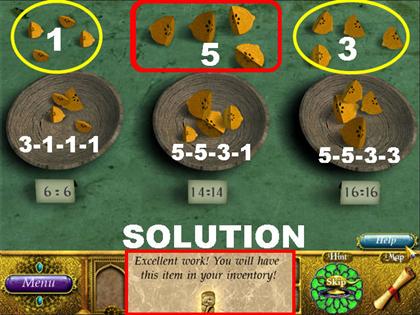
- Your goal in this puzzle is to place the fruit pieces in the right bowls according to their weight.
- Each time you place a piece of fruit on the bowl, the amount in the bowl will increase according to the weight of the fruit.
- From left to right, the pieces of fruit weigh the following:LEFT FRUIT = 1 MIDDLE FRUIT = 5 RIGHT FRUIT = 3
- There is more than one solution for this puzzle, we will show you one of them. Place the fruits in this order:LEFT BOWL: 3, 1, 1, 1 = 6 MIDDLE BOWL: 5, 5, 3, 1 = 14 RIGHT BOWL: 5, 5, 3, 3 = 16
- Once the puzzle has been completed, you will receive an Idol in your inventory.
- This room is complete. Go back to the First Scene.
FIRST SCENE
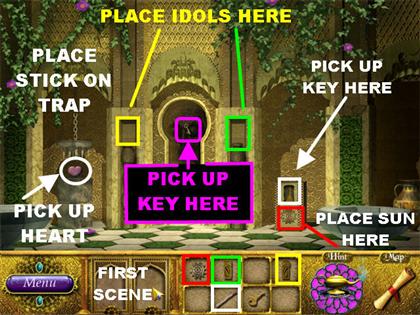
- Place an Idol on the left pedestal.
- Place an Idol on the right pedestal.
- Pick up the Key that appears inside the door.
- Place the Sun Artifact on the spot for the missing artifact on the lower right.
- Pick up the Key that appears above the artifact.
- Place the Wooden Stick on the trap located on the left side of the wall.
- Pick up the Heart below the trap.
- This scene is complete. Go back to the Second Scene.
SECOND SCENE
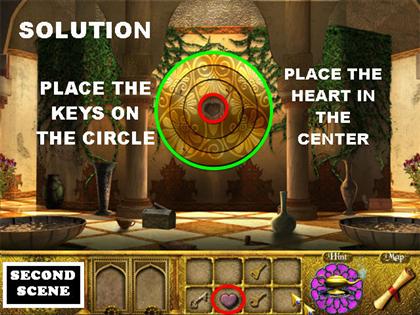
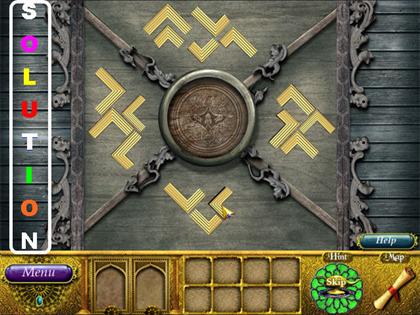
- Place the 3 Keys from inventory at the bottom of the large circle in the center of the scene.
- Your goal is to arrange the circles in the right positions. Please look at the screenshot for the solution.
- Once the puzzle has been solved the center will open up.
- Place the Heart in the center of the puzzle to receive a Pedestal Artifact.
5TH REALM
FIRST SCENE
- Pick up the pieces according to the markings on the screenshot. You cannot pick up the last piece of the “X “Artifact at this time.
- Go to the Second Scene.
SECOND SCENE
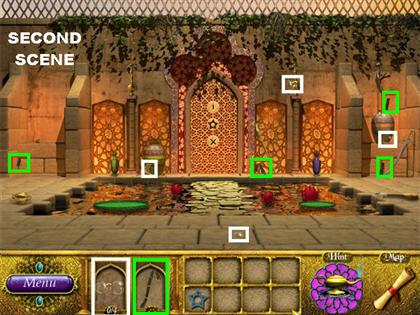
- Pick up the fragments according to the markings in the screenshot. The Glasses and the Crowbar will go into inventory.
- Go to the Third Scene.
THIRD SCENE
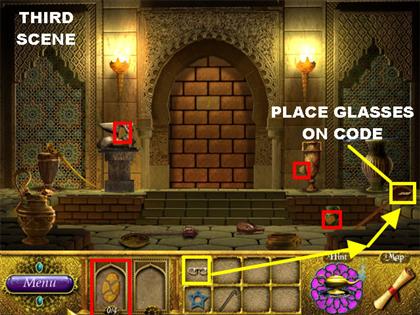
- Pick up the fragmented pieces according to the markings on the screenshot.
- Place the Glasses on the Combination Code in the lower right. The Combination Code goes into your inventory.
- Go back to the First Scene.
FIRST SCENE

- Click on the Combination Code in your inventory to open it.
- Click on the Chest in the lower right for a view of the lock.
- Change the symbols on the chest until it looks like the image on the Code.
- Pick up the Flute inside the Chest.
- Place the Crowbar on the loose tile in the lower left.
- Click on the hole in the floor for a closer view.
- Pick up the last “X “Artifact Fragment in the floor.
- This Scene is now complete. Go back to the Second Scene.
SECOND AND THIRD SCENES
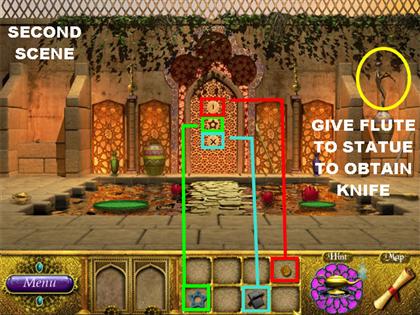
- Second Scene – Give the Flute to the statue in the upper right.
- The statue will place a Knife in your inventory.
- Go back to the Third Scene.
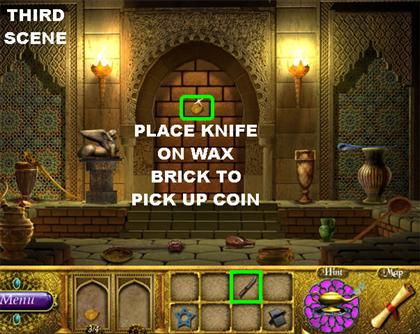
- Third Scene – Place the Knife on the Wax Brick on the back wall.
- Pick up the last Coin Fragment on the wall.
- This scene is now complete. Go back to the Second Scene.
- Second Scene - Place the Coin on the first slot on the door.
- Place the Star Artifact in the middle slot on the door.
- Place the “X “Artifact in the bottom slot on the door.
- This is the end of this Realm. You receive a Lamp Hall Gem which you place in the Hall now or later.
6TH REALM
FIRST SCENE
- Pick up the pieces as shown in the screenshot.
- The Lantern will go into your inventory. You cannot pick up the last piece of the Knife at this time.
- Go to the Second Scene.
SECOND SCENE
- Pick up the fragmented pieces shown in the screenshot. You can only pick up 2 fragments of the Key.
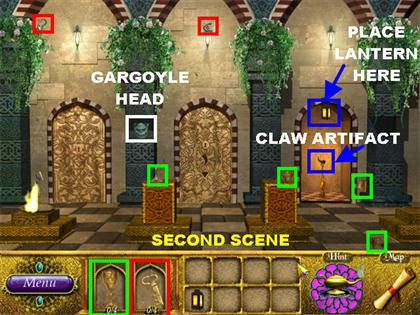
- Pick up the Gargoyle Head on the left side of the back wall.
- Place the Lantern on the third entryway to light it.
- Pick up the Claw Artifact inside the third entryway.
- Go to the Third Scene.
THIRD SCENE

- Pick up the items as shown in the screenshot.
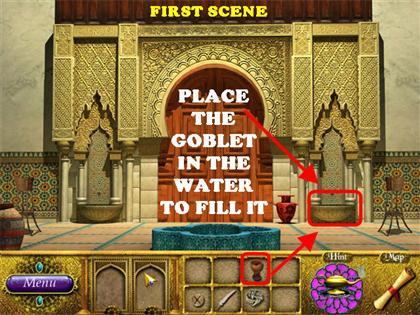
- Place the Handle on the pot in the lower right. The pot is full of water.
- Place the Goblet in the pot of water and it will go back into your inventory full of water.
- Go back to the First Scene.
FIRST SCENE
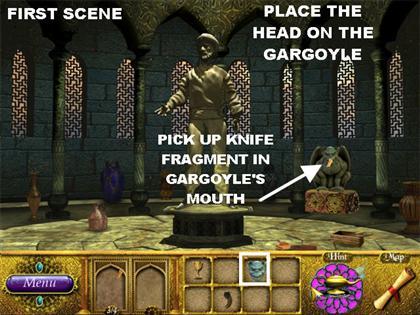
- Place the Gargoyle Head on the Headless Gargoyle on the far right.
- Pick up the Last Knife Fragment that appears inside the Gargoyle’s mouth.
- This Scene has been completed. Go back to the Third Scene.
THIRD SCENE
- Place the Knife on the box on the lower left to remove the loose board.
- Pick up the last Jewel Fragment inside the box.
- This scene has been completed. Go back to the Second Scene.
SECOND SCENE
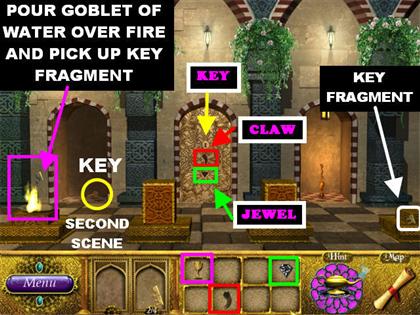
- Place the Goblet FULL of Water on the fire on the left.
- Pick up the Key Fragment that appears after the fire has been eradicated.
- Place the Claw Artifact in the middle slot of the door in the middle.
- Place the Jewel on the bottom slot of the door in the middle.
- Click on the symbols on the door and the Key Fragment will appear in the lower right. This part can be tricky sometimes; you may to exit the scene for the Key Fragment to appear.
- Pick up the Key Fragment in the lower right.
- Place the Key on the LEFT door.
- Pick up the Key that appears inside the LEFT door.
- Place the Key you just found in the top slot of the MIDDLE door to trigger a mini-game.
AIM THE CANNON MINI-GAME
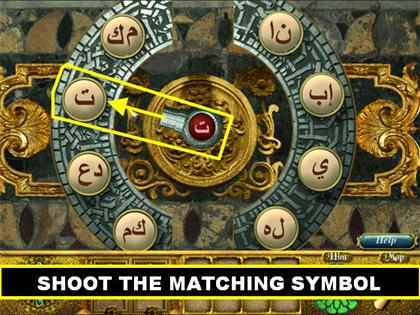
- Your goal is to shoot the white target with the symbol that matches the one on the cannon.
- Move your mouse around to aim the cannon.
- Left-click to shoot the cannon.
- Each time you hit a target successfully, the symbol will disappear.
- You have to complete 2 rounds of this mini-game to beat it.
- You will receive a Pedestal Artifact after you beat the mini-game. You can place it in the Hall now or later.
7TH REALM
FIRST SCENE
- Pick up the fragmented pieces as shown in the screenshot. The Hammer will go into your inventory but the last piece of the Axe is inaccessible at this time.
- Pick up the Artifact in the lower right.
- Go to the Second Scene.
SECOND SCENE
- Pick up all the fragmented pieces.
- Click on the locked chest in the lower left.
- Place the Artifact on top of the chest to open it.
- Pick up the last piece of the Hammer inside the chest.
- Go to the Third Scene.
THIRD SCENE
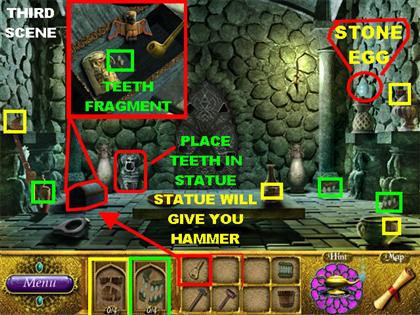
- Pick up all the pieces as shown in the screenshot.
- Place the Key in the chest in the lower left to open it.
- Pick up the last Teeth Fragment inside the chest.
- Place the Teeth in the statue’s mouth on the left side of the back wall.
- Click on the statue and a Hammer will be added to your inventory.
- Pick up the Stone Egg in the upper right.
- This Scene has been completed. Go back to the Second Scene.
FIRST AND SECOND SCENES
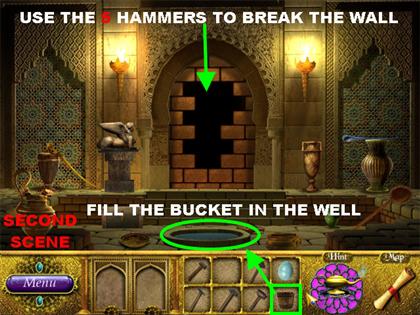
- Second Scene – Place the Wooden Bucket in the well in the lower center.
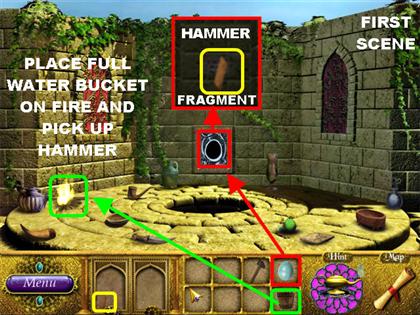
- Go back to the First Scene.
- First Scene - Place the Bucket FULL of Water on the fire.
- Pick up the Hammer that appears after the fire has dissipated.
- Place the Stone Egg into the egg-shaped carving on the wall.
- Pick up the last Hammer Fragment in the wall.
- This scene is complete. Go back to the Second Scene.
- Second Scene – Place all 5 Hammers on the brick wall to end this Realm.
- You obtain a Lamp Hall Gem; you can place it in the Hall now or later.
8TH REALM
FIRST SCENE
- Click on the items shown in the screenshot.
- The Emerald Artifact will go into your inventory. The last Key Fragment can be picked up later.
- Go to the Second Scene.
SECOND SCENE

- Pick up the items as shown in the screenshot.
- Place the Emerald Artifact below the Left Gargoyle.
- Pick up the last Gold Artifact Fragment that appears below the Gargoyle.
- Go to the Third Scene.
THIRD SCENE
- Pick up the items as shown in the screenshot.
- Place the Gold Artifact on the decorative window on the left side of the wall.
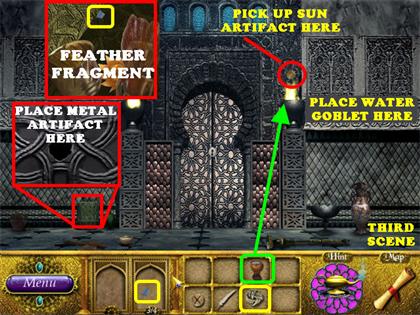
- Pick up the last Feather Fragment inside the window. The Feather goes into your inventory.
- Go back to the First Scene.
FIRST SCENE
- Place the Feather on the stone head on the left.
- Pick up the Key Fragment that appears on the stone head.
- Go back to the Second Scene.
SECOND SCENE
- Place the Key below the Right Gargoyle.
- Pick up the Mask that appears below the Gargoyle.
- Go back to the Third Scene.
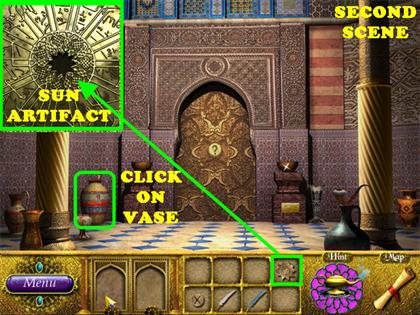
THIRD LOCATION
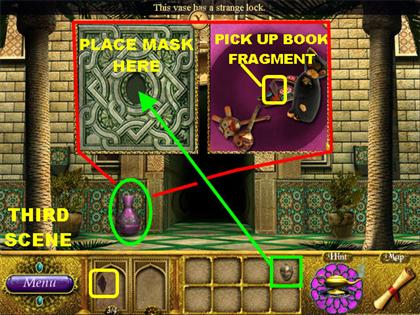
- Click on the Purple Vase in the lower left.
- Place the Mask in the slot that appears above the Vase.
- Pick up the last Book Fragment that appears inside the Vase.
- Go back to the First Scene.
FIRST SCENE

- Place the Book on top of the other books in the lower right.
- Symbols will appear above the book.
- Click on the Symbols to enter them into your inventory.
- The Scene is complete. Go back to the Second Scene.
SECOND AND THIRD SCENES
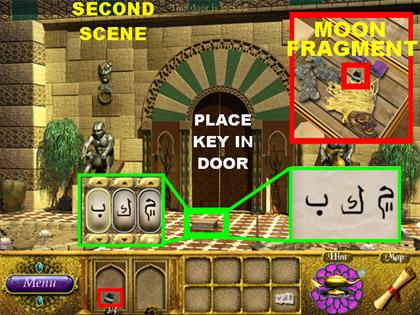
- Second Scene – Click on the box in the center of the ground to view the lock.
- Click on the symbols in your inventory for a better view.
- Change the symbols on the box to match the symbols from your inventory.
- Pick up the last Moon Fragment inside the box.
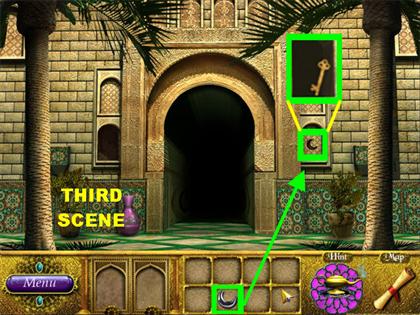
- Go back to the Third Scene.
- Third Scene – Place the Moon on the decorative window on the right.
- Pick up the Key inside the window.
- This Scene is complete.
- Go back to the Second Scene.
- Second Scene – Place the Key on the door to trigger a puzzle.
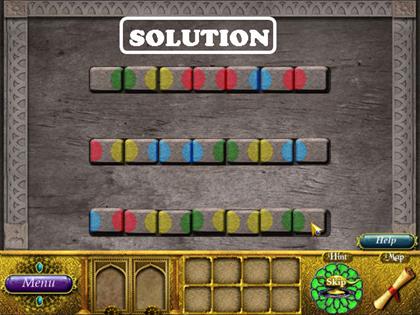
WOODEN BLOCKS PUZZLE
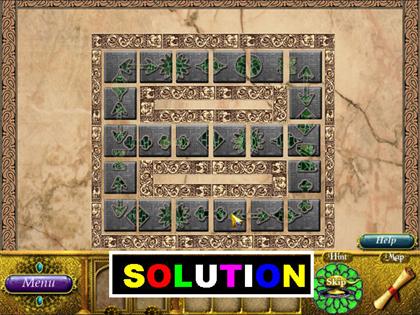
- Your goal is to place all the wooden blocks so they match on each side.
- Left-click on a piece to pick it up.
- Right-click on a piece to release it.
- Start with the corners first and work your way into the puzzle.
- Please look at the screenshot for the solution.
- Once the puzzle has been solved you will receive a Pedestal Artifact. You can place it in the Hall now or later.
9TH REALM
FIRST SCENE

- Pick up the items according to the screenshot. You can only pick up 6 out of the 8 Paper Fragments.
- Pick up the Empty Bottle in the pedestal on the right.
- Go to the Second Scene.
SECOND SCENE
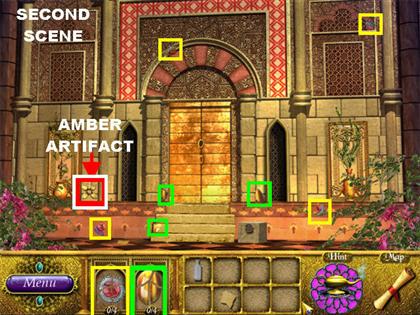
- Pick up the items according to the screenshot. The Red & Silver Jewel will go into your inventory.
- Pick up the Amber Artifact in the lower left side of the wall.
- Go to the Third Scene.
THIRD SCENE
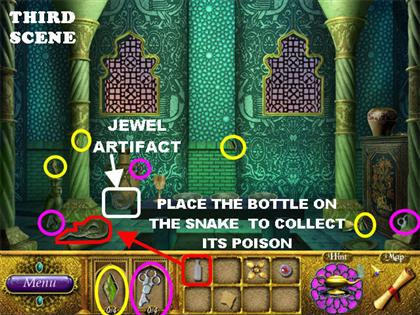
- Pick up the items according to the markings on the screenshot. The GreenJewel will go into your inventory.
- Pick up the Spiral Jewel Artifact in the lower left side.
- Place the Empty Bottle on the snake in the lower left so you can collect its poison. The Acid Bottle will be added to your inventory.
- Go to the First Scene.
FIRST SCENE
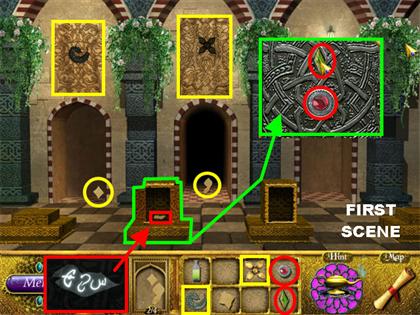
- Click on the small pedestal in the middle of the floor for a closer view.
- Place the Red & Silver Jewel in the slot.
- Place the Green Jewel in the slot above the Red & Silver Jewel.
- The door will open.
- Click on the Code inside the door for a closer view.
- Click on the Code to enter it into inventory.
- Place the Amber Artifact on the middle door.
- Pick up the Paper Fragment inside the middle door.
- The Silver Spiral Jewel Artifact belongs on the left door.
- Pick up the Paper Fragment inside the left door.
- This room is now complete.
- Go to the Third Scene.
THIRD SCENE
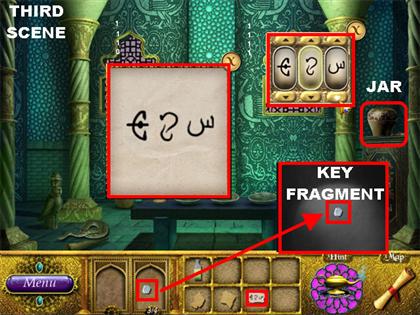
- Click on the locked Jar on the right to view the lock.
- Click on the Code in your inventory for a closer view.
- Change the codes on the Jar to match those from inventory.
- Pick up the last Key Fragment inside the Jar.
- This Scene is complete. Go back to the Second Scene.
SECOND SCENE
- Click on the piece of paper in the lower left for a closer view.
- Place the 2 Pieces of Paper from inventory in the empty slots. Close that window out for now.
- Place the Acid Bottle on the padlock on the lower right for a closer view.
- Pick up the last Jewel Fragment inside the padlock.
- Place the Key in the front door to unlock it.
- Place the Jewel on the door.
- Click on the code in inventory to open it.
- Click on the door’s lock for a closer view.
- Open the lock by matching the symbols on the paper.
- A puzzle will appear.
GOLD SHAPES PUZZLE
- Your goal is to place the shapes in the right spots.
- Once a piece is in the right spot, it will lock itself in.
- Please look at the screenshot for the solution.
- You will receive a Lamp Hall Gem after you complete the puzzle. You can place it in the Hall now or later.
10TH REALM
FIRST SCENE
- Pick up the items according to the markings on the screenshot
- The Knife and the Bug will go into your inventory.
- Go to the Second Scene.
SECOND SCENE

- Pick up the items according to the markings on the screenshot. You cannot pick up the last Key Fragment at this time.
- Place the Knife on the small basket in the lower left.
- Pick up the last Eye Fragment inside the basket.
- Go to the Third Scene.
THIRD SCENE
- Pick up the items according to the markings on the screenshot.
- Click on the small chest in the lower left for a closer view of the lock.
- Place the Bug on the lock.
- Pick up the last Jewel Fragment inside the chest.
- Click on the small box in the lower right to trigger a puzzle.
WOODEN TILES PUZZLE
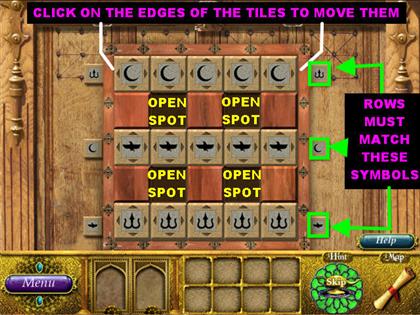
- Your goal is to align the tiles horizontally so the tile’s symbol matches the symbol on the side.
- Click on the edges of the tiles to move them to an empty slot.
- Try to start lining up symbols on either the top or bottom row.
- Please look at the screenshot for the solution.
- Please watch the video for a step-by-step solution for this puzzle.
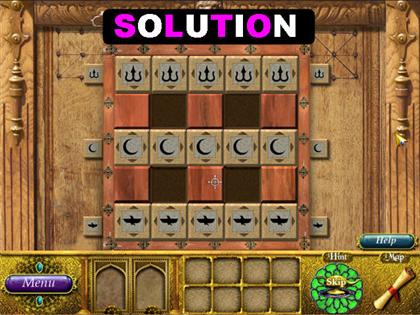
- Once the puzzle has been completed, an Eye will go into your inventory.
- This Scene is complete. Go back to the First Scene.
FIRST SCENE
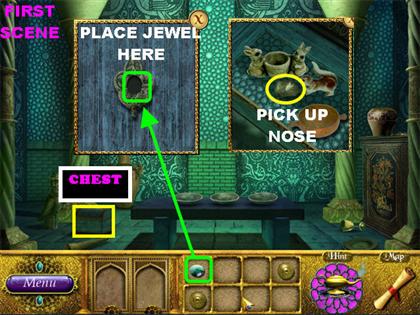
- Click on the chest in the lower left for a closer view.
- Place the Jewel on top of the chest.
- Pick up the Nose inside the chest.
- This Scene is Complete. Go back to the Second Scene.
SECOND SCENE
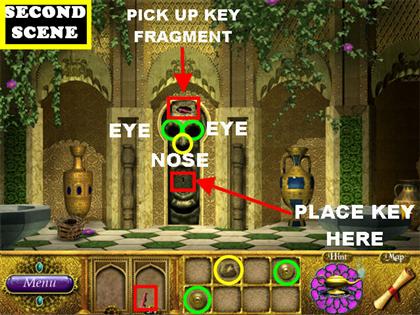
- Place the Eye in the left eye socket of the mask in the center of the scene.
- Place the Eye in the right eye socket of the mask in the center of the scene.
- Place the Nose on the mask in the center of the scene.
- Pick up the last Key Fragment that appears on the mask’s forehead.
- Place the Key in the mask’s mouth.
- You will receive a Pedestal Artifact. You can place it in the Hall now or at the end of the game.
11th REALM
FIRST SCENE
- Pick up the items as shown in the screenshot. The Left Leg and the Left Arm will go into your inventory.
- Click on the Piece of Paper on the floor to enter the code into your inventory.
- Go to the Second Scene.
SECOND SCENE
- Pick up the items as shown in the screenshot. The Right Foot and the Right Arm will go into your inventory.
- Click on the box on the left for the code to appear.
- Click on the code in your inventory.
- Pick up the Torso that appears above the box.
- Go to the Third Scene.
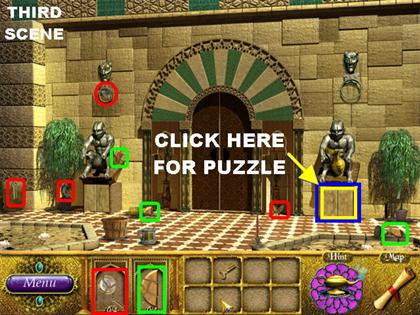
THIRD SCENE
- Pick up the items as shown in the screenshot. The Hammer and the Right Leg will go into your inventory.
- Click on the Vase on the left to trigger a puzzle.
TOKENS PUZZLE
- Your goal is to place the tokens on the board according to their environment.
- Left-click to pick a piece and right-click to put it back.
- When you hover your mouse over a token you will be able to read its description in the center of the puzzle.
- Once a section has been placed correctly, it will light up.
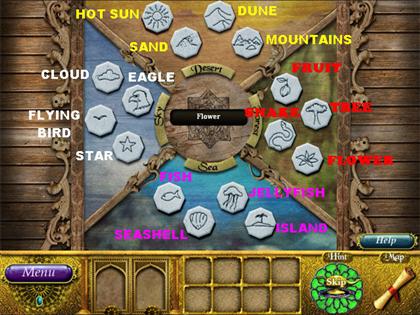
- The solution is as follows:DESERT: Hot Sun – Sand – Dune - Mountains FOREST: Fruit – Tree – Python Snake - Flower SEA: Fish – Jellyfish – Seashell - Island SKY: Cloud - Eagle – Star – Flying Bird
- Once the puzzle has been completed the Left Foot will go into your inventory.
- This scene is complete. Go back to the first scene.
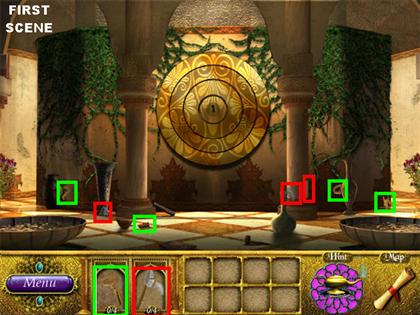
FIRST SCENE
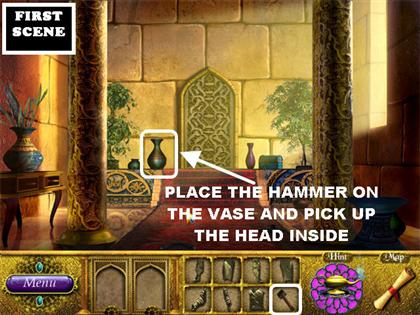
- Place the Hammer on the Vase on the far left, close to the door.
- Click inside the broken vase to pick up the Head.
- Go back to the Second Scene.
SECOND SCENE
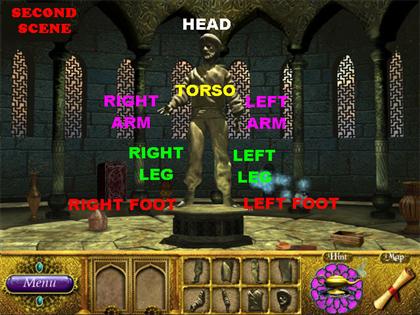
- Your goal is to assemble Bahar’s statue on the base in the center of the scene.
- You have to start at the bottom and work your way up.
- Place the items in the following order to build the statue:Right Foot Left Foot Right Leg Left Leg Torso Right Arm Left Arm Head
- You will receive a Lamp Hall Gem once the statue is complete. You can place it in the Hall now or at the end of the game.
12TH REALM
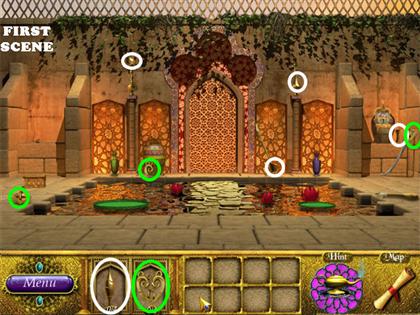
FIRST SCENE
- Pick up the items as shown in the screenshot. The Key will go into your inventory. You will not be able to pick up the last Fishnet fragment at this time.
- Go to the Third Scene.
THIRD SCENE
- Pick up the items as shown in the screenshot. The Magnifying Glass will go into your inventory.
- Click on the small door below the Right statue to open it.
- Click on the door to trigger a puzzle.
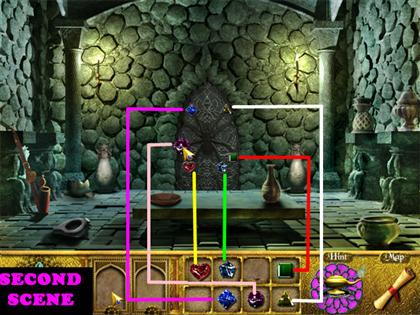
CONNECTING LINES PUZZLE
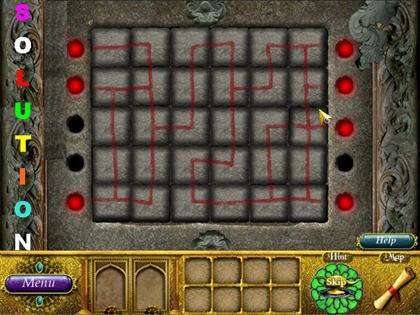
- Your goal is to connect each line with each other and the holes with red lights.
- Click on a stone to rotate it.
- Please look at the screenshot for the solution.
- You will receive an artifact once this puzzle is complete.

- Place the Key from inventory on the small door below the Left statue.
- Pick up the last Artifact Fragment inside the door.
- Place BOTH gold artifacts on the door.
- Pick up the Key inside the door.
- This room is complete. Go to the Second Scene.
SECOND AND FIRST SCENES
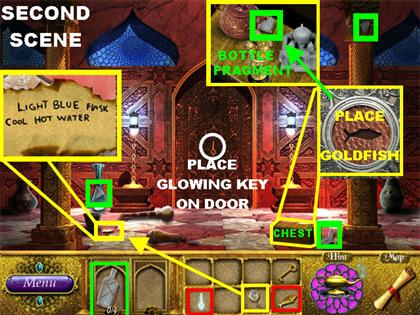
- Second Scene - Pick up the items as shown in the screenshot.
- Place the Magnifying Glass on the tiny piece of paper in the lower left.
- The note says: “Light Blue Flask Cool Hot Water”
- Go back to the First Scene.
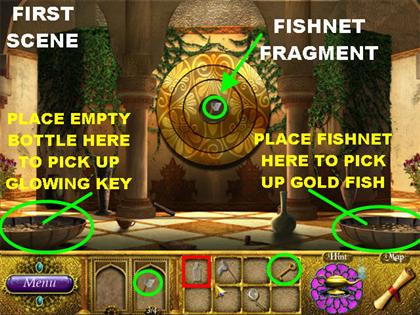
- First Scene – Place the Key in the keyhole on the large circle.
- Pick up the last Fishnet fragment inside the circle.
- Place the Fishnet on the water on the right side of the scene to pick up a Gold Fish.
- Go back to the Second Scene.
- Second Scene – Click on the chest in the lower right for a closer view.
- Place the Goldfish on top of the chest.
- Pick up the last Empty Bottle Fragment.
- Go back to the First Scene.
- First Scene – Place the Empty Bottle in the hot water on the lower left.
- The Glowing Key will go into your inventory.
- This scene is complete. Go back to the Second Scene.
- Second Scene – Place the Glowing Key on the door to end this Realm.
- You will receive a Pedestal Artifact. You can place it in the Hall now or at the end of the game.
13th REALM
FIRST SCENE
- Pick up the items as shown in the screenshot. The Pipe Artifact will go into your inventory.
- Go to the Second Scene.
SECOND SCENE
- Pick up the items as shown in the screenshot. The Water Flask and the Green Artifact will go into inventory.
- Place the Water Flask in the water on the ground to fill the Flask.
- Go to the Third Scene.
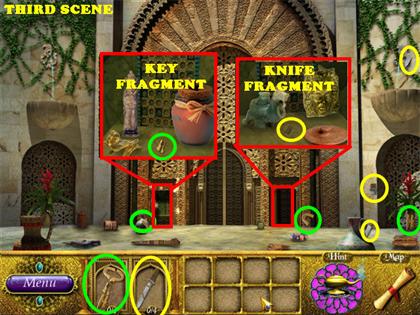
THIRD SCENE
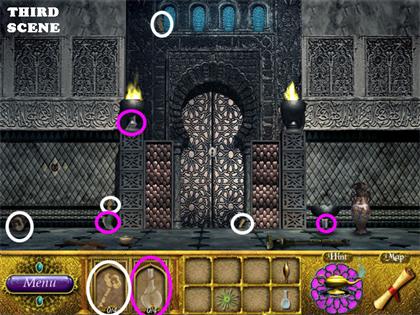
- Pick up the items as shown in the screenshot. The Key will go into your inventory. You will not be able to collect the last fragment of the Smoke Flask at this time.
- Go back to the First Scene.
FIRST SCENE
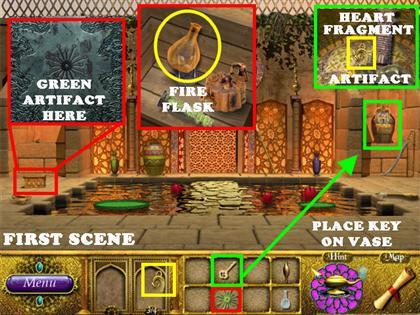
- Place the Key in the locked vase on the right.
- Pick up the last Heart Artifact Fragment inside the Vase.
- Click on the box on the lower left for a closer view.
- Place the Green Artifact on the box to unlock it.
- Pick up the Fire Flask inside.
- This scene is complete. Go back to the Third Scene.
THIRD SCENE
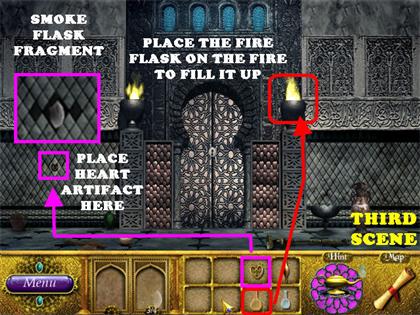
- Place the Heart Artifact on the lower left side of the wall.
- Pick up the last Smoke Flask Fragment inside the wall.
- Place the FIRE Flask on the fire by the door to fill up the Fire Flask with fire.
- This Scene is complete. Go back to the Second Scene.
SECOND SCENE
- Place the Pipe Artifact on the contraption in the upper left side. Smoke will come out of the pipe.
- Place the Smoke Flask on the smoke to fill the flask with smoke.
- If you haven’t done so already, place the Water Flask in the water on the ground.
- Place the FULL Smoke Flask on the mechanism on the right.
- Place the FULL Water Flask on the mechanism on the right.
- Place the FULL Fire Flask on the mechanism on the right.
- Pick up the Key above the mechanism.
- Place the Key in the lock to end this Realm.
- You receive a Lamp Hall Gem. You can place it in the Hall now or at the end of the game.
14TH REALM
SECOND AND FIRST SCENES
- Second Scene - Pick up the items as shown in the screenshot. The Shovel will go into your inventory.
- Go to the First Scene.
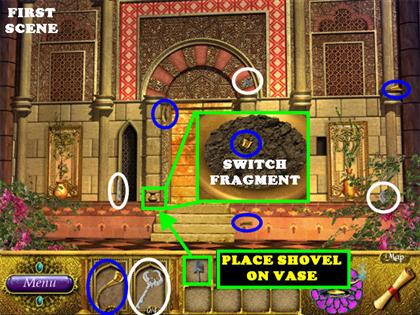
- First Scene - Pick up the items as shown in the screenshot.
- Place the Shovel on the tiny Vase on the lower left.
- Pick up the last Switch Fragment inside the vase.
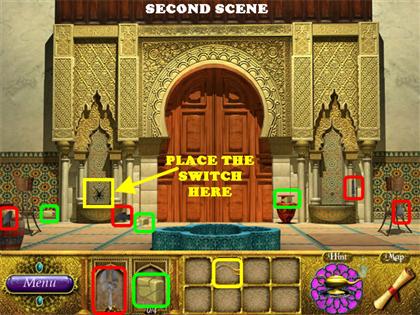
- Go back to the Second Scene.
- Second Scene – Place the Switch on the lower left side of the back wall. This action activates the small LEFT door in the Third Scene.
- Go to the Third Scene.
THIRD SCENE
- Pick up the items as shown in the screenshot.
- Click on the small sparkly door on the left.
- Pick up the last Key Fragment inside the door. If the door does not open for you, go back to the Second Scene and place the Switch on the left side of the wall.
- Place the Key on the right door.
- Pick up the last Knife Fragment inside the door.
- This scene is complete. Go to the Second Scene.
SECOND AND FIRST SCENES
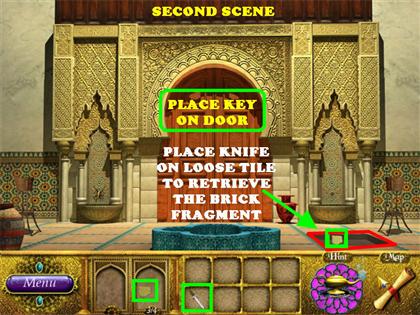
- Second Scene - Place the Knife on the loose tile in the lower right.
- Pick up the last Brick Fragment below the tile.
- Go back to the First Scene.
- First Scene – Place the Brick on the empty slot on the right side of the wall.
- Pick up the last Key Fragment that appears below the brick.
- This Scene is complete. Go back to the Second Scene.
- Second Scene – Place the Key on the door to end this Realm.
- You are given a Pedestal Artifact. You can place it in the Hall now or at the end of the game.
15TH REALM
FIRST SCENE
- Pick up the items as shown in the screenshot. The Fire Bug and the Goblet will go into your inventory.
- Go to the Third Scene.
THIRD SCENE
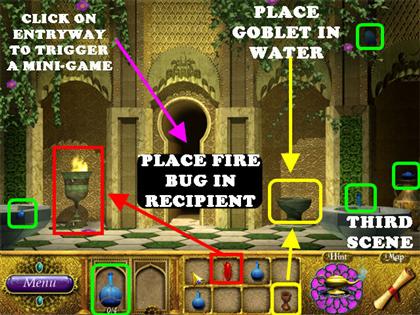
- Pick up the items as shown in the screenshot. The Flammable Bottle will go into your inventory.
- Place the Fire Bug in the Bronze Recipient on the left to start a fire.
- Place the Goblet on the water on the right side of the entryway to fill it with water.
- Click on the entryway to trigger a puzzle.
MATCHING MINI-GAME
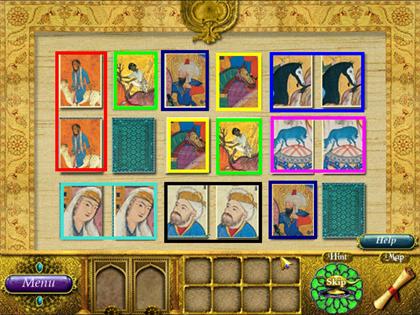
- Your goal is to match the pairs of cards.
- Click on a card to flip it over.
- When you click on 2 matching cards they will disappear off the board.
- You will receive a 2nd Flammable Bottle once the mini-game has been completed.
SECOND SCENE
- Pick up the items as shown in the screenshot. The Glasses and the Candle will go into your inventory.
- Go back to the First Scene.
FIRST SCENE
- Place the Glasses on the note on the left side of the ground for a closer view.
- The note shows you what you have to do to make and extinguish a fire.
- This Scene is complete. Go back to the Third Scene.
THIRD SCENE
- Make sure you place the goblet on the water located on the small urn to the right of the entryway if you haven't already done so.
- Place the Candle on the fire to light it.
- This Scene is complete. Go back to the Second Scene.
SECOND SCENE
- Click on the Note in your inventory for a closer view.
- Place the Flammable Bottle on the left urn.
- Place the Candle on the left urn to light it.
- Place the 2nd Flammable Bottle on the right urn.
- Place the Candle on the right urn to light it.
- Place the Goblet of Water on the left urn to extinguish the fire.
- Place the Goblet of Water on the right urn to extinguish the fire.
- Pick up the Key that appears over the doorway.
- Place the key on the door to end this Realm.
- You will receive a Lamp Hall Gem. You can place it in the Hall now or at the end of the game.
16TH REALM
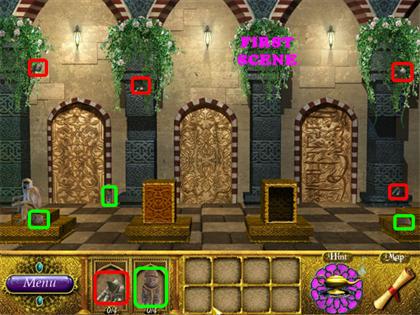
FIRST SCENE
- Pick up the items as shown in the screenshot. The Goblet will go into your inventory.
- Go to the Third Scene.
THIRD SCENE
- Pick up the items as shown in the screenshot. The Pick will go into your inventory.
- Go to the Second Scene.
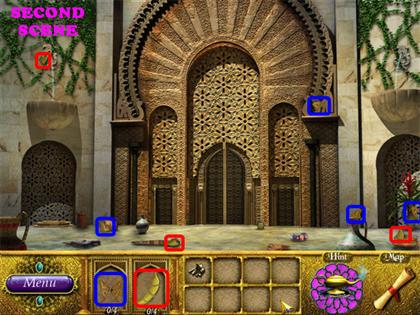
SECOND SCENE
- Pick up the items as shown in the screenshot. The Bottle will go into your inventory.
- Place the Pick on the small vase in the lower right.
- Pick up the last Insect fragment inside the vase.
- Click on the small left window to trigger a mini-game.
BUMPER MINI-GAME
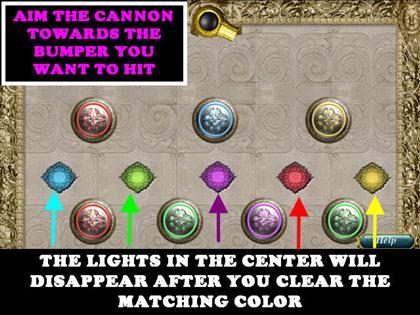
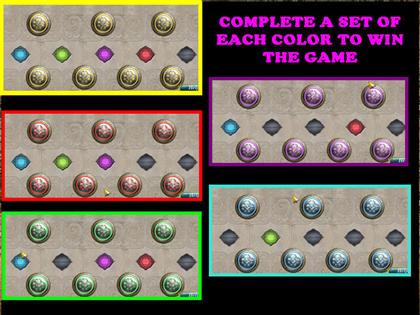
- Your goal is to shoot the bumpers until they are all the same color.
- You have to turn all 5 colors, one color at a time (Purple, Green, Red, Yellow, and Blue) in order to win the game.
- After you complete a color, the matching light in the center of the puzzle will disappear.
- When you aim the cannon towards a bumper it will always hit in the same exact spot until you move it.
- You will receive a Shell in your inventory once this puzzle has been completed.
- Please watch the video for a step-by-step solution for this puzzle.
- Go to the First Scene.
FIRST SCENE
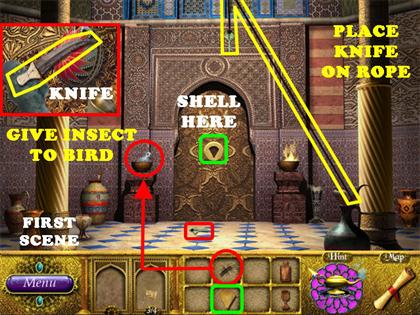
- Give the Insect to the Bird on the left side of the door for a pop-up window to appear.
- Pick up the Knife inside the pop-up window.
- Use the Knife to cut the rope on the right. The Key falls in the middle of the ground.
- Pick up the Key on the floor.
- Place the Shell from inventory on the door. A Piece of Paper on fire will appear in the doorway. It is too hot to pick up at this time.
- Go to the Third Scene.
THIRD SCENE
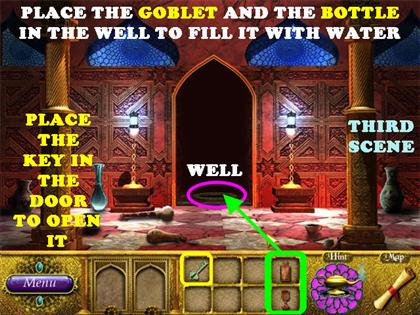
- Place the Key in the door to open it and you will find a well inside the entryway.
- Place the Bottle in the well to fill it with water.
- Place the Goblet in the well to fill it with water.
- This scene is complete. Go back to the First Scene.
FIRST SCENE
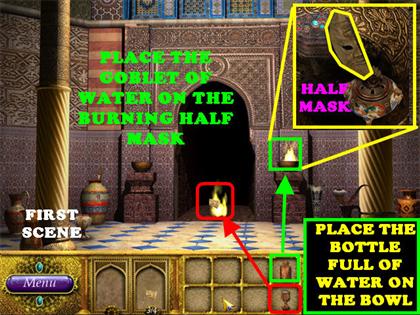
- For this next step make sure that you filled the Bottle and the Goblet with water in the well located in the Second Scene.
- Place the Goblet Full of Water on the Half Mask on fire in the entryway.
- Place the Bottle Full of Water on the burning bowl on the right.
- Click on the bowl for a pop-up window to appear.
- Pick up the Half Mask inside the bowl.
- This Scene is complete. Go back to the Second Scene.
SECOND SCENE
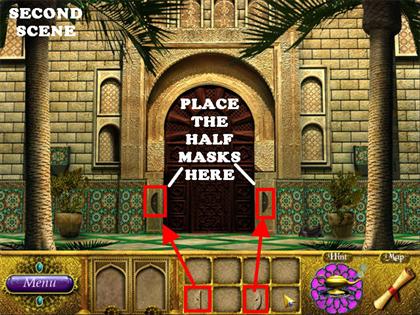
- Place the 2 Half Masks on the slots for the masks on each side of the door to complete this Realm.
- You receive a Pedestal Artifact. You can place it in the Hall now or at the end of the game.
17TH REALM
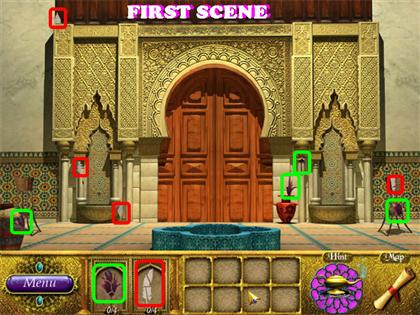
FIRST SCENE
- First Scene - Pick up the items as shown in the screenshot. The Hand will go into your inventory.
- Go to the Second Scene.
SECOND SCENE
- Pick up the items as shown in the screenshot. The Butterfly will go into your inventory.
- Go to the Third Scene.
THIRD SCENE
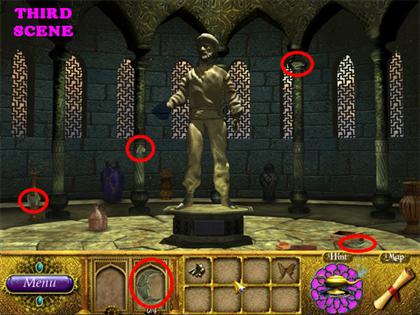
- Pick up the items as shown in the screenshot. The Moon will go into your inventory.
- Go back to the First Scene.
FIRST SCENE
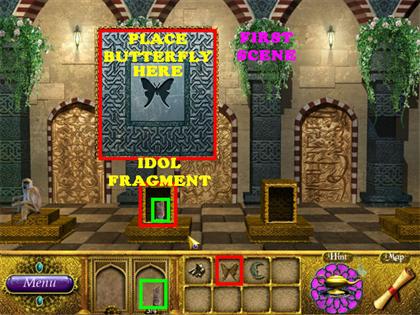
- Click on the small door in the middle of the scene for a pop-up window to appear.
- Place the Butterfly in the pop-up window for the door to open.
- Pick up the last Idol Fragment inside the door.
- Go back to the Third Scene.
THIRD SCENE
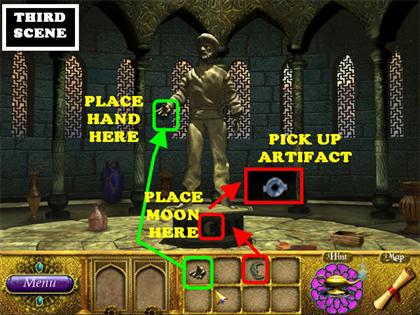
- Place the Hand on the statue’s hand. The slot at the base of the statue opens up.
- Place the Moon Artifact at the bottom of the base.
- Pick up the Artifact that appears on the statue’s base.
- This Scene is Complete. Go back to the Second Scene.
SECOND SCENE
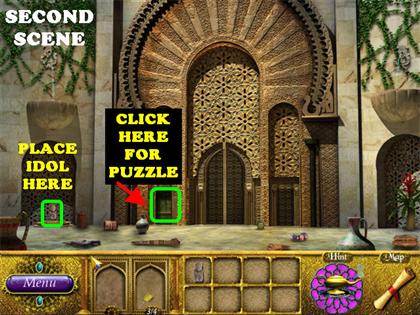
- Place the Idol on the lower left side to unlock the small door to the left of the large door.
- Click on the small left door to trigger a puzzle.
NUMBERED EMERALDS PUZZLE
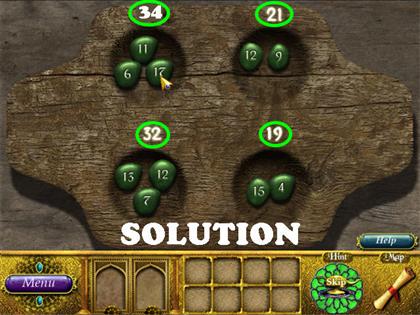
- Your goal in this puzzle is to place the numbered stones in the holes that add up to a particular number.
- Each time a set of numbers has been placed correctly, the number above the hole will light up.
- The solution is as follows:34 = 6-11-17 21 = 9-12 32= 7-12-13 19 = 4-15
- You will receive the last Banana Fragment after the puzzle has been solved.
- Go back to the First Scene.
FIRST SCENE
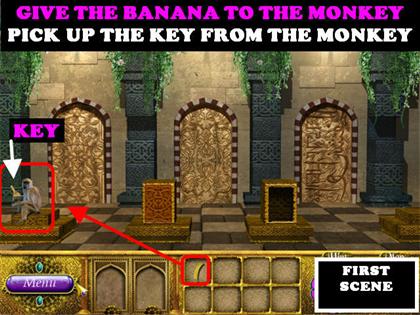
- Give the Banana to the Monkey.
- Pick up the Key from the Monkey.
- This scene is complete. Go back to the Second Scene.
SECOND SCENE
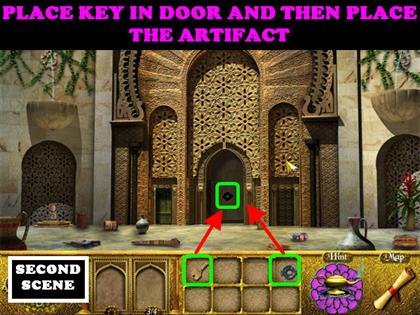
- Place the Key on the door and a spot for an artifact opens up.
- Place the Artifact in the spot to end this Realm.
- You obtain a Lamp Hall Gem. You can place it in the Hall now or at the end of the game.
18TH REALM
FIRST SCENE
- Pick up the items as shown in the screenshot. The Feather and the Feather Duster will go into your inventory.
- Go to the Third Scene.
THIRD SCENE
- Pick up the items as shown in the screenshot. The Coin will go into your inventory.
- Go to the Second Scene.
SECOND SCENE

- Pick up the items as shown in the screenshot. The Goblet and the Metal Artifact will go into inventory.
- Place the Feather Duster on the plaque located on the right pedestal.
- Click on the plaque for a closer look.
- Go to the First Scene.
FIRST SCENE
- Place the Goblet in the water located on the right side of the door.
- Go back to the Third Scene.
THIRD SCENE
- Click on the vase in the lower left for a pop-up window to appear.
- Place the Metal Artifact in the pop-up window.
- Pick up the last Feather Fragment inside the vase.
- Place the Goblet of Water on the fire in the Right Urn to extinguish it. If you haven’t filled the Goblet yet go do so in the First Scene.
- Pick up the Sun Artifact in the spot directly above the Left urn.
- This Scene is complete. Go back to the Second Scene.
SECOND SCENE
- Click on the large vase on the left for a pop-up window to appear.
- Place the Sun Artifact on the pop-up window to trigger a puzzle.
TURBAN MINI-GAME
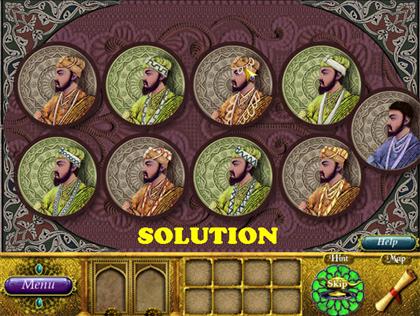
- Your goal is to place the correct turbans on the right sultans.
- Click on any turban and it will be attached to your cursor.
- Click on a different turban to attach the one on your cursor to it. Click on the turban one more time to pick up the one you just replaced.
- Pay attention to the color and the pattern of the turbans. They must be matched with the sultan’s clothing.
- The sultan dressed in blue will not have a turban.
- Please look at the screenshot for the solution.
- You will receive a Fish in your inventory once this puzzle has been solved.
- Go to the First Scene.
FIRST SCENE
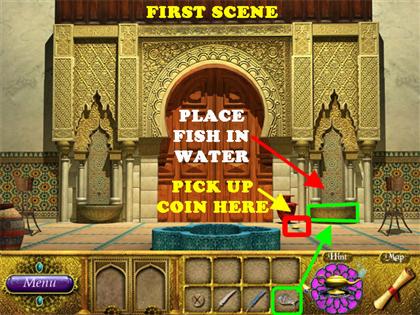
- Place the Fish in the water located to the right side of the door.
- A Coin will pop out of the water and onto the floor, pick it up.
- This Scene is complete. Go back to the Second Scene.
SECOND SCENE
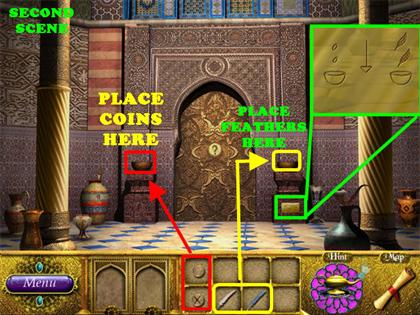
- Click on the plaque on the right for a closer view. The plaque shows you that the Coins go in the left bowl and the Feathers belong in the right bowl.
- Place the 2 Coins in the bowl to the left of the door.
- Place the 2 Feathers in the bowl to the right of the door.
- The door will open and this Realm will end.
- You are given a Pedestal Artifact. You can place it in the Hall now or later.
19TH REALM
FIRST SCENE
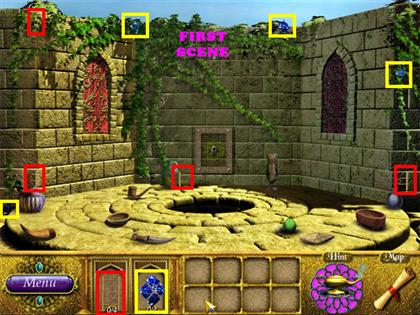
- Pick up the items as shown in the screenshot. The blue diamond-shaped Jewel and the Ladder go into inventory.
- Go to the Second Scene.
SECOND SCENE
- Pick up the items as shown in the screenshot. The Hammer and the green triangle Jewel go into inventory.
- Place the Hammer on the teardrop-shaped vase on the left to break it open.
- Pick up the pentagon-shaped Jewel inside the pop-up window.
- Pick up the Torch in the upper right.
- Place the Torch on the fire in the upper right side of the back wall to light it.
- Go to the Third Scene.
THIRD SCENE
- Pick up the items as shown in the screenshot. The square emerald Jewel will go into inventory.
- Place the Ladder in the upper left side of the scene. This will give you access to the last Key Fragment.
- Pick up the last Key Fragment in the upper left side.
- Go to the First Scene.
FIRST SCENE
- Place the Key in the lock on the back wall.
- Click on the niche in the back wall to trigger a puzzle.
WOODEN BLOCKS PUZZLE
- Your goal is to place all the blocks in the right spots.
- The blocks in the slots cannot be moved, use those as your guide.
- Left-click on a piece to pick it up and right-click on a piece to set it back down.
- Please look at the screenshot for the solution.
- You receive a heart-shaped red Jewel after the puzzle has been solved.
- This Scene is complete. Go to the Third Scene.
THIRD SCENE
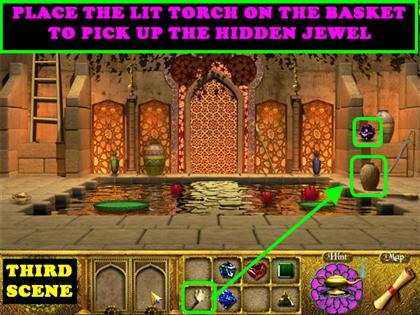
- Place the Lit Torch on the basket on the right side. You can light the Torch in the Second Scene if you haven’t already done so.
- Pick up the round-shaped Jewel that appears after the basket has been burned.
- This Scene is complete. Go to the Second Scene.
SECOND SCENE
- Place the Jewels in the correct spots on the door.
- Please look at the screenshot for the solution.
- You will receive a Lamp Hall Gem. You can place it in the Hall now or at the end of the game.
20TH REALM
THIRD SCENE
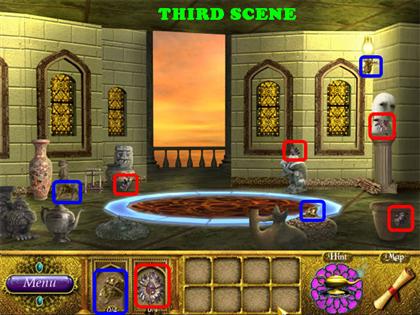
- Pick up the items as shown in the screenshot. The Artifact goes into inventory. You cannot pick up the last Statue Head fragment at this time.
- Go to the Second Scene.
SECOND SCENE
- Pick up the items as shown in the screenshot.
- Click on the book on the floor for a pop-up window to appear.
- Place the Artifact in the pop-up window.
- Pick up the last key Fragment in the pop-up window.
- Go to the First Scene.
FIRST SCENE
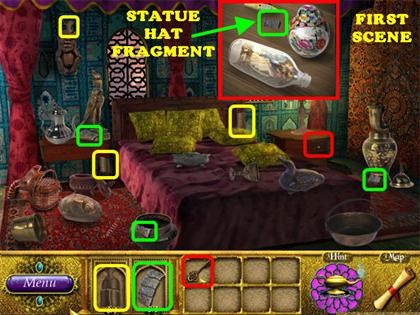
- Pick up the items as shown in the screenshot.
- Place the Key in the drawer to the right side of the bed.
- Pick up the last Statue Hat Fragment inside the drawer.
- Go to the Third Scene.
THIRD SCENE
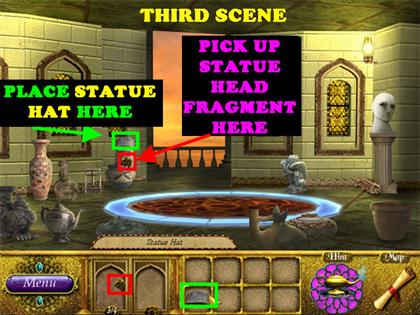
- Place the Statue Hat on the statue on the left side of the scene.
- Pick up the last Statue Head Fragment that appears in the statue’s mouth.
- Go back to the Second Scene.
SECOND SCENE
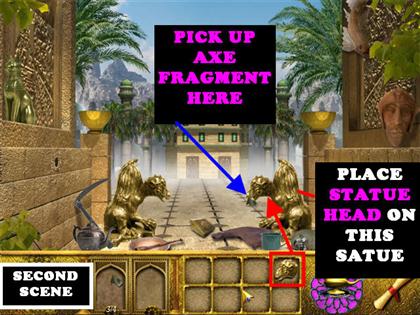
- Place the Statue Head on the gold statue on the right.
- Pick up the last Axe Fragment in the mouth of the gold statue on the right.
- Go to the First Scene.
FIRST SCENE
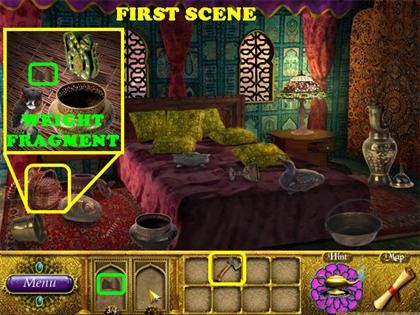
- Place the Axe on the basket in the lower left.
- Pick up the last Weight Fragment in the basket.
- Go back to the Third Scene.
THIRD SCENE
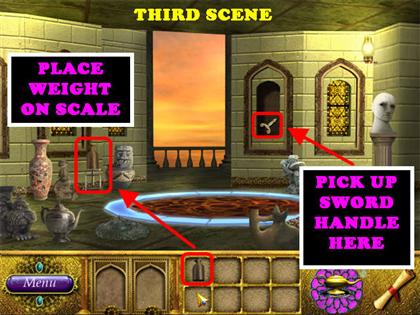
- Place the Weight on the scale on the far left and a niche opens up on the right side of the wall.
- Pick up the Sword Handle that appears in the niche on the wall.
- Go back to the Second Scene.
SECOND SCENE

- Place the Sword Handle on the Sword leaning against the right side of the wall.
- The Sword goes into your inventory.
- Go back to the First Scene.
FIRST SCENE
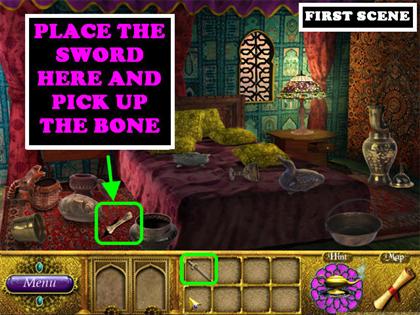
- Place the Sword on the stitched part of the carpet in the lower left.
- Pick up the Bone that appears in the carpet.
- This Scene is complete. Go to the Third Scene.
THIRD SCENE
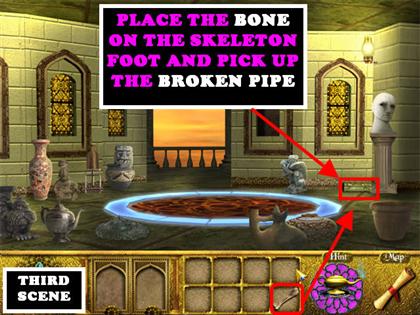
- Place the Bone on the Skeleton Foot on the far right, close to the column.
- Pick up the Broken Pipe that appears by the column.
- This Scene is complete. Go to the Second Scene.
SECOND SCENE
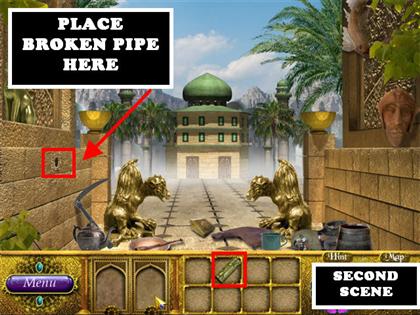
- Place the Broken Pipe in the hole on the left side of the wall to end this Realm.
- You are given a Pedestal Piece. You will be taken back to the Lamp Hall.
LAMP HALL
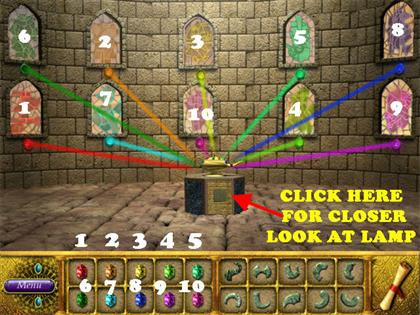
- Your goal is to place all the Jewels in the right spots below each window.
- Grab the Jewels from inventory and place them in the slots below the windows. Some of the colors are very similar so you have to test them after you place them.
- To test the Jewels, click on the Genie Lamp in the middle of the scene for a closer view. If the Jewels are in the right place, they will glow on the close-up view of the lamp.
- If the Jewels are in the wrong place, click on the “Return” button in the lower left to return to the previous view.
- Please look at the screenshot for the solution.
PEDESTAL PIECES
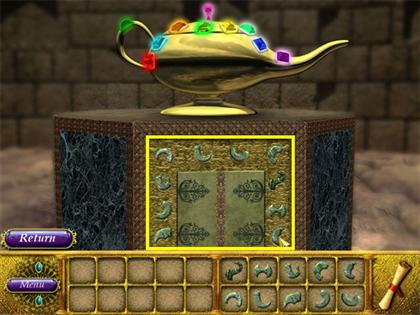
- Click on the Genie Lamp for a closer look at the lamp.
- Place the Pedestal Pieces in the right spots. Please look at the screenshot for the solution.
- A final puzzle will appear once all the Jewels and pedestal Pieces have been placed correctly.
FINAL PUZZLE
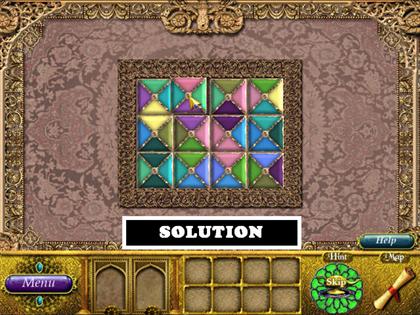
- Your goal is to place all the wooden blocks with matching colors on each side.
- Left-click on a block to pick it up. Right-click on a block to take it off the board.
- Please look at the screenshot for the solution. The game will end once the puzzle has been completed.
- Watch the ending scenes!
Created at: 2010-01-24