

Walkthrough Menu
- General Tips
- Chapter 1: The Dock
- Chapter 2: The Club
- Chapter 3: The Hunter's Base
- Chapter 4: The Witch's Mansion
- Chapter 5: The Police Station
- Chapter 6: Ester's House
- Chapter 7: The Pier
General Tips
- This is the official guide for The Unseen Fears: Body Thief.
- This guide will not mention when to zoom into a location; screenshots will show each zoom scene.
- The screenshots will show where to play a Hidden-Object Puzzle (HOP).
- A match-3 game can be played instead of an HOP.
- Some inventory items require further actions.
- This guide will give step-by-step solutions for all puzzles which are not random. Read the game instructions for each puzzle.
Chapter 1: The Dock
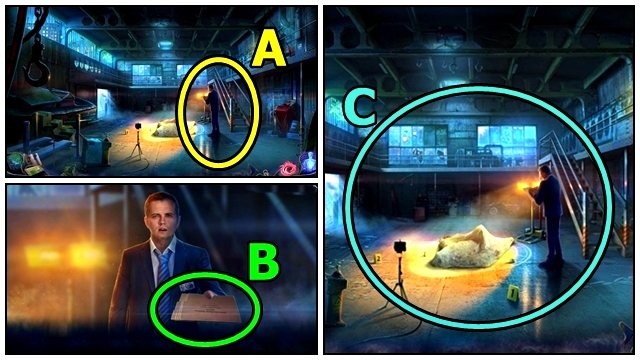
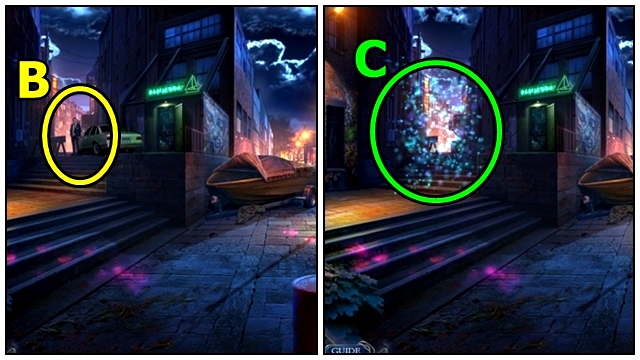
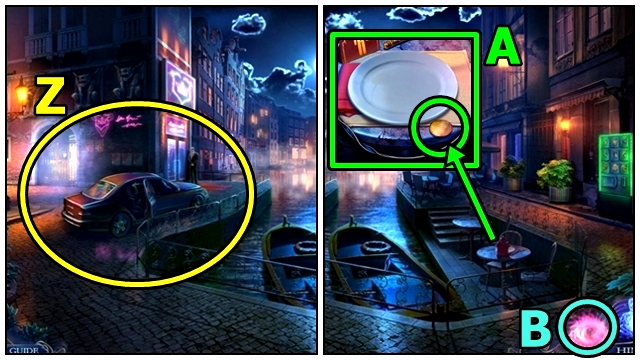
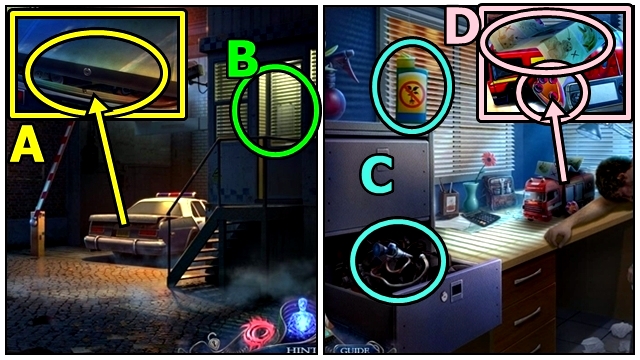
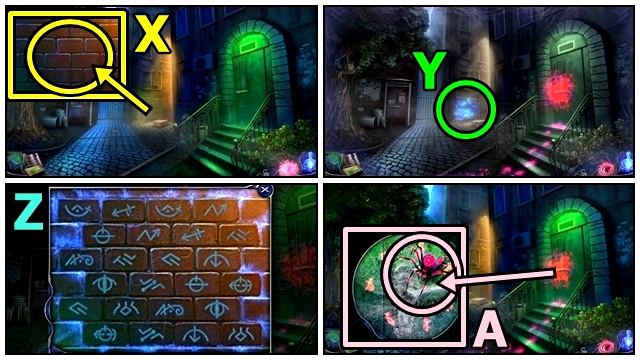
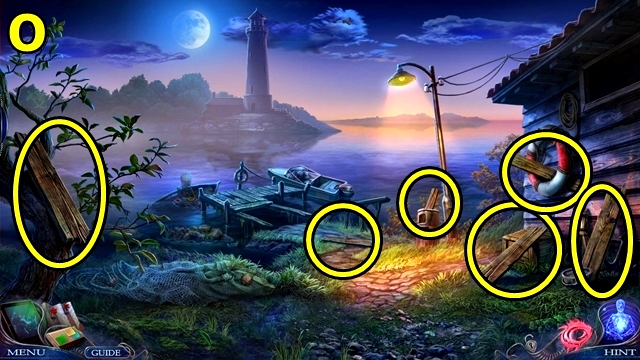
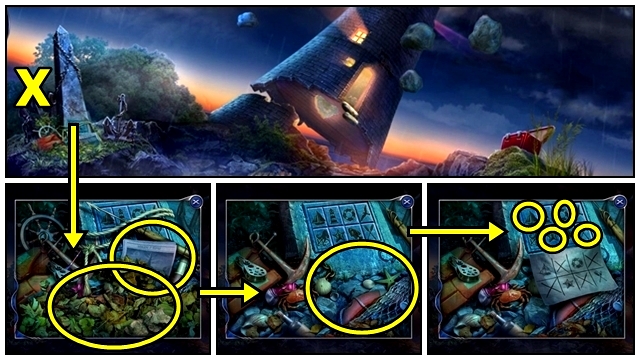
- Talk to the man (A).
- Take the CASE FILE (B).
- Examine anywhere (C). Play the HOP.
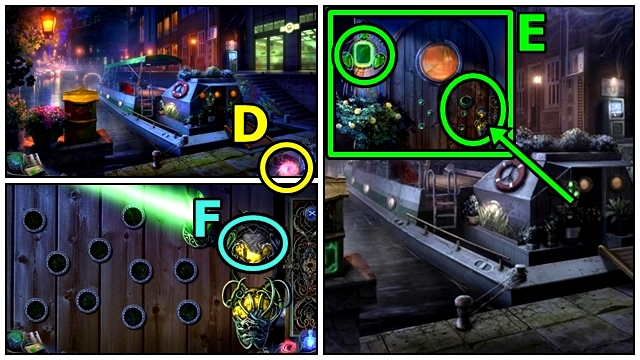
- Take the GLOWING LIQUID (D).
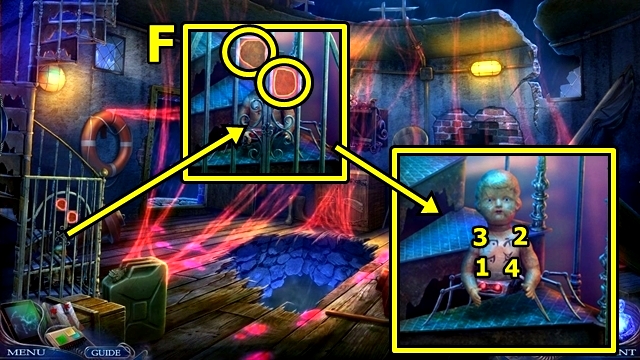
- Remove the cloth (E); play the HOP; receive the TULIP BUTTON.
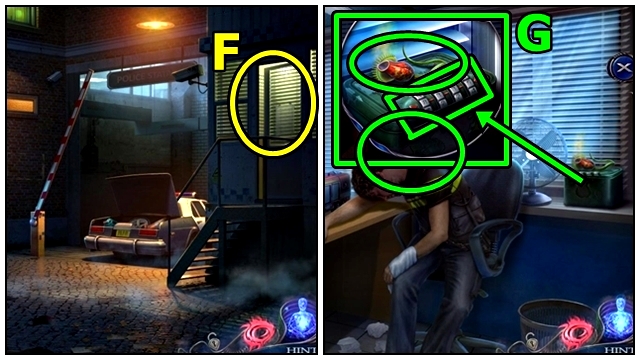
- Enter the Dock Yard (F).
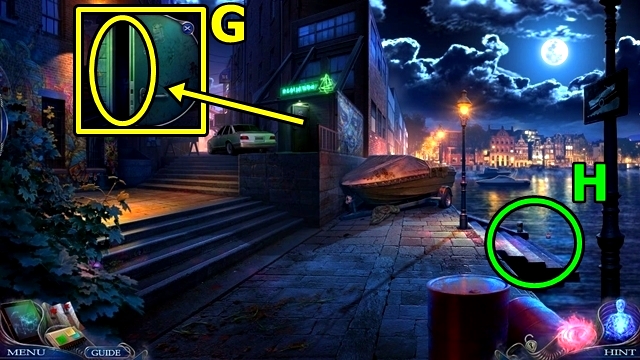
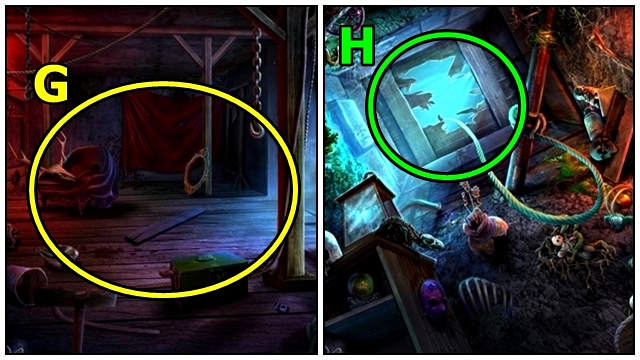
- Open the door (G); use the GLOWING LIQUID. Remove the straw; take the BROOM HANDLE.
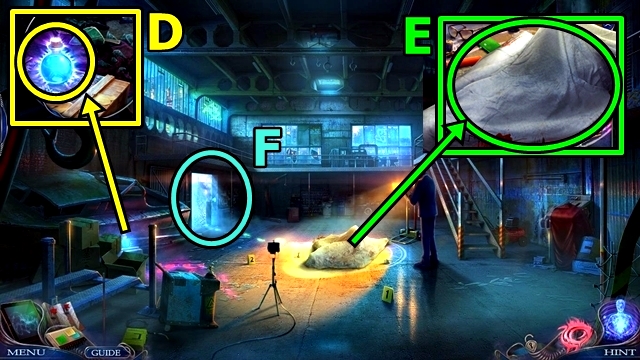
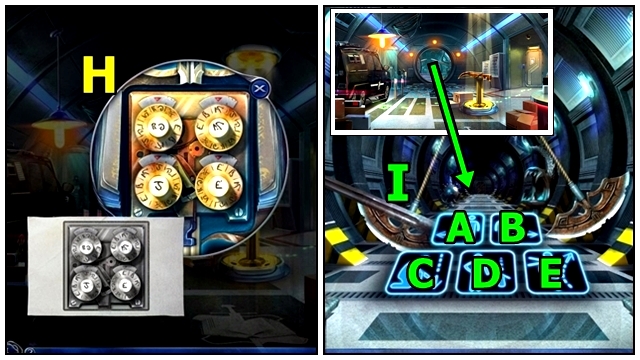
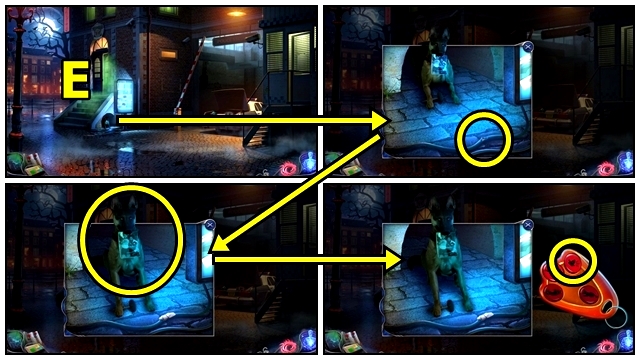
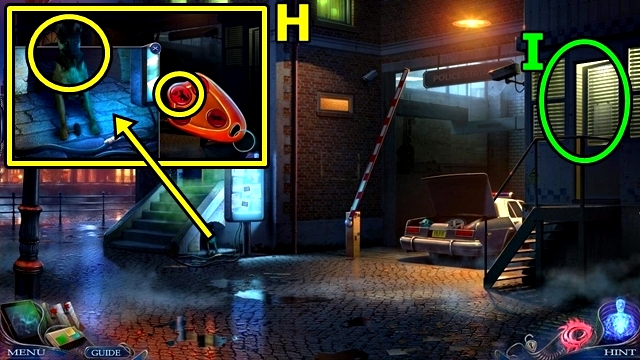
- Activate your Mystical Ability (H).
- Open the CASE FILE (inventory); take the PHONE CODE.
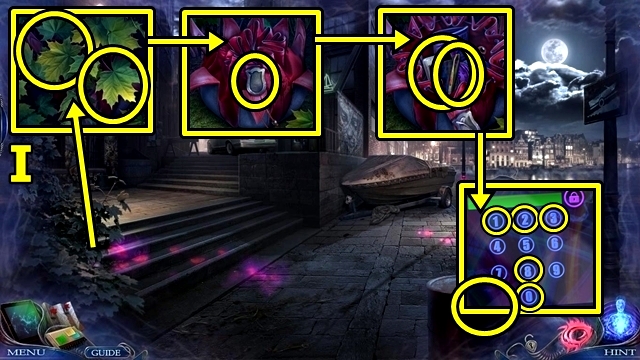
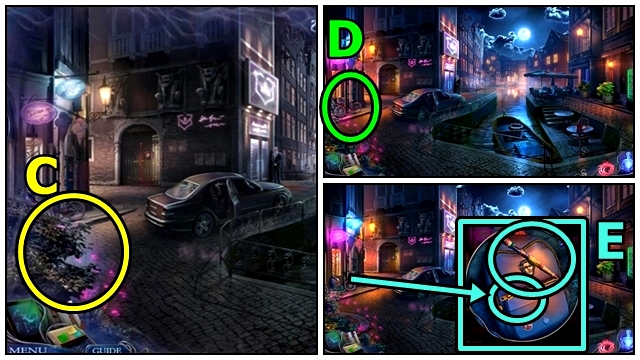
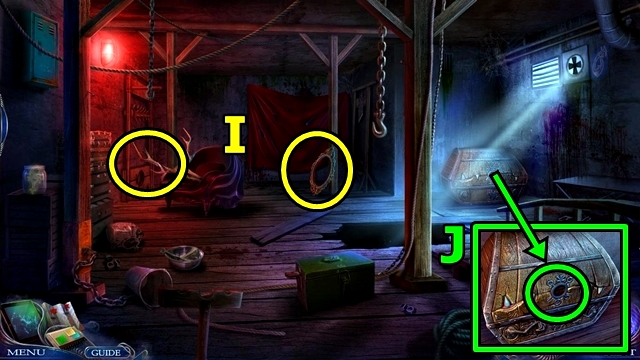
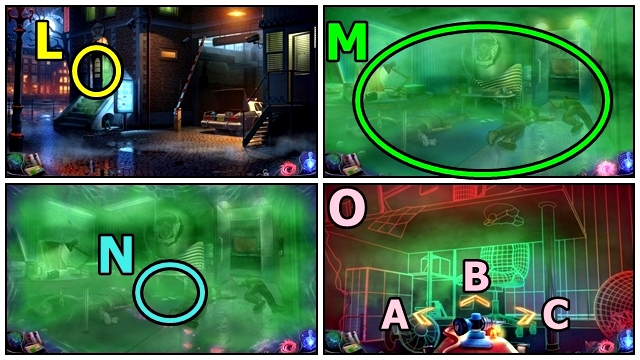
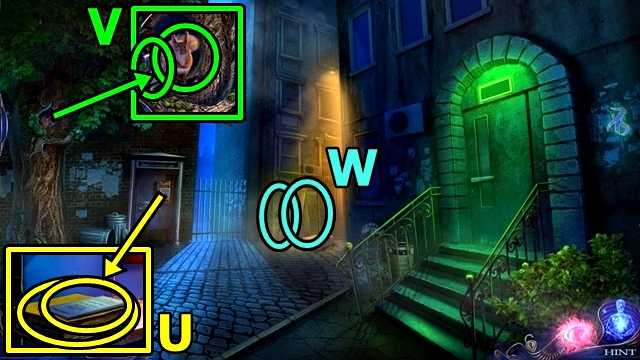
- Move the leaves (I); insert the TULIP BUTTON. Open the purse; take the TWEEZERS and phone; add the PHONE CODE. Enter code: 2-3-8-0-1. Play the mini-game.
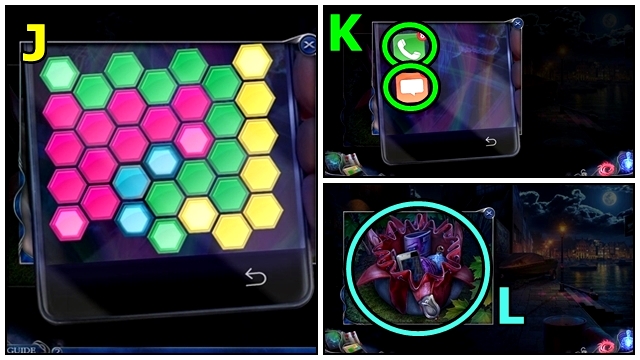
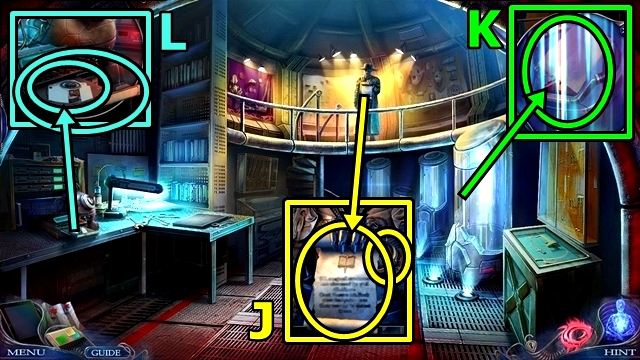
- Solution: (J).
- Read the text (K); check the calls. Receive the CLUE: PHONE.
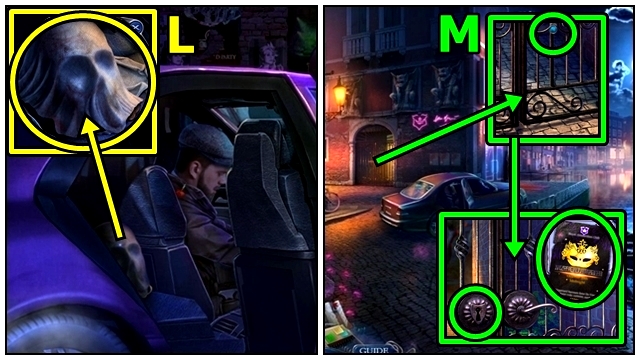
- Move the purse (L); take the INVITATION PART.
- Move down.
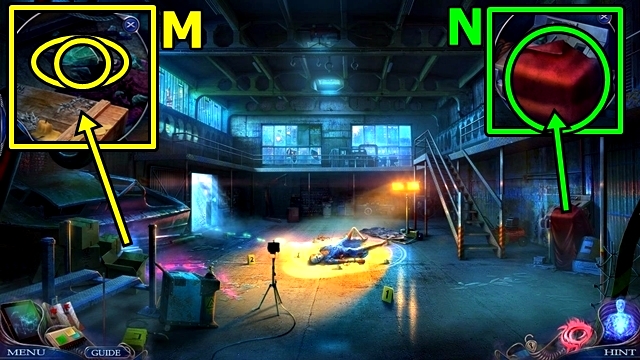
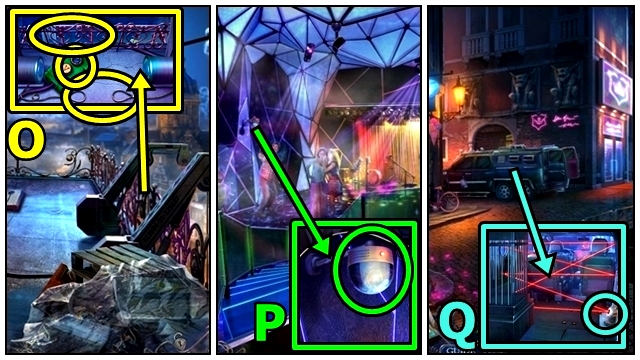
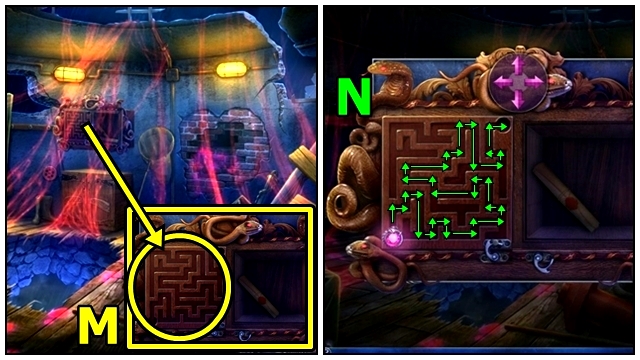
- Use the TWEEZERS (M); receive the CLUE: GLASS WITH FINGERPRINTS. Take the SCALPEL.
- Remove the cloth (N); insert and pull the BROOM HANDLE.
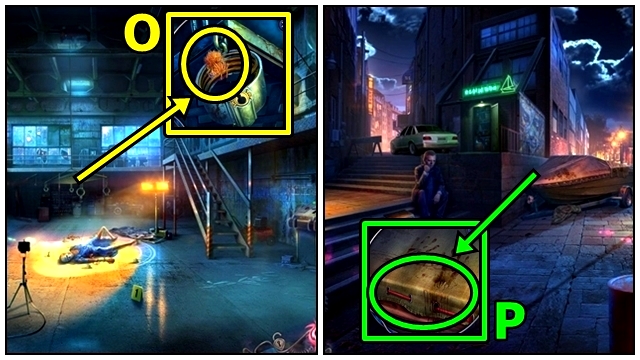
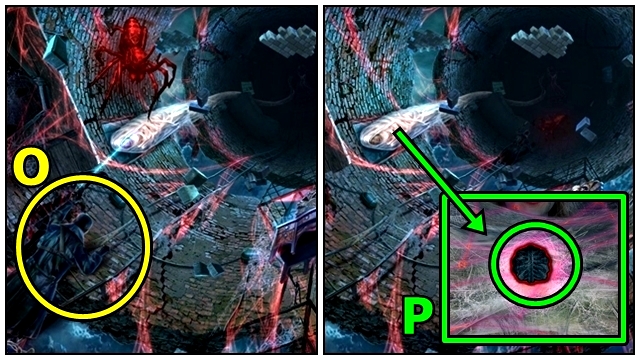
- Use the TWEEZERS (O); receive the CLUE: FUR AND FEATHERS.
- Go to the Dock Yard.
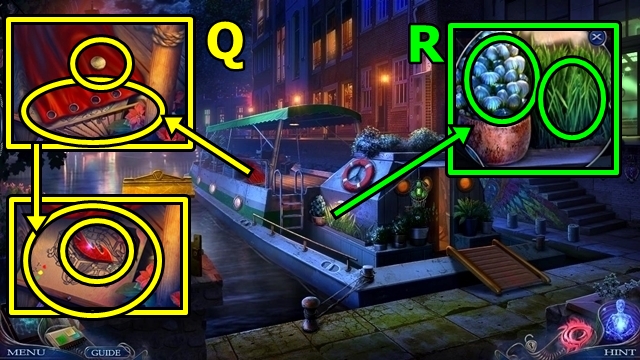
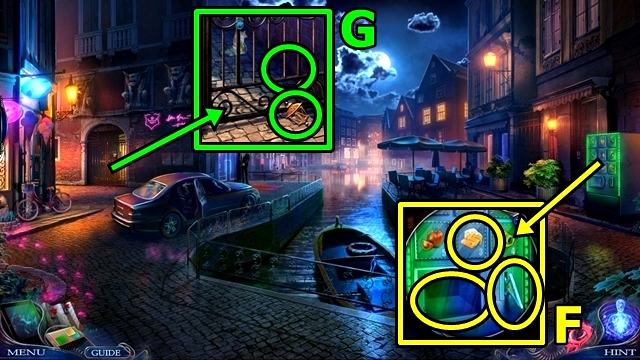
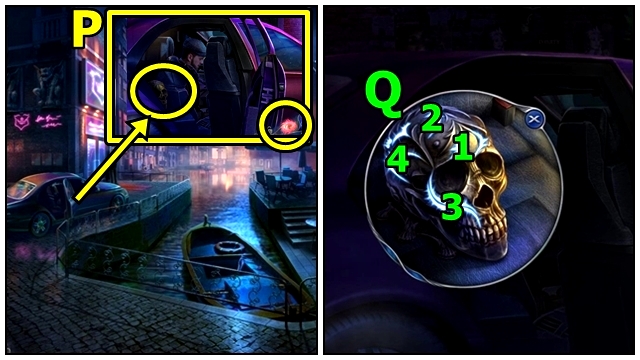
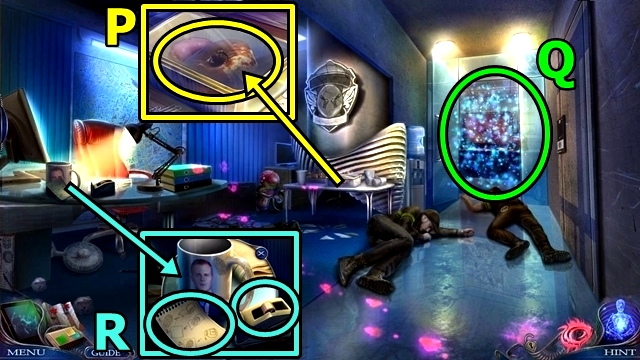
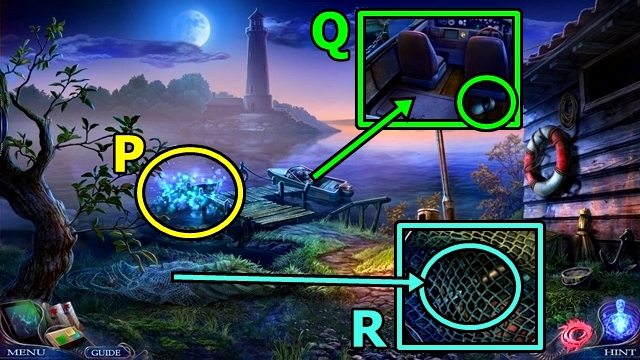
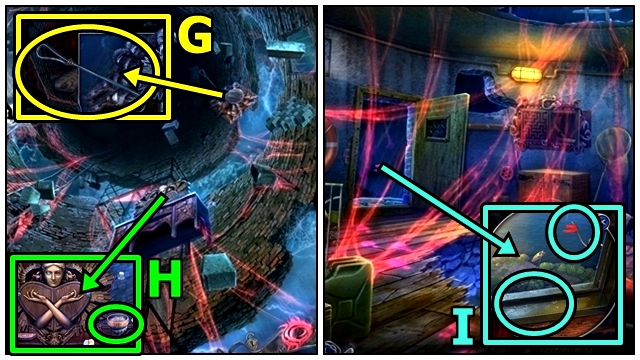
- Use the SCALPEL (P); receive the ROPE. Lift the tarp; move the items; take the NAIL PULLER.
- Move down.
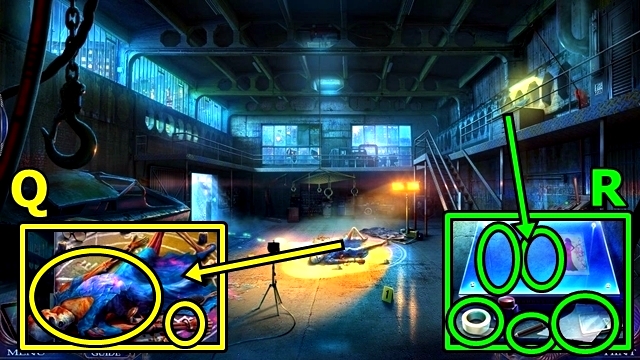
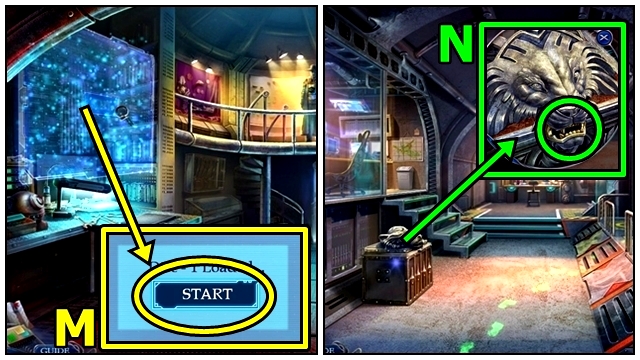
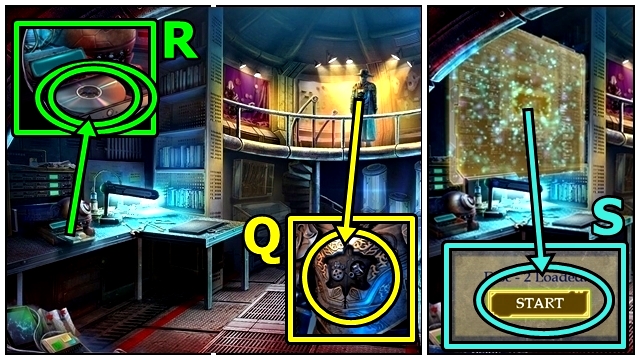
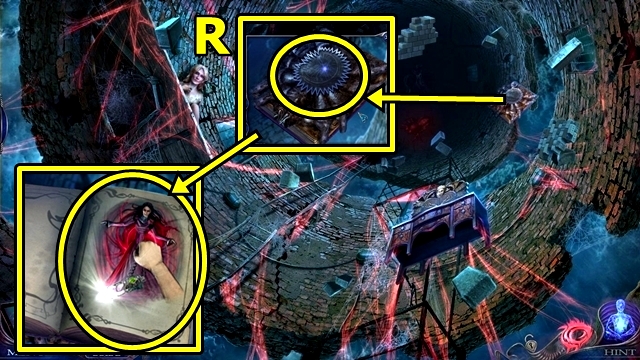
- Examine the body (Q). Use the NAIL PULLER; move the arm then hand; take the MEDALLION PIECE and INVITATION PART.
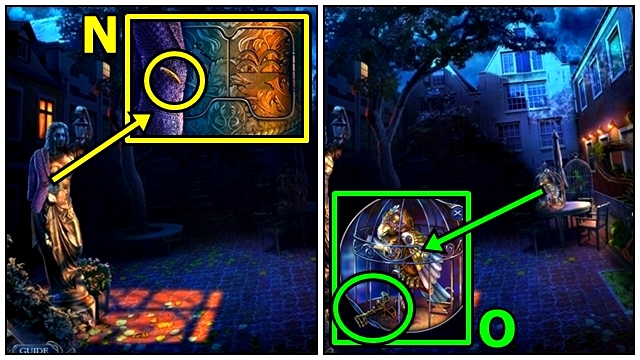
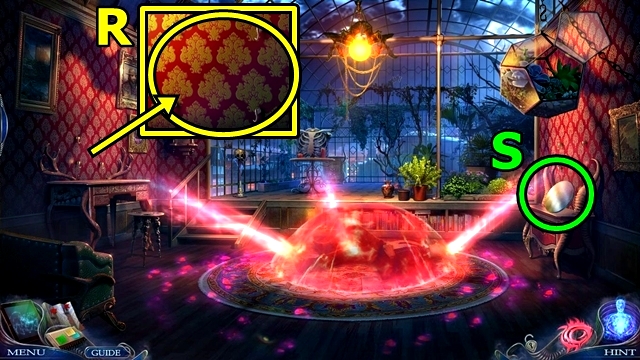
- Add the INVITATION PARTS (R); use the tape. Use the tracing paper, then pencil. Take the MYSTICAL SYMBOLS and CLUE: INVITATION.
- Go to the Dock Yard.
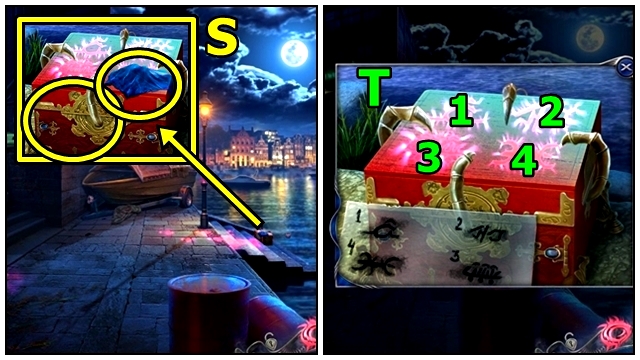
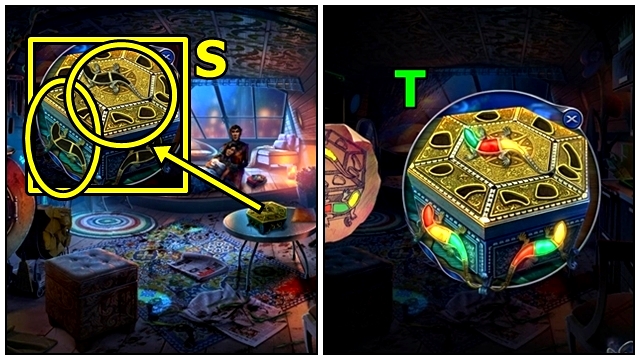
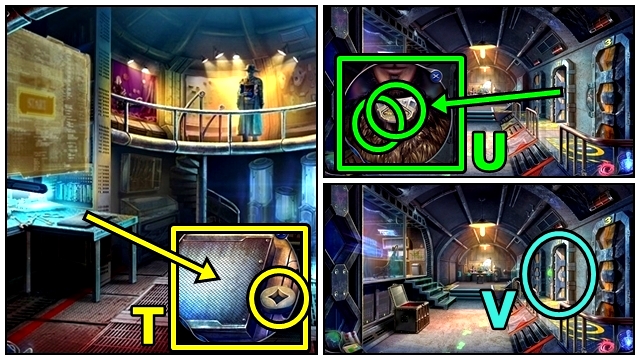
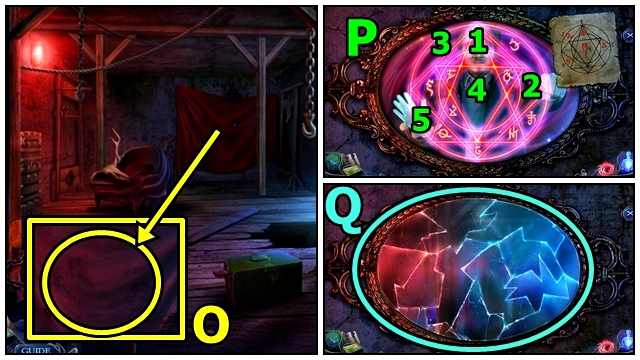
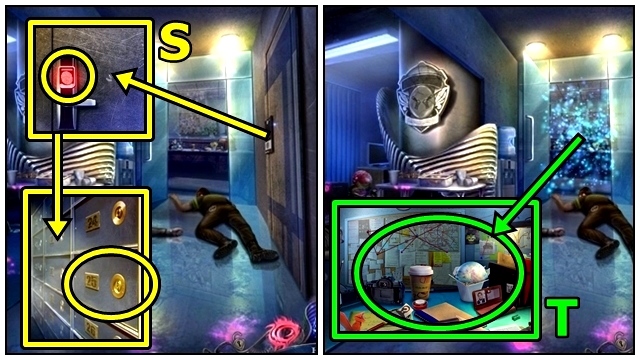
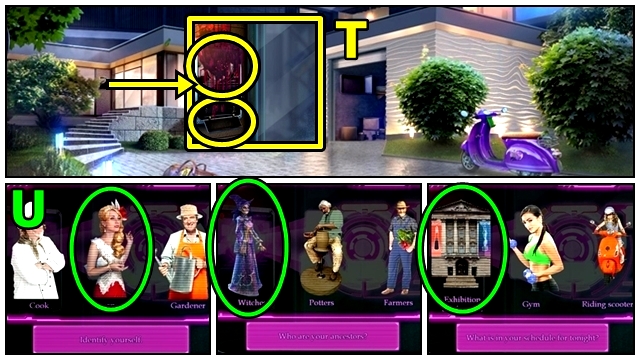
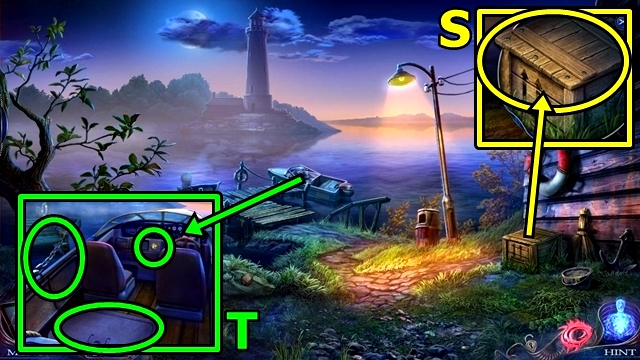
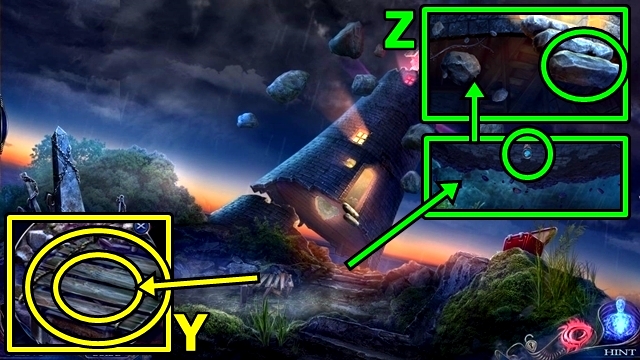
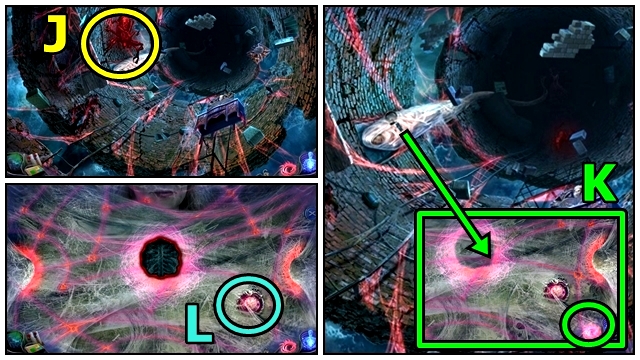
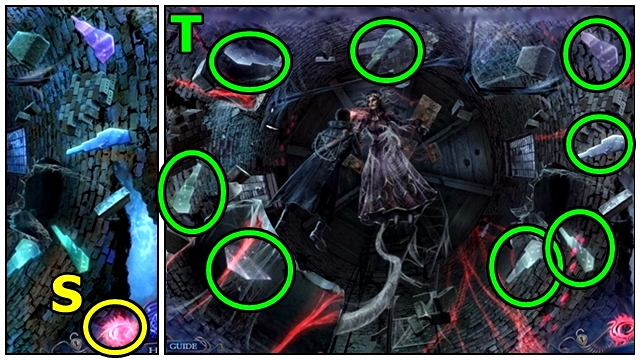
- Take the CLUE: DRESS FRAGMENT (S). Add the MYSTICAL SYMBOLS.
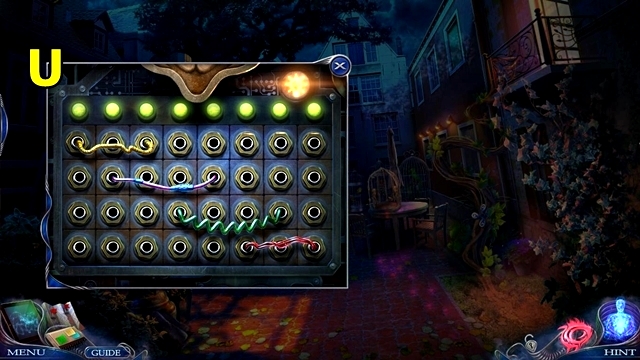
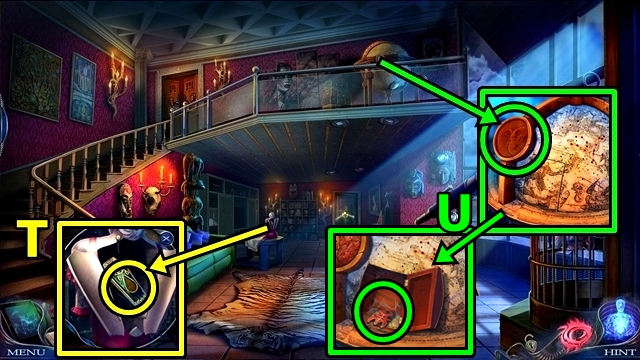
- Press the symbols in order (T). Read the note; take the OLD KEY.
- Move down.
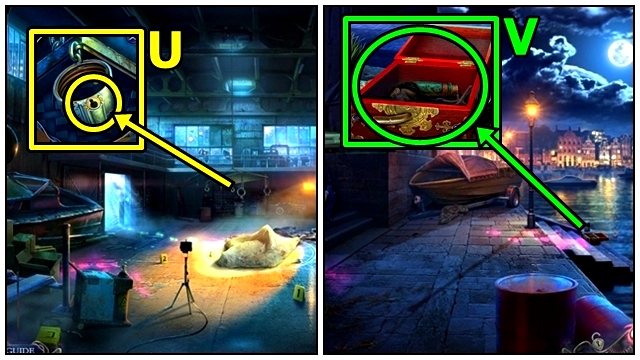
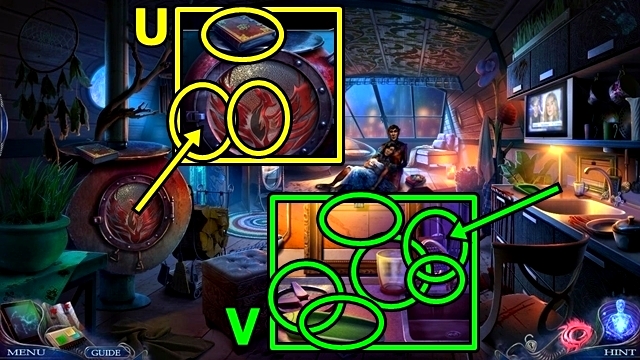
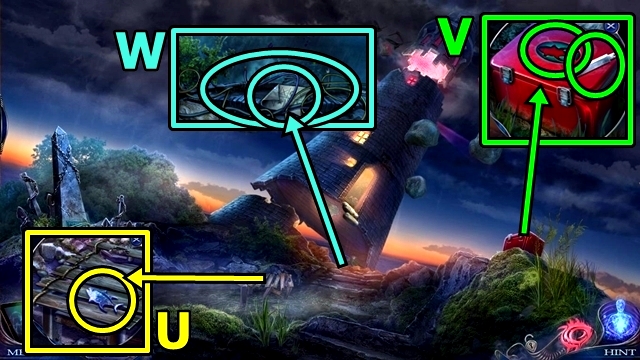
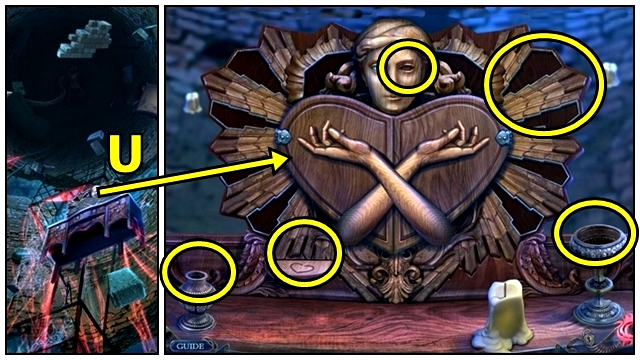
- Insert the OLD KEY (U); take the BRACELET.
- Go to the Dock Yard.
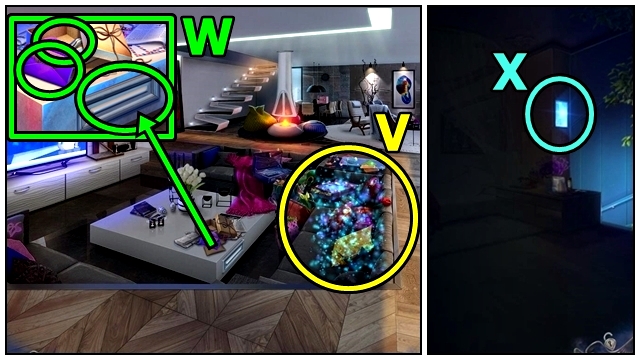
- Use the SCALPEL on the BRACELET (inventory); receive the GEMSTONE. Unwind the bracelet, take the UNBENT BRACELET.
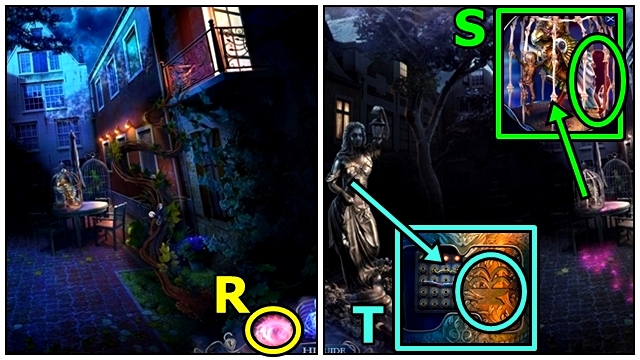
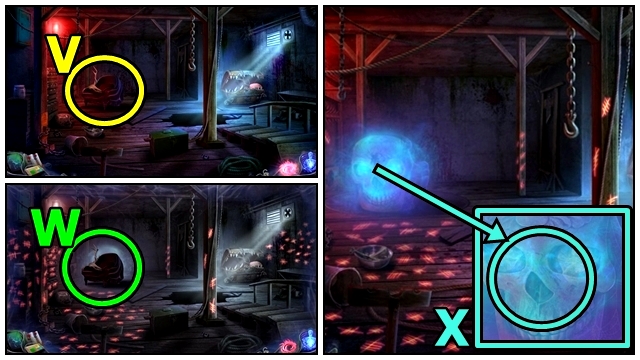
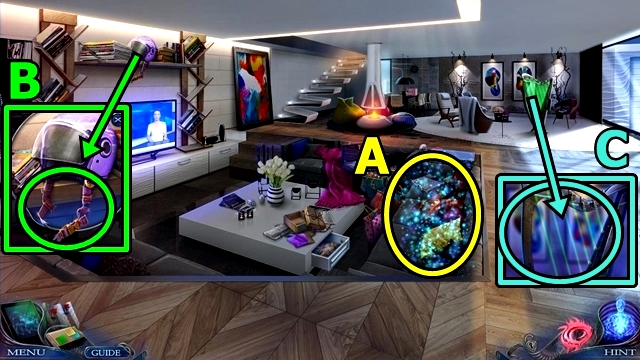
- Move the box (V); use the UNBENT BRACELET; take the CLUE: GRAY HAIR.
- Turn the page of the CASE FILE (inventory).
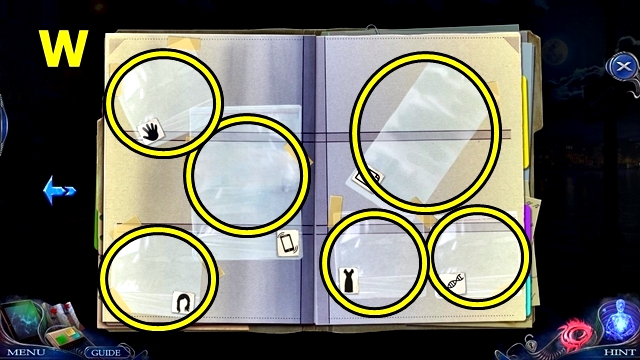
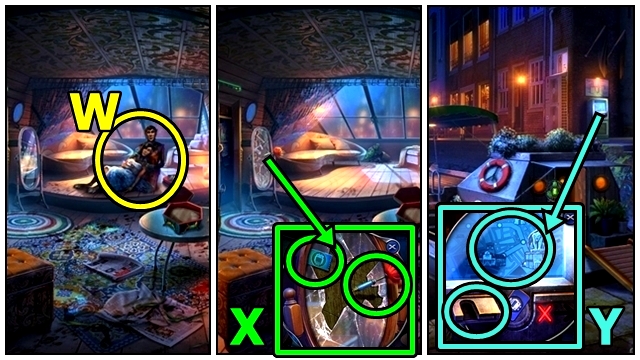
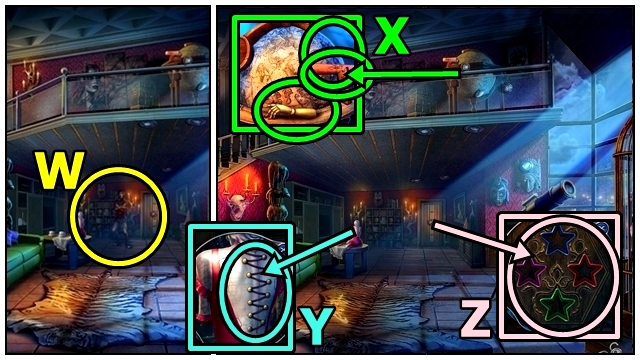
- Place the CLUE: GLASS WITH FINGERPRINTS (W), CLUE: PHONE, CLUE: GRAY HAIR, CLUE: INVITATION, CLUE: DRESS FRAGMENT and CLUE: FUR AND FEATHERS; receive the CASE FILE.
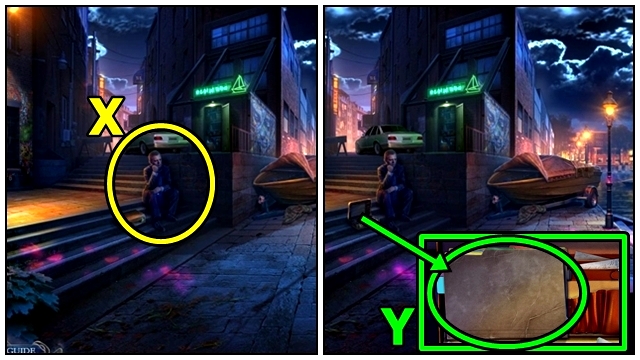
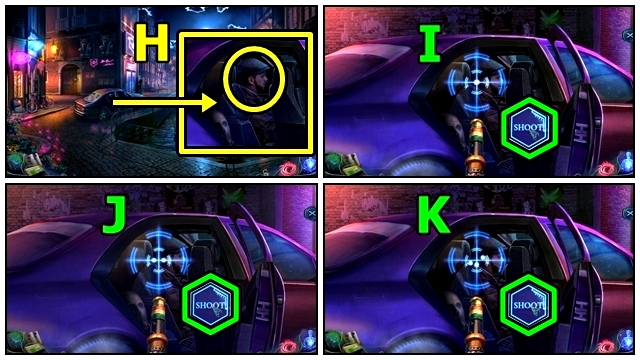
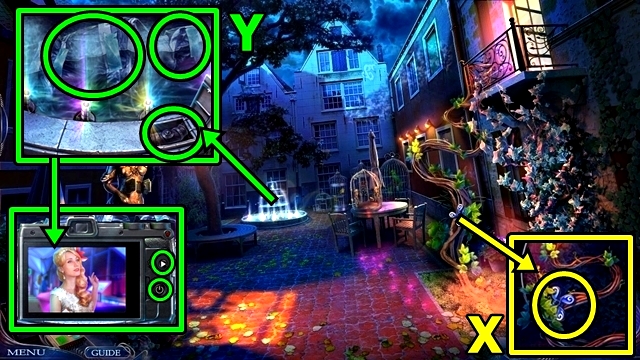
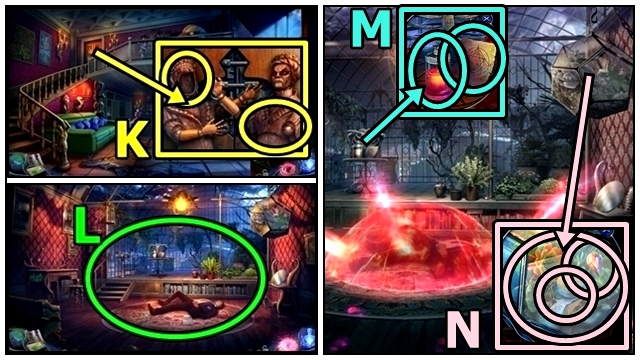
- Offer the CASE FILE (X); talk to the agent.
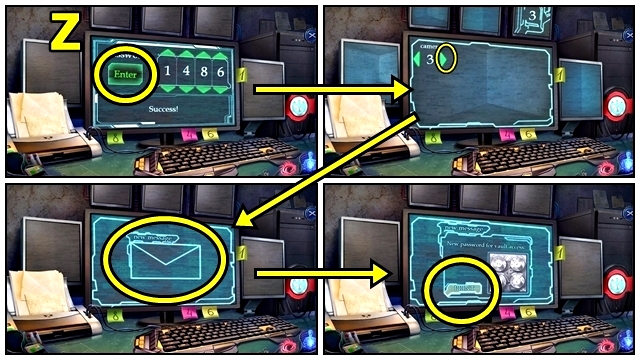
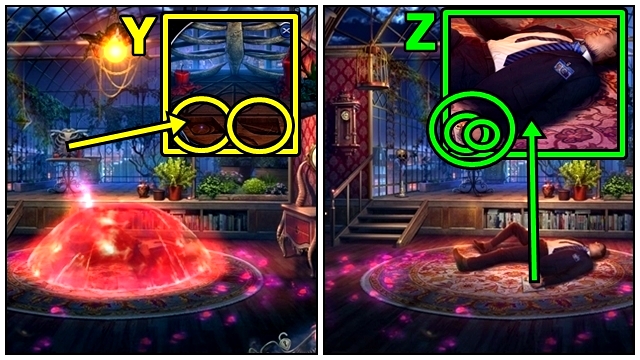
- Open the file (Y); read the report. Play the mini-game.
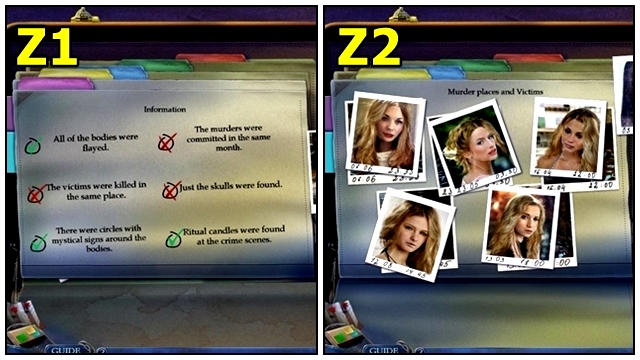
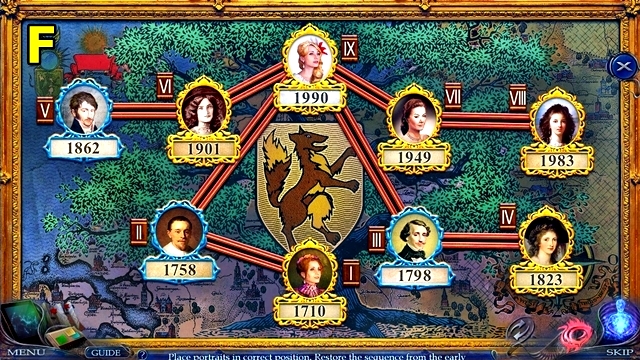
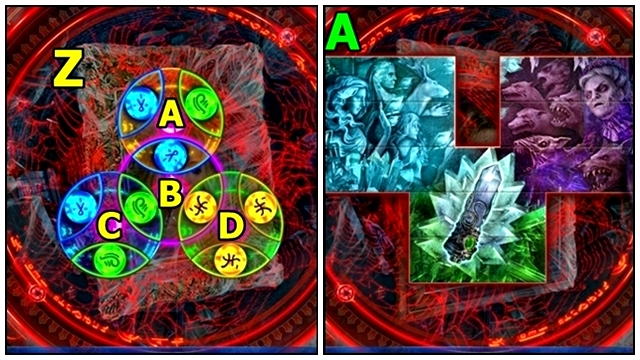
- Solution: (Z1-Z2). Take the note.
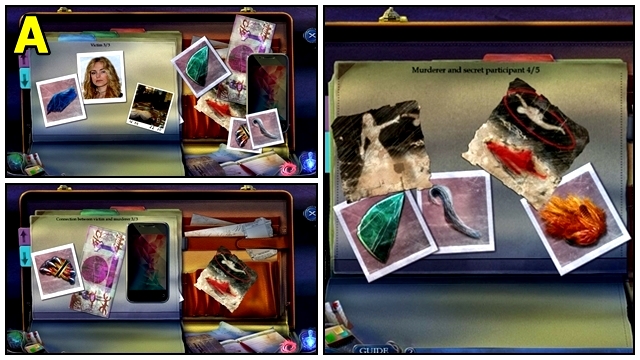
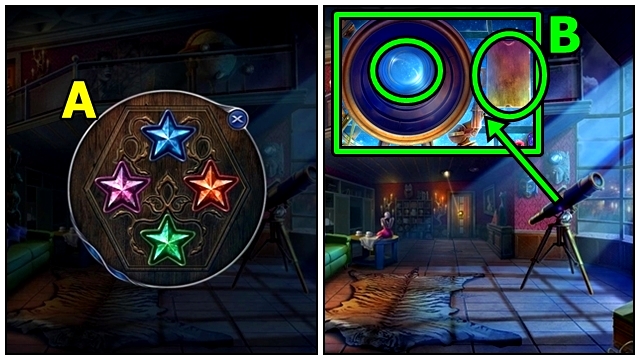
- Solution (A). Take the note.
- Talk to the agent (B). Receive the LOCK PART.
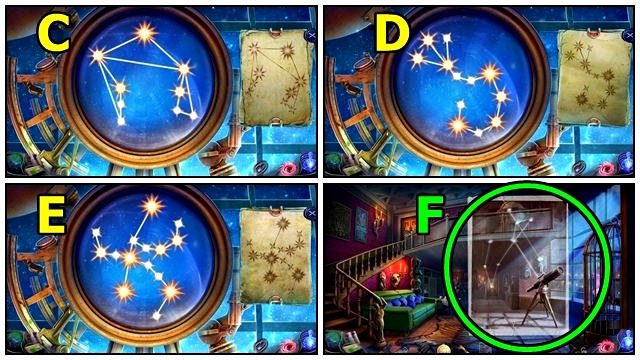
- Play the HOP (C).
- Move forward.
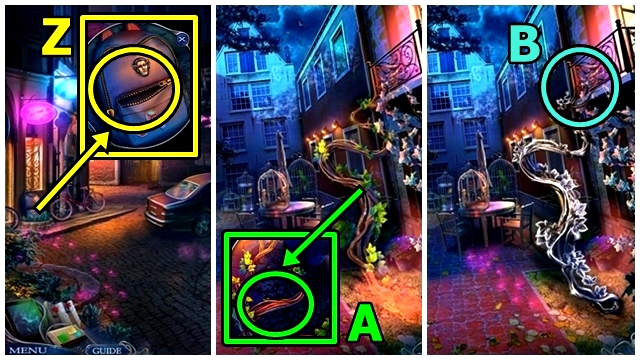
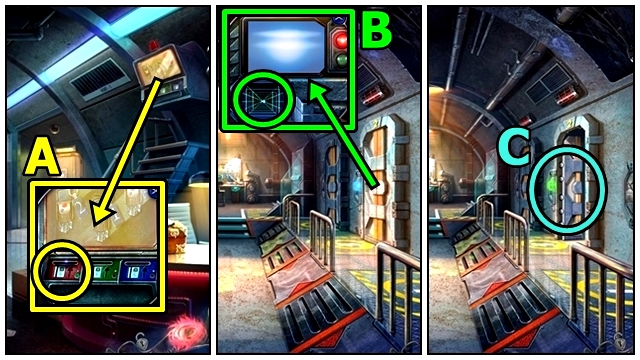
- Activate your Mystical Ability (D).
- Insert the GEMSTONE (E).
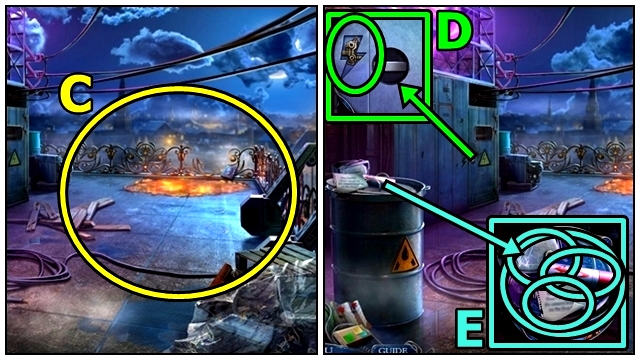
- Insert the LOCK PART (F). Play the mini-game.

- Solution: (G).
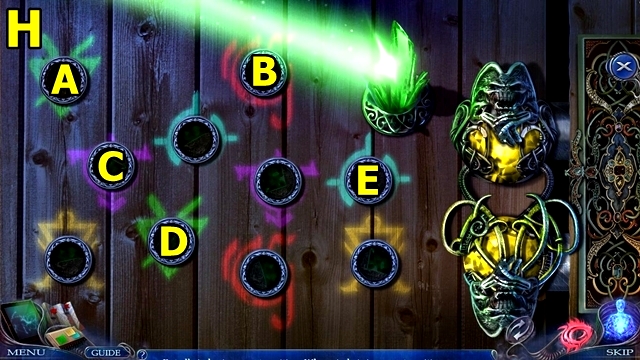
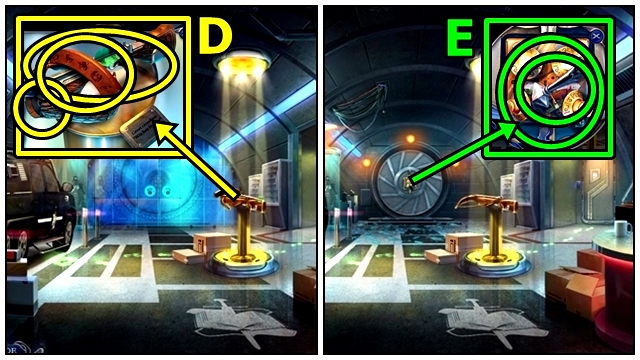
- Solution: Ax2-Bx2-Cx2-Dx2-Ex2 (H).
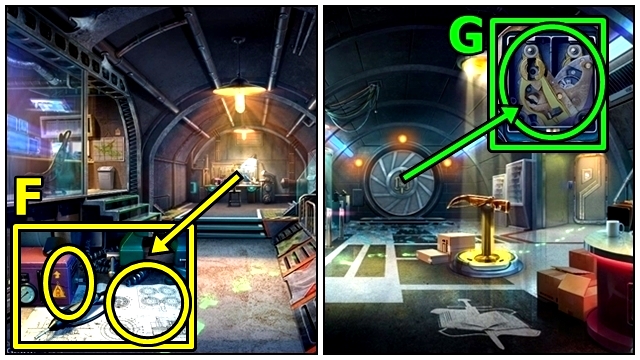
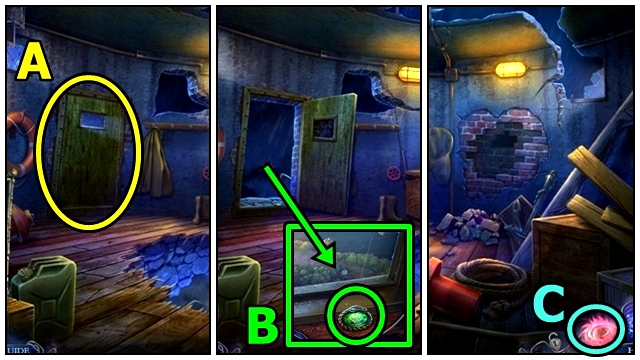
- Enter the Houseboat.
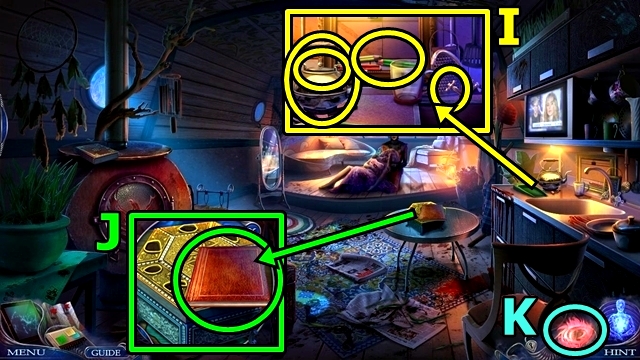
- Take the PENCILS (I). Remove the kettle lid; turn the tap, fill the kettle; receive the KETTLE WITH WATER.
- Open the book (J); take the PHOTOS; close the book.
- Activate your Mystical Ability (K).

- Insert the MEDALLION PIECE (L). Play the mini-game.
- Solution: (M). Receive the VAULT KEY.
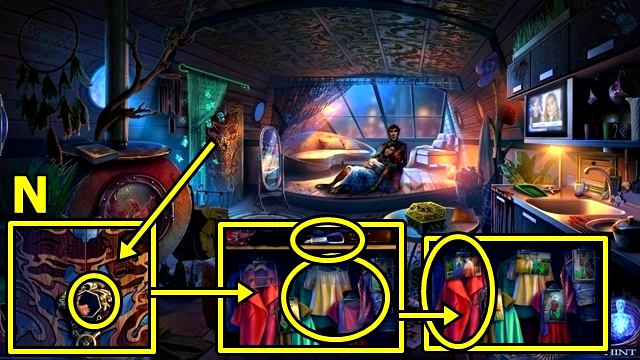
- Insert the VAULT KEY (N). Take the EXTRACTOR. Add the PHOTOS; take the SPECIAL CLOTHES.
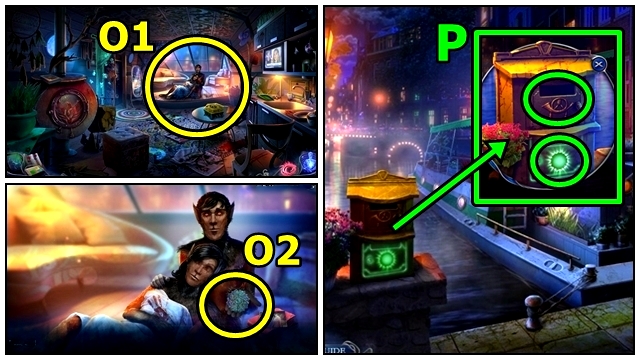
- Offer the SPECIAL CLOTHES (O). Take the SHAPESHIFTER EMBLEM.
- Move down.
- Open the mailbox (P). Open the envelope; read the note; take the GEMS. Add the SHAPESHIFTER EMBLEM; open the package; take the TANGLED ROOT.
- Take the COIN (1/3) (Q). Insert the ROPE; lift the hammock. Take the FIRE TOKEN. Examine the easel; use the PENCILS; take the JEWEL DESIGN.
- Move the grass (R); remove the lid; insert the EXTRACTOR; replace the lid; take the PLANT SAP.
- Enter the Houseboat.
- Add the GEMS (S) and JEWEL DESIGN. Play the mini-game.
- Solution: (T). Open the cloth; take the MAGIC WOOD.
- Open the book (U); take the AMPLIFIER POTION RECIPE and book. Insert the FIRE TOKEN (); open the door. Place the KETTLE WITH WATER; offer the MAGIC WOOD. Take the BOILING KETTLE.
- Place the AMPLIFIER POTION RECIPE (V); then BOILING KETTLE. Turn the tap, dampen the TANGLED ROOT; use the grater. Add the shredded root; place the PLANT SAP; add the plant sap; pour the BOILING KETTLE. Take the AMPLIFIER POTION.
- Offer the AMPLIFIER POTION (W). Receive the MAP PIECE.
- Remove the dart (X); receive the DART. Take the TICKET.
- Move down.
- Add the MAP PIECE (Y); then place and insert the TICKET.
- Enter the Station.
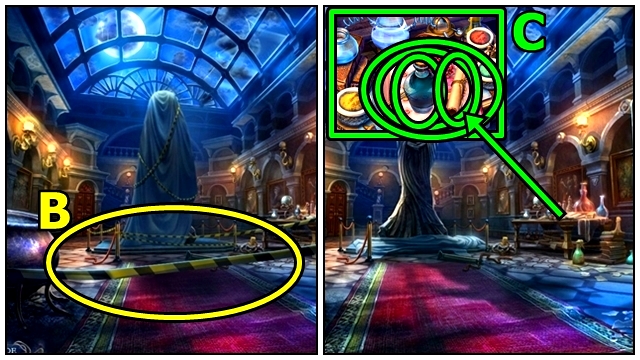
Chapter 2: The Club
- Examine anywhere (Z).
- Take the COIN (2/3) (A).
- Activate your Mystical Ability (B).
- Move the bush (C).
- Move the bikes (D).
- Take the PIPE (E). Open the bag; take MARJOLAINE'S PURSE.
- Open MARJOLAINE'S PURSE (inventory); unzip the pouch; take the COIN (3/3).
- Take the LIGHTNING (F). Insert the COINS; press the Cheese button; open the flap and sandwich; take the CHEESE.
- Take the LANTERN TOKEN (G). Offer the CHEESE; take the BOTTLE WITH CHLOROFORM.
- Add the BOTTLE WITH CHLOROFORM to the PIPE (inventory); add the DART to the bottle; put the dart in the pipe; take the PIPE WITH DART.
- Use the DART WITH PIPE (H); play the mini-game.
- Solution: (I-K).
- Remove the cloth (L); take the GATE KEY.
- Look up (M). Read the poster; insert the GATE KEY.
- Enter the Club Back Yard.
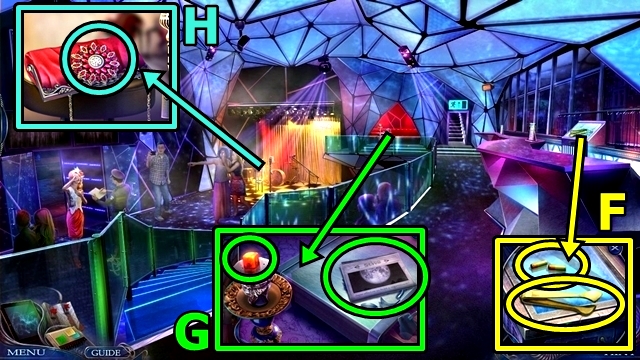
- Take the BUTTON (N); examine the badge. Insert the LANTERN TOKEN. Flip the switches.
- Take the CARVED BONE KEY (O).
- Move down.
- Activate your Magical Ability (P). Examine the skull.
- Press the symbols in order (Q). Insert the CARVED BONE KEY. Take the SKELETON FIGURINE; read the note; take the METALIZATION POTION.
- Enter the Club Back Yard.
- Activate your Magical Ability (R).
- Insert the SKELETON FIGURINE (S). Take the schism, MECHANICAL BIRD and FOUNTAIN TOKEN.
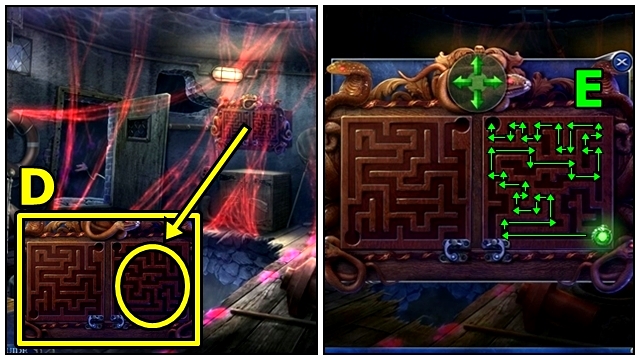
- Insert the FOUNTAIN TOKEN (T); press the button. Play the mini-game.
- Solution: (U).

- Take the BELL PART (V).
- Move down.
- Add the BELL PART (W). Ring the bell; open the napkin; take the OYSTER KNIFE.
- Enter the Club Back Yard.
- Take the VALVE (X).
- Add the VALVE (Y). Use the OYSTER KNIFE. Open the head wrap; take the MASQUERADE MASK. Open the body wrap; take the camera. Press the power button, then arrow twice. Move the camera. Take the PIN.
- Move down.
- Use the PIN (Z); receive the PERFUME ATOMIZER.
- Enter the Club Back Yard.
- Remove the cap from the METALIZATION POTION (inventory); add the PERFUME ATOMIZER; take the METALIZATION SPRAY.
- Use the METALIZATION SPRAY (A).
- Try to enter (B). Use the MASQUERADE MASK.
- Play the HOP.
- Examine anywhere (C).
- Insert the LIGHTNING (D); take the BRUSH.
- Read the note (E); take the GAS REFILL and GOGGLES. Lift the lid; use the BRUSH; receive the BRUSH WITH PITCH.
- Move down.
- Take the TONGS (F) and BATTERIES.
- Use the TONGS (G); receive the TONGS WITH COAL. Read the newspaper. Upright the pitcher; use the BRUSH WITH PITCH; take the GLASS.
- Open the purse (H); take the POWDER. Touch the bottle to activate your Magical Ability.
- Use the TONGS WITH COAL (I); take the EYE.
- Lift the panel (J); use the GLASS; receive the GLASS WITH ICE.
- Go to the Roof.
- Use the GLASS WITH ICE (K). Open the book; add the EYE. Read the note; turn the page; take the BIRD KEY.
- Move down.
- Insert the BIRD KEY into the MECHANICAL BIRD (inventory); take the HYPNOTIC BIRD.
- Place the HYPNOTIC BIRD (L).
- Exit to the Club Entrance.
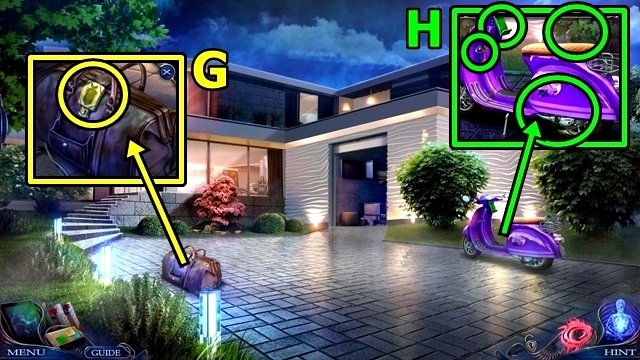
- Move the leaves (M); open the bag; take the CAR KEY.
- Use the CAR KEY (N). Take the HANDCUFFS.
- Return to the Roof.
- Add the BUTTON (O); remove the thread. Add the HANDCUFFS. Press the button. Take the MOP.
- Move down.
- Use the MOP (P); receive the SECURITY CAMERA.
- Go to the Club Entrance.
- Open the SECURITY CAMERA (inventory); take the MIRROR.
- Use the MIRROR (Q).
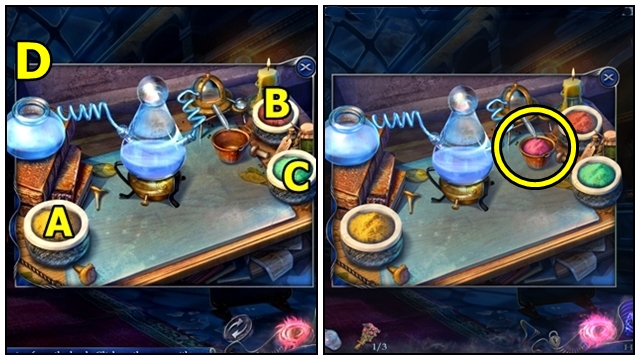
Chapter 3: The Hunter's Base
- Examine anywhere (R).
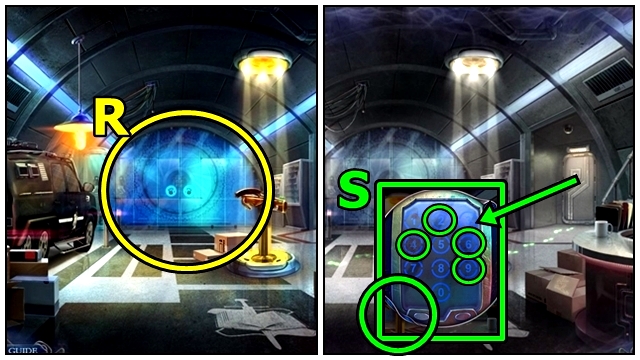
- Add the POWDER (S); open the compact; press 4-6-2-9.
- Enter the Prison.
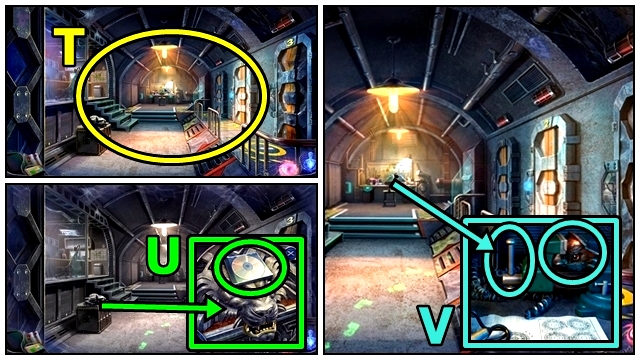
- Examine anywhere (T).
- Take DISC 1 (U).
- Loosen the vice (V); take the CROSSBOW PART.
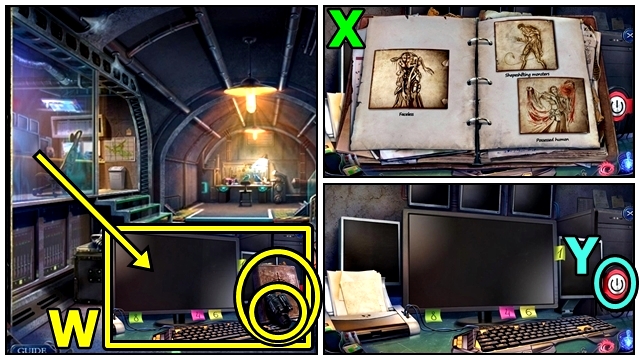
- Take the CAMERA (W). Open the book.
- Reattach the pictures (X). Take the PRISON CARD.
- Press the Power button (Y); play the mini-game.
- Solution: (Z). Go to Camera 2. Read the New Message. Press Print; receive the CODE.
- Move down.
- Insert the PRISON CARD (A); take the PRISON KEY.
- Enter the Prison.
- Insert the PRISON KEY (B).
- Talk to Sorrel (C). Receive the CROSSBOW STRING.
- Move down.
- Take the ZODIAC RING (D). Add the CROSSBOW PART and CROSSBOW STRING.
- Take the ARROW TIP BOLT (E) and BROKEN LOCK.
- Enter the Prison.
- Add the BROKEN LOCK (F) and GAS REFILL. Remove the top; use the soldering iron; take the LOCK MECHANISM.
- Move down.
- Add the LOCK MECHANISM (G) and CODE. Play the mini-game.
- Solution: (H).
- Move forward.
- Play the mini-game (I).
- Solution: A-C-B-D; D-A-D-B-D; C-D-B-C-D; E-B-D-B-C; E-A-C-B-D.
- Read the scroll (J); take the LION'S RING.
- Open the panel (K); take the schism. Take the COLLAR TOKEN.
- Insert DISC 1 (L); close the disc tray.
- Press Start (M). Play the HOP. Press OK. Take the HUNTER FIGURE.
- Return to the Prison.
- Insert the LION'S RING (N); take the DEMON'S GLOVE.
- Return to the Repository.

- Take the CLAW (O); add the DEMON'S GLOVE. Take the DEMON FIGURE.
- Move down.
- Take the LENS (P). Add the HUNTER FIGURE and DEMON FIGURE; take the HUNTER SYMBOL.
- Move forward.
- Add the HUNTER SYMBOL (Q); take the PENTACLE, DISC and CRYSTALS.
- Remove the disc (R); add the DISC; close the drawer.
- Press Start (S). Play the HOP. Receive the CRYSTAL CHARGER.
- Add the CRYSTALS to the CRYSTAL CHARGER (inventory); remove the cap; take the CHARGED CRYSTALS.
- Insert the ARROW TIP BOLT (T); take the key fob; remove the back; add the BATTERIES and CHARGED CRYSTALS; replace the back; take the COLLAR CONTROLLER.
- Return to the Prison.
- Insert the COLLAR TOKEN (U); use the COLLAR CONTROLLER. Press the button.
- Talk to Sorrel (V).
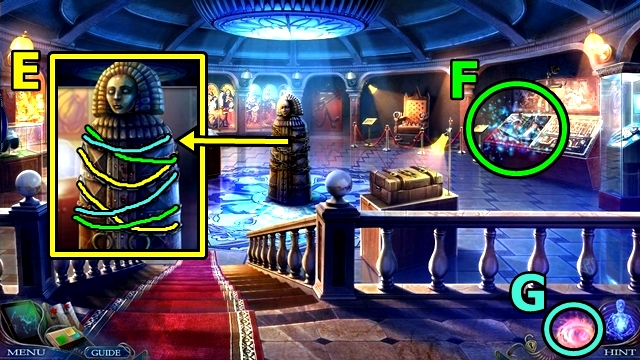
Chapter 4: The Witch's Mansion
- Talk to Sorrel (W).
- Read the scroll (X). Take the PUPPET'S HAND; add the ZODIAC RING. Take the CELESTIAL COORDINATES.
- Use the CLAW (Y); open the back. Take the STARS.
- Insert the STARS (Z).
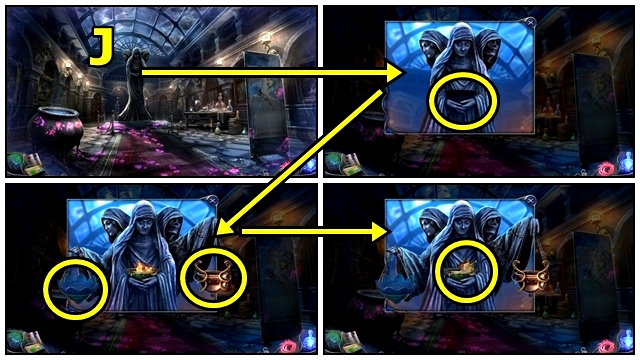
- Rearrange the stars (A).
- Add the LENS (B) and CELESTIAL COORDINATES. Play the mini-game.
- Solution: (C-E). Receive the MIRROR SCHEMATIC.
- Use the MIRROR SCHEMATIC (F).
- Enter the Occult Chamber.
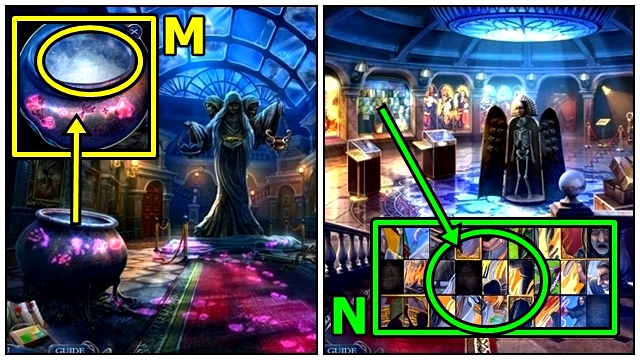
- Examine anywhere (G). Play the HOP.
- Move up (H). Receive the PUPPET MASK.
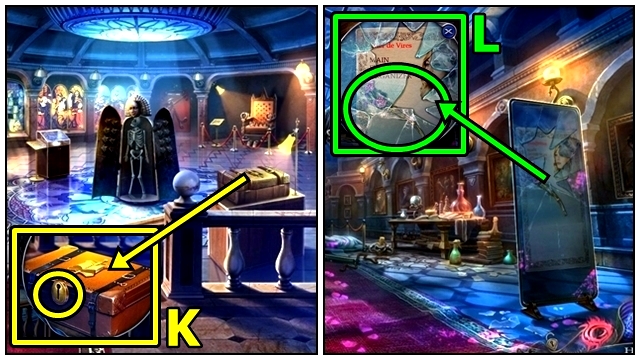
- Take the HORN (I) and FRAME.
- Insert the PENTACLE (J). Place the HORN; take the MAGICAL CANDLE and WITCH STATUE.
- Move down.
- Add the PUPPET MASK (K) and PUPPET'S ARM.
- Enter the Winter Garden.
- Examine anywhere (L).
- Take the ECTOPLASM (M) and MIRROR INSTRUCTION.
- Open the panel (N); take the INK and RUBY TEAR.
- Return to the Occult Chamber.
- Remove the cloth (O). Add the ECTOPLASM and MIRROR INSTRUCTION. Play the mini-game.
- Solution: (P). Take the MIRROR HAND. Play the mini-game.
- Solution: (Q). Receive the MIRROR.
- Return to the Winter Garden.
- Add the MIRROR (R), then MIRROR HAND. Read the note; take the MOON.
- Add the FRAME (S).
- Move down.
- Insert the RUBY TEAR (T); take the DARK LENS.
- Add the MOON (U); take the TRIPLE MOON TOKEN.
- Enter the Occult Chamber.
- Remove the GOGGLES' lens (inventory); add the DARK LENS; take the GOGGLES.
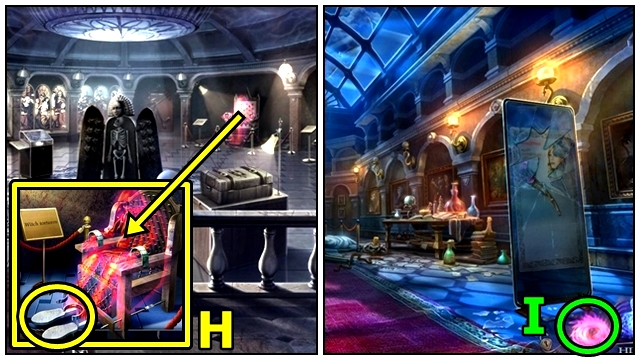
- Activate your Mystical Ability (V).
- Turn the chair (W).
- Use the GOGGLES (X); open the eyes; add the TRIPLE MOON TOKEN. Take the TEMPLAR STATUE.
- Return to the Winter Garden.
- Add the WITCH STATUE (Y) and TEMPLAR STATUE.
- Move the hand (Z); take the STRONG ROOM KEY; read the note.
Chapter 5: The Police Station
- Open the trunk (A). Play the HOP; receive the FIRST AID KIT.
- Examine the office (B).
- Take the FIRE HOSE (C) and WEED KILLER.
- Take the instructions (D) and CLICKER.
- Move down.
- Open the FIRST AID KIT (inventory); take the BANDAGE and SCISSORS.
- Add the BANDAGE (E). Use the CLICKER; press the button. Receive the PHOTO.
- Examine the office (F).
- Use the WEED KILLER (G); move the flower. Add the PHOTO. Enter code: 0-5-0-7. Take the FIRE TRUCK INSTRUCTION, WATER and BALL.
- Move down.
- Throw the BALL (H); press the button; receive the CAR WHEEL.
- Enter the office (I).

- Examine the guard (J); take the TOWEL.
- Add the FIRE TRUCK INSTRUCTION (K), then FIRE HOSE, CAMERA and WEED KILLER. Use the wrench. Add the CAR WHEEL; then the glue. Take the FIRE TRUCK.
- Add the WATER to the TOWEL (inventory); remove the cap, then pour; take the WET TOWEL.
- Use the WET TOWEL (L).
- Enter the Police Office.
- Examine anywhere (M).
- Use the FIRE TRUCK (N). Play the mini-game.
- Solution: B-C-B-C-B-B (O). Receive the MANDRAKE ROOT.
- Use the SCISSORS (P); take the FINGERPRINT TAPE.
- Play the HOP (Q); receive the TAPE.
- Take the FINGERPRINT INSTRUCTIONS (R). Add the TAPE; rip the tape; receive the FINGERPRINT.
- Add the FINGERPRINT, FINGERPRINT INSTRUCTIONS and INK to the FINGERPRINT TAPE (inventory). Place the fingerprint, remove the ink cap; take the TAPE.
- Use the TAPE (S). Insert the STRONG ROOM KEY. Take the CHALICE; read the note; take the MUSEUM KEY and VOICE RECORDER.
- Use the VOICE RECORDER (T). Play the HOP.
- Read the pamphlet (U); open the book; take the NUTS.
- Take the LIGHTER (V); offer the NUTS; take the STAINED GLASS (1/3).
- Move the boards (W).
- Activate your Mystical Ability (X).
- Play the mini-game (Y).
- Solution: (Z). Take the MAGIC BIRD.
- Use the LIGHTER on the MAGICAL CANDLE (inventory); take the BURNING CANDLE.
- Use the MAGIC BIRD (A), then the BURNING CANDLE. Insert the MUSEUM KEY.
- Enter the Museum.
- Remove the tape (B).
- Read the scroll (C); take the FLASK, DRIED FLOWERS (1/3) and book. Play the mini-game.
- Solution: Bx2-C; B-A-C; Ax2-B; Bx2-A (D). Take the MAGIC POWDER.
- Enter the Inquisition Installation.
- Remove the chain pairs (E); open the Iron Maiden; take the BROKEN HEART ARTIFACT and BLUE FLOWER.
- Play the HOP (F); receive the IRON BOOTS.
- Activate your Mystical Ability (G).
- Place the IRON BOOTS (H); take the SNAKE SPIRIT.
- Move down.
- Activate your Mystical Ability (I).
- Place the CHALICE (J). Add the BLUE FLOWER; take the BLOOD. Add the SNAKE SPIRIT; take the STAINED GLASS. Take the INQUISITOR'S KEY.
- Enter the Inquisition Installation.
- Insert the INQUISITOR'S KEY (K); take the DOLL, LEATHER GLOVES, book and DRIED FLOWERS (2/3).
- Move down.
- Use the LEATHER GLOVES (L); take the DRIED FLOWERS (3/3) and ESTER'S PORTRAIT.
- Add the DRIED FLOWERS (M), MANDRAKE ROOT and MAGIC POWDER; use the FLASK; receive the WEAKENING POTION; take the STAINED GLASS.
- Enter the Inquisition Installation.
- Add the STAINED GLASS (N); play the mini-game.
- Solution: (O). Take the picture; add ESTER'S PORTRAIT; touch the picture twice; take ESTER'S ADDRESS.
- Return to the Museum Back Door.
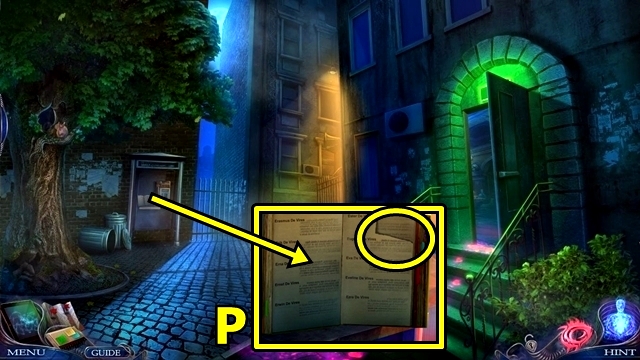
- Add ESTER'S ADDRESS (P); take the page.
Chapter 6: Ester's House
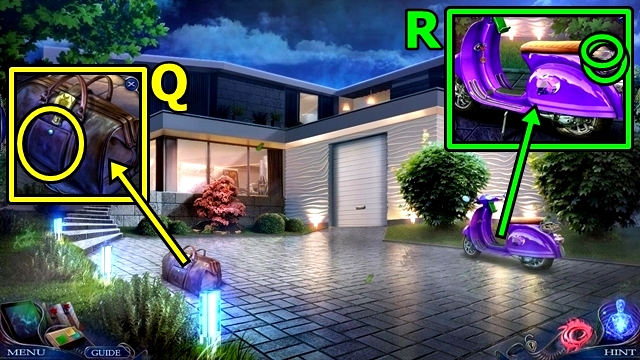
- Open the flap (Q); take the COSMETIC OIL and GARAGE KEY.
- Read the note (R); take the RAG.
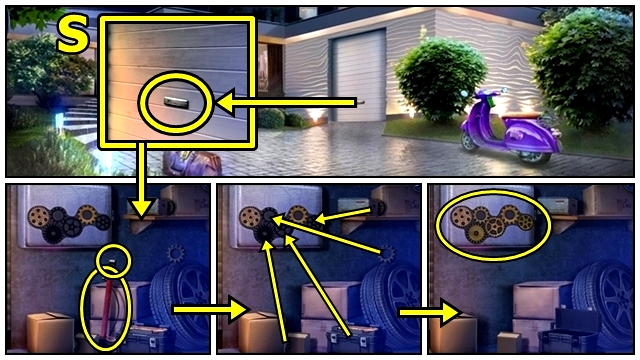
- Use the GARAGE KEY (S); remove the top; take the BROKEN PUMP. Replace the gears (move the boxes and open the toolbox); activate the gears; take the CLIPPER and BATTERY.
- Use the RAG (T); insert the BATTERY; play the mini-game.
- Solution: (U).
- Enter the Guest Room.
- Play the HOP (V); receive the RULER.
- Read the note (W); take the PUMP HANDLE. Use the RULER; remove the wrap; pour the COSMETIC OIL; take the SPADE.
- Go upstairs.
- Turn on the lights (X).
- Read the note (Y); take the LYCORIS. Move the vase; take the FIRST NOTES PART.
- Use the SPADE (Z); take the NEEDLE and the SECOND NOTES PART.
- Go downstairs.
- Play the HOP (A); receive the HELMET BUCKLES.
- Add the HELMET BUCKLES (B); take the HELMET.
- Add the FIRST NOTES PART (C) and SECOND NOTES PART; play the mini-game.

- Solution: A-B-E-C-E-B-C-D-G (D). Take the DECORATIVE DAGGER and PORTRAIT PENDANT.
- Go upstairs.
- Place the PORTRAIT PENDANT (E); play the mini-game.
- Solution: (F). Take the FAMILY EMBLEM.
- Return to Ester de Vires House.
- Insert the FAMILY EMBLEM (G); move the items; take the ROPE and phone. Turn on the phone; read the text; take the PHONE.
- Place the PUMP HANDLE on the BROKEN PUMP (inventory); take the PUMP.
- Place and attach the PUMP (H); place the HELMET and PHONE. Turn the key.
Chapter 7: The Pier
- Remove the coat (I); take ESTER'S PURSE.
- Use the CLIPPER (J); add the ROPE.
- Play the mini-game.
- Solution: (K).
- Open ESTER'S PURSE (inventory); take the AMULET and HAIR.
- Activate your Mystical Ability (L).
- Use the AMULET (M).
- Talk to the men (N); receive the BOAT KEY.
- Move toward the Pier.
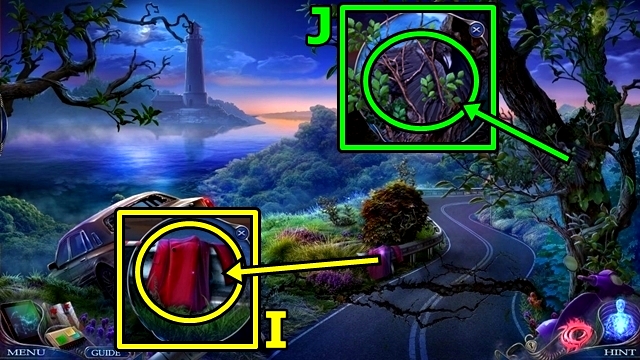
- Take the planks (O).
- Play the HOP (P); receive FUEL.
- Take the CAN (Q).
- Use the CAN (R); take the CHISEL.
- Use the CHISEL (S); lift the top; take the NIPPERS.
- Insert and turn the BOAT KEY (T). Lift the panel; pour the FUEL. Turn the key; use the NIPPERS.
- Take the FISH (U).
- Take the BLADE (V). Insert the FISH; take the RUBBER GLOVES and INSULATING TAPE.
- Use the RUBBER GLOVES (W); take the INSTRUCTION.
- Move the leaves (X); read the newspaper; play the HOP; receive ROPE. Add the INSTRUCTION; press the correct tiles; take the WITCH TOKEN and HOOKS.
- Add the INSULATING TAPE to the KNIFE (inventory); attach the tape; take the KNIFE.
- Use the KNIFE (Y); take the BOARDS.
- Add the ROPE and HOOKS to the BOARDS (inventory); attach everything; take the ROPE LADDER.
- Look up (Z). Add the ROPE LADDER.
- Enter the Lighthouse.
- Open the door (A).
- Take the GREEN SNAKE (B).
- Activate your Mystical Ability (C).
- Place the GREEN SNAKE (D); play the mini-game.
- Solution: (E). Read the scroll; take the GIRL TOKEN.
- Add the WITCH TOKEN (F) and GIRL TOKEN; press the symbols in order; take the RITUAL GEM (2/10).
- Enter the Tower.
- Take the POKER (G).
- Take the EMPTY GOBLET (H).
- Return to the Lighthouse.
- Place the EMPTY GOBLET (I); take the GOBLET WITH WATER. Use the POKER; receive the DRESS PART.
- Go to the Tower.
- Add the NEEDLE and HAIR to the DOLL (inventory); move the arm; place the hair; add the DRESS PART; take the BAIT DOLL.
- Use the BAIT DOLL (J).
- Activate your Mystical Ability (K).
- Take the PINK SNAKE (L).
- Return to the Lighthouse.
- Add the PINK SNAKE (M); play the mini-game.
- Solution: (N). Take the SEAL AMULET.
- Go to the Tower.
- Offer the WEAKENING POTION (O).
- Insert the SEAL AMULET (P); play the mini-game.
- Solution: (Q). Use the KNIFE. Receive the MOONLIGHT SYMBOL.
- Place the MOONLIGHT SYMBOL (R). Reassemble the picture; touch the page; take the CRYSTAL EYE.
- Move forward.
- Activate your Mystical Ability (S).
- Take the RITUAL GEMS (10/10) (T).
- Move down.
- Remove the cap and pour the BLOOD into the BROKEN HEART ARTIFACT (inventory); add the DECORATIVE DAGGER; take the HEART ARTIFACT.
- Place the LYCORIS (U), HEART ARTIFACT, GOBLET WITH WATER, CRYSTAL EYE and RITUAL GEMS. Play the HOP; receive the CRYSTAL OF PURE LIGHT.
- Move forward.
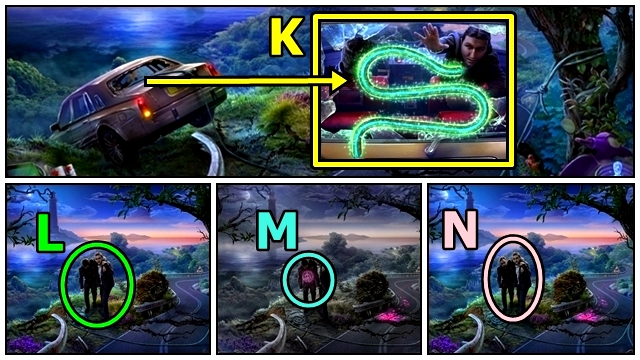
- Use the CRYSTAL OF PURE LIGHT (V); play the mini-game.
- Solution: (W).

- Solution: (X-Y).
- Solution: Bx2-Ax2-D-Cx2-B-D-B-Ax2-Dx2-B (Z).
- Solution: (A).
- Congratulations! You've completed The Unseen Fears: Body Thief.
Created at: 2017-04-14