

Walkthrough Menu
- General Tips
- Chapter 1: Lyon Square
- Chapter 2: Sweet Street
- Chapter 3: Dark Alley
- Chapter 4: Miracle Avenue
- Chapter 5: Incredible Street
- Chapter 6: Behind the Scenes
General Tips
- This is the official guide for The Unseen Fears: Last Dance.
- This guide will not mention each time you have to zoom into a location; the screenshots will show each zoom scene.
- Hidden-object puzzles are referred to as HOPs. This guide will not show HOP solutions. It will identify the location of the HOP and the inventory item acquired.
- This guide will show solutions for non-random puzzles. Please read the in-game instructions for each puzzle.
- In this game, you will sometimes have to select the new scene to trigger dialog, cut-scenes, or tasks prior to interacting with the scene.
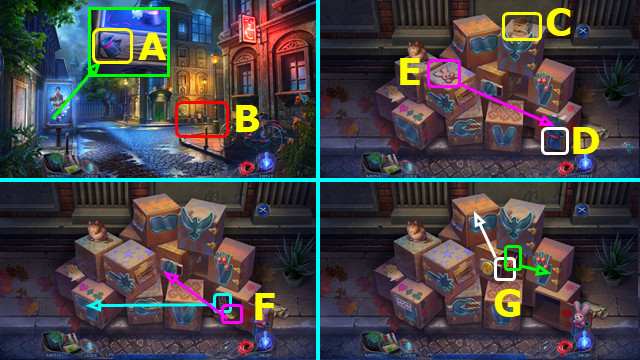
Chapter 1: Lyon Square
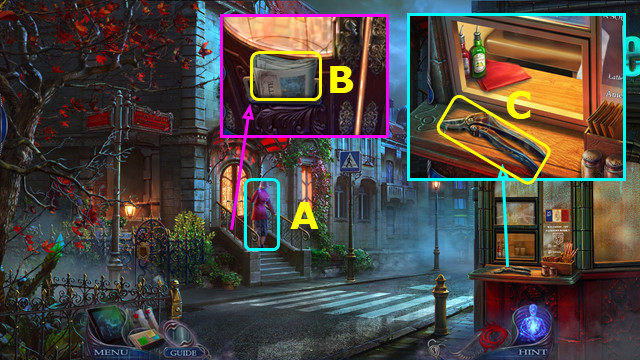
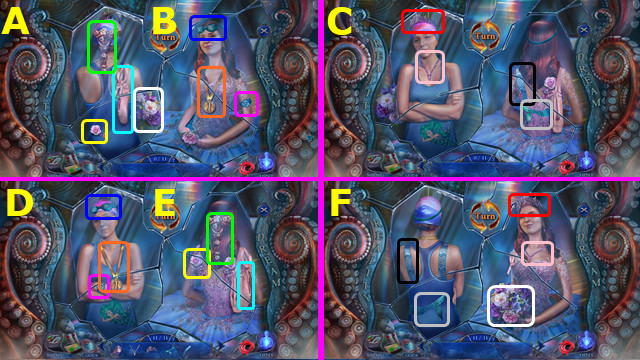
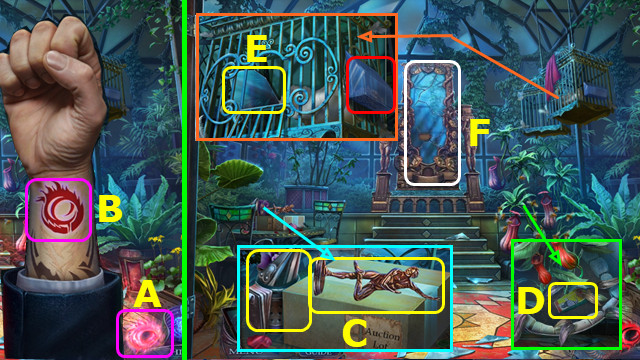
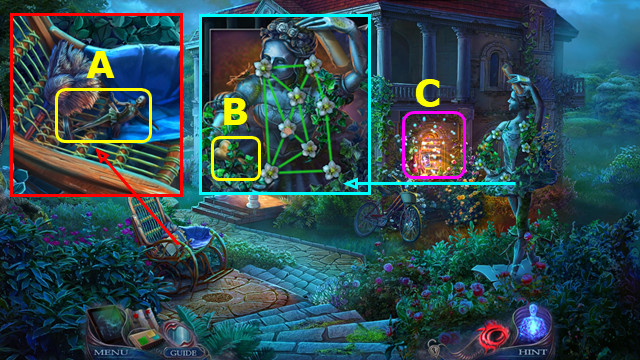
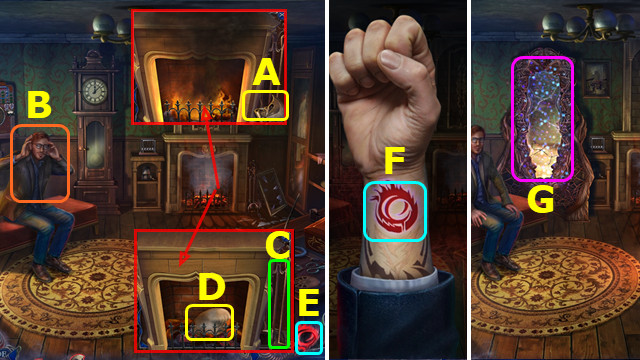
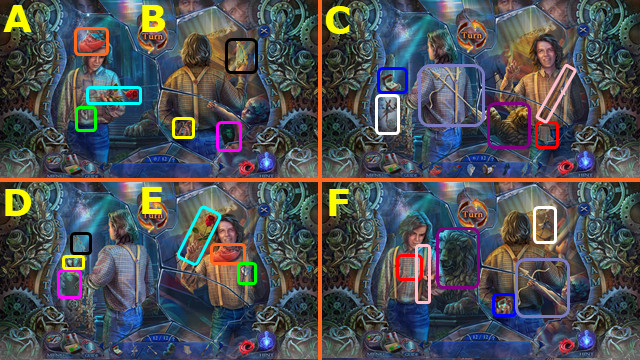
- Select tablet.
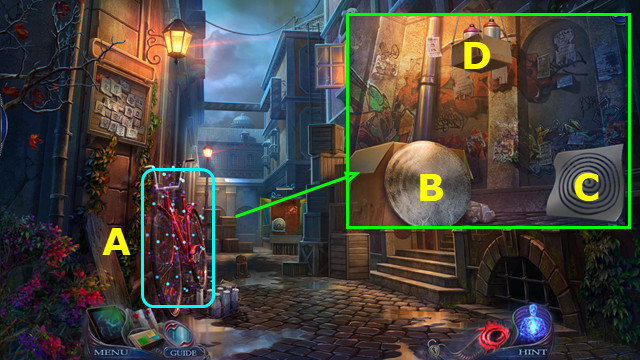
- Talk; take phone (A).
- Take NEWSPAPER (B).
- Take CLIPPERS (C).
- CLIPPERS on NEWSPAPER; take COFFEE COUPON.
- Use COFFEE COUPON; take CITY SYMBOL and coffee (D).
- Take BROKEN STATUETTE; place CITY SYMBOL (E).
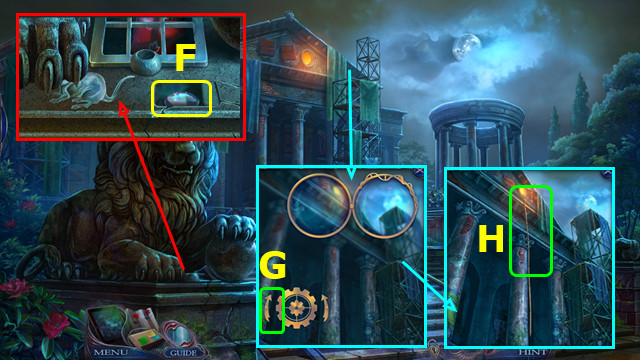
- Play HOP; take PLIERS (F).
- Use PLIERS (G).
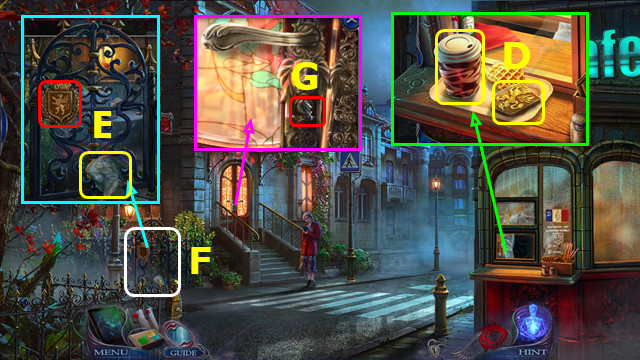
- Go forward.
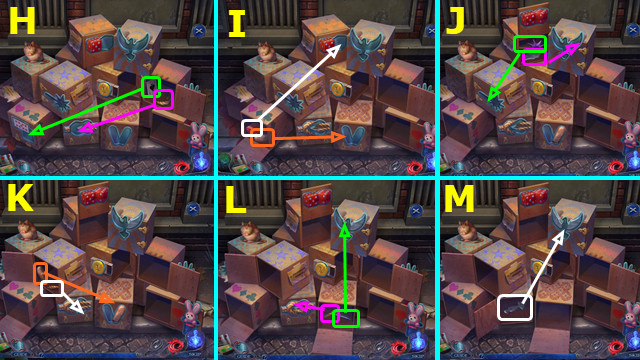
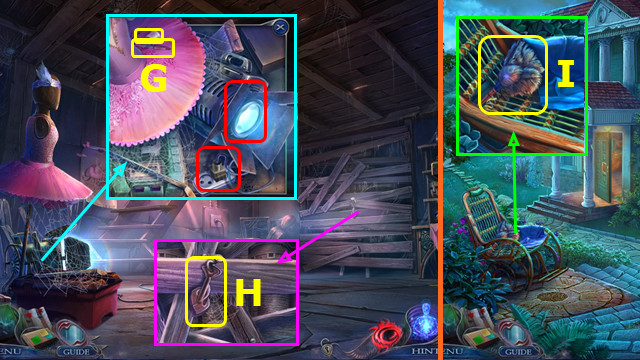
- Take VALVE (H).
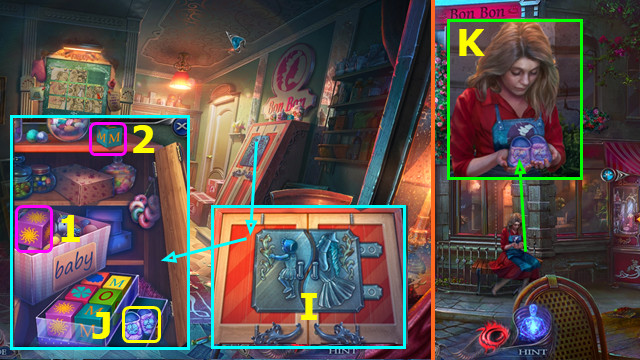
- Talk; take ORIGAMI BAT (I).
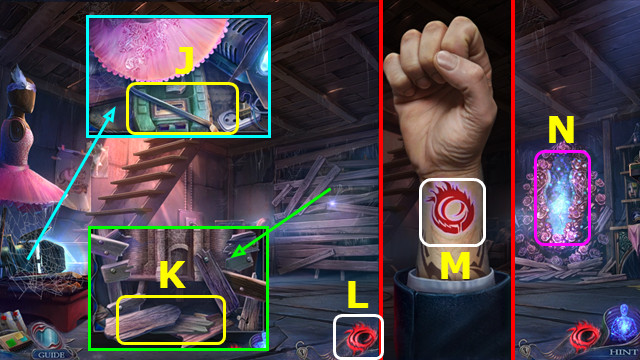
- Take LETTER B (J).
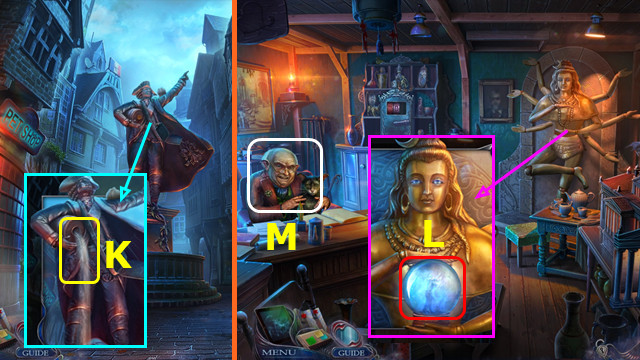
- Take GLUE and 8 STATUETTE PIECES (green) (K).
- STATUETTE PIECES and GLUE on BROKEN STATUETTE; take STATUETTE.
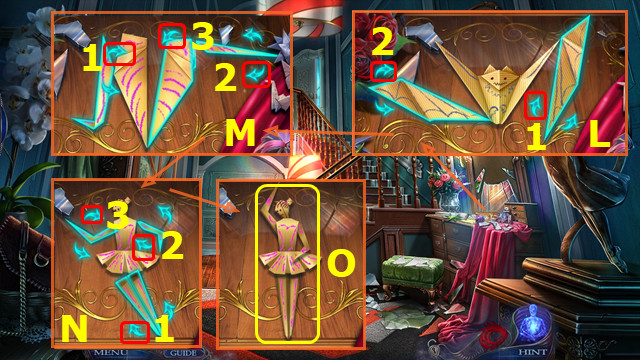
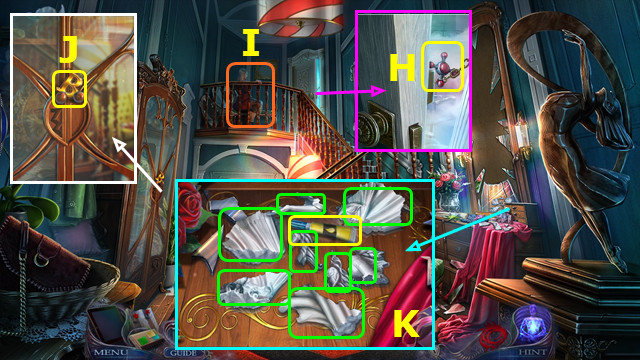
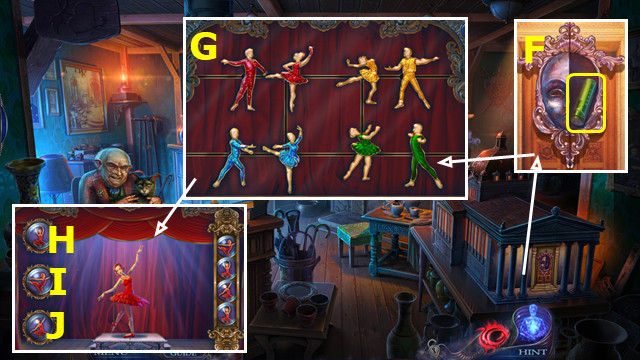
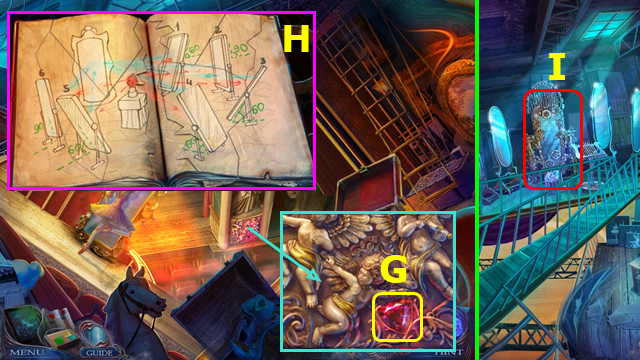
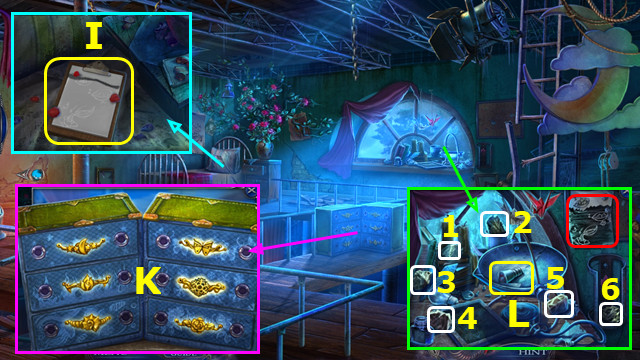
- Place ORIGAMI BAT; solution 1-2 (L).
- Solution 1-3 (M).
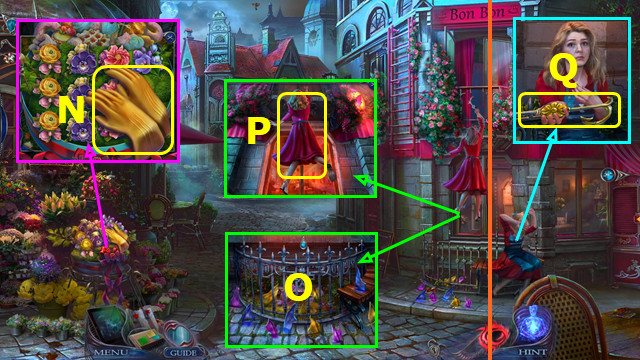
- Solution 1-3 (N); take BALLERINA FIGURE (O).
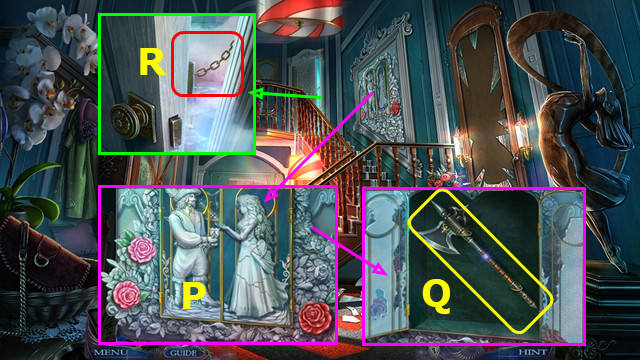
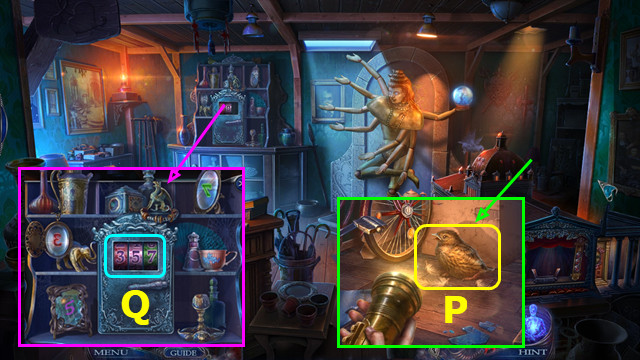
- Rotate 3 roses as shown; place STATUETTE (P).
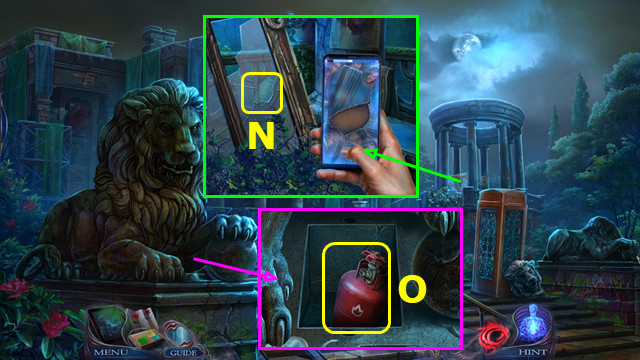
- Take AXE (Q).
- Use AXE (R).
- Go forward.
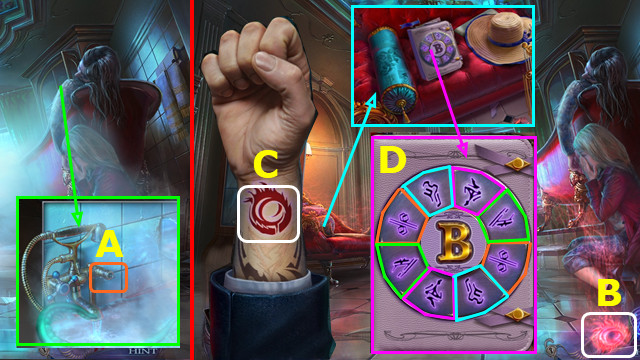
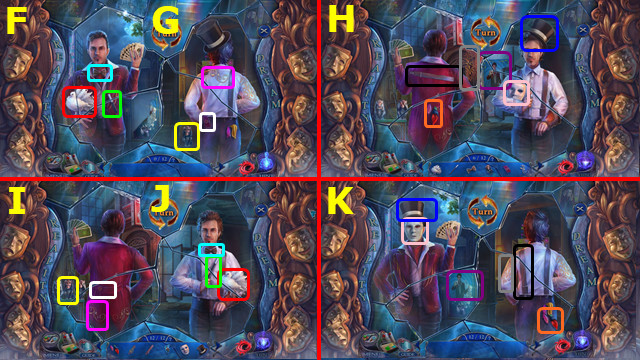
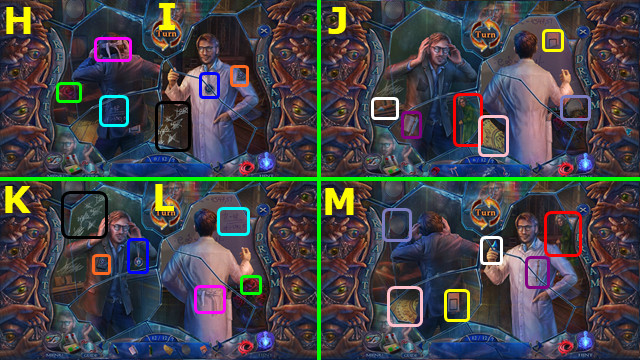
- Use VALVE (A).
- Select POWER (B) and TATTOO (C).
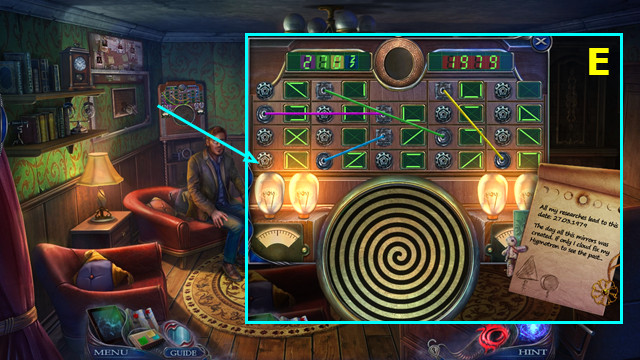
- Select; place LETTER B; select pairs (D).
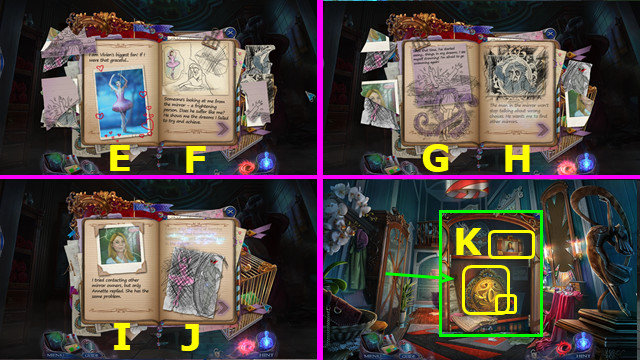
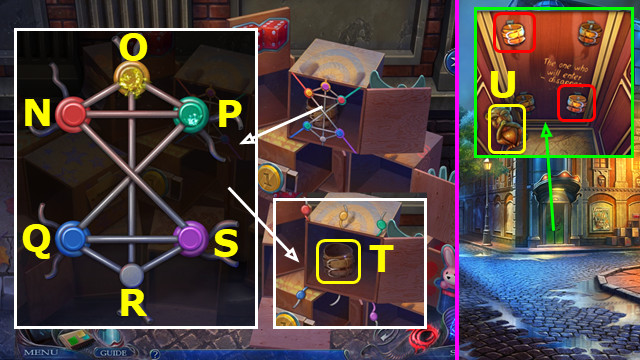
- Open journal; restore E-F; turn page.
- Restore G-H; turn page.
- Restore I-J; turn page.
- Take STRANGE KEY.
- Walk down.
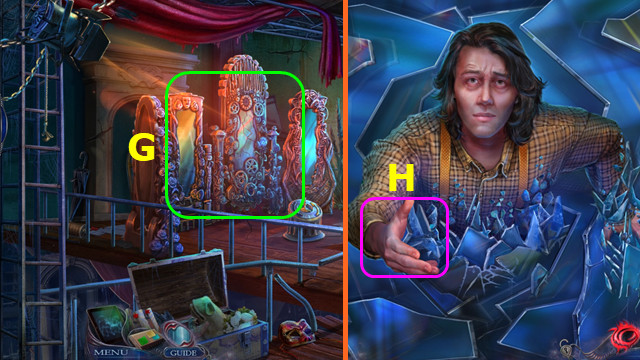
- Use STRANGE KEY; read note; take FRAME, PHOTO BOX, and MAGNET (K).
- Walk down.
- Play HOP; earn CHINCHILLA KEY (M).
- CHINCHILLA KEY on PHOTO BOX; take BRIGITTE'S PHOTO.
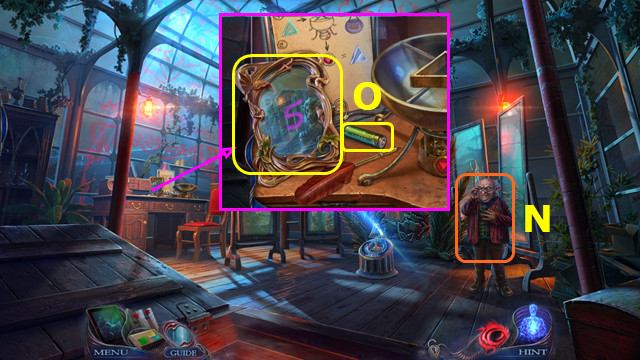
- Use MAGNET; earn GEM (N).
- GEM on FRAME; solution (O). Read tickets; take VIVIEN'S PORTRAIT.
- Go forward 2x.

- Place VIVIEN'S PORTRAIT (P).
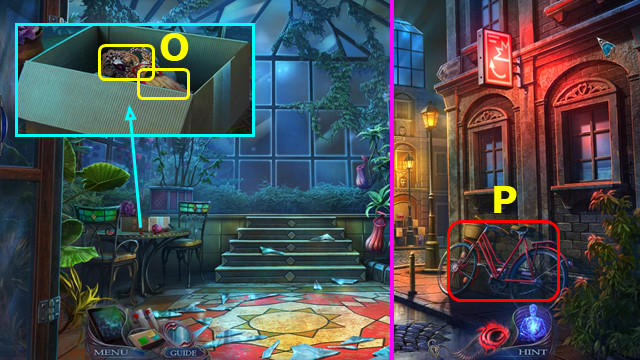
- Place BALLERINA FIGURE; restore ballerina; take CRUMPLED PHOTO (Q).
- Pan left.
- Open CRUMPLED PHOTO; take HAIRPIN.
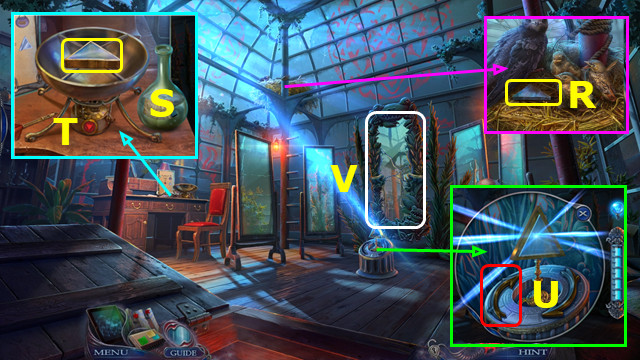
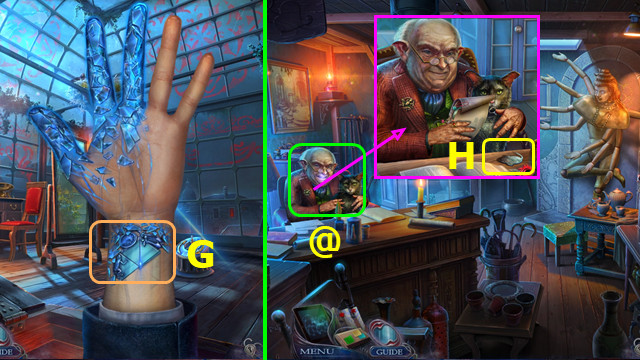
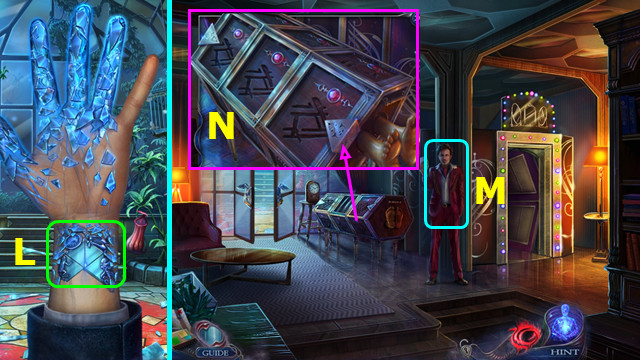
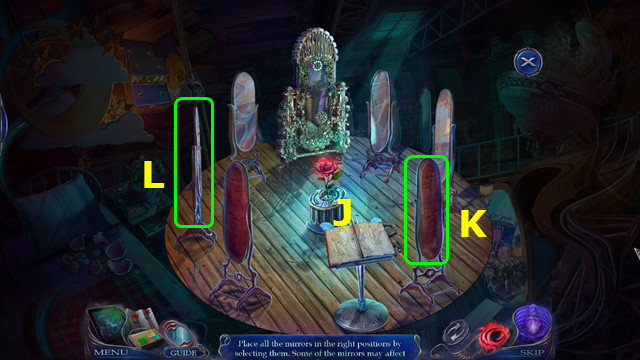
- Take HANDKERCHIEF (R); use HANDKERCHIEF and HAIRPIN; earn MIRROR SHARD (S).
- Select (T).
- Place MIRROR SHARD; collect items (A).
- Use turn button to change view (B).
- Collect items (C).
- Restore items (D).
- Select (E).
- Restore items (F).
- Take WATCH CHAIN.
- Select (G).
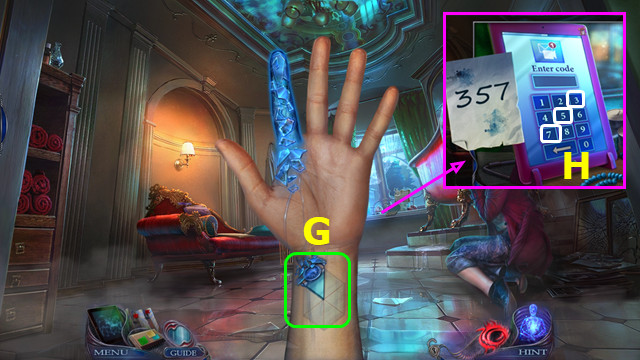
- Take TABLET CODE from WATCH CHAIN.
- Place TABLET CODE; select 3-5-7 (H); select screen.
- Walk down 2x.
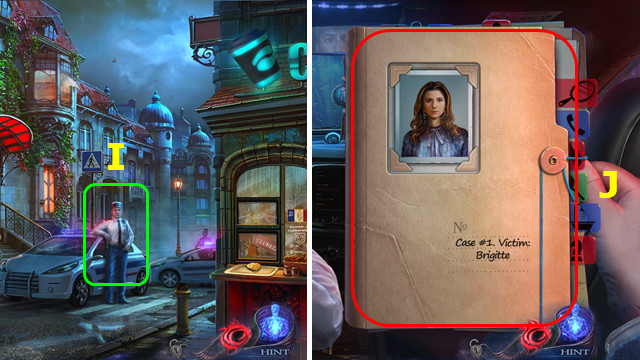
- Talk; take BLANK FILE (I).
- BRIGITTE'S PHOTO on BLANK FILE; take FILE.
- Give FILE (I).
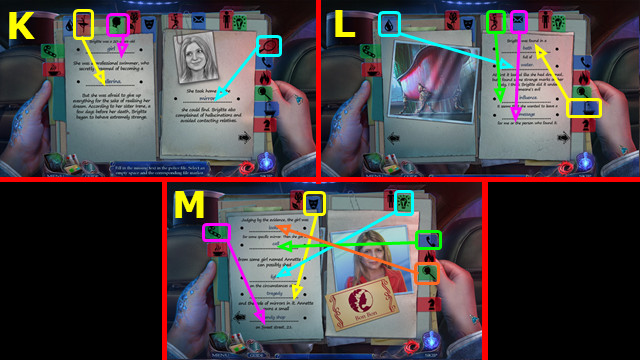
- Select (J).
- Use tabs to complete (K); turn page.
- Use tabs to complete (L); turn page.
- Use tabs to complete (M).
Chapter 2: Sweet Street
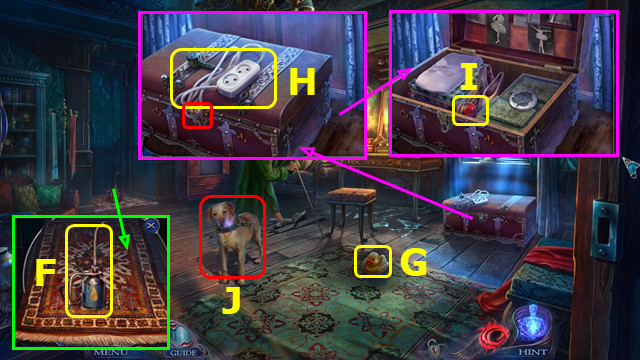
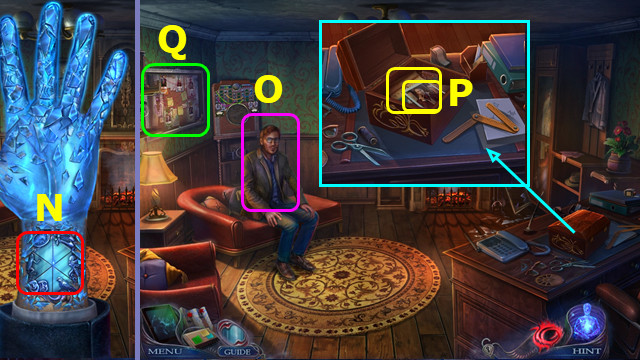
- Take LATEX GLOVES (N).
- Pan down; use LATEX GLOVES; play HOP (O).
- Select (P).
- Select birds 4x; take CANE (Q).
- Pan right.
- Restore scenes (R-T).
- Use arrows to move between scenes.
- Take CUPCAKE SYMBOL (U).

- Use CANE; take PAPER NOTE (A).
- Go up (B).
- Select POWER (C) and TATTOO (D).

- Take 1/2 EYES; remove apron (E).
- Read birth certificate; take MIRROR SHARD and NOTEBOOK (F).
- Place PAPER NOTE; select Gx1-Hx2-Gx1; take ORDER.
- Select (I).

- Place MIRROR SHARD; collect items (J).
- Use turn button to change view (K).
- Collect items (L).
- Restore items (M).
- Select (N).
- Restore items (O).
- Take HEART SYMBOL and WATCH CASE.
- Select (A).
- WATCH CASE on WATCH CHAIN; take WATCH.
- Place CUPCAKE SYMBOL and HEART SYMBOL (B).
- Select; move croissant symbol (C-D).
- Open apron; take 1/2 LOCK PARTS (E).
- Walk down; pan left.
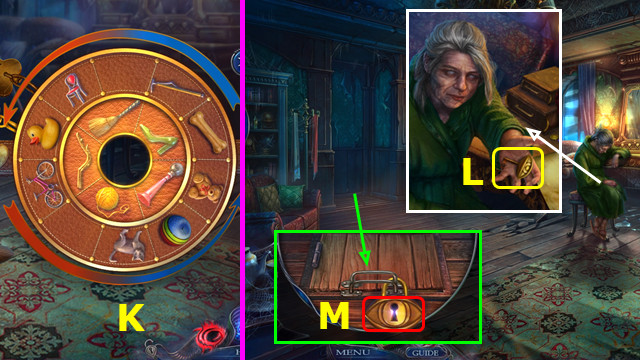
- Place ORDER; solution (F); take NOTEBOOK KEY (G).
- NOTEBOOK KEY on NOTEBOOK; solution (H). Read note; take 2/2 LOCK PARTS.
- Go up.
- Place 2 LOCK PARTS; select (I).
- Remove boxes; select blocks (1-2); take BOOTIES (J).
- Walk down.
- Give BOOTIES; talk. Give WATCH; take CARD (K).
- Go forward.
Chapter 3: Dark Alley
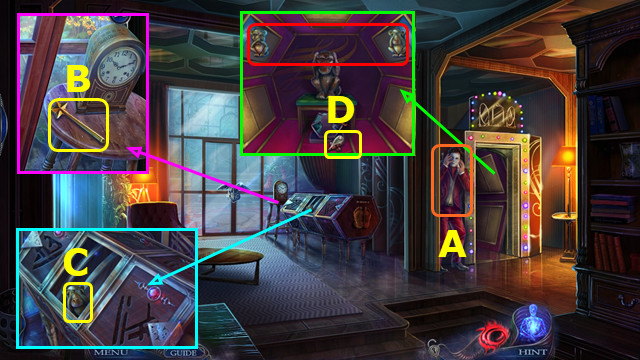
- Take CLOAK PIECE; use CARD (L).
- Play HOP; earn FLEA MEDICINE (M).
- Take BRUSH (N).
- FLEA MEDICINE on BRUSH; take MEDICINE BRUSH.
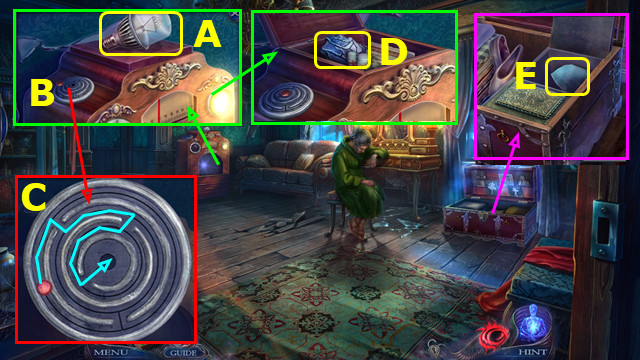
- Place CLOAK PART; solution (O).
- Take DEAD FLASHLIGHT and NUMBER DIAL (P).
- Select pairs (Q).
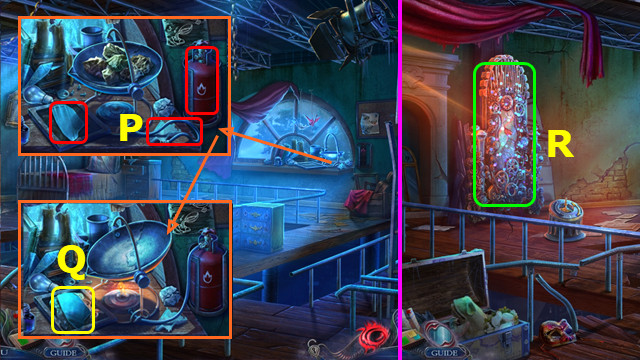
- Take BOWL, PLIERS, and LEAF BLOWER (R).
- Use MEDICINE BRUSH; take 2/2 EYES (S).
- Use PLIERS; open door (T).
- Take MASK HALF (U); use LEAF BLOWER 3x.
- Go right.
- Select POWER (A) and TATTOO (B).
- Talk (C).
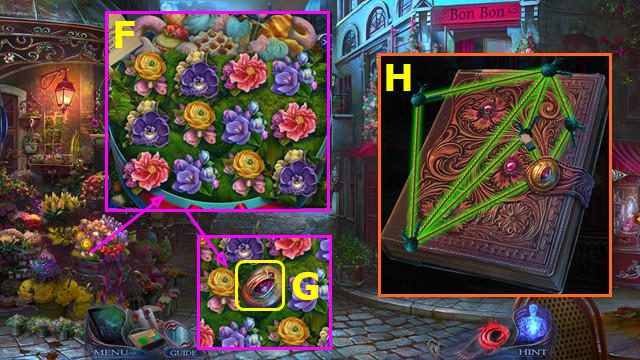
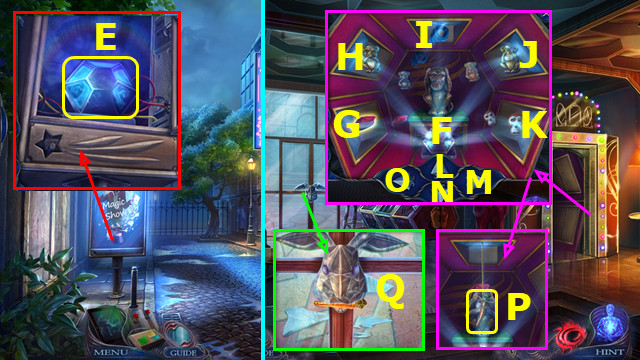
- Take SNOWFLAKES (D); remove crow and urn. Select pairs.
- Take GLYCEROL; place 2 EYES (E).
- Take 1/2 BATTERIES; place MASK HALF (F).
- Solution (G).
- Select (I-H-J-H); take GLOBE BASE.
- Walk down.
- Select; use BOWL; earn WATER BOWL (K).
- SNOWFLAKES, GLYCEROL, and WATER BOWL on GLOBE BASE; take SNOW GLOBE.
- Go right.
- Place SNOW GLOBE (L).
- Talk; take WATCH (M).
- Go forward.
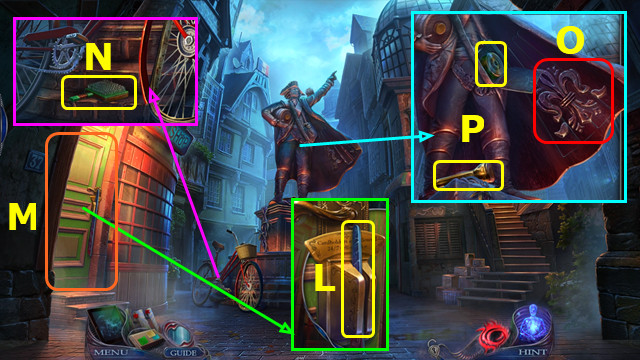
- Talk; take 1/2 ARROWS (N).
- Take MIRROR and 2/2 BATTERIES (O).
- 2 BATTERIES in DEAD FLASHLIGHT; take FLASHLIGHT.
- Walk down.
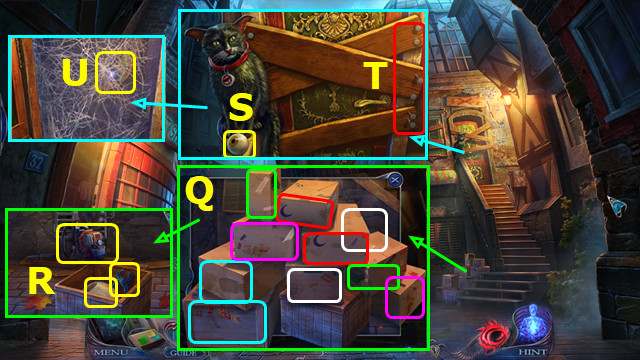
- Use FLASHLIGHT; take BABY BIRD (P).
- Place NUMBER DIAL and MIRROR; set to 3-5-7 (Q); take 2/2 ARROWS and LIQUID SILVER.
- Go forward.
- Place BABY BIRD; take LENS (R).
- Place LENS and LIQUID SILVER; select (T-S); take COLORED LENS.
- Place COLORED LENS and 2 ARROWS; select Ux6.
- Select (V).
- Collect items (A).
- Use turn button to change view (B).
- Collect items (C).
- Restore items (D).
- Select (E).
- Restore items (F).
- Take LETTER and WATCH GEARS.
- Select (G).
- Walk down.
- Give LETTER (@); take MOUSE KEY (H).
- Walk down.

- Play HOP; earn BICYCLE WHEEL (I).
- Use MOUSE KEY; take WRENCH (J).
- Use WRENCH and BICYCLE WHEEL (K).
Chapter 4: Miracle Avenue
- Take TOP HAT (A); select (B).
- Take 1/2 STRAPS (C).
- Place TOP HAT (D); move (E-D).
- Move items as indicated (F-G).
- Move items as indicated (H-M).
- Select O-N-P-Q-S-R.
- Take 2/2 STRAPS (T).
- Open door; take 1/2 MONKEYS; place 2 STRAPS (U).
- Go forward.
- Talk (A).
- Read journal; take WAND (B).
- Take 2/2 MONKEYS (C).
- Take BIRD KEY; place 2 MONKEYS (D).
- Walk down.
- Use WAND; take LAMP (E).
- Go forward.
- Place LAMP (F); select G-Mx2-Lx3-H-Mx2-I-M-Nx2-J-Ox2-N-K-Ox3-Lx2.
- Select; take CARROT (P).
- Use CARROT (Q).
- Go forward.
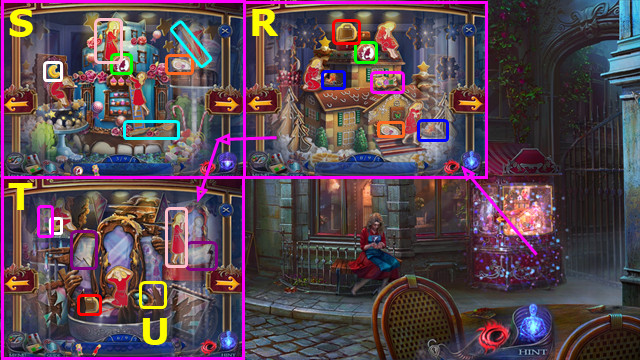
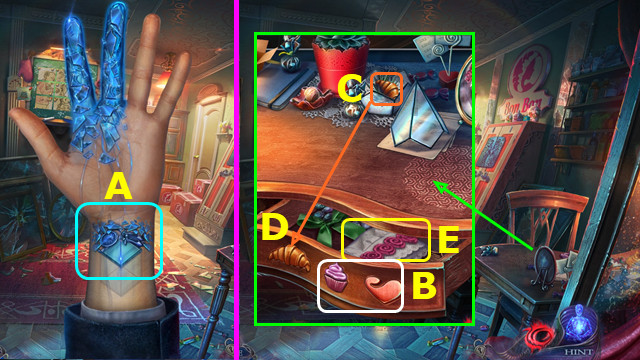
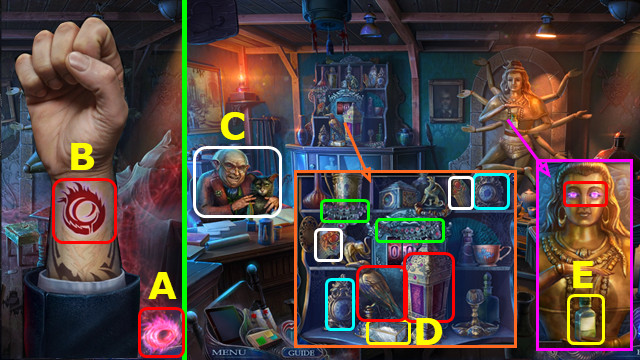
- Select POWER (A) and TATTOO (B).
- Take SMOKER and 1/2 BALLET STATUETTES (C).
- Use SMOKER; move leaves and take BIRDSEED (D).
- Take SHAWL; use BIRD KEY and BIRDSEED; take MIRROR SHARD (E).
- Select (F).
- Place MIRROR SHARD; collect items (F).
- Use turn button to change view (G).
- Collect items (H).
- Restore items (I).
- Select (J).
- Restore items (K).
- Take UNSIGNED PATENT and WATCH FACE.
- Select (L).
- WATCH GEARS and WATCH FACE on WATCH.
- Walk down.
- Give UNSIGNED PATENT; take MAGIC BOX (M).
- WATCH on MAGIC BOX; open box; take BOX TILE.
- Place BOX TILE; solution (N); take KNIFE.
- Go forward.
- Use KNIFE; remove packing; take TIARA and VIVIEN'S ADDRESS (O).
- Walk down 2x.
- Use VIVIEN'S ADDRESS (P).
- Read note; take 2/2 BALLET STATUETTES (A).
- Solution; take 1/3 DOG TOYS (B).
- Play HOP; earn DOMINO (C).

- Place 2 BALLET STATUETTES (D).
- Place DOMINO; solution (E).
- Go forward.
- Take OIL; remove carpet (F).
- Take 2/3 DOG TOYS (G).
- Take EXTENSION CORD; use OIL (H).
- Open case; read note; take 3/3 DOG TOYS (I).
- Select (J).
- Use 3 DOG TOYS; solution (K).
- Talk; give TIARA; take BASEMENT KEY (L).
- Use BASEMENT KEY (M).
- Take BULB (A); select (B).
- Drag ball on path (C).
- Read note; take ROSE SYMBOL (D).
- Place ROSE SYMBOL; take MIRROR SHARD (E).
- Go left.
- Take 1/2 FUSES and NAIL FILE; place BULB and EXTENSION CORD (G).
- Take FIRE KEY (H).
- Go forward, walk down.
- Use NAIL FILE; take DUSTER (I).
- Go forward, left.
- Use DUSTER; take CROWBAR (J).
- Use CROWBAR; take BOARDS (K).
- Select POWER (L) and TATTOO (M).
- Select (N).

- Place MIRROR SHARD; collect items (O).
- Use turn button to change view (P).
- Collect items (Q).
- Restore items (R).
- Select (S).
- Restore items (T).
- Take RED ROSE and WATCH HANDS.

- Select (A).
- WATCH HANDS on WATCH; earn WORKING WATCH.
- Attempt to go up (B).
- Take SCREW KEY (C).
- Use SCREW KEY; take NAIL GUN (D).
- Place BOARDS as shown; use NAIL GUN (E).
- Go up.
- Give RED ROSE (F).
- Use WORKING WATCH; earn INCOMPLETE WATCH (G).
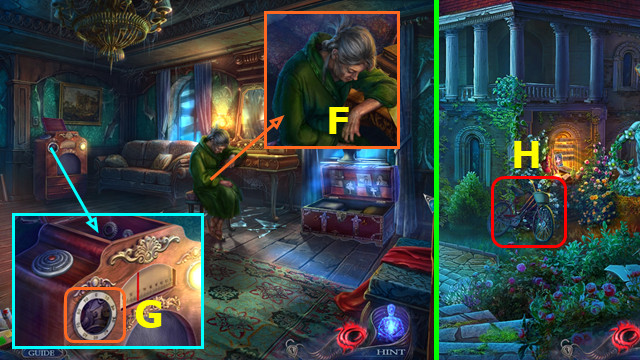
- Talk; take ANTOINE'S ADDRESS (F).
- Walk down.
- Use ANTOINE'S ADDRESS (H).
Chapter 5: Incredible Street

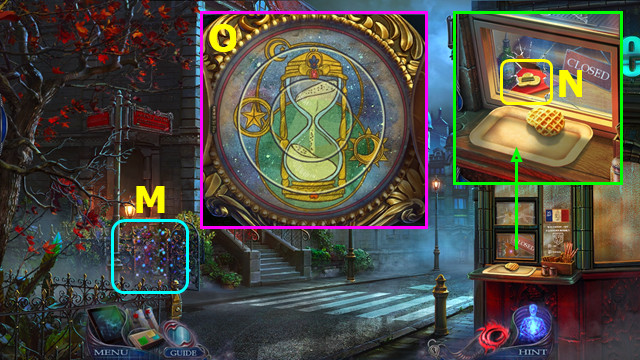
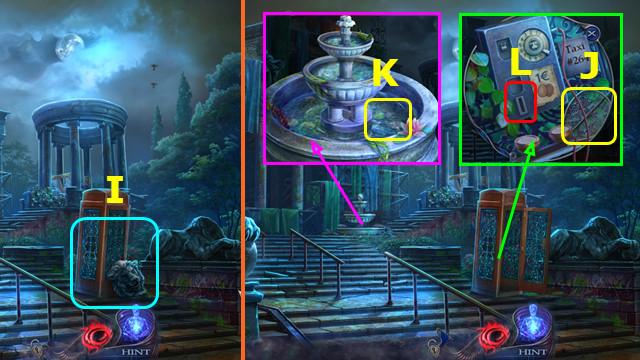
- Take COIN (J); select 1-7.
- Use FIRE KEY; take EXTINGUISHER (K).
- Use COIN; take 2/2 FUSES (L).
- Remove old fuse; place 2 FUSES; select button (M).
- Select 1-5 (N); earn BOXES.
- Use BOXES; restore 1-6; use SHAWL (P).
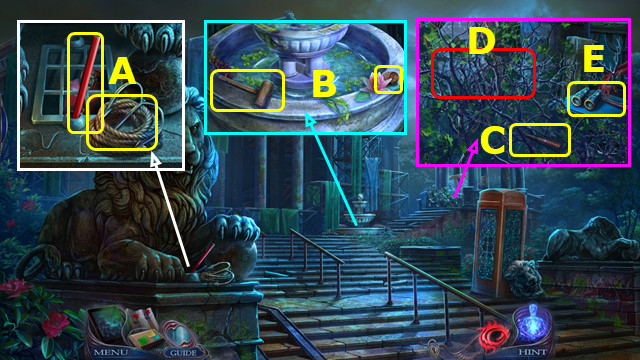
- Use EXTINGUISHER; take AXE HEAD (A).
- Talk (B).
- Use C-D; take DAMAGED HYPNODISK.
- Select POWER (E) and TATTOO (F).
- Select (G).
- Collect items (H).
- Use turn button to change view (I).
- Collect items (J).
- Restore items (K).
- Select (L).
- Restore items (M).
- Take HYPNOTRON SCHEME and WATCH COVER.
- Select (N).
- WATCH COVER on INCOMPLETE WATCH; take HYPNOTRON CORE.
- Give HYPNOTRON SCHEME; earn STRANGE KEY (O).
- Use STRANGE KEY; take JEAN'S PHOTO and EVENT DATE (P).
- Select (Q).
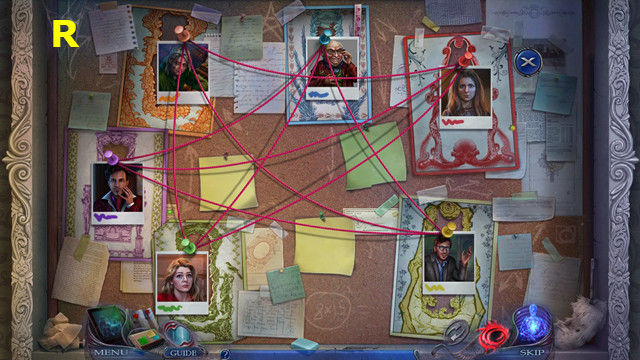
- Place JEAN'S PHOTO; solution (R).
- Take UMBRELLA.
- Walk down.
- Play HOP (A).
- Place DAMAGED HYPNODISK (B); select (C).
- Use UMBRELLA; select (D); take HYPNODISK.
- Go up.
- Place EVENT DATE, HYPNODISK, and HYPNOTRON CORE; solution (E).
Chapter 6: Behind the Scenes
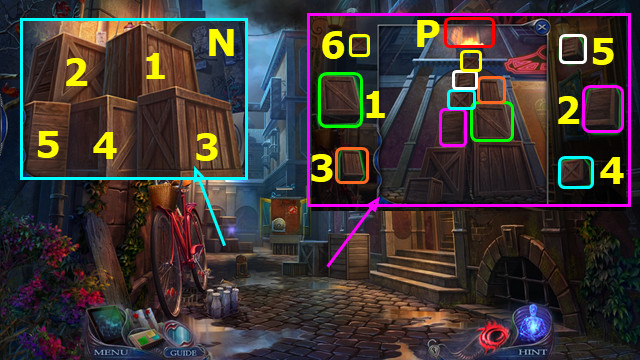
- Take CHEST KEY (F); move clouds and 2 lights.
- Take BROKEN NUTCRACKER; read note (G).
- Select 1-3; take LEVER (H).
- Read note; take WOODEN JAW and VINTAGE CAROUSEL (I).
- Use CHEST KEY; remove items; take 1/2 GEARS (J).

- Take SCREW (K).
- WOODEN JAW and SCREW on BROKEN NUTCRACKER; take NUTCRACKER.
- Use NUTCRACKER 2x; earn 2/2 GEARS and WEIGHT (L).
- Select (M).
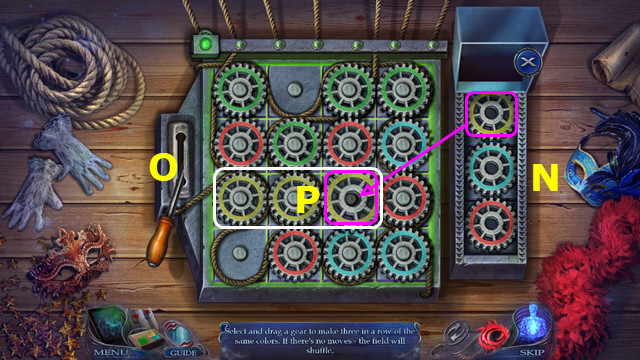
- Place 2 GEARS (N); replace lever; select (O).
- Create rows of three x6 (P).
- This mini-game is randomly generated.
- Go right.

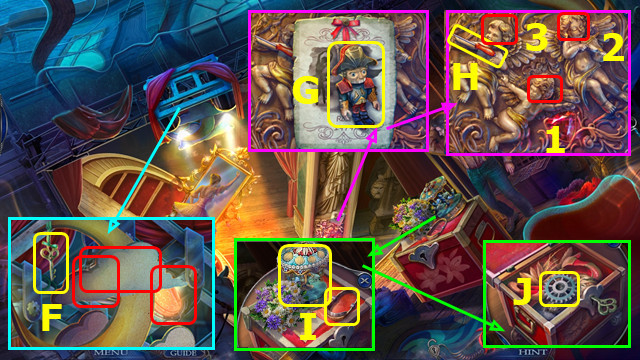
- Move pillow; use WEIGHT; take 1/2 SEAHORSES, 1/3 GEMS, and ROSE (A).
- Take POINTE SHOES (B).
- Place POINTE SHOES; take 2/2 SEAHORSES and NAIL FILE (C).
- 2 SEAHORSES on VINTAGE CAROUSEL; take 2/3 GEMS.
- Play HOP; earn LOCKED BOOK (D).
- Walk down.
- Use NAIL FILE; earn 3/3 GEMS (G).
- 3 GEMS on LOCKED BOOK; take THEATER ADDRESS.
- Restore pages (H); take OPEN BOOK.
- Go right.
- Select (I).
- Place OPEN BOOK and ROSE (J).
- Select K-L.
- Go forward.
- Talk; earn WATCH (N).
- Walk down.
- Use THEATER ADDRESS (O).
- Take GRAPPLING HOOK and PENCIL (A).
- Take MALLET and FOCUS KNOB (B).
- Take STICK (C).
- STICK and MALLET on AXE HEAD; take AXE.
- Use AXE (D); play HOP; earn STONE MOUSE; take BROKEN BINOCULARS (E).
- Place STONE MOUSE; take LENS (F).
- LENS and FOCUS KNOB on BROKEN BINOCULARS; take BINOCULARS.
- Use BINOCULARS; select Gx4.
- Use GRAPPLING HOOK (H).
- Go forward; pan right.
- Use PENCIL; earn INSTRUCTIONS (I).
- Take 1/2 METAL HANDLES; restore handles (K); take GLASS CLEANER.
- Take 2/2 METAL HANDLES (L); place INSTRUCTIONS; select 1-6.
- Walk down.
- Use 2 METAL HANDLES; take GAS TANK (O).
- Use GLASS CLEANER; take GLASS (N).
- Go forward.
- Place GLASS and GAS TANK; select (P).
- Take MIRROR SHARD (Q).
- Pan left.
- Select (R).
- Place MIRROR SHARD; collect items (A).
- Use turn button to change view (B).
- Collect items (C).
- Restore items (D).
- Select (E).
- Restore items (F).
- Take CAMEO.
- CAMEO on WATCH.
- Select (G).
- Give WATCH (H); earn CANE.
- Walk down.
- Use CANE (I).
- Take NET (J).
- Use NET; take COINS (K).
- Use COINS (L).
- Congratulations, you've completed The Unseen Fears: Last Dance.
Created at: 2018-12-28