Walkthrough Menu
- General Tips
- Chapter 1 - The Theatre
- Chapter 2 - The Watchmaker
- Chapter 3 - The Boatman
- Chapter 4 - The Tailor
- Chapter 5 - The Psychic
General Tips
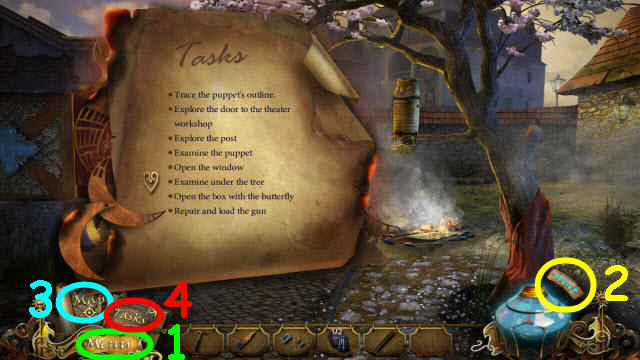
- Select Menu (1) and then Options to adjust the Music, Effects, and Environment Volume. You may also adjust Full Screen, and Custom Cursor.
- You may select between Casual, Challenge, and Extreme Mode.
- Throughout the guide, we will use the acronym 'HOS' for Hidden Object Scenes.
- Items written in orange in HOS require an extra step before they can be obtained.
- Puzzles can be skipped.
- Select the Hint button (2) on the bottom right to get the instructions for the puzzles, help in HOS, and hints on where interactive areas are.
- Select the map (3) to jump to other locations quickly.
- Select the Task button (4) to get a list of active tasks.
- Select the dialogue box during conversations to advance the dialogue. In order to get some items needed you will need to complete the conversations fully.
Chapter 1- The Theatre
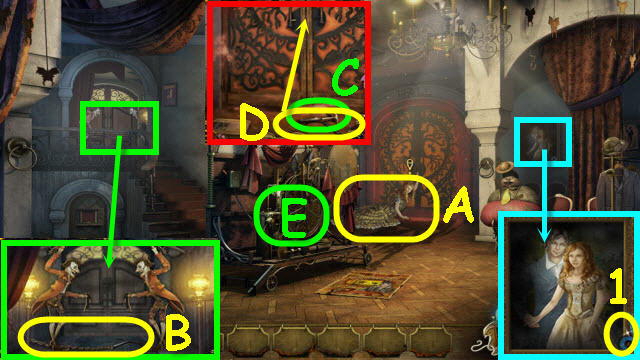
- Talk to Donna (A) on the floor and then again on the left; select Donna a few times to finish the dialog while on the floor.
- Examine the exit; take the CHAIN HOOK (B).
- Examine the portrait; take the INSULATING TAPE (1).
- Examine the hall door; take the HAMMER (C) and use the CHAIN HOOK on the door.
- Pick up the CHAIN HOOK (D) and attach to the door handles.
- Examine the device (E).
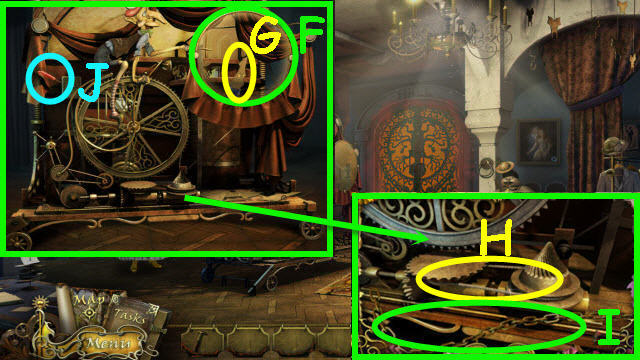
- Use the HAMMER on the glass (F).
- Use the INSULATING TAPE on the broken glass; take the SHARD (G).
- Examine the base; use the SHARD on the rope (H); select and drag the chain (I) to where the rope was.
- Select the lever (J).
- Go through the hall doorway.
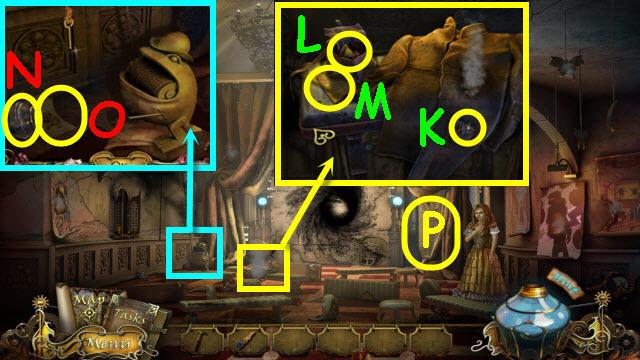
- Examine the jacket; open the pocket and take the BULLET (K).
- Open the bag; take the BELL (L).
- Read the note (M).
- Examine the winch; take the GLASS VASES 1/2 (N).
- Examine the diagram (O).
- Go straight into the area left of Donna (P).
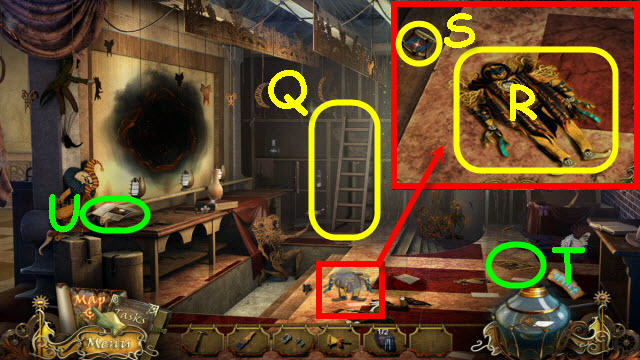
- Take the LADDER (Q).
- Examine and select the puppet (R).
- Take the DRUM (S).
- Examine the diagram (T) and magazine (U).
- Back out.
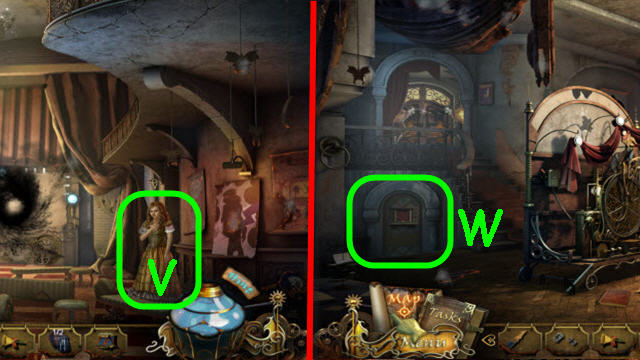
- Talk to Donna (V).
- Back out.
- Examine and place the BELL and DRUM on the door to trigger a puzzle (W).
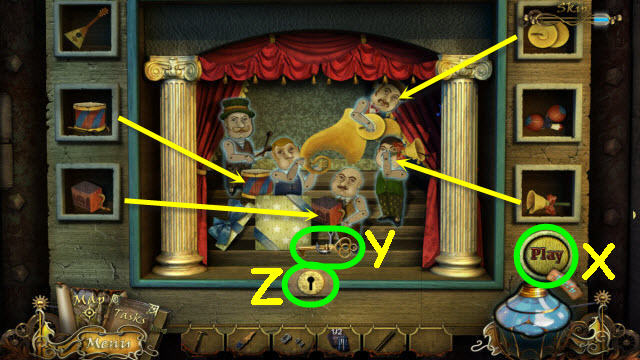
- Give the correct instruments to the musicians.
- To solve the puzzle, place the following instruments from left to right: Drums, hurdy gurdy, and bell. Press play twice; give the upper right musician the cymbals and press play (X).
- Use the key (Y) on the lock (Z).
- Examine the newly-opened doorway to access a HOS.
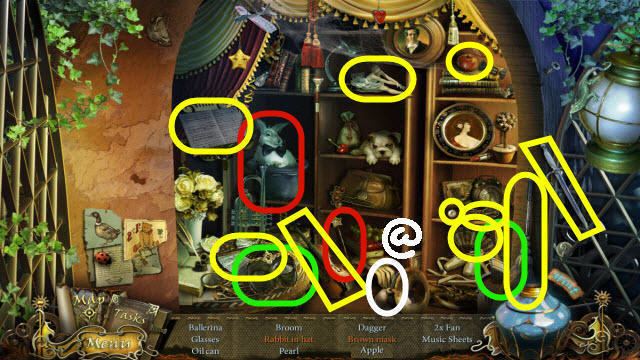
- Find the items listed.
- Marked in red: use the wand on the hat to get a rabbit in hat.
- Marked in green: use the paintbrush on the mask to get a brown mask.
- You will earn an OIL CAN (@).
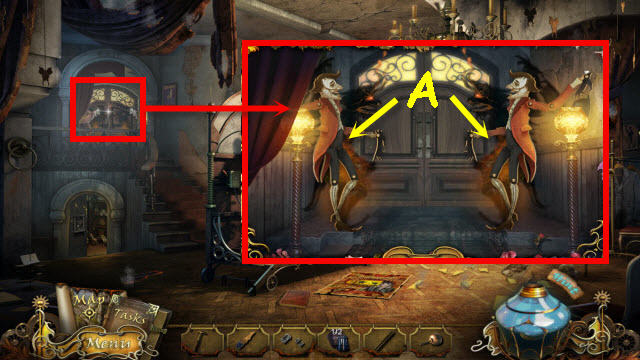
- Examine the exit; use the OIL CAN on both puppets and select both to move them (A).
- Open the exit door and go through.
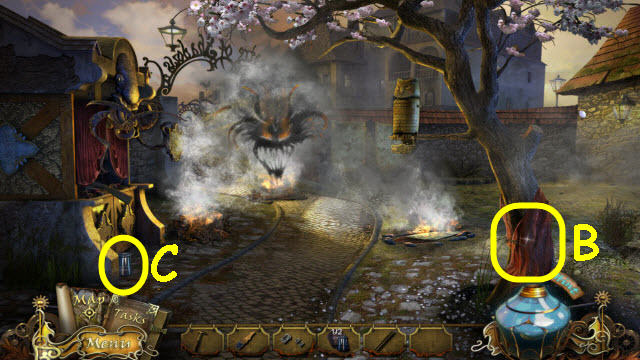
- Examine and use the SHARD on the cloth 3 times to get RAGS 1/3, 2/3, and 3/3 (B).
- Take the GLASS VASES 2/2 (C).
- Go to the back room of the theatre.
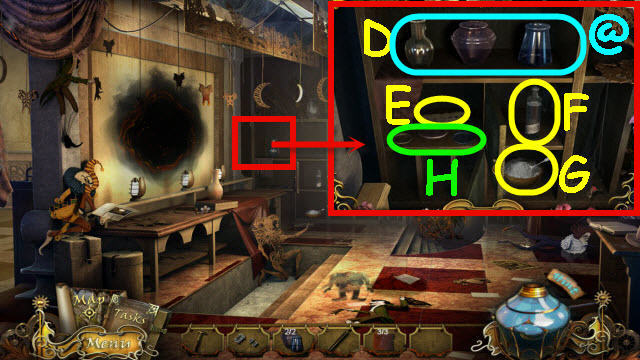
- Examine and place the 2 GLASS VASES on the top shelf (D).
- Read the instructions (E).
- Use the vinegar (F), 3 RAGS, powder (G) and lids (H) on the glass vases; take each of the 3 EXTINGUISHERS (@).
- Back out twice and go out the exit.
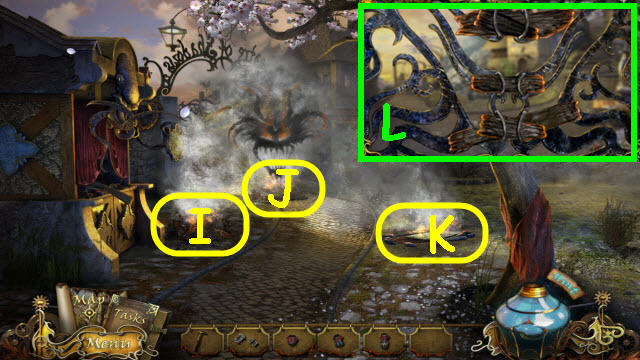
- Use the 3 EXTINGUISHERS on the fires (I, J, K).
- Examine the gate; use the HAMMER on the wood five times (L).
- Open and then go through the gate.
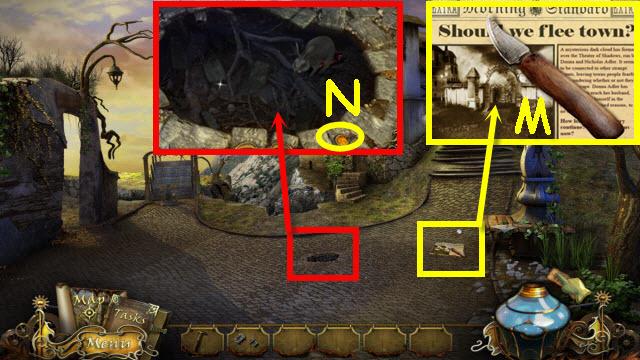
- Examine the paper; take the KNIFE (M).
- Examine the hole; take the COIN (N).
- Go left through the stone arch.
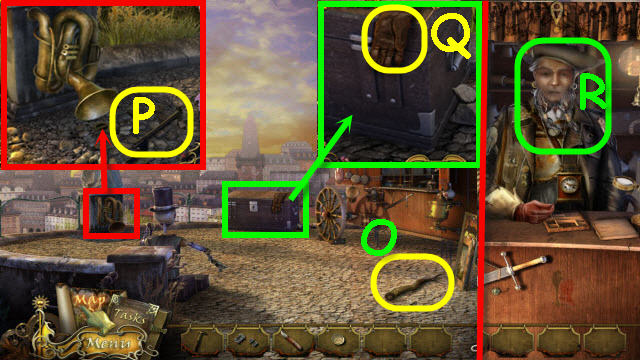
- Take the BRANCH (O).
- Examine the horn; take the RIFLE BARREL (P).
- Examine the trunk; take the GLOVE (Q).
- Go to the junk wagon and speak to the vendor (R).
- Back out twice and go forward to the bridge.
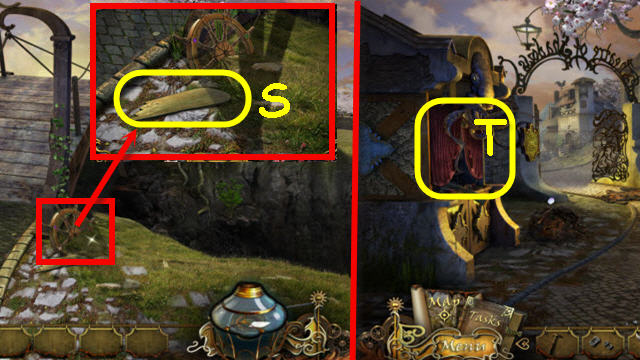
- Examine the wagon wheel; take the OWL WING 1/2 (S).
- Back out twice.
- Examine the shooting gallery (T); place the RIFLE BARREL and BULLET on the rifle to trigger a puzzle.
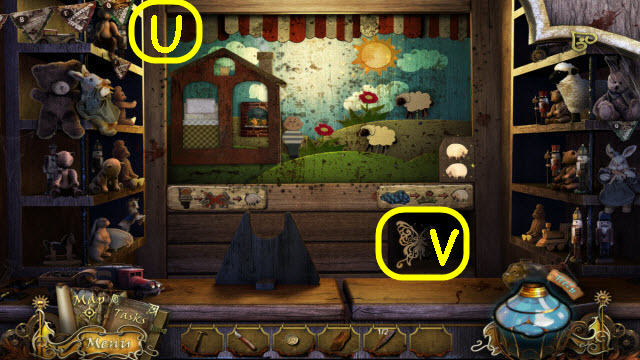
- Your goal is to get the two sheep into the field.
- To solve the puzzle, shoot the objects in the following order: candle in the attic window, polka-dotted cloud, rain cloud, moon, woman x 2, man x 2, and blades of grass.
- See screenshot for completed scene (U).
- Take the BUTTERFLY (V).
- Go to the backroom of the theatre.
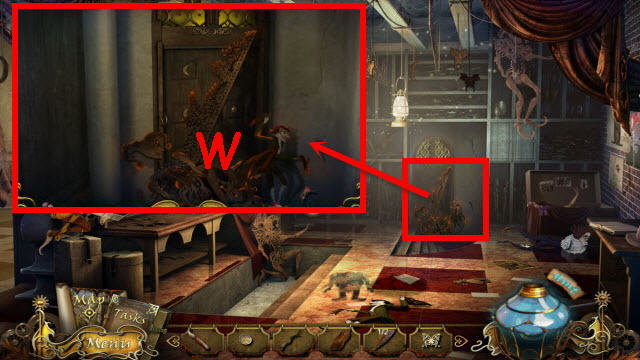
- Examine the doorway; use the GLOVE six times to remove the debris (W).
- Go through the newly-opened doorway.
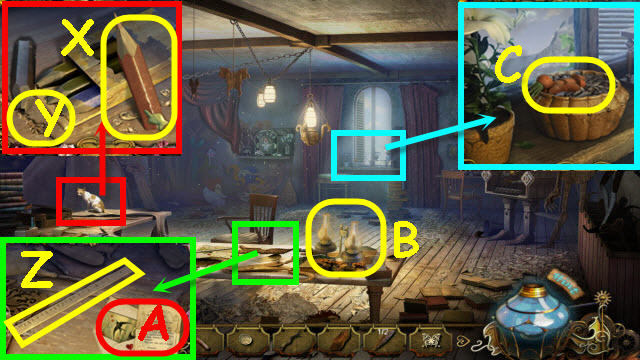
- Examine the left table; use the KNIFE on the pencil and take the PENCIL (X).
- Take the CLOCK HAND (Y).
- Examine the table; use the PENCIL on the wood and take the MARKED RULER (Z).
- Read the note (A).
- Take the BURNING LAMP (B).
- Examine the window sill; pull out and cut the carrot with the KNIFE and take the CARROTS (C).
- Back out.
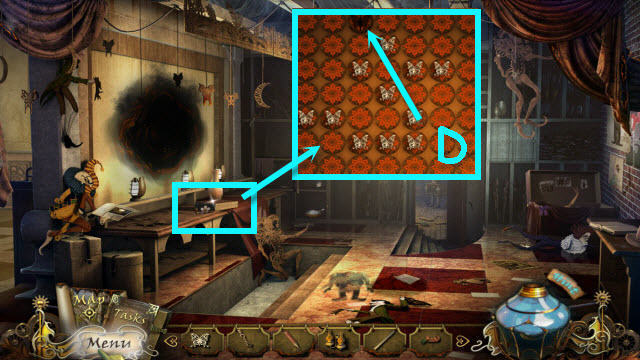
- Examine the table.
- Place the BUTTERFLY on the empty slot (D) to trigger a puzzle.
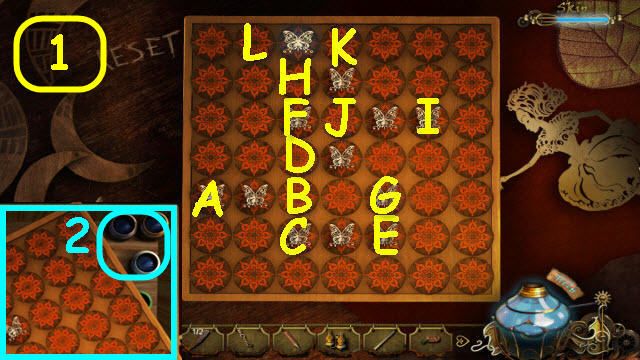
- Remove all the butterflies from the board by jumping over them.
- To solve the puzzle, jump the following: A-B, C-D, E-C, F-B, C-D, G-F, D-H, I-J, J-K, K-L, and L-J (1).
- Take the PAINT (2).
- Back out.
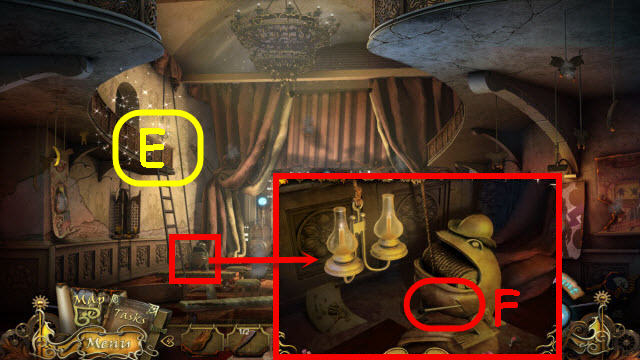
- Examine and place the LADDER against the balcony (E).
- Examine the winch; place the BURNING LAMP on the hook and pull the lever (F).
- Examine the balcony to access a HOS.
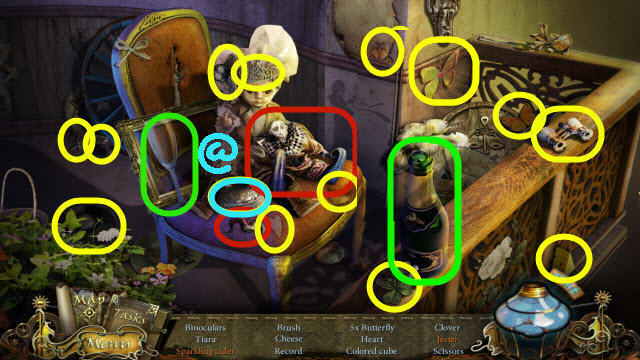
- Find the items listed.
- Marked in red: place the hat on the jester to get the jester.
- Marked in green: use the bottle on the glass to get sparkling cider.
- You will earn a BRUSH (@).
- Go to the main courtyard.
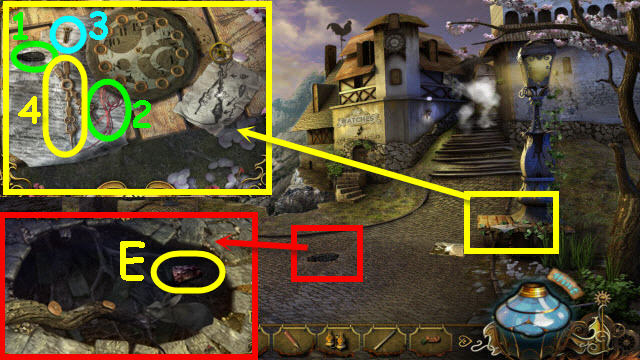
- Examine and place the BRANCH in the hole; place the CARROTS on the BRANCH and take the DIRTY PLATE (E).
- Examine and place the CLOCK HAND on the pedestal.
- Place the weight (1) on the clock hands, select the string (2), place the screw (3) in the hole on the clock hands; take the COMPASS (4).
- Go left.
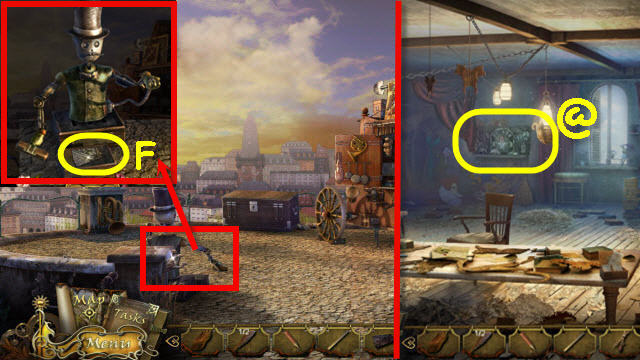
- Examine the mechanical shoe shine and place the BRUSH in his right hand, the COIN in his left hand and the DIRTY PLATE on the pedestal; take the PLATE (F).
- Go to the crafting room in the theatre.
- Examine and place the PLATE on the empty slot of the puzzle box to trigger a puzzle (@).
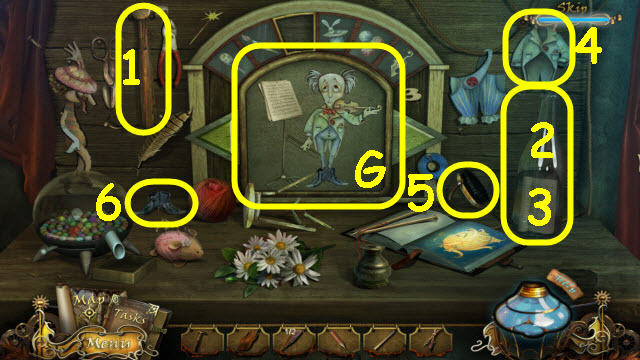
- Place the appropriate items with their matching puppets.
- First solution: Use the hammer (1) on the bottle (2) and place the sheet music (3) on the stand.
- Place the coat with tails (4) on the maestro. Use the brush (5) on the shoes (6) and place both of the shoes on the maestro (G).
- Press the right arrow to get the next puppet. See next screenshot for the second solution.
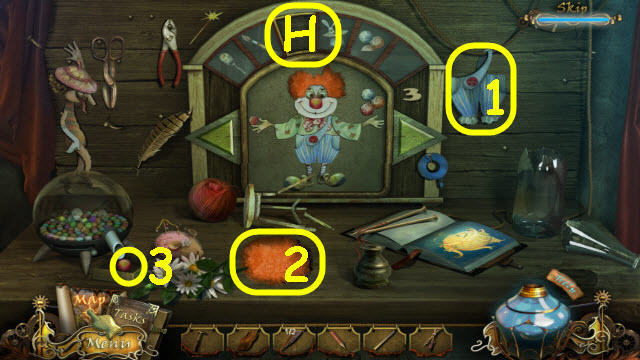
- Second solution: Place the pants (1) on the clown. Move the flowers three times and place the wig (2) on the clown.
- Move the lever on the dispenser to get the red ball (3) and place the red ball on the clowns face for a nose (H).
- Press the right arrow to get the next puppet. See next screenshot for the third solution.
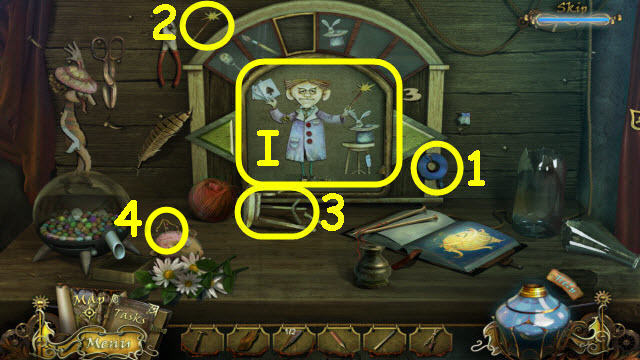
- Third solution: Use the tape (1) on the chair (3) and place the chair next to the magician.
- Give the wand (2) to the magician. Use the needle (4) on the magicians ripped sleeve (I).
- Press the right arrow to get the next puppet. See next screenshot for the fourth solution.
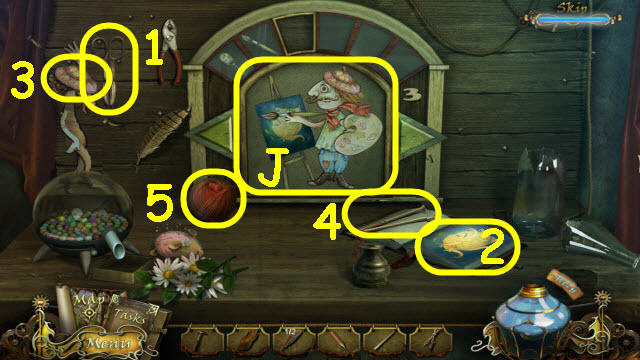
- Fourth solution: Use the scissors (1) on the book (2) and place the picture on the easel.
- Place the beret (3) on the artist. Use the knitting needles (4) on the yarn (5) to make a scarf; place the scarf on the artist (J).
- Press the right arrow to get the next puppet. See next screenshot for the fifth solution.
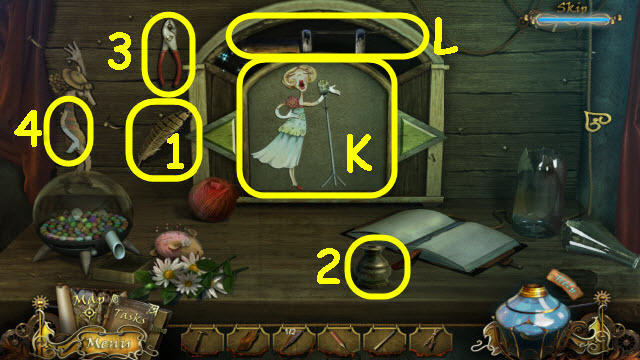
- Fifth solution: Use the quill (1) in the inkwell (2) and paint the singers face. Use the pliers (3) on the arm (4) and place the arm on the singer (K).
- Take the FRETSAW (L).
- Exit the theatre building.
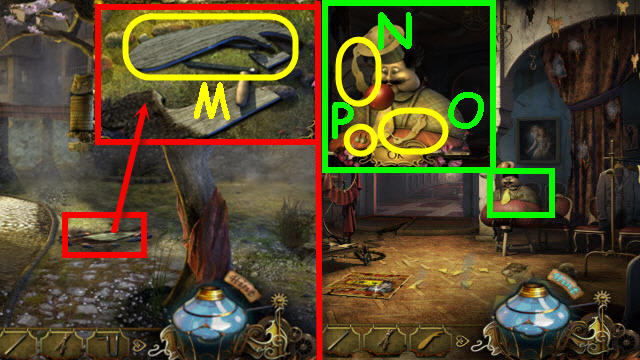
- Examine and use the FRETSAW on the board; take the DOLL'S ARM (M).
- Back out.
- Examine and place the DOLL'S ARM on the end of the puppet's right arm (N); press on the hat three times to blow up the balloon.
- Move the lower arm (O); take the HORN VALVE (P).
- Go to the wagon area.
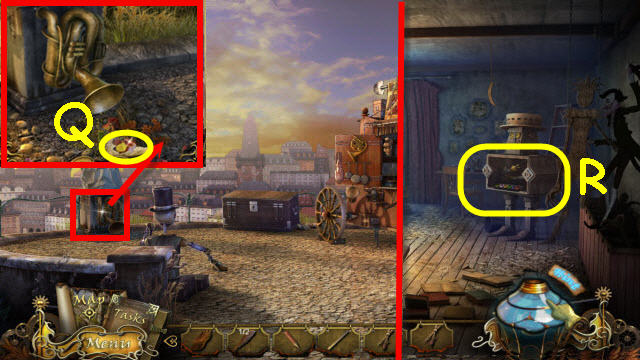
- Examine and place the HORN VALVE on the horn; press the valve and take the RIPPED DIAGRAM (Q).
- Go to the craft room in the theatre.
- Examine and place the PAINT and RIPPED DIAGRAM in the box to trigger a puzzle (R).
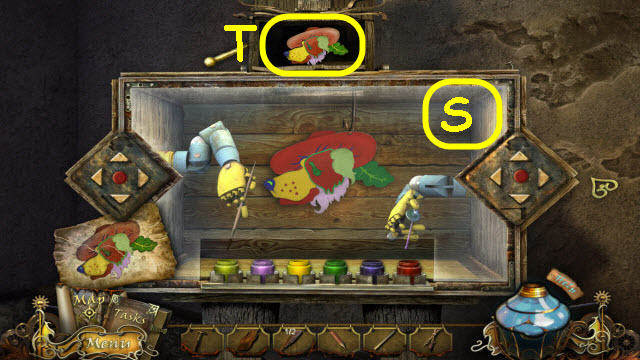
- Paint the head to match the diagram on the left by using the arrows and button on the right.
- See screenshot for solution (S).
- Take the DOG'S HEAD (T).
- Back out twice.
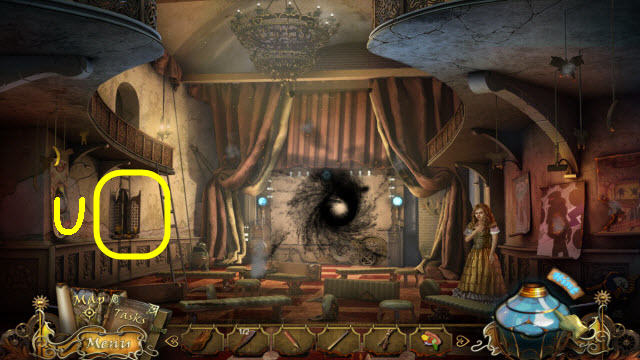
- Examine the alcove (U).
- Place the DOG'S HEAD on the right puppet to trigger a puzzle.
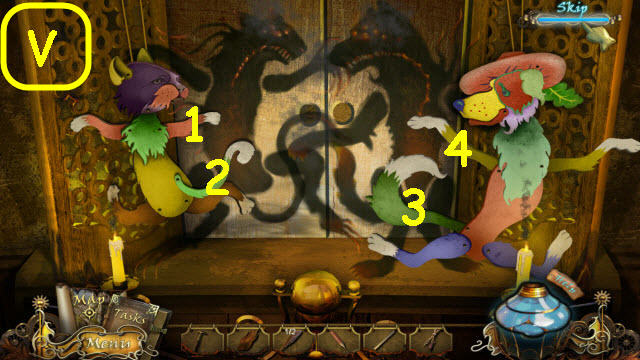
- Move the puppet's legs and tails away from the shutter.
- See screenshot for order to move (V).
- Take the PAPER.
- Go forward to the backroom.
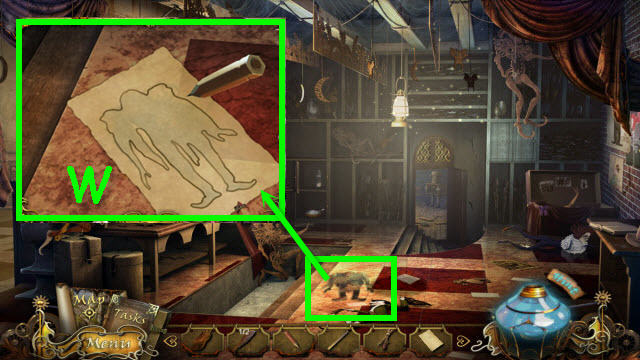
- Examine and use the PAPER and PENCIL on the puppet outline; take the BURNED DOLL PRINT (W).
- Go to the junkman's wagon.
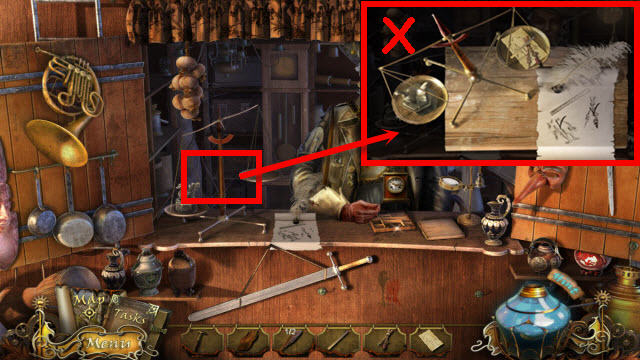
- Examine and place the BURNED DOLL PRINT, COMPASS, and MARKED RULER on the scale (X).
- Back out twice.
- Speak to Donna.
- Go toward the watchmaker's house.
Chapter 2 - The Watchmaker
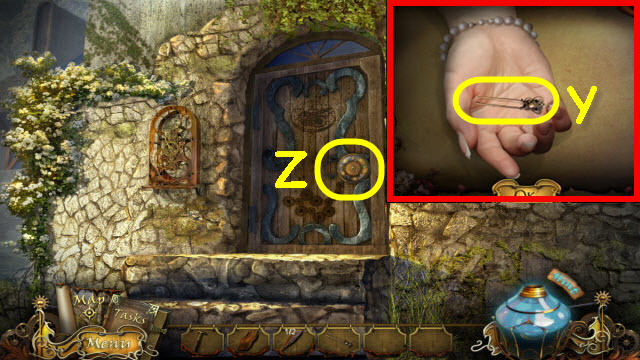
- Speak to Donna; take the HAIRPIN (Y).
- Examine and use the HAIRPIN on the door lock to trigger a puzzle (Z).
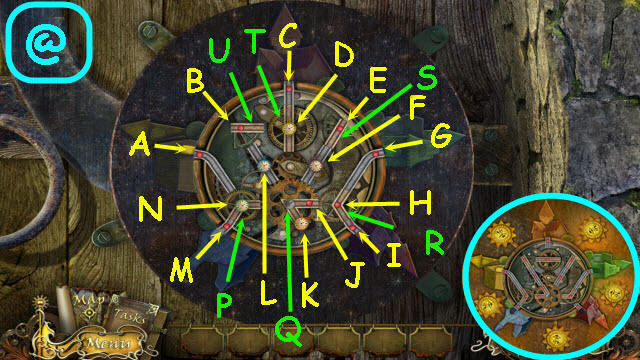
- Move the suns to the same colored houses to light them up.
- To solve the puzzle, move the designated clocks to the red points labeled in yellow and pivot the gears labeled in green as follows; Q, purple clock to J, Q, orange clock to F, orange clock to E, S, T, yellow clock to B, U, orange clock to D, T, orange clock to C.
- Q x 2, green clock to K, Q x 3, R, green clock to H, R, green clock to G, Q, purple clock to H, R, purple clock to I, Q x 2, blue clock to J, Q, yellow clock to L, yellow clock to K, blue clock to N, blue clock to M, Q, yellow clock to N, P, and yellow clock to A (@).
- Enter through the newly-opened door.
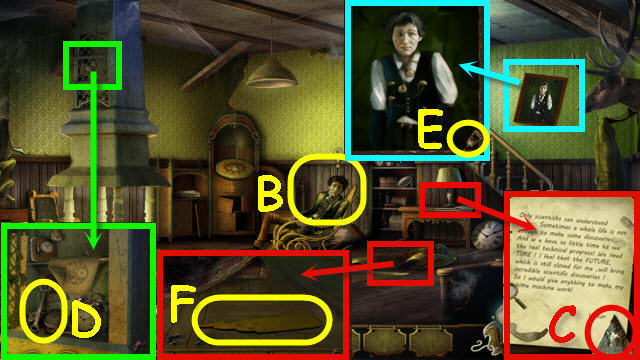
- Talk to the watchmaker (B).
- Examine the table; take the TRIANGLE (C).
- Examine the chimney; open the compartment and take the WRENCH (D).
- Examine the portrait; take the LAMP KEY (E).
- Move the carpet; examine the area and take the OWL WING 2/2 (F).
- Back out.
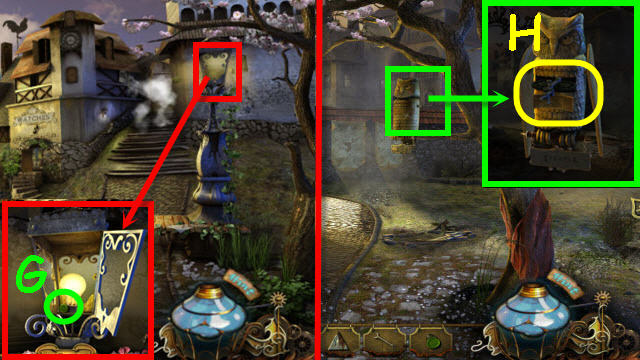
- Examine and use the LAMP KEY on the lamp; take the LAMP BUTTON (G).
- Back out.
- Examine and place the 2 OWL WINGS on the owl; take the CHRONOLOGY PROMPT and the CLOCKWORK (H).
- Go into the watchmaker's house.
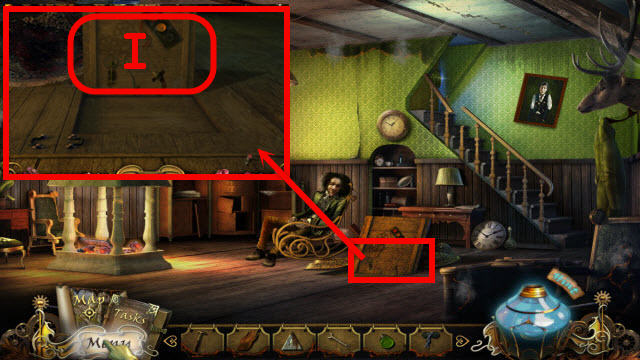
- Examine and open the hatch; place the CLOCKWORK and LAMP BUTTON on the hatch door (I).
- Go down the hatch.
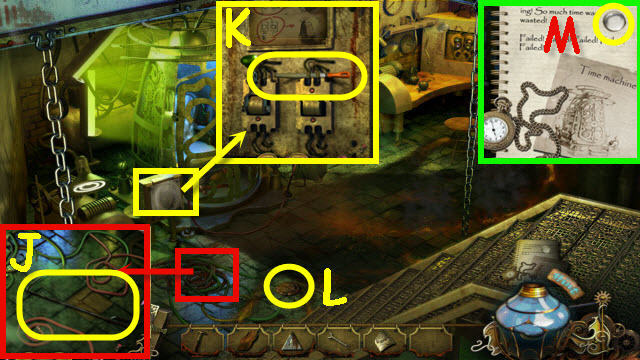
- Examine and move the topmost wires until they are all moved; take the FIREPLACE SHOVEL (J).
- Examine and use the WRENCH on the panel; take the FILE (K).
- Take the CLOCKS 1/2 (L).
- Examine the notes; take the LENS (M).
- Back out.
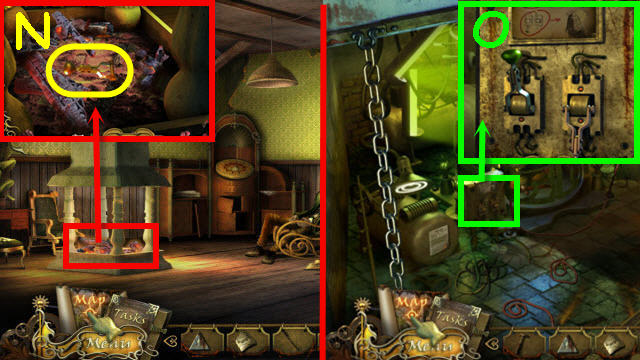
- Examine and use the FIREPLACE SHOVEL on the fireplace four times; use the GLOVE to get the LEVER (N).
- Go down the hatch.
- Examine and place the LEVER on the panel; pull down the green lever (O).
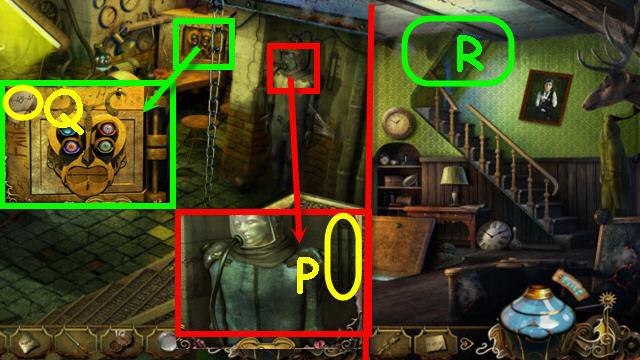
- Examine the suit; take the CLOCK DIAL (P).
- Examine the compartment; take the CODE (Q).
- Back out.
- Examine and place the CLOCK DIAL and CODE on the door to trigger a puzzle (R).
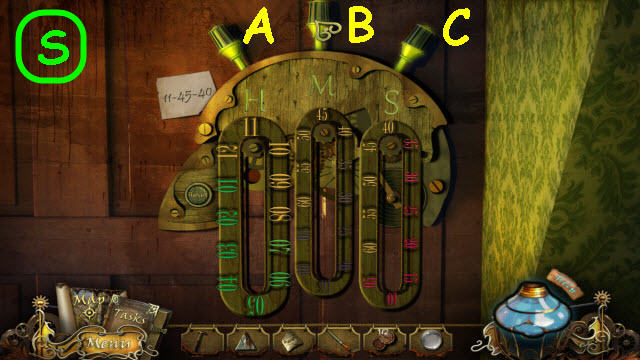
- Set the time to the code.
- To solve the puzzle, select the following dials: B, A, C, A, and B (S).
- Go up to the workshop.
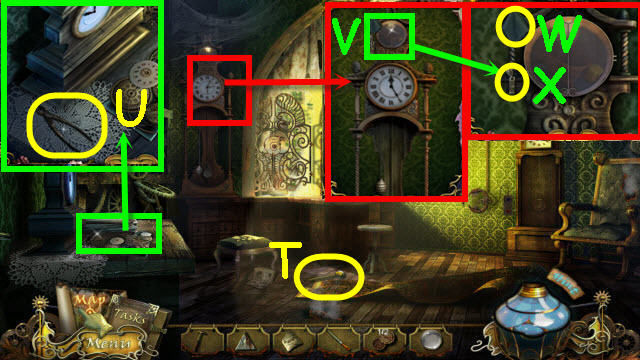
- Take the LOCK HANDLE (T).
- Examine the table; take the PLIERS (U).
- Examine the clock face, and then examine the cuckoo compartment (V).
- Take the RAG (W) and the ZIPPER PULL (X).
- Back out and go down the hatch.
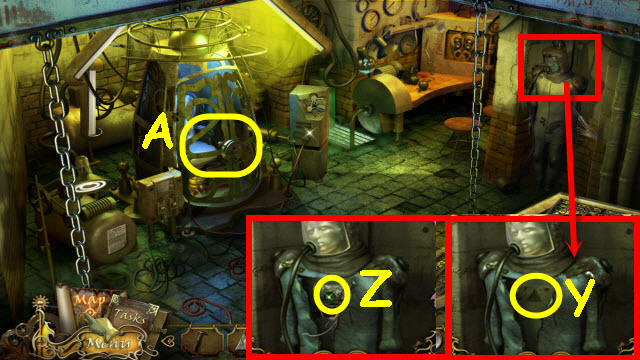
- Examine and place the ZIPPER PULL on the suit zipper; place the TRIANGLE on the center (Y).
- Use the PLIERS on the wires; take the BUTTON STUDS (Z).
- Examine and place the LOCK HANDLE on the time machine (A).
- Examine the time machine to access a HOS.
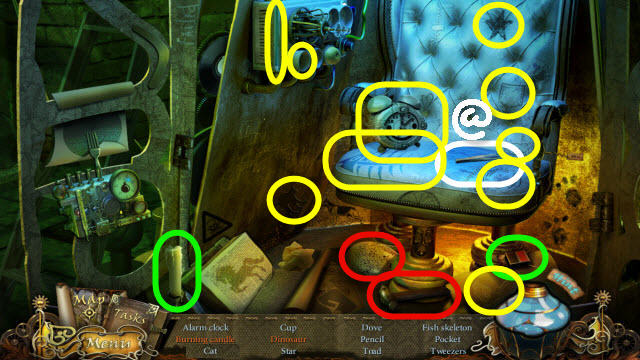
- Find the items listed.
- Marked in red: use the hammer on the egg to get the dinosaur.
- Marked in green: strike a match on the matchbox and use the lit match on the candle to get a burning candle.
- You will earn TWEEZERS (@).
- Back out and go up the stairs.
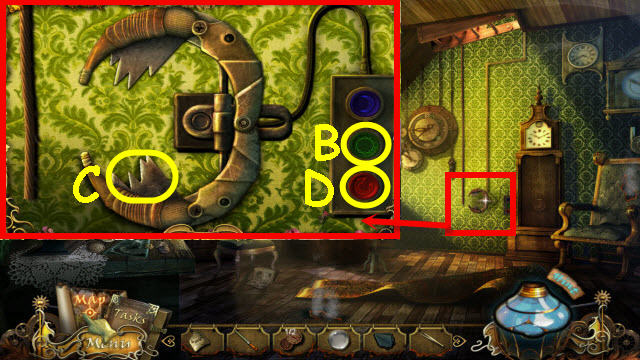
- Examine the claws; place the BUTTON STUDS on the center slot (B).
- Use the FILE on the teeth (C).
- Use the TWEEZERS on the red button (D).
- Press the blue, green and red buttons from the top down.
- Go up the ladder.
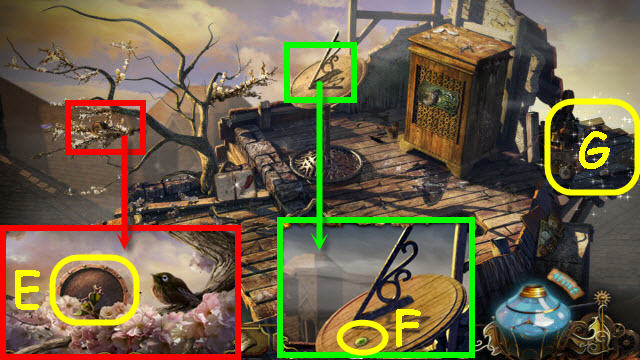
- Examine the branch; move the flowers and take the CLOCKS 2/2 (E).
- Examine the sundial; take the EYE (F).
- Examine the floor on the right to access a HOS (G).
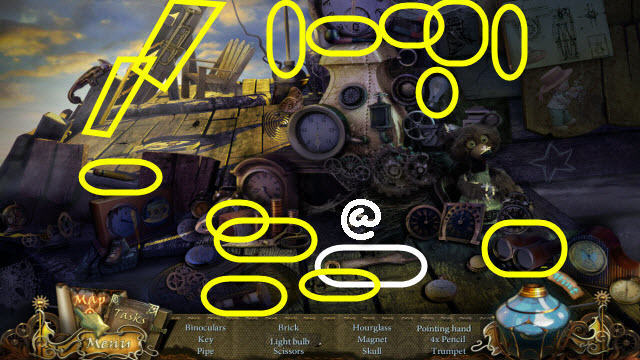
- Find the items listed and earn a HAND (@).
- Back out.
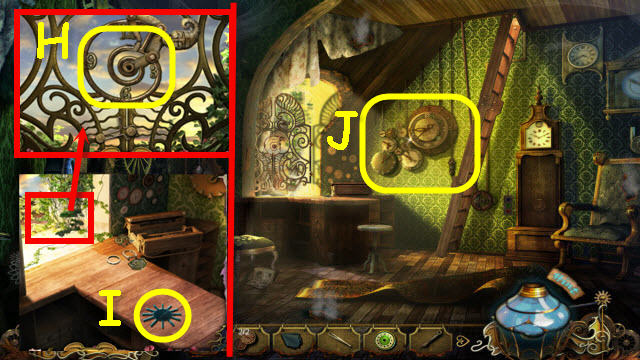
- Examine the counter and then examine and place the HAND on the window grate (H).
- Take the GLASS SUN (I).
- Examine and place the 2 CLOCKS on the wall clocks to trigger a puzzle (J).
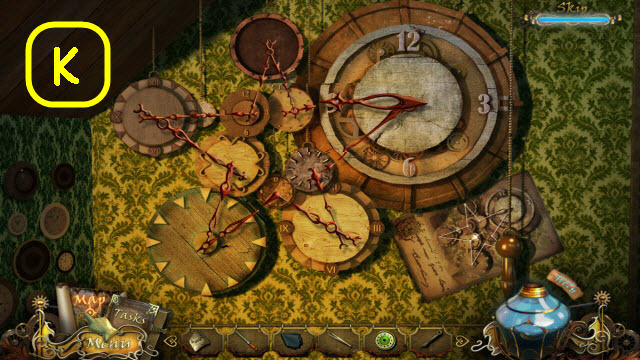
- Arrange the clock hands to duplicate the star pattern.
- See screenshot for solution (K).
- Take the TIMELINE PIECE.
- Examine the window to access a HOS.
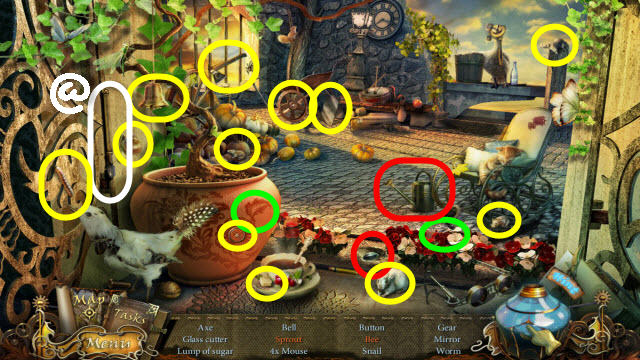
- Find the items listed.
- Marked in green: select the flowers to get the bee.
- Marked in red: use the watering can on the seed to get a sprout.
- You will earn a GLASS CUTTER (@).
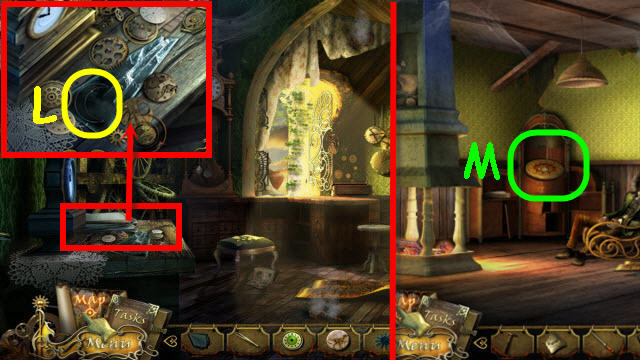
- Examine the table, and move the clock pieces starting with the one on top. Use the GLASS CUTTER on the moon; take the GLASS CRESCENT (L).
- Back out.
- Examine and place the TIMELINE PIECE on the device and the CHRONOLOGY PROMPT on the book to trigger a puzzle (M).
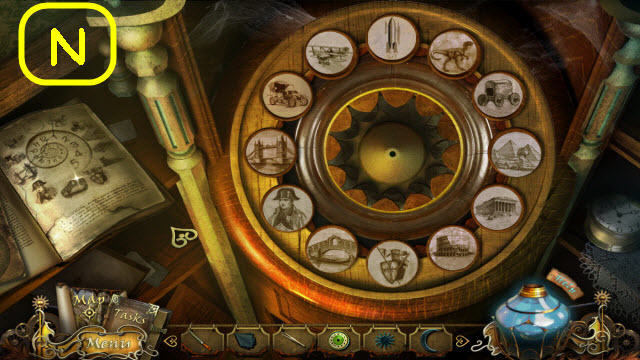
- Arrange the time pieces in chronological order.
- See screenshot for solution (N).
- Take the HANLE ADULT.
- Go down the hatch.
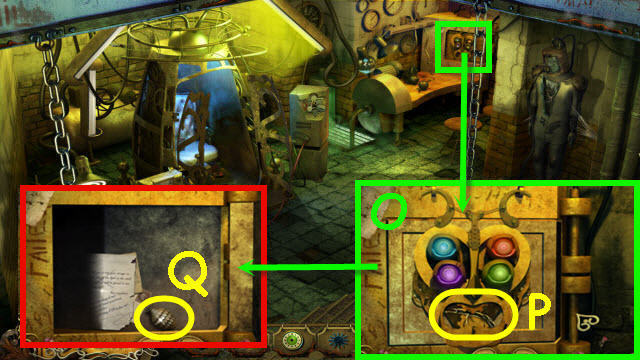
- Examine and place the EYE on the compartment lock (O).
- Move the eyes to their matching colored slots; use the TWEEZERS on the gears (P).
- Read the notes and take the WEIGHT (Q).
- Back out and go upstairs.
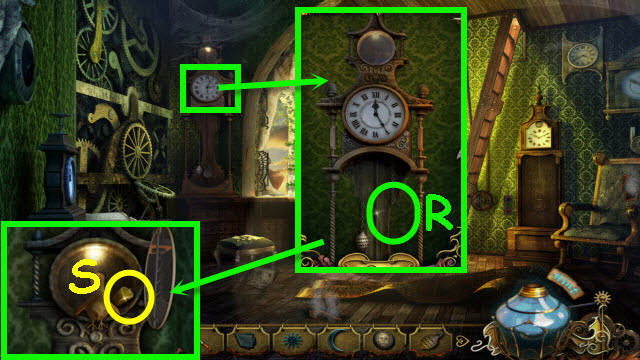
- Examine and place the WEIGHT on the cuckoo clock (R).
- Take the CANDLE (S).
- Go up the ladder.
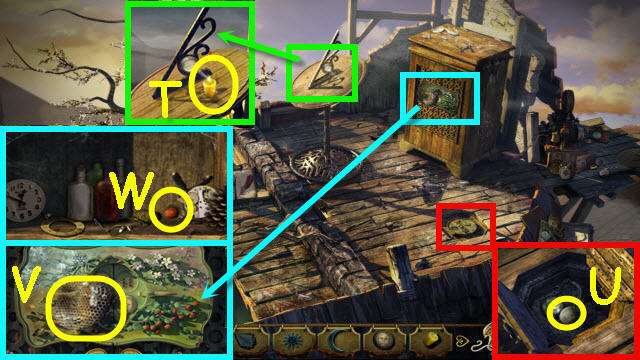
- Examine and place the LENS and CANDLE on the sundial; take the BURNING CANDLE (T).
- Examine and place the GLASS SUN and GLASS CRESCENT on the lock in the floor; take the HANLE CHILD (U).
- Examine the cabinet; use the BURNING CANDLE and the RAG on the wasp nest (V).
- Place the HANLE ADULT and HANLE CHILD on the lock; take the POWER BUTTON (W).
- Back out twice and go down the hatch.
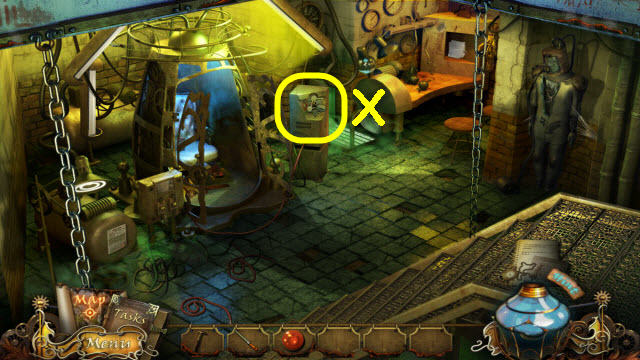
- Examine the control panel (X).
- Place the POWER BUTTON on the panel to trigger a puzzle.
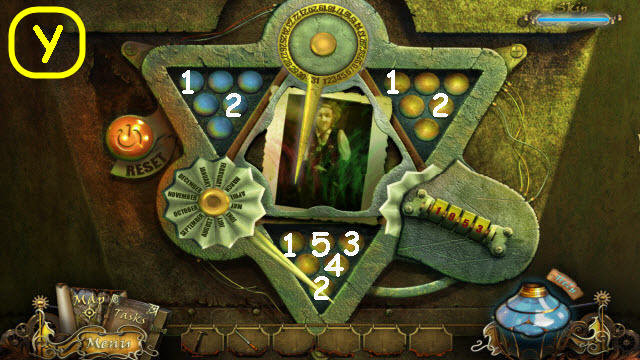
- Light all the circles up.
- See screenshot for solution (Y).
- Back out.
- Speak to Victor.
- Go down the hatch.
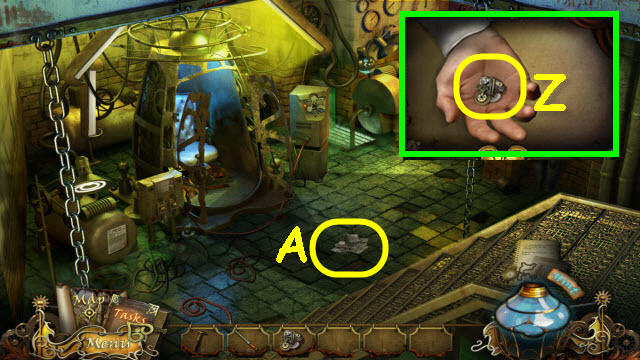
- Speak to Victor; take the MECHANICAL DOLL'S DETAILS (Z).
- Examine and select each photo for a story update (A).
- Go to the junkman's wagon.
Chapter 3 - The Boatman
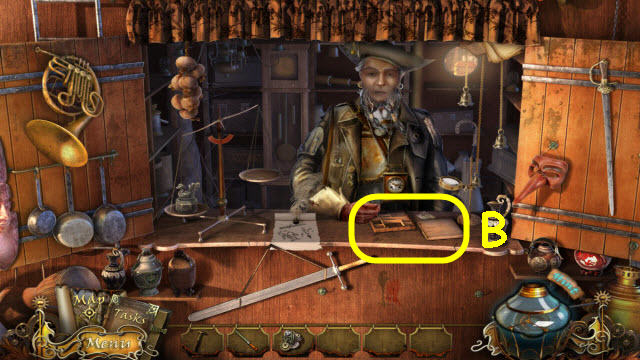
- Examine the counter (B).
- Place the MECHANICAL DOLL'S DETAILS in the box to trigger a puzzle.
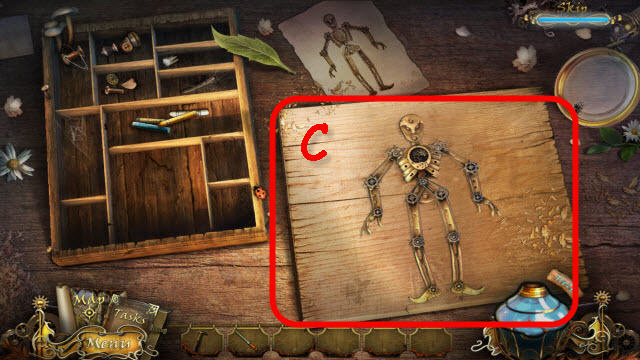
- Assemble the puppet frame.
- See screenshot for solution (C).
- Speak to the junkman; take the BRIDGE HAND.
- Back out twice and go forward to the bridge.
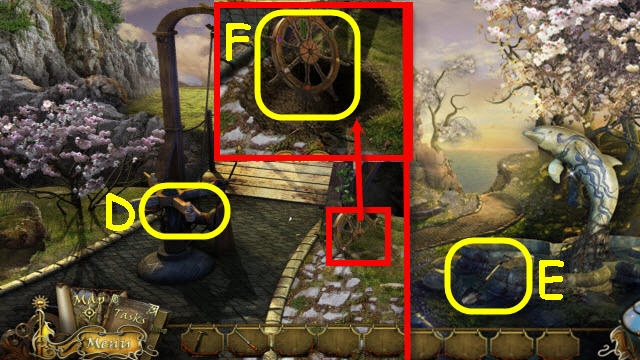
- Place the BRIDGE HAND on the mechanism (D).
- Cross the bridge.
- Take the SHOVEL (E).
- Read the note on the ground.
- Back out.
- Examine and use the SHOVEL on the dirt three times; take the STEERING WHEEL (F).
- Go forward three times.
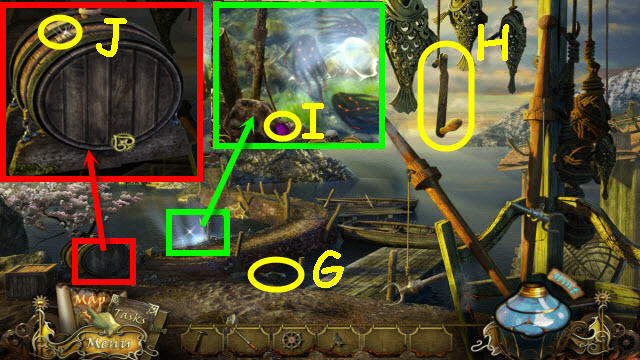
- Examine the message in a bottle (G).
- Take the WINCH DETAIL (H).
- Examine the water; take the FOUNTAIN GEM 1/2 (I).
- Examine the barrel; take the NAILS (J).
- Back out.
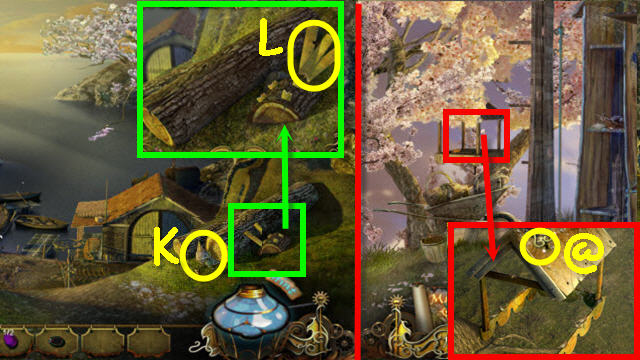
- Take the IRON BIRD (K).
- Examine and use the HAMMER on the wood three times; take the WOODEN PLANKS (L).
- Back out and go up the left stone stairs.
- Examine the birdhouse; take the FISH EYE (@).
- Back out and go forward.
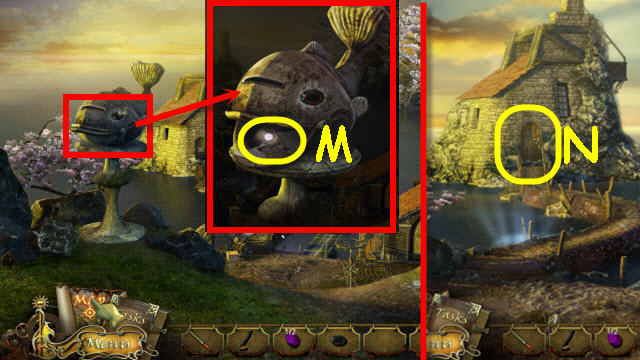
- Examine and place the FISH EYE on the fish; take the HELM'S PART (M).
- Go forward.
- Examine the door (N).
- Place the STEERING WHEEL on the center and the HELM'S PART on the left of the door lock to trigger a puzzle.
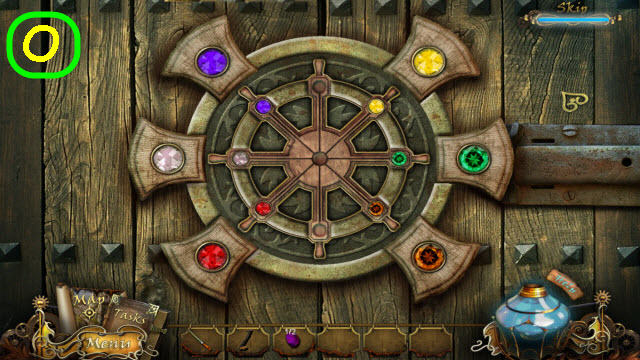
- Rotate the steering wheel to move the gems to the matching colored larger gems.
- To solve the puzzle, turn the wheel right or left (R is for Right and L is for Left) the number of spokes listed, pausing only after turning the number of times listed as follows: R, L, L, L x 2, select the clear gem on top, L, R x 2, L x 3, L, L, and R x 5 (O).
- Go forward into the boatman's house.
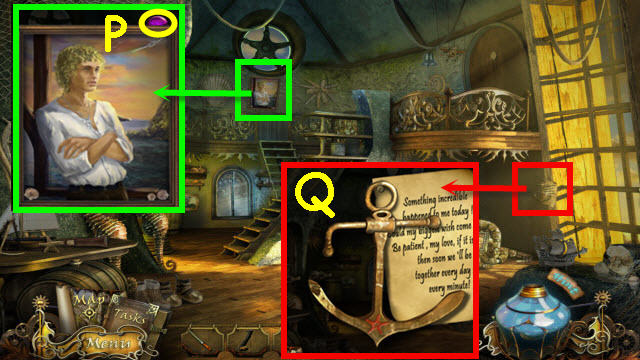
- Examine the portrait; take the FOUNTAIN GEM 2/2 (P).
- Examine the note; take the ANCHOR HANDLE (Q).
- Back out three times.
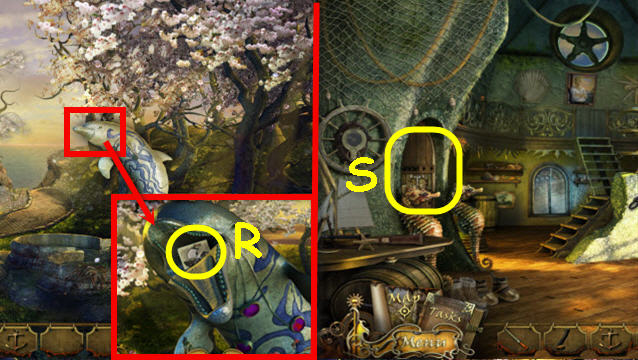
- Examine and place the 2 FOUNTAIN GEMS on the dolphin; take the SHIP TILE (R).
- Go into the boatman's house.
- Examine and place the SHIP TILE on the door lock to trigger a puzzle (S).
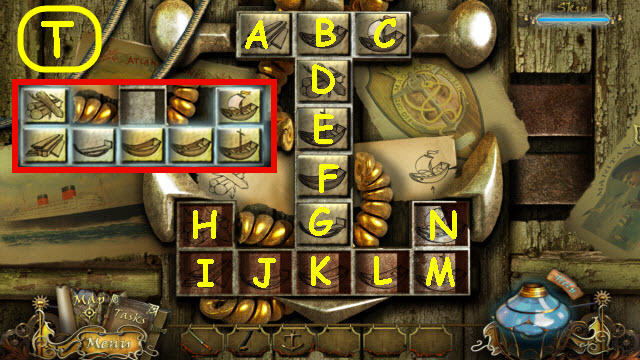
- Place the tiles in the correct order.
- To solve the puzzle, drag the tiles to the following squares: G – N, F – J, E – M, J – L, D – H, L - I, M – J, B – M, A – L, J – F, I – G, L – I, G – J, F – L, J – A, C – J, L – E, M – F, N – G, J – N, G – M, F – L, E – J, L – F, M – G, J – M, G – J, F – L, and A – K (T).
- Go left into the newly-opened doorway.
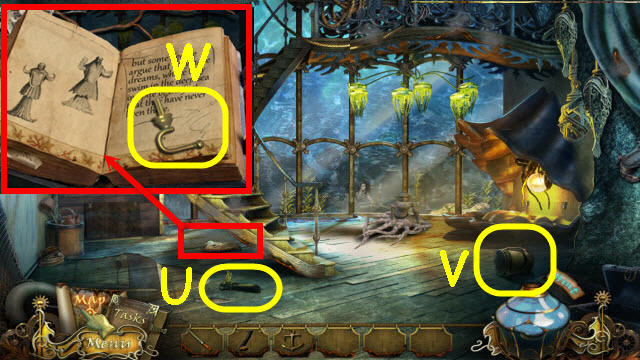
- Take the HARPOON (U).
- Take the BUCKET (V).
- Examine the book; turn the page and take the HOOK WITH THREAD (W).
- Back out twice.
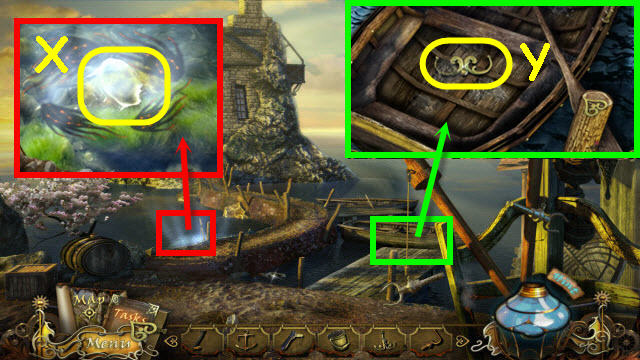
- Examine and use the HARPOON in the water; get a MEDUSA LAMP (X).
- Examine and use the BUCKET on the boat three times; get a BUCKET WITH WATER and take the BED HANDLE (Y).
- Go forward.
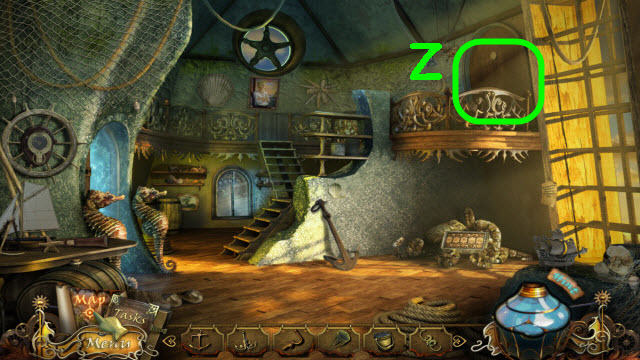
- Examine and use the BED HANDLE on the door (Z).
- Examine the balcony to access a HOS.
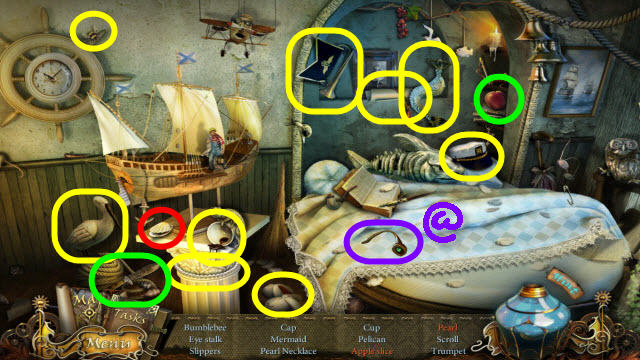
- Find the items listed.
- Marked in green: use the knife on the apple to get an apple slice.
- Marked in red: open the shell to get a pearl.
- You will earn a CRAB'S EYE (@).
- Go through the door on the left and then go forward.
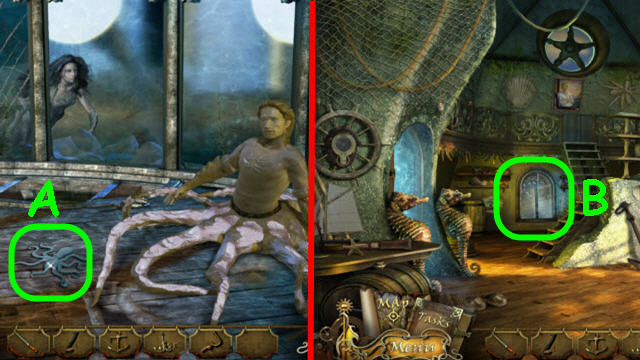
- Use the BUCKET WITH WATER on Nerio; take the OCTOPUS (A).
- Back out twice.
- Examine and place the OCTOPUS on the door to trigger a puzzle (B).
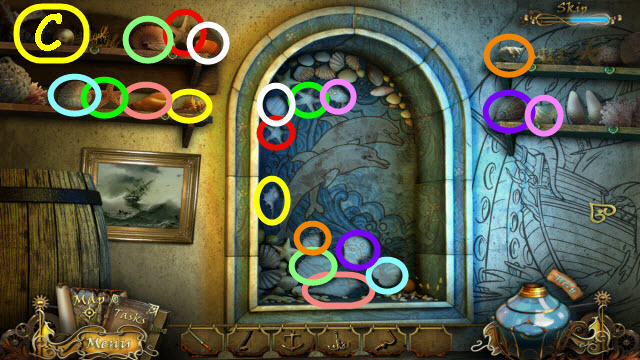
- Place the items from the shelves into their correct locations.
- See screenshot for solution (C).
- Take the FISH AQUARIUM.
- Go left.
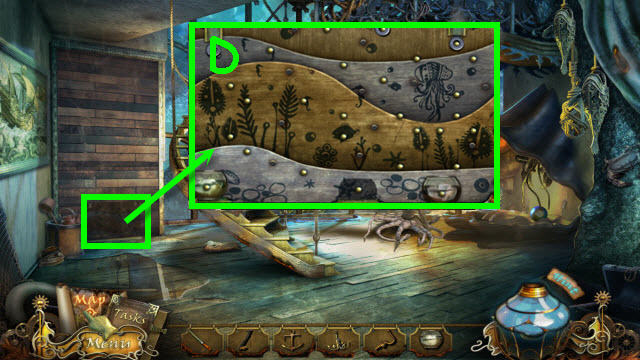
- Examine the wall.
- Place the FISH AQUARIUM on the board to trigger a puzzle (D).
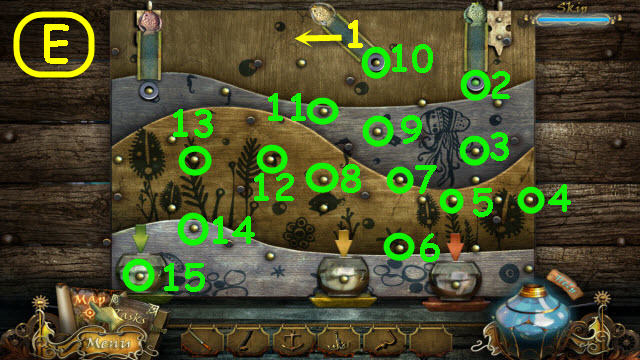
- Move the fish into the same colored bowl by pivoting the stream to a gold pin.
- To solve the puzzle move the bars and fish to the pins marked. See screenshot for green fish solution (E).
- See next screenshot for yellow fish.
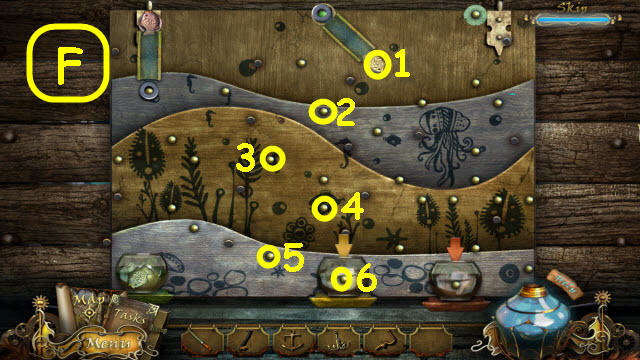
- See screenshot for yellow fish solution (F).
- See next screenshot for pink fish.
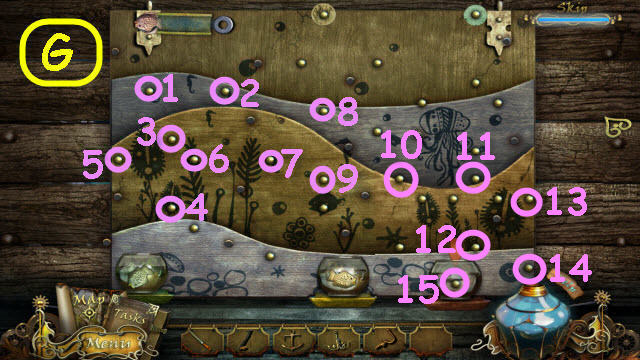
- See screenshot for pink fish solution (G).
- Examine the opening in the wall to access a HOS.
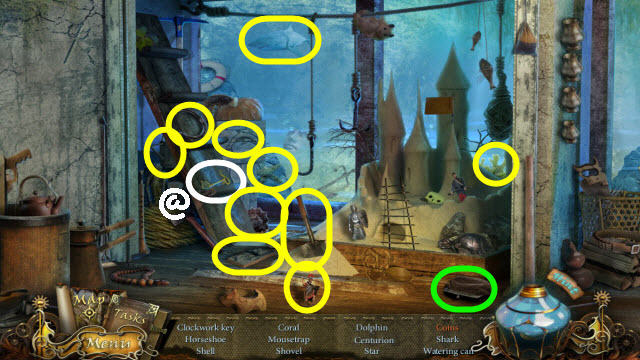
- Find the items listed.
- Marked in green: open the coin purse to get the coins.
- You will earn a CLOCKWORK KEY (@).
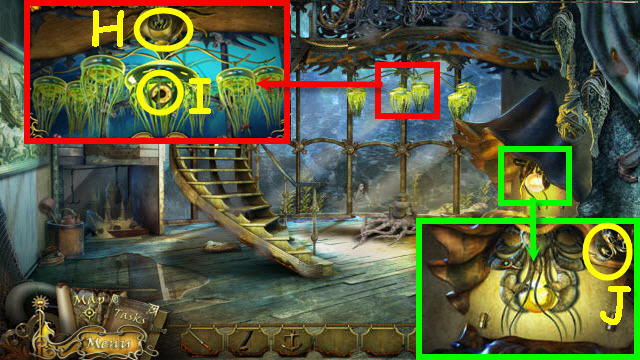
- Examine and place the MEDUSA LAMP on the lamp; place the CLOCKWORK KEY on the base (H) turn the key.
- Take the WORKSHOP KEY (I).
- Examine the oyster; take the ROPE WITH ANCHOR (J).
- Back out three times.
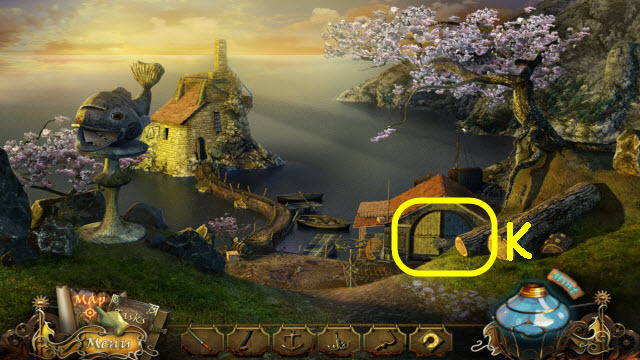
- Examine the workshop door (K).
- Place the WORKSHOP KEY on the door lock to trigger a puzzle.
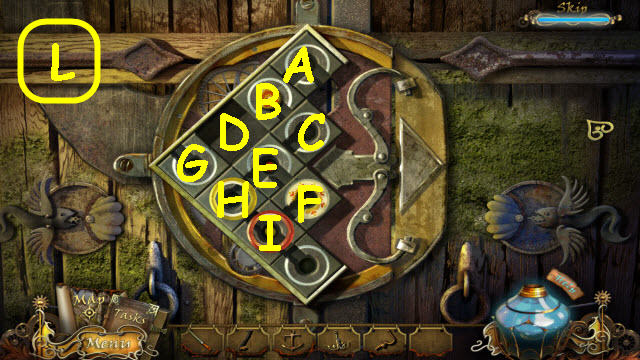
- Move the flowered center into the flower semi-circle.
- To solve the puzzle, select the following: G, H, E, D, B, slide the flower button into E, D, G, H, E, slide the flower button to G, H, I, slide the flower button to H, slide the flower button back to G, H, E, D, G, H, E, D, slide the flower button to H, E, F, and slide the flower button to E (L).
- Enter the workshop.
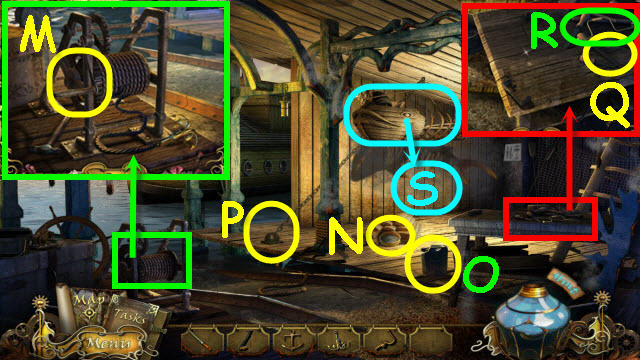
- Examine and place the WINCH DETAIL and ROPE WITH ANCHOR on the winch; turn the handle (M).
- Take the SIEVE (N) and the GAS (O).
- Examine and use the FILE on the chain (P).
- Examine the table; take the GARDEN SCISSORS (Q) and DRILL (R).
- Examine the fallen boat (S) to access a HOS.
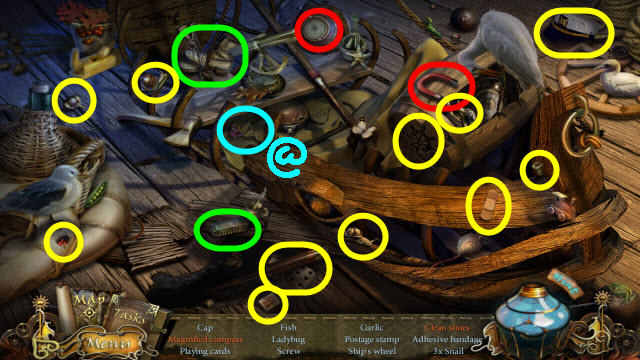
- Find the items listed.
- Marked in green: use the brush on the shoes to get clean shoes.
- Marked in red: use the magnet on the compass to get a compass.
- You will earn a FORGED FISH (@).
- Go left.
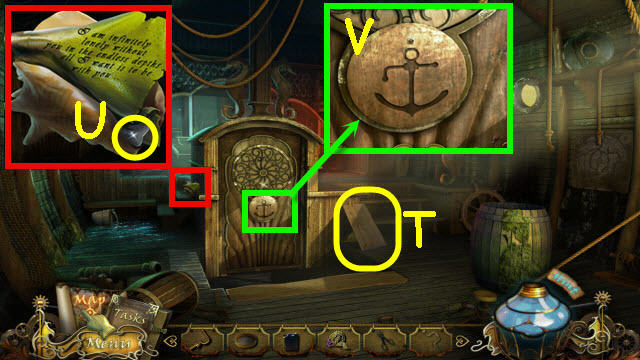
- Take the BOARD (T).
- Examine the conch; take the LATCH (U).
- Examine and use the DRILL, HOOK WITH THREAD in the drilled hole, and ANCHOR HANDLE on the door lock (V).
- Enter through the newly-opened door.
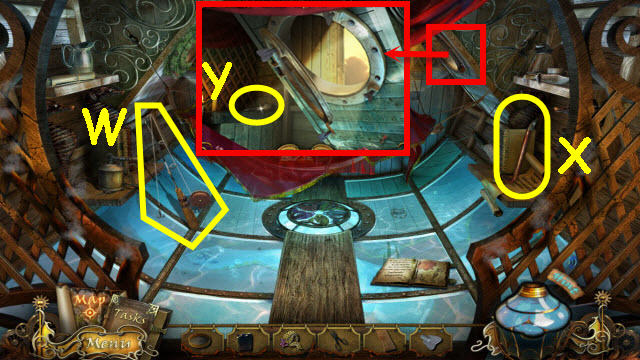
- Take the FISHING ROD (W).
- Take the CROWBAR (X).
- Examine the right portal; take the TOOL (Y).
- While still in the close-up, place the LATCH on the portal and turn to open.
- Back out and go forward up the right stairs.
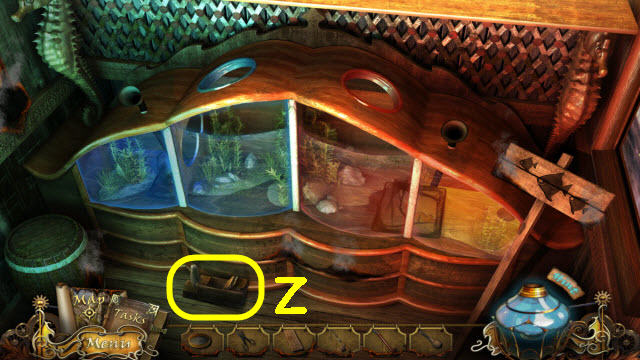
- Take the WOODEN PLANE (Z).
- Back out twice.
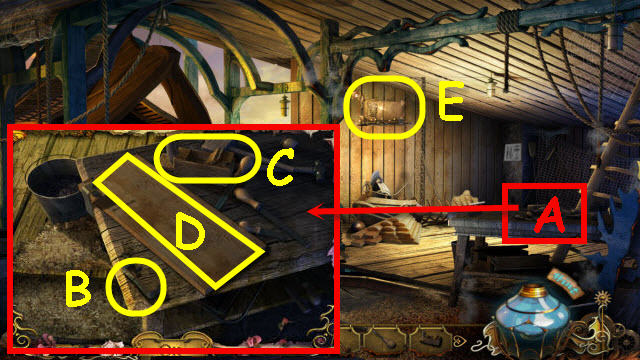
- Examine and place the BOARD and the WOODEN PLANE on the workbench (A).
- Select the clamp (B) and WOODEN PLANE (C); take the THIN BOARD (D).
- Examine and place the TOOL on the shelf to trigger a puzzle (E).
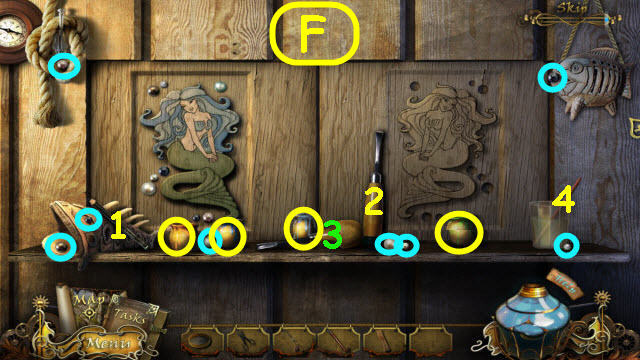
- Use the tools to duplicate the mermaid on the left to the etching on the right.
- To complete the picture, use the following tools: 1 and 2 on the mermaid outline, 3 to make the 8 holes around the mermaid for the gems. Place the gems (circled in cyan) in the holes, 4 – dip the brush in each color (circled in yellow) and use on the mermaid (F).
- Take the SLUICE SWITCHES 1/2.
- Go left.
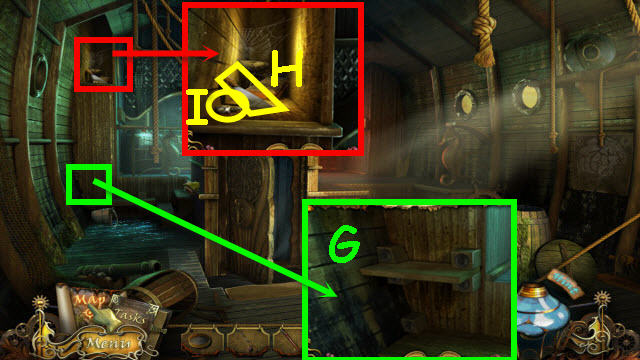
- Examine and place the THIN BOARD on the pegs (G).
- Examine the cubby; take the PALETTE KNIFE (H) and BURNER DETAIL (I).
- Go through the center door.
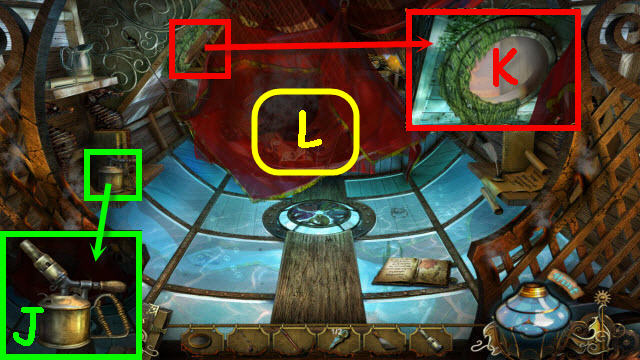
- Examine and use the GAS and BURNER DETAIL on the blowtorch; take the SOLDERING IRON (J).
- Examine and use the PALETTE KNIFE on the left portal; open the portal (K).
- Move the cloth and select the area to access a HOS (L).
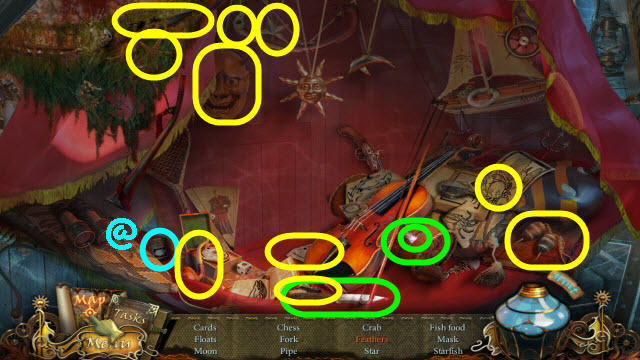
- Find the items listed.
- Marked in green: use the knife on the pillow to get feathers.
- You will earn FISH FOOD (@).
- Back out three times and go forward.
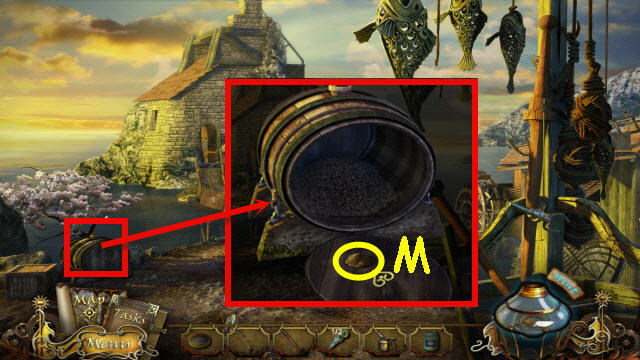
- Examine and use the CROWBAR on the barrel; use the SIEVE on the grain in the barrel and take the CORN (M).
- Back out twice and go up the left stone stairs.
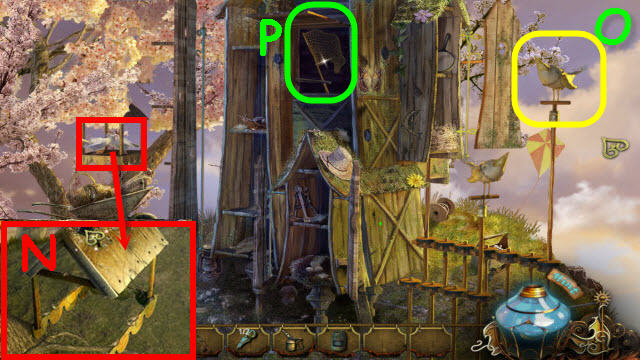
- Examine and use the WOODEN PLANKS, NAILS, HAMMER and CORN on the birdhouse (N).
- Place the IRON BIRD on the pole (O).
- Take the FISHNET (P).
- Go into the workshop; go left and through the center door.
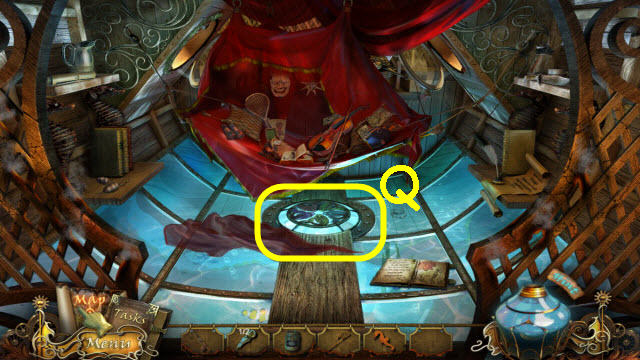
- Examine the center glass panel (Q).
- Place the FORGED FISH on the center glass to trigger a puzzle.
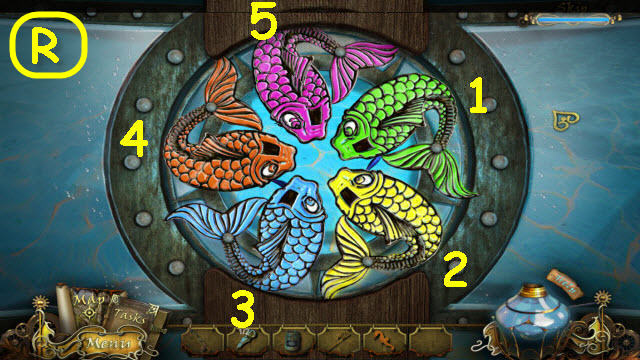
- Combine the fish so that they have matching colored heads and bodies.
- To solve the puzzle, select the following tail sections; 1, 2, 5, 1, 4, and 5 (R).
- Use the FISHNET in the center; get a BLUE FISH.
- Back out.
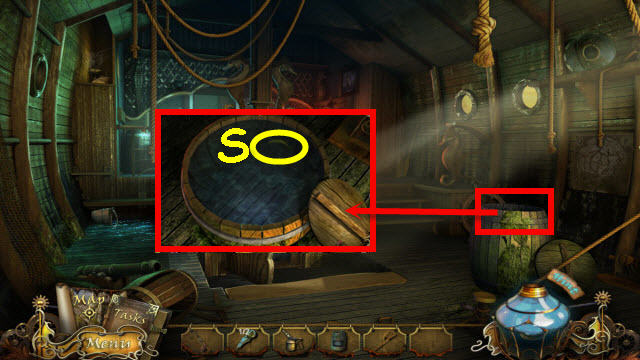
- Examine and use the CROWBAR and FISHNET on the barrel; get a YELLOW FISH (S).
- Go forward up the right stairs.
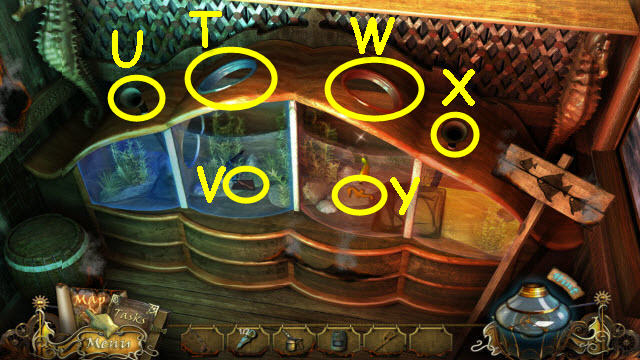
- Place the BLUE FISH in the large blue hole (T); place the FISH FOOD in the small blue funnel (U).
- Use the FISHING ROD on the large blue hole; get a PICTURED TILE (V).
- Place the YELLOW FISH on the large red hole on the right (W) and the FISH FOOD on the small red funnel on the right (X).
- Use the FISHING ROD on the large right hole; get a SEAHORSE (Y).
- Go into the boatman's house.
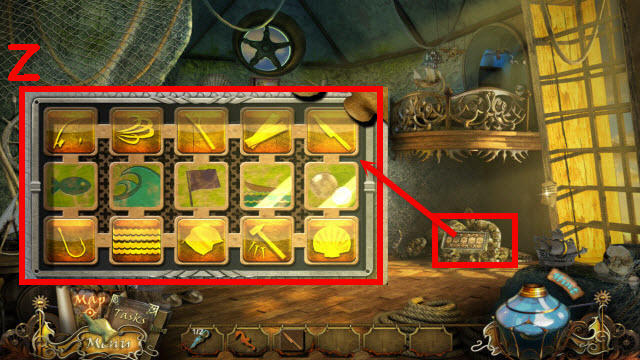
- Examine the octopus; place the PICTURED TILE on the upper left of the board to trigger a puzzle.
- Arrange the tiles so that all corresponding tiles are in columns.
- See screenshot for solution (Z).
- Take the FISH SWITCH.
- Back out three times.
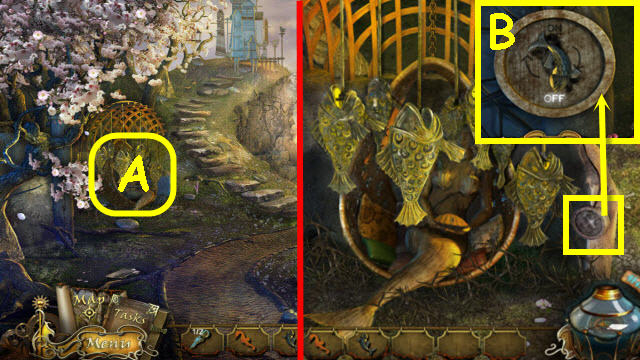
- Examine and use the GARDEN SCISSORS four times on the brambles (A).
- Examine and use the FISH SWITCH on the switch; turn to off (B).
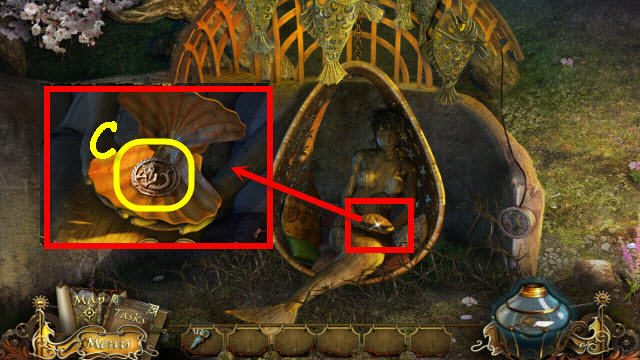
- Examine and use the SEAHORSE on the shell; press to open and take the AQUARIUS SYMBOL (C).
- Go into the boatman's house and go left.
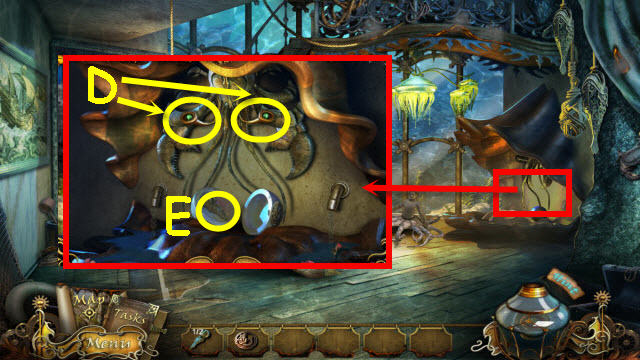
- Examine and place the CRAB'S EYE in the oyster; select both eyes (D) to drop the pearl.
- Use the AQUARIUS SYMBOL on the pearl; take the SLUICE SWITCHES 2/2 (E).
- Go forward.
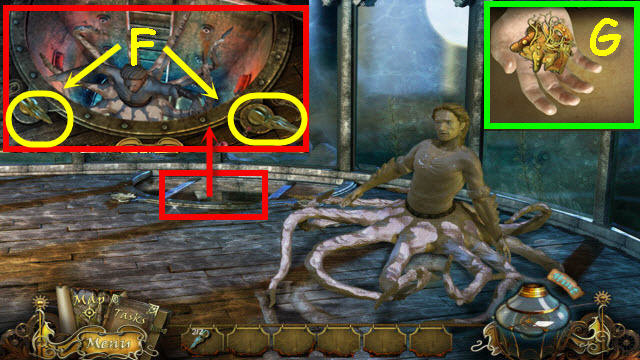
- Examine and use the SOLDERING IRON and the 2 SLUICE SWITCHES on the hatch; select both of the SLUICE SWITCHES to attach them (F).
- Speak to Nerio.
- Examine the hatch; select the left switch twice, pausing in between.
- Select the right switch and wait.
- When Nerio returns; select the right and then the left switch.
- Take the WOODEN DOLL PARTS (G).
- Go to the junkman's wagon.
Chapter 4 - The Tailor
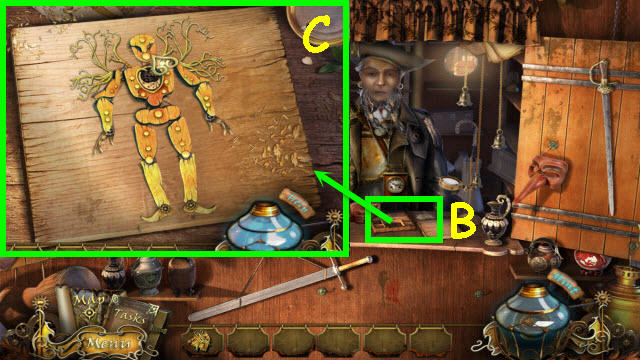
- Examine and place the MECHANICAL DOLL PARTS in the box to trigger a puzzle (B).
- Assemble the pieces from the box on the puppet.
- See screenshot for solution (C).
- Speak to the junkman; take the PIPE.
- Back out twice and go up the stairs on the right.
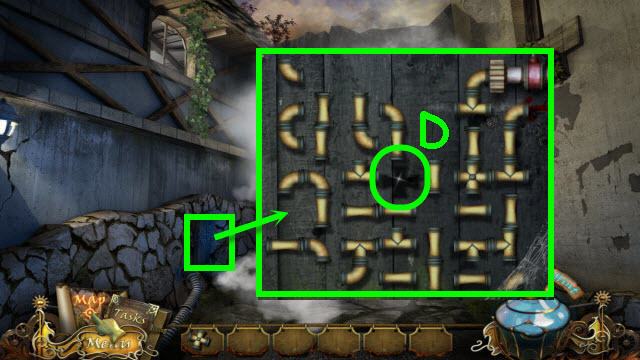
- Examine the wall.
- Place the PIPE on the shadow area to trigger a puzzle (D).
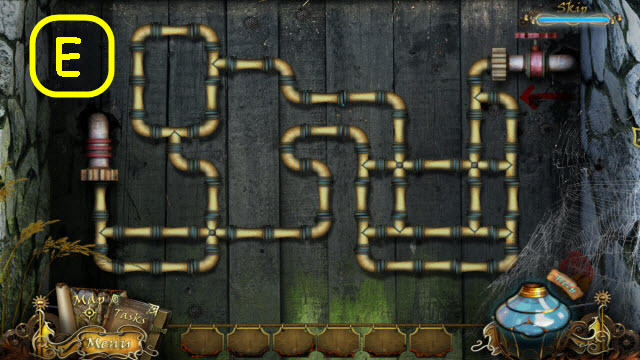
- Arrange the pipes to connect them all so no steam escapes.
- See screenshot for solution (E).
- Go forward up the stairs.
- Speak to Donna.
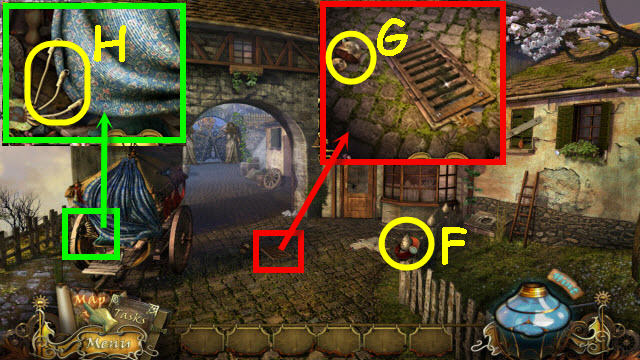
- Take the PENDANT (F).
- Examine the grate; take the CAT'S BELL (G).
- Examine the carriage; untie the three ropes (H) and move the cover.
- Examine the carriage to access a HOS.
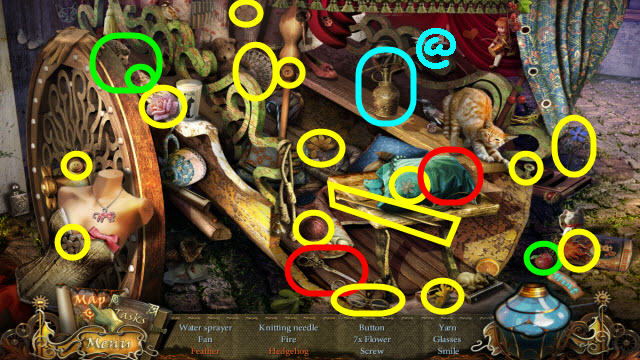
- Find the items listed.
- Marked in green: place the apple on the ledge to get the hedgehog.
- Marked in red: use the scissors on the pillow to get a feather.
- You will earn a SPRINKLER (@).
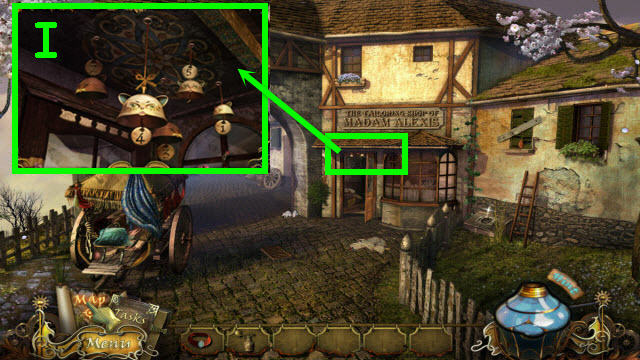
- Examine and hang the CAT'S BELL in the entryway; use the SPRINKLER five times to clean all the bells (I).
- Ring the bells in the numerical order written on the bells.
- Enter the tailor shop.
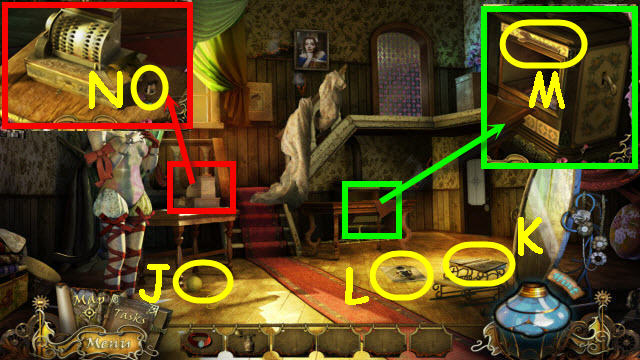
- Take the YELLOW CLEW (J).
- Examine the book (K) and sketch (L).
- Examine the heater; take the TRIANGULAR WRENCH (M).
- Examine the cash register; take the THIMBLE 1/2 (N).
- Go through the beaded doorway upstairs.
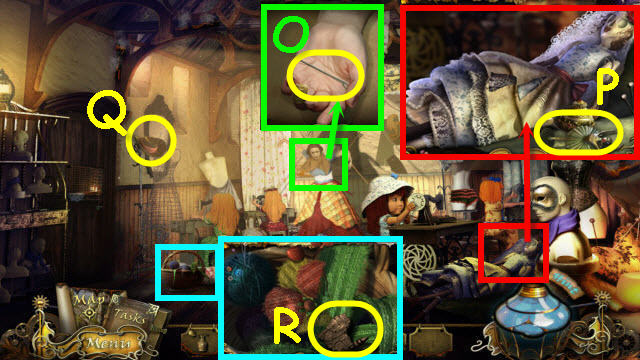
- Go forward and speak to the seamstress; get a NEEDLE AND COTTON (O).
- Back out.
- Examine the doll; take the BALLERINA STATUE (P).
- Take the HAT (Q).
- Examine the basket; take the WOODEN CAT (R).
- Back out twice.
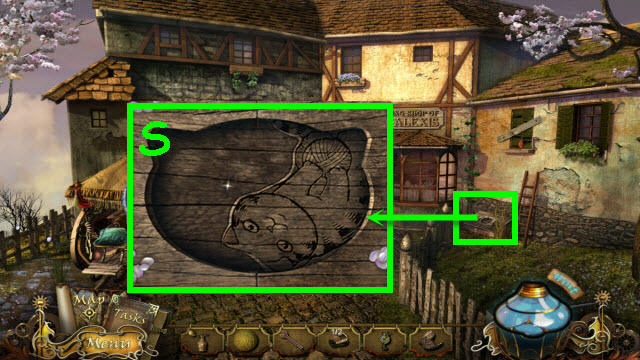
- Examine the window well (S).
- Place the WOODEN CAT on the board to trigger a puzzle.
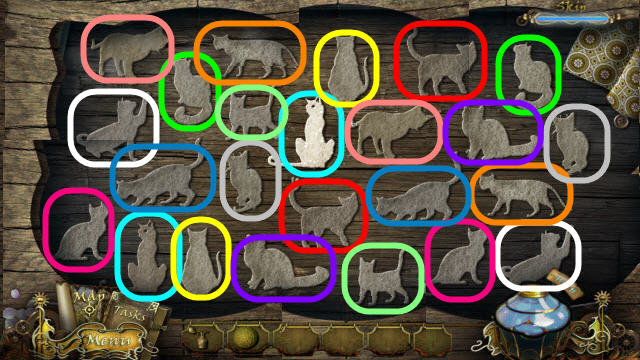
- Find the pairs of cats.
- Use the handles on the board to move the board and view the hidden cats.
- See screenshot for solution (T).
- Take the HAMMER HEAD.
- Go into the tailor shop.
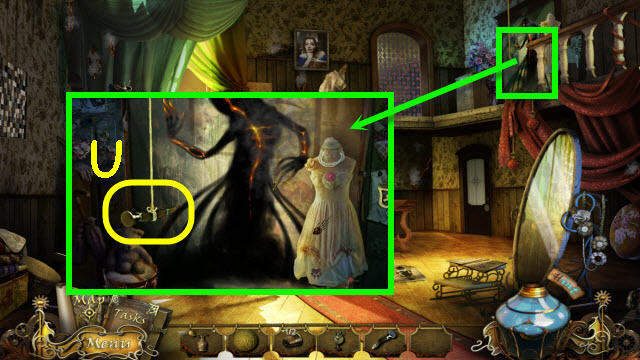
- Examine the shadow; tie the HAMMER HEAD on the rope (U) and swing the HAMMER HEAD three times to break the glass.
- Examine the balcony area to access a HOS.
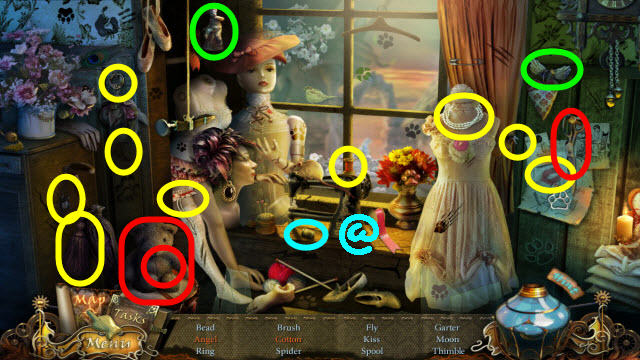
- Find the items listed.
- Marked in green: place the angel wings on the statue to get an angel.
- Marked in red: use the scissors on the teddy bear to get cotton.
- You will earn the THIMBLES 2/2 (@).
- Go up through the beaded doorway.
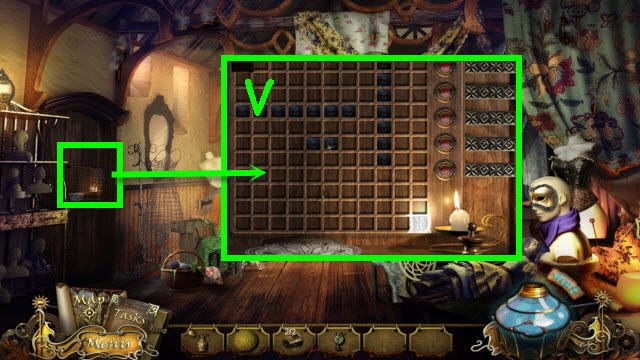
- Examine the door on the left (V).
- Place the 2 THIMBLES on the board to trigger a puzzle.
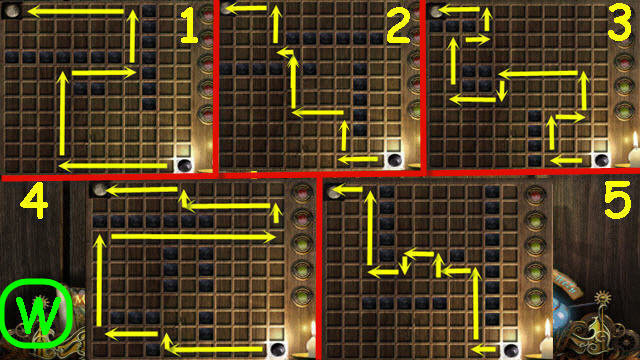
- Move the black and white thimbles to their matching colored spaces.
- See screenshot for solution (W).
- Go left through the newly-opened door.
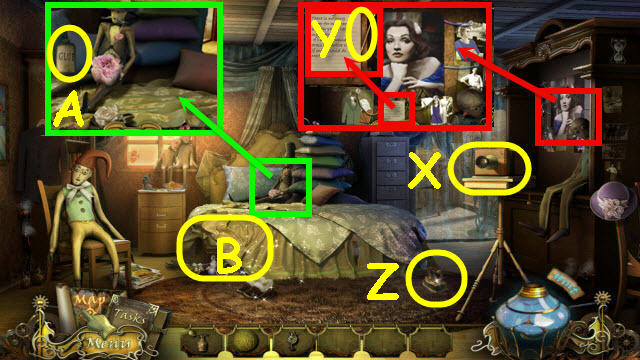
- Select the camera (X).
- Examine the bulletin board; look closely at the note and take the KNITTING NEEDLES 1/2 (Y).
- Take the IRON (Z).
- Examine the bed; take the GLUE (A).
- Move the bed skirt to trigger a HOS. Examine under the bed to access a HOS (B).
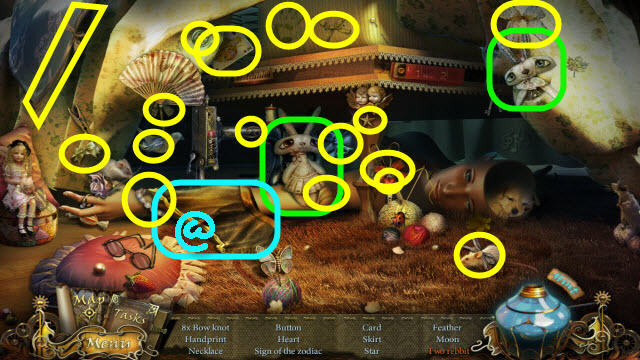
- Find the items listed.
- Marked in green: place the rabbit by the rabbit to get two rabbits.
- You will earn a CRUMPLED SKIRT (@).
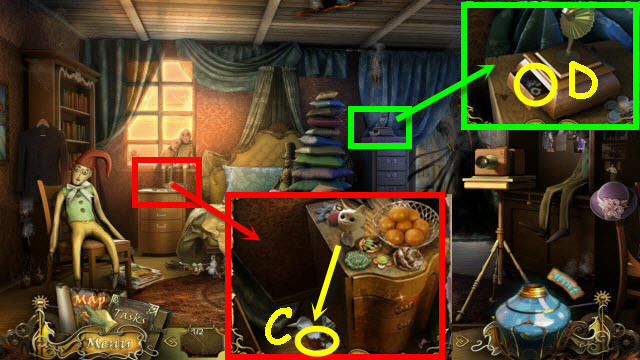
- Examine the night stand; push the cat statue three times and take the SUNS 1/4 (C).
- Examine and place the BALLERINA STATUE on the music box; take the DOLL'S FACE (D).
- Back out.
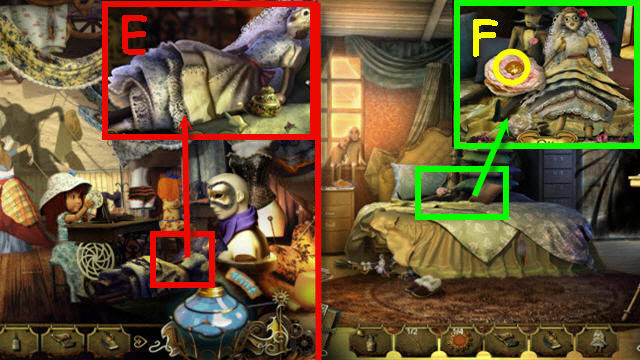
- Examine use the NEEDLE AND COTTON on the doll three times; place the GLUE and the DOLL'S FACE on the doll's face and take the BRIDE DOLL (E).
- Go left.
- Examine and place the BRIDE DOLL on the bed; take the SYMBOLIC CIRCLE (F).
- Back out twice.
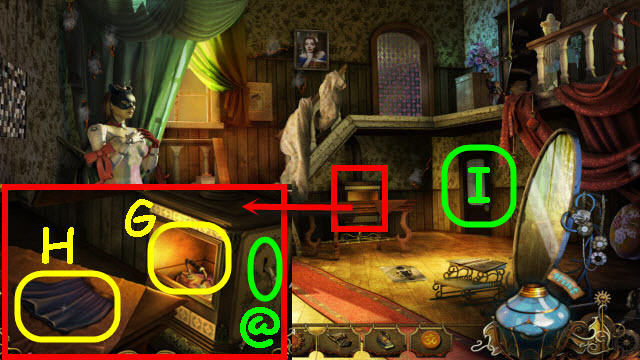
- Examine and place the IRON in the furnace (G); pull the handle (@).
- Place the CRUMPLED SKIRT on the table; use the SPRINKLER and IRON on the CRUMPLED SKIRT and take the SKIRT (H).
- Examine and place the SYMBOLIC CIRCLE on the door to trigger a puzzle (I).
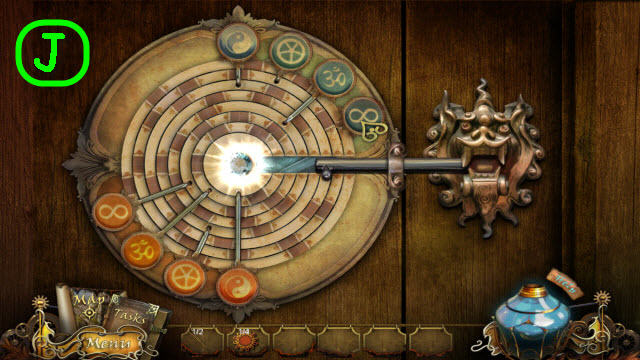
- Arrange the tokens to open the lock.
- See screenshot for solution (J).
- Go right through the newly-opened door.
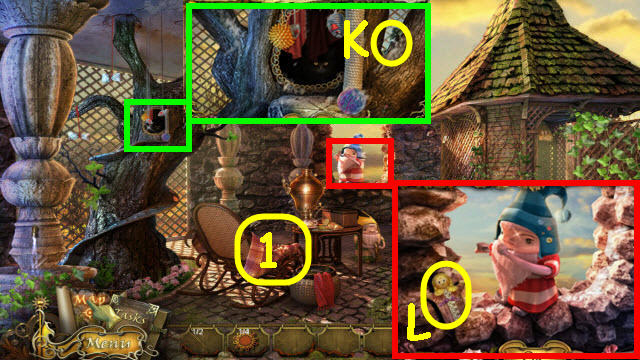
- Examine the tree hole; take the SHARPENED METAL PAW (K).
- Examine the gnome; take the GLOVE DOLL (L).
- Move the cloth (1) to trigger a HOS.
- Examine the chair to access a HOS.
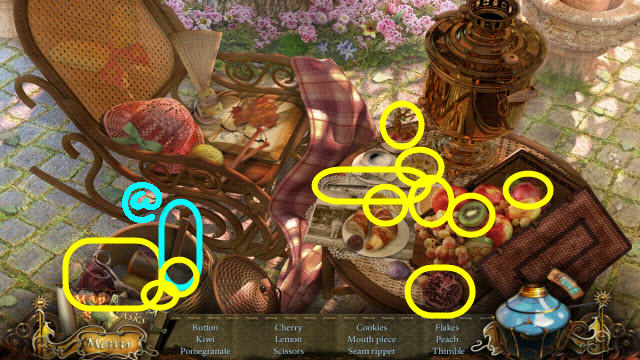
- Find the items listed and you will earn a SEAM RIPPER (@).
- Go right into the gazebo.
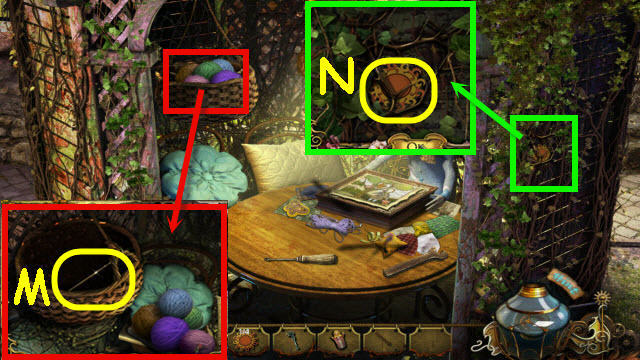
- Examine the basket; move the balls of yarn and take the KNITTING NEEDLES 2/2 (M).
- Examine the vines; use the GLOVE DOLL to get SUNS 2/4 (N).
- Back out twice and go up through the beaded doorway and then left through the door.
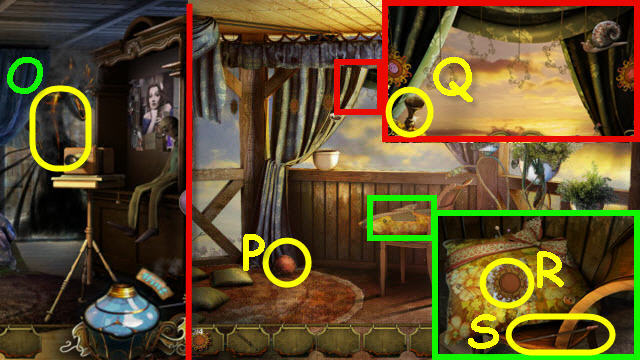
- Use the SHARPENED METAL PAW on the shadow (O).
- Go through the newly-opened doorway.
- Take the RED CLEW (P).
- Examine the window; take the TRUMPET (Q).
- Examine and use the SEAM RIPPER on the pillow; take the SUNS 3/4 (R) and KNITTING HOOK (S).
- Back out.
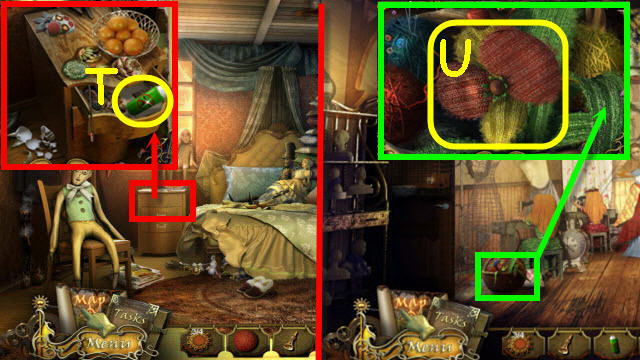
- Examine and use the KNITTING HOOK on the nightstand; take the INSECTICIDE (T).
- Back out.
- Examine and place the YELLOW CLEW, RED CLEW and the 2 KNITTING NEEDLES in the basket; take the KNIT FLOWER (U).
- Back out and go right through the door.
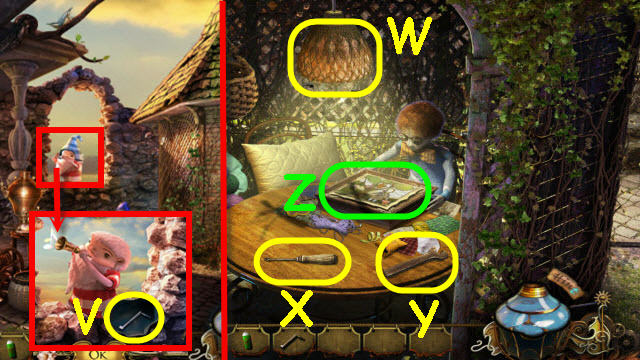
- Examine and give the TRUMPET to the gnome; take the CASH REGISTER HANDLE (V).
- Go into the gazebo.
- Use the INSECTICIDE on the lamp (W).
- Take the SCREWDRIVER (X) and SQUARE WRENCH (Y).
- Examine the box to trigger a puzzle (Z).
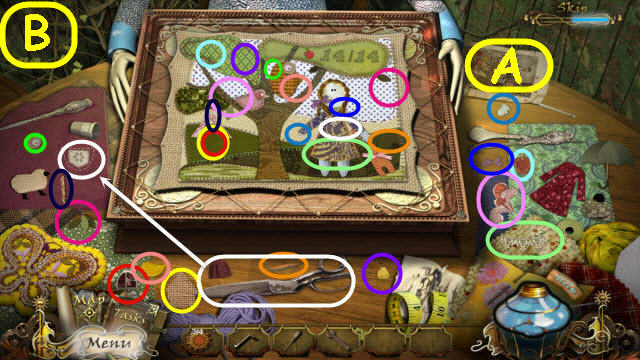
- Place the items on the table on the fabric to complete the picture.
- Use the diagram as your guide (A).
- See screenshot for solution (B).
- Take the SPOOLS OF THREAD 1/3 from the opened box.
- Back out twice.
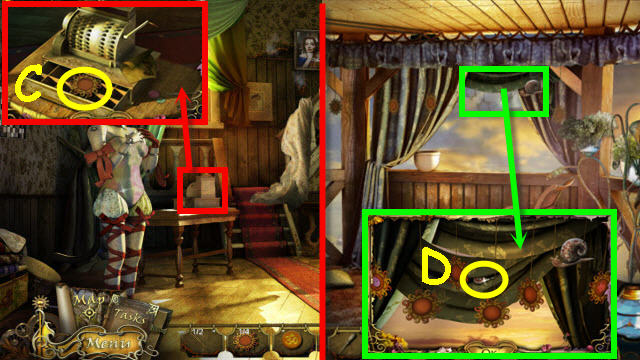
- Examine and use the CASH REGISTER HANDLE on the cash register; turn the handle and take the SUNS 4/4 (C).
- Go up through the beaded doorway; left, and then straight on the right.
- Examine and hang the 4 SUNS on the window hangers; take the SPOOLS OF THREAD 2/3 (D).
- Back out four times.
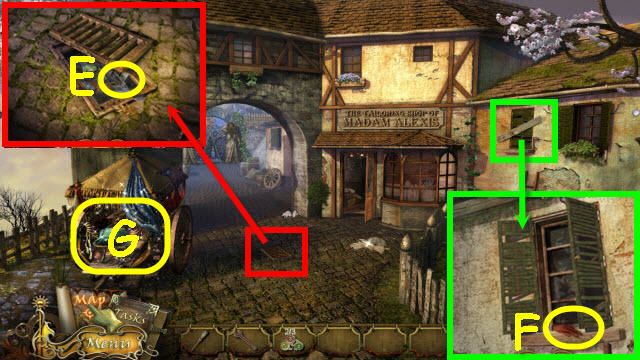
- Examine and use the SCREWDRIVER on the grate; remove the cover and take the MINI-THEATRE ELEMENT (E).
- Examine and use the TRIANGULAR WRENCH and the SQUARE WRENCH on the matching bolts on the boarded window; take the RED GLOVE (F).
- Examine the carriage to access a HOS (G).
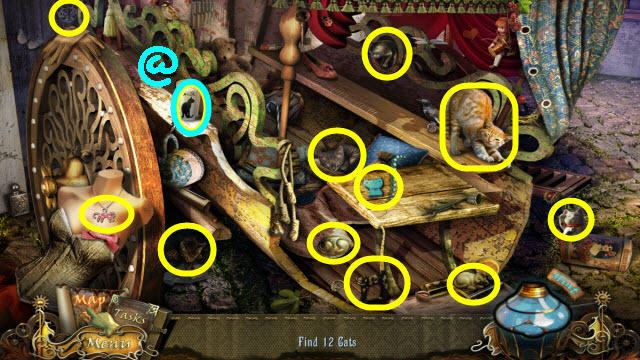
- Find the 12 cats and you will earn MILK (@).
- Go into the tailor shop and go right.
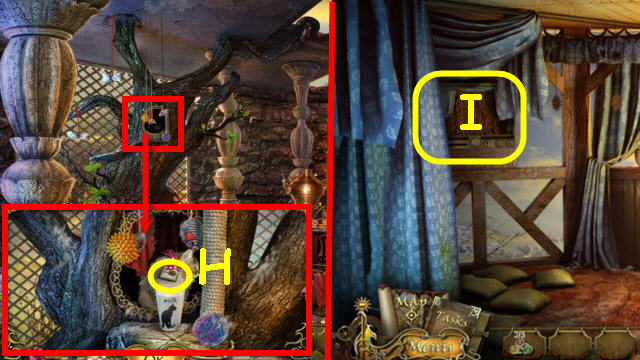
- Examine and place the MILK by the hole in the tree; take the MINI-THEATRE ELEMENT 2/2 (H).
- Back out and go up through the beaded doorway. Go left and then straight through the right doorway.
- Examine and place the 2 MINI-THEATRE ELEMENTS on the bottom buttons of the puppet theatre to trigger a puzzle (I).
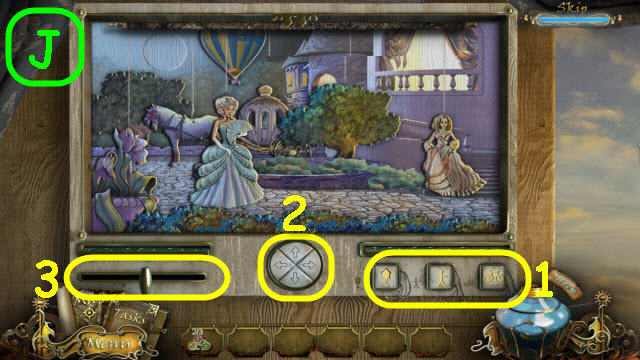
- Arrange the scene according to the backdrop.
- Use the buttons (1) to add the items to the scene.
- Use the arrows (2) to move the items around. Use the lever (3) to bring the items closer or further away.
- Select the items you wish to move and then select the arrows or buttons. The item will briefly light up when it is in the correct place.
- See screenshot for solution (J).
- Take the CORSET.
- Back out three times.
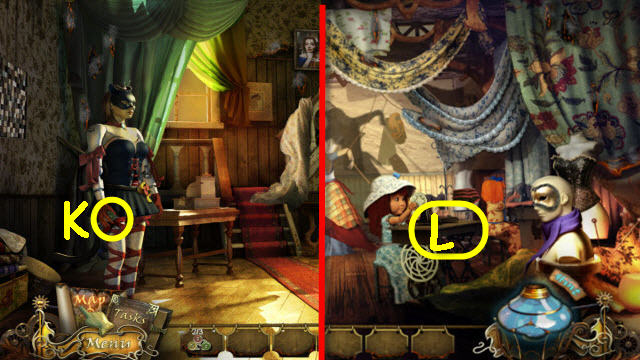
- Place the PENDANT, HAT, RED GLOVE, CORSET and SKIRT on their appropriate spots on the mannequin.
- Place the KNIT FLOWER on the SKIRT and take the SPOOLS OF THREAD 3/3 (K).
- Go up through the beaded doorway.
- Examine and place the 3 SPOOLS OF THREAD on the sewing machine to trigger a puzzle (L).
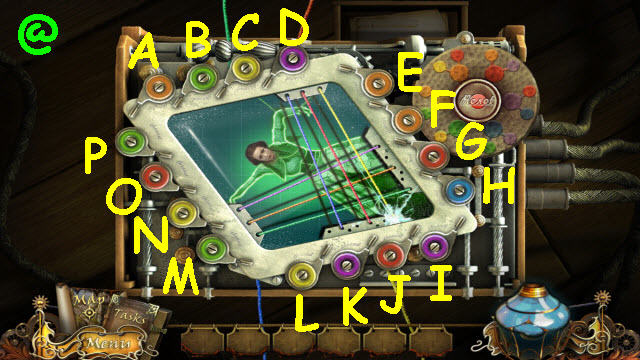
- Remove the spools by creating and matching the colors.
- Select the following spools to solve the puzzle: E – F, I – K, G – L – G - A, D – M – D - H, C – N, B – P, and O – J (@).
- Talk to the seamstress; take the RAGDOLL'S DETAILS.
Chapter 5 - The Psychic
- Go to the junkman's wagon.
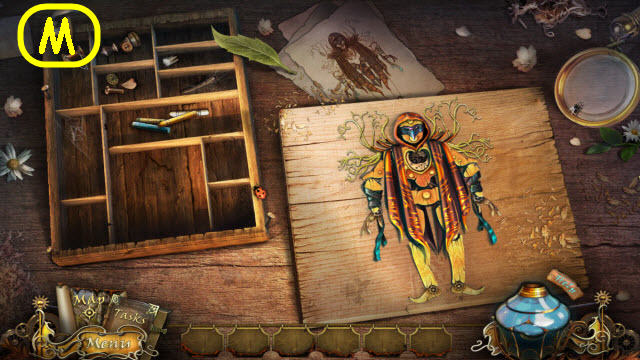
- Examine and place the RAGDOLL'S DETAILS on the box on the counter to trigger a puzzle.
- Assemble the pieces from the box on the puppet.
- See screenshot for solution (M).
- Speak to the junkman; take the SNAKE.
- Go to the entrance of the tailor shop.
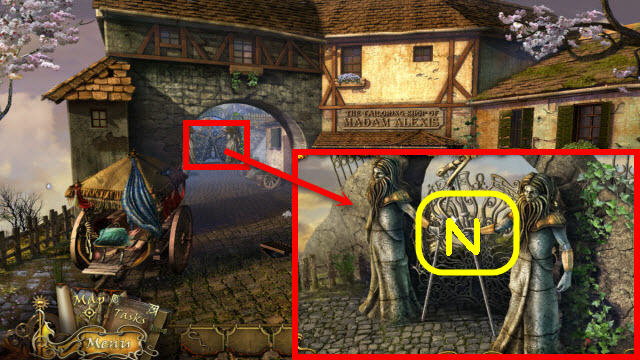
- Examine the archway; place the SNAKE on the guards (N).
- Go forward.
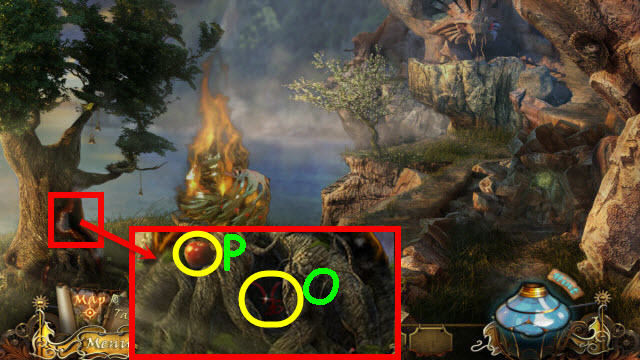
- Examine the tree trunk; move the roots and take the MAGIC SIGNS 1/3 (O).
- Take the APPLE (P).
- Go forward down the path.
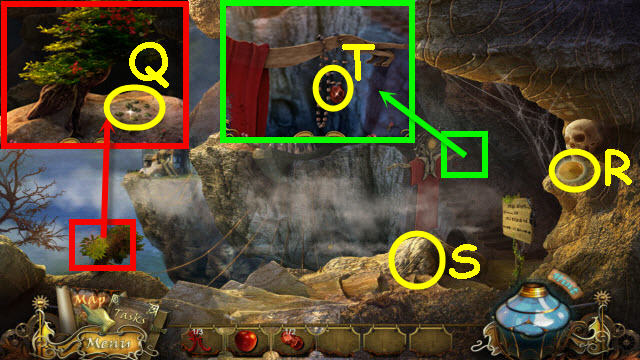
- Examine and shake the tree twice; take the SEED (Q).
- Take the PART OF A RING 1/2 (R).
- Take the PICK (S).
- Examine the pointer's arm; take the STONES 1/2 (T).
- Back out.
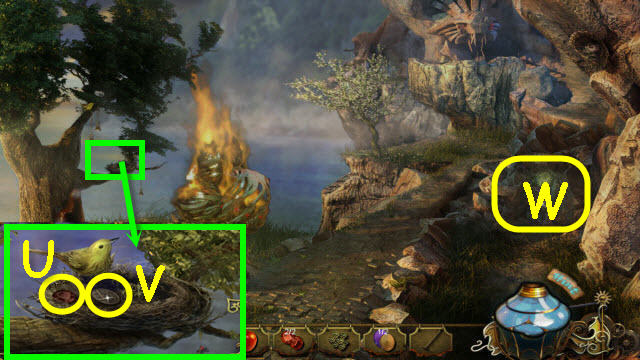
- Examine and place the SEED in the nest; take the STONES 2/2 (U) and SING COIN (V).
- Examine and use the PICK three times on the stones (W).
- Examine the stone area to access a HOS.
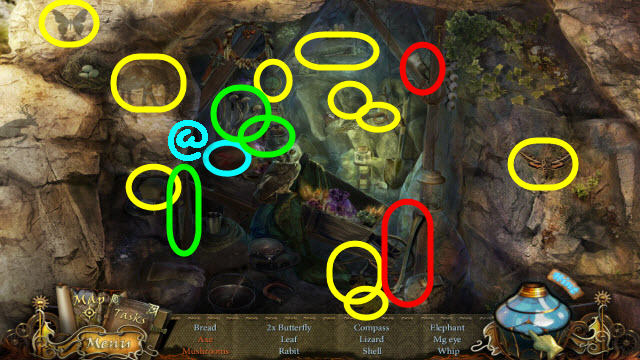
- Find the items listed.
- Marked in green: use the knife on the mushrooms to get mushrooms.
- Marked in red: use the axe head on the handle to get an axe.
- You will earn the MAGIC SIGNS 2/3 (@).
- Go forward.
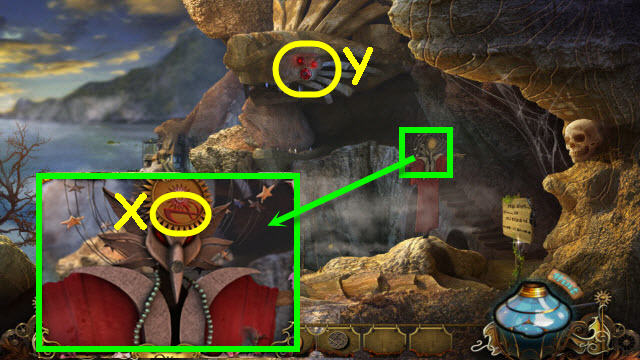
- Examine and place the SING COIN on the pointer; take the MAGIC SIGNS 3/3 (X).
- Examine and place the 3 MAGIC SIGNS on the gems to trigger a puzzle (Y).
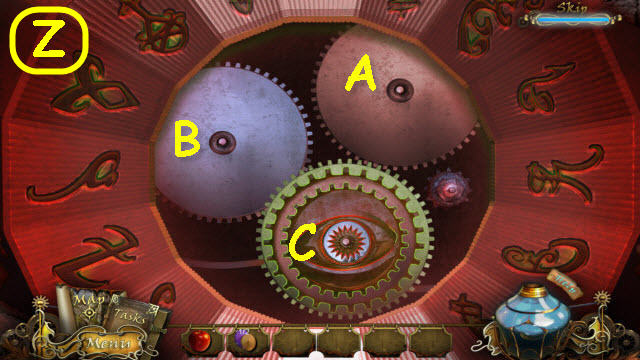
- Move the eye pieces and gears from the red platform to the green platform.
- Move one piece at a time; larger pieces cannot be placed on a smaller piece.
- Labeling the 3 platforms A, B, and C, move the top weight in the stack in the following order: A to C, A to B, C to B, A to C, B to A, B to C, A to C, A to B, C to B, C to A, B to A, C to B, A to C, A to B, C to B, A to C, B to A, B to C, A to C, B to A, C to B, C to A, B to A, B to C, A to C, A to B, C to B, A to C, B to A, B to C, A to C (Z).
- Go through the newly-opened passage.
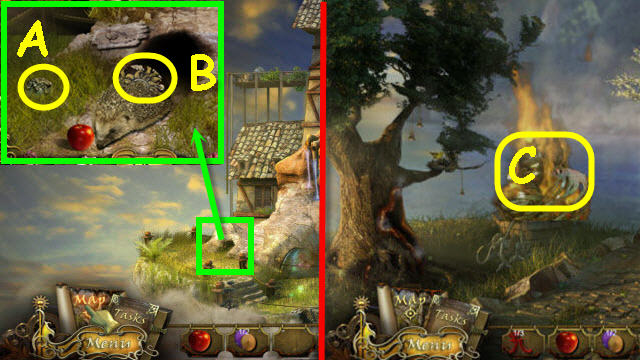
- Examine and place the APPLE by the hole; take the TERSE BUTTON (A) and HALF SUN PICTURE (B).
- Back out twice.
- Examine and place the STONES 2/2 on the phoenix.
- Examine and place the HALF SUN PICTURE on the opened phoenix to trigger a puzzle (C).
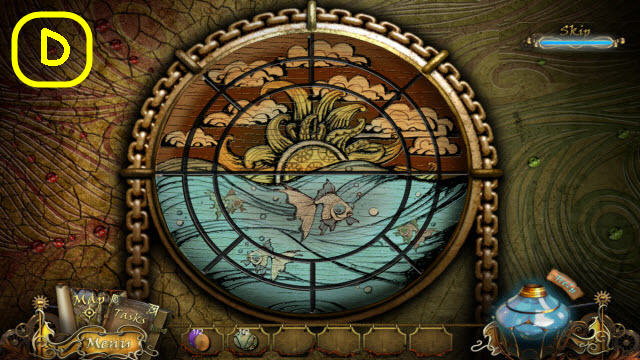
- Swap the pieces to complete the picture.
- See screenshot for solution (D).
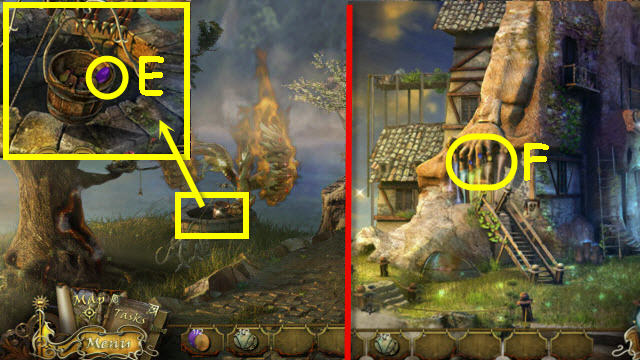
- Examine the well; take the PART OF A RING 2/2 (E).
- Go forward on the path twice.
- Examine and place the 2 RING PARTS on the left center fingers to trigger a puzzle (F).
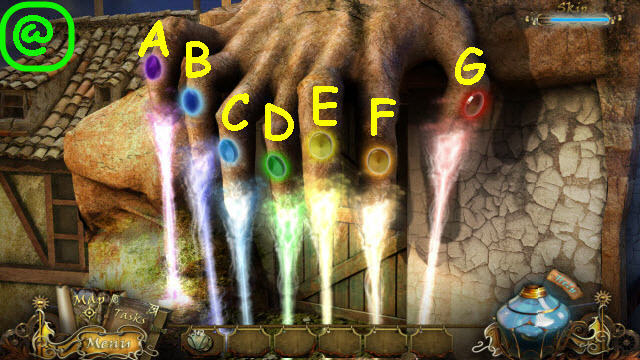
- Set the colors in the order of a rainbow.
- Your starting layout may differ from ours. If the solution does not work, back out of the puzzle and start again. My solution will then work.
- To solve the puzzle select the following buttons: E, F, E x 6, D, A , C x 2, D x 5, F x 2, G x 5, D, and A (@).
- Enter the psychic's house.
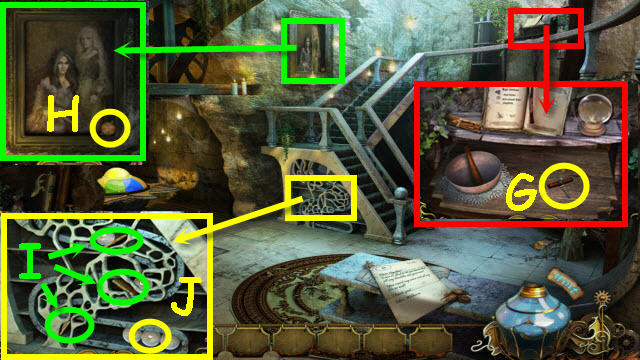
- Examine the table; take the CORKSCREW (G).
- Examine the painting; take the MG WATERFALL PARTS 1/2 (H).
- Examine under the stairs; remove the three wood pieces from the top down (I) and take the PHOSPHORUS (J).
- Go straight through the passage.
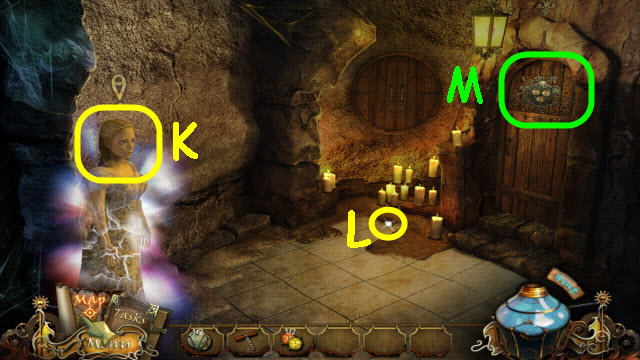
- Speak to Lara (K).
- Take the TERSE BUTTON 2/2 (L).
- Examine and place the 2 TERSE BUTTONS on the door to trigger a puzzle (M).
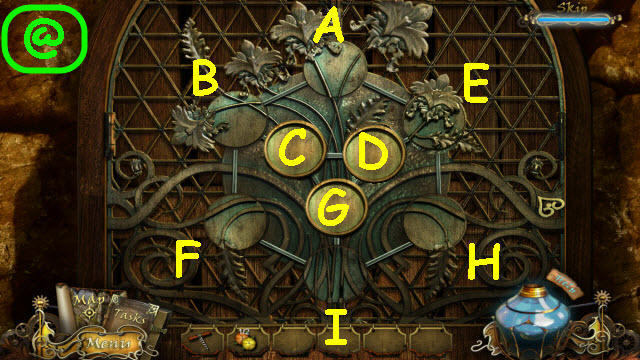
- Slide the circles to the correct slots to complete the pattern.
- To solve the puzzle, move the circles to the following spots in the following order: E – D, B – C, A – B, H – E, E – A, I - G, F – I, I – H, H – E, G – I, I – H, D – G, G – I, I – F, C – G, and G – I (@).
- Go right through the newly-opened door.
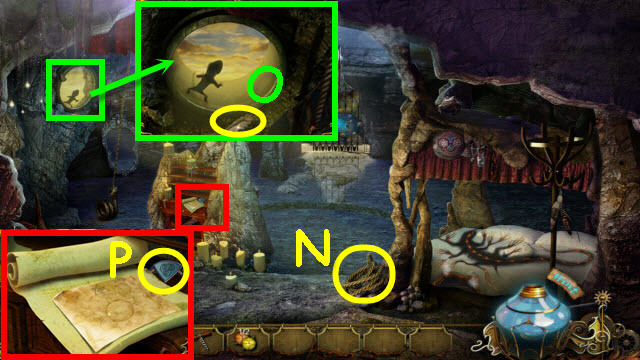
- Take the ROPE (N).
- Examine the portal; take the HALF AURA SYMBOL (O).
- Examine the scroll; take the BLUE TRIANGLE (P).
- Back out three times.
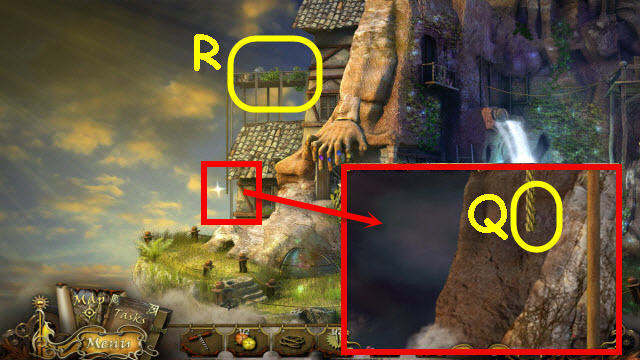
- Examine and tie the ROPE on the rope (Q).
- Examine the deck to access a HOS (R).
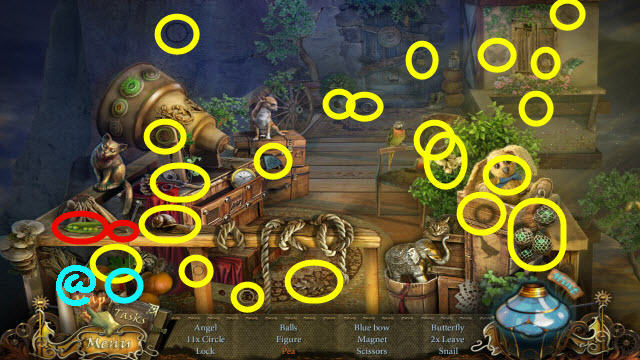
- Find the items listed.
- Marked in red: remove a pea from the pod and get a pea.
- You will earn a MAGNET (@).
- Back out.
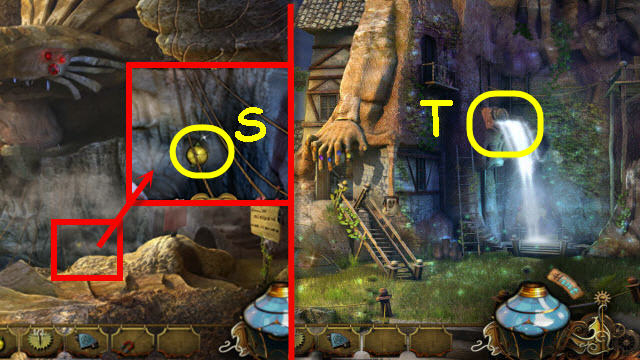
- Examine and use the MAGNET on the pendant; get the MG WATERFALL PART 2/2 (S).
- Go forward down the path.
- Examine and place the 2 MG WATERFALL PARTS on the top of the waterfall to trigger a puzzle (T).
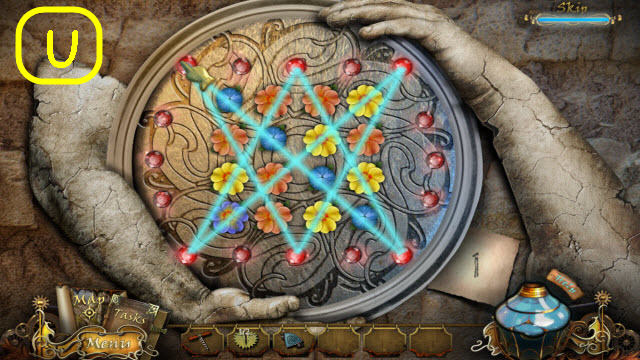
- Open all the flowers using six lines.
- See screenshot for solution (U).
- Head through the newly-opened passage.
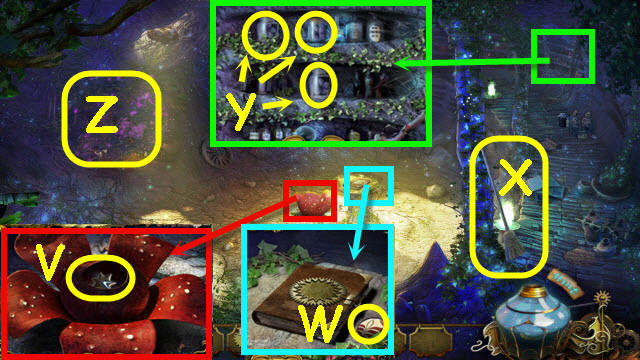
- Examine the large flower; open each petal and take the STAR 1/2 (V).
- Examine the pedestal; take the PLANT CIRCLE (W).
- Take the BROOM (X).
- Examine the shelves; use the CORKSCREW three times on the bottles and take the DRIED FLOWERS 1/3, 2/3, and 3/3 (Y).
- Examine and move the flowers (Z) to trigger a HOS.
- Examine the flowers to access a HOS.
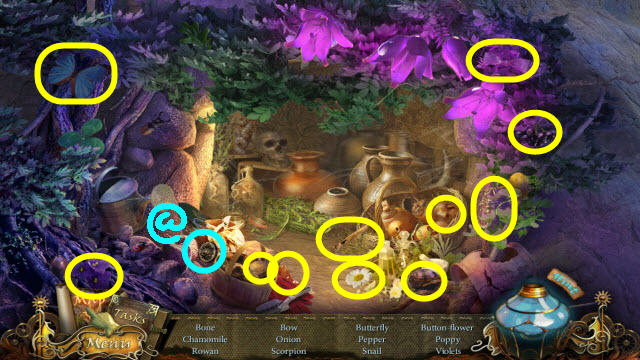
- Find the items listed and you will earn a BUTTON FLOWER (W).
- Back out.
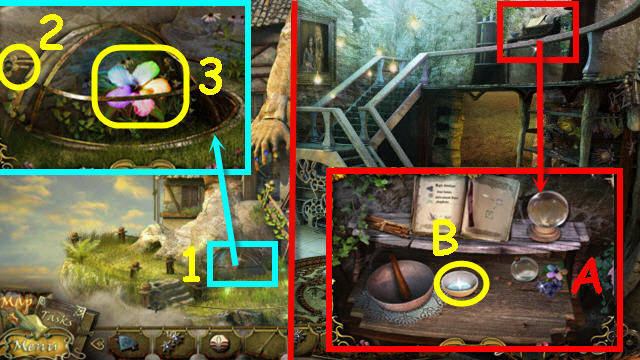
- Examine and use the BROOM on the glass dome (1).
- Place the BUTTON FLOWER on the left (2) and push the button; take the MULTICOLORED FLOWER (3).
- Enter the psychic's house.
- Examine and place the PHOSPHORUS, 3 DRIED FLOWERS and MULTICOLORED FLOWER on the table (A).
- Place the PHOSPHORUS, all 3 DRIED FLOWERS and MULTICOLORED FLOWER in the mortar; use the pestle to grind and take the REVEAL POWDER (B).
- Go forward through the door.
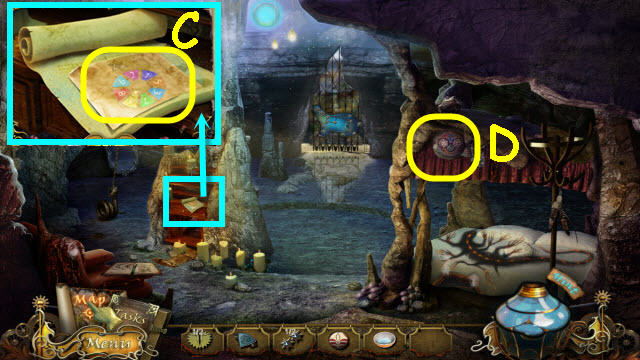
- Examine and use the REVEAL POWDER on the note; take the COLOR PROMPT (C).
- Examine and place the PLANT CIRCLE on the disk to trigger a puzzle (D).
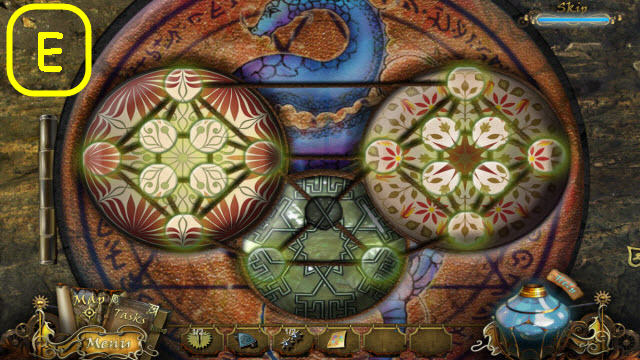
- Set the circles so they complete the pattern.
- The starting layouts are random. See screenshot for solution (E).
- Tip: you can exit out of the puzzle and re-enter to get a different and potentially easier layout.
- Take the VESSEL ELEMENTS 1/3.
- Back out twice.
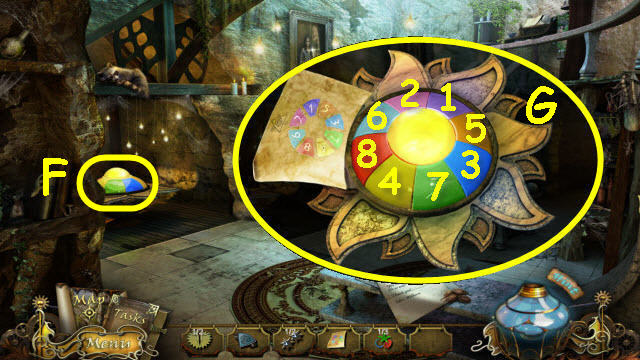
- Examine and use the COLOR PROMPT on the color wheel to trigger a puzzle (F).
- See screenshot for order to press (G).
- Examine the color wheel area to access a HOS.
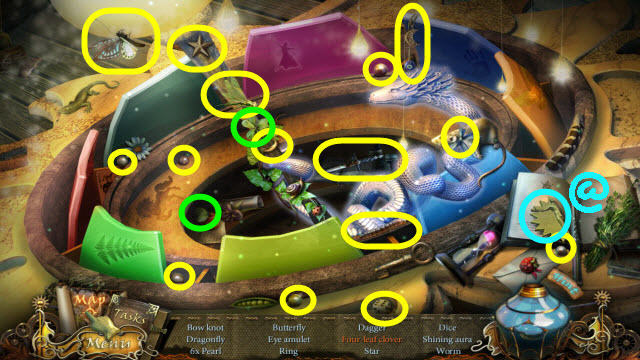
- Find the items listed.
- Marked in green: place the leaf on the clover to get a four-leaf clover.
- You will earn a HALF AURA SYMBOL 2/2 (@).
- Back out and go forward into the opening on the right.
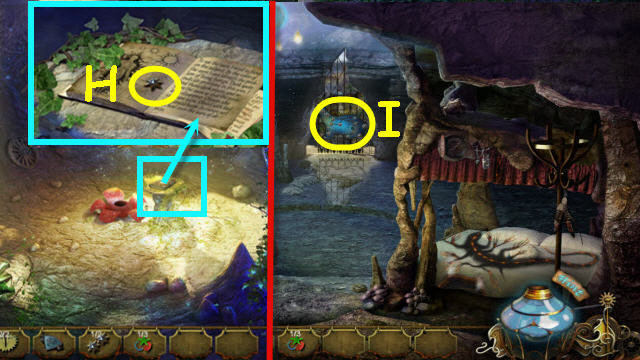
- Examine and place the 2 HALF AURA SYMBOLS on the book; take the STAR 2/2 (H).
- Back out; enter the house and go forward through two doorways.
- Examine and place the 2 STARS on the gate (I).
- Go forward.
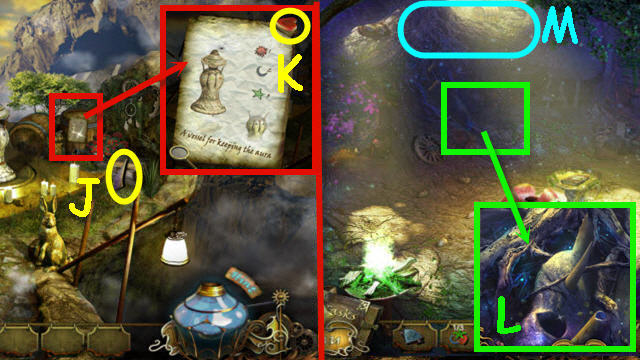
- Take the FANG (J).
- Examine the note; take the HEART STONE (K).
- Exit the house and go into the right passage.
- Examine and place the FANG in the roots (L).
- Go into the upper area (M).
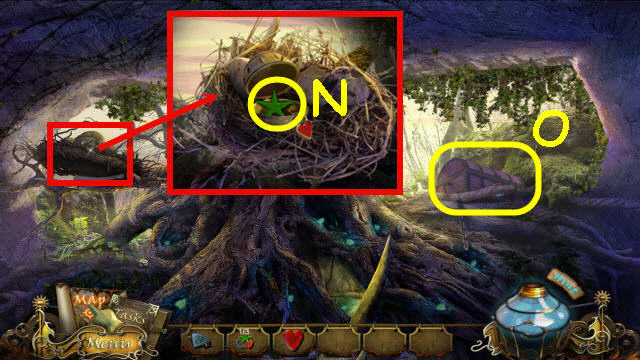
- Examine the nest; place the HEART STONE in the lock, open the egg and take the VESSEL ELEMENTS 2/3 (N).
- Examine and place the BLUE TRIANGLE on the chest to trigger a puzzle (O).
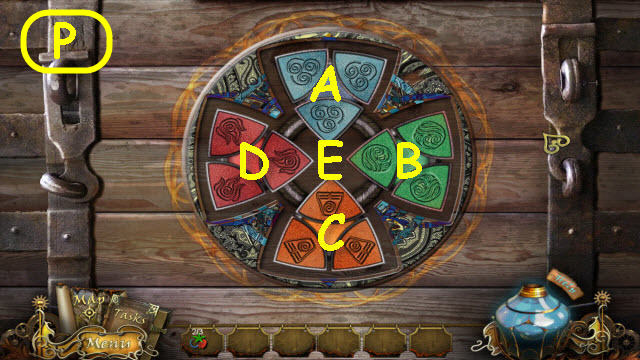
- Arrange the elements so that all the same colors are together.
- To solve the puzzle, select the following areas: A x 2, B x 1, C x 2, D x 1, and E x 3 (P).
- Take the SNAKE TAIL.
- Go into the psychic's house and forward through two doorways.
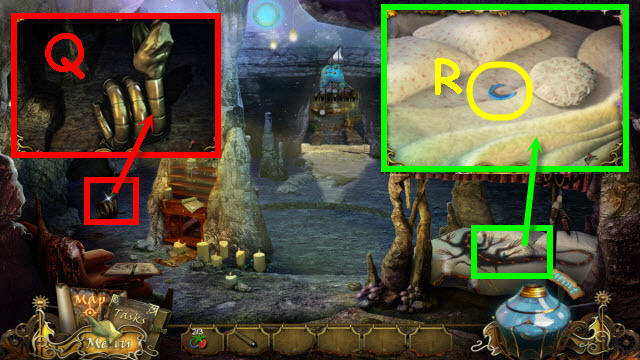
- Examine and place the SNAKE TAIL on the snake (Q).
- Examine the bed; move the pillow and take the VESSEL ELEMENTS 3/3 (R).
- Go forward.
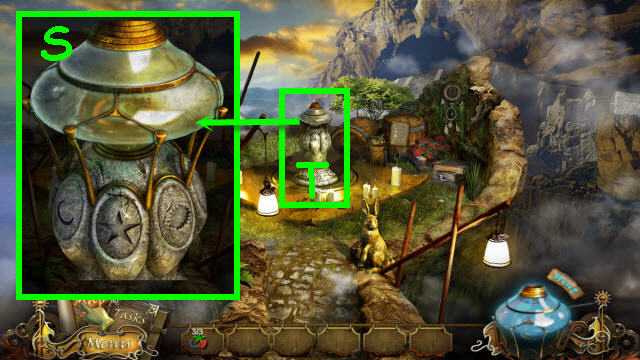
- Examine and place the 3 VESSEL ELEMENTS on the vessel (S).
- Take the AURA VESSEL (T).
- Back out twice.
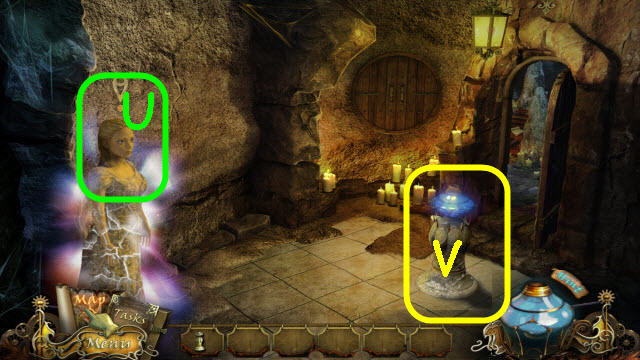
- Speak to Lara (U).
- Use the AURA VESSEL on Lara; take the VESSEL WITH AURA (V).
- Go to the junkman's wagon.
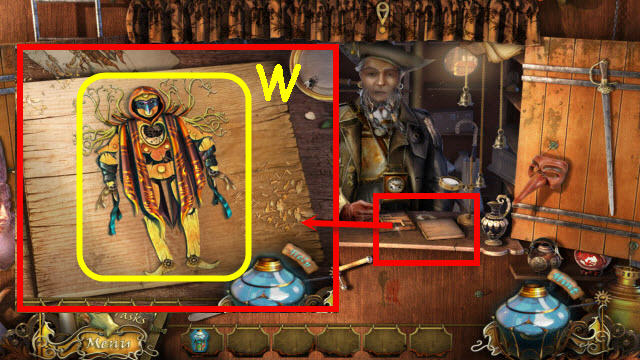
- Examine and place the VESSEL WITH AURA on the puppet on the counter; take the ALIVE DOLL (W).
- Go to the theater.
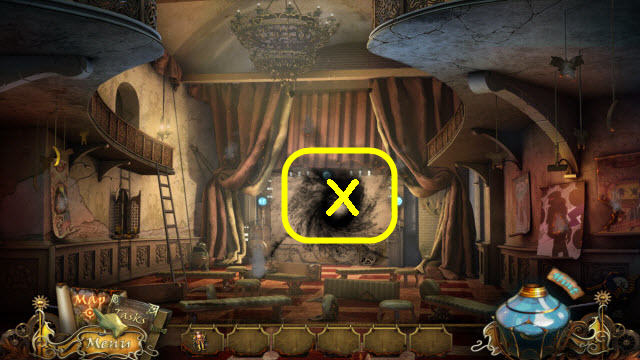
- Use the ALIVE DOLL on the portal (X).
- Congratulations! You have successfully completed Theatre of Shadows: As you Wish!
Created at: 2012-08-08

