

Walkthrough Menu
- General Tips
- Chapter 1: The Bell Tower
- Chapter 2: The Hall and the Library
- Chapter 3: The Secret Lab
- Chapter 4: The Courtyard and Lounge
- Chapter 5: The Theatre
- Chapter 6: Under the Theatre
- Chapter 7: The Crypt and Finale
General Tips
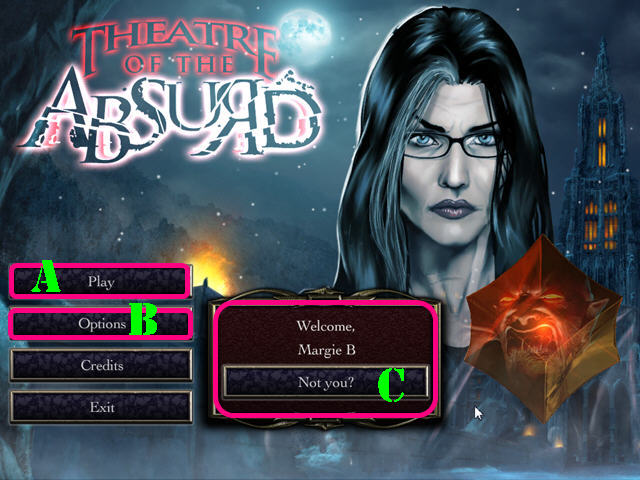
- Select 'Play' (A) to begin your quest.
- The 'Options' (B) button allows you to adjust the screen size, volume, and difficulty level.
- The 'Not you?' button (C) can be used to manage your profiles in the game.
- Use the ROOSTER to help you grab out of reach objects. Use the MINER to take care of tasks that require strength.
- This guide will refer to Hidden Object Scenes as 'HOS'.
- Click on the hand to view a hint.
- Open the book in the lower left to view your tasks.
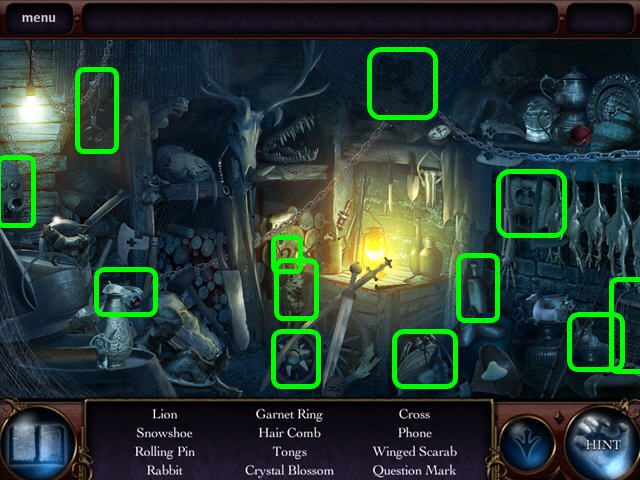
Chapter 1: The Bell Tower
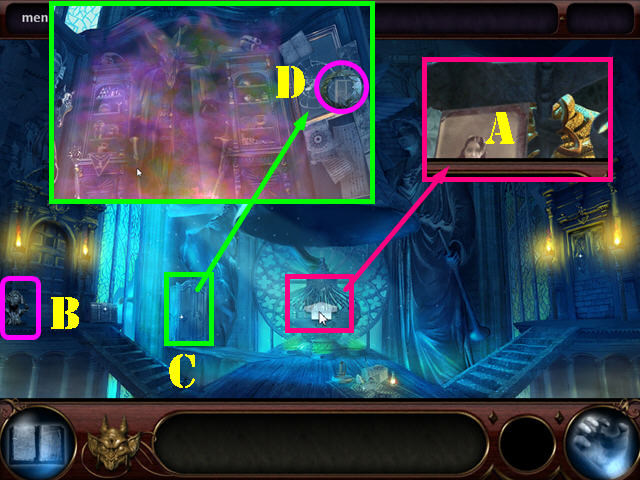
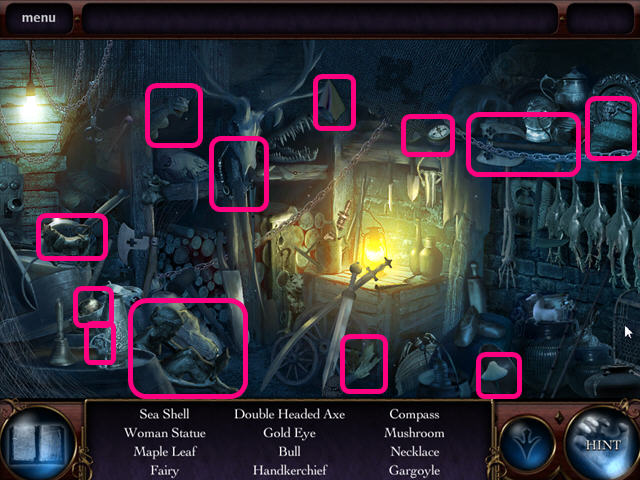
- Move towards the cage.
- Approach the cage again and pick up the PICTURE OF BETHANY (A).
- Pick up the HEAR NO EVIL statue (B).
- Investigate the Dresser to open it, then move to it (C).
- Pick up the JADE RING (D).
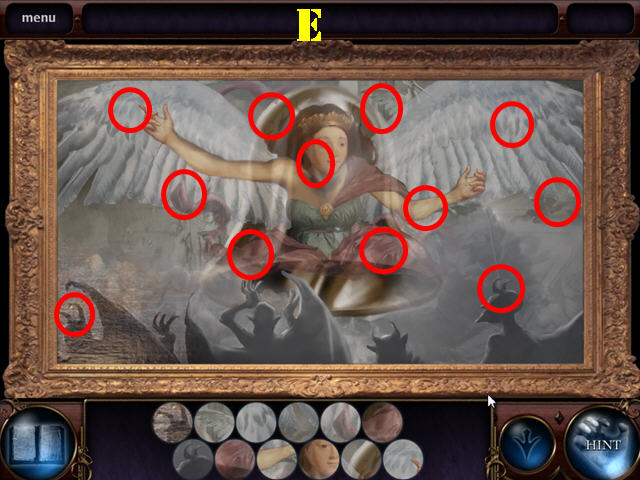
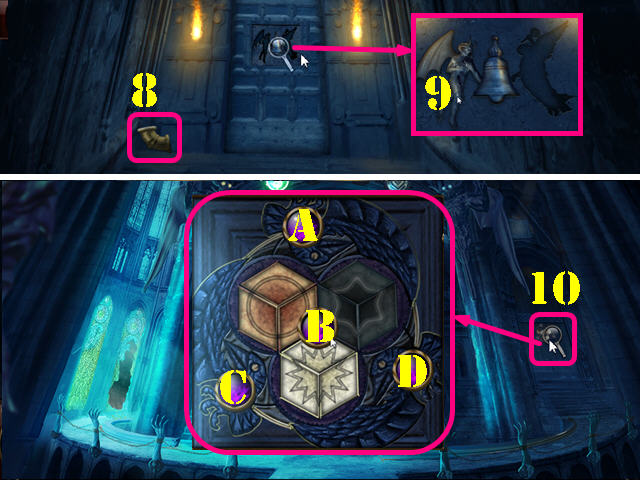
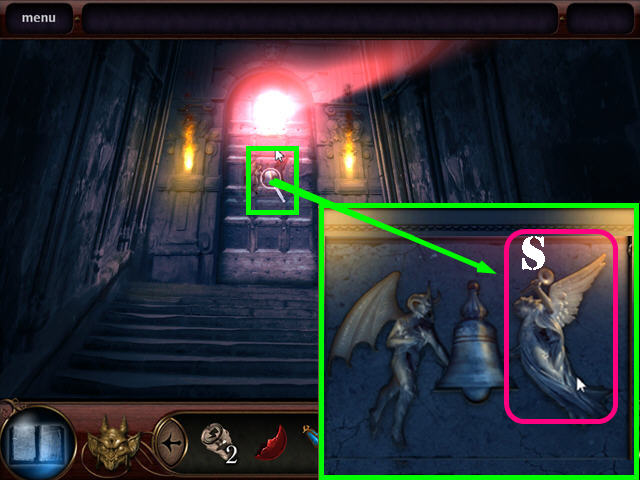
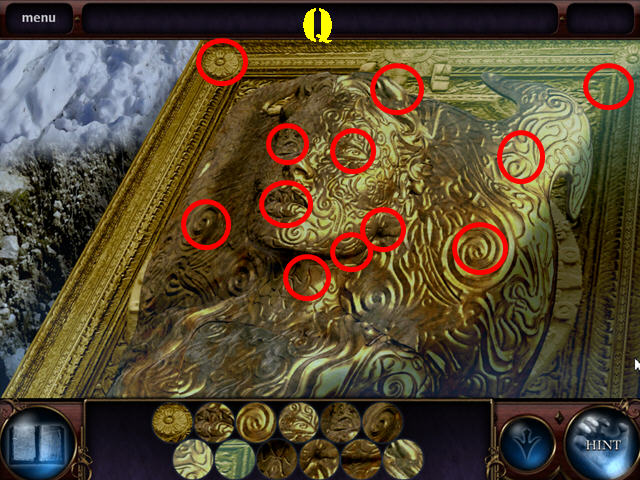
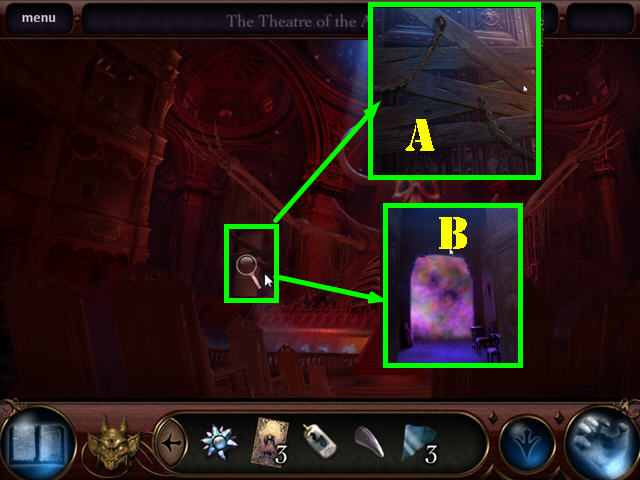
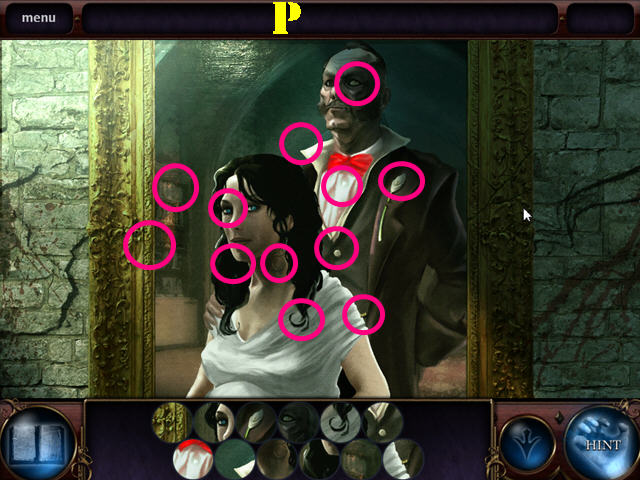
- Investigate the Angel Portrait.
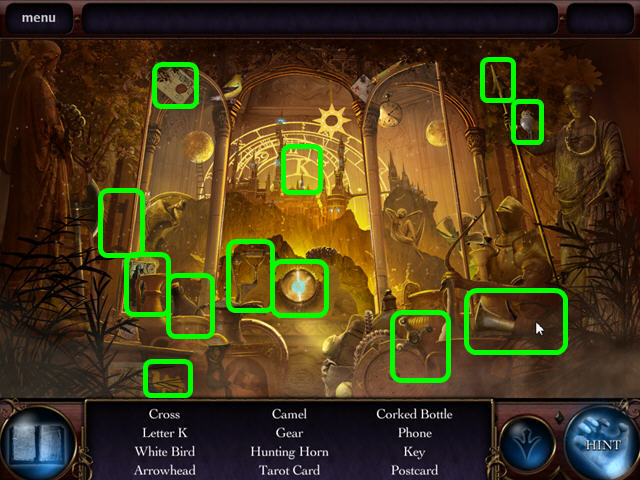
- Find the images shown at the bottom of the scene in the picture.
- Please look at the screenshot for the solution (E).
- You will receive the JADE RING.
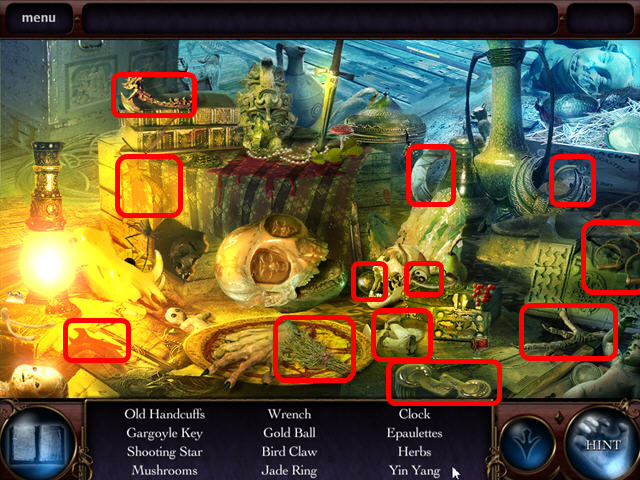
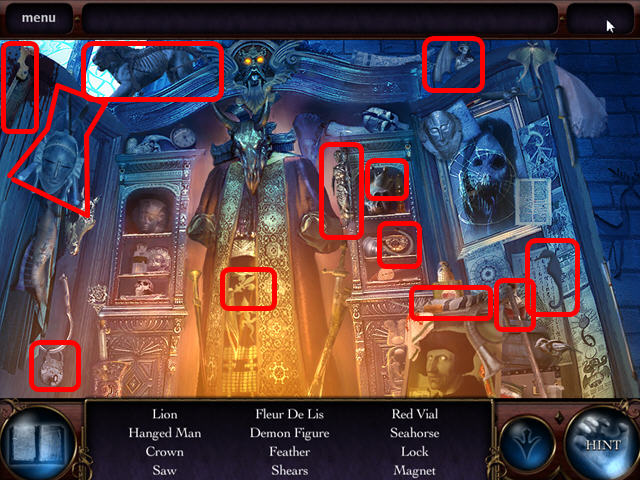
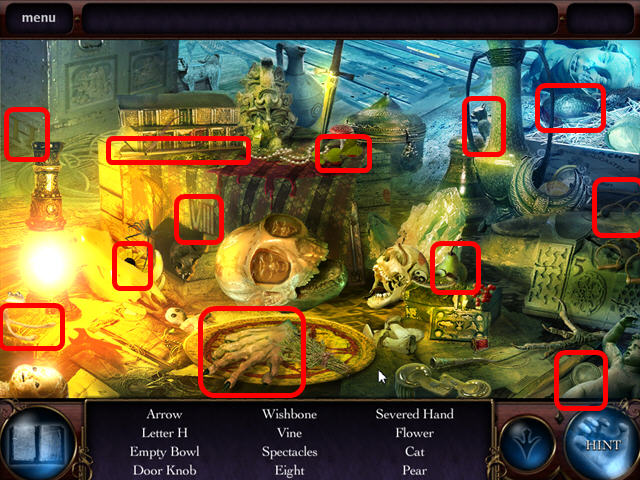
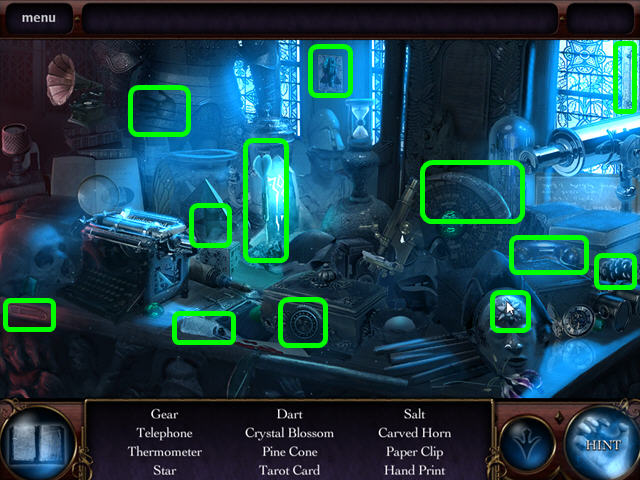
- Zoom into the objects on the ground to play a HOS.
- Complete this scene to obtain a GARGOYLE KEY, a JADE RING, and a GOLDEN EYE.
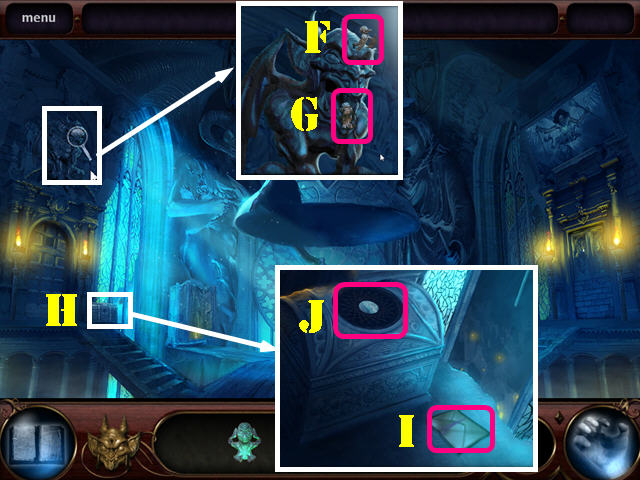
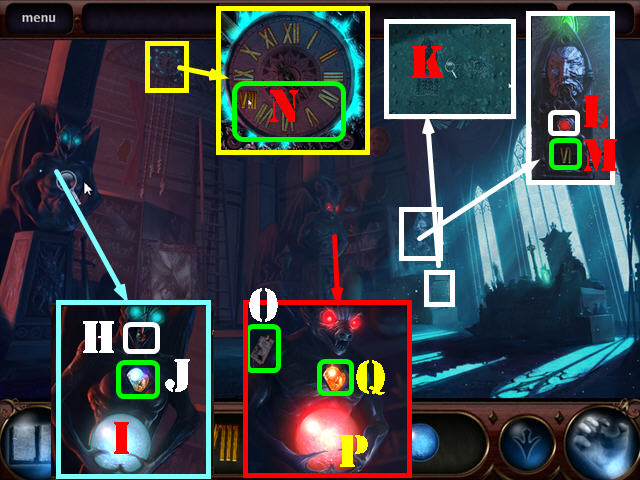
- Investigate the Gargoyle in the upper left.
- Use the GARGOYLE KEY on the keyhole (F), then pick up the SPEAK NO EVIL statue (G).
- Investigate the small chest (H).
- Pick up the LETTER (I).
- Investigate the top of the chest (J) for a puzzle.
- Place the 3 JADE RINGS into the circle.
- To solve the puzzle, move the rings in this order: A x 3, B x 6, and C x 3.
- Pick up the WATER OF HORUS and the PUSH BUTTON (K).
- Investigate the Dumbwaiter on the right.
- Place the PUSH BUTTON into the hole and push it to activate a HOS.
- Complete this scene to obtain the SEE NO EVIL statue, the DEMON SKULL, and the FIRE ICON.
- Investigate the Cage Base.
- Place the statues on their bases: SEE NO EVIL on the left, HEAR NO EVIL in the middle, and SPEAK NO EVIL on the right (L).
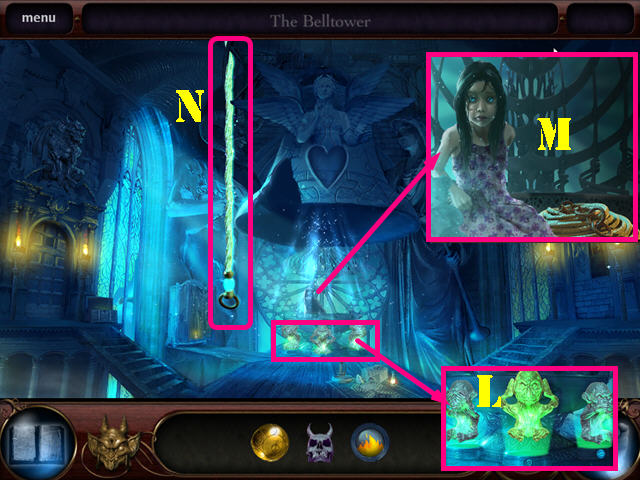
- Move to the open Cage.
- Give Bethany the WATER OF HORUS to calm the demon inside her (M).
- Receive the MAGIC ROPE.
- Place the MAGIC ROPE on the Bell and you will be given the power to clear Demon Smoke (N).
- Move to the Dresser on the left.
- Use your hand to dispel the Demon Smoke and activate a HOS.
- Complete the scene to obtain the SHARP SHEARS, a DEMON FIGURINE, a HANGED MAN FIGURE, and a MAGNET.
- Investigate the Dumbwaiter.
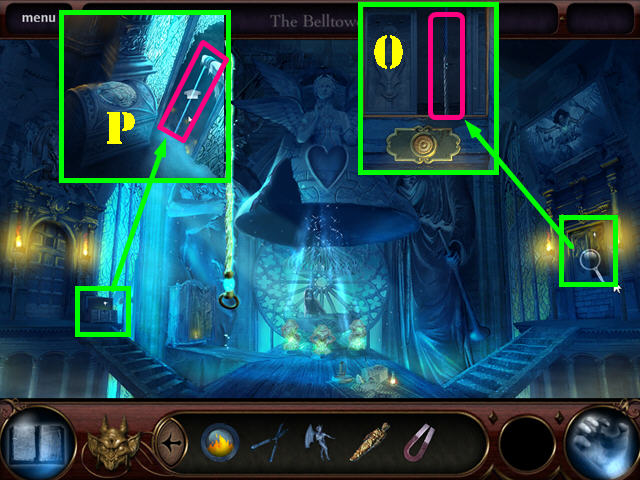
- Use the SHARP SHEARS on the dumbwaiter cable to obtain a CABLE (O).
- Investigate the Chest.
- Use the CABLE on the Beam (P) outside the window; exit the Bell Tower.
Chapter 2: The Hall and the Library
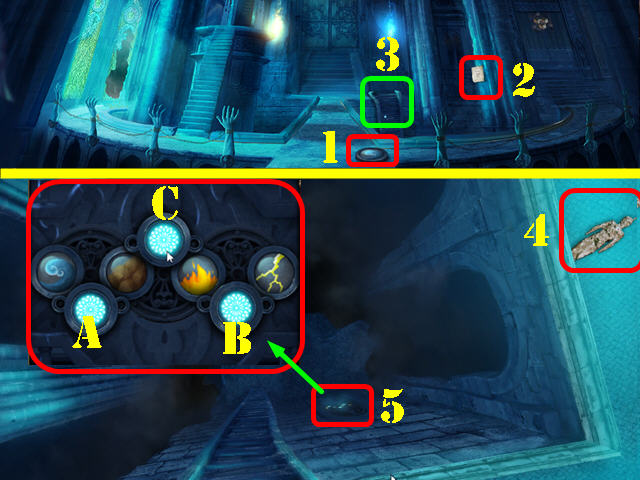
- Pick up the WATER ICON (1).
- Pick up the NOTE (2).
- Move down the Ladder (3).
- Pick up the HANGED MAN FIGURE (4).
- Investigate the Door (5).
- Place the FIRE ICON and WATER ICON into the mechanism to activate a puzzle.
- To solve the puzzle, click on the buttons in this order: A, B, and C.
- Move into the Boiler Room.
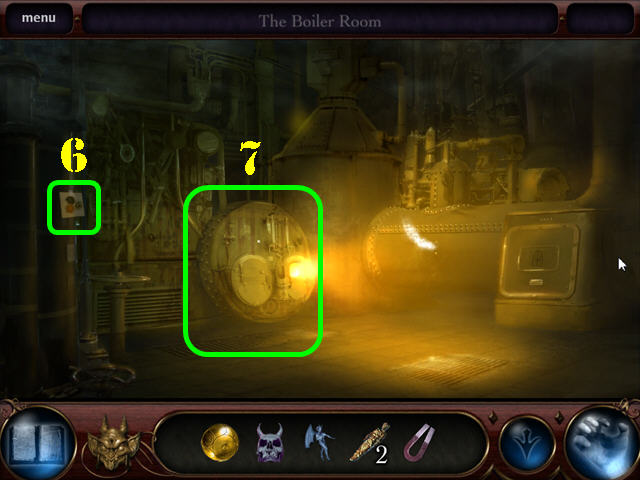
- Pick up the NOTE (6).
- Investigate the Boiler (7) to activate a HOS.

- Complete this scene to obtain a CROW EMBLEM, SCREWDRIVER, and ELBOW PIPE.
- Walk down twice; go up the left staircase and up the ladder.
- Pick up the ELBOW PIPE (8).
- Investigate the door; place the DEMON FIGURINE into its slot (9).
- Walk down twice.
- Investigate the Right Door; place the CROW EMBLEM into the empty slot to activate a puzzle (10).
- Assemble the image correctly.
- To solve the puzzle, press on the buttons in this order: B x 2, C, A, D, and B.
- Proceed through to the Library.
- Use your hand to dispel the Demon Smoke above the door.
- Investigate the Crow Statue (11) and take the ELBOW PIPE (12).
- Pick up the GOLDEN EYE (13).
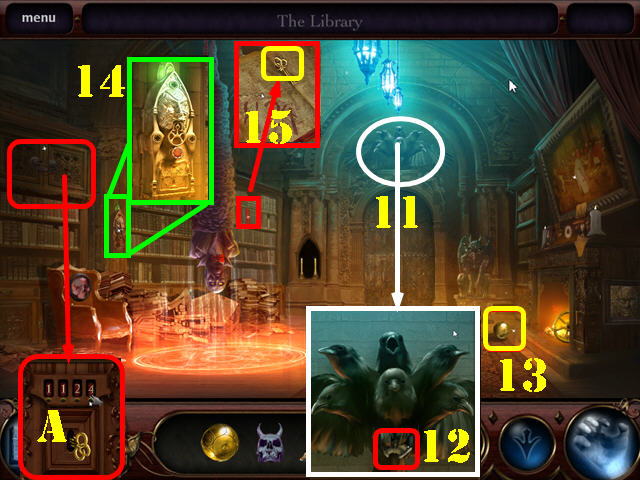
- Investigate the intercom; press the button for a clue (14).
- Investigate the Red Book and take the CABINET KEY (15).
- Investigate the Locked Cabinet. Insert the CABINET KEY into the keyhole, and enter the code 1124 (A).
- Click on the KEY to unlock the door and activate a HOS.
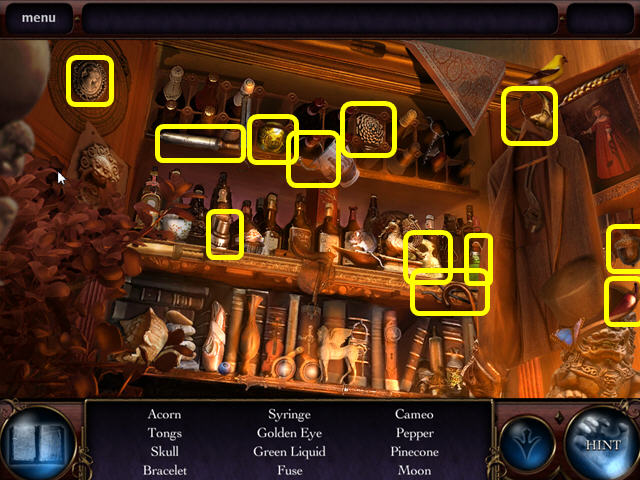
- Play the cabinet HOS.
- Complete this scene to obtain the FIREPLACE TONGS, a FUSE, and a GOLDEN EYE.
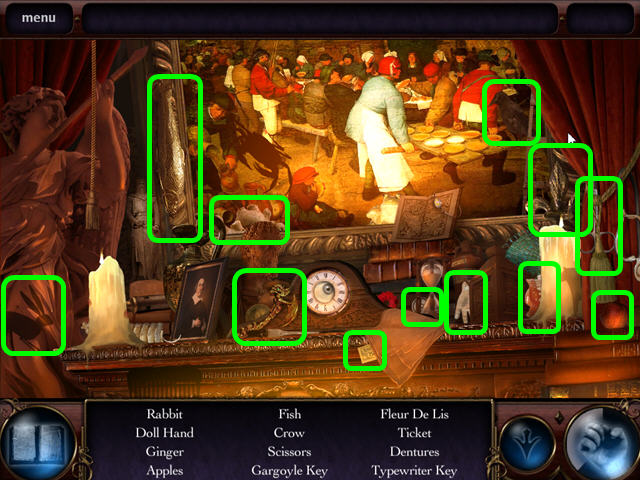
- Investigate the Fireplace Mantel for a HOS.
- Complete this scene to obtain a GARGOYLE KEY.
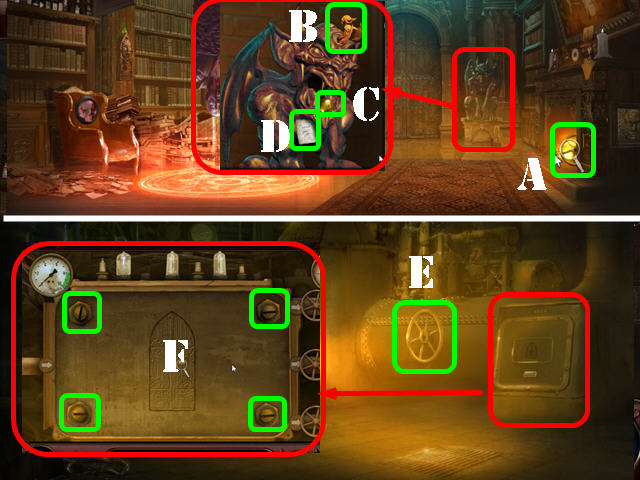
- Use the FIREPLACE TONGS on the Fireplace to recover the STEAM VALVE (A).
- Investigate the Gargoyle; put the GARGOYLE KEY (B) in the lock and take the GOLDEN EYE (C).
- Collect the NOTE (D) on the gargoyle.
- Return to the Boiler Room.
- Place the STEAM VALVE onto the Boiler (E).
- Investigate the Machine Panel; use your SCREWDRIVER to unscrew all 4 screws (F).
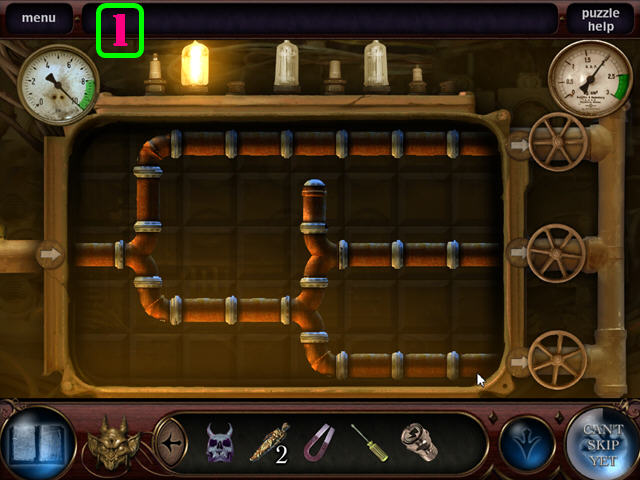
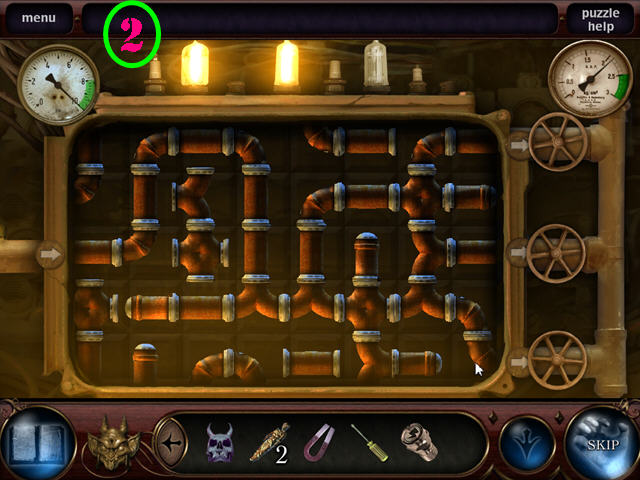
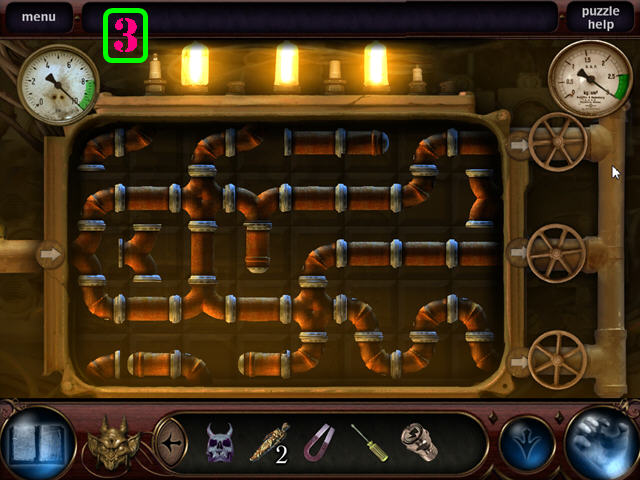
- Place the 3 ELBOW PIPES on the pipes to activate a puzzle.
- Press on each pipe to rotate it.
- You have to solve 3 rounds of this puzzle.
- Please look at the screenshots for the solution (1, 2, and 3).

- Return to the Main Hall and then go through the middle door to access the Annex.
- Pick up the GOLDEN EYE (G).
- Investigate the Gate Sign. Use your SCREWDRIVER to unscrew all 4 screws (H).
- Place a HANGED MAN FIGURE onto each of the two empty hooks (I).
- Go through the gate to activate a HOS (J).
- Play the HOS.
- Complete this scene to obtain a GOLDEN EYE and a CLOTH.
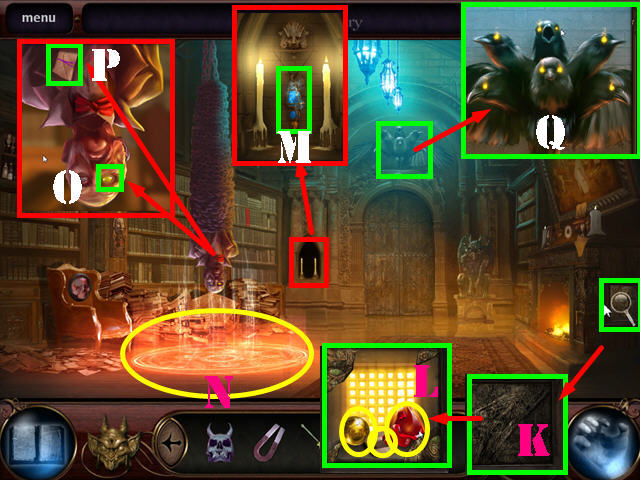
- Go back to the Library.
- Investigate the Dirty Plaque; use the CLOTH to clean the 5 grimy patches (K).
- Pick up the GOLDEN EYE, MATCHES, and A RED FRAGMENT (L).
- Investigate the Small Nook. Use the MATCHES to light the candles and collect the WATER OF HORUS (M).
- Use the WATER OF HORUS on the Magic Circle (N).
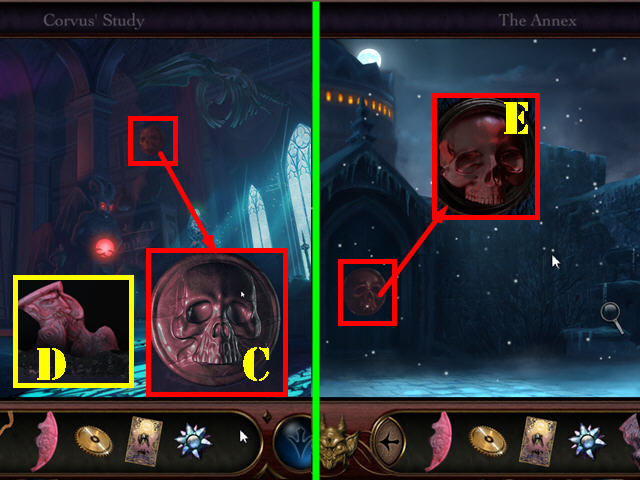
- Investigate Corvus; collect his GOLDEN EYE (O) and the LETTER (P).
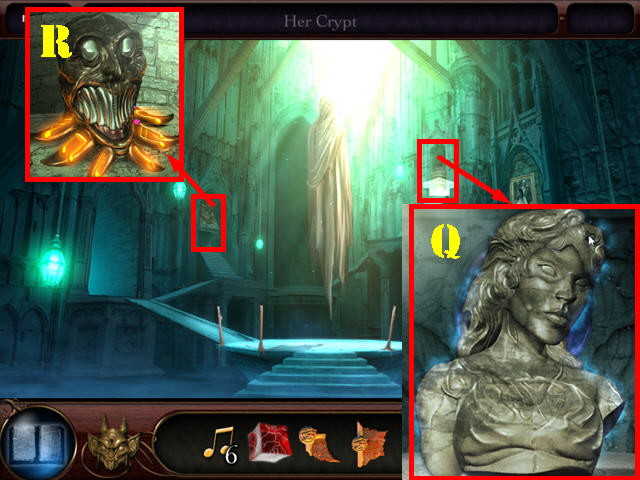
- Investigate the Crow Statue; place the 8 GOLDEN EYES into the eye sockets (Q).
- Try to move through the open door and a puzzle will appear.
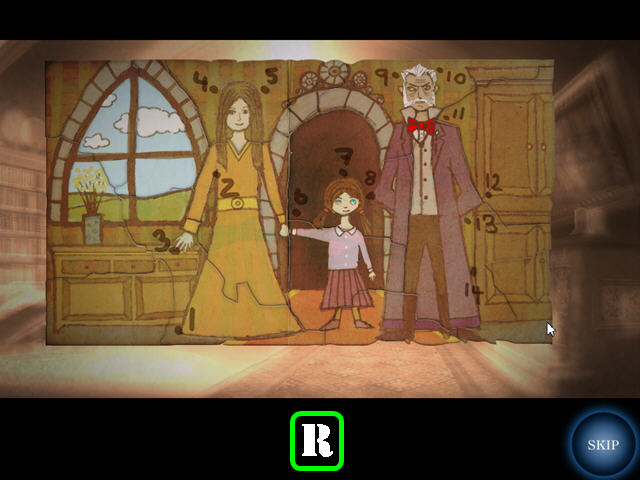
- Assemble the picture as shown in the screenshot (R).
- Press on the numbers in the sequence shown on the picture.
- Go through the door to access Corvus' Study.
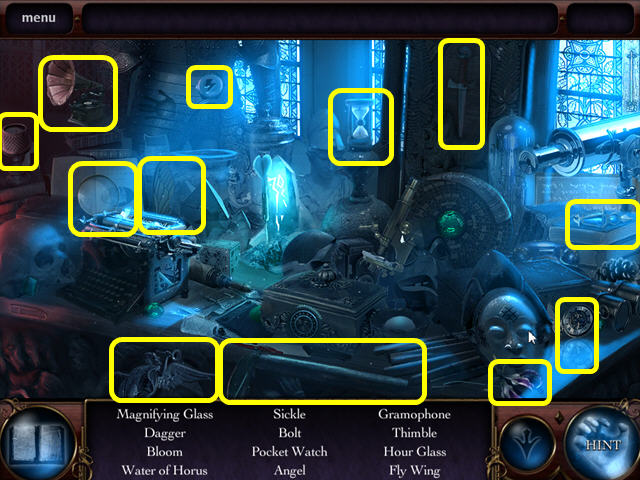
- Investigate Corvus' Desk to activate a HOS.
- Complete this scene to obtain the DAGGER, WATER OF HORUS, a FUSE, and an ANGEL FIGURINE.
- Return to the Main Hall; go up the left steps, and up the ladder to access the Bell Tower.
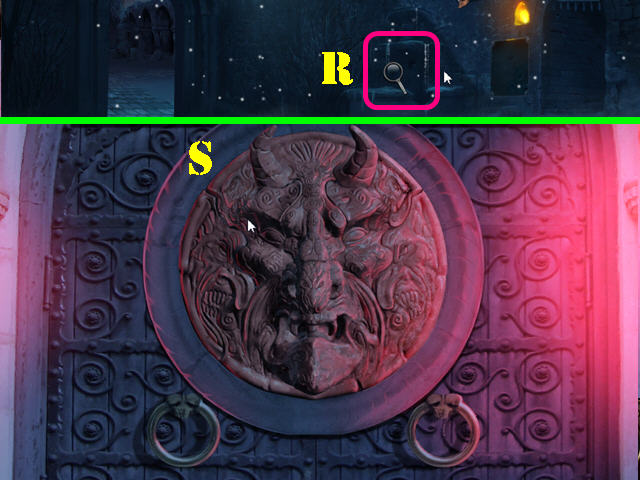
- Investigate the Door; place the ANGEL FIGURINE into its slot (S).
- Go through the door.
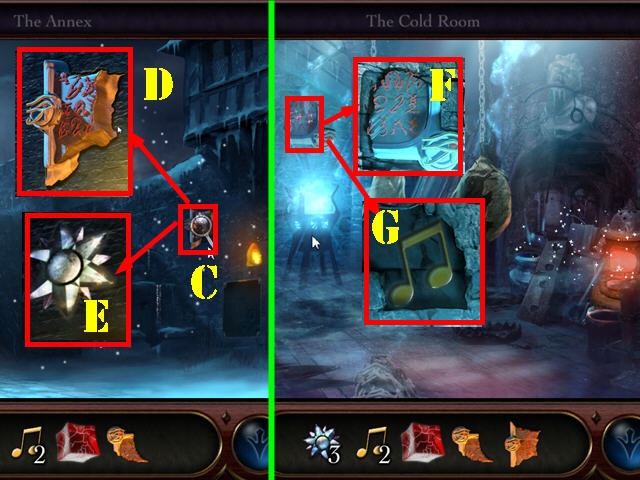
Chapter 3: The Secret Lab
- After scaring off the demon, give Bethany the WATER OF HORUS.
- Walk down.
- Investigate the Rite of Possession Site on the ground for a HOS.
- Complete this scene to obtain the NUMBER 8.
- Return to Corvus' Study.
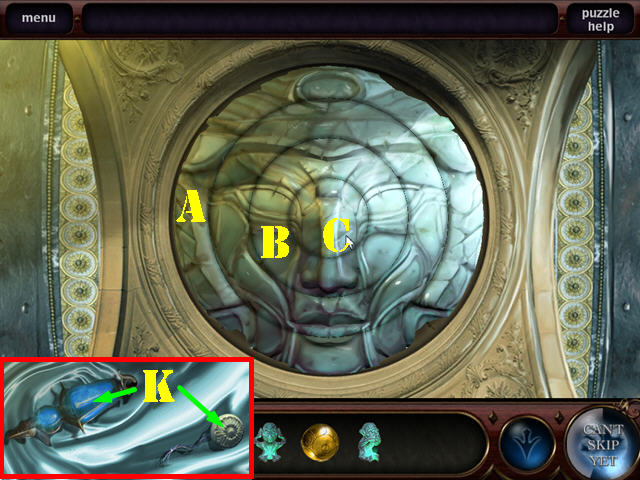
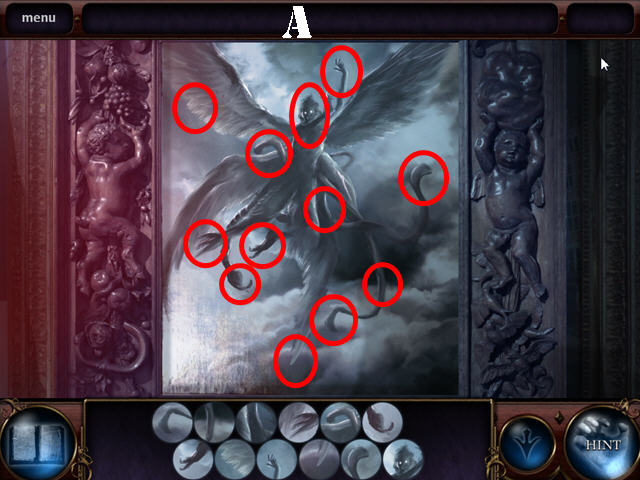
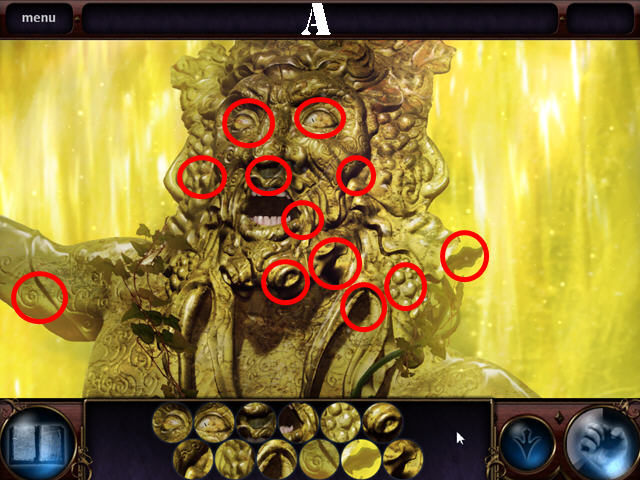
- Investigate the Painting on the ground for a puzzle.
- Find the images shown at the bottom of the scene in the picture.
- Please look at the screenshot for the solution (A).
- Complete this scene to obtain the NUMBER 7.
- Pick up the RED FRAGMENT on the floor (B).
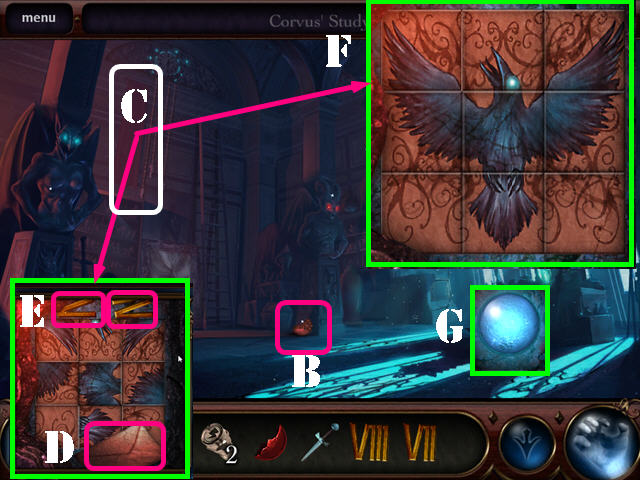
- Investigate the Banner to discover a crack in the wall. Use your DAGGER on the crack. Dispel the Demon Smoke (C).
- Collect the LETTER (D), the NUMBER 4 and THE NUMBER 5 (E).
- Rotate the different sections of the panel to form an image of a crow. Rotating one tile affects others.
- Please look at the screenshot for the solution (F).
- Grab the BLUE CRYSTAL SPHERE (G).
- Investigate the Blue Demon Statue and take the FUSE (H). Place the BLUE CRYSTAL SPHERE into its hands (I), then pick up the BLUE DEMON'S HEART (J).
- Investigate the Small Panel; use the Dagger to pry off the panel (K).Place the 3 FUSES into their holes and press the button on the Intercom to receive a clue (L).
- Collect the NUMBER 6 on the intercom (M).
- Investigate the Clock; place the NUMBERS 4, 5, 6, 7, and 8 into their respective slots to obtain the RED FRAGMENT (N).
- Investigate the Red Demon Statue; collect the NOTE (O).
- Place the 3 RED FRAGMENTS into the Red Demon Statue's hands (P) and take the RED DEMON'S HEART (Q).
- Place the BLUE DEMON'S HEART into the chest of the Red Demon Statue.
- Zoom into the Blue Demon Statue; put the RED DEMON'S HEART into its chest.
- Proceed into the secret passage in the upper left.
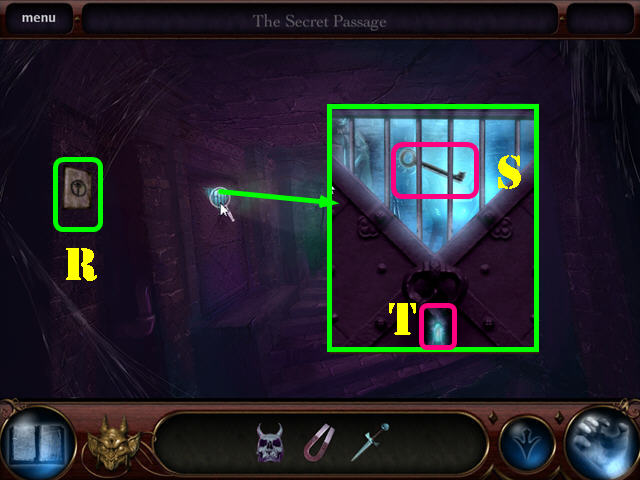
- Pick up the NOTE (R).
- Investigate the Door. Use the MAGNET to get the CELL KEY (S).
- Use the CELL KEY in the lock (T).
- Go through the door access the Cold Room.
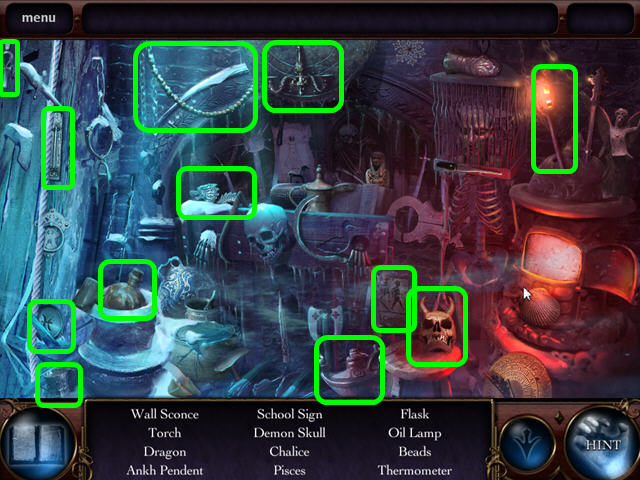
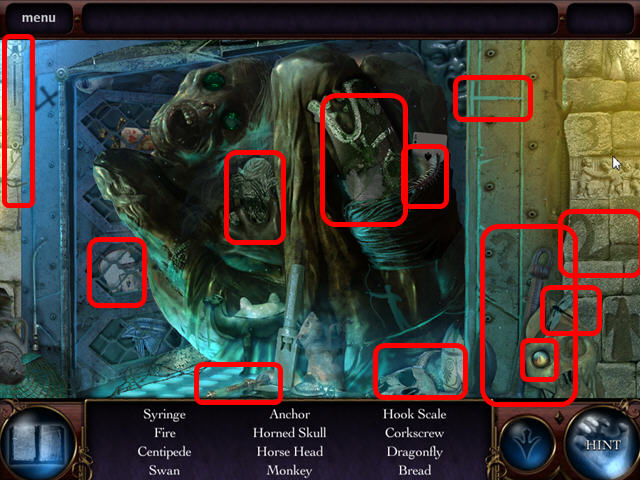
- Investigate the cell on the right to activate a HOS.
- Complete the scene to collect the TORCH, a ZODIAC BUTTON, and a DEMON SKULL.
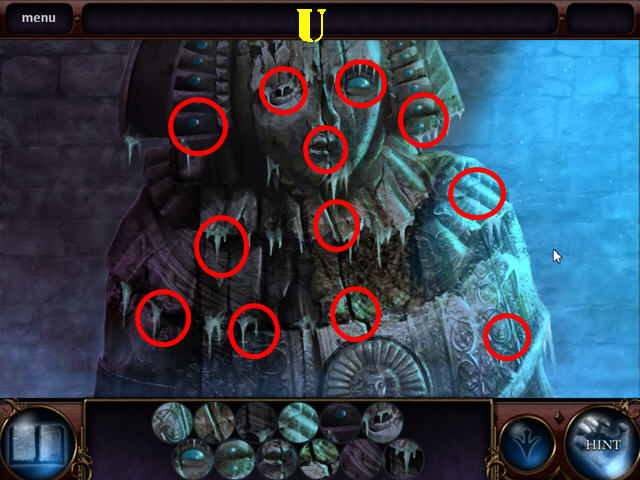
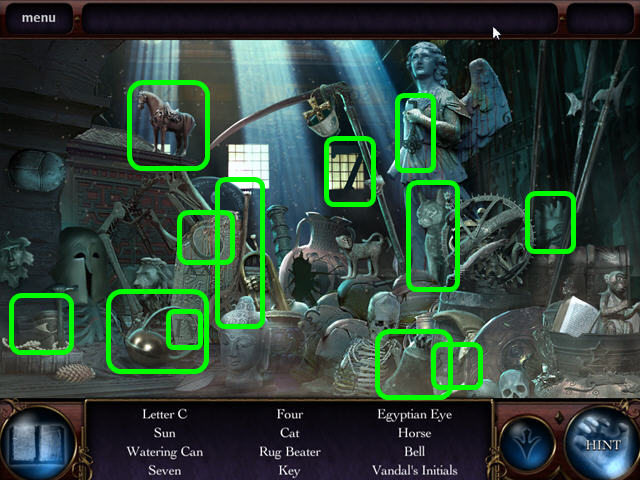
- Investigate the Iron Maiden.
- Find the images shown at the bottom of the scene in the picture.
- Please look at the screenshot for the solution (U).
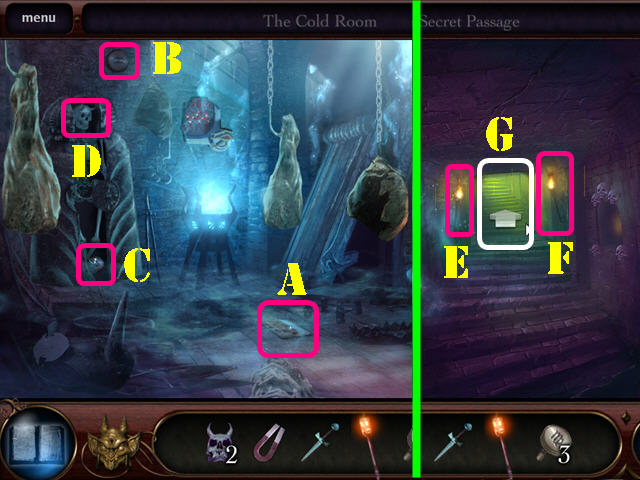
- Pick up the NOTE (A).
- Pick up the 2 ZODIAC BUTTONS (B and C).
- Collect the DEMON SKULL (D).
- Walk down to the Secret Passage.
- Use the TORCH to light the two torches on the wall (E and F).
- Proceed through the Open Gate to reach the Astrology Lab (G).
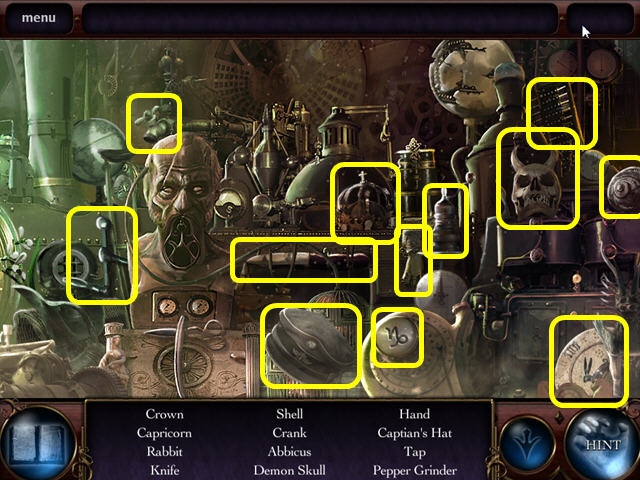
- Investigate the Lab Desk for a HOS.
- Complete the Scene to collect a ZODIAC BUTTON, a DEMON SKULL, and the TELESCOPE CRANK.
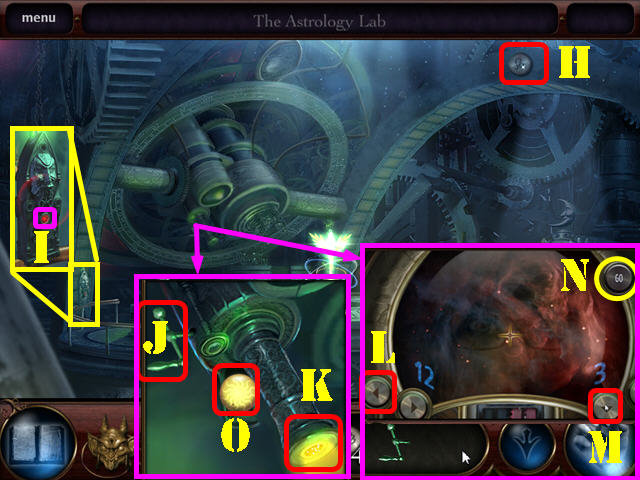
- Pick up the ZODIAC BUTTON (H).
- Investigate the Intercom and press the button (I) to hear a clue.
- Investigate the Telescope; place the TELESCOPE CRANK into its slot (J).
- Investigate the Eye Piece (K).
- Use the Left Arrow Key to adjust the Telescope to the Number 12 (L).
- Use the Down Arrow Key to adjust the Telescope to the Number 3 (M).
- Hit the Go Button (N).
- Take the EYE OF THE SUN (O).
- Walk down.
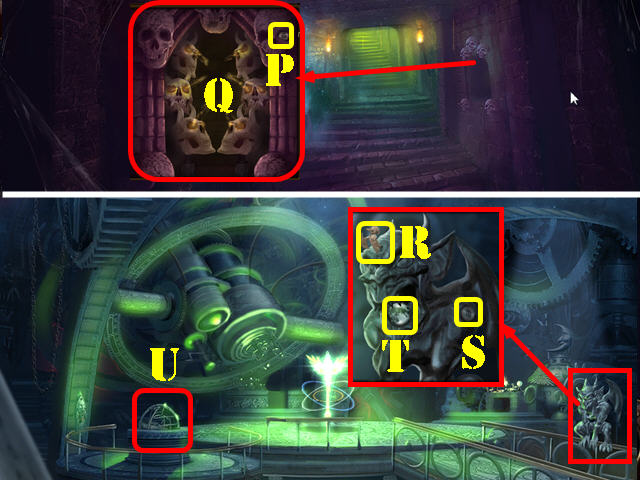
- Investigate the alcove; pick up the ZODIAC BUTTON (P).
- Place the 4 DEMON SKULLS on the glowing crystals (Q).
- Collect the GARGOYLE KEY.
- Go forward.
- Investigate the Gargoyle. Use the GARGOYLE KEY in the lock (R).
- Pick up the ZODIAC BUTTON (S) and collect the EYE OF THE MOON (T).
- Investigate the Zodiac Pedestal (U).
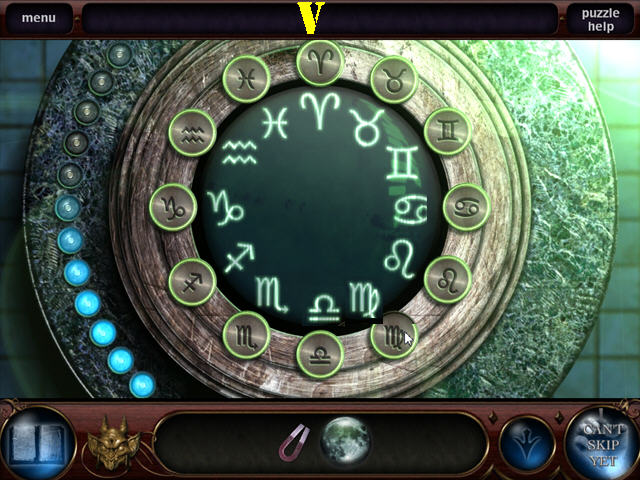
- Place the7 ZODIAC BUTTONS into the slots to activate the puzzle.
- Press the buttons to swap adjacent symbols until all the symbols are next to their matching buttons.
- Please look at the screenshot for the solution (V).
- You will get the EYE OF THE EARTH.
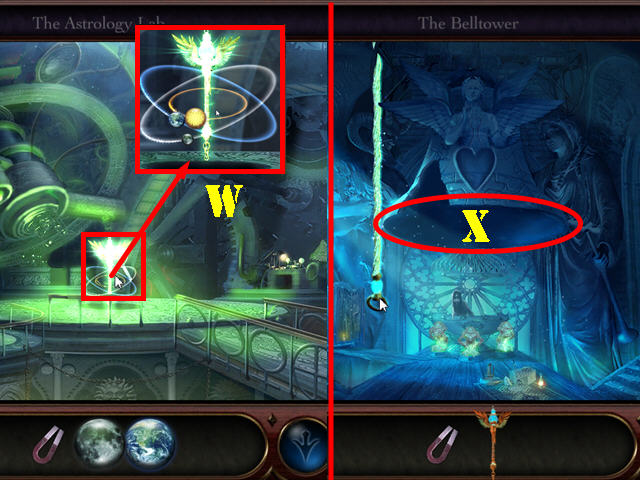
- Investigate the Celestial Mace. Place the EYE OF THE SUN, the EYE OF THE EARTH and the EYE OF THE MOON (W).
- Collect the CELESTIAL MACE.
- Return to the Bell Tower.
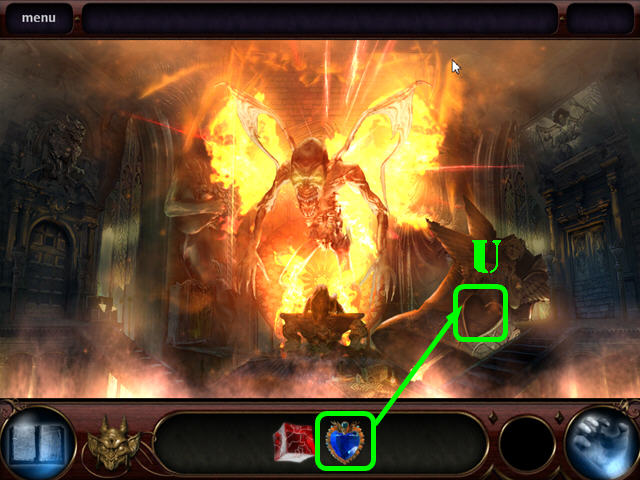
- Place the CELESTIAL MACE in the bell (X), and receive a new ability to break red skull seals.
Chapter 4: The Courtyard and Lounge
- Return to the Library.
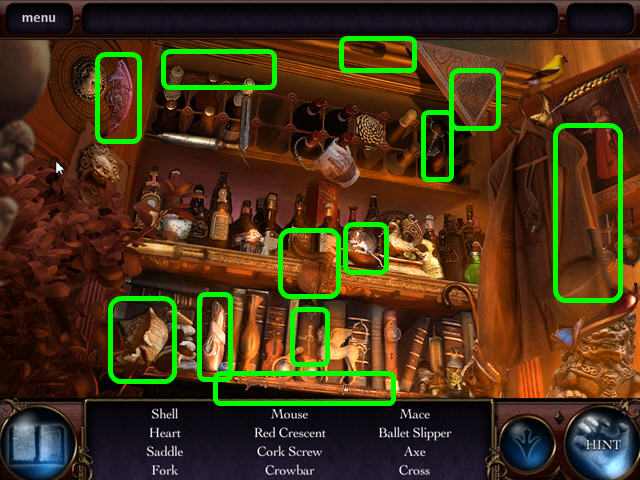
- Investigate the Open Cabinet for a HOS.
- Complete the scene to receive the CROWBAR, and EMBLEM PIECE.
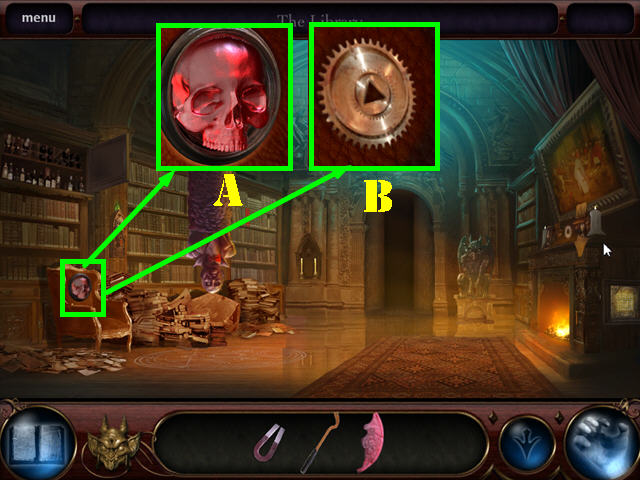
- Investigate the Red Skull Seal; use your hand to break the Skull Seal (A).
- Take the GEAR (B).
- Proceed to the Study.
- Investigate the Desk for a HOS.
- Complete the scene to collect the TAROT CARD and the CRYSTAL BLOSSOM.
- Investigate the Red Skull Seal. Use your hand to break the Skull Seal (C).
- Collect the EMBLEM PIECE (D).
- Return to the Annex.
- Investigate the Red Skull Seal. Use your hand to break the Skull Seal (E).
- Go through the door to access the Courtyard.
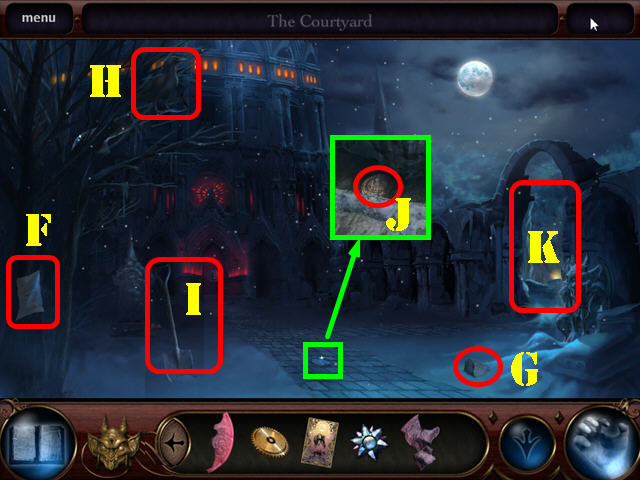
- Pick up the NOTE (F).
- Pick up A ROCK (G).
- Throw the ROCK at the Crow (H).
- Collect the SHOVEL (I).
- Investigate the Flagstone. Use the SHOVEL to move the Flagstone. Take the GOLD COIN (J).
- Go through the entryway (K) and then proceed across the bridge to the Castle Crypt.
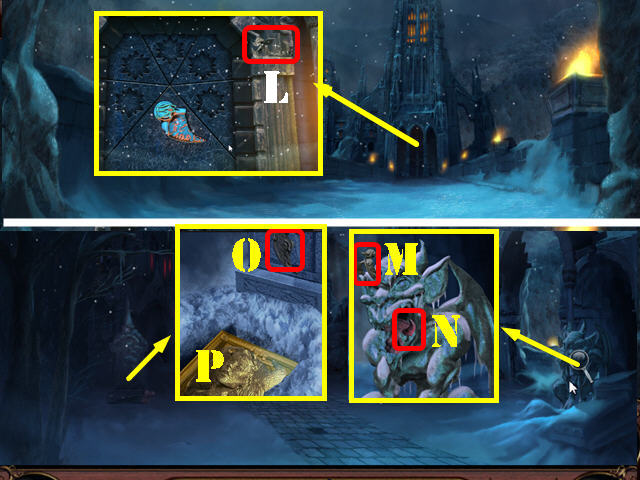
- Pick up the GARGOYLE KEY (L).
- Head Back to the Courtyard.
- Investigate the Gargoyle; use the GARGOYLE KEY in the lock (M) and take the EMBLEM PIECE (N).
- Investigate the Grave; pick up the EMBLEM PIECE (O).
- Use the SHOVEL to move the snow and press on Golden Coffin to activate a puzzle (P).
- Find the images shown at the bottom of the scene in the picture.
- Please look at the screenshot for the solution (Q).
- Complete this scene to receive the EMBLEM PIECE.
- Return to the Annex.
- Use the GOLD COIN at the Fountain to receive the EMBLEM PIECE (R).
- Go back into The Courtyard. Proceed to the Theatre door.
- Place the EMBLEM PIECES into the proper slots and arrange them as shown in the screenshot (S).
- You now have access to the Theatre Lounge.
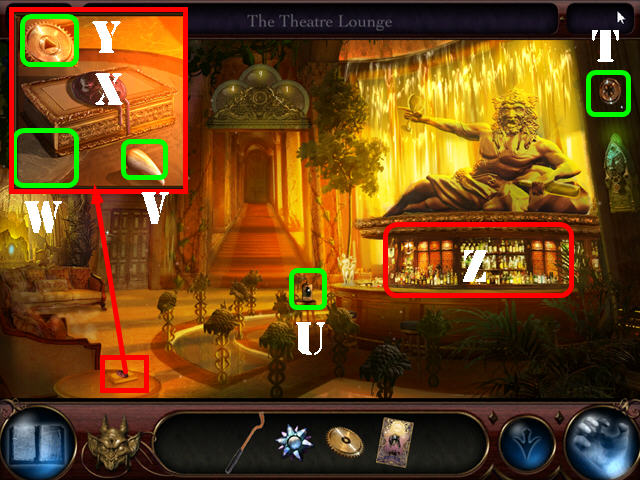
- Pick up the GEAR (T).
- Pick up the VACUUM TUBE (U).
- Investigate the Small Box; collect the TOOTH (V) and the LETTER (W).
- Use your hand to break the Skull Seal (X) and collect the GEAR (Y).
- Investigate the bar for a HOS (Z).
- Play the HOS.
- Complete the scene to collect a GEAR, the SMALL CROW PIN, and A SHARD OF MIRROR.
- Investigate the Cabinet on the far left. Use the SMALL CROW PIN to pick the Lock to activate a HOS.
- Complete the scene to collect the GEAR and the TAROT CARD.
- Investigate the Bacchus Statue on the right.
- Find the images shown at the bottom of the scene in the picture.
- Please look at the screenshot for the solution (A).
- Complete the scene to able to fix the timer.
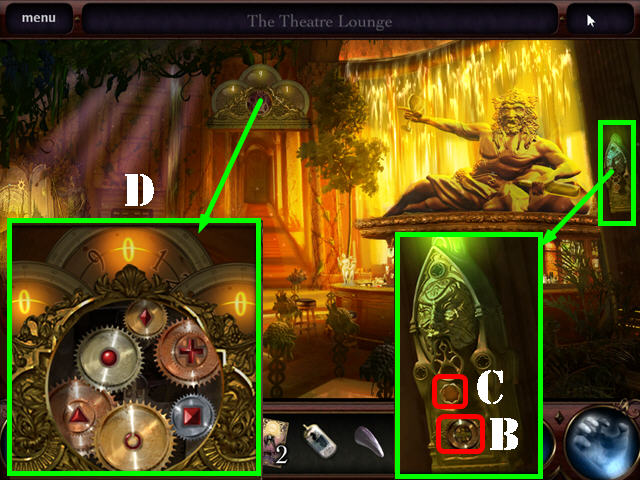
- Investigate the intercom; pick up the GEAR (B).
- Press the Button to receive a clue (C).
- Investigate the Timer; place the 6 GEARS on the proper symbols to unlock the door (D).
- Proceed through the door to access the Theatre of the Absurd.
Chapter 5: The Theatre
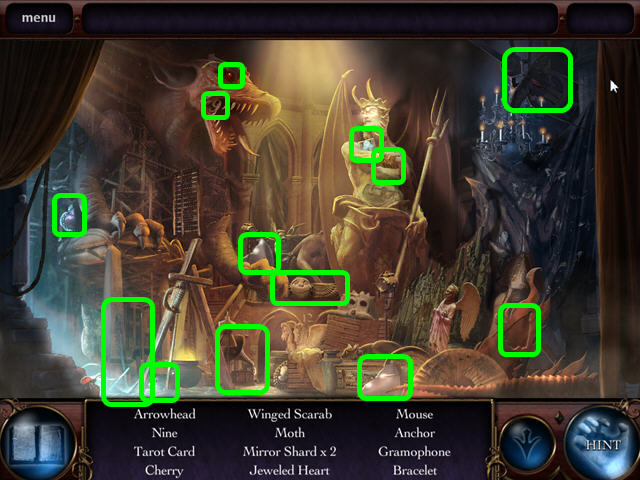
- Investigate the Orchestra Pit for a HOS.
- Complete the scene and receive Two SHARDS OF MIRROR, and a TAROT CARD.
- Investigate the Barred Door. Use the CROWBAR to pry off the boards (A).
- Use your hand to dispel the Smoke (B).
- Proceed through the Door to reach Backstage.
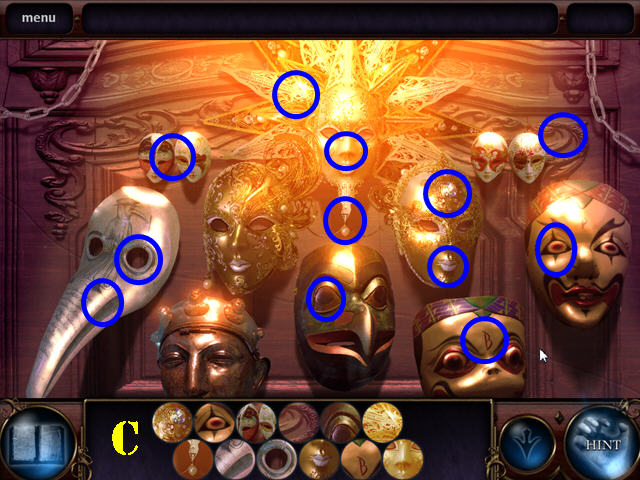
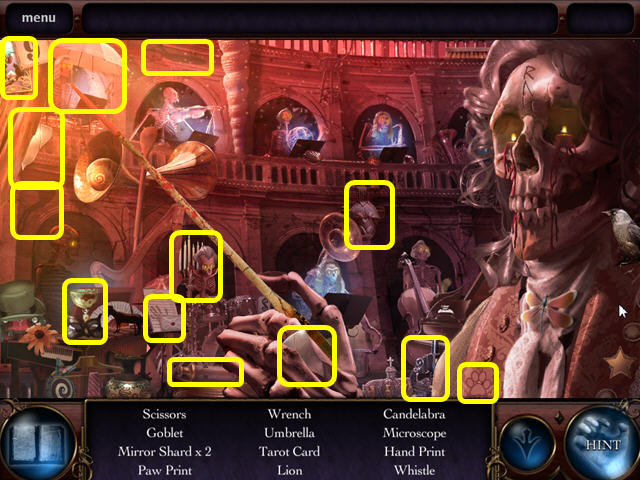
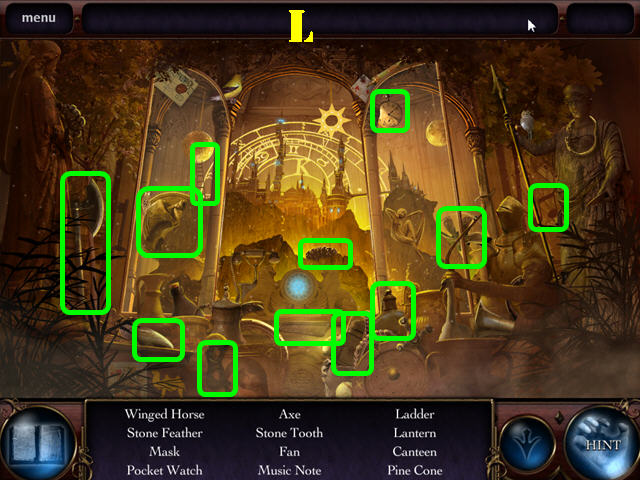
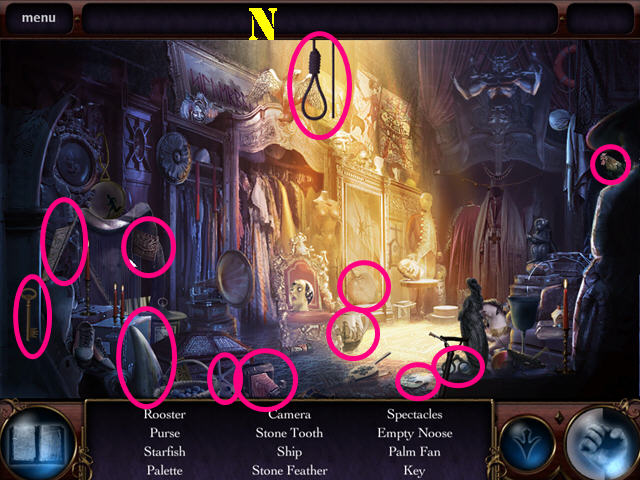
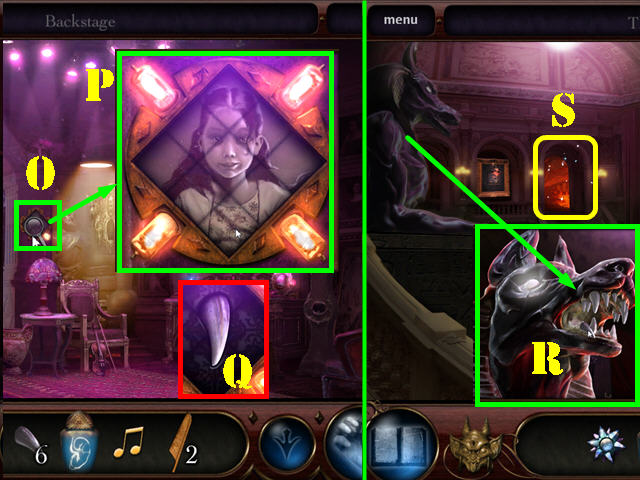
- Investigate the Mask Alcove for a puzzle.
- Find the images shown at the bottom of the scene in the picture.
- Please look at the screenshot for the solution (C).
- Finish the scene to receive the SPOTLIGHT LAMP.

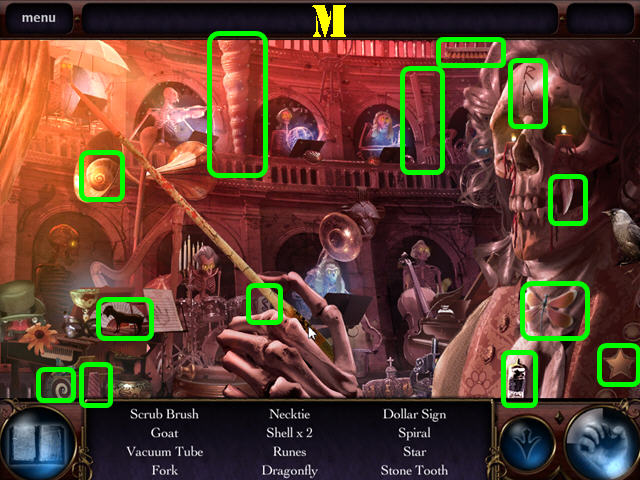
- Investigate the Back Room for a HOS.
- Finish the scene to receive A POWER BUTTON and a TAROT CARD.
- Pick up the TOOTH (D).
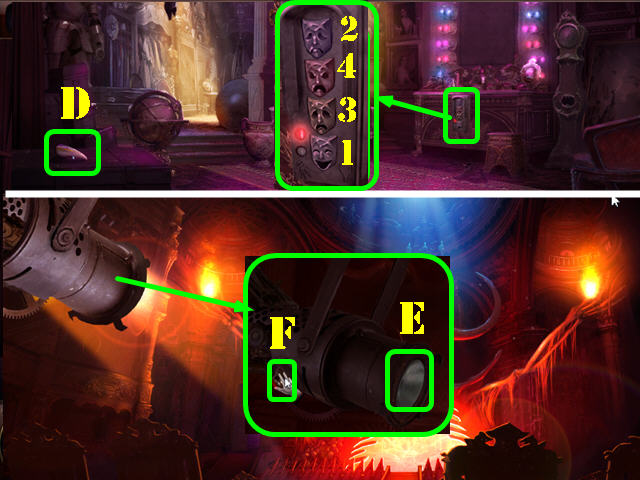
- Investigate the Dresser under the Mirror. Solve the Puzzle by pressing the Mask Buttons in sequence: 1, 2, 3, and 4.
- Walk down to the Theatre.
- Investigate the Spotlight. Place the SPOTLIGHT LAMP (E) and the POWER BUTTON (F) on the spotlight.
- Press the button.
- Investigate the Stage for a HOS.
- Complete the scene to receive two SHARDS OF MIRROR and a TAROT CARD.
- Return to the Backstage.
- Investigate the Mirror. Place the 5 SHARDS OF MIRROR into the correct places (G).
- Receive a TAROT CARD.
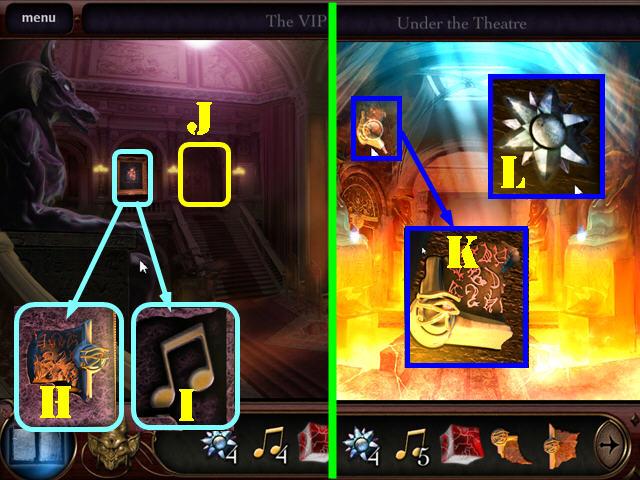
- Return to the Theatre Lounge.
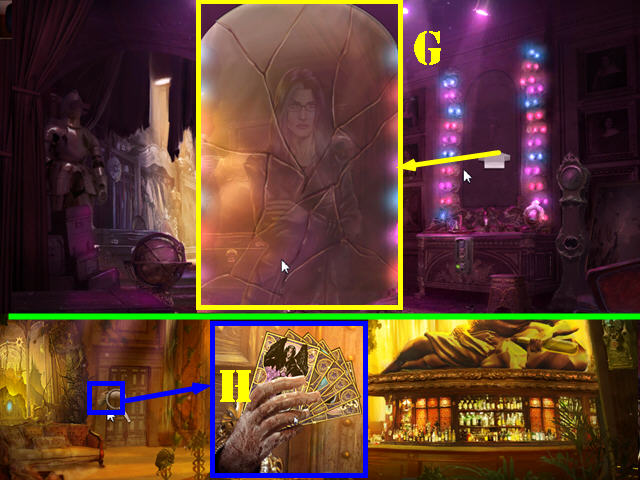
- Investigate the Hand. Place the 6 TAROT CARDS in the Hand (H).
- Proceed through the Open Door to reach the VIP Room.
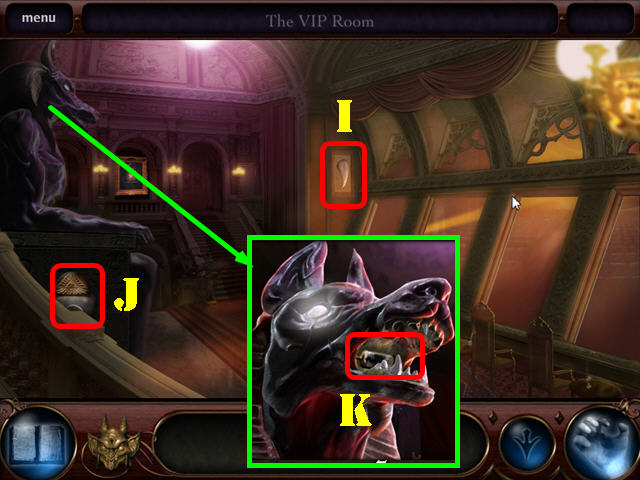
- Pick up the TOOTH (I).
- Pick up the CANOPIC JAR (KIDNEY) (J).
- Investigate the Anubis Statue. Pick up the VACUUM TUBE (K).
- Return to the Lounge.
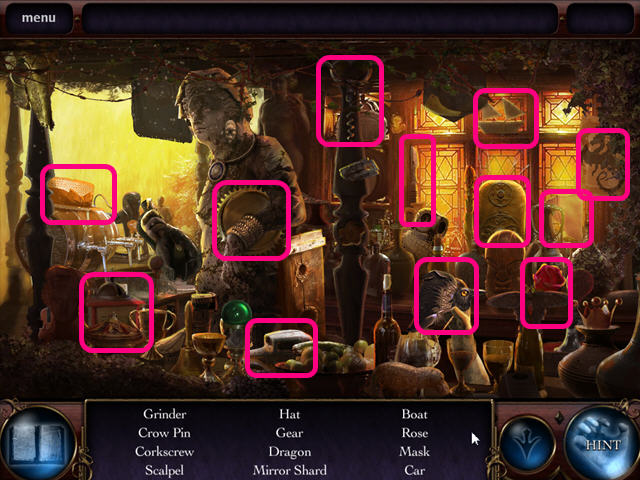
- Investigate the Cabinet for a HOS.
- Finish the scene to receive a TOOTH, MUSIC NOTE, and a STONE FEATHER (L).
- Proceed to the Theatre.
- Investigate the Orchestra Pit for a HOS.
- Complete the scene and receive a TOOTH, and a VACUUM TUBE (M).
- Proceed to the Backstage.
- Investigate the Large Backstage Alcove for a HOS.
- Finish the scene to receive a TOOTH and a STONE FEATHER (N).
- Investigate the Pillar (O).
- Place the 3 VACUUM TUBES in the slots to activate a puzzle.
- Rotate the puzzle pieces to make an image of Bethany; rotating one piece affects another.
- Please look at the screenshot for the solution (P).
- Collect the TOOTH (Q).
- Proceed back to the VIP Room.
- Investigate the Anubis Statue. Place the 7 TEETH in the Mouth of the Statue (R).
- Proceed into the Open Door (S). Go forward to access Under the Theatre (S).
Chapter 6: Under the Theatre

- Investigate the Left Alcove for a HOS.
- Complete the scene to receive a MUSIC NOTE, a CANOPIC JAR (LUNGS), and an EYE OF HORUS PIECE.
- Pick up the Stone Feather (T).
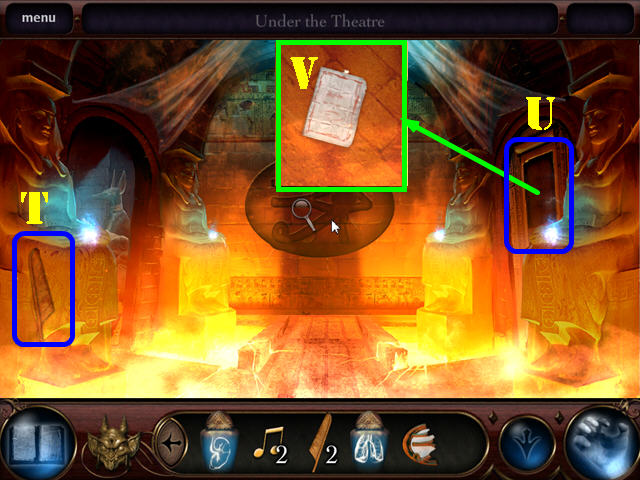
- Investigate the Right Alcove (U). Pick Up the Note (V).
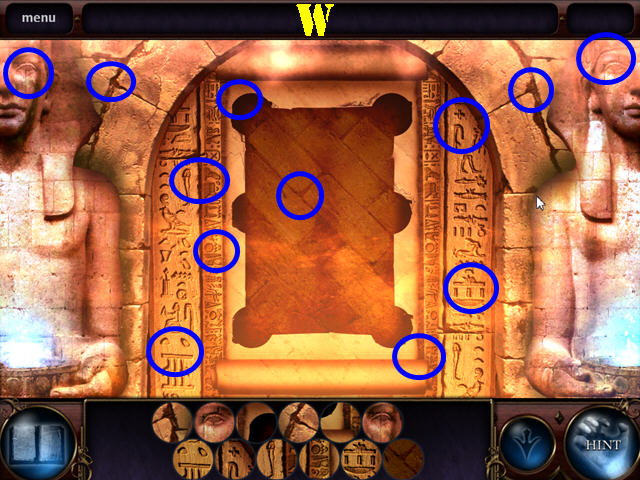
- Find the images shown at the bottom of the scene in the picture.
- Please look at the screenshot for the solution (W).
- Complete the scene to get the EYE OF HORUS PIECE.
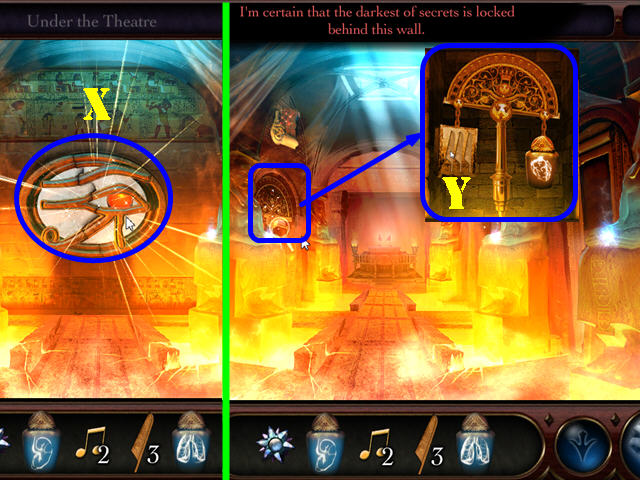
- Walk down to Under the Theatre.
- Place the 2 EYE OF HORUS PIECES in the slot on the wall (X).
- Investigate the Second Left Alcove; place the STONE FEATHERS into the Slots (Y) to receive the CANOPIC JAR (HEART).
- Investigate the Back Chamber.
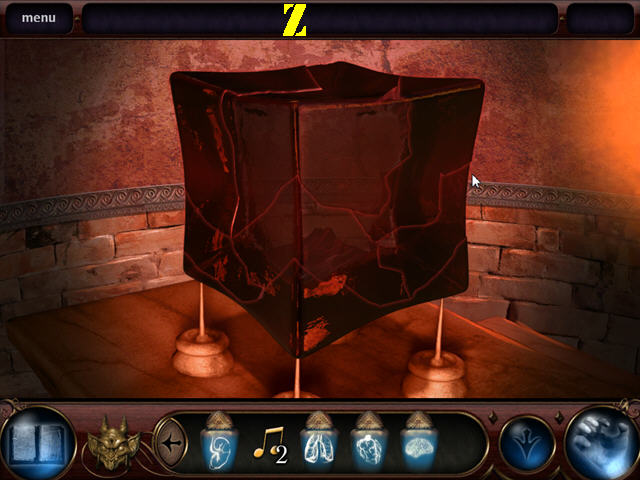
- Fix the Cube by fitting the pieces together as shown in the screenshot (Z).
- Receive the CANOPIC JAR (BRAIN) and the HAPSBURG CUBE (FRACTURED).
- Walk down.
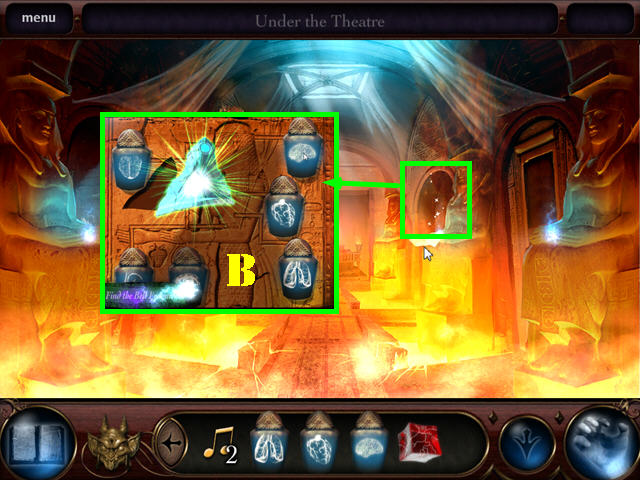
- Investigate the Second Right Alcove.
- Place the CANOPIC JAR (KIDNEY), CANOPIC JAR (LUNGS), CANOPIC JAR (HEART), and the CANOPIC JAR (BRAIN) into the proper places (B).
- Receive the BELL FRAGMENT.
Chapter 7: The Crypt and Finale
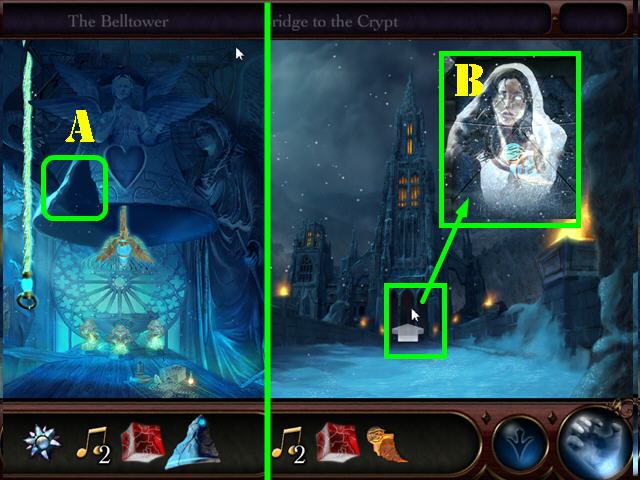
- Head Back to the Bell Tower.
- Place the BELL FRAGMENT in the Bell (A).
- Go back to the Bridge to the Crypt and zoom into the door.
- Use your hand to get the JEWELED TABLET (B).
- Go to the Annex.
- Investigate the Open Gate for a HOS.
- Complete the scene to receive the CRYSTAL BLOSSOM.
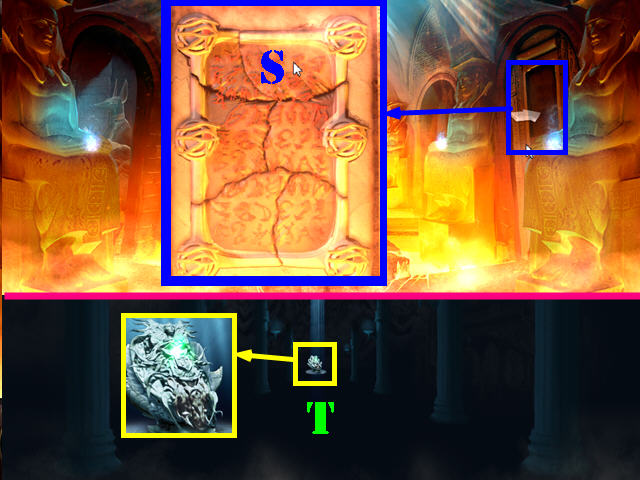
- Investigate the Plaque (C).
- Use your hand to unlock the JEWELED TABLET (D).
- Pick up the CRYSTAL BLOSSOM (E).
- Return to the Cold Room, in the Secret passage. Note: You can access it by going through Corvus' Study.
- Investigate the Plaque. Use your hand to unlock the JEWELED TABLET (F).
- Collect the MUSIC NOTE (G).

- Investigate the Cold Room Cell for a HOS.
- Complete the scene to collect the CRYSTAL BLOSSOM, and the MUSIC NOTE.
- Head to the VIP Room in the theatre.
- Investigate the Plaque. Use your hand to unlock the JEWELED TABLET (H).
- Collect the MUSIC NOTE (I).
- Proceed through the door (J) and then go forward to reach Under the Theatre.
- Investigate the Plaque. Use your hand to unlock the JEWELED TABLET (K).
- Collect the CRYSTAL BLOSSOM (L).
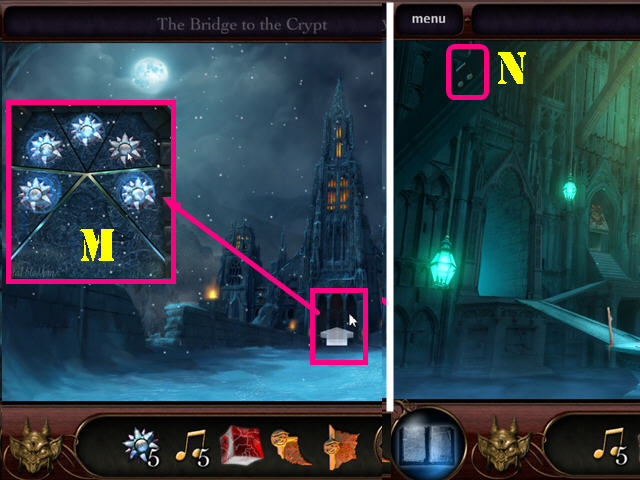
- Head back to the Bridge to the Crypt and zoom into the door.
- Place the 5 CRYSTAL BLOSSOMS into the slots (M).
- Proceed through the open door to access Her Crypt.
- Pick up the MUSIC NOTE (N) in the upper left.
- Investigate the Painting.
- Find the images shown at the bottom of the scene in the picture.
- Please look at the screenshot for the solution (P).
- Finish the scene to light one of the torches.
- Investigate the right Pedestal Alcove.
- Assemble the Bust pieces.
- Please look at the screenshot for the solution (Q).
- Finish the scene to Light one of the torches.
- Investigate the Small left Alcove. Place the 6 MUSIC NOTES in the slots to light one of the torches (R).
- Investigate the large Alcove on the left for a HOS.
- Complete the scene to light one of the torches.
- Collect the Final JEWELED TABLET.
- Proceed to Under the theatre.
- Investigate the First Right Alcove. Place the 5 JEWELED TABLETS in the correct Slots to open the hidden door (S).
- Proceed forward to the Coffin (T). Receive the CRYSTAL BELL HEART.
- Go back to the Bell Tower.
- Place the CRYSTAL BELL HEART into the Bell slot (U).
- Congratulations, you have completed Theatre of the Absurd!
Created at: 2012-06-02