

Walkthrough Menu
- General Tips
- Chapter 1: Lhasa
- Chapter 2: The Scepter
- Chapter 3: Inside the City
- Chapter 4: Across the Lake
- Chapter 5: To Shangri-La
- Chapter 6: The Amulet
General Tips
- This is the official guide for Tibetan Quest: Beyond the World's End.
- This guide will not show when you have to zoom into a location; the screenshots will show each zoom scene.
- Hidden-object puzzles are referred to as HOPs. This guide will not show screenshots of the HOPs, however, it will mention when an HOP is available and the inventory item you'll collect from it.
- Use the Map to fast travel to a location.
Chapter 1: Lhasa
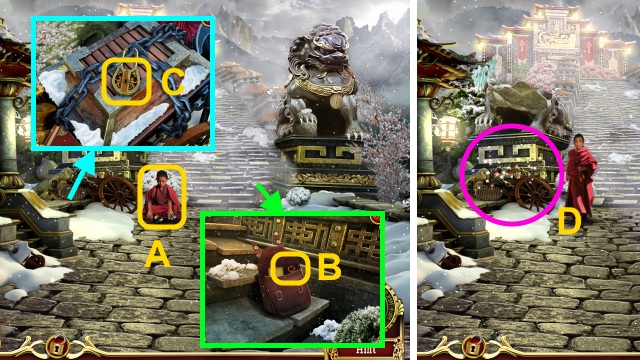
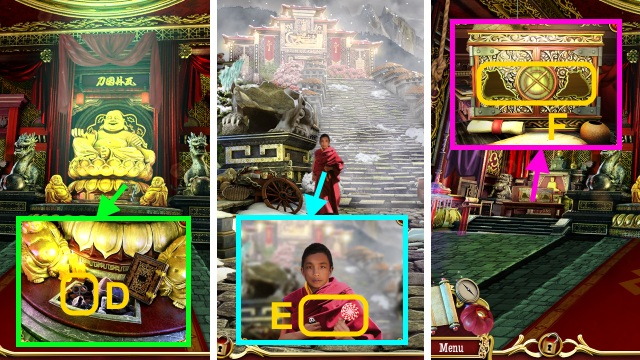
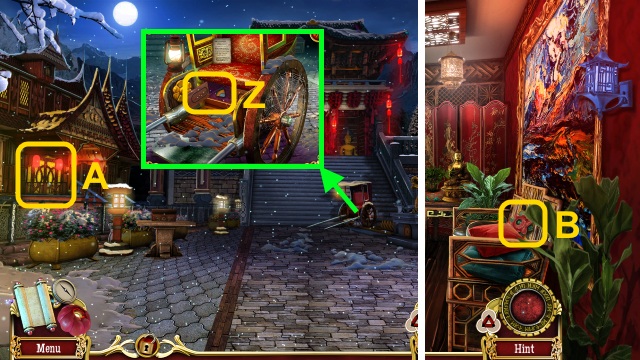
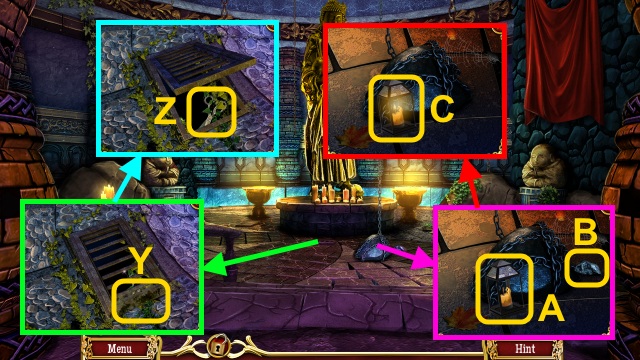
- Talk to the boy (A).
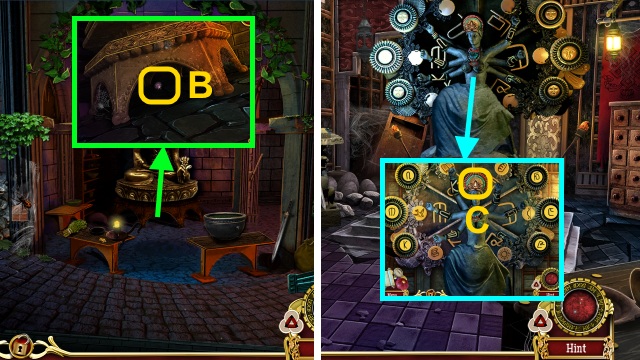
- Open the bag; take the KEY (B).
- Use the KEY (C).
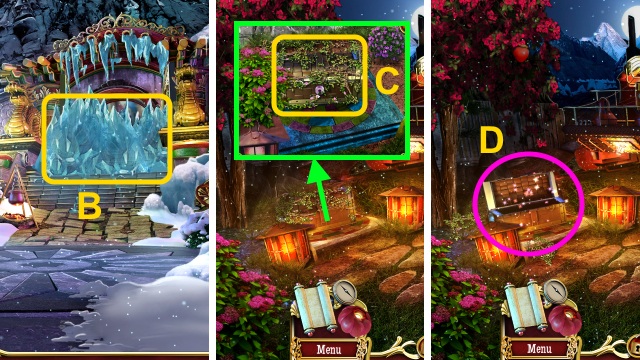
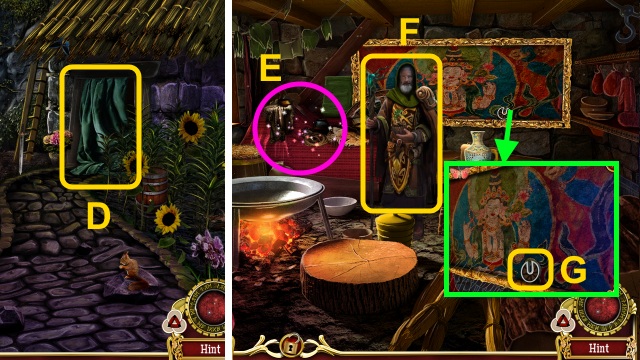
- Play the HOP to receive the TINDER (D).
- Walk forward.
- Play the HOP to receive the KETTLE WITH WATER (E).
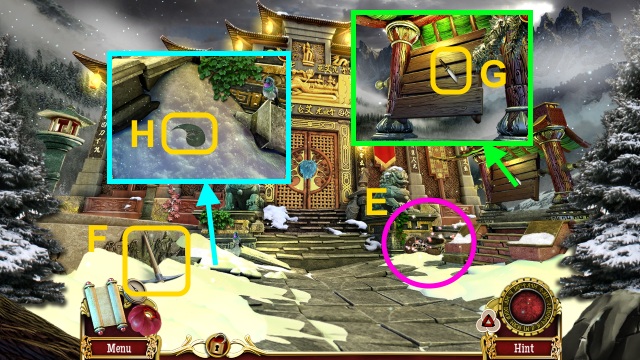
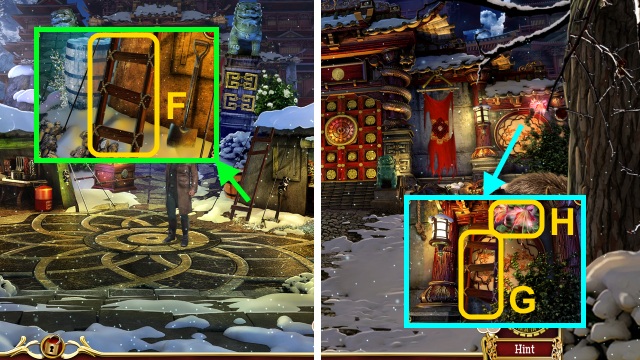
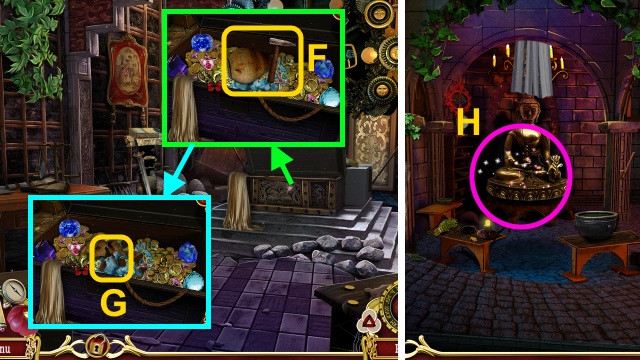
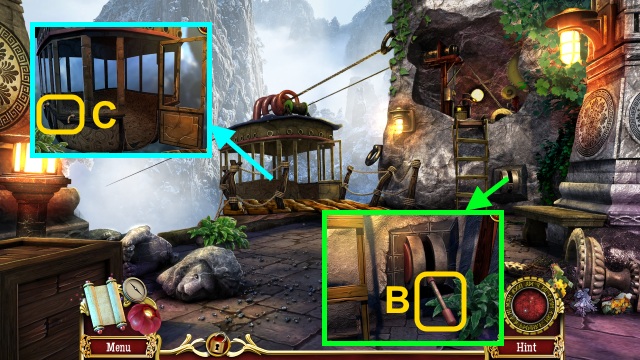
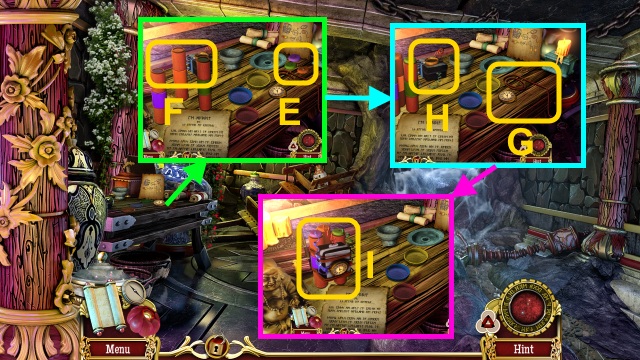
- Take the PICKAXE (F).
- Take the DAGGER (G).
- Move the snow; take the GATE LOCK ELEMENT (H).
- Walk down.

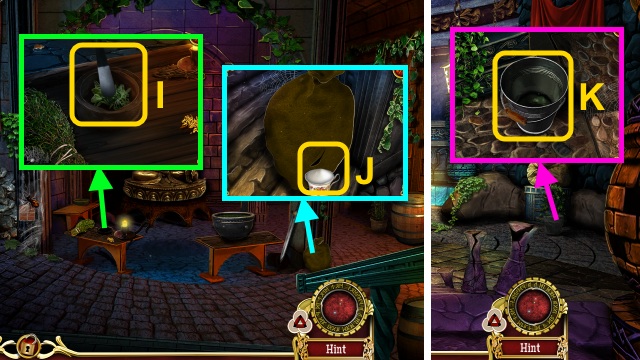
- Move the snow; use the DAGGER (I).
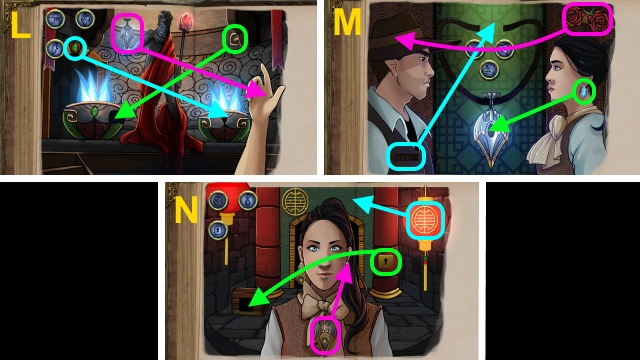
- Take the FLINT (1/2).
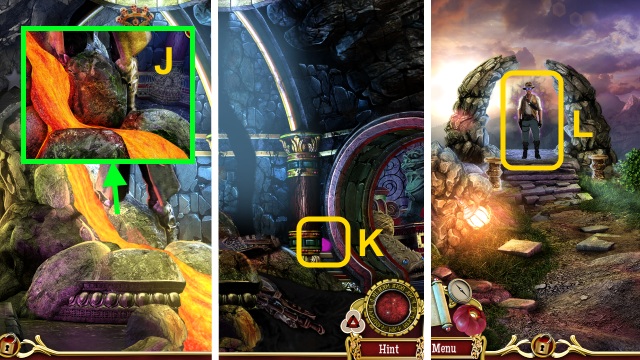
- Use the PICKAXE (J); open the door.
- Take the LONG HOOK, PANDA, and FLINT (2/2) (K).
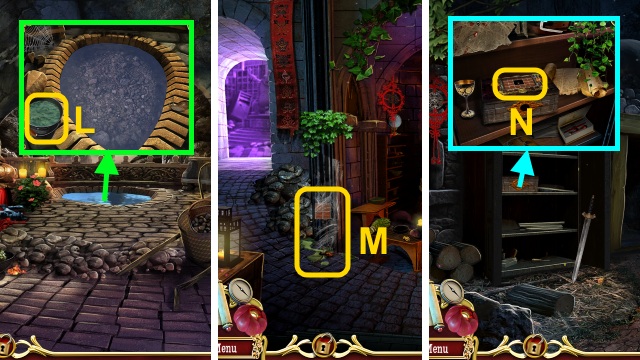
- Use the TINDER, FLINT (2/2) and KETTLE WITH WATER (L); take the KETTLE WITH HOT WATER.
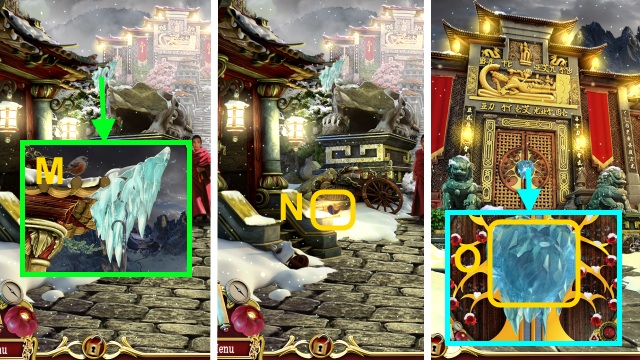
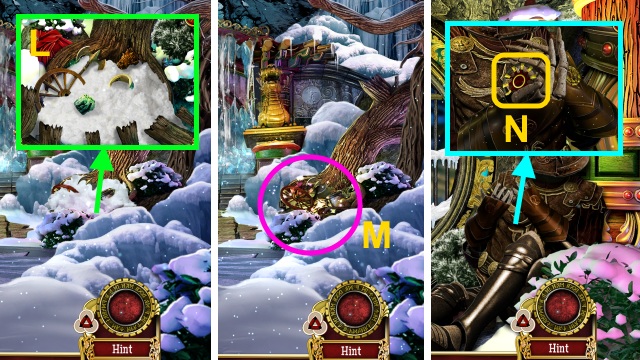
- Use the LONG HOOK (M).
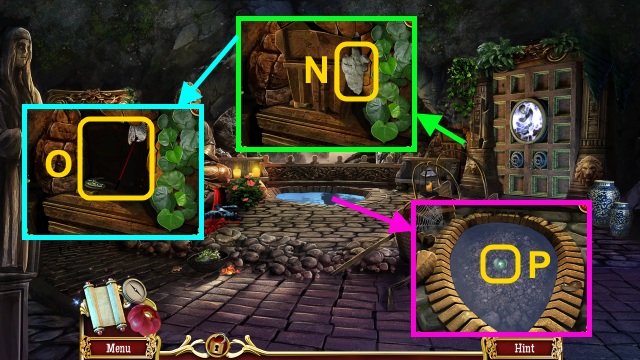
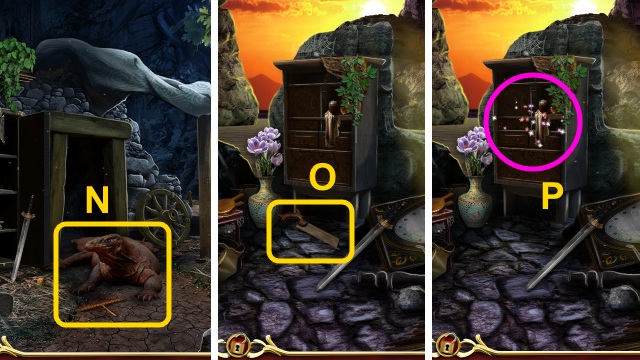
- Take the GATE LOCK ELEMENT (N).
- Walk forward.
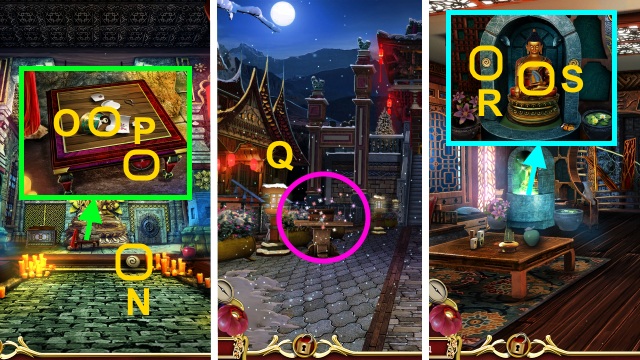
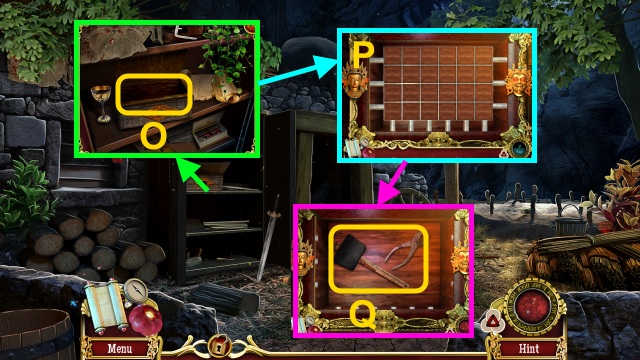
- Pour the KETTLE WITH HOT WATER (O); place the GATE LOCK ELEMENTS for a mini-game.
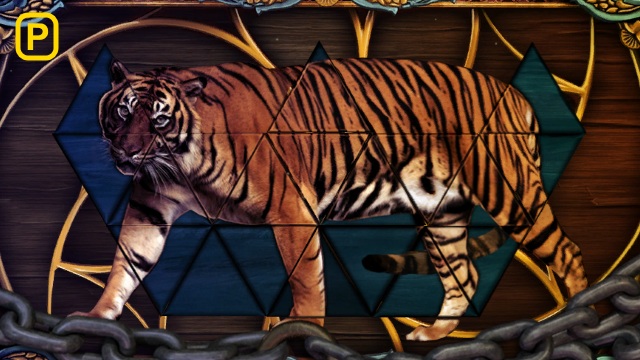
- Solution (P).
- Walk forward.
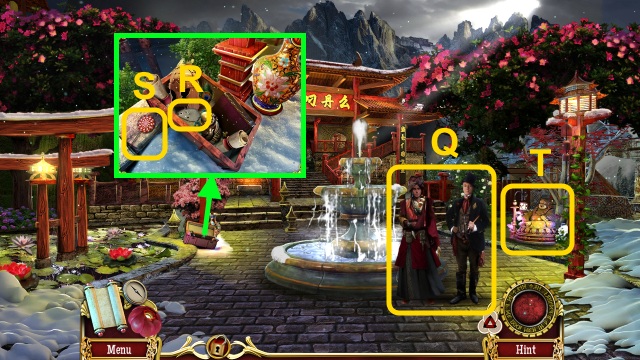
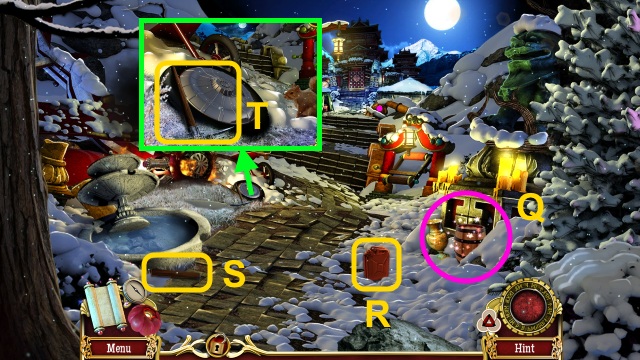
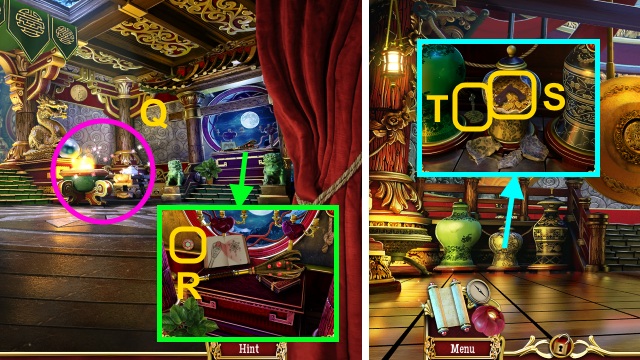
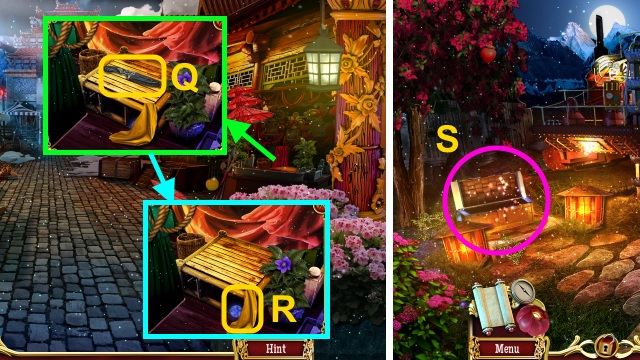
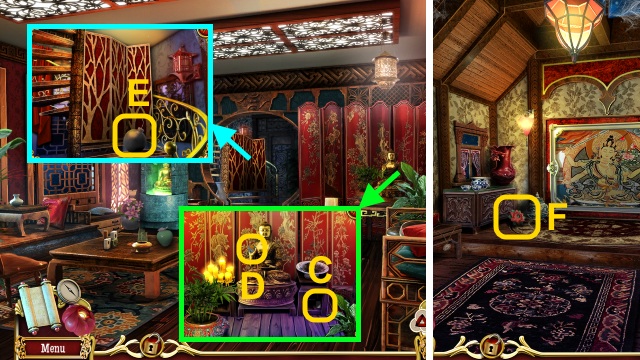
- Talk to the men (Q).
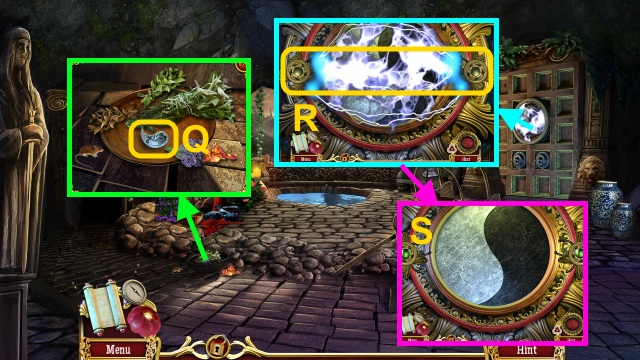
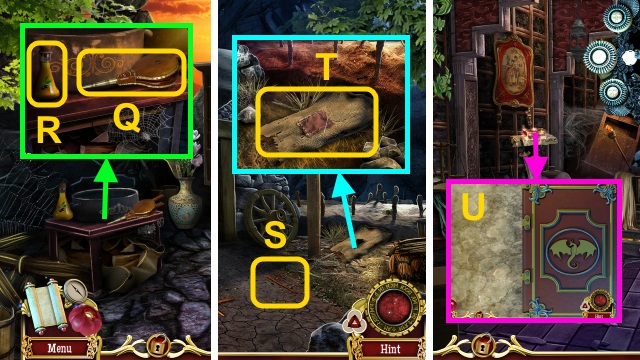
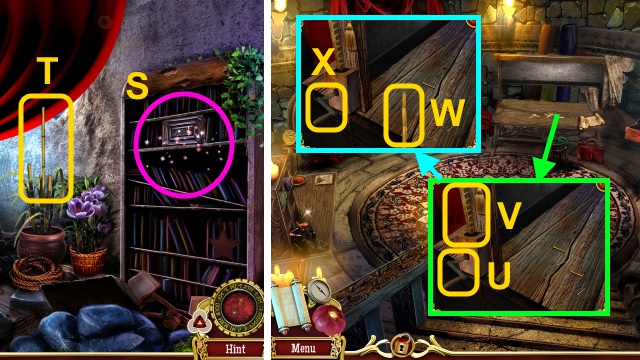
- Move the objects; take the TOY MOUSE (R) and LOLLIPOP (S).
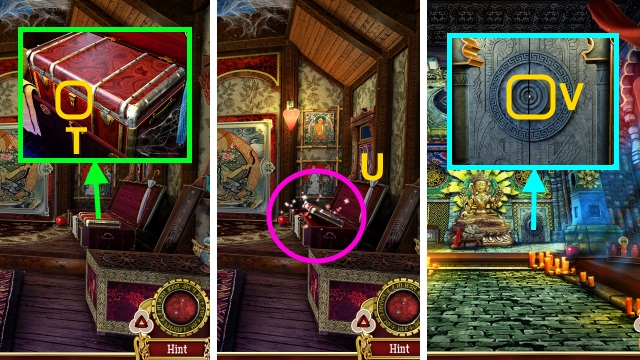
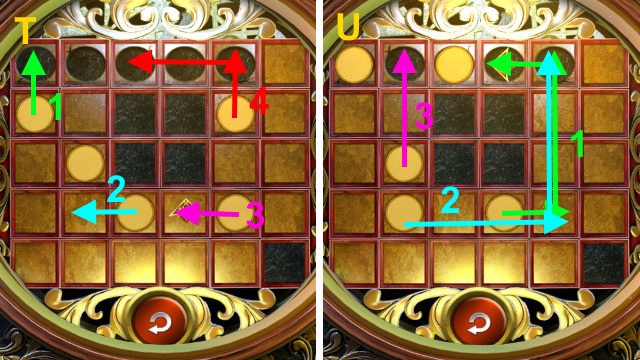
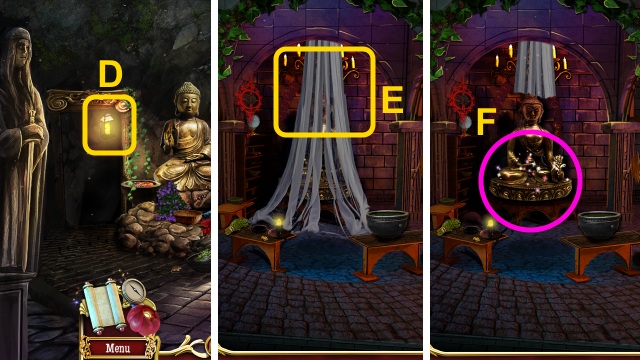
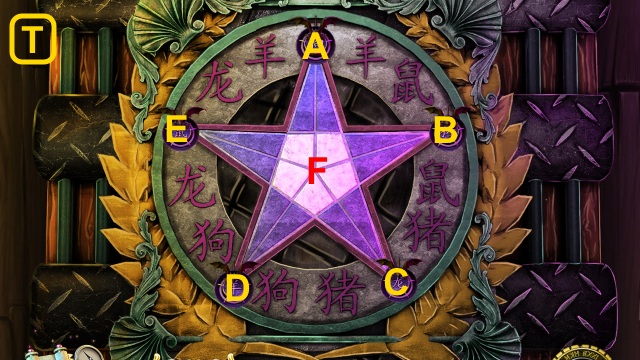
- Examine the statue for a mini-game (T).
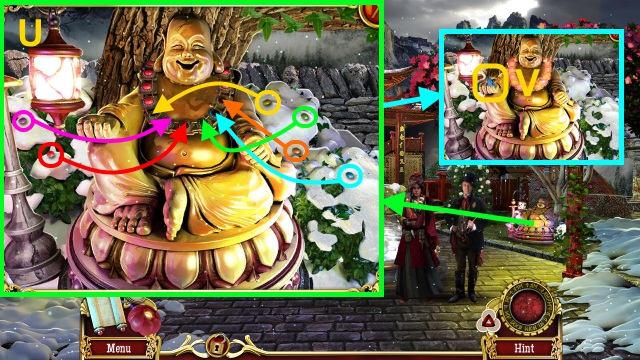
- Solution (U).
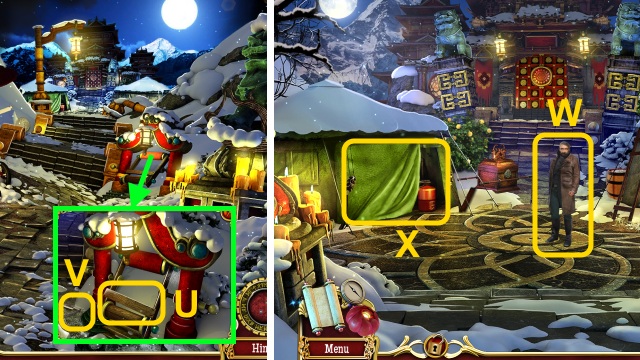
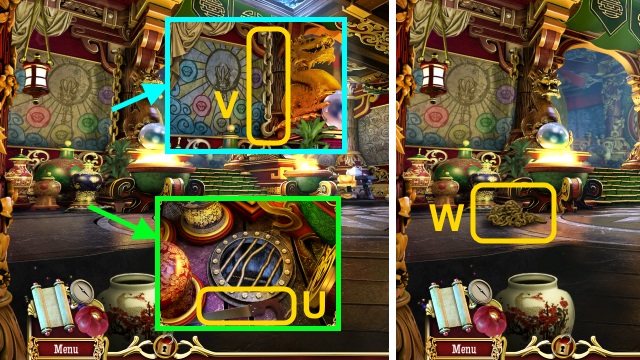
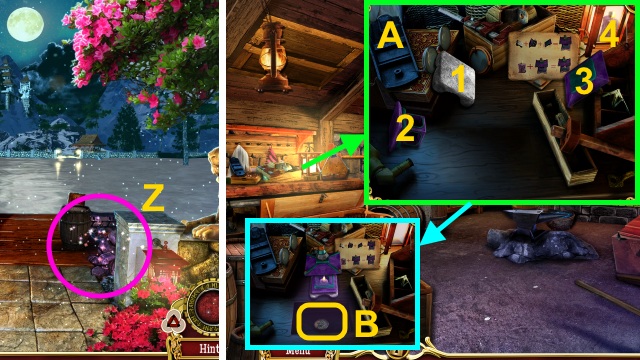
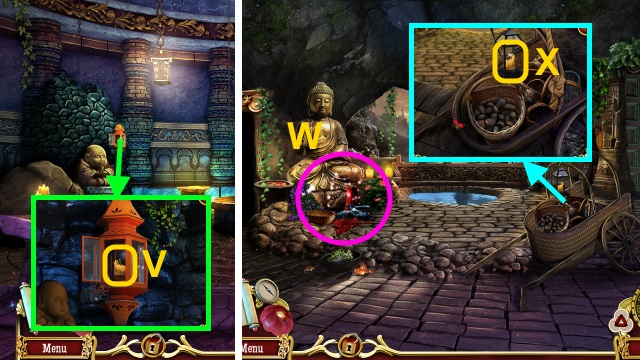
- Take the BLUE HANDLE (V).
- Walk forward.
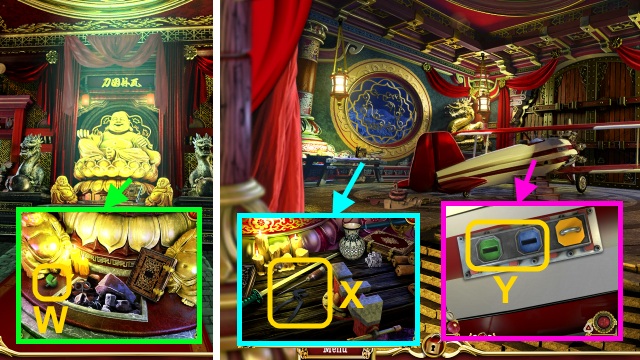
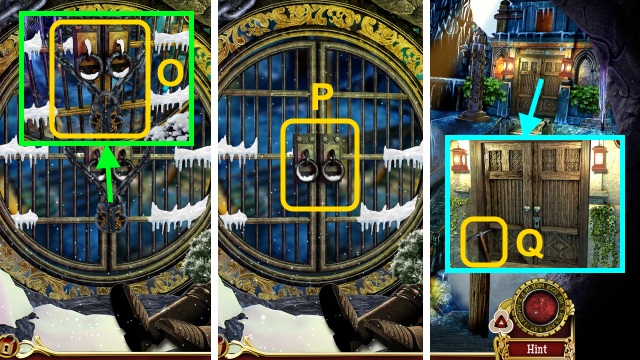
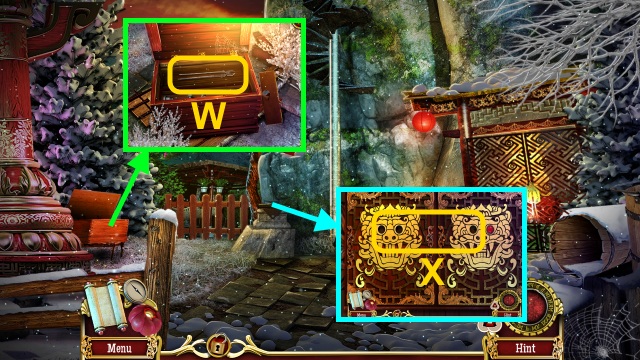
- Take the GREEN HANDLE (W).
- Walk right.
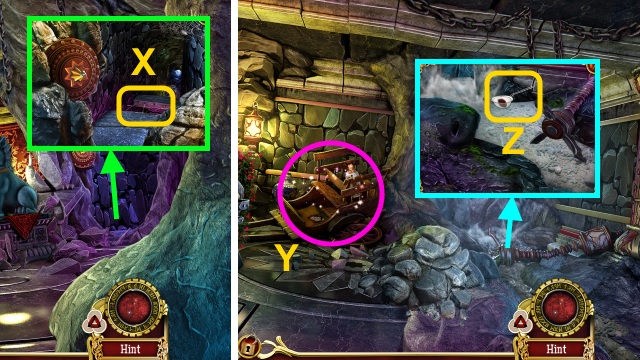
- Take the ICE PICK and PLIERS (X).
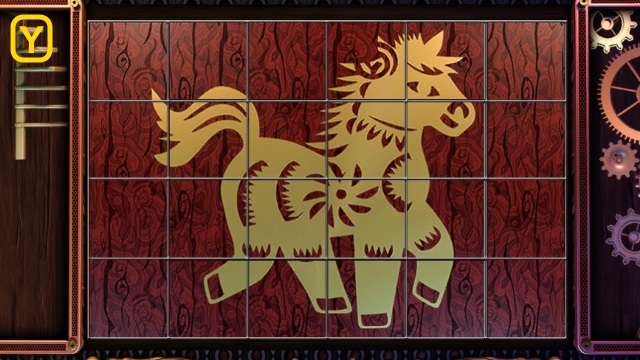
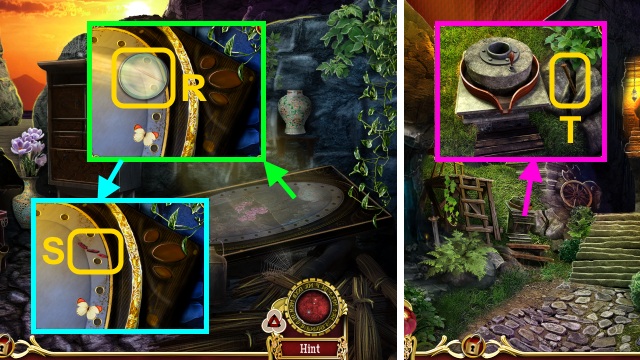
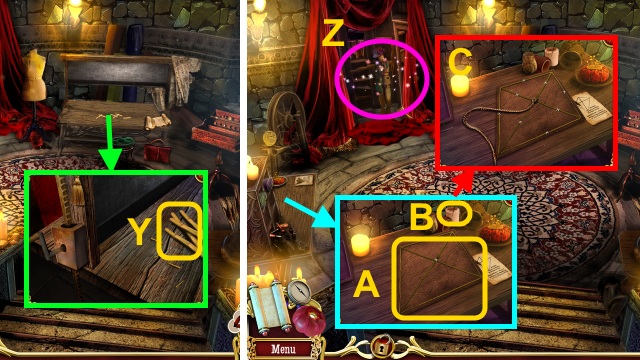
- Place the GREEN HANDLE and BLUE HANDLE for a mini-game (Y).
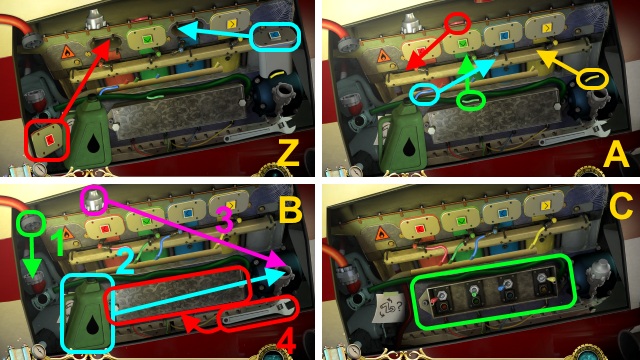
- Solution (Z-C).
- Walk down.
- Use the ICE PICK; take the WINDING KEY (D).
- Walk down three times.
- Give the LOLLIPOP; take the PANDA (E).
- Go to the Main Hall.
- Place the PANDAS (F).
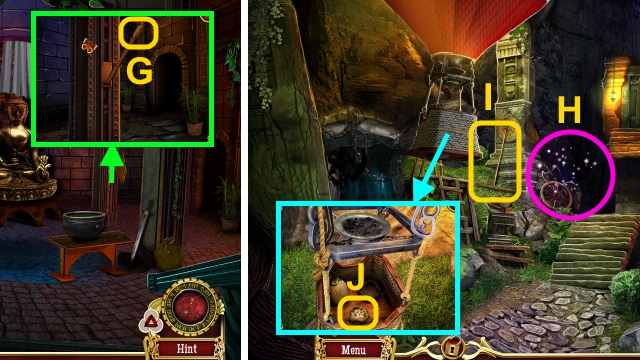
- Play the HOP to receive the DULL SCISSORS (G).
- Walk right.
- Turn the HANDLE (H); use the DULL SCISSORS to receive the SHARP SCISSORS (I).
- Place the TOY MOUSE; use the WINDING KEY (J).
- Use the SHARP SCISSORS (K); take the PIECE OF LEATHER.
- Walk down.
- Use the PIECE OF LEATHER (L); take the METAL FLAGPOLE.
- Walk right.
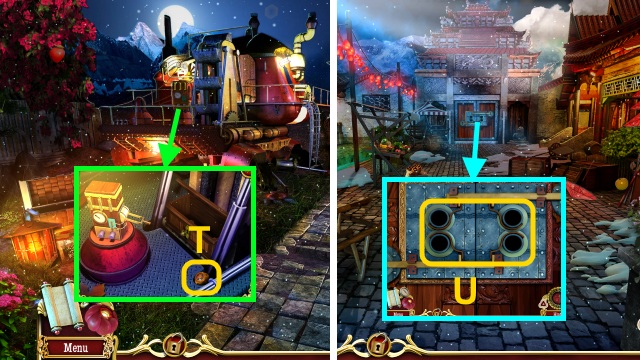
- Place the METAL FLAGPOLE (M); turn the handle (N).
- Use the PLIERS (O); you receive the PLANE STARTING CRANK.
- Place the PLANE STARTING CRANK (P).
- Play the HOP to receive the PROVISIONS (Q).
- Take the GAS CANISTER (R).
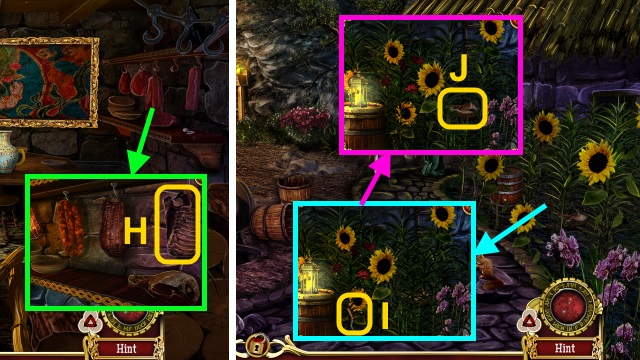
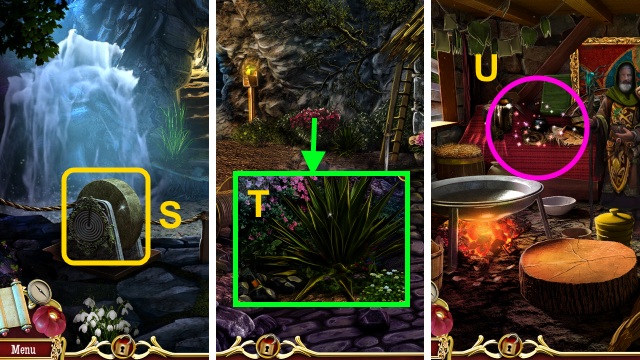
- Take the PLANK (1/3) (S).
- Take the PICKAXE (T).
- Take the PLANK (2/3) (U) and STRAIGHT RAZOR (V).
- Walk forward.
- Talk to Peter (W).
- Open the tent (X).
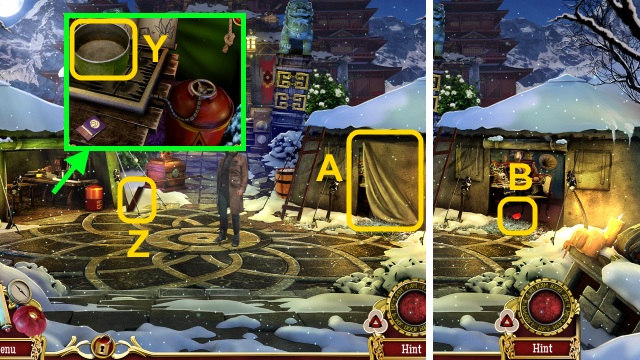
- Take the COOKING POT (Y).
- Take the PLANK (3/3) (Z).
- Open the tent (A).
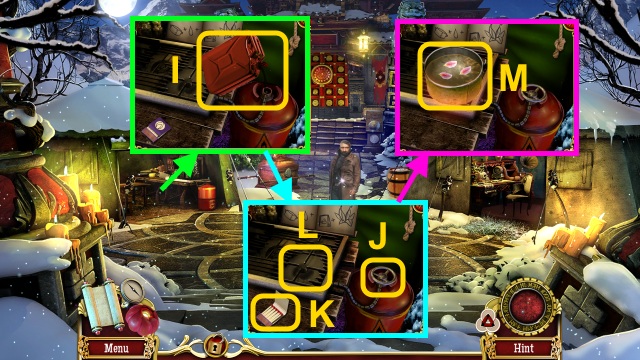
- Take the GATE PIECE (1/2) (B).
- Walk down.
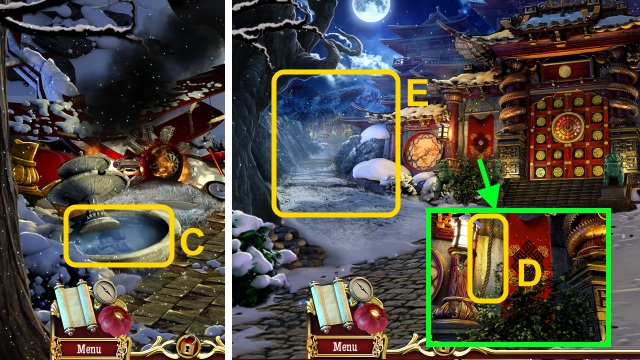
- Use the COOKING POT to receive the COOKING POT WITH WATER (C).
- Walk forward twice.
- Use the STRAIGHT RAZOR to take the ROPE (D).
- Try to walk left (E).
- Walk down.
- Place the PLANKS; use the ROPE (F).
- Take the LADDER.
- Walk forward.
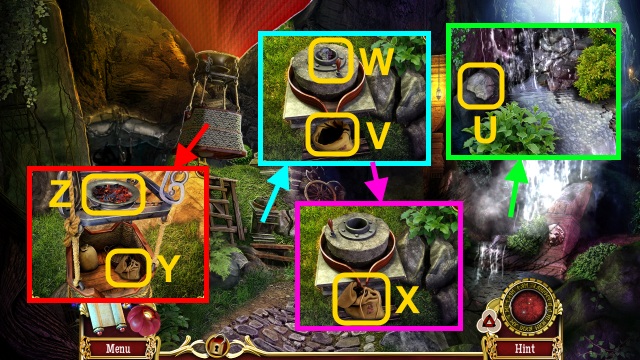
- Use the LADDER (G); take the HEALING HERB (H).
- Walk down.
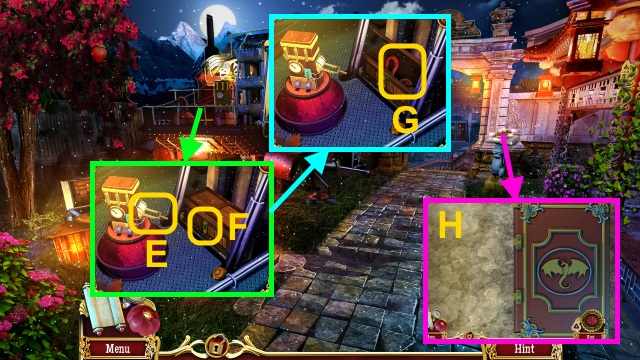
- Remove the handle; use the GAS CANISTER (I).
- Place the handle; turn it (J).
- Open the matchbook (K); use the matches (L).
- Place the COOKING POT WITH WATER; use the PROVISIONS and HEALING HERB (M).
- Take the HEALING STEW.
- Give the HEALING STEW (M); you receive the GATE PIECE (2/2).
- Walk forward.
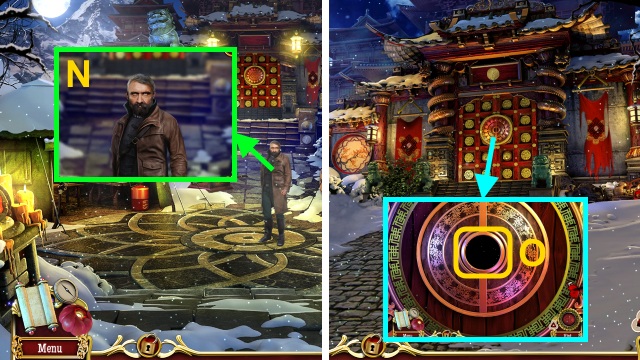
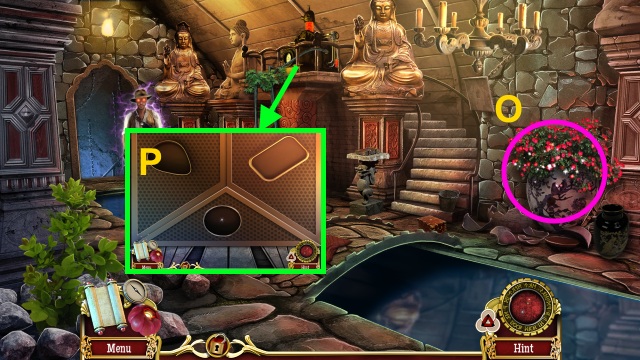
- Place the COMPLETE GATE PIECE for a mini-game (N).
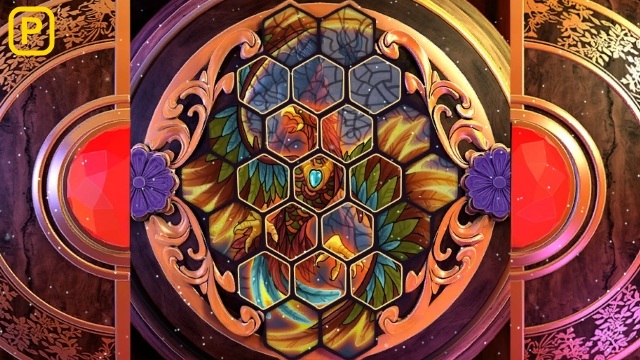
- Solution (P).
- Walk forward.
Chapter 2: The Scepter
- Play the HOP to receive the WAR AXE (Q).
- Take the GATE PIECE (R).
- Walk forward.
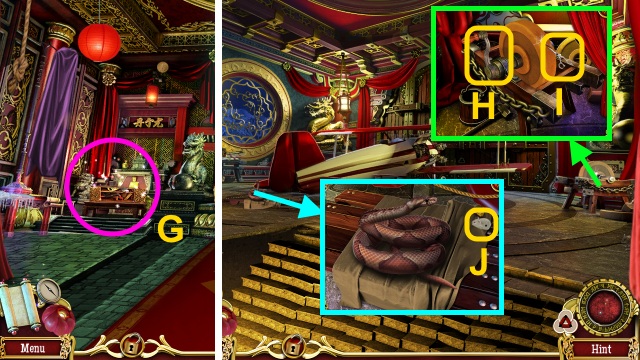
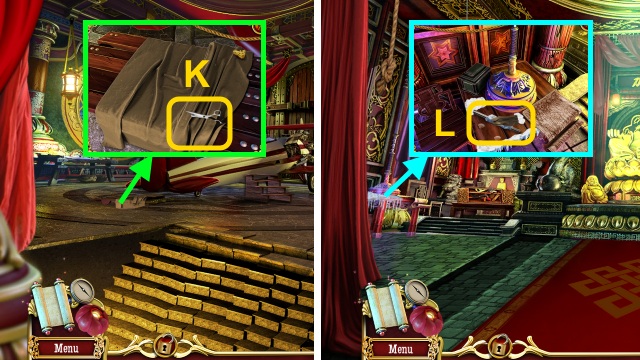
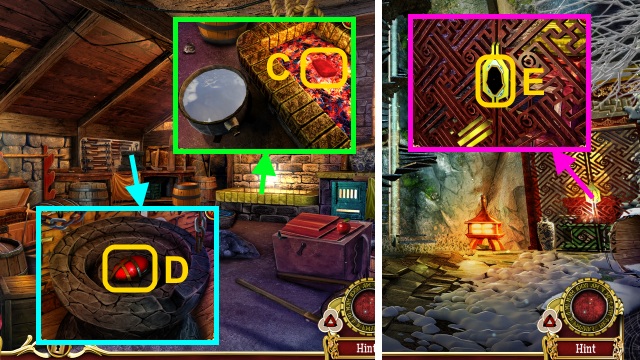
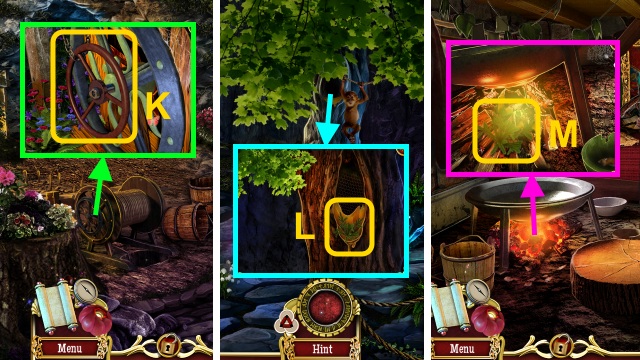
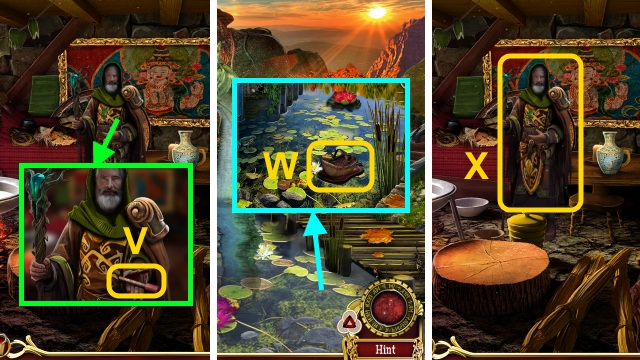
- Use the PICKAXE; take the SAW HANDLE (S) and CHEST KEY (T).
- Walk down.
- Place the SAW HANDLE (U); take the SAW.
- Use the SAW (V).
- Take the CHAIN WITH A HOOK (W).
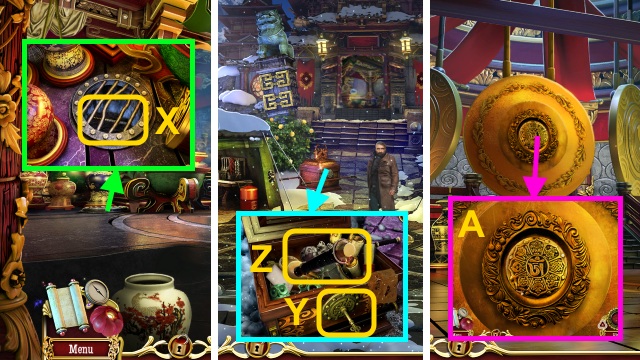
- Use the CHAIN WITH A HOOK to take the GONG MALLET HANDLE (X).
- Walk down twice.
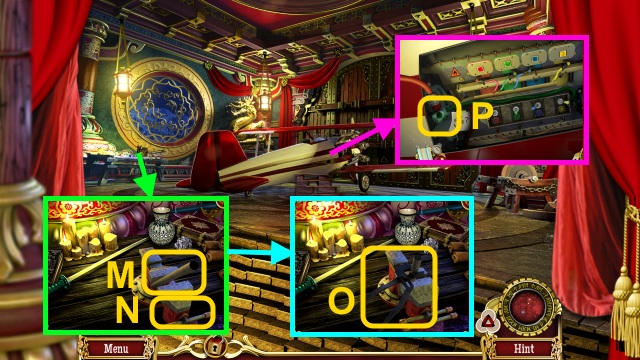
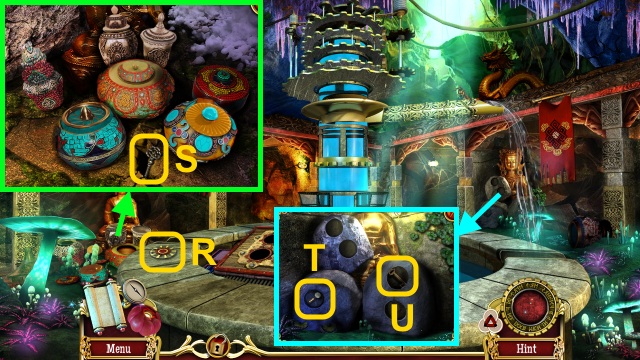
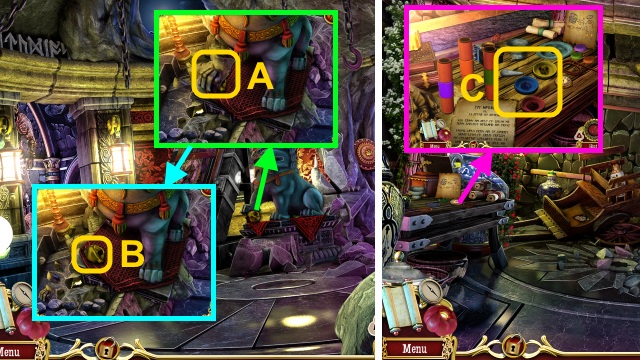
- Use the CHEST KEY (Y); move the treasures.
- Place the GONG MALLET HANDLE (Z); take the GONG MALLET.
- Walk forward three times.
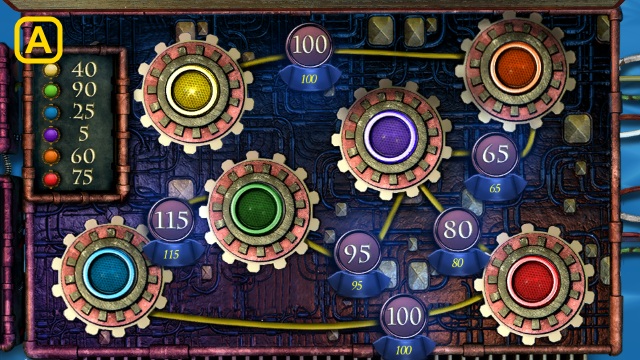
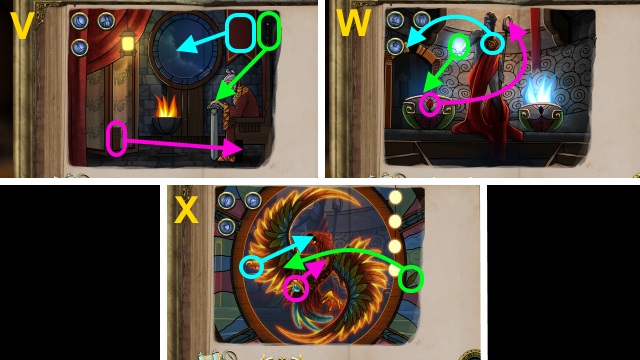
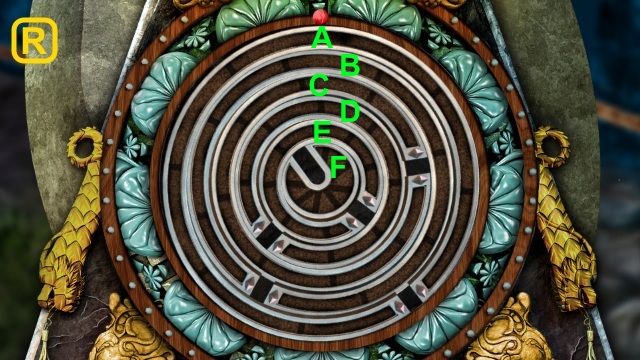
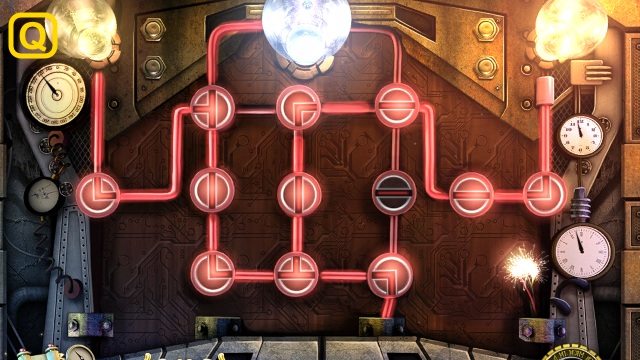
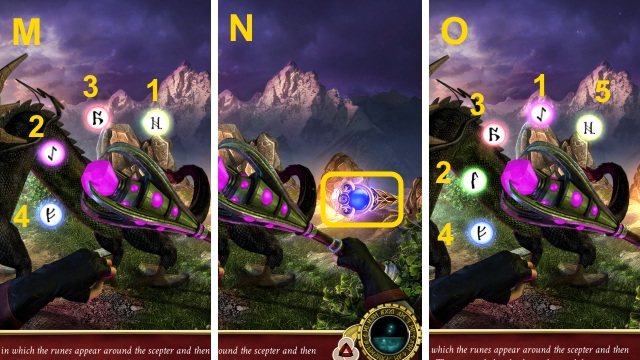
- Use the GONG MALLET for a mini-game (A).
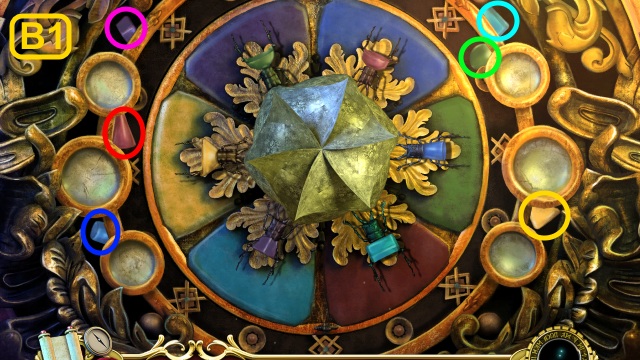
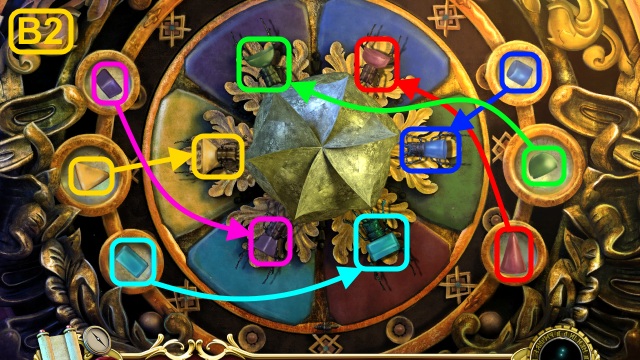
- Solution (B1, B2).
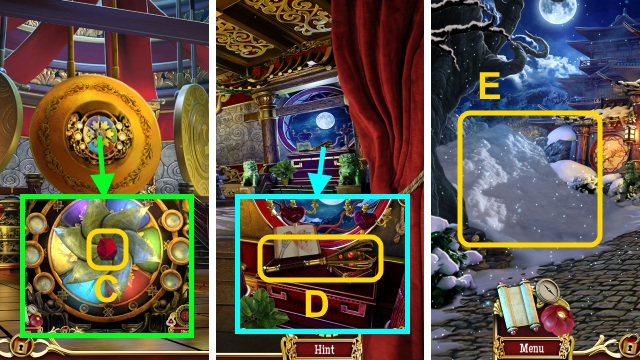
- Take the RED CRYSTAL (C).
- Walk down.
- Place the RED CRYSTAL (D); you receive the SCEPTER.
- Walk down.
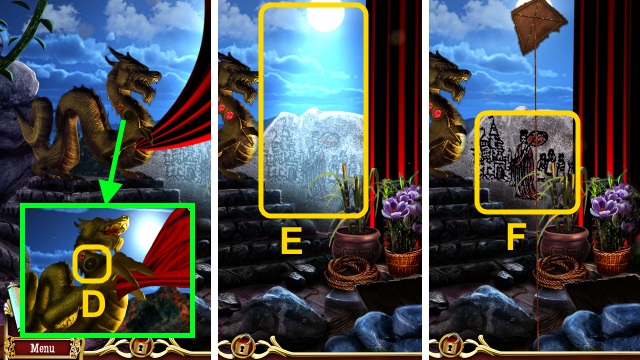
- Use the SCEPTER (E).
- Walk left.

- Use the WAR AXE (F).
- Play the HOP to receive the GATE PIECE (G).
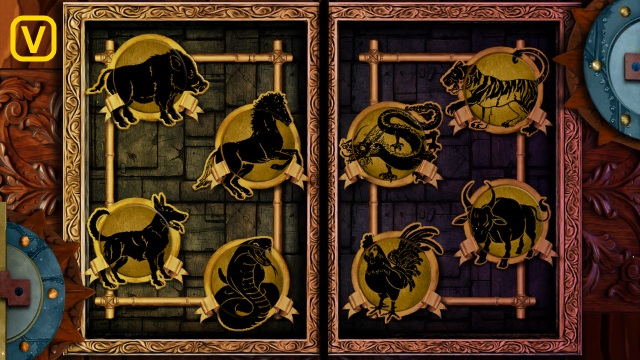
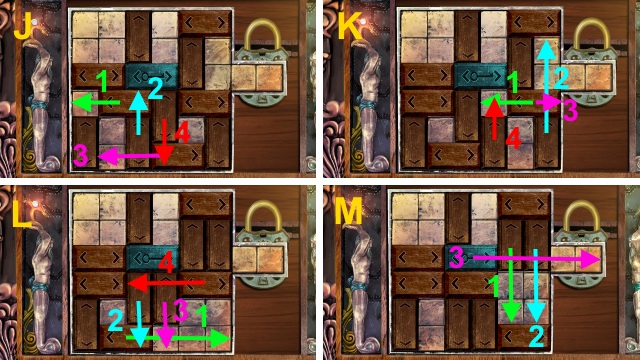
- Place the GATE PIECES for a mini-game (H).
- Solution (I) : G, H, I, D, C, B, E, H, I, D, E, C, D, E.
- A, F, G, E, A, F, G, E, I, D, C, B, E, F, A, B, C, D, E.
- Take the BLUE CRYSTAL (1/2) (J).
- Take the SMALL SPADE (K).
- Use the SMALL SPADE (L).
- Play the HOP to receive the ICE AXE (M).
- Walk left.
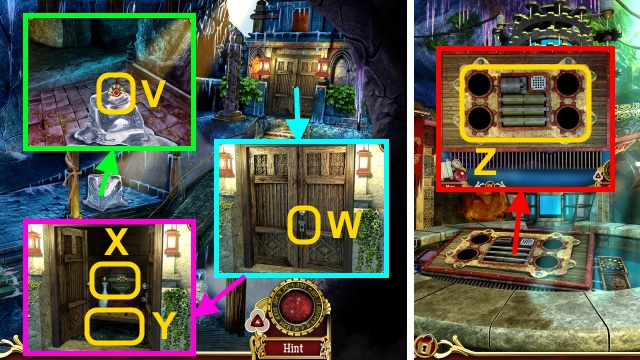
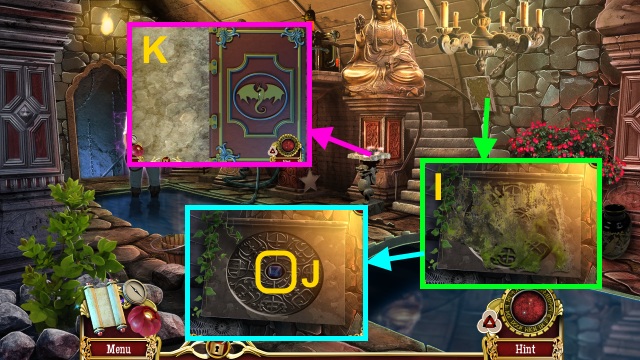
- Open the hand; take the METAL PIECES (1/4) (N).
- Use the ICE AXE (O); move the chain.
- Open the gate (P).
- Walk forward.
- Take the ORNATE PICKAXE (Q).
- Walk left.
- Take the METAL PIECE (2/4) (R).
- Place the lids; take the ORNATE SHRINE KEY (S).
- Use the ORNATE PICKAXE; take the MAGNIFYING GLASS (T) and COFFER KEY (U).
- Walk down.
- Use the MAGNIFYING GLASS; take the METAL PIECE (3/4) (V).
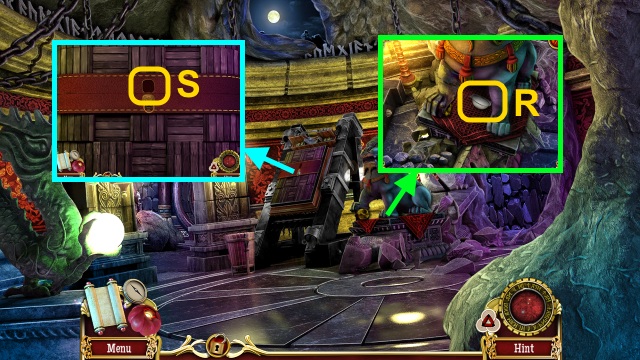
- Use the ORNATE SHRINE KEY (W); take the METAL PIECE (4/4), SMALL KEY (X), and MACHETE (Y).
- Walk left.
- Place the METAL PIECE (4/4) for a mini-game (Z).
- Solution (A).
- Walk down three times.
- Use the SCEPTER (B).
- Walk forward.
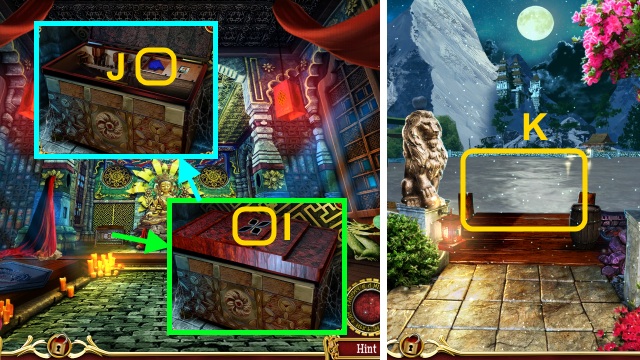
- Use the MACHETE and COFFER KEY (C).
- Play the HOP to receive the CRANK (D).
- Place the CRANK; pull it (E).
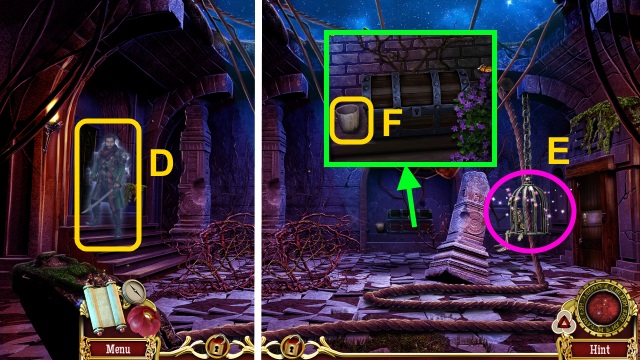
- Use the SMALL KEY (F); take the MAGNET and FLOWER ORNAMENT (1/4) (G).
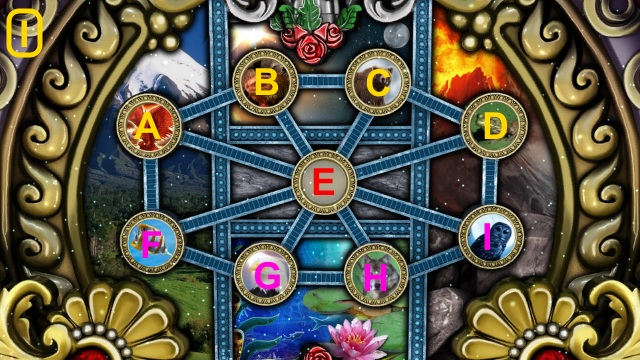
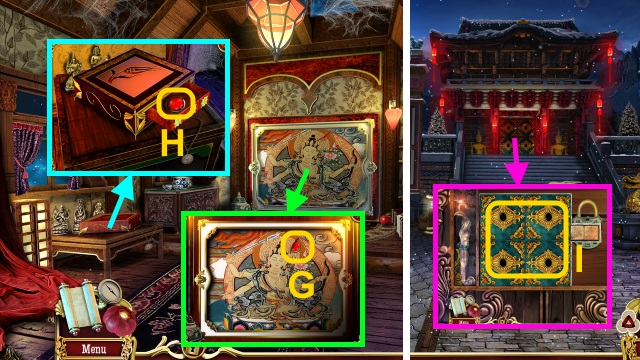
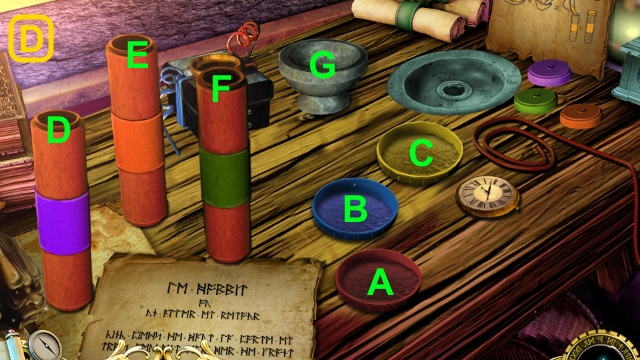
- Open the book for a mini-game (H).

- Solution (I-K).
- You receive the King's Abdication.
- Walk forward.
- Use the hook (L) on the chime (M).
- Move the pieces; take the GOLD PIECE (1/4) (N).
- Use the MAGNET to receive the GOLD PIECE (2/4) (O).
- Take the DAGGER HANDLE (P).
- Place the DAGGER HANDLE; take the DAGGER (Q).
- Move the cloth; take the BLUE GEM (R).
- Walk down.
- Play the HOP to receive the GOLD PIECE (3/4) (S).
- Use the DAGGER to take the GOLD PIECE (4/4) (T).
- Walk forward.
- Place the GOLD PIECE (4/4) for a mini-game (U).
- Solution (V).
- Walk forward.
Chapter 3: Inside the City
- Take the FLOWER ORNAMENT (2/4) and BOMB (W).
- Place the BLUE GEM (X).
- Play the HOP to receive the DRAGON EMBLEM (1/5) (Y).
- Open the compartment; take the DRAGON EMBLEM (2/5) (Z).
- Open the door (A).
- Walk left.
- Take the FLOWER ORNAMENT (3/4) (B).
- Take the LIGHTER (C) and DRAGON EMBLEM (3/5) (D).
- Place the BOMB; use the LIGHTER (E).
- Walk forward.
- Take the FLOWER ORNAMENT (4/4) (F).
- Take the DRAGON EYES (1/3) (G).
- Open the drawer; take the DRAGON EYES (2/3) (H).
- Walk down twice.
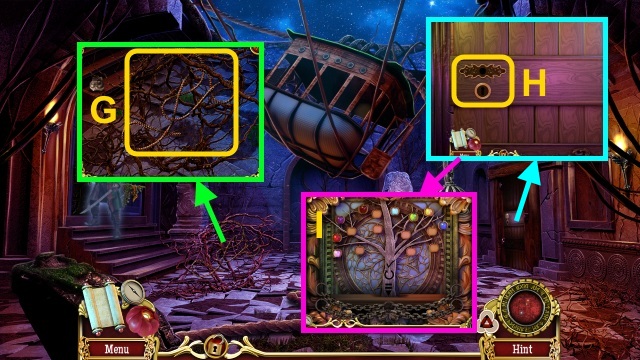
- Place the FLOWER ORNAMENT (4/4) for a mini-game (I).
- Solution (J-M).
- Walk forward.
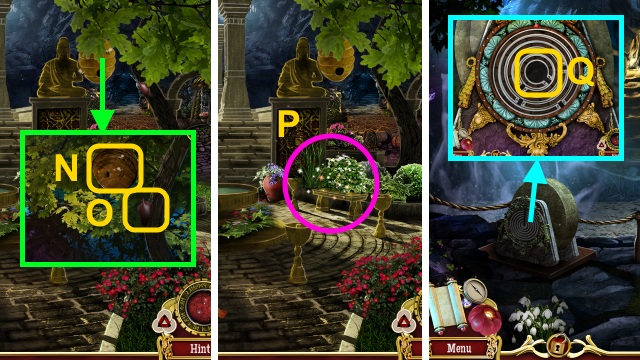
- Take the SPIRAL STONE (N).
- Take the COFFER KEY (O) and DRAGON EYES (3/3) (P).
- Walk down.
- Play the HOP to receive the COIN (Q).
- Walk left.
- Place the SPIRAL STONE (R); take the DRAGON EMBLEM (4/5) (S).
- Walk forward.
- Use the COFFER KEY (T).
- Play the HOP to receive the DRAGON EMBLEM (5/5) (U).
- Go to the Temple.
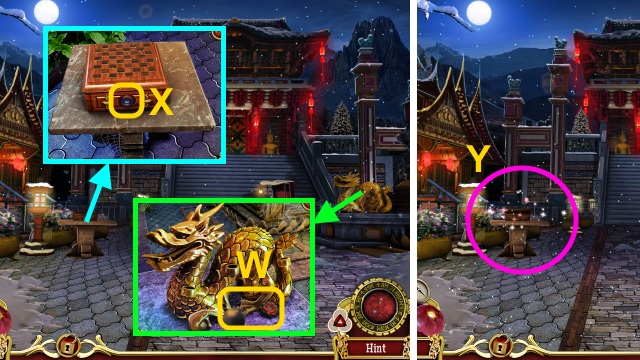
- Place the DRAGON EMBLEM (V).
- Walk forward.
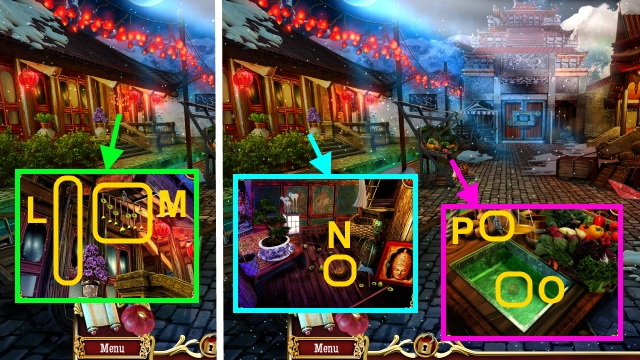
- Move the board; take the TONGS (W).
- Place the DRAGON EYES (3/3) for a mini-game (X).
- Solution (Y).
- Go up.
- Play the HOP to receive the CRYSTALS (1/4) (Z).
- Walk left.
- Assemble the lantern (A).
- Move the board; take the COIN (B).
- Use the TONGS to take the CRYSTALS (2/4) (C).
- Take the KING'S LOCKET (D).
- Walk down twice.
- Place the KING'S LOCKET (E).

- Play the HOP to receive the CRYSTALS (3/4) (F).
- Walk down.
- Place the COINS (G); take the CRYSTALS (4/4) (H).
- Place the CRYSTALS (4/4) (I); take the BLUE CRYSTAL (2/2) (J).
- Walk forward twice.
- Use the SCEPTER (K).
- Walk forward.
Chapter 4: Across the Lake
- Play the HOP to receive the GEM (1/2) (L).
- Take the SEASHELL (M).
- Use the SEASHELL (N); take the FISHING NET and YIN PIECE (O).
- Use the FISHING NET to take the GEM (2/2) (P).
- Move the herbs; take the YANG PIECE (Q).
- Place the GEM (2/2) (R); place the YIN PIECE and YANG PIECE for a mini-game (S).
- Solution (T, U).
- Walk right.
- Take the WICK (V).
- Walk down.
- Play the HOP to receive the VIAL OF ACID (W).
- Place the WICK; take the LANTERN (X).
- Walk right.
- Use the VIAL OF ACID (Y); take the SCISSORS (Z).
- Place the LANTERN (A); use the stone (B).
- Take the IGNITED LANTERN (C).
- Walk down.
- Use the IGNITED LANTERN (D).
- Walk left.
- Use the SCISSORS (E).
- Play the HOP to receive the HERBS (F).
- Move the cloth; take the HANDLE (G).
- Walk right.
- Play the HOP to receive the LEATHER PATCH (H).
- Take the RAKE (I).
- Take the BAG OF BREAD CRUMBS (J).
- Walk left.
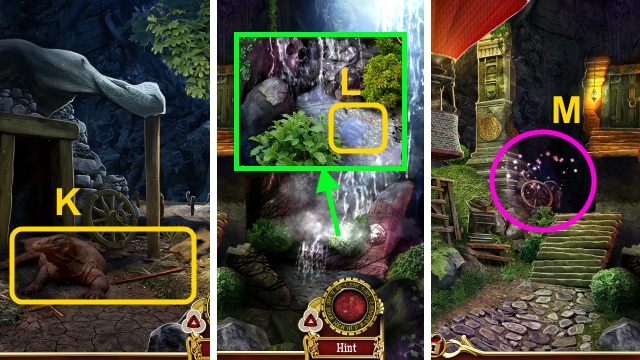
- Use the RAKE; take the STICK (K).
- Walk down.
- Use the BAG OF BREAD CRUMBS (L); use the STICK to receive the FISH ON A STICK.
- Play the HOP to receive the LENS (M).
- Walk left.
- Give the FISH ON A STICK (N).
- Walk forward.
- Take the SAW (O).
- Play the HOP to receive the NEEDLE AND THREAD (P).
- Take the BELLOWS (Q) and OIL (R).
- Walk down.
- Take the SHORT STICK (S).
- Place the LEATHER PATCH; use the NEEDLE AND THREAD (T).
- Take the SACK.
- Walk down twice, then left.
- Open the book for a mini-game (U).
- Solution (V-X).
- You receive the Diary Entry.
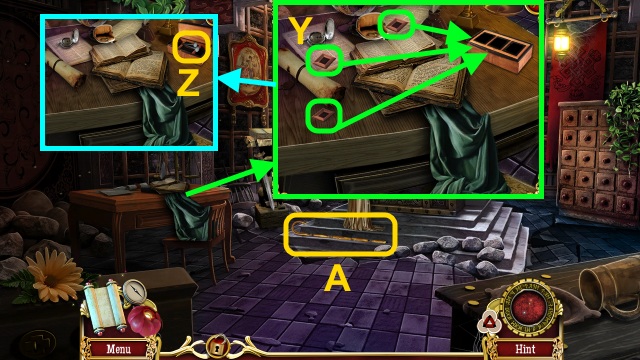
- Move the objects; place the pieces (Y).
- Take the NAILS (Z).
- Take the CANE (A).
- Walk down.
- Use the CANE to take the CRYSTAL (B).
- Walk left.
- Place the CRYSTAL for a mini-game (C).

- Solution (D): Cx2, Bx2, Ax2, Dx2, E.

- Solution (E).
- Assemble the hammer; use it (F).
- Take the PESTLE (G).
- Walk down.
- Play the HOP to receive the KNIFE (H).
- Place the HERBS; use the PESTLE (I).
- Take the SLEEPING POWDER.
- Move the cup; use the knife (J).
- Take the CUP OF SUGAR.
- Walk down, then right.
- Place the HANDLE and NAILS; take the EMPTY BUCKET (K).
- Walk down.
- Use the EMPTY BUCKET; use the CUP OF SUGAR and SLEEPING POWDER (L).
- Take the SLEEPING MIXTURE.
- Walk left.
- Pour the SLEEPING MIXTURE; take the STRANGE WOODEN PIECE (M).
- Walk right, then left.
- Place the STRANGE WOODEN PIECE (N).
- Examine the box for a mini-game (O); solution is random (P).
- Take the HAMMER and PINCERS (Q).
- Walk forward.
- Place the SHORT STICK and LENS (R); take the EMBERS (S).
- Walk down twice.
- Use the OIL and PINCERS (T); take the CHISEL.
- Use the CHISEL and HAMMER (U); take the ROCK.
- Place the SACK (V) and ROCK (W); turn the handle.
- Take the BALLAST (X).
- Place the BALLAST (Y).
- Place the EMBERS (Z); use the BELLOWS.
Chapter 5: To Shangri-La
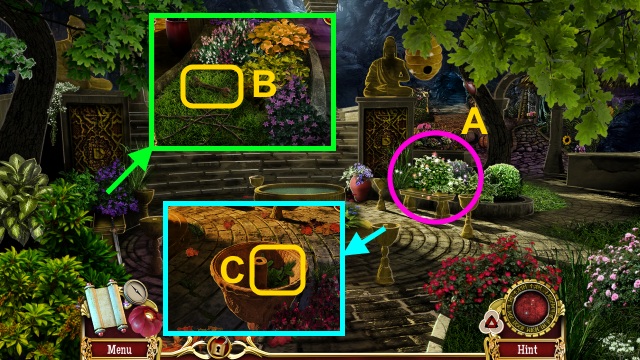
- Play the HOP to receive the SHEETS OF LEATHER (A).
- Move the sticks; take the WRENCH (B).
- Take the BRANCH (C).
- Walk right.
- Move the curtain (D).
- Walk right.
- Play the HOP to receive the ORNATE TILE (E).
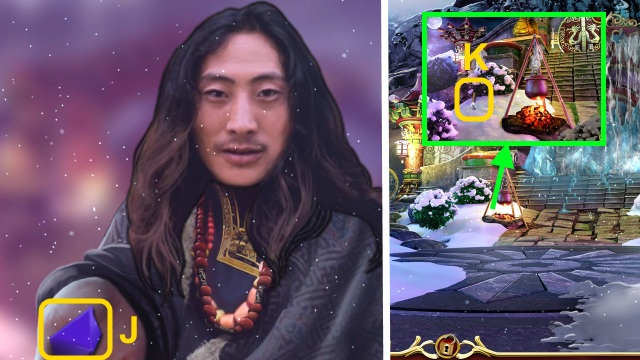
- Talk to the man (F).
- Take the ORNAMENT CIRCLE (G).
- Take the DRIED MEAT (H).
- Walk down.
- Use the scythe (I); take the BASKET (J).
- Use the WRENCH and SAW (K); take the VALVE.
- Walk left.
- Use the BRANCH to receive the BRANCH WITH RESIN (L).
- Walk down, then right.
- Use the BRANCH WITH RESIN to receive the BURNING BRANCH (M).
- Walk down twice.
- Use the BURNING BRANCH (N); take the AIR BAG (O).
- Play the HOP to receive the DULL SCYTHE (P).
- Walk right, then forward.
- Place the ORNAMENT CIRCLE for a mini-game (Q).
- Solution (R): Turn A, turn C to align B, turn D to align C.
- Turn E to align D and E, Turn F.
- Use the DULL SCYTHE to receive the SHARPENED SCYTHE (S).
- Walk down.
- Use the SHARPENED SCYTHE to receive the WATTLE (T).
- Walk right.
- Play the HOP to receive the MECHANISM GEAR (U).
- Give the WATTLE; take the STONE WALL LEVER (V).
- Walk down, then forward twice.
- Place the AIR BAG, BASKET, and DRIED MEAT (W).
- Walk down twice, then right.
- Talk to the man (X).
- Walk down.
- Take the YELLOW CRYSTAL (Y).
- Walk down, then forward.
- Place the MECHANISM GEAR (Z).
- Place the VALVE (A); turn it.
- Place the STONE WALL LEVER (B); pull it.
- Move the gondola floor; close the brackets (C).
- Go left.
- Talk to the warden (D).
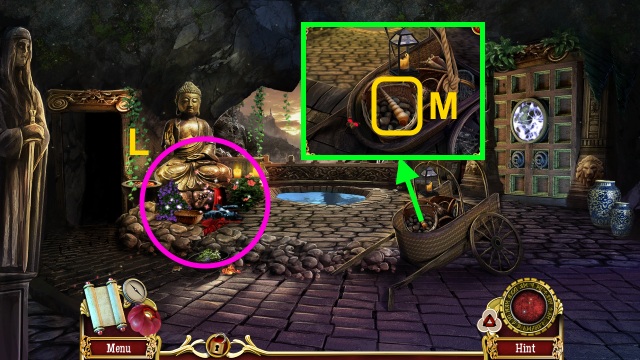
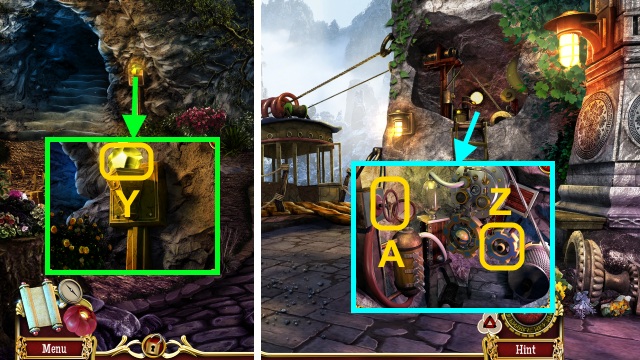
- Play the HOP to receive the GATE KEY (E).
- Take the STONE CUP (F).
- Take the ROPE (G).
- Use the ORNATE TILE and GATE KEY (H); turn the key for a mini-game.
- Solution is random (I).
- Walk right.
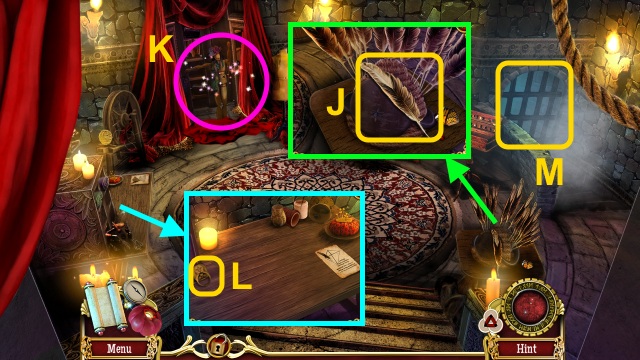
- Take the QUILL (J).
- Move the cloth; play the HOP to receive the WAR CLUB (K).
- Take the TORTURE DEVICE PIECE (L).
- Open the gate (M).
- Walk right.

- Place the QUILL; take the INKED QUILL (N) and DRAGON GEM (O).
- Use the STONE CUP to take the OIL (P).
- Use the WAR CLUB; take the FLINT BLADE (Q) and HANDLE (R).
- Walk forward.
- Play the HOP to receive the SCALPEL (S).
- Use the FLINT BLADE to take the REED (T).
- Walk down twice.
- Place the HANDLE (U); use the OIL (V).
- Place the REED (W); turn the handle (X).
- Take the CUT REEDS (Y).
- Play the HOP to receive the FILE (Z).
- Use the SHEETS OF LEATHER, INKED QUILL, SCALPEL, and CUT REEDS (A); use the needle (B).
- Place the ROPE; take the KITE (C).
- Walk right, then forward.
- Place the DRAGON GEM (D).
- Use the KITE (E).
- Examine the stone (F); you receive The Warden's Family.

- Play the HOP to receive the YELLOW GEM (G).
- Walk down three times.
- Talk to the warden (H).
- Walk left.
Chapter 6: The Amulet
- Use the FILE (I); take the BLUE GEM (J).
- Open the book for a mini-game (K).
- Solution (L-N).
- You receive The Truth Behind The Evil.
- Play the HOP to receive the RED GEM (O).
- Place the BLUE GEM, RED GEM, and YELLOW GEM for a mini-game (P).
- Solution (Q).
- Walk left.
- Take the SIFTER (R).
- Place the TORTURE DEVICE PIECE for a mini-game (S).
- Solution (T): A, D, F, B, E, C, F.

- Take the ORNATE CHEST KEY (U).
- Walk down twice.
- Use the ORNATE CHEST KEY; take the RETRACTABLE STAIRCASE PIECE (V).
- Play the HOP to receive the BLUE MINERAL (W).
- Walk left twice.
- Place the RETRACTABLE STAIRCASE PIECE (X).
- Walk right.
- Play the HOP to receive the SMALL PICKAXE (Y).
- Use the SIFTER; take the RED MINERAL (Z).
- Walk down.
- Use the SMALL PICKAXE (A); move the paw.
- Take the YELLOW MINERAL (B).
- Walk right.
- Place the BLUE MINERAL, RED MINERAL, and YELLOW MINERAL; use the pestle for a mini-game (C).
- Solution (D): A-G, B-G, G-D, A-G, C-G, G-E, B-G, C-G, G-F.
- Place the lids (E) on the tubes (F).
- Place the clock and string (G) on the case (H).
- Take the BOMB (I).
- Walk down, then left.
- Use the BOMB (J).
- Take the pink crystal (K).
- Walk right, then forward.
- Talk to Roger for a mini-game (L).

- Solution (M-Q).
- Congratulations! You have completed Tibetan Quest: Beyond the World's End.
Created at: 2015-08-02