

Walkthrough Menu
- General Tips & Information
- Chapter 1: Welcome Home
- Chapter 2: The Intruder
- Chapter 3: Better Tomorrow
- Chapter 4: Past Endeavors
- Chapter 5: Guest
- Chapter 6: How to Have Fun in Jail
- Chapter 7: The Consequences
- Chapter 8: Happy Beginning
General Tips & Information
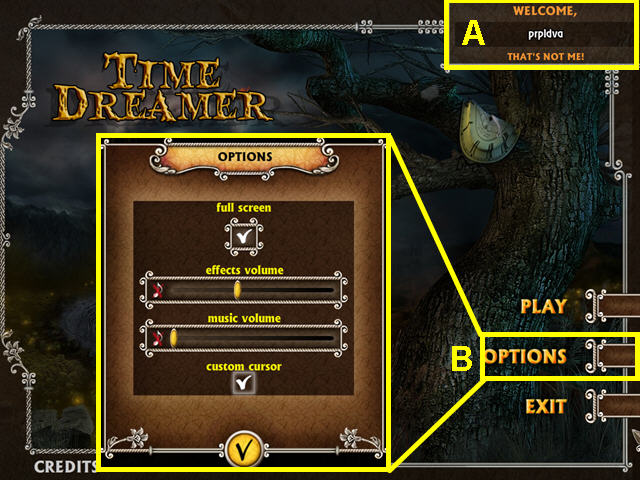
- From the Main Menu you can manage your player profiles (A).
- The Options Menu allows for the adjustment of music and sound volume (B).
- You may play this game in windowed or full screen mode.
- The custom cursor may be disabled.
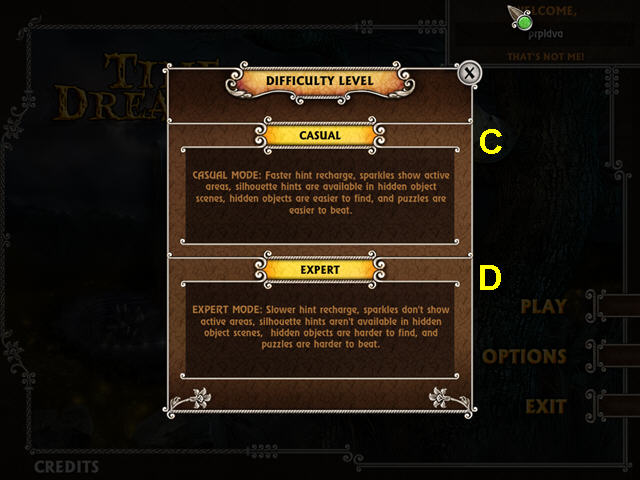
- After you create your profile and click play, select the difficulty level of the game.
- Casual mode has a faster hint recharge, sparkling denotes active areas, silhouette hints are available in hidden object scenes, hidden objects are easier to find, and puzzles are easier to solve (C).
- Expert mode has a slower hint recharge, there is no sparkling or silhouette hints, and the puzzles and hidden object scenes are more difficult (D).
- You are offered a brief tutorial once you start the game.
- You may skip mini-games once the Skip Meter is full.
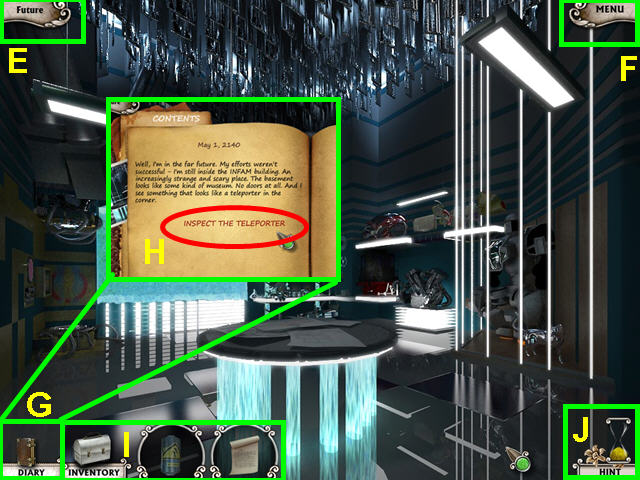
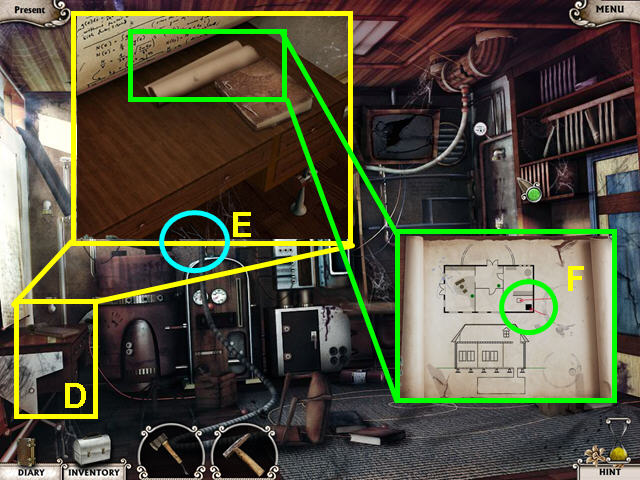
- The upper left corner of the screen tells if you are in the past, present, or future (E).
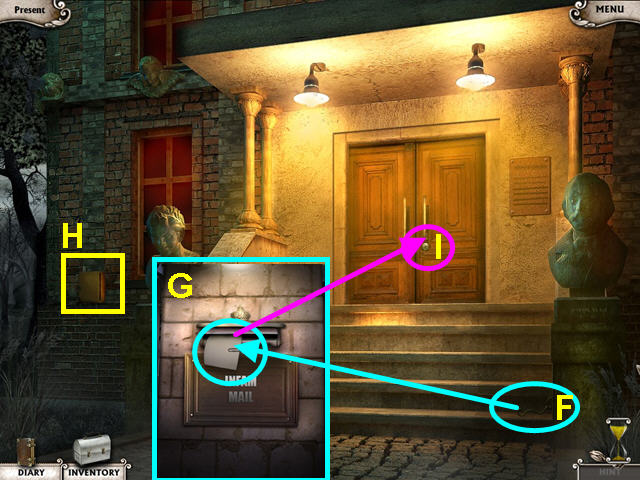
- The MENU Button in the upper right corner allows access to the menu (F).
- The DIARY Icon in the lower left accesses the diary (G).
- Read the diary to go over current tasks and accomplishments (H).
- The Inventory Icon (the lunch box in the lower left) accesses your inventory (I).
- The Hint Icon (the hourglass in the lower right) is for hints (J).
- You must wait for the hourglass to refill between uses.
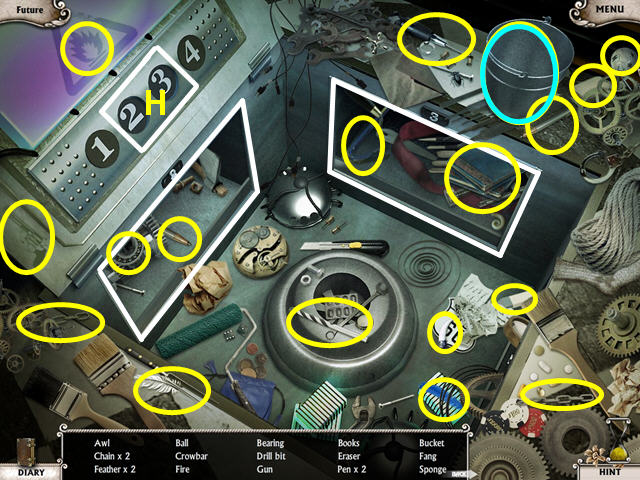
Chapter 1: Welcome Home
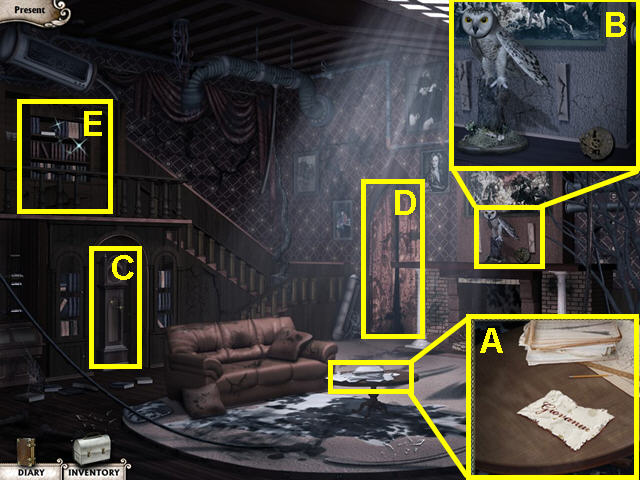
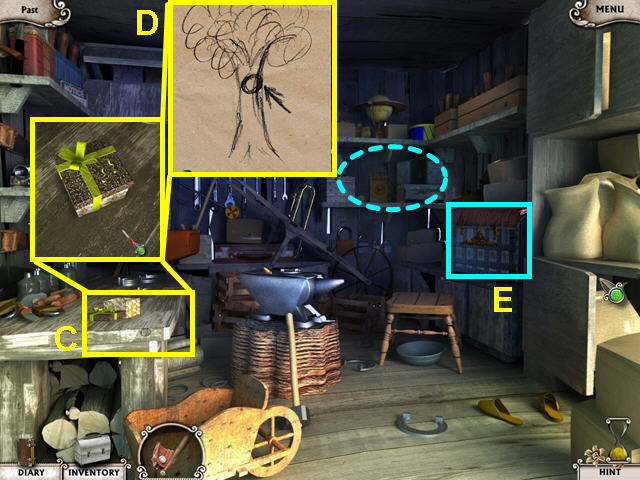
- Look at the close-up of the coffee table and read the name Giovanni (A).
- Look at the close-up of the owl and take the CLOCK MECHANISM (B).
- Note the location of the grandfather clock (C) and the door (D).
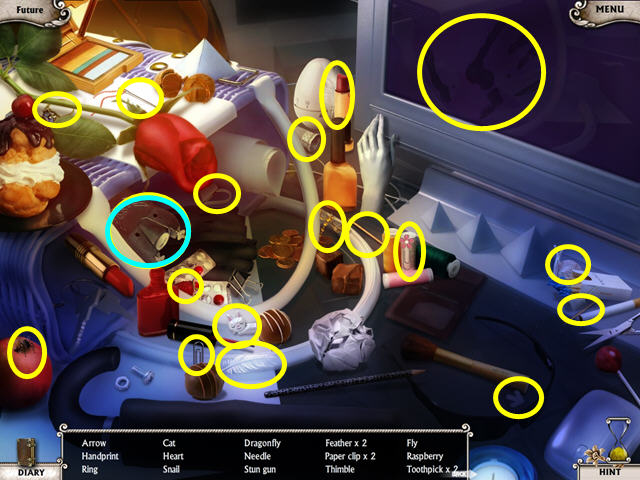
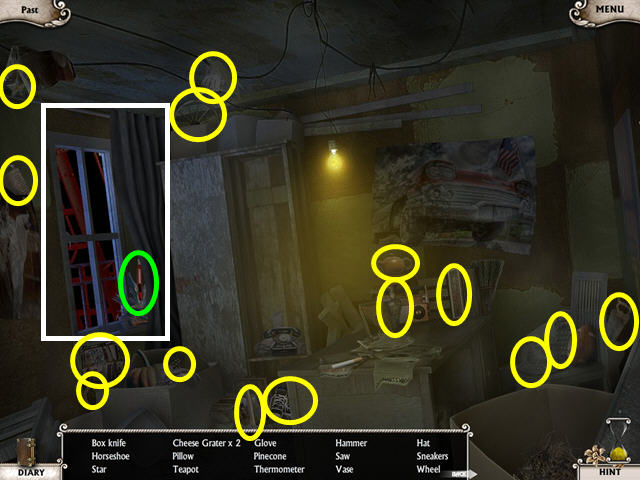
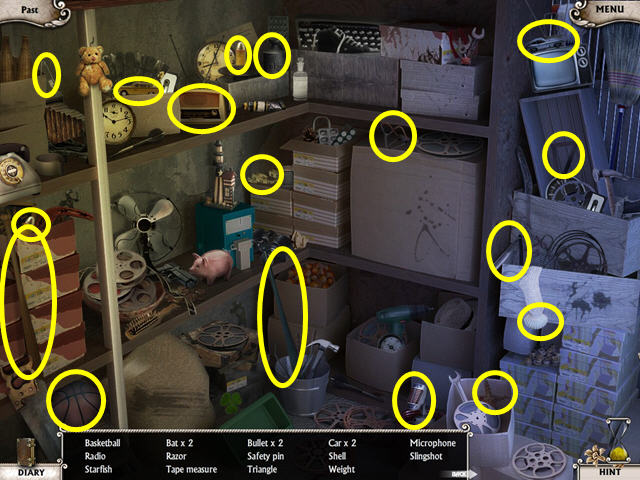
- Select the bookcase for a hidden object scene (E).
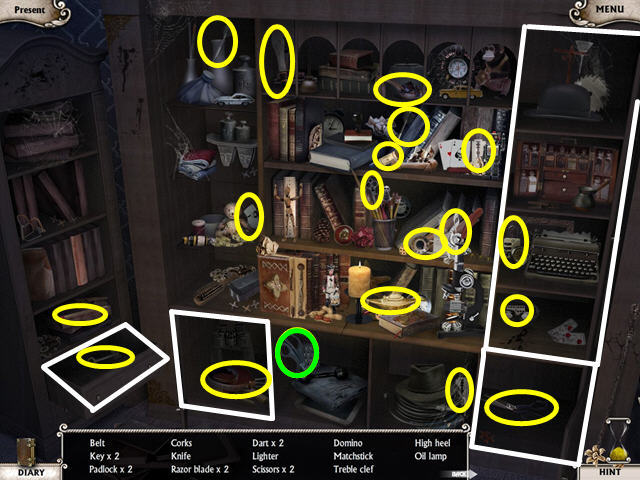
- Some things need to be opened to reveal items, they are marked in white.
- Locate all the hidden objects on the list.
- A pair of SCISSORS will go into your inventory.
- Click on the door to exit the room.
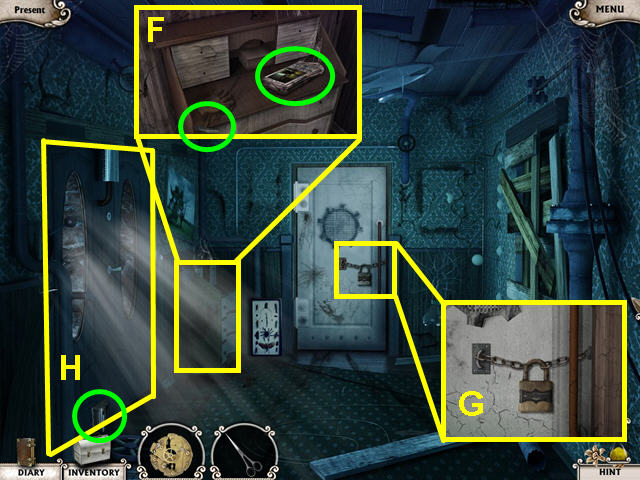
- Look at the close-up of the desk and read the newspaper (F).
- Take the SMALL HAMMER.
- Make note of the padlocked lab door (G).
- Click on the latch near the floor to unlock the double doors (H).
- Click on the double doors to access the terrace.
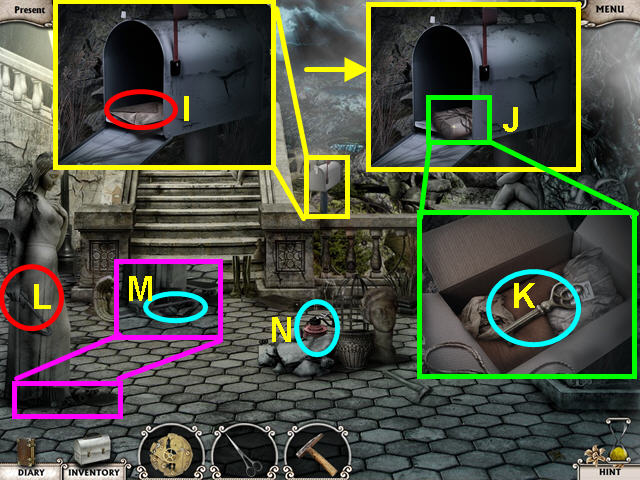
- Look in the mailbox (I).
- Take the letter and learn of your father's death.
- Use the SCISSORS to cut open the package (J).
- Take the KEY (K).
- Use the SMALL HAMMER on the hand of the statue holding the crowbar (L).
- Take the CROWBAR from the floor (M).
- Take the OIL CAN (N).
- Return to the hall.
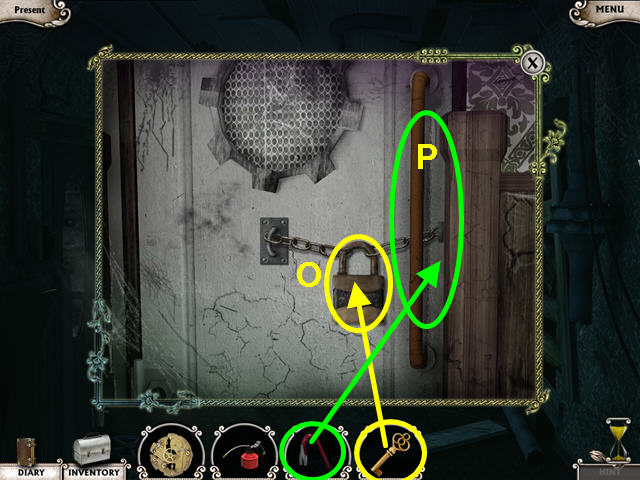
- Look at the close-up of the lock on the lab door.
- Use the KEY to unlock the padlock (O).
- Use the CROWBAR to force open the door (P).
- Enter the lab.

- Locate all the hidden objects on the list.
- The CLOCK PARTS will go into your inventory.
- Return to the living room.
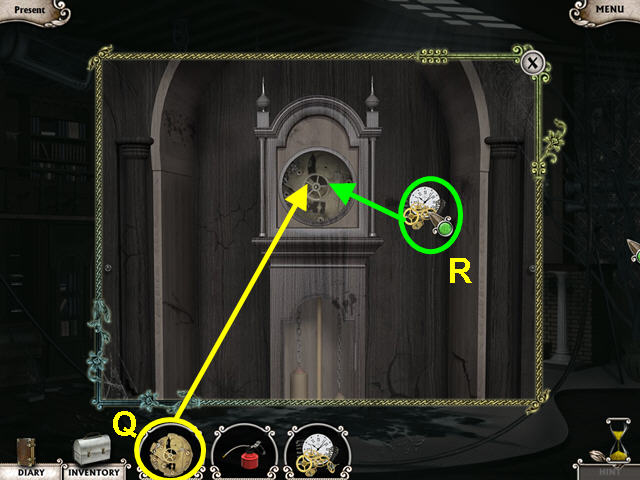
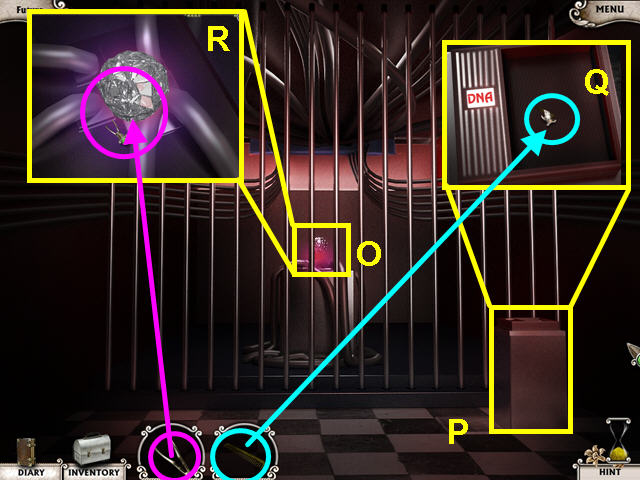
- Look at the close-up of the clock.
- Place the CLOCK MECHANISM into the clock (Q).
- Use the CLOCK PARTS on the clock (R).
- This will trigger a mini-game.
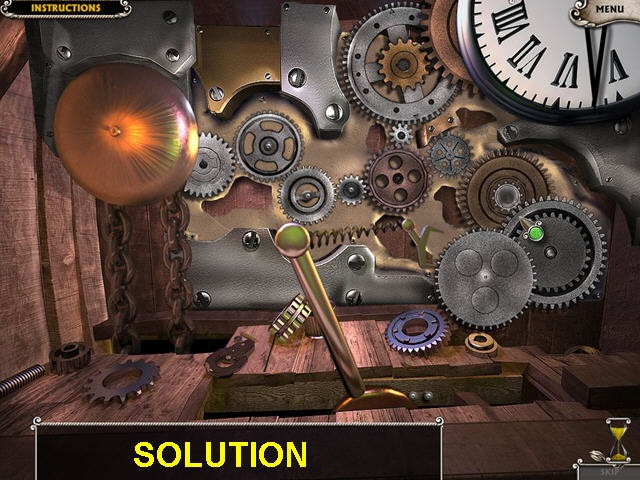
- Place the parts into the clock so that all the gears run.
- Click on the face of the clock to set the time.
- Use the OIL CAN on the face of the clock.
- Select the couch to go to sleep.
- Exit the living room through the door.
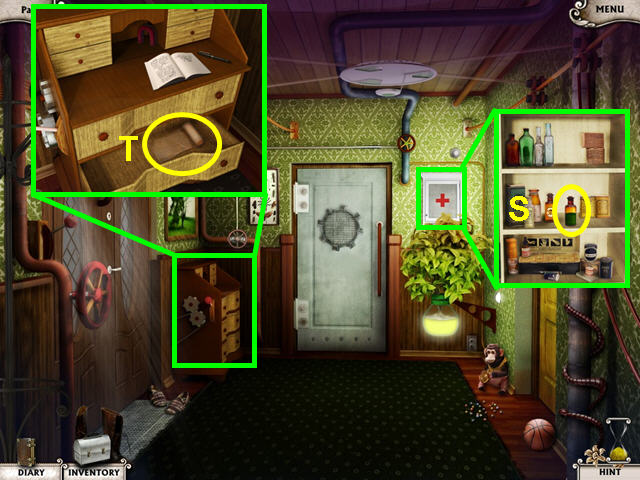
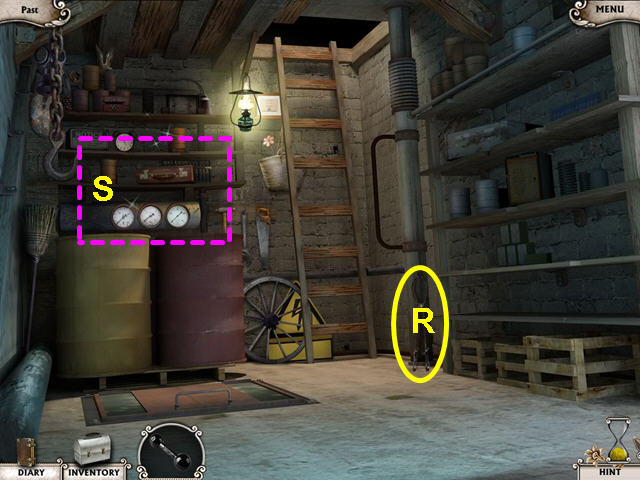
- Look at the medicine cabinet and take the ANTISEPTIC (S).
- Look at the close-up of the desk.
- Open the second drawer and take the BANDAGE (T).
- Return to the living room.
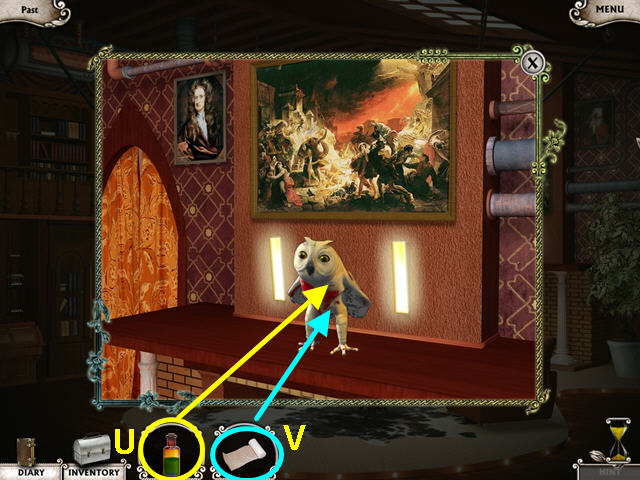
- Look at the close-up of the owl over the fireplace.
- Use the ANTISEPTIC (U), then the BANDAGE (V), on the owl.
- Exit to the hall and open the terrace door.
Chapter 2: The Intruder
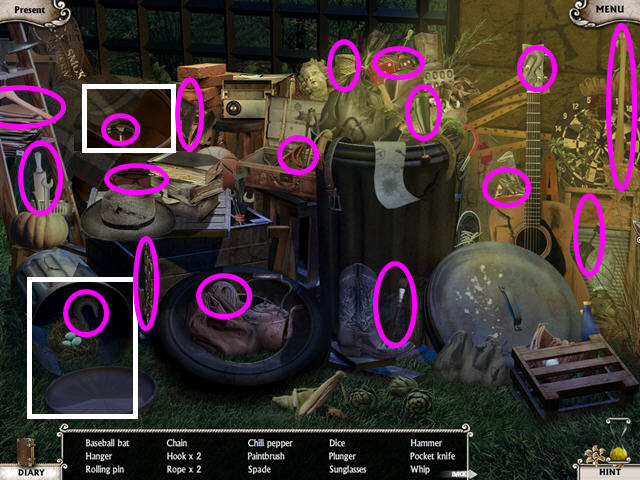
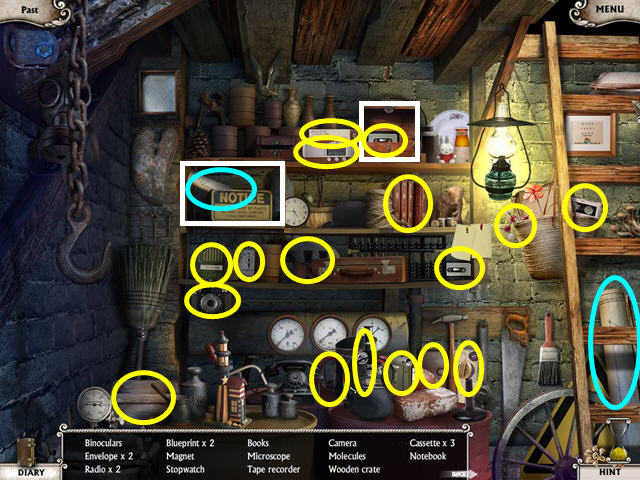
- Select the garbage can on the left for a hidden object scene.
- Locate all the items on the list.
- The ROPE LADDER will go into your inventory.

- Note the hidden object scene (A).
- Look at the close-up of the mail box and take the CODE (B).
- Look at the close-up of the security panel and click on the keypad (C).
- Make note of the sand (D).
- Use the ROPE LADDER on the gate then climb the gate (E).
- Take the WIRE from the steps and return to the front gate (F).
- Look at the close-up of the mail box and use the WIRE on the slot (G).
- Take the PAPER CLIP.
- Return to the front steps.
- Make note of the electric panel (H).
- Use the PAPER CLIP on the front door key hole for a mini-game (I).
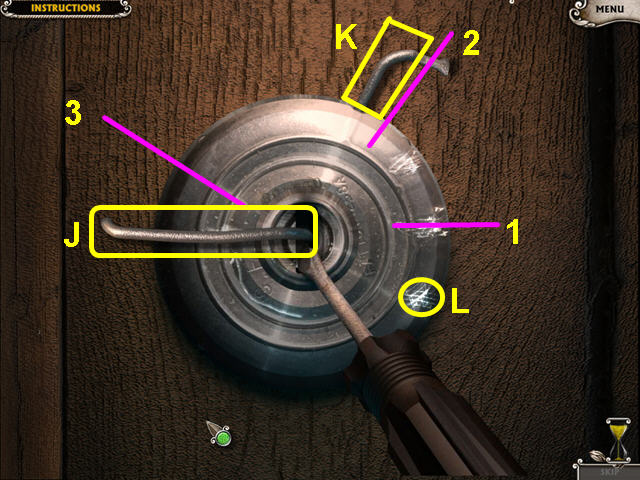
- Use the mouse to position the wire (J).
- Left-click, hold and move to the right once in the correct position.
- The screwdriver will not turn if it’s in the wrong position.
- This is done 3 times to move the bent wire (K) into position (L).
- Our solution is marked (1-3).
- Due to randomization, your solution may vary.
- Select the security desk on the right for a hidden object scene.
- Locate all the items.
- The BOTTLE CAP will go into your inventory.
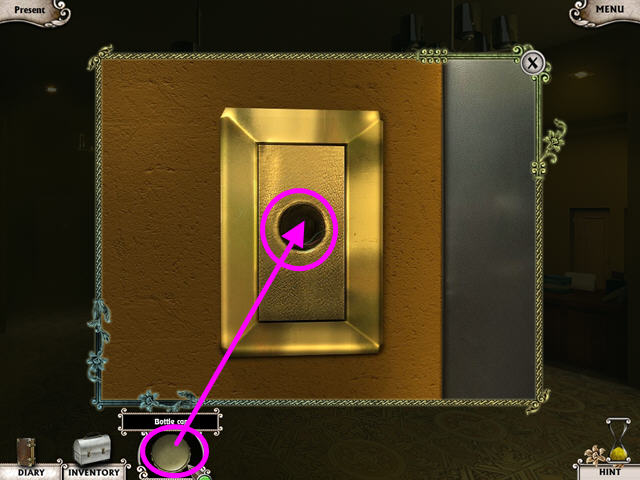
- Look at the elevator.
- Use the BOTTLE CAP to replace the missing button.
- Press the button and enter the elevator.
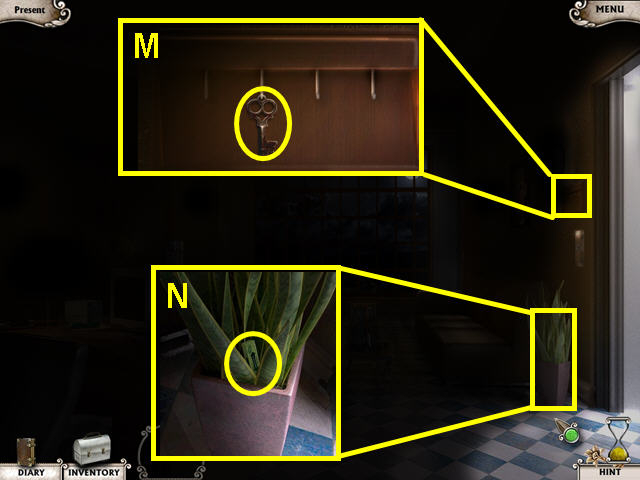
- Look at the key box and take the SMALL KEY (M).
- Look at the plant and take the BUBBLE GUM (N).
- Exit to the front of the building and look at the electrical panel.
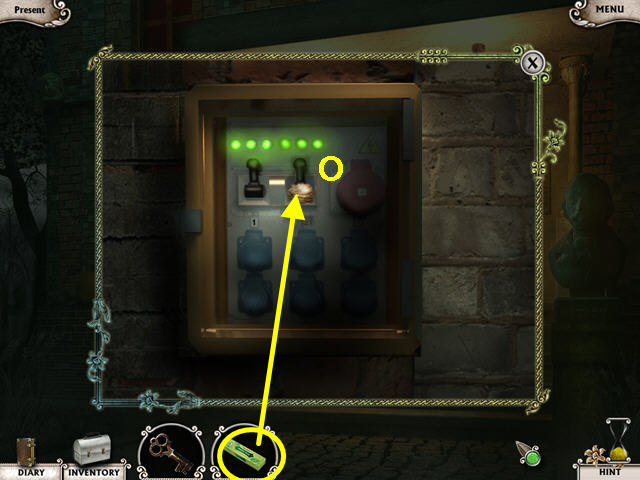
- Use the SMALL KEY to open the electrical panel.
- Use the BUBBLE GUM on the loose breaker (O).
- Return to the second floor.
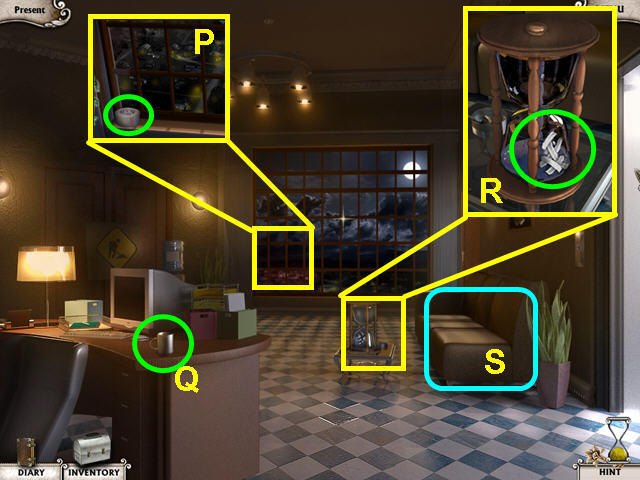
- Look at the window and take the TAPE (P).
- Take the MUG from the desk (Q).
- Look at the close-up of the hourglass.
- Use the TAPE on the hour glass(R).
- Exit to the front gate and use the MUG to collect SAND.
- Return to the second floor and put the SAND in the hour glass.
- Exit the close-up and click on the couch to sleep (S).
Chapter 3: Better Tomorrow
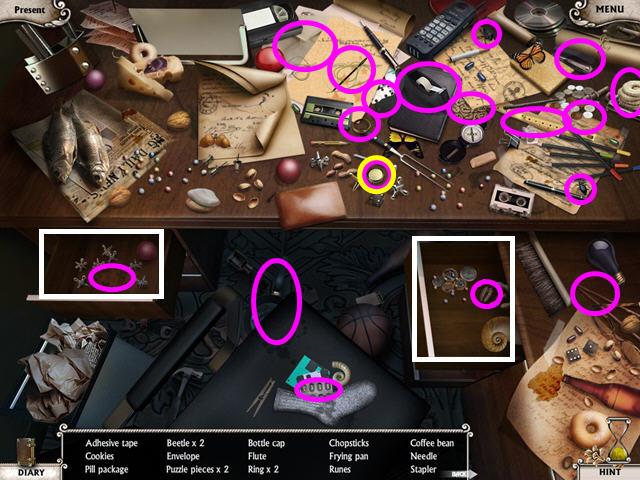
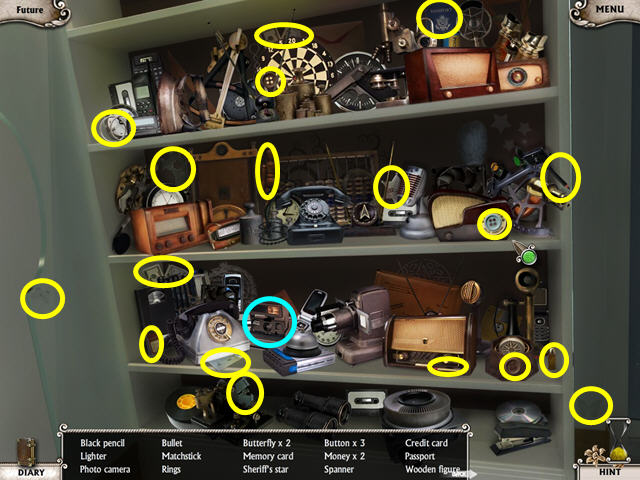
- Select the desk on the left for a hidden object scene.
- Locate all the items on the list.
- The STUN GUN will go into your inventory.
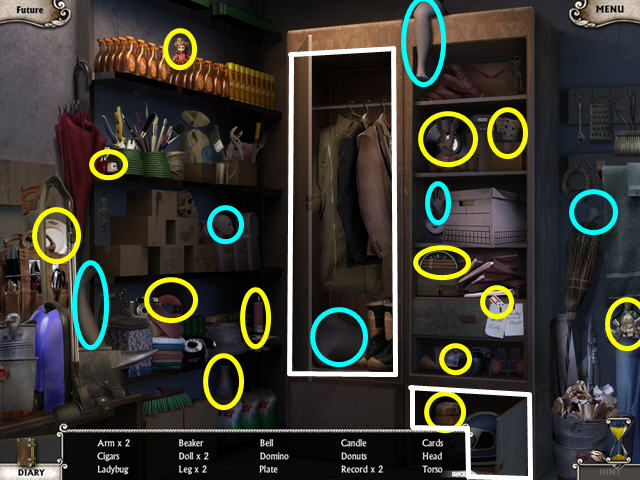
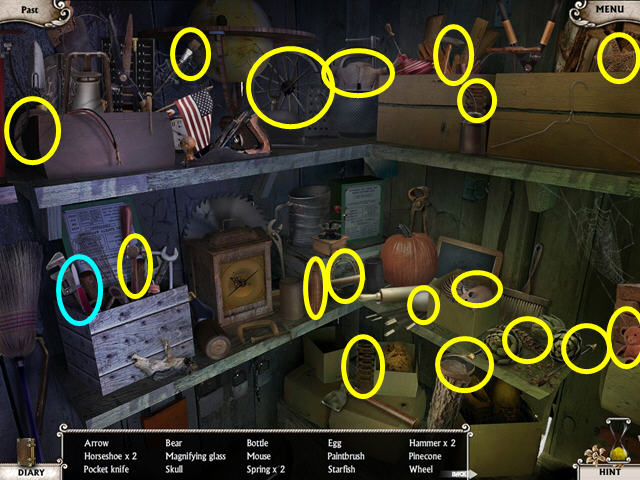
- Select the janitor's closet on the right for a hidden object scene.
- Collect all the objects.
- A MANNEQUIN made of the items collected will go into your inventory.
- Look out the window and take the GLASS CUTTER (A).
- Make note of the hologram on the wall (B).
- Enter the doors on the left (C).

- Place the MANNEQUIN into the booth (D).
- Look at the close-up of the sign and take the BATTERY (E).
- Exit and return to the first floor.
- Look at the close-up of the plant and take the BATTERY (F).
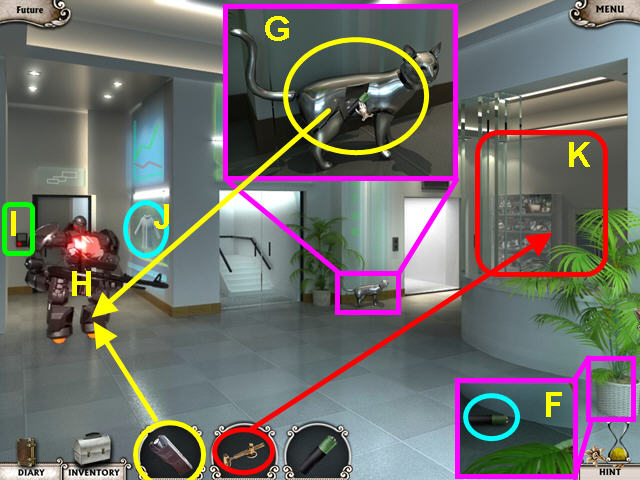
- Look at the close-up of the robokitty and open the battery door (G).
- Insert both BATTERIES into the robokitty and close the door.
- The ROBOKITTY will go into your inventory.
- Use the ROBOKITTY on the Guard Robot (H).
- While the robot guard has its back to you, use the STUN GUN on it.
- Make note of the key card reader (I).
- Take the UNIFORM (J).
- Use the GLASS CUTTER on the right to open a hidden object scene (K).
- Collect all the items on the list.
- The CAMERA will go into your inventory.
- Go upstairs and use the CAMERA on the hologram.
- You will now have a PHOTO.
- Walk left through the doors.
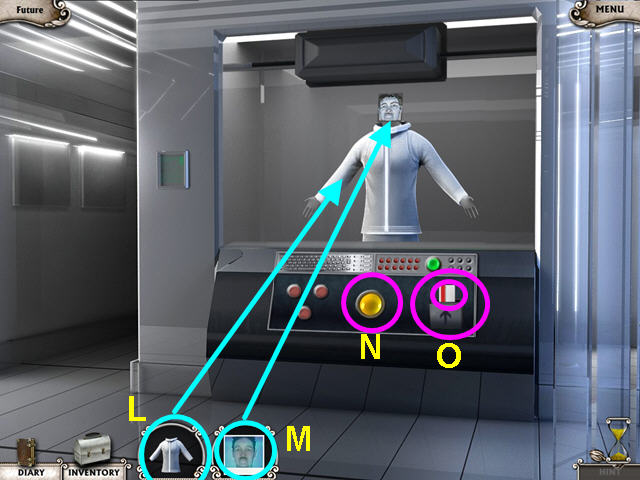
- Put the UNIFORM on the mannequin (L).
- Use the PHOTO on the face of the mannequin (M).
- Press the yellow button (N).
- Take the KEY CARD (O).
- Return to the first floor.
- Use the KEY CARD on the far left keypad.
- Enter the archives.
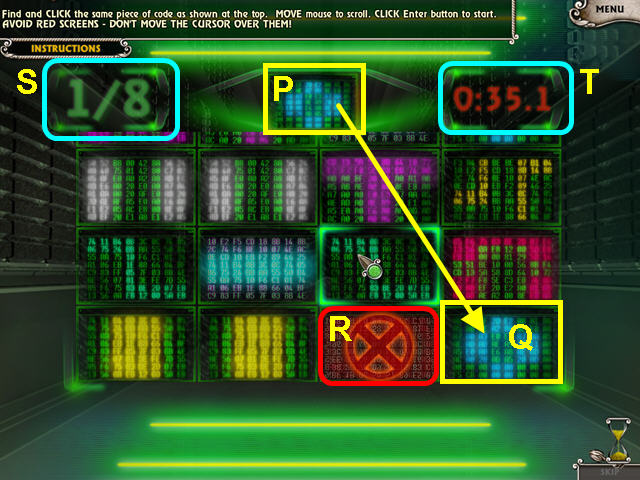
- The object of this mini-game is to find the piece of code that matches the one on top (P).
- Use the mouse to move up and down.
- You need to find 8 codes; click on a code when you find it (Q).
- Do not allow your mouse to roll over a red area (R).
- The upper left number tells you how many (out of 8) you have correctly found (S).
- The upper right number is the time remaining (T).
Chapter 4: Past Endeavors
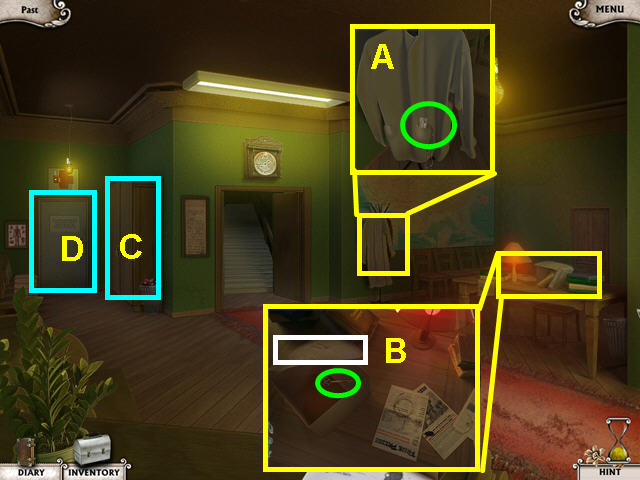
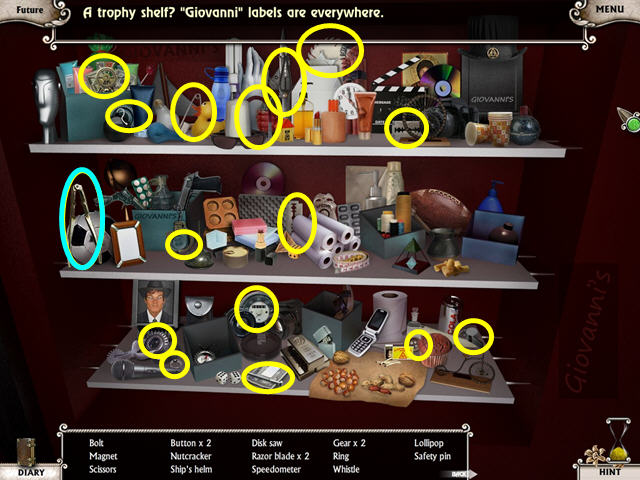
- Walk downstairs and look at the medical coat (A).
- Take the SOPORIFIC pills.
- Look at the desk and move the paper off the box (B).
- Take the KEY.
- Note the locked cabinet (C) and medical practice (D).
- Walk upstairs and use the KEY to unlock the right door.
- Collect all the items on the list.
- The BOX KNIFE will go into your inventory.
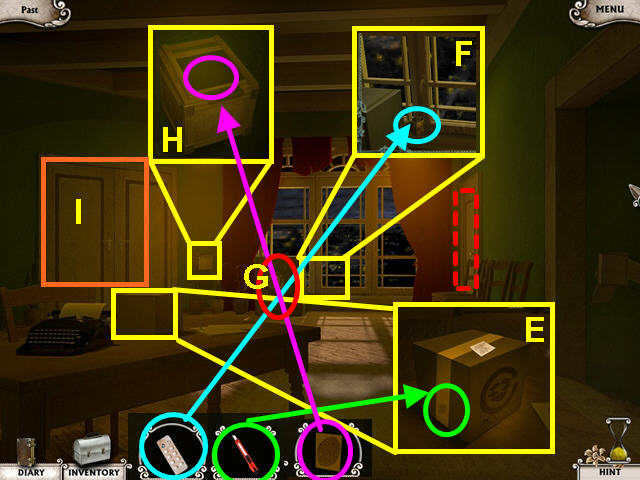
- Look at the close-up of the box on the table (E).
- Use the BOX KNIFE to cut the FINGERPRINT from the tape.
- Look at the window and use the SOPORIFIC pills on the coffee cup (F).
- Make note of the locked safe (G).
- Look at the close-up of the fingerprint scanner and use the FINGERPRINT (H).
- Enter the doors on the left (I).

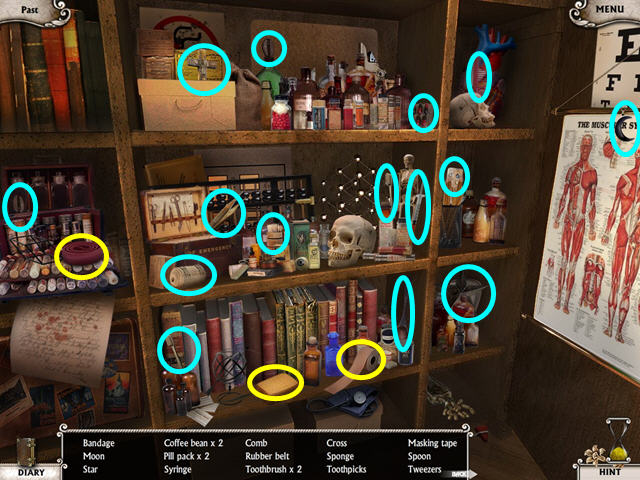
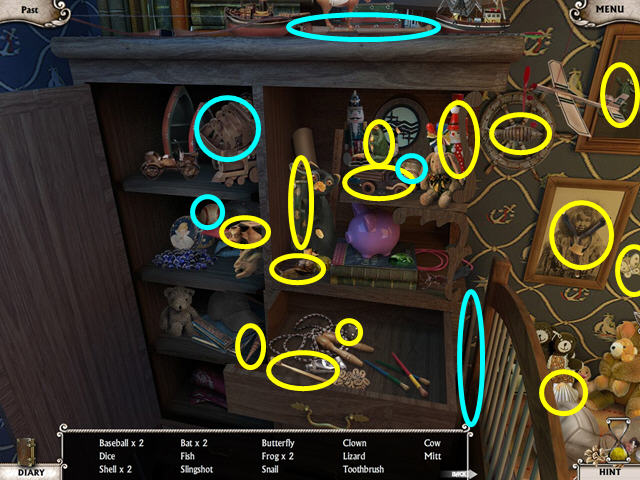
- Select the lower right bookcase for a hidden object scene.
- Locate all the items on the list.
- The MARKER PEN will go into your inventory.
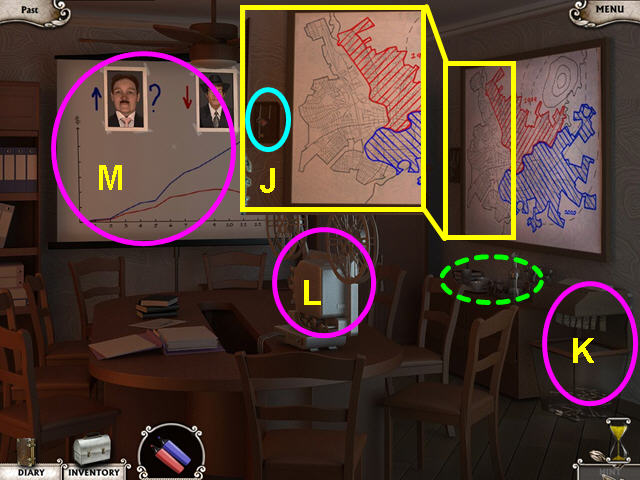
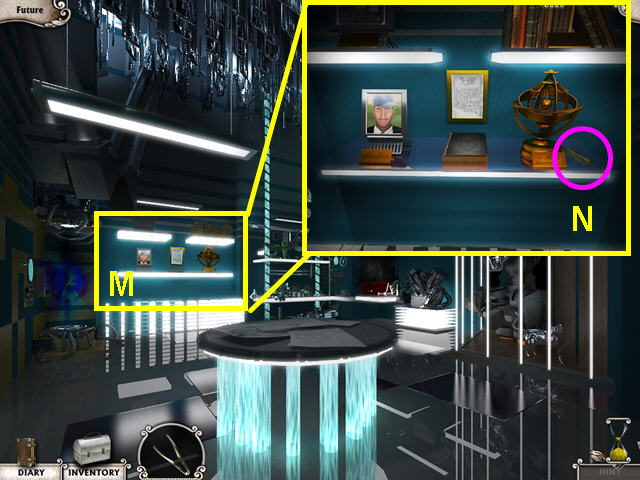
- Look at the map on the right and take the KEY (J).
- Make note of the shredder (K), projector (L), and sales chart (M).
- Go to the first floor.
- Use the key to open the locked cabinet.
- Locate all the items on the list.
- The SPONGE, MASKING TAPE, and the GARROT will go into your inventory.
- Return to the second floor and enter the left office.
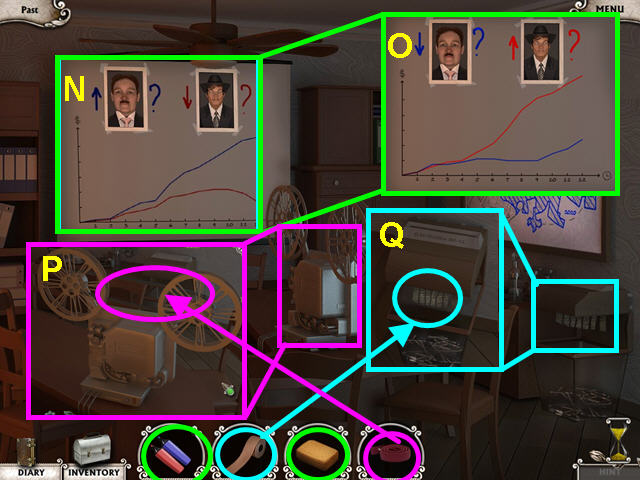
- Use the SPONGE to erase the sales chart (N).
- Use the MARKER PENS to rewrite the chart in Giovanni's favor (O).
- Look at the close-up of the projector and replace the GARROT (P).
- Look at the close-up of the shredder and use the MASKING TAPE on the shredded document and get the SAFE CODE (Q).
- Exit the room.
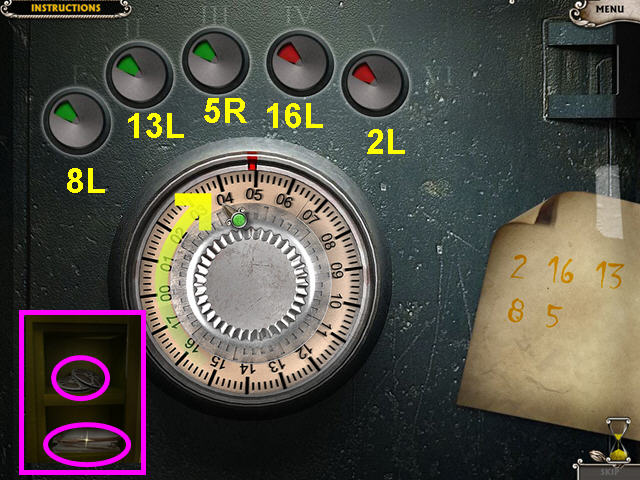
- Look at the safe for a mini-game.
- The object is to determine the correct order and direction for each of the numbers in the SAFE CODE.
- Make the red markers at the top all green to open the safe.
- The solution is 8L-13L-5R-16L-2L.
- Take STIMMER'S REPORT and the FILM REELS.
- Enter the left office and use STIMMER'S REPORT on the shredder.
- Place the film reels on the projector.
Chapter 5: Guest
- Enter the front of the house on the left.
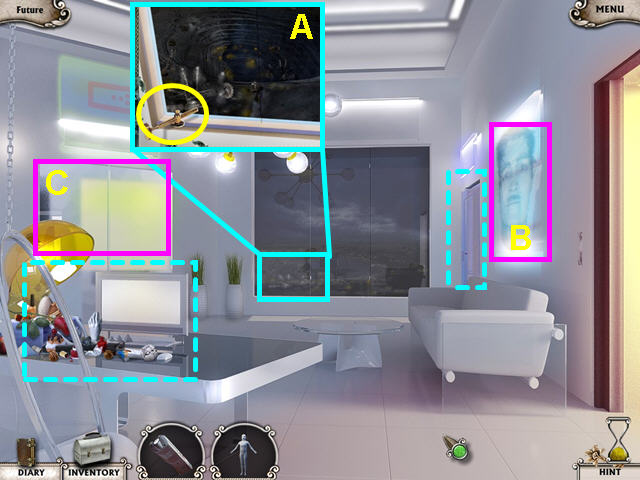
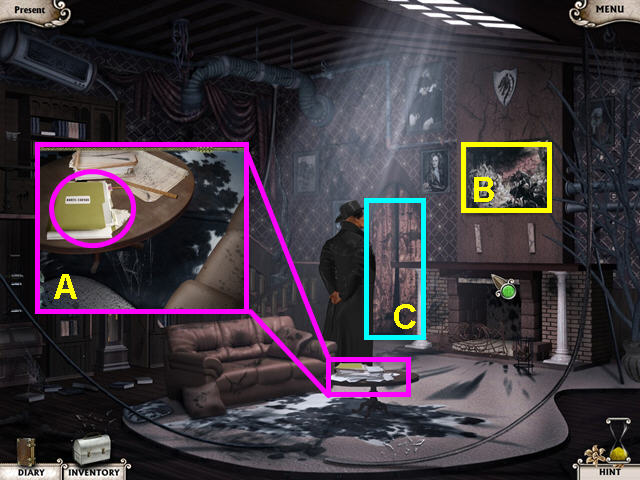
- Look at the police report on the table (A).
- Note that Giovanni tells you that the painting over the fireplace holds a secret (B).
- Exit to the hall (C).
- Use the left door to go to the terrace.
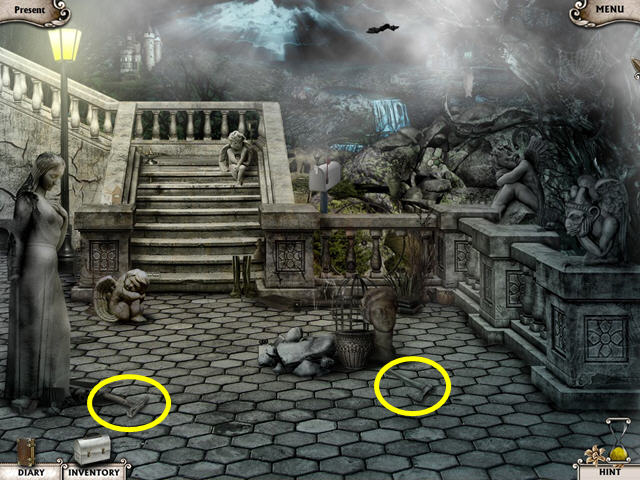
- Take the RUSTED AXE and the HAMMER.
- Exit and return to the hall.
- Enter the lab through the center door.
- Look at the close-up of the desk on the left (D).
- Take the NAILS (E).
- Look at the house plans and click on the marked section that shows another entrance to the storeroom from the attic (F).
- Exit the lab and return to the front of the house.
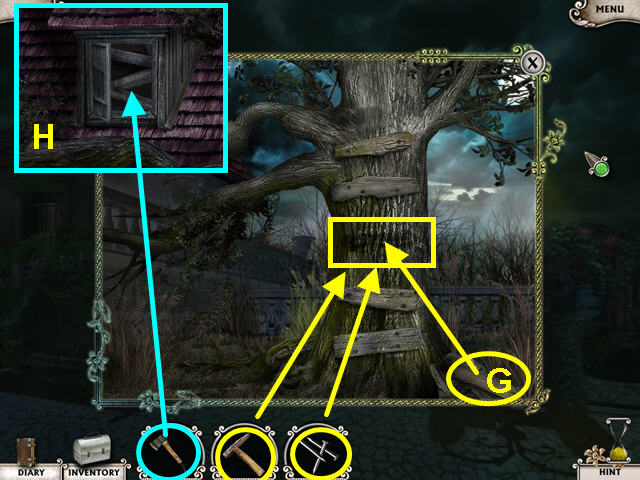
- Walk to the tree.
- Take the BOARD from the base of the tree and use it to repair the ladder (G).
- Use the NAILS and then the HAMMER on the BOARD.
- Climb up the ladder and use the AXE to remove the boards on the window (H).
- Enter the window.
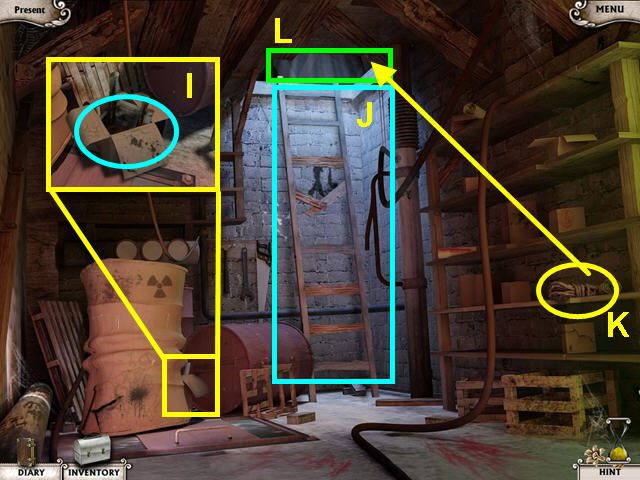
- Look by the barrels and take the box of PLANS (I).
- Try to leave using the ladder, but it breaks (J).
- Take the ROPE (K) and use it on the attic opening (L).
- Climb the rope to exit and return to the living room.
- Give Giovanni the plans.
- Click on the couch to sleep.
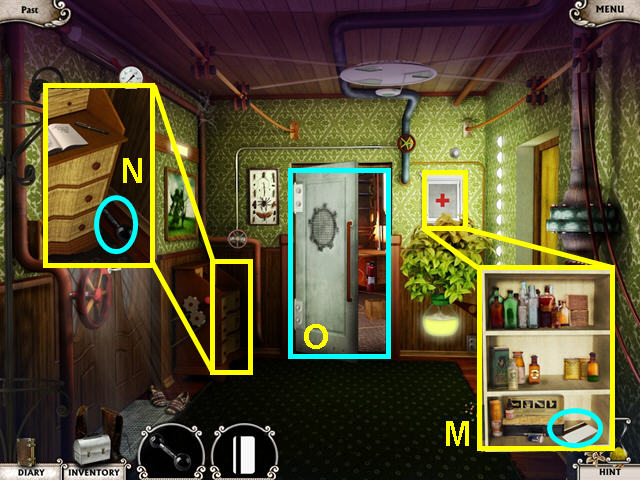
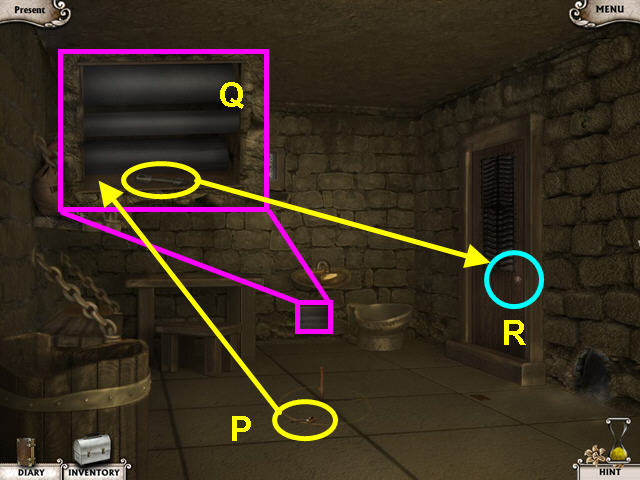
- Exit to the hall and look at the close-up of the medicine cabinet (M).
- Take the MAGNETIC CARD.
- Look at the close-up of the desk and take the DUMB BELL (N).
- Enter the lab through the center door (O).

- Look at the blue door on the right (P).
- Use the MAGNETIC CARD on the lock (Q).
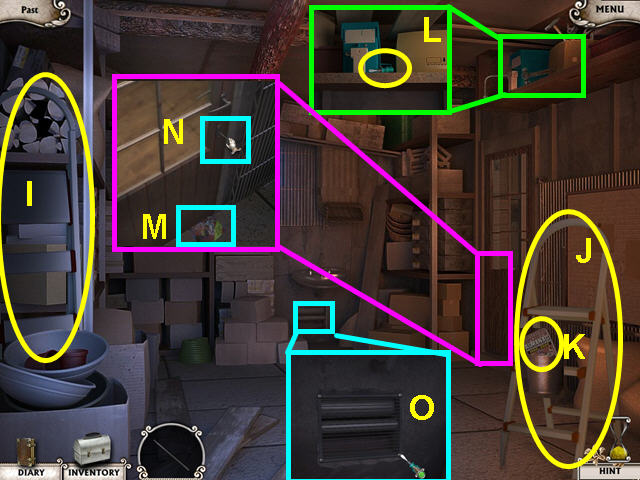
- Enter the storeroom through the door.
- Take the FIRE TONGS (R).
- Select the area over the barrels for a hidden object scene (S).
- Locate all the items on the list.
- The BLUEPRINTS will go into your inventory.
- Return to the living room.
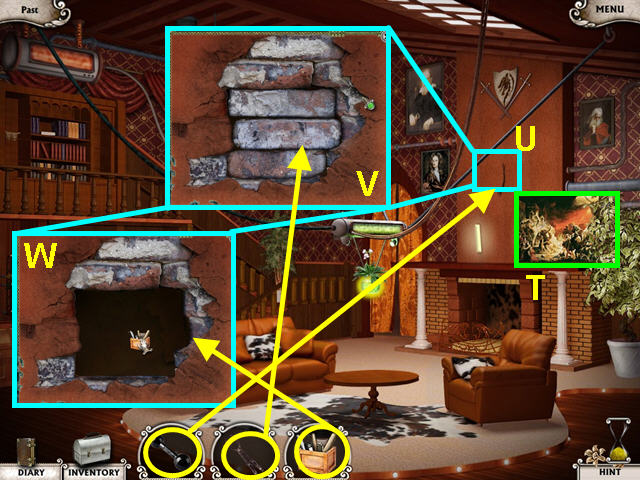
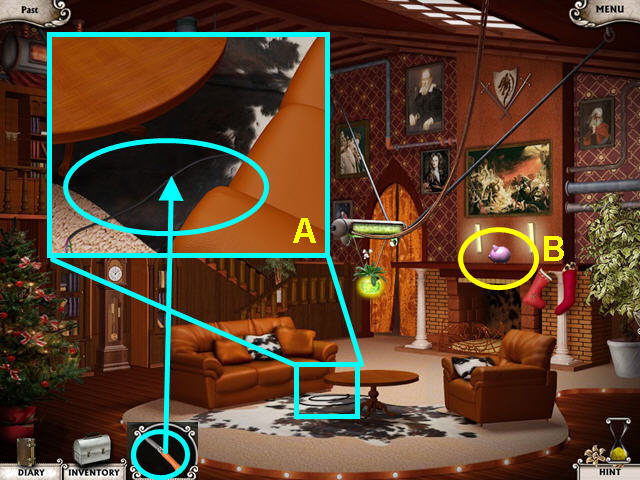
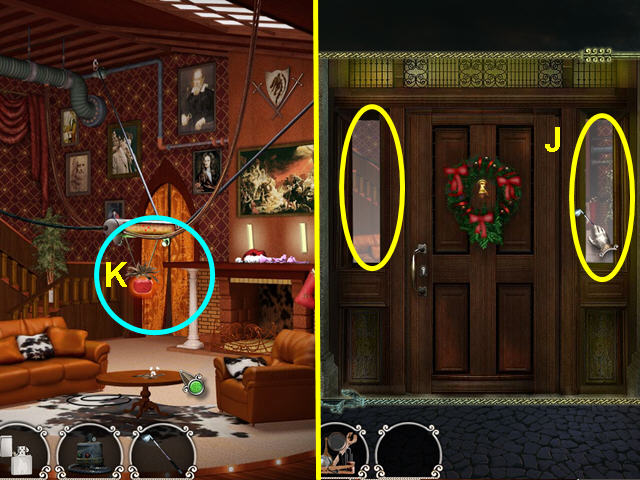
- Remove the painting over the fireplace (T).
- Look at the close-up of the crack and use the DUMBBELL to remove the plaster (U).
- Use the FIRE TONGS to remove the bricks (V).
- Put the PLANS into the hole in the wall (W).
- Once you are back in the present, remove the painting over the fire place and give Giovanni the PLANS.
- After Giovanni tells you what to do, click on the couch to sleep.
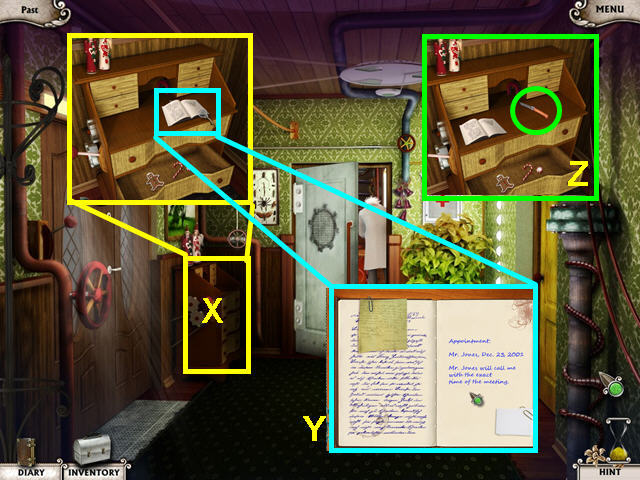
- Exit to the hall and look at the close-up of the desk (X).
- Look at the appointment book (Y).
- Look at the desk again and take the knife (Z).
- Return to the living room and look at the CABLE (A).
- Use the KNIFE to cut the CABLE.
- Note the piggy bank on the mantle (B).
- Exit to the front of the house and go to the telephone booth.
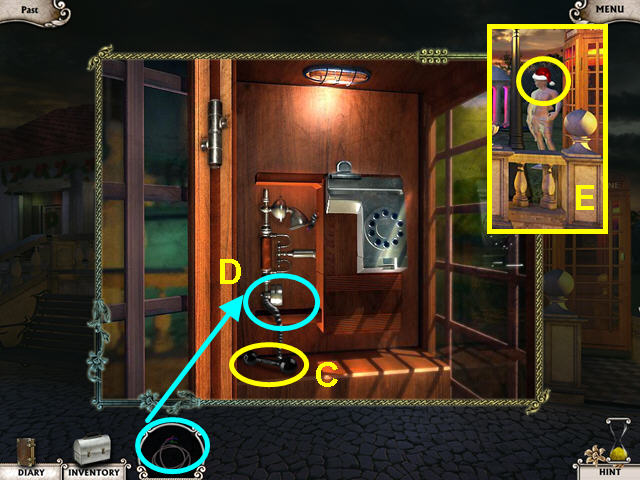
- Take the DUMB BELL (C).
- Use the CABLE to repair the phone (D).
- Exit the phone booth and take the SANTA HAT from the statue (E).
- Return to the living room and use the SANTA HAT on the piggy bank.
- Use the DUMB BELL to smash the piggy bank; take the COINS that were inside.
- Return to the phone booth and use the COINS to make the call.
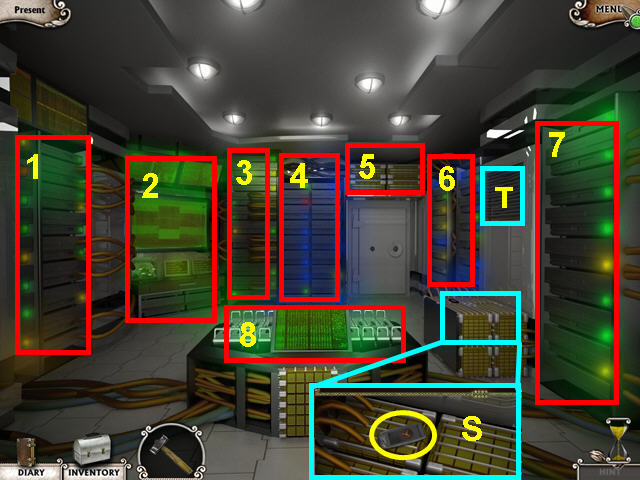
- Return to the lab.
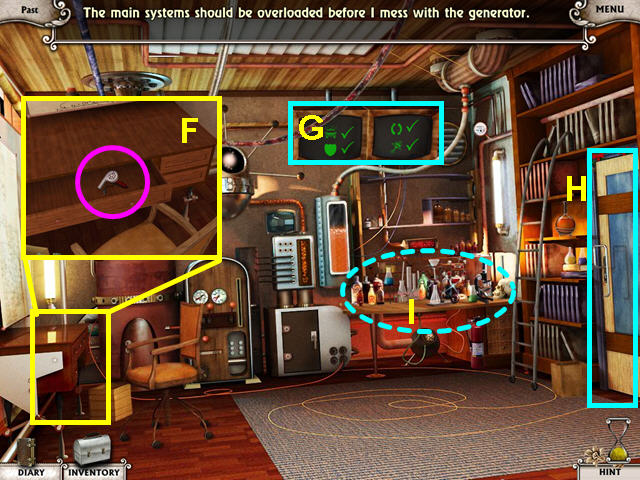
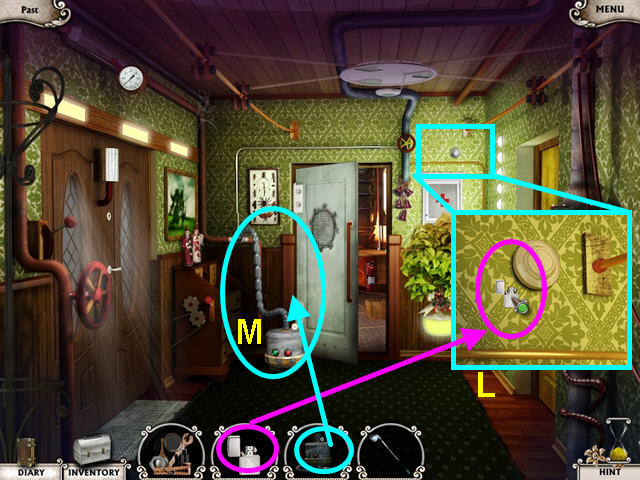
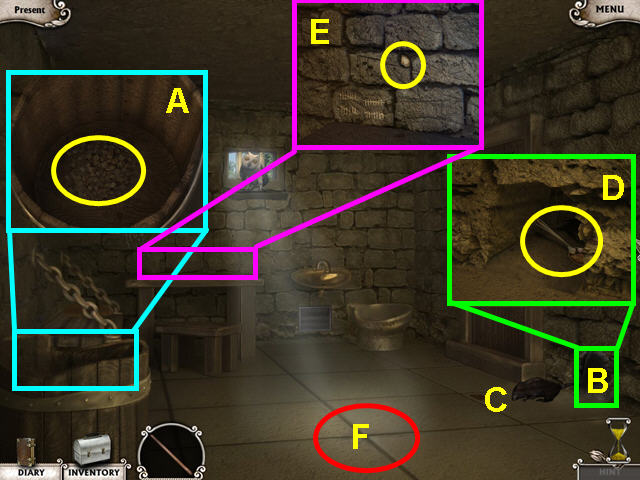
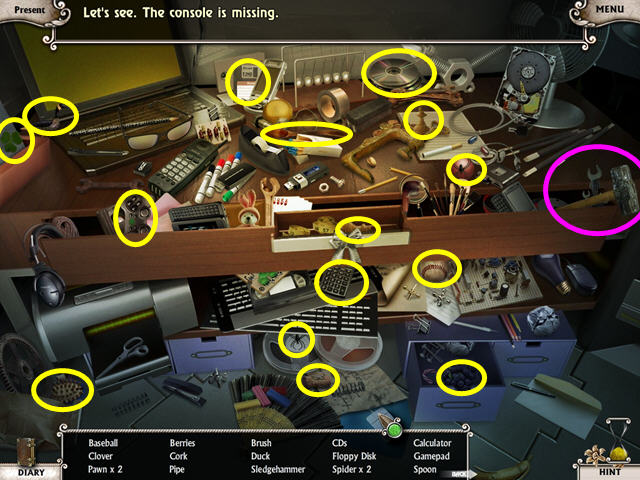
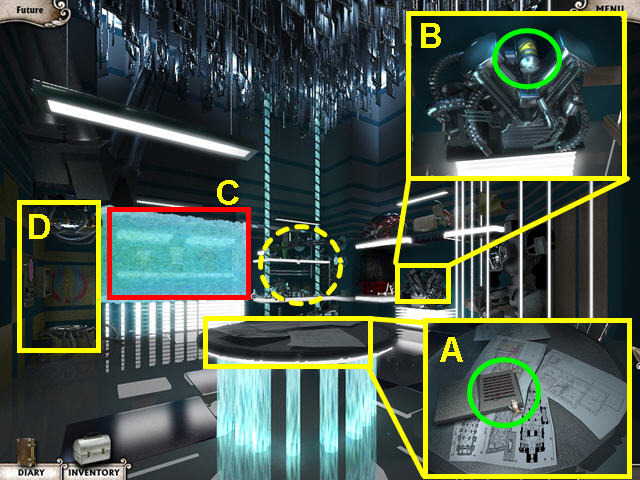
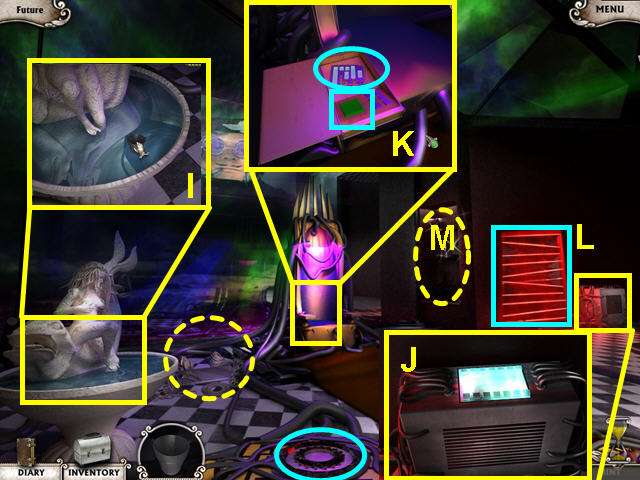
- Look at the close-up of the desk and open the large drawer to find the HAIR DRYER (F).
- Note the two monitors that tell the status of each system (G).
- Note the storeroom door (H).
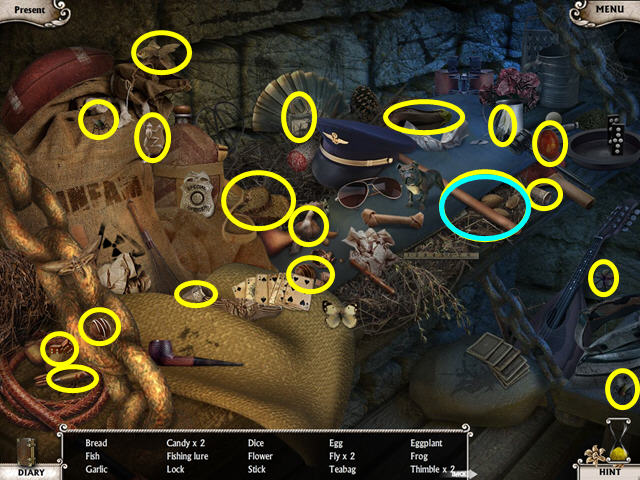
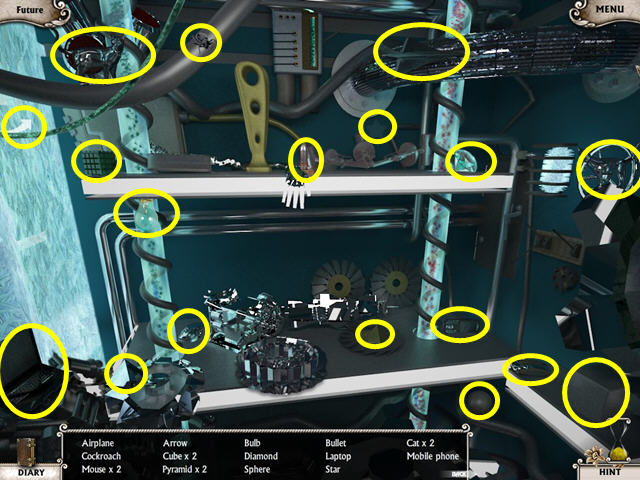
- Select the cluttered lab equipment for a hidden object scene (I).
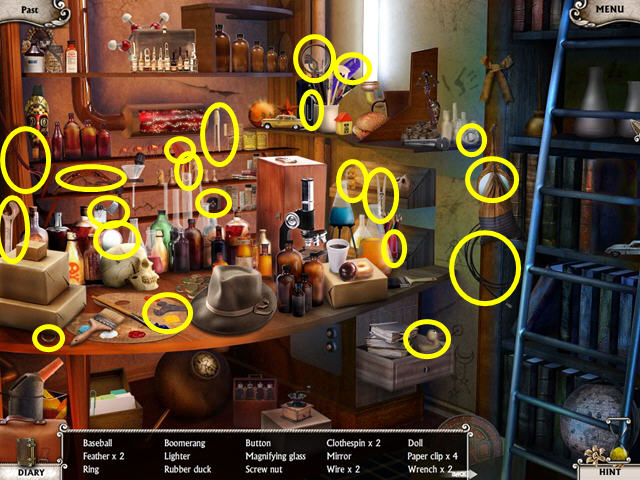
- Locate all the items on the list.
- The LIGHTER and some STUFF will go into your inventory.
- Use the right door to enter the storeroom.
- Take the SHOP VAC and the GOLF CLUB.
- Exit and go to the front door.
- Use the GOLF CLUB to break the window (J).
- Enter to return to the living room.
- Use the HAIR DRYER on the hanging plant (K).
- Exit to the hall.
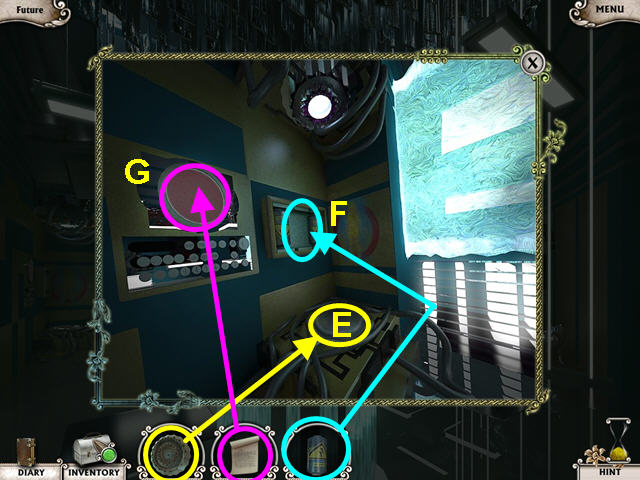
- Look at the close-up above the medicine cabinet.
- Use the LIGHTER on the fire alarm (L).
- Attach the SHOP VAC to the valve by the desk (M).
- Click on the vacuum to reverse the flow.
- Enter the lab through the center door.
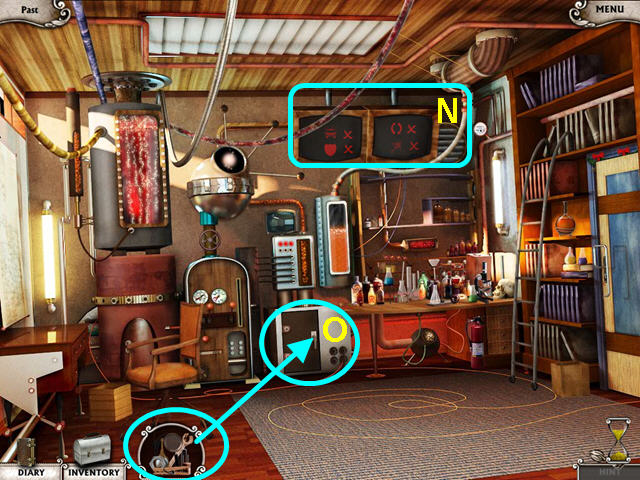
- Make sure the monitors show all 4 systems in the red (N).
- Use the STUFF on the generator to trigger a mini-game (O).
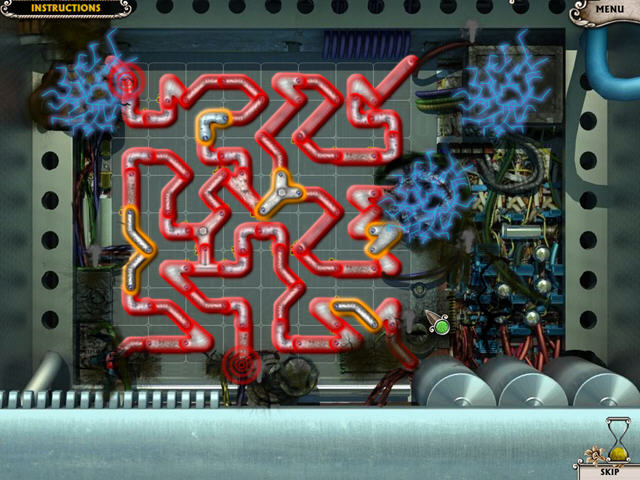
- The object of this mini-game is to complete all the connections.
- Place the pieces from below onto the missing spaces.
Chapter 6: How to Have Fun in Jail
- Select the upper left bunk for a hidden object scene.
- Locate all the items on the list.
- The STICK will go into your inventory.
- Look in the barrel on the right and take the CRACKERS (A).
- The owl will appear at the window.
- Look in the hole in the wall and the rat will appear (B).
- Give CRACKERS to the rat several times; the owl will capture the rat (C).
- Look in the hole again and take the SPOON (D).
- Look at the close-up of the table and take the CHALK (E).
- Look at the center of the floor (F).
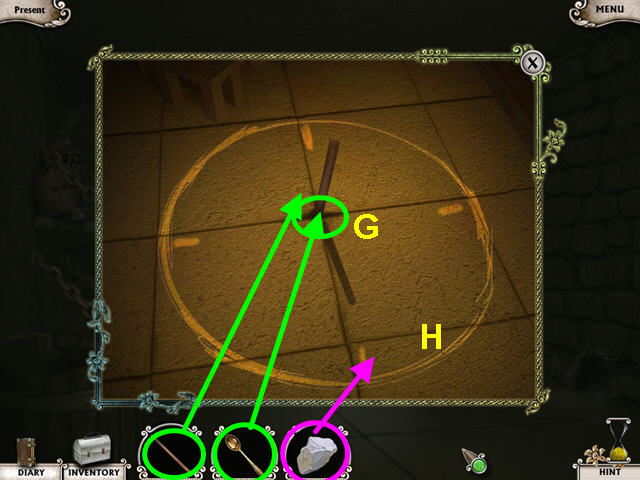
- Use the SPOON to dig a hole in the center of the floor (G).
- Place the STICK in the hole.
- Use the CHALK to draw the sundial (H).
- Exit the close-up to sleep.
- Select the large box on the left for a hidden object scene.
- Locate all the items on the list.
- The ANTENNA from the radio will go into your inventory.
- Take the STEP LADDER (I) from the left and place it under the right shelf (J).
- Take the MAGAZINE from the garbage can (K).
- Look at the right top shelf and take the SCREWDRIVER (L).
- Look at the close-up of the door and place the MAGAZINE under the door (M).
- Use the ANTENNA to push the KEY from the keyhole (N).
- After the cut scene, take the KEY.
- Look at the close-up of the vent under the sink.
- Use the SCREWDRIVER to remove the vent and place the KEY inside (O).
- Take the SPOON from the floor (P).
- Look at the close-up of the vent under the sink (Q).
- Use the spoon to unscrew the vent.
- Take the KEY.
- Use the KEY on the door then exit the cell (R).
- Use the SPOON to open the left air vent and climb inside.
- Select the left back corner of the machinery for a hidden object game.
- Find all the items on the list.
- The SLEDGEHAMMER will go into your inventory.
- Use the SLEDGEHAMMER on the 8 lighted computer banks (1-8).
- Look at the close-up of the gold box and take the MEDIA PLAYER (S).
- Exit the room through the vent (T).

- Click on the arrows to navigate through the vents.
- You will find a map of the vent system at the blue dot.
- Take the map (U).
- The exit is marked by a red square.
- Click on the vent to exit (V).
Chapter 7: The Consequences
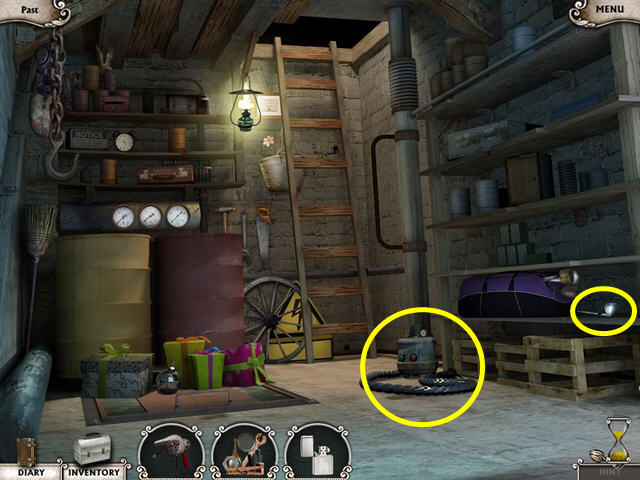
- Select the center shelves for a hidden object scene.
- Locate all the items on the list.
- The STABILIZER will go into your inventory.
- Look at the round table and take the transporter COORDINATES (A).
- Look at the perpetual motion machine and take the BATTERY (B).
- Make note of the energy shield (C).
- Look at the close-up of the transporter (D).
- Place the STABILIZER in the base of the transporter (E).
- Put the BATTERY into the power center (F).
- Use the COORDINATES on the controls (G).
- Enter the blue cloud to travel.
- Look at any item to trigger a cut scene.
- Select the junk pile to the left of the chair for a hidden object scene.
- Locate all the hidden objects.
- Press the “2” and “3” buttons to open the doors (H).
- The BUCKET will go into your inventory.
- Look at the fountain and use the BUCKET on the water (I).
- Take the BUCKET of WATER.
- Look at the generator on the right; pour the BUCKET of WATER on it (J).
- Look at the close-up of the chair and press the white panel.
- Take the KEY and push the green button (K).
- Note the room that had the laser bars (L).
- Select the shelves that opened when you pressed the button on the chair (M).
- Locate all the hidden objects on the list.
- The NUT CRACKER will go into your inventory.
- Exit by using the transporter at the bottom of the screen.
- Use the KEY on the energy shield (M).
- Look at the display and take the COMB (N).
- Travel back through the transporter and enter the room that had the lasers.
- Try to take the crystal and the bars will go up (O).
- Open the floor panel to bring up the control (P).
- Look at the control and place the COMB into the tray (Q).
- Look at the crystal; use the NUTCRACKER to break it (R).
Chapter 8: Happy Beginning
- Select the dresser on the left for a hidden object scene.
- Locate all the hidden objects.
- The BASEBALL KIT will go into your inventory.
- Click on the curtains then exit the room using the window door.
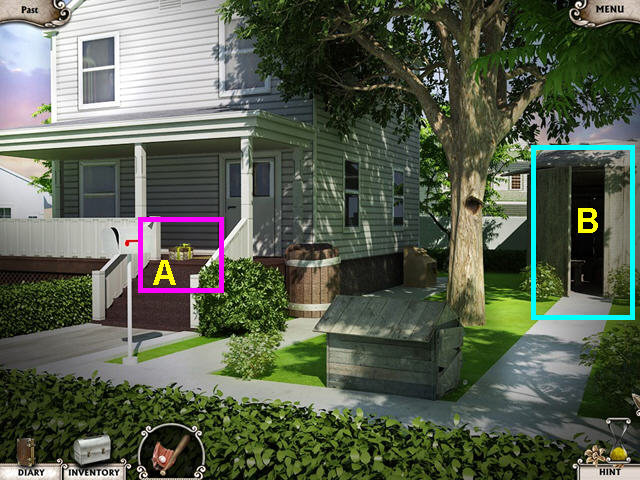
- Take the PRESENT from the front porch (A).
- Enter the shed (B).
- Select the back right corner of the shed for a hidden object scene.
- Locate all the items on the list.
- The POCKET KNIFE will go into your inventory.
- Look at the work bench and place the PRESENT there (C).
- Use the POCKET KNIFE to open the PRESENT.
- Look at the drawing inside the PRESENT (D).
- Make note of the locked chest (E).
- Exit the shed.
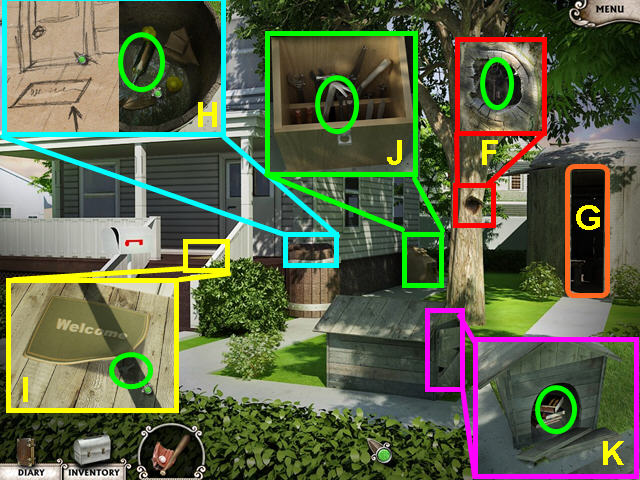
- Look in the tree hole and take the KEY (F).
- Return to the shed and use the KEY on the locked chest (G).
- Take the FISHING ROD and exit the shed.
- Look at the rain barrel and use the FISHING ROD (H).
- Look at the message in the bottle.
- Look at the porch and lift the welcome mat (I).
- Take the KEY from under the mat.
- Look at the tool box and use the KEY to unlock the cover (J).
- Take the CROWBAR.
- Look at the doghouse and use the CROWBAR to remove the boards (K).
- Use the BASEBALL KIT on the books.
- Congratulations! You have completed Time Dreamer!
Created at: 2010-07-11