

Welcome to the Top Secret Finders Walkthrough
Welcome to Top Secret Finders. Your first mission is to save a small town, uncover the truth about a government conspiracy and stop the villain in his tracks!
Whether you use this document as a reference when things get difficult or as a road map to get you from beginning to end, we’re pretty sure you’ll find what you’re looking for here.
This document contains a complete Top Secret Finders game walkthrough featuring annotated screenshots from actual gameplay!
We hope you find this information useful as you play your way through the game. Use the walkthrough menu below to quickly jump to whatever stage of the game you need help with.
Remember to visit the Big Fish Games Forums if you find you need more help. Have fun!
This walkthrough was created by LuckySmile, and is protected under US Copyright laws. Any unauthorized use, including re-publication in whole or in part, without permission, is strictly prohibited.
- General Tips
- Chapter 1: The Cave
- Chapter 2: The Surface
- Chapter 3: Entering the Town
- Chapter 4: The Chasm
- Chapter 5: The Fire
General Tips
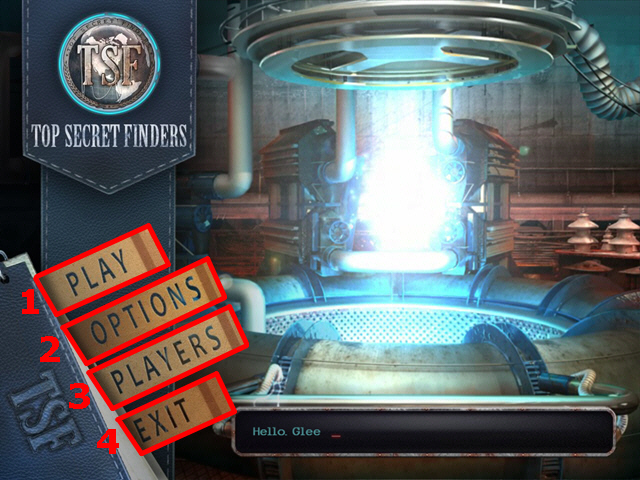
• Play (1) allows you to start the game.
• To change specific volumes, resolution, or cursor click Options (2).
• Selecting players (3) enables you to edit, delete, or create profiles.
• If you want to leave the game choose Exit (4).
• Hidden Object Scenes will be referred to as HOS in this guide.
• Items in HOS are randomized except for inventory items.
• Important details and information will go into the Top-Secret folder.
• The Top-Secret folder also includes a map with all important locations and markings for transmitters.
• You can choose between casual and advanced mode. The latter one does not indicate HOS in addition hint and skip-buttons take longer to recharge.
• You can skip any mini-game when the skip-button is charged. Most of the times you also have the choice to reset mini-games if you want to give it a new try. You can also leave mini-games, but in most cases you will lose your progress.
• You can leave every HOS at any time, but you will not receive the inventory item until the HOS is completed.
Chapter 1: The Cave
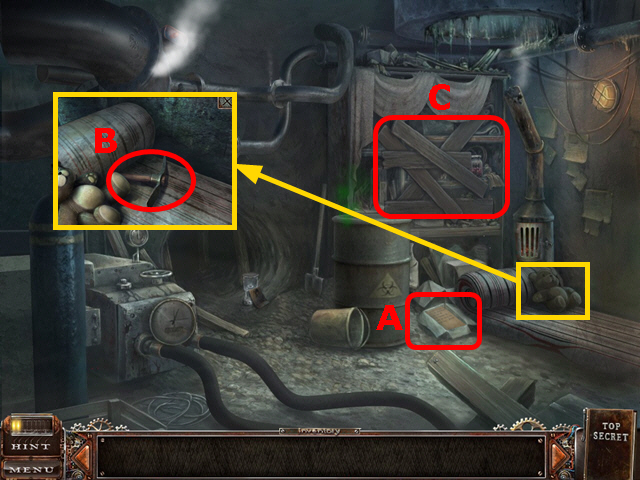
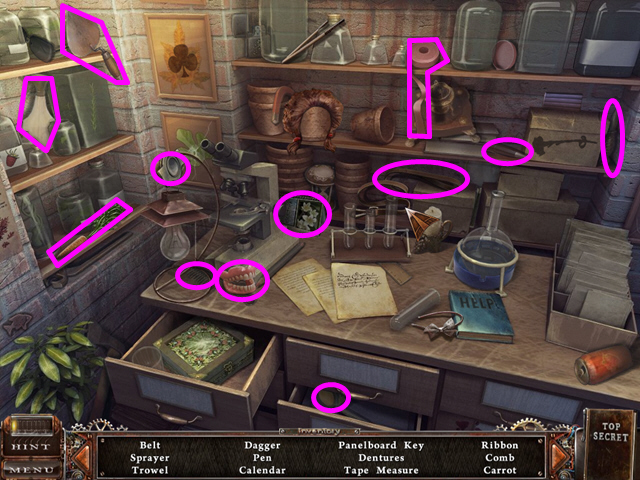
• Read the letter (A).
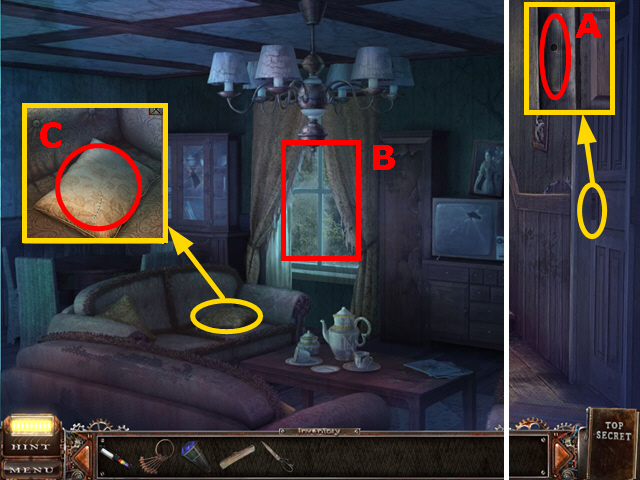
• Zoom into the teddy bear; move it and take the PICKAX (B).
• Use the PICKAX on the boards (C) five times to remove them and activate a HOS.
• Play the HOS.
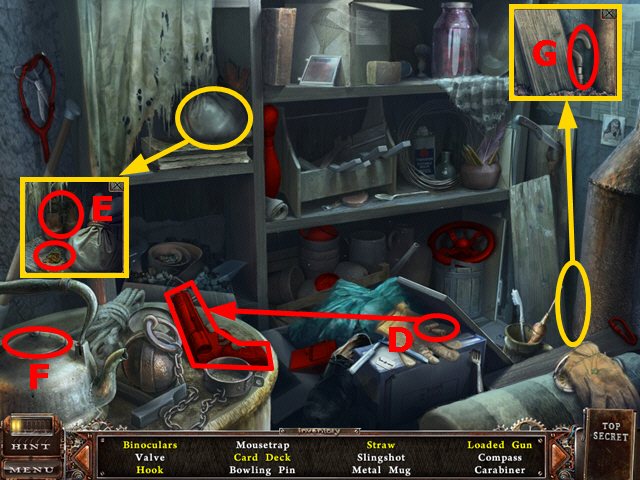
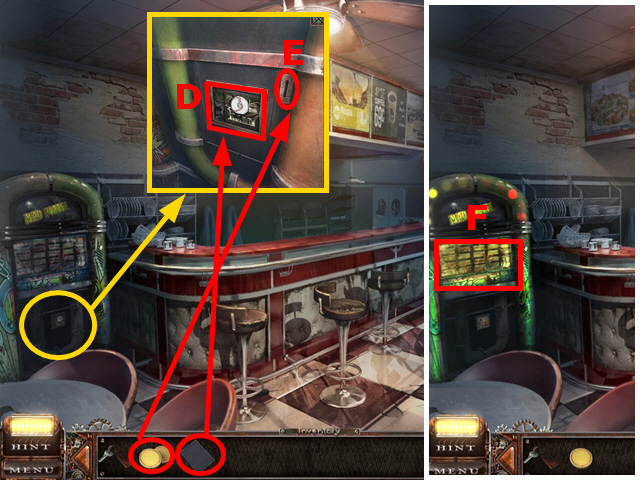
• Put the bullets into the gun (D) and collect the loaded gun.
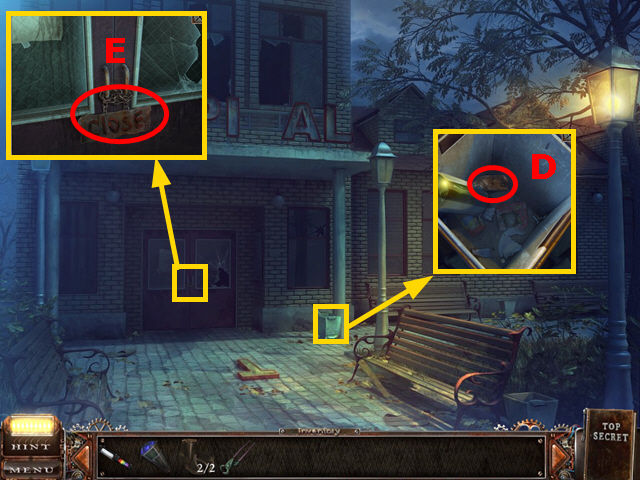
• Zoom into the bag to get card deck and binoculars (E).
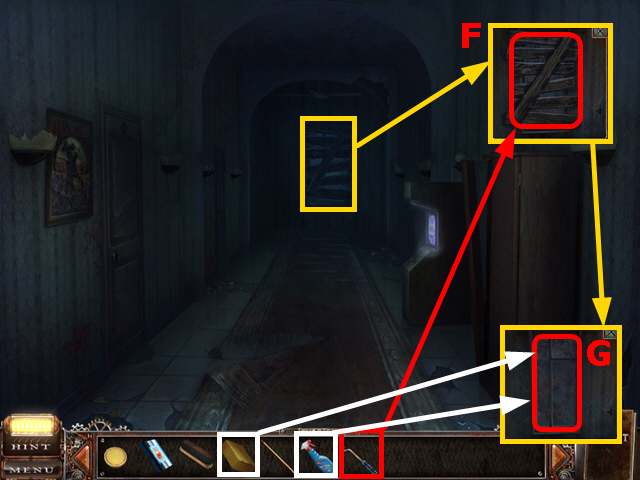
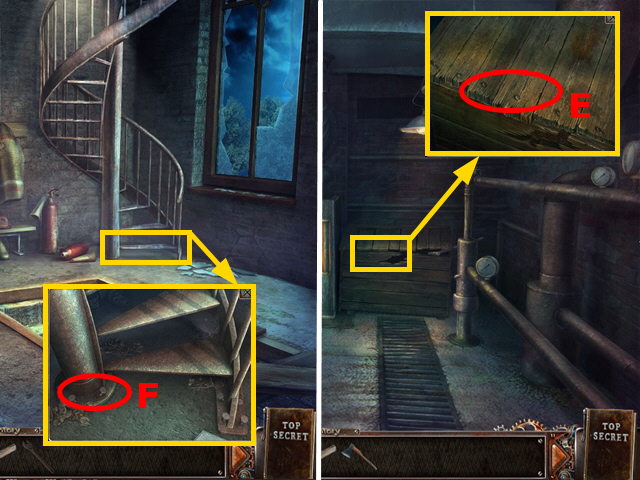
• Remove the lid (F) to collect the straw.
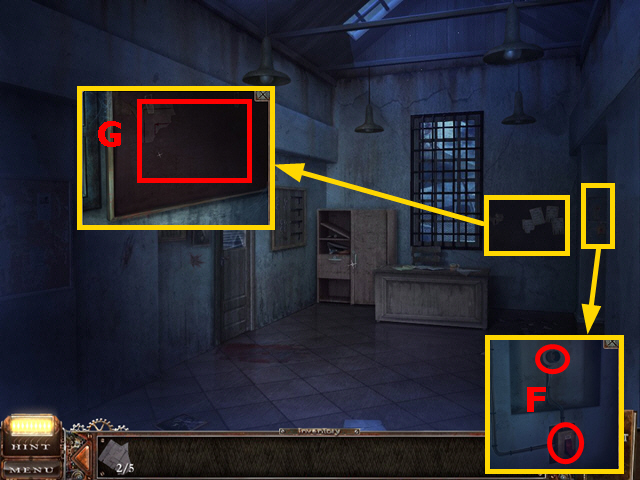
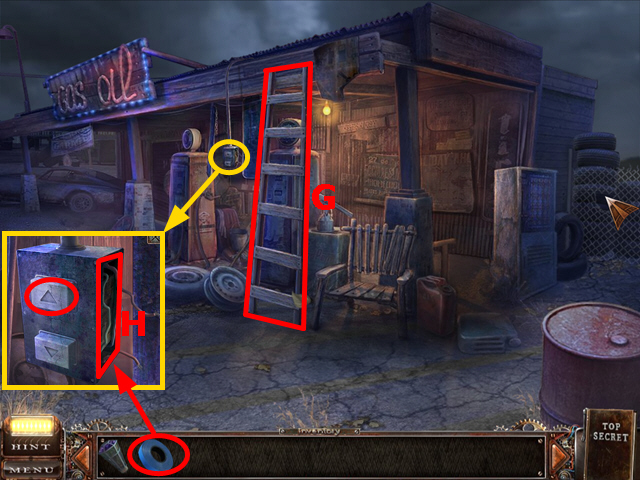
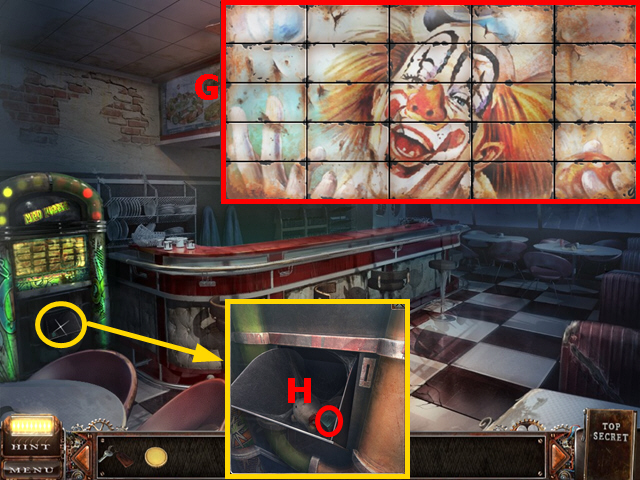
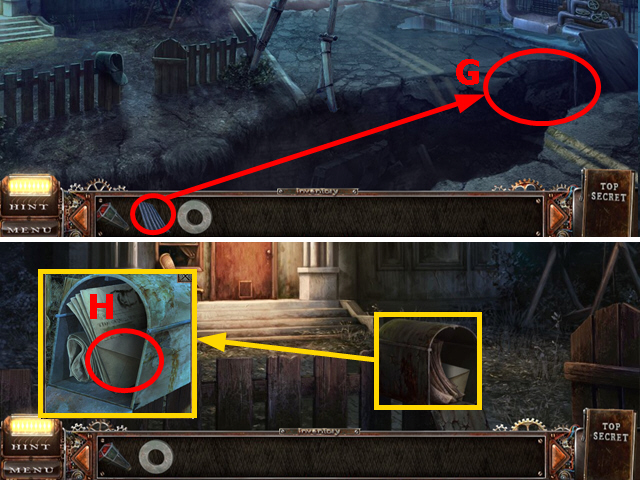
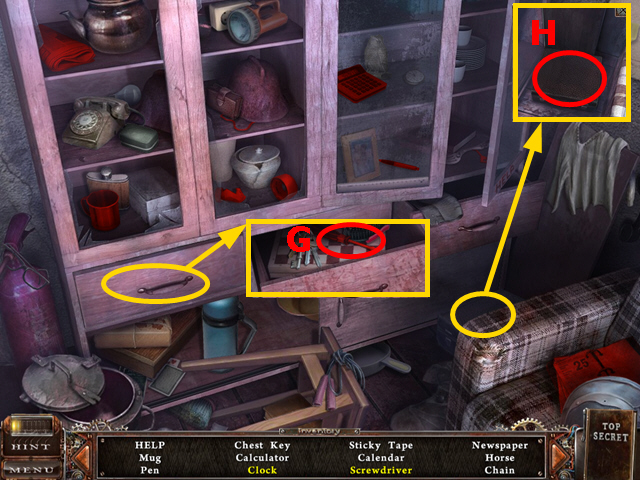
• Zoom into the plank to find the hook (G).
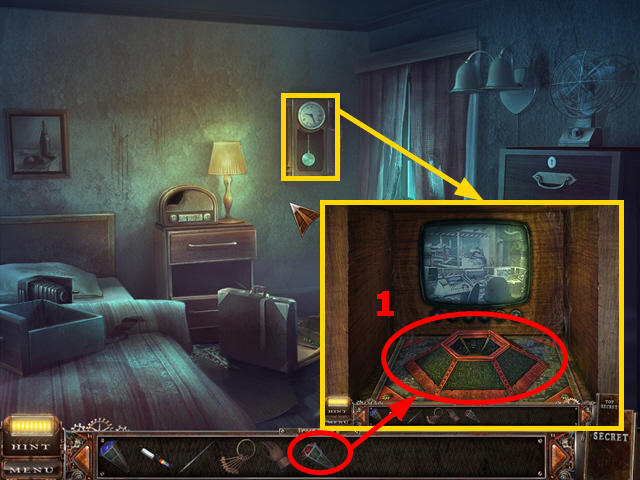
• The VALVE will go into your inventory.
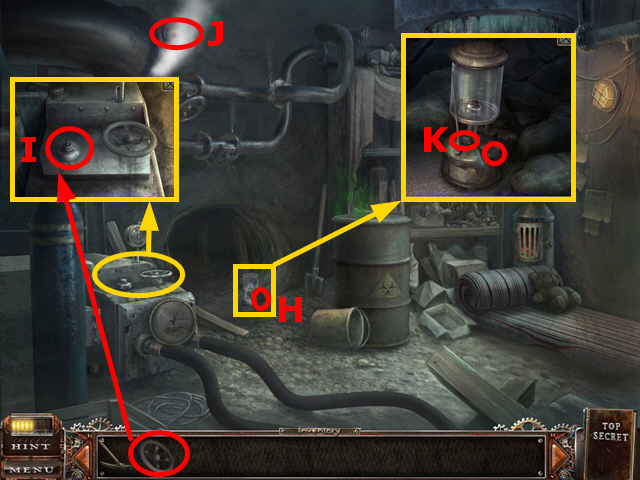
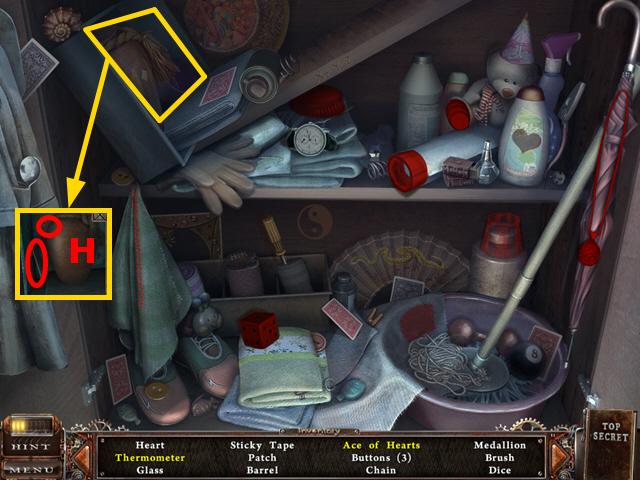
• Take the photo (H).
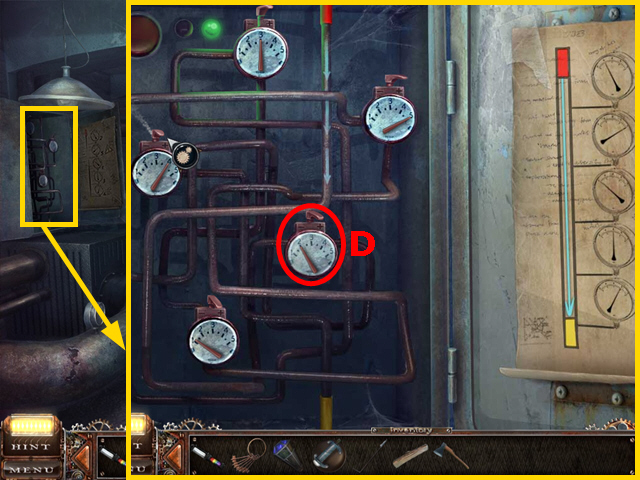
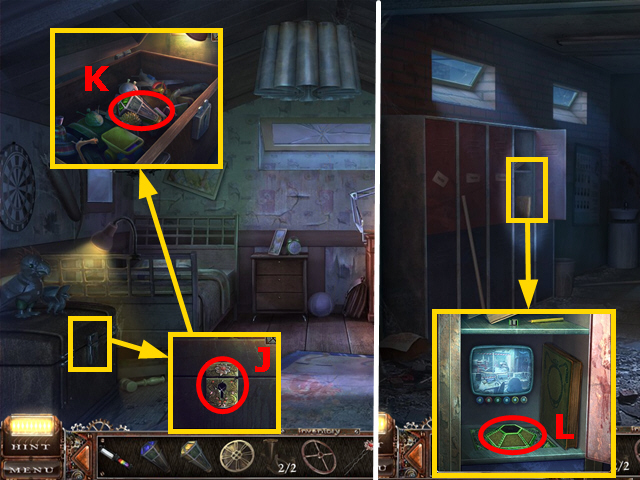
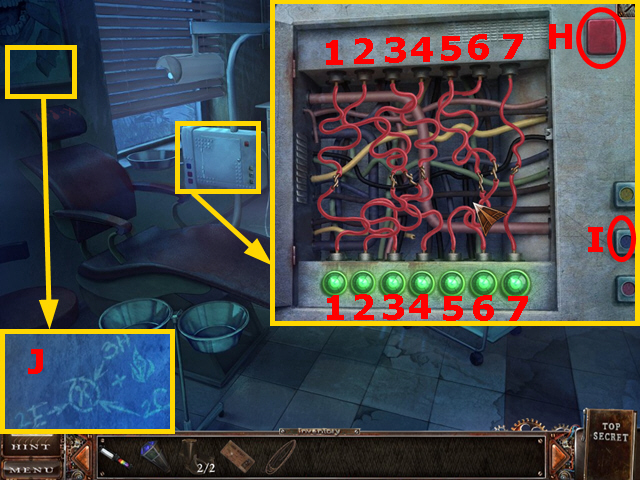
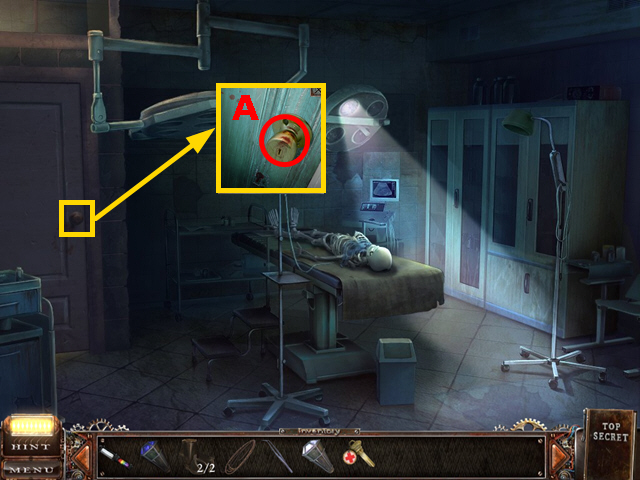
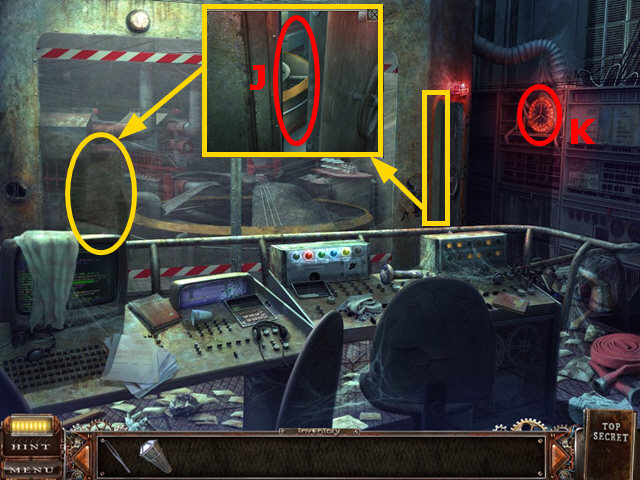
• Inspect the device and put the VALVE on it (I). Turn the valve five times to turn off the steam.
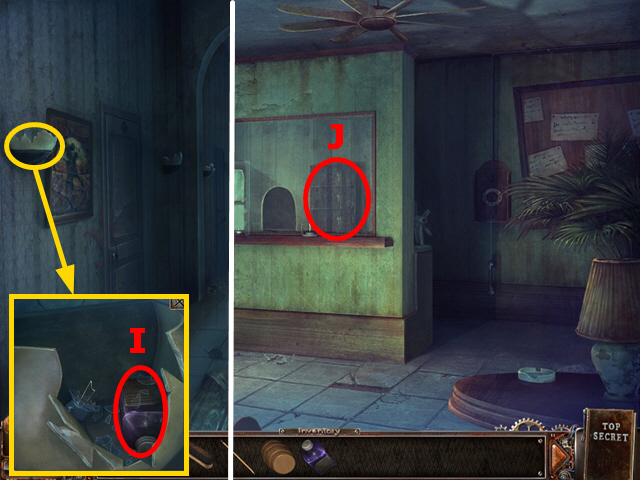
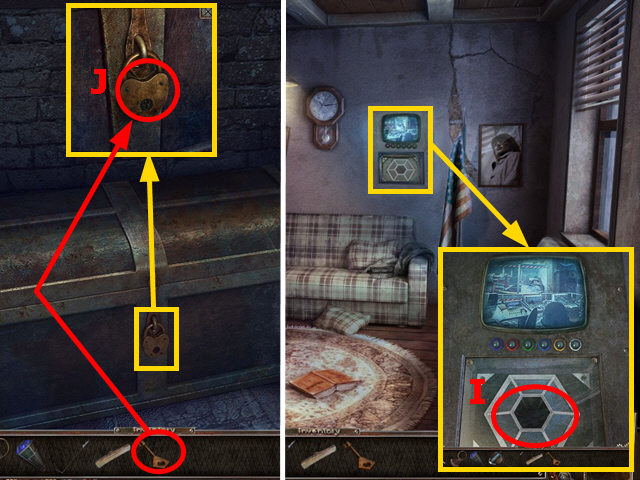
• Take the OIL CAN (J).
• Zoom into the lamp, remove the tiny lid, fill it with the OIL CAN and turn it on (K).
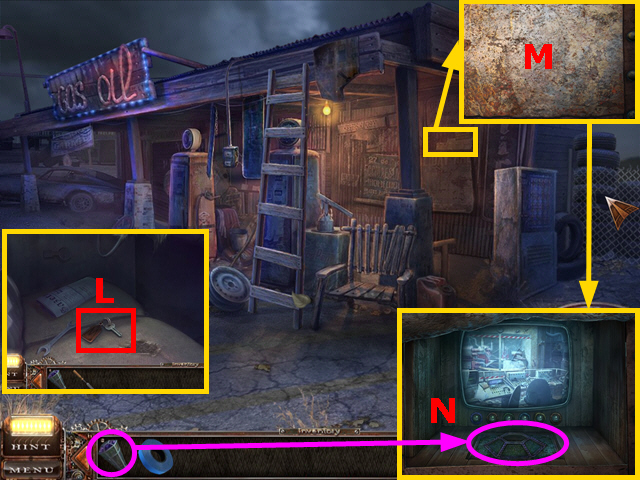
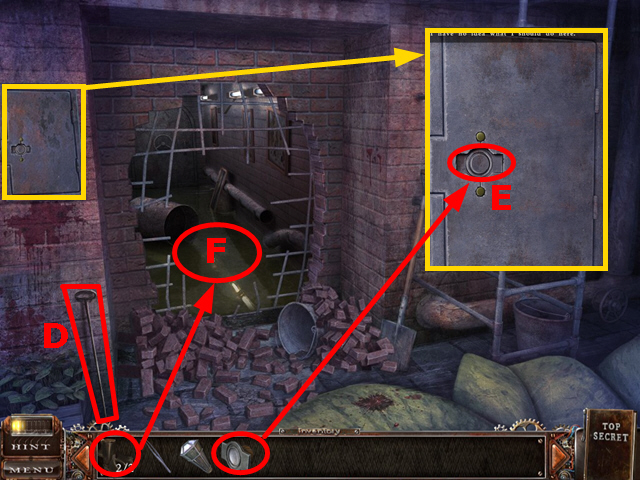
• Move through the tunnel at the end of the room.
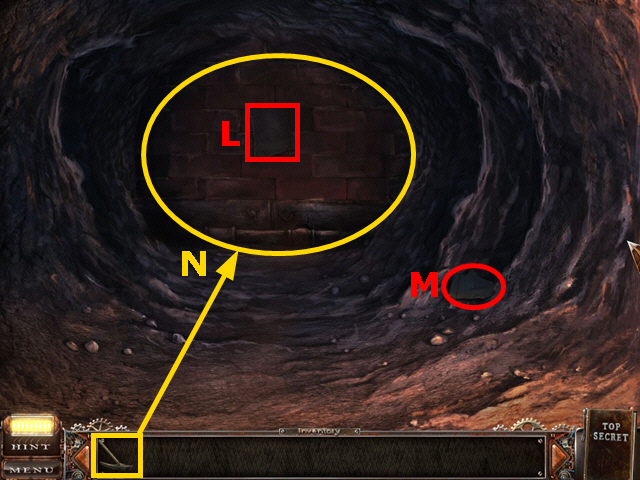
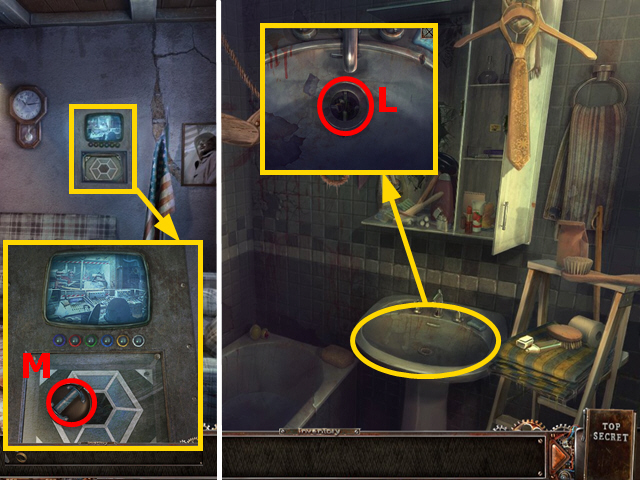
• Read the note (L).
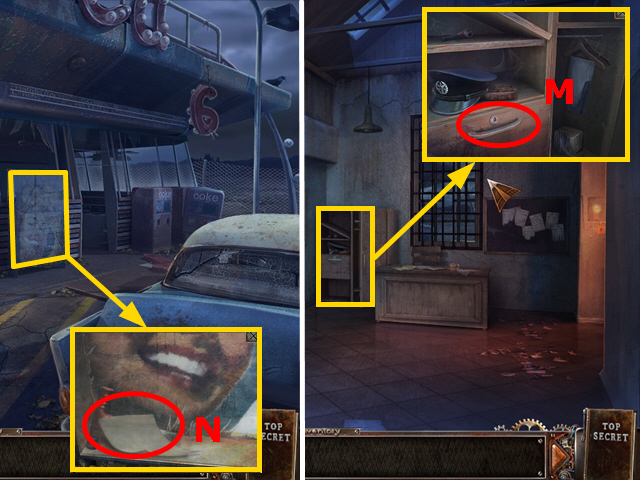
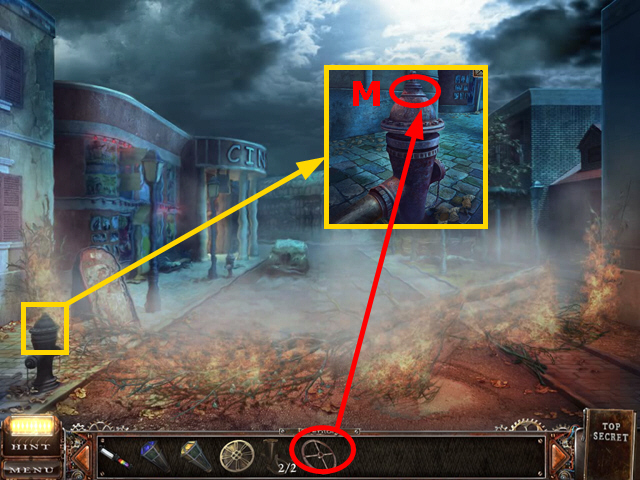
• Take the PLAN FRAGMENT 1/5 (M).
• Hit the wall with the PICKAX three times (N).
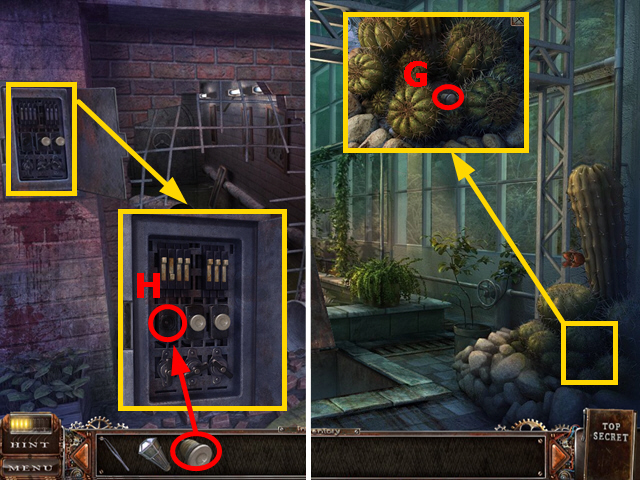
• Proceed into the new area.
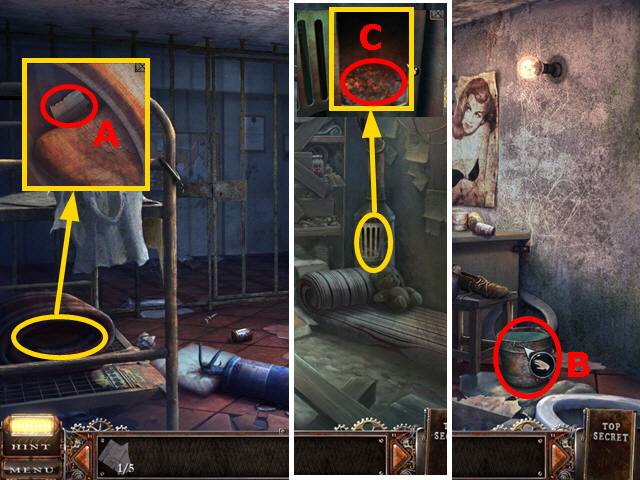
• Zoom into the mattress and take the PLAN FRAGMENT 2/5 (A).
• Take the BUCKET OF WATER (B).
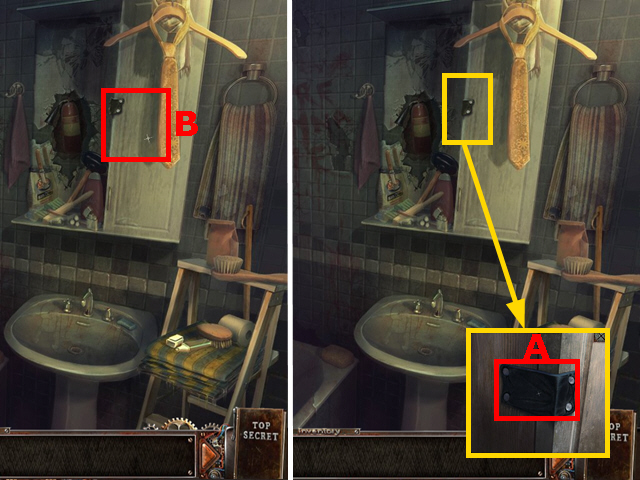
• Return to the cave, zoom into the oven and extinguish fire with the BUCKET OF WATER (C); take the WRENCH.
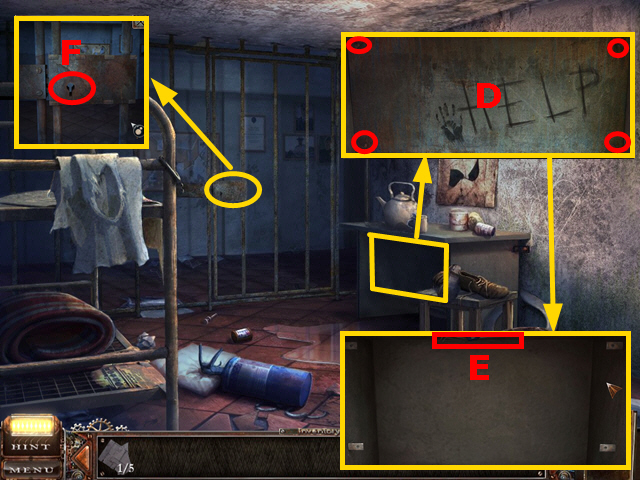
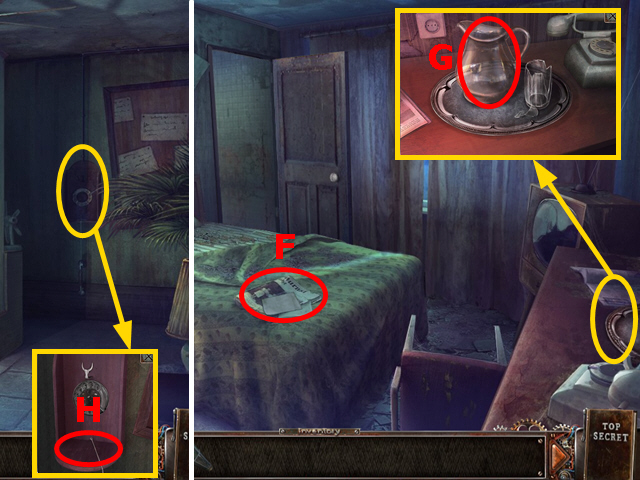
• Zoom into the desk and use the WRENCH to remove four screws (D).
• Take the LOCKPICK (E).
• Inspect the door and open it with the LOCKPICK (F).
• Proceed to the new area.
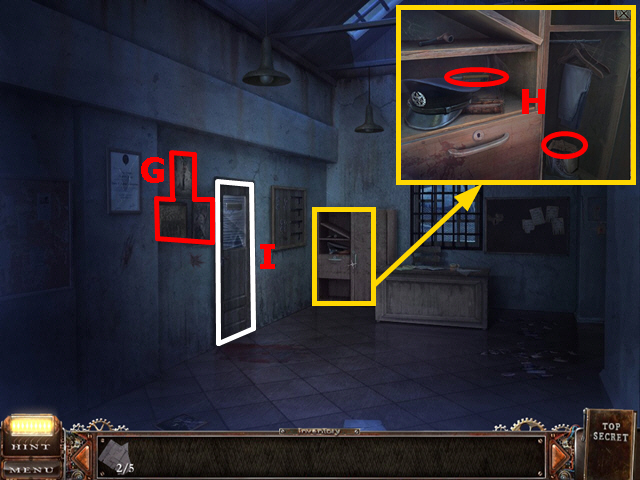
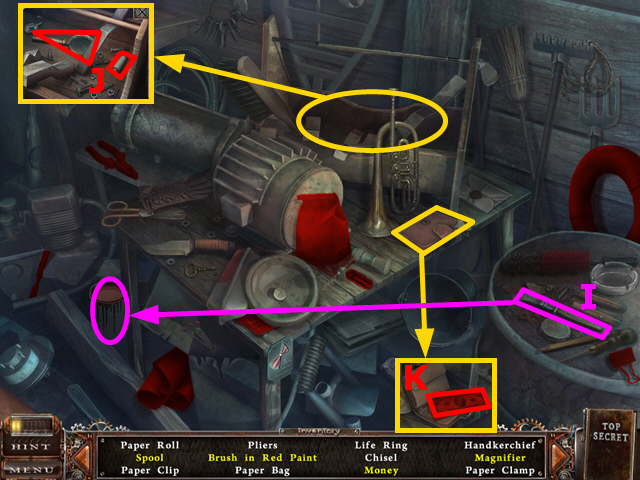
• Take a look at the portraits (G).
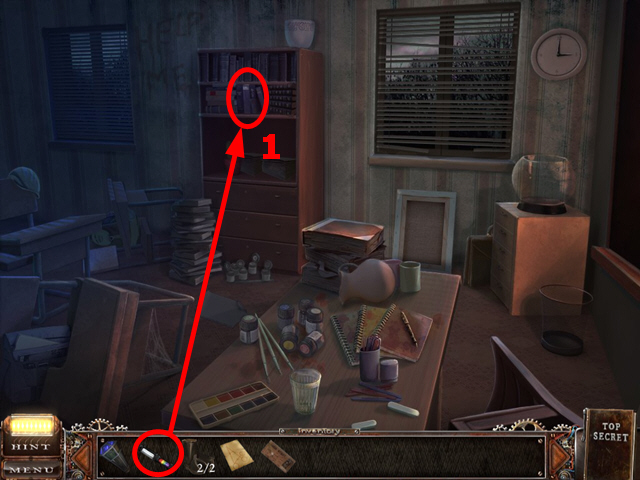
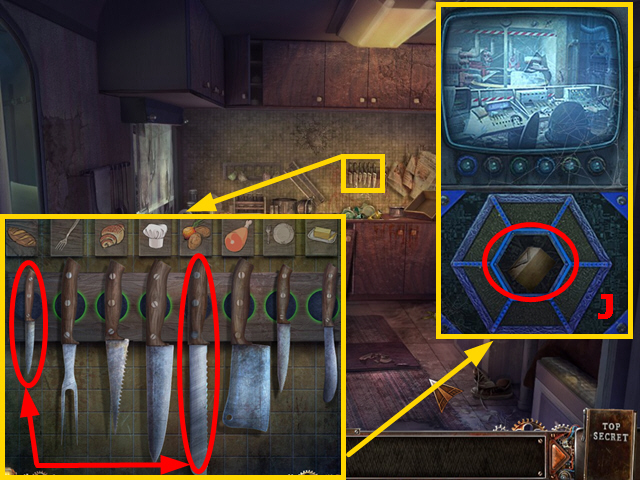
• Zoom into the shelf and collect the PLAN FRAGMENT 3/5 and the CUTTER (H).
• Go through the door (I).
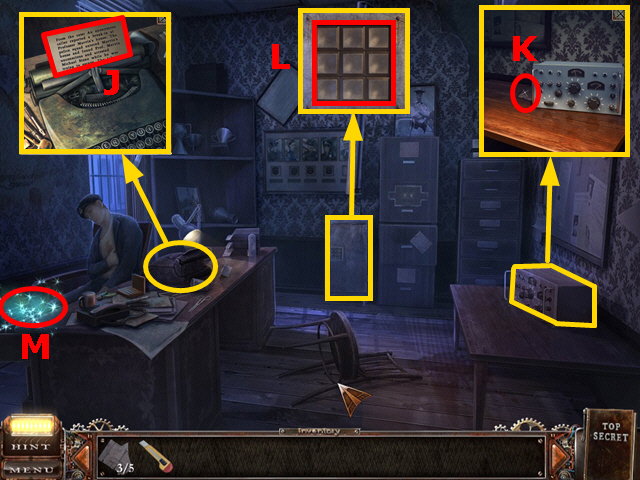
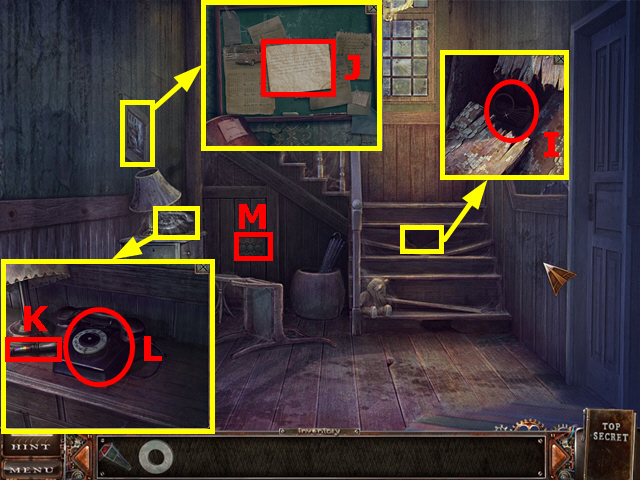
• Inspect the typewriter and take the letter (J).
• Zoom into the radio and take the PLAN FRAGMENT 4/5 (K).
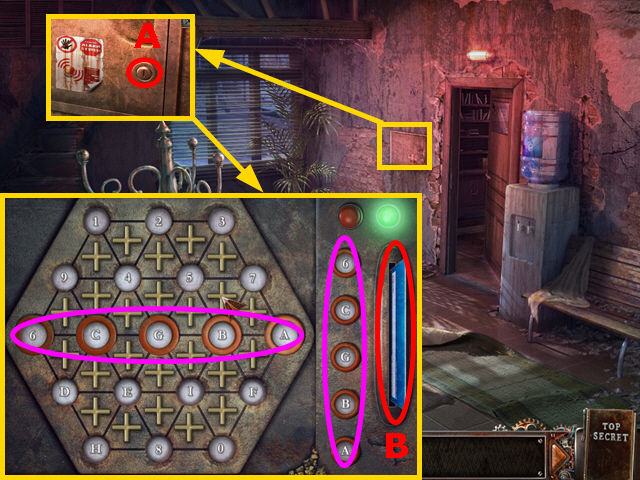
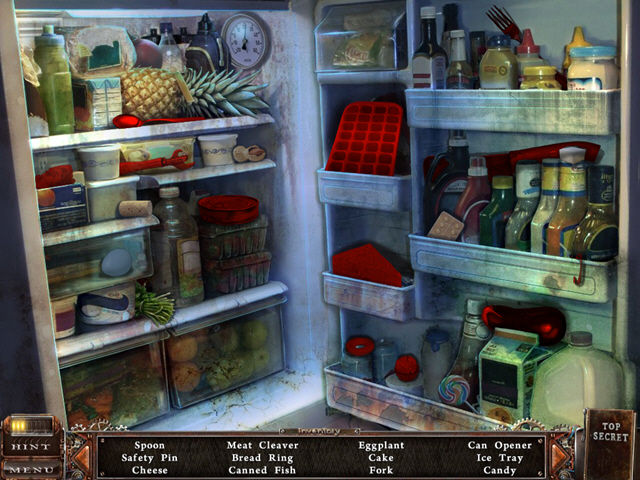
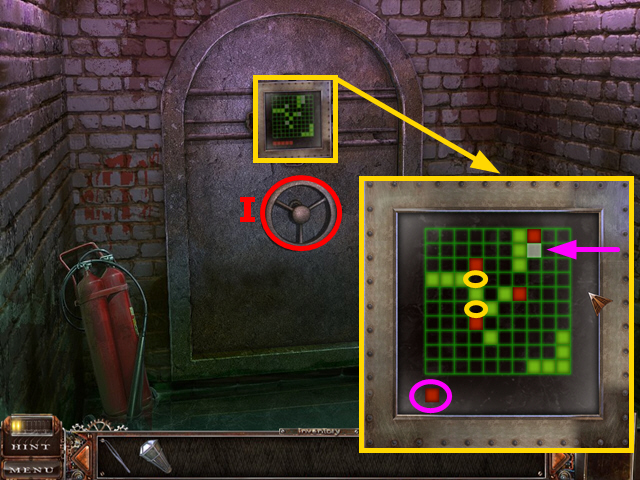
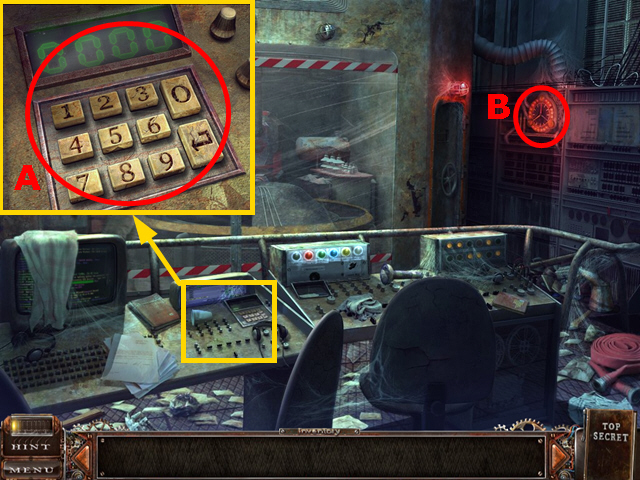
• Inspect the safe and play the Mini-Game (L). You have to push three buttons in the right order three times in a row to unlock the safe. The order of buttons is randomized, but a correct choice is indicated by a green light.
• Play the HOS (M).
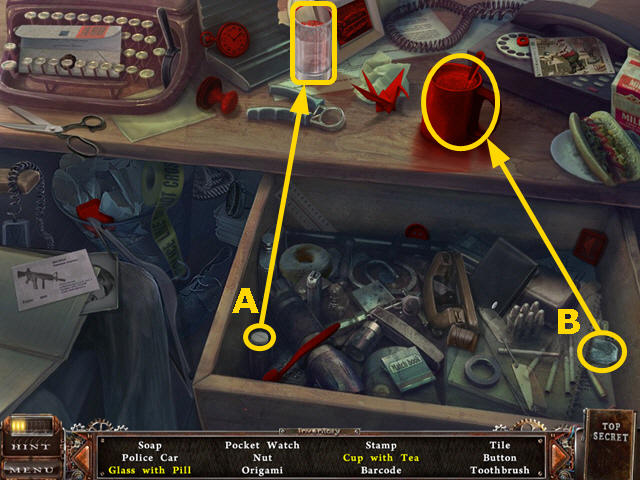
• Put the pill into the glass (A) and take the glass with pill.
• Put the tea bag into the cup (B) and take the cup with tea.
• You will receive a TILE.
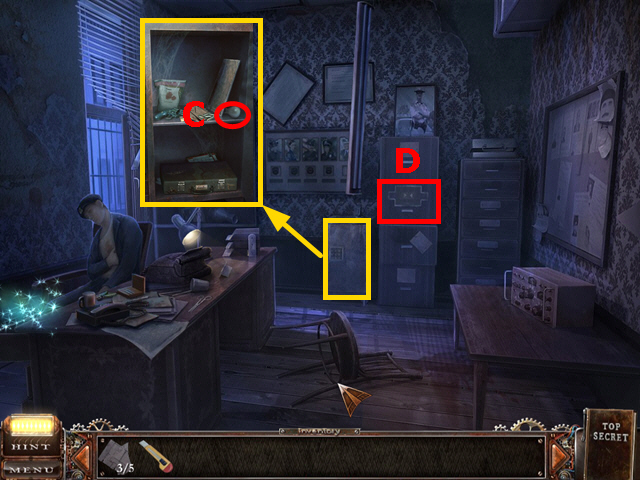
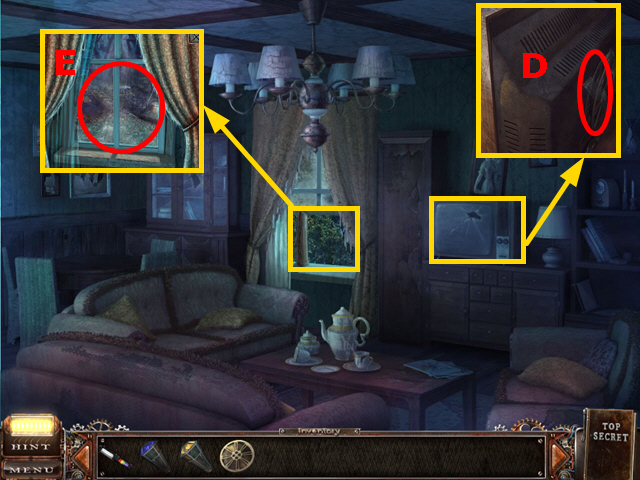
• Inspect the safe and take the LIGHT BULB (C).
• Zoom into the cupboard and play the mini-game (D).
• You have to put the tile onto the board.
• The board has to be rearranged according to the pattern.
• After solving the puzzle (E) look at the folder and take the PLAN FRAGMENT 5/5.
• Return to the hall.
• Inspect the light switch. Put the LIGHT BULB into the bracket and press the switch to turn on the light (F).
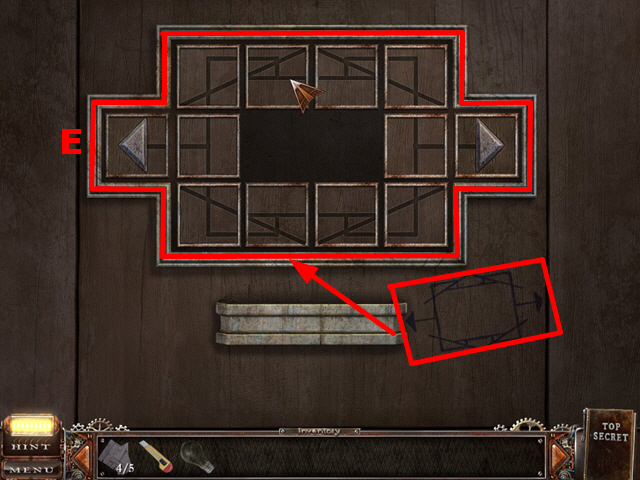
• Zoom into the board and put 5 PLAN FRAGMENTS on it (G).
• Play the Mini-game.
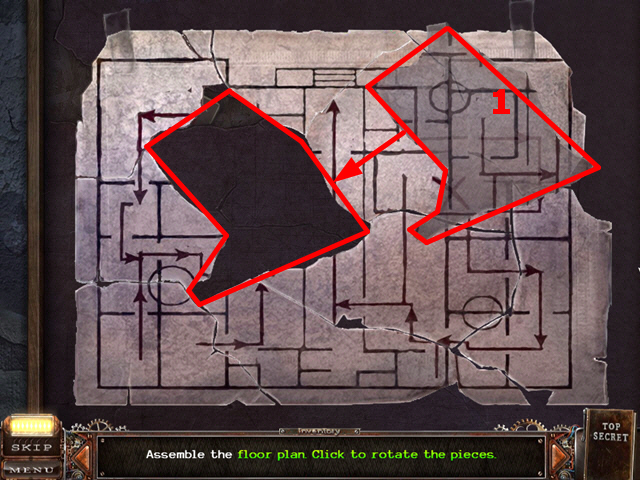
• Parts of the plan have to be arranged to form a complete plan.
• Pieces can be turned by right-clicking them.
• Please look at the screenshot for the solution (1).
• Take the TRACING PAPER PLAN and the CARD.
• Play the HOS.
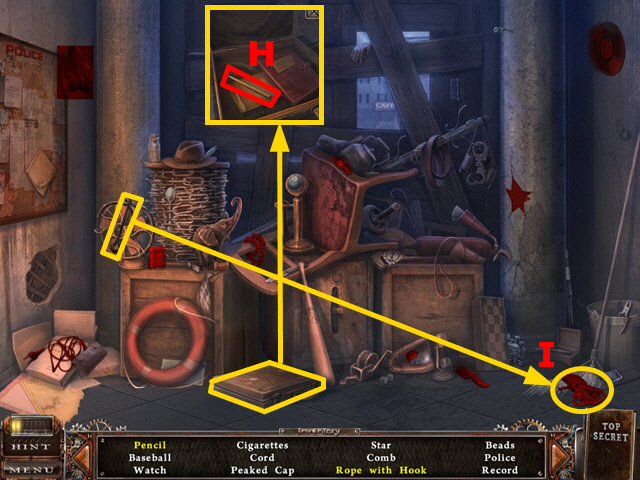
• Open the suitcase to take the pencil (H).
• Connect the rope with hook (I) and take the rope with hook.
• You will receive the ROPE WITH HOOK.
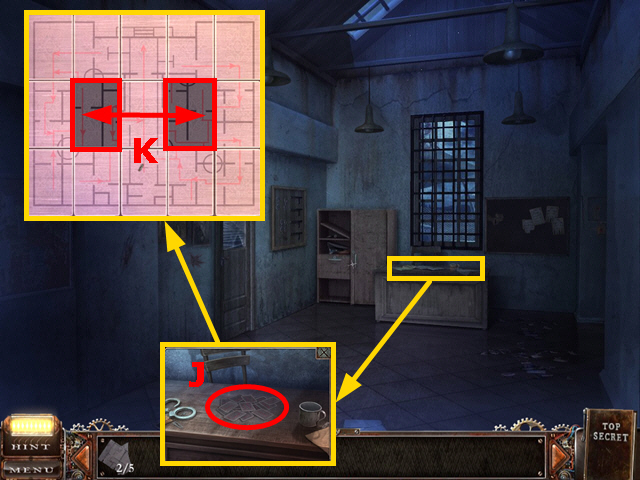
• Zoom into the desk and put the card onto the pile (J).
• Play the mini-game.
• Arrange the plan by swapping cards. Look at the screen for the solution (K).
• Put the TRACING PAPER PLAN on the completed floor plan.
• Uncover the card beneath the “X”, pull its upper half and make note of the number “963”.
• Return to the room with the corpse of the sheriff.
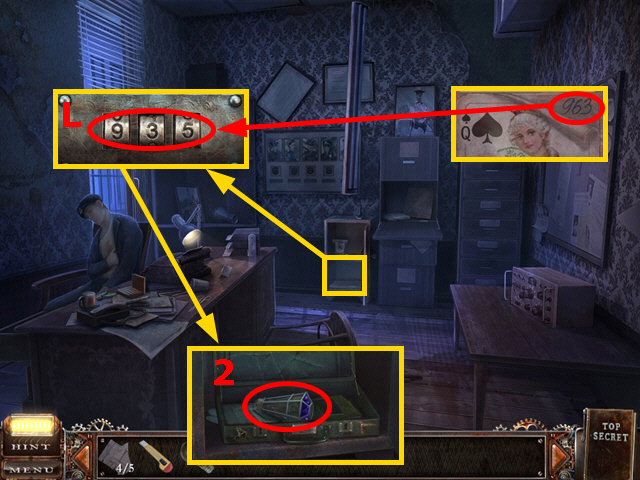
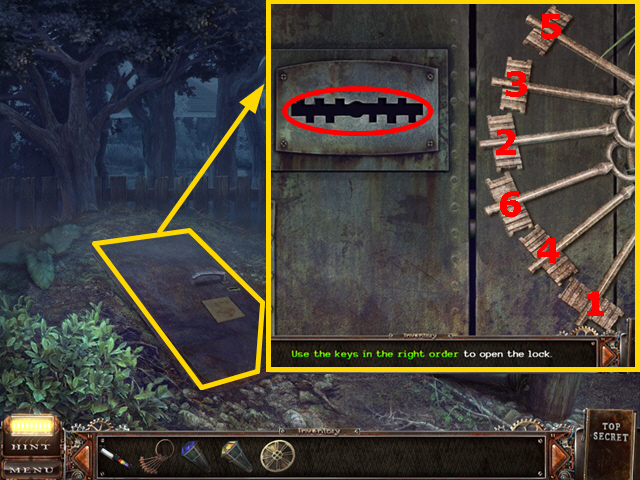
• Zoom into the suitcase and use the number “963” from the card to crack its code (L).
• Take the PURPLE CORE (2).

• Return to the cave.
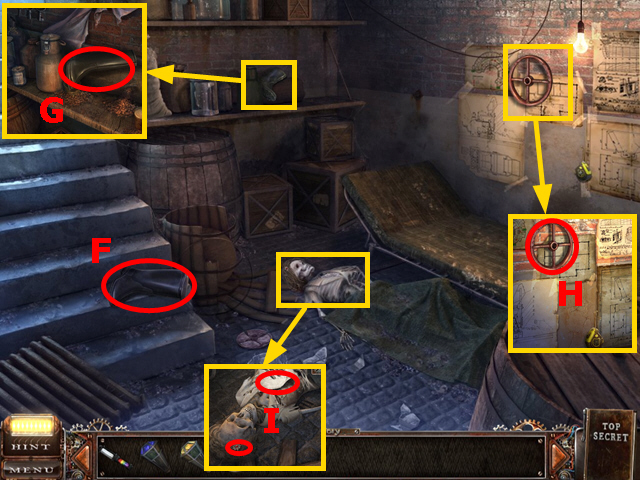
• Zoom into the hole at the ceiling (M).
• Use the ROPE WITH HOOK on the missing ladder (N).
• Climb to the surface.
Chapter 2: The Surface
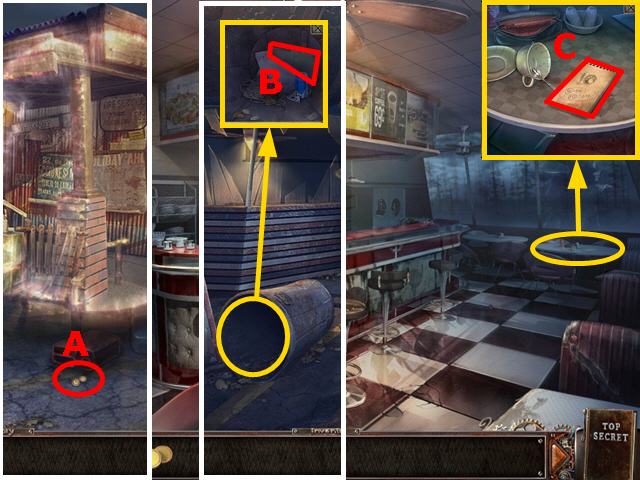
• Turn to the right, and go straight into the café.
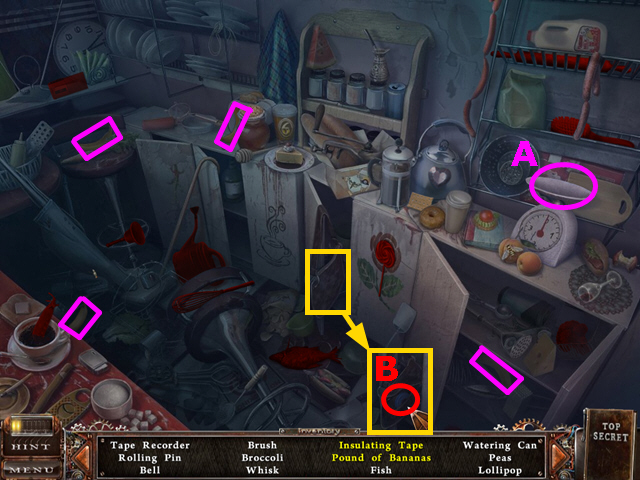
• Play the HOS.
• Put four bananas marked in purple onto the scale (A) to get the pound of bananas and take them.
• Inspect the bag to collect INSULATING TAPE (B).
• INSULATING TAPE will go to your inventory.
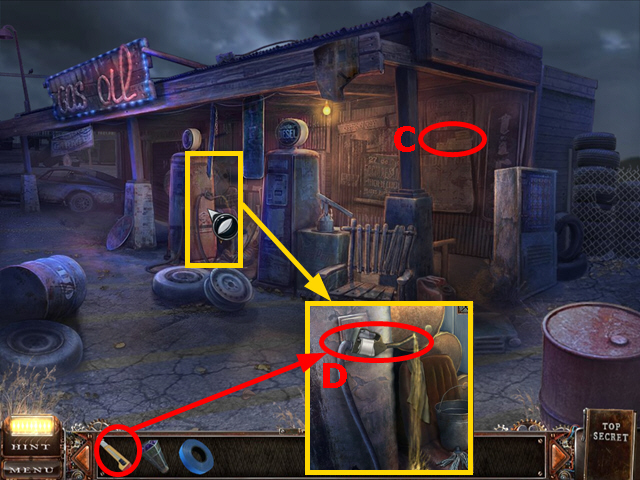
• Go back to the intersection and take the turn on the left to the gas station.
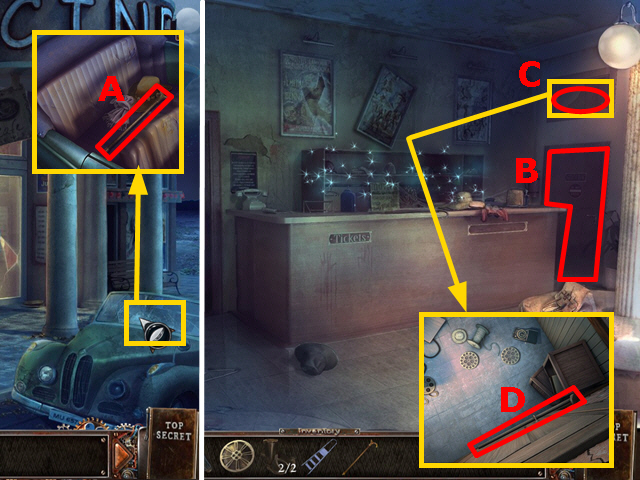
• Take the photo (C).
• Zoom into the rear gas pump and cut the connection with the CUTTER (D).
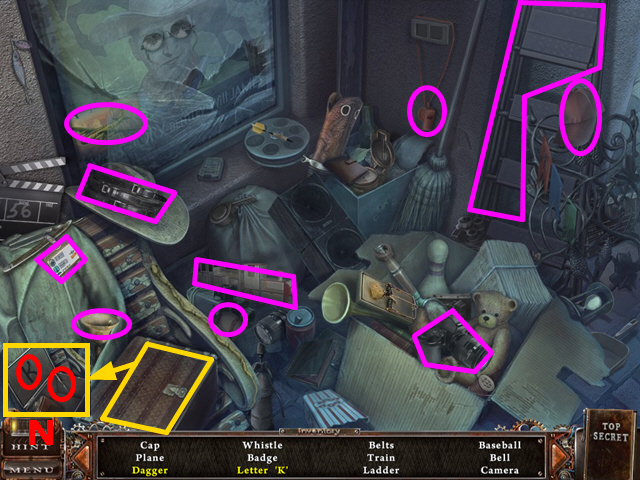
• Play the HOS.
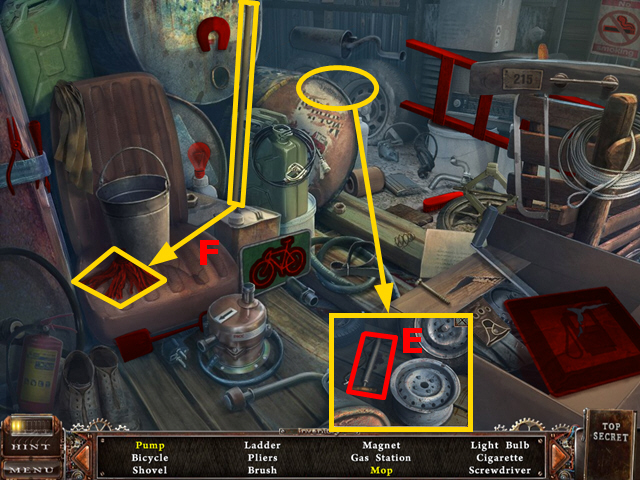
• Take a closer look at the tires and collect the pump (E).
• Pick up the stick and connect it with the mop. Take the mop (F).
• The LADDER will be added to your inventory.
• Place the LADDER near the roof (G).
• Pull the control from the top of the roof.
• Zoom into the control, repair it with the INSULATING TAPE and push the up button (H).
• Enter the garage and play the HOS.
• Put the brush into the red paint (I) and take the brush.
• Inspect the toolbox to collect spool and magnifier (J).
• Open the wallet to take the money (K).
• The CHISEL will go into your inventory.
• Take the TOWN HALL KEY from the inside of the car (L), then leave the garage.
• Zoom into the steel cover and remove it by using the CHISEL six times (M).
• Read the book and the letter, then push aside the wooden cover.
• Put the PURPLE CORE into the orifice (N).
• Take the COINS which appear near the gas canisters (A).
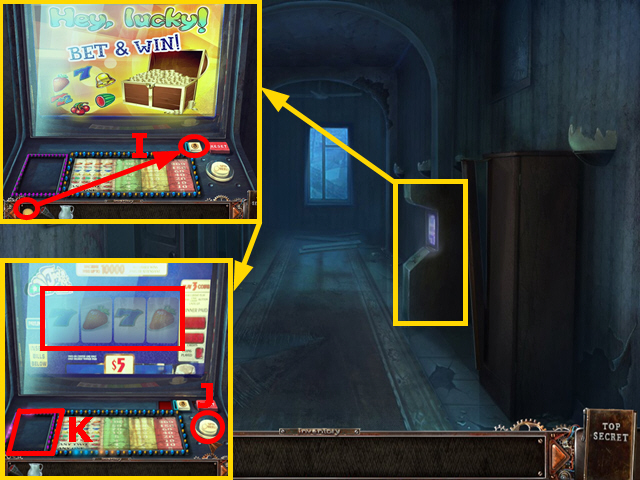
• Return to the entrance of the café, zoom into the garbage bin and take the PANEL (B).
• Enter the café, inspect the desk in the back and take the slip (C).
• Zoom into the gaming machine and repair it with the PANEL (D).
• Put the COINS into the slot (E).
• Play the mini-game (F).
• Each tile can be swapped with any other tile. Each tile has two differing sides. Tiles will begin to flash when placed correctly. Look at the screenshot for the solution (G).
• After completing the game a prize slot will open.
• Inspect the prize slot and take the “ON” BUTTON (H).
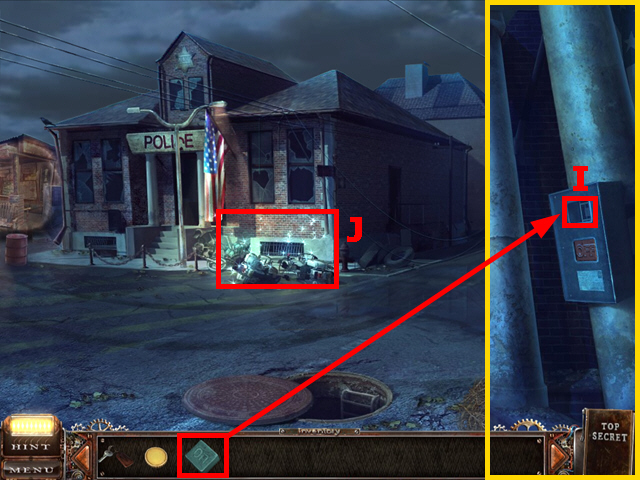
• Go to the police station.
• Apply the “ON” BUTTON to the control panel (I).
• Push the “on” button to turn on the light.
• Step back from the police station and play the HOS (J).
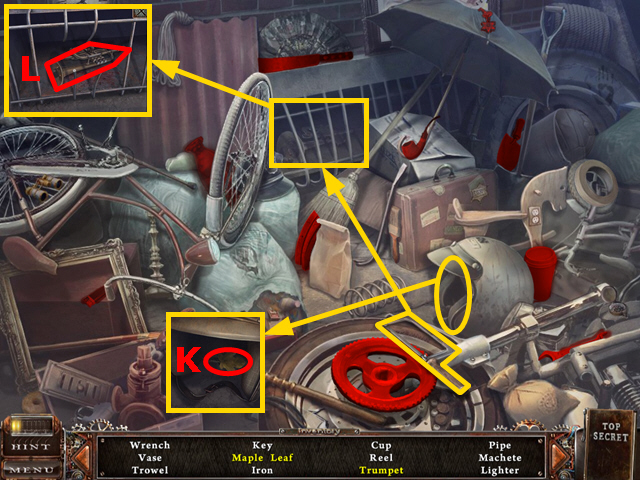
• Inspect the motorcycle helmet and take the maple leaf (K).
• Use the saw to cut the bars and collect the trumpet (L).
• The SHERIFF’S KEY will go into your inventory.
• Go back to the cave and enter the hall in front of the sheriff’s office.
• Zoom into the shelf and open the drawer by turning the SHERIFF’S KEY twice (M).
• Take the HAMMER.
• Return to the front of the café and inspect the showcase.
• Use the HAMMER on the showcase; take the note and the LEVER (N).
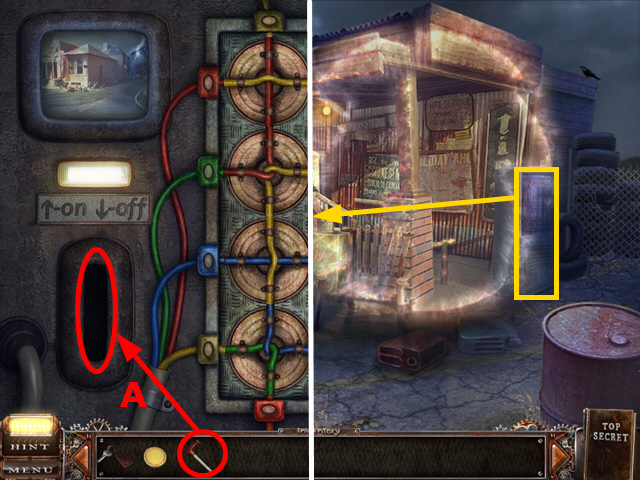
• Return to the gas station and zoom into the device.
• Put the LEVER into the appropriate place (A).
• Play the mini-game.
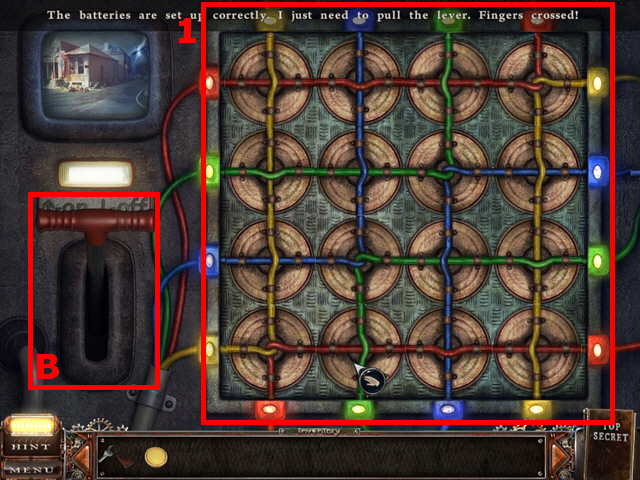
• Each part of the maze can be swapped with any other part and be rotated.
• Look at the screenshot to see the solution (1).
• When all bulbs are shining pull the lever (B) to turn off electricity.
Chapter 3: Entering the Town
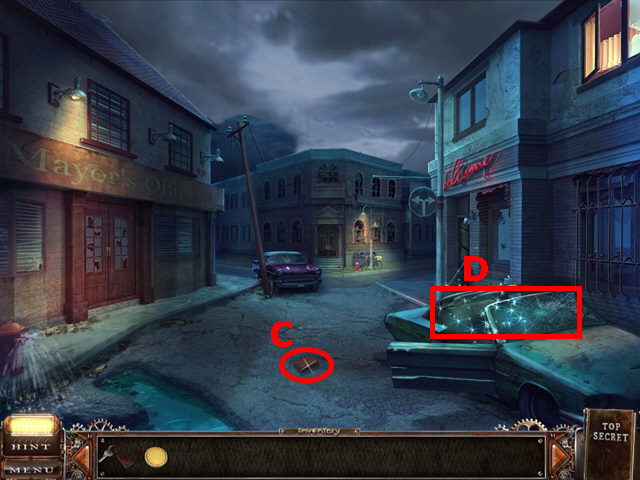
• Return to the crossing and move straight forward.
• Pick up the BRICK (C).
• Play the HOS (D).
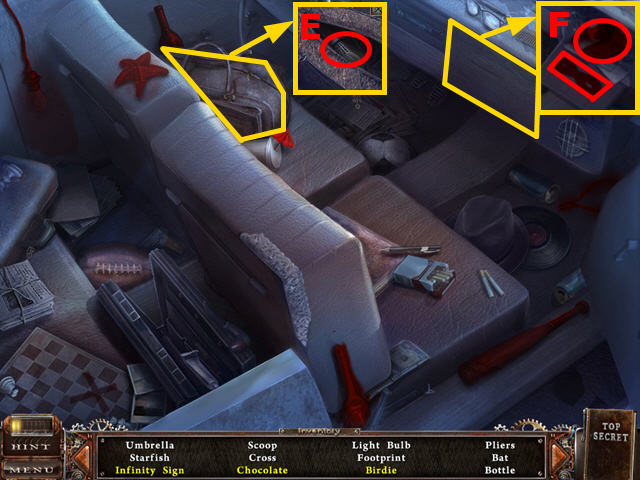
• Click the bag twice and inspect it to take the birdie (E).
• Open the hatch to find chocolate and infinity sign (F).
• PLIERS will be added to the inventory.
• Turn to the right and you will arrive at the hotel.
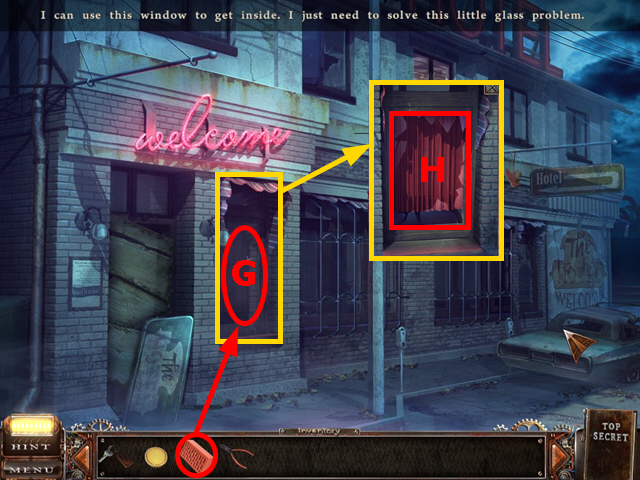
• Use the BRICK on the window (G).
• Zoom into the window and remove eight shards (H).
• Enter the hotel and play the HOS.
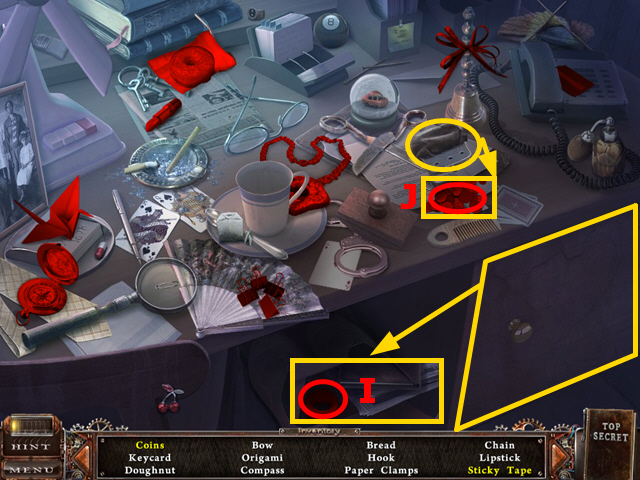
• Open the door to collect the sticky tape (I).
• Open the purse to get the coins (J).
• The KEY CARD will go to your inventory.
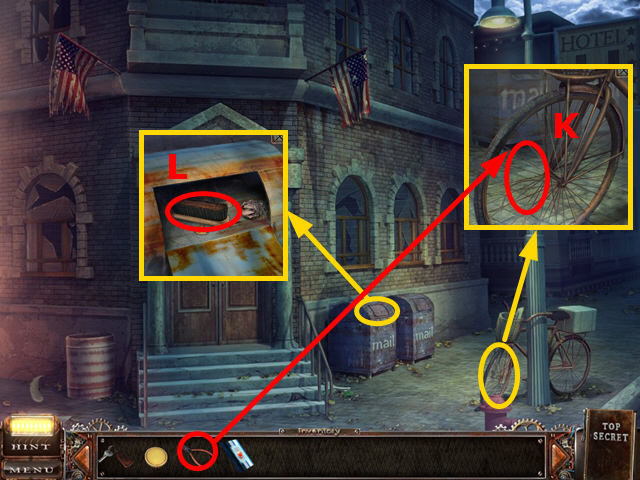
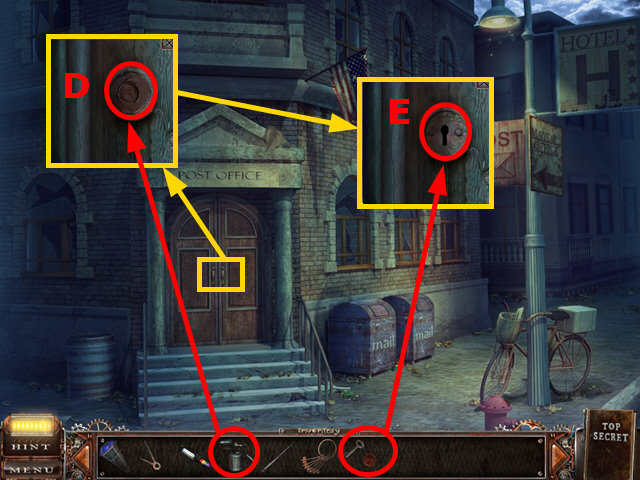
• Step back from the hotel and move straight to the post office.
• Remove the “Closed” sign from the door.
• Use the PLIERS on the bicycle wheel to get the SPOKE (K).
• Open the lid from the mailbox and take the BRUSH (L).
• Step back from the post office and go to the mayor’s office.

• Inspect the broken window and use the SPOKE to get a SPONGE (M).
• Take a closer look at the door to the mayor’s office.
• Use the TOWN HALL KEY and turn it twice (N) to enter the mayor’s office.
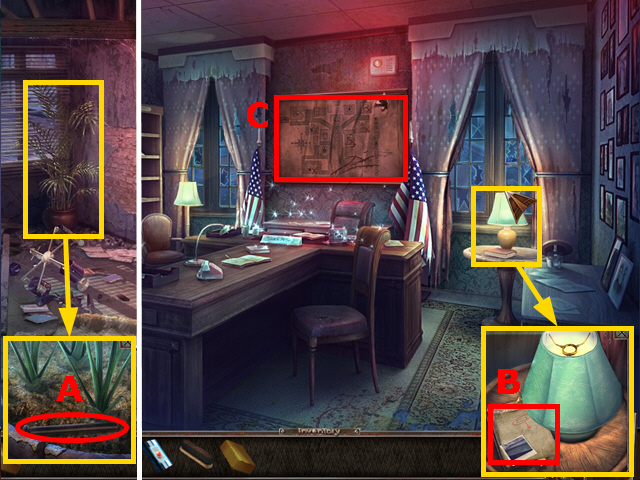
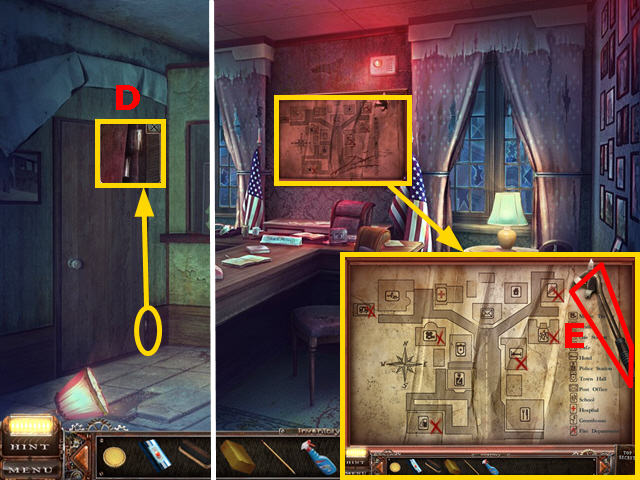
• Inspect the palm tree in the first room, take the HINGE PIN (A) and proceed through the door.
• Zoom into the small table; take the photo and the PENCIL (B).
• Take a look at the large plan (C), some houses have a red cross assigned to them.
• Play the HOS.
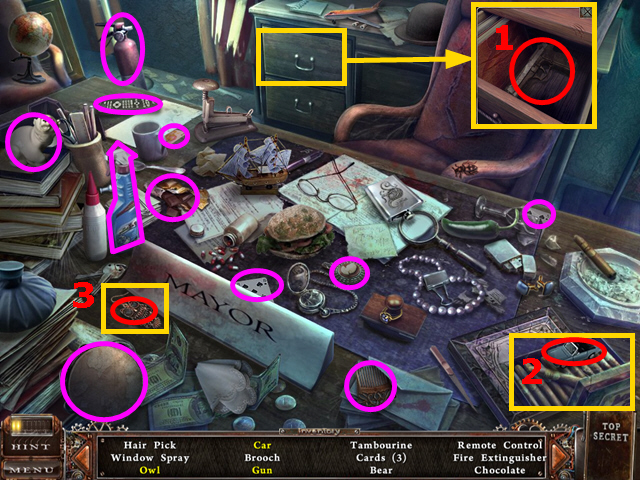
• Inspect the drawer to get the gun (1).
• Open the box of cigars to get the car (2).
• Push the mayor card and take the owl (3).
• The GLASS CLEANER will go into your inventory.
• Return to the hotel and use the HINGE PIN (D) on the broken door.
• Go to the mayor’s office and pick up the CROWBAR (E) from the large plan.
• Go back to the hotel and up the stairs.
• Use the CROWBAR on the boarded window (F).
• Use the GLASS CLEANER and the SPONGE to clean the dirt on the window (G).
• Play the HOS.
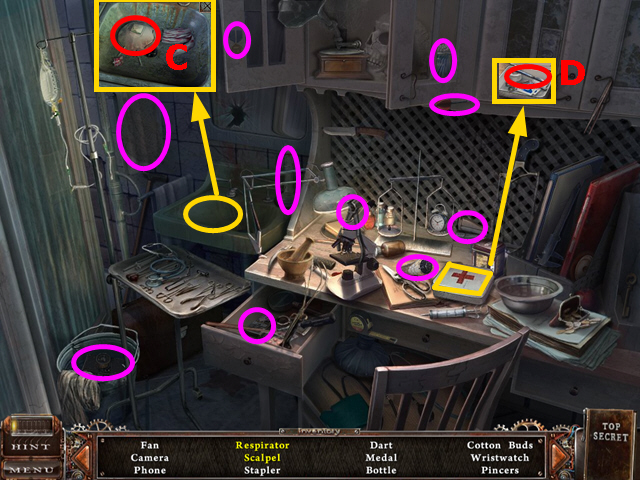
• Take a closer look at the open box; take the ace of hearts and the thermometer (H).
• The BARREL will go in your inventory.
• Inspect the broken lamp and take the ANTI-RUST LIQUID (I).
• Go downstairs and zoom into the board with keys (J).
• Play the mini-game.
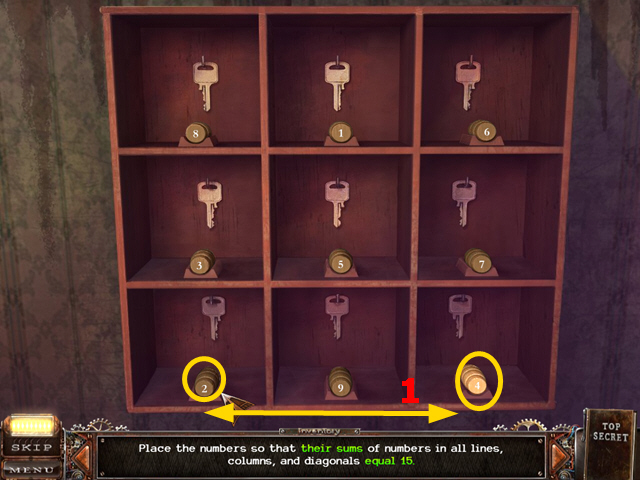
• Put the BARREL into the empty compartment.
• You have to swap barrels until sums of each row, column and diagonal add up to “15”. A barrel can be swapped with any other barrel.
• In the screen above only barrel “4” and barrel “2” are left to swap to solve this mini-game (1).
• The ROOM KEY will go into your inventory.
• Go back upstairs.
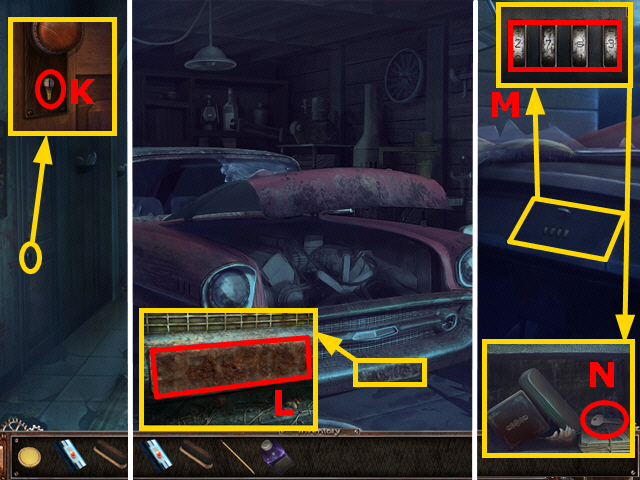
• Inspect the locked door and open it with the ROOM KEY (K) by turning it twice.
• Return to the garage.
• Zoom into the license plate and clean it with the ANTI-RUST LIQUID and the BRUSH (L).
• Go inside the car, inspect the lock and enter the code “53m8” (M); zoom into the compartment again and take the ALARM SYSTEM KEY (N).
• Go to the mayor’s office.
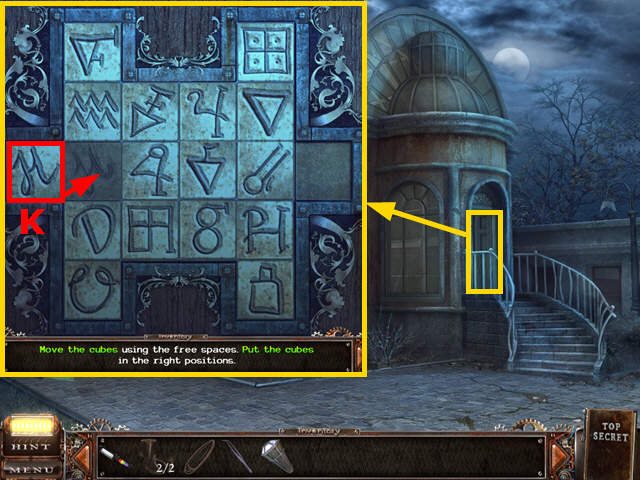
• Zoom into the alarm box and turn the ALARM SYSTEM KEY three times to open the panel (A).
• Insert the KEY CARD into the slot (B) and rearrange the numbers and letters according to the pattern on the right to turn the alarm off.
• The order and appearance of numbers and letters is randomized.
• Go into the office.

• Inspect the lowest compartment of the shelf.
• Enter the codes you found in the café (C), 40-790 and 80-341 into the control panel (D) and turn the handle three times to open the safe.
• To do so, turn the wheel to 40, enter “790” on the panel, turn the wheel to 80, then enter “341” on the panel.
• Take the BLUE CORE (E).
• Go back to the hotel, go upstairs, and enter the second room.
• Take a look at the newspaper and collect the note and the PAPER SHEET (F).
• Inspect the desk and collect the EMPTY JUG (G).
• Go back downstairs and zoom into the broken phone. Use the PAPER SHEET and the PENCIL on it to receive a code consisting of two “7”s and two strawberries (H).
• Go upstairs.
• Zoom into the slot machine.
• Put the COIN into the slot (I).
• Spin the wheels until the code “seven-strawberry-seven-strawberry” is correctly aligned (J).
• Take the picture of the clown (K).
• Leave the hotel.
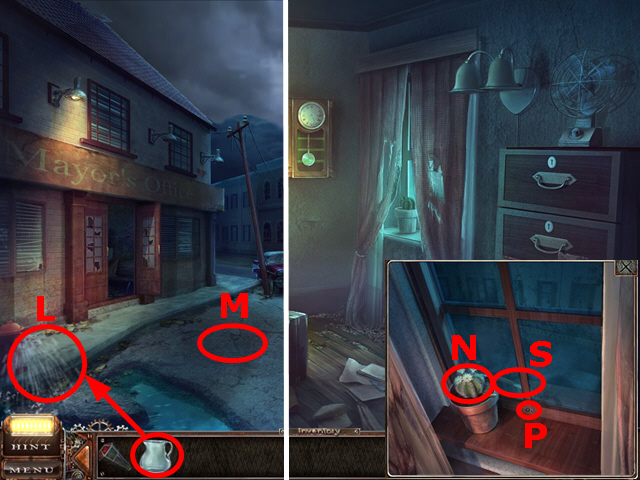
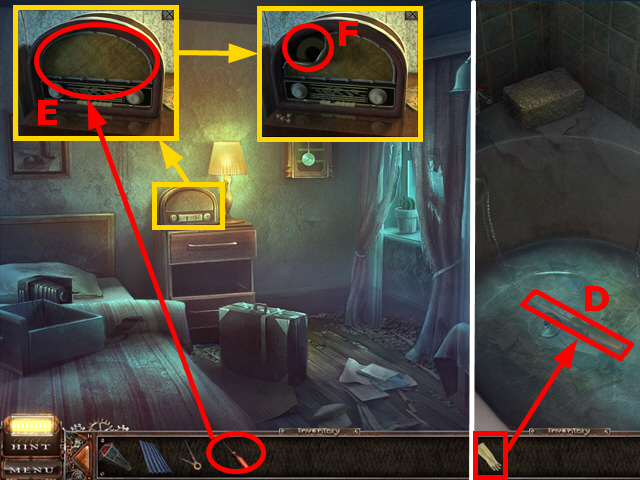
• Use the EMPTY JUG on the broken hydrant to get a JUG OF WATER (L).
• Collect the ROOF TILE from the street (M).
• Go back to the hotel, go upstairs, enter the first room.
• Inspect the flower, use the JUG OF WATER on it and take the HANDLE (N).
• Use the HANDLE on the window (P) and take the KNIFE (S).
• Go to the bath of the second room.
• Zoom into the cupboard. Use the KNIFE on the plastic barrier (A).
• Open the cupboard (B).
• Play the HOS.
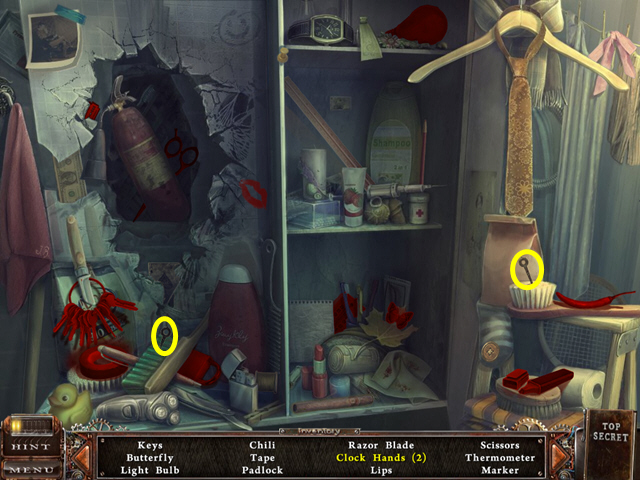
• Collect the clock hands marked in yellow.
• The CLOCK HANDS will go into your inventory.
• Go into the other room of the hotel and play the HOS.
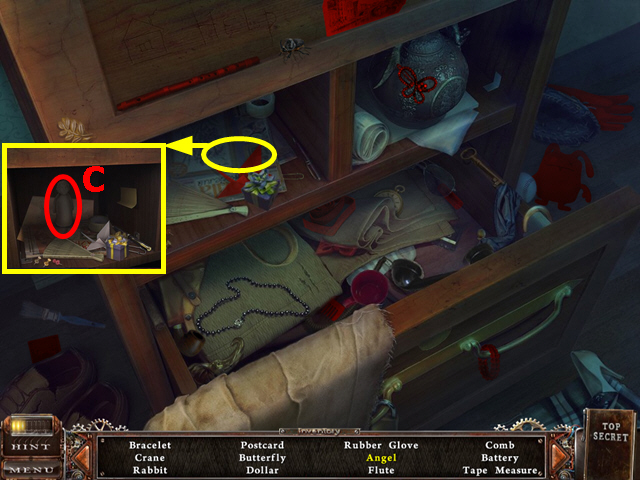
• Inspect the compartment to take the angel (C).
• The RUBBER GLOVE goes into your inventory.
• Return to the bath of the second room.
• Pull the shower curtain and inspect the shower.
• Use the RUBBER GLOVE to take the SCREWDRIVER (D).
• Return to the first room and inspect the radio.
• Use the SCREWDRIVER to remove the cover (E).
• Take the MAGNET (F).
• Go the post office, then take the turn to the right.
Chapter 4: The Chasm
• Use the ROOF TILE to cross the chasm (G).
• Turn to the left and zoom into the mail box.
• Take the letter (H).
• Go through the door.
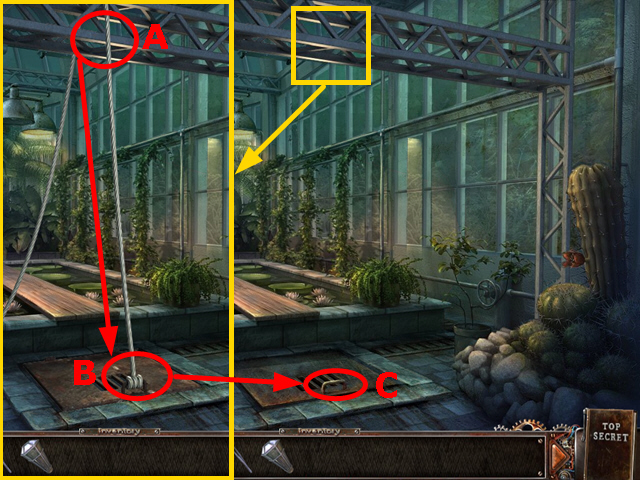
• Inspect the stairwell and use the MAGNET on it (I).
• Zoom into the board on the wall and read the note (J).
• Look at the desk, take the NEON FLASHLIGHT (K) and lift the receiver (L).
• Play the mini-game (M).
• Spin the symbols outside of the three circles until all of them match the pattern on the inside of the three circles.
• The order of symbols is randomized.
• Play the HOS.
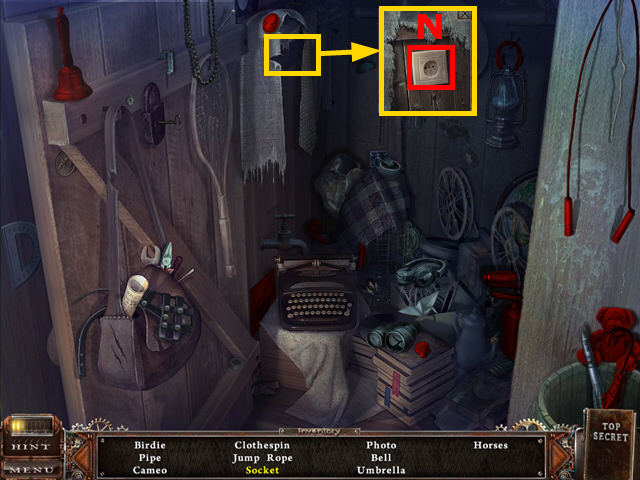
• Zoom into edge covered in a blanket to collect the socket (N).
• The BLOWTORCH will go into your inventory.

• Go upstairs.
• Turn on the light (P).
• Play the HOS.
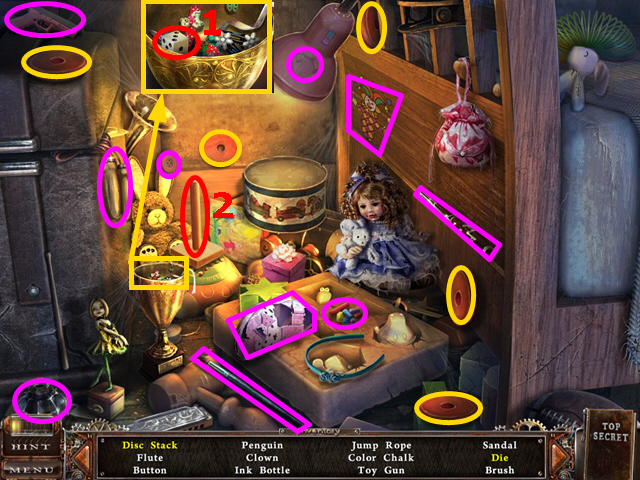
• Zoom into the goblet to collect the die (1).
• Put the five discs marked in yellow on the stack (2) and collect the stack.
• The BRUSH will go into your inventory.
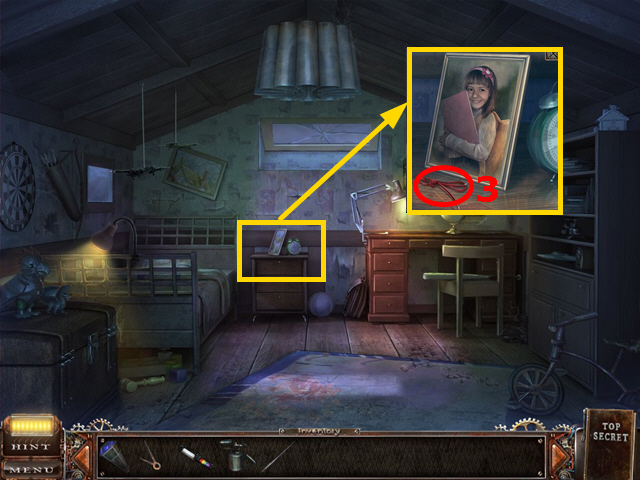
• Inspect the nightstand and look at the photo.
• Collect the SHOELACE (3).
• Go downstairs.
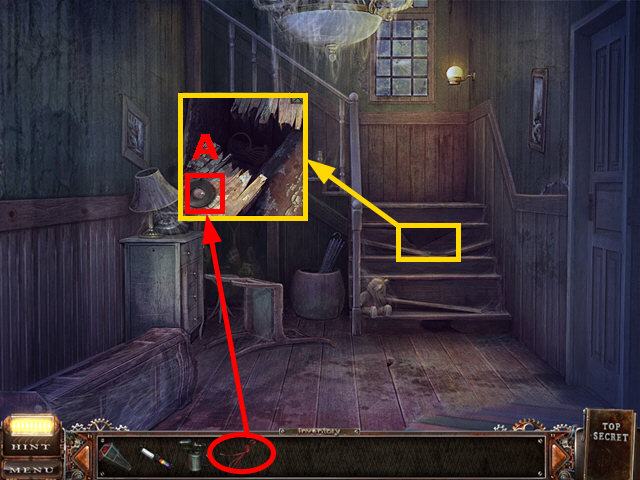
• Zoom into the hole in the stairwell.
• Add the SHOELACE to the magnet (A).
• The BUNCH OF KEYS will go into your inventory.
• Return to the hotel, go upstairs, and enter the first room.
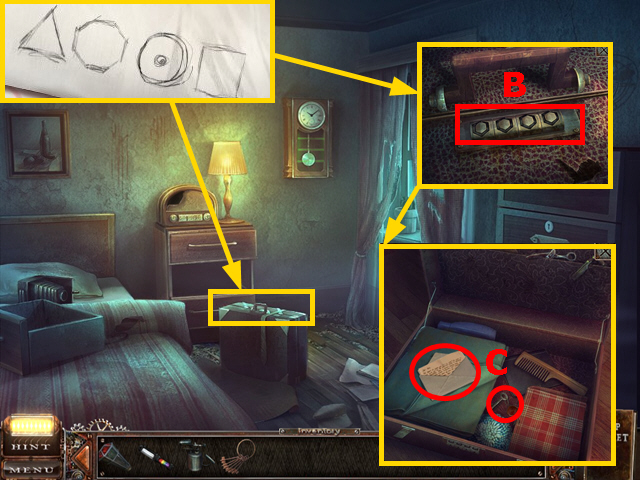
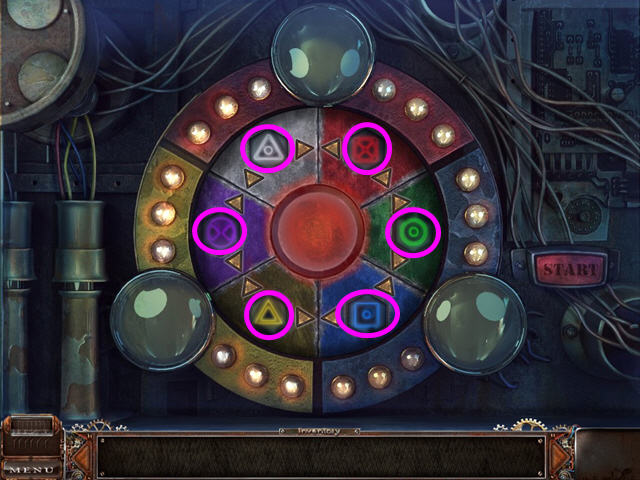
• Zoom into the suitcase, choose the correct symbols to open it (B). The order of the symbols is: triangle – octagon – circle with a dot in the center – square.
• Open the suitcase, zoom into it, and collect the letter and the POST OFFICE KEY (C).
• Go to the post office.
• Zoom into the locked door of the post office.
• Use the BLOWTORCH on the seal (D).
• Unlock the door with the POST OFFICE KEY by turning it three times (E).
• Enter the post office and play the HOS.
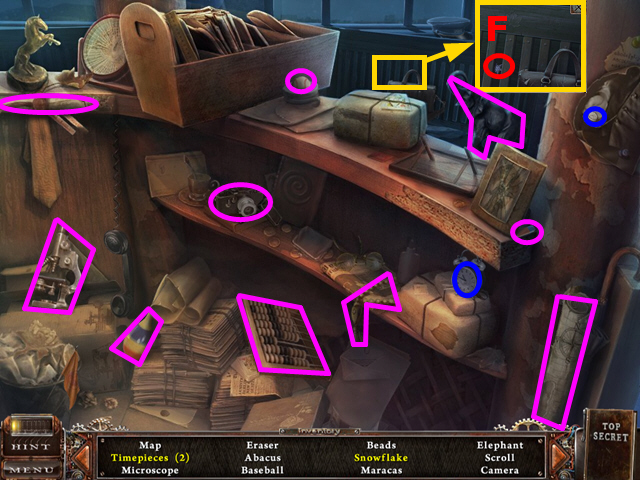
• Zoom into the heating and collect the snowflake (F).
• Collect both timepieces marked in blue.
• The ERASER will go into your inventory.
• Zoom into the counter in the centre of the room and take the WORK GLOVE (1).
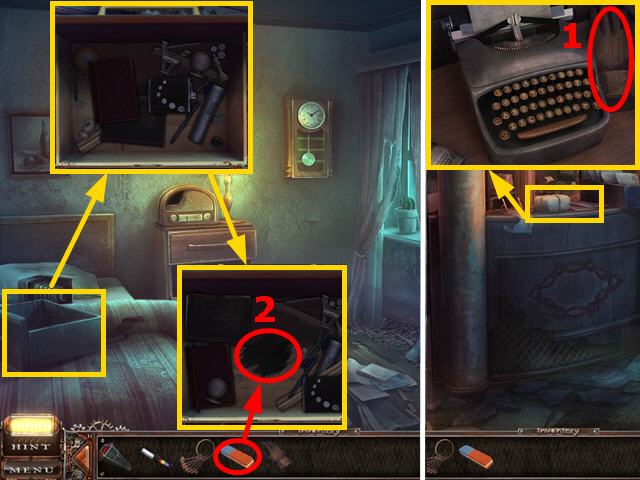
• Return to the hotel, go upstairs, enter the first room.
• Zoom into the box, put objects aside until you see a black stain.
• Remove the stain with the ERASER (2) to reveal “9:25”.
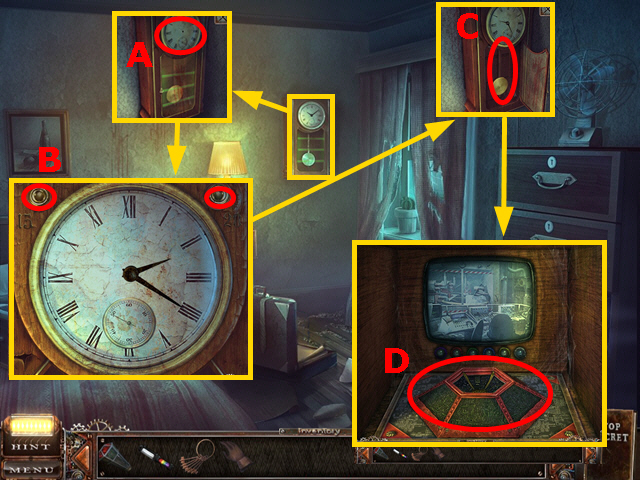
• Zoom into the clock on the wall.
• Add the CLOCK HANDS to the clock (A).
• Push the “15 minutes backwards” button twenty times, the “20 minutes forward” button once, and the “15 minutes backwards” button once to turn the time to “9:25” (B).
• Zoom into the clock again, remove pendulum and wooden panel (C).
• Zoom into the clock and to note the red orifice (D).
• Return to the post office.

• Inspect the bottom of the counter. Use the WORK GLOVE on it and take the PAGE SCRAP (E).
• Zoom into the rack below the phone. Open the book and add the PAGE SCRAP to it (F). You will read the code “Phantom 74”.
• Inspect the counter in the center of the room. Enter the code “Phantom 74” on the typewriter and take the RED CORE (G).
• Return to the hotel, go upstairs, enter the first room.
• Zoom into the clock.
• Put the RED CORE into the orifice (1).
• Go back to the post office and take the right turn.
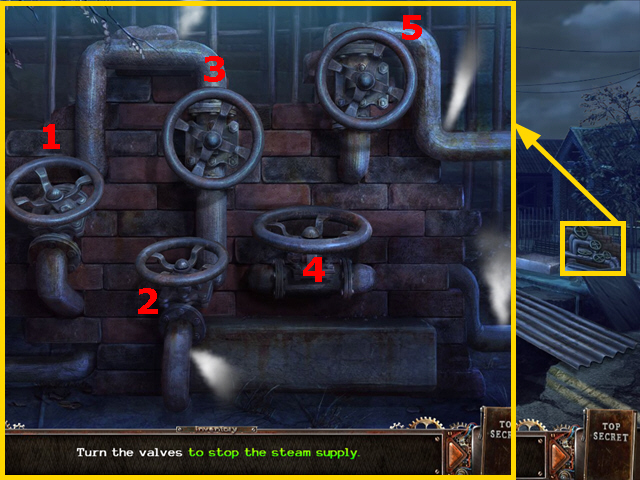
• Zoom into the steam pipelines.
• Use the WORK GLOVE on the pipelines to play the mini-game.
• Turn the valves in the correct order to stop the steam. The order is randomized..
• Turn to the right to arrive at the entrance of the school.
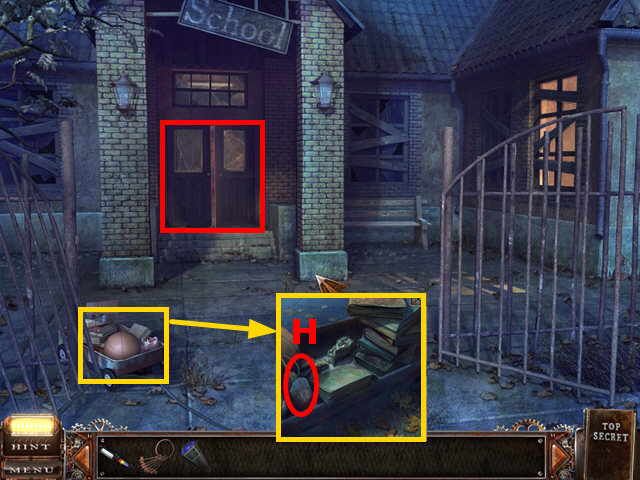
• Zoom into the small vehicle and take the OIL CAN (H).
• Go through the door and play the HOS.

• Pick up the two math compasses marked in purple.
• Push the ink bottle to create an ink blot (J) and collect it.
• Take the chalk to create a heart at the blackboard (I) and take the heart.
• Pick up the suction cup (K).
• The SUCTION CUP will go into your inventory.
• Go through the door in front of you.

• Pick up the POKER (L).
• Zoom into the machine in the center of the room. Use the OIL CAN to oil the valve and turn it five times (M).
• Open the door of the box (N).
• Go back to the chasm and go straight forward to the fire station.
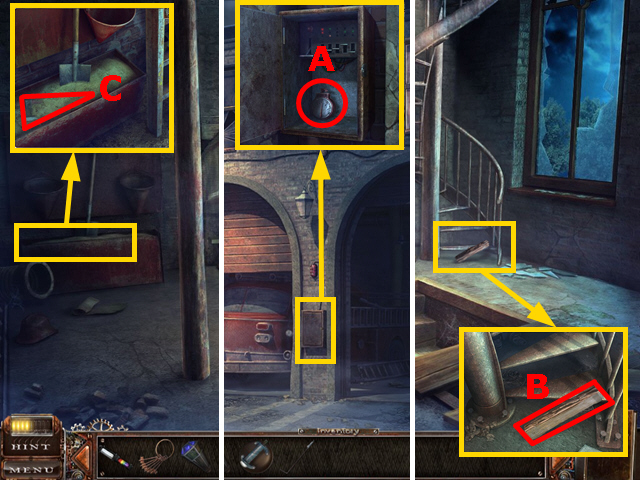
• Inspect the box, open its door, and take the PRESSURE GAUGE (A).
• Enter the fire station and zoom into the bottom of the stairwell. Take the LOG (B).
• Take a closer look at the crate filled with sand. Take the AXE (C).
• Return to the cellar of the school.
• Zoom into the box and add the PRESSURE GAUGE (D).
• Push the handle of each gauge to the minus side to lower pressure, and to the right side to increase pressure.
• Each pressure gauge has to be adjusted according to the figures of the scheme. You have to follow the pipes to see which pressure gauges represent those in the scheme to fulfill the correct order.
• Look at the screenshot above for the correct solution.
• Zoom into the wooden crate, use the AXE to open it (E) and take the ADJUSTABLE WRENCH.
• Go inside the fire station.
• Zoom into the stairwell and tighten the screws with the ADJUSTABLE WRENCH (F).
• Go upstairs and play the HOS.
• Open the drawer to get the screwdriver (G).
• Inspect the case near the armchair, open it and take the clock (H).
• The CHEST KEY will go into your inventory.
• Remove the portrait from the wall and inspect the panel.
• Put the SUCTION CUP onto the panel (I).
• Go downstairs twice and inspect the lock of the chest.
• Use the CHEST KEY and turn it twice to open the chest and take the FIRE HOSE (J).
• Go back to the post office and turn to the left.

• Zoom into the hydrant, remove its cap, and use the FIRE HOSE on it (K).
• Go back to the school cellar and inspect the oven.
• Heat the POKER in it to get RED-HOT POKER (L).
• Go back to the school hall, inspect the compartment and use the RED-HOT POKER on it (M).
• Open the panel and take SCISSORS, HANDLE and uncover the orifice for the green core (N).
• Go back to the chasm and turn to the left, enter the house.
• Inspect the door, add the HANDLE to it (A) and enter the room to the right.
• Remove the curtain from the window in the front (B).
• Inspect the pillow on the sofa. Use the SCISSORS on it (C) and take the YELLOW CORE.
• Zoom into the tv and take the FILM (D).
• Inspect the window. Keep it open by adding the LOG to it (E).
• Enter the backyard through the window.
• Inspect the door in the earth and play the mini-game.
• Add the BUNCH OF KEYS to the door.
• You have to choose the right key according to the pattern six times. The key you choose is shown mirror-inverted. Follow the order displayed in the screenshot above.
• Go through the door.
• Take the BOOTS 1/2 (F).
• Inspect the shelf and take BOOTS 2/2 (G).
• Zoom into the plans at the wall and collect the HYDRANT VALVE (H).
• Take a closer look at the skeleton. Read the note and take the HAIRPIN (I).
• Go back into the house and walk upstairs.
• Inspect the chest. Use the HAIRPIN on the lock to open it (J).
• Take the GREEN CORE (K).
• Go back to the school hall and zoom into the compartment.
• Put the GREEN CORE into the orifice (L).
• Go to the post office and turn left to the burning barricade.
Chapter 5: The Fire
• Zoom into the hydrant and put the HYDRANT VALVE on it (M).
• Turn the hydrant valve to extinguish the fire.
• Turn to the left to the movie theater and play the HOS.
• Open the chest to collect the letter “K” and the dagger (N).
• The LADDER will go into your inventory.
• Inspect the car and take the CANE (A).
• Enter the movie theater.
• Put the LADDER in front of the door to the right side (B).
• Remove the glass on top with the CANE (C).
• Take a peek through the window and remove the beam with the CANE (D).
• Remove the LADDER.
• Play the HOS.
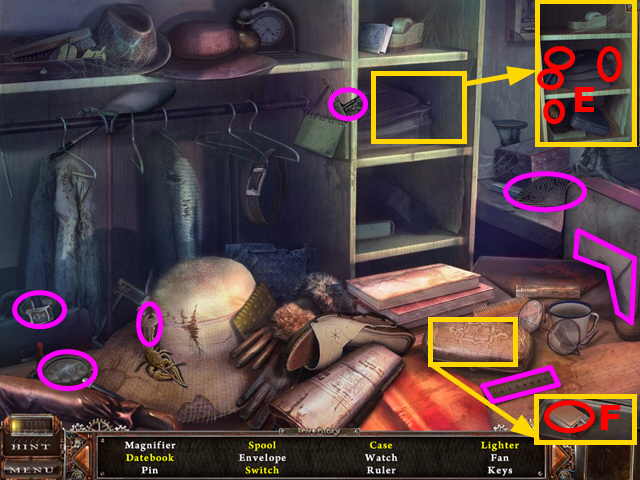
• Inspect the shelf to collect the spool, switch, case and datebook (E).
• Open the case and take the lighter (F).
• The SWITCH goes into your inventory.
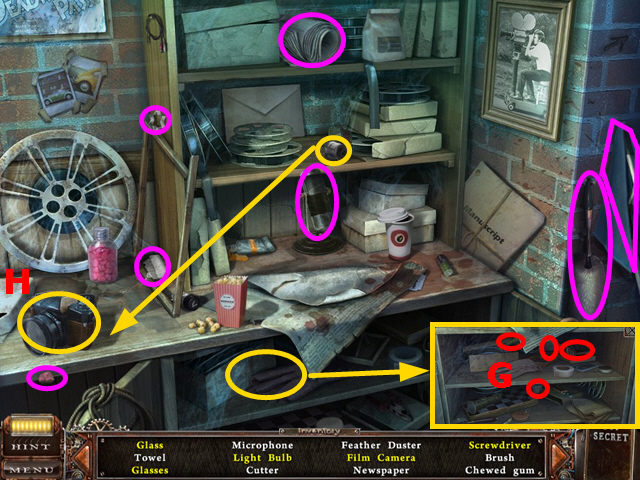
• Go through the door on the right side, open the cabinet and play the HOS.
• Zoom into the shelf to collect glass, glasses, screwdriver and light bulb (G).
• Put the film into the camera and take the film camera (H).
• The FEATHER DUSTER will go into your inventory.
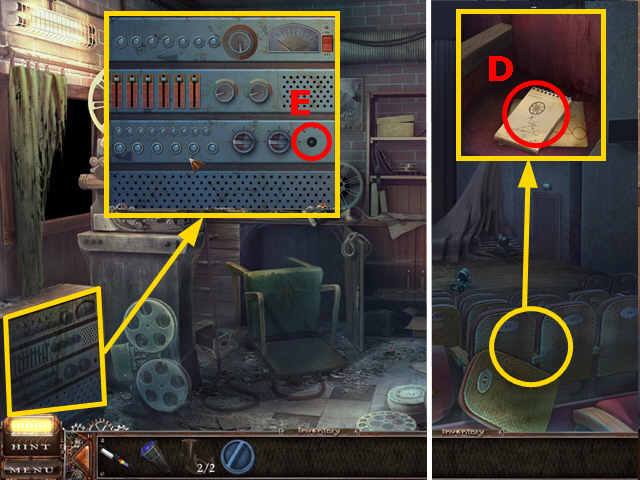
• Inspect the panel and use the FEATHER DUSTER on it (A).
• Put the YELLOW CORE into the orifice (B).
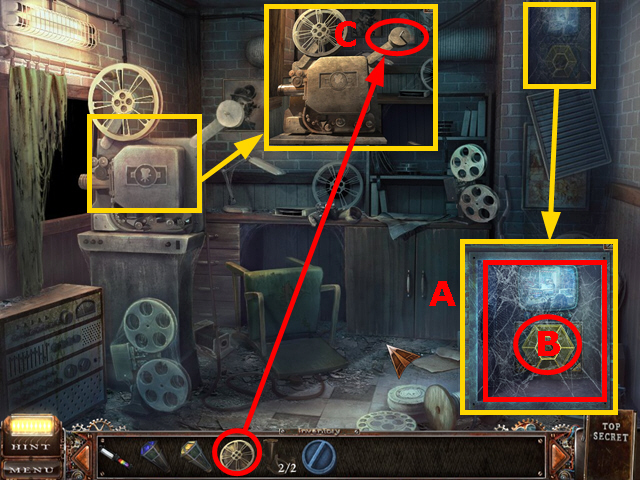
• Zoom into the film projector, open its lid and put the FILM in it (C).
• Go back into the other room and through the door on the left side.
• Inspect the chairs and collect the NOTE WITH ARROWS (D).
• Go back to the room with the film projector.
• Zoom into the device and put the SWITCH on it (E).
• Return to the school hall and enter the room to the right.
• Use the NEON FLASHLIGHT to detect the paint, once detected take the NEON PAINT (1).
• Go back to the chasm, turn to the left, and go upstairs into the child’s room.
• Zoom into the desk.
• Take the instruction.
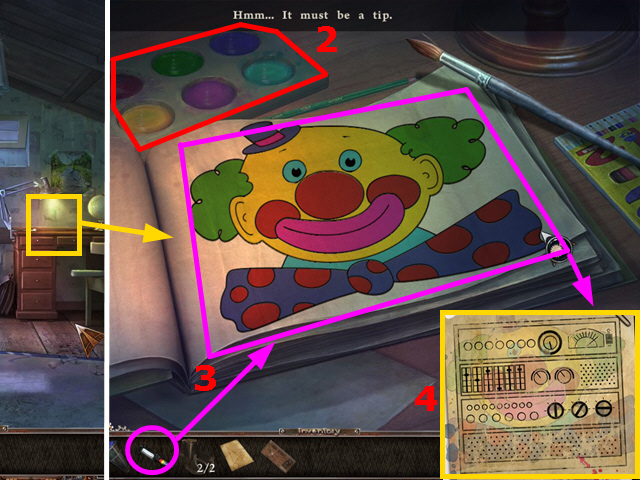
• Add the NEON PAINT and BRUSH to the painting book (2).
• Paint the clown according to the picture with the neon paint and brush.
• Please look at the screenshot for the solution.
• When the clown is finished, use the NEON FLASHLIGHT on the painting (3).
• You will receive a scheme (4) for the amplifier in the cinema.
• Return to the cinema, and go into the right-hand room.
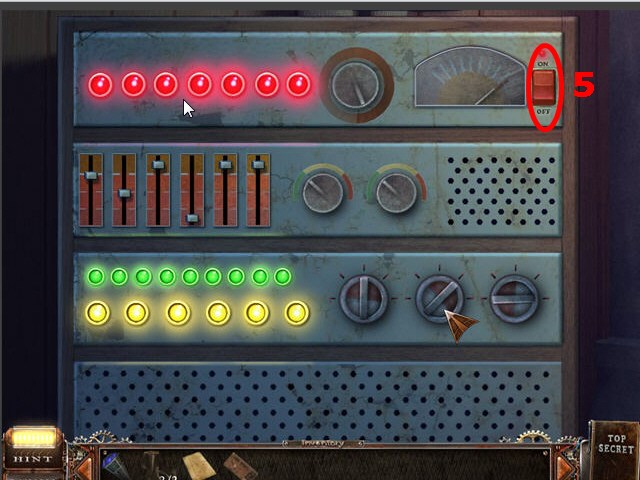
• Play the mini-game at the amplifier.
• Push the “on”-button (5).
• All the switches and slides have to be turned and moved to correspond to the scheme.
• Look at the screenshot for the correct solution.
• Go into the left-hand room of the cinema.
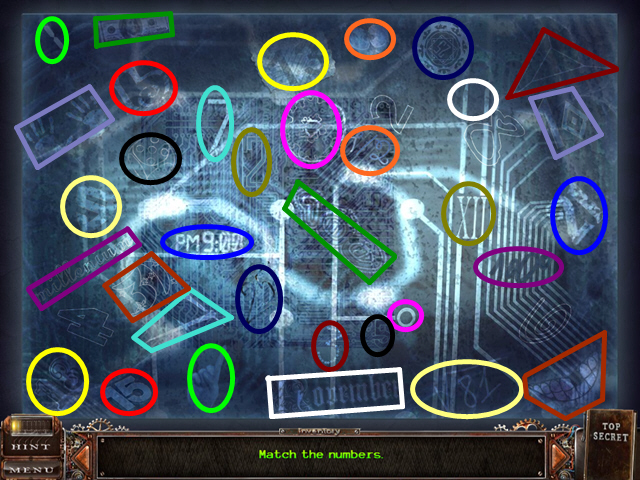
• Inspect the screen and play the mini-game.
• Correct matches are marked in the same color. When you have matched all necessary numbers put the NOTE WITH ARROWS on it to receive the code “8462”.
• Open the small door beside the screen and play the HOS.

• Pull the curtain as far as possible.
• Use the cord to tie up the curtain to get the nippers (A).
• Take the hammer and break the piggybank to collect the coin (B).
• Inspect the crate to collect the hanger and the cactus (C).
• The BOLT CUTTERS will go to your inventory.
• Leave the movie theater; turn to the right to arrive at the entrance of the hospital.
• Inspect the bin. Take the MOVIE TICKET (D).
• Zoom into the locked door. Use the BOLT CUTTERS to cut the chain (E).
• Enter the hospital and play the HOS.

• Inspect the compartment in the shelf and take the bottle (F).
• Open the bag, zoom into it and collect scissors and bandage (G).
• The ROPE will go into your inventory.
• Go forward and enter the room of the dentist.
• Open the box, zoom into it, and play the mini-game.
• Each ending from the top has to be connected to the related ending on the bottom. Follow the wires to activate all lights. After that turn the light on (H) and press the button for blue light (I).
• Look at the screenshot above for the correct solution.
• Inspect the picture above the chair and make note of the recipe (J).
• Inspect the desk and prepare the recipe.
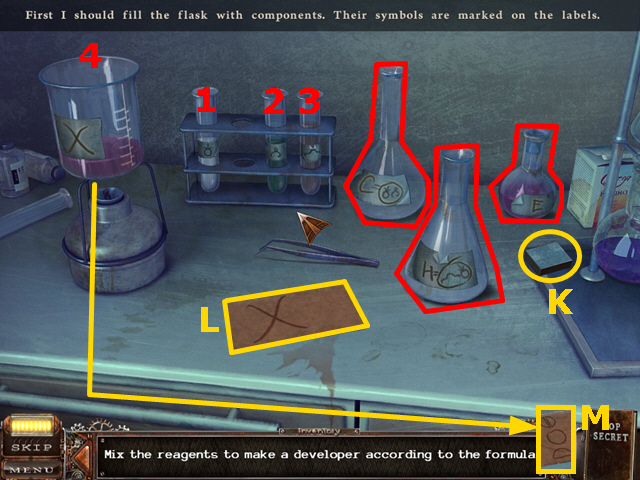
• Put the MOVIE TICKET onto the desk.
• Take the flask “E” and add it to container (4) twice.
• Add liquid from test tubes (3) and (1) to the flask “H”. Add the flask “H” to container (4) three times.
• Add liquid from test tubes (1) and (2) to the flask “C”. Add the flask “C” to container (4) twice.
• Take the matches (K) and the container (4) will be heated.
• Take the MOVIE TICKET (L) and the recipe will be finished. TWEEZERS will go into your inventory.
• Make note of the symbols (M).
• Return to the hall and enter the second room.
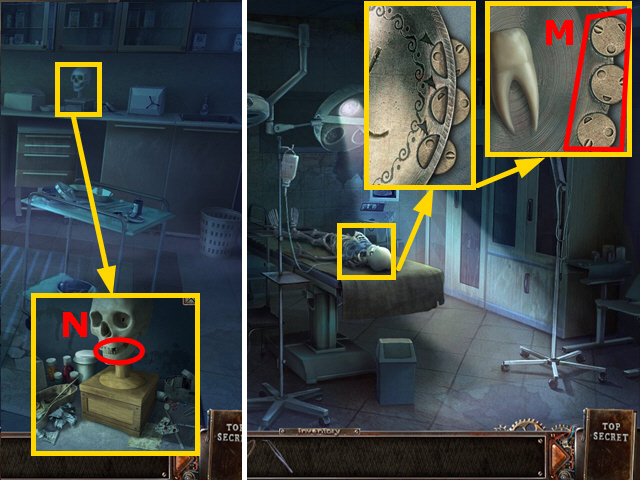
• Inspect the skeleton and play the mini-game.
• Each symbol can be turned by pressing the related circle. Symbols have to be aligned according to the code you received after preparing the recipe (M).
• Take the PROFESSOR’S TOOTH.
• Return to the room of the dentist and zoom into the skull. Add the PROFESSOR’S TOOTH to it (N).
• Take the WHITE CORE and the OPERATING ROOM KEY.
• Return to the second room.
• Zoom into the door; use the OPERATING ROOM KEY to open it (A).
• Play the HOS.
• Inspect the sink and collect the respirator (C).
• Open the bag and take the scalpel (D).
• The RESPIRATOR will go into your inventory.
• Go back to the street and straightforward to the front of the greenhouse.
• Use the RESPIRATOR on the toxic fumes (D) to access the trailer.
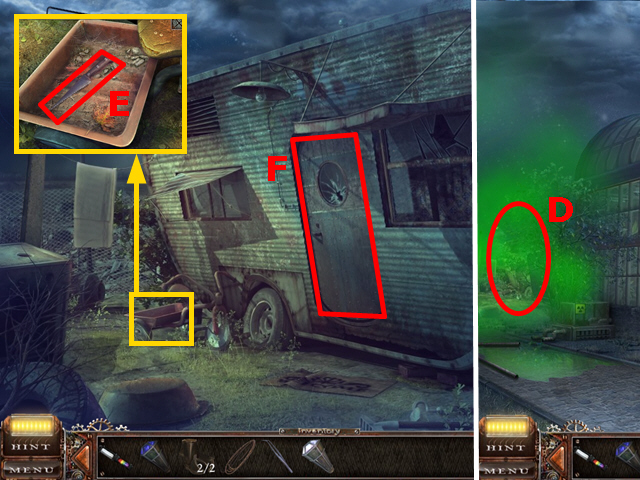
• Inspect the small vehicle and take the KITCHEN KNIFE 1/3 (E).
• Open the door (F) and enter the trailer.
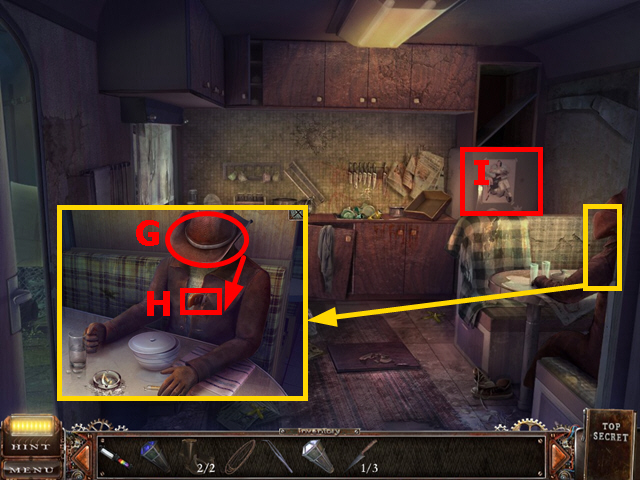
• Inspect the person sitting at the desk.
• Pull the hat (G) and take the KITCHEN KNIFE 2/3 (H).
• Open the door of the fridge (I).
• Play the HOS.
• The KITCHEN KNIFE 3/3 will go into your inventory.
• Zoom into the board, put the KITCHEN KNIFE 3/3 onto the board and play the mini-game.
• Each knife has to be at the correct place. Correct placements are indicated by a green glow.
• Swap the two knives marked in red for the correct solution.
• Take the CUBE WITH SYMBOLS (J) and put the BLUE CORE into the orifice.
• Go back to the greenhouse.
• Zoom into the entrance door of the greenhouse.
• Put the CUBE WITH SYMBOLS on the board and play the mini-game.
• Both spaces on the side are free; the other spaces reveal which cubes have to be placed upon them.
• Move the last cube on the space marked in red (K) for the correct solution.
• Enter the greenhouse.
• Use the ROPE on the ceiling (A).
• Connect the ROPE to the cellar door (B).
• Open the cellar door (C).
• Go downstairs and play the HOS.
• The PANEL BOARD KEY will go into your inventory.
• Go downstairs.
• Take the PIKE POLE (D).
• Inspect the small door. Use the PANEL BOARD KEY on it and open it (E).
• Use the BOOTS on the flooded room (F).
• Move backwards and go upstairs twice.
• Inspect the cacti. Use the PIKE POLE to get the FUSE (G).
• Go downstairs twice.
• Take another look at the box and put the FUSE on it (H).
• Go into the flooded area.
• Inspect the green panel and play the mini-game.
• Red blocks have to be placed in the white-highlighted fields. First fill those fields that require a second red block as a placeholder, then fill the remaining three fields. The fields marked with yellow have to be filled with a red block temporarily to enter a second red block on a correct field.
• The last red block has to be moved into the field indicated by a purple arrow for the correct solution.
• Turn the valve four times (I) and move into the new room.
• Inspect the door off the latch, close it and turn the handle to confine the man (J).
• Inspect the clock on the wall (K), return to the hotel.
• Go upstairs and enter the bath of the second room.
• Inspect the sink and use the TWEEZERS to get the DIAMOND RING (L).
• Go to the fire station, go upstairs, and zoom into the panel.
• Use the DIAMOND RING on the suction cup to cut the glass. Put the WHITE CORE into the orifice (M).
• Return to the greenhouse, go downstairs twice and enter the laboratory.
• Zoom into the control panel, put in the code “8462” and hit enter (A).
• Inspect the clock on the wall again (B) and play the mini-game.
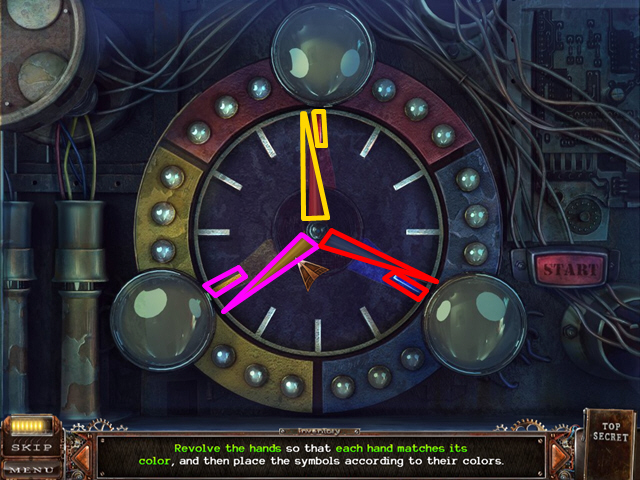
• For the first part of this puzzle, rotate the yellow clock hand in a clockwise direction until all clock hands reach their designated color.
• For the second part of this puzzle, you have to switch between symbols for each color until you meet those which are displayed for the six transmitters on your map.
• Look at the screenshot above for the correct solution.
• Congratulations, you have completed Top Secret Finders.