

Walkthrough Menu
- General Tips
- Chapter 1: England
- Chapter 2: Germany
- Chapter 3: Egypt
- Chapter 4: France
- Chapter 5: Siberia
- Bonus Levels: England (26 Tasks)
General Tips
- This game has 5 Chapters and an extra Chapter which will be unlocked after the game has been completed.
- You will be asked to select the difficulty level at the beginning of the game. Click on the name of each mode to read a brief description of what each mode entails. Once you’ve made your selection, click on the “OK” button at the bottom.
- The outcome of the game is the same in both Modes; the only thing that changes is how much in-game help you will receive.
- Some items can be hidden inside objects or in other areas. Make sure that you explore as many areas as you can.
- Each location has passages to other areas. Click on the walking feet icons to access these areas.
- The magnifying glass icon allows you to take a closer look at items.
- The hand icon allows you to pick up items in the scene.
- In the Hidden Object scenes the items marked in yellow can only be found after you pick up another item and combine it with something else. You can also find yellow items by looking inside of hidden compartments.
Tasks
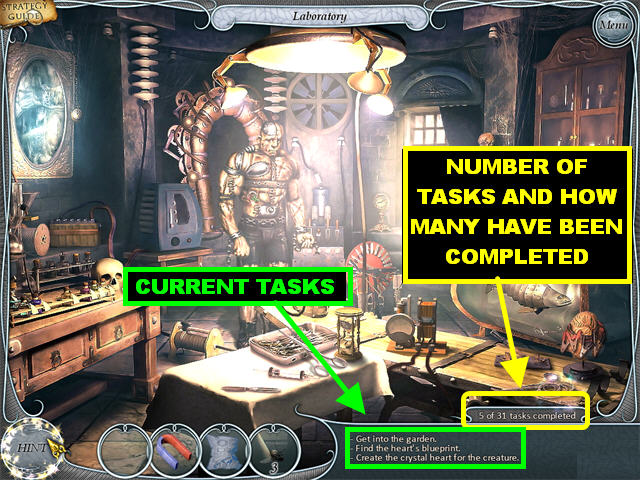
- There are several tasks that need to be completed for each level.
- The tasks are located in the lower right corner of each scene.
- Once a task has been completed, it will disappear from the list.
- There can be several tasks displayed at once. Make sure you read each task carefully to find out what you need to do.
Strategy Guide
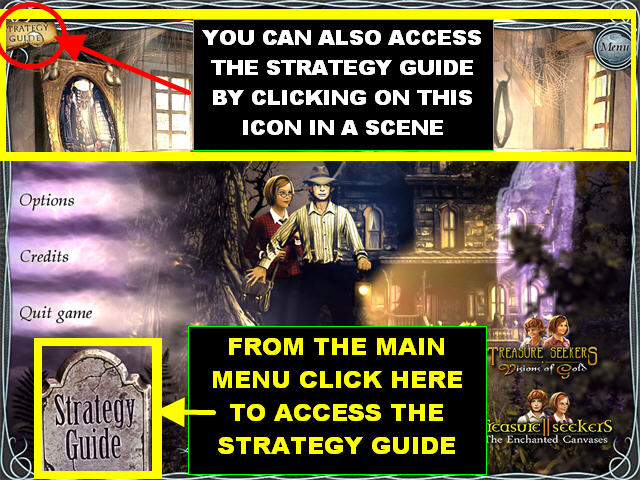
- There are 2 ways to access the Collector’s Edition Strategy Guide.
- From the Main Menu, you can click on the “Strategy Guide” gravestone in the lower left corner.
- During the game, you can click on the “Strategy Guide” icon in the upper left corner of the scene.
Key Objects
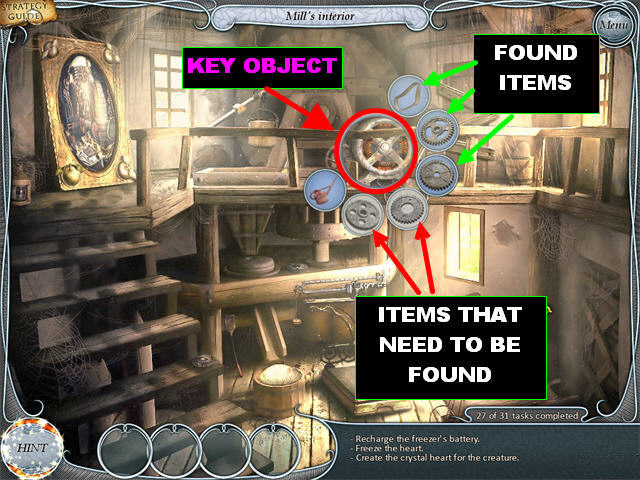
- A Key Object can be obtained by clicking on the areas that glow when you pass your mouse over them.
- Selecting a Key Item will bring up a bubble showing you the items needed to fill that Key Object.
- Pick up the items shown in the small bubbles and drag them to the center of the Key Object.
- Each time the correct item has been added to the bubble, that item will turn from black and white to color.
Mini-games
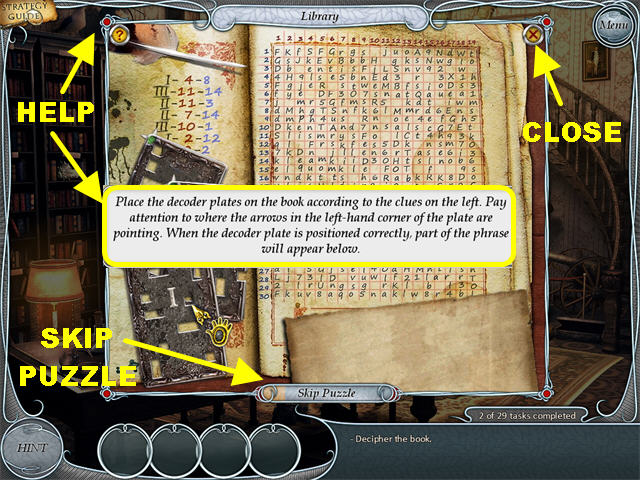
- There are several mini-games in Treasure Seekers: Follow the Ghosts.
- All mini-games can be skipped once using the Skip button in the lower center.
- Click on the “?” in the upper left corner to view the instructions for each puzzle.
Chapter 1: England
Library & Office
- This chapter has 29 tasks to complete.
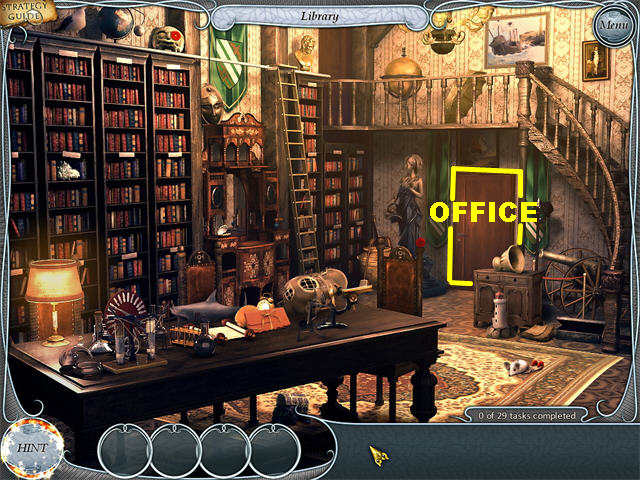
- Library - Click on the door to enter the office. Go through the dialogue.
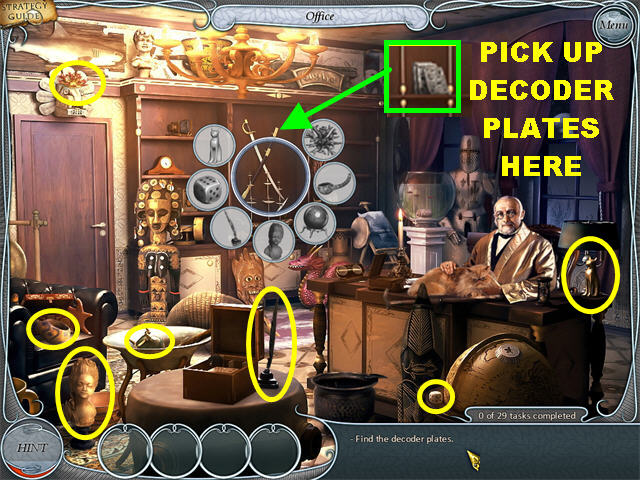
- Office - Click on the shelves on the left to bring up a bubble.
- Pick up the items shown in the screenshot and drag them to the shelves.
- After all the items have been found, the center shelf falls down.
- Click on the DECODER PLATES in the center of the shelf.
Library
- Go back to the library.
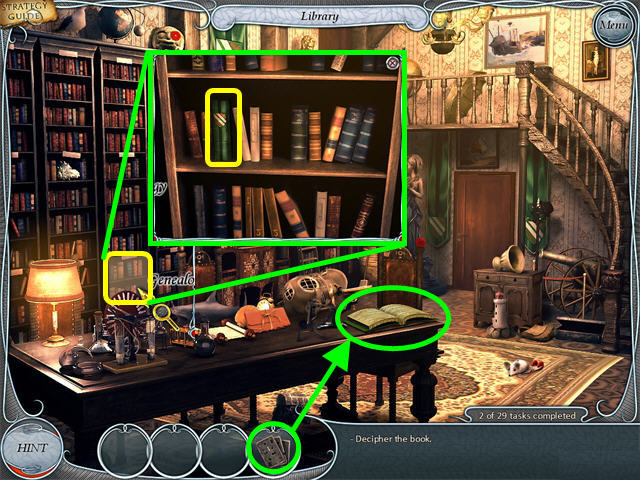
- Click on the Genealogy section in the lower part of the bookcase.
- Click on the green book on the left side of the middle shelf.
- The book lands on the right side of the desk.
- Place the DECODER PLATES on the ENCRYPTED BOOK on the desk to trigger a mini-game.
Decoder Plates Mini-game
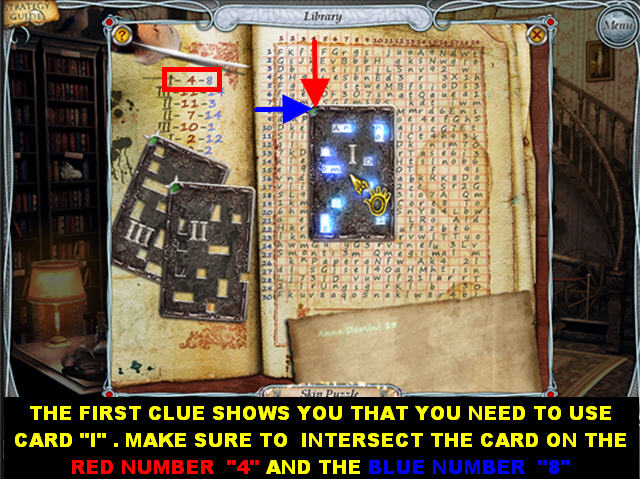
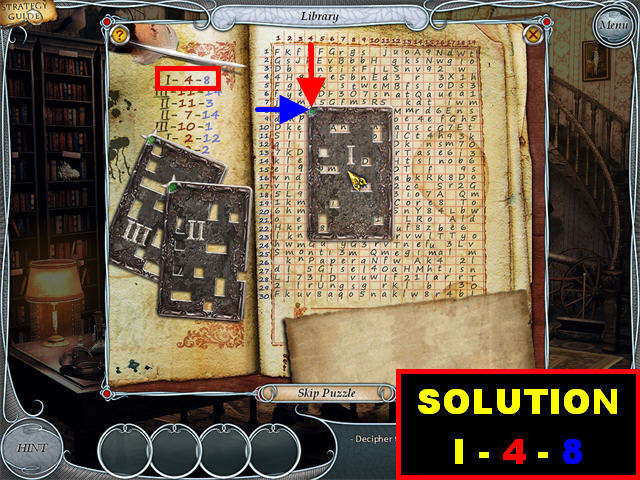
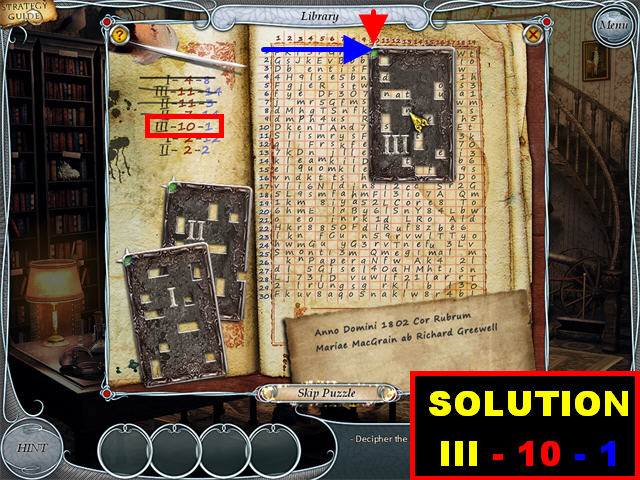
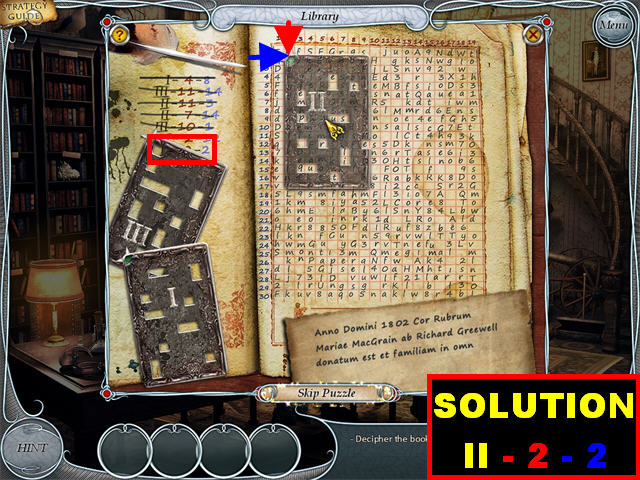
- Your goal in this puzzle is to decipher the book by using the decoder plates on the lower left and the clues shown in the upper left.
- Each decoder plate has a number in the center. Make sure when using the plates that you are matching them with the right numbers in the upper left.
- The page on the right has numbers written in red across the top and in blue on the left.
- Drag the decoder plates to the right side of the page and line them up according to the numbers marked in the upper left side of the puzzle.
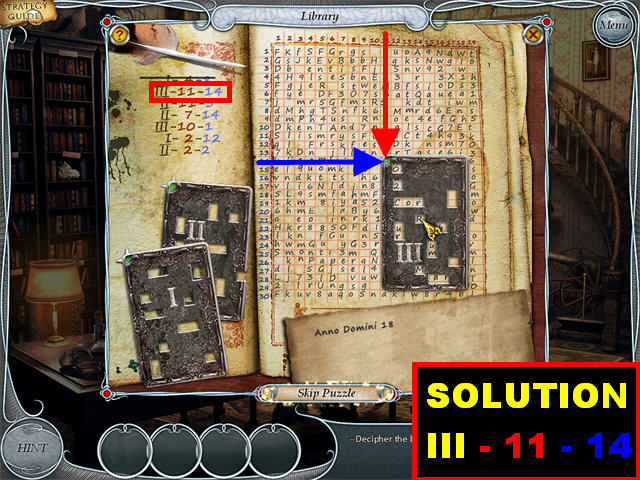
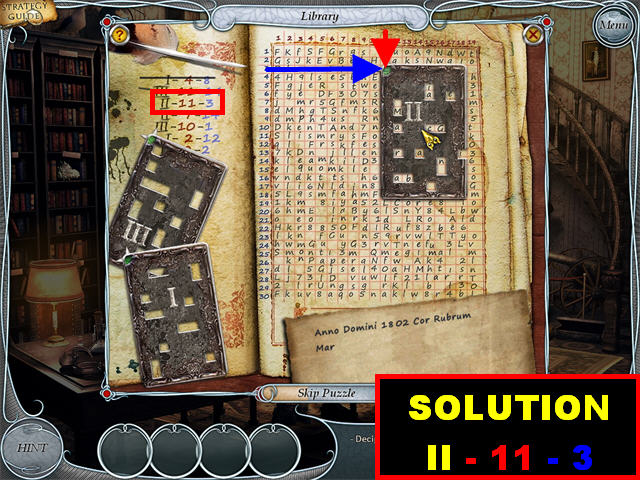
- Pay close attention to the numbers marked in red and blue and the Roman numerals for each card.
- Once the card is positioned correctly, it will begin to flash. When this happens, click on it to make your selection.
- Please look at the next set of screenshots for the solutions for each card:
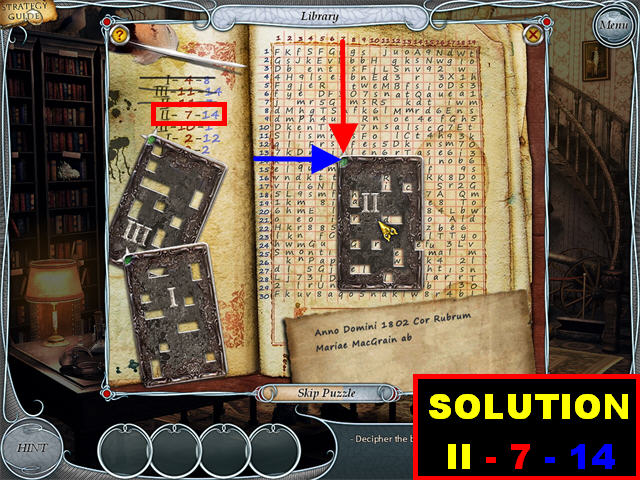

- The complete message after the puzzle is solved reads:
Library & Office
- Go back into the office.
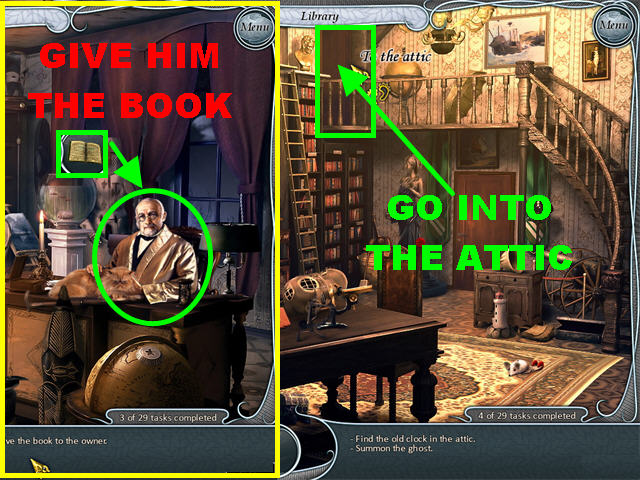
- Office - Give the GENEALOGICAL BOOK to the owner seated behind the desk.
- Go back to the Library.
- Library - Click on the door above the steps to access the Attic.
Attic & Library
- Attic - Click on the clock to trigger a new task: “Lure away the cat.”
- Click on the floor to exit the attic.
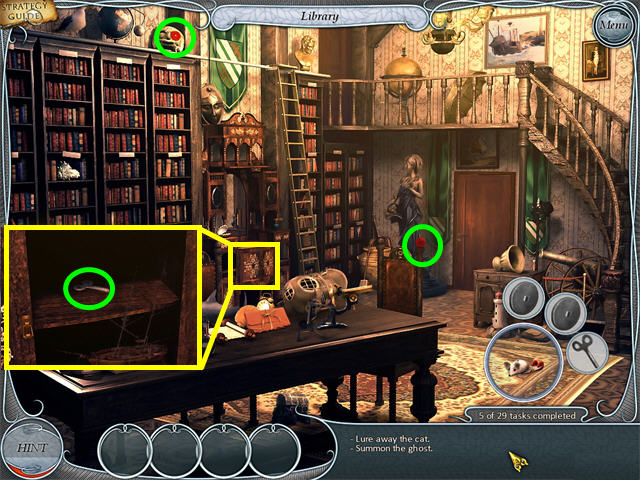
- Library – The Key Object is the mouse in the lower right corner of the scene.
- Pick up the items shown in the screenshot and drag them to the Key Item.
- Click on the small cabinet next to the ladder for a closer view.
- Pick up the last Key object inside the cabinet.
- The MECHANICAL MOUSE goes into your inventory.
- Go back to the attic.
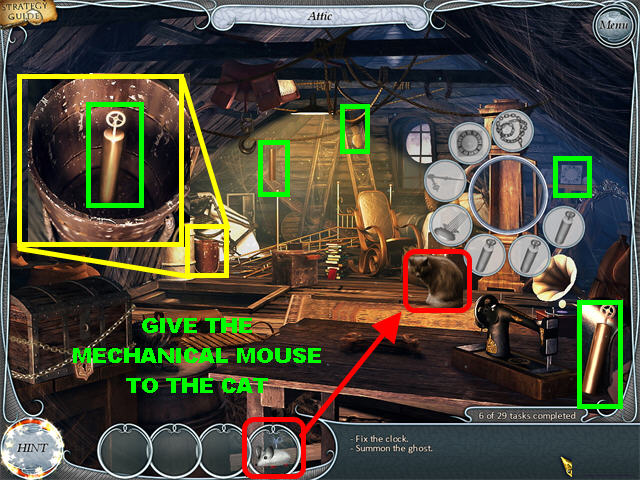
- Attic – Give the MECHANICAL MOUSE to the cat on the right.
- The cat chases after the mouse and leaves the attic.
- The Grandfather Clock is the Key Object.
- Pick up the items shown in the screenshot and drag them to the clock.
- Click on the small bucket close to the door for a closer view.
- Pick up the item inside the bucket and drag it to the Key Object.
- Click on the locked chest in the lower left. You can only pick up 5 of the necessary items at this time.
- Go back to the office.
Office & Library
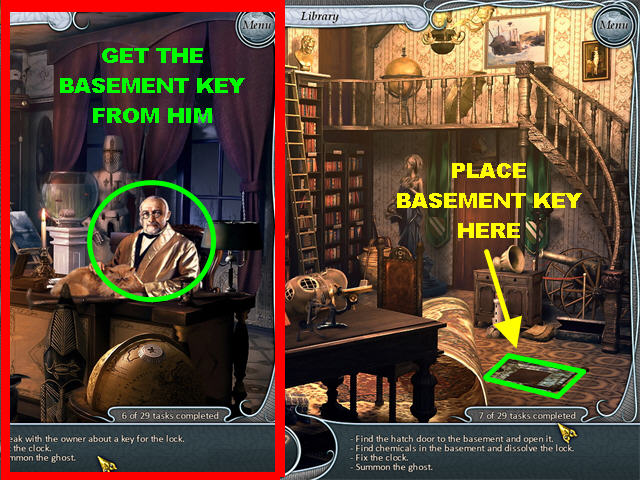
- Office - Click on the owner and ask him for the key to the old lock in the attic.
- The owner tells you that you can find the acid in the basement. He gives you a key to use on the hatch in the library that leads to the basement.
- The BASEMENT KEY goes directly into your inventory.
- Go back to the library.
- Library – Click on the right edge of the carpet to lift it.
- Place the BASEMENT KEY on the hatch to open it.
- Click on the hatch to enter the basement.
Basement & Attic
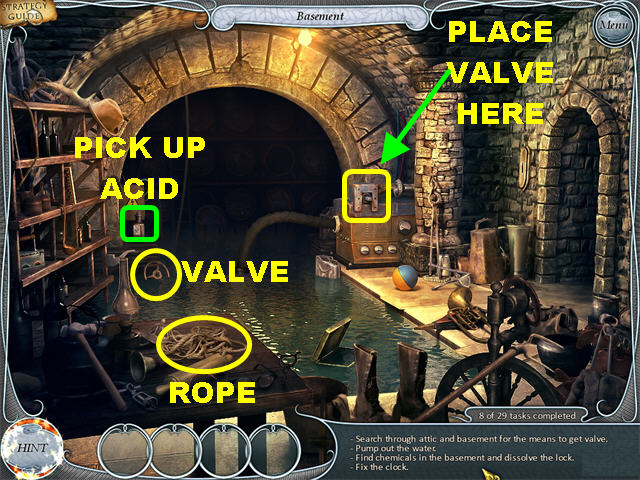
- Pick up the ROPE in the lower left.
- Go back to the attic.
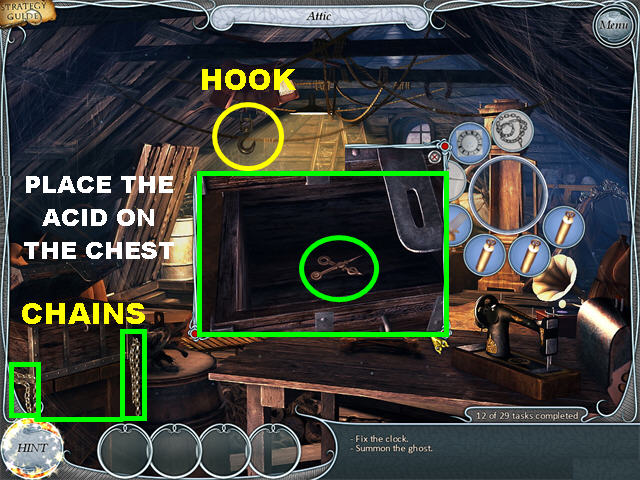
- Attic – Pick up the HOOK in the upper left. The HOOK will automatically combine itself with ROPE in your inventory to form a ROPE AND HOOK.
- Go back to the basement.
- Basement – Place the ROPE AND HOOK on the valve in the far left.
- The VALVE goes into your inventory.
- Place the VALVE on the machine on the far right.
- Click on the VALVE to pump out the water.
- Pick up the bottle of ACID on the far left, in the post near where you picked up the valve.
- Go back to the attic.
- Attic – Place the ACID on the locked chest in the lower left to open it.
- Click on the open chest for a closer view.
- Pick up the item inside the chest and drag it to the key Object.
- Click on the chains on the chest after they’ve been broken and place them on the Key Object.
- Click on the clock’s face to trigger a mini-game.
Clock Mini-game
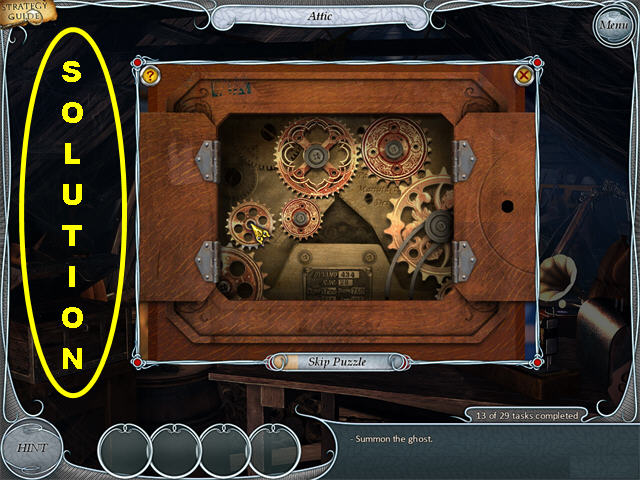
- Your goal is to place the gears in the right spots.
- Drag a gear into a spot and click it into place.
- Once all the gears have been placed correctly, the gears will move.
Attic
- The Ghost will appear after the clock has been fixed. Go through the dialogueue.
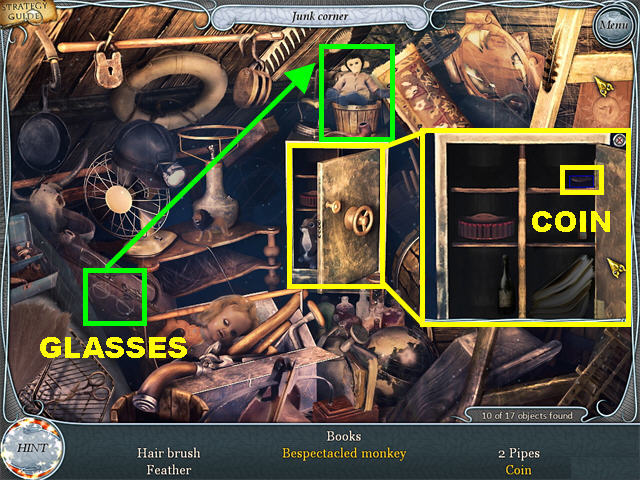
- Click on the hotspot on the far left to trigger a Hidden Object scene.
- Bespectacled monkey – Grab the glasses in the lower left and place them on the monkey in the upper center.
- Click on the bespectacled monkey to remove it from your list.
- Coin – Click on the safe in the center for a closer view.
- Pick up the Coin in the upper shelf to remove it from your list.
- The CHEST WITH OLD STUFF goes into your inventory.
- Go back to the basement.
Basement & Office
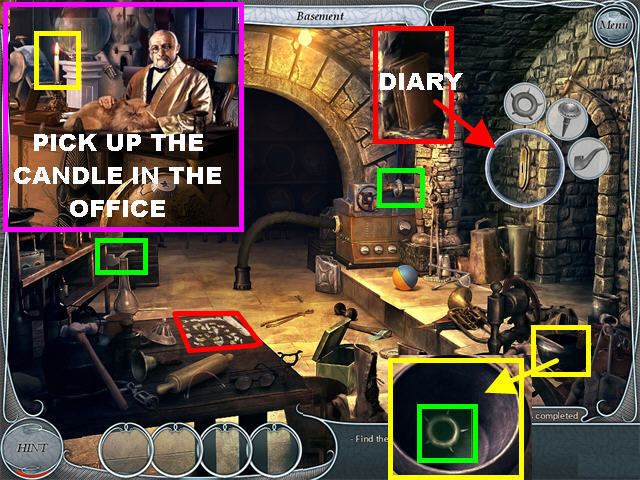
- Basement - Click on the Key Object close to the door.
- Place the items in the Key Object as shown in the screenshot.
- Click on the pot in the lower right for a closer look.
- Pick up the item inside the pot.
- Go back to the office.
- Office – Pick up the CANDLE behind the desk.
- Go back to the basement.
- Basement – Place the CANDLE on the sconce by the door.
- Once the candle has been placed, the sconce will light up and move upwards. A secret niche appears below the sconce.
- Click on the niche for a closer look.
- Click on the GHOST’S DIARY inside the niche.
- The pieces of the diary fall on the table in the lower left.
- Click on the diary pieces to trigger a puzzle.
Wine Barrels Puzzle
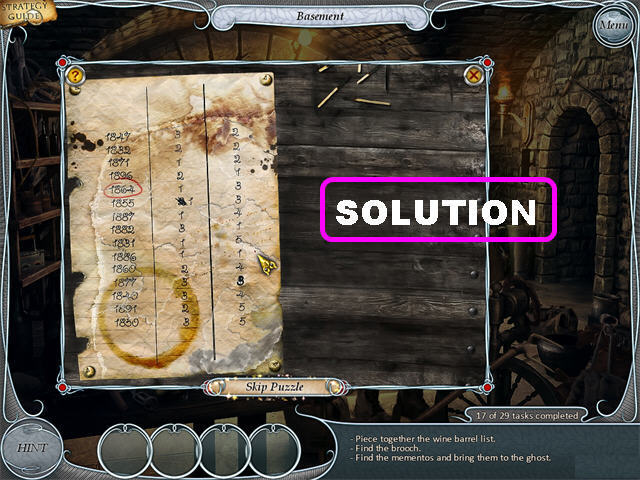
- Drag the pieces from the right onto the left.
- Correct pieces will snap in place.
Basement
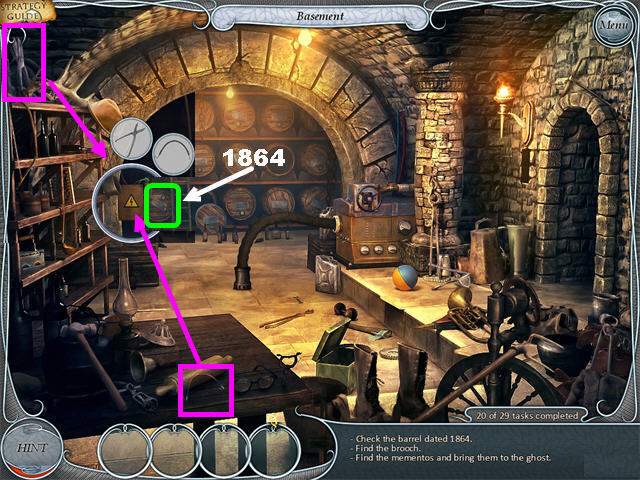
- Click on the fuse box on the far left.
- Click on the barrel marked “1?64” close to the fuse box to trigger the key Object.
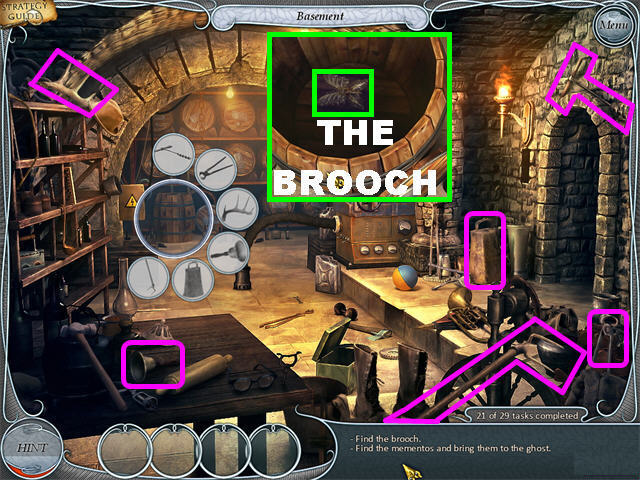
- Look for all the items, as shown in the screenshot, and drag them to the Key Object.
- Click on the barrel after all the Key Objects have been placed for a closer view.
- Pick up the BROOCH inside the barrel.
- Go back to the library.
Library
- The large picture above the steps is the Key Object.
- Place the items marked in the screenshot on the key Object.
- Click on the small cabinet behind the desk for closer view.
- Pick up the item inside the cabinet and place it in the Key Object above the steps.
- After all the items have been placed, the picture will fall off the wall revealing a safe.
- Click on the safe to find out that it is empty.
- Go to the office.
Office
- Talk to the owner behind the desk.
- The owner tells you to search through the attic again.
- Go back to the attic.
Attic
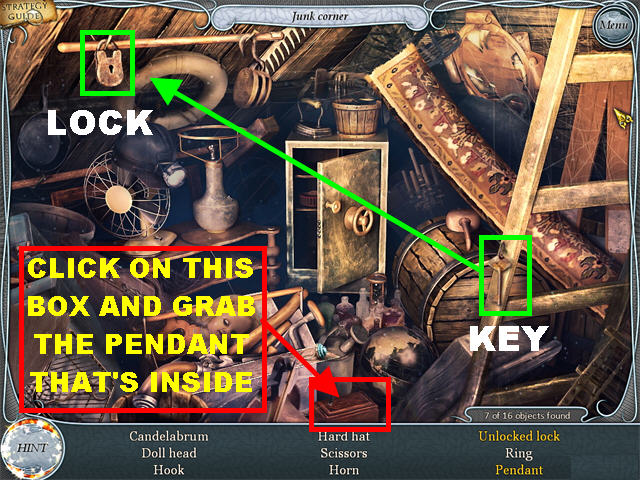
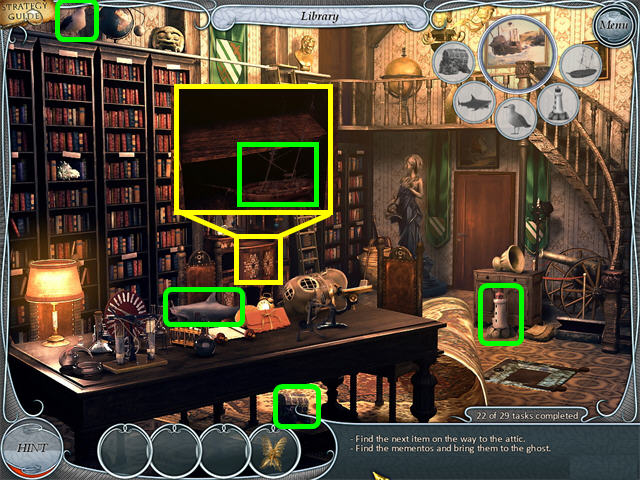
- Click on the Hidden Object scene in the back of the attic.
- Unlocked Lock – Grab the Key in the lower right (attached to the ladder).
- Drag the Key to the lock in the upper left.
- Click on the Unlocked Lock to remove it from your list.
- Go back to the office.
Office
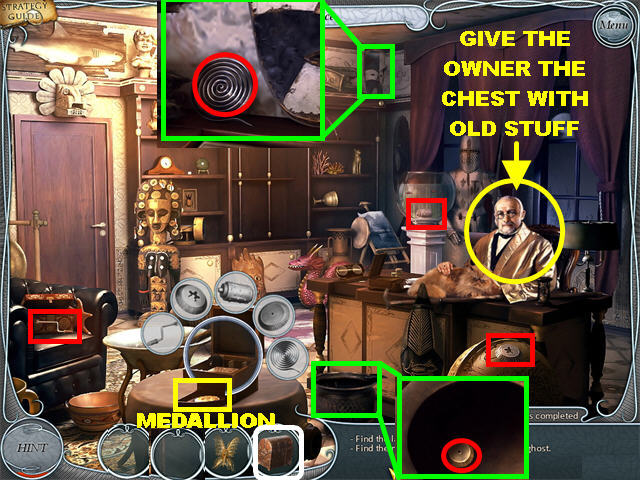
- Give the CHEST WITH OLD STUFF to the owner behind the desk. There are 2 chests, make sure you are giving the right one to the owner.
- The RING will automatically go into your inventory.
- The Key Object is the music box on the small round table.
- Pick up the items, as marked in the screenshot, and drag them to the Key Object.
- Click on the pot in the lower right for a closer look.
- Pick up the item inside the pot and drag it to the Key Object.
- Click on the niche in the upper center for a closer view.
- Pick up the item inside the niche and drag it to the Key Object.
- The music box will play a little song and a drawer below the music box will appear.
- Click on the MEDALLION from the music box.
- Go back to the Attic.
Attic
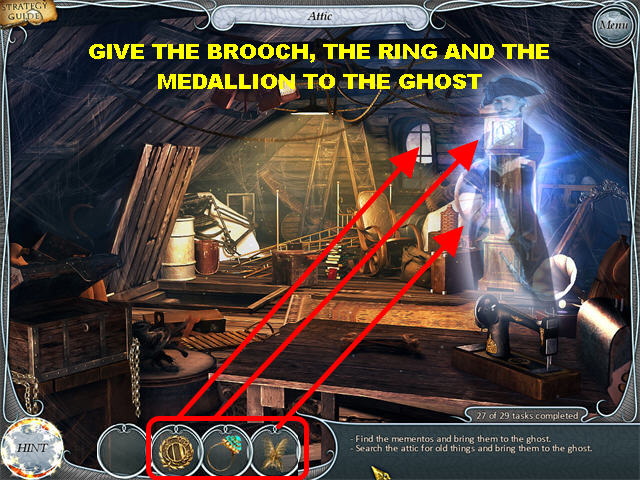
- Give the Ghost the CHEST WITH OLD STUFF from inventory.
- Give the Ghost the MEDALLION from inventory.
- Give the Ghost the RING from inventory.
- Give the Ghost the BROOCH from inventory.
- This marks the end of this chapter.
Chapter 2: Germany
Outside the Mill
- This chapter has 31 tasks.
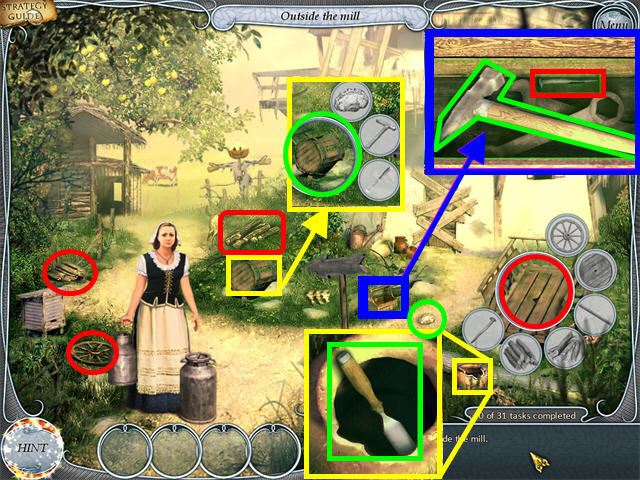
- The cart on the right is the Key Object.
- The barrel in the center is also a Key Object.
- Pick up all the items shown in the screenshot and drag them to the cart, or to the barrel.
- Click on the toolbox in the lower center for a closer view.
- Pick up the hammer inside the toolbox and place it in the barrel.
- Pick up the nail inside the toolbox and place it on the cart.
- Click on the pot in the lower right corner for a closer view.
- Pick up the chisel inside the pot and place it on the barrel.
- Once all the items have been dragged to the barrel, the lid will fall to the ground.
- Grab the BARREL’S LID and place it on the cart.
- Click on the arrow in the lower center and you will be asked to go into the barn.
- Go into the barn to access a Hidden Object scene.
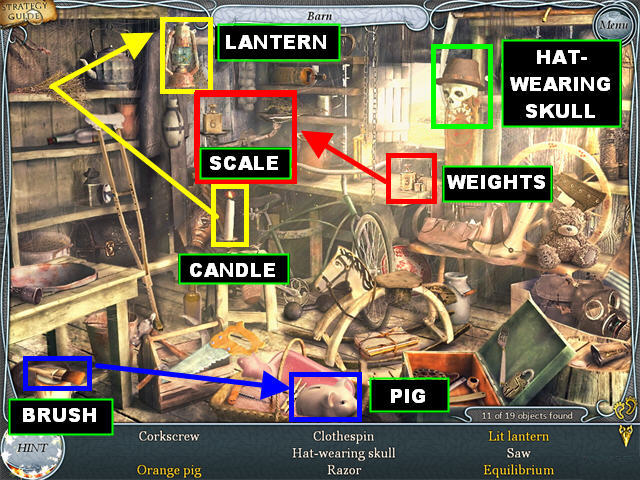
- Orange Pig – Pick up the brush in the lower left corner and place it on the pig in the basket in the lower center.
- Click on the Orange Pig to remove it from your list.
- Click on the hat in the upper right and a skull will appear.
- Click on the Hat-wearing skull to remove it from your list.
- Grab the weights on the right side of the table and place them on the scale, on the left side of the table.
- Click on the Equilibrium scale on the table to remove it from your list.
- Grab the candle close to the table and place it on the lantern in the upper left.
- Click on the Lit Lantern to remove it from your list.
- The SAW and the SPADE will be added to your inventory at the end of your search.
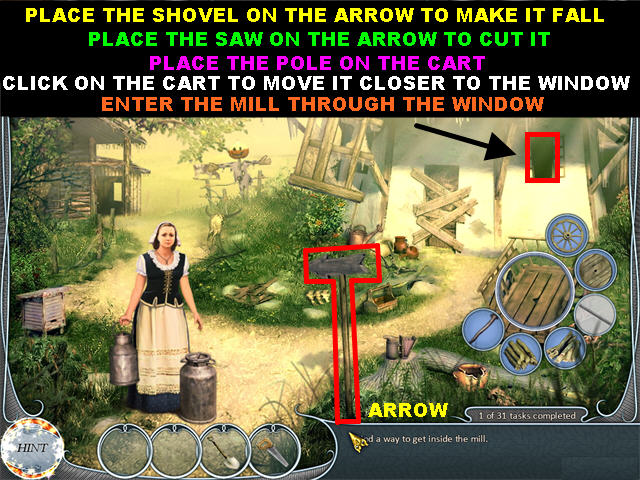
- Place the SHOVEL on the arrow in the lower center and it will fall to the ground.
- Place the SAW on the fallen arrow to cut it.
- Place the POLE from the arrow in the cart.
- Click on the cart to move it closer to the window.
- Click on the window to access the inside of the mill.
Mill’s Interior
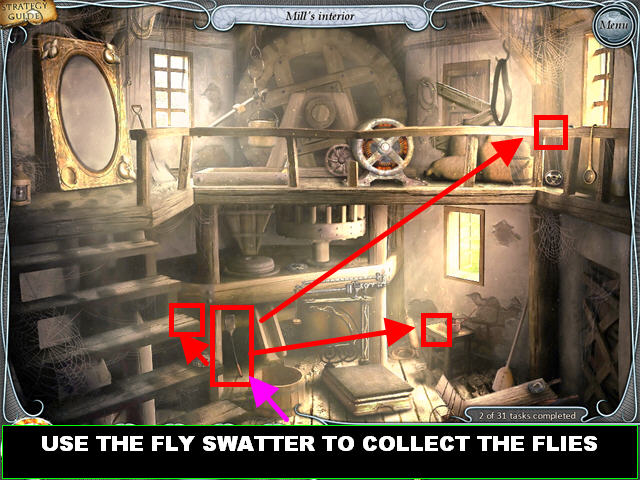
- Grab the flyswatter in the lower left.
- Use the flyswatter to grab flies; you only need one.
- The flies will eventually land in one spot; place the flyswatter on them to capture them.
- Click on the mirror in the upper left to activate a new task.
- Go back outside through the window on the right.
Outside the Mill
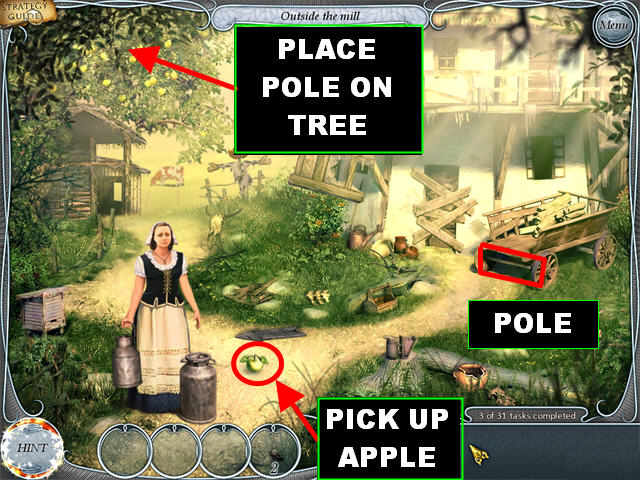
- Grab the Pole under the cart.
- Place the POLE on the tree in the upper left to knock down an apple.
- Pick up the APPLE that falls next to the Milkwoman.
- Go back inside.
Mirror Puzzle
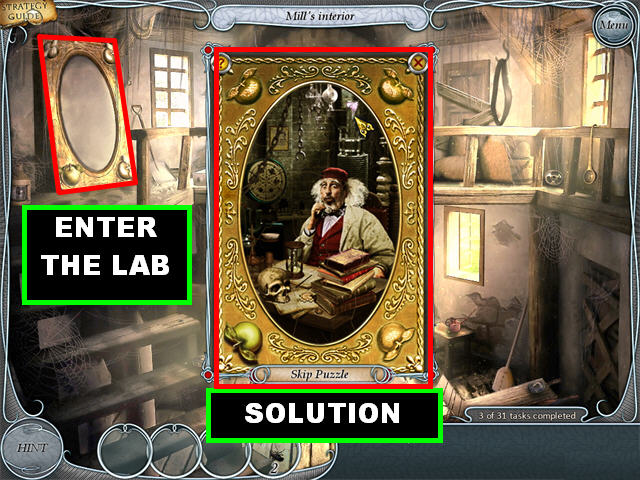
- Mill Interior - Place the APPLE on the mirror in the upper left to trigger a puzzle.
- Drag the pieces onto the mirror.
- Correct pieces will snap in place.
- Please look at the screenshot for the solution.
- Click on the mirror to enter the laboratory.
Laboratory & Garden
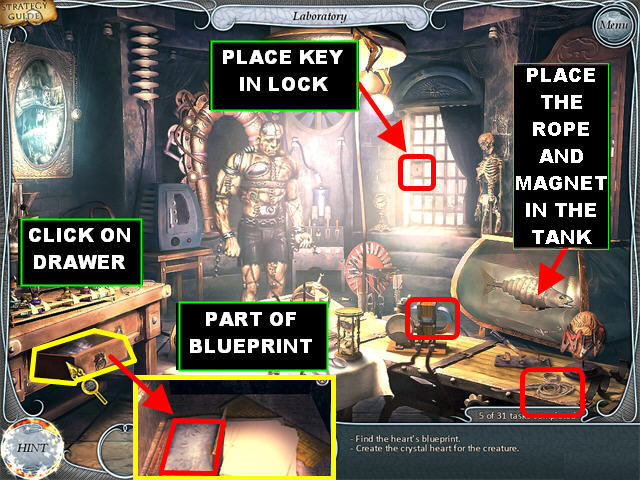
- Click on the drawer in the lower left to open it.
- Pick up the PART OF THE BLUEPRINT inside the drawer.
- Pick up the MAGNET in the lower right.
- Pick up the ROPE in the lower right.
- The MAGNET and the ROPE will automatically combine in inventory as FISHING TACKLE.
- Place the FISHING TACKLE in the fish tank on the right.
- The KEY will be added to your inventory.
- Place the KEY on the lock of the door in the back of the scene.
- Click on the door to access the garden.
Secret Garden
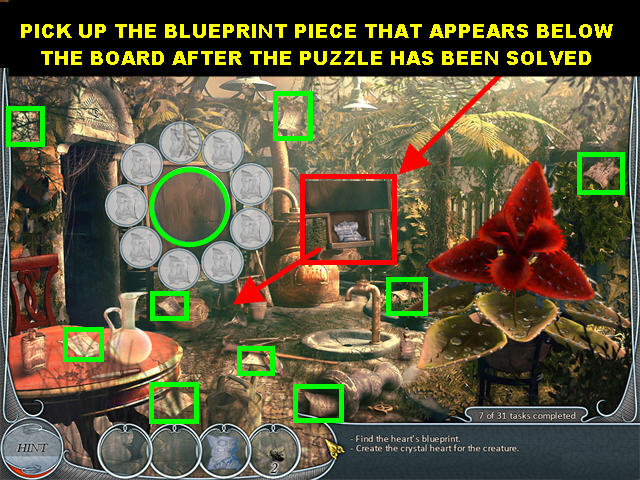
- The Key Object is the board on the left.
- Pick up all the papers according to the screenshot and place them on the Key Object.
- Once all the papers are in place a puzzle will appear.
Secret Garden Puzzle
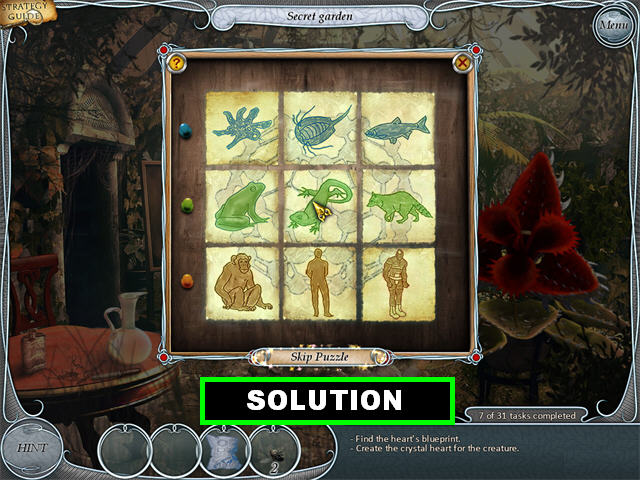
- Your goal is to place the pictures in the correct order starting from the upper left corner.
- Notice the colored buttons on the left side of the puzzle. Make sure the images you place on each row coincide with the color on the left.
- You can only swap 2 adjacent papers.
- Pick up the 2nd part of the BLUEPRINT that appears below the board after the puzzle has been solved.
- You will now have the complete BLUEPRINT in inventory.
- Go inside the laboratory.
Laboratory & Mill’s Interior
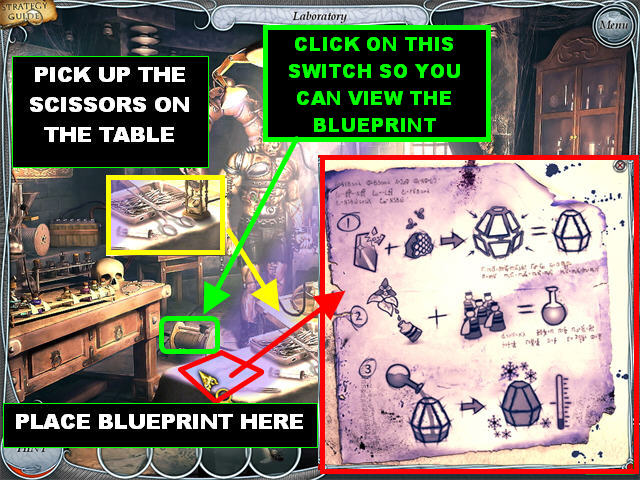
- Laboratory - Place the BLUEPRINT on the table in the center of the scene.
- Click on the floor switch so you can read the blueprint.
- Click on the BLUEPRINT for a closer view.
- Go back to the mill’s interior.
- Mill’s Interior - The Key Object is the tray on the upper left.
- Pick up all the items marked in the screenshot and place them on the tray.
- After all the items have been found, click on the bag folded over the railing in the upper left to trigger a new task.
- Go back to the laboratory.
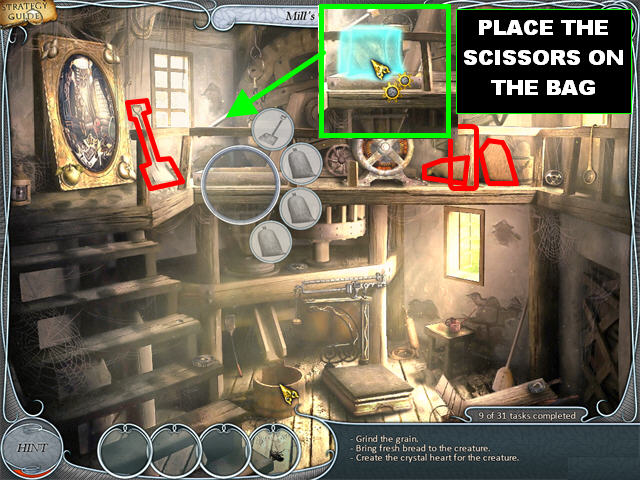
- Laboratory – Pick up the SCISSORS on the table.
- Go back to the mill’s interior by clicking on the mirror.
- Mill’s Interior – Place the Scissors on the cloth on the railings in the upper left.
- A PATCH will be added to your inventory.
- Go outside the mill.
Outside the Mill & Mill’s Interior
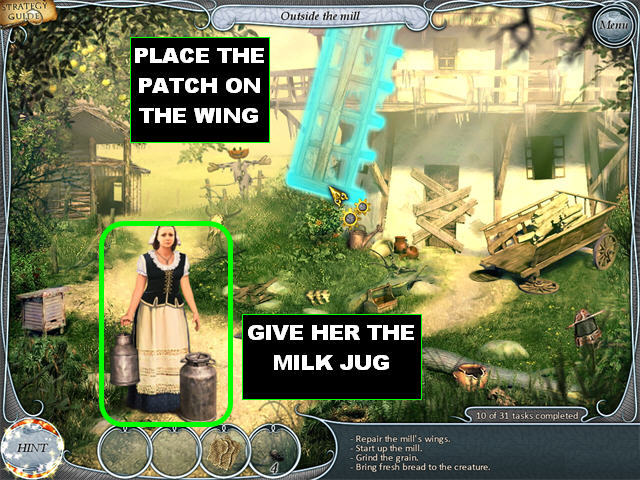
- Outside the Mill - Place the PATCH on the wing in the upper center.
- Go back inside the mill.
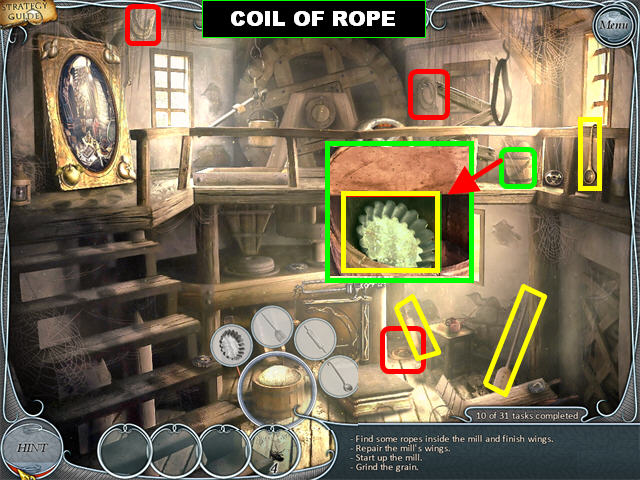
- Mill’s Interior – Pick up the first COIL OF ROPE in the upper right.
- Pick up the second COIL OF ROPE in the upper left, above the mirror.
- Pick up the second COIL OF ROPE in the lower center.
- You will have a ROPE in your inventory after the 3 pieces have been collected.
- Go back outside.
- Outside the Mill – Place the ROPE on the wing in the upper center.
- The windmill starts moving at this point. Go back to the mill’s interior.
- Mill’s Interior – The Key Object is the small bucket in the lower center.
- Place all the items marked in the screenshot into the bucket.
- The dough will land on the table on the floor.
- Go back outside.
- Outside the Mill – Click on the Milkwoman and she will ask you to go in the barn.
- Click on the barn on the left to enter a Hidden Object scene.
Barn
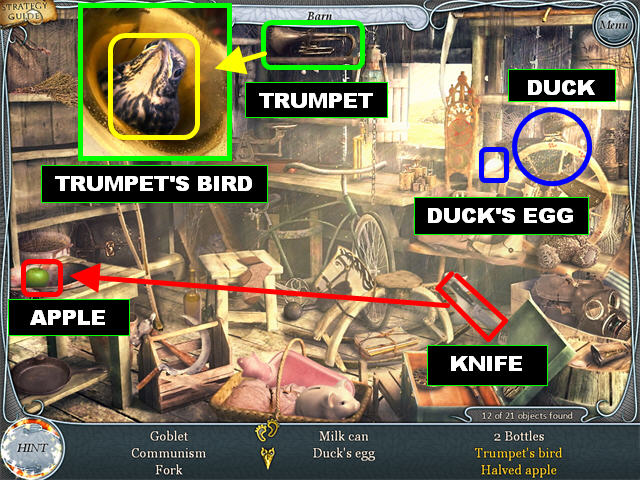
- Duck’s Egg – Click on the duck in the upper right and it will lay an egg.
- Pick up the Egg behind the duck.
- Halved Apple - Pick up the knife in the lower center and place it on the green apple on the left.
- Pick up the Halved Apple on the left to remove it from your list.
- Trumpet’s Bird – Click on the trumpet in the upper center for a closer view.
- Pick up the Bird inside the trumpet to remove it from your list.
- The MILK JUG goes into your inventory after the search has been completed. You will be automatically taken back outside.
- Give the MILK JUG to the Milkwoman outside the mill.
- The jug goes back into inventory full of MILK.
- Go back inside.
Mill’s Interior & Secret Garden
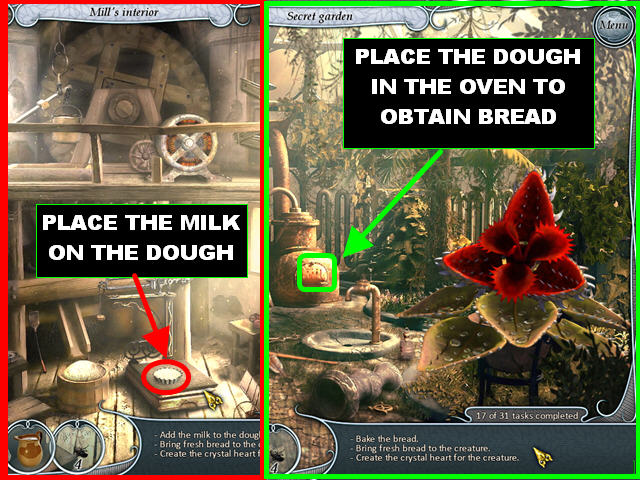
- Mill’s Interior - Place the MILK on the dough in the lower center.
- The DOUGH goes into your inventory.
- Go back to the garden.
- Secret Garden - Place the DOUGH in the oven.
- You will receive BREAD in your inventory.
- Go back to the laboratory.
Laboratory
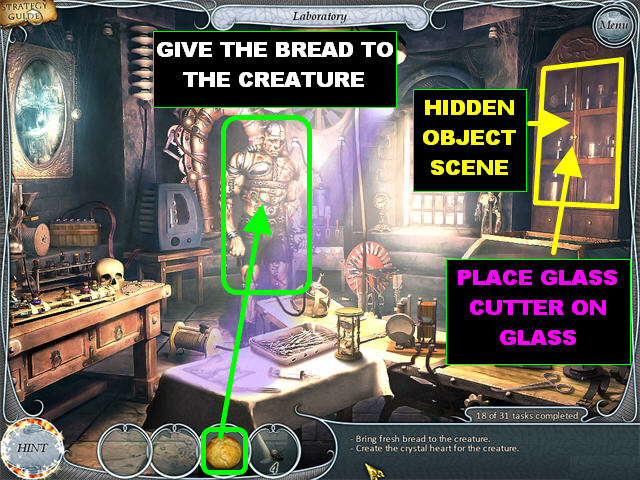
- Give the BREAD to the creature.
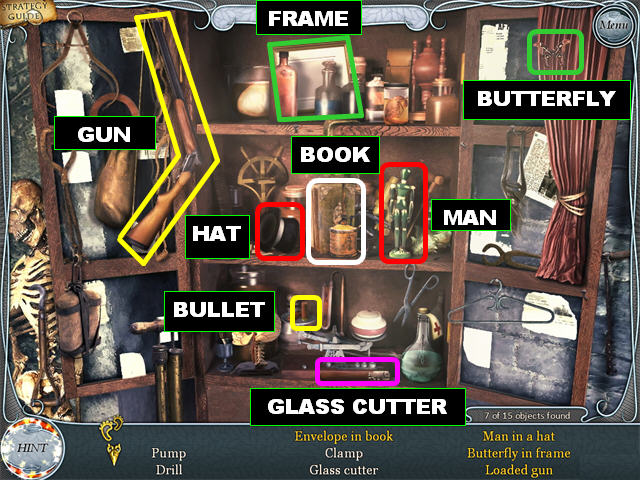
- Click on the cabinet on the right to trigger a Hidden Object scene.
- Pick up the GLASS CUTTER in the lower center.
- Man in a Hat – Grab the top hat from the middle shelf and place it on the silver dummy on the middle shelf.
- Click on the Man in a Hat to remove it from your list.
- Butterfly in Frame – Pick up the butterfly in the upper right and place it on the frame in the upper center.
- Click on the Butterfly in Frame to remove it from your list.
- Loaded Gun – Pick up the bullet in the bottom shelf and place it on the gun in the upper left.
- Click on the Loaded Gun to remove it from your list.
- Envelope in a Book – Click on the book on the middle shelf and an envelope will fall out.
- Click on the Envelope in a Book to remove it from your list. You will be automatically transported back to the lab.
- Laboratory - Place the GLASS CUTTER on the glass in the cabinet in the upper right after all the items have been picked up.
- Some GLASS will be added to your inventory. Go back outside.
Outside the Mill & Secret Garden
- Outside the Mill - Click on the smoker in the lower right to activate a new task.
- The Key Object is the box in the lower left.
- Pick up the items marked in red and drag them to the box.
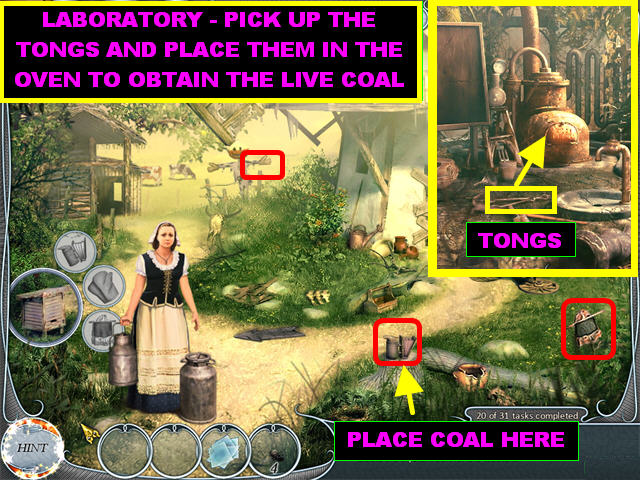
- Go inside to the secret garden.
- Secret Garden - Pick up the TONGS on the ground.
- Place the TONGS in the oven.
- The LIVE COAL will be added to your inventory.
- Go back outside the mill.
- Outside the Mill – Place the LIVE COAL in the smoker in the lower right.
- Click on the coal and drag it to the box in the lower left.
- You will receive the GLASS MOULD in your inventory after all the items have been automatically combined.
Laboratory
- Click on the creature so he can tell you about the aggressive plant.
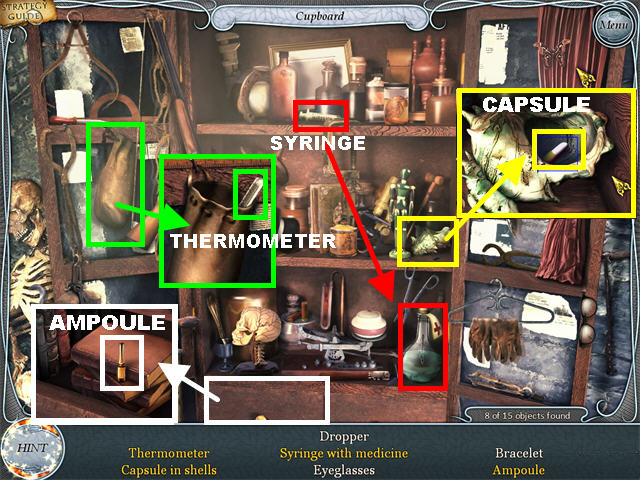
- Click on the cabinet in the upper right to enter a Hidden Object scene.
- Thermometer – Click on the brown bag in the upper left.
- Click on the Thermometer inside the bag to remove it from your list.
- Capsule in Shells – Click on the shell, on the right side of the middle shelf, for a closer view.
- Click on the Capsule in Shells to remove it from your list.
- Syringe with Medicine – Grab the syringe in the center of the top shelf and drag it to the medicine bottle in the lower shelf.
- Click on the Syringe with Medicine to remove it from your list.
- Ampoule – Open the drawer in the lower center.
- Click on the Ampoule vial inside the drawer to remove it from your list.
- The HYPNOTIC DRUG will be added to your inventory once the search has been completed.
- Go to the secret garden.
Secret Garden
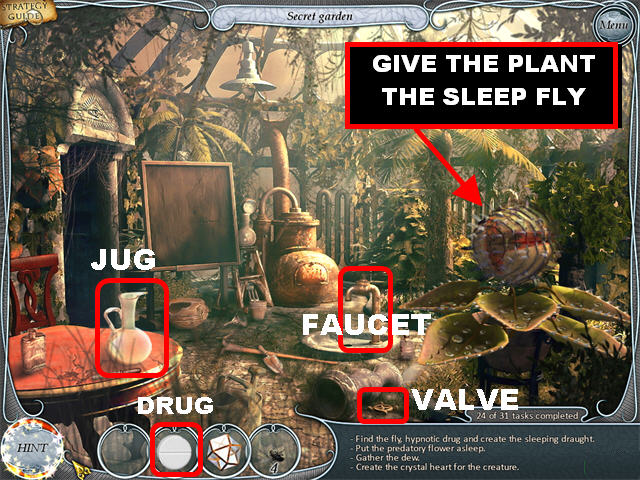
- Pick up the VALVE in the lower center.
- Place the VALVE on the faucet close to the aggressive plant.
- Click on the VALVE to turn the water on.
- Pick up the JUG in the lower left.
- Place the JUG under the running water to fill it. The JUG WITH WATER goes back on the table.
- Place the HYPNOTIC DRUG in the JUG WITH WATER.
- Place one of your FLIES in the JUG WITH HYPNOTIC DRUG. If you did not capture a fly earlier, you can go back to the mill’s interior and use the fly swatter to catch one.
- The SLEEP FLY will be added to your inventory.
- Give the SLEEP FLY to the aggressive plant on the right to put it to sleep.

- The Key Object here is the aggressive plant, click on it.
- Grab the items marked in red and place them in the Key Object.
- The DEW BOTTLE will be added to your inventory.
- Go back to the lab.
Laboratory Chemical Puzzle
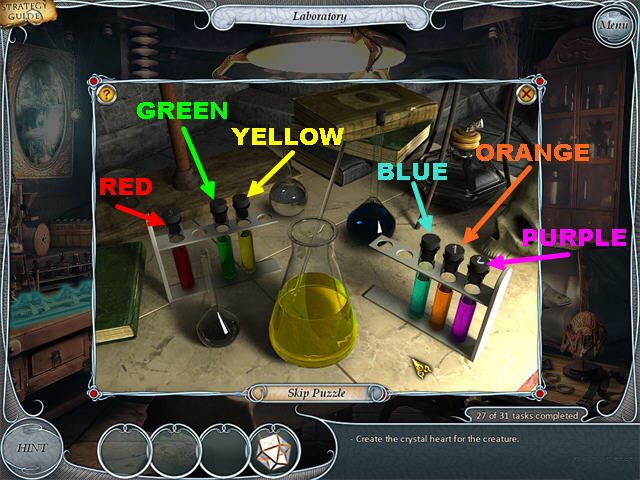
- Place the DEW BOTTLE on the chemical lab, in the lower left, to trigger a puzzle.
- Your goal in this puzzle is to add the chemicals in the right order.
- Grab a vial and place it on the beaker.
- If the color is correct, the liquid will change colors.
- If you click on the wrong ingredient you will have to start the process over. You will see black smoke when this happens.
- When vials are chosen correctly, a number will appear on the cap letting you know the order you’ve chosen.
- The solution may be random, here is a sample solution:ORANGE, PURPLE, RED, YELLOW
- You will receive a HALF FINISHED HEART in your inventory at the end of the puzzle.
Laboratory
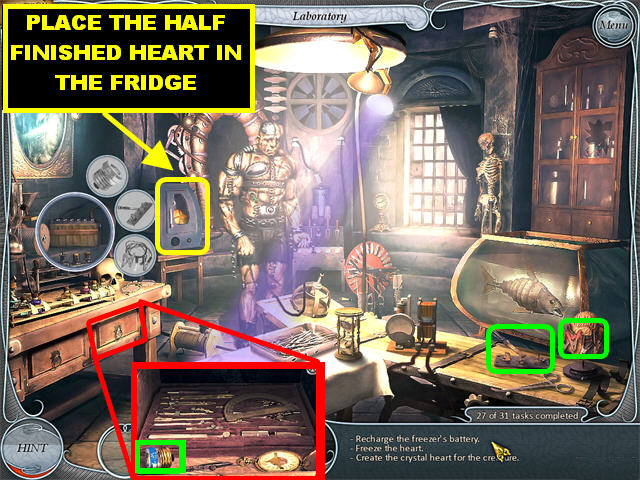
- Place the HALF FINISHED HEART in the fridge next to the creature. The battery is dead and needs to be recharged.
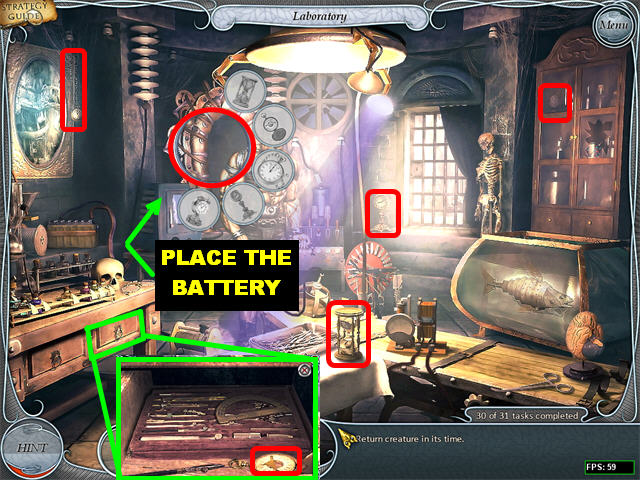
- The Key Object is the battery on the left; click on it.
- Place the items marked in green into the Key Object.
- Click on the right drawer below the table on the right.
- Pick up the piece inside the drawer.
- The BATTERY goes into your inventory.
- Go to the mill’s interior.
Mill’s Interior
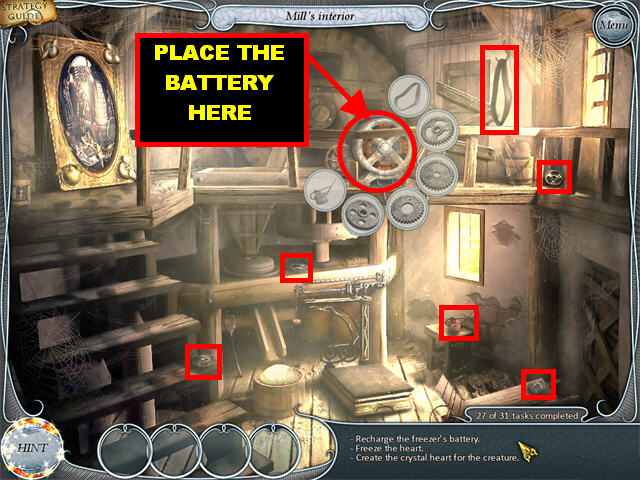
- Place the BATTERY on the place for storage battery in the upper center.
- Click on the same spot to bring out the bubbles.
- Place the items marked in red in the Key Object.
- The charged BATTERY goes into your inventory.
- Go back to the lab.
Laboratory
- Place the charged BATTERY in the fridge next to the creature. The battery will end up back on the table on the left.
- Pick up the CRYSTAL HEART from the fridge.
- Give the CRYSTAL HEART to the creature.
- The Key Object is the portal behind the creature.
- Pick up the items marked in red and place them in the Key Object.
- Click on the right drawer below the table on the right.
- Pick up the item inside the drawer and drag it to the Key Object.
- This marks the end of this chapter.
Chapter 3: Egypt
Bedouin’s Camp
- This chapter has 31 tasks to complete.
- Click on the ramp of the pyramid to trigger a puzzle.
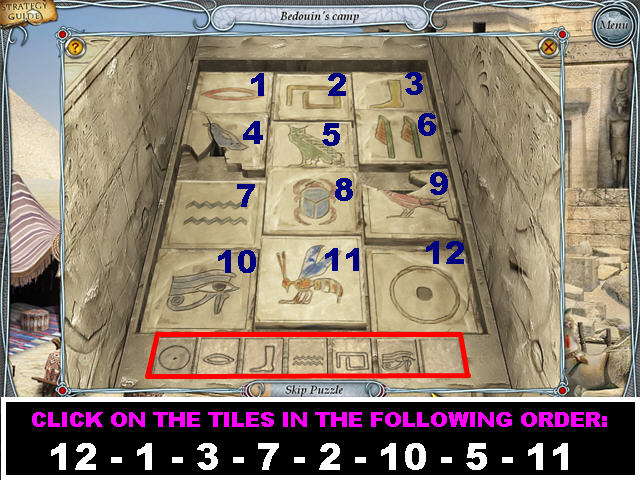
- Your goal is to find the correct sequence of tiles.
- Click on the tiles to select them. Correct tiles will stay pushed in.
- The bottom line of blocks displays the tiles that have been pressed correctly.
- The tiles have been numbered 1 to 12, starting from the top. Please click on the tiles in the following order:12-1-3-7-2-10-5-11
- Click on the locked door to add a new task.

- Click on the sphinx by the ramp to trigger a puzzle.
- Place all the gold pieces from the bottom into the different parts of the puzzle.
- Once all the pieces are in place, pick up the EYE OF RAH in the secret niche.
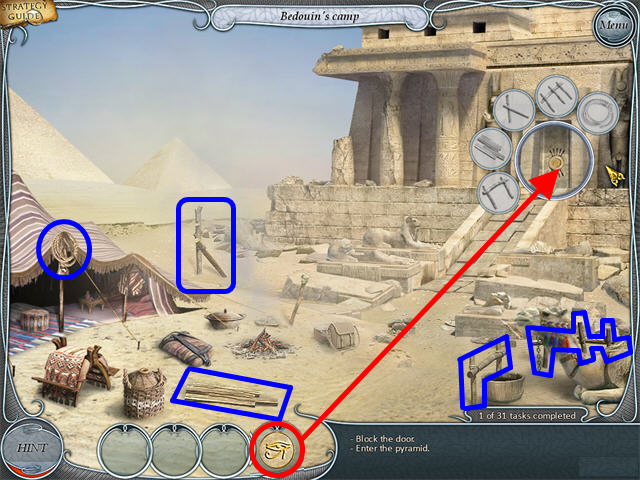
- Place the EYE OF RAH on the stone door above the ramp. The door is broken.
- Click on the door to trigger the next Key Object.
- Pick up all the items marked in blue and place them in the Key Object.
- Click on the door to enter the pyramid after all the items have been placed.
Pyramid Corridor
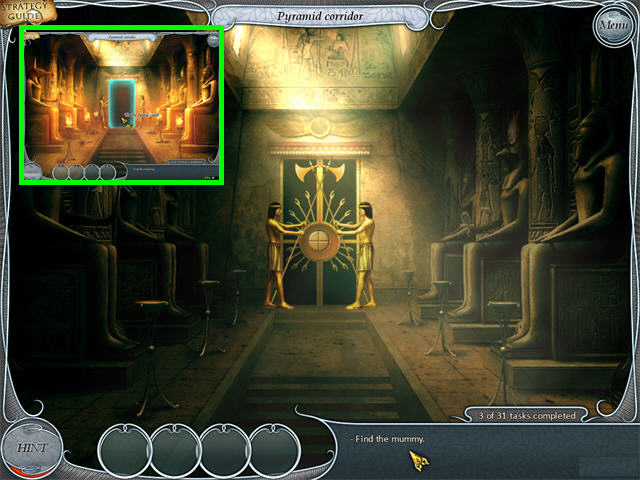
- Pyramid Corridor - In this section you have to keep going back and forth to look for items that the guards ask you for.
- Click on the door and you receive a message that states: “It rides on the other’s back and carries the load on his own?”
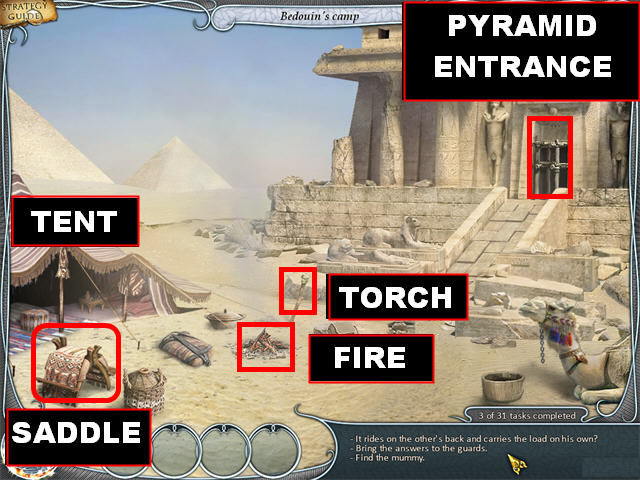
- Go back outside.
- Bedouin’s Camp - Pick up the SADDLE in the lower left corner.
- Go back inside.
- Pyramid Corridor - Give the SADDLE to the guards at the door.
- Click on the door again and another riddle appears: “The raven provided for the dove, and the dove provides for the chicks. What is ‘dove’?”
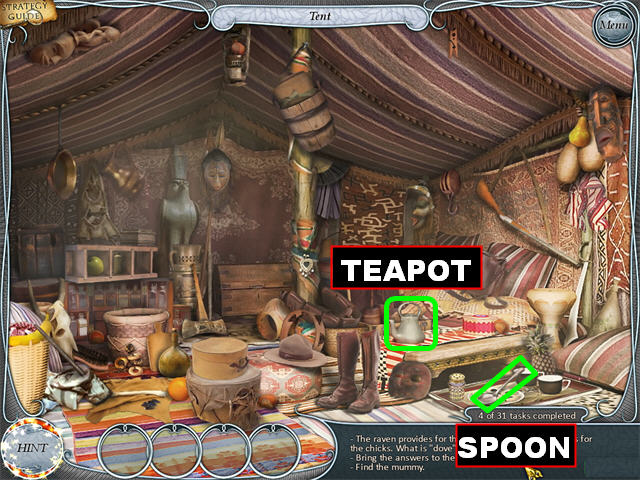
- Go back outside. Go into the tent on the left.
- Tent - Pick up the TEAPOT in the lower right.
- Go back inside the pyramid.
- Pyramid Corridor - Give the TEAPOT to the guards at the door.
- Click on the door again and another riddle appears: “What can feed anyone but isn’t eating himself?”
- Go back to the tent.
- Tent - Pick up the SPOON in the lower right corner.
- Go back inside the pyramid.
- Pyramid Corridor - Give the SPOON to the guards at the door.
- Click on the door again and another riddle appears: “Give it food and it will live; give it water and it will die?”
- Go back outside.
- Bedouin’s Camp - Pick up the TORCH in the center of the scene.
- Place the TORCH on the fire in the center of the scene.
- The FIRE will be added to your inventory.
- Go back inside the pyramid.
- Pyramid Corridor - Give the FIRE to the guards at the door.
- All the torches will light up, after the guards receive the torch, and the door will open.
- Go through the door to access the burial vault.
Burial Vault
- Burial Vault – Go through the dialogue to activate a new task.
- Click on the right wall to activate some more tasks.
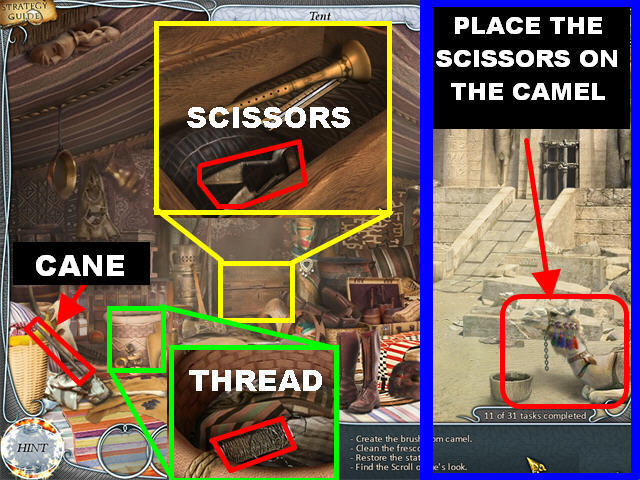
- Go back to the tent.
- Tent – Pick up the STICK in the lower left corner.
- Click on the basket in the lower left for a closer view.
- Pick up the THREAD inside the basket.
- Click on the chest in the back of the scene to open it.
- Pick up the SCISSORS inside the chest.
- Go outside.
- Bedouin’s Camp - Place the SCISSORS on the camel in the lower right.
- The scissors will cut the camel’s hair. All items will mix in inventory and form a BRUSH.
- Go back to the vault.
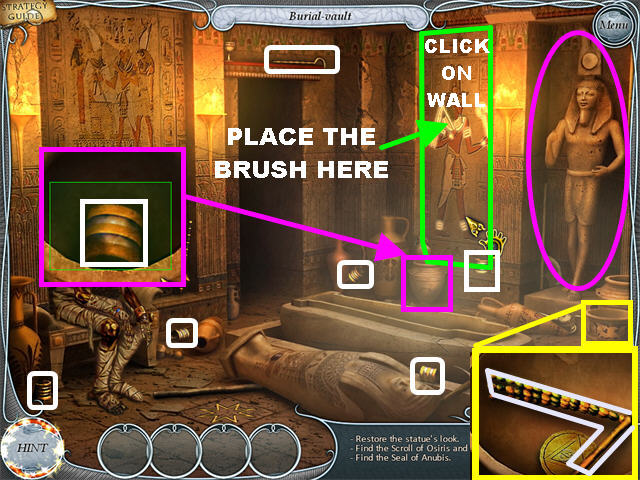
- Place the BRUSH on the right side of the wall.
- Click on the pot in the lower right corner for a closer view.
- Pick up the STAFF inside the pot.
- Give the STAFF to the statue on the right.
- Click on the pot close to the right wall for a closer view.
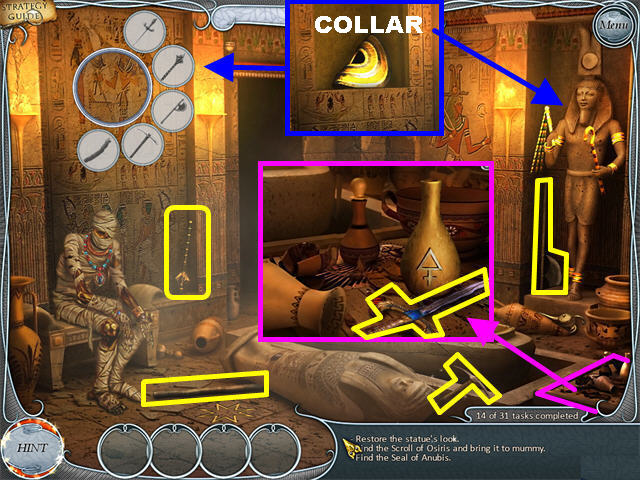
- Pick up the GOLD BAND inside the pot.
- Give the GOLD BAND to the statue on the right.
- Pick up all the items highlighted in white and give them to the statue on the right.
- Click on the upper left side of the wall to trigger the Key Object.
- Drag all the items marked in yellow to the Key Object.
- Click in the lower right corner for a closer view.
- Pick up the sword in the corner and drag it to the Key Object.
- Once all the items have been placed, a niche opens up in the back wall.
- Pick up the COLLAR inside the niche and place it on the statue on the right.
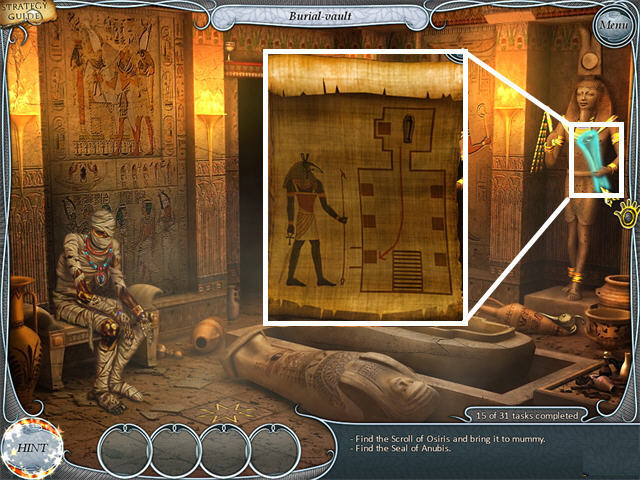
- Click on the scroll the statue on the right is holding for a closer view.
- Go outside.
Pyramid Corridor
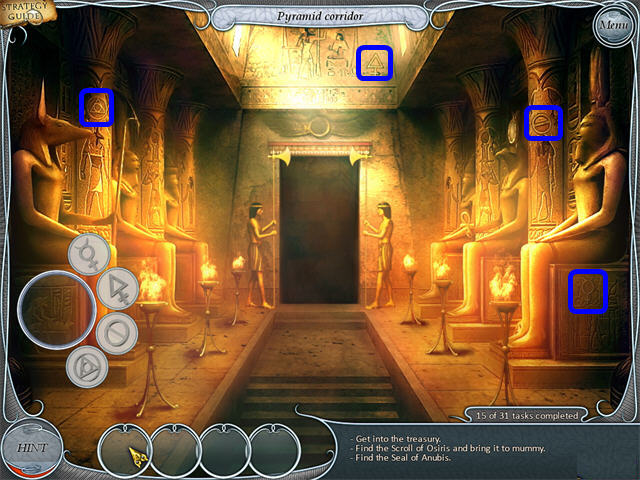
- Click on the statue on the left to trigger the Key Object.
- Place all the items marked in blue in the Key Object.
- A puzzle will appear after all the items have been placed in the Key Object.
- You don’t have the necessary items you need right now for the puzzle, so you need to go back to the tent.
Tent
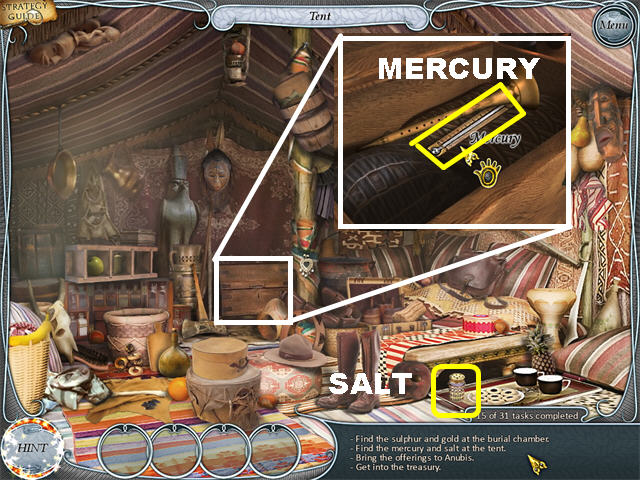
- Pick up the SALT in the lower right corner.
- Click on the chest in the back of the scene to open it.
- Pick up the MERCURY inside the chest.
- Go to the burial vault.
Burial Vault
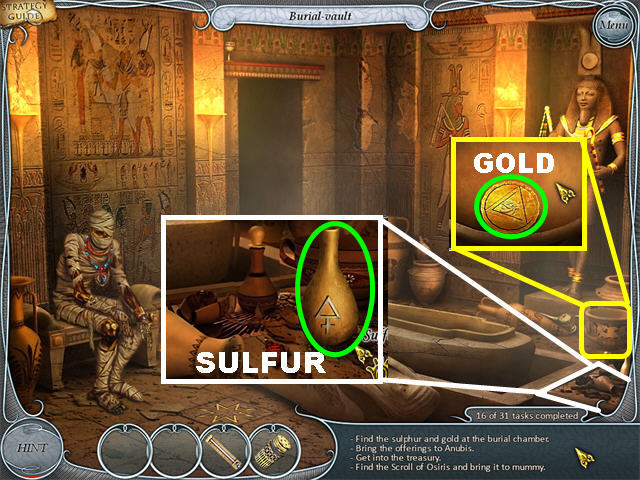
- Click in the lower right corner for a closer view.
- Pick up the SULFUR inside the tray.
- Click on the pot in the lower right for a closer view.
- Pick up the GOLD inside the pot.
- Go back to the corridor.
Pyramid Corridor
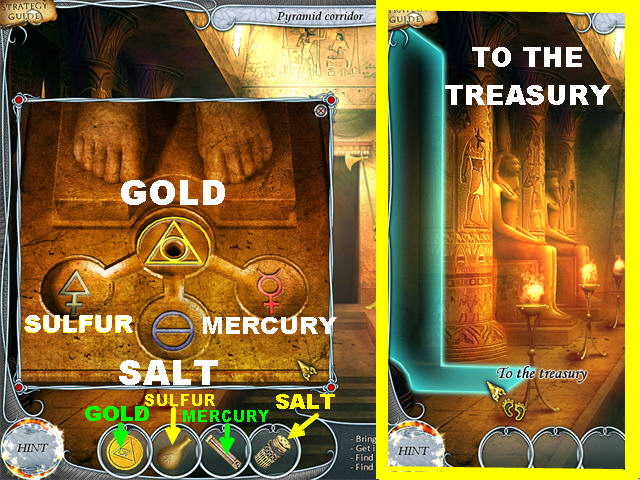
- Click on the first statue on the left to bring up the puzzle.
- Place the GOLD in the top slot.
- Place the SULFUR on the bottom left slot.
- Place the SALT in the bottom center slot.
- Place the MERCURY in the bottom right slot.
- The statue moves aside revealing a passageway to the treasure room.
- Go to the treasure room by clicking on the left side of the scene.
Tent
- Treasure Room - You will receive 2 new tasks as soon as the dialogue is complete.
- Leave the treasure room and go back to the tent.
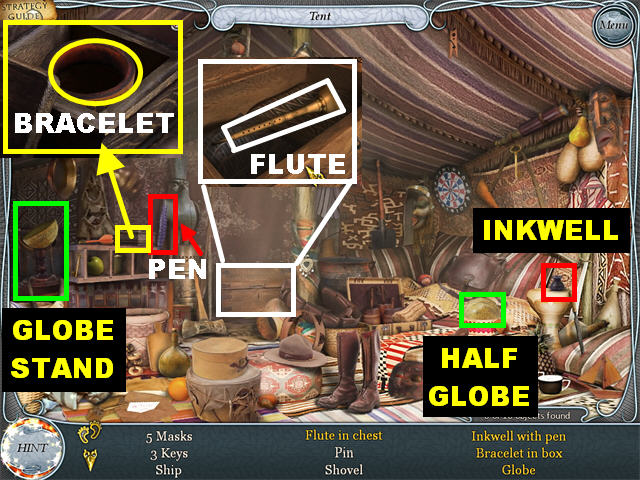
- Tent – As soon as you enter the tent, you will be faced with a Hidden Object scene.
- Inkwell with Pen – Pick up the pen (quill) on the left and place it in the inkwell on the right.
- Click on the Inkwell with the Pen to remove it from your list.
- Bracelet in Box – Click on the small box on the left, next to the bird statues, for a closer look.
- Click on the Bracelet in Box to remove it from your list.
- Globe – Pick up the half globe in the lower right and place it on the globe stand on the left.
- Click on the Globe to remove it from your list.
- Flute in Chest – Click on the chest in the back of the scene for a closer look.
- Click on the Flute in Chest to remove it from your list.
- The FLUTE goes into your inventory after the search has been completed.
- Go back to the treasure room.
Treasure Room
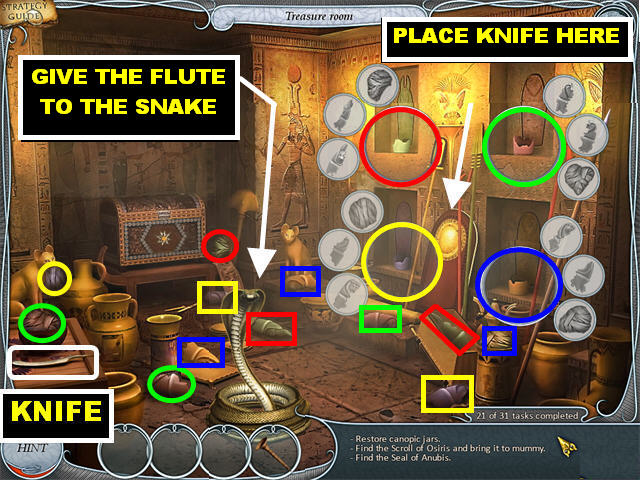
- Give the FLUTE to the snake to make it disappear.
- There are 4 broken canopic jars on the right side of the wall.
- The 4 broken canopic jars are the Key Objects.
- Drag the items marked in Red to the Key Object in the upper left.
- Drag the items marked in Green to the Key Object in the upper right.
- Drag the items marked in Yellow to the Key Object in the lower left.
- Drag the items marked in Blue to the Key Object in the lower right.
- Pick up the KNIFE in the lower left corner.
- Place the KNIFE on the sun disk against the back wall to remove it.
- The SUN DISK goes into your inventory.
- Go back to the corridor.
Pyramid Corridor
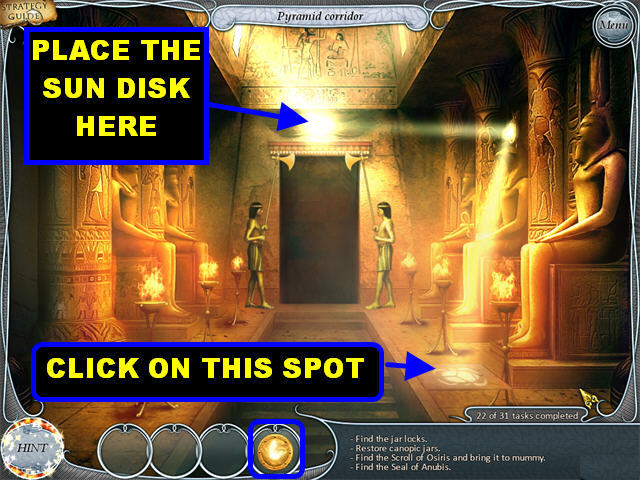
- Place the SUN DISK above the entryway in the back of the scene.
- The ray of light will hit on a spot in the lower right.
- Click on the spot and you will be asked to go back to the treasure room and find some scarabs.
Treasure Room
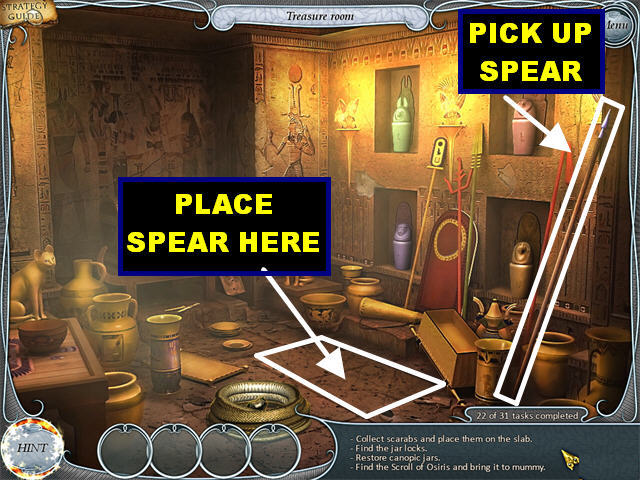
- Pick up the SPEAR in the lower right.
- Place the SPEAR on the stone slab on the floor to remove it.
- Go through the floor to access the secret vault.
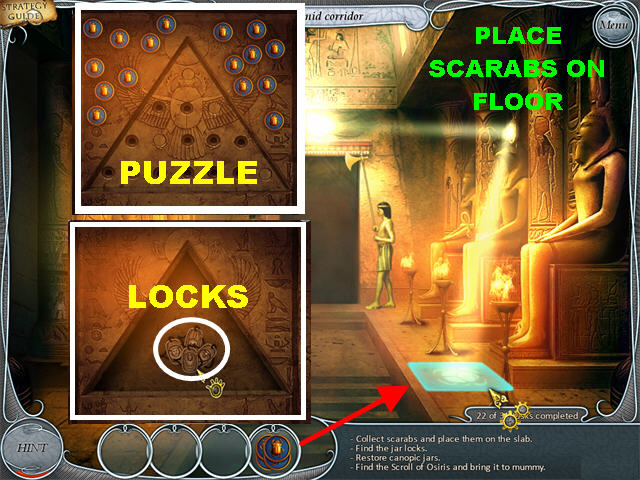
Find 16 Scarabs
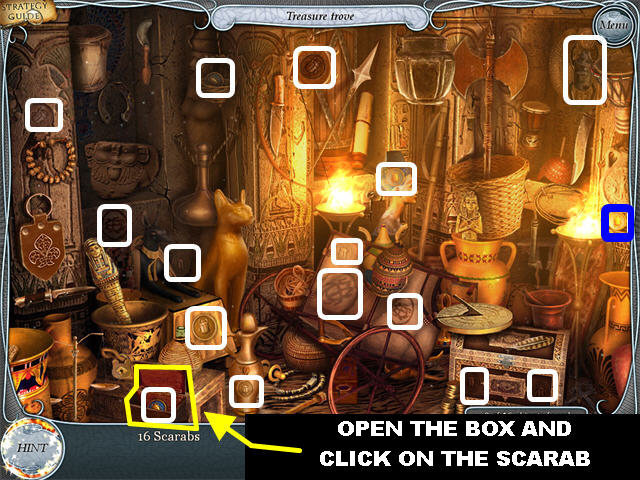
- Please look at the screenshot for the locations of all the scarabs.
- Click on the small box in the lower left corner.
- Pick up the 4 scarabs inside the box.
- Go back to the corridor.
Pyramid Corridor
- Place the SCARABS on the spot on the ground to trigger a puzzle.
Scarab Puzzle
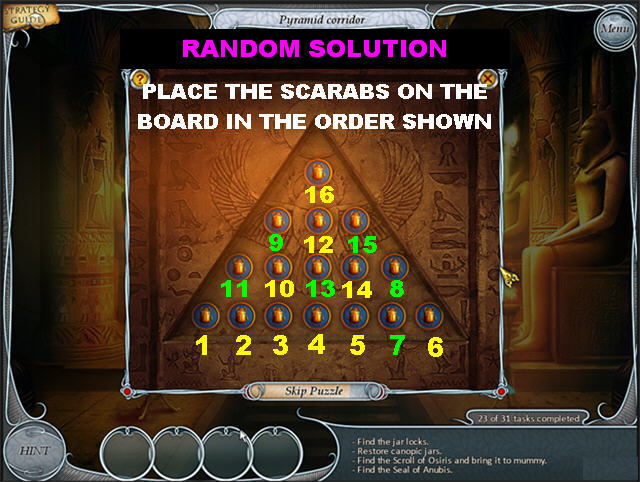
- Your goal is to place all the scarabs on the puzzle one by one until all the scarabs are on the board.
- Each time you place a scarab it opens, or closes, one of the other holes on the board.
- Choose your moves very carefully; you’ll have to start again if you have a spot in which you cannot place a scarab.
- To remove a scarab, drag it to the outside of the puzzle and start over.
- Please look at the screenshot for a random solution for this puzzle. The starting point for this puzzle varies with each game.
- Once the puzzle has been solved, click on the LOCKS inside the puzzle and 4 LOCKS will be added to your inventory.
- Go back to the treasure room.
Treasure Room
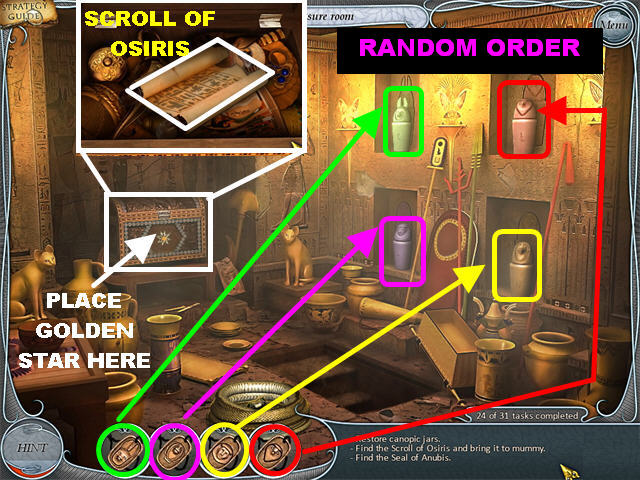
- Treasure Room - Place the LOCKS on the right canopic jars on the back wall.
- The locks will only stay when placed on the right jars.
- Please look at the screenshot for a random placement of the locks.
- Click on the locked chest in the back. You need to unlock it.
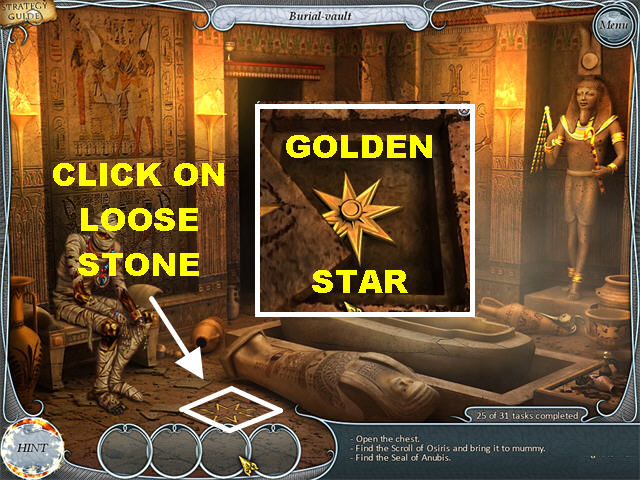
- Go back to the burial vault.
- Burial Vault - Click on the loose tile on the lower left corner of the scene.
- Click on the loose tile again for a closer look. If the tile is not moving, make sure that you click on the locked chest in the treasure room first.
- Pick up the GOLDEN STAR inside the floor.
- Go back to the treasure room.
- Treasure Room - Place the GOLDEN STAR on the chest in the back of the scene to unlock it.
- Click on the chest again for a closer look.
- Pick up THE SCROLL OF OSIRIS inside the chest.
- Go back to the burial vault.
Burial Vault
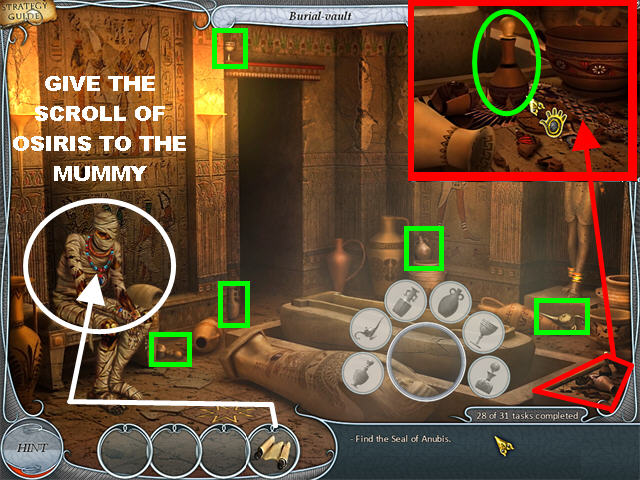
- Give THE SCROLL OF OSIRIS to the mummy on the left.
- Click on the tomb to trigger the Key Object.
- Place all the items marked in green in the Key Object.
- Click on the tray in the lower right for a closer view.
- Pick up the bottle inside the tray and place it on the Key Object.
- Go back to the secret vault in the treasure room to encounter a Hidden Object scene.
Secret Vault
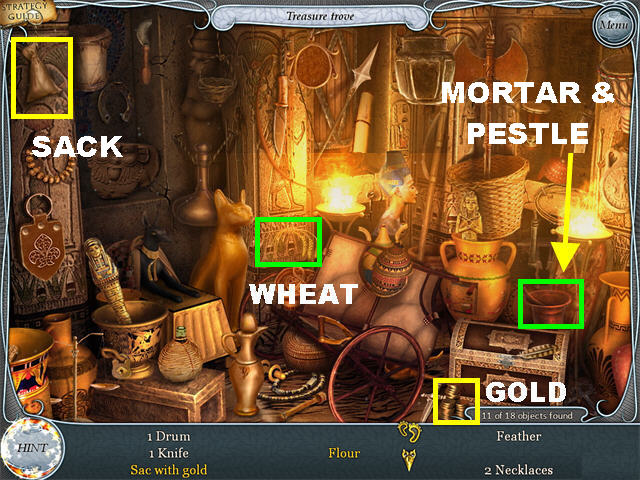
- Flour – Grab the wheat on the left and place it on the mortar and pestle on the right to grind it.
- Click on the Flour to remove it from your list.
- Sack with Gold – Grab the stack of coins in the lower right and place them in the sac in the upper left.
- Click on the Sack with Gold to remove it from your list.
- The SEAL OF ANUBIS will be added to your inventory.
Pyramid Corridor
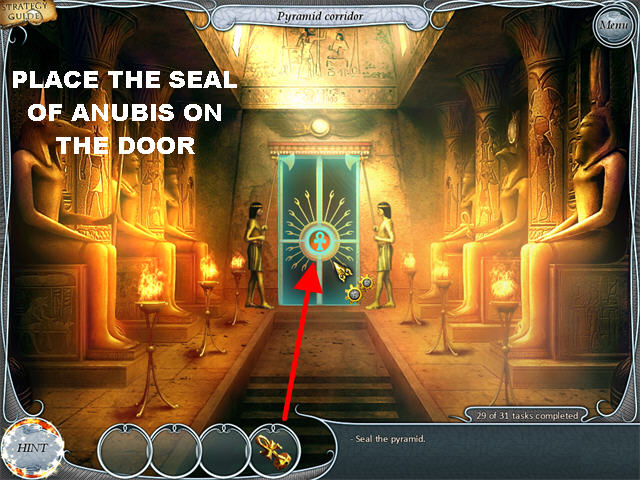
- Go to the corridor.
- As soon as you arrive at the corridor, the door on the left and the door in the back will both close.
- Place the SEAL OF ANUBIS on the back door.
- Go back to the camp outside. The pyramid is now completely sealed.
- Go to the tent to encounter a Hidden Object scene.
Tent
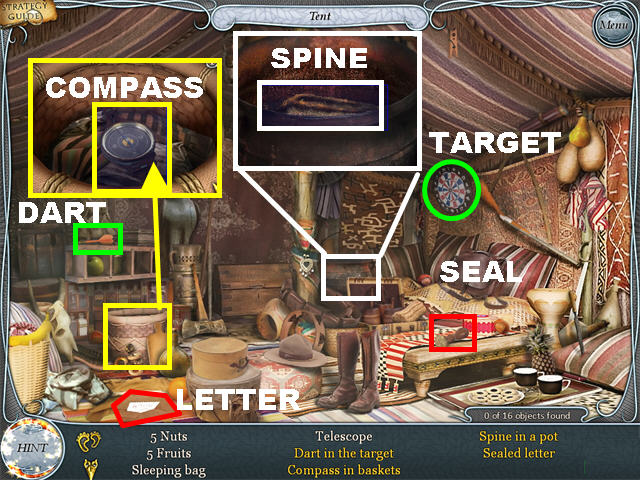
- Dart in the Target – Pick up the dart on the left and place it on the target on the right.
- Click on the Dart in the Target to remove it from your list.
- Spine in a Pot – Click on the pot on the right for a closer view.
- Click on the Spine in a Pot to remove it from your list.
- Sealed Letter – Pick up the seal on the right and place it on the letter on the lower left.
- Click on the Sealed Letter to remove it from your list.
- Compass in Basket – Click on the basket on the left for a closer look.
- Click on the Compass in Basket to remove it from your list.
- TOM’S LETTER will be added to your inventory after you complete your search.
- This marks the end of this chapter.
Chapter 4: France
Square
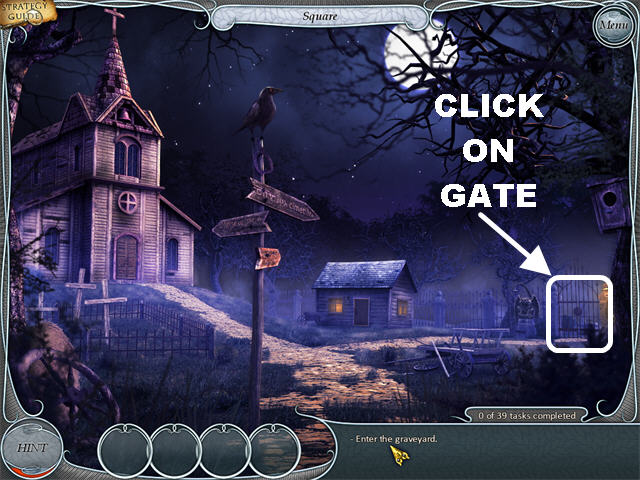
- This chapter contains 39 tasks.
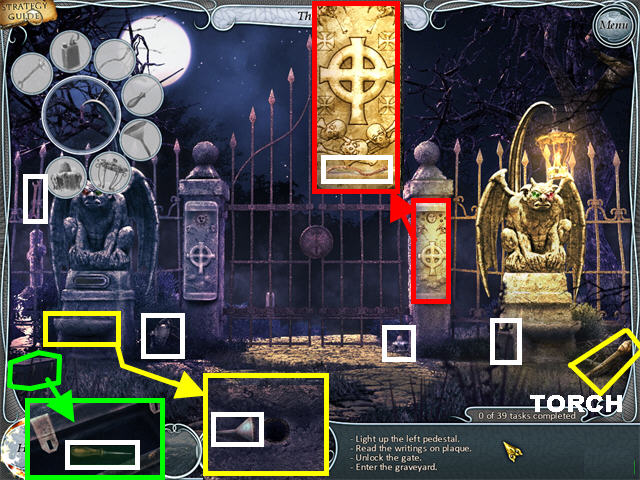
- Click on the cemetery gate for a closer look. Three more tasks are unlocked as soon as you enter this scene.
- Pick up the TORCH in the lower right corner.
- Click on the base of the statue on the left for a closer look.
- Pick up the funnel on the base and place it on the Key Object.
- Click on the toolbox in the lower left for a closer look.
- Pick up the screwdriver inside the toolbox and place it in the Key Object.
- Click on the plaque on the right side of the gate for a closer look.
- Pick up the rope and place it in the Key Object.
- Place the TORCH on the lantern above the right gargoyle to light it.
- Place the BURNING TORCH on the lantern above the gargoyle on the left to light it.
- Click on the base of the statue on the right for a closer look.
- Pick up the WET RAG on the base.
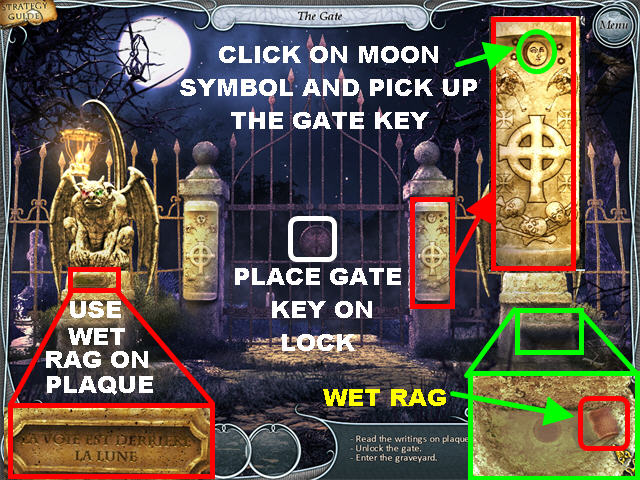
- Click on the plaque at the base of the statue on the left.
- Place the WET RAG on the plaque to clean it.
- The plaque is in French but it says: “The path lies behind the moon.”
- Click on the plaque on the right side of the gate.
- Click on the MOON emblem on the plaque to remove it.
- Click in the empty space to retrieve the GATE KEY.
- Place the GATE KEY on the gate’s lock.
- Go through the gates to access the graveyard.
Graveyard
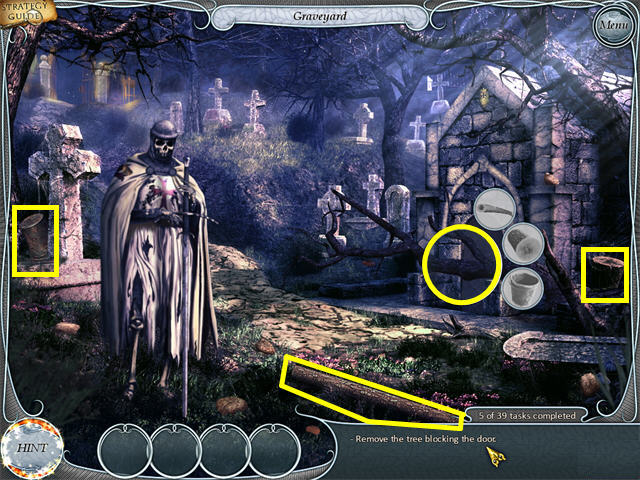
- The tree blocking the door is the Key Object.
- Place the items marked in yellow on the Key Object.
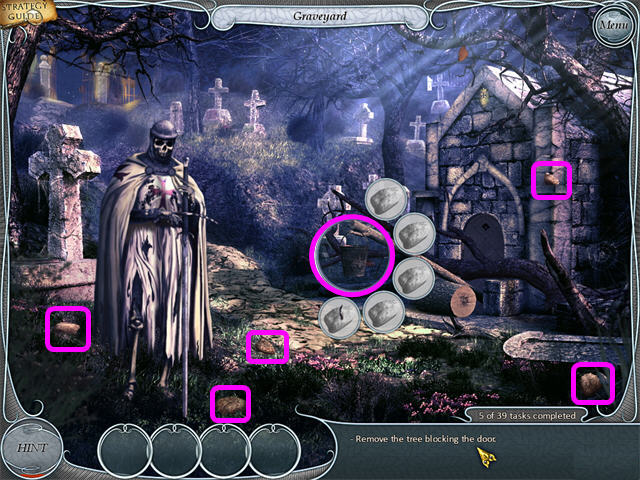
- The next Key Object is the bucket hanging from the tree.
- Place the items marked in purple in the Key Object.
- Go back to the cemetery gate by clicking in the upper left corner. From there, go to the square.
- From the square, click on the door of the small house to enter Sexton’s house.
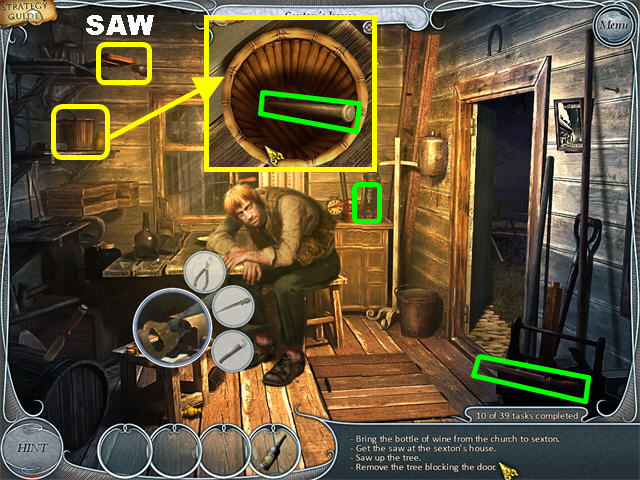
Sexton’s House
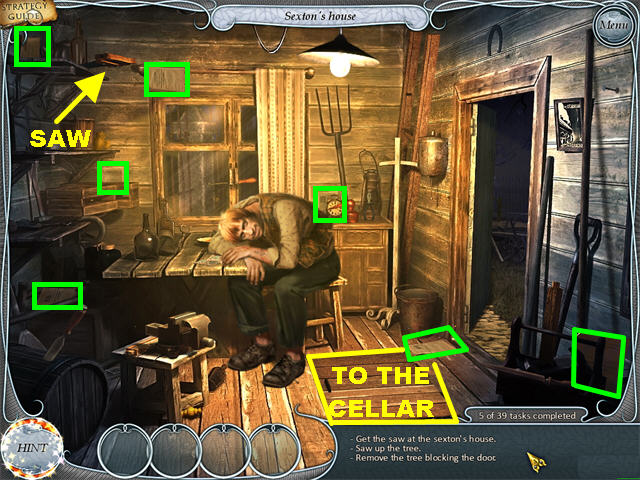
- Try to pick up the SAW in the upper left corner and a bottle will fall on the table, waking Sexton.
- You have to collect all the newspapers marked in green.
- Give the NEWSPAPERS to Sexton after all 7 of them have been collected.
- Click on Sexton to trigger a puzzle.
Newspaper Puzzle
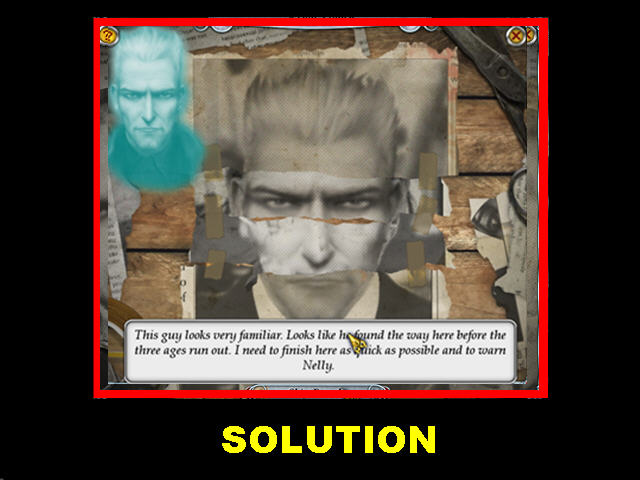
- Your goal is to create the possible image of the thief using parts from other photos.
- Click on the center of the puzzle to bring into focus the image of a man.
- In the upper left corner you will see a ghostly face.
- Click on different parts of the photo to change the image so it looks like the ghostly image in the top left corner.
- Sexton asks you to go to the cellar and bring him the wine and hors d’oeuvres.
- Click on the trapdoor to enter the cellar.
Cellar
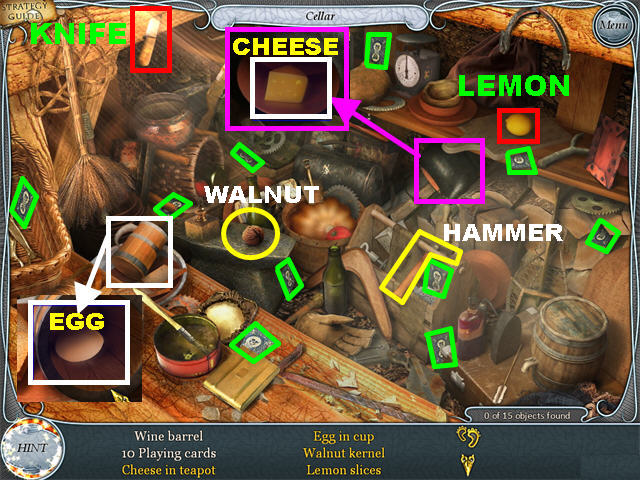
- The 10 playing cards are marked in green.
- Cheese in Teapot – Click on the Teapot on the right for a closer look.
- Click on the Cheese in the Teapot to remove it from your list.
- Egg in Cup – Click on the cup in the lower left for close-up view.
- Click on the Egg in Cup to remove it from your list.
- Walnut Kernel – Grab the Hammer on the right and place it on the Walnut in the center to break it.
- Click on the Walnut Kernel to remove it from your list.
- Lemon Slices – Pick up the Knife in the upper left corner and place it on the lemon in the upper right to cut it.
- Click on the Lemon Slices to remove it from your list.
- You will receive FOOD ‘N’ DRINK in your inventory.
Sexton’s House
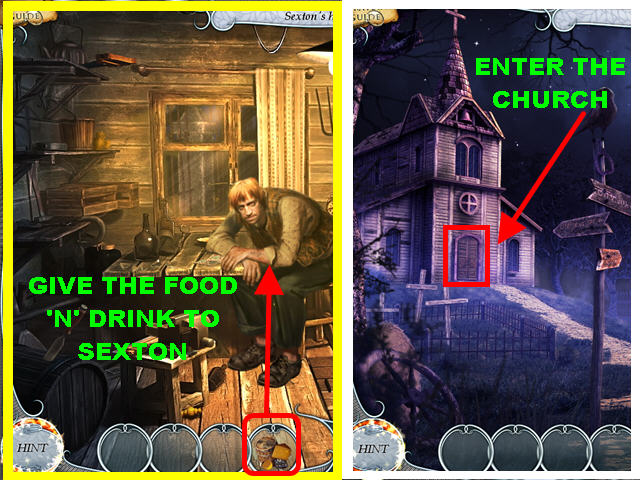
- Give the FOOD ‘N’ DRINK to Sexton.
- Go back outside.
- Enter the church on the left.
Church
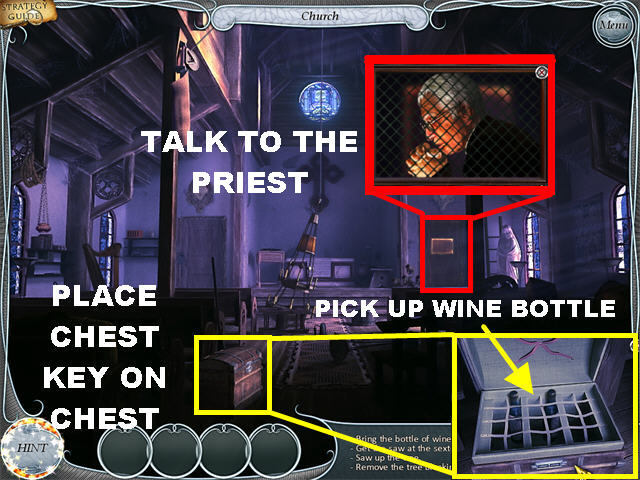
- Church - Click on the chest in the lower left to trigger new tasks.
- Click on the door in the back right side of the church.
- Ask the priest for the keys by clicking on him.
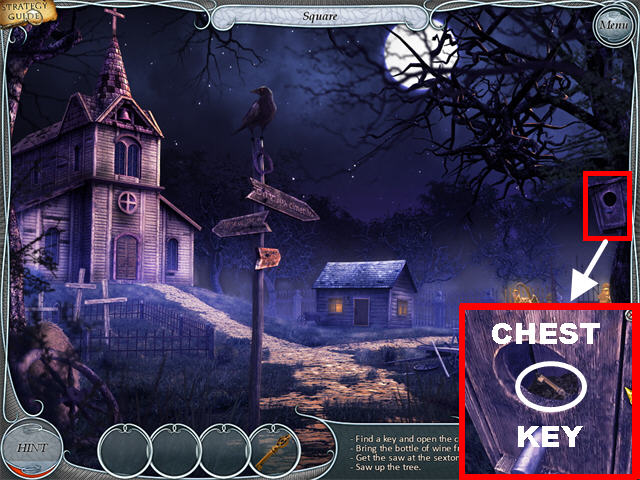
- Go outside to the square.
- The Square – Click on the birdhouse in the upper right for a closer view.
- Pick up the CHEST KEY inside the birdhouse.
- Go back inside the church.
- Church - Place the CHEST KEY on the chest in the lower left to unlock it.
- Click on the chest for a closer view.
- Pick up the WINE BOTTLE inside the chest.
- Go back to Sexton’s House.
Sexton’s House
- Give the WINE BOTTLE to Sexton.
- Grab the BLUNT SAW from the upper left corner.
- Place the BLUNT SAW on the machine in the lower left.
- Click on the saw to trigger the Key Object.
- Pick up all the items marked in green and place them in the Key Object.
- Click on the basket in the upper left.
- Pick up the nail inside the basket and place it in the Key Object.
- The SHARP SAW will be added to your inventory.
- Go back to the graveyard.
Graveyard
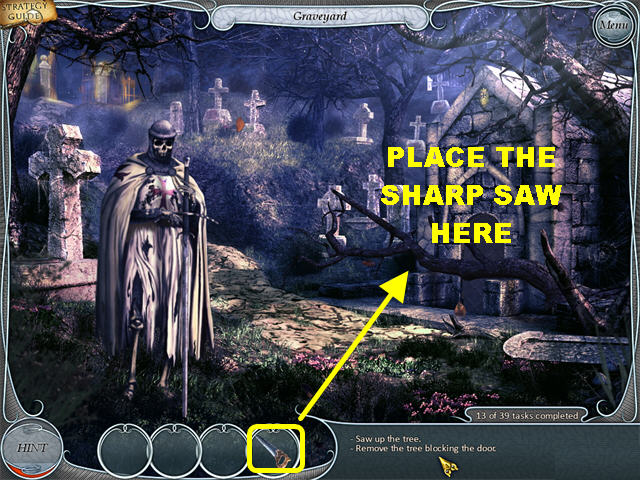
- Graveyard - Place the SHARP SAW on the log blocking the door.
- Click on the door for a new task to appear.
- Go back to Sexton’s House.
Sexton’s House & Church
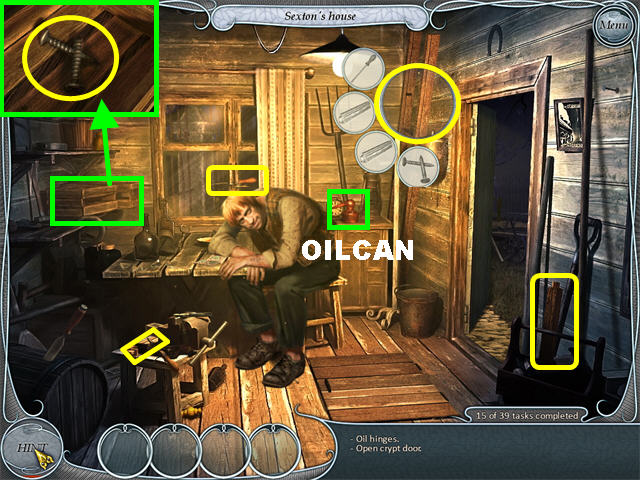
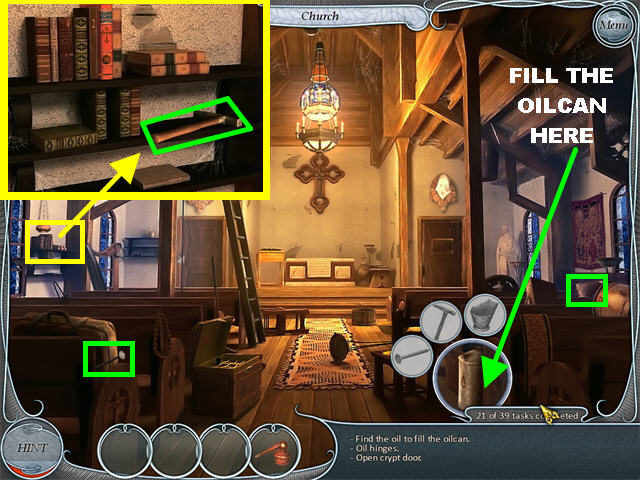
- Sexton’s House - Pick up the OILCAN on the right side of the back wall.
- Go back to the church.
- Church – Click on the chandelier in the back of the room.
- Click on the sack in the upper left for some new tasks to appear.
- Pick up the LADDER on the far right side. It is too short.
- Go back to the house.
- Sexton’s House – Click on the LADDER against the back wall to trigger the Key Object.
- Pick up all the items marked in yellow and place them in the Key Object.
- Click on the crate in the upper left.
- Pick up the screws inside the crate and place them in the Key Object.
- The SHORT LADDER will be added to your inventory.
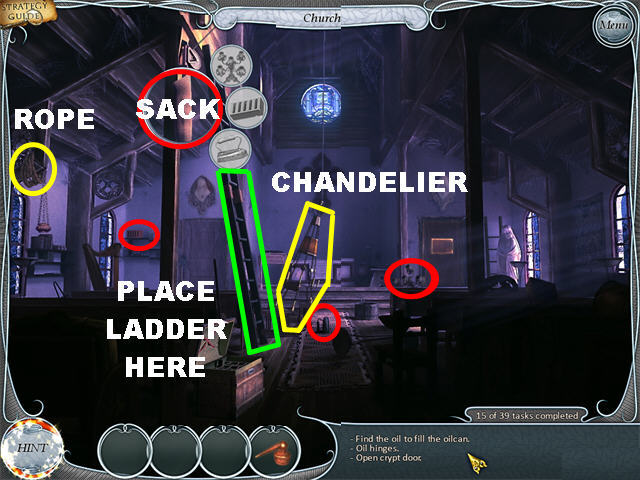
- Go back to the church.
- Church - Pick up the ROPE in the upper left. The ROPE will combine with the ladder.
- You have a LONG LADDER in your inventory.
- Place the LONG LADDER on the left side of the church.
- Click on the sack in the upper left to trigger the Key Object.
- Pick up the items marked in red and place them in the Key Object.
- The weight of the sack lifts the chandelier.
- Click on the chandelier and a CANDLE will be added to your inventory.
- Go to the gate.
Cemetery Gate
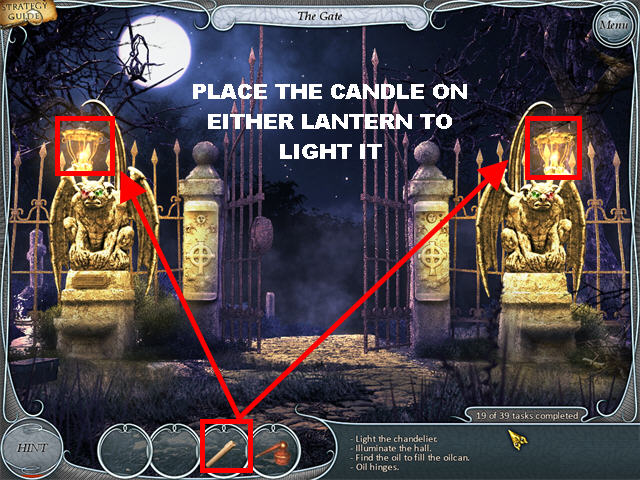
- Place the CANDLE on the lantern above the right or left gargoyle to light the candle.
- You now have a LIT CANDLE in your inventory.
- Go back to the church.
Church
- Place the LIT CANDLE on the chandelier to light the room.
- Click on the large oil container in the lower right to trigger the Key Object.
- Place all the items marked in green in the Key Object.
- Click on the shelf on the left.
- Pick up the Hammer on the shelf and place it on the key Object.
- The oil container will start spilling oil into the bucket in the lower right.
- Place the OILCAN on the bucket to fill it with oil.
- Go back to the Graveyard.
Graveyard
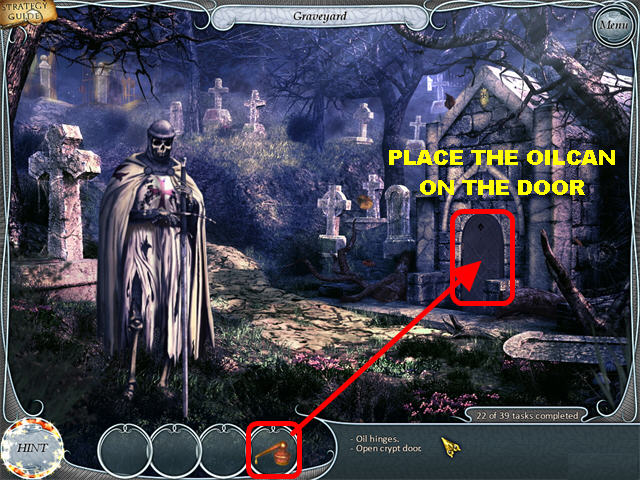
- Place the FULL OILCAN on the door.
- Click on the door to open it.
- Go through the door to enter the crypt.
Crypt
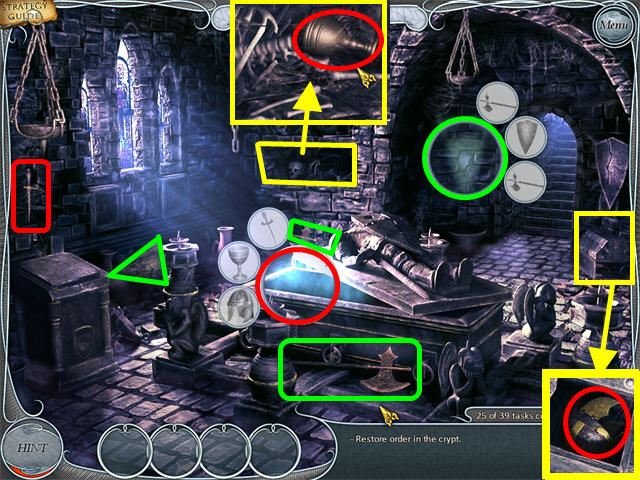
- Click on the sarcophagus lid to trigger the Key Object.
- Place the items marked in red into the Key Object.
- Click on the shelf on the back wall.
- Pick up the goblet and place it in the Key Object.
- Click on the chest on the far right.
- Pick up the helmet and place it on the Key Object.
- Click on the Key Object on the right side of the wall.
- Place the items marked in green into the Key Object on the wall.
The Gate
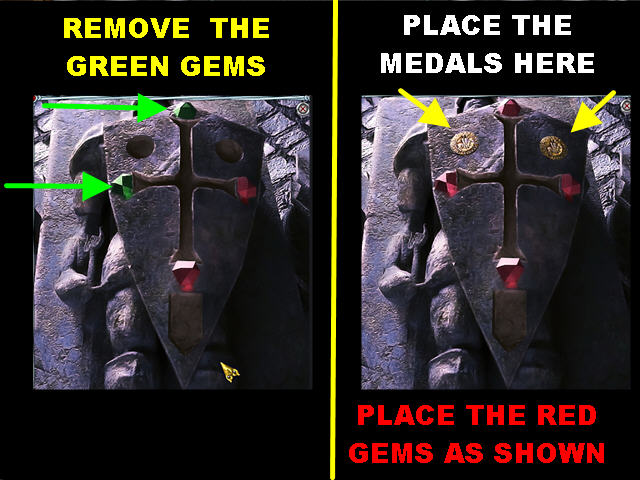
- Crypt - Click on the sarcophagus lid.
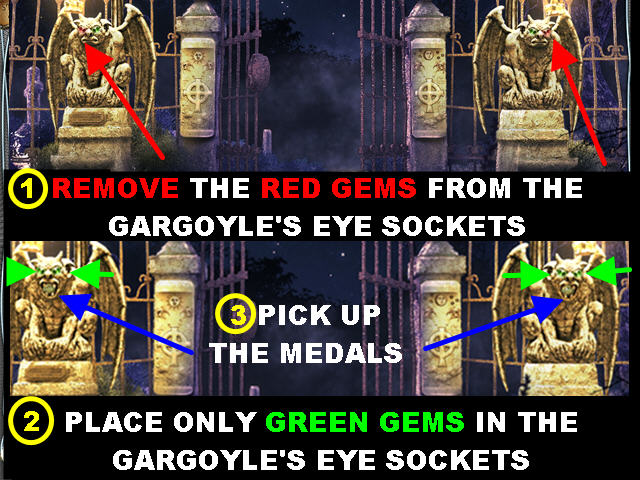
- Your goal is to find the right combinations for all the gems.
- Click on the 2 GREEN GEMS to remove them.
- Go to the cemetery gate.
- Cemetery Gate – Click on the RED GEM of the gargoyle on the left to remove it.
- Click on the RED GEM of the gargoyle on the right to remove it.
- Place the GREEN GEM on the eye of the left gargoyle.
- Place the GREEN GEM on the eye of the right gargoyle.
- Both gargoyles should now have green eyes.
- Click on the mouth of the left gargoyle to retrieve the MEDAL.
- Click on the mouth of the right gargoyle to retrieve the other MEDAL.
- Go back to the crypt.
- Crypt – Click on the sarcophagus lid.
- Place the 2 RED GEMS on the shield as shown in the screenshot. At this point 1 red gem should be in each corner of the cross.
- Place the 2 MEDALS in the top left and right slots on the shield.
- Go to the graveyard.
Graveyard
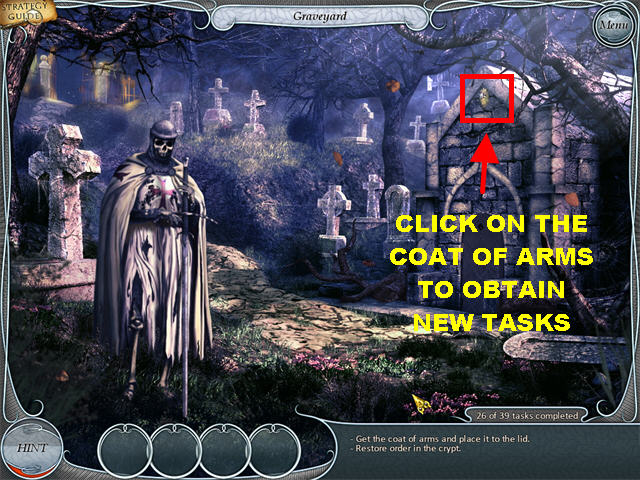
- Click on the COAT OF ARMS above the door for new tasks to appear.
- Go to the cellar located in Sexton’s house.
Cellar
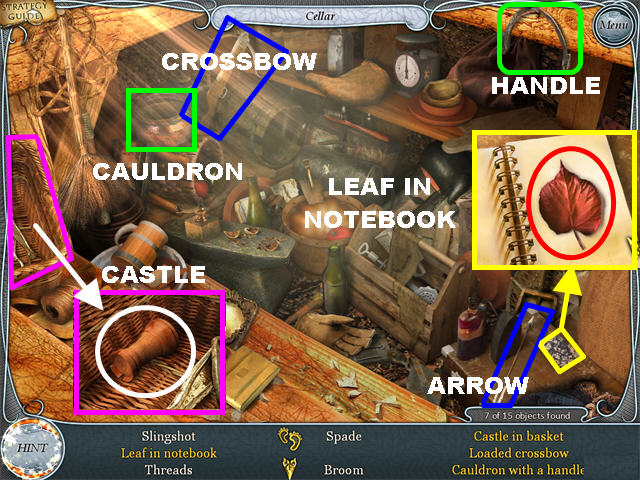
- You will encounter a Hidden Object scene as soon as you enter the cellar.
- Castle in Basket – Click on the basket on the left for a closer view.
- Click on the Castle in Basket to remove it from your list.
- Loaded Crossbow – Pick up the arrow in the lower right and place it on the crossbow in the upper left.
- Click on the Loaded Crossbow to remove it from your list.
- Cauldron with a Handle – Pick up the handle in the upper right and place it on the cauldron in the upper left.
- Click on the Cauldron with a Handle to remove it from your list.
- Leaf in a Notebook – Click on the notebook in the lower right corner for a closer view.
- Click on the Leaf in a Notebook to remove it from your list.
- A FORKED STICK will be added to your inventory.
- Click on Sexton to trigger a mini-game.
Card Mini-game
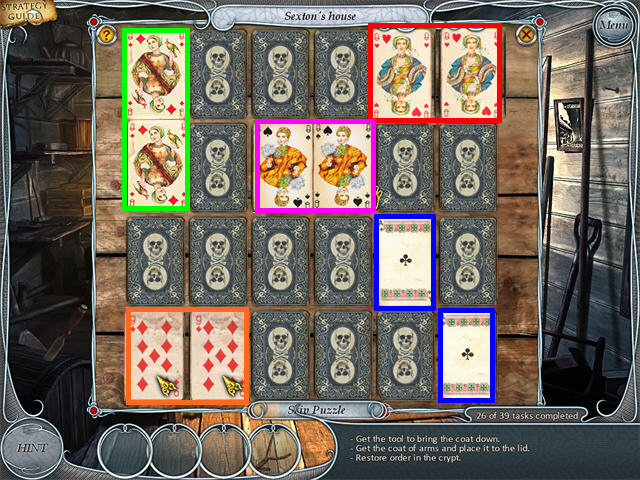
- Your goal is to flip over all the matching cards on the pile.
- Matching cards will be eliminated from the board.
- Once you beat the game, Sexton will give you a rubber band for your stick. You will now have a SLINGSHOT in your inventory.
- Go back to the graveyard.
Graveyard & Crypt
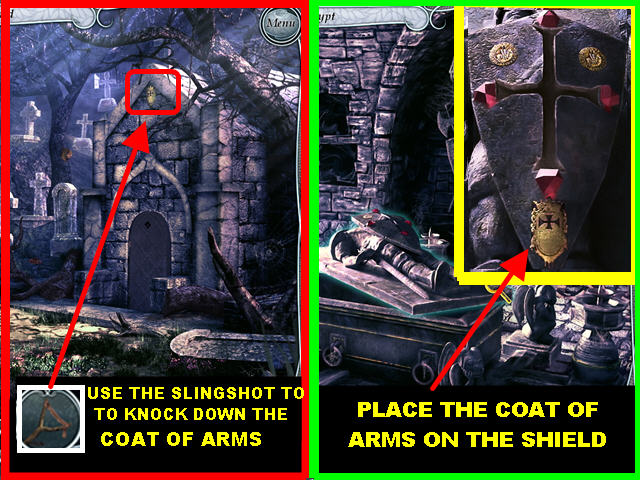
- Graveyard - Use the SLINGSHOT to knock down the coat of arms.
- The COAT OF ARMS goes into your inventory.
- Go into the crypt.
- Crypt - Click on the sarcophagus’ lid.
- Place the COAT OF ARMS on the shield.
- Go back to the church.
Church
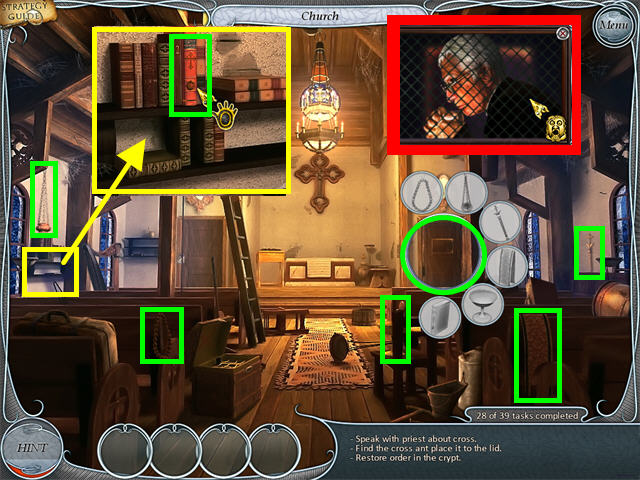
- Click on the door on the far right to bring up the priest. Click on the priest to talk to him and he’ll ask you to bring him some items.
- Click on the door on the far right to bring up the Key Object.
- Place the items marked in green into the Key Object.
- Click on the rug on the right side of the wall to knock it down. Pick up the sword and drag it to the Key Object.
- Click on the books on the left wall for a closer view. Click on the book and drag it to the Key Object.
- Go back to Sexton’s house.
Sexton’s House
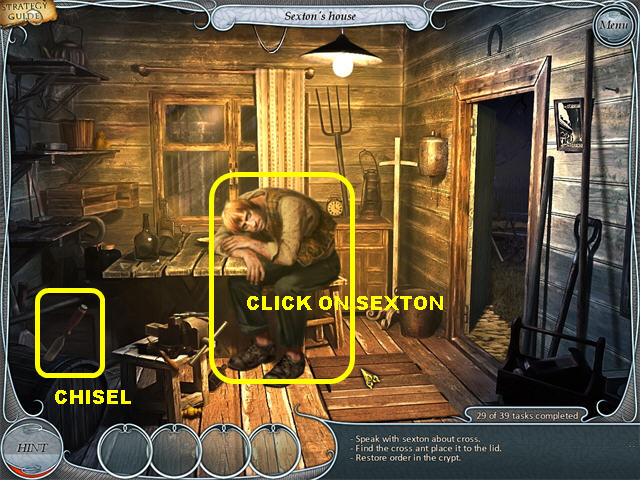
- Sexton’s House - Click on Sexton to talk to him.
- He wants you to find the 10 franc bill he lost and return it to him.
- Go to the graveyard.
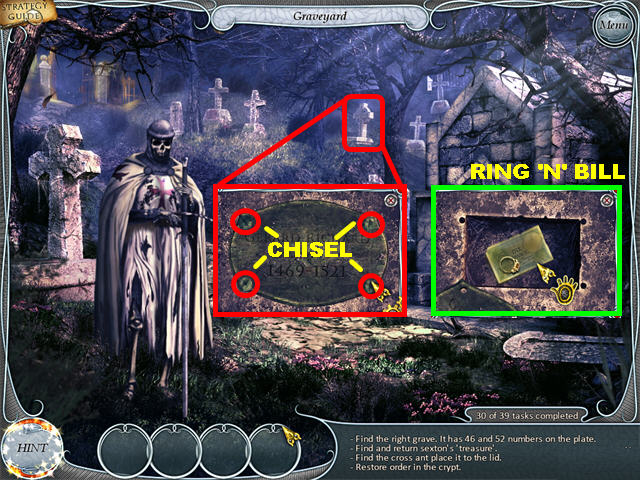
- Graveyard - Click on all the graves to take a closer look. You need to find the grave that has the numbers 46 and 52 on it.
- Click on the grave stone on the screenshot. The grave is marked “GERARD RICHARD 1469-1521.”
- Make sure the gears icon appears when you click on the grave, since this allows you to pick up the chisel.
- When you click on it, you’ll find that you need something to unscrew the screws.
- Go back to Sexton’s House.
- Sexton’s House – Pick up the CHISEL on the lower left side of the room.
- Go back to the graveyard.
- Graveyard – Click on the grave shown in the screenshot.
- Place the CHISEL on all 4 screws to remove them.
- Pick up the RING ‘N’ BILL in the grave.
- Go back to Sexton.
Sexton’s House
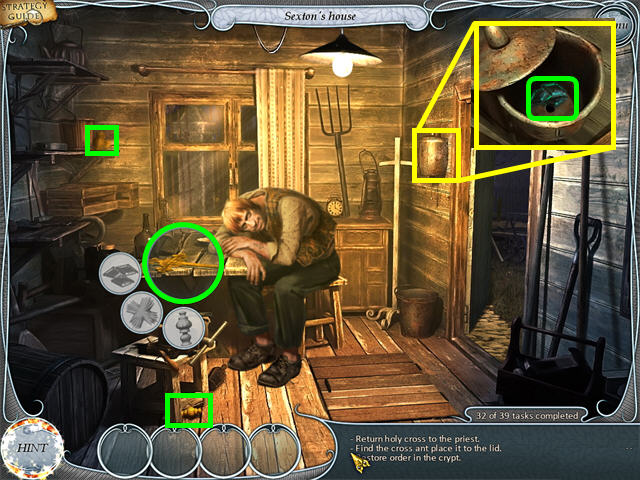
- Give the RING ‘N’ BILL to Sexton.
- The Key Object is the cross on the table.
- Place all the items marked in green in the Key Object.
- Click on the pot in the upper left.
- Pick up the gems inside the pot and place them in the Key Object.
- Click on the HOLY CROSS on the table to add it to your inventory.
- Go to the church.
Church
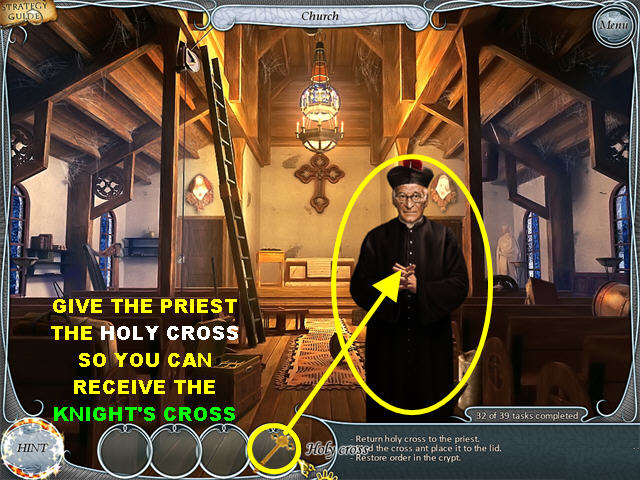
- Give the HOLY CROSS to the priest.
- The KNIGHT’S CROSS goes into your inventory.
- Go back to the crypt.
Crypt
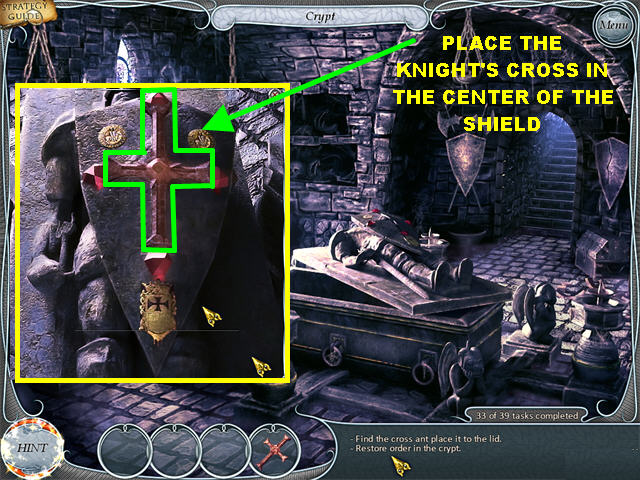
- Click on the sarcophagus lid.
- Place the KNIGHT’S CROSS on the shield.
- Go to the graveyard.
Graveyard & Church
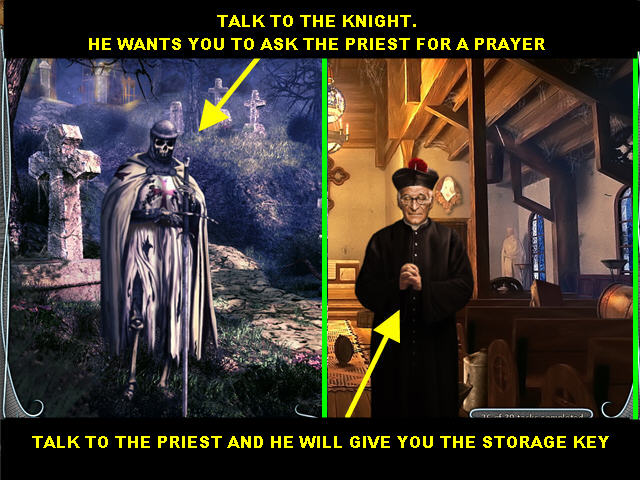
- Graveyard - Click on the Knight to talk to him. He wants you to talk to the priest about a special prayer.
- Go back to the church.
- Church - Talk to the priest.
- The priest gives you the STORAGE KEY.
- Click on the door on the far left to trigger a new task.
- Place the STORAGE KEY on the door on the far left to open it.
- Enter the door to encounter a Hidden Object scene.
Storage
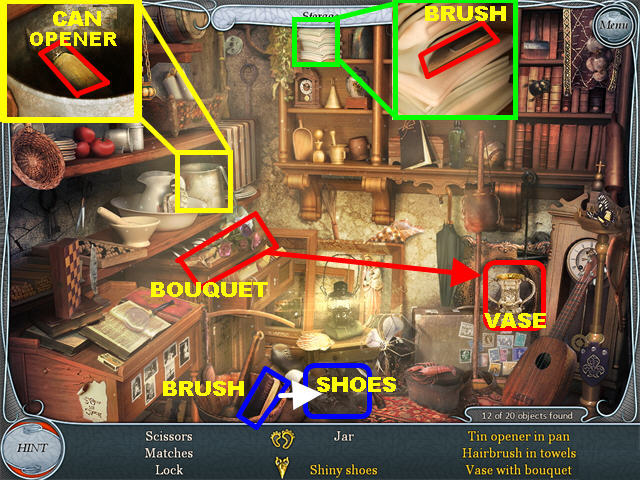
- Tin Opener in Pan – Click on the pan in the upper left for a closer view.
- Click on the Tin Opener in Can to remove it from your list.
- Hairbrush in Towels – Click on the white towels in the upper center for a closer view.
- Click on the Hairbrush in Towels to remove it from your list.
- Vase with Bouquet – Pick up the bouquet on the left and place it in the vase on the right.
- Click on the Vase with Bouquet to remove it from your list.
- Shiny Shoes – Pick up the brush in the lower left and place it on the shoes in the lower center.
- Click on the Shiny Shoes to remove them from your list.
- You will receive 4 FUNERAL CANDLES, MATCHES, and a EUCHOLOGIAN BOOK in your inventory at the end of your search.
- Go to the crypt.
Crypt
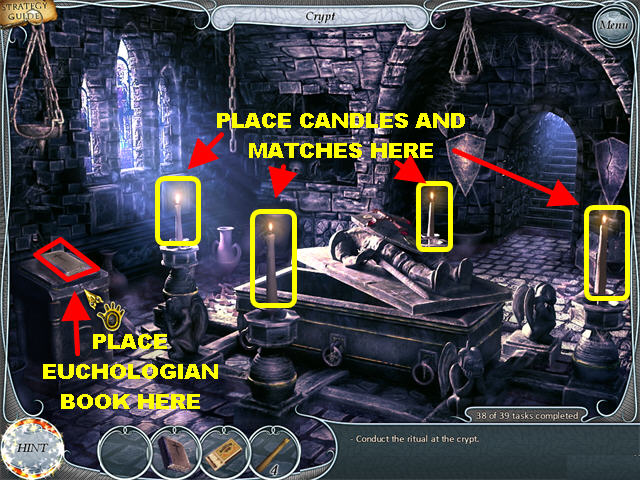
- Place the 4 FUNERAL CANDLES on the candleholders as shown in the screenshot.
- Light all 4 CANDLES with the MATCHES in inventory.
- Place the EUCHOLOGIAN book on the stand in the lower left.
- Click on the EUCHOLOGIAN book on the stand to start the ceremony.
- This marks the end of this chapter.
Chapter 5: Siberia
Great Forest
- This chapter contains 44 tasks.
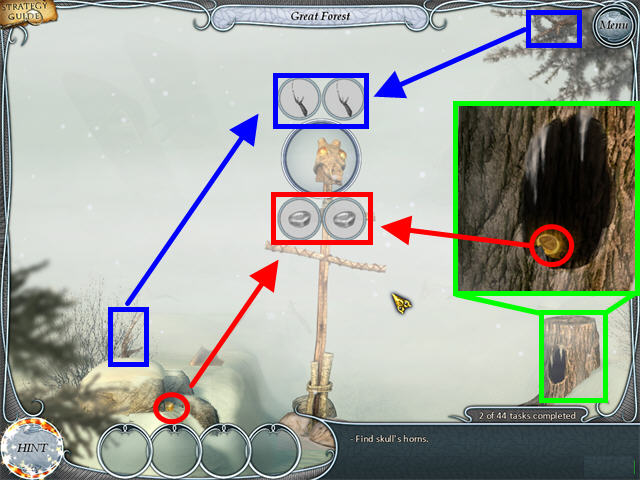
- Click on the skull in the center of the scene.
- Click on the skull again to trigger the Key Object.
- Click on the tree stump in the lower right.
- Pick up the EYE inside the tree stump and place it inside the key Object.
- Pick up the other EYE in the lower left corner and place it in the Key Object.
- Click on the skull one more time to bring up a different Key Object which asks you to find the horns.
- Pick up the horn in the upper right corner and place it in the Key Object.
- Pick up the horn in the lower left and place it in the key Object.
- The last action clears the scene.
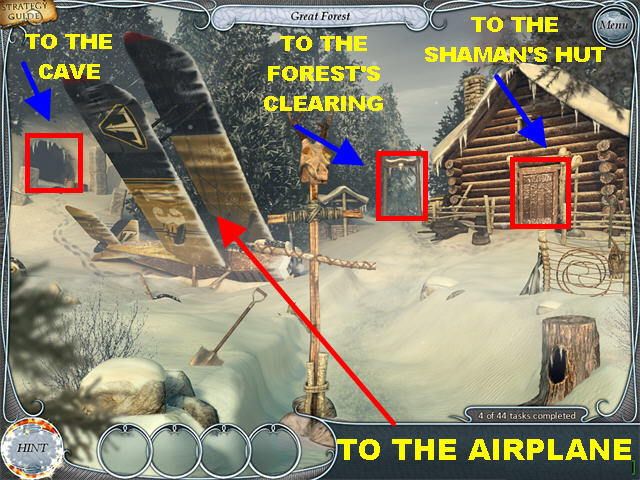
- You can access the forest’s clearing in the back of the scene.
- The cave can be accessed on the left side of the scene.
- The Airplane is on the left side of the scene.
- Enter the Shaman’s hut on the right for now.
Shaman’s Hut
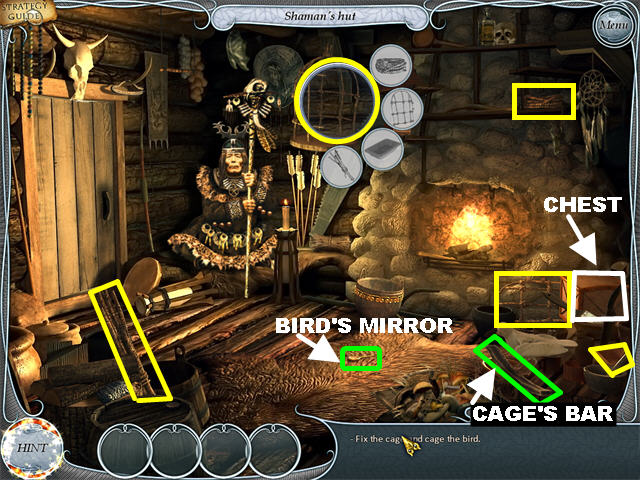
- Each time you try to click on the bird, it will fly to the opposite side of the room.
- Pick up the CAGE’S BAR in the lower right.
- Pick up the BIRD’S MIRROR in the center of the carpet.
- The Key Object is the bird’s cage.
- Pick up all the items marked in yellow and drag them to the bird’s cage.
- Place the BIRD’S MIRROR in the cage and the bird will fly inside the cage.
- Click on the cage to close it.
- Place the CAGE’S BAR on the cage to lock it. If you wait too long to complete the process, the bird will fly out of the cage. If this happens, just start the same process over.
- Click on the chest on the right. When it opens you find out it is empty.
- Click on the Shaman to talk to him. The Shaman asks you to go to the forest.
- Exit the hut and go to the forest’s clearing.
Forest’s Clearing
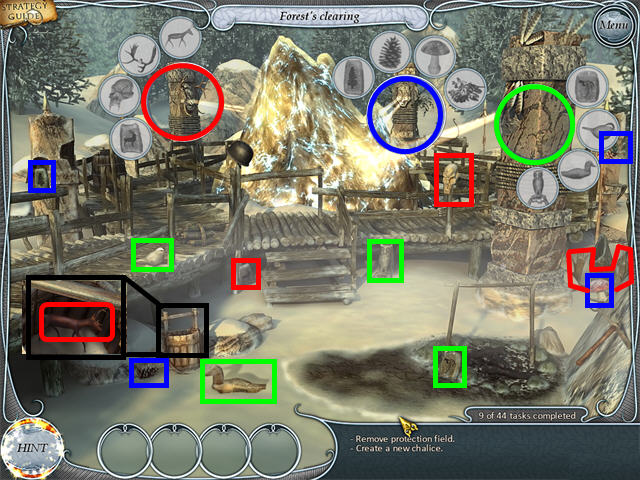
- Click on the 3 Key Objects shown in the screenshot.
- The red items go in the Key Object on the left.
- The blue items go in the Key Object in the middle.
- The green items go in the Key Object on the right.
- Click on the bucket in the lower left for a closer view.
- Pick up the item inside the bucket and drag it to the Key Object on the left.
- Each time a key Object is filled, the idol will turn around.
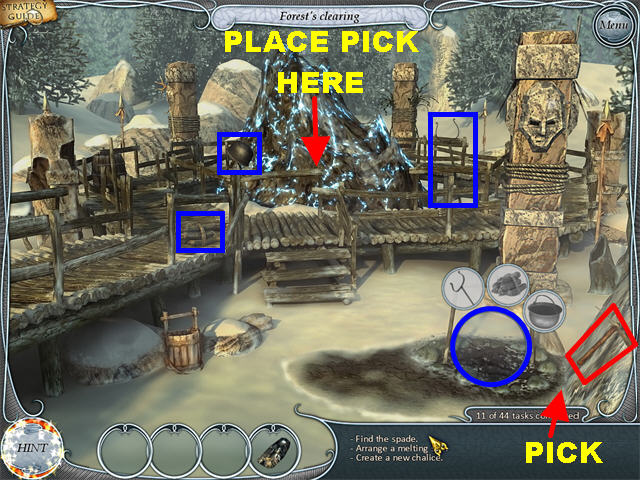
- Grab the PICK in the lower right.
- Place the PICK on the meteorite in the back of the scene to cut a piece off.
- A METEORITE’S PIECE will be added to your inventory.
- Click in the lower right to trigger the Key Object.
- Place all the items marked in blue into the Key Object.
- Go back to the hut.
Shaman’s Hut & Great Forest
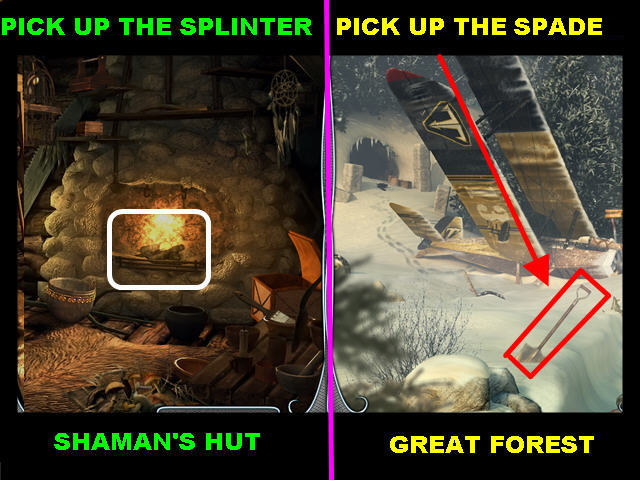
- Shaman’s Hut - Click inside the fireplace.
- A SPLINTER will be added to your inventory.
- Go outside to the great forest.
- Great Forest – Pick up the SPADE in the lower left.
- Go back to the forest’s clearing.
Forest’s Clearing & Shaman’s Hut
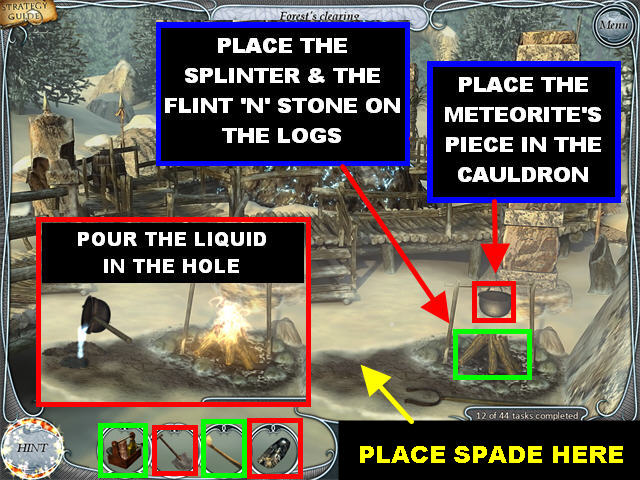
- Forest’s Clearing - Place the METEORITE’S PIECE in the cauldron.
- Place the SPLINTER on the logs below the cauldron.
- Go back to the hut.
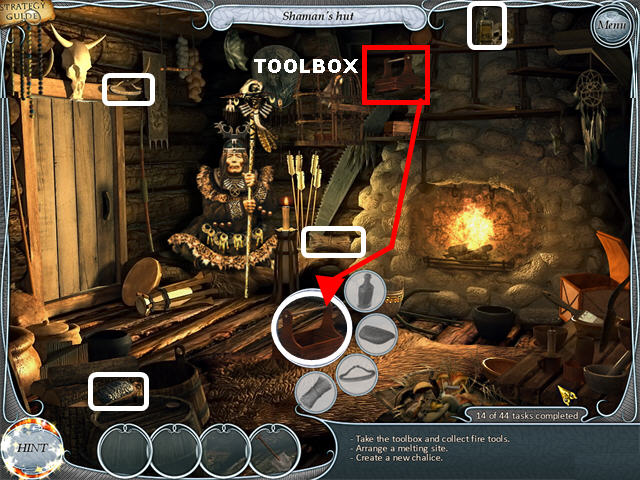
- Shaman’s Hut - Click on the Shaman to talk to him.
- Click on the toolbox in the upper center and it will fall on the floor.
- Click on the toolbox on the floor to bring up the Key Object.
- Place all the items marked in white into the Key Object.
- The FLINT ‘N’ STONE will be added to your inventory.
- Go back to the clearing.
- Forest’s Clearing – Place the FLINT ‘N’ STONE on the wooden logs below the cauldron to start the fire.
- Place the SPADE on the ground close to the fire to dig a hole.
- Pick up the cauldron from the fire and place it on the hole in the ground to the left of the fire.
- A RITUAL CHALICE will be added to your inventory.
- Go back to the hut.
Shaman’s Hut
- Hut – Click on the Shaman to talk to him.
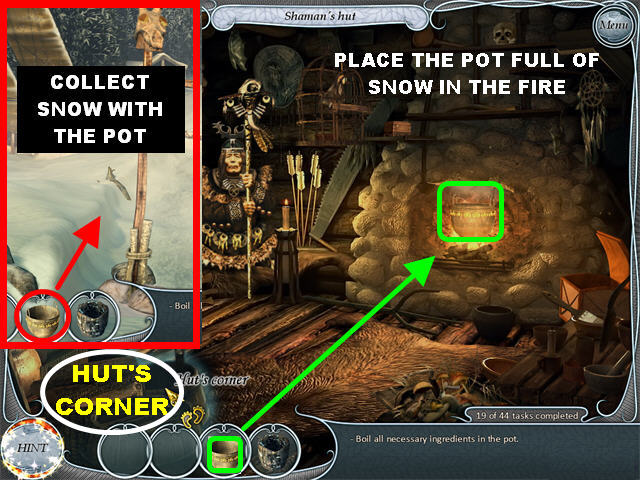
- Pick up the POT close to the fireplace.
- Go outside.
- Great Forest - Place the POT on the snow to collect it.
- You now have a POT FULL OF SNOW in your inventory.
- Go back inside the hut.
- Shaman’s Hut – Place the POT FULL OF SNOW into the fireplace.
- Click on the hut’s lower left corner to enter a Hidden Object scene.
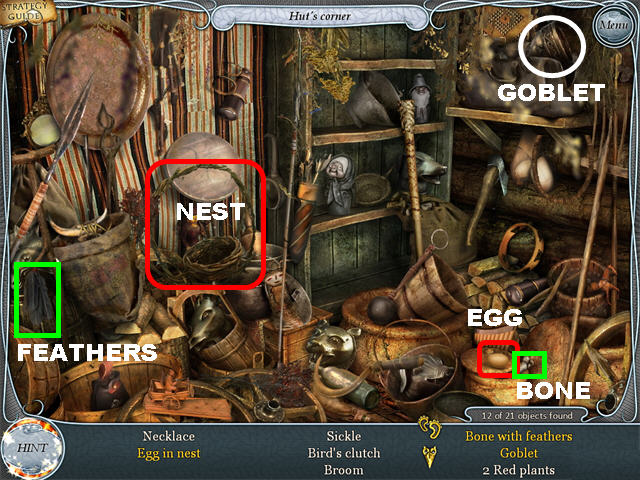
- Egg in Nest – Pick up the egg in the lower right and place it in the nest on the left.
- Click on the Egg in Nest to remove it from your list.
- Bone with Feathers – Pick up the feathers in the lower left and place them on the bone in the lower right.
- Click on the Bone with Feathers to remove it from your list.
- Goblet – Click on the bag in the upper right to open it.
- Click on the Goblet inside the bag to remove it from your list.
- You will receive the POTION INGREDIENTS at the end of your search.
Great Forest
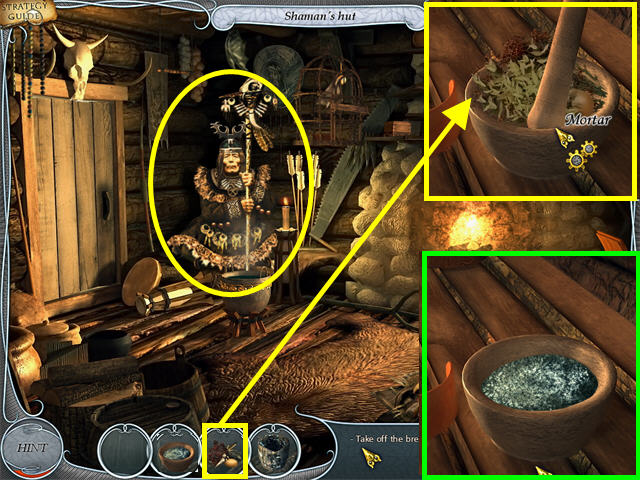
- Shaman’s Hut - Click on the mortar and pestle in the lower right.
- Place the POTION INGREDIENTS into the mortar.
- Click on the pestle to grind the ingredients.
- The POWDER will be added to your inventory.
- Place the POWDER into the pot on the fire.
- Click on the POT in the fire and it will land in front of the Shaman.
- Place the RITUAL CHALICE on the pot.
- You will receive the FILLED CHALICE in inventory.
- Give the FILLLED CHALICE to the Shaman.
- Go outside to the great forest.
- Great Forest – Click on the airplane on the left side of the scene to trigger a Hidden Object scene.
Airplane
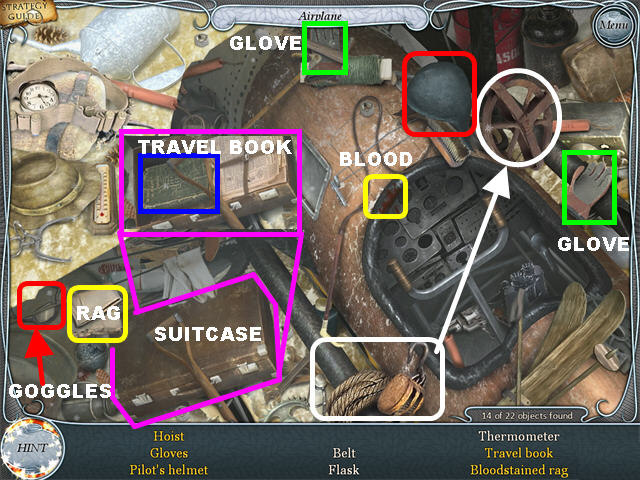
- Pilot’s Helmet - Pick up the goggles in the lower left and place them on the helmet in the upper right.
- Click on the Pilot’s Helmet to remove it from your list.
- Travel Book – Click on the suitcase in the lower left to open it.
- Click on the Travel Book inside the suitcase to remove it from your list.
- Gloves – Pick up the glove in the upper center and place it on the other glove in the upper right.
- Click on the Gloves to remove it from your list.
- Hoist – Grab the pulley in the lower center and place it on the wheel in the upper right.
- Click on the Hoist to remove it from your list.
- Bloodstained Rag – Pick up the rag in the lower left and place it on the bloodstain in the center.
- Click on the Bloodstained Rag to remove it from your list.
- You will receive the BLOODSTAINED RAG in your inventory.
Shaman’s Hut & Cave
- Hut - Give the BLOODSTAINED RAG to the Shaman
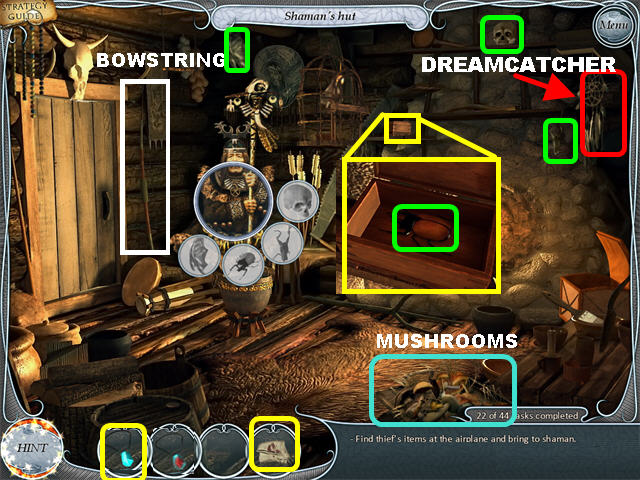
- Pick up the BOWSTRING on the side of the door, close to the Shaman.
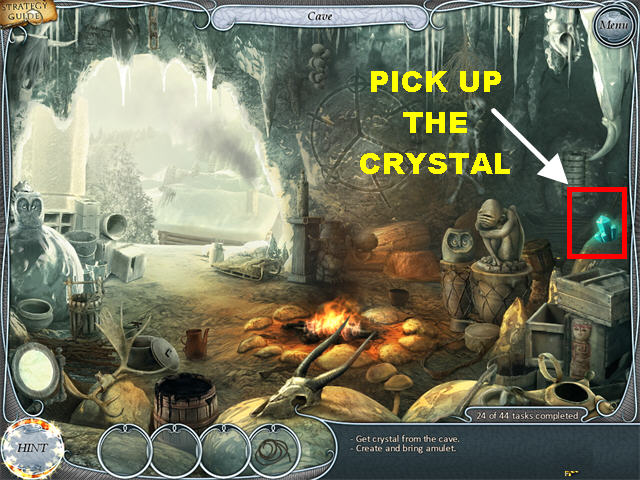
- Go to the cave.
- Cave - Pick up the CRYSTAL in the upper right corner.
- The AMULET will mix with the BOWSTRING forming a BASIC AMULET in your inventory.
- Go back to the hut.
- Hut - Give the BASIC AMULET to the Shaman.
- He gives you back a PROTECTION AMULET.
- Click on the Shaman again to trigger the Key Object.
- Pick up all the items marked in green and place them in the Key Object.
- Click on the pile of mushrooms in the lower right to trigger a puzzle.
Mushroom Puzzle
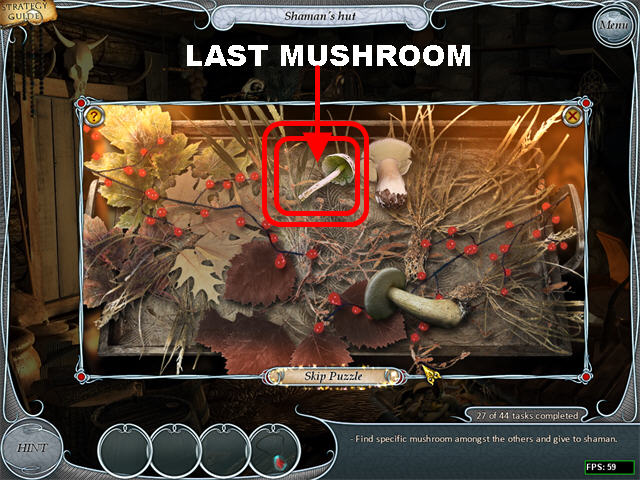
- Your goal is to sort through all the matching pairs of mushrooms until only one is left.
- Click on a mushroom to select it. Click on the matching pair to eliminate if from the board.
- Keep making matches until you reach the mushroom that does not have a pair.
- Keep in mind that matching mushrooms may be different sizes and facing different directions.
- The DEATH CAP mushroom will be added to you inventory at the end of your search.
- Give the DEATCH CAP mushroom to the Shaman.
- The Shaman gives you POWDER.
- Pick up the DREAMCATCHER in the upper right corner.
- Go back to the cave.
Cave & Shaman’s Hut
- Cave - Place the DREAMCATCHER above the cave exit.
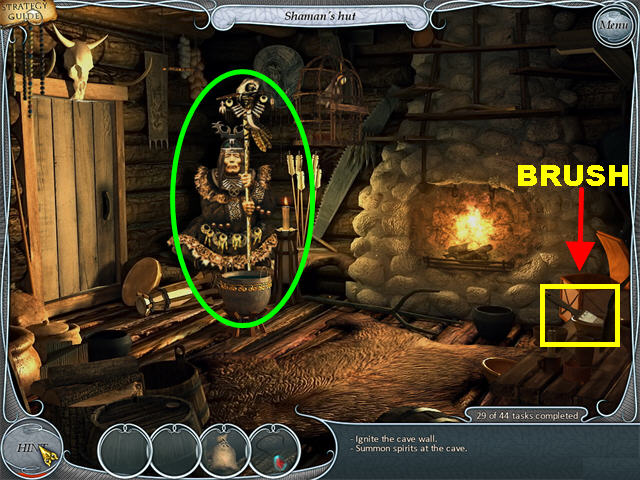
- Go back to the Shaman’s Hut.
- Shaman’s Hut – Pick up the BRUSH on the right edge of the scene.
- Go back to the cave.
- Cave – Place the BRUSH in the bucket of tar in the lower left. The BRUSH goes back in inventory.
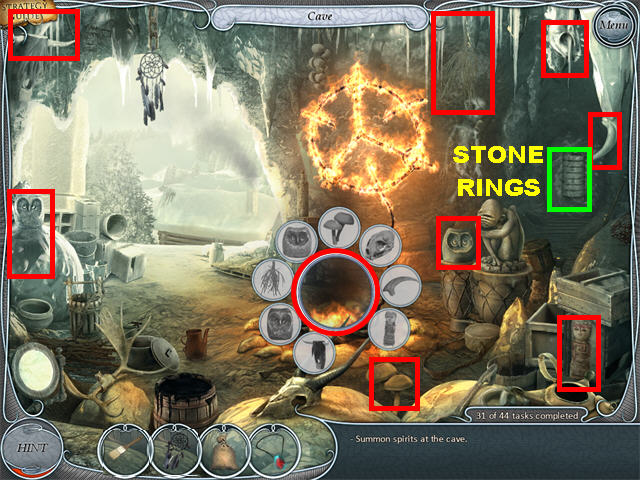
- Place the BRUSH on the carving on the wall to ignite the carving.
- Click on the fire to trigger the Key Object.
- Pick up all the items marked in red and place them in the Key Object.
- Place the POWDER on the fire to summon the spirits.
- You receive the CHARGED DREAMCATHER in your inventory.
- Go back to the hut.
- Shaman’s Hut – Talk to the Shaman to activate a task.
- Go back to the cave.
- Cave – Click on the stone rings on the right side of the wall to trigger a puzzle.
Stone Rings Puzzle
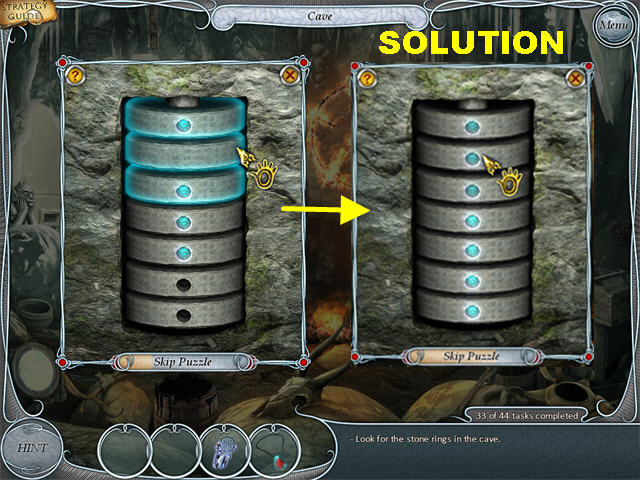
- Your goal is to turn the rings until all the dots line up.
- Each ring you turn affects the movement of another ring.
- Hover your mouse over a ring and the rings it affects will light up.
- The puzzle is random so a step-by-step solution cannot be given.
- A secret passageway opens in the upper left. Click on the passageway to enter the lab.
Secret Laboratory
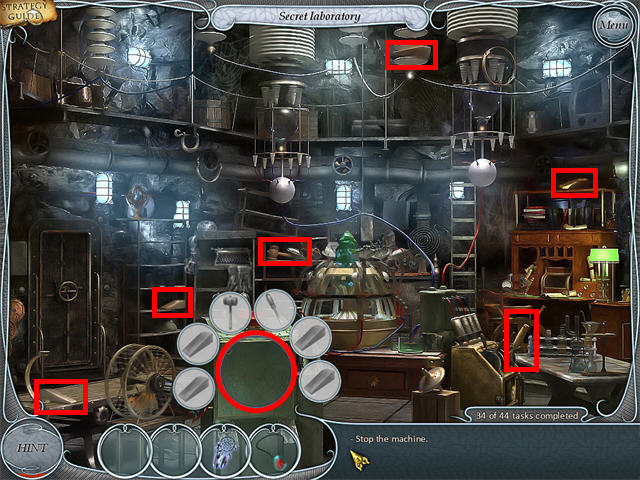
- The Key Object is the panel in the lower center.
- Place all the items marked in red into the Key Object.
- The panel will open up after all the items have been placed.
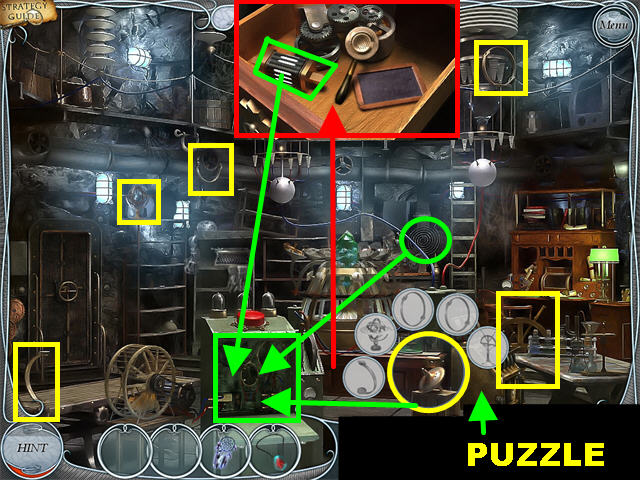
- Click on the gyro in the lower right to trigger the next Key Object.
- Place all the items marked in yellow into the Key Object.
- Place the item circled in green into the panel in the lower center.
- Place the gyro into the panel after all the items have been added.
- Click on the drawer in the lower center to open it. You will not be able to open the drawer unless you followed the previous steps.
- Pick up the apparatus in the drawer and place it in the panel.
- Click on the red button above the panel.
- Click on the regulator on the right to trigger a puzzle.
Regulator Puzzle
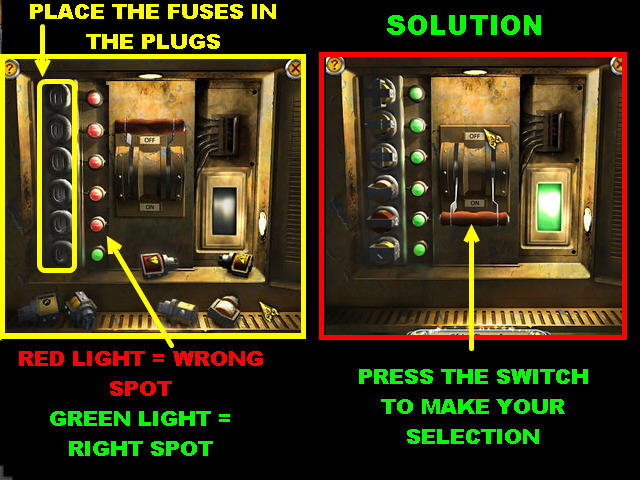
- Your goal is to place the fuses into the corresponding plugs on the left and turn the switch on.
- Drag the fuses into the plugs.
- Click on the switch once you’ve made your selections.
- If the light bulb next to the fuse turns red, that fuse is in the wrong plug.
- If the light bulb turns green, that fuse is in the right plug. Once a fuse is in the right plug, you cannot move it.
- When you want to remove a plug from a spot, click on it and drop it back down.
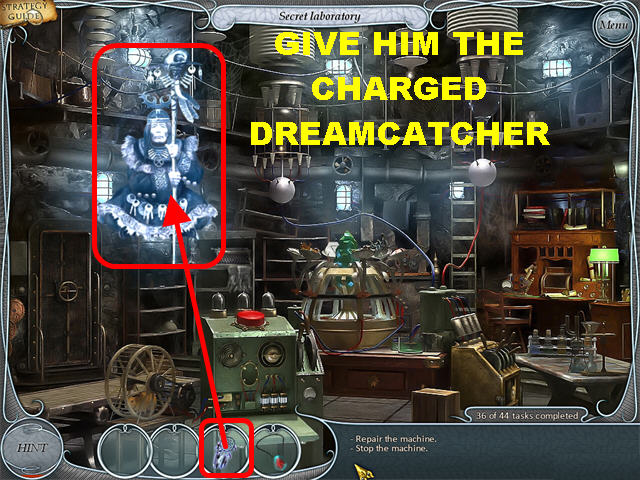
- The Shaman appears in the scene.
- Give the Shaman the CHARGED DREAMCATCHER to be transported to the spirit world.
Spirit World
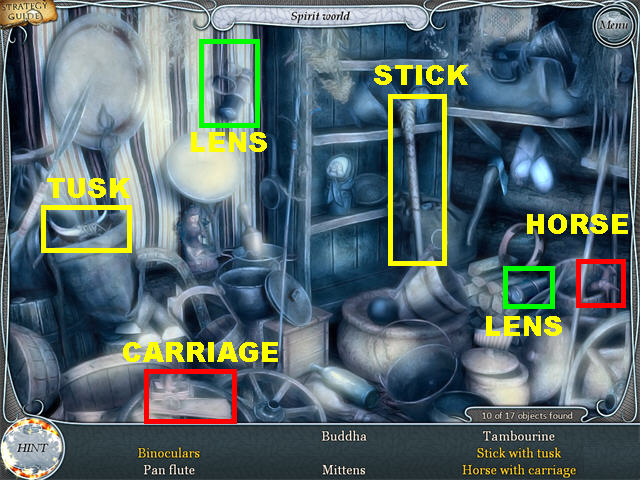
- Click on the Shaman and you will be automatically taken to a Hidden Object scene.
- Stick with Tusk – Pick up the tusk on the left edge and place it on the stick in the center.
- Click on the Stick with Tusk to remove it from the list.
- Horse with Carriage – Pick up the horse in the lower right and place it on the carriage in the lower left.
- Click on the Horse with Carriage to remove it from the list.
- Binoculars – Pick up the lens in the lower right and place it on the other lens in the upper left.
- Click on the Binoculars to remove them from the list.
Column Puzzle
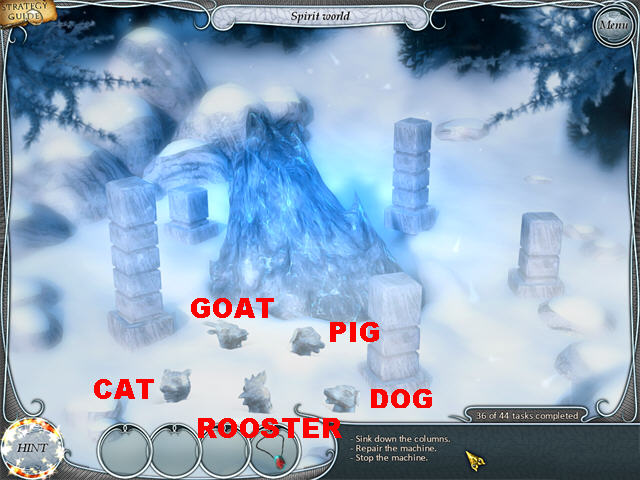
- Your goal is to shift down all the columns beginning from the tallest column.
- Place the animals in the following order to solve the puzzle. Each column has a different amount of tiers.
- Place the PIG on the column with 5 tiers.
- Place the GOAT on the column with 4 tiers.
- Place the DOG on the column with 3 tiers.
- Place the CAT on the column with 2 tiers.
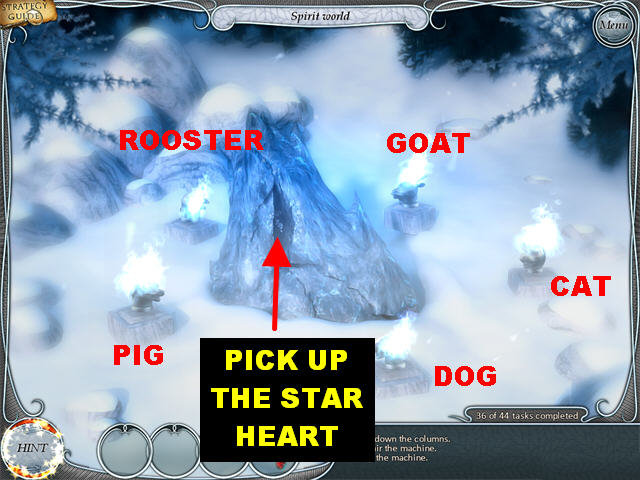
- Place the ROOSTER on the column with 1 tier.
- Pick up the STAR HEART in the center of the scene.
- You will be automatically transported to the lab.
Secret Laboratory
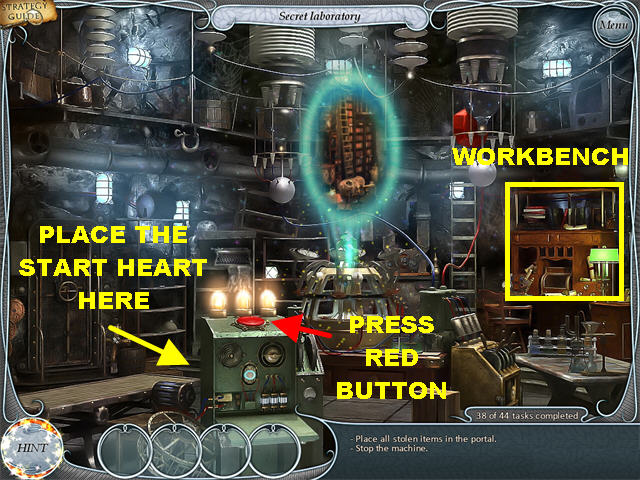
- Place the STAR HEART into the panel in the lower center.
- Click on the red button on top of the machine.
- A portal appears after the red button is hit.
- Click on the workbench on the right to trigger a Hidden Object scene.
Workbench
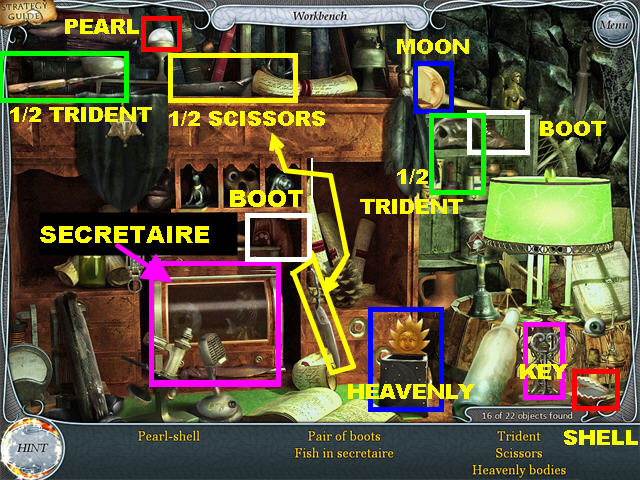
- Scissors – Pick up the half scissors in the upper center and place them on the other half scissors in the lower center.
- Click on the Scissors to take them off the list.
- Heavenly Bodies – Pick up the crescent moon in the upper right and place it on the sun box in the lower center.
- Click on the Heavenly Bodies to take them off the list.
- Pearl-Shell – Pick up the pearl in the upper left and place it in the shell in the lower right.
- Click on the Pearl-Shell to remove it from the list.
- Pair of Boots – Pick up the boot in the center and place it with the other boot in the upper right.
- Click on the Pair of Boots to take them off the list.
- Trident – Pick up the half trident piece in the upper right and place it on the other half trident piece in the upper left.
- Click on the Trident to remove it from the list.
- Fish in Secretaire – Pick up the key on the lamp in the lower right and place it on the secretaire in the lower center to unlock it.
- Click on the Fish in Secretaire to remove it from the list.
- You receive a SEAL OF ANUBIS in your inventory after your search.
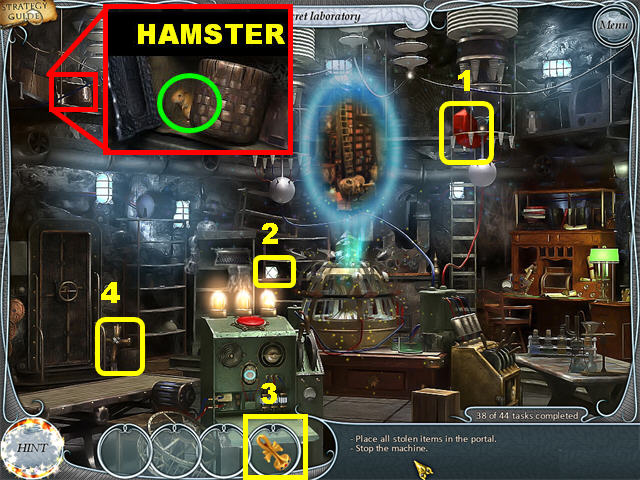
- Place the items marked in yellow into the portal in the order shown.
- Pick up the RED GEM in the upper right and place it in the portal.
- Pick up the CRYSTAL CUBE next to the portal and place it in the portal.
- Place the SEAL OF ANUBIS in the portal.
- Place the CROSS from the lower left into the portal.
- Click on the niche in the upper left for a closer view.
- Pick up the HAMSTER inside the niche.
- Leave the lab, through the door in the lower left, and head to the airplane.
Airplane
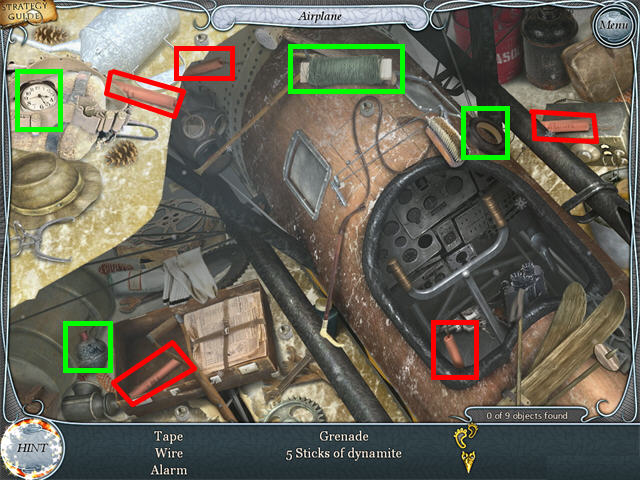
- The 5 sticks of dynamite are marked in red.
- Collect the other items marked green in the screenshot.
- The DYNAMITE will be added to your inventory.
- Go back to the lab.
Secret Laboratory
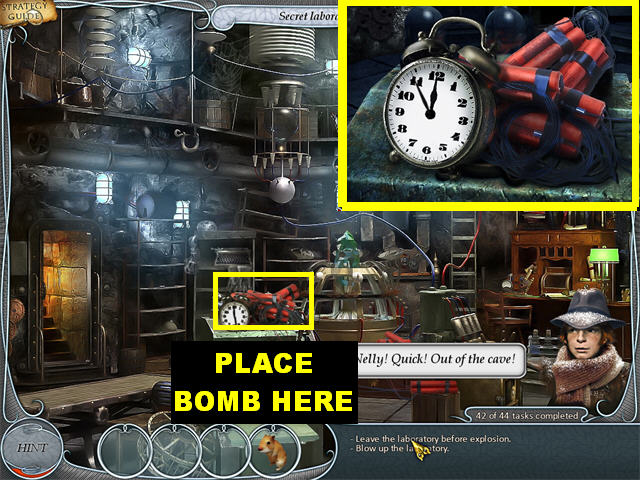
- Place the DYNAMITE on top of the panel in the lower center and exit the lab.
- Wait for the explosion.
- The HAMSTER will stay in your inventory.
- This marks the end of this chapter.
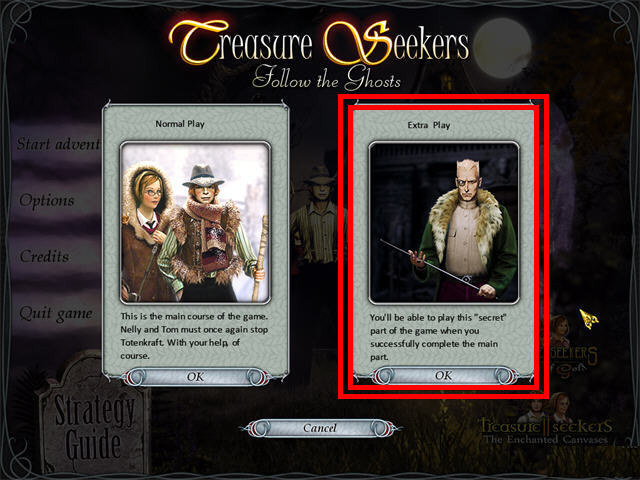
- Go to the Main Menu and click on “Adventures.”
- Select the “Extra Play” card on the right to begin your bonus play.
Bonus Levels: England
Entrance
- This chapter contains 26 tasks
- You will be asked to choose your difficulty level at the beginning of this chapter.
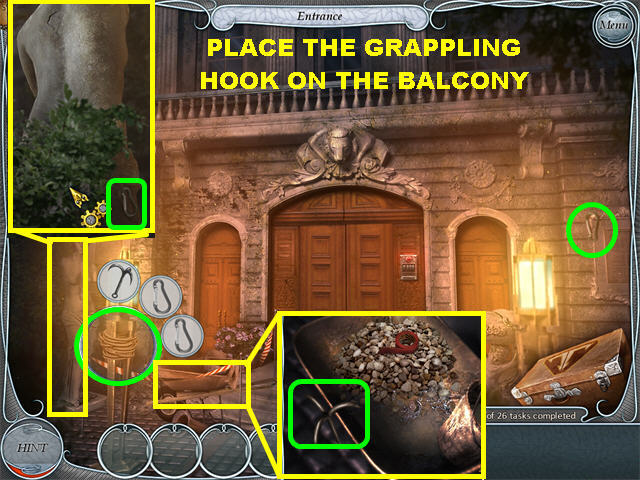
- Click on the Key Object (lamppost) in the lower left.
- Pick up the carabiner in the upper right and place it in the Key Object.
- Click on the wheelbarrow on the lower left.
- Pick up the hook in the wheelbarrow and place it in the Key Object.
- Click on the statue on the left edge.
- Pick up the carabiner in the lower right part of the statue and place it on the Key Object.
- The GRAPPLING HOOK will be added to your inventory.
- Place the GRAPPLING HOOK on the balcony so you can climb up there.
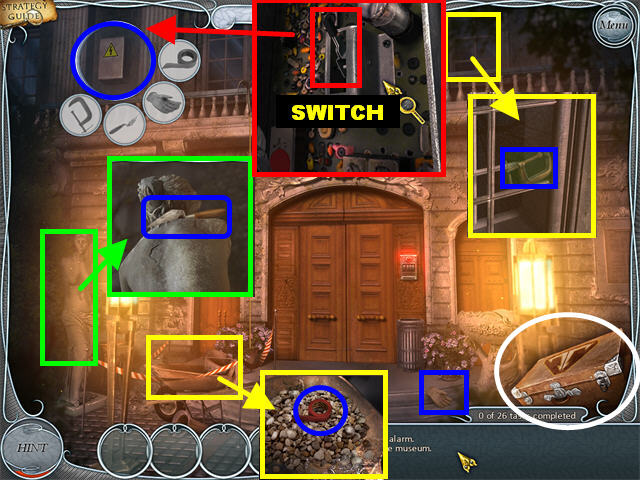
- Click on the window in the upper left to trigger a task.
- Click on the fuse box in the upper left to trigger the Key Object.
- Click on the last window; pick up the vice grip and place it in the Key Object.
- Click on the statue on the left edge.
- Pick up the spade on the statue and place it in the Key Object.
- Click on the wheelbarrow in the lower left.
- Pick up the tape on the wheelbarrow and place it in the Key Object.
- Click on the fuse box to look inside.
- Click on the switch to turn off the lights.
- Click on the suitcase in the lower right to trigger a Hidden Object scene.
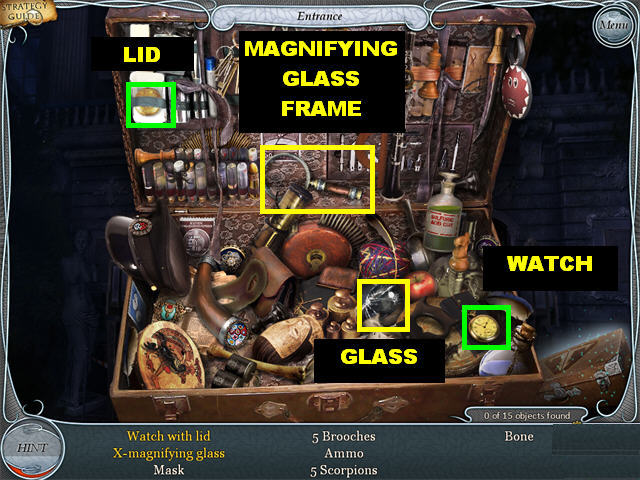
- Watch with Lid – Click on the gold lid in the upper left and place it on the watch in the lower right.
- Click on the Watch with Lid to remove it from the list.
- X-Magnifying Glass – Pick up the glass in the lower center and place it on the magnifying glass frame in the upper center.
- Click on the X-Magnifying Glass to remove it from the list.
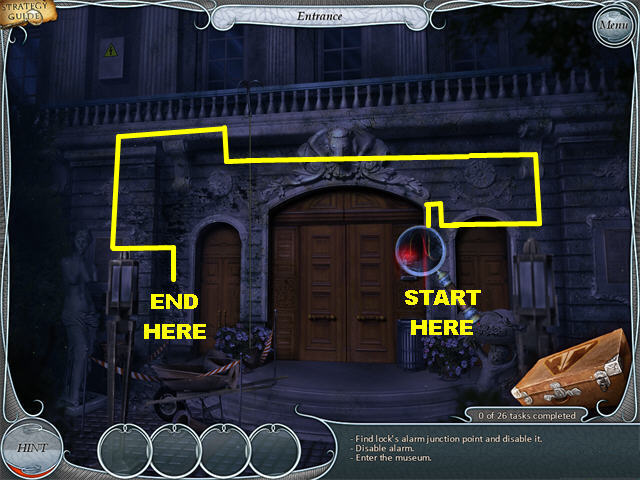
- The magnifying glass will be attached to your cursor.
- You have to run it across the front of the house until you find the right path that leads to the fuse box.
- Begin with the electronic keypad to the right of the door.
- You must follow the lines until you reach the line in the lower left.
- If you go through the wrong path, the wire will end.

- Click on the fuse box in the upper left.
- Pick up the GARDEN SHEARS inside the fuse box.
- Click on the statue on the left.
- Place the GARDEN SHEARS on the foliage surrounding the statue. Keep cutting the foliage until the shears disappear.
- You will see “E 842” etched onto the back of the statue.

- Click on the suitcase in the lower right.
- Pick up the items marked in the screenshot.
- You will receive a bottle of ACID at the end of your search.
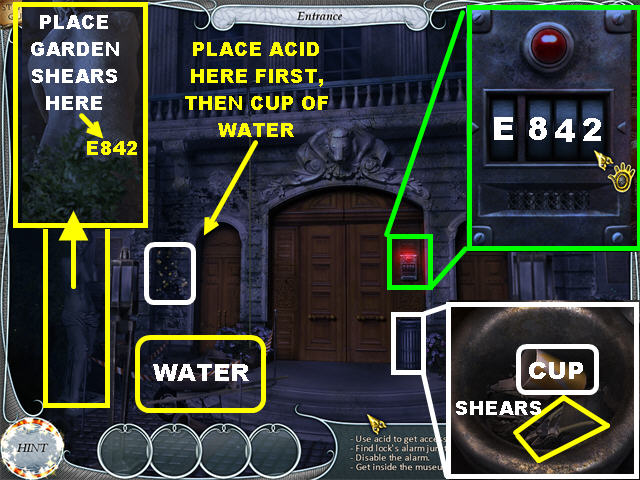
- Place the ACID on the left side of the wall.
- Click on the trashcan on the right side of the door.
- Pick up the PAPER CUP inside the trashcan.
- Click on the wheelbarrow on the left.
- Place the PAPER CUP in the water in the bucket to fill up the cup.
- You have a FILLED CUP in inventory.
- Place the FILLED CUP in the same spot in which you poured the acid.
- Click on the security lock on the right.
- Click on the dials to change the numbers to “E842” to disable the alarm.
- Enter the museum.
Entrance
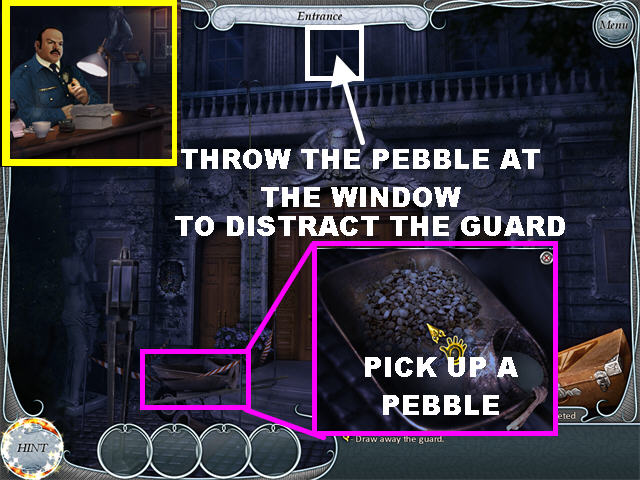
- Main Hall – You’ll need to find a way to get rid of the security guard sitting at the desk.
- Go back outside.
- Entrance - Click on the wheelbarrow on the left.
- Pick up the PEBBLE on the wheelbarrow.
- Throw the PEBBLE at one of the upstairs windows outside the museum.
- Go back inside the museum.
Main Hall
- When you go back into the museum, the guard will be gone.
- Click in the center of the scene to access the main hall.
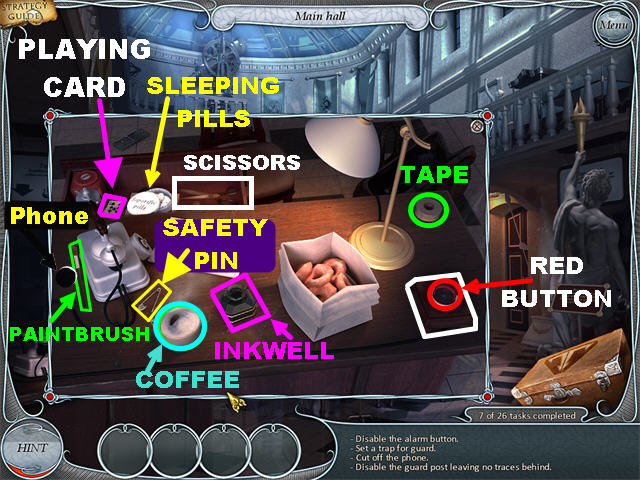
- Click on the guard’s desk on the left.
- Pick up the SLEEPING PILLS in the upper left.
- Place the SLEEPING PILLS into the cup of coffee.
- Grab the SCISSORS from the drawer.
- Use the SCISSORS to cut the telephone cord on the left.
- Grab the TAPE on the upper right.
- Place the TAPE on the cut telephone cord to mend it.
- Pick up the SAFETY PIN on the left.
- Place the SAFETY PIN on the red button to remove it.
- Grab the PLAYING CARD from the upper left.
- Place the PLAYING CARD in the hole in which the red button was located.
- Click on the red button to put it back where it belongs.
- Pick up the PAINTBRUSH on the left.
- Dip the PAINTBRUSH into the inkwell.
- Place the INKED PAINTBRUSH on the telephone wire.
- Go outside for a brief moment.
- Go back inside the museum.
Entrance
- When you return to the museum, the guard will be asleep at the desk.
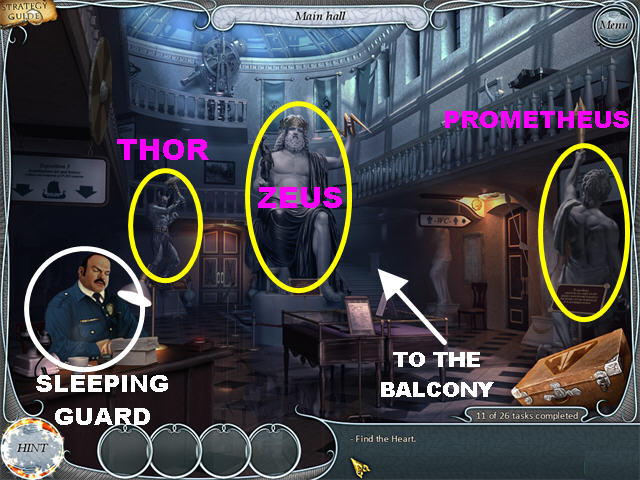
- Each statue in the main hall has a plaque attached to it. Click on the plaques to learn all the names. You will need this information later.
- Click on the balcony area on the far right side of the scene.
Balcony
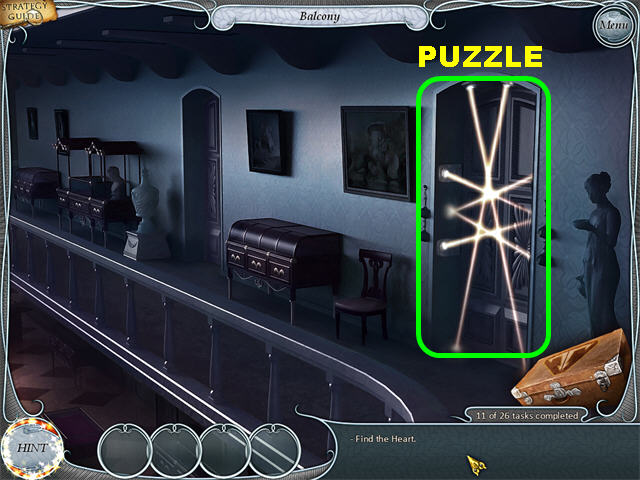
- Click on the door on the right to trigger a puzzle.
Light Rays Puzzle
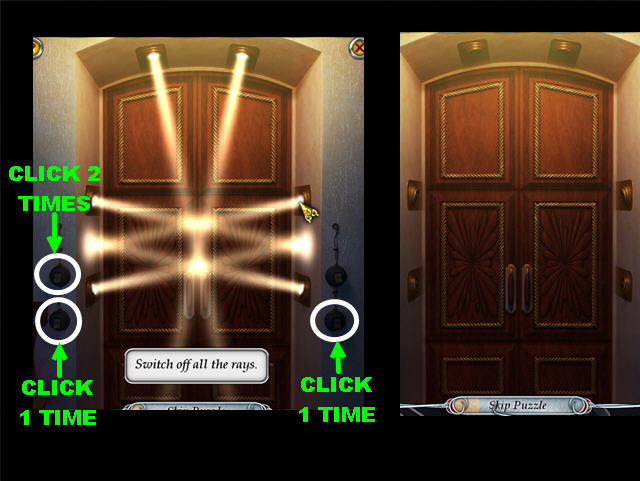
- Your goal is to switch off all the lights.
- There are 4 switches you need to press to disable the alarm. There are 2 to the lower left side of the door, and 2 on the lower right side of the door.
- Each switch you click on affects a set of lights.
- Click on the lights in the following order to solve the puzzle:Lower Left Button 1 Time Upper Left Button 2 Times Lower Right Button 1 Time
- Enter the exposition.
Exposition
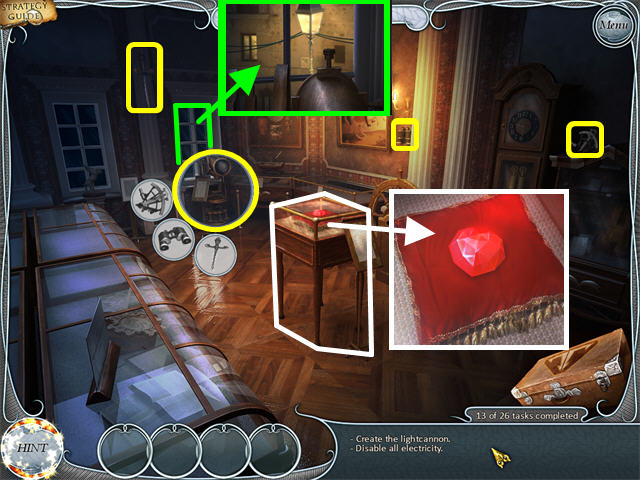
- Click on the heart exposition in the center of the room to eliminate a task.
- Click on the second window to bring up a task.
- Click on the telescope by the window to trigger the Key Object.
- Grab all the items marked in yellow and drag them to the Key Object.
- Click on the telescope again to bring up another task.
- Go to the Main Hall.
Main Hall & Exposition
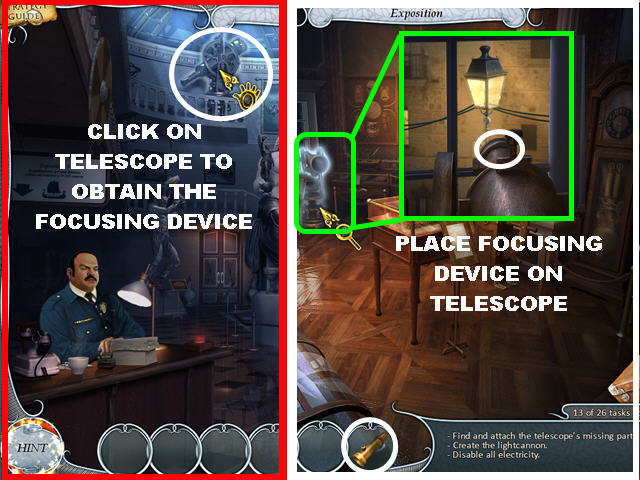
- Main Hall - Click on the telescope in the upper left.
- The FOCUSNG DEVICE will be added to your inventory.
- Go back to the exposition.
- Exposition – Click on the telescope for a closer view.
- Place the FOCUSING DEVICE on the telescope.
- Close the telescope view.
- Click on the suitcase in the lower right to trigger a Hidden Object scene.
Suitcase
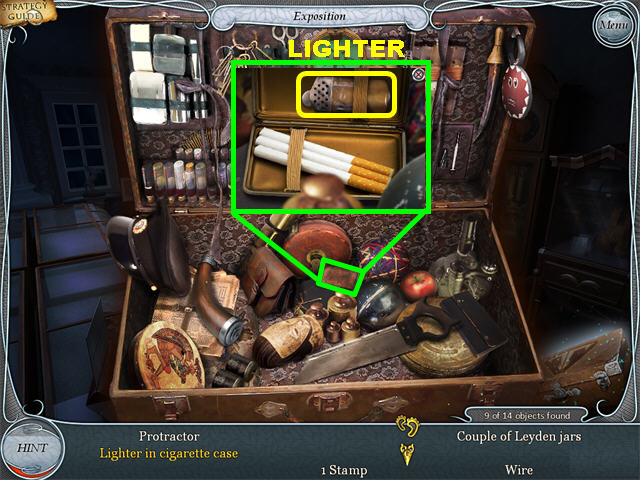
- Lighter in Cigarette Case – Click on the cigarette case in the center to open it.
- Click on the Lighter in Cigarette Case to take it off your list.
- The LIGHTNING ACCUMULATOR goes into your inventory.
- Go back to the Main Hall.
Main Hall
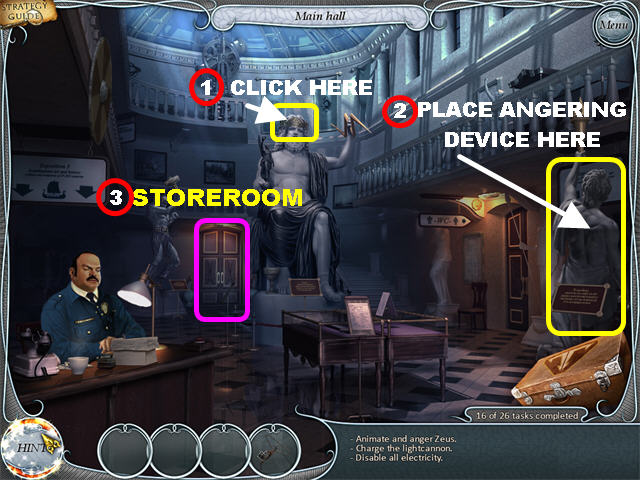
- Click on the head of the Zeus statue to take off its crown.
- The crown mixes with the LIGHTNING ACCUMULATOR to form an ANGERING DEVICE.
- Click on the Prometheus statue on the right to trigger a task.
- Place the ANGERING DEVICE on the statue of Prometheus.
- Click on the storeroom door on the far left.
Storeroom
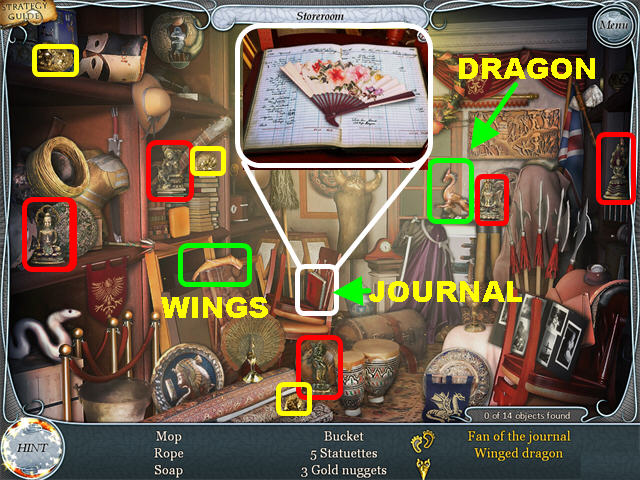
- The statuettes are marked in red.
- The 3 gold nuggets are marked in yellow.
- Fan of the Journal – Click on the journal in the lower center to open it.
- Click on the Fan on the Journal to eliminate it from the list.
- Winged Dragon – Pick up the wings on the lower left and place them on the dragon on the right.
- Click on the Winged Dragon to take it off your list.
- You will receive JANITOR’S TOOLS at the end of your search.
- Go to the main hall.
Main Hall
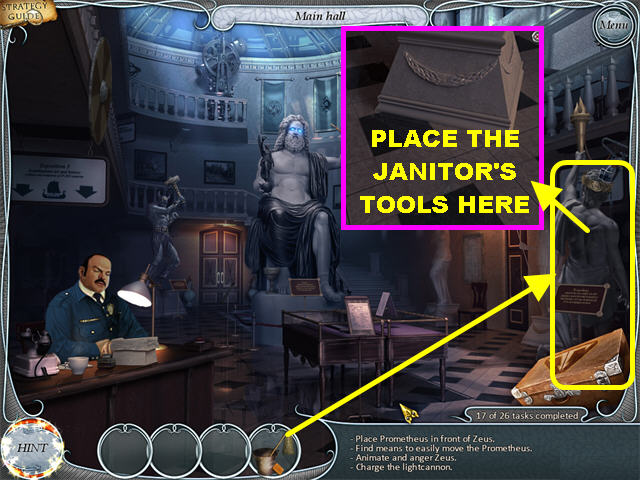
- Click on the statue of Prometheus for a closer look at the base.
- Place the JANITOR’S TOOLS on the floor to wet it.
- Click on the Prometheus statue to move it aside. This action also animates and angers the statue of Zeus.
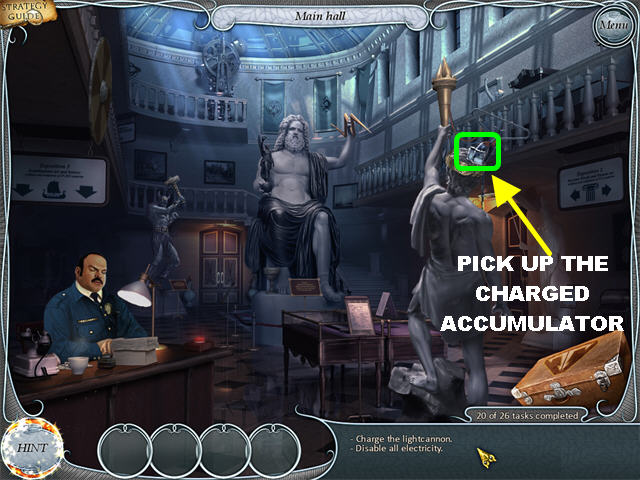
- Pick up the CHARGED ACCUMULATOR on the head of the Prometheus statue.
- Go back to the exposition.
Exposition
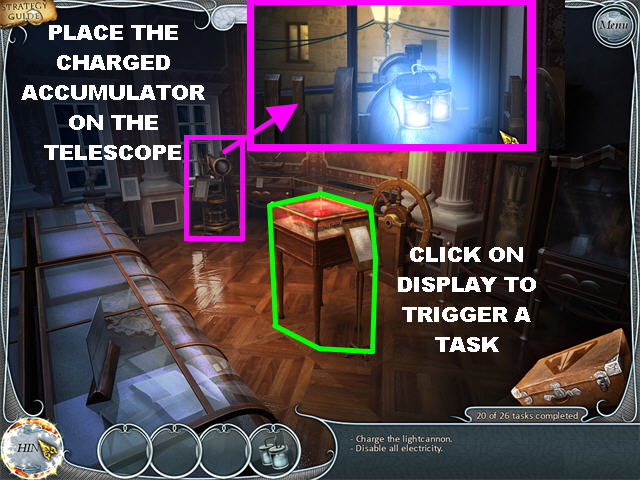
- Click on the telescope.
- Place the CHARGED ACCUMULATOR on top of the telescope. This action disables the electricity.
- Click on the heart exposition in the middle of the floor.
- Click on the case to trigger a new task.
- Go back to the Main Hall.
Main Hall

- Click on Thor’s statue on the far left to trigger the Key Object.
- Place the items marked in red in the Key Object.
- Click on the case on the floor for a closer view.
- Pick up the weapon inside the case and place it in the Key Object.
- Go back to the storeroom.
Storeroom
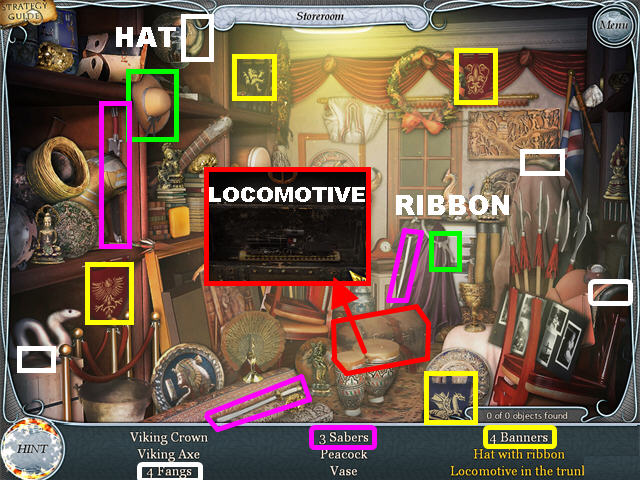
- When you enter the storeroom, all you have is a spotlight to look around. The screenshot has been enhanced to show you the exact locations of the items.
- The 3 sabers are marked in purple.
- The 4 banners are marked in yellow.
- The 4 fangs are marked in white.
- Hat with Ribbon – Grab the ribbon on the right and place it on the hat in the upper left.
- Click on the Hat with Ribbon to take it off your list.
- Locomotive in the Trunk – Click on the trunk in the lower right to open it.
- Click on the Locomotive in the Trunk to take it off your list.
- The VIKING’S EQUIPMENT will be added to your inventory.
Main Hall & Balcony
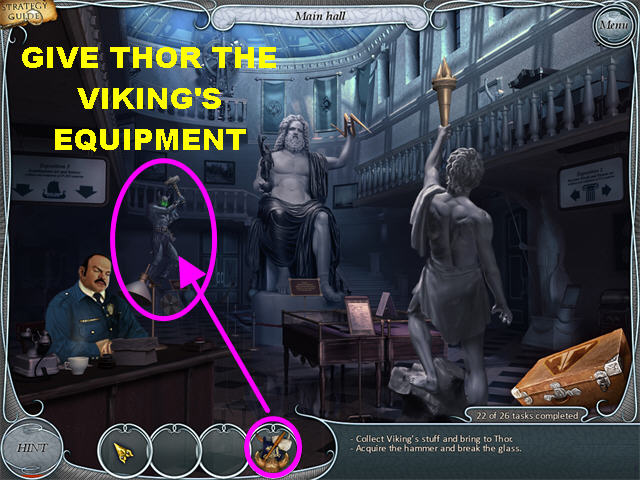
- Place the VIKING’S EQUIPMENT on Thor’s statue on the far left.
- Go to the balcony.
- Click on the left door marked the “Horses in Modern Art” to find the horses.
Find 15 Horses
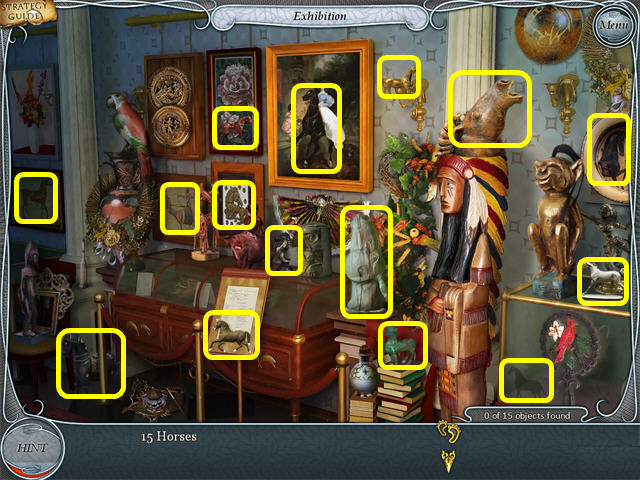
- Please look at the screenshot for the locations of all the horses.
- The HERD will be added to your inventory.
- Go back to the Main Hall.
Main Hall
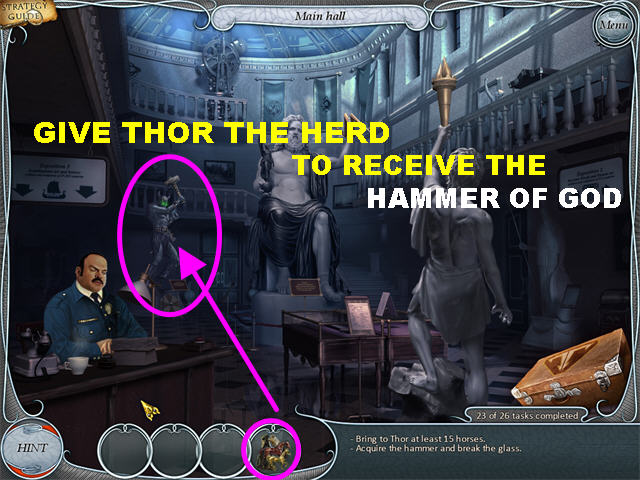
- Give the HERD to Thor’s statue on the far left.
- The HAMMER OF GOD will be added to your inventory.
- Go to the exposition.
Exposition
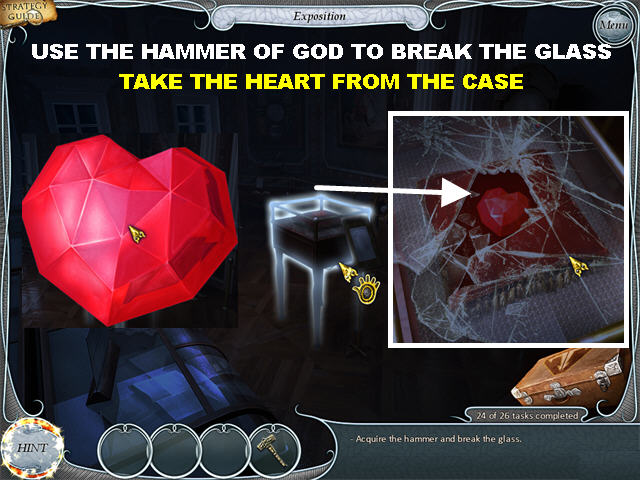
- Click on the glass display for a closer look.
- Place the HAMMER OF GOD on the glass to break it.
- Grab the HEART from the display.
Created at: 2010-02-25