

Walkthrough Menu
- General Tips
- Chapter 1: Pirates
- Chapter 2: A Cure for Jack
- Chapter 3: Doctor Ben
- Chapter 4: Escape
- Chapter 5: The Island
- Chapter 6: The Cursed Rose
General Tips
- This is the official guide for Uncharted Tides: Port Royal.
- This guide won't tell you when to zoom into a location; the screenshots show each zoom scene.
- Hidden-object puzzles are referred to as HOPs. Only the locations of the HOPs will be shown.
- Use the map for fast travel to a location.
Chapter 1: Pirates
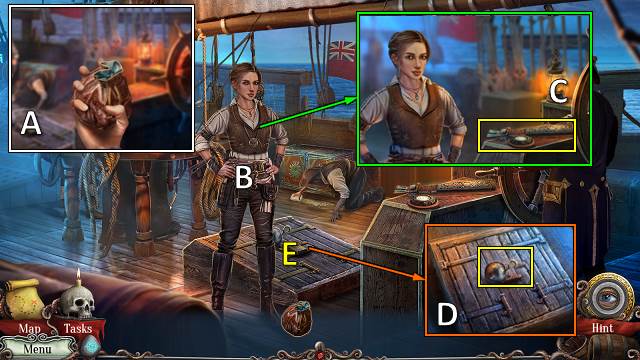
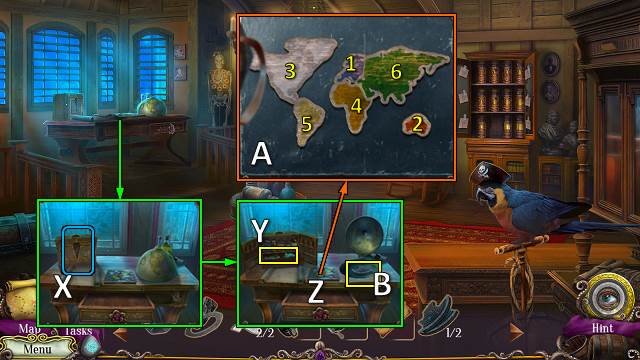
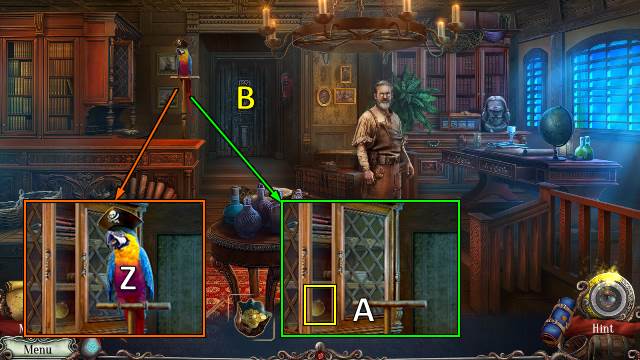
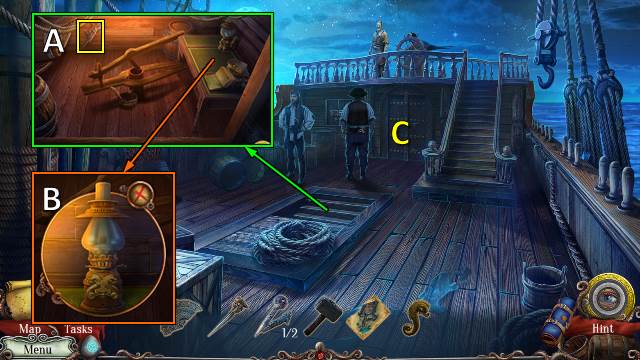
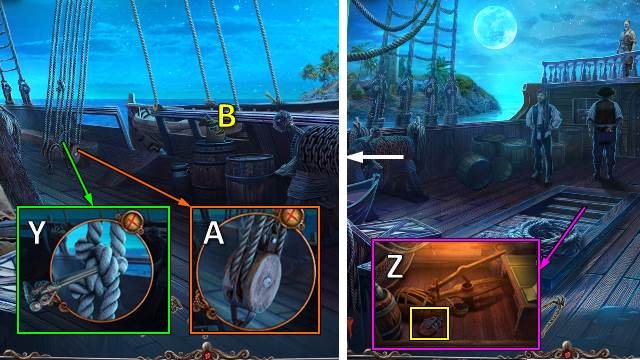
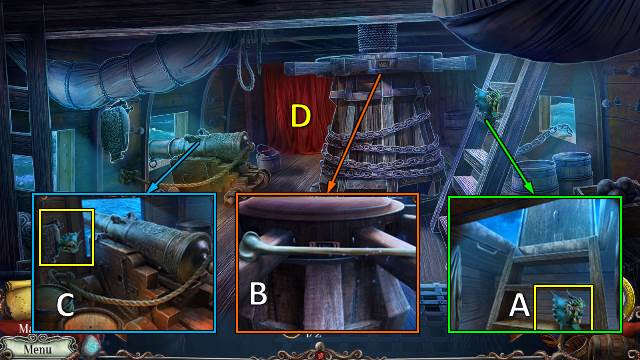
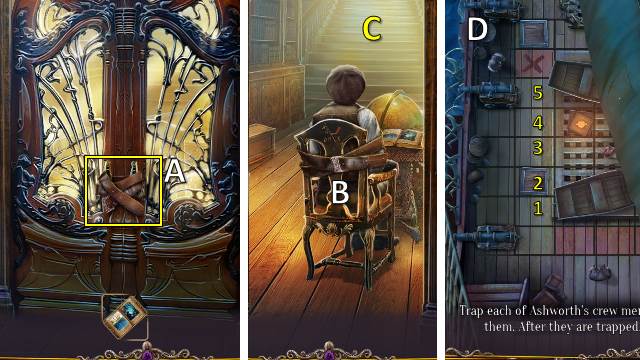
- Take COIN POUCH (A).
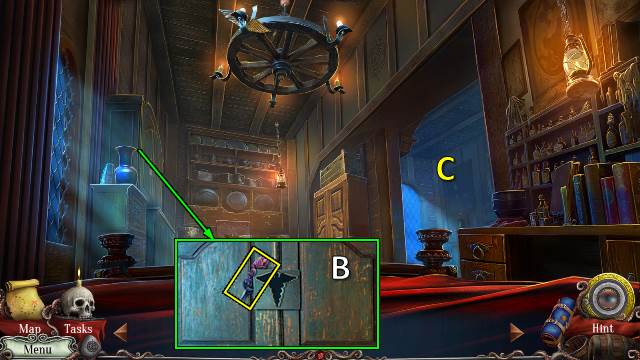
- Talk (B).
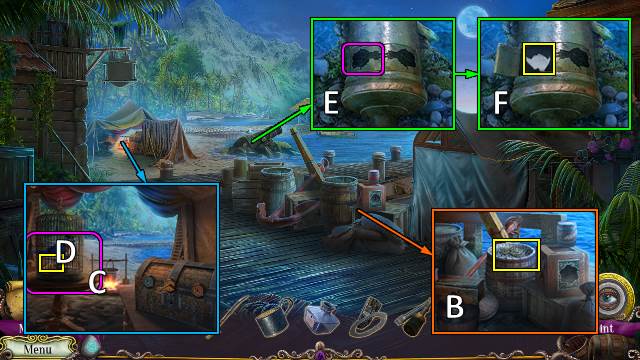
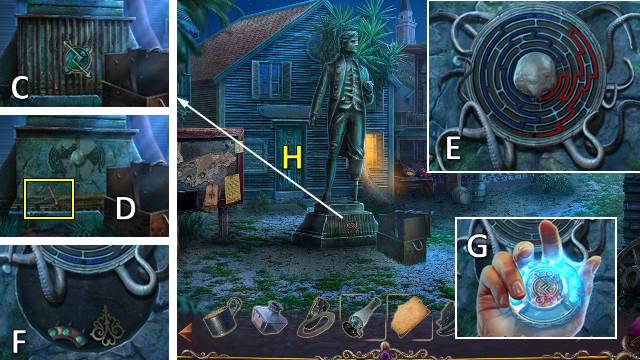
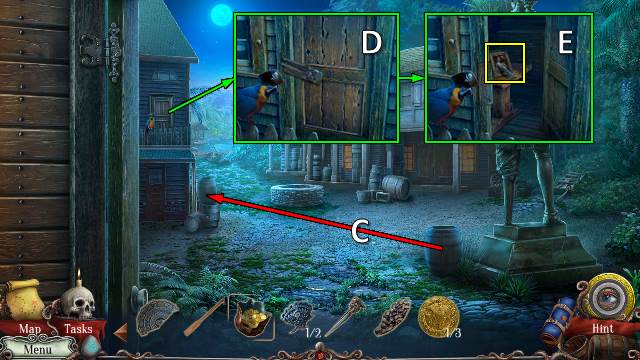
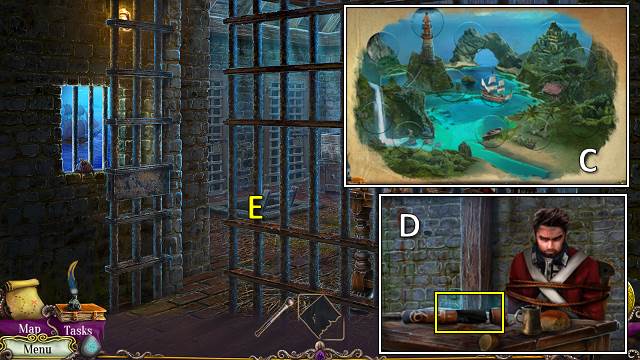
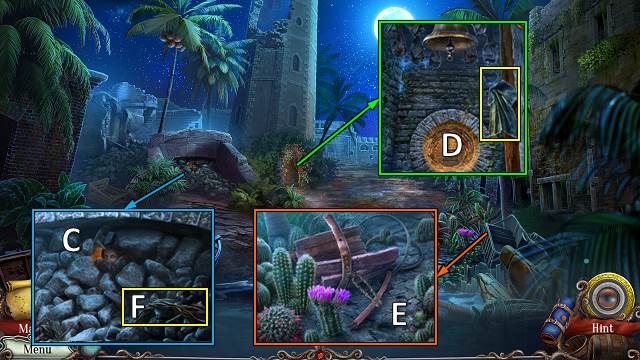
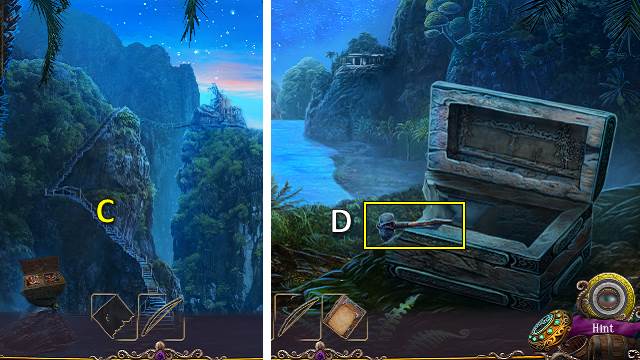
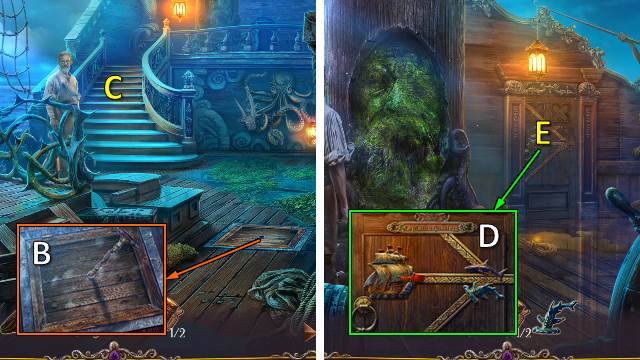
- Take CROWBAR (C).
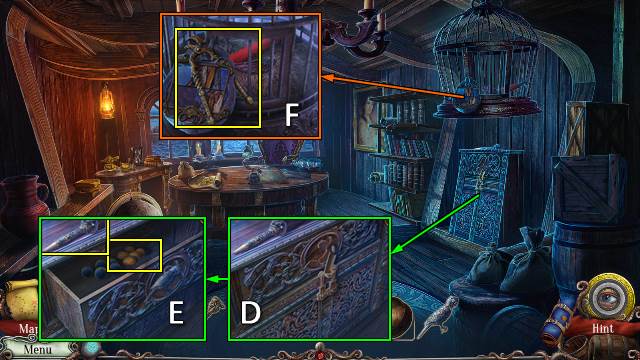
- Take ROUND SHOTS 1/3. Use CROWBAR (D).
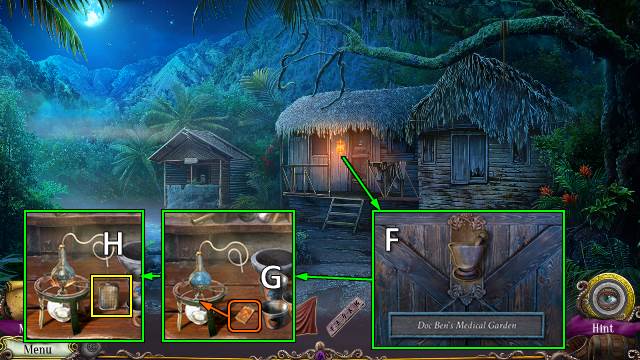
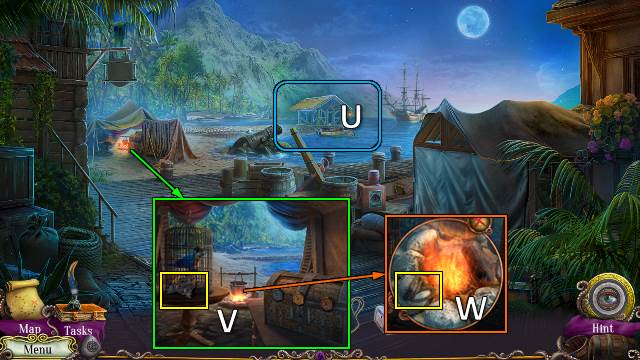
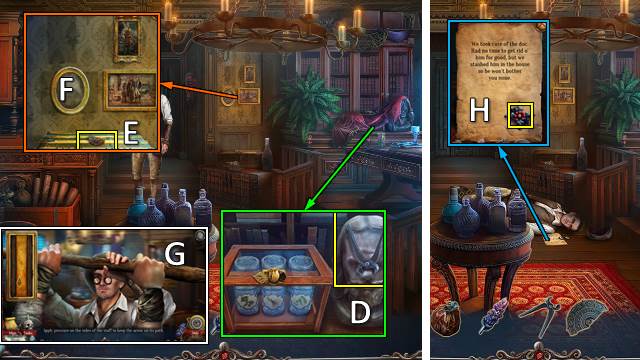
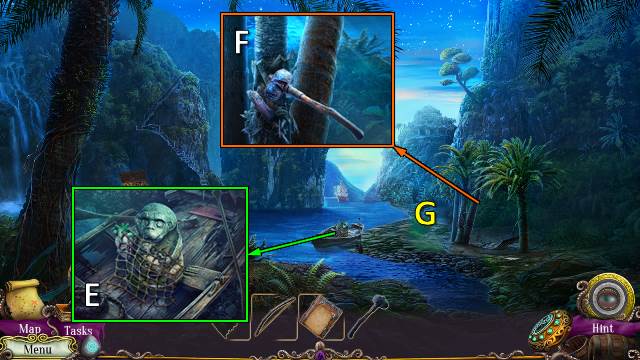
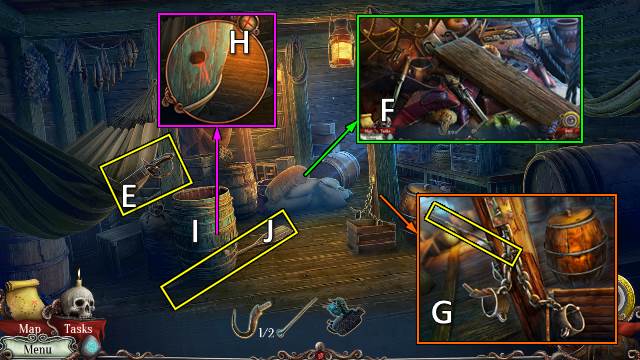
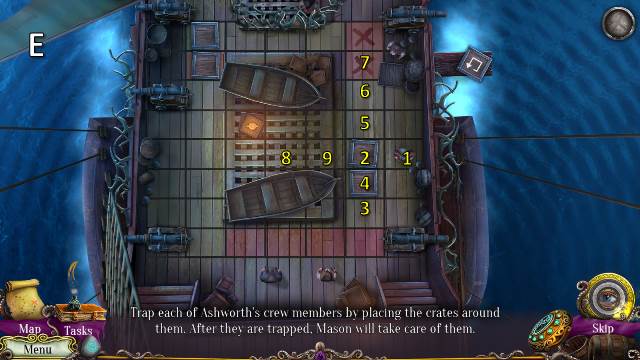
- Go (E).
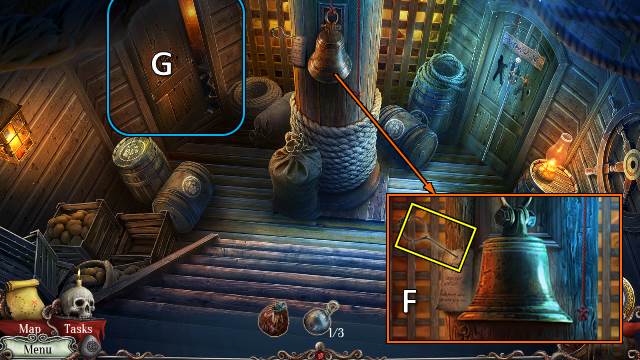
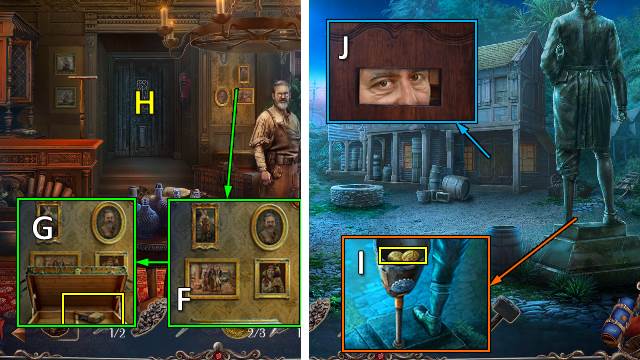
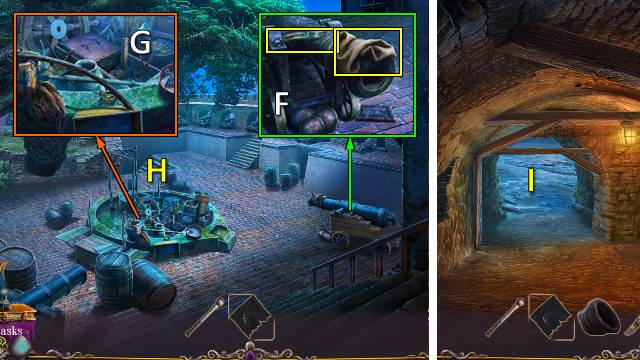
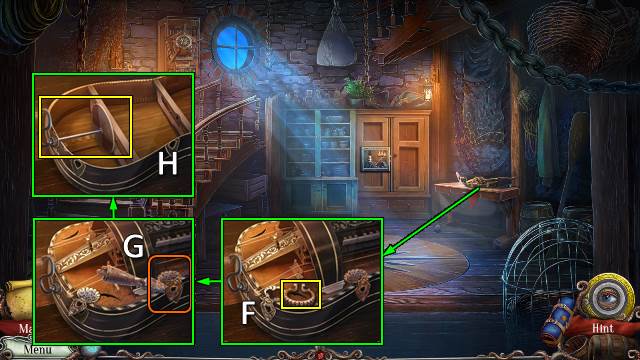
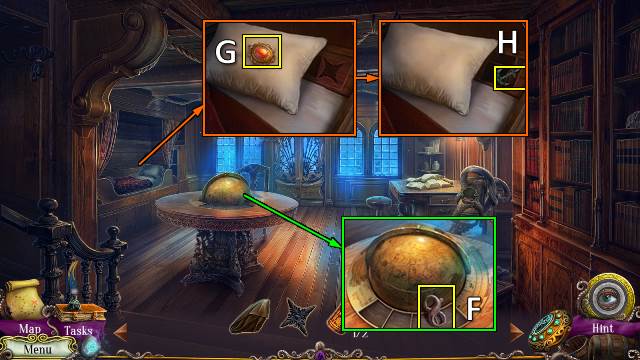
- Take MAP DIVIDER (F).
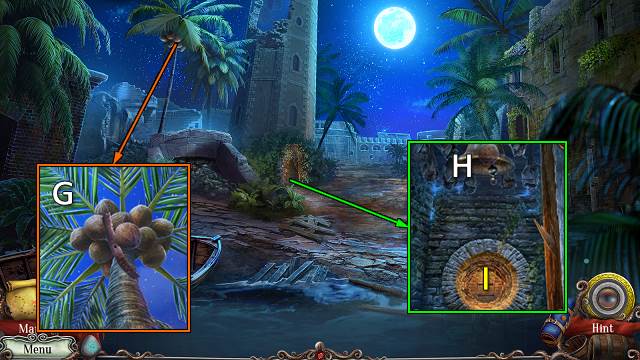
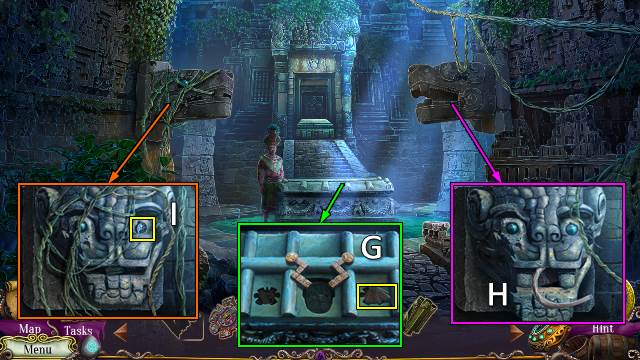
- Open (G). Play HOP; receive Lockpicking Gear and MARY JANE'S BAG.
- Read note and close MARY JANE'S BAG.
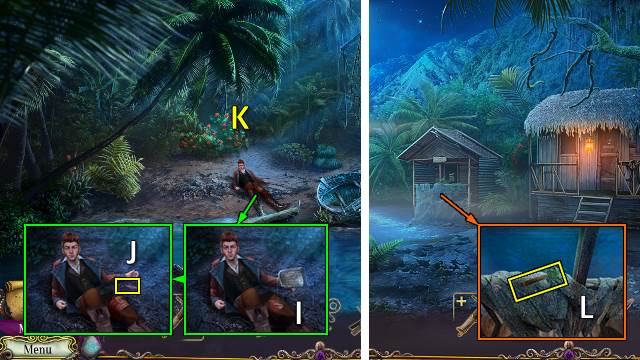
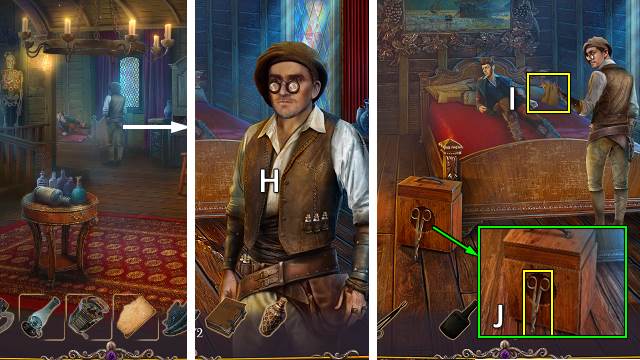
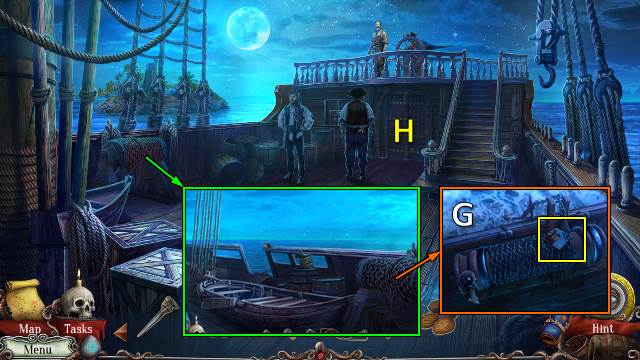
- Walk down.

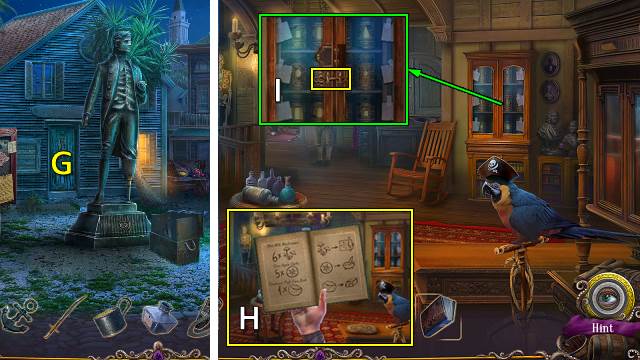
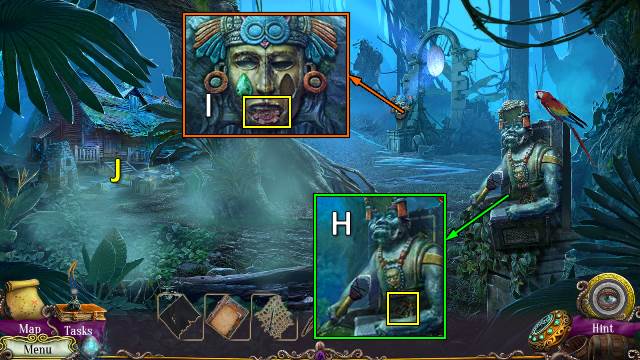
- Offer MARY JANE'S BAG (H).
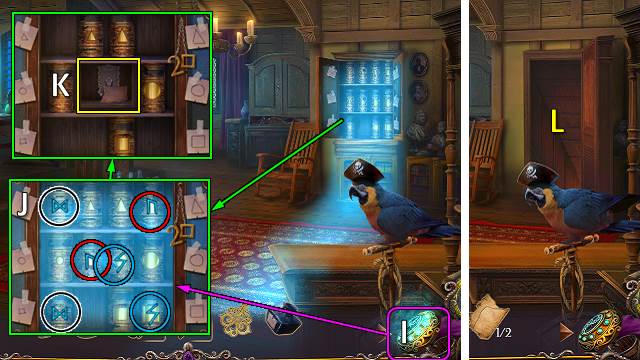
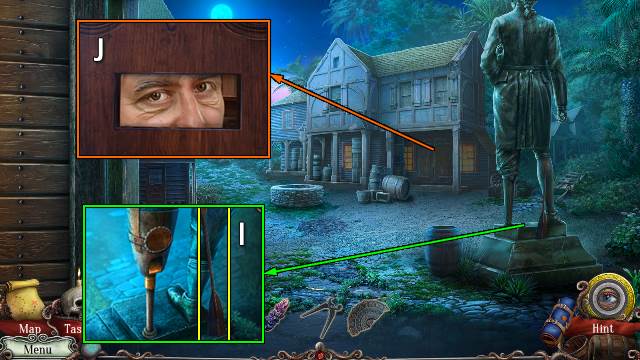
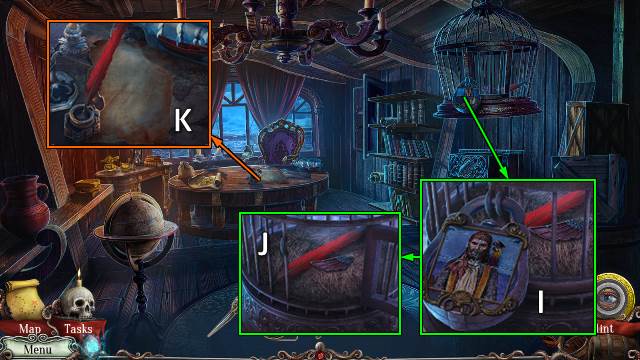
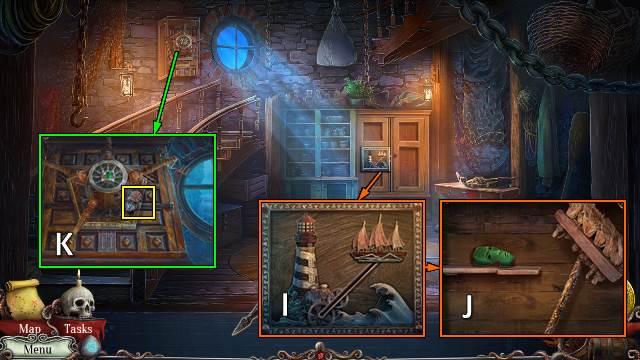
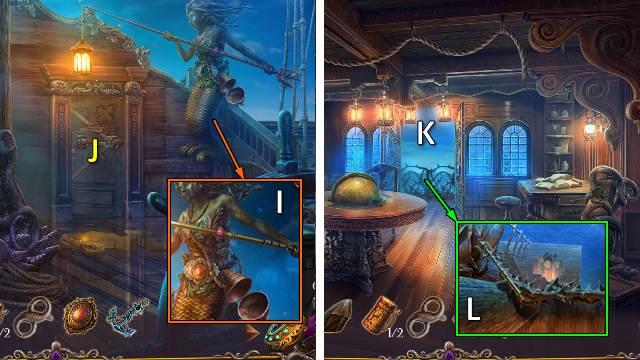
- Take WOODEN FLAG (I).
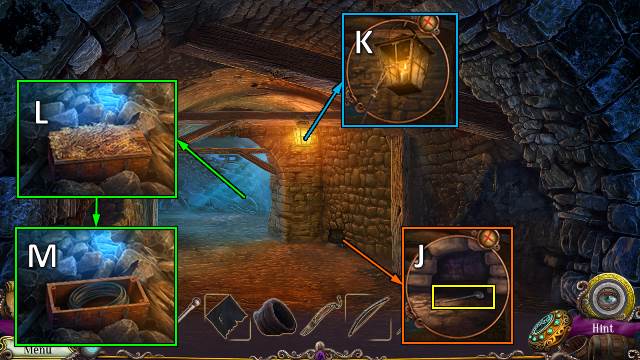
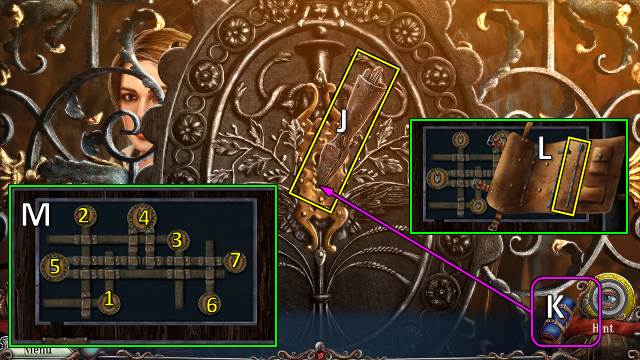
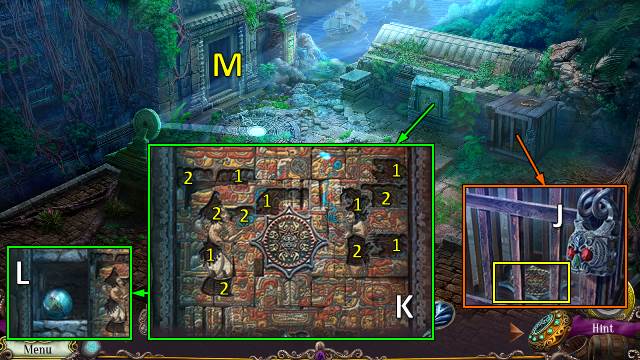
- Use Lockpicking Gear (J).
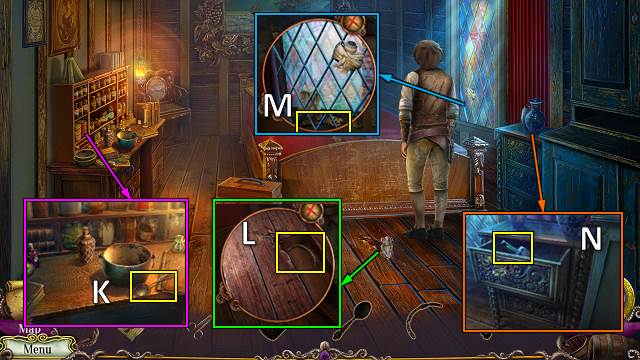
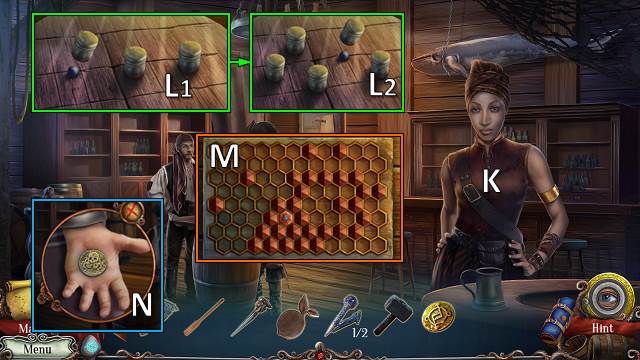
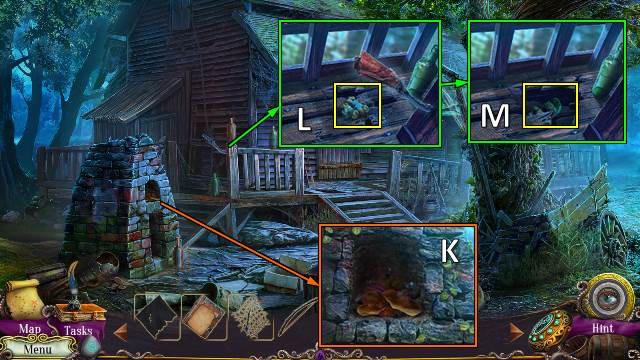
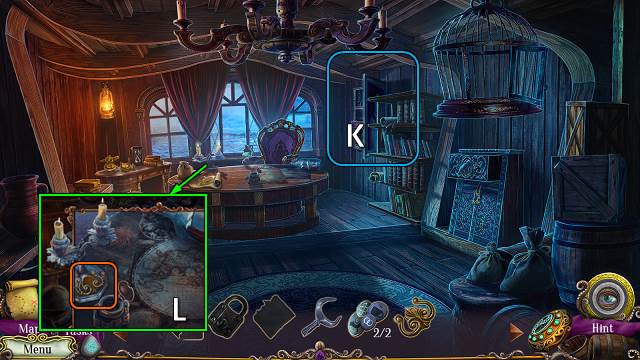
- Select K. Select 1, then 2.
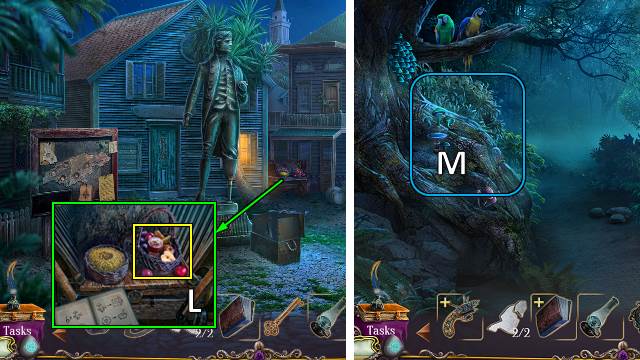
- Open; take SPYGLASS and MAP (L).
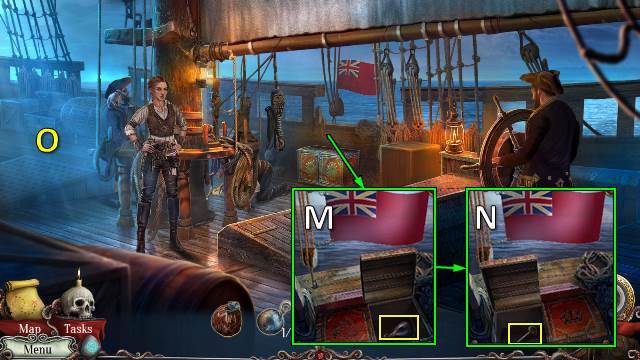
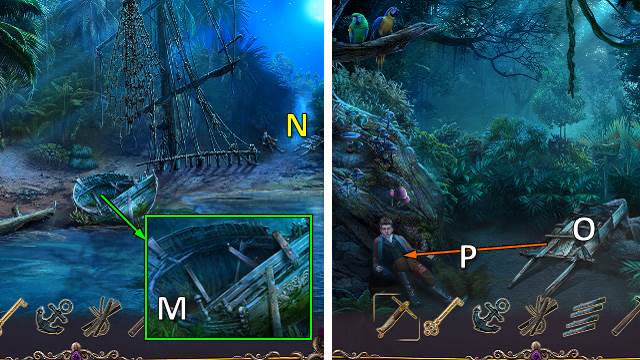
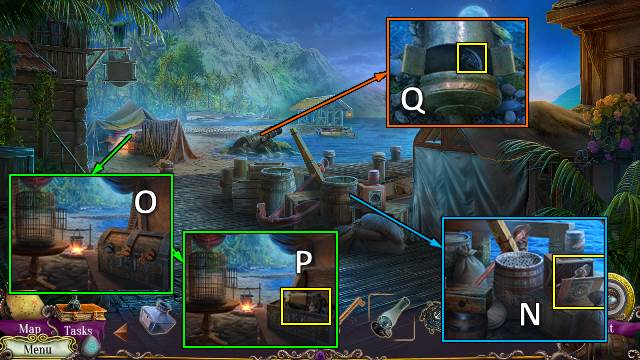
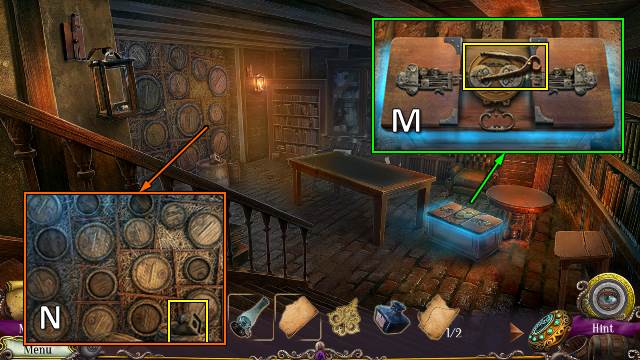
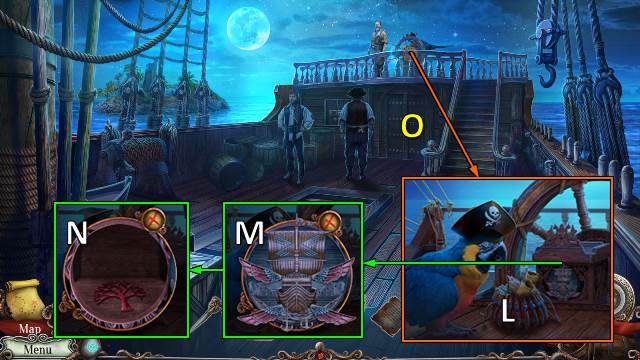
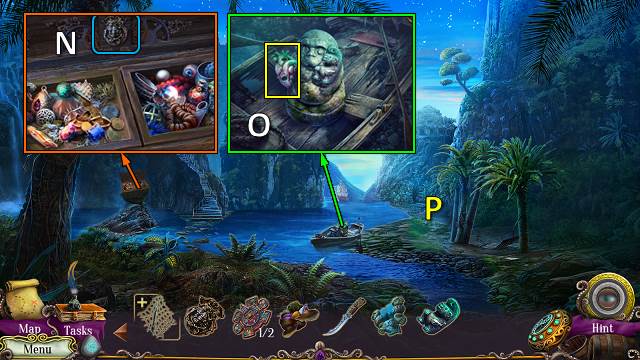
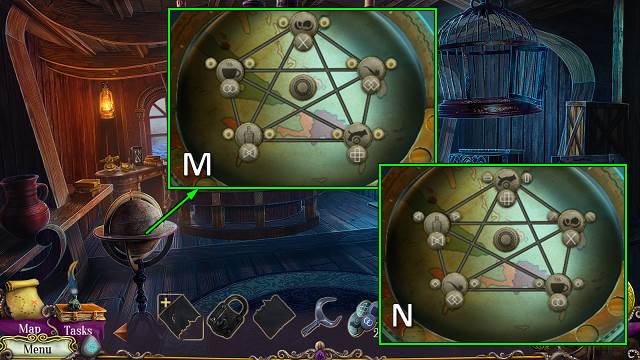
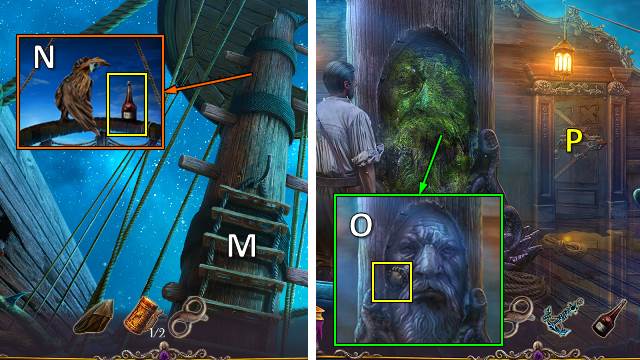
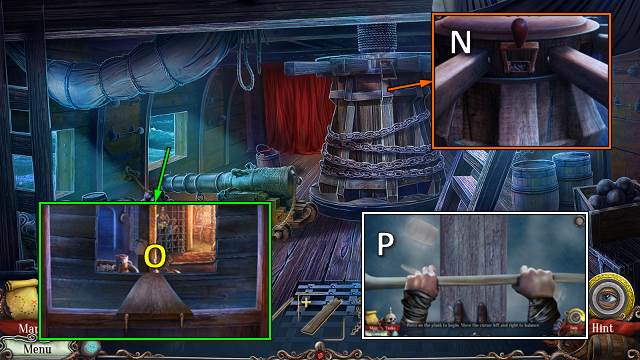
- Take ROUND SHOTS 2/3 (M) and BELL CLAPPER (N).
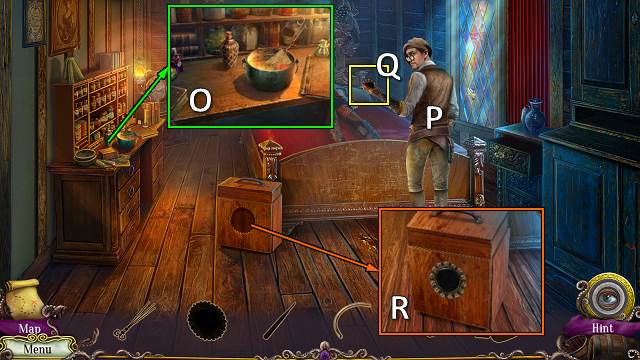
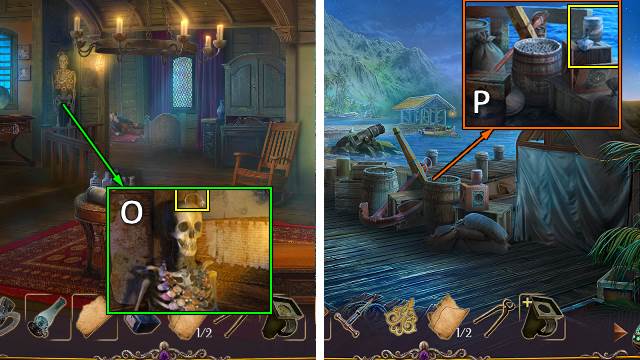
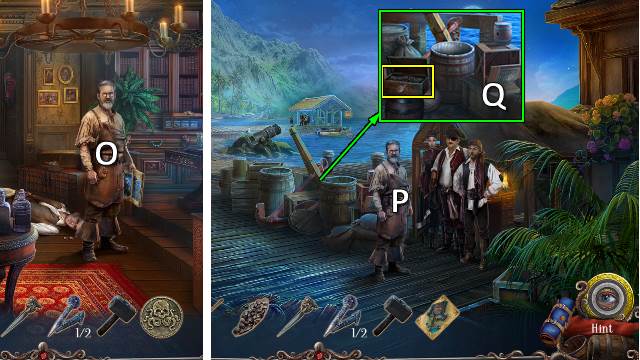
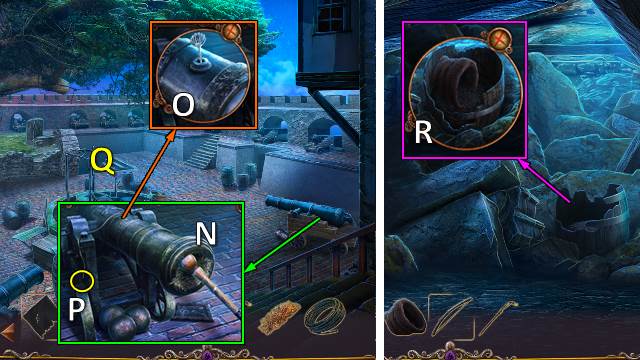
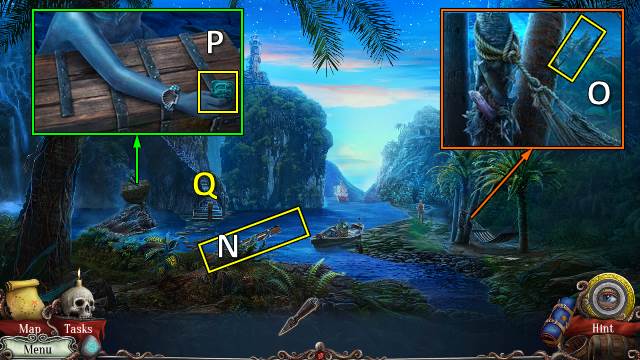
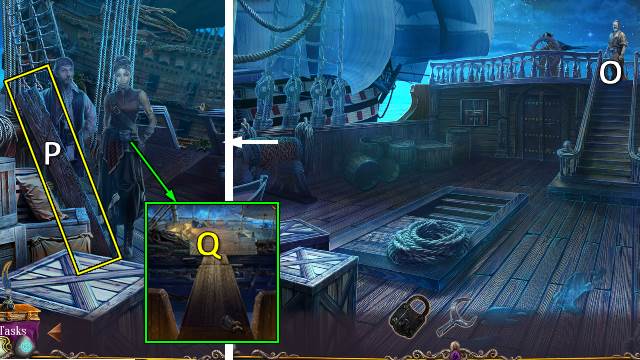
- Go (O).
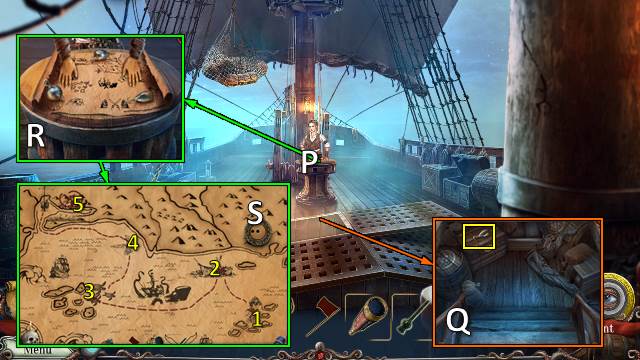
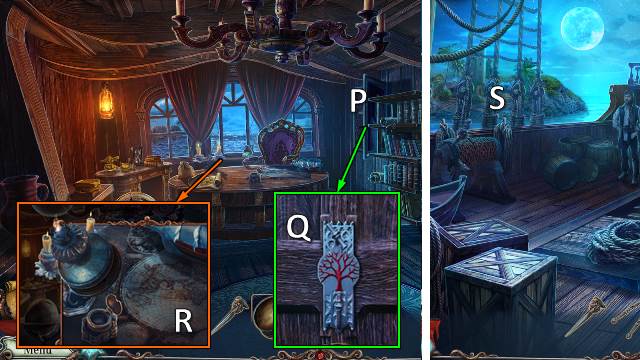
- Offer MAP (P).
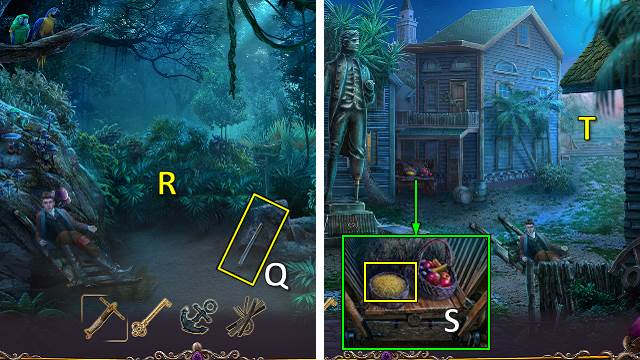
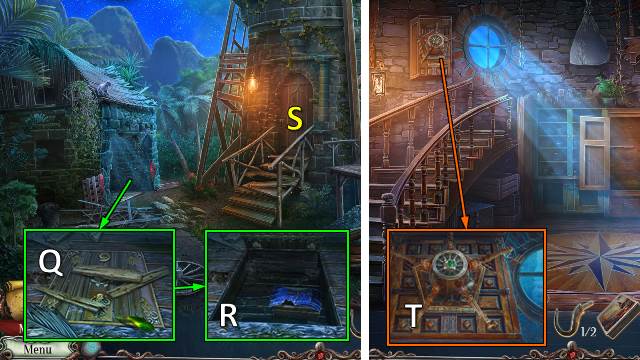
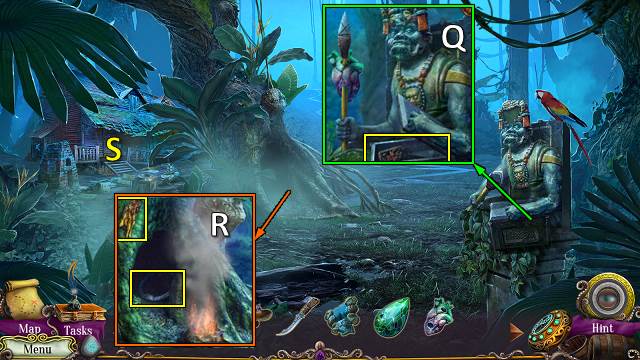
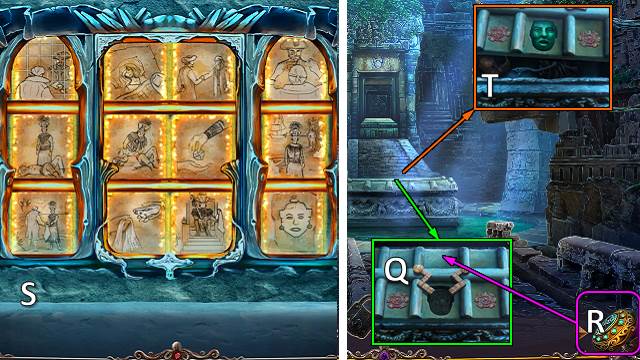
- Take ROUND SHOTS 3/3 (Q).
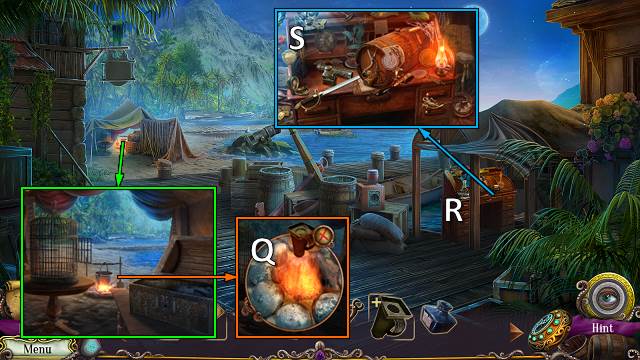
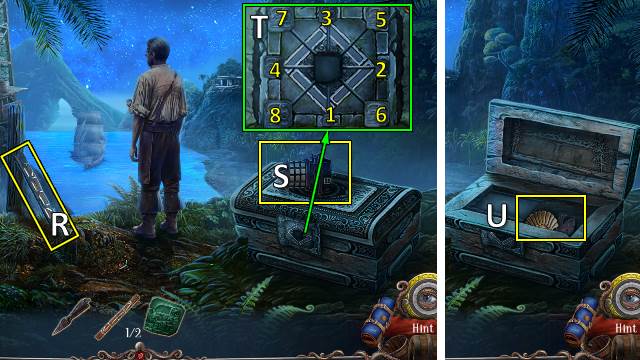
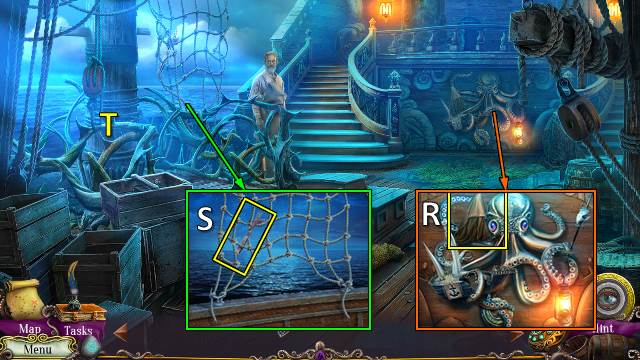
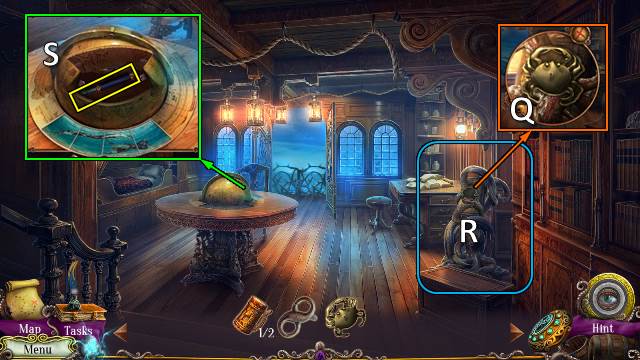
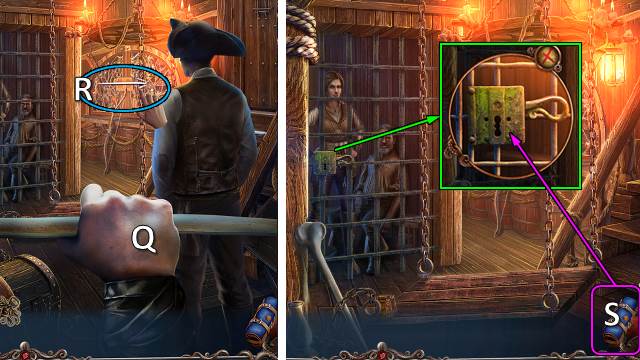
- Place ROUND SHOTS and MAP DIVIDER (R).
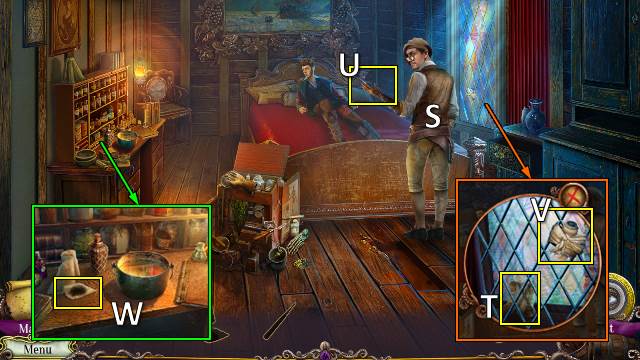
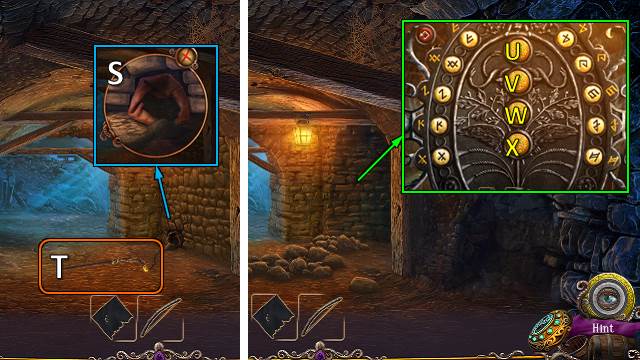
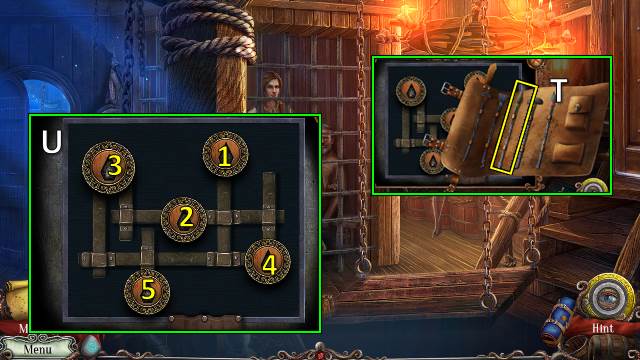
- Select 1-5 (S).

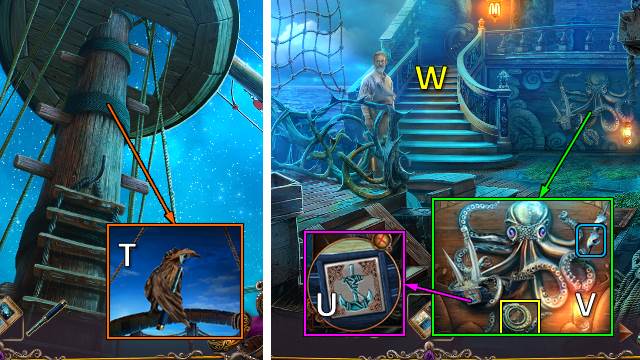
- Take BELT STRAP and BELL CLAPPER PART; pull rope (T).
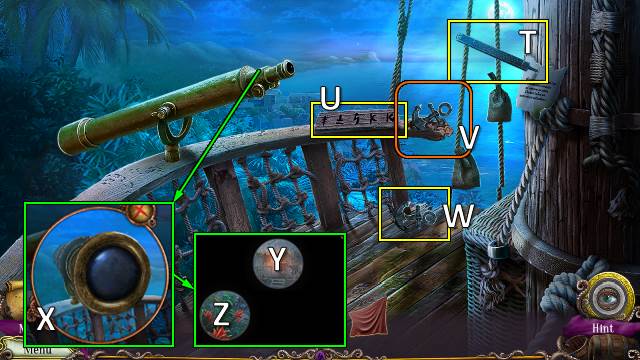
- Expand SPYGLASS.
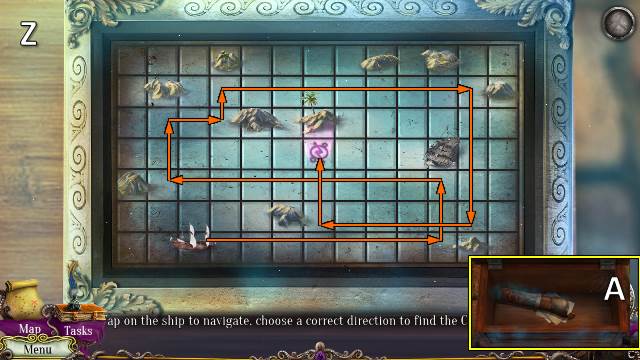
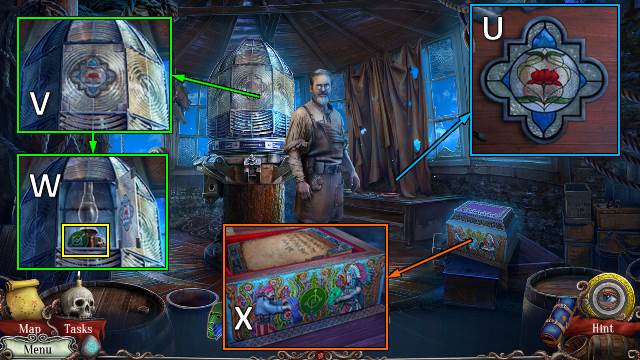
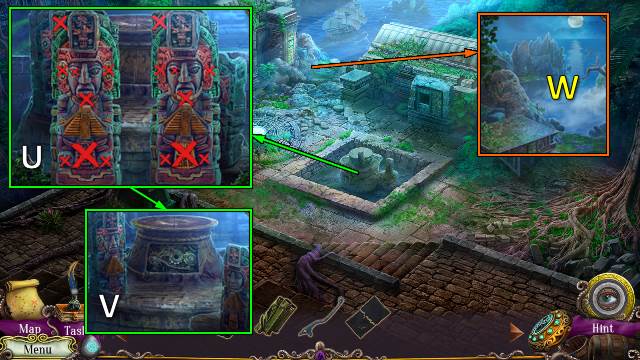
- Use SPYGLASS (U).
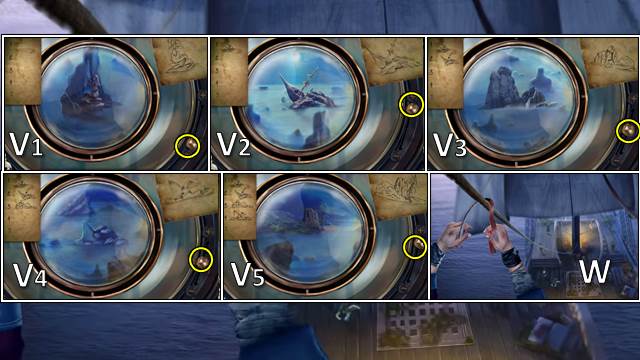
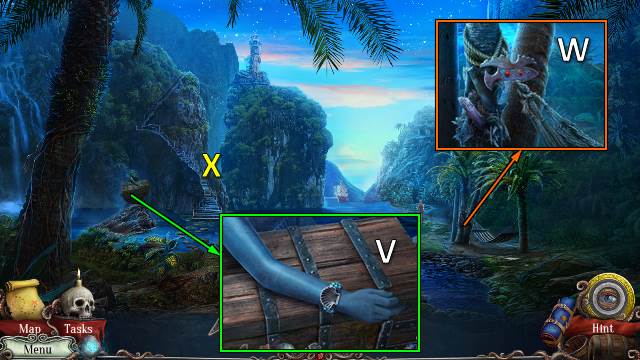
- Find landmarks (V1-5).
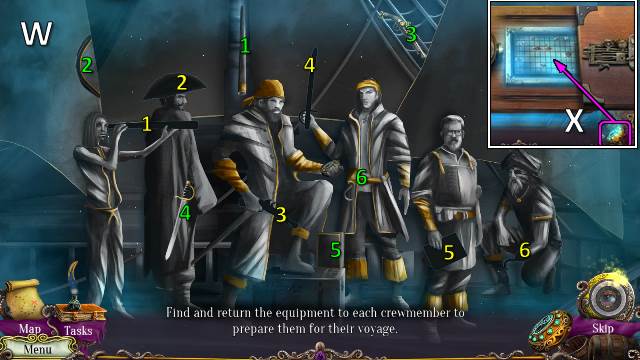
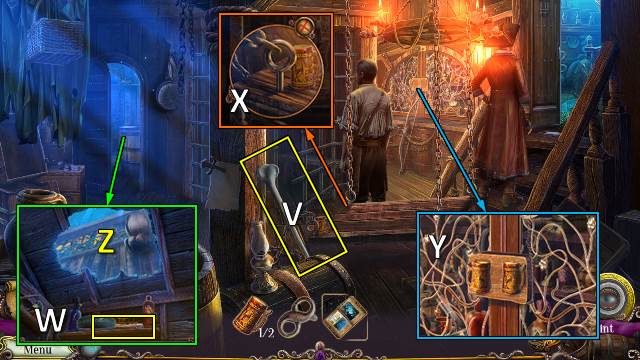
- Use BELT STRAP (W).
- Go to Crew Quarters.
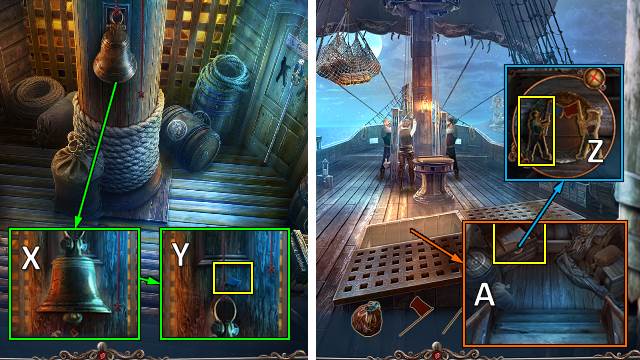
- BELL CLAPPER PART on BELL CLAPPER.
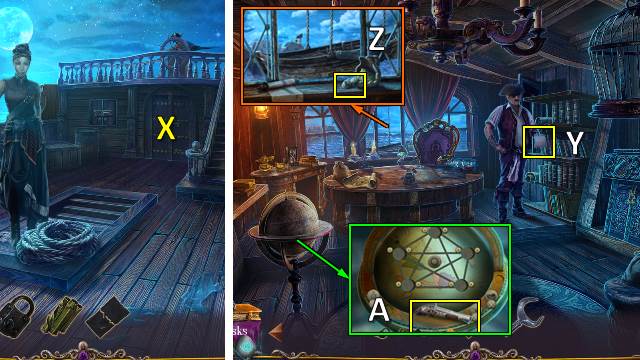
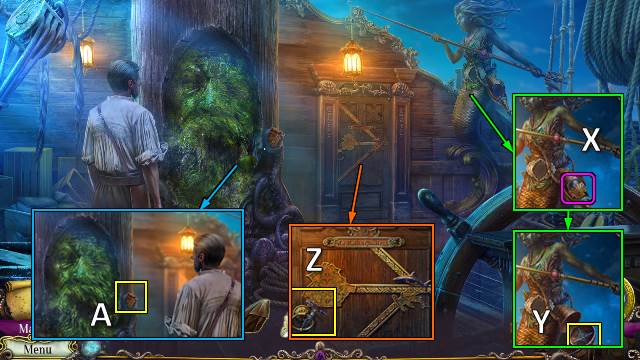
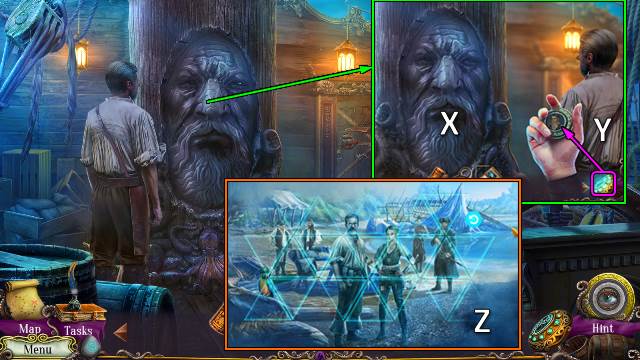
- Place BELL CLAPPER; pull rope (X).
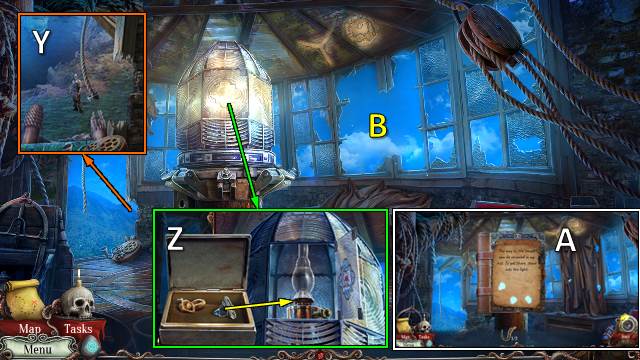
- Take WOODEN FLAG (Y).
- Go to Front Deck.
- Place WOODEN FLAG x2; take CREW FIGURINE (Z).
- Take WHITE FLAG (A).
- Go to Crew Quarters.
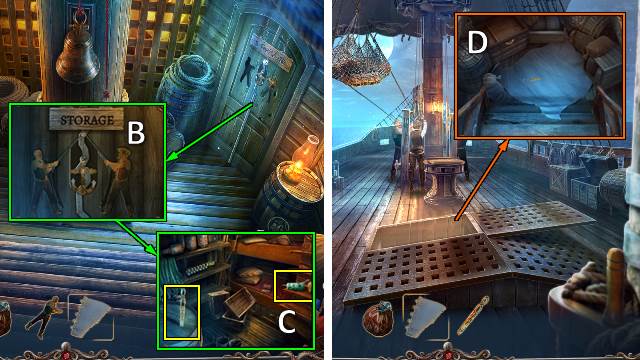
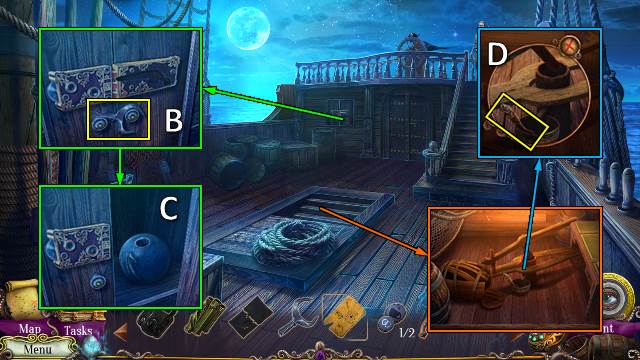
- Place CREW FIGURINE (B).
- Take THREAD AND NEEDLE and SCISSORS (C).
- Go to Front Deck.
- Pull cloth; use SCISSORS (D). Receive SAIL CLOTH.
- Walk down.
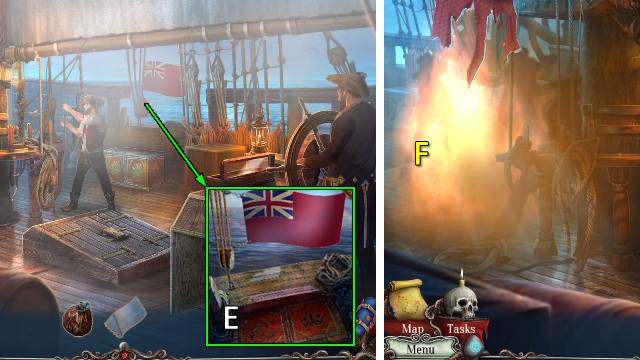
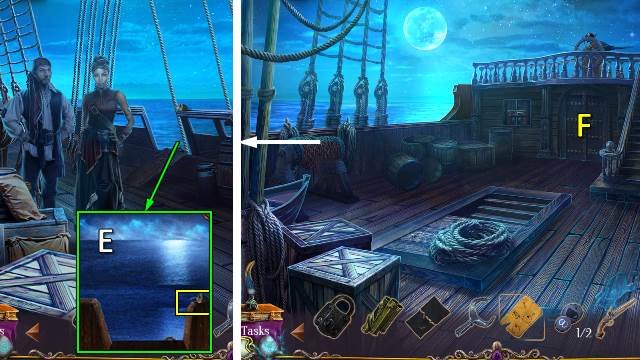
- SAIL CLOTH and THREAD AND NEEDLE on WHITE FLAG.
- Place WHITE FLAG (E).
- Go (F).
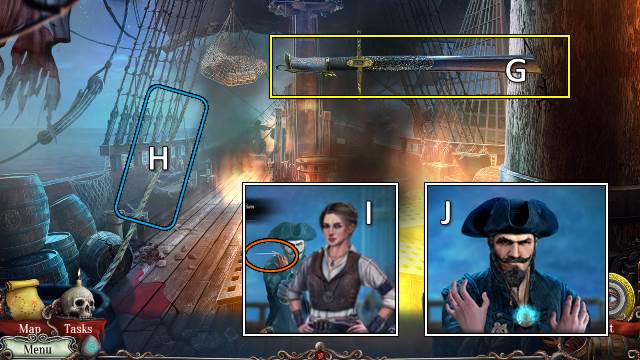
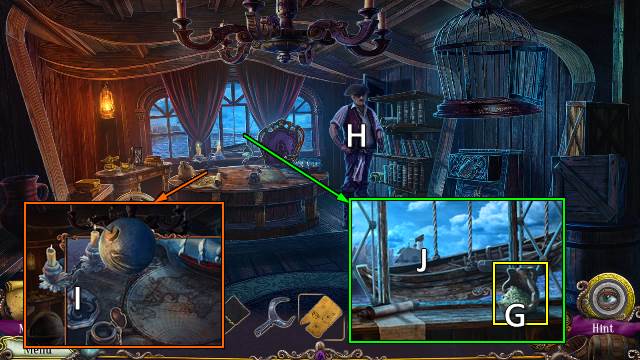
- Take CUTLASS (G).
- Use CUTLASS (H).
- Swipe right (I).
- Push pirate (J).
Chapter 2: A Cure for Jack
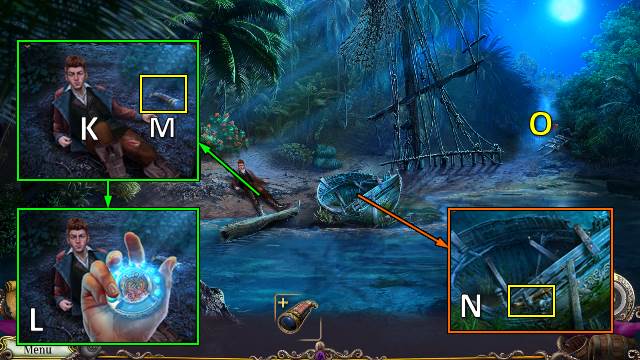
- Talk (K).
- Place FATHER'S PENDANT; take Magical Compass (L).
- Take SPYGLASS (M).
- Take CUTLASS (N).
- Go (O).

- Take HOOK ROPE (P).
- Take TORN SHIRT (Q).
- Walk down.
- Throw HOOK ROPE. Select when target is green (R).
- Go (S).
- Take RASP (T).
- Take SYMBOL SEQUENCE (U).
- Use RASP (V).
- Take MINIATURE ANCHOR (W).
- LENS PIECE from SPYGLASS.
- Place LENS PIECE (X).
- Select Y, Z.
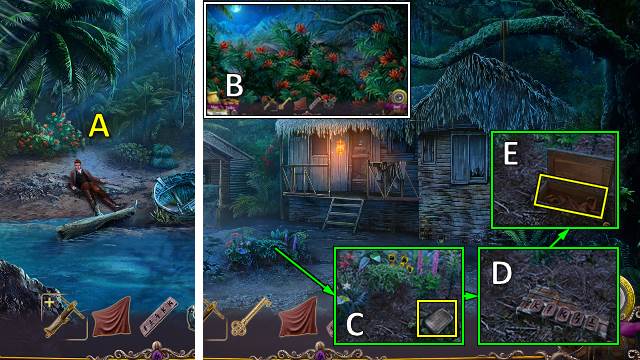
- Go (A).
- Move flowers (B).
- Take CANTEEN and move vines (C). Place SYMBOL SEQUENCE (D); take LEATHER STRAPS and HERBALIST DOOR SIGN (E).
- Place HERBALIST DOOR SIGN (F).
- Use matches (G). Place CANTEEN (H); receive DISTILLED WATER.
- Walk down.
- Use DISTILLED WATER and TORN SHIRT (I). Take HARPOON TIP (J).
- Go (K).
- Move net; use HARPOON TIP. Take CLAWHAMMER (L).
- Walk down.
- Take PLANKS with CLAWHAMMER (M).
- Go (N).
- Use PLANKS and CLAWHAMMER (O).
- Move gurney (P).
- Take BLADE (Q).
- GOLDEN KEY from CUTLASS. Place BLADE and LEATHER STRAPS.
- Use CUTLASS. Go (R).
- Take BEESWAX (S).
- Go (T).
- Play HOP (U); receive EMPTY INK POT.
- Take ISLAND PART (V).
- Take FLINT AND STEEL (W).
- Walk down.

- Read notes; place ISLAND PART. Select 1-5. Take STONEMASONS SYMBOL (X).
- Place STONEMASONS SYMBOL (Y); take STONEMASONS TOOLS (Z).
- Go (A).
- Use STONEMASONS TOOLS; take CANNON LOCK and MUSKET BULLETS (B).
- Place MUSKET BULLETS (C).
- Take FLINTLOCK (D).
- Place CANNON LOCK (E); take AMERICA 1/2 (F).
- Walk down.
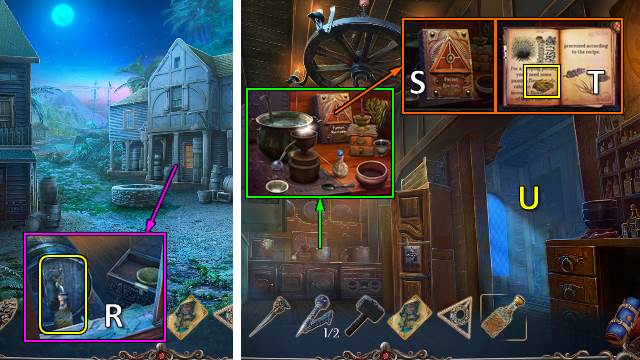
- Go (G).
- Take RECIPE (H).
- Take BRONZE KEY (I).

- Take LAMP (J).
- Take AMERICA 2/2; place MINIATURE ANCHOR. Receive ANCHOR EMBLEM (K).
- Walk down.
- Use CUTLASS twice; take STAR APPLE (L).
- Walk down.
- Play HOP (M); receive BLUE MILK MUSHROOMS.
- Go to Docks.
- Place ANCHOR EMBLEM; take DRAWER KNOB and SMALL SPADE (N).
- SILVER KEY from FLINTLOCK.
- Place SILVER KEY, GOLDEN KEY and BRONZE KEY (O); take CONCERTINA, CANNON LOCK and TORN PAGE (P).
- Place CANNON LOCK; take MAZE PIECES 1/2 (Q).
- Go to Doctor's Office.
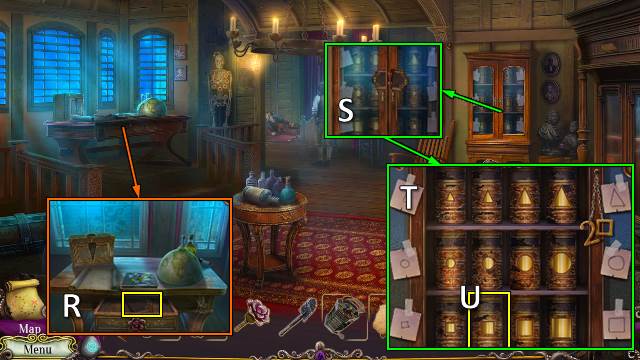
- Place DRAWER KNOB; take BOOKSHELF DECORATION (R).
- Place BOOKSHELF DECORATION (S).
- Solution (T).
- Take BOOK OF TREATMENTS (U).
- Go to Medical Garden.
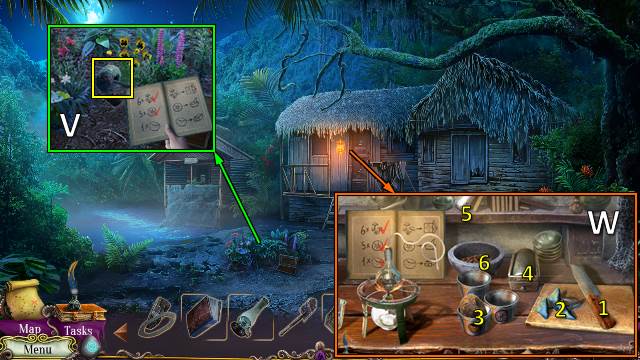
- Use SMALL SPADE; take ELEPHANT FOOT YAM ROOT (V).
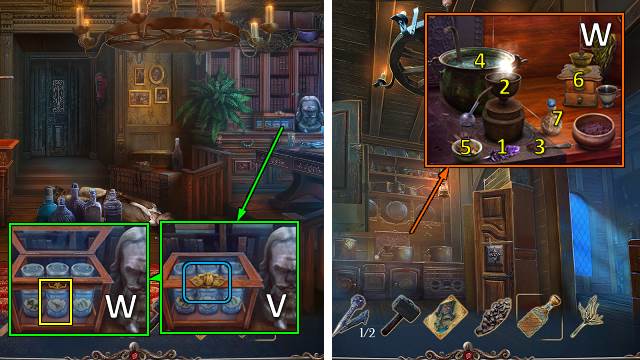
- STAR APPLE, BLUE MILK MUSHROOMS, and ELEPHANT FOOT YAM ROOT on RECIPE; receive COMPLETE RECIPE.
- Place COMPLETE RECIPE (W). Use 1 on 2, 3 on 4, 5 on 6.
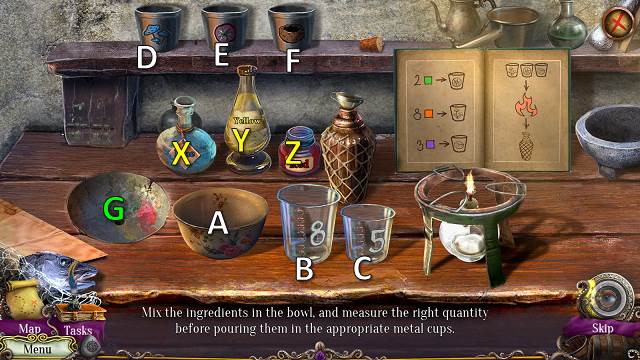
- Solution: (X-A)-(Y-A)-(A-C)-(C-B)-(A-C)-(C-B)-(C-E)-(A-G)-(B-G).
- (Y-A)-(Z-A)-(A-B)-(B-D)-(A-G).
- (X-A)-(Z-A)-(A-B)-(B-C)-(B-F).
- Receive HERBAL REMEDY.
- Go to Doctor's Office.
- Offer BOOK OF TREATMENTS and HERBAL REMEDY (H).
- Take PIECE OF GAUZE (I).
- Take MEDICAL FORCEPS (J).
- Take SPOON (K).
- Use SPOON; take DIRTY NEEDLE (L).
- Take DRAWER KEY (M).
- Use DRAWER KEY; take ALCOHOL (N).
- Use ALCOHOL, PIECE OF GAUZE and MEDICAL FORCEPS; receive STERILIZED GAUZE. Place DIRTY NEEDLE; receive CLEAN NEEDLE (O).
- Offer STERILIZED GAUZE (P).
- Take BAG TOKEN (Q).
- Place BAG TOKEN (R). Play HOP; receive BULLET EXTRACTOR.
- Offer BULLET EXTRACTOR (S).
- Place CLEAN NEEDLE; take SUTURE KIT (T).
- Offer SUTURE KIT (S).
- Take SCALPEL (U).
- Use SCALPEL (V); receive BANDAGES.
- Place BANDAGES; take SOAKED BANDAGES (W).
- Offer SOAKED BANDAGES (S).
- Take PLAGUE MASK (U).
- Place PLAGUE MASK (X); take ASIA and FATHER'S SYMBOL (Y).
- AMERICA and ASIA on CONCERTINA. Take ACCORDION.
- Place ACCORDION (Z).
- Select 1-6 (A).
- Take MAZE PIECES 2/2 (B).
- Walk down.
- Place FATHER'S SYMBOL (C).
- Take CORKSCREW (D).
- Place MAZE PIECES. Solve maze (E).
- Take COMPASS PART TOP and CHEST ORNAMENT 1/2 (F).
- Place COMPASS PART TOP (G).
- Go (H).
- Use Magical Compass (I).
- Match symbols (J).
- Take PAGE PIECES 1/2 and pull lever (K).
- Go (L).
- Take PINCERS (M).
- Take CANDLE MOLD (N).
- Walk down.
- Take WICK with PINCERS (O).
- Go to Docks.
- Use CORKSCREW and EMPTY INK POT (P); receive INK.
- BEESWAX and WICK on CANDLE MOLD.
- Place CANDLE MOLD (Q); receive CANDLE.
- CANDLE and FLINT AND STEEL on LAMP.
- Move drape (R).
- Place LAMP for HOP (S); receive SHIPMENT LOGBOOK.
- Go to Secret Room.
- PAGE PIECES 2/2 from SHIPMENT LOGBOOK.
- PAGE PIECES and INK on TORN PAGE; receive BARREL DRAWING.
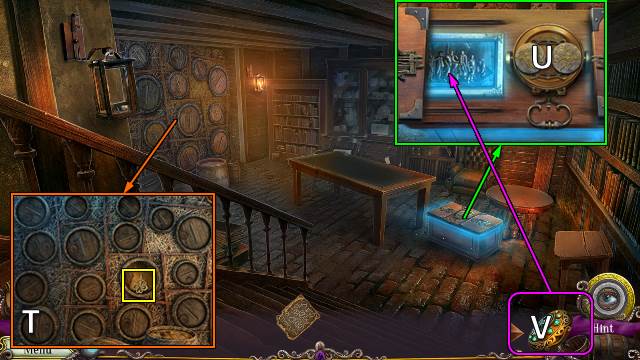
- Place BARREL DRAWING. Turn barrels as shown. Take CHEST ORNAMENT 2/2 (T).
- Place CHEST ORNAMENT (U).
- Use Magical Compass (V).
- Solution (W).
- Use Magical Compass (Y).
- Solution (Z).
- Take item (A).
Chapter 3: Doctor Ben
- Take LAVENDER FLOWERS (B).
- Go (C).
- Remove drape; take PLIERS (D).
- Take JANE'S MEDALLION (E); inspect (F).
- Wrestle the man (G).
- Take CLOSET ORNAMENT (H).
- Go.
- Take OAR (I).
- Talk. Offer COIN POUCH (J).
- Walk down twice.
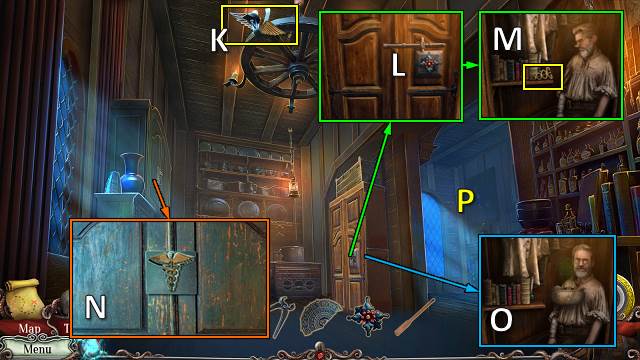
- Take CADUCEUS 1/2 with OAR (K).
- Place CLOSET ORNAMENT (L).
- Take CADUCEUS 2/2 (M).
- Place CADUCEUS for HOP (N); receive STIMULANT.
- Offer STIMULANT (O).
- Go (P).
- Receive BUCKLE PART 1/2.
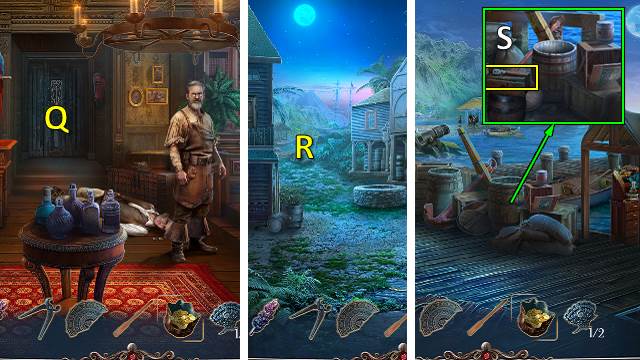
- Go (Q).
- Go (R).
- Take GLASS CUTTER (S).
- Walk down.
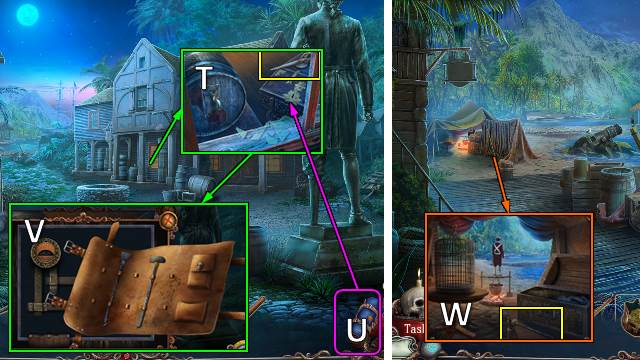
- Use GLASS CUTTER; open window. Take ROPE SPIKE and FRUIT EMBLEM (T).
- Use Lockpicking Gear (U).
- Go (V).
- Take lockpick (W).
- Walk down.
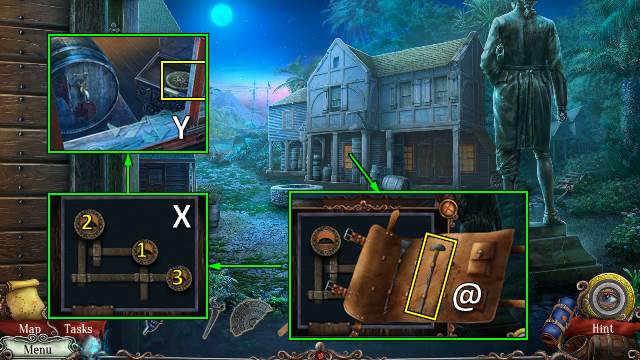
- Select (@).
- Select 1-3 (X).
- Take ALMONDS (Y).
- Walk down.
- Offer ALMONDS (Z).
- Take DUBLOONS 1/3 (A).
- Go (B).
- Move (C).
- Use PLIERS; open door (D).
- Take MISSING PORTRAIT, WOODEN STAKE 1/2, and DUBLOONS 2/3 (E).
- Walk down.
- Place MISSING PORTRAIT; swap paintings (F).
- Take BUCKLE PART 2/2 and WOODEN MALLET (G).
- Go (H).
- Place BUCKLE PART; take SYMBOL and DUBLOONS 3/3 (I).
- DUBLOONS on COIN POUCH.
- Offer COIN POUCH (J).
- Offer SYMBOL (K).
- Solution (L1-L2).
- Trap opponent (M).
- Take CAPTAIN'S SYMBOL (N).
- Walk down.
- Offer CAPTAIN'S SYMBOL. Play HOP (O); receive FORT CHARLES BLUEPRINTS.
- Go to Docks.
- Talk (P).
- Receive BOOK LOCK and EMPTY FLASK.
- Place FRUIT EMBLEM; take PASSION FLOWER SEEDS (Q).
- Walk down.
- Place EMPTY FLASK; turn faucet. Take FLASK OF RUM (R).
- Walk down twice.
- Place BOOK LOCK (S); take BRASS LEAF (T).
- Go (U).
- Place BRASS LEAF (V); take VALERIAN ROOT (W).
- Walk down.
- Place LAVENDER FLOWERS, VALERIAN ROOT, and PASSION FLOWER SEEDS (W). Place 1 on 2, 3 on 4, 5 on 6. Take SLEEPING POTION (7).
- Go to Docks.

- SLEEPING POTION on FLASK OF RUM. Receive SPIKED RUM.
- Place SPIKED RUM (X).
- Take LANTERN PART; place OAR (Y).
- Go (Z).
Chapter 4: Escape
- Take LATCH PART (A).
- Place LANTERN PART; take LAMP OIL (B).
- Go (C).
- Place LATCH PART (D); take PARROT TREATS and WOODEN STAKE 2/2 (E).
- Take NUTCRACKER (F).
- Walk down.
- Use WOODEN STAKES and MALLET. Turn; take CAGE LOCK (G).
- Go (H).
- Place CAGE LOCK; solution (I).
- Take HELM INSIGNIA and FEATHER (J).
- Place FEATHER; take NOTE (K).
- Walk down.
- Offer PARROT TREATS. Place JANE'S MEDALLION, FORT CHARLES BLUEPRINTS and NOTE (L).
- Place HELM INSIGNIA. Solution (M).
- Take TREE TOKEN (N).
- Go (O).
- Open (P).
- Place TREE TOKEN for a HOP (Q); receive LANTERN.
- LANTERN on LAMP OIL; receive UNLIT LANTERN.
- Use UNLIT LANTERN (R); receive LIT LANTERN.
- Walk down.
- Use LIT LANTERN (S).
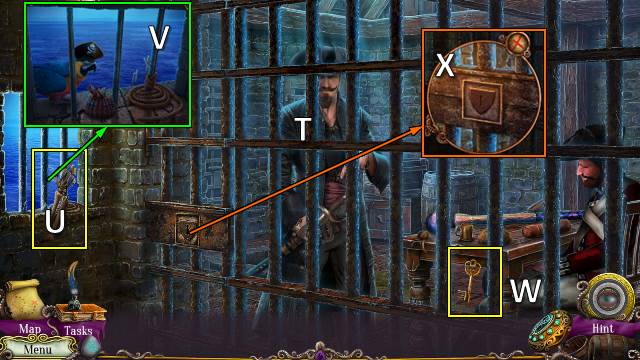
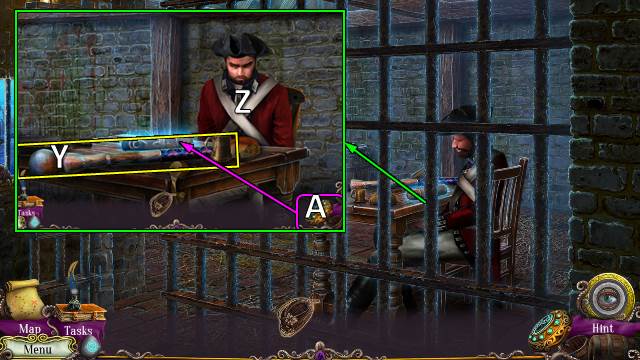
- Talk (T).
- Take SKELETON ARM (U).
- Take JANE'S MEDALLION. Take ROPE with JANE'S MEDALLION (V).
- Take CELL KEY with SKELETON ARM (W).
- Use CELL KEY (X).
- Take CANNON LOADER (Y).
- Use CANNON LOADER and ROPE (Z).
- Use Magical Compass (A).
- Solution (B).
- Solution 2 (C).
- Take CURSED ROSE FLAG PART (D).
- Go (E).
- Take LINEN SACK and CRATE OPENER (F).
- Take BOW. Play HOP (G); receive LINSTOCK.
- Go (H).
- Go (I).
- Take HAIRPIN (J).
- Use LINSTOCK (K); receive LIT LINSTOCK.
- Take HAY; use CRATE OPENER (L). Take SLOW FUSE (M).
- Walk down.
- Place HAY, CANNON LOADER, and cannon ball (N).
- Use HAIR PIN and SLOW FUSE (O).
- Use LIT LINSTOCK (P).
- Go (Q).
- Take GUNPOWDER with LINEN SACK (R).
- Go left.
- Place GUNPOWDER (S).
- Use LIT LINSTOCK (T).
- Solution: U-V-Xx2-Wx2-Xx3.
- Use ROPE SPIKE (Y).
- Take PULLEY (Z).
- Place PULLEY (A).
- Go (B).
- Talk (C).
- Take LARGE PIECE OF CLOTH (D).
- Use LARGE PIECE OF CLOTH; remove plants. Use NUTCRACKER; take SHARP METAL PIECE (E).
- Use SHARP METAL PIECE; take VINE and lockpick (F).
- Place VINE; take COCONUT with SHARP METAL PIECE (G).
- Throw COCONUT (H); go (I).
- Take CROSSBOW BOLT (J).
- Use Lockpicking Gear (K).
- Select (L).
- Remove 1-7 (M).
Chapter 5: The Island
- Take PLANKS 1/2 (N).
- Take lockpick (O).
- Take XIBALBA HEAD (P).
- Go (Q).
- Take PLANKS 2/2 (R).
- Take LIGHTHOUSE LANTERN TOP (S).
- Place XIBALBA HEAD. Select 1-8 (T).
- Take SEA SHELL and MAYAN BLADE (U).
- Walk down.
- Place SEA SHELL for HOP (V); receive DECORATIVE PIECE.
- Use MAYAN BLADE; take ROPE LINK (W).
- Go (X).
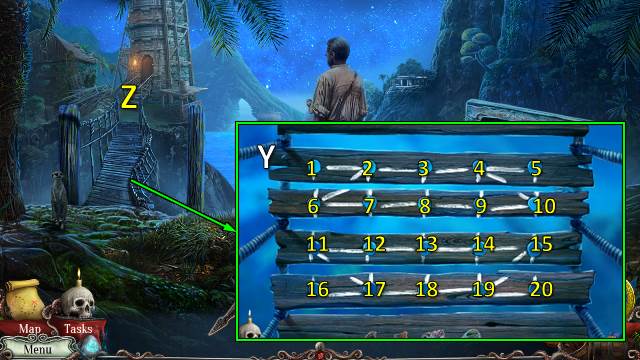
- Place PLANKS and ROPE LINK (Y).
- Solution: 3-8-13-18-17-16-11-6-1-2-3-4-5-10-15-20-19-15-14-13-12-11-17-12-7-2-6-7-8-9-10-4-9-14-19-18.
- Go (Z).

- Take BUCKLE PART (A).
- Use Lockpicking Gear (B).
- Select (C).
- Remove 1-4 (D).
- Go (E).
- Take TRAPDOOR RING (F).
- Place BUCKLE PART. Touch other buckle; use CROSSBOW BOLT (G).
- Take CRANK (H).
- Place LIGHTHOUSE LANTERN TOP (I).
- Take MOP and TRUNK DECORATIONS 1/3 (J).
- Take DECORATIVE PIECE (K).
- Walk down.

- Place DECORATIVE PIECE x2 (L); receive BOARDING HOOK.
- MOP on BOARDING HOOK.
- Use BOARDING HOOK (M).
- Go (N).
- Place CRANK; take CAPSTAN HANDLE and HOOKS 1/2 (O).
- Go (P).
- Move items. Place TRAPDOOR HANDLE (Q).
- Take TRUNK DECORATIONS 2/2 and TINDERBOX (R).
- Go (S).
- Place CAPSTAN HANDLE for HOP (T); receive LENS PIECE.
- Go to Lighthouse Lantern Room.
- Place LENS PIECE. Restore and take LENS (U).
- Place LENS (V); take TRUNK DECORATIONS 3/3 (W).
- Place TRUNK DECORATIONS; take JOURNAL and VALVE (X).
- Look (Y).
- Place VALVE and TINDERBOX. Use flint (Z).
- Use JOURNAL (A).
- Throw JOURNAL (Y).
- Go (B).
- Go (C).
- Receive JOURNAL.
- Take STONE HATCHET (D).
- Walk down.
- Take NET (E).
- Take PALM TREE BARK with STONE HATCHET (F).
- Go (G).
- Take CAPTAIN'S TOKEN (H).
- Take TABLET PIECES 1/2 (I).
- Go (J).
- Take LEAVES (K).
- Take CROWN ORNAMENT. Take DAGGER with PALM TREE BARK (L).
- Use STONE HATCHET; take BABY MONKEY (M).
- Walk down twice.
- Place CAPTAIN'S TOKEN for HOP (N); receive STATUE TEAR.
- Place BABY MONKEY; take STONE HEART (O).
- Go (P).
- Place STONE HEART and CROWN ORNAMENT; take COTTAGE KEY and STATUE PIECE (Q).
- ARROW SHAFT from NET.
- ARROW SHAFT on BOW; receive FIRE DRILL.
- Place LEAVES and FIRE DRILL. Take STONE RING; take RESIN with DAGGER (R).
- Go (S).
- STONE RING and RESIN on NET.
- Use NET (T); take JOURNAL TOKENS 1/2 and CHARCOAL (U).
- Use COTTAGE KEY; take PADLOCK (V).
- Play HOP (W); receive BLANK PAPER.
- Walk down.
- STONE CROWN from BLANK PAPER. Use CHARCOAL; receive COORDINATES.
- Place STATUE TEAR and STONE CROWN; take DEATH MASK and JOURNAL TOKENS 2/2 (X).
- JOURNAL TOKENS on JOURNAL. Take MIRROR. Place COORDINATES.
- Offer JOURNAL (Y).
- Solution (Z).
- Take RIB BONE (A).
- Take SUGARCANE (B).
- Place MIRROR (C).
- Take SKULL EYE (D).
- Take SKULL NOSE (E).
- Go (F).
- Take STATUE PIECE (G).
- Take STONE TABLET with RIB BONE (H).
- Take SKULL FOREHEAD (I).
- Walk down.
- Place SKULL EYE, SKULL NOSE and SKULL FOREHEAD; take SUN SYMBOL (J).
- Place SUN SYMBOL (K). Find symbols.
- Take SNAKE EYE (L).
- Go (M).

- Place SNAKE EYE; take STONE FIGURINE (N).
- Walk down.
- Place STONE TABLET and STONE FIGURINE. Turn stones as shown. Take TABLET PIECES 2/2 (O).
- Go (P).
- Place TABLET PIECES (Q).
- Use Magical Compass (R).
- Solution (S).
- Place DEATH MASK. Take CURSED ROSE FLAG PART and MECHANISM LEVER (T).
- Walk down.
- Place STATUE PIECE x2. Find differences (U).
- Place MECHANISM LEVER (V).
- Go (W).
Chapter 6: The Cursed Rose
- Go (X).
- Take ONE EYE'S LIST (Y).
- Take MISSING TILES 1/2 (Z).
- Take FLINTLOCK ORNAMENT (A).
- Walk down.
- Take OAR STOPPER. Use FLINTLOCK ORNAMENT (B).
- Take HOLLOW CANNONBALL and MISSING TILES 2/2 (C).
- Take WOODEN LADLE. Place SUGARCANE; receive SUGARCANE JUICE (D).
- Take CANNONBALL FUSE (E).
- Go (F).
- Take PHOSPHOR with WOODEN LADLE (G).
- HOLLOW CANNONBALL, CANNONBALL FUSE, SUGARCANE JUICE, and PHOSPHOR on ONE EYE'S LIST.
- Offer ONE EYE'S LIST (H).
- Receive SMOKE BOMB.
- Light SMOKE BOMB (I); receive LIT SMOKE BOMB.
- Throw LIT SMOKE BOMB (J).
- Play HOP (K); receive CANDLE HOLDER PART.
- CURSED ROSE FLAG PART on CURSED ROSE FLAG.
- Place CANDLE HOLDER PART. Place CURSED ROSE FLAG (L).
- Place MISSING TILES and CURSED ROSE FLAG. Solution 1 (M).
- Solution 2 (N).
- Receive COORDINATES.
- Walk down.
- Offer COORDINATES (O).
- Take PLANK (P).
- Place PLANK and PADLOCK; go (Q).
- Take RAG (R).
- Place OAR STOPPER; attach net and take NAIL PULLER (S).
- Go (T).

- Take SHELL DECORATION (U). Use NAIL PULLER; take SMALL SHIP with RAG (V).
- Walk down and go (W).
- Place SHELL DECORATION (X); take STAR ORNAMENT (Y).
- Take HATCH PULLER (Z).
- Take MUG 1/2 (A).
- Walk down.
- Use HATCH PULLER for HOP (B); receive SMALL SHARK.
- Go (C).
- Place SMALL SHIP and SMALL SHARK (D).
- Go (E).
- Take CLASP (F).
- Take ARMOR PIECE; place STAR ORNAMENT (G). Take ANCHOR (H).
- Walk down.
- Place ARMOR PIECE; take TRIDENT (I).
- Go (J).
- Open (K).
- Take ROPE LADDER with TRIDENT (L).
- Go to Mast.
- Inspect mast; place ROPE LADDER (M).
- Take BOTTLE OF RUM (N).
- Go to Quarterdeck.
- Use BOTTLE OF RUM and RAG; take BOOKEND ADORNMENT (O).
- Go (P).
- Place BOOKEND ADORNMENT (Q).
- Play HOP (R); receive BOOK OF THE ROSE.
- GLOBE DECORATION from BOOK OF THE ROSE.
- Place and move GLOBE DECORATION; take SPYGLASS DECORATION (S).
- Go to Mast.
- Offer SPYGLASS DECORATION (T); receive SHIP MAST.
- Walk down.
- Place ANCHOR (U).
- Place SHIP MAST; take FATHER'S LOCKET twice (V).
- Go (W).
- Offer FATHER'S LOCKET (X).
- Use Magical Compass (Y).
- Solution (random) (Z).
- Take OIL LAMP DECORATION (A).
- Take WHALE BONE (B).
- Place OIL LAMP DECORATION; take OIL (C).
- Go (D).
- Take CUTLASS (E).
- Take HOOK PLANK for HOP (F); receive BOTTLE OPENER.
- Take lockpick. Use OIL; take HOOKS 2/2. Use BOTTLE OPENER; take MANACLES (G).
- Use BOTTLE OPENER (H).
- Move (I).
- Take OAR (J).
- Walk down.

- Place OAR and MANACLES (K).
- Use CUTLASS (L). Move cannon; take LEVER (M).
- Use LEVER (N).
- HOOKS on HOOK PLANK.
- Place HOOK PLANK (O). Go.
- Walk across (P).
- Use WHALEBONE (Q).
- Swipe right (R).
- Use Lockpicking Gear (S).
- Select (T).
- Remove 1-5 (U).
- Take WHALE BONE (V).
- Take CHISEL (W).
- Take MUG 2/2. Use CHISEL and WHALE BONE. Take CHAIN (X).
- Place MUG for HOP (Y); receive GRAPPLING HOOK.
- CHAIN and CLASP on GRAPPLING HOOK.
- Use GRAPPLING HOOK; go (Z).
- Take LEATHER BELT (A).
- Use LEATHER BELT. Offer BOOK OF THE ROSE (B).
- Remove belt (B).
- Go (C).
- Solution (D): select 1-5.
- Solution (E): select 1-2-3-4-2-5-6-7-8-9-4-2-5-6.
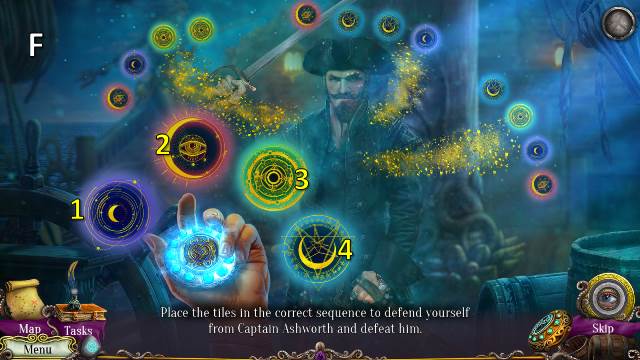
- Solution (F): select 1-2-2-4, 3-1-3-2-2-1-4, 2-1-3-3-4-4-1-3-1-2.
- Congratulations, you have completed Uncharted Tides: Port Royal.
Created at: 2019-07-28