

Walkthrough Menu
- General Tips
- Level 1: Reception
- Level 2: The Ship
- Level 3: The Dome
- Level 4: The Dungeon
- Level 5: The Plane Yard
- Level 6: The Roof
General Tips
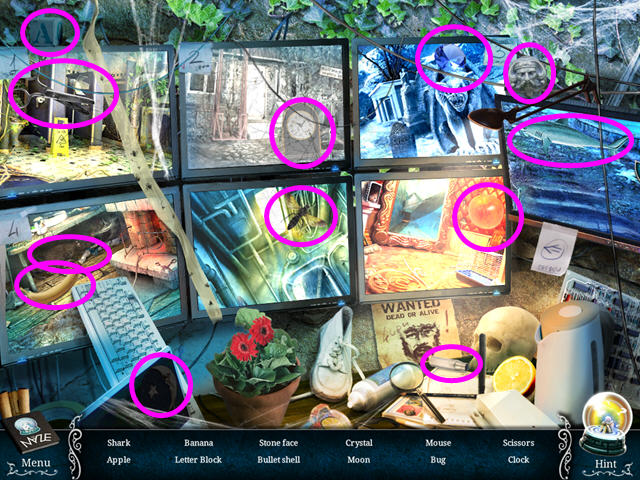
- Hidden Object Scenes and mini-games are often randomized - your solutions may vary.
- Hidden Object Scenes will be referred to as 'HOS' in this walkthrough.
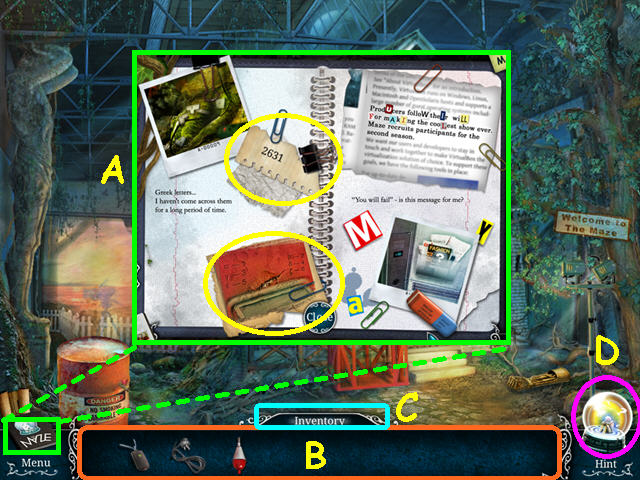
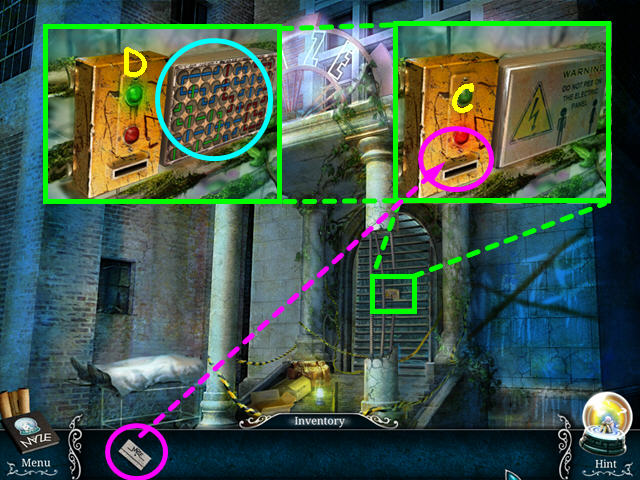
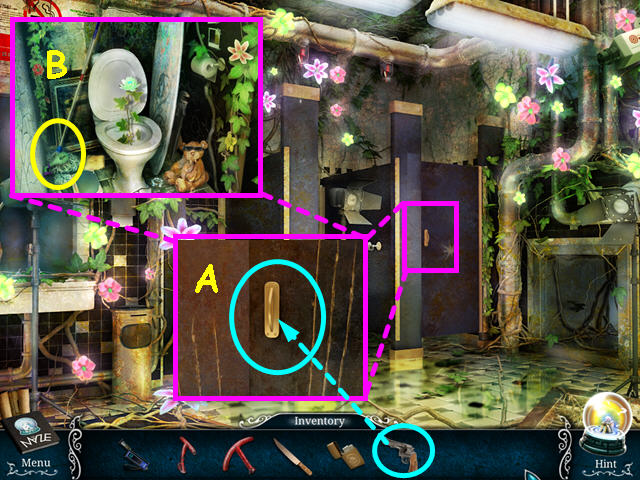
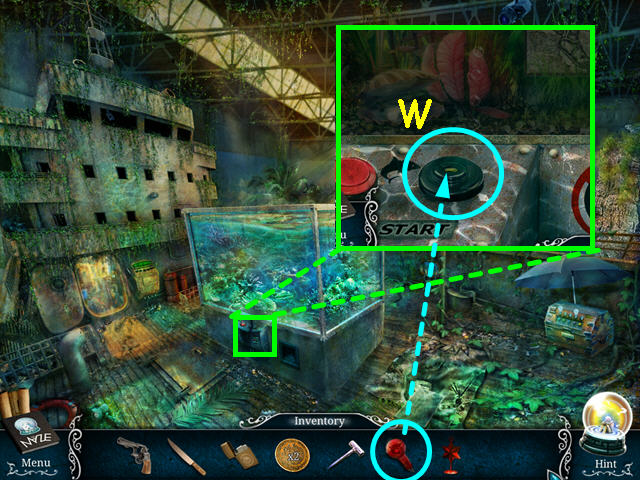
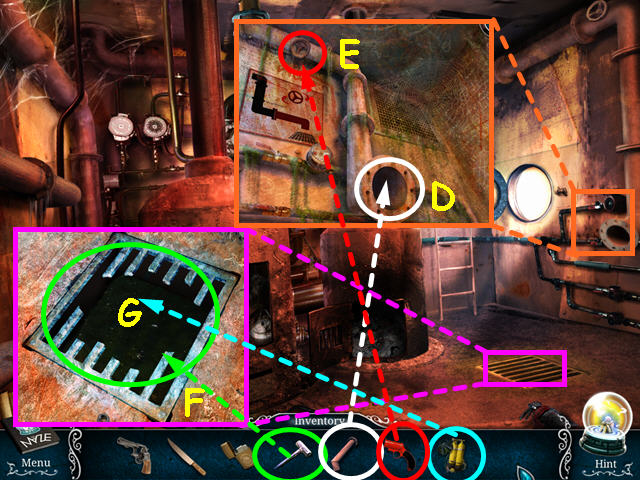
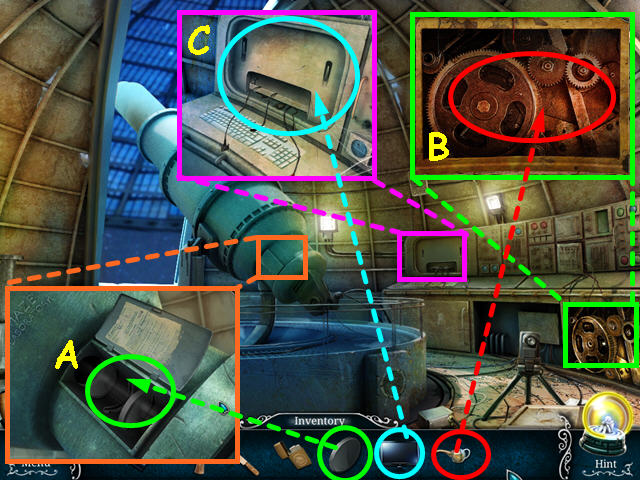
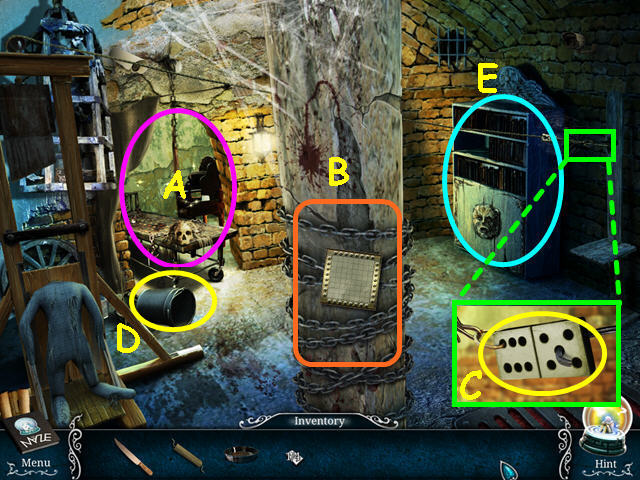
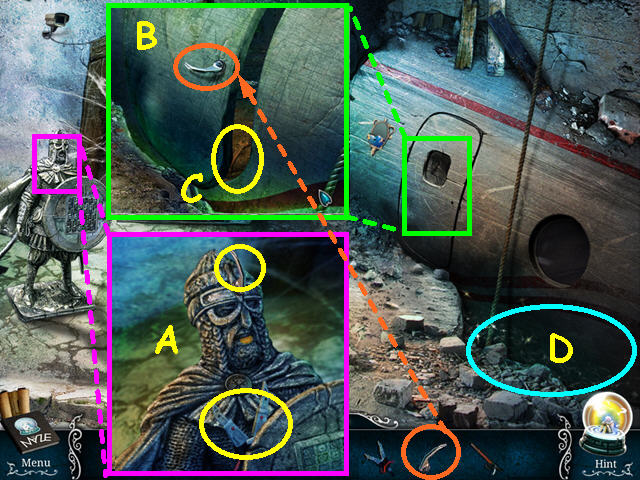
- Inside the journal you will find notes and clues such as combinations (A).
- Your inventory is in the bottom panel - click on an item to select it for use (B).
- The inventory will auto-hide when not in use; move your mouse over the 'Inventory' sign to reveal the panel (C).
- Hints are unlimited, but you must wait for the snow globe to recharge (D).
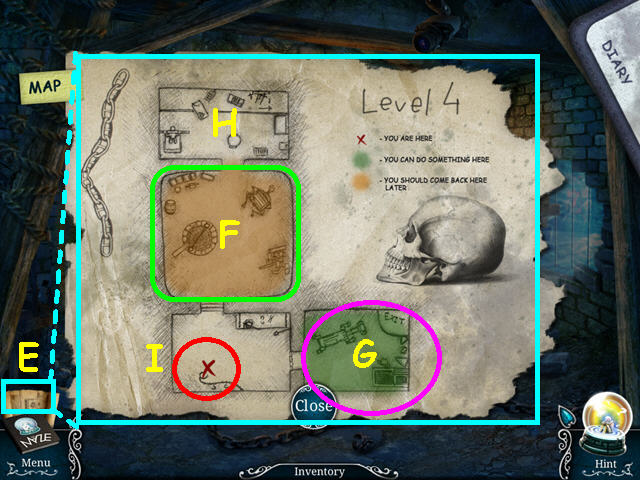
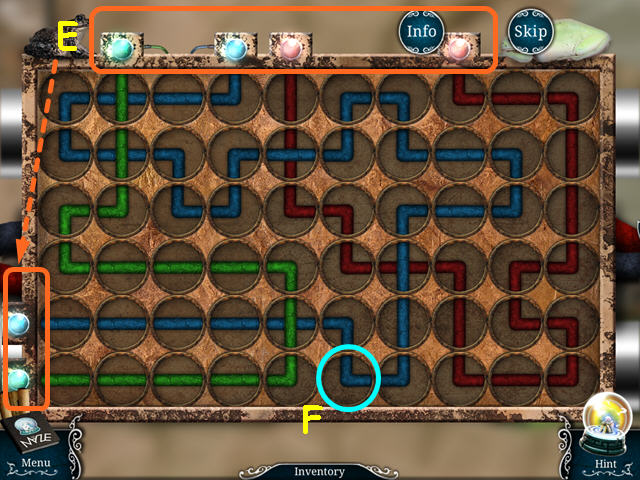
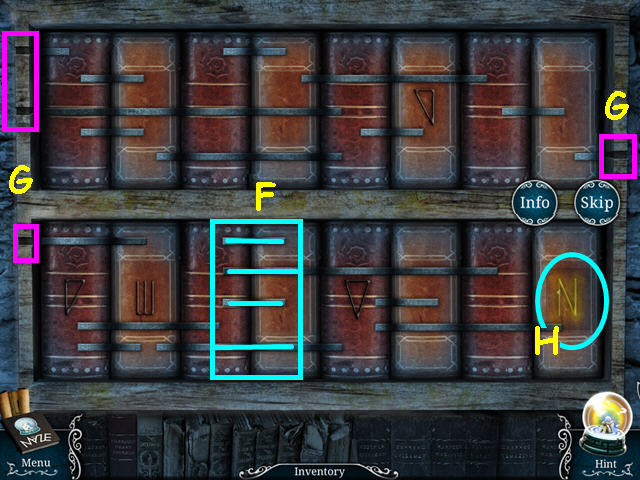
- Click on the map icon just above the journal for a helpful map (E).
- Rooms will appear on the map once you have visited there.
- Rooms highlighted in green indicate that there are things available to do now (F).
- Rooms highlighted in brown indicate that there will eventually be something to do there (G).
- White rooms are complete (H).
- The red 'X' indicates your current position (I).
- Click on a room to travel to that location.
Level 1: Reception
- You will have the option of some interactive help.
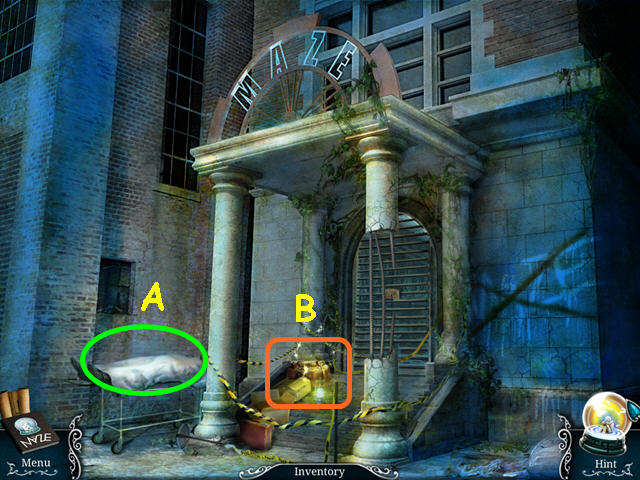
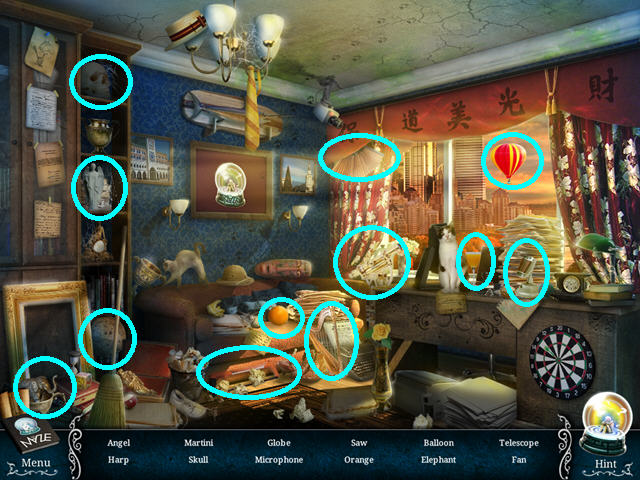
- Look at the body on the gurney (A).
- Select the bag on the steps for a HOS (B).
- Locate all the items on the list.
- You will earn the TICKET.
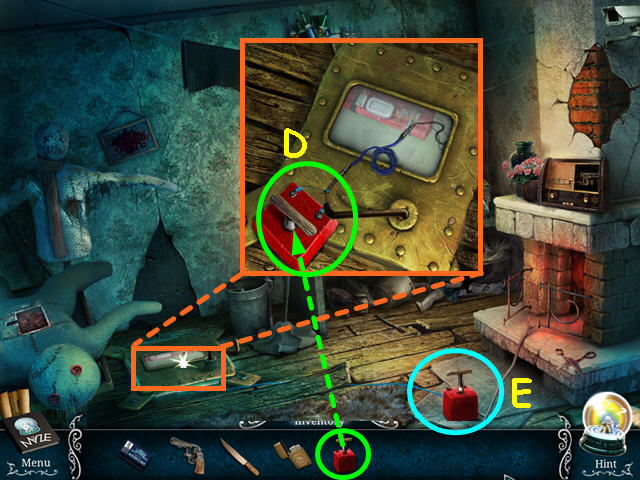
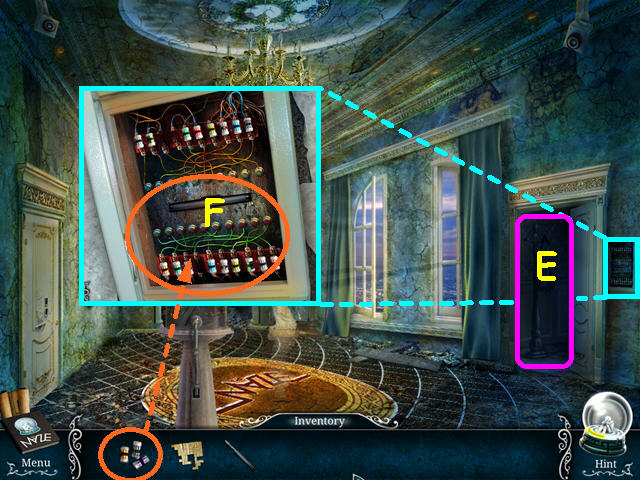
- Look at the door and use the TICKET in the slot on the electronic lock (C).
- Select the area to the right of the lock for a mini-game (D).
- Connect the colored wires until all the lights are on (E).
- Click on a circle to rotate a connection (F).
- Walk forward and enter the building.
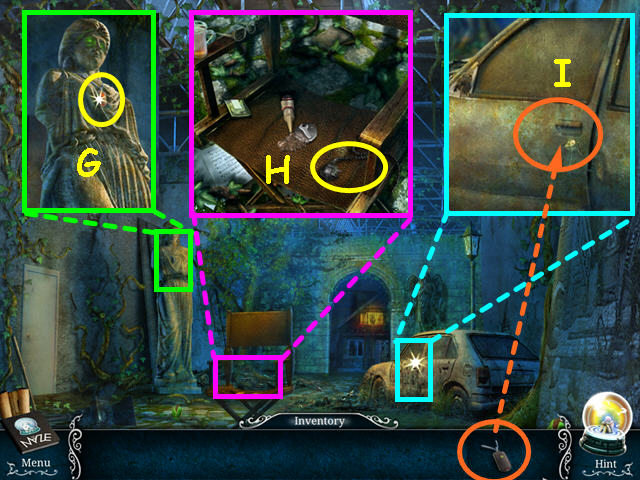
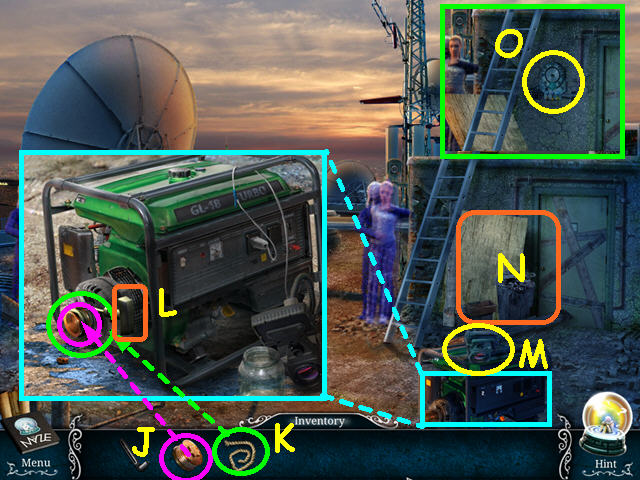
- Look at the statue and take the CAR REMOTE (G).
- Look at the chair and take the POWER CORD (H).
- Look at the car door and use the CAR REMOTE (I).
- Select the car for a HOS.
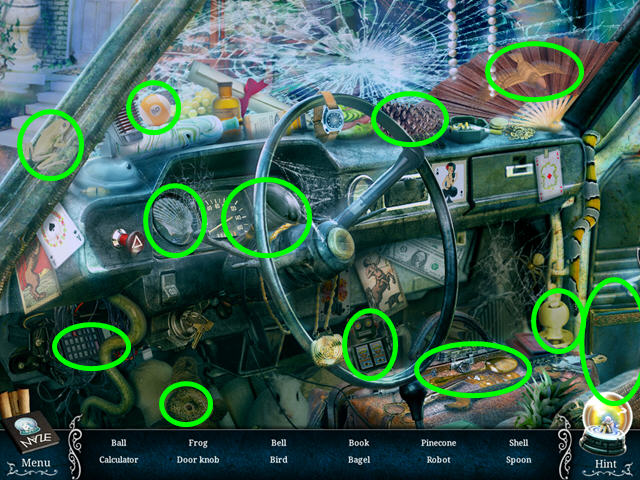
- Locate all the items on the list.
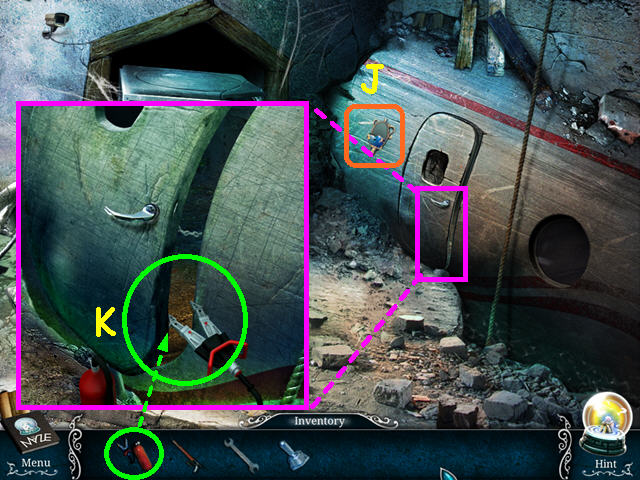
- You will earn the DOOR KNOB.
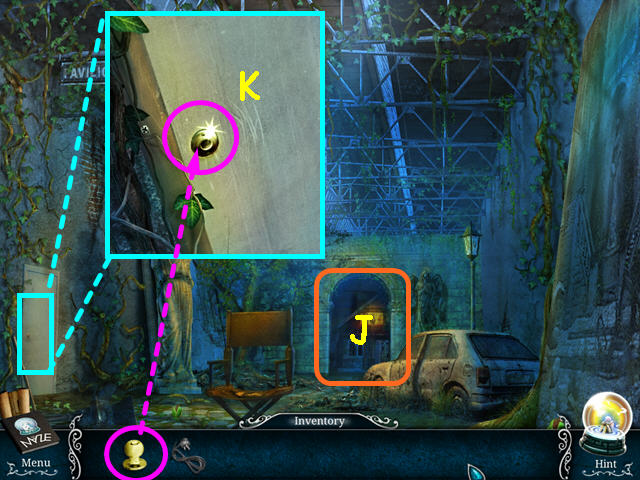
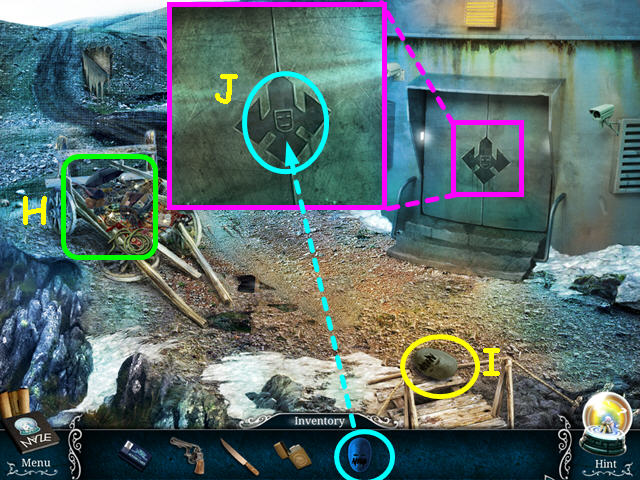
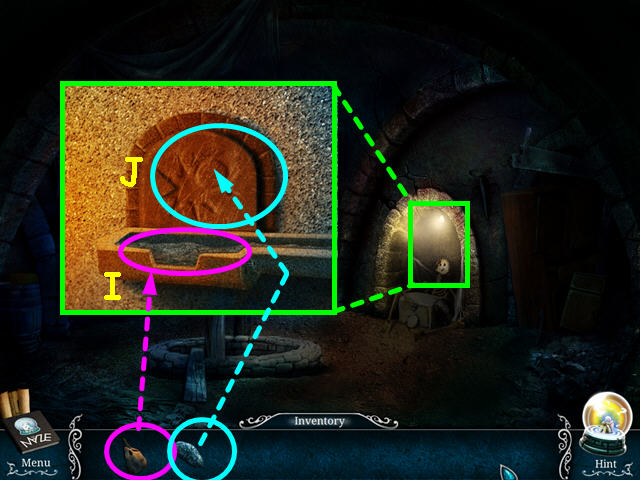
- Note the archway at the end of the room (J).
- Look at the door on the left and use the DOOR KNOB on the hole (K).
- Walk left to the corridor.
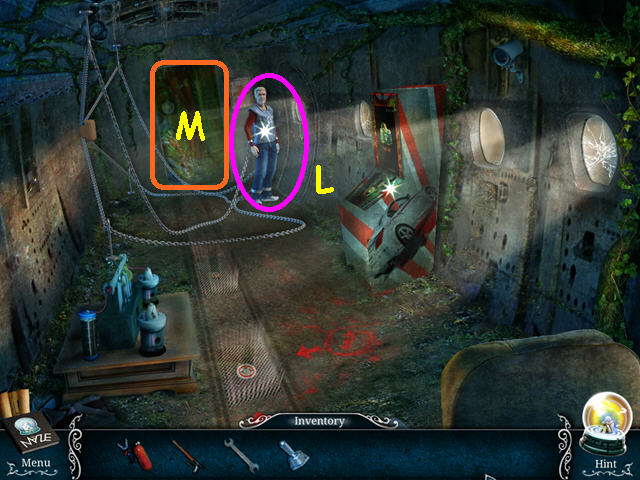
- Click anywhere on the screen for a cut scene.
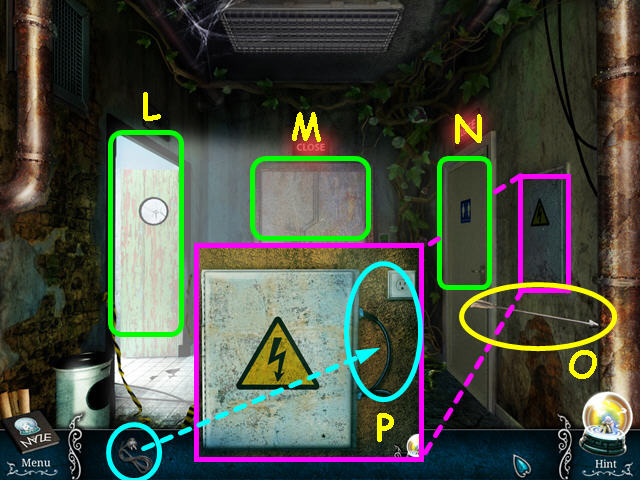
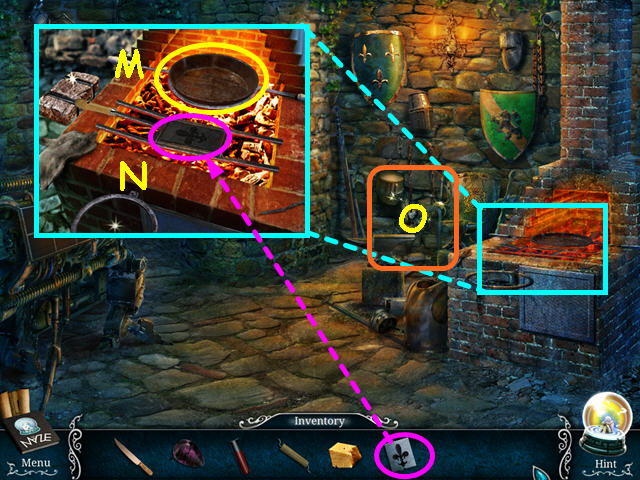
- Note the hall to pavilion 2 (L).
- Note the door to reception (M).
- Note the door to the bathroom (N).
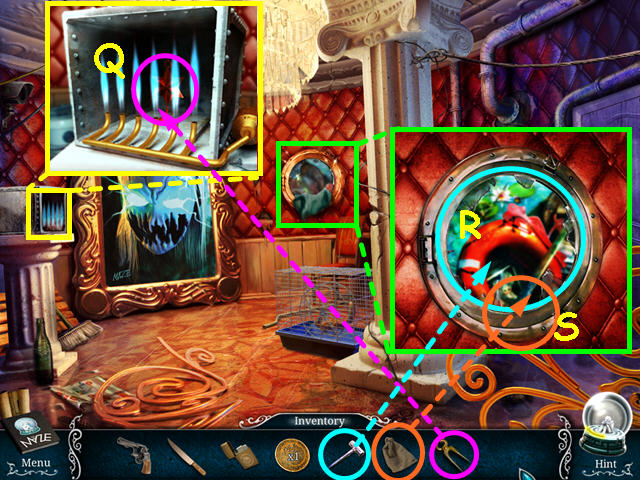
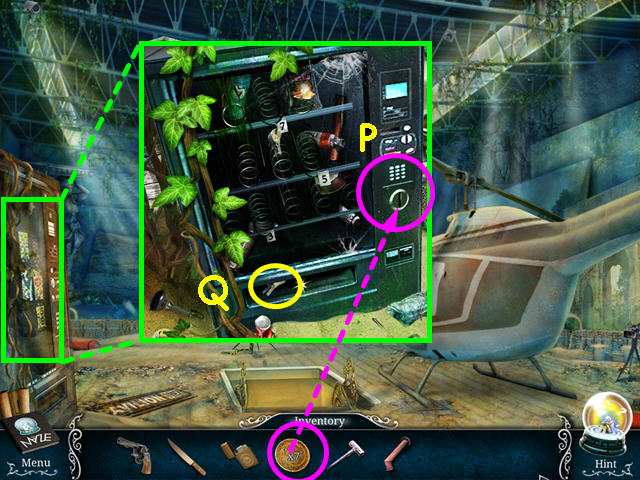
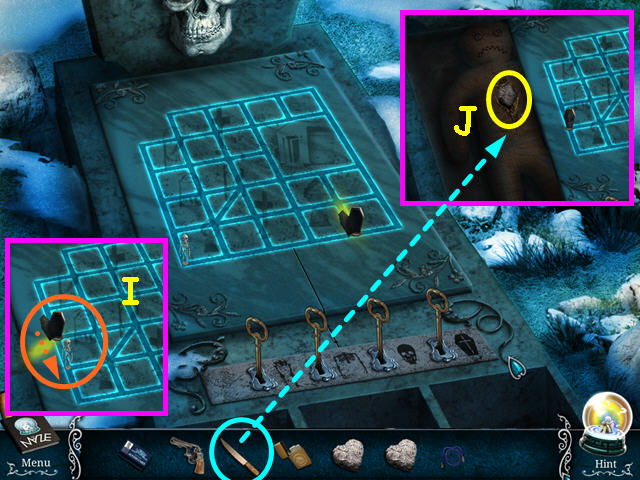
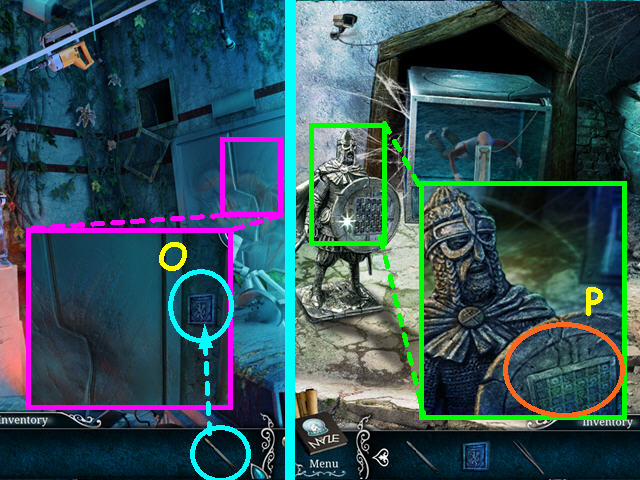
- Take the ARROW (O).
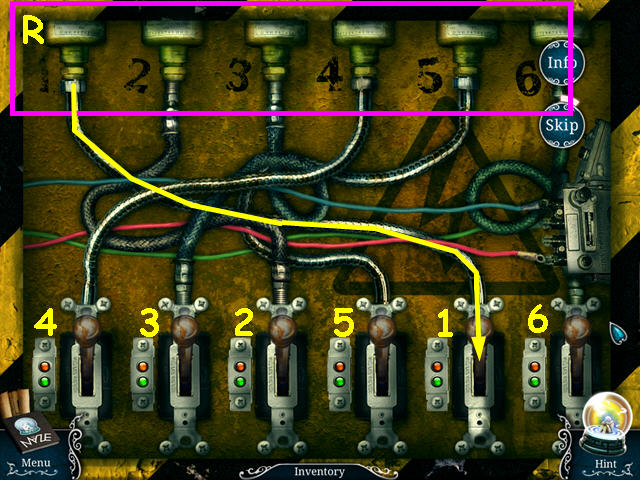
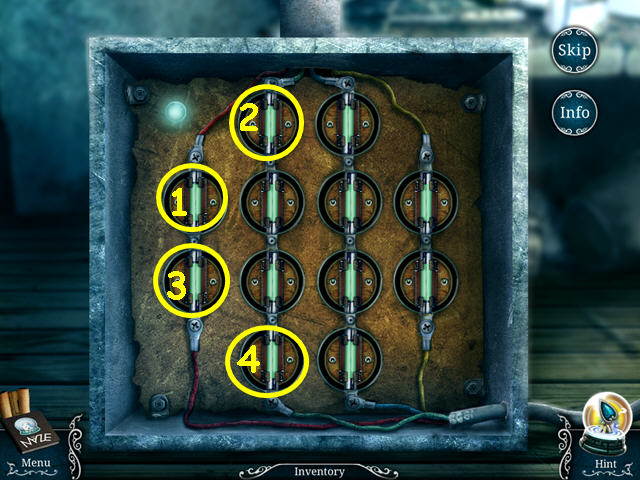
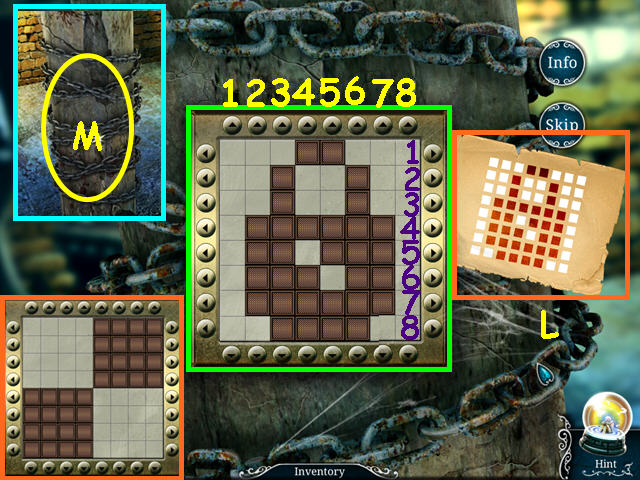
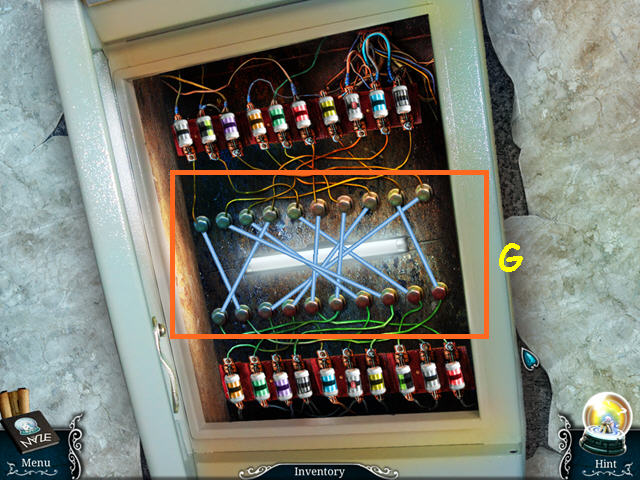
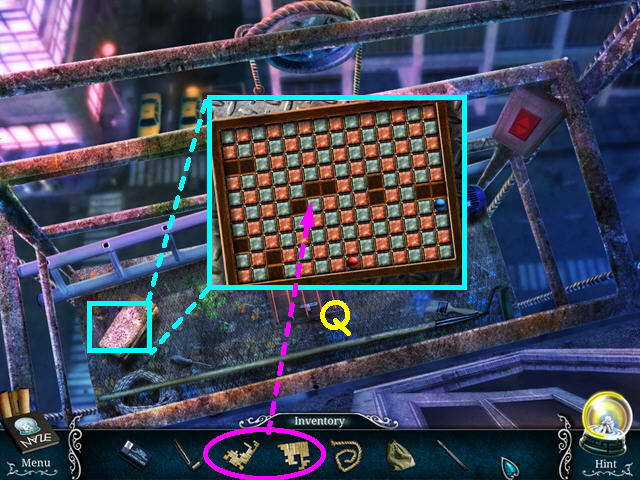
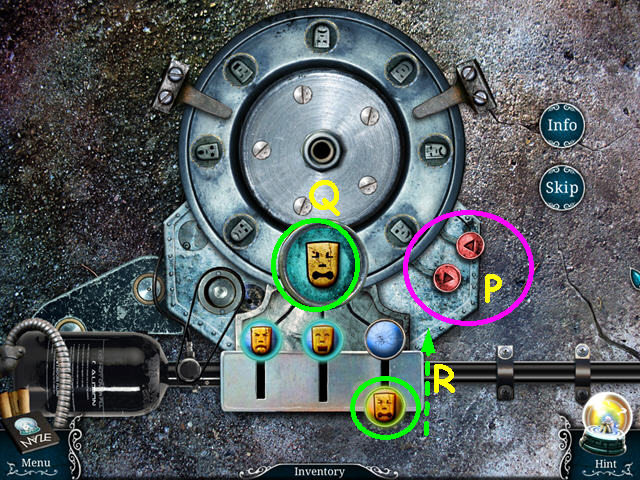
- Look at the electric panel and use the POWER CORD to trigger a mini-game (P).
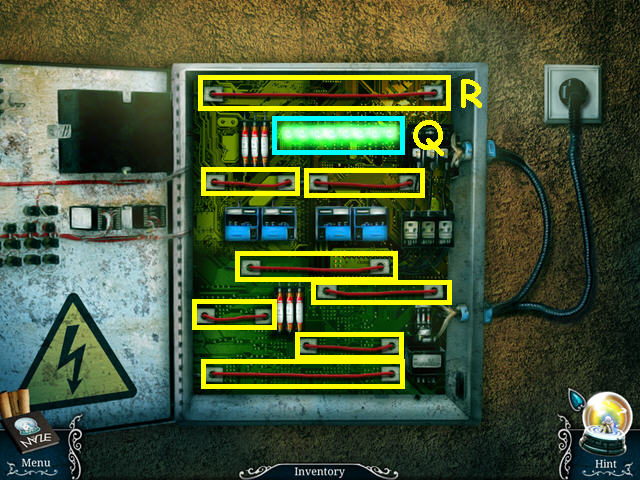
- Move the wires to complete all the connections and illuminate the lights (Q).
- Click on a wire to take it and click it over another wire to change positions.
- There are 8 wires to move; it is best to start with the widest connection at the top (R).
- Walk left to pavilion 2.
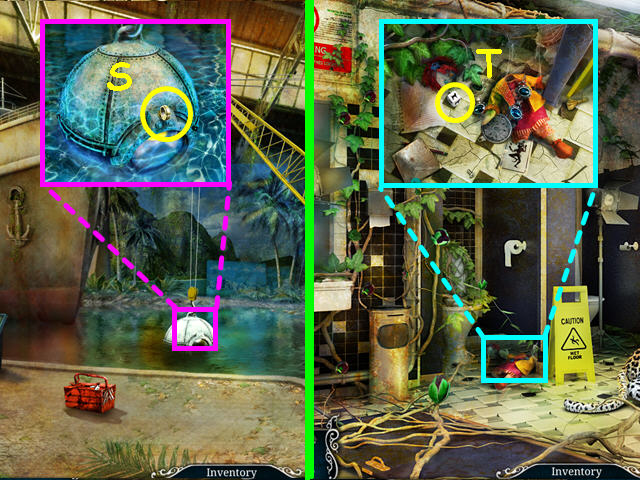
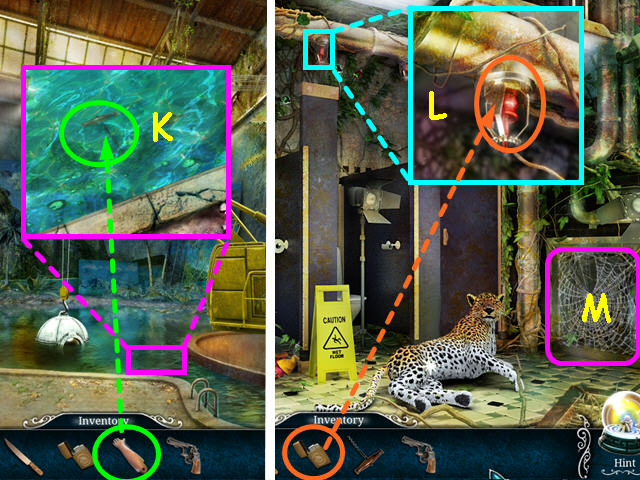
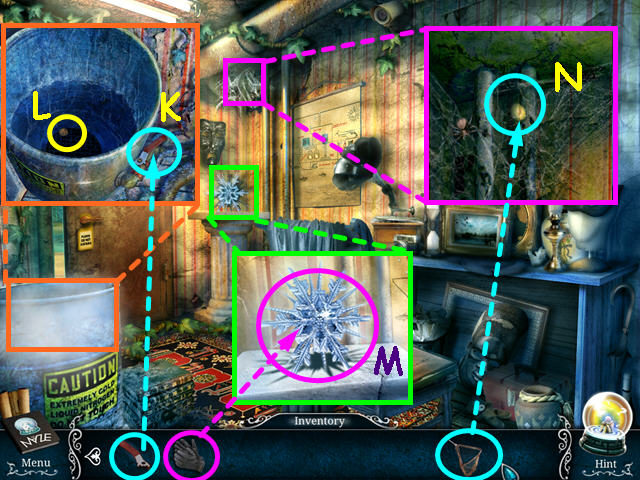
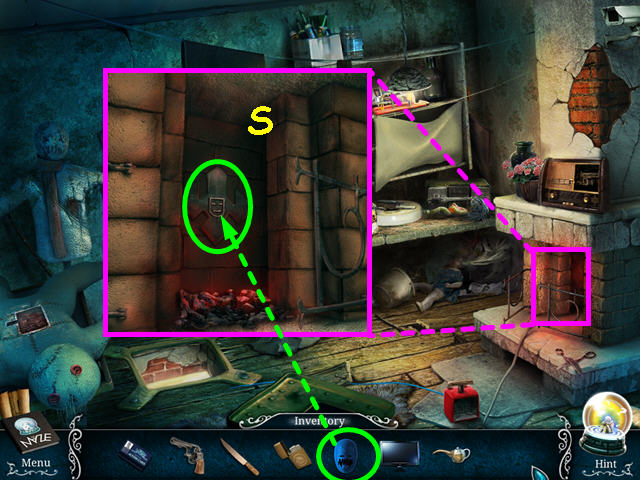
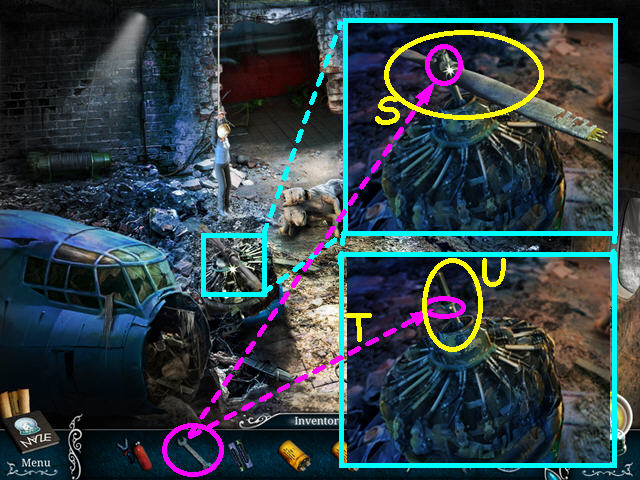
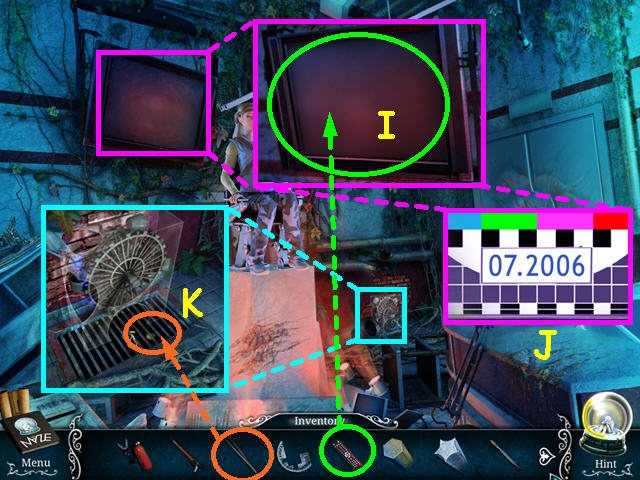
- Look at the bathyscaphe and take the RING (S).
- Walk down to the corridor, then enter the bathroom on the right.
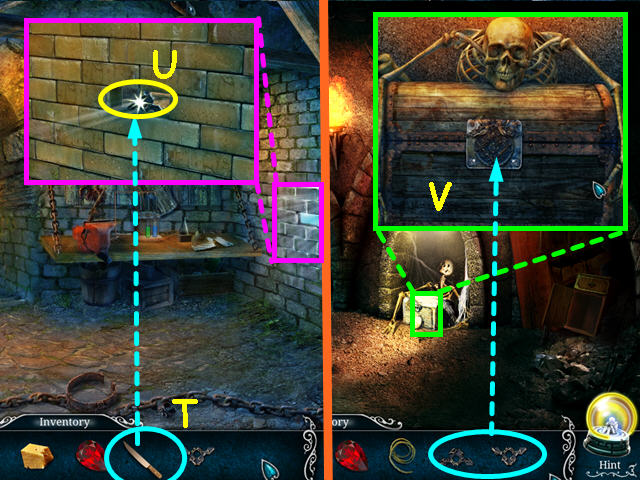
- Look at the floor in the left stall and take the DIE (T).
- Exit the bathroom, then walk forward to reception.
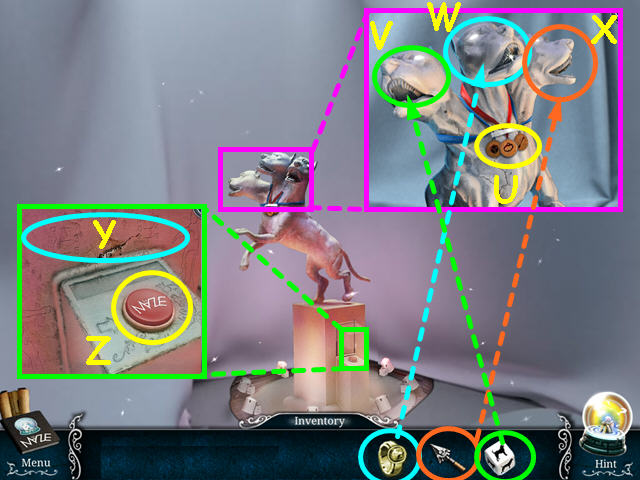
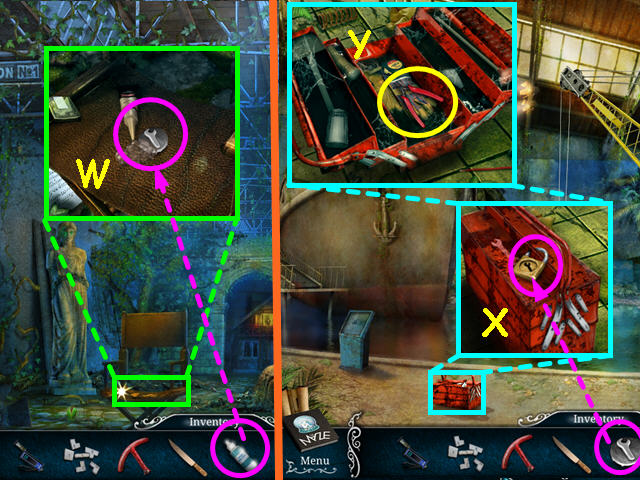
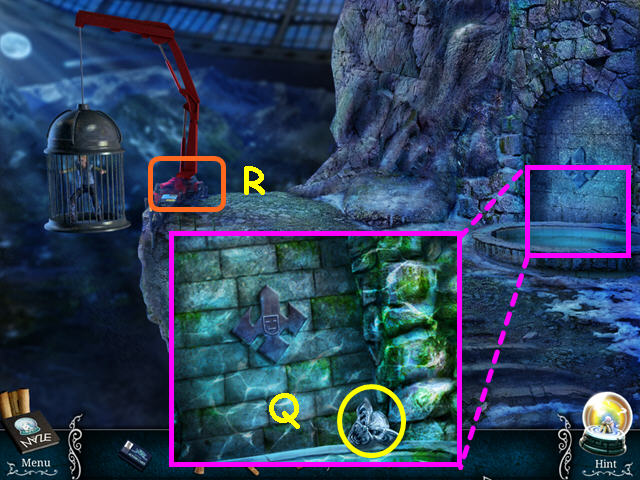
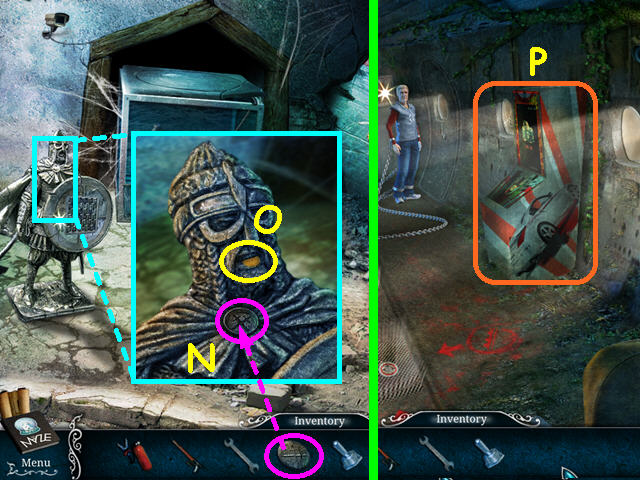
- Look at the 3-headed dog and read the collar tags (U).
- Place the DIE in the mouth of the left head (V).
- Place the RING in the mouth of the center head (W).
- Place the ARROW in the mouth of the right head (X).
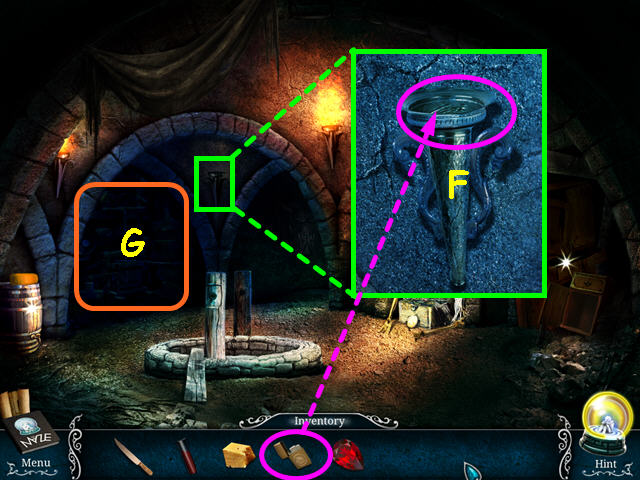
- Look at the side of the pedestal and note the code; it will record in your diary automatically (Y).
- Press the red button (Z).
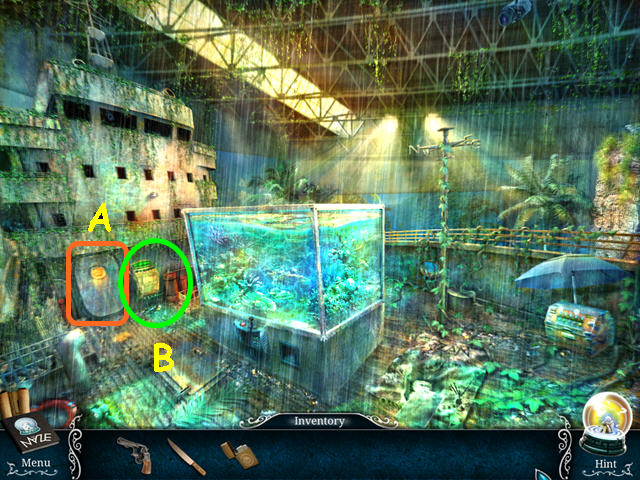
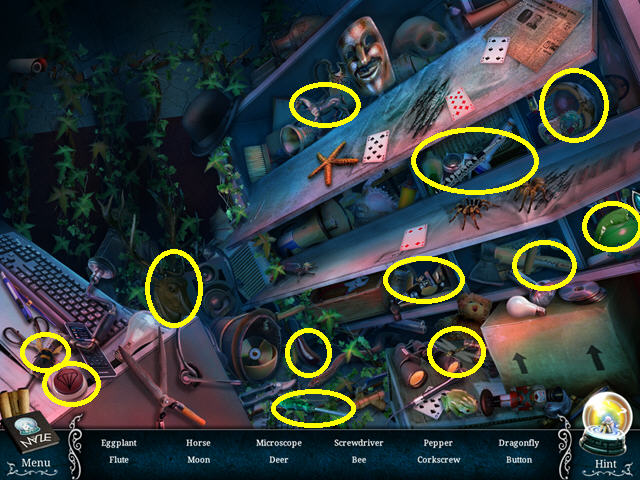
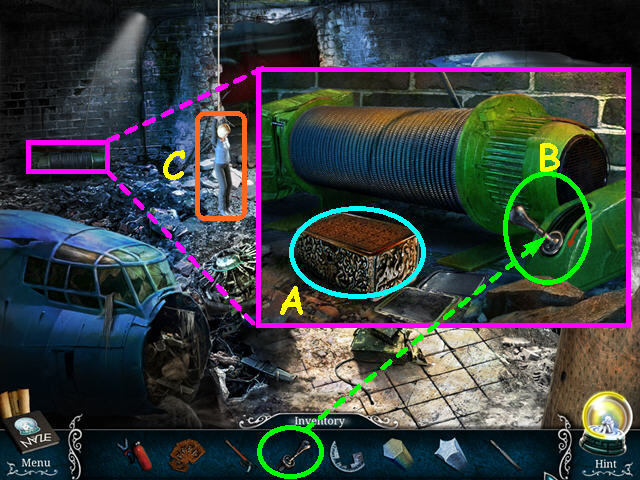
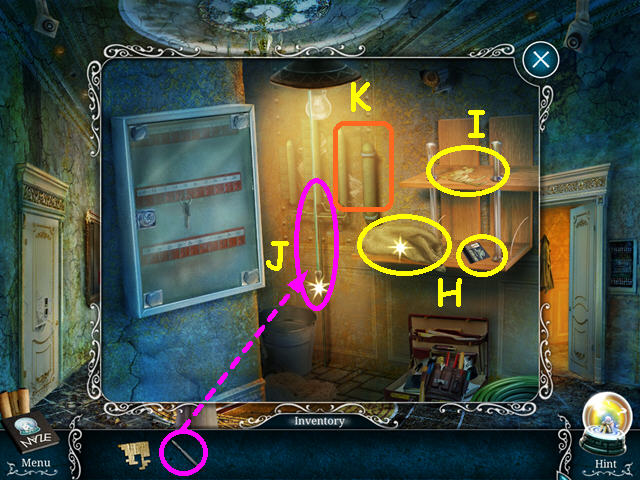
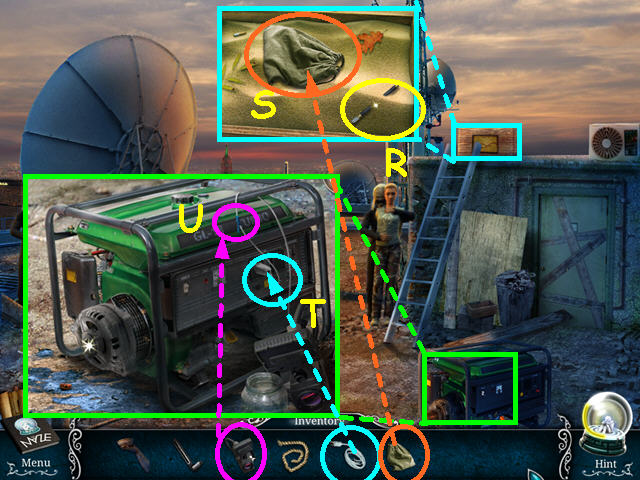
- Look at the desk and take the EMPTY GUN (A).
- Look at the water cooler and take the 1/3 PART OF VALVE (B).
- Enter the lift (C).
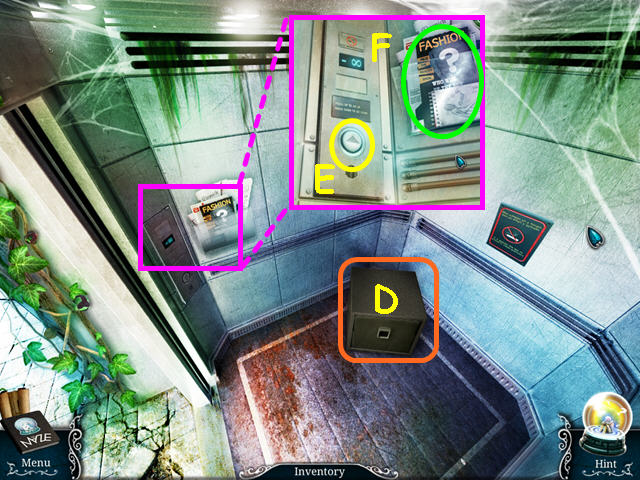
- Note the safe is missing some buttons (D).
- Look at the controls and take the LIFT BUTTON (E).
- Read the magazine note (F).
- Exit the lift and walk down twice to return to pavilion 1.
- Walk forward to the house.
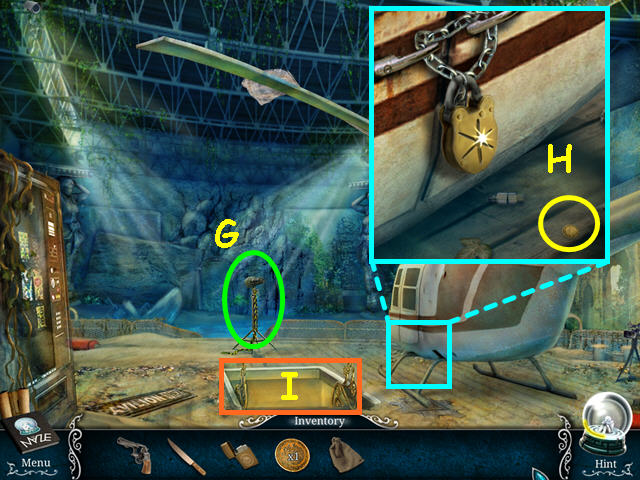
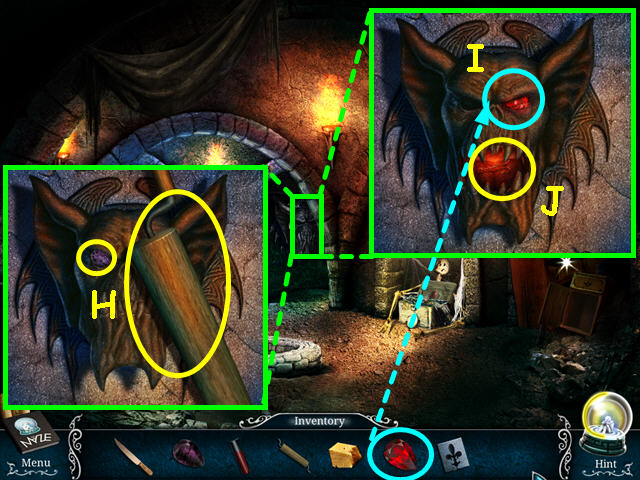
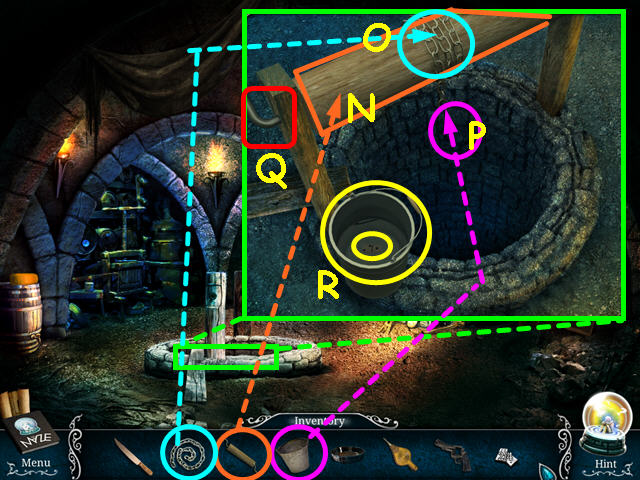
- Look at the mechanical arm and take the FLOAT (G).
- Look at the front door and take the STETHOSCOPE (H).
- Try to open the front door.
- Look at the lift and place the LIFT BUTTON in the control (I).
- Read the clipping (J).
- Press the 'up' button on the control.
- Walk forward to enter the room.
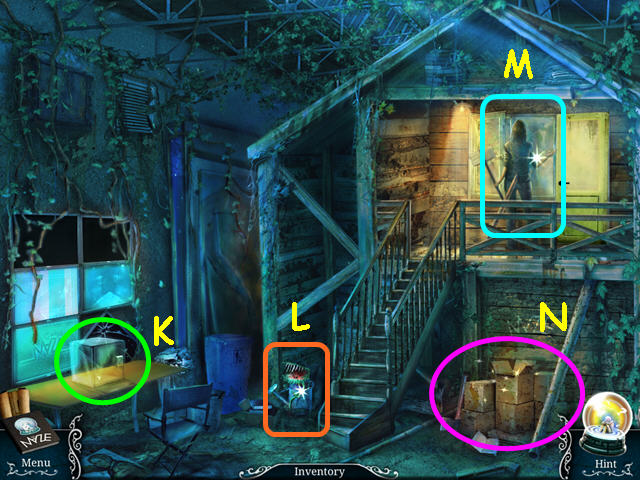
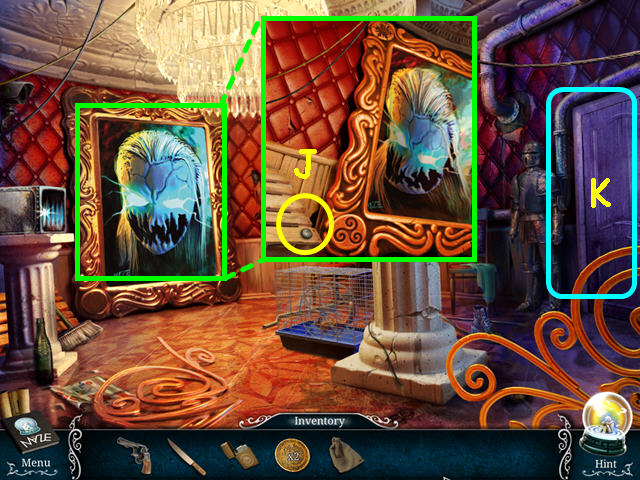
- Note the safe on the table (K).
- Note the carnivorous plant (L).
- Note the dummy in the window (M).
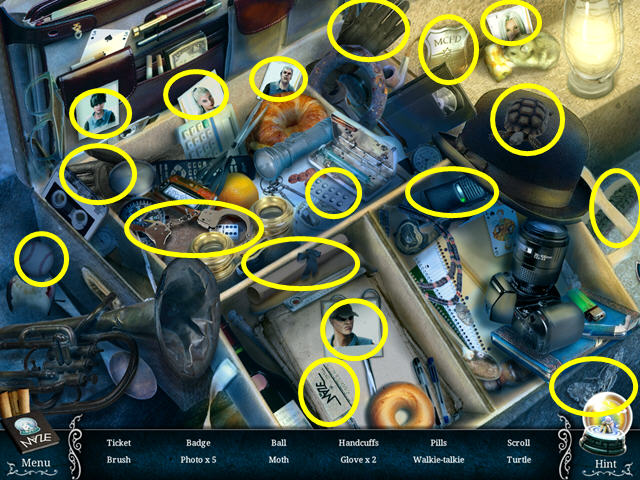
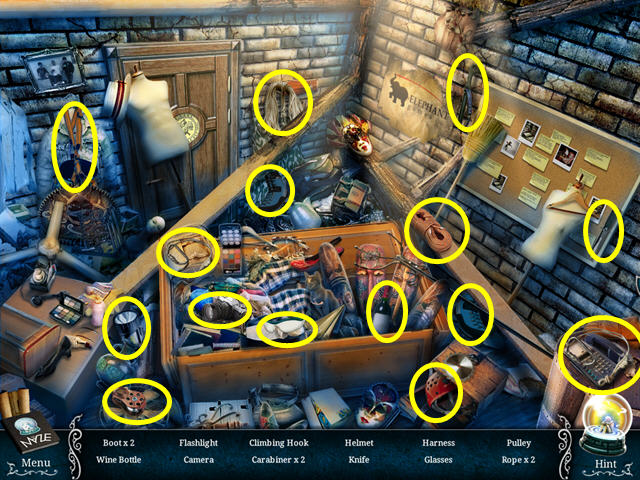
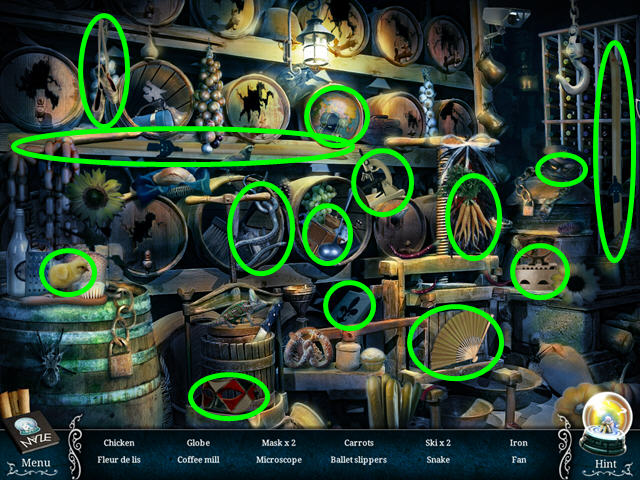
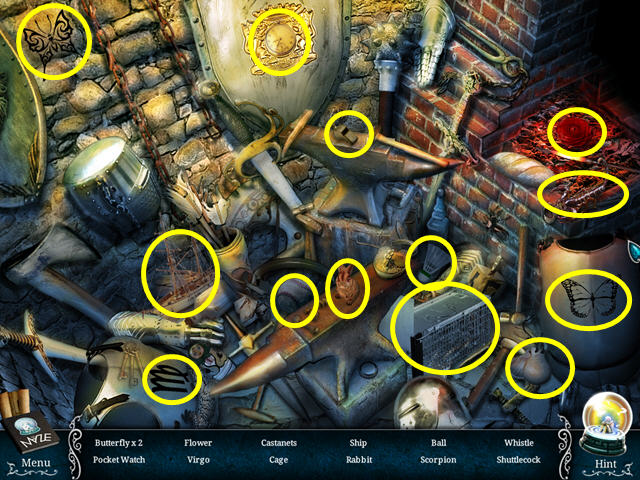
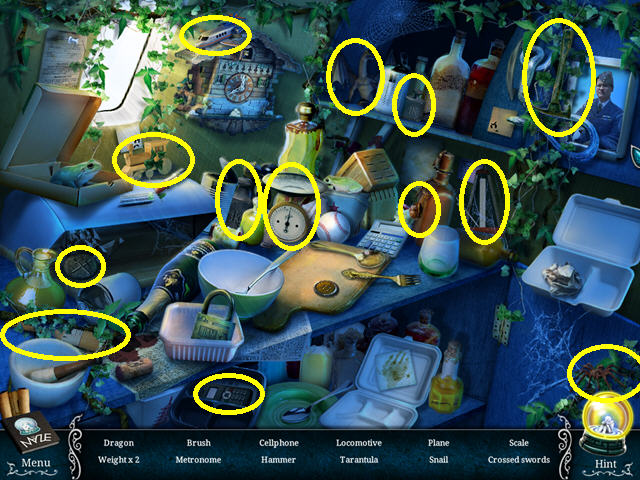
- Select the boxes area for a HOS (N).
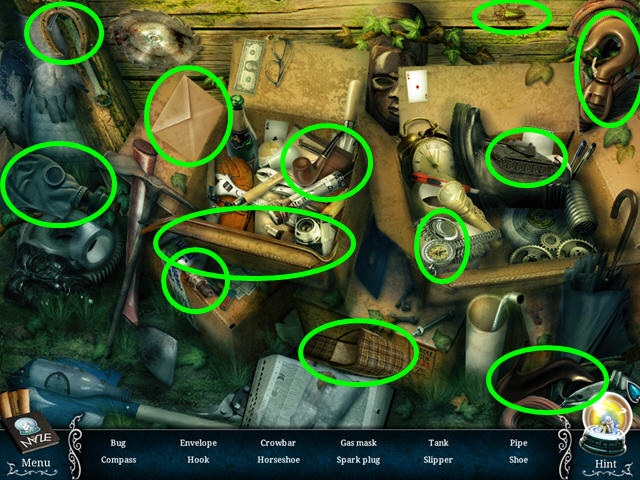
- Locate all the items on the list.
- You will earn the CROWBAR.
- Walk forward to exit the house, then press the down button in the lift.
- Walk down twice, then go left into the corridor and enter reception.
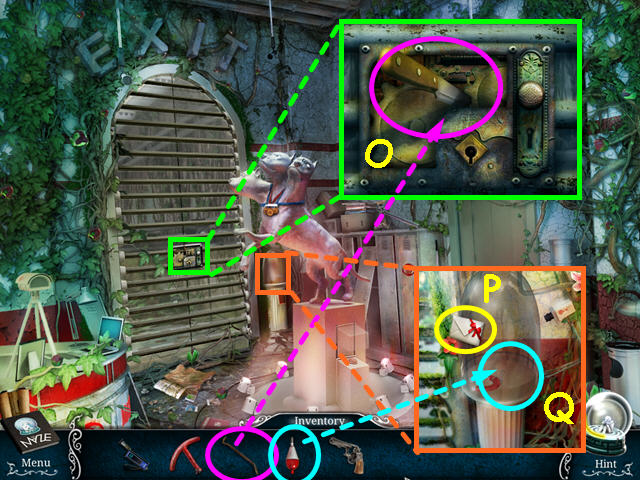
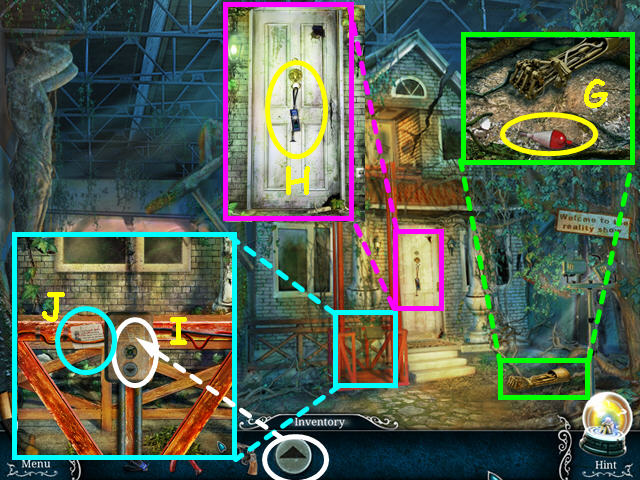
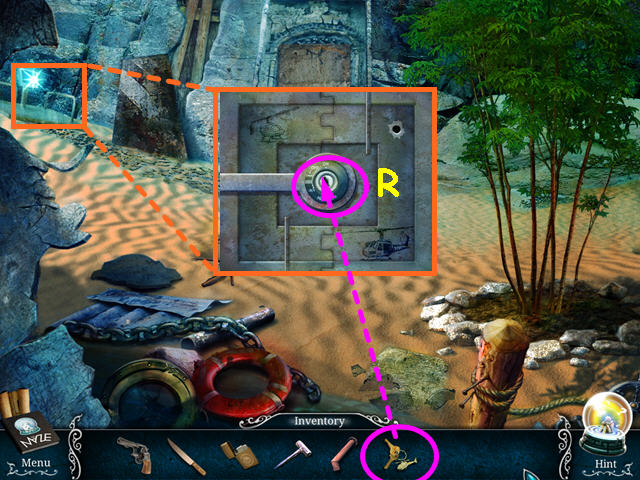
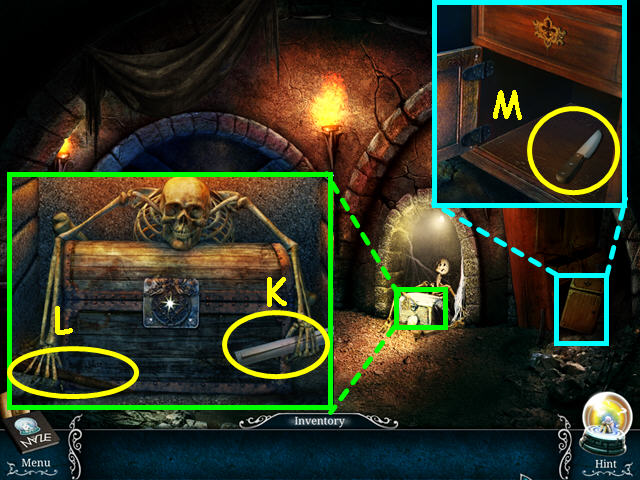
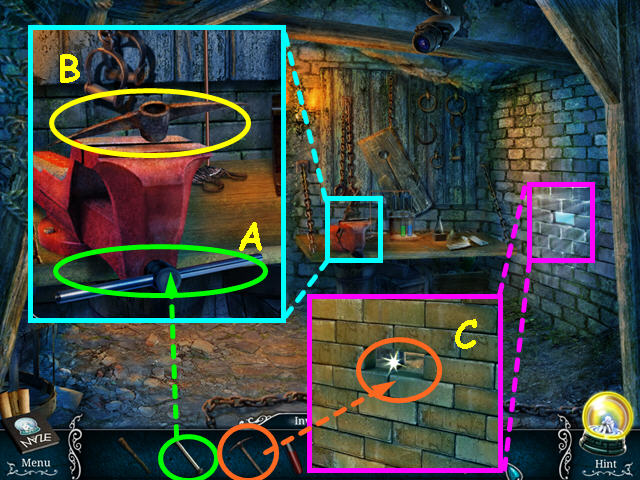
- Look at the lock on the gate and use the CROWBAR to take the KNIFE (O).
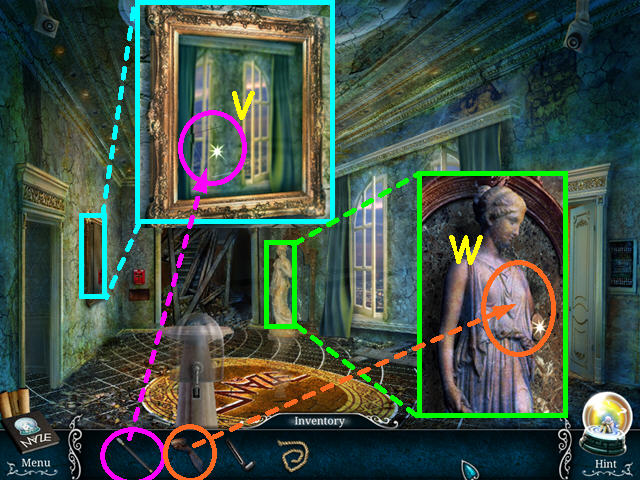
- Look at the glass dome and take the note (P).
- Use the FLOAT on the magnet (Q).
- Return to the front of the house.
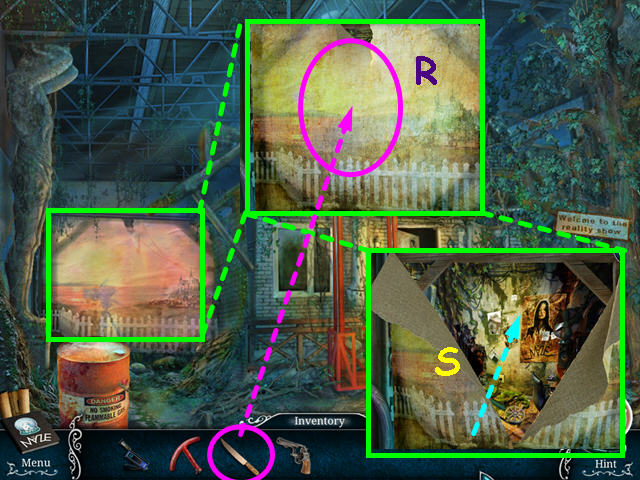
- Look at the painted backdrop; use the KNIFE to cut it open (R).
- Walk forward through the backdrop (S).

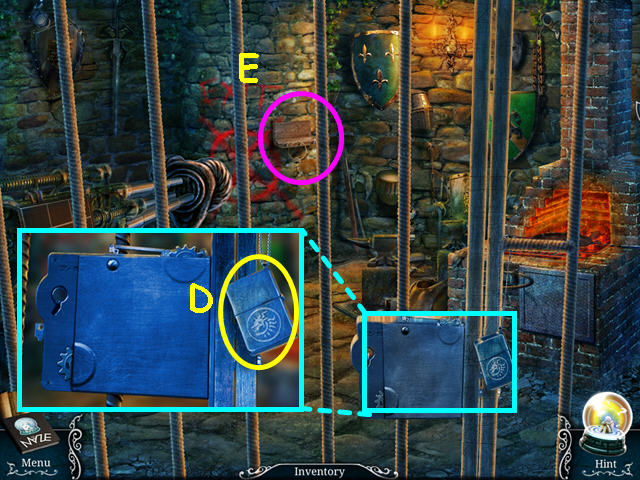
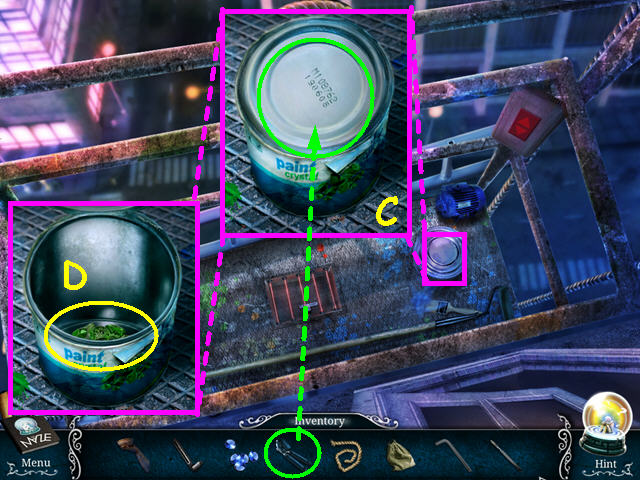
- Look at the corner by the plug and take the BUTTONS (T).
- Read the note for a code (U).
- Look at the bin and take the SOLVENT (V).
- Walk down twice to pavilion 1.
- Look at the chair and use the SOLVENT to retrieve the key (W).
- Walk left, then go left to pavilion 2.
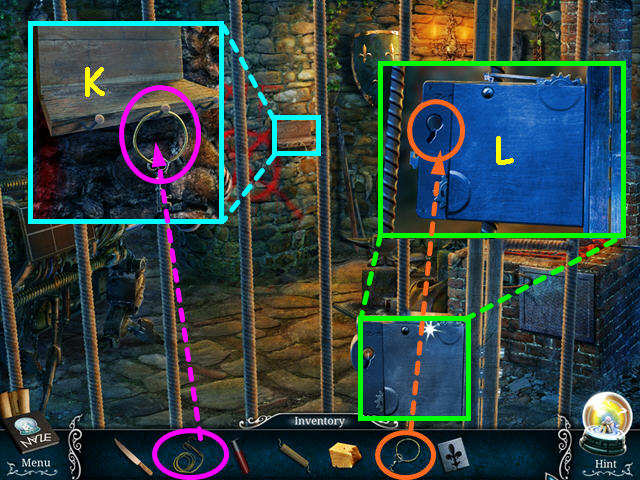
- Look at the toolbox and use the KEY to unlock it (X).
- Take the CLIPPERS (Y).
- Exit pavilion 2, enter reception and walk to the lift.
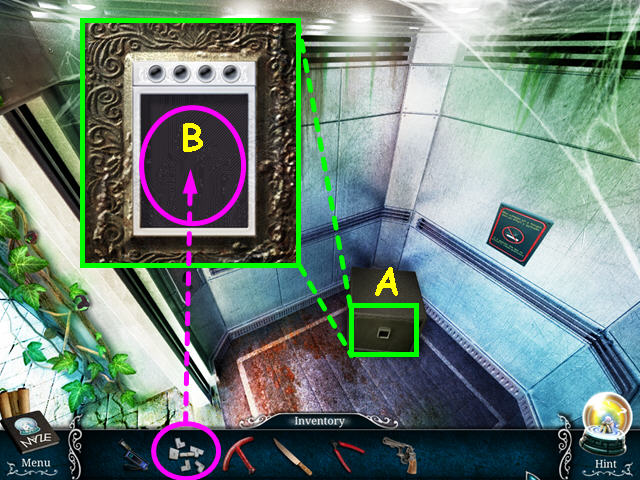
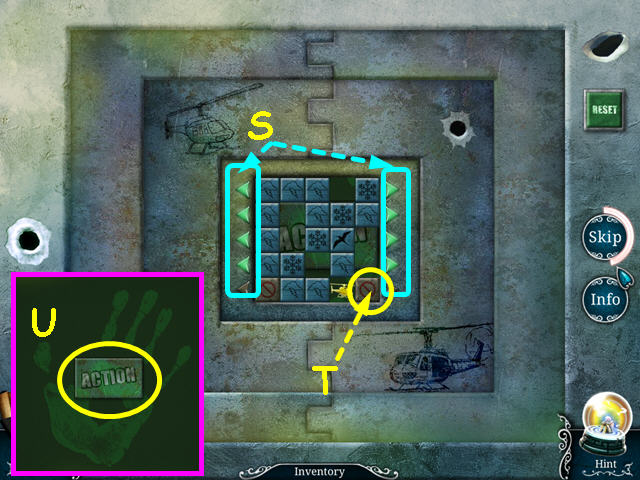
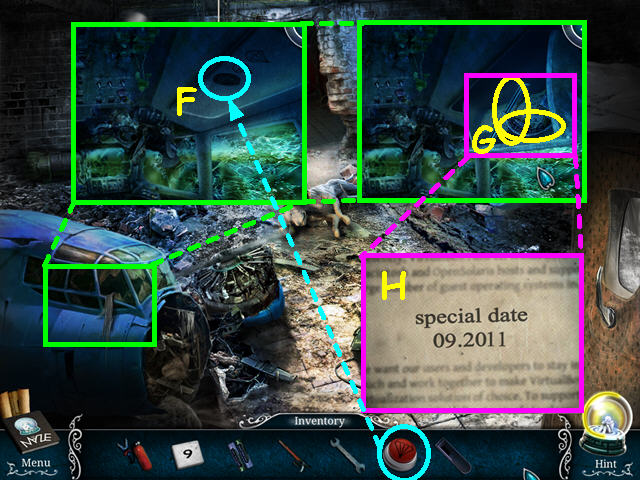
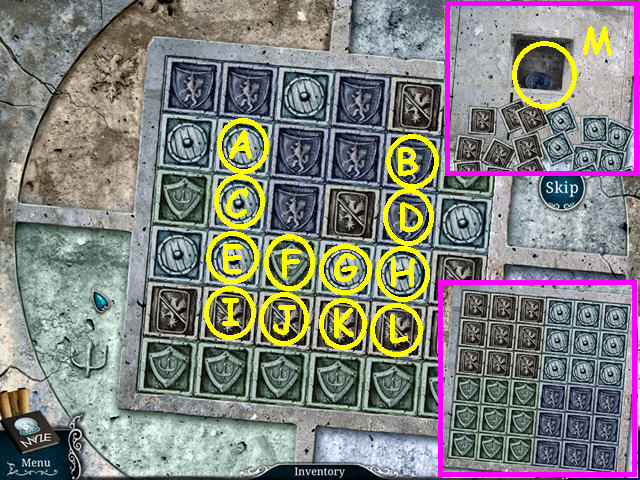
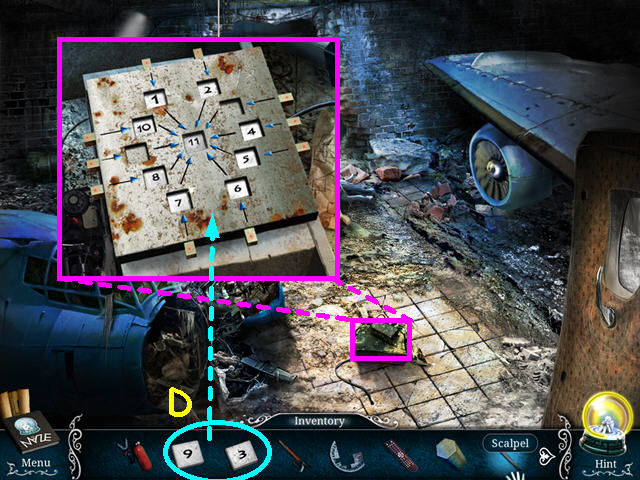
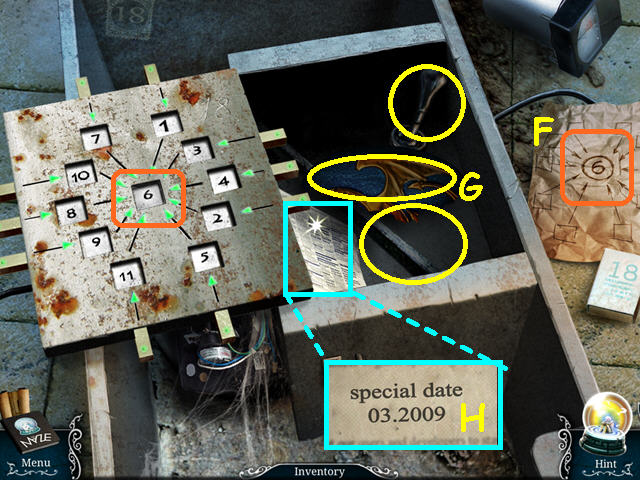
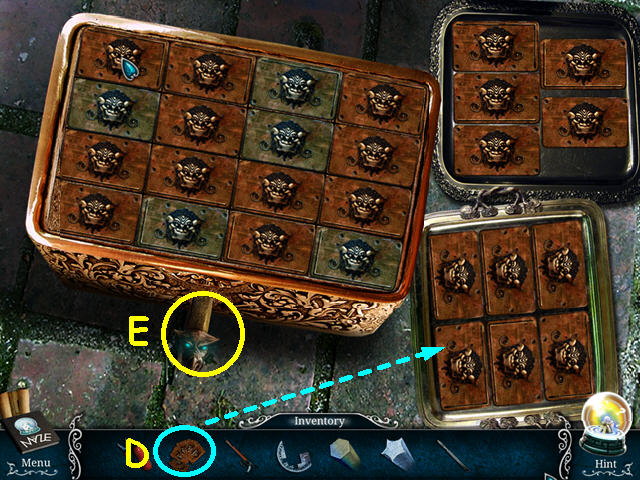
- Look at the safe on the floor (A).
- Use the BUTTONS on the control to trigger a mini-game (B).
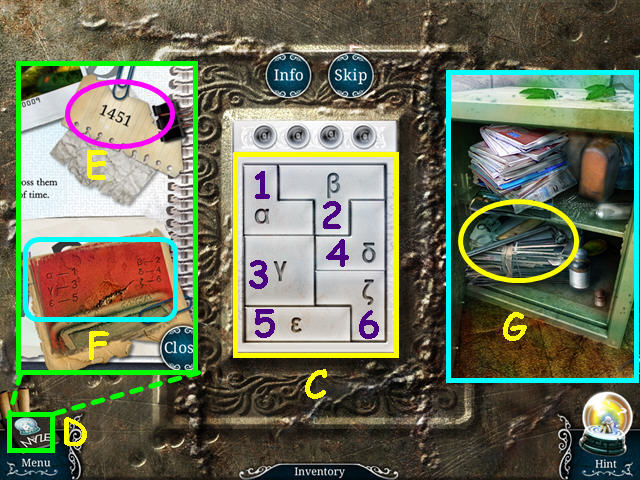
- You must first fit the buttons into the rectangular area (C).
- Refer to your diary for the 2 clues to entering the code (D).
- Note – this code is randomly generated - you must use the numbers from the note in the secret room when you found the buttons (E).
- The other clue was found scratched around the button on the 3-headed dog (F).
- Press the symbols that match the numbers in the code.
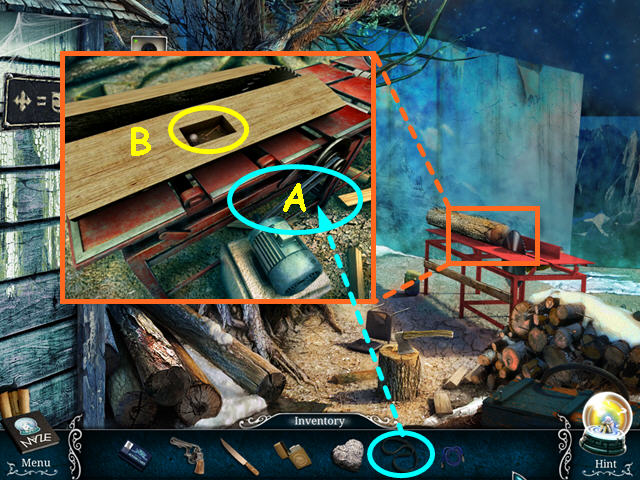
- Take the RATCHET TOOL from inside the safe (G).
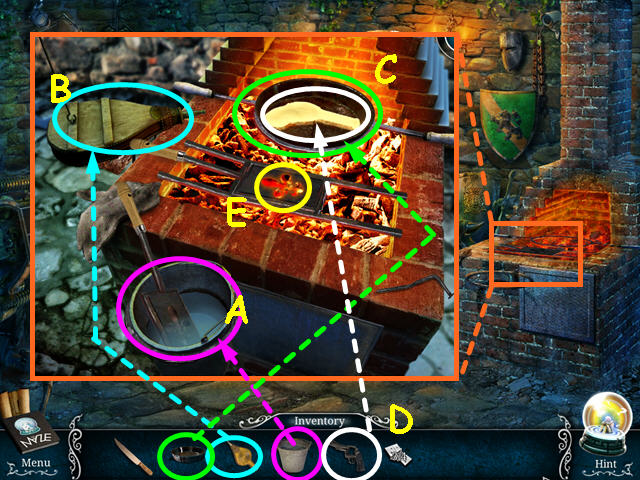
- Return to the front of the house.
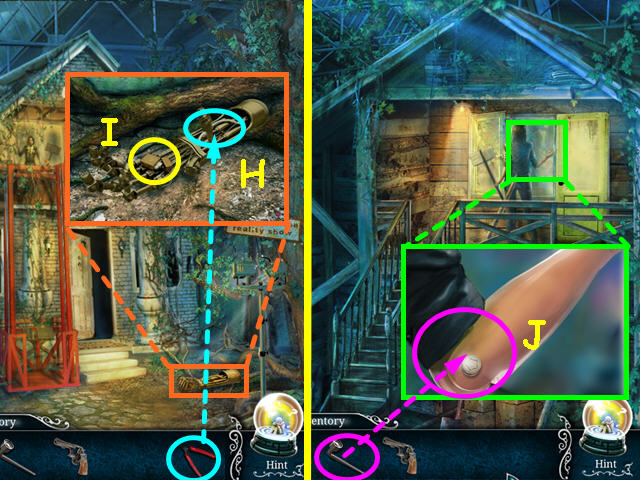
- Look at the mechanical are and use the CLIPPERS on the wires (H).
- Take the LIGHTER (I).
- Take the lift up and enter the house.
- Look at the dummy and use the RATCHET TOOL to remove the ARM (J).
- Return to pavilion 2.
- Look in the pool and use the ARM to collect the CORKSCREW (K).
- Return to the bathroom.
- Look at the sprinklers and use the LIGHTER to start them (L).
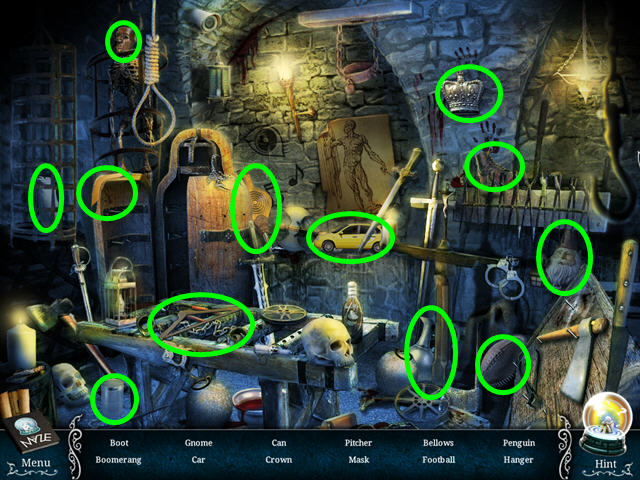
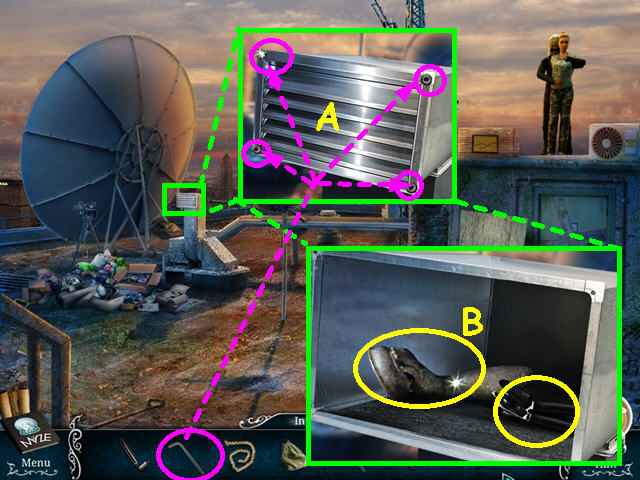
- Once the big cat leaves, select the large vent for a HOS (M).
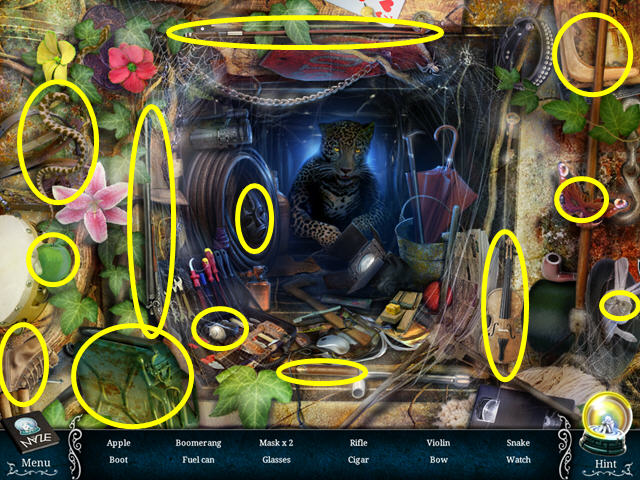
- Locate all the items on the list.
- You will earn the EMPTY FUEL CAN.
- Exit the bathroom and return to the front of the house.
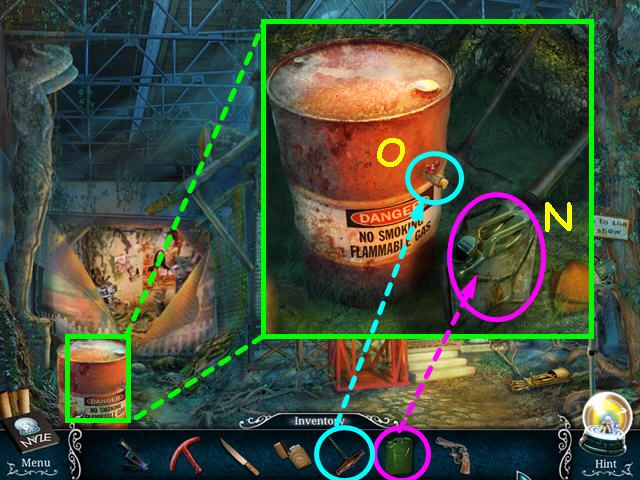
- Look at the fuel barrel and place the EMPTY FUEL CAN next to it (N).
- Use the CORKSCREW on the tap to remove the cork, then click on the tap (O).
- Take the FILLED FUEL CAN.
- Return to pavilion 2.
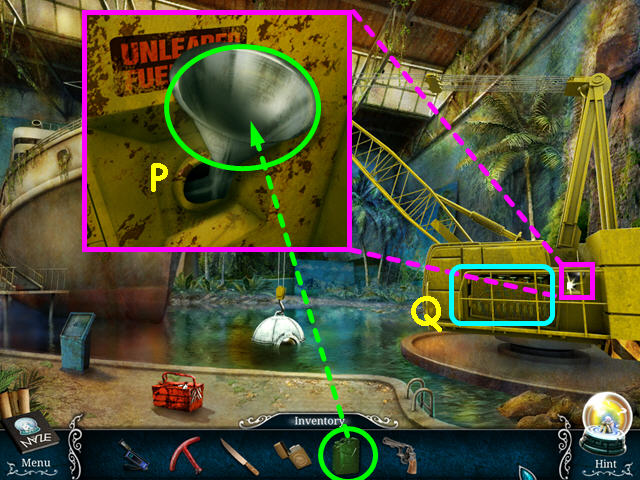
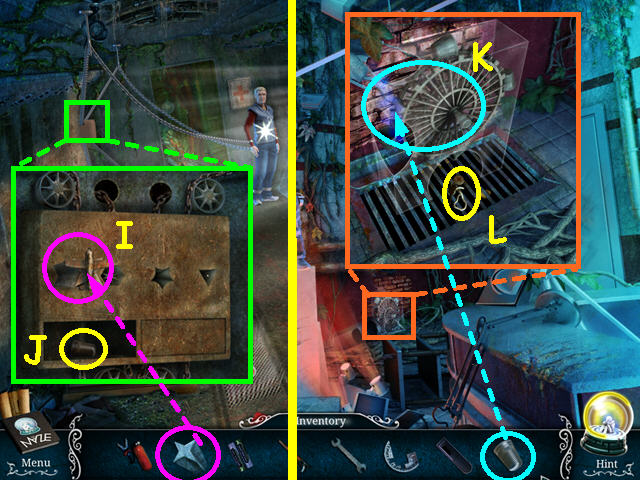
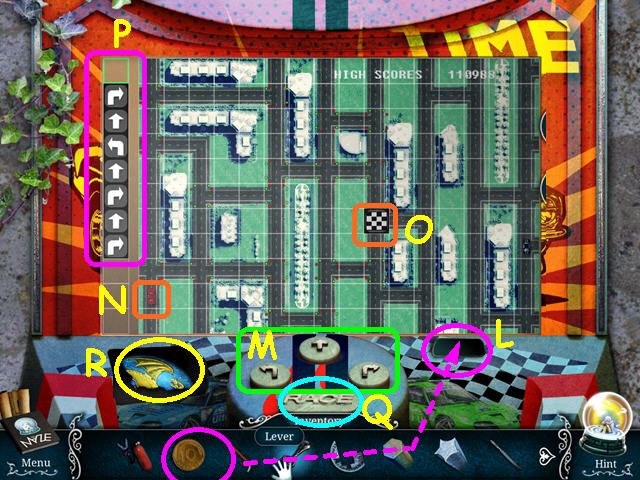
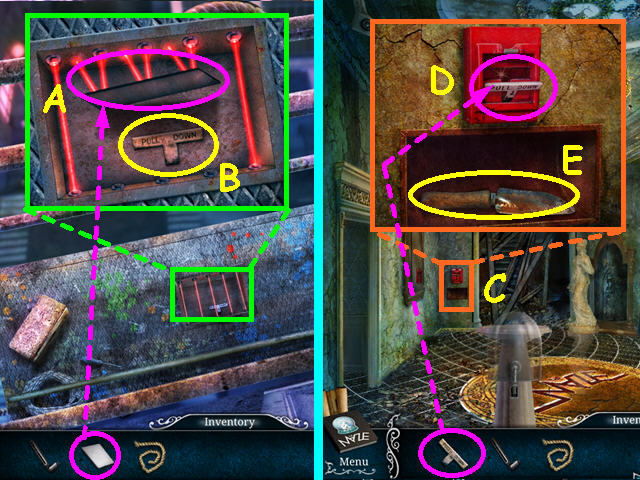
- Look at the crane and use the FULL CANISTER on the funnel (P).
- Select the crane control for a mini-game (Q).
- Follow the hoses from the top to find the correct order of the levers (R).
- Pull the levers down in numerical order (1-6).
- Should you pull down the wrong lever, all other levers will turn off and you must start over.
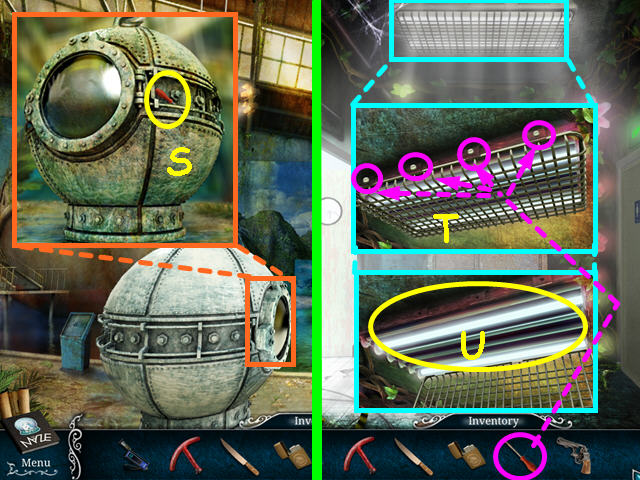
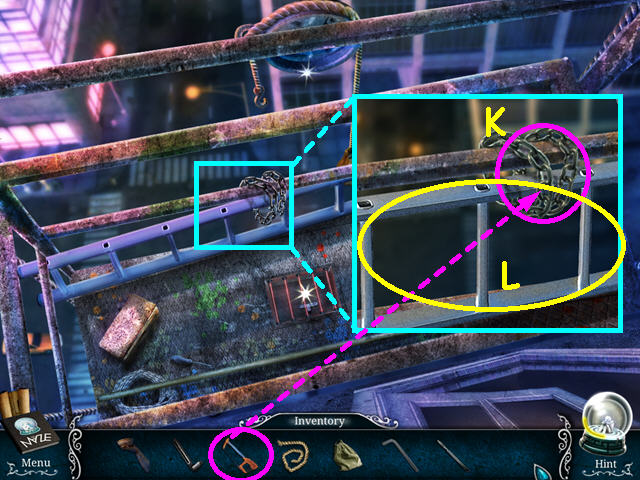
- Look at the bathyscaphe and take the SCREWDRIVER (S).
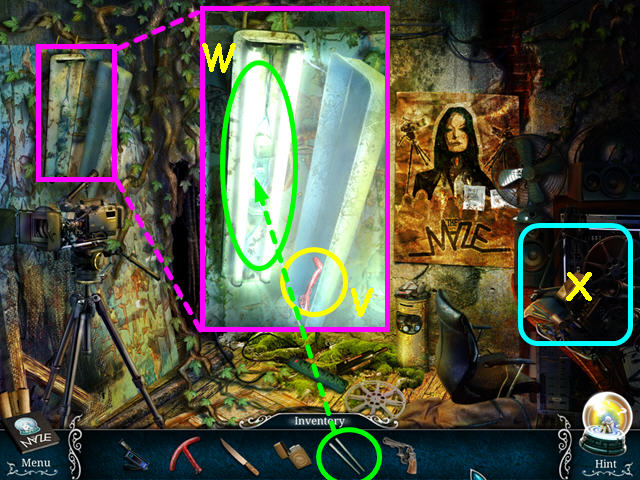
- Exit to the corridor and look at the ceiling light.
- Use the SCREWDRIVER to remove the 4 screws (T).
- Take the FLUORESCENT BULBS (U).
- Return to the secret room.
- Look at the broken light fixture and take the 2/3 PART OF VALVE (V).
- Place the FLUORESCENT BULBS into the fixture (W).
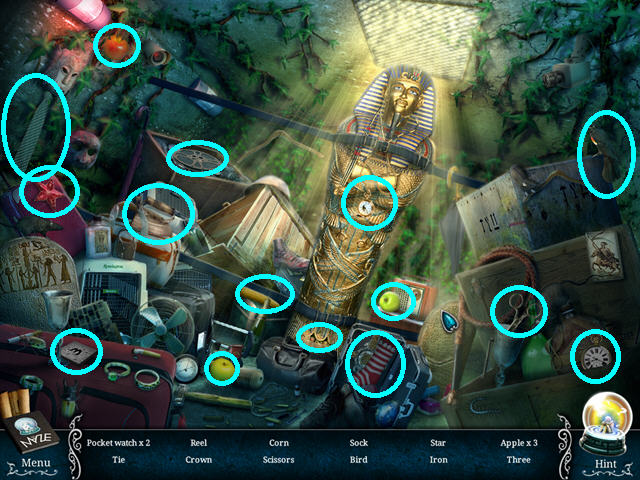
- Select the desk for a HOS (X).
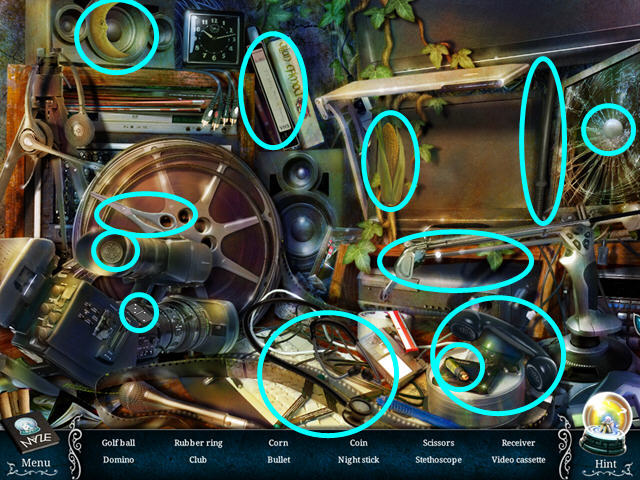
- Locate all the items on the list.
- You will earn the BULLET, which will automatically combine with the EMPTY GUN to make the LOADED GUN.
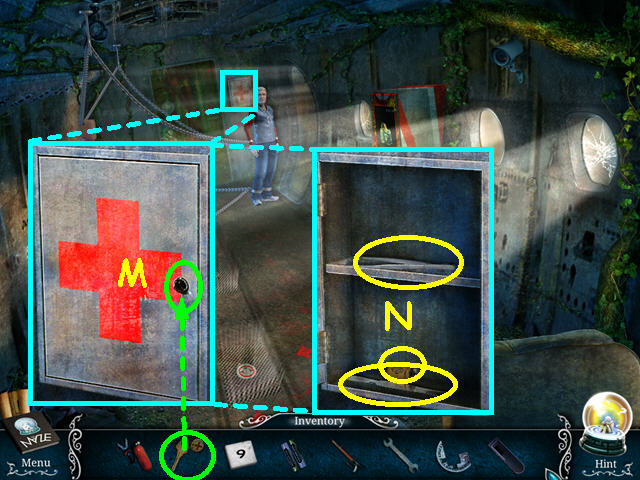
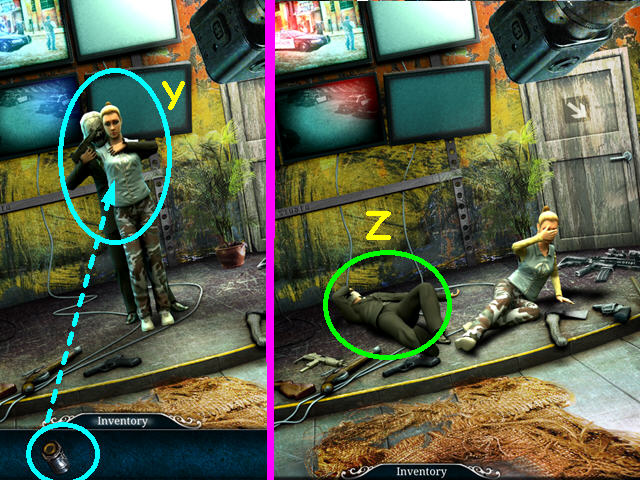
- Travel to the bathroom.
- Look at the stall door and use the LOADED GUN to blast the door open (A).
- Look inside the stall and take the PLANT KILLER (B).
- Return to the house, take the lift up and enter the room.
- Look at the plant and use the PLANT KILLER on the plant (C).
- Take the EMPTY WATERING CAN (D).
- Exit and return to pavilion 2.
- Look at the pool and use the EMPTY WATERING CAN on the water to get the FULL WATERING CAN (E).
- Travel to reception.
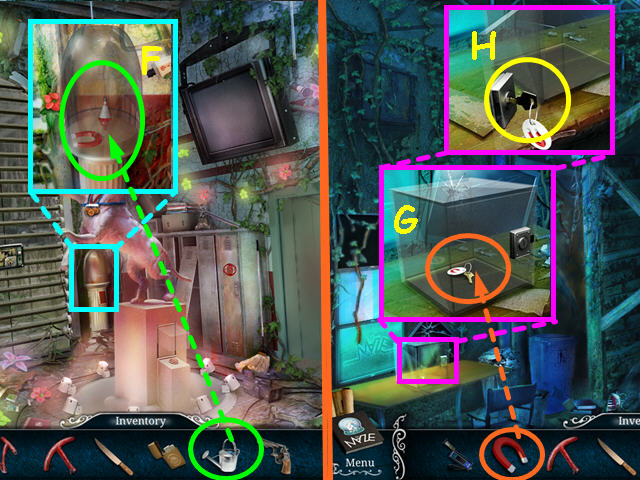
- Look at the glass dome and use the FULL WATERING CAN to fill it (F).
- You will receive the MAGNET.
- Return to the room with the dummy.
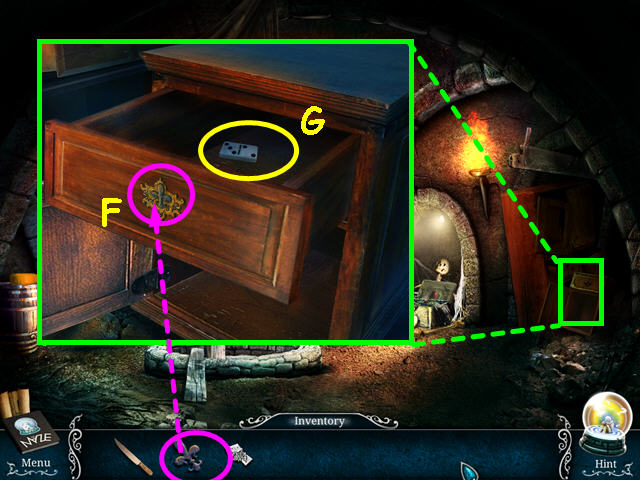
- Look at the safe and use the MAGNET to unlock the safe (G).
- Take the KEY (H).
- Travel to reception.
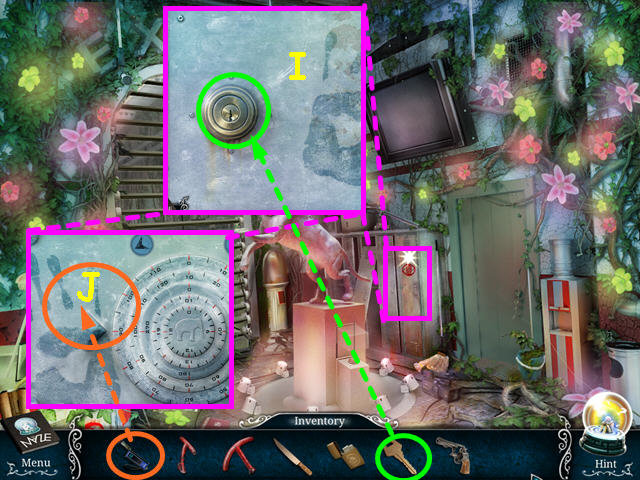
- Look at the locker and use the KEY on the lock (I).
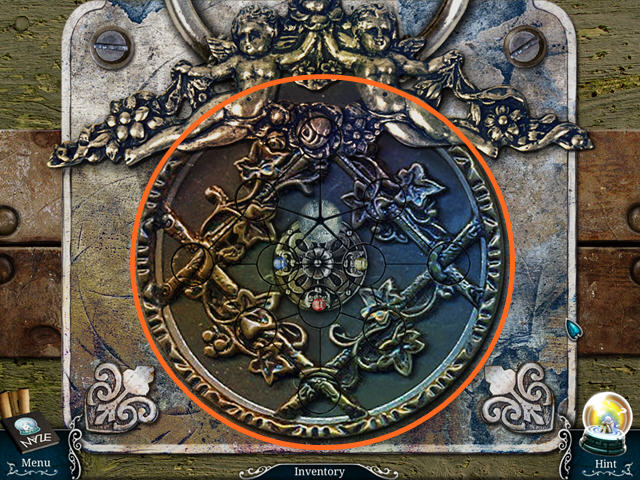
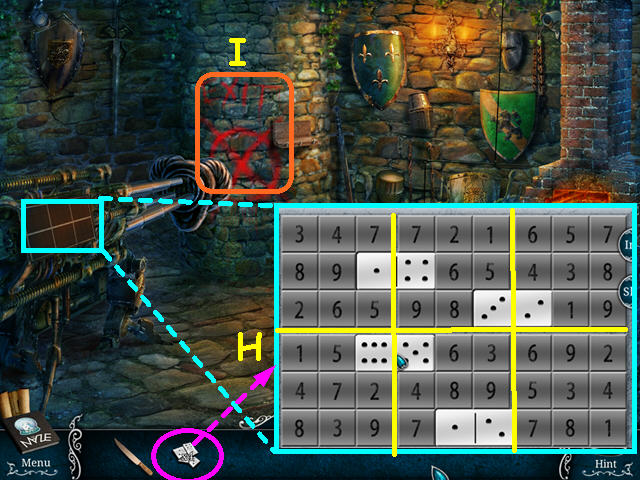
- Use the STETHOSCOPE near the safe dial to trigger a mini-game (J).
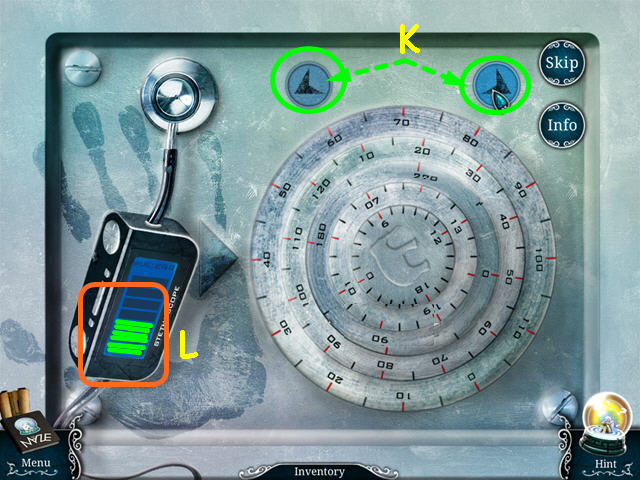
- Click on one of the rings in the dial, then use the right or left arrows (K) to rotate until the stethoscope flashes green (L) or you hear a louder click.
- You must do this for each of the 5 dials.
- This mini-game is randomized – your solution may vary.
- Select the locker for a HOS.
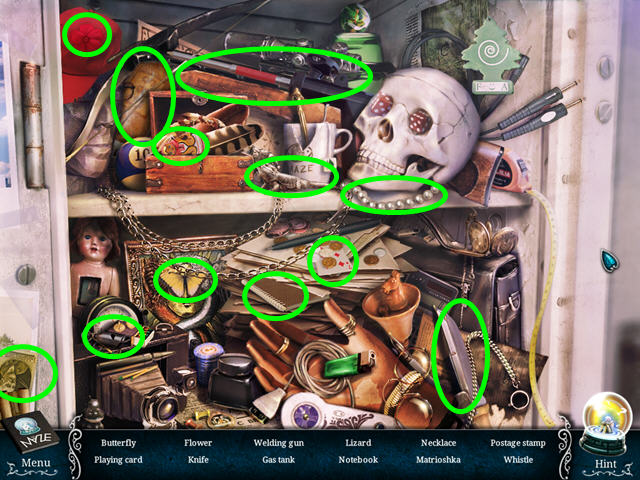
- Locate all the items on the list.
- You will earn the WELDING GUN.
- Walk to pavilion 2.
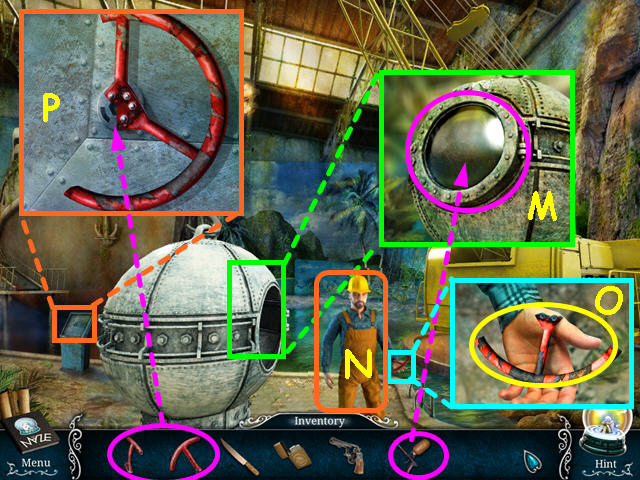
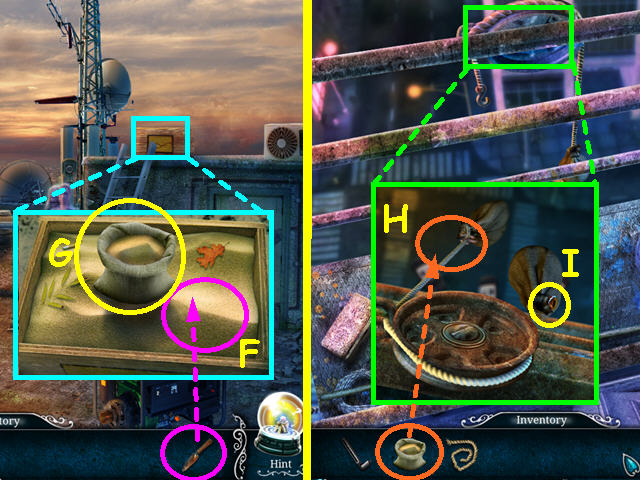
- Look at the bathyscaphe and use the WELDING GUN on the hatch (M).
- Talk to Jim (N).
- Look at Jim's hand and take the 3/3 PART of VALVE (O).
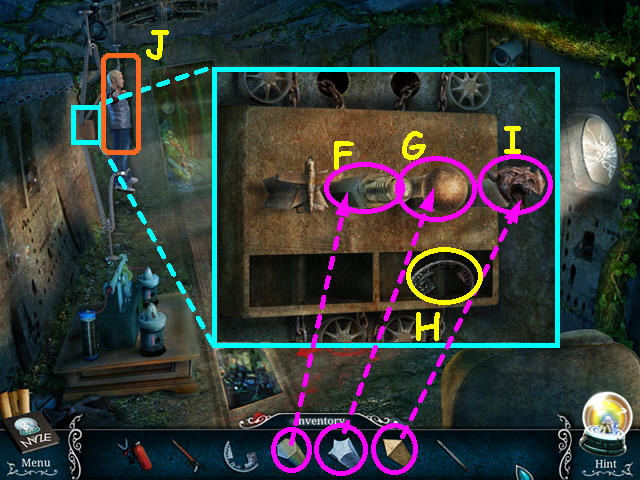
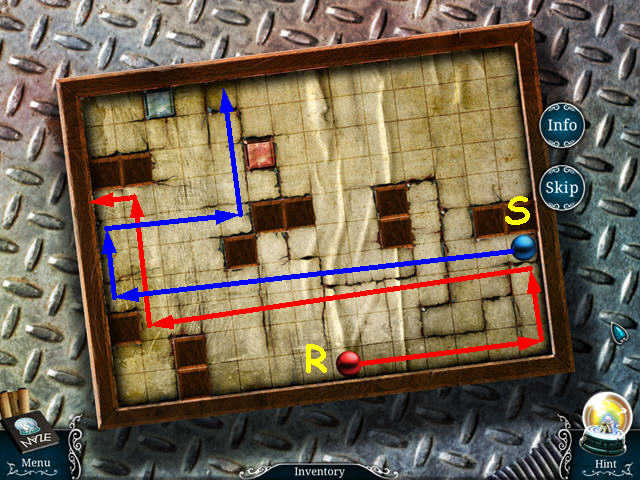
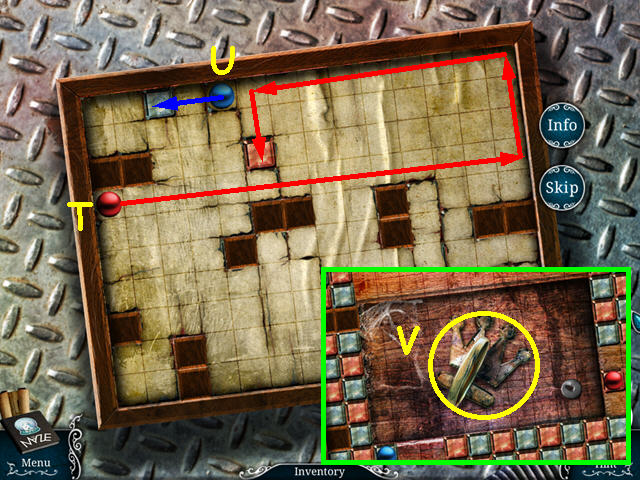
- Look at the bridge control panel and place the 3 PART of VALVES into the notch for a mini-game (P).
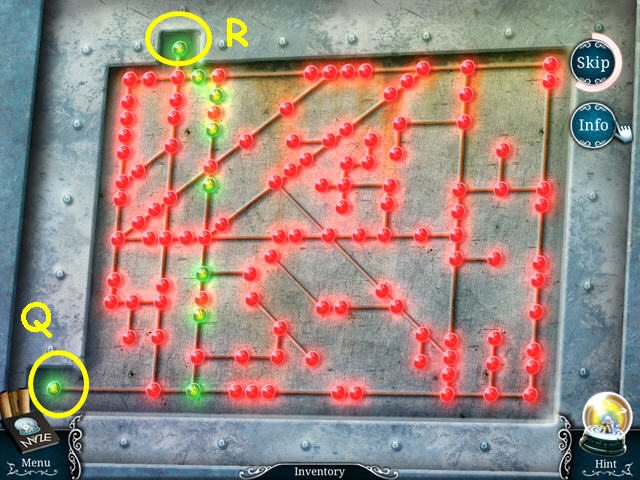
- Light a path from the start (Q) to the finish (R).
- You must click on every other light.
- There are numerous solutions for this mini-game; the screenshot shows on possibility.
Level 2: The Ship
- Note the door to the makeup room (A).
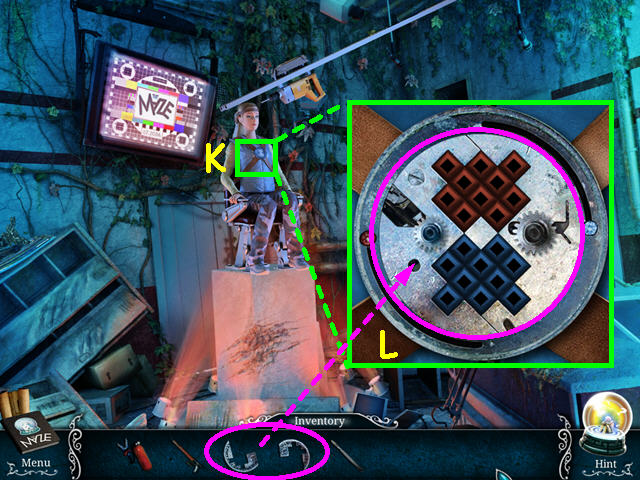
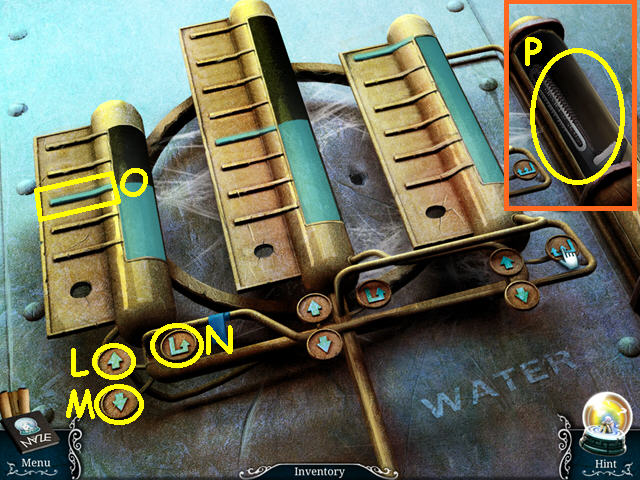
- Select the weather machine for a mini-game (B).
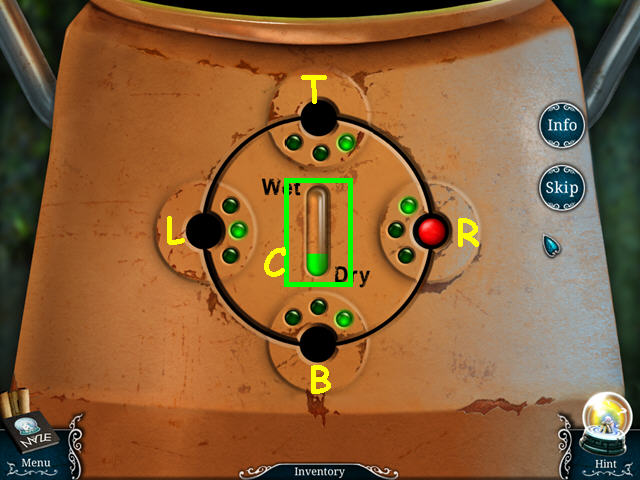
- Move the ball to change the lights so the center gauge is empty (C).
- Click on an adjacent location to move the red ball to that position.
- The lights at each location either fill, do nothing, or empty the gauge.
- Move the ball around the 4 positions so the lights match the positions shown in the screenshot.
- Our solution was: R-T-R-B-L-B-L-T-L-T.
- Enter the makeup room.
- Note the door to the helicopter deck (D).
- Look at the pedestal in the corner and take the 1/3 COIN (E).
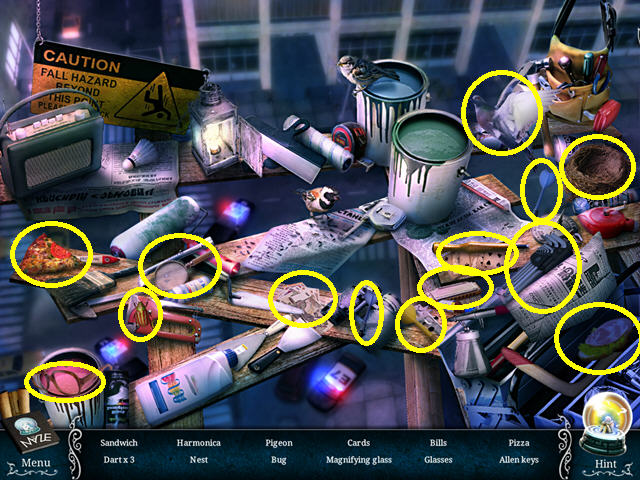
- Look at the table for a HOS (F).
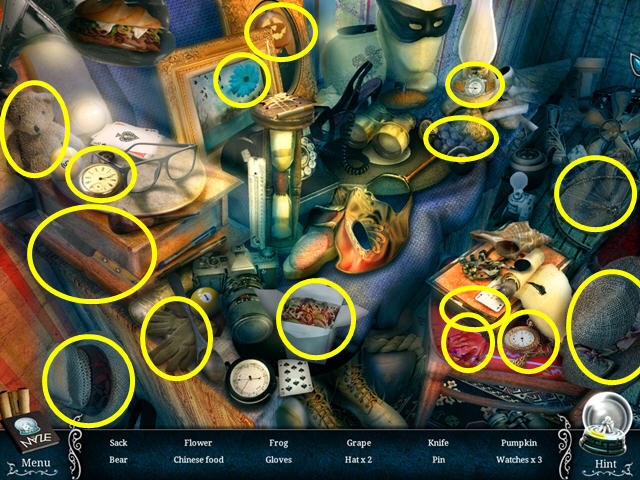
- Locate all the items on the list.
- You will earn the SACK.
- Walk to the helicopter deck.
- Look at the spyglass (G).
- Look at the helicopter and take the 2/3 COIN (H).
- Enter the hatch to the main hall (I).
- Look at the portrait and take the 3/3 COIN (J).
- Note the door to the boiler room (K).
- Walk down to return to the helicopter deck.
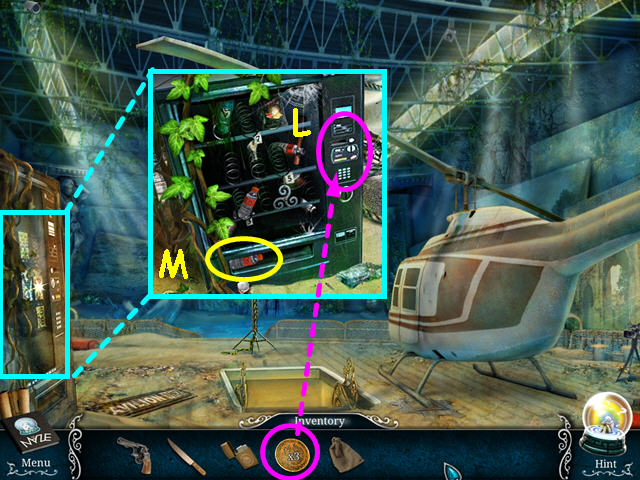
- Look at the vending machine and use the 3 COINS on the slot (L).
- Take the BOTTLE of WATER (M).
- Enter the hatch to the main hall, then walk to the boiler room.
- Look at the upper hatch and take the TONGS (N).
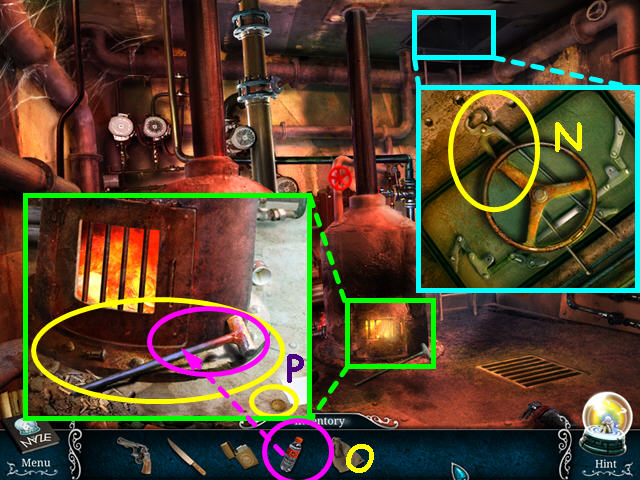
- Look at the small oven and use the BOTTLE of WATER on the HAMMER (O).
- Take the cooled HAMMER and the 1/5 COIN (P).
- Return to the main hall.
- Look at the metal box and use the TONGS to take the STRANGE FIGURE star (Q).
- Look at the porthole/window and use the HAMMER 3 times to break the glass (R).
- Place the SACK over the jagged glass (S).
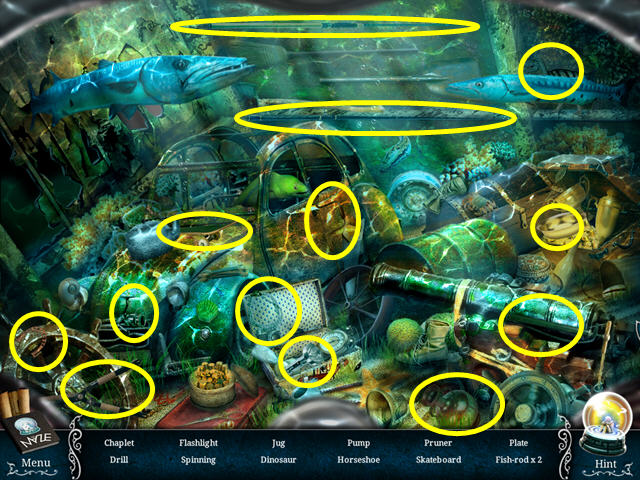
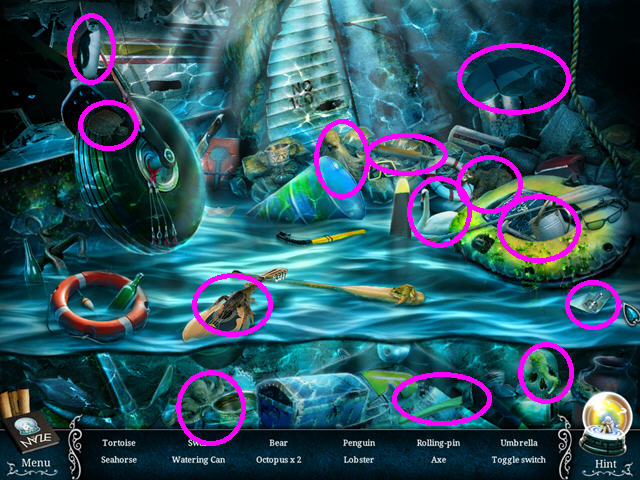
- Select the window for a HOS.
- Locate all the items on the list.
- You will earn the NAIL PULLER.
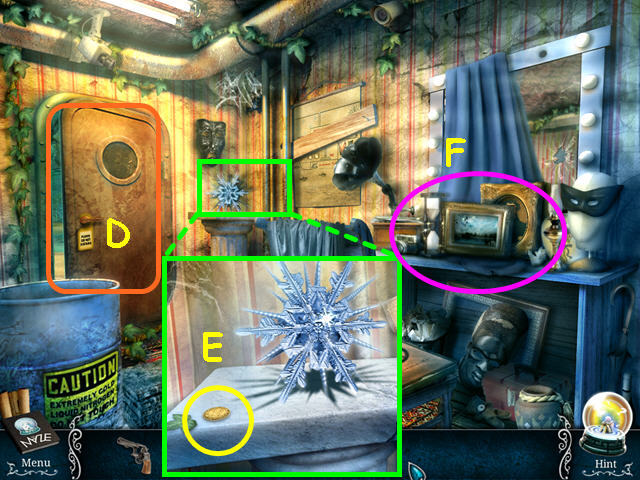
- Travel to the makeup room.
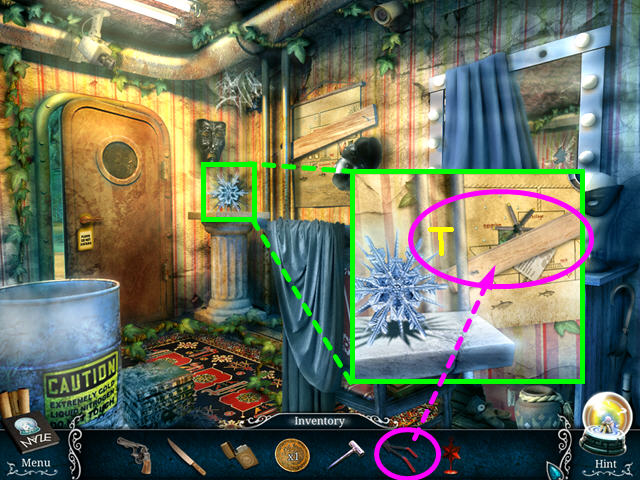
- Look at the snowflake area and use the NAIL PULLER on the board (T).
- You will automatically receive the PROPELLER KEY.
- Travel to the helicopter deck.
- Look at the helicopter door and use the PROPELLER KEY on the lock (U).
- Look inside the helicopter and take the 2/5 COIN and the JOYSTICK (V).
- Return to the front deck.
- Look at the aquarium and place the JOYSTICK into the control (W).
- This will trigger a mini-game.
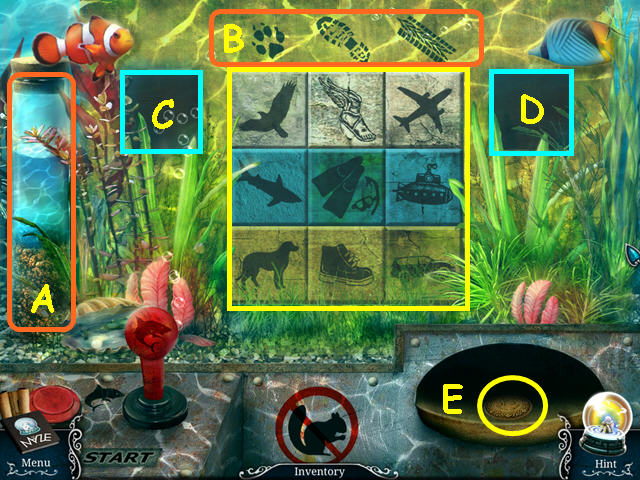
- Move the tiles to the correct position.
- The bottle on the left tells us that the top row should be air-related, the middle will be water-related, and the bottom will be ground-related (A).
- The symbols above the tiles indicate that animals should be in the left column, footwear in the center column, and machines in the right column (B).
- Click on two tiles to move their location.
- The first tile will go into the left box (C), and will return to the first open spot once a second tile is selected.
- The second tile clicked will go to the right box, then will return to the last open spot (D).
- Note that gravity will cause the upper tiles to fall if a lower tile is taken.
- Take the 3/5 COIN from the return (E).
- Return to the boiler room.
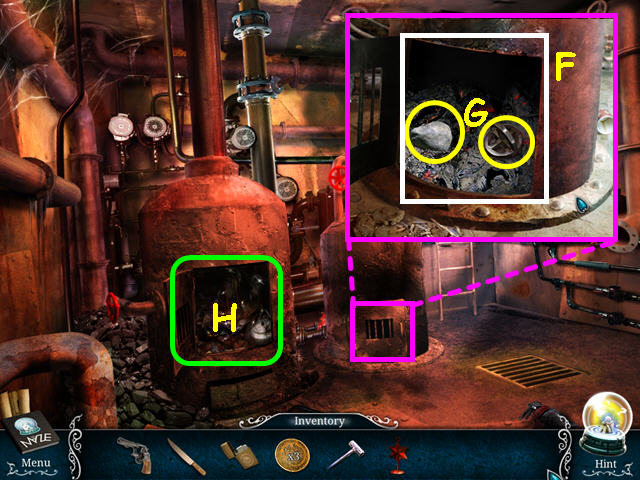
- Look at the small oven and open the grate (F).
- Take the STONE and the STRANGE FIGURE circle (G).
- Select the big oven for a HOS (H).

- Locate all the items on the list.
- You will earn the TAP.
- Travel to the helicopter deck.
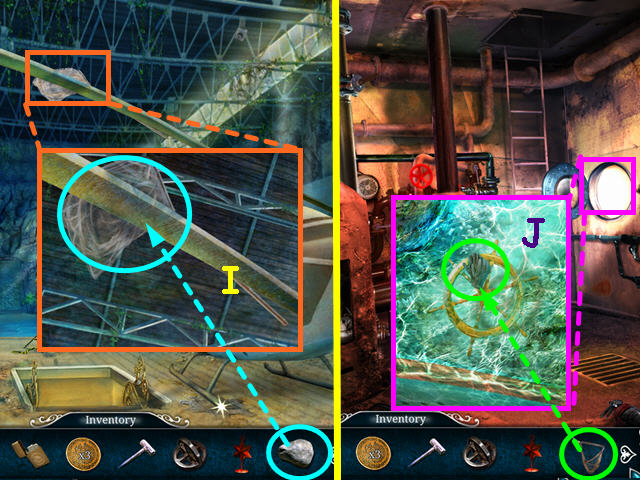
- Look at the helicopter blade and use the ROCK to get the NET (I).
- Return to the boiler room.
- Look out the port hole and use the NET to collect the GLOVES (J).
- Travel to the makeup room.
- Look at the barrel and use the TAP on the side control (K).
- Take the 4/5 COIN (L).
- Look in the corner and use the GLOVES to take the STRANGE FIGURE snowflake (M).
- Look in the upper corner and use the NET to get the 5/5 COIN (N).
- Return to the helicopter deck.
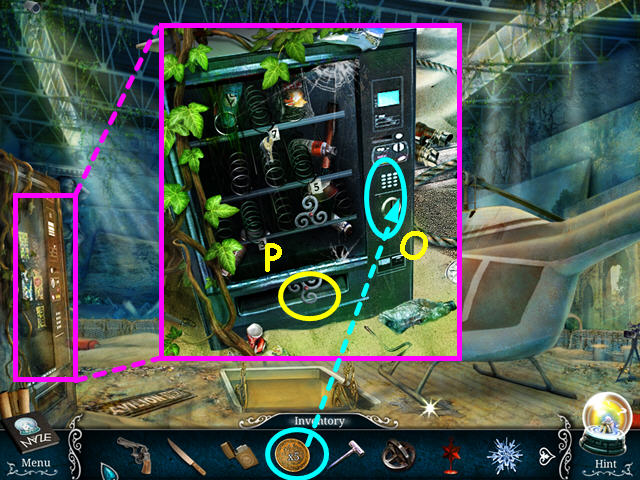
- Look at the vending machine and use the 5 COINS in the slot (O).
- Take the STRANGE FIGURE swirls (P).
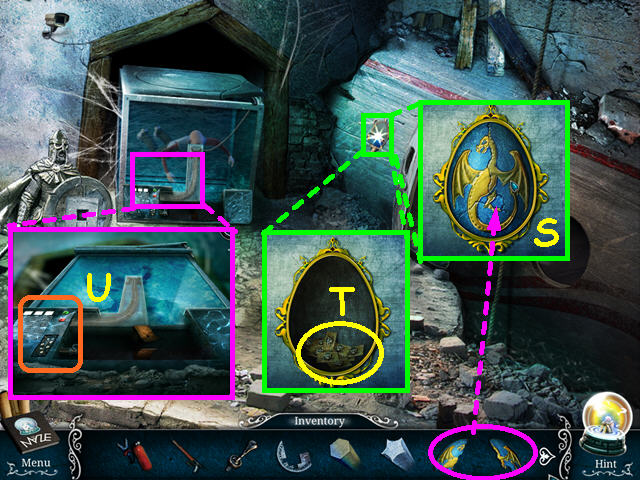
- Return to the main hall and look at the painting.
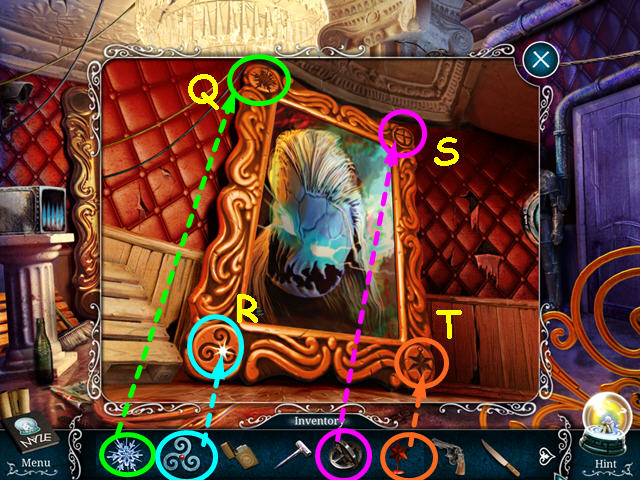
- Place each of the STRANGE FIGURES into the matching slot on the painting.
- Place the snowflake STRANGE FIGURE in the upper left corner (Q).
- Place the swirls STRANGE FIGURE in the lower left corner (R).
- The circle STRANGE FIGURE belongs in the upper right corner (S).
- Place the star STRANGE FIGURE in the lower right corner (T).
- Walk through the painting to the submarine.
- Look at the area on the left and take the PIPE and the 1/7 COIN (U).
- Look at the door control on the right and take the 2/7 COIN (V).
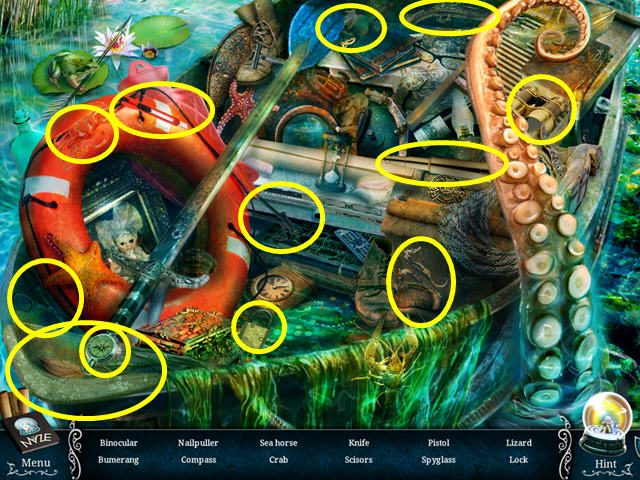
- Walk forward to the shore.

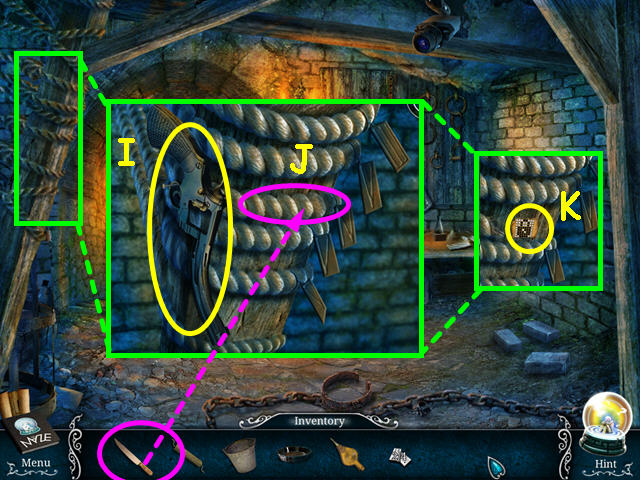
- Take the WIRES, GLASS BOTTLE, 1/3 HOOK, BOOMERANG, and the 2/3 HOOK (circled in green).
- Use the BOOMERANG to knock down the 3/3 HOOK, then take it (A).
- Break the GLASS BOTTLE on the rock, then take the GLASS SHARD (B).
- Use the GLASS SHARD to cut the ROPE (C).
- The ROPE, 3 HOOKS and the wire will automatically combine to make the GRAPPLING HOOK.
- Aim the GRAPPLING HOOK at the scaffolding, then climb out of the sand (D).
- Look at the tree and take the 3 BULBS and the NUT (E).
- Look at the terminal and take the 3/7 COIN (F).
- Return to the main hall.
- Look at the squirrel and use the NUT to capture him (G).
- Travel to the front deck.
- Look at the aquarium and place the SQUIRREL in the change return. (H).
- Take the 4/7 COIN (I).
- Look at the weather-vane and use the NET to get the 5/7 COIN (J).
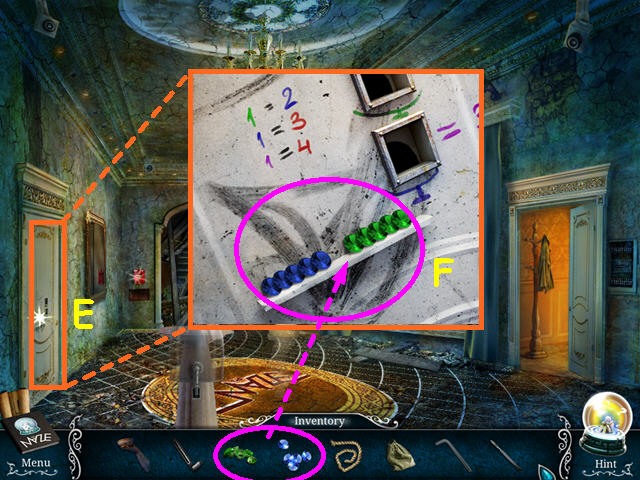
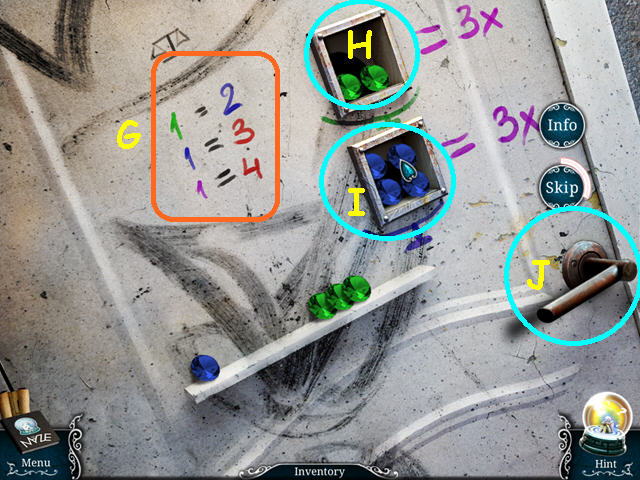
- Look at the casket and use the 3 BULBS on the top to trigger a mini-game (K).
- Watch the sequence of lights, then press the colored buttons to repeat the sequence (L).
- You will need to copy 5 sets of sequences – they are tracked in the lower panel (M).
- After 3 mistakes, the mini-game will restart - mistakes are noted in the upper left panel (N).
- Our sequences were: blue-yellow, blue-blue-blue, blue-green-blue-purple, yellow-aqua-green-purple-yellow, and purple-aqua-blue-purple-blue-yellow.
- Take the 6/7 and 7/7 COINS from inside the chest (O).
- Travel to the helicopter deck.
- Look at the vending machine and use the 7 COINS on the slot (P).
- Take the IGNITION KEY (Q).
- Travel to the coast.
- Look at the terminal and use the IGNITION KEY on the keyhole (R).
- Click on the key to turn it and it will trigger a mini-game.
- Slide the rows of tiles back and forth so the helicopters can rise.
- Click on the green arrows to slide the rows (S).
- The 'stop' symbol means that a row cannot move any further in that direction (T).
- There are 3 levels to solve.
- Levels 2 and 3 have multiple helicopters; you may move one to the top at a time.
- Press the green action button (U).

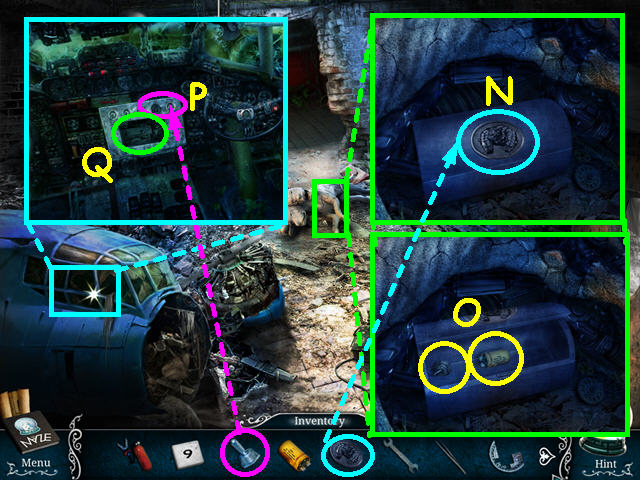
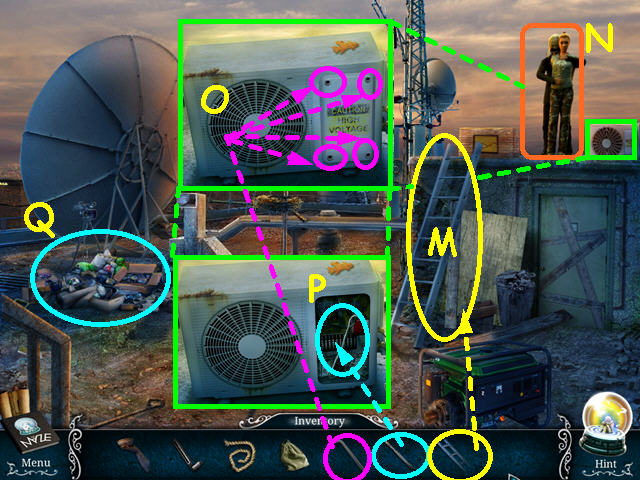
- Look at the crashed helicopter and take the FLARE GUN (V).
- Return to the helicopter deck.
- Look at the hatch, then click on the handle (W).
- Take the GEARS (X).
- Return to the submarine.
- Look at the door control and add the GEARS (A).
- Press the button (B).
- Take the SCUBA GEAR from the compartment (C).
- Travel to the boiler room.
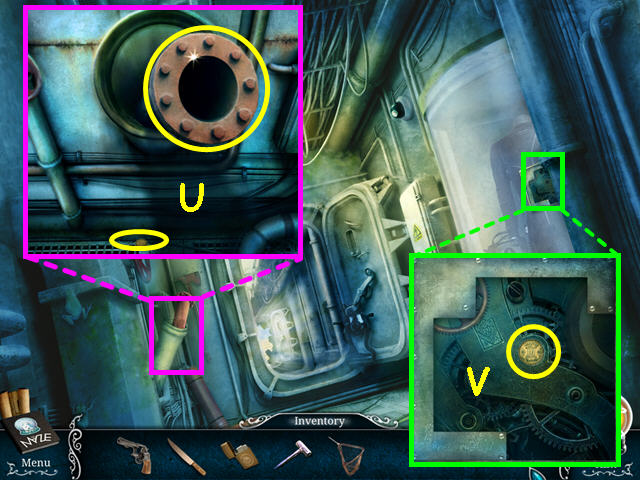
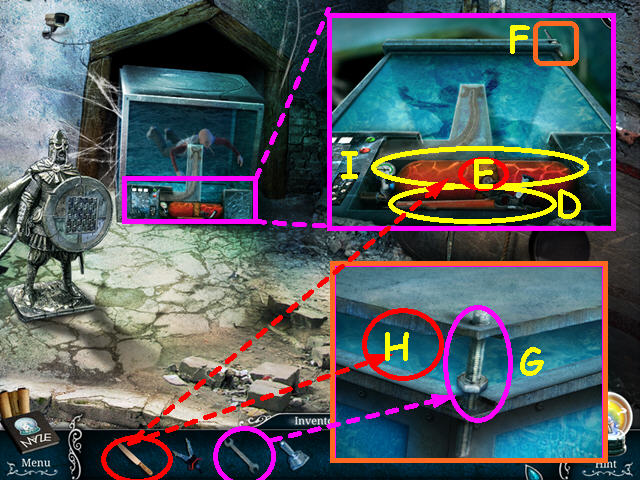
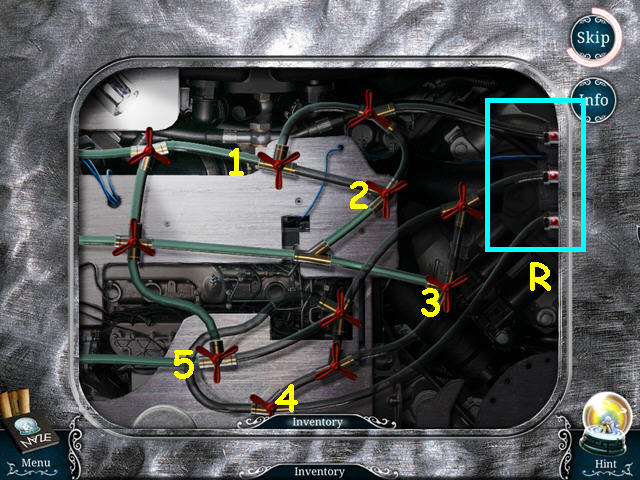
- Look at the right wall and connect the PIPE to the pipe on the wall (D).
- Use the FLARE GUN on the valve (E).
- Look at the floor grate and use the HAMMER to break it open (F).
- Use the SCUBA GEAR on the water in the hole (G).
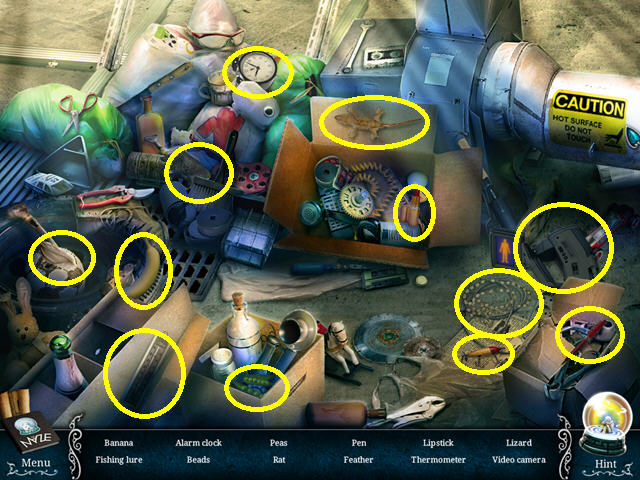
- Select the hatch for a HOS.
- Locate all the items on the list.
- You will earn the ROD.
- Return to the submarine.
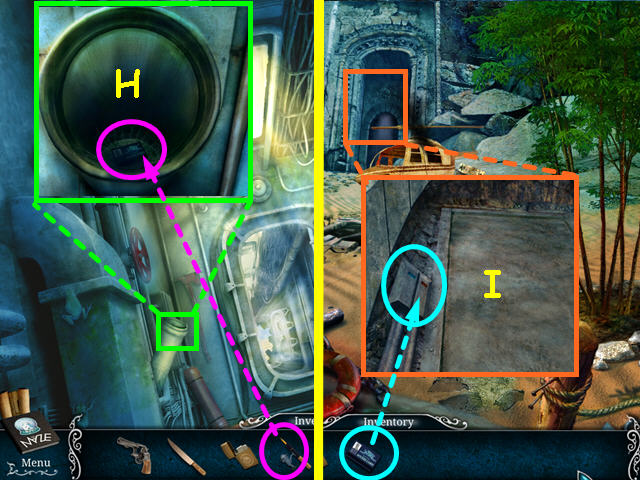
- Look at the pipe and use the ROD to get the ACCESS CARD (H).
- Travel to the shore.
- Look at the cave door and use the ACCESS CARD on the reader (I).
- Walk forward.
Level 3: The Dome
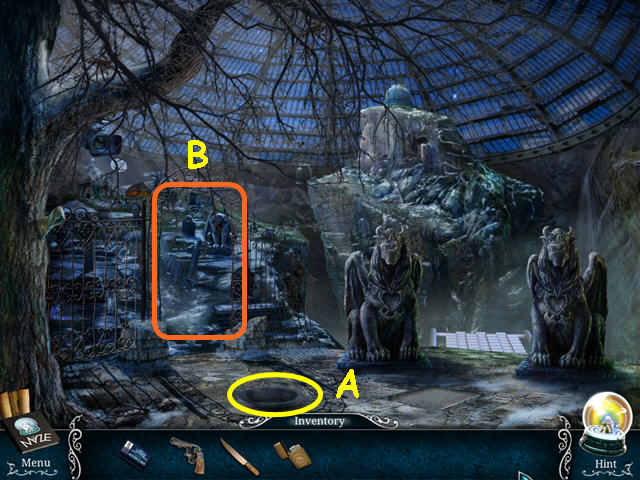
- Take the BOWL (A).
- Walk forward to the cemetery (B).
- Look at the statue and take the CORD (C).
- Walk forward to the house (D).
- Look at the door and take the AXE HANDLE (E).
- Pace the BOWL in the stand (F).
- Look at the gate and use the KNIFE to cut the rope (G).
- Walk down twice to return to the ways area.
- Look at the tree and use the AXE HANDLE on the axe head to take the AXE (H).
- Return to the house, then walk forward through the gate on the right (I).
- Note the symbols on the sign (J).
- Look at the sawmill and take the LIGHTER FLUID (K).
- Note the roots of the tree (L).
- Look at the chopping block (M).
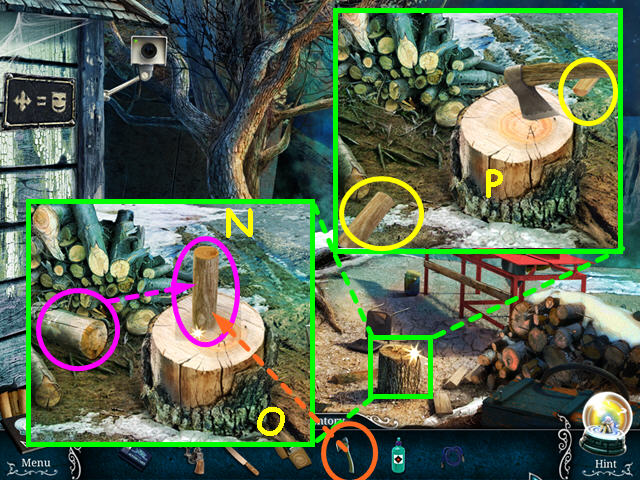
- Take the LOG and place it on the block (N).
- Use the AXE on the log (O).
- Take the 2 FIREWOOD (P).
- Select the roots for a HOS.
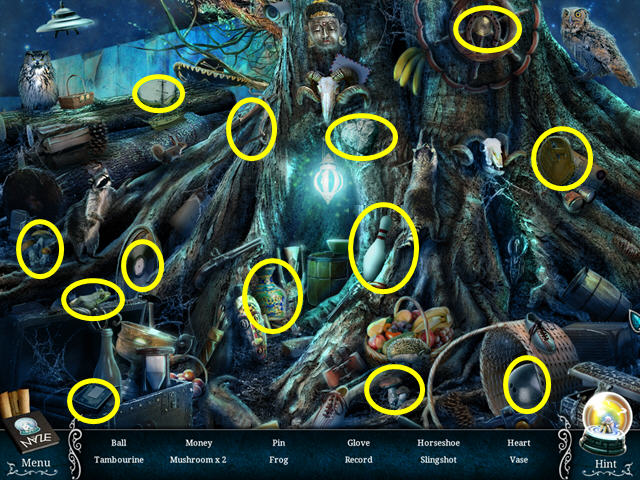
- Locate all the items on the list.
- You will earn the 1/2 HEART.
- Walk down to return to the front of the house.
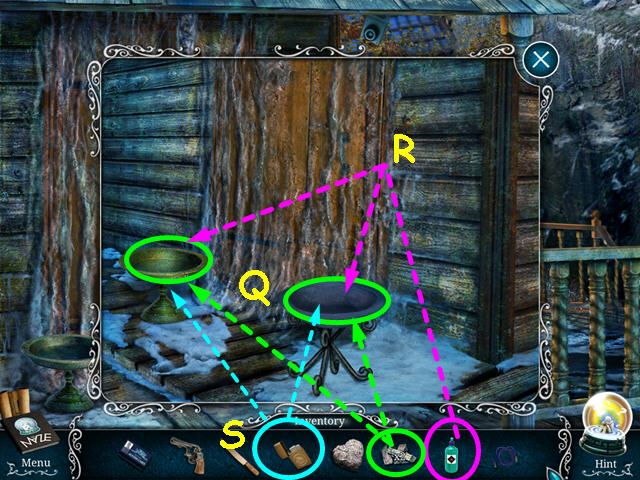
- Look at the braziers and place FIREWOOD in each bowl (Q).
- Use the LIGHTER FLUID on each bowl (R).
- Use the LIGHTER on each bowl (S).
- Enter the house.
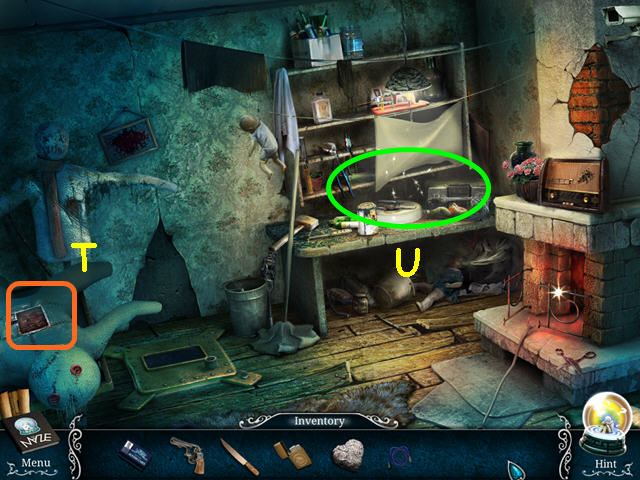
- Note the puppet stomach (T).
- Select the desk for a HOS (U).
- Locate all the items on the list.
- You will earn the KEY (leg bones).
- Exit the house and walk down to the cemetery.
- Look at the headstone and use the KEY (leg bones) in the left keyhole (V).
- Take the MAGNET from the compartment (W).
- Return to the house and look at the puppet stomach.
- Use the MAGNET to move the pieces and slide the key to the right.
- Move the blocks in numerical order as far as possible in the direction indicated (1-15).
- Take the KEY (torso) from the slot (X).
- Return to the cemetery.
- Look at the headstone and use the KEY (torso) in the second from the left keyhole (Y).
- Take the BELT from the compartment (Z).
- Travel to the backyard.
- Look at the sawmill and place the BELT on the motor (A).
- Take the KEY (skull) from the cut log (B).
- Return to the cemetery.
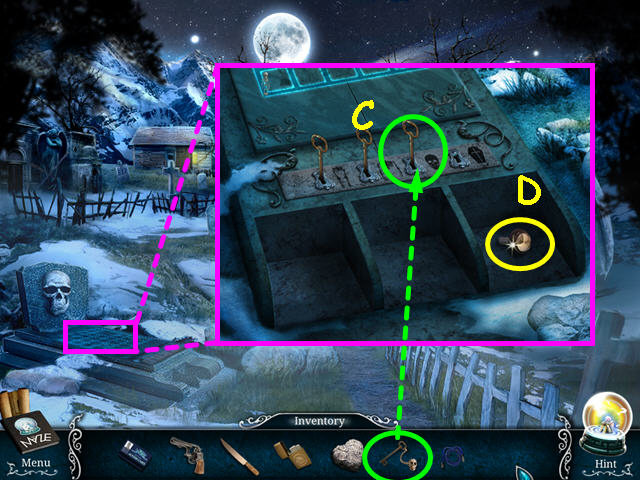
- Look at the headstone and use the KEY (skull) in the third from the left keyhole (C).
- Take the KNOB from the compartment (D).
- Travel to inside the house.
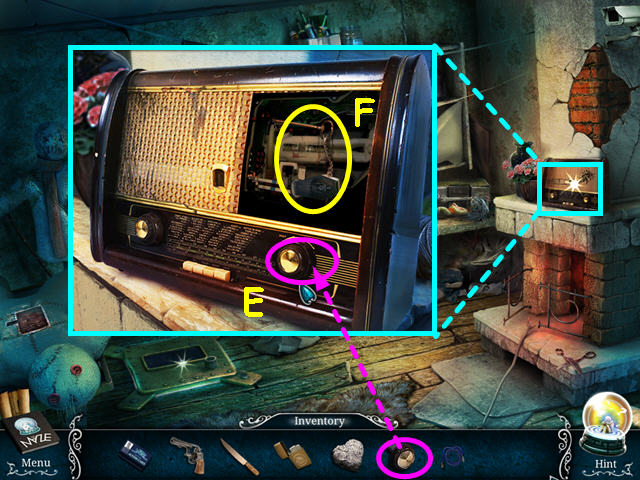
- Look at the radio ans place the KNOB on the spindle (E).
- Take the KEY (casket) from inside the radio (F).
- Return to the cemetery.
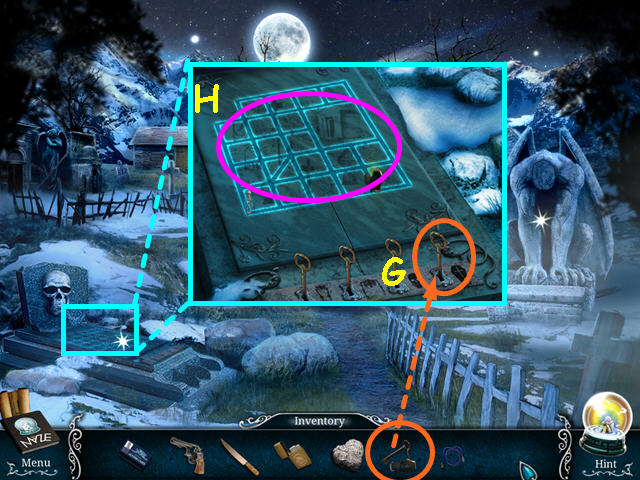
- Look at the headstone and use the KEY (casket) in the right keyhole (G).
- This will trigger a mini-game above the keys (H).
- Capture the skeleton with the casket (I).
- Move the casket one space at a time until you land on the same spot as the skeleton.
- Click on the adjacent intersection to where you wish to move the casket.
- Our moves were: L-L-U-U-L-D-R-D-U-U-U-U-L-D-U-L-D-R-R-D-D-L-L-D-R-U-DIAG-L.
- Use the KNIFE on the doll to get the 2/2 HEART (J).
- Walk down to the ways area.
- Look at the left statue and place a HEART in the niche (K).
- Look at the right statue and place a HEART in the niche (L).
- Look at the tile on the ground for a mini-game (M).
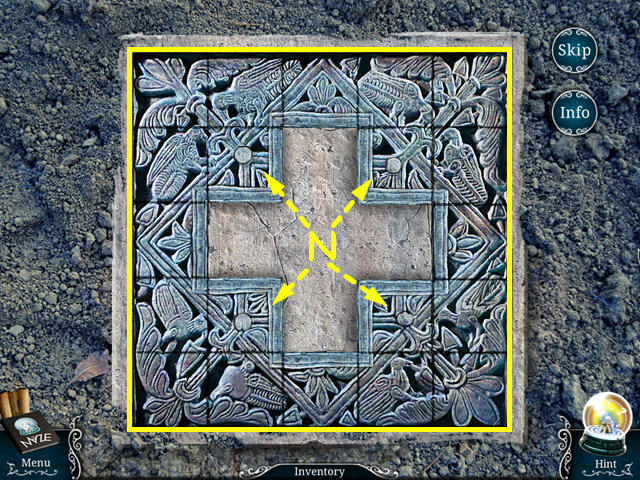
- Slide the tiles to reform the carving.
- The 4 inner tiles do not move (N).
- Tiles will tint blue when in the correct position.
- Walk across the bridge in-between the two statues to the mountain pass.
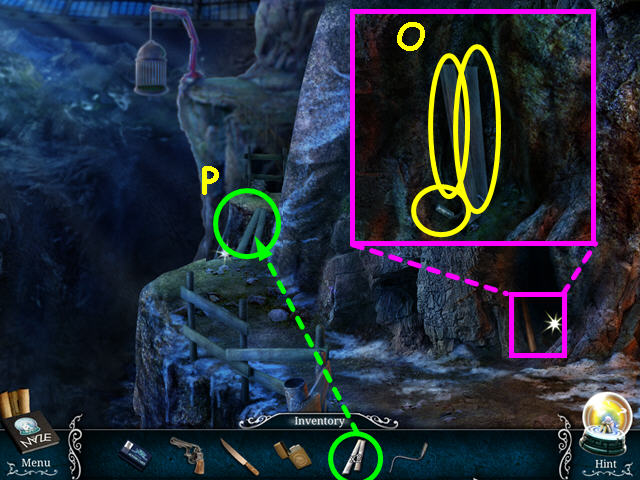
- Look in the crack and take the 2 PLANKS and the CRANK (O).
- Place the 2 PLANKS over the abyss (P).
- Cross the abyss on the planks.
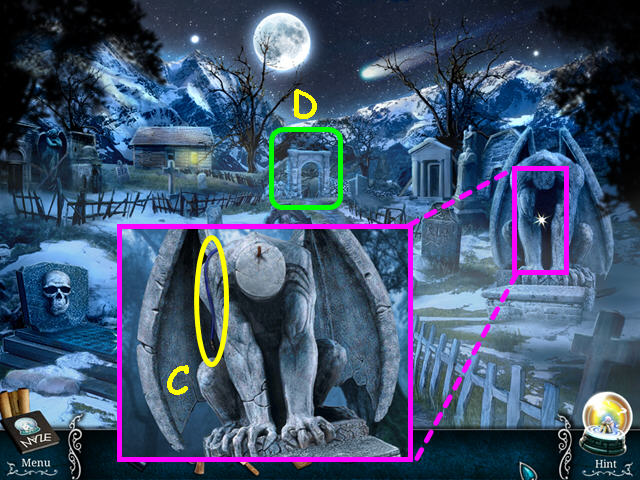
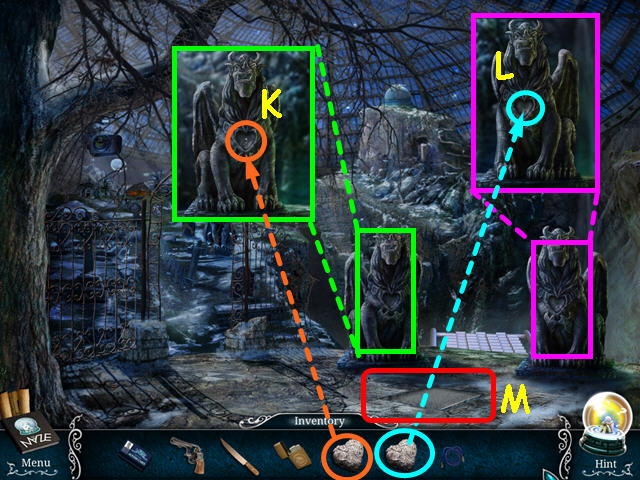
- Look in the fountain and take the GARGOYLE HEAD (Q).
- Note the crane is missing a control (R).
- Return to inside the house.

- Look at the hatch and use the CRANK to open the screen (S).
- Take the ORNATE KEY (T).
- Attach the CORD to the wire (U).
- Travel to the cemetery.
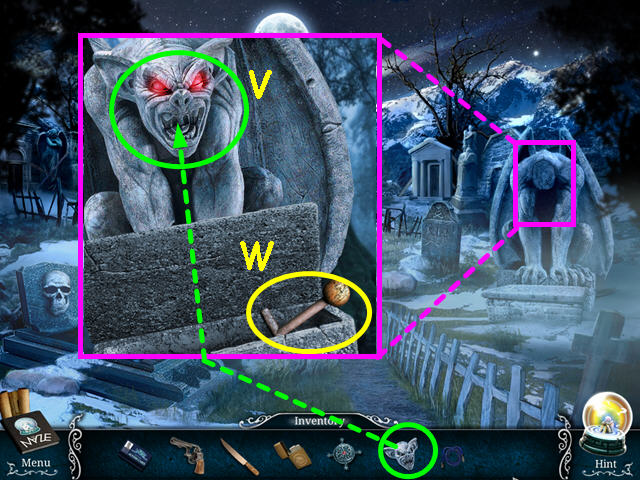
- Look at the statue and place the GARGOYLE HEAD on the neck (V).
- Take the LEVER from the stone box (W).
- Return to the crane and the cage.
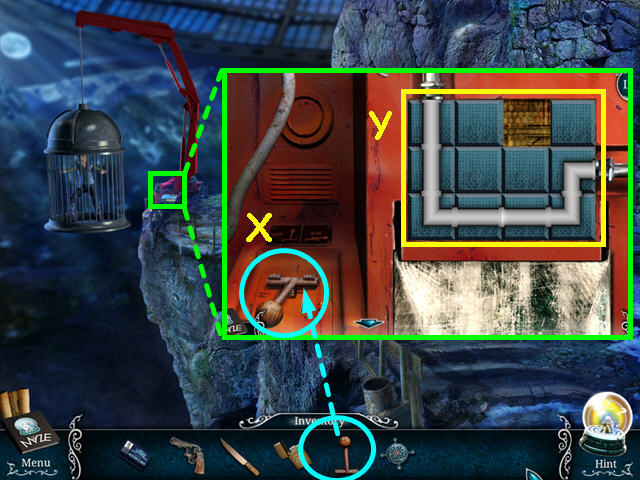
- Look at the crane and place the LEVER in the control (X).
- Click on the lever to open the panel.
- Move the tiles so that all the pipes are connected (Y).
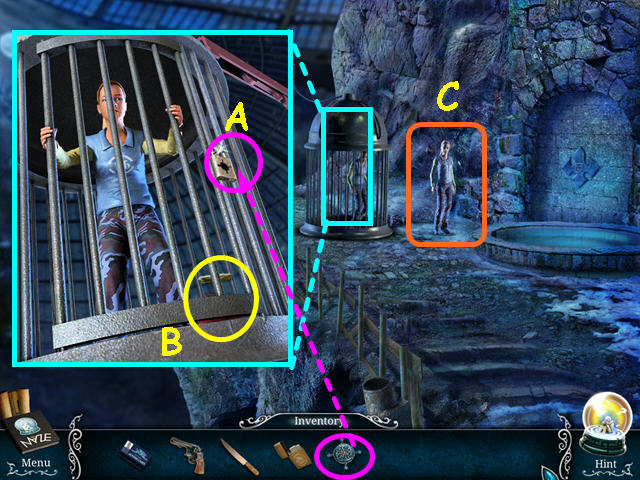
- Look at the cage and use the ORNATE KEY in the lock (A).
- Take the DETONATOR (B).
- Look at the girl, then click on her to talk (C).
- Travel back to inside the house.
- Look at the hatch and attach the DETONATOR to the cord (D).
- Click on the detonator to open the back, then look inside for a mini-game (E).
- Turn all the fuses to the vertical position.
- Turning a fuse will effect the surrounding fuses.
- Click on the fuses in numerical order (1-4).
- Press the plunger on the detonator, then select the hatch for a HOS.
- Locate all the items on the list.
- You will earn the CLIMBING GEAR.
- Return to the area with the cage.
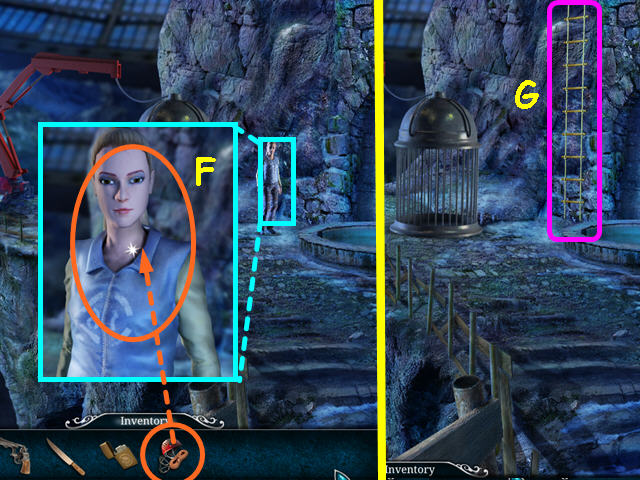
- Look at the girl and give her the CLIMBING GEAR (F).
- Climb up the rope ladder (G).
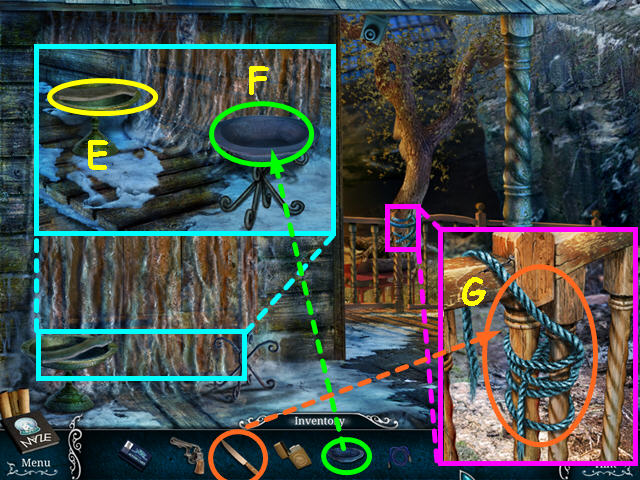
- Note the broken cart (H).
- Take the MASK (I).
- Look at the doors and use the MASK on the symbol for a mini-game (J).
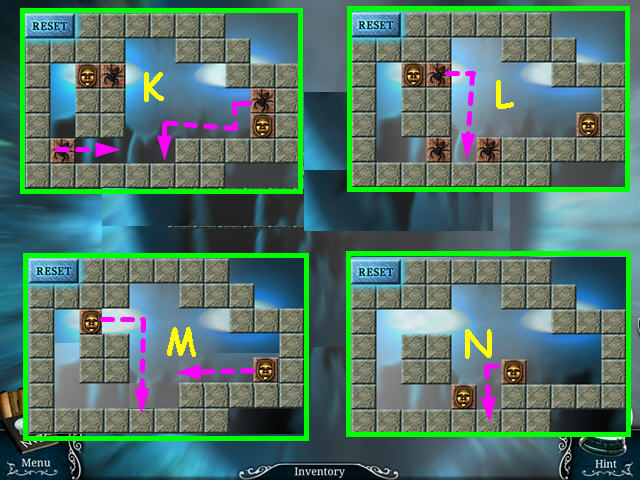
- Move like tiles together so they explode.
- Move the left and right spider tiles within one space of each other (K).
- Drag the third spider tie off the ledge and between the other two spiders tiles (L).
- Move the 2 face tiles together (M, N).
- Select the broken cart for a HOS.
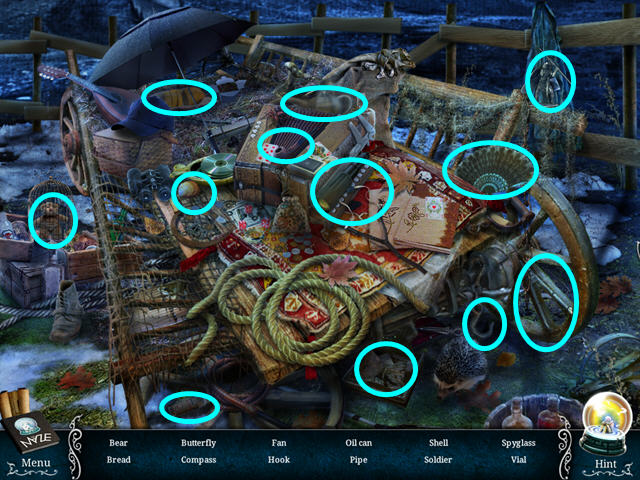
- Locate all the items on the list.
- You will earn the OIL CAN.
- Return to the cage area.
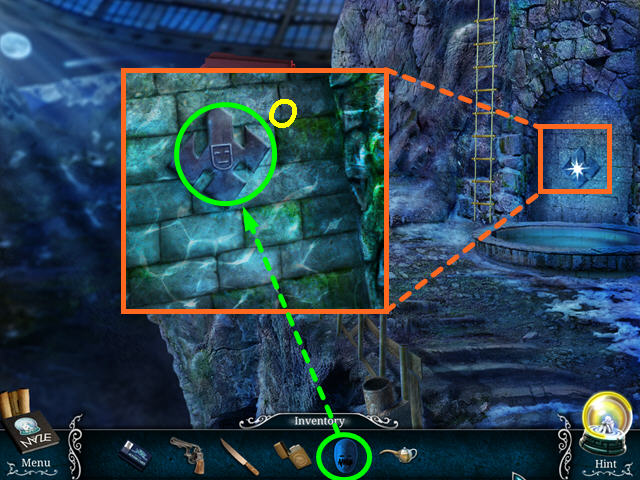
- Look at the fountain and use the MASK on the symbol (O).
- This will trigger a mini-game.
- Move like tiles together so they explode.
- First move the upper sun to the left so it falls in the hole and explodes, then move the upper trophy and apples tiles right to fill the hole (P).
- Move the upper gem, spider and face tiles to the right so they pass the hole.
- Move the upper trophy to the left to explode, then do the same for the spider tile in that area; the apple will automatically fall and explode (Q).
- Move the upper green gem to the right so it falls and explodes, then finish with the spider and face tiles (R).
- Select the area behind the fountain for a HOS.
- Locate all the items on the list.
- You will earn the MONITOR.
- Return to the inside of the house.
- Look at the fireplace and use the MASK on the symbol (S).
- This will trigger a mini-game.
- First, move the upper gem out of the way, but do not make a match.
- Then move the left and right spiders to the lower gem as shown (T).
- Move the middles spider to the left and down to meet the other 2 spiders (U).
- Move the left and right face tiles to the same positions the spiders were in, then drop the middle face tile to make the match (V).
- Move the upper gem left to the other gem.
- Take the LENS from inside the fireplace (W).
- Travel to the area with the broken cart then enter the observatory.
- Look at the telescope, open the cover ans place the LENS inside (A).
- Look at the gears and use the OIL CAN (B).
- Look at the console and place the MONITOR in the niche for a mini-game (C).
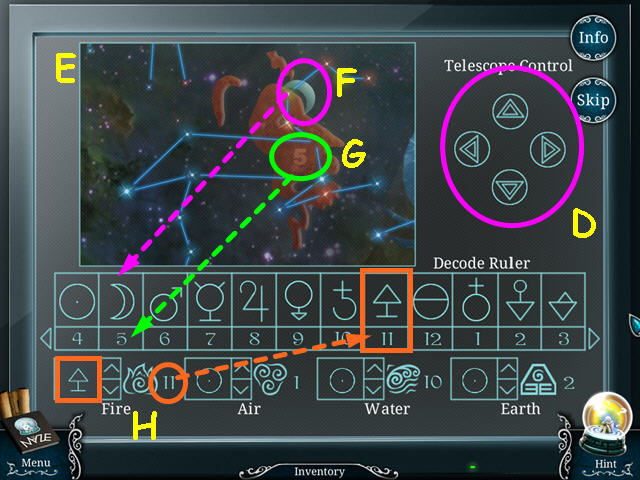
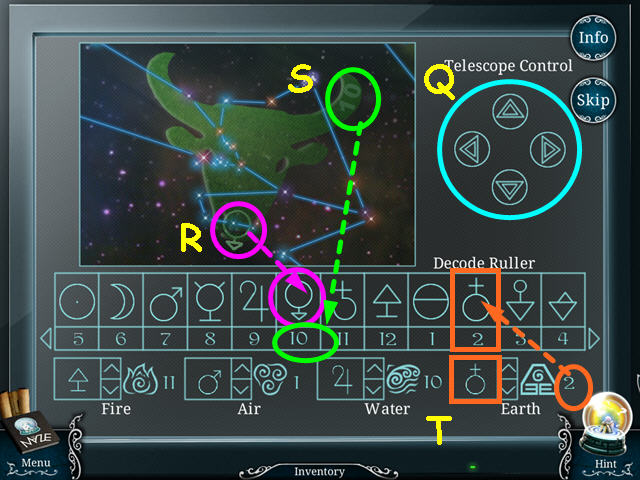
- Use the telescope control buttons to find the constellations (D).
- Four of the constellations have both a number and a symbol (E).
- Find the symbol on the ruler (F).
- Move the numbers so that the number on the constellation is below the symbol (G).
- This constellation is Leo, which is an Fire sign.
- Look at the bottom section to see the Fire section wants the symbol for 11 (H).
- Look at the ruler and find the symbol over 11, then use the arrows in the Fire section to change to that symbol.
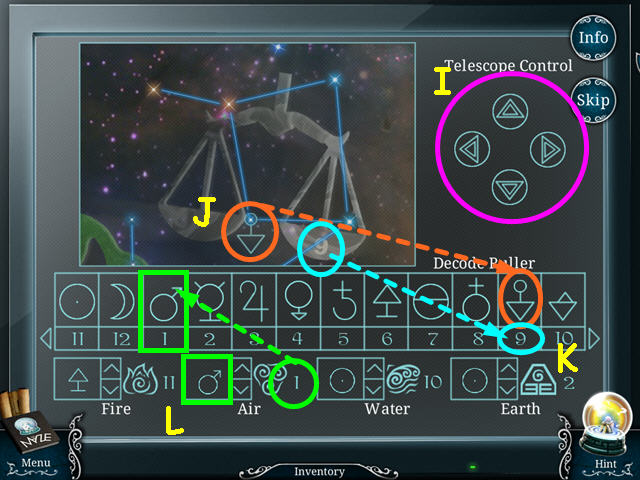
- Use the telescope control buttons to find another constellation (I).
- Find the symbol on the ruler (J).
- Move the numbers so that the number on the constellation is below the symbol (K).
- This constellation is Libra, which is an Air sign.
- Look at the bottom section to see the Air section wants the symbol for 1 (L).
- Look at the ruler and find the symbol over 1, then use the arrows in the Air section to change to that symbol.
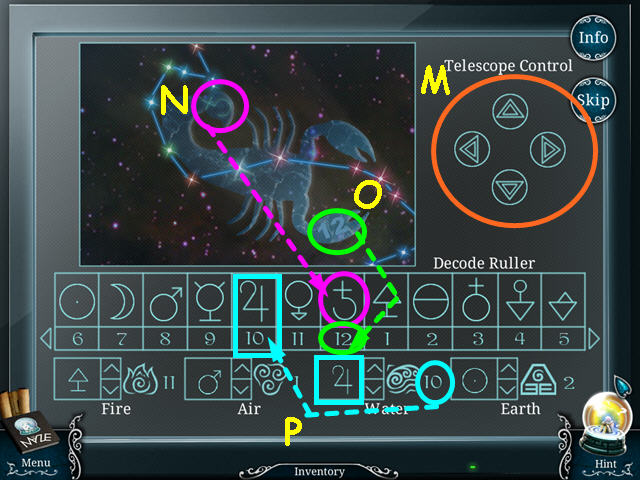
- Use the telescope control buttons to find another constellation (M).
- Find the symbol on the ruler (N).
- Move the numbers so that the number on the constellation is below the symbol (O).
- This constellation is Scorpio, which is a Water sign.
- Look at the bottom section to see the Water section wants the symbol for 10 (P).
- Look at the ruler and find the symbol over 10, then use the arrows in the Water section to change to that symbol.
- Use the telescope control buttons to find another constellation (Q).
- Find the symbol on the ruler (R).
- Move the numbers so that the number on the constellation is below the symbol (S).
- This constellation is Taurus, which is an Earth sign.
- Look at the bottom section to see the Earth section wants the symbol for 2 (T).
- Look at the ruler and find the symbol over 2, then use the arrows in the Earth section to change to that symbol.
- Exit the observatory.
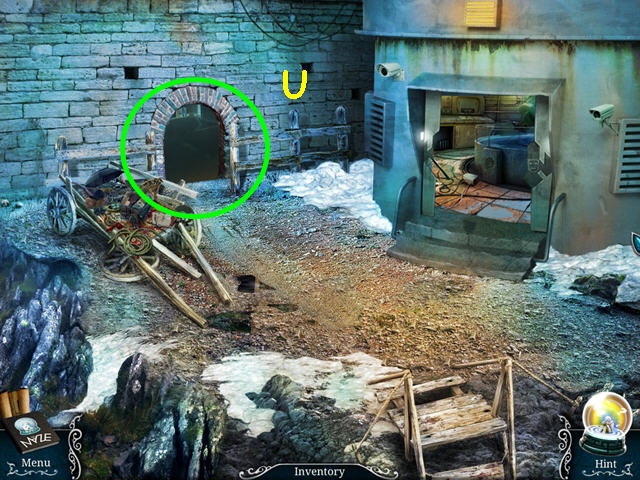
- Walk forward through the stone archway (U).
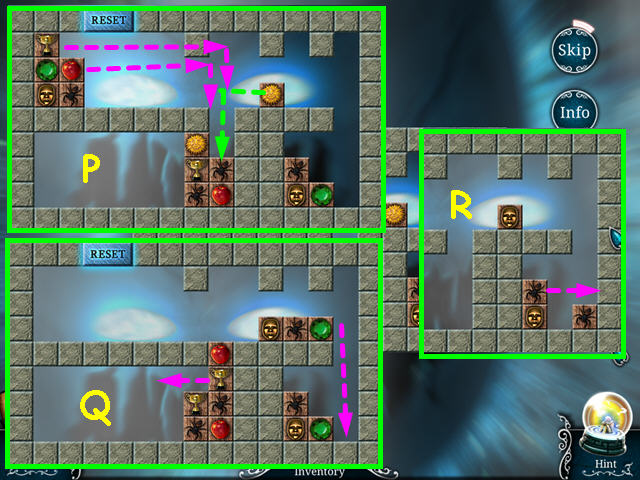
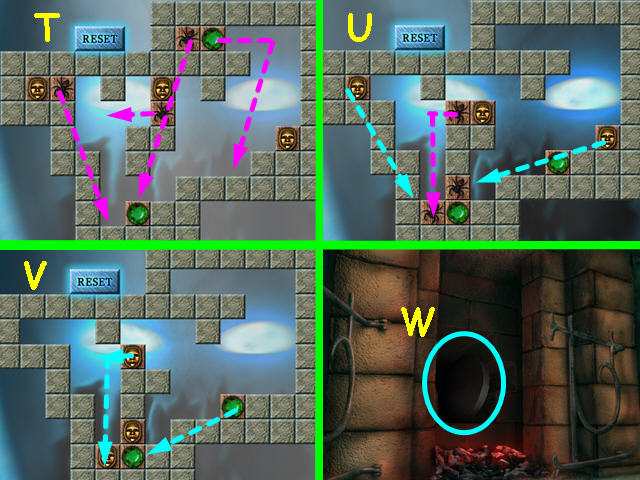
Level 4: The Dungeon
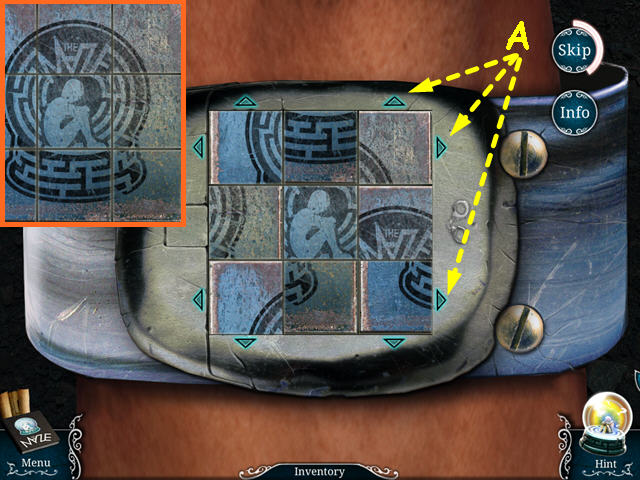
- Using the arrows, move the tiles to restore the logo (A).
- Our solution was: left column down, bottom row right x2, top row right, right column up, bottom row left, and top row left.

- Note the work table (B).
- Look at the wall and take the ROCK (C).
- Note the figure stuck in the hole (D).
- Walk forward to the well area (E).
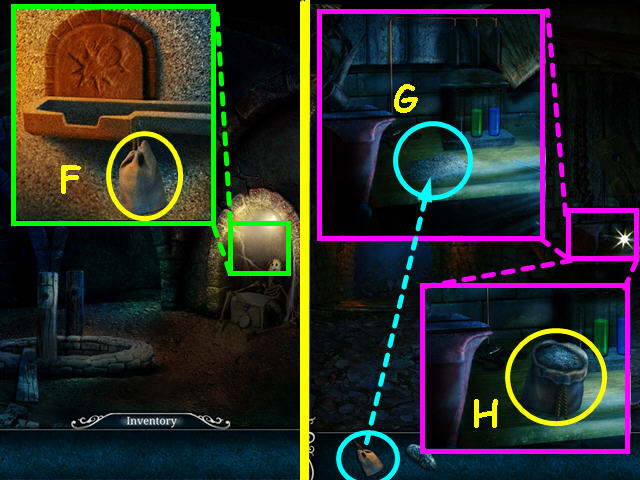
- Look in the alcove and take the POUCH (F).
- Walk down to the first room.
- Look at the work bench and use the POUCH on the powder (G).
- Take the POWDER (H).
- Walk forward to the well area.
- Look at the alcove and use the POWDER in the trough (I).
- Use the ROCK on the panel to light the powder (J).
- Look at the skeleton and take the map (K).
- Take the PICKAXE HANDLE (L).
- Look at the nightstand, open the cabinet door and take the KNIFE (M).
- Return to the workbench area.
- Look at the workbench and take the ROPE and SHOVEL (N).
- Look at the chemicals and take the RUBY and the EMPTY VIAL (O).
- Exit the close-ups, then walk to the well area.
- Look at the barrel and take some CHEESE (P).
- Use the EMPTY VIAL on the spigot, then take the FULL VIAL (Q).
- Look at the map in the diary to learn where to dig (R).
- Use the SHOVEL to dig a hole, then take the 1/2 LOCK PART (S).
- Walk down to the other room.
- Look at the wall and use the KNIFE to loosen the item in the hole (T).
- Take the 2/2 LOCK PART (U).
- Return to the well area and look at the skeleton.
- Look at the lock on the chest and place the 2 LOCK PARTS in the lock for a mini-game (V).
- Slide the circular tiles around the grid to reform the design.
- The tiles can move from 3-5 directions; click, hold and drag the tiles into position.
- Select the skeleton's chest for a HOS.

- Locate all the items on the list.
- You will earn the VICE HANDLE.
- Travel to the room with the work bench.
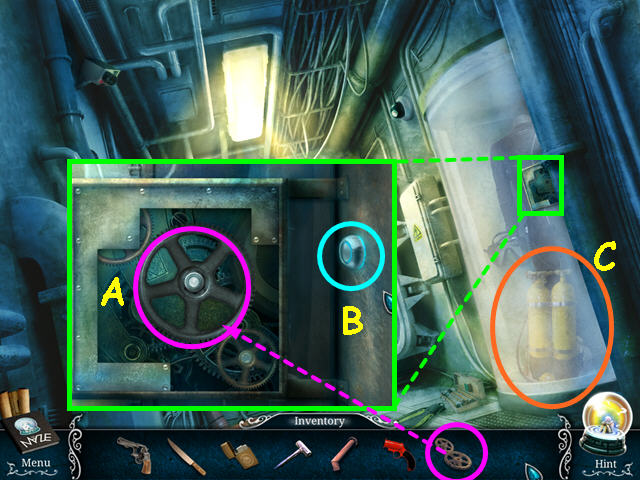
- Look at the work bench and use the VICE HANDLE on the vice (A).
- Take the PICKAXE HEAD and it will automatically combine with the PICKAXE HANDLE to become the PICKAXE (B).
- Look at the brick wall and use the PICKAXE to make a hole (C).
- Walk through the hole to the smithy.
- Look at the lock and take the lighter (D).
- Note the key on the far wall (E).
- Travel to the well area.
- Look at the unlit torch and use the LIGHTER on it (F).
- Select the barrels in the alcove for a HOS (G).
- Locate all the items on the list.
- You will earn the MOLD FORM.
- Look at the carved head and take the DIRTY RUBY and the WINCH (H).
- Place the RUBY in the eye of the head (I).
- Take the HOOK which will automatically combine with the ROPE to make the GRAPPLING HOOK (J).
- Return to the smithy.
- Look at the shelf and use the GRAPPLING HOOK to get the KEY (K).
- Look at the lock and use the KEY to trigger a mini-game (L).

- Move the tiles so all the gears are moving.
- Click and drag the gears into position as shown in the screenshot.
- Look at the craft area and take the PAN (M).
- Place the MOLD FORM into the rectangle (N).
- Select the smith stuff for a HOS (O).
- Locate all the items on the list.
- You will earn the CAGE.
- Exit the room, look at the workbench and select the chemical lab.
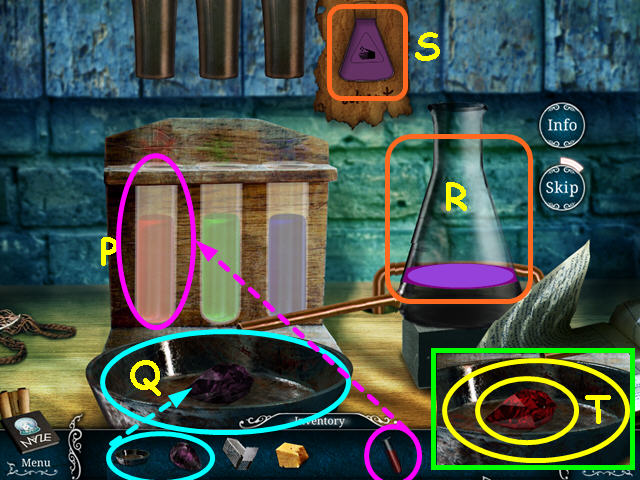
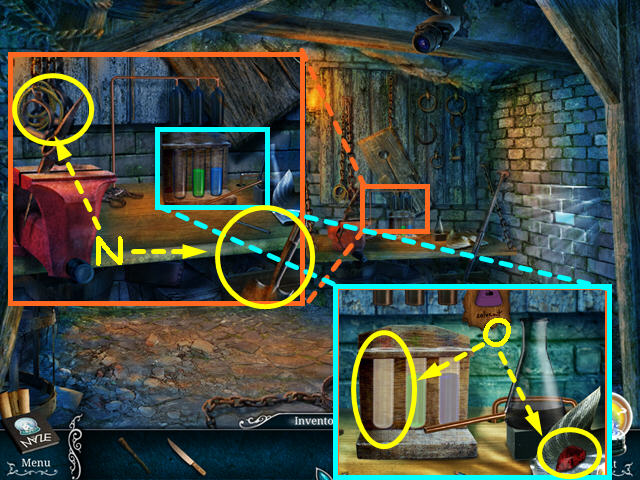
- Place the FULL VIAL in the stand (P).
- Place the PAN on the counter, the place the DIRTY RUBY inside (Q).
- Use the 3 vials to mix a solvent in the beaker (R).
- The color needs to match the color shown in the symbol (S).
- Add these colors to the beaker: red x2, green, and blue x2.
- Take the RUBY from the pan, then take the PAN (T).
- Walk forward to the well area.
- Look at the barrel with the cheese and place the CAGE on the ground (U).
- Place the CHEESE in the cage (V) and take the 1/4 DOMINO from the rat (W).
- Look at the carved head and place the RUBY in the eye (X).
- Walk forward to the torture area.
- Note the torture room (A).
- Note the chain lock on the pole (B).
- Look at the rope and take the 2/4 DOMINO (C).
- Take the BUCKET (D).
- Select the bookcase for a mini-game (E).
- Place the books so the bars on the bindings match (F).
- Note the notches in the bookcase to help you get started (G).
- The symbol 'N' will glow when all the books are in the correct position (H).
- Select the torture room for a HOS.
- Locate all the items on the list.
- You will earn the BELLOWS.
- Return to the area with the workbench.
- Look at the beam and take the BROKEN GUN (I).
- Use the KNIFE to cut the rope with the symbol 'N' (J).
- Take the LOCK SOLUTION (K).
- Return to the torture area and look at the chain lock.
- Use the LOCK SOLUTION on the grid to trigger a mini-game (L).
- Slide the columns and rows to recreate the lock shown in the solution.
- Our solution was: 7D, 8D, 1L, 6D, 6D, 7D, 7D, 2L, 2L, 3L, 3L, 4L, 8U, 4L, 5R, 8U, 4L, 4D, 6L, 4U, 6D, 6L, 6L, 6U, 8D, 6R, 6R, 6R, 8U, 6L, 6L, 7R, 8U, 7R, 7R, 8D, 7L, 8D, 7L, 8R, 8R.
- Take the CHAIN from the pole (M).
- Exit the room.
- Look at the well and place the WINCH on the poles (N).
- Place the CHAIN on the winch (O).
- Place the BUCKET on the chain (P).
- After the bucket hits the bottom, click on the winch handle (Q).
- Take the 3/4 DOMINO from inside the bucket, then take the FULL BUCKET (R).
- Travel to the smithy area.
- Place the BUCKET into the holder (A).
- Place the BELLOWS on the left stand (B).
- Place the PAN in the ring over the fire (C).
- Place the BROKEN GUN in the pan (D).
- Once the gun turns yellow, click on it to pour in the mold.
- Click on the mold so it dunks in the bucket.
- Click on the mold in the bucket to return it to the frame, then take the FLEUR-DE-LIS (E).
- Return to the well area.
- Look at the furniture and use the FLEUR-DE-LIS in the drawer lock (F).
- Take the 4/4 DOMINO (G).
- Return to the smithy area.
- Look at the battering ram and place the 4 DOMINOES on the grid for a mini-game (H).
- Place the dominoes in the empty spaces so that each 3x3 block of numbers has the digits 1-9.
- Walk forward through the hole in the wall (I).
Level 5: The Plane Yard
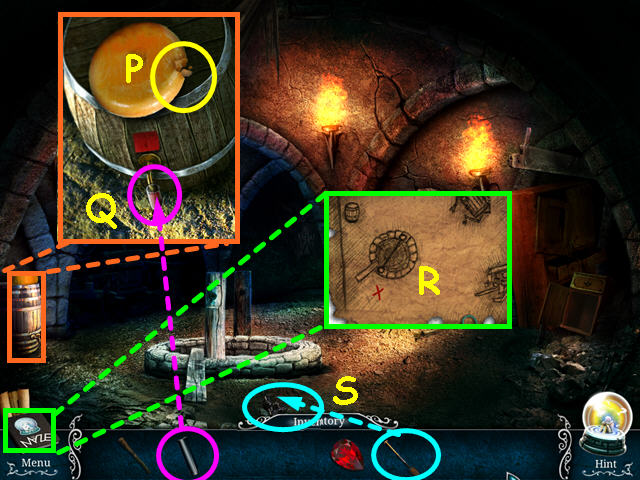
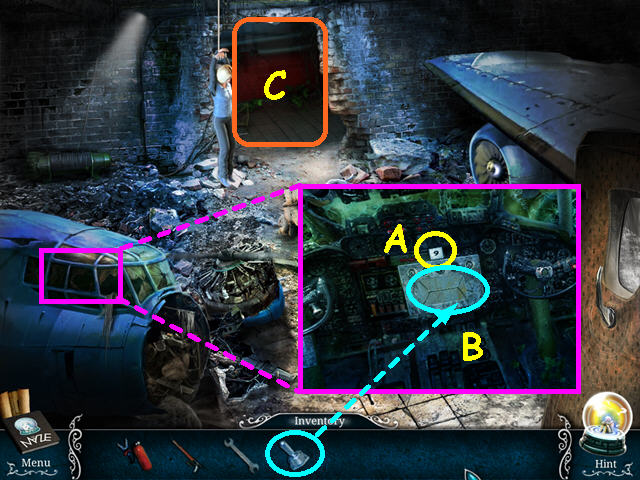
- Look at the statue and take the DOOR HANDLE and the METAL JAW (A).
- Look at the plane door and use the DOOR HANDLE to open the door (B).
- Take the WRENCH (C).
- Select the hole under the plane for a HOS (D).
- Locate all the items on the list.
- You will earn the 1/2 TOGGLE SWITCH.
- Look at the tank and take the SPEAR GUN (D).
- Use the WRENCH to undo the strap on the air tank (E).
- Look at the upper right corner of the tank (F).
- Use the WRENCH to undo the bolt (G).
- Slide the KNIFE into the tank (H).
- Take the air tank, which will combine with the METAL JAW to make the MECHANICAL JAW (I).
- Note the egg on the side of the plane (J).
- Look at the plane door and use the MECHANICAL JAW (K).
- Enter the plane.
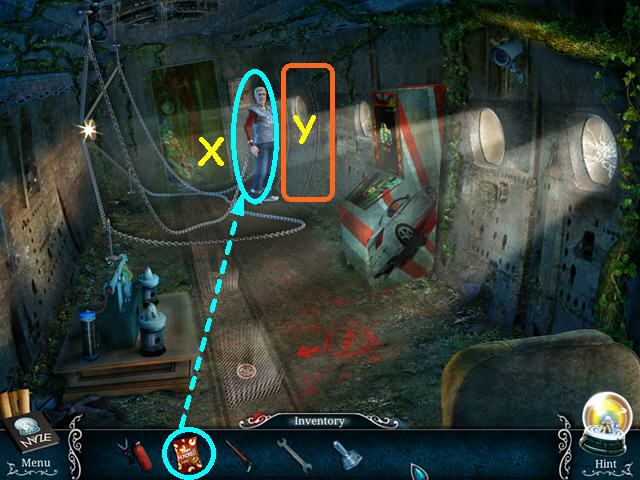
- Talk to the chained man to learn he is hungry (L).
- Select the rear area for a HOS (M).
- Locate all the items on the list.
- You will earn the CROSSED SWORDS.
- Walk down to exit the area.
- Look at the statue and use the CROSSED SWORDS on the matching symbol (N).
- Take the COIN (O).
- Return to the plane and select the video game (P).
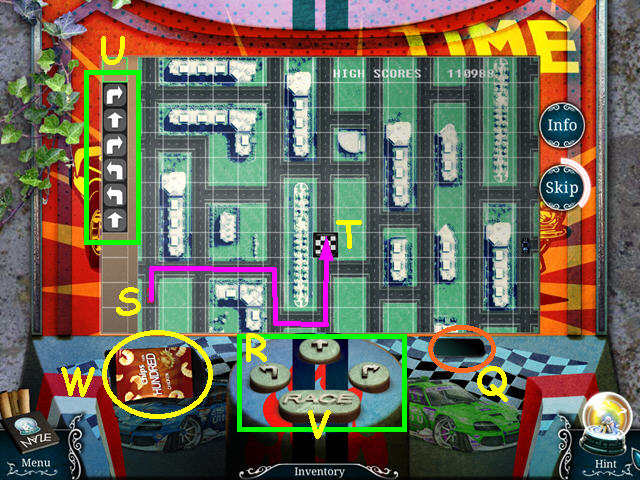
- Use the COIN on the slot to trigger the mini-game (Q).
- Press the buttons (R) to create a path for the car (S) to follow to the flag (T).
- The path is shown on the left (U).
- Press the 'Race' button to begin the race (V).
- Take the FOOD (W).
- Give the FOOD to the man (X).
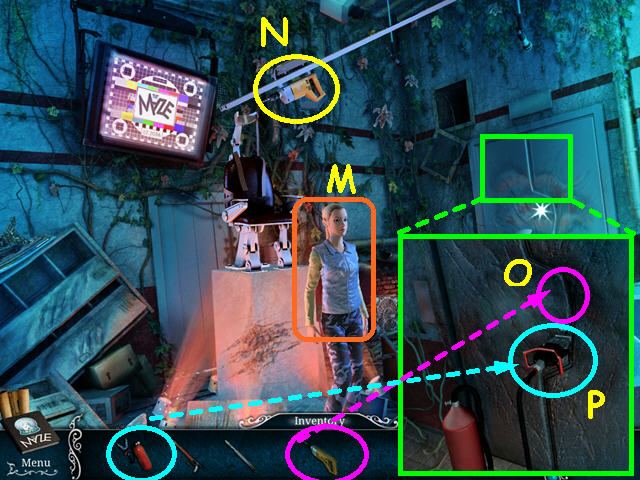
- Walk right to the plane graveyard (Y).
- Look in the airplane cabin and take the NUMBER 9 (A).
- Place the 1/2 TOGGLE SWITCH on the panel (B).
- Exit the cabin and walk forward to reception (C).
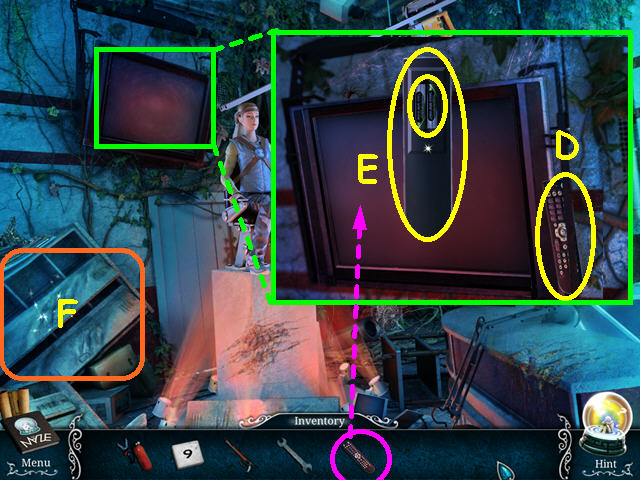
- Look at the TV and take the REMOTE (D).
- Use the REMOTE on the TV; then take the BATTERIES and the EMPTY REMOTE (E).
- Select the lockers for a HOS (F).
- Locate all the items on the list.
- You will earn the PARACHUTE BUTTON.
- Return to the plane graveyard.
- Look in the airplane cabin and place the PARACHUTE BUTTON in the hole (F).
- Press the button to open the compartment.
- Take the AIRPLANE ROD and 1/2 LOCK PART (G).
- Make sure to look at the newspaper (H).
- Exit the close-up and walk down to enter the plane.
- Look at the chains control and use the AIRPLANE ROD in the left spot (I).
- Take the THIMBLE (J).
- Return to reception.
- Look at the water wheel and use the THIMBLE to repair it (K).
- Take the KEY (L).
- Return to the plane.
- Look at the medicine chest and use the KEY to unlock it (M).
- Take the TWEEZERS, SCALPEL, and the 1/2 CAPACITOR (N).
- Return to reception.
- Look at the door and use the SCALPEL to loosen the SHIELD (O).
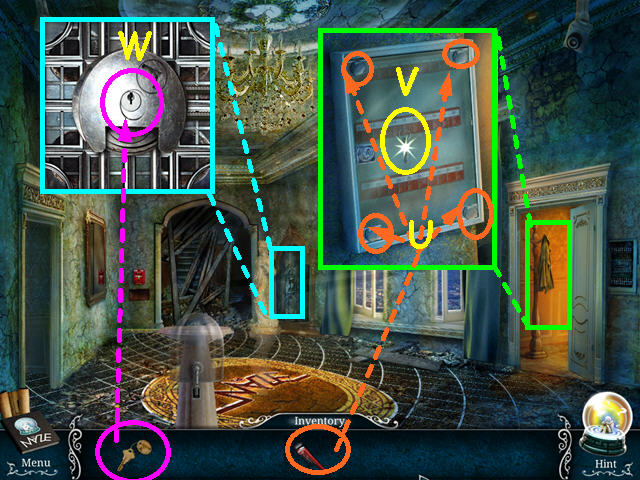
- Take the SHIELD, then travel to the aquarium area.
- Look at the statue then click on the shield for a mini-game (P).
- Use the SHIELD on the grid to trigger a mini-game.
- Move the tiles to the matching quadrants indicated by color and symbol.
- Click on a tile to rotate the surrounding tiles clockwise – note that the tiles on the outer edge will not work.
- This mini-game is randomly generated – your solution may vary.
- Our solution was: Ex4, Ax4, Hx3, Fx2, Ex1, Gx1, Ex2, Cx2, Ix1, Cx2, Hx2, Bx4, Gx2, Fx1, Hx1, Ex1, Gx1, Ex4, Kx1, Ix2, Kx1, Jx1, Kx1, Lx1, Jx2, Kx2, Hx1, Dx6, Lx6, Kx2, Bx2, Lx1, Bx1, Hx1, Bx2, Dx4, Lx1, Hx3, Lx4, Dx4, and Hx4.
- Click on the square in the center of the slab and take the DOG MEDALLION (M).
- Travel to the plane graveyard.
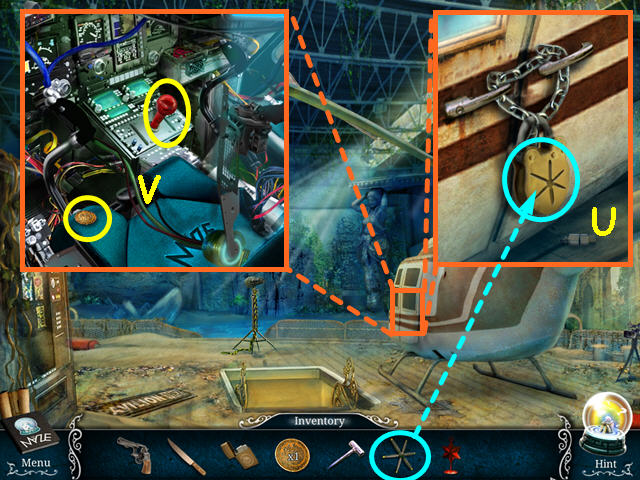
- Look at the Cerberus and use the DOG MEDALLION on the case (N).
- Take the 2/2 TOGGLE SWITCH and the 2/2 CAPACITOR (O).
- Look in the airplane cabin and use the 2/2 TOGGLE SWITCH on the panel (P).
- Click on the panel for a mini-game (Q).
- Stop the fuel supply to all 3 exits on the right (R).
- Click on the valves to open/close them, noting that the pressure may cause other valves to open or close.
- The tube will turn black when no fuel is present.
- Click on the valves in numerical order (1-5).
- Look at the engine, use the WRENCH then take the PROPELLER (S).
- Use the WRENCH on the shaft again (T).
- Take the BOLT ROD (U).
- Return to the plane.

- Look at the device on the left and place the 2 CAPACITORS into the 2 holes (A).
- Place the BATTERIES into the center (B).
- Once the gauge fills with green, take the batteries (C).
- The batteries will combine with the EMPTY REMOTE to become the REMOTE.
- Look at the hatch in the floor and use the PROPELLER to open it (D).
- Select the open hatch for a HOS.
- Locate all the items on the list.
- You will earn the NUMBER 3.
- Travel to the plane graveyard.
- Look at the box on the floor and place the NUMBER 3 and NUMBER 9 into the empty spots (D).
- This will trigger a mini-game.
- Move the numbers so that all the sets add up to 18.
- Per the clue, the center number should be 6 (F).
- Click on an outer number to swap it with the center number.
- The arrows will turn green when a set is correct.
- Take the LEVER, SPHERE ROD, and 1/2 EGGSHELL (G).
- Make sure to read the newspaper for a clue (H).
- Travel to reception.
- Look at the TV and use the REMOTE to turn it on (I).
- Make sure to click on the picture to find the clue (J).
- Look at the water wheel and use the TWEEZERS to get the COIN (K).
- Travel to the plane and look at the video game.
- Use the COIN on the slot to trigger the mini-game (L).
- Press the buttons (M) to create a path for the car (N) to follow to the flag (O).
- The path is shown on the left (P).
- Press the 'Race' button to begin the race (Q).
- Take the 2/2 EGGSHELL (R).
- Walk down to exit the plane.
- Look at the egg and place the 2 EGGSHELLS into the form (S).
- Take the DRAGONS from inside the egg (T).
- Look at the aquarium and select the code lock on the left for a mini-game (U).
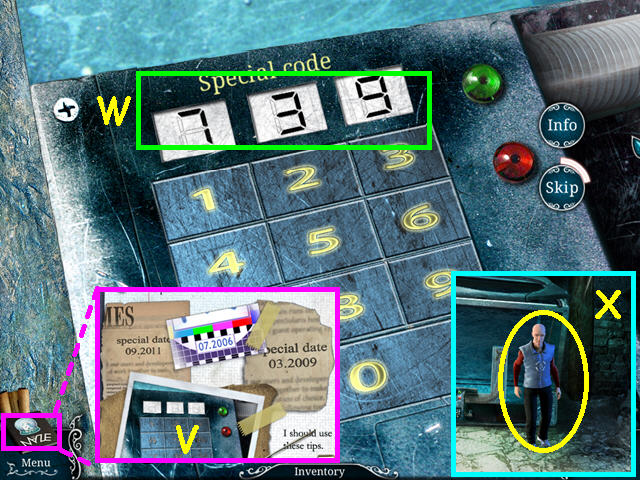
- Look in the diary for the 3 clues (V).
- Put the numbers in the order of the years 2006-2009-2011.
- Press the numbers 7-3-9 on the keypad (W).
- Talk to Josh (X).
- Travel to the plane graveyard.
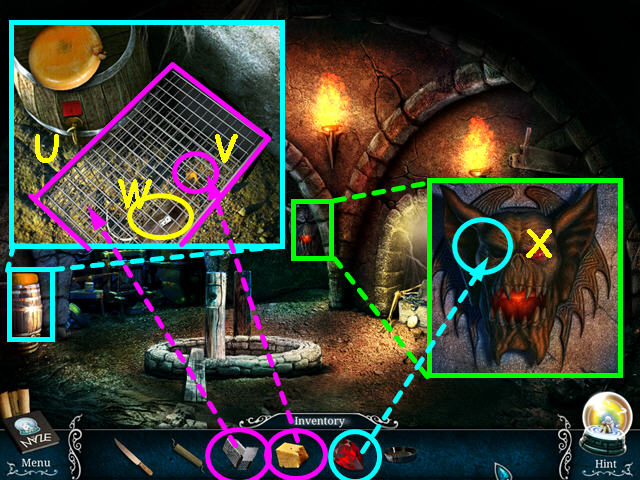
- Look at the winch and note the dragon box (A).
- Place the lever on the right of the winch (B).
- Talk to Lindsey (C).
- Look at the winch again and select the dragon box for a mini-game.
- Place the dragons on the box top trigger the mini-game (D).
- Place the tiles in the correct positions based on the number of dots and the lines.
- The top row has lines in the upper right corner, the 2nd row had no lines, the 3rd row has a line on the bottom, while the bottom row has lines in the lower left corner.
- The 1st column has 2 dots, the 2nd column has 4 dots, the 3rd column has 1 dot, and the 4th column has 3 dots.
- Take the DRAGON ROD (E).
- Walk down to enter the plane.
- Look at the chains mechanism.
- Use the BOLT ROD in the second position (F).
- Use the SPHERE ROD in the 3rd position (G).
- Take the 2/2 LOCK PART (H).
- Place the DRAGON ROD in the last position (I).
- Talk to Adrian (J).
- Travel to reception.
- Look at the lock on the girl (K).
- Place the 2 LOCK PARTS into the lock for a mini-game (L).
- Move the blue tiles to the top section and the red tiles to the bottom section.
- Move a tile to the empty space by sliding or jumping an adjacent tile.
- Please look at the screenshot for the solution.
- Talk to Cindy (M).
- Take the DRILL (N).
- Look at the door and use the DRILL to make a small hole (O).
- Use the MECHANICAL JAW on the metal door (P).
Level 6: The Roof
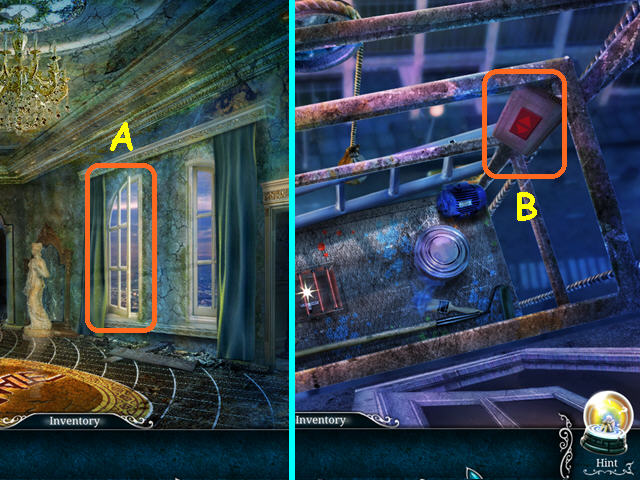
- Climb out the window (A).
- Press the up arrow on the scaffold control (B).
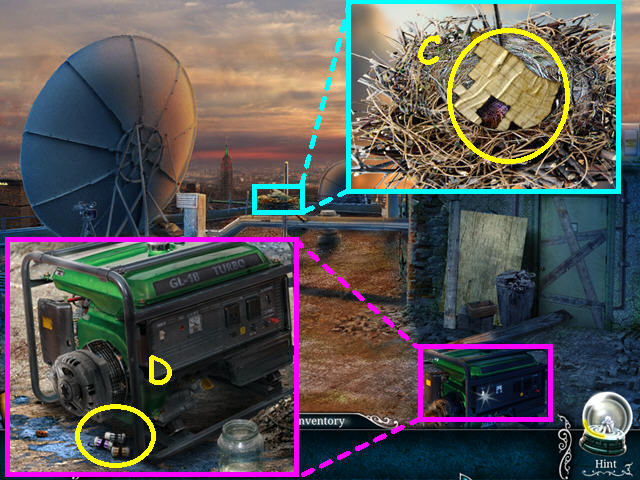
- Look at the bird's nest and take the 1/2 PIECE of PAPER (C).
- Look at the generator and take the FUSES (D).
- Walk down to take the scaffold down.
- Walk down again to return to the hall.
- Note the storage room (E).
- Look at the fuse box and place the FUSES inside for a mini-game (F).
- Connect the top fuses to the matching bottom fuses.
- Choose a fuse on the top and follow its wire to the bolt in the center section (G).
- Find the same color fuse in the bottom area and follow its wire up to the bolt in the center section.
- Click on the 2 bolts to connect the fuses.
- Look in the storage room.
- Take the SACK and the ACCESS CARD (H).
- Take the 2/2 PIECE of PAPER (I).
- Use the SCALPEL on the light pull to get a ROPE (J).
- Select the pipe system for a mini-game (K).
- Using the fill (L), empty (M), and transfer buttons (N), fill each of the 3 pipes to the green line (O).
- Our solution was: right fill button, right transfer button, left empty button, center transfer button, right transfer button, left empty button, right fill button, right transfer button, and right fill button.
- Take the 1/2 WRENCH PART (P).
- Exit to the scaffold.
- Look at the small box and place the 2 PIECES of PAPER onto the grid (Q).
- This will trigger a mini-game.
- Roll the red ball to the red square and roll the blue ball to the blue square.
- Click on a ball, then select the direction you wish to move.
- Move the red ball: right-up-left-up-left (R).
- Move the blue ball: left-up-right-up (S).
- Move the red ball: right-up-left- down (T).
- Move the blue ball to the left (U).
- Take the CROWN KEY (V).
- Enter the hall.

- Look at the glass dome and use the ACCESS CARD on the slot (W).
- Take the BLUE CRYSTALS (X).
- Look at the right window and use the CROWN KEY on the lock (Y).
- Select the right window for a HOS (Z).
- Locate all the items on the list.
- You will earn the ALLEN KEY.
- Return to the roof.
- Look at the vent and use the ALLEN KEY on the 4 bolts (A).
- Take the CAN OPENER and the STATUE ARM (B).
- Walk down to the scaffold.
- Look at the paint can and use the CAN OPENER on the top (C).
- Take the GREEN CRYSTALS (D).
- Walk to the hall.
- Look at the door on the left (E).
- Place the BLUE CRYSTALS and the GREEN CRYSTALS on the shelf to trigger a mini-game (F).
- Use the clues to determine how many crystals go in each box (G).
- Since 1 purple equals 4 red, then 3 purple equals 12 red.
- Since 1 blue equals 3 red, then 4 blue equals 12 red, which is equal to 3 purple.
- Since 1 green equals 2 blue, then 2 green equals 4 blue, which is equal to 3 purple.
- Place 2 green crystals in the upper box to equal 3 purple (H).
- Place 4 blue crystals in the lower box to equal 3 purple (I).
- Click on the door handle (J).
- Select the door for a HOS.
- Locate all the items on the list.
- You will earn the SAW.
- Return to the scaffold.
- Look at the ladder and use the SAW to cut the chains (K).
- Take the ladder (L).
- Return to the roof.
- Place the LADDER against the shed (M).
- Click on the villain and the hostage (N).
- Look at the air conditioner and use the ALLEN KEY on the 4 bolts (O).
- Use the SCALPEL to cut, then take the PLUG (P).
- Select the trash pile for a HOS (Q).
- Locate all the items on the list.
- You will earn the THERMAL CAMERA.
- Look at the box of sand and take the GLASS CUTTER (R).
- Place the SACK on the sand (S).
- Look at the generator and place the PLUG into the outlet (T).
- Attach the THERMAL CAMERA to the end of the wire (U).
- Return to the hall.
- Look at the mirror, use the GLASS CUTTER then take the piece of MIRROR (V).
- Look at the statue and place the STATUE ARM on it (W).
- Travel to the scaffold.
- Look at the lasers and use the MIRROR to block the rays (A).
- Take the FIRE ALARM HANDLE (B).
- Enter the hall and look at the fire alarm (C).
- Place the FIRE ALARM HANDLE in the alarm (D).
- Take the SHOVEL (E).
- Return to the roof.
- Look at the box of sand and use the SHOVEL on the sand (F).
- Take the SANDBAG (G).
- Return to the scaffold.
- Look at the pulley and hang the SANDBAG on the hook (H).
- Take the GENERATOR WINCH (I).
- Travel to the roof.
- Look at the generator and place the GENERATOR WINCH on the end (J).
- Place the ROPE on the winch (K).
- Pull the handle to start the generator (L).
- Take the thermal camera to see where the villain is hiding (M).
- Exit the thermal picture and click on the debris in front of the door (N).
- Click on the lock for a mini-game (O).
- Press the red buttons to spin the masks around (P).
- When a mask in the large circle (Q) matches one of the 3 yellow masks at the bottom, slide the matching mask up (R).
- The upper red button rotates the masks counterclockwise 5 places and the lower red button rotates the masks clockwise 3 places.

- Enter the door to the right of the lock (S).
- Take the 2/2 WRENCH PART which will combine with the 1/2 WRENCH PART and make the WRENCH (T).
- Return to the hall.
- Look in the storage room and use the WRENCH on the 4 bolts on the key case (U).
- Take the GUN KEY (V).
- Look at the statue and use the GUN KEY in the lock for a mini-game (W).
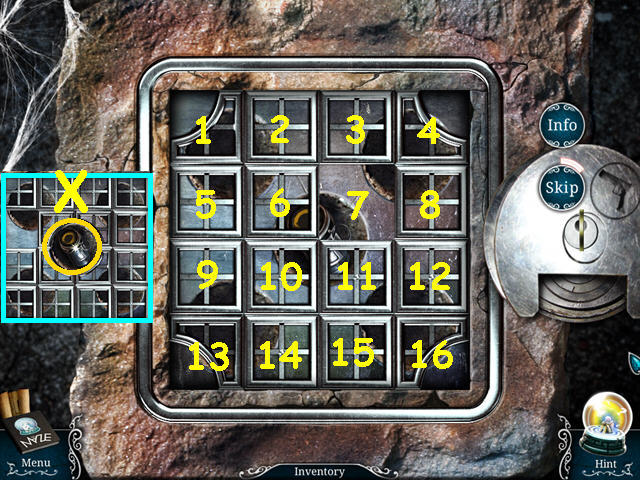
- Slide the tiles to create an opening in the center.
- Click on a tile adjacent to the empty spot to move it to that location.
- Click on the tiles in the numerical location in this order: 3-4-8-12-16-15-11-12-16-15-14-13-9-10-11-7-3-2-1-5-6-10.
- 14-15-11-7-3-2-1-5-6-10-11-7-3-4-8-12-11-7-6-5.
- Take the FLASH GRENADE from the center (X).
- Return to the room on the roof.
- Use the FLASH GRENADE on the villain (Y).
- Click on the villain to put him in handcuffs (Z).
- Congratulations! You have completed Urban Legends: The Maze!
Created at: 2011-09-17