

Walkthrough Menu
- General Tips & Information
- Prologue
- Chapter One: Finding Mouse
- Chapter Two: The Senator's Boat
- Chapter Three: The Senator's House
- Chapter Four: The Casino
- Chapter Five: The Bank
General Tips & Information
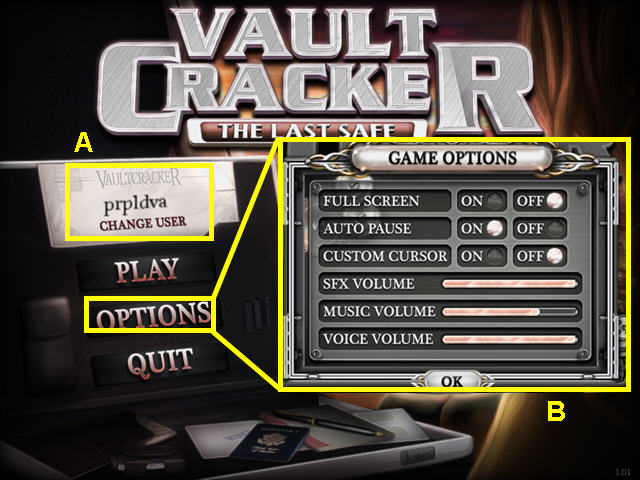
- From the main screen you may manage player profiles (A).
- The options menu allows for the adjustment of music and sounds volume (B).
- You may play this game in windowed or full screen mode.
- The custom cursor may be disabled.
- Enter your name to get started.
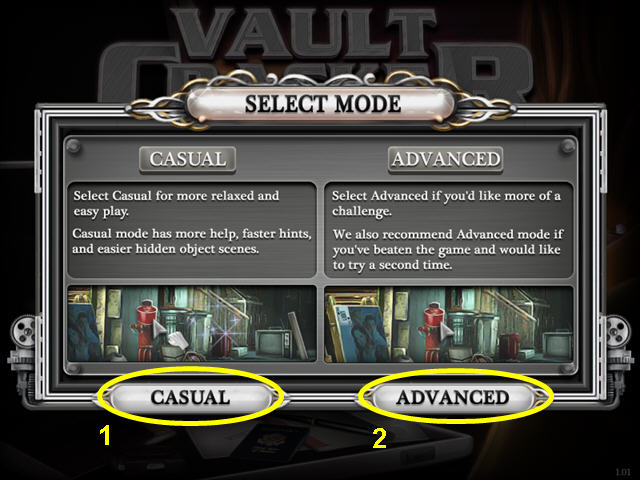
- Select the difficulty level of the game.
- Casual mode has easier hidden object scenes and shorter recharge times for hint and skip buttons, as well as sparkle hints.
- Advances mode is more challenging and has longer recharge times for hint and skip buttons.
- You have a brief tutorial once you start the game.
- You may skip mini-games once the skip meter is full.
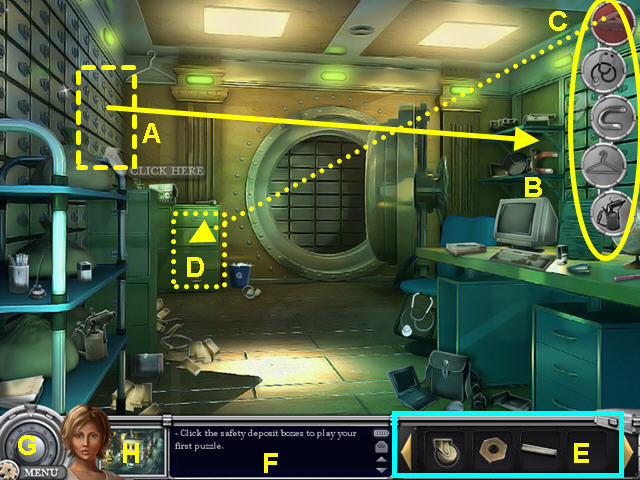
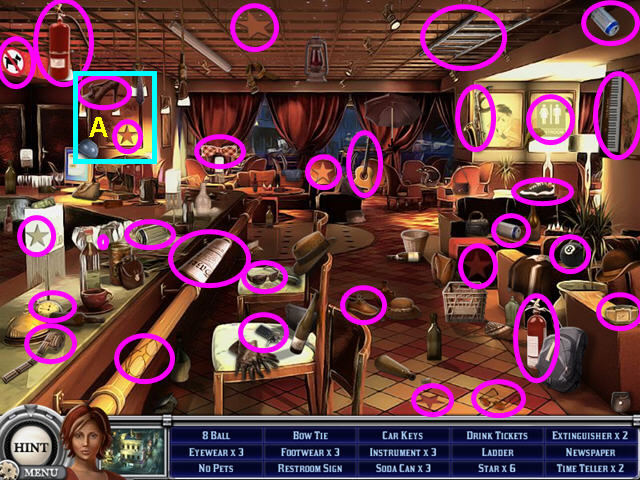
- Selecting a key item (A) will bring up circles with the required items (B).
- Locate the item in the scene and place them in the matching circle or on the key item.
- Some circles are in red (C) and are hidden, usually in hidden object scenes (D).
- Items you have found previously will be in your inventory (E).
- Goals and instructions are found in the message area (F).
- Click on the safe dial for a hint (G).
- Return to the over map by selection the icon to the left of Melissa's head (H).
- Key hot spots are marked with a dashed box.
- Items for that task are circled in the same color.
- Close-up and hidden object scenes that hold a required item are marked with a dotted box in the same color.
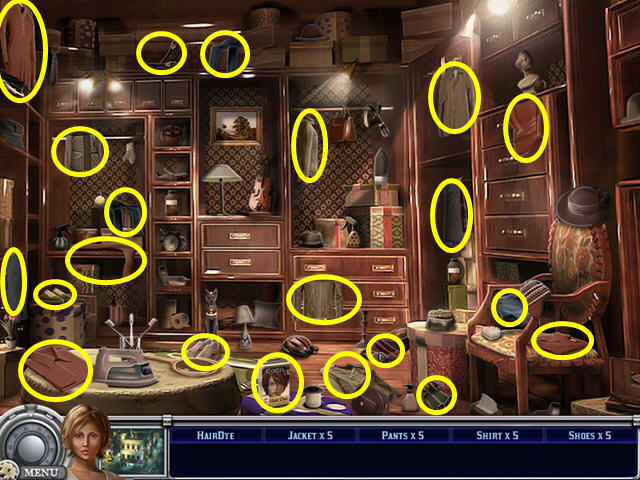
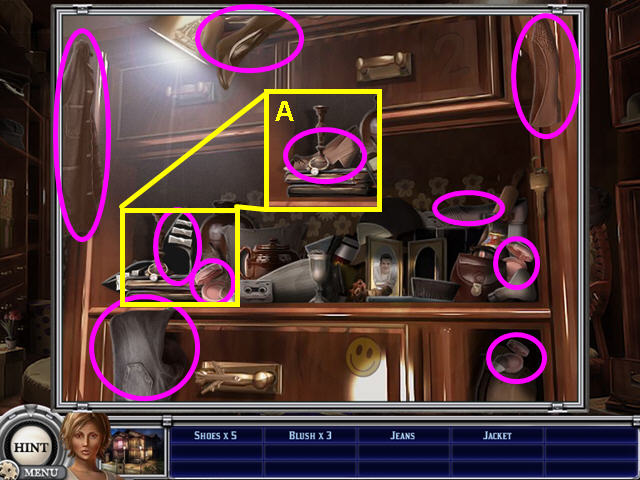
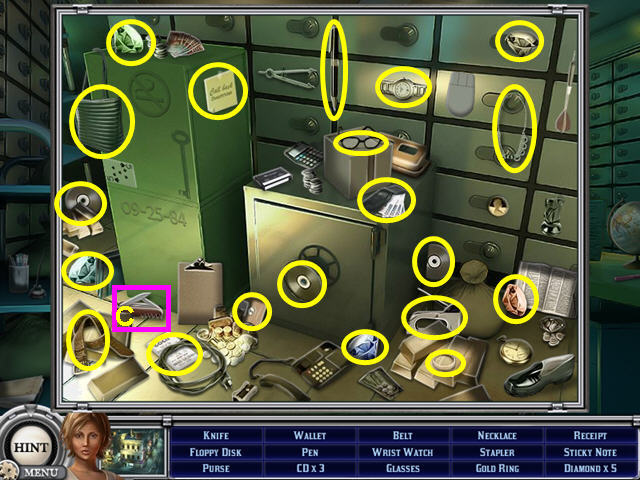
Prologue
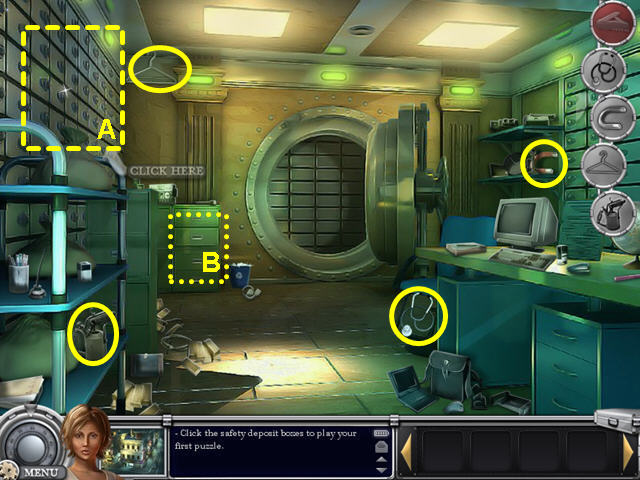
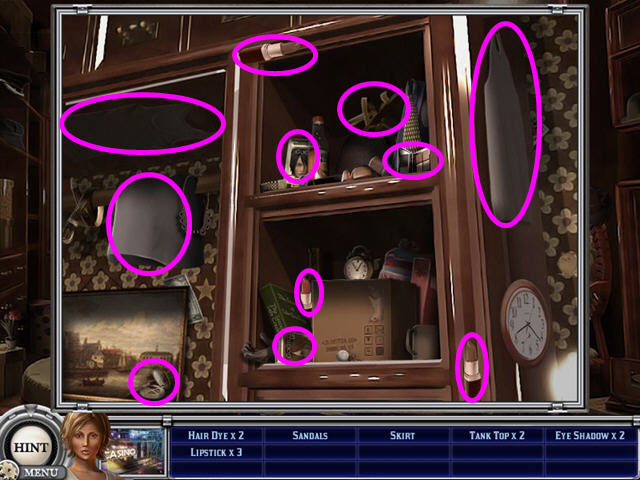
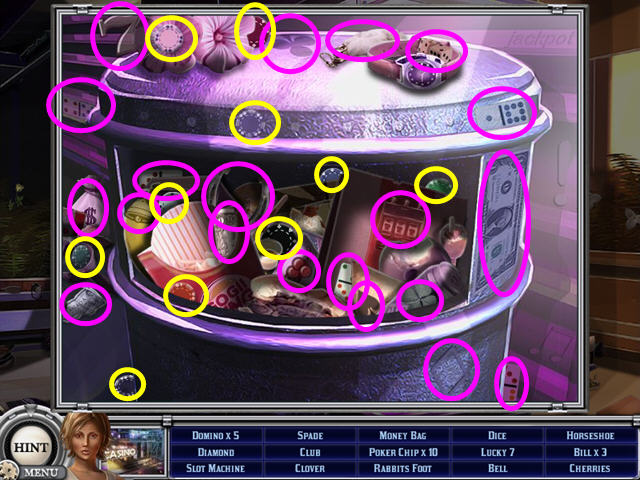
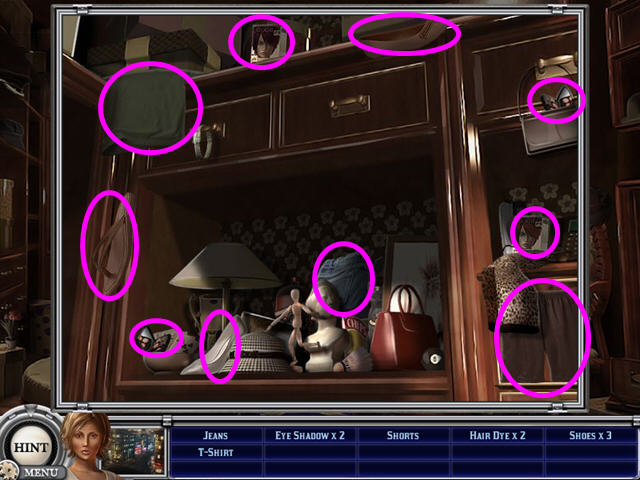
- Select the sparkling safe deposit boxes on the left (A).
- Collect the requested items and place them into the circles on the right.
- Select the cabinet for a hidden object scene (B).

- Find the KNIFE (C).
- Locate the remaining hidden objects on the list.
- Take the KNIFE from your inventory and place it in its circle.
- You are returned to the main menu of the game.
Chapter One: Finding Mouse
- Select PLAY to continue the game.
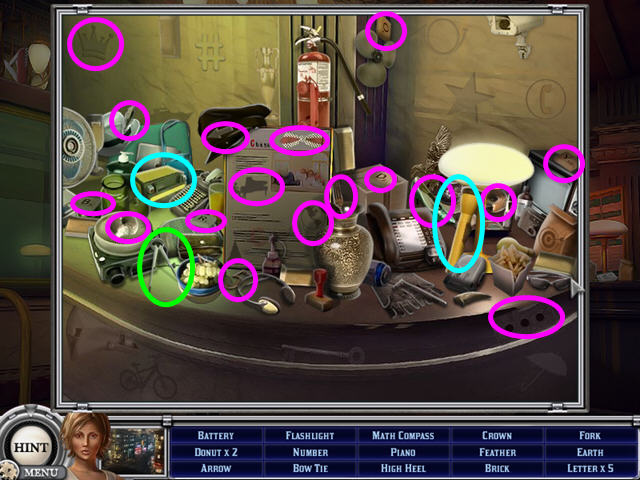
- Locate all the hidden objects on the list.
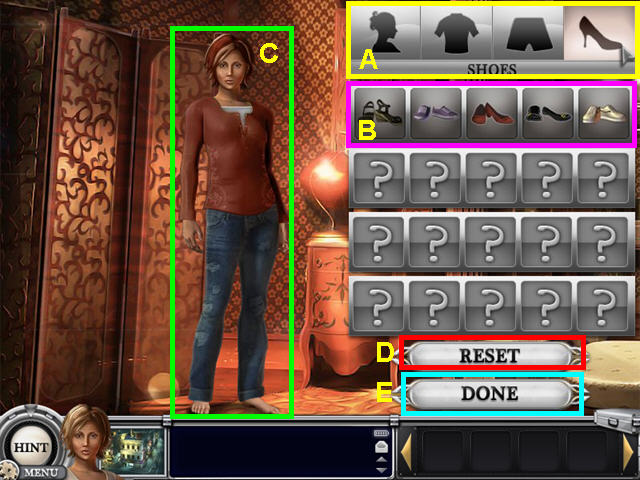
- Select the area to change (A).
- Select the item to wear or the hair color (B).
- You can see how each item looks on Melissa (C).
- Press the Reset button to remove everything (D).
- Press the Done button when you like what she is wearing (E).
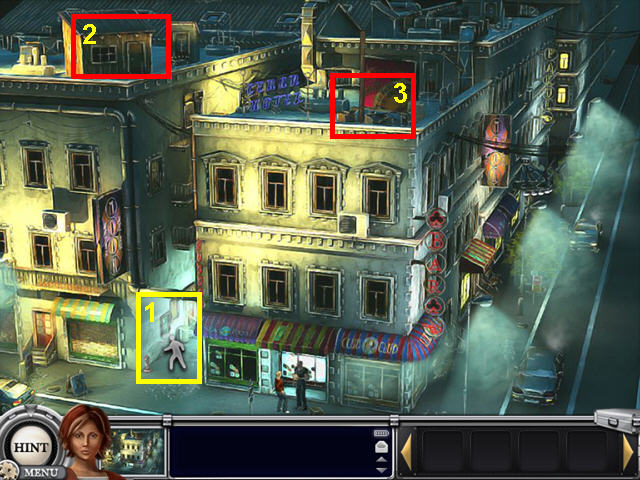
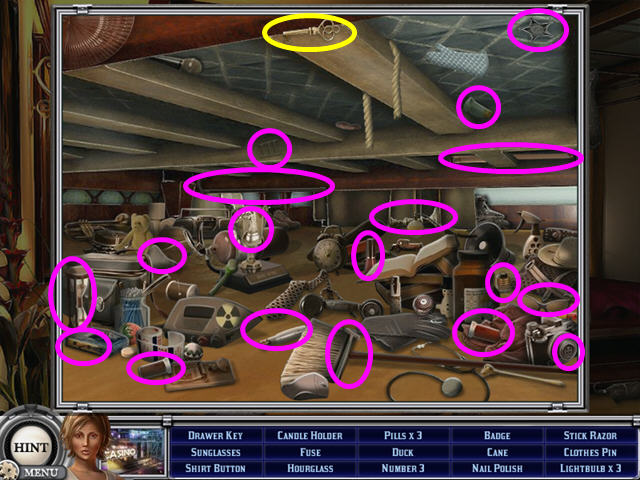
- After finding out you are not on the guest list, go to the alley (1).
- There are two other locations on this map, the work-shed (2) and the rooftop (3), but they are not yet accessible.
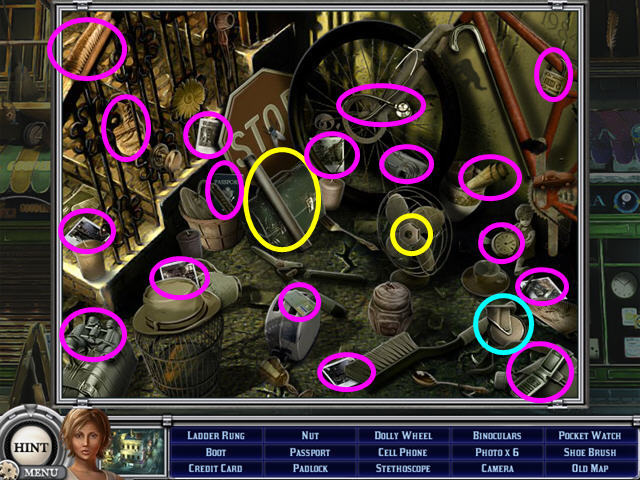
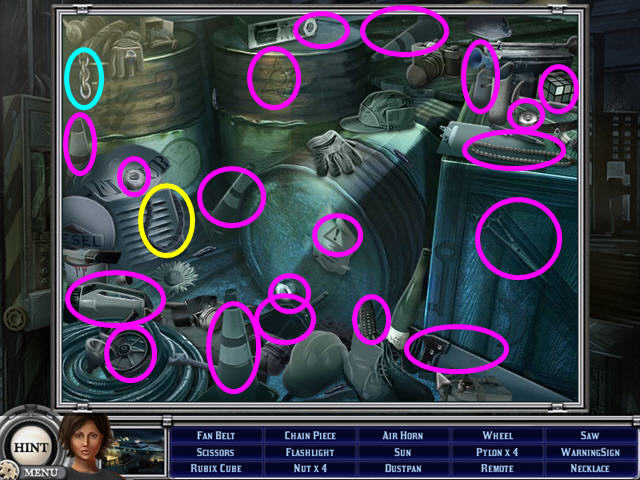
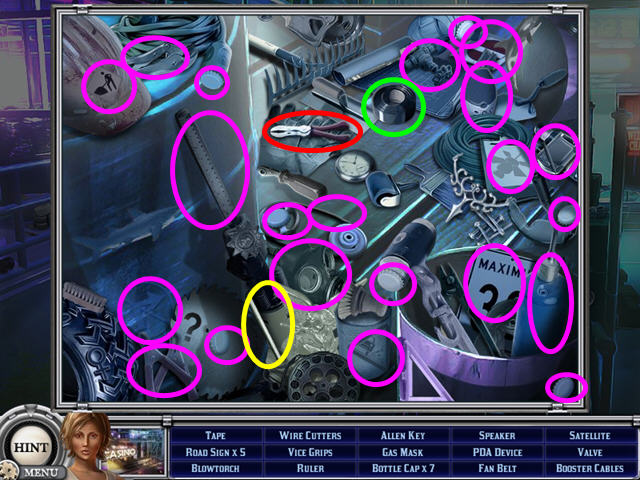
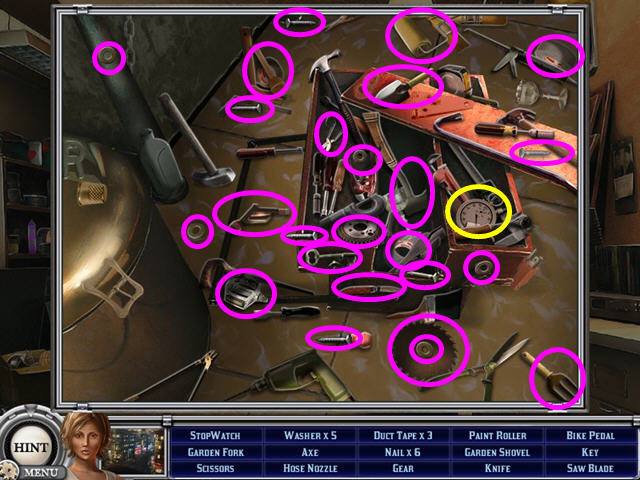
- Select the close-up of the garbage cans near the fire hydrant for a hidden object scene (A on the next screenshot).
- Locate all the hidden objects on the list.
- The LADDER RUNG, NUT and DOLLY WHEEL will go into your inventory automatically.
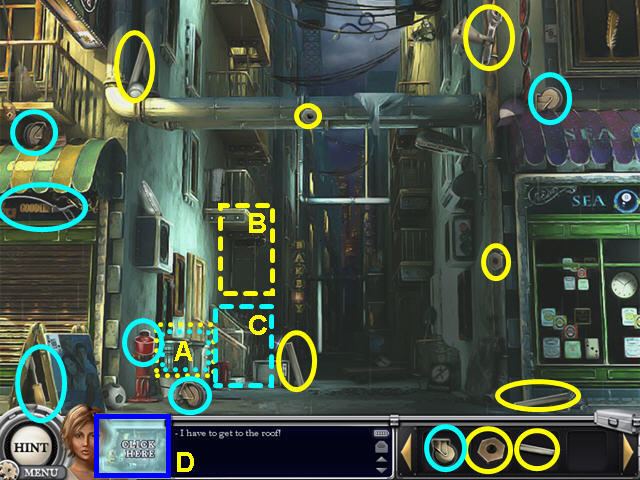
- Select the fire escape ladder and locate the possible items (B).
- Use the LADDER RUNG and NUT from your inventory to complete the collection.
- Select the dumpster under the fire escape ladder and collect the required items (C).
- Use the DOLLY WHEEL from your inventory to complete the collection.
- Click on the map button that says“Click Here” to the right of Melissa's face (D).
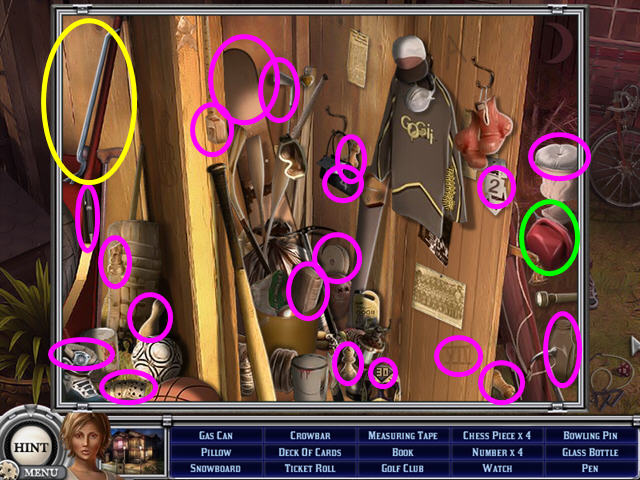
- Select the work-shed at the top of the left building.
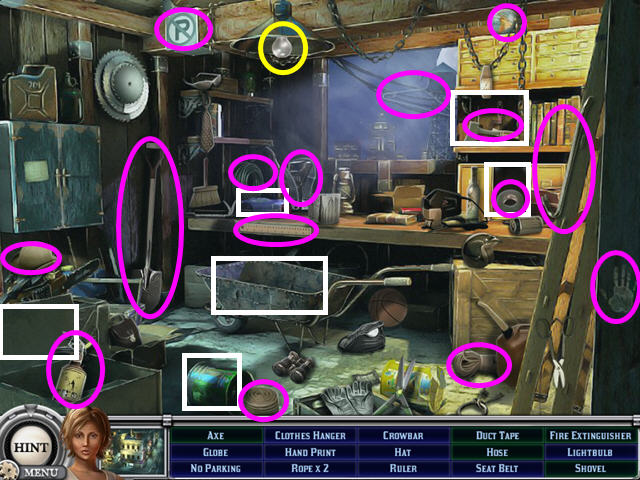
- Some items need to be moved to reveal the items they are hiding- they are marked in white.
- Locate all the hidden objects on the list.
- The LIGHT BULB will go automatically into your inventory.
- Return to the alley.
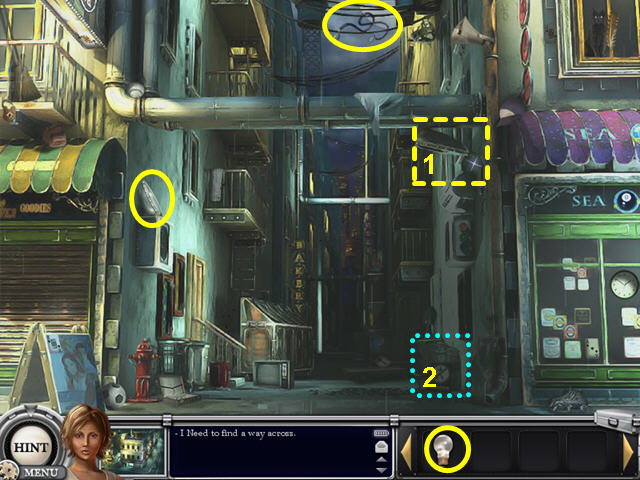
- Select the street lamp and find the required items (1).
- Use the LIGHT BULB from your inventory to complete the collection.
- Select the garbage cans on the right side of the alley for a hidden object scene (2).
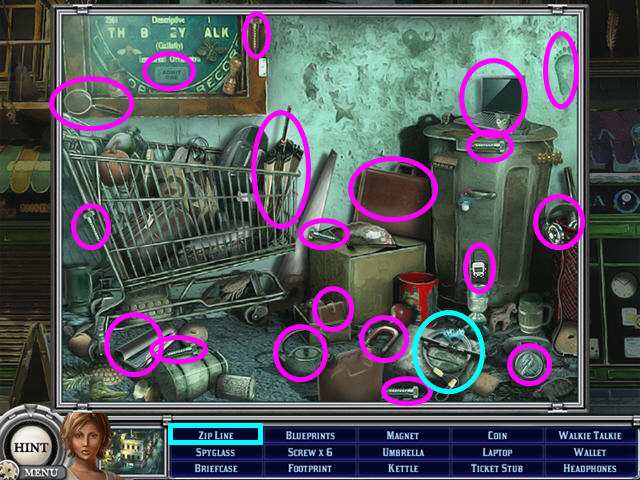
- Locate all the hidden objects on the list.
- The ZIP LINE will go automatically into your inventory.
- Click on the map button to the right of Melissa's face.
- Select the rooftop of the right building.
- Melissa will automatically use the ZIP LINE.
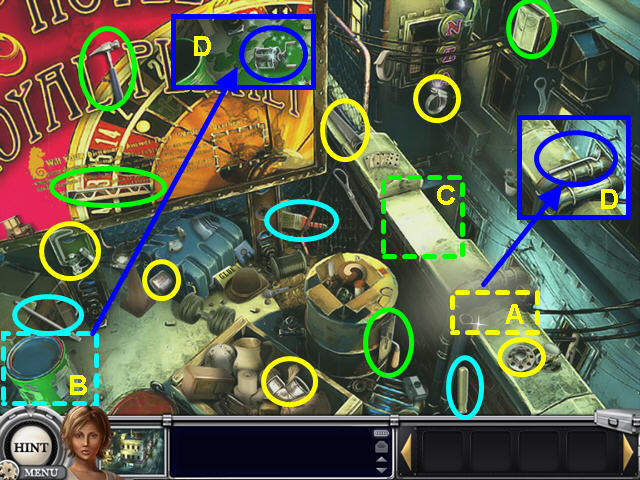
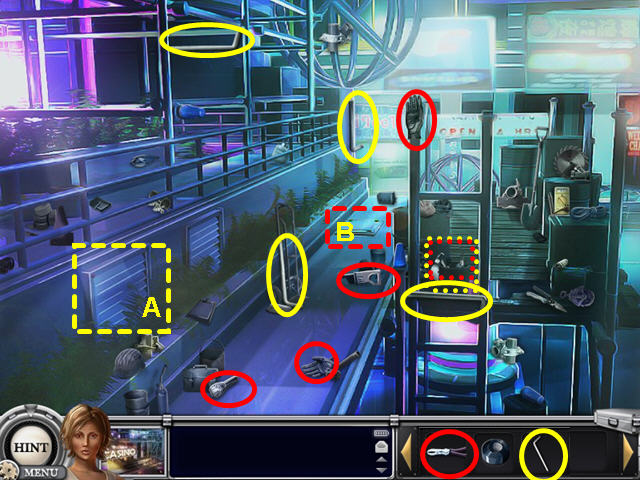
- Select the area with the missing pipe on the right and find the required items (A).
- Select the paint can on the left and find the required items (B).
- Select the area on the safety wall with the missing brick and find the required items (C).
- Take the LOCK PICK and the REEL (D).
- Click on the map button to the right of Melissa's face.
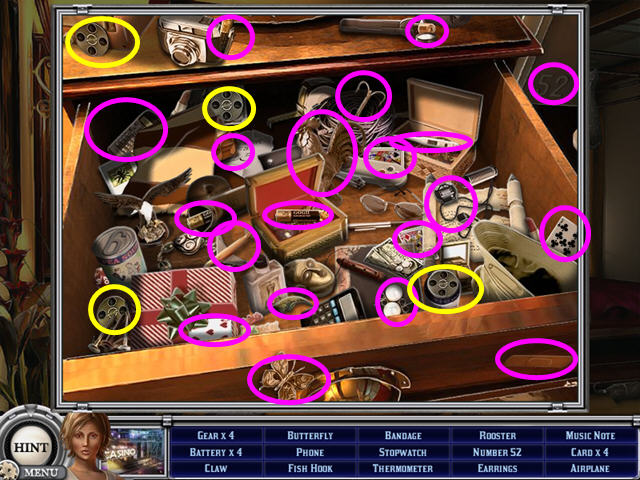
- Select the work shed on the left building.
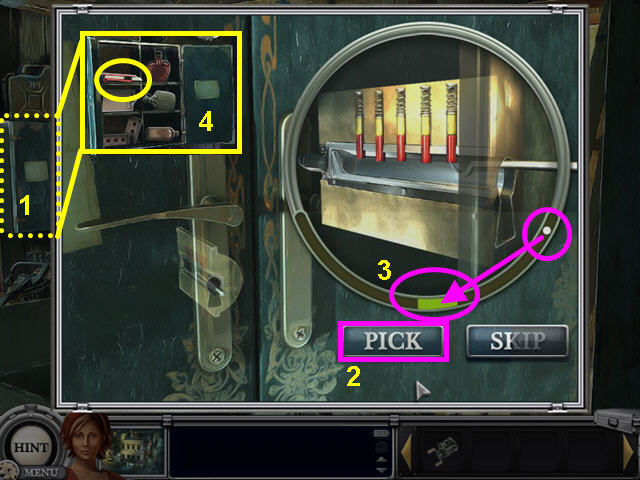
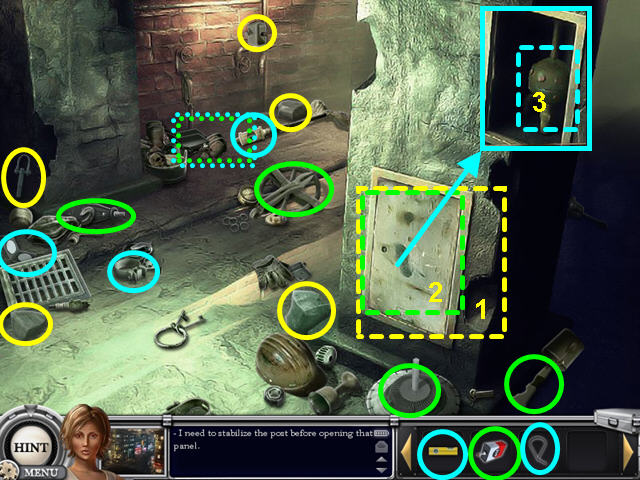
- Use the LOCK PICK to open the blue cabinet on the left (1).
- Press the “PICK” button (2) when the white ball is in the green section (3).
- You will need to repeat 4 additional times.
- Should you click outside the green section, you will need to restart the process.
- Take the KNIFE from the cabinet (4).
- Click on the map button to the right of Melissa's face.
- Select the rooftop of the right building.
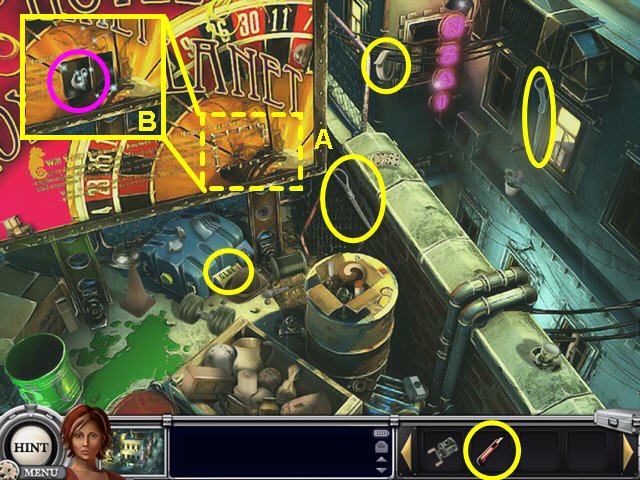
- Select the patch on the billboard and collect the items (A).
- Use the KNIFE from your inventory to complete the collection.
- Take the HOOK (B).
- Melissa will automatically use the hook and reel to add here name to the guest list.
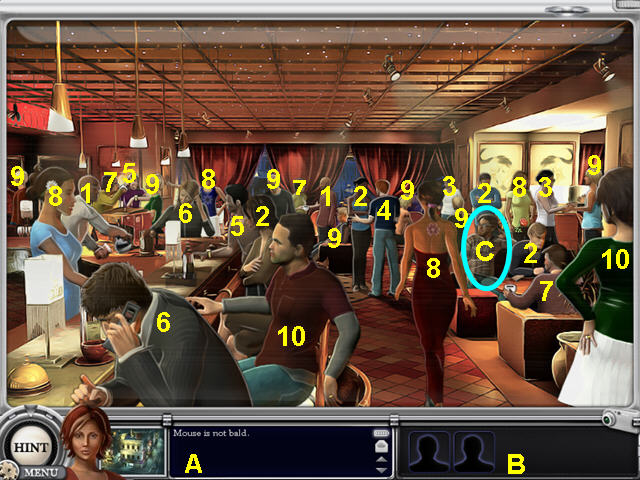
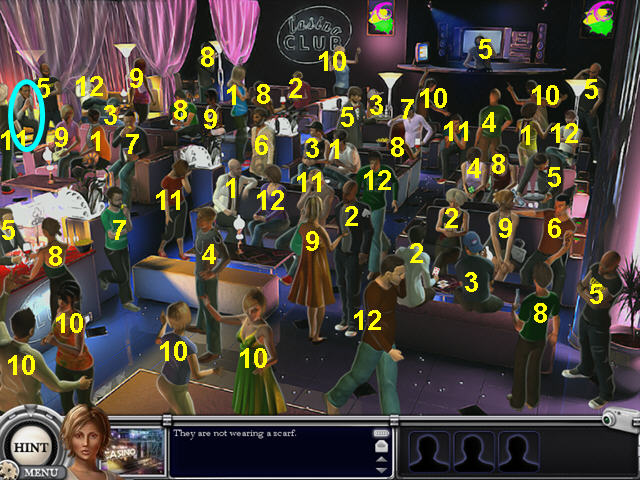
- Click on the people to eliminate them as Mouse by the listed characteristic (A).
- The number of people with the characteristic will be on the right (B).
- Mouse is not bald- click on the 2 bald men (1).
- Mouse's arms are not crossed- 4 people (2).
- Mouse is not wearing a white shirt- 2 people (3).
- Mouse doesn't have red hair- 1 person (4).
- Mouse is not wearing a watch- 2 people (5).
- Mouse is not talking on the phone- 2 people (6).
- Mouse does not like coffee- 3 people (7).
- Mouse was never a fan of flowers- 4 people (8).
- Mouse is not a blond- 7 people (9).
- Mouse is not married- 2 people (10).
- Only Mouse remains (C).
- Collect all the hidden objects on the list.
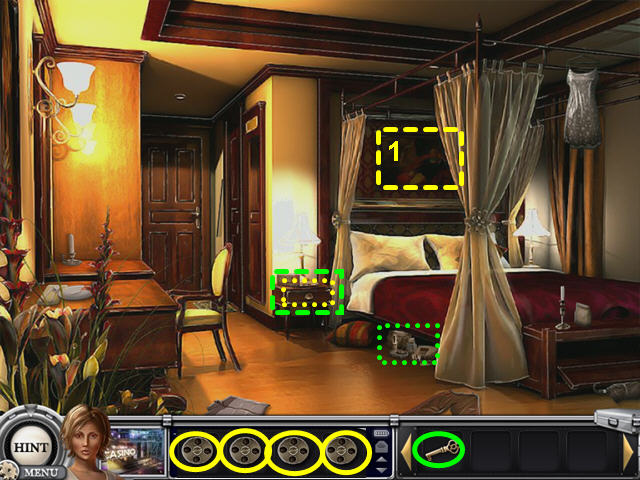
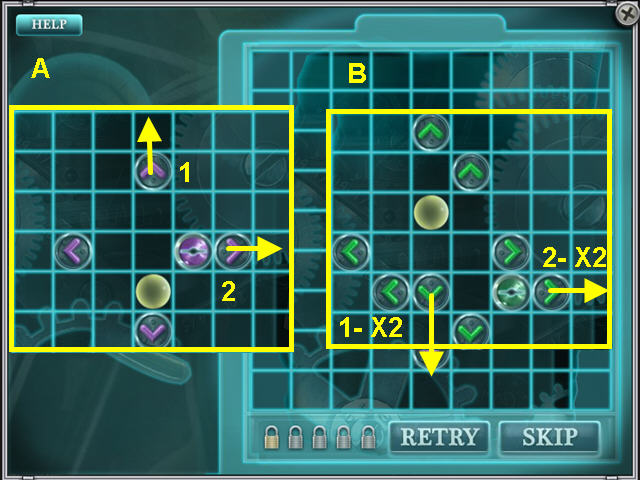
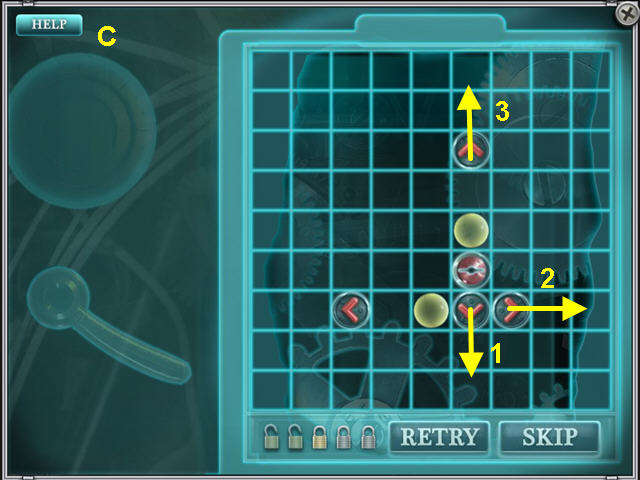
- Click on the painting on the left back wall to trigger a mini-game (A).
- The object of this mini-game is to remove all but one of the balls.
- Click on a ball, then a direction arrow to roll a ball and knock one off the board.
- Move the balls in numerical order in the indicated direction.
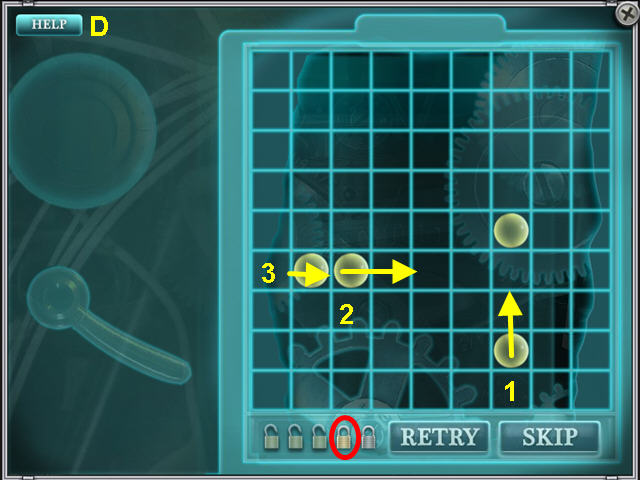
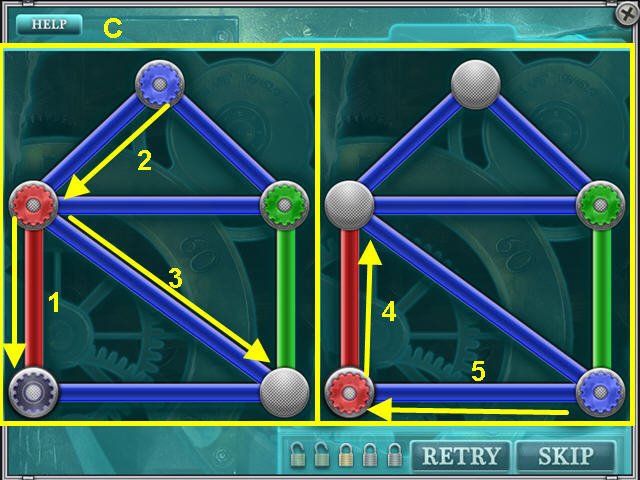
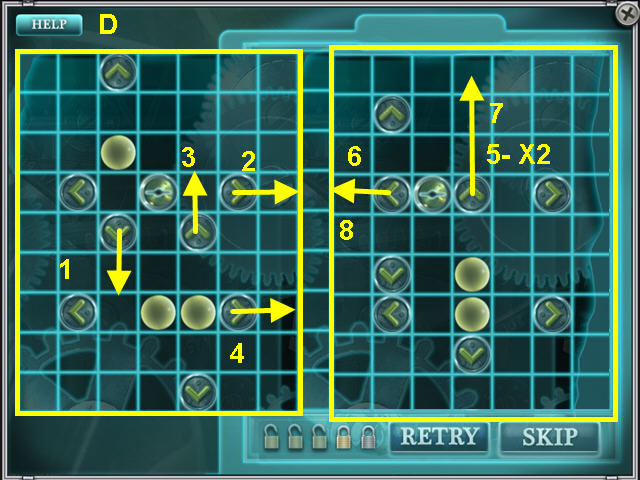
- There are 5 puzzles to complete-please look at the following solutions.
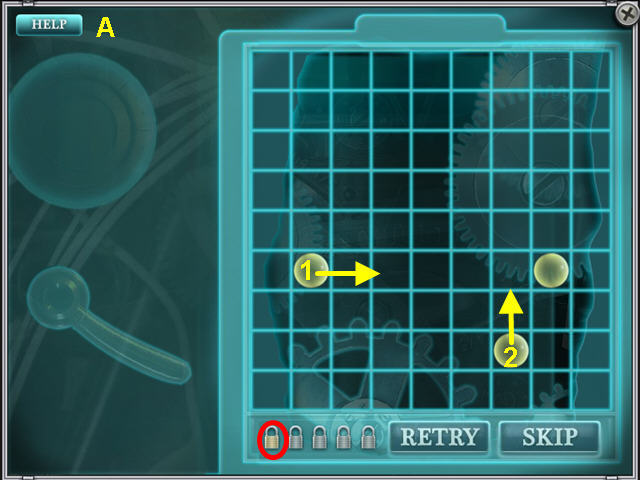
- This solution applies to the first puzzle (A).
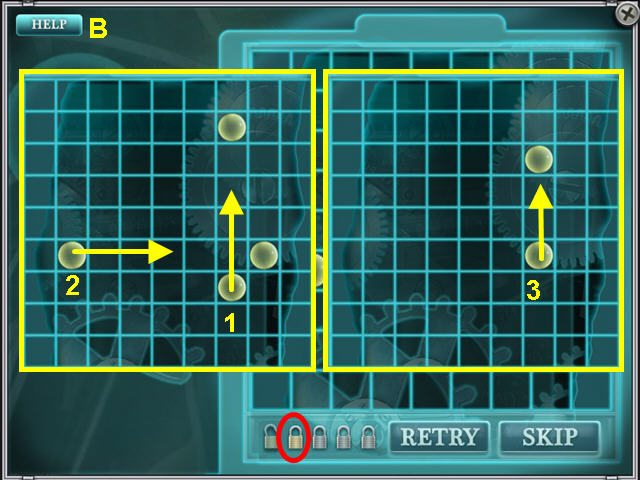
- This solution applies to the second puzzle (B).
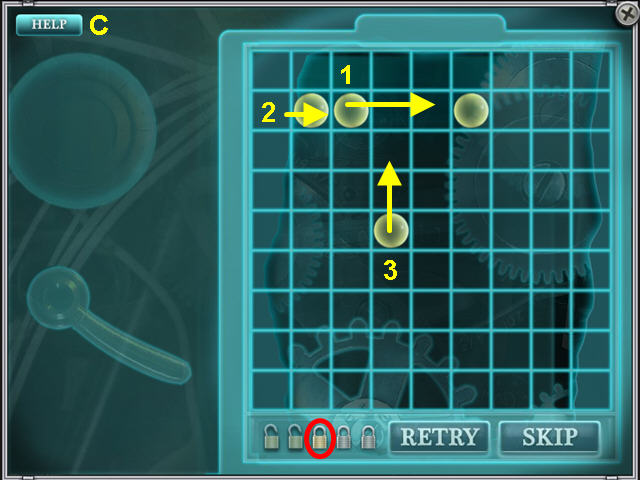
- This solution applies to the third puzzle (C).
- This solution applies to the fourth puzzle (D).
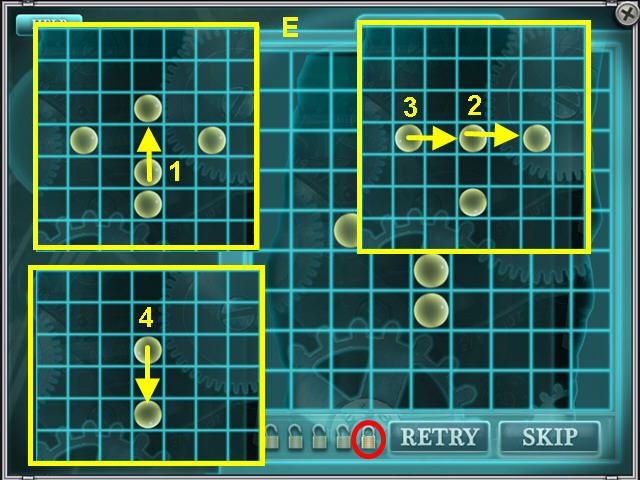
- This solution applies to the fifth puzzle (E).
- Take Mouse's file from the safe once the puzzles are completed.
Chapter Two: The Senator's Boat
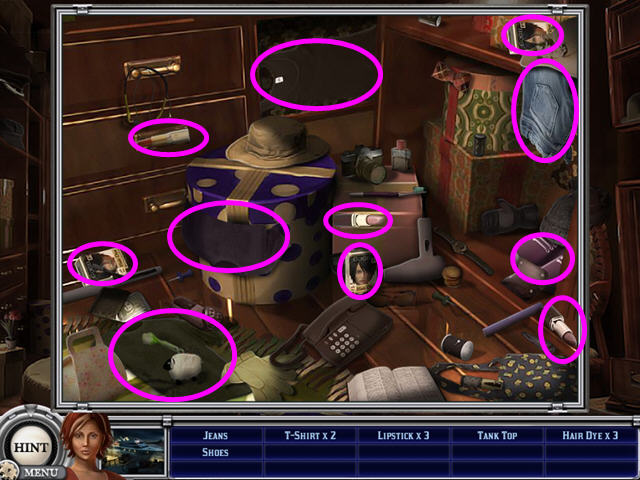
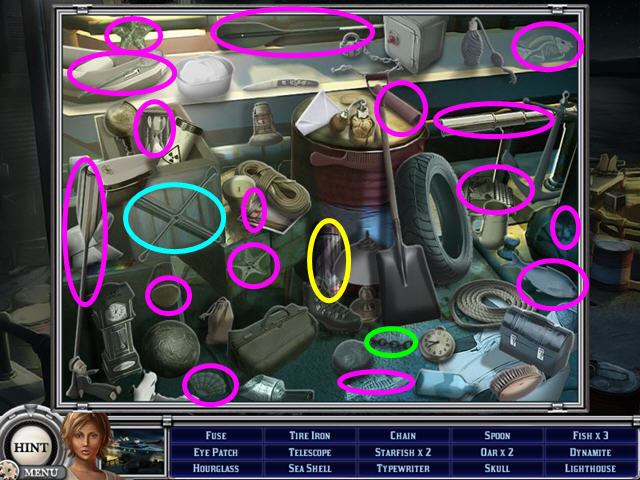
- Select the hat box on the left floor for a hidden objects scene.
- Locate all the items on the hidden object list.
- Select Melissa's hair color, make-up and clothing.
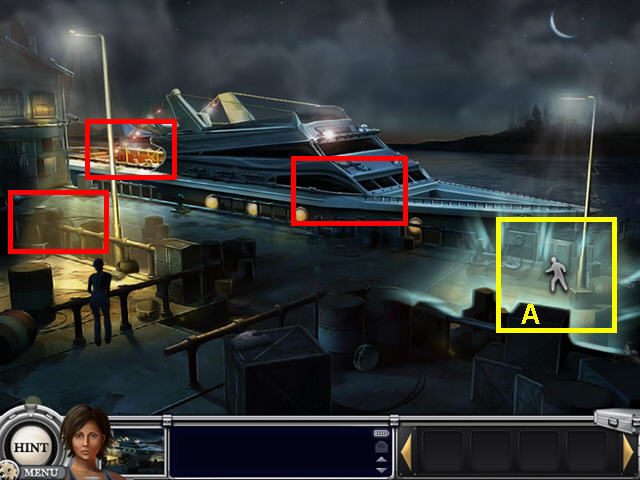
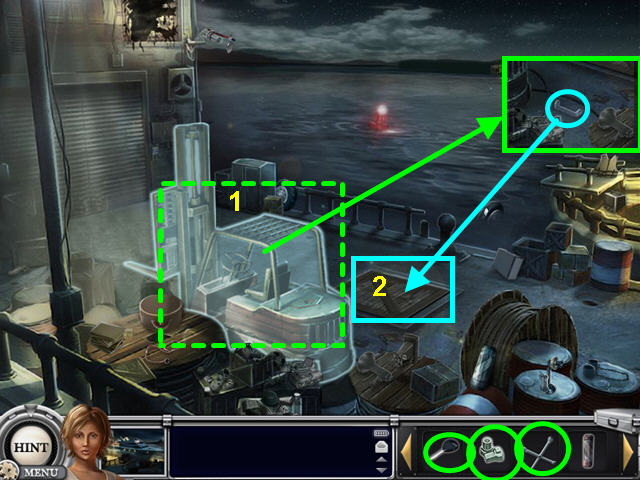
- Select the right end of the dock (A).
- There are two other locations on this map, the warehouse area (2) and the yacht (3), but they are not yet accessible.
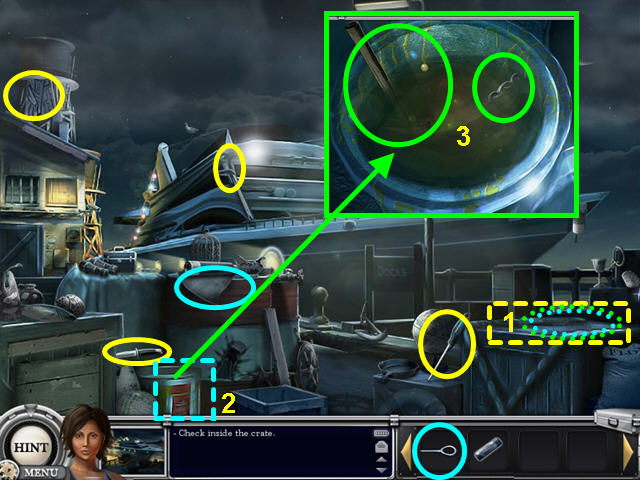
- Select the lid of the crate and find the required items (1).
- Look inside the crate for a hidden object scene.
- Select the large can and collect the items (2).
- Use the CAN OPENER from your inventory to complete the collection.
- Look inside the can and take the CHAIN and the HAMMER (3).
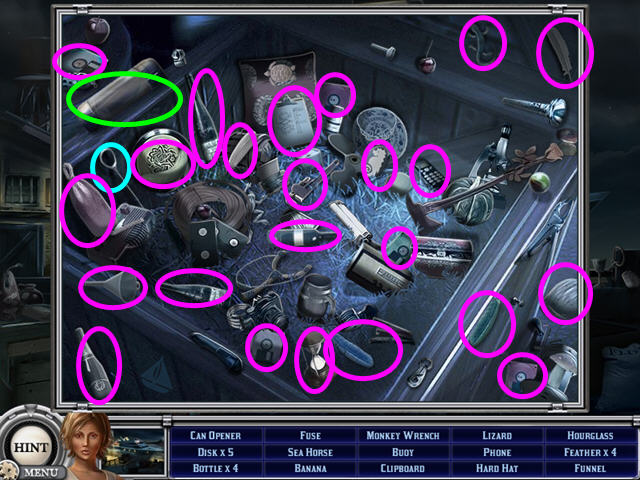
- Locate all the hidden objects on the list.
- The FUSE and CAN OPENER will automatically go into your pocket.
- Click on the map button to the right of Melissa's face.
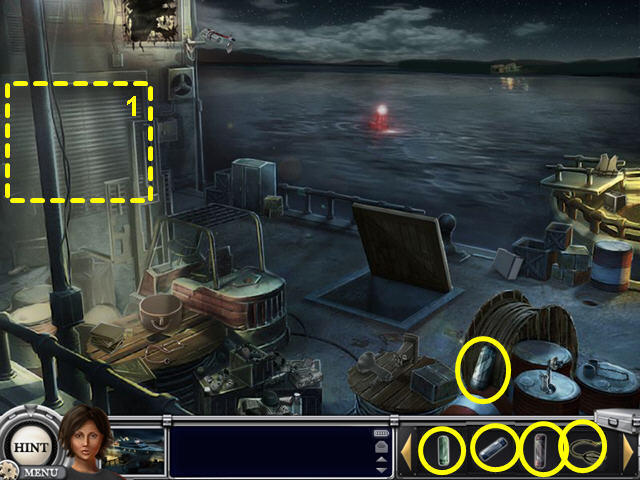
- Select the lighted area on the left.
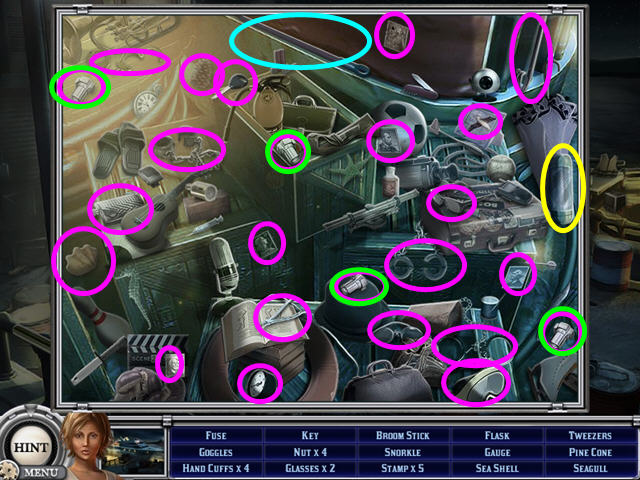
- Select the sparkling area bottom center for a hidden object scene.
- Collect all the items on the list.
- The FUSE, KEY, NUTS, and BROOMSTICK will go automatically into your inventory.
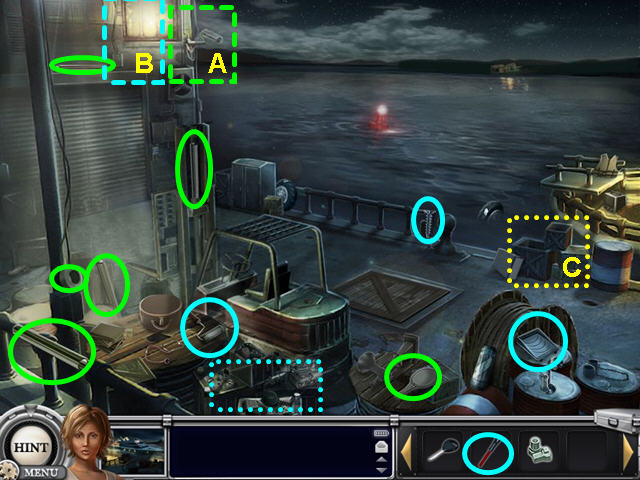
- Choose the video camera and locate the required items (A).
- Choose the window and locate the required items (B).
- Use the BROOM STICK from your inventory to complete the collection.
- Select the crates near the boat for a hidden object area (C).
- Collect all the items on the list.
- The FUSE, TIRE IRON, and CHAIN will go automatically into your inventory.
- Select the forklift and find the required items (1).
- Use the TIRE IRON from your inventory to complete the collection.
- Take the HANDLE and use it on the trap door (2).
- Enter the trap door.
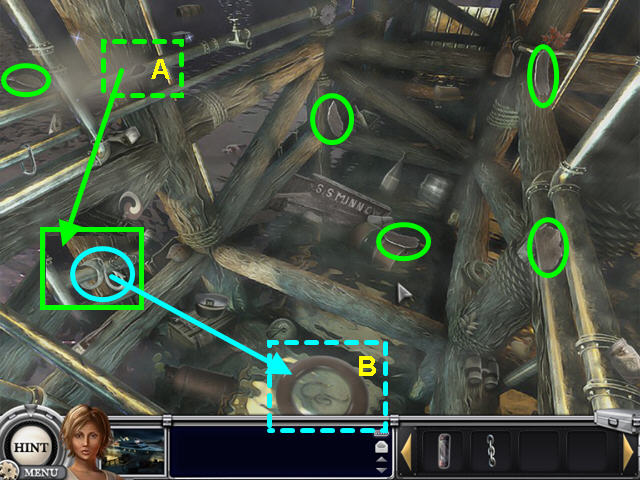
- Select the broken pipe and find the needed pieces (A).
- Select the life ring and use the hook that was hidden by the steam (B).
- Click on the map button to the right of Melissa's face.
- Select the warehouse door.
- Select the warehouse door and find the required items (1).
- Use the 3 FUSES and the WIRE from your inventory to complete the collection.
- Click on the open door to enter.
- Select the sparkling area bottom center for a hidden object scene.
- Collect all the items on the list.
- The FAN BELT and CHAIN will go automatically into your inventory.
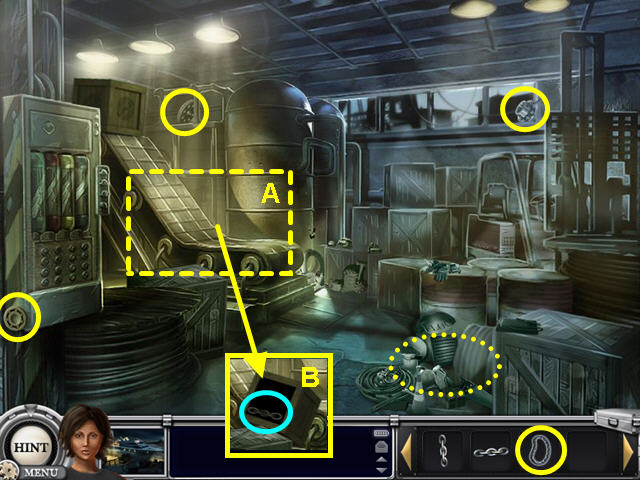
- Select the conveyor and find the required items (A).
- Use the FAN BELT from your inventory to complete the collection.
- The CHAIN from the box that falls (B).
- Click on the map button to the right of Melissa's face.
- Select the right end of the dock.
- Look inside the sparkling crate for a hidden object scene.
- Collect all the items on the list.
- The SLING SHOT and MARBLE will go automatically into your inventory.
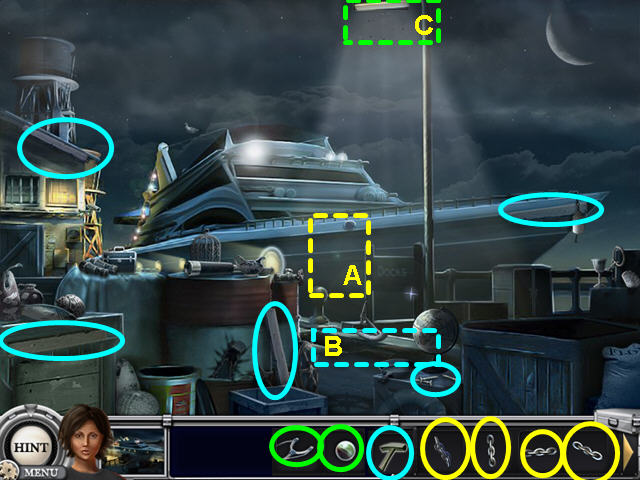
- Select the hull of the boat and use the 4 CHAINS from your inventory (A).
- Select the curb and find the required items (B).
- Use the HAMMER from your inventory to complete the collection.
- Select the street lamp and use the marble and slingshot from your inventory (C).
- Click on the map button to the right of Melissa's face.
- Select the bow front of the boat.
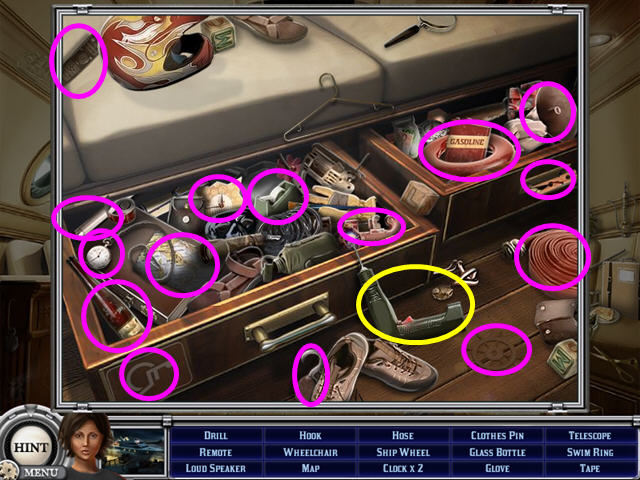
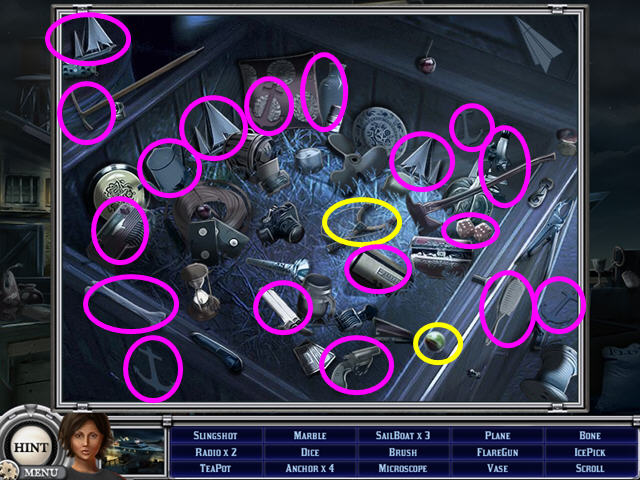
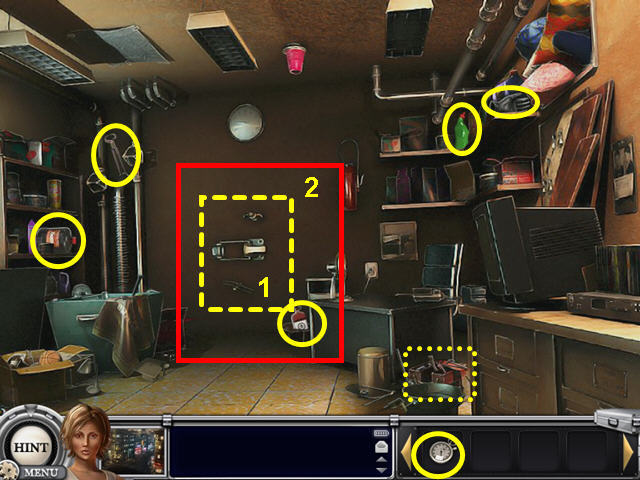
- Look the drawers under the left seats for a hidden object scene.
- Collect all the items on the list.
- The DRILL will go automatically into your inventory.
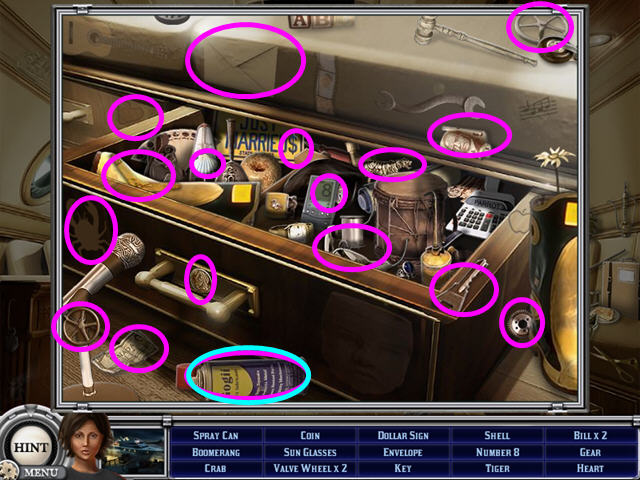
- Look the drawers under the right seats for a hidden object scene.
- Collect all the items on the list.
- The SPRAY CAN will go automatically into your inventory.
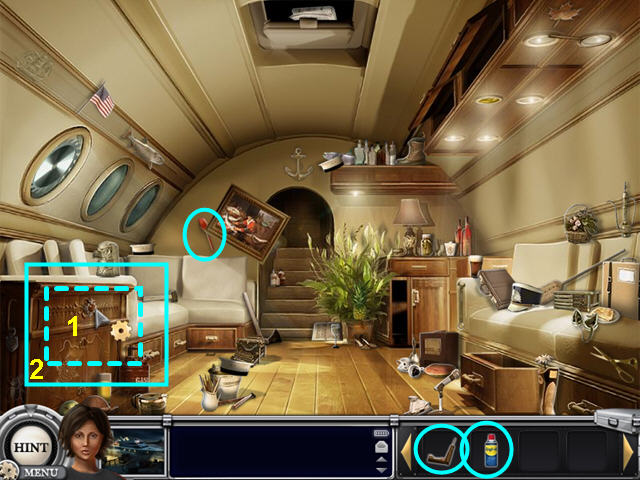
- Click on the painting to reveal the spatula.
- Click on the left cabinet and find the required items (1).
- Use the DRILL and SPRAY CAN from your inventory to complete the collection.
- Click on the left cabinet again to trigger a mini-game (2).
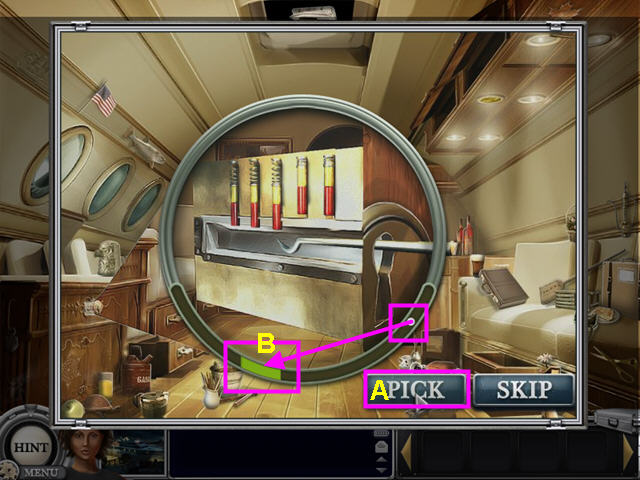
- Press the “PICK” button (A) when the white ball is in the green section (B).
- You will need to repeat 4 additional times.
- Should you click outside the green section, you will need to restart the process.

- Click on the left cabinet again to trigger another mini-game.
- The object is to duplicate the pattern only partially shown.
- Click on tiles to change position.
- There are 5 puzzles to solve (1-5).
- Select the glowing stairs to exit the room.
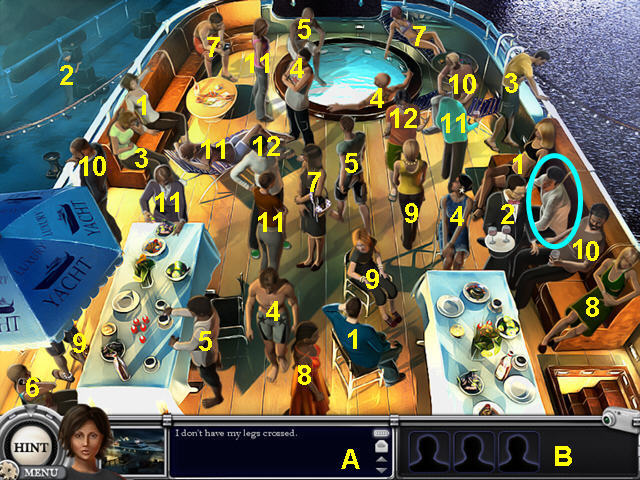
- Determine who the Senator is mingling with.
- Click on the people to eliminate them by the listed characteristic (A).
- The number of people with the characteristic will be on the right (B).
- I don't have my legs crossed- 3 people (1).
- I am not working- 2 people (2).
- I am not seasick- 2 people (3).
- I don't have any stars- 4 people (4).
- I'm not barefoot- 3 people (5).
- I don't have a phone- 2 people (6).
- I didn't bring a swimsuit- 2 people (7).
- I am not wearing a dress- 2 person (8).
- I am not wearing any jewelery- 3 people (9).
- I have no facial hair- 3 people (10).
- I am not a brunette- 5 people (11).
- I hate green- two people. (12).
- The remaining person is Russian Mobster, Evgeni Morozov.
Chapter Three: The Senator's House
- Select the sparkling area on the upper right for a hidden object area.
- Collect all the items on the list.
- One shoe is hidden behind another (A).
- Choose Melissa's hair, make-up and clothing.

- Select the area on the left, by the dog house (1).
- There are two other locations, the front gate (2) and the side of the house (3) that will become available later.

- Look at the opening of the dog house for a hidden object area.
- Collect all the items on the list.
- The WATER BOWL, WRENCH, POWER CORD, and VALVE HANDLE will go automatically into your inventory.
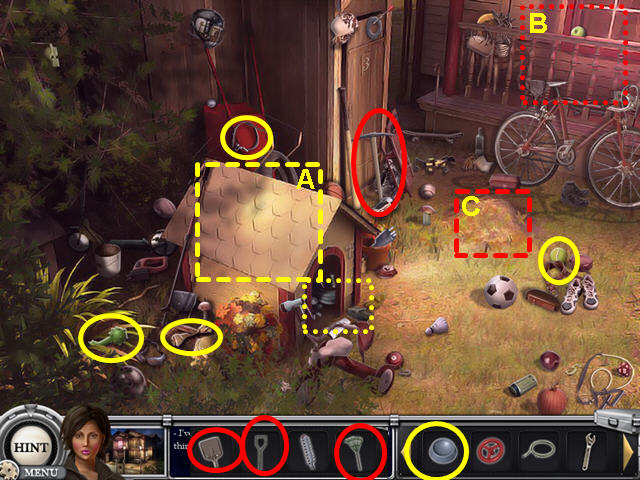
- Click on the dog house and find the required items (A).
- Use the WATER BOWL from your inventory to complete the collection.
- Select the porch for a hidden objects area (B).
- Click on the dirt mound and find the required items (C.
- Use the RAKE, SHOVEL HANDLE, and SHOVEL BLADE from your inventory to complete the collection.
- Collect all the items on the list.
- The RAKE, SHOVEL HANDLE, TRIMMER BLADE, and SHOVEL BLADE will go automatically into your inventory.
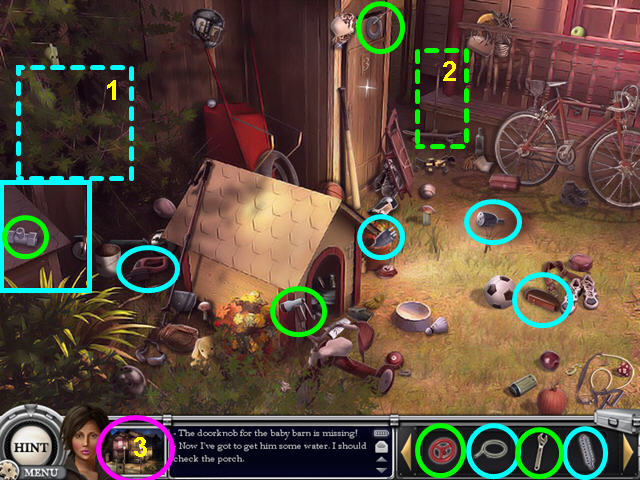
- Click on the bushes on the upper right and locate the required items (1).
- Use the TRIMMER BLADE, and POWER CORD from your inventory to complete the collection.
- Click on the dripping faucet by the porch and locate the required items (2).
- Use the TRIMMER BLADE, and POWER CORD from your inventory to complete the collection.
- Click on the map button to the right of Melissa's face (3).
- Select the front gate.
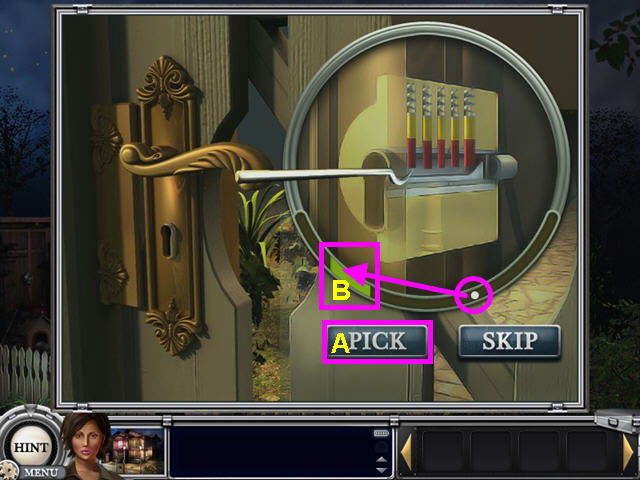
- Press the “PICK” button (A) when the white ball is in the green section (B).
- You will need to repeat 4 additional times.
- Should you click outside the green section, you will need to restart the process.
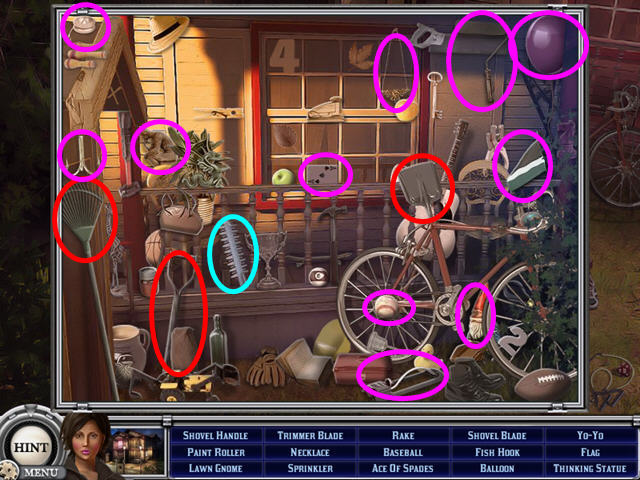
- Select the lighted window on the right side of the house.
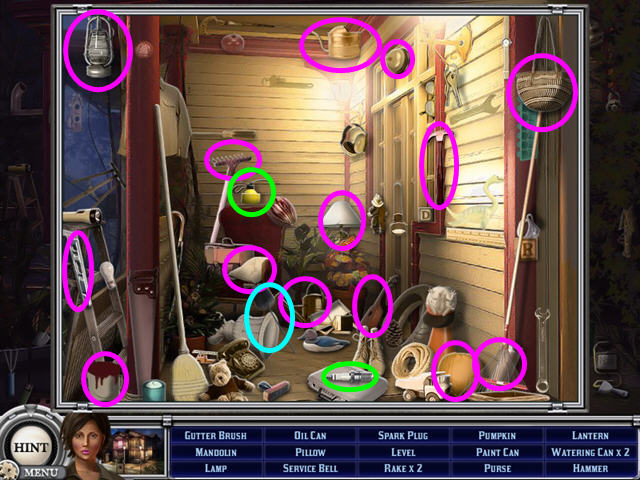
- Click on the left porch for a hidden objects area.
- Collect all the items on the list.
- The GUTTER BRUSH, OIL CAN, and SPARK PLUG will go automatically into your inventory.
- Click on the leaky gutter pipe and locate the required items (1).
- Use the GUTTER BRUSH from your inventory to complete the collection.
- Take the DOOR KNOB that falls from the gutter.
- Click on the carriage light and locate the required items (2).
- Click on the map button to the right of Melissa's face (3).
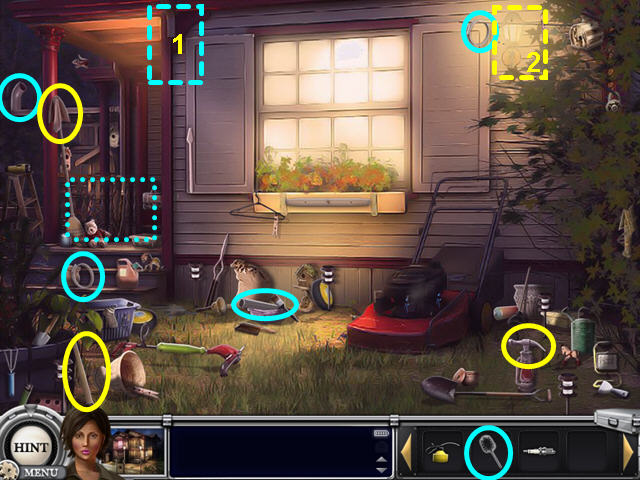
- Select the dog house area.
- Use the DOOR KNOB from your inventory on the wooden locker (baby barn).
- Locate all the items on the hidden object list.
- The CROWBAR and GAS CAN will go automatically into your inventory.
- Click on the map button to the right of Melissa's face.
- Return to the right side of the house.
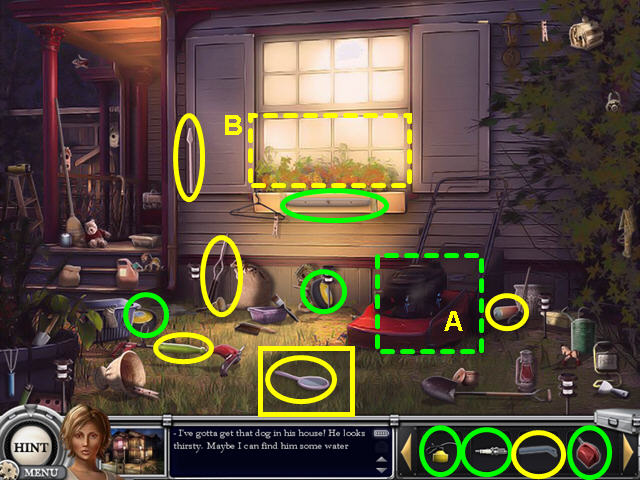
- Click on the lawn mower and locate the required items (A).
- Use the GAS CAN, OIL CAN, and SPARK PLUG from your inventory to complete the collection.
- This will reveal the MIRROR in the grass.
- Click on the window and locate the required items (B).
- Use the CROWBAR from your inventory to complete the collection.
- Click on the open window to enter the house.
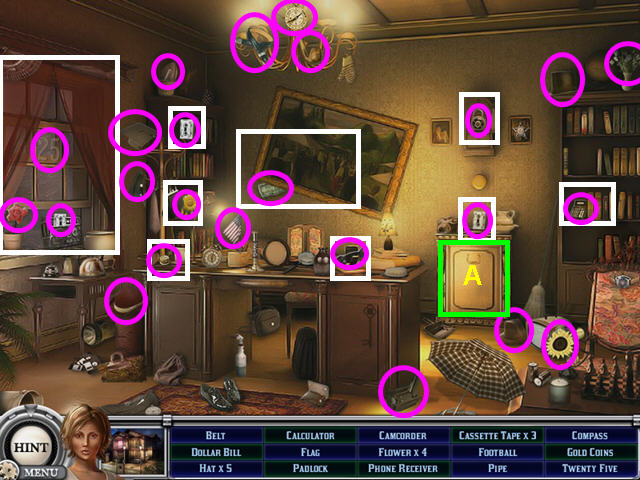
- Some items need to be moved to reveal the items they are hiding- they are marked in white.
- Locate all the hidden objects on the list.
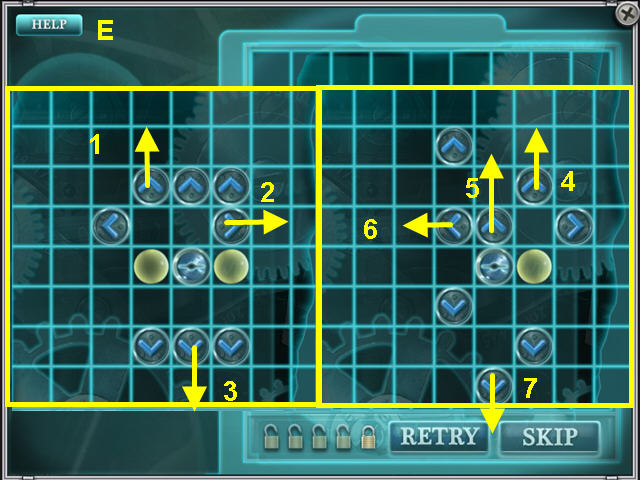
- Click on the safe to trigger a mini-game (A).
- The object is to move the blue gear to the gear symbol.
- Gears can only move on rails of the same color.
- Click on a gear then a direction arrow to move it to another position.
- Make the moves in numerical order.
- There are 5 puzzles to complete (A-E).
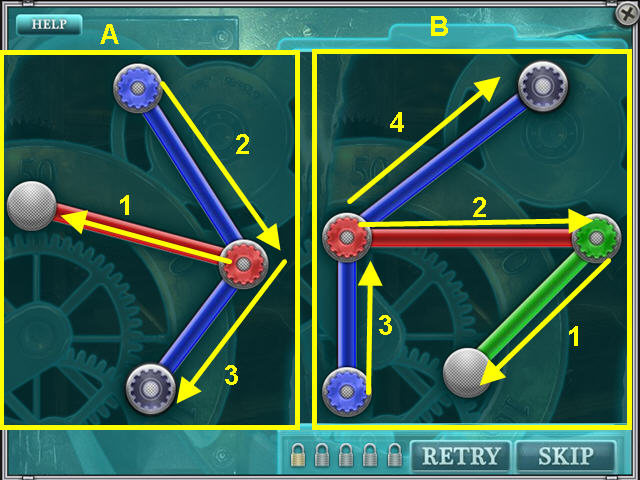
- This solution applies to the first (A) and second (B) puzzle.
- This solution applies to the third puzzle (C).
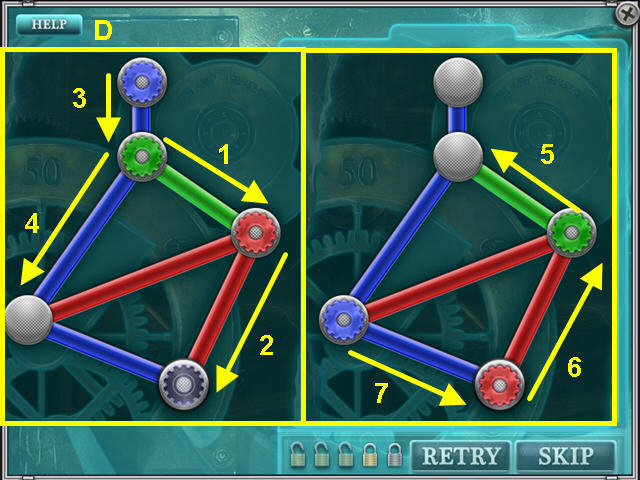
- This solution applies to the fourth puzzle (D).
- This solution applies to the fifth puzzle (E).
- Take the photograph from the safe.
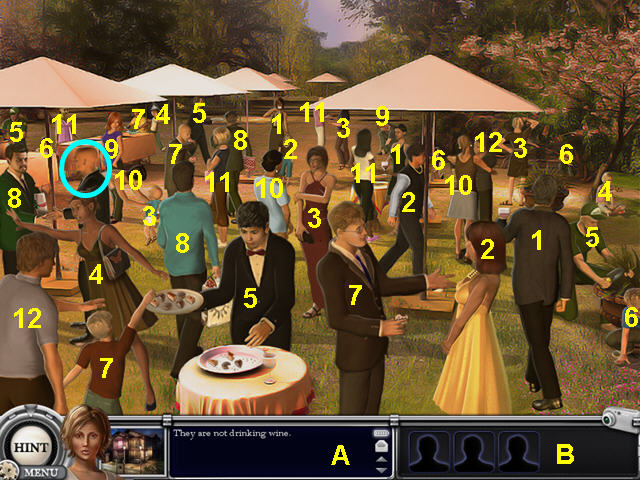
- Determine who the Senator is mingling with.
- Click on the people to eliminate them by the listed characteristic (A).
- The number of people with the characteristic will be on the right (B).
- They are not drinking wine- 3 people (1).
- They are not wearing a necklace- 3 people (2).
- They are not wearing sandals- 4 people (3).
- They hate butterflies- 3 people (4).
- They are not working- 4 people (5).
- They are not playing hide and seek- 4 people (6).
- They are not eating anything- 4 people (7).
- They didn't bring a gift- 3 people (8).
- They are not a redhead- 2 people (9).
- They are not wearing earrings- 3 people (10).
- They are not wearing pink- 3 people (11).
- They don't have any hair- 2 people (12).
- The remaining person is Russian Mob King Karel Pavik.
Chapter Four: The Casino
- Select the sparkling area on the upper left for a hidden object area.
- Collect all the items on the list.
- Choose Melissa's hair, make-up and clothing.
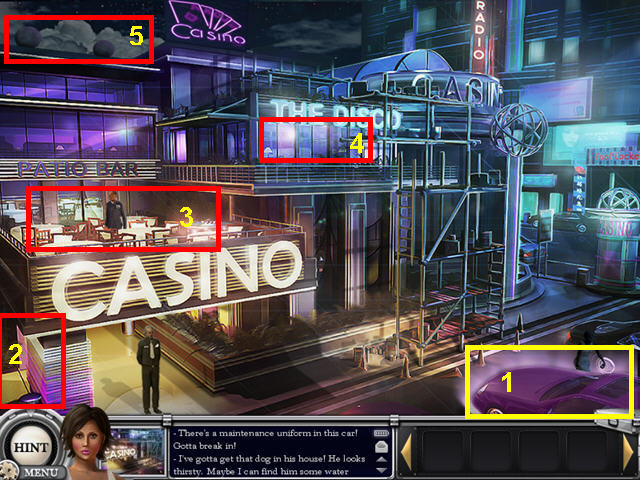
- Select the car on the lower right (1).
- There are four other locations on this map, the side entrance (2), the patio bar (3), the disco (4), and the roof (5) but they are not yet accessible.
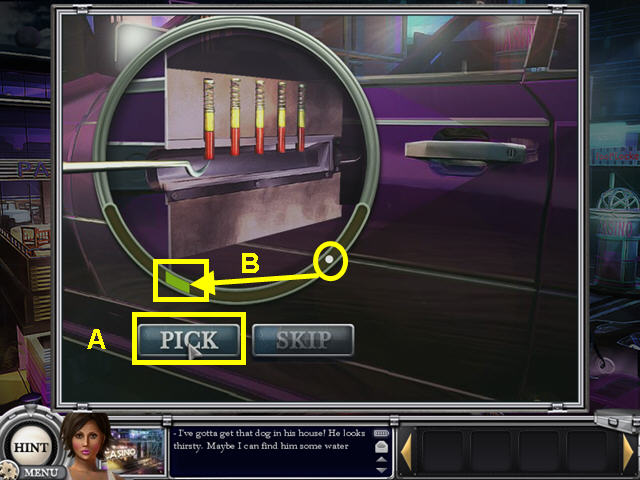
- Press the “PICK” button (A) when the white ball is in the green section (B).
- You will need to repeat 4 additional times.
- Should you click outside the green section, you will need to restart the process.
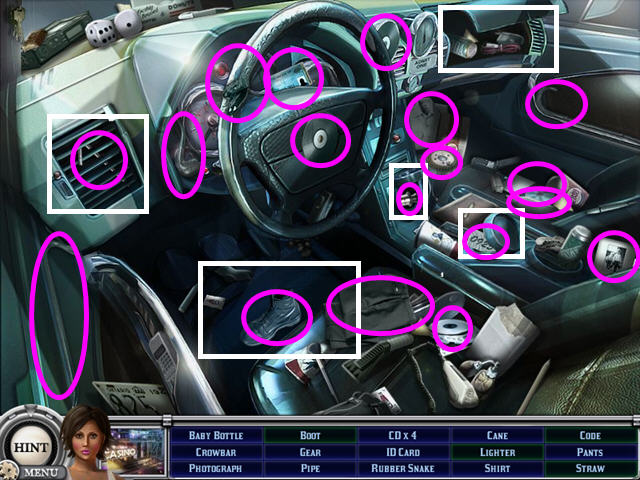
- Some items need to be moved to reveal the items they are hiding- they are marked in white.
- Locate all the hidden objects on the list.
- The pants, shirt, boots and ID card will go into your inventory and Melissa will automatically dress in the uniform.
- Click on the side entrance.
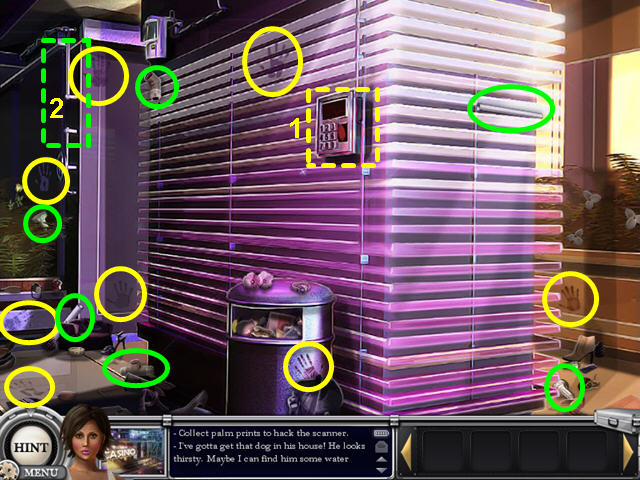
- Click on the security scanner and locate all the hand prints (1).
- Click on the loose pipe and locate the required items (2).
- Click on the map button to the right of Melissa's face.
- Select the Patio Bar.
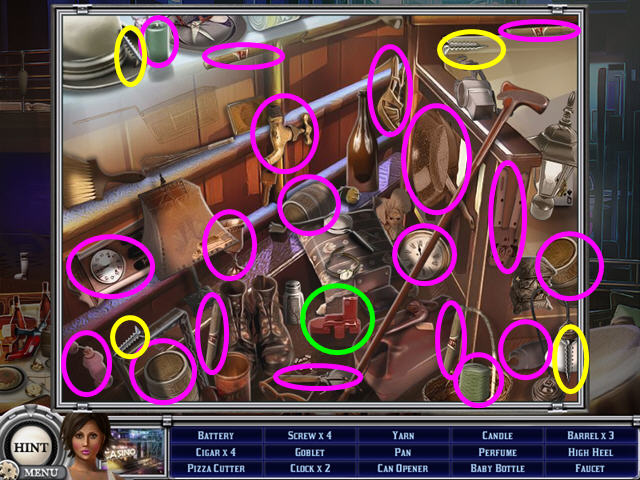
- Select the area on the right, under the hose hanging on the railing for a hidden object scene.
- Locate all the items on the hidden object list.
- The BATTERY and the 4 SCREWS will go automatically into your inventory.
- Select the area on the left table for a hidden object scene.
- Locate all the items on the hidden object list.
- The WRENCH and the 2 ROPES will go automatically into your inventory.
- Click on the fountain and locate the required items (A).
- Use the WRENCH and BATTERY from your inventory to complete the collection.
- Click on the overturned chair, bottom center and locate the required items (B).
- Use the 4 SCREWS from your inventory to complete the collection.
- Click on the right table and locate the required items (C).
- Click on the map button to the right of Melissa's face.
- Select the side entrance.
- Select the garbage can for a hidden object scene.
- Locate all the items on the hidden object list.
- The CHIPS will go automatically into your inventory.
- Click on the map button to the right of Melissa's face.
- You will return automatically to the patio bar.

- Click on the area just above the fountain and locate the required items (A).
- Use the 2 ROPES from your inventory to complete the collection.
- Click on the map button to the right of Melissa's face.
- Select the Disco.
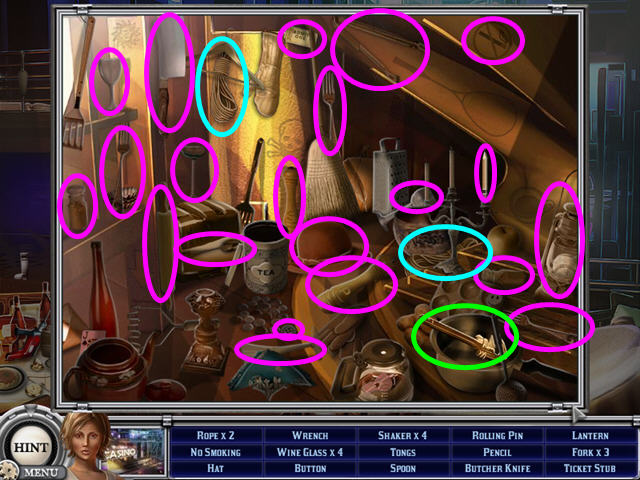
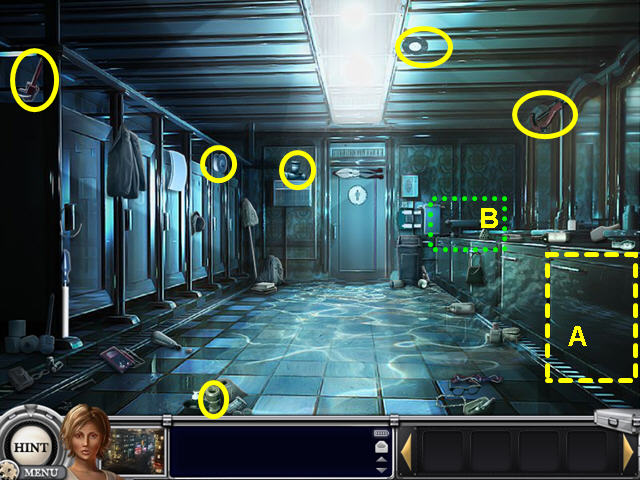
- Select the area just below the top rung of the ladder for a hidden object scene.
- Locate all the items on the hidden object list.
- The ALLEN KEY, TAPE, and WIRE CUTTERS will go automatically into your inventory.
- Click on the left vent and locate the required items (1).
- Use the ALLEN KEY from your inventory to complete the collection.
- Click on the access panel on the floor and locate the required items (1).
- Use the TAPE, and WIRE CUTTERS from your inventory to complete the collection.
- Click on the map button to the right of Melissa's face.
- Select the Disco.
- Determine who the is the architect.
- Click on the people to eliminate them by the listed characteristic (A).
- The number of people with the characteristic will be on the right (B).
- They are not wearing a scarf - 3 people (1)
- They don't like cards - 4 people (2).
- They are not wearing a hat- 4 people (3).
- They don't believe in lucky charms - 3 people (4).
- They are not working - 7 people (5).
- They hate dragons - 2 people (6).
- They are not eating - 3 people (7).
- They are not drinking - 7 people (8).
- They don't have a purse - 5 people (9).
- They are not dancing - 7 people (10).
- They are not wearing red shoes - 5 people (11).
- They are not wearing jeans - 6 people (12).
- All that remains is the architect.
- Click on the sparking access panel on the floor and locate the required items (A).
- Use the TAPE from your inventory to complete the collection.
- Click on the top, center of the scaffolding and locate the required items (B).
- Click on the map button to the right of Melissa's face.
- Select the roof.
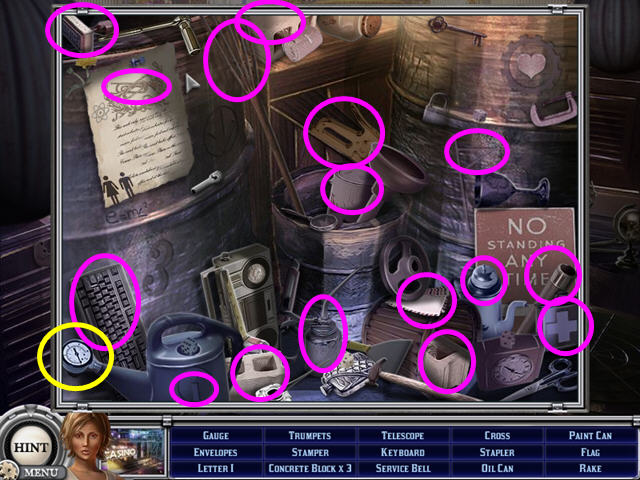
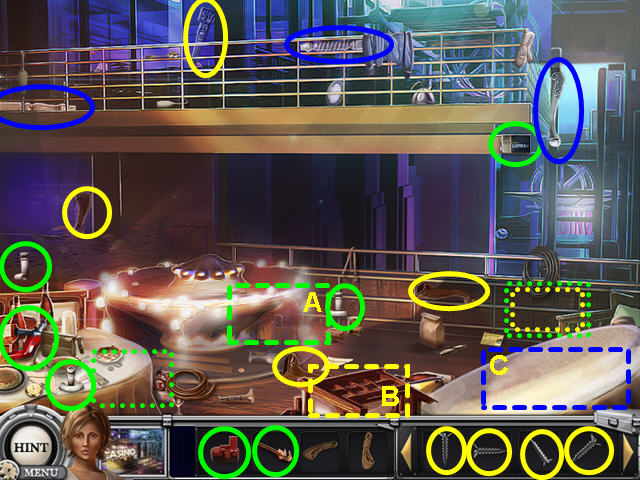
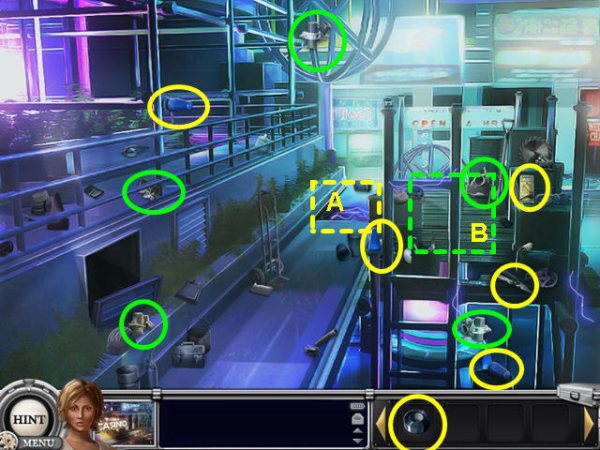
- Select the upper left crates for a hidden object scene.
- Locate all the items on the hidden object list.
- The GAGE will go automatically into your inventory.
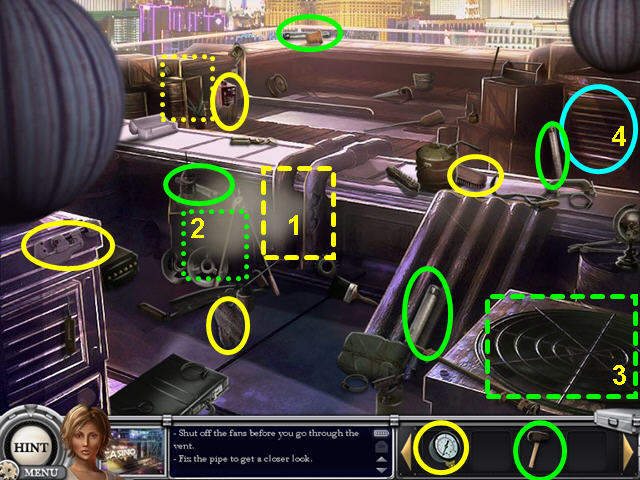
- Click on the broken steam pipe and locate the required items (1).
- Use the GAGE from your inventory to complete the collection.
- Select the crate to the left of the newly repaired pipe for a hidden object scene (2).
- Click on the top of the air conditioner and locate the required items (3).
- Use the MACE from your inventory to complete the collection.
- Select upper right air vent.
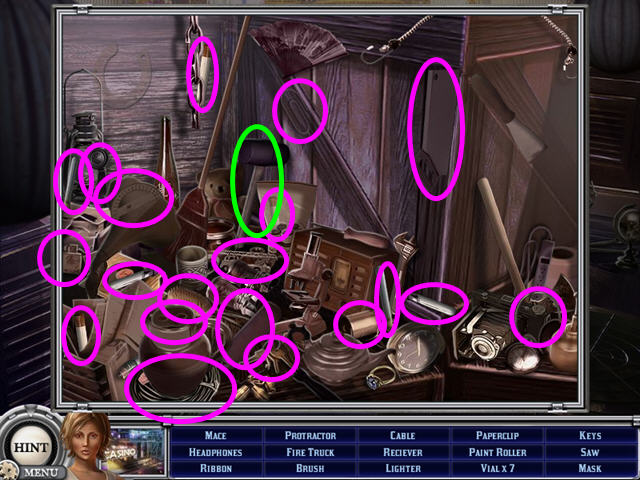
- Locate all the items on the hidden object list.
- The MACE will go automatically into your inventory.
- Look under the bed for a hidden object scene.
- Locate all the items on the hidden object list.
- The DRAWER KEY will go automatically into your inventory.
- Use the DRAWER KEY on the nightstand for a hidden object scene.
- Locate all the items on the hidden object list.
- The 4 GEARS will go automatically into your inventory.
- Click on the painting over the bed and locate the required items (1).
- Use the 4 GEARS from your inventory to complete the collection.
- Select the safe that is behind the painting for a mini-game.
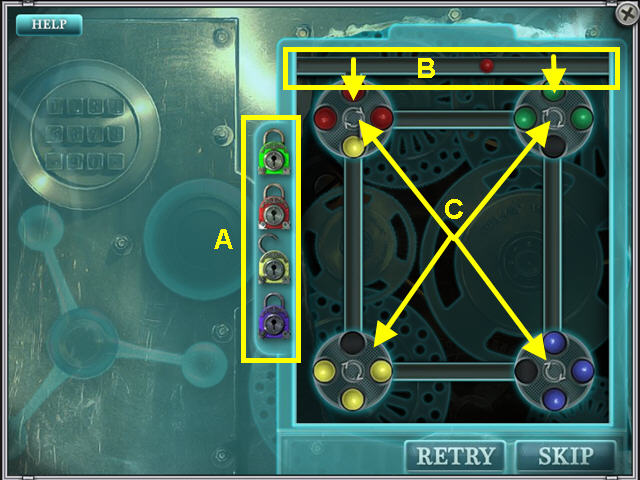
- The object of this mini-game is to collect 4 balls of the same color on one wheel to break open the lock of the same color (A).
- The balls will come down the chute and you can use them in either wheel (B).
- Rotate the wheels and click on a ball to move to the next wheel (C).
- You can collect a set of four balls on any wheel.
- You will need to make one set in each color.
- Take the roll of plans from the top shelf of the vault.
Chapter Five: The Bank
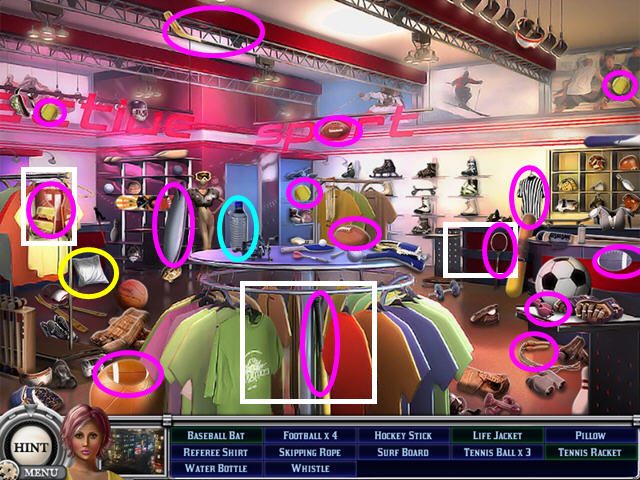
- Select the sparkling area on the upper right for a hidden object area.
- Collect all the items on the list.
- Choose Melissa's hair, make-up and clothing.
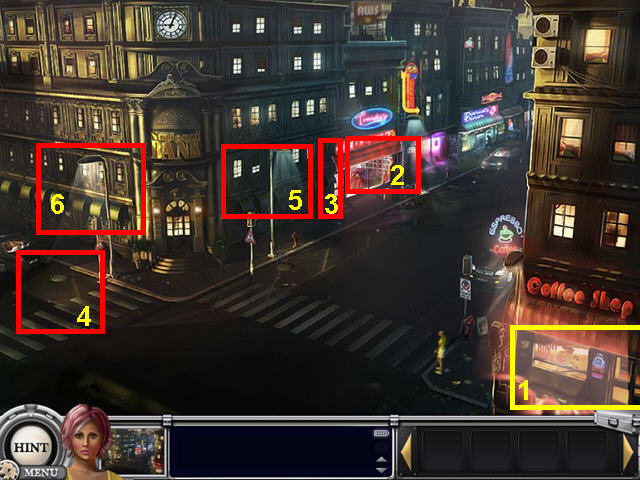
- Select the coffee shop on the lower right (1).
- There are four other locations on this map, the sports store (2), store office (3), the sewers (4), and the bank lobby (5), and bank vault (6) but they are not yet accessible.
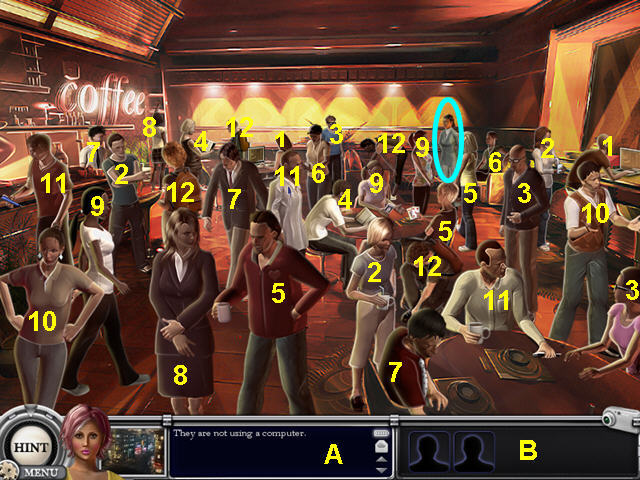
- Determine who the is the bank manager.
- Click on the people to eliminate them by the listed characteristic (A).
- The number of people with the characteristic will be on the right (B).
- They are not using a computer- 2 people (1).
- They are not drinking from a straw- 3 people (2).
- They are not wearing glasses- 3 people (3).
- They are not reading- 2 people (4).
- They have no hearts- 3 people (5).
- They are not listening to music- 2 people (6).
- They are not wearing a tie- 2 people (7).
- The are not wearing a skirt- 2 people (8).
- They have no hair bands on- 3 people (9).
- They have no diamonds- 2 people (10).
- They don't have a pen- 3 people (11).
- They don't have back packs- 4 people (12).
- The remaining person is the bank manager.
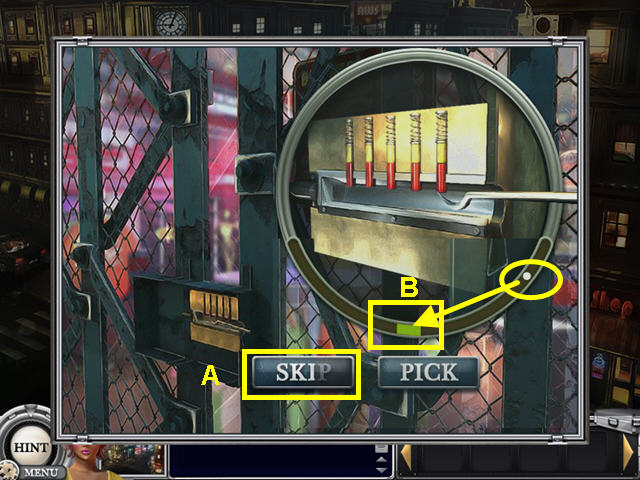
- Press the “PICK” button (A) when the white ball is in the green section (A).
- You will need to repeat 4 additional times.
- Should you click outside the green section, you will need to restart the process.
- Some items need to be moved to reveal the items they are hiding- they are marked in white.
- Locate all the hidden objects on the list.
- The PILLOW and WATER BOTTLE will go automatically into your inventory.
- Click on the map button to the right of Melissa's face.
- Select the sports store office.
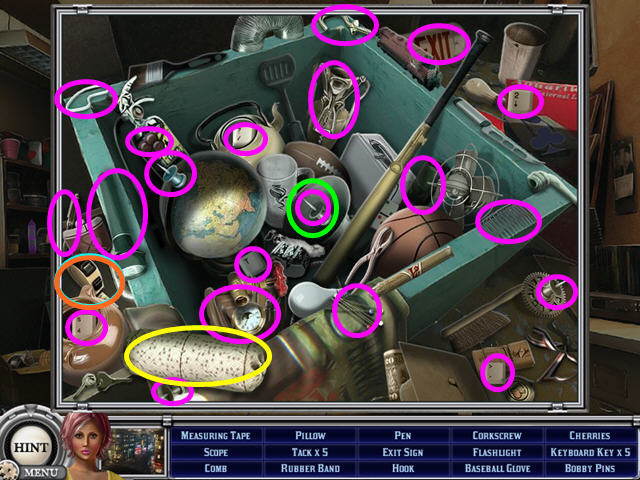
- Select the green box on the left for a hidden object scene.
- Locate all the items on the hidden object list.
- *Note- one tack is directly over another.
- The PILLOW, MEASURING TAPE, and TACK will go automatically into your inventory.
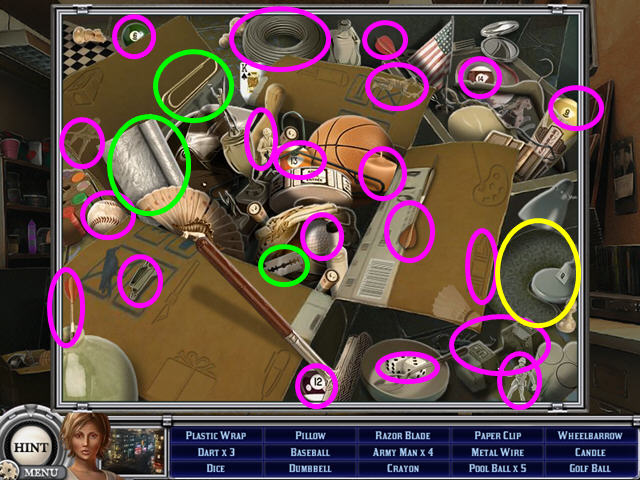
- Select the cardboard box on the left for a hidden object scene.
- Locate all the items on the hidden object list.
- The PILLOW, RAZOR BLADE, PLASTIC WRAP, and PAPER CLIP will go automatically into your inventory.
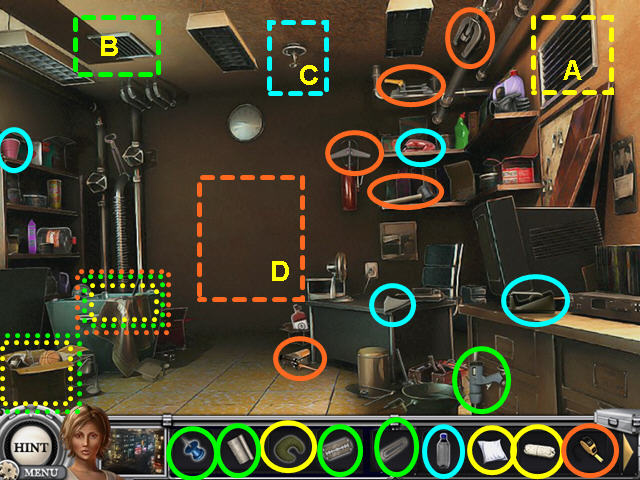
- Click on the upper right vent and locate the required items (A).
- Use the 3 PILLOWS from your inventory to complete the collection.
- Click on the upper left vent and locate the required items (B).
- Use the RAZOR BLADE, PLASTIC WRAP, TACK and PAPER CLIP from your inventory to complete the collection.
- Click on the ceiling sprinkler and locate the required items (C).
- Use the WATER BOTTLE from your inventory to complete the collection.
- Click on the ceiling sprinkler and locate the required items (D).
- Use the MEASURING TAPE from your inventory to complete the collection.
- Click on the map button to the right of Melissa's face.
- Select the sewers.
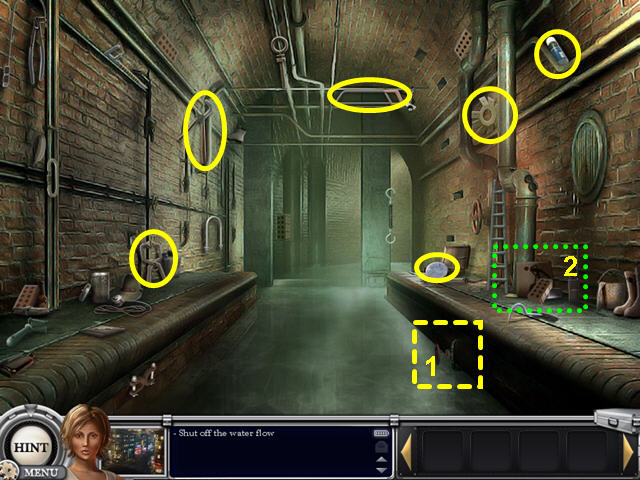
- Click on the right valve near the water and locate the required items (1).
- Select the rubbish pile on the right for a hidden object scene (2).
- Locate all the items on the hidden object list.
- The PLUNGER, CROWBAR, and PULLEY will go automatically into your inventory.
- Click on the left drain in the water and locate the required items (A).
- Use the CROWBAR, and PLUNGER from your inventory to complete the collection.
- Click on the far right wall and locate the required items (B).
- Click on the overhead pipes and locate the required items (C).
- Use the PULLEY from your inventory to complete the collection.
- Click on the glowing area to move to the next room (D).
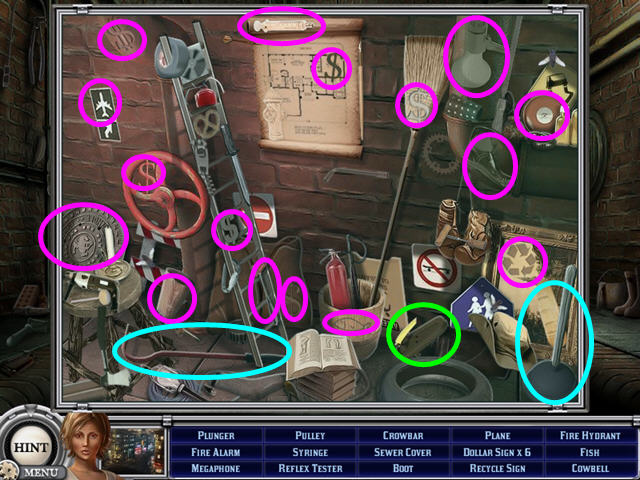
- Select the rubbish pile by the brick wall for a hidden object scene.
- Locate all the items on the hidden object list.
- The LEVEL, OIL CAN, and ZIP TIE will go automatically into your inventory.
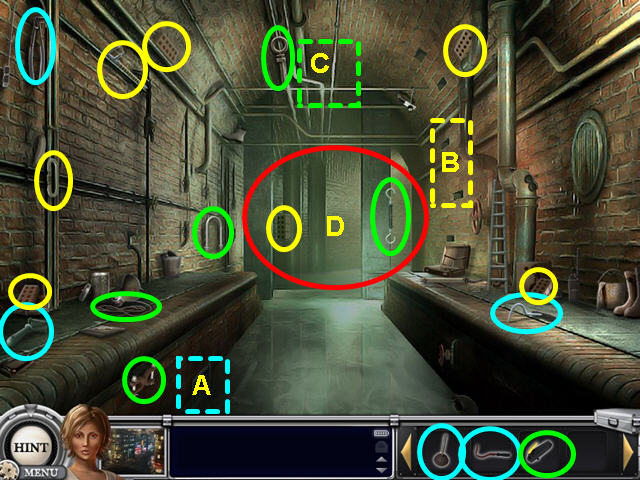
- Select the right column and locate the required items (1).
- Select the door on the right column and locate the required items (2).
- Use the OIL CAN from your inventory to complete the collection.
- Select the machine inside the door and locate the required items (3).
- Use the LEVEL and ZIP TIE from your inventory to complete the collection.
- Click on the map button to the right of Melissa's face.
- Return to the sports store office.
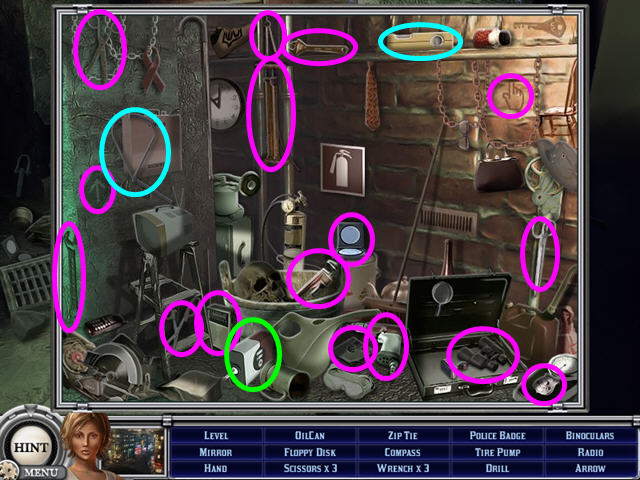
- Select the red tool box by the desk for a hidden object scene.
- Locate all the items on the hidden object list.
- The STOPWATCH will go automatically into your inventory.
- Select the back wall and locate the required items (1).
- Use the STOPWATCH from your inventory to complete the collection.
- Click on the hole in the wall to move to the next room (2).
- You can also click on the map button to the right of Melissa's face and select the bank.
- Select the right cabinet and locate the required items (A).
- Select the far back sink by the door for a hidden object scene (B).
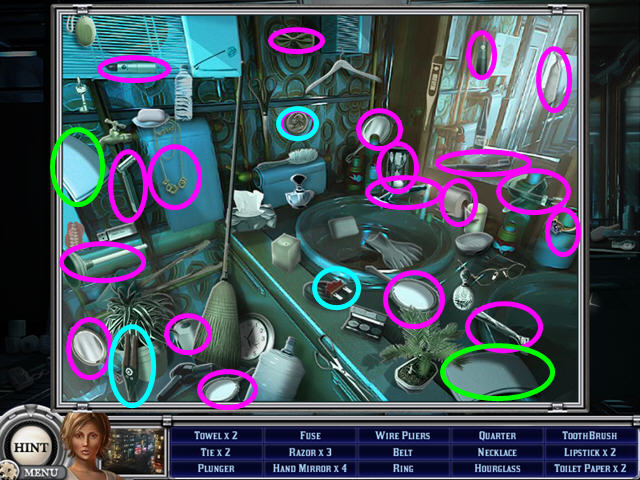
- Locate all the items on the hidden object list.
- The 2 TOWELS, QUARTER, FUSE, and WIRE PLIERS will go automatically into your inventory.
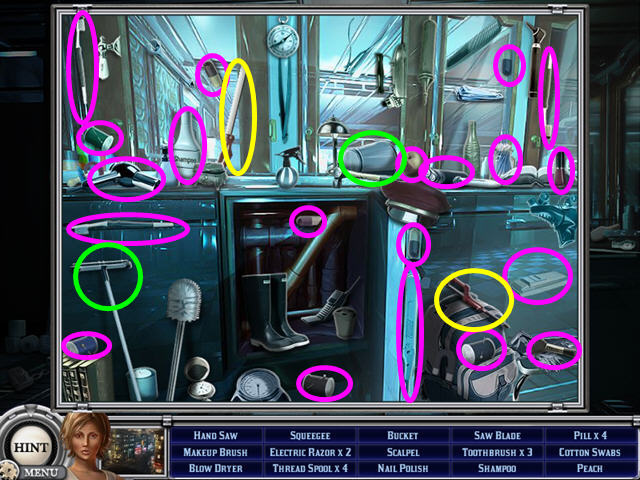
- Select the right cabinet for a hidden objects scene.
- Locate all the items on the hidden object list.
- The HANDSAW, SQUEEGEE, BUCKET, and SAW BLADE will go automatically into your inventory.
- Select the floor and locate the required items (A).
- Use the 2 TOWELS, BUCKET, and SQUEEGEE from your inventory to complete the collection.
- Select the area to the left of the door and locate the required items (B).
- Use the HAND SAW and SAW BLADE from your inventory to complete the collection.
- Select the area to the left of the door again and locate the required items (C).
- Use the QUARTER, FUSE, and WIRE PLIERS from your inventory to complete the collection.
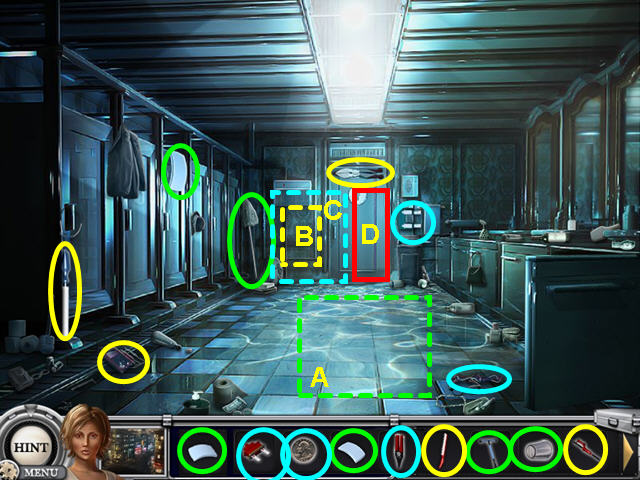
- Click on the highlighted door to move to the lobby (D).
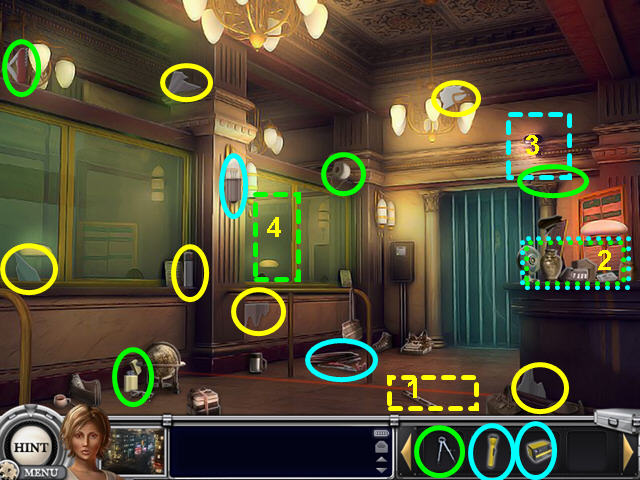
- Select the laser beam on the floor and locate the required items (1).
- Select the right desk for a hidden object area (2).
- Select the overhead camera and locate the required items (3).
- Use the BATTERY and FLASHLIGHT from your inventory to complete the collection.
- Select the teller window and locate the required items (4).
- Use the COMPASS from your inventory to complete the collection.
- Locate all the items on the hidden object list.
- The COMPASS, BATTERY, and FLASHLIGHT will go automatically into your inventory.
- Select the bank teller window again.
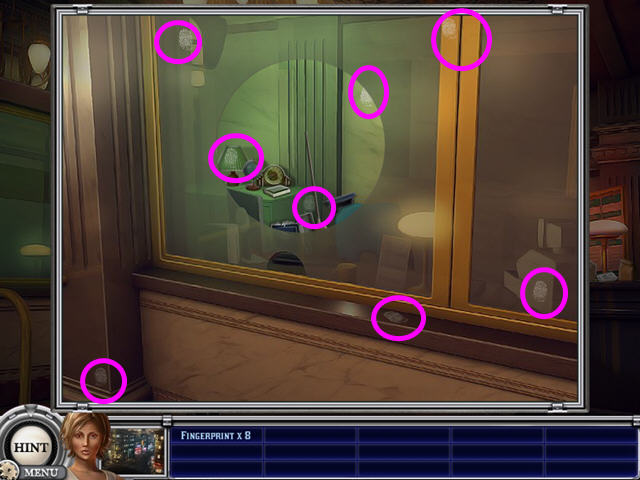
- Collect all the fingerprints.
- One FINGERPRINT will go into your inventory.
- Use the FINGERPRINT on the gate to the vault.
- Click on the vault door for a mini-game.
- The object of this game is to move the balls into the holes by moving the sliders.
- Click on the arrows in numerical order the number of times indicated.
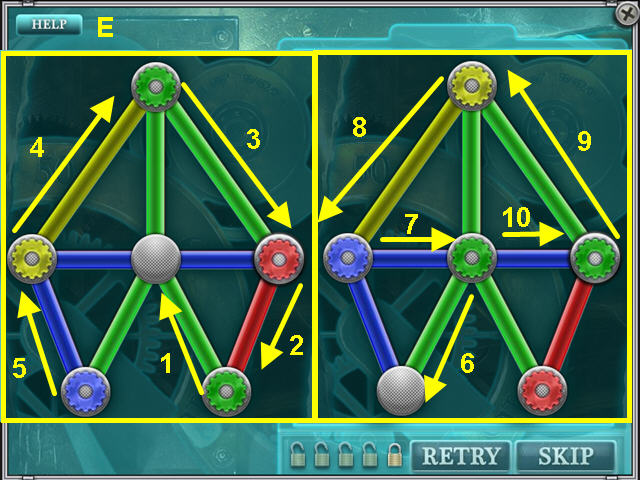
- There are 5 puzzles to solve-please see the solutions below.
- This solution applies to the first (A) and second (B) puzzle.
- This solution applies to the third puzzle (C).
- This solution applies to the fourth puzzle (D).
- This solution applies to the fifth puzzle (E).
- Take the diamond from the safe.

- Select the sparkling safe deposit boxes on the left (A).
- Collect the requested items and place them into the circles on the right.
- Select the cabinet for a hidden object scene (B).
- Find the KNIFE (C).
- Locate the remaining hidden objects on the list.
- Take the KNIFE from your inventory and place it in its circle.
- Congratulations! You have completed Vaultcracker: The Last Safe!
Created at: 2010-07-03