

Walkthrough Menu
- General Tips
- Chapter 1: Lupin
- Chapter 2: College
- Chapter 3: Graveyard
- Chapter 4: Bridgetown
- Chapter 5: Lighthouse
General Tips
- This is the official guide for Vermillion Watch: Fleshbound.
- This guide will not tell you when you have to zoom into a location; the screenshots will show each zoom scene.
- Hidden-object puzzles are referred to as HOPs. This guide will not show screenshots of the HOPs, however, it will mention when an HOP is available and the inventory item you'll collect from it.
- Use the Map to fast travel to a location.
Chapter 1: Lupin
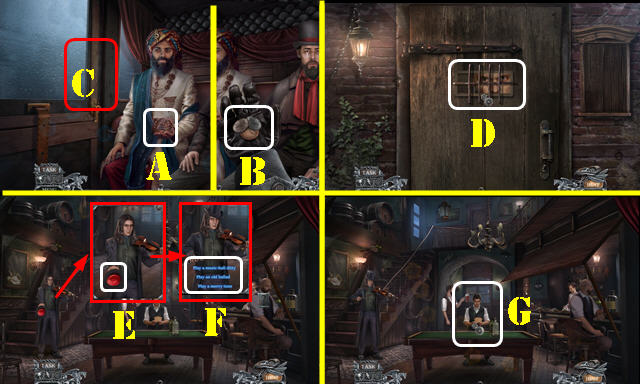
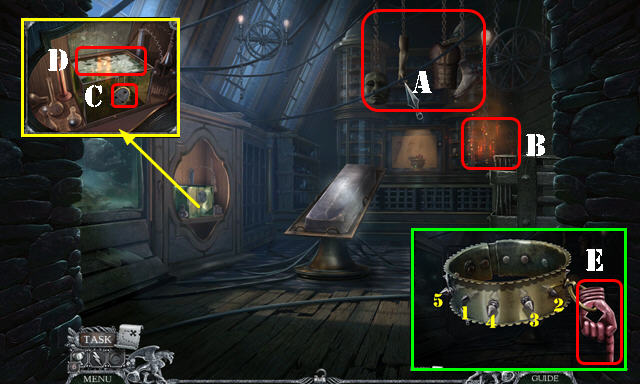
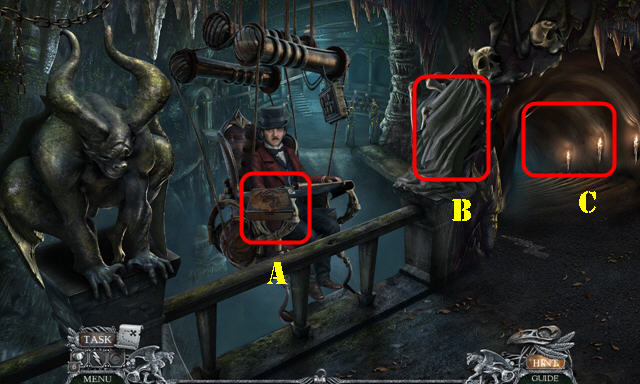
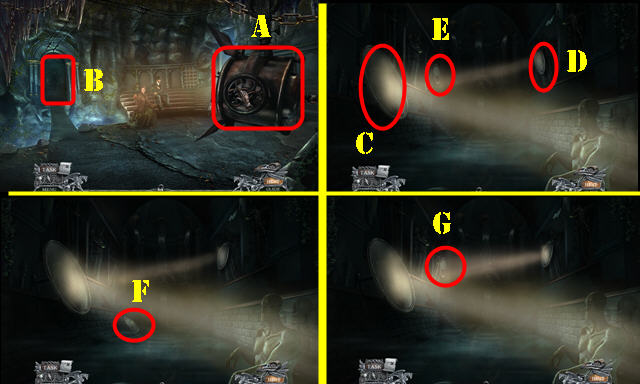
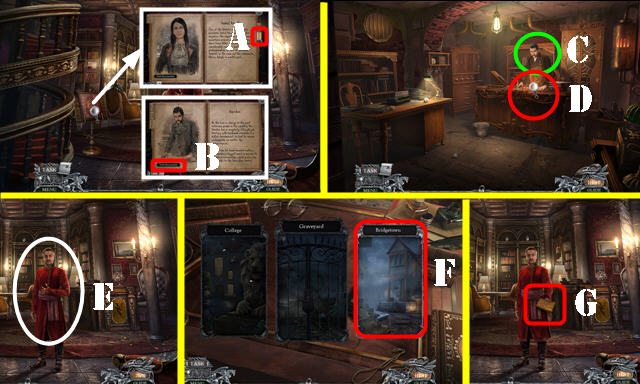
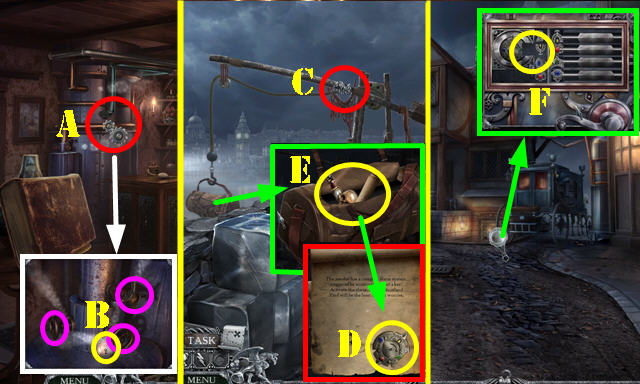
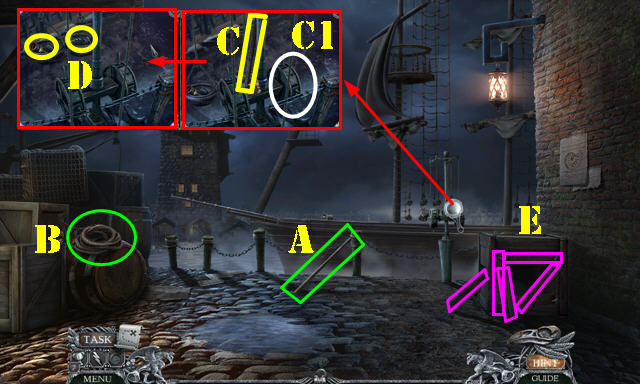
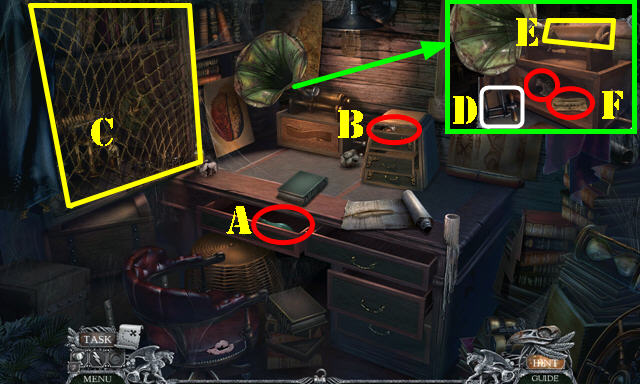
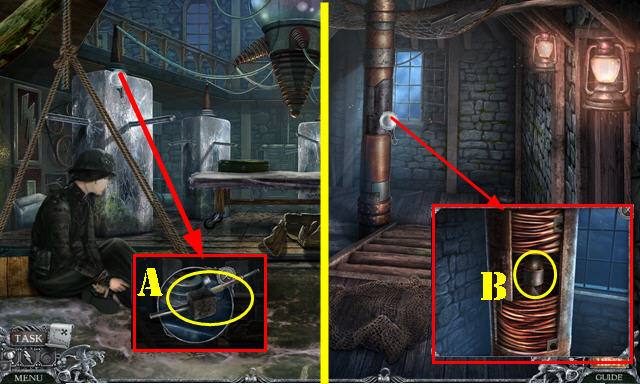
- Take the METAL CASE (A).
- Open the METAL CASE and look at the note; take the CALLING CARD.
- Take the COINS (B).
- Exit the carriage (C).
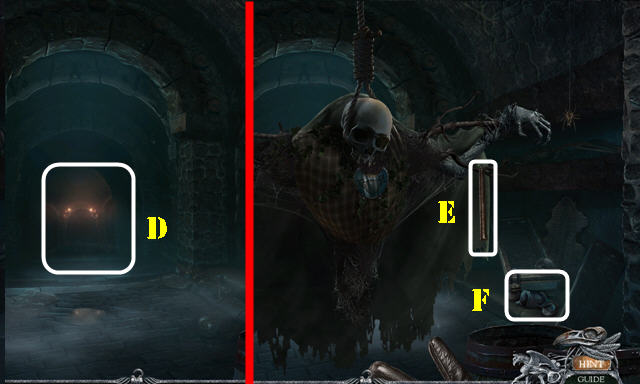
- Knock on the door; use the CALLING CARD and open the door (D).
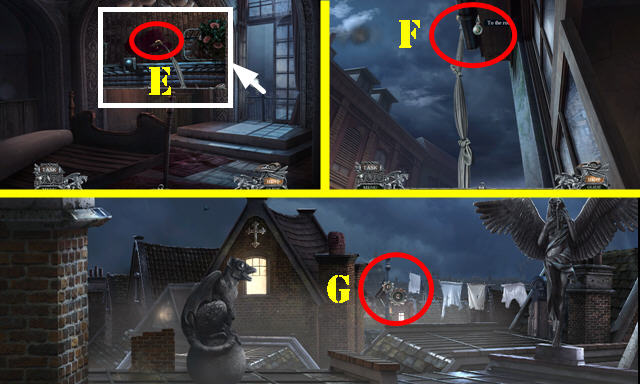
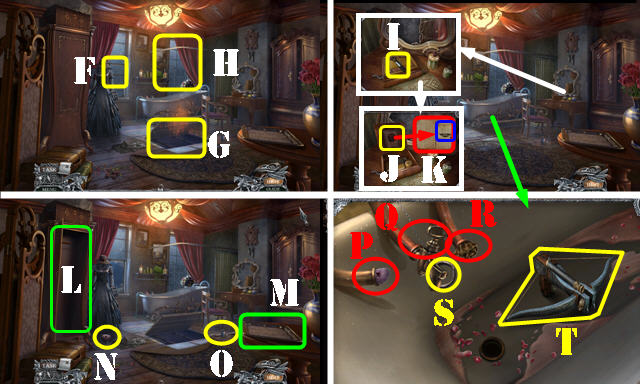
- Place the COINS (E); select any song choice (F).
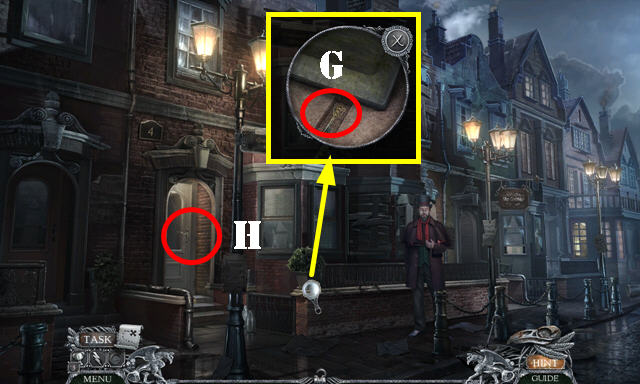
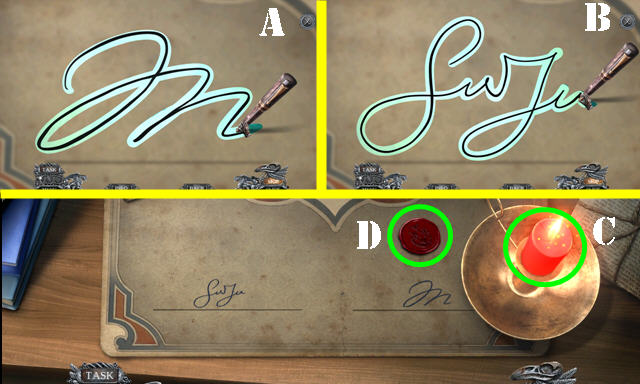
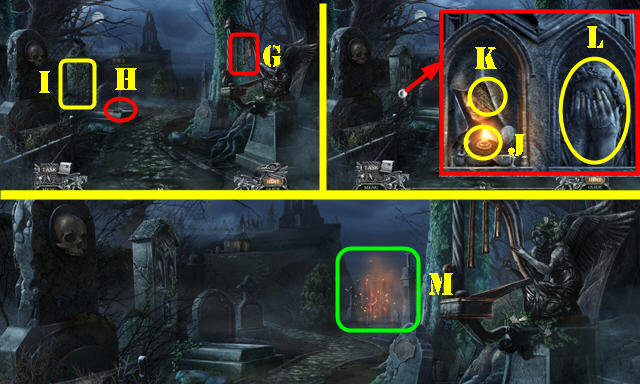
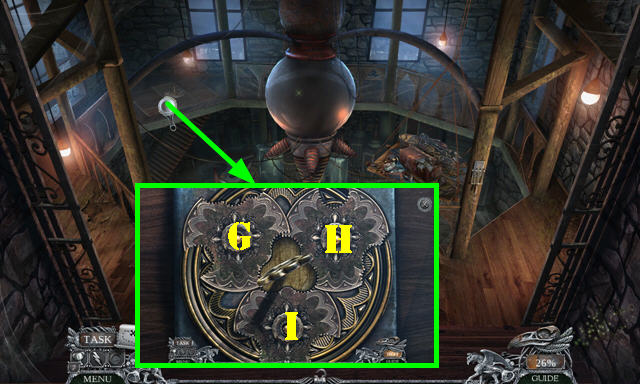
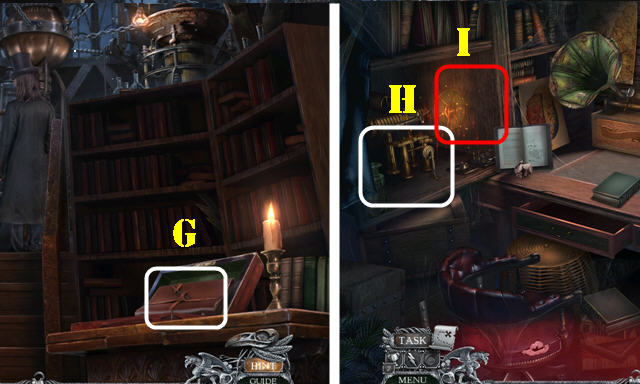
- Throw the CALLING CARD for a puzzle (G).
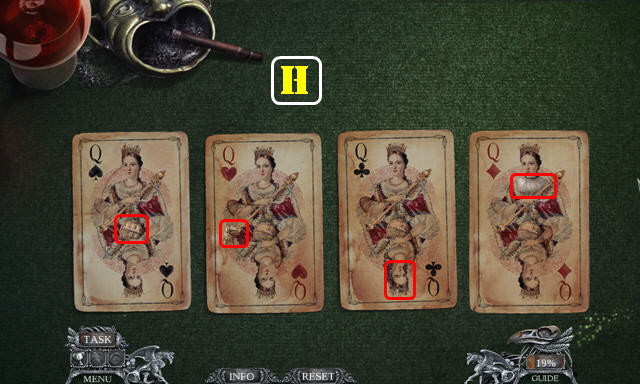
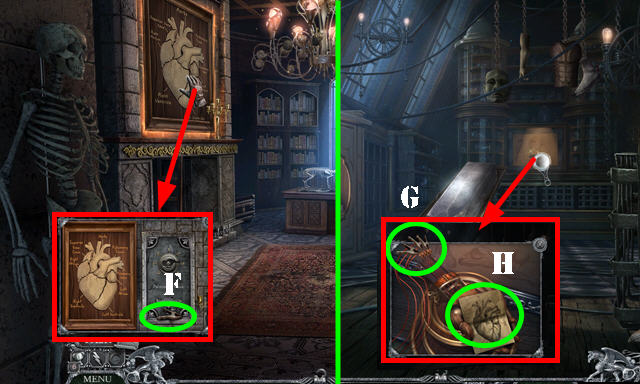
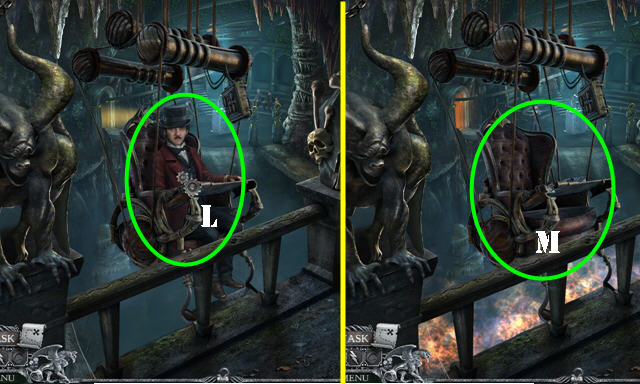
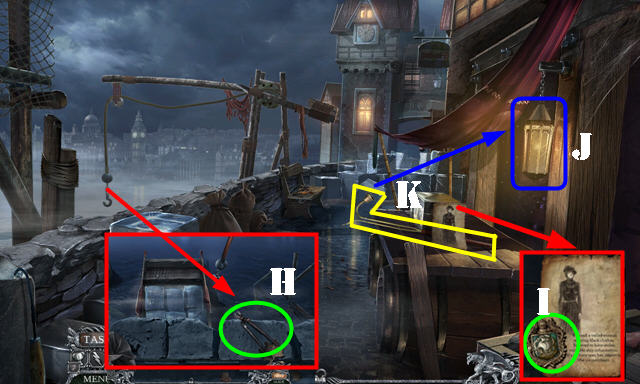
- Find the differences (H).
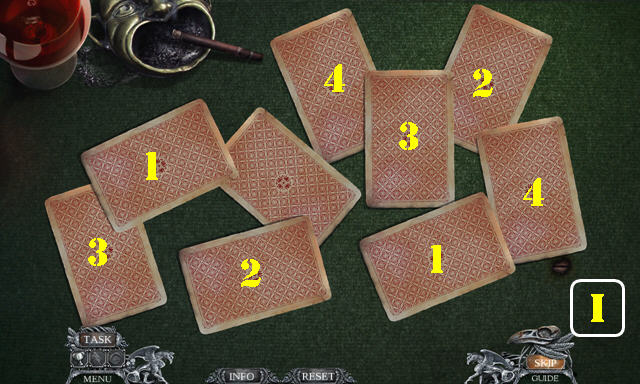
- Select matching cards (I).
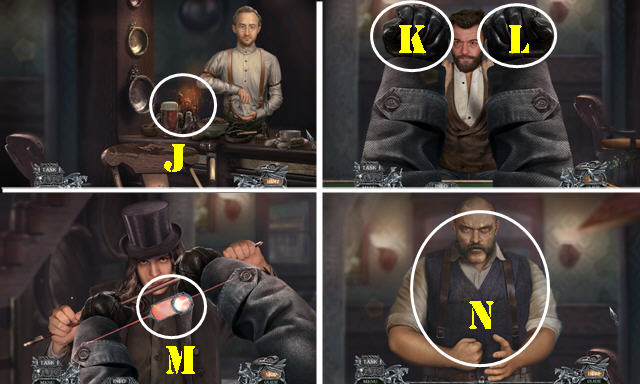
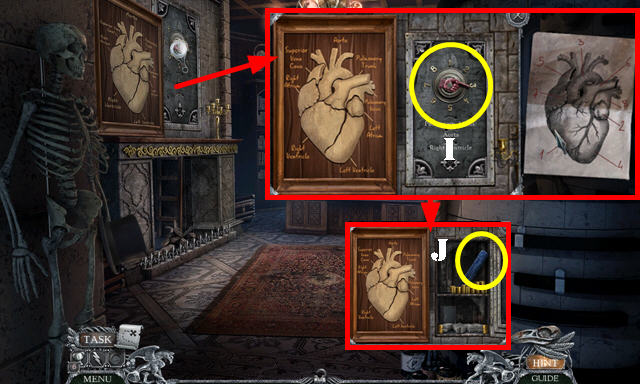
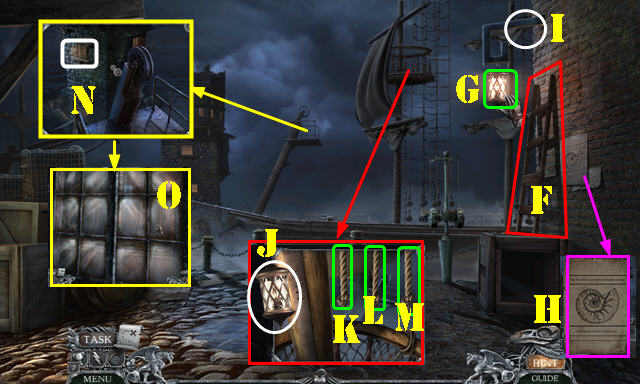
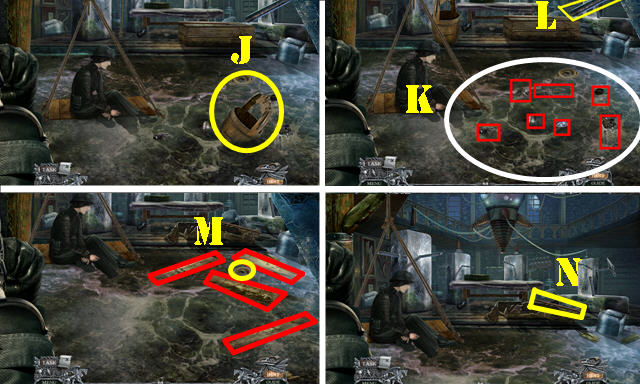
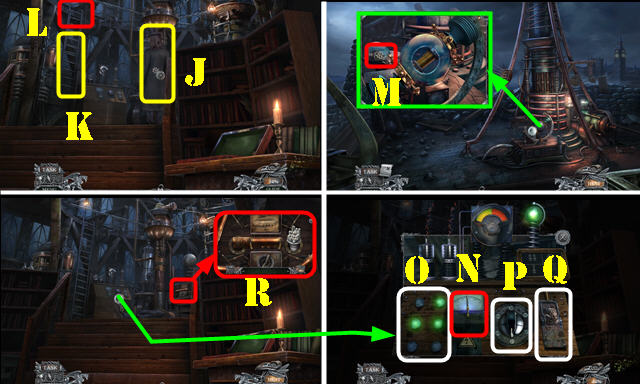
- Play the HOP to receive the WINE BOTTLE (J).
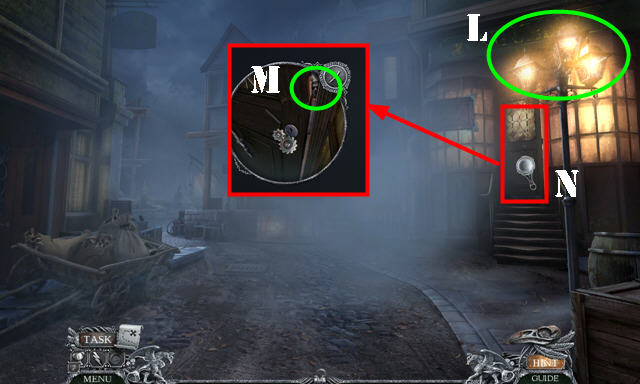
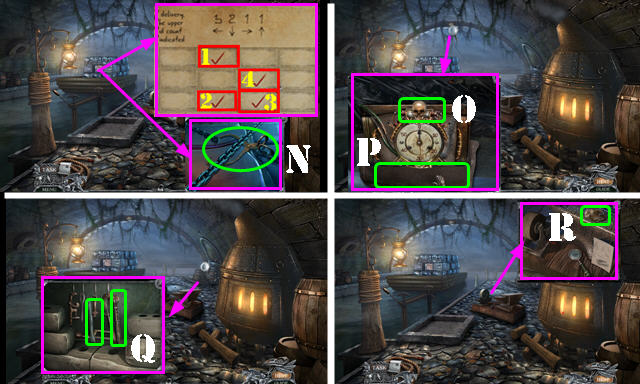
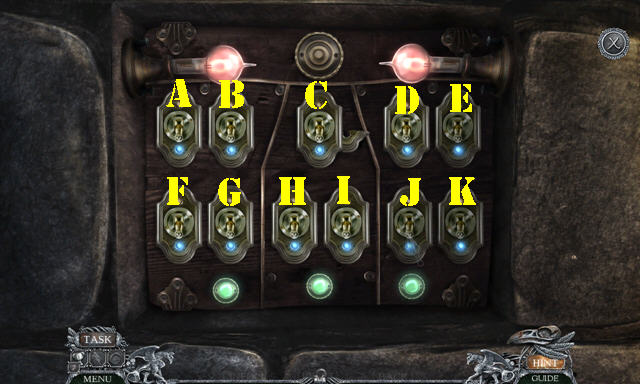
- Select: (K-L-K)-(L-Kx2-L).
- Stop the ball in the middle 3x (M).
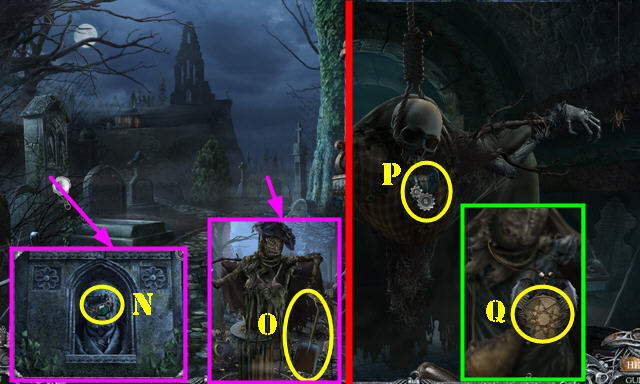
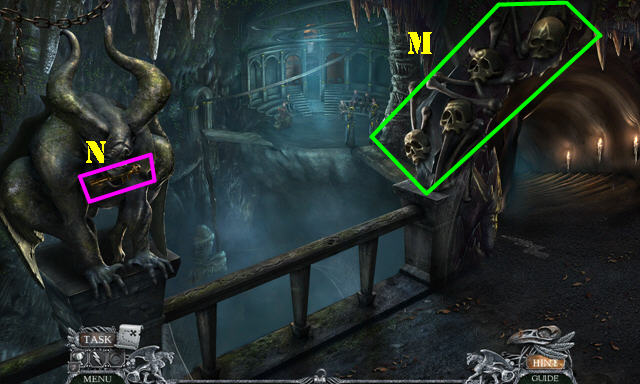
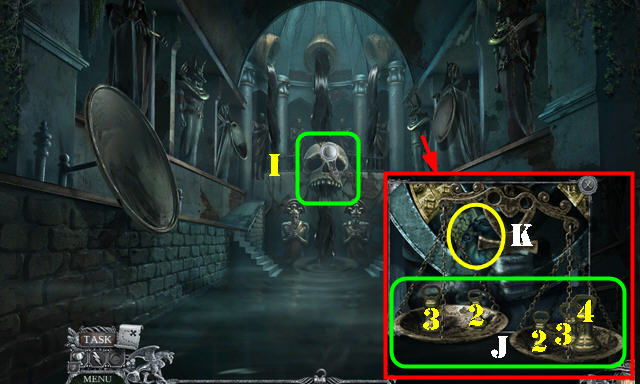
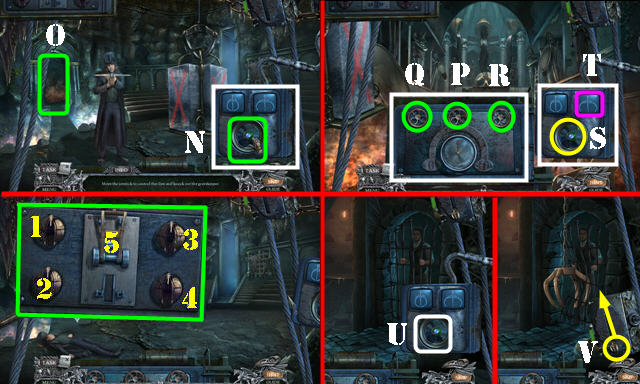
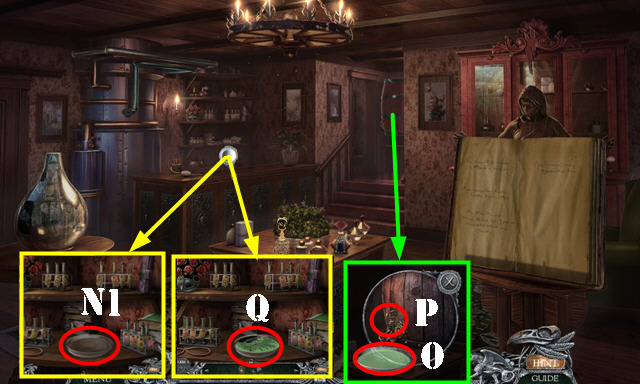
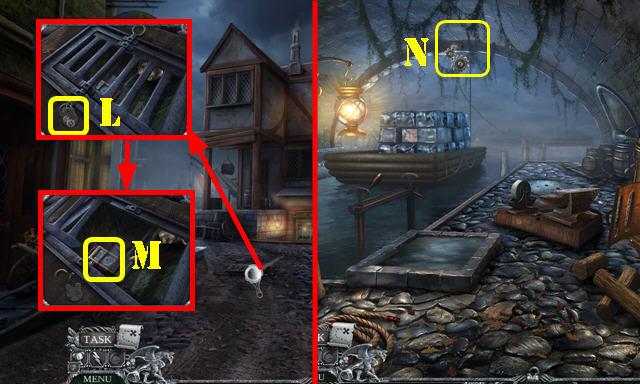
- Use the WINE BOTTLE (N).
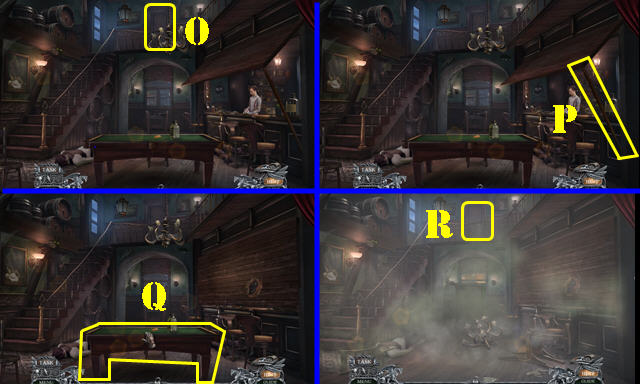
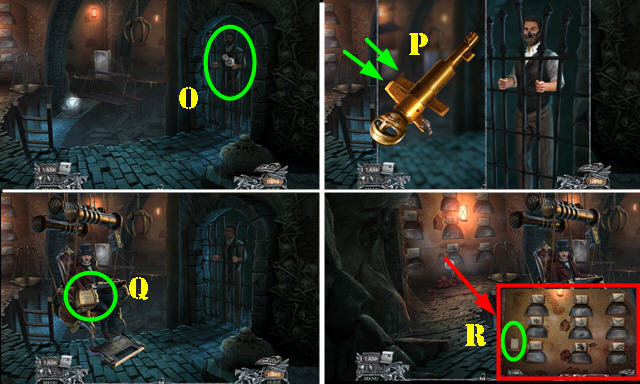
- Try to go to Lupin's Room (O).
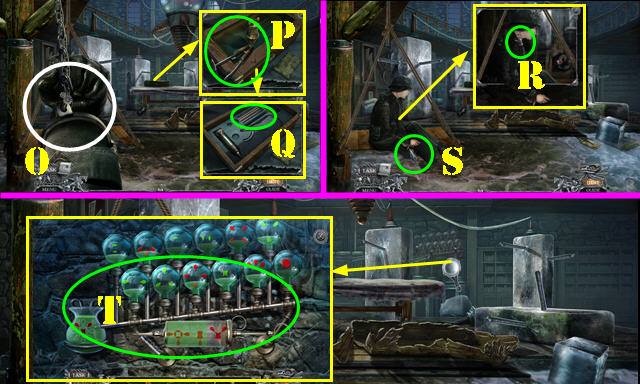
- Remove the stick (P).
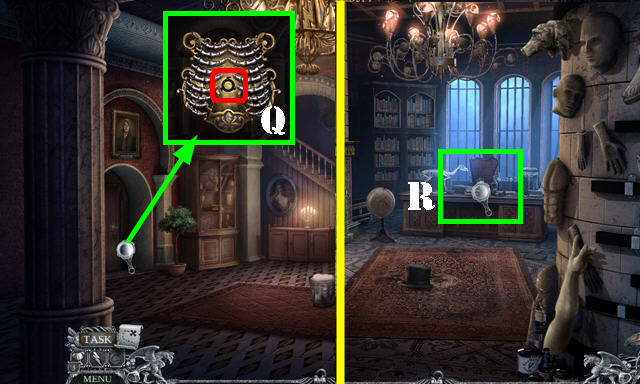
- Select the table 4x (Q).
- Go to Lupin's Room (R).
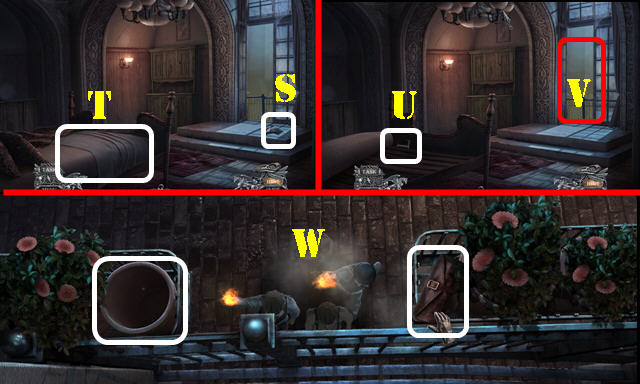
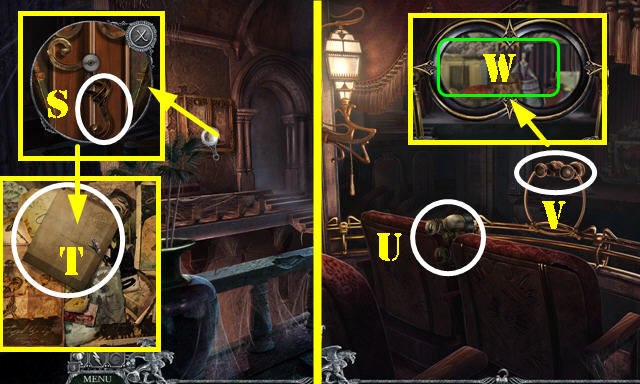
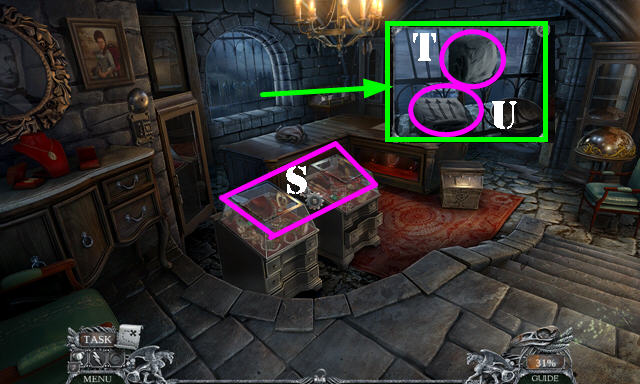
- Take the SHOE (S).
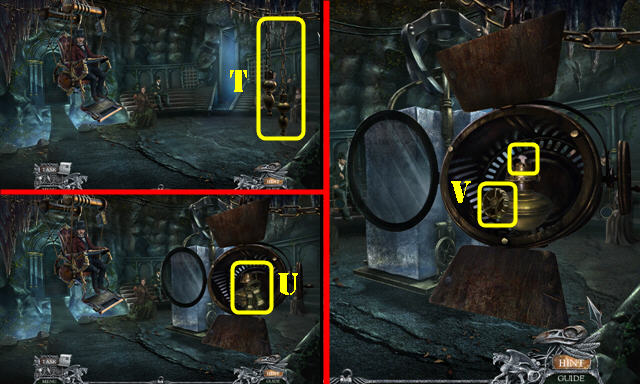
- Remove the cover; take the BEDSHEET (T).
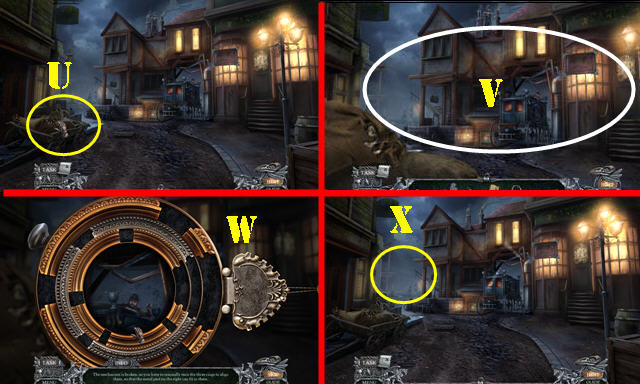
- Lift the mattress; take the INITIAL (U).
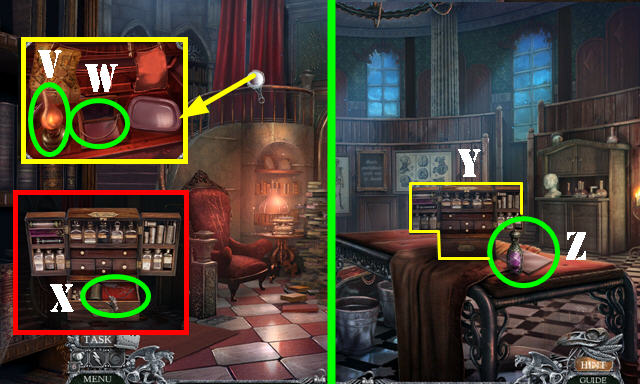
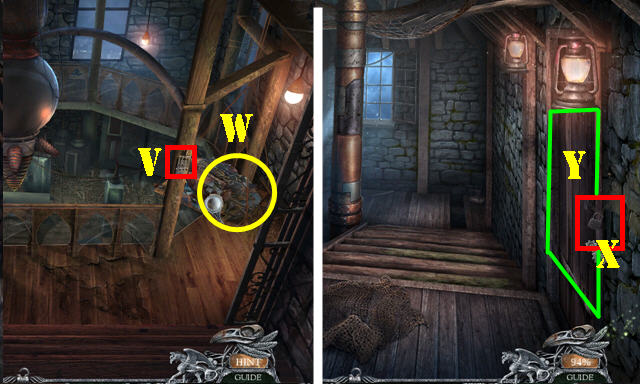
- Look out the window (V).
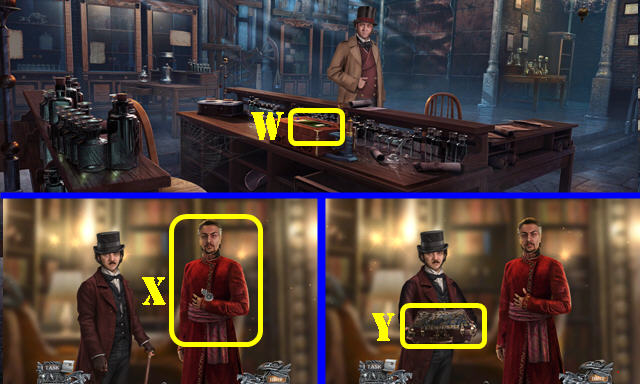
- Take the FLOWERPOT and LOCK PICKING TOOLS (W).
- Walk down.
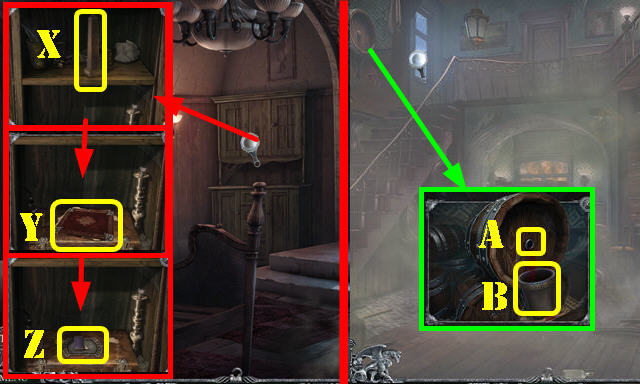
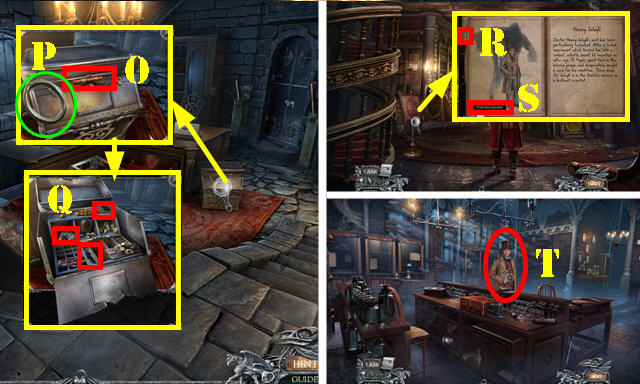
- Use the LOCK PICKING TOOLS; take the OBELISK (X).
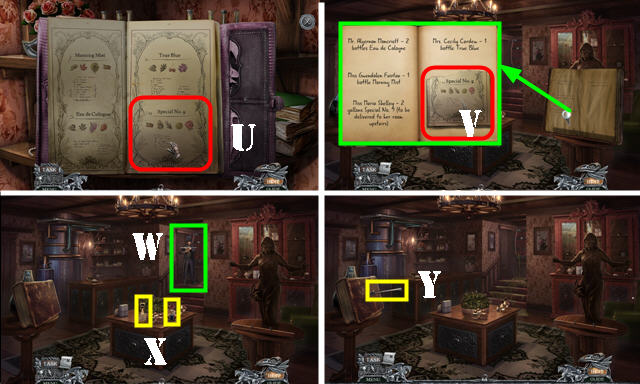
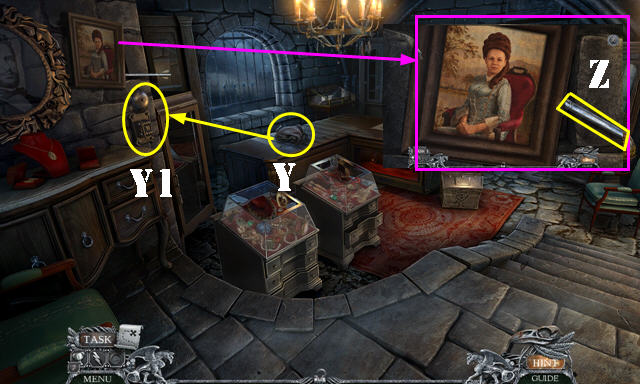
- Look at the book (Y); look at the note and card; take the INVITATION.
- Take the MATCHES and place the INITIAL (Z); play the HOP to get the HANDKERCHIEF.
- Walk down twice and open the door.
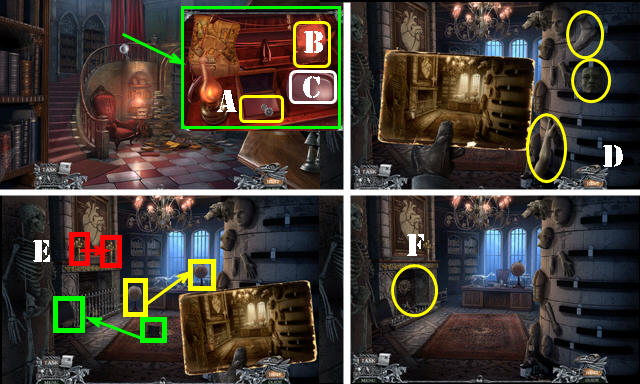
- Use the OBELISK and SHOE (A); use the FLOWERPOT (B) to receive the FULL FLOWERPOT.
- Go to Lupin's Room.
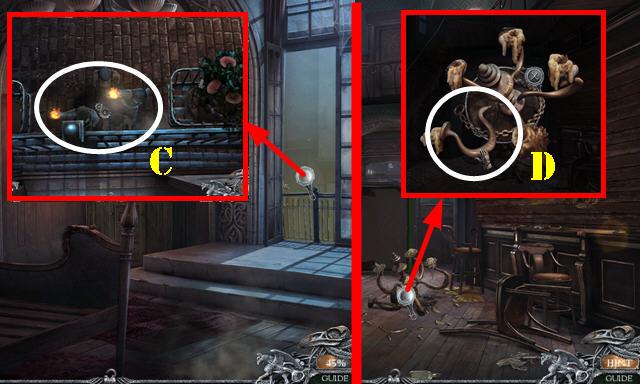
- Use the FULL FLOWERPOT (C).
- Walk down twice.
- Take the CHANDELIER HOOK (D).
- Select the BEDSHEET 4x and use the CHANDELIER HOOK; receive the ROPED HOOK.
- Return to Lupin's Room.
- Use the ROPED HOOK; receive the CRYPTEX (E).
- Use the ROPED HOOK; go to the Roof (F).
- Use the CRYPTEX for a puzzle (G).
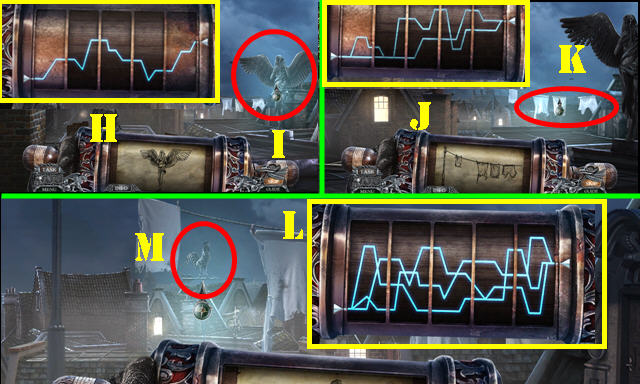
- Arrange as shown (H); go forward (I).
- Arrange as shown (J); go forward (K).
- Arrange as shown (L); go forward (M).
- Go forward 3x.
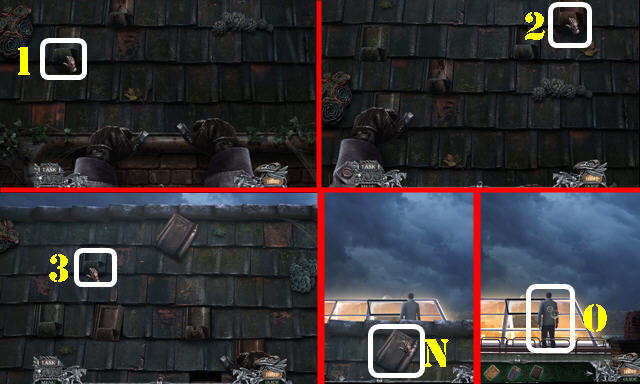
- Select 1-3.
- Take the ROOF TILE (N).
- Throw the ROOF TILE (O).
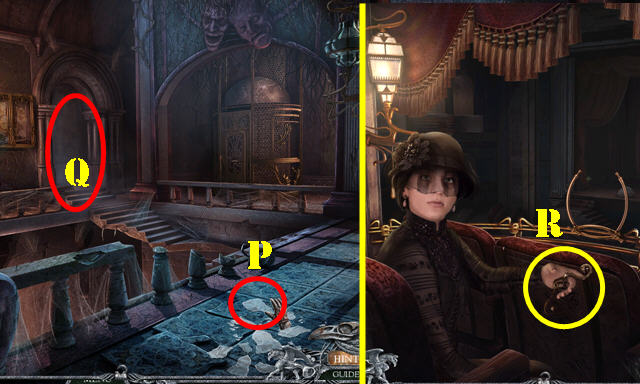
- Take the GLASS SHARD (P).
- Go to the Balcony (Q).
- Give the INVITATION; take the HANDLE PART (R).
- Walk down.
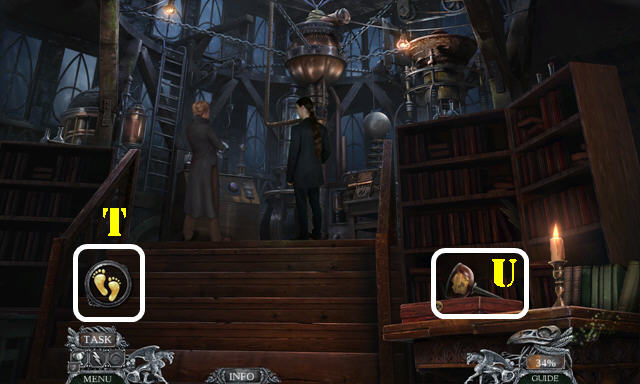
- Place the HANDLE PART(S) and select the map (T); play the HOP to get the PLAY POSTER.
- Return to the Balcony.
- Take the BINOCULARS (U).
- Place the BINOCULARS (V) and the PLAY POSTER (W) for a puzzle.
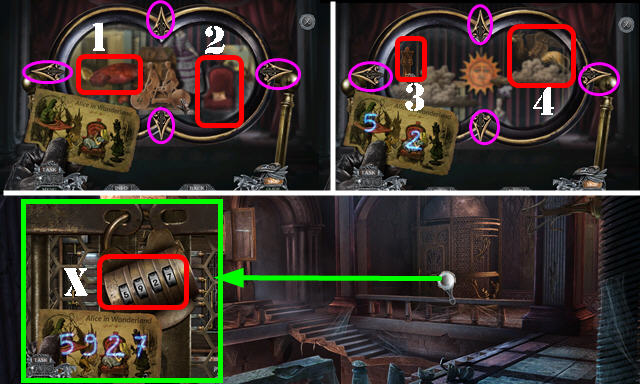
- Use the arrows (purple); select 1-4; receive the ELEVATOR SEQUENCE.
- Walk down.
- Place the ELEVATOR SEQUENCE; enter 5927 for a puzzle (X).

- Solution (Y).
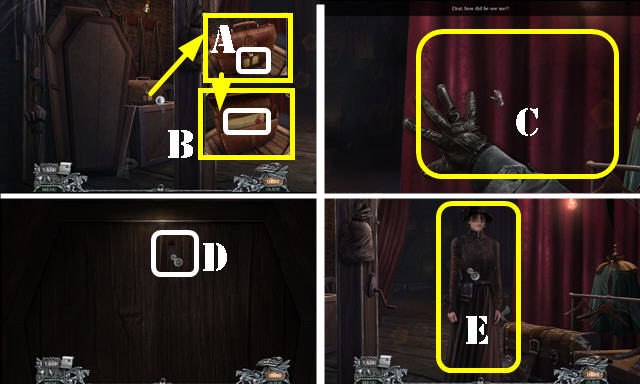
- Take SCHNITTER'S CARD (A).
- Use the GLASS SHARD and open the bag; take the DELIVERY ORDERS (B).
- Select the curtain (C). Put your hands on the door twice; use the MATCHES (D).
- Give the DELIVERY ORDERS (E).
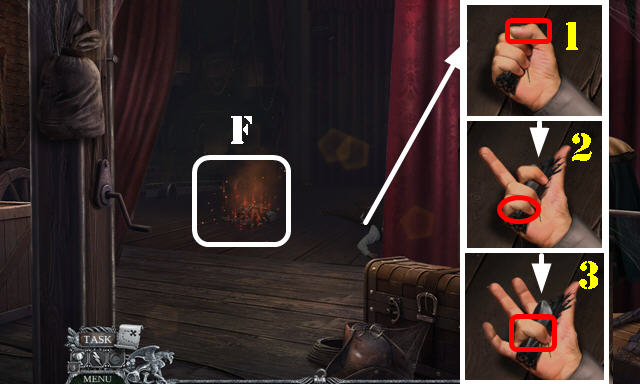
- Play the HOP (F) to receive the SIGIL.
- Select 1-3; take the VEIL PIECE.
- Walk down.
- Lift the flowerpot; take the HOUSE KEY (G).
- Use the HOUSE KEY (H); go to the Interior.
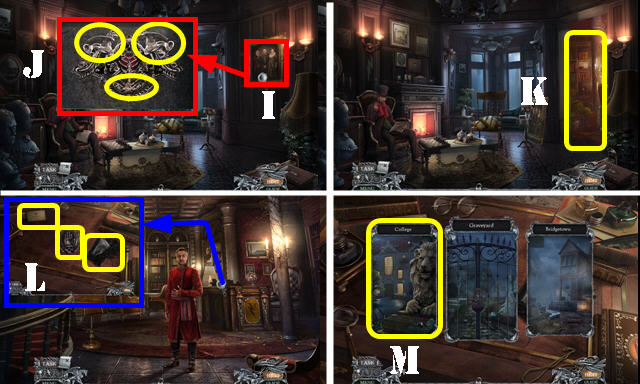
- Select the picture (I) and the three parts (J). Go to the Hideout (K).
- Place SCHNITTER'S CARD, the VEIL PIECE, and SIGIL (L).
- Select College (M); receive SCHNITTER'S CARD.
Chapter 2: College
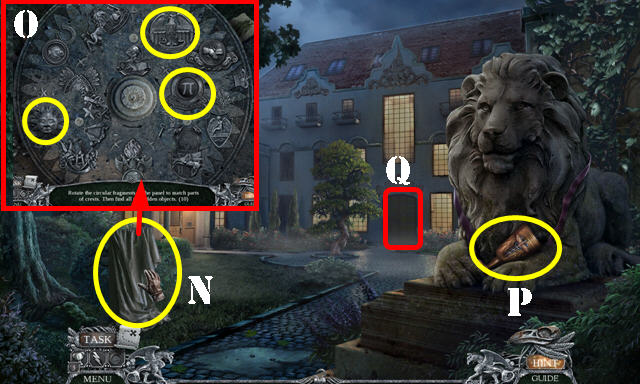
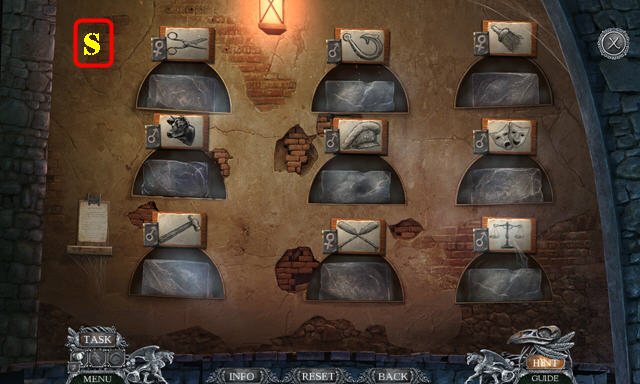
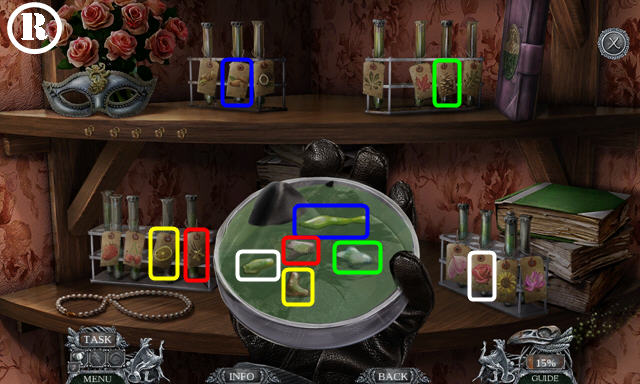
- Take the WET TARP (N); play the HOP to receive the MEDAL. Swap pieces around the board and rotate them to find the crest parts. Examples (O). Not all pieces are visible at the same time. Keep swapping until you find all.
- Take the AWARD (P).
- Go to the Main Hall (Q).
- Take the FEATHER DUSTER (R).
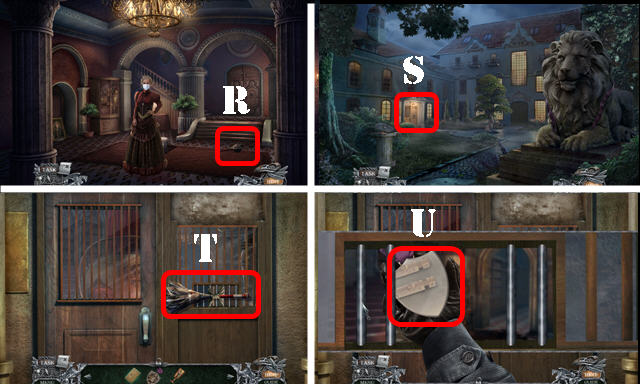
- Walk down and go to the Records Room (S).
- Place the WET TARP and FEATHER DUSTER; select once and place the MEDAL (T).
- Position the MEDAL as shown and select it (U).

- Take the PAPER AND CHARCOAL (V), TROPHY (W), and DEAN'S SIGNATURE (X).
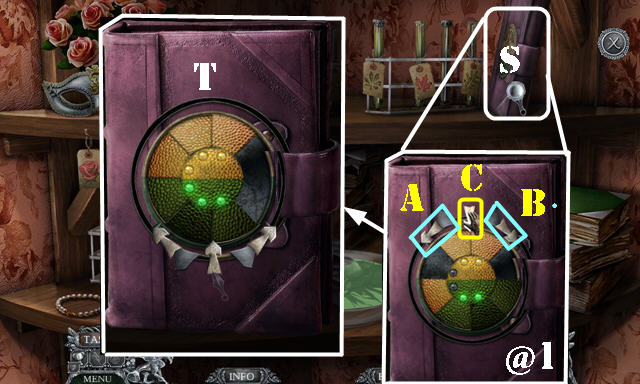
- Put down the SCHNITTER'S CARD and DEAN'S SIGNATURE for a puzzle (Y).
- Trace both signatures (A-B).
- Select the candle (C) and use the MEDAL (D). Select the stamp to get the COLLEGE PASS.
- Go to the Main Hall.
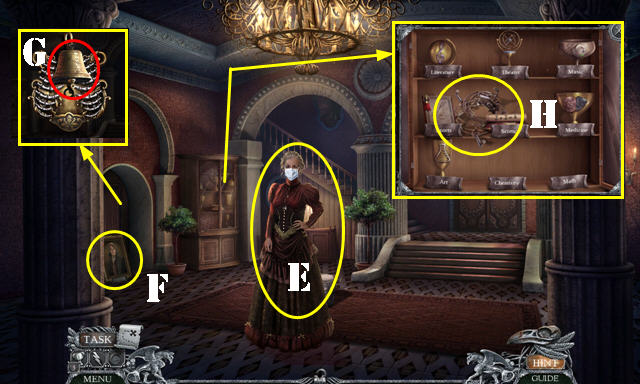
- Give the COLLEGE PASS (E).
- Select the portrait (F). Take the BELL (G).
- Open the cabinet; take the SHOCK HELMET (H). Place the AWARD and TROPHY for a puzzle.
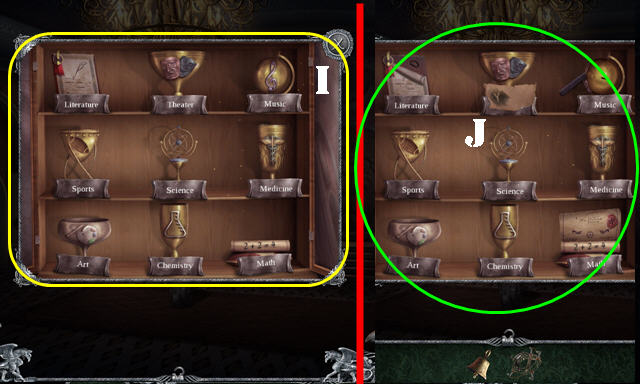
- Solution (I).
- Use the PAPER AND CHARCOAL on the trophies; receive the WRITTEN CODE (J).
- Return to the Records Room.

- Place the WRITTEN CODE; select the three keys (K); take the WIRE SAW (L).
- Return to the Main Hall.
- Use the WIRE SAW and select the door (M); enter the Amphitheater.
- Look at the chalkboard; take the FIRST AID KIT (N).
- Open the cabinets and drawers of the FIRST AID KIT; take the BRASS KEY and STRING (O).
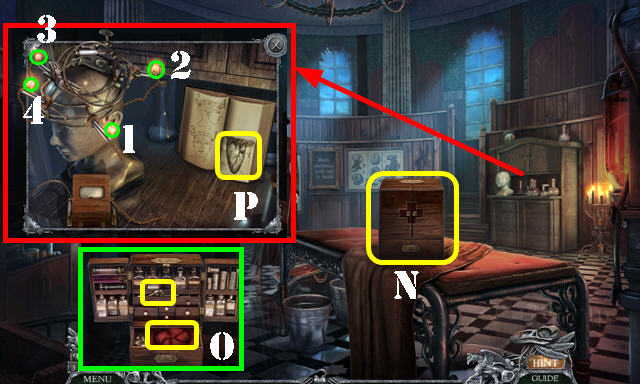
- Open the book; take the RIPPED PAGE (P).
- Place the SHOCK HELMET; select 1-4 and take the RED BULB.
- Walk down.
- Use the BRASS KEY (Q); enter the Consulting Office.
- Play the HOP (R) to get the SCARIFICATOR.
- Return to the Amphitheater.
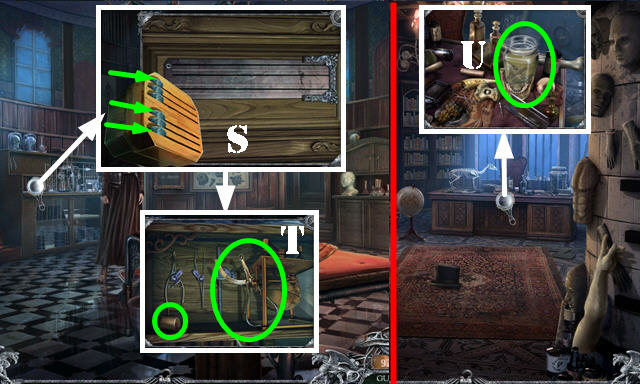
- Place the SCARIFICATOR; select the blades as shown (S). Take the BANDAGES and CRANIOMETER (T).
- Return to the Consulting Office.
- Remove the lid; use the CRANIOMETER to receive the CLAMPS 1/3 (U).
- Return to the Records Room.
- Place the RED BULB (V); take the NEEDLE (W).
- Place the BANDAGES and NEEDLE in the FIRST AID KIT; take the FIRST AID KIT (X).
- Return to the Amphitheater.
- Put down the FIRST AID KIT (Y); take the STRONG PERFUME and NEGATIVE (Z).
- Return to the Records Room.
- Place the NEGATIVE (A). Dip the paper (B) in the liquid (C). Place over the negative and select (A). Take the OFFICE PHOTOGRAPH.
- Return to the Consulting Office.
- Place the OFFICE PHOTOGRAPH. Take the CLAY PARTS 1/3, CLAY PARTS 2/3, and CLAY PARTS 3/3 (D).
- Place the items as shown (E).
- Select the fireplace and papers twice. Select the dial twice and play the puzzle (F).
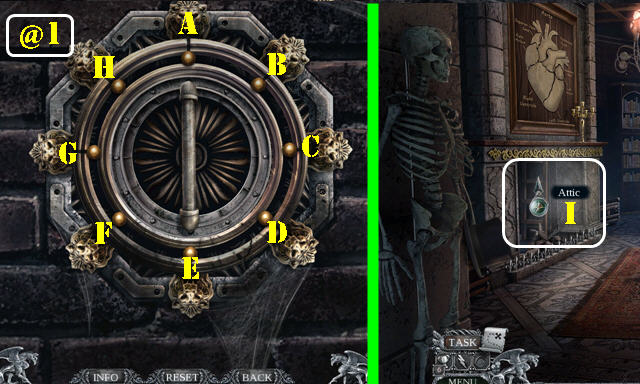
- Solution: E-D-F-C-Dx2-H-G-A-Hx2-B (@1).
- Go to the Attic (I). Climb the ladder 3x.
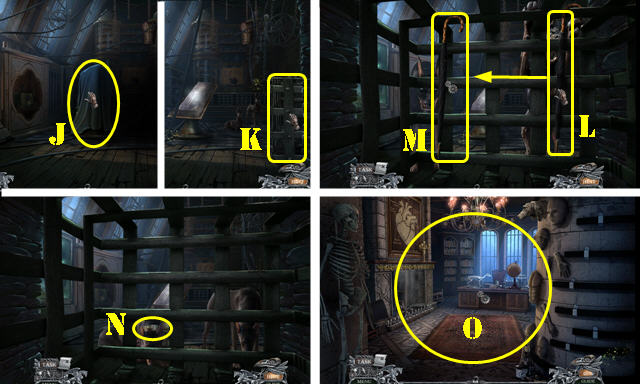
- Remove the sheet (J) and select the cage (K).
- Use the umbrella (L) here (M); receive the UMBRELLA.
- Take the STAINED COLLAR (N).
- Walk down.
- Throw the STRONG PERFUME on the scene (O).
- Walk down.
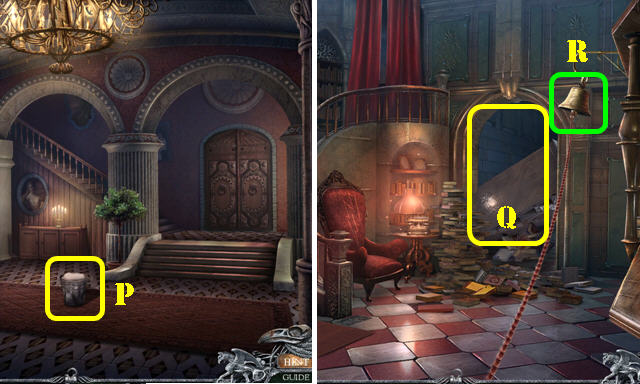
- Tip the bucket (P).
- Walk down and go to the Records Room.
- Select the doorway (Q).
- Place the BELL and use the STRING (R).
- Walk down.
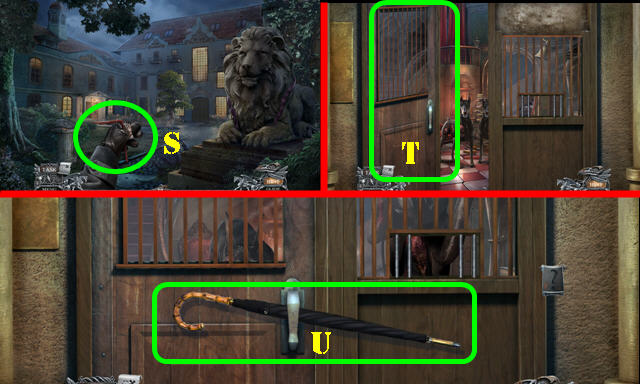
- Pull the string (S).
- Go to the Records Room.
- Select the door (T); use the UMBRELLA (U).
- Return to the Attic.

- Select 1-2.
- Look at the note (V); select the switch (W) for a puzzle.
- Solution: X-Yx2-X. Pull the switch (Z).
- Take the CLAMPS 2/3 (Z1).
- Place the CLAY PARTS 3/3 (A); play the HOP (B) to get the LOCK PIECE.
- Place the LOCK PIECE (C). Dip the STAINED COLLAR (D); receive the DOG COLLAR.
- Select 1-5 on the DOG COLLAR; take the MINIATURE HAND (E).
- Walk down.
- Select the painting; take the CLAMPS 3/3 (F).
- Go to the Attic.
- Use the CLAMPS 3/3 (G); select the paper and place the RIPPED PAGE to receive the HEART DIAGRAM (H).
- Walk down.
- Place the MINIATURE HAND and HEART DIAGRAM for a puzzle. Turn the hand to 8 clockwise, 3 counterclockwise, and to 1 clockwise (I).
- Take the MACHINE SCHEMATICS (J).
- Walk down.
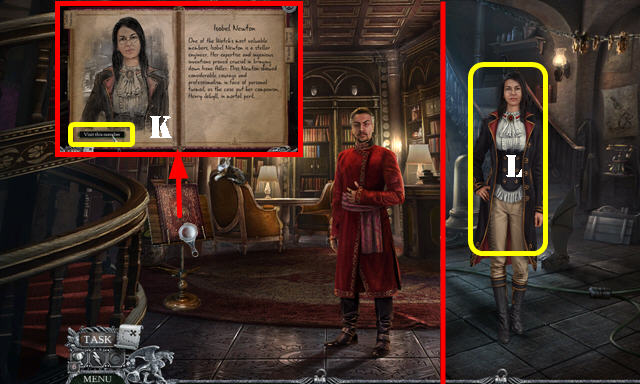
- Open the book; select 'Visit this member' (K).
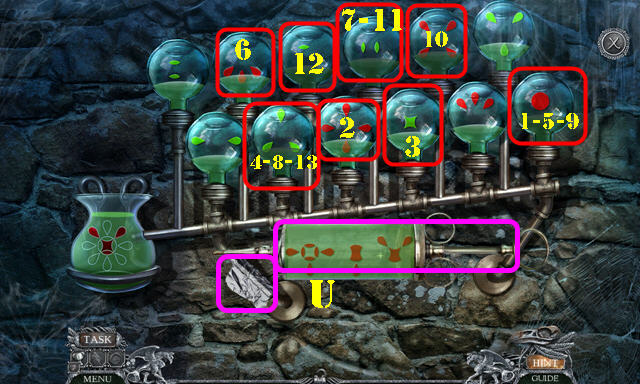
- Give the MACHINE SCHEMATICS (L) for a puzzle.
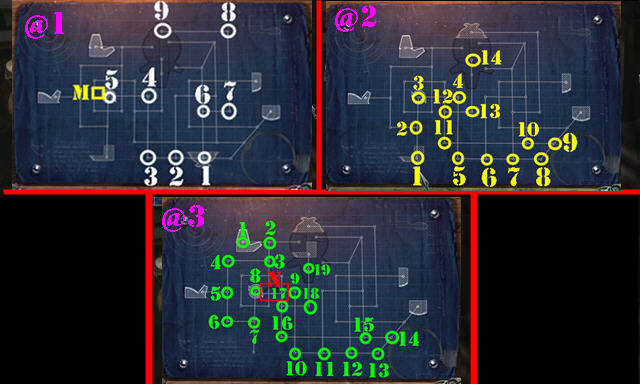
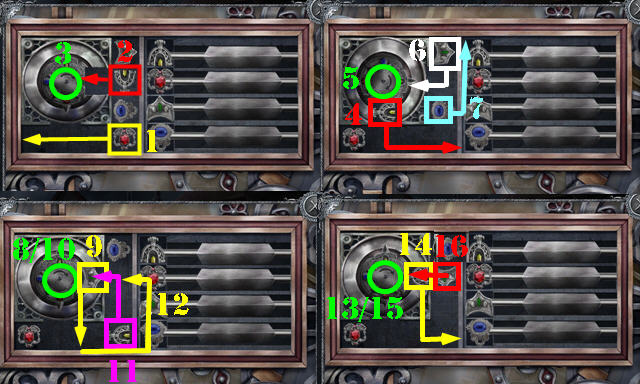
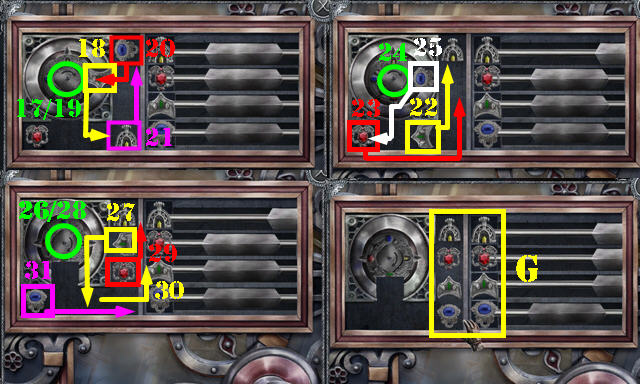
- Solution: 1-2-3-4-5-M-M-4-3-2-1-6-7-8-9 (@1).
- 1-2-3-4-5-6-7-8-9-10-11-12-13-14 (@2).
- 1-2-3-4-5-6-7-8-N-N-9-10-11-12-13-14-15-16-17-18-19 (@3).
- 1-2-3-4-5-P-5-6-7-8-9-10-11-12 (@4).
- 1-2-3-4-5-6-7-8-9-Q-10-11-12-13-14-15-16 (@5).
- 1-2-3-4-5-6-7-8-9-10-11-R-10-9-8-7-12-13-14-15 (@6).

- Take the COIL SCHEMATICS (S).
- Walk down.
- Give the COIL SCHEMATICS (T).
- Select the Graveyard (U); you receive the SIGIL.
Chapter 3: Graveyard
- Select the SIGIL (V). Take the DULL SICKLE (W) and CLOTH POUCH (X).
- Open the CLOTH POUCH; take the CEMETERY KEY and SHORT CHIME.
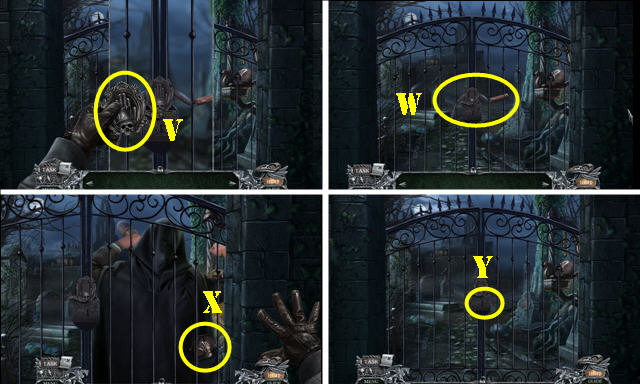
- Use the CEMETERY KEY (Y).
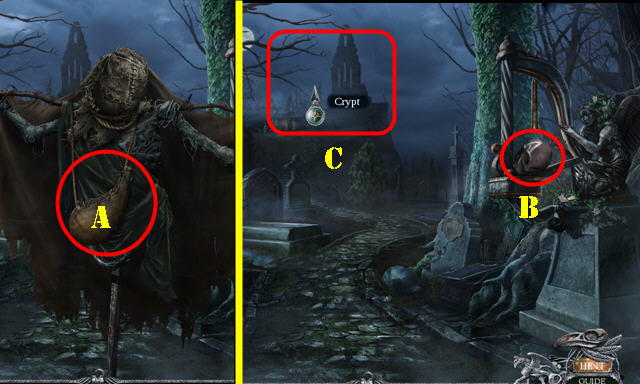
- Try to go forward; take the WATERSKIN (A) and select the scarecrow.
- Take the ARROWHEAD SKULL (B).
- Go to the Crypt (C).
- Try to go the Lower Passage (D).
- Take the LONG CHIME (E) and BROKEN LANTERN (F).
- Walk down.
- Place the SHORT CHIME and LONG CHIME and select them (G).
- Take the SANDSTONE (H).
- Use the SANDSTONE on the DULL SICKLE; receive the SICKLE.
- Use the SICKLE (I); select the burner (J); take the FRAGMENT HERBS (K) and KEROSENE (J).
- Use the WATERSKIN (L); receive the SYMBOLS and LANTERN LATCH.
- Select the BROKEN LANTERN twice; use the KEROSENE and close the door. Place the LANTERN LATCH and select it to receive the LANTERN.
- Use the LANTERN (M); play the HOP to get the CENSER.
- Use the CENSER; select it and use the FRAGRANT HERBS; take the BROOCH (N).
- Take the SHOVEL (O).
- Return to the Crypt.
- Use the BROOCH (P); take the COIN (Q).
- Go forward.

- Take the CODE SHEET 1/2 (R).
- Return to the Graveyard.
- Place the COIN (S); take the CODE SHEET 2/2 (T).
- Return to the Lower Passage.
- Place the CODE SHEET 2/2 on the scene.
- Select 1-4.
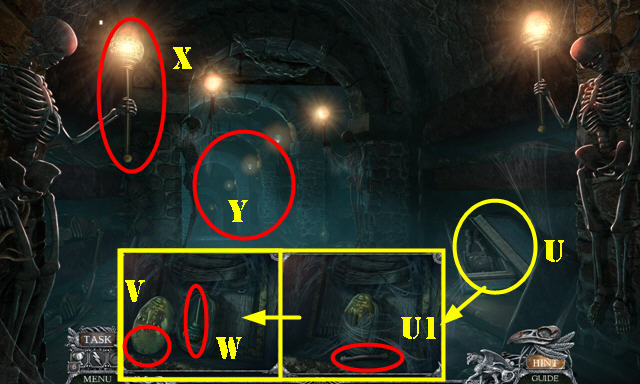
- Use the SHOVEL (U); take the WICK (U1); select the cobwebs twice and the turban 3x. Place the SYMBOLS (V) and take the TORCH (W).
- Place the TORCH (X).
- Go forward.
- Give the SIGIL; take the TOOLBOX (A).
- Take the RAG (B).
- Go to the Auction Hall (C).

- Take the BONE PIECES 1/5 (D).
- Go to the Drain (E).
- Take the BONE PIECES 2/5 (F).
- Walk down. Go to the Storage (G).
- Take the BONE PIECES 3/5 (H).
- Go left. Select the ladder (I).Take the BONE PIECES 4/5 and BONE PIECES 5/5 (J).
- Place the BONE PIECES 5/5 on the TOOLBOX; take the WRENCH and LAMP VALVE.
- Return to the Underground Chamber.
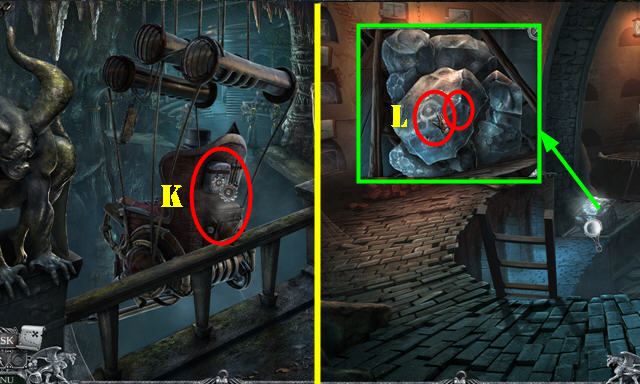
- Use the WRENCH (K); play the HOP to receive the ICE PICK.
- Go to the Storage.
- Use the ICE PICK; take the ICE CHUNK and the STRIPED SKULL (L).
- Go to the Underground Chamber.
- Place the ARROWHEAD SKULL and STRIPED SKULL; swap the skulls as shown (M).
- Take the MASK PIN (N).
- Return to Storage and go right.
- Use the MASK PIN (O); select each section (P).
- Take the CLIPBOARD (Q).
- Go left. Place the CLIPBOARD for a puzzle (R).
- Solution (S).
- Walk down.
- Select the chains (T).
- Select the mechanism twice; take the WEIGHTS (U).
- Place the WICK and LAMP VALVE (V). Select the valve.
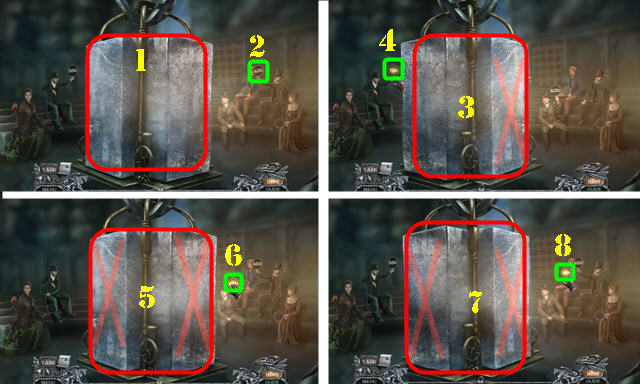
- Select the block (1) and 600 (2).
- Select the block (3) and 700 (4).
- Select the block (5) and 600 (6).
- Select the block (7) and 1000 (8).
- Select the mechanism (A).
- Go to the Drain (B).
- Select (C-D-E).
- Take the FALLEN MIRROR (F).
- Select the 3 shards on the FALLEN MIRROR. Place the RAG and the ICE CHUNK; receive the MIRROR.
- Place the MIRROR (G) and select it.
- Play the HOP (I) to get the 'LOT 4' BOX.
- Take the LABEL and BOX from the 'LOT 4' BOX.
- Place the LABEL and WEIGHTS for a puzzle. Solution (J).
- Take the RED QUEEN'S ORDER (K).
- Return to the Underground Chamber.
- Give the RED QUEEN'S ORDER (L).
- Sit in Price's Chair (M).
- Go forward to the Auction Hall.
- Pull the joystick down once and left twice (N).
- Go to the Drain (O).
- Select (P-Q-R)-(Sx2-T).
- Walk down.
- Select 1-5.
- Go to the Storage.
- Pull the joystick down 2x and right 3x (U). Pull the slider (V) all the way up.
- Walk down five times.
- Open the book; select The Warden (A) and Visit this member (B).
- Give the BOX (C).
- Play the HOP (D) to receive the HARBOR DOCUMENTS.
- Walk down.
- Give the HARBOR DOCUMENTS (E).
- Select Bridgetown (F); receive the VEIL PIECE.
- Take the BUNDLE (G).
Chapter 4: Bridgetown
- Open the BUNDLE; take the FLINTLOCK, POCKETKNIFE, and KNUCKLES.
- Go forward 4x.
- Take the NAIL PULLER (H) and MERCHANT'S SEAL (I).
- Open the lantern (J). Drag the pole (K) to the lantern; receive the LIT POLE.
- Walk down.
- Use the LIT POLE (L).
- Use the NAIL PULLER (M); receive the SKULL CUFF LINKS 1/2.
- Enter the Perfume Shop (N).
- Take the GLASS DISH (N1).
- Place the GLASS DISH (O); turn the spigot (P) and take the PERFUME OIL.
- Place the PERFUME OIL; add the VEIL PIECE to it for a puzzle (Q).
- Solution (R).
- Select the book (S) for another puzzle.
- Solution: C-Bx2-C-Bx4-C-Bx2-C-Bx3-C-Bx3-C-A-C-Ax2-C-Ax2-C.
- Ax4-C-Bx2-C-B-C-Ax3-C-B-C-Ax3-C-B-C (@1).
- Solved puzzle (T).
- Take the PERFUME LABEL (U).
- Place the PERFUME LABEL (V).
- Try to go to the Rented Room (W).
- Select the two bottles on the table (X).
- Take the BOLT (Y).
- Walk down.

- Use the BOLT (A); receive the BOLT 1/2.
- Take the SANDBAG and SACKCLOTH (B).
- Go to the Perfume Shop.
- Use the SANDBAG (C).
- Take the SPIGOT (D).
- Go to the Rented Room (E).
- Close the window (F).
- Lift the rug and the trapdoor (G); play he HOP to get the WIND-UP KEY.
- Open the curtain (H).
- Take the MAKEUP BRUSH (I). Use the WIND-UP KEY and select it; select the cover and look at the notes (J). Select the book and place the MERCHANT'S SEAL; take the SHIPMENT BLUEPRINT (K).
- Open the door (L). Take the tray (M) and throw it.
- Take the POWDER PUFF (N) and BOLT 2/2 (O).
- Place the POWDER PUFF (P), SPIGOT (Q), and SACKCLOTH (R); take the STEEL RING (S) and EMPTY CROSSBOW (T).
- Place the BOLT 2/2 on the EMPTY CROSSBOW; receive the CROSSBOW.
- Return to Bridge Square.
- Select the sacks twice (U); place the CROSSBOW on the scene for a puzzle (V).
- Solution (W). You will have to solve this puzzle twice, once by stopping the rings and then by rotating them into place. You receive the EMPTY CROSSBOW.
- Go to the Ice Merchant (X).

- Look on the side of the wall (Y).
- Take the SKULL CUFF LINKS 2/2 (Y1).
- Walk down.
- Place the SKULL CUFF LINKS 2/2 and select twice. Look at the note; take the CHAINS and TAR (Z).
- Return to the Perfume Shop.
- Use the TAR and MAKEUP BRUSH (A); turn each valve once (purple) and take the PADLOCK (B).
- Go to the Ice Merchant.
- Place the CHAINS and PADLOCK (C).
- Take the bag and open it. Look at the note and take the JEWELER'S KEY (D). Take the DEACTIVATOR (E).
- Walk down.
- Place the JEWELER'S KEY for a puzzle (F).
- Solution 1-31.
- Solved puzzle (G).

- Go to the Jeweler's Store (H).
- Take the FILE (I) and ARROWHEADS (J).
- Select both levers (K-L); go to Under the Bridge (M).
- Place the SHIPMENT BLUEPRINT. Select 1-4.
- Use the FILE; take the ICE TONGS (N).
- Place the DEACTIVATOR (O); take the CLAY (P).
- Remove three bricks; take the GEM CUTTER and CHISEL (Q).
- Take the FLINT (R).
- Walk down.
- Use the GEM CUTTER (S); play the HOP to get the SCRAP JEWELRY.
- Place the CLAY (T); take the CLAY IMPRINT (U).
- Go to Under the Bridge.
- Open the furnace; place the CLAY IMPRINT and SCRAP JEWELRY; use the ICE TONGS to get the HEATED METAL (V).
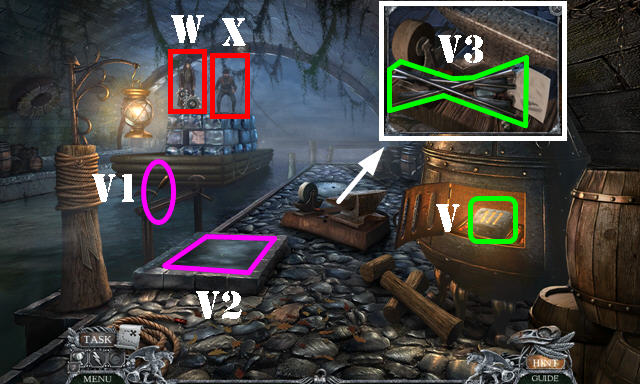
- Select the lever (V1). Dip the HEATED METAL (V2); receive the BOLTS.
- Place the BOLTS and ARROWHEADS; take the CRAFTED BOLTS (V3).
- Place the CRAFTED BOLTS on the EMPTY CROSSBOW; receive the CROSSBOW.
- Use the CROSSBOW twice (W-X).
- Place the rag (Y) on the bell (Y1).
- Remove the arrow for a puzzle (Z).
- Solution: A-I-E-A-H-D-B-I-K-G-C-J.
- Walk down.
- Use the CHISEL and FLINT (L); take the EXPLOSIVE REMOTE (M).
- Go to Under the Bridge.
- Use the EXPLOSIVE REMOTE (N); play the HOP to get the DYNAMITE STICK.
- Walk down.
- Place the DYNAMITE STICK (O); use the FLINT and STEEL RING (P). Open the chest; select the three mold pieces (Q); take the COMPLETE MOLD.
- Walk down.
- Open the book; select Henry Jekyll (R) and Visit this member (S).
- Give the COMPLETE MOLD for a puzzle (T).
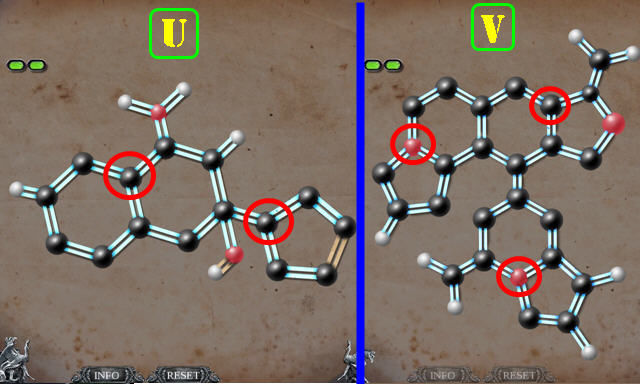
- Solution one (U).
- Solution two (V).
- Take the METEOR SAMPLES (W).
- Walk down.
- Give the METEOR SAMPLES (X).
- Take EDGAR'S SUITCASE (Y).
Chapter 5: Lighthouse
- Take the POLES 1/2 (A) and ANCHOR AND ROPE (B).
- Take the POLES 2/2 (C) and select the wheel (C1). Take the SPYGLASS and NAILS (D).
- Open EDGAR'S SUITCASE for an HOP; play it to get the GADGET WATCH.
- Use the GADGET WATCH; select the 5 boards to receive the BOARDS (E).
- Use the POLES 2/2 and NAILS on the BOARDS; take the LADDER.
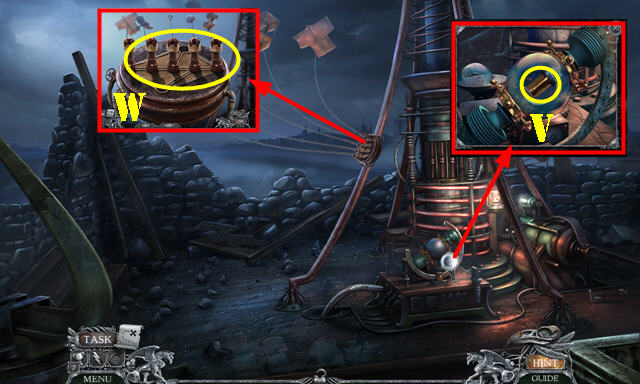
- Place the LADDER (F); take the LANTERN (G). Look at the note (H).
- Use the ANCHOR AND ROPE (I) and hang the LANTERN (J). Select (K-L-M-K-M). Place the ANCHOR AND ROPE (by K, L, or M).
- Use the SPYGLASS and ANCHOR AND ROPE (N).
- Open both windows (O), go forward, then walk down.

- Take the WAX CYLINDER (P).
- Go to the Gallery (Q).
- Open the gate (R), walk down, and go to the Machine Room (S).
- Select the scene; keep the cursor inside the marked spot (T) until it disappears. When it jumps to another location, you must act quickly to get your cursor back in it or it will restart.
- Take the OILCAN (U).
- Go to the Gallery.
- Use the OILCAN and flip the switch (V).
- Play the HOP (W) to get the BOLT CUTTERS.
- Flip the switch again (V).
- Walk down.
- Use the BOLT CUTTERS (X); enter the Private Office (Y).
- Open the drawer; take the LAUDANUM (A).
- Open the drawer; take the MULTI-TOOL (B).
- Remove the net (C).
- Take the SPREADER (D). Place the WAX CYLINDER (E); take the LOCK SEGMENT and KEY DESIGN (F).
- Return to the Gallery.
- Place the LOCK SEGMENT; Select (Hx3-Ix3-Gx3).
- Select the marked items (J-K-L-M).
- Select the pole (N) to receive the GADGET WATCH.
- Use the GADGET WATCH (O); receive the SHACKLE.
- Look at the note; take the BLOWTORCH (P). Open the box; take the SCREWDRIVER HEADS 1/3, SCREWDRIVER HEADS 2/3, and SCREWDRIVER HEADS 3/3 (Q).
- Show the KEY DESIGN; take MARIA'S KEY (R).
- Take the EMPTY SYRINGE (S).
- Place the SCREWDRIVER HEADS 3/3 on the MULTI-TOOL; take the SCREWDRIVER.
- Place the EMPTY SYRINGE and LAUDANUM for a puzzle (T).
- Solution 1-12.
- Take the PARALYTIC AGENT and ALUMINUM (U).
- Walk down.
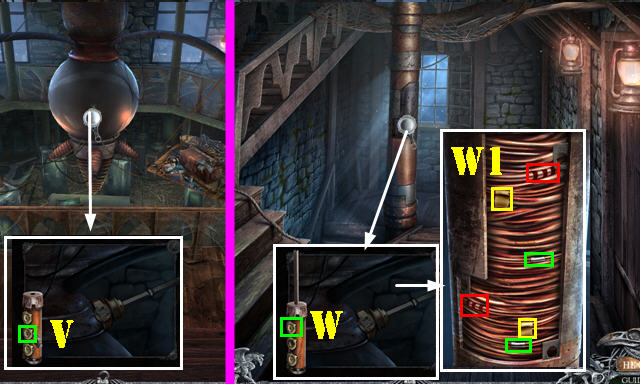
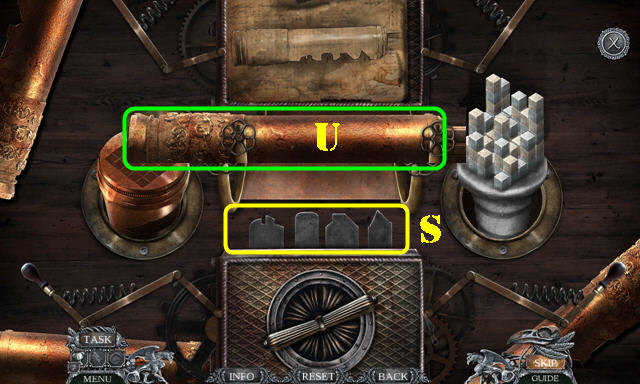
- Place the SCREWDRIVER; press the middle button (V); receive the SILVER STAKE.
- Walk down.
- Place the SCREWDRIVER; press the top button (W). Select matching wires (W1) to receive the COPPER WIRES.
- Go to the Private Office.
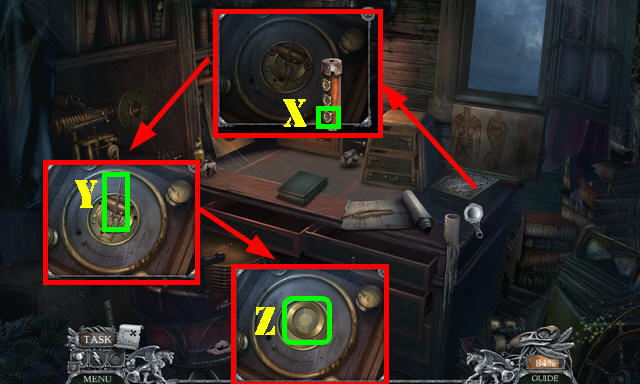
- Use the SCREWDRIVER; press the bottom button (X). Take the POINTER (Y), remove the mechanism and take the GOLD SPRING (Z).
- Use the ALUMINUM, COPPER WIRES, and GOLD SPRING on the SILVER STAKE; take the CONDUCTOR.
- Return to the Basement.
- Place the CONDUCTOR and select it; receive the METAL RING (A).
- Return to the Stairs.
- Use the SPREADER and place the METAL RING. Use the BLOWTORCH (B).
- Walk down and then go to the Gallery.
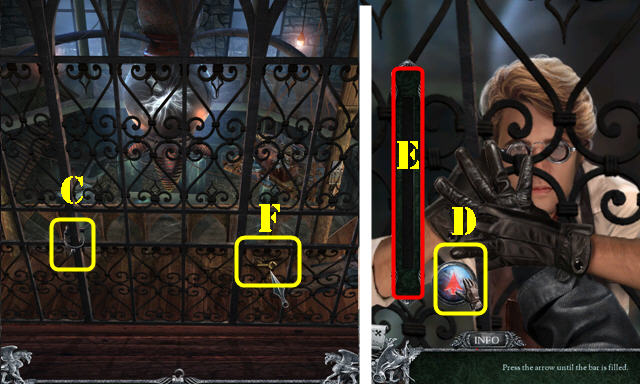
- Close the gate; use the SHACKLE (C).
- Press the arrow (D) until the bar (E) is filled.
- Take the STRONGBOX KEY (F).
- Return to the Machine Room.
- Use the STRONGBOX KEY; take the DECODING PAMPHLET (G).
- Return to the Private Office.
- Place the DECODING PAMPHLET (H). Play the HOP (I) to get the TRANQUILIZER GUN.
- Return to the Machine Room.
- Use the TRANQUILIZER GUN (J) and insert the PARALYTIC AGENT.
- Drop the ladder (K); Go to the Rooftop (L).
- Take the CLAY MODEL (M).
- Walk down.
- Place the POINTER (N). Select the buttons as shown (O). Turn dial to 30 twice (P) and flip the switch (Q).
- Place MARIA'S KEY, KEY DESIGN, and CLAY MODEL for a puzzle (R).

- Swap the key parts as shown (S).
- Arrange the numbers as shown (T).
- Take the MODIFIED KEY (U).
- Go to the Rooftop.
- Select and then take the METEOR KEY (V).
- Place the MODIFIED KEY (V).
- Play the puzzle (W).
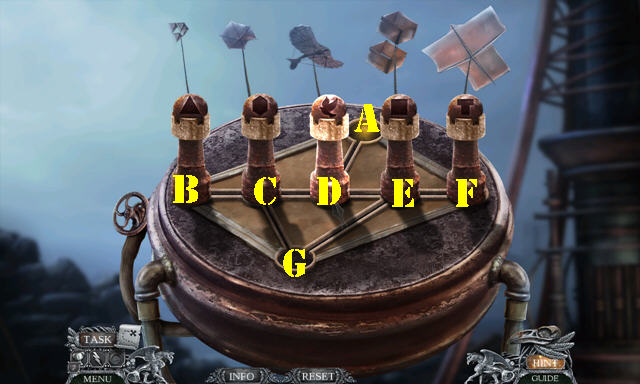
- Solution: (C-G)-(D-C)-(E-D-A)-(C-D)-(G-E)-(B-C-G)-(D-C-B).
- (A-D-C)-(E-D-A)-(F-E-D)-(G-E-F)-(D-E)-(A-D).
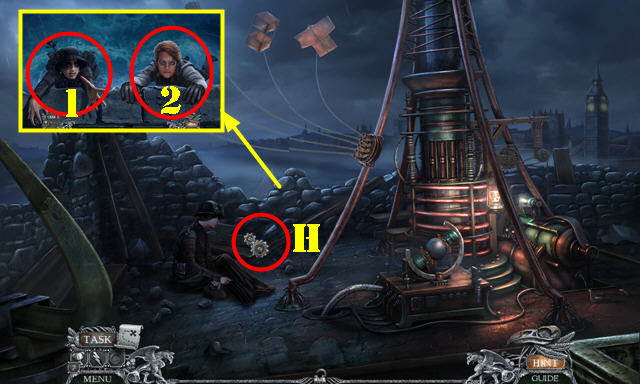
- Select the two people (1-2).
- Use the METEOR KEY (H).
- Congratulations, you've completed Vermillion Watch 2: Fleshbound!
Created at: 2017-01-29