

Walkthrough Menu
- General Tips
- Chapter 1: The Factory
- Chapter 2: White Rabbit's Hat Shoppe
- Chapter 3: Newton Manor
- Chapter 4: Inferno Prison
- Chapter 5: The Emporium
General Tips
- This is the official guide for Vermillion Watch: Moorgate Accord.
- This guide will not tell you when you have to zoom into a location; the screenshots will show each zoom scene.
- Hidden-object puzzles are referred to as HOPs. This guide will not show screenshots of the HOPs, however, it will mention when an HOP is available and the inventory item you'll collect from it.
- Use the Map to fast travel to a location.
Chapter 1: Factory
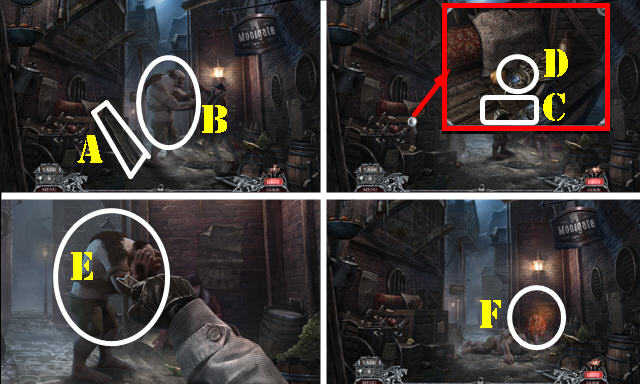
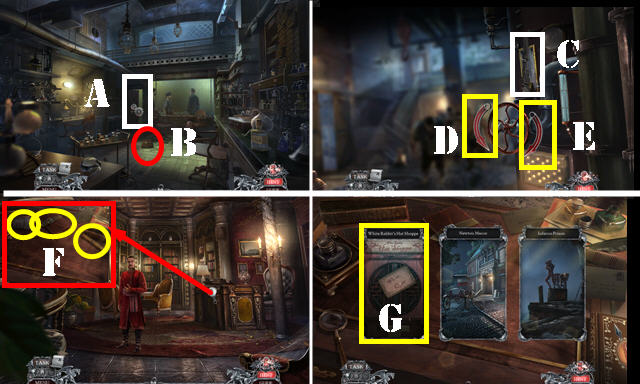
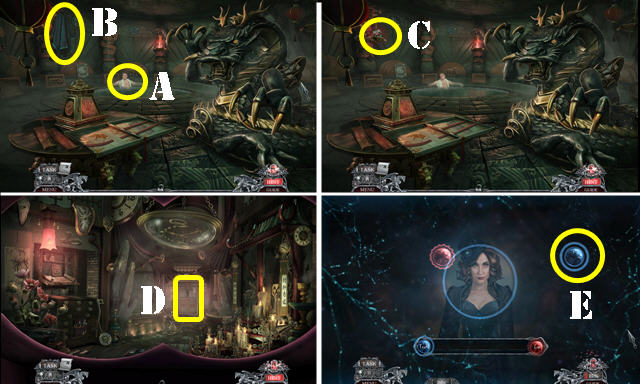
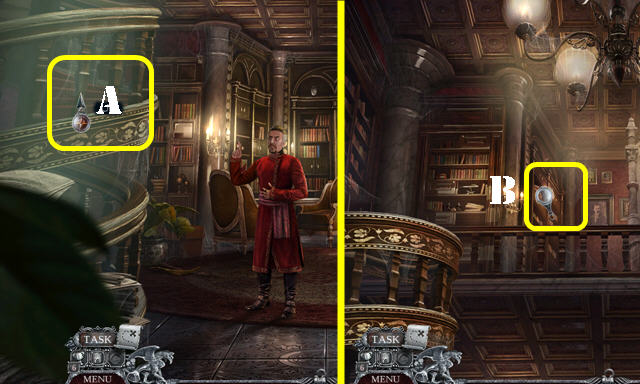
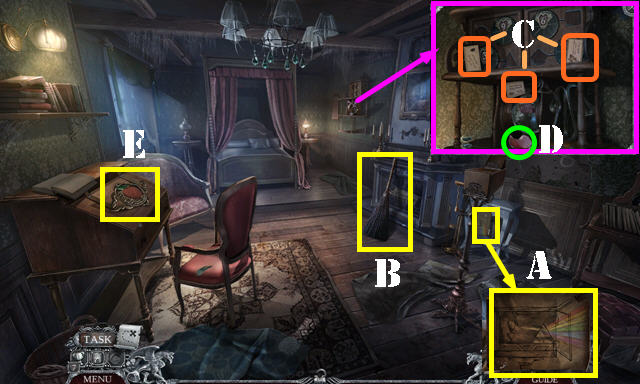
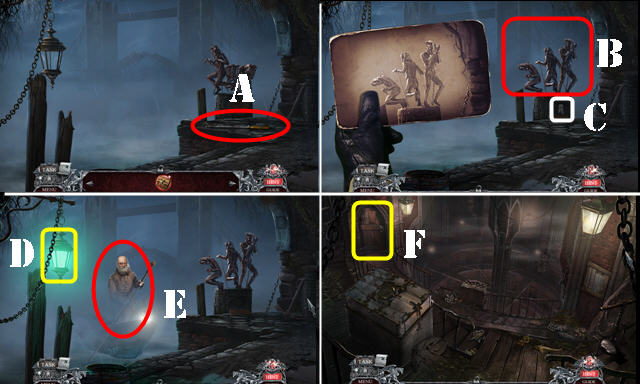
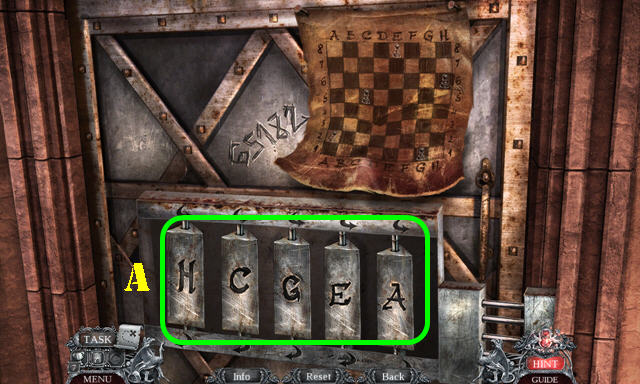
- Take the WOODEN BEAM (A).
- Use the WOODEN BEAM (B).
- Select the pieces (C); take the CONTRAPTION PIECES and BROKEN CONTRAPTION (D).
- Place the CONTRAPTION PIECES into the BROKEN CONTRAPTION; receive the STUN CONTRAPTION.
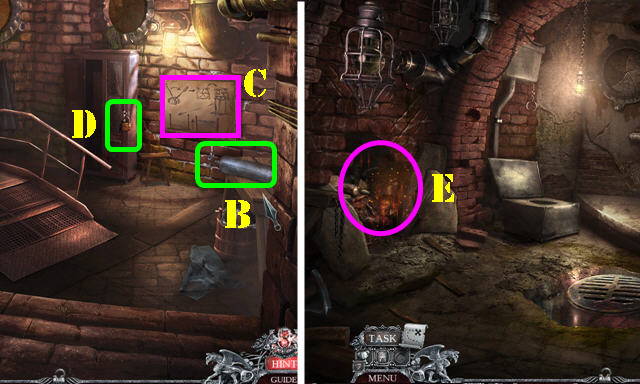
- Use the STUN CONTRAPTION (E).
- Play the HOP (F) to get the UNCLE'S AMULET.
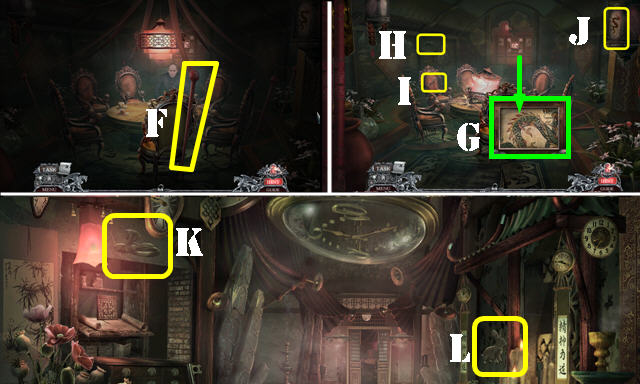
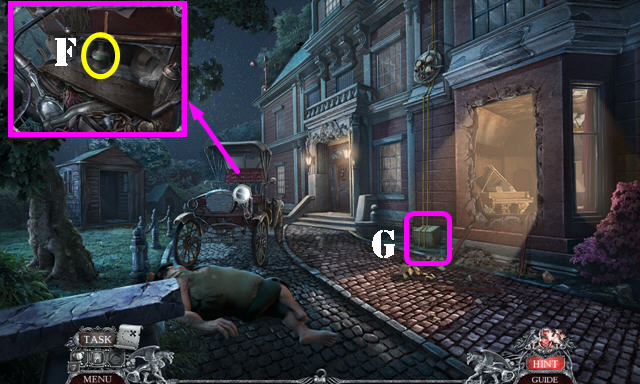
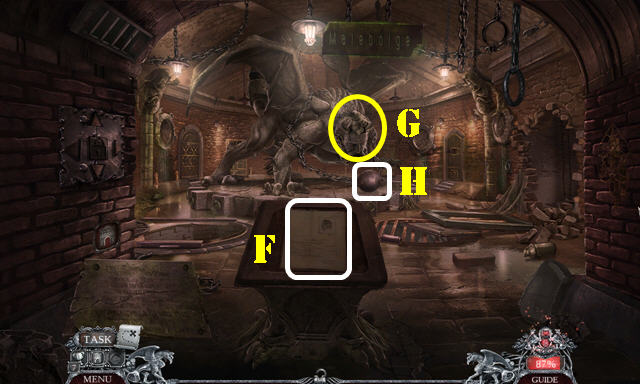
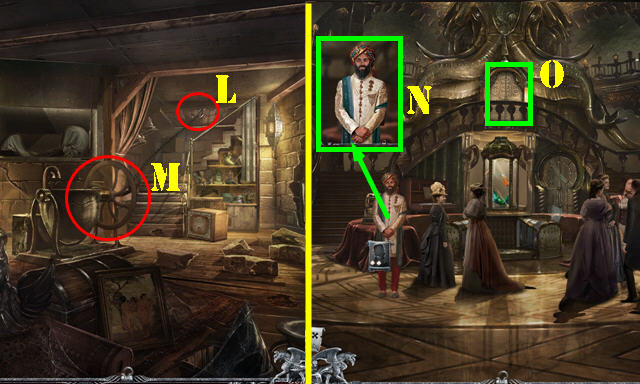
- Go forward.
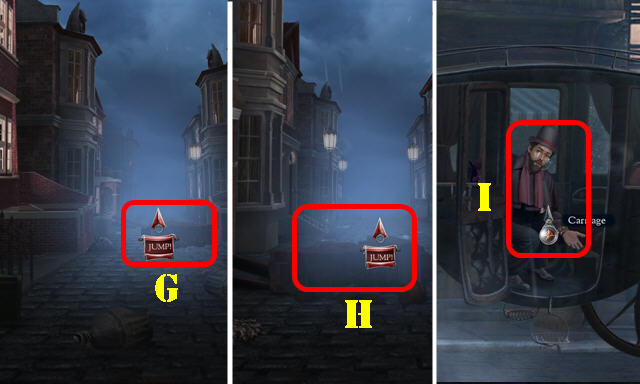
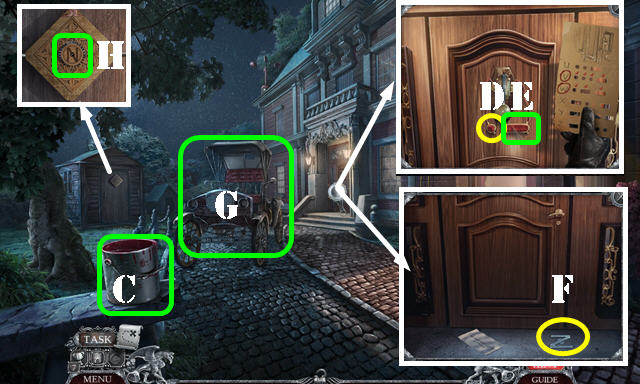
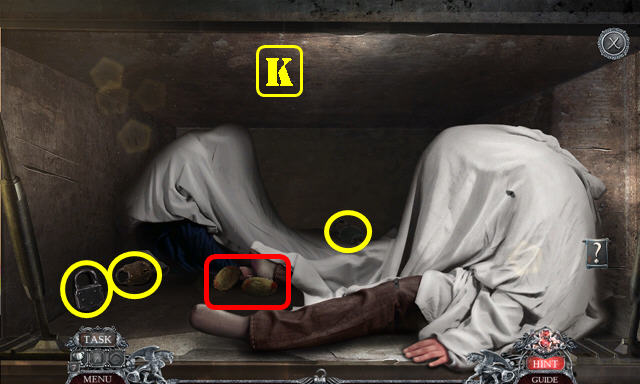
- Jump twice when prompted (G-H).
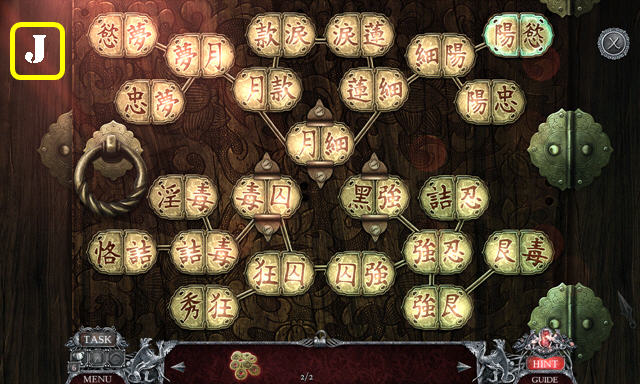
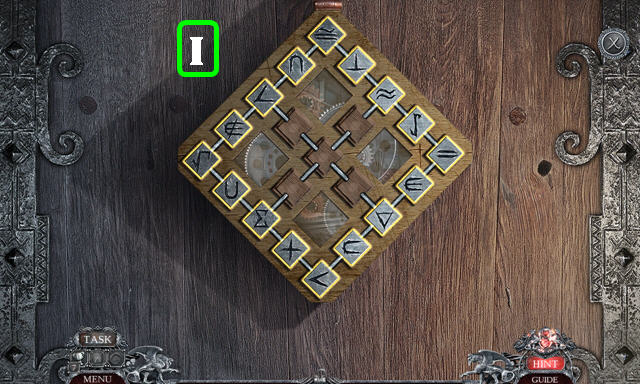
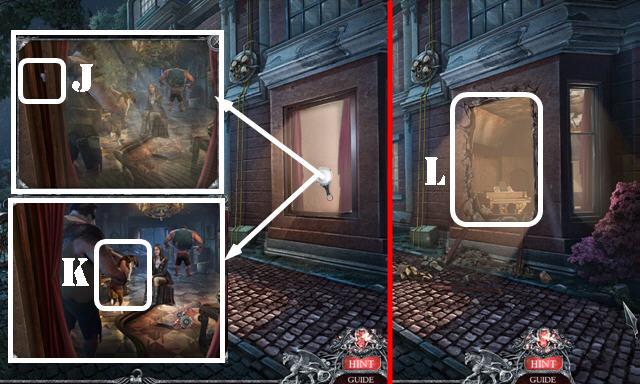
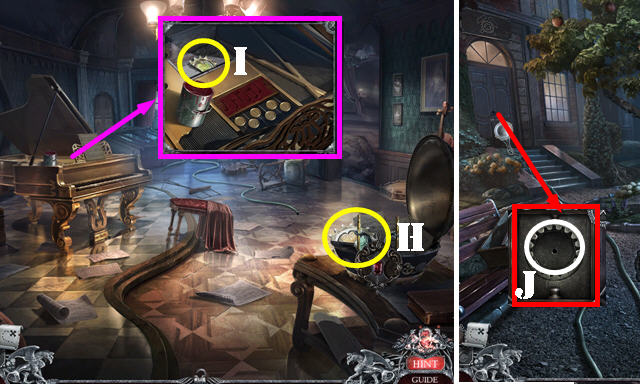
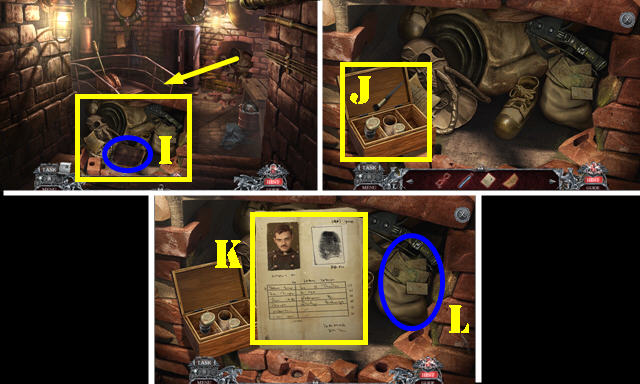
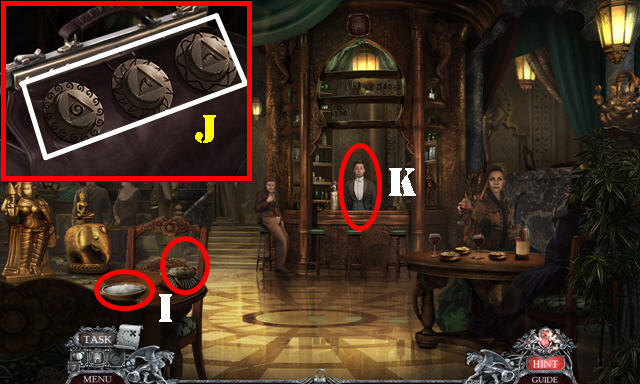
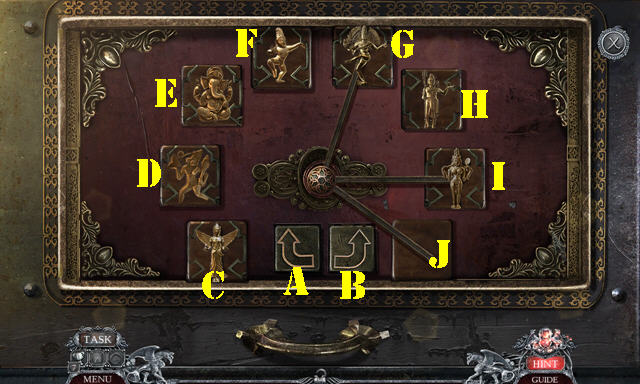
- Enter the carriage for a puzzle (I).
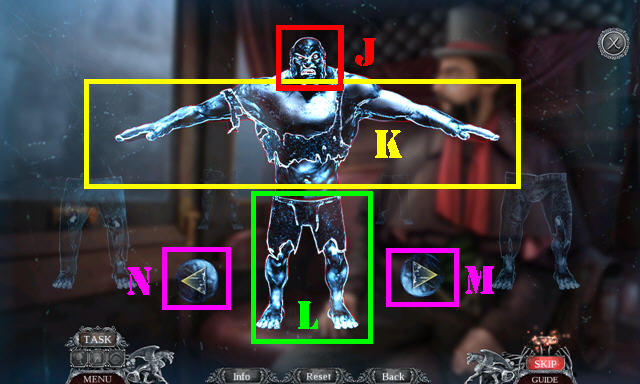
- Solution one: J-Nx2-adjust head size. K-Mx2, adjust the chest to fit. L-Mx2, adjust legs.
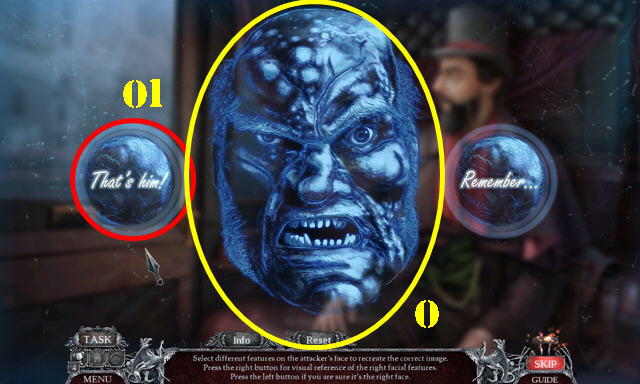
- Solution two (O); select 'That's him' (O1).
- Exit the carriage.
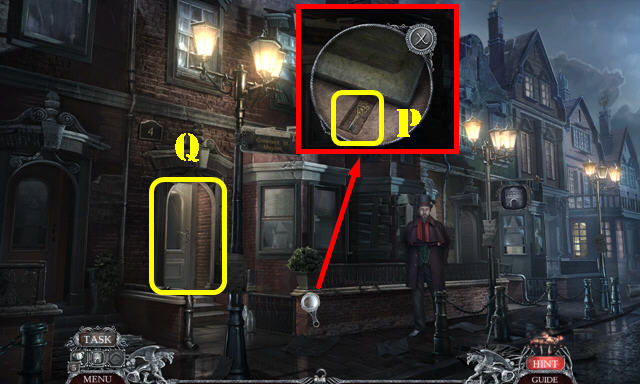
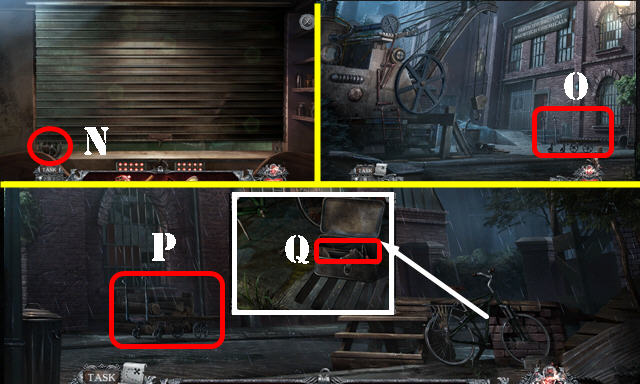
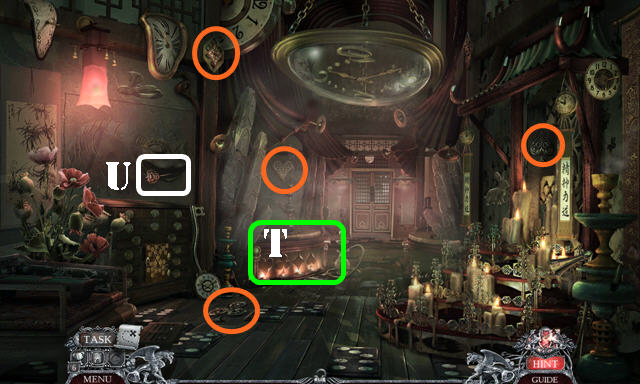
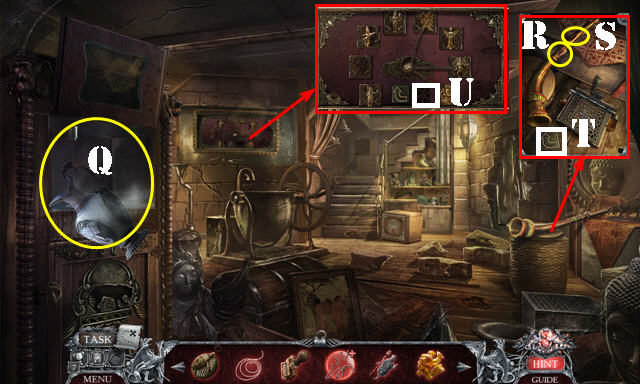
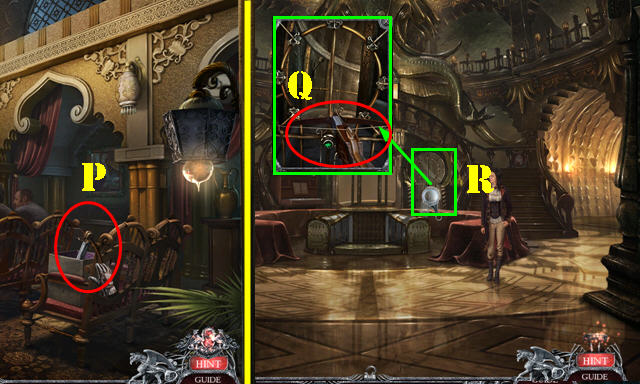
- Lift the pot; take the HOUSE KEY (P).
- Use the HOUSE KEY (Q); go through the door.
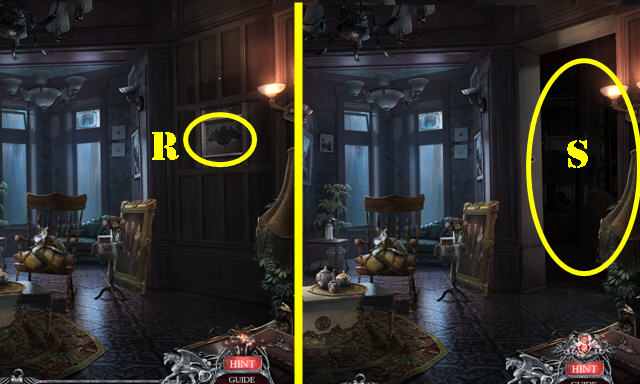
- Remove the painting; place the UNCLE'S AMULET (R).
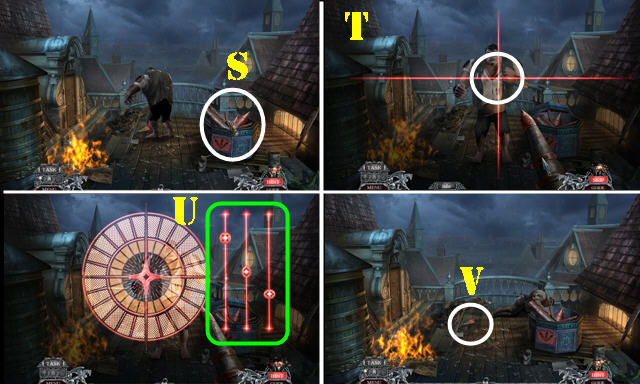
- Go the Secret Passageway(S).
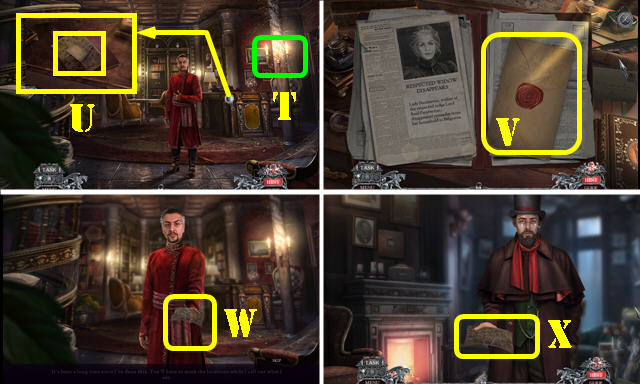
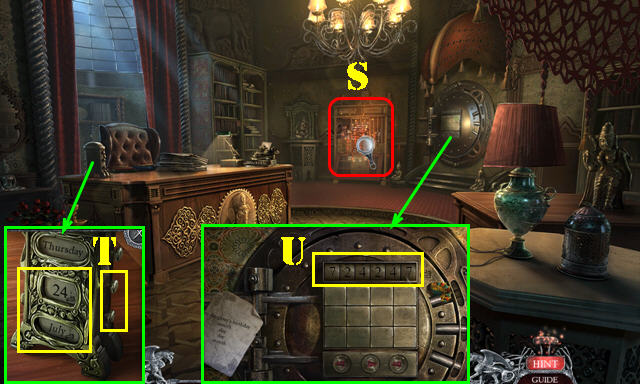
- Turn on the lights (T).
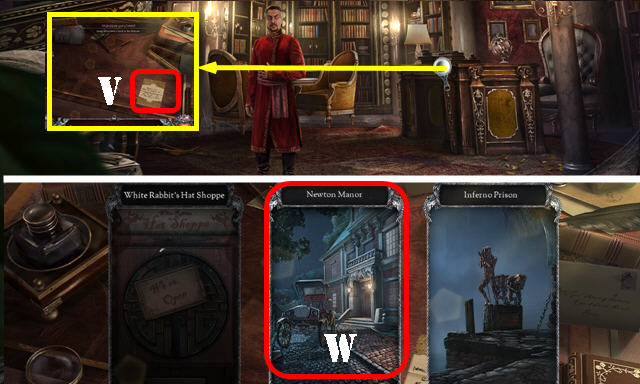
- Look at the note; take the LONDON MAP (U).
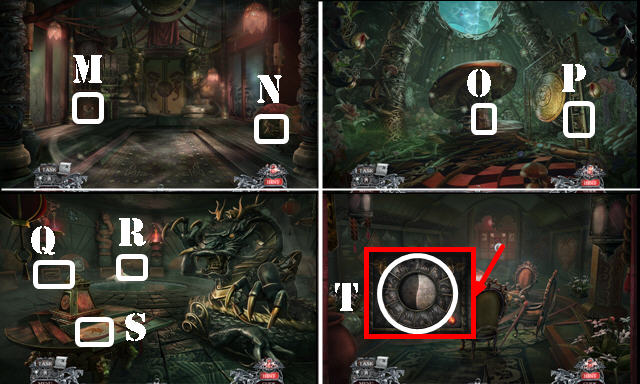
- Open the case file and envelope (V); receive LADY PEMBERTON'S EARRING. Take the CASE FILE.
- Give LADY PEMBERTON'S EARRING and the LONDON MAP for an HOP (W).
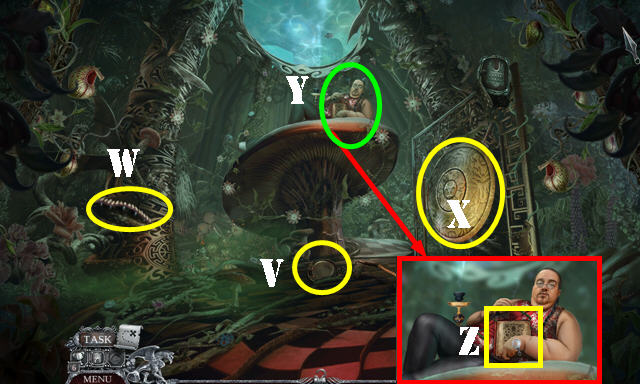
- Play the HOP to receive the MARKED MAP.
- Walk down.
- Give the MARKED MAP and select it (X). Exit the carriage.
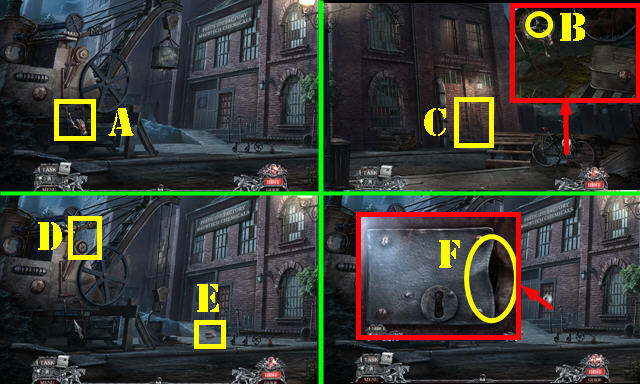
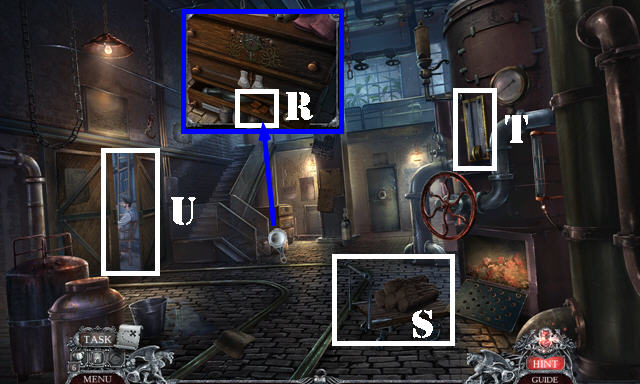
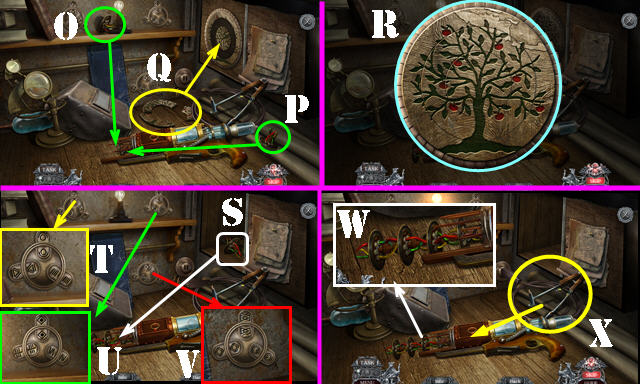
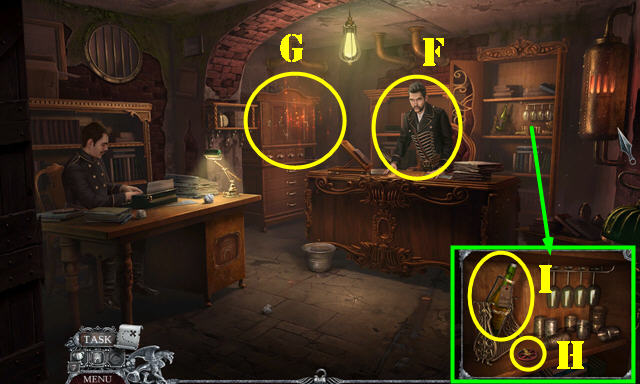
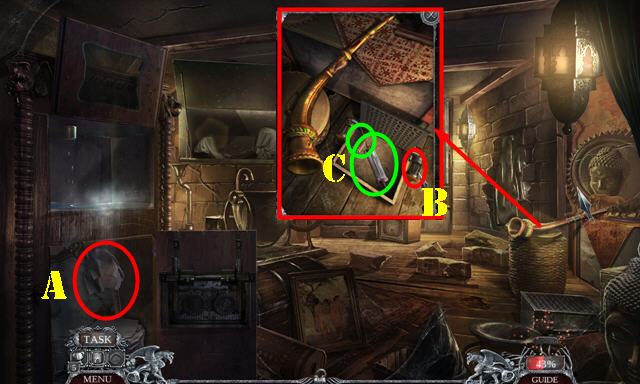
- Take the ELECTRICAL ROD (A). Go right.
- Remove the screw (B); take the BICYCLE CHAIN.
- Take the STEEL FENCE (C).
- Go left.
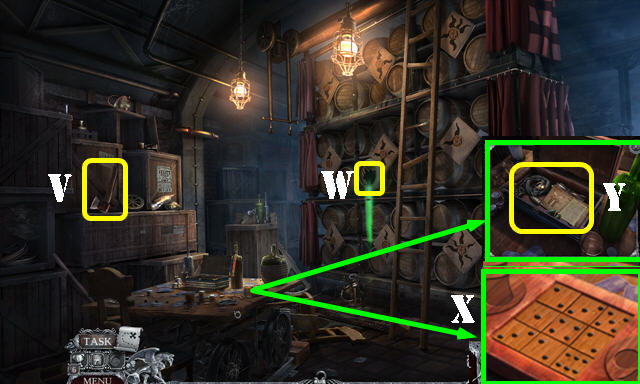
- Use the BICYCLE CHAIN and select it (D); take the SPREADER (E).
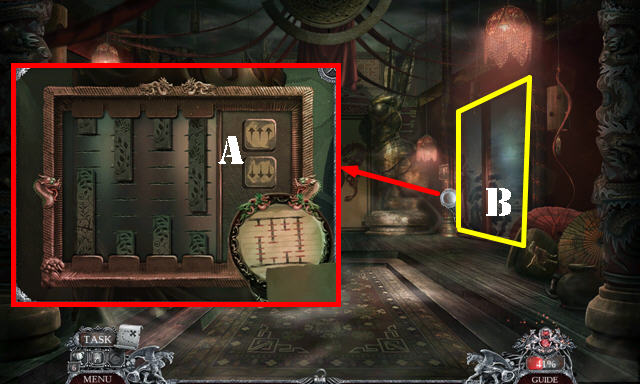
- Place the SPREADER and select it; remove the cover for a puzzle (F).
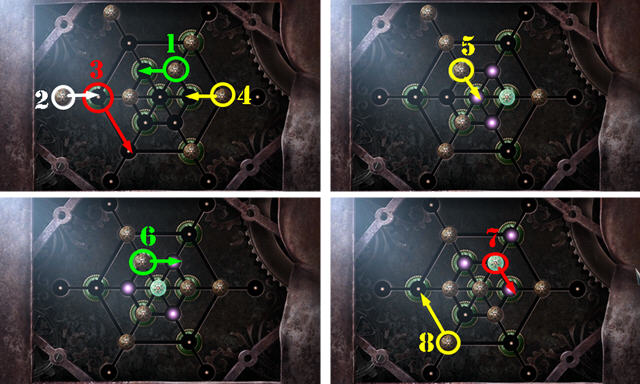
- Solution (1-8).
- Go through the door.
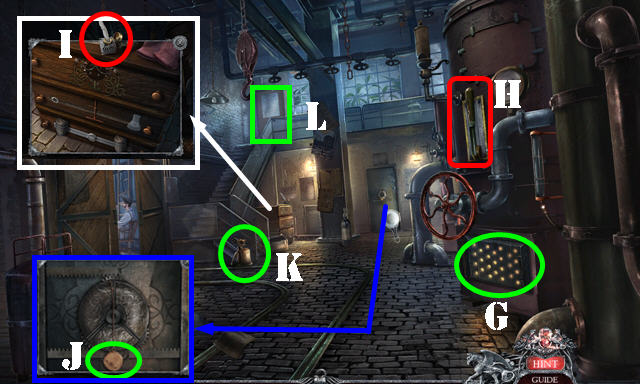
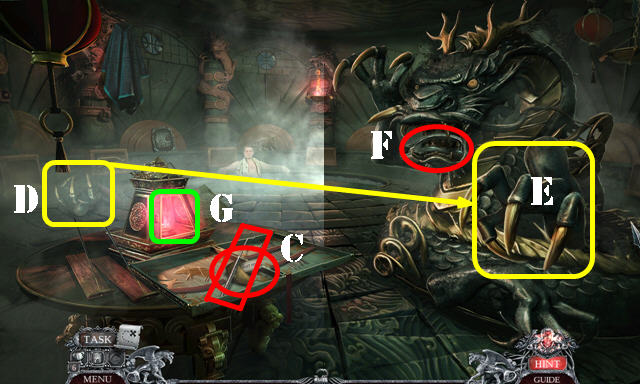
- Open the door (G).
- Select the lever (H).
- Take the QUILL AND INK (I), POCKET WATCH (J) and RUSTY BLOW TORCH (K).
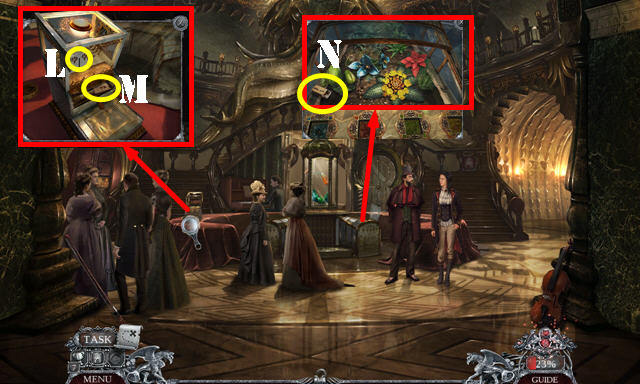
- Go to the Greenhouse (L).
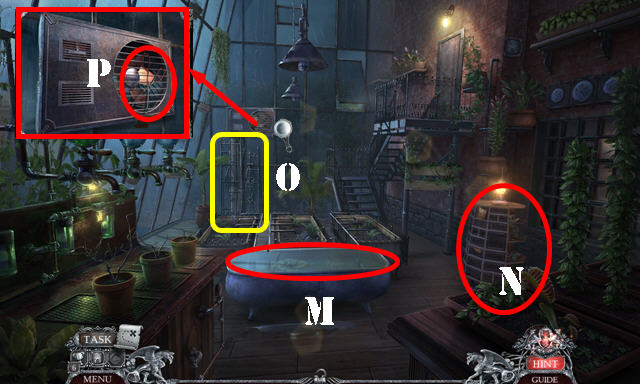
- Remove the cover (M).
- Play the HOP (N) to get the GREENHOUSE SYMBOL.
- Use the STEEL FENCE (O); take the TONGS (P). Remove the cover.
- Walk down.
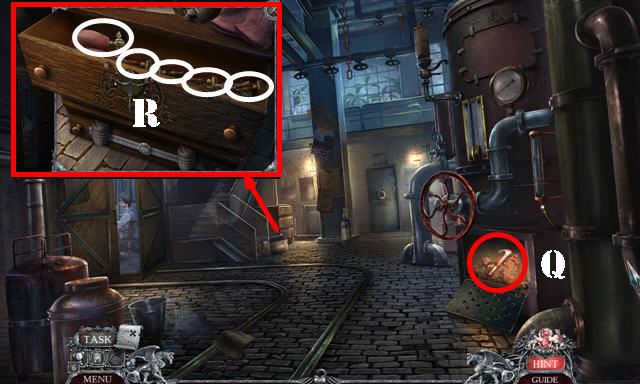
- Use the TONGS to get the HOT HAMMER (Q).
- Place the GREENHOUSE SYMBOL; Take the ATOMIZER, WATCH PINS 1/4, WATCH PINS 2/4, WATCH PINS 3/4 and WATCH PINS 4/4 (R).
- Return to the Greenhouse.

- Dip the HOT HAMMER; receive the HAMMER (S).
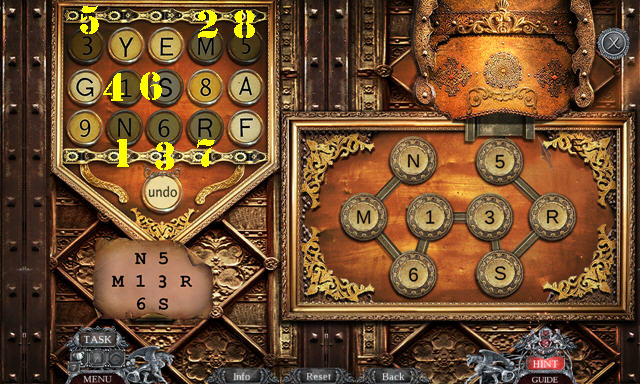
- Open the POCKET WATCH and use the HAMMER; place the WATCH PINS 4/4; take the CODE WATCH.
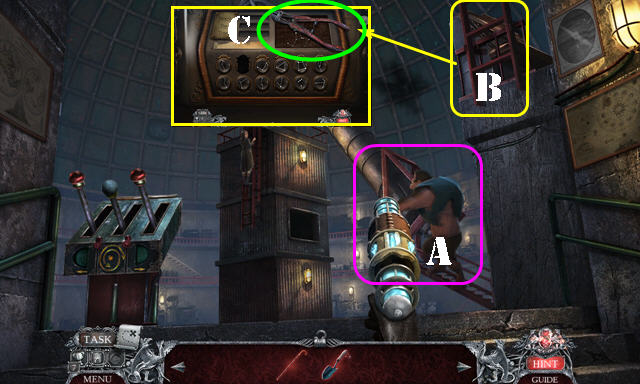
- Place the CODE WATCH. Press the symbols on the watch to see the numbers they fall on, then select the number on the lock. Solution: 35298 (T).
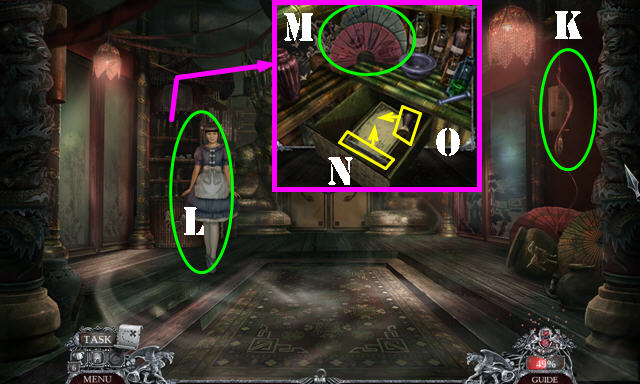
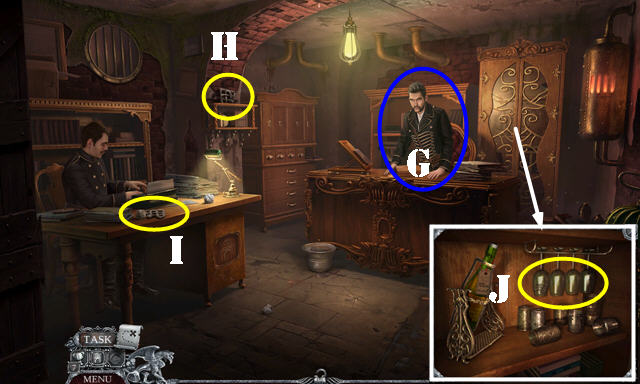
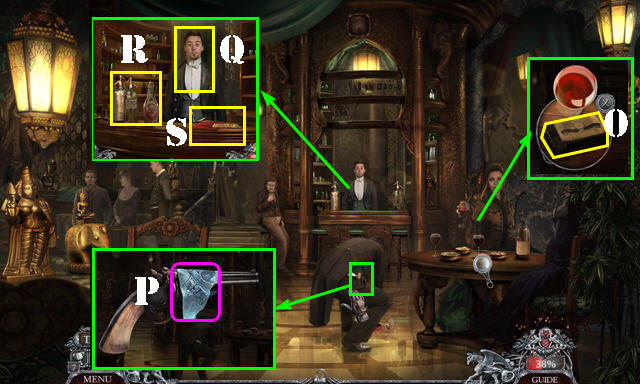
- Go to the Manager's Office (U).
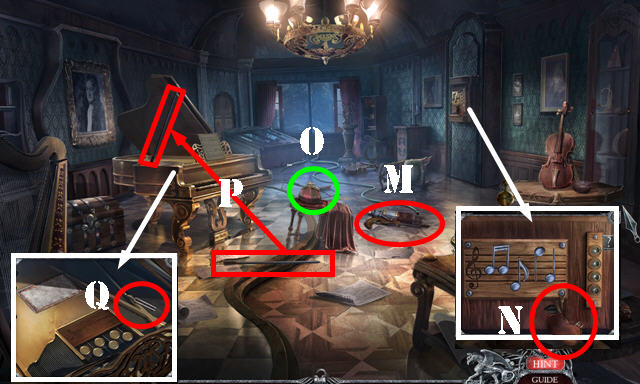
- Give the CASE FILE; take the ROLLED PAPER (V).
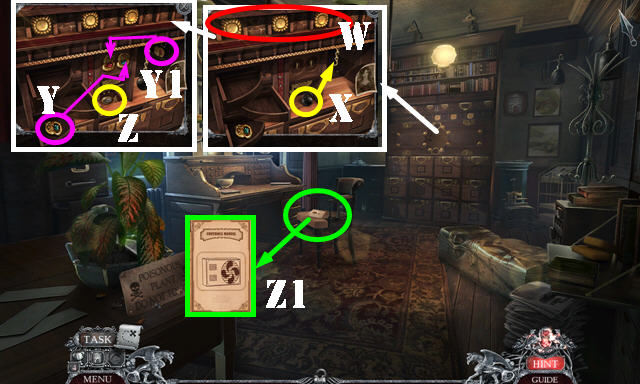
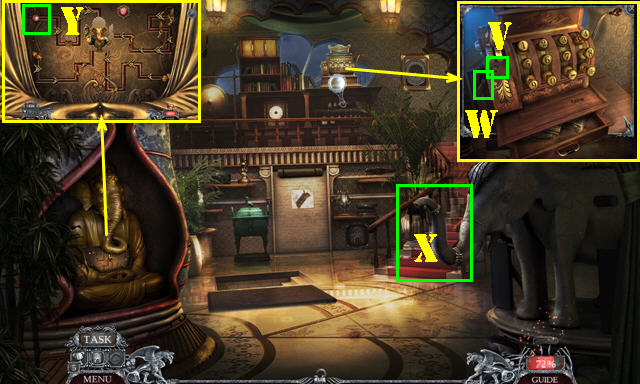
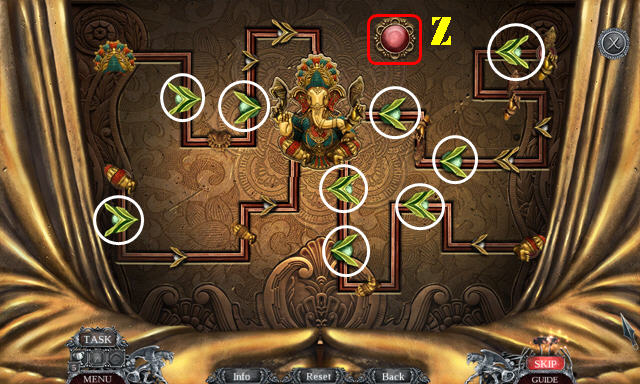
- Use the QUILL AND INK; select the photo twice. Select the three knobs (W). Hang the weight (X). Place the two emblems (Y-Y1); take the BROKEN PERFUME BOTTLE (Z).
- Take the CONTROLS MANUAL (Z1).
- Place the ATOMIZER on the BROKEN PERFUME BOTTLE; receive the PERFUME BOTTLE.
- Walk down.
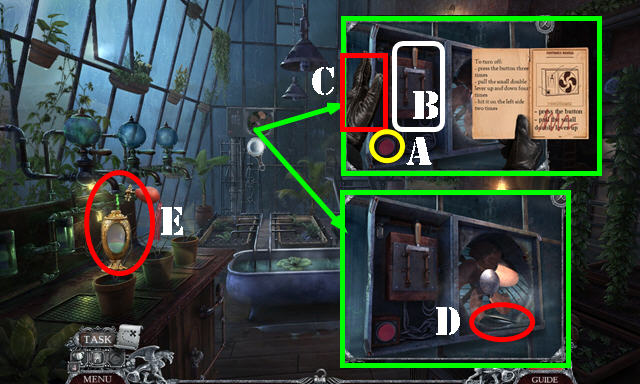
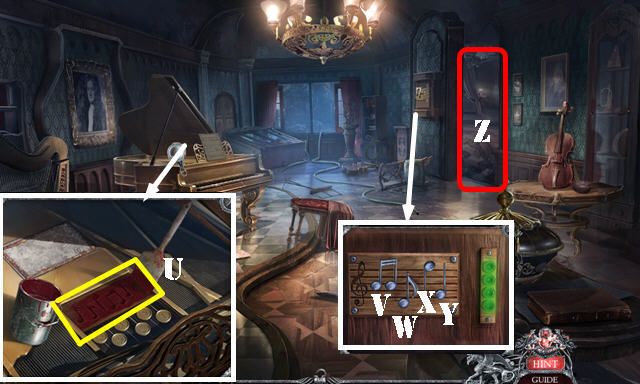
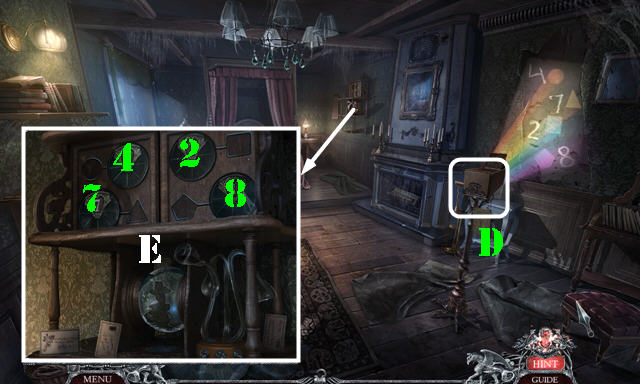
- Place the CONTROLS MENU and select Ax3-Bx4-Cx2. Take the PLANT DIBBER (D).
- Use the PERFUME BOTTLE; receive the HERBICIDE BOTTLE (E).
- Go to the Manager's Office.

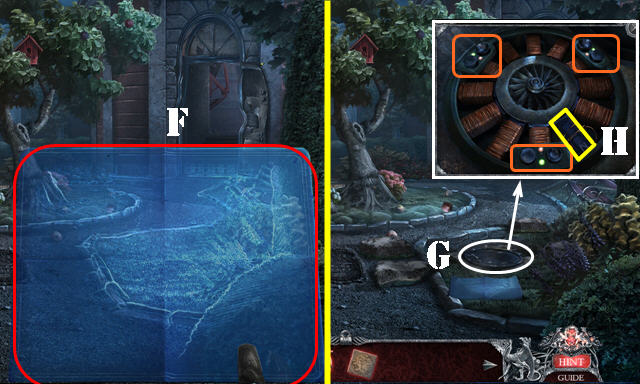
- Use the HERBICIDE BOTTLE; take the LAB SYMBOL (F).
- Use the PLANT DIBBER and HAMMER (G); play the HOP to receive the LAB DOOR MECHANISM.
- Walk down twice.
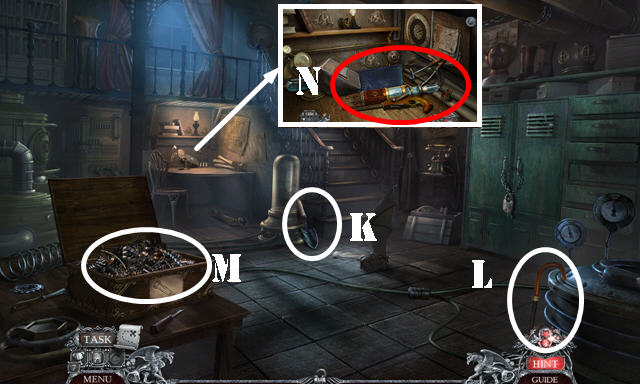
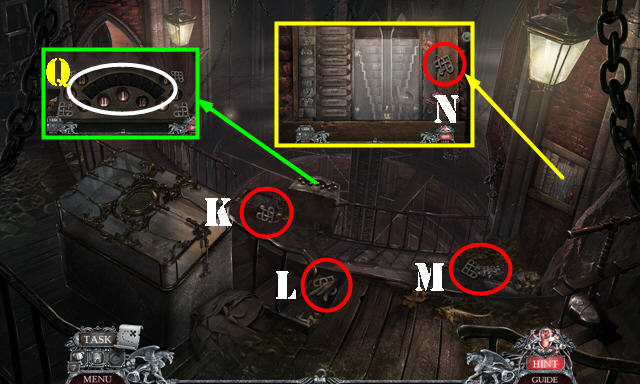
- Place the LAB SYMBOL; take the WIRE COIL (H).
- Place the LAB DOOR MECHANISM (I); enter the Laboratory.
- Take the SHACKLES 1/3 (J). Look at the paper (K). Select 1-7; take the PLANT OIL (L).
- Use the PLANT OIL on the RUSTY BLOW TORCH; receive the BLOW TORCH.
- Place the WIRE COIL and ELECTRICAL ROD for a puzzle (M).
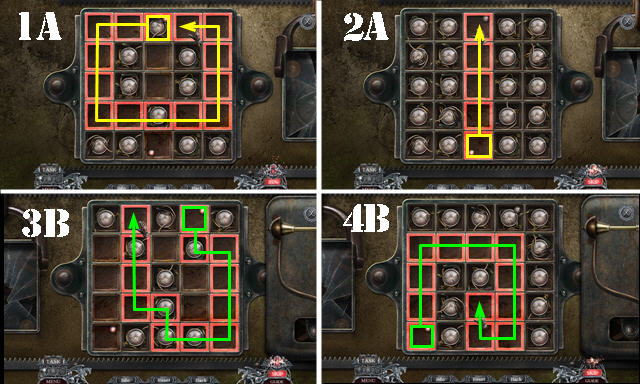
- Solution one (1A-2A).
- Solution two (3B-4B).
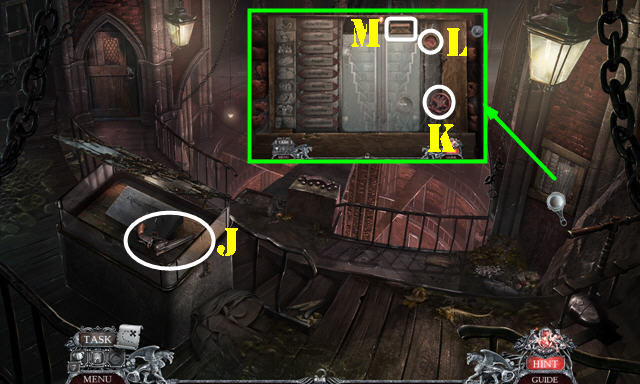
- Look at the note. Try to open the door; take the METAL WHEEL (N).
- Walk down twice.
- Place the METAL WHEEL; take the FACTORY CART (O).
- Go right.
- Use the FACTORY CART; select twice and take the LOGS ON CART (P).
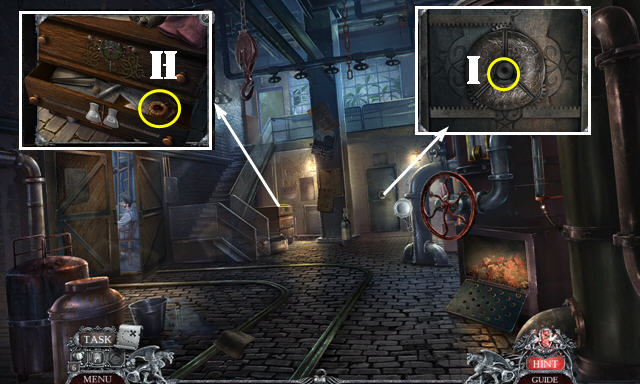
- Use the BLOW TORCH and open the case; take the WRENCH and BARREL MODEL (Q).
- Go to the Inside Factory.
- Use the BARREL MODEL; take the DICE (R).
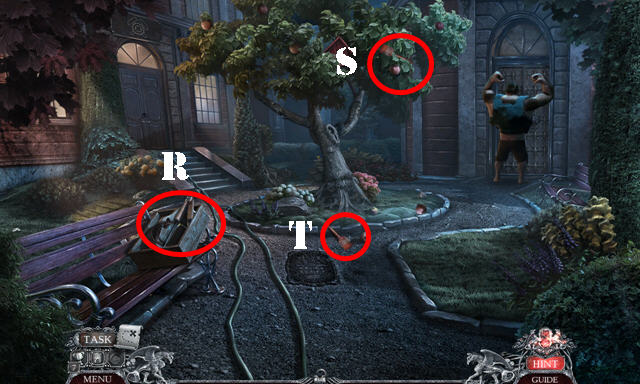
- Put down the LOGS ON CART and select the logs (S).
- Place the WRENCH and pull it (T).
- Go to the Storage (U).
- Open the 3 curtains on the right.
- Take the FIRE AXE (V).
- Use the FIRE AXE (W); receive the SHACKLES 2/3.
- Place the DICE; arrange them according to the images on the barrels. Solution (X). Take the SHACKLES 3/3 and WORKERS' REMINDER (Y).
- Return to the Laboratory.
- Use the SHACKLES 3/3 (A).
- Take IRENE'S ORDERS (B).
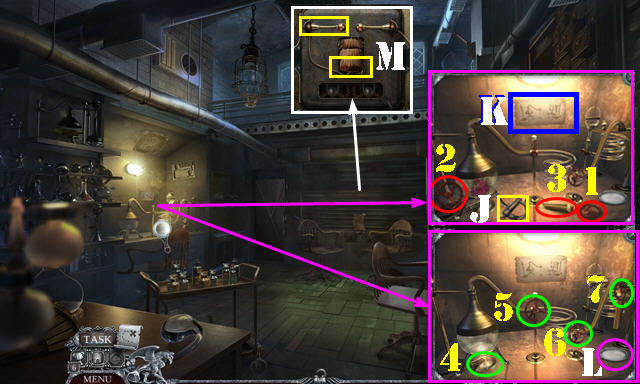
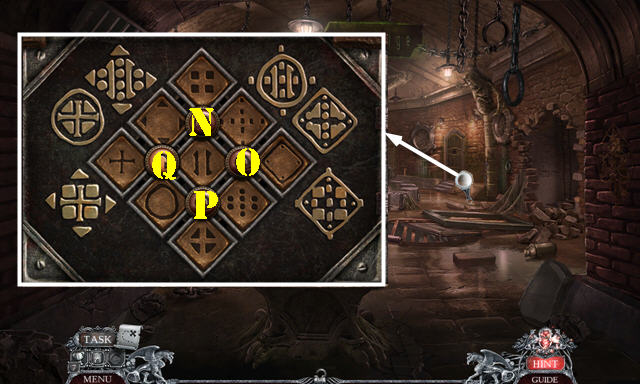
- Select C-Ex2-D-C.
- Walk down.
- Put down IRENE'S ORDERS, WORKERS' REMINDER and ROLLED PAPER (F).
- You can choose any of the three locations, but for the purposes of this guide, we chose the White Rabbit's Hat Shoppe (G).
Chapter 2: White Rabbit's Hat Shoppe
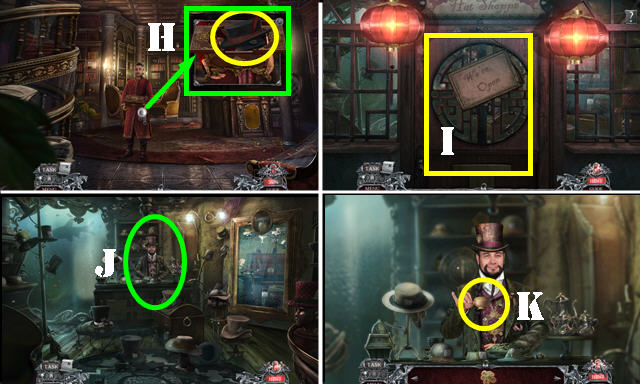
- Open the box; take the HAT (H).
- Open the door (I).
- Talk to the Mad Hatter (J).
- Pull the rabbit out of the HAT; take the JADE PAW and CHINESE COINS.
- Give the JADE PAW and select the tea cup (K) for a puzzle.
- Five stars (L).
- Six Ravens (M).
- Seven Flames (N).
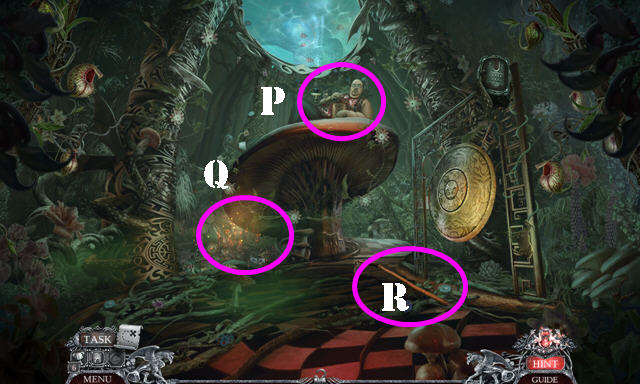
- Go Through the Looking Glass (O).
- Select 1-2-3.
- Take the WAX COVERED EMBLEM (P), BOTTOM GRIN (Q) and GONG HAMMER (R).
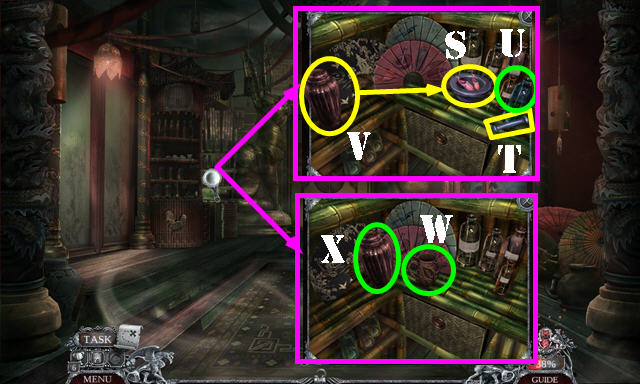
- Go to the Smoking Room (S).
- Select the four symbols (orange); play the HOP (T) to get the GLASS CLEANING SET.
- Take the IMPROVISED PICKLOCK 1/2 (U).
- Walk down and left to the Gardens.
- Take the DIRTY MIRROR (V) and TOP GRIN (W).
- Use the GONG HAMMER (X).
- Talk to the man (Y).
- Select the book 2x (Z); take the CROOKED DRAWING.
- Use the GLASS CLEANING SET on the DIRTY MIRROR to get the DISTORTED MIRROR. Place the CROOKED DRAWING on the DISTORTED MIRROR; receive the MIRROR DRAWING.
- Walk down.
- Place the MIRROR DRAWING for a puzzle. Solution (A).
- Go to the Steam Bath (B).
- You automatically receive the EMPTY MUG.
- Take the IMPROVISED PICKLOCK 2/2 and select the fortune cookie (C).
- Pick up the claw (D); place it and select it (E); take the INCOMPLETE GRIN (F).
- Place the TOP GRIN and BOTTOM GRIN on the INCOMPLETE GRIN; receive the GRIN.
- Open the door; place the WAX COVERED EMBLEM; receive the CHINESE SYMBOLS 1/2 (G).
- Return to the Smoking Room.

- Place the GRIN; take the CHINESE SYMBOLS 2/2 and SHARP SOUVENIR (H).
- Place the CHINESE SYMBOLS 2/2 for a puzzle (I).
- Solution (J).
- Take the BLANK PRESCRIPTION FORM.
- Walk down.
- Use the SHARP SOUVENIR to get the SILK CORD (K).
- Give the CHINESE COINS (L).
- Look at the fan (M).
- Use the IMPROVISED PICKLOCK 2/2. Put down the BLANK PRESCRIPTION FORM; use the pen (N) and stamp (O) on it. Take the FORGED PRESCRIPTION.
- Go to the Gardens.
- Give the FORGED PRESCRIPTION (P); play the HOP (Q) to get the SLEEPING POTION PLANT.
- Use the SILK CORD; take the LONG BAMBOO HOE (R).
- Walk down.
- Place the SLEEPING POTION PLANT (S); use the pestle (T) and bottle (U).
- Drag the container (V) to the mortar.
- Put down the EMPTY MUG (W); select the container (X); take the SLEEPING POTION.
- Go to the Steam Bath.
- Give the SLEEPING POTION (A).
- Remove the cape (B).
- Use the LONG BAMBOO HOE to get the mask (C).
- Return to the Smoking Room and go forward for a puzzle (D).
- The solution is random. Select the blue balls (E) before they reach Irene.
- Select the lever (F).
- Open the secret compartment (G).
- Select the CHINESE ZODIAC 1/12 (H), CHINESE ZODIAC 2/12 (I) and CHINESE ZODIAC 3/12 (J).
- Walk down.
- Select the CHINSE ZODIAC 4/12 (K) and CHINESE ZODIAC 5/12 (L).
- Walk down.
- Select the CHINESE ZODIAC 6/12 (M) and CHINESE ZODIAC 7/12 (N).
- Go to the Gardens.
- Select the CHINESE ZODIAC 8/12 (O) and CHINESE ZODIAC 9/12 (P).
- Go to the Steam Bath.
- Select the CHINESE ZODIAC 10/12 (Q), CHINESE ZODIAC 11/12 (R) and CHINESE ZODIAC 12/12 (S).
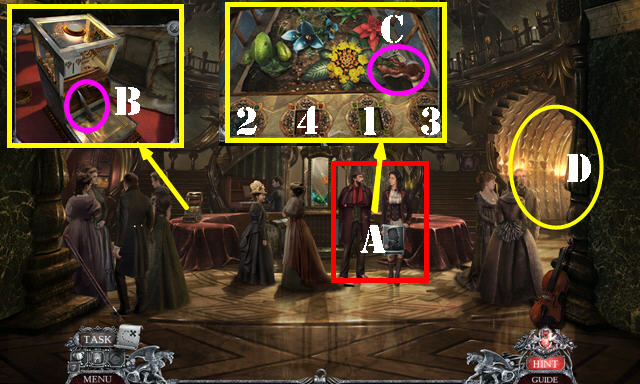
- Go to the Meeting Chamber.
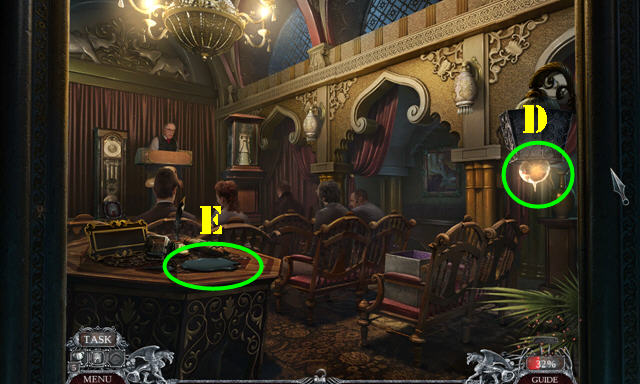
- Place the CHINESE ZODIAC 12/12 for a puzzle (T).
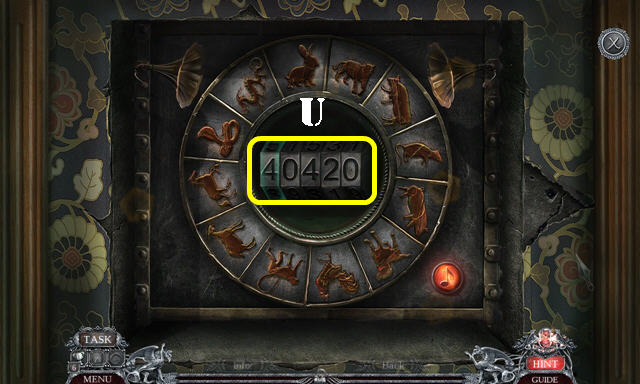
- Solution (U).
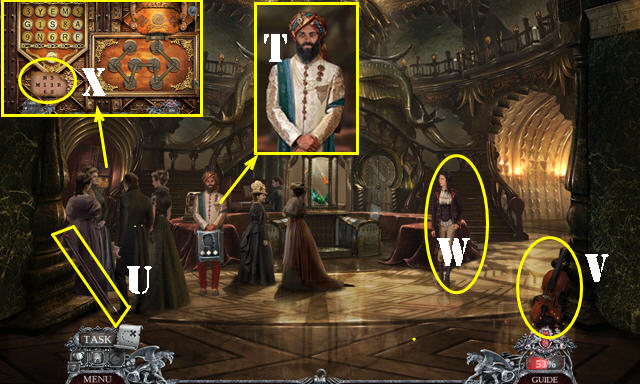
- Take the PARTY INVITATION.
- Walk down.
- Put down the PARTY INVITATION (V).
- Select Newton Manor (W).
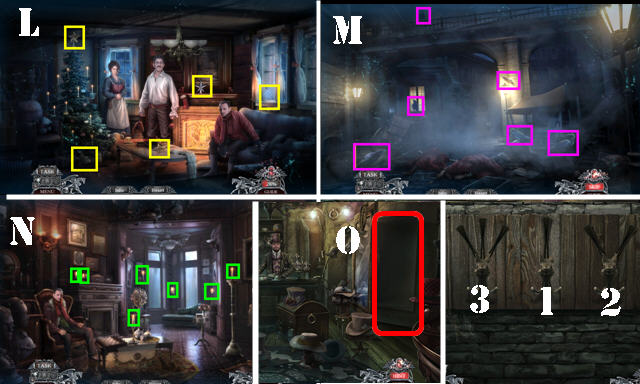
- Go up (A).
- Play the HOP (B); receive the BELL HINT.
Chapter 3: Newton Manor
- Take the PAINT CAN (C).
- Place the BELL HINT. Select Dx3-E-D-Ex2.
- Look at the note; take the LETTER 'N' (F).
- Play the HOP (G) to get the COMPASS.
- Place the LETTER 'N' for a puzzle (H).
- Solution (I).
- Open the box; take the DOG WHISTLE.
- Use the COMPASS (J).
- Use the DOG WHISTLE (K).
- Enter the Music Room (L).
- Take the BROKEN PROTOTYPE (M), HALF APPLE (N) and ISOBEL'S POUCH (O).
- Place the stick (P); take the TUNING FORK (Q).
- Go forward.
- Take the WELDING EQUIPMENT (R).
- Select the tree twice (S); take the BRUSH (T).
- Walk down.
- Put down the PAINT CAN and use the BRUSH (U).
- Select Wx3-Vx2-X-Yx3.
- Enter the Private Chambers (Z).
- Remove the cloth; look at the note (A).
- Take the FIREPLACE BROOM (B).
- Remove the cloth; look at the three notes (C). Use the TUNING FORK; look at the picture and take the HALF APPLE (D).
- Place the HALF APPLE on the HALF APPLE; receive the APPLE.
- Remove the cloth; place the APPLE (E); play the HOP to get the LETTER OPENER.
- Use the LETTER OPENER on ISOBEL'S POUCH; take the CARRIAGE KNOB.
- Walk down twice.
- Place the CARRIAGE KNOB; open the compartment; take the ACID (F).
- Use the FIREPLACE BROOM; take the PACKAGE (G).
- Select the PACKAGE twice; take the MUSIC BOX MECHANISM.
- Go to the Music Room.
- Place the MUSIC BOX MECHANISM; take the GEARS EMBLEM 1/2 (H).
- Use the ACID; open the compartment and take the GEARS EMBLEM 2/2 (I).
- Go forward.
- Place the GEARS EMBLEM 2/2 (J) and enter the Workshop.
- Take the SPADE (K) and CANE (L).
- Open the case (M).
- Put down the BROKEN PROTOTYPE and WELDING EQUIPMENT (N) for a puzzle.
- Look at the blueprint. Place the two fuses (O-P).
- Select the three pieces and place them on the wall (Q). Zoom in and rotate as shown (R). Take the fuse (S) and place it on the prototype.
- Arrange the fuses as shown (W).
- Match up the three knobs as shown (T-U-V).
- Select the welding equipment and then use it (X).
- Take the FUNCTIONAL PROTOTYPE.
- Walk down and enter the Observatory on the right.
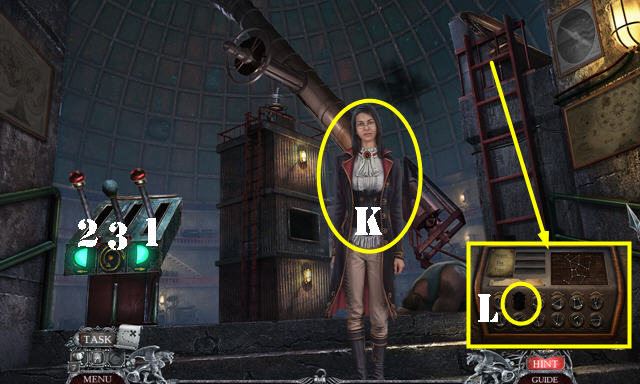
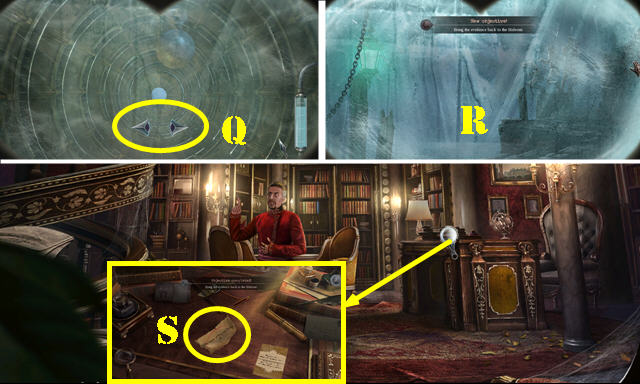
- Use the FUNCTIONAL PROTOTYPE and select it (A).
- You receive the PERFORATED PRISM.
- Use the CANE (B). Take the BROKEN BOLT CUTTER (C).
- Return to the Private Chambers.
- Place the PERFORATED PRISM and select it (D).
- Change the disks to 7428 (E). Take the CONSTELLATION MAP and BLUEPRINTS.
- Go to the Apple Garden.
- Place the BLUEPRINTS and select it (F).
- Place the SPADE and select it 4x (G). Remove the cover and press the three buttons (orange). Remove the coil; take the STRONG MAGNET (H).
- Go to the Workshop.

- Use the STRONG MAGNET to get the BOLT PIN (I).
- Place the BOLT PIN on the BROKEN BOLT CUTTER; receive the BOLT CUTTER.
- Use the BOLT CUTTER (J); open the door and play the HOP to get the MACHINE DISK.
- Return to the Observatory.
- Give the CONSTELLATION MAP (K).
- Select 1-2-3.
- Place the MACHINE DISK for a puzzle (L).
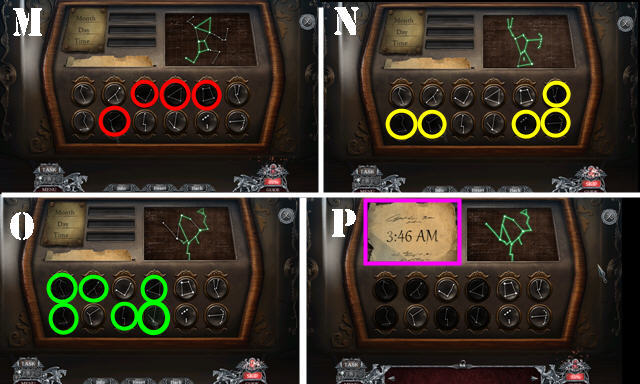
- Solutions (M-N-O).
- Take the BLOSSOM TIME (P).
- Walk down.
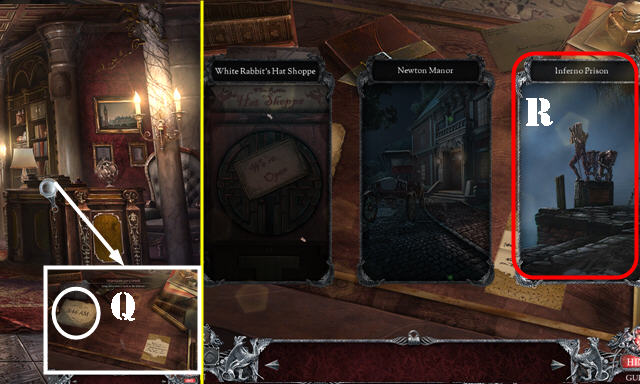
- Place the BLOSSOM TIME (Q).
- Select Inferno Prison (R).
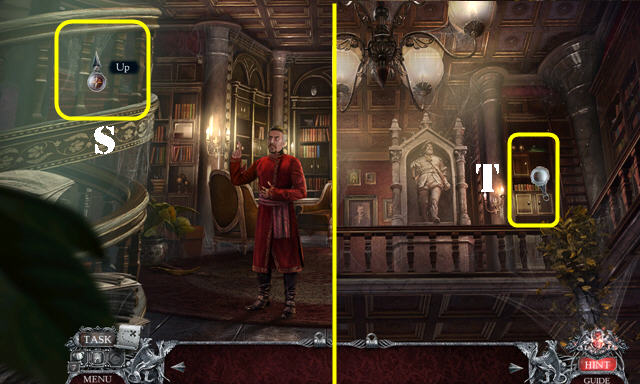
- Go up (S).
- Play the HOP (T) to receive the INFERNO CHEST.
Chapter 4: Inferno Prison
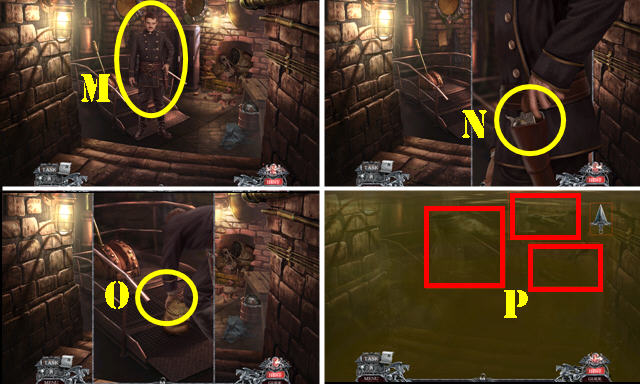
- Take the LAMP LIGHTER (A).
- Open the INFERNO CHEST and look at the note; take the TWO PENCE, POWDER, CIGARETTE CASE and PHOTOGRAPH.
- Place the PHOTOGRAPH. Arrange the statues as shown (B).
- Take the LAMP OIL (C).
- Use the POWDER on the LAMP OIL; receive the COLORED LAMP OIL.
- Select the lantern. Use the COLORED LAMP OIL and LAMP LIGHTER; select the lantern again (D).
- Give the TWO PENCE (E).
- Go forward and then go to the Warden's Office (F).
- Give the CIGARETTE CASE (G).
- Select the note on the screen.
- Take the ELEVATOR PARTS 1/7 (H) and ELEVATOR PARTS 2/7 (I).
- Open the cabinet; select the glasses (J); receive the ELEVATOR PARTS 3/7.
- Walk down.
- Take the ELEVATOR PARTS 4/7 (K), ELEVATOR PARTS 5/7 (L), ELEVATOR PARTS 6/7 (M) and ELEVATOR PARTS 7/7 (N).
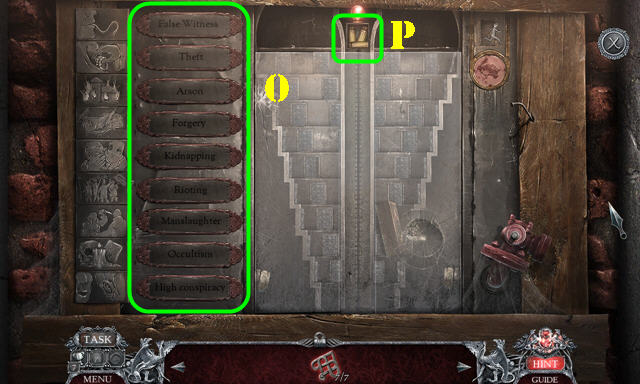
- Swap the plaques. From top to bottom: False Witness-Theft-Arson-Forgery-Kidnapping-Rioting-Manslaughter-Occultism-High Conspiracy (O).
- Take the BULLET SHELLS (P).
- Place the ELEVATOR PARTS 7/7 for a puzzle (Q).
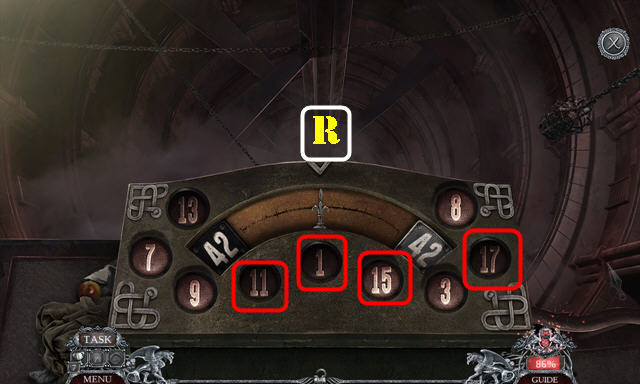
- Solution: 15-17-11-1 (R).
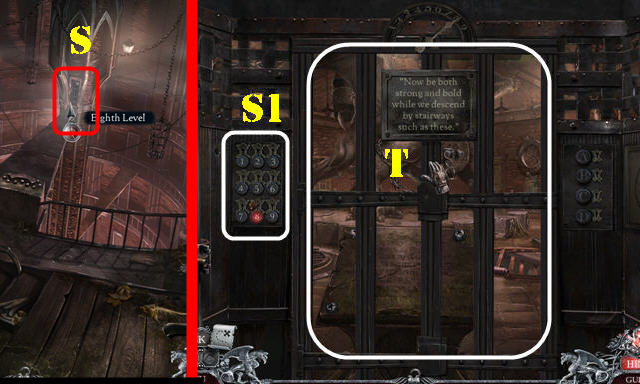
- Go to the Eighth level (S).
- Select the elevator buttons (S1).
- Open the door (T).

- Take the HANDCUFFS (U) and HATCH PUZZLE 1/3 (V).
- Look at the note (W).
- Go to the Sentry Room (X).
- Take the CODE (Y).
- Walk down and go to Bradley Headstone's cell (Z).
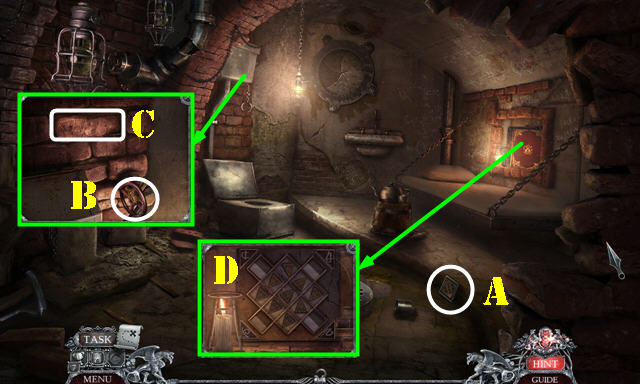
- Take the HATCH PUZZLE 2/3 (A).
- Take the RUSTED VALVE (B). Remove the stone (C).
- Open the compartment; place the CODE for a puzzle (D).
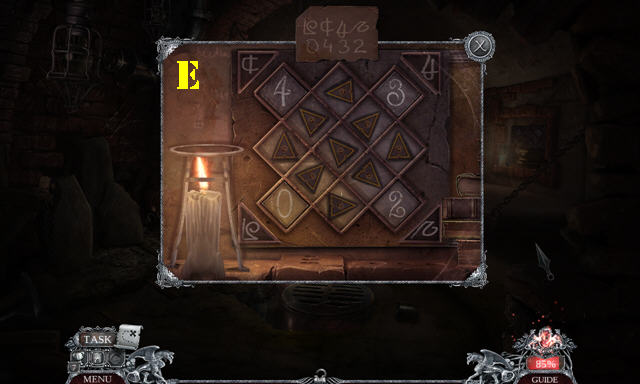
- Solution (E).
- Take the LETTER TO BRADLEY HEADSTONE.
- Return to the Warden's Office.
- Give the LETTER TO BRADLEY HEADSTONE (F); receive the FINGERPRINT KIT.
- Play the HOP (G) to receive the WEAPON EMBLEM.
- Place the RUSTED VALVE (H); select the bottle (I) and take the VALVE.
- Walk down.
- Place the WEAPON EMBLEM; take the EMPTY REVOLVER (J).
- Place the VALVE (K); select it twice. Press the button (L). Open the box and take the HATCH PUZZLE 3/3 (M).
- Go to the Eighth level.
- Place the HATCH PUZZLE 3/3 for a puzzle.
- Solution: Qx3-Nx2-Px3-Ox2-Nx3-Px3-Qx2.

- Select 1-5.
- Take the WET TOBACCO and WIRE HOOK (R).
- Put down the BULLET SHELLS (S). Select the powder (T) and caps (U). Take the REVOLVER BULLETS.
- Place the REVOLVER BULLETS in the EMPTY REVOLVER; receive the LOADED REVOLVER.
- Go to Bradley Headstone's cell.

- Place the WET TOBACCO; take the TOBACCO (V).
- Use the WIRE HOOK (W). Open the box and take the PIPE (X).
- Place the TOBACCO in the PIPE; receive the TOBACCO PIPE.
- Walk down.
- Give the TOBACCO PIPE; take the CHESS BOARD (Y).
- Go to the Sentry Room. Place the CHESS BOARD for a puzzle (Z).
- Solution (A).
- Take the AIR CYLINDER (B).
- Remove the picture (C).
- Use the LOADED REVOLVER (D); take the WOODEN BATON.
- Go to Bradley Headstone's cell.
- Use the WOODEN BATON (E); play the HOP to get GERYON'S HEAD.
- Select GERYON'S HEAD; take the POLICE BADGE.
- Walk down.
- Use the POLICE BADGE; look at the paper and take the BASIC FINGERPRINT PATTERNS (F).
- Place GERYON'S HEAD (G); take the PRISON BALL (H).
- Go to the Sentry Room.
- Use the PRISON BALL; look at the note; open the book and receive the ADDRESS (I).
- Place the FINGERPRINT KIT and select it (J).
- Place the BASIC FINGERPRINT PATTERNS and select the pages 3x (K).
- Take the MONEY BAG (L).
- Give the MONEY BAG (M).
- Select the gun (N).
- Put on the HANDCUFFS (O).
- Select the three areas shown (P).
- Use the AIR CYLINDER on the scene for a puzzle. Solution is random (Q).
- Select the scene (R).
- Walk down.
- Put down the ADDRESS (S).
- Select the scene.
Chapter 5: The Emporium
- Select the people on the scene. Talk to Isobel (A).
- Take the PIPE CLEANER (B).
- Select 1-4; take the EYEGLASSES (C).
- Go to the Bar (D).
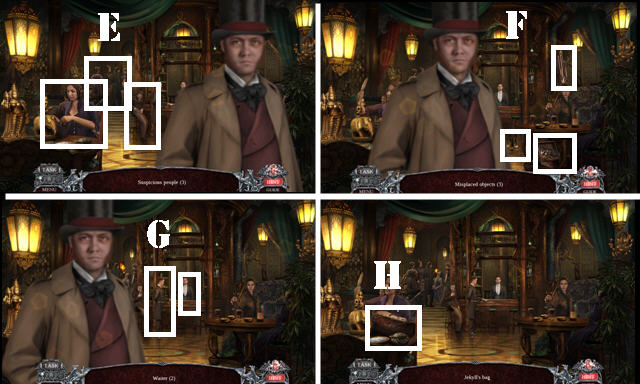
- Select E-F-G.
- Take JEKYLL'S BAG (H).
- Take the SUGAR BOWL and METAL PAPERWEIGHT (I).
- Arrange the buttons on JEKYLL'S BAG as shown (J). Open the bag; take the MATCHBOX and CIGAR TOKEN.
- Talk to the bartender (K).
- Walk down.
- Insert the CIGAR TOKEN (L); select the machine and take the DRINK VOUCHER (M).
- Use the MATCHBOX and SUGAR BOWL; take the BUG IN MATCHBOX (N).
- Go to the Bar.
- Use the BUG IN MATCHBOX (O).
- Take the INCOMPLETE MAP (P). Select the revolver twice.
- Give the DRINK VOUCHER (Q). Select the bottles (R); take the STAIRS 1/3 and SMUDGED NAPKIN (S).
- Place the INCOMPLETE MAP on the SMUDGED NAPKIN; receive the NAPKIN MAP.
- Walk down.
- Talk to Mr. Singh (T); give him the NAPKIN MAP. You receive the EMPORIUM DOOR CODE.
- Take the VIOLIN BOW (U) and VIOLIN (V).
- Give the VIOLIN and VIOLIN BOW (W).
- Place the EMPORIUM DOOR CODE for a puzzle (X).
- Solution (1-8).
- Go left to the Emporium.
- Take the LONG STRING (A) and pull the trunk twice; take the STAIRS 2/3 (B).
- Take the BRASS CYLINDER (C). Use the EYEGLASSES (D). Use the PIPE CLEANER and select 25673 (D1). Pull the handle (D2); take the STAIRS 3/3 (D3).
- Lift the rug (E). Place the STAIRS 3/3 (F).
- Go to the Basement (G).
- Pull the curtains (H); play the HOP to get the CABINET CLUE.
- Take the CHAIN PARTS (I).
- Open the cabinet; use the PIPE CLEANER; take the ANCIENT MASK (J).
- Take the STATUE (K).
- Go back to the Emporium.
- Pull the trunk twice (L). Use the CABINET CLUE and arrange the pieces as shown (M). Take the RESIN (N).
- Pull the trunk twice (L). Place the ANCIENT MASK (O); take the VASE and ARROW (P).
- Go to the Basement.
- Use the VASE (Q); receive the VASE WITH WATER.
- Use the RESIN (R) and VASE WITH WATER (S); take the BOARD BUTTON (T).
- Place the BOARD BUTTON for a puzzle (U).
- Solution: Bx3-G-A-E-H-G-Ax2-J-I-B-F-Bx3-C-E-Ax2-G-H-A-F-Bx2-G-Ax3-J.
- Take the NAME TAGS, PADLOCKS 1/3, PADLOCKS 2/3 and PADLOCKS 3/3 (K).
- Place the PADLOCKS 3/3 on the CHAIN PARTS; receive the LONG CHAIN.
- Use the LONG CHAIN (L) and select it. Select the wheel (M).
- Return to the Atrium.
- Give the NAME TAGS (N).
- Go to the Auction Hall (O).
- Take the EMPTY CROSSBOW (P).
- Use the LONG STRING and ARROW on the EMPTY CROSSBOW; receive the CROSSBOW.
- Walk down.
- Place the CROSSBOW and shoot (Q).
- Enter Singh's Office (R).
- Select the cabinet (S); play the HOP to get the POUND SYMBOL.
- Select 24 and July (T).
- Select 724247 (U); receive the ELEPHANT CROWN.
- Return to the Emporium.
- Place the POUND SYMBOL (V); take the SPRING (W).
- Pull the trunk (X); place the ELEPHANT CROWN for a puzzle (Y).
- Select the marked arrows and press the red button (Z).
- Take the SNOW LEOPARD.
- Go to the Basement.
- Place the SNOW LEOPARD; take the RAG (A).
- Use the SPRING (B); pull the handle; take the SYRINGE and BATTERY (C).
- Return to the Auction Hall.
- Use the RAG (D); receive the ELECTRICAL BULB.
- Use the SYRINGE (E); receive the SQUID INK.
- Return to Singh's Office.
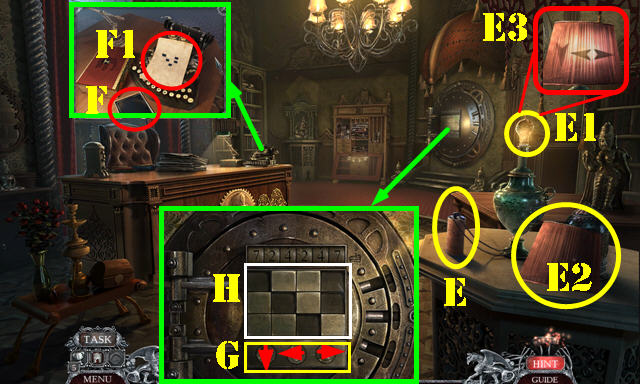
- Remove the lampshade and bulb. Use the BATTERY (E) and the ELECTRICAL BULB (E1). Select the lampshade (E2). Note the clue (E3).
- Remove the paper; use the SQUID INK and BRASS CYLINDER (F). Note the clue (F1).
- Rotate the arrows (G) and select the pattern (H) to automatically enter the Vault.
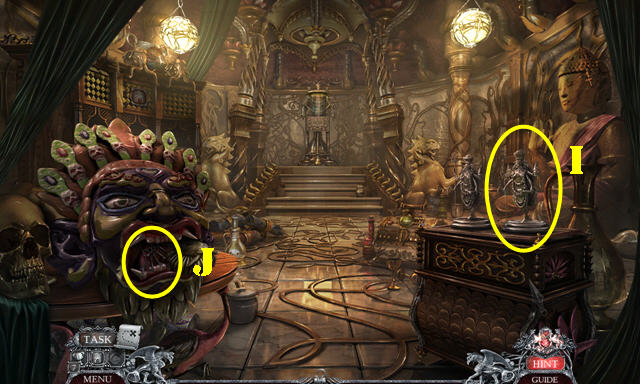
- Place the STATUE (I); play the HOP to get the CRYSTAL ELEPHANT.
- Use the METAL PAPERWEIGHT; take the BUNCH OF KEYS (J).
- Walk down.
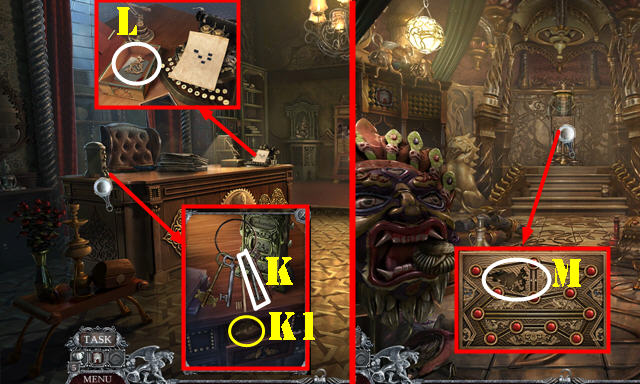
- Use the BUNCH OF KEYS and select the fourth key (K); take the PEACOCK ORNAMENT 1/2 (K1).
- Place the CRYSTAL ELEPHANT; take the PEACOCK ORNAMENT 2/2 (L).
- Go to the Vault.
- Place the PEACOCK ORNAMENT 2/2 for a puzzle (M).
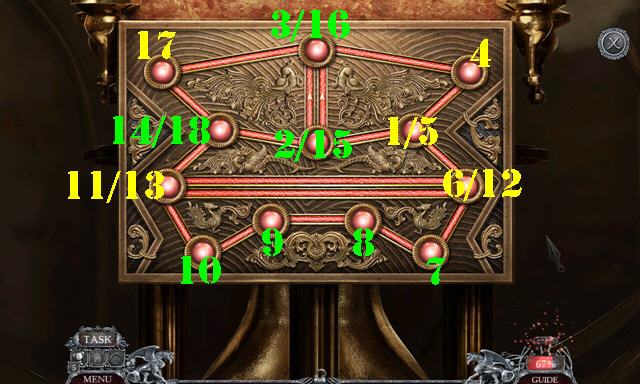
- Solution (1-18).
- Take the FLOWER.
- Walk down twice.
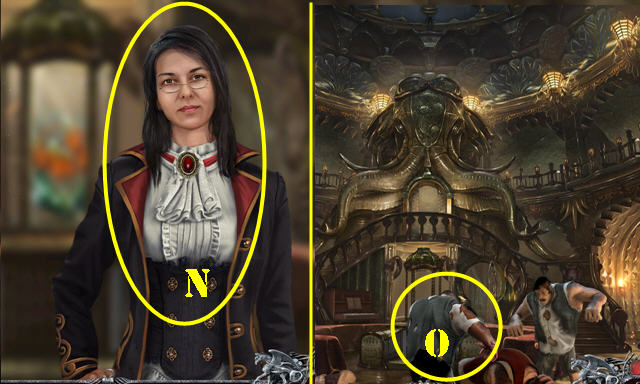
- Give the FLOWER (N).
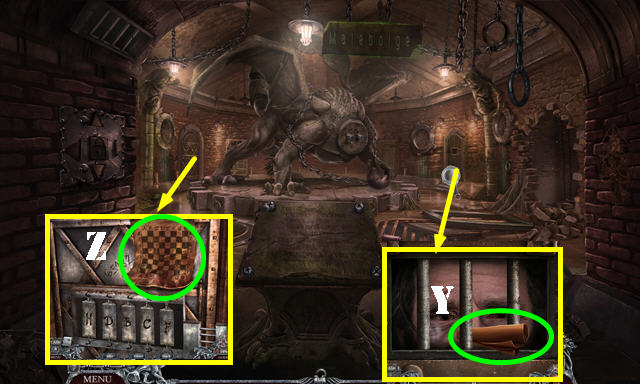
- Select the monster (O) for a puzzle.
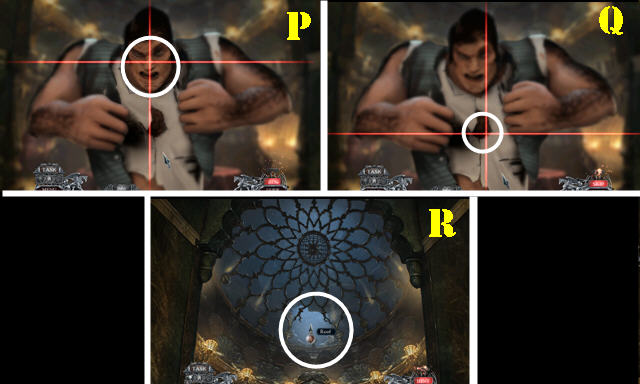
- Solution one (P).
- Solution two (Q).
- Go to the Roof (R).
- Select the firework (S).
- Solution one (T).
- Solution two (U).
- Select the flower (V).
- Congratulations, you've completed Vermillion Watch: Moorgate Accord!
Created at: 2016-07-22