

Walkthrough Menu
- General Tips
- Chapter 1: Grand Hall
- Chapter 2: Ahab's Ship
- Chapter 3: Museum
- Chapter 4: Zoological Garden
- Chapter 5: Nautilus Center
General Tips
- This is the official guide for Vermillion Watch: Order Zero.
- This guide won't tell you when to zoom into a location; the screenshots show each zoom scene.
- Hidden-object puzzles are referred to as HOPs. Only the locations of the HOPs will be shown.
- Use the Map to fast travel to a location.
Chapter 1: Grand Hall
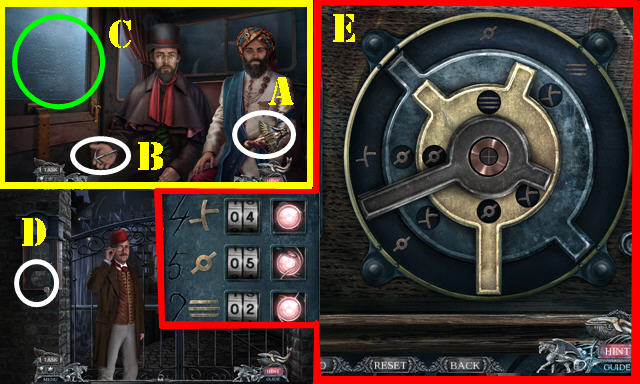
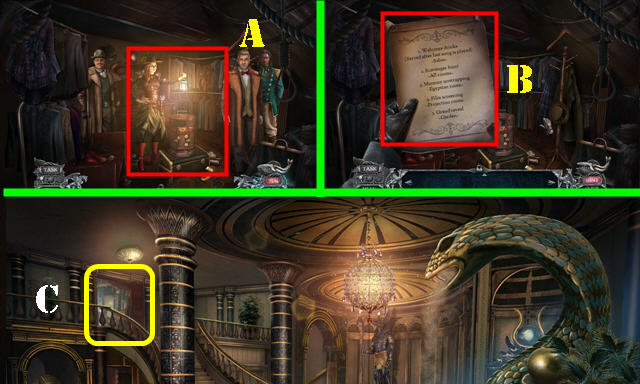
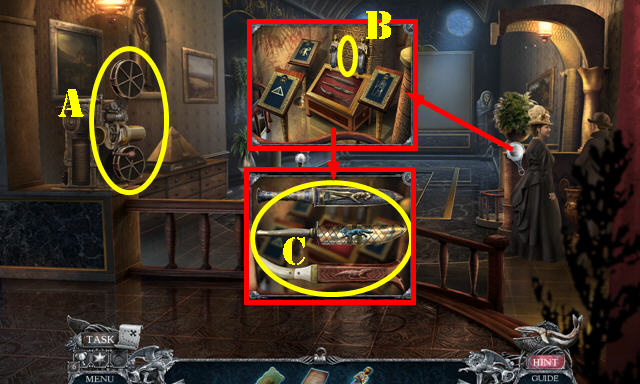
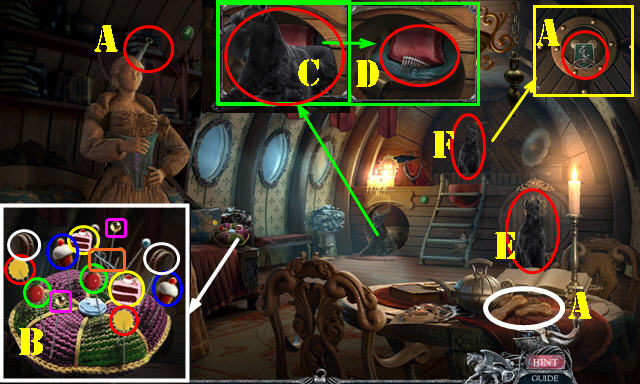
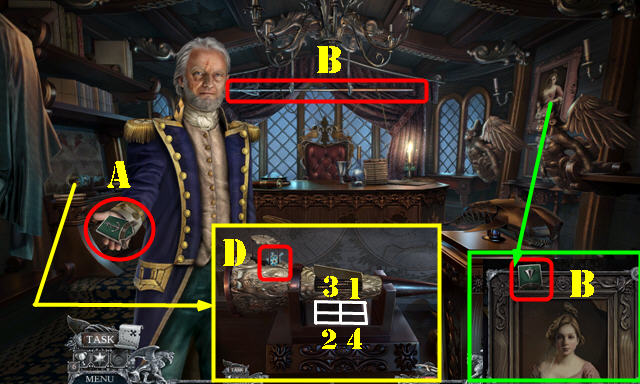
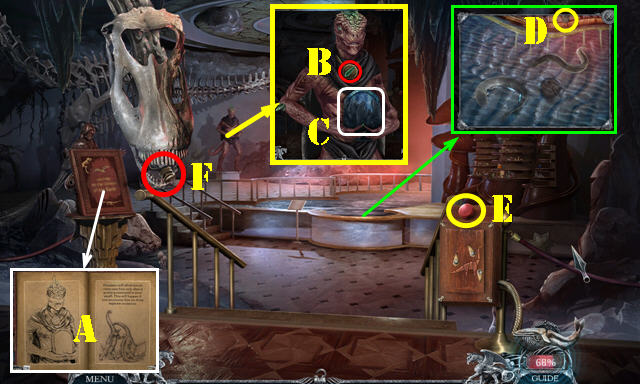
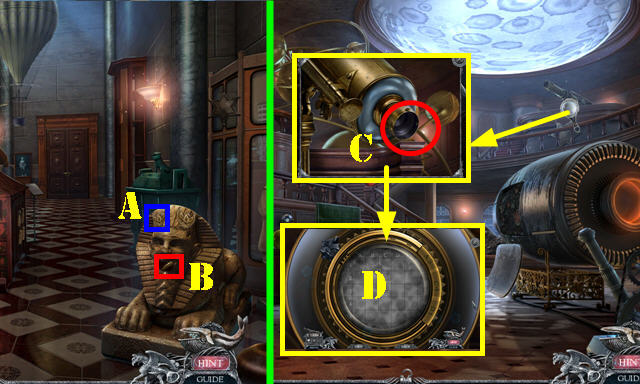
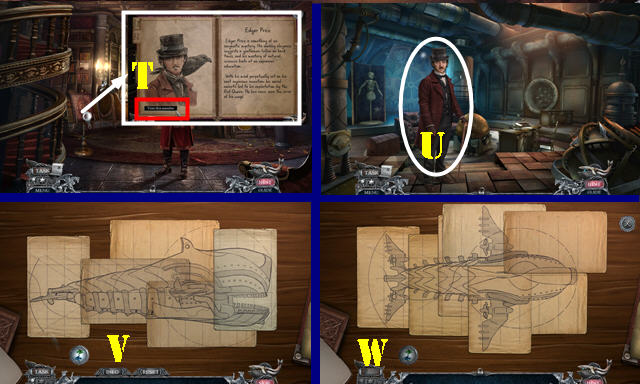
- Take INVITATION (A).
- Select INVITATION twice.
- Take MASTER KEY (B).
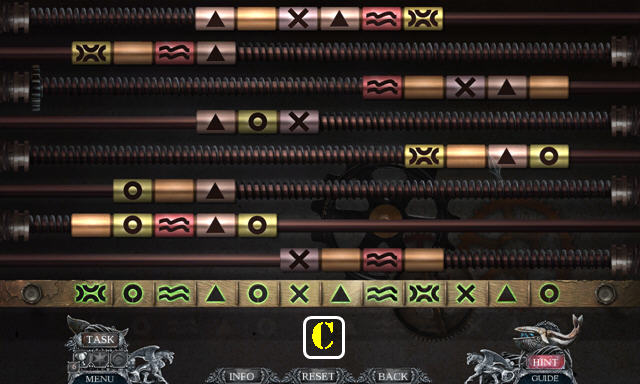
- Exit (C).
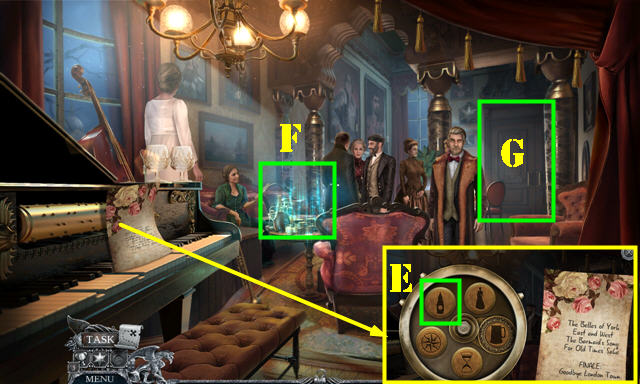
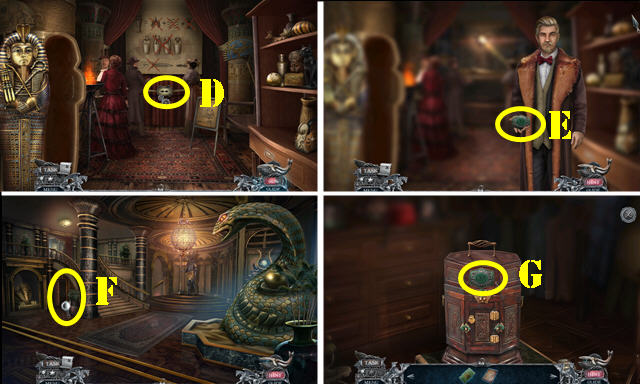
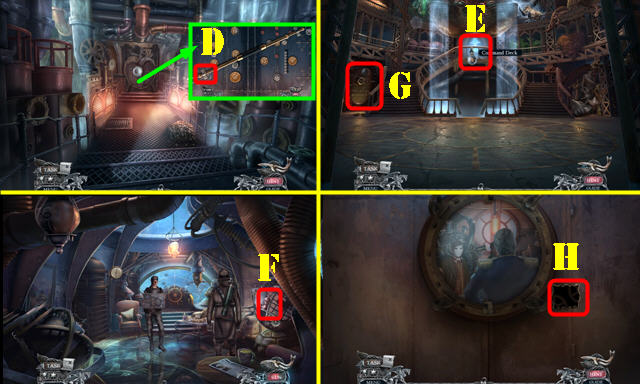
- Use MASTER KEY (D).
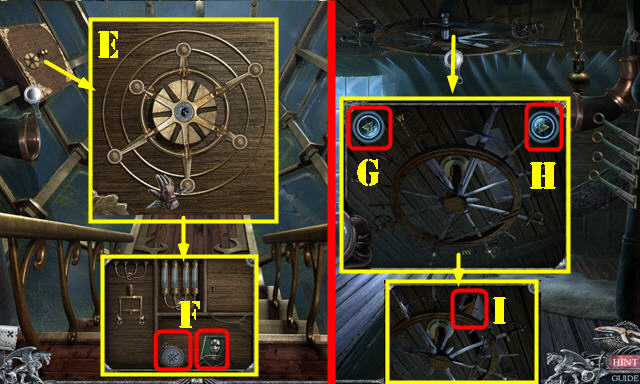
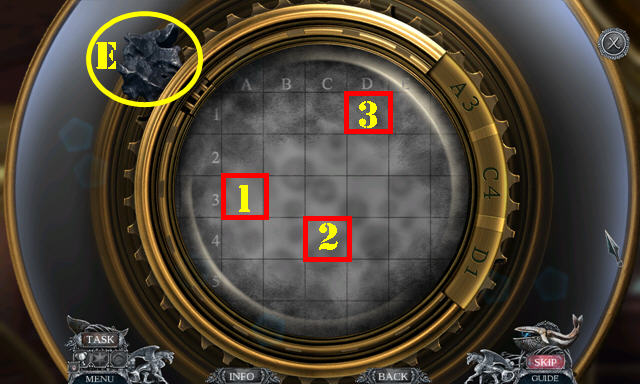
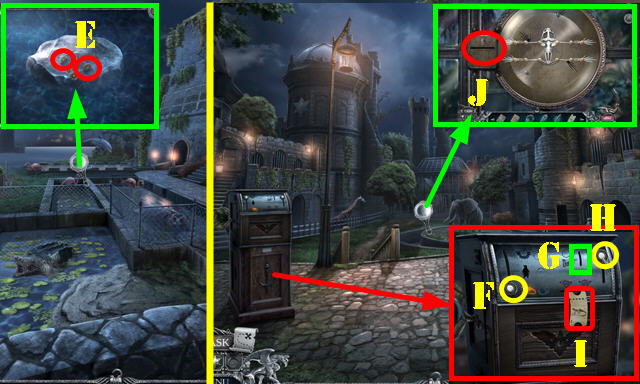
- Solution (E).
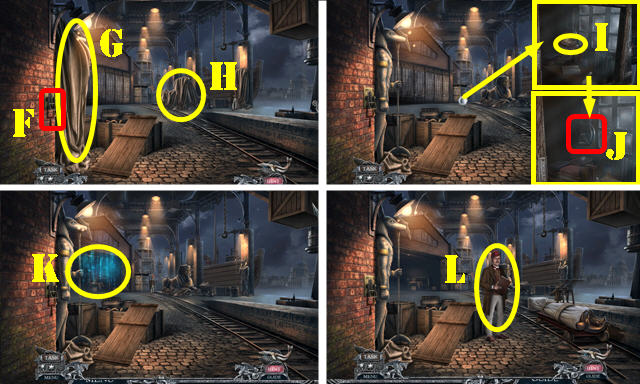
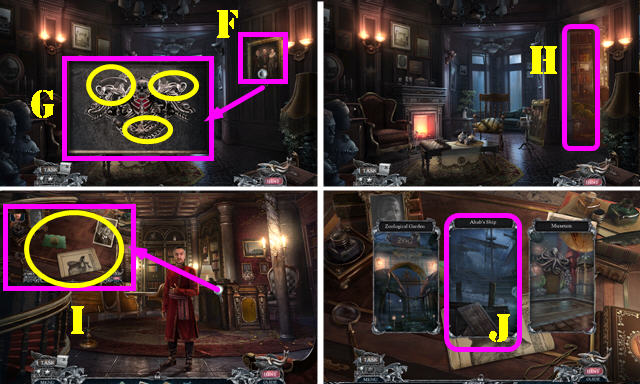
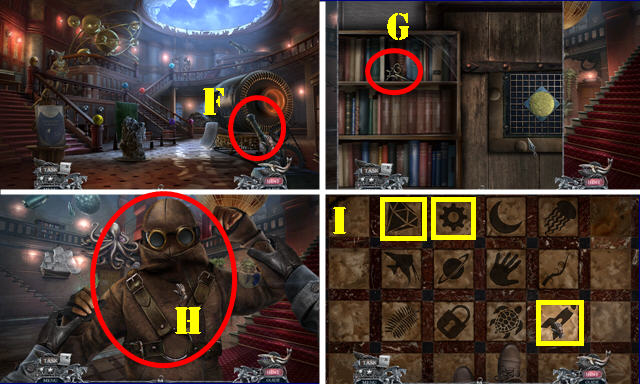
- Pull switch (F).
- Use INVITATION on scene.
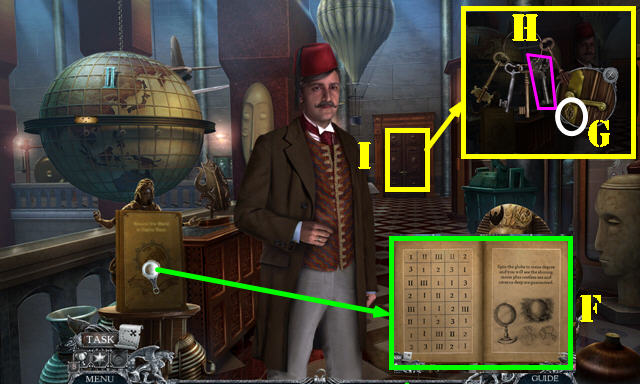
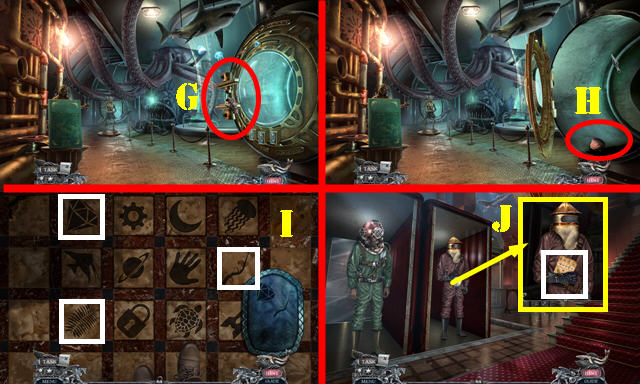
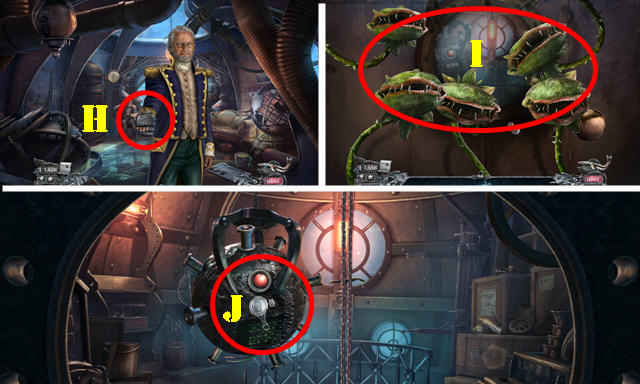
- Remove sheets (G-H).
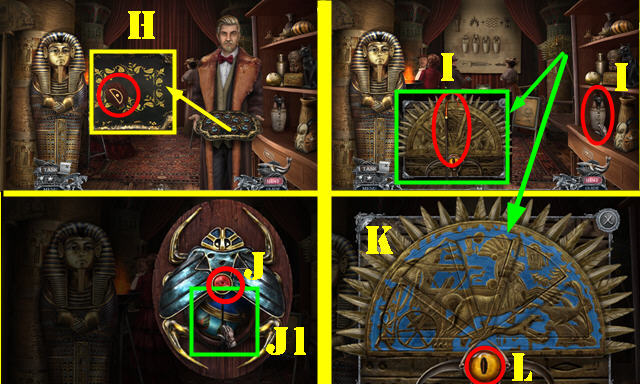
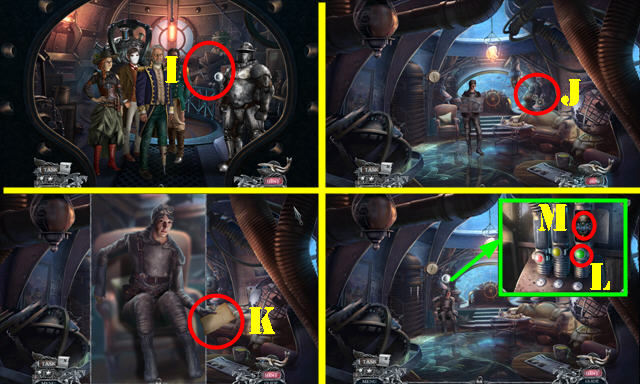
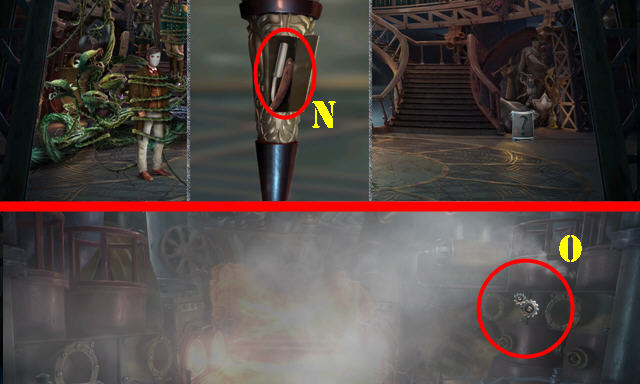
- Use MASTER KEY and select; take SCISSORS (I).
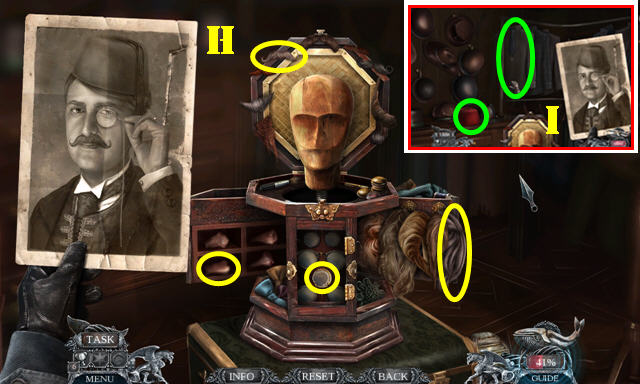
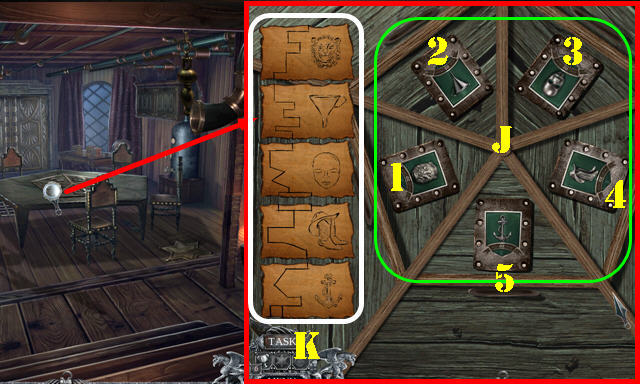
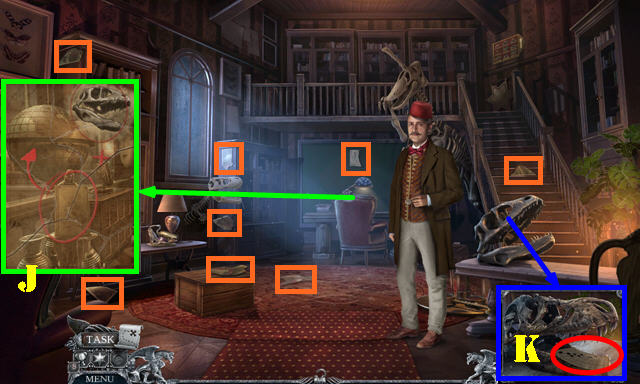
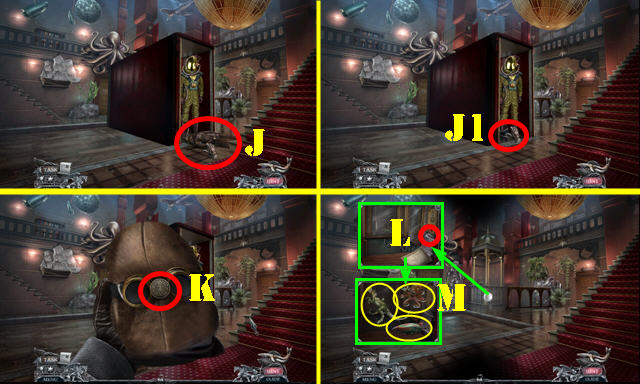
- Move items; select handle (J).
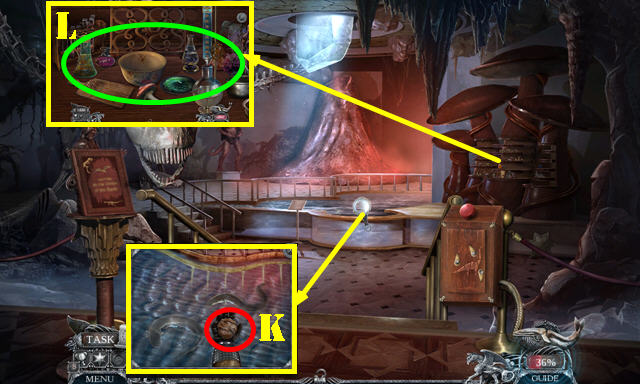
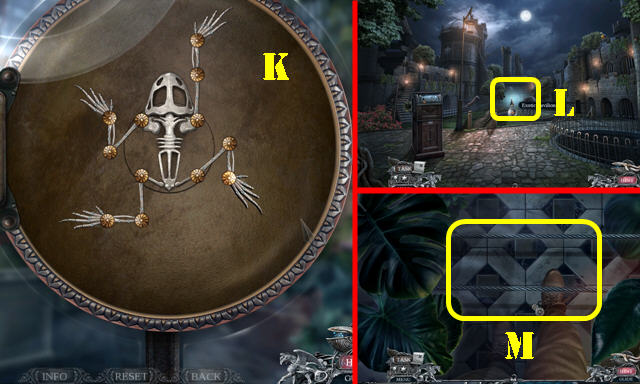
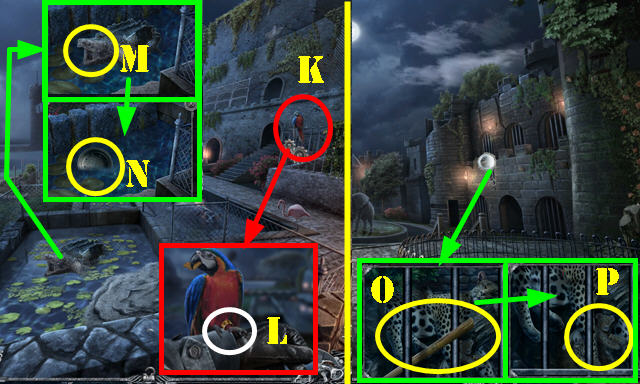
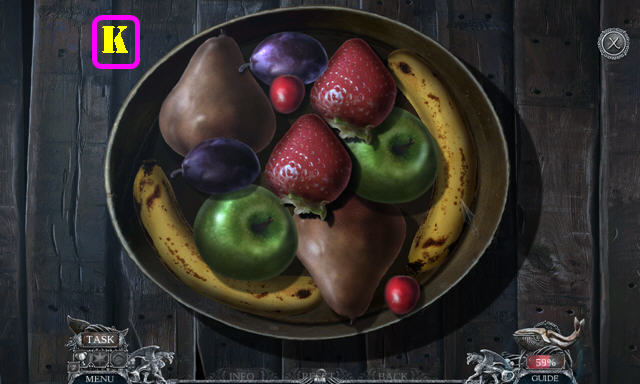
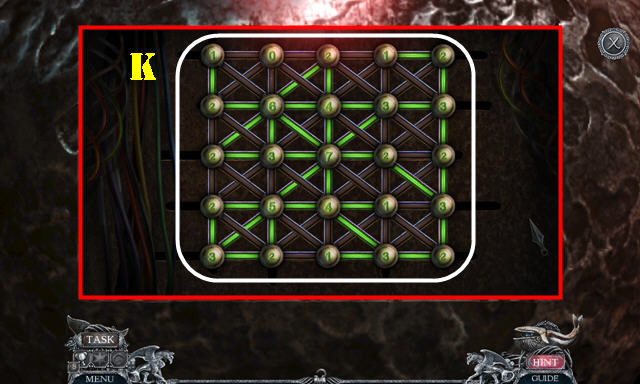
- Play HOP (K); receive CARGO TAG.
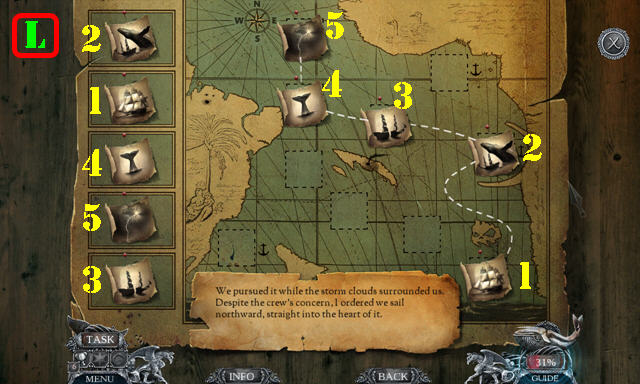
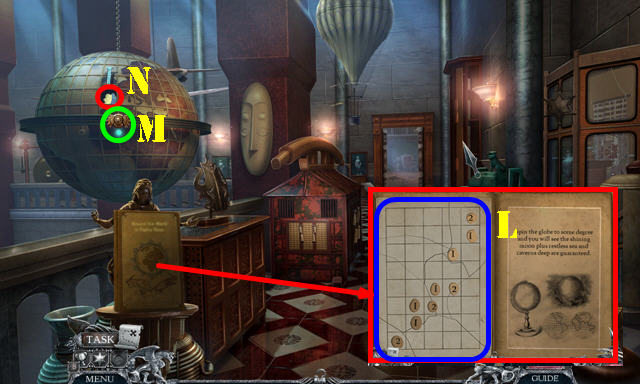
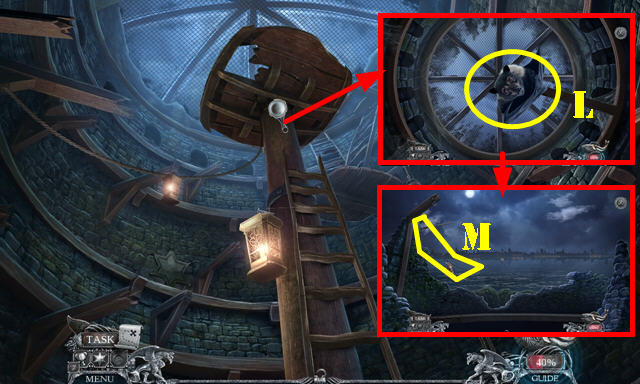
- Give CARGO TAG (L); select map on scene.
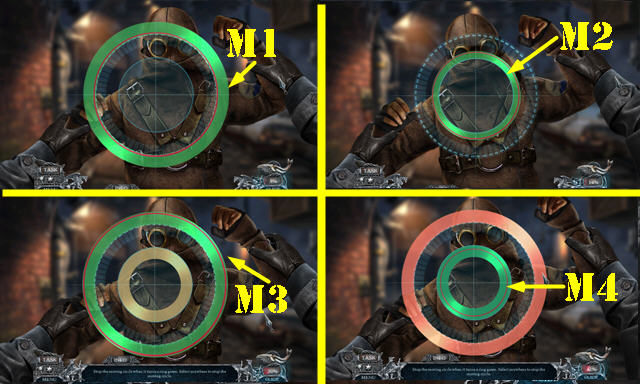
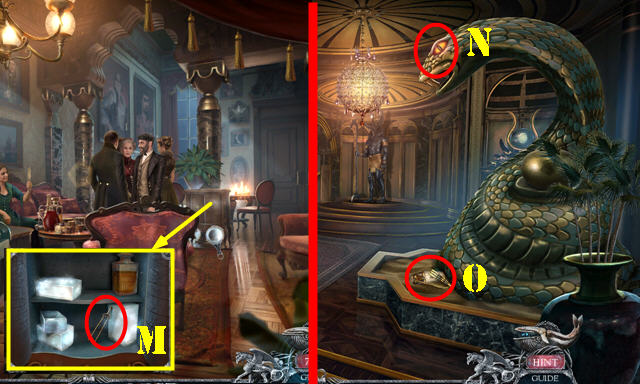
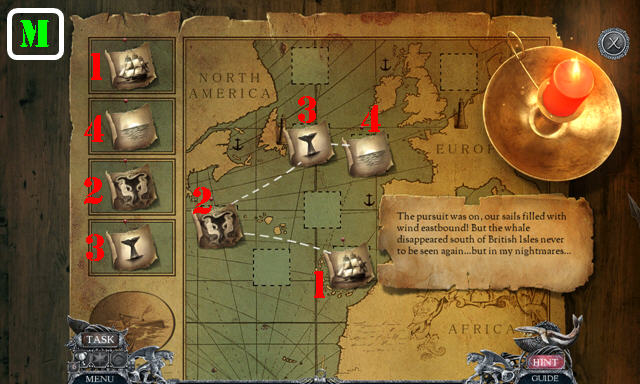
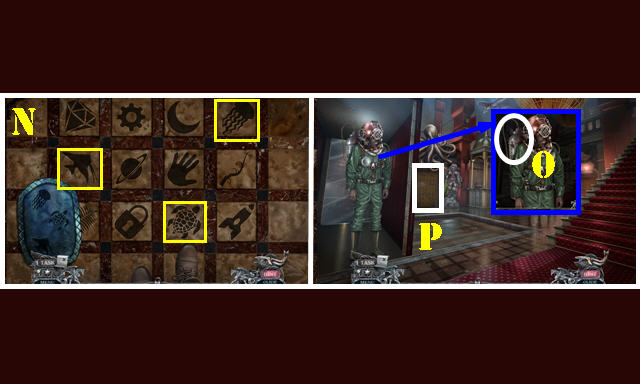
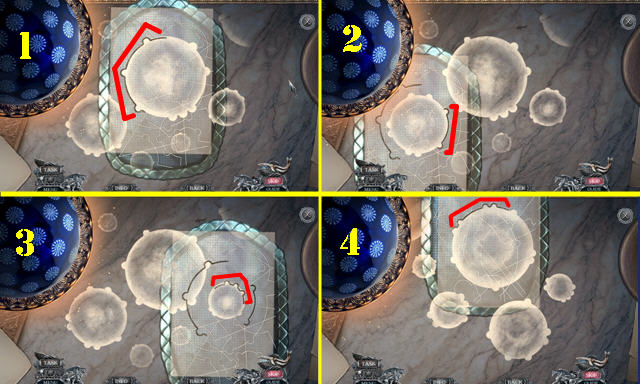
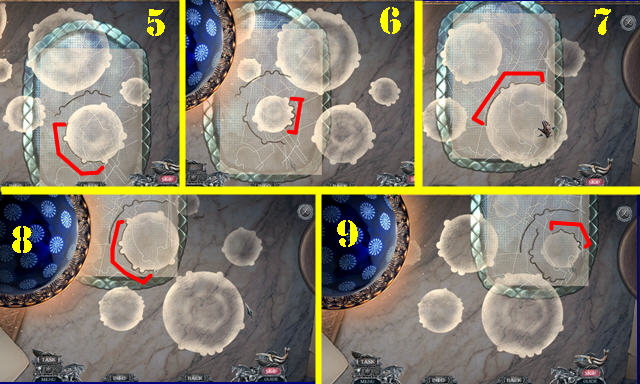
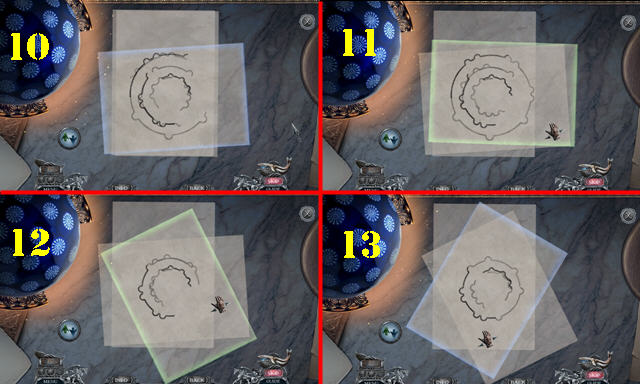
- Solution (M1-M4).
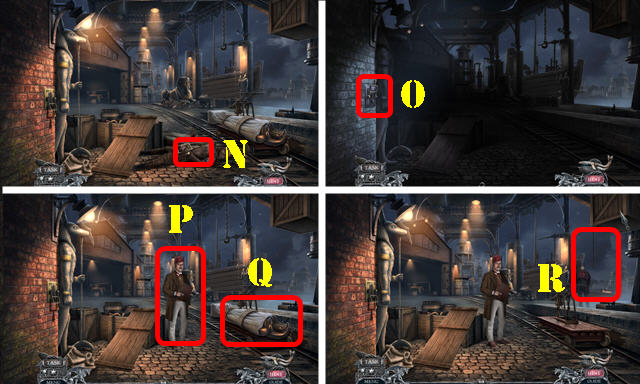
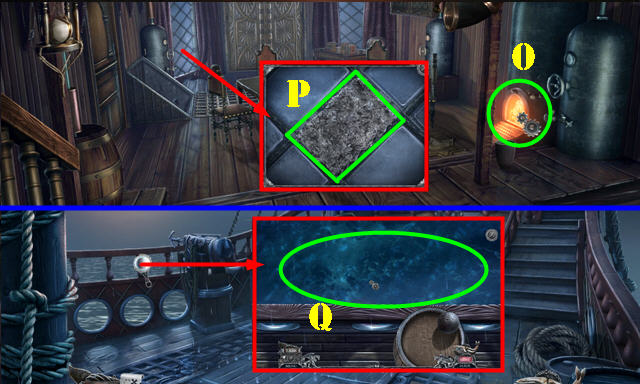
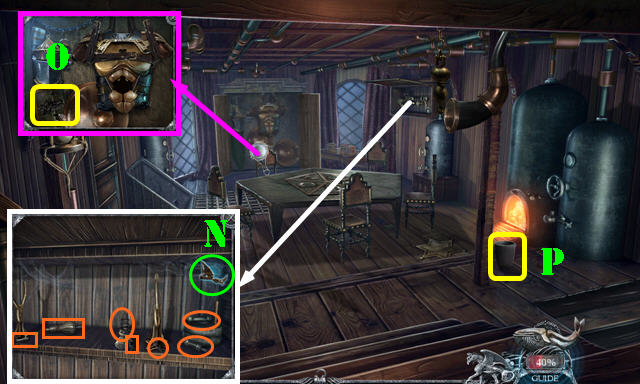
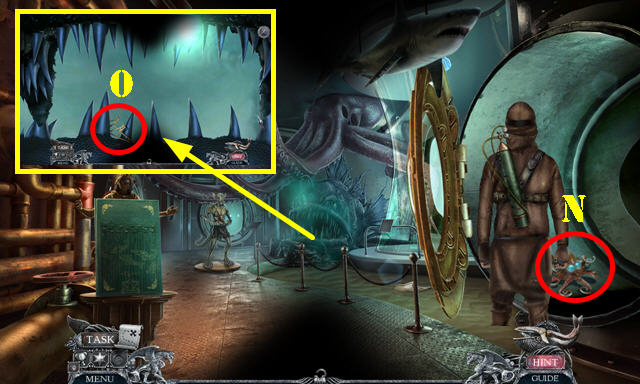
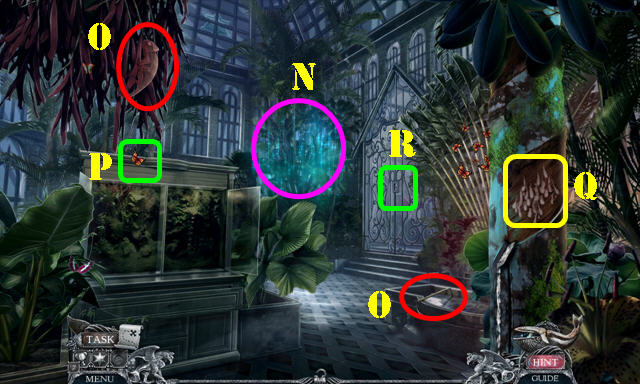
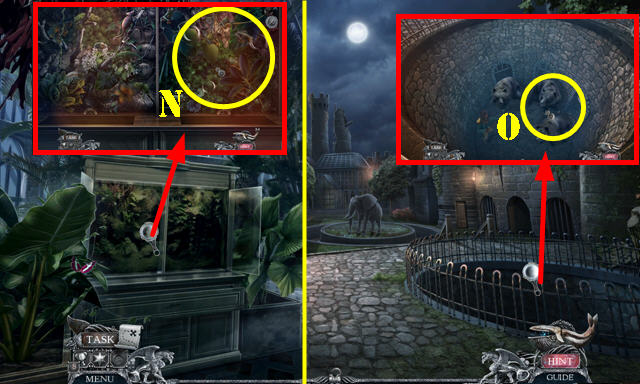
- Take PATCH and look at picture (N).
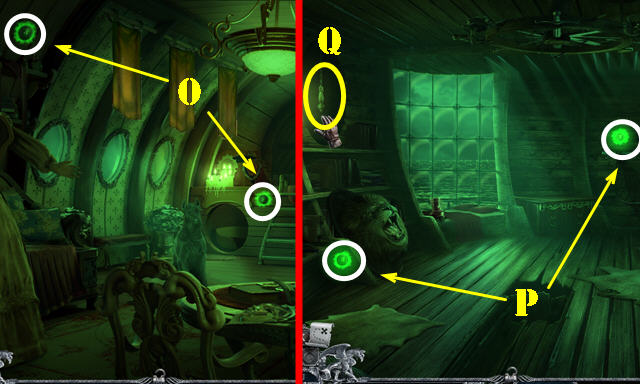
- Pull switch (O).
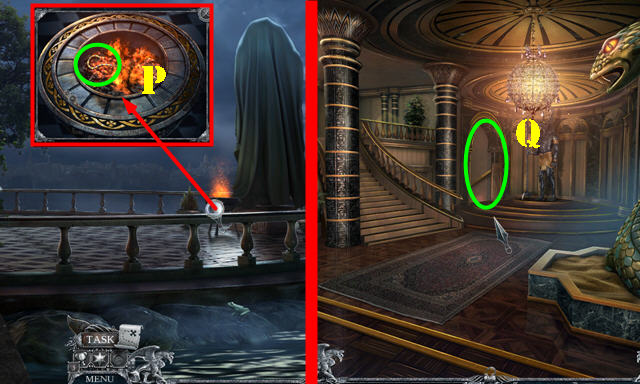
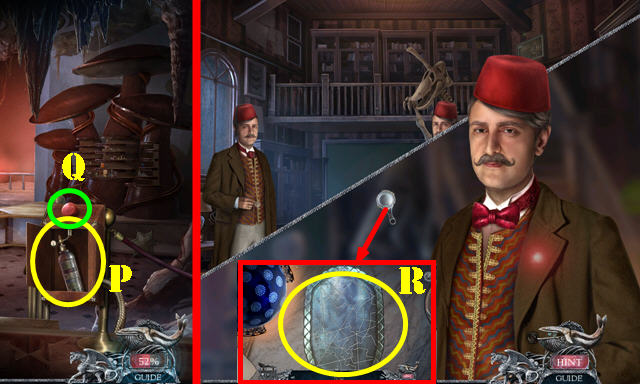
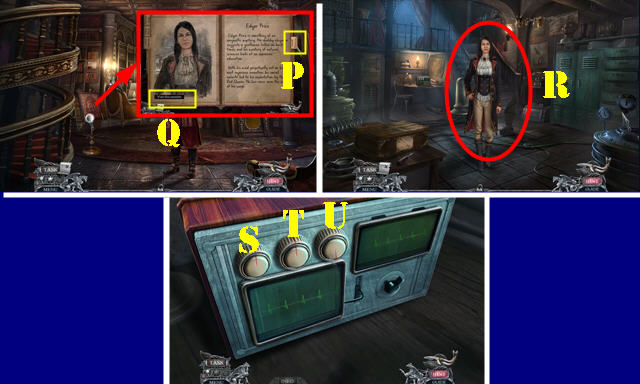
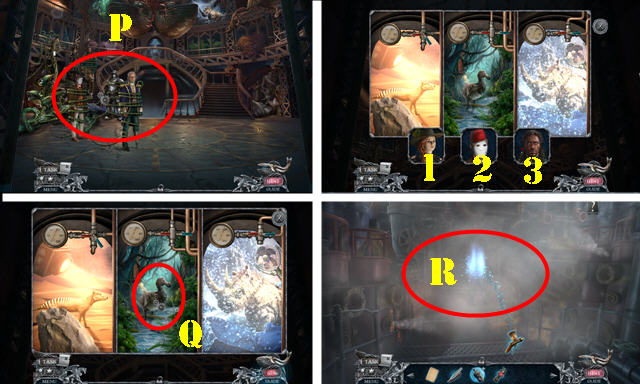
- Talk (P).
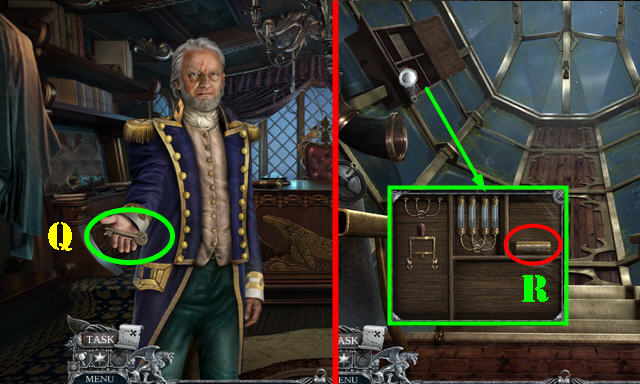
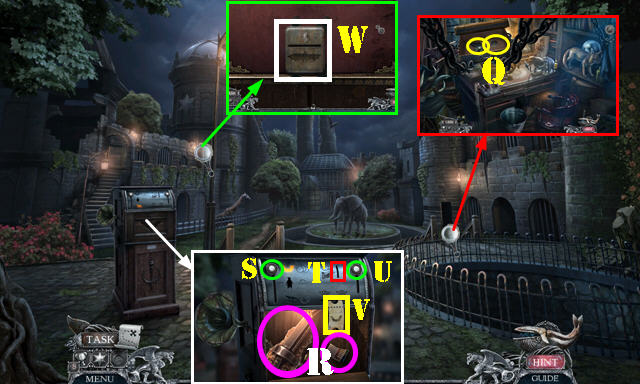
- Select statue (Q).
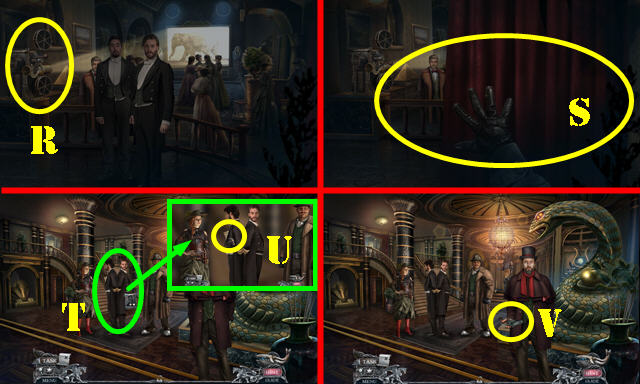
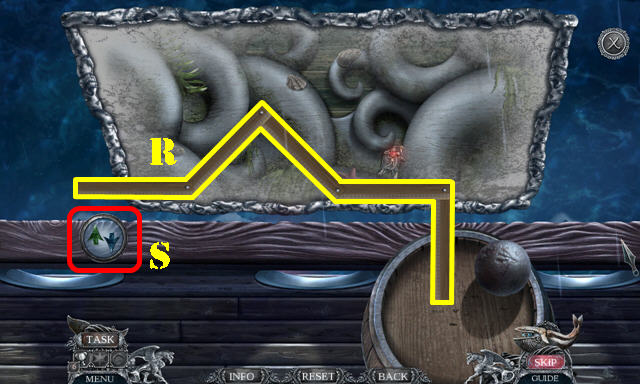
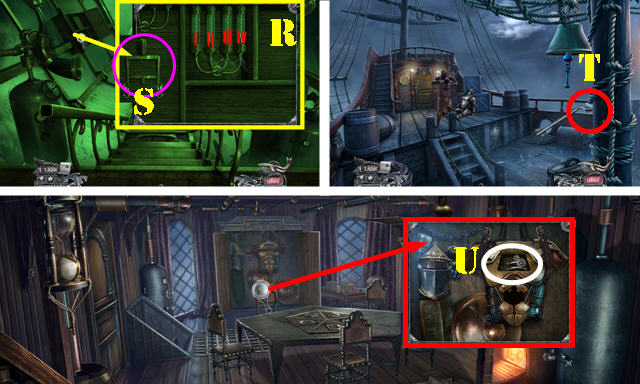
- Go (R).
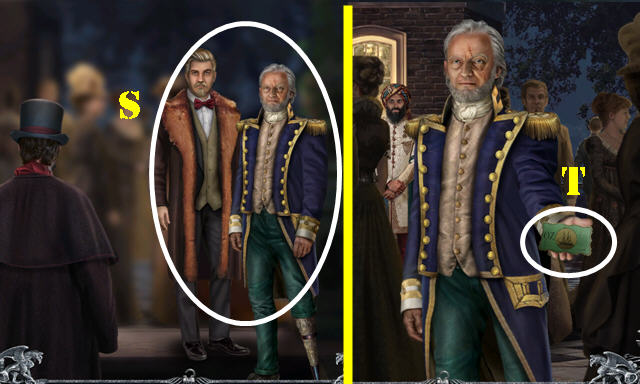
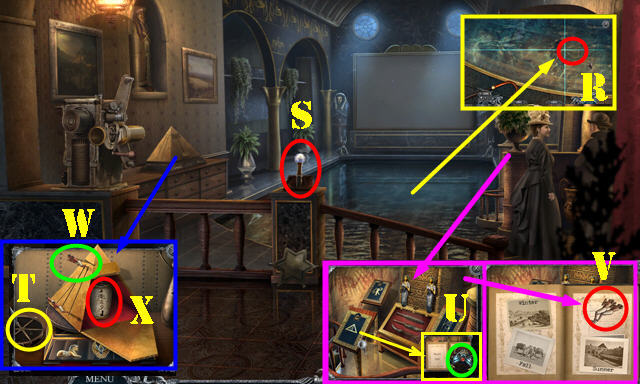
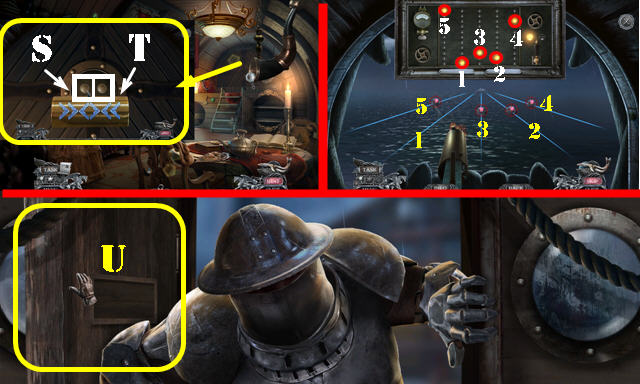
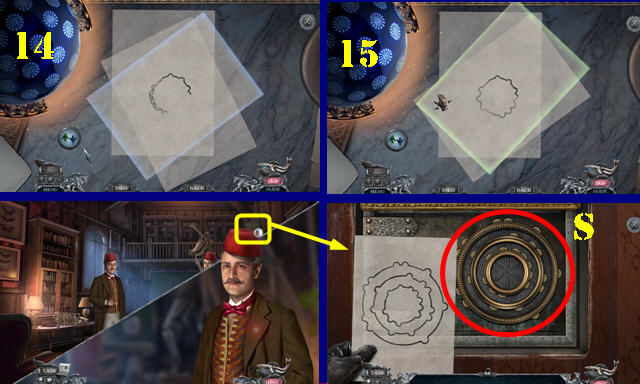
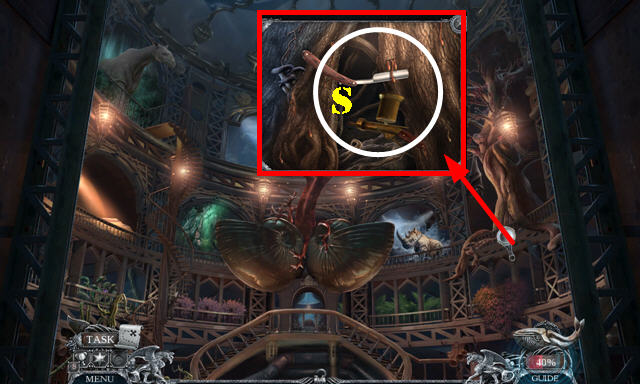
- Give INVITATION (S).
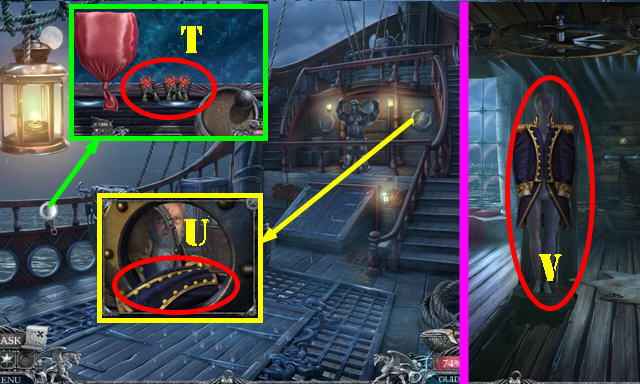
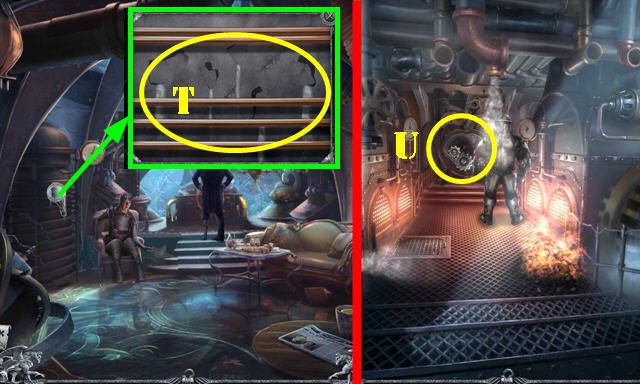
- Go forward: take CALLING CARD (T).
- Go forward twice.

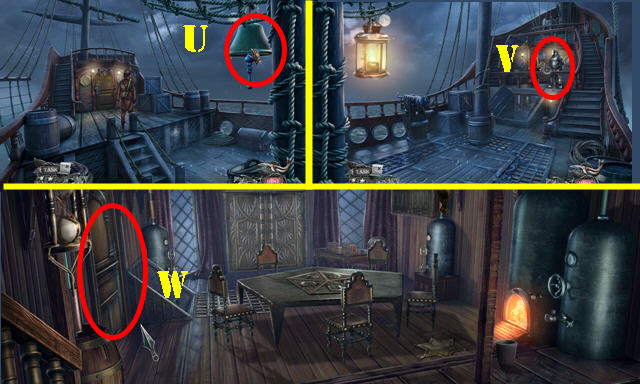
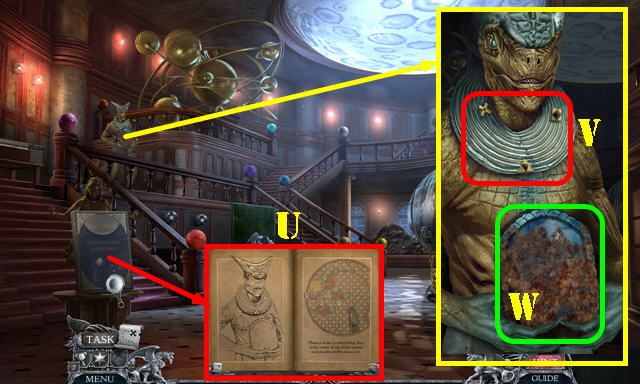
- Open door and enter; play HOP (U).
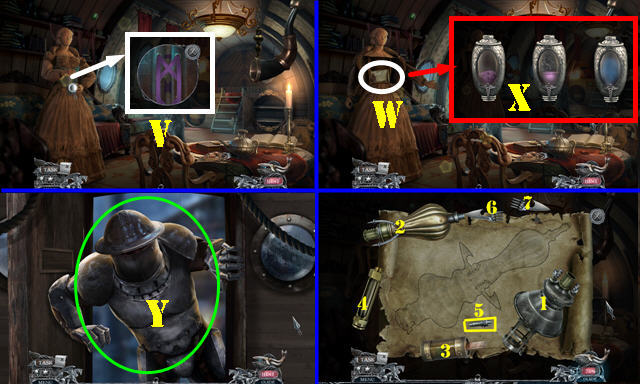
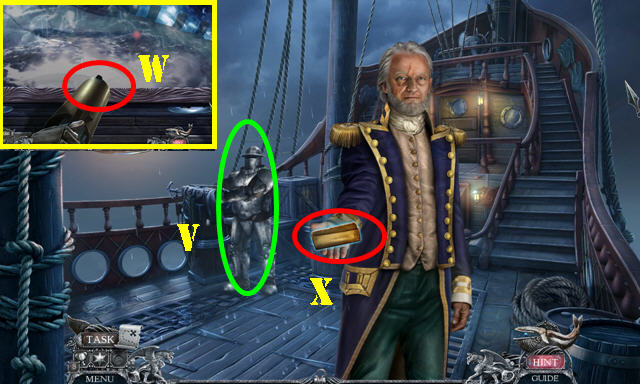
- Use PATCH (V).
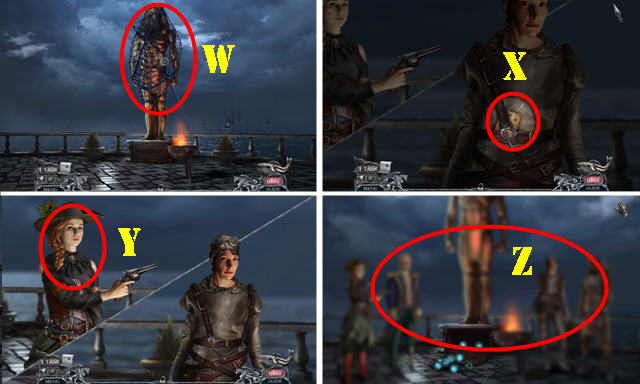
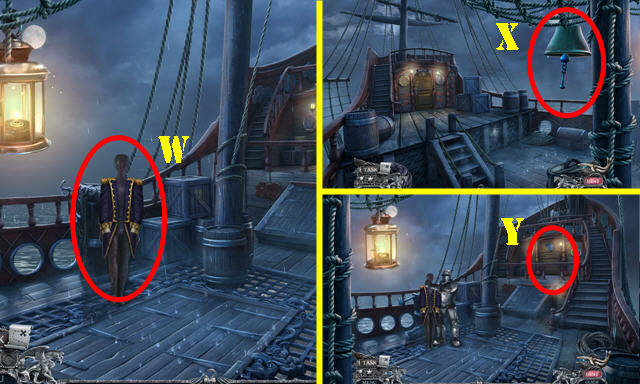
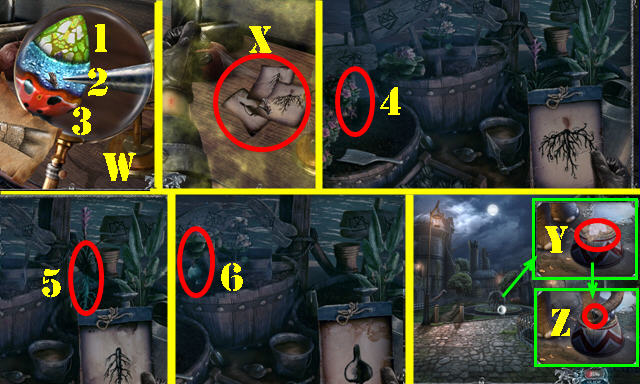
- Use SCISSORS (W); take FOLDED PAPER (W1).
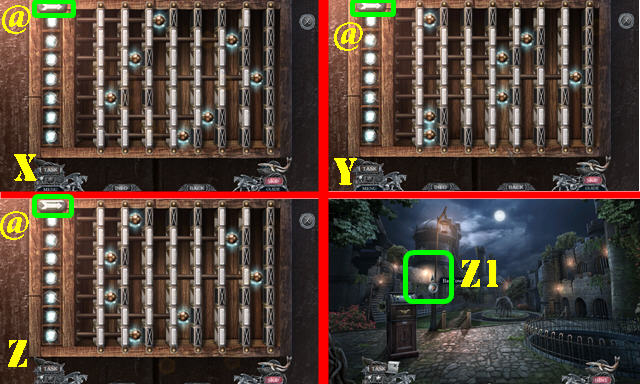
- Open FOLDED PAPER. Solution (X). Take ORIGAMI MESSAGE.
- Go (Y-Z).
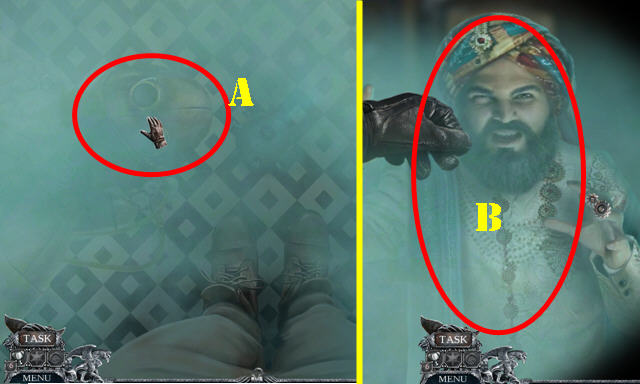
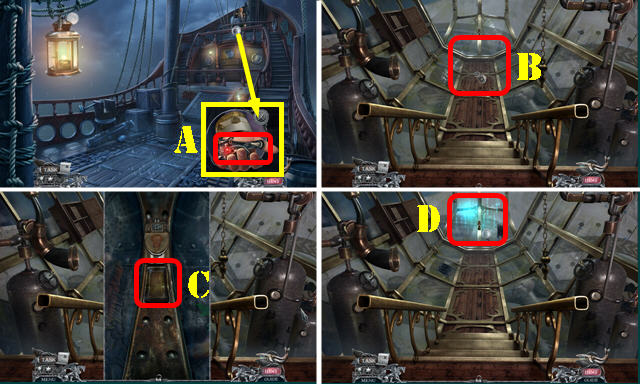
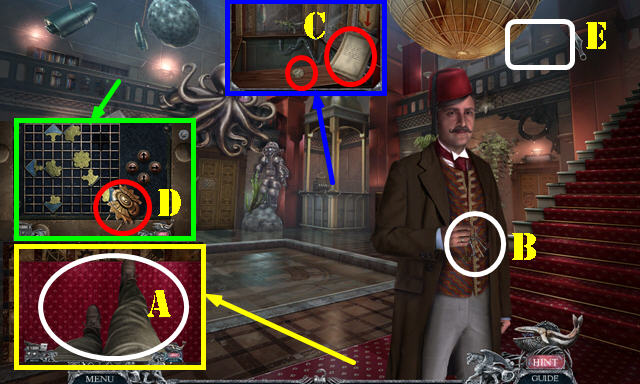
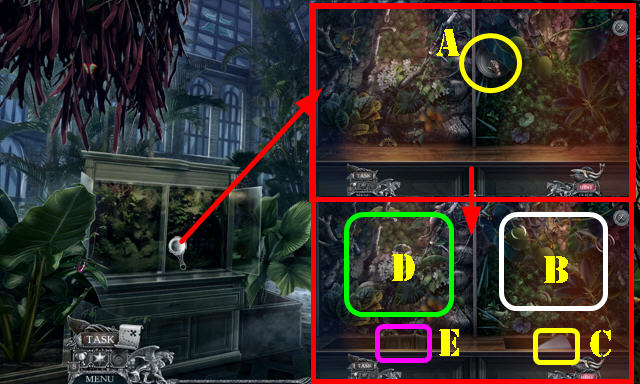
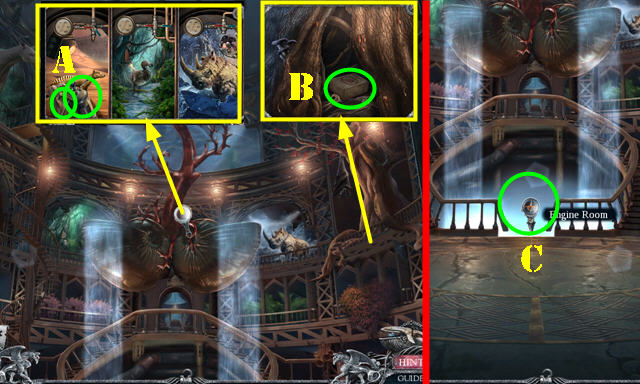
- Use ORIGAMI MESSAGE on scene (A).
- Take PARTY PROGRAM (B).
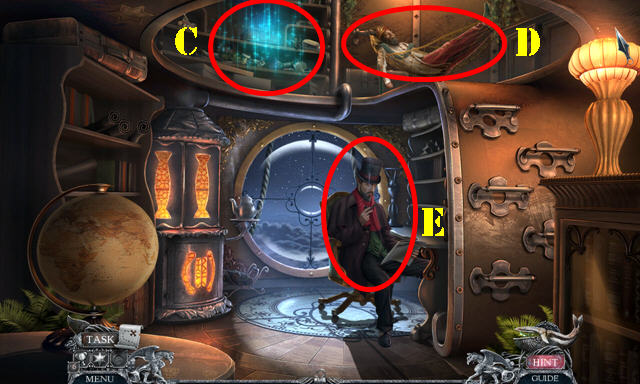
- Walk down and go (C).
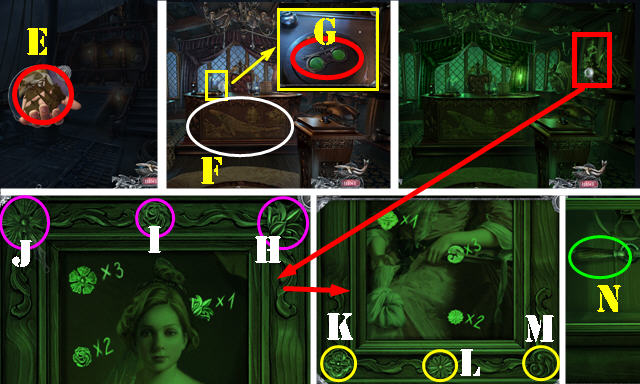
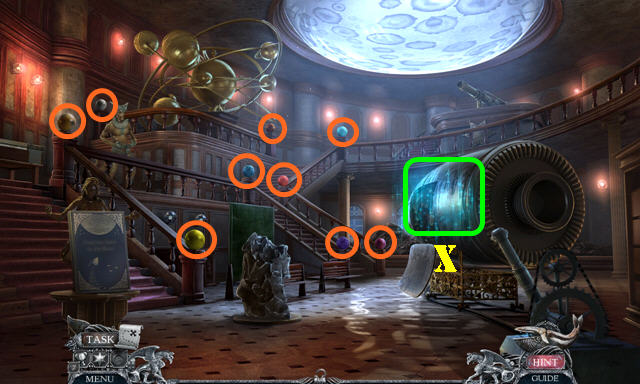
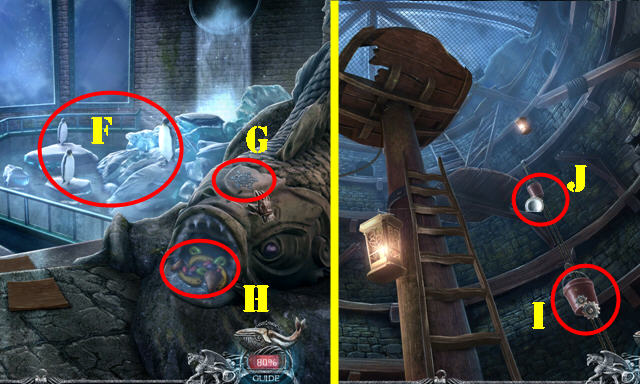
- Select (E).
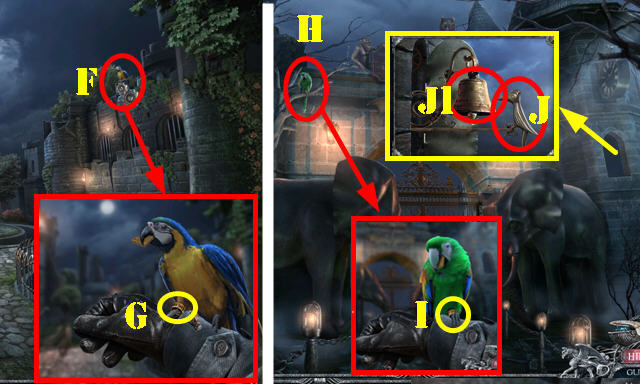
- Play HOP (F); receive TOKEN CLUE.
- Go (G).
- Place TOKEN CLUE. Solution is random; scarab will always be in the last spot you select. Take SCARAB (H).
- Take ANUBIS JAR and CANE (I).
- Select note on SCARAB. Select button 7x (J); take PIGMENT and SCARAB (J1).
- Use PIGMENT; swap as shown (K); take SNAKE EYE (L).
- Walk down.
- Open door and look at tag; take TONGS (M).
- Walk down.
- Place SNAKE EYE (N); remove sand; take ARTIFACTS 1/3 and FALCON JAR (O).
- Walk down; go right.
- Use TONGS (P); receive ARTIFACTS 2/3.
- Go to Grand Hall and go (Q).
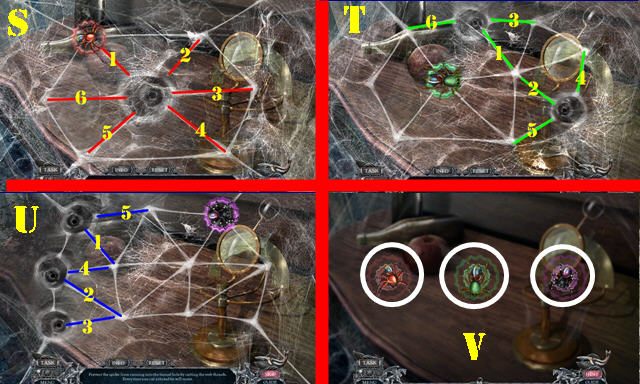
- Use CANE; stop lines twice (R); receive ARTIFACTS 3/3.
- Pull lever (S).
- Take FILM REELS 1/2 (T).
- Open book; place SCARAB (U); move card and take BUILDERS (V).
- Place BUILDERS and select (W); take HAPI JAR (X).
- Go to Egyptian Room.
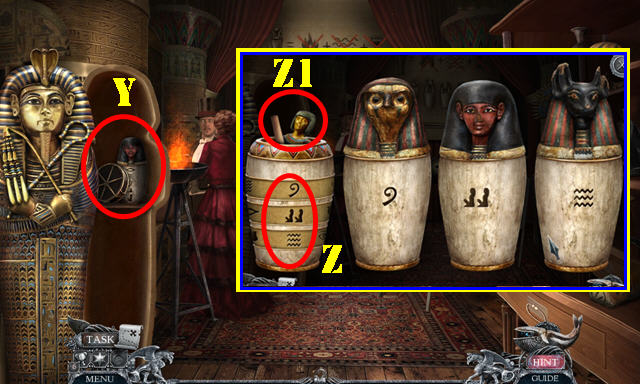
- Use ARTIFACTS 3/3; take FILM REELS 2/2 and OSIRIS JAR (Y).
- ANUBIS JAR, FALCON JAR, and OSIRIS JAR on HAPI JAR; arrange as shown (Z).
- Look at note; take DISPLAY FIGURINE (Z1).
- Go to Projection Room.
- Place FILM REELS 2/2 (A).
- Place DISPLAY FIGURINE (B). Choose any DAGGER (C).
- Open DAGGER; look at note.
- Go to Egyptian Room.
- Use DAGGER (D).
- Take OZ BADGE (E).
- Go to Grand Hall; go (F).
- Place OZ BADGE (G).
- Solution (H).
- Select (I).
- Receive PORTRAIT.
- Go to Egyptian Room.
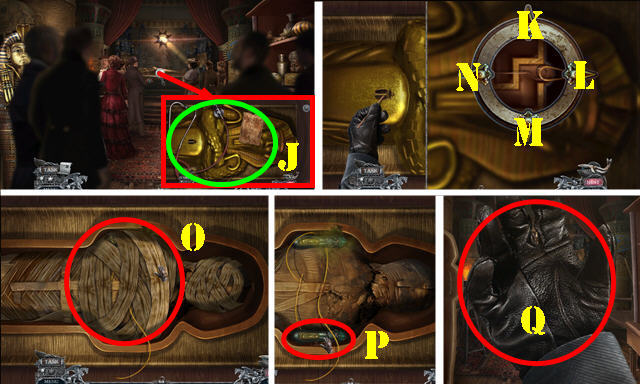
- Remove items (J).
- Solution: N-Kx2-Nx3-Kx2-L-K-L-M-Lx2-K.
- Open casket; remove all bandages, starting from topmost one (O).
- Take ACID (P).
- Select scene (Q).
- Go to Projection Room.
- Select projector (R).
- Select scene (S).
- Walk down.
- Talk (T). Ask questions.
- Take ZOOLOGICAL PAMPHLET (U) and FLARE GUN (V).
- Walk down.
- Throw ACID (W).
- Take RED QUEEN CARD (X).
- Select lady (Y).
- Select scene; receive GAS DEVICE (Z).
- Remove Mask (A).
- Go forward twice; select scene and use FLARE GUN (B).
- Go forward twice.
- Play HOP (C); receive SMELLING SALTS.
- Use SMELLING SALTS (D).
- Give RED QUEEN CARD (E).
- Walk down.
- Select painting (F).
- Select parts (G).
- Go (H).
- Place PORTRAIT, ZOOLOGICAL PAMPHLET, and CALLING CARD (I).
- Select Ahab's Ship (J).
Chapter 2: Ahab's Ship
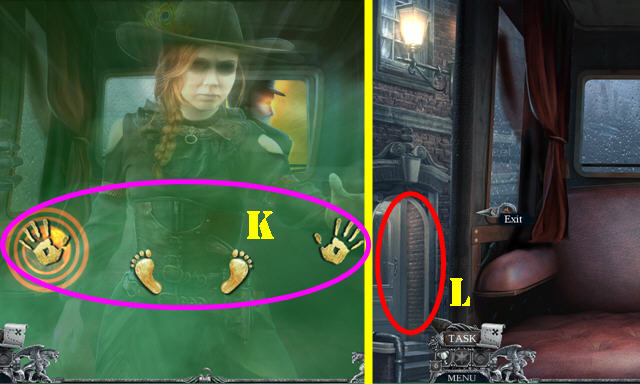
- Repeat sequence 3x. Puzzle is random (K).
- Exit (L).
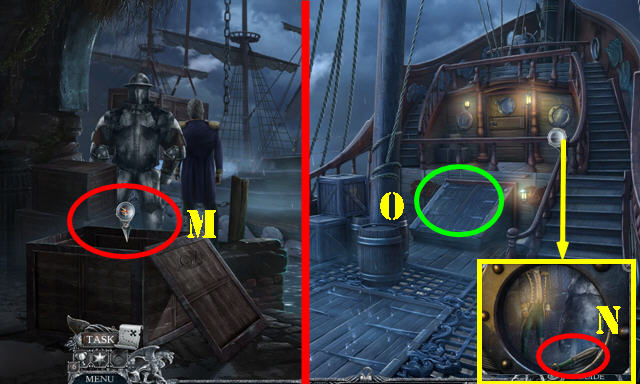
- Go (M).
- Go forward.
- Take KUNAI 1/4 (N).
- Go (O).
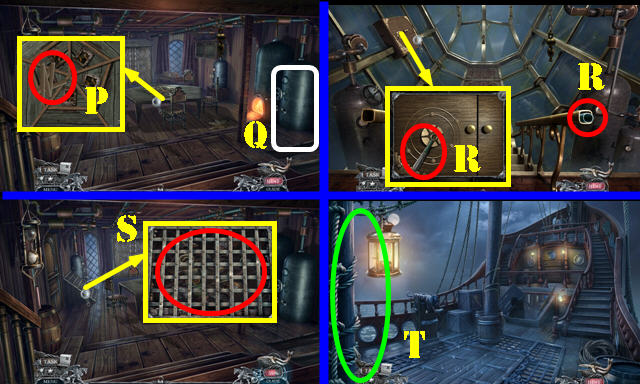
- Take FOLDING RULER (P).
- Go (Q).
- Take STEEL PIPE and KUNAI 2/4 (R).
- Walk down.
- Use STEEL PIPE (S). Play HOP; receive TRACKING DEVICE.
- Walk down and hide (T).
- Ring bell (U).
- Throw TRACKING DEVICE (V).
- Go to Workshop Deck and go (W).

- Take RAG (X).
- Move rug; take LION'S BADGE (Y).
- Go to Main Deck.
- Use RAG (Z); receive OILED RAG.
- Go left.
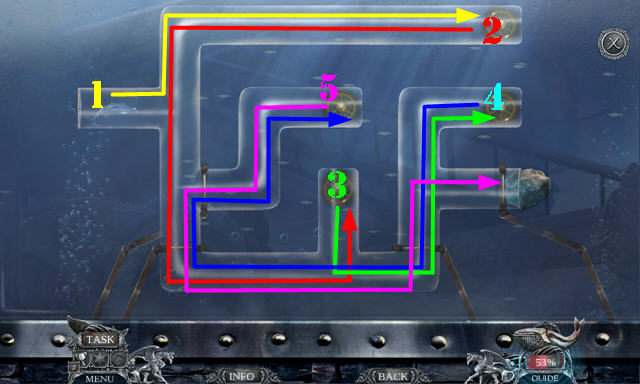
- Use OILED RAG; solution 1-5.
- Go (Z1).
- Take KUNAI 3/4, DOROTHY'S BADGE, and DOG TREATS (A).
- Select matching pairs (B); take THREADED NEEDLE (orange).
- Give DOG TREATS (C); take FISH BONE and SILK PILLOWCASE (D).
- Give DOG TREATS twice (E-F).
- Go to Lion's Room.
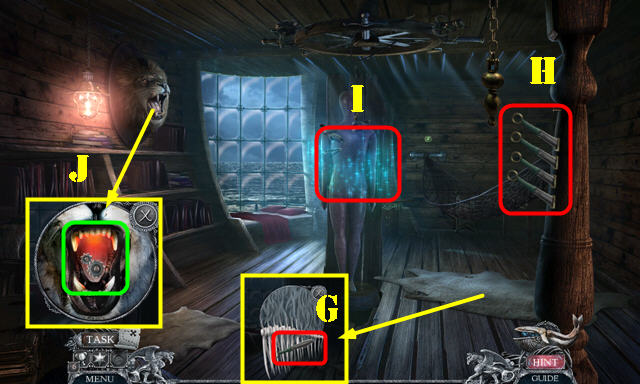
- Use FISH BONE; take KUNAI 4/4 (G).
- Place KUNAI 4/4 (H).
- Play HOP (I); receive MECHANICAL HEART.
- Use THREADED NEEDLE (J); receive TRACKING DEVICE 1/3.
- Take COMPARTMENT KEY from MECHANICAL HEART; receive HEART.
- Go to Glass Dome.
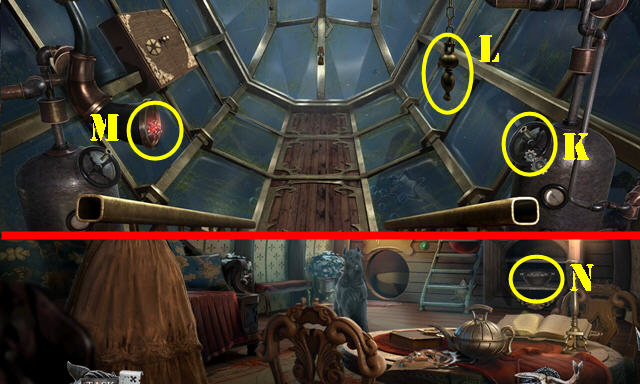
- Use SILK PILLOWCASE (K); receive INFLATED BALLOON.
- Pull (L); take TRACKING DEVICE 2/3 (M).
- Go to Dorothy's Room.
- Use COMPARTMENT KEY; take BULLETS (N).
- Go to Workshop Deck.
- Use BULLETS (O); receive MOLTEN LEAD.
- Use MOLTEN LEAD and select; take LEAD MIRROR (P).
- Walk down; go right.
- Use LEAD MIRROR and FOLDING RULER (Q).
- Solution (R). Press button (S).
- Receive TRACKING DEVICE 3/3.
- Place TRACKING DEVICE 3/3 and INFLATED BALLOON; select each tracking device (T).
- Take AHAB'S COAT (U).
- Go to Lion's Room.
- Place AHAB'S COAT; take DECOY (V).
- Go to Main Deck.
- Place DECOY (W).
- Go left.
- Ring bell (X).
- Go (Y).
- Take AHAB'S BADGE (A).
- Take LARGE HARPOON and TIN MAN'S BADGE (B).
- Select 1-4.
- Solution (C).
- Take NORTHERN STAR (D).
- Go to Glass Dome.
- Place NORTHERN STAR; rotate as shown (E).
- Take SCARECROW'S BADGE and COMPASS (F).
- Go to Lion's Room.
- Use COMPASS; Solution: Hx6-Gx8-Hx7-Gx6.
- Take THE ESSEX (I).
- Walk down.
- Place DOROTHY'S BADGE, LION'S BADGE, AHAB'S BADGE, TIN MAN'S BADGE, and SCARECROW'S BADGE (J).
- Arrange as shown (K).
- Select 1-5 (J).
- Solution one (1-5) (L).
- Solution two (1-4) (M).
- Take NEMO'S MAP.
- Take CAPSULE PIECES 1/7-7/7 (orange) and THE ANN ALEXANDER (N).
- Take TAR CHUNK (O).
- Place TAR CHUNK (P); receive MOLTEN TAR.
- Go to Ahab's Quarters.
- Give NEMO'S MAP; take GLASS DOME KEY (Q).
- Go to Glass Dome.
- Use GLASS DOME KEY; take GUN CYLINDER (R).
- Go to Dorothy's Room.
- Place GUN CYLINDER. Select: Tx2-S-T-Sx2.
- Solution is random. Use order shown in example above (1-5).
- Close door (U).
- Select corset (V); take CAPSULE DESIGN (W).
- Select vials and then any bottle (X); receive FLASH GRENADE.
- Open door; use FLASH GRENADE (Y).
- CAPSULE PIECES 7/7 on CAPSULE DESIGN. Select 1-7; receive EXPLOSIVE CAPSULE.
- Walk down.
- Take TRACKING DEVICE (A).
- Go to Glass Dome.
- Use MOLTEN TAR twice (B).
- Place TRACKING DEVICE (C).
- Play HOP (D).
- Go to Main Deck.
- Take THE PEQUOD (E).
- Enter Ahab's Quarters.
- Place THE ESSEX, THE ANN ALEXANDER, and THE PEQUOD (F).
- Remove dome and select (G).
- Select (H-Ix2-Jx3)-(K-Lx2-Mx3)-(N).
- Go to Dorothy's Room.
- Select two lights (O).
- Go to Lion's Room.
- Select two lights (P).
- Pull (Q).
- Go to Glass Dome.
- Swap fuses: I-II-III-IV (R).
- Pull switch (S).
- Take HARPOON TIP (T).
- Go to Workshop Deck.
- Use HARPOON TIP; place HEART (U) and select armor.
- Walk down.
- Play automatic HOP.
- Talk (V).
- EXPLOSIVE CAPSULE on LARGE HARPOON; receive EXPLOSIVE HARPOON.
- Place EXPLOSIVE HARPOON (W).
- Take NAVIGATION MAP (X).

- Select 'visit this member' (Y).
- Give NAVIGATION MAP (Y1).
- Solution is random (Z).
- Walk down.
- Select Museum (Z1); receive PORTRAIT.
Chapter 3: Museum
- Select rug (A); go up.
- Take CURATOR'S KEYS (B).
- Read note; take PENNIES 1/4 (C).
- Take SATELLITE MODEL (D).
- Go (E).
- Look at book (F).
- Use CURATOR'S KEYS (G); select (H).
- Go (I).
- Take DOCUMENT PIECES 1/8-8/8 (orange).
- Move lamp; place DOCUMENT PIECES 8/8; solution (J).
- Take RESTORED GRAPH PAPER.
- Place RESTORED GRAPH PAPER; select head and take GLOBE HINT (K).
- Walk down.
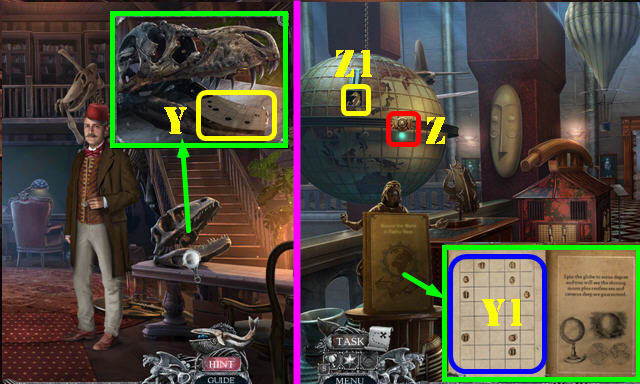
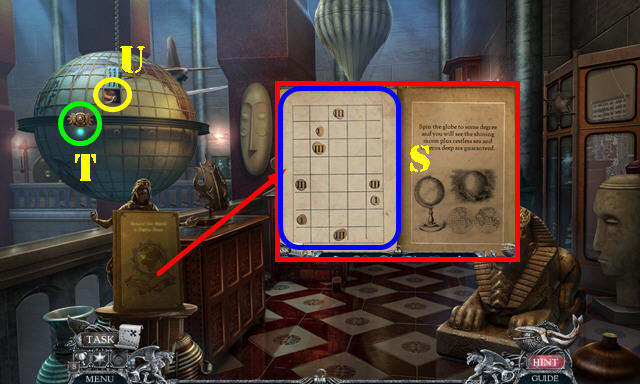
- Open book; place GLOBE HINT (L).
- Place SATELLITE MODEL (M). Select satellite model once and spin globe twice; take PUZZLE PIECE (N).
- Walk down.
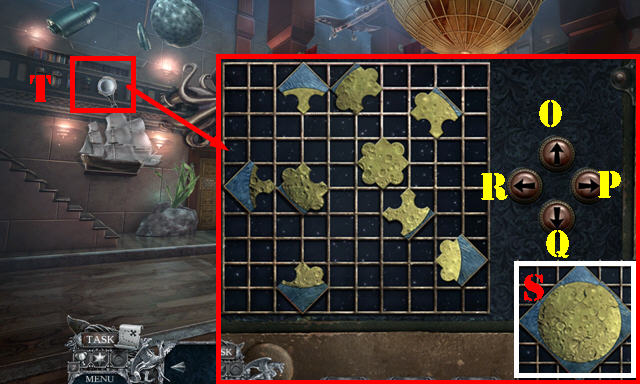
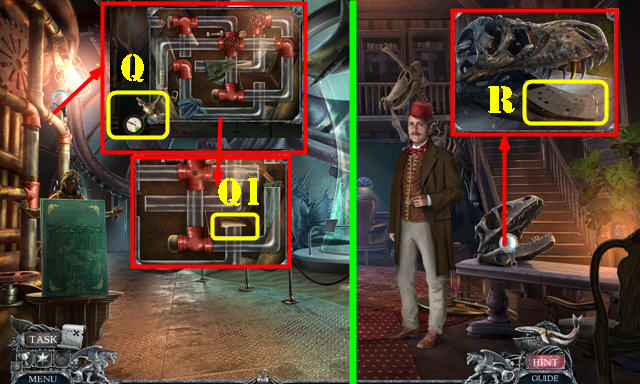
- Place PUZZLE PIECE. Solution: Q-R-Qx3-Px2-Ox6-R-Qx2-Rx2-Q-R-Ox2-Qx4.
- Solved image (S).
- Go (T).
- Open book (U).
- Arrange symbols (V); take MOON TABLET (W).
- Arrange planets (orange).
- Play HOP (X); receive WRAPPED SILVER TOOTH.
- Select WRAPPED SILVER TOOTH; take SILVER TOOTH and GRAPH PAPER.
- Go to Curator's Office.
- Place SILVER TOOTH and GRAPH PAPER; select head; take GLOBE HINT (Y).
- Walk down.
- Open book; place GLOBE HINT (Y1).
- Spin globe; select satellite (Z); take SEAHORSE (Z1).
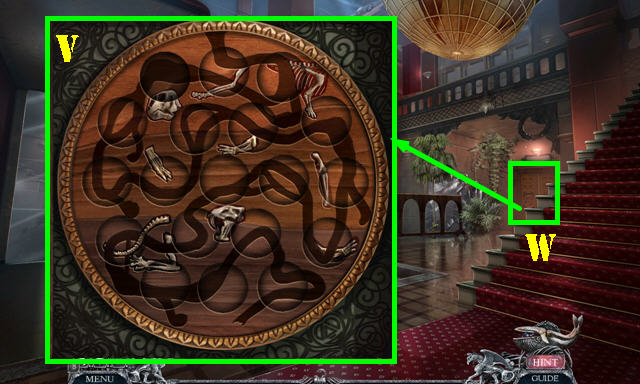
- Walk down.
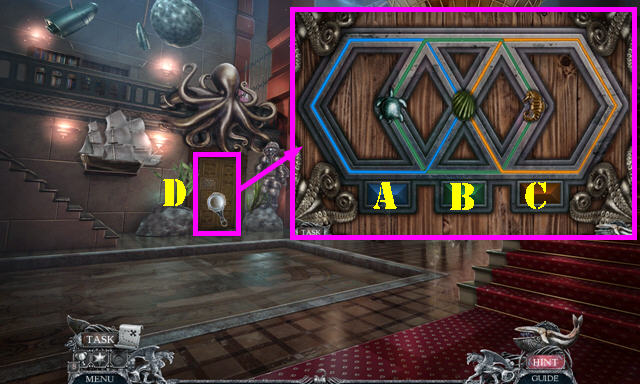
- Place SEAHORSE. Solution: Bx2-C-Bx2-Ax2.
- Enter (D).

- Open book (E).
- Arrange spikes (F); take SEA TABLET (G).
- Take SHORT PIPE (H).
- Select: Ix2-J-Ix2-K-I-L.
- Play HOP (M); receive PRESSURE GAUGE.
- Walk down twice.
- Select SEA TABLET twice; receive SEA TABLET CLUE.
- Place SEA TABLET CLUE; select tiles (N); take SYMBOL TABLETS 1/3.
- Take OXYGEN TANK (O).
- Go (P).
- PRESSURE GAUGE on OXYGEN TANK.
- Use OXYGEN TANK (Q). Play HOP; take WRAPPED GOLDEN TOOTH (Q1).
- Select WRAPPED GOLDEN TOOTH; take GRAPH PAPER and GOLDEN TOOTH.
- Go to Curator's Office.
- Place GOLDEN TOOTH and GRAPH PAPER; select head; take GLOBE HINT (R).
- Walk down.
- Place GLOBE HINT (S).
- Spin globe; press satellite twice (T); take PUZZLE PIECES (U).
- Walk down.
- Place PUZZLE PIECES; solution (V).
- Enter (W).
- Look at book (A).
- Select crystal 6x (B); take EARTH TABLET (C).
- Take PENNIES 2/4 (D).
- Walk down. Return to The Earth. Press button (E).
- Walk down. Return to The Earth. Press button a second time (E).
- Walk down. Return to The Earth. Press button a third time (E).
- Take WICK and OIL (F).
- Go to The Sea.
- Use OIL (G).
- Open glass; take SHELL (H).
- Walk down twice.
- OXYGEN TANK and SHELL on EARTH TABLET; take EARTH TABLET CLUE.
- Place EARTH TABLET CLUE; select tiles (I); take SYMBOL TABLETS 2/3.
- Take INSULATING GLOVE, MESH NET, and SOLVENT RECIPE (J).
- Go to The Earth.
- Use INSULATING GLOVE; take WET CLAY (K).
- Place SOLVENT RECIPE (L).
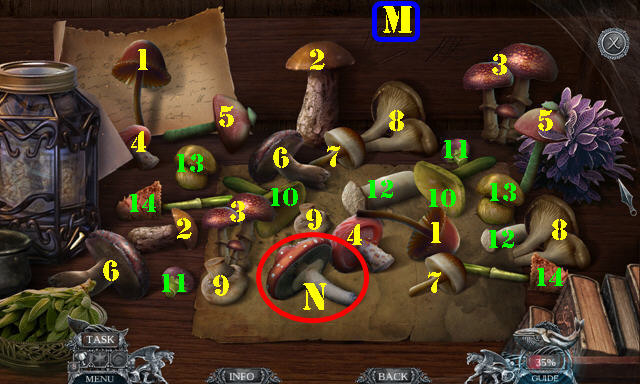
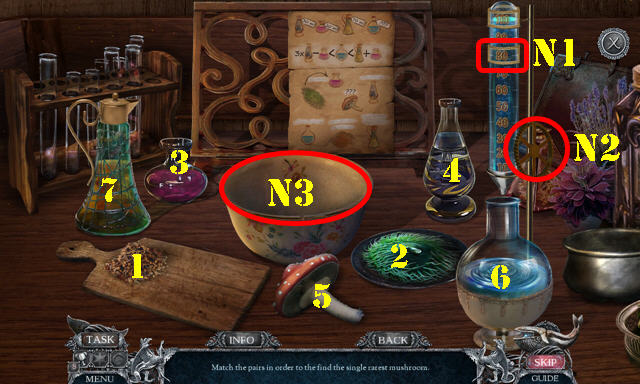
- Match pairs: 1-14 (M). Take Mushroom (N).
- Slide to 80 (N1).
- Select wheel (N2).
- Place 1-7 in bowl (N3).
- Take MUSHROOM SOLVENT.
- Walk down twice.
- MUSHROOM SOLVENT on MOON TABLET; take MOON TABLET CLUE.
- Place MOON TABLET CLUE; select tiles (O); take SYMBOL TABLETS 3/3.
- Take GLAZED LENS (P) and HOOK (Q).
- Go to Exhibition Hall.
- Place WET CLAY (R); receive PRINTED MOLD.
- Go to The Earth.
- Use HOOK (S). Take off gag (T).
- Go to Curator's Office.
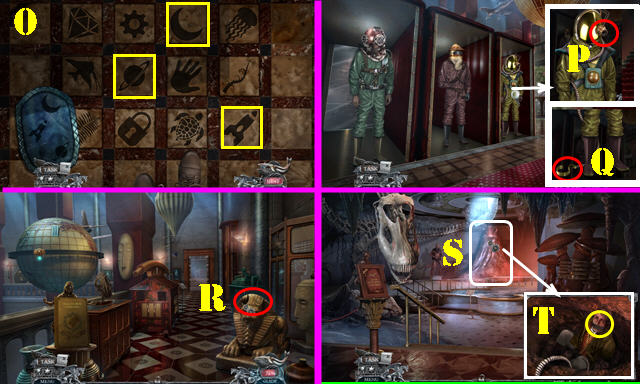
- Play HOP (U).
- PORTRAIT on scene. Find differences (V).
- Take MOTH TOKEN (W).
- Place MOTH TOKEN (W1). Solution (X).
- Take PENNIES 3/4, DIAMOND, and GOLD CHUNK.
- Go to The Moon.
- GOLD CHUNK on PRINTED MOLD; receive FILLED MOLD.
- Use FILLED MOLD (Y); receive GOLDEN BIRD.
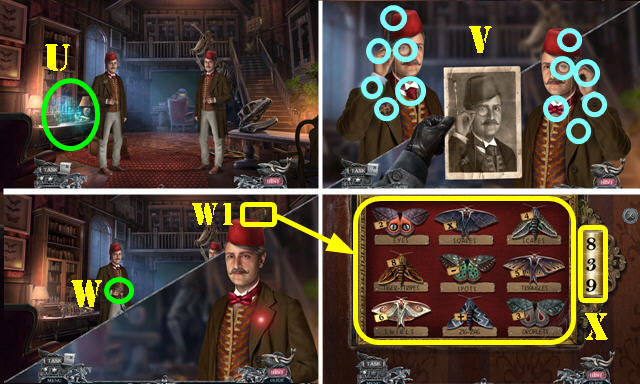
- Use DIAMOND and MESH NET (Z); select stones; take GRAPHITE POWDER (Z1) and MAGNETIZED GRAPHITE (Z2).
- GRAPHITE POWDER and WICK on SHORT PIPE; receive FLASHBANG.
- Go to Exhibition Hall.
- Place GOLDEN BIRD (A); take TELESCOPE RING (B).
- Go to The Moon.
- Place GLAZED LENS (C).
- Place TELESCOPE RING and MAGNETIZED GRAPHITE (D).
- Solution one: 1-E-2-E-3-E.
- Take PROJECTOR SLIDES.
- Pull lever (F).
- Walk down.
- Select bookcase; take WIND-UP KEY (G). Select bookcase again.
- Kick (H).
- Select tiles (I).
- Select man twice (J-J1).
- Select mask; take PENNIES 4/4 (K).
- Use PENNIES 4/4 (L).
- Select any toy; we selected OCTOPUS TOY (M).
- WIND-UP KEY on OCTOPUS TOY; take OCTOPUS DECOY.
- Go to The Sea.
- Place OCTOPUS DECOY (N); close lid.
- Use FLASHBANG; take DINOSAUR INSIGNIA (O).
- Go to The Earth.
- Place DINOSAUR INSIGNIA; remove tank; place OXYGEN TANK (P).
- Push button (Q).
- Select scene.
- Go to Curator's Office.
- Place SYMBOL TABLETS 3/3 and PROJECTOR SLIDES (R).
- Solution 1-9.
- Solution 10-15.
- Take SAFE COMBINATION.
- Place SAFE COMBINATION. Solution (S).
- Take VERNE'S NOTES.
- Walk down.
- Select Edgar Price and then 'visit this member' (T).
- Give VERNE'S NOTES (U).
- Solution one (V).
- Solution two (W).
- Walk down.
- Select Zoological Garden. Receive ZOOLOGICAL PAMPHLET.
Chapter 4: Zoological Garden
- Select map; move forward.
- Take KUNAI and CHAMELEONS 1/5 (A).
- Look at sign (B).
- Use KUNAI; set time to 7:00 (C).
- Go (D).
- Select scene.
- Take KUNAI and ZOO INSTRUCTIONS (E).
- Place ZOOLOGICAL PAMPHLET on scene and select.
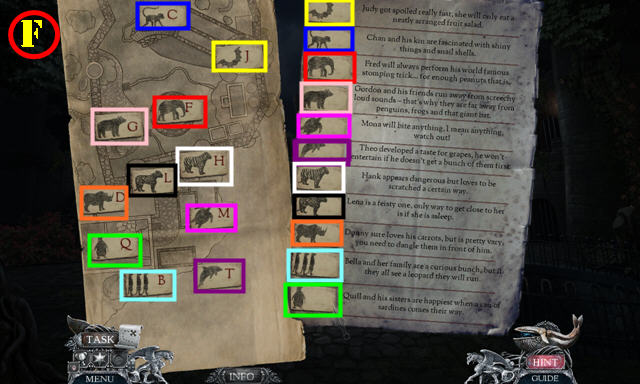
- Solution (F).
- Receive ANIMAL GUIDE.
- Play HOP (G): receive BROOM.
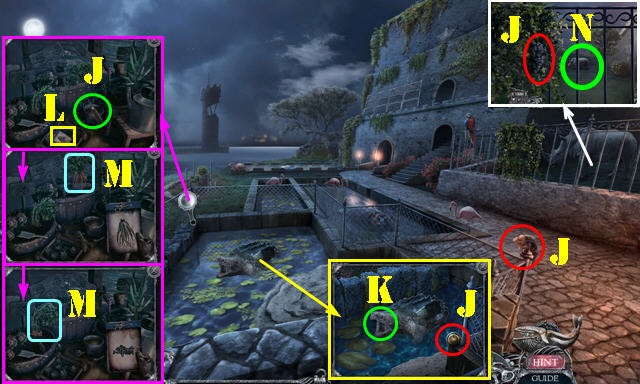
- Take CHAMELEONS 2/5 and PAPER (H).
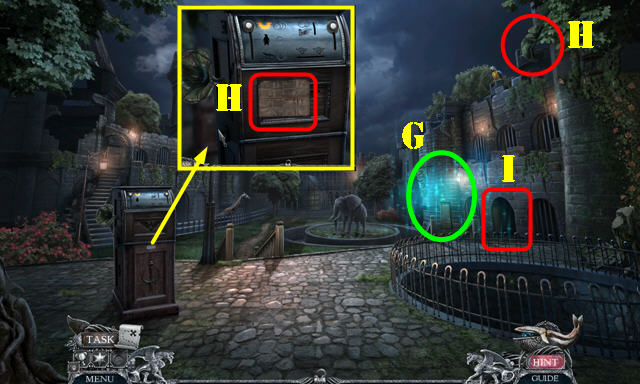
- Go (I).
- Use BROOM on scene; go forward.
- Take CHAMELEONS 3/5, SNAIL SHELL, SMALL RAKE, and GRAPES (J).
- Use BROOM (K); receive BROKEN BROOM.
- KUNAI on BROKEN BROOM; receive SPEAR.
- Select packet (L); take CARROTS and PEANUTS (M).
- Use CARROTS (N).
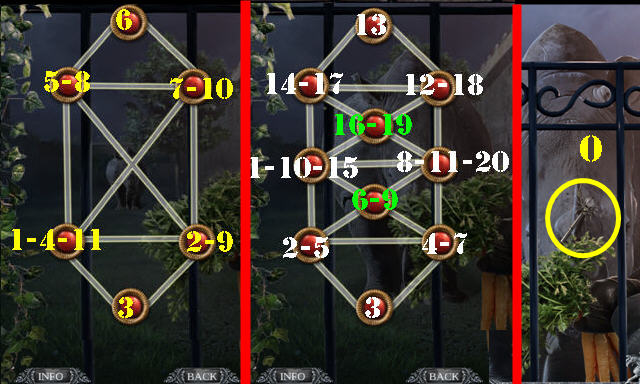
- Solution (1-11)-(1-20).
- Take SPIDER KEY (O).
- Walk down.
- Use SMALL RAKE (1-4).
- Take BALL (P).
- Use SNAIL SHELL; receive ONE COIN (Q).
- Give SPEAR (R); take KUNAI and DOLPHIN (S).
- Select button (T); place ONE COIN (U).
- Select button (V); take POLAR TICKET (W).
- Go (X-Y).
- Insert POLAR TICKET (Z).
- Throw BALL on scene.
- Take CHAMELEONS 4/5 (A).
- Place DOLPHIN (B); insert GRAPES (C).
- Select five grapes (D).
- Solution (1-5).
- Walk down.
- Use KUNAI; take TWO COINS (E).
- Walk down.
- Select button (F); place TWO COINS (G).
- Select button (H); take EXOTIC TICKET (I).
- Insert EXOTIC TICKET (J).
- Solution (K).
- Go (L).
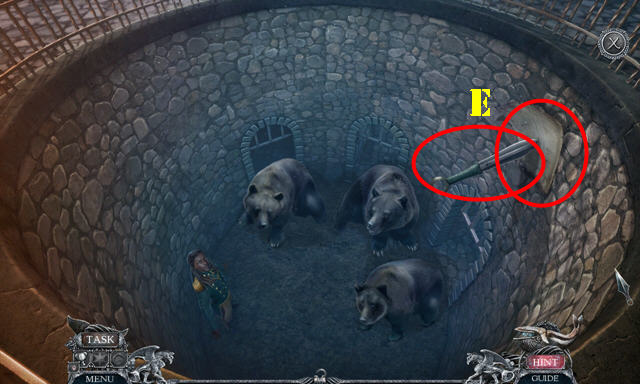
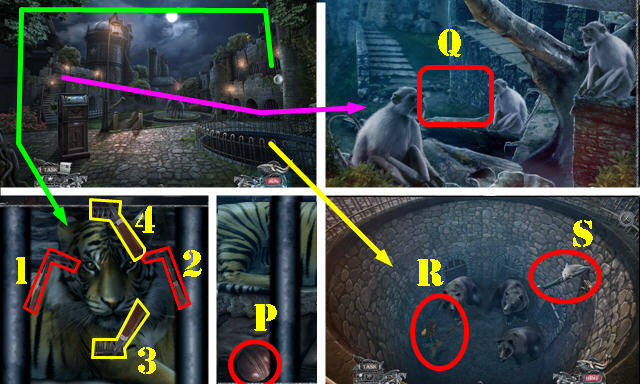
- Use KUNAI (M).
- Play HOP (N); receive FROGS.
- Take CHAMELEONS 5/5 and BLOWGUN (O).
- Select butterfly (P).
- Place PAPER (Q); receive STICKY PAPER.
- Use SPIDER KEY (R).
- Solution (S-T-U).
- Choose any spider (V).
- Select 1-3 (W); take ANTIDOTE RECIPE (X).
- Place ANTIDOTE RECIPE. Select 4-6.
- Walk down.
- Place STICKY PAPER; Give PEANUTS (Y); take SANDPAPER (Z).
- Go to Exotic Pavilion.
- Take METAL BOWL (A).
- Place FROGS (B); take SARDINE CAN (C).
- Place CHAMELEONS 5/5 (D); take CRACKERS (E).
- Walk down.
- Give CRACKERS (F); receive BLUE FEATHER; take SECOND CODE DIAL (G).
- Walk down.
- Give CRACKERS (H); receive GREEN FEATHER; take FIRST CODE DIAL (I).
- Use SANDPAPER (J) and METAL BOWL (J1); receive METAL COLANDER.
- Go to Aquatic Zone.
- Give CRACKERS (K); receive RED FEATHER; take THIRD CODE DIAL (L).
- Use SARDINE CAN (M); receive SARDINES.
- Use METAL COLANDER (N); receive TWO COINS.
- Walk down.
- BLUE FEATHER, GREEN FEATHER, and RED FEATHER on ANESTHETIC NEEDLE; select base of the feathers; take ANESTHETIC DART.
- Use BLOWGUN and ANESTHETIC DART (O); take LEOPARD TOY (P).
- Place FIRST CODE DIAL, SECOND CODE DIAL, and THIRD CODE DIAL; select 415. Take THREE COINS and DECORATION (Q).
- Place DECORATION; take MATCHES and AUDIO DEVICE (R).
- Select button twice (S); Insert THREE COINS (T). Select button (U) and take BAT TICKET (V).
- Insert BAT TICKET (W).
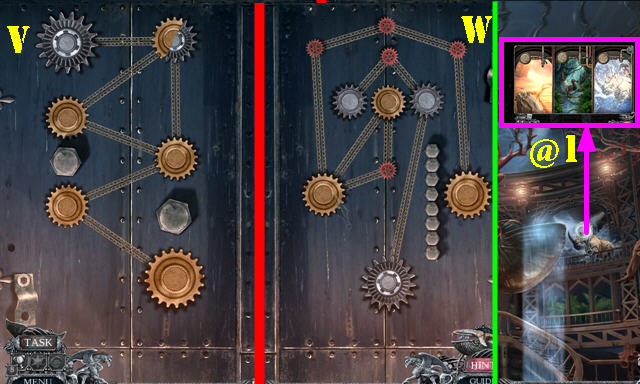
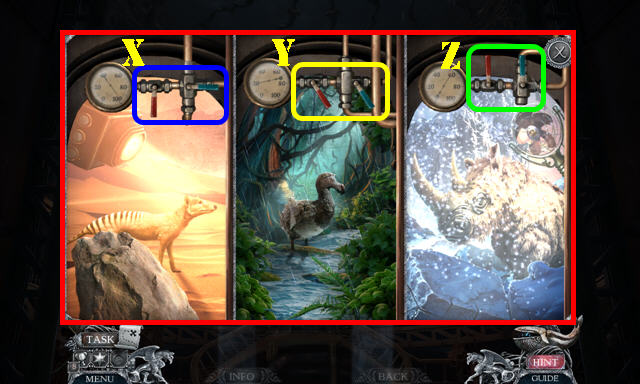
- Solutions (X-Y-Z). Select button after each puzzle (@).
- Go to Bat Tower (Z1).

- Use MATCHES (1-3).
- Go to Aquatic Zone.
- Use LEOPARD TOY. Solution (A-C-D).
- Take SNOWFLAKE.
- Go to Polar Chamber.
- Open compartment on AUDIO DEVICE, use SANDPAPER and close it; receive BLANK AUDIO DEVICE.
- Throw SARDINES; use BLANK AUDIO DEVICE (F).
- Place SNOWFLAKE (G); take FRUIT (H).
- Go to Bat Tower.
- Place FRUIT (I).
- Play puzzle (J).
- Solution (K).
- Receive FRUIT SALAD.
- Use FRUIT SALAD and BLANK AUDIO DEVICE (L).
- Take ROPE (M).
- Go to Exotic Pavilion.
- Use BLANK AUDIO DEVICE (N); receive AUDIO RECORDING.
- Walk down.
- Use AUDIO RECORDING and ROPE (O).
- Walk down.
- Open book; select Isobel Newton (P); select 'Visit this member' (Q).
- Give AUDIO RECORDING (R).
- Solution: (Sx2-Ux3)-(Tx2-Sx3-Ux3)-(T-Sx3-Ux2).
- Walk down.
Chapter 5: Nautilus Center
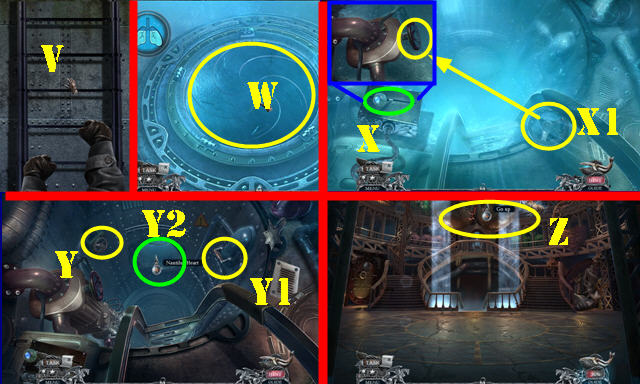
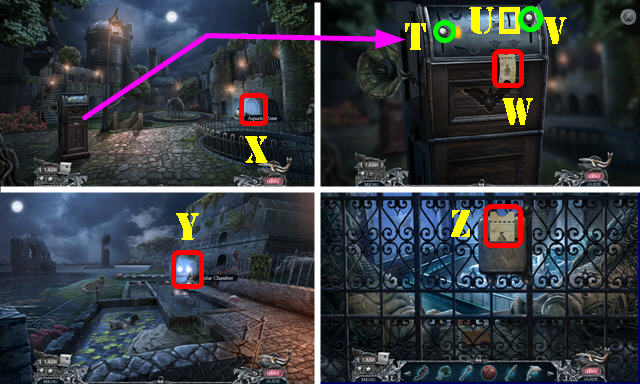
- Select ladder 4x (V).
- Open hatch (W).
- Slide lever (X); place valve (X1).
- Select valve (Y); pull lever (Y1).
- Go (Y2).
- Go up (Z).
- Take HEX KEY and SPRAYER (A).
- Select vines twice; take HERBICIDE POWDER (B).
- HERBICIDE POWDER on SPRAYER; receive UNPRESSURIZED SPRAYER.
- Go down and go (C).
- Use HEX KEY (D); receive EXTENDABLE TRIDENT.
- Walk down; go (E).
- Use EXTENDABLE TRIDENT (F); receive STORAGE KEY.
- Walk down; go (G).
- Use STORAGE KEY (H).
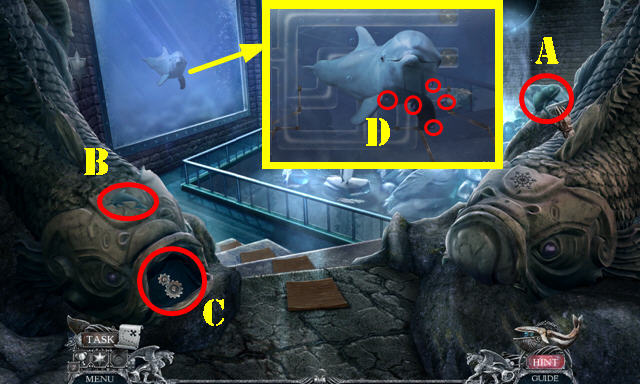
- Play HOP (I); receive HARPOON GUN.
- Go to Command Deck.
- Use HARPOON GUN (J).
- Take TASK LIST (K).
- Push button (L); take INERT CORE (M).
- Walk down.
- Open compartment; take RAZOR (N).
- Go to Engine Room.
- Use UNPRESSURIZED SPRAYER (O); receive HERBICIDE.
- Walk down.
- Use HERBICIDE (P); receive EMPTY SPRAYER.
- Select (1-3).
- Use INERT CORE; receive ACTIVE CORE (Q).
- Go to Engine Room to receive EMPTY GLUE GUN (R).
- Walk down; go up.
- Use EMPTY GLUE GUN and RAZOR (S); receive GLUE GUN.
- Go to Command Deck.
- Use GLUE GUN (T).
- Go to Engine Room.
- Use ACTIVE CORE (U). Play HOP; receive CONTROL PLATE.
- Solution (V-W).
- Walk down; go up.
- Play puzzle (@1).
- Solution (X-Y-Z).
- Go to Command Deck.
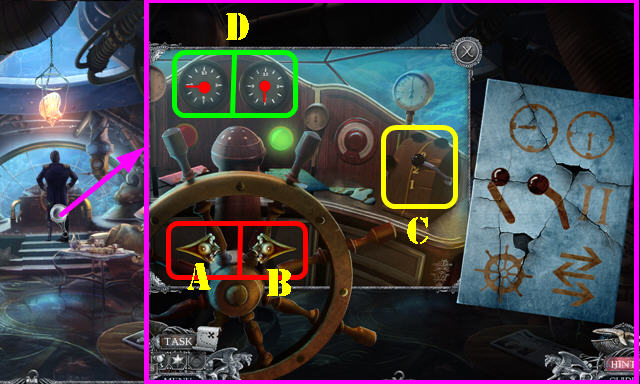
- Place CONTROL PLATE. Select B-A-B.
- Select levers once (C).
- Set clocks (D).
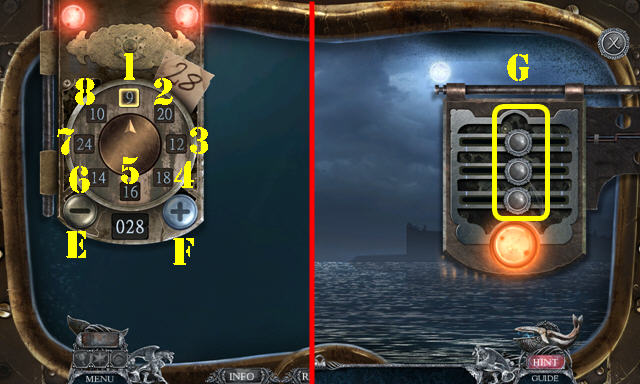
- Solution one: 7-E-4-E-8-F-1-E.
- Solution two: set sliders in center (G).
- Take RUM FLASK (H).
- RUM FLASK on EMPTY SPRAYER; receive SPRAYER.
- Go to Storage.
- Use SPRAYER (I).
- Play puzzle (J).
- Solution (K).
- Congratulations, you've completed Vermillion Watch: Order Zero!
Created at: 2017-09-03