

Walkthrough Menu
General Tips
- This is the official guide for Wanderlust: Shadow of the Monolith.
- This guide won't tell you when to zoom into a location; the screenshots show each zoom scene.
- Hidden-object puzzles are referred to as HOPs. Only the locations of the HOPs will be shown.
- Use the Map to fast travel to a location.
Chapter 1: Victor
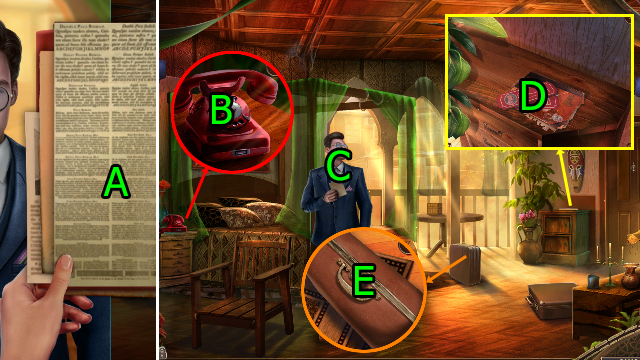
- Press (Ax4).
- Press (B) and (C).
- Clear (D); get SUITCASE CODE.
- Use SUITCASE CODE on (E).
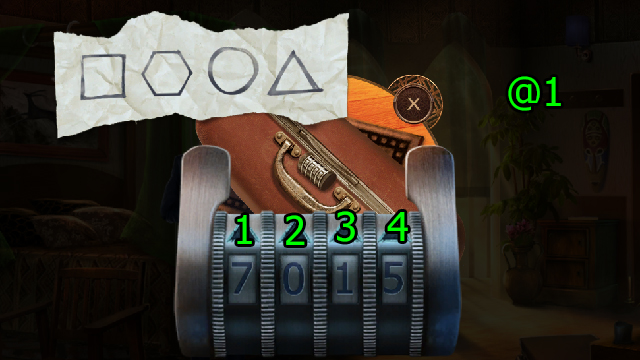
- Solution (@1): Press (1x7)-(2x6)-(3x9)-(4x8).
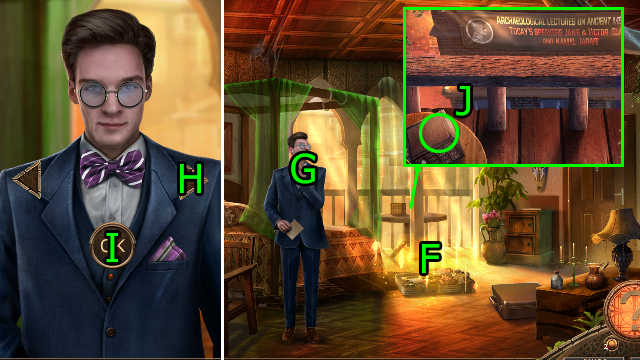
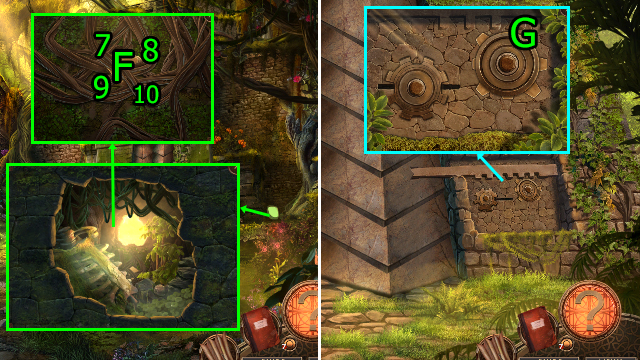
- Solve HOP (F); get FOUR BOW TIES.
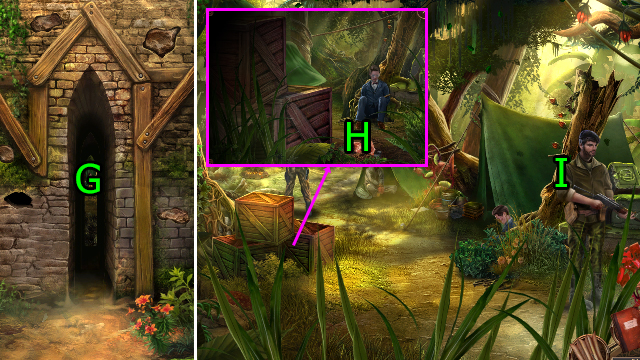
- Use FOUR BOW TIES on (G).
- Press (Hx4) and (I).
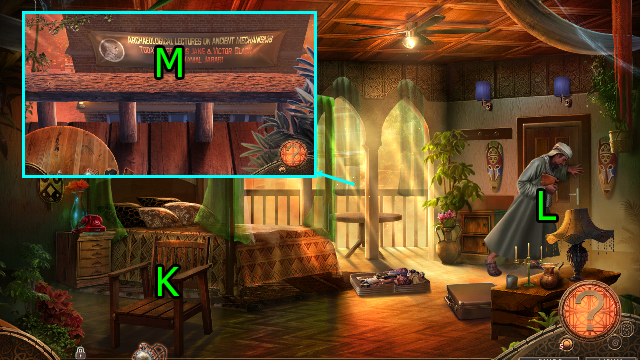
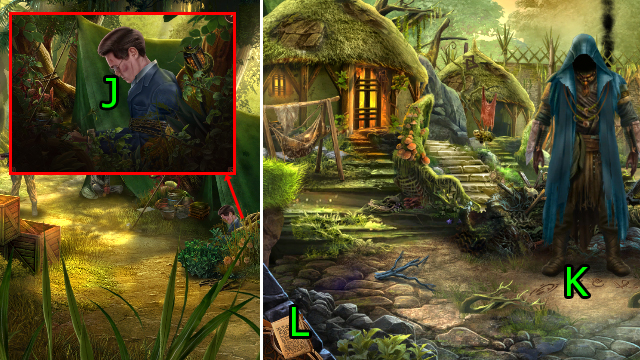
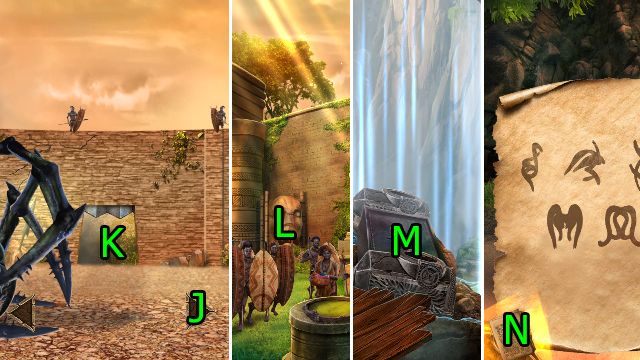
- Get ANCIENT BOX (J).
- Inspect ANCIENT BOX.

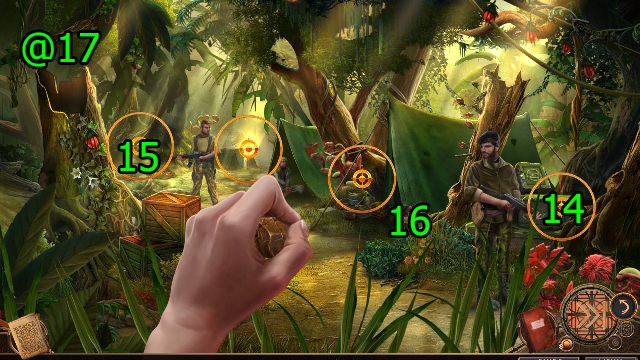
- Solution (@2): Press (5-6)-(7-8)-(9), press (10-11)-(12), press (13-14)-(15-16)-(17), press (18-19)-(20-21).
- Get FATHER'S POCKET WATCH.
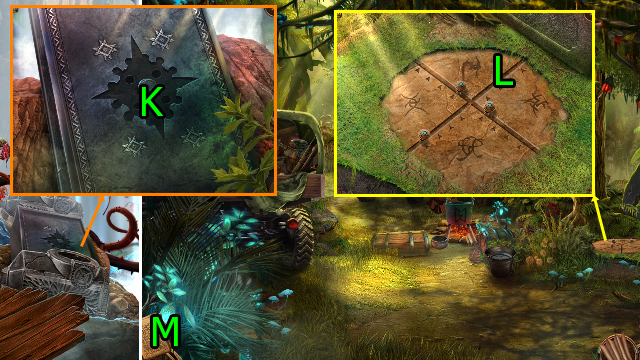
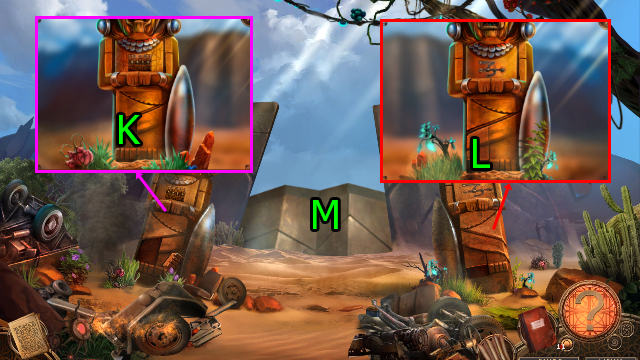
- Drag (K-L); get JEEP KEY and THE BOOK.
- Press (M).
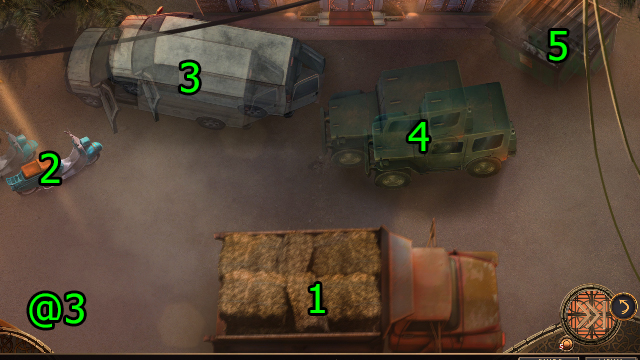
- Solution (@3): Press (1)-(2)-(3)-(4)-(5) when the visions overlap on each, then press (1).
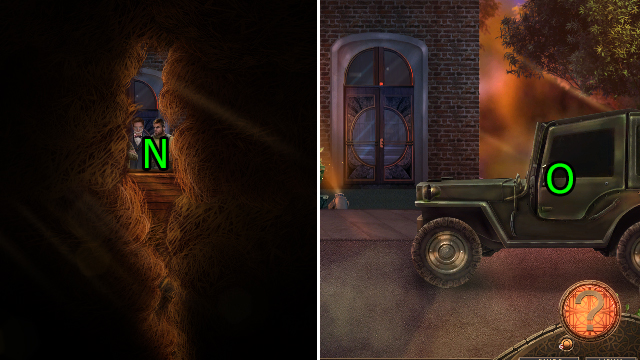
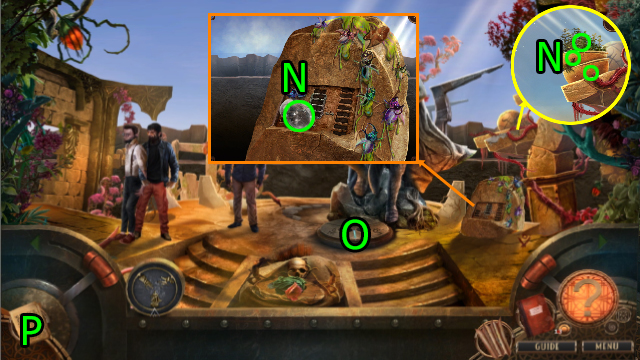
- Press (Nx4).
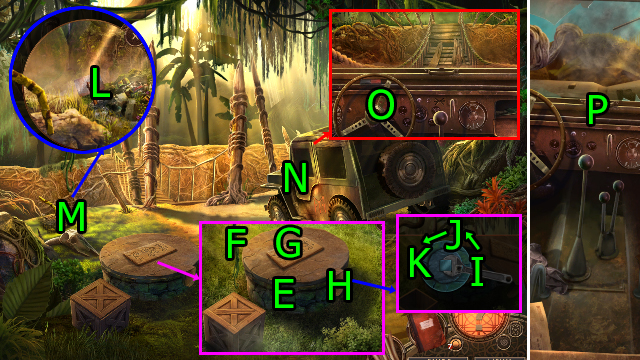
- Use JEEP KEY on (O).
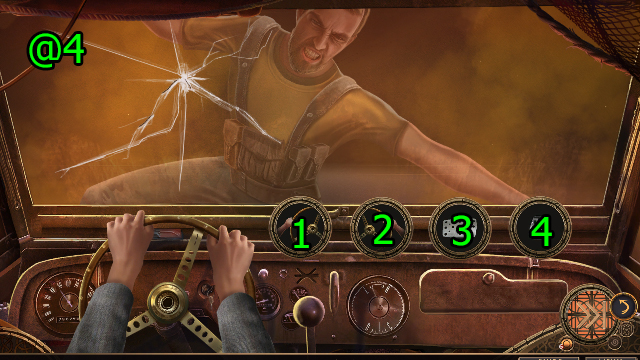
- Solution (@4): Press (1-2-4)-(1-2-1-3)-(4-1-3-2-1).
- Use THE BOOK; get Map, Objectives, My Collection of Ancient Languages, and PAPER WITH CODE.
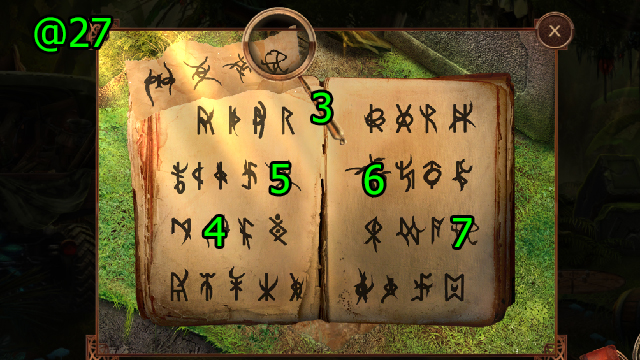
- Use PAPER WITH CODE and press (P).
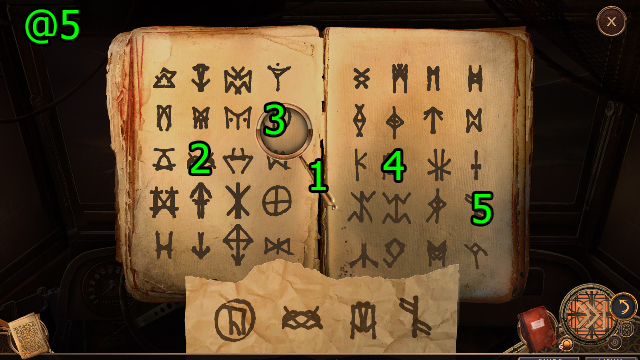
- Solution (@5): Press (1)-(2-3-4-5).
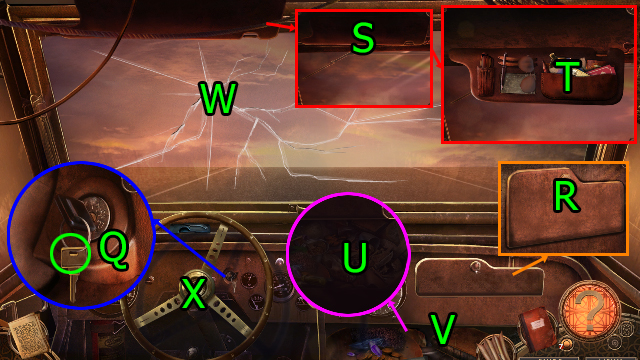
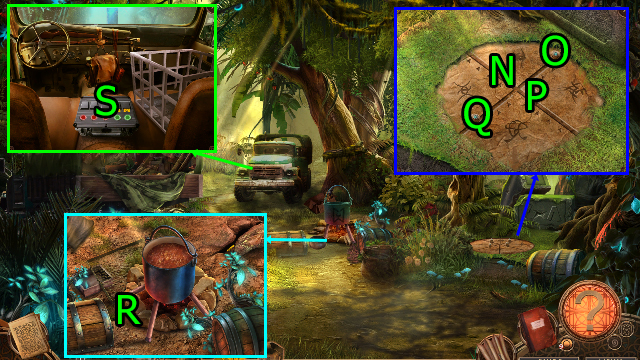
- Press (R).
- Get GLOVE COMPARTMENT KEY (Q).
- Use GLOVE COMPARTMENT KEY on (R).
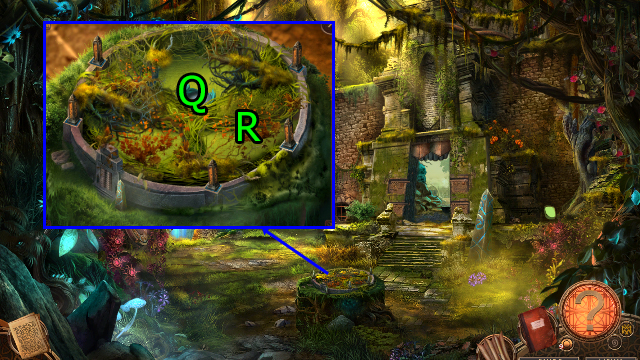
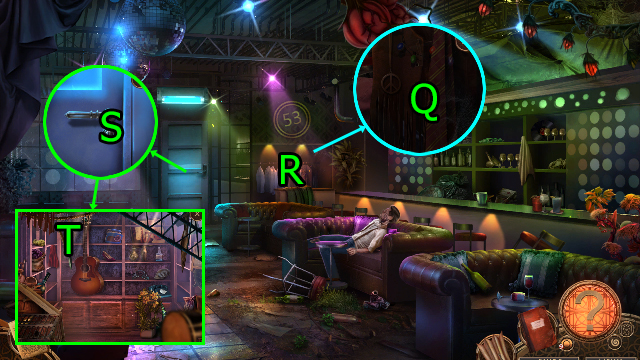
- Press (S); Search (T), get MATCHES.
- Use MATCHES on (U).
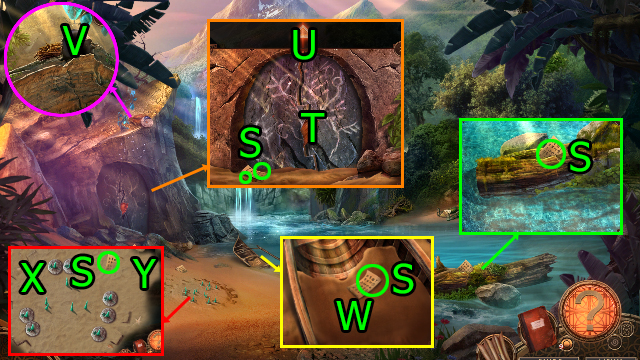
- Solve HOP (V); get IMPROVISED TONGS.
- Press and use IMPROVISED TONGS on (R); get SMALL PICKAXE and ROADMAP.
- Use ROADMAP.
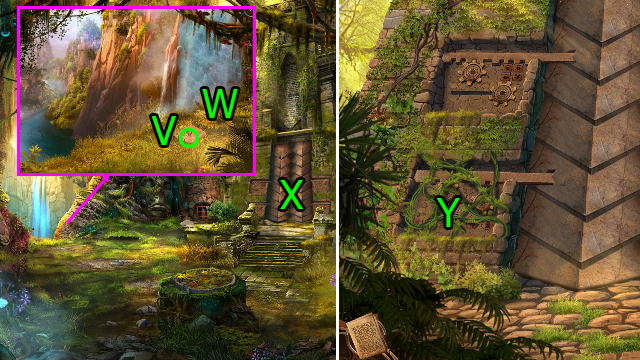
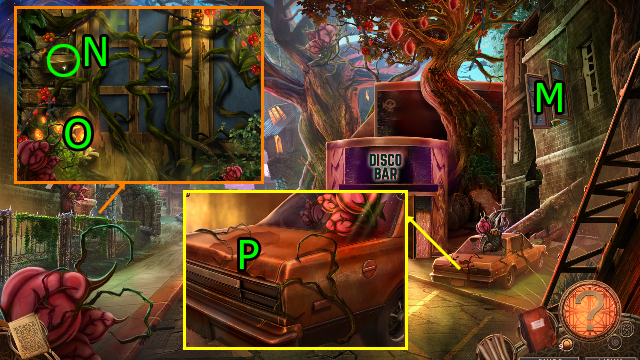
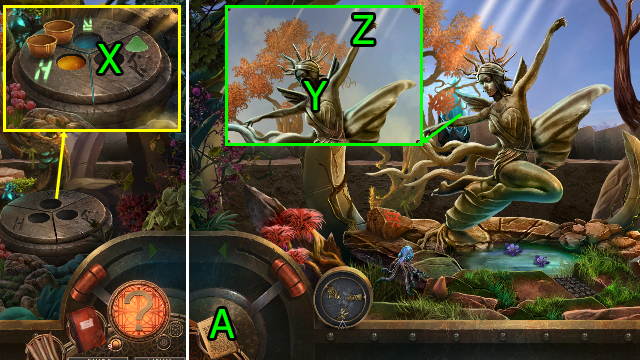
- Use SMALL PICKAXE on (W) and press (X).
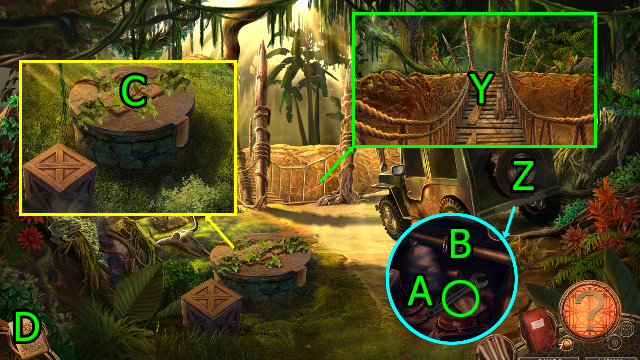
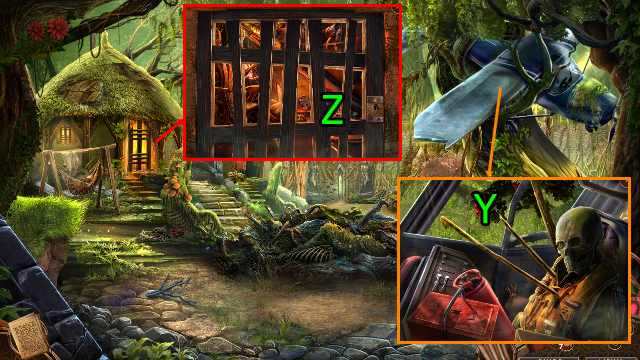
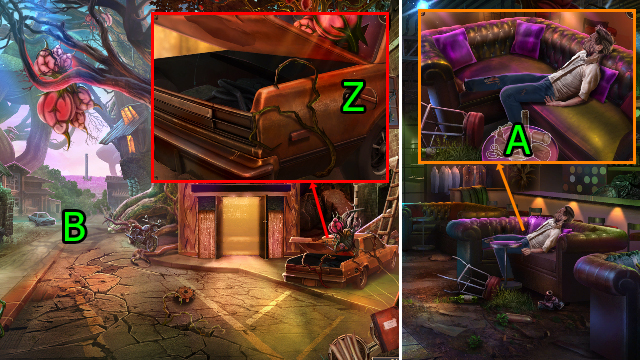
- Press (Y) and (Z).
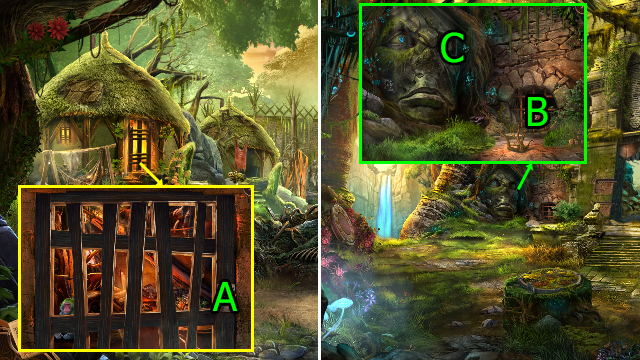
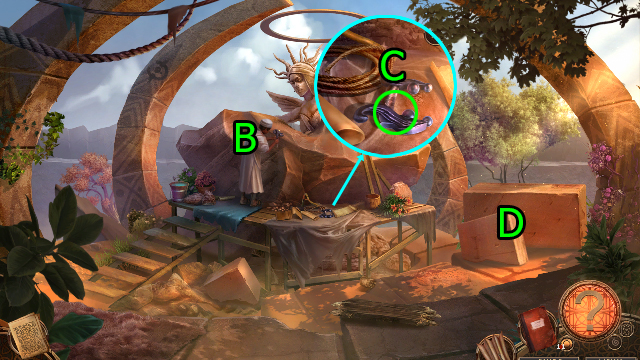
- Get WRENCH (A).
- Use SMALL PICKAXE on (B); get METAL BAR.
- Press (Cx3); Press (D).
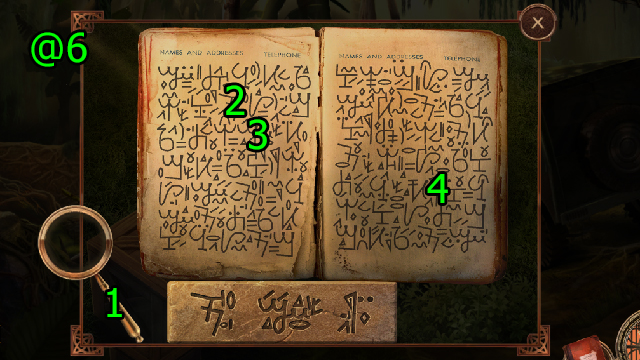
- Solution (@6): Press (1)-(2-3-4).
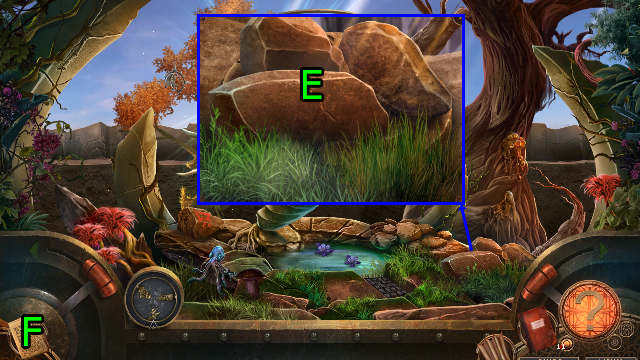
- Use METAL BAR on (E).
- Drag (F) to (G).
- Use WRENCH on (H); drag (I-J-K).
- Use SMALL PICKAXE on (G); get VINE.
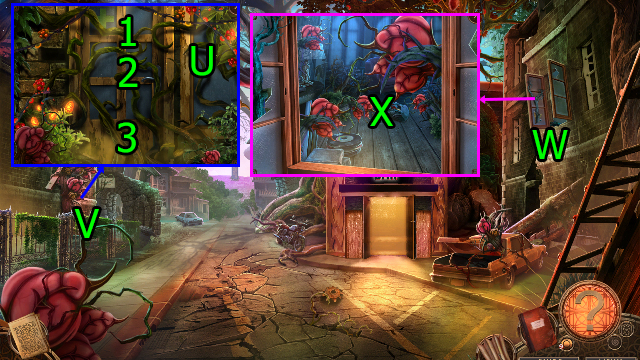
- Press and use VINE on (L); solve HOP (M), get ROAD SIGN.
- Use ROAD SIGN.
- Go (N).
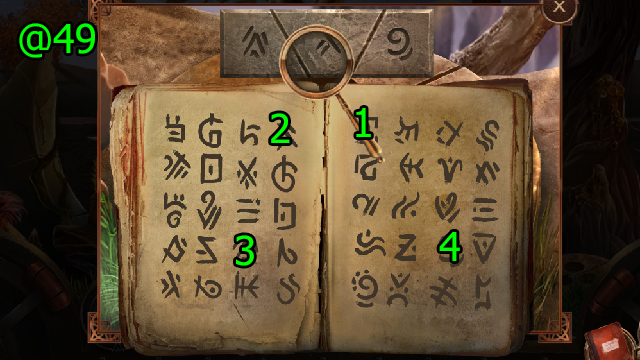
- Press (O).
- Press (P).
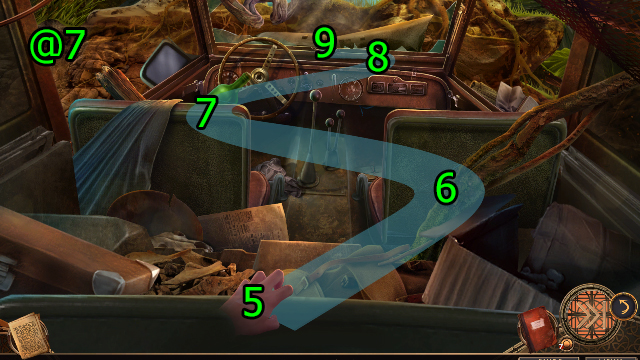
- Solution (@7): Drag (5-6-7-8-9).
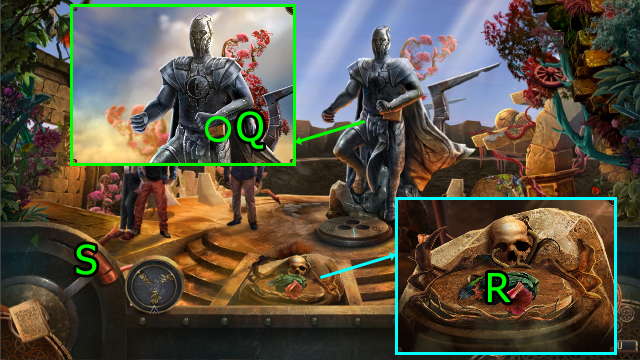
- Press (Q).
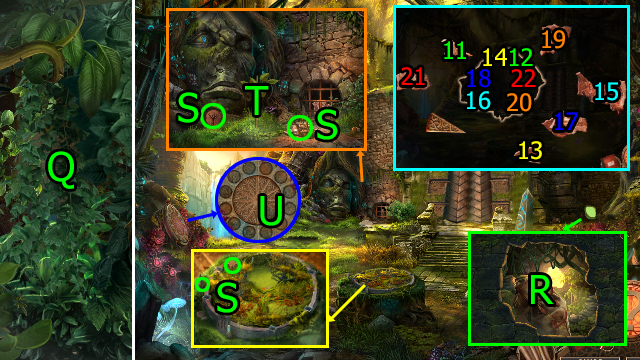
- Press (R); get TROWEL and SYMBOL LOCK CLUE.
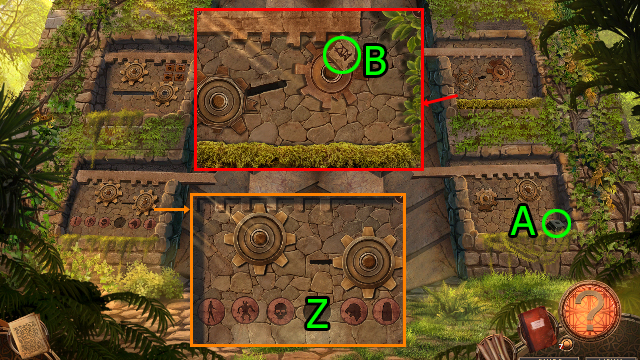
- Get STONE ARROWHEAD, GEAR TOOTH (1/2), STONE TILES, and TREE STONE BUTTON (S).
- Use STONE ARROWHEAD on (T); get SAPLING.
- Use STONE TILES; press (11-12)-(13-14)-(15-16)-(17-18)-(19-20)-(21-22), get STONE WEDGE and HISTORY WALL SEGMENT (1/6).
- Use STONE WEDGE on (U).
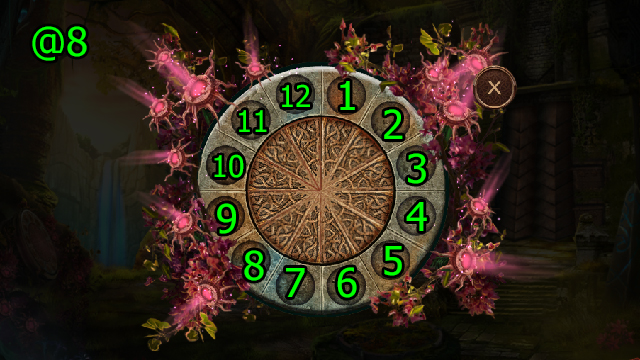
- Solution (@8): Press (1-4)-(2-10)-(3-12)-(5-8)-(6-11)-(7-9).
- Get STONE CYLINDER.
- Get SYMBOL LOCK PART (1/2) (V).
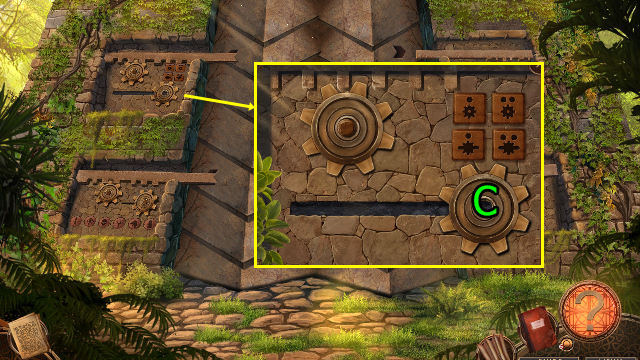
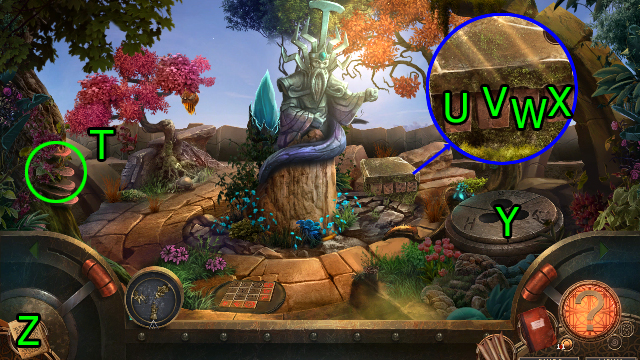
- Press (W); get MINI OBELISK (1/5).
- Go (X).
- Press (Y); get VINE.
- STONE ARROWHEAD and VINE on SAPLING; get IMPROVISED SPEAR.
- Use TREE STONE BUTTON on (Z).
- Get MINI OBELISK (A).
- Get SYMBOL LOCK PART (2/2) (B).
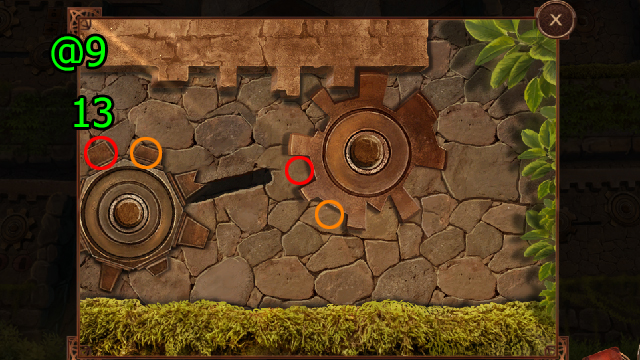
- Solution (@9): Press (13) when the gears line up.
- Use STONE CYLINDER on (C).
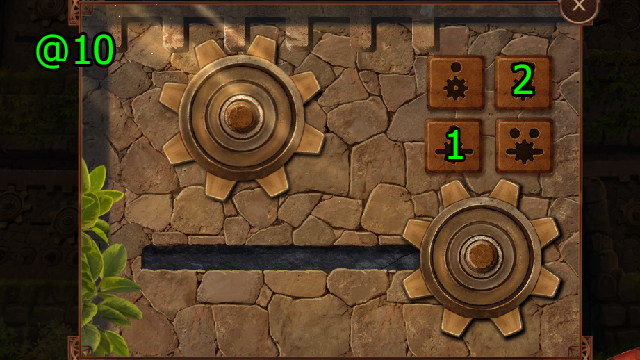
- Solution (@10): Press (1-2).
- SYMBOL LOCK PART (2/2) on SYMBOL LOCK CLUE.

- Press (D).
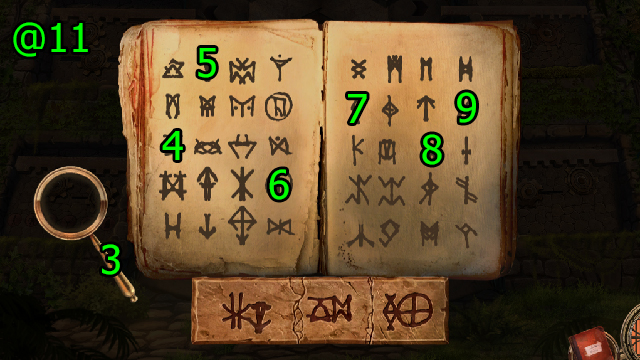
- Solution (@11): Press (3)-(4-5-6-7-8-9).
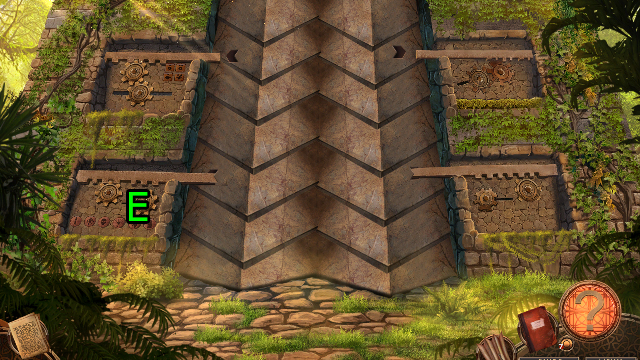
- Go (E).
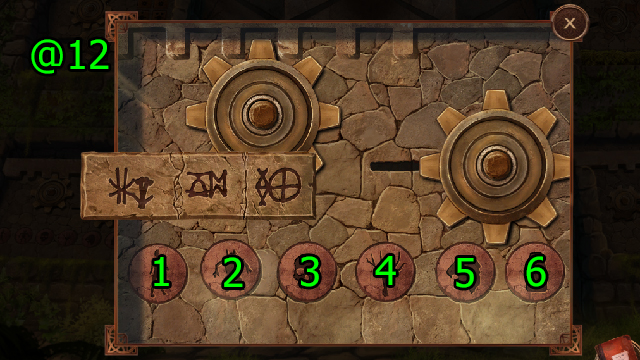
- Solution (@12): Press (1-4)-(5-2)-(6-3)-(4-5)-(5-6).
- Go Ancient Temple.
- Use IMPROVISED SPEAR on (F); drag (7-8-9-10), get GEAR TOOTH (2/2).
- Go Temple Door.
- Use GEAR TOOTH (2/2) on (G).
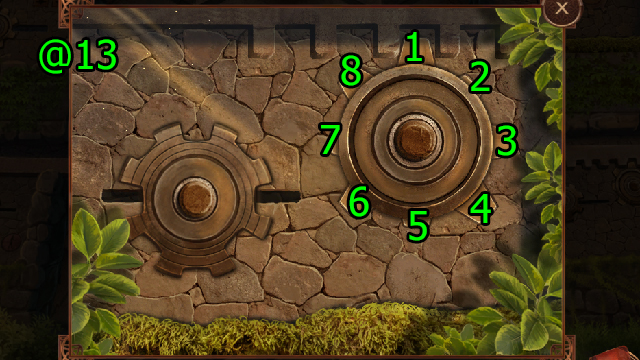
- Solution (@13): Press (1-2)-(4-5).
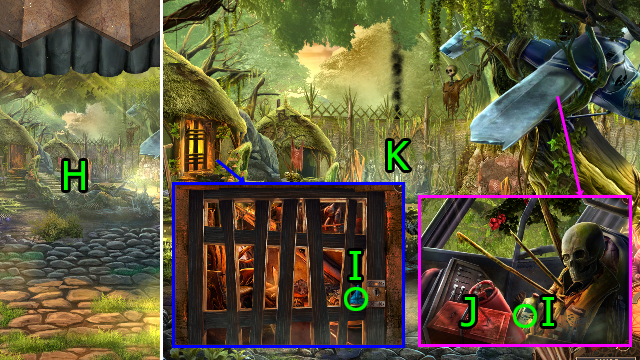
- Go (H).
- Get STICKY LIQUID and BLUE STAR CRYSTAL (I).
- Press (J); get BOLT CUTTER.
- Go (K).
- Drag (L-M)-(N-O)-(P-Q)-(R-S)-(T-U)-(V-W); get MONKEY.
- Get LONG HOOK, HISTORY WALL SEGMENT (2/6), and MINI OBELISK (2/5) (X).
- STICKY LIQUID on MONKEY; get STICKY MONKEY.
- Go Ancient Village.
- Use LONG HOOK on (Y); get BERRIES.
- Use STICKY MONKEY and BERRIES on (Z).

- Solution (@14): Press (1) when (2) lines up at the correct power and angle to throw berries and guide monkey along depicted path.
- Get LARGE HUT KEY.
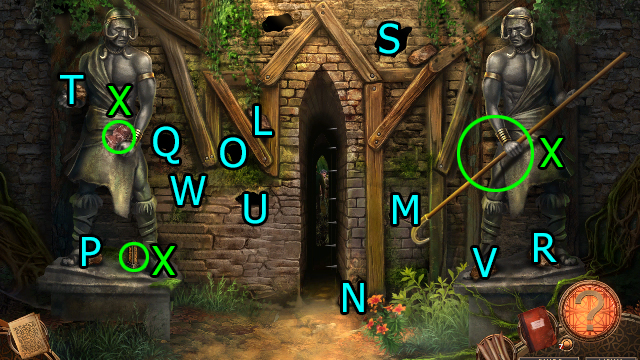
- Use LARGE HUT KEY on (A); get HISTORY WALL SEGMENT (3/6) and MINI GEAR.
- Go Ancient Temple.
- Use BOLT CUTTER on (B); get HISTORY WALL SEGMENT (4/6).
- Use BLUE STAR CRYSTAL on (C).
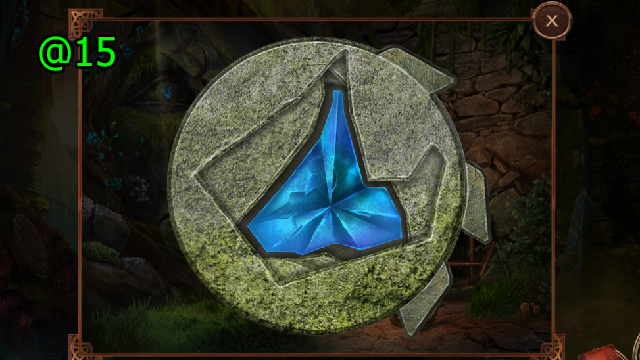
- Solution (@15).
- Go (D).
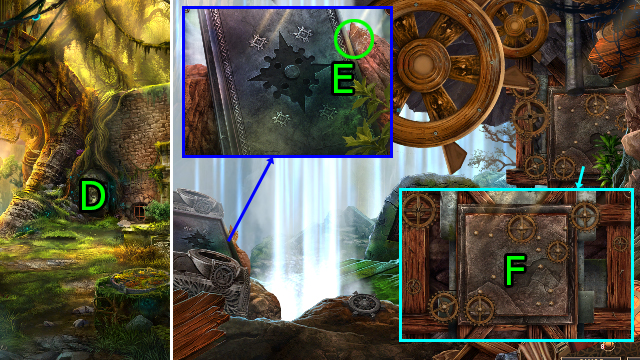
- Get HISTORY WALL SEGMENT (5/6) (E).
- Use MINI GEAR on (F).
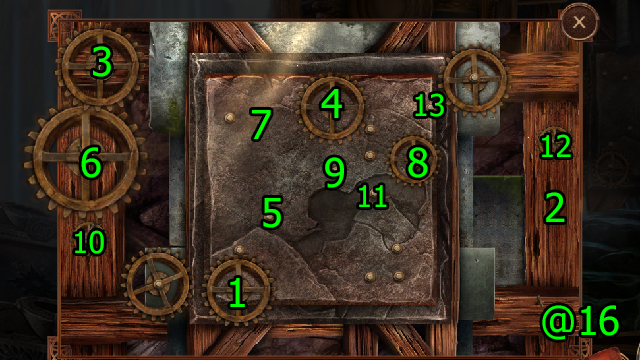
- Solution (@16): Press (1-2)-(3-1)-(4-5)-(6-7)-(8-9)-(10-11)-(2-8)-(12-13).
- Get MINI OBELISK (3/5).
- Go Ancient Village; go Secret Passage.
- Go (G).
- Use TROWEL on (H); get HISTORY WALL SEGMENT (6/6) and PEBBLES.
- Use PEBBLES on (I).
- Solution (@17): Press (14-15-16).
- Press (Jx2); solve HOP.
- Go Ancient Village.
- Go (K).
- Press (L).
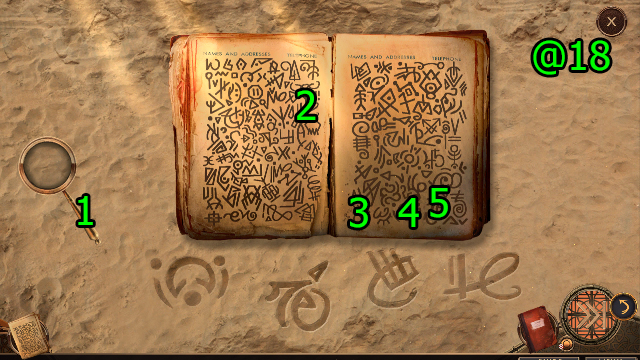
- Solution (@18): Press (1)-(2-3-4-5).
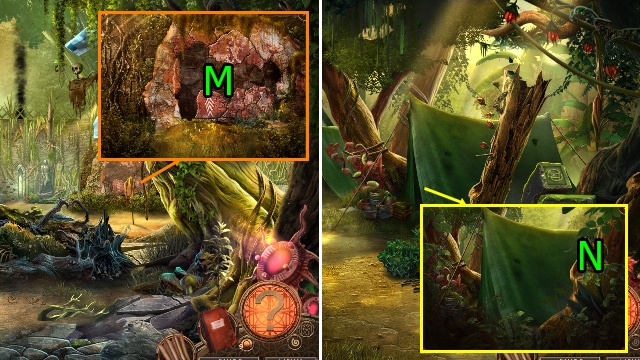
- Use HISTORY WALL SEGMENT (6/6) on (M); solve HOP, get MINI OBELISK (4/5).
- Go Mercenary Camp.
- Press (N); get MINI OBELISK TOP.
- MINI OBELISK TOP on MINI OBELISK BASE; get MINI OBELISK (5/5).
- Go Ancient Temple.
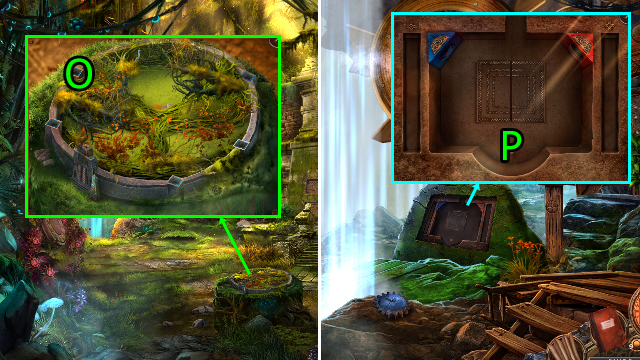
- Use MINI OBELISK (5/5) on (O); get STRANGE LOCK PIECE.
- Go Waterfall Cave.
- Use STRANGE LOCK PIECE on (P).
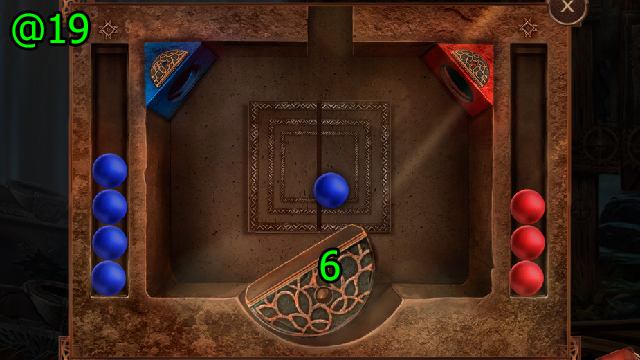
- Solution (@19): Press (6) to send balls to the left or right. Send blue balls left, send red balls right.
- Get MINI MONOLITH.
- Go Ancient Temple.
- Use MINI MONOLITH on (Q) and press (R).
Chapter 2: Monolith
- Get BOOK PAGES (1/5), BOOK PAGES (2/5), BOOK PAGES (3/5), ROCK, and BOOK PAGES (4/5) (S).
- Press (T); get SHOVEL TOP.
- Press (U).
- Use ROCK on (V); get STONE WITH SAP.
- Use SHOVEL TOP on (W); get HANDLE.
- Use STONE WITH SAP on (W); get STONE DISC.
- Use STONE DISC on (X).
- Use SHOVEL TOP on (Y).
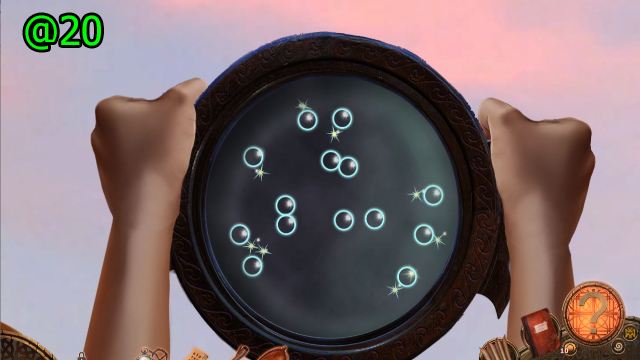
- Solution (@20): Scroll left until the stars line up as shown.
- Press (Z).
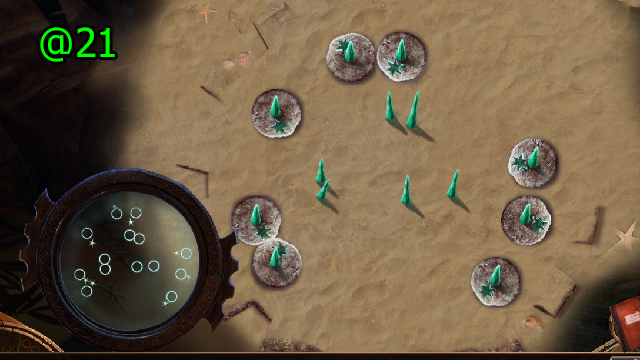
- Solution (@21): Rotate disks to match image.
- Solve HOP (A); get BROKEN WEAPONS.
- Use BROKEN WEAPONS; get LEATHER STRAP, TIPLESS SPEAR, METAL SPIKE, and STONE AXE.
- SHOVEL TOP and LEATHER STRAP on TIPLESS SPEAR; get IMPROVISED OAR.
- HANDLE and METAL SPIKE on STONE AXE; get STONE AXE.
- Use STONE AXE on (B); get BARK.
- Use BARK and IMPROVISED OAR on (C).
- Go (D).
- Use STONE AXE on (E) and press (F).
- Press (G).
- Go (H).
- Press and go (I).
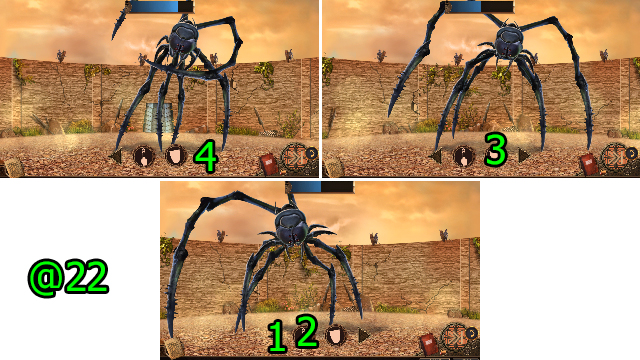
- Solution (@22): Press (1) when monster raises the leg on the right, then (2) when it says to, press (3) when monster rears back to the right with both legs down, press (4) when it rears back with both legs bent in a tackling pose. Repeat until health is depleted.
- Press (J) until door appears; go (K).
- Go (L).
- Go (M); get SARCOPHAGUS KEY and BLOWGUN.
- Press (N).
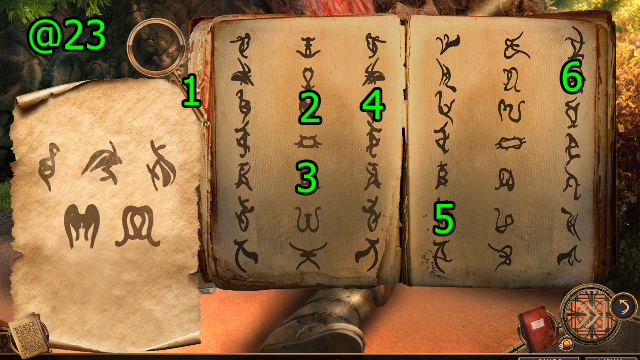
- Solution (@23): Press (1)-(2-3-4-5-6).

- Press (O).
- Use BLOWGUN on (P).
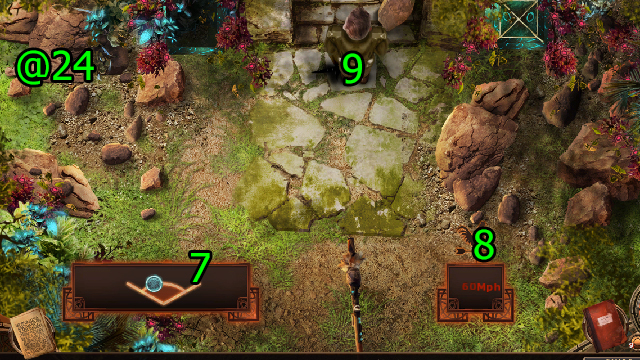
- Solution (@24): Press (7) when the blowgun is in the correct position and again at max power. Adjust position based on wind speed and direction (8) to hit (9).
- Press (Q)-(R).
- Get PICKAXE and LARGE ROCK (S).
- Use PICKAXE on (T); press (Tx3), get GAS MASK and LIGHTER.
- Use GASK MASK on (U); get PARACHUTE and JACK.
- Use LARGE ROCK and JACK on (V).
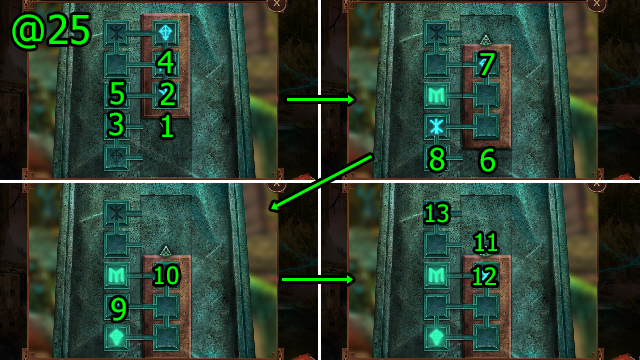
- Solution (@25): Press (1), move (2-3)-(4-5), press (6), move (7-8), move (9-10), press (11x2), move (12-13).
- Press (W)-(X).
- Press (Y).
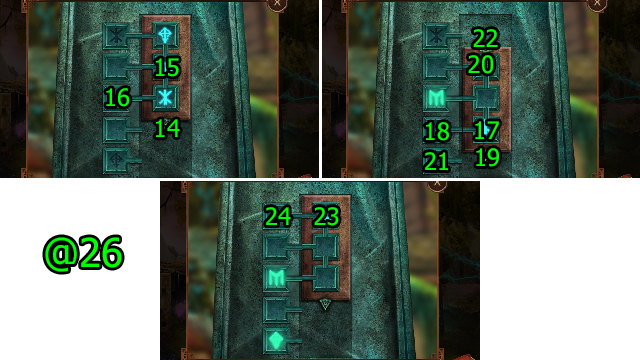
- Solution (@26): Press (14), move (15-16), move (17-18), press (19), move (20-21)-(18-20), press (22x2), move (23-24).
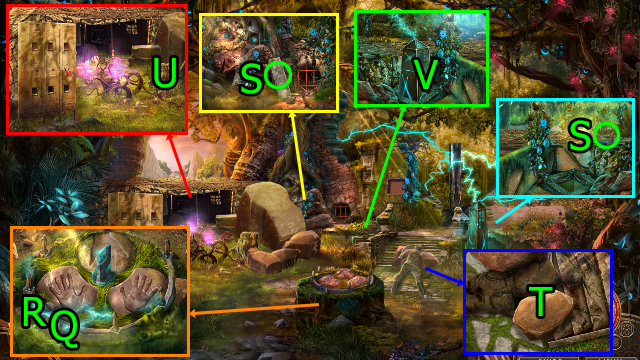
- Go (Z).
- Go (A).
- Press (B); get KEYRING.
- Press (C); get IRON SPIKE.
- Get TOOLBOX (D).
- IRON SPIKE on TOOLBOX.

- Press (1-2).
- Solve HOP (E); get KEY CARD (1/3).
- Go Destroyed Ancient Temple.
- Use KEYRING on (F); get HAMMER and BOWL.
- HAMMER on TOOLBOX; get RING SPANNER.
- Get KEY CARD (2/3) (G).
- Go Mercenary Convoy.
- Use RING SPANNER on (H); get DYNAMITE.
- Go Destroyed Ancient Temple.
- Use DYNAMITE and LIGHTER on (I).
- Go (J).
- Use SARCOPHAGUS KEY on (K); get MEDKIT and CRYSTAL SLIDER.
- Go Mercenary Convoy.
- Use CRYSTAL SLIDER on (L) and press (M).
- Solution (@27): Press (3)-(4-5-6-7).
- Press (N)-(O)-(Px3)-(Qx3); get GOLDEN SIEVE.
- Use BOWL and GOLDEN SIEVE on (R); get KEY CARD (3/3).
- Use KEY CARD (3/3) and press (S).
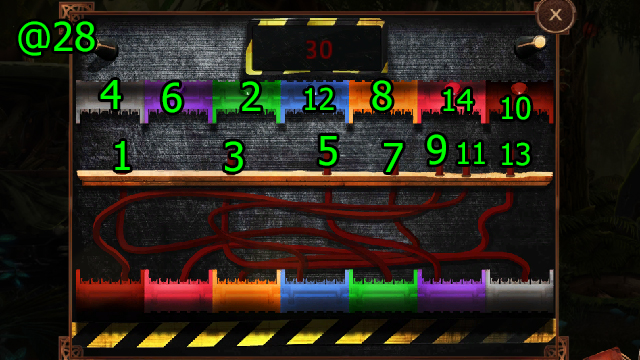
- Solution (@28): Press (1-2)-(3-4)-(5-6)-(7-8)-(9-10)-(11-12)-(13-14).

- Press (Tx3).
- Use PARACHUTE on (U).
- Use MEDKIT on (V); get MONOLITHS MAP.
- Use MONOLITHS MAP and press (W).
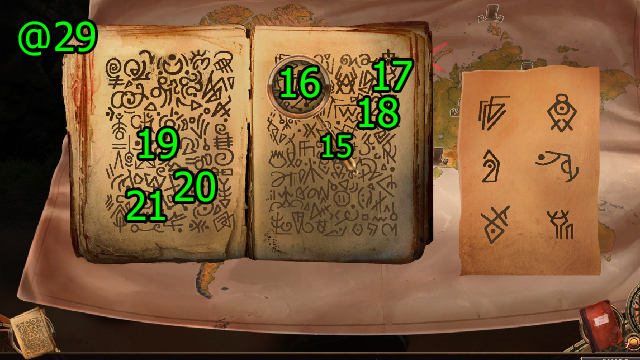
- Solution (@29): Press (15)-(16-17-18-19-20-21).
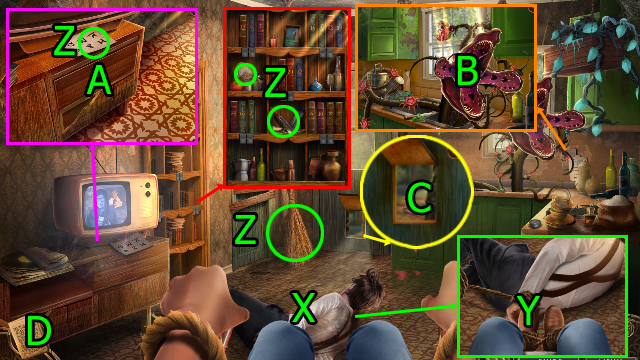
- Press (Xx2).
- Press (Yx5).
- Get BROOM, FLAT FILE, MIRROR, and ANCIENT SCRIPT (Z).
- Use FLAT FILE on (A); get WIRE and STRANGE BOOK (1/3).
- Press and use MIRROR on (B); get KITCHEN KNIFE, CLIP, and STRANGE BOOK (2/3).
- CLIP and WIRE on BROOM; get IMPROVISED HOOK.
- Use IMPROVISED HOOK on (C); get STRANGE BOOK (3/3).
- Use ANCIENT SCRIPT and press (D).
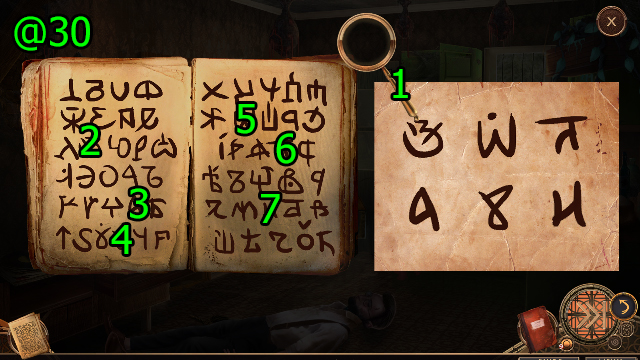
- Solution (@30): Press (1)-(2-3-4-5-6-7).
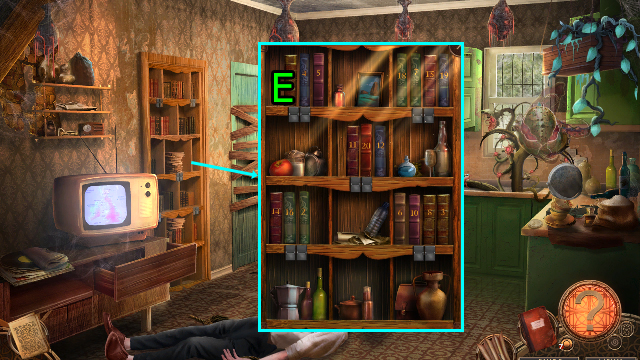
- Use STRANGE BOOK (3/3) on (E).
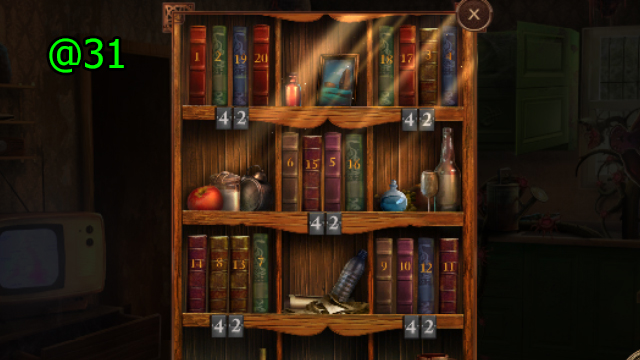
- Solution (@31).
- Press (F) and go (G).
- Go (H).
- Get FISHING ROD, LOCK TILE (1/2), and LOCK TILE (2/2) (I).
- Press (Jx3); get ALCOHOL and RAG.
- Use LOCK TILE (2/2) on (K).
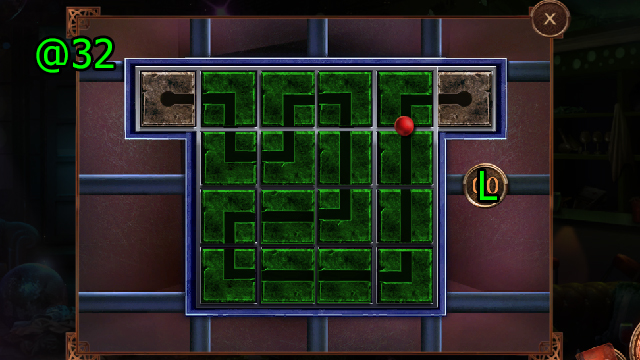
- Solution (@32): Arrange as shown and press (L).
- Get EMPTY BARREL.
- Go Salisbury Street.
- Use IMPROVISED HOOK on (M); get FLOWERPOT.
- Get BRICK (N).
- Use FLOWERPOT on (O); get GLOWING COCOON.
- Use BRICK and press (P); get GAUZE and BANDAGES.
- Go Disco Bar.
- Use GLOWING COCOON on (Q).
- Solve HOP (R); get STORAGE KEY.
- Use STORAGE KEY on (S); solve HOP, get LADDER and EMPTY CANISTER.
- Use KITCHEN KNIFE on (T); get GARDEN SCISSORS.
- Go Salisbury Street.
- Use GARDEN SCISSORS on (U); press (U-1)-(U-2)-(U-3).
- Solve HOP (V); get MEDICAL SUPPLIES.
- Use MEDICAL SUPPLIES; get IODINE, ALCOHOL WIPES, and PAINKILLER.
- Use LADDER on (W).
- Use FISHING ROD on (X).

- Solution (@33): Move (Y) left and right to pull bag to the bottom.
- Get SCISSORS and HOSE.
- Press and use EMPTY CANISTER and HOSE on (Z); get GASOLINE CANISTER.
- Go Disco Bar.
- Use ALCOHOL, GAUZE, BANDAGES, SCISSORS, IODINE, ALCOHOL WIPES, and PAINKILLER on (A); get ELECTRIC LIGHTER.
- RAG, GASOLINE CANISTER, and ELECTRIC LIGHTER on EMPTY BARREL; get GASOLINE BOMB.
- Go Salisbury Street.
- Use GASOLINE BOMB on (B).
- Go (B).
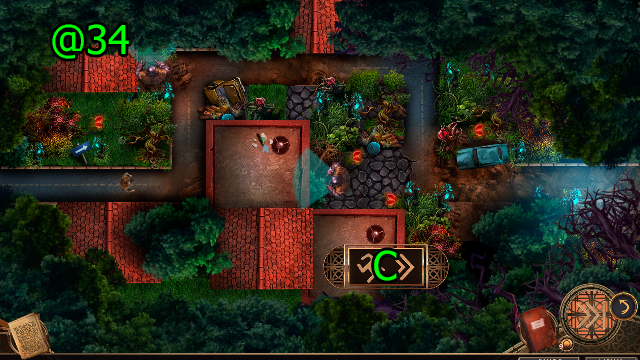
- Solution (@34): Press (C) to get past the guards.
- Press (D).
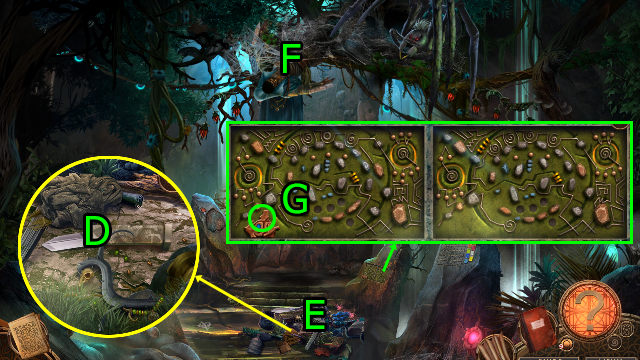
- Solve HOP (E); get NEEV'S REPAIRED BLADE.
- Use NEEV'S REPAIRED BLADE on (F).
- Get PUZZLE FRAGMENT (G).
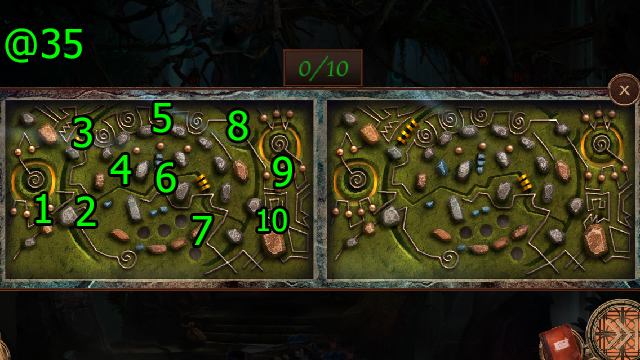
- Solution (@35): Press (1-2-3-4-5-6-7-8-9-10).
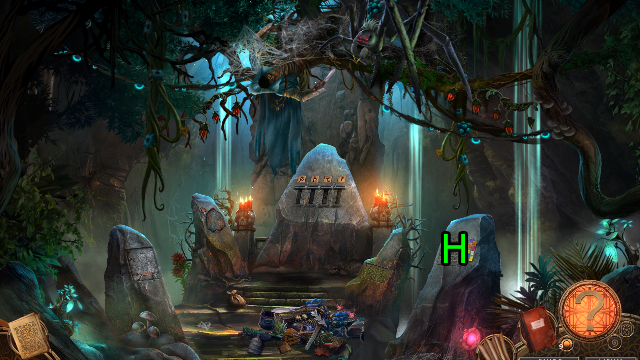
- Go (H).
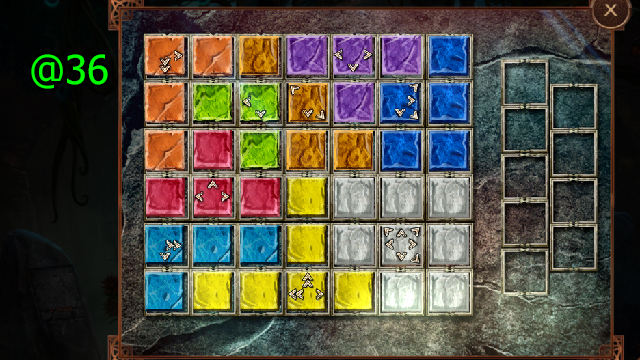
- Solution (@36).
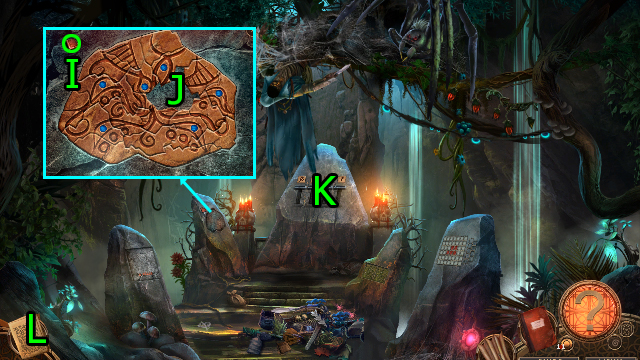
- Get TILE (I).
- Place puzzle pieces as shown; use PUZZLE FRAGMENT on (J).
- Go (K) and press (L).
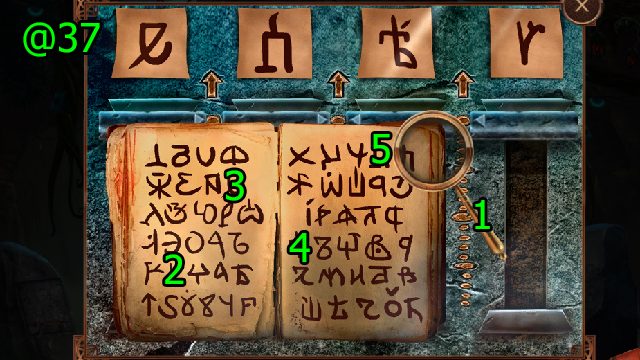
- Solution (@37): Press (1)-(2-3-4-5).
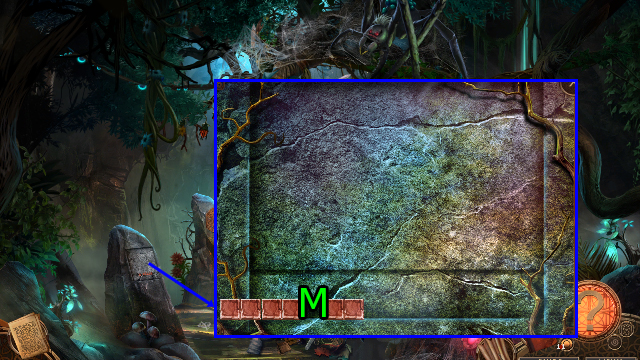
- Use TILE on (M).
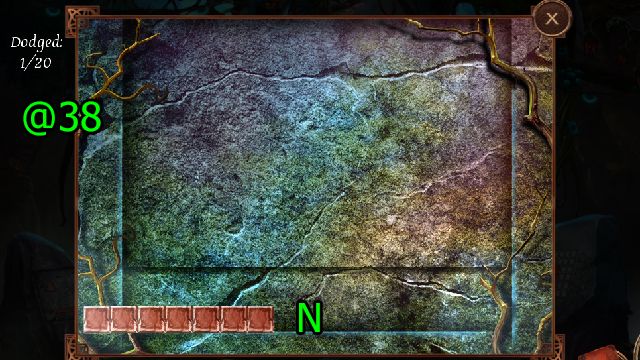
- Solution (@38): Press (N) to make the bar go faster, dodge 20 tiles.
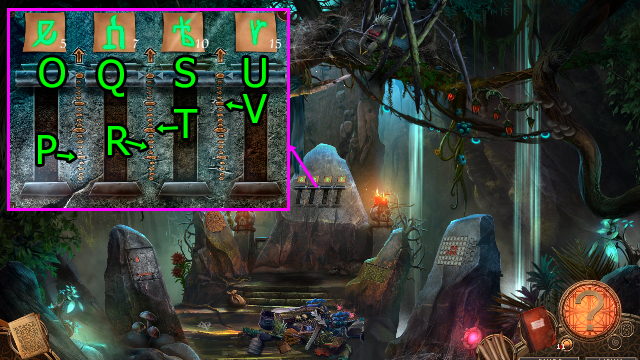
- Drag (O) to (P), drag (Q) to (R), drag (S) to (T), drag (U) to (V).
Chapter 3: Monsters
- Solve HOP (W); get PLIERS.
- Use PLIERS on (X).
- Press (Yx3); get TOTEM FIST.
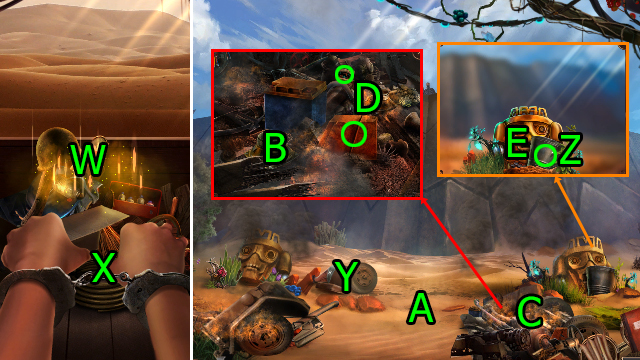
- Get BUCKET (Z).
- Use BUCKET on (A); get BUCKET WITH SAND.
- Use BUCKET WITH SAND on (B).
- Solve HOP (C); get LONG ROD.
- Get TOTEM LEG and TOTEM JAW (D).
- Use TOTEM JAW on (E).
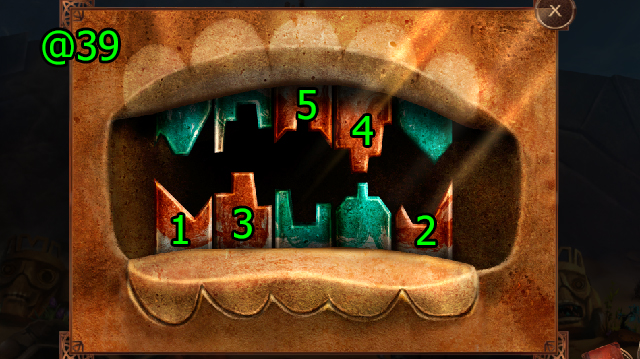
- Solution (@39): Press (1-2)-(3-4)-(5-4).
- Get TOTEM EYE.

- Go (F).
- Use TOTEM FIST on (G).
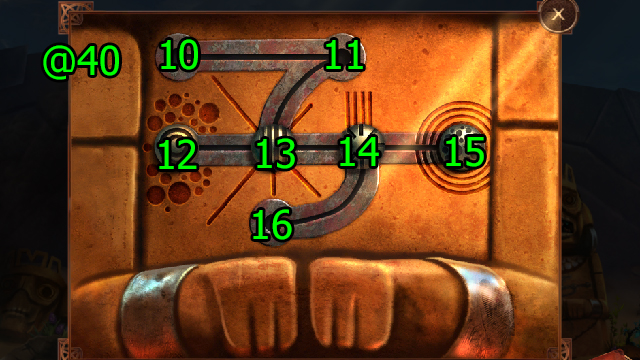
- Solution (@40): Press (13-11)-(11-10)-(12-13)-(13-11)-(14-13)-(13-12), (11-13)-(13-14)-(14-16)-(10-11)-(11-13)-(13-14)-(12-13)-(13-11)-(11-10), (14-13)-(13-11)-(15-14)-(14-13)-(13-12), (16-14)-(14-15)-(11-13)-(13-14)-(10-11)-(11-13).
- Use TOTEM EYE on (H).
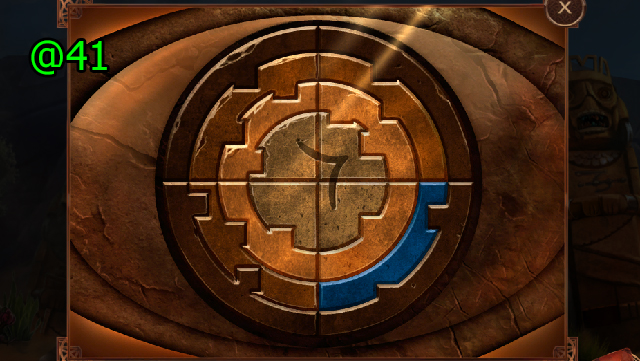
- Solution (@41).
- Get WOODEN HAMMER.

- Use LONG ROD and WOODEN HAMMER on (I); get TOTEM CHEST.
- Use TOTEM CHEST on (J).
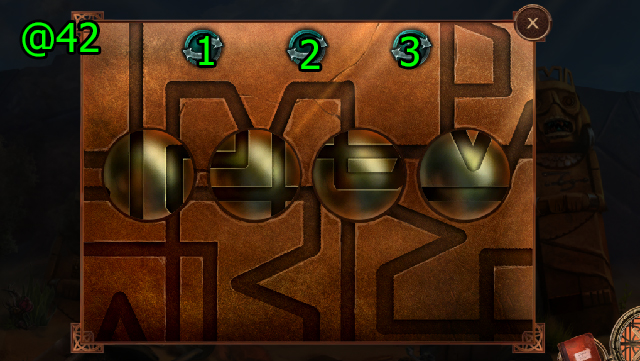
- Solution (@42): Press (1)-(3)-(2).
- Get TOTEM FOOT.
- Use TOTEM LEG on (K).
- Use TOTEM FOOT on (L).
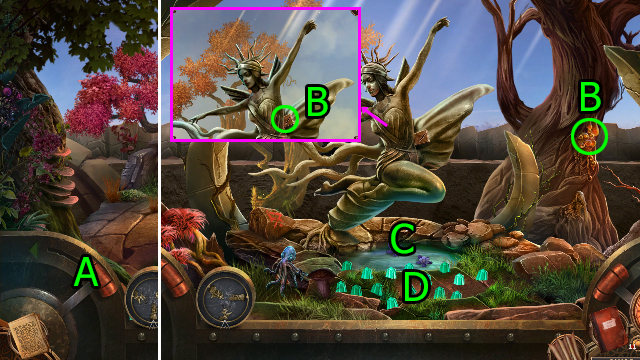
- Go (M).
- Get GLASS LENS, FRAGRANT HERBS, SMALL POT (1/2), and SMALL POT (2/2) (N).
- Go (O) and press (P).

- Solution (@43): Press (1)-(2-3-4).
- Get GRID TILE (1/2) (Q).
- Press (Rx3); get FEATHER.
- Go (S).
- Get MUSHROOM (T).
- Press (U-V-W-X); get STAR (1/2).
- Go (Y) and press (Z).
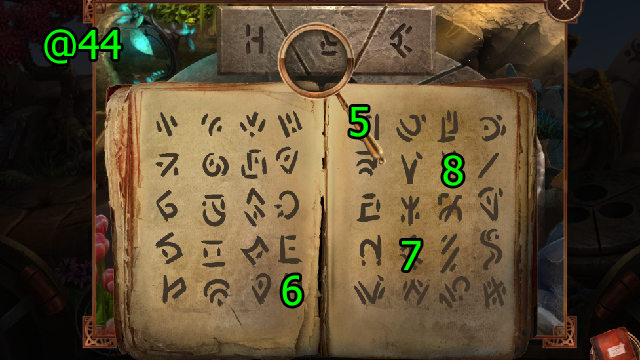
- Solution (@44): Press (5)-(6-7-8).
- Go (A).
- Get SAP and GRID TILE (2/2) (B).
- Use SMALL POT (2/2) on (C); get WATER.
- Go (D).
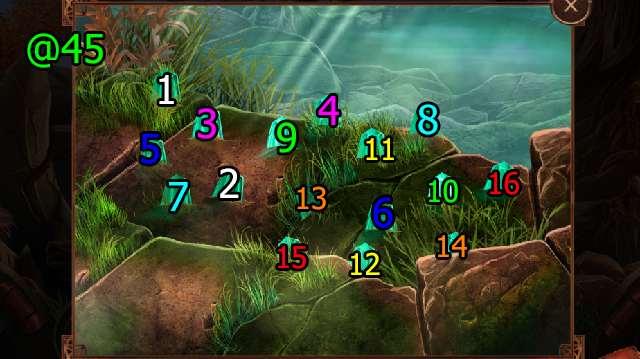
- Solution (@45): Press (1-2)-(3-4)-(5-6)-(7-8)-(9-10)-(11-12)-(13-14)-(15-16).
- Get CRYSTAL.
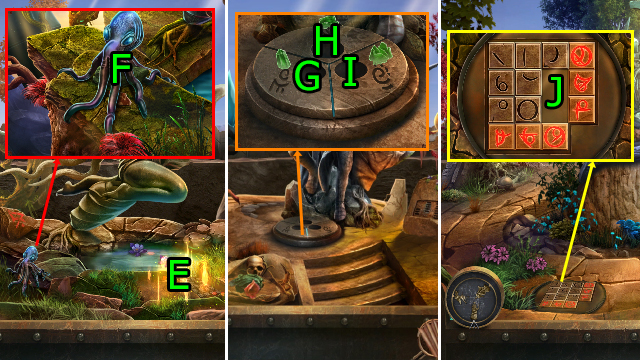
- Solve HOP (E); get STAR (2/2).
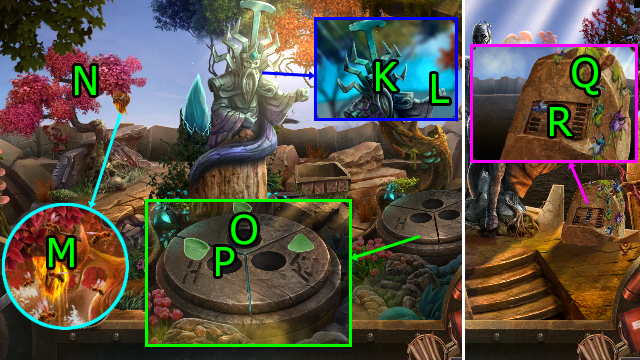
- Use FEATHER on (Fx3); get NECKLACE IMAGE.
- Go Platform One.
- Use CRYSTAL on (G), use SAP on (H), use MUSHROOM on (I); get SWORD.
- Go Platform Three.
- Use GRID TILE (2/2) on (J).
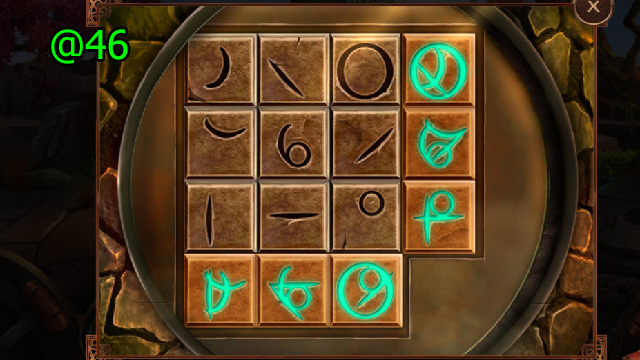
- Solution (@46).
- Get BEE SMOKER.
- Use STAR (2/2) on (K), use SWORD on (L).
- FRAGRANT HERB and GLASS LENS on BEE SMOKER; get LIT BEE SMOKER.
- Use LIT BEE SMOKER and SMALL POT on (M); get HONEY POT and NECKLACE IMAGE (1/3).
- Solve HOP (N); get FLOWER BOUQUET.
- Use WATER on (O), use HONEY POT on (P).
- Go Platform One.
- Use HONEY POT on (Q); get NECKLACE IMAGE (2/3) and press (R).
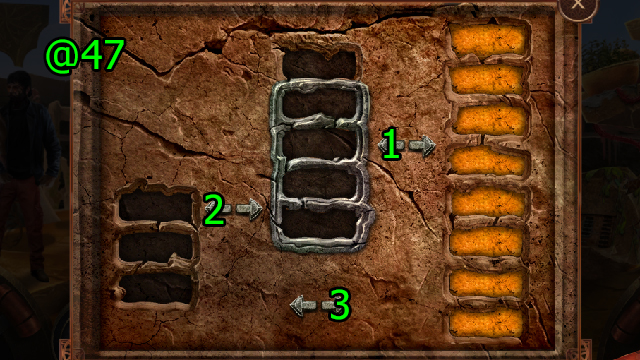
- Solution (@47): Press (1-2-3-2-1-2).
- Get NECKLACE IMAGE (3/3).
- NECKLACE IMAGE (3/3) on NECKLACE IMAGE; get ASSEMBLED NECKLACE IMAGE.
- Use ASSEMBLED NECKLACE IMAGE on (S).
- Solve HOP (T); get BLACK NECKLACE.
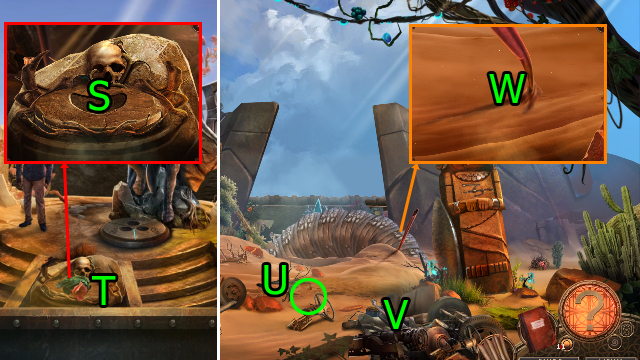
- Go CONVOY REMAINS.
- Get SAND (U).
- Solve HOP (V); get RADIO, BATTERY, and SPEAKER (2/2).
- Use RADIO, BATTERY, and SPEAKER (2/2) on (W).
- Go Platform Three.
- Use SAND on (X); get SATURN'S RING.
- Go Platform Two.
- Use BLACK NECKLACE on (Y). use SATURN'S RING on (Z).
- Press (A).

- Solution (@48): Press (4)-(5-6-7-8-9).
- Get SERUM.
- Press (B).
- Get MAGNETIC DEVICE (C).
- Use MAGNETIC DEVICE and press (D).
- Press (Ex3) and (F).
- Solution (@49): Press (1)-(2-3-4).

- Use FEATHER on (G), use LIT BEE SMOKER on (H), use FLOWER BOUQUET on (I); get SPEAR.
- Use SPEAR on (J); get MOON KEY.
- Go Platform One.
- Use MOON KEY on (K), use SPEAR on (L).
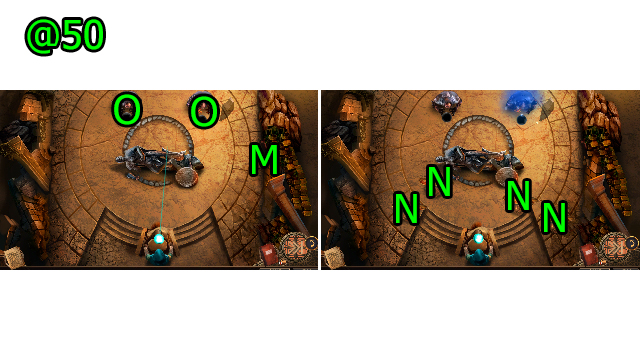
- Solution (@50): Press (M) to launch energy balls, press any (N) to deflect the opponent's energy balls. Hit (O) five times.
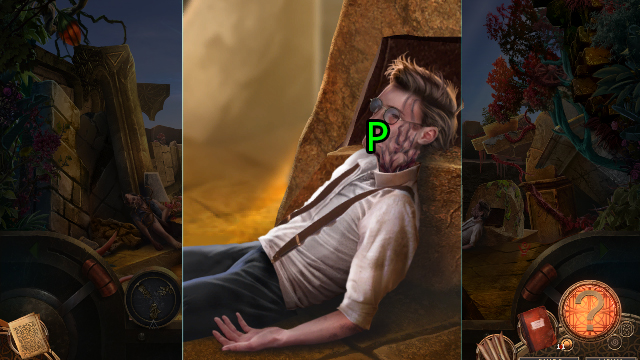
- Use FATHER'S POCKET WATCH and SERUM on (P).
- Congratulations! You've completed Wanderlust: Shadow of the Monolith!
Created at: 2019-10-20